
- Manuals
- Brands
- Gigabyte Manuals
- Motherboard
- X570S AORUS ELITE AX
- User manual
-
Contents
-
Table of Contents
-
Bookmarks
Quick Links
X570S AORUS ELITE AX
X570S AORUS ELITE
User’s Manual
Rev. 1001
12ME-X57SELW-1001R
X570S AORUS ELITE AX
X570S AORUS ELITE
To reduce the impacts on global warming, the packaging materials of this product
are recyclable and reusable. GIGABYTE works with you to protect the environment.
For more product details, please visit GIGABYTE’s website.
Related Manuals for Gigabyte X570S AORUS ELITE AX
Summary of Contents for Gigabyte X570S AORUS ELITE AX
-
Page 1
X570S AORUS ELITE AX X570S AORUS ELITE For more product details, please visit GIGABYTE’s website. To reduce the impacts on global warming, the packaging materials of this product are recyclable and reusable. GIGABYTE works with you to protect the environment. -
Page 2
GIGABYTE’s prior written permission. Documentation Classifications In order to assist in the use of this product, GIGABYTE provides the following types of documentations: „ For quick set-up of the product, read the Quick Installation Guide included with the product. -
Page 3: Table Of Contents
Table of Contents X570S AORUS ELITE (AX) Motherboard Layout …………4 X570S AORUS ELITE (AX) Motherboard Block Diagram ……….5 Chapter 1 Hardware Installation ………………6 Installation Precautions ………………6 1-2 Product Specifications ………………7 Installing the CPU ………………11 Installing the Memory ………………11 Installing an Expansion Card ……………..
-
Page 4: X570S Aorus Elite (Ax) Motherboard Layout
F_U32_2 Temperature sensor THB_C F_USB2 SYS_FAN3 F_PANEL Box Contents 5 X570S AORUS ELITE AX or X570S AORUS ELITE motherboard 5 User’s Manual 5 One G Connector 5 Quick Installation Guide 5 M.2 screws 5 Four SATA cables 5 One antennaM * The box contents above are for reference only and the actual items shall depend on the product package you obtain.
-
Page 5: X570S Aorus Elite (Ax) Motherboard Block Diagram
X570S AORUS ELITE (AX) Motherboard Block Diagram PCI Express 4.0 /3.0 Bus (Note) CPU CLK+/- (100 MHz) DDR4 3200 /2933/2667/2400/2133 MHz (Note) 1 M.2 Socket 3 (M2A_CPU) AMD Socket BIOS AM4 CPU 4 USB 3.2 Gen 1 ® HDMI 2.1 Super I/O CODEC 1 USB Type-C…
-
Page 6: Chapter 1 Hardware Installation
Chapter 1 Hardware Installation Installation Precautions The motherboard contains numerous delicate electronic circuits and components which can become damaged as a result of electrostatic discharge (ESD). Prior to installation, carefully read the user’s manual and follow these procedures: • Prior to installation, make sure the chassis is suitable for the motherboard. •…
-
Page 7: 1-2 Product Specifications
Support for ECC Un-buffered DIMM 1Rx8/2Rx8 memory modules Š Support for non-ECC Un-buffered DIMM 1Rx8/2Rx8/1Rx16 memory modules Š Support for Extreme Memory Profile (XMP) memory modules Š (Go to GIGABYTE’s website for the latest supported memory speeds and memory modules.) Onboard Integrated Graphics Processor: Š Graphics 1 x HDMI port, supporting a maximum resolution of 4096×2160@60 Hz (Note 1) * Support for HDMI 2.1 version, HDCP 2.3, and HDR.
-
Page 8
Expansion Slots Š 1 x PCI Express x16 slot (PCIEX16), integrated in the CPU: AMD Ryzen 5000 Series Processors/AMD Ryzen 3000 Series Processors ™ ™ support PCIe 4.0 x16 mode AMD Ryzen 4000 G-Series Processors/AMD Ryzen 2000 Series ™ ™ Processors support PCIe 3.0 x16 mode AMD Ryzen 3000 G-Series Processors/AMD Ryzen… -
Page 9
* Whether the fan (pump) speed control function is supported will depend on the fan (pump) you install. BIOS 1 x 256 Mbit flash Š Use of licensed AMI UEFI BIOS Š PnP 1.0a, DMI 2.7, WfM 2.0, SM BIOS 2.7, ACPI 5.0 Š Only for X570S AORUS ELITE AX. — 9 -… -
Page 10
X570S AORUS ELITE AX X570S AORUS ELITE Please visit GIGABYTE’s website for support lists of CPU, memory modules, SSDs, and M.2 devices. Please visit the SupportUtility List page on GIGABYTE’s website to download the latest version of apps. — 10 -… -
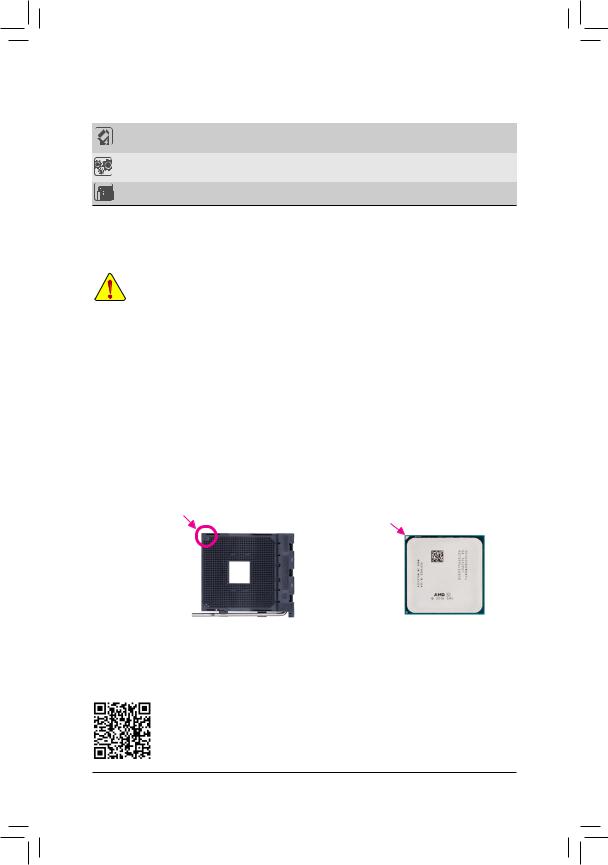
Page 11: Installing The Cpu
• Make sure that the motherboard supports the memory. It is recommended that memory of the same capacity, brand, speed, and chips be used. (Go to GIGABYTE’s website for the latest supported memory speeds and memory modules.) • Always turn off the computer and unplug the power cord from the power outlet before installing the memory to prevent hardware damage.
-
Page 12: Installing An Expansion Card
Use this connector to connect an antenna. Tighten the antennas to the antenna connectors and then aim the antennas correctly for better signal reception. Only for X570S AORUS ELITE AX. • When removing the cable connected to a back panel connector, first remove the cable from your device and then remove it from the motherboard.
-
Page 13
Use this audio jack to connect center/subwoofer speakers. Rear Speaker Out Use this audio jack to connect rear speakers. (Note 1) To enable the Q-Flash Plus function please visit the «Unique Features» webpage of GIGABYTE’s website. (Note 2) For AMD Ryzen… -
Page 14
• If you want to install a Side Speaker, you need to retask either the Line in or Mic in jack to be Side Speaker out through the audio driver. • To enable or configure the audio amplifying function for the Line out jack, please access the Realtek Audio Console application. Please visit GIGABYTE’s website for details on configuring the audio software. — 14 -… -
Page 15: Internal Connectors
Internal Connectors 17 18 ATX_12V D_LED1/D_LED2 F_AUDIO CPU_FAN F_PANEL SYS_FAN1/2/3 F_U32C SYS_FAN4_PUMP F_U32_1/F_U32_2 CPU_OPT F_USB1/F_USB2 M2A_CPU/M2B_SB/M2C_SB THB_C SATA3 0/1/2/3/4/5 LED_CPU LED_C1/LED_C2 CLR_CMOS Read the following guidelines before connecting external devices: • First make sure your devices are compliant with the connectors you wish to connect. •…
-
Page 16
1/2) ATX_12V/ATX (2×4 12V Power Connector and 2×12 Main Power Connector) With the use of the power connector, the power supply can supply enough stable power to all the components on the motherboard. Before connecting the power connector, first make sure the power supply is turned off and all devices are properly installed. The power connector possesses a foolproof design. Connect the power supply cable to the power connector in the correct orientation. -
Page 17
3/4) CPU_FAN/SYS_FAN1/2/3 (Fan Headers) All fan headers on this motherboard are 4-pin. Most fan headers possess a foolproof insertion design. When connecting a fan cable, be sure to connect it in the correct orientation (the black connector wire is the ground wire). The speed control function requires the use of a fan with fan speed control design. For optimum heat dissipation, it is recommended that a system fan be installed inside the chassis. -
Page 18
7) M2A_CPU/M2B_SB/M2C_SB (M.2 Socket 3 Connectors) The M.2 connectors support M.2 SATA SSDs or M.2 PCIe SSDs and support RAID configuration. Please note that an M.2 PCIe SSD cannot be used to create a RAID set either with an M.2 SATA SSD or a SATA hard drive. Refer to Chapter 3, «Configuring a RAID Set,» for instructions on configuring a RAID array. M2A_CPU M2B_SB M2C_SB Follow the steps below to correctly install an M.2 SSD in the M.2 connector. Step 1: Locate the M.2 connector where you will install the M.2 SSD, use a screwdriver to unfasten the screw on the heatsink and then remove the heatsink (Only the M2A_CPU connector has the heatsink). -
Page 19
LED strip. For how to turn on/off the lights of the LED strip please visit the «Unique Features» webpage of GIGABYTE’s website. Before installing the devices, be sure to turn off the devices and your computer. Unplug the power cord from the power outlet to prevent damage to the devices. -
Page 20
LED strip. For how to turn on/off the lights of the LED strip please visit the «Unique Features» webpage of GIGABYTE’s website. Before installing the devices, be sure to turn off the devices and your computer. Unplug the power cord from the power outlet to prevent damage to the devices. -
Page 21
12) F_AUDIO (Front Panel Audio Header) The front panel audio header supports High Definition audio (HD). You may connect your chassis front panel audio module to this header. Make sure the wire assignments of the module connector match the pin assignments of the motherboard header. Incorrect connection between the module connector and the motherboard header will make the device unable to work or even damage it. Pin No. -
Page 22
14) F_U32C (USB Type-C Header with USB 3.2 Gen 2 Support) ® The header conforms to USB 3.2 Gen 2 specification and can provide one USB port. Pin No. Definition Pin No. Definition Pin No. Definition F_USB3 F_USB30 3 VBUS RX2+ 1 2 3 TX1+ SBU1 RX2- TX1- SBU2 VBUS RX1+ TX2+ RX1- TX2- VBUS 15) F_U32_1/F_U32_2 (USB 3.2 Gen 1 Headers) The headers conform to USB 3.2 Gen 1 and USB 2.0 specification and each header can provide two USB… -
Page 23
S B_ 17) THB_C (Thunderbolt Add-in Card Connector) ™ This connector is for a GIGABYTE Thunderbolt add-in card. ™ Supports a Thunderbolt add-in card. ™ F_USB3 F 18) TPM (Trusted Platform Module Header) You may connect a TPM (Trusted Platform Module) to this header. -
Page 24
20) CLR_CMOS (Clear CMOS Jumper) Use this jumper to clear the BIOS configuration and reset the CMOS values to factory defaults. To clear the CMOS values, use a metal object like a screwdriver to touch the two pins for a few seconds. Open: Normal Short: Clear CMOS Values • Always turn off your computer and unplug the power cord from the power outlet before clearing the CMOS values. -
Page 25: Chapter 2 Bios Setup
To access the BIOS Setup program, press the <Delete> key during the POST when the power is turned on. To upgrade the BIOS, use either the GIGABYTE Q-Flash or @BIOS utility. Q-Flash allows the user to quickly and easily upgrade or back up BIOS without entering the operating system.
-
Page 26: The Main Menu
The Main Menu System Time Setup Menus Configuration Items Hardware Information Option Description Current Settings Quick Access Bar allows you to quickly move to the General Help, Easy Mode, Smart Fan 5, or Q-Flash screen. Advanced Mode Function Keys <f><g> Move the selection bar to select a setup menu <h><i>…
-
Page 27: Smart Fan 6
Smart Fan 6 Use the <F6> function key to quickly switch to this screen. This screen allows you to configure fan speed related settings for each fan header or monitor your system/CPU temperature. & TUNE ALL Allows you to apply the current settings to all fan headers. & Temperature Displays the current temperature of the selected target area. & Fan Speed Displays current fan/pump speeds.
-
Page 28: Favorites (F11)
& FAN/PUMP Stop Enables or disables the fan/pump stop function. You can set the temperature limit using the temperature curve. The fan or pump stops operation when the temperature is lower than the limit. (Default: Disabled) & FAN/PUMP Mode Allows you to set the operating mode for the fan. Adjusts the fan speed linearly based on the temperature.
-
Page 29: Tweaker
Tweaker Whether the system will work stably with the overclock/overvoltage settings you made is dependent on your overall system configurations. Incorrectly doing overclock/overvoltage may result in damage to CPU, chipset, or memory and reduce the useful life of these components. This page is for advanced users only and we recommend you not to alter the default settings to prevent system instability or other unexpected results.
-
Page 30
ƒ Advanced CPU Settings & Core Performance Boost (Note 1) Allows you to determine whether to enable the Core Performance Boost (CPB) technology, a CPU performance-boost technology. (Default: Auto) & SVM Mode Virtualization enhanced by Virtualization Technology will allow a platform to run multiple operating systems and applications in independent partitions. -
Page 31
& System Memory Multiplier Allows you to set the system memory multiplier. Auto sets memory multiplier according to memory SPD data. (Default: Auto) & FCLK Frequency Allows you to set the FCLK frequency. Options are: Auto (default), 667MHz~4000MHz. & UCLK Mode Allows you to specify the UCLK mode. -
Page 32: Settings
Settings ƒ Platform Power & AC BACK Determines the state of the system after the return of power from an AC power loss. The system returns to its last known awake state upon the return of the AC power. Memory Always On The system is turned on upon the return of the AC power.
-
Page 33
ƒ IO Ports & Initial Display Output Specifies the first initiation of the monitor display from the installed PCI Express graphics card or the onboard graphics. IGD Video Sets the onboard graphics as the first display. (Note) S ets the graphics card on the PCIEX16 slot as the first display. (Default) PCIe 1 Slot S ets the graphics card on the PCIEX4 slot as the first display. PCIe 2 Slot & Integrated Graphics (Note) Enables or disables the onboard graphics function. The BIOS will automatically enable or disable the onboard graphics depending Auto on the graphics card being installed. -
Page 34
ƒ APP Center Download & Install Configuration & APP Center Download & Install Allows you to determine whether to automatically download and install GIGABYTE APP Center after entering the operating system. Before installing APP Center, make sure the system is connected to the Internet. (Default: Enabled) ƒ… -
Page 35
& Chipset SATA Port 0/1/2/3/4/5 Displays the information of the connected SATA device(s). ` Network Stack Configuration & Network Stack Disables or enables booting from the network to install a GPT format OS, such as installing the OS from the Windows Deployment Services server. (Default: Disabled) &… -
Page 36
& PCIe ASPM Mode Allows you to configure the ASPM mode for the device connected to CPU/Chipset’s PCI Express bus. (Default: Disabled) & 3DMark01 Enhancement Allows you to determine whether to enhance some legacy benchmark performance. (Default: Disabled) & IOMMU Enables or disables AMD IOMMU support. (Default: Auto) & TSME Enables or disables TSME support. (Default: Auto) &… -
Page 37: System Info
System Info. This section provides information on your motherboard model and BIOS version. You can also select the default language used by the BIOS and manually set the system time. & System Language Selects the default language used by the BIOS. &…
-
Page 38: Boot
System (Default) & Full Screen LOGO Show Allows you to determine whether to display the GIGABYTE Logo at system startup. Disabled skips the GIGABYTE Logo when the system starts up. (Default: Enabled) & Fast Boot Enables or disables Fast Boot to shorten the OS boot process. Ultra Fast provides the fastest bootup speed.
-
Page 39
& VGA Support Allows you to select which type of operating system to boot. Enables legacy option ROM only. Auto EFI Driver Enables EFI option ROM. (Default) This item is configurable only when Fast Boot is set to Enabled or Ultra Fast. & USB Support All USB devices are disabled before the OS boot process completes. Disabled Full Initial All USB devices are functional in the operating system and during the POST. -
Page 40
& User Password Allows you to configure a user password. Press <Enter> on this item, type the password, and then press <Enter>. You will be requested to confirm the password. Type the password again and press <Enter>. You must enter the administrator password (or user password) at system startup and when entering BIOS Setup. However, the user password only allows you to make changes to certain BIOS settings but not all. To cancel the password, press <Enter> on the password item and when requested for the password, enter the correct one first. When prompted for a new password, press <Enter> without entering any password. -
Page 41: Save & Exit
Save & Exit & Save & Exit Setup Press <Enter> on this item and select Yes. This saves the changes to the CMOS and exits the BIOS Setup program. Select No or press <Esc> to return to the BIOS Setup Main Menu. &…
-
Page 42: Chapter 3 Appendix
Chapter 3 Appendix 3-1 Configuring a RAID Set RAID Levels RAID 0 RAID 1 RAID 10 Minimum Number of ≥2 Hard Drives Number of hard drives * Size of the smallest drive (Number of hard drives/2) * Array Capacity Size of the smallest drive Size of the smallest drive Fault Tolerance Before you begin, please prepare the following items:…
-
Page 43
Windows installation process. After the operating system is installed, we recommend that you install all required drivers from the GIGABYTE APP Center to ensure system performance and compatibility. If the operating system to be installed requires that you provide additional RAID driver during the OS installation process, please refer to the steps below: 1. -
Page 44: Drivers Installation
After you install the operating system, a dialog box will appear on the bottom-right corner of the desktop asking if you want to download and install the drivers and GIGABYTE applications via APP Center. Click Install to proceed with the installation. (In BIOS Setup, make sure SettingsIO PortsAPP Center Download & Install ConfigurationAPP Center Download & Install is set to Enabled.)
-
Page 45: Regulatory Notices
Supplier’s Declaration of Conformity 47 CFR § 2.1077 Compliance Information Product Name: Motherboard Trade Name: GIGABYTE Model Number: X570S AORUS ELITE AX/X570S AORUS ELITE Responsible Party – U.S. Contact Information: G.B.T. Inc. Address: 17358 Railroad street, City Of Industry, CA91748 Tel.: 1-626-854-9338 Internet contact information: https://www.gigabyte.com…
-
Page 46
European Commission Delegated Directive (EU) 2015/863 Statement I prodotti con il marchio CE sono conformi con una o più delle seguenti GIGABYTE products have not intended to add and safe from hazardous Direttive UE, come applicabile: Direttiva EMC 2014/30/UE, Direttiva sulla substances (Cd, Pb, Hg, Cr+6, PBDE, PBB, DEHP, BBP, DBP and DIBP). -
Page 47
European Community Radio Equipment Directive Compliance Statement: This equipment complies with all the requirements and other relevant provisions of Radio Equipment Directive 2014/53/EU. This equipment is suitable for home and office use in all the European Community Member States and EFTA Member States. The low band 5.15 -5.35 GHz is for indoor use only. Wireless module manufacturer: Intel Corporation SAS ®… -
Page 48: Contact Us
Contact Us GIGA-BYTE TECHNOLOGY CO., LTD. Address: No.6, Baoqiang Rd., Xindian Dist., New Taipei City 231, Taiwan TEL: +886-2-8912-4000, FAX: +886-2-8912-4005 Tech. and Non-Tech. Support (Sales/Marketing) : https://esupport.gigabyte.com WEB address (English): https://www.gigabyte.com WEB address (Chinese): https://www.gigabyte.com/tw GIGABYTE eSupport • To submit a technical or non-technical (Sales/Marketing) question, please link to: https://esupport.gigabyte.com…
инструкцияGigabyte X570 Aorus Elite

For more product details, please visit GIGABYTE’s website.
To reduce the impacts on global warming, the packaging materials of this product
are recyclable and reusable. GIGABYTE works with you to protect the environment.
X570 AORUS ELITE WIFI X570 AORUS ELITE
X570 AORUS ELITE
X570 AORUS ELITE WIFI
User’s Manual
Rev. 1002
12ME-X57AELT-1002R
Посмотреть инструкция для Gigabyte X570 Aorus Elite бесплатно. Руководство относится к категории материнские платы, 4 человек(а) дали ему среднюю оценку 7.9. Руководство доступно на следующих языках: английский. У вас есть вопрос о Gigabyte X570 Aorus Elite или вам нужна помощь? Задайте свой вопрос здесь
- X570 AORUS ELITE/X570 AORUS ELITE WIFI Motherboard Layout
- Chapter 1 Hardware Installation
- Chapter 2 BIOS Setup
- Chapter 3 Appendix

Главная
| Gigabyte | |
| X570 Aorus Elite | X570 AORUS ELITE | |
| материнская плата | |
| 4719331806439, 5706998995971 | |
| английский | |
| Руководство пользователя (PDF), Инструкция по установке (PDF) |
Процессор
| Производитель процессора | AMD |
| Сокет процессора | Разъем AM4 |
| Совместимые серии процессоров | AMD Ryzen 3 2nd Gen, AMD Ryzen 3 3rd Gen, AMD Ryzen 5 2nd Gen, AMD Ryzen 5 3rd Gen, AMD Ryzen 7 2nd Gen, AMD Ryzen 7 3rd Gen, AMD Ryzen 9 3rd Gen |
Свойства
| Семейство чипсета материнской платы | AMD |
| Чипсет материнской платы | AMD X570 |
| Комплектующие для | ПК |
| Формат материнской платы | ATX |
| Выходные звуковые каналы | 5.1 канала |
| Поддерживаемые операционные системы Windows | Да |
| Мониторинг состояния ПК | FAN, Temperature, Voltage |
Память
| Поддерживаемые типы памяти | DDR4-SDRAM |
| Количество слотов памяти | 4 |
| Тип слотов памяти | DIMM |
| Каналы памяти | Dual-channel |
| Error-correcting code (ECC) | Да |
| без функции коррекции ошибок | Да |
| Поддерживаемые частоты памяти | 2133,2400,2667,2933,3200,3300,3333,3400,3466,3600,3733,3800,3866,4000 MHz |
| Максимальная внутренняя память | 128 GB |
| Небуферизованная память | Да |
Контроллеры хранения данных
| Поддерживаемые интерфейсы носителя | M.2, SATA III |
| Уровни RAID | 0, 1,10 |
Графический адаптер
| Поддержка технологии параллельной обработки | 2-Way CrossFireX, Quad-GPU CrossFireX |
| Максимальное разрешение | 4096 x 2160 пикселей |
Внутренние порты
| Разъемы USB 2.0 | 2 |
| Разъемы USB 3.2 Gen 1 (3.1 Gen 1) | 2 |
| Количество разъемов SATA III | 6 |
| Количество разъемов SATA II | 0 |
| Количество параллельных разъемов ATA (PATA) | 0 |
| Аудиоразъем передней панели | Да |
| Разъем передней панели | Да |
| Разъем питания ATX (24-конт.) | Да |
| Разъем вентилятора центрального процессора | Да |
| TPM коннектор | Да |
| 12В разъем питания | Да |
| RGB LED контактный разъем | Да |
| Количество разъемов вентилятора корпуса | 2 |
Порты на задней панели
| Количество портов USB 2.0 | 4 |
| Количество портов USB 3.2 Gen 1 (3.1 Gen 1) Type-A | 4 |
| Количество портов USB 3.2 Gen 1 (3.1 Gen 1) Type-С | 0 |
| Количество портов USB 3.2 Gen 2 (3.1 Gen 2) Type-A | 2 |
| Количество портов USB 3.2 Gen 2 (3.1 Gen 2) Type-С | 0 |
| Количество портов Ethernet LAN ( RJ-45) | 1 |
| Количество портов eSATA | 0 |
| Количество портов PS/2 | 0 |
| Порты FireWire | 0 |
| Количество портов VGA (D-Sub) | 0 |
| Количество HDMI портов | 1 |
| Количество портов DVI-D | 0 |
| Линейные выходы наушников | 1 |
| Линейный вход микрофона | Да |
| Порт выхода S/PDIF | Да |
Сеть
| Подключение Ethernet | Да |
| Wi-Fi | — |
| Тип Ethernet интерфейса | Гигабитный Ethernet |
Слоты расширения
| PCI Express x16 слоты | 2 |
| PCI Express x1 слоты | 2 |
BIOS
| Тип BIOS | UEFI AMI |
| Размер памяти BIOS | 128 Mbit |
| Версия ACPI | 5.0 |
| Перемычка Clear CMOS | Да |
Вес и размеры
| Ширина | 305 mm |
| Глубина | 244 mm |
Содержимое упаковки
| Поставляемое ПО | Norton® Internet Security (OEM version)ncFosSpeed |
Логистические данные
| Код гармонизированной системы описания (HS) | 84733020 |
показать больше
Не можете найти ответ на свой вопрос в руководстве? Вы можете найти ответ на свой вопрос ниже, в разделе часто задаваемых вопросов о Gigabyte X570 Aorus Elite.
Какая ширина Gigabyte X570 Aorus Elite?
Какая толщина Gigabyte X570 Aorus Elite?
Инструкция Gigabyte X570 Aorus Elite доступно в русский?
Не нашли свой вопрос? Задайте свой вопрос здесь
X
You may only add up to 5 items for comparison at one time.
Закрыть
- Загрузить
- Список совместимых процессоров
- Инструкции
- Перечень совместимых устройств
- FAQ
Загрузить
-
-
WLAN+BT
AMD WIFI driver
OS:Windows 10 64bit,Windows 11 64bit
[3.3.0.496]
6.57Mb
09/08/2022

AMD Bluetooth Driver
OS:Windows 10 64bit,Windows 11 64bit
[1.8240.169]
2.46Mb
09/08/2022
AMD WIFI driver
(Note) Win10 ver.2004 supported.OS:Windows 10 64bit,Windows 11 64bit
[3.2.0.0192]
2.88Mb
27/08/2021
-
Аудио
Realtek HD Audio Driver
OS:Windows 10 64bit,Windows 11 64bit
[6.0.9373.1]
38.08Mb
25/07/2022
Realtek HD Audio Driver
OS:Windows 10 64bit,Windows 11 64bit
[6.0.9235.1]
17.82Mb
02/11/2021
-
Chipset
AMD Chipset Driver
OS:Windows 10 64bit,Windows 11 64bit
[3.10.22.706]
50.41Mb
08/04/2022
AMD APU Driver
OS:Windows 10 64bit,Windows 11 64bit
[21.30.14]
587.84Mb
13/10/2021
-
LAN
[1168.007.0318.2022]
4.84Mb
01/04/2022
[10.056.0119.2022]
5.02Mb
08/03/2022
Realtek LAN Driver
(Note) Win10 20H2 supported.[10.048.0315.2021]
4.88Mb
09/06/2021
-
SATA RAID/AHCI
[9.3.0.296]
129.94Mb
17/12/2021
AMD RAID Preinstall Driver
(Note) Windows setup to read from USB thumb drive.[9.3.0.296]
2.03Mb
17/12/2021
AMD RAID Preinstall Driver
(Note) Windows setup to read from USB thumb drive.
(Note) Win10 ver.2004 supported.[9.3.0.221]
1.32Mb
09/06/2021
AMD RAID Utility
(Note) Win10 ver.2004 supported.[9.3.0.158]
82.56Mb
28/05/2020
-
WLAN+BT
-
BIOS(+6)
-
F6b
16.22Mb
23/03/2023
- Checksum : B881
- Update AMD AGESA V2 1.2.0.8
- Optimized performance for 5800X3D
F5
16.20Mb
26/12/2022
- Checksum : 867E
- Update AMD AGESA V2 1.2.0.7
F5a
16.10Mb
16/02/2022
- Checksum : A495
- Update AMD AGESA V2 1.2.0.6 B for Ryzen 7 5800X3D support
- Reappear the option of Max CPU Boost Clock Override for Vermeer
F4
16.09Mb
28/01/2022
• Major vulnerabilities updates, customers are strongly encouraged to update to this release at the earliest.
Credits to ‘Assaf Carlsbad and Itai Liba from SentinelOne’
• Introduce capsule BIOS support starting this version.
- Checksum : 09BB
- Update AGESA ComboV2 1.2.0.5
- Change default status of AMD PSP fTPM to Enabled for addressing basic Windows 11 requirements(https://support.microsoft.com/windows/1fd5a332-360d-4f46-a1e7-ae6b0c90645c)
F3
16.22Mb
13/07/2021
- Checksum: EB4F
- Update AMD AGESA ComboV2 1.2.0.3 B for Ryzen 5000 G-Series processors support
F2
16.21Mb
13/05/2021
- Checksum: 60A6
- First release
- AMD AGESA ComboV2 1.2.0.2
-
-
-
Easy Tune
(Note) Support Intel 600 / 500 / 400 / 300 and AMD 500 / 400 series motherboards (support may vary by model).
(Note) Please install APP Center first before install this utility.OS:Windows 10 64bit,Windows 11 64bit
B23.0308.1
51.90Mb
03/05/2023
System Information Viewer
(Note) Support Intel 600 / 500 / 400 / 300 and AMD 500 /400 series motherboards (support may vary by model).
(Note) Please install APP Center first before install this utility.OS:Windows 10 64bit,Windows 11 64bit
B23.0310.1
104.49Mb
03/05/2023
RGB Fusion
OS:Windows 10 64bit,Windows 11 64bit
B23.0328.1
123.62Mb
02/05/2023
APP Center
(Note) Support Intel 600 / 500 / 400 / 300 and AMD 500 / AM4 / TRX40 series motherboards (support may vary by model).
(Note) Please install Microsoft .NET Framework 4.5 first before install APP Center utility.OS:Windows 10 64bit,Windows 11 64bit
B22.1031.1
23.43Mb
31/10/2022
Realtek Gaming LAN bandwidth Control Utility
(Note) Support Intel 700 / 600 / 500 / 400 series and AMD 600 / 500 series motherboards (support may vary by model).OS:Windows 10 64bit,Windows 11 64bit
6.12.3101.2
77.76Mb
05/05/2022
Fast Boot
(Note) Support Intel 600 / 500 / 400 / 300 and AMD 500 / AM4 / TRX40 series motherboards (support may vary by model).
(Note) Please install APP Center first before install this utility.OS:Windows 10 64bit,Windows 11 64bit
B21.1214.1
7.83Mb
12/01/2022
@BIOS
(Note) Support Intel 600 / 500 / 400 / 300 and AMD 500 / AM4 / TRX40 series motherboards (support may vary by model).
(Note) Please install APP Center first before install this utility.OS:Windows 10 64bit,Windows 11 64bit
B21.1203.1
13.68Mb
12/01/2022
On/Off Charge™ / On/Off Charge™ 2
(Note) Support Intel 600 / 500 / 400 and AMD 500 / AM4 series motherboards (support may vary by model).
(Note) Please install APP Center first before install this utility.B19.1119.1
12.13Mb
02/11/2021
Smart Backup
(Note) Support Intel 600 / 500 / 400 / 300 and AMD 500 / AM4 / TRX40 series motherboards (support may vary by model).
(Note) Please install APP Center first before install this utility.OS:Windows 10 64bit,Windows 11 64bit
B21.0326.1
23.00Mb
02/11/2021
Game Boost
(Note) Support Intel 600 / 500 / 400 / 300 and AMD 500 / AM4 / TRX40 series motherboards (support may vary by model).
(Note) Please install APP Center first before install this utility.OS:Windows 10 64bit,Windows 11 64bit
B18.0730.1
8.52Mb
14/10/2021
Norton® Internet Security (OEM version)
OS:Windows 10 64bit,Windows 7 32bit,Windows 7 64bit
22.9.2.3
235.84Mb
02/07/2019
-

- Инструкции
- Инструкции(+7)
-
Traditional Chinese
1101
15.51Mb
09/03/2023
English
1101
14.78Mb
09/03/2023
Japanese
1101
14.99Mb
09/03/2023
Korean
1101
14.86Mb
09/03/2023
Simplified Chinese
1101
15.45Mb
09/03/2023
English
2.91Mb
06/09/2021
Unique Features Introduction
English
1.87Mb
06/09/2021
RAID Setup Guide
-
- Перечень совместимых устройств
-
Перечень совместимых устройств(+8)
-
Модули памяти
461.61kB
16/09/2021
For AMD Picasso APU
281.04kB
14/09/2021
For AMD Vermeer CPU
225.65kB
14/09/2021
For AMD Matisse CPU
378.51kB
08/09/2021
For AMD Cezanne APU
341.46kB
25/08/2021
For AMD Renoir APU
396.81kB
25/08/2021
For AMD Pinnacle Ridge CPU
Перечень SSD-накопителей
93.75kB
05/05/2023
Перечень M.2-накопителей
312.47kB
05/05/2023
-
CPU Support
Socket AM4 — AMD X570 — X570S AORUS ELITE AX (Rev. 1.1)
N/A = Not support
| Socket AM4 | ||||||||||
|---|---|---|---|---|---|---|---|---|---|---|
| Motherboard | Model |
X570S AORUS ELITE AX |
||||||||
| PCB | 1.1 | |||||||||
| Vendor | CPU Model | Frequency | L2 Cache | L3 Cache | GPU Info. | Core Name | Process | Stepping | Wattage | Since BIOS Version |
| AMD | Ryzen 3 1200 (YD1200BBM4KAF) | 3.1GHz / 3.4GHz | 2MB | 8MB | N/A | Pinnacle Ridge | 12nm | B2 | 65W | F2 |
| AMD | Ryzen 3 2200G | 3.5GHz / 3.7GHz | 2MB | 4MB | 1100 MHz | Raven Ridge | 14nm | B0 | 45-65W | F2 |
| AMD | Ryzen 3 2200GE | 3.2GHz / 3.6GHz | 2MB | 4MB | 1100 MHz | Raven Ridge | 14nm | B0 | 35W | F2 |
| AMD | Ryzen 3 3100 | 3.6GHz / 3.9GHz | 3MB | 16MB | N/A | Matisse | 7nm | B0 | 65W | F2 |
| AMD | Ryzen 3 3200G (YD3200C5M4MFH) | 3.6GHz / 4.0GHz | 2MB | 4MB | 1250 MHz | Picasso | 12nm | B1 | 45-65W | F2 |
| AMD | Ryzen 3 3200G (YD320GC5M4MFH) | 3.6GHz / 4.0GHz | 2MB | 4MB | 1250 MHz | Picasso | 12nm | B1 | 45-65W | F2 |
| AMD | Ryzen 3 3200G (YD320GC5M4MFI) | 3.6GHz / 4.0GHz | 2MB | 4MB | 1250 MHz | Picasso | 12nm | B1 | 45-65W | F2 |
| AMD | Ryzen 3 3200GE | 3.3GHz / 3.8GHz | 2MB | 4MB | 1200 MHz | Picasso | 12nm | B1 | 35W | F2 |
| AMD | Ryzen 3 3300X | 3.8GHz / 4.3GHz | 3MB | 16MB | N/A | Matisse | 7nm | B0 | 65W | F2 |
| AMD | Ryzen 3 4100 | 3.8GHz / 4.0GHz | 2MB | 4MB | N/A | Renoir | 7nm | A1 | 65W | F4 |
| AMD | Ryzen 3 4300G | 3.8GHz / 4.0GHz | 2MB | 4MB | 1700MHz | Renoir | 7nm | A1 | 65W | F2 |
| AMD | Ryzen 3 4300GE | 3.5GHz / 4.0GHz | 2MB | 4MB | 1700MHz | Renoir | 7nm | A1 | 35W | F2 |
| AMD | Ryzen 3 5100 | 3.8GHz / 4.2GHz | 2MB | 8MB | N/A | Cezanne | 7nm | A0 | 65W | F4 |
| AMD | Ryzen 3 5300G | 4.0GHz / 4.2GHz | 2MB | 8MB | 1700MHz | Cezanne | 7nm | A0 | 65W | F3 |
| AMD | Ryzen 3 5300GE | 3.6GHz / 4.2GHz | 2MB | 8MB | 1700MHz | Cezanne | 7nm | A0 | 35W | F3 |
| AMD | Ryzen 3 PRO 2200G | 3.5GHz / 3.7GHz | 2MB | 4MB | 1100 MHz | Raven Ridge | 14nm | B0 | 45-65W | F2 |
| AMD | Ryzen 3 PRO 2200GE | 3.2GHz / 3.6GHz | 2MB | 4MB | 1100 MHz | Raven Ridge | 14nm | B0 | 35W | F2 |
| AMD | Ryzen 3 PRO 3200G (YD320BC5M4MFH) | 3.6GHz / 4.0GHz | 2MB | 4MB | 1250 MHz | Picasso | 12nm | B1 | 45-65W | F2 |
| AMD | Ryzen 3 PRO 3200G (YD320BC5M4MFI) | 3.6GHz / 4.0GHz | 2MB | 4MB | 1250 MHz | Picasso | 12nm | B1 | 45-65W | F2 |
| AMD | Ryzen 3 PRO 3200GE | 3.3GHz / 3.8GHz | 2MB | 4MB | 1200 MHz | Picasso | 12nm | B1 | 35W | F2 |
| AMD | Ryzen 3 PRO 4350G | 3.8GHz / 4.0GHz | 2MB | 4MB | 1700MHz | Renoir | 7nm | A1 | 65W | F2 |
| AMD | Ryzen 3 PRO 4350GE | 3.5GHz / 4.0GHz | 2MB | 4MB | 1700MHz | Renoir | 7nm | A1 | 35W | F2 |
| AMD | Ryzen 3 PRO 4355G | 3.8GHz / 4.0GHz | 2MB | 4MB | 1700MHz | Renoir | 7nm | A1 | 65W | F2 |
| AMD | Ryzen 3 PRO 4355GE | 3.5GHz / 4.0GHz | 2MB | 4MB | 1700MHz | Renoir | 7nm | A1 | 35W | F2 |
| AMD | Ryzen 5 1600 (YD1600BBM6IAF) | 3.2GHz / 3.6GHz | 3MB | 16MB | N/A | Pinnacle Ridge | 12nm | B2 | 65W | F2 |
| AMD | Ryzen 5 2400G | 3.6GHz / 3.9GHz | 2MB | 4MB | 1250 MHz | Raven Ridge | 14nm | B0 | 45-65W | F2 |
| AMD | Ryzen 5 2400GE | 3.2GHz / 3.8GHz | 2MB | 4MB | 1250 MHz | Raven Ridge | 14nm | B0 | 35W | F2 |
| AMD | Ryzen 5 2600 | 3.4GHz / 3.9GHz | 3MB | 16MB | N/A | Pinnacle Ridge | 12nm | B2 | 65W | F2 |
| AMD | Ryzen 5 2600X | 3.6GHz / 4.2GHz | 3MB | 16MB | N/A | Pinnacle Ridge | 12nm | B2 | 95W | F2 |
| AMD | Ryzen 5 3350G | 3.6GHz / 4.0GHz | 2MB | 4MB | 1300 MHz | Picasso | 12nm | B1 | 45-65W | F2 |
| AMD | Ryzen 5 3400G (YD3400C5M4MFH) | 3.7GHz / 4.2GHz | 2MB | 4MB | 1400 MHz | Picasso | 12nm | B1 | 45-65W | F2 |
| AMD | Ryzen 5 3400G (YD340GC5M4MFH) | 3.7GHz / 4.2GHz | 2MB | 4MB | 1400 MHz | Picasso | 12nm | B1 | 45-65W | F2 |
| AMD | Ryzen 5 3400G (YD340GC5M4MFI) | 3.7GHz / 4.2GHz | 2MB | 4MB | 1400 MHz | Picasso | 12nm | B1 | 45-65W | F2 |
| AMD | Ryzen 5 3400GE | 3.3GHz / 4.0GHz | 2MB | 4MB | 1300 MHz | Picasso | 12nm | B1 | 35W | F2 |
| AMD | Ryzen 5 3500 | 3.6GHz / 4.1GHz | 3MB | 16MB | N/A | Matisse | 7nm | B0 | 65W | F2 |
| AMD | Ryzen 5 3500X | 3.6GHz / 4.1GHz | 3MB | 32MB | N/A | Matisse | 7nm | B0 | 65W | F2 |
| AMD | Ryzen 5 3600 | 3.6GHz / 4.2GHz | 3MB | 32MB | N/A | Matisse | 7nm | B0 | 65W | F2 |
| AMD | Ryzen 5 3600X | 3.8GHz / 4.4GHz | 3MB | 32MB | N/A | Matisse | 7nm | B0 | 95W | F2 |
| AMD | Ryzen 5 3600XT | 3.8GHz / 4.5GHz | 3MB | 32MB | N/A | Matisse | 7nm | B0 | 95W | F2 |
| AMD | Ryzen 5 4500 | 3.6GHz / 4.1GHz | 3MB | 8MB | N/A | Renoir | 7nm | A1 | 65W | F4 |
| AMD | Ryzen 5 4600G | 3.7GHz / 4.2GHz | 3MB | 8MB | 1900MHz | Renoir | 7nm | A1 | 65W | F2 |
| AMD | Ryzen 5 4600GE | 3.3GHz / 4.2GHz | 3MB | 8MB | 1900MHz | Renoir | 7nm | A1 | 35W | F2 |
| AMD | Ryzen 5 5500 | 3.6GHz / 4.2GHz | 3MB | 16MB | N/A | Cezanne | 7nm | A0 | 65W | F4 |
| AMD | Ryzen 5 5600 | 3.5GHz / 4.4GHz | 3MB | 32MB | N/A | Vermeer | 7nm | B0 | 65W | F4 |
| AMD | Ryzen 5 5600G | 3.9GHz / 4.4GHz | 3MB | 16MB | 1900MHz | Cezanne | 7nm | A0 | 65W | F3 |
| AMD | Ryzen 5 5600GE | 3.4GHz / 4.4GHz | 3MB | 16MB | 1900MHz | Cezanne | 7nm | A0 | 35W | F3 |
| AMD | Ryzen 5 5600X | 3.7GHz / 4.6GHz | 3MB | 32MB | N/A | Vermeer | 7nm | B0 | 65W | F2 |
| AMD | Ryzen 5 PRO 2400G | 3.6GHz / 3.9GHz | 2MB | 4MB | 1250 MHz | Raven Ridge | 14nm | B0 | 45-65W | F2 |
| AMD | Ryzen 5 PRO 2400GE | 3.2GHz / 3.8GHz | 2MB | 4MB | 1250 MHz | Raven Ridge | 14nm | B0 | 35W | F2 |
| AMD | Ryzen 5 PRO 3400G (YD340BC5M4MFH) | 3.7GHz / 4.2GHz | 2MB | 4MB | 1400 MHz | Picasso | 12nm | B1 | 45-65W | F2 |
| AMD | Ryzen 5 PRO 3400G (YD340BC5M4MFI) | 3.7GHz / 4.2GHz | 2MB | 4MB | 1400 MHz | Picasso | 12nm | B1 | 45-65W | F2 |
| AMD | Ryzen 5 PRO 3400GE | 3.3GHz / 4.0GHz | 2MB | 4MB | 1300 MHz | Picasso | 12nm | B1 | 35W | F2 |
| AMD | Ryzen 5 PRO 3600 | 3.6GHz / 4.2GHz | 3MB | 32MB | N/A | Matisse | 7nm | B0 | 65W | F2 |
| AMD | Ryzen 5 PRO 4650G | 3.7GHz / 4.2GHz | 3MB | 8MB | 1900MHz | Renoir | 7nm | A1 | 65W | F2 |
| AMD | Ryzen 5 PRO 4650GE | 3.3GHz / 4.2GHz | 3MB | 8MB | 1900MHz | Renoir | 7nm | A1 | 35W | F2 |
| AMD | Ryzen 5 PRO 4655G | 3.7GHz / 4.2GHz | 3MB | 8MB | 1900MHz | Renoir | 7nm | A1 | 65W | F2 |
| AMD | Ryzen 5 PRO 4655GE | 3.3GHz / 4.2GHz | 3MB | 8MB | 1900MHz | Renoir | 7nm | A1 | 35W | F2 |
| AMD | Ryzen 5 PRO 5650G | 3.9GHz / 4.4GHz | 3MB | 16MB | 1900MHz | Cezanne | 7nm | A0 | 65W | F3 |
| AMD | Ryzen 5 PRO 5650GE | 3.4GHz / 4.4GHz | 3MB | 16MB | 1900MHz | Cezanne | 7nm | A0 | 35W | F3 |
| AMD | Ryzen 7 2700 | 3.2GHz / 4.1GHz | 4MB | 16MB | N/A | Pinnacle Ridge | 12nm | B2 | 65W | F2 |
| AMD | Ryzen 7 2700X | 3.7GHz / 4.35GHz | 4MB | 16MB | N/A | Pinnacle Ridge | 12nm | B2 | 105W | F2 |
| AMD | Ryzen 7 3700X | 3.6GHz / 4.4GHz | 4MB | 32MB | N/A | Matisse | 7nm | B0 | 65W | F2 |
| AMD | Ryzen 7 3800X | 3.9GHz / 4.5GHz | 4MB | 32MB | N/A | Matisse | 7nm | B0 | 105W | F2 |
| AMD | Ryzen 7 3800XT | 3.9GHz / 4.7GHz | 4MB | 32MB | N/A | Matisse | 7nm | B0 | 105W | F2 |
| AMD | Ryzen 7 4700G | 3.6GHz / 4.4GHz | 4MB | 8MB | 2100MHz | Renoir | 7nm | A1 | 65W | F2 |
| AMD | Ryzen 7 4700GE | 3.1GHz / 4.3GHz | 4MB | 8MB | 2000MHz | Renoir | 7nm | A1 | 35W | F2 |
| AMD | Ryzen 7 5700 | 3.7GHz / 4.6GHz | 4MB | 16MB | N/A | Cezanne | 7nm | A0 | 65W | F3 |
| AMD | Ryzen 7 5700G | 3.8GHz / 4.6GHz | 4MB | 16MB | 2000MHz | Cezanne | 7nm | A0 | 65W | F3 |
| AMD | Ryzen 7 5700GE | 3.2GHz / 4.6GHz | 4MB | 16MB | 2000MHz | Cezanne | 7nm | A0 | 35W | F3 |
| AMD | Ryzen 7 5700X | 3.4GHz / 4.6GHz | 4MB | 32MB | N/A | Vermeer | 7nm | B0 | 65W | F4 |
| AMD | Ryzen 7 5800X | 3.8GHz / 4.7GHz | 4MB | 32MB | N/A | Vermeer | 7nm | B0 | 105W | F2 |
| AMD | Ryzen 7 5800X3D | 3.4GHz / 4.5GHz | 4MB | 96MB | N/A | Vermeer | 7nm | B0 | 105W | F2 |
| AMD | Ryzen 7 PRO 3700 | 3.6GHz / 4.4GHz | 4MB | 32MB | N/A | Matisse | 7nm | B0 | 65W | F2 |
| AMD | Ryzen 7 PRO 4750G | 3.6GHz / 4.4GHz | 4MB | 8MB | 2100MHz | Renoir | 7nm | A1 | 65W | F2 |
| AMD | Ryzen 7 PRO 4750GE | 3.1GHz / 4.3GHz | 4MB | 8MB | 2000MHz | Renoir | 7nm | A1 | 35W | F2 |
| AMD | Ryzen 7 PRO 5750G | 3.8GHz / 4.6GHz | 4MB | 16MB | 2000MHz | Cezanne | 7nm | A0 | 65W | F3 |
| AMD | Ryzen 7 PRO 5750GE | 3.2GHz / 4.6GHz | 4MB | 16MB | 2000MHz | Cezanne | 7nm | A0 | 35W | F3 |
| AMD | Ryzen 9 3900 | 3.1GHz / 4.3GHz | 6MB | 64MB | N/A | Matisse | 7nm | B0 | 65W | F2 |
| AMD | Ryzen 9 3900X | 3.8GHz / 4.6GHz | 6MB | 64MB | N/A | Matisse | 7nm | B0 | 105W | F2 |
| AMD | Ryzen 9 3900XT | 3.8GHz / 4.7GHz | 6MB | 64MB | N/A | Matisse | 7nm | B0 | 105W | F2 |
| AMD | Ryzen 9 3950X | 3.5GHz / 4.7GHz | 8MB | 64MB | N/A | Matisse | 7nm | B0 | 105W | F2 |
| AMD | Ryzen 9 5900X | 3.7GHz / 4.8GHz | 6MB | 64MB | N/A | Vermeer | 7nm | B0 | 105W | F2 |
| AMD | Ryzen 9 5950X | 3.4GHz / 4.9GHz | 8MB | 64MB | N/A | Vermeer | 7nm | B0 | 105W | F2 |
| AMD | Ryzen 9 PRO 3900 | 3.1GHz / 4.3GHz | 6MB | 64MB | N/A | Matisse | 7nm | B0 | 65W | F2 |

![]()
X570 AORUS ELITE
User’s Manual
Rev. 1001
12ME-X57AELT-1001R
For more product details, please visit GIGABYTE’s website.
To reduce the impacts on global warming, the packaging materials of this product are recyclable and reusable. GIGABYTE works with you to protect the environment.

Motherboard
X570 AORUS ELITE
Jun. 14, 2019
Motherboard
X570 AORUS ELITE
Jun. 14, 2019
Copyright
© 2019 GIGA-BYTE TECHNOLOGY CO., LTD. All rights reserved.
The trademarks mentioned in this manual are legally registered to their respective owners.
Disclaimer
Information in this manual is protected by copyright laws and is the property of GIGABYTE.
Changes to the specifications and features in this manual may be made by GIGABYTE without prior notice. No part of this manual may be reproduced, copied, translated, transmitted, or published in any form or by any means without GIGABYTE’s prior written permission.
For quick set-up of the product, read the Quick Installation Guide included with the product.In order to assist in the use of this product, carefully read the User’s Manual.
For product-related information, check on our website at: https://www.gigabyte.com
Identifying Your Motherboard Revision
The revision number on your motherboard looks like this: «REV: X.X.» For example, «REV: 1.0» means the revision of the motherboard is 1.0. Check your motherboard revision before updating motherboard BIOS, drivers, or when looking for technical information.
Example:

Table of Contents
|
X570 AORUS ELITE Motherboard Layout…………………………………………………………….. |
4 |
|
|
Chapter 1 Hardware Installation………………………………………………………………………….. |
5 |
|
|
1-1 |
Installation Precautions…………………………………………………………………………. |
5 |
|
1-2 |
Product Specifications………………………………………………………………………….. |
6 |
|
1-3 |
Installing the CPU………………………………………………………………………………… |
9 |
|
1-4 |
Installing the Memory………………………………………………………………………….. |
10 |
|
1-5 Installing an Expansion Card……………………………………………………………….. |
10 |
|
|
1-6 |
Back Panel Connectors………………………………………………………………………. |
11 |
|
1-7 |
Internal Connectors……………………………………………………………………………. |
13 |
|
Chapter 2 BIOS Setup……………………………………………………………………………………… |
22 |
|
|
2-1 |
Startup Screen…………………………………………………………………………………… |
22 |
|
2-2 |
The Main Menu………………………………………………………………………………….. |
23 |
|
2-3 |
Favorites (F11)…………………………………………………………………………………… |
24 |
|
2-4 |
Tweaker……………………………………………………………………………………………. |
25 |
|
2-5 |
Settings…………………………………………………………………………………………….. |
27 |
|
2-6 |
System Info……………………………………………………………………………………….. |
32 |
|
2-7 |
Boot…………………………………………………………………………………………………. |
33 |
|
2-8 |
Save & Exit……………………………………………………………………………………….. |
36 |
|
Chapter 3 Appendix…………………………………………………………………………………………. |
37 |
|
|
3-1 Configuring a RAID Set………………………………………………………………………. |
37 |
|
|
3-2 |
Drivers Installation……………………………………………………………………………… |
39 |
|
Regulatory Statements…………………………………………………………………………………. |
40 |
|
|
Contact Us………………………………………………………………………………………………….. |
44 |
— 3 —
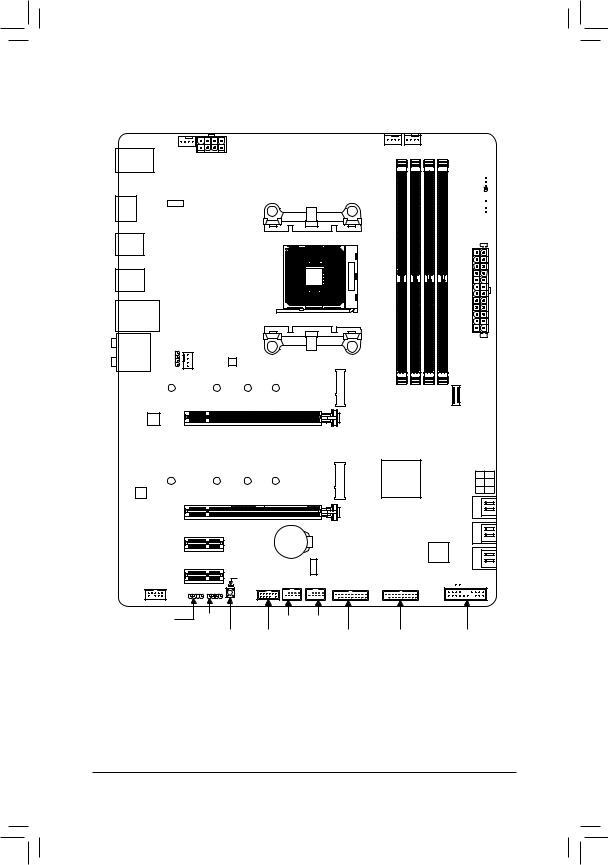
X570 AORUS ELITE Motherboard Layout
|
HDMI |
Socket AM4 |
|
|
USB 2.0 Hub |
||
D_LED2 LED_C2
|
R_USB30_2 |
||||
|
R_USB30_1 |
||||
|
USB31_LAN |
LED CPU |
SYS FAN2 |
||
|
AUDIO |
||||
|
M_BIOS |
||||
|
110 |
80 |
60 |
42 |
|
|
Intel® |
PCIEX16 |
|||
|
GbE LAN |
ATX
|
M2A SOCKET |
DDR4 A1 DDR4 A2 DDR4 B1 DDR4 B2 |
F USB31C |
X570 AORUS ELITE
|
CODEC |
80 |
60 |
42 |
SOCKET |
|
|
110 |
|||||
|
PCIEX4 |
M2B_ |
||||
|
PCIEX1_1 |
BAT |
||||
|
PCIEX1_2 |
USB 2.0 Hub |
||||
|
F_AUDIO |
QFLED |
||||
|
D_LED1 |
LED_C1 |
F_USB2 F_USB1 |
|||
|
QFLASH_PLUS |
TPM |
F_USB30_2 |
iTE® Super I/O
CLR_CMOS 
F_USB30_1 F_PANEL
Box Contents
|
55 X570 AORUS ELITE motherboard |
55 |
Four SATA cables |
|
55 Motherboard driver disk |
55 |
One G Connector |
|
55 User’s Manual |
55 |
M.2 screw(s)/M.2 standoff(s) |
|
55 Quick Installation Guide |
*The box contents above are for reference only and the actual items shall depend on the product package you obtain. The box contents are subject to change without notice.
—4 —

Chapter 1 Hardware Installation
1-1 Installation Precautions
The motherboard contains numerous delicate electronic circuits and components which can become damaged as a result of electrostatic discharge (ESD). Prior to installation, carefully read the user’s manual and follow these procedures:
•• Prior to installation, make sure the chassis is suitable for the motherboard.
•• Prior to installation, do not remove or break motherboard S/N (Serial Number) sticker or warranty sticker provided by your dealer. These stickers are required for warranty validation.
•• Always remove the AC power by unplugging the power cord from the power outlet before installing or removing the motherboard or other hardware components.
•• When connecting hardware components to the internal connectors on the motherboard, make sure they are connected tightly and securely.
•• When handling the motherboard, avoid touching any metal leads or connectors.
•• It is best to wear an electrostatic discharge (ESD) wrist strap when handling electronic components such as a motherboard, CPU or memory. If you do not have an ESD wrist strap, keep your hands dry and first touch a metal object to eliminate static electricity.
•• Prior to installing the motherboard, please have it on top of an antistatic pad or within an electrostatic shielding container.
•• Before connecting or unplugging the power supply cable from the motherboard, make sure the power supply has been turned off.
•• Before turning on the power, make sure the power supply voltage has been set according to the local voltage standard.
•• Before using the product, please verify that all cables and power connectors of your hardware components are connected.
•• To prevent damage to the motherboard, do not allow screws to come in contact with the motherboard circuit or its components.
•• Make sure there are no leftover screws or metal components placed on the motherboard or within the computer casing.
•• Do not place the computer system on an uneven surface.
•• Do not place the computer system in a high-temperature or wet environment.
•• Turning on the computer power during the installation process can lead to damage to system components as well as physical harm to the user.
•• If you are uncertain about any installation steps or have a problem related to the use of the product, please consult a certified computer technician.
•• If you use an adapter, extension power cable, or power strip, ensure to consult with its installation and/or grounding instructions.
— 5 —
1-2 Product Specifications
|
CPU |
AMD Socket AM4, support for: |
|
3rd Generation AMD Ryzen™ processors/ |
|
|
2nd Generation AMD Ryzen™ processors/ |
|
|
2nd Generation AMD Ryzen™ with Radeon™ Vega Graphics processors/ |
|
|
AMD Ryzen™ with Radeon™ Vega Graphics processors |
|
|
(Go to GIGABYTE’s website for the latest CPU support list.) |
|
|
Chipset |
AMD X570 |
|
Memory |
3rd Generation AMD Ryzen™ processors: |
|
— Support for DDR4 3200/2933/2667/2400/2133 MHz memory modules |
|
|
2ndGenerationAMDRyzen™ processors/2ndGenerationAMDRyzen™ with Radeon™ |
|
|
Vega Graphics processors/AMD Ryzen™ with Radeon™ Vega Graphics processors: |
|
|
— Support for DDR4 2933/2667/2400/2133 MHz memory modules |
|
|
4 x DDR4 DIMM sockets supporting up to 128 GB (32 GB single DIMM capacity) |
|
|
of system memory |
|
|
Dual channel memory architecture |
|
|
Support for ECC Un-buffered DIMM 1Rx8/2Rx8 memory modules |
|
|
Support for non-ECC Un-buffered DIMM 1Rx8/2Rx8/1Rx16 memory modules |
|
|
Support for Extreme Memory Profile (XMP) memory modules |
|
|
(Go to GIGABYTE’s website for the latest supported memory speeds and memory |
|
|
modules.) |
|
Onboard |
Integrated Graphics Processor: |
||
|
Graphics (Note 1) |
— |
1 x HDMI port, supporting a maximum resolution of 4096×2160@60 Hz |
|
|
* Support for HDMI 2.0 version, HDCP 2.2, and HDR. |
|||
|
Maximum shared memory of 16 GB |
|||
|
Audio |
Realtek® ALC1200 codec |
||
|
High Definition Audio |
|||
|
2/4/5.1/7.1-channel |
|||
|
Support for S/PDIF Out |
|||
|
LAN |
Intel® GbE LAN chip (10/100/1000 Mbit) |
||
|
Expansion Slots |
Integrated in the CPU (PCIEX16): |
||
|
3rd Generation AMD Ryzen™ processors: |
|||
|
— |
1 x PCI Express x16 slot, supporting PCIe 4.0 and running at x16 |
||
|
2nd Generation AMD Ryzen™ processors: |
|||
|
— |
1 x PCI Express x16 slot, supporting PCIe 3.0 and running at x16 |
||
|
* For optimum performance, if only one PCI Express graphics card is to be installed, |
be sure to install it in the PCIEX16 slot.
2nd Generation AMD Ryzen™ with Radeon™ Vega Graphics processors/AMD Ryzen™ with Radeon™ Vega Graphics processors:
—1 x PCI Express x16 slot, supporting PCIe 3.0 and running at x8 Integrated in the Chipset (PCIEX4/PCIEX1):
—1 x PCI Express x16 slot, supporting PCIe 4.0 (Note 2)/3.0 and running at x4 (PCIEX4)
—2 x PCI Express x1 slots, supporting PCIe 4.0 (Note 2)/3.0
(Note 1) For2ndGenerationAMDRyzen™ with Radeon™ VegaGraphicsprocessors/AMDRyzen™ with Radeon™ Vega Graphics processors only.
(Note 2) For 3rd Generation AMD Ryzen™ processors only. — 6 —
|
Multi-Graphics |
SupportforAMDQuad-GPUCrossFire™ and2-WayAMDCrossFire™ technologies |
|
Technology (Note 3) |
|
|
Storage Interface |
Integrated in the CPU (M2A_SOCKET): |
|
3rd Generation AMD Ryzen™ processors: |
|
|
— 1 x M.2 connector (Socket 3, M key, type 2242/2260/2280/22110 SATA and |
|
|
PCIe 4.0 x4/x2 SSD support) |
|
|
2ndGenerationAMDRyzen™ processors/2ndGenerationAMDRyzen™ with Radeon™ |
|
|
Vega Graphics processors/AMD Ryzen™ with Radeon™ Vega Graphics processors: |
|
|
— 1 x M.2 connector (Socket 3, M key, type 2242/2260/2280/22110 SATA and |
|
|
PCIe 3.0 x4/x2 SSD support) |
|
|
Integrated in the Chipset (M2B_SOCKET): |
|
|
— 1 x M.2 connector (Socket 3, M key, type 2242/2260/2280/22110 SATA and |
|
|
PCIe 4.0 (Note 2)/3.0 x4/x2 SSD support) |
|
|
— 6 x SATA 6Gb/s connectors |
|
|
— Support for RAID 0, RAID 1, and RAID 10 |
|
|
USB |
Integrated in the CPU: |
|
— 4 x USB 3.1 Gen 1 ports on the back panel |
|
|
Integrated in the Chipset: |
|
|
— 1 x USB Type-C™ port with USB 3.1 Gen 2 support, available through the |
|
|
internal USB header |
|
|
— 2 x USB 3.1 Gen 2 Type-A ports (red) on the back panel |
|
|
— 4 x USB 3.1 Gen 1 ports available through the internal USB headers |
|
|
Chipset+2 USB 2.0 Hubs: |
|
|
— 8 x USB 2.0/1.1 ports (4 ports on the back panel, 4 ports available through |
|
|
the internal USB headers) |
|
|
Internal |
1 x 24-pin ATX main power connector |
|
Connectors |
1 x 8-pin ATX 12V power connector |
|
1 x CPU fan header |
|
|
1 x water cooling CPU fan header |
|
|
2 x system fan headers |
|
|
2 x addressable LED strip headers |
|
|
2 x RGB LED strip headers |
|
|
1 x CPU cooler LED strip/RGB LED strip header |
|
|
2 x M.2 Socket 3 connectors |
|
|
6 x SATA 6Gb/s connectors |
|
|
1 x front panel header |
|
|
1 x front panel audio header |
|
|
1 x USB Type-C™ header, with USB 3.1 Gen 2 support |
|
|
2 x USB 3.1 Gen 1 headers |
|
|
2 x USB 2.0/1.1 headers |
|
|
1 x Trusted Platform Module (TPM) header (2×6 pin, for the GC-TPM2.0_S |
|
|
module only) |
|
|
1 x Clear CMOS jumper |
|
|
1 x Q-Flash Plus button |
(Note 2) For 3rd Generation AMD Ryzen™ processors only.
(Note 3) For 3rd Generation AMD Ryzen™ processors/2nd Generation AMD Ryzen™ processors only. — 7 —
|
Back Panel |
4 x USB 2.0/1.1 ports |
||
|
Connectors |
1 x HDMI port |
||
|
4 x USB 3.1 Gen 1 ports |
|||
|
2 x USB 3.1 Gen 2 Type-A ports (red) |
|||
|
1 x RJ-45 port |
|||
|
1 x optical S/PDIF Out connector |
|||
|
5 x audio jacks |
|||
|
I/O Controller |
iTE® I/O Controller Chip |
||
|
Hardware |
Voltage detection |
||
|
Monitor |
Temperature detection |
||
|
Fan speed detection |
|||
|
Water cooling flow rate detection |
|||
|
Overheating warning |
|||
|
Fan fail warning |
|||
|
Fan speed control |
|||
|
* Whether the fan speed control function is supported will depend on the fan you install. |
|||
|
BIOS |
1 x 128 Mbit flash |
||
|
Use of licensed AMI UEFI BIOS |
|||
|
PnP 1.0a, DMI 2.7, WfM 2.0, SM BIOS 2.7, ACPI 5.0 |
|||
|
Unique Features |
Support for APP Center |
||
|
* Available applications in APP Center may vary by motherboard model. Supported |
|||
|
functionsofeachapplicationmayalsovarydependingonmotherboardspecifications. |
|||
|
— |
@BIOS |
||
|
— |
AutoGreen |
||
|
— |
Cloud Station |
||
|
— |
EasyTune |
||
|
— |
Fast Boot |
||
|
— |
Game Boost |
||
|
— |
ON/OFF Charge |
||
|
— |
RGB Fusion |
||
|
— |
Smart Backup |
||
|
— |
Smart Keyboard |
||
|
— |
Smart Survey |
||
|
— |
System Information Viewer |
||
|
— |
USB Blocker |
||
|
Support for Q-Flash Plus |
|||
|
Support for Q-Flash |
|||
|
Support for Xpress Install |
Please visit GIGABYTE’s website for support lists of CPU, memory modules, SSDs, and M.2 devices.
Please visit the SupportUtility List page on GIGABYTE’s website to download the latest version of apps.
— 8 —
|
Bundled |
Norton® Internet Security (OEM version) |
|
|
Software |
cFosSpeed |
|
|
Operating |
Support for Windows 10 64-bit |
|
|
System |
||
|
Form Factor |
ATX Form Factor; 30.5cm x 24.4cm |
*GIGABYTE reserves the right to make any changes to the product specifications and product-related information without prior notice.
|
1-3 |
Installing the CPU |
|
|
Read the following guidelines before you begin to install the CPU: |
||
|
•• |
Make sure that the motherboard supports the CPU. |
|
|
(Go to GIGABYTE’s website for the latest CPU support list.) |
||
|
•• |
Always turn off the computer and unplug the power cord from the power outlet before installing the |
|
|
CPU to prevent hardware damage. |
||
|
•• |
Locate the pin one of the CPU. The CPU cannot be inserted if oriented incorrectly. |
|
|
•• |
Apply an even and thin layer of thermal grease on the surface of the CPU. |
|
|
•• |
Do not turn on the computer if the CPU cooler is not installed, otherwise overheating and damage |
|
|
of the CPU may occur. |
||
|
•• |
Set the CPU host frequency in accordance with the CPU specifications. It is not recommended |
|
|
that the system bus frequency be set beyond hardware specifications since it does not meet the |
||
|
standard requirements for the peripherals. If you wish to set the frequency beyond the standard |
||
|
specifications, please do so according to your hardware specifications including the CPU, graphics |
||
|
card, memory, hard drive, etc. |
Installing the CPU
Locate the pin one (denoted by a small triangle) of the CPU socket and the CPU.
|
A Small Triangle Marking |
A Small Triangle Marking |
|||
|
Denotes Pin One of the Socket |
AM4 Socket |
AM4 CPU |
||
|
Denotes CPU Pin One |
Please visit GIGABYTE’s website for details on hardware installation.
— 9 —
1-4 Installing the Memory
Read the following guidelines before you begin to install the memory:
•• Make sure that the motherboard supports the memory. It is recommended that memory of the same capacity, brand, speed, and chips be used.
(Go to GIGABYTE’s website for the latest supported memory speeds and memory modules.)
•• Always turn off the computer and unplug the power cord from the power outlet before installing the memory to prevent hardware damage.
•• Memory modules have a foolproof design. A memory module can be installed in only one direction. If you are unable to insert the memory, switch the direction.
Dual Channel Memory Configuration
This motherboard provides four memory sockets and supports Dual Channel Technology. After the memory is installed, the BIOS will automatically detect the specifications and capacity of the memory. Enabling Dual
Channel memory mode will double the original memory bandwidth.
The four memory sockets are divided into two channels and each channel has two memory sockets as following:
Channel A: DDR4_A1, DDR4_A2Channel B: DDR4_B1, DDR4_B2
Dual Channel Memory Configurations Table
|
DDR4_A1 |
DDR4_A2 |
DDR4_B1 |
DDR4_B2 |
|
|
2 Modules |
— — |
DS/SS |
— — |
DS/SS |
|
DS/SS |
— — |
DS/SS |
— — |
|
|
4 Modules |
DS/SS |
DS/SS |
DS/SS |
DS/SS |
(SS=Single-Sided, DS=Double-Sided, «- -«=No Memory)
Due to CPU limitations, read the following guidelines before installing the memory in Dual Channel mode.
1.Dual Channel mode cannot be enabled if only one memory module is installed.
2.WhenenablingDualChannelmodewithtwoorfourmemorymodules,itisrecommendedthatmemory of the same capacity, brand, speed, and chips be used. For optimum performance, when enabling
Dual Channel mode with two memory modules, we recommend that you install them in the DDR4_A2 and DDR4_B2 sockets.
1-5 Installing an Expansion Card
Read the following guidelines before you begin to install an expansion card:
•• Make sure the motherboard supports the expansion card. Carefully read the manual that came with your expansion card.
•• Always turn off the computer and unplug the power cord from the power outlet before installing an expansion card to prevent hardware damage.
— 10 —
![]()
1-6 Back Panel Connectors
USB 2.0/1.1 Port
The USB port supports the USB 2.0/1.1 specification. Use this port for USB devices.
HDMI Port (Note 1)
 The HDMI port is HDCP 2.2 compliant and supports Dolby TrueHD and DTS


 HD Master Audio formats. It also supports up to 192KHz/24bit 8-channel LPCM audio output. You can use this port to connect your HDMI-supported monitor. The maximum supported resolution is 4096×2160@60 Hz, but the actual resolutions supported are dependent on the monitor being used.

 After installing the HDMI device, make sure to set the default sound playback device to HDMI. (The
item name may differ depending on your operating system.)
USB 3.1 Gen 1 Port
The USB 3.1 Gen 1 port supports the USB 3.1 Gen 1 specification and is compatible to the USB 2.0 specification. Use this port for USB devices.
USB 3.1 Gen 1 Port (White)
The USB 3.1 Gen 1 port supports the USB 3.1 Gen 1 specification and is compatible to the USB 2.0 specification. Use this port for USB devices. Before using Q-Flash Plus(Note 2), make sure to insert the USB flash drive into this port first.
RJ-45 LAN Port
The Gigabit Ethernet LAN port provides Internet connection at up to 1 Gbps data rate. The following describes the states of the LAN port LEDs.
|
Connection/ |
Connection/Speed LED: |
Activity LED: |
||||||||||||||||||
|
Speed LED |
Activity LED |
|||||||||||||||||||
|
State |
Description |
State |
Description |
|||||||||||||||||
|
Orange |
1 Gbps data rate |
Blinking |
Data transmission or receiving is occurring |
|||||||||||||||||
|
Green |
100 Mbps data rate |
On |
No data transmission or receiving is occurring |
|||||||||||||||||
|
Off |
10 Mbps data rate |
|||||||||||||||||||
|
LAN Port |
||||||||||||||||||||
USB 3.1 Gen 2 Type-A Port (Red)
The USB 3.1 Gen 2 Type-A port supports the USB 3.1 Gen 2 specification and is compatible to the USB 3.1 Gen 1 and USB 2.0 specification. Use this port for USB devices.
Center/Subwoofer Speaker Out
Use this audio jack to connect center/subwoofer speakers.
(Note 1) For2ndGenerationAMDRyzen™ with Radeon™ VegaGraphicsprocessors/AMDRyzen™ with Radeon™ Vega Graphics processors only.
(Note 2) To enable the Q-Flash Plus function please visit the «Unique Features» webpage of GIGABYTE’s website.
— 11 —
Rear Speaker Out
Use this audio jack to connect rear speakers.
Optical S/PDIF Out Connector
This connector provides digital audio out to an external audio system that supports digital optical audio. Before using this feature, ensure that your audio system provides an optical digital audio in connector.
Line In/Side Speaker Out
The line in jack. Use this audio jack for line in devices such as an optical drive, walkman, etc.
Line Out/Front Speaker Out
The line out jack. This jack supports audio amplifying function. For better sound quality, it is recommended that you connect your headphone/speaker to this jack (actual effects may vary by the device being used).
Mic In/Side Speaker Out
The Mic in jack.
Audio Jack Configurations:
|
Jack |
Headphone/ |
4-channel |
5.1-channel |
7.1-channel |
|
|
2-channel |
|||||
|
Center/Subwoofer Speaker Out |
a |
a |
|||
|
Rear Speaker Out |
a |
a |
a |
||
|
Line In/Side Speaker Out |
a |
||||
|
Line Out/Front Speaker Out |
a |
a |
a |
a |
|
|
Mic In/Side Speaker Out |
a |
||||
•• If you want to install a Side Speaker, you need to retask either the Line in or Mic in jack to be 
 Side Speaker out through the audio driver.
•• To enable or configure the audio amplifying function for the Line out jack, please access the HD Audio Manager application.
•• When removing the cable connected to a back panel connector, first remove the cable from your device and then remove it from the motherboard.
•• When removing the cable, pull it straight out from the connector. Do not rock it side to side to prevent an electrical short inside the cable connector.
Please visit GIGABYTE’s website for details on configuring the audio software.
— 12 —
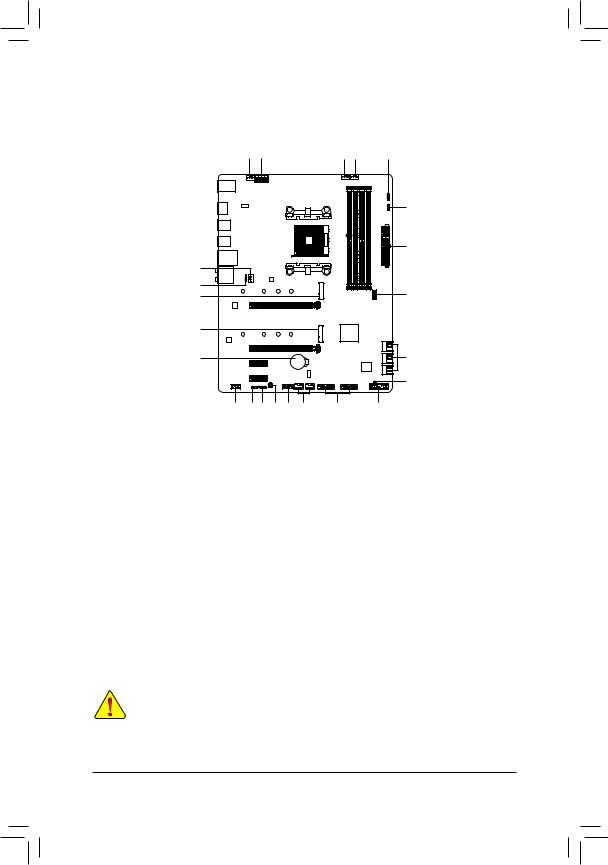
1-7 Internal Connectors |
||||
|
4 |
1 |
5 |
3 |
8 |
|
9 |
||||
|
2 |
||||
|
4 |
||||
|
10 |
13 |
|||
|
6 |
||||
|
6 |
||||
|
17 |
7 |
|||
|
18 |
|
11 |
9 |
8 |
19 |
16 |
15 |
14 |
12 |
|
1) |
ATX_12V |
11) |
F_AUDIO |
|
2) |
ATX |
12) |
F_PANEL |
|
3) |
CPU_FAN |
13) |
F_USB31C |
|
4) |
SYS_FAN1/2 |
14) |
F_USB30_1/F_USB30_2 |
|
5) |
CPU_OPT |
15) |
F_USB1/F_USB2 |
|
6) |
M2A_SOCKET/M2B_SOCKET |
16) |
TPM |
|
7) |
SATA3 0/1/2/3/4/5 |
17) |
BAT |
|
|
LED_C1/LED_C2 |
18) |
CLR_CMOS |
|
9) |
D_LED1/D_LED2 |
19) |
QFLASH_PLUS |
|
10) |
LED_CPU |

Read the following guidelines before connecting external devices:
•• First make sure your devices are compliant with the connectors you wish to connect.
•• Before installing the devices, be sure to turn off the devices and your computer. Unplug the power cord from the power outlet to prevent damage to the devices.
•• After installing the device and before turning on the computer, make sure the device cable has been securely attached to the connector on the motherboard.
— 13 —
1/2) ATX_12V/ATX (2×4 12V Power Connector and 2×12 Main Power Connector)
With the use of the power connector, the power supply can supply enough stable power to all the components on the motherboard. Before connecting the power connector, first make sure the power supply is turned off and all devices are properly installed. The power connector possesses a foolproof design. Connect the power supply cable to the power connector in the correct orientation.
The 12V power connector mainly supplies power to the CPU. If the 12V power connector is not connected, the computer will not start.
To meet expansion requirements, it is recommended that a power supply that can withstand high 
 power consumption be used (500W or greater). If a power supply is used that does not provide the
required power, the result can lead to an unstable or unbootable system.
|
ATX_12V: |
|||
|
Pin No. |
Definition |
Pin No. |
Definition |
|
1 |
GND (Only for 2×4-pin |
5 |
+12V (Only for 2×4-pin 12V) |
|
12V) |
|||
|
2 |
GND (Only for 2×4-pin |
6 |
+12V (Only for 2×4-pin 12V) |
|
12V) |
|||
|
3 |
GND |
7 |
+12V |
|
4 |
GND |
8 |
+12V |
|
ATX: |
|||
|
Pin No. |
Definition |
Pin No. |
Definition |
|
1 |
3.3V |
13 |
3.3V |
|
2 |
3.3V |
14 |
-12V |
|
3 |
GND |
15 |
GND |
|
4 |
+5V |
16 |
PS_ON (soft On/Off) |
|
5 |
GND |
17 |
GND |
|
6 |
+5V |
18 |
GND |
|
7 |
GND |
19 |
GND |
|
8 |
Power Good |
20 |
NC |
|
9 |
5VSB (stand by +5V) |
21 |
+5V |
|
10 |
+12V |
22 |
+5V |
|
11 |
+12V (Only for 2×12-pin |
23 |
+5V (Only for 2×12-pin ATX) |
|
ATX) |
|||
|
12 |
3.3V (Only for 2×12-pin |
24 |
GND (Only for 2×12-pin |
|
ATX) |
ATX) |
— 14 —
 Loading…
Gigabyte x570 Aorus Elite – бюджетная плата, которая способна потянуть конфигурацию с топовым процессором Ryzen 9 3950X от AMD и обладает необходимым минимумом среди x570 плат. В арсенале у платы два разъема под M2 SSD накопителя (каждый на которых 110 мм и один из них с радиатором), колодки 2 x USB 2.0 и 2 x USB 3.0, разъем USB 3.1 второго поколения. Задняя панель неразъемная и имеет стандартный набор разъемов: HDMI, Ethernet, звуковые разъемы и 10 USB разъемов разных версий от 2.0 до 3.1. В комплекте с платой идет Q Connector, который упрощает подключение передней панели корпуса. Производитель предусмотрел возможность обновления BIOS без процессора.
Плата имеет хорошую систему питания – это контроллеры контроллеры ISL69138, работающие в режиме 6+1 и 7 даблеров (делителей) ISL6617A. Таким образом, материнская плата имеет 12 фаз для питания центрального процессора и две фазы для питания System On Chip. Только топовые платы X470 имели подобную систему питания и то далеко не всех. Производители материнских плат обычного ставят такую систему питания на платы ориентированные под процессор с 10, 12 и болеее ядрами. Охлаждение мосфетов построено без тепловой трубки, но при явных серьезных проблем с перегревом у платы нет. Охлаждение чипсета здесь неплохое и как правило он не нагревается выше 65 градусов, а профили его вентилятора уже с завода настроены так, чтобы вентилятор работал на минимальных оборотах при относительно небольшом шуме. Сам вентилятор чипсета не перекрывается видеокартой, поскольку расположен несколько ниже.

Где купить?
Материнскую плату GIGABYTE X570 AORUS ELITE можно было купить на computeruniverse по цене 175,63 €. Сейчас цена на товар несколько выше – 191,51 € (14 939,29 ₽), но его по-прежнему выгодно покупать в немецком интернет-магазине. В российских дискаунтерах цена на материнскую плату начинается от 20 тысяч или товар вовсе отсутствует в продаже. Гораздо выгоднее будет купить GIGABYTE X570 AORUS ELITE в немецком интернет-магазине, используя купон computeruniverse на скидку: FWANUVT. Еще два золотых совета покупателю: оплата с помощью PayPal воизбежание проблем с гарантией и оплата Картой Кукуруза, чтобы не платить за конвертацию валюты банку.

Спецификации
- Сокет: AM4
- Поддерживаемые процессоры: AMD Ryzen/2nd Generation Ryzen with Radeon Vega Graphics/Ryzen with Radeon Vega Graphics
- Поддержка многоядерных процессоров: есть
- Чипсет: AMD X570
- BIOS: AMI
- Поддержка EFI: есть
- Поддержка CrossFire X
- Память: 4 x DDR4 DIMM, 2133-4000 МГц, работа в двухканальном режиме
- Максимальный объем памяти: 128 ГБ
- SATA: 6Gb/s: 6 разъемов, RAID: 0, 1, 10 на основе AMD X570
- Количество слотов M.2: 2 слота
- Тип интерфейса M.2: PCI-E/SATA 3.0
- Слоты расширения: 2xPCI-E x16, 2xPCI-E x1
- Поддержка PCI Express 3.0: есть
- Звук: 7.1CH, HDA, на основе Realtek ALC1200
- Сеть: Ethernet 1000 Мбит/с
- Интерфейсы 17 USB, выход S/PDIF, HDMI, Ethernet, в том числе на задней панели: 10 USB, оптический выход, HDMI, Ethernet
- Комплектация: 4 кабеля SATA, G коннектор, винты для M.2
- Разъем подключения ленты RGB: есть
- Срок службы и гарантийный срок: 3 года
Питание
- Основной разъем питания: 24-pin
- Разъем питания процессора: 8-pin
- Тип системы охлаждения: активное
- Форм-фактор: ATX

Обзор
Темнота беззвездной ночи — не помеха для сокола, выискивающего добычу. Даже в условиях минимальной видимости он точно определяет местоположение цели и терпеливо ожидает идеального момента для нападения. Острое зрение птицы доминирует над ночным покровом, точно также наша эксклюзивная подсветка способна преобразить всю экосистему ПК на базе компонентов AORUS.
GIGABYTE
Главные особенности и преимущества
AMD X570 AORUS Motherboard with 12+2 Phases Digital VRM with DrMOS, Advanced Thermal Design with Enlarge Heatsink, Dual PCIe 4.0 M.2 with Single Thermal Guard, Intel® GbE LAN with cFosSpeed, Front USB Type-C, RGB Fusion 2.0
- Плата совместима с процессорами AMD Ryzen™ 3-поколения / AMD Ryzen™ 2-поколения / AMD Ryzen™ 2-поколения с интегрированным графическим ядром AMD Radeon™ Vega / AMD Ryzen™ с интегрированным графическим ядром AMD Radeon™ Vega;
- 4 DIMM-разъема для ОЗУ DDR4, двухканальный режим работы модулей памяти без ECC и буферизации;
- 12+2 Phases Digital VRM Solution with DrMOS;
- Advanced Heatsink Design with Enlarge Heatsink;
- Dual Ultra-Fast NVMe PCIe 4.0/3.0 x4 M.2 with Single Thermal Guard;
- Высококачественные аудиоконденсаторы, экранирование шумов и LED-трассировка зоны размещения аудиоподсистемы;
- Контроллер Intel® GbE LAN и утилита управления трафиком cFosSpeed;
- Технология RGB FUSION 2.0, многозональная сетодиодная подстветка (предустановленные профили и эффекты), предусмотрена возможность подключения адресных светодиодных RGB-линеек;
- Фирменная функция Smart Fan 5 для контроля и управления массивом термодатчиков, гибридные разъемы для подключения вентиляторов (функция FAN STOP);
- Front USB 3.1 Gen2 Type-C™ Header & HDMI 2.0 support;
- Предустановленная планка для защиты секции портов ввода-вывода;
- Функция Q-Flash Plus для обновления микрокода BIOS без необходимости устанавливать в систему процессоры, модули ОЗУ и графическую плату;

Эксклюзивная подсветка
Темнота беззвездной ночи — не помеха для сокола, выискивающего добычу. Даже в условиях минимальной видимости он точно определяет местоположение цели и терпеливо ожидает идеального момента для нападения. Острое зрение птицы доминирует над ночным покровом, точно также наша эксклюзивная подсветка способна преобразить всю экосистему ПК на базе компонентов AORUS.

Схема материнской платы с разъемами и контроллерами
- (1) 12+2 Phases IR Digital VRM Solution with DrMOS. Печатная плата нового поколения.
- (2) HDMI 2.0.
- (3) Эффективная система охлаждения, фирменные радиаторы. Термопрокладки 1,5 мм.
- (4) Контроллер Intel® GbE LAN. Утилита cFosSpeed
- (5) Планка секции портов ввода/вывода. USB-порт Q-Flash Plus
- (6) Два M.2-разъема PCIe 4.0 x4: Поддерживается PCIe 4.0/3.0 x4 NVMe; 1X M.2 Thermal Guard
- (7) Аудиоподсистема: Аудиокодек Realtek ALC1200, Антишумовой экран, High-End аудиоконденсаторы (WIMA и Nichicon Fine Gold)
- (8) Разъем AM4 ЦП AMD Ryzen™. 4 DIMM-разъема для модулей ОЗУ DDR4, 2-канальный режим
- (9) Цельнометаллические контакты ATX-разъемов: ATX-разъем (24-контакта), 8-контактный разъем питания ЦП
- (10) Разъем фронтального USB 3.2 Gen2 Type-C™
- (11) PCIe 4.0 x16/x4/x1 Slots. Армированная защита Ultra Durable.
- (12) Приложение RGB Fusion 2.0: 2 разъема для адресуемых LED-линеек; Разъем RGB LED*3

Особенности AMD RYZEN™ 3000-серии
Материнские платы GIGABYTE X570 на базе чипсета AMD X570 в полном объеме совместимы с процессорами AMD Ryzen™ 3-поколения. Абсолютно новый дизайн и подбор компонентов элементной базы свидетельствуют о приверженности инженеров GIGABYTE высоким стандартам качества. Материнские платы GIGABYTE X570-серии выгодно отличает обширный перечень востребованных функций, в частности, высокоскоростной шинный интерфейс PCIe 4.0 и порты USB Type-C™, совершенная аудиоподсистема и удовлетворяющий современным требованиям модуль WiFi, продуктивная работа в сетях Ethernet и Интернет, а также ряд других преимуществ, которые отвечают самым насущным запросам пользователей в отношении производительности платформы, воспроизведения медиаконтента и оперативной передачи данных. Новый, усовершенствованный дизайн подсистемы питания и охлаждения ключевых компонентов позволяет раскрыть потенциал процессоров AMD Ryzen™ 3000-серии. Материнские платы GIGABYTE X570-серии – это идеальное решение для проектирования самой скоростной игровой платформы на базе современных процессоров AMD.

Особенности технологии AMD StoreMI
Материнские платы GIGABYTE X570-серии способны раскрыть потенциал Вашего ПК средствами технологии AMD StoreMI. Технология AMD StoreMI представляет собой мощный инструмент для ускорения отклика системы, моментальной загрузки ПК и отдельных приложений, а также более совершенного управления файлами. Эта простая в применении утилита позволяет оптимальным образом организовать хранилище данных, используя преимущество в скорости SSD-накопителей и емкости классических жестких дисков. Таким образом, благодаря AMD StoreMI, дисковая подсистема демонстрирует скорость на операциях чтения/записи устройства, сопоставимую с быстродействием SSD, значительно возрастает общая производительность платформы, при этом даже повседневный ПК начинает на равных конкурировать с мощными системами.
Преимущества технологии AMD StoreMI:
• Выполнять работу на ПК стало еще проще и гораздо быстрее
• Минимальное время отклика и ускоренная загрузка ПК и приложений.
• Быстродействие SSD-накопителя и емкость типового жесткого диска по доступной цене
• Быстрый доступ к ключевым файлам на основе анализа поведения пользователя

Производительность AORUS
Эксклюзивная схема питания
Чтобы раскрыть весь потенциал процессоров AMD Ryzen ™ 3-го поколения, материнской плате требуется наилучшая мощность процессора. X570 AORUS с самыми качественными компонентами и возможностями проектирования и разработки GIGABYTE – настоящий зверь среди материнских плат.
12 * + 2 фазы Цифровой дизайн питания
Материнская плата X570 AORUS ELITE использует 12 * + 2-фазный цифровой процессор питания, который включает в себя как цифровой ШИМ-контроллер, так и DrMOS. Эти 100% цифровые контроллеры предлагают невероятную точность в подаче питания на самые энергоемкие и чувствительные к энергопотреблению компоненты материнской платы, что позволяет энтузиастам получить абсолютную максимальную производительность от новых процессоров AMD Ryzen серии 3000.
Печатная плата нового поколения
Эксклюзивная 2X медная конструкция печатных плат PCIe 4.0 Ready от GIGABYTE обеспечивает достаточные пути трассировки питания между компонентами для обработки нагрузок, превышающих нормальные, и для отвода тепла из критической области питания ЦП. Это важно для того, чтобы материнская плата могла выдерживать повышенную нагрузку, необходимую при разгоне.

Современная система охлаждения
Фирменные радиаторы. Увеличенная площадь поверхности радиатора улучшает тепловые характеристики за счет увеличения теплоотдачи поверхности и сохранения стильной эстетики.
Умный радиатор вентилятора чипсета. Smart Fan
Обеспечивает 3 различных режима работы, чтобы минимизировать шум и продлить срок службы вентилятора. Режимы Без звука, Сбалансированный и Производительность, выберите режим, который подходит вам лучше всего в любой ситуации.
Высокая прочность
Материнские платы X570 оснащены высококачественным вентилятором на шарикоподшипниках, который гарантирует 60 000 * рабочих часов.

Полноценный PCIe 4.0
X570 AORUS снова расширяет границы, предлагая Full PCIe 4.0 Design, включая слоты PCIe 4.0, разъемы PCIe 4.0 M.2, и обеспечивая высокооптимизированную производительность и гибкость, требуемые для опытных пользователей и любителей экстремальных игр.

Совместимость с PCIe 4.0
Материнские платы серии X570 AORUS имеют встроенные слоты PCIe 4.0, обеспечивая превосходную пропускную способность по сравнению с технологией предыдущего поколения. Производительность видеокарт и твердотельных накопителей PCIe NVMe AIC не будет ограничена недостаточной пропускной способностью.
Слоты PCIe 4.0 имеют более высокую стабильность сигнала слотов и более низкий импеданс, максимизируя пропускную способность PCIe, а также будучи обратно совместимыми с PCIe 3.0.

Два разъема PCIe 4.0 M.2 с одним термозащитным кожухом
Материнские платы AORUS Gaming ориентированы на предоставление технологии M.2 энтузиастам, которые хотят максимально использовать потенциал своих систем.


Двойной PCIe 4.0 SSD в RAID 0
Высочайшая производительность благодаря PCIe 4.0 x4 NVMe PCIe SSD
Материнские платы X570 AORUS обеспечивают лучшую в отрасли совместимость с точки зрения хранилища NVMe для пользователей, которым требуется высокая емкость и которые ищут наилучшую производительность. Уникальная конструкция AORUS может быть сконфигурирована в RAID для скорости записи до 9534 МБ / с (последовательное чтение), что делает AORUS очевидным выбором для конечного ПК.

Энергоэффективное решение GIGABYTE M.2 Thermal Guard
Для будущих ультрабыстрых твердотельных накопителей PCIe 4.0 скомпрометированная производительность неприемлема. Хорошо управляемые тепловые характеристики особенно важны для высокопроизводительных твердотельных накопителей NVMe Gen 4.
GIGABYTE предлагает улучшенные тепловые решения для устройств M.2 SSD. M.2 Thermal Guard предотвращает удушение и узкие места на высокоскоростных твердотельных накопителях M.2, поскольку помогает рассеивать тепло, прежде чем оно станет проблемой.
Термотроттлинг при повышении температуры

Поддерживаются модули DDR4 с XMP-профилем до 4000 МГц и выше
GIGABYTE предлагает испытанные и проверенные платформы, которые обеспечивают надлежащую совместимость с профилями модулей ОЗУ на частотах до 4000 МГц и выше. Все, что необходимо сделать пользователю, чтобы оценить прирост производительности подсистемы памяти, убедиться, что установленные модули имеют XMP-профили, а функция XMP активирована в соответствующем разделе BIOS материнской платы AORUS.


Коммуникации
Коммуникации будущего
Высококачественный продукт должен быть ориентирован на будущее, чтобы ваша система соответствовала новейшим технологиям. Материнские платы X570 AORUS предоставляют всю сеть следующего поколения, хранилище, чтобы держать вас в курсе.

Сетевой адаптер Intel® GbE LAN и приложение cFosSpeed
Технология Intel® Gigabit LAN и приложения cFosSpeed для управления сетевым трафиком позволяет минимизировать задержку и время отклика, демонстрируя наилучшее быстродействие в условиях высокой нагрузки локальной сети.


Разъем для портов USB Type-C ™ на фронтальной панели
Материнские платы AORUS Gaming с поддержкой следующего поколения уже поддерживают шасси будущего. Встроенный разъем USB Type-C ™ для USB 3.2 Gen2 обеспечивает удобный доступ при подключении накопителя USB 3.2 Gen2 или зарядке нового мобильного устройства.

Интерфейс HDMI 2.0 для 4K / 60P / 21:9 / HDCP 2.2
Разъем спецификации HDMI 2.0 обратно совместим с разъемом HDMI 1.4, при этом пропускная способность шинного HDMI-интерфейса составляет 18 Гбит/с, что почти вдвое превышает быстродействие соединения предыдущего поколения. Таким образом, открывается возможность одновременно транслировать несколько видеопотоков в оригинальном для современного кинематографа разрешении с соотношением сторон 21:9, обеспечивая максимальный комфорт и наилучшее визуальное восприятие видеоконтента.

Стиль AORUS
Приложение RGB Fusion 2.0
С материнскими платами AORUS RGB Fusion 2.0 еще лучше с адресными светодиодами. * RGB Fusion 2.0 предлагает пользователям возможность управления встроенными RGB и внешними светодиодными RGB / адресными полосами для своих ПК. Материнские платы AORUS серии R5 Fusion 2.0, уже наполненные цветами и узорами, теперь дополнены поддержкой адресуемых светодиодов. С помощью внешних адресных светодиодных лент *, где каждый светодиод имеет цифровую адресацию, пользователи могут получить еще больше шаблонов, стилей и подсветки.
Материнские платы AORUS будут поддерживать адресные светодиодные полосы 5 В и до 300 светодиодных ламп. RGB Fusion 2.0 с адресуемыми светодиодами поставляется с новыми моделями и различными настройками скорости.

Многозональное световое шоу
Теперь, предлагая больше светодиодных настроек, чем когда-либо, пользователи могут по-настоящему адаптировать свой ПК для представления своего образа жизни. Благодаря полной поддержке RGB и переработанному приложению RGB Fusion 2.0 пользователь имеет полный контроль над светодиодами, которые окружают материнскую плату.

RGB Fusion 2.0 Ready
С ослепительным набором поддерживаемых продуктов RGB Fusion 2.0-это программное обеспечение, которое объединяет все это вместе, позволяя вашим аксессуарам синхронизироваться в одном ритме. Настройте все свои светодиоды так, как вам нравится — пусть они совпадают, ослепляют и впечатляют. Узнайте больше о RGB Fusion 2.0.

Программное обеспечение RGB Fusion 2.0
Интуитивно понятный пользовательский интерфейс и расширенный функционал приложения RGB Fusion 2.0 позволяют быстро и максимально эффективно настроить подсветку любого совместимого с данной технологией устройства. Объединяйте в одну схему подсветки материнскую плату и графический 3D-ускоритель, периферийные устройства и другие компоненты, придайте Вашему игровому ПК уникальный неповторимый облик и поделитесь персональными профилями с друзьями. Новый режим подсветки <Игра> позволяет применить доступные световые эффекты к выбранным игровым приложениям, помогая сделать развлечения на ПК еще более интерактивными и приобрести неоценимый игровой опыт.
Мгновенная синхронизация

Индивидуальные настройки к Вашим услугам

Аудиоподсистема
High-End аудиоконденсаторы WIMA
Материнские платы AORUS могут похвастаться сочетанием конденсаторов WIMA FKP2 класса Hi-Fi и высококачественных аудиоконденсаторов Chemicon. В то время как высококачественные аудиоконденсаторы подходят для высококачественного аудиооборудования, используя передовые технологии для обеспечения насыщенного звука на низких и более чистых высоких частотах, конденсаторы WIMA FKP2 широко используются в системах Hi-Fi премиум-класса. В дополнение к эксклюзивной технологии AORUS AMP-UP Audio это идеальное бортовое звуковое решение для самых требовательных аудиофилов.

Антишумовой экран
Материнские платы AORUS имеют защиту от шумов, которая по существу отделяет чувствительные аналоговые аудиокомпоненты платы от потенциального шумового загрязнения на уровне печатной платы. Светодиодное освещение трассы Горит, чтобы показать разделение слоев печатной платы.

Охлаждение AORUS
Функция SmartFan 5
Благодаря Smart Fan 5 пользователи могут быть уверены в том, что их игровой ПК будет функционировать в наиболее благоприятном температурном режиме без ущерба для производительности. Благодаря термодатчикам, размещенным на материнской плате, средствами Smart Fan 5 можно контролировать работу каждого вентилятора. Кроме того, Smart Fan 5 – это еще и большее количество гибридных разъемов для подключения вентиляторов, которые поддерживают режимы работы PWM и Voltage, обеспечивая максимальное удобство обслуживания установленной жидкостной системы охлаждения.

- 4 разъема для Вениляторов/Помпы
- 6 термодатчиков
- Гибридные разъемы двойного назначения
- Отлаженное взаимодействие датчиков и терморезисторов
- Интуитивно понятный интерфейс приложения
- Разъемы для Вентиляторов/Помпы
- Встроенные термодатчики


Функция FanStop – интеллектуальное управление вентилятором
Добейтесь молчания вентиляторов. С помощью функции «Остановка вентилятора» установите полную остановку любого вентилятора, когда температура упадет ниже указанного порогового значения. Какой вентилятор останавливается, основываясь на показаниях какого датчика и при какой температуре – все это можно настроить по своему вкусу.

Гибридные Fan-разъемы
Примите полный контроль над настройкой жидкостного охлаждения! Smart Fan 5 получает самую свежую информацию о расходе и температуре воды через гибридные разъемы для вентиляторных выводов, предоставляя вам абсолютное мастерство над своим ПК.
Все гибридные вентиляторные разъемы могут автоматически настраивать подключаемое устройство (вентилятор или помпа) и иметь возможность выбора режима ШИМ или напряжения.

Новое приложение SmartFan 5
Исходя из предпочтительных режимов, от тихого до полноскоростного.
Значения пороговой температуры в контрольных точках.

Концепция ULTRA DURABLE
Кнопка Q-Flash Plus
Обновление микрокодов BIOS без ЦП, модулей ОЗУ и дискретной графики

Благодаря фирменной технологии GIGABYTE Q-Flash Plus для обновления микрокода BIOS Вам не даже не нужно устанавливать в систему процессор, память, графическую плату и вызывать меню BIOS Setup. Просто загрузите с сервера GIGABYTE и сохраните на USB флэш-накопителе актуальную версию BIOS (измените имя сохраненного файла на gigabyte.bin), а затем нажмите специальную кнопку Q-Flash Plus. Немного терпения и все готово!

Усиленные контакты разъема питания
Материнские платы X570 AORUS имеют сплошные 24-контактные разъемы питания ATX 24 В и ATX 12 В для обеспечения стабильного питания при перегрузке ЦП.

Преимущества цельнометаллических контактов
- Увеличенная площадь соприкосновения для электроконтакта
- Масса металла выдерживает большую нагрузку и лучше рассеивает тепло
- Высокая надежность и продолжительный срок службы

Защита Ultra Durable™ для портов PCI Express
Армированные PCIe-разъемы
В рамках концепции нового дизайна плат GIGABYTE на разъемах PCIe установлены экраны из нержавеющей стали, благодаря которым пластиковые колодки приобретают дополнительную защиту и готовы к инсталляции любых PCI Express плат расширения.

Колодка с двойной фиксацией (патент GIGABYTE)

Превосходство AORUS
Микросхема BIOS
- Новый пользовательский интерфейс. На экран режима EASY MODE выводится важнейшая информацию об оборудовании – частота ЦП и системной памяти, объем модулей ОЗУ, температура, напряжение питания и многое другое.
- Предпочтения пользователя. Возможность добавить часто используемые опции в персональное меню для быстрого доступа.
- Информация о дисковой подсистеме. Информация о всех подключенных к системе накопителях (интефейсы/разъемы SATA, PCIe и M.2)
- Сделанные изменения. Указываются все внесенные пользователем изменения перед сохранением и выходом из BIOS Setup. Возможность быстро оценить характер изменений.
- Кривая калибровки Load Line. Наглядное отображение параметров калибровки средствами интуитивно понятного графического изображения кривой нагрузки.
Центр приложений APP Center
GIGABYTE APP CENTER – это полезный портал всех утилит и драйверов GIGABYTE MB, вы можете выбрать любую утилиту, которую хотите установить, из APP CENTER и получать последние версии утилит и драйверов.

Утилита EasyTune ™
Приложение GIGABYTE EasyTune ™ – это простая в использовании специальная утилита, которая позволяет выполнять тонкую настройку параметров системы, в частности регулировать напряжение питания и частоту установки модулей в среде Windows. Благодаря функциям Smart Quick Boost одним нажатием кнопки мыши могут инициировать процедуру оверклокинга в автоматическом режиме, когда это необходимо.

Утилита @BIOS
Приложение GIGABYTE @BIOS позволяет вам обновлять BIOS вашей системы из Windows, используя простой и удобный графический интерфейс пользователя. @BIOS может автоматически загружать последнюю версию с серверов GIGABYTE или вы можете обновить BIOS из файла на вашем компьютере. @BIOS также позволяет сохранять текущий BIOS в файл, восстанавливать предыдущий BIOS из образа и резервировать его в образ.

Обозреватель SIV
Обозреватель GIGABYTE Просмотр информации о системе (SIV) – одна из основных функций, которая обеспечивает мониторинг и информирование пользователя о текущем состоянии системы. Мониторинг, в частности, требует наличия часов и процессора, скорость вращения вентилятора при управлении задним профилем, оповещение о превышении температуры или соответствующей записи в системном журнале; интерфейс обозревателя информации о системе.
Отзывы покупателей
Покупатели похвалили хорошую совместимость материнской платы – у большинства пользователей их конфигурация завелась “из коробки” без каких-либо танцев с бубном, а оперативная память заводится сразу на максимальной частоте XMP профиля. Среди других достоинств достоинств устройства: наличие радиатора для твердотельных дисков m.2; хороший VRM; удачное расположение вентилятора чипсета, который почти не перекрывается видеокартами; достаточное пространства для установки даже больших кулеров; наличие 6 портов SATA;
Один из покупатель в своем отзыве отметил следующие особенности платы:
- возможность перевести вентилятор чипсета в режим Silent – не будет крутиться до достижения чипсетом 58 градусов, а после достижения данной температуры все равно работает тихо.
- возможность вручную задавать кривые работы всех вентиляторов системы в Bios через Smart Fan 5.
- возможность обновления биоса с флеш-карты на пустой плате с подключенным питанием 24 и 8 Pin (Функция Q-Flash Plus)
К недостаткам покупатели отнесли: плохой авто-разгон центрального процессора (Precision Boost), длительный тест биоса при включении компьютера даже с учетом включенной быстрой загрузки, наличие всего двух разъёмов для корпусных вентиляторов, отсутствие Wi-Fi и Bluetooth.
Лучшая плата X570 для 3900X
Отзыв от 11 июля 2019 года в США
Эта плата является одной из лучших плат X570, которая легко справляется с процессором 3900X. Это простая плата, без Wi-Fi, гигабитной сетевой карты от Intel и фантастически построенного 12 + 2-фазного VRM, который даже сможет работать с 3950X, когда он выйдет. По моему скромному мнению, если вам не нужны дополнительные компоненты на вашей материнской плате, то лучшего значения для X570 нет, чем для Gigabyte X570 Elite.Положительный отзыв американского покупателя с сайта Amazon.com
Солидная материнская плата / Ужасный BIOS
Отзывы от покупателя из США 15 ноября 2019 г. [Подтвержденная покупка]Подводя черту:
Они не шутили насчет дополнительной меди – эта плата имеет серьезный вес. Flex не существует.
Подсветка RGB на задней и над IO хороши.
Мне бы очень хотелось, чтобы второй слот M.2 PCI SSD также имел теплоотвод.
Сама плата – отличная. Никаких проблем вообще.
Это 5-звездочная материнка, за исключением одного серьезного недостатка.
BIOS отстой. И это ужасно.
Он имеет меньше возможностей, чем на M5A99FX Pro R2.0 (моя старая плата, которую я купили где-то 6 лет назад)
Утилита AMD RAID Expert – трудная задача даже для навигации. При выборе параметров мышью они обычно не меняются. Вы должны использовать клавиши со стрелками на клавиатуре.
Этот BIOS не распознает RAID-контроллеры PCI. Если вы используете карту RAID, вы не сможете настроить ее в BIOS или загрузиться с нее. Но все же, если он предварительно настроен, Windows распознает его в проводнике / управлении дисками.
Меню, которые вы на самом деле будете использовать, скрыты в не относящихся к делу опциях.
Windows 7 и эта плата также не дружат.
У меня ушло около двух дней ошибок и перезагрузок, чтобы заставить Windows 10 установить и действительно загрузиться. Молитесь, чтобы все прошло гладко в первый раз, на что-то больше не рассчитывайте. Плата по-прежнему считает, что у меня есть две установки Windows 10, несмотря на то, что все мои диски стерты.
Веселые времена.Кроме того, время загрузки POST варьируется от 5 до 60 секунд, делая это время САМЫМ МЕДЛЕННЫМ ВРЕМЕНЕМ ЗАГРУЗКИ ПОСТ, которое я когда-либо видел. Windows 10 загружается буквально за 1 секунду для меня, но мне иногда приходится ждать целую минуту, чтобы добраться туда.
Если у вас нет настройки RAID в BIOS, это быстрее – 5-25 секунд.***Обновить***
К сожалению, я должен обновить свой рейтинг и снизить оценку плате до 1 звезды. BIOS очень плохой. Мало того, что это просто больно, ему не хватает базовой функциональности.
Например, я получил NVMe m.2 ssd. Установил, нашел в биосе, протестировал. Оно работает. Я загружаю Windows, это не отображается в управлении дисками. Дальнейшее копание показывает в диспетчере устройств, оно есть, но вы должны включить «показать скрытые устройства». Свойства на нем показали, что окна распознали его как отключенный в данный момент.
После рывков по BIOS я попытался включить NVMe RAID. Устройство теперь отображается в Windows, но как устаревшая поддержка и не способная поддерживать PCI 4 поколения, на котором я был.
Нет, и я имею в виду, что нет причин, по которым включение RAID должно заполнять его.
Если вы похожи на меня и у вас много памяти (всего 10 дисков: 2 M.2, 1 M.2 nvme, 1 SATA SSD, 6 SATA HDD), эта материнская плата не для вас.
Я потратил бесчисленные часы на поиск настроек, чтобы запустить всю конфигурацию. Это процесс для моей последней материнской платы, которая даже не нуждалась в настойках BIOS, кроме порядка загрузки и доступа к моему RAID-контроллеру PCI.
Я действительно подружиться с этой материнской платой, но Gigabyte упустил из внимания один из самых важных аспектов.Негативный отзыв о материнской плате. Покупатель остался недоволен биосом и совместимостью с большим количеством дисков SSD и HDD.
