PDF инструкция · 107 страниц(ы) русский
инструкцияGigaset AS690

Gigaset A690IP-AS690IP / LUG-IP RU ru / A31008-M2813-S301-1-5619 / Cover_front_c_IP.fm / 6/15/20
Последняя полная версия руководства
пользователя представлена по адресу
www.gigaset.com/manuals
A690 IP — AS690 IP
Посмотреть инструкция для Gigaset AS690 бесплатно. Руководство относится к категории телефоны, 57 человек(а) дали ему среднюю оценку 7.7. Руководство доступно на следующих языках: русский. У вас есть вопрос о Gigaset AS690 или вам нужна помощь? Задайте свой вопрос здесь
- Содержание
- Общие сведения
- Начало работы
- Использование телефона
- Совершение вызовов
- Списки вызовов/сообщений
- Телефонный справочник
- Сетевой почтовый ящик
- Дополнительные функции
- Расширение функциональных возможностей телефона
- Настройки телефона
- Веб-конфигуратор
- Служба сервиса и поддержи
- Рекомендации изготовителя
- Технические характеристики
- Обзор меню
- Алфавитный указатель
- Licence texts
Главная
| Gigaset | |
| AS690 | S30852-H2816-K101 | |
| телефон | |
| 4250366854816 | |
| русский | |
| Руководство пользователя (PDF) |
Производительность
| Тип | Аналоговый/DECT телефон |
| Автоответчик | Нет |
| Тип телефонной трубки | Беспроводная телефонная трубка |
| ECO режим | Да |
| Совместимость со стандартом GAP | Да |
| Бесшумный режим | Да |
| Количество мелодий | 20 |
| Максимальная дальность в помещении | 50 m |
| Максимальная дальность вне помещения | 300 m |
Экран
| Встроенный экран | Да |
| Диагональ экрана | 2 « |
| Дисплей с задней подсветкой | Да |
| Размер дисплея (ГхВ) | 34 x 36 mm |
| Разрешение экрана | 96 x 64 пикселей |
Дизайн
| Тип крепления | Стол |
| Цвет товара | Черный |
| Телефон для пожилых людей | Нет |
| Встроенная антенна | Да |
| Подсветка кнопок | Да |
Характеристики телефона
| Громкоговоритель | Да |
| Вместимость телефонной книги | 100 записей |
| Поддержка нескольких телефонных трубок | 4 |
| Служба коротких сообщений (SMS) | Нет |
Управление вызовами
| Идентификация абонента (Caller ID) | Да |
| Блокирование вызовов | Да |
| Индикация номера входящего звонка | Да |
| Переадресация вызова | Да |
| Возможность совещаний по телефону | Да |
| Повторный набор | Да |
| Объем списка вызовов | 25 |
Энергопитание
| Время работы в режиме разговора | 14 h |
| Время работы в режиме ожидания | 180 h |
| Тип батареек | AAA |
| Число поддерживаемых батарей | 2 |
| Технология батареи | Никель-металл-гидридный (NiMH) |
Характеристики управления
| Будильник | Да |
| Регулятор громкости | Цифровой |
| Поддержка языков | Мульти |
| Клавиша навигации | Да |
Содержимое упаковки
| Количество трубок в комплекте | 1 |
| Базовая станция | Да |
Вес и размеры
| Размеры телефонной трубки (ШхГхВ) | 49 x 28 x 155 mm |
| Вес телефонной трубки | 119 g |
| Вага бази | 70 g |
| Размеры базы | 88 x 105 x 44 mm |
Условия эксплуатации
| Диапазон температур при эксплуатации | 5 — 45 °C |
| Диапазон относительной влажности при эксплуатации | 20 — 75 % |
показать больше
Не можете найти ответ на свой вопрос в руководстве? Вы можете найти ответ на свой вопрос ниже, в разделе часто задаваемых вопросов о Gigaset AS690.
Какой размер экрана Gigaset AS690?
Какое разрешение экрана дисплея Gigaset AS690?
Инструкция Gigaset AS690 доступно в русский?
Не нашли свой вопрос? Задайте свой вопрос здесь

-
Contents
-
Table of Contents
-
Bookmarks
Quick Links
AS690
HX
Information on the phone system:
Detailed and up-to-date operating guide for
your Gigaset phone
www.gigaset.com/manual
Documentation relating to your base/router
Related Manuals for Gigaset AS690HX
Summary of Contents for Gigaset AS690HX
-
Page 1
AS690 Information on the phone system: Detailed and up-to-date operating guide for your Gigaset phone www.gigaset.com/manual Documentation relating to your base/router… -
Page 2
Internet (SUOTA). On a Gigaset base Connect your HX handset to a Gigaset base and use the many features with the quality you would expect from Gigaset. In this guide, functions that are available for your HX handset are detailed/described. -
Page 3: Table Of Contents
Contents Contents Overview …………….5 Safety precautions .
-
Page 4
Contents Phone settings …………..32 Date and time . -
Page 5: Overview
Overview Overview 5 Message key Access to the call and message lists; flashes: new message or new call New messages in the call list / network mailbox list are shown on the display by message New messages. 6 Talk key / Handsfree key Accepting call;…
-
Page 6
Overview Symbols used in the user guide Icons Warnings, the non-adherence to which can result in damage to devices or personal injury. Important information regarding function and appropriate handling or functions that could generate costs. Prerequisite for carrying out the following action. Additional helpful information. -
Page 7: Safety Precautions
If you use a medical device (e.g., a pacemaker), please contact the device manufacturer. They will be able to advise you regarding the susceptibility of the device to external sources of high frequency energy (for the specifications of your Gigaset product see «Technical data»). Availability and operation of the functions…
-
Page 8: Getting Started
Getting started Getting started Package contents • One handset, two batteries, one battery cover, one charging cradle with power adapter • One user guide The charging cradle is designed for use in closed, dry rooms within a temperature range of +5°C to +45°C. Never expose the telephone to heat sources, direct sunlight or other electrical devices.
-
Page 9: Setting Up And Registering A Handset
OK . . . Country-specific settings are configured Registering a handset The handset is in Register mode. On the base / router Gigaset base: Press and hold the Register/Paging key on the base for about 3 seconds. Other base/router: Information on the registration procedure…
-
Page 10
Registration Register Handset Some Gigaset bases and bases/routers from third party manufacturers might not be fully com- patible with the handset and not all functions are displayed correctly. In such cases, register the handset manually and use option Legacy (GAP) Registration. -
Page 11: Using The Phone
Using the phone Using the phone Switch the handset on and off Switching on: When the handset is switched off, press and hold the End call key Switching off: When the handset is in idle mode, press and hold the End call key If you place a deactivated handset into the charging slot, it will automatically activate itself.
-
Page 12: Display
Using the phone Display Display keys The display keys perform a range of functions depending on the operating situation. Menu Current display key functions Display keys Press the display key . . . Function shown in display above. Open the main menu / submenu Menu Confirm menu function / save entry Back one menu level…
-
Page 13: Menu Navigation
Using the phone Answer machines Local answer machine switched on (if available) Battery charge level 0 — 10% 11 — 33% 34 — 66% > 66% symbol is shown at the front during the charge process. Flashing Battery almost flat (less than 10 minutes of talk time) Menu navigation The functions of your phone are displayed in a menu comprising several levels.
-
Page 14: Making Calls
Ending a call / cancelling dialling: Press the End call key On a base with several phone connections (e.g. a Gigaset base with Internet access or a router) The number is selected via the send connection (line) set for the handset. To use another line:…
-
Page 15: Accepting A Call
Making calls Dialling from the call list Open the call list: Press the Display key Call List Scroll to the required entry Press the Talk key Dialling with speed dial key Entries from the directory are assigned to keys 2 to 9. Press and hold the quick dial key to which the required number is assigned One touch call A predefined number is dialled by pressing any key.
-
Page 16: Handsfree Mode
Making calls Handsfree mode In handsfree mode, you switch on the loudspeaker so that you can hear the caller without holding the handset to your ear. Enabling/disabling handsfree mode during a call and when listening to the answer machine: Press the handsfree key Placing the handset in the charging cradle during a call: Press and hold down the Handsfree key Place the handset into the charging cradle…
-
Page 17: Calling Line Identification
Making calls Query calls / Call swapping During a call or in state Call on hold, call a second subscriber. Menu External Call Accept Enter the phone number Dial . . . The call is initiated End an active call: Menu End Active Call .
-
Page 18: Network Services
Call/message lists Network services (dependent on base and must be supported by provider) Next call is anonymous When the function is enabled, sending of the call number is suppressed for outgoing calls. Menu Select Services Select the connection as required With- hold Number OK (…
-
Page 19: Message List
Directory Opening the call list Press the display key . . . The list selection is opened Call List Select the call type as required (All Calls / Accepted Calls / Outgoing Calls / Missed Calls ) The entry shows: number of new entries + number of old, read Call List 01+02 entries…
-
Page 20
Directory Creating a directory entry First entry: . . . No entries. New entry? Enter the phone number Enter the name More numbers: Menu New Entry Enter the phone number Enter the name Marking an entry as VIP Every existing entry can be marked as a VIP contact. VIP contacts are assigned their own ring- tones and are displayed with symbol in the directory and when they call. -
Page 21: Base Directory
Directory Deleting a directory (entry) Deleting a directory entry Select entry Menu Delete Entry Deleting a directory Menu Delete List Confirm deletion with OK Transferring a directory (entry) to another handset The sending and receiving handsets must both be registered with the same base. The other handset and the base are able to send and receive directory entries.
-
Page 22: Transferring Directory (Entry)
Answering machine Transferring directory (entry) Transferring a phone entry from the local to the base directory Select the entry Menu Send Entry to Basestation Directory Sending a local directory to the base Menu Send List to Basestation Directory Sending the base directory to the handset On the handset to which the directory is to be sent: Menu Receive List…
-
Page 23: Network Mailbox
Answering machine Network mailbox The network mailbox is registered with the network provider and enabled on the phone. To enable and disable the network mailbox, use a number and function code from your network provider. Please contact the network provider if you require any further infor- mation.
-
Page 24: Additional Functions
The procedure required for your telephone may differ from the procedures described here. Additional information Regarding the telephone system, if the handset is connected to a Gigaset base: User guide for your Gigaset telephone Regarding the telephone system, if the handset is connected to another base/router:…
-
Page 25: Baby Monitor (Room Monitoring)
Additional functions Turning off the wake-up call A wake-up call is shown on the display and indicated by the ringtone melody selected. Off . . . The alarm call is switched off for 24 hours Press Later or any key . . . Snooze is shown on the display, the alarm call is repeated after five minutes Baby monitor (Room monitoring) When the baby monitor is switched on, the stored external phone numbers or all handsets reg-…
-
Page 26
Additional functions Activating and setting the baby monitor Menu Baby Monitor Enable/disable: Activation OK ( = enabled) . . . if a phone number to call is already entered, the baby monitor is enabled immediately Entering/changing call number: Call Target Select Internal or External Call for External Call, enter phone number… -
Page 27: Eco Dect
Additional functions ECO DECT (depending on the base) The device range is set to maximum by default. This guarantees the best connection between handset and base. In idle mode, the handset does not transmit (it is radiation-free). Only the base maintains contact with the handset, using weak wireless signals.
-
Page 28: Protection From Undesired Calls
Additional functions Protection from undesired calls Black list (depending on the base) The incoming call number is sent (CLIP). You can enter up to 32 numbers in a black list. When the black list is enabled, calls from black list numbers are blocked.
-
Page 29
Additional functions Creating an entry Enter the number Enter the name If you create an entry for an existing number, the existing entry is overwritten by the new name. Creating an entry for an incoming call or during an active conversation: Press the display key Copy to Blacklist . -
Page 30
Additional functions Specifying rules for the complete black list Specify what happens when the maximum number of entries in the black list is reached and a new entry is created. Menu Call Manager Blacklist Rule for Full List Select the option required ( = selected) Do not add new entries The new entry can not be created. -
Page 31
Additional functions Off for anonymous calls You can set your handset so that it does not ring for calls where Calling Line Identification has been withheld. The call is only signalled on the display. Menu Call Manager Mute Anonym. Calls OK ( = enabled) Availability and operation of the functions… -
Page 32: Phone Settings
Phone settings Phone settings Date and time Setting Set the date/time so that the correct date and time can be assigned to incoming calls and to ena- ble the alarm to be used. Menu Settings Date and Time Set Date and Time Enter the date (day, month and year) in 8-digit format Enter the time (hours and minutes) in 4-digit format…
-
Page 33: Country And Language (If Available)
Phone settings Country and language (if available) Country Select the country where you use the phone. Menu Settings Country Select the country = enabled) Display language Menu Settings Language Select the language = enabled) If you accidentally choose a language you do not understand: Menu Press keys one after the other Select the language…
-
Page 34: Tones And Signals
= enabled) Enabling the info ticker (only on a Gigaset base with Internet access) When info services are set up on the base, text information can be displayed as ticker informa- tion in idle mode, such as weather and news headlines.
-
Page 35
Phone settings Tone quality Change the tone quality of the receiver to how you want it. Menu Audio Settings Acoustic Profile Low / High = selected) Ringtone volume (ringer volume) Adjust the volume of the ringtone on 5 levels or select Crescendo. Menu Audio Settings Ringer Volume… -
Page 36: System
Phone settings Enabling/disabling advisory and warning tones The handset provides acoustic notification of different activities and statuses. Advisory tone: e.g. keypress tones, error tone, a new message Battery warning tone: The battery charge falls below a certain level during a call. Range warning tone: The handset moves outside the range of the base.
-
Page 37
The handset supports firmware updating via the DECT radio link to the base/router (SUOTA = Software Update Over The Air). The base/router to which the handset is registered must also support this function and be connected to the Internet www.gigaset.com/compatibility Menu Settings Firmware Update… -
Page 38: Connections
On the router, multiple connections can be set up and assigned to the handsets. You can configure the following connection settings on the handset. On a Gigaset base with Internet access, you can also set up different connections and assign them to handsets.
-
Page 39: Customer Service & Product Warranty — Australia And New Zealand
If you require assistance in operating this product please contact us AUS: +61 1300 780 878 or by e-mail at the Customer Care section of our website at www.gigaset.com. NZ: 0800 780 878 or by e-mail at the Customer Care section of our website at www.gigaset.com.
-
Page 40: Manufacturer’s Advice
Data protection We at Gigaset take the protection of our customers’ data very seriously. It is precisely for this reason that we are ensuring all our products feature «Privacy by Design» as standard. All information we collect is used to make our products as good as possible.
-
Page 41: Care
Manufacturer‘s advice Environmental management system Gigaset Communications GmbH is certified pursuant to the international standards ISO 14001 and ISO 9001. ISO 14001 (Environment): Certified since September 2007 by TÜV SÜD Management Service GmbH. ISO 9001 (Quality): Certified since 17/02/1994 by TÜV SÜD Management Service GmbH.
-
Page 42: Technical Data
Capacity: 400 — 1000 mAh Handset operating times/charging times The operating time of your Gigaset depends on the capacity of the battery, its age and the way it is used. (All times are maximums). Standby time (hours) 180 / 110* Talktime (hours) Operating time for 1.5 h of calls per day (hours)
-
Page 43: Character Set Tables
Technical data Character set tables The character set used on the handset is dependent on the language set. Entering letters/characters Press the relevant key several times. Briefly press the Hash key to switch from mode “Abc” to “123”, from “123” to “abc” and from “abc” to “Abc”.
-
Page 44: Index
Index Index ….42 Charging time of handset ….17 CLI, Calling Line Identification .
-
Page 45
Index ….36 ……14 Enable/disable warning tones Last number redial . -
Page 46
Index ……..6 Symbol ……13 answer machine . -
Page 47
Issued by Gigaset Communications GmbH Frankenstr. 2a, D-46395 Bocholt © Gigaset Communications GmbH 2021 Subject to availability. All rights reserved. Rights of modification reserved. www.gigaset.com…
Относительно недавно в наш интернет-магазин поступила новинка от Gigaset — комплект беспроводной DECT трубки с базой AS690 IP. После тестирования данная модель оставила очень приятные впечатления.
Эстетичный дизайн трубки одновременно с удобством использования и качеством пластика делают её отличным выбором для любого офиса. Динамики трубки и спикерфона передают хороший чёткий звук приятного тона, который не режет слух. Микрофон отлично отсеивает посторонние шумы без потерь при захвате голоса оператора.
Настройка Gigaset AS690 IP
Принцип настройки новой модели не отличается от других представителей линейки Gigaset. После подключения базы к локальной сети и питанию, устройство получит внутренний IP-адрес от роутера. Адрес вы сможете увидеть на любой, привязанной к этой базе, трубке через меню: «Настройки» — «Система» — «Местная Сеть».
Узнав IP-адрес, вам потребуется ввести его в адресной строке браузера компьютера, чтобы попасть на веб-интерфейс для настройки. В первую очередь для входа в меню настроек, необходимо ввести пин-код.
Пин-код по умолчанию на Gigaset AS690IP
0000 — 4 нуля.
Для обеспечения безопасности сети, вы сможете поменять его через настройки (см. руководство пользователя).
Итак, приступим к регистрации телефона на IP АТС.
Выберите меню «Настройки» на веб-интерфейсе. Далее пройдите по маршруту: «Телефония» — «Соединения». Справа вы увидите список городской линии, внутренней сети Gigaset.net и 6 SIP-аккаунтов. Первые 2 нас не интересуют. Выбираем первый SIP-аккаунт, помеченный IP1. Ставим галочку в столбце «активная» и нажимаем кнопку «Правка».
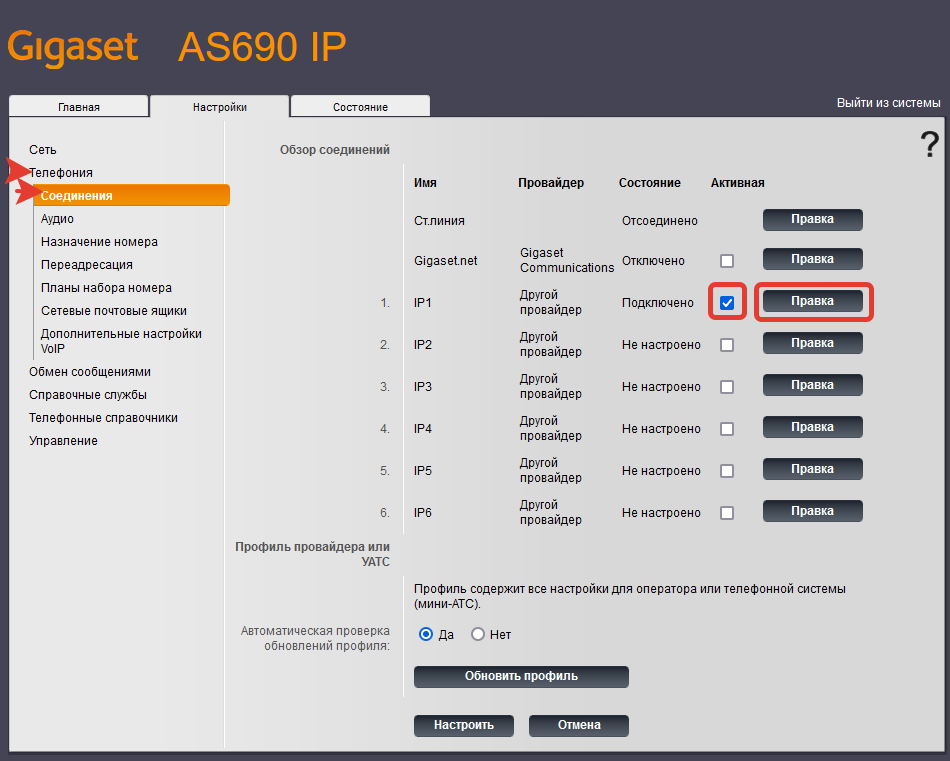
В верхней строке «Имя или номер соединения» можно поменять лейбл этого соединения, чтобы было проще ориентироваться, если на базе будет использоваться несколько аккаунтов.
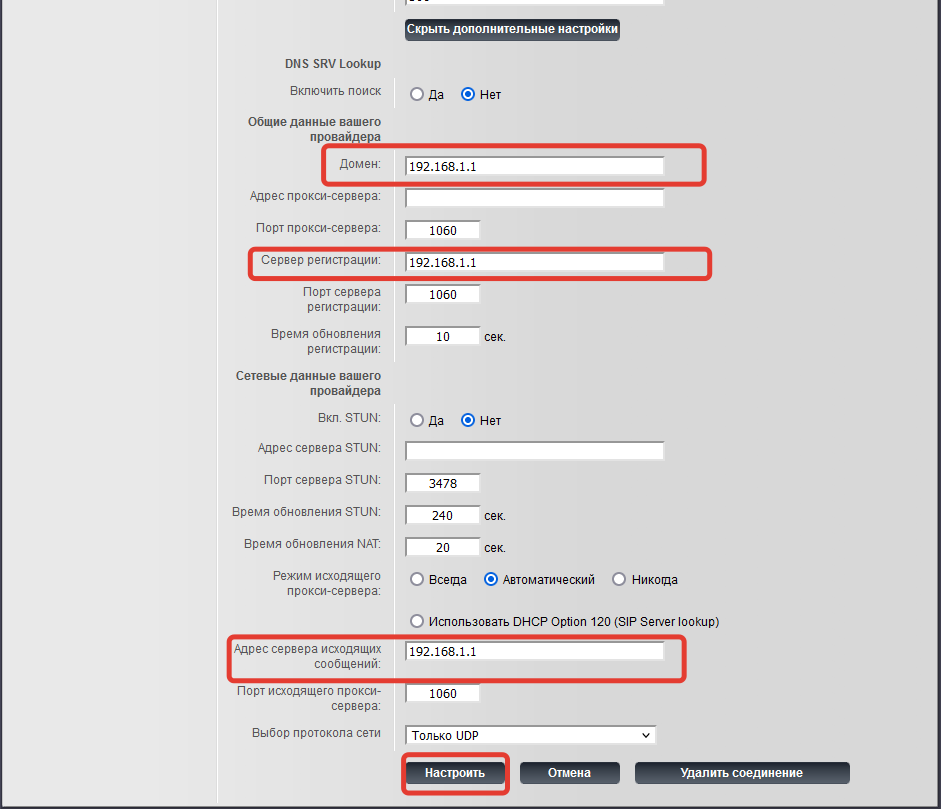
Для регистрации вам необходимо заполнить поля данными, которыми вам предоставил провайдер услуги или системный администратор:
- Имя для входа в систему, Имя пользователя, Отображаемое имя — указывается внутренний номер (extention) или логин учётной записи SIP провайдера;
- Пароль — пароль к учётной записи.
Далее, необходимо нажать на кнопку «Показать доп. настройки».

В полях «Домен», «Сервер регистрации» и «Адрес сервера исходящих сообщений» указывается IP-адрес сервера АТС. После ввода данных, кликните кнопку «Настроить».
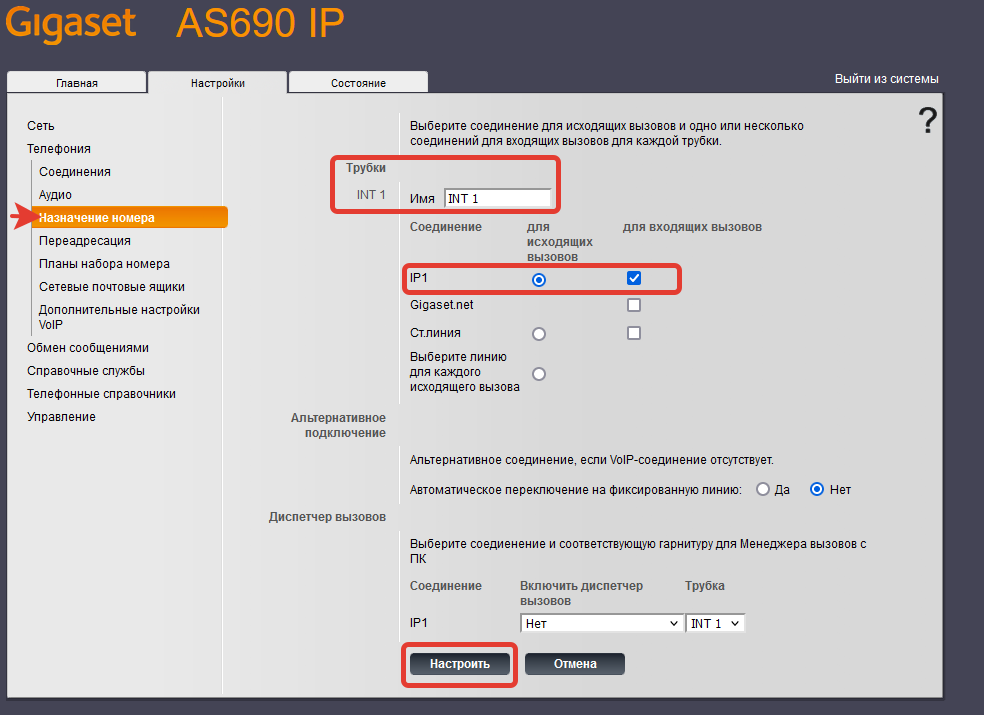
Если все данные были введены верно, в списке SIP аккаунтов состояние первого аккаунта изменится на «Подключено». Далее нам необходимо присвоить аккаунт к трубке. В разделе «Телефония» переходим в меню «Назначение номера».
Здесь также можно присвоить имя трубки в поле «Имя» для более удобного дальнейшего управления несколькими трубками. Ниже показан наш зарегистрированный SIP аккаунт, необходимо установить галочки в столбцах «для исходящих вызовов» и «для входящих вызовов». После этого, нажимаем «Настроить» и трубка готова к использованию.
Проверка состояния AS690IP
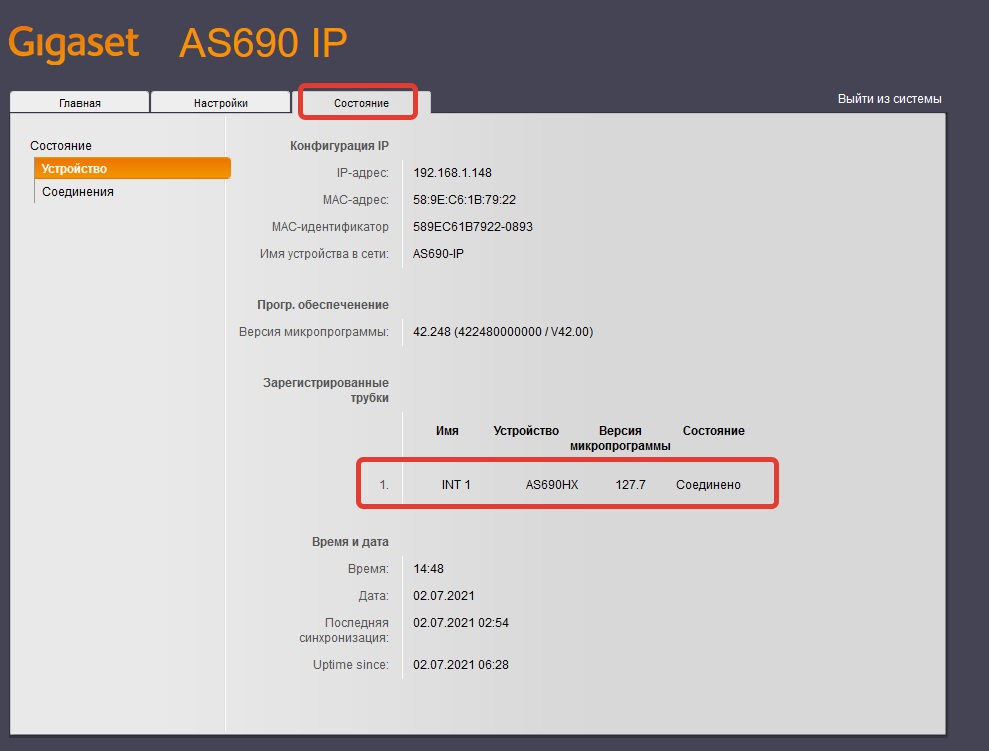
Если вы испытываете проблемы с приёмом или совершением звонков, вам в первую очередь необходимо проверить регистрацию трубки на базе и SIP аккаунта. Для этого на веб-интерфейсе заходим в раздел «Состояние». В подразделе «Устройство» вы можете видеть список зарегистрированных трубок и статус их подключения к базе.
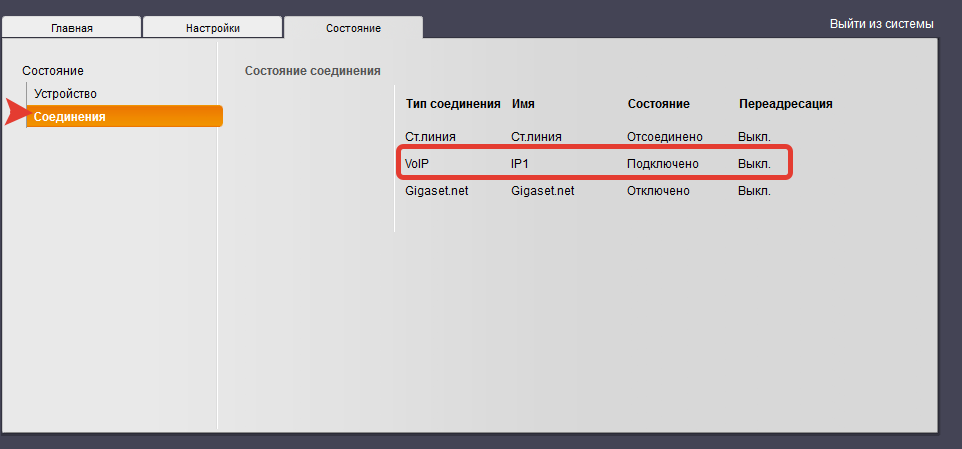
В подразделе «Соединения» вы можете отслеживать статус регистрации SIP аккаунтов.
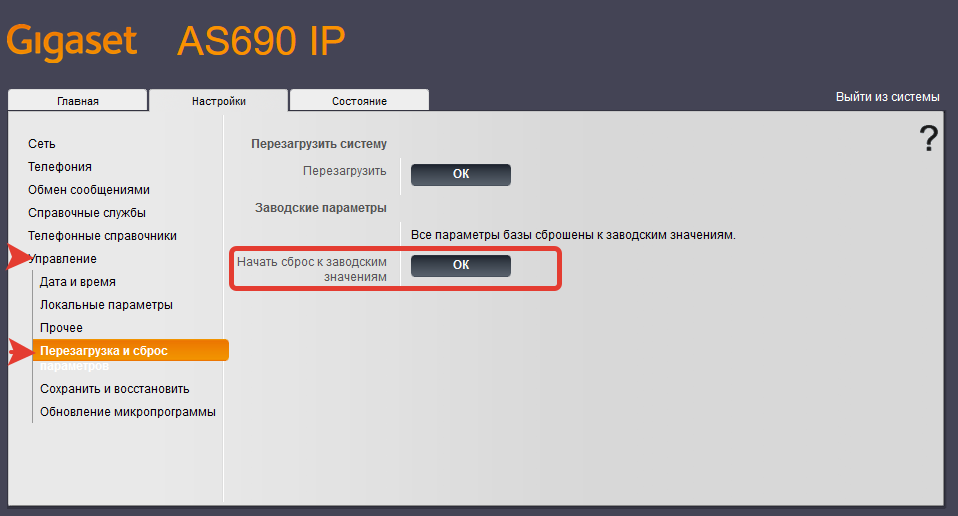
Возврат к заводским настройкам (сброс настроек) на AS690IP
Если вы допустили ошибку в настройках или телефон начал функционировать неправильно, вам может помочь сброс настроек до заводского состояния.
Это действие удалит все изменения, совершенные вами после первого подключения трубки, в том числе пин-код для доступа.
В разделе «Настройки» откройте «Управление» и выберите «Перезагрузка и сброс». После этого кликните ОК возле надписи «Начать сброс к заводским значениям.