Как создать собственный виртуальный инструмент в Cubase Groove Agent при помощи нарезки лупов, семплов и любых аудиофайлов за несколько минут.
Встроенный в Steinberg Cubase Groove Agent поставляется с набором хороших барабанных установок. Тем не менее никто не запрещает пойти дальше и создать свой инструмент, который может и не относиться к ударным. Сделать собственный виртуальный инструмент намного проще, чем может показаться на первый взгляд.
Выбираем луп
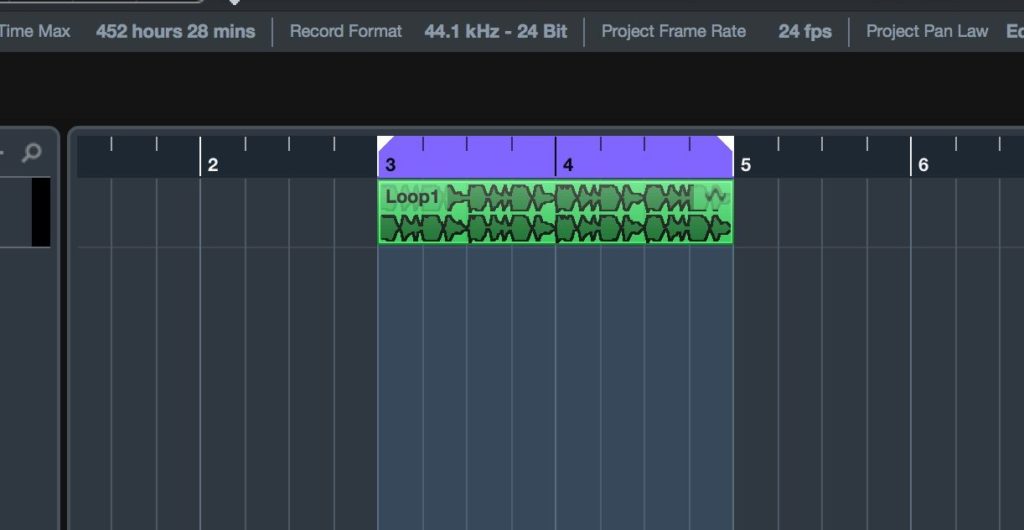
Первым делом стоит выбрать луп, который станет отправной точкой для дальнейшей работы. Я выбрал первый попавшийся под руку луп — он оказался барабанным, хотя вы можете взять луп с любым другим инструментом.
Суть дальнейших действий заключается в использовании некого звука, обладающего «вводными данными»: строгой длительностью, определенной высотой и другими подобными свойствами. Другими словами, потребуется одиночный «монофонический» звук, а не целый грув или партия инструмента. Ищите лупы, состоящие из одного аккорда или ноты — это поможет Cubase Groove Agent легче определить основные свойства звука.
Для создания собственного инструмента в Cubase Groove Agent подойдет любой инструмент, кроме пэдов.
Создаем хитпоинты (маркеры)
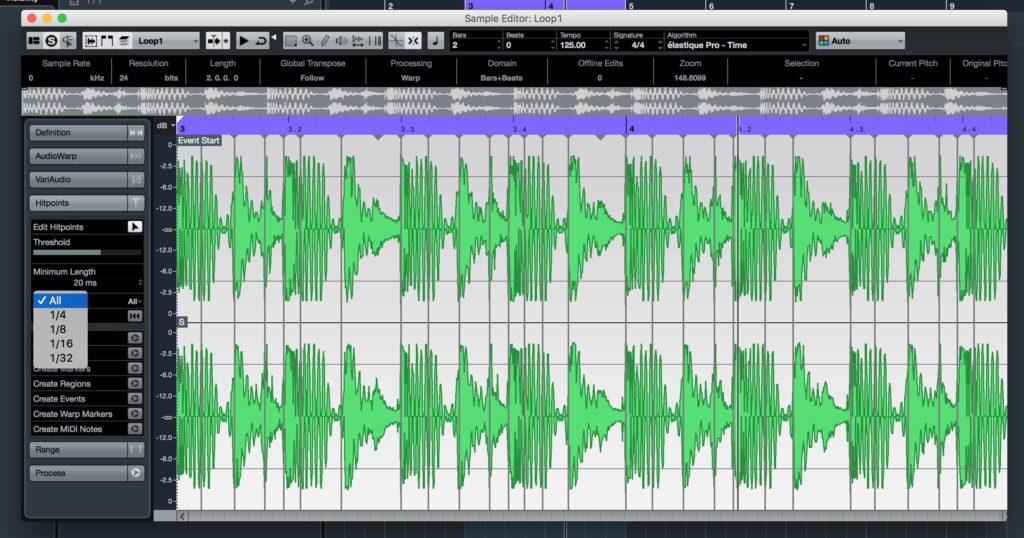
Дважды кликните левой кнопкой мыши по выбранному лупу, чтобы открыть редактор семплов (окно Sample Editor). Перейдите к пункту Hitpoints в боковой панели и нажмите кнопку ‘Edit Hitpoints’. Нажатие кнопки приведет к анализу аудиофайла в Cubase Groove Agent. Программное обеспечение «оценит» множество параметров лупа и расставит специальные маркеры по всей длине имеющегося аудио.
Маркеры отмечают ключевые места аудиофайла. Так как я использовал барабанный луп, в моем случае ключевыми местами аудио станут удары по рабочему барабану, удары бас-бочки и звучание хай-хэта. Если же работа ведется с вокальным лупом, Cubase Groove Agent может расставить маркеры в начале каждого слова или фразы.
Автоматически расставленные маркеры можно передвинуть в любую сторону. Можно добавить дополнительные отметки. Помимо этого, существует возможность настройки параметров расстановки маркеров для указания частоты простановки хитпоинтов. В дополнение к этому, стоит заглянуть в меню ‘Beats’ и создать маркеры на каждую восьмую или шестнадцатую долю такта.
Не переживайте, если в какой-то момент вам понадобится изменить положение меток: здесь не существует «точки невозврата», после которой пропадет возможность внесения правок.
Как только вас устроит результат, нажмите кнопку ‘Create Slices’, которая вернет окно проекта обратно и закончит процесс расставления хитпоинтов.
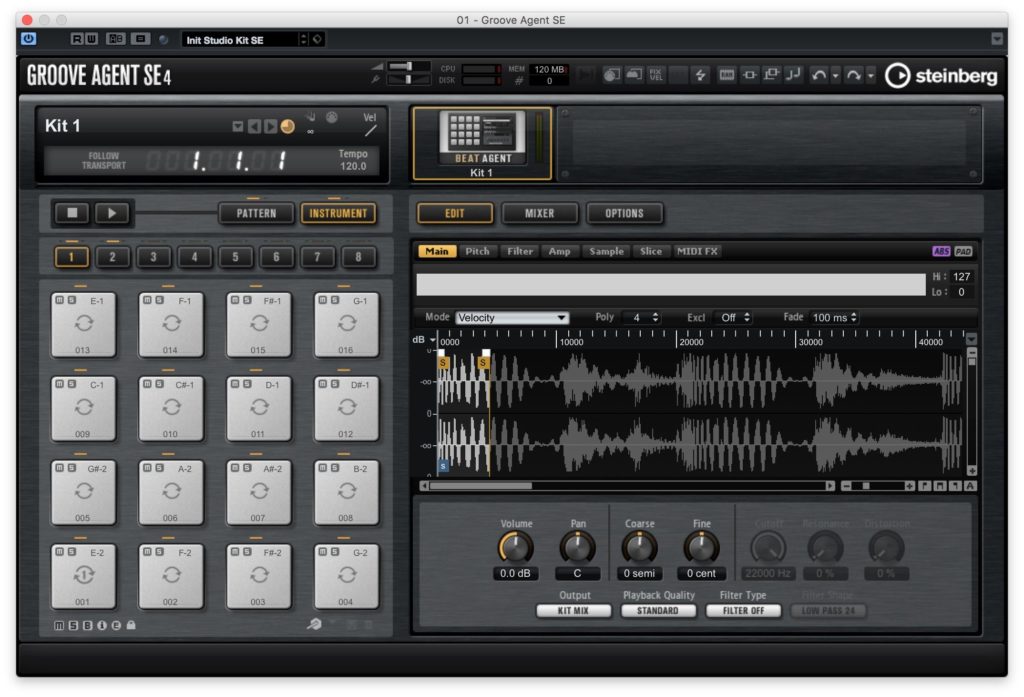
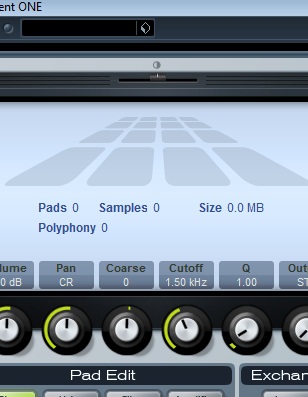
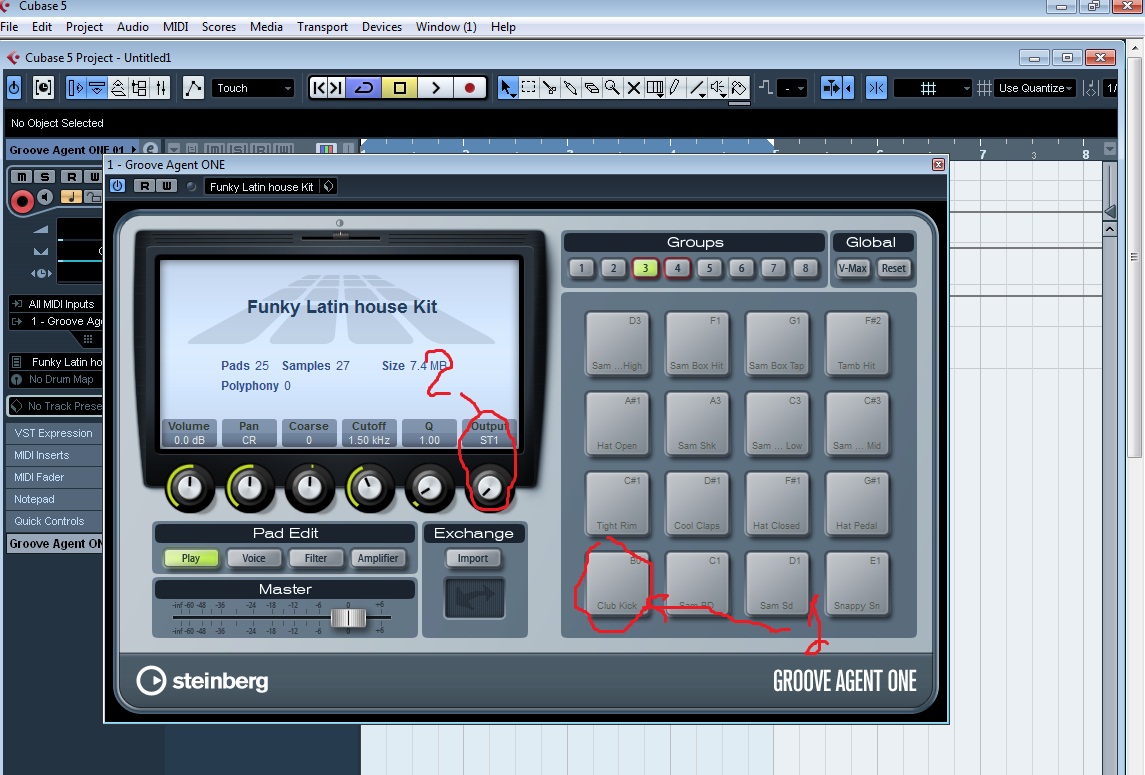
Создайте инструментальную дорожку и активируйте экземпляр Groove Agent. Если вместе с активацией Groove Agent программа загрузит пресет ударных, нажмите правой клавишей мыши на левой половине интерфейса (где отражаются элементы ударной установки) и выберите пункт ‘Cut Kit’. Это позволит выгрузить все звуки, оставив нас наедине с пустым пресетом.
Убедитесь, что в ряде кнопок Group, пронумерованных от 1 до 8, выбрана первая группа. Группы отвечают за конкретные клавиши на MIDI-клавиатуре или в окне Piano Roll, к которым привязываются звуки из Groove Agent. Чем выше номер группы, тем выше по клавиатуре расположатся звуки.
Вернитесь к свеженарезанному аудиофайлу (тому, где мы расставляли маркеры) и перетащите его в окно Groove Agent на пэд E-2 (или любой другой), находящийся в нижнем левом углу первой группы. Groove Agent отобразит нарезанный луп и начнет сопоставлять его с имеющимися свободными пэдами. Всего в Groove Agent существует восемь групп по 16 пэдов, так что общего количества должно хватить для нашего лупа, если только мы не нарезали файл на особо короткие кусочки.
Сопоставляем мэппинг
Перемещение лупа в Groove Agent откроет возможность проигрывания имеющихся кусочков файла при помощи пэдов или MIDI-клавиатуры, подключенной к компьютеру. Если вы возьмете другой луп и переместите его на другой пэд в этой же или любой иной группе в окне Groove Agent, то плагин привяжет все куски нового нарезанного файла ко всем следующим свободным пэдам.
В распоряжении изначально имеется 128 пэдов, на которые можно назначить такое же количество разнообразных звуков или лупов. Все пэды в Groove Agent, конечно же, синхронизированы с Piano Roll и клавишами подключенного MIDI-контроллера, так что можно спокойно собрать собственный инструмент из необходимого количества звуков.
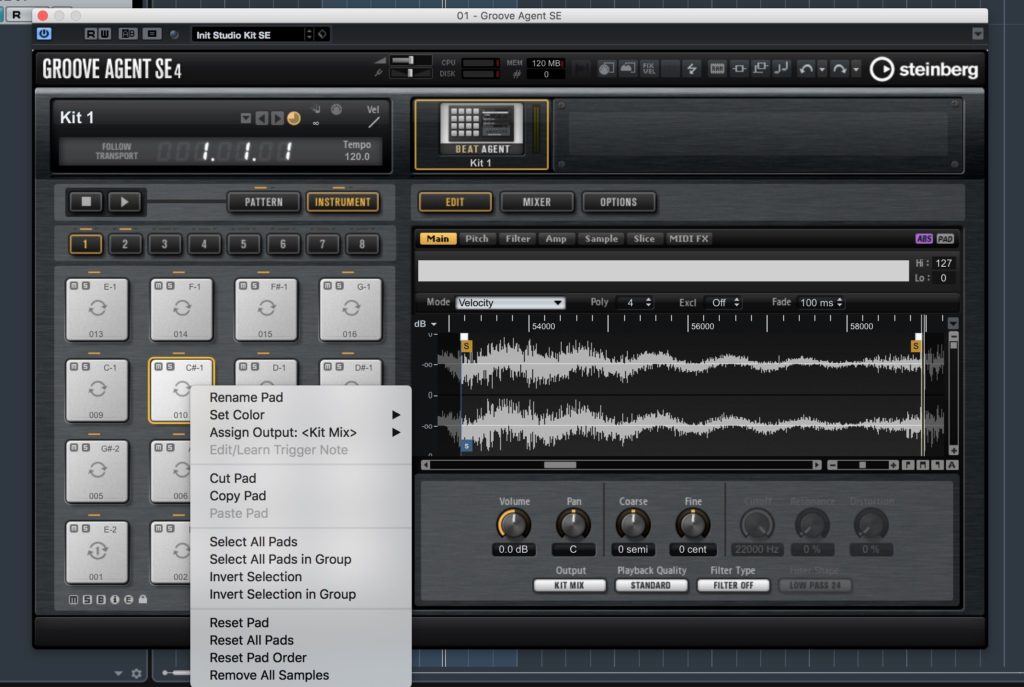
Помимо возможности проигрывания звуков, вы можете спокойно перетаскивать нарезанные кусочки между разными пэдами Groove Agent для создания удобной раскладки. Нажатие правой клавишей на нарезанном куске или пэде вызывает специальное меню с огромным количеством опций, позволяющих произвести более детальную настройку будущего виртуального инструмента. Так, например, можно настроить параметры нарезки и копирования лупов или назначить собственные выходы на микшер Cubase.
Настраиваем длину нарезки
Каждый кусочек, привязываемый к пэду, отображается для большей наглядности в правой стороне драм-машины: так можно определить, какая часть аудиофайла использовалась для звука в конкретном пэде. Такой подход упрощает создание инструмента в Cubase Groove Agent, делая процесс более наглядным и понятным.
Воспользовавшись масштабированием, можно заметить границы каждого кусочка. Чем меньше масштаб звуковой волны в правой части экрана, тем больше маркеров появится на экране. Маркеры можно свободно перемещать прямо в окне Groove Agent при помощи мыши. Так что если захочется сделать звучание пэда дольше или короче, то достаточно изменить длительность звучания в правой части интерфейса драм-машины.
Обратите внимание на вкладку ‘Slice’, в которой отображаются все маркеры аудиофайла. В этой вкладке также можно изменять привязку лупов к пэдам.
Настраиваем параметры нарезки

Для каждого нарезанного кусочка доступно несколько вкладок с параметрами. Музыканту дается возможность настройки фильтрации, усиления и высоты звука, а на вкладке ‘Main’ разрешают «поиграться» с настройками громкости, панорамирования, «грубости» и строя звука, и связанных выходов. Каждый из параметров позволит быстро изменить один конкретный отрезок, не затрагивая настройки других.
В общем, если какой-либо из кусочков оказался слишком громким или тихим, то его можно быстро поправить за счет множества доступных параметров и настроек.
Записываем или загружаем паттерн
Помимо использования готового семпла, лупа или аудиофайла, Groove Agent прекрасно работает и с записанными звуками. Достаточно записать аудио при помощи настоящего инструмента, аналогового синтезатора или MIDI-клавиатуры с подключенной библиотекой звуков, чтобы начать создание инструмента в Cubase Groove Agent.
Также не стоит забывать, что в составе Cubase имеется большая библиотека паттернов и заготовок, доступная через секцию ‘Pattern’. Библиотека предлагает превеликое множество самых разнообразных звуков, которые можно нарезать для создания собственного инструмента и экономии времени.
Вместе с тем помните, что большинство контента в библиотеке паттернов привязано к раскладке Middle C. Это значит, что луп стоит помещать на пэд C1, находящийся в третьей группе, иначе инструмент не будет издавать никаких звуков вплоть до ноты C1.
Добавляем эффекты
В микшере Groove Agent имеется набор из 16 встроенных каналов, шин и посылов, а также одного мастер-канала. Некоторые из каналов имеют слоты для помещения эффектов, которые также встроены в Groove Agent. Попробуйте выбрать любой эффект и поместить его в микшер.
Интерфейс встроенных эффектов открывается по нажатию клавиши «E» на клавиатуре.
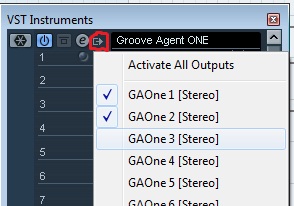
Активируем больше выходов
Кликув по основным настройкам Groove Agent в правом верхнем углу, можно активировать до 16 стереовыходов в дополнение к основному. На каждый из 16 выходов можно назначить конкретные пэды. Другими словами, пэды можно маршрутизировать.
Возможность маршрутизации сигнала станет хорошим подспорьем при применении специфических VST-эффектов или создании более сложных библиотек звуков из нарезанных лупов.
Что дальше?
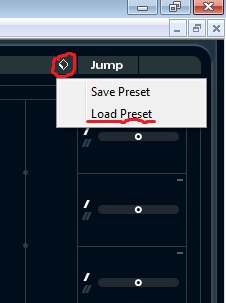
Как видите, создание инструмента в Cubase Groove Agent не вызывает трудностей. В принципе все, что остается теперь — сохранить созданный инструмент в качестве пресета и пользоваться им в любое удобное время.
Хорошие годные плагины с русской душой и русским характером!

Пробовал их бесплатные плаги — отличное качество, звук и полезность
Например их красящий эквал Overtone GEQ нередко оказывался сочнее и вкуснее пультека
— MSED — незаменим для мониторинга и коррекции стерео и мид-сайда,
— TubeAmp — годный ламповый сатуратор/дисто
— SPAN — спектро-анализатор, часто можно встретить в разных туториалах
итд…

Надо брать!

Где найти эталонный спектр едм для спан?Подскажите пожалуйста.
![]()
DJ_PRO
написал 22.05.2023 в 11:12
Да. Тоже думал новый. Из этих сэмплов вытаскиваю только драмсы. Остальное не использую. Люблю сам накручивать.
согласен, Reaper и Bitwig, пресеты есть!
фуфло 
Тьфу ты, я думал новый пак от Vengeance вышел 
![]()
Niki
написал 21.05.2023 в 21:52
Вот как соседей можно до.бывать 
врубил на всю катушку молотки ))
Информация о версии: загрузите установщик или файл VST самостоятельно
omnisphere 2.8.5F
keyscape V1.5.0.C
trilian V1.0.1
stylus

Тыц
написал 21.05.2023 в 20:35
Нада нада А там сравним.
Это ВАУ. Нужен был герой, который придет и всех спасет. И вот оно, торжество гендерного равноправия и токсичной маскулинности.
P.S. Все же есть нечто музыкальное в слове «ЗАПОЙ»…

Ни-ни-ни! Нинада гитару — тогда придётся удалять Амплов!
+1. Наиудобнейшее пополнение экосистемы Тунтраков. Одначе, звук всё же — как правильно заметил уважаемый alexsphere_steinberg — именно УБЕДИТЕЛЬНЕЕ — ИМХО у Пианотека, хотя тот и не самоиграйка.
Тыц
написал 21.05.2023 в 16:12
Благодарствуем.
Я перенёс все инструменты и миди из EZkeys в EZkeys2. Всё работает.
Выше кнопки Close, есть кнопка Launch Library Tool. После её нажатия, выскочит программа для добавления библиотек. Там нужно нажать — Add Library. Ты пробовал так делать?
![]()
ss
написал 21.05.2023 в 13:37

краас
написал 21.05.2023 в 13:30
Это просто шедеврально…..ну пожалуйста тун треки-сделайте еще гитару,и это будет просто бомбически))Спасибо огромное!!!!
Настоятельно рекомендую этот невероятнейший инструмент.

Тоха
написал 21.05.2023 в 13:20
Да, отличный инструмент. осталось создать EzGuitar
Естественно. Это же не апдейт. Это другой совсем инструмент.
![]()
ksoft
написал 21.05.2023 в 09:04
Оставил старый, сверху накатил 2ю версию, 2-е суток полет нормальный. Работает 1 и 2. Подхватил все дополнения. Библу своих MIDI поместил в юзвергдокиtoontrackezkeys2midi, пересканил, свои midi зацепились. Довооооолен обновкой!
последствия поцелуя поезда и танка
спасибо огромное
Кто-нибудь скажет, cтарый EZkeys надо сносить или можно ставить этот и использовать параллельно?

guter
написал 21.05.2023 в 05:54
У меня как раз эта версия установлена, и всё до сих пор работает! 
![]()
Zafa
написал 21.05.2023 в 02:35
Спасибо!
спасибо , но а что нового?
вейвс утомили обновами честн 
Pianoteq — это действительно один из лучших инструментов…За годы написания песен, перепробовал наверное почти все «известные и не очень» VST piano, в итоге последние два года спокойно пишу все партии фортепиано в Pianoteq
Самоиграйка зачётная, а звук не очень. Кто играть на пианино не может, можно легко партию накидать, в любом стиле. Потом закинуть её на миди дорожку, и заменить инструмент. Тот же Pianoteq звучит убедительней!
Не проходите мимо! EZkeys 2 — это плагин — шедевр!
Процитирую горячо любимого Михаила нашего Афанасьевича:
«— Я в восхищении, — монотонно пел Коровьев, — мы в восхищении, королева в восхищении.
— Королева в восхищении, — гнусил за спиною Азазелло.
— Я восхищен, — вскрикивал кот.»
P.S. Честно говоря, ничего другого я от Toontrack и не ожидал. Даже цена в сотку дохлых америкосовских президентов не кажется высокой.
P.P.S. По меньшей мере 50% моих роялей и пианин направились к выходу…
Не работает данная версия на Win 10. Фл20 даже не грузит пишет что не удалось загрузить.
![]()
Nannfs
написал 20.05.2023 в 19:20
у тя есть работающая версия серума?
![]()
Nannfs
написал 20.05.2023 в 19:09
нашёл норм серум?
![]()
Nannfs
написал 20.05.2023 в 19:09
нашёл норм серум?
![]()
Igor
написал 20.05.2023 в 12:24
Не стоит даже ставить и заморачиваться.Поставил в рипере с готовыми пресетами.По сравнению с pro l 2 даёт грязищу и захлёб.Короче плагин ни о чём.Вот pro l 2 Кристально звучит, а этот уступает конкретно…..Стёр как ненужный.
Одна из лучших эмуляций гитары Fender Stratocaster, минусы- может быть слишком тихой и не лечь в микс и не всегда слышно эффект слайд и легато. Встроенные эффекты неплохие(отличная имитация Phaser, Wah -педали, Chorus, Flanger, Reverb) но можно использовать и сторонние.
![]()
Niek
написал 20.05.2023 в 11:19
В аблике все есть. Пресеты PA нужно искать не в самом плагине, а в браузере слева, как в стоковых плагинах аблика
Все хорошо только у данного баса слайд и легато работают плохо. Для тех кто в танке-грузить данный банк лучше через Halion sonic, Halion 6 его не воспринимает..
Лупы это совсем не интересно.
Это деду надо
Какие пресеты при мастеринге?
У кого Studio One тоже, в Рипере все открывается.
у кого аблик, про пресеты забудьте..
Да супер, но если сравнивать с самоиграйками от UJam, то здесь только паттерны как я понял, а это не очень удобно. У UJam есть отдельно еще режим инструмента для собсно творчества.
Не может быть! 
На трекере уже лежит кстати Портабл Kontakt 7 v7.3.1 . Проверил, работает все гуд
-
#31
если попробовать все поставить по умолчанию, так как положено? Все на основной диск.
Замотала эта мышиная возня с поиском БИБЛИОТЕК
К сожалению, это лучший вариант. Потому, что любое обновление устанавливается в папки по дефолту. И для корректного обновления библиотек требуется их наличие в этих местах.
В Library Manager появилась возможность выбора Library Default Location, но почему то, при попытке выбрать папку на другом диске, у меня Halion 6 не увидел установленный туда контент. Более того, его вручную также присоединить из Halion не вышло. Пошел по старому пути, как написал выше. Установил на системный диск, по умолчанию, запустил Halion, подождал, пока он просканирует библиотеку, закрыл. Потом проделал фокус с переносом и ярлыками, все стало доступным. И чего им не сделать возможность сразу выбирать место установки контента, а не лепить кучу менджеров, один на загрузку, другой вообще непонятно зачем, ума не приложу. Наверное какая-то логика в этом есть, но мне она недоступна.
З.Ы. Писал вверху про Halion, так с Groove Agent 5 такой — же алгоритм, только папки у меня на другом диске для каждого инструмента отдельные.

-
#32
@Verda Lumo, я вот немного не понял,ставим библы по умолчанию ,потом переношу файлы в нужное место,а ярлыки оставить заместо них в папке по умолчанию?
-
#33
@-ГЕПАТИТ-, да, не закрывая папку по дефолту, нужно выделить весь массив библиотеки, переместить в нужную папку, после перемещения кликнуть правой кнопкой мыши на выделенном перемещенном контенте и не отпуская кнопку потянуть в исходную папку. В появившемся контекстном меню выбрать: Создать ярлык (и). Имена ярлыков не изменять. Можно запускать Halion (GA5).
Расположение контента по умолчанию можно посмотреть в Library Manager.
-
#34
Verda Lumo, как все просто и гениально! Я когда ставил контент на другой диск, обратил внимания, что многие файлы начинают потом лететь куда попало, но не по назначению, не по своим папкам. У меня уже появилась такая идейка, а не свалить ли все в какую нибудь одно папку. А вот от то что обновления новые, будут устанавливаться по дефолту, несколько напрягает. Ведь контент уже в другом месте! Спасибо!!!
-
#35
Ведь контент уже в другом месте!
Ну, на время обновления можно вернуть все на место.
-
#36
Мне пока GA так и не удалось поставить от а , до я, не достает каких то библиотек. А для чего еще одна папка под №3? Вроде с подобным материалом есть уже папка №3/ тот же вроде контент, только будто как для скачивания? GA настаивает на каких то не достающих файлов, я уже где только мог просмотрел, но их нет. С Галионом, проблем вообще нет. Что ж, буду искать.
-
#37
@Otec, возможно, это контент Groove Agent SE (если установлена какая либо версия Cubase). Повторяется, если устанавливались какие нибудь обновления. Пришлите скрин, как у Вас выглядит системная папка с библиотеками GA5.
З.Ы. Тему бы перенести в музыкальный софт. Как-то тема про VST затесалась в ветку по DAW.
-
#38
Всем привет! Вот несколько скринов. Пока я экспериментировал, у меня вдруг отказался ставиться С9.5, в любых вариантах (т.е. плюс с обновлением из интернете, или же стандартно, все что есть на компе, включая обновление. Но. С8 ставится без проблем.
P/S/ GA ставил начисто, без дополнительных для него экспансий.
-

49,4 KB
Просмотры: 152 -
34,3 KB
Просмотры: 144 -
8,6 KB
Просмотры: 154 -
105,2 KB
Просмотры: 153

Последнее редактирование: 26 Ноя 2018
-
#39
@Otec, у Вас недокачан контент. В первом скрине — файлы с расширением «aria2» — это значит, что эти файлы не полностью скачаны. После извлечения из архива дистрибутив GA5 должен выглядеть вот так:

Докачайте и переустановите и все получится.
-
#40
@Verda Lumo, Благодарю Вас! А не придется ли мне все заново скачивать? Как то странно он у меня «расфасован».
Последнее редактирование: 26 Ноя 2018
-
#41
А не придется ли мне все заново скачивать? Как то странно он у меня «расфасован».
Не могу подсказать. У меня после распаковки выглядит так, как на моем скрине выше.И запускать установку надо приложением со значком.
-
#42
Контент от GA4 идущий с ним в комплекте, тут отсутствует?
Должен идти. А то пользователи просто замучаются ставить, что то удалять. При установке это даже прописывается. Тогда точно ДА! Но это мое мнение и хорошо бы, что бы кто то его опроверг.
И запускать установку надо приложением со значком
А еще у вас на скрине есть какая то библиотечка. Что ж придется пробовать, а возможно и перезакачивать. Спасибо за помощь!
Как на софтовый делается, совершенно далек от истины. А вопрос давно стоит. И где он находится этот самый софтовый ключ — ни бум-бум.
Последнее редактирование: 26 Ноя 2018
-
#43
Переустановил GA5. Вот что получилось. Скажите, все верно на этот раз?
-
132,6 KB
Просмотры: 139
-
#44
Контента полных версий GA5 и GA4 вообще нет на Вашем скрине. У Вас GA5 видит только контент SE и тот, что поставляется с Cubase. Посмотрите на мой скрин выше, там все, что включено в контент перечислено.
Последнее редактирование: 28 Ноя 2018
-
#45
Как на софтовый делается, совершенно далек от истины. А вопрос давно стоит. И где он находится этот самый софтовый ключ — ни бум-бум.
Когда вводите код продкута в elicenser control center, он предлагает на какой ключ разместить лицензию.
-
18,5 KB
Просмотры: 95

-
#46
У меня скачалось 29 Гб контента. Но установочный файл находился в отдельной папке. Контент в другой. Я запустил установочный-вот и результат.( Кстати на вашем скрине, установочный файл находится в одной папке с контентом, плюс там еще ест какая то библиотечка. Я вот этого и не понял. Может контент переместить в ту папку где установочный файл? Не могу догнать, как установить все это.
Контента полных версий GA5 и GA4 вообще нет на Вашем скрине. У Вас GA5 видит только контент SE и тот, что поставляется с Cubase. Посмотрите на мой скрин выше, там все, что включено в контент перечислено.
Кстати GA4 не установлен у меня. На чисто ставил. Потому его нет, так же как всех остольных экспнсий. Как то влип я не грамотно с GA.
-
5,9 KB
Просмотры: 110 -
33,9 KB
Просмотры: 121 -
7,5 KB
Просмотры: 112

Последнее редактирование: 28 Ноя 2018
-
#47
нет, так же как всех остольных экспнсий.
В Вашем же скрине находятся все эти библиотеки — и Rock Kit и Vintage Kit и т.п. — эти библиотеки и есть привет из GA4. Также в папке с контентом должен быть файл, запускающий установку библиотек, как на моем скрине, самый верхний. Они у Вас попросту не установлены. В крайнем случае, попробуйте скопировать этот контент туда, где установлены библиотеки GA SE и запустить GA5. После того как он их увидит, перенесите куда нужно.
-
#48
Verda Lumo, я поставил GA4 и его контент, ну конечно контент от GA5. Вот что получилось. Два скрина посмотрите пожалуйста? 430 наборов.
-
161 KB
Просмотры: 136 -
149 KB
Просмотры: 131
Последнее редактирование: 28 Ноя 2018
-
#49
@Otec, вот теперь все на месте, можно переносить контент на другой диск, если это еще не сделано.
-
#50
Все перенесено, благодарен Вам от души, спасибо огромное. Удачи Вам, успеха и здравия!
вот теперь все на месте, можно переносить контент на другой диск, если это еще не сделано.
Последний вопрос, которым здесь уже кто то интересовался; Обязательно ли ставить контент от GA4, если ставишь GA5? Неужели Ga5 лишен этой информации и несет только обновление? Спасибо!
Последнее редактирование: 28 Ноя 2018
-
#51
Обязательно ли ставить контент от GA4, если ставишь GA5?
Вот эти — Rock Kit и Vintage Kit и т.п., это и есть контент, доставшийся в «наследство» от GA4. GA5 дополнен новыми библиотеками серии «RAW» и «The Kit» https://new.steinberg.net/groove-agent/new-in-5/
Выше задавали вопрос о контенте GA4 в GA5 — он есть, и доступен также при чистой установке.
-
#52
Verda Lumo, Еще раз благодарю Вас, с наилучшими пожеланиями! Сейчас я хоть стал что то понимать и знать во всей этой схеме установки.
Последнее редактирование: 1 Дек 2018
-
#53
вопрос пользующимся GA5 есть ли возможность настроить на пэд клавишу репит?
-
#54
вопрос отменяется, разобрался. можно даже видео отснять ))
-
#55
Поставил и себетоже.
Проблем с установкой контента не возникло, после загрузки ихней качалкой нажал кнопку открыть и запустилась программа и в ней выбрал куда его ставить, потом она спросила — это путь по умолчанию для контента и я нажал нет и всё заработало.
-
#56
Где у него в менять сетку паттерна? При смене квантайза ничего не меняется. Рисовать кроме 16-х ничего невозможно. Ерунда какая-та. Неужели сложно было весь функционал из Drum Editor добавить в Pattern…
-
#57
@vip76, а вот эта звёздочка не то ? (правда это четвёртый грувагент, но должно быть также)
-
#58
@Wham_48, вообще ноль реакции на эту звездочку, остается сетка в 16-х и 4/4. На 3/4 не поменять сетку, ноты снэпятся куда-то наугад и фиг пойми. Вообще какая-то недоделка, чтоб назвать это Драм Машинкой, пипетс..
В 4-м вроде таких проблем не было. Но там окошко маленькое было. Я на 5-й только из за того и перешел, что щас его можно хоть на весь экран. Но блин такие сюрпризы, что его делает полностью нерабочим…
Еще два экспаншна перестал видеть, так понял, что не поддерживает их. Нафиг я эти экспаншны покупал.. даже поюзать толком не успел.
-
#59
@vip76, Вот кино сделал навсякий, как это в четвёрке, меняетсяснапится вроде ок
-
#60
@Wham_48, ну да, в 4 работает как и должно, а в 5 беда какая-то
Создание партии ударных в Cubase 5 Drum-Groove Agent ONE Beat Designer
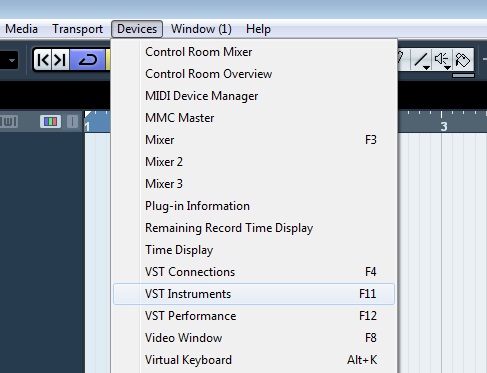
Создание партии ударных в Cubase 5.Для начала в панели выберем Devices->VST Instruments, либо вызываем горячей
клавишей F11.

В эти поля можно добавлять
любые VST,
и очень удобны для разных сэмплеров.
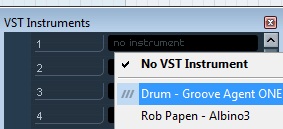
Добавляем такой стандартный
инструмент ,как Drum—Groove Agent ONE.

В диалоговом
окне нажимаем create
В самом инструменте в верхнем окне выбираем пресет
 Для более удобного отображения выбираем Categories

Выбираем любоой понравившейся нам пресет
Закрываем Drum—Groove Agent ONE, в окне VST Instruments, устанавливаем галачками
сколько нам нужно выходных каналов,сколько используем звуков «cэмплов« столько и ставим
каналов,далее закрываем это окно.
Переходим к вкладке MIDI inserts, добавляем Beat Designer,я думаю что уже из названия
понятно что он нам нужен для редактирования бита.


Здесь уже можно набирать Pattern или проще говоря бит.Для
объяснения этой программы понадобится отдельная статья, но если потыкать можно
разобратся как она работает.
Мы же пойдём коротким путём,
не будем забивать свой кривой бит, в этой программе предусмотрен мэнеджер
пресетов,загружаем любой пресет

Всё бит набрали теперь нужно
вставить его в проект,для этого нужно, чтобы область в которую нужно вставить
была выделена


Нажимаем fill loop with Pattern, и теперь наш бит добавлен в
проект,закрываем Beat
Designer.
Теперь остаётся все эти
сэмплы направить на нужный нам канал,для того что бы мы в дальнейшем могли, по
отдельности редактировать их,производить мастеринг,налаживать какие то эфекты и
прочее.Для этого заходим в Drum—Groove Agent ONE. Первое, выбираем нажатием
тот сэмпл который хотим направить на канал например бочку.И второе, поварачивая
ручку Output
меняем канал St1 на St2, теперь бочка будет играть на отдельном канале.

Популярные сообщения из этого блога
Стерео панорамирование в Cubase

Вот пара способов панорамирования,можно как обычно направить дорожку в правый или левый канал . Но для того что бы панорамировать дорожку сразу на правый и левый
Создание аккордов score editor в Cubase 5

В интернете много раз искал информации про то, как можно автоматически в Cubase вставлять аккорды, но к сожалению не чего стоящего не нашёл. И вот потратив не много времени, я самостоятельно нашёл такой способ.

Operation Manual

Matthias Klag, Michael Ruf
Cristina Bachmann, Heiko Bischoff, Christina Kaboth, Insa Mingers, Matthias Obrecht, Sabine Pfeifer, Benjamin
Schütte, Marita Sladek
This PDF provides improved access for vision-impaired users. Please note that due to the complexity and number
of images in this document, it is not possible to include text descriptions of images.
The information in this document is subject to change without notice and does not represent a commitment on
the part of Steinberg Media Technologies GmbH. The software described by this document is subject to a License
Agreement and may not be copied to other media except as
part of this publication may be copied, reproduced, or otherwise transmitted or recorded, for any purpose,
without prior written permission by Steinberg Media Technologies GmbH. Registered licensees of the product
described herein may print one copy of this document for their personal use.
All product and company names are ™ or ® trademarks of their respective owners. For more information, please
visit www.steinberg.net/trademarks.
© Steinberg Media Technologies GmbH, 2018.
All rights reserved.
Groove Agent_5.0.0_en-US_2018-11-01
specically allowed in the License Agreement. No

Table of Contents
4 Installation and Setup
4 Conventions
5 Installing the Program
5 Activating Your License
5 How You Can Reach Us
5 About the Documentation
6 Setting Up
8 Common Editing Methods
8 Dials and Sliders
8 Multi Selection and Parameter Controls
8 Buttons
9 Value Fields
9 Using Key Commands
10 Presets
12 Getting Started
12 Window Overview
13 Agents, Kits, Presets, and Content Files
14 Loading a Kit
15 Pattern and Instrument Pads
15 Browsing for MIDI Patterns and Styles
16 Playing back Pattern Pads
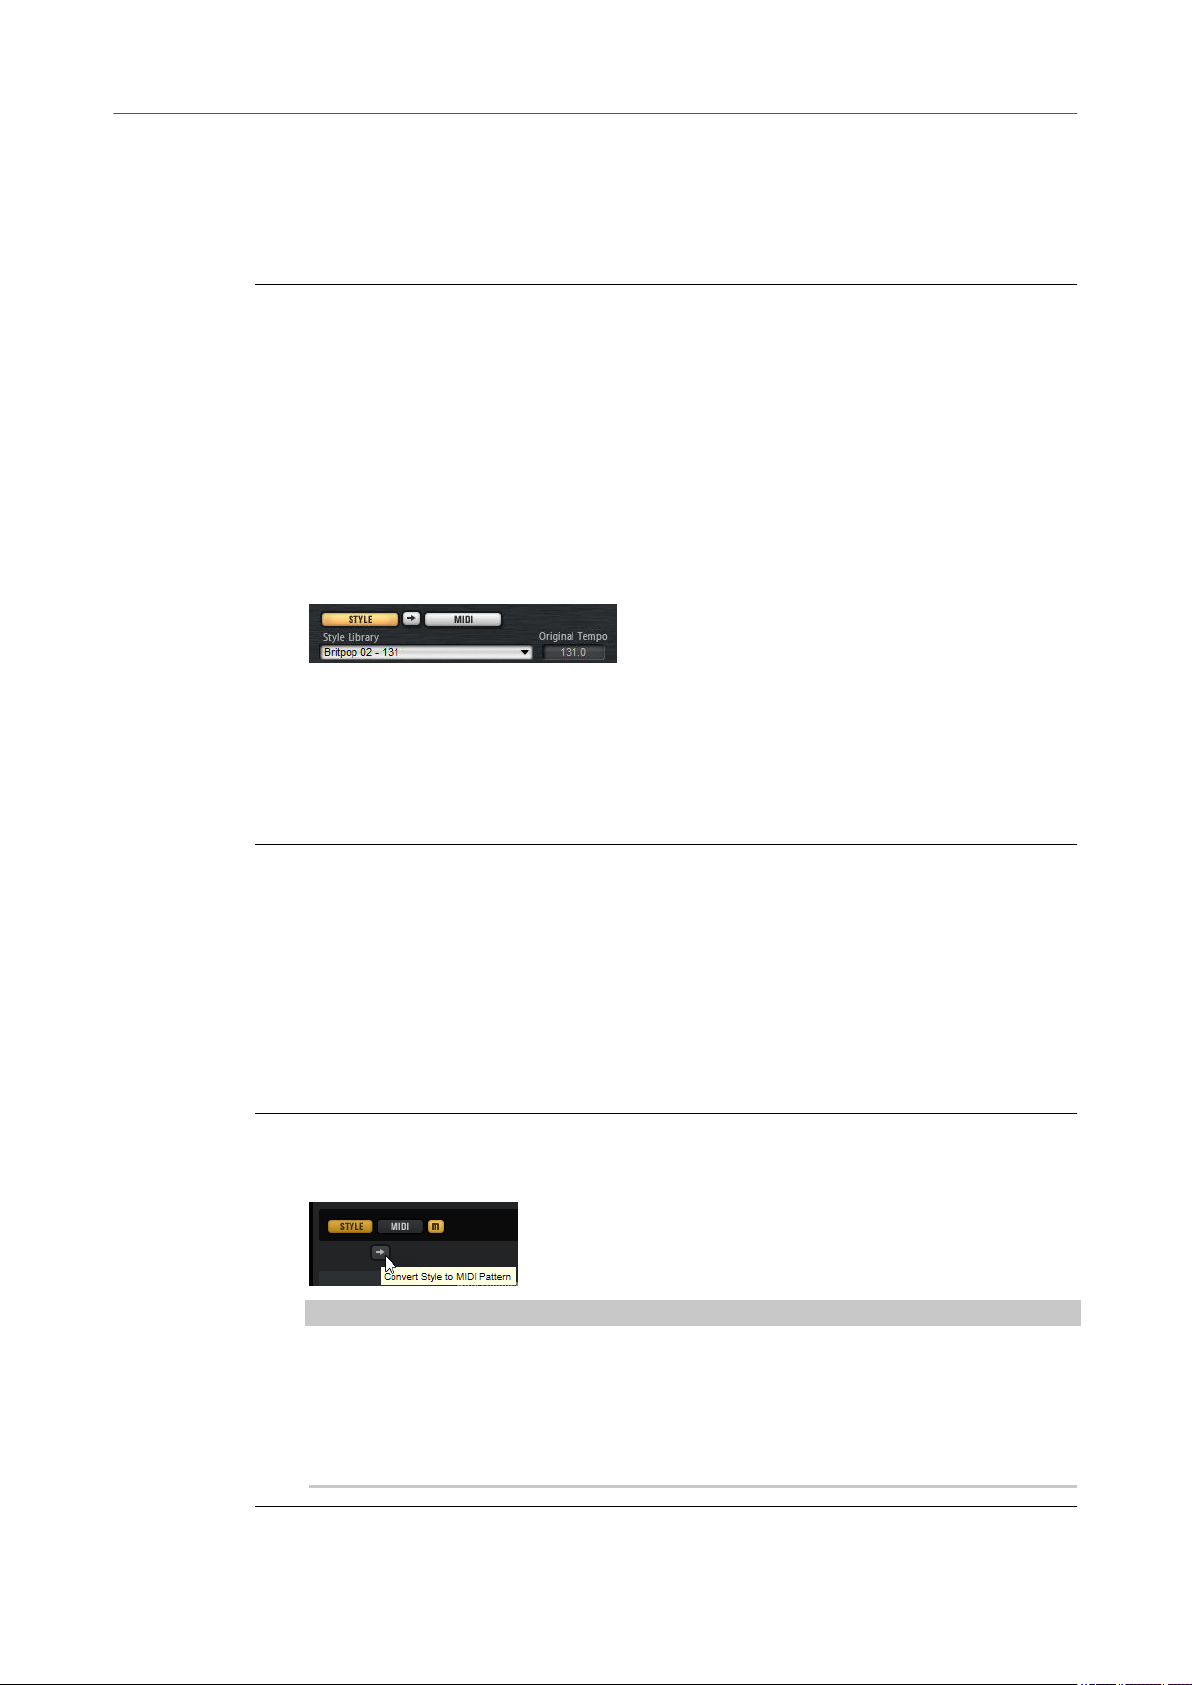
16 Converting Styles to MIDI Patterns
17 Modifying MIDI Patterns in the Pattern Editor
17 Creating the Different Sections of a Drum Track
18 Recording Trigger Notes for Your Patterns
18 Dragging Patterns into a Project
19 Editing Patterns in the DAW
20 Working with Multiple Agents
21 Recording the MIDI Output
22 Note Repeat
30 Decompose
33 Managing Your Sounds
33 Loading Kits
33 Kit Slot
34 Kit Rack
35 Kit Context Menu
36 Managing and Loading Files
50 Working With Pads
50 Pad Section
52 Renaming Pads
52 Using Different MIDI Channels/Ports for
Instrument Pads and Pattern Pads
53 Instrument Pads
59 Pattern Pads
90 Beat Agent
90 Beat Agent Sound Editing
133 Importing and Exporting Files
136 Acoustic Agent
136 Acoustic Agent Sound Editing
145 Percussion Agent
145 Percussion Agent Sound Editing
148 Mixing and Effect Handling
148 Beat Agent Mixer
149 Acoustic Agent Mixer
153 Percussion Agent Mixer
155 AUX Mixer
155 Kits Mixer
156 Master Mixer
156 Effect Handling
158 Effects Reference
158 Reverb Effects
161 Delay Effects
162 EQ Effects
164 Filter Effects
168 Distortion Effects
170 Modulation Effects
177 Dynamics Effects
186 Spatial and Panner Effects
187 Automation and MIDI Controllers
187 Automation
188 MIDI Controllers
190 Global Functions and Settings
190 Plug-in Functions Section
191 Plug-in Name and Steinberg Logo
191 Toolbar
192 Keyboard
193 Options Page
198 Using the Standalone Version of the Plug-In
198 Making Preferences Settings
198 Preferences Dialog
202 Selecting the MIDI Input and the Audio Output
202 Scratch Pad
204 Loading a MIDI File
204 Saving a MIDI File
205 Master Volume
206 Mixer Routing Diagrams
209 Index
3

Installation and Setup
Before you can use Groove Agent, you must install the program and the required content and set
up your system.
Conventions
In our documentation, we use typographical and markup elements to structure information.
Typographical Elements
The following typographical elements mark the following purposes.
Prerequisite
Requires you to complete an action or to fulll a condition before starting a
procedure.
Markup
Procedure
Lists the steps that you must take to achieve a specic result.
Important
Informs you about issues that might affect the system, the connected hardware, or
that might bring a risk of data loss.
Note
Informs you about issues that you should consider.
Example
Provides you with an example.
Result
Shows the result of the procedure.
After Completing This Task
Informs you about actions or tasks that you can perform after completing the
procedure.
Related Links
Lists related topics that you can nd in this documentation.
Bold text indicates the name of a menu, option, function, dialog, window, etc.
EXAMPLE
In the header of the plug-in panel, click the Preset Management button next to the preset name
eld and select Load Preset.
4

Installation and Setup
Installing the Program
If bold text is separated by a greater-than symbol, this indicates a sequence of different menus
to open.
Key Commands
Many of the default key commands, also known as keyboard shortcuts, use modier keys, some
of which are different depending on the operating system.
Many of the default key commands use modier keys, some of which are different depending on
the operating system. When key commands with modier keys are described in this manual, they
are indicated with the Windows modier key rst, followed by the macOS modier key and the
key.
EXAMPLE
Ctrl/Cmd-Z means: press Ctrl on Windows or Cmd on macOS, then press Z.
Installing the Program
After downloading the required les, you can install Groove Agent on your computer.
For detailed installation instructions, see https://www.steinberg.net/how-to-install-grooveagent-5.
Activating Your License
Groove Agent uses a software-based copy protection scheme. This Soft-eLicenser is installed
automatically with Groove Agent. It can be accessed via the eLicenser Control Center application
that is installed automatically with the product.
After installation, you must activate your product.
If you purchased Groove Agent in a shop, the product package contains a “Download Access
Code” that allows you to download both the software and the license of the product.
If you purchased the download version of Groove Agent, you receive an e-mail with the activation
code and a description of the activation process.
How You Can Reach Us
Click the Steinberg logo in the top right corner of the control panel to open a pop-up menu
containing items for getting additional information and help.
● This menu contains links to various Steinberg web pages. Select a link to open the
corresponding page. On the web pages, you can nd support and compatibility
information, answers to frequently asked questions, links for downloading new drivers,
etc.
About the Documentation
The documentation is available online and can be downloaded in PDF format from steinberg.help
To visit steinberg.help, enter steinberg.help in the address bar of your web browser or
●
open Groove Agent, click the Steinberg logo in the top right corner and select Help >
Groove Agent Help.
5

Installation and Setup
Setting Up
Setting Up
The following sections describe how to use Groove Agent as a plug-in in different host
applications.
NOTE
Groove Agent can also be used as a standalone application.
Selecting Outputs
Groove Agent loads with a stereo output conguration by default. However, you can use up to 32
stereo outputs in the Steinberg DAW. This allows you to route all kit slots to a dedicated channel
in the MixConsole.
PROCEDURE
1. To make the outputs available in the VST instrument, open the VST Instruments window.
2. Click the Activate Outputs button for the instrument.
3. Activate the outputs that you want to use.
RESULT
The Steinberg DAW automatically adds an output channel for each additional output to the
MixConsole.
Using the Instrument in an AU-Compatible Application
The AU version of Groove Agent is installed in your AU plug-ins folder and lets Groove Agent
work in an AU environment without any performance loss or incompatibilities.
For example, to load Groove Agent as an AU instrument for Logic Pro, proceed as follows:
PROCEDURE
1. Open the Track Mixer and select the instrument channel that you want to use.
2. Click in the I/O eld and select AU Instruments > Steinberg > Groove Agent.
3. Select one of the available channel congurations.
Using the Instrument in an AAX-Compatible Application
The AAX version of Groove Agent is installed in your AAX plug-ins folder and makes Groove Agent
available as AAX instrument in ProTools.
PROCEDURE
1. To use Groove Agent as stereo multichannel plug-in, open the Track menu, and select
New > Stereo > Instrument Track.
2. On the instrument track, click Inserts and select Groove Agent from the multichannel
plug-in > Instrument submenus.
Using the Instrument as Standalone Application
Groove Agent can be used as a standalone application, independently of any host application. In
this case, you can connect the instrument directly to your audio hardware.
6

Installation and Setup
Setting Up
RELATED LINKS
Using the Standalone Version of the Plug-In on page 198
7

Common Editing Methods
Dials and Sliders
Dials and sliders can be unidirectional or bidirectional. Unidirectional values, for example level
values, start at a minimum value and go up to the maximum. Bidirectional controls start from the
middle position and go to the left for negative and to the right for positive values.
Most of the editing methods are the same for dials and sliders.
● To adjust a value, click a dial or a slider and drag up and down, or use the mouse wheel.
If you press Alt when clicking a dial, a small slider appears, allowing you to set the
parameter.
● To make ne adjustments, press Shift and move the dial or use the mouse wheel.
● To restore the default value for a parameter, press Ctrl/Cmd and click on the control.
Multi Selection and Parameter Controls
To edit multiple pad parameters at the same time, select the pads that you want to edit.
If several pads are selected and they are not set to the exact same values, most of the controls
indicate this by turning red. This is true for dials, on/off buttons, combo boxes, value elds, and
text faders.
NOTE
More complex controls, such as the envelope editors, only show the values of the focused pad.
Adjusting Value Ranges
You can adjust the value range of a parameter using the corona of the encoder. The values for
the pads are distributed within the new range, keeping their relative distances.
● To compress or expand the value range, drag the corona.
● To adjust the upper limit of the range, hold down Ctrl/Cmd and drag the corona.
● To adjust the lower limit of the range, hold down Alt and drag the corona.
Buttons
On/Off Buttons
These buttons have two states: on and off. If you move the mouse over an On/Off button, it
changes its appearance to show that you can click it.
8
Common Editing Methods
Value Fields
Push Buttons
Push buttons trigger an action and then go back to their inactive state. These buttons open
menus or le dialogs.
Value Fields
To set a value, you have the following possibilities:
● Double-click in a value eld, enter a new value, and press Enter.
If the entered value exceeds the parameter range, it is automatically set to the maximum
or the minimum value, respectively.
● Click in the value eld and drag up or down.
● Position the mouse over a value eld and use the mouse wheel.
● Click the up/down triangles next to the eld.
● To set the parameter to its default value, Ctrl/Cmd-click the value eld.
● To use a fader to adjust the value, Alt-click a value eld.
● To enter musical values, such as key ranges or the root key, with your MIDI keyboard,
double-click the value eld, press a key on your MIDI keyboard, and press Return.
● To navigate to the next parameter, press Tab. To jump backwards to the previous
parameter, press Shift—Tab.
If no parameter is selected inside the focused view, pressing Tab always jumps to the rst
parameter.
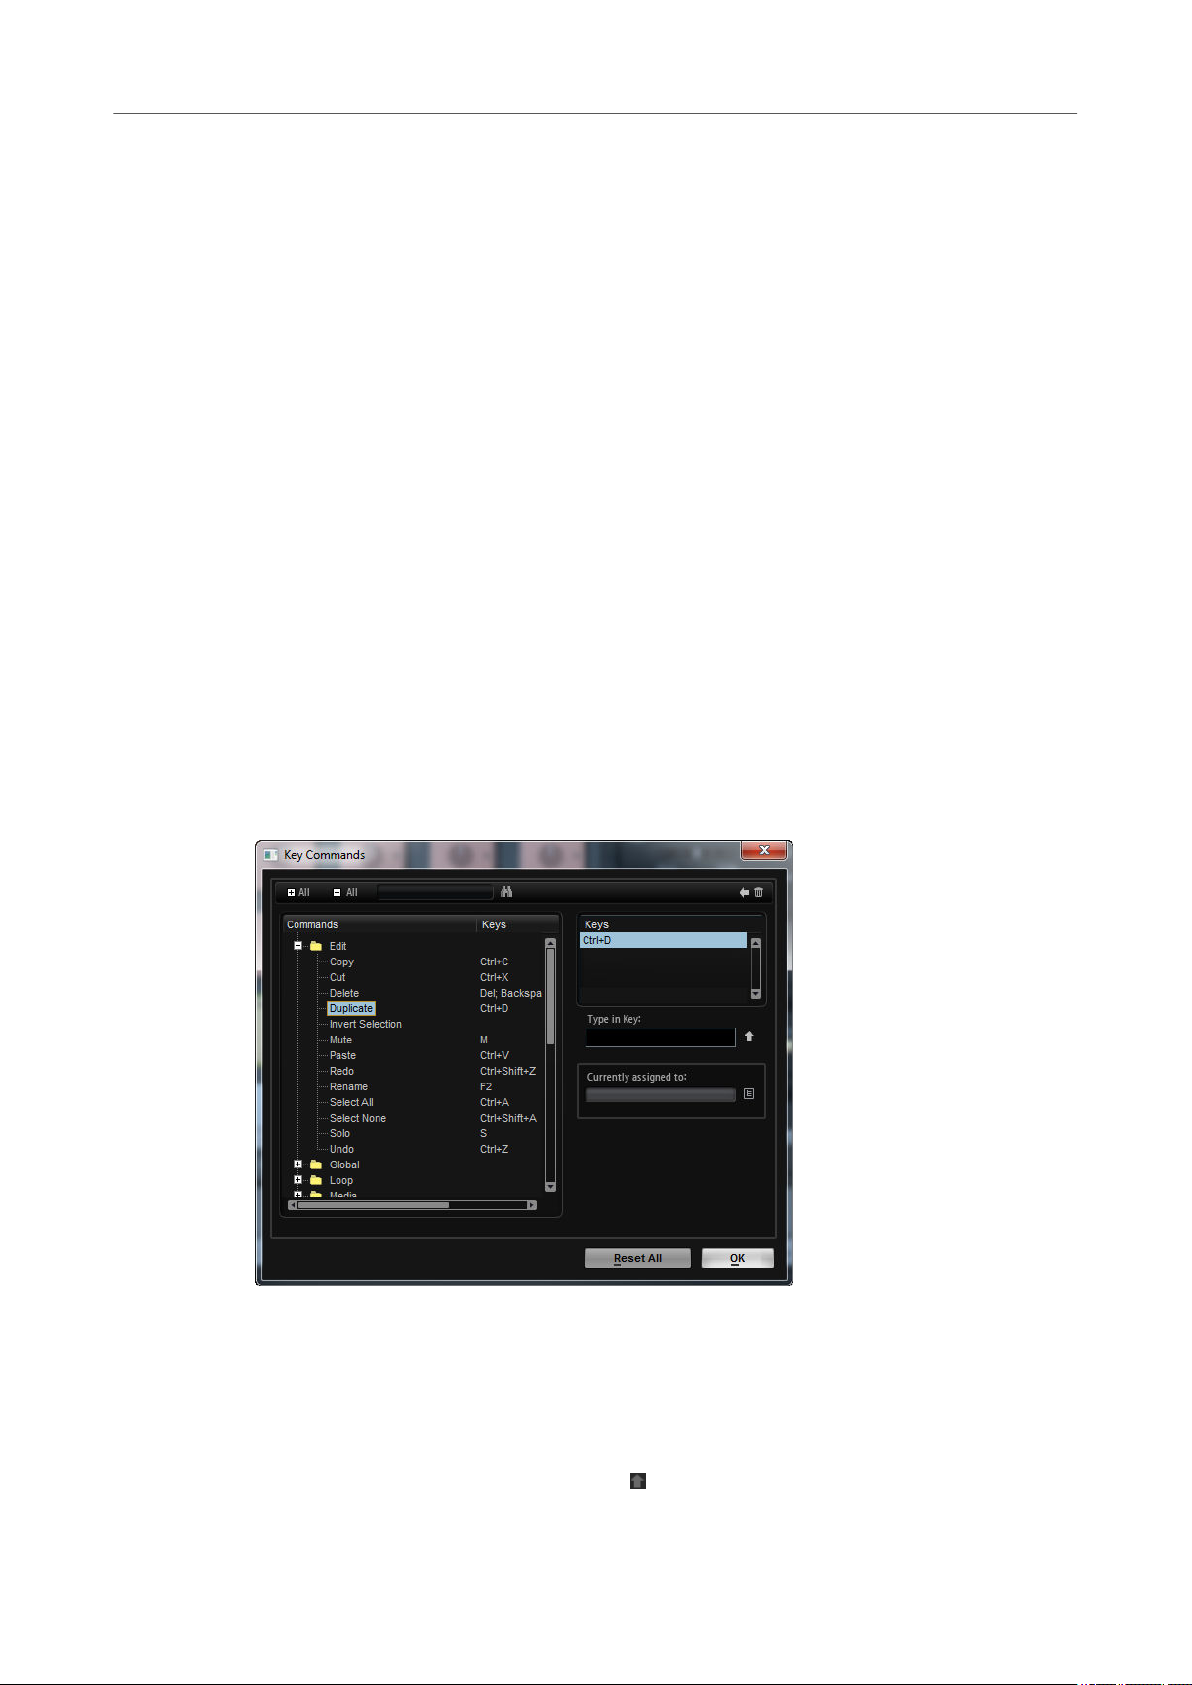
Using Key Commands
● To open the Key Commands dialog, open the Options page and click the Key Commands
button.
The commands are arranged in a hierarchical folder structure on the left. When you open a
category folder, the items and functions are displayed with any currently assigned key
commands.
● To set up a key command, select the function in the list, enter the key command in the
Type in Key eld and click the Assign button to the right of the eld. If this key
command is already used for another function, this is displayed in the
9
eld below.
Common Editing Methods
Presets
● To delete a key command, select the function in the list, select the key command in the
Keys list and click the Delete button.
● To search for a specic function, enter its name in the search eld at the top of the dialog
and click the
NOTE
You can set up several key commands for the same function.
Presets
Groove Agent offers two types of presets: section/module presets and VST presets. Section and
module presets store and recall the setup of a specic component on the Groove Agent panel.
VST presets contain all information necessary to restore the complete state of the plug-in.
During setup, the factory presets are installed in a dedicated folder and a user folder is created
for your own presets. The handling of presets is the same throughout the program.
NOTE
Factory presets are write-protected, but may be overwritten when a software update is executed.
Presets in your user folder are never changed by the software update.
Start/Continue Search button.
Handling Section and Module Presets
The preset controls can be found throughout the program. The handling is always the same.
● To save a preset, click Save .
NOTE
You cannot overwrite factory presets. If you want to save changes made to a factory
preset, save the preset under a new name or in a new location.
● To load a preset, click the arrow icon and select a preset from the list.
● To delete a preset, click Delete .
NOTE
Factory presets cannot be deleted.
Handling VST Presets
Loading VST Presets
PROCEDURE
1. In the header of the plug-in panel, click the Preset Management button next to the preset
name eld and select Load Preset.
2. Do one of the following:
Select a preset to load it.
●
Double-click a preset to load it and close the preset loader.
●
10

Common Editing Methods
Presets
Saving VST Presets
PROCEDURE
● In the header of the plug-in panel, click the Preset Management button next to the preset
name eld and select Save Preset.
11
Getting Started
These sections help you to get started with Groove Agent and introduce program functions and
settings.
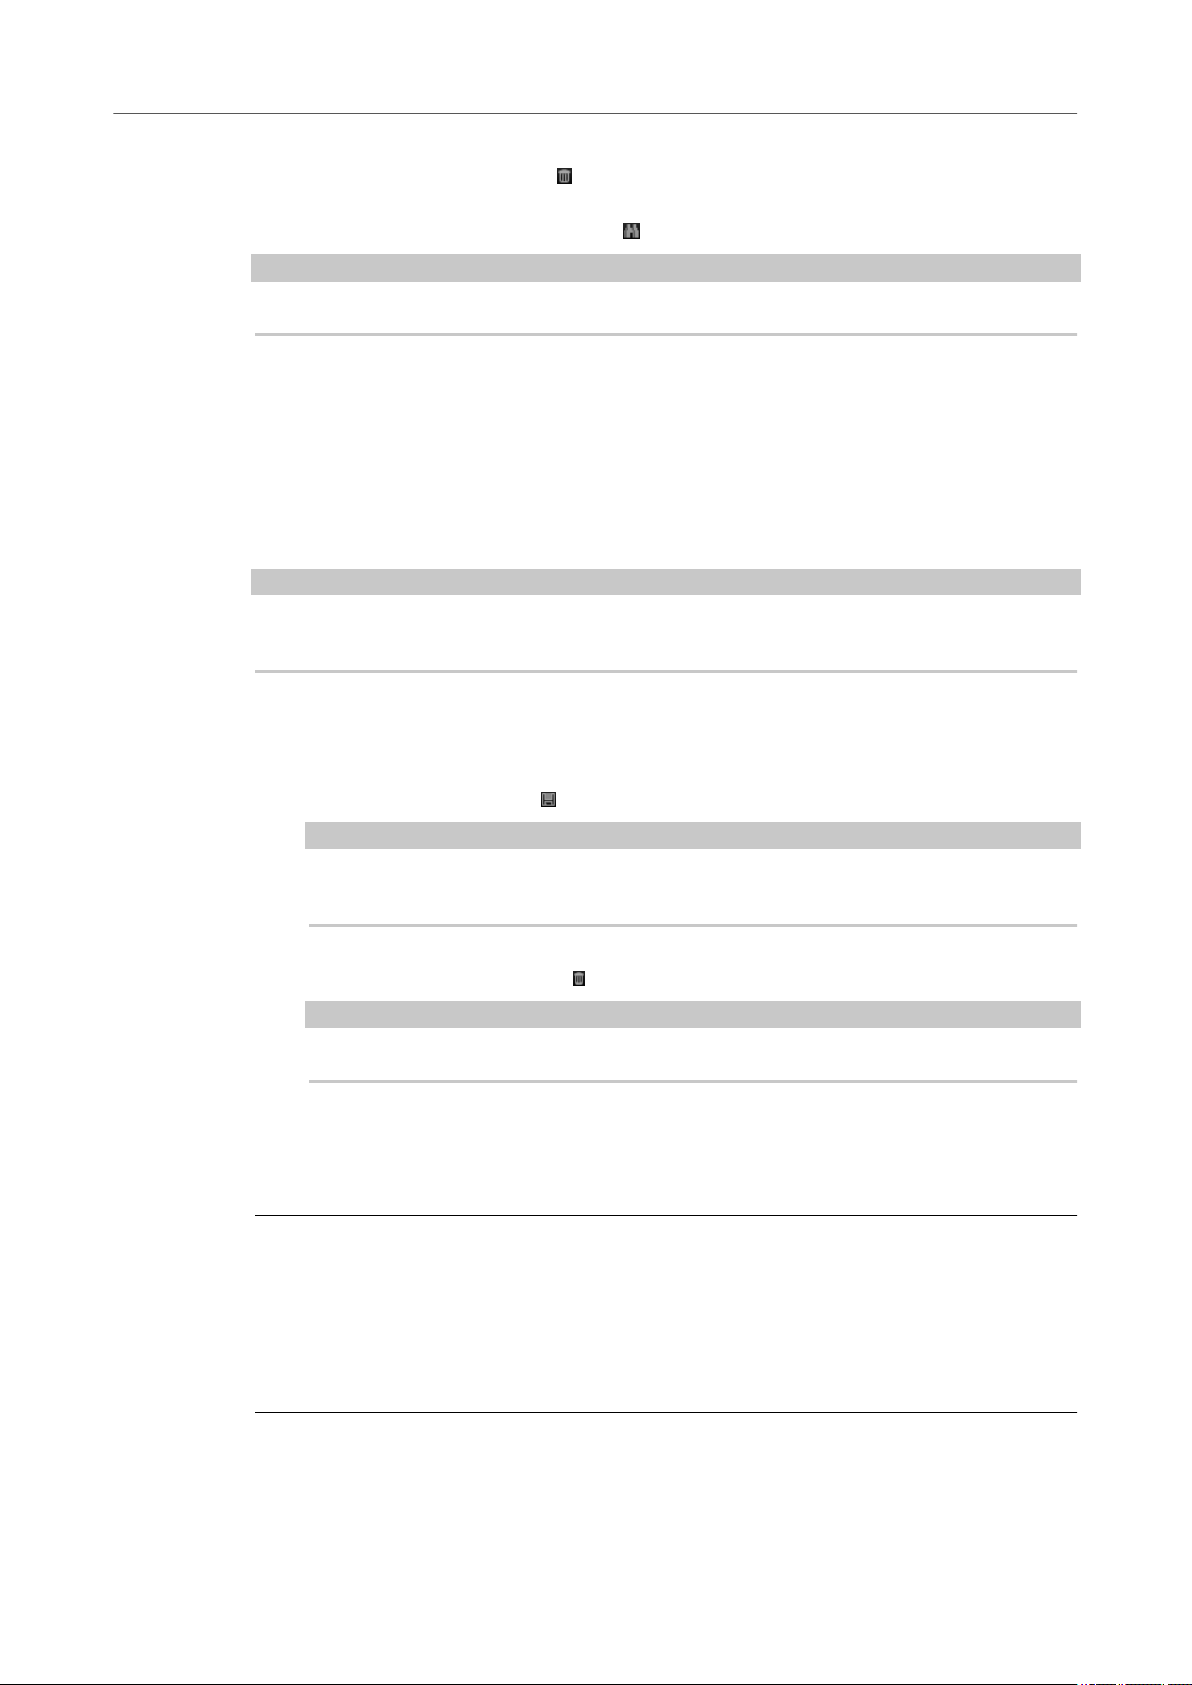
Window Overview
The Groove Agent window is divided into several sections.
1 In the standalone version of Groove Agent, you nd a number of additional functions in an
extra section at the top of the application window.
2 If you use the plug-in in a host application, you nd the plug-in functions section at the top
of the window.
3 Below the plug in-functions section on the left, the kit slot is located.
4 On the right of the kit slot, you nd the kit rack.
5 The edit display on the right contains the Edit, Mixer, Perform, and Options pages.
6 With the two buttons at the top right of the edit display, you can expand the window to
show a keyboard at the bottom, and/or the Load panel at the right.
7 On the left of the edit display, you can nd the pad section.
RELATED LINKS
Kit Slot on page 33
Kit Rack on page 34
12

Getting Started
Agents, Kits, Presets, and Content Files
Using the Standalone Version of the Plug-In on page 198
Agents, Kits, Presets, and Content Files
Groove Agent comes with a variety of content that can be loaded and edited. At the top of the
hierarchy, you can load kits or multis. Further down the hierarchy, you can load and edit MIDI
patterns, styles, drum samples, etc.
Agents
Groove Agent combines the creative power of different rhythm modules: Acoustic Agent, Beat
Agent, and Percussion Agent.
Each of these modules offers its own approach to drums and rhythms, with special ways of
creating your own inspiring beats in a huge range of styles.
The creative potential of each agent can be combined with any of the others. Four slots allow you
to mix and match your ideal rhythm section or create ultra-modern hybrid beats, for example.
Kits
Kits are loaded to play the sounds in Groove Agent. They contain all information that is required
to produce the sound of the selected drum kit, that is, about the sliced loop and the MIDI phrase
that is needed to play back the loop, about the used MIDI patterns or styles, and about the insert
effects that are used on the mixer channel.
You can save and load kits via the kit rack or the kit slot section.
Furthermore, kits contain information on the agent that the kit uses. In the Load dialog and on
the Kits tab in the Load panel, kits are identied by the kit preset icon .
VST Presets
VST presets contain all Groove Agent settings, that is, all information necessary to restore the
complete state of the plug-in. This includes all 4 kits, the MIDI patterns or styles, as well as any
insert and AUX effects. All of these settings are also saved with the project in your host
application. You can load VST presets via the pop-up menus in the plug-in header and in the
plug-in functions section. In the Load dialog, these presets are identied by the VST preset icon
.
Content Files and Folder Structure
Groove Agent comes with a large number of ready-to-use sound content les, containing kits,
patterns, styles, and presets. Factory kits are write-protected. You can edit those les while they
are loaded, but you cannot overwrite them.
To save your modications to a factory kit, save the le under a new name. The le gets the le
name extension .vstpreset and is saved with your user content. User content can be searched
and categorized in the same way as factory content. User content is saved in a
structure on your hard disk. You can create subfolders within this structure to facilitate moving
or exchanging content.
MIDI Patterns
MIDI patterns contain information on notes and drum sounds and the rhythm in
which they are played.
predened folder
Styles
Styles are complex structures of multiple patterns suited to create different parts of
the drum tracks, for example, main pattern, ll, ending, and intro.
You can manage your user MIDI patterns and styles, for example by adding new subfolders to
the folder structure, by moving or removing MIDI
13
les, etc. To access the folder where the user
Getting Started
Loading a Kit
MIDI patterns or styles are saved, right-click the pattern or style, either in the Load panel or the
Load dialog and select Show in Explorer/Finder. In this location, you can add, remove and
rename les and create subfolders to organize your MIDI patterns.
Groove Agent ONE Content
Groove Agent can load Groove Agent ONE presets. The presets can either be loaded as kits in the
kit rack or the kit slot section or as plug-in presets via the preset management menu in the plugin header.
If you load a Groove Agent ONE preset as a plug-in preset, the global plug-in parameters are set
to the default values.
If you load a preset as a kit, the global plug-in parameters remain unchanged.
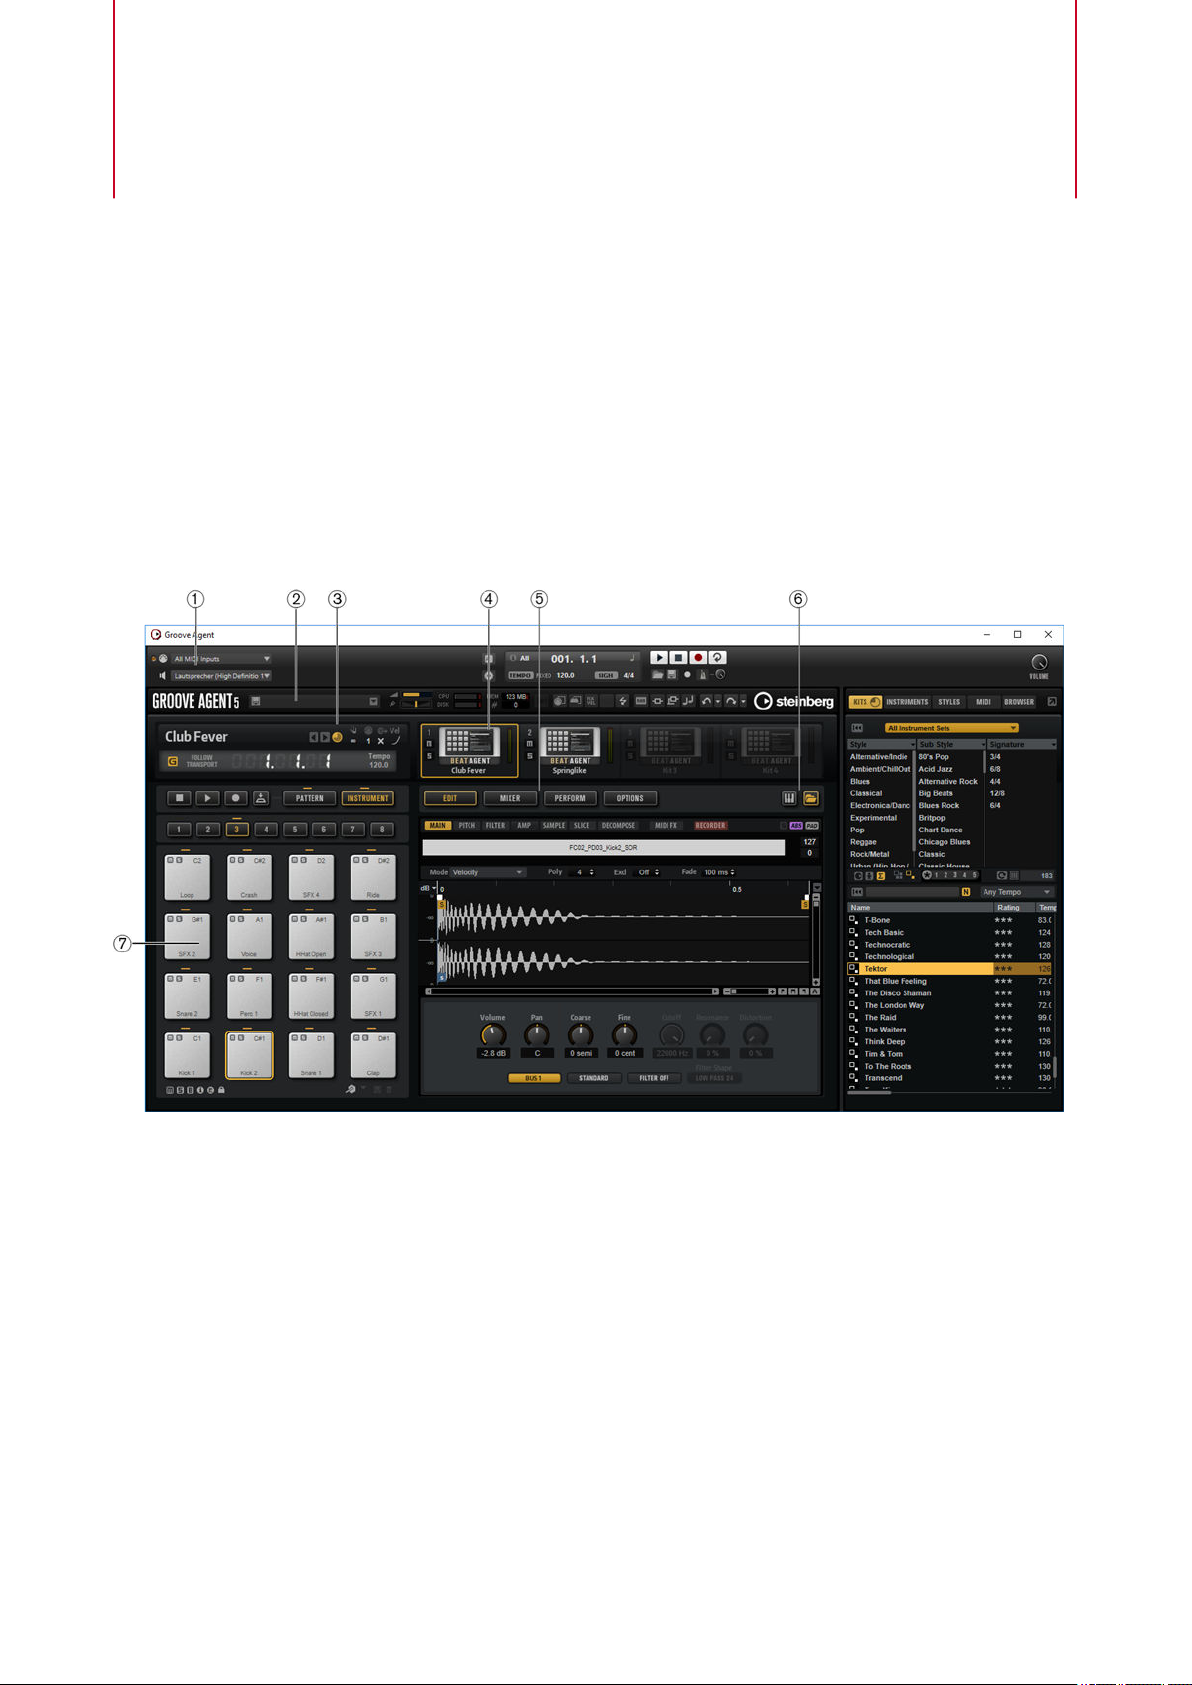
Loading a Kit
To be able to hear a sound, you need to load a kit into Groove Agent.
PROCEDURE
1. Select a kit slot in the kit rack.
2. Open the Load panel and select the Kits tab.
3. On the Select Content Set pop-up menu at the top of the page, select a content set.
4. In the attribute columns, specify the sound that you want to use, by selecting a musical
style, sub style, etc.
5. In the results list, select a kit and double-click it or drag it onto the kit slot.
RELATED LINKS
Managing and Loading Files on page 36
14

Getting Started
Pattern and Instrument Pads
Pattern and Instrument Pads
In Groove Agent, you can edit both the sounds and the patterns that are used by your drum
tracks. Instrument sounds can be accessed via the instrument pads. The pattern or style that is
played can be edited via the pattern pads.
To switch between the instrument pads and the pattern pads, click the corresponding
●
button above the pads.
Instrument Pads
If the instrument pads are shown, the pads trigger the instrument samples and you
can edit the sound of the instruments. These instruments are then used by the
pattern pads to play the selected MIDI pattern or style.
Pattern Pads
If the pattern pads are shown, the pads trigger the selected MIDI pattern or style.
●
MIDI patterns contain information on notes and drum sounds and the
rhythm in which they are played.
●
Styles are complex structures of multiple patterns suited to create different
sections of the drum tracks, such as,
lls, endings, and intros.
Browsing for MIDI Patterns and Styles
The Load panel allows you to browse for patterns and styles and assign them to the pattern
pads.
PREREQUISITE
Show Pattern Pads is activated on the left.
PROCEDURE
1. Depending on the le type that you want to load, select the Styles or MIDI page.
2. On the Select Content Set menu, select the content set from which you want to load a le.
To browse the entire content, select All.
3. Optional: In the upper section of the page, click on an attribute to display only those les
containing the attribute, for example, percussion, or a specic musical style, etc.
You can activate several attribute lters simultaneously.
4. If you are looking for a specic le, enter its name in the text search eld on the toolbar.
You can also enter text that is part of the le name or the le attributes in the search eld.
5. Use the transport controls below the results list to prelisten the results.
6. Step through the les in the results list and listen to them until you found the le that you
want to use.
7. Drag the le onto a pad.
8. Repeat the above steps to assigning more les to other pads.
RELATED LINKS
Prelistening Patterns and Styles on page 41
Prelisten Section for MIDI Patterns and Styles on page 40
15
Getting Started
Playing back Pattern Pads
Playing back Pattern Pads
You can play back pattern pads using the MIDI Player or the Style Player. The MIDI player
allows you to play and modify one pattern. The style player offers a variety of patterns, suited to
create the different sections of your drum tracks.
PROCEDURE
1. Load an Acoustic Agent kit.
2. Open the Pattern page and click on an empty pattern pad.
If a pattern pad is empty, it also plays the instrument sound.
3. To activate the pattern pad and make it play the pattern, open the Edit page in the right
section of the plug-in panel and click Pad On/Off in the top right so that it lights up.
4. Click the Use Style button to activate the style player, and select a style from the Select
Style pop-up menu.
5. Adjust the tempo in the DAW to match the tempo of the style.
The original tempo of the style is indicated by the second number in the le name of the
style and in the value eld to the right of the Select Style pop-up menu.
6. Click the Play button in the transport section to play back the style.
7. Try out different Quantize and Swing settings, move the Complexity slider, select a main
pattern, a
8. Keep the settings as they are and select different styles on the Pattern Library pop-up
menu in the Pattern section to compare the sound and to nd the style that you want to
use.
ll, an ending, etc., and listen to the results.
Converting Styles to MIDI Patterns
If you have found an acoustic or a percussion style that you want to use on your pad, but want to
edit it further in the Pattern editor, you must convert it to a MIDI pattern rst.
PREREQUISITE
● In the pad section on the left, the pad that contains the style is active.
● You have set up the style on the Agent page so that it plays the way you want it.
PROCEDURE
● Click Convert Style to MIDI Pattern on the Agent page to convert the current style into a
MIDI pattern.
NOTE
The conversion takes into account all the settings in the Performance section, with one
exception: If you convert a percussion style, Random Complexity is not taken into
account.
If you convert an acoustic style, only the active part of the style, that is, the selected main,
ll, intro, or ending is converted.
16

Getting Started
Modifying MIDI Patterns in the Pattern Editor
RESULT
The style is converted and the Agent page automatically switches to the MIDI player. The Pattern
editor becomes available, allowing you to modify the pattern.
NOTE
Once a style is converted to a MIDI pattern, it can no longer be opened in the style player.
Modifying MIDI Patterns in the Pattern Editor
In the Pattern editor, you can modify patterns by adding or deleting notes, by replacing a drum
sound with another, etc.
PROCEDURE
1. Click the Pattern tab in the edit display to open the Pattern editor.
2. Edit the pattern. You can for example insert new notes for an existing or for a new drum
sound, delete notes or move notes.
RELATED LINKS
Entering, Editing, and Previewing Notes on page 85
Creating the Different Sections of a Drum Track
To create the different sections of your drum track, for example, an intro, a ll, a main part, and
an ending, it is useful to start by copying the current style to other pads. And then, to modify the
style for those pads.
PREREQUISITE
You have set up a pattern pad to play back a style.
PROCEDURE
1. To copy the settings of the current pad to another pad, hold down Alt and drag the pad
onto another pad.
2. Repeat this until you have four pads with the same settings.
3. Select the second pad. Set the dial to a ll.
You can choose between eight lls.
4. Set up the ll to your liking. For example, change the complexity, activate half-time, try out
different intensity settings, etc.
5. When you are done, right-click the pattern pad, select Rename Pad from the context
menu, and enter a name for the pad, for example
6. Set up the pads for intro and ending in the same way.
Fill.
17

Getting Started
Recording Trigger Notes for Your Patterns
AFTER COMPLETING THIS TASK
You can now record trigger notes for the pads in the DAW or transfer the patterns to the DAW by
dragging them into a project.
RELATED LINKS
Pattern Editor on page 81
Converting Styles to MIDI Patterns on page 16
Dragging Patterns into a Project on page 18
Recording Trigger Notes for Your Patterns on page 18
Recording Trigger Notes for Your Patterns
When you use Groove Agent in a DAW project, you can record trigger notes at the positions
where you want to trigger the patterns. This allows you to create the drums for your project on
the y, in the project context.
PREREQUISITE
You have created a project in your DAW to which you want to add a drum track.
You have added a MIDI track that is assigned to Groove Agent.
PROCEDURE
1. In Groove Agent, set up the MIDI patterns or styles for your drum track.
2. In the DAW, record-enable the MIDI track and start playback of your project.
3. Record the trigger notes at the positions in the project where you want to hear the drums.
RESULT
When you now play back the project, the trigger notes trigger the pattern playback. You can
automate parameters like Complexity and Intensity from within the DAW. Any changes that you
make to a pattern in Groove Agent are automatically reected in all occurrences of this pattern in
the project.
Dragging Patterns into a Project
You can drag patterns from Groove Agent into your DAW project and edit them there.
PREREQUISITE
You have created a project in your DAW to which you want to add a drum track.
You have added a MIDI track that is assigned to Groove Agent.
Before you drag your patterns into a project, check whether the pattern pads are mapped to the
same keys as the instrument pads. If this is the case, the trigger notes of the pattern pads
interfere with the notes that are part of your pattern pads. To prevent this, you can either set up
a different MIDI port or a different MIDI channel for the pattern pads.
PROCEDURE
1. In Groove Agent, set up the MIDI patterns or styles for your drum track.
2. Select the pad that plays the pattern that you want to use and drag it onto the MIDI track
at the position where you want to insert it.
3. In the same way, drag the other pads into the project until you have assembled your drum
track.
18

Getting Started
Editing Patterns in the DAW
RESULT
The patterns are inserted as MIDI parts on the track. When you play back the project, the drum
parts are played back as well.
RELATED LINKS
Using Different MIDI Channels/Ports for Instrument Pads and Pattern Pads on page 52
Editing Patterns in the DAW on page 19
Editing Patterns in the DAW
When you have created MIDI parts from your Groove Agent patterns, you can further edit the
parts in the DAW.
PREREQUISITE
You have assigned a MIDI track in your DAW to Groove Agent.
You have dragged your patterns to this track.
PROCEDURE
1. In the Inspector of your Steinberg DAW, open the Drum Map pop-up menu for the track
and select Create Drum Map from Instrument.
This creates a drum map based on the information about the used drum sounds in Groove
Agent.
2. Open the part in the Drum Editor.
The editor displays the correct drum names in the drum names list on the left. In the event
display on the right, the MIDI notes are shown.
3. Set up the pattern by deleting or entering notes, by copying or moving notes, etc.
For information about how to edit notes and controllers in the Drum Editor, refer to the
Operation Manual for your Steinberg DAW.
19
Getting Started
Working with Multiple Agents
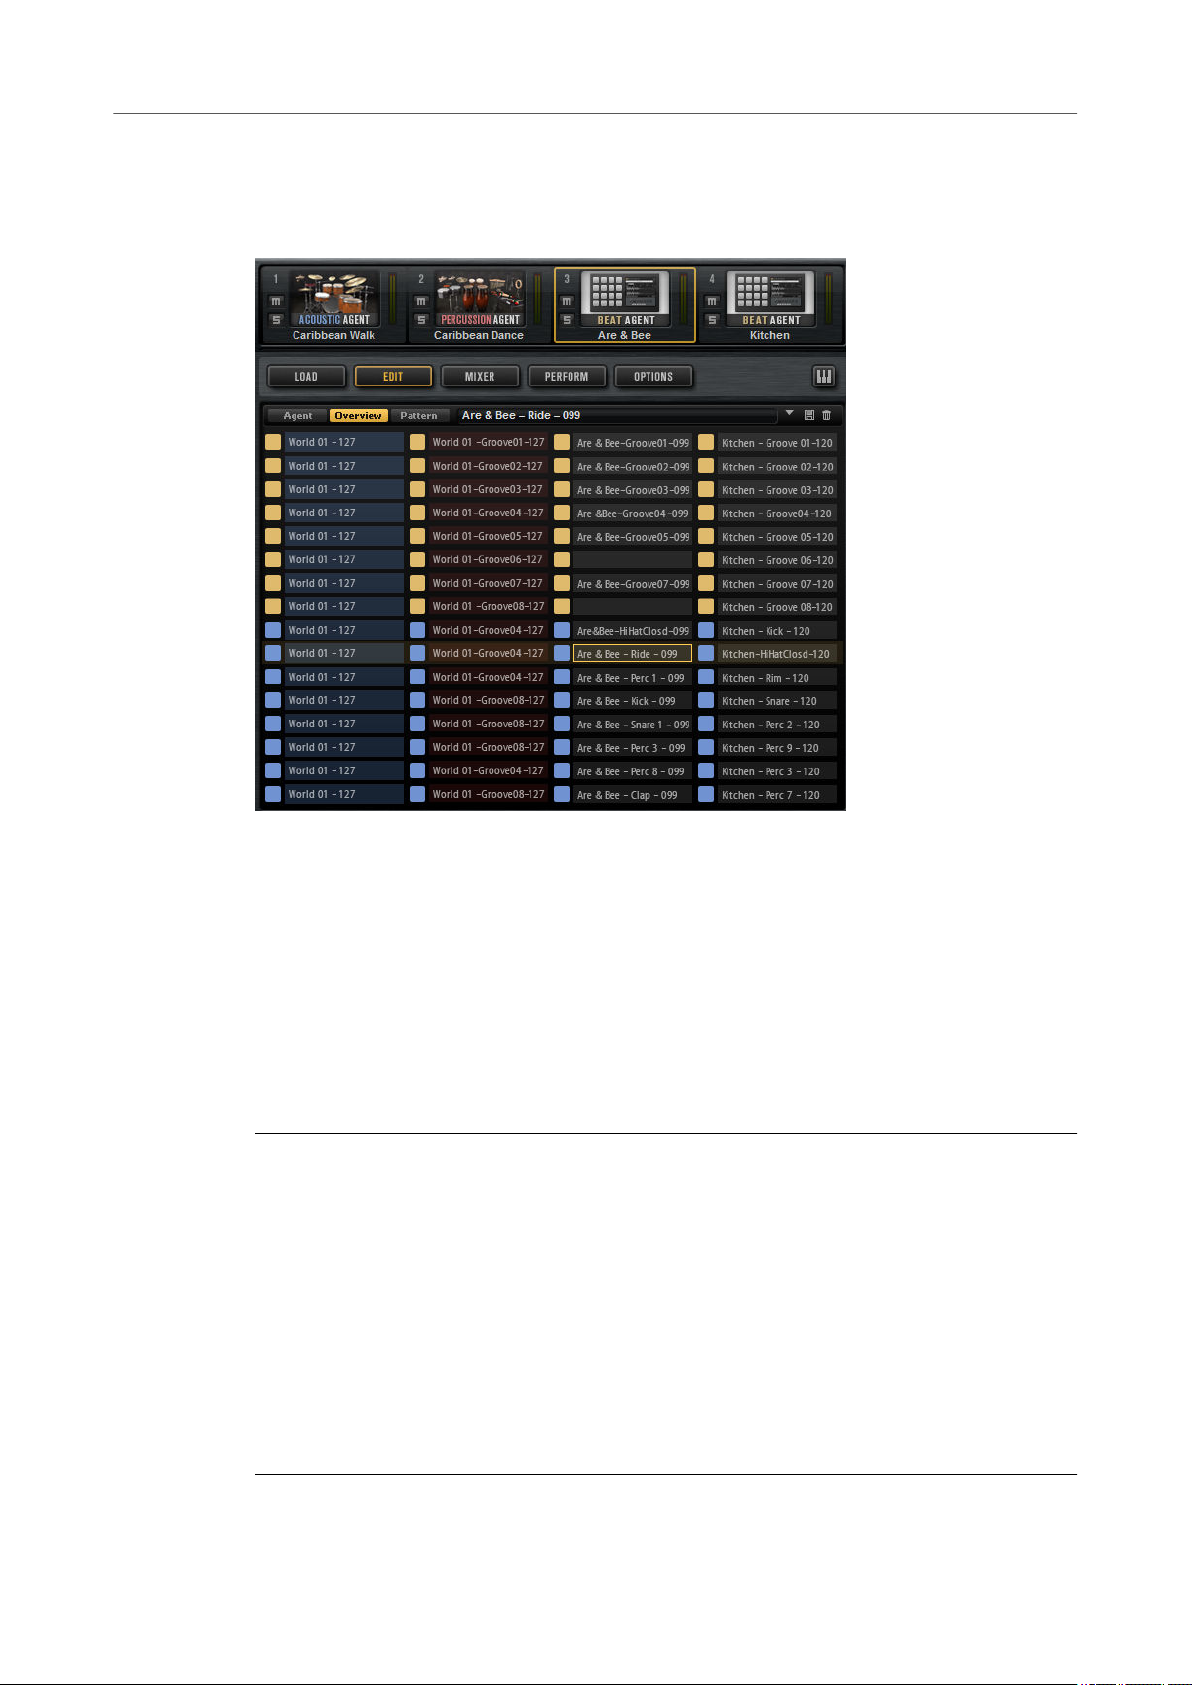
Working with Multiple Agents
Using multiple agents allows you to add drums of different styles to your drum track, for
example, to add percussion to your acoustic drums.
When working with multiple agents, the Overview page shows you exactly which kit contains
which patterns, to which pads the patterns are mapped, and which patterns are played
simultaneously. The four columns correspond to the four kits in the kit rack. The 16 slots
represent the pattern pads of the selected pattern group.
Adding a Second Agent to Complement the First Agent
You can set up the kits for two different agents to play styles that complement each other.
Some of the Percussion Agent styles were created to be used with Acoustic Agent styles. These
styles are found in the Complements folder of the Select Style pop-up menu for the style player
in
Percussion Agent.
PROCEDURE
1. For the rst kit slot in the kit rack, open the Kits tab in the Load section.
2. Deactivate Load Kit with Patterns or Styles and load an Acoustic Agent kit.
3. For the second kit slot, load a Percussion Agent kit, also without patterns.
4. Select a pattern pad from the rst kit, open the Agent page, activate the pad and select
the style player.
5. Select the style Acid Jazz 01 for the pattern pad.
6. Select the main pattern and adjust the complexity to your liking.
7. Select the second kit, open the Select Style pop-up menu, navigate to the Complements
folder, and select a style from the Acid Jazz 01 folder.
The instrument sounds for this kit are received on MIDI channel 2.
20

Getting Started
Recording the MIDI Output
RESULT
Now, the pattern pads for Acoustic Agent and Percussion Agent trigger matching styles.
● To listen only to the patterns of one kit, deactivate the patterns of the other kit on the
Overview page or mute the sounds of the second kit in the corresponding Agent mixer.
Adding a Second Agent to Fatten the Sound
You can fatten the sound of your current drum kit by adding a kit from another agent that does
not contain its own patterns, but that adds to the patterns of the rst kit.
PREREQUISITE
You have loaded a kit in the rst kit slot and set it up to play the way you want it.
PROCEDURE
1. Select the second kit slot in the kit rack and open the Kits tab in the Load section.
2. Deactivate Load Kit with Patterns or Styles .
3. Load a kit in the second slot.
4. On the Overview page, copy the patterns or styles of the rst agent to the second agent.
This way, the same groove is played by both kits.
5. To accentuate only particular drum sounds, for example, snare or kick drums, make sure
that only these drum sounds are used for the pads.
This way, the unused instrument pads do not play back any samples. Do one of the
following:
● Reset the instrument pads for all drum sounds that you do not want to use.
● Edit the MIDI patterns for the drum sounds that you want to use, so that it contains
only the notes that you want to play.
6. If you use Beat Agent kits, you can load your own drum samples to customize your drum
sounds even further.
RELATED LINKS
Assigning Samples to Pads on page 92
Recording the MIDI Output
If the host application supports MIDI output from plug-ins, you can record the MIDI output on a
track in your DAW.
The kits in the kit rack are routed to the MIDI output ports Kit 1 to Kit 4.
PROCEDURE
1. In Groove Agent, load one or more kits with patterns.
2. In the DAW, create one or more MIDI tracks.
3. On the MIDI input pop-up menu for each track, select one of the four kit outputs.
4. Record-enable the tracks.
5. If you have not recorded trigger notes in the DAW, select the patterns that you want to use
for the kits on the Pattern page and activate Follow Transport in the kit slot section.
6. In the DAW, activate recording.
21

Getting Started
Note Repeat
RESULT
The MIDI output of the kits is recorded on the tracks for which Groove Agent is selected as MIDI
input.
NOTE
Under VST2 hosts, the kits send their events only to the rst MIDI output port. If you do not want
to record all loaded kits, deactivate MIDI output for the kits that you do not want to use in the kit
slot section.
AFTER COMPLETING THIS TASK
You can now separate the recordings for the kits by dissolving the recorded MIDI part according
to MIDI channel. The channel number of the events of a kit corresponds to the MIDI channel that
is set in the kit slot section.
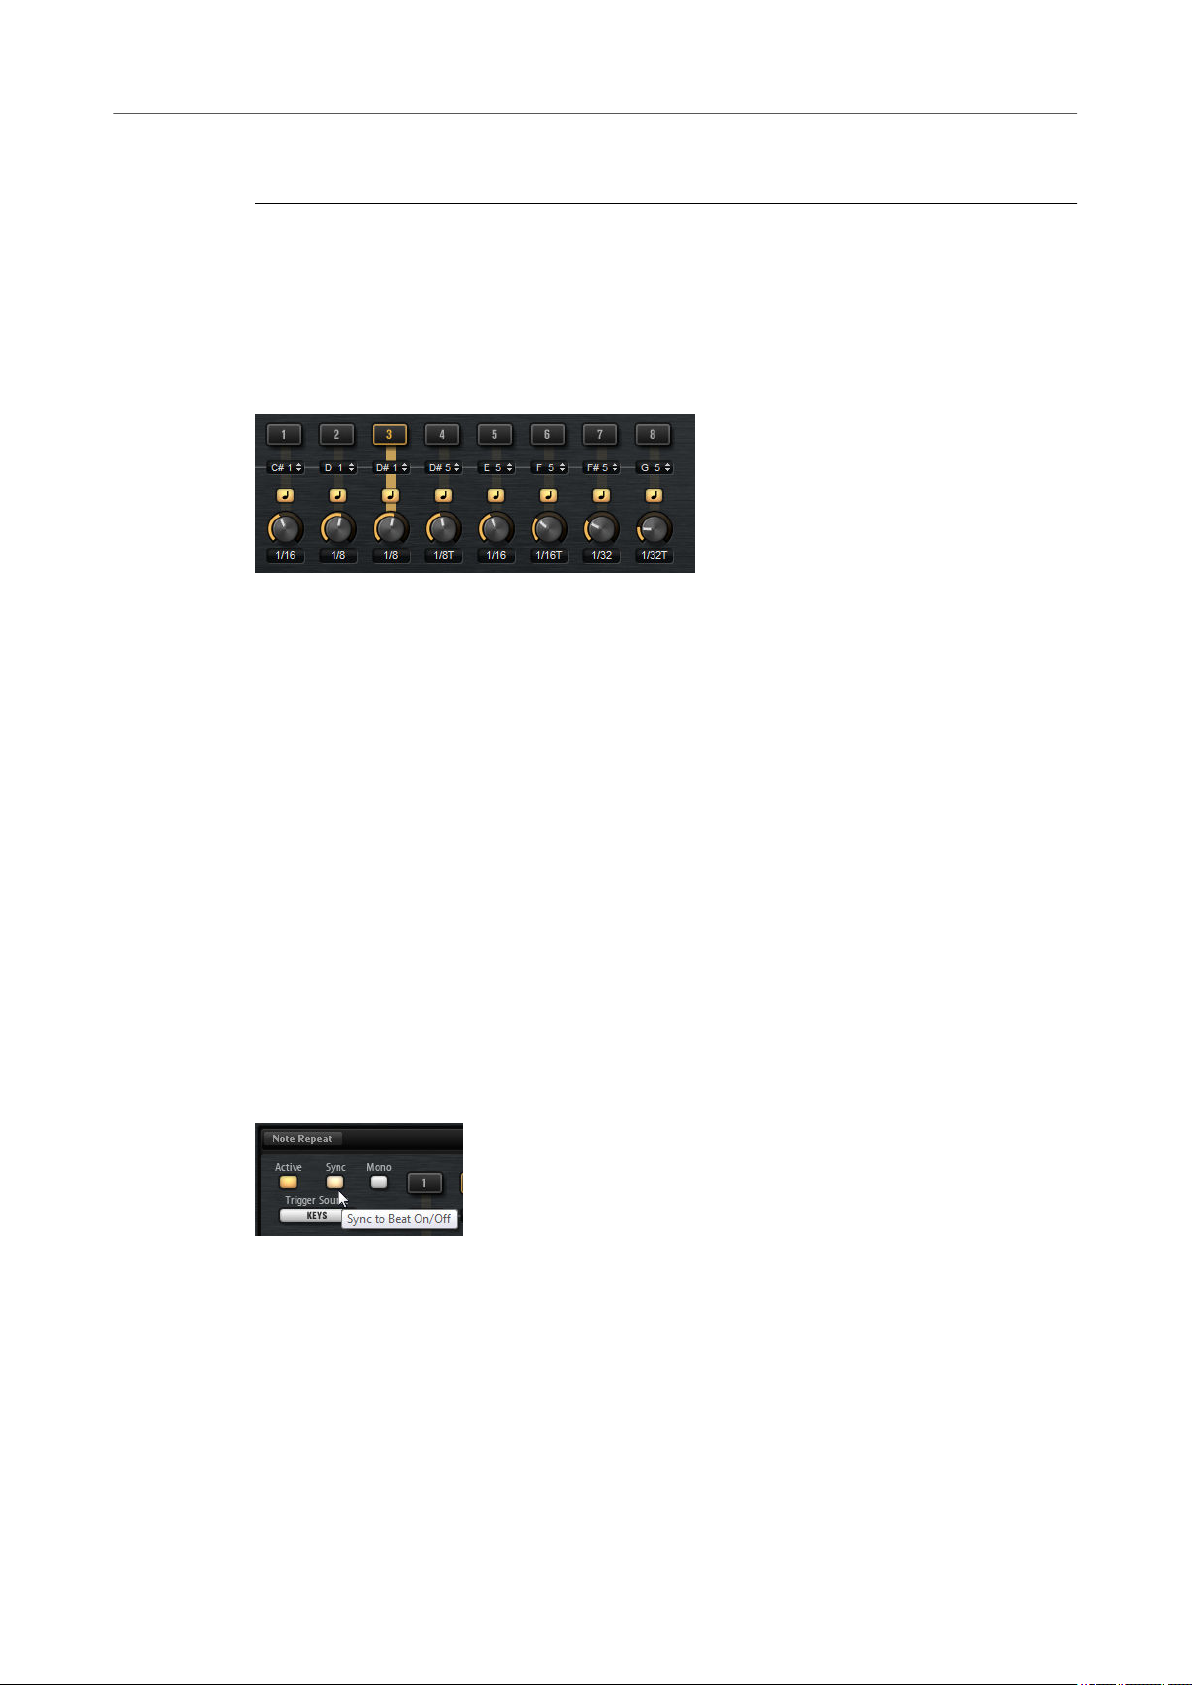
Note Repeat
Note Repeat allows you to repeat the notes of a particular drum sound.
In its most basic form, Note Repeat plays the current note with its velocity and note length over
and over again. Additionally, Note Repeat allows you to specify the note length, based on note
values or on milliseconds, and to
dene the velocity of the notes.
Using the phrase player, you can set up a complex series of repeat notes, specify both a velocity
and a pitch progression for the notes, and create your own rhythmic patterns.
Each kit comes with its own Note Repeat settings. This allows you to simultaneously perform
note repeats for different instruments of multiple kits on dedicated MIDI channels.
The Note Repeat notes are also sent to the MIDI output of Groove Agent, allowing you to trigger
external plug-ins, or to record the notes in your host sequencer. Furthermore, if you are working
with Beat Agent, you can use the pitch curve to modulate the pitch of your samples.
Note Repeat Page
The Note Repeat page has two sections. The upper section allows you to create simple note
repeats, assign trigger keys, and control the general behavior. The lower section provides the
phrase player.
● To open the Note Repeat page, open the Perform page in the edit display.
Active
Activates the Note Repeat parameters.
Sync
If Sync is activated, the repeat notes always start on the next valid note position,
depending on the current song position.
If Sync is deactivated, the note repeat starts immediately, even if the note is not
played on the beat.
22

Getting Started
Note Repeat
Mono
By default, Note Repeat works on all instruments that you trigger simultaneously,
which means that if you play two notes, both are repeated.
If Mono is activated, only the last note that was played is repeated.
Trigger Source
Determines whether the keys on the keyboard or MIDI controller messages are used
to switch between variations.
● If this parameter is set to Keys, you can specify a key, either by clicking in the
eld below the button and dragging up or down, or by playing the note on
your keyboard.
NOTE
Trigger notes for variations can only be used for one variation at a time.
● If this parameter is set to Controllers, you can specify a controller, either by
clicking in the eld below the button and selecting a controller from the list, or
by using the corresponding hardware control on your MIDI keyboard.
Low Key/High Key
You can limit the key range that is affected by Note Repeat with the Low Key and
High Key parameters.
Notes outside this range are not repeated, they are played back normally. This way,
you can use Note Repeat to record complex hihat patterns in your host sequencer,
without repeating an already recorded bass drum or snare from the same kit, for
example.
Velocity Controller
Determines how the output velocities of the repeated notes are generated.
If you use single note repeat notes, the following applies:
● Constant (127) triggers the notes with a xed velocity of 127.
● Velocity triggers the notes with the velocity of the note that you play.
● The MIDI Controller submenu allows you to select a MIDI controller. The
value of this MIDI controller is used as velocity for the triggered notes.
● If Aftertouch is selected, the triggered notes get the velocity from the
aftertouch controller.
● Poly Pressure is similar to Aftertouch, but by sending poly pressure
messages, you can control the velocity per key.
NOTE
Note Repeat starts to trigger notes if a poly pressure value greater than 0 is
received, even if no MIDI note is triggered.
If you use note repeat phrases, the following applies:
● If Constant (127) is selected, the velocity of the trigger note is not taken into
account. The output velocity is determined by the velocity specied for the
steps.
● If Velocity, MIDI Controller, Aftertouch, or Poly Pressure are selected, the
velocity progression specied in the phrase is used to modulate the velocity of
the trigger note. For example, if a phrase contains 3 steps with the velocity
values 127, 64, and 1, and you trigger the phrase using a note with the velocity
127, the output velocity of the 3 steps is 127, 64, and 1. However, if you trigger
the phrase with a velocity of 64, the output velocity of the 3 steps is scaled,
and you get 64, 32, and 1.
23
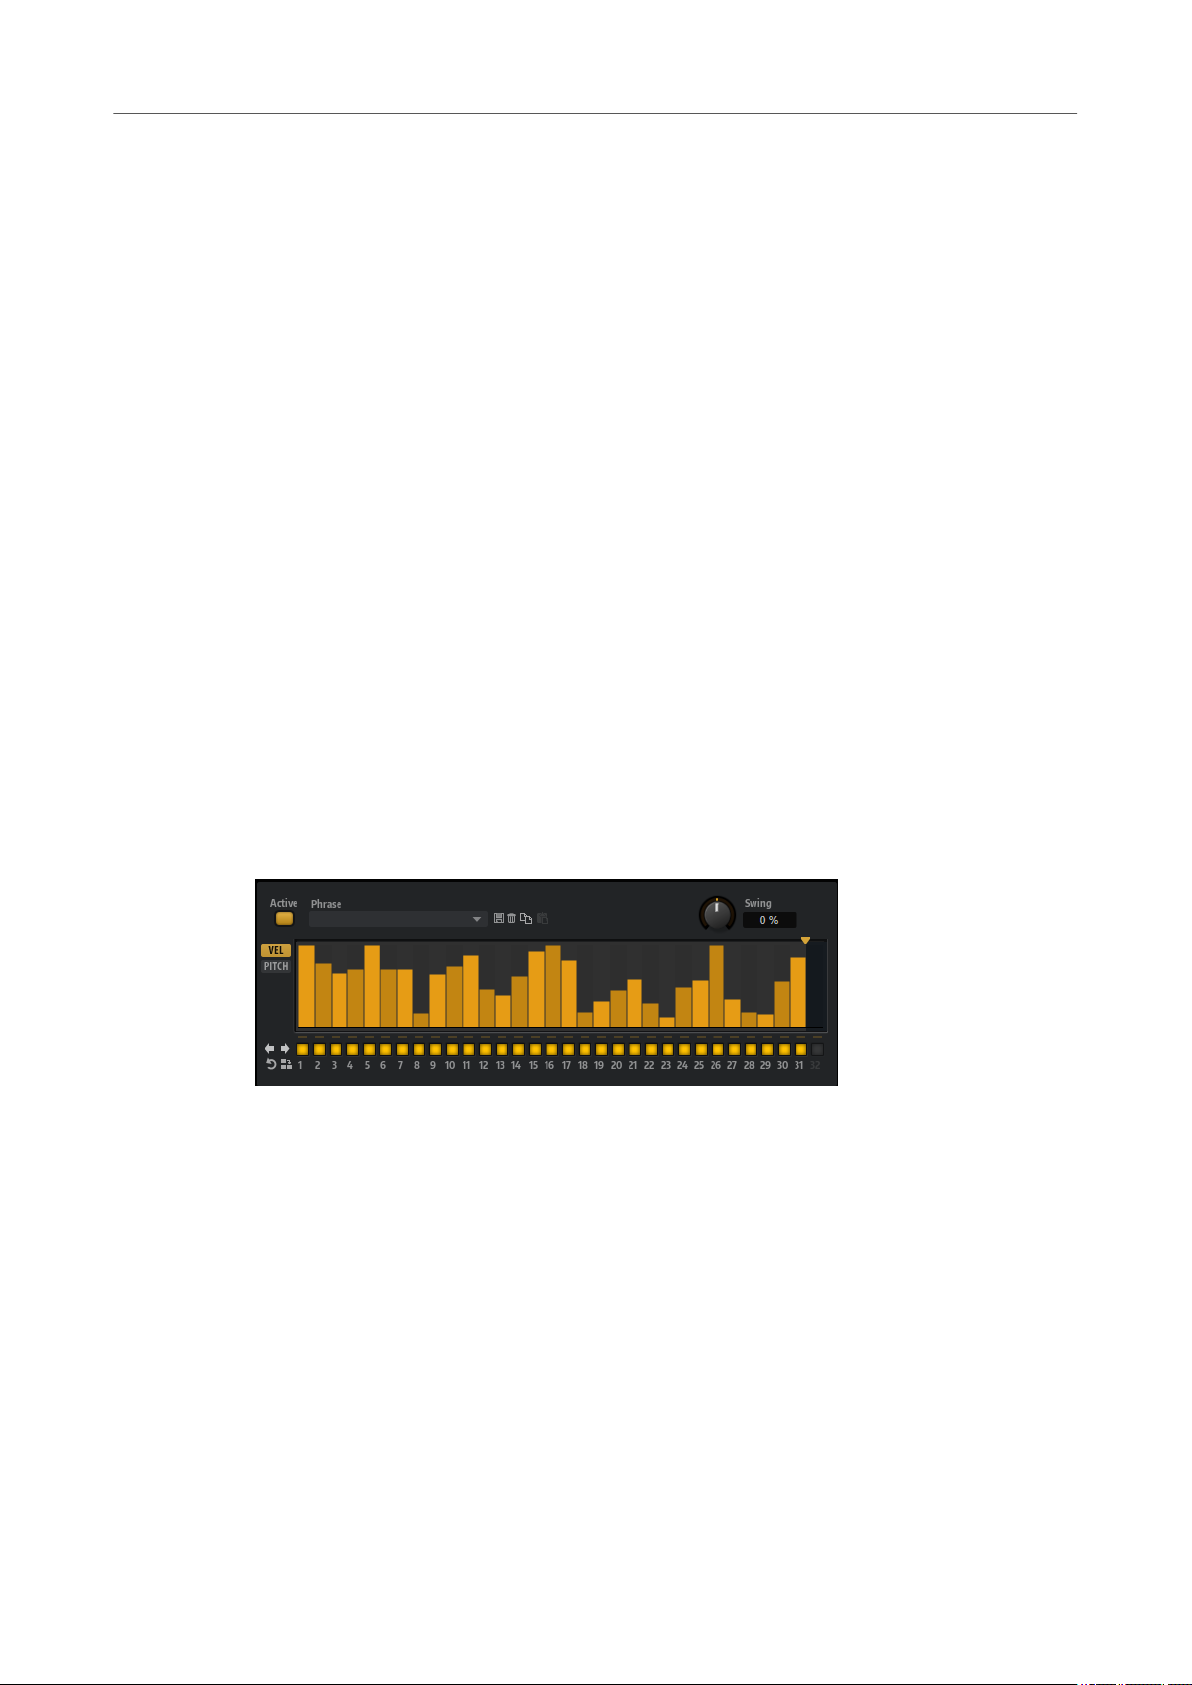
Getting Started
Note Repeat
Fetch
If aftertouch, poly pressure, or a MIDI controller are used to specify the velocity of
the notes, the Fetch option determines the way that the notes are generated.
● If Fetch is activated, the rst note that you play denes the initial velocity. As
soon as the controller value exceeds this velocity, new notes get their velocity
from the controller.
● If Fetch is deactivated, notes are directly generated with the current controller
value.
If poly pressure is used, notes are only generated for values larger than 0. This
means that if you play a note, and the poly pressure has not yet been set to a
value larger than 0, no note repeats are generated. If you raise the poly
pressure value above 0, note repeats are generated, with a velocity that
corresponds to the current poly pressure value.
Note Repeat Variation Buttons 1–8
You can set up eight different variations for the Note Repeat and use these buttons
to play the associated repeat notes or phrases.
MIDI Follow
● If MIDI Follow is activated and you switch between note repeat variations, the
editor also switches to the current settings.
● If MIDI Follow is deactivated, the editor alway shows the settings for the
selected note repeat variation.
Phrase Player Section
The lower section of the page contains the phrase player.
You can edit the velocity and the pitch controller values for the steps. To display the velocity
values, activate VEL, and to display the pitch modulation curve, activate PITCH.
Active
Activates/Deactivates the phrase player.
Phrase
Allows you to select one of the available phrases.
Preset controls
With the preset controls, you can save a phrase or remove it from the user library, or
copy and paste phrases between variations.
MIDI Controller
If the pitch modulation curve is displayed, this pop-up menu allows you to select the
MIDI controller that is used for pitch modulation.
If you want to use the pitch curve to modulate the pitch of your samples, open the
Pitch page for the corresponding pad and select the same MIDI controller on the
MIDI Controller pop-up menu.
24
Getting Started
Note Repeat
Swing
Shifts the timing of notes on even-numbered beats. This way, the pattern gets a
swing feeling. Negative values let the notes play earlier, positive values let the notes
play later.
Number of Steps
To specify the length of the phrase, drag the Number of Steps handle to the right or
left.
Step display context menu
The context menu is available both for the velocities and for the pitch modulation
values of the steps.
● If velocity values are displayed, Reset Step sets the velocity of the step to 127.
If the pitch modulation curve is displayed, Reset Step sets the pitch
modulation for the step to 0 semitones.
● If velocity values are displayed, Reset All Steps sets the velocity of all steps to
127.
If the pitch modulation curve is displayed, Reset All Steps sets the pitch
modulation for all steps to 0 semitones.
● Enable All Steps activates all steps.
● If velocity values are displayed, Copy Phrase copies the current phrase to the
clipboard.
If the pitch modulation curve is displayed, Copy Phrase copies the pitch
modulation curve to the clipboard.
● If velocity values are displayed, Paste Phrase pastes the phrase from the
clipboard to the current phrase player. This allows you to copy phrases
between different kits.
If the pitch modulation curve is displayed, Paste Phrase pastes the pitch
modulation curve to the current curve display. This allows you to copy pitch
modulation curves between different kits.
Performing Simple Note Repeats
You can create note repeats for a particular drum sound, and specify the interval in which the
notes are repeated.
PREREQUISITE
● A MIDI keyboard is connected to your computer and set up correctly.
● You have loaded a kit into the rst kit slot.
25

Getting Started
Note Repeat
PROCEDURE
1. Open the Perform page in the edit display.
2. Set Trigger Mode to Keys.
This way, you can trigger the note repeats using the keys on your MIDI keyboard.
NOTE
Note Repeat variation trigger notes have a higher priority than instrument notes, which
means that if they share the same key, you cannot play the instrument on that key.
3. Activate the rst variation button.
4. Specify the trigger note in the eld below the button.
The corresponding instrument pad displays a repeat icon.
5. Click the Note Values/Milliseconds button below the trigger note eld to specify whether
you want to set the repeat interval in note values or milliseconds.
6. Use the control below the Note Values/Milliseconds button to specify the note repeat
interval.
7. On the MIDI keyboard, play the trigger key for the instrument pad, and then play the
trigger key that you specied for the note repeat.
RESULT
The drum sound is repeated, according to the set interval, for as long as you press the key.
Creating Note Repeat Phrases
With the phrase player in the lower section of the Note Repeat page, you can create complex
note repeats phrases for a particular drum sound.
● To use the phrase player, activate the Active button.
Activating Steps
A phrase can contain up to 32 steps. Only the steps that are activated are played.
● To activate a step, click its On/Off button below the display.
● To activate all steps, right-click in the step display and select Enable All Steps from the
context menu.
Setting the Velocity for the Steps
The height of a step represents its velocity value. You can edit the velocity of steps in the
following way:
● To adjust the velocity for a single step, click it and drag up or down.
26

Getting Started
Note Repeat
● To adjust the velocity of multiple steps, click and draw a curve.
● To adjust the velocity of all steps relatively, Shift-click and drag.
● To draw a ramp, hold down Alt and draw a line.
● To draw symmetric ramps at the beginning and the end of the sequence, hold down Shift—
Alt and draw a line.
● To reset the velocity of a step to 127, Ctrl/Cmd-click the step.
● To reset the velocity of all steps to 127, hold Shift—Ctrl/Cmd and click a step.
Adjusting the Phrase
● To shift the rhythm of the phrase, use the Shift Phrase Right /Shift Phrase Left
buttons.
If you shift the rhythm of the phrase to the left, the rst step is moved to the end. If you
shift the phrase to the right, the last step is moved to the beginning.
● To reverse the phrase, click the Reverse Phrase button.
● To duplicate short phrases, click the Duplicate Phrase button.
NOTE
The maximum number of steps is 32. Therefore, phrases that contain more than 16 steps
cannot be duplicated entirely.
Phrase Presets
Groove Agent comes with a set of phrase presets.
● To load a preset, click in the Phrase eld and select a preset from the pop-up menu.
● To create your own presets, use the preset controls to the right of the Phrase eld.
Performing Note Repeat Phrases
PREREQUISITE
● A MIDI keyboard is connected to your computer and set up correctly.
● You have loaded a kit into the rst kit slot.
PROCEDURE
1. Open the Perform page in the edit display.
2. Set the Trigger Mode to Keys.
This way, you can trigger the note repeats using keys on your MIDI keyboard.
NOTE
Note Repeat variation trigger notes have a higher priority than normal instrument notes,
which means that if they share the same key, you cannot play the instrument on that key.
3. Activate the rst variation button.
4. Specify the trigger note in the eld below the button.
The corresponding instrument pad displays a repeat icon.
5. Activate the phrase player by clicking the Phrase On/Off button.
6. Set up the steps for the phrase or select a phrase from the Phrase pop-up menu.
27
Getting Started
Note Repeat
7. On the MIDI keyboard, play the trigger key for the instrument pad, and then play the
trigger key that you specied for the note repeat phrase.
RESULT
The phrase is repeated for as long as you keep the keys pressed.
Creating and Using Note Repeat Variations
You can set up eight different Note Repeat variations using the variation buttons and switch
between them to bring more variation to your Note Repeat performance.
Variations can trigger both Note Repeat notes and Note Repeat phrases. For example, you can
set up repeats with different note values, and then switch between them in real time, or switch
between phrases of different complexities.
If a pattern pad and a note repeat variation share the same trigger note, the pattern pad gets
priority.
You can copy and paste variation settings between buttons using the commands on the variation
button context menu.
Triggering Variations Using MIDI Controllers
If you trigger the variations using MIDI controllers, a variation is activated as soon as the
controller value exceeds 64. The last controller value higher than 64 decides which variation to
play.
It is recommended to use On/Off buttons or push buttons rather than faders or encoders to
control the variation selection. Set the buttons up so that they send a value of 127 when you
press the button, and a value of 0 when you release it.
The use of faders or encoder controls is not recommended for the triggering of variations,
because they do not offer the required amount of control.
Note Repeat Variations and Sync to Beat
● If Sync to Beat is activated, the repeated notes always start at the next valid position. If
you play a legato to switch between two variations, the repeat phrase is not restarted, but
continues from the current beat position.
● If Sync to Beat is deactivated, the note repeat starts immediately, even if the note is not
played on the beat. Phrases are always restarted from the beginning.
28

Getting Started
Note Repeat
Recording the Notes Created by Note Repeat
You can record the Note Repeat output using the pattern player. This way, you can record
complex rhythmic patterns that would be
another plug-in.
PREREQUISITE
You have added two instrument tracks in your Steinberg DAW.
If you record a drum pattern in a loop, you can add different instruments with each cycle using
various note repeat variations.
NOTE
It is not recommended to route the recording track back to the kit that you are using to generate
the note repeat notes, because if you want to record a second cycle, notes that have been
recorded in a rst cycle will also be affected by this second cycle.
PROCEDURE
1. Leave the rst kit slot empty.
This slot is used to generate the notes.
2. Open the Perform page for the rst kit slot and activate the note repeat functionality by
clicking the Active button.
3. Select kit slot 2 and load the kit that contains the drum sound that you want to use for the
repeated notes.
4. In the DAW, route the rst track to kit slot 1. This way, the notes that you play on your MIDI
keyboard are routed to the Note Repeat page for the rst kit slot.
5. Set up the note repeat parameters for kit slot 1.
6. Activate the Monitor button on the rst track in the DAW.
7. For the second track, open the Input Routing pop-up menu, and select Groove Agent Kit
1.
8. Set the MIDI channel for the track to channel 2. This way, the notes are sent to the second
kit slot.
9. Record-enable the second track.
10. Activate the Record button and play an instrument key together with a note repeat
variation key to generate and record the notes.
dicult to play live or use the recorded notes to trigger
Recording Patterns on Pattern Pads
Notes generated by Note Repeat can be used to record complex patterns directly on the pattern
pads in
PROCEDURE
1. Load a kit in the rst kit slot.
2. Activate and congure the Note Repeat parameters for that slot.
3. Select an empty pattern pad and click the Record button.
4. Click the Play button.
5. Play your instruments and add note repeats.
6. Optional: Add different note repeat notes which each pattern cycle.
Groove Agent.
Recording starts.
The instrument notes and the repeated notes are recorded into the pattern.
29

Getting Started
Decompose
7. Click the Stop button to stop recording.
RESULT
When you trigger the pattern pad, it plays the pattern that you recorded.
Decompose
If you are working with Beat Agent kits, you can use the Decompose function to split your
samples into their noise and tonal components.
This allows you to edit the tonal and the noise components of your samples separately, for
example, to change the distribution between the noise and tonal portions of a sample, to
combine different noise samples with a tonal sample, or to experiment with different source
samples to create entirely new sounds.
Decomposing Samples
The Decompose function separates the noise and the tonal components of a sample and allows
you to save these components separately as new samples.
PREREQUISITE
● The instrument pads are shown in the pad section.
● You have loaded the sample that you want to decompose and opened the Decompose
tab.
PROCEDURE
1. Optional: On the Main tab, click Prelisten.
You can now play back the two components separately by using the corresponding Solo
buttons.
2. Click Apply to decompose the sample.
RESULT
Two new samples are created. They are saved with the extensions “_noise” and “_tonal”,
respectively.
30

Getting Started
Decompose
NOTE
If a sample with the same name already exists at the save location, for example, because you
tried out different Decompose settings, a number is added to the new le name. No sample les
are overwritten by the Decompose function.
AFTER COMPLETING THIS TASK
You can now edit the tonal and noise samples separately, combine them differently, etc.
RELATED LINKS
Changing the Distribution of the Tonal and the Noise Components of Samples on page 32
Fine-Tuning the Decompose Settings on page 32
Decompose Tab on page 121
Combining Noise and Tonal Components of Different Samples
Once the tonal and noise components are split, you can use them separately. This allows you to
try out different noise components with a tonal sample, edit the components of a sample
separately before combining them again, etc. You can also create entirely new sounds from your
samples this way.
PREREQUISITE
You used the Decompose function on several samples, so that you have a variety of different
noise and tonal samples to choose from.
PROCEDURE
1. On the Load panel, open the Browse tab.
2. Navigate to the folder that contains the decomposed samples or lter the view to show
only the decomposed samples using the Filter by Sound Component pop-up menu.
You can lter the list to show the tonal component samples, the noise component
samples, or all the component samples, that is, noise and tonal, that were created with the
Decompose function.
3. Drag the samples on the instrument pads.
By layering two components from different original samples on one pad, you can play
them together.
4. Play back the pad.
5. Experiment with different combinations.
AFTER COMPLETING THIS TASK
When you found the combination that you want to use, you can edit the samples further on the
Sample tab, for example.
RELATED LINKS
Sample Tab on page 109
31

Getting Started
Decompose
Changing the Distribution of the Tonal and the Noise Components of
Samples
The Decompose function allows you to mix the noise and the tonal components of samples
differently. This can be used to reduce the sound of the drum stick hitting the drum head, for
example.
PREREQUISITE
You have loaded the sample that you want to decompose and opened the Decompose tab.
PROCEDURE
1. Click Prelisten.
2. Modify the mix by adjusting the Level dial of the Noise or the Tonal component.
3. When you are satised with the mix, activate Mix and click Apply.
RESULT
The two components are mixed and the modied sample is saved with the extension “_mix”.
NOTE
If a sample with the same name already exists at the save location, for example, because you
tried out different Decompose settings, a number is added to the new le name. No sample les
are overwritten by the Decompose function.
Fine-Tuning the Decompose Settings
If the Decompose algorithm does not separate the noise and tonal components to your liking,
you can
Sensitivity
Cutoff
Duration
ne-tune the settings using the parameters on the Main tab.
Allows you to specify the level difference that is required between the signal partials
and the noise oor. The value you specify denes the minimum distance between
the peaks and the troughs of the spectrum for a partial to be detected. If you lower
this value, more signal portions of the sample are considered to be part of the tonal
component.
Allows you to dene the upper limit of the range in which Groove Agent searches for
partials. Any signals above the Cutoff frequency are considered to be noise,
regardless of the Sensitivity or Duration settings.
Allows you to specify the minimum length for a partial. Signals that are shorter than
the value specied here are automatically considered to be noise, longer signals are
considered to be part of the tonal component.
You can try to lower this setting if you work with samples that have fast attacks or
strong transients that were not detected correctly by the Decompose function.
32
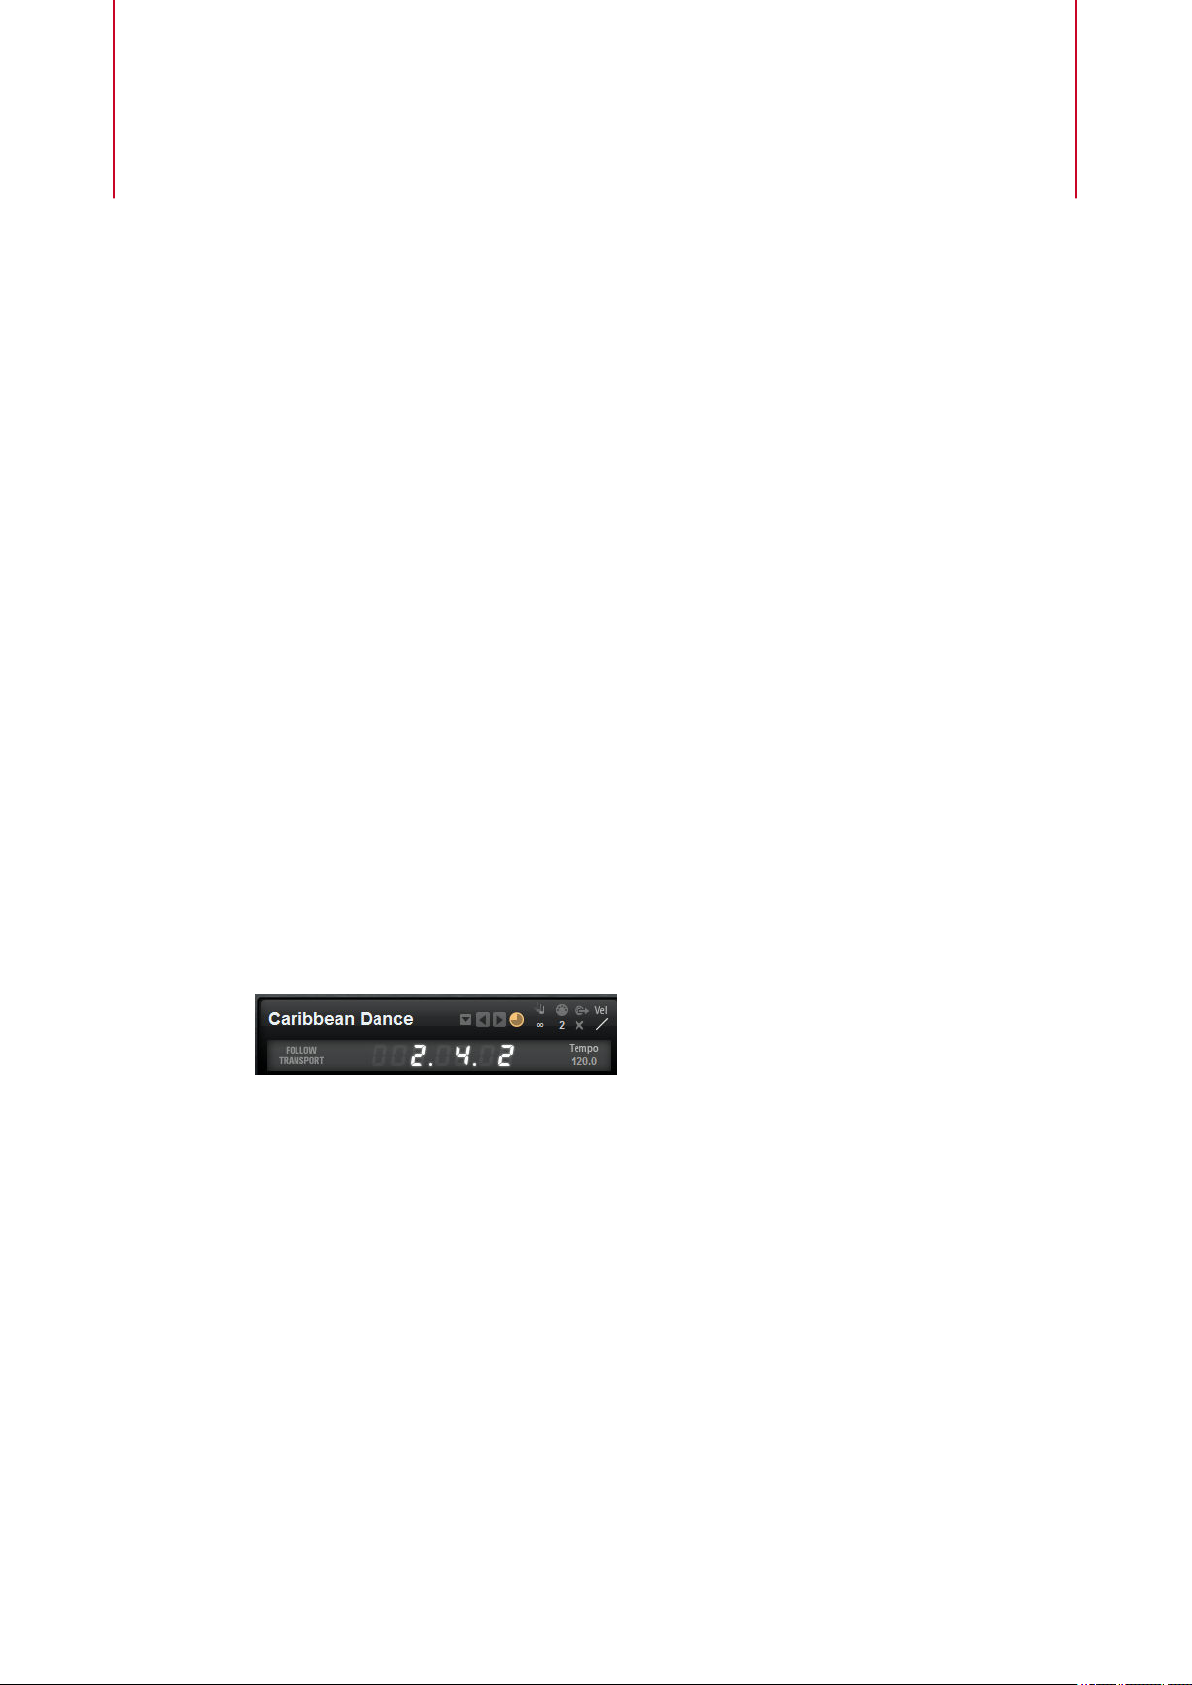
Managing Your Sounds
The following sections describe how to load, save, and manage the different kinds of sound les
in Groove Agent.
Loading Kits
You need at least one kit to produce a sound with Groove Agent.
There are several ways to load kits:
● Via drag & drop from the Kits page or the Browser page in the Load panel onto the kit
slot or the kit rack.
● Via drag & drop from the File Explorer/macOS Finder or the MediaBay of your Steinberg
DAW.
● Via the context menu in the kit rack.
● By clicking the Load Kit button at the right of the kit name in the kit slot section.
● By clicking the name of the kit in the lower section of the kit rack to open the Load dialog
and selecting a new kit.
Kit Slot
This section shows the name of the loaded kit, allows you to load a different kit, and make basic
settings such as specifying the polyphony for the kit, for example.
Load button
Click this button to show the list of available kits.
You can also click the kit name to open this list. Right-click the kit name to open the
kit context menu.
Load Previous/Next Kit
Click these buttons to load the previous/next kit from the list of available kits.
Load Kit with Patterns
Activate this button to make sure that kits are always loaded together with their
patterns.
Polyphony
Adjusts the polyphony of the kit.
MIDI Channel
Sets the MIDI channel for the kit.
33
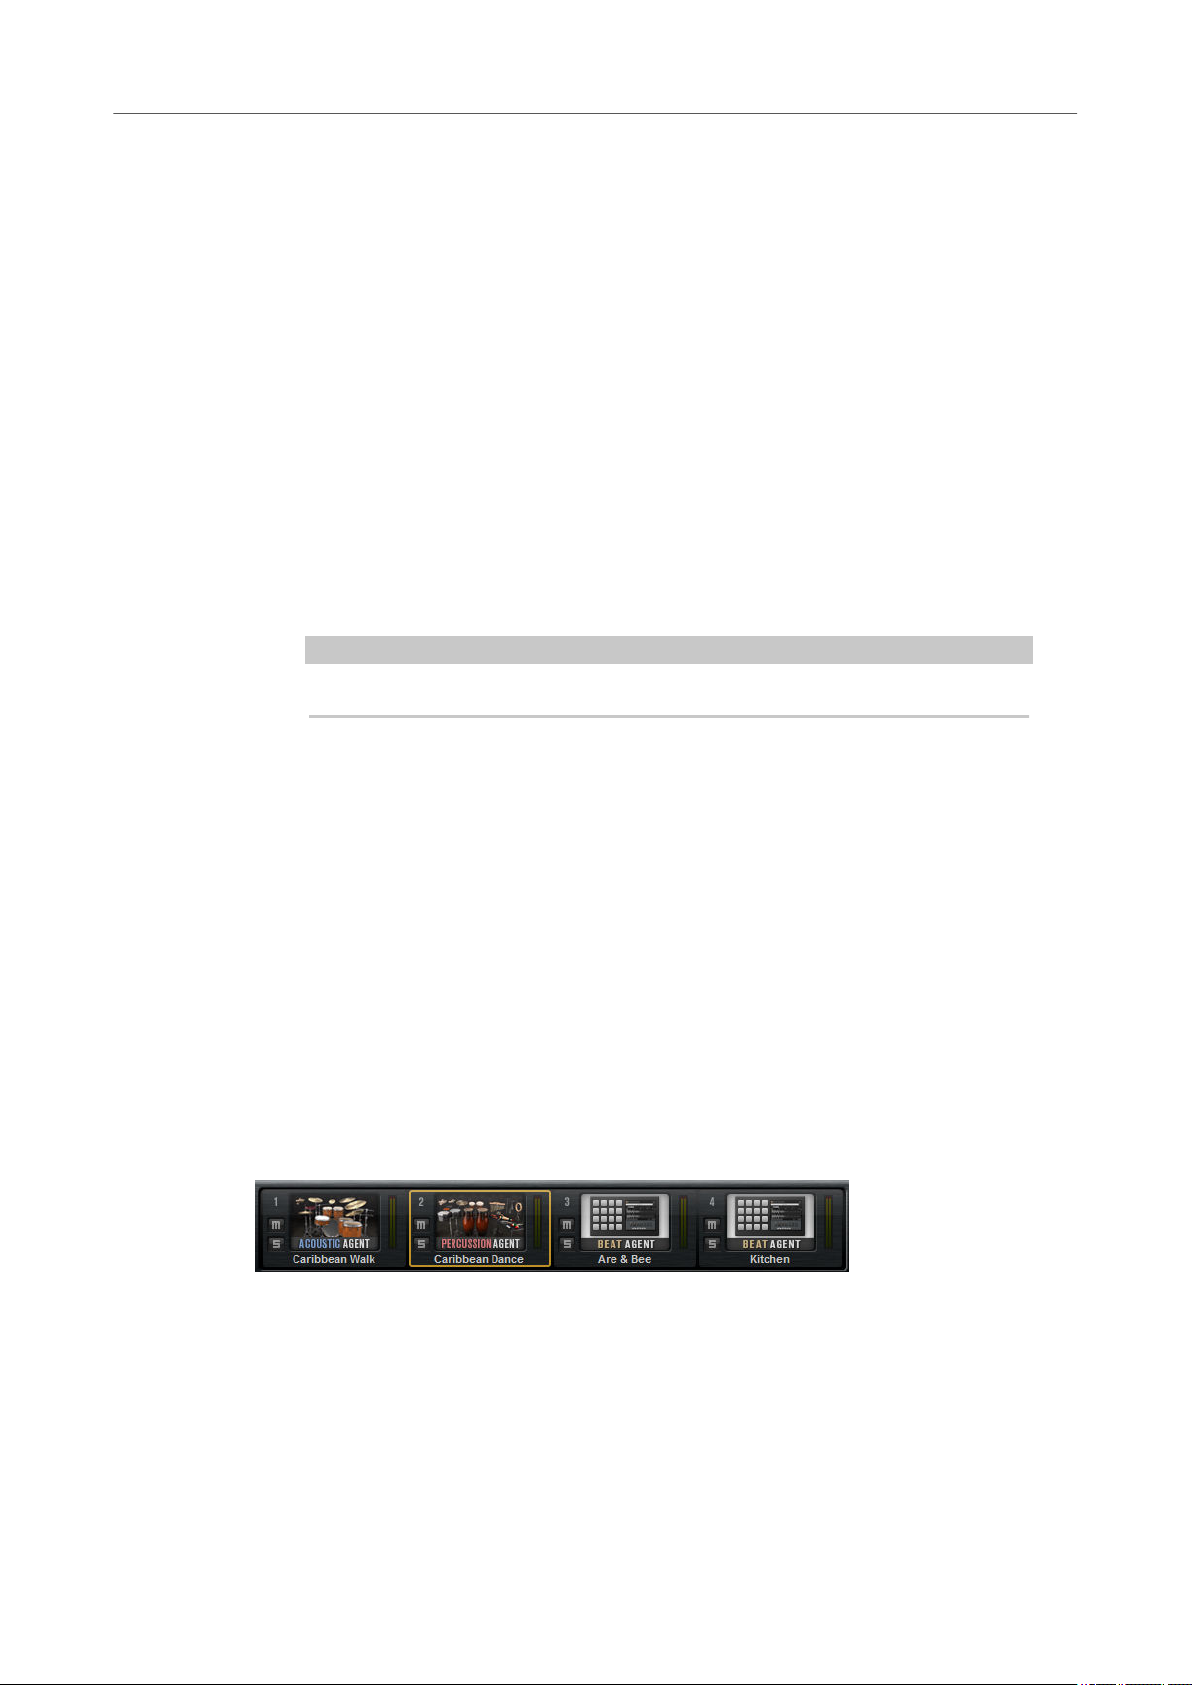
Managing Your Sounds
Kit Rack
MIDI Input Indicator
MIDI Out
Velocity Curve
Follow Transport
The MIDI symbol starts blinking if incoming MIDI signals are detected.
Deactivates MIDI output for the kit.
Sets the velocity response curve of the kit. This allows you to adapt the kit to your
hardware MIDI controller or playing style.
If Follow Transport is activated, you can use the transport functions in the DAW to
start and stop playback both in the DAW and in
record an audio track in your host application while Groove Agent plays the drums,
for example.
● If playback is started in the DAW, Groove Agent plays back the active pad.
● If trigger keys are sent and the active pad is in Exclusive mode, playback
switches to the pad that was triggered last. Playback returns to the active pad
as soon as the trigger key is released. Pads that are not in Exclusive mode can
play simultaneously.
Groove Agent. This allows you to
Kit Rack
NOTE
Follow Transport works differently in Jam Mode.
Song Position Counter
The song position counter shows the current song position in bars, beats, and 16th
notes. If you activate the Play button in Groove Agent, the song position counter
always starts at 1.0.0.0 and runs until you click stop.
Tempo Display
The tempo display next to the position counter shows the tempo of the host
application.
RELATED LINKS
Jam Mode on page 76
The kit rack to the right of the kit slot section gives you an overview over the loaded kits and their
corresponding agent, and allows you to perform some editing for the selected kit via the context
menu.
● To select a kit, click on it.
● To solo or mute a kit, activate the Mute or the Solo button. This is the same as activating
the corresponding button in the Kit mixer.
● Empty Beat Agent kits are grayed out in the kit rack.
34
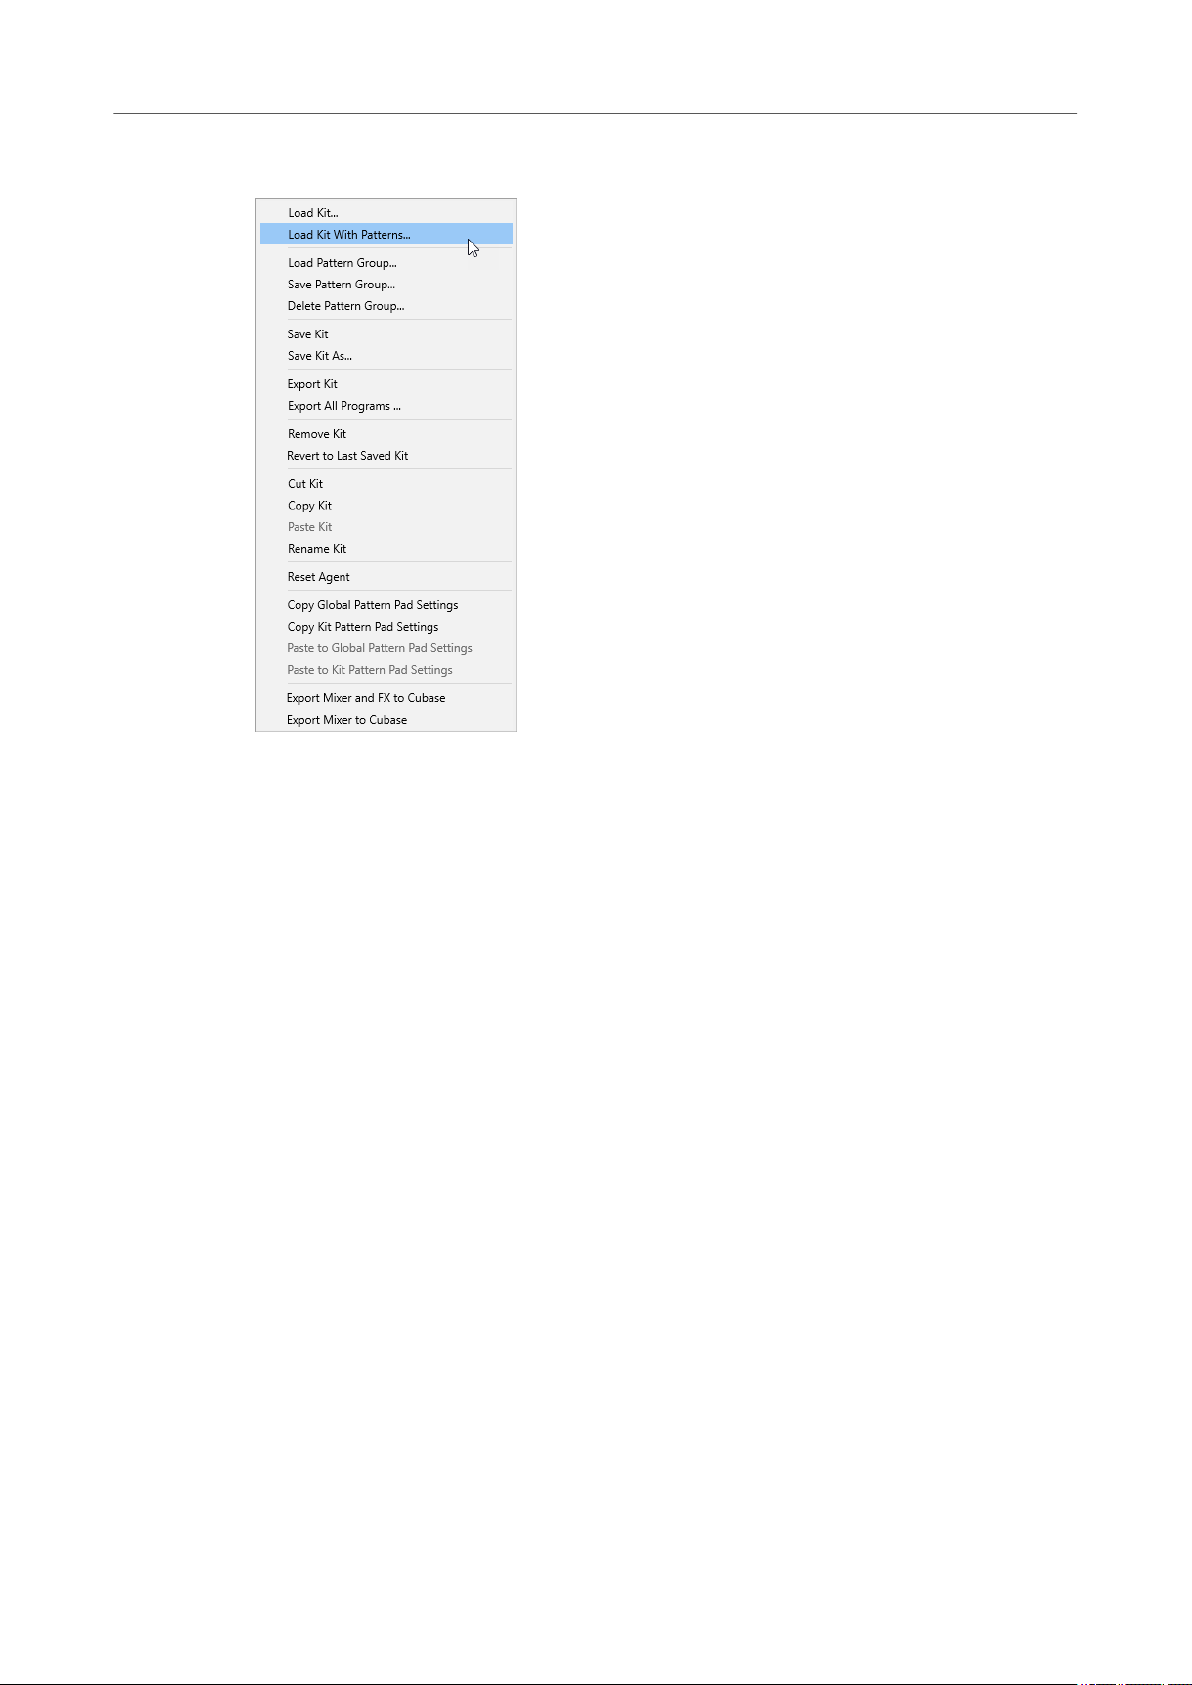
Managing Your Sounds
Kit Context Menu
Kit Context Menu
Load Kit
Allows you to load a kit.
Load Kit With Patterns
Allows you to load a kit with its MIDI patterns or its styles, if any.
Load Pattern Group
Allows you to load a predened set of MIDI le assignments and play parameter
settings for the 16 pads of the selected group.
Save Pattern Group
Allows you to save the 16 pads of the current group and their settings as a pattern
group.
Delete Pattern Group
Allows you to delete a pattern group.
Save Kit
Saves the kit. If you try to overwrite write-protected factory content, a dialog opens
that allows you to save the edited kit under a new name.
Save Kit As
Allows you to save the kit under a new name.
Remove Kit
Removes the kit and its patterns from the slot.
Revert to Last Saved Kit
Reverts to the kit that was originally loaded on the slot. If the kit was loaded without
patterns, only the kit and no patterns are loaded.
Cut Kit
Copies the kit and its patterns and removes it from the slot.
35

Managing Your Sounds
Managing and Loading Files
Copy Kit
Copies the kit and its patterns.
Paste Kit
Pastes the copied kit into the slot. If the slot already contains a kit, it is replaced.
Rename Kit
Allows you to rename the kit.
Reset Agent
Loads the Init preset of the agent.
Import (Beat Agent only)
Allows you to import MPC and GAK les into Beat Agent kits.
Export Kit With Samples (Beat Agent only)
Exports the Beat Agent kit together with its associated samples.
NOTE
Samples that are part of protected content, such as the VST Sound content, cannot
be exported.
Copy Global Pattern Pad Settings
Copies the global pattern pad settings.
Copy Kit Pattern Pad Settings
Copies the pattern pad settings of the focused kit slot.
Paste to Global Pattern Pad Settings
Pastes the copied settings as global pattern pad settings.
Paste to Kit Pattern Pad Settings
Pastes the copied settings to the focused kit slot.
Export Mixer and FX to Cubase/Nuendo
Allows you to transfer the Acoustic Agent mixer settings, complete with equalizer
settings and effects, to your Steinberg DAW, which means, you can perform mixing
for the kit entirely in the MixConsole.
Export Mixer to Cubase/Nuendo
Allows you to transfer the Acoustic Agent mixer settings, without equalizer settings
or effects, to your Steinberg DAW. This is useful if you want to create your own mix
from scratch.
Managing and Loading Files
The Load panel allows you to manage, navigate to, load, and preview different le types.
To display the Load panel, click the corresponding button in the top right of the edit display.
To open the Load panel in a separate window, click Dock/Undock Load Panel at the right of
the page buttons.
The Load panel contains the Kits, Instruments, Styles, MIDI, and Browser pages.
36
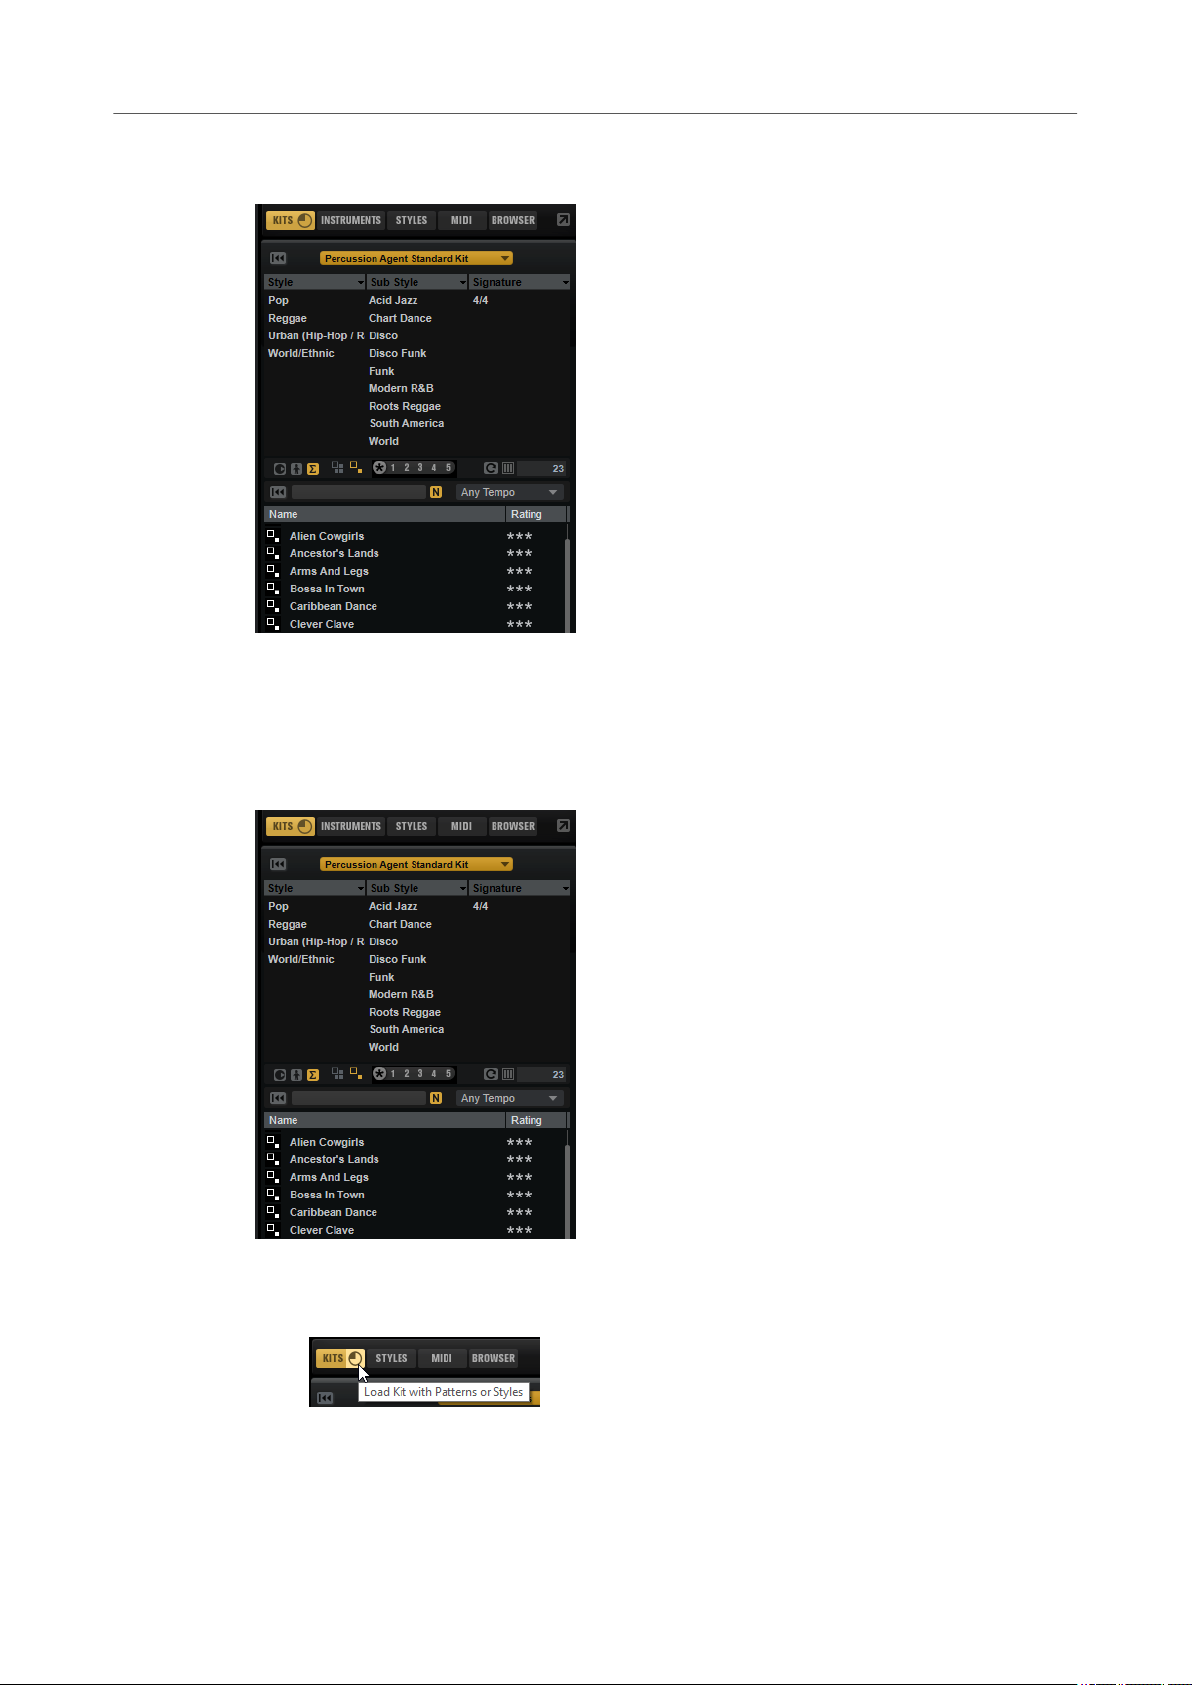
Managing Your Sounds
Managing and Loading Files
In the top section of the page, you specify which sounds to look for. The lower section presents
the corresponding results.
● To adjust the size of the two sections, drag the divider at the top of the results list.
Managing Files via the Kits, Instruments, Styles, and MIDI Pages
The Kits, Instruments, Styles, and MIDI pages are based on Steinberg’s MediaBay technology.
These pages give you access to the available kits, MIDI patterns, styles, etc.
The Kits page gives you access to the kits.
●
If you want to load kits with their patterns or styles, activate Load Kit with Patterns or
Styles.
If this button is deactivated, only the kits are loaded while the patterns and styles are kept.
The Instruments page on the Load panel shows the instruments that you created from
●
your instrument pads.
37
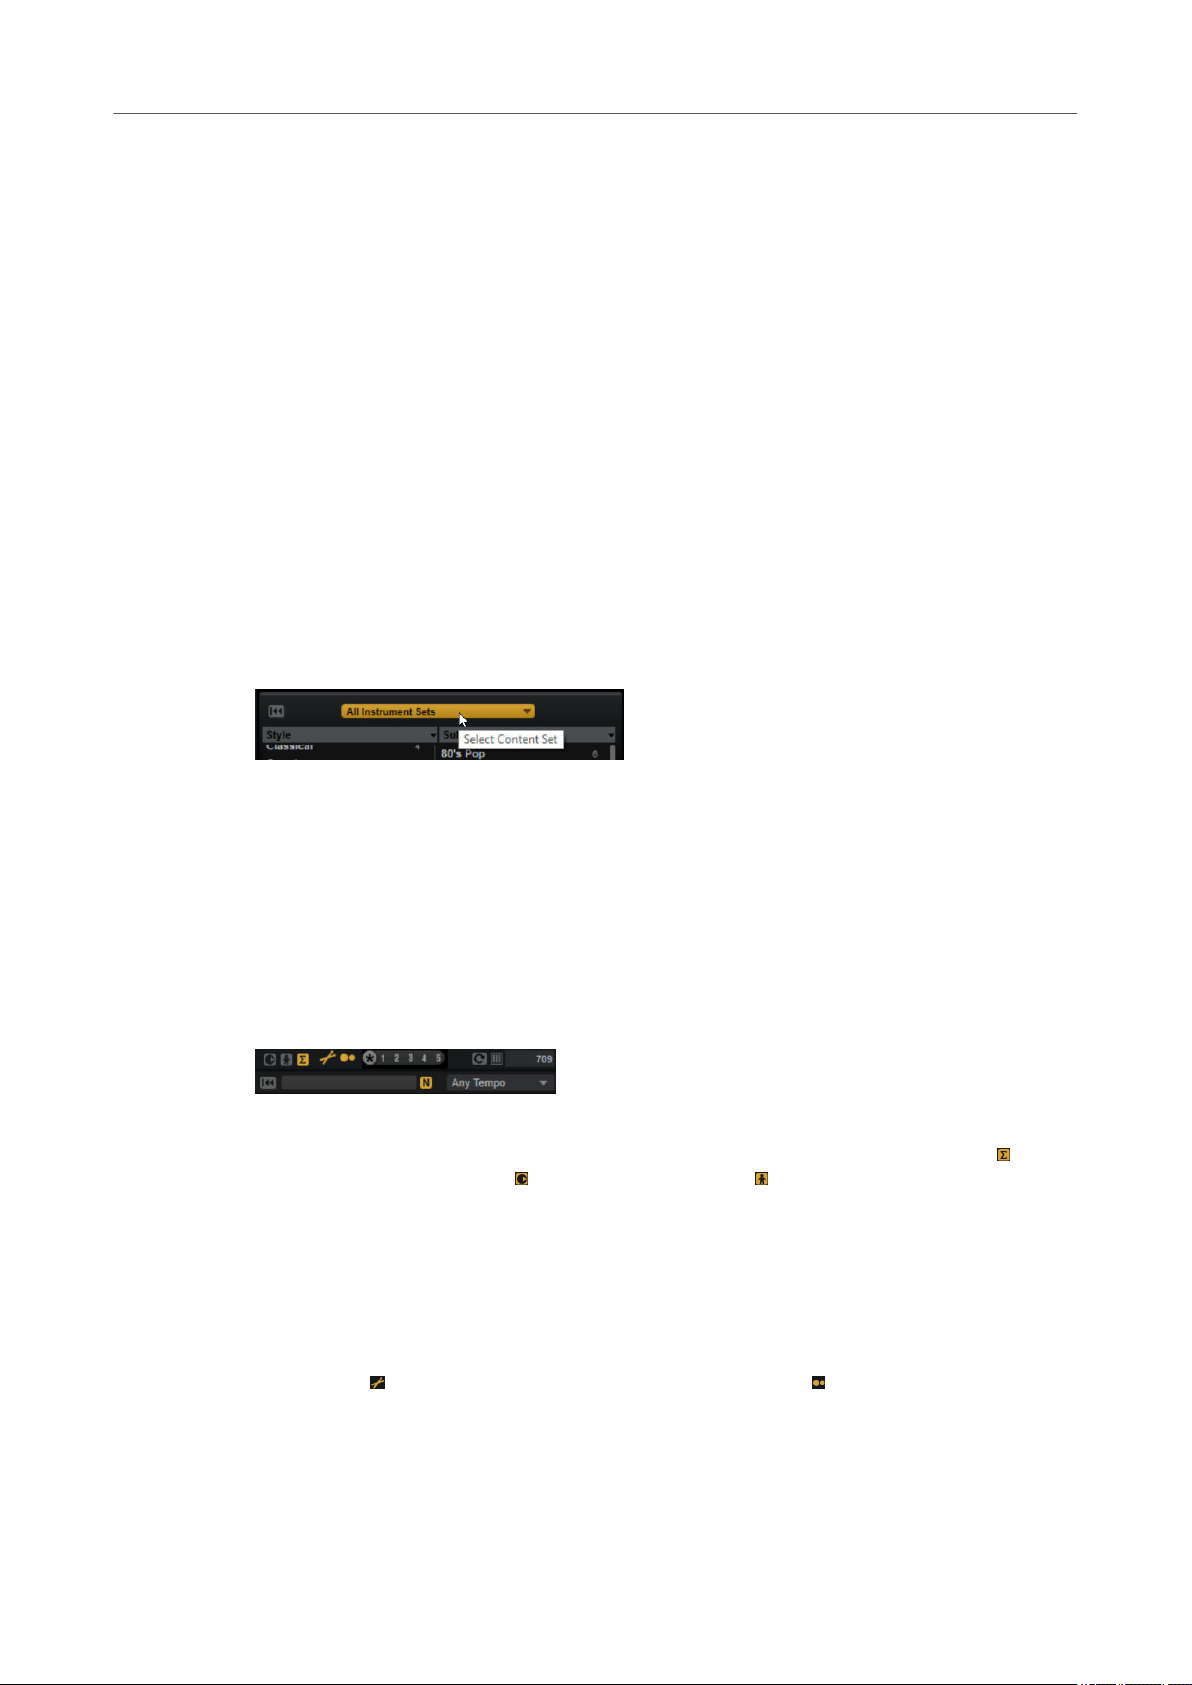
Managing Your Sounds
Managing and Loading Files
● The Styles page gives you access to the styles.
The factory styles are created for Acoustic Agent kits and are usually loaded and used in
the Style Player. Furthermore, content from Content Sets such as “Nashville” and “Simon
Phillips Studio Drums”, make use of the style player.
You can also load styles in Beat Agent. However, in this case, make sure to map the
instruments correctly to the instrument pads.
Percussion styles are available for the Percussion Player used by Percussion Agent, but
can also be used with the MIDI Player.
● The MIDI page gives you access to MIDI les and MIDI patterns. They can be used in the
MIDI Player. The MIDI
Furthermore, the MIDI
Mindset” or “Prime Cuts” can be loaded in the MIDI Player.
Filtering the Results
You can lter the results list using the congurable attribute columns at the top or by restricting
the search to a
Content Set Filter
Use the Select Content Set pop-up menu to restrict the search to a specic content set. By
default, the search is performed in all installed content sets.
les in the factory content are created for use in Beat Agent kits.
le content from VST Sound Instrument Sets such as “Neuro
specic content set.
Results List
Attribute Filter
● To set up the lter, click on specic values in the columns.
● To select different lter criteria, click the column header and select a different attribute
from the submenu.
Only the les that match the set lter are displayed in the results list.
The results list shows all les that have been found, according to your lter settings.
Content Filters
The content lter buttons allow you to dene whether to show the entire content ,
only the factory content , or only your user content .
View Filters (Kits Page)
The toolbar has two lter buttons that allow you to dene which preset types to
display: multis or kits. In the results list, the corresponding icon is shown to the left
of the preset name.
Style Filters (Styles Page)
The two style lter buttons allow you to show the styles that are used in the Style
Player , the styles that are used in the Percussion Player , or both.
Rating Filter
You can limit the results list according to the rating of the presets. Use the rating
slider to dene the minimum rating.
38

Managing Your Sounds
Managing and Loading Files
Rescan Disk
Rescans the disk for les that match the search criteria. Click this button if you added
or removed les on your hard disk, for example.
Set Up Result Columns
Allows you to select which attribute columns to display on the toolbar.
Results Counter
Displays the number of les that match the lter criteria. To stop an active scanning
process, click in the value
Text Search
In the text search eld on the results list toolbar, you can enter text contained in the
name or any of the attributes of a preset that you are looking for. The results list is
updated immediately and the category search section above shows all categories
that contain presets matching the text search.
To reset the text-based result lter, click Clear Search Text next to the search eld.
To restrict the search to the names only, activate Search Names Only . This way,
other attributes are not taken into account.
Tempo Filter
The Tempo Filter pop-up menu allows you to limit the results list to les within a
specied tempo range. This way, you can restrict the results to les that match your
current project. The options on the pop-up menu are automatically adapted to the
tempo of the host application. You can set the lter to display only les that match
the project tempo, or you can allow for a deviation of 5, 10, or 20 bpm from the
project tempo.
eld.
NOTE
If you change the tempo in the host application, this is not reected automatically on
the pop-up menu. The menu is updated when you open it and select an option.
To show all les, regardless of their tempo, set Tempo Filter to Any Tempo.
RELATED LINKS
Conguring the Results List on page 39
Conguring the Results List
You can specify which le attributes you want to be displayed in the results list and set up the
column order so that this attribute is visible without scrolling. This allows you to nd the les that
have a particular attribute more quickly.
● To congure which attributes are shown in the results list, click Set up Result Columns in
the upper right corner of the results list and activate the corresponding entries. New
attributes are added at the right of the list.
To reorder the columns in the results list, drag the column headers to another position.
●
To change the sorting of the list entries, click the column header. The triangle in the
●
column header shows the sorting direction.
39
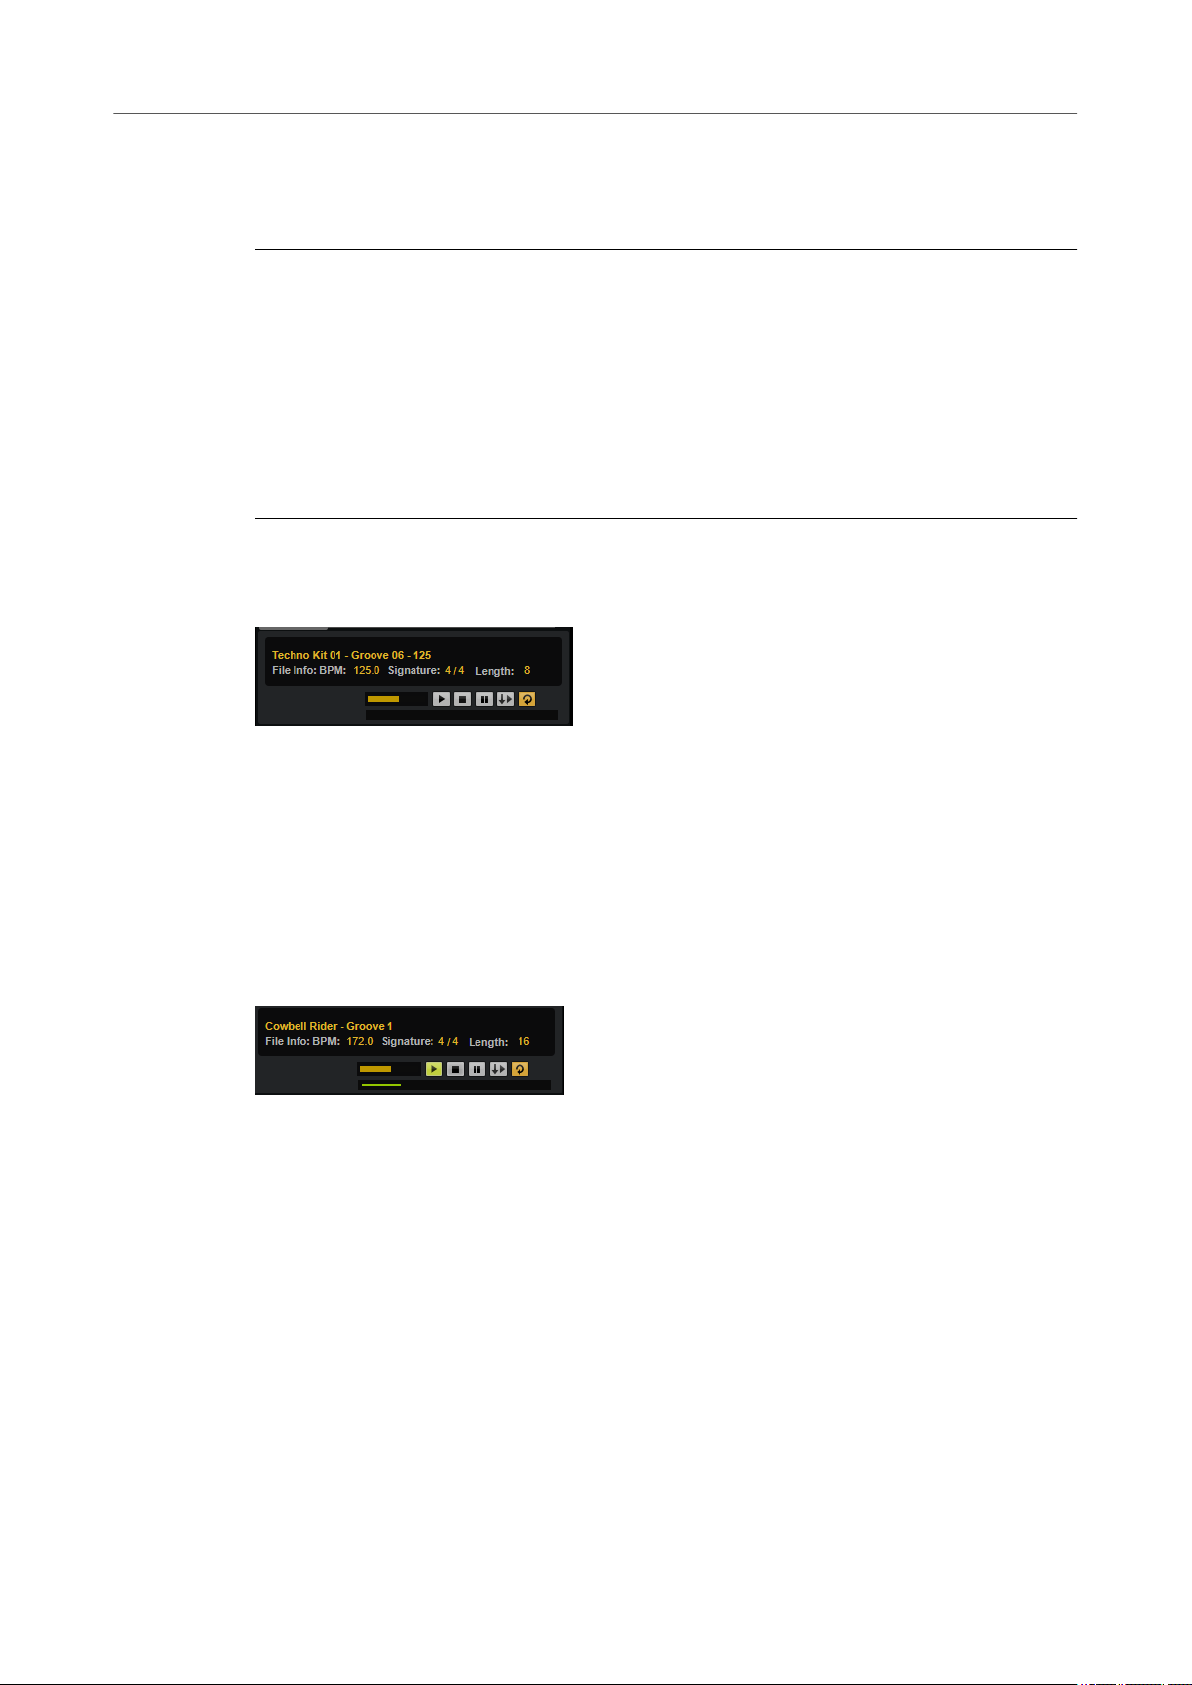
Managing Your Sounds
Managing and Loading Files
Assigning General MIDI Program Change Numbers to Sounds
Assigning General MIDI program change numbers to sounds allows you to use MIDI program
change messages to load the sounds into the slot of the corresponding MIDI channel.
PROCEDURE
1. In the Load section, select the Kits, Styles, or MIDI page and click Set up Result Columns
on the title bar of the lower section.
2. Select Musical > GM Sound.
3. Select the sound to which you want to apply the GM program change number.
4. In the GM Sound column for the sound, select the General MIDI program change number
that you want to use.
You can assign the same GM Sound program number several times. If a program number
is used more than once, the
Rating attribute can be used to decide which program to load.
File Info Section
The File Info section below the results list shows information about the selected le.
● For MIDI les, original tempo, signature, and length are shown, as they are saved in the
le.
● For styles, signature and length are shown.
● For instruments, the name of the instrument and the number of samples that it contains
are shown.
Prelisten Section for MIDI Patterns and Styles
The Prelisten section below the results list allows you to listen to the selected MIDI pattern or
style.
For MIDI pattern and style les, the following controls are available:
Level
Adjusts the playback level.
Play
Plays back the focused le.
Stop
Stops playback. The play locator jumps back to the start of the le.
Pause
Pauses playback. Click again to resume playback.
Auto Play
Automatically starts playback of the focused le.
40
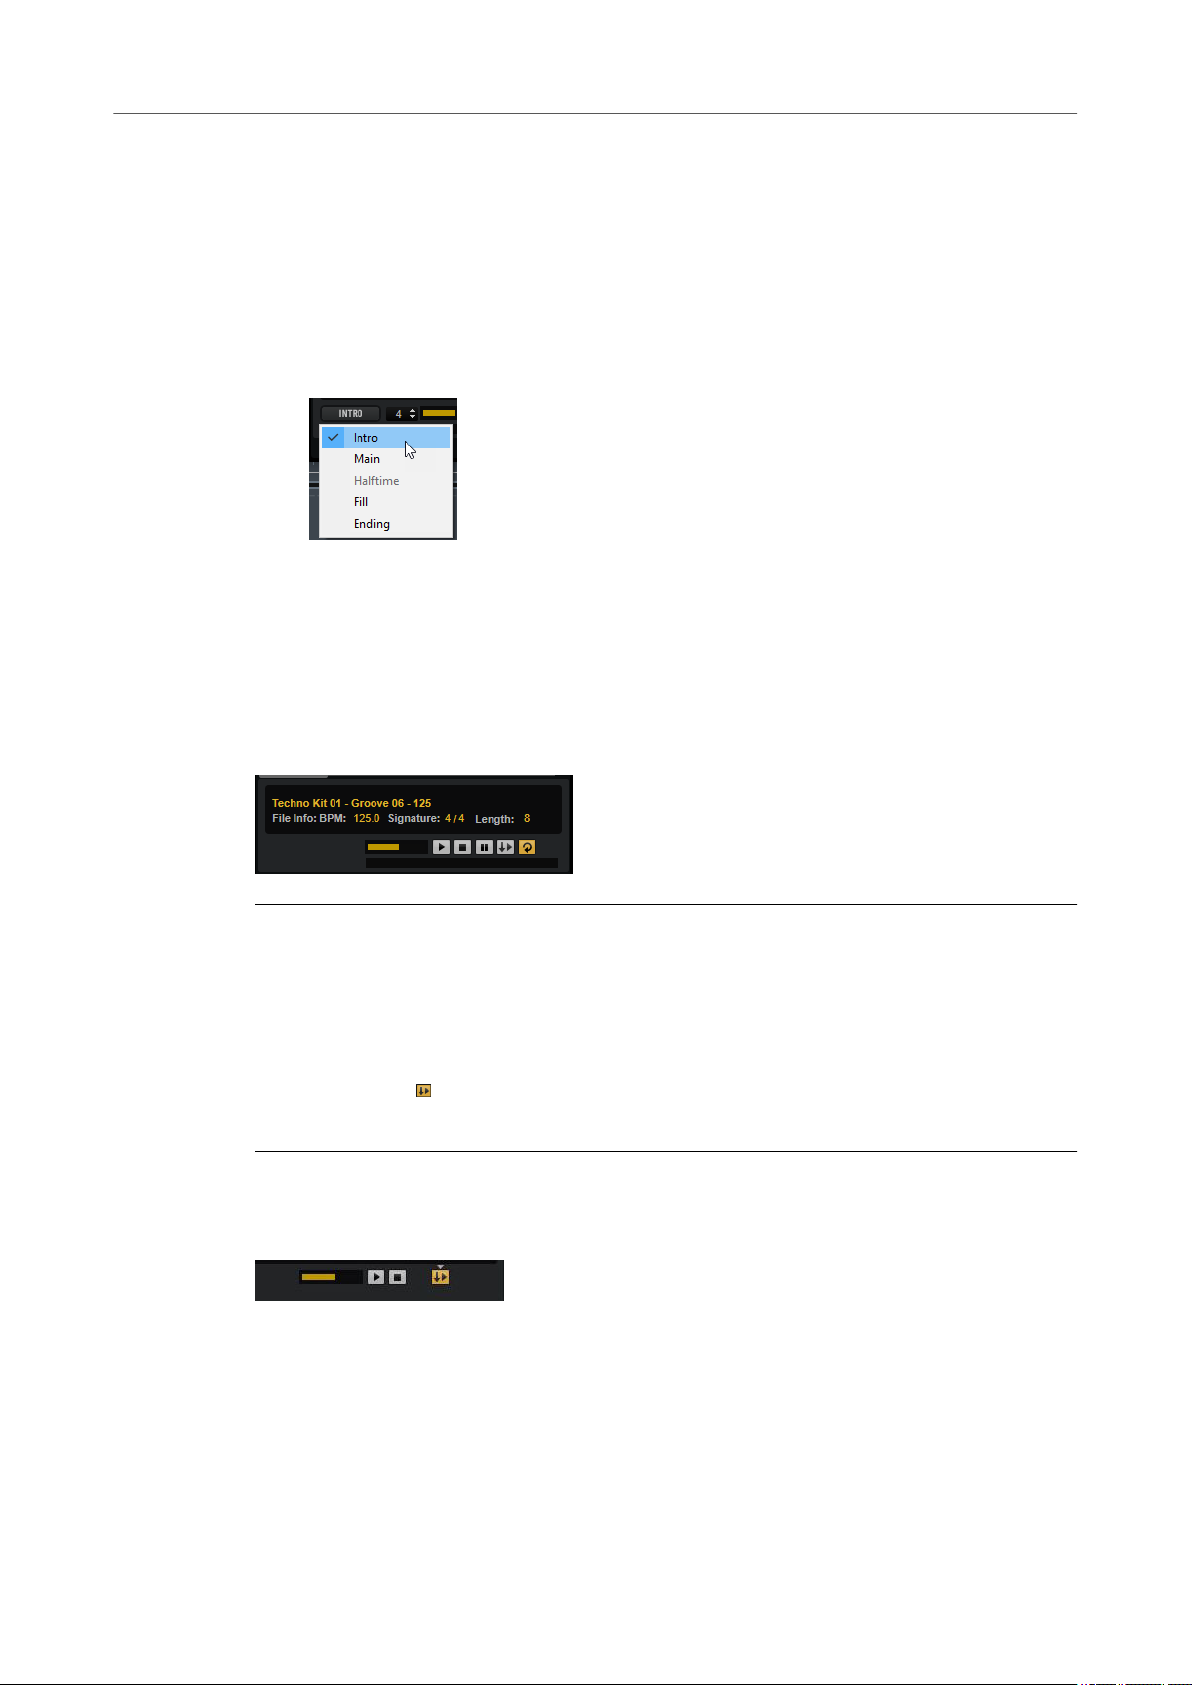
Managing Your Sounds
Managing and Loading Files
Loop Playback
If this button is activated, the focused le is played back repeatedly.
Play Position
The play position indicator shows the playback position within the focused le. To
select another position for playback, click on the slider or drag the handle.
For styles, the following additional controls are available:
Style Part
Allows you to select a part of the style, such as intro, ll, ending, etc.
Complexity/Variation
● If the Main part of the style is selected, you can select a complexity.
● If any other part of the style is selected, you can select a variation.
Prelistening Patterns and Styles
With the controls below the results list, you can listen to the MIDI patterns and styles in the
results list before loading them.
PROCEDURE
1. On the Styles or MIDI page, select a le in the results list.
If you listen to a style, you can use the pop-up menu on the left to specify which part of the
style you want to listen to. With the Complexity/Variation control, you can select a
complexity for the Main part of the style or a variation for the other parts of the style.
2. Use the transport controls below the list to play back the le.
If Auto Play is activated, the selected le is automatically played back.
3. Step through the les in the results list to listen to different les.
Prelisten Section for Instruments
The Prelisten section below the results list allows you to listen to the selected instrument.
Level
Adjusts the playback level.
Play
Plays back the focused le.
Stop
Stops playback. The play locator jumps back to the start of the le.
41

Managing Your Sounds
Managing and Loading Files
Prelisten in Place
Activates prelistening of the selected instrument. This allows you to listen to the
instrument in the context of a running style or pattern.
Click the triangle above the button to select a prelisten option.
● If Always is selected, selecting an instrument in the results list always triggers
the instrument.
● If Auto is selected, selecting an instrument in the results list does not trigger
the instrument if the Style Player or the MIDI Player are playing. This
prevents the prelisten instruments from being triggered off the beat.
NOTE
As soon as the instrument loses the focus in the results list, the Prelisten function
stops and the original pad content is played again. This allows you to quickly
compare two instruments, for example.
Loading MIDI Patterns or Styles in Your Host Application
You can drag MIDI patterns and styles from the Load panel onto a MIDI track in your host
application.
PREREQUISITE
You have added a MIDI track in your host application project.
PROCEDURE
1. In the Load section, open the MIDI page or the Styles page.
2. Select the le that you want to import into your host application.
3. If you want to drag a style into the project, use the prelisten controls below the results list
to select the part of the le and the complexity/variation.
All performance settings, such as Auto Complexity, Auto Fill, Quantize,etc. are taken into
account, that is, they will be part of the resulting MIDI pattern.
4. Drag the le onto a MIDI track in you DAW.
RESULT
A MIDI part containing the pattern is added to your project.
The MIDI patterns that you drag out of Groove Agent are MIDI les, that is, you can drop them in
any host application that supports drag and drop of MIDI
Loading Kits into Slots
To load a kit into the selected agent slot, you have the following possibilities:
● Select the slot into which you want to load the kit, and double-click the kit in the results list.
● Drag a kit from the results list to a kit in the kit rack or onto the slot in the kit slot section.
If a kit is already loaded, it is replaced with the new kit.
● Right-click the kit in the results list and select Load Kit from the context menu.
les.
42
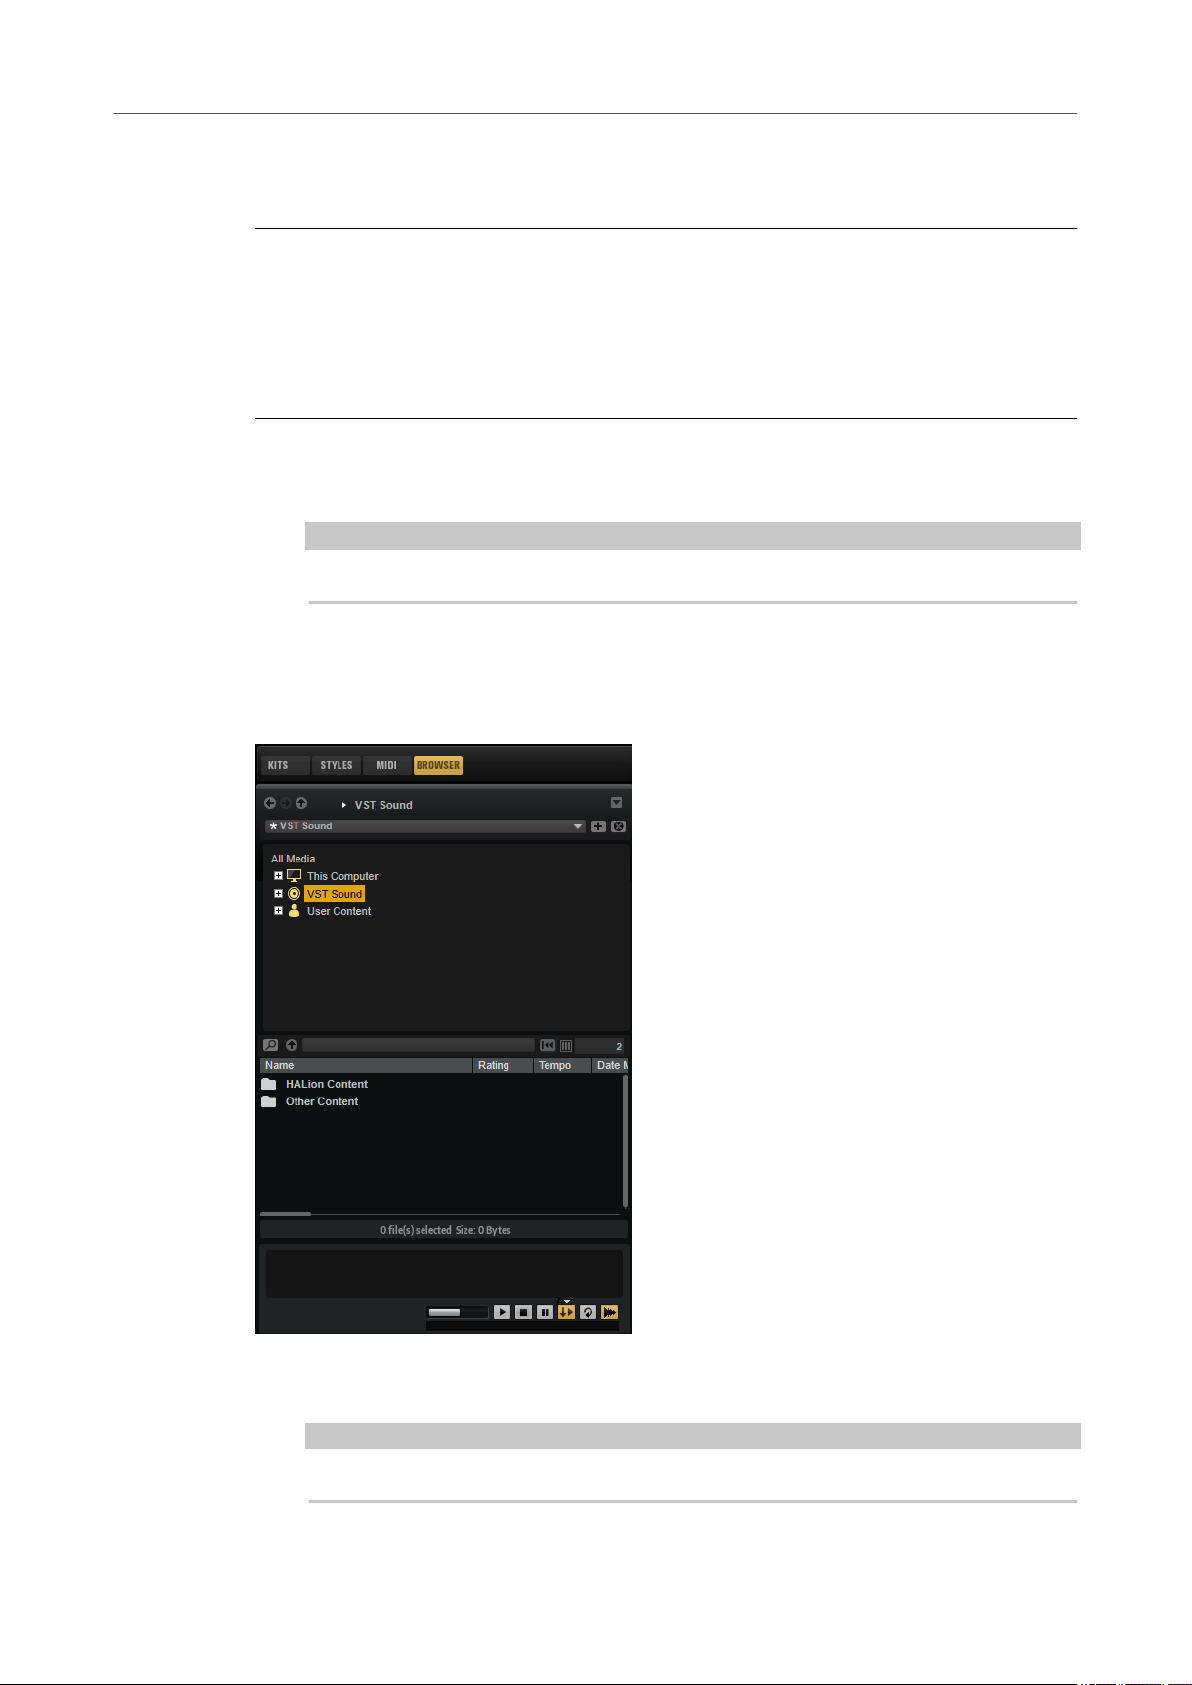
Managing Your Sounds
Managing and Loading Files
Editing Attributes
Presets can be described by using a predened set of attributes.
PROCEDURE
1. In the New Preset Attributes section of the Save dialog, click in the eld of the attribute
value that you want to set.
Depending on the attribute, a menu or a dialog opens.
2. Select a value.
Attribute values are written into the corresponding preset les.
Deleting User Presets
● To delete a user preset, right-click it and select Delete from the context menu.
NOTE
Factory presets cannot be deleted.
Loading Files Using the Browser
In the Browser, you can browse for samples, MIDI les, and presets. The Browser also shows
samples that are part of VST Sound content.
In the Browser, you can search and load the following les:
Samples from the le system or from within loaded kits.
●
NOTE
Samples can only be loaded for Beat Agent kits.
43
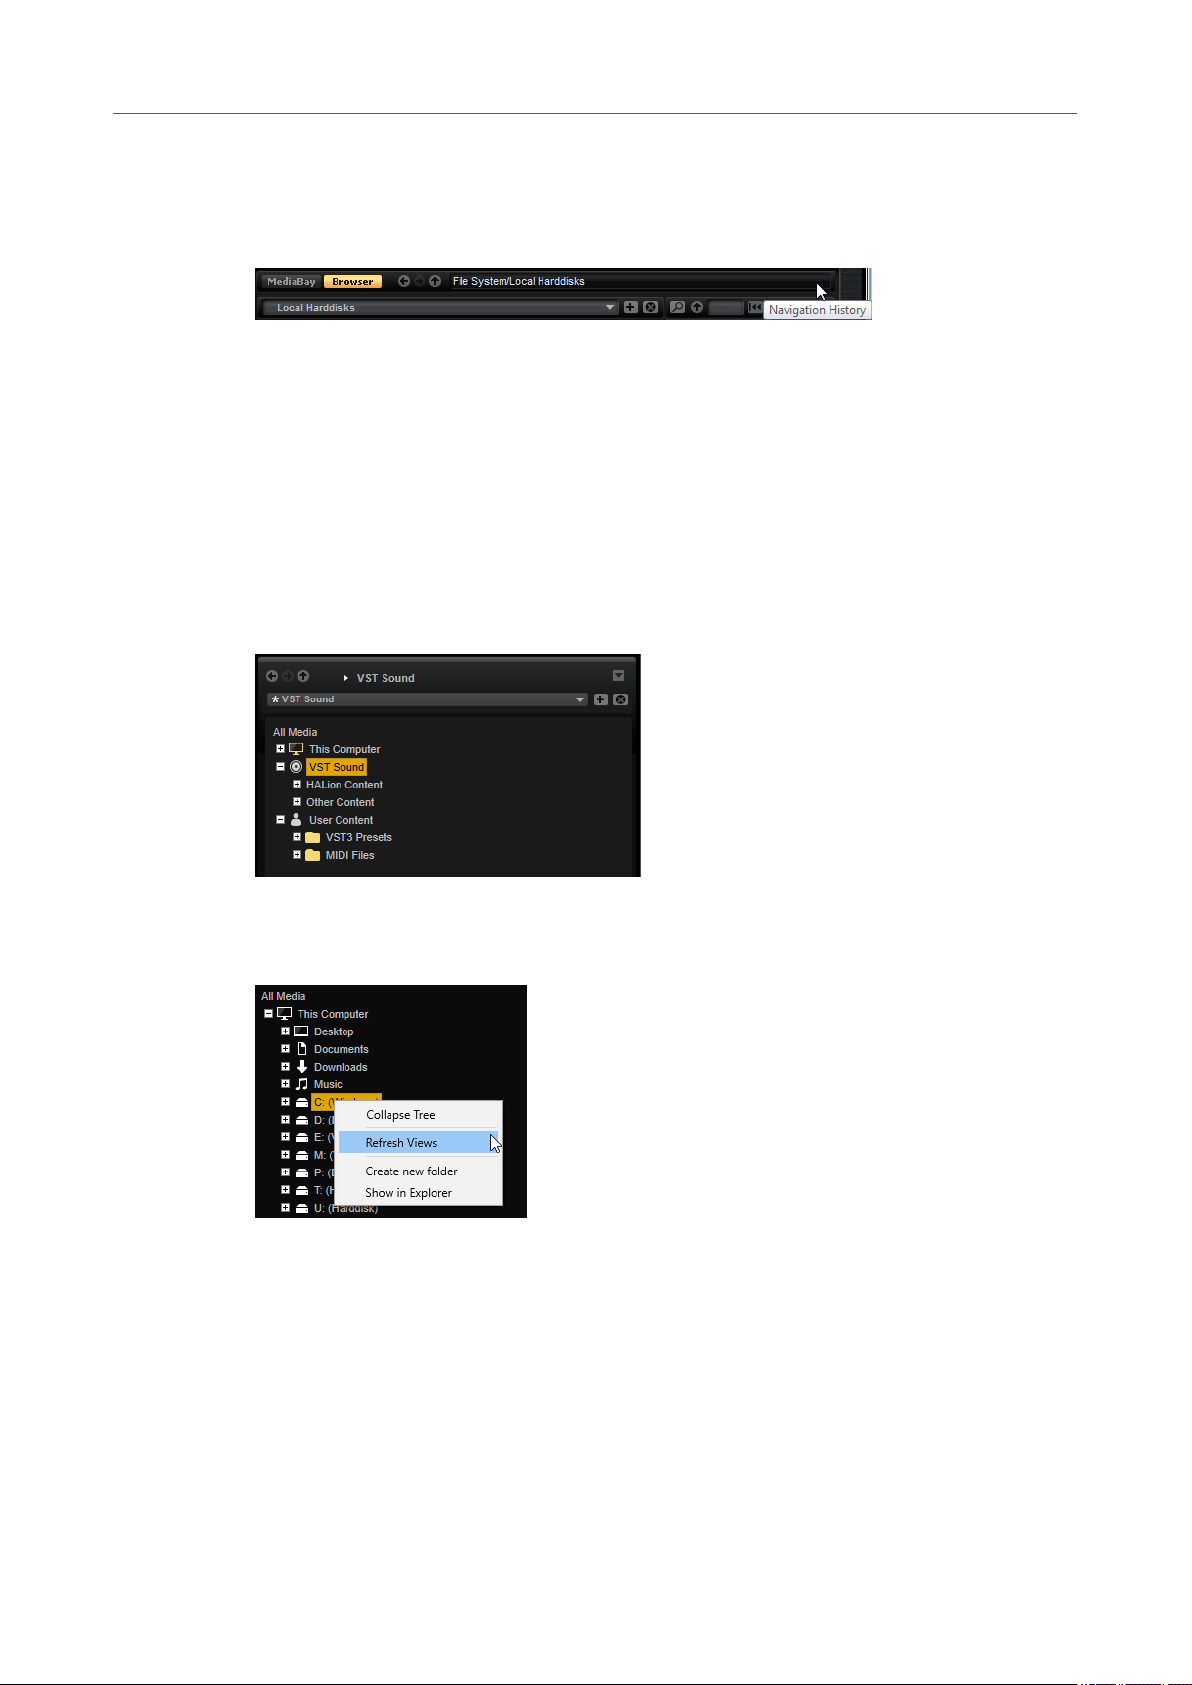
Managing Your Sounds
Managing and Loading Files
● MIDI les.
● Multis and kits.
Path Section
● To step through the recent locations, click the Previous Browse Location/Next Browse
Location buttons.
● To navigate to the folder one level up in the location tree, click the Browse Containing
Folder button.
● The path to the current position in the hierarchy is shown on the right. To navigate to one
of these folders, click its name.
● To open the navigation history, click at the very right of the path eld.
Location Tree
The location tree on the left in the Browser allows you to navigate through your samples, in any
folder on your system. You can even access les contained in VST Sound containers and ISO les.
If you select an entry in the tree, the results list shows the corresponding content.
Location Tree Context Menu
Refresh Views
Updates the tree. This is useful if you added a new disk to your setup or created a
new folder on the hard disk.
Rescan Disk
Rescans the selected element in the tree. The corresponding les are opened, the
information is extracted, and the database le is updated accordingly.
Quick Rescan Disk
Rescans only the folders that have changed since the last scan.
44
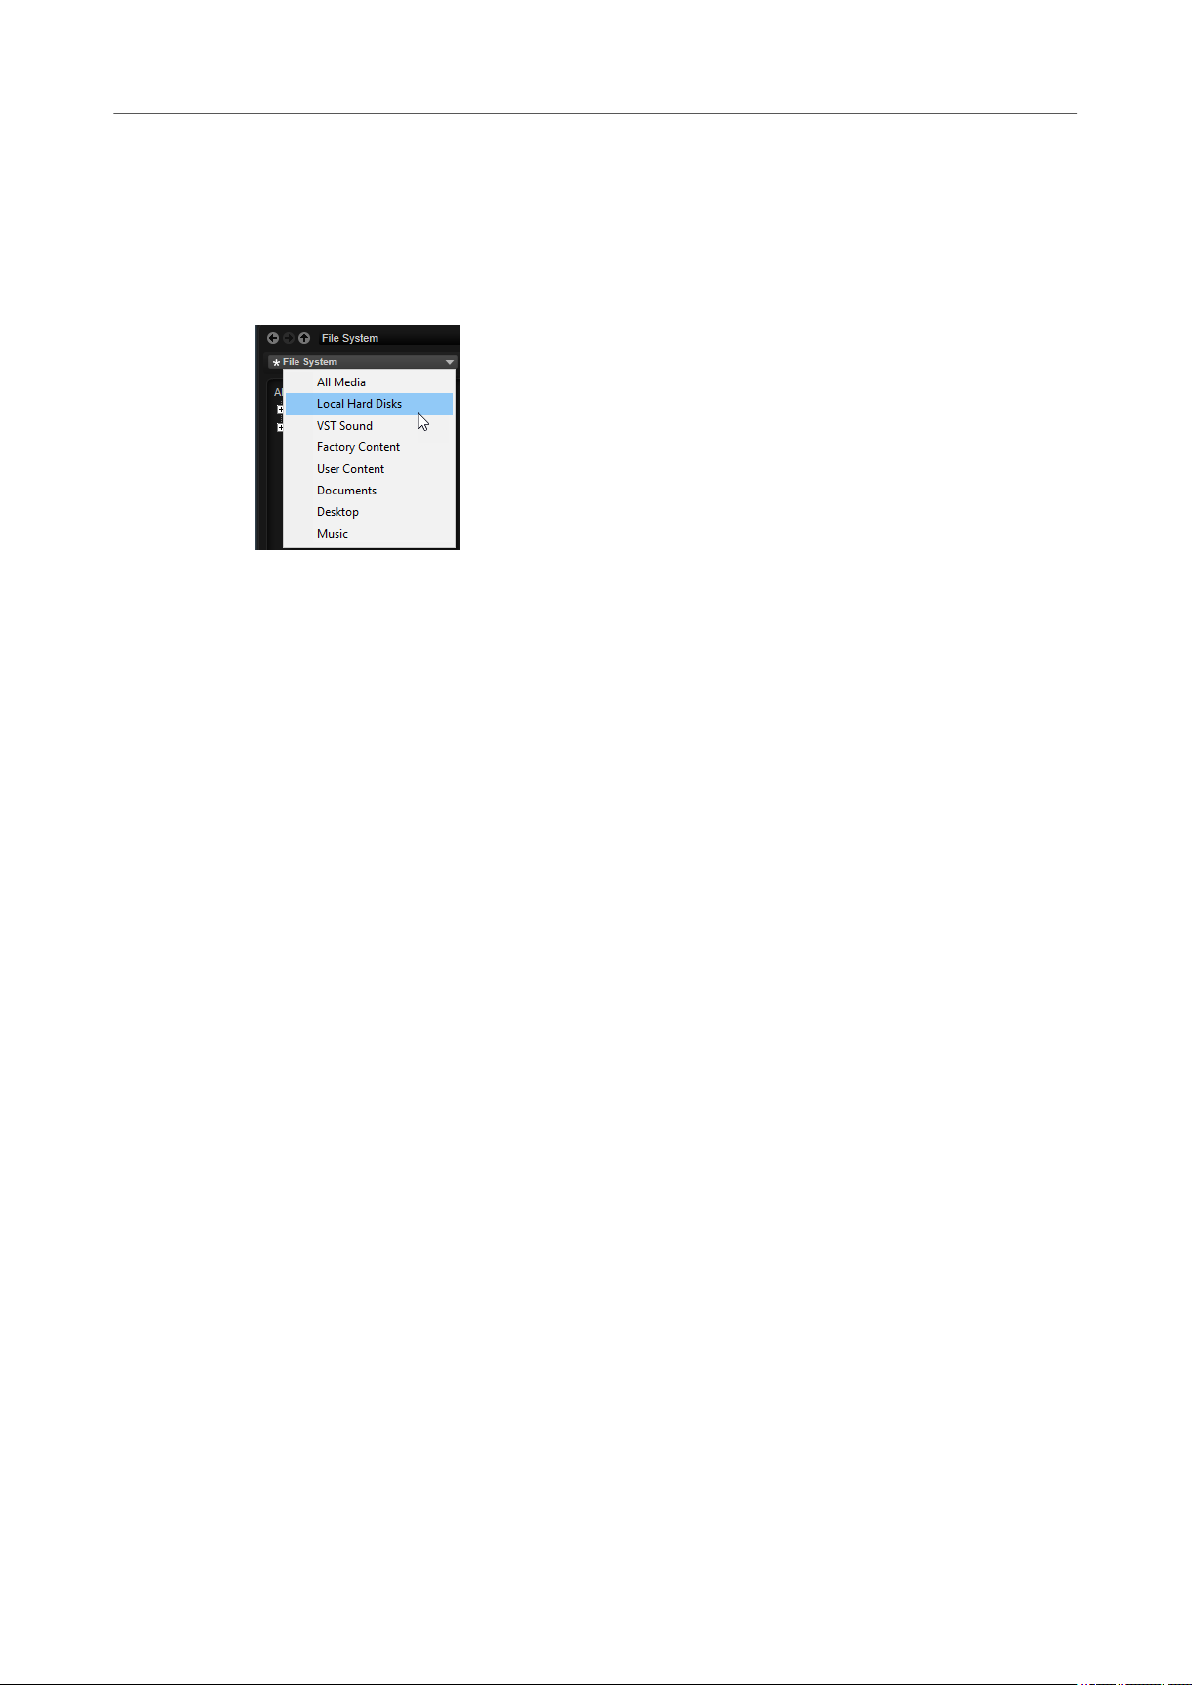
Managing Your Sounds
Managing and Loading Files
Show in Explorer (Win)/Reveal in Finder (Mac)
Shows the location of the selected le on your system.
Locations
Locations are folders or directories on your system that contain media les. By setting up
locations, you can organize the
The text eld above the tree shows the name of the selected folder. If the name is preceded by
an asterisk, the folder has not been saved as a location yet.
les that are available in the results list according to context.
Results List
Managing Locations
● To open the list of favorite locations, click in the text eld.
● To add the current folder to the favorite locations, click Add Selected Media Node as
Favorite Location.
You can keep the folder name or specify a new name for the location.
● To delete the current location from the list, click Remove Favorite Location.
The results list shows the les found in the selected folder. It displays all les that Groove Agent
can read, such as VST presets or samples.
In addition to information like le name and path, the columns in the results list can be
congured to show different attributes.
The results list also shows any subfolders of the selected folder, but does not include the les
contained in the subfolders themselves. To see the content of subfolders, you must select the
corresponding subfolder.
● To open a folder or location, double-click it in the results list.
If you double-click a preset, its contents are shown.
● To move up one level in the folder hierarchy, click Browse Containing Folder.
You can limit the number of results in the results list using the text search function. This way, you
can search for
attributes into account. The value eld in the top right corner indicates the number of les that
match the search text. To clear the search text, click Clear Filter Text.
les with specic names, for example. For presets, the search also takes any
Conguring the Results List
You can specify which le attributes you want to be displayed in the results list and set up the
column order so that this attribute is visible without scrolling. This allows you to nd the les that
have a particular attribute more quickly.
To congure which attributes are shown in the results list, click Set up Result Columns in
●
the upper right corner of the results list and activate the corresponding entries. New
attributes are added at the right of the list.
45
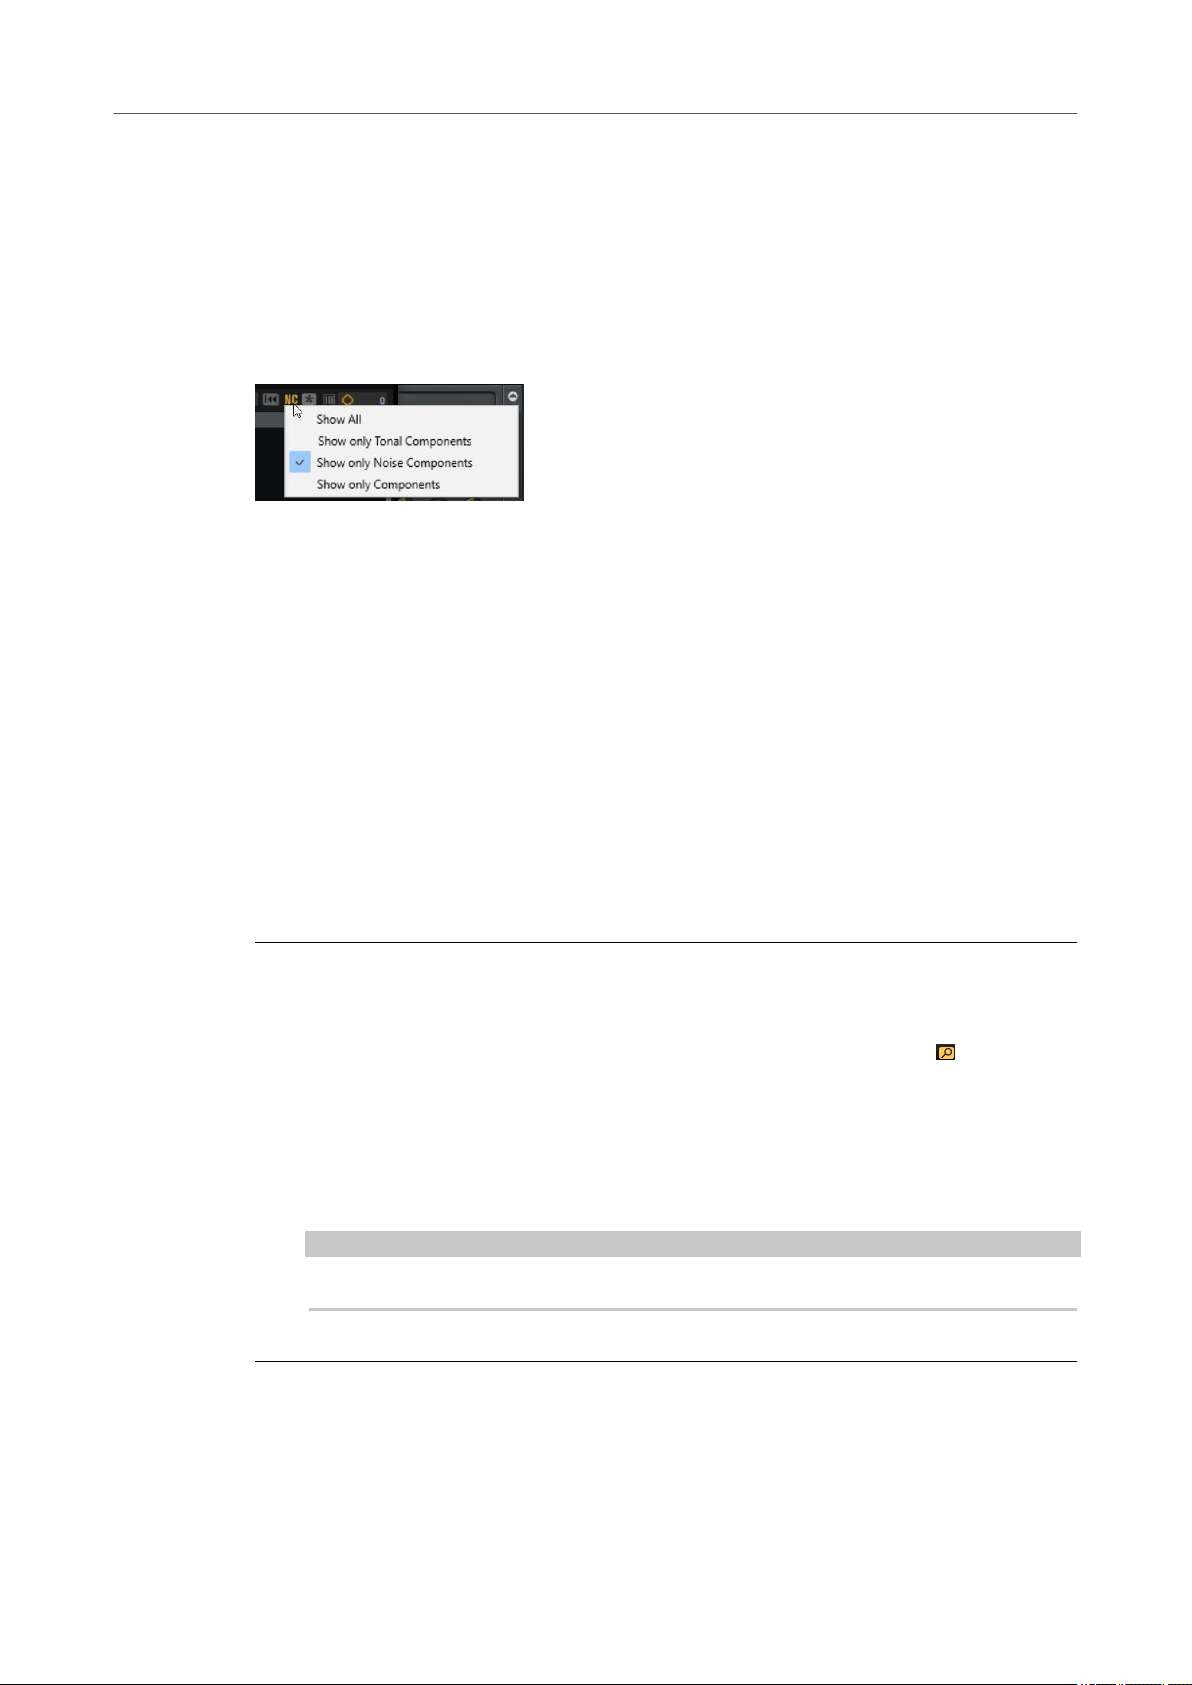
Managing Your Sounds
Managing and Loading Files
● To reorder the columns in the results list, drag the column headers to another position.
● To change the sorting of the list entries, click the column header. The triangle in the
column header shows the sorting direction.
Browsing For Tonal and Noise Samples Created with the Decompose Function
When you want to edit or use your tonal or noise samples, you can lter the results list to show
only these samples.
On the toolbar, click Filter by Sound Component and select an option from the pop-up menu.
Show All Files
If this option is selected, the results list is not ltered.
Show Tonal Components
Displays only the samples containing the tonal component. Those samples have the
extension “_tonal”.
Show Noise Components
Displays only the samples containing the noise component. Those samples have the
extension “_noise”.
Show Components only
Displays both the noise and the tonal sample les.
Searching for Files on Your System
Instead of searching the current results list, you can also use the text search to look for les on
your hard disks or in VST Sound containers.
PROCEDURE
1. Select the location that you want to use as the starting point for the search.
The higher up in the hierarchy the location, the longer the search takes.
2. In the top left corner of the results list, click the Search Location Content button and
enter the search text in the text eld.
3. Optional: Click the button to the right of the search eld to specify whether you want to
search for samples, MIDI patterns, kits, multis, or all types.
4. To start the search, press Return or click Search/Stop Search to the right of the search
text.
The les that match the search criteria are listed in the results list.
NOTE
The maximum of les that can be displayed in the list is 10,000.
5. Double-click a result to show it in the location tree.
46
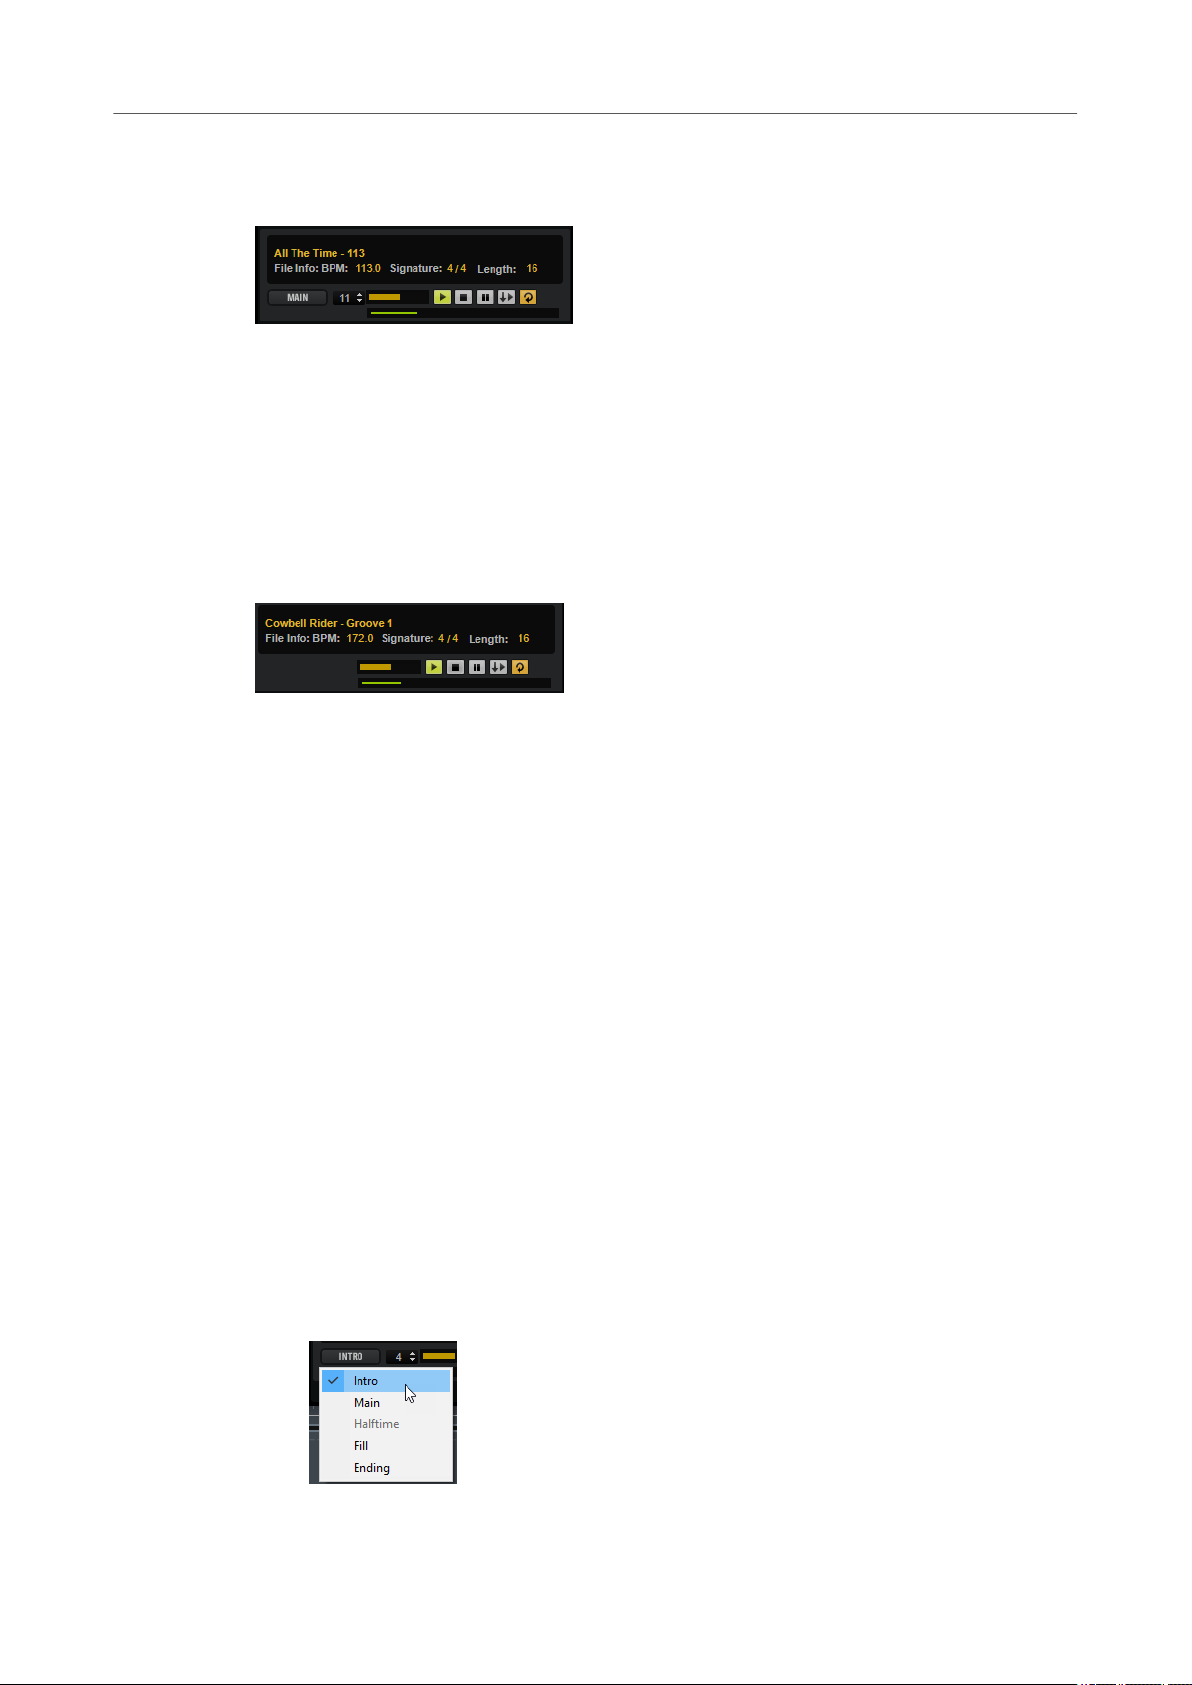
Managing Your Sounds
Managing and Loading Files
File Info Section
The File Info section below the results list shows information about the focused le.
● For MIDI les, the original tempo, signature, and length are shown, as they are saved in
le.
the
● For styles, the signature and length are shown.
● For samples, the length, channels, bit depth, and sample rate are shown. If available, root
key, key, and velocity range are also shown.
Prelisten Section for MIDI Patterns and Styles
The Prelisten section below the results list allows you to listen to the selected MIDI pattern or
style.
For MIDI pattern and style les, the following controls are available:
Level
Adjusts the playback level.
Play
Plays back the focused le.
Stop
Stops playback. The play locator jumps back to the start of the le.
Pause
Pauses playback. Click again to resume playback.
Auto Play
Automatically starts playback of the focused le.
Loop Playback
If this button is activated, the focused le is played back repeatedly.
Play Position
The play position indicator shows the playback position within the focused le. To
select another position for playback, click on the slider or drag the handle.
For styles, the following additional controls are available:
Style Part
Allows you to select a part of the style, such as intro, ll, ending, etc.
47

Managing Your Sounds
Managing and Loading Files
Complexity/Variation
● If the Main part of the style is selected, you can select a complexity.
● If any other part of the style is selected, you can select a variation.
Prelisten Section for Samples
The Prelisten section below the results list allows you to listen to the selected sample.
Level
Adjusts the playback level.
Play
Plays back the focused le.
Stop
Stops playback. The play locator jumps back to the start of the le.
Pause
Pauses playback. Click again to resume playback.
Prelisten in Place
Activates prelistening of the selected sample.
Click the triangle above the button to select a prelisten option.
● If Always is selected, selecting an audio le in the results list always triggers
the sample, regardless of whether a sequence from the host or the internal
pattern player is playing.
● If Auto is selected, selecting an audio le in the results list does not trigger the
sample if a sequence from the host or the internal Style Player or MIDI
Player are playing. This prevents the prelisten samples from being triggered
off the beat. However, the prelisten sample for the pad is replaced and when
the pad is played, the new sample is used.
NOTE
As soon as the sample loses the focus in the results list, the Prelisten function stops
and the original pad content is played again. This allows you to quickly compare two
samples, for example.
Loop Playback
If this button is activated, the focused le is played back repeatedly.
Replace Pad/Focused Sample
Determines whether the sample that is selected for prelistening replaces the entire
pad or the focused sample .
Play Position
The play position indicator shows the playback position within the focused le. To
select another position for playback, click on the slider or drag the handle.
48
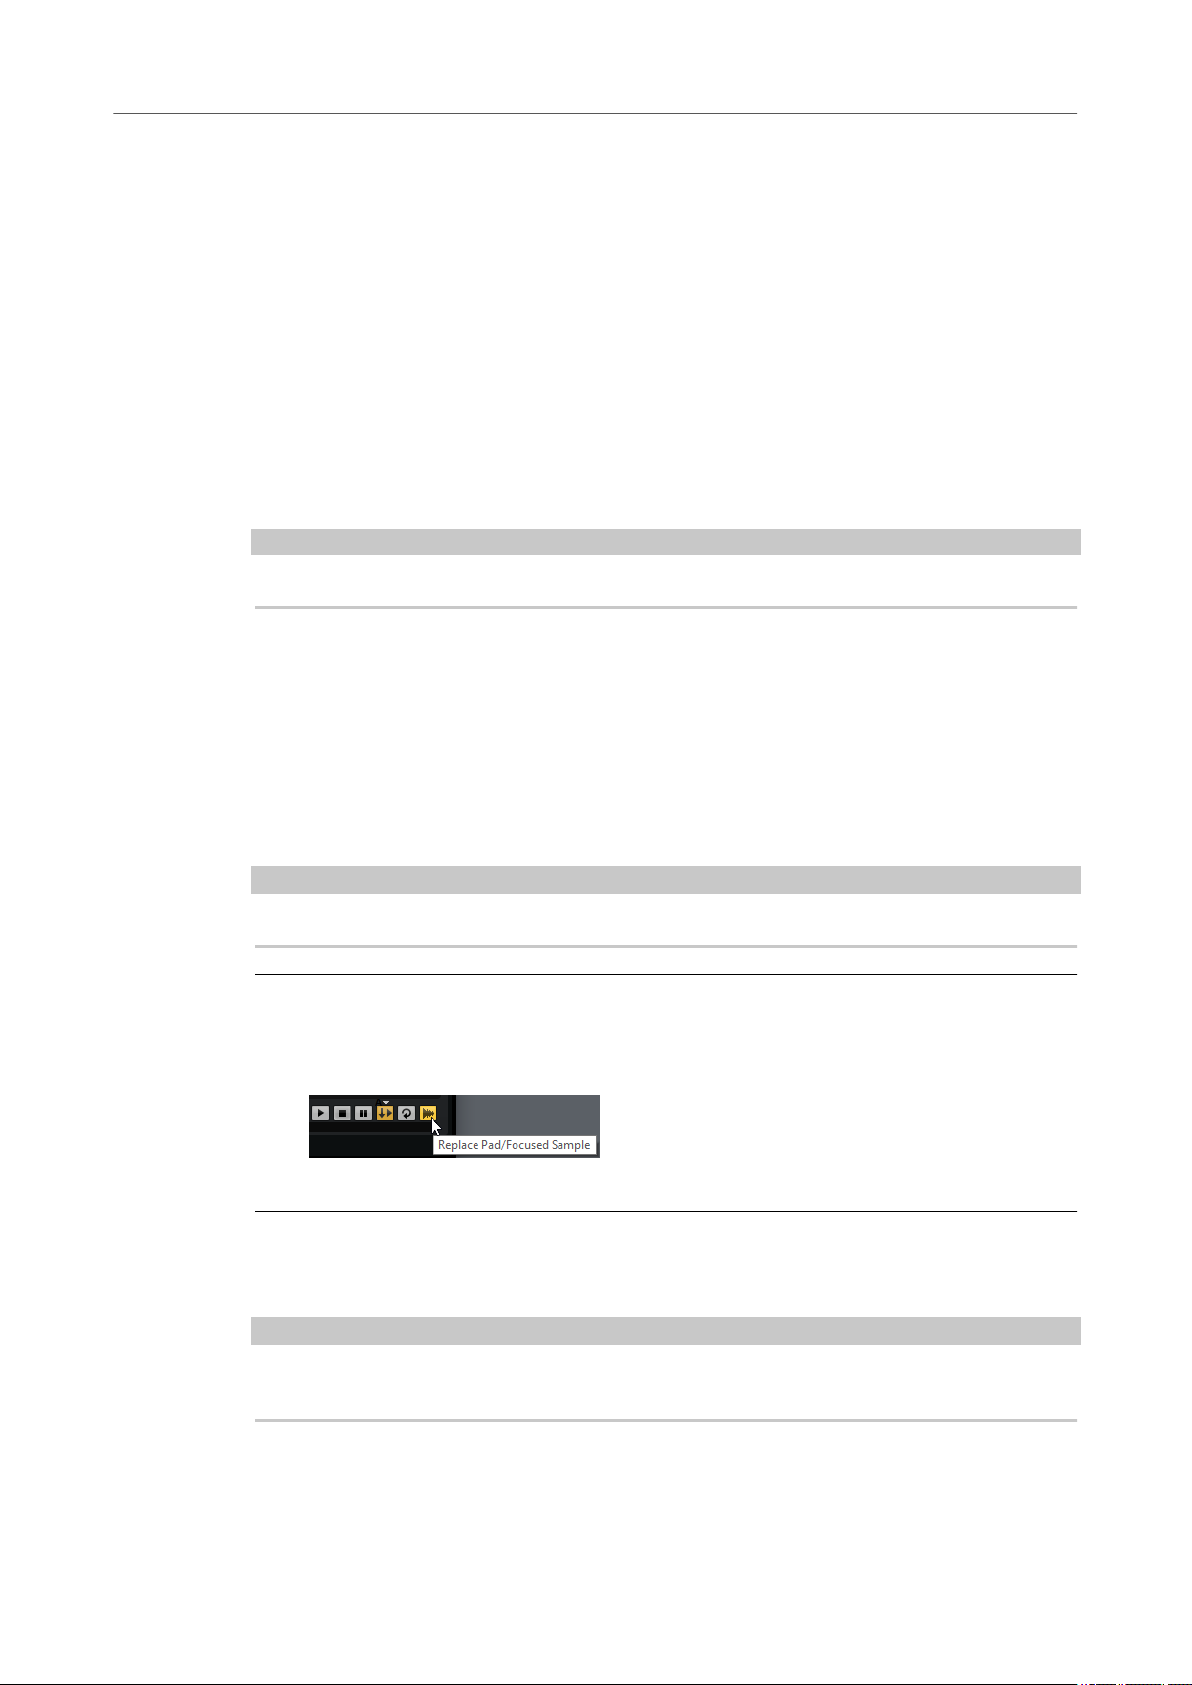
Managing Your Sounds
Managing and Loading Files
Missing Samples
If you browse the samples of a program and you cannot load them or listen to them, they may
have been moved or deleted. In this case, the sample info displays
To remedy this, load the program again and make sure that no samples are missing. Afterwards,
be sure to save the program with the restored sample paths.
RELATED LINKS
Finding Missing Samples on page 134
Loading Files
●
To load the sample that is focused in the results list into the selected instrument pad, use
the key commands Return or L, or double-click the le.
●
To load a kit, drag it from the results list to the kit slot, the kit rack, or onto a pad.
NOTE
This replaces the current samples and resets the sound settings.
Some le types are not supported. In this case, an icon is displayed to indicate that the le
format cannot be loaded.
“Sample not found”.
Protected kits are shown with a lock icon to indicate that you cannot extract single samples.
However, you can load the kit as a whole.
Replacing the Focused Sample
When you load a sample via the Browser, all samples on the selected pad are replaced. But you
can also replace only a specic sample.
NOTE
You can also replace samples that are part of the factory VST Sound content.
PROCEDURE
1. On the Edit page, in the mapping view, select the sample that you want to replace.
2. In the Browser, activate Replace Pad/Focused Sample so that a waveform is displayed on
the button.
3. In the location tree, browse to the new sample and double-click it.
RESULT
The selected sample is replaced with the new sample. All sound settings of the previous sample
are kept.
NOTE
Replace Pad/Focused Sample affects only the loading of samples via double-click or key
commands. It does not affect the loading of samples via drag & drop from the Browser to pads.
49
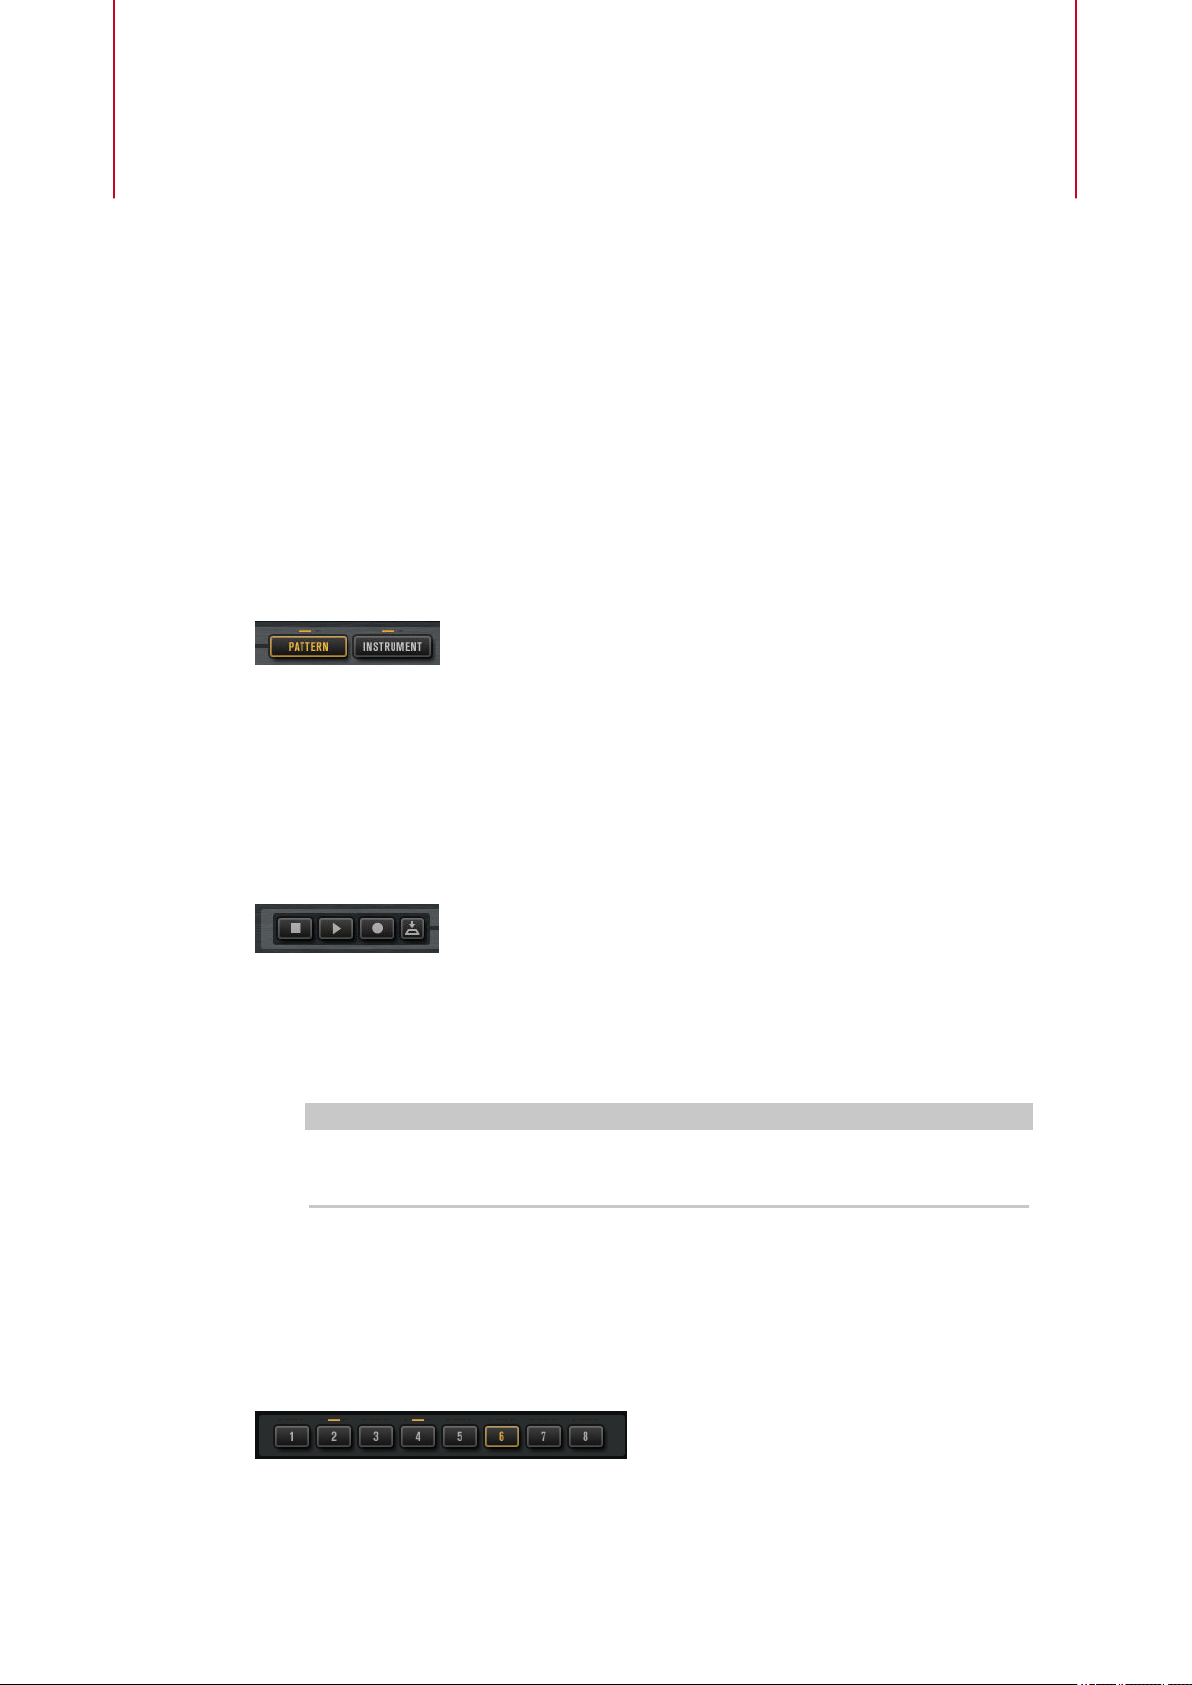
Working With Pads
Groove Agent features two different types of pads: instrument pads and pattern pads.
Instrument pads are used to trigger samples. Pattern pads trigger MIDI drum patterns or styles.
Instrument and pattern pads have multiple functions and can show various information about
the pads. Some pad functions are only available for
clearly stated.
The pad section on the left can show the instrument pads or the pattern pads. To switch between
the instrument pads and the pattern pads, click the corresponding button above the pads.
Pad Section
specic agents. If this is the case, this is
The pad section is located on the left in the plug-in window. It contains the transport controls,
the group buttons, and the pads.
Transport Controls
The transport controls allow you to trigger the focused pattern pad without playing a MIDI note.
Stop
Stops playback of the selected pad.
Start
Starts playback of the selected pad.
NOTE
If you switch between pattern pads during playback, the pattern changes according
to the set
Record
Allows you to record MIDI events live.
Jam Mode
Activates/Deactivates Jam Mode.
Trigger Mode.
Group Buttons
The pad section provides up to 128 pads, organized in eight groups of 16 pads.
50
 Loading…