Вся представленная на сайте информация, касающаяся автомобилей и сервисного
обслуживания, носит информационный характер и не является публичной офертой,
определяемой положениями ст. 437 (2) ГК РФ. Все цены, указанные на данном
сайте, носят информационный характер и являются максимально рекомендуемыми розничными
ценами по расчётам дистрибьютора (ООО «Хендэ Мотор СНГ»). Для получения
подробной информации просьба обращаться к ближайшему официальному дилеру ООО «Хендэ
Мотор СНГ». Опубликованная на данном сайте информация может быть изменена в любое
время без предварительного уведомления.
- Manuals
- Brands
- Hyundai Manuals
- Automobile
- Sonata 2020
- Getting started manual
-
Contents
-
Table of Contents
-
Bookmarks
Quick Links
2020 Hyundai
SONATA
Getting Started Guide
Audio, Connectivity, and Navigation
Related Manuals for Hyundai SONATA 2020
Summary of Contents for Hyundai SONATA 2020
-
Page 1
2020 Hyundai SONATA Getting Started Guide Audio, Connectivity, and Navigation… -
Page 2: Let’s Get Started
Automatic Manual Seat Seat Seat Seat Integ Favorites Connecting a Device Transmission Transmission Adjusting Lumbar Height Recliner Phone Pairing Thanks again for choosing Hyundai! Voice Bluetooth TPMS Battery Window Window Navigation Rear Smart Car Turn Wiper Phone Camera Features Signals…
-
Page 3
Seat Seat Transmission Transmission Adjusting Height Lumbar Smartphone Integ Automatic Transmission T Automatic Manual Transmission Transmission 2020 Hyundai SONATA Navigation Media 1 Fuel Gauge Media 2 Sunroof (if equipped) Seat Automatic Manual Seat • Finding/Setting a Destination Transmission Transmission Adjusting… -
Page 4: Connecting A Device
Connecting a Device Phone Pairing For vehicles equipped with Navigation Navigation Phone Rear Smart Car Turn Wiper Pairing Camera Features Signals The vehicle’s shifter must be in PARK. Bluelink Smartphone Tailgate Custom Integ Favorites Press the SETUP button. DEVICE CONNECTIONS. Then select Select BLUETOOTH®…
-
Page 5
Connecting a Device Phone Pairing Navigation Phone Rear Smart Car Turn Wiper Pairing Camera Features Signals Press NEW. Select your Bluetooth preferences and push OK. Bluelink Smartphone Tailgate Custom Integ Favorites Then turn on your phone’s BLUETOOTH and select the device (Sonata) found by your phone. Your phone may require a PASSKEY. -
Page 6
Connecting a Device Phone Pairing Navigation Phone Rear Smart Car Turn Wiper Pairing Camera Features Signals The vehicle will confirm that your phone has been successfully connected. Bluelink Smartphone Tailgate Custom Integ Favorites Check your phone to allow your vehicle access to your contacts. -
Page 7
Connecting a Device Phone Pairing For vehicles not equipped with Navigation Navigation Phone Rear Smart Car Turn Wiper Pairing Camera Features Signals The vehicle’s shifter must be in PARK. SETUP Press the button. Bluelink Smartphone Tailgate Custom Integ Favorites Press the DEVICE CONNECTIONS icon on the screen. -
Page 8
Connecting a Device Phone Pairing Navigation Phone Rear Smart Car Turn Wiper Pairing Camera Features Signals Your phone may require a PASSKEY. If prompted, enter it into your phone. Bluelink Smartphone Tailgate Custom Integ Favorites The vehicle will confirm that your phone has been successfully connected. -
Page 9: Making A Call
Making a Call (if equipped) Using Voice Commands Before You Start Make sure your phone has been paired and your contacts have been Voice downloaded. If this has not been done, please follow the instructions on Activation the previous pages. If your vehicle is not equipped with navigation, you will need to connect your phone using Android Auto or Apple CarPlay to use this feature.
-
Page 10
Making a Call (if equipped) Using Voice Commands Voice Activation The selected number will be dialed and your contact’s name and phone number will appear on the screen. Automatic To end the call, press the END CALL button located Transmission on the steering wheel. -
Page 11: For Example
Making a Call (if equipped) Common Voice Commands Voice To start voice command, press the PUSH TO TALK Activation button located on the steering wheel. Here are a few common voice commands to use Automatic after your phone has been paired: Transmission “HELP”…
-
Page 12: Smartphone Connection
Smartphone Connection (if equipped) Setting Up Android Auto™/Apple CarPlay® Android Auto and Apple CarPlay allow you to access the most commonly used smartphone features, including Smartphone Integ calling, navigation, text messaging, and playing music all from your driver’s seat. Connect a USB data cable from your phone to the vehicle’s USB data port.
-
Page 13
Smartphone Connection (if equipped) Making a Call Connect a USB data cable from your phone to the vehicle’s Smartphone USB data port. Notice the icon displayed on your screen. Integ Press the PUSH TO TALK button located on the steering wheel and say a command after the beep. For Apple CarPlay, you will see these screens: For Android Auto, you will see these screens: Note… -
Page 14
Smartphone Connection (if equipped) Making a Call Smartphone Integ To end the call, press the END CALL button located on the steering wheel. Note The display, button, and/or icon locations may differ from the images shown. « 14 2020 SONATA Smartphone Connection Table of Contents… -
Page 15
Navigation (if equipped) Finding/Setting a Destination Using Voice Recognition Navigation Rear Smart Car Turn Wiper Camera Features Signals Press the PUSH TO TALK button located on the steering wheel. You will hear a beep. Bluelink Smartphone Tailgate Custom Integ Favorites After the beep, say a command. -
Page 16
Navigation (if equipped) Finding/Setting a Destination Using Voice Recognition Navigation Rear Smart Car Turn Wiper Camera Features Signals The destination route will be displayed on the screen and route guidance will begin. Bluelink Smartphone Tailgate Custom Integ Favorites Press the PUSH TO TALK button located on the ROUTE”… -
Page 17
Navigation (if equipped) Finding/Setting a Destination Using the Search Box Navigation Rear Smart Car Turn Wiper Camera Features Signals The vehicle must be in PARK. Press the button. Bluelink Smartphone Tailgate Custom Integ Favorites Touch the SEARCH box. Enter the address of your destination and press when finished. -
Page 18: Start Guidance
Navigation (if equipped) Finding/Setting a Destination Using the Search Box Navigation Rear Smart Car Turn Wiper Camera Features Signals Confirm the address that you have entered is correct. Bluelink Smartphone Tailgate Custom Integ Favorites The route to your destination will be displayed on the START GUIDANCE screen.
-
Page 19
Navigation (if equipped) Common Voice Commands Navigation Rear Smart Car Turn Wiper To start voice command, press the PUSH TO TALK Camera Features Signals button located on the steering wheel. Bluelink Smartphone Tailgate Custom Integ Favorites Here are a few common voice commands available to use: “HELP”… -
Page 20
Destination Search by Voice Bluelink Smartphone Integ Press the DESTINATION SEARCH BY VOICE button. When prompted, you can say the name of a Point of Interest (POI), an address, or a POI in a city. Example: “FIND COFFEE SHOP IN FOUNTAIN VALLEY, CALIFORNIA.”… -
Page 21: Custom Button
Custom Button Initial Setup/Reassign Feature The Custom Button ( ) can be used to quickly access your Bluelink Smartphone Tailgate Custom favorite feature with just the touch of a button. Integ Favorites Initial Setup CUSTOM BUTTON. Press the Select from the listed options to set as your custom button.
2020 СОНАТА
Hyundai 2020 года
SONATA
Руководство по началу работы
Аудио, подключение и навигация
Hyundai 2020 года
SONATA
Руководство по началу работы
Аудио, подключение и навигация
Добро пожаловать в семью Hyundai!
Это руководство по началу работы содержит простые инструкции, которые помогут вам узнать, как использовать несколько полезных функций, чтобы вы могли начать свой путь к невероятному опыту владения.
Еще раз спасибо за выбор Hyundai!
Это руководство является интерактивным для вашего удобства.
7
Звонок
· Использование голосовых команд · Общие голосовые команды
3 Нажмите ДОБАВИТЬ. Затем включите BLUETOOTH вашего телефона и выберите устройство (Elantra), обнаруженное вашим телефоном.
Примечание. Настройки Bluetooth можно найти в приложении НАСТРОЙКИ на большинстве телефонов. Обратитесь к руководству пользователя вашего телефона или посетите HyundaiBluetooth.com для получения дополнительной информации. * Расположение дисплея, кнопок и / или значков может отличаться от показанного на изображениях.
4 февраля 2020 г.
Подключение устройства
» Оглавление
ttings можно найти в приложении НАСТРОЙКИ на большинстве телефонов. Обратитесь к руководству пользователя или посетите HyundaiBluetooth.com для получения дополнительной информации.
расположение кнопок и / или значков может отличаться от показанного на изображениях.
Подключение устройства
» Оглавление
Щелкните по темам, указанным в разделе Щелкните по ссылкам в примечаниях
Оглавление к
разделы для дополнительных
переходить к разделам.
Информация.
Вернитесь к содержанию на
в любое время.
Давайте начнем «
Содержание
Руководство по началу работы
Аудио, подключение и навигация
4 Подключение устройства · Сопряжение с телефоном
9
Совершение звонка (при наличии)
· Использование голосовых команд · Общие голосовые команды
Hyundai SONATA 2020 года
12
Подключение к смартфону
(при наличии)
· Настройка Android AutoTM / Apple CarPlay®
· Совершение звонка
15
Навигация (если есть)
· Поиск / установка пункта назначения с помощью распознавания голоса
· Поиск / установка пункта назначения с помощью окна поиска
· Общие голосовые команды
20 Blue Link® (при наличии) · Голосовой поиск пункта назначения
21
Пользовательская кнопка
· Первоначальная настройка · Переназначить функцию
3 2020 СОНАТА
Содержание
Подключение устройства
Сопряжение с телефоном
Для автомобилей с навигацией
1
‘ПАРК &’ (‘&) 01’ s &) 34’5 67s4 8 ‘) 9
F
2
НАСТРОЙКА 5’ss 4 & ‘
@ 8744A9F
& ‘9 s’1’04 ПОДКЛЮЧЕНИЯ УСТРОЙСТВF
3
СОЕДИНЕНИЯ BLUETOOTH ‘1’04 BLUETOOTH® @ F и’ 9 C5’sF
Внимание
f ¡¢ toot £ ¤ ¢ tt ¥ ¦§¤ ¨ © ¦ ¢ o¡¦ ¥ ¦ t £ ¢ © o¦ o¤t £ o¦ ¢ ¤! 2 ¢¢ е в
y ‘o¡e £ o¦ ¢ ¤ ow¦ ¢ e ”¤
© ¦¡ © oe v ¥ ¤ ¥ tr # ¡¦ © ¥ f ¡¢ toot £! ¨o
oe
oe ¢ ¥ ¦oe © t ¥ o¦!
y, y B £ ¢ ¥ ¤ © ¡tto¦ $ © ¦% oe ¥ ¨o¦ o¨ © t ¥ o¦¤
© ¥ ¢ e eo
t £ ¢ ¥ © § ¢ ¤ ¤ £ ow¦!
R 2020 СОНАТА
Подключение устройства
» Оглавление
Подключение устройства
Сопряжение с телефоном
4
ДОБАВИТЬ НОВОЕ. sGQcc
iQdQeY yDEG tdEQYDDYI HGQXQGQPeQc
ОК TP` HEcI
p
5
‘BLUETOOTH bIQP YEGP DP yDEG HIDPQ c
ТП` cQdQeY
YIQ `QgVeQ hiDPTYTp XDEP` qy yDEG HIDPQp
6
Y ПАРОЛЬ. DEG HIDPQ STy GQUEVGQ T
WX HGDSHYQ`a QPYQG VY
VPYD yDEG HIDPQp
5 2020 СОНАТА
Подключение устройства
» Оглавление
Подключение устройства
Сопряжение с телефоном
7 Автомобиль подтвердит, что ваш телефон был успешно подключен.
8 Проверьте свой телефон, чтобы разрешить автомобилю доступ к вашим контактам.
Внимание
УФ wxy x yx wxy xwvx wxy yxw df xxg xh
ix xw jy xx xkx xl xkg vk y
· Список контактов может начинаться с имени или фамилии, в зависимости от модели телефона. · Для некоторых телефонов может потребоваться дополнительное подтверждение на устройстве, чтобы разрешить
контакты для синхронизации
6 2020 СОНАТА
Подключение устройства
» Оглавление
Подключение устройства
Сопряжение с телефоном
Для автомобилей без навигации
1
‘ПАРК xzq qzq r rz | qn} r | q {
u
НАСТРОЙКА mnqrr | zq
} || ~ {u
2 Нажмите значок ПОДКЛЮЧЕНИЯ УСТРОЙСТВА * на экране. Затем нажмите ПОДКЛЮЧЕНИЯ BLUETOOTH.
3
ДОБАВИТЬ НОВЫЙ BLUETOOTH mnqrr
u xzq {|} n {~ {~} nz ~ {qr
{rqq | | zq qq ~ {| ~} {~} nz ~ {qu
Внимание
¡¡¢ £ ¤ ¥¥ ¦ ¥ § ¨ ©
‘ª © ¥ «© ¬ ¦ © ¯ª§¦ © ¦ © © ¦§
, wn. ° ¡¥ ª ± ² © ¦ª © © ¦ ¦
7 2020 СОНАТА
Подключение устройства
» Оглавление
Подключение устройства
Сопряжение с телефоном
4
Y PASSKEY ed, введите его ³´µ ¶ · ³¸¹ º »¼ µ¹½´¾µ¹»
¿ÀÁ ¶µ³º¶Â
в свой телефон.
5 Автомобиль подтвердит, что ваш телефон был успешно подключен.
Представленное изображение может отличаться от реального изображения продукта.
6 Автомобиль подтвердит, что загрузка ваших контактов завершена.
Представленное изображение может отличаться от реального изображения продукта.
Примечание. Если ваш телефон поддерживается, ваш список контактов может быть перенесен в ваш автомобиль.
автоматически. В зависимости от марки и модели телефона:
· Некоторые телефоны могут запрашивать разрешение на загрузку контактов; этот процесс займет несколько минут
· Список контактов может начинаться с имени или фамилии, в зависимости от модели телефона.
· На некоторых телефонах может потребоваться дополнительное подтверждение на устройстве, чтобы контакты могли синхронизироваться.
8 2020 СОНАТА
Подключение устройства
» Оглавление
Совершение звонка (при наличии)
Использование голосовых команд
Прежде чем ты начнешь
Убедитесь, что ваш телефон сопряжен и ваши контакты загружены. Если этого не было сделано, следуйте инструкциям на предыдущих страницах. Если ваш автомобиль не оборудован навигацией, вам необходимо подключить телефон с помощью Android Auto или Apple CarPlay, чтобы использовать эту функцию. Дополнительные сведения см. В разделе «Подключение смартфона».
1 Нажмите кнопку PUSH TO TALK *, расположенную на рулевом колесе. Вы услышите звуковой сигнал.
2 После звукового сигнала произнесите команду «ЗВОНИТЬ», а затем имя нужного контакта. Бывшийample: «ПОЗВОНИТЕ ДЖОНУ СМИТУ»
3 Выберите номер, по которому хотите позвонить, произнеся «ОДИН» или «ДВА».
Примечание. * Расположение дисплея, кнопок и / или значков может отличаться от показанного на изображениях.
9 2020 СОНАТА
Звонок
» Оглавление
Совершение звонка (при наличии)
Использование голосовых команд
4 Будет набран выбранный номер, и на экране появятся имя и номер телефона вашего контакта.
5 Чтобы завершить вызов, нажмите кнопку ОТБОЙ * на рулевом колесе.
Примечание. * Расположение дисплея, кнопок и / или значков может отличаться от показанного на изображениях.
10 2020 СОНАТА
Звонок
» Оглавление
Совершение звонка (при наличии)
Общие голосовые команды
Чтобы начать голосовую команду, нажмите кнопку PUSH TO TALK *, расположенную на рулевом колесе.
Вот несколько распространенных голосовых команд, которые можно использовать после сопряжения телефона: «СПРАВКА» предоставляет руководство по командам, которые можно использовать в рамках текущей функции.
Произнесите «ЗВОНИТЬ», чтобы позвонить, а затем произнесите имя сохраненного контакта, с которым вы хотите поговорить. Для бывшегоample: «ПОЗВОНИТЕ ДЖОНУ СМИТУ».
«НАБОР» выполняет вызов, набирая разговорные номера. Для бывшегоample: «НАБЕРИТЕ 1-800-633-5151.»
«ТЕЛЕФОН» дает инструкции по совершению звонка.
«КОНТАКТЫ» отображает экран контактов телефона.
Примечание. Совместимость и производительность могут различаться в зависимости от вашего телефона, программного обеспечения телефона и вашего оператора беспроводной связи. * Расположение дисплея, кнопок и / или значков может отличаться от показанного на изображениях.
11 2020 СОНАТА
Звонок
» Оглавление
Подключение к смартфону (при наличии)
Настройка Android AutoTM / Apple CarPlay®
Android Auto и Apple CarPlay позволяют получить доступ к наиболее часто используемым функциям смартфона, включая звонки, навигацию, обмен текстовыми сообщениями и воспроизведение музыки, прямо с сиденья водителя.
1 Подключите USB-кабель для передачи данных от телефона к USB-порту автомобиля. *
Android-Авто
Apple CarPlay
2 Разрешите своему телефону подключиться к автомобилю.
Android-Авто
Apple CarPlay
3 Наслаждайтесь использованием приложений, отображаемых на мультимедийном экране вашего автомобиля.
Android-Авто
Apple CarPlay
Внимание
Пользователям Android Auto будет предложено view учебник. Выберите свой вариант и продолжайте.
* USB-порт данных обычно находится в передней панели приборной панели или рядом с ней. Обратитесь к руководству по эксплуатации вашего автомобиля, чтобы узнать конкретное место. Для Apple CarPlay требуется кабель для передачи данных для устройства iOS.
Apple CarPlay является зарегистрированным товарным знаком Apple Inc. Android Auto является товарным знаком Google Inc.
12 2020 СОНАТА
Подключение к смартфону
» Оглавление
Подключение к смартфону (при наличии)
Звонок
1 Подключите USB-кабель для передачи данных от телефона к USB-порту автомобиля. * Обратите внимание на значок, отображаемый на вашем экране.
2 Нажмите кнопку PUSH TO TALK ** на рулевом колесе и произнесите команду после звукового сигнала.
3 Для Apple CarPlay вы увидите следующие экраны:
Для Android Auto вы увидите следующие экраны:
Примечание. * USB-порт данных обычно находится в передней панели приборной панели или рядом с ней.
Обратитесь к руководству по эксплуатации вашего автомобиля, чтобы узнать конкретное место.
** Расположение дисплея, кнопок и / или значков может отличаться от показанного на изображениях.
13 2020 СОНАТА
Подключение к смартфону
» Оглавление
Подключение к смартфону (при наличии)
Звонок
4 Чтобы завершить вызов, нажмите кнопку ОТБОЙ * на рулевом колесе.
Примечание. * Расположение дисплея, кнопок и / или значков может отличаться от показанного на изображениях.
14 2020 СОНАТА
Подключение к смартфону
» Оглавление
Навигация (если есть)
Поиск / установка пункта назначения с помощью распознавания голоса
1 Нажмите кнопку PUSH TO TALK *, расположенную на рулевом колесе. Вы услышите звуковой сигнал.
2 После звукового сигнала произнесите команду. Бывшийample: «НАЙТИ КОФЕЙНЫЙ МАГАЗИН».
3 Результаты будут перечислены на экране. Чтобы сделать выбор, произнесите номер позиции. Бывшийample: «ТРИ»
Примечание. * Расположение дисплея, кнопок и / или значков может отличаться от показанного на изображениях.
15 2020 СОНАТА
Навигация
» Оглавление
Навигация (если есть)
Поиск / установка пункта назначения с помощью распознавания голоса
4 Маршрут к месту назначения отобразится на экране, и начнется ведение по маршруту.
5 Нажмите кнопку PUSH TO TALK *, расположенную на рулевом колесе, и произнесите «ОТМЕНА МАРШРУТА» после запроса, чтобы остановить навигацию.
Примечание. * Расположение дисплея, кнопок и / или значков может отличаться от показанного на изображениях.
16 2020 СОНАТА
Навигация
» Оглавление
Навигация (если есть)
Поиск / установка пункта назначения с помощью окна поиска
1 Транспортное средство должно быть в ПАРКЕ. Нажмите кнопку NAV *.
2 Коснитесь поля ПОИСК.
3 Введите адрес места назначения и нажмите OK, когда закончите.
Примечание. * Расположение дисплея, кнопок и / или значков может отличаться от показанного на изображениях.
17 2020 СОНАТА
Навигация
» Оглавление
Навигация (если есть)
Поиск / установка пункта назначения с помощью окна поиска
4 Подтвердите, что адрес, который вы ввели, правильный.
5 На экране отобразится маршрут к пункту назначения. Выберите НАЧАТЬ НАВИГАЦИЮ, чтобы начать свой маршрут.
6 Нажмите кнопку PUSH TO TALK *, расположенную на рулевом колесе, и произнесите «ОТМЕНА МАРШРУТА» после запроса, чтобы остановить навигацию.
Примечание * Расположение дисплея, кнопок и / или значков может отличаться от показанного на изображениях.
18 2020 СОНАТА
Навигация
» Оглавление
Навигация (если есть)
Общие голосовые команды
Чтобы начать голосовую команду, нажмите кнопку PUSH TO TALK *, расположенную на рулевом колесе.
Вот несколько доступных голосовых команд:
«HELP» предоставляет руководство по командам, которые можно использовать в текущей функции.
Скажите «НАЙТИ ”Для поиска адреса и установки его в качестве пункта назначения. Для бывшегоample: «ГЛАВНАЯ УЛИЦА 300 (THREEZERO-ZERO), ФОНТАННАЯ ДОЛИНА».
«НАЙТИ »Выполняет поиск указанной достопримечательности. Для бывшегоample: «НАЙТИ БАНКИ».
«ИДТИ ДОМОЙ / НА РАБОТУ» устанавливает пункт назначения — ваш дом или работа / офис. Ваш домашний или рабочий адрес должен быть указан в навигационной системе.
«ОТМЕНА МАРШРУТА» отменяет маршрут к установленному пункту назначения и выходит из режима навигации.
«ПОЛИЦЕЙСКИЙ УЧАСТОК / БОЛЬНИЦА» отображает список ближайших полицейских участков и больниц.
Примечание. Система будет искать адреса или пункты назначения, расположенные в текущем состоянии, в котором находится транспортное средство. Если вы хотите выполнить поиск в другом состоянии, сначала произнесите название штата.
Совместимость и производительность могут различаться в зависимости от вашего телефона, программного обеспечения телефона и вашего оператора беспроводной связи.
* Расположение дисплея, кнопок и / или значков может отличаться от показанного на изображениях.
19 2020 СОНАТА
Навигация
» Оглавление
Поиск места назначения по голосу
1 Нажмите кнопку ПОИСК НАЗНАЧЕНИЯ ПО ГОЛОСУ *. При появлении запроса вы можете произнести название точки интереса (POI), адрес или POI в городе. Бывшийample: «НАЙТИ КОФЕЙНЫЙ МАГАЗИН В ФОНТАННОЙ ДОЛИНЕ, КАЛИФОРНИЯ».
2 Отобразится список ближайших пунктов назначения, соответствующих вашим критериям поиска. Чтобы сделать выбор, произнесите номер позиции. Бывшийample: Произнесите «ONE», чтобы выбрать первый в списке Starbucks.
3 Маршрут к месту назначения отобразится на экране, и начнется ведение по маршруту.
Внимание
Требуется подписка Blue Link®. Чтобы зарегистрироваться, посетите своего дилера или посетите MyHyundai.com. Все названия продуктов, товарные знаки, логотипы и бренды являются собственностью соответствующих владельцев. Все названия компаний, продуктов, товарных знаков и услуг, используемые в данном документе, используются только в иллюстративных целях.
* Расположение дисплея, кнопок и / или значков может отличаться от показанного на изображениях.
20 2020 СОНАТА
Синяя ссылка
» Оглавление
Пользовательская кнопка
Первоначальная настройка / функция переназначения
Пользовательскую кнопку () можно использовать для быстрого доступа к любимой функции одним нажатием кнопки. Начальная настройка
1 Нажмите ПОЛЬЗОВАТЕЛЬСКУЮ КНОПКУ. *
2 Выберите один из перечисленных вариантов **, чтобы установить его в качестве пользовательской кнопки. Для бывшегоample, выберите ТЕЛЕФОН.
Переназначить функцию
1 Нажмите и удерживайте CUSTOM BUTTON * 2–3 секунды.
2 Выберите один из перечисленных вариантов **, чтобы установить его в качестве пользовательской кнопки. Для бывшегоample, выберите СИНЯЯ ССЫЛКА.
Примечание. * Расположение дисплея, кнопок и / или значков может отличаться от показанного на изображениях.
** Перечисленные варианты могут отличаться от показанного на изображении.
21 2020 СОНАТА
Пользовательская кнопка
» Оглавление
Документы / Ресурсы
Рекомендации
инструкцияHyundai Sonata (2020)

OWNER’S MANUAL
Operation
Maintenance
Specifications
All information in this Owner’s Manual is current at the time
of publication. However, HYUNDAI reserves the right to make
changes at any time so that our policy of continual product
improvement may be carried out.
This manual applies to all HYUNDAI models and includes
descriptions and explanations of optional as well as standard
equipment. As a result, you may find material in this manual
that does not apply to your specific vehicle.
Посмотреть инструкция для Hyundai Sonata (2020) бесплатно. Руководство относится к категории автомобили, 1 человек(а) дали ему среднюю оценку 7.5. Руководство доступно на следующих языках: английский. У вас есть вопрос о Hyundai Sonata (2020) или вам нужна помощь? Задайте свой вопрос здесь
- DN8a HMA 0
- DN8a HMA 1
- DN8a HMA 2
- DN8a HMA 3
- DN8a HMA 4
- DN8a HMA 5
- DN8a HMA 6
- DN8a HMA 7
- DN8a HMA 8
- DN8a HMA Index
Главная
Не можете найти ответ на свой вопрос в руководстве? Вы можете найти ответ на свой вопрос ниже, в разделе часто задаваемых вопросов о Hyundai Sonata (2020).
Как перевести мили в километры?
Где я могу узнать идентификационный номер транспортного средства Hyundai?
Что такое идентификационный номер транспортного средства (VIN)?
Когда транспортному средству Hyundai требуется техническое обслуживание?
Когда следует заменять тормозную жидкость на Hyundai?
В чем разница между топливом E10 и E5?
Одна или несколько дверей не открываются изнутри. Что мне делать?
Автомобильный радиоприемник не включается, что делать?
Инструкция Hyundai Sonata (2020) доступно в русский?
Не нашли свой вопрос? Задайте свой вопрос здесь
![]()
OWNER’S MANUAL
Operation
Maintenance
Specifications
All information in this Owner’s Manual is current at the time of publication. However, HYUNDAI reserves the right to make changes at any time so that our policy of continual product improvement may be carried out.
This manual applies to all HYUNDAI models and includes descriptions and explanations of optional as well as standard equipment. As a result, you may find material in this manual that does not apply to your specific vehicle.

Introduction
CAUTION: MODIFICATIONS TO YOUR HYUNDAI
Your HYUNDAI should not be modified in any way. Such modifications may adversely affect the performance, safety or durability of your HYUNDAI and may, in addition, violate conditions of the limited warranties covering the vehicle. Certain modifications may also be in violation of regulations
established by the U.S. Department of Transportation and other federal or state agencies.
TWO-WAYRADIOORCELLULAR
TELEPHONE INSTALLATION
Your vehicle is equipped with electronic fuel injection and other electronic components. It is possible for an improperly installed/adjusted two-way radio or cellular telephone to adversely affect electronic systems. For this reason, we recommend that you carefully follow the radio manufacturer’s instructions or consult your HYUNDAI dealer for precautionary measures or special instructions if you choose to install one of these devices.
SAFETY AND VEHICLE DAMAGE WARNING
This manual includes information titled as DANGER, WARNING, CAUTION and NOTICE.
titles indicate the following:
DANGER
indicates a hazardous situation which, if not avoided, will result in or serious injury.
WARNING
indicates a hazardous situation which, if not avoided, could result or serious injury.
CAUTION
CAUTION indicates a hazardous situation which, if not avoided, could result in minor or moderate injury.
NOTICE
NOTICE indicates a situation which, if not avoided, could result in vehicle damage.
F2

HYUNDAI VEHICLE OWNER PRIVACY POLICY
Your Hyundai vehicle may be equipped with technologies and services that use information collected, generated, recorded or stored by the vehicle. Hyundai has created a Vehicle Owner Privacy Policy to explain how these technologies and services collect use and share this information.
You may read our Vehicle Owner Privacy Policy on the Hyundaiusa.com website at: https://www.hyundaiusa.com/owner-privacy-policy.aspx
If you would like to receive a hard copy of our Vehicle Owner Privacy Policy, please contact our Customer Connect Center at:
Hyundai Customer Care P.O. Box 20850
Fountain Valley, CA 92728 800-633-5151 consumeraffairs@hmausa.com
Hyundai’s Customer Connect Center representatives are available Monday through Friday,
between the hours of 5:00 AM and 7:00 PM PST and Saturday and Sunday between 6:30 AM and 3:00 PM PST (English).
For Customer Connect Center assistance in Spanish or Korean, representatives are available Monday through Friday between 6:30 AM and 3:00 PM PST.
F3

Table of Contents
Foreword
Vehicle Information
Seats & Safety System
Instrument Cluster
Convenient Features
While Driving
Emergency Situations
Maintenance
Index
1. Foreword
|
………………………………………………………………………………………..Introduction |
1-2 |
||
|
Hyundai Motor America………………………………………………………………………. |
1-2 |
||
|
1 |
|||
|
Guide to Hyundai Genuine Parts |
1-3 |
||
|
How to Use This Manual……………………………………………………………………… |
1-4 |
||
|
………………………………………………………………………………….Safety Messages |
1-4 |
||
|
Fuel Requirements……………………………………………………………………………… |
1-5 |
||
|
Vehicle Modifications………………………………………………………………………….. |
1-7 |
||
|
Vehicle Break-In Process……………………………………………………………………… |
1-7 |
||
|
Vehicle Data Collection and Event Data Recorders………………………………. |
1-8 |

Foreword
INTRODUCTION
Congratulations, and thank you for choosing HYUNDAI. We are pleased to welcome you to the growing number of discerning people who drive HYUNDAIs. We are very proud of the advanced engineering and high-quality construction of each HYUNDAI we build.
Your Owner’s Manual will introduce you to the features and operation of your new HYUNDAI. To become familiar with your new HYUNDAI, so that you can fully enjoy it, read this Owner’s Manual carefully before driving your new vehicle.
This manual contains important safety information and instructions intended to familiarize you with your vehicle’s controls and safety features so you can safely operate your vehicle.
This manual also contains information on maintenance designed to enhance safe operation of the vehicle. It is recommended that all service and maintenance on your car be performed by an authorized HYUNDAI dealer. HYUNDAI dealers are prepared to provide high-quality service, maintenance and any other assistance that may be required.
This Owner’s Manual should be considered a permanent part of your vehicle, and should be kept in the vehicle so you can refer to it at any time. The manual should stay with the vehicle if you sell it to provide the next owner with important operating, safety and maintenance information.
HYUNDAI MOTOR AMERICA
 CAUTION
Severe engine and transmission damage may result from the use of poor quality fuels and lubricants that do not meet HYUNDAI specifications. You must always use high quality fuels and lubricants that meet the specifications listed on Page 2-11 in the Vehicle Specifications section of the Owner’s Manual.
Copyright 2019 HYUNDAI Motor America. All rights reserved. No part of this publication may be reproduced, stored in any retrieval system or transmitted in any form or by any means without the prior written permission of HYUNDAI Motor America.
1-2

01
GUIDE TO HYUNDAI GENUINE PARTS
1.What are HYUNDAI Genuine Parts?
HYUNDAI Genuine Parts are the same parts used by HYUNDAI Motor Company to manufacture vehicles. They are designed and tested for the optimum safety, performance, and reliability for our customers.
2.Why Hyundai Genuine Parts?
HYUNDAI Genuine Parts are engineered and built to meet rigid manufacturing requirements. Damage caused by using imitation, counterfeit or used salvage parts is not covered under the HYUNDAI New Vehicle Limited Warranty or any other HYUNDAI warranty.
In addition, any damage to or failure of HYUNDAI Genuine Parts caused by the installation or failure of an imitation, counterfeit or used salvage part is not covered by any HYUNDAI Warranty.
3.How can you tell if you are purchasing HYUNDAI Genuine Parts?
Look for the HYUNDAI Genuine Parts Logo on the package (see below).
HYUNDAI Genuine Parts exported to the U.S. are packaged with labels written only in English.
HYUNDAI Genuine Parts are only sold through authorized HYUNDAI Dealerships.
1-3

Foreword
HOW TO USE THIS MANUAL
We want to help you get the greatest possible driving pleasure from your vehicle. Your Owner’s Manual can assist you in many ways. To gain an overview of the contents of your Owner’s Manual, use the Table of Contents in the front of the manual. The first page of each Chapter includes a detailed Table of Contents of the topics in that Chapter.
To quickly locate information about your vehicle, use the Index in the back of the manual. It is an alphabetical list of what is in this manual and the page number where it can be found.
For your convenience, we have incorporated tabs on the right-hand page edges. These tabs are coded with the Chapter titles to assist you with navigating through the manual.
SAFETY MESSAGES
Your safety, and the safety of others, is very important. This Owner’s Manual provides you with many safety precautions and operating procedures. This information alerts you to potential hazards that may hurt you or others, as well as cause damage to your vehicle.
Safety messages found on vehicle labels and in this manual describe these hazards and what to do to avoid or reduce the risks.
Warnings and instructions contained in this manual are for your safety. Failure to follow safety warnings and instructions can lead to serious injury or death.
1-4

Throughout this manual DANGER, WARNING, CAUTION, NOTICE and the
ALERT SYMBOL will be used.
This is the safety alert symbol. It is used to alert you to potential physical injury hazards. Obey all safety messages that follow this symbol to avoid possible injury or death. The safety alert symbol precedes the signal words DANGER, WARNING and CAUTION.
DANGER
DANGER indicates a hazardous which, if not avoided, will
in death or serious injury.
WARNING
WARNING indicates a hazardous which, if not avoided, could
in death or serious injury.
CAUTION
CAUTION indicates a hazardous situation which, if not avoided, could result in minor or moderate injury.
NOTICE
NOTICE indicates a situation which, if not avoided, could result in vehicle damage.
01
FUEL REQUIREMENTS
Your new vehicle is designed to obtain maximum performance with UNLEADED FUEL, as well as minimize exhaust emissions and spark plug fouling.
Your new vehicle is designed to use only unleaded fuel having an octane number ((R+M)/2) of 87 (Research Octane Number 91) or higher. (Do not use methanol blended fuels)
NOTICE
To prevent damage to the engine and engine components, never add any fuel system cleaning agents to the fuel tank other than what has been specified.
an authorized HYUNDAI dealer information.
WARNING
•Do not “top off” after the nozzle automatically shuts off when refueling.
•Always check that the fuel cap is installed securely to prevent fuel spillage in the event of an accident.
1-5
![]()
Foreword
Gasoline containing alcohol or methanol
Gasohol, a mixture of gasoline and ethanol (also known as grain alcohol) are being marketed along with or instead
of leaded or unleaded gasoline. For example, “E15” is a gasohol comprised of 15% ethanol and 85% gasoline.
Do not use gasohol containing more than 15% ethanol, and do not use gasoline or gasohol containing any methanol. Either of these fuels may cause drivability problems and damage to the fuel system, engine control system and emission control system.
Discontinue using gasohol of any kind if drivability problems occur.
“E85” fuel is an alternative fuel comprised of 85 percent ethanol and 15 percent gasoline, and is manufactured exclusively for use in Flexible Fuel Vehicles. “E85” is not compatible with your vehicle. Use of “E85” may result in poor engine performance and damage to your vehicle’s engine and fuel system. HYUNDAI recommends that customers do not use fuel with an ethanol content exceeding 15 percent.
NOTICE
To prevent damage to your vehicle’s engine and fuel system:
•Never use gasohol which contains methanol.
•Never use gasohol containing more than 15% ethanol.
•Never use leaded fuel or leaded gasohol.
•Never use “E85” fuel.
Your New Vehicle Limited Warranty does not cover damage to the fuel system or any performance problems caused by the use of “E85” fuel.
Using Fuel Additives (except Detergent Fuel Additives)
Using fuel additives such as: — Silicone fuel additive
— Ferrocene (iron-based) fuel additive — Other metallic-based fuel additives
may result in cylinder misfire, poor acceleration, engine stalling, damage to the catalyst, or abnormal corrosion, and may cause damage to the engine resulting in a reduction in the overall life of the powertrain.
— The Malfunction Indicator Lamp (MIL) may illuminate.
NOTICE
Damage to the fuel system or performance problem caused by the use of these fuels or fuel additives may not be covered by your New Vehicle Limited Warranty.
Gasoline containing MMT
Some gasoline contains harmful manganese-based fuel additives such as MMT (Methylcyclopentadienyl Manganese Tricarbonyl).
HYUNDAI does not recommend the use of gasoline containing MMT.
This type of fuel can reduce vehicle performance and affect your emission control system.
The malfunction indicator lamp on the cluster may come on.
1-6

Detergent Fuel Additives
HYUNDAI recommends that you use good quality gasolines treated with detergent additives such as TOP TIER Detergent Gasoline, which help prevent deposit formation in the engine. These gasolines will help the engine run cleaner and enhance performance of the Emission Control System. For more information on TOP TIER Detergent Gasoline, please go to the website (www. toptiergas.com).
For customers who do not use TOP Tier Detergent Gasoline regularly, and have problems starting or the engine does not run smoothly, detergent-based fuel additives that you can purchase
separately may be added to the gasoline. If TOP TIER Detergent Gasoline is
not available, one bottle of additive added to the fuel tank according to the maintenance schedule is recommended (refer to the Maintenance Schedule in chapter 8).
Additives are available from your authorized HYUNDAI dealer along with information on how to use them. Do not mix other additives.
Operation in foreign countries
If you are going to drive your vehicle in another country, be sure to:
•Observe all regulations regarding registration and insurance.
•Determine that acceptable fuel is available.
01
VEHICLE MODIFICATIONS
•This vehicle should not be modified. Modification of your vehicle could affect its performance, safety or durability and may even violate governmental safety and emissions regulations.
In addition, damage or performance problems resulting from any modification may not be covered under warranty.
•If you use unauthorized electronic devices, it may cause the vehicle to operate abnormally, wire damage, battery discharge and fire. For your safety, do not use unauthorized electronic devices.
VEHICLEBREAK-IN
PROCESS
By following a few simple precautions for the first 600 miles (1,000 km) you may add to the performance, economy and life of your vehicle.
•Do not race the engine.
•While driving, keep your engine speed (rpm, or revolutions per minute) between 2,000 rpm and 4,000 rpm.
•Do not maintain a single speed for long periods of time, either fast or slow. Varying engine speed is needed to properly break-in the engine.
•Avoid hard stops, except in emergencies, to allow the brakes to seat properly.
1-7

Foreword
 WARNING
CALIFORNIA PROPOSITION 65 WARNING
Items contained in motor vehicles or emitted from them are known to the State of California to cause cancer and birth defects or reproductive harm. These include:
•Gasoline and its vapors
•Engine exhaust
•Used engine oil
•Interior passenger compartment components and materials
•Component parts which are subject to heat and wear
In addition, battery posts, terminals and related accessories contain lead, lead compounds and other chemicals known to the State of California to cause cancer and reproductive harm.
For more information go to https://www.p65warnings.ca.gov/ passenger-vehicle
VEHICLE DATA COLLECTION AND EVENT DATA RECORDERS
This vehicle is equipped with an event data recorder (EDR). The main purpose of an EDR is to record, in certain crash or near crash-like situations, such as an air bag deployment or hitting a road obstacle, data that will assist in understanding how a vehicle’s systems performed. The EDR is designed to record data related to vehicle dynamics and safety systems for a short period of time, typically 30 seconds or less. The
EDR in this vehicle is designed to record such data as:
•How various systems in your vehicle were operating;
•Whether or not the driver and passenger safety belts were buckled/ fastened;
•How far (if at all) the driver was depressing the accelerator and/or brake pedal; and,
•How fast the vehicle was traveling.
This data can help provide a better understanding of the circumstances in which crashes and injuries occur. NOTE: EDR data is recorded by your vehicle only if a non-trivial crash situation occurs; no data is recorded by the EDR under normal driving conditions and no personal data (e.g., name, gender, age, and crash location) are recorded. However, other parties, such as law enforcement, could combine the
EDR data with the type of personally identifying data routinely acquired during a crash investigation.
To read data recorded by an EDR, special equipment is required, and access to the vehicle or the EDR is needed. In addition to the vehicle manufacturer, other parties, such as law enforcement, that have the special equipment, can read the information if they have access to the vehicle or the EDR.
1-8
2. Vehicle Information
|
……………………………………………………………………………….Exterior Overview |
2-2 |
||
|
Interior Overview……………………………………………………………………………….. |
2-4 |
||
|
Instrument Panel Overview………………………………………………………………… |
2-5 |
||
|
Engine Compartment…………………………………………………………………………. |
2-6 |
||
|
Dimensions………………………………………………………………………………………… |
2-7 |
||
|
2 |
|||
|
Engine Specification…………………………………………………………………………… |
2-7 |
||
|
Bulb Wattage…………………………………………………………………………………….. |
2-8 |
||
|
Tires and Wheels……………………………………………………………………………….. |
2-9 |
||
|
Volume and Weight…………………………………………………………………………… |
2-10 |
||
|
Air Conditioning System……………………………………………………………………. |
2-10 |
||
|
Recommended Lubricants and Capacities………………………………………….. |
2-11 |
||
|
Recommended SAE Viscosity Number………………………………………………………… |
2-12 |
||
|
Vehicle Identification Number (VIN)…………………………………………………… |
2-13 |
||
|
Vehicle Certification Label…………………………………………………………………. |
2-13 |
||
|
Tire Specification and Pressure Label…………………………………………………. |
2-14 |
||
|
Engine Number…………………………………………………………………………………. |
2-14 |
||
|
Refrigerant Label ……………………………………………………………………………… |
2-15 |

Vehicle Information
EXTERIOR OVERVIEW
Front view
The actual shape may differ from the illustration.
|
ODN8A019001 |
|||||
|
1. |
Hood ……………………………………………… |
5-64 |
5. |
Panoramic sunroof …………………………. |
5-60 |
|
2. |
Headlamp………………………………………. |
8-55 |
6. |
Front windshield wiper blades ………… |
8-29 |
|
3. |
Tires and wheels …………………………….. |
8-34 |
7. |
Windows………………………………………… |
5-56 |
|
4. |
Side view mirror…………………………….. |
5-53 |
2-2
02
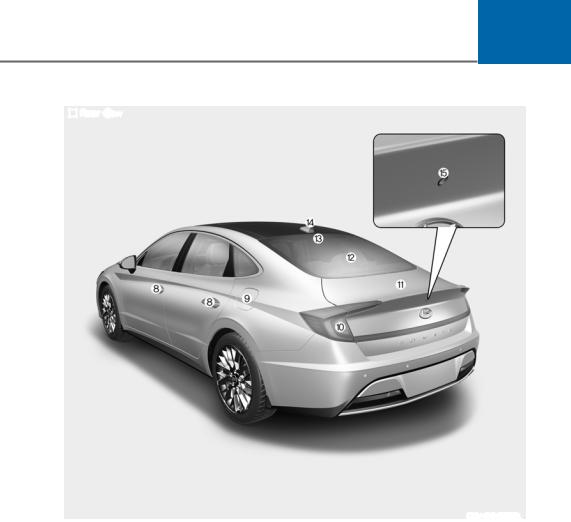
Rear view
The actual shape may differ from the illustration.
|
ODN8019002L |
|||||
|
8. |
Door handle…………………………………….. |
5-31 |
12. |
Defroster……………………………………….. |
5-142 |
|
9. |
Fuel filler door………………………………… |
5-70 |
13. |
High mounted stop lamp…………………. |
8-58 |
|
10. Rear tail lamp…………………………………. |
8-56 |
14. |
Antenna…………………………………………. |
5-152 |
|
|
11. |
Trunk……………………………………………… |
5-65 |
15. |
Rear view camera…………………………… |
5-86 |
2-3

Vehicle Information
INTERIOR OVERVIEW
The actual shape may differ from the illustration.
ODN8A019003
|
1. |
Inside door handle………………………….. |
5-32 |
|
2. |
Seat position memory system………….. |
5-39 |
|
3. |
Side view mirror control switch……….. |
5-54 |
|
4. |
Central door lock switch ………………….. |
5-33 |
|
5. |
Power window switches………………….. |
5-56 |
|
6. |
Power window lock button………………. |
5-59 |
|
7. |
Steering wheel tilt/telescopic lever….. |
5-43 |
|
8. |
Steering wheel……………………………….. |
5-42 |
|
9. |
Instrument panel illumination control |
|
|
switch………………………………………………. |
4-3 |
|
|
10. Idle Stop and Go (ISG) OFF button…… |
6-33 |
|
|
11. |
Lane Keeping Assist system button….. |
6-58 |
|
12. |
Trunk release button……………………….. |
5-65 |
|
13. |
ESC OFF button………………………………. |
6-29 |
|
14. |
EPB (Electronic Parking Brake)………….. |
6-21 |
|
15. |
Hood release lever …………………………. |
5-64 |
2-4

02
INSTRUMENT PANEL OVERVIEW
The actual shape may differ from the illustration.
ODN8019005
|
1. |
Instrument cluster…………………………….. |
4-2 |
|
2. |
Driver’s front air bag……………………….. |
3-39 |
|
3. |
Key ignition switch/ …………………………. |
6-6 |
|
Engine Start/Stop button………………….. |
6-9 |
|
|
4. |
Audio / Video / Navigation system….. |
5-154 |
|
5. |
Hazard warning flasher switch……………. |
7-2 |
|
6. |
Manual climate control system/………. |
5-118 |
|
Automatic climate control system…… |
5-127 |
|
|
7. |
Passenger’s front air bag…………………. |
3-39 |
|
8. |
Glove box………………………………………. |
5-144 |
|
9. |
Transmission shift button…………………. |
6-13 |
|
10. Reverse Parking Distance |
|
|
Warning/………………………………………… |
5-95 |
|
Forward/Reverse Parking Distance |
|
|
Warning system button…………………… |
5-99 |
11.Surround View Monitor system button 5-88
12.Drive mode integrated control system 6-37
|
13. AUTO HOLD……………………………………. |
6-24 |
|
14. Remote Smart Parking Assist (RSPA) |
|
|
system button……………………………….. |
5-104 |
2-5

Vehicle Information
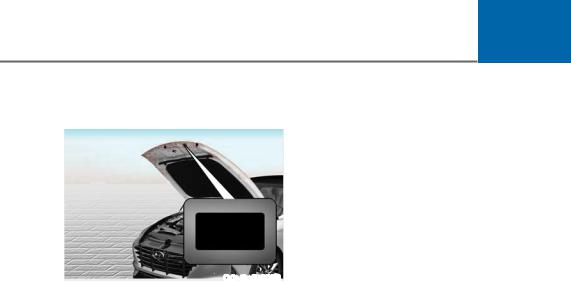
ENGINE COMPARTMENT
Smartstream G1.6 T -GDi
-GDi
Smartstream G2.5 GDi
The actual engine room in the vehicle may differ from the illustration.
|
ODN8089103/ ODN8089048L |
|||||
|
1. |
Engine coolant reservoir |
…………………… 8-21 |
5. |
Engine oil filler cap…………………………… |
8-19 |
|
2. |
Brake fluid reservoir………………………… |
8-24 |
6. |
Windshield washer fluid reservoir…….. |
8-25 |
|
3. |
Air cleaner………………………………………. |
8-26 |
7. |
Fuse box…………………………………………. |
8-46 |
|
4. |
Engine oil dipstick…………………………… |
8-19 |
8. |
Battery……………………………………………. |
8-31 |
2-6

02
DIMENSIONS
|
Items |
in. (mm) |
|||
|
Overall length |
||||
|
192.9 (4,900) |
||||
|
Overall width |
73.2 (1,860) |
|||
|
Overall height |
56.9 (1,445) |
|||
|
205/65 R16 |
64.3 |
(1,633) |
||
|
Front tread |
215/55 R17 |
63.9 |
(1,623) |
|
|
235/45 R18 |
63.7 |
(1,618) |
||
|
205/65 R16 |
64.6 (1,640) |
|||
|
Rear tread |
215/55 R17 |
64.2 (1,630) |
||
|
235/45 R18 |
64.0 |
(1,625) |
||
|
Wheelbase |
111.8 (2,840) |
|||
ENGINE SPECIFICATION
|
Item |
Smartstream G1.6 T-GDi |
Smartstream G2.5 GDi |
|||
|
Displacement |
cu. in. (cc) |
97.08 (1,591) |
152.37 (2,497) |
||
|
Bore x Stroke |
in. (mm) |
3.03 x 3.06 (77 x 85.44) |
3.47 x 4.00 (88.5 x 101.5) |
||
|
Firing order |
1-3-4-2 |
1-3-4-2 |
|||
|
No. of cylinders |
4, in-line |
4, in-line |
|||
2-7
![]()
Vehicle Information
BULB WATTAGE
|
Light bulb |
Bulb type |
Wattage |
|||
|
Headlamp (High/Low) |
LED |
LED |
|||
|
Daytime running lamp (DRL)/ |
LED |
LED |
|||
|
Position lamp |
|||||
|
Front |
|||||
|
Turn signal lamp |
LED |
LED |
|||
|
Side repeater lamp |
LED |
LED |
|||
|
(Outside mirror) |
|||||
|
Stop lamp |
Bulb type |
PY21W |
21 |
||
|
LED type |
LED |
LED |
|||
|
Tail lamp |
LED |
LED |
|||
|
Rear |
|||||
|
Turn signal lamp |
LED |
LED |
|||
|
Back up Lamp |
W16W |
16 |
|||
|
High mounted stop lamp |
LED |
LED |
|||
|
License plate lamp |
W5W |
5 |
|||
|
Map lamp |
Type A |
WEDGE |
10 |
||
|
Type B |
LED |
LED |
|||
|
Interior |
Personal lamp (if equipped) |
LED |
LED |
||
|
Room lamp (if equipped) |
FESTOON |
10 |
|||
|
Vanity mirror lamp |
FESTOON |
5 |
|||
|
Luggage compartment lamp |
FESTOON |
5 |
|||
2-8

02
TIRES AND WHEELS
|
Inflation pressure kPa (psi) |
Wheel lug |
|||||||||||
|
Normal load *1 |
Maximum load |
|||||||||||
|
Wheel |
nut torque |
|||||||||||
|
Item |
Tire Size |
|||||||||||
|
kgf·m |
||||||||||||
|
Size |
||||||||||||
|
Front |
Rear |
Front |
Rear |
(lbf·ft, |
||||||||
|
N·m) |
||||||||||||
|
205/65 R16 |
6.5Jx16 |
240 (35) |
240 (35) |
240 (35) |
240 (35) |
|||||||
|
Full size tire |
215/55 R17 |
7.0Jx17 |
240 (35) |
240 (35) |
240 (35) |
240 (35) |
||||||
|
235/45 R18 |
7.5Jx18 |
240 (35) |
240 (35) |
240 (35) |
240 (35) |
11~13 |
||||||
|
Compact |
T125/80 D16 |
4Tx16 |
420 (60) |
420 (60) |
420 (60) |
420 (60) |
(79~94, |
|||||
|
107~127) |
||||||||||||
|
spare tire |
T135/80 D17 |
4Tx17 |
420 (60) |
420 (60) |
420 (60) |
420 (60) |
||||||
|
(if equipped) |
||||||||||||
|
T135/80 D18 |
4Tx18 |
420 (60) |
420 (60) |
420 (60) |
420 (60) |
|||||||
*1 : Normal load: Up to 3 persons
NOTICE
•It is permissible to add 3 psi to the standard tire pressure specification if colder temperatures are expected soon.
Tires typically lose 1psi (7kPa) for every 12°F temperature drop. If extreme temperature variations are expected, recheck your tire pressure as necessary to keep them properly inflated.
•Tire inflation pressures will vary with changes in elevation. If driving in areas of higher or lower elevation, be sure to check and adjust for proper tire inflation.
 CAUTION
•When replacing tires, use the same size originally supplied with the vehicle. Using tires of a different size can damage the related parts or not work properly.
•When replacing tires, ALWAYS use the same size, type, construction and tread pattern supplied with the vehicle for all tires.
2-9
Vehicle Information
VOLUME AND WEIGHT
|
Items |
Smartstream G1.6 T-GDi |
Smartstream G2.5 GDi |
||
|
A/T |
A/T |
|||
|
Gross vehicle weight |
lbs. (kg) |
4354 (1975) |
||
|
Luggage volume (SAE) |
cu ft (ℓ) |
16 (453) |
||
|
A/T : Automatic Transmission |
||||
|
AIR CONDITIONING SYSTEM |
|
Item |
Weight of Volume |
Classification |
|
|
Refrigerant |
Smartstream G1.6 T-GDi |
17.6±0.88 (500±25) |
R-1234yf |
|
oz. (g) |
Smartstream G2.5 GDi |
18.3±0.88 (520±25) |
R-1234yf |
|
Compressor lubricant |
32.8±0.35 (80±10) |
PAG (FD46XG) |
|
|
oz. (g) |
|||
|
Contact an authorized HYUNDAI dealer for more details. |
2-10

02
RECOMMENDED LUBRICANTS AND CAPACITIES
To help achieve proper engine and powertrain performance and durability, use only lubricants of the proper quality. The correct lubricants also help promote engine efficiency that results in improved fuel economy.
These lubricants and fluids are recommended for use in your vehicle.
|
Lubricant |
Volume |
Classification |
||
|
Engine oil *1 *2 |
Smartstream |
|||
|
(drain and refill) |
4.76 US qt. (4.5 ℓ) |
API Lastest (SN PLUS) *3 |
||
|
G1.6 T-GDi |
||||
|
Smartstream |
5.49 US qt. (5.2 ℓ) |
API Lastest (SN PLUS) *3 |
||
|
G2.5 GDi |
||||
|
MICHANG ATF SP-IV, SK ATF SP IV, |
||||
|
NOCA ATF SP-IV, S-oil ATF SP-IV |
||||
|
Automatic transmission fluid |
6.89 US qt. (6.5ℓ) |
HYUNDAI genuine ATF SP-IV |
||
|
or other brands meeting the |
||||
|
above specification approved by |
||||
|
HYUNDAI Motor Co. |
||||
|
Smartstream |
4.76 US qt. (4.5 ℓ) |
Mixture of antifreeze and distilled |
||
|
Coolant |
G1.6 T-GDi |
|||
|
water (Ethylene glycol base |
||||
|
Smartstream |
||||
|
5.49 US qt. (5.2 ℓ) |
coolant for aluminum radiator) |
|||
|
G2.5 GDi |
||||
|
Brake fluid *4 |
0.74 ~ 0.85 US qt. |
DOT-4 |
||
|
(0.7 ~ 0.8 ℓ) |
||||
|
15.85 US gal. (60 ℓ) |
||||
|
Fuel |
14.79 US gal. (56 ℓ) |
Refer to “Fuel requirements” in |
||
|
(for ECO package |
chapter 1. |
|||
|
model) |
Refer to the recommended SAE viscosity numbers on page 12.
Engine oils labeled Energy Conserving Oil are now available. Along with other additional benefits, they contribute to fuel economy by reducing the amount of fuel necessary
to overcome engine friction. Often, these improvements are difficult to measure in everyday driving, but in a year’s time, they can offer significant cost and energy savings.
If the recommended engine oil is not available in your country, you are able to use API SL/ILSAC GF-3 or ACEA A3.
To maintain the best braking performance and ABS/ESC performance, we recommend that you use genuine brake fluid that conform to specifications. (Standard : SAE J1704 DOT-4 LV, ISO4925 CLASS-6 and FMVSS 116 DOT-4)
2-11

Vehicle Information
Recommended SAE Viscosity
Number
 CAUTION
Always be sure to clean the area around any filler plug, drain plug, or dipstick before checking or draining any lubricant. This is especially important in dusty or sandy areas and when the vehicle is used on unpaved roads. Cleaning the plug and dipstick areas will prevent dirt and grit from entering the engine and other mechanisms that could be damaged.
Engine oil viscosity (thickness) has an effect on fuel economy and cold weather operating (engine start and engine oil flowability). Lower viscosity engine oils can provide better fuel economy and cold weather performance, however, higher viscosity engine oils are required for satisfactory lubrication in hot weather.
Using oils of any viscosity other than those recommended could result in engine damage.
When choosing an oil, consider the range of temperature your vehicle will be operated in before the next oil change. Proceed to select the recommended oil viscosity from the chart.
Temperature Range for SAE Viscosity Numbers
|
Temperature |
°C |
-30 -20 |
-10 |
0 |
10 |
20 |
30 |
40 |
50 |
||
|
(°F) |
-10 0 |
20 |
40 |
60 |
80 |
100 |
120 |
||||
|
Engine Oil |
10W-30 |
||||||||||
|
0/5W-20, 0/5W-30 |
|||||||||||
*1 : For better fuel economy, it is recommended to use the engine oil of a viscosity grade 0W-20 (API Latest
(SN PLUS)). However, if the engine oil is not available in your country, select the proper engine oil using the engine oil viscosity chart.
2-12

VEHICLE IDENTIFICATION
NUMBER(VIN)
Frame number
ODN8019020
The vehicle identification number (VIN) is the number used in registering your car and in all legal matters pertaining to its ownership, etc.
The number is punched on the floor under the passenger seat.
VIN label
ODN8019026L
The VIN is also on a plate attached to the top of the dashboard. The number on the plate can easily be seen through the windshield from outside.
02
VEHICLE CERTIFICATION LABEL
ODN8019021
The vehicle certification label attached on the driver’s side center pillar gives the Vehicle Identification Number (VIN).
2-13

Vehicle Information
|
TIRE SPECIFICATION AND |
ENGINE NUMBER |
|
|
PRESSURE LABEL |
ODN8H019025L
The tires supplied on your new vehicle are chosen to provide the best performance for normal driving.
The tire label located on the driver’s side center pillar gives the tire pressures recommended for your car.
ODN8019022
The engine number is stamped on the engine block as shown in the drawing.
2-14
02
REFRIGERANT LABEL
(IFEQUIPPED)
ODN8A079026
The refrigerant label provides information such as refrigerant type and amount. (R-1234yf)
2-15

3.Seats & Safety System
This chapter provides you with important information about how to protect yourself and your passengers. It explains how to properly use your seats and seat belts, and how your air bags work. Additionally, this chapter explains how to properly restrain infants and children in your vehicle.
|
Important Safety Precautions …………………………………………………………….. |
3-2 |
|
Always Wear Your Seat Belt…………………………………………………………………………. |
3-2 |
|
Restrain All Children……………………………………………………………………………………. |
3-2 |
|
Air Bag Hazards ………………………………………………………………………………………….. |
3-2 |
|
Driver Distraction ……………………………………………………………………………………….. |
3-2 |
|
Control Your Speed …………………………………………………………………………………….. |
3-2 |
|
Keep Your Vehicle in Safe Condition…………………………………………………………….. |
3-2 |
|
Seats ………………………………………………………………………………………………… |
3-3 |
||
|
3 |
|||
|
Safety Precautions ……………………………………………………………………………………… |
3-4 |
||
|
Front Seats…………………………………………………………………………………………………. |
3-5 |
||
|
Rear Seats …………………………………………………………………………………………………. |
3-10 |
||
|
Head Restraints ………………………………………………………………………………………….. |
3-11 |
||
|
Seat Warmers and Air Ventilation Seats ………………………………………………………. |
3-15 |
||
|
Seat Belts…………………………………………………………………………………………. |
3-19 |
||
|
Seat Belt Safety Precautions ………………………………………………………………………. |
3-19 |
||
|
Seat Belt Warning Light …………………………………………………………………………….. |
3-20 |
||
|
Seat Belt Restraint System …………………………………………………………………………. |
3-21 |
||
|
Additional Seat Belt Safety Precautions ……………………………………………………… |
3-26 |
||
|
Care of Seat Belts……………………………………………………………………………………… |
3-28 |
||
|
Child Restraint System (CRS)……………………………………………………………. |
3-29 |
||
|
Children Always in the Rear……………………………………………………………………….. |
3-29 |
||
|
Selecting a Child Restraint System (CRS)……………………………………………………. |
3-30 |
||
|
Installing a Child Restraint System (CRS) …………………………………………………….. |
3-31 |
||
|
Air Bag — Advanced Supplemental Restraint System ………………………….. |
3-37 |
||
|
Where Are the Air Bags? ……………………………………………………………………………. |
3-39 |
||
|
How Does the Air Bag System Operate?……………………………………………………… |
3-42 |
||
|
What to Expect After an Air Bag Inflates …………………………………………………….. |
3-46 |
||
|
Occupant Classification System (OCS)……………………………………………………….. |
3-47 |
||
|
Why Didn’t My Air Bag Go Off in a Collision? ………………………………………………. |
3-52 |
||
|
SRS Care ………………………………………………………………………………………………….. |
3-56 |
||
|
Additional Safety Precautions ……………………………………………………………………. |
3-57 |
||
|
Air Bag Warning Labels……………………………………………………………………………… |
3-57 |

Seats & Safety System
IMPORTANT SAFETY PRECAUTIONS
You will find many safety precautions and recommendations throughout this section, and throughout this manual. The safety precautions in this section are among the most important.
Always Wear Your Seat Belt
A seat belt is your best protection in all types of accidents. Air bags are designed to supplement seat belts, not replace them. So even though your vehicle is equipped with air bags, ALWAYS make sure you and your passengers wear your seat belts, and wear them properly.
Restrain All Children
All children under age 13 should ride in your vehicle properly restrained in a
rear seat, not the front seat. Infants and small children should be restrained in an appropriate child restraint. Larger children should use a booster seat with the lap/shoulder belt until they can use the seat belt properly without a booster seat.
Air Bag Hazards
While air bags can save lives, they can also cause serious or fatal injuries to occupants who sit too close to them, or who are not properly restrained. Infants, young children, and shorter adults are at the greatest risk of being injured by an inflating air bag. Follow all instructions and warnings in this manual.
Driver Distraction
Driver distraction presents a serious and potentially deadly danger, especially for inexperienced drivers. Safety should be the first concern when behind the wheel, and drivers need to be aware of the wide array of potential distractions, such as drowsiness, reaching for objects, eating, personal grooming, other passengers, and using cellular phones.
Drivers can become distracted when they take their eyes and attention off the road or their hands off the wheel to focus on activities other than driving. To reduce your risk of distraction or getting into an accident:
•ALWAYS set up your mobile devices (i.e., MP3 players, phones, navigation units, etc.) when your vehicle is parked or safely stopped.
•ONLY use your mobile device when allowed by laws and when conditions permit safe use. NEVER text or email while driving. Most states have laws prohibiting drivers from texting. Some states and cities also prohibit drivers from using handheld phones.
•NEVER let the use of a mobile device distract you from driving. You have a responsibility to your passengers and others on the road to always drive safely, with your hands on the wheel as well as your eyes and attention on the road.
Control Your Speed
Excessive speed is a major factor in crash injuries and deaths. Generally, the higher the speed, the greater the risk, but serious injuries can also occur at lower speeds. Never drive faster than is safe for current conditions, regardless of the maximum speed posted.
Keep Your Vehicle in Safe Condition
Having a tire blowout or a mechanical failure can be extremely hazardous. To reduce the possibility of such problems, check your tire pressures and condition frequently, and perform all regularly scheduled maintenance.
3-2
![]()
03
SEATS
|
Driver’s Side |
Passenger’s Side |
|
• Manual |
• Manual |
The actual layout of the vehicle may differ from the illustration.
ODN8A039001
|
Front seats |
Rear seats |
||
|
(1) |
Forward and rearward |
(6) |
Armrest |
|
(2) |
Seatback angle |
(7) |
Seatback folding |
(3)Seat cushion height
(4)Seat cushion angle
(5)Lumbar support
3-3

Seats & Safety System
Safety Precautions
Adjusting the seats so that you are sitting in a safe, comfortable position plays an important role in driver and passenger safety together with the seat belts and air bags in an accident.
 WARNING
Do not use a cushion that reduces friction between the seat and the passenger. The passenger’s hips may slide under the lap portion of the seat belt during an accident or a sudden stop. Serious or fatal internal injuries could result because the seat belt cannot operate properly.
Air bags
You can take steps to reduce the risk of being injured by an inflating air bag. Sitting too close to an air bag greatly increases the risk of injury in the event the air bag inflates.
The National Highway Traffic Safety Administration (NHTSA) recommends that drivers allow at least 10 inches (25 cm) between the center of the steering wheel and their chest.
 WARNING
To reduce the risk of serious injury or death from an inflating air bag, take the following precautions:
•Adjust the driver’s seat as far to the rear as possible while maintaining the ability to maintain full control of the vehicle.
•Adjust the front passenger seat as far to the rear as possible.
•Hold the steering wheel by the rim with hands at the 9 o’clock and 3 o’clock positions to minimize the risk of injuries to your hands and arms.
•NEVER place anything or anyone between the steering wheel and the air bag.
•Do not allow the front passenger to place feet or legs on the dashboard to minimize the risk of leg injuries.
Seat belts
Always fasten your seat belt before starting any trip.
At all times, passengers should sit upright and be properly restrained. Infants and small children must be restrained in appropriate child restraint systems. Adults and children who have outgrown a booster seat must be restrained using the seat belts.
 WARNING
Take the following precautions when adjusting your seat belt:
•NEVER use one seat belt for more than one occupant.
•Always position the seatback upright with the lap portion of the seat belt snug and low across the hips.
•NEVER allow children or small infants to ride on a passenger’s lap.
•Do not route the seat belt across your neck, across sharp edges, or reroute the shoulder strap away from your body.
•Do not allow the seat belt to become caught or jammed.
3-4

03
Front Seats
 WARNING
Take the following precautions when adjusting your seat:
•NEVER attempt to adjust the seat while the vehicle is moving. The seat could respond with unexpected movement and may cause loss
of vehicle control resulting in an accident.
•Do not place anything under the front seats. Loose objects in the driver’s foot area could interfere with the operation of the foot pedals, causing an accident.
•Do not allow anything to interfere with the normal position and proper locking of the seatback.
•Do not place a cigarette lighter on the floor or seat. When you operate the seat, gas may exit out of the lighter causing a fire.
•Use extreme caution when picking up small objects trapped under the seats or between the seat and the center console. Your hands might be cut or injured by the sharp edges of the seat mechanism.
•If there are occupants in the rear seats, be careful while adjusting the front seat position.
•Make sure that the seat is locked in place after the adjustment. If not, the seat might move unexpectedly resulting in an accident.
 CAUTION
To prevent injury:
•Do not adjust your seat while wearing your seat belt. Moving the seat cushion forward may cause strong pressure on your abdomen.
•Do not allow your hands or fingers to get caught in the seat mechanisms while the seat is moving.
Manual adjustment (if equipped)
The front seat can be adjusted by using the levers located on the outside of the seat cushion. Before driving, adjust the seat to the proper position so that you can easily control the steering wheel, foot pedals and controls on the instrument panel.
ODN8039002
Forward and rearward adjustment
To move the seat forward or rearward:
1.Pull up the seat slide adjustment lever and hold it.
2.Slide the seat to the position you desire.
3.Release the lever and make sure the seat is locked in place. Move forward and rearward without using the lever. If the seat moves, it is not locked properly.
3-5

Seats & Safety System
ODN8039003
Seatback angle
To recline the seatback:
1.Lean forward slightly and lift up the seatback lever.
2.Carefully lean back on the seat and adjust the seatback to the position you desire.
3.Release the lever and make sure the seatback is locked in place. (The lever MUST return to its original position for the seatback to lock.)
Reclining seatback
Sitting in a reclined position when the vehicle is in motion can be dangerous. Even when buckled up, the protection of your restraint system (seat belts and air bags) is greatly reduced by reclining your seatback.
 WARNING
NEVER ride with a reclined seatback when the vehicle is moving.
Riding with a reclined seatback increases your chance of serious or fatal injuries in the event of a collision or sudden stop.
Drivers and passengers should ALWAYS sit well back in their seats, properly belted, and with the seatbacks upright.
Seat belts must be snug against your hips and chest to work properly. When the seatback is reclined, the shoulder belt cannot do its job because it will not be snug against your chest. Instead,
it will be in front of you. During an accident, you could be thrown into the seat belt, causing neck or other injuries.
The more the seatback is reclined, the greater chance the passenger’s hips will slide under the lap belt or the
passenger’s neck will strike the shoulder belt.
ODN8039004
Seat cushion height
To change the height of the seat cushion:
•Push down on the lever several times, to lower the seat cushion.
•Pull up on the lever several times, to raise the seat cushion.
3-6

03
Power adjustment (if equipped)
The front seat can be adjusted by using the control switches located on the outside of the seat cushion.Before driving, adjust the seat to the proper position so that you can easily control the steering wheel, foot pedals and controls on the instrument panel.
WARNING
NEVER allow children in the vehicle unattended. The power seats are operable when the vehicle is turned off.
NOTICE
To prevent damage to the seats:
•Always stop adjusting the seats when the seat has moved as far forward or rearward as possible.
•Do not adjust the seats for longer than necessary when the vehicle is turned off. This may result in unnecessary battery drain.
•Do not operate two or more seats at the same time.This may result in an electrical malfunction.
ODN8039005
Forward and rearward adjustment
To move the seat forward or rearward:
1.Push the control switch forward or rearward.
2.Release the switch once the seat reaches the desired position.
ODN8039006
Seatback angle
To adjust the seatback:
1.Rotate the top of control switch forward or rearward.
2.Release the switch once the seatback reaches the desired position.
3-7

Seats & Safety System
Reclining seatback
Sitting in a reclined position when the vehicle is in motion can be dangerous. Even when buckled up, the protection of your restraint system (seat belts and air bags) is greatly reduced by reclining your seatback.
 WARNING
NEVER ride with a reclined seatback when the vehicle is moving. Riding with a reclined seatback increases your chance of serious or fatal injuries in the event of a collision or sudden stop. Driver and passengers should ALWAYS sit well back in their seats, properly belted, and with the seatbacks upright.
Seat belts must be snug against your hips and chest to work properly. When the seatback is reclined, the shoulder belt cannot do its job because it will not be snug against your chest. Instead, it will be in front of you. During an accident, you could be thrown into the seat belt, causing neck or other injuries. The more the seatback is reclined, the greater chance the passenger’s hips will slide under the lap belt or the passenger’s neck will strike the shoulder belt.
ODN8039007
Seat cushion tilt (1)
To change the angle of the front part of the seat cushion: Push the front portion of the control switch up to raise or down to lower the front part of the seat cushion. Release the switch once the seat reaches the desired position.
Seat cushion height (2)
To change the height of the seat cushion: Push the rear portion of the control switch up to raise or down to lower the height of the seat cushion. Release the switch once the seat reaches the desired position.
3-8

03
ODN8039008
Lumbar support
(for driver’s seat, if equipped)
The lumbar support can be adjusted by pressing the lumbar support switch. Press the front portion of the switch (1)
to increase support or the rear portion of the switch (2) to decrease support.
Seatback pocket (if equipped)
ODN8039016
The seatback pocket is provided on the back of the front seatbacks.
 WARNING
To prevent the Occupant Classification System from malfunctioning:
Do not hang onto the front passenger’s seatback.
 CAUTION
Do not put heavy or sharp objects in the seatback pockets. In an accident they could come loose from the pocket and injure occupants.
3-9

Seats & Safety System
Rear Seats
Folding the rear seat
The rear seatbacks can be folded to facilitate carrying long items or to increase the luggage capacity of the vehicle.
 WARNING
•Never allow passengers to sit on top of the folded down seatback while the vehicle is moving. This is not a proper seating position and no seat belts are available for use. This could result in serious injury or death in case of an accident or sudden stop.
•Objects carried on the folded down seatback should not extend higher than the top of the front seatbacks. This could allow cargo to slide forward and cause injury or damage during sudden stops.
To fold down the rear seatback:
1.Set the front seatback to the upright position and if necessary, slide the front seat forward.
ODN8039062L
2.Lower the rear head restraints to the lowest position by pushing and holding the release button and pushing down on the head restraint.
ODN8039063L
3.Pull on the seatback folding lever located in the trunk.
ODN8039064L
4.Fold the seatback toward the front of the vehicle.
5.To use the rear seat, lift and pull the seatback rearward. Pull the seatback firmly until it clicks into place. Make sure the seatback is locked in place.
3-10

 WARNING
When returning the rear seatback from a folded to an upright position, hold the seatback and return it slowly. Ensure that the seatback is completely locked into its upright position by pushing on the top of the seatback. In an accident or sudden stop, an unlocked seatback could allow cargo to move forward with great force and enter the passenger compartment, which could result in serious injury or death.
 WARNING
Do not place objects in the rear seats, since they cannot be properly secured and may hit vehicle occupants in a collision causing serious injury or death.
 WARNING
Make sure the vehicle is off, the shift button is in P (Park), and the parking brake is securely applied whenever loading or unloading cargo. Failure to take these steps may allow the vehicle to move if the shift button is inadvertently moved to another position.
03
Armrest
ODN8039018
The armrest is located in the center of the rear seat. Pull the armrest down from the seatback to use it.
Head Restraints
The vehicle’s front and rear seats have adjustable head restraints. The head restraints provide comfort for
passengers, but more importantly they are designed to help protect passengers from whiplash and other neck and spinal injuries during an accident, especially in a rear impact collision.
 WARNING
To reduce the risk of serious injury or death in an accident, take the following precautions when adjusting your head restraints:
•Always properly adjust the head restraints for all passengers BEFORE starting the vehicle.
•NEVER let anyone ride in a seat with the head restraints removed or reversed.
3-11

Seats & Safety System
OLF034072N
•Adjust the head restraints so the middle of the head restraint is at the same height as the height of the top of the eyes.
•NEVER adjust the head restraint position of the driver’s seat when the vehicle is in motion.
•Adjust the head restraint as close to the passenger’s head as possible. Do not use a seat cushion that holds the body away from the seatback.
•Make sure the head restraint locks into position after adjusting it.
NOTICE
To prevent damage, NEVER hit or pull on the head restraints.
CAUTION
When there are no occupants in the rear seats, adjust the height of the head restraint to the lowest position. The rear seat head restraint can reduce the visibility of the rear area.
Front seat head restraints
ODN8039068L
Both the driver’s and passenger’s front seat are equipped with adjustable head restraints for the safety and comfort.
ODN8H039011
Adjusting the height up and down
To raise the head restraint:
1. Pull it up to the desired position (1).
To lower the head restraint:
1.Push and hold the release button (2) on the head restraint support.
2.Lower the head restraint to the desired position (3).
3-12
![]()
03
Type A
Type B
NOTICE
If you recline the seatback towards the front with the head restraint and seat cushion raised, the head restraint may come in contact with the sunvisor or other parts of the vehicle.
ODN8039013
Removal/Reinstallation
To remove the head restraint:
1. Recline the seatback (2) rearward using the seatback angle lever (1).
2. Raise the head restraint as far as it can go.
3. Press the head restraint release button
(3) while pulling the head restraint up
(4).
3-13

Seats & Safety System
|
Type A |
Rear seat head restraints |
ODN8039014
Type B
ODN8039015
To reinstall the head restraint:
1.Put the head restraint poles (2) into the holes while pressing the release button (1).
2.Adjust the head restraint to the appropriate height.
3.Adjust the seatback (4) forward using the seatback angle lever (3).
ODN8039069L
The rear seats are equipped with head restraints in all the seating positions for the passenger’s safety and comfort.
ODN8H039017
Adjusting the height up and down
To raise the head restraint:
1. Pull it up to the desired position (1).
To lower the head restraint:
1.Push and hold the release button (2) on the head restraint support.
2.Lower the head restraint to the desired position (3).
3-14

03
Seat Warmers and Air Ventilation Seats
Front seat warmers (if equipped)
Seat warmers are provided to warm the seats during cold weather.
 WARNING
The seat warmers can cause a SERIOUS BURN, even at low temperatures and especially if used for long periods of time.
Passengers must be able to feel if the seat is becoming too warm so they can turn it off, if needed.
People who cannot detect temperature change or pain to the skin should
use extreme caution, especially the following types of passengers:
•Infants, children, elderly or disabled persons, or hospital outpatients.
•People with sensitive skin or who burn easily.
•Fatigued individuals.
•Intoxicated individuals.
•People taking medication that can cause drowsiness or sleepiness.
WARNING
NEVER place anything on the seat that insulates against heat when the seat warmer is in operation, such as a
blanket or seat cushion. This may cause the seat warmer to overheat, causing a burn or damage to the seat.
NOTICE
To prevent damage to the seat warmers and seats:
Never use a solvent such as paint thinner, benzene, alcohol or gasoline to clean the seats.
Do not place heavy or sharp objects on seats equipped with seat warmers.
Do not change the seat cover. It may damage the seat warmer or air ventilation system.
3-15

Seats & Safety System
Front
ODN8039019
While the engine is running, push either of the switches to warm the driver’s seat or front passenger’s seat.
During mild weather or under conditions where the operation of the seat warmer is not needed, keep the switches in the OFF position.
•Manual temperature control
Each time you push the switch, the temperature setting of the seat is changed as follows:
— Front seat
|
UP |
UP |
|
|
OFF HIGH ( |
) HIGH ( |
) |
|
DOWN DOWN |
||
|
LOW ( ) MIDDLE ( |
) HIGH ( |
) |
|
DOWN |
UP |
•Automatic temperature control
The seat warmer starts to automatically control the seat temperature in order to prevent low-temperature burns after being manually turned ON.
—Front seat
30 MIN
LOW (


 ) MIDDLE (


 )
)
60 MIN
You may manually press the switch to increase seat temperature. However, it soon returns the automatic mode again.
•When pressing the switch for more than 1.5 seconds with the seat warmer
operating, the seat warmer will turn OFF.
•The seat warmer defaults to the OFF position whenever the ignition switch is in the ON position. However, if the Auto Comfort Control function is ON, the driver’s seat warmer will turn on and off depending on the ambient temperature.
•Auto Comfort Control (for driver’s seat, if equipped)
The seat warmer automatically controls the seat temperature depending on the ambient temperature when the engine is running. If the seat warmer switch is pushed, the seat warmer will have to be controlled manually. To use this function, it must be activated from the Settings menu in the AVN system screen. For more information, refer to the separately supplied Car Infotainment System manual.
3-16

Front air ventilation seat (if equipped)
ODN8039023
The air ventilation seats are provided to cool the front seats by blowing air through small vent holes on the surface of the seat cushions and seatbacks.
When the operation of the air ventilation seat is not needed, keep the switches in the OFF position.
While the engine is running, push the switch to cool the driver’s seat or the front passenger’s seat.
03
•Each time you push the switch, the airflow changes as follows:
|
DOWN |
DOWN |
|
|
OFF HIGH ( |
) HIGH ( |
) |
|
UP UP |
||
|
LOW ( ) MIDDLE ( |
) HIGH ( |
) |
|
UP |
DOWN |
•When pressing the switch for more than 1.5 seconds with the air ventilation seat operating, the operation will turn OFF.
•The air ventilation seat defaults to the OFF position whenever the ignition switch is in the ON position. However, if the Auto Comfort Control function is ON,
the driver’s air ventilation seat will turn on and off depending on the ambient temperature.
•Auto Comfort Control (for driver’s seat, if equipped)
The air ventilation seat automatically controls the seat temperature depending on the ambient temperature when the engine is running. If the air ventilation seat switch is pushed, the seat warmer will have to be controlled manually. To use this function, it must be activated from the Settings menu in the AVN system screen. For more information, refer to
the separately supplied Car Infotainment System manual.
3-17

Seats & Safety System
NOTICE
To prevent damage to the air ventilation seat:
•Use the air ventilation seat ONLY when the climate control system is on. Using the air ventilation seat for prolonged periods of time with
the climate control system off could cause the air ventilation seat to malfunction.
•NEVER use a solvent such as paint thinner, benzene, alcohol or gasoline to clean the seats.
•Avoid spilling liquids on the surface of the front seats and seatbacks; this may cause the air vent holes to become blocked and not work properly.
•Do not place materials such as plastic bags or newspapers under the seats. They may block the air intake causing the air vents to not work properly.
•Do not change the seat covers. It may damage the air ventilation seat.
•If the air vents do not operate, restart the vehicle. If there is no change, have the vehicle inspected by an authorized HYUNDAI dealer.
3-18

SEAT BELTS
This section describes how to use the seat belts properly. It also describes some of the things to avoid when using seat belts.
Seat Belt Safety Precautions
Always fasten your seat belt and make sure all passengers have fastened their seat belts before starting any trip. Air bags are designed to supplement the seat belt as an additional safety device, but they are not a substitute. Most states require all occupants of a vehicle to wear seat belts.
 WARNING
Seat belts must be used by ALL passengers whenever the vehicle is moving. Take the following precautions when adjusting and wearing seat belts:
•ALWAYS properly restrain children under age 13 in the rear seats.
•NEVER allow children to ride in the front passenger seat. If a child age 13 or older must be seated in the front seat, move the seat as far back as possible and properly restrain them in the seat.
•NEVER allow an infant or child to be carried on an occupant’s lap.
•NEVER ride with the seatback reclined when the vehicle is moving.
•Do not allow children to share a seat or seat belt.
•Do not wear the shoulder belt under your arm or behind your back.
•Always wear both the shoulder portion and lap portion of the lap/ shoulder belt.
•Do not use the seat belt if it is twisted. A twisted seat belt will not protect you properly in an accident.
•Do not use a seat belt if the webbing or hardware is damaged.
03
•Do not latch the seat belt into the buckles of other seats.
•NEVER unfasten the seat belt while driving. This may cause loss of vehicle control resulting in an accident.
•Make sure there is nothing in the buckle interfering with the seat belt latch mechanism. This may prevent the seat belt from fastening securely.
•No modifications or additions should be made by the user which will either prevent the seat belt adjusting devices from operating to remove slack, or prevent the seat belt assembly from being adjusted to remove slack.
 WARNING
Damaged seat belts and seat belt assemblies will not operate properly. Always replace:
•Frayed, contaminated, or damaged webbing
•Damaged hardware
•The entire seat belt assembly after it has been worn in an accident, even if damage to webbing or assembly is not apparent
3-19

Seats & Safety System
Seat Belt Warning Light
Seat belt warning light (for driver’s seat)
ODN8039070L
As a reminder to the driver, the seat belt warning light will illuminate for approximately 6 seconds each time you place the ignition switch to the ON position regardless of belt fastening. However, if the seat belt is Unfastened, a warning chime will sound for approximately 6 seconds.
If you continue not to fasten the seat belt and you drive under 12 mph (20 km/h), the warning light will stay illuminated.
If you continue not to fasten the seat belt and you drive over 12 mph (20 km/h) the seat belt warning chime will sound for approximately 100 seconds and the corresponding warning light will blink.
If you unfasten the seat belt while driving under 12 mph (20 km/h), the seat belt warning light will illuminate until the seat belt is fastened.
If you unfasten the seat belt while driving over 12 mph (20 km/h), the seat belt warning chime will sound for approximately 100 seconds and the corresponding warning light will blink.
Seat belt warning light (for front passenger’s seat)
As a reminder to the front passenger, the front passenger’s seat belt warning lights will illuminate for approximately 6 seconds each time you place the ignition switch to the ON position regardless of belt fastening.
If you continue not to fasten the seat belt and you drive under 12 mph (20 km/h), the warning light will stay illuminated.
If you continue not to fasten the seat belt and you drive over 12 mph (20 km/h) the seat belt warning chime will sound for approximately 100 seconds and the corresponding warning light will blink.
If you unfasten the seat belt while driving under 12 mph (20 km/h) the seat belt warning light will illuminate until the seat belt is fastened.
If you unfasten the seat belt while driving over 12 mph (20 km/h), the seat belt warning chime will sound for approximately 100 seconds and the corresponding warning light will blink.
 WARNING
The front passenger’s seat belt warning light may not properly operate if the front passenger does not sit properly in the seat.
If you place an object on the passenger seat or back seat or under the seats, the warning chime may sound. Please remove the object if the chime sounds.
3-20

03
Seat Belt Restraint System
 WARNING
Improperly positioned seat belts may increase the risk of serious injury
in an accident. Take the following precautions when adjusting the seat belt:
•Position the lap portion of the seat belt as low as possible across your hips, not on your waist, so that it fits snugly.
•Position one arm under the shoulder belt and the other over the belt, as shown in the illustration.
•Always position the shoulder belt anchor into the locked position at the appropriate height.
•NEVER position the shoulder belt across your neck or face.
Seat Belt-Driver’s 3-point system with emergency locking retractor
OHI038140
To fasten your seat belt:
Pull the seat belt out of the retractor and insert the metal tab (1) into the buckle
(2). There will be an audible “click” when the tab locks into the buckle.
OHI038137
You should place the lap belt (1) portion across your hips and the shoulder belt (2) portion across your chest.
The seat belt automatically adjusts to the proper length after the lap belt portion is adjusted manually so that it fits snugly around your hips. If you lean forward in a slow, easy motion, the belt will extend and move with you.
If there is a sudden stop or impact, the belt will lock into position. It will also lock if you try to lean forward too quickly.
3-21

Seats & Safety System
NOTICE
If you are not able to smoothly pull enough of the seat belt out from the retractor, firmly pull the seat belt out and release it. After release, you will be able to pull the belt out smoothly.
Height adjustment
You can adjust the height of the shoulder belt anchor to one of the three different positions for maximum comfort and safety. The shoulder portion should be adjusted so it lies across your chest and midway over your shoulder nearest the door, not over your neck. To adjust the height of the seat belt anchor, lower
or raise the height adjuster into an appropriate position.
Front seat
ODN8039072L
To raise the height adjuster, pull it up
(1). To lower it, push it down (3) while pressing the height adjuster button (2). Release the button to lock the anchor into position. Try sliding the height adjuster to make sure that it has locked into position.
OHI038142
To release your seat belt:
Press the release button (1) in the locking buckle.
When it is released, the belt should automatically draw back into the retractor. If this does not happen, check the belt to be sure it is not twisted, then try again.
Rear Seat Belt – Passenger’s 3-point system with convertible locking retractor
This type of seat belt combines the features of both an emergency locking retractor seat belt and an automatic locking retractor seat belt. Convertible retractor type seat belts are installed in the rear seat positions to help accommodate the installation of child
restraint systems. Although a convertible retractor is also installed in the front passenger seat position, NEVER place any infant/child restraint system in the front seat of the vehicle.
3-22
 Loading…