If you’re reading this guide, you’re most likely new to Hero Siege and wish to know everything there is about the game before you begin your epic journey — but on the other hand, you could also be a veteran player who simply wish to refresh your memory — and that’s fine too. This guide is for beginners and veterans alike, as it’s designed to be both detailed and as easy to understand as possible.
Without further notice, let’s get started!
Introduction to Hero Siege 3.0
If you’re coming back from a long break, or if this is the first time you’re playing Hero Siege, it’s important to know that the 3.0 update is a total rewrite of the game, with features that did not exist in older versions. While you’re getting more and more familiar with the game, you might need to ask a question or two about the game, and although you could simply Google it — it’s not recommended.
What is Hero Siege all about?
Hero Siege is a pixel ARPG and compared to other similar titles on the market, it’s truly one of it’s kind. The main goal of your gameplay is about leveling up your class to the max level (which is 100) and obtain gear, which you can later on upgrade to do wormholes (which is the end game) — but we’re gonna cover that in a bit, so don’t worry if it sounds confusing.
How is Hero Siege different from other similar titles?
- It is not built around roguelike elements. There is two roguelike element in the game — relics — but these are optional for gameplay.
- The game is being developed by the studio Panic Art Studios (PAS for short), and the game has 2 main developers, Elias and Jussi, as well as other staff, all active on the community discord.
- It’s cheap — actually much cheaper than other similar titles which goes for over 20 euros each. Hero Siege only costs 6.99 euros, and it often goes on a 75-90% sale on Steam.
- It has an active economy where you can trade with other people.
- It has no pay-to-win aspect. Everything that is needed to reach end-game can be farmed.
In other words, Hero Siege is like a mix between Diablo, Path of Exile and Bindings of Isaac.
Roguelike Elements
Hero Siege does not have many roguelike elements to it, in fact it only has two — relics. This means that you do not lose your character or progress when you die (unless you’re playing in Hardcore mode).
Relics
Relics are items that can be found randomly in the world, dropped from chests, bosses or crafted in town. You lose all of your relics when you die.
Upon collecting a relic, depending on what kind of relic it is, it’s stored in your relic inventory — which holds a maximum of 32 relics. The more relics you have, the less relics you’ll find — and once you’ve hit the limit, you will no longer find relics, and rewards that previously would be relics will now be gold instead.
There are 4 types of relics in the game:
Active/Usable Relics: You can only have one of these relics active at a time, and they’ll appear under your health bar next to the potion button in the HUD. When you press the key bound to usable relics, the relic will do something special.
Orbitable Relics: These relics orbits around the player at all times, either to do damage to nearby enemies or block incoming damage.
Stat Relics: Stat relics will simply give you some extra bonus stats.
On hit/On attack Relics: These relics are often called proc relics, and they do something special whenever you attack or hit an enemy with an attack.
It can be a bit difficult to farm relics as they spawn randomly and have no set spawn location.
Leveling from 1-100
Leveling in Hero Siege can be both a pain and a pleasure at the same time, depending on how you look at it. Compared to previous versions of the game, leveling has actually been improved a lot and no longer requires you to endlessly grind to reach level 100.
When you first start the game, you’ll be placed in the tutorial zone. Read the signs that you find here and kill all the mobs, this will bring you a level or two. When you enter the portal to town, talk to all of the NPCs in town to see if they can give you a few quests.
Going to the zone 1 of act 1 for the first time all you have to do is find the other portal to the next zone, optionally the waypoint as well. To be able to teleport to any zone in Hero Siege, you must first find and activate the waypoint in each zone.
The easiest way to level after that is to just play the game from normal mode to nightmare mode, doing all the levels and beating each difficulty, which means that you have to beat the final boss of act 6, which is Satan, in order to progress into nightmare. You can change difficulty when creating your game, or by using the switch at the zone selector in the town if you’re playing in Local. It’s important not to fight enemies that are more than, or less than 20 levels than you, as you will not gain any experience from them. You should always try to stay within a reasonable level difference of around 5-10 levels, as that grants you the most optimal amount of experience — otherwise you’ll actually end up with less overall experience.
Hero Levels
Hero Levels are like Paragon in Diablo 3. When you’ve hit level 100, all further experience that you get will be added into your hero levels. The experience needed for each level increases for every level you gain. Every 10 Hero levels you gain unlocks a new tier of abilities, where you can chose one out of three options.
Unlocking Nightmare and Hell
Unlocking new difficulties in the game can be done by killing the final boss of Act 6 (Satan). To unlock Nightmare, that is all you have to do, kill Satan in Normal Difficulty. To unlock Hell difficulty, you need to kill All Act bosses before killing Satan. It’s important to note that although there are 7 acts in the game, act 7 is a DLC and is not needed to advance in the game.
What if you get stuck?
If you get stuck while leveling, it’s as easy as going back a few levels and killing enemies of lower levels until you get better gear or get a few more level points to put into your skills. It can be frustrating at times, but it all depends on the class you play as all classes have their own weaknesses and strengths.
What to do after hitting level 100
Good job on hitting that sweet level 100! This is where the real game starts. By now you’ve hopefully unlocked the Hell difficulty and you’re ready to begin farming for Satanics. These items appear with a red name and a red glowing aura around them when they drop on the map, and appear as a red star on your map. These are items with fixed stats that you will use to grind in the end game.
The most important thing to do before attempting to really begin that satanic grind, is getting your mining to 500 and eventually maxing it out. Ores are in high demand and used for crafting of things like relics, gems/jewels and tokens. A good way to prepare you mining skills for the endgame is to level it in the Mt. Fuji mini dungeon on Normal (until 225) and then on Nightmare (until 500).
Basically, these are the things you will do after hitting 100:
- Max out your mining.
- Get a Satanic piece of gear in every slot.
- Upgrade the good satanics to level 10.
- Use re-roll tokens and satanic dice to improve the quality (%) of your gear.
Understanding Satanics
For a full list of all satanics in the game, click here.
Satanics always have fixed stats. This means that end-game builds will use specific satanics that benefit their playstyle, and satanics actually don’t all share the same drop location or drop chance either.
Drop Chances
All satanics in the game are divided into different drop tiers, meaning that some are more common than others.
Drop Locations
Satanics can drop anywhere in the game, with the exceptions being event boss items, and boss sets. New with Season 14 is the addition of Chase Items, which can only drop in certain parts of tarethiel.
Quality in Percentage (Quality %)
The quality listed on a Satanic determines how low/high the stats will be; the higher the quality, the higher the stats. The lowest you can go is 50% when an item is bricked using a satanic dice; an action that is irreversible. The lowest quality you can actually drop however, is 60%, and the highest is 110% (Pristine+). 100% quality items are often referred to as Pristine. The quality of an item can be changed by using a Re-roll Token.
Item Level
The item level on satanics is always fixed and can not be modified and is only for visual purposes, they don’t actually do anything on satanics.
Satanic Levels
Not to be confused with the item level, satanic levels go from 1 to 10. Every satanic drops at level 1/10, and you can increase the level with Upgrade Tokens, which can be crafted with specific ore found in the world, or with rubies. Each level increases the base value of every stat, meaning that level 10 items will be x2.5 stronger than level 1 items, regardless of quality.
Farming Satanics
There are a few ways to farm satanics, but there’s one factor they all have in common; mob density and clear speed.
Magic Find VS Clear Speed
Magic Find Increases the chance of finding good satanics, and clear speed makes you have more chances at finding satanics, so you want to balance the two to a point where you can effectively farm while having high Magic Find.
Farming in Nightmare
Before venturing into Hell, especially on Hardcore, It is a good idea to farm some low tier satanics, as well as mythics, in Nightmare. Only C tier Satanics can drop in Nightmare.
Farming in Hell
Welcome to the beginning of the end game. As you’re starting out in hell, a good way to get your first Satanics is to mine ruby ore and either craft random/specific satanics, or sell the ore for rubies to buy the pieces you need.
There are multiple ways to farm for Satanics and Chase items:
- Boss dungeons: Farming the act bosses is the way to go if you want to hunt the super expensive heroic items. Refer to the heroic drop table in order to decide which one you want to farm. Team up with others to farm multiple ones at in short succession.
- Specific or all Acts. The more popular farming spots are the following:
- «1-2»: great exp, great loot quantity, bad heroics (maggots spawn more monsters on death)
- «2-4»: many rifts, good heroics
- «2-5»: many mining veins, good heroics
- «3-2»: many rifts, many mining veins, decent heroics
- «3-3»: many rifts, many mining veins, decent heroics
- «3-4»: good exp, many mining veins, decent heroics
- «3-5»: good exp, many mining veins, decent heroics
- «4-5»: many mining veins, decent heroics
- «5-3»: many rifts, decent heroics
- Chaos Towers (often referred to as CT)
- Key Dungeons: Key Dungeons have special rewards such as tokens, runes, keys and chaos shrine. On top of that they have a way better heroic loot table than the normal zones. The keys to open the dungeons on hell drop randomly from monsters and chaos shrines.
- Uber Bosses: Hunting for exclusive boss items can be a great farming strategy as well if you are able to defeat them (monster level 1000).
A combination of these is usually the best way to get started.
Talents
Talents are what abilities are called in this game, whether it be an active talent which you can press on your action bar, or a passive talent that is always active, or a proc talent that has a chance to activate when you do a certain thing. The deciding factor for the damage of your talents is the element it has been assigned with.
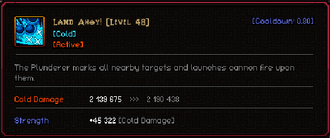
In this picture, we can see what the element it has by looking at the text in the middle right of it, surrounded by brackets. In this talent, the damage is increased by Cold. This means that the cold element is what gives it more damage, but you also need to understand that the number of points affects how much it scales. A talent with 20 base points spent will be gaining 100% of the elemental value, while a talent with 10 base points will be gaining around 50% of it — meaning that for each base point spent into an ability, the more damage from the element it’s going to get.
We can also see the synergy of the talent at the bottom left of the image. Most of the time you’re going to see either Energy, Strength or Stamina in that place. But some talents also have a second parameter: Weapon Damage. These synergies scale off of these primary attributes, giving you a small percentage of them as bonus damage to the skill.
Active Talents
These are the talents you can activate and that have a cooldown, located in your action bar at the bottom left of your screen, as seen below.
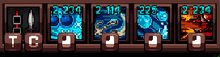
Every active talent in the game share a global cooldown of 0.5 seconds, meaning that you can’t spam all talents at the same time, and that their cooldown can never go below 0.5s regardless of how much Cooldown Reduction you stack.
Passives/Auras
These are the talents that provide you with a constant buff, and auras also provide your teammates with the same buff as long as they are within its range.
Procs
These are the talents that have a small chance to activate when you do a certain task. For example, reading the description of a talent can tell you it has a chance to proc when attacking, this means that it as X% chance to activate when you hold down the attack button. For these kind of talents, attack speed is what usually makes them proc more, and thus make them better.
Primary Stats
The primary stats in the game are:
- Energy: Increases your max mana pool.
- Strength: Increases your base attack damage.
- Stamina: Increases your max health.
- Armor: Increases your Damage Reduction
Elemental Damage
Elemental Damage is what boosts all of your damage output in the game, specific or generic.
There are currently 7 elements you can use: Wind, Cold, Fire, Poison, Lightning, Physical, Magic, Elemental.
- Physical Damage increases the damage of your physical based attacks and abilities.
- Magic Damage increases the damage of your magic based attacks and abilities.
- Wind Damage increases the damage of your Wind based attacks and abilities.
- Cold Damage increases the damage of your cold based attacks and abilities.
- Fire Damage increases the damage of your fire based attacks and abilities.
- Poison Damage increases the damage of your poison based attacks and abilities.
- Lightning Damage increases the damage of your lightning based attacks and abilities.
- Elemental Damage increases damage done by all elements (Including Physical).
Equipment
Equipment is how you become stronger. You find them by killing enemies in the game, by crafting them and by trading them with other people.
There are 8 equipment slots you can use in the game:
- Amulet
- Helmet
- Weapon
- Chest
- Shield
- Gloves
- Boots
- Charm
- Rings
- Belts
- Potions
There are also 9 (8 if you don’t count set items as their own quality/tier) item qualities, or tiers, in the game, listed from the most common to the least common:
- Common
- Superior
- Rare
- Legendary
- Mythic
- Runeword
- Satanic
- Set Items
- Chase
- Angelic
All items up to Legendary quality have random stats when they drop. It is impossible to farm for a specific Mythic or Legendary to help you reach higher difficulties. You’ll have to rely on pure luck of getting the stats you need, and the amount each stat provides increases with each quality.
Angelics
Angelic items are the rarest items in the game, but their power fluctuates a lot. Some of them are better than any satanic, while some other angelics are worse than most satanics.
Runewords
Runewords varies in power depending on which runes are used. They are crafted by inserting specific runes into a common item. More on runewords can be found in Runewords
Crafting, Sockets, Runes and Gems
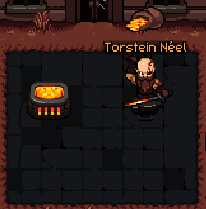
You can craft by going to the NPC Torstein Néel in any town.
Crafting is another way of obtaining gear in the game. By getting legendary or mythic drops, you can sell those for dust, which you can use to craft more legendaries and mythics. The same can be done with rares, which you purchase with gold — and legendaries can also be crafted with gold, although it’s a lot for a new player.
Sockets
Sockets can hold gems and runes, which will increase a specific stat or element. Almost every item has sockets, and can also be found on non-satanics. The amount of sockets on most satanics are random, while Chase and boss items/sets have a fixed amount
Gems
Gems can be found in levels randomly, and at the blacksmith you can combine smaller gems into more powerful, larger gems. They will boost a certain element of yours by a flat amount.
Runes
Runes can be found randomly in levels or traded from other players. They will boost a specific stat by a percentage, and also by smaller amounts depending on the stat. Depending on the build, runes can have a huge impact, but also no impact at all. It’s up to you how you wish to build your class.
Removing Gems and Runes
You can remove socketed gems and runes by going to the blacksmith and choose to sell your items. There will be an option to remove all runes, but this will delete them from your item and you will not get them back.
Mining
For a detailed guide about mining, click here.
Trading
Most Trading is done in the in-game market, where the trades are listed in Rubies.
You can trade with other people in the game outside the market by holding TAB and right clicking the player and choosing “Trade”.
When trading, it’s extremely important to pay attention to what’s happening on your screen. Some shady people will try to give you gold instead of rubies when trading, and players don’t usually notice this until it’s too late. It’s also important to make sure you’re not being given a bricked item (a 50% quality item), as those are ruined and you can never improve it further.
Each player has to accept the trade twice after putting their items in. Afterwards it’s also a good idea to vote reset to make sure the server saves the transaction, or you risk losing your items.
Currency
There are currently two main currencies in the game:
- Rubies
- Jade Ore
Rubies: Can be dropped from enemies, bosses and found in the world in chests. This is the primary currency and is used to trade for gear from other players.
Jade Ore: This is a new currency that some people use to trade with instead. Jade ore is used to craft specific items to upgrade your items further. It can be found in Ruby Veins with a slight chance.
Seasons
Just like in most other ARPGs, Hero Siege has seasons. This means that during a season, you can choose to create a seasonal character, you get the chance to compete with other seasonal players on the leaderboard.
A season usually lasts 3 months, and when a new season starts your old seasonal characters will be converted into non-seasonal characters and you’ll have to begin from scratch again.
It’s also important to note that seasonal can only play with other seasonal players, which also applies to softcore, hardcore and non-seasonal players. Hardcore players can not play with softcore players, and so on.
Reaching the top 35 of the leaderboards of a season will award you with unique cosmetics.
What is the End-Game like?
The end-game in Hero Siege is to min-max your items until they can’t get any better; by upgrading them to level 10 and 115% quality, which is a lengty process. After that you’ll need to do Wormholes so you can get a seasonal leaderboard placement for your class.
Wormholes
A wormhole can only be opened in Hell difficulty, by going to the NPC in the top left corner of Town of Inoya.
When opening a wormhole for the first time, it will be a level 1 wormhole, which means that the mob level will be around 140. Every additional wormhole level increases the mob level slightly. The point of a wormhole is to kill all enemies before the timer (the blue bar at the top of the screen) runs out.
At the end of a wormhole, you’ll be summoning a powerful boss (which includes bosses that are harder and unique to wormholes) that you have to kill. When the boss is killed, and if you killed all enemies before the timer ran out, a red button will appear. Clicking this button will advance your wormhole progression by +1 level, however, if you don’t complete it in time no button will spawn and it will all be for nothing.
Leaderboards (Seasonal Characters only)
When you complete a wormhole, that wormhole level will be added to the leaderboard for the class you were playing at the time. If you completed wormhole 3, this will be visible on the leaderboard for your class and you’ll be given a rank depending on how many others have completed higher levels than you. Your wormhole level is unique to your character, so if you create a new class or a new character but with the same class again, your wormhole level will be 1.
Гайд по игре
Создание выделенного сервера или своего через порт 6510

Если при заходе на какой то сервер у вас на время зависает игра и ничего не происходит — то у хоста сервера закрыт порт 6510
Нажав Create server, вам предлогают 2 варианта
Dedicated — выделенный сервер из германии, но использование его может нести за собой кучу косяков, так как это в разработке
Peer-to-peer — создание своего личного сервера, требующего как в старых версиях порт 6510
Как узнать открыт ли порт 6510?
Проще всего в игре создать лобби с названием «Test join» и подождать чтобы кто то зашёл (а ещё лучше позвать кого то из друзей). Можно зайти на 2ip, но он может неправильно показывать состояние порта.
Как открыть порт 6510?

Сказать как 100% открыть порт у любого я не смогу, но вы можете попробовать добавить его в роутер.
1) Нажмите Пуск > Выполнить … > введите cmd > OK
2) Введите ipconfig и прокрутите вверх, нам будет нужен основной шлюз и I Pv4
3) Введите в браузер адрес который у вас напротив основного шлюза (у меня 192.168.100.1)
4) Дальше вам прийдётся самим, тк роутеры бывают разные, прогуглите и найдите видео как открывать порты на вышем роутере. (зайдя по адресу вы должны увидеть как называется роутер)
Если это не помогло попробуйте на время отключить брандмаузер и перезагрузить роутер. Если и это не помогло, то играть у вас с друзьями получится по хамачи или может кто то из них сможет создать без.
Герои

ВНИМАНИЕ! Создав героя в одиночной игре, вы не сможите играть им в мультиплэере и наоборот!
На данный момент в игре 10 героев, силой паинта я выделил синим героев с dlc, а жёлтым героев которых лично я считаю самыми сильными (если учитывать игру не только на нормальной сложности). Ещё 2 героя не попавшие в скрин будут доступны в dlc которого ещё нету.
При создании героя можно поставить галочку к Hardcore, тогда вы не сможете играть вашим героем после смерти (не советую это делать, так как из за багов в том числе и с ачивками это к добру не приведёт).
Максимальный уровень героя: 250 150
Чем выше уровень активной способности, тем больше она требует маны.
Viking/Викинг

Активные способности:
1) Урон по небольшой области перед героем и оглушение.
2) Рывок к ближайшему противнику и нанесение урона в области цели + оглушение. (Если на пути будут декорации рывок остановится. Во время рывка герой неуязвим, но оглушение не отменяет применение способностей и залетев в толпу можно огрести)
3) Урон по области с оглушением (оглушение зависит от способности Iron Skin) после небольшой паузы (Во время приминения способности вы становитесь уязвимы, советую применять эту способность вместе со 2).
4) Волна наносящая урон и оглушающая противников (Волна может нанести несколько раз урон цели если будет толкать её).
Пасивные способности:
Шанс на крит при атаке
Шанс на оглушение при атаке
Шанс нанести сразу 2 атаки подряд
Шанс при атаки наложить на себя каменную кожу
Шанс поджеч рядомстоящих врагов
Pyromancer/Поджигатель
![]()
Активные способности:
1) Выстрел несколькими огненными шарами с небольшим разбросом.
2) Поджигание земли в небольшром радиусе на короткое время.
3) Огненный дождь на небольшом радиусе от героя.
4) Создание огненной гидры.
Пасивные способности:
Шанс выпустить метеор при атаке
Шанс оставить огненный след за выстрелом
Шанс выстрелить сразу несколько огненных шаров
Призыв огонька при убийстве врагов, нападающего на врагов (после 1 атаки огонёк исчезает)
Шанс взорвать убитого врага
Marksman/Меткий стрелок
![]()
Активные способности:
1) Герой прыгает назад оставляя за собой огненный след.
2) Установка баллисты ведущей огонь по врагам тремё стрелами (максимум можно поставить 4), баллиста получает дополнительный урон и здоровье от первой способности.
3) Запуск стрел летящих от одного конца экрана к другому.
4) Установка мины оглушающей наступившего и врагов неподалёку.
Пасивные способности:
Шанс на крит при атаке
Шанс выстрелить сразу несколько стрел
Шанс выпустить наводящуюся ракету
Шанс кинуть гранату, за каждые 15 уровней мины даётся ещё 1 граната, но не больше 3
Шанс увеличить урон и скорость бега при атаке
Nomad/Кочевник
![]()
Активные способности:
1) Бросок трёх копий наносящих урон противникам.
2) Создание на небольшой дистанции вокруг героя песчаной бури, наносящей врагам урон.
3) Создание вихрей, наносящих урон противникам.
4) Создание миражей, отвлекающих противников определённое время.
Пасивные способности:
Если какое то время не атаковать, следующая атака получит бонус к урону
Шанс бросить песок вперёд при атаке
Шанс атаковать случайного врага лучём света
Шанс вызвать кровотечение наносящее урон и замедляющее врагов
Шанс вызвать несколько маленьких торнадо, летящих в разные направления при атаке
Redneck/Деревенщина

Активные способности:
1) Бросок коктеля молотова, разлетающегося на несколько горящих лужиц наносящих урон наступающим врагам.
2) Герой начинает вертеться на 360 градусов нанося урон врагам поблизости (радиус чуть больше, чем у обычной атаки).
3) Установка капкана наносящего урон и оглушающего противника.
4) Вызов машины с деревенщиной, проезжающей мимо и стреляющей по врагам.
Пасивные способности:
Шанс при атаке вылить неподалёку горящего топлива
Шанс при атаке запустить горящее колесо
Шанс при атаке оглушить врагов неподалёку + урон
Повышенное восстановления здоровья со сфер
Шанс увеличить скорость атаки и передвижения
Pirate/Пират

Активные способности:
1) Герой ставит метку, если на неё встанет враг, она взорвётся с 4 направления (как с бомбермэном).
2) Выброс ядер вокруг героя тремя волнами.
3) Притяжение ближайшего противника к себе при помощи крюка и оглушение, крюк действует на небольшой дистанции.
4) Временное увеличение скорости атаки.
Пасивные способности:
Шанс получить дополнительное золото с атакованых врагов
Шанс при атаке выстрелить ядром
Шанс выстрелить взрывной пулей
Шанс замедлить цель
Неуязвимый папугай атакующих врагов неподалёку
Necromancer/Неромант

Активные способности:
1) Призыв скелета-война из трупа, максимум 3 юнита одновременно.
2) Призыв скелета-мага из трупа, максимум 2 юнита одновременно.
3) Бросок куска мяса оставляющего после себя 5 трупов (из которых можно вызвать скелетов).
4) Вызов голема, максимум 1 юнит.
Пасивные способности:
Вокруг героя и суммонов из под земли в рандомной точке, но не далеко от юнита вылазят руки и атакуют врагов
Шанс выпустить наводящегося светлячка
Бонус к здоровью и урону суммонов
Шанс выпустить 2 шара пробивающих врагов насквозь
Шанс выпустить кольцо яда
Герои (продолжение)
Samurai/Самурай

Активные способности:
1) Получение заряда, при атаке вылетит 3 электрических шара наносящих урон врагам и пролетающим насквозь.
2) Получение заряда, при атаке вылетят ледяные наконечники во все стороны и временно заморозят и нанесут урон врагам.
3) Получение заряда, при атаке вылетает торнадо, наносящий урон врагам.
4) Получение заряда, при атаке герой делает рывок вперёд на среднюю дистанцию нанося урон врагам по пути.
Пасивные способности:
Каждая 10 атака выпускает энергетический шар
Шанс увернуться от атаки
Шанс при атаке запустить 4 катаны по диагоналям
Шанс установить взрывающийся через 1.5 сек камень
Шанс восстановить здоровье при атаке
Paladin/Паладин

Активные способности:
1) Получение заряда, при атаке нанесение дополнительного урона и оглушение.
2) Создание вращающегося вокруг героя молота, наносящего урон врагам.
3) Активация щита, дающего неуязвимость на короткий промежуток времени.
4) Лечебная волна исцеляющая себя и всех дружественных юнитв неподалёку.
Пасивные способности:
Аура восстановления здоровья
Шанс при атаке вызвать летающие вокруг героя щиты, наносящие урон врагам при приближении
Шанс выпустить несколько раз отскакивающую молнию
Нанесение урона молнией врагам неподалёку
Шанс восстановить здоровье себе и союзникам при нанесении урона
Amazon/Амазонка

Активные способности:
1) Прыжёк на небольшую дистанцию и нанесение урона всем врагам в небольшом радиусе от приземления + оглушение.
2) Бросок копий на 360 градусов несколькими волнами наносящими урон противникам.
3) Получение заряда, при следующей атаки копьё разлетится на 3 и нанесёт дополнительный урон молнией.
4) Временное увеличение урона ядом.
Пасивные способности:
Атаки и способности имеют шанс отравить врагов
Аура увеличения скорости передвижения
Шанс копий разделиться
Шанс у копья нанести урон молнией
Шанс получив урон выпусить облако яда
Статы


У героя 6 характеристик, таких как:
Speed — Скорость, отвечает за перемещение, хотя очень станно меняется со значением
Swiftness — Быстрота, отвечает за скорость атаки
Strenght — Сила, отвечает за урон героя
Energy — Энергия, отвечает максимум маны
Armour — Броня, отвечает за процент поглощённого урона, он не может быть выше 85% и чем выше сложность тем надо больше брони для поддержания процента поглощения
Stamina — Выносливость, отвечает за число очков здоровья персонажа и силу некоторых способностей
Также можно повысить статы с помощью статуй, либо временно, либо навсегда (для активации нужно просто подойти к статуе), но я советую использовать только статую девушки, ибо вторая может и отнять статы навсегда. Статуя девушки выглядет так (на знаю как её ещё назвать) >
Даст +2 навсегда к какому либо стату (кроме скорости передвижения и атаки) или +20 на время игры
А статуя которую НЕ стоит трогать выглядет так >
Даст +4 или -4 навсегда к какому либо стату (кроме скорости передвижения и атаки) или +40 или -40 на время игры
Способности и статы можно сбросить при выборе персонажа, то и то стоит 15 камней(Как получить камни читай ниже)
Камни


В одиночной игре синие камни, в мультиплэере красные.
Они могут выпасть из боссов из кристальных сундуков, купленны у магистра Куджала и за выполнение квестов.
Потратить их можно нажав Shop при выборе персонажей.
Первым делом советую купить миньёна за 1000 (с собой можно взять только одного миньёна и для каждого персонажа выбирать надо будет отдельно, но куплен будет для всех.). Подробнее про миньёнов ниже.
Так же можно потратить на шапки.
Переименовать героя или сбросить статы и таланты. (При сбросе статов, очки со статуй не считаются)
Миньёны


Как я уже написал выше, для покупки миньёна надо 1000 камней и покупается он в магазине при выборе персонажа. У обоих типов миньёнов есть свой набор скинов, причём для каждого героя прийдётся снова и снова выбирать нужный, для смены надо нажать на миньёна в магазине (даже если вы видете что стоит нужный скин нажав на него, вы можете увидеть, что стоит другой, если вы ранее не меняли)
Различаются миньён ближнего боя и дальнего боя способностями и статами. У миньёна ближнего боя больше очков здоровья чем у миньёна дальнего боя, но у миньёна дальнего боя больше базовый урон. Миньён получает опыт вместе с героем и повышает уровень, так же убитого миньёна как героя можно воскресить постояв с его надгробьем, но он не может воскресить вас.
Точно про способности я сказать не могу, так как они не описанны, скажу то, что заметил сам. (хотя по картинкам они похожи на те, что у героев, но это не совсем так)
Способности миньёна ближнего боя:
1) Шанс оглушения при атаке (хотя возможно оглушение идёт только от рывка)
2) Рывок на ближайшего врага с оглушением
3) Шанс при атаке пустить маленькие смерчи в разные стороны.
4) ???
Способности миньёна дальнего боя:
1) Шанс на критический урон
2) 100% Мультивыстрел
3) ???
4) Шанс выпустить ракету при атаке
Золото и сундуки
Золото


Золото можно получить из монстров, боссов, ящиков, кувшинов, травы, за задания …
Есть три вида монет:
Бронзовая +1 к золоту
Серебрянная + 5 к золоту
Золотая + 10 к золоту
Есть 2 способа тратить золото:
1) Именно его я рекоммендую. Как окажетесь в городе идете вправо, обойдите стену и найдите Магистра Куджала, у него можно приобрести 10 камней за 1000 золота.
2) Так же можно зайти в торговый пост, но он открыт только когда на карте нет врагов и надо сначало будет открыть ворота, на которые нужен обычный ключ. В нём вы на время игры можете повысить характеристики, купить зелье и артефакт.
Сундуки


Есть 3 вида сундуков:
Обычный. Для него не нужно ключа. Может содержать зелье и обычный ключ.
Золотой. Для него нужен обычный ключ. Может содержать не плохие предметы и артефакт.
Кристальный. Для него нужен кристальный ключ. Может содержать хорошие предметы и камни.
Зелья


Из ящиков и монстров могут выпадать зелья (или можно купить одно в магазине), которые могут повысить или понизить статы на время текущей карты, востановить или сбросить здоровье, заспамить артефакт или мух, НО я бы не рекоммендовал их подбирать вот почему:
1) подобрав зелье вы несколько секунд будете уязвимы и вас смогут слить
2) не пытайтесь запомнить бонусы от зелий, с каждой новой игрой они меняются, так что думая, что зелье вылечит вас как в прошлой игре, она может сбросить важе хп или характеристики
3) если у вас уже есть зелье и вы подберёте другое, вы можите навсегда застрять
Акты и волны


На данный момент в игре 6 актов, чтобы попасть на следующий надо пройти предыдущий, после прохождения последнего вам будет доступна новая сложность.
В актах есть волны, минни боссы и босс.
Начинаем мы с 5 карт со случайными минни боссами, потом мы попадаем к боссу акта.
На картах по 5(оказывается на разных картах по разному, я всё время пропускаю и сосчитал только на самой первой …) волн и потом волна с мини боссом, можно сразу же запустить несколько волн нажав несколько раз пробел.
Не забывайте о вызываемом портале (кнопка V), с его помощью вы можете попасть в город чтобы потратить золото или убежать от зажимающих врагов. Если вы вернётесь обратно через него, то вы окажетесь на карте с которой телепортировались. Портал не может быть открыт если когда уже убит босс или мини босс.
Чтобы играть 5 акт нужно длс KoD, чтобы 6 — DoH и вы не сможите играть 6 акт не имея 5’го.
Дополнительные подземелья


С началом волны есть шанс, что на карте окажется Dungeon или Crypt (о их появлении указывает текст). Они открываются после прохождения волны, но исчезают после волны с мини боссом. В них находится реликвия и возможно мини босс, но имея слабого героя лучше их обходить т.к. там может быть множество ловушек или при входе поджидать толпа монстров. Crypt особо ничем не отличается от Dungeon, хотя в Crypt обычно много ловушек.
Crypt
Dungeon
Квесты

Чтобы у вас были квесты, вам надо длс The Depths Of Hell
На карте в случайном месте может появится случайный NPC который даст квест.
Если вы играете в мультиплэере, то только вы будете видеть его.
Квесты бывают:
-Соединить 4 разных камня с подходящими платформами (камень должен лежать прямо на платфоре, он чего она изменит цвет на жёлтый
-Собрать бутылки с выпивкой.
-Собрать грибы.
-Collect 12 Sceleton bones — Собрать 12 костей.
-Собрать металл.
-Спасти заключённых.
-Убить определённых монстров.
-Убить монстров появившихся рядом.
-Убить осбого монстра.
-Найти гитару.
-Найти ключ и сундук.
-Выкопать сокровище (надо много раз нажать F).
-Сломать шестерёнки.
-Завершить ритуал.
-Защитить обелиск.
Артефакты/Реликвии

В игре множество артефактов которые дают небольшие плюсы или слабые способности, в большинстве они бестолковые не плохие бонусы и способности (последний патч значительно увеличил боунсы артефактов), но если вы не можете затащить какой либо акт, вы можите пройти кучу раз самый 1 акт на нормальной сложности.
Жёлтым кругом я выделил самый стоящий на мой взгляд артефакт дающий вампиризм.
При смерти или прохождении финального акта герой теряет все артефакты.
И кстати там внизу это не сластика.
DLC


К игре есть 3 длс (НЕ ПЕРЕПУТАЙТЕ И НЕ КУПИТЬТЕ ОБЫЧНЫЙ И ДЭЛЮКС, в них разница только в наборе)
Amazon’s Jungle Bandle добавляет:
— Амазонку
— 2 артефакта
— Тёмно зелёный цвет ника
— Маску вуду
The Karp of Doom добавляет:
— Акт5
— Новые достижения
— Самурая
— Покупные шапки
— Новые артефакты
— Новых врагов и боссов
Если вы приобрели дэлюкс, то так же в наборе будет:
— Особый скин для Самурая
— Цвет аква для ника
— Шапка карпа
Я не знаю в какой набор входят так же скин для мили миньёна «Карп» и для стреляющего «Самурай»
The Depths of Hell добавляет:
— Акт6
— Паладина
— Новые достижения
— Новых врагов и боссов
— Новые подземелья
— Новые артефакты
— Квесты
— Осадный режим
— Новые шапки
— Особые предметы лута
— Новые цвета для ника
Если вы приобрели дэлюкс, то так же в наборе будет:
— Особый скин для паладина
-Серебряный цвет ника
— Скин для стреляющего миньёна «голова Дамиена»
Если вы собрались брать только KoD, то не советую, лично мне Самурай и акт 5 показались ватными, смысл его брать вместе с DoH, чтобы попасть на акт6.
Welcome to my Hero Siege beginner’s guide. Throughout this guide, I will introduce you to all the key concepts that will help you progress through the game and understand your objectives.
If you have ever played a game in the Diablo series before, this 2D, top-down hack-and-slash will be very familiar to you.
Hero Siege is filled with bosses with affixes and abilities, tons of enemies, and loot to help you progress further than other players in a leaderboard.
Hero Selection
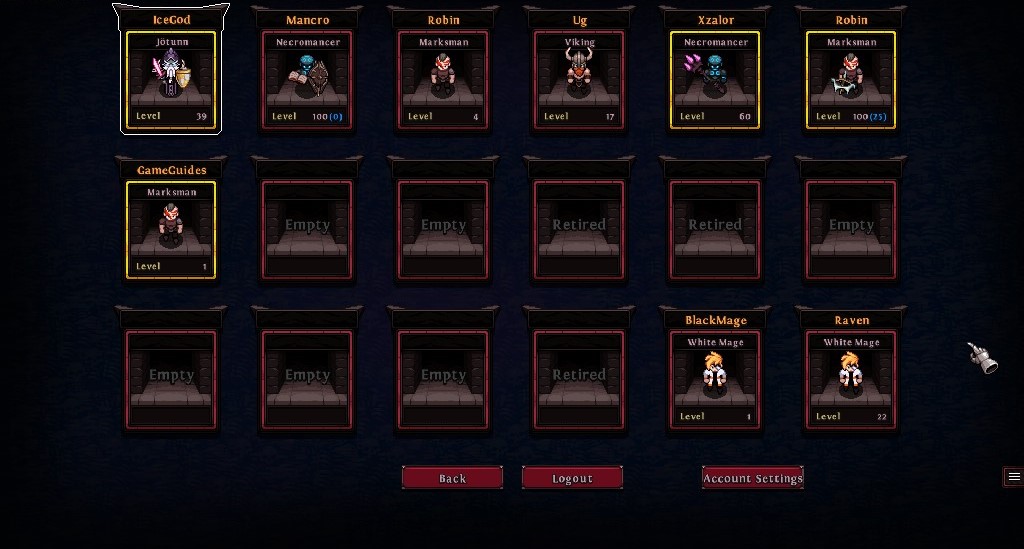
In your hero selection screen, all playable heroes are displayed here, including open slots for new heroes to be created,
If the hero has a yellow border around it, that means it has been created within the current season and will contest for leaderboards amongst other players by gaining wormhole levels.
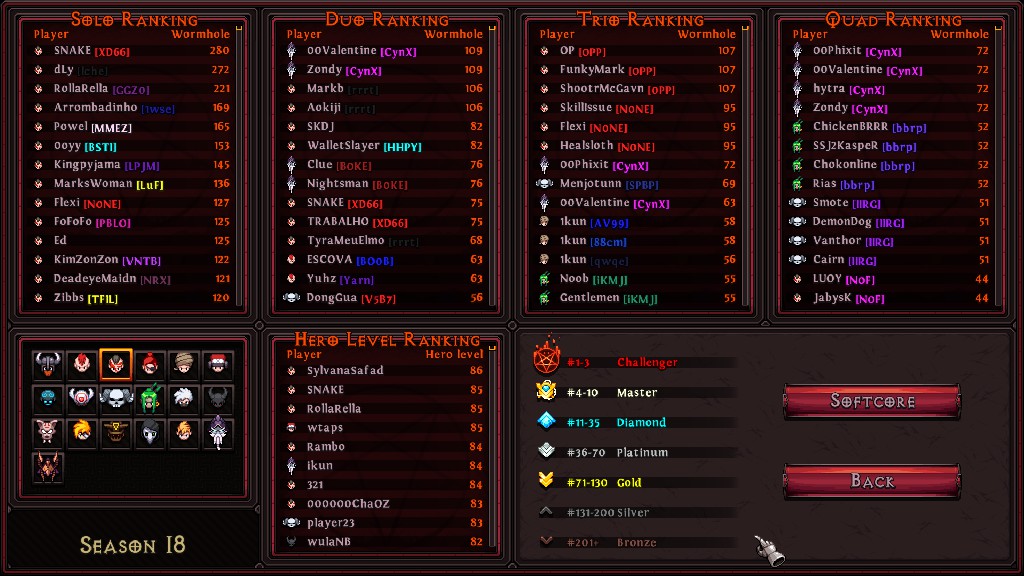
An example of the leaderboard table is displayed in the image below.
Once you have created your character, you will enter the lobby, where you can view the global chat, trade chat and guild chat.
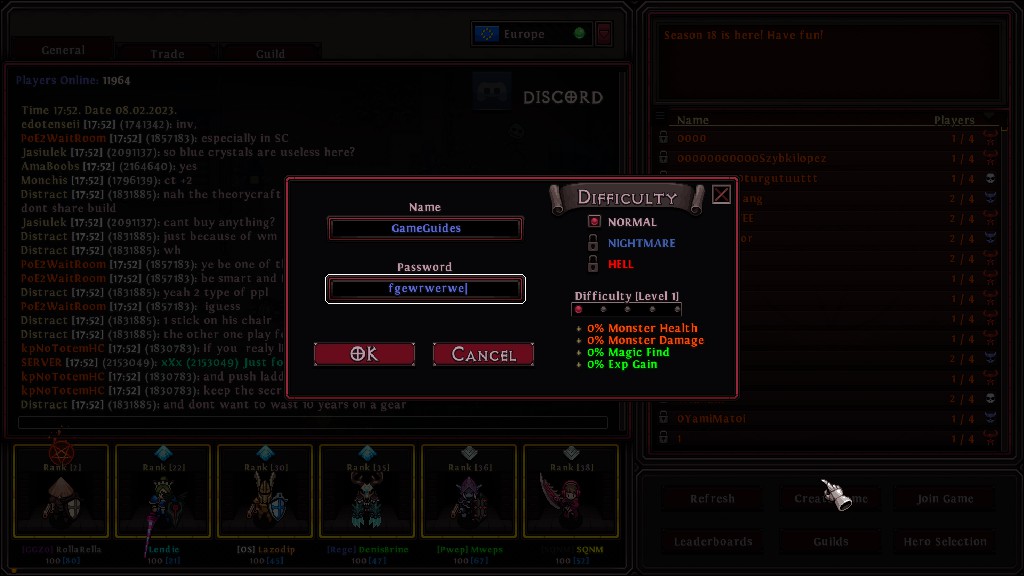
To start playing, click create game. For a brand new character, you can only select normal mode. You must beat a difficulty to unlock the next.
You do, however, have the option to increase the level of your selected difficulty which will make the enemies tougher, but increase your rewards and experience.
If you want to gain experience quickly, you need to find a difficulty balance. The difficulty needs to be as high as possible, but you also want to continuously move around the map so that you are killing monsters quickly and progressing through the story.
As you are creating the game, you can choose to enter a password so that nobody can join your game, or you can ignore the password which will allow other players to freely join your game at will.
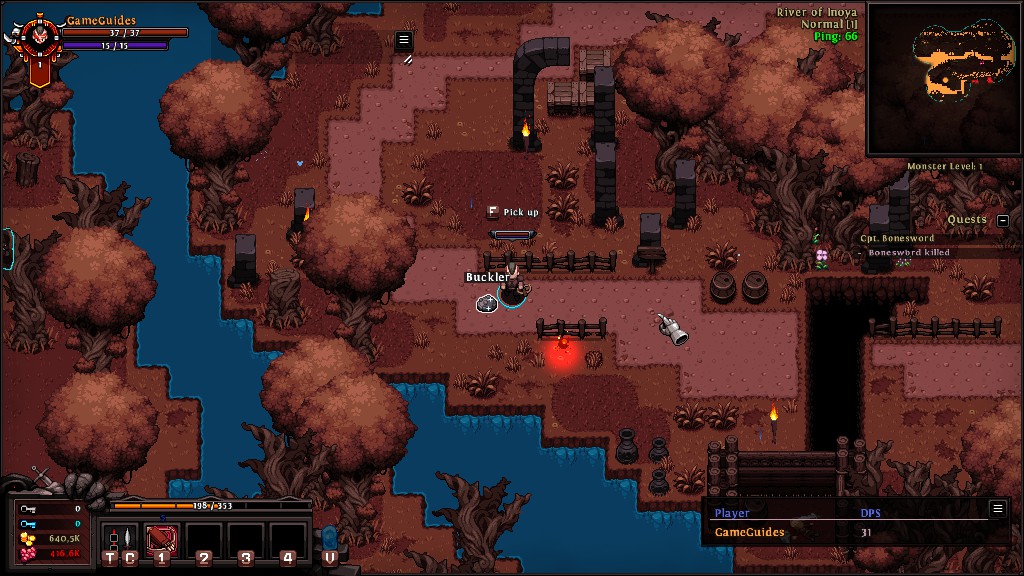
River of Inoya (Tutorial Level)
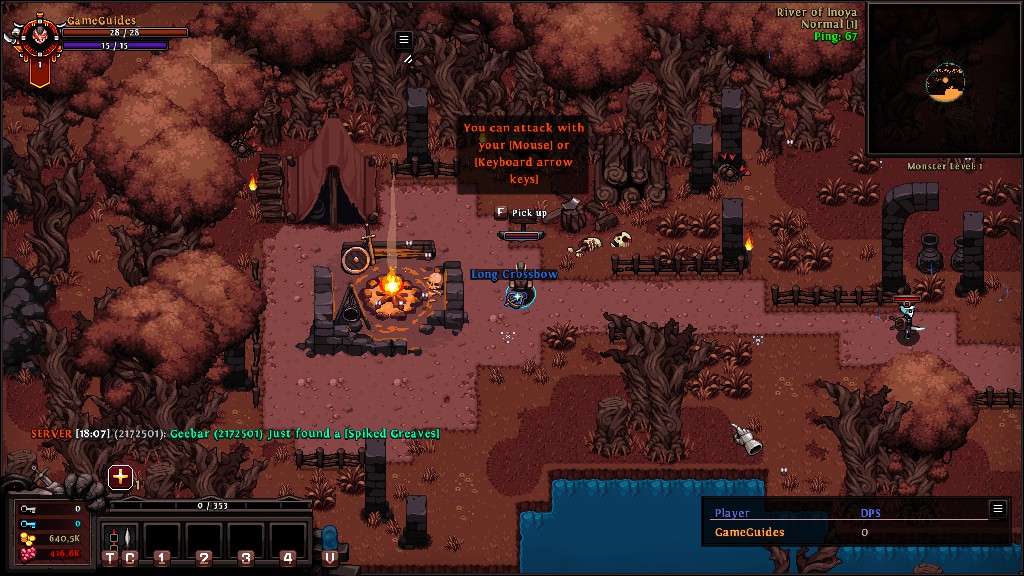
You will instantly be dropped in the River of Inoya, which will have a weapon for you to collect and sign posts telling you how to play the game. Follow the linear path and read the sign posts, then you will quickly learn how to play the game.
Hero Siege is both Mouse + Keyboard, and Controller friendly, so choose the control you feel most comfortable playing with.
However, later in the game when you start trading and using your mailbox, you will highly benefit using a mouse and keyboard for these activities.
Talents
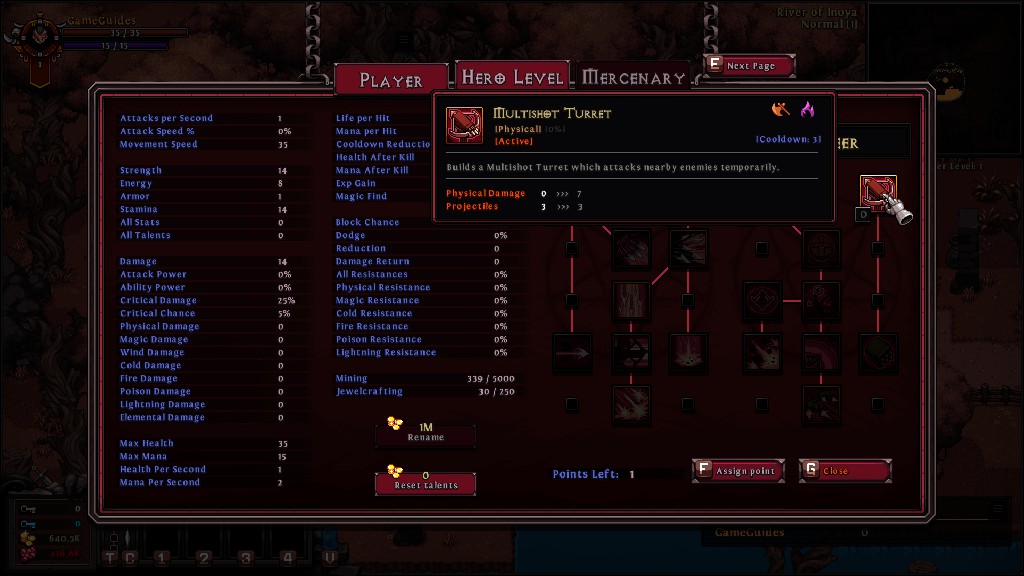
You will gain 1 talent point to spend on a new character, You gain a talent point each and every level.
When you hover over a talent, the tooltip will provide information on the ability:
- How much damage the ability will deal
- Whether it is [Active] or [Passive]
- The Cooldown of the Active ability or Proc chance of the passive ability
- Icons in the top left to showcase whether the talent benefits from strength, energy or both
Each row of talent points requires you to spend at least 1 talent in the previous row and also reach a level requirement.
The talents generally become stronger as you go further down the rows.
- Row 1: Level 1
- Row 2: Level 12
- Row 3: Level 24
- Row 4: Level 36
- Row 5: Level 48
Do not hesitate the reset your talents and put more points into abilities you use more often, especially in the earlier levels when resetting your talent points is free.
Control Configuration
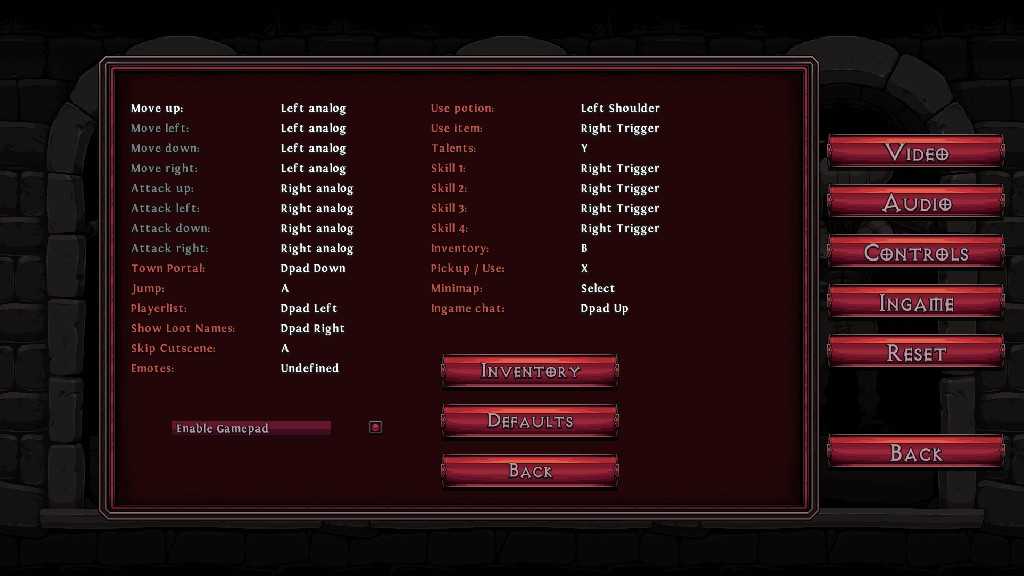
This section is important for you to feel comfortable while you play. Heed my advice here carefully.
Each talent will be bound to its own key.
As you gain more levels and gear, you can fall into a position where you are constantly spamming your skills while you move.
To make casting easier, you can simply hold down the talent key and the skill will cast again when it is off cooldown.
To make this even easier, you can map every skill to the same button in the controls menu if it suits your playstyle.
Like playing a racing game, you can hold down a single button and it will cast all your skills on cooldown constantly in order from left to right with a small global cooldown in between before casting the next skill.
If you tap the single skill button, it will only cast the first skill. If that skill comes off cooldown and you tap the skill button again, it will once again only cast the first skill.
Hero Stats
On the left side of the screen on the talents page, you can see all the stats you can view every available stat your hero has, for every damage type to every resistance to the elements.
As you start playing the game, you do not need to worry about these stats much, just ensure that you are always equipping better gear as you progress throughout the game and make sure you know whether your character needs energy or strength as a primary stat.
Notable useful stats early game:
- Strength/Energy for damage
- Exp gain to reach the next level faster
- Speed for navigating around the map quickly
- +All talents for a huge damage boost to your abilities
- All Stats for damage and survivability
Dropped Items
As you kill enemies, items may drop on the floor, from gear, to gold/rubies, or health and mana orbs.
If you pick up an item in a slot that you do not have equipped, you will equip it automatically as you pick it up.
Items are dropped in a variety of tiers in this order:
- Common
- Superior
- Rare
- Legendary
- Mythic
- Satanic (Nightmare or Hell Difficulty)
- Set
- Heroic
- Angelic
Loot Filtering
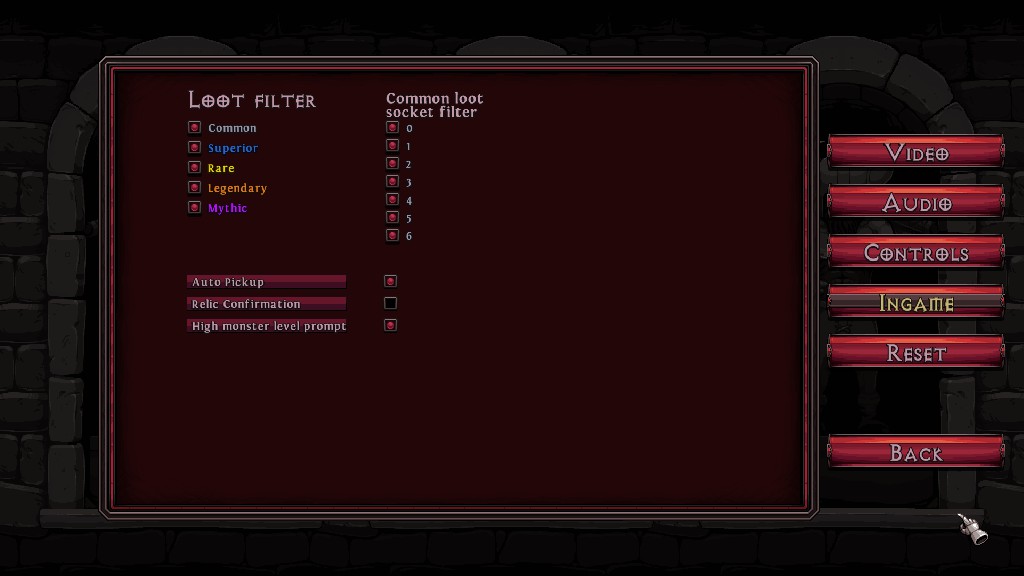
Common items are very weak and are easily replaced. You should be able to quickly find a full set of Rare pieces while killing enemies to give you a good head start into the game.
If you find that you are seeing too many undesirable pieces drop as you are killing enemies and you would not like the drops to show on the floor, you can change your ingame setting in the menu to stop them from showing.
As well as this, you can also filter the number of sockets that you would like to drop from Common items, which will be useful for crafting Runewords.
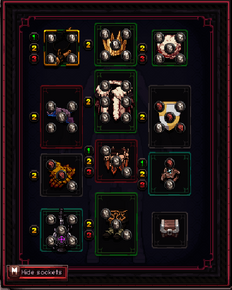
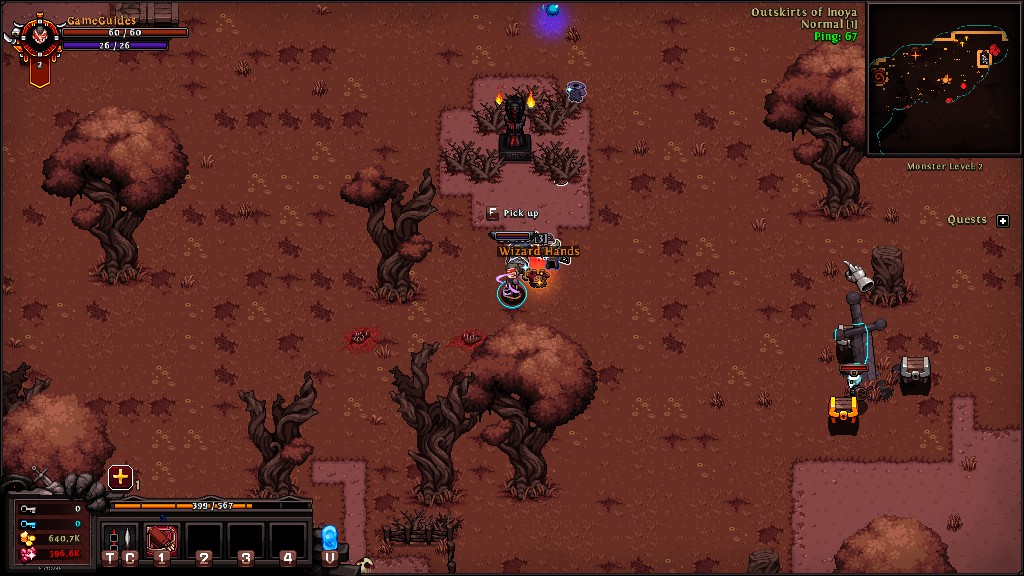
Runewords (Strong Common Items)
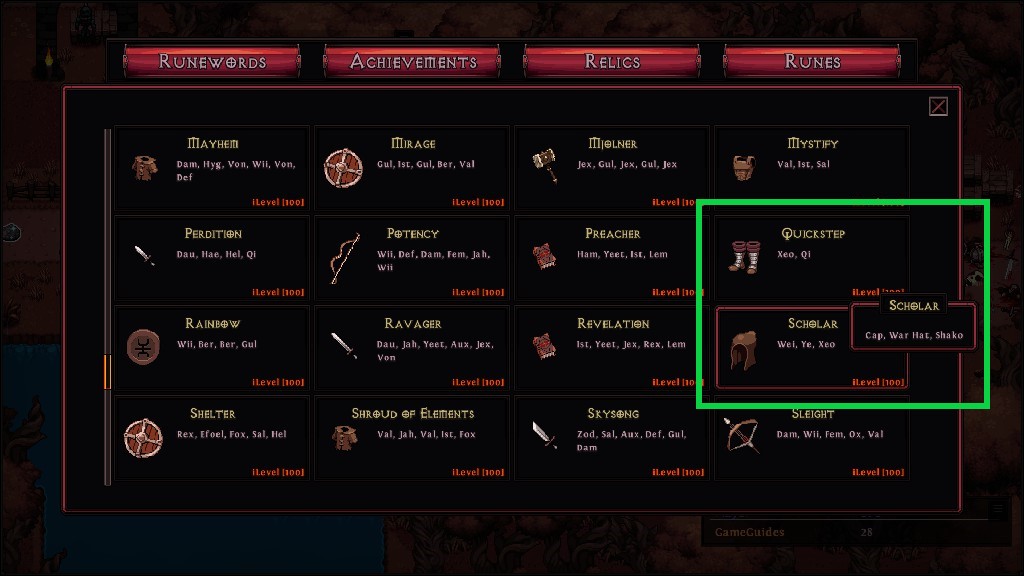
Runewords are very strong items that can be crafted from base Common items that have been slotted with the correct runes.
If you go to the main menu and select journal, you will be presented with the Runewords menu. Here there is a huge catalog of common items that can be made significantly stronger.
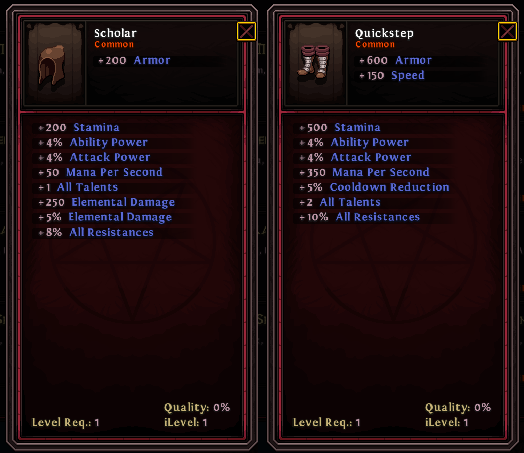
To create a runeword, you must have the correct type of common item which you can see in the tooltip for Scholar (Cap, War Hat, Shako), and you must slot it with the correct runes (Wei, Ye, Xeo).
This means that the base common item you use for Scholar must have 3 rune slots.
Quickstep on the other hand uses any type of common boot which has 2 rune slots for Xeo and Qi runes.
All Runewords require your character to be level 100 to use, with 2 exceptions:
- Scholar
- Quickstep
These can be used from level 1, which is very powerful for a new character, as long as you have the necessary items to craft it.
I have highlighted these in the green square border.
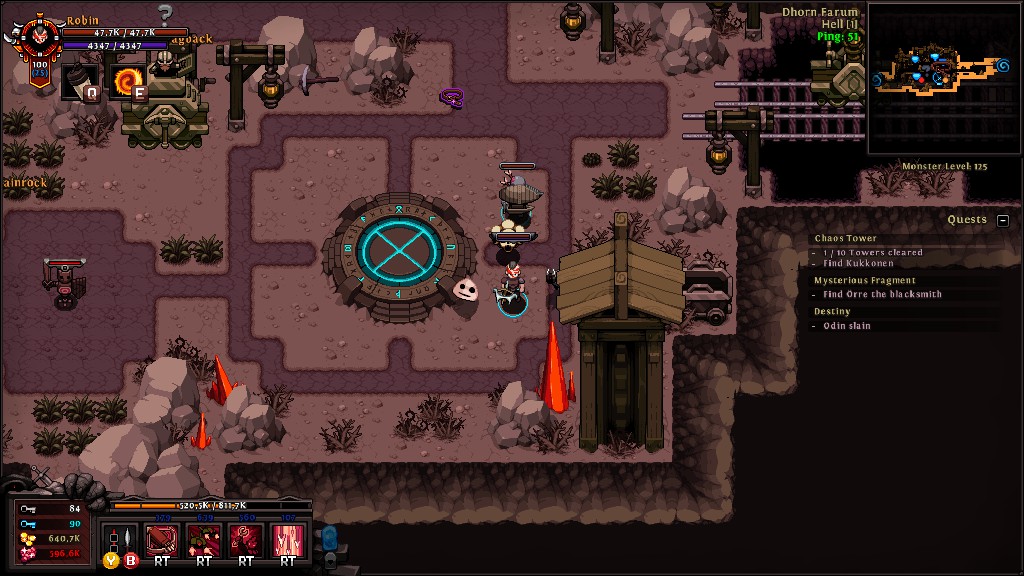
Quests
As you progress through the game, you will have quests that are completely optional (until you reach the Gates of Valhalla – Act 8).
Quests can tell you to defeat certain bosses, collect items in a zone, release prisoners, destroy portals, and many different variations. They are displayed on the far right side of the screen.
There are quests in every zone of the game, but you must complete all the quests in the previous Act (always ending with killing the Act’s boss) before you can unlock quests in the next Act.
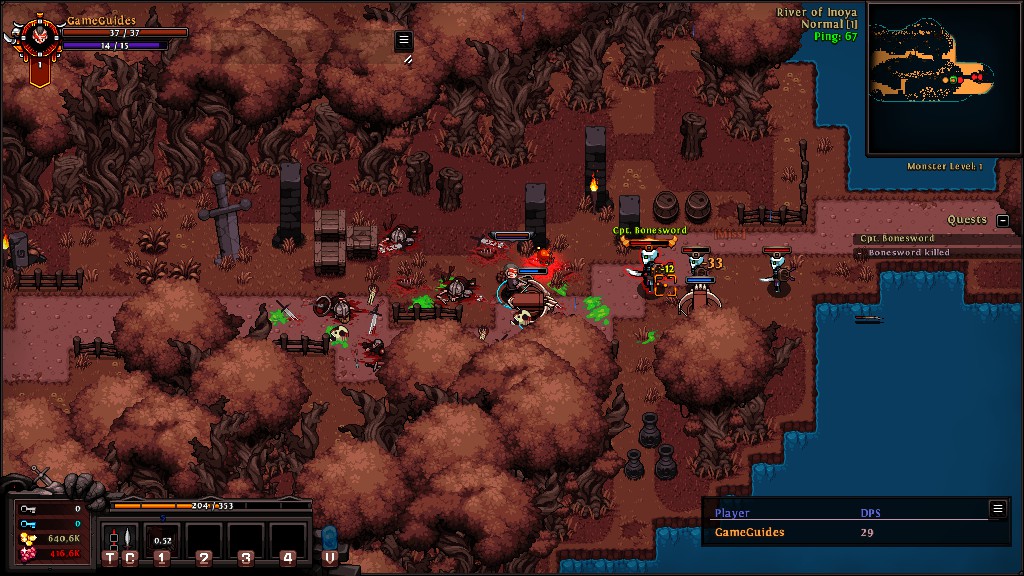
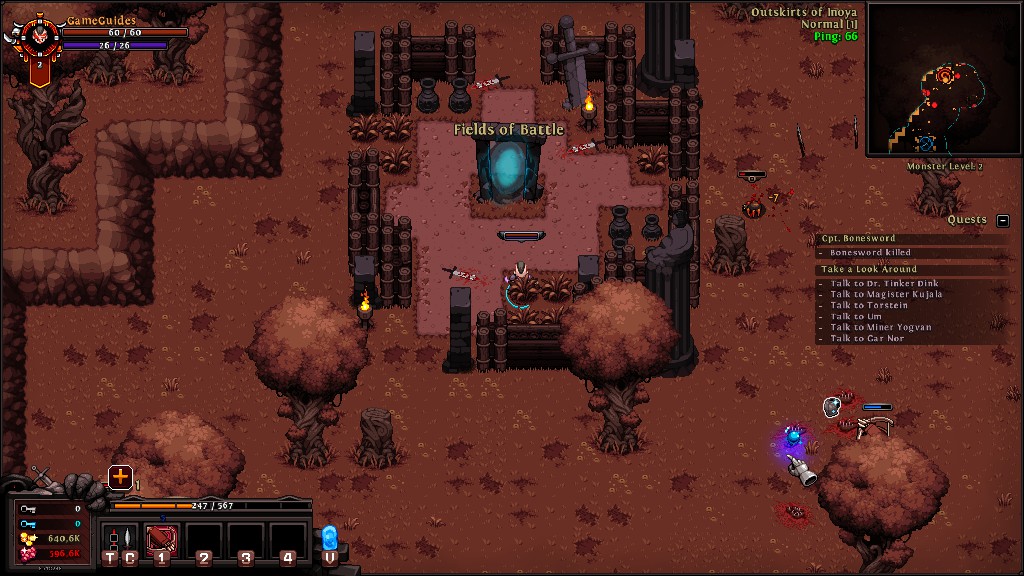
Your very first quest is to kill Captain Bonesword before reaching the Town of Inoya.
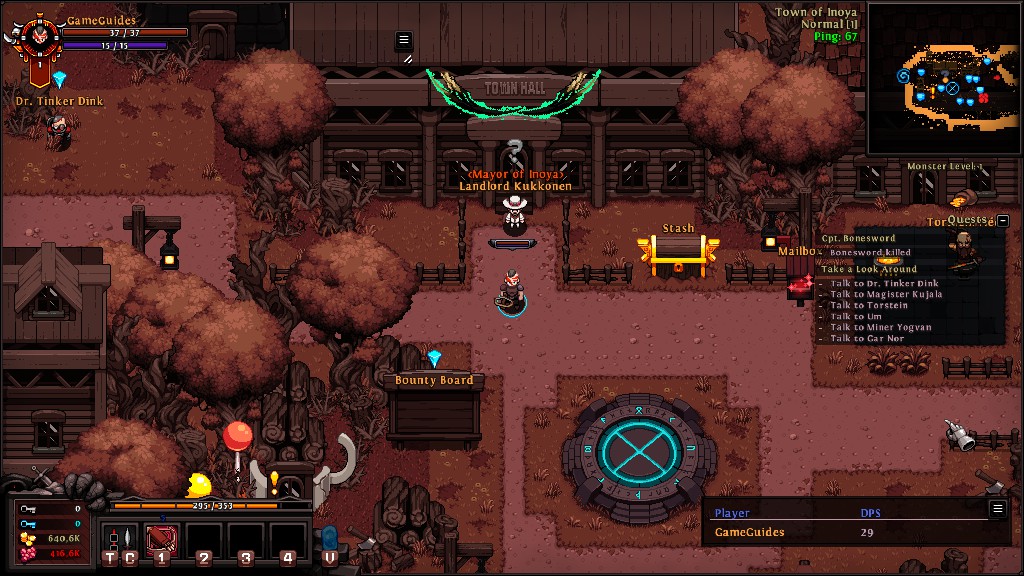
Talk to the Mayor, who will tell you to talk to the rest of the NPCs before you make your way to the first zone.
One of the NPCs you speak to will teach you about mining, which I will disclose in the next section.
Mining
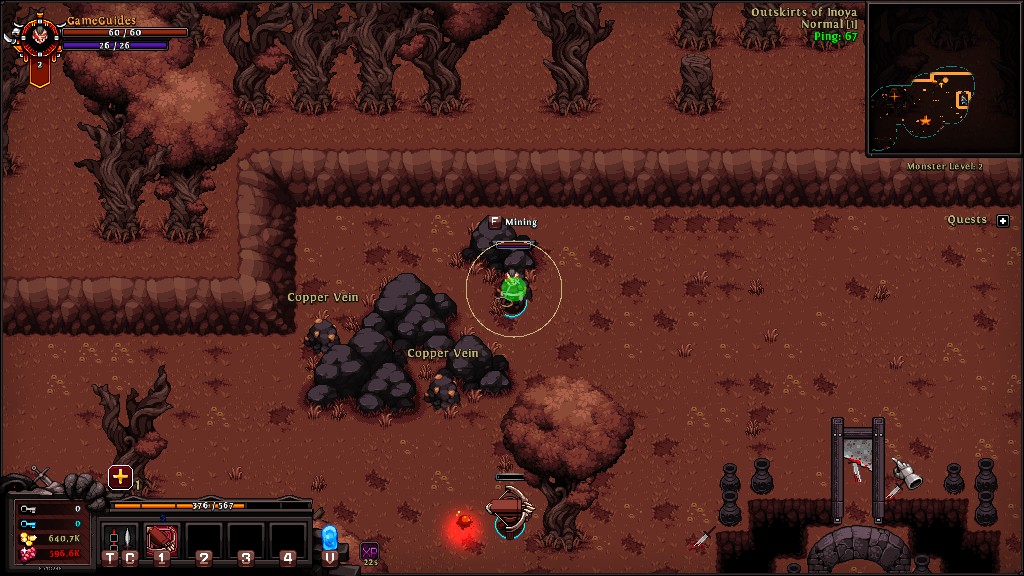
Mining is a skill in Hero Siege that allows you to gather ore.
To successfully collect the ore, you must wait for the outer circle to shrink inside the green circle then press your action button (F on the keyboard by default).
Most ores are either used to craft items or relics at the blacksmith.
Jade Ore is used to craft Upgrade tokens, re-roll tokens, ability tokens or satanic dice.
Jewelcrafting (Act 4)
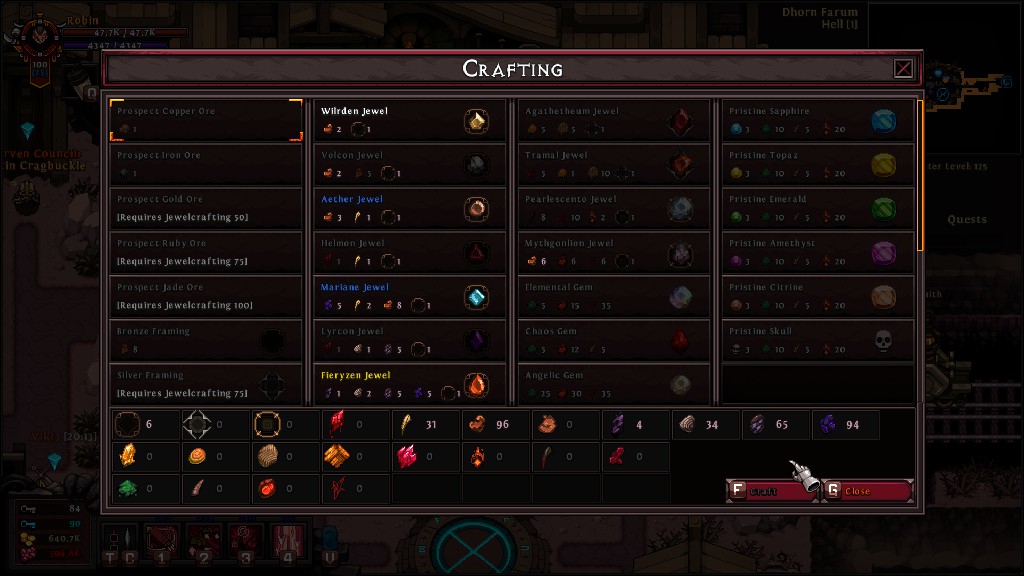
Once you reach Act 4, you will receive a quest from the jewel crafter to prospect ore at his station.
Do not get confused by the quest, you do not need to find a copper ore vein to prospect ore as you would in Old School Runescape,
Jewelcrafting allows you to socket your items with powerful gems to greatly enhance your hero’s power.
This spreadsheet will show you all the effects of each type of gem.
NOTE – You can only have 1 of each Unique gem equipped on your character.
They give you:
- 800 Elemental Damage
- 5% All Stats
- +2 All Talents
- 10% Attack Speed
You will need a lot of ore to keep your character fully equipped with gems, so it is important to keep mining any time you find ores.
Once you have placed a gem in an item, you cannot retrieve it back, so I would only recommend using it on high-quality satanic gear during the end game, where you will not replace that piece of gear for a long time.
Act Zones
As you enter a zone, you will be placed at the zone’s portal.
The minimap will display a lot of very useful information for you to keep track of while you play, so you know where points of interest are from outside your field of view.
During your first run-through of the game, the goal is to find the portal to the next zone, which will eventually lead you to the boss level, then to the next act.
The portal to the next act, or in other cases the next level of a dungeon is indicated by the red swirl on the minimap.
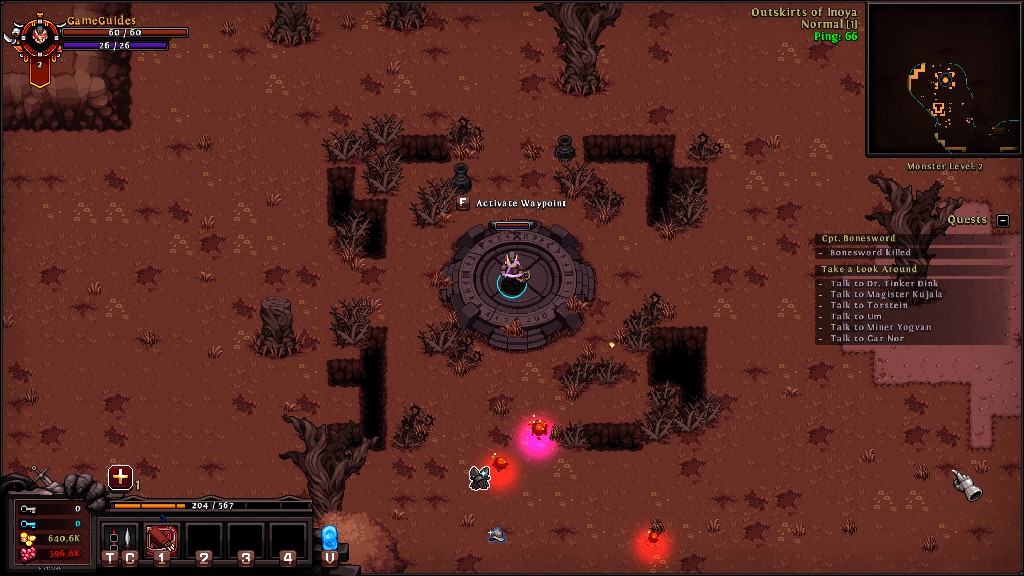
When selecting a zone to play in the current town you are in, you must find and unlock the waypoint in that zone first.
If you are the kind of player that wants to race to the end of the game as quickly as possible, it would be wise to unlock a few of these waypoints across the way, especially before bosses so that you do not have to travel from the most recently unlocked waypoint.
As you progress through zones, the monster level will increase. You can see the monster level at any time just under the minimap. It is important to never fight enemies 20 levels above or below your current hero level so that you always gain experience from the enemies.
Every zone is randomly generated while keeping to its theme, most share similar features that you can randomly come across such as:
- Dungeons
- Unstable Rifts
- Chaos Towers
- Eternal Battlefields
- Small Puzzles for Keys/Relics
Just to name a few.
There are a lot of different activities that are randomly generated throughout each zone, so I suggest you simply play the game and enjoy what Hero Sege has to offer.
Dungeons
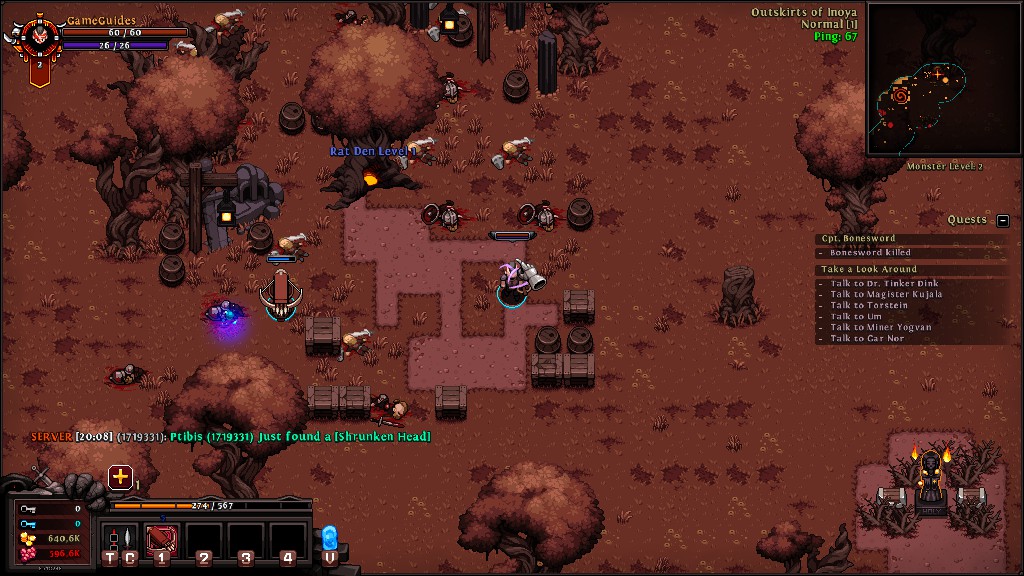
Dungeons usually contain a dense/compact number of enemies to defeat, which can be a great source of experience.
The layout is the same every time you enter each unique dungeon.
You may also find relics or may ore deposits in dungeons, so make sure to fully explore them and understand what they contain, so you can farm them for the resources you require.
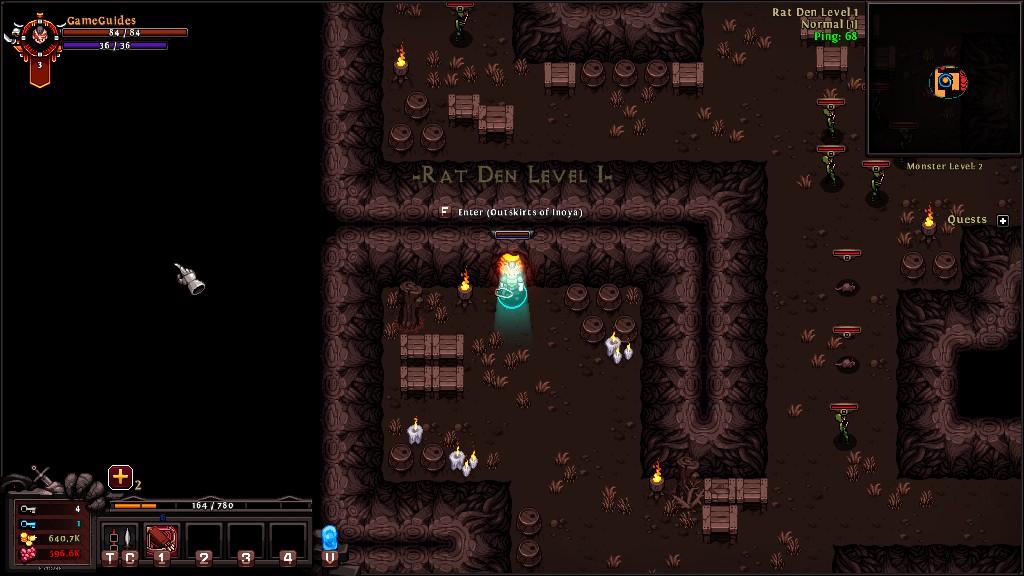
As an example, you will always find 2 ore deposits in the Rat Den, therefore it can be a great way to farm ore.
Each dungeon is specific to an act, so you will only find the Rat Den in Outskirts of Inoya, but it may not appear every time you enter the map as part of the game’s randomly generated mechanic throughout Hero Siege.
Unstable Rifts
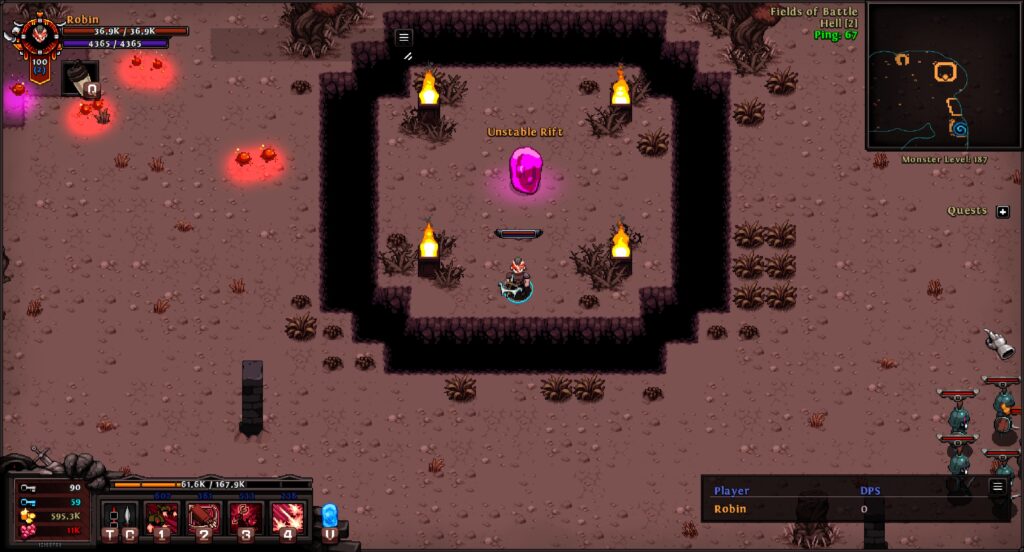
Unstable Rifts can contain an array of different locations that you are teleported to once you enter them.
They are always surrounded by a chasm, so make sure you jump appropriately so you can enter the rift island, or have a flight relic (or be a Demonspawn).
Most commonly, you will enter the Unstable Rifts Room which consists of 5 waves of enemies. Here you will span in the center of the room and enemies will spawn from 4 directions towards the center.
While leveling, this is a fantastic source of experience as you will have to defeat a lot of enemies in a short span of time. Just make sure that you don’t die and try to constantly keep moving!
Throughout the earlier level, you can earn up to 3 levels by completing one unstable rift room!
For a list of the different combinations of locations you can teleport to, follow this link.
Rare Drops
As you defeat enemies, you have a chance of dropping rare Legendary and Mythic gear. The chance this gear will drop will increase as you unlock nightmare mode with the potential of dropping Satanic gear.
As you will be collecting a lot of loot throughout your journey, you can waste a lot of time looking through the menu, trying to decide what is best for your current hero’s build.
While you are leveling, my general rule of thumb is if enemies are dying rapidly and you have a decent amount of exp gain on your items already, continue to non-stop grind until your inventory is full, then go back to town, equip, and sell.
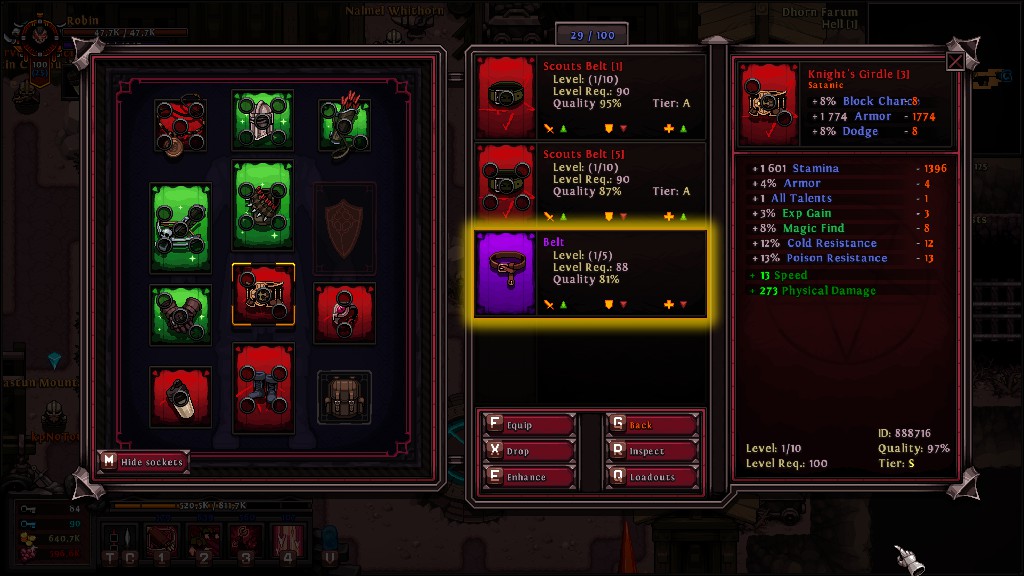
When comparing stats, try not to look at the comparable green and red arrows that dictate the power, health and defense of an item, as it is not usually accurate to your character’s needs.
Carefully look at which stats you are gaining and losing. In the image above, my hero will gain a bit of physical damage, but I will lose a lot of defenses that help me survive.
Conclusion
This guide generally outlines everything you need to know to get started with Hero Siege.
Once you are level 100 and reach the end game, firstly, congratulations for maxing out your character!
Now, this is only the start of the end game. You need to understand how to get better gear in order to increase your damage and survivability so you have a chance at ranking on the leaderboards.
As a loot game, luck is required to drop the gear that you require.
You will now need to learn about:
- Angelic & Biofrost Keys for access to better gear
- Completing Chaos Towers
- Efficient Hell Mode Level 5 farming
- Tier sets
All of which will make your character incredibly powerful!
Click this link to view our other guides!

A complete walkthrough and Introduction of game’s mechanisms, UI, NPCs, and simply all you need as a Newbie, to start mastering the game.
Playing Online
Registering
To play online you have to create a PAS account. You will need an email, username and password.
Making a Character
Choose a Class / Hero
Click on a hero to read their special talent at top of the screen, write a name, choose if you want to play Hardcore or Seasonal or Non-season and click Enter to start your game.
Notes
- Hardcore: Character will remain dead if it dies and you will need to create another character to continue playing.
- Seasonal: Go with game’s latest updates and receive rewards at end of each season if you were ranked. After each season a lot of things about the game changes and you can’t carry any progress from previous season to the next one (this is the most popluar and recomended game mode).
- Non-season: After end of each season, your character doesn’t get deleted, instead it becomes a non-season character that you can play anytime to either test stuff, earn achievements or pass time.
Shop
After clicking on the character you made, you can see the “Shop” button on purple. This is where you customize your character’s Hat, Skin, Minion, HUD, Name Color, Companion, and Season Reward.
Lobbies and Servers
- You can’t join rooms that use P2P connection (don’t have “PAS” icon behind room name).
- You choose the difficulty of the game when creating the lobby. You are forced to play Normal difficulty first, Nightmare, Hell and then Inferno. Joining a difficulty that you didn’t unlock yet is not possible.
- Choose if you want to connect through the 6510 (P2P) port and play with zero ping (recomended for solo), or through official PAS servers (recomended for group plays).
- At top-center of the screen you can choose the region. It doesn’t affect much and isn’t mandatory or premanet to change it. It makes it easy to find other people.
Rules and Notes
There are “General” , “Trade” , and “Guild” chat tabs. Try using each one for their purpose.
Account sharing is not allowed, so keep your account close to your chest.
Cheating for any reason is not allowed. Taking cheated items or currency can also get you banned.
Real life tradng is not allowed. Rubies (rec crystals in-game), and sometimes in-game gold and items are the trading currency used.
To report players for cheating, other reasons, right click on their name and click “Inspect” and note their “ID”. Visit official HS discord to do report.
In-Game, UI
River of Inoya
This is the first stage of the game, which is the tutorial. Read sings while progressing through the river to learn how to attack, jump, collect loot and manage your inventory.
Town of Inoya
This is the main tower and camp of the game.
Acts and Zones
You can select the next map to play using the portal in the middle of town. Simply walk to the blinking blue light circle at middle, and click F.
Note
The final act that is locked it a DLC that called “Wrath of Mevius” that you can purchase. If you completed lastest map you could, exit the room and make another one selecting the higher difficulty.
NPCs
Those that are not mentioned here are probably useless.
Dr.Tinker Dink
Later (at inferno difficulty) you will have access to Wormhole Portal which are unlimited!? ladder maps with increasing difficulties that determine your rank at leaderboard. This NPC is the guy for that! give him a Wormhole key and he will open the portal for you.
Um
You have a chance to receive specific loots from specific bosses, giving all 4 of them to this NPC will take you to a special map:
- Gurag’s Heart: by killing Gurag at King’s Garden
- Death’s Sigil: by killing Greap Reaper at The Glacial Trail
- Anibus Ankh: by killing Anibus at The Pyramid Level 2
- Damien’s Eye: by killing Damien at The Devil’s Breach
Magister Kujala
You can buy Mystery Chests from him for 900 rubies each. They have a chance to unlock a hat or drop: Wormhole key, Runes, Relics, Items, Gems, Keys, and Rubies.
Torstein Neel
AKA Vendor / Blacksmith is your shopkeeper NPC. Using this NPC you can:
- Sell Items
- Clear Item Sockets
- Craft Wormhole Keys
- Merge Legendary Powders to Mythic
- Craft Keys
- Craft Items
- Upgrade Gems
Gar Nor
You can lock your EXP bar from progressing here. Also test how much damage you deal. To test your damage, Speak with NPC and click “Test Damage Per Second” and you will see numbers floating above him; let him finish counting and do your best to that dummy target untill the countdown above it is finished. You will see your DPS above the dummy when it’s calculated.
Special Dungeons
There some special dungeons at some maps. When you find them you need to get closer to their enterance and click F to enter. There can be only one of these at each map and they don’t spawn more than one at once. And they only have a chance to spawn, meaning you will not find them all the time.
Note
Relics can be accessed by pressing ESC.
Options
Ability Casting Controlls
You can map all your active skills to a single button; for example “Space” button from [Option’s -> Controlls] or you can have any of them in separate buttons, depensing on your playing style.
Mentioned controlls: Skill 1, 2, 3, 4.
Too Many Items?
While in-game, (hosted or joined a lobby) go to Options, In-game, and select the minimum rarity of items that you want to see dropped from killed mobs. If you select “Satanic” for example, you will no longer see lower quality items dropped.
Notes
- This option is simply a UI filter and doesn’t affect item drop chances.
- There is a DLC to purchase that increases your Stash and Inventory capacity.
Abbreviations
These are meanings of some short terms that are used often in this game:
- PAS: Panic Art Studios (The game’s developers)
- HS: Hero Siege
- P2P: Peer to Peer
- WTS: Want to Sell
- WTB: Want to Buy
- WTT: Want to Trade
- C/O: Current Offer
- B/O: Buyout
- TP: Town Portal
- Town: Maps that include no mobs, these are camps that provide stash and NPC.
- Zone: Every Map/Level with mobs is called a Zone.
- Act: Every 6 Maps together called an Act (A Town, 4 Zones and final Zone with boss).
Overview
Introduction:It was written for SEASON 1 and is no longer up to date, I will update it soon. This guide covers endgame, that means wormhole progression with all characters, it’s not aimed for leveling or just casual playing. Please take into consideration, that you can currently skip regular enemies in wormhole just by pressing “T” and you can go straight to boss room and that’s why I focused this guide mainly on how well all classes perform against bosses. Even if they fix it and you won’t be able to skip it, following list should be still relevant!How was testing of all characters done?All classes were tested in wormhole levels 1-200 and then solo level 1000. They all had gear with item level adequate to the wormhole they were in, no cheating, no boosting stats.Overall results:Warning:It is possible that class balance may change with super high wormhole levels like 10 000, 50 000 or 1 000 000 but you won’t get there most likely. ( It gets boring )So the current meta revolves around ranged classes, not because they are necessary stronger, but their survivability is just better. You can stay at your max range and easily avoid enemy attacks and abilities, also there is less “visual busyness” you can’t see well what’s going on most of the time, when fighting with melee due to all those animations. They’re not bad or boring, but inhigher wormhole levels, melee tend to die almost instantly from an unavoidable source of dmg.Next thing I noticed is that strength builds are much more better than energy ones. Mostly because synergies with energy builds have lower dmg and how scaling with weapon works.Having Satanic weapon with high dmg and high attack speed is much more better than having a mythic or legendary with tripple its stats. Why? Your best damage source if you are strength user is your basic attack, often boostet from talents and proc from your other abilities. For an example if a class has 50% chance to spawn lighting bolt with every attack, the higher your attack speed is the more lighting bolts you will spawn and that equals higher dmg, not to mention your talents, even if they are strong, have cooldowns. If you have extremely high attack speed and additonal proc chance from other abilities, doing just basic attacks will result in most of your dmg in boss fights. There are few exception to that, but it mostly works like that. Character List:(Full guide on every single character is below ) S Tier :1. Paladin2. Marksman A Tier :1. Pyromancer 2. Amazon3. Pirate B Tier :1. Shaman2. Demon Slayer3. Demon Spawn4. Necromancer C Tier :1. Nomad2. Samurai D Tier :1. Viking2. Redneck
Hero Siege – Classes part 1

Fallen Paladin:
Wait, wait … what? Didn’t you just write that the current meta revolves around ranged classes only? Isn’t Fallen Paladin a melee class? Well yes that’s true and most of his abilities suck, but… Yes there is a but and a big one 🙂 He is immortal, like literally and thus can’t be killed. However you need few things to achiev that, it may take some time tho so be
prepared you won’t be invincible from the start.
Pros :
– Immortality
– “Go to” class for Hardcore
– Highest Wormhole level potential
– High dmg thanks to Lightning Fury proc
Cons :
– Most of his talents are useless in endgame
– Lack of challenge = gets boring quickly
– Gear and talent dependent
Gameplay :
Use your buble ( Divine shield ) keep it up the entire fight and just stay close to boss and do basic attack with your Lightning Fury proc, you can use your hammer, it doesn’t stop you from attacking but it’s useless and provides minimal dmg boost. Although spamming Holy Nova on cooldown escpecially in early levels will result in a slightly faster boss killing time.
Stats :
Put everything in energy, simple as that, there is no need for stamina/armor
(At higher wormhole levels, stats that are given to you thru leveling become obsolete, but if you are going to “min-max” it put them to the stat mentioned above )
Talents :
Divine Shield – Put everything here first until you reach cap with spendable talents.
Lightning Fury – Your second best talent, put here all your talents until you reach cap.
Holy Nova – Max this as your last talent, put here all your talents until you run out of them.
Optional : You can switch Holy Nova for Holy Shock Aura, but it’s weaker. The only downside of Holy Nova is that you have to spam it constantly.
Synergies ( You can only have two at a time ) :
Divine Light – It’s a must have synergy, only by having this bonus you can become immortal. ( At some point you may not need it, if you reach 20 sec duration of your Divine Shield just from items in very high wormhole levels, but it will take you some time )
Lightning God – Simple effect, it increases your proc chance to 65% and that equals higher dmg, quite noticeable in high wormhole levels.
Gear :
Your most wanted stat is plus to all talents or if an item has plus to Divine shield talent, with Divine Light synergy it triples the duration of that skill, and because
it has 20 sec cooldown, you must have a minimum of 6.67 sec duration of Divine Shield talent in order to be invincible. If possible go for 7 sec or maybe even more, so you don’t have to press that skill exactly on that time. It’s much more safer that way.
Your other stats on items should be strength and energy. Ignore stamina, it won’t help you when you are invincbile 🙂
Why Energy ? It has a synergy with your other talents such as Lightning Fury and Holy Nova or Holy shock Aura, it’s a big dmg boost.
Why Strenght ? It increases your basic attack and curent meta kinda relies on that and of course proc from your abilities.
Stat priority : Plus to all talents/ Plus to Divine shield until you reach immortality > Energy > Strength > Stamina/Armor
Don’t forget ! Choose weapon speed over its stats and dmg, only exception is if you are missing talent points in Divine Shield.

Marksman:
Currently strongest damage dealer in game. His dmg scales best with current strength/basic attack meta. Can place turrets and traps and has an escape ability.
Marksman is also the only class that hasn’t most of his abilities completly useless. Many of his talents can be proc from basic attacks and that makes
him very strong. Thanks to his synergies, he can alter between high single targed dps or strong aoe.
Pros :
– Currently strongest damage dealer in game
– If lazy, turrets can do his work for him
– Escape ability ( jump )
– Can choose between aoe or single target with his synergies
Cons :
– To maximize your dmg, you must have all your turrets up for the entire boss fight.
Gameplay :
When approaching boss, try placing as many turrets as possible before he spawns and keep them up for the entire duration of fight.
Spam Arrow Rampages whenever they are off cooldown. Use Disengage to avoid projectiles if needed.
Stats :
Put everything in strength, there is no need for other stats.
(At higher wormhole levels, stats that are given to you thru leveling become obsolete, but if you are going to “min-max” it put them to the stat mentioned above )
Talents :
Critical Attack – Put everything here first until you reach cap with spendable talents or around 95% crit chance.
Multishot – Your best talent, put here all your talents until you reach cap
Grenade Throw – Max this as your last talent, put here all your talents until you run out of them.
OPTIONAL : Homing Rocket – Slightly worse than Grenade Throw, it has lower proc chance but deals bigger AOE dmg, also having homing projectiles may help sometimes.
Synergies ( You can only have two at a time ) :
Colossal Arrow – It’s a must have synergy, your highest single target dmg boost. If you want to have better AOE don’t choose this.
Turret Master – Max turrets increased to 8 + turrets shoot homing rockets with a 10% chance.
Gear :
Always go for strength over everything, also having plus to all talents or plus to talents mentioned above is never a bad choice!
Your next stat should be stamina, survivability is needed as you progress thru higher wormhole levels.
Stats like energy or armor are completly useless for your class.
Why Strength ? It has synergy with all your talents and of course increases your basic attack dmg.
Why not Energy/Armor ? You are already almost capped with dmg reduction so you don’t need more of it. Energy builds are currently bad overall.
You choose Energy only if your class depends on it because of talent tree synergies like Pyromancer od Demon Spawn have.
Stat priority : Strength > Stamina > Plus to all talents/Plus to your main talents you are using > Energy > Armor
Hero Siege – Classes part 2

Pyromancer:
Unfortunately in current meta strength > energy builds because of how scaling from weapon works. When I tested all characters he had pretty decent killing times on bosses as energy user to my surprise but his major downside is that he is hard to play. There is no punishment for spamming all your skills and performing basic attacks at the same time. You can do both efficiently and you should ! 🙂 If you want to “min-max” your dmg you must use all your abilities constantly, and because they have low cooldowns and you want to use them as often as possible ( for an example having all hydras up for the entire duration of your fight ) there is a high chance that you won’t pay attention to projectiles or other boss abilities and you will die.
Pros :
– As an energy user, he has decent dps
– If lazy, hydras can do his work for him
Cons :
– Hard to play if you want to push the dmg to its maximum potential
– No escape ability like jump, dash or charge
Gameplay :
As I wrote earlier in the class introduction, you want to spam all your skills as soon as they are off cooldowns, but you also have to pay attention to your surroundings
a loose projectile can easily kill you.
Stats :
Put everything in energy, there is no need for strength/armor
(At higher wormhole levels, stats that are given to you thru leveling become obsolete, but if you are going to “min-max” it put them to the stat mentioned above )
Talents :
Meteor – Put everything here first until you reach cap with spendable talents.
Hydra – Other good talent, put here all your talents until you reach cap.
Blazing trail – Max this as your last talent, put here all your talents until you run out of them.
Those three are the most valuable talents for you.
Synergies ( You can only have two at a time ) :
Meteor Master – It’s a must have synergy, your highest dmg boost along with hydras
Hydrality- Spawns 2 hydras instead of 1 so it doubles their dmg, again very useful.
Gear :
Always go for energy over everything, also having plus to all talents or plus to talents mentioned above is never a bad choice!
Your next stat should be stamina, survivability is needed as you progress thru higher wormhole levels.
Stats like strenght or armor are completly useless for your class.
Why Energy ? It has synergy with all your talents that you will be using.
Why not Strength/Armor ? You are already almost capped with dmg reduction so you don’t need more of it. Strength increases your basic attak, which is always
good in current meta, but energy is more valuable for you because of your synergies.
Stat priority : Energy > Stamina > Plus to all talents/Plus to your three talents you are using > Strenght > Armor

Amazon :
Back in the day it was my favorite class, strong, great escape ability with stun, fast, high aoe dmg but when revisiting her after such a long time she changed.
Not really to worse, but from my testing she either doesn’t scale properly or something is not working as it should. She should have much more stronger DOT ( damage over time )
with skills like Envenom which triples all her poison dmg and Venom synergy that should tripple it again. To my knowledge it’s not a multiplicative increase as it should deal much more dmg with
weapon dmg scaling from Master Poisoner talent if that would be the case. Still her dmg is high thanks to Tropical thunder proc combined with your high attack speed.
Pros :
– Fun to play
– Escape ability with stun
– Fast
Cons :
– Currently her dmg scaling or some ability doesn’t work as it should
– Most of her talents have no synergies, making them useless.
Gameplay :
Use her jump ability to avoid death, spam Spearnage and Envenom when they’re off cooldown, don’t even bother to use her 3rd ability as it deals zero dmg without synergy scaling.
Use Spearnage with caution, it’s a mid range ability, if you are too far away from boss it won’t be as strong but staying too close can be even more dangerous.
Stats :
Put everything in Strength, there is no need for energy/armor
(At higher wormhole levels, stats that are given to you thru leveling become obsolete, but if you are going to “min-max” it put them to the stat mentioned above )
Talents :
Master Poisoner- Put everything here first until you reach cap with spendable talents.
Spearnage – Other good talent, put here all your talents until you reach cap.
Tropical Thunder – Max this as your last talent, put here all your talents until you run out of them, noticable dmg boost.
Those three are the most valuable talents for you, but don’t forget to put at least 1 point in each talent!
Synergies ( You can only have two at a time ) :
Venom – It should be the best choice for you, but I am not quite sure if it works as it should.
Thunderstorm – Instead of releasing a thunder proc, releases a small thunderstorm in the location, basically more dmg, high proc chance.
Gear :
Always go for strength over everything, also having plus to all talents or plus to talents mentioned above is never a bad choice!
Your next stat should be stamina, survivability is needed as you progress thru higher wormhole levels.
Stats like armor is completly useless for your class.
Why Strength ? It has synergy with Spearnage and it increases your basic attack dmg.
Why not Energy/Armor ? You are already almost capped with dmg reduction so you don’t need more of it. Energy works with your Tropical
Thunder skill and if you have it boostet with synergy from satanic gear it’s even better but not as good as basic attack combined with Spearnage.
Stat priority : Strength > Stamina > Plus to all talents/Plus to your three talents you are using > Energy > Armor
Hero Siege – Classes part 3

Pirate:
I played this class for the first time, so I didn’t know what to expect. After testing her in wormhole, fighting several bosses my results are… actually surprising!
What makes her A tier class? Well as I wrote several times ranged classes and strength builds with strong weapon dmg and high attack speed combined with proc from basic attacks are current meta.Her burst dmg with Rapid Fire talent is stronger than Amazon’s, but she can’t have 100% uptime on that at least not with the gear I had from wormhole levels I ran and in terms of who had faster killing time on bosses she is below Amazon but only by a few seconds. There isn’t a big difference but the fact that she is missing escape ability and her pet ( Parrot ) can bug and not attack makes her slighly worse. If you don’t want to spam your abilities the entire duration of fight, choose her over Amazon.
Pros:
– High burst dmg for a short period of time thanks to Rapid Fire and its synergy from Satanic item
– Has a pet
Cons :
– Useless skills
– Pet AI is not the best
– Stun bound to grip ability, it feels more like a suicidal ability, stunned enemies can cast their abilities.
Neutral :
– Her grip ability ( Anchor Hook ) can be used to reposition a boss if you are careful enough, but it has little to none use, she is a ranged class, it would be useful for a melee class instead.
Gameplay :
Very simple, just do your basic attacks, you can’t resummon your pet ( Parrot ) so if he is bugged you are out of luck. Don’t forget to use Rapid Fire whenever it’s off cooldown and
of course don’t get hit by a projectile 🙂
Stats :
Put everything in Strength, there is no need for energy/armor
(At higher wormhole levels, stats that are given to you thru leveling become obsolete, but if you are going to “min-max” it put them to the stat mentioned above )
Talents :
Rapid Fire- Put everything here first until you reach cap with spendable talents.
Cannonball – Other good talent, put here all your talents until you reach cap, it has a chance to activate with your basic attack.
Parrot – Max this as your last talent, put here all your talents until you run out of them, not a bad skill but AI is weak.
Those three are the most valuable talents for you, but don’t forget to put at least 1 point in each talent!
Synergies ( You can only have two at a time ) :
Rocket Madness – When rapid fire is active, pirate shoots homing rockets with her base damage = small dmg boost.
Second synergy is up to you, both are useless, but Rocket Madness is a little bit better I guess. ( Still useless )
Gear :
Always go for strength over everything, also having plus to all talents or plus to talents mentioned above is never a bad choice!
Your next stat should be stamina, survivability is needed as you progress thru higher wormhole levels.
Stats like armor is completly useless for your class.
Why Strength ? It has synergy with your talents and increases your basic attack.
Why not Energy/Armor ? You are already almost capped with dmg reduction so you don’t need more of it. Energy works only
with your Explosive Bullets which are pretty trashy. Don’t bother.
Stat priority : Strength > Stamina > Plus to all talents/Plus to your three talents you are using > Energy > Armor

Shaman :
New addition to Hero Siege character roster, and because it was a new character I immediately though he will be the strongest one. Oh boy, how much wrong I was.He is not the worst by any means but his skills are kinda bad. He can be build in two ways. Energy or Strength as your main stat. The problem is, his energy build is weak as it relies on his totems and they are completly useless, their dmg doesn’t scale well. Second build requires strength in order to be good. But there lays another problem. If you are going for strength, your build revolves around wolves. They aren’t bad but the AI they have is just… They bug so often, not attacking just standing or walking around enemies, it’s very frustrating, the only good think is that you can resummon them and they are immortal, unlike Necro’s pets that can be killed quickly and you need corpses to resummon them. Bosses like Leviathan/Satan are super annoying, because you can’t command your pet to attack different target, you have to resummon them and just pray that they will attack what you want. However if you fully utilize your pets he is on pair with Amazon’s and Pirat’s dmg but because you can not rely on luck, and his pets bug pretty often, he is first in B Tier.
Pros :
– New fresh class to play
– Has immortal pets and can resummon them if needed
– Can immobilize enemies
– Elemental blast can benefit from both energy and strength
Cons :
– His pets are retarded, bad AI and you can’t command them to attack what you want and he depends on them too much.
– Most of your talents are useless and they scale bad, dealing almost zero dmg.
– No escape ability like jump or charge or dash.
– You have to get used to resummon pets often so they MAY attack right target if you are lucky enough.
Gameplay :
At the start of a boss fight, place your totems use Earth Bind to root your target, and spawn pets. Use Elemental blast as soon as it is off cooldown.
Resummon your pets if they aren’t attacking your target. If you move too far from your totems, resummon them, but as I wrote they don’t provide
big dmg boost, so it’s not really necessary.
Stats :
Put everything in Strength, there is no need for energy/armor
(At higher wormhole levels, stats that are given to you thru leveling become obsolete, but if you are going to “min-max” it put them to the stat mentioned above )
Talents :
Spirit Wolves- Put everything here first until you reach cap with spendable talents.
Scent of the Wolf – Other good talent, put here all your talents until you reach cap.
Elemental Blast – Max this as your last talent, put here all your talents until you run out of them.
Those three are the most valuable talents for you, but don’t forget to put at least 1 point in each talent!
Synergies ( You can only have two at a time ) :
Pack Leader – Summons three wolves instead of two, increasing your dmg at also chance that one will bug and just wonder around zone doing nothing 🙂
Elementalist – Shoot six Elemental Blasts instead of three, in each direction, doubles your dmg from that skill.
Gear :
Always go for strength over everything, also having plus to all talents or plus to talents mentioned above is never a bad choice!
Your next stat should be stamina, survivability is needed as you progress thru higher wormhole levels.
Stats like armor is completly useless for your class.
Why Strength ? It has synergy with your wolves and increases your basic attack.
Why not Energy/Armor ? You are already almost capped with dmg reduction so you don’t need more of it. Energy works with your Totem abilities, which are completly useless as of now.
Stat priority : Strength > Stamina > Plus to all talents/Plus to your three talents you are using > Energy > Armor
Hero Siege – Classes part 4

Demon Slayer :
My favorite class back in the day, when his leech from talent was actually useful. The only reason he isn’t in A Tier is that when he switch to ranged weapon, his dmg is lowered by 2.5 times, also Katana Barrier loses its effectivnes, you can no longer stay close to your enemies. Shredder Trap is still active thru the entire fight and Executioner provides a small boost if it works as it should and also having around 100% crit chance isn’t bad either. Almost forgot to mention, I have a feeling that Demon Slayer has many bugged abilities, his Execute sometimes doesn’t hit enemies even when they are close to you and you can clearly see it passed thru them. Weapon Switch does nothing, except switching between melee and ranged weapon. According to the description it should deal dmg when you switch weapons I guess but it does nothing. Light In Darkness is not updated and completly useless and Executioneer is not working at all or it’s just a graphical bug, it doesn’t increase your dmg at all, at least from the numbers you can see on the screen when enemies are below 50% HP.
Pros :
– Can be played as melee or ranged
– Has an escape ability ( dash )
Cons :
– When played as ranged, his dmg is significantly lowered ( around 2.5 times )
– Can’t fully utilize all of his abilities, when played as ranged.
Gameplay :
You can play as melee in lower wormhole levels, when it’s too dangerous switch to ranged but be prepared to lose your dmg. Your Dash can be used as an escape ability.
There is no need for you to use Katana Barrier when playing as ranged but you can spam Bullet Hell for small dmg boost, it has synergy with energy so it’s not really significant.
Stats :
Put everything in Strength, there is no need for energy/armor
(At higher wormhole levels, stats that are given to you thru leveling become obsolete, but if you are going to “min-max” it put them to the stat mentioned above )
Talents :
Crippling Strike – Put everything here first until you reach cap with spendable talents or reach around 95% crit chance.
Shredder Trap – Other good talent, put here all your talents until you reach cap.
Executioneer – Max this as your last talent, put here all your talents until you run out of them, but I am not sure if it works, if you think it does nothing go for Bullet Hell talent.
Those three are the most valuable talents for you, but don’t forget to put at least 1 point in each talent!
Synergies ( You can only have two at a time ) :
Demon Slave – Gains an immortal minion that has Demon Slayer’s Damage, his pet is kinda weak and definitely not doing as much dmg as Demon Slayer, not sure how exactly it does work but few
times I had more than one minion, still not a significant boost.
Sixth Sense – Homing Projectiles, rest of his synergies are meh, but use this over the other one.
Gear :
Always go for strength over everything, also having plus to all talents or plus to talents mentioned above is never a bad choice!
Your next stat should be stamina, survivability is needed as you progress thru higher wormhole levels.
Stats like armor is completly useless for your class.
Why Strength ? It has synergy with your talents and it increases your basic dmg.
Why not Energy/Armor ? You are already almost capped with dmg reduction so you don’t need more of it. Energy only works with Bullet Hell and it’s not needed to increase dmg of it.
Stat priority : Strength > Stamina > Plus to all talents/Plus to your three talents you are using > Energy > Armor

Demon Spawn:
Whaaaaat? The almighty Demon Spawn is B Tier and not even first in that tier? Are you out of your mind or something? Didn’t you see Season 1 totally cheating-free leaderboards? They are everywhere! Well yes, and I was surprised myself when I tested him. I thought he will be the strongest class, but nope not even close. Remember Manacalypse? Member? Remember when it one-shot every single enemy on map? Remember?  Well it doesn’t work like that anymore, in fact it’s almost useless now. Low dmg, you have to be very close to your enemies, radius was drastically nerfed. Not only that, but current meta doesn’t favor him, he is an energy user. His Blood Surge ability isn’t bad, however you have to channel it and that means you need to stay still and it can cause problems, not only that, but the direction you are facing with Blood Surge covers projectiles with its animation, so you are often hit by something you can’t even see, also its cooldown could be lower.
Pros :
– Mana Shield can save you from dying
– Can recover his mana very quickly thanks to his talent
– Blood Surge has long range
Cons :
– Dmg of Manacalypse even with Satanic synergy is bad and it has low radius, forcing you to shorten your range between you and a boss.
– Blood Surge is a channel ability so you have to stay still and it prevents you from seeing projectiles because its animation covers them.
– No escape ability like jump or charge or dash
– Long cooldowns on Blood Surge and Manacalypse
Gameplay :
If you have low HP use Mana Shield to survive, stay at max range when using Blood Surge and watch your surroundings, so you won’t die. You dont have to wait until the channeling is over,
avoiding projectiles and boss abilities has bigger priority.
Stats :
Put everything in Energy, there is no need for strength/armor
(At higher wormhole levels, stats that are given to you thru leveling become obsolete, but if you are going to “min-max” it put them to the stat mentioned above )
Talents :
Blood Surge- Put everything here first until you reach cap with spendable talents, your main dmg ability except basic attack.
Demonic Presence – Other good talent, put here all your talents until you reach cap, it increases your dmg of Blood Surge.
Mana Devour – Max this as your last talent, put here all your talents until you run out of them. Not having enough mana won’t be an issue.
Those three are the most valuable talents for you, but don’t forget to put at least 1 point in each talent!
Synergies ( You can only have two at a time ) :
Blood Surgery : Blood Surge is now wider, ticks more frequently and deals 3x its damage, It’s a must have synergy.
When it comes to second Synergy bonus from Satanic gear, it’s up to you. You really won’t be using any of them. It won’t make a difference.
Gear :
Always go for energy over everything, also having plus to all talents or plus to talents mentioned above is never a bad choice!
Your next stat should be stamina, survivability is needed as you progress thru higher wormhole levels.
Stats like armor is completly useless for your class.
Why Energy ? It has synergy with your Blood Surge ability.
Why not Strength/Armor ? You are already almost capped with dmg reduction so you don’t need more of it. Strength is good but unfortunately not for your class.
Stat priority : Energy > Stamina > Plus to all talents/Plus to your three talents you are using > Strength > Armor
Hero Siege – Classes part 5

Necromancer:
Why is he last in B Tier ? Good potential, the biggest problem with him is that he relies on AI ( his pets ) too much and in current state of game it’s just unpredictable. If his other skills had synergies with energy or at least any other stat, he could have been played in different ways. Back to his minions ( pets ). They have pretty decent dmg but they aren’t immortal and you can’t resummon them whenever you want. There lays the issue. You need corpses to make your army of undeads except Rock Golem. With Satanic gear synergy you can have up to 10 skeletons on your side, that’s good but with all the limitation they have as I just mentioned like not being immortal and you need corpses to summon them and they die pretty fast in boss fights ( Also they can bug, attack wrong target etc. that lowers your dmg even more) so you are stuck to your basic attack and Rock Golems. Not to mention you can’t skip enemies in wormhole and jump straight to the boss room, you need to kill at least one pack and summon all your skeletons ( pets ) and then pray for having easy boss that won’t kill them in a few seconds. When I tested them in Wormhole lvl 1000 they died instantly, so the higher lvl of wormhole you have the less useful they become.
Pros :
– A lot of skeletons ( pets )
Cons :
– Relies too much on his pets and has weak dmg without them
– No escape ability like jump or charge or dash
– Pets aren’t immortal and can’t be resummoned without corpses of enemies
– Pets have bad AI in general
Gameplay:
Before you enter boss room, make sure you have all your skeletons ( pets ) up, 6x Skeleton Mauler, 4x Skeleton Mage, 2x Rock Golem.
Avoid projectiles and boss abilities as usual and pray that your pets won’t bug or be killed in a few seconds.
Stats :
Put everything in Strength, there is no need for energy/armor
(At higher wormhole levels, stats that are given to you thru leveling become obsolete, but if you are going to “min-max” it put them to the stat mentioned above )
Talents :
Rock Golem- Put everything here first until you reach cap with spendable talents, your only pet that can be resummoned without having worrying about corpses of enemies.
Skeleton Mauler – Next talent, put here all your talents until you reach cap.
Skeleton Mage – Max this as your last talent, put here all your talents until you run out of them.
Optional : You can withdraw few talents from Skeleton Mauler and Skeleton Mage and put them to Summon Mastery, especially for low wormhole levels.
Those four are the most valuable talents for you, but don’t forget to put at least 1 point in each talent!
Synergies ( You can only have two at a time ) :
Necronomicon – It’s a must have synergy at least for early endgame ( low wormhole levels )
Meat Wagon – Triples the amount of bits from your corpse bomb, not really useful but better than third synergy. Doesn’t make a big difference.
Gear :
Always go for strength over everything, also having plus to all talents or plus to talents mentioned above is never a bad choice!
Your next stat should be stamina, survivability is needed as you progress thru higher wormhole levels.
Stats like armor is completly useless for your class.
Why Strength ? It has synergy with your skeletons ( pets ) and it increases your basic dmg.
Why not Energy/Armor ? You are already almost capped with dmg reduction so you don’t need more of it. Energy is useless for your class.
Stat priority : Strength > Stamina > Plus to all talents/Plus to your three talents you are using > Energy > Armor

Nomad :
Now we start with melee classes, yes even worst ranged is better than melee. Why is Nomad best from them? Because you don’t want to play him as melee but rather as a mid-range class. Having a distance between you and boss is great but, you still have to hit boss with your basic attack to heal yourself if you are injured and that can be problematic. He has vanish ability, it may sound good but in reality it’s garbage. On the other hand his Rupture ability is much better. It has a chance for proc but it deals dmg until enemy dies. Of course as a melee class you have to be very careful in higher wormhole levels.
Pros :
– Best melee class in terms of dmg dealing from a distance.
Cons :
– Melee class
– If you want to heal yourself you have to do basic attacks at close range
– You won’t be using most of his abilities
Gameplay :
Stay at max range of your Dissipate ability, it has proc chance with your basic attacks. At the start of boss fight try applying Rupture on him, then immediately back out.
If you are hit by something and you have low hp, you have to go close to boss to hit him with your basic attack to regain your missing health, be careful when doing that.
Spam your Flying Scimitar and Demolishing Tornado when it’s of the cooldown. Demolishing Tornado can hit boss when it’s spread at its max range but both skills provide minimal dmg boost.
Stats :
Put everything in Strength, there is no need for energy/armor
(At higher wormhole levels, stats that are given to you thru leveling become obsolete, but if you are going to “min-max” it put them to the stat mentioned above )
Talents :
Dissipate- Put everything here first until you reach cap with spendable talents, it’s your primary attacking ability.
Wind Master – Next talent, put here all your talents until you reach cap.
Rupture – Max this as your last talent, put here all your talents until you run out of them.
Those three are the most valuable talents for you, but don’t forget to put at least 1 point in each talent!
Synergies ( You can only have two at a time ) :
Sands of Time : Throws 3 sand projectiles instead of 1, you will be using it a lot so it’s a decent dmg boost for you.
Wind Master : Wind & Sand has a chance to release double the tornados with 1.3x damage, it can speed up boss killing.
Gear :
Always go for strength over everything, also having plus to all talents or plus to talents mentioned above is never a bad choice!
Your next stat should be stamina, survivability is needed as you progress thru higher wormhole levels.
Stats like armor is completly useless for your class.
Why Strength ? It has synergy with talents and increases your basic attack dmg.
Why not Energy/Armor ? You are already almost capped with dmg reduction so you don’t need more of it. Energy is useless for your class.
Stat priority : Strength > Stamina > Plus to all talents/Plus to your three talents you are using > Energy > Armor
Hero Siege – Classes part 6

Samurai :
Interesting class design, I really liked it. You boost your next attack with different abilities to deal dmg or freeze enemies. Because of that he can be also played as a semi ranged class. His proc chance from basic attack and dmg is lower than Nomad’s but can be played safer since you can stay further from boss. Additional to that, he has useful escape ability. As I previously mentioned in Nomad’s class description, if you are hit by something and you need to heal yourself, those abilities or proc from basic attack won’t heal you, you have to get close to boss. However his Evasion ability gives him upper hand to Nomad.
Pros :
– Can stay at long range
– Interesting class design
– Escape ability
– Chance to Evade attacks
– Better survivability than Nomad
Cons :
– Melee class
– If you want to heal yourself you have to do basic attacks at close range
– You will be constatnly spamming all your abilities
– Low dmg
Gameplay :
Stay at max range whenever possible, your main damage source is proc from Focus ability. Spam all your three offensive abilities as soon as they are off cooldowns. Use Vorpal Enchant to dash forward and
escape from potential danger. Don’t forget, after using it you have to perform basic attack to activate the ability. If you are hit by something and you have low hp, you have to go close to boss to hit him
with your basic attacks to regain your missing health, be careful when doing that.
Stats :
Put everything in Strength, there is no need for energy/armor
(At higher wormhole levels, stats that are given to you thru leveling become obsolete, but if you are going to “min-max” it put them to the stat mentioned above )
Talents :
Focus – Put everything here first until you reach cap with spendable talents, you will be using it all the time.
Evasion – Next talent, put here all your talents until you reach cap.
Lightning Enchant – Max this as your last talent, put here all your talents until you run out of them.
Those three are the most valuable talents for you, but don’t forget to put at least 1 point in each talent!
Synergies ( You can only have two at a time ) :
Vorpal Mind : Vorpal Strike proc from 3 hits instead of 6, basically higher dmg.
Lightning Reflexes : Every time you evade an attack the enemy is struck with chainlightning, that means it does dmg constantly when you are not hit by anything.
Gear :
Always go for strength over everything, also having plus to all talents or plus to talents mentioned above is never a bad choice!
Your next stat should be stamina, survivability is needed as you progress thru higher wormhole levels.
Stats like armor is completly useless for your class.
Why Strength ? It has synergy with talents and increases your basic dmg.
Why not Energy/Armor ? You are already almost capped with dmg reduction so you don’t need more of it. Energy is useless for your class, it only boosts your one ability.
Stat priority : Strength > Stamina > Plus to all talents/Plus to your three talents you are using > Energy > Armor

Viking :
I’m really sad to see him in last tier. Not only he is my favorite melee class, but his dmg is really high. He is a simple character that benefits from doing just basic attack which is boosted from his talents. If he could somehow survive being insta-killed in high wormhole levels, he would be in A tier for sure. He has very strong abilities like charge that can be used as an escape skill or knockback, can stun enemies for the entire duration of fight, too bad that stunned enemies
can cast abilities so it’s kinda useless. Shame he is in same tier as Redneck 🙁
Pros :
– Can permanently keep enemies in stun.
– Simple but effective in what he does.
– Escape ability.
Cons :
– Melee class.
– If you want to heal yourself you have to do basic attacks at close range.
– Only one ranged ability that has long cooldown.
– His stun doesn’t prevent enemies from using their abilities.
Gameplay :
Very tricky, at lower wormhole levels you feel almost like a god, but the higher wormhole level gets the lower chance for surviving you have. I really don’t know what else to type, don’t die do dmg, kill boss… I guess.
I know it may sound simple and easy but if you are doing wormhole levels above certain level it’s almost impossible to kill anything without dying first.
Stats :
Put everything in Strength, there is no need for energy/armor
(At higher wormhole levels, stats that are given to you thru leveling become obsolete, but if you are going to “min-max” it put them to the stat mentioned above )
Talents :
Critical Strike – Put everything here first until you reach cap with spendable talents or if you hit around 95% crit chance.
Berserk – Next talent, put here all your talents until you reach cap.
Zeal – Max this as your last talent, put here all your talents until you run out of them.
Those three are the most valuable talents for you, but don’t forget to put at least 1 point in each talent!
Synergies ( You can only have two at a time ) :
Rage : Double the Berserk effect.
Gates of Valhalla : A hit that would kill you makes you immortal for 5 seconds instead (3min cooldown) can be helpful sometimes.
Gear :
Always go for strength over everything, also having plus to all talents or plus to talents mentioned above is never a bad choice!
Your next stat should be stamina, survivability is needed as you progress thru higher wormhole levels.
Stats like armor is completly useless for your class.
Why Strength ? It has synergy with talents and increases your basic attack dmg.
Why not Energy/Armor ? You are already almost capped with dmg reduction so you don’t need more of it. Energy is useless for your class.
Stat priority : Strength > Stamina > Plus to all talents/Plus to your three talents you are using > Energy > Armor

Redneck :
Don’t play him, just don’t.