Manuals Directory
Manualsdir.ru — Онлайн поиск инструкций и руководств
С 132 nf g, Combi refrigerator-freezer installation and use
- Текст
- Оригинал
Advertising

С 132 NF G
Combi refrigerator-freezer
Installation and use
Комбинированный холодильник-морозильник
Установка и использование
Advertising
Популярные бренды
- Apple
- Bissell
- Brother
- Canon
- Casio
- Dell
- Garmin
- Honeywell
- HP
- LG
- Motorola
- Nikon
- Panasonic
- Pioneer
- Samsung
- Sharp
- SINGER
- Sony
- Whirlpool
- Yamaha
Популярные инструкции
- Nikon — D5000
- Nikon — D40
- Nikon — D3100
- Nikon — D90
- Nikon — D7000
- Nikon — D80
- Nikon — D3000
- HP — Officejet Pro 8600
- Canon — EOS 60D
 24:22
24:22
Замена терморегулятора холодильника Индезит (Indesit)
 09:51
09:51
Холодильник Индезит. Можно ли покупать. Обзор от мастера
 09:58
09:58
Ремонт Холодильника INDESIT No Frost термостат (датчик) оттайки. Днепр
 02:55
02:55
Косяки холодильника INDESIT
 10:35
10:35
Замена уплотнителя двери холодильника Индезит Стинол Атлант
 08:43
08:43
Перевешиваем дверь в холодильнике indesit и ремонт уплотнитель холодильника Индезит на дому
 13:38
13:38
Про холодильник Индезит Ноу Фрост
 33:45
33:45
Почему холодильник Индезит не отключается
NF G Combi refrigerator…
С 132 nf g, Combi refrigerator-freezer installation and use
- Изображение
- Текст
С 132 NF G
Combi refrigerator-freezer
Installation and use
Комбинированный холодильник-морозильник
Установка и использование

1
GB
Combi refrigerator-freezer
Instructions for installation and use……………………………………….3
CIS
Комбинированный холодильник-морозильник
Инструкции по установке и использованию………………………….10
To maintain the EFFICIENCY and SAFETY of this appliance, we recommend:
— call only the Service Centers authorized by the manufacturer
— always use original Spare Parts
Производитель оставляет за собой право без предупреждения вносить изменения в
конструкцию, не ухудшающие эффективность работы оборудования.
— Некоторые параметры, приведенные в этой инструкции, являются ориентировочными:
— Производитель не несет ответственности за незначительные отклонения от указанных величин.

ATTENTION
Read your manual carefully since it contains instruc-
tions, which will ensure safe installation, use and
maintenance of your appliance.
Your Refrigerator is built to International safety stan-
dards (EN60) and has been awarded the European ap-
proval mark (IMQ) for conformity with UK electrical
safety requirements. It also meets the EC standards on
the prevention and elimination of readio interference
(EC directive 87/308 — 02.06.89).
1. This appliance is designed to be used indoors and
under no circumstances should it be installed outside
even if protected by a roof. Leaving the appliance ex-
posed to the rain and whether is exceedingly danger-
ous.
2. The appliance should be used only by adults and ex-
clusively for storing foodstuffs in compliance with the
instructions provided in this manual. Under no circum-
stances should children be allowed to operate, or tam-
per with, this product.
3. Do not attempt to operate or handle this appliance
when barefoot, or with wet hands or feet.
4. It is highly recommended that you do not operate
this appliance by connecting it to the power supply
with extensions or multiple socket plugs. If the refrig-
erator has been installed between two cabinets, make
sure that the supply cord is not dangerously crimped or
trapped beneath a heavy
object.
5. Never pull the cable or the appliance to remove the
plug from the socket; this is exceedingly dangerous.
6. Do not touch the internal cooling elements, especially if
your hands are wet, since you could burn or hurt yourself.
7. Before doing any cleaning, disconnect the appliance from
the electricity (by pulling out the plug or turning off the gen-
eral switch in your home); it is not sufficient to place the
temperature regulation knob “off” to cut off the power.
8. Before disposing of your old appliance, remember to
break or remove the lock as a safety measure to protect chil-
dren who might lock themselves inside the appliance when
playing. In addition, if the appliance is a new one with a
lock, keep the key out of the reach of small children.
9. If your appliance is not operating properly, read the chap-
ter entitled, “Trouble Shooting”, which might help you to re-
solve the problem, before calling an after-sales service cen-
ter. Do not attempt to repair the appliance by tampering with
the internal components.
10. If the power supply cord must be replaced, please contact
one of our Customer Service Centers. In some cases, the
connections are made using special terminals and in others a
special tool must be used to access the connections.
11. Do not use electric appliances inside the compartment
for food storage, if these are not those recommended by the
manufacturer.
12. At the end of the functional life of your appliance –
containing cyclopentane gas in the insulation foam and
gas R134a (tetraphtorethane) in the refrigeration circuit – the
latter should made safe before being sent to the dump. For
this operation, please contact your dealer or the Local Or-
ganisation in charge of waste disposal.
Proper installation of the appliance is essential to
ensure the best and most efficient performance of
your appliance.
Ventilation
The compressor and condenser generate heat and,
therefore, need to be ventilated properly. Rooms with
less than perfect ventilation are not very suited for in-
stallation of the appliance. Therefore, it should be in-
stalled in a room with
an opening (window or French window) that provides
the appropriate amount of air re-circulation. It is also
important that the room should not be too humid.
During installation, make sure not to cover or obstruct
the grates that allow proper ventilation of the appli-
ance. For proper ventilation of the appliance, you must
leave:
— a space of at least 10 cm between the top part and any
cabinets above it;
— a space of at least 5 cm between the sides of the ap-
pliance and any adjacent cabinets/walls.
Away from Heat
Avoid positioning the appliance in a place where it is
directly exposed to sunlight or near an oven, cook top or the
like.
Levelling
The floor should be perfectly levelled; if not, you can adjust
the feet at the front of the appliance.
Earthing
Before making the electrical connection, check that the volt-
age shown on the data plate, that you will find on the bottom
left hand side of the appliance next to the crisper, corre-
sponds to that of your mains and that the socket is earthed in
conformity with all current electrical regulations. If the sys-
tem is not earthed, the manufacturer declines all liability for
consequent damages or losses. Do not use adapters or multi-
ple sockets.
Check the power load
The electrical socket must support the maximum power load
of the appliance shown on the data plate (on the bottom left
hand side of the appliance next to the crisper).
Before plugging the appliance to the mains
Set the appliance upright and wait at least 3 hours before
plugging the appliance into the mains to ensure proper per-
formance.
Safety — a good habit to get into.
Installation

3
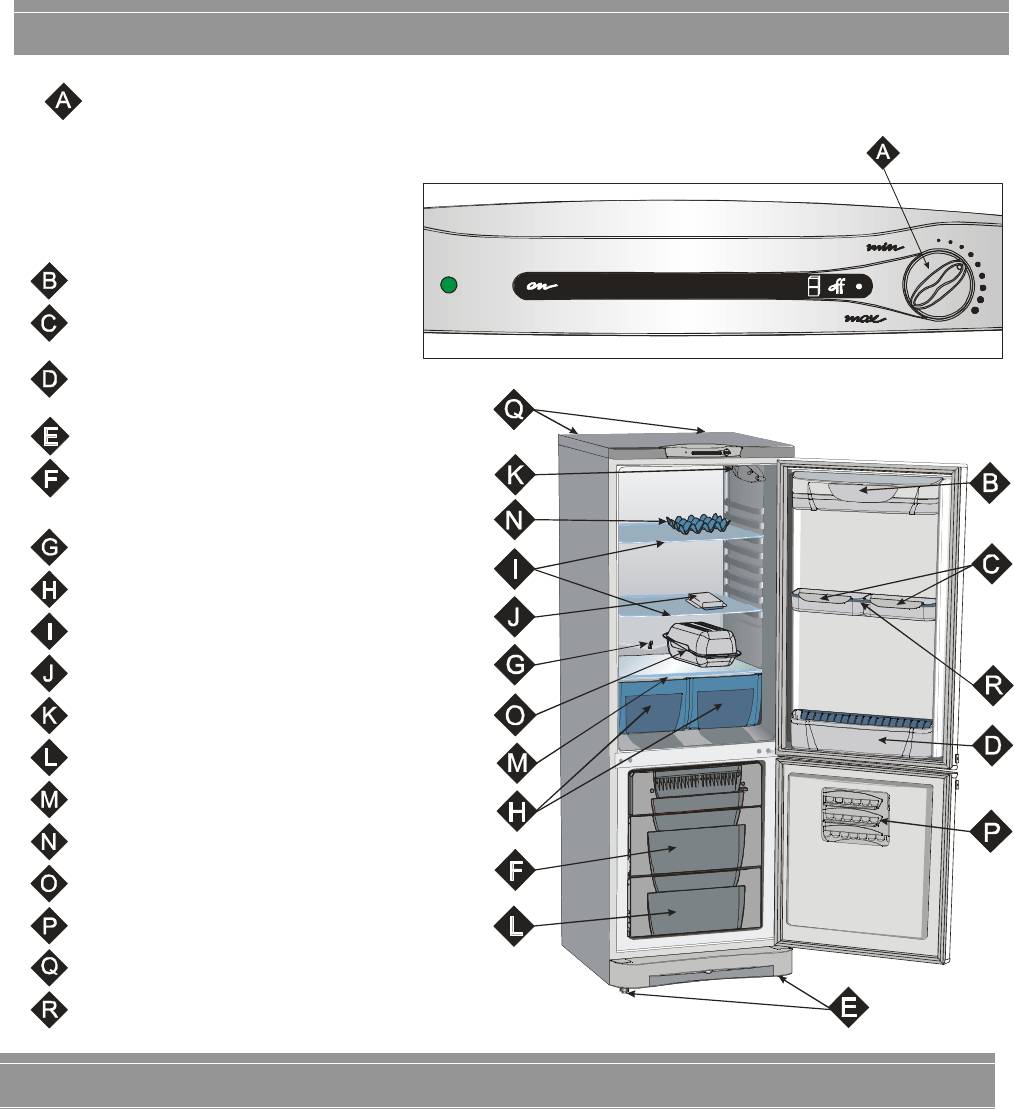
Thermostat knob for regulating
the temperature
Use this knob to regulate the temperature of the refrig-
erator. The following settings are available (fig. 1):
off — The refrigerator is off;
min — less cold;
max — colder
Hanging rack with transparent cover
Small hanging rack
Lower hanging rack with bottles holder
Adjustable feet
Container for freezing and frozen food storage
Drainage system for thawn water
Fruit and vegetable drawer
Removable height adjustable shelves
Butter dish with cover
Lamp
Container for frozen food storage
Glass tray
Eggs tray
Miat container
Ice containe
Rear stoppers (Fig 4)
Hanging rack holder
Fig. 1
ATTENTION
After transport set the appliance upright and wait
at least 3 hours before plugging the appliance into
the mains to ensure proper performance.
Use these average temperature settings to ensure
optimum performance and to save energy.
Before storing food in your refrigerator, wipe the interior
with a solution of warm water and bicarbonate of soda.
After having plugged the appliance into the socket, make
sure that the refrigerator lamp has turned on. Then turn the
thermostat knob “A” to setting “medium”.
After a couple of hours, you can place fresh food in the
refrigerator.
A Closer Look
Setting up Your Appliance

4
The thermostat automatically regulates the temperature
inside the appliance
Min = less cold
Max = colder
It is recommended that a medium setting be used.
To increase the amount of space, optimize arrange-
ment and improve appearance, this appliance has a
“cooling area” located within the back panel of the re-
frigerator compart-ment.
When the appliance is operating, this panel may be
covered with frost or droplets of water depending on
whether the compressor is operating or not at a set time. Do
not be concerned about this! The refrigerator is operating
normally.
If the thermostat knob is positioned on higher settings while
the refrigerator is heavily filled and the ambient temperature
is high, the appliance may run continuously, resulting in the
formation of frost on the back cooling area. This will lead to
an increase in energy consumption.
To avoid this situation, just turn the thermostat knob to
a lower setting so that the appliance defrosts auto-
matically.
Storing food in the Refrigerator Compartment
Food
Storage time
Location in the Refrigerator
Wrapped meat and cleavec fish
(use plastic wrap or pack in plastic bags)
2 or 3 days
On the shelf above the vegetable container
(which is the coldest area).
Fresh cheese
3 or 4 days
On the shelf above the vegetable container
(which is the coldest area).
Eggs
1 month
In special egg tray on any shelf
Butter, margarine
1 week
On any shelf
Cooked or precooked food (placer in air-tight contain-
ers and when cool store in refrigerator)
3 or 4 days
On any shelf
Sausages, salami, sandwich meats in general, fresh
pasta, custards, puddings, chocolates, cream pastries,
bread, dry pastries, red tomatoes
3 or 4 days
On any shelf
Bottled products, milk, drinks, yoghurt
On special door shelves
What Should Not be Stored in the Refrigerator
Garlic (transmits odour), onions and leeks.
Bananas (they will turn black).
Citrus fruits.
Potatoes and root vegetables (store in dark, dry places).
— Within the refrigerator compartment, the air circulates
naturally, with the colder air falling down because it is
heavier. This is the reason why meat and cheeses should
be placed above the vegetable container.
— Please follow our instructions carefully on maximum
storage time: any food, even the freshest, will not remain
edible for any extended amount of time.
— Do not place liquids in containers without covering them
because this will lead to an increase in the level of mois-
ture within the refrigerator, causing the formation of frost.
— Remember to cool hot food before storing otherwise the
temperature inside the appliance will increase, causing the
compressor to work harder and use more energy.
— Contrary to popular belief, cooked foods are not stored
any longer than raw food.
— The refrigerator compartment is equipped with conven-
ient, removable shelves which can be adjusted for height
using the shelf guides. This allows you to place even large
containers and foodstuffs in the refrigerator.
— Be careful not to place containers (plastic or glass), food
or other objects in direct contact with the cooling area of
the back wall of the refrigerator. This could harm the food,
in-crease energy consumption and facilitate the formation
of condensate (on food, containers, etc.).
How to use the refrigerator compartment…

Consult a specialized manual when packaging foodsfor fre…
Страница 6
- Изображение
- Текст
5
Consult a specialized manual when packaging foods
for freezing.
— Remember that you should never re-freeze products
you have allowed to thaw, even if only partially: cook
the food, then either eat (within 24 hours) or refreeze
it.
— When freezing fresh foods, remember that they
should not touch other previously frozen or deep fro-
zen foods. Place the food that you wish to freeze in the
top compartment where the temperature will fall below
-18°C, which is ideal
for freezing food properly. Remember that proper con-
ser-vation depends on the speed of freezing.
— Do not open the freezer door during freezing.
— Freeze only the quantities (in kg) shown on the data
plate on the left of the container.
— For the best conservation and defrosting, remember
to freeze small portions; this will ensure rapid and uni-
form freezing. Mark package with a description of the
contents and the date it was frozen.
— In the case of power failure or breakdown, do not
open the freezer door. This will help maintain the tem-
perature inside the freezer ensuring that foods are con-
served for at least 17 hours.
— Do not store full bottles in the freezer since they
could explode when they freeze. (Remember that liquids in
crease in volume when frozen)
— If the room temperature remains below 14°C for an ex-
tended period of time the freezer will not reach the tempera-
tures required for storage, and storage life will be shorter. In
this case, frozen foodstuffs should be used within a relatively
short period of time.
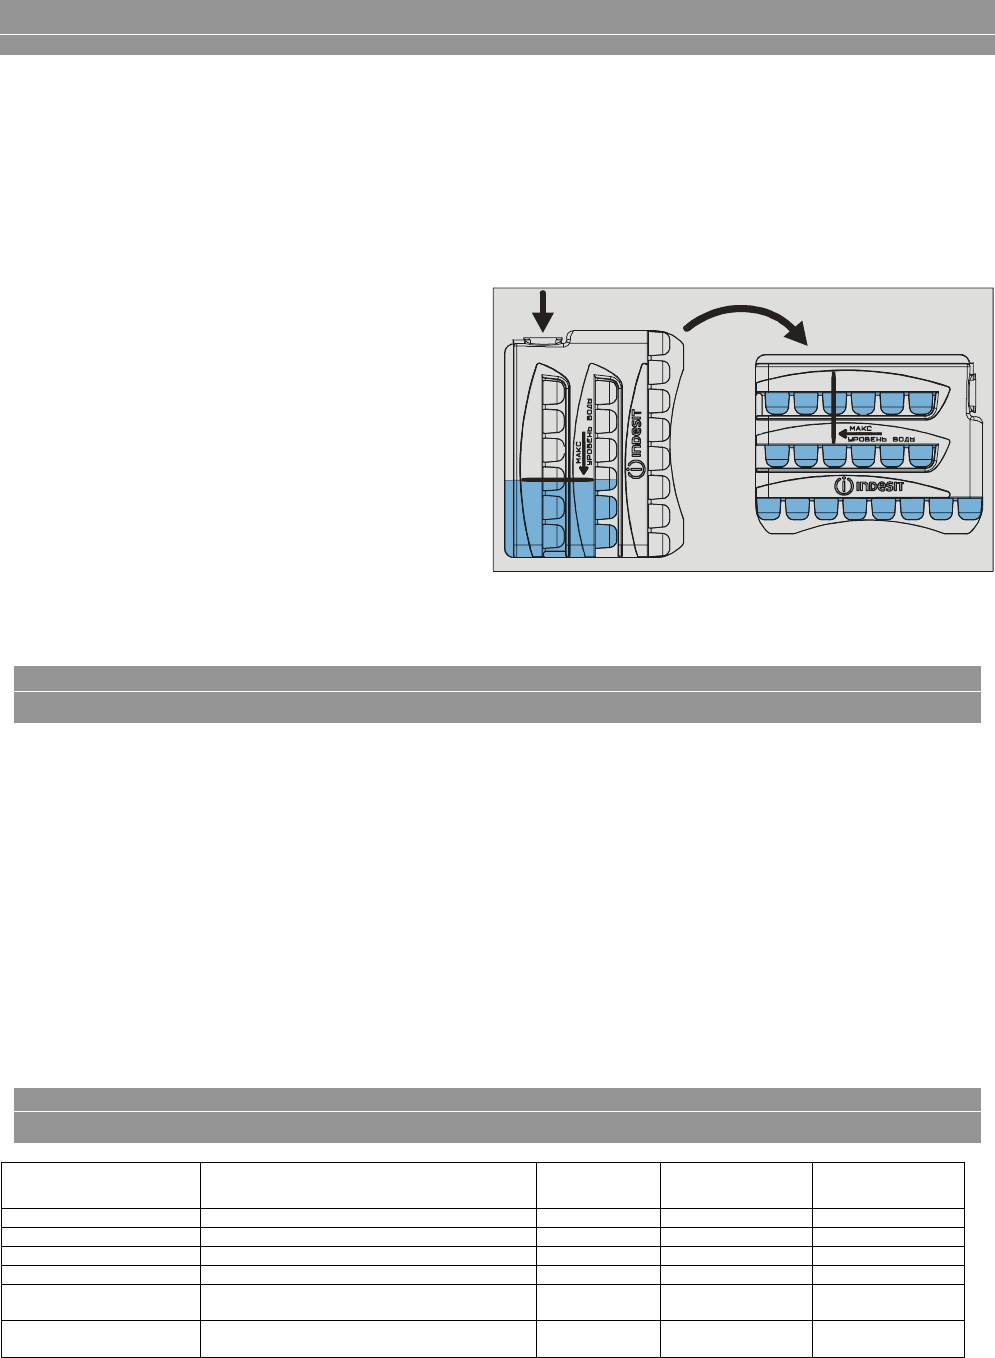
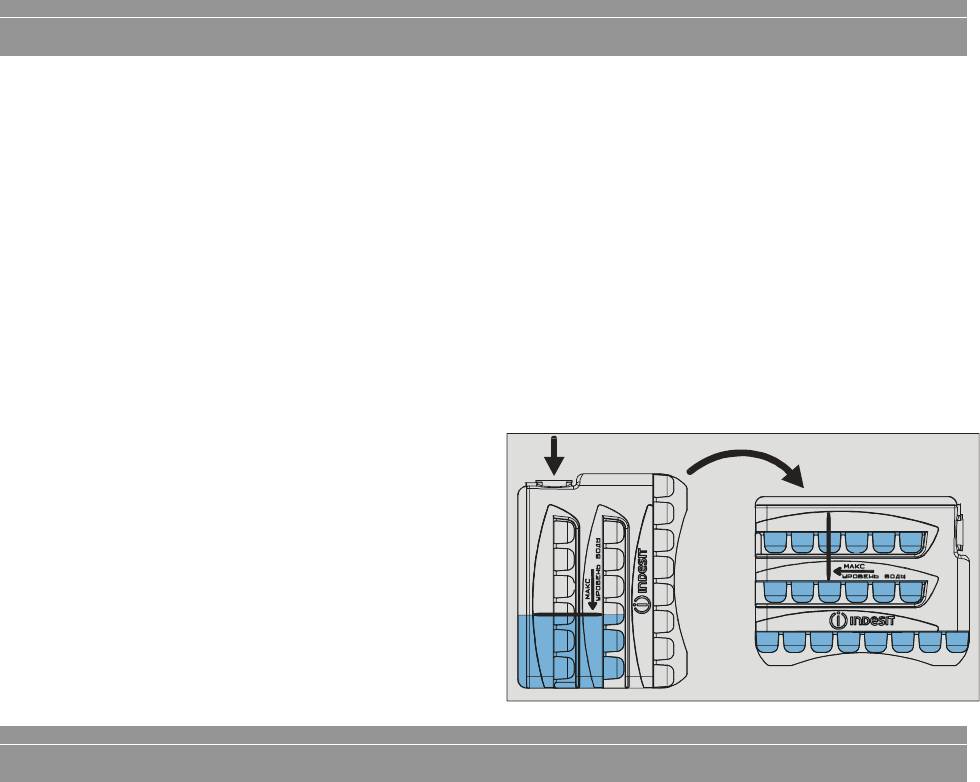
— Fill the ice container so that they are no more indication of
line.
— Install the appliance correctly
This means that the appliance should be installed away
from heat sources or direct sunlight in a well ventilated
room.
— Correct temperature settings
Set the refrigerator or freezer temperature knob to one
of the medium settings. Very low temperatures will not
only consume a great deal of energy but will neither
improve or lengthen the storage life of the food. Ex-
cessively low temperature may in fact spoil vegetables,
cold meats and cheese.
— Do not overfill your appliance
Remember that proper storage of food requires good
air circulation. Overfilling your appliance will prevent
this circulation and overwork the compressor.
— Shut the doors
Open your appliance only when strictly necessary; remem-
ber that every time you open the door most of the cold air
will be lost.
The motor will have to run, and consume energy, to restore
the correct temperature.
— Check the door gaskets
keep the gaskets clean and soft so that they fit closely
against the door to ensure that no cold air is lost.
— Never store hot foods
A container of hot food in the refrigerator will increase the
temperature significantly; allow food to cool to room tem-
perature before storing.
Meat and fish
Food Wrapping
Tenderising
(days)
Storage
(month)
Thawings Time
Beef Roast
Tinfoil
2/3
9/10 Not
required
Lamb Tinfoil
1 / 2
6
Not required
Pork Roast
Tinfoil
1 6
Not
required
Veal Roast
Tinfoil
1 8
Not
required
Veal/Pork Chops
Each piece wrapped in cling wrap and then in tin-
foil (4 to 6 slices)
6
Not
required
Minced Meat
Each piece wrapped in cling wrap and then in tin-
foil (4 to 6 slices)
6
Not
required
How to use the freezer compartment…
Energy Saving Tips
Frozen food storage

6
Heart and Liver
Plastic Baggies
3
Not required
Sausages
Cling Wrap or Tinfoil
2
As necessary
Chicken and Turkey
Tinfoil
1/3
9
Very slowly in re-
frigerator
Duck and Goose
Tinfoil
1 / 4
6
Very slowly in re-
frigerator
Pheasant, Partrige and Wild
Duck
Tinfoil
1 / 3
9
Very slowly in re-
frigerator
Hare and Rabbit
Tinfoil
3 / 4
6
Very slowly in re-
frigerator
Venison
Tinfoil or Cling Wrap
5/6
9
Very slowly in re-
frigerator
Large Fish
Tinfoil or Cling Wrap
4/6
Very slowly in re-
frigerator
Small Fish
Plastic Baggies
2 / 3
Not reguired
Crustaceans Plastic
Baggies
3/6
Not
reguired
Shellfish
Store in salted water in aluminium containers or
plastic containers
3
Very slowly in re-
frigerator
Boiled Fish
Tinfoil or Cling Wrap
12
In hot water
Fired Fish
Plastic Baggies
4/6
Directly in pan
Fruits and Vegetables
Food Preparation
Blanching
Time
Wrapping Storage
(month)
Thawing
Time
Apples and Pears
Peel and cut into slices
2′
In Containers (cover
with syrup)
12 In
refrigerator
very slowly
Apricot, Peaches, Cherries
and Plums
Peel and pit
1’/2′ In
Containers
(cover
with syrup)
12 In
refrigerator
very slowly
Strawberries, Blackberries
and Raspberries
Rinse and fry
In Containers (cover
with sugar)
10/12 In
refrigerator
very slowly
Cooked Fruit
Cut, cook and strain
In Containers (add
10% sugar)
12 In
refrigerator
very slowly
Fruit Juice
Wash, cut and crush
In Container (sugar
to test)
10/12 In
refrigerator
very slowly
Cauliflower
Remove leaves, cut head into small
pieces and blanch in water and a lit-
tle lemon juice
2′ Plastic
Baggies
12 Not
reguired
Cabbage and Brussel
Sprouts
Wash and cut into small pieces
1’/2′ Plastic
Baggies 10/12 At
room
tempera-
ture
Peas
Shell and wash
2′
Plastic Baggies
12 Not
reguired
French Beans
Wash and slice if reguired
2
Plastic Baggies
10/12 Not
reguired
Carrots, Peppers and Tu-
mips
Peel, wash and slice if necessary
3’/4′
Plastic Baggies
12 Not
reguired
Mushrooms and Asparagus
Wash, peel and cut up
3’/4′
Plastic Baggies
6
At room tempera-
ture
Spinach
Wash and mince
2′
Plastic Baggies
12 At
room
tempera-
ture
Vegetable for Soups
Wash and cut up small pieces
3′
Plastic Baggies or
Containers
6/7 Not
reguired
Varios Foods
Preparation
Blanching Time
Wrapping
Storage
(month)
Thawing time
Bread
Plastic Baggies
4
At room tempera-
ture in the oven
Cakes
Plastic
Baggies
6
About
10 minutes
at room tempera-
ture, cook at
100/200
0
C
Cream
Plastic Containers
6
At room tempera-
ture or in refrig-
erator
Butter
In original wrap-
ping or tinfoil
6 In
refrigerator
Boiled Food or Vege-
table Soup
Plastic or Glass
Containers
3/6 At
room
tem-
perature or in
hot water
Eggs
Freeze
without
shells in small con-
tainers
10 At
room
tem-
perature or in
refrigerator

7
Defrosting
WARNING: do not damage the refrigeration circuit.
Do not use mechanical devices or other tools to speed
up the defrosting process, unless they have been rec-
ommended by the manufacturer.
How to Defrost the Refrigerator
This appliance defrosts automatically and the water is
drained to the back towards the drain pipe installed for this
purpose (fig. 2). Here, the heat produced by the compres-
sor will make it evaporate. The only thing you must do is
to periodically check and clean the hole of the drain, which
is located behind the vegetable crispers, so that the water
drains properly.
Fig. 2
How to Defrost the Freezer No Frost
This appliance defrosts automatically and the water is
drained to the back towards the drain pipe installed for this
purpose. Here, the heat produced by the compressor will
make it evaporate.
Cleaning and maintenance
Always unplug the appliance from the mains before
cleaning.
— Your appliance is manufactured with hygienic odourless
materials. To preserve these characteristics, always use
sealed containers for strong smelling foods to avoid the
formation of odours that are difficult to remove.
— Use only a water and bicarbonate solution: Clean the in-
ternal and exterior of your appliance with a sponge soaked
with a warm water and sodium bicarbonate solution, which
is also a good disinfectant. If you do not have any sodium
bicarbonate at home, use neutral detergent.
— What not to use: Do not use abrasive detergents, bleach
or detergents containing ammonia. Never use solvent
based products.
— Dishwashable: All the removable parts can be cleaned by
soaking in hot soapy water or detergent. If you own a
dishwasher, you may wash these parts in the dishwasher.
Remember to dry thoroughly before replacing them.
— What about the back panel? Dust may deposit on the
back panel and affect the proper running of the appliance.
To remove dust, vacuum away the dust very carefully us-
ing the appropriate vacuum cleaner accessory.
— Discontinued use of the appliance: If the appliance is not
in use for any length of time, remember to clean the inte-
rior and dry thoroughly, leaving the doors open to prevent
the formation of bad odours and mould.
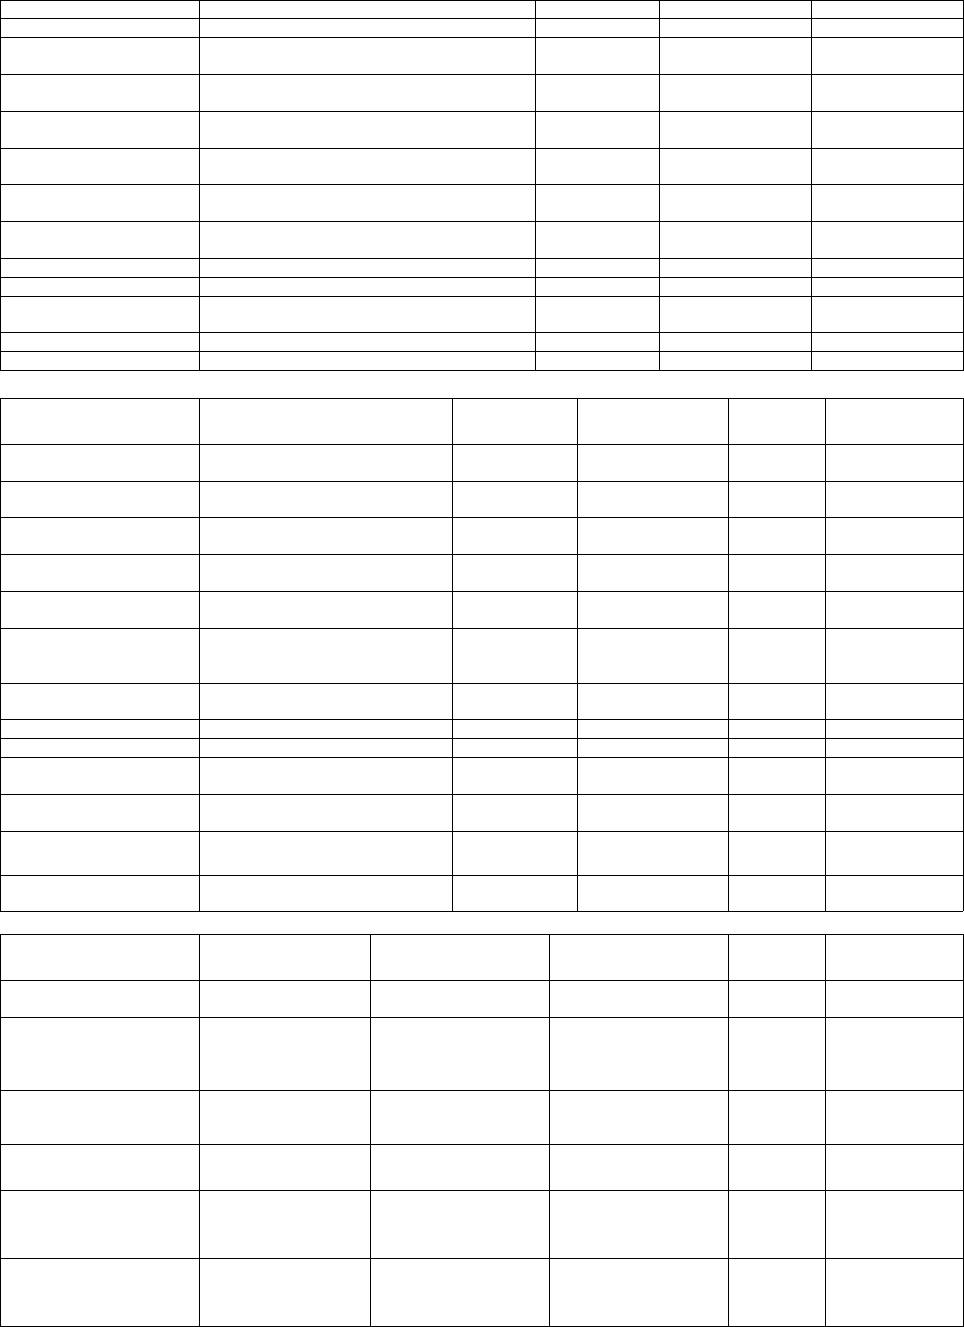
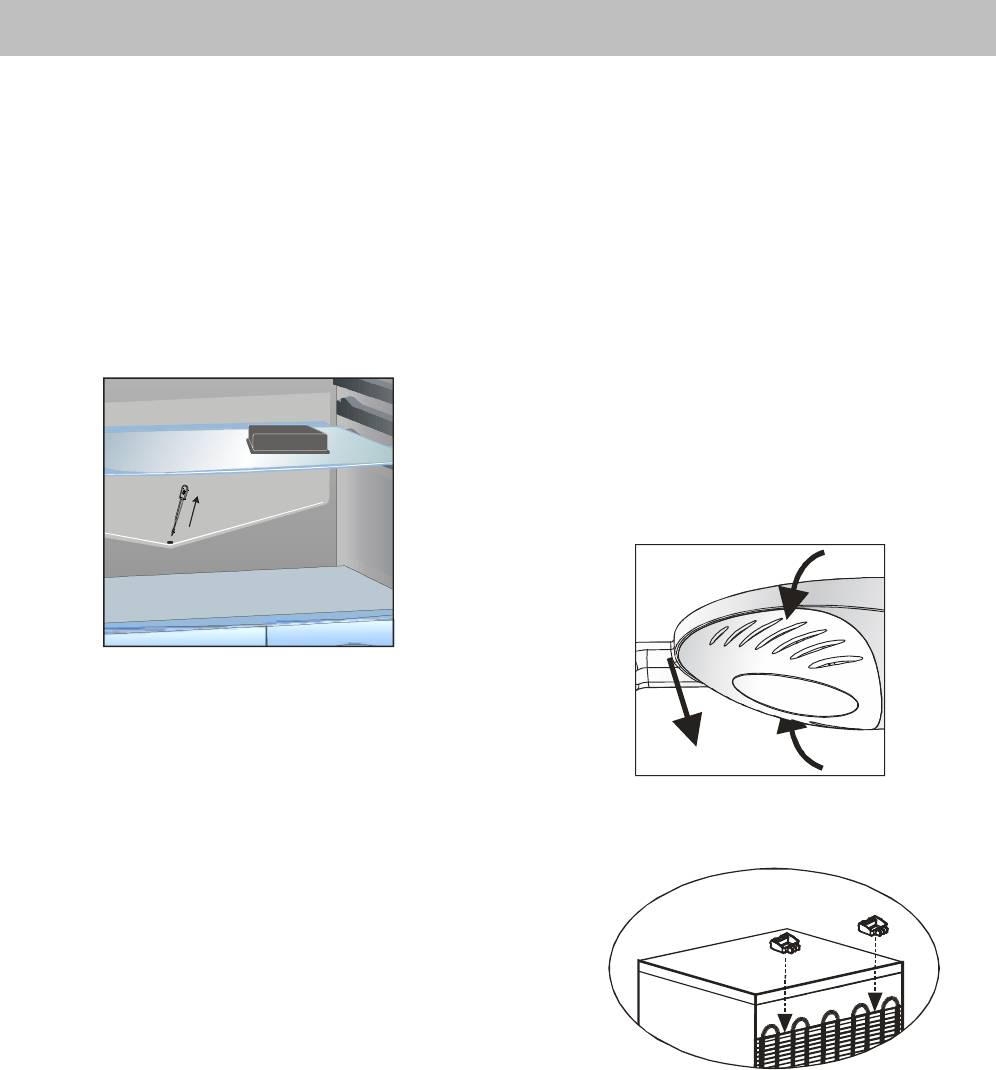
— Replacing the lamp. The lamp for lighting the interior of
the appliance is located at the back of the lamp box. Un-
screw the burnt lamp and replace it with another lamp of
no more than 15 Watt, follow the instructions illustrated in
fig. 3.
Fig. 3
Fig. 4
The scheme of intallation of rear stoppers
Keeping Your Appliance in Shape
1
1
2

8
Door re-hinging is corried out in accordance with the scheme (see fig. 5).
Fig. 6
The refrigerator does not function.
Have you checked whether:
•
The main switch for the power supply to the apart-
ment or home has been turned off;
•
The plug is properly inserted in the outlet;
•
The outlet is adequate; try inserting the plug into an-
other outlet in the room.
The refrigerator and the freezer do not cool properly.
Have you checked whether:
•
The doors do not close well or the gaskets are faulty;
•
The doors are left open too long;
•
The thermostat knob is not on the proper setting;
•
The refrigerator or freezer is overfilled.
The food in the refrigerator becomes too cold.
Have you checked whether:
•
The thermostat knob is on the proper setting;
•
The food is in contact with the back wall — which is
The motor runs continuously.
Have you checked whether
•
The doors are not closed well or have remained open
too long;
•
The ambient temperature is too high;
The thermostat knob is not on the proper setting.
The appliance makes too much noise.
The gas refrigerant produces a slight noise even when the
compressor is not running (this is not a defect).
Have you checked whether:
•
The refrigerator is levelled.
•
The appliance was installed between cabinets or ob-
jects that vibrate and make noise.
There is water on the bottom of the
refrigerator.
Have you checked whether:
•
The hole for draining the water from the frost is
l
d (
fi 2)
Door re-hinging scheme
Is There a Problem?
1
2
3
4
5

9
the coldest part.
If after all the checks, the appliance still does not operate
or the problem persists, call the nearest Service Centre
and inform them of: the type of problem, the abbrevia-
tion of the model name (Mod.) and the relative
clogged (see fig. 2).
numbers (S/N) written on the rating plate located at the
bottom left next to the vegetable crisper (see examples in
the figures below).
Never call on unauthorized technicians and always re-
fuse spare parts which are not originals.
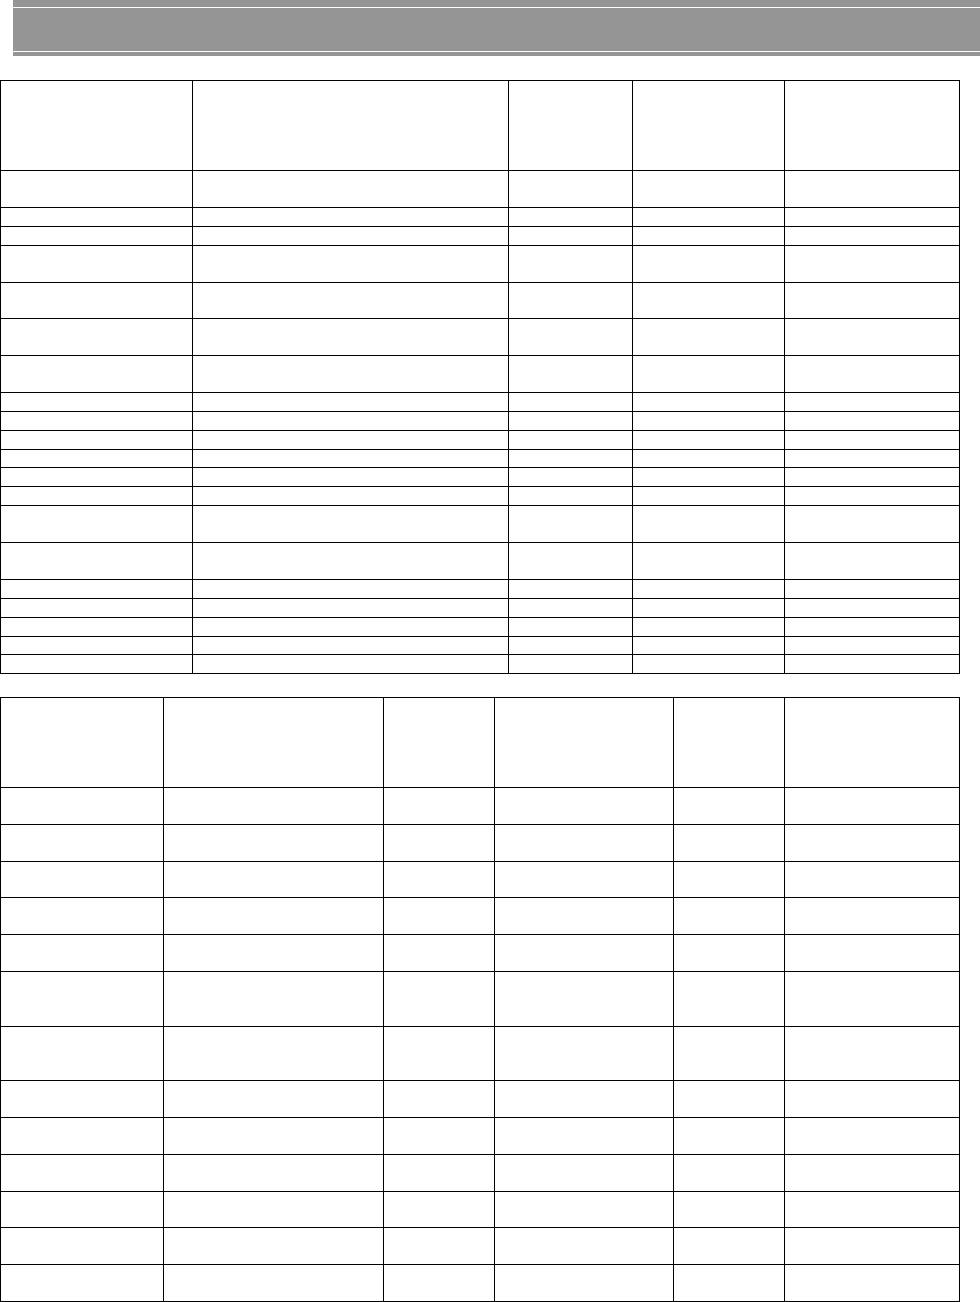
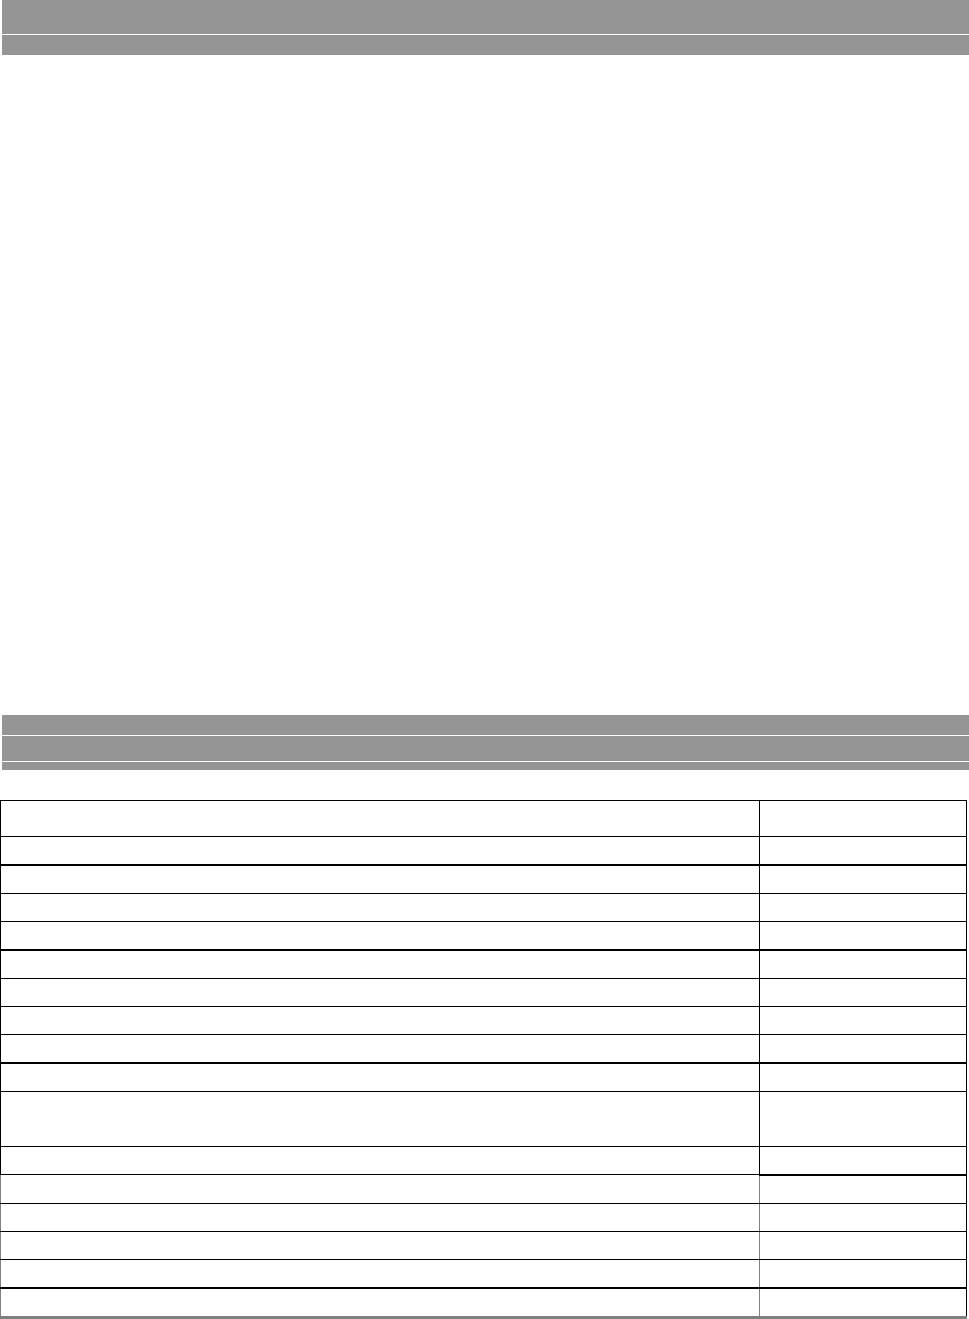
Parameters
Value
Overall dimensions: heignt/ width/ depth, cm
167/60/66.5
Total gross volume, dm
3
280
Gross volume of a food freezer compartment, dm
3
80
Total storage volume, dm
3
223
Storage volume of a food freezer compartment, dm
3
66
Cooling system
No Frost
Storage shelf area, m
2
1.12
Uniform shelf load is recommended, kg, no more than
30
Ambient temperature while operating,
о
С
from +16 to +32
Temperature rise time in a food freezer compartment from -18
о
С
to -9
о
С when power supply is switched off, h
17
Energy efficiency class
C
Energy consumption, kw*h/24h
1,25
Compressor quantity
1
Pure mass, kg
71.8
Specified service life, years
10
Average service life period, years
15
The rest characteristics are presented in a data plate.
Technical characteristics

Комментарии
Раздел: Бытовая, кухонная техника, электроника и оборудование
Тип: Холодильник

Инструкция к Холодильнику Indesit C 132 NF G

С 132 NF G
Combi refrigerator-freezer
Installation and use
Комбинированный холодильник—морозильник
Установка и использование

GB
Combi refrigerator-freezer
Instructions for installation and use……………………………………….3
CIS
Комбинированный холодильник—морозильник
Инструкции по установке и использованию………………………….10
To maintain the EFFICIENCY and SAFETY of this appliance, we recommend:
— call only the Service Centers authorized by the manufacturer
— always use original Spare Parts
Производитель оставляет за собой право без предупреждения вносить изменения в
конструкцию, не ухудшающие эффективность работы оборудования.
— Некоторые параметры, приведенные в этой инструкции, являются ориентировочными:
— Производитель не несет ответственности за незначительные отклонения от указанных величин.
1

Safety — a good habit to get into.
ATTENTION
6. Do not touch the internal cooling elements, especially if
Read your manual carefully since it contains instruc-
your hands are wet, since you could burn or hurt yourself.
tions, which will ensure safe installation, use and
7. Before doing any cleaning, disconnect the appliance from
maintenance of your appliance.
the electricity (by pulling out the plug or turning off the gen-
Your Refrigerator is built to International safety stan-
eral switch in your home); it is not sufficient to place the
dards (EN60) and has been awarded the European ap-
temperature regulation knob “off” to cut off the power.
proval mark (IMQ) for conformity with UK electrical
8. Before disposing of your old appliance, remember to
safety requirements. It also meets the EC standards on
break or remove the lock as a safety measure to protect chil-
the prevention and elimination of readio interference
dren who might lock themselves inside the appliance when
(EC directive 87/308 — 02.06.89).
playing. In addition, if the appliance is a new one with a
1. This appliance is designed to be used indoors and
lock, keep the key out of the reach of small children.
under no circumstances should it be installed outside
9. If your appliance is not operating properly, read the chap-
even if protected by a roof. Leaving the appliance ex-
ter entitled, “Trouble Shooting”, which might help you to re-
posed to the rain and whether is exceedingly danger-
solve the problem, before calling an after-sales service cen-
ous.
ter. Do not attempt to repair the appliance by tampering with
2. The appliance should be used only by adults and ex—
the internal components.
clusively for storing foodstuffs in compliance with the
10. If the power supply cord must be replaced, please contact
instructions provided in this manual. Under no circum-
one of our Customer Service Centers. In some cases, the
stances should children be allowed to operate, or tam-
connections are made using special terminals and in others a
per with, this product.
special tool must be used to access the connections.
3. Do not attempt to operate or handle this appliance
11. Do not use electric appliances inside the compartment
when barefoot, or with wet hands or feet.
for food storage, if these are not those recommended by the
4. It is highly recommended that you do not operate
manufacturer.
this appliance by connecting it to the power supply
12. At the end of the functional life of your appliance –
with extensions or multiple socket plugs. If the refrig-
containing cyclopentane gas in the insulation foam and
erator has been installed between two cabinets, make
gas R134a (tetraphtorethane) in the refrigeration circuit – the
sure that the supply cord is not dangerously crimped or
latter should made safe before being sent to the dump. For
trapped beneath a heavy
this operation, please contact your dealer or the Local Or-
object.
ganisation in charge of waste disposal.
5. Never pull the cable or the appliance to remove the
plug from the socket; this is exceedingly dangerous.
Installation
Proper installation of the appliance is essential to
directly exposed to sunlight or near an oven, cook top or the
ensure the best and most efficient performance of
like.
your appliance.
Levelling
Ventilation
The floor should be perfectly levelled; if not, you can adjust
The compressor and condenser generate heat and,
the feet at the front of the appliance.
therefore, need to be ventilated properly. Rooms with
Earthing
less than perfect ventilation are not very suited for in-
Before making the electrical connection, check that the volt-
stallation of the appliance. Therefore, it should be in-
age shown on the data plate, that you will find on the bottom
stalled in a room with
left hand side of the appliance next to the crisper, corre-
an opening (window or French window) that provides
sponds to that of your mains and that the socket is earthed in
the appropriate amount of air re-circulation. It is also
conformity with all current electrical regulations. If the sys-
important that the room should not be too humid.
tem is not earthed, the manufacturer declines all liability for
During installation, make sure not to cover or obstruct
consequent damages or losses. Do not use adapters or multi-
the grates that allow proper ventilation of the appli-
ple sockets.
ance. For proper ventilation of the appliance, you must
Check the power load
leave:
The electrical socket must support the maximum power load
— a space of at least 10 cm between the top part and any
of the appliance shown on the data plate (on the bottom left
cabinets above it;
hand side of the appliance next to the crisper).
— a space of at least 5 cm between the sides of the ap-
Before plugging the appliance to the mains
pliance and any adjacent cabinets/walls.
Set the appliance upright and wait at least 3 hours before
Away from Heat
plugging the appliance into the mains to ensure proper per-
Avoid positioning the appliance in a place where it is
formance.
A Closer Look
Thermostat knob for regulating
the temperature
Fig. 1
Use this knob to regulate the temperature of the refrig-
erator. The following settings are available (fig. 1):
off — The refrigerator is off;
min — less cold;
max — colder
Hanging rack with transparent cover
Small hanging rack
Lower hanging rack with bottles holder
Adjustable feet
Container for freezing and frozen food storage
Drainage system for thawn water
Fruit and vegetable drawer
Removable height adjustable shelves
Butter dish with cover
Lamp
Container for frozen food storage
Glass tray
Eggs tray
Miat container
Ice containe
Rear stoppers (Fig 4)
Hanging rack holder
Setting up Your Appliance
ATTENTION
Before storing food in your refrigerator, wipe the interior
After transport set the appliance upright and wait
with a solution of warm water and bicarbonate of soda.
at least 3 hours before plugging the appliance into
After having plugged the appliance into the socket, make
the mains to ensure proper performance.
sure that the refrigerator lamp has turned on. Then turn the
Use these average temperature settings to ensure
thermostat knob “A” to setting “medium”.
optimum performance and to save energy.
After a couple of hours, you can place fresh food in the
refrigerator.
3

How to use the refrigerator compartment…
The thermostat automatically regulates the temperature
whether the compressor is operating or not at a set time. Do
inside the appliance
not be concerned about this! The refrigerator is operating
Min = less cold
normally.
Max = colder
If the thermostat knob is positioned on higher settings while
It is recommended that a medium setting be used.
the refrigerator is heavily filled and the ambient temperature
To increase the amount of space, optimize arrange-
is high, the appliance may run continuously, resulting in the
ment and improve appearance, this appliance has a
formation of frost on the back cooling area. This will lead to
“cooling area” located within the back panel of the re-
an increase in energy consumption.
frigerator compart-ment.
To avoid this situation, just turn the thermostat knob to
When the appliance is operating, this panel may be
a lower setting so that the appliance defrosts auto-
covered with frost or droplets of water depending on
matically.
Storing food in the Refrigerator Compartment
Food
Storage time
Location in the Refrigerator
Wrapped meat and cleavec fish
2 or 3 days On the shelf above the vegetable container
(use plastic wrap or pack in plastic bags)
(which is the coldest area).
Fresh cheese 3 or 4 days On the shelf above the vegetable container
(which is the coldest area).
Eggs 1 month In special egg tray on any shelf
Butter, margarine 1 week On any shelf
Cooked or precooked food (placer in air-tight contain-
3 or 4 days On any shelf
ers and when cool store in refrigerator)
Sausages, salami, sandwich meats in general, fresh
3 or 4 days On any shelf
pasta, custards, puddings, chocolates, cream pastries,
bread, dry pastries, red tomatoes
Bottled products, milk, drinks, yoghurt On special door shelves
What Should Not be Stored in the Refrigerator
Garlic (transmits odour), onions and leeks.
Bananas (they will turn black).
Citrus fruits.
Potatoes and root vegetables (store in dark, dry places).
— Within the refrigerator compartment, the air circulates
— Contrary to popular belief, cooked foods are not stored
naturally, with the colder air falling down because it is
any longer than raw food.
heavier. This is the reason why meat and cheeses should
— The refrigerator compartment is equipped with conven-
be placed above the vegetable container.
ient, removable shelves which can be adjusted for height
— Please follow our instructions carefully on maximum
using the shelf guides. This allows you to place even large
storage time: any food, even the freshest, will not remain
containers and foodstuffs in the refrigerator.
edible for any extended amount of time.
— Be careful not to place containers (plastic or glass), food
— Do not place liquids in containers without covering them
or other objects in direct contact with the cooling area of
because this will lead to an increase in the level of mois-
the back wall of the refrigerator. This could harm the food,
ture within the refrigerator, causing the formation of frost.
in-crease energy consumption and facilitate the formation
— Remember to cool hot food before storing otherwise the
of condensate (on food, containers, etc.).
temperature inside the appliance will increase, causing the
compressor to work harder and use more energy.
4
How to use the freezer compartment…
Consult a specialized manual when packaging foods
could explode when they freeze. (Remember that liquids in
for freezing.
crease in volume when frozen)
— Remember that you should never re-freeze products
— If the room temperature remains below 14°C for an ex-
you have allowed to thaw, even if only partially: cook
tended period of time the freezer will not reach the tempera-
the food, then either eat (within 24 hours) or refreeze
tures required for storage, and storage life will be shorter. In
it.
this case, frozen foodstuffs should be used within a relatively
— When freezing fresh foods, remember that they
short period of time.
should not touch other previously frozen or deep fro-
— Fill the ice container so that they are no more indication of
zen foods. Place the food that you wish to freeze in the
line.
top compartment where the temperature will fall below
—18°C, which is ideal
for freezing food properly. Remember that proper con-
ser-vation depends on the speed of freezing.
— Do not open the freezer door during freezing.
— Freeze only the quantities (in kg) shown on the data
plate on the left of the container.
— For the best conservation and defrosting, remember
to freeze small portions; this will ensure rapid and uni-
form freezing. Mark package with a description of the
contents and the date it was frozen.
— In the case of power failure or breakdown, do not
open the freezer door. This will help maintain the tem-
perature inside the freezer ensuring that foods are con-
served for at least 17 hours.
— Do not store full bottles in the freezer since they
Energy Saving Tips
— Install the appliance correctly
this circulation and overwork the compressor.
This means that the appliance should be installed away
— Shut the doors
from heat sources or direct sunlight in a well ventilated
Open your appliance only when strictly necessary; remem-
room.
ber that every time you open the door most of the cold air
— Correct temperature settings
will be lost.
Set the refrigerator or freezer temperature knob to one
The motor will have to run, and consume energy, to restore
of the medium settings. Very low temperatures will not
the correct temperature.
only consume a great deal of energy but will neither
— Check the door gaskets
improve or lengthen the storage life of the food. Ex-
keep the gaskets clean and soft so that they fit closely
cessively low temperature may in fact spoil vegetables,
against the door to ensure that no cold air is lost.
cold meats and cheese.
— Never store hot foods
— Do not overfill your appliance
A container of hot food in the refrigerator will increase the
Remember that proper storage of food requires good
temperature significantly; allow food to cool to room tem-
air circulation. Overfilling your appliance will prevent
perature before storing.
Frozen food storage
Meat and fish
Food Wrapping Tenderising
Storage
Thawings Time
(days)
(month)
Beef Roast Tinfoil 2/3 9/10 Not required
Lamb Tinfoil 1 / 2 6 Not required
Pork Roast Tinfoil 1 6 Not required
Veal Roast Tinfoil 1 8 Not required
Veal/Pork Chops Each piece wrapped in cling wrap and then in tin-
6 Not required
foil (4 to 6 slices)
Minced Meat Each piece wrapped in cling wrap and then in tin-
6 Not required
foil (4 to 6 slices)
5
Heart and Liver Plastic Baggies 3 Not required
Sausages Cling Wrap or Tinfoil 2 As necessary
Chicken and Turkey Tinfoil 1/3 9 Very slowly in re—
frigerator
Duck and Goose Tinfoil 1 / 4 6 Very slowly in re-
frigerator
Pheasant, Partrige and Wild
Tinfoil 1 / 3 9 Very slowly in re-
Duck
frigerator
Hare and Rabbit Tinfoil 3 / 4 6 Very slowly in re-
frigerator
Venison Tinfoil or Cling Wrap 5/6 9 Very slowly in re-
frigerator
Large Fish Tinfoil or Cling Wrap 4/6 Very slowly in re—
frigerator
Small Fish Plastic Baggies 2 / 3 Not reguired
Crustaceans Plastic Baggies 3/6 Not reguired
Shellfish Store in salted water in aluminium containers or
3 Very slowly in re-
plastic containers
frigerator
Boiled Fish Tinfoil or Cling Wrap 12 In hot water
Fired Fish Plastic Baggies 4/6 Directly in pan
Fruits and Vegetables
Food Preparation Blanching
Wrapping Storage
Thawing
Time
(month)
Time
Apples and Pears Peel and cut into slices 2′ In Containers (cover
12 In refrigerator
with syrup)
very slowly
Apricot, Peaches, Cherries
Peel and pit 1‘/2′ In Containers (cover
12 In refrigerator
and Plums
with syrup)
very slowly
Strawberries, Blackberries
Rinse and fry In Containers (cover
10/12 In refrigerator
and Raspberries
with sugar)
very slowly
Cooked Fruit Cut, cook and strain In Containers (add
12 In refrigerator
10% sugar)
very slowly
Fruit Juice Wash, cut and crush In Container (sugar
10/12 In refrigerator
to test)
very slowly
Cauliflower Remove leaves, cut head into small
2‘ Plastic Baggies 12 Not reguired
pieces and blanch in water and a lit-
tle lemon juice
Cabbage and Brussel
Wash and cut into small pieces 1‘/2‘ Plastic Baggies 10/12 At room tempera-
Sprouts
ture
Peas Shell and wash 2′ Plastic Baggies 12 Not reguired
French Beans Wash and slice if reguired 2 Plastic Baggies 10/12 Not reguired
Carrots, Peppers and Tu—
Peel, wash and slice if necessary 3′/4‘ Plastic Baggies 12 Not reguired
mips
Mushrooms and Asparagus Wash, peel and cut up 3’/4′ Plastic Baggies 6 At room tempera-
ture
Spinach Wash and mince 2‘ Plastic Baggies 12 At room tempera-
ture
Vegetable for Soups Wash and cut up small pieces 3′ Plastic Baggies or
6/7 Not reguired
Containers
Varios Foods Preparation Blanching Time Wrapping Storage
Thawing time
(month)
Bread Plastic Baggies 4 At room tempera-
ture in the oven
Cakes Plastic Baggies 6 About 10 minutes
at room tempera-
ture, cook at
0
100/200
C
Cream Plastic Containers 6 At room tempera-
ture or in refrig-
erator
Butter In original wrap—
6 In refrigerator
ping or tinfoil
Boiled Food or Vege-
Plastic or Glass
3/6 At room tem-
table Soup
Containers
perature or in
hot water
Eggs Freeze without
10 At room tem-
shells in small con-
perature or in
tainers
refrigerator
6
Kee
Defrosting
— What not to use: Do not use abrasive detergents, bleach
WARNING: do not damage the refrigeration circuit.
or detergents containing ammonia. Never use solvent
Do not use mechanical devices or other tools to speed
based products.
up the defrosting process, unless they have been rec-
— Dishwashable: All the removable parts can be cleaned by
ommended by the manufacturer.
soaking in hot soapy water or detergent. If you own a
How to Defrost the Refrigerator
dishwasher, you may wash these parts in the dishwasher.
This appliance defrosts automatically and the water is
Remember to dry thoroughly before replacing them.
drained to the back towards the drain pipe installed for this
— What about the back panel? Dust may deposit on the
purpose (fig. 2). Here, the heat produced by the compres-
back panel and affect the proper running of the appliance.
sor will make it evaporate. The only thing you must do is
To remove dust, vacuum away the dust very carefully us-
to periodically check and clean the hole of the drain, which
ing the appropriate vacuum cleaner accessory.
is located behind the vegetable crispers, so that the water
— Discontinued use of the appliance: If the appliance is not
drains properly.
in use for any length of time, remember to clean the inte-
Fig. 2
rior and dry thoroughly, leaving the doors open to prevent
the formation of bad odours and mould.
— Replacing the lamp. The lamp for lighting the interior of
the appliance is located at the back of the lamp box. Un-
screw the burnt lamp and replace it with another lamp of
no more than 15 Watt, follow the instructions illustrated in
fig. 3.
Fig. 3
How to Defrost the Freezer No Frost
This appliance defrosts automatically and the water is
drained to the back towards the drain pipe installed for this
purpose. Here, the heat produced by the compressor will
make it evaporate.
Cleaning and maintenance
Fig. 4
Always unplug the appliance from the mains before
The scheme of intallation of rear stoppers
cleaning.
— Your appliance is manufactured with hygienic odourless
materials. To preserve these characteristics, always use
sealed containers for strong smelling foods to avoid the
formation of odours that are difficult to remove.
— Use only a water and bicarbonate solution: Clean the in-
ternal and exterior of your appliance with a sponge soaked
with a warm water and sodium bicarbonate solution, which
is also a good disinfectant. If you do not have any sodium
bicarbonate at home, use neutral detergent.
7
p
in
g
Your A
pp
liance in Sha
p
e
1
1
2

Door re-hinging is corried out in accordance with the scheme (see fig. 5).
Fig. 6
The refrigerator does not function.
The motor runs continuously.
Have you checked whether:
Have you checked whether
•
The main switch for the power supply to the apart—
•
The doors are not closed well or have remained open
ment or home has been turned off;
too long;
• The plug is properly inserted in the outlet;
• The ambient temperature is too high;
•
The outlet is adequate; try inserting the plug into an-
The thermostat knob is not on the proper setting.
other outlet in the room.
The appliance makes too much noise.
The refrigerator and the freezer do not cool properly.
The gas refrigerant produces a slight noise even when the
Have you checked whether:
compressor is not running (this is not a defect).
• The doors do not close well or the gaskets are faulty;
Have you checked whether:
•
The doors are left open too long;
• The refrigerator is levelled.
• The thermostat knob is not on the proper setting;
• The appliance was installed between cabinets or ob-
• The refrigerator or freezer is overfilled.
jects that vibrate and make noise.
The food in the refrigerator becomes too cold.
There is water on the bottom of the
Have you checked whether:
refrigerator.
Have you checked whether:
• The thermostat knob is on the proper setting;
• The hole for draining the water from the frost is
•
The food is in contact with the back wall — which is
8
ld(fi2)
Door re-hinging scheme
1
2
3
4
5
Is There a Problem?

the coldest part.
clogged (see fig. 2).
If after all the checks, the appliance still does not operate
numbers (S/N) written on the rating plate located at the
or the problem persists, call the nearest Service Centre
bottom left next to the vegetable crisper (see examples in
and inform them of: the type of problem, the abbrevia-
the figures below).
tion of the model name (Mod.) and the relative
Never call on unauthorized technicians and always re-
fuse spare parts which are not originals.
Technical characteristics
Parameters
Value
Overall dimensions: heignt/ width/ depth, cm
167/60/66.5
3
Total gross volume, dm
280
3
Gross volume of a food freezer compartment, dm
80
3
Total storage volume, dm
223
3
Storage volume of a food freezer compartment, dm
66
Cooling system
No Frost
2
Storage shelf area, m
1.12
Uniform shelf load is recommended, kg, no more than
30
о
Ambient temperature while operating,
С
from +16 to +32
о
Temperature rise time in a food freezer compartment from —18
С
о
17
to -9
С when power supply is switched off, h
Energy efficiency class
C
Energy consumption, kw*h/24h
1,25
Compressor quantity
1
Pure mass, kg
71.8
Specified service life, years
10
Average service life period, years
15
The rest characteristics are presented in a data plate.
9

Соблюдение безопасности – хорошая привычка
1. Холодильник разработан для использования внут—
мокрые или сырые. Не кладите в рот куски льда,
ри помещений. Ни при каких обстоятельствах не ис—
только что вынутые из морозильника — так можно по—
пользуйте холодильник на улице.
лучить местное обморожение.
2. Холодильник должен использоваться в домашних
7. Перед выполнением любых операций по мойке или
условиях для замораживания и хранения заморожен—
обслуживанию, отсоедините холодильник от сети.
ных и охлажденных продуктов в соответствии с дан—
Установка термостата в положение «off» недостаточ—
ной инструкцией. Не разрешайте детям пользоваться
на для обеспечения электробезопасности.
холодильником без присмотра.
8. Если холодильник предназначен для замены старо—
3. Холодильник обладает довольно большим весом,
го, имеющего запирающие устройства на двери, пе—
передвигайте его только при уверенности в своих си—
ред тем как выбросить старый холодильник, выведи—
лах.
те из строя или снимите запирающее устройство. Это
4. Не касайтесь холодильника влажными руками.
необходимо для того, чтобы обезопасить детей, кото—
5. Не пользуйтесь удлинителями и тройниками. При
рые могут играть с выброшенными предметами и
повреждении шнура питания его следует заменить
рискуют быть запертыми внутри холодильника.
специальным шнуром или комплектом, получаемым
9. При возникновении нестандартной ситуации от—
у изготовителя или его представителя. Замена кабеля
ключите холодильник от сети и позвоните в сервис—
должна производиться только квалифицированным
ный центр, телефон которого напечатан в гарантий—
персоналом. Если Вы все—таки решили использовать
ном документе (сервисном сертификате). Перед
удлинитель, то вилка и розетка удлинителя должны
звонком в сервисный центр прочитайте раздел «Уст—
иметь заземляющие лепестки и соответствовать типу
ранение неисправностей».
вилки холодильника.
10. Запрещается изменение конструкции холодиль—
Помните, что включение холодильника с использо—
ника и вмешательство лиц, не уполномоченных про—
ванием тройников и удлинителей создает потенци—
изводителем на гарантийный ремонт.
альную опасность возгорания. Производитель не не—
11. Не используйте электрические приборы, исполь—
сет ответственности за возгорания, произошедшие
зуемые для приготовления пищи, внутри отделения
из—за использования тройников и удлинителей, а
для хранения пищевых продуктов, если это не реко—
также соединительного кабеля, сечение которого не
мендовано производителем.
соответствует потребляемой мощности. При установ—
12. Если Вы решили больше не использовать Ваш
ке холодильника необходимо проверить соответствие
холодильник, перед тем как выбросить, позаботьтесь
характеристик сети и электроприборов холодильни—
об его утилизации. Ваш холодильник содержит цик—
ка. Не вынимайте вилку из розетки за провод: это
лопентановый газ в изоляционной пене и тетрафто—
очень опасно.
рэтан (R134а) в охлаждающем контуре — в последнем
6. Не касайтесь внутренних охлаждающих поверхно—
случае Вам необходимо связаться с местной органи—
стей холодильника, особенно если Ваши руки
зацией, ответственной за утилизацию.
Установка
Правильная установка необходима для обеспече—
Не располагайте вблизи источников тепла
ния надежной и наиболее эффективной работы
Не следует устанавливать холодильник так, чтобы он
холодильника.
находился под воздействием прямых солнечных лу—
Вентиляция
чей или рядом с источниками тепла (кухонными пли—
Компрессор и конденсатор холодильника в процессе
тами, духовками, каминами).
работы нагреваются, поэтому необходимо обеспечить
Выравнивание
достаточную вентиляцию. Холодильник должен быть
Для хорошей работы холодильника важно, чтобы он
установлен в хорошо проветриваемом помещении с
находился на ровной плоскости. После установки хо—
нормальной влажностью. Запрещено устанавливать
лодильника на место отрегулируйте его положение
холодильники в помещениях с повышенной влажно—
путем вращения регулировочных опор в его передней
стью, например, ванных комнатах, подвалах.
части. Наклон холодильника назад не должен пре—
Следите, чтобы во время эксплуатации доступ возду—
вышать 5°.
ха к отверстиям для вентиляции не был перекрыт или
Подключение к электросети
затруднен:
Холодильник выполнен по степени защиты от пора—
— расстояние между верхней частью холодильника и
жения электрическим током класса 1 и подключается
мебелью должно быть не менее 10 см;
к электрической сети при помощи двухполюсной ро—
— расстояние между боковыми стенками холодильни—
зетки с заземляющим контактом. Перед подключени—
ка и мебели должно быть не менее 5 см.
ем к электросети убедитесь:
• что напряжение сети соответствует данным, ука—
10

занным на таблице, которая находится на правой сто—
ний безопасности бытовых приборов большой мощ—
роне холодильного отделения со стороны двери;
ности, изложенных в данной инструкции, является
• что заземляющий контакт электрической розетки
потенциально опасным.
непосредственно электрически соединен с зазем—
Холодильник, непосредственно подключаемый к
ляющим проводом или с нулевым проводом питаю—
двухпроводной электросети, эксплуатируют с уст—
щего кабеля электрической сети (соединительный
ройством защитного отключения (УЗО), имеющим
провод должен быть рассчитан на ток не менее 10А);
следующие значения параметров: диапазон номи—
• розетка и вилка одного типа; если вилка не подхо—
нальных напряжений от 220 до 240 В, переменный
дит к розетке, розетку следует заменить на новую,
ток частотой 50 Гц, мощность нагрузки не менее 1,3
соответствующую вилке питающего шнура (работы
кВА, время срабатывания по току утечки до 3 мА—не
должен выполнять квалифицированный электрик).
более 1 секунды.
Холодильник должен быть установлен таким обра—
Производитель не несет ответственности за ущерб
зом, чтобы Вы всегда имели доступ к розетке.
здоровью и собственности, если он вызван несоблю—
Холодильник, подключенный с нарушением требова—
дением указанных норм установки.
Описание
Ручка терморегулятора
Ручка терморегулятора позволяет регулировать
температуру в холодильном и морозильном отделе—
Рис. 1
ниях. Возможны следующие установки (рис. 1):
off— холодильник выключен;
min- минимальное охлаждение;
max- максимальное охлаждение.
Балкон с крышкой
Балкон малый с пиктограммой
Балкон нижний с держателем для бутылок
Регулируемые опоры
Отделение для замораживания и хранения
замороженных продуктов
Ящики для хранения овощей и фруктов
Дренажная система
Полки стеклянные
Масленка
Плафон освещения холодильного отделения
Отделение для хранения замороженных про—
дуктов
Поддон стеклянный
Подставка для яиц
Емкость для мяса
Контейнер для льда
Упоры задние (Рис. 5)
Балконодержатель
11
Включение холодильника
ВНИМАНИЕ
дильной и морозильной камер раствором пищевой
После установки подождите примерно три часа
соды.
перед тем, как подключить холодильник к элек—
После того как Вы подключили холодильник к элек—
тросети, чтобы быть уверенными, что хладагент
трической сети, убедитесь, что индикаторная лам—
после транспортировки распределился должным
почка на панели управления загорелась
,
установите
образом — это необходимо для правильной работы
ручку терморегулятора А в среднее положение, через
холодильника.
несколько часов Вы можете поместить продукты в
Перед началом эксплуатации в холодильнике
холодильное и морозильное отделения.
необходимо вымыть внутренние поверхности холо—
Использование холодильного отделения
Температура внутри холодильного отделения автома—
того, работает компрессор в данный момент или нет.
тически регулируется в соответствии с позицией, ус—
Не беспокойтесь, это совершенно нормально.
тановленной ручкой терморегулятора.
Если терморегулятор установлен в максимальное по—
min — наименее холодный режим
ложение (например, холодильник сильно заполнен
max
— наиболее холодный режим
продуктами или температура в помещении очень вы—
Мы рекомендуем устанавливать терморегулятор в
сокая), то компрессор может работать беспрерывно, в
среднее положение.
результате чего на задней стенке испарителя образу—
Для того, чтобы увеличить пространство, оптими—
ется слой инея. Это приводит к повышенному по—
зировать расположение продуктов и улучшить види—
треблению электроэнергии. Во избежание подобной
мость внутри отделения, испаритель расположен за
ситуации просто установите ручку терморегулятора
задней стенкой холодильного отделения. Во время
А в меньшее положение, так чтобы холодильное от—
работы холодильника задняя стенка может покры—
деление разморозилось автоматически.
ваться инеем или каплями воды в зависимости от
Продукты Время хранения Расположение в холодильнике
Упакованные мясо и рыба (в пластико—
2 или 3 дня В нижней части холодильника над ящиками для
вой пленке или пакетах)
овощей (самое холодное место в холодильнике)
Свежий сыр 3 или 4 дня В нижней части холодильника над ящиками для
овощей (самое холодное место в холодильнике)
Яйца 1 месяц В специальной подставке на любой полке
Масло, маргарин 1 неделя На любой полке
Готовые продукты или полуфабрикаты,
3 или 4 дня На любой полке
упакованные в воздухонепроницаемые
контейнеры
Колбасы, салями, мясо для сэндвичей,
3 или 4 дня На любой полке
готовые макароны, пудинги, кремовые и
песочные пирожные, хлеб, шоколад,
красные помидоры
Продукты в бутылках, молоко, напитки,
3 или 4 дня На дверных полках
йогурты
Фрукты и бобовые В ящиках для овощей
Не следует хранить в холодильнике
Лук, лук—порей и чеснок.
Бананы (они могут почернеть).
Цитрусовые.
Картофель и корнеплоды (храните в темном, сухом месте).
12
Холодный воздух в холодильном отделении цирку—
меньшее время, чем свежие. Холодильное отделение
лирует таким образом, что более низкая температура
оборудовано удобными полками, высота которых
устанавливается в нижней части отделения. Чтобы
может регулироваться благодаря специальным на—
правильно разместить продукты питания в отделени—
правляющим, это позволяет размещать крупные упа—
ях для обеспечения наилучших условий хранения
ковки и высокие бутылки. Не ставьте в холодильник
следуйте инструкции по хранению: при неправиль—
жидкости в емкостях без крышки во избежание по—
ном хранении даже самые свежие продукты быстро
вышения влажности – что ведет к повышению темпе—
испортятся. Вопреки общеизвестному мнению пом—
ратуры в холодильной камере.
ните, что приготовленные продукты можно хранить
Использование морозильного отделения
Для подготовки продуктов к замораживанию
напитки. Жидкость, кристаллизуясь, может разру—
смотрите специальную инструкцию.
шить емкость.
1. Продукты, хотя бы частично размороженные, не
7. Наполняйте контейнер для льда не более метки
следует замораживать повторно: используйте их для
(рис.2).
приготовления блюд, которые следует либо употре—
8. Если температура окружающей среды в течение
бить в течение 24 часов, либо заморозить.
продолжительного времени не превышает 14°С, то
2. Когда замораживаете свежие продукты, не допус—
температура, необходимая для хранения продуктов,
кайте, чтобы они касались ранее замороженных про—
не будет достигнута, что сократит время хранения
дуктов. Предпочтительно, чтобы продукты размеща—
продуктов.
лись внутри морозильного отделения, не соприкаса—
СИСТЕМА ОХЛАЖДЕНИЯ “NO FROST” про—
ясь с задней и боковыми стенками. Помните, что со—
изводит режим оттайки автоматически.
хранность продуктов зависит от скорости замора—
Таймер периодически включает нагревательные эле—
живания.
менты, происходит таяние «снеговой шубы» с испа—
3. Старайтесь не открывать дверь морозильного от—
рителя. Талая вода по каналам стекает в ванночку над
деления во время замораживания.
компрессором, где испаряется.
4. Для правильного хранения и легкости последую—
Рис. 2
щего размораживания размещайте продукты в моро—
зильном отделении небольшими порциями; это спо—
собствует более быстрому и надежному заморажива—
нию. Рекомендуем вести записи с указанием даты за—
мораживания.
5. В случае сбоев в электропитании не открывайте
дверцу морозильного отделения. Это поможет сохра—
нить температуру в морозильном отделении не выше
-9°С до 17 часов.
6. Не помещайте в морозильное отделение на дли—
тельное время полные стеклянные емкости с замер—
зающими жидкостями, особенно если в них находят—
ся плотно закупоренные шипучие или газированные
Рекомендации по экономии электроэнергии
Правильно устанавливайте холодильник
холодильника и вызывает дополнительный расход
На расстоянии от источников тепла, в хорошо про—
электроэнергии.
ветриваемом помещении, в соответствии с рекомен—
Держите двери закрытыми
дациями параграфа «Установка» (Вентиляция).
Открывайте двери только при необходимости, пом—
Правильно установите температуру
ните, что каждое открывание двери несколько повы—
Установите терморегулятор в среднее положение.
шает температуру внутри холодильника и на восста—
Установка излишне низкой температуры скажется
новление прежней температуры затрачивается элек—
только на повышении расхода электроэнергии, но не
троэнергия.
улучшит сохранность продуктов. Слишком низкая
Закрывайте плотно
температура может повредить сохранности овощей,
Следите за тем, чтобы уплотнительная резина на две—
готового мяса и сыра.
рях холодильника оставалась чистой и плотно приле—
Не переполняйте
гала к корпусу при закрытии, это позволит избежать
Для сохранности продуктов важна достаточная цир—
утечки холодного воздуха.
куляция воздуха. Переполнение продуктами мешает
Не помещайте горячую пищу
свободной циркуляции воздуха, правильной работе
Горячие продукты, помещенные в холодильник, не—
13
медленно повышают температуру на несколько гра—
ной температуры перед тем, как помещать их в холо—
дусов. Дайте остыть продуктам и посуде до комнат—
дильник.
Хранение замороженных продуктов
Мясо и рыба
Продукты
Упаковка
Время хра—
Время хране—
Время и условия
нения до
ния в моро—
размораживания
заморозки
зильнике (ме—
(дни)
сяцы)
Жареная / вареная говя—
Алюминиевая фольга 2-3 9-10 Нет необходимости
дина
Баранина Алюминиевая фольга 1-2 6 Нет необходимости
Жареная свинина Алюминиевая фольга 1 6 Нет необходимости
Жареная / вареная теля—
Алюминиевая фольга 1 8 Нет необходимости
тина
Телячья / баранья отбив—
Каждый кусок в полиэтилене, затем по 4-6
6 Нет необходимости
ная
кусков в алюминиевой фольге
Телячьи / бараньи котле—
Каждый кусок в полиэтилене, затем по 4-6
6 Нет необходимости
ты
кусков в алюминиевой фольге
Мясной фарш Алюминиевые поддоны, закрываемые
Свежеприго—
2 Медленно в холодиль—
пленкой
товленный
нике
Сердце, потроха Полиэтиленовые пакеты 3 Нет необходимости
Колбасы Пакеты или алюминиевая фольга 2 По потребности
Курица и индейка Алюминиевая фольга 1-3 9 Очень медленно
Гусь и утка Алюминиевая фольга 1-4 6 Очень медленно
Фазан и др. птица Алюминиевая фольга 1-3 9 Очень медленно
Зайчатина и крольчатина Алюминиевая фольга 3-4 6 Очень медленно
Оленина и дичь Алюминиевая фольга и полиэтиленовая
5-6 9 Очень медленно
пленка
Крупная рыба Алюминиевая фольга и полиэтиленовая
4-6 Очень медленно
пленка
Мелкая рыба Полиэтиленовые пакеты 2-3 Нет необходимости
Крабы, раки Полиэтиленовые пакеты 3-6 Нет необходимости
Устрицы, молюски Залитые соленой водой 3 Очень медленно
Вареная рыба Полиэтиленовая пленка 12 В горячей воде
Жареная рыба Полиэтиленовые пакеты 4-6 Прямо на сковороде
Овощи и фрукты
Продукты Подготовка
Время
Упаковка Время
Время и условия
к хранению
бланши—
хранения
размораживания
ровки
(месяцы)
(мин)
Яблоки и груши Почистить и порезать кусоч—
2 В контейнерах (залить
12 В холодильнике (очень
ками
сиропом)
медленно)
Абрикосы, персики,
Промыть и вынуть косточки 1-2 В контейнерах (засы—
12 В холодильнике (очень
вишня и сливы
пать сахаром)
медленно)
Клубника, ежевика Промыть и высушить В контейнерах (засы—
В холодильнике (очень
пать сахаром)
10-12
медленно)
Печеные фрукты Порезать и приготовить В контейнерах (доба—
вить 10% сахара)
12
Очень медленно
Фруктовые соки Помыть, порезать и выжать
В контейнерах (сахар
сок
по вкусу)
10-12
Очень медленно
Цветная капуста Снять листья, порезать на ку—
сочки, смочить разведенным
Полиэтиленовые паке—
лимонным соком
2
ты
12
Нет необходимости
Белокачанная и
Вымыть и порезать на мелкие
Полиэтиленовые паке—
При комнатной темпе—
брюссельская капус—
кусочки
1-2
ты
10-12
ратуре
та
Горох Очистить и помыть 2 Полиэтиленовые паке—
12 Нет необходимости
ты
Французская фасоль Вымыть и порезать, если не—
Полиэтиленовые паке—
обходимо
2
ты
10-12
Нет необходимости
Морковь, перец и
Очистить, вымыть и поре—
Полиэтиленовые паке—
репа
зать, если необходимо
3-4
ты
12
Нет необходимости
Грибы, спаржа Вымыть, почистить и поре—
Полиэтиленовые паке—
При комнатной темпе—
зать
3-4
ты или контейнеры
6
ратуре
Шпинат Промыть и мелко порубить
Полиэтиленовые паке—
При комнатной темпе—
2
ты
12
ратуре
Овощи для супа Вымыть и порезать на мелкие
Полиэтиленовые паке—
кусочки
ты
6-7
Нет необходимости
14

Другие продукты
Продукты Приготовле—
Время бланши—
Упаковка Время хра—
Время и условия
ние
ровки (мин)
нения (ме—
размораживания
сяцы)
Хлеб Полиэтиленовые пакеты
1 час при комнатной
4
температуре
Около 10 мин при
Пирожные
Полиэтиленовые пакеты
комнатной темпер.,
6
далее в плите с 1°до
100-200°С
В пластиковых контей—
3 часа при комнатной
Сметана
нерах
6
температуре или 5 ча—
сов в холодильнике
Масло В собственной упаковке
5 часов при комнатной
или алюмин. фольге
6
температуре или 9 ча—
сов в холодильнике
Вареные продукты
В пластиковых или стек—
При комнатной темпе—
или овощной суп
лянных контейнерах
3-6
ратуре или в горячей
воде
Яйца Без скорлупы, в неболь—
При комнатной темпе—
ших контейнерах
10
ратуре или в холо—
дильнике
Обслуживание и уход
Перед выполнением любых операций по мойке и
мойте губкой или мягкой тканью, смоченной в рас—
обслуживанию отсоедините холодильник от элек—
творе пищевой соды в теплой воде (сода также явля—
тросети.
ется хорошим дезинфектором). При отсутствии пи—
Размораживание
щевой соды используйте нейтральное моющее сред—
Внимание: не используйте для ускорения процесса
ство.
размораживания предметы, которые могут поцара—
• Никогда не используйте органические растворите—
пать стенки холодильника или нарушить герметич—
ли, абразивные, хлор— и аммиак— содержащие вещест—
ность отделений холодильника.
ва.
Размораживание холодильного отделения
• Все съемные части можно мыть раствором мыла
Холодильное отделение размораживается автомати—
или моющего средства в воде. Также их можно мыть
чески; образующаяся вода поступает в дренажную
в посудомоечной машине. Помните, что все съемные
систему (рис.3), затем испаряется теплом компрессо—
части необходимо тщательно высушить перед тем,
ра. Единственное, что Вам необходимо делать для
как поставить их обратно в холодильник.
обслуживания холодильного отделения — следить,
• Пыль может скапливаться на конденсаторе холо—
чтобы дренажное отверстие, которое находится за
дильника и препятствовать его нормальной работе.
ящиком для овощей и фруктов, не было засорено.
Осторожно пропылесосьте заднюю стенку холодиль—
Рис. 3
ника, используя подходящие насадки.
Обслуживание и уход
• Если вы не собираетесь использовать холодильник
продолжительное время, разморозьте его, вымойте
внутри, высушите и оставьте дверь приоткрытой,
чтобы избежать образования неприятного запаха и
плесени.
Замена лампы освещения
(не является гарантийным ремонтом).
Отключите холодильник от сети, вынув вилку из ро—
зетки. Лампа внутреннего освещения находится в
задней части корпуса плафона освещения. Выверните
лампу и замените ее аналогичной (мощностью не бо—
лее 15 Вт), как показано на рис. 4
• Ваш холодильник изготовлен из не пахнущих ги—
Рис. 4 Рис. 5
гиеничных материалов. Для сохранения этих харак—
Схема установки задних упоров
теристик, всегда храните сильно пахнущие продукты
в плотно закрывающихся контейнерах, чтобы избе—
жать образования запахов, которые потом будет
сложно удалить.
• Внутренние и внешние поверхности холодильника
15
1
1
2
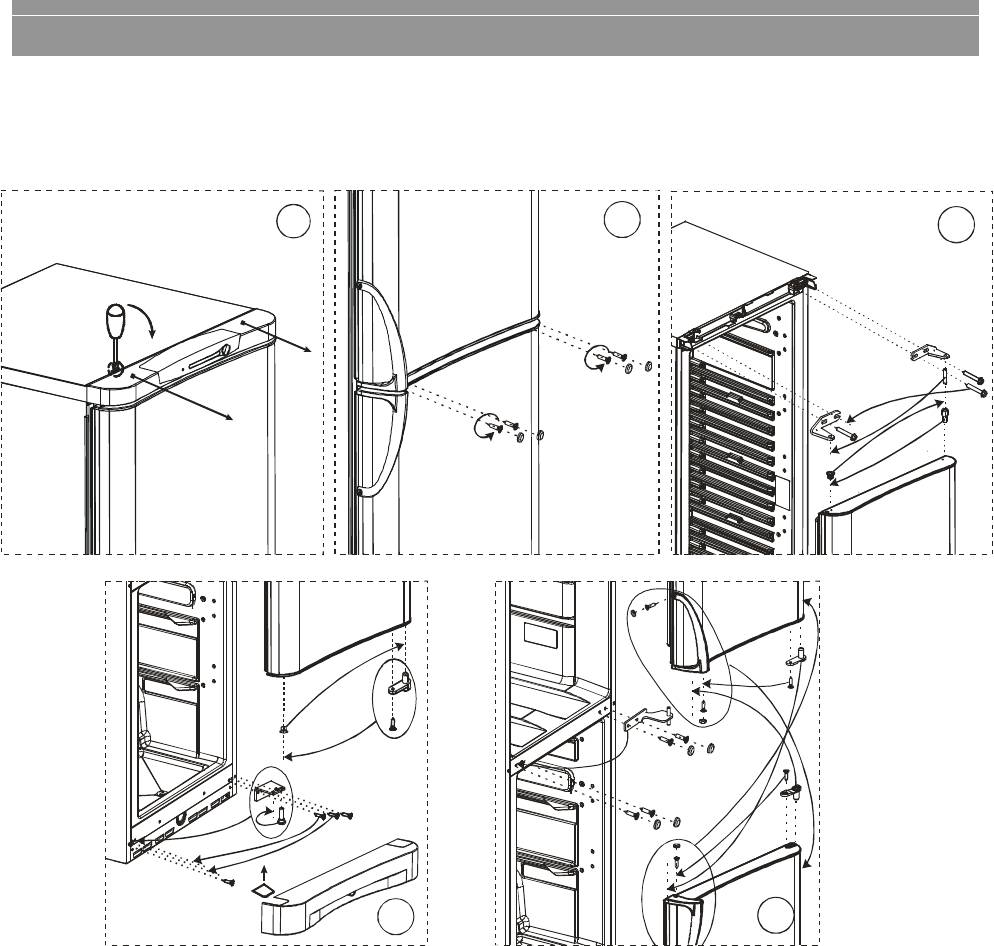
Схема перенавески дверей
Перенавеска дверей осуществляется согласно схеме, приведенной на рис. 6
Рис. 6
1
2
3
4
5
16
Устранение неисправностей
В случае неудовлетворительной работы холо—
Постоянно работает компрессор
дильника или возникновения неисправностей прочи—
Проверьте, что:
тайте этот раздел, прежде чем вызывать техников. В
• дверцы холодильника плотно закрываются и откры—
большинстве случае Вы можете решить возникшие
ваются не слишком часто;
проблемы сами.
• температура в помещении не слишком высокая;
Холодильник не работает
• ручка терморегулятора находится в правильном по—
Проверьте, что :
ложении.
• в доме не отключено электричество;
Холодильник слишком шумит при работе
• светится индикаторная лампочка;
Проверьте, что:
• вилка надежно вставлена в розетку;
• холодильник выровнен.
• розетка исправна; для проверки подключите уст—
• холодильник не касается постоянно вибрирующих
ройство, в исправности которого Вы уверены;
посторонних предметов (например, окружающей ме—
Температура в отделениях холодильника слиш—
бели).
ком высокая
Хладагент, циркулирующий внутри системы охлаж—
Проверьте, что:
дения, может негромко булькать, даже если компрес—
• дверцы отделений закрыты плотно, уплотнения на
сор не работает. Не беспокойтесь, это совершенно
дверцах не повреждены;
нормально.
• ручка терморегулятора находится в правильном по—
В холодильном отделении скапливается вода
ложении;
Проверьте, что:
• отделения не переполнены продуктами;
• дренажное отверстие не засорено (см. рис. 3).
• дверь отделения не открывали часто.
Если после проверки холодильник продолжает рабо—
Продукты в холодильном отделении переохлаж—
тать не должным образом, свяжитесь с авторизован—
даются
ным сервисным центром, обслуживающим продук—
Проверьте, что:
цию марки Indesit.
• ручка терморегулятора находится в правильном по—
ложении;
• Не пользуйтесь услугами лиц, не уполномочен—
• продукты не касаются задней части холодильника —
ных производителем.
она очень холодная.
• При ремонте требуйте использования ориги—
нальных запасных частей.
Технические данные
Наименование параметра Значение
Габаритные размеры: высота/ширина/глубина, см 167/60/66.5
3
Общий объем брутто, дм
280
3
Объем брутто МО, дм
80
3
Общий объем для хранения, дм
223
3
Объем для хранения МО, дм
66
Система охлаждения No Frost
2
Площадь полок для хранения продуктов, м
1.12
Рекомендуемая равномерная нагрузка на полку, кг, не более 30
о
Температура окружающей среды при эксплуатации,
С от +16 до +32
О
о
Время повышения температуры в МО от —18
С до –9
С, при отключении
17
эл. питания, ч
Класс энергетической эффективности С
.
Потребление энергии, кВт
ч/24 часа, 1.25
Количество компрессоров 1
Масса нетто, кг 71.8
Установленный срок службы, лет 10
Средний срок службы, лет 15
Остальные данные приведены в Табличке—паспорте.
17
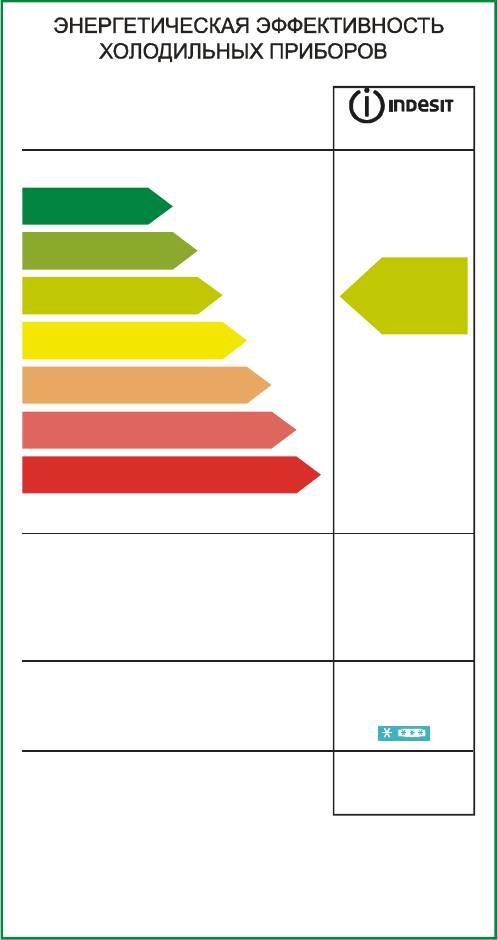
Изготовитель
Модель
C132 NF G
Максимально эффективный
A
B
C
C
D
E
F
G
Минимально эффективный
Потребление электроэнергии, кВт*ч/год
456
3
Общий объем для хранения свежих продуктов, дм
157
Общий объем для хранения замороженных
3
продуктов, дм
66
Символы маркировки самого холодного отделения
Корректированный уровень
звуковой мощности, дБа
43
Экологическая чистота хладагента
Да
Этикетка эффективности: ГОСТ Р 51565-2000
ГОСТ Р 51388-99
DIN FN153-90
Директива 86/594/ЕЕС (для NF)
18

Изготовитель
ЗАО “Завод холодильников
СТИНОЛ”
РОССИЯ, 398040 г. Липецк,
Пл. Металлургов 2
ЗАО «ЗХ СТИНОЛ»
Служба сервиса
тел: (0742) 42 41 00 .
Код документа: 645930
19
Аннотации для Холодильника Indesit C 132 NF G в формате PDF
Топ 10 инструкций
Другие инструкции
15
Другие продукты
Продукты
Приготовле-
ние
Время бланши-
ровки (мин)
Упаковка
Время хра-
нения (ме-
сяцы)
Время и условия
размораживания
Хлеб
Полиэтиленовые пакеты
4
1 час при комнатной
температуре
Пирожные
Полиэтиленовые пакеты
6
Около 10 мин при
комнатной темпер.,
далее в плите с 1
°
до
100-200
°
С
Сметана
В пластиковых контей-
нерах
6
3 часа при комнатной
температуре или 5 ча-
сов в холодильнике
Масло
В собственной упаковке
или алюмин. фольге
6
5 часов при комнатной
температуре или 9 ча-
сов в холодильнике
Вареные продукты
или овощной суп
В пластиковых или стек-
лянных контейнерах
3-6
При комнатной темпе-
ратуре или в горячей
воде
Яйца
Без скорлупы, в неболь-
ших контейнерах
10
При комнатной темпе-
ратуре или в холо-
дильнике
Перед выполнением любых операций по мойке и
обслуживанию отсоедините холодильник от элек-
тросети.
Размораживание
Внимание: не используйте для ускорения процесса
размораживания предметы, которые могут поцара-
пать стенки холодильника или нарушить герметич-
ность отделений холодильника.
Размораживание холодильного отделения
Холодильное отделение размораживается автомати-
чески; образующаяся вода поступает в дренажную
систему (рис.3), затем испаряется теплом компрессо-
ра. Единственное, что Вам необходимо делать для
обслуживания холодильного отделения — следить,
чтобы дренажное отверстие, которое находится за
ящиком для овощей и фруктов, не было засорено.
Рис. 3
Обслуживание и уход
• Ваш холодильник изготовлен из не пахнущих ги-
гиеничных материалов. Для сохранения этих харак-
теристик, всегда храните сильно пахнущие продукты
в плотно закрывающихся контейнерах, чтобы избе-
жать образования запахов, которые потом будет
сложно удалить.
• Внутренние и внешние поверхности холодильника
мойте губкой или мягкой тканью, смоченной в рас-
творе пищевой соды в теплой воде (сода также явля-
ется хорошим дезинфектором). При отсутствии пи-
щевой соды используйте нейтральное моющее сред-
ство.
• Никогда не используйте органические растворите-
ли, абразивные, хлор- и аммиак- содержащие вещест-
ва.
• Все съемные части можно мыть раствором мыла
или моющего средства в воде. Также их можно мыть
в посудомоечной машине. Помните, что все съемные
части необходимо тщательно высушить перед тем,
как поставить их обратно в холодильник.
• Пыль может скапливаться на конденсаторе холо-
дильника и препятствовать его нормальной работе.
Осторожно пропылесосьте заднюю стенку холодиль-
ника, используя подходящие насадки.
• Если вы не собираетесь использовать холодильник
продолжительное время, разморозьте его, вымойте
внутри, высушите и оставьте дверь приоткрытой,
чтобы избежать образования неприятного запаха и
плесени.
Замена лампы освещения
(не является гарантийным ремонтом).
Отключите холодильник от сети, вынув вилку из ро-
зетки. Лампа внутреннего освещения находится в
задней части корпуса плафона освещения. Выверните
лампу и замените ее аналогичной (мощностью не бо-
лее 15 Вт), как показано на рис. 4
Рис. 4 Рис. 5
Схема установки задних упоров
Обслуживание и уход
1
1
2
-
Инструкции по эксплуатации
1

INDESIT C 132 NF G инструкция по эксплуатации
(20 страниц)
- Языки:Русский
-
Тип:
PDF -
Размер:
1.49 MB -
Описание:
Холодильник
Просмотр
На NoDevice можно скачать инструкцию по эксплуатации для INDESIT C 132 NF G. Руководство пользователя необходимо для ознакомления с правилами установки и эксплуатации INDESIT C 132 NF G. Инструкции по использованию помогут правильно настроить INDESIT C 132 NF G, исправить ошибки и выявить неполадки.