![]()
4-я Красноармейская, 2А
Санкт-Петербург, 190005
Email: info@lenmoto.ru
Телефон: +7 (921) 930-81-18
Телефон: +7 (911) 928-08-06
Компания ЛенМото
Запчасти, аксессуары, экипировка, тюнинг для мотоциклов, скутеров, квадроциклов, снегоходов, багги, гидроциклов, катеров и лодочных моторов.
Подпишитесь на наши новости
Подписаться
Материал из BikesWiki — энциклопедия японских мотоциклов
Перейти к: навигация, поиск

Honda NT 650V Deauville
Ниже представлены прямые ссылки на скачку сервисной документации.
Для Honda NT650V Deauville
- Сервисный мануал (Service Manual) на Honda NT650V Deauville
- Руководство по ремонту и обслуживанию (Haynes Service Manual) на Honda NT650V Deauville и Honda NTV600/650 Revere
Обзор модели
- Honda NT650V Deauville
Источник — «https://bikeswiki.ru/index.php?title=Honda_NT650V_Deauville:_мануалы&oldid=9510»
Категория:
- Сервисная документация

Название: Honda: Руководство по ремонту и техническому обслуживанию мотоцикла Honda NT 650 V Deauville
Автор: Коллектив авторов
Издательство: Honda
Жанр: ремонт, обслуживание, эксплуатация ТС
Год издания: 2000
Страниц: 495
Язык: Английский
Формат: PDF
Качество: Хорошее
Размер: 92 Мб
Honda NT 650 V Deauville Workshop Manual
Скачать с turbobit.net

НЕ РАБОТАЕТ TURBOBIT.NET? ЕСТЬ РЕШЕНИЕ, ЖМИ СЮДА! ПРАВООБЛАДАТЕЛЯМСООБЩИТЬ ОБ ОШИБКЕ ИЛИ НЕ РАБОЧЕЙ ССЫЛКЕ
Категория: КНИГИ » ТЕХНИКА
Вернуться назад
Внимание
Уважаемый посетитель, Вы зашли на сайт как незарегистрированный пользователь.
Мы рекомендуем Вам зарегистрироваться либо войти на сайт под своим именем.
Информация
Посетители, находящиеся в группе Гости, не могут оставлять комментарии к данной публикации.
-
Contents
-
Table of Contents
-
Bookmarks
Quick Links
HONDA
OWNER’S MANUAL
89′
NT650
HAWK GT
Related Manuals for Honda NT650
Summary of Contents for Honda NT650
-
Page 1
HONDA OWNER’S MANUAL 89’ NT650 HAWK GT… -
Page 2: Important Notice
IMPORTANT NOTICE OPERATOR AND PASSENGER This motorcycle is designed to carry the operator and one passenger. Never exceed the maximum weight capacity as shown on the tire information label. ON-ROAD USE This motorcycle is not equipped with a spark arrester and is designed to be used only on the road.
-
Page 3
All information in this publication is based on the latest production information available at the time of approval for printing. HONDA MOTOR CO., LTD. reserves the right to make changes at any time without notice and without incurring any obligation. -
Page 4
To help meet the challenges safely and enjoy the adventure fully, become thoroughly familiar with this Owner’s Manual BEFORE YOU RIDE THE MOTORCYCLE. Also for your own and your Honda’s sake, please read all the written material which came with your new Honda. These items include: … -
Page 5
OPERATION Page Page 1 MOTORCYCLE SAFETY Right Handlebar Controls 2 Safe Riding Rules Left Handlebar Controls 3 Protective Apparel 4 Modifications FEATURES (Not required for 5 Loading and Accessories operation) Steering Lock 9 PARTS LOCATION Helmet Holder 12 Instruments and Indicators Seat Document Compartment 16 MAJOR COMPONENTS (Information… -
Page 6
MAINTENANCE Page Page 49 MAINTENANCE 75 ELECTRICAL Maintenance Schedule Battery Maintenance Record Fuse Replacement Tool Kit Serial Numbers 79 CLEANING Color Label Maintenance Precautions 80 STORAGE GUIDE 57 FILTERS/LUBRICATION 82 SPECIFICATIONS 57 Engine Oil Crankcase Breather 86 CONSUMER INFORMATION Emission Control System 61 ENGINE Warranty Service Spark Plugs… -
Page 7: Motorcycle Safety
MOTORCYCLE SAFETY Read these WARNING LABELS before you ride. ⚠ WARNING ALWAYS WEAR HELMET. ON ROAD USE ONLY FAILURE TO FOLLOW PROPER STARTING AND OPERATING INSTRUCTIONS MAY RESULT IN AN ACCIDENT. READ OWNER’S MANUAL CAREFULLY. ⚠ WARNING ACCESSORIES AND LOADING …
-
Page 8
⚠ WARNING DO NOT REMOVE RADIATOR CAP WHILE THE ENGINE IS HOT. ALLOW THE ENGINE TO COOL BEFORE DRAINING. SEVERE SCALDING MAY RESULT. ⚠ CAUTION CHECK THE COOLING SYSTEM FREQUENTLY BY OBSERVING THE COOLANT LEVEL IN THE RESERVE TANK FILLER OPENING … -
Page 9
T H I S M O T O R C Y C L E I S T I R E I N F O R M A T I O N E Q U I P P E D W I T H T U B E L E S S T I R E S . COLD TIRE PRESSURES M A X I M U M W E I G H T C A P A C I T Y : FRONT 225 kPa… -
Page 10
⚠ WARNING * M o t o r c y c l e * Don’t ride in another motorist’s r i d i n g «blind spot.» r e q u i r e s special efforts on your part to ensure your safety. Know 4. -
Page 11
P R O T E C T I V E A P P A R E L M O D I F I C A T I O N S ⚠ WARNING 1. Most motorcycle accident fatalities are due to head injuries: ALWAYS wear a helmet. -
Page 12
L O A D I N G A N D A C C E S S O R I E S L o a d i n g ⚠ WARNING combined weight rider, passenger, cargo additional accessories must not exceed the maximum * T o p r e v e n t a n a c c i d e n t , u s e weight capacity: 345 lbs (156 kg) Cargo e x t r e m e… -
Page 13
3. Vehicle handling and stability can be A c c e s s o r i e s adversely affected by loose cargo. Genuine Honda accessories have been Recheck cargo security and accessory specifically designed for and tested on this mounts frequently. -
Page 14
3. Accessories which alter your riding position by moving hands or feet away from controls may increase reaction time in an emergency. 4. Do not add electrical equipment that will exceed the motorcycle’s electrical system capacity. A blown fuse could cause a dangerous loss of lights or engine power. -
Page 15: Parts Location
PARTS LOCATION Coolant temperature gauge Speedometer Warning and Tachometer indicator lights Front brake fluid reservoir Rearview mirror Rearview mirror Front brake lever Clutch lever Engine stop switch Headlight Throttle grip dimmer switch Starter button Ignition switch Turn signal Horn button Fuel tank cap…
-
Page 16
Document compartment Battery Oil filler cap/ dipstick Passenger footpeg Rear brake pedal Footpeg… -
Page 17
Coolant reserve tank Tool box Fuel valve Helmet holder Footpeg Side stand Gear shift pedal Passenger footpeg Center stand… -
Page 18: Instruments And Indicators
INSTRUMENTS AND INDICATORS The indicators and warning lights are grouped between the instruments. Their functions are described in the tables on the following pages. USA model: Odometer and tripmeter read in miles. Canadian model: Odometer and tripmeter read in kilometers. Tripmeter Speedometer Odometer…
-
Page 19
(Ref .No.) Description Function (1) Tripmeter Shows mileage per trip (2) Speedometer Shows riding speed. (3) Odometer Shows accumulated mileage. (4) Tachometer Shows engine rpm. (5)Tachometer red zone Never allow the tachometer needle to enter the red zone, even after the engine has been broken in. CAUTION: * The red zone indicates the maximum limits of engine speed and running the engine in the red… -
Page 20
(Ref .No.) Description Function (7) Oil pressure warning light Lights when the engine oil pressure is below the normal operating range. Should light when ignition switch is ON and engine is not running. Should go out when the engine starts, except for occasional flickering at or near idling speed when engine is warm. -
Page 21
Coolant Temperature Gauge When the needle begins to move above the C (Cold) mark, the engine is warm enough for the motorcycle to be ridden. The normal operating temperature range is within the wider section of the outlined band. If the needle reaches the H (Hot) mark, stop the engine and check the reserve tank coolant level. -
Page 22
MAJOR COMPONENTS (Information you need to operate this motorcycle.) ⚠ WARNING * I f t h e P r e — r i d e I n s p e c t i o n ( p a g e 3 9 ) i s n o t p e r f o r m e d , s e v e r e p e r s o n a l i n j u r y… -
Page 23
(page 19), there is probably air in the brake system and it must be bled. See your authorized Honda dealer for this service. F r o n t B r a k e F l u i d L e v e l : Screws ⚠… -
Page 24
Brake fluid must be added to the reservoir F r o n t B r a k e F l u i d L e v e l : whenever the fluid level begins to reach the lower level mark (4). Remove the ⚠… -
Page 25
Other checks: B r a k e P a d W e a r Brake pad wear will depend upon the Make sure there are no fluid leaks. Check severity of usage, type of riding, and for deterioration or cracks in the hoses condition of the roads. -
Page 26
Pull back the rubber dust cover (2). CLUTCH Loosen the lock nut (3) and turn the Clutch adjustment may be required if the adjuster (4). Tighten the lock nut (3) and motorcycle stalls when shifting into gear check the adjustment. If the adjuster is or tends to creep;… -
Page 27
NOTE * If proper adjustment cannot be obtained or the clutch does not work correctly, see your authorized Honda dealer. (5) Adjusting nut (A) Increase free play (6) Lock nut (В) Decrease free play… -
Page 28
The factory provides a 50/50 solution of COOLANT antifreeze and water in this motorcycle. Coolant Recommendation This coolant solution is recommended for The owner must properly maintain the most operating temperatures and provides coolant to prevent freezing, overheating good corrosion protection. -
Page 29
LOWER level loss is excessive, check for leaks and see mark (3), remove the reserve tank cap (4) your authorized Honda dealer for repair. and add coolant mixture until it reaches the UPPER level mark (2). Do not remove the radiator cap. -
Page 30
FUEL ⚠ WARNING Manual Fuel Valve * T o a v o i d r u n n i n g o u t o f f u e l The manual fuel valve (1) is under the t h a t m a y r e s u l t i n a s u d d e n… -
Page 31
(1) Fuel tank cap (2) Ignition key (3) Filler neck The engine is designed to use any Fuel Tank gasoline that has a pump octane number The fuel tank capacity, including reserve, (R+M)/2 of 86 or higher, or that has a research octane number of 91 or higher. -
Page 32
* R e f u e l i n a w e l l — v e n t i l a t e d a r e a authorized Honda dealer. Failure to do w i t h… -
Page 33
Honda. There are two covered under the warranty. Honda types of «gasohol»: one containing ethanol, cannot endorse fuels and the other containing methanol. Do not… -
Page 34: Engine Oil
CAUTION: ENGINE OIL * Running the engine with insufficient Engine Oil Level Check pressure cause serious Check the engine oil level each day before engine damage. riding the motorcycle. The level must be maintained between the upper (2) and lower (3) level marks on the dipstick (1). 1.
-
Page 35: Tubeless Tires
This motorcycle is equipped with tubeless dents or deformation. If there is any tires, valves, and wheel rims. Use only damage, see your authorized Honda dealer tires marked «TUBELESS» and tubeless for repair, replacement, and balancing. valves on rims marked «TUBELESS TIRE ⚠…
-
Page 36
• P r o p e r w h e e l b a l a n c e Tire Repair/Replacement: See your authorized Honda Dealer n e c e s s a r y f o r s a f e , s t a b l e h a n d l i n g o f t h e m o t o r c y c l e . -
Page 37: Essential Individual Components
ESSENTIAL INDIVIDUAL COMPONENTS IGNITION SWITCH The ignition switch (1) is located below the indicator panel. Ignition switch Key Position Function Key Removal Steering is locked. Engine and lights cannot be LOCK Key can be operated. (steering lock) removed For parking the motorcycle near traffic. The P(parking) Key can be taillight is on, but all other lights are off.
-
Page 38
RIGHT HANDLEBAR CONTROLS Starter Button Engine Stop Switch The starter button (2) is below the engine The engine stop switch (1) is next to the stop switch (1), throttle grip. When the switch is in the When the starter button is pressed the RUN position, the engine will operate. -
Page 39
LEFT HANDLEBAR CONTROLS The three controls next to the left handlebar grip are: Headlight Dimmer Switch (1) Select HI for high beam, LO for low beam. Turn Signal Switch (2) Move to L to signal a left turn, R to signal a right turn. -
Page 40
FEATURES (Not required for operation) STEERING LOCK To lock the steering, turn the handlebars all the way to the left or right, turn the key (1) to LOCK while pushing in. Remove the key. ⚠ WARNING * D o n o t t u r n t h e k e y t o L O C K w h i l e r i d i n g t h e… -
Page 41
⚠ HELMET HOLDER WARNING * T h e h e l m e t h o l d e r i s d e s i g n e d The helmet holder (1) is on the left side f o r h e l m e t s e c u r i t y w h i l e… -
Page 42
SEAT DOCUMENT COMPARTMENT To remove the seat (1), Insert the ignition The document compartment (1) is under key into the helmet holder (2), turn it the seat. clockwise and pull the seat lock lever (3) This o w n e r ‘ s m a n u a l a n d o t h e r downward. -
Page 43
SIDE COVER The side cover (1) must be removed for main fuse maintenance. To remove the side cover, remove the mounting bolts (2), pull out both side cover tabs (3). Slide the cover upward. (1) Side cover (2) Mounting bolts (3) Tabs… -
Page 44
1. Engine oil level — add engine oil if Correct any discrepancy before you ride. required (page 28). Check for leaks. Contact your authorized Honda dealer for 2. Fuel level fill fuel… -
Page 45
Starting procedure STARTING THE ENGINE ⚠ To restart a warm engine, follow the WARNING procedure for «High Air Temperature.» Normal Air Temperature * N e v e r r u n t h e e n g i n e 10-35 °C (50-95 °F) c l o s e d a r e a . -
Page 46
NOTE High Air Temperature 35 °C (95 °F) or above * Do not open the throttle when starting 1. Do not use the choke. the engine with the choke on. This will 2. Open the throttle slightly. lean the mixture, resulting in hard starting. -
Page 47
Flooded Engine If the engine fails to start after repeated attempts, it may be flooded with excess fuel. To clear a flooded engine, turn the engine stop switch OFF and push the choke lever forward to Fully off (B). Open the throttle fully and crank the engine for 5 seconds. -
Page 48
BREAK-IN 4. Upon reaching an odometer reading of During initial break-in, newly machined 1600 km (1000 miles), you can subject surfaces will be in contact with each other the motorcycle to full throttle operation. and these surfaces will wear in quickly. However, do not exceed 8500 rpm at Break-in maintenance at 600 miles (1000 any time (tachometer RED ZONE limit). -
Page 49
RIDING Proper shifting will provide better fuel ⚠ economy. When changing gears under WARNING n o r m a l c o n d i t i o n s , u s e t h e s e recommended shift points: * R e v i e w M o t o r c y c l e S a f e t y… -
Page 50
⚠ CAUTION: WARNING * Do not ride over a curb or rub the wheel * D o n o t d o w n s h i f t w h e n against an obstacle, as wheel damage may t r a v e l i n g a t a s p e e d t h a t w o u l d result. -
Page 51
High altitude riding When operating this motorcycle at high altitude the air-fuel mixture becomes overly rich. Above 6500 feet (2000 m) drivability performance reduced and fuel consumption increased. See your authorized Honda dealer for high altitude adjustments. -
Page 52
* When riding in wet or rainy conditions, BRAKING or on loose surfaces, the ability to 1. For normal braking, gradually apply maneuver and stop will be reduced. All both front and rear brakes while of your actions should be smooth under downshifting to suit your road speed. -
Page 53
NOTE: PARKING When stopping for a short time near 1. After stopping the motorcycle, shift the traffic at night, the ignition switch may be transmission into neutral, turn the turned to P and the key removed. This ignition switch OFF and remove the will turn on the taillight to make the key. -
Page 54
ANTI-THEFT TIPS NAME:_______________________________ 1. Always lock the steering and never ______________________________________ leave the key in the ignition switch. This ADDRESS:____________________________ sounds simple but people do forget. ______________________________________ 2. Be sure the registration information for your motorcycle accurate current. 3. Park your motorcycle in a locked garage whenever possible. -
Page 55
Motorcycle Emission Control Systems is necessary in order to keep the emissions system warranty in effect. (USA ONLY) When service is required, remember that your authorized Honda dealer knows your motorcycle best and is fully equipped to maintain and repair it. The scheduled maintenance may also be performed by a qualified service facility that normally does this kind of work;… -
Page 56: Maintenance Schedule
MAINTENANCE SCHEDULE The following items require some mechanical knowledge Certain items (particularly those marked * and **) may require more technical information and tools. Consult your authorized Honda Dealer. Perform the Pre-ride Inspection (page 38) at each scheduled maintenance period.
-
Page 57
NUTS, BOLTS, FASTENERS ** WHEELS/TIRES ** STEERING HEAD BEARINGS SHOULD RE SERVICED BY AN AUTHORIZED HONDA DEALER UNLESS THE OWNER HAS PROPER TOOLS AND SERVICE DATA AND IS MECHANICALLY QUALIFIED. REFER TO THE OFFICIAL HONDA SERVICE MANUAL. ONLY * * IN THE INTEREST OF SAFETY. WE RECOMMEND THESE ITEMS BE SERVICED… -
Page 58
MAINTENANCE RECORD Miles Performed By Odometer Date 4000 8000 12000 16000 20000 24000 Make sure whoever performs the maintenance completes this record. All scheduled maintenance, including the 600 mile (1,000 km) break-in maintenance, is considered a normal owner operating cost and will be charged for by your dealer. … -
Page 59
TOOL KIT The tool kit (1) is in the tool box under the seat. Some roadside repairs, minor adjustments and parts replacement can be performed with the tools contained in the kit. 10 x 12 mm open end wrench … -
Page 60
The VIN, Vehicle Identification Number, SERIAL NUMBERS (1) is on t h e Safety Certification Label The frame and engine serial numbers are affixed to the right side frame. The frame required when registering your number (2) is stamped on the right side of motorcycle. -
Page 61
The engine number (3) is stamped on the COLOR LABEL right side of the crankcase. The color label (1) is attached to the rear fender under the seat. It is helpful when ENGINE NO. ___________________________ ordering replacement parts. Record the color and code here for your reference. -
Page 62
, f o r misalignment and damage that you may not be able to detect. * Use new, genuine Honda parts or their equivalent for maintenance and repair. Parts which are not of equivalent… -
Page 63
Other viscosities shown in the chart below page 56). used when average Engine Oil Recommendation: USE HONDA temperature in your riding area is within 4-STROKE OIL OR AN EQUIVALENT the indicated range. Use only high detergent, premium quality motor oil certified to meet US automobile… -
Page 64
CAUTION: Engine Oil and Filter To prevent oil leaks and filter damage, Engine oil quality is the chief factor never support the engine on the oil affecting engine service life. Change the filter. engine oil as specified in the maintenance 1. -
Page 65
4. Apply a thin coat of engine oil to the 6. Check that the sealing washer on the Я new oil filter rubber seal (4). ВВ drain plug is in good condition and 5. Install t h e new oil filter and tighten it install the plug. -
Page 66
NOTE CRANKCASE BREATHER Please dispose of used engine oil in a (Refer to the maintenance precautions on manner that is compatible with the page 56). environment. We suggest you take it in a sealed container to your local service 1. -
Page 67
SPARK PLUGS 5. With the plug washer attached, thread the new spark plug in by hand to (Refer to t h e maintenance precautions on prevent cross-threading. page 57). 6. Tighten the spark plug 1/2 turn with a Recommended plugs: spark plug wrench to compress t h e Standard: washer. -
Page 68
The idle speed adjustment procedure given here should only be used when changes in altitude affect normal idle speed as set by your dealer. See your authorized Honda dealer for regularly scheduled c a r b u r e t o r adjustments,… -
Page 69
D R I V E C HA I N the gauge while pulling the chain down (Refer to the maintenance precautions on with your finger. page 57). The service life of the drive chain is dependent upon proper lubrication and adjustment. -
Page 70
A drive chain with damaged rollers, loose 5. Rotate the rear wheel and check the pins, or missing О-rings must be replaced. drive chain slack as the wheel rotates. A chain which appears dry, or shows signs Repeat this procedure several times. o f r u s t , r e q u i r e s s u p p l e m e n t a r y Drive chain… -
Page 71
CAUTION: Adjustment: Drive chain slack should be checked and The drive chain on this motorcycle is adjusted, if necessary, every 600 miles equipped with small О-rings between the (1,000km). When operated at sustained link plates. These О-rings retain grease high speeds or under conditions of inside the chain to improve its service… -
Page 72
Wear inspection: Check the chain wear label when adjusting the chain. If the red zone (4) on the label aligns with the tip of driven sprocket teeth (5) after the chain has been adjusted to the proper slack, the chain is excessively worn and must be replaced. -
Page 73
Lubrication and cleaning: Lubricate every 600 miles (1,000 km) or sooner if chain appears dry. The О-rings in this chain can be damaged by steam cleaning, high pressure washers, and certain solvents. Clean the chain with high flash-point solvent, such as kerosene. Wipe dry and lubricate only with SAE 80 gear oil. -
Page 74: Wheel Removal
If this engine. occurs, servicing of the brake system 2. Remove the speedometer cable set will be necessary. See your authorized Honda dealer for this service. screw disconnect speedometer cable (2). 3. Remove the brake caliper mount bolts (3) and the brake caliper (4).
-
Page 75
Installation Note: Install the brake caliper. To install the front wheel assembly, Tighten the brake caliper mount bolts to position the wheel between the fork legs. the specified torque. Insert the front axle from the left side, Brake caliper mount bolts torque: through the left front fork leg and wheel 27 Nm (2.7 kgm, 20 f t l b ) hub. -
Page 76
, s e e y o u r authorized Honda dealer as soon as possible to v e r i f y proper assembly. Improper assembly may lead to loss of… -
Page 77
4. Turn the bearing holder clockwise until Rear Wheel Removal it stops. 1. Place the motorcycle on its center 5. Remove the cap(l), cotter pin(2), wheel stand. nut (3), shim(4) and then remove the 2. Loosen the bearing holder pinch bolt. axle center collar(5). -
Page 78
, s e e y o u r Installation Notes: authorized Honda dealer as soon as Install the axle aligning the spline with possible to v e r i f y proper assembly. the wheel hub. -
Page 79
CAUTION: Used cotter pins may not effectively secure fasteners. Always replace used cotter pins with new ones. -
Page 80
Replace if wear extends to any point of the wear mark (1) as shown. Check the side stand spring for damage and loss of tension, and the side stand assembly for freedom of movement. See your authorized Honda dealer replacement. (1) Wear mark… -
Page 81
Wear electrical troubles, see your authorized protective clothing and a face shield. Honda dealer. If electrolyte gets on your skin, flush with water. CAUTION: If electrolyte gets in your eyes, flush Do not attempt to remove the sealing… -
Page 82
* KEEP OUT OF REACH OF CHILDREN. Battery Removal: 1. Remove the seat (page 37). 2. Remove the battery cover (1) by removing the mount bolts. 3. Disconnect negative terminal lead (2) from the battery first, then disconnect positive terminal lead (3). 4. -
Page 83
FUSE REPLACEMENT usually indicates a short circuit or an (Refer to the maintenance precautions on overload in the electrical system. See your authorized Honda dealer for repair. page 56 ). CAUTION The main fuse (1), located on the starter magnetic switch (2) behind the left side … -
Page 84
⚠ To replace fuses in the fuse box (4), WARNING remove t h e screw and the fuse box cover. The spare fuses (5) are located in the fuse * Never use a fuse with a different box. r a t i n g f r o m t h a t s p e c i f i e d . -
Page 85
3. Test t h e brakes before riding t h e CLEANING motorcycle. Several applications may be necessary to restore normal braking Clean y o u r motorcycle regularly performance. protect t h e surface finishes and inspect 4. Lubricate the drive chain immediately for damage, wear and oil, coolant or after washing the motorcycle. -
Page 86: Storage Guide
⚠ WARNING STORAGE GUIDE * G a s o l i n e flammable Extended storage, such as for winter, e x p l o s i v e u n d e r c e r t a i n requires that you take certain steps to conditions.
-
Page 87
5. Remove the battery. Store in an area REMOVAL FROM STORAGE protected from freezing temperatures and direct sunlight. 1. Uncover and clean the motorcycle. 6. Wash and dry the motorcycle. Wax all Change the engine oil if more than 4 painted surfaces. -
Page 88: Specifications
SPECIFICATIONS DIMENSIONS Overall length 2,085 mm (82.1 in) Overall width 750 mm (29.5 in) Overall height 1,075 mm (42.3 in) Wheelbase 1,430 mm (56.3 in) Ground clearance 155 mm (6.1 in) WEIGHT Dry weight 184 kg (406 lbs) CAPACITIES Engine oil (3.0 US qt, 2.5 Imp qt) After disassembly (2.3 US qt, 1.9 Imp qt) After draining Fuel tank…
-
Page 89
ENGINE Bore and stroke 79.0 x 66.0mm (3.11 x 2.60in) Compression ratio 9.4:1 Displacement 647 cm (39.5 cu-in) Spark plug Standard DPR8EA — 9(NGK) X24EPR — U9(ND) For cold climate DPR7EA — 9(NGK) (Below 5 °C, 41 °F) X22EPR — U9(ND) For extended high speed DPR9EA—9(NGK) riding… -
Page 90
CHASSIS AND SUSPENSION Caster Trail 111 mm (4.4 in) Tire size, front 110/80 -17 57H Tire size, rear 150/70 -17 69H POWER TRANSMISSION Primary reduction 1.888 Gear ratio, 1st 2.769 1.882 1.450 1.174 0.965 Final reduction 2.750… -
Page 91
ELECTRICAL Battery 12V—8Ah Generator 240W/5,000rpm LIGHTS Headlight (HIGH/LOW) 12 V — 60/55W Tail/stoplight 12 V — 3/32cp x 2 SAE No. 1157 Turn signal light Front 12 V — 32/3cp SAE No.1034 Rear 12 V — 32cp SAE No.1073 Instrument lights 12 V — 3.4W XI, 12V-1.7W X2 Neutral indicator light 12 V — 3W… -
Page 92
Carbon monoxide does not react in the same way, but it is toxic. Honda Motor Co., Ltd. utilizes lean carburetor settings and other systems to reduce carbon monoxide and hydrocarbons. Exhaust Emission Control System Except for California;… -
Page 93
Evaporative Emission Control System (California only) This motorcycle complies with the California Air Resources Board (CARB) requirements for evaporative emission regulations. Fuel vapor from the fuel tank and carburetor is directed into the charcoal canister and air cleaner where it is adsorbed and stored while the engine is stopped. -
Page 94
Problems that May Affect Motorcycle Emissions If you are aware of any of the following symptoms, have the vehicle inspected and repaired by your authorized Honda Motorcycle Dealer: 1. Hard starting or stalling after starting 2. Rough idle 3. -
Page 95
MEMO… -
Page 96: Warranty Service
Your purchase of a Honda product is greatly appreciated by both the dealer and American Honda Motor Co., Inc. We want to assist you in every way possible to assure your complete satisfaction with your purchase.
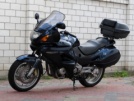
Honda NT650V Deauville 2000
Бортовой журнал
Последний раз был на сайте 344 дня и 13 часов назад
Изготовление регулятора напряжения.
В конце сезона начали гореть лампочки ближнего света. При проверке напряжения заряда на холостых норма, а вот на оборотах до 17 вольт. Аккумулятор чуть достал — его раздуло. Хотя в середине сезона ещё всё было хорошо. Аккумулятор купил новый Exide ETZ10-BS 8.6 а/ч 145 ампер пусковой ток, цена вопроса 30 долларов. Но пост не об этом.
Читать дальше
 Yan-4ik
- Денис Янчик
- 16 апреля 2017 в 22:06
-
22
-
оценка: +22
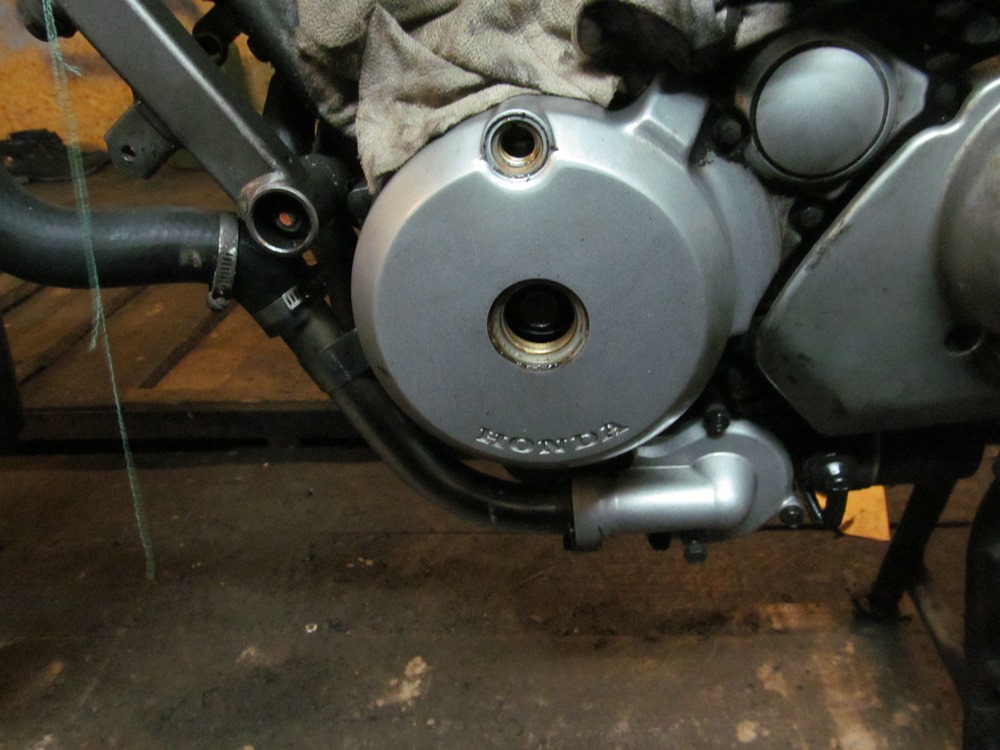
Ремонт крышки насоса водяного охлаждения двигателя
Итак ни что не бывает столь постоянным, как что-то временное!
Был дефект крышки помпы. В частности трещина на входе.
Чёрная полоса

Охлаждайка не капала, но ооочень кто-то ненадёжно «запилил» холодной сваркой. При демонтаже трубки((мешала добраться до промежуточной втулки между двигателем и рамой для снятия двигателя)) оказалось, что она тоже залипла основательно в крышке, в итоге трещина пошла дальше и надо было что-то делать.
Решено было нарезать резьбу и в крутить ввёртыш. Что из этого вышло смотрите ниже…
Читать дальше
- Yan-4ik
- Денис Янчик
- 22 января 2015 в 23:24
-
3
-
оценка: +16
Эксплуатационные жидкости, свечи, фильтры.
Главной деталью любого транспортного средства считается его двигатель, мотоцикл не исключение. Каждый мотолюбитель старается, чтобы мотор его байка находился в отличном состоянии. Двигатель проживет намного дольше, если своевременно менять эксплуатационные жидкости, фильтры и проводить техническое обслуживание.
Так как я, этим летом купил своего «Водевиля» и толком не знаю, что там болтается в бачках и
промежностях
картерах двигателя, а самое главное КОГДА это всё было залито? Было решено заменить всё и больше не переживать по этому поводу. Итак ништяки.
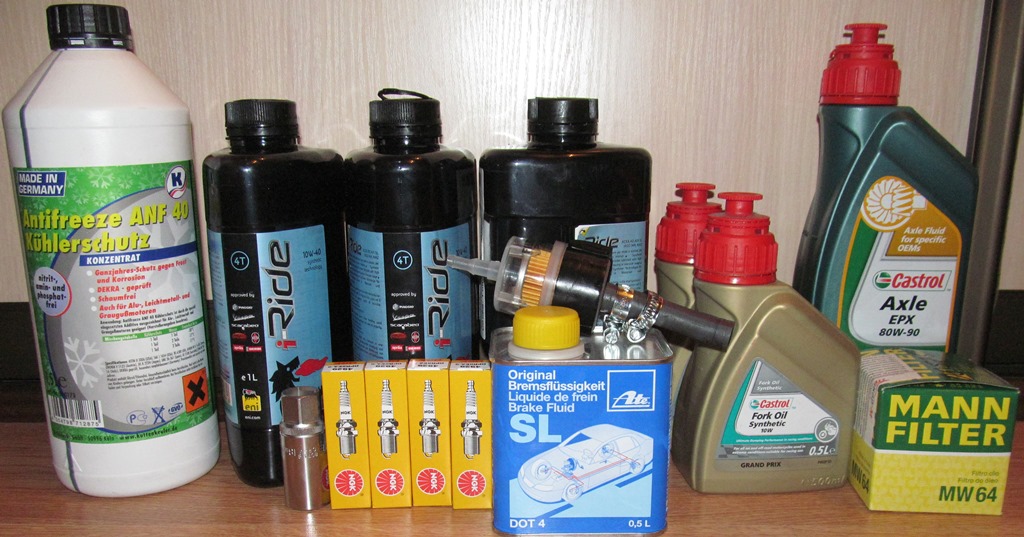
Начну слева на право.
Читать дальше
- Yan-4ik
- Денис Янчик
- 16 января 2015 в 0:15
-
10
-
оценка: +22
Обслуживание клапанного механизма
Всем привет.
Как обычно продолжаю тему самостоятельного технического обслуживания своего мотоцикла.
Как видно из названия темы речь пойдёт о регулировании зазора между клапаном и толкателем(коромыслом, рокером).
В наличии есть мануал на английском языке, поэтому буду отталкиваться от него и приводить выдержи тоже оттуда.
Для компенсации теплового расширения клапана конструктивно задается зазор между торцом стержня клапана и толкателем. При увеличенном зазоре клапан не будет полностью открываться, при уменьшенном — полностью закрываться.
Следует иметь в виду, что при увеличенных зазорах затрудняется пуск двигателя, а работа его на всех режимах сопровождается стукам и клапанов и толкателей. При уменьшенных зазорах двигатель теряет компрессию и не развивает полной мощности… Признаком малого зазора у впускных клапанов является „чихание» в карбюраторе, а у выпускных— „выстрелы» в глушителе. Указанные явления особенно заметны при работе двигателя на больших оборотах.
Продолжительная работа двигателя с уменьшенными зазорами приводит к обгоранию головок клапанов и их седел, а с увеличенными зазорами—к разбиванию их.
Я решил отрегулировать этот узел из-за того, что у меня на холодном двигателе было чихание в карбюратор, и еле слышимый цокот в районе клапанов. Хотя даже если бы всех этих неприятностей небыло, я бы всё равно полез туда т.к.:
1. Сила привычки.
2. Мой транспорт должен быть в идеальном техническом состоянии.
2. Всё разобрано, для замены охлаждающей, покраски двигателя, чистки карбюратора и т.д, но об этом позже.
Примечание:
• Проверьте и отрегулируйте зазоры клапанов в то время когда двигатель холодный (ниже 35°C/95° F).
Откручиваем заглушку гайки коленвала шестигранник на 10мм и заглушку меток ГРМ шестигранник на 6мм.
Читать дальше
- Yan-4ik
- Денис Янчик
- 4 января 2015 в 16:27
-
19
-
оценка: +34
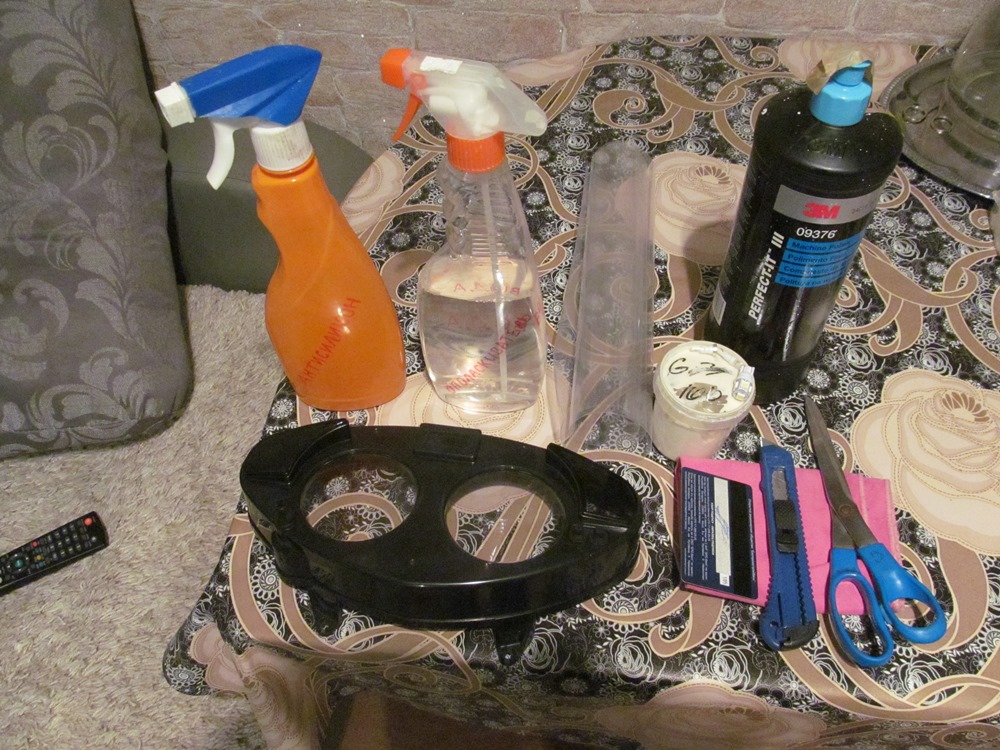
Обслуживание приборной панели.
Всем привет. Зимой можно сделать много чего интересного и полезного. Мои стёкла приборной панели были в мелких царапинах, что вызывало неприятное ощущение. Свет тусклее тусклого, поэтому ночью ни одометров ни времени не было видно, плюс был затруднён ход рычажка сброса километража.
Для начала я просто аккуратно снял спидометр и смазал литолом механизм сброса счётчика одометра, всё заскользило как положено.
Удаление царапин чуть-чуть сложнее. Сразу скажу, что процесс идентичен с полировкой фар автомобиля. Но я полировал вручную, т.к. поролоновым кругом не добраться. Взял микрофибру, пару полиролей(среднюю и финишную), обезжирил всё антисиликоном и начал полировку.
Читать дальше
- Yan-4ik
- Денис Янчик
- 29 декабря 2014 в 11:36
-
13
-
оценка: +26
Всем привет. Вот и наступил момент написания моего первого поста для моего Водевиля. Я человек, который привык делать всё сам, очень часто изобретать и подходить к всякому делу с интересом и нестандартным решением. Думаю ещё не один мой пост будет кому-нибудь интересен.
Заказывать воздушный фильтр с экзиста невероятно дорого, с ебея долго ждать, да и цена тоже завышена в соотношении с авто.
Я решил заколхозить родной фильтр. Для этого был приобретён воздушный фильтр для автомобиля HONDA артикл АР154 FILTRON, за смешную сумму: 3,5 доллара. Ещё понадобится очень хороший герметик, с отличной адгезией ко всем материалам. Он у меня был в наличии с прошлого ремонта, поэтому на его стоимость я не заморачиваюсь. Почему я выбрал именно герметик, а не пластины, саморезы и т.д. да потому, что это просто и вообще считаю неприемлемым нахождение в коробке воздушного фильтра, дополнительных болтов, шурупов и другого.
Взял всё необходимое:
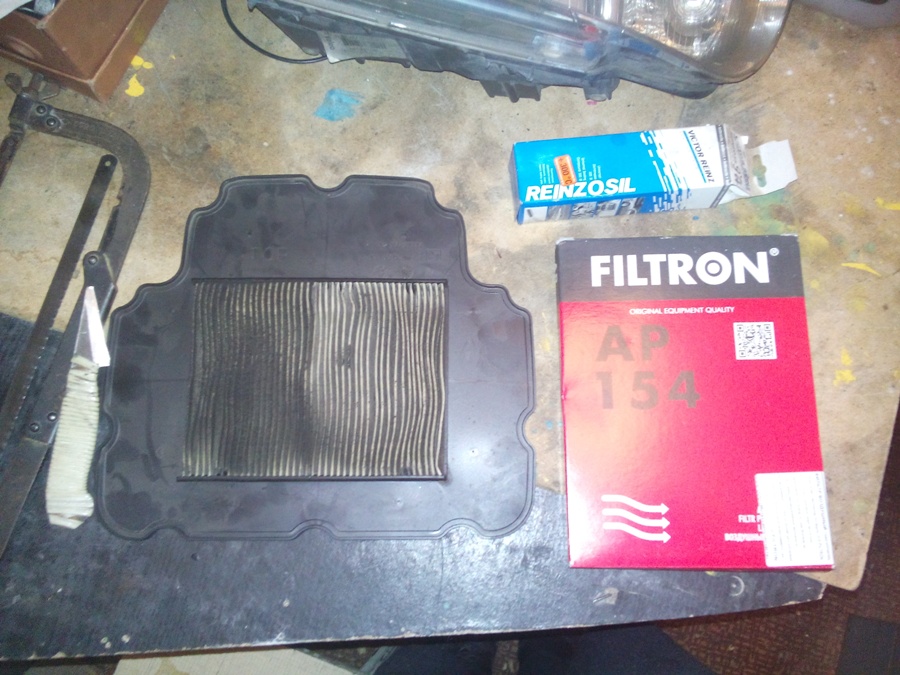
Читать дальше
- Yan-4ik
- Денис Янчик
- 21 декабря 2014 в 20:43
-
7
-
оценка: +28
При перепечатке материалов, видео или картинок гиперссылка на «bikepost.ru» обязательна