Окончание поддержки: драйверы для принтеров в Windows 7, 8, 8.1, Server 2008, 2008R2.
HP больше не поддерживает эти драйверы принтеров с 1 ноября 2022 г. HP рекомендует обновить операционную систему до поддерживаемой версии. Подробнее
LASERJET PRO 300 COLOR
LASERJET PRO 400 COLOR
Руководство пользователя
M351
M451


Цветные принтеры HP LaserJet Pro
300 M351 и HP LaserJet Pro 400 M451
Руководство пользователя

Авторские права и лицензия
© 2014 Copyright Hewlett-Packard
Development Company, L.P.
Копирование, адаптация или перевод
без предварительного письменного
разрешения запрещены, за исключением
случаев, разрешенных законом об
авторских правах.
Информация, содержащаяся в этом
документе, может быть изменена без
предварительного уведомления.
Гарантии на изделия и услуги HP
устанавливаются в специальных
гарантийных положениях, прилагаемых к
таким изделиям и услугам. Ничто из
сказанного в настоящем документе не
должно ис
толковываться как
дополни
тельная гарантия. HP не несет
ответственности за технические или
редакторские ошибки или упущения,
содержащиеся в настоящем документе.
Edition 1, 10/2014
Номер изделия: CE955-91006
Информация о товарных знаках
Adobe
®
, Acrobat
®
и PostScript
®
являются
зарегистрированными товарными
знаками Adobe Systems Incorporated.
Intel® Core™ является товарным знаком
Intel Corporation в США и других странах/
регионах.
Java™ является зарегистрированным в
США товарным знаком Sun Microsystems
Inc.
Microsoft®, Windows®, Windows XP® и
Windows Vista® являются
зарегистрированными в США товарными
знаками Microsoft Corporation.
UNIX
®
является зарегистрированным
товарным знаком Open Group.
Знаки ENERGY STAR и ENERGY STAR
являются зарегистрированными в США
товарными знаками.
Условные обозначения
СОВЕТ: Врезки «совет» содержат полезные советы и ссылки.
ПРИМЕЧАНИЕ. Во врезках «примечание» указываются существенные пояснения к понятиям и
процедурам выполнения заданий.
ПРЕДУПРЕЖДЕНИЕ. Символами предостережения обозначены инструкции, которые следует
выполнять во избежание потерь данных или повреждения устройства.
ВНИМАНИЕ! Символы предупреждения указывают на необходимость соблюдения
инструкций, которые следует выполнять во избежание травм персонала, серьезных потерь
данных или существенных повреждений устройства.
RUWW iii

iv Условные обозначения RUWW

Содержание
1 Основные функции устройства …………..…….……….…………….…….………..…….……….……….…….……….…. 1
Сравнение продуктов …………..…………..………………….…………………..……..…………..………………….…. 2
Характеристики условий окружающей среды …..…………….…………………….…..……….………………… 4
Удобство обслуживания ……..…………..………………………….………………..…………………………..………… 4
Изображения изделия ……………………….……………………………..………………….………………….…………. 5
Вид спереди …………………………………………………..…………………………………………………… 5
Вид сзади ………….………..…………………….…………………….………………………………….………. 6
Интерфейсные соединения ………….…………..……..………….…………..…..……..………….…… 6
Расположение серийного номера и номера модели ……………….……………..………….….. 7
Устройство панели управления ..……………….………..……..………..…….……………….……….. 8
2 Меню панели управления ….………………………………..…….…………………..…………………………………………… 9
Меню Веб—службы HP …………..…….…………….……….…………….…….………………..…………….…….….. 10
Меню Отчеты …..……….……………….……………….………….…….……………….……………….………………… 11
Меню Краткие формы ………………………..…………………………..………….……………….………….………… 12
Меню Настройка системы …………………………….……….…………..……….…………………….…………….… 13
Меню Обслуживание ..………..………….……….…………..……….…………..……….……………………………… 19
Меню Сетевая установка ……………..………………….…………………..………….…………………..……..……. 20
3 Программное обеспечение для Windows ………….…….………..……..……….…….……………….………..……... 23
По
ддерживаемые операционные системы и драйверы принтеров для Windows …………………. 24
Выберите правильную версию драйвера принтера для Windows ………..………………..………….…. 24
Универсальный драйвер печати HP ……………..…………..……….…………..…………………... 26
Режимы установки универсального драйвера печати …………………………… 26
Изменение настроек задания печати для Windows ………..………….…………………..……..………….... 27
Приоритет параметров печати …………………………..………..…………….………………………. 27
Изменение параметров всех заданий печати до закрытия программного
обеспечения ………….………..…….……….………..…….……….…….………..…….……….…….…… 27
Изменение параметров по умолчанию для всех заданий печати ……………….………… 28
Изменение параметров конфигурации продукта ……….………..……….………..……….…… 28
Удал
ение драйвера принтера в Windows …..…………..……….…………..……….………….………………… 29
RUWW v

Поддерживаемые утилиты для Windows ….……….……………..……….……………..……….……………..… 30
Другие компоненты и средства Windows ….…..…………..……..…..…………..……..…………. 30
Программное обеспечение для других операционных систем …………..………………………….…….. 30
4 Использование устройства с компьютерами Mac ………..……………..………………………………………….… 31
Программное обеспечение для Mac ………………..………….…….…………………….……..……………….... 32
Поддерживаемые операционные системы и драйверы принтеров для Mac ….…….... 32
Установка программного обеспечения для Mac …….………….………..………….…………... 32
Установка программы для Mac компьютеров, подключенных
непосредственно к устройству ….……………………………………..………………….. 32
Установка программного обеспечения для компьютеров Mac в
проводной сети ………………………………..………………..…………..…………………… 33
Настройка IP-адреса …………..………..……………….……………………… 33
Установка программного обеспечения ..
…
……..…..……..……..……. 33
Установка программного обеспечения для компьютеров Mac в
беспроводной сети ….…….………..……..………..…….………..…….……………….….. 33
Подсоединение устройства к беспроводной сети с
использованием WPS через меню панели управления ….….…… 34
Настройка подключения устройства к беспроводной сети при
помощи кабеля USB …..…..……..…..……..…..…….………….…………... 34
Удаление принтера в операционных системах Mac ..……..….……..…..…….…..…….….... 35
Приоритет параметров печати для Mac ..….…….….…….….………..……….…….……….…… 35
Изменение настроек драйвера принтера для Mac …….………………..…………..…………… 36
Изменение параметров всех заданий печати до закрытия
программного обеспечения ..……………………………………………………………….. 36
Изменение па
раметров вс
ех заданий печати ..……….…….……….……………... 36
Изменение параметров конфигурации продукта ..…….……….………..…….….. 36
Программное обеспечение для компьютеров Mac ..…….….…….…..………..………..…….. 36
HP Utility для Mac ………..………………..……………….………….………………..………. 36
Откройте утилиту HP Utility ..….…….…..…….…..…….…..…….…….…. 37
Функции HP Utility ………..……..…………..………………….……….……….. 37
Поддержка утилит для Mac ……..…..…….……..….……..…..…….…..……..…..…… 37
Встроенный Web-сервер HP ..……………………………………………….. 37
HP ePrint ..…..…………..…………..……..…………..…………..……..……….. 37
AirPrint ….……..……………….………….……..………..……..………………..… 38
Основные задания печати при использовании Mac ….……….………………..……………….…………….. 39
Отмена задания на компьютерах Mac ……….…..…….…….…..………..…….…..…….…..…… 39
Смена типа и формата бумаги (Mac) ………..…..……..………………..…………..……..……….. 39
Изменение форматов документов или печать документа на бумаге
нестандартного формата ….……….…..………………………….……..………………………….……. 39
Создание и использование готовых наборов на ком
п
ьютерах Mac …..……..……….….. 40
Печать обложки с помощью Mac ….…………….…..……….………………….……………………... 40
vi RUWW

Использование водяных знаков в Mac ………………..…………..……..………….……..………… 40
Печать нескольких страниц на одном листе бумаги с помощью Mac …………..……….. 41
Печать на обеих сторонах листа (двусторонняя печать) в Mac …………………………….. 41
Настройка параметров цвета в Mac …..…………………………..………………..……………….… 42
Использование AirPrint ……………….………..…………….……….……………………..…………….………..…….. 44
Решение проблем в Mac ……….……….…………..……….…………..……….…………..……….…………..…….. 45
5 Подключение устройства в Windows …..………….……..…………..……..………….………………….……..……….. 47
Отказ от совместного использования принтера ….…..……..…..……..…..……..…..……..…….…………. 48
Соединение с USB ………..………………………..……………………………………………………………………….. 48
Установка ПО с компакт—диска …….…….…….…..…….…..…….…..…….….…….…..…….….... 48
Подключение к сети в Windows ………….……………………………………………….……..………….……..…… 49
Поддерживаемые сетевые прото
колы ……..……..…………………………………..………….….. 49
Установка устройства в проводной сети в Windows …..…..…….….……..….…….…..…….. 49
Получение IP-адреса ……..…..……..…..……..…..…….…..……..…..……..…..……... 49
Установка программного обеспечения ….……………..…………….…….………….. 50
Установите устройство в беспроводной сети в Windows (только для
беспроводных моделей) ………….……….…………..……….…………………………………………… 50
Настройка подключения устройства к беспроводной сети при помощи
WPS …….………..…….……………….………..……..………..…….……………….………..… 51
Подсоединение устройства к беспроводной сети с использованием
WPS через меню панели управления ….……….…………….………..…………….… 51
Настройка подключения устройства к беспроводной сети при помощи
кабеля USB ..…………….……….……………..…………….…….…………….……….…….. 51
Установка пр
ограммного об
еспечения для беспроводного устройства,
подключенного к сети ……..………………………………..…………….………..…………. 52
Настройка сетевых параметров IP в Windows …………..…………..…………………………..… 53
Просмотр и изменение сетевых параметров …….………………………………….. 53
Установка или изменение пароля устройства ….……………..…………….….….. 53
Настройка параметров TCP/IP IPv4 вручную с панели управления ……….. 54
Скорость подключения и параметры двусторонней печати ……….……..…… 55
6 Бумага и носители для печати …………………..…….…………….……….…….………..…………….……….…….…… 57
Использование бумаги …………………………..……….………….…………………..……….…………..……..……. 58
Смена драйвера принтера для соответствия типу и формату бумаги .…………..………..…….……. 59
Под
держиваемые форматы бумаги ……………..………………….………………………..…………..……..…… 60
Поддерживаемые типы бумаги и емкость лотков ………..…………..……..………………………………..… 62
Загрузка бумаги в лотки ………….………….……..………….……..………….……..………….…….………….…… 65
Загрузка в лоток 1 ……….……………….………..………..……..……….…….………………..………... 65
Загрузка лотка 2 и дополнительного лотка 3 ………….……………………………………………. 66
Настройка лотков ……..………………..…………….……..…….…………..……………………………………………. 68
RUWW vii

7 Картриджи ……….…….………..…….………..………..…….……….…….………..……..………..…….…………………….….. 69
Сведения о картридже …..………..…….…………………..……..………..……..………..……..………..…….……. 70
Изображения расходных материалов ……..……..….……..…..…….………….…..……..…….…..……..…... 71
Изображения картриджей печати ……….…….……………….……………….………..……..……… 71
Управление картриджами печати .……..…………..…..…………..……..…………..…………..…..……………. 72
Изменение параметров картриджей ……..…….………….…..…….…..…….…..……..….……... 72
Использование картриджей с заканчивающимся сроком службы ……..…… 72
Включение и отключение параметров «при очень низком уровне» с
панели управления …..….……..…..…….…….…..…….…..……..….…….………….…. 72
Печать в экономичном режиме (EconoMode) ……..……………………………….... 73
Хранение и переработка расходных материалов …….………………………………………….. 73
Переработка расходных материалов ………..…….…..……..…..……..….……..…. 73
Хранение картриджа ……………….………………….…………….…………………….….. 74
Политика компании НР относительно ра
сх
одных материалов других
производителей ……………………..……………………………………………………..……. 74
Веб—сайт HP по вопросам защиты от подделок …………….….……..….…….….…….….…… 74
Инструкции по замене ……..………..………….…………………..……….………….…………..……….………….... 75
Замена картриджа ………………..………………..…………..…………………..…………..………….... 75
Решение проблем, связанных с расходными материалами ……….…………..…………………………... 79
Проверка картриджей ………..………..……………….………………..………..……..……………….… 79
Печать страницы состояния расходных материалов ….……………………….... 80
Интерпретация страницы качества печати …..……..…..…….………….……..….. 81
Проверка повреждения картриджа …………..……..…………..…..……..…………... 81
Повторяющиеся дефекты …….……..……………….………………………….………….. 82
Интерпретация сообщений панели управления для расходных материалов .……….. 83
Голубой картридж в неправильном положении …….………….………………..…. 83
Голубой по
чти за
кончился ……………..…….……………….………..……..………..….. 83
Желтый в неправ. пол—нии ………..……………..………..……………….………..……… 83
Желтый почти закончился ….…………………..………………..…………………………. 84
Замените <цвет> ………..…………….…………….…………….……….…………….…….. 84
Используется б/у картридж: <color> ……….……………….……….………….………. 84
Используются б/у картриджи ……..………….……..………….……..………….……..… 85
Недопуст. расходный материал ……….……………….…………………..……..……… 85
Неподдерживаемый <цвет> [OK] — продолжить …..…….…………….………..….. 85
Несовместимый <цвет> ……………………………….………………….…………..……… 85
Низкий уровень голубого картриджа ……..…….……………….….………….………. 85
Низкий уровень желтого картриджа …….…………………….……………..……….…. 86
Низкий уровень пурпурного картриджа ………..………….….………..……….…….. 86
Низкий уровень расходных материалов …..…………….……….……………..…….. 86
Низкий уровень черного картриджа …….…….……….…….……….…….……….….. 86
Ошибка расходного ма
териала 1
0.XXXX ….……..……..…..…….………….…..…. 87
viii RUWW

Пурпурный картридж в неправильном положении ..……….……….…………….. 87
Пурпурный почти закончился ….…………………..………………………………..…….. 87
Удалите фиксатор с картриджа <цвет> …..………….……..…………………………. 88
Удалите фиксаторы с картриджей ……….…………….……………….……………….. 88
Установ. <цвет.> картриджа ..…..……….………………….…………………….……….. 88
Установлен использованный картридж: <color> [OK] — продолжить ….……. 88
Установлен подлинный расходный материал HP ……..…….……..…..……..…. 88
Черный картридж находится в неверном положении ………………………..….. 89
Черный почти закончился …..……..…………………………..……..…………………….. 89
8 Функции печати ………….………………………..…………..……..………….………………………..………….……………..… 91
Отмена задания …..……….…………………….…………………….……………………..………………………………. 92
Основные задания печати при использовании ОС Windows …..…….………..…….……….…….……… 93
Открытие драйвера принтера в Wi
ndows ..………..………..………..…….….…….………..…… 93
Получение справки по параметрам печати в Windows ………….………….……..…………… 94
Изменение количества печатаемых копий в Windows ………….……….…….………..……... 94
Сохранение нестандартных параметров печати для повторного использования в
Windows ..………..…….………..…….……….…….………..…….……….…….………..…….………..….. 94
Использование ярлыка печати в Windows ….…..………..………..………….….…. 94
Создание ярлыков печати .…..……..…..……..…..……..……..…..……..…..……..…. 96
Улучшение качества печати в Windows ……….…………………………………………….……….. 98
Выбор формата страницы в Windows .…….…….…….….…….………….…………. 98
Выбор нестандартного формата страницы в Windows ….…….….…….…….… 98
Выбор типа бумаги в Windows ………..……….…….….…….….…….….………..…… 99
Выбор лотка для бумаги в Windows ………….…………………………………..……… 99
Печать на об
еи
х сторонах (дуплекс) в Windows .……………….…….….………….…………... 99
Двусторонняя печать в Windows с ручной подачей ………………………..…….. 99
Автоматическая печать на обеих сторонах в Windows …..……………………. 101
Печать нескольких страниц на листе в Windows ………………………….…………………….. 102
Выбор ориентации страницы в Windows ……….….………..……….…….…..……….…….….. 104
Настройка параметров цвета в Windows ..…….……….………..……….…….….……….…….. 106
Использование HP ePrint .…………..……..…………..…………..…………..…..…………………..…..……..….. 107
Дополнительные задания на печать при использовании ОС Windows ..….………..……………….. 108
Печать всего текста черным цветом (оттенки серого) в Windows …….………..……….. 108
Печать на фирменных блан
ках или печатных формах в Windows ………..………..…… 108
Печать на специальной бумаге, этикетках или прозрачных пленках из Windows .... 110
Печать первой или последней страницы на бумаге другого типа в Windows ….…… 113
Масштабирование документа до размера страницы в Windows .…………………….….. 115
Добавление водяные знаки к документу в Windows ....…….……..….……..….………..….. 117
Создание буклета в Windows ………….…………………………………………….………………….. 117
RUWW ix

9 Цветная печать …………….…………………………………………………..………….……………..………..……….………… 121
Настройка цвета ……………………..……..………..…….……………….……………….………………..……….….. 122
Изменение цветовых тем для задания печати …………..……..……………………………….. 122
Изменение параметров цвета ….……..…….….…….………….….……..….…….…..…….…..… 123
Установка параметров цвета вручную ……..…….………..…….………..…….……….…….….. 124
Использование технологии HP EasyColor …..……….…….……….…….……….…….……….……………... 125
Соответствие цветов на отпечатке цветам на экране ….……….……….……….…..….……….……….. 127
10 Управление и обслуживание …..…….………..…….……….…….………..…….………..…….………..…….……….. 129
Печать информационных страниц …….………..……..………..……….……..………..……..……….……..…. 130
Использование встроенного Web-сервера HP ………………………………………………..………………... 131
Открытие встроенного Web-сервера HP ……………..………………………………………..…… 131
Функции встроенного веб—сервера HP ..…………..………………………………………………… 131
Использование ПО HP Web Jetadmin …..……….…….…………….……….…………….……….…………….. 132
Функции безопасности устройства …..…………………………………………….……………..……….………… 132
Назначение системного пароля ……
……………………..…………………….……………………… 132
Параметры экономии …………………….…….………..…….……….…….………..…….……….…….………..…. 134
Печать в экономичном режиме (EconoMode) ..…..…….………….….……..…..…….……..… 134
Режимы энергосбережения .………………………………………………………..……………………. 134
Настройка режима ожидания …….……..…….…..……..…..…….………….…..…… 134
Установка задержки Автоматическое выключение. …………..……..……..….. 135
Архивная печать …………………..………………..………………………..…………………..…………. 135
Установка модулей памяти DIMM ………..………..…….……….…….………..…….………..…….………..…. 136
Установка модулей памяти DIMM ………..…….….…….…..…….….…….….……..….…….….. 136
Активация памяти ……..…………….……….…….…………….…………….……….…………….……. 139
Проверка правильности установки DIMM ……………..……..…………..…………………..…… 140
Установка памяти ………………….…………………………………………………………………………. 141
Очистка продукта ….………………………………………………………..………….……………..……………………. 142
Обновления ……………………..………………………….………….………………………………………………..……. 142
11 Решение проблем ……….…….…………….…………….…………….………………..…………….…………….………….. 143
Справочная информация ……………………..………..……………..………………………..………..…………….. 144
Контрольный список устранения типичных неполадок ….……..…..……..…..……..….……..…..…….. 145
Факторы, влияющие на производительность устройства …………………………………… 146
Восстановление зав
о
дских настроек …………….………………………..………….……..…………………….. 147
Интерпретация сообщений панели управления ..………..…….………..…….………..……….…….…….. 148
Типы сообщений панели управления ….….………..………..…….……….…..………..……….. 148
Сообщения панели управления ..…….…..…….….……..….…….…..…….…….…..…….…..… 148
Голубой картридж в неправильном положении …….…..……..………….……… 148
Голубой почти закончился ……….……….…….………………..……….…….………... 148
x RUWW

Желтый в неправ. пол—нии ………..……………..………..……………….………..……. 149
Желтый почти закончился ….…………..………………………..…………..…………… 149
Загрузите лоток # <ТИП> <ФОРМАТ> ….…….……………..………….……………. 149
Загрузите лоток <X> Нажмите [OK] для доступного носителя …..…..…….. 149
Загрузите лоток 1 <ТИП> <ФОРМАТ> ….…….……………..………….……………. 150
Загрузите лоток 1 <ФОРМАТ> Режим очистки [OK] для запуска …….……. 150
Задн. дверца откр. …..……….…….…………….……….…………….……………..…….. 150
Замените <цвет> ………..…………….…………….…………….…………….……………. 150
Замятие в лотке # Устраните замятие и Нажмите [OK] ……………………….. 151
Замятие: <location> .………….………….…..……..……..…..……..…..……..…..…….. 151
Используется б/у картридж: <color> ……….…….………….……….………….……. 151
Используются б/у картриджи …………..………….…………..…..……..……..…..….. 151
Недопуст. расходный ма
териал .……..…..…….…..……..….……..…..…….…..…. 151
Недопустимый драйвер Нажмите [OK] ……….….……….…………….………..….. 152
Недост. памяти Нажмите [OK] …….………………….…………..…………..…………. 152
Неподдерживаемый <цвет> [OK] — продолжить ………….………….……….…… 152
Непредвиденный формат бумаги в лотке # Загрузите <формат>
Нажмите [OK] ………………………..………………..…………..………………………..….. 152
Несовместимый <цвет> …………………………………….…………..…………….……. 153
Низкий уровень голубого картриджа ……………………….…….….…….…………. 153
Низкий уровень желтого картриджа ….…………..………………………..………….. 153
Низкий уровень пурпурного картриджа ………..…………….…….….……….……. 153
Низкий уровень расходных материалов ………..…………..…..……..………….... 153
Низкий уровень черного картриджа …..….…….….…….….………..………..…….. 154
Открыта передняя дверца .…..…….…..…….…..…….…….…..…….…..…….…..… 154
Очистка . . . .……………….…………………………..……..……………….……………….… 154
Ош. вентилят. 57 Выкл. и вкл. устр—во ..
……..…..……..…..…….…..……..…..…. 154
Ош
иб.обсл—ия 79 Выкл. и вкл. устр—во …….……..…..…….….……..….…….……. 154
Ошибка 49 Выкл. и вкл. устр—во ….…….….…….…..…….…..…………..….…….… 155
Ошибка 51.XX Выкл. и вкл. устр—во …….…….………….……….………….……….. 155
Ошибка 54.XX Выкл. и вкл. устр—во …….…….………….……….………….……….. 155
Ошибка 55.X Выкл. и вкл. устр—во ……..…….….…….…..…….….…….….…….…. 156
Ошибка 59.X Выкл. и вкл. устр—во ……..…….….…….…..…….….…….….…….…. 156
Ошибка 79 Выкл. и вкл. устр—во ….…….….…….…..…….…..…………..….…….… 156
Ошибка печати Нажмите [OK] …..….……….……….…….….……….……….…….… 156
Ошибка расходного материала 10
.XXXX .…….………….…….……..…….……... 157
Ошибка термоэлемента 50.x Выкл. и вкл. устр—во ………….…………………… 157
Ошибка устройства Нажмите [OK] ..……….…….……….…….….………..………... 158
Подача вручную <TYPE> <SIZE> Нажмите [OK] для доступного
носителя ………….…….…………….………..…………….………..…………….…….…….. 158
Пурпурный картридж в неправильном положении ………………………..…….. 158
RUWW xi

Пурпурный почти закончился ………….…….……….……….…….….……….…….… 158
Ручной дуплекс Загрузите лоток <X> Нажмите [OK] ……………….…………… 159
Сбой печати, нажмите OK. Если ош. повтор., выкл. и вкл. снова. .……….. 159
Удалите фиксатор с картриджа <цвет> …..………………………………….………. 159
Удалите фиксаторы с картриджей ……………..……………..………..……………... 159
Установ. <цвет.> картриджа ..……….……………………..…………………….………. 160
Установлен использованный картридж: <color> [OK] — продолжить ..….... 160
Установлен подлинный расходный материал HP ………..……..……..…..…… 160
Черный картридж находится в неверном положении …..…….…….…..…….. 160
Черный почти закончился …..……..………………..………………..…………………... 160
Неправильная подача бумага и возникновение зам
ятий …………………..……….…………….……….. 162
Устройство не захватывает бумагу …………….………………………………..……….………….. 162
Устройство захватывает больше одного листа бумаги. …………………….……………….. 162
Предотвращение замятий бумаги ………..………………….……..………….…………………….. 163
Устранение замятий ….………………….………….………………….……..…………..……………………………… 164
Места возникновения замятий бумаги …………………………………………………………..….. 164
Устранение замятий в лотке 1 ……………………….………………………………………….……… 165
Устранение замятий в лотке 2 ……………………….………………………………………….……… 166
Устранение замятия в области термоэлемента ………….………….………………….………. 167
Устранение замятий в выходном лотке …………..………..……..………..……..………..…….. 169
Устранение замятий в устройстве двусторонней печати (только для моделей с
устройством двусторонней печ
ати) ….
…………..……..………….……..………….……………… 169
Улучшение качества печати .…………………….………………………….……….………………………………… 172
Использование настроек для соответствующего типа носителя в драйвере
принтера ………………………………………….………………………………..……….…………..………. 172
Смена настроек для типа бумаги в Windows …………………………….…..……. 172
Смена настроек для типа бумаги в Mac ……..……..……………………………….. 172
Регулировка параметров цвета в драйвере принтера …………….………………………….. 173
Изменение цветовых тем для задания печати ……………..…………….………. 173
Изменение параметров цвета ……………………………………………………………. 174
Использование бумаги, которая соответствует требованиям HP ..…..…….…..…….... 174
Печать страницы очистки ……………….………………….………………….…………………………. 175
Калибровка устройства для в
ыравнивания цв
ета ……….…..……..…………………..…..… 175
Проверка картриджей ….………………………….………..……………..………………………………. 176
Печать страницы состояния расходных материалов ….…………………..…... 177
Интерпретация страницы качества печати …………………………….…………… 178
Проверка повреждения картриджа …………..………………….………………….…. 178
Повторяющиеся дефекты …….……..……………….…………………..……..………… 179
Использование наиболее подходящего для нужд печати драйвера принтера ….…. 179
Устройство не печатает или печать выполняется слишком медленно …………..…..……..…..….. 181
Устройство не печатает ……….……………..………..……………..…………………………………... 181
xii RUWW

Устройство медленно печатает .………….…………………………..…………………………..…… 182
Устранение неполадок с подключением ….……..…..……..…..……..………….………….………….……… 183
Устранение неполадок прямого подключения …………………….………………….…………. 183
Решение проблем с сетью ……….…………….……………..…………….……….…………….……. 183
Некачественное подключение на физическом уровне ………………………… 183
В компьютере используется неверный IP-адрес устройства ……………….. 184
Компьютер не может связаться с устройством ……….……….………..……….. 184
В устройстве используется неверное подключение и неправильные
параметры двусторонней печати ..……………….………..…….………..…….…….. 184
Новое программное обеспечение может вызывать неполадки с
совместимостью. ..…….………………..…………….…………….…….…………….……. 184
Неправильные настройки ко
мпьютера ил
и рабочей станции ..…………….. 184
Устройство отключено или настройки сети неверны ……………..…..……..… 185
Решение проблем беспроводной сети ..…..………………………………………………………………………. 186
Контрольный список для проверки беспроводного соединения …….…..……..………… 186
На панели управления отображается сообщение: Функция беспроводного
соединения на этом устройстве отключена ……..………..………………………….……….…. 187
Устройство перестает печатать после завершения настройки беспроводного
соединения ……….…………………………………..………….…….………….…….………….……..….. 187
Устройство не печатает, а на компьютере установлен межсетевой экран
стороннего разработчика …………………………………………………………………………………. 187
Беспроводное с
оединение не ра
ботает после перемещения беспроводного
маршрутизатора или устройства …………….………..…….………..…….………..…….………… 188
Невозможно подсоединить дополнительные компьютеры к устройству с
функциями беспроводной связи …………………………………………..………………..…………. 188
Устройство с беспроводным соединением теряет связь при подсоединении к
виртуальной частной сети (VPN) ……..………………….………………..……..………..……..….. 188
Сеть не представлена в списке беспроводных сетей ….……..…..……………..……..…… 189
Беспроводная сеть не функционирует ……….……………..………..……………..……………... 189
Устранение неполадок программного обеспечения устройства в ОС Windows ………….………. 190
Устранение неполадок программного об
еспечения ус
тройства в ОС Mac .…….…….…….……… 192
Драйвер принтера не появляется в списке «Принтеры и факсы« ……..………..…….…. 192
Имя устройства, не отображается в списке «Принтеры и факсы» ………….……………. 192
Драйвер принтера не выполняет автоматическую настройку выбранного
устройства в списке «Принтеры и факсы» ………..……….……………….………………..…….. 192
Задание печати не было отправлено на нужное устройство ..…..…….…..…….……….. 193
При подключении с помощью USB-кабеля устройство не появляется в списке
«Пр
интеры и факсы» после выбора драйвера ..…..………………….…………..…………..…. 193
При USB-соединении используется универсальный драйвер принтера …………..…. 193
Приложение А Расходные материалы и дополнительные принадлежности ……….….…….…………. 195
Заказ комплектующих, дополнительных принадлежностей и расходных материалов ………… 196
RUWW xiii

Коды изделий ……………..……….…………….………..…………….……….……………..……….…………….……. 196
Приложение Б Обслуживание и поддержка ………………….…………………………..………..………………..……. 197
Ограниченная гарантия компании Hewlett-Packard ……..…..…………..……..…………..…………..…... 198
Premium Protection Warranty HP: Обязательство ограниченной гарантии на картридж
печати LaserJet …………..………..……..………..……..………………..………..……..……………….…….………. 200
Данные, сохраняемые в картридже …….……….…….……….…………….…….……….……….…….………. 201
Лицензионное соглашение с конечным пользователем ..……..…..…….….……..….……..…….…..… 202
OpenSSL ….…………….……….…………………….…………….……….…………………….………….………………. 206
Поддержка заказчиков …………………………………….………………….…………………….………………….… 207
Повторная упаковка устройства ….………………….…………………………………….………………….……... 208
Приложение В Технические характеристики устройства ………..…………..…………………………..………… 209
Физические характеристики ………………..…………….………………………..………………………..……….... 210
Потребляемая мощность, электрические характеристики и акустическая эмиссия ……….…… 210
Требования к условиям окружающей среды …..…………………………….…………….……………………. 210
Приложен
ие Г Регламентирующая информация ……..………..………..……..……….…….……………….……… 211
Правила FCC ………..…….……….……………..…………….…………….……….…………….…….……………….. 212
Программа поддержки экологически чистых изделий .………………………..……….…………..……….. 213
Защита окружающей среды …..……….……………..…….…………….………..…………….…….. 213
Образование озона …………….…………………..…………….…………..……….……………………. 213
Потребление электроэнергии ..…………….…….…………….…………….……….…………….…. 213
Расход тонера ………..………..……..……….………………..……….……..………..…….……………. 213
Использование бумаги …………..…………………………………………..…………….…………..…. 213
Пластмассовые материалы ……….…………..…………..…………..………………..……………… 214
Расходные материалы для печати HP LaserJet ……….……….……………..…………….….. 214
Инструкции для возврата и переработки ………………..………………..………………..……… 214
США и Пуэрто—Рико …….…………………………..……..……………….………………... 214
Возврат нескольких элементов (нескольких картриджей) ……... 214
Возврат одного картриджа ………………………….…………………….… 215
Доставка …………..…………..……..…..…………..……..…..…………..…… 215
Возврат картриджей для потребителей за п
ределами США ..
……..…..…… 215
Бумага ……………….…………………..……….………….…………………..…………………..………….. 215
Ограничения для материалов ………………….………..……………..……………….………..……. 216
Утилизация использованного оборудования частными пользователями в
странах Европейского Союза ….……….…………….………..…………………….…………….…… 216
Химические вещества ……..…………..…………..……..…..…………..……..…………..…..……… 216
Таблица безопасности материалов (MSDS) ….………………..………….………………..……. 216
Дополнительная информация ….……..…..……..…………..…..……..…………..………….……. 217
Заявление о соответствии …..………….…………………..………………….…………………..………………….. 218
xiv RUWW

Декларации о соответствии (беспроводные модели) ……………..…………..…………………..……….. 220
Положения безопасности …….………………….……….…………..…………………..………….……….……….. 222
Лазерная безопасность ….……….…….……….…….……….…….……….………..…….……….…. 222
Правила DOC для Канады ……………….…………………………………..…………………….……. 222
Заявление VCCI (Япония) ……….……………..……………..………………………..………..……… 222
Инструкции относительно кабеля питания …………………..…………….……………………… 222
Правила для шнуров питания (Япония) ………..…………….……..…….…………….……….… 223
Директива EMC (Корея) ………………….…………..………….…………………..……….…………... 223
Заявление о лазерной безопасности (Финляндия) .………..……..……….…….……………. 223
Заявление GS (Германия) ……..……….………………………………….……….……………………. 225
Таблица веществ (Китай) ……..………..…….……………….………..……..………..…….………... 225
Директива, ограничивающая содержание вредных веществ (Турция) ………………… 225
Заявление об ограничении по опасным веществам (Украина) ………………….……..…. 225
Дополнительные положения для б
еспроводных ус
тройств ……………………………….……………… 226
Положение о соответствии требованиям FCC — США …….………..…….……….…….…… 226
Положения для Австралии ……….…………..……….…………..……….…………..……….………. 226
Положение для Бразилии (ANATEL) …..…………….…………….…………….…………….……. 226
Положения для Канады ………..………………………..…………..………………………..………….. 226
Регламентирующая информация для Европейского Союза (ЕС) ………………….…….. 226
Примечание для использования во Франции …….………………………..………….…………. 227
Примечание для использования в России ………………….……………………………….…….. 227
Положение для Кореи …………………….……..……………………………..……..………….………. 227
Положения для Тайваня ………………….………………………….………..……………….…………. 228
Маркировка проводов Vietnam Telecom для утвержденных устройств типа
ICTQC ……………………………………..………………………..………..……………….………………….. 228
Указатель ……..……….…………..……….…………………….…………..……….…………….………….………………………….. 229
RUWW xv

xvi RUWW

1 Основные функции устройства
● Сравнение продуктов
●
Характеристики условий окружающей среды
●
Удобство обслуживания
●
Изображения изделия
RUWW 1

Сравнение продуктов
Цветной принтер HP LaserJet Pro 300
M351a
CE955A
●
Производительность: Скорость печати: до 18 страниц в минуту (стр./мин.) на
бумаге формата A4 и 19 стр./мин. на бумаге формата Letter
● Работа с бумагой:
Лоток 1 на 50 листов, лоток 2 на 250 листов
Дополнительный лоток 3 на 250 листов
Выходной лоток на 150 листов
●
Поддерживаемые операционные системы:
Windows XP, 32-разрядная версия
Windows Vista (32- и 64-разрядные версии)
Windows 7 (32- и 64-разрядные версии)
Mac OS X версии 10.5 и выше
● Возможности подключения: Высокоскоростное подключение USB 2.0
●
Установка программного обеспечения: Для установки в Windows используйте
компакт—диск устройства.
● Память: 128 МБ ОЗУ, расширяемое до 384 МБ
●
Экран панели управления: 2-строчный текстовый
Цветной принтер HP LaserJet Pro 400
M451nw
CE956A
Обладает теми же характеристиками, что и модель Цветной принтер HP LaserJet Pro
300 M351a, за исключением следующих отличий:
● Производительность: Скорость печати: до 20 страниц в минуту (стр./мин.) на
бумаге формата A4 и 21 стр./мин. на бумаге формата Letter
●
Возможности подключения:
Высокоскоростное подключение USB 2.0
10/100 Ethernet LAN
Подключение к беспроводной сети
2 Глава 1 Основные функции устройства RUWW
LASERJET PRO 400
Software Technical Reference
M401


HP LaserJet Pro 400 M401 Printer Series
Software Technical Reference

Copyright and License
© 2012 Copyright Hewlett-Packard
Development Company, L.P.
Reproduction, adaptation, or translation
without prior written permission is
prohibited, except as allowed under the
copyright laws.
The information contained herein is subject
to change without notice.
The only warranties for HP products and
services are set forth in the express warranty
statements accompanying such products and
services. Nothing herein should be
construed as constituting an additional
warranty. HP shall not be liable for technical
or editorial errors or omissions contained
herein.
Edition 1, 4/2012
Trademark Credits
Adobe
®
, Acrobat
®
, and PostScript
®
are
trademarks of Adobe Systems Incorporated.
Apple and the Apple logo are trademarks of
Apple Computer, Inc., registered in the U.S.
and other countries. iPod is a trademark of
Apple Computer, Inc. iPod is for legal or
rightholder-authorized copying only. Don’t
steal music.
Bluetooth is a trademark owned by its
proprietor and used by Hewlett-Packard
Company under license.
Java™ is a US trademark of Sun
Microsystems, Inc.
Microsoft®, Windows®, Windows® XP,
and Windows Vista® are U.S. registered
trademarks of Microsoft Corporation.
UNIX
®
is a registered trademark of The
Open Group.

Table of contents
1 Document and product basics ………………………..…………………………..………………………… 1
Purpose and scope ………………….……………………..…………………………………………………….…… 2
Software availability and localization ………………….……………………………………………….………... 3
Printing-system software on the Web ………………………………………………………………… 3
In-box printing-system software CD …………………………………………………………………... 3
HP LaserJet Software CD — Windows partition ……………………….……………… 3
CD versions and language support …………..………………….……………………… 4
Driver languages ………………………………………..…………………….. 6
Installer languages ……………………………………………………………. 7
Documentation languages …………………………………………………… 8
2 Windows software description and installation ………………………………………………….….. 11
Introduction ……..………………………………………………..…………………….…………………….……… 11
Install overview …….…………………….……………………………………………..…………………….…….. 12
Software installation types for Windows ………………………………………………………….. 12
Installation options …………………………………..………………………………………………… 12
CD installation and HP Smart Install installation …………………………….…………………………………. 13
Supported operating systems for Windows …………....…………………………………………. 13
Installation for software components from the Web ………………………………………………………….. 13
Supported operating systems for Windows …………....…………………………………………. 13
HP LaserJet software components for Windows …………………..……………………………..……………. 14
Installer …………….……………………………………….…………………….………………….….. 14
Uninstaller ……….…………………..…………………..…………………….……………………….. 14
Print drivers ……………….………………………..…………………………………………………… 14
HP PCL 6 print driver and PS Universal Print Driver ………………………………… 14
Print driver version numbers for Windows operating systems ……………………. 14
HP PCL 6 print driver for Windows ………….………………………….…………….. 15
Introduction …………………………………………………………………… 15
Access print drivers …………………………………………………………. 15
Help system ………………..……………………….………………………… 17
Incompatible print settings messages ………………..…………………… 17
ENWW iii

Advanced tab features ……………………………………………………… 19
Printing Shortcuts tab features …………………………………………….. 22
Paper/Quality tab features ………………………………………………… 26
Effects tab features ………………………………………………………….. 32
Finishing tab features .……………………..……………………….………. 39
Services tab features ….…………………..……………………..…………. 44
Device Settings tab features ………………………………………….……. 45
About tab features ……….……………………………………………..…… 49
Driver configuration for Windows ………………………………………………………………….. 50
Driver autoconfiguration ……………………….………………………….…………….. 50
Bidirectional communication ……….…………………………………………………… 51
Enterprise AutoConfiguration ……….………………………………………………….. 51
Update Now ……………………..……………………………………………………..… 53
HP Reconfiguration Utility …..………………………………………………………………..………. 54
Font support ……………………………………………………….……………………………………. 54
Basic fonts …………..……………………..……………………..……………………..… 54
HP ePrint ………..…………………..…………………..………………………………………………. 55
HP Update ………………………………………………………….…………………………………... 55
Help & Learn Center .………………………………………….…………………..………………….. 55
Toner Cartridge Authentication ……………………………………………………………………… 56
HP Device Toolbox ……………………………………………………………………………….……. 57
Home tab …………………………………………………………………………….…….. 59
Device Status ……………..………………………………..………………… 59
Supplies Status ……………………………….…………………….………… 60
Device Configuration page ……………...……………………..…………. 60
Network Summary page …………………………………………………… 61
Reports …………………………………………………………….………….. 61
Event Log page …………………..………………………………..………… 62
System tab …………………………………..…………………………………………….. 62
Device Information page ……………………..……………………………. 63
Paper Setup page …………………………………………………………… 63
Print Quality page ………………………………………………..…………. 64
EcoSMART Console page ……………..………………………..…………. 64
Paper Types page ……………………………..……………………………. 64
System Setup page ……………………………….…………………………. 65
Service page ……………………………….………………………………… 65
Save and Restore page ………………………………………….…………. 65
Administration Page ………………………………………………………… 66
Print tab ……………………………………………………………………..……………… 66
Printing ……………………………….……………………………………….. 66
PCL5 …………………………………………………………………………… 66
iv ENWW

PostScript ……………………………………………………………………… 66
Networking tab …………………..…………………………………………………..…… 67
Network Summary ………………..………………………….……………… 68
IPv4 Configuration …….……………………………………………………. 68
IPv6 Configuration …….……………………………………………………. 69
Wireless Configuration (wireless models only) ………………………… 70
Wireless Direct Setup (wireless models only) ……………….………….. 70
Network Identification …………….……………………….……………….. 70
Advanced page ………………..……………………..…………………….. 71
Certificates page ……..………………….………………………………….. 71
HTTPS Enforcement page .…………………………………………………. 72
SNMP page ……………..………………………….……………………….. 72
HP Web Services tab …………………………………………………………………….. 73
Web Services Setup page ……………………..………………………….. 73
HP ePrint page ……………….……………………..…………………….…. 73
Apps page …………..……………………..……………………..…………. 74
Proxy Settings page ……………………………………………………….… 74
HP Smart Install tab …………………………………..…………………..……………… 74
HP Product Improvement Study ……………………………………………………..……………….. 74
Online product registration ……………………………………………………………..……………. 76
Detailed Windows installation instructions …………………….……………………………………………….. 77
Use the Recommended installation with HP Smart Install or the CD ………………………….. 77
Perform a custom installation with HP Smart Install or the CD ……………………………..….. 85
Point-and Print installation ……………………………………………………………………………………..….. 97
Remove Windows software ………………..……………………………………………………………………… 98
Use the HP Uninstall utility to remove the product software ……………………………………. 98
Use the software CD to remove the product software …………………………………………. 100
Remove the print driver by using the Windows Add or Remove Programs feature ………. 103
Remove the print driver by using the Server Properties feature ……………….……………… 105
3 Mac software and utilities .……………….……………….……………..……………………………… 107
Software installation methods …………………………………………………………………………………… 108
CD installation ……..…………………………………………………………………………………. 108
Supported operating systems for Mac ……………………………….……………… 108
Supported languages ……………..…………………………..……………………….. 108
HP LaserJet software components and utilities for Mac ……………………………………….. 108
HP LaserJet Pro 400 M401 Printer Series PPD …………………………………….. 109
HP LaserJet Pro 400 M401 Printer Series PDE …………………………………….. 109
HP USB EWS Gateway …………..…………………….……………………………… 109
HP Utility for Mac ………………….…………………..……………………..………… 109
Open the HP Utility ……………..……………………..………………….. 110
ENWW v

HP Utility toolbar ……………….………………………….………………. 110
Supplies Status ……………………………………………………………… 111
Device Information ………………………………………………………… 112
File Upload …………………………………………………………………. 112
HP ePrintCenter …………………………………………………………….. 113
Test ………………………………………………………………..…………. 114
Upload Fonts ……………………………………………………………….. 114
Auto-off …………….……………………….……………………………….. 115
Network Settings …………….…………………….………………………. 116
Supplies Management ……………………………………………………. 117
Trays Configuration ……………………………………………………..… 118
Additional Settings ……………………………………………….……….. 119
Message Center ………….……………………..…………………………. 120
Supported print drivers for Mac ……………………………………………………… 120
Priority for print settings for Mac …………………………………………………….. 120
Install the Mac printing-system software …………..…………………………………………………………… 121
General installation for Mac operating systems ………………………………………………… 121
Detailed Mac installation …….…………………………………………………………………….. 122
Setup instructions …………….………………………………………………………………………. 132
Set up a printer with a Mac …….………………………..………………………..…. 132
Troubleshoot the product setup ……………………………………………………….. 133
Remove the printing-system software from Mac operating systems ………………………………………. 134
4 Linux and Unix …………………..…………………………………………………………………….……. 139
Linux information …………………..…………………………………..………………………………….…..….. 140
Unix information …………..…………………………….……………………………..…………………………. 141
5 Engineering details ..……………………….…………………………………………………….………… 143
Introduction ……..……………………….………………………..…………………….…………………………. 143
Network Diagnostic Utility (NDU) …………………………………………………………….………………… 144
Printer Diagnostic Utility (PDU) ………………………………..…………………………….………………….. 145
SAP and Citrix Printing …………………………………………………………………………………………... 146
Index ………………………………….…………………………………………..…………………….………… 147
vi ENWW

1 Document and product basics
●
Purpose and scope
●
Software availability and localization
ENWW 1

Purpose and scope
This software technical reference (STR) provides information about and troubleshooting tips for the
printing-system software for the product.
This STR is prepared in an electronic format to serve as a quick-reference tool for Global Support
Center (GSC) agents, support engineers, system administrators, management information systems (MIS)
personnel, and end users, as appropriate.
NOTE: This STR describes drivers that are available from the product firmware and shipped on the
printing-system software CD that comes with the product. This STR does not describe drivers that will
become available on the Web.
The following information is included in this STR:
●
Descriptions of drivers, operating systems, and system environments
●
Descriptions of installing and uninstalling the printing-system software components
For information about the location of information within chapters, see the table of contents. An index is
also provided in this STR.
Additional detailed information about the printing-system software is published in an addendum to this
STR. The following information is available in the addendum:
●
Lists of installed files
●
System-modification information, such as files added or modified
2 Chapter 1 Document and product basics ENWW

Software availability and localization
This section provides information about the availability of the product printing-system software and
related software and firmware. Printing-system software on a CD is available from HP fulfillment
centers.
Printing-system software on the Web
All software that is contained on the installation CD is also available on the Web.
Web deployment is the preferred method for obtaining the latest software. The Web site offers an
option for automatic email notification about new software releases.
NOTE: This STR describes drivers that are shipped with the printing-system software CD. This STR
does not describe any drivers that might be released for use by support personnel.
To view the product support Web site, complete the following steps.
1. In the main screen of the installer, click the More Options button, and then click the
Documentation button.
2. Click the HP Help and Learn Center button.
3. In the HP Help and Learn Center screen, click the Web Support tab, and then select the
product model number.
In-box printing-system software CD
The software CD contains a variety of files for installing the printing-system software on the computer.
This section describes the files that are available on the software CD and provides additional
information about support and availability.
The product comes with one printing-system software CD with software for both Windows operating
systems and Mac OS X operating systems.
The files on the CD include documentation files and files that are required in order to install and
uninstall the printing-system components.
NOTE: For the latest software and printer drivers, go to www.hp.com/support/ljm401series.
HP LaserJet Software CD — Windows partition
NOTE: For information about the contents of the Mac partition, see Mac software and utilities
on page 107.
The root directory of the Windows software partition contains the AUTORUN.EXE file, the SETUP.EXE
file, and the following directories:
●
Documents
●
Installer
●
Installer Content
ENWW
Software availability and localization
3

●
Languages
●
Prerequisites
●
Setup
●
Utilities
●
x64
The Utilities folder contains the files to run these stand-alone utilities:
●
FileToEmail
●
LogAnalyzer.exe
●
Scrubber
CD versions and language support
The product printing-system software CD is available with the following components and languages.
Table 1-1 Software CD supported languages
Language Two-letter abbreviation HP-preferred name File designation
Arabic AR Arabic ARWW
Bulgarian BG Bulgarian BGWW
Catalan CA Catalan CAWW
Croatian HR Hrvatski HRWW
Czech CS Cestina CSWW
Danish DA Dansk DAWW
Dutch NL Nederlands NLWW
English EN English ENWW
Estonian ET Estonian ETWW
Farsi (Persian) FA Farsi (Persian) FAWW
Finnish FI Suomi FIWW
French FR Francais FRWW
German DE Deutsch DEWW
Greek EL Greek ELWW
Hebrew HE Hebrew HEWW
Hungarian HU Magyar HUWW
Italian IT Italiano ITWW
Japanese JA Japanese JAWW
Korean KO Korean KOWW
4 Chapter 1 Document and product basics ENWW

Table 1-1 Software CD supported languages (continued)
Language Two-letter abbreviation HP-preferred name File designation
Latvian LV Latvian LVWW
Lithuanian LT Lithuanian LTWW
Norwegian NO Norsk NOWW
Polish PL Polski PLWW
Portuguese PT Portugues PTWW
Romanian RO Romanian ROWW
Russian RU Russian RUWW
Serbian SR Serbian SRWW
Simplified Chinese ZHCN Simplified Chinese ZHCN
Slovak SK Slovak SKWW
Slovenian SL Slovenian SLWW
Spanish ES Espanol ESWW
Swedish SV Svenska SVWW
Thai TH Thai THWW
Traditional Chinese ZHTW Traditional Chinese ZHTW
Turkish TR Turkce TRWW
Ukrainian UK Ukrainian UKWW
ENWW
Software availability and localization
5

Driver languages
The product provides discrete driver support in the following languages.
Table 1-2 Supported discrete driver languages
Component Language list
HP PCL 6 Print Driver
●
Arabic
●
Bulgarian
●
Catalan
●
Croatian
●
Czech
●
Danish
●
Dutch
●
English
●
Estonian
●
Farsi
●
Finnish
●
French
●
German
●
Greek
●
Hebrew
●
Hungarian
●
Italian
●
Japanese
●
Korean
●
Latvian
●
Lithuanian
●
Norwegian
●
Polish
●
Portuguese
●
Romanian
●
Russian
●
Serbian
●
Simplified Chinese
●
Slovak
●
Slovenian
●
Spanish
●
Swedish
●
Thai
●
Traditional Chinese
●
Turkish
●
Ukrainian
6 Chapter 1 Document and product basics ENWW

Installer languages
The product provides installer component support in the following languages.
Table 1-3 Installer component languages
Component Language list
Administrator install
Installer
Common Windows installer
Web registration *
●
Arabic
●
Bahasa Indonesian
●
Catalan
●
Croatian
●
Czech
●
Danish
●
Dutch
●
English
●
Finnish
●
French
●
German
●
Greek
●
Hebrew
●
Hungarian
●
Italian
●
Japanese
●
Korean
●
Norwegian
●
Polish
●
Portuguese
●
Romanian
●
Russian
●
Simplified Chinese
●
Slovak
●
Slovenian
●
Spanish
●
Swedish
●
Thai
●
Traditional Chinese
●
Turkish
* Arabic and Hebrew support in English only
* Catalan support in Spanish only
* No support for Bulgarian, Estonian, Japanese, Kazakh, Lithuanian, Latvian, Serbian, Ukrainian, or
Vietnamese
ENWW
Software availability and localization
7

Documentation languages
The product provides documentation in the following languages.
Table 1-4 Documentation languages
Language User Guide Help and Learn
Center
Warranty and
Legal Guide
Install Notes
(Windows)
Hardware
Install Guide
ArabicXXXXX
Bahasa IndonesianXXXXX
Bulgarian X
CatalanXXXXX
CzechXXXXX
DanishXXXXX
DutchXXXXX
EnglishXXXXX
Estonian X
Farsi X
FinnishXXXXX
FrenchXXXXX
GermanXXXXX
GreekXXXXX
HebrewXXXXX
HungarianXXXXX
ItalianXXXXX
Japanese X X X
Kazakh XX X
KoreanXXXXX
Latvian X
Lithuanian X
NorwegianXXXXX
PolishXXXXX
PortugueseXXXXX
RomanianXXXXX
RussianXXXXX
Serbian X
8 Chapter 1 Document and product basics ENWW

Table 1-4 Documentation languages (continued)
Language User Guide Help and Learn
Center
Warranty and
Legal Guide
Install Notes
(Windows)
Hardware
Install Guide
SlovakXXXXX
SlovenianXXXXX
SpanishXXXXX
SwedishXXXXX
ThaiXXXXX
TurkishXXXXX
Ukranian X
Simplified ChineseXXXXX
Traditional
Chinese
XXXXX
ENWW
Software availability and localization
9

10 Chapter 1 Document and product basics ENWW

2 Windows software description and
installation
Introduction
The product comes with software and installers for Microsoft Windows and Apple Computer, Inc., Mac
systems. Linux and UNIX systems are supported, and software is available on the Web. For information
about specific system installers, drivers, and components, see the section that corresponds to that
system. For information about Mac software, see
Mac software and utilities on page 107.
This section contains information about the following topics:
●
Install overview
●
CD installation and HP Smart Install installation
●
Installation for software components from the Web
●
HP LaserJet software components for Windows
●
Detailed Windows installation instructions
●
Point-and Print installation
●
Remove Windows software
ENWW
Introduction
11

Install overview
The printing-system software CD contains the product software. The printing-system software can also
be installed when the product is connected to the computer through Smart Install.
For all supported operating systems, each install option presents a series of screens that guide you
through the installation process.
Software installation types for Windows
The following printing-system software installation types are available:
●
Select the recommended software (default)
●
Select the minimum software
Selecting Click here for more install options allows you to choose between the installation types
and allows you to view the software components that are installed with each installation type.
Installing the recommended software installs these software components:
●
HP Device Toolbox
●
HP Help & Learn Center
●
HP Printer Status and Alerts
●
HP Product Improvement Study
●
Reconfigure your HP Device
●
Uninstall Product Software
The installer guides the installation, whether you are configuring a direct-connected or a network-
connected product.
The installer additionally detects hardware and network connections, and helps guide the installation.
For example, if the installer detects an HP LaserJet Pro 400 M401 Printer Series, it automatically
configures the software connection to that product. This saves several steps. If the installer detects a
network, it also guides setting up those features.
Installation options
The printing-system software can be installed when the product is connected to the computer in the
following configurations:
●
Directly connected via a USB port
NOTE: Smart Install will begin when a USB cable is connected.
●
Connected via a wired or wireless network
12 Chapter 2 Windows software description and installation ENWW
CD installation and HP Smart Install installation
Supported operating systems for Windows
The product comes with software for the following Windows operating systems:
●
Windows 7 (32-bit and 64-bit)
●
Windows Vista (32-bit and 64-bit)
●
Windows XP (32-bit, Service Pack 2)
●
Windows Server 2003 (32-bit, Service Pack 3)
NOTE: Basic print and scan components only
●
Windows Server 2008 and 2008 R2 (32-bit and 64-bit)
NOTE: Basic print and scan components only
Installation for software components from the Web
Supported operating systems for Windows
The product comes with software for the following Windows operating systems:
●
Windows 7 (32-bit and 64-bit)
●
Windows Vista (32-bit and 64-bit)
●
Windows XP (32-bit, Service Pack 2)
●
Windows Server 2003 (32-bit, Service Pack 3)
NOTE: Basic print and scan components only
●
Windows Server 2008 and 2008 R2 (32-bit and 64-bit)
NOTE: Basic print and scan components only
ENWW
CD installation and HP Smart Install installation
13
HP LaserJet software components for Windows
Installer
The Installer is a Windows–only software component that provides an installer for the driver files,
connects the product to the user’s computer, installs software components, launches configuration
utilities, and provides links to Web sites or documentation.
Uninstaller
The uninstall program removes files and folders that were installed when the printing-system software
was originally installed on the computer.
Print drivers
Print drivers provide the printing features and communication between the computer and the product.
The software CD includes software for end users and network administrators who are working in the
following operating environments:
●
Windows XP (32-bit and 64-bit), Windows Server 2003 (32-bit and 64-bit), Windows
Server 2008 and 2008 R2 (32-bit and 64-bit), and Windows Vista (32-bit and 64-bit), and
Windows 7 (32-bit and 64-bit)
●
Mac OS X v10.5 and later
In Windows operating systems, automatic configuration, driver updates after a new product
configuration, and preconfiguration features are available with the product.
NOTE: For additional information about installing the printing-system software, see the HP LaserJet
Pro 400 M401 Printer Series Install Notes on the printing-system software CD.
All of the drivers provide access to the paper-handling and print-quality features.
HP PCL 6 print driver and PS Universal Print Driver
Windows drivers are supported by Microsoft 32-bit and 64-bit operating systems. The HP PCL 6 driver
is included on the HP LaserJet Pro 400 M401 Printer Series printing-system software CD. The PS
Universal Print Driver is available for download at the following Web site:
www.hp.com/support/ljm401series
NOTE: If you select the recommended installation by clicking Install Now on the main screen of the
Installer, the HP PCL 6 print driver is installed by default.
Print driver version numbers for Windows operating systems
Access to print driver version numbers varies, depending on the operating system in which the product
is installed.
14 Chapter 2 Windows software description and installation ENWW

NOTE: For a list of HP LaserJet Pro 400 M401 print drivers, updated HP printing-system software,
and product-support information, go to:
www.hp.com/support/ljm401series
The Windows XP, Windows Server 2003, Windows Server 2008 and 2008 R2, Windows Vista, and
Windows 7 operating systems support the HP PCL 6, PCL 5 Universal Print Driver, and PS Emulation
Universal Print Drivers. If you are using an HP print driver in a Windows environment, follow these
steps to find driver-version information:
1. Depending on your operating system, click the Start button and then do one of the following to
find the list of installed printers:
●
Click Devices and Printers or Printers and Faxes
●
Click Control Panel and then click Printers, or first click Hardware and Sound, and
then click Printers
●
Click Settings, and then click Printers or Printers and Faxes
2. Right-click the product icon.
3. Click Printer Properties.
4. Click the About tab.
You can also gain information about driver versions by clicking the About button that appears on most
driver tabs.
HP PCL 6 print driver for Windows
Introduction
You can change the print job settings through the product control panel, the software program, or the
print driver.
Generally, for features that are duplicated in more than one location (for instance, you can select the
paper input tray from any of them), settings that are established in the software program take
precedence over print driver settings. Print driver settings, in turn, override product control-panel
settings.
Access print drivers
Depending on the operating system on which you are installing the print drivers, you can gain access
to the print drivers and different print-driver interfaces in several ways.
To gain access to the print driver settings from within most software programs, follow these steps:
1. Click the File menu.
2. Click the Print item.
3. Click the Properties button.
ENWW
HP LaserJet software components for Windows
15

The appearance and names of the driver tabs can vary, depending on the operating system. These
driver settings apply only while that software program is open.
You can control the drivers directly from the Printers folder. Here you have access to two sets of driver
tabs: the Printing Preferences tabs and the Properties tabs. The settings that you make on the
Printing Preferences driver tabs control the driver default settings for each user profile. Installable
options can be configured in Properties driver tabs.
Printing Preferences driver tabs
The Printing Preferences driver tabs change the default settings that are used across all software
programs. To gain access to these tabs, follow these steps:
1. Depending on your operating system, click the Start button and then do one of the following to
find the list of installed printers:
●
Click Devices and Printers or Printers and Faxes
●
Click Control Panel and then click Printers, or first click Hardware and Sound, and
then click Printers
●
Click Settings, and then click Printers or Printers and Faxes
2. Right-click the product icon.
3. Click the Printing Preferences item.
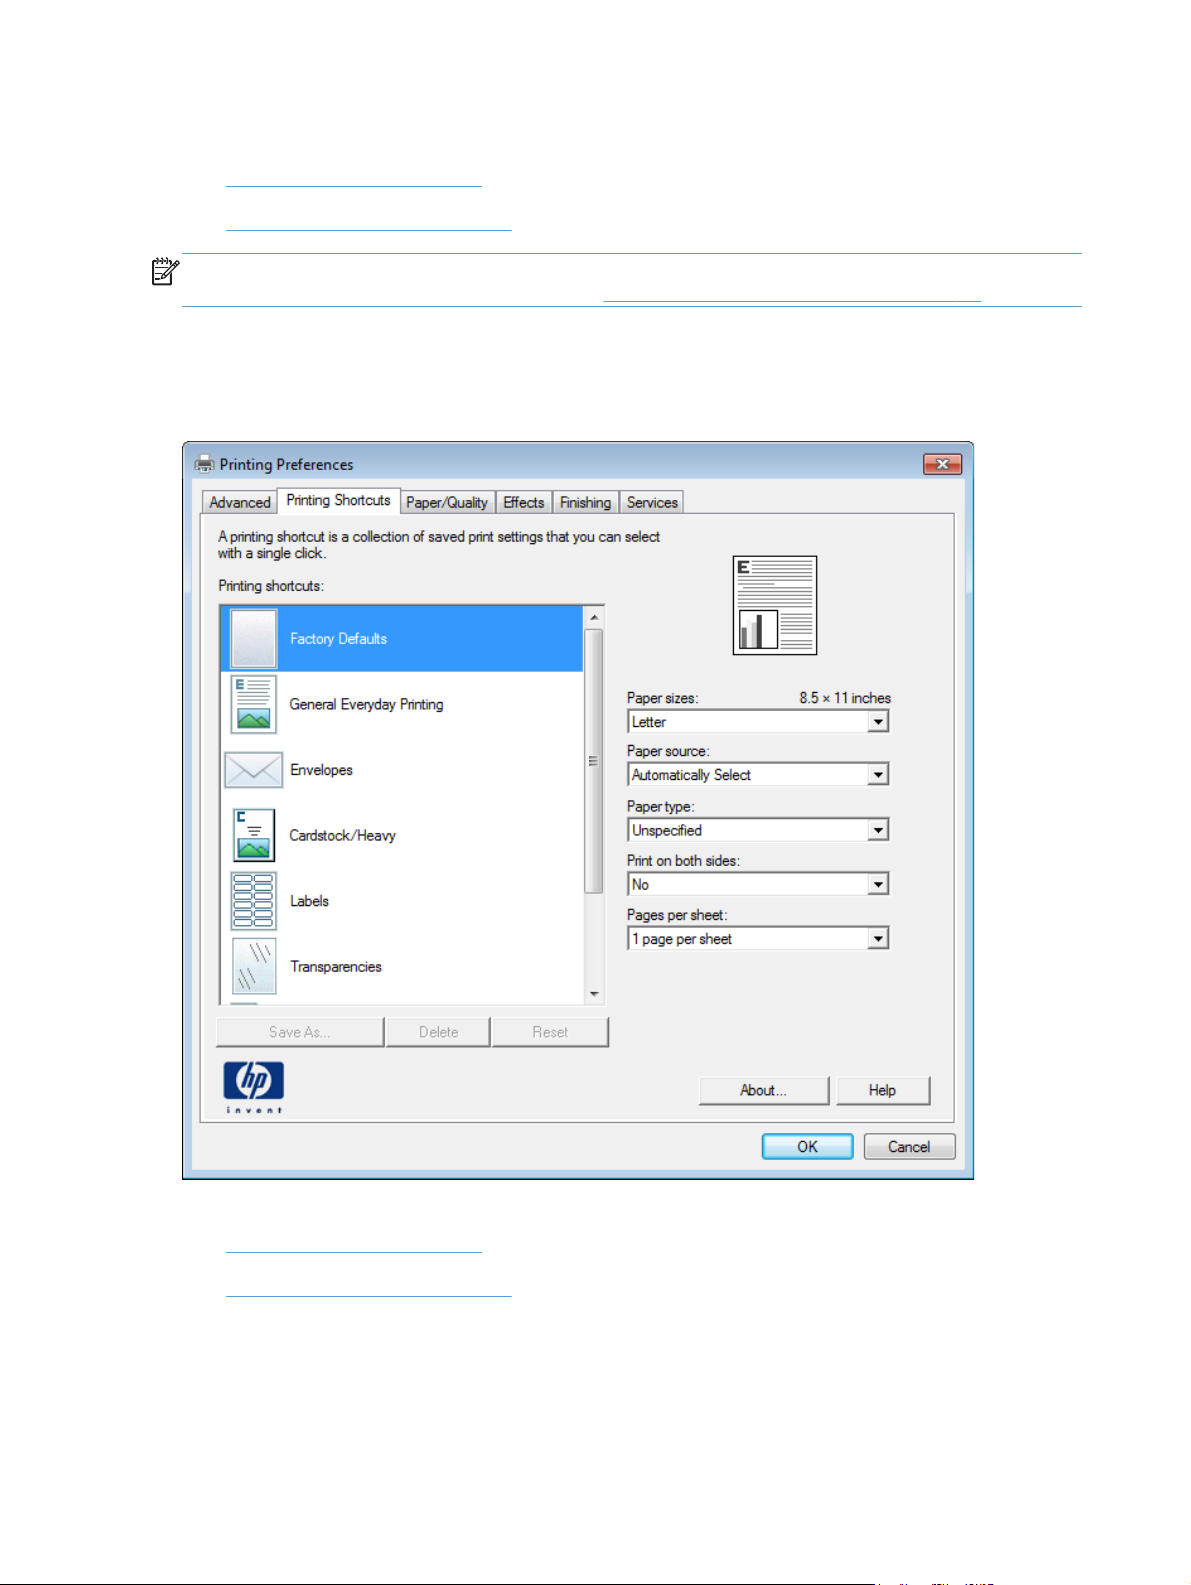
The following Printing Preferences print-driver tabs are available:
●
Advanced
●
Printing Shortcuts
●
Paper/Quality
●
Effects
●
Finishing
●
Services
16 Chapter 2 Windows software description and installation ENWW

Printer Properties driver tabs
This set of tabs controls the driver behavior and driver connections. To gain access to the Printer
Properties tabs, follow these steps:
1. Depending on your operating system, click the Start button and then do one of the following to
find the list of installed printers:
●
Click Devices and Printers or Printers and Faxes
●
Click Control Panel and then click Printers, or first click Hardware and Sound, and
then click Printers
●
Click Settings, and then click Printers or Printers and Faxes
2. Right-click the product icon.
3. Click the Properties or Printer Properties item.
The following Printer Properties print-driver tabs are available:
●
General
●
Sharing
●
Ports
●
Advanced
●
Security
●
Device Settings
●
About
Help system
The HP PCL 6 print driver includes a full-featured Help system to provide assistance with printing and
configuration options.
●
Right-click a feature or control. A pop-up Help window appears.
●
Click a feature or control, and then press the F1 key. The Help window for the currently selected
control appears.
Incompatible print settings messages
Incompatible print settings (constraint) messages are unsolicited messages that appear in response to
specific print-driver selections. These messages alert you to selections that are illogical or impossible
given the product capabilities or the current settings of other controls.
NOTE: Constraint messages are limited, and the underlying software architecture might accept some
settings that are illogical or impossible for the product to perform. Sending a job with incompatible
settings can lead to unexpected results. If print jobs do not print as expected, check the product
documentation for the product capabilities.
ENWW
HP LaserJet software components for Windows
17
In supported Windows operating environments, some technically invalid print-driver configurations
result in warning messages. For example, duplexing is not possible when printing an envelope. The
following figure shows an incompatible print settings warning.
Figure 2-1 Incompatible print settings warning
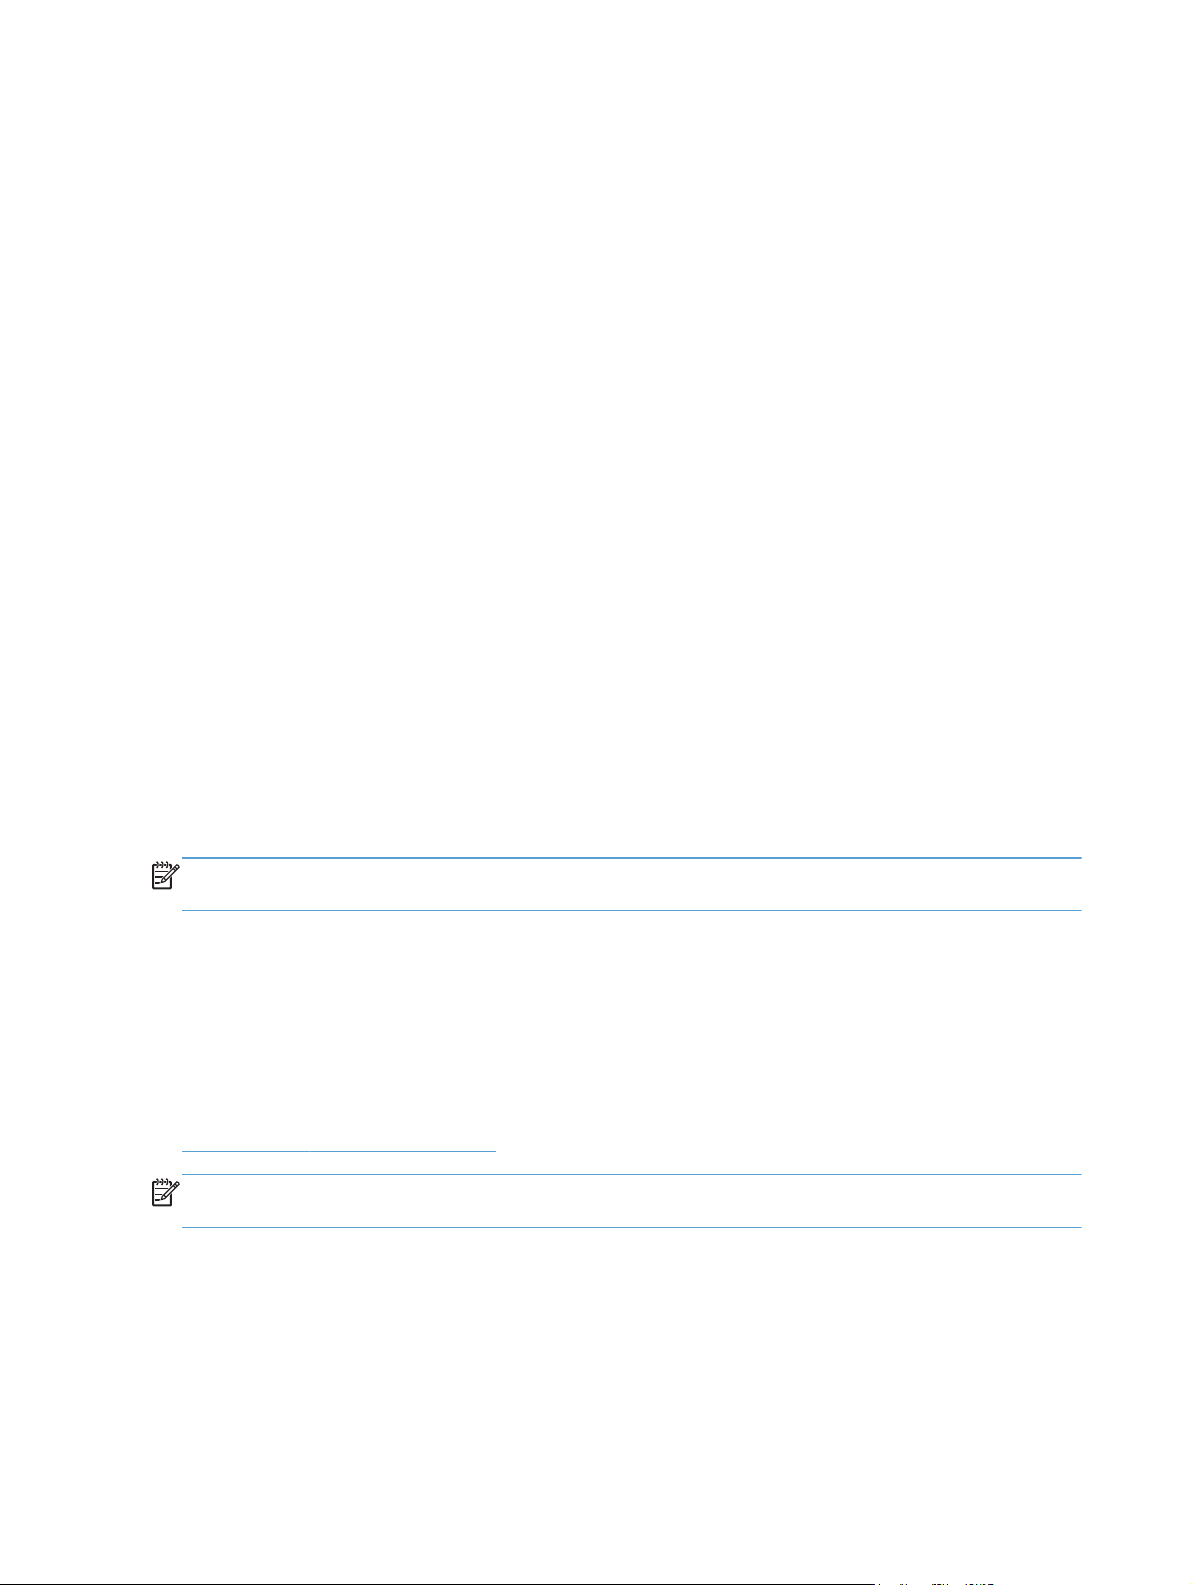
If you click the OK button, the Incompatible Print Settings dialog appears.
Figure 2-2 Incompatible Print Settings dialog
To resolve the conflicting settings, click the Restore my previous settings option, and then click the
OK button. The driver resets the conflicting control back to its previous state.
18 Chapter 2 Windows software description and installation ENWW

If you want to keep the conflicting setting, click the Keep this setting, and I will change it later
option, and then click the OK button.
NOTE: In this example, the conflict can be resolved manually. If the conflict is not resolved when the
driver is closed, then the same dialog appears again when a print job is sent to the product.
Advanced tab features
NOTE: The Advanced tab is located on the Printing Preferences tab set. For information about
how to access these tabs, see
Printing Preferences driver tabs on page 16,
Use the Advanced tab to change the layout of printed pages. Use this tab to configure special
controls that are not commonly used, as well as to control features such as collating and font
management in the driver (although most current software programs support these features in the print
dialog box or through the page settings in the software program). The following figure shows the
Advanced tab.
Figure 2-3 Advanced tab
The Advanced tab contains the following controls:
●
Graphic
●
Document Options
ENWW
HP LaserJet software components for Windows
19

Graphic
The Graphic setting contains the following controls:
●
True Type Font settings
True Type Font
Use the Substitute with Device Font option (the default setting) to print documents that contain
TrueType fonts by using equivalent printer fonts. This permits faster printing; however, you might lose
special characters that the equivalent printer font does not support. Select the Download as
Softfont option to download TrueType fonts for printing instead of using printer fonts.
Document Options
The Document Options setting contains the following controls:
●
Advanced Printing Features
●
Printer Features
●
Layout Options
Advanced Printing Features
When the Advanced Printing Features setting is Enabled, metafile spooling is turned on and
Finishing tab options such as Page Order, Booklet Layout, and Pages per Sheet are
available, depending on the product.
Enhanced metafile spooling is used to greatly reduce the amount of time that elapses between a request
to print (initiated by a software program) and the return of control to the software program by the
operating system.
For normal printing, leave the Advanced Printing Features setting at the default (Enabled). If
compatibility problems occur, you can disable the feature. However, some advanced printing features
might still appear in the print driver, even though they have been disabled. If you select an advanced
printing feature in the print driver that has been disabled on the Advanced tab, the feature is
automatically re-enabled.
20 Chapter 2 Windows software description and installation ENWW

Printer Features
The Printer Features setting contains the following controls:
●
Print All Text as Black
The feature is Disabled by default. When Enabled is selected, the driver prints all text as black
regardless of the original document text color. Color text is printed as black, except for white text,
which remains white. (White text is a reliable method of printing reverse typeface against a dark
background.) This setting does not affect graphic images on the page, nor does it affect any text
that is part of a graphic.
●
Send True Type as Bitmap
Send True Type as Bitmap provides an alternative for software programs that have trouble
using TrueType fonts for special graphic aspects such as shading, rotation, or slanting. The setting
is Disabled (off) by default. The TrueType fonts are converted to bitmap soft fonts before
downloading. The Enabled setting causes the driver to send TrueType fonts to the product as
outlines, which retains the standard format (outline) of the fonts.
●
Raster Compression
Use the Raster Compression feature to select the graphics-compression method:
◦
Automatic. The software determines the best compression method to use.
◦
Best Quality. This option forces the software to use a lossless compression method.
(Lossless means that no data is lost during compression.)
◦
Maximum Compression. Where applicable, this option requires the software to always
use a lossy compression method (some data is lost).
●
Print Data Optimization
When selected, this feature allows the print job to use the host memory to ensure quick and high-
quality printing. The print speed increases without any print quality degradation.
When this option is selected, you must use one of the following settings:
◦
Auto (the default setting)
◦
Optimize for Raster
◦
Optimize for Text and Vector
Layout Options
The Layout Options setting contains the Page Order setting.
Page Order specifies the order in which the pages of your document are printed. Front to Back
prints the document so that page 1 prints first. Back to Front prints the document so that page 1
prints last.
NOTE: The page-ordering operation works on whole sheets of paper rather than on individual logical
pages. Accordingly, if you set Pages per Sheet (on the Finishing tab) to be greater than one, the
ordering of logical pages on a physical sheet of paper does not change.
ENWW
HP LaserJet software components for Windows
21
Printing Shortcuts tab features
●
Use defined printing shortcuts
●
Create a custom printing shortcut
NOTE: The Printing Shortcuts tab is located on the Printing Preferences tab set. For
information about how to access these tabs, see
Printing Preferences driver tabs on page 16,
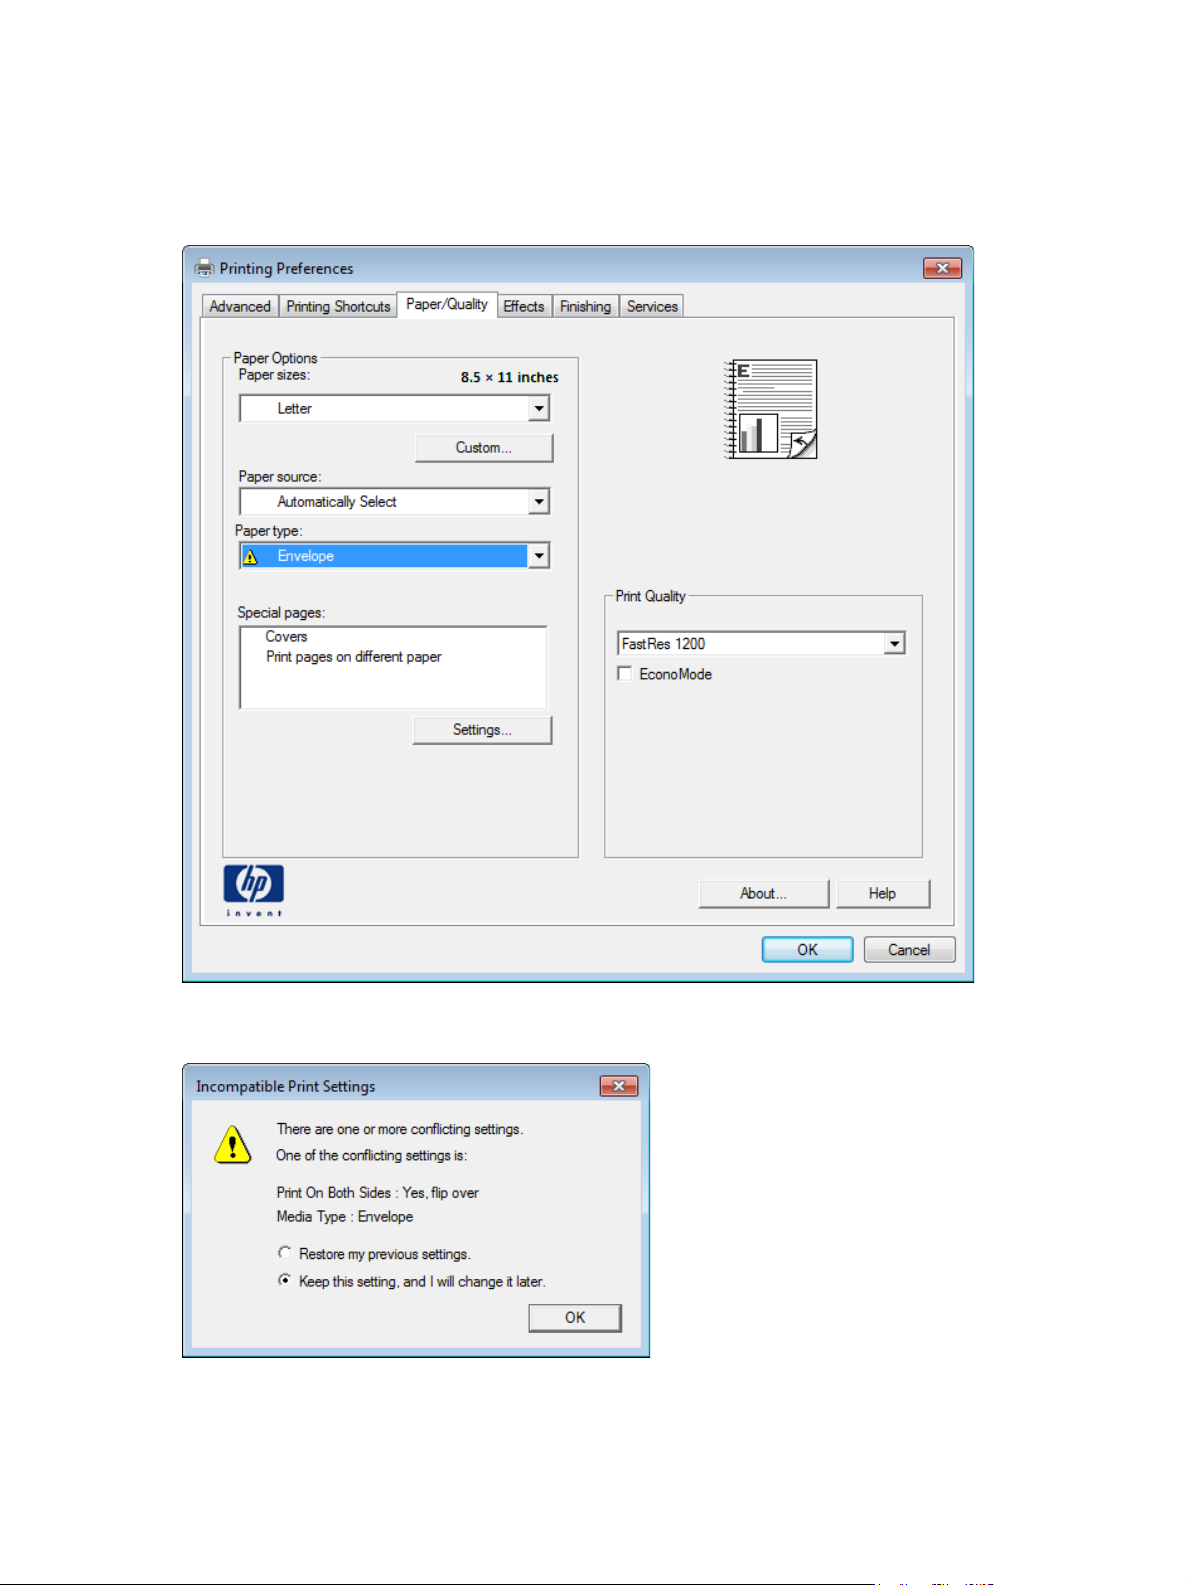
Use the Printing Shortcuts tab to store specific combinations of driver settings for easy use.
The following figure shows the Printing Shortcuts tab.
Figure 2-4 Printing Shortcuts tab
The Printing Shortcuts tab saves commonly used driver settings under a shortcut name.
●
Use defined printing shortcuts
●
Create a custom printing shortcut
Use defined printing shortcuts
The Printing Shortcuts tab contains the following pre-defined shortcuts:
22 Chapter 2 Windows software description and installation ENWW

●
Factory Defaults
●
General Everyday Printing
●
Envelopes
●
Cardstock Heavy
●
Labels
●
Transparencies
●
EcoSMART Settings
●
Booklet Printing
Factory Defaults
The Factory Defaults are as follows:
●
Paper sizes: Letter (This setting changes according to country/region.)
●
Paper source: Automatically Select
●
Paper type: Unspecified
●
Print on both sides: No
●
Pages per sheet: 1 page per sheet
General Everyday Printing
When General Everyday Printing is selected, the following controls are available:
●
Paper sizes: Letter (This setting changes according to country/region.)
●
Paper source: Automatically Select
●
Paper type: Unspecified
●
Print on both sides: No
●
Pages per sheet: 1 page per sheet
When options other than the defaults are selected, the Save as… and Reset buttons become active.
Click Save As… to create a custom printing shortcut.
Click Reset to change customized settings back to the default settings.
Paper sizes
The Paper sizes setting is a drop-down menu that lists all of the supported paper sizes. For detailed
information on the supported paper sizes, see the user guide.
ENWW
HP LaserJet software components for Windows
23

Paper source
The following options are available:
●
Automatically Select (default)
●
Printer auto select
●
Manual Feed in Tray 1
●
Tray 1
●
Tray 2
Paper type
The Paper type setting is a drop-down menu that lists all of the supported paper types. For detailed
information on the supported paper types, see the user guide.
Print on both sides
The following options are available:
●
No (default)
●
Yes, flip over
●
Yes, flip up
Pages per sheet
The following options are available:
●
1 page per sheet (default)
●
2 pages per sheet
●
4 pages per sheet
●
6 pages per sheet
●
9 pages per sheet
●
16 pages per sheet
Envelopes
These settings are automatically selected:
●
Paper sizes: Envelope #10
●
Paper source: Automatically Select
●
Paper type: Envelope
24 Chapter 2 Windows software description and installation ENWW

Cardstock Heavy
These settings are automatically selected:
●
Paper sizes: Letter (This setting changes according to country/region.)
●
Paper source: Automatically Select
●
Paper type: Unspecified
●
Print on both sides: No
Labels
These settings are automatically selected:
●
Paper sizes: Letter (This setting changes according to country/region.)
●
Paper source: Automatically Select
●
Paper type: Labels
Transparencies
These settings are automatically selected:
●
Paper sizes: Letter (This setting changes according to country/region.)
●
Paper source: Automatically Select
●
Paper type: Monochrome Laser Transparency
EcoSMART Settings
●
Paper sizes: Letter (This setting changes according to country/region.)
●
Paper source: Automatically Select
●
Paper type: Unspecified
●
Print on both sides: Yes, flip over
●
Pages per sheet: 1 page per sheet
Booklet Printing
●
Paper sizes: Letter (This setting changes according to country/region.)
●
Paper source: Automatically Select
●
Paper type: Unspecified
●
Booklet Layout: Left binding
ENWW
HP LaserJet software components for Windows
25

Create a custom printing shortcut
1. Select General Everyday Printing as a base.
2. Select the appropriate print settings on the Printing Shortcuts tab or use the settings on any of
the Printing Preferences tabs.
3. On the Printing Shortcuts tab, click Save As…. The Printing Shortcuts dialog box
appears.
4. Type a name for the custom printing shortcut, and then click the OK button. The custom printing
shortcut appears in the Printing Shortcuts list.
5. To delete a custom printing shortcut, click the custom shortcut, and then click the Delete button.
Paper/Quality tab features
NOTE: The Paper/Quality tab is located on the Printing Preferences tab set. For information
about how to access these tabs, see
Printing Preferences driver tabs on page 16,
Use the Paper/Quality tab to specify paper size, type, and source. You can also use this tab to
specify different paper selections for the front cover, first page, other pages, last page, and back cover
of the document. The following figure shows the Paper/Quality tab.
26 Chapter 2 Windows software description and installation ENWW
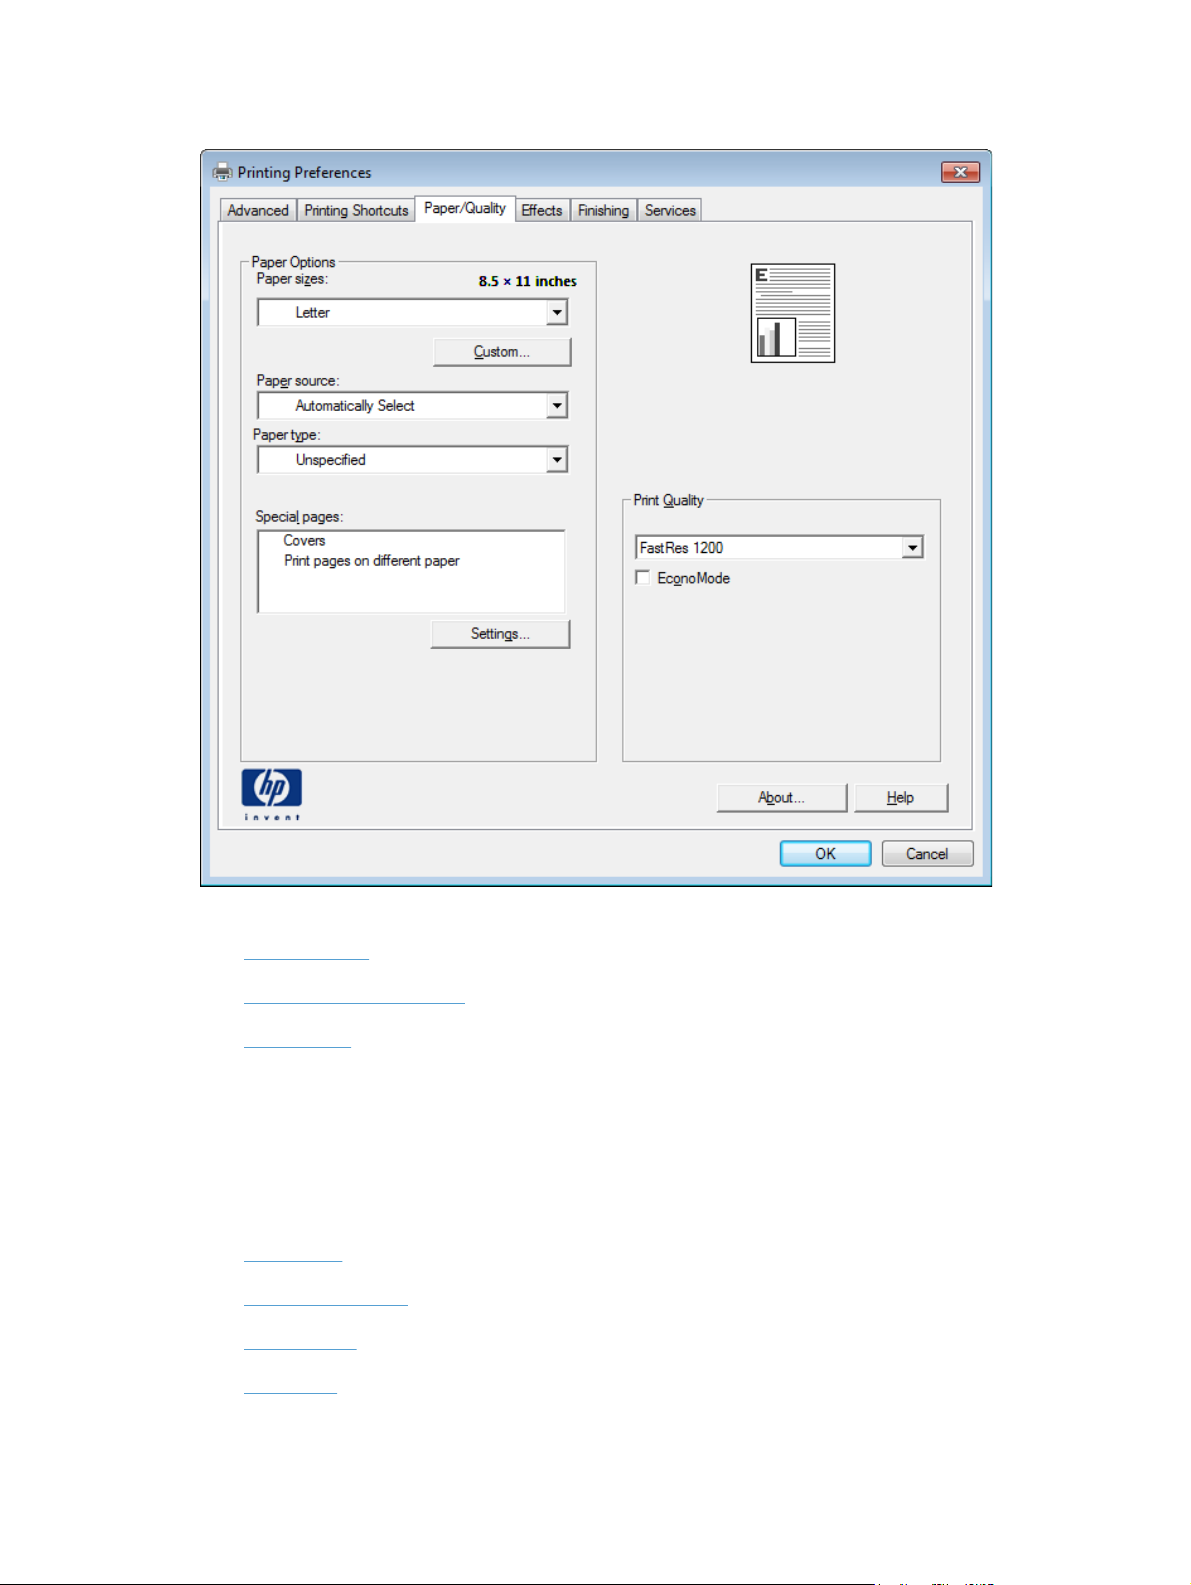
Figure 2-5 Paper/Quality tab
The Paper/Quality tab contains the following control sets:
●
Paper Options
●
Document preview image
●
Print Quality
Paper Options
The settings specified in the Paper Options group box on the Paper/Quality tab apply to all of the
pages of the document.
The settings in the Paper Options group box are described in the following order:
●
Paper sizes
●
Custom Paper Size
●
Paper source
●
Paper type
ENWW
HP LaserJet software components for Windows
27

●
Special pages
Paper sizes
The Paper sizes setting is a drop-down menu that lists all of the supported paper sizes.
When you move the mouse over the dimensions label, the mouse cursor changes from an arrow to a
gloved hand. Click the dimensions label to toggle between English and metric units.
Because paper-size settings in most software programs override driver settings, it is generally best to
use the driver to set paper size only when you are printing from software programs that do not include
a paper-size setting, such as NotePad, or when you are producing a book or a booklet that does not
require different paper sizes.
NOTE: Certain software programs can override the size command and specify different paper sizes
within a single document.
When you change the print-driver setting to a paper size that is not currently loaded in the product, a
control-panel message appears that prompts you to load the paper size or select another tray.
When the Settings under the Special Pages section have been changed, the Paper sizes, Paper
source, and Paper type menus change also, offering a variety of options. For more information, see
Special pages on page 30.
Custom Paper Size
The Custom Paper Size dialog box appears when you click Custom… on the Paper/Quality
tab. The following figure shows the initial appearance of the Custom Paper Size dialog box.
NOTE: The HP LaserJet Pro 400 M401 Printer Series product supports custom paper sizes from 3
inches to 8.5 inches in width and 5 inches to 14 inches in length. To use this paper size, set the custom
paper size to match the custom paper size that you are using.
Name
Use the Name text box to type a new name for a custom paper size. When you change the name to
something other than Custom, the Save and OK buttons become active.
The name that appears in the Name text box depends on the following conditions:
●
If a saved custom paper size has been selected from the drop-down menu on the Paper/Quality
tab, then the Name text box shows the name of the selected custom paper size.
●
If a standard paper size has been selected on the Paper/Quality tab, then the Name text box
shows the default name of Custom .
●
If a new name has been typed into the Name text box for the purpose of saving a new size or
renaming an existing size, then that new name will remain in the text box until the new size is
saved or the dialog box is closed.
If you type a new name into the Name text box, but then do not click Save, you can change the
width and height values without losing the name. However, if you close the dialog box without clicking
Save, any unsaved name or size values are lost without warning.
28 Chapter 2 Windows software description and installation ENWW

Paper size
The width and height values can be changed by typing numeric strings into the edit boxes in the
Paper Size group box.
Any entry that is greater than the maximum limits of the width and height control is rounded down to
the maximum valid entry, while any entry that is smaller than the minimum limits of the width and height
control is rounded up to the minimum valid entry.
If units are in millimeters, the custom paper-size range minimum is the limit rounded up to the nearest
whole millimeter. The custom paper-size range maximum is the limit rounded down to the nearest whole
millimeter. Any non-numerical entry reverts to the minimum value. Width and height entries are
validated when the focus has changed.
The resolution of each control is 1 millimeter or 1/10 of an inch, depending on the current
measurement units.
NOTE: If the paper size is not physically supported by the product, the driver will scale the page
data down to a size that will fit on a letter size paper.
Units
To change measurement units, click one of the options in the Units group box (either Inches or
Millimeters).
Custom width and height control limits
The minimum paper size for the product is 76 x 127 mm (3 x 5 in) and the maximum is 215.90 x
355.60 mm (8.50 x 14.00 in).
Paper source
The Paper source setting specifies the source tray to use for printing a document. The list of source
trays depends on the product accessories that are installed. Any optional source trays that are installed
through the Device Settings tab also appear here.
The Paper source drop-down menu can contain the following options, depending on what has been
installed on the product:
●
Automatically select
●
Printer auto select
●
Manual Feed in Tray 1
●
Tray 1
●
Tray 2
The default setting is Automatically Select. When this setting is selected, the product uses the source
tray that supports the paper size that you have selected. If you select a source tray other than
Automatically select, make sure that the correct paper size is loaded in the source tray.
ENWW
HP LaserJet software components for Windows
29

Paper type
The Paper type drop-down menu shows the first few paper types that the product supports and an
entry for More. Clicking More opens the Type Is dialog box. Click the + next to Type Is and its
subcategories to view all of the paper types that the product supports. For detailed information on the
supported paper types, see the user guide.
The default setting is Unspecified.
No mechanism exists for manually adding custom paper types through the driver. Use HP Web
Jetadmin to add custom paper types. Custom types can be added only by using bidirectional
communication, so they must already exist in the product when the bidirectional query occurs. If
bidirectional communication is enabled, then an updated list of paper types is returned. If bidirectional
communication is not enabled, then the driver looks for custom paper types that have been saved from
a previous bidirectional communication query, and uses those. Otherwise, no custom paper types are
available through the driver.
NOTE: To download a current version of HP Web Jetamin and for the latest list of supported host
systems, go to the following Web site:
www.hp.com/go/webjetadmin
If you select a setting other than the default, make sure that the correct paper type is loaded in the tray
that you selected in the Paper source setting.
When you change the print-driver setting to a paper type that is not currently loaded in the product, a
control-panel message appears that prompts you to load the paper type or select another tray.
Special pages
To specify special pages to be used, click the Settings button under the Special Pages list.
Covers
To use specific cover settings, click the Covers item in the Special Pages list.
Use the Covers options to include a blank or preprinted cover on a document, or to include a front/
back cover from a source tray that is different from the one used for the remainder of the document.
The following are the Covers options:
●
Add a blank or preprinted cover: Select which cover is customized: Front, Back, or Both.
●
Paper source: The Paper source setting specifies the source tray to use for adding a front
and/or back cover to the document. The list of source trays depends on the accessories that are
installed. Any optional trays that are installed through the Device Settings tab also appear here.
●
Paper type: The Paper type setting specifies the paper size to use for front and/or back
covers. Changes made to the Paper type setting here override any previous Paper type
settings using the same paper source.
NOTE: The same size of paper will be used for the entire print job.
When you change the type and source of the paper and covers, the settings remain configured until
you close the software program.
30 Chapter 2 Windows software description and installation ENWW

Print pages on different paper
Use the Print pages on different paper options to select an alternative paper type or source for
the first, last, or other pages of a document.
The following are the Print pages on different paper options:
●
Pages in document. Select which pages are customized: the First page, the Last page, or
specify a page range with the Pages option.
●
Paper source: The Paper source setting specifies the source tray to use for printing a
document. The list of source trays depends on the accessories that are installed. Any optional trays
that are installed through the Device Settings tab also appear here.
●
Paper type: The Paper type drop-down menu shows all of the paper types that the HP LaserJet
Pro 400 M401 Printer Series supports.
NOTE: The same type of paper is used for the entire print job.
When you change the type and source of the paper and covers, the settings remain configured until
you close the software program.
Document preview image
The document preview image is a line-drawn image of a page that represents graphics and text. The
document preview image is always oriented so that the contents of the page are right-side-up. The
document preview image appears in the upper-right corner of the following Printing Preferences
driver tabs:
●
Printing Shortcuts
●
Paper/Quality
●
Effects
●
Finishing
Switching between tabs does not change the location or appearance of the document preview image.
When you move the mouse over the document preview image, the mouse cursor changes from an
arrow to a gloved hand. You can toggle between portrait and landscape page orientation by clicking
the image.
Print Quality
The Print Quality group box contains the following control:
●
Print Quality drop down menu
●
EconoMode
Print Quality drop down menu
Use this control to select print quality. ImageREt settings precisely control colors by combining up to 4
colors and varying the amount of toner in a given area to create many smooth colors, sharp images,
and crisp text.
ENWW
HP LaserJet software components for Windows
31

The Print Quality drop-down menu contains the following resolution options.
●
600 dpi
●
FastRes 1200 (the default setting)
●
ProRes 1200 (180 lpi)
●
ProRes 1200 (132 lpi)
EconoMode
Select the EconoMode check box to enable this feature. When this feature is turned on, the product
uses less toner on each page, extending the life of the toner cartridge and reducing the cost per page.
Because less toner is used on each page, the print quality is also reduced.
The default setting for the EconoMode option is off (not selected).
NOTE: HP does not recommend the full-time use of EconoMode. If EconoMode is used full-time,
the toner supply might outlast the mechanical parts in the toner cartridge. If print quality begins to
degrade and is no longer acceptable, consider replacing the toner cartridge.
Effects tab features
NOTE: The Effects tab is located on the Printing Preferences tab set. For information about how
to access these tabs, see
Printing Preferences driver tabs on page 16,
Use the Effects tab to create unique paper effects such as scaling and watermarks. The following
figure shows the Effects tab.
32 Chapter 2 Windows software description and installation ENWW
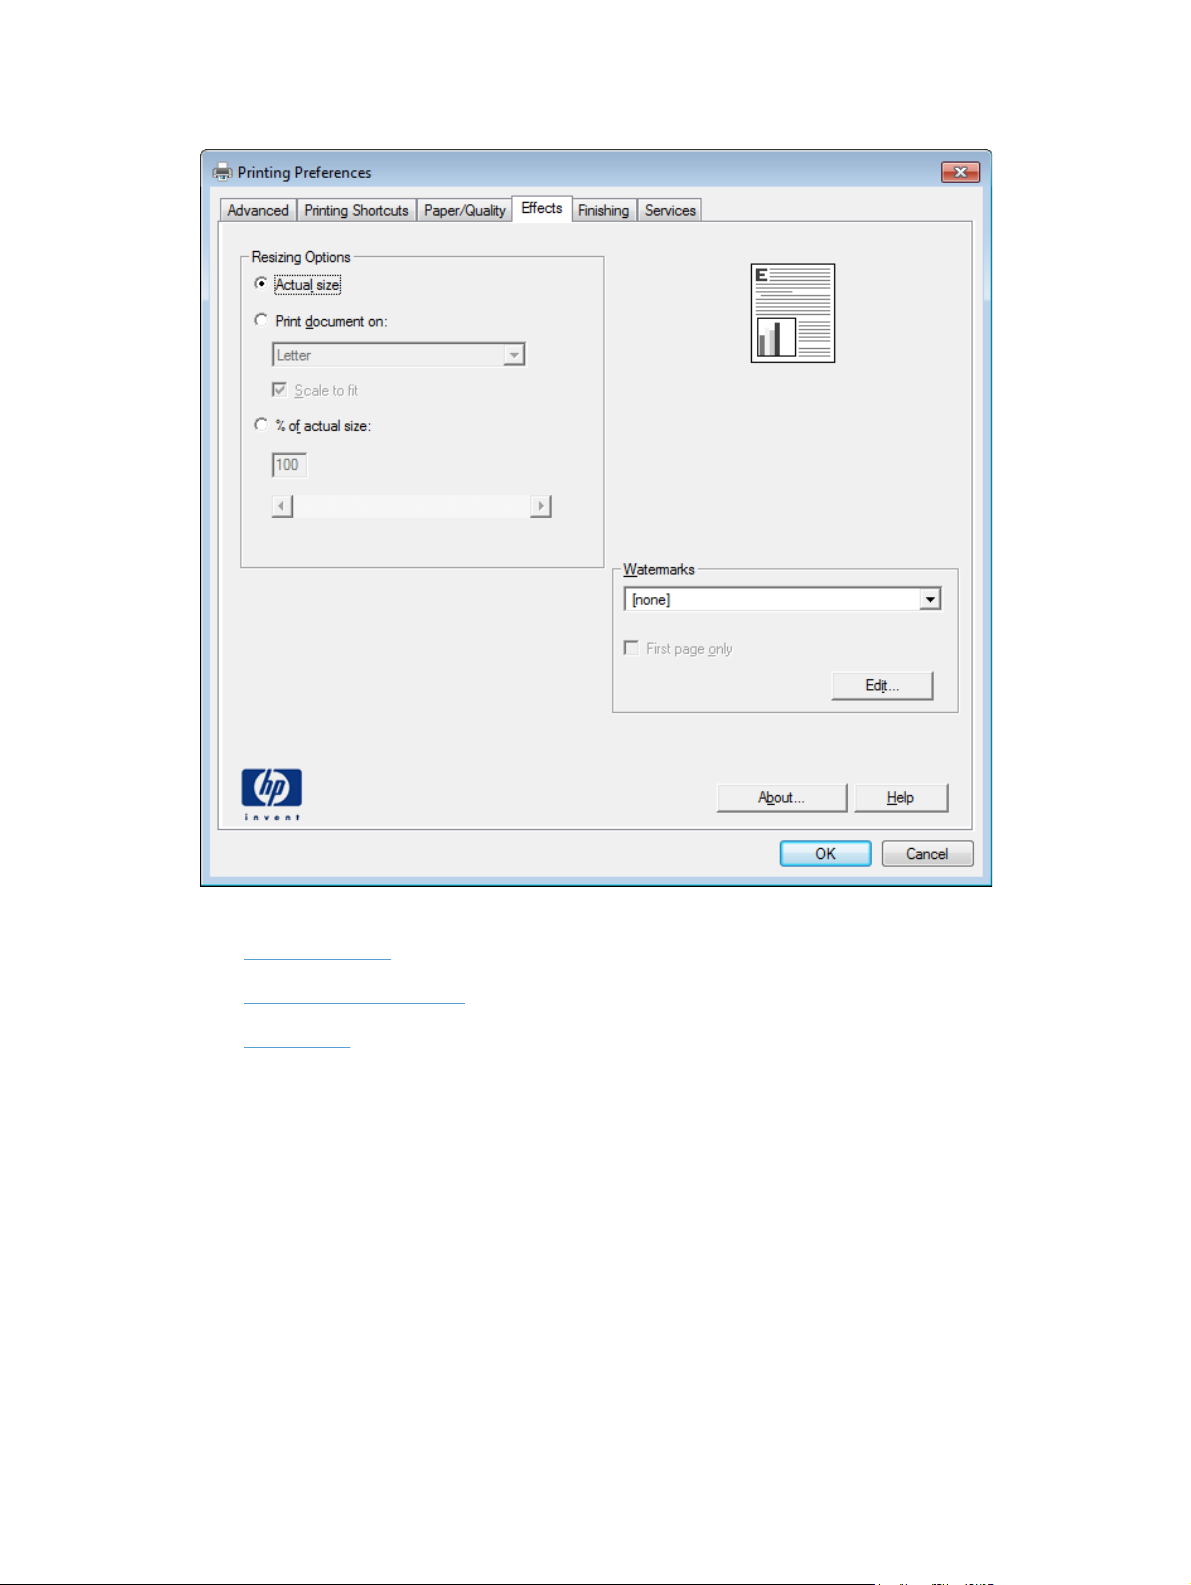
Figure 2-6 Effects tab
The Effects tab contains the following controls:
●
Resizing Options
●
Document preview image
●
Watermarks
Resizing Options
The Resizing Options group box consists of the following controls:
●
Actual size (default)
●
Print document on
●
Scale to fit
●
% of actual size
Actual size
Actual size is the default setting. It prints the document without changing the document size.
ENWW
HP LaserJet software components for Windows
33

Print document on
Click the Print document on option to format the document for one paper size and then print the
document on a different paper size, with or without scaling the image to fit the new paper size.
The Print document on control is disabled by either of the following conditions:
●
The % of actual size value is not 100.
●
The Pages per sheet value (on the Finishing tab) is not 1.
When Print Document On is selected, the drop-down menu shows the paper sizes on which you
can print. The list contains all of the standard paper sizes that the selected paper source supports and
any custom sizes that you have created. When Print document on is selected, Scale to fit is
automatically selected. Clear this check box if you do not want your document reduced or enlarged to
fit on the selected paper.
Scale to fit
The Scale to fit option box specifies whether each formatted document page image is scaled to fit the
target paper size. By default, Scale to fit is selected when Print document on is selected. If the
setting is turned off, then the document page images will not be scaled, and are instead centered at full
size on the target paper. If the document size is larger than the target paper size, then the document
image is clipped. If it is smaller, then it is centered within the target paper.
When the size for which the document is formatted (that is, the logical size) differs from the target size,
the preview image uses a dashed gray line to show the boundaries of the logical page in relation to
the target paper size.
% of actual size
The % of actual size option provides a slider bar and input box to use for scaling the percentage
setting. The default setting in the entry box is 100% of actual size. Actual size is defined as the paper
size that is selected within the driver or what the driver receives from the software program (if the
software program does not negotiate the paper size with the driver). The driver scales the page by the
appropriate factor and sends it to the product.
The limits of the range are from 25% to 400%, and any values outside the range are adjusted to those
limits as soon as the focus is removed from the control (that is, when the Tab key is pressed or another
control is selected).
Any change to the scale also changes the page preview, which increases or decreases from the upper-
left corner of the preview.
The slider bar controls the scale directly. The value in the edit box changes as the slider-bar indicator is
dragged, and the document preview image is updated to the new image scale. Each click on the
arrows increases or decreases the scale by 1%. Each click on the slider bar affects the scale by 10%.
You cannot achieve an exact value by dragging the slider-bar indicator. Instead, either use the slider-
bar indicator to approximate the value that you want and then use the arrows to refine the value, or
type the value into the entry box.
34 Chapter 2 Windows software description and installation ENWW

The following settings disable % of actual size:
●
Print document on (on the Effects tab) is selected
●
Pages per sheet (on the Finishing tab) is not 1
Document preview image
The document preview image is a line-drawn image of a page that represents graphics and text. The
document preview image is always oriented so that the contents of the page are right-side-up. The
document preview image appears in the upper-right corner of the following Printing Preferences driver
tabs:
●
Printing Shortcuts
●
Paper/Quality
●
Effects
●
Finishing
Switching between tabs does not change the location or appearance of the document preview image.
When you move the mouse over the document preview image, the mouse cursor changes from an
arrow to a gloved hand. You can toggle between portrait and landscape page orientation by clicking
the image.
Watermarks
Use the Watermarks feature to select a watermark, create a new watermark (text only), or edit an
existing watermark. The following watermarks are preset in the driver:
●
(none)
●
[Username]
●
Confidential
●
Draft
●
SAMPLE
The Watermarks feature can be configured using the Driver Configuration Utility.
If the [Username] watermark is selected, the driver will use the network username of the logged in
user for the watermark.
The drop-down menu shows alphabetically sorted watermarks that are currently available on the
system, plus the string «(none),» which indicates that no watermark is selected. This is the default
setting. Any watermark that is selected from this list appears in the preview image.
When the First page only check box is selected, the watermark is printed only on the first page of
the document. The First page only check box is disabled when the current watermark selection is
«(none).”
ENWW
HP LaserJet software components for Windows
35
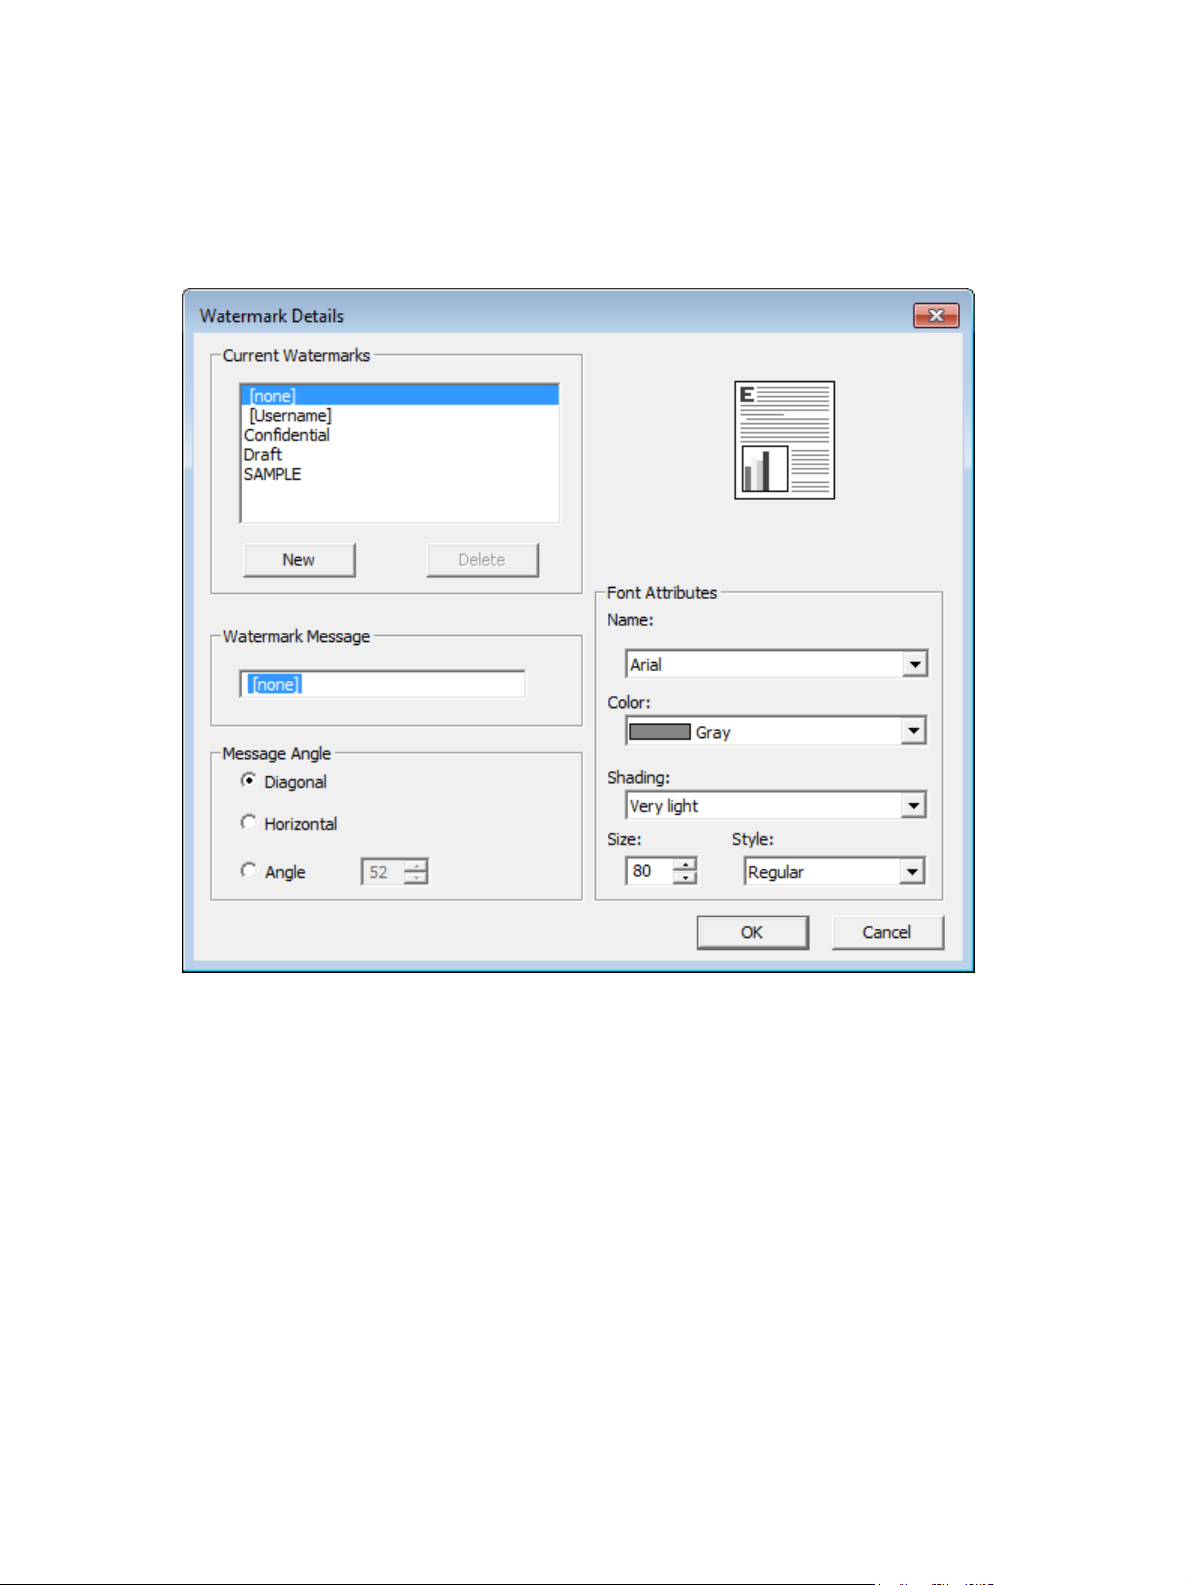
Watermarks are applied to logical pages. For example, when Pages per sheet is set to «4» and
First page only is turned off, four watermarks appear on the physical page (one on each logical
page).
Click Edit, and the Watermark Details dialog box appears.
Figure 2-7 Watermark Details dialog box
The dialog box shows a preview image and provides options for creating a new watermark and
controlling the message angle and font attributes.
Click OK to accept all of the changes that are made in the Watermark Details dialog box.
However, clicking Cancel does not cancel all of the changes. If you make changes to a watermark
and then select a different watermark or click New, all of the changes are saved, and only the current,
unsaved changes can be canceled.
Current Watermarks
The Current Watermarks group box contains a list of available watermarks, both predefined
watermarks that are available in the driver and any new watermarks that you have created.
To create a new watermark, click New. The new watermark appears in the Current Watermarks
list and in the Watermark Message edit box as «Untitled» until you name it. The name that you
type in the Watermark Message field appears in the Current Watermarks group box in the
Watermark Details dialog box and in the Watermarks group box on the Effects tab.
36 Chapter 2 Windows software description and installation ENWW

To name the new watermark, type the selected watermark text in the Watermark Message edit
box.
To delete a watermark, select the watermark in the Current Watermarks list, and then click Delete.
A warning appears asking whether you are sure you want to delete the selected item. Click Cancel if
you want to keep the watermark. Click OK to delete the selected watermark.
NOTE: You can have no more that 30 watermarks in the Current Watermarks list at one time.
When you reach the limit of 30 watermarks, the New button is disabled.
To edit an existing watermark, select the watermark in the Current Watermarks list. If you change
the Watermark Message for that watermark, you are, in effect, creating a new watermark.
Watermark Message
The Watermark Message is also the name that identifies the watermark in the Current
Watermarks list, except when more than one watermark has the same message. For example, you
might want several different watermarks with the message DRAFT, each with a different typeface or font
size. When this occurs, the string is appended with a space, a pound sign, and a number (for
example, Draft #2). When a number is added, the number two is used first, but if the resulting name
is also in the list, then the number increases until the name is unique (Draft #3, Draft #4, and so on).
Message Angle
Use the controls in the Message Angle group box to print the watermark in different orientations on
the page. All settings center the watermark string within the page; the selection of a particular setting
affects only the angle of the string placement. The following settings are available:
●
Diagonal. This is the default setting. Select this setting to place the text along a line that spans
the lower-left to upper-right corners of the page.
●
Horizontal. Select this setting to place the text along a line that spans the mid-left and mid-right
edges of the page.
●
Angle. Select this setting to place the text at the specified angle across the page. Use the numeric
spin box to select the angle.
Font Attributes
Use the controls in the Font Attributes group box to change the font and the shading, size, and style
of the font.
The Font Attributes group box contains the following controls:
●
Name
The Name drop-down menu lists fonts that are currently installed on the system. The default is
language-dependent.
●
Color
The Color drop-down menu contains the following selections:
◦
Gray
ENWW
HP LaserJet software components for Windows
37

●
Shading
The default Shading setting for new and preset watermarks is Very light. The following range
of shades is available from the Shading drop-down menu:
◦
Lightest
◦
Very light (default)
◦
Light
◦
Medium light
◦
Medium
◦
Medium dark
◦
Dark
◦
Very dark
◦
Darkest
These values represent the intensity of the gray that is used. Select Light to produce a lightly
saturated gray watermark. Select Lightest to produce the lightest shade of watermark. Select
Darkest to produce a black watermark.
●
Size
Font sizes from 1 to 999 points are available from the Size menu. The default point size is
language-dependent.
●
Style
The following settings are available:
◦
Regular
◦
Bold
◦
Italic
◦
Bold Italic
The default Style setting for new and preset watermarks is Regular.
Default watermark settings
The following table shows Font Attribute settings for new and preset watermarks.
Table 2-1 Font Attribute settings for new and preset watermarks
Setting New watermark Preset watermark
Name Arial Varies by language
Color Gray Gray
Shading Very light Very light
38 Chapter 2 Windows software description and installation ENWW
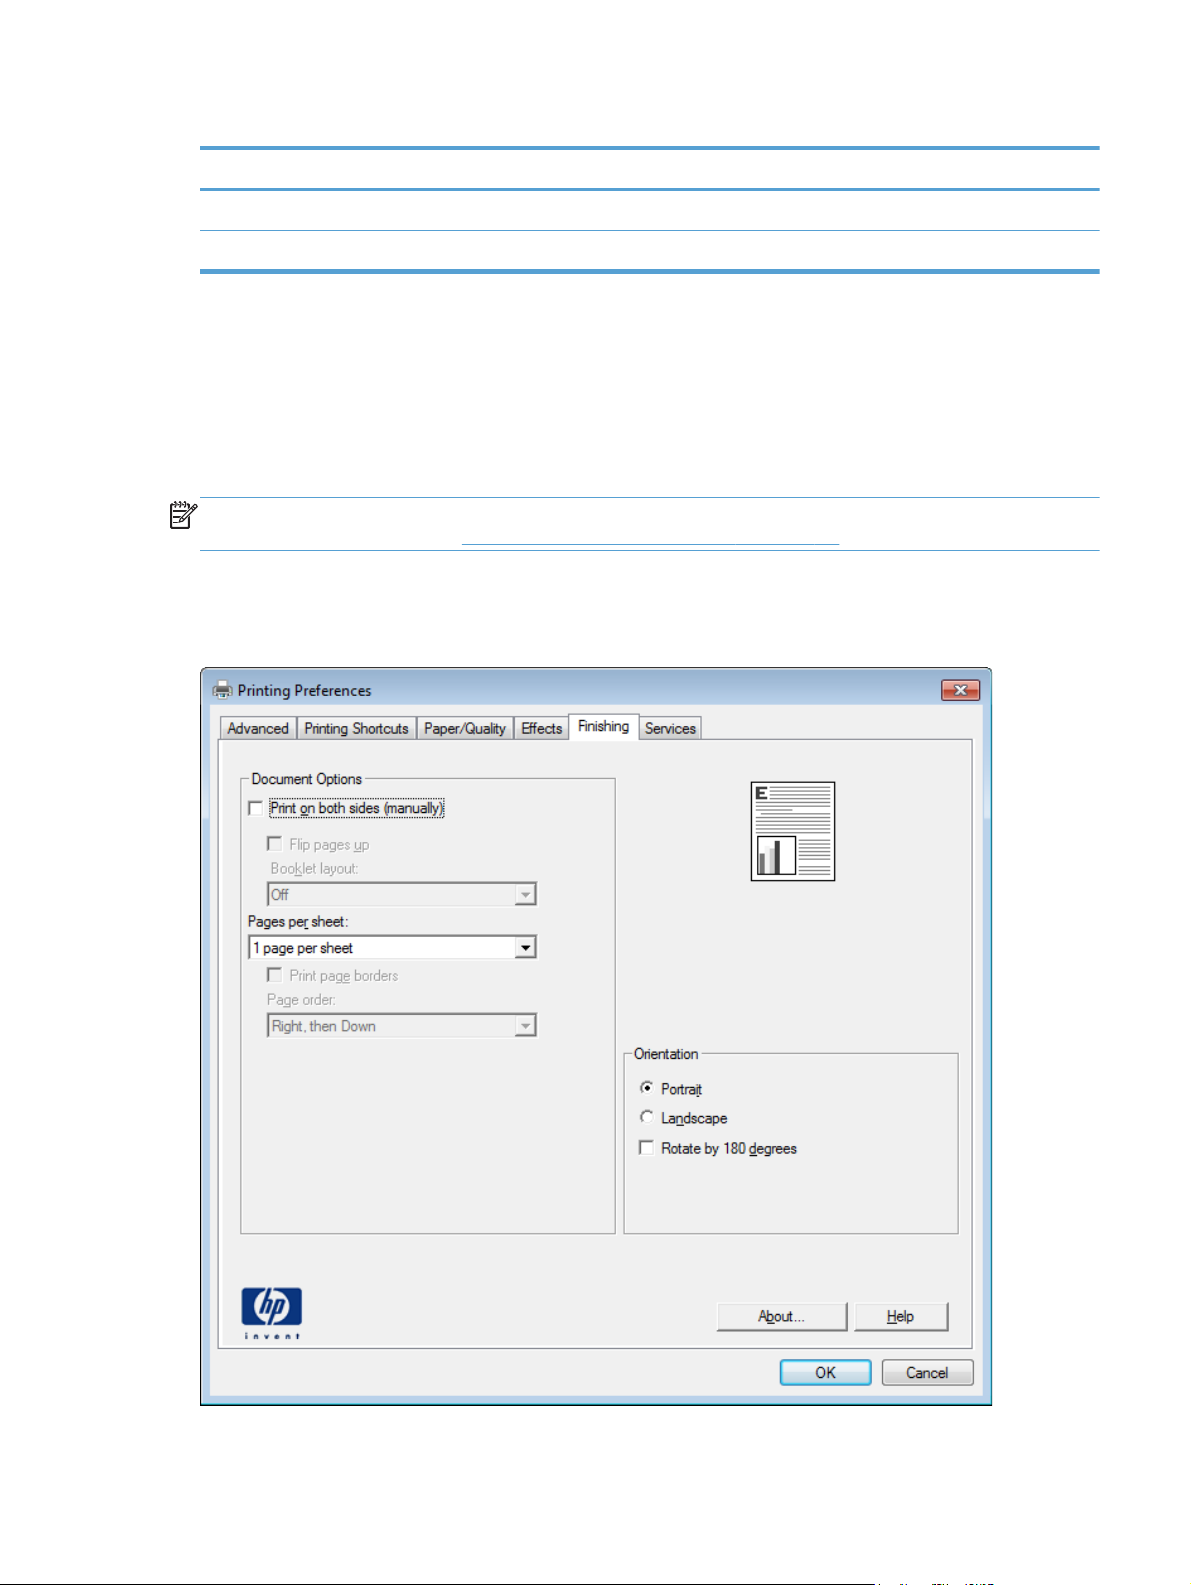
Table 2-1 Font Attribute settings for new and preset watermarks (continued)
Setting New watermark Preset watermark
Size 80 Varies by language
Style Regular Regular
Click the OK button to accept all of the changes that have been made in the Watermark Details
dialog box. Clicking the Cancel button does not cancel all of the changes. If you make changes to a
watermark and then select a different watermark or click New, all of the changes are saved, and only
the current, unsaved changes can be canceled.
Finishing tab features
NOTE: The Finishing tab is located on the Printing Preferences tab set. For information about
how to access these tabs, see
Printing Preferences driver tabs on page 16.
Use the Finishing tab to print booklets and control the paper output. The following figure shows the
Finishing tab.
Figure 2-8 Finishing tab
The Finishing tab contains the following controls:
ENWW
HP LaserJet software components for Windows
39

●
Document Options
●
Document preview image
●
Orientation
Document Options
The Document Options group box contains the following controls:
●
Print on both sides
●
Flip pages up
●
Booklet layout
●
Pages per sheet
●
Print page borders
●
Page order
Print on both sides
NOTE: For models that do not have the automatic duplexing feature, this feature appears as Print
on both sides (manually).
The default setting for the Print on both sides option is off (not selected).
Print on both sides is available when the following conditions exist:
●
Paper type on the Paper/Quality tab is set to any paper type except for the following
types:
◦
Labels
◦
Laser Transparency
◦
Envelope
◦
Opaque Film
●
Paper sizes is set to any paper size except for the following sizes:
◦
Envelope #10
◦
Double Japan Postcard Rotated
◦
Envelope Monarch
◦
Envelope B5
◦
Envelope C5
◦
Envelope DL
Select the Print on Both Sides check box to print on the second side of the paper.
40 Chapter 2 Windows software description and installation ENWW
 Loading…