Сегодня речь пойдет о молодом бренде телевизоров iFFALСON, которые сочетают в себе критерии высокого качества и выгодной цены. Данная техника работает на платформе Android TV, что позволяет получить доступ к Плей маркету, где доступны сотни различных приложений для скачивания.
Давайте разберемся как самостоятельно на данном телевизоре настроить каналы цифрового телевидения. Для этого необходимо подключить телевизор iFFALСON к источнику сигнала. Это может быть ДМВ антенна для приема бесплатного эфирного цифрового ТВ или же кабельное телевидения. Также большинство моделей можно подключить к спутниковому провайдеру, таким как МТС ТВ, Трикролор, НТВ+ или Телекарта, без использования ресивера.
Автонастройка каналов
Если вам необходимо быстро произвести поиск всех доступных телеканалов используйте опцию автопоиска. Как это сделать читайте далее.

- С помощью пульта заходим в главное меню нажав кнопку НОМЕ.
- Выбираем источник сигнала Телевидение.
- Далее вам необходимо войти в настройки ТВ, для этого нажмите на значок настроек.
- Выбираем раздел меню Канал.

- Выбираем правильно Режим установки канала в соответствии с тем какой источник вы используете. Для приема каналов DVB-T2 обязательно выбираем Антенну. Если у вас кабельное ставим Кабель. Для спутникового вещания выбираем соответственно Спутник.
- После изменения параметров тюнера нажимаем на каналы.
- В следующем разделе нажимаем на Сканирование каналов и ждем окончания процесса.
- Если вы выбрали Кабель, необходимо будет выбрать тип поиска Полный, и только после этого запускаем сканирование.

- Также рекомендуем вам отключить функцию LCN для сортировки программ.
Ручной поиск
Для данных телевизоров есть возможность найти каналы одного мультиплекса. Для этого вам нужно знать параметры сети, а именно номер частоты ЦЭТВ которая вещает в вашем населенном пункте. Узнать частоты РТРС можно на сайте Смотри цифру РФ используя интерактивную карту местности.

- С помощью пульта заходим в настройки.
- Переходим в пункт канал.
- Далее в списке параметров заходим в Канал.
- Выбираем Одиночное сканирование rf.
- Водим частоту и сканируем.
- Повторяем процедуру для следующего мультиплекса.
- После сохранения выходим нажав на кнопку EXIT.
Настройка интернета
iFFALСON это идеальный Смарт телевизор, так как работает на Андроиде. Однако для того чтобы на вашем ТВ появилась возможность выходить в глобальную сеть, необходимо иметь рабочую точку доступа интернета. Если вы планируете произвести подключение через беспроводную технологию WI-FI, заранее уточните данные вашего роутера, которые потребуется вам для соединения.

- С помощью пульта переходим в главное меню Smart TV.
- Переходим в раздел настройки.
- Нажимаем на Сеть и Интернет.
- Если у вас проводное, то соединяем телевизор и роутер кабелем и выбираем соответствующий пункт синхронизации.
- Для подключения телевизора с помощью WI-FI нажимаем на обновить.
- Выбираем в списке доступных устройств, свою точку доступа.
- Вводим пароль.
- Телевизор сообщит вам о удачном завершении процесса.
Если вы видите Подключено, без доступа в Интернет, скорее всего у вас неправильно установлено время и дата.
User Manual for iFFALCON models including: LED TV, F2A series
72-RT41KT-EAP1C R1
72-RT41KT-EAP1C R1 — TCL
your schedule list. 3. Press GUIDE or EXIT to exit EPG. Bluetooth
Note: Figures and illustrations in this operation manual are provided for reference only and may differ from actual product appearance. Certain function may not …
Note: Instructions below are just the usual ways to connect your TV to the wired or wireless network. The connection method may be different depending on your …
- PDF Viewer
- Universal Document Viewer
- Google Docs View
- Google Drive View
- Download Document [pdf]
- Download Document [Optimized]
- Document:
- Text
- References
Not Your Device? Search For Manuals / Datasheets:
File Info : application/pdf, 18 Pages, 1.57MB
DocumentA1URiQV0ETS
For use with models: F2A series

Table of Contents

Chapter 1: Introduction
Precautions ...............................................................3 Warning ...................................................................3 Product ....................................................................3 Power and Plug .......................................................3 Power Cord and Signal Cable .................................3 Use Environment .....................................................3 Cleaning ..................................................................3 Hanging the TV Set on the Wall ...............................3
Sockets ......................................................................4 Remote Control Functions ...................................... 5
Installing Batteries ....................................................5 Exclusive Remote Control .......................................6
How to Use the Remote Control................................6 Installing Batteries ...................................................6
Chapter 2: Getting Started
Switching On .............................................................7 Switching Off .............................................................7 Network Connection .................................................8 TV Buttons ...........................................................9 Initial Setup .............................................................9

Network Wake Up ................................................12 Using Instant Power On ..........................................12 T-Link .......................................................................12
Enabling or Disabling T-Link ...................................12 Using Auto Power On .............................................12 Using Auto Standby ................................................12 Using EPG (Electronic Program Guide) ...................12 Bluetooth Function .................................................12 Netflix Settings ........................................................13 Password in Parental Control ................................13
Chapter 5: Other Information
Problems & Solutions .............................................14 Troubleshooting .....................................................15 Legal Statement ......................................................16

Chapter 3: Basic TV Operations
Accessing Channels ..............................................10 Watching Connected Devices ...............................10 Adjusting Volume ...................................................10 Accessing Smart TV Homepage ............................10 Accessing T recommended ....................................10
Using System Settings menu .................................10 Using TV Settings Menu ........................................10

Chapter 4: Using More of Your TV
Installing Channels ................................................11 Using Subtitles ........................................................11
Turning On/Off Subtitles .........................................11 Enabling Subtitle Languages on Digital TV Channels ................................................................11 Selecting a Subtitle Type on Digital TV Channels ...11 Using Teletext .........................................................11 Selecting Decoding Page Language ......................11 Digital Teletext Language .......................................11

2

Chapter 1

Introduction

Precautions
Read all of the instructions before operating the set. Keep these instructions well for future use.
Warning
Never place a television set in an unstable location. A television set may fall, causing serious personal injury or death. Many injuries, particularly to children, can be avoided by taking simple precautions such as:
- Using cabinets or stands recommended by the manufacturer of the television set.
- Only using furniture that can safely support the television set.
- Ensuring the television set is not overhanging the edge of the supporting furniture.
- Not placing the television set on tall furniture (for example, cupboards or bookcases) without anchoring both the furniture and the television set to a suitable support.
- Not placing the television set on cloth or other materials that may be located between the television set and supporting furniture.
- Educating children about the dangers of climbing on furniture to reach the television set or its controls.
If your existing television set is being retained and relocated, the same considerations as above should be applied.
Product
· Do not block or cover the ventilation openings on the back cover.
· Do not push objects of any kind into this unit through the cabinet slots as they could touch the current carrying parts or short-circuit parts, resulting in fire, electric shock, or damage to the unit.
· Do not attempt to open the cabinet as this may cause damage. There are no parts inside you can service by yourself. Refer all servicing to qualified personnel.
· Do not touch the screen surface with fingers as this may scratch or mar the TV screen.
· Do not impact the TV screen with hard pressure as this may damage the TV screen severely.
Power and Plug
· Unplug the set under the following conditions:
- If the set will not be used for a long period of time. - If the power cord or the power outlet/plug is
damaged. - Follow the instructions to install and adjust the
product. Adjust those controls that are covered in these operating instructions as improper adjustment of other controls may result in damage. If this happens, unplug the set and refer to the service personnel. - If the set is subject to impact or has been dropped and the cabinet has been damaged.
· Where the mains plug or an appliance coupler is used as disconnect device, the disconnect device shall remain readily operable.

(*Where an all-pole mains switch is used as the disconnect device, the switch shall remain readily operable.)
Power Cord and Signal Cable
· Do not allow anything to rest on or roll over the power cord and the signal cable.
· Protect the power cord and the signal cable from being trampled.
· Do not overload the power cord or the power outlet. · Do not expose the power cord and the signal cable to
moisture.
Use Environment
· Do not place the set on an unstable cart, stand, or table.
· Place the set on a place that allows good ventilation. · Do not use the set near damp, and cold areas. · Do not expose the set to excessive heat such as direct
sunlight, fire, or the like and no naked flame sources, such as lighted candles, should be placed on the apparatus. · Do not expose the set to dripping or splashing and no objects filled with liquids, such as vases, shall be placed on the apparatus. · Do not use the set in dusty environments. · Operating Temperature: 5°C to 35°C (41°F to 95°F) Operating Humidity: 20% to 80%, non-condensing
Storage Temperature: -15°C to 45°C (5°F to 113°F)
Storage Humidity: 10% to 90%, non-condensing
Cleaning
· Dust the set by wiping the screen and the cabinet with a soft, clean cloth or some special liquid cleaner.
· Do not apply excessive force to the screen when cleaning.
· Do not use water or other chemical cleaner to clean the screen as this may damage the surface of the TV screen.
Hanging the TV Set on the Wall
Warning: This operation requires two people.
To ensure a safe installation, observe the following safety notes:
· Check that the wall can support the weight of the TV set and wall mount assembly.
· Follow the mounting instructions provided with the wall mount.
· The TV set must be installed on a vertical wall. · Make sure to use only screws suitable for the material
of the wall. · Make sure that the TV set cables are placed so that
there is no danger of tripping over them.
All other safety instructions about our TV sets are also applicable here. (Note: Certain TV model is not designed to be mounted to the wall.)

3

Introduction

Sockets
Note: The location and names of the sockets on the TV may vary according to TV model, and not all sockets available on all models.

LAN

LAN

Router / Modem

This socket can be used to connect to external modem or network

access equipment.

SPDIF

SPDIF socket (output)
This socket can be used to connect a compatible digital audio receiver.

HDMI (SERVICE) or HDMI
(ARC)
USB 2.0

HDMI(SERVICE) or HDMI(ARC) socket (input)
The HDMI (High-Definition Multimedia Interface) socket can be used to connect a Blu-ray player, PC with a compatible video card installed, certain DVD players or a high-definition compatible digital satellite decoder. This socket provides an uncompressed digital connection that carries both video and audio data by way of an integrated mini-plug cable.
HDD
USB2.0 socket (input) These sockets can be used to connect a USB device. Note: The number of USB sockets on the TV may vary according to TV model.

ANTENNA /CABLE IN

ANTENNA/CABLE IN socket (input)
This socket can be used to connect the outside aerial or cable network.

AV IN adapter

V

L

R

V

L

R

V

L

R

AV IN adapter socket The AV IN adapter socket can be used to connect the attached AV adapter cable with VIDEO and AUDIO L & R IN sockets. The AV IN sockets can be used to connect a range of equipment, including video recorders, camcorders, decoders, satellite receivers, DVD players, or games consoles.

Headphone socket (output) This socket can be used to connect headphones or stereo earphones. Warning: Excessive sound pressure from earphones and earphones and headphones can cause hearing loss.

4

Introduction

Remote Control Functions

Most of your television's functions are available via the menus that appear on the screen. The remote control(s) supplied with your set can be used to navigate through the menus and to configure all the general settings.
Note: Figures and illustrations in this operation manual are provided for reference only and may differ from actual product appearance. Certain function may not be available for some models, e.g. GUIDE/SUBTITLE functions are only available under DTV source. And DTV is not available for certain model.

To switch the sound off and back on.

Standby / quit standby.

Numeric buttons To enter channel numbers or a digit.

To access T recommended apps.

LIST To display the channel list.

/ To control the volume.

To display program information, if available.

To display the Settings menu.

P / To change channels.

To access the Smart TV homepage.

/// OK

To display the Option menu. Navigation direction buttons. To confirm an entry or selection. To return to the previous menu or quit an App.

To select input source.

EXIT To exit the Settings menu.

LANG To select an audio language available for selected digital TV program.

GUIDE To toggle the Electronic Program Guide on or off. (only available for digital channels.)

TEXT To toggle Teletext on or off.
SUBT. To select a subtitle language available for selected digital TV program.

Colour buttons To select tasks or Teletext pages.

To start fast reverse.

To pause playback.

To start fast forward.

ZOOM

To select the desired screen format. Note: You are recommended to use the full screen mode. Do not use the display mode with black bars on both sides of the picture (such as 4:3) for a long time; otherwise the TV screen may be damaged permanently.

To start playback.

To stop playback.

To access Netflix. (Not available for some models.)

Installing Batteries

1

2

1. Push to open the back cover as illustrated.

2. Insert two AAA batteries according to the

3

polarities marked on the battery case.

3. Replace the back cover as illustrated.

5

Introduction

Exclusive Remote Control

To switch the sound off and back on.

Standby / quit standby.

/ To control the volume.

To access T recommended apps.

To display the Settings menu.

P/

To change channels. To access the Smart TV homepage. To select input source.

/ / / Navigation direction buttons.

OK To confirm an entry or selection. To return to the previous menu or quit an App.

To display the Option menu.

To access Netflix. (Not available for some models.)

To pop up the virtual remote control keyboard when available.

To turn on the voice function. (Available only when the network connection works normally.)

Note: This remote control is only available for selected models. The remote control type may be changed without notice.

How to Use the Remote Control
When using button for the first time, you will be prompted to pair the remote with the TV. Please follow the on-screen guide for paring instructions.
a.Keep the remote control and TV in 1 meter, press OK and button on the remote at the same time. You can use
button after activating successfully.
b.This voice search function is only available for content search from certain apps.
c.Set languages in the TV settings to your local language or official language to enhance voice search successfully.
Installing Batteries
1. Hold the bottom part of the remote control, use a plastic coin-shaped object to twist the switch to the "Open" location as illustrated.
2. Pull out the battery cover.
3. Insert two AAA batteries according to the polarities marked on the battery case.
4. Replace the battery cover and use a plastic coin-shaped object to twist the switch to the "Close" location.

Close Open

6

Chapter 2

Getting Started
Switching On
Follow the instructions on this page on how to switch on your TV set and the remote control before going on to following pages describing how to use the channel set-up procedure.
1. Insert two AAA batteries in the remote control. Precautions on using batteries: - Only use the battery types specified. - Make sure you use the correct polarity. - Do not mix new and used batteries. - Do not use rechargeable batteries. - Do not expose batteries to excessive heat such as sunshine, fire or the like, throw them in a fire, recharge them or try to open them, as this could cause them to leak or explode. - Remove the batteries from the remote control if you are not using it for a long period of time. - Attention should be drawn to the environmental aspects of battery disposal.
2. Connect the power cable FIRST to the television, THEN to a mains socket. (Note: If the power cable is connected to the television, please only connect the power cable to the mains socket.)
Your TV set should only be connected to an AC supply. It must not be connected to a DC supply. If the plug is detached from the cable, do not, under any circumstances, connect it to a mains socket, as there is a risk of electric shock. Note: The figures are for representation only, the location of power socket of the television may differ depending on the model.
3. Connect an outside aerial to the ANTENNA IN socket at the back of the TV set. The aerial socket (75 OHM - VHF / UHF / cable) can be used for connecting an external aerial or other equipment fitted. Note: If you want to receive the signal from your cable or cable box, please connect a coaxial cable to the CABLE IN socket at the back of the TV set.
4. When powered on, the TV will be turned on directly or be in standby mode. If the power indicator lights up, the TV set is in standby mode. Press the button on the remote control or on the TV set to turn on the TV.
Switching Off
· To put the TV set into standby mode, press the button on the remote control. The TV set remains powered up, but with low energy consumption.
· To switch off the TV set, unplug the mains socket from the mains outlet.
7

Getting Started

Network Connection

Your TV will require an internet connection to operate all functions. Data usage charges may apply. Please refer to your Internet Service Provider (ISP) for additional information.
To access the Internet, you must subscribe to high speed broadband Internet service with your Internet service provider (ISP). Your TV can be connected to your home network in two ways:
· Wired, using the RJ45 (LAN) connector on the back panel. · Wireless, using the internal wireless and your home wireless network.
Note: Instructions below are just the usual ways to connect your TV to the wired or wireless network. The connection method may be different depending on your actual network configuration. If you have any questions about your home network, please refer to your ISP.

Connecting to a Wired Network To connect to a wired network:
1. Ensure you have:
· An Ethernet cable long enough to reach your TV · A router or modem with an available Ethernet
port · A high-speed Internet connection · An Ethernet (LAN) port on the back of the TV
2. Connect your Ethernet cable to the router and to the Ethernet port on the back of the TV.
3. Use the Network menu to configure the TV.

Router LAN port

Modem

Internet

Connecting to a Wireless Network To connect to a wireless network: 1. Ensure you have:
· A router broadcasting a high-speed wireless signal
· A high-speed Internet connection
2. Use the Network menu to configure the TV.

Modem

Internet

Wireless router

Note: Please follow below steps to enter the Network menu.
1. Press on the remote control to display the Smart TV homepage. 2. Press // to move the cursor to (Settings) on the right top of the screen and press OK to enter. 3. Press / to select Network, then press OK to enter the submenu and follow the on-screen guidance to
set up your network.

8

Getting Started

TV Buttons

If the batteries in your remote control are run down, you can use the buttons on your TV set. They have the following functions:

For models with below buttons on the set: /
/ Features (Short press)
(Long press)

For models with below buttons on the set:

TV mode

In menus

P


P


Features (Long press) Features (Long press)

OK (Short press)

OK (Short press)

For models with only one button on the set:

Power on/Standby

Note: Figures and illustrations are provided for reference only and may vary depending on the model.

Initial Setup
The first time you switch the set on, the Welcome screen appears, which guides you through the initial setup process. Follow the on-screen instructions to finish the initial setup process such as selecting the language, connecting to the network, scanning channels, and more. During each step, either make a choice or skip the step. If you skip a step, you can perform the setup later from the settings menu.
Note: If the channel search retrieved only the analogue channels it could be caused by poor broadcasting and therefore is not covered by manufacturer warranty. Manufacturers cannot be held responsible for lack of or poor broadcasting in some areas.

9

Chapter 3

Basic TV Operations

Accessing Channels
Using the numeric buttons: press the corresponding numeric buttons on the remote control to access the channels. Using the P / buttons: press the P / buttons on the remote control or the corresponding buttons on the TV set to scroll through the channels. Using the LIST button: press the LIST button on the remote control to display the channel list and press /// and OK to select channels.
Watching Connected Devices
Press on the remote control to display the source list. Press / to select TV or other input sources and press OK to confirm. You can also press on the remote control to display the homepage, press / to move the cursor to the
(Inputs) area on the right top of the screen, and press OK to enter. Then press / and OK to select the input source.
Adjusting Volume
Volume control: press the / buttons on the remote control or the corresponding buttons on the TV set to increase or decrease the volume. Sound mute: press the button to temporarily mute the sound. Press this button again or the button to restore the sound.
Accessing Smart TV Homepage
Allows you to enjoy Internet Applications (Apps) and specially adapted Internet websites, and perform system settings for your TV. You can make controlling with the TV remote control.
WARNING: · Configure the network settings before using Smart TV
applications. · Slow responses and/or interruptions may occur,
depending on your network conditions. · If you experience a problem using an application,
please contact the content provider. · According to circumstances of the content provider, an
application's updates or the application itself may be discontinued. · Depending on your country's regulations, some applications may have limited service or not be supported. · Changes in application content may be made without prior notice by the service provider. 1. Press on the remote control to display the Smart
TV homepage.

2. Press /// and OK to enter the desired Apps, functions or settings.
3. Press to return to the homepage. 4. To exit the homepage, press // to move the
cursor to the (Inputs) area on the right top of the screen, press OK to enter and then press / and OK to select your desired input source.
Note: Since the connection with Internet takes time, it's recommended that you wait a few minutes to use the Smart TV feature after activation of TV from standby.
Accessing T recommended
Allows you to enjoy Internet Applications (Apps). 1. Press on the remote control to display the
recommended apps. 2. Press /// and OK to enter the desired Apps. 3. Press to return to the recommend page and exit.
Using System Settings menu
Allows you to not only adjust device settings, such as Network, Inputs, Google Cast, Power and Apps, etc., but also set preferences. 1. Press on the remote control to display the Smart
TV homepage. 2. Press // to move the cursor to (Settings) on
the right top of the screen and press OK to enter the system settings. 3. Press / to choose the items and press OK to enter. 4. Press to return to previous interface.
5. Press EXIT to close the menu.
Using TV Settings menu
Allows you to adjust TV settings, such as picture and sound. 1. Press on the remote control to display the Settings
menu. 2. Press / to select the desired item, then press
OK/ to enter the corresponding submenu. 3. In submenus, press / to select menu options,
then press OK/ to enter the option list, the adjustment interface, or the corresponding submenu. 4. Press to return to the previous menu. 5. Press EXIT or to close the menu.
Notes: - You can also press on the remote control, select Settings (if available) and press OK to enter the Settings menu. Some options may not be available for certain signal sources. - Setting LED Motion clear on will make fast moving images clearer by controlling the LED backlight, but the picture will be darker and more flickering than with LED Motion clear off.

10

Chapter 4

Using More of Your TV

Installing Channels
This section describes how to search and store channels automatically. This may be done in any of the cases below:
- you have skipped the channel installation step in the initial setup;
- you are prompted that there are no channels in TV mode;
- you want to update your channels.
1. In TV mode, press on the remote control and select Channel > Channel scan. Press OK/ to enter.
2. The TV installs and arranges channels according to your country or region. Press / to select Country/Region, and press OK/ to enter. Enter the default password 1234 or your own password in case you have changed the password in the System > Lock menu. Press / to select your country or region and press OK to confirm.
3. Press / to select Automatic search and press OK/ to enter.
4. Press / to select Tuner mode and press / to select Cable or Antenna.
5. Press / to select other options and use / to configure.
6. After configuration is completed, press  to select Search and press OK to start scanning channels.
7. The channel search may take a few minutes. After the automatic search, channels are arranged in a preset order. If you wish to hide or swap channels, press on the remote control, select Channel > Channel organizer and press OK/ to enter.
Using Subtitles
You can enable subtitles for each TV channel. Subtitles are broadcast via Teletext or DVB-T/DVB-C digital broadcasts. With digital broadcasts, you have the additional option of selecting a preferred subtitle language.
Note: Some options are available only when Subtitle is set to On.
Turning On/Off Subtitles
1. Press on the remote control, select Channel > Subtitle and press OK/ to enter.
2. Select the Subtitle option, press OK/ to enter, press / to select On or Off and press OK to confirm.
3. Press EXIT or to close the menu. Enabling Subtitle Languages on Digital TV Channels

1. Press on the remote control, select Channel > Subtitle > Digital subtitle language 1st and press OK/ to enter.
2. Press / to select a subtitle language as your preferred language and press OK to confirm.
3. Press / to select Digital subtitle language 2nd and press OK/ to enter.
4. Press / to select a secondary subtitle language and press OK to confirm.
5. Press EXIT or to close the menu.
Shortcut operation: Press SUBT. on the remote control to directly select a subtitle language available for the selected digital TV program.
Selecting a Subtitle Type on Digital TV Channels
1. Press on the remote control, select Channel > Subtitle > Subtitle type and press OK/ to enter.
2. Press / to select a subtitle type and press OK to confirm. You can select Hearing impaired to display the hearing impaired subtitles with your selected language.
3. Press EXIT or to close the menu.
Using Teletext
Selecting Decoding Page Language
1. Press on the remote control, select Channel > Teletext > Decoding page language and press OK/ to enter.
2. Press / to select a proper type of language in which Teletext will display and press OK to confirm.
3. Press EXIT or to close the menu.
Digital Teletext Language
On digital TV channels, depending on the broadcaster, you may be able to enjoy a service with multiple initial Teletext pages in different languages. This function allows you to select an available language as primary language, which relates to different initial Teletext pages.
1. Press on the remote control, select Channel > Teletext > Digital teletext language and press OK/ to enter.
2. Press / to select a language and press OK to confirm.
3. Press EXIT or to close the menu.

11

Using More of Your TV

Network Wake Up
This function allows you to turn on your TV from standby mode via a network. To use this function, please make sure:
1. Your TV is connected to an effective home network; 2. The desired controller, such as a smartphone, is
connected to the same network as your TV; 3. An App which supports network waking up function,
has been installed into the controller; 4. Networked standby is set to On in the Network
menu under homepage by pressing > (Settings) > Network.
When the TV is in networked standby mode, you can use the App to wake up the TV remotely.
Using Instant Power On
It enables you to turn on your TV faster from standby mode than turning this function off, but it will also increase standby power consumption.
1. Press on the remote control to display the homepage, Press / to select > Device > Power > Instant power on and press OK to toggle between On and Off.
2. Press to return to the homepage.
T-Link
Use this function to search for CEC devices connected to the HDMI sockets in your TV and enable auto power on and auto standby between the TV and CEC devices.
Enabling or Disabling T-Link
1. Press on the remote control, select System > T-Link and press OK/ to enter.
2. Press / to select T-Link and press OK/ to enter.
3. Press / to select On or Off and press OK to confirm.
4. Press EXIT or to close the menu.
Using Auto Power On
Enables the TV to automatically power on when you power on a CEC device (e.g. DVD) with the device's remote. Select On to enable this function.
Using Auto Standby
Enables all CEC devices to automatically go to the standby mode when you turn off the TV with the TV remote. Select On to enable this function.
Note: The CEC functions depend on the devices connected and it is possible that some devices may not interoperate correctly when connected to this TV. The user manual or the manufacturer of the problematic

devices should be consulted for further information.
Using EPG (Electronic Program Guide)
EPG is an on-screen guide that displays scheduled digital TV programs. You can navigate, select and view programs.
1. Press GUIDE on the remote control, the Program Guide menu will appear, which allows you to get information about the current or next program playing on each channel. Navigate through the different programs using the /// buttons on the remote control.
2. Use the related buttons shown at the bottom of the screen to view EPG.
- Program filter: Program guide filter for digital TV programs. · Press to display the type list of the program. · Navigate through the different types using the / buttons on the remote control. · Select one or more types, which you want to highlight from the type list, press OK to select or deselect. A checkmark will appear to the right of the type when selected.
- Custom schedule: Press / to select a program, then press the RED button to set the schedule, press OK to enter Schedule reminder.
- Select date: Press the GREEN button to select date.
- Schedule list: Press the YELLOW button to view your schedule list.
3. Press GUIDE or EXIT to exit EPG.
Bluetooth Function
(* not available for some models) You can connect Bluetooth audio device, mouse or keyboard via the TV.
1. Press on the remote control, move to the Settings area, select Settings and press OK to enter.
2. Move to the Remote & accessories area, select Add accessory and press OK to enter. The TV will search nearby Bluetooth devices automatically.
3. Select an available device, press OK and follow the guides on the screen to connect it.
Note: Bluetooth technology (if available in your TV) uses 2.4GHz frequency thus close proximity to WiFi access points, routers or microwave ovens might interfere with Bluetooth audio streaming. If you face interruptions in audio reception, you should restart your Bluetooth device to find frequency with less interferences and if you continue to face issues you should move closer to TV or increase space between TV and source of interferences.

12

Netflix settings
Netflix provides on-demand movies and TV shows delivered via the Internet. Netflix is available in certain countries.Unlimited membership is required. More information can be found at www.netflix.com <http:// www.netflix.com/> . Note: you can directly access Netflix via clicking the Netflix button on the remote control.
Password in Parental Control
· The default password is 1234. You can change it to a new one.
· The super password is 0423. If you forget your code, enter the super password to override any existing codes.

Using More of Your TV

13

Chapter 5

Other Information

Problems & Solutions

Note: Problems & solutions 1 to 2 are for the TV models which have network functions, so users of non-connected TV models can disregard them.

1. Fail to link to the network. - Check if your TV is connected with the network; - Reboot your TV; - Consult your internet service provider, to confirm if access of your router is supported. Refer to the operation manual of your router. - Make sure your TV is connected to a router, and make sure your router is powered on. Check that your router/modem has an internet connection, and that your Ethernet cables/wireless connection is OK. Test your connection with a computer to make sure it is OK. Should the problem persist, contact customer service.
2. The video could not be played smoothly. - Videos from your USB flash drive --- It may result from data transmission, or its code flow is far beyond the supported formats of this TV set. - Videos downloaded from internet, or online videos. a. It may be caused by the lower bandwidth of your network. A high network speed is required to handle online videos. b. Peak internet usage times may affect the bandwidth. c. Check if any other computers on the same network are also operating, as they may be using up bandwidth. Especially if they are downloading or playing on-line videos. d. The video may not be smooth itself, it is not the problem of your TV or network.
3. When two mobile hard disks are connected with the TV at the same time, they will not be recognized some times.
- All mobile hard disks consume a lot of power, which may result in power supply problems. We recommend inserting only one hard disk, or a low power consumption mobile hard disk.
4. The video from a mobile hard disk (USB) is playing with no sound.
- The audio format of the video in your mobile hard disk is not supported by the TV player.
5. Some videos fail to play. - The formats of the videos may not be supported by the TV, especially videos shot by certain kinds of cameras, generally with their private protocol of formats, which are not compatible with your TV.
6. Video stops playing midway. - Mistakes may occur when videos are copied or

compressed, so they may automatically stop playing during playback.
7. What should I pay attention to, when I do SW updating?
- No power cuts when SW updating; - Avoid any operations with your remote control when
SW updating; - Depending on your internet connection speed, the
software updating process may take some time.
8. There are no distinct changes of TV interface after SW updating.
- Under certain conditions, SW updating may not only update or add new functions but also improve the performance of the TV set, without distinct changes to the user interface. Also, there may be no changes to the user interface at all.
9. What should I do when SW updating process stops due to a sudden power-off?
- If you do SW updating by USB, do not pluck the USB from your TV, and restart your TV to continue SW updating; If you do SW updating by Network, also restart your TV and check if it is well functioned.
10. With a USB device being inserted into the TV in advance, I am prompted that no USB devices are detected after I access Media, why?
- There may be something wrong with your mobile hard disk(s), damaged or with low voltage. You could increase power supply by inserting the two plugs on one end on the USB wire into TV's USB port simultaneously.
11. External device cannot be recognized. - Some external devices (e.g. webcam, smart phone, tablet, game handle, and external wireless adapter) may not be compatible with the TV and cannot be supported for certain functions (nScreen, wireless display, gesture control, face recognition, if any). Please try a similar device. If it does not work, contact your local dealer.
12. Voice search does not work. - Check if your remote control has been successfully paired with your TV. - Check if the language setting is correct. - Check if Google server is available and stable.

14

Other Information

Troubleshooting
Most problems you encounter with your TV can be corrected by consulting the following troubleshooting list.

No picture, no sound 1. Check if the fuse or circuit breaker is working. 2. Plug another electrical device into the outlet to make
sure it is working or turned on. 3. Power plug is in a bad contact with the outlet. 4. Check the signal source.
No color 1. Change the color system. 2. Adjust the saturation. 3. Try another channel. Black-white program may be
received.
Remote control does not work 1. Change the batteries. 2. Batteries are not installed correctly.
No picture, normal sound 1. Adjust the brightness and contrast. 2. Broadcasting failure may happen.
Normal picture, no sound 1. Press the VOLUME UP button to increase volume. 2. Volume is set to mute, press the MUTE button to
restore sound. 3. Change the sound system. 4. Broadcasting failure may happen.
Unorderly ripples on the picture It is usually caused by local interference, such as cars, daylight lamps and hair driers. Adjust the antenna to minimize the interference.

Snowy dots and interference If the antenna is located in the fringe area of a television signal where the signal is weak, the picture may be marred by dots. When the signal is extremely weak, it may be necessary to install a special antenna to improve the reception.
1. Adjust the position and orientation of the indoor/ outdoor antenna.
2. Check the connection of antenna.
3. Fine tune the channel.
4. Try another channel. Broadcasting failure may happen.
Ignition Black spots or horizontal streaks appear, or the picture flutters or drifts. This is usually caused by interference from car ignition system, neon lamps, electric drills, or other electrical appliance.
Ghost Ghosts are caused by the television signal following two paths. One is the direct path, the other is reflected from tall buildings, hills, or other objects. Changing the direction or position of the antenna may improve the reception.
Radio frequency interference This interference produces moving ripples or diagonal streaks, and in some case, loss of contrast in the picture. Find out and remove the radio interference source.
* To bring you better visual experience, please remove all labels from TV front panel and screen before use.

15

Other Information

Legal Statement
[Legal Statement] of manufacturer of this TV set
Due to the various capabilities of products featuring the SmartTV - Services, as well as limitations in the available content, certain features, applications, and services may not be available on all devices or in all territories. Some features on SmartTV may also require additional peripheral devices or membership fees that are sold separately. Please visit our website for more information on specific device information and content availability. The services and availability of content through SmartTV are subject to change from time to time without prior notice.
All content and services accessible through this device belong to third parties and are protected by copyright, patent, trademark and/or other intellectual property laws. Such content and services are provided solely for your personal noncommercial use. You may not use any content or services in a manner that has not been authorized by the content owner or service provider. Without limiting the foregoing, unless expressly authorized by the applicable content owner or service provider, you may not modify, copy, republish, upload, post, transmit, translate, sell, create derivative works, exploit, or distribute in any manner or medium any content or services displayed through this device.

Third party services may be changed, suspended, removed, terminated or interrupted, or access may be disabled at any time, without notice, and manufacturer makes no representation or warranty that any content or service will remain available for any period of time. Content and services are transmitted by third parties by means of networks and transmission facilities over which manufacturer has no control. Without limiting the generality of this disclaimer, manufacturer expressly disclaims any responsibility or liability for any change, interruption, disabling, removal of or suspension of any content or service made available through this device. Manufacturer may impose limits on the use of or access to certain services or content, in any case and without notice or liability. Manufacturer is neither responsible nor liable for customer service related to the content and services. Any question or request for service relating to the content or services should be made directly to the respective content and service providers.

You expressly acknowledge and agree that use of the device is at your sole risk and that the entire risk as to satisfactory quality, performance and accuracy is with you. The device and all third party content and services are provided "as is" without warranty of any kind, either express or implied. Manufacturer expressly disclaims all warranties and conditions with respect to the device and any content and services, either express or, implied, including but not limited to, warranties of merchantability, of satisfactory quality, fitness for a particular purpose, of accuracy, of quiet enjoyment, and non-infringement of third party rights. Manufacturer does not guarantee the accuracy, validity, timeliness, legality, or completeness of any content or service made available through this device and does not warrant that the device, content or services will meet your requirements, or that operation of the device or services will be uninterrupted or errorfree. Under no circumstances, including negligence, shall manufacturer be liable, whether in contract or tort, for any direct, indirect, incidental, special or consequential damages, attorney fees, expenses, or any other damages arising out of, or in connection with, any information contained in, or as a result of the use of the device, or any content or service accessed by you or any third party, even if advised of the possibility of such damages.

16

This symbol indicates that the product and its electronic accessories should not be disposed of as general household waste at their end-of-life. Instead, the products should be handed over to the applicable collection points for the recycling of electrical and electronic equipment. By disposing of these products correctly, you will help to conserve natural resources and will help to prevent potential negative effects on the environment and human health which could otherwise be caused by inappropriate waste handling of these products. For more information about collection points and recycling of these products, please contact your local municipal office, your household waste disposal service or the shop where you purchased the product.
The terms HDMI and HDMI High-Definition Multimedia Interface, and the HDMI logo are trademarks or registered trademarks of HDMI Licensing Administrator, Inc. in the United States and other countries.
Manufactured under license from Dolby Laboratories. Dolby, Dolby Audio, and the double-D symbol are trademarks of Dolby Laboratories.
* Figures and illustrations in this User Manual are provided for reference only and may differ from actual product appearance. Product design and specifications may be changed without notice.

72-RT41KT-EAP1C
References
Adobe PDF library 10.01 Adobe Illustrator CS6 (Windows)
32″ (81 см) Телевизор LED iFFALCON 32F52 черный
HD, 1366×768, Wi-Fi, 60 Гц, Android TV, HDMI х 2, USB х 1
подробнее

1.8k
Код товара: 5059864
Содержание разделов
Настройка телевизора iFFALCON

Нашей компанией производится настройка телевизора iFFALCON по всем техническим параметрам эфирного,
кабельного и спутникового телевидения, настройка яркостных, цветовых и геометрических параметров экрана,
настройка оптимального звукового сопровождения,
подключение телевизора к глобальной сети интернет, подключение внешних проигрывателей воспроизведения
и записи.
Мы знаем как настроить каналы на телевизоре iFFALCON.
Для вашего удобства организована
Консультация по настройке телевизоров.
Инструкция телевизора iFFALCON
Основная информация телевизора iFFALCON 32F51
- Тип продукта Google Android TV LCE
- Процессор CA53*4 64-битный
- Графический процессор Mali470x2
- Сертифицированный Google Android TV
- Память 8 Гбайт eMMC
- Версия HDMI и HDCP HDMI1.4b, HDCP1.4
- HDR 2K HDR10
- Встроенный Wi-Fi 2,4G 802.11 b/g/n
- Сеть Ethernet RJ45
- Bluetooth Да
Спецификация ЖК Панели
- Блок подсветки DLED
- Производитель CSOT
- Активный размер панели (дюйм) 31,5
- Разрешение дисплея 1366*768
- Яркость (кд/м2) 220
- Время отклика 6,5 мс
- Угол обзора (H/V) 178°/178°
- Срок службы 30 000 часов
- Цвет 16,7 миллиона (8 бит)
- Частота обновления 60 Гц
Звуковое сопровождение
- Встроенный блок динамиков (Нижняя сторона Корпуса)
- Выходная мощность звука (THD=7%) 2×5 Вт
- Звуковой режим Стандартный/Фильм/Музыка/Голос/Игра/Стадион/Персональный
- Графический эквалайзер 5 Регулируемая частота
- Расширенный Баланс/Автоматическая регулировка громкости/Тип Spdif/Задержка SPDIF
Пульт для телевизора iFFALCON назначение кнопок
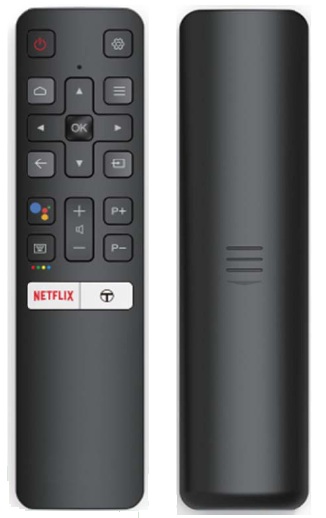
Пульт для телевизора iFFALCON имеет следующие кнопки управления:
- Включение/выключение в дежурный режим
- Экранное меню настройка
- Курсорные клавиши перемещения по экранному меню
- Кнопка подтверждения выбора ОК
- Домашний экран
- Возврат к предыдущему меню
- Список телевизионных программ
- Выбор источника внешнего подключения
- Кнопка голосового ввода
- Функциональные клавиши
- Увеличение и уменьшение громкости
- Переключение каналов P+
- Переключение каналов P-
- Кинотеатр Netflix
На нашем сайте можно скачать
Пульт для телевизора
расположение и обозначение кнопок дистанционного управления, а также инструкцию и Руководство пользователя
Отзывы и ответы на вопросы по телевизору iFFALCON
Как подключить телевизор
01.02.2022 iffalcon 32f52 Нужна инструкция настройки и подключения
Настройка телевизора iffalcon 32f52, согласно инструкции, состоит из следующих пунктов: выбор языка; перемещение сети wi-fi и аккаунта Google с помощью телефона на ОС Android;
На телефоне Android откройте предустановленное приложение Google, Введите или скажите «Окей Google, настрой устройство, Нажмите на название UnionTV в списке.
Далее устанавливается подключение к сети интернет и проверка обновлений.
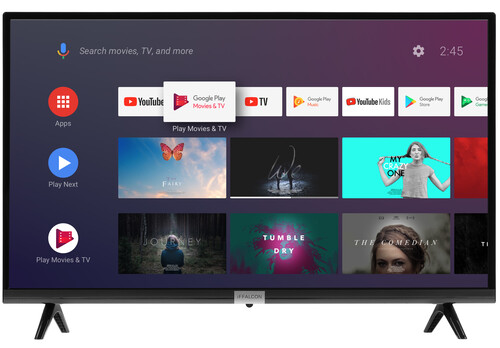
Домашняя страница
10.03.2022 IFFALCON 43K61 Прекратился доступ к Домашней странице Smart TB. После нажатия соответствующей кнопки пульта управления — черный экран.
Доступ к сети есть. Ютьюб смотрю, обращаясь к ярлыку в настройках. Многих приложений не вижу. Неудобно без домашней страницы.
Вызов домашней страницы производится нажатием на кнопку ПДУ «Домик». Если этого не происходит, следует проверить исправность пульта.
Настройка спутникового тв
23.03.2022 Iffalcon 43K61 «Телевизор не показывает с модулем Cl+ от Триколор. Показывают информационные каналы,рекламные и радио. Подписка активна.
Скидывал к заводским настройкам как телевизор, так и модуль. В ручных настройках прописывал 10750, 12226/L/27500-ничего не помагает. Пишет: проверьте подключение антенны.
На SAMSUNG подключается без проблем.»
Вам следует обратиться к оператору спутникового телевидения Триколор.
Разрешение экрана 4к
15.03.2022 IFFALCON 55k61 как настроить разрешение экрана 4к или Fulhd
Качество изображения, выводимого на экран телевизора, зависит от разрешения входного видео сигнала.
Ответы на вопросы по TV Smart iFFALCON
15.04.2022 iFFALCON 43K61 Телевизор подключается к интернету, но показывает без доступа, пробовал перезагрузить, не помогает.
Необходимо проверить подключение телевизора в настройках роутера сети.
iFFALCON Q72 – это серия QLED телевизоров 4K от суббренда TCL. Стратегия компании – выпуск недорогих телевизоров, в параметрах не уступающих гораздо более дорогим моделям. В основе новой серии лежит матрица VA с частотой обновления 50 Гц. Q72 работает на платформе Google TV, что позволяет загружать и устанавливать многочисленные приложения и игры на смарт-телевизор.
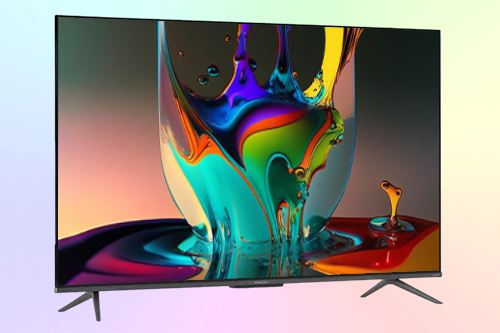
Телевизоры серии Q72 традиционно поддерживают все форматы HDR, включая HDR10+ и Dolby Vision. А это обеспечивает хорошую адаптацию к контенту различных потоковых сервисов. Что касается звука, то и здесь iFF Q72 всеяден, обрабатывая и DTS кодеки, и Dolby Atmos. В обзоре iFFALCON iFF50Q72 4K HDR мы расскажем, насколько качество изображения соответствует заявленным характеристикам телевизора.
Дизайн

Телевизор iFFALCON iFF50Q72 имеет практически безрамочный дизайн с трёх сторон. На металлическом сером нижнем безеле по центру расположен слегка вытянутый подбородок, над которым красуется логотип компании. Телевизор не громоздкий, но и не такой тонкий, как Samsung Q60C, например. Металлические ножки, удерживающие телевизор, можно установить в двух положениях – ближе к краям или ближе к центру.
Необходимые винты и крепления находятся в упаковке. Таким образом решается проблема размера ТВ мебели. Ножки в крайнем положении позволяют установить между ними звуковую панель, если только высота её не будет загораживать подбородок с приёмниками пульта ДУ и микрофоном голосового управления без рук. Есть вариант повесить телевизор iFF50Q72 на стену с помощью VESA-совместимого кронштейна.
Довольно сильно выпирающий относительно задней панели аппаратный блок даёт общую толщину 50-дюймовой модели порядка 8 см. Поэтому экран тоже будет заметно отдалён от стены. Все коммутационные разъёмы модели Q72 смотрят вбок. Для настенного монтажа это очень удобно. Единственное препятствие – они расположены далековато от края.
Как такового кабель-менеджмента у телевизора нет, но пара крючков-защёлок для того, чтобы собрать провода хотя бы в один жгут, имеется. Рамки узкие, не отвлекают от изображения. Только на самой матрице есть небольшие неиспользуемые для изображения зоны по периметру. Пульт такой же, как и у телевизоров TCL, например C735. У него есть ИК-канал, а также Bluetooth для голосового управления телевизором.
Если батарейки пульта разрядились, или не можете найти пульт, воспользуйтесь кнопкой включения / выключения телевизора. Она может выводить на экран специальное меню, содержащее виртуальные кнопки переключения каналов, регулировки громкости, а также выбора источника сигнала.
Качество изображения
У телевизора iFFALCON iFF50Q72 QLED хорошая собственная контрастность 5000:1. Поэтому чёрный цвет очень хорошо смотрится в тёмной комнате. Тёмные сцены выглядят слегка размытыми, когда присутствуют яркие блики, из-за отсутствия локального затемнения. Это обусловлено тем, что телевизор не может сделать яркие участки ярче, не влияя на остальную часть изображения,
В основе модели iFF50Q72, как уже отмечалось, лежит матрица VA со слоем квантовых точек. Панель обеспечивает яркость 300 нит и поддерживает все популярные стандарты HDR, такие как HDR10/10+, HLG и Dolby Vision. К сожалению, уровня пиковой яркости не хватает для выделения ярких бликов на изображении HDR, поэтому поддержка этого режима скорее номинальная.
Для контента SDR пиковую яркость вполне хороша. Телевизор достаточно яркий, чтобы справиться с бликами в комнате с умеренным освещением, и в большинстве сцен яркость не меняется. Однако нужно заметить, что сам по себе экран телевизора iFFALCON 50Q72 бликует из-за глянцевой поверхности. Поэтому лучше располагать телевизор так, чтобы избежать прямого попадания света.
В связи с этим нужно упомянуть, что не в пример матрицам IPS, используемая в телевизоре матрица VA имеет неширокие углы обзора. Т.е. при отклонении взгляда от центра изменяется насыщенность цветов и контрастность картинки. Иными словами, для домашнего кинотеатра это телевизор представляет собой удачный выбор, а для просмотра большими компаниями с широкой рассадкой – не совсем.
В целом же изображение, выводимое на экран телевизора iFFALCON Q72, великолепное. Особенно, если помнить о цене ТВ. Да и обработка изображения процессором, реализующим алгоритм AiPQ, на высоте. Масштабирование обычного контента до уровня 4K доставляет удовольствие. Компенсация движения ближе к TCL C645. На контурах быстро движущихся объектов можно заметить небольшие провалы.
Равномерность серого приличная. По краям квадрантов экрана есть определённые засветы, приводящие к незначительному эффекту грязного экрана. В основном он отвлекает при просмотре спортивных программ. Почти тёмные сцены выглядят намного лучше, без существенных проблем. Это обусловлено в том числе и хорошей однородностью чёрного.

Игровой режим
Впечатляющие характеристики телевизора iFFALCON 50 Q72 распространяются и на игры, обеспечивая достойный опыт благодаря комплексу опций Game Master. Он включает в себя игровую панель Game Bar, опцию ALLM и помощник прицеливания. Игровая панель отображает параметры игры, позволяя оперативно их перенастроить.
ALLM автоматически переводит телевизор в игровой режим после подключения совместимой приставки. Любая дополнительная обработка изображения при этом отключается, чтобы обеспечить наименьшую задержку вывода его на экран. Перекрестие поможет точнее нацелиться на врага. Инпут-лаг в игровом режиме составляет примерно 10 мс.
Смарт ТВ
Выдающейся особенностью телевизора Q72 QLED является его интеграция с ОС Google TV, расширяющая возможности развлечений благодаря персонализированным рекомендациям. Интерфейс базируется на Android TV 11. Домашняя страница занимает целый экран и имеет ряды плиток – с рекомендованным контентом, текущего просмотра, установленных приложений.
ОС также имеет список Google Watchlist и Google Photos, что ещё больше обогащает пользовательский опыт. Список наблюдения помогает сохранить найденный вами интересный контент (будь то фильм, а даже и телепередача), с тем чтобы просмотреть его позже. Фото от Гугл помогают оживить интерьер комнаты, пока вы не смотрите телевизор, выводя на экран красивые картинки или ваши фото.
Функция TCL Home предоставляет пользователям возможность беспрепятственно управлять устройствами iFFALCON и устройствами TCL с поддержкой Wi-Fi с помощью смартфонов, создавая интеллектуальную взаимосвязанную среду обитания. Опция MagiConnect (что-то вроде Chromecast) отображает на большом экране содержимо маленького экрана смартфона или планшета.

Звук
Аудиосистема телевизора iFFALCON Q 72 представляет собой два широкополосных динамика, подписанных брендом ONKYO, мощностью 2 х 10 Вт. Звук получается непритязательным, хотя диалоги воспроизводятся чётко, стереобаза чувствуется хорошо. Но сказывается отсутствие насыщенных басов, без которых не получить достойного погружения в происходящее на экране. Вывод прост – это приобретение (по необходимости) звуковой панели.
Подключения
В списке портов iFFALCON Q72 мы видим три порта HDMI, один из которых поддерживает ARC, два порта USB 2.0, оптический аудиовыход, вход A / V (миниджек с адаптером), выход для наушников и порт LAN. Все, как мы уже говорили, расположены вдоль правого края заднего модуля. Варианты беспроводного подключения включают Bluetooth 5.0 для подключения к беспроводным динамикам или наушникам и двухдиапазонный Wi-Fi.
Характеристики iFFALCON Q72
| Панель | |
| Разрешение | 4K UHD 3840×2160 |
| Соотношение сторон | 16:9 |
| Размер по диагонали | 50 дюймов, 127 см |
| Тип | VA QLED |
| Частота обновления | 50 Гц |
| HDR | HDR10, HLG, Dolby Vision IQ, HDR10+ |
| Контрастность | 5000:1 (тип.) |
| Яркость | 300 нит (макс.) |
| Подсветка | Прямая Direct LED |
| Аудио | |
| Система | 2.0 |
| Общая мощность | 20 Вт |
| Количество динамиков | 2 |
| Dolby Atmos | Да |
| Смарт ТВ | |
| Операционная система | Google TV (Android TV 11) |
| Процессор | 4-ядерный |
| Операционная память | 2 ГБ |
| Голосовое управление без рук | Да, зависит от региона |
| Google Assistant | Да |
| MagiConnect (трансляция экрана смартфона) | Да |
| Игровой центр | Game Master |
| Игровые опции | Game Bar, ALLM |
| DLG 120 Гц | Нет |
| Подключения | |
| HDMI | 3 х |
| USB | 2 x 2.0 |
| Слот CI | Да |
| Аудиовыход | Цифровой оптический |
| Аналоговый видеовход | Да, через адаптер |
| Выход на наушники | Миниджек 3.5 мм |
| Порт LAN | Да, RJ-45 |
| Wi-Fi | 5 / 2.4 ГГц + WiFi6 802.11 ax / ac / b / g / n |
| Bluetooth | v5.0 |
| Размеры и вес | |
| Размер с подставкой (ШxВxГ) | 1112 х 700 х 290 мм |
| Размер без подставки (ШxВxГ) | 1112 х 636 х 79.5 мм |
| Вес с подставкой | 10.76 кг |
| Крепление VESA | 300 x 300 |
Цена iFFALCON Q72
На текущий момент (май 2023) цена телевизора iFFALCON iFF50Q72 составляет 22000 рублей у отечественного ритейлера. Купить телевизор iFFALCON iFF55Q72 можно за 30000 рублей, а телевизор iFFALCON iFF65Q72 стоит 39500 рублей по предзаказу.
Итоги обзора iFFALCON Q72
В завершение обзора Q72 от iFFALCON – краткое резюме. По этой цене вы получаете телевизор, который явно на голову выше обычных ЖК телевизоров. Это хороший бюджетный QLED-телевизор, который поднимает планку производительности в сегменте доступных моделей. Он представляет собой хорошую ступеньку для людей, желающих перейти на территорию QLED с разумным бюджетом.
https://ultrahd.su/tv/iffalcon-iff50q72-obzor.htmliFFALCON Q72 обзор2023-05-20T17:29:22+03:00SemenТВтелевизорыiFFALCON Q72 – это серия QLED телевизоров 4K от суббренда TCL. Стратегия компании – выпуск недорогих телевизоров, в параметрах не уступающих гораздо более дорогим моделям. В основе новой серии лежит матрица VA с частотой обновления 50 Гц. Q72 работает на платформе Google TV, что позволяет загружать и устанавливать многочисленные…SemenСемён
EditorUltraHD