-
Драйверы
28
-
Руководства по ремонту
36
-
Инструкции по эксплуатации
29
Языки:

Dell Inspiron 15 Gaming 7566 инструкция по эксплуатации
(93 страницы)
- Языки:Английский, Русский
-
Тип:
PDF -
Размер:
3.09 MB -
Описание:
Компьютер
Просмотр

Dell Inspiron 15 Gaming 7566 инструкция по эксплуатации
(96 страниц)
- Языки:Русский
-
Тип:
PDF -
Размер:
4.78 MB -
Описание:
Ноутбук
Просмотр

Dell Inspiron 15 Gaming 7566 инструкция по эксплуатации
(96 страниц)
- Языки:Немецкий
-
Тип:
PDF -
Размер:
4.49 MB
Просмотр

Dell Inspiron 15 Gaming 7566 инструкция по эксплуатации
(93 страницы)
- Языки:Итальянский
-
Тип:
PDF -
Размер:
4.43 MB
Просмотр

Dell Inspiron 15 Gaming 7566 инструкция по эксплуатации
(96 страниц)
- Языки:Французский
-
Тип:
PDF -
Размер:
4.48 MB
Просмотр

Dell Inspiron 15 Gaming 7566 инструкция по эксплуатации
(97 страниц)
- Языки:Испанский
-
Тип:
PDF -
Размер:
4.5 MB
Просмотр

Dell Inspiron 15 Gaming 7566 инструкция по эксплуатации
(80 страниц)
- Языки:Китайский
-
Тип:
PDF -
Размер:
4.51 MB
Просмотр

Dell Inspiron 15 Gaming 7566 инструкция по эксплуатации
(93 страницы)
- Языки:Корейский
-
Тип:
PDF -
Размер:
4.76 MB
Просмотр

Dell Inspiron 15 Gaming 7566 инструкция по эксплуатации
(89 страниц)
- Языки:Арабский
-
Тип:
PDF -
Размер:
4.98 MB
Просмотр

Dell Inspiron 15 Gaming 7566 инструкция по эксплуатации
(84 страницы)
- Языки:Иврит
-
Тип:
PDF -
Размер:
4.85 MB
Просмотр

Dell Inspiron 15 Gaming 7566 инструкция по эксплуатации
(93 страницы)
- Языки:Вьетнамский
-
Тип:
PDF -
Размер:
4.6 MB
Просмотр

Dell Inspiron 15 Gaming 7566 инструкция по эксплуатации
(93 страницы)
- Языки:Шведский
-
Тип:
PDF -
Размер:
4.43 MB
Просмотр

Dell Inspiron 15 Gaming 7566 инструкция по эксплуатации
(92 страницы)
- Языки:Финский
-
Тип:
PDF -
Размер:
4.42 MB
Просмотр

Dell Inspiron 15 Gaming 7566 инструкция по эксплуатации
(93 страницы)
- Языки:Сербский
-
Тип:
PDF -
Размер:
4.38 MB
Просмотр

Dell Inspiron 15 Gaming 7566 инструкция по эксплуатации
(94 страницы)
- Языки:Словенский
-
Тип:
PDF -
Размер:
4.39 MB
Просмотр

Dell Inspiron 15 Gaming 7566 инструкция по эксплуатации
(95 страниц)
- Языки:Румынский
-
Тип:
PDF -
Размер:
4.44 MB
Просмотр

Dell Inspiron 15 Gaming 7566 инструкция по эксплуатации
(95 страниц)
- Языки:Венгерский
-
Тип:
PDF -
Размер:
4.49 MB
Просмотр

Dell Inspiron 15 Gaming 7566 инструкция по эксплуатации
(92 страницы)
- Языки:Чешский
-
Тип:
PDF -
Размер:
4.45 MB
Просмотр

Dell Inspiron 15 Gaming 7566 инструкция по эксплуатации
(94 страницы)
- Языки:Словацкий
-
Тип:
PDF -
Размер:
4.4 MB
Просмотр

Dell Inspiron 15 Gaming 7566 инструкция по эксплуатации
(92 страницы)
- Языки:Японский
-
Тип:
PDF -
Размер:
4.89 MB
Просмотр

Dell Inspiron 15 Gaming 7566 инструкция по эксплуатации
(96 страниц)
- Языки:Португальский
-
Тип:
PDF -
Размер:
4.45 MB
Просмотр

Dell Inspiron 15 Gaming 7566 инструкция по эксплуатации
(95 страниц)
- Языки:Нидерландский
-
Тип:
PDF -
Размер:
4.45 MB
Просмотр

Dell Inspiron 15 Gaming 7566 инструкция по эксплуатации
(92 страницы)
- Языки:Турецкий
-
Тип:
PDF -
Размер:
4.32 MB
Просмотр

Dell Inspiron 15 Gaming 7566 инструкция по эксплуатации
(92 страницы)
- Языки:Датский
-
Тип:
PDF -
Размер:
4.36 MB
Просмотр

Dell Inspiron 15 Gaming 7566 инструкция по эксплуатации
(105 страниц)
-
Тип:
PDF -
Размер:
5.02 MB
Просмотр

Dell Inspiron 15 Gaming 7566 инструкция по эксплуатации
(100 страниц)
-
Тип:
PDF -
Размер:
4.53 MB
Просмотр

Dell Inspiron 15 Gaming 7566 инструкция по эксплуатации
(93 страницы)
-
Тип:
PDF -
Размер:
4.42 MB
Просмотр

Dell Inspiron 15 Gaming 7566 инструкция по эксплуатации
(92 страницы)
-
Тип:
PDF -
Размер:
4.41 MB
Просмотр

Dell Inspiron 15 Gaming 7566 инструкция по эксплуатации
(95 страниц)
-
Тип:
PDF -
Размер:
4.41 MB
Просмотр
На NoDevice можно скачать инструкцию по эксплуатации для Dell Inspiron 15 Gaming 7566. Руководство пользователя необходимо для ознакомления с правилами установки и эксплуатации Dell Inspiron 15 Gaming 7566. Инструкции по использованию помогут правильно настроить Dell Inspiron 15 Gaming 7566, исправить ошибки и выявить неполадки.

Inspiron 15 Gaming
Руководство по
обслуживанию
Модель компьютера: Inspiron 15-7566
нормативная модель: P65F
нормативный тип: P65F001
Примечания,
предостережения и
предупреждения
ПРИМЕЧАНИЕ: Пометка ПРИМЕЧАНИЕ указывает на важную
информацию, которая поможет использовать данное изделие
более эффективно.
ПРЕДОСТЕРЕЖЕНИЕ: Пометка ПРЕДОСТЕРЕЖЕНИЕ указывает
на потенциальную опасность повреждения оборудования или
потери данных и подсказывает, как этого избежать.
ПРЕДУПРЕЖДЕНИЕ: Пометка ПРЕДУПРЕЖДЕНИЕ указывает на
риск повреждения оборудования, получения травм или на
угрозу для жизни.
© Корпорация Dell или ее дочерние компании, 2016 г. Все права защищены.
Dell, EMC и другие товарные знаки являются товарными знаками корпорации Dell
или ее дочерних компаний. Другие товарные знаки могут быть товарными
знаками соответствующих владельцев.
2016 — 11
Ред. A01

Содержание
Подготовка к работе с внутренними
компонентами компьютера…………………………….. 10
Перед началом работы ………………………………………………….. 10
Инструкции по технике безопасности………………………………….10
Рекомендуемые инструменты………………………………………….. 12
Список винтов………………………………………………………………. 12
После работы с внутренними компонентами
компьютера…………………………………………………….. 15
Снятие нижней крышки……………………………………16
Последовательность действий…………………………………………. 16
Установка нижней крышки……………………………….19
Последовательность действий…………………………………………. 19
Снятие батареи………………………………………………..20
Предварительные действия…………………………………………….. 20
Последовательность действий…………………………………………. 20
Установка батареи……………………………………………22
Последовательность действий…………………………………………. 22
Действия после завершения операции……………………………….22
Извлечение модулей памяти……………………………23
Предварительные действия…………………………………………….. 23
Последовательность действий…………………………………………. 23
3

Установка модулей памяти………………………………25
Последовательность действий…………………………………………. 25
Действия после завершения операции……………………………….26
Извлечение жесткого диска……………………………..27
Предварительные действия…………………………………………….. 27
Последовательность действий…………………………………………. 27
Установка жесткого диска………………………………..30
Последовательность действий…………………………………………. 30
Действия после завершения операции……………………………….30
Извлечение твердотельного накопителя…………31
Предварительные действия…………………………………………….. 31
Последовательность действий…………………………………………. 31
Установка твердотельного накопителя……………33
Последовательность действий…………………………………………. 33
Действия после завершения операции……………………………….34
Извлечение платы беспроводной сети……………35
Предварительные действия…………………………………………….. 35
Последовательность действий……………………………………..35
Установка платы беспроводной сети………………37
Последовательность действий…………………………………………. 37
Действия после завершения операции……………………………….38
Извлечение батарейки типа «таблетка»…………..39
Предварительные действия…………………………………………….. 39
Последовательность действий…………………………………………. 39
4

Установка батареи типа «таблетка»…………………41
Последовательность действий…………………………………………. 41
Действия после завершения операции……………………………….41
Снятие задней крышки…………………………………….42
Предварительные действия…………………………………………….. 42
Последовательность действий…………………………………………. 42
Установка задней крышки………………………………. 44
Последовательность действий…………………………………………. 44
Действия после завершения операции……………………………….44
Снятие упора для рук и клавиатуры в сборе…. 45
Предварительные действия…………………………………………….. 45
Последовательность действий…………………………………………. 45
Установка упора для рук и клавиатуры в
сборе………………………………………………………………..51
Последовательность действий…………………………………………. 51
Действия после завершения операции……………………………….51
Извлечение платы ввода-вывода……………………53
Предварительные действия…………………………………………….. 53
Последовательность действий…………………………………………. 53
Установка платы ввода-вывода………………………55
Последовательность действий…………………………………………. 55
Действия после завершения операции……………………………….55
Снятие вентиляторов……………………………………… 56
Предварительные действия…………………………………………….. 56
Последовательность действий…………………………………………. 56
5

Установка вентиляторов………………………………….59
Последовательность действий…………………………………………. 59
Действия после завершения операции……………………………….59
Снятие платы индикатора состояния………………60
Предварительные действия…………………………………………….. 60
Последовательность действий…………………………………………. 60
Установка платы индикатора…………………………..62
Последовательность действий…………………………………………. 62
Действия после завершения операции……………………………….62
Извлечение динамиков…………………………………… 63
Предварительные действия…………………………………………….. 63
Последовательность действий…………………………………………. 63
Установка динамиков……………………………………… 65
Последовательность действий…………………………………………. 65
Действия после завершения операции……………………………….65
Извлечение платы кнопки питания………………….66
Предварительные действия…………………………………………….. 66
Последовательность действий…………………………………………. 66
Установка платы кнопки питания…………………….68
Последовательность действий…………………………………………. 68
Действия после завершения операции……………………………….68
Снятие сенсорной панели………………………………. 69
Предварительные действия…………………………………………….. 69
Последовательность действий…………………………………………. 69
6

Установка сенсорной панели………………………….. 71
Последовательность действий…………………………………………. 71
Действия после завершения операции……………………………….71
Извлечение системной платы………………………….72
Предварительные действия…………………………………………….. 72
Последовательность действий…………………………………………. 73
Установка системной платы…………………………….77
Последовательность действий…………………………………………. 77
Действия после завершения операции……………………………….78
Снятие радиатора…………………………………………… 79
Предварительные действия…………………………………………….. 79
Последовательность действий…………………………………………. 80
Установка радиатора………………………………………. 81
Последовательность действий…………………………………………. 81
Действия после завершения операции……………………………….81
Снятие разъема адаптера питания…………………. 83
Предварительные действия…………………………………………….. 83
Последовательность действий…………………………………………. 83
Установка разъема адаптера питания……………..85
Последовательность действий…………………………………………. 85
Действия после завершения операции……………………………….85
Снятие дисплея………………………………………………. 86
Предварительные действия…………………………………………….. 86
Последовательность действий…………………………………………. 86
7

Установка дисплея………………………………………….. 90
Последовательность действий…………………………………………. 90
Действия после завершения операции……………………………….91
Снятие лицевой панели дисплея……………………. 92
Предварительные действия…………………………………………….. 92
Последовательность действий…………………………………………. 92
Установка лицевой панели дисплея………………..94
Последовательность действий…………………………………………. 94
Действия после завершения операции……………………………….94
Снятие шарниров дисплея……………………………… 95
Предварительные действия…………………………………………….. 95
Последовательность действий…………………………………………. 95
Установка шарниров дисплея………………………….97
Последовательность действий…………………………………………. 97
Действия после завершения операции……………………………….97
Снятие панели дисплея………………………………….. 98
Предварительные действия…………………………………………….. 98
Последовательность действий…………………………………………. 98
Установка панели дисплея……………………………. 101
Последовательность действий……………………………………….. 101
Действия после завершения операции……………………………..101
Извлечение кабеля дисплея…………………………..102
Предварительные действия…………………………………………… 102
Последовательность действий……………………………………….. 102
8

Установка кабеля дисплея……………………………..104
Последовательность действий……………………………………….. 104
Действия после завершения операции……………………………..104
Извлечение камеры………………………………………. 105
Предварительные действия…………………………………………… 105
Последовательность действий……………………………………….. 105
Установка камеры…………………………………………. 107
Последовательность действий……………………………………….. 107
Действия после завершения операции……………………………..107
Снятие задней крышки дисплея и антенны в
сборе………………………………………………………………108
Предварительные действия…………………………………………… 108
Последовательность действий……………………………………….. 109
Установка задней крышки дисплея и
антенны в сборе……………………………………………. 111
Последовательность действий…………………………………………111
Действия после завершения операции…………………………….. 111
Перепрограммирование BIOS……………………….. 112
Диагностика……………………………………………………113
Справка и обращение в компанию Dell…………..115
Материалы для самостоятельного разрешения вопросов……. 115
Обращение в компанию Dell……………………………………………………116
9
Подготовка к работе с
внутренними компонентами
компьютера
ПРИМЕЧАНИЕ: Изображения, приведенные в этом документе,
могут отличаться от вашего компьютера в зависимости от
заказанной конфигурации.
Перед началом работы
1 Сохраните и закройте все открытые файлы, выйдите из всех
приложений.
2 Затем завершите работу компьютера. Нажмите кнопкуПуск →
Питание → Выключение.
ПРИМЕЧАНИЕ: При использовании другой операционной
системы ознакомьтесь с инструкциями по выключению в
документации к операционной системе.
3 Отсоедините компьютер и все внешние устройства от электросети.
4 Отключите от компьютера все подключенные сетевые и периферийные
устройства, например клавиатуру, мышь, монитор и т. д.
5 Извлеките все мультимедийные карты и оптические диски из
компьютера, если такие имеются.
6 Закройте дисплей и переверните компьютер.
Инструкции по технике безопасности
Следуйте этим инструкциям во избежание повреждений компьютера и для
собственной безопасности.
10
ПРЕДУПРЕЖДЕНИЕ: Перед началом работы с внутренними
компонентами компьютера прочитайте инструкции по технике
безопасности, прилагаемые к компьютеру. Дополнительные
сведения по вопросам безопасности см. на веб-странице,
посвященной соответствию нормативам: www.dell.com/
regulatory_compliance.
ПРЕДУПРЕЖДЕНИЕ: Перед открыванием корпуса компьютера
или снятием панелей отключите все источники питания. После
завершения работ с внутренними компонентами компьютера
установите на место все крышки, панели и винты перед
подключением к электрической розетке.
ПРЕДОСТЕРЕЖЕНИЕ: Чтобы не повредить компьютер, работы
следует выполнять на чистой ровной поверхности.
ПРЕДОСТЕРЕЖЕНИЕ: Чтобы не повредить компоненты и платы,
их следует держать за края, не прикасаясь к контактам.
ПРЕДОСТЕРЕЖЕНИЕ: Пользователь может выполнять только те
действия по устранению неисправностей и ремонту, которые
разрешены или контролируются специалистами службы
технической поддержки Dell. На ущерб, вызванный
неавторизованным обслуживанием, гарантия не
распространяется. См. инструкции по технике безопасности,
прилагаемые к устройству или доступные по адресу
www.dell.com/regulatory_compliance.
ПРЕДОСТЕРЕЖЕНИЕ: Прежде чем прикасаться к чему-либо
внутри компьютера, избавьтесь от заряда статического
электричества, прикоснувшись к неокрашенной металлической
поверхности, например, к металлической части на задней
панели. Во время работы периодически прикасайтесь к
неокрашенной металлической поверхности, чтобы снять
статическое электричество, которое может повредить
внутренние компоненты.
11
ПРЕДОСТЕРЕЖЕНИЕ: При отключении кабеля тяните его за
разъем или за язычок, но не за сам кабель. На разъемах
некоторых кабелей имеются защелки или винты-барашки,
которые нужно разъединить перед отключением кабеля. При
отключении кабелей их следует держать ровно, чтобы не погнуть
контакты разъемов. При подключении кабелей следите за
правильной ориентацией и выравниванием разъемов и портов.
ПРЕДОСТЕРЕЖЕНИЕ: Нажмите и извлеките все карты памяти из
устройства чтения карт памяти.
Рекомендуемые инструменты
Для выполнения процедур, описанных в этом документе, могут
потребоваться следующие инструменты:
• крестообразная отвёртка
• Отвертка Torx № 8 (T8)
• пластмассовая палочка
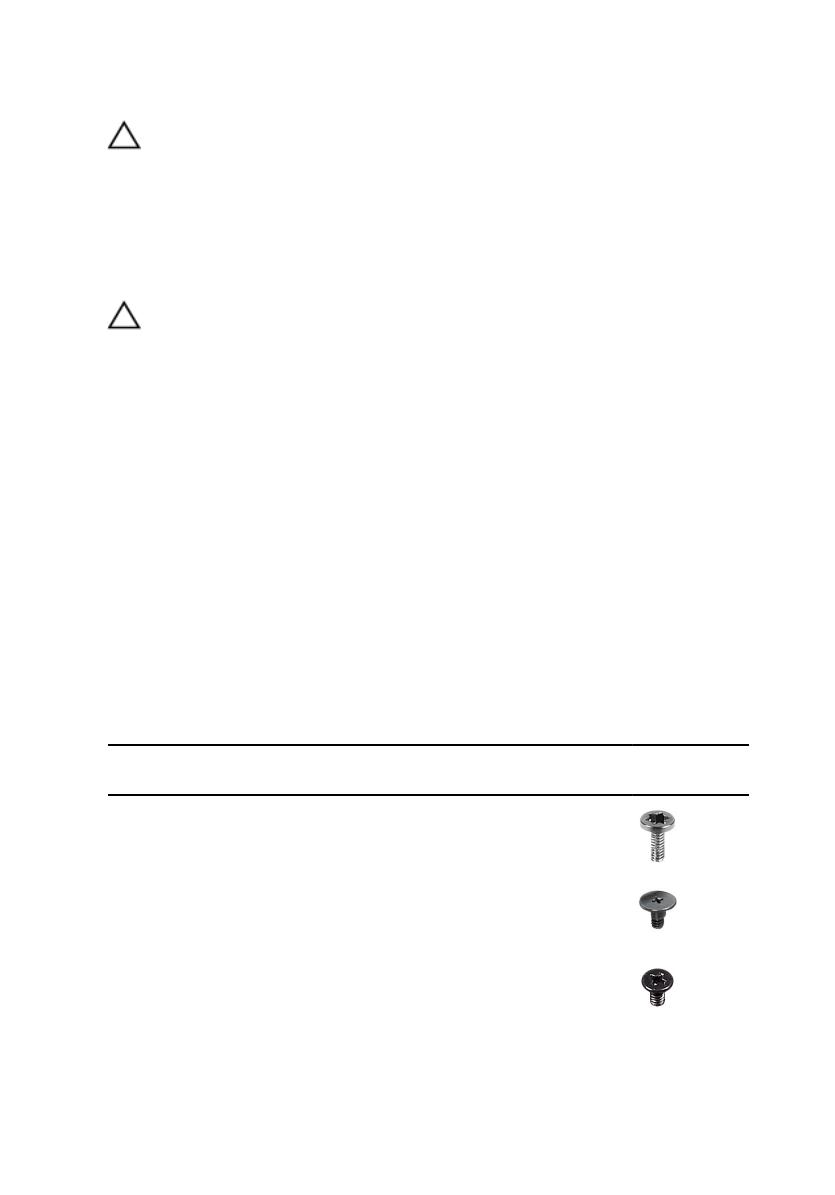
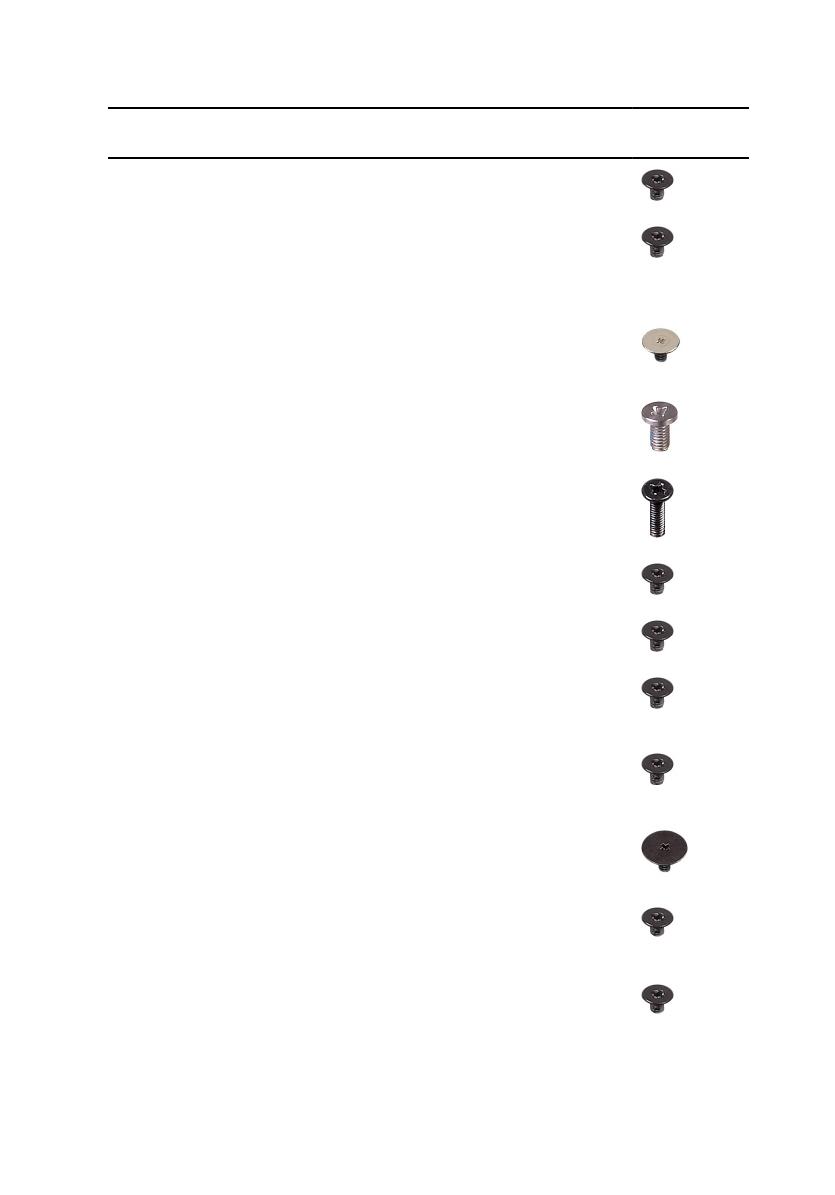
Список винтов
В приведенной ниже таблице содержится список винтов, которые
используются для крепления различных компонентов к упору для рук и
клавиатуре в сборе.
Таблица 1. Список винтов
Компонент Крепится к Тип винта Количеств
о
Изображен
ие винта
Аккумулятор Основание
компьютера
M2x4 T8 5
Жесткий диск Основание
компьютера
M2,5×3
ступенчатого
типа
4
Консоль
жесткого
диска
Жесткий диск M3x3 4
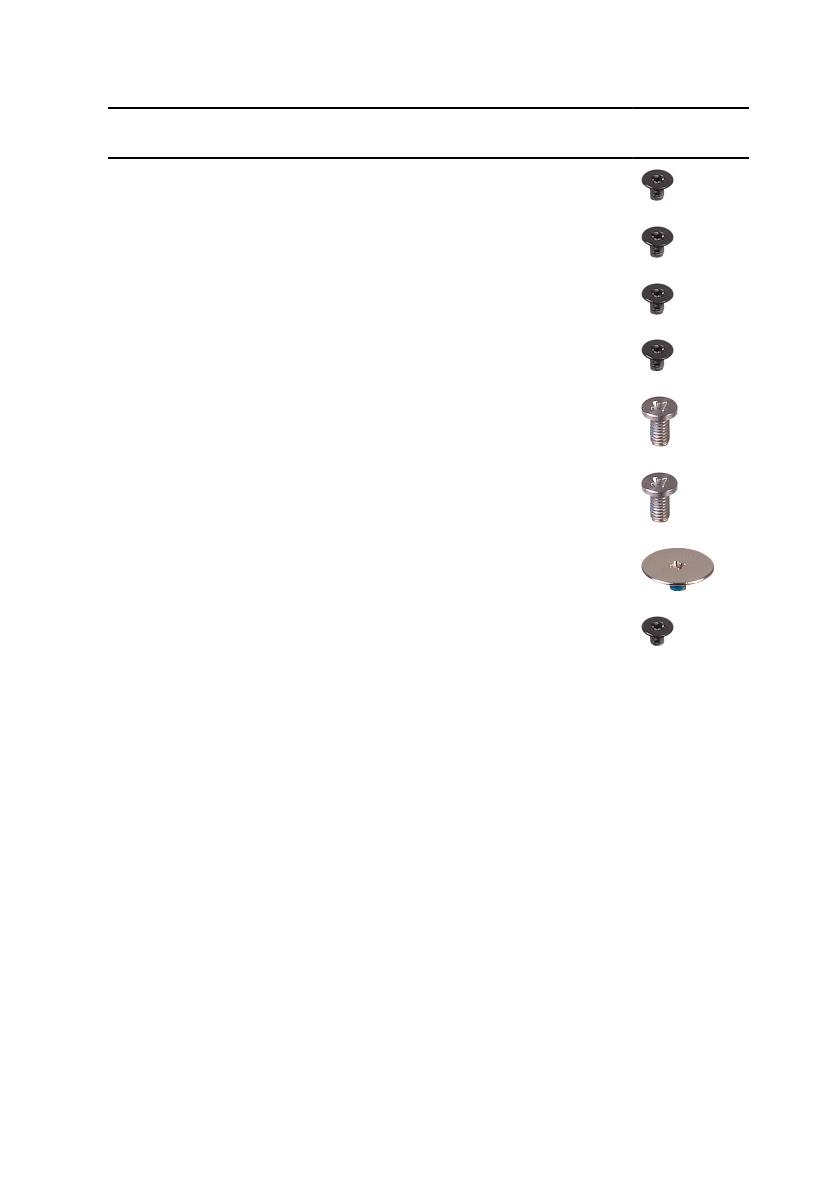
12
Компонент Крепится к Тип винта Количеств
о
Изображен
ие винта
Твердотельны
й накопитель
Основание
компьютера
M2x3 1
Консоль
платы
беспроводной
сети
Основание
компьютера
M2x3 1
Задняя
крышка
Основание
компьютера
M2x3 с
крупной
головкой
4
Упор для рук и
клавиатура в
сборе
Основание
компьютера
M2,5×5 15
Упор для рук и
клавиатура в
сборе
Основание
компьютера
M2,5×8 2
Плата ввода-
вывода
Основание
компьютера
M2x3 2
Вентилятор Основание
компьютера
M2x3 6
Скоба порта
адаптера
питания
Основание
компьютера
M2x3 4
Плата
индикаторов
состояния
Основание
компьютера
M2x3 2
Динамик Основание
компьютера
M2x3 с
крупной
головкой
6
Плата кнопки
питания
Упор для рук и
клавиатура в
сборе
M2x2,5 2
Сенсорная
панель
Упор для рук и
клавиатура в
сборе
M2x2 4
13
Компонент Крепится к Тип винта Количеств
о
Изображен
ие винта
Скоба кабеля
дисплея
Системная
плата
M2x3 1
Системная
плата
Основание
компьютера
M2x3 2
Радиатор Системная
плата
M2x3 6
Дисплей в
сборе
Основание
компьютера
M2x3 2
Дисплей в
сборе
Основание
компьютера
M2,5×5 2
Дисплей в
сборе
Основание
компьютера
M2,5×5 2
Шарниры
дисплея
Задняя крышка
дисплея
M2,5×2,5 8
Панель
дисплея
Задняя крышка
дисплея
M2x2,5 4
14

После работы с
внутренними компонентами
компьютера
ПРЕДОСТЕРЕЖЕНИЕ: Забытые или плохо закрученные винты
внутри компьютера могут привести к его серьезным
повреждениям.
1 Закрутите все винты и убедитесь в том, что внутри компьютера не
остались затерявшиеся винты.
2 Подключите все внешние и периферийные устройства, а также кабели,
отсоединенные перед началом работы на компьютере.
3 Установите все карты памяти, диски и любые другие компоненты,
которые были отключены перед работой с компьютером.
4 Подключите компьютер и все внешние устройства к электросети.
5 Включите компьютер.
15

Снятие нижней крышки
ПРЕДУПРЕЖДЕНИЕ: Перед проведением работ с внутренними
компонентами компьютера ознакомьтесь с информацией по
технике безопасности, поставляемой с компьютером, и следуйте
инструкциям, приведенным в разделе
Подготовка к работе с
внутренними компонентами компьютера. После работы с
внутренними компонентами компьютера следуйте инструкциям,
приведенным в разделе После работы с внутренними
компонентами компьютера. Дополнительные сведения по
вопросам безопасности см. на веб-странице, посвященной
соответствию нормативам: www.dell.com/regulatory_compliance.
Последовательность действий
1 Ослабьте невыпадающий винт крепления нижней крышки к основному
блоку компьютера.
2 Кончиками пальцев осторожно приподнимите нижнюю крышку и
извлеките выступы из пазов в основании компьютера.
16
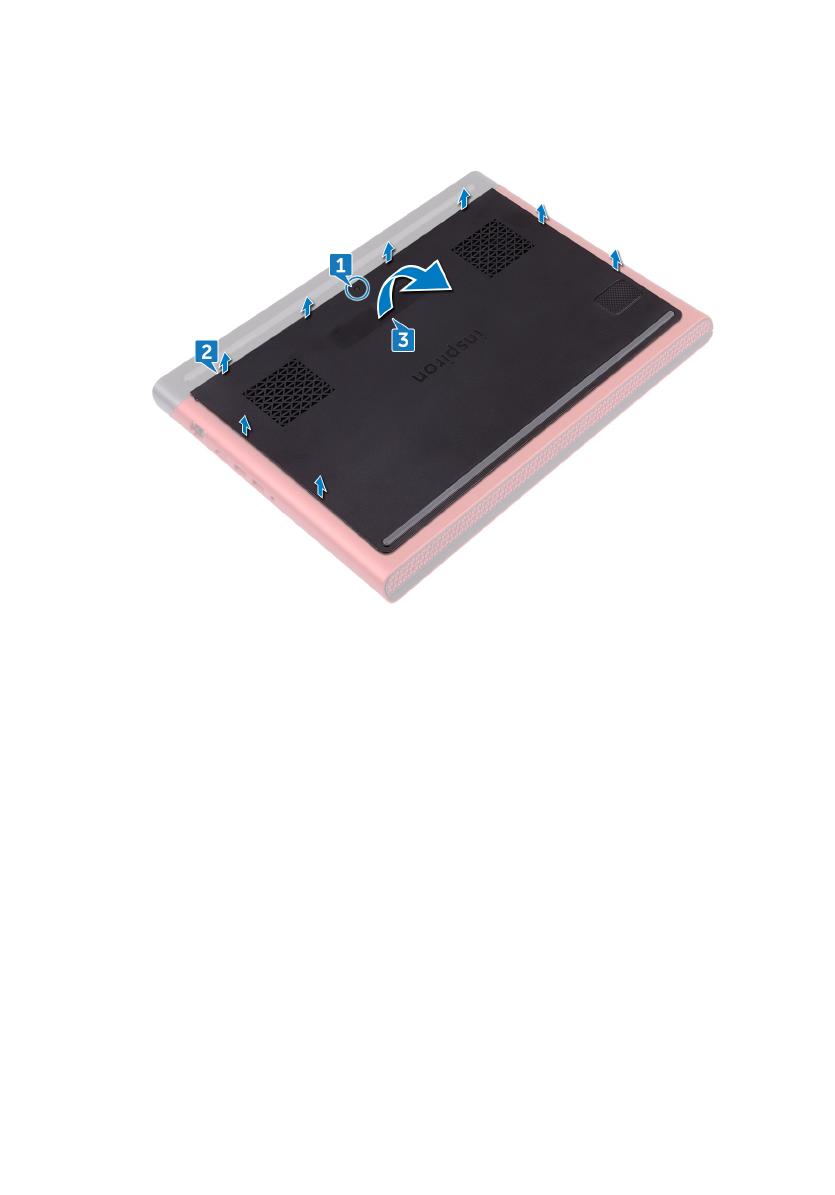
3 Приподнимите нижнюю крышку и снимите ее с основного блока
компьютера.
17
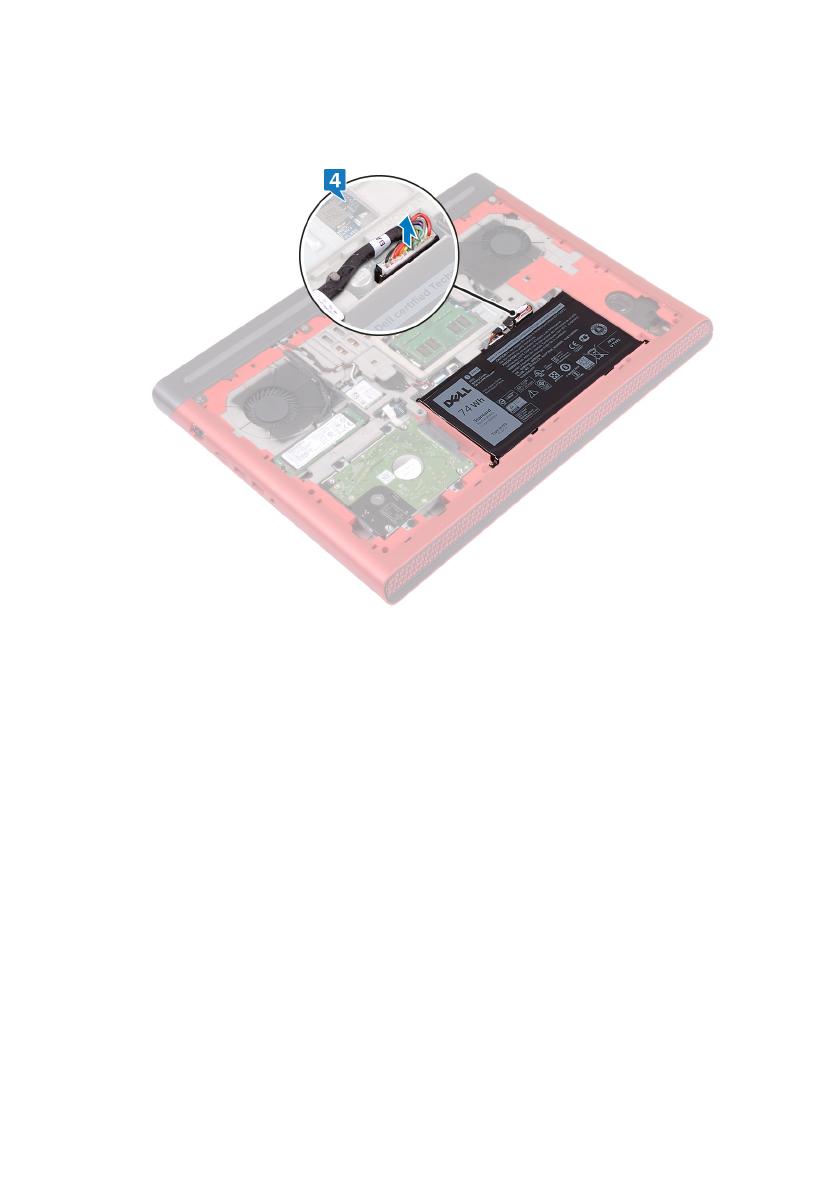
4 Отсоедините кабель аккумулятора от системной платы.
18

Установка нижней крышки
ПРЕДУПРЕЖДЕНИЕ: Перед проведением работ с внутренними
компонентами компьютера ознакомьтесь с информацией по
технике безопасности, поставляемой с компьютером, и следуйте
инструкциям, приведенным в разделе
Подготовка к работе с
внутренними компонентами компьютера. После работы с
внутренними компонентами компьютера следуйте инструкциям,
приведенным в разделе После работы с внутренними
компонентами компьютера. Дополнительные сведения по
вопросам безопасности см. на веб-странице, посвященной
соответствию нормативам: www.dell.com/regulatory_compliance.
Последовательность действий
1 Подключите кабель аккумулятора к системной плате.
2 Опустите фиксаторы на крышке основания в выступы в основании
компьютера и установите нижнюю крышку на место со щелчком.
3 Заверните невыпадающий винт крепления нижней крышки к основному
блоку компьютера.
19

Снятие батареи
ПРЕДУПРЕЖДЕНИЕ: Перед проведением работ с внутренними
компонентами компьютера ознакомьтесь с информацией по
технике безопасности, поставляемой с компьютером, и следуйте
инструкциям, приведенным в разделе
Подготовка к работе с
внутренними компонентами компьютера. После работы с
внутренними компонентами компьютера следуйте инструкциям,
приведенным в разделе После работы с внутренними
компонентами компьютера. Дополнительные сведения по
вопросам безопасности см. на веб-странице, посвященной
соответствию нормативам: www.dell.com/regulatory_compliance.
Предварительные действия
Снимите нижнюю крышку.
Последовательность действий
1 Извлеките кабель аккумулятора из направляющих на основании
компьютера.
2 Извлеките пять винтов крепления аккумулятора к основанию
компьютера (M2x4 T8).
20
- Manuals
- Brands
- Dell Manuals
- Laptop
- Inspiron 15 Gaming
- Service manual
-
Contents
-
Table of Contents
-
Bookmarks
Quick Links
Inspiron 15 Gaming
Service Manual
Computer Model: Inspiron 15-7566
Regulatory Model: P65F
Regulatory Type: P65F001
Related Manuals for Dell Inspiron 15 Gaming
Summary of Contents for Dell Inspiron 15 Gaming
-
Page 1: Service Manual
Inspiron 15 Gaming Service Manual Computer Model: Inspiron 15-7566 Regulatory Model: P65F Regulatory Type: P65F001…
-
Page 2
© 2016 Dell Inc. All rights reserved. This product is protected by U.S. and international copyright and intellectual property laws. Dell and the Dell logo are trademarks of Dell Inc. in the United States and/or other jurisdictions. All other marks and names mentioned herein may be trademarks of their respective companies. -
Page 3: Table Of Contents
Contents Before working inside your computer……..10 …………………10 Before you begin ………………..10 Safety instructions ………………11 Recommended tools ………………….12 Screw list After working inside your computer……..14 Removing the base cover…………15 ………………….15 Procedure Replacing the base cover…………17 ………………….17 Procedure Removing the battery……………
-
Page 4
Removing the hard drive…………25 …………………25 Prerequisites ………………….25 Procedure Replacing the hard drive…………28 ………………….28 Procedure ………………..28 Post-requisites Removing the solid-state drive……….29 …………………29 Prerequisites ………………….29 Procedure Replacing the solid-state drive……….31 ………………….31 Procedure ………………..32 Post-requisites Removing the wireless card………… 33 …………………33 Prerequisites ………………..33… -
Page 5
Removing the rear cover…………40 ………………..40 Prerequisites ………………….40 Procedure Replacing the rear cover…………42 ………………….42 Procedure ………………..42 Post-requisites Removing the palm rest and keyboard assembly….43 …………………43 Prerequisites ………………….43 Procedure Replacing the palm rest and keyboard assembly….49 …………………. -
Page 6
Removing the status-light board……….57 …………………57 Prerequisites ………………….57 Procedure Replacing the status-light board……….59 ………………….59 Procedure ………………..59 Post-requisites Removing the speakers…………60 ………………..60 Prerequisites ………………….60 Procedure Replacing the speakers…………62 ………………….62 Procedure ………………..62 Post-requisites Removing the power-button board……..63 …………………63 Prerequisites …………………. -
Page 7
Removing the system board……….. 69 ………………..69 Prerequisites ………………….69 Procedure Replacing the system board………… 74 ………………….74 Procedure ………………..75 Post-requisites Removing the heat sink…………76 …………………76 Prerequisites ………………….76 Procedure Replacing the heat sink…………78 ………………….78 Procedure ………………..78 Post-requisites Removing the power-adapter port……..79 …………………79 Prerequisites ………………….79… -
Page 8
Removing the display bezel………… 88 ………………..88 Prerequisites ………………….88 Procedure Replacing the display bezel………….90 ………………….90 Procedure ………………..90 Post-requisites Removing the display hinges………..91 ………………… 91 Prerequisites ………………….91 Procedure Replacing the display hinges………..93 ………………….93 Procedure ………………..93 Post-requisites Removing the display panel………… 94 ……………….. -
Page 9
Removing the display back-cover and antenna assembly………………. 104 ………………..104 Prerequisites …………………. 105 Procedure Replacing the display back-cover and antenna assembly………………107 …………………..107 Procedure ………………..107 Post-requisites Flashing the BIOS…………..108 Diagnostics…………….109 Getting help and contacting Dell……… 111 ………………111 Self-help resources ………………..111 Contacting Dell… -
Page 10: Before Working Inside Your Computer
Use the following safety guidelines to protect your computer from potential damage and ensure your personal safety. WARNING: Before working inside your computer, read the safety information that shipped with your computer. For more safety best practices, see the Regulatory Compliance home page at www.dell.com/regulatory_compliance.
-
Page 11: Recommended Tools
CAUTION: You should only perform troubleshooting and repairs as authorized or directed by the Dell technical assistance team. Damage due to servicing that is not authorized by Dell is not covered by your warranty. See the safety instructions that shipped with the product or at www.dell.com/regulatory_compliance.
-
Page 12: Screw List
Screw list The following table provides the list of screws that are used for securing different components to the palm rest and keyboard assembly. Component Secured to Screw type Quantity Screw image Battery Computer base M2x4 T8 Hard drive Computer base M2.5×3 Ladder type Hard-drive Hard drive…
-
Page 13
Component Secured to Screw type Quantity Screw image Speaker Computer base M2x3 Big head Power-button Palm rest and M2x2.5 board keyboard assembly Touch pad Palm rest and M2x2 keyboard assembly Display-cable System board M2x3 bracket System board Computer base M2x3 Heat sink System board M2x3… -
Page 14: After Working Inside Your Computer
After working inside your computer CAUTION: Leaving stray or loose screws inside your computer may severely damage your computer. Replace all screws and ensure that no stray screws remain inside your computer. Connect any external devices, peripherals, or cables you removed before working on your computer.
-
Page 15: Removing The Base Cover
After working inside your computer, follow the instructions in After working inside your computer. For more safety best practices, see the Regulatory Compliance home page at www.dell.com/regulatory_compliance. Procedure Loosen the captive screw that secures the base cover to the computer base.
-
Page 16
Disconnect the battery cable from the system board. -
Page 17: Replacing The Base Cover
After working inside your computer. For more safety best practices, see the Regulatory Compliance home page at www.dell.com/regulatory_compliance. Procedure Connect the battery cable to the system board. Slide the tabs on the base cover into the slots on the computer base and snap the base cover into place.
-
Page 18: Removing The Battery
Before working inside your computer. After working inside your computer, follow the instructions in After working inside your computer. For more safety best practices, see the Regulatory Compliance home page at www.dell.com/regulatory_compliance. Prerequisites Remove the base cover. Procedure Remove the battery cable from the routing guide on the computer base.
-
Page 19
Lift the battery at an angle off the computer base. Turn the computer over, open the display, and press and hold the power button for five seconds to ground the system board. -
Page 20: Replacing The Battery
After working inside your computer. For more safety best practices, see the Regulatory Compliance home page at www.dell.com/regulatory_compliance. Procedure Slide the battery in the slot on the computer base and align the screw holes on the battery with the screw holes on the computer base.
-
Page 21: Removing The Memory Modules
Before working inside your computer. After working inside your computer, follow the instructions in After working inside your computer. For more safety best practices, see the Regulatory Compliance home page at www.dell.com/regulatory_compliance. Prerequisites Remove the base cover. Procedure Use your fingertips to carefully spread apart the securing-clips on each end of the memory-module slot until the memory module pops up.
-
Page 22
Remove the memory module from the memory-module slot. -
Page 23: Replacing The Memory Modules
After working inside your computer. For more safety best practices, see the Regulatory Compliance home page at www.dell.com/regulatory_compliance. Procedure Align the notch on the memory module with the tab on the memory- module slot and slide it firmly into the slot at an angle.
-
Page 24: Post-Requisites
Press the memory module down until it clicks into place. NOTE: If you do not hear the click, remove the memory module and reinstall it. Post-requisites Replace the base cover.
-
Page 25: Removing The Hard Drive
After working inside your computer. For more safety best practices, see the Regulatory Compliance home page at www.dell.com/regulatory_compliance. CAUTION: Hard drives are fragile. Exercise care when handling the hard drive. CAUTION: To avoid data loss, do not remove the hard drive while the computer is in sleep or on state.
-
Page 26
Lift the hard-drive assembly, along with its cable, off the computer base. Disconnect the interposer from the hard-drive assembly. Remove the four screws (M3x3) that secure the hard-drive bracket to the hard drive. -
Page 27
Remove the hard-drive bracket off the hard drive. -
Page 28: Replacing The Hard Drive
After working inside your computer, follow the instructions in After working inside your computer. For more safety best practices, see the Regulatory Compliance home page at www.dell.com/regulatory_compliance. CAUTION: Hard drives are fragile. Exercise care when handling the hard drive. Procedure Align the screw holes on the hard-drive bracket with the screw holes on the hard drive.
-
Page 29: Removing The Solid-State Drive
After working inside your computer. For more safety best practices, see the Regulatory Compliance home page at www.dell.com/regulatory_compliance. CAUTION: Solid-state drives are fragile. Exercise care when handling the solid-state drive. CAUTION: To avoid data loss, do not remove the solid-state drive while the computer is in sleep or on state.
-
Page 30
Slide and remove the solid-state drive from the solid-state drive slot. -
Page 31: Replacing The Solid-State Drive
After working inside your computer, follow the instructions in After working inside your computer. For more safety best practices, see the Regulatory Compliance home page at www.dell.com/regulatory_compliance. CAUTION: Solid-state drives are fragile. Exercise care when handling the solid-state drive. Procedure Align the notch on the solid-state drive with the tab on the solid-state drive slot and slide the solid-state drive into the solid-state drive slot.
-
Page 32: Post-Requisites
Replace the screw (M2x3) that secures the solid-state drive to the computer base. Post-requisites Replace the base cover.
-
Page 33: Removing The Wireless Card
Before working inside your computer. After working inside your computer, follow the instructions in After working inside your computer. For more safety best practices, see the Regulatory Compliance home page at www.dell.com/regulatory_compliance. Prerequisites Remove the base cover. Procedure Remove the screw (M2x3) that secures the wireless-card bracket to the to the wireless card and system board.
-
Page 34
Slide and remove the wireless card from the wireless-card slot. -
Page 35: Replacing The Wireless Card
After working inside your computer, follow the instructions in After working inside your computer. For more safety best practices, see the Regulatory Compliance home page at www.dell.com/regulatory_compliance. Procedure CAUTION: To avoid damage to the wireless card, do not place any cables under it.
-
Page 36: Post-Requisites
Replace the screw (M2x3) that secures the wireless-card bracket to the wireless card and system board. Post-requisites Replace the base cover.
-
Page 37: Removing The Coin-Cell Battery
After working inside your computer. For more safety best practices, see the Regulatory Compliance home page at www.dell.com/regulatory_compliance. CAUTION: Removing the coin-cell battery resets the BIOS setup program’s settings to default. It is recommended that you note the BIOS setup program’s settings before removing the coin-cell battery.
-
Page 38
Peel off the coin-cell battery from the battery socket on the computer base. -
Page 39: Replacing The Coin-Cell Battery
After working inside your computer, follow the instructions in After working inside your computer. For more safety best practices, see the Regulatory Compliance home page at www.dell.com/regulatory_compliance. Procedure Adhere the coin-cell battery into the battery socket on the computer base.
-
Page 40: Removing The Rear Cover
Before working inside your computer. After working inside your computer, follow the instructions in After working inside your computer. For more safety best practices, see the Regulatory Compliance home page at www.dell.com/regulatory_compliance. Prerequisites Remove the base cover. Procedure Remove the four screws (M2x3 Big head) that secure the rear cover to the computer base.
-
Page 41
Slide and remove the rear cover from the computer base. -
Page 42: Replacing The Rear Cover
After working inside your computer. For more safety best practices, see the Regulatory Compliance home page at www.dell.com/regulatory_compliance. Procedure Slide the tabs on the rear cover into the slots on the computer base and snap the rear cover into place.
-
Page 43: Removing The Palm Rest And Keyboard Assembly
Before working inside your computer. After working inside your computer, follow the instructions in After working inside your computer. For more safety best practices, see the Regulatory Compliance home page at www.dell.com/regulatory_compliance. Prerequisites Remove the base cover. Remove the battery.
-
Page 44
Remove the two screws (M2.5×8) that secure the palm rest and keyboard assembly to the computer base. Turn the computer over and open the display. -
Page 45
Using a plastic scribe, release the tabs on palm rest and keyboard assembly from the slots on the computer base. Lift the palm rest and keyboard assembly at an angle. -
Page 46
Open the latches and disconnect the keyboard cable and the power- button board cable from the system board. -
Page 47
Lift the palm rest and keyboard assembly off the computer base. Remove the power-button board. 10 Remove the touch pad. -
Page 48
11 After performing all the above steps, you are left with the palm rest and keyboard assembly. -
Page 49: Replacing The Palm Rest And Keyboard Assembly
Before working inside your computer. After working inside your computer, follow the instructions in After working inside your computer. For more safety best practices, see the Regulatory Compliance home page at www.dell.com/regulatory_compliance. Procedure Replace the touch pad. Replace the power-button board.
-
Page 50: Removing The I/O Board
Before working inside your computer. After working inside your computer, follow the instructions in After working inside your computer. For more safety best practices, see the Regulatory Compliance home page at www.dell.com/regulatory_compliance. Prerequisites Remove the base cover. Remove the battery.
-
Page 51
Lift the I/O board off the computer base. -
Page 52: Replacing The I/O Board
After working inside your computer. For more safety best practices, see the Regulatory Compliance home page at www.dell.com/regulatory_compliance. Procedure Align the screw holes on the I/O board with the screw holes on the computer base.
-
Page 53: Removing The Fans
Before working inside your computer. After working inside your computer, follow the instructions in After working inside your computer. For more safety best practices, see the Regulatory Compliance home page at www.dell.com/regulatory_compliance. Prerequisites Remove the base cover. Remove the battery.
-
Page 54
Lift the left fan, along with its cable, off the computer base. Disconnect the right-fan cable from the system board. Remove the three screws (M2x3) that secure the right fan to the system board. -
Page 55
Lift the right fan, along with its cable, off the computer base. -
Page 56: Replacing The Fans
After working inside your computer. For more safety best practices, see the Regulatory Compliance home page at www.dell.com/regulatory_compliance. Procedure Align the screw holes on the left fan with the screw holes on the computer base.
-
Page 57: Removing The Status-Light Board
Before working inside your computer. After working inside your computer, follow the instructions in After working inside your computer. For more safety best practices, see the Regulatory Compliance home page at www.dell.com/regulatory_compliance. Prerequisites Remove the base cover. Remove the battery.
-
Page 58
Lift the status-light board off the computer base. -
Page 59: Replacing The Status-Light Board
After working inside your computer. For more safety best practices, see the Regulatory Compliance home page at www.dell.com/regulatory_compliance. Procedure Align the screw holes on the status-light board with the screw holes on the computer base.
-
Page 60: Removing The Speakers
Before working inside your computer. After working inside your computer, follow the instructions in After working inside your computer. For more safety best practices, see the Regulatory Compliance home page at www.dell.com/regulatory_compliance. Prerequisites Remove the base cover. Remove the battery.
-
Page 61
Remove the speakers from the alignment posts and lift the speakers and woofer, along with the cable, off the computer base. -
Page 62: Replacing The Speakers
After working inside your computer. For more safety best practices, see the Regulatory Compliance home page at www.dell.com/regulatory_compliance. Procedure NOTE: The rubber grommets may get pushed out while replacing the speaker. Ensure that the rubber grommets are in their position after placing the speaker on the system board.
-
Page 63: Removing The Power-Button Board
Before working inside your computer. After working inside your computer, follow the instructions in After working inside your computer. For more safety best practices, see the Regulatory Compliance home page at www.dell.com/regulatory_compliance. Prerequisites Remove the base cover. Remove the battery.
-
Page 64
Lift the power-button board, along with the cable, off the palm rest and keyboard assembly. -
Page 65: Replacing The Power-Button Board
After working inside your computer. For more safety best practices, see the Regulatory Compliance home page at www.dell.com/regulatory_compliance. Procedure Align the screw holes on the power-button board with the screw holes on the palm rest and keyboard assembly.
-
Page 66: Removing The Touch Pad
Before working inside your computer. After working inside your computer, follow the instructions in After working inside your computer. For more safety best practices, see the Regulatory Compliance home page at www.dell.com/regulatory_compliance. Prerequisites Remove the base cover. Remove the battery.
-
Page 67
Lift the touch pad, along with the cable, at an angle from under the touch-pad bracket off the palm rest and keyboard assembly. -
Page 68: Replacing The Touch Pad
After working inside your computer. For more safety best practices, see the Regulatory Compliance home page at www.dell.com/regulatory_compliance. Procedure Slide the touch pad under the touch-pad bracket. NOTE: Ensure that the touch pad is aligned with the guides available on the palm rest and keyboard assembly, and the gap on either sides of the touch pad is equal.
-
Page 69: Removing The System Board
After working inside your computer. For more safety best practices, see the Regulatory Compliance home page at www.dell.com/regulatory_compliance. NOTE: Your computer’s Service Tag is stored in the system board. You must enter the Service Tag in the BIOS setup program after you replace the system board.
-
Page 70
Disconnect the coin-cell battery cable from the system board. Using the pull-tab, disconnect the hard-drive cable from the system board. Using the pull tab, disconnect the camera cable from the system board. Turn the computer over and open the display as far as possible. Disconnect the speaker cable from the system board. -
Page 71
10 Open the latch and disconnect the I/O board cable from the system board. 11 Remove the two screws (M2x3) that secure the system board to the computer base. 12 Gently release the ports on the system board from the slots on the computer base. -
Page 72
13 Lift the system board at an angle and turn the system board over. 14 Disconnect the power-adapter port cable from the system board. -
Page 73
15 Remove the heat sink. -
Page 74: Replacing The System Board
After working inside your computer. For more safety best practices, see the Regulatory Compliance home page at www.dell.com/regulatory_compliance. NOTE: Your computer’s Service Tag is stored in the system board. You must enter the Service Tag in the BIOS setup program after you replace the system board.
-
Page 75: Post-Requisites
Post-requisites Replace the fans. Follow the procedure from step 3 to step 9 in “Replacing the palm rest and keyboard assembly”. Replace the wireless card. Replace the solid-state drive. Replace the memory modules. Replace the rear cover. Replace the battery. Replace the base cover.
-
Page 76: Removing The Heat Sink
After working inside your computer. For more safety best practices, see the Regulatory Compliance home page at www.dell.com/regulatory_compliance. WARNING: The heat sink may become hot during normal operation. Allow sufficient time for the heat sink to cool before you touch it.
-
Page 77
Lift the heat sink off the system board. -
Page 78: Replacing The Heat Sink
After working inside your computer. For more safety best practices, see the Regulatory Compliance home page at www.dell.com/regulatory_compliance. CAUTION: Incorrect alignment of the heat sink can damage the system board and processor. NOTE: The original thermal grease can be reused if the original system board and heat sink are reinstalled together.
-
Page 79: Removing The Power-Adapter Port
Before working inside your computer. After working inside your computer, follow the instructions in After working inside your computer. For more safety best practices, see the Regulatory Compliance home page at www.dell.com/regulatory_compliance. Prerequisites Remove the base cover. Remove the battery.
-
Page 80
Lift the power-adapter port, along with its cable, off the computer base. -
Page 81: Replacing The Power-Adapter Port
After working inside your computer. For more safety best practices, see the Regulatory Compliance home page at www.dell.com/regulatory_compliance. Procedure Place the power-adapter port into the slot on the computer base. Align the screw holes on the power-adapter port bracket with the screw holes on the computer base.
-
Page 82: Removing The Display Assembly
Before working inside your computer. After working inside your computer, follow the instructions in After working inside your computer. For more safety best practices, see the Regulatory Compliance home page at www.dell.com/regulatory_compliance. Prerequisites Remove the base cover. Remove the battery.
-
Page 83
Remove the display cable from the routing guides on the computer base and peel off the display cable from the computer base. Remove the two screws (M2x3) that secure the display assembly to the computer base. -
Page 84
Remove the two screws (M2.5×5) that secure the display assembly to the computer base. 10 Turn the computer over and open the display. 11 Remove the two screws (M2.5×5) that secure the display assembly to the computer base. -
Page 85
12 Lift the display assembly off the computer base. -
Page 86: Replacing The Display Assembly
After working inside your computer. For more safety best practices, see the Regulatory Compliance home page at www.dell.com/regulatory_compliance. Procedure Align the screw holes on the display assembly with the screw holes on the computer base.
-
Page 87
Replace the wireless card. Replace the rear cover. Replace the battery. Replace the base cover. -
Page 88: Removing The Display Bezel
After working inside your computer, follow the instructions in After working inside your computer. For more safety best practices, see the Regulatory Compliance home page at www.dell.com/regulatory_compliance. Prerequisites NOTE: These instructions are applicable only for laptops with a non- touch screen display.
-
Page 89
Lift the display bezel off the display assembly. -
Page 90: Replacing The Display Bezel
After working inside your computer. For more safety best practices, see the Regulatory Compliance home page at www.dell.com/regulatory_compliance. Procedure Align the display bezel with the display back-cover, and gently snap the display bezel into place.
-
Page 91: Removing The Display Hinges
After working inside your computer, follow the instructions in After working inside your computer. For more safety best practices, see the Regulatory Compliance home page at www.dell.com/regulatory_compliance. Prerequisites NOTE: These instructions are applicable only for laptops with a non- touch screen display.
-
Page 92
Lift the display hinges off the display back-cover. -
Page 93: Replacing The Display Hinges
After working inside your computer. For more safety best practices, see the Regulatory Compliance home page at www.dell.com/regulatory_compliance. Procedure Align the screw holes on the display hinges with the screw holes on the display back-cover.
-
Page 94: Removing The Display Panel
After working inside your computer, follow the instructions in After working inside your computer. For more safety best practices, see the Regulatory Compliance home page at www.dell.com/regulatory_compliance. Prerequisites NOTE: These instructions are applicable only for laptops with a non- touch screen display.
-
Page 95
Gently lift the display panel and turn it over. Peel off the tape that secures the display cable to the display panel. Open the latch and disconnect the display cable from the display panel. -
Page 96
Lift the display panel away from the display back-cover. -
Page 97: Replacing The Display Panel
After working inside your computer. For more safety best practices, see the Regulatory Compliance home page at www.dell.com/regulatory_compliance. Procedure Slide the display cable into the connector on the display panel and close the latch to secure the cable.
-
Page 98: Removing The Display Cable
Before working inside your computer. After working inside your computer, follow the instructions in After working inside your computer. For more safety best practices, see the Regulatory Compliance home page at www.dell.com/regulatory_compliance. Prerequisites Remove the base cover. Remove the battery.
-
Page 100: Replacing The Display Cable
After working inside your computer, follow the instructions in After working inside your computer. For more safety best practices, see the Regulatory Compliance home page at www.dell.com/regulatory_compliance. Procedure Adhere and route the display cable according to the routing guides on the display back-cover.
-
Page 101: Removing The Camera
After working inside your computer, follow the instructions in After working inside your computer. For more safety best practices, see the Regulatory Compliance home page at www.dell.com/regulatory_compliance. Prerequisites NOTE: These instructions are applicable only for laptops with a non- touch screen display.
-
Page 102
Using a plastic scribe, pry and lift the camera off the display back-cover. -
Page 103: Replacing The Camera
After working inside your computer. For more safety best practices, see the Regulatory Compliance home page at www.dell.com/regulatory_compliance. Procedure Using the alignment posts, adhere the camera to the display back-cover. Connect the camera cable to the camera.
-
Page 104: Removing The Display Back-Cover And Antenna Assembly
Before working inside your computer. After working inside your computer, follow the instructions in After working inside your computer. For more safety best practices, see the Regulatory Compliance home page at www.dell.com/regulatory_compliance. Prerequisites Remove the base cover. Remove the battery.
-
Page 105: Procedure
Procedure Note the camera cable routing and remove the cable from the routing guides on the display back-cover and antenna assembly.
-
Page 106
After performing the above step, we are left with the display back-cover and antenna assembly. -
Page 107: Replacing The Display Back-Cover And Antenna Assembly
After working inside your computer, follow the instructions in After working inside your computer. For more safety best practices, see the Regulatory Compliance home page at www.dell.com/regulatory_compliance. Procedure Place the display back-cover and antenna assembly on a flat surface. Post-requisites Replace the camera.
-
Page 108: Flashing The Bios
You may need to flash (update) the BIOS when an update is available or when you replace the system board. To flash the BIOS: Turn on your computer. Go to www.dell.com/support. Click Product support, enter the Service Tag of your computer, and then click Submit.
-
Page 109: Diagnostics
Diagnostics Power and battery-status light/ hard-drive activity light: Indicates the battery-charge status or the hard-drive activity. NOTE: Press Fn+H to toggle this light between power and battery-status light and hard-drive activity light. Hard-drive activity light Turns on when the computer reads from or writes to the hard drive. Power and battery-status light Indicates the power and battery-charge status.
-
Page 110
Light Pattern Problem description System board or chipset error LCD failure CMOS battery failure PCI/video card failure Recovery image not found Recovery image found but invalid The computer may emit a series of beeps during start-up if the errors or problems cannot be displayed. -
Page 111: Getting Help And Contacting Dell
Getting help and contacting Dell Self-help resources You can get information and help on Dell products and services using these self-help resources: Information about Dell products and www.dell.com services Dell Help & Support app Get started app Accessing help In Windows search, type Help and Support, and press Enter.
-
Page 112
NOTE: If you do not have an active internet connection, you can find contact information on your purchase invoice, packing slip, bill, or Dell product catalog.
Инструкцию для Dell Inspiron 7566-9647 на русском языке, в формате pdf можно скачать с нашего сайта. Наш каталог предоставляем Вам инструкцию производителя фирмы Dell, которая была взята из открытых источников. Ознакомившись с руководством по эксплуатации от Dell, Вы на все 100% и правильно сможете воспользоваться всеми функциями устройства.
Для сохранения инструкции «Ноутбук Dell Inspiron 7566-9647» на русском языке на вашем компьютере либо телефоне, нажмите кнопку «Скачать инструкцию». Если активна кнопка «Инструкция онлайн», то Вы можете просмотреть документ (manual), в своём браузере онлайн.
Если у Вас нет возможности скачать инструкцию по эксплуатации либо просмотреть её, Вы можете поделиться ссылкой на эту страницу в социальных сетях и при удобном моменте скачать инструкцию. Либо добавьте эту страницу в закладки Вашего браузера, нажав кнопку «Добавить страницу в закладки браузера».
Inspiron 15 Gaming
Quick Start Guide
Skrócona instrukcja uruchomienia
Краткое руководство по началу работы
Priročnik za hitri zagon
הריהמ הלחתה ךירדמ
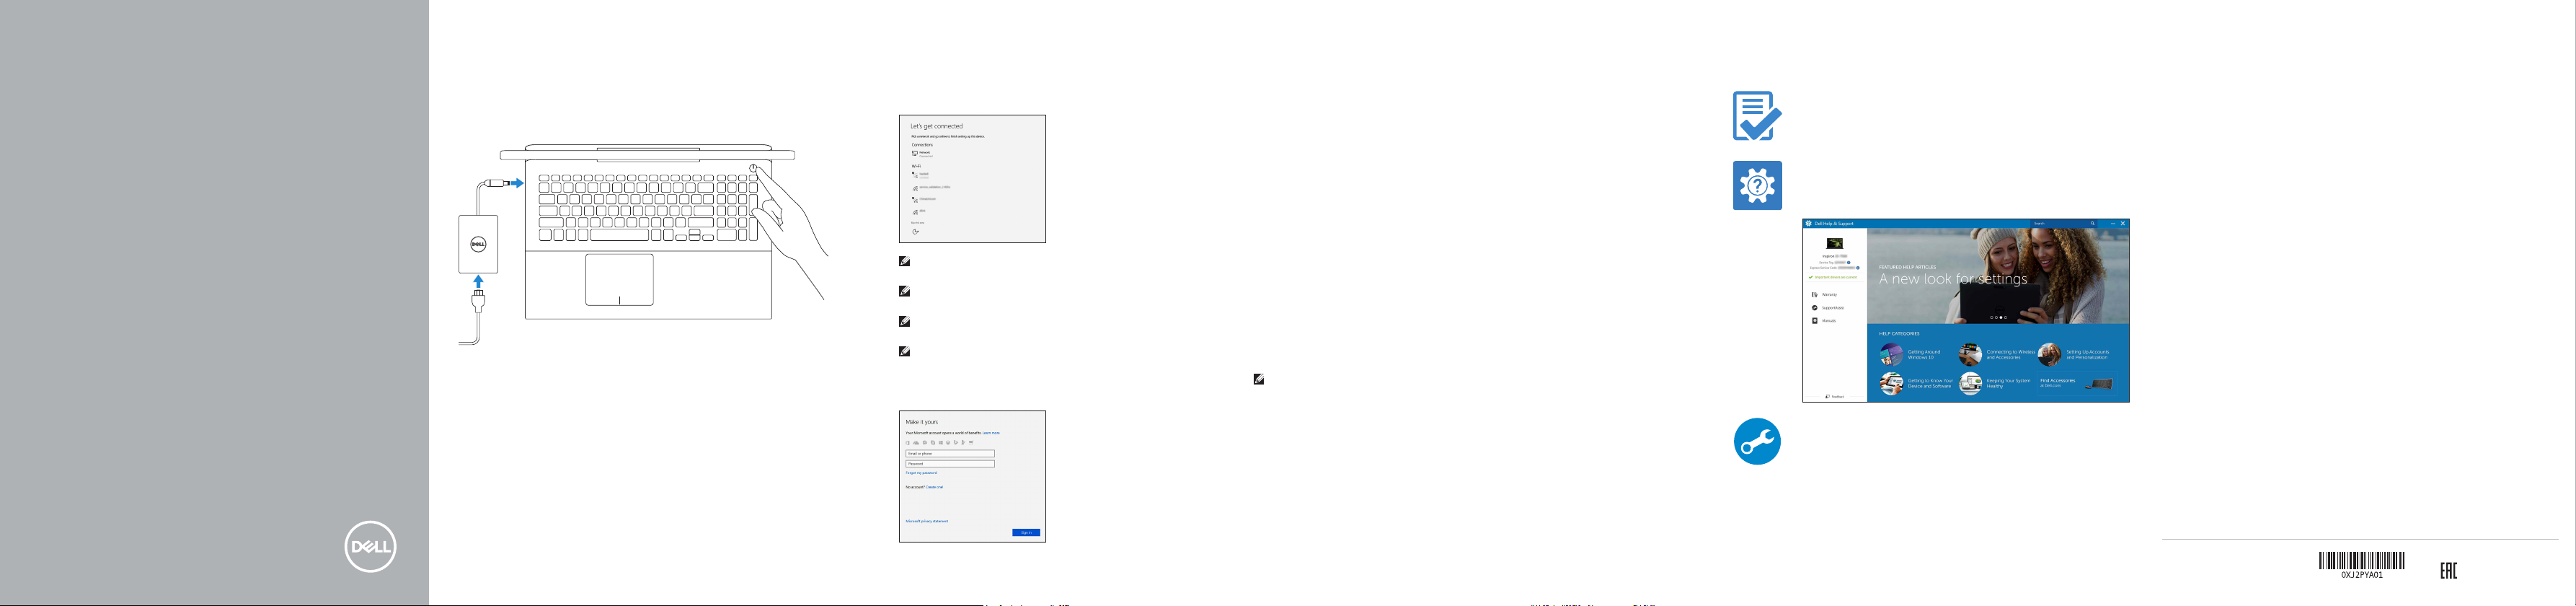
Connect the power adapter and
1
press the power button
Podłącz zasilacz i naciśnij przycisk zasilania
Подключите адаптер источника питания и нажмите на кнопку питания
Priključite napajalnik in pritisnite gumb za vklop/izklop
הלעפהה רותפכ לע ץחלו למשחה םאתמ תא רבח
2 Finish Windows setup
Skonfiguruj system Windows |
Dokončajte namestitev sistema Windows | המייתסה Windows תרדגה
Windows
NOTE: If you are connecting to a secured wireless network, enter the password for
the wireless network access when prompted.
UWAGA: Jeśli nawiązujesz połączenie z zabezpieczoną siecią bezprzewodową,
wprowadź hasło dostępu do sieci po wyświetleniu monitu.
ПРИМЕЧАНИЕ. В случае подключения к защищенной беспроводной сети при
появлении подсказки введите пароль для доступа к беспроводной сети.
OPOMBA: Če se povezujete v zaščiteno brezžično omrežje, ob pozivu vnesite
geslo za dostop do brezžičnega omrežja.
תשרה לא השיגה תמסיס תא ןזה ,תחטבואמ תיטוחלא תשרל רבחתמ התא םא :הרעה
Завершите установку Windows
Connect to your network
Nawiąż połączenie z siecią
Подключитесь к сети
Povežite računalnik z omrežjem
תשרל רבחתה
.תאז תושעל שקבתת רשאכ תיטוחלאה
Sign in to your Microsoft account orcreate
alocal account
Zaloguj się do konta Microsoft albo utwórz
kontolokalne
Войти в учетную запись Microsoft или создать
локальную учетную запись
Vpišite se v račun Microsoft ali ustvarite
lokalniračun
ימוקמ ןובשח רוצ וא ךלש Microsoft ןובשחל סנכיה
Create recovery drive for Windows
Utwórz nośnik odzyskiwania dla systemu Windows
Создайте диск восстановления для Windows
Ustvarite obnovitveni pogon za Windows
Windows-ל רוזחש ןנוכ רוצ
In Windows search, type Recovery, click Create a recovery drive, and follow the
instructions on the screen.
W polu wyszukiwania systemu Windows wpisz Odzyskiwanie, kliknij opcję Utwórz nośnik
odzyskiwania i postępuj zgodnie z instrukcjami wyświetlanymi na ekranie.
В поиске Windows введите Восстановление, нажмите Создать носитель для
восстановления системы и следуйте инструкциям на экране.
V iskalnik Windows vtipkajte Obnova, kliknite Ustvari obnovitveni pogon in sledite
navodilom na zaslonu.
.ךסמה לעש תוארוהה יפל לעפו ,’רוזחש ןנוכ רוצ‘ לע ץחל ,רוזחש דלקה ,Windows לש שופיחה תביתב
Locate Dell apps
Odszukaj aplikacje firmy Dell |
Poiščite programe Dell | Dell ימושיי תא רתא
Register your computer
Zarejestruj komputer |
Registrirajte svoj računalnik | ךלש בשחמה תא םושר
Dell Help & Support
Pomoc i wsparcie Dell |
Pomoč in podpora Dell | Dell לש הכימתו הרזע
SupportAssist Check and update your computer
Найдите приложения Dell
Зарегистрируйте компьютер
Справка и поддержка Dell
Wyszukaj i zainstaluj aktualizacje komputera
Проверка и обновление компьютера
Preverite in posodobite svoj računalnik
ךלש בשחמה תא ןכדעו קודב
Product support and manuals
Pomoc techniczna i podręczniki
Техническая поддержка и руководства по продуктам
Podpora in navodila za izdelek
רצומל םיכירדמו הכימת
Contact Dell
Kontakt z firmą Dell |
Stik z družbo Dell | Dell לא הנפ
Regulatory and safety
Przepisy i bezpieczeństwo
Соответствие стандартам и технике безопасности
Zakonski predpisi in varnost | תוחיטבו תונקת
Regulatory model
Model |
Модель согласно нормативной документации
Regulatorni model | הניקת םגד
Regulatory type
Typ |
Тип согласно нормативной документации
Regulativna vrsta | הניקת גוס
Computer model
Model komputera |
Model računalnika | בשחמ םגד
Обратитесь в компанию Dell
Модель компьютера
Dell.com/support
Dell.com/support/manuals
Dell.com/support/windows
Dell.com/contactdell
Dell.com/regulatory_compliance
P65F
P65F001
Inspiron 15-7566
Connection and use of this communications equipment is permitted by
the Nigerian Communications Commission
© 2016 Dell Inc.
© 2016 Microsoft Corporation.
Printed in China.
2016-10