Press Key
You can customize the functions of these buttons according to your own habits, and you can uncheck «Enable press keys» in the lower left corner to turn off the button function.
Place the cursor on a key to check its default value. Click the key for a pop-up dialog box and then set the function.
You can enter a name for the keystroke, then select the property of the keystroke and customize the function.

1. Keyboard Key
Click on the input box above and enter a valid key combination to creat a shortcut. For example «Ctrl+A», «Ctrl+Z», and so on.

2. Mouse Key
Select the function of a Mouse or Wheel. Please see the picture below for detailed functions.
Mouse: Left Button, Right Button, Middle Button.
Wheel: Wheel Forward, Wheel Backward.
Double-Left Click.

3. Switch
Select Switch Screen or Switch Brush.
Note: Some software does not support the «Switch Brush» function.

4. Run Program
Browse and select a program that you want to launch quickly. After the setting, you can launch that program with just a single press.

5. System Application
The table below are the functions of Windows and Mac Systems that can be customized on the Keys.

6. Multimedia
To realize the functions such as previous song, next song, play/pause, volume up, volume down.

7. None
When select None, the keys will have no function.
Working Area
Select the Working Area tab to define the relationship between pen movement on the tablet and cursor movement on the monitor screen.
By default the entire active area of tablet maps to the entire monitor. If more than one monitor is in use and you are in extended mode, you need to choose the related monitor on the driver interface which you are going to map to.
If your monitors are in mirror mode (All monitors display the same content), the tablet maps to the entire space on each monitor and the screen cursor is displayed on each monitor simultaneously.
1. Working Area Setting
Define the tablet area that will be mapped to the screen area.
[1] Full Area: the entire active area of the tablet. This is the default setting.
[2] Screen Ratio:As a general rule, be 16:9.
[3] Customized Area:
1> Enter coordinate values.
2> Drag the corners of the foreground graphic to select the screen area.

2. Rotate Working Area
By changing the direction of the tablet to adapt to the left and right hand operation. You can rotate the tablet by 0°,90°,180° or 270°.

Inspiroy Dial Q620M
Безграничные возможности для творчества
Сделай работу легче с Dial контроллером
Дизайн, который разжигает искру вашей невероятной идеи
Каждая деталь имеет значение
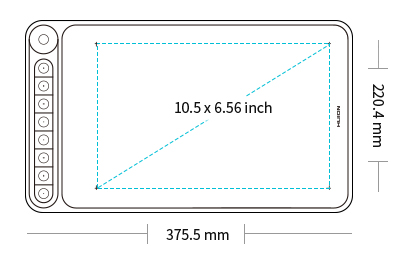
Изготовленный из высококачественного пластика и металла, Inspiroy Dial отличается исключительным эстетическим дизайном и изысканным качеством исполнения. Кроме того, рабочая область 10,5 х 6,5 дюйма – это огромный холст для творчества.

*победитель «Golden Pin Design Award 2019», Тайвань

Мультифункциональный Dial контроллер

Долговечное покрытие

Матовая рабочая область
Новые возможности для творчества
Dial Контроллер совместим с протоколом Windows Radial Controller. Функции Dial Контроллера могут программироваться в меню драйвера по умолчанию. В то время как функции Windows Radial будут активированы после выбора «Использовать Windows Radial» в меню драйвера. Длительно нажмите клавишу в центре Dial Контроллера, чтобы вызвать меню инструментов. Dial Контроллер, также может использоваться для регулировки размера кисти, выбора цвета, прокрутки страниц и т. д.

Новые функции для масштабных идей
*при активном режиме Windows Radial, функции Dial Контроллера могут иметь различные значения, в зависимости от используемого программного обеспечения.


Мультифункциональные LED индикаторы
В каждую из экспресс-клавиш встроен светодиодный индикатор, который может указывать оставшийся заряд батареи, низкий заряд батареи и потребление энергии в режиме реального времени. Когда вы включаете графический планшет планшет, 8 светодиодных индикаторов будут включаться один за другим, в то время как при последующем выключении перьевого планшета они погаснут.

Диагностика аккумулятора

Низкий заряд батареи

Заряд батареи
Настоящие штрихи!
Воплощая идеи в жизнь
В цифровом пере PW500 используется прорезиненный корпус. Теперь перо еще удобней лежит в руке.

Быстрые и точные наброски
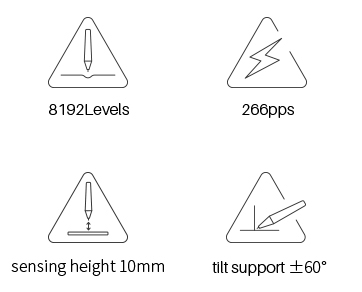
Высочайшая скорость отклика 266PPS и 8192 уровня чувствительности к давлению обеспечивают более точное и подробное рисование.

8192 уровня

266 PPS

Рисуйте по новому
± 60° чувствительности к наклону позволяют работать с пером так же естественно, как и с обычным карандашом. Наклоните ручку, чтобы оживить свои штрихи.
Наклон ± 60°
Оптимизируйте Ваши идеи!
Начните с вашего мобильного холста
Q620M поддерживает соединение с устройствами Android, чтобы обеспечить пользователям еще большее удобство.
8 мм
толщина
666 гр.
вес
Поддержка Android устройств

*соединение кабелем между планшетом и телефоном приведет к зарядке планшета от вашего телефона, поэтому батарея вашего телефона может быстро разрядиться.
Удобное беспроводное соединение
Благодаря беспроводному приемнику USB 2.4G Inspiroy Q620M освобождает вас от множества проводов для передачи данных, что обеспечивает еще более свободное рисование без ограничений.

Удивительное время автономной работы
Inspiroy Q620M можно заряжать от источника питания 5 В, 500 мА или 5 В, 1 А, Время автономной работы — 20 часов. Время до полной зарядки — 1 ч. 20 мин.
от 1 ч. 20 мин.
время зарядки
около 20 часов
время работы
6 месяцев
режим ожидания
1100 мАч
ёмкость батареи

Быстрый доступ ко всем функциям
Экспресс-клавиши Inspiroy Q620M обеспечивают более простой и быстрый подход к реализации Ваших идей.
Просто подключить и использовать
Удобный и надежный интерфейс Type-C решает проблему, с которой сталкиваются все пользователи USB. Какой же стороной подключить?
Больше удовольствия от большей совместимости
Подключите планшет к macOS / Windows с помощью USB-кабеля, чтобы облегчить работу с основными программами для рисования и проектирования, включая PS, SAI, AI и CDR.
")
Спецификации

Внешний вид
Технические характеристики
Беспроводное подключение
Совместимость

Посмотреть инструкция для Huion Inspiroy Q620M бесплатно. Руководство относится к категории графические планшеты, 1 человек(а) дали ему среднюю оценку 7. Руководство доступно на следующих языках: английский. У вас есть вопрос о Huion Inspiroy Q620M или вам нужна помощь? Задайте свой вопрос здесь
Не можете найти ответ на свой вопрос в руководстве? Вы можете найти ответ на свой вопрос ниже, в разделе часто задаваемых вопросов о Huion Inspiroy Q620M.
Инструкция Huion Inspiroy Q620M доступно в русский?
Не нашли свой вопрос? Задайте свой вопрос здесь
- Manuals
- Brands
- Huion Manuals
- Graphics Tablet
- INSPIROY Dial
- User manual
-
Contents
-
Table of Contents
-
Troubleshooting
-
Bookmarks
Quick Links
INSPIROY Dial
Q620M
User Manual
Related Manuals for Huion INSPIROY Dial
Summary of Contents for Huion INSPIROY Dial
-
Page 1
INSPIROY Dial Q620M User Manual… -
Page 2: Table Of Contents
Q620M Contents 1 / Precautions ………………….3 2 / Product Overview ………………..4 2.1 Tablet Introduction ……………………4 2.2 Product and Accessories ………………….4 2.3 Tablet Connection……………………5 2.4 Introduction to LED Indicator ………………..7 2.5 Install Driver ……………………..8 3 / Pen Basic Operation ………………..
-
Page 3: Precautions
Q620M / Precautions 【 Please read this manual carefully before using, and keep it well for future reference.】 —Before cleaning the tablet please unplug the power cord and wipe with a soft damp cloth, do not use any kind of detergents. —Don’t expose this product to water or other liquids.
-
Page 4: Product Overview
/ Product Overview 2.1 Tablet Introduction ® ® Thanks for choosing HUION INSPIROY Dial Q620M creative pen tablet. This is a new generation of professional battery-free drawing tablet, which can greatly improve your work efficiency of painting and creation, and full of fun. You can freely painting and writing, depicting different lines and colors, just as the pen writes on the paper, which brings you a real shock experience.
-
Page 5: Tablet Connection
Q620M 2.2.2 Accessories Battery-free pen Replacement Nibs Pen Holder (inside the pen holder) Wireless Receiver Pen Nib Clip Cleaning Cloth (inside the pen holder) Quick Start Guide USB-C Cable Warranty Card 2.3 Tablet Connection 2.3.1 Connecting to Computer Connect the tablet to your computer with USB cable. [1] Take out the Usb cable from the package, then connect tablet to your computer.
-
Page 6
Q620M Wireless Mode [1] Insert the wireless receiver to your computer. [2] Switch the power button on to power on the tablet. [3] Not using 15 mins, the tablet will enter sleep mode. In this case, you need to switch the power button on again to wake the tablet up. 2.3.2 Connecting to Android Phone &… -
Page 7: Introduction To Led Indicator
Q620M Notes: [1] The phone will reverse charge the tablet when they are wired connected and will quickly drain the phone battery, so it can only be used by wirelessly connecting to the phone. [2] The pen tablet can works without installing any driver into your phone/tablet. [3] Once connected, the tablet will automatically enter the phone mode, in which the pen can only work in the left gray area.
-
Page 8: Install Driver
2.5.1 OS Support Windows 7 or later, macOS 10.12 or later. 2.5.2 Install Driver Please download the driver from our website: www.huion.com/download. After finishing installation, you can find the driver icon » » in the system tray area, which means the driver was installed successfully; when you connect the tablet to computer, the icon will change to color «…
-
Page 9: Pen Basic Operation
Q620M / Pen Basic Operation 3.1 Hold the pen Hold the pen as you hold a normal pen or pencil. Adjust your grip so that you can toggle the side switch easily with your thumb or forefinger. Be careful not to accidentally press the switch while drawing or positioning with the pen.
-
Page 10: Click
Q620M 3.3 Click Use the pen tip to tap once on the screen to register a click. Tap to highlight or select an item on the screen and double-click to open it. 3.4 Move Select the object, then slide the pen tip across the screen to move it. 3.5 Use the side buttons The buttons on the pen can be set to two different customizable functions.
-
Page 11: Pen Nib Replacement
Q620M 3.6 Pen Nib Replacement The nib will be wear off after using for a long time, then you need to replace a new nib. [1] Anticlockwise rotate the pen holder to open the cover, take a new nib out. [2] Insert the pen nib into the pen nib clip and tilt the pen to pull out the old nib.
-
Page 12: Function Setting
Q620M / Function Setting 4.1 Working Area Setting 4.1.1 Using Multiple Monitors Select the Working Area tab to define the relationship between pen movement on the tablet and cursor movement on the monitor screen. By default the entire active area of tablet maps to the entire monitor. If more than one monitor is in use and you are in extended mode, you need to choose the related monitor on the driver interface which you are going to map to.
-
Page 13: Tablet Setting
Q620M ① ② ③ 4.1.3 Rotate Working Area By changing the direction of the tablet to adapt to the left and right hand operation. You can rotate the tablet by 0° , 90° , 180° or 270° . 4.2 Tablet Setting Click the «…
-
Page 14
Q620M 4.2.1 General settings Add App: Shortcut key function can be set by adding different programs. When opening different programs, the driver will automatically recognize that the shortcut function is the corresponding function set. 4.2.2 Hotkeys settings Set the shortcut key to quickly open the driver interface. The default value is Ctrl+Alt+H, which can be set according to usage habits. -
Page 15: Press Keys Function Setting
Q620M 4.2.3 Updates You can view the driver version number, click «Check for Update», view the latest driver version, and update according to the system prompt. 4.3 Press Keys Function Setting Default Setting:Place the cursor on the press key or click the press key to find the default values.
-
Page 16
Q620M The following shortcut key customization interface is displayed, with a total of 5 Settings. ① Custom: according to the use of custom or professional terms to set. ② Key combination function keys: Ctrl, Shift, Alt, Win+ any letter or other. Ctrl, Shift, Alt, Win, you can select one or more of them, and you can arrange them in any combination. -
Page 17: Pen Buttons Function Setting
Q620M 4.4 Pen Buttons Function Setting Select the function to be achieved on the pop-up dialog box, then click «Apply» or «OK» to take effect. 4.5 Enable the Windows Ink feature Microsoft Windows provides extensive support for pen input. Pen features are supported in such as Microsoft Office, Windows Whiteboard, Adobe Photoshop CC, SketchBook 6 and so on.
-
Page 18: Pressure Sensitivity Setting
Q620M 4.6 Pressure Sensitivity Setting The pressure sensitivity will be changed by dragging the slider up and down, the smaller the value, the more pressure sensitive. Drag upward (left): the pressure change is more obvious, small pressure produces a great pressure. Drag down (right): pressure change is weak, a lot of pressure produces less pressure.
-
Page 19: Pen Pressure Testing
Q620M 4.7 Pen Pressure Testing You can gradually apply pressure to the stylus on the screen to test the pressure level. Click » » button to clear all the ink. 4.8 Pen Nib Activity Setting The pen nibs can be set to be Active/Inactive as needed.Click the drop-down option to select, and click OK again to save the Settings.
-
Page 20: Data Export And Import
Q620M 4.9 Data Export and Import The driver supports exporting and importing your custom configuration data of the product, which is convenient for you to use different software and avoid the trouble of repeated settings.
-
Page 21: Specifications
Q620M / Specifications Tablet Model Q620M Touch Technology Battery-Free Electromagnetic Resonance Computer:266.7 x 166.7mm Working Area Android:104.2 x 166.7mm Dimension 375.5 x 220.4 x 8mm Net Weight 666g Touch Resolution 5080LPI Report Rate 266PPS Pen Sensing Height 10mm Interface USB-C Press Keys 8 Programmable Press Keys + Dial Windows 7 or later,…
-
Page 22: Trouble Shooting
There is no pressure in drawing software when installing the driver. Please uninstall all the graphics software drivers and close the drawing software, then reinstall the Huion but the cursor moves driver. It’s better to restart your computer after finishing the installation.’…
This manual is also suitable for:
Q620m
Продолжаем знакомство с графическим планшетом Huion Q620M. В этом видео мы рассмотрим основные функции и настройки планшета.
Графический планшет предоставлен для обзора российским представительством компании Huion.
А для тех, кто хочет в совершенстве освоить графический планшет, у нас есть миникурс «Графический планшет — секретное оружие для профессиональной ретуши», в котором рассматривается настройка графического планшета и специальные упражнения.

Вы можете пройти первые три урока курса бесплатно. Несмотря на то, что курс записан на примере планшета Wacom, он подойдет обладателям любых графических планшетов, так как логика настроек и работы в целом одинаковая.
Кроме того, с 14 по 16 июля данный курс, как и все другие, будет доступен со скидкой 30%.
Еще уроки из рубрики «Разное»
![]()
Настройка планшета Huion KD200
Как настроить графический планшет с клавиатурой для комфортной работы? Именно об этом я буду рассказывать в сегодняшнем видеоуроке. Разберем настройки рабочей области, цифрового…
Читать дальше →
21/06/2022.
Видеоуроки — Разное.
Автор: Евгений Карташов
2 205
0
![]()
Huion KD200. Планшет с клавиатурой.
Графический планшет — очень важный и главный инструмент ретушера или цифрового художника. Моделей и производителей графических планшетов довольно много. Одним из таких…
Читать дальше →
02/06/2022.
Видеоуроки — Разное.
Автор: Евгений Карташов
2 294
0
![]()
Как правильно собрать фотобокс Godox LST-60
Вроде бы простая задача — собрать фотобокс Godox LST-60? Но не тут-то было! Даже я, имея инженерное мышление и опыт работы со сложными электроустановками, допустил несколько…
Читать дальше →
12/05/2022.
Видеоуроки — Разное.
Автор: Евгений Карташов
2 097
0
![]()
Обзор рефлектора Godox Parabolic 128
Наконец-то свершилось! Этого долго ждали все фотографы, знающие толк в свете… Компания Godox выпустила линейку светоформирующих насадок Godox Parabolic. Что же такого…
Читать дальше →
18/04/2022.
Видеоуроки — Разное.
Автор: Евгений Карташов
2 054
0
![]()
Обзор источника GreenBean SunLight PRO 300
Постоянный свет в последние 2-3 года становится все более популярным для фотосъемки. Про видеосъемку я уже и не говорю, без качественных и надежных источников постоянного…
Читать дальше →
23/03/2022.
Видеоуроки — Разное.
Автор: Евгений Карташов
2 570
0
![]()
Godox SL200II — первое знакомство
В этом видео вы познакомитесь со светодиодным источником Godox SL200II. Это прибор постоянного света, оснащенный круглым светодиодом мощностью 200 Вт, что примерно эквивалентно…
Читать дальше →
02/02/2022.
Видеоуроки — Разное.
Автор: Евгений Карташов
4 162
11
