- Manuals
- Brands
- Hotpoint Ariston Manuals
- Washer/Dryer
- ARMXXD 129
- Instructions for use manual
-
Contents
-
Table of Contents
-
Troubleshooting
-
Bookmarks
Quick Links
Instructions for use
GB
English,1
BG
ÁÚËÃÀÐÑÊÈ,37
ARMXXD 129
Downloaded From WashingMachine-Manual.com Manuals
PL
CIS
Polski,25
ÐÓÑÑÊÈÉ, 13
RO
Românã,49
Contents
WASHER DRYER
1
GB
Related Manuals for Hotpoint Ariston ARMXXD 129
Summary of Contents for Hotpoint Ariston ARMXXD 129
-
Page 1
Românã,49 ÁÚËÃÀÐÑÊÈ,37 How to run a wash cycle or a drying cycle, 6 Wash cycles and functions, 7 Detergents and laundry, 8 ARMXXD 129 Precautions and tips, 9 Care and maintenance, 10 Troubleshooting, 11 Service, 12 Downloaded From WashingMachine-Manual.com Manuals… -
Page 2: Armxxd
Installation Connecting the electricity and water supplies Unpacking and levelling Connecting the water inlet hose Unpacking (see figure). see figure (see figure) (see next page). Levelling see figure Downloaded From WashingMachine-Manual.com Manuals…
-
Page 3: The First Wash Cycle
Connecting the drain hose The first wash cycle see figure Technical data Model Dimensions Electrical connections Capacity Electrical connections Water connections Spin speed (see opposite); Wash: press of the button (see opposite); Energy rated programmes Drying: according to IRON DRY regulation EN 50229 CUPBORD DRY…
-
Page 4: Description Of The Washer Dryer
Description of the washer dryer Control panel CONTROL PANEL LOCK ON/OFF DRYING SPIN SPEED DISPLAY START/ Detergent dispenser MEMORY PAUSE drawer FUNCTION WASH CYCLE SELECTOR DELAYED TEMPERATURE START Detergent dispenser drawer: TEMPERATURE see “Detergents and laundry” CONTROL PANEL LOCK activate ON/OFF deactivate DELAYED START…
-
Page 5
Display Door locked symbol N.B.: simultaneously Downloaded From WashingMachine-Manual.com Manuals… -
Page 6: How To Run A Wash Cycle Or A Drying Cycle
How to run a wash cycle or a drying cycle SWITCH THE MACHINE ON. Drying only LOAD THE LAUNDRY. Table of Drying times (guideline values) Fabric Load type Max. Cupboard Henger Iron type load MEASURE OUT THE DETERGENT. (kg) «Detergents and laundry».
-
Page 7: Wash Cycles And Functions
Wash cycles and functions Table of wash cycles D e te rge nts M ax . load (k g) M ax M ax . D ry C yc le D e scrip tion of the wash cycle tem p . sp e ed d uration Fa b ric…
-
Page 8: Detergents And Laundry
Detergents and laundry Detergent dispenser drawer Special wash cycles Mix 30’: Mix 15’: Silk: Curtains: Wool: compartment 1: Pre-wash detergent (powder) compartment 2: Detergent for the wash cycle (powder or liquid) compartment 3: Additives (fabric softeners, etc.) extra compartment 4: Bleach Load balancing system Preparing the laundry How much does your laundry weigh?
-
Page 9: Precautions And Tips
Precautions and tips General safety Opening the porthole door manually figure see figure Disposal Downloaded From WashingMachine-Manual.com Manuals…
-
Page 10: Care And Maintenance
Care and maintenance Cutting off the water and electricity Cleaning the pump supplies Cleaning the washer dryer figure ; Cleaning the detergent dispenser drawer see figure see figure : Caring for the door and drum of your appliance Checking the water inlet hose Downloaded From WashingMachine-Manual.com Manuals…
-
Page 11: Troubleshooting
Troubleshooting see “Assistance” Problem: Possible causes / Solutions: The washer dryer does not switch on. The wash cycle does not start. see “How to run a wash cycle or a drying cycle”). The washer dryer does not take in water (the text «NO WATER, CHECK SUPPLY»…
-
Page 12: Service
Service Before calling for Assistance: • “Troubleshooting” Have the following information to hand: Downloaded From WashingMachine-Manual.com Manuals…
-
Page 13: Downloaded From Washingmachine-Manual.com Manuals
ARMXXD 129 Downloaded From WashingMachine-Manual.com Manuals…
-
Page 14
 ñì. ñõåìó ñì. ñõåìó). (ñì. ñõåìó) (ñì. ñòðàíèöó ðÿäîì). (ñì. ñõåìó). Downloaded From WashingMachine-Manual.com Manuals… -
Page 15
ñì. ñõåìó). Òåõíè÷åñêèå õàðàêòåðèñòèêè Ìîäåëü ARMXXD 129 øèðèíà 59,5 ñì Ðàçìåðû âûñîòà 85 ñì ãëóáèíà 53,5 ñì îò 1 äî 7 êã íà öèêë ñòèðêè; Çàãðóçêà îò 1 äî 5 êã íà öèêë ñóøêè cìîòðèòå ïàñïîðòíóþ òàáëè÷êó ñ Ýëåêòðè÷åñêèå òåõíè÷åñêèìè õàðàêòåðèñòèêàìè íà… -
Page 16
ß÷åéêà äëÿ ñòèðàëüíîãî âåùåñòâà ß÷åéêè äëÿ ñòèðàëüíîãî âåùåñòâà: ñì. «Ñòèðàëüíûå âåùåñòâà è òèïû áåëüÿ» (ñì. «Òàáëèöà ïðîãðàìì»). Downloaded From WashingMachine-Manual.com Manuals… -
Page 17
Downloaded From WashingMachine-Manual.com Manuals… -
Page 18
Òàáëèöà ïðîäîëæèòåëüíîñòè ñóøêè (ïðèìåðíûå çíà÷åíèÿ) Òèï Çàêðóçêà  øêàô Íà âåø aëêó Ïîä Ìàêñ. òêàíè óòþã çàãðóçêà (êã) «Ñòèðàëüíûå âåùåñòâà è òèïû áåëüÿ». Õëîïîê Áåëüå ðàçíîãî ðàçìåðà, Ìàõðîâûå ïîëîòåíöà Ñèíòåò- Ïðîñòûíè, Ðóáàøêè, èêà Ïèæàìû, íîñêè è ò.ä. Øåðñòü Ñâèòåðà, ïîëóâåðû Ïîä… -
Page 19
Ìàêñ. Ñòèðàëüíûå ñ ð åäñ òâà Ìàêñ . çàãð óçêà (êã) Ìàêñ ñêîð- Ïð î äîë — Îïèñ àí èå ï ð îãð àì ì û òåìï. îñòü Cóøêà æèòòü Îòáå- Ñòèðêà Îïîëàñ êè- Íîð ìàëü- Ìèí è (°C) (îá./ öèêëà… -
Page 20
Downloaded From WashingMachine-Manual.com Manuals… -
Page 21
ñõåìå. (ñì. ñõåìó Downloaded From WashingMachine-Manual.com Manuals… -
Page 22
ñì. ñõåìó) ñì. ñõåìó). ñì. ñõåìó) Downloaded From WashingMachine-Manual.com Manuals… -
Page 23
ñì. Ñåðâèñíîå îáñëóæèâàíèå ñì. “Ïîðÿäîê îñóùåñòâëåíèÿ öèêëà ìîéêè èëè ñóøêè” ñì. «Óñòàíîâêà» . ñì. «Óñòàíîâêà» . ñì. «Ïðîãðàììû è ôóíêöèè» ñì. «Ïðîãðàììû è ôóíêöèè» ñì. «Óñòàíîâêà» . • (ñì. «Óñòàíîâêà»). ñì. «Óñòàíîâêà» . ñì. «Óñòàíîâêà» . (ñì. «Óñòàíîâêà»). ñì. â ïàðàãðàôå… -
Page 24
ñì. «Íåèñïðàâíîñòè è ìåòîäû èõ óñòðàíåíèÿ» Downloaded From WashingMachine-Manual.com Manuals… -
Page 25
Downloaded From WashingMachine-Manual.com Manuals… -
Page 26
(patrz rysunek). patrz rysunek (patrz rysunek). (patrz strona obok). (patrz rysunek); Downloaded From WashingMachine-Manual.com Manuals… -
Page 27
patrz rysunek (patrz obok); (1°° naciœniêcie przycisku); ° patrz obok Downloaded From WashingMachine-Manual.com Manuals… -
Page 28
Szufladka na œrodki pior¹ce Szufladka na œrodki pior¹ce: patrz „Œrodki pior¹ce i bielizna”). (patrz „Tabela programów”). Downloaded From WashingMachine-Manual.com Manuals… -
Page 29
Downloaded From WashingMachine-Manual.com Manuals… -
Page 30
Rodzaj Rodzaj zaladunku Zaladunek Szafa Wieszanie Prasowanie tkaniny maksymalny (kg) „Œrodki pior¹ce i bielizna”. Bawelna Bielizna róznych rozmiarów, Reczniki frotté Sintetików Przescieradla, koszule, Pizamy, skarpetki itp. ³ Welna Koszulki, swetry itp. Prasowanie Wieszanie Szafa (patrz tabela obok) Downloaded From WashingMachine-Manual.com Manuals… -
Page 31
(°C) (1°° naciœniêcie przycisku ) 90° 1200 (2 °° n a ciœn iêc ie przyc isk u) 60° 1200 (3 °° n a ciœn iêc ie przyc isk u) 40° 1200 (1 °° n aciœn iêcie p rzycisku ) 60° 1 ,5 (2 °°… -
Page 32
Downloaded From WashingMachine-Manual.com Manuals… -
Page 33
rysunku patrz rysunek Downloaded From WashingMachine-Manual.com Manuals… -
Page 34
patrz patrz rysunek patrz rysunek : Downloaded From WashingMachine-Manual.com Manuals… -
Page 35
patrz „Serwis Techniczny”) patrz “Jak wykonaæ cykl prania lub suszenie”). patrz „Instalacja”) patrz „Instalacja”). patrz „Programy i funkcje” „Programy i funkcje”). patrz „Instalacja”) patrz „Instalacja”). patrz „Instalacja”) patrz „Instalacja”) patrz „Instalacja”). patrz „Utrzymanie i konserwacja”) patrz „Instalacja”) Downloaded From WashingMachine-Manual.com Manuals… -
Page 36
• Sprawdziæ, czy problemu nie mo¿na rozwi¹zaæ samodzielnie ( Downloaded From WashingMachine-Manual.com Manuals… -
Page 37
Downloaded From WashingMachine-Manual.com Manuals… -
Page 38
(âèæ ôèãóðàòà). âèæ ïîêàçàíîòî íà ôèãóðàòà (âèæ ôèãóðàòà) (âæ. ñëåäâàùàòà ñòðàíèöà). âèæ ôèãóðàòà); !& Downloaded From WashingMachine-Manual.com Manuals… -
Page 39
âæ. ôèãóðàòà Òåõíè÷åñêè äàííè Ìîäåë ARMXXD 129 øèðèíà 59,5 ñì Ðàçìåðè âèñî÷èíà 85 ñì äúëáî÷èíà 53,5 ñì Îò 1 äî 7 êã çà ïðàíå Âìåñòèìîñò Îò 1 äî 5 êã çà ñóøåíå Åëåêòðè÷åñêî Âèæ òàáåëêàòà ñ õàðàêòåðèñòèêèòå, çàõðàíâàíå ïîñòàâåíà íà ìàøèíàòà… -
Page 40
×åêìåäæå çà ïåðèëíèòå ïðåïàðàòè ×åêìåäæå çà ïåðèëíèòå ïðåïàðàòè: âæ. “Ïåðèëíè ïðåïàðàòè è äðåõè çà ïðàíå”) (âèæ “Òàáëèöà ñ ïðîãðàìèòå”). » Downloaded From WashingMachine-Manual.com Manuals… -
Page 41
» Downloaded From WashingMachine-Manual.com Manuals… -
Page 42
Âèä Òèï íà ïðàíåòî Ìàêñè- Çà ãàðäåðîáà Èäåàëíî Çà òúêàí ìàëíè ñóõè ãëàäåíå êã. Ïàìóê Äðåõè ñ ðàçëè÷íè ðàçìåðè, ”Ïåðèëíè Õàâëèåíè êúðïè ïðåïàðàòè è äðåõè çà ïðàíå”. Ñèíòå- Õàâëèåíè êúðïè, ×àðø àôè, ôàíåëè òè÷íè Âúëíà Çà ãëàäåíå Èäåàëíî ñóõè: Çà ãàðäåðîáà (âæ. -
Page 43
Ç àð å æ ä àí å Ì àêñ . Ì àêñ . Ïð î ä ú- Ïå ð è ë í è ï ð å ï àð àòè ì aêñ .(êã) ò å ì ï å — ñ êî ð î ñ ò ë… -
Page 44
«» Downloaded From WashingMachine-Manual.com Manuals… -
Page 45
ôèãóðà âæ. ôèãóðà «# Downloaded From WashingMachine-Manual.com Manuals… -
Page 46
âæ. ôèãóðà âèæ ôèãóðàòà âèæ ôèãóðà : «$ Downloaded From WashingMachine-Manual.com Manuals… -
Page 47
âæ. “Ñåðâèçíî îáñëóæâàíå”), âæ. “Êàê ñå èçâúðøâà åäèí öèêúë íà ïðàíå èëè íà ñóøåíå”). âæ. “Ìîíòèðàíå”) âæ. “Ìîíòèðàíå” . âæ. “Ïðîãðàìè è ôóíêöèè” âæ. “Ïðîãðàìè è ôóíêöèè” âæ. “Ìîíòèðàíå” . âæ. “Ìîíòèðàíå” . âæ. “Ìîíòèðàíå” . âæ. “Ìîíòèðàíå” . âæ. “Ìîíòèðàíå” . âæ. -
Page 48
• (âæ. “Ïðîáëåìè è ìåðêè çà îòñòðàíÿâàíåòî èì «& Downloaded From WashingMachine-Manual.com Manuals… -
Page 49
Downloaded From WashingMachine-Manual.com Manuals… -
Page 50
(a se vedea figura). a se vedea figura (a se vedea figura) (a se vedea pagina alãturatã). (a se vedea figura); Downloaded From WashingMachine-Manual.com Manuals… -
Page 51
se vedea figura) Date tehnice Model Dimensiuni Capacitate Legãturi electrice Legãturi hidrice Turaþia de centrifugare Spãlare (1-a apãsare a tastei); (a se vedea alãturi); °C; Uscare Programe de control în baza normei (a se vedea EN 50229 alãturi); Downloaded From WashingMachine-Manual.com Manuals… -
Page 52
Sertarul detergenþilor Sertarul detergenþilor: (a se vedea “Detergenþi ºi rufe albe”). (a se vedea “Tabel de programe”). Downloaded From WashingMachine-Manual.com Manuals… -
Page 53
Downloaded From WashingMachine-Manual.com Manuals… -
Page 54
N.B: (a se vedea pagina urmãtoare). „Detergenþi ºi rufe albe”. Tipul Tipul sarcinii Sarcinã Maximã Medie Delicatã þesãturii max (kg) Delicatã Medie Maximã (a se vedea tabelul alãturat) Downloaded From WashingMachine-Manual.com Manuals… -
Page 55
Sarcina M ax. V iteza D urata Detergenþi Temp. (Kg) max. ciclului D escrierea P rogramului max. Uscare (rotaþii pe D eco- Spãlare B alsam (°C) Normalã Sarcina minut) spalare lorant rufe M in. Programe Bumbac (1-a apãsare a tastei) 90°… -
Page 56
Downloaded From WashingMachine-Manual.com Manuals… -
Page 57
figura a se vedea figura Downloaded From WashingMachine-Manual.com Manuals… -
Page 58
a se vedea figura ; a se vedea figura se vedea figura) Downloaded From WashingMachine-Manual.com Manuals… -
Page 59
a se vedea “Asistenþã” a se vedea “Cum se efectueazã un ciclu de spãlare sau de uscare”). a se vedea “Instalare”) a se vedea “Instalare”) a se vedea “Programe ºi funcþii”) a se vedea “Programe ºi funcþii”). (a se vedea “Instalare”). a se vedea “Instalare”) a se vedea “Instalare”) a se vedea “Instalare”) -
Page 60
195068049.00 11/2007 — Xerox Business Services • (a se vedea “Anomalii ºi remedii”); Downloaded From WashingMachine-Manual.com Manuals…
Характеристики, спецификации
Установка:
отдельно стоящая, съемная крышка для встраивания
Максимальная загрузка белья:
7 кг
Управление:
электронное (интеллектуальное)
Размеры (ШxГxВ):
60x54x85 см
Класс электропотребления:
B
Класс эффективности стирки:
A
Класс эффективности отжима:
B
Расход воды за стирку:
65 л
Скорость вращения при отжиме:
до 1200 об/мин
Выбор скорости отжима:
есть
Защита от протечек:
частичная (корпус)
Функция «Защита от детей»:
есть
Контроль за уровнем пены:
есть
Программа стирки шерсти:
есть
Специальные программы:
стирка деликатных тканей, экономичная стирка, предотвращение сминания, супер-полоскание, экспресс-стирка, предварительная стирка, программа удаления пятен
Таймер отсрочки начала стирки:
есть (до 24 ч)
Материал изготовления бака:
пластик
Люк загрузки:
диаметр 35 см

Instructions for use
WASHER DRYER
Contents
GB
Installation, 2-3
GB
CIS
PL
Unpacking and levelling
Connecting the electricity and water supplies
English,1
ÐÓÑÑÊÈÉ, 13
Polski,25
The first wash cycle
Technical data
Description of the washer dryer, 4-5
BG RO
Control panel
Display
ÁÚËÃÀÐÑÊÈ,37
Românã,49
How to run a wash cycle or a drying cycle, 6
Wash cycles and functions, 7
Table of wash cycles
Wash functions
Detergents and laundry, 8
ARMXXD 129
Detergent dispenser drawer
Preparing the laundry
Special wash cycles
Load balancing system
Precautions and tips, 9
General safety
Disposal
Opening the porthole door manually
Care and maintenance, 10
Cutting off the water or electricity supply
Cleaning the washer dryer
Cleaning the detergent dispenser drawer
Caring for the door and drum of your appliance
Cleaning the pump
Checking the water inlet hose
Troubleshooting, 11
Service, 12
1
Installation
This instruction manual should be kept in a safe
Levelling the machine correctly will provide it with
GB
place for future reference. If the washer dryer is sold,
stability, help to avoid vibrations and excessive noise
transferred or moved, make sure that the instruction
and prevent it from shifting while it is operating. If it is
manual remains with the machine so that the new
placed on carpet or a rug, adjust the feet in such a
owner is able to familiarise himself/herself with its
way as to allow a sufficient ventilation space
operation and features.
underneath the washer dryer.
Read these instructions carefully: they contain vital
information relating to the safe installation and
Connecting the electricity and water
operation of the appliance.
supplies
Unpacking and levelling
Connecting the water inlet hose
Unpacking
1. Insert seal A into the
end of the inlet hose and
1. Remove the washer dryer from its packaging.
screw the latter onto a
2. Make sure that the washer dryer has not been
cold water tap with a 3/4
damaged during the transportation process. If it has
gas threaded opening
been damaged, contact the retailer and do not
A
(see figure).
proceed any further with the installation process.
Before performing the
connection, allow the
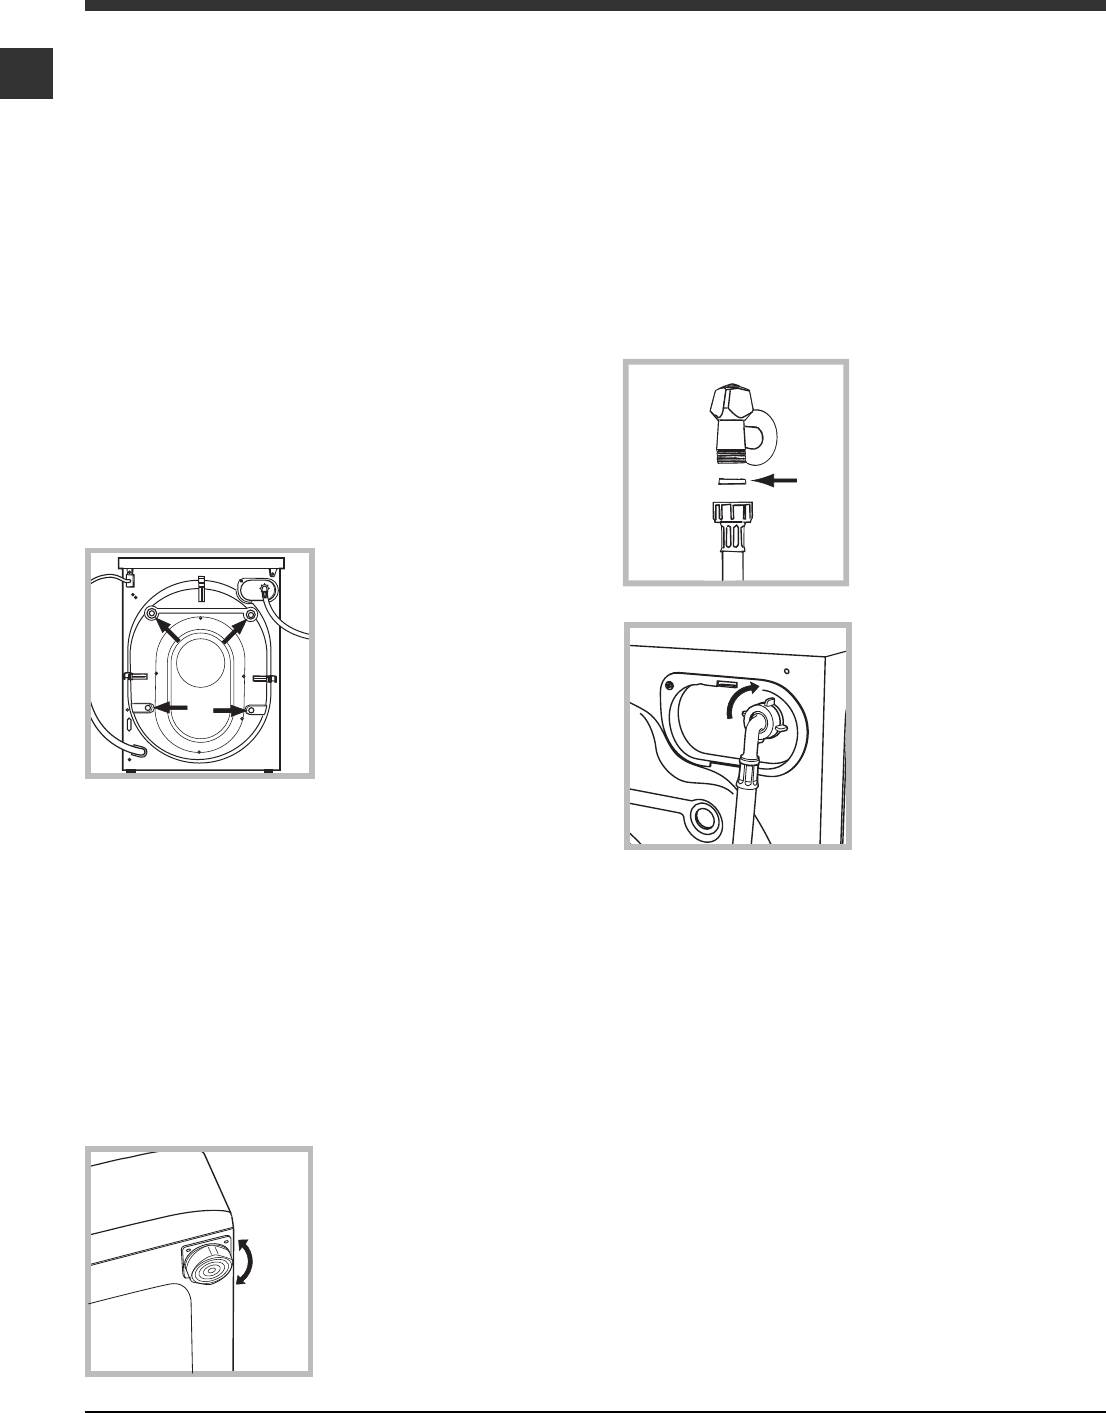
3. Remove the 4
water to run freely until it
protective screws (used
is perfectly clear.
during transportation) and
the rubber washer with
2. Connect the inlet hose
the corresponding
to the washer dryer by
spacer, located on the
screwing it onto the
rear part of the appliance
corresponding water inlet
(see figure).
of the appliance, which is
situated on the top right-
hand side of the rear part
of the appliance (see
4. Close off the holes using the plastic plugs provided.
figure).
5. Keep all the parts in a safe place: you will need
them again if the washer dryer needs to be moved to
another location.
3. Make sure that the hose is not folded over or bent.
Packaging materials should not be used as toys for
The water pressure at the tap must fall within the
children.
values indicated in the Technical details table (see
next page).
Levelling
If the inlet hose is not long enough, contact a
1. Install the washer dryer on a flat sturdy floor,
specialised shop or an authorised technician.
without resting it up against walls, furniture cabinets
or anything else.
Never use second-hand hoses.
2. If the floor is not
Use the ones supplied with the machine.
perfectly level, compen-
sate for any unevenness
by tightening or loosening
the adjustable front feet
(see figure); the angle of
inclination, measured in
relation to the worktop,
must not exceed 2°.
2
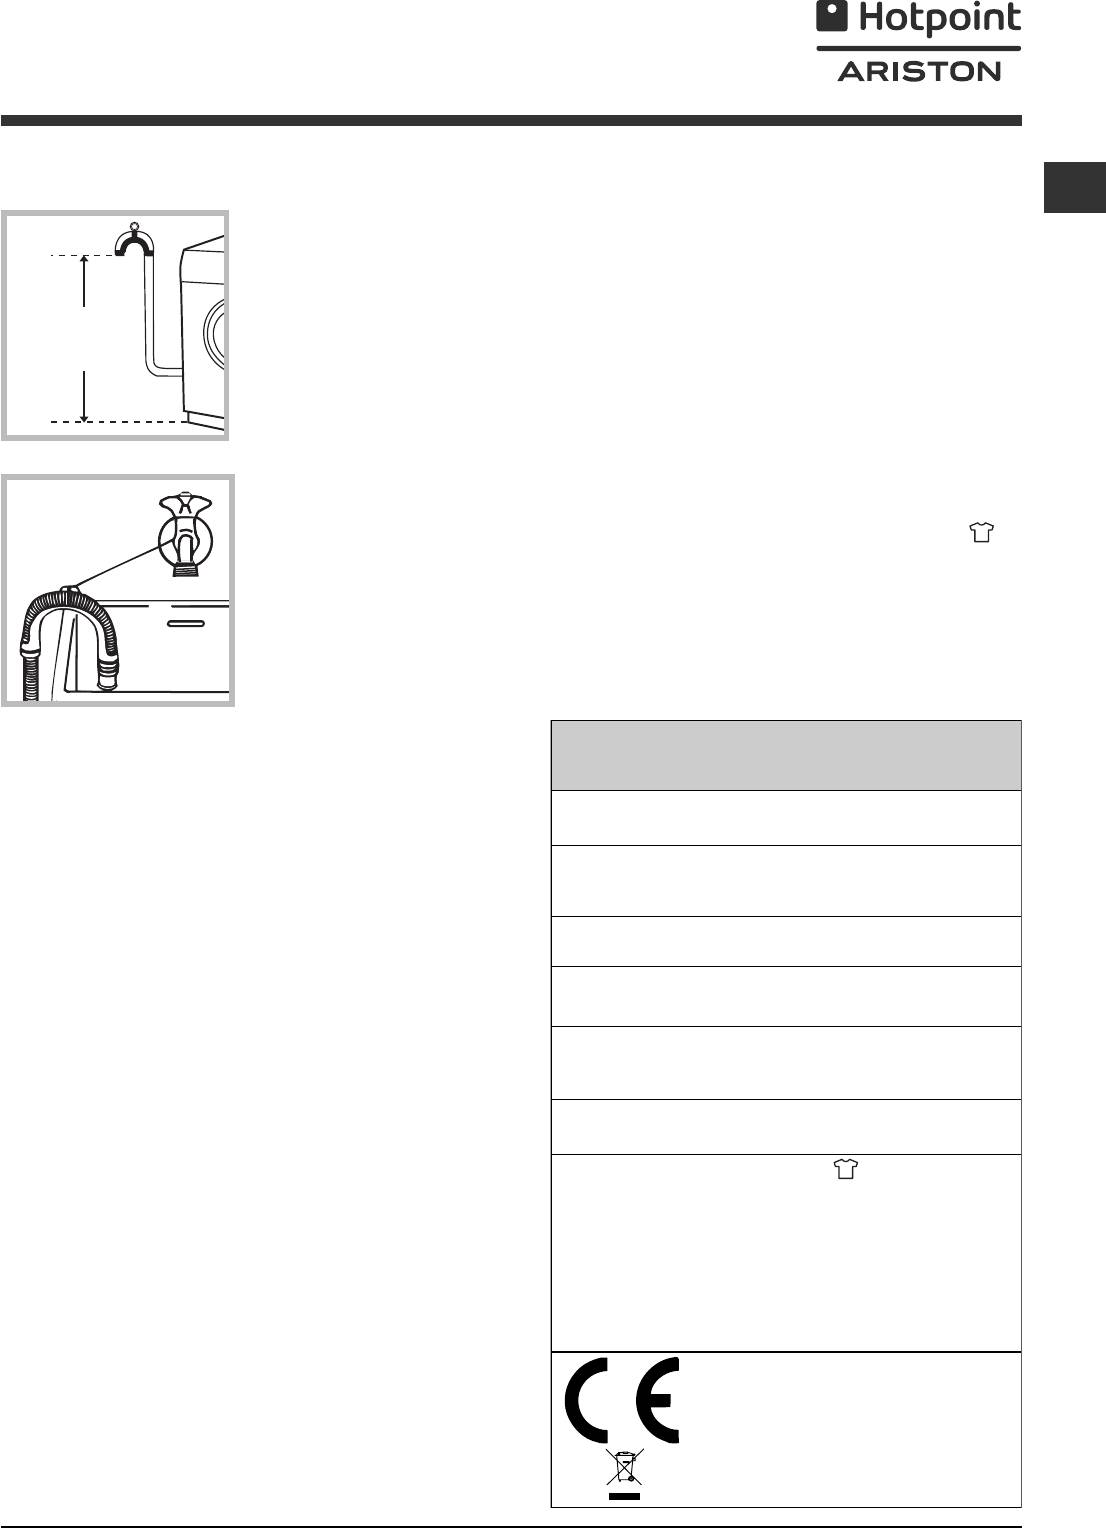
Connecting the drain hose
Do not use extension cords or multiple sockets.
GB
Connect the drain hose,
The cable should not be bent or compressed.
without bending it, to a
drainage duct or a wall
The power supply cable must only be replaced by
drain located at a height
authorised technicians.
between 65 and 100 cm
65 — 100 cm
from the floor;
Warning! The company shall not be held responsible
in the event that these regulations are not respected.
The first wash cycle
alternatively, rest it on
Once the appliance has been installed, and before
the side of a washbasin
you use it for the first time, run a wash cycle with
or bathtub, fastening the
detergent and no laundry, using the wash cycle
.
duct supplied to the tap
(see figure). The free end
of the hose should not
be underwater.
We advise against the use of hose extensions; if it is
Te ch n i c a l d a t a
absolutely necessary, the extension must have the
same diameter as the original hose and must not
exceed 150 cm in length.
Model
ARMXXD 129
width 59.5 cm
Dimensions
height 85 cm
Electrical connections
depth 53,5 cm
from 1 to 7 kg for the wash programme;
Before plugging the appliance into the electricity
Capacity
from 1 to 5 kg for the drying programme
socket, make sure that:
Electrical
please refer to the technical data plate
the socket is earthed and complies with all
connections
fixed to the machine
applicable laws;
maximum pressure 1 MPa (10 bar)
Wate r
minimum pressure 0.05 MPa (0.5 bar)
connections
the socket is able to withstand the maximum power
drum capacity 52 litres
load of the appliance as indicated in the Technical
data table (see opposite);
Spin speed
up to 1200 rotations per minute
Wash:
programme
(1
st
press of the
the power supply voltage falls within the values
button); temperature 60°C;
indicated in the Technical data table (see opposite);
Energy rated
using a load of 7 kg.
programmes
Drying: first drying cycle performed with a
the socket is compatible with the plug of the
according to
2 kg load, by selecting the «IRON DRY«
washer dryer. If this is not the case, replace the
regulation
dryness level;
socket or the plug.
EN 50229
The second drying cycle is performed
with a 5 kg load, by selecting the
«CUPBORD DRY» dryness level.
The washer dryer must not be installed outdoors,
even in covered areas. It is extremely dangerous to
This appliance conforms to the following
EC Directives:
leave the appliance exposed to rain, storms and other
— 89/336/EEC dated 03/05/89
weather conditions.
(Electromagnetic Compatibility) and
subsequent modifications
When the washer dryer has been installed, the
— 2006/95/EC (Low Voltage)
electricity socket must be within easy reach.
— 2002/96/EC
3
-
Инструкции по эксплуатации
1

HOTPOINT-ARISTON ARMXXD 129 инструкция по эксплуатации
(60 страниц)
- Языки:Русский
-
Тип:
PDF -
Размер:
1.69 MB -
Описание:
Стиральная машина
Просмотр
На NoDevice можно скачать инструкцию по эксплуатации для HOTPOINT-ARISTON ARMXXD 129. Руководство пользователя необходимо для ознакомления с правилами установки и эксплуатации HOTPOINT-ARISTON ARMXXD 129. Инструкции по использованию помогут правильно настроить HOTPOINT-ARISTON ARMXXD 129, исправить ошибки и выявить неполадки.
Создать заявку на ремонт можно 2-мя способами. Во-первых, с 8 до 22.00 ежедневно по телефонам:
+7 (495) 215 – 14 – 41
+7 (903) 722 – 17 – 03
А во-вторых, с помощью формы-заявки на сайте. В обращении укажите:
- Марку и модель машинки.
- Признаки неисправности. Например, стиральная машинка скрипит при отжиме или барабан стиралки не вращается.
- Подходящее вам время ремонта.
- Имя, адрес, телефон.
В назначенный день ремонта мастер свяжется с вами по указанному номеру для уточнения времени приезда.
Если проявились первые признаки поломки, не медлите с ремонтом вашей Hotpoint-Ariston ARS 68. Иначе это может привести к фатальным последствиям для стиральной машины. Лучше сразу звоните в «РемБытТех»! Опытный мастер приедет на вызов уже в течение 24 часов после вашего обращения и отремонтирует неисправный агрегат с гарантией так, что машинка прослужит вам ещё продолжительное время.
Страницы и текст этой инструкции
 Инструкция стиральной машины Hotpoint-Ariston ARMXXD 129
 Информация отображена на картинке
 Информация отображена на картинке
 Информация отображена на картинке
 Информация отображена на картинке
Как использовать наш сайт инструкций OnlineManuals.ru
Наша цель состоит в том, чтобы предоставить вам быстрый доступ к содержанию инструкции для стиральной машины Hotpoint-Ariston ARMXXD 129.
С помощью онлайн просмотра, Вы можете быстро просмотреть содержимое инструкции и найти решение проблемы с стиральной машины Hotpoint-Ariston ARMXXD 129.
Для Вашего удобства
Если листать руководство пользователя стиральной машины Hotpoint-Ariston ARMXXD 129 прямо на сайте, не очень удобно для Вас, есть два возможных решения:
• Просмотр в полноэкранном режиме — легко просмотреть руководство пользователя (без загрузки его на свой компьютер), Вы можете использовать режим полноэкранного просмотра.
Для просмотра инструкции пользователя стиральной машины Hotpoint-Ariston ARMXXD 129 на полном экране, используйте кнопку «Открыть в Pdf-viewer».
• Загрузка на компьютер — Вы можете также скачать Инструкция стиральной машины Hotpoint-Ariston ARMXXD 129 на свой компьютер и сохранить его в файлах.
Многие люди предпочитают читать документы не на экране, а в печатной версии.
Возможность печати руководства пользователя также была предусмотрена на нашем сайте,
и вы можете использовать ее, нажав на иконку «печать» в Pdf-viewer.
Нет необходимости печатать все руководство стиральной машины Hotpoint-Ariston ARMXXD 129, можно выбрать только нужные страницы инструкции.
GB
1
English,1
Contents
Installation, 2-3
Unpacking and levelling
Connecting the electricity and water supplies
The first wash cycle
Technical data
Description of the washer dryer, 4-5
Control panel
Display
How to run a wash cycle or a drying cycle, 6
Wash cycles and functions, 7
Table of wash cycles
Wash functions
Detergents and laundry, 8
Detergent dispenser drawer
Preparing the laundry
Special wash cycles
Load balancing system
Precautions and tips, 9
General safety
Disposal
Opening the porthole door manually
Care and maintenance, 10
Cutting off the water or electricity supply
Cleaning the washer dryer
Cleaning the detergent dispenser drawer
Caring for the door and drum of your appliance
Cleaning the pump
Checking the water inlet hose
Troubleshooting, 11
Service, 12
GB
ARMXXD 129
Instructions for use
WASHER DRYER
PL
Polski,25
ÐÓÑÑÊÈÉ, 13
CIS
ÁÚËÃÀÐÑÊÈ,37
BG
RO
Românã,49