Автор:
Roger Morrison
Дата создания:
20 Сентябрь 2021
Дата обновления:
10 Май 2023

Содержание
- Шаг 1
- Шаг 2
- Шаг 3
- Шаг 4
- Шаг 5

Casio Telememo 30 — это многофункциональные наручные часы, которые позволяют сохранять имена и номера телефонов до 30 человек. В дополнение к функции Telememo часы Casio Telememo 30 предлагают точное аналоговое и цифровое хронометрирование, а также такие функции, как множественные будильники. Несмотря на все особенности, научиться пользоваться наручными часами Casio Telememo 30 — это простой процесс, который занимает всего несколько минут.
Шаг 1

Установите цифровое время на часах Casio Telememo 30. Нажмите и удерживайте верхнюю левую кнопку, пока секунды не начнут мигать, указывая на то, что открыт экран настройки времени. Нажмите нижнюю правую кнопку, чтобы сбросить секунды на «00», а затем нажмите нижнюю левую кнопку, чтобы увеличить мигающие цифры часа. Установите желаемое время в часах, используя верхнюю и нижнюю правые кнопки. Нажмите нижнюю левую кнопку, чтобы увеличить количество мигающих цифр минут, и установите их на желаемое время с помощью верхней и нижней правой кнопок. Нажмите кнопку в верхнем левом углу, чтобы выйти из экрана настроек.
Шаг 2

Установите аналоговое время на своих наручных часах Casio Telememo 30. Быстро нажмите нижнюю левую кнопку шесть раз, чтобы войти в режим настройки стрелки часов. Нажмите и удерживайте верхнюю левую кнопку, пока цифровой дисплей времени не начнет мигать, указывая на то, что вы получили доступ к настройке времени аналогового дисплея. Нажимайте нижнюю правую кнопку несколько раз, чтобы сдвигать стрелки на несколько секунд за раз, удерживайте кнопку, чтобы стрелки двигались быстрее. Отпустите кнопку, когда стрелки часов покажут желаемое время. Нажмите кнопку в левом верхнем углу, чтобы выйти из экрана настроек, и кнопку в левом нижнем углу, чтобы вернуться в обычный режим хронометража.
Шаг 3

Сохраните новую запись телемемо на свои часы Casio Telememo 30. Нажмите кнопку в левом нижнем углу, чтобы войти в режим Telememo. Нажмите и удерживайте верхнюю и нижнюю правые кнопки, чтобы получить доступ к новому экрану данных. Нажмите и удерживайте верхнюю левую кнопку, пока в поле имени не появится мигающий курсор. Используйте кнопки вправо вверх и вниз, чтобы пролистать алфавит до нужной буквы. Нажмите нижнюю левую кнопку, чтобы переместить курсор вправо. Когда имя закончено, нажимайте нижнюю левую кнопку несколько раз, пока курсор не переместится в числовое поле. Используйте тот же процесс, который вы использовали для ввода имени, которое вы ввели для номера телефона. Нажмите верхнюю левую кнопку, чтобы сохранить данные.
Шаг 4

Просмотрите ранее сохраненные записи телемемо на Casio Telememo 30. Войдите в режим телемемо, нажав кнопку в правом нижнем углу несколько раз. Нажмите кнопку в правом нижнем углу, чтобы просмотреть записи телемемо. Обратите внимание, что отображается только имя каждой записи и кнопка в левом верхнем углу, чтобы увидеть соответствующий номер.

Установите будильник на Casio Telememo 30. Нажмите кнопку в левом нижнем углу, чтобы перейти в режим будильника. Нажмите кнопку в правом нижнем углу, чтобы выбрать, какой из трех экранов сигналов тревоги вы хотите настроить. Нажмите и удерживайте кнопку в верхнем левом углу, чтобы открыть экран настроек для выбранного будильника. С помощью кнопок «вправо» и «вверх» и «вниз» установите будильник на желаемое время. Нажмите верхнюю левую кнопку, чтобы сохранить сигнал и выйти из экрана настроек.

The casio telememo 30 digital wrist watch provides accurate timekeeping with the ability to save contact information for up to 30 friends directly on your watch. The Casio Telememo 30 also includes handy features like an alarm and stopwatch. Learning to use the Casio Telememo 30 is simple and can be done in just a few minutes.
Setting the Time and Date
The time and date are the primary functions on your Casio Telememo watch. To set the time and date, hold down the «A» button while in Timekeeping mode until the seconds begin flashing, indicating that you have entered the settings screen. Move the flashing to the minutes or hours place by pressing the «D» button. Use the «E» and «B» buttons to increase or decrease the number values to reach the correct time. The same procedure can be used to set the minutes, hours, year, month and day on your watch.
Using the Telememo Feature
The Telememo feature on your Casio Telememo watch allows you to store contact information for friends in your wrist watch. To use this feature, begin by pressing the «D» button until you have entered Telememo mode. Press «C» to view the memory screen in Telememo mode, this screen tells you have many more contacts can be added to your watch memory. Hold down the «A» button to cause the cursor in the name area to flash. Use the «E» and «B» buttons to cycle through characters and the «D» button to select when entering your contact’s name. When you are done entering the contact’s name, press the «D» button to move the cursor to the number field. Use the same process you used to enter the contact’s name to enter their telephone number. When you are finished entering your contact’s information, press the «A» button to return to the main Telememo screen. You can access contact information saved in your Telememo watch by using the «E» and «B» buttons to scroll through your records while in Telememo mode.
Using the Countdown Timer
The countdown timer on your Casio Telememo watch can be used to countdown to important events. To set the countdown timer, begin by using the «D» button to enter Countdown Timer mode. Hold down the «A» button until the displayed digits begin to flash, indicating that you have entered the settings screen. You can move the flashing from place to place by pressing the «D» button. Use the «E» and «B» buttons to increase and decrease the number values until the appropriate time is reached. To exit the settings screen, press the «A» button. Use the «C» button to start, pause and stop countdown timing.
Setting an Alarm
Your Casio Telememo watch is equipped with three one-time alarms and a snooze alarm. To set any of the one-time alarms, access Alarm mode by pressing the «D» button. Use the «E» and «B» buttons to scroll through the four alarm screens until you reach the one you want to set. To select an alarm screen, hold down the «A» button until the hours place begins flashing, indicating the settings screen. Use the «E» and «B» buttons to increase and decrease the number values until the desired time is reached. Move the flashing to minutes by pressing the «D» button. Exit the settings screen with the «A» button and use the «C» button to enable your alarm. When the alarm sounds, pressing any button on the Casio Telememo will silence the alarm.
Using the Stopwatch
The stopwatch feature on your Casio Telememo watch is capable of measuring elapsed times, split times and two finishes. To measure elapsed time, use the «C» button to start, pause and stop timing, and the «B» button to clear the stopwatch. To measure split time, use the «C» button to start and stop timing and the «B» button to start the split, release the split and clear the stopwatch. To record two finishes, press the «C» button to start timing, the «B» button to split at the first finish, the «C» button when the second runner finishes and the «B» button to display the time of the second runner. Clear the stopwatch by pressing the «B» button again.
The Casio Telememo 30 is a multifunction wrist watch that allows you to save the names and telephone numbers of up to 30 people. In addition to the Telememo function, Casio Telememo 30 watches offer accurate digital and analogue timekeeping, as well as features such as multiple alarms. Despite all of its features, learning to use your Casio Telememo 30 wrist watch is a simple process that takes just minutes.
Set the digital time on your Casio Telememo 30 watch. Press and hold the top left button until the seconds digits flash, indicating that you have accessed the time-setting screen. Press the bottom right button to reset the seconds to «00» and then press the bottom left button to advance the flashing to the hours digits. Adjust the hours digits to the desired time using the top and bottom right buttons. Press the bottom left button to advance the flashing to the minutes digits, and set them to the desired time with the top and bottom right buttons. Press the top left button to exit the time-setting screen.
- The Casio Telememo 30 is a multifunction wrist watch that allows you to save the names and telephone numbers of up to 30 people.
- Press the bottom left button to advance the flashing to the minutes digits, and set them to the desired time with the top and bottom right buttons.
Set the analogue time on your Casio Telememo 30 wrist watch. Press the bottom left button six times in quick succession to access the hand-setting mode on the watch. Press and hold the top left button until the digital time display begins to flash, indicating that you have accessed the analogue time-setting screen. Press the bottom right button repeatedly to advance the hands by a few seconds each time; hold down the button to advance the hands more quickly. Release the button when the watch hands reflect the desired time. Press the top left button to exit the settings screen and the bottom left button to return to regular timekeeping mode.
- Set the analogue time on your Casio Telememo 30 wrist watch.
- Press the bottom left button six times in quick succession to access the hand-setting mode on the watch.
Save a new Telememo record in your Casio Telememo 30 watch. Press the bottom left button to access the Telememo mode. Press and hold the top and bottom right buttons to access the new data screen. Hold down the top left button until a blinking cursor appears in the name field. Use the top and bottom right buttons to scroll through the alphabet until the desired letter is displayed. Press the bottom left button to move the cursor to the right. When the name is finished, press the bottom left button repeatedly until the cursor moves to the number field. Use the same process that you used to input the name to input the telephone number. Press the top left button to save the data.
Review previously saved Telememo records on your Casio Telememo 30. Access Telememo mode by pressing the bottom right button repeatedly. Press the bottom right button to scroll through the Telememo records. Note that only the name is displayed for each record; press the top left button to view the related number.
Set an alarm on your Casio Telememo 30. Press the bottom left button to access the alarm mode. Press the bottom right button to select which of the three alarm screens you want to set. Press and hold the top left button to enter the settings screen for your chosen alarm. Use the top and bottom right buttons to set the alarm to the desired time. Press the top left button to save your alarm and exit the settings screen.
- Review previously saved Telememo records on your Casio Telememo 30.
- Press the top left button to save your alarm and exit the settings screen.
When the alarm on your Casio Telememo 30 sounds, press any button on the watch to silence it.
The Casio Telememo 30 is incapable of holding more than 30 Telememo records. If a new data screen does not display when you are trying to enter a new record, the memory is full and you must delete a previous record in order to enter a new one.
Фирма «CASIO COMPUTER CO., LTD» не несет ответственности за какой бы то ни
было ущерб, который может возникнуть при использовании этих часов, и не
принимает никаких претензий со стороны третьих лиц.
ОБЩЕЕ ОПИСАНИЕ РЕЖИМОВ РАБОТЫ
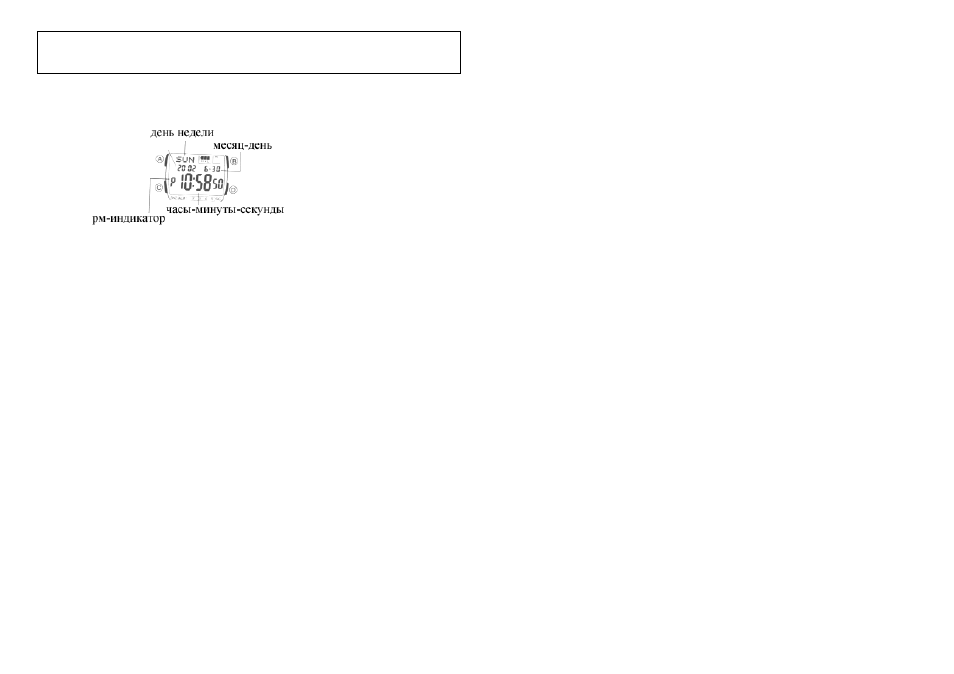
На рисунке изображен общий вид часов в Режиме Текущего Времени.
Нажмите кнопку “C” для перехода из разряда в разряд в следующей
последовательности:
Режим Т
ижки
Текущего
начнет
мигать.
разряд в следующей
и
ы изо
4.
5.
7.
SVE — шведский
L — польский
R
й
8. Для
“D”.
• Удер
с
и
енять значения с
боль
0.
ени, то часы
и звучании любых звуковых
(ЕL) элементах,
мо
с
в
по
“B” в
ключается автоматически каждый раз, когда ваша рука расположена
,
времени которого вы хотите установить.
ения мигающей индикации DST (летнего
Æ Часы Æ Минуты.
екущего Времени
→ Режим Мирового Времени → Режим Записной Кн
З
Отсчета
й
→
Секундо
→ Режим вукового Сигнала → Режим
Дне
Режим
мера
→
Режим Обратного Отсчета Æ Режим
Времени.
В любом режиме нажмите кнопку “B” для включения подсветки дисплея.
РЕЖИМ ТЕКУЩЕГО ВРЕМЕНИ
Установка времени и даты
. Нажмите кнопку “А” в Режиме Текущего Времени. Изображение секунд
1
2. Нажмите кнопку “С” для перехода из разряда в
последовательности: Секунды
→ Режим Летнего Времени (DST) Æ Часы Æ
Минуты
→ Год→ Месяц Æ Число → Язык → Секунды.
3. Если вы выбрали для коррекц и секунд (
бражение секунд мигает), нажмите
кнопку “D” для сброса значения счетчика секунд в 00. Если вы нажмете кнопку
“D” при значении счетчика секунд между 30 и 59, то значение счетчика
установится в 00 и 1 прибавится к счетчику минут, если значение счетчика секунд
будет между 00 и 29, то изменение счетчика минут не произойдет.
Для изменения значений минут и т.д., используйте кнопку “D” для увеличения и
кнопку “B” для уменьшения значений.
Для переключения 12/24 часового формата нажмите кнопку “D” в Режиме
Текущего Времени. При выбранном 12-ти часовом формате представления
времени индикация “P” обозначает значение времени после полудня, а индикация
“A” – значение времени до полудня.
6. Для выбора кода города нажимайте кнопку “D”.
Для выбора языка нажимайте кнопки “D” и “B”:
ENG – английский
CES — чешский
POR — португальский
ESP — испанский
PO
й
E
FRA — французски
ЛЛ — греческий
NED — голландский
OM — румынски
DAN — датский
TUR — турецкий
DEU — немецкий
РУС — русский
ITA — итальянский
JPN — японский
чения летнего времени
включения/выклю
нажимайте кнопку
м
живание кнопки в нажатом остоян и позволяет из
шей скоростью.
• День недели устанавливается автоматически в соответствии с датой.
в
д
9. После устано ки даты и времени, нажмите кнопку “А” ля возврата в Режим
Текущего времени.
1 Если вы не будете нажимать кнопки в течении некоторого врем
ж
автоматически перейдут в ре им Текущего времени.
Подсветка
В любом режиме нажмите кнопку “В” для включения подсветки.
Подсветка часов автоматически включается пр
сигналов.
• Подсветка этих часов выполнена на электролюминесцентных
которых
л
щность
падает после длительного срока испо ьзования.
• Во время о вещения дисплея часы испускают слышимый сигнал. Это происходит
потому, что элементы подсветки
ибрируют, это не является
казателем
неисправности часов.
• Подсветку трудно разглядеть, если на часы падают прямые солнечные лучи.
• Частое использование подсветки сокращает жизнь элемента питания.
Автоподсветка
кнопки
Вы можете включить или выключить функцию автоподсветки нажатием
ечение 2-х секунд в Режиме Текущего Времени.
т
Автоподсветка в
под углом 40
° градусов относительно земли.
Не используйте функцию автоподсветки, когда свет может повредить вам или отвлечь
ваше внимание. Например, при управлении мотоциклом или велосипедом.
РЕЖИМ МИРОВОГО ВРЕМЕНИ
В данном режиме вы можете просмотреть местное время любого из 28 городов мира
29 часовых поясов).
(
Установка значения мирового времени
1. Нажмите кнопку “D” в Режиме Мирового Времени для выбора года города
значение
2. Нажимайте кнопку “A” до появл
времени).
3. Нажмите кнопку “С” для перехода из разряда в разряд в следующей
последовательности: Режим Летнего Времени (DST)