Перейти к контенту
![]()
Русские электронные инструкции по эксплуатации
Постоянно обновляемый большой каталог документации по эксплуатации и использованию современных устройств и оборудования на русском языке. Бесплатное скачивание файлов.
Поиск:
Главная
Просмотр инструкции в pdf


Инструкция по эксплуатации электрической плиты Hotpoint-Ariston C3V M57 W RU.
Скачать инструкцию к электрической плите Hotpoint-Ariston C3V M57 W RU (611,18 КБ)

Инструкции по эксплуатации электрических плит Hotpoint-Ariston
« Инструкция к электрической плите Gefest ЭПНД 6560-03 0057
» Инструкция к электрической плите Gorenje EC6141WC
Вам также может быть интересно

Инструкция к холодильнику Hotpoint-Ariston HTS 5180 W

Инструкция к газовой варочной панели Hotpoint-Ariston HAGS 61F-BK

Инструкция к стиральной машине Hotpoint-Ariston WMTL 501 L CIS

Инструкция к микроволновой печи Hotpoint-Ariston MWHA 13321 VAN

Инструкция к встраиваемой микроволновой печи Hotpoint-Ariston MN 413 IX HA

Инструкция к холодильнику Hotpoint-Ariston HF 4201 X R

Инструкция к стиральной машине Hotpoint-Ariston QVE 111697 SS CIS

Инструкция к стиральной машине Hotpoint-Ariston WMSF 6080B CIS
Добавить комментарий
Имя *
Email *
Сайт
Комментарий


![]()


Сохранить моё имя, email и адрес сайта в этом браузере для последующих моих комментариев.
- Добавить инструкцию
- Заказать инструкцию

Плита Hotpoint-Ariston C3V M57 W RU — инструкция пользователя по применению, эксплуатации и установке на русском языке. Мы надеемся, она поможет вам решить возникшие у вас вопросы при эксплуатации техники.
Вы можете скачать инструкцию к Hotpoint-Ariston C3V M57 W RU по ссылке ниже, если не хотите ждать загрузки. Если остались вопросы, задайте их в комментариях после инструкции.
«Загружаем инструкцию», означает, что нужно подождать пока файл загрузится и можно будет его читать онлайн. Некоторые инструкции очень большие и время их появления зависит от вашей скорости интернета.
Остались вопросы?
Не нашли свой ответ в руководстве или возникли другие проблемы? Задайте свой вопрос в форме ниже с подробным описанием вашей ситуации, чтобы другие люди и специалисты смогли дать на него ответ. Если вы знаете как решить проблему другого человека, пожалуйста, подскажите ему


Часто задаваемые вопросы

Как посмотреть инструкцию к Hotpoint-Ariston C3V M57 W RU?
Необходимо подождать полной загрузки инструкции в сером окне на данной странице или скачать кликнув по специальной кнопке.
Руководство на русском языке?
Все наши руководства представлены на русском языке или схематично, поэтому вы без труда сможете разобраться с вашей моделью
Как можно распечатать инструкцию?
Скачайте ее по специальной кнопке над формой чтения на ваше устройства и отправьте на печать.
Для ознакомления с инструкцией необходимо нажать на ссылку «ЗАГРУЗИТЬ», чтобы скачать pdf файл. Если есть кнопка «ПРОСМОТР», то можно просто посмотреть документ онлайн.
Для удобства, Вы можете сохранить данную страницу с файлом руководства по эксплуатации в свой список «избранное» прямо на сайте (доступно для зарегистрированных пользователей).
Смотрите инструкцию для похожих моделей:

Вы можете задать вопрос посетителям сайта по модели HOTPOINT-ARISTON C3V M57 W RU. Если Вы являетесь её пользователем, то пожалуйста оставьте, по возможности развёрнутый отзыв:
-
Инструкции по эксплуатации
1

Ariston HOTPOINT-ARISTON C3V M57 инструкция по эксплуатации
(24 страницы)
- Языки:Русский
-
Тип:
PDF -
Размер:
1.66 MB -
Описание:
Плита
Просмотр
На NoDevice можно скачать инструкцию по эксплуатации для Ariston HOTPOINT-ARISTON C3V M57. Руководство пользователя необходимо для ознакомления с правилами установки и эксплуатации Ariston HOTPOINT-ARISTON C3V M57. Инструкции по использованию помогут правильно настроить Ariston HOTPOINT-ARISTON C3V M57, исправить ошибки и выявить неполадки.
GB
COOKER AND OVEN
C3VM57RU /HA
Contents
Installation, 2-3
Positioning and levelling
Electrical connections
Technical data
Description of the appliance, 4
Overall view
Control panel
Start-up and use, 5-8
Starting the oven
Cooking modes
Electronic timer
Oven cooking advice table
Using the glass ceramic hob, 9
Switching the cooking zones on and off
Cooking zones
Precautions and tips, 10
General safety
Disposal
Respecting and conserving the environment
Care and maintenance, 11
Switching the appliance off
Cleaning the oven
Replacing the oven light bulb
Cleaning the glass ceramic hob
Assistance
Operating Instructions
English, 1 РУССКИЙ,12
RSGB
2
GB
! Before operating your new appliance please read
this instruction booklet carefully. It contains
important information concerning the safe installation
and operation of the appliance.
! Please keep these operating instructions for future
reference. Make sure that the instructions are kept
with the appliance if it is sold, given away or moved.
! The appliance must be installed by a qualified
professional according to the instructions provided.
! Any necessary adjustment or maintenance must be
performed after the appliance has been
disconnected from the electricity supply.
Positioning and levelling
! It is possible to install the appliance alongside
cupboards whose height does not exceed that of the
hob surface.
! Make sure that the wall in contact with the back of
the appliance is made from a non-flammable, heat-
resistant material (T 90°C).
To install the appliance correctly:
• Place it in the kitchen, the dining room or the bed-
sit (not in the bathroom).
• If the top of the hob is higher than the cupboards,
the appliance must be installed at least 200 mm
away from them.
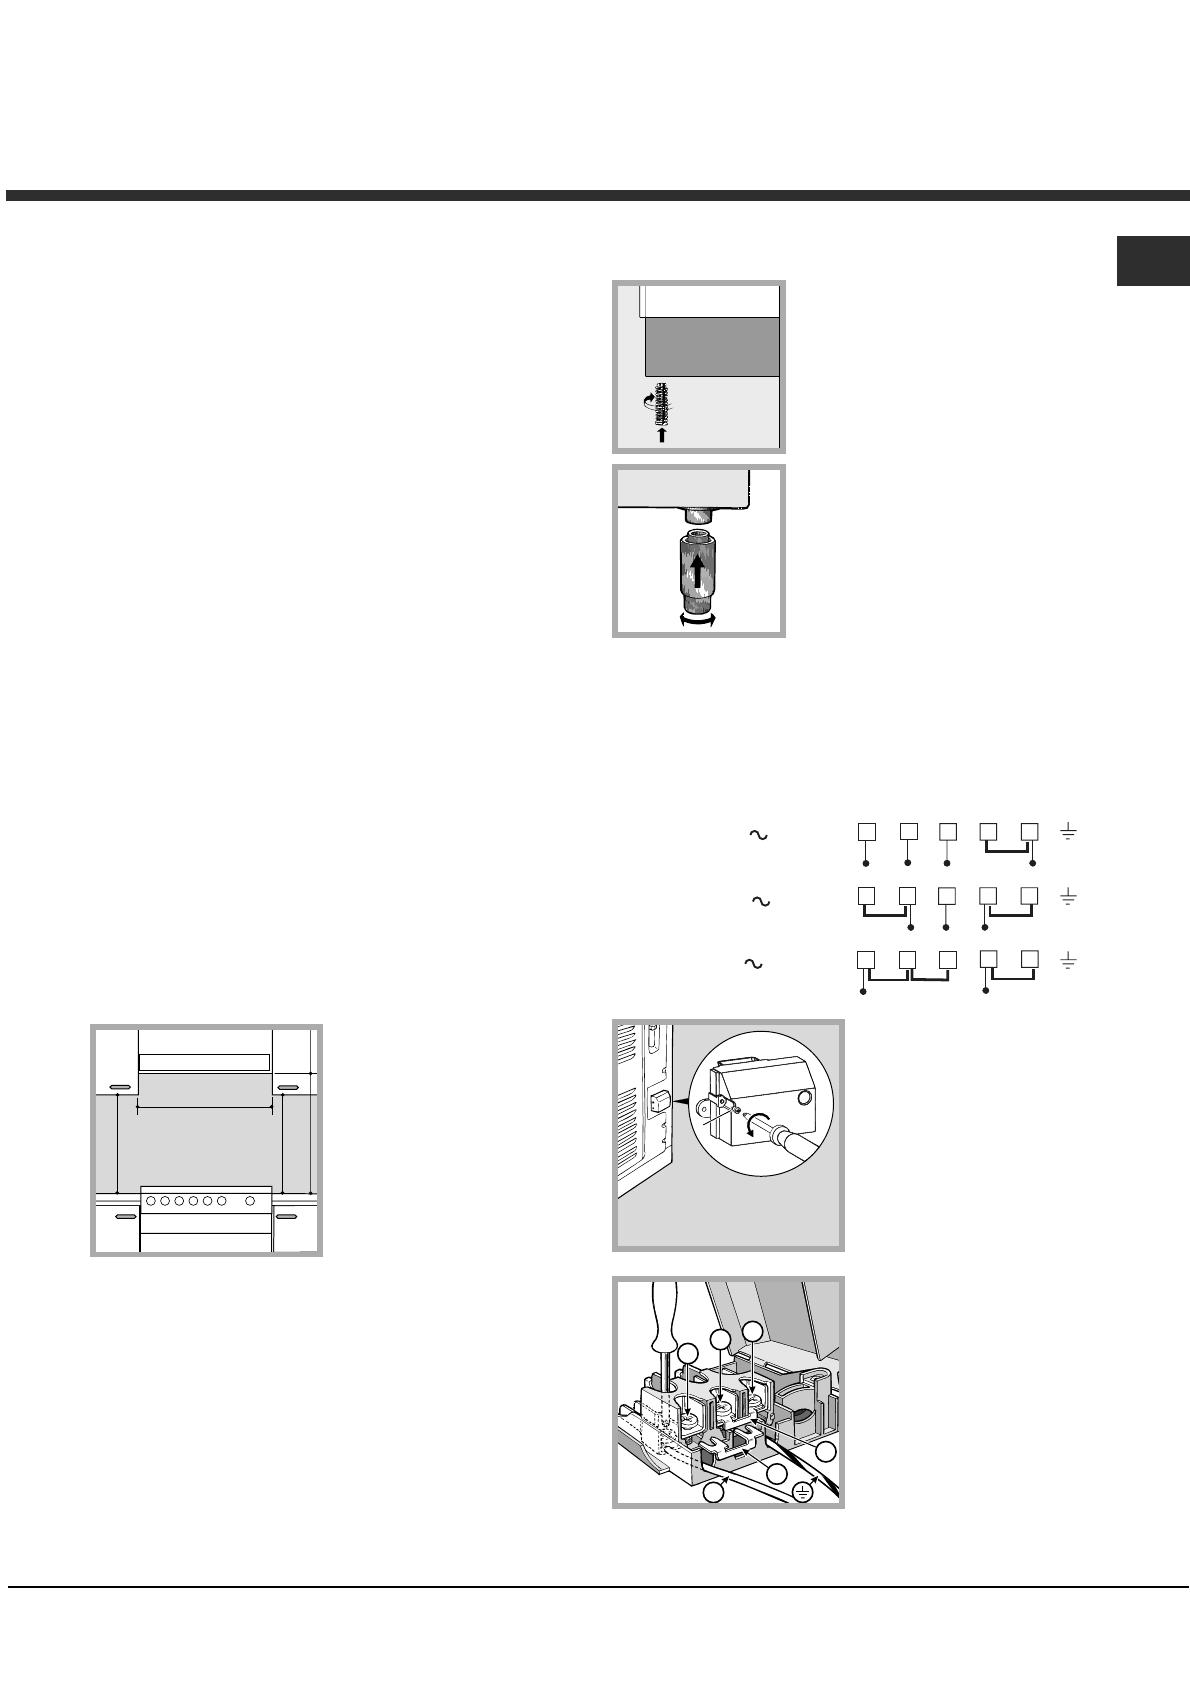
• If the cooker is
installed underneath a wall
cabinet, there must be a
minimum distance of 420
mm between this cabinet
and the top of the hob.
This distance should be
increased to 700 mm if
the wall cabinets are
flammable (
see figure
).
• Do not position blinds behind the cooker or less
than 200 mm away from its sides.
• Any hoods must be installed according to the
instructions listed in the relevant operating manual.
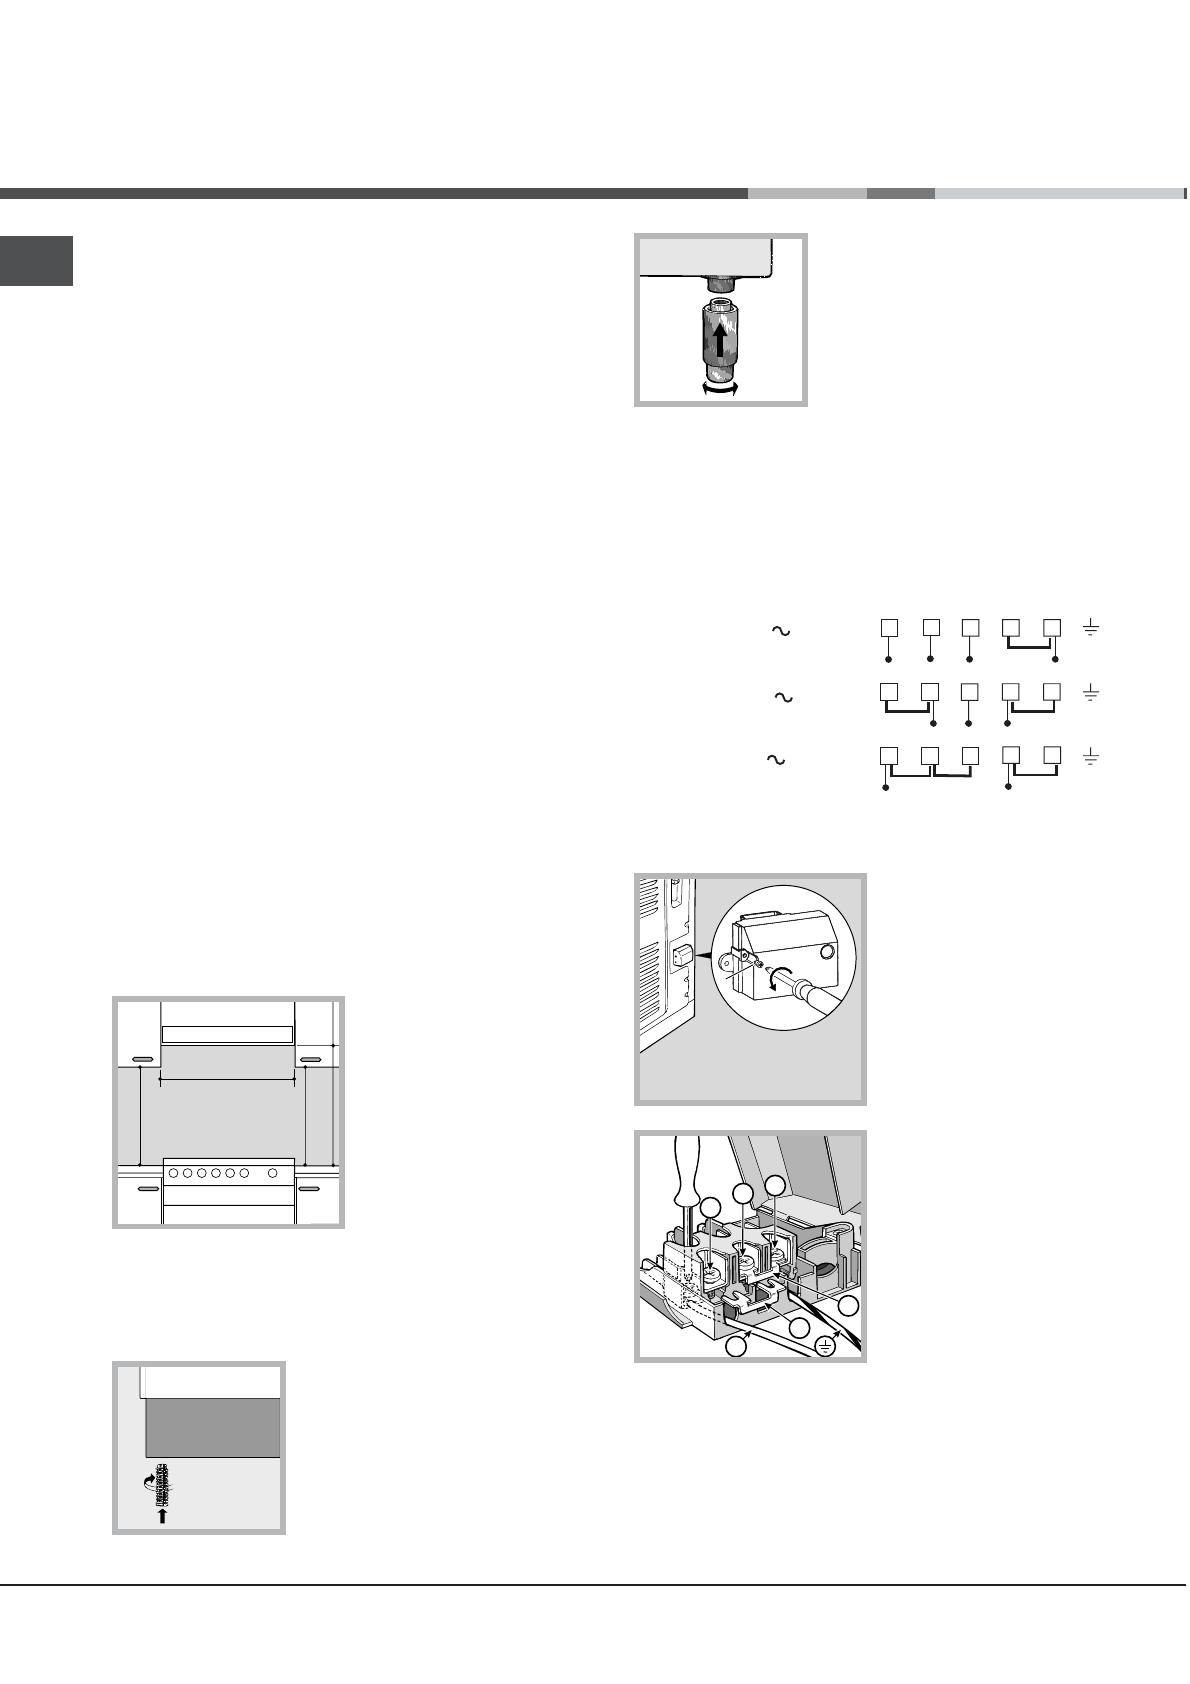
Levelling
If it is necessary to level the
appliance, screw the
adjustable feet* into the
places provided on each
corner of the base of the
cooker (
see figure
).
The legs* provided with the
appliance fit into the slots on
the underside of the base of
the cooker.
Electrical connections
Fitting the power supply cable
The cable should be suited to the type of electrical
connection used, according to the following
connection diagram:
To install the power supply cable correctly:
1. Loosen the screw V
in the terminal board
and pull the cover to
open it (
see figure
).
2. Position the connection
support A (
see figure
)
according to the
connection diagram shown
above. The terminal board
is designed for single-
phase 230 V connection:
terminals 1, 2 and 3 are
connected to each other;
jumper 4-5 is located in the
lower area of the terminal board.
3. Position wires N and
66
66
6 according to the diagram
(
see figure
) and perform the connection by
tightening the terminal board screws as much as
possible.
4. Position the remaining wires on terminals 1-2-3
and tighten the screws.
Installation
HOOD
420
Min.
min.
650
mm. with hood
min.
700
mm. without hood
mm.
600
Min. mm.
420
Min. mm.
V
1
2
3
N
A
B
1 2
3
4
5
12345
1
2
3
4
5
R
S
T
N
R
S
N
R
N
400 3N
H05RR-F 5×2.5 CEI-UNEL 35363
400V 2N
H05RR-F 4×4 CEI-UNEL 35363
230V
H05RR-F 3×4 CEI-UNEL 35363
GB
3
5. Fix the power supply cable in place by fastening
the cable clamp screw.
6. Close the terminal board cover by tightening the
screws V.
Connecting the supply cable to the mains
Install a standardised plug corresponding to the
load indicated on the data plate located on the
appliance.
The appliance must be directly connected to the
mains using an omnipolar circuit-breaker with a
minimum contact opening of 3 mm installed between
the appliance and the mains. The circuit-breaker
must be suitable for the charge indicated and must
comply with current electrical regulations (the
earthing wire must not be interrupted by the circuit-
breaker). The supply cable must be positioned so
that it does not come into contact with temperatures
higher than 50°C at any point.
Before connecting the appliance to the power
supply, make sure that:
• The appliance is earthed and the plug is compliant
with the law.
• The socket can withstand the maximum power of
the appliance, which is indicated by the data
plate.
• The voltage is in the range between the values
indicated on the data plate.
• The socket is compatible with the plug of the
appliance. If the socket is incompatible with the
plug, ask an authorised technician to replace it.
Do not use extension cords or multiple sockets.
! Once the appliance has been installed, the power
supply cable and the electrical socket must be
easily accessible.
! The cable must not be bent or compressed.
! The cable must be checked regularly and replaced
by authorised technicians only.
! The manufacturer declines any liability should
these safety measures not be observed.
*
Only available in certain models.
TECHNICAL DATA
Oven dimensions
(HxWxD)
34×38x41 cm
Volume
53 l
Useful
measurements
relating to the oven
compartment
width 42 cm
depth 44 cm
height 17 cm
Power supply
voltage and
frequency
see data plate
Ceramic hob
Front Left
Back Left
Back Right
Front Right
Max. ceramic hob
consumption
1200 W
1800 W
1200 W
1800 W
6000 W
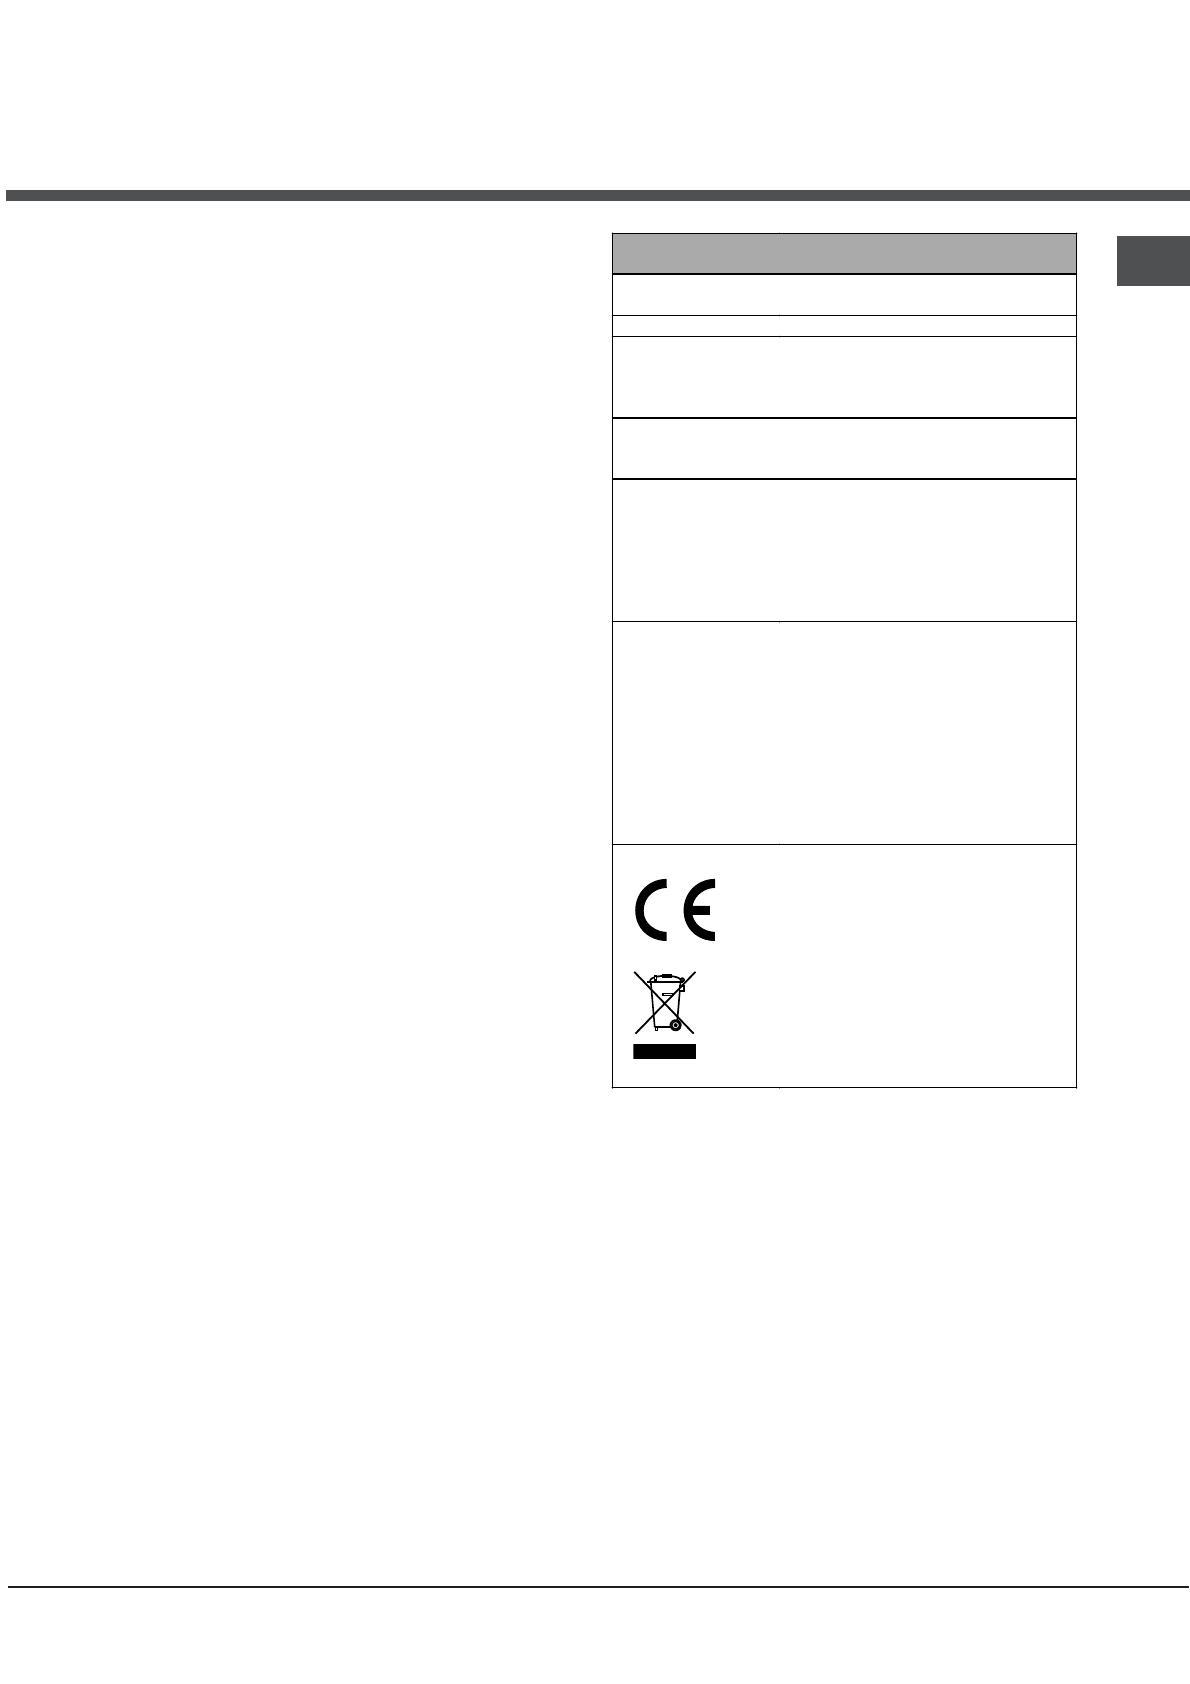
ENERGY LABEL
Directive 2002/40/EC on the label of
electric ovens. Standard EN 50304
Energy consumption for Natural
convection – heating mode:
a
Static;
Declared energy consumption for
Forced convection Class – heating
mode:
b
Fan-assisted.
EC Directives: 06/95/EC dated 12/12/06
(Low Voltage) and subsequent
amendments –
04/108/EC dated 15/12/04
(Electromagnetic Compatibility) and
subsequent amendments –
93/68/EEC dated 22/07/93 and
subsequent amendments –
2002/96/EC.
1275/2008 Stand-by/ Off mode
4
GB
Description of the
appliance
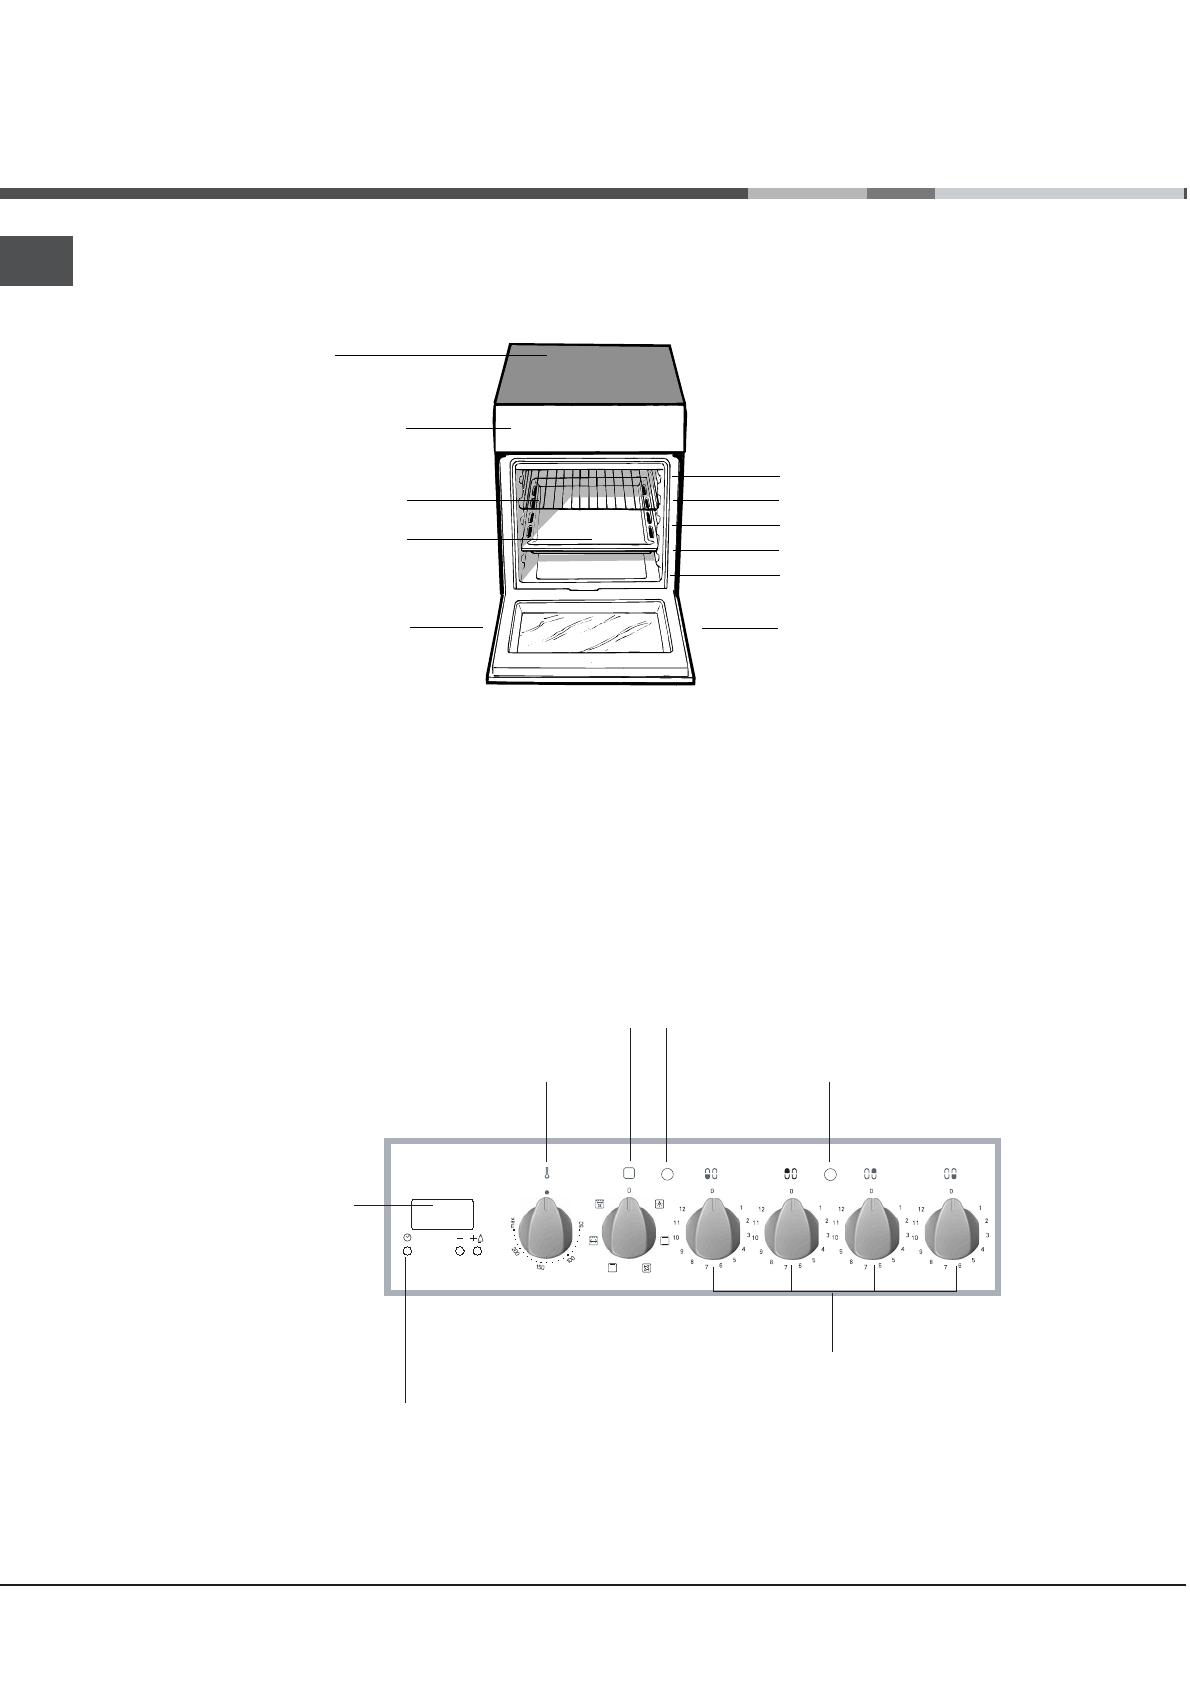
Overall view
Control panel
Control panel
GRILL rack
DRIPPING PAN
GUIDE RAILS
for the sliding racks
position 3
position 2
position 1
Glass
ceramic hob
Adjustable foot
Adjustable foot
position 5
position 4
TIMER
button
THERMOSTAT
knob
ACTIVE HOTPLATE
indicator light
HALOGEN
hotplate knobs
SELECTOR
knob
THERMOSTAT
indicator light
Electronic
timer
GB
5
Start-up and use
! The first time you use your appliance, heat the
empty oven with its door closed at its maximum
temperature for at least half an hour. Ensure that the
room is well ventilated before switching the oven off
and opening the oven door. The appliance may emit
a slightly unpleasant odour caused by protective
substances used during the manufacturing process
burning away.
! Before operating the product, remove all plastic
film from the sides of the appliance.
Starting the oven
1. Select the desired cooking mode by turning the
SELECTOR knob.
2. Select the recommended temperature for the
cooking mode or the desired temperature by turning
the THERMOSTAT knob.
A list detailing cooking modes and suggested
cooking temperatures can be found in the relevant
table (
see Oven cooking advice table
).
During cooking it is always possible to:
• Change the cooking mode by turning the
SELECTOR knob.
• Change the temperature by turning the
THERMOSTAT knob.
• Set the total cooking time and the cooking end
time (
see below
).
• Stop cooking by turning the SELECTOR knob to
the “0” position.
! Never put objects directly on the bottom of the
oven; this will avoid the enamel coating being
damaged. Only use position 1 in the oven when
cooking with the rotisserie spit.
! Always place cookware on the rack(s) provided.
THERMOSTAT indicator light
When this is illuminated, the oven is generating
heat. It switches off when the inside of the oven
reaches the selected temperature. At this point the
light illuminates and switches off alternately,
indicating that the thermostat is working and is
maintaining the temperature at a constant level.
Oven light
This is switched on by turning the SELECTOR knob
to any position other than “0”. It remains lit as long
as the oven is operating. By selecting
88
88
8
with the
knob, the light is switched on without any of the
heating elements being activated.

6
GB
Cooking modes
! A temperature value can be set for all cooking modes
between 50°C and Max, except for the following modes
• GRILL and DOUBLE GRILL (recommended: set
only to MAX power level).
• FAN-ASSISTED DOUBLE GRILL (recommended:
do not exceed 200°C).
aa
aa
a
STATIC OVENSTATIC OVEN
STATIC OVENSTATIC OVEN
STATIC OVEN mode
Both the top and bottom heating elements will be
activated. When using this traditional cooking mode,
it is best to use only one rack at a time, otherwise
the heat will not be distributed evenly.
bb
bb
b
FAN OVEN FAN OVEN
FAN OVEN FAN OVEN
FAN OVEN mode
The top and bottom heating elements will switch on
and the fan will begin to operate. Since the heat
remains constant throughout the oven, the air cooks
and browns food in a uniform manner. A maximum
of two racks may be used at the same time.
cc
cc
c
GRILLGRILL
GRILLGRILL
GRILL
mode
The central part of the top heating element is
switched on. The high and direct temperature of the
grill is recommended for food that requires a high
surface temperature (veal and beef steaks, fillet
steak and entrecôte). This cooking mode uses a
limited amount of energy and is ideal for grilling
small dishes. Place the food in the centre of the
rack, as it will not be cooked properly if it is placed
in the corners.
22
22
2
DOUBLE GRILL DOUBLE GRILL
DOUBLE GRILL DOUBLE GRILL
DOUBLE GRILL
mode
The top heating element and the rotisserie spit will
be activated.
This provides a larger grill than the normal grill
setting and has an innovative design that improves
cooking efficiency by 50% and eliminates the cooler
corner areas. Use this grilling mode to achieve a
uniform browning on top of the food.
TT
TT
T
DOUBLE GRILL mode
The top heating element and the turnspit are
activated and the fan begins to operate. This
combination of features increases the effectiveness of
the unidirectional thermal radiation of the heating
elements through forced circulation of the air
throughout the oven. This prevents the food from
burning on top by enabling heat to penetrate into the
food more effectively; it is therefore an ideal way of
cooking food quickly under the grill or for grilling large
pieces of meat without having to use the turnspit.
! The GRILL, DOUBLE GRILL and FAN-ASSISTED
DOUBLE GRILL cooking modes must be performed
with the oven door shut.
! When using the GRILL and DOUBLE GRILL cooking
modes, place the rack in position 5 and the dripping pan
in position 1 to collect cooking residues (fat and/or
grease). When using the FAN-ASSISTED DOUBLE GRILL
cooking mode, place the rack in position 2 or 3 and the
dripping pan in position 1 to collect cooking residues.
Electronic timer
This function displays the time and works as a timer
which counts down to zero.
! All functions will be implemented approximately 7
seconds after they have been set.
Resetting the clock
After the appliance has been connected to the power
supply, or after a power cut, the clock display will
begin to blink, showing the figure:
0:000:00
0:000:00
0:00
• Press button
G G
G G
G and then buttons — and + to set
the exact time. Press and hold the buttons to
quicken the count upwards.
Any necessary modifications can be made by
repeating the above process.
Timer feature
This function may be accessed by pressing the
nn
nn
n
button, after which the display will show the symbol
nn
nn
n. Every time the + button is pressed it corresponds
to a time increase of 10 seconds, until it reaches 99
minutes and 50 seconds. After this point, each press
of the button represents an increase of one minute,
up to a maximum of 10 hours.
Pressing the
— button reduces the time.
After the time period has been set, the timer will
begin to count down. When the timer reaches zero,
the buzzer will sound (this may be stopped by
pressing any button).
The time may be displayed by pressing the
GG
GG
G
button, and the
nn
nn
n symbol indicates that the timer
function has been set. After approximately 7 seconds,
the display will automatically revert to the timer.
GB
7
Cancelling a time that has already been set
Press the – button until the display shows
0:00.0:00.
0:00.0:00.
0:00.
Adjusting the buzzer volume
After selecting and confirming the clock settings,
use the
– button to adjust the volume of the alarm
buzzer.
Rotisserie
To operate the
rotisserie (
see diagram
)
proceed as follows:
1. Place the dripping
pan in position 1.
2. Place the rotisserie
support in position 4
and insert the spit in
the hole provided on
the back panel of the
oven.
3. Activate the rotisserie by selecting
22
22
2
or
TT
TT
T
with
the SELECTOR knob.
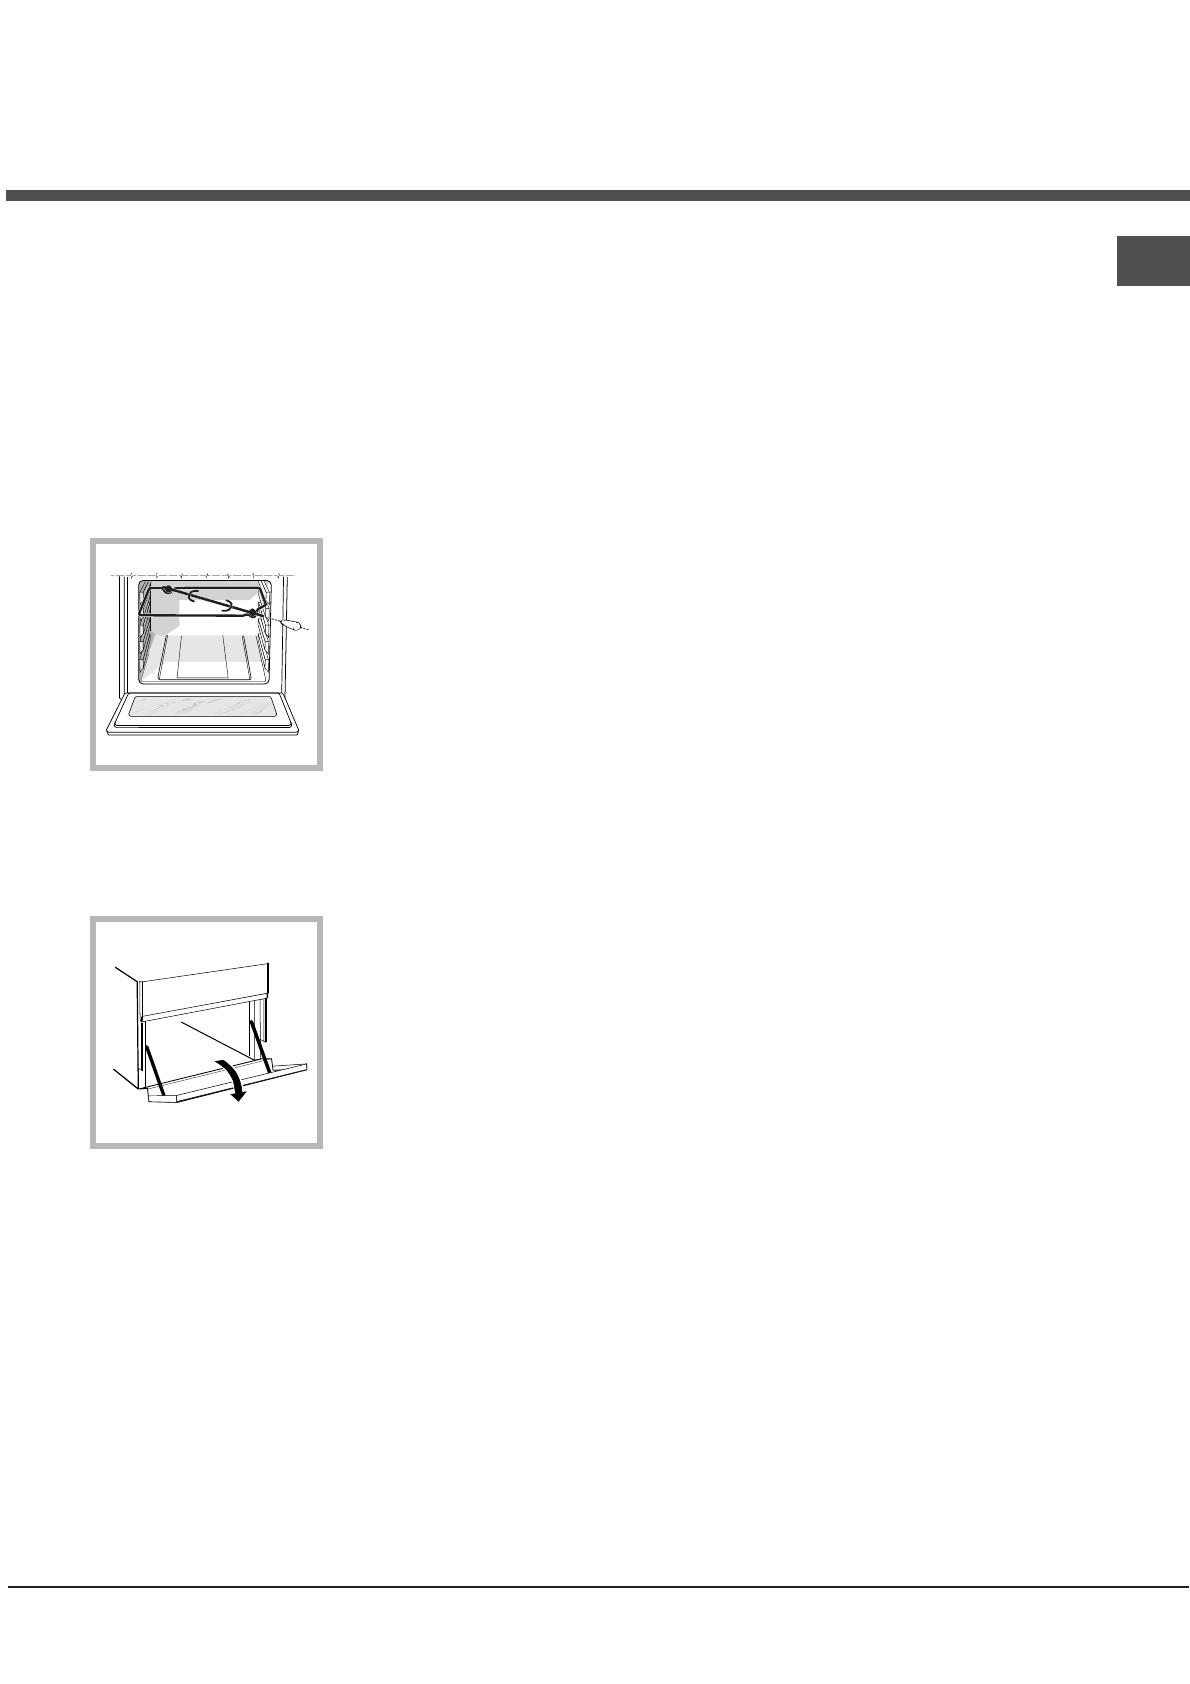
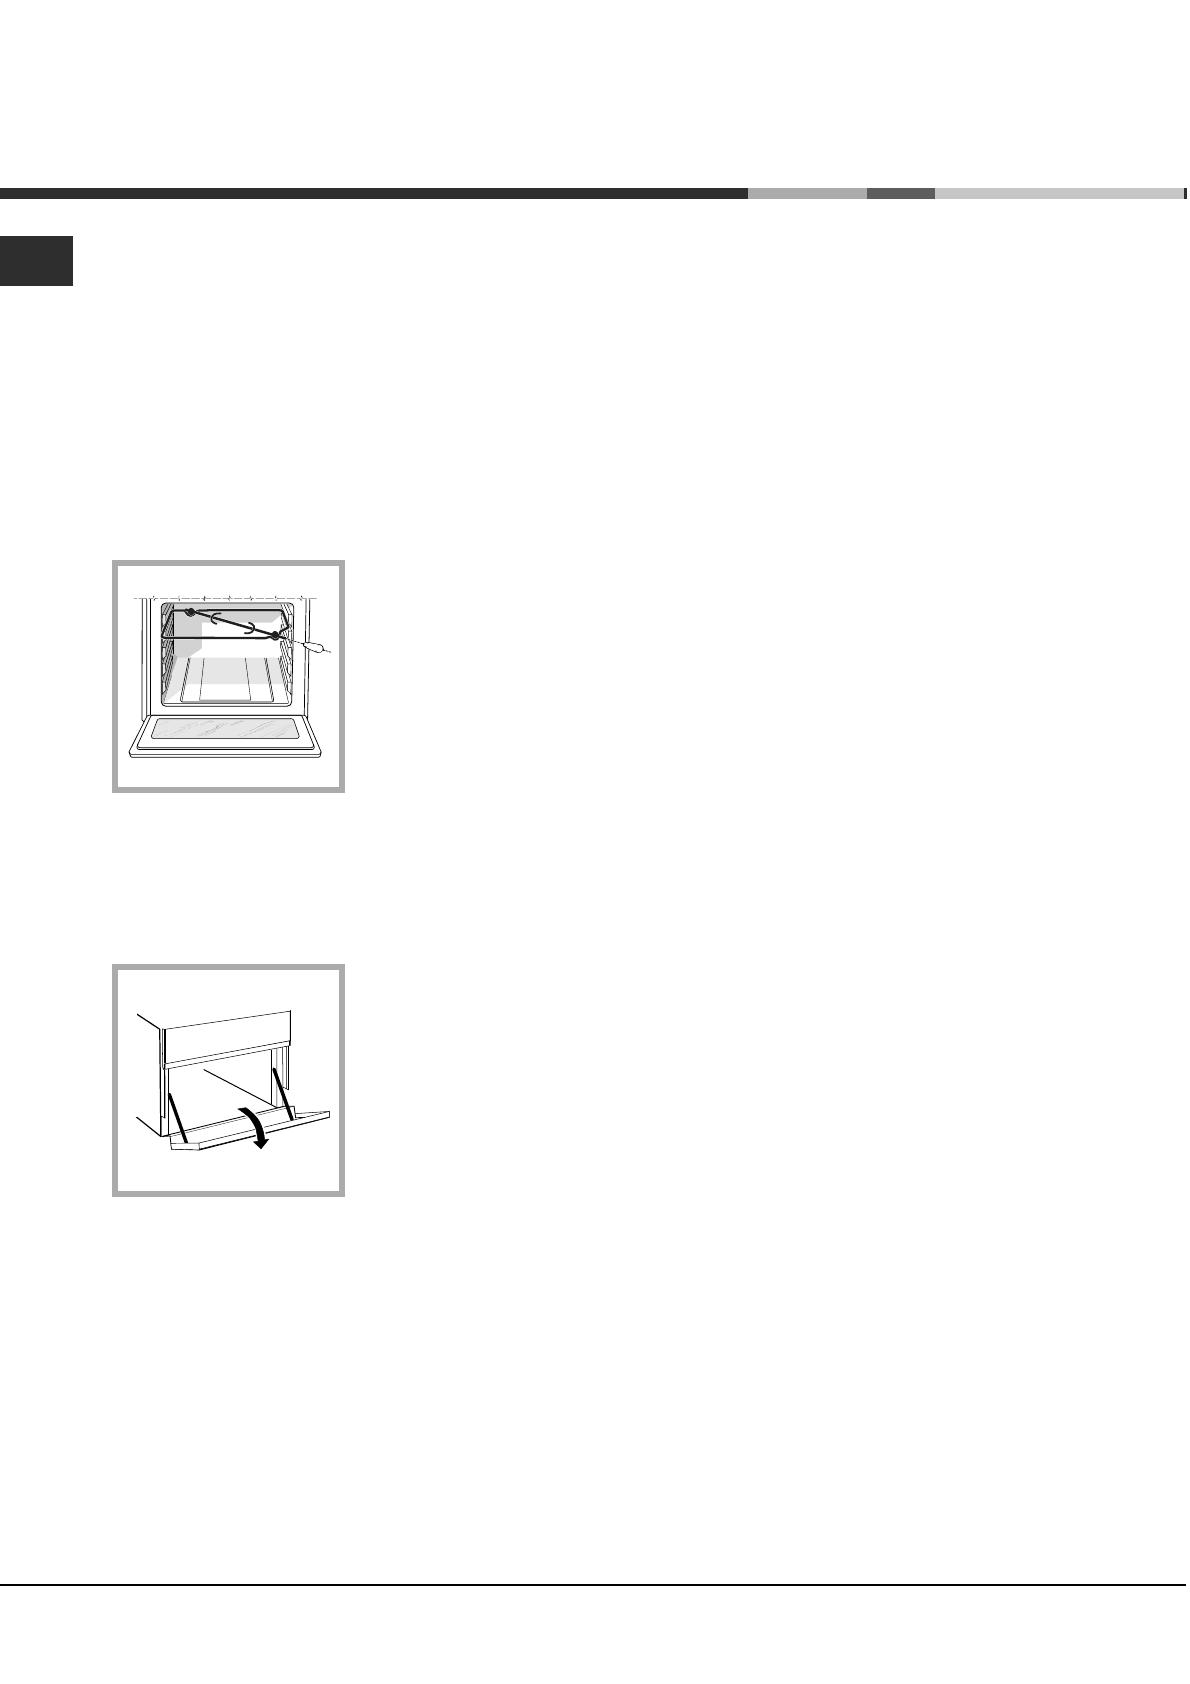
Lower compartment*
There is a compartment
underneath the oven
that may be used to
store oven accessories
or deep dishes. To open
the door pull it
downwards (
see
figure
).
! Do not place flammable materials in the lower oven
compartment.
! The internal surfaces of the compartment (where
present) may become hot.
Cooking on several shelves simultaneously
If it is necessary to use two racks, use the FAN
OVEN cooking mode
bb
bb
b
, as this is the only cooking
mode suited to this type of cooking. We also
recommend that:
• Positions 1 and 5 are not used. This is because
excessive direct heat can burn temperature
sensitive foods.
• Positions 2 and 4 are used and that food that
requires more heat is placed on the rack in
position 2.
• When cooking foods that require different cooking
times and temperatures, set a temperature that is
halfway between the two recommended
temperatures (
see Oven cooking advice table
)
and place the more delicate food on the rack in
position 4. Remove the food that requires a
shorter cooking time first.
• When cooking pizzas on several racks with the
temperature set to 220°C, the oven is preheated
for 15 minutes. Generally speaking, cooking on
the rack in position 4 takes longer: we
recommend that the pizza cooked on the lowest
rack position is removed first, followed by the
pizza cooked in position 4 a few minutes later.
• Place the dripping pan on the bottom and the rack
on top.
* Only available in certain models.
8
GB
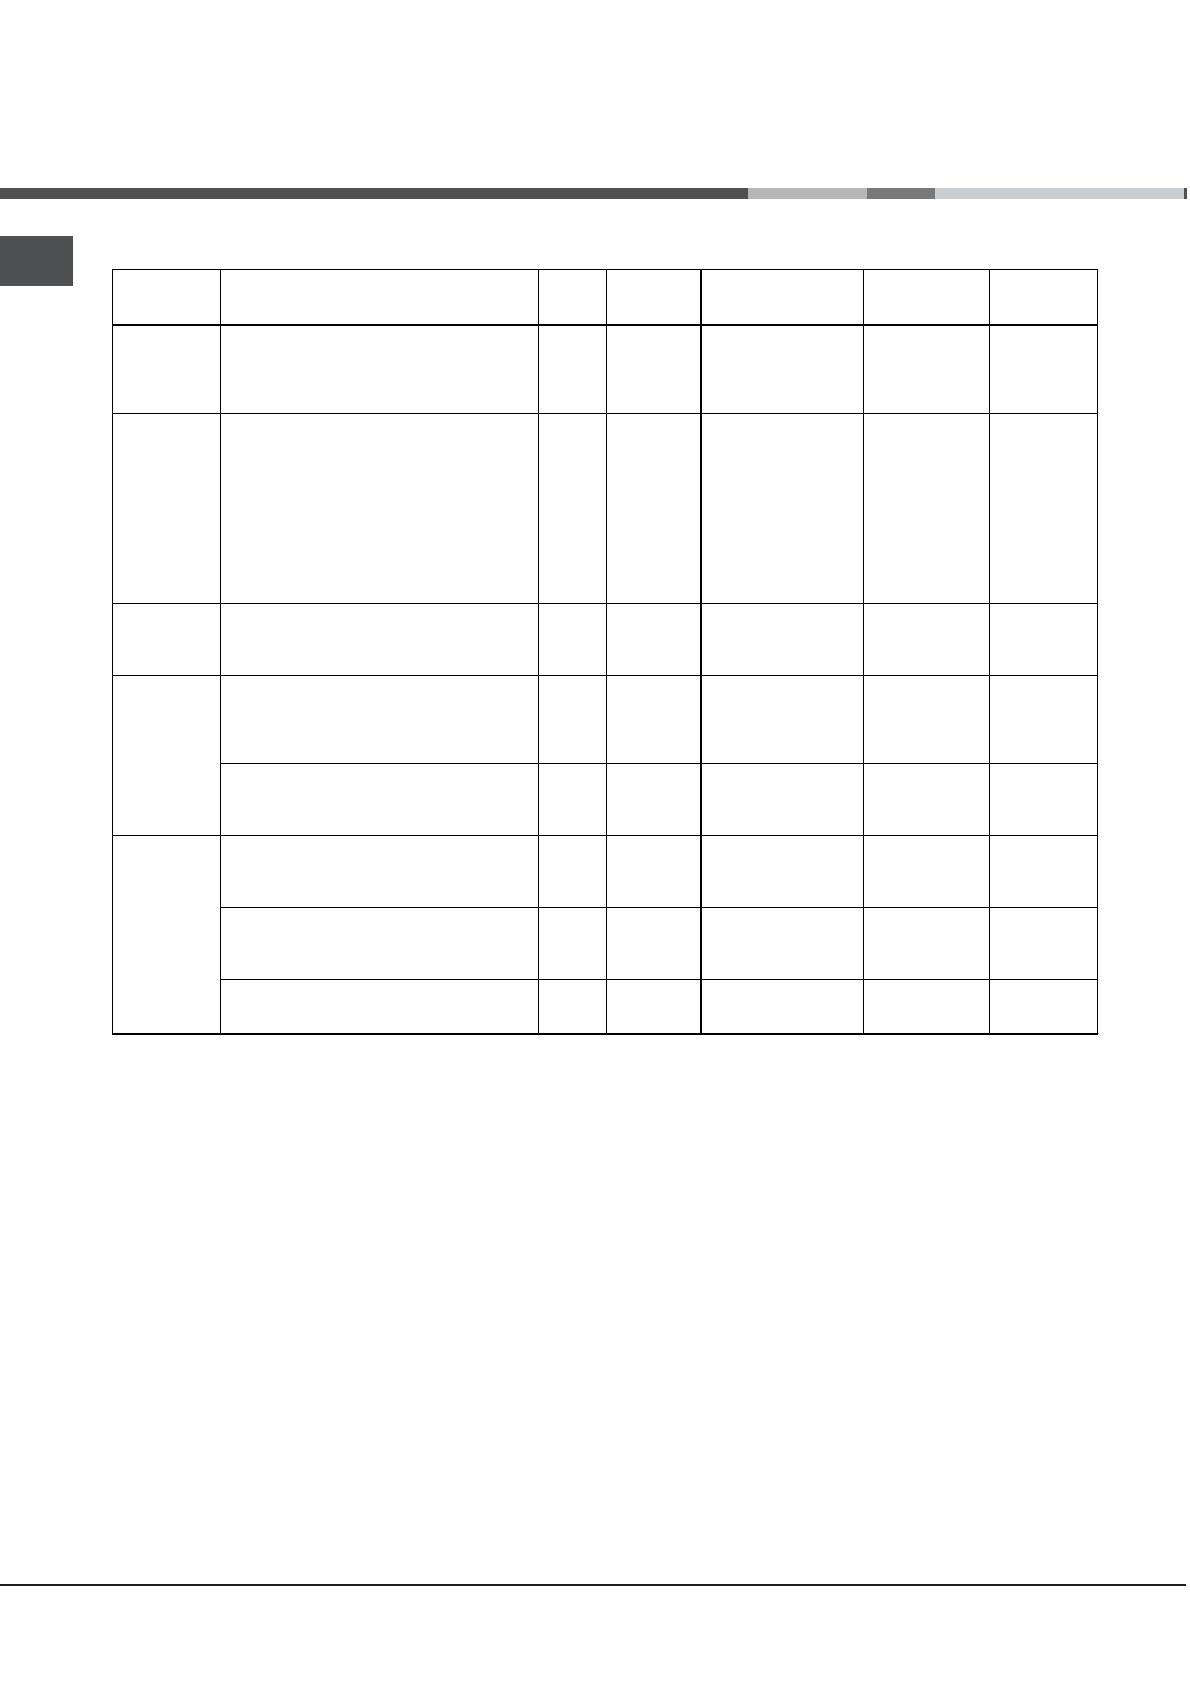
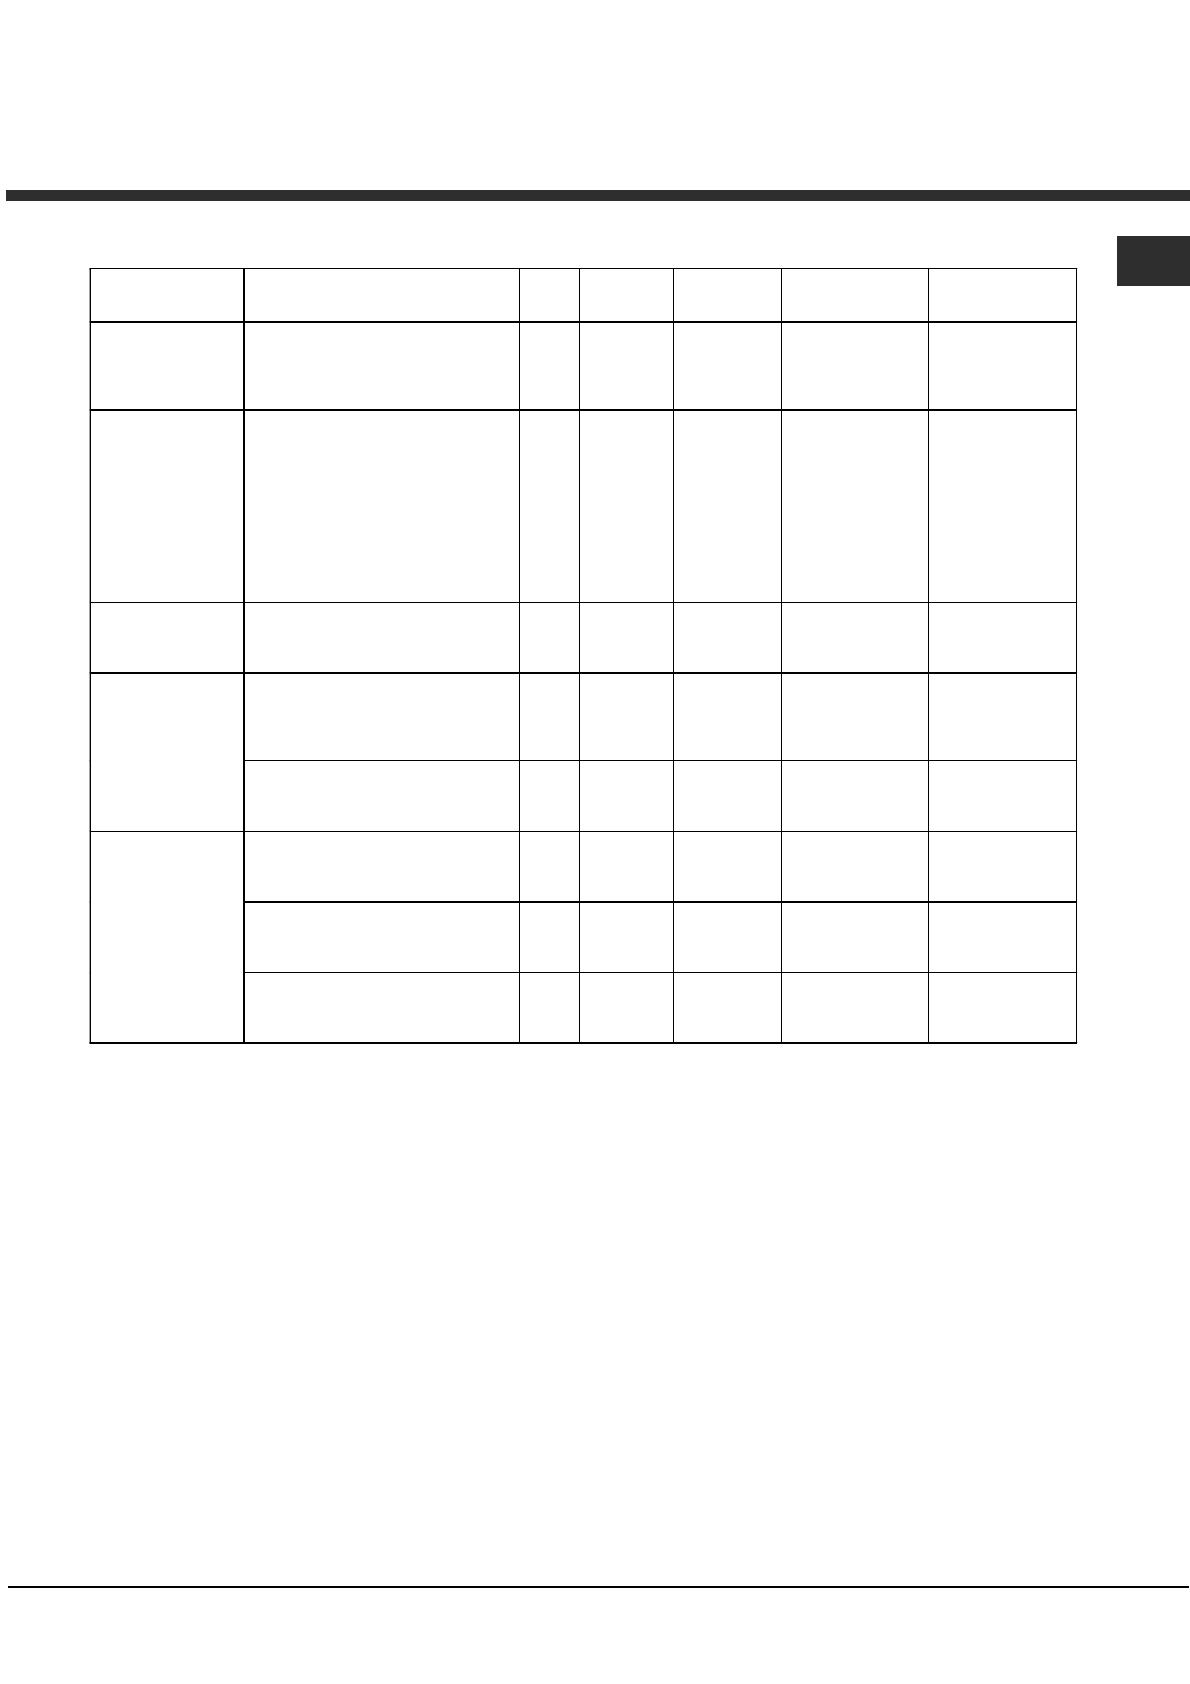
Oven cooking advice table
Cooking
modes
Foods
Weight
(in kg)
Rack
position
Preheating time
(min)
Recommended
Temperature
(°C)
Cooking
time
(minutes)
Static
Duck
Roast veal or beef
Roast pork
Biscuits (shortcrust pastry)
Tarts
1
1
1
—
1
3
3
3
3
3
15
15
15
15
15
200
200
200
180
180
65-75
70-75
70-80
15-20
30-35
Fan-assisted
Pizza (on 2 racks)
Lasagne
Lamb
Roast chicken + potatoes
Mackerel
Sponge cake made with yoghurt
Cream puffs (on 2 racks)
Biscuits (on 2 racks)
Sponge cake (on 1 rack)
Sponge cake (on 2 racks)
Savoury pies
1
1
1
1+1
1
1
0.5
0.5
0.5
1
1.5
2 and 4
3
2
2 and 4
2
2
2 and 4
2 and 4
2
2 and 4
3
15
10
10
15
10
10
10
10
10
10
15
230
180
180
200
180
170
190
180
170
170
200
15-20
30-35
40-45
60-70
30-35
40-50
20-25
10-15
15-20
20-25
25-30
Grill
Sole and cuttlefish
Squid and prawn kebabs
Cod fillet
Grilled vegetables
1
1
1
1
4
4
4
3/4
5
5
5
5
Max
Max
Max
Max
8-10
6-8
10
10-15
Veal steak
Cutlets
Hamburgers
Mackerel
Toast
1
1
1
1
4 pcs
4
4
4
4
4
5
5
5
5
5
Max
Max
Max
Max
Max
15-20
15-20
7-10
15-20
2-3
Double Grill
With the rotisserie
Spit-roast veal
Spit-roast chicken
Spit-roast lamb
1.0
1.5
1.0
—
—
—
5
5
5
Max
Max
Max
80-90
70-80
70-80
Grilled chicken
Cuttlefish
Chicken (on the spit) +
potatoes (on the dripping pan)
1.5
1.5
1.5
—
2
2
—
2
5
5
5
5
200
200
200
200
55-60
30-35
70-75
70-75
With the rotisserie
Spit-roast veal
Spit-roast chicken
Spit-roast lamb
1.5
1.5
1.5
—
—
—
5
5
5
200
200
200
70-80
70-80
70-80
Fan-assisted
Double Grill
With multi-spit rotisserie (where present)
Meat kebabs
Vegetable kebabs
1.0
0.8
—
—
5
5
200
200
40-45
25-30
GB
9
Using the glass ceramic hob
!The glue applied on the gaskets leaves traces of
grease on the glass. Before using the appliance, we
recommend you remove these with a special non-
abrasive cleaning product. During the first few hours
of use there may be a smell of rubber which will
disappear very quickly.
Switching the cooking zones on and off
To switch on a cooking zone, turn the corresponding
knob in a clockwise direction.
To switch it off again, turn the knob in an
anticlockwise direction until it is in the “0” position.
If the ELECTRIC HOTPLATE ON indicator light is lit,
this shows that at least one hotplate on the hob is
switched on.
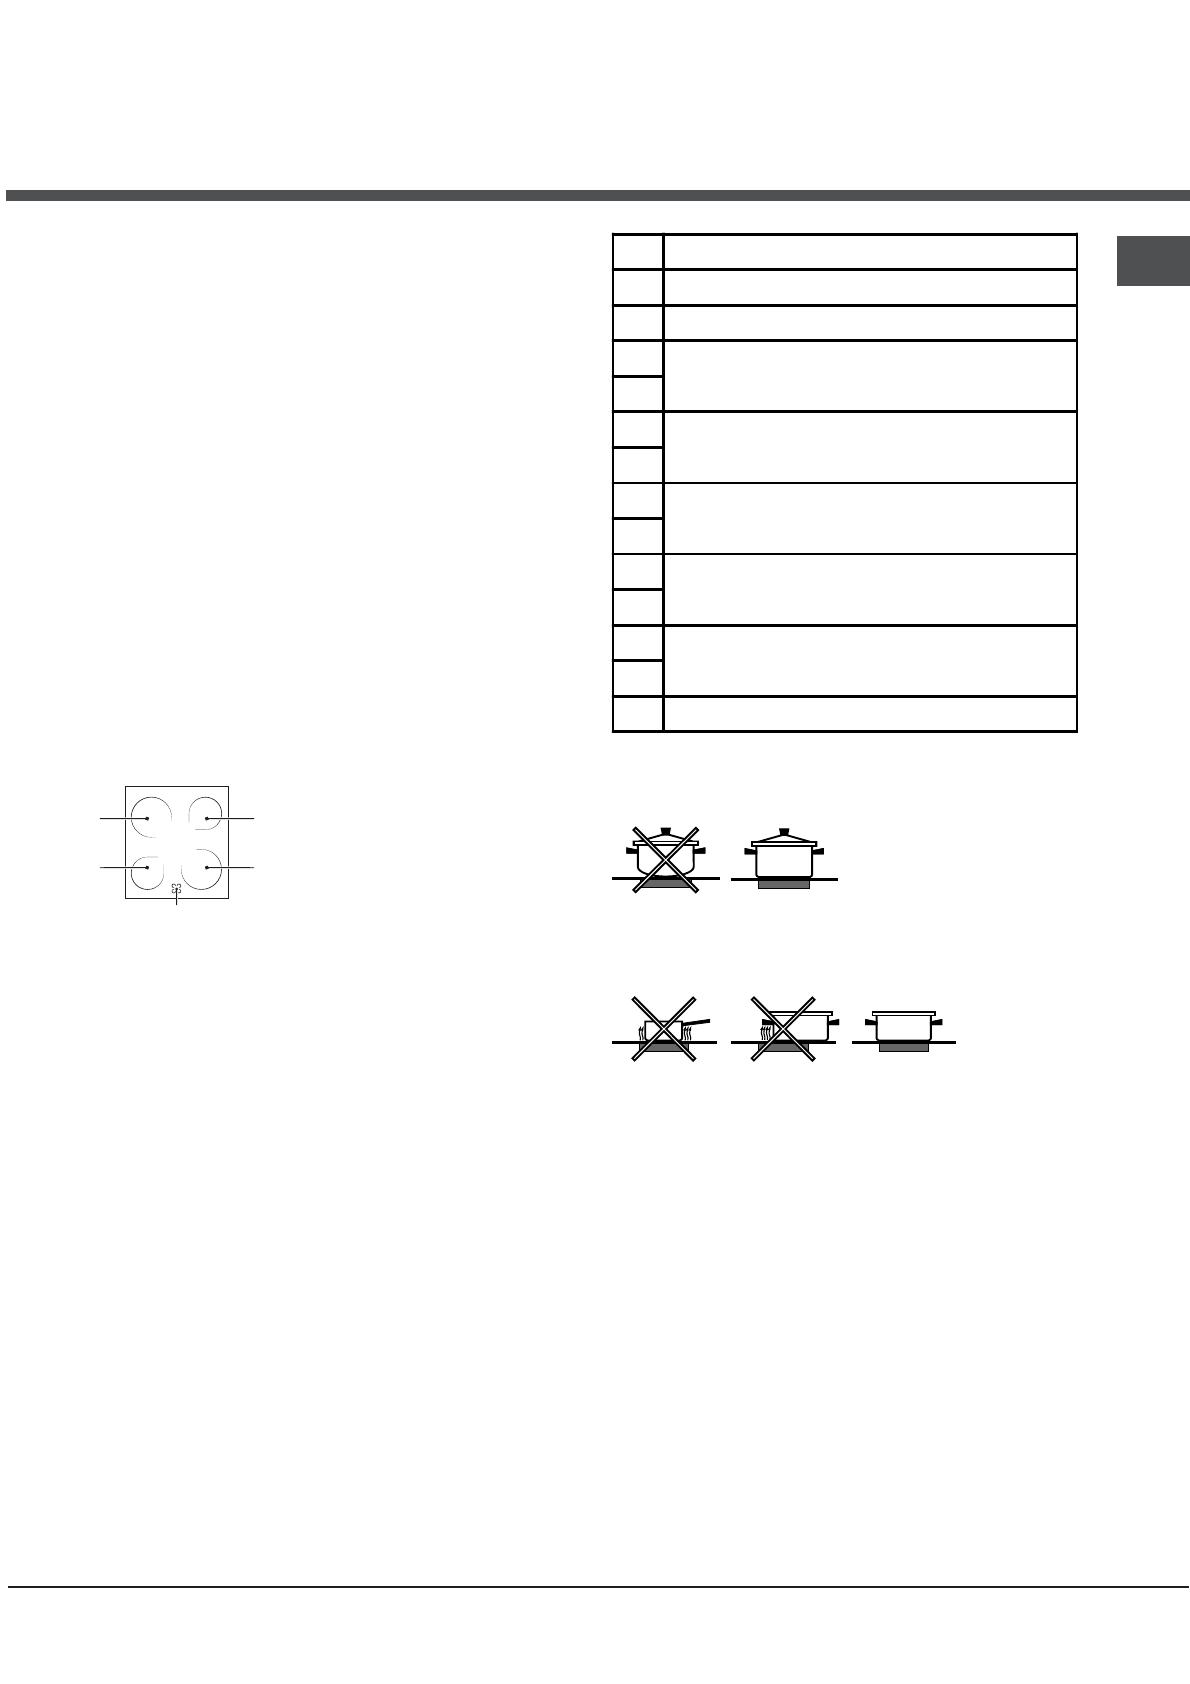
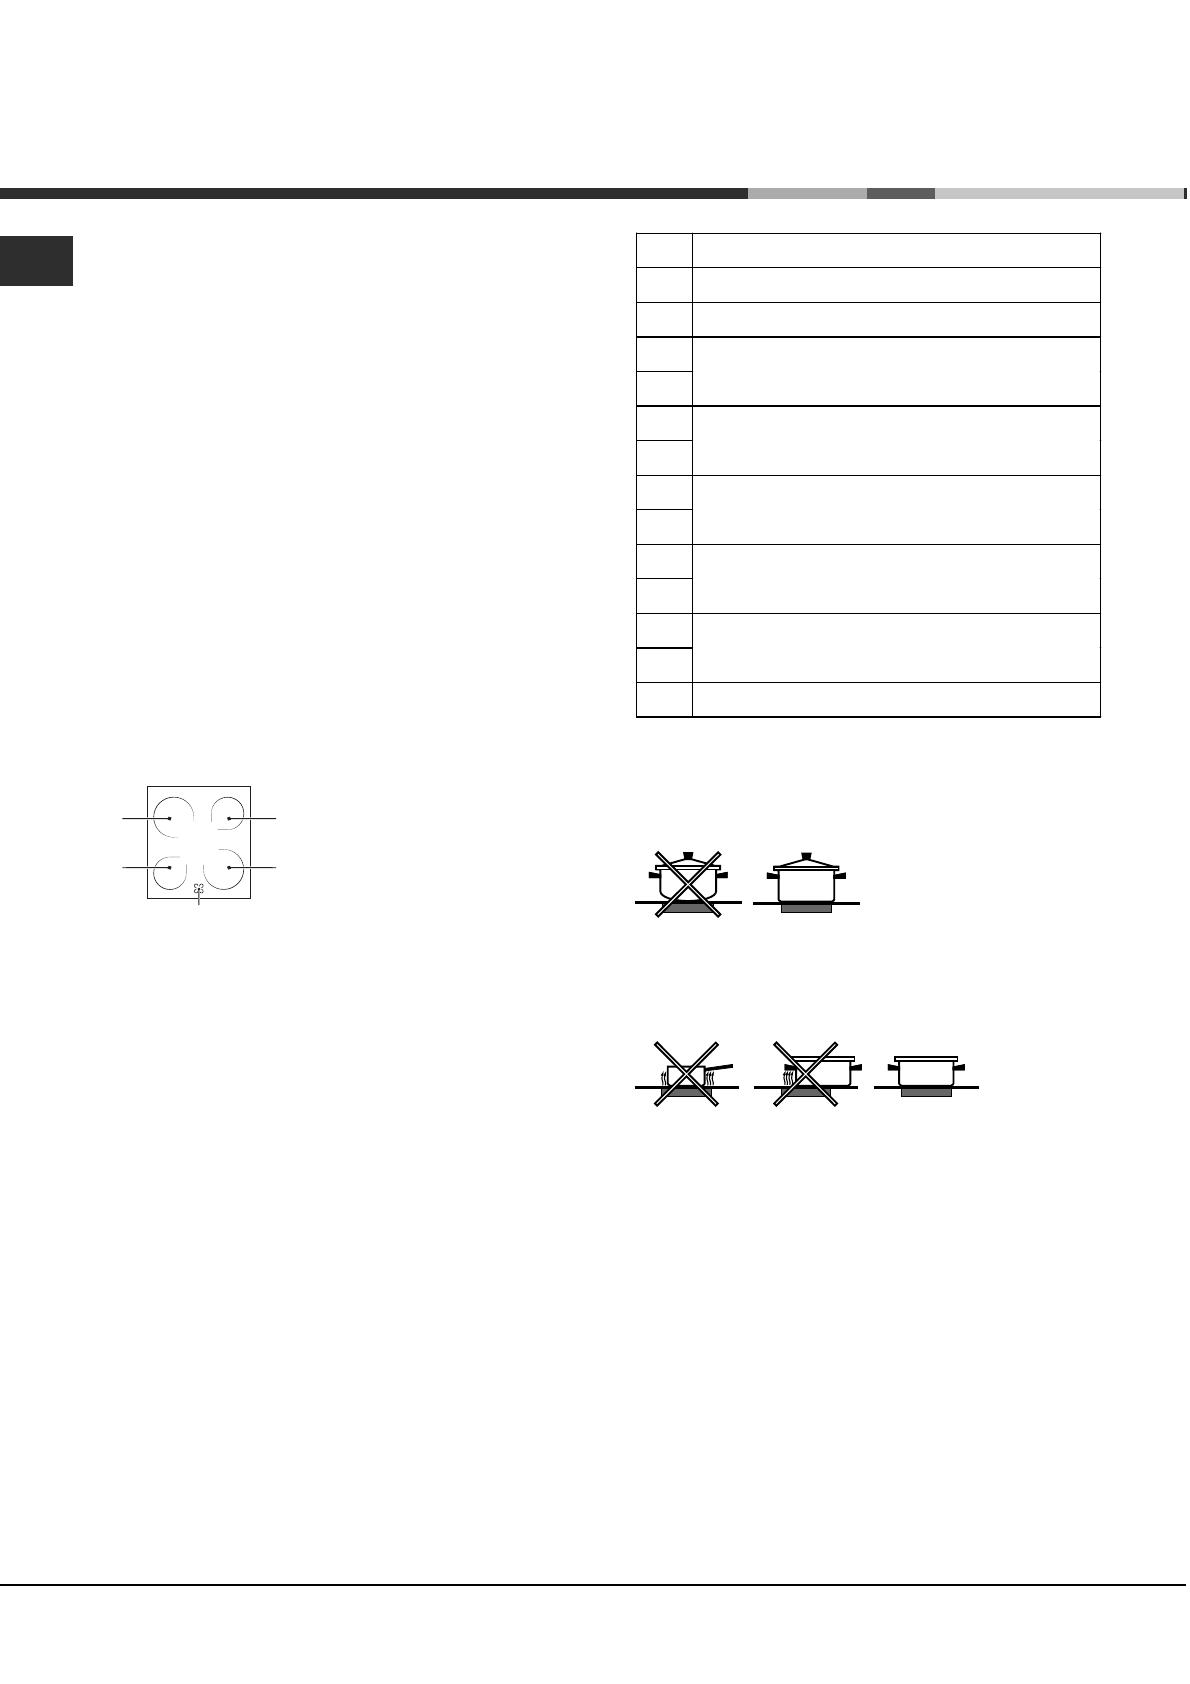
Cooking zones
The hob is equipped with electric halogen heating
elements. When they are in use the following items
on the hob become red.
A. The cooking zone with
halogen heating elements.
B. The residual heat indicator
light: this indicates that the
temperature of the
corresponding cooking zone
is greater than 60°C, even
when the heating element has been switched off but
is still hot.
Cooking zones with halogen heating elements
These emit heat via radiation from the halogen
lamps they contain. They have similar properties to
gas burners: they are easy to control and reach set
temperatures quickly, allowing you to actually see
the power they are providing.
! Do not look directly at the halogen heating elements.
Turn the corresponding knob in a clockwise
direction, to a position between 1 and 12.
Practical advice on using the hob
• Use pans with a thick, flat base to ensure that
they adhere perfectly to the cooking zone.
• Always use pans with a diameter that is large
enough to cover the hotplate fully, in order to use
all the heat produced.
• Always make sure that the base of the pan is
completely clean and dry: this ensures that the
pans adhere perfectly to the cooking zones and
that both the pans and the hob last for a longer
period of time.
• Avoid using the same cookware that is used on
gas burners: the heat concentration on gas
burners may have warped the base of the pan,
causing it not to adhere to the surface correctly.
• Never leave a cooking zone switched on without a
pan on top of it, as doing so may cause the zone
to become damaged.
A
A
A
A
B
Pos. Radiant hotplate
0
Off
1 Melting butter and chocolate
2
Heating liquids
3
4
Soups and sauces
5
6
Cooking at boiling point
7
8
Pan-roasting
9
10
Boiling large quantities
11
12 Frying

10
GB
Precautions and tips
! This appliance has been designed and
manufactured in compliance with international safety
standards.
The following warnings are provided for safety
reasons and must be read carefully.
General safety
• The glass ceramic hob is resistant to temperature
fluctuations and shocks. It is, however, wise to
remember that blades or cooking utensils may
ruin the surface of the hob. If this happens,
remove the plug of the cooker from the electricity
socket and contact an authorised Technical
Assistance Centre in order to request original
spare parts. Failure to comply with the above may
compromise the safety of the appliance.
• If the surface of the hob is cracked, switch off the
appliance to prevent electric shocks from
occurring.
• The appliance was designed for domestic use
inside the home and is not intended for
commercial or industrial use.
• The appliance must not be installed outdoors, even
in covered areas. It is extremely dangerous to
leave the appliance exposed to rain and storms.
• Do not touch the appliance with bare feet or with
wet or damp hands and feet.
• The appliance must be used by adults only for
the preparation of food, in accordance with the
instructions outlined in this booklet. Any other
use of the appliance (e.g. for heating the room)
constitutes improper use and is dangerous.
The manufacturer may not be held liable for
any damage resulting from improper, incorrect
and unreasonable use of the appliance.
• The instruction booklet accompanies a class 1
(insulated) or class 2 — subclass 1 (recessed
between 2 cupboards) appliance.
• When the appliance is in use, the heating
elements and some parts of the oven door
become extremely hot. Make sure you don’t
touch them and keep children well away.
• Make sure that the power supply cables of other
electrical appliances do not come into contact
with the hot parts of the oven.
• The openings used for the ventilation and
dispersion of heat must never be covered.
• Always use oven gloves when placing cookware
in the oven or when removing it.
• Do not use flammable liquids (alcohol, petrol,
etc…) near the appliance while it is in use.
• Do not place flammable material in the lower
storage compartment or in the oven itself. If the
appliance is switched on accidentally, it could
catch fire.
• Always make sure the knobs are in the
• position
when the appliance is not in use.
• When unplugging the appliance, always pull the
plug from the mains socket; do not pull on the
cable.
• Never perform any cleaning or maintenance work
without having disconnected the appliance from
the electricity mains.
• If the appliance breaks down, under no
circumstances should you attempt to repair the
appliance yourself. Repairs carried out by
inexperienced persons may cause injury or further
malfunctioning of the appliance. Contact
Assistance.
• Do not rest heavy objects on the open oven door.
Disposal
• When disposing of packaging material: observe
local legislation so that the packaging may be
reused.
• The European Directive 2002/96/EC relating to
Waste Electrical and Electronic Equipment
(WEEE) states that household appliances should
not be disposed of using the normal solid urban
waste cycle. Exhausted appliances should be
collected separately in order to optimise the cost
of re-using and recycling the materials inside the
machine, while preventing potential damage to
the atmosphere and to public health. The
crossed-out dustbin is marked on all products to
remind the owner of their obligations regarding
separated waste collection.
Exhausted appliances may be collected by the
public waste collection service, taken to suitable
collection areas in the area or, if permitted by
current national legislation, they may be returned
to the dealers as part of an exchange deal for a
new equivalent product.
All major manufacturers of household appliances
participate in the creation and organisation of
systems for the collection and disposal of old and
disused appliances.
Respecting and conserving the
environment
• You can help to reduce the peak load of the
electricity supply network companies by using the
oven in the hours between late afternoon and the
early hours of the morning.
• Always keep the oven door closed when using the
GRILL, DOUBLE GRILL and FAN-ASSISTED
DOUBLE GRILL modes: This will achieve better
results while saving energy (approximately 10%).
• Check the door seals regularly and wipe them
clean to ensure they are free of debris so that
they adhere properly to the door, thus avoiding
heat dispersion.

GB
11
Switching the appliance off
Disconnect your appliance from the electricity supply
before carrying out any work on it.
! Never use steam cleaners or pressure cleaners on the
appliance.
Cleaning the oven
• The stainless steel or enamel-coated external parts
and the rubber seals may be cleaned using a sponge
that has been soaked in lukewarm water and neutral
soap. Use specialised products for the removal of
stubborn stains. After cleaning, rinse and dry
thoroughly. Do not use abrasive powders or corrosive
substances.
• The inside of the oven should ideally be cleaned after
each use, while it is still lukewarm. Use hot water and
detergent, then rinse well and dry with a soft cloth. Do
not use abrasive products.
•
Clean the glass part of the oven door using a sponge
and a non-abrasive cleaning product, then dry
thoroughly with a soft cloth. Do not use rough
abrasive material or sharp metal scrapers as these
could scratch the surface and cause the glass to
crack.
• The accessories can be washed like everyday
crockery, and are even dishwasher safe.
• Dirt and grease should be removed from the control
panel using a non-abrasive sponge or a soft cloth.
Inspecting the oven seals
Check the door seals around the oven regularly. If the
seals are damaged, please contact your nearest After-
sales Service Centre. We recommend that the oven is
not used until the seals have been replaced.
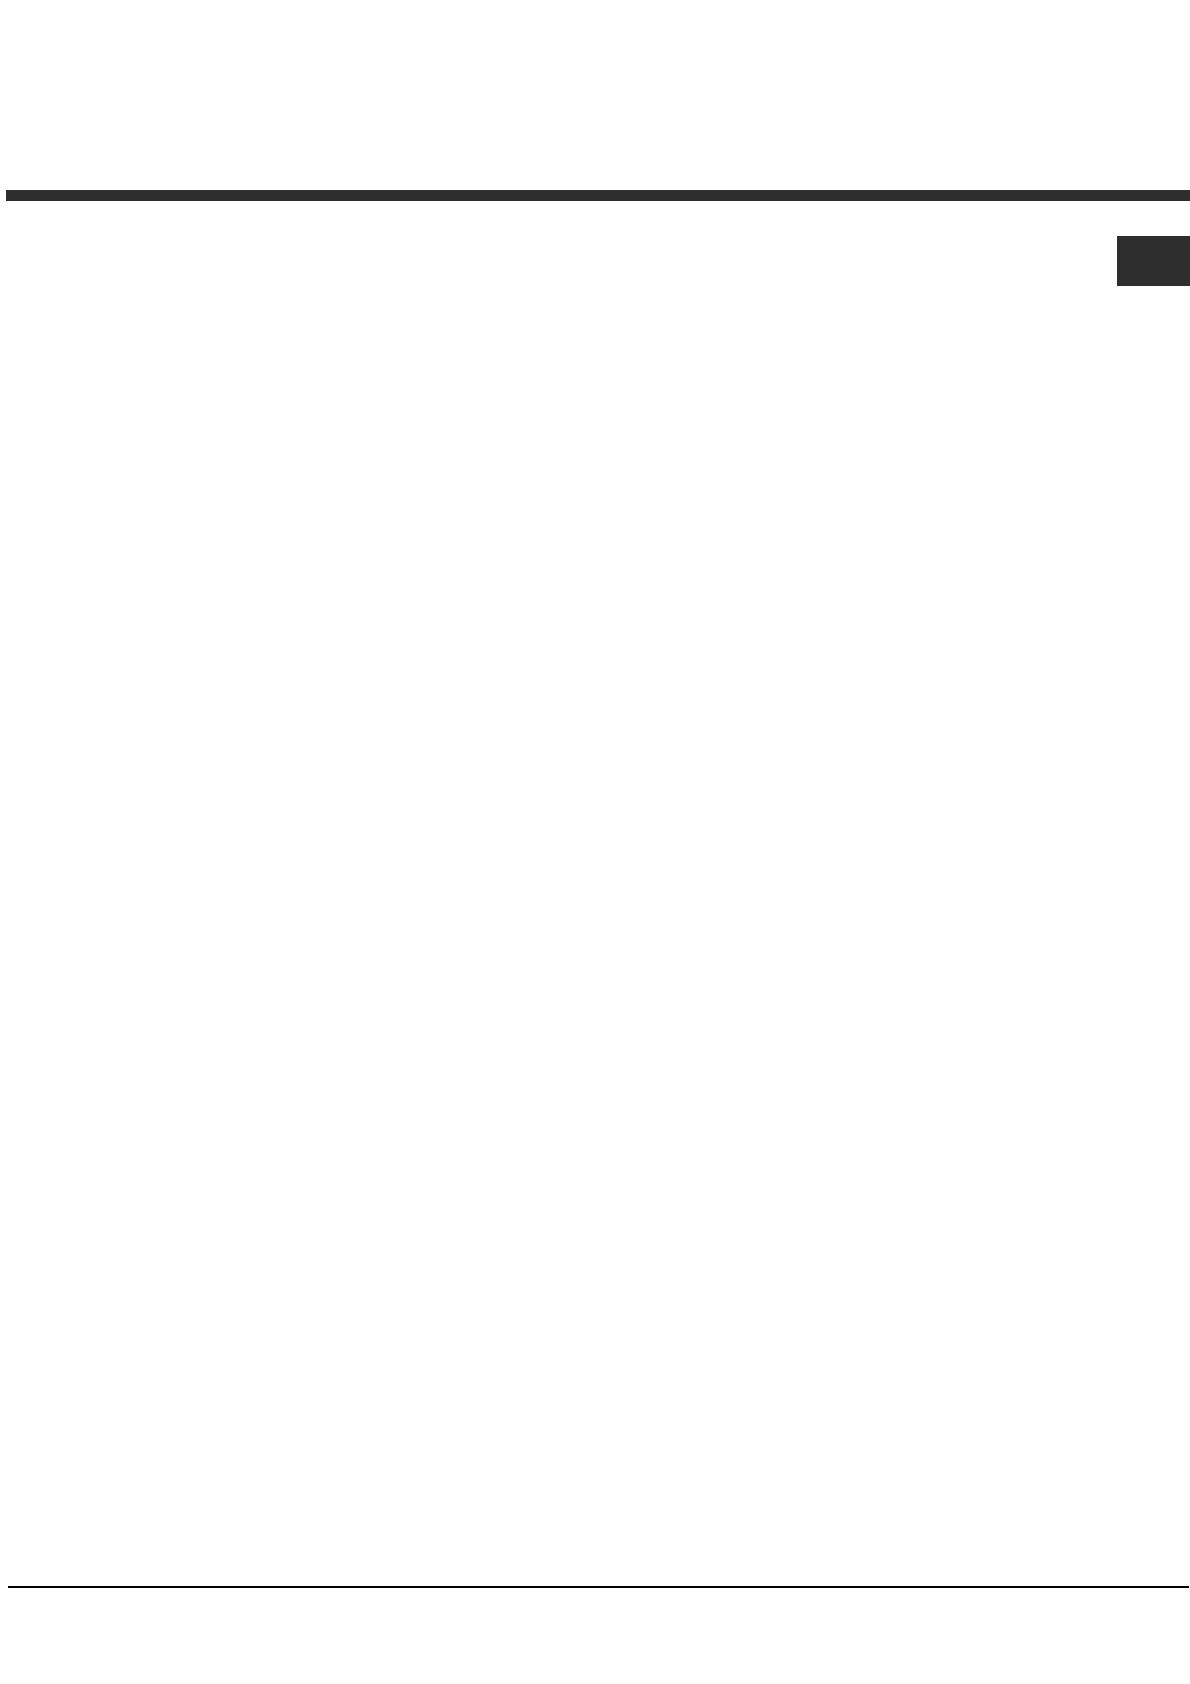
Replacing the oven light bulb
1. After disconnecting the oven from the
electricity mains, remove the glass lid
covering the lamp socket (
see figure
).
2. Remove the light bulb and replace
it with a similar one: voltage 230 V,
wattage 25 W, cap E 14.
3. Replace the lid and reconnect the
oven to the electricity supply.
Cleaning the glass ceramic hobCleaning the glass ceramic hob
Cleaning the glass ceramic hobCleaning the glass ceramic hob
Cleaning the glass ceramic hob
! Do not use abrasive or corrosive detergents (for
example, products in spray cans for cleaning barbecues
and ovens), stain removers, anti-rust products, powder
detergents or sponges with abrasive surfaces: these
may scratch the surface beyond repair.
• It is usually sufficient simply to wash the hob using a
damp sponge and dry it with absorbent kitchen roll.
• If the hob is particularly dirty, rub it with a special
glass ceramic cleaning product, then rinse well and
dry thoroughly.
• To remove more stubborn dirt, use a suitable scraper
(this is not supplied with the appliance). Remove
spills as soon as possible, without waiting for the
appliance to cool, to avoid residues forming crusty
deposits. You can obtain excellent results by using a
rustproof steel wire sponge — specifically designed for
glass ceramic surfaces — soaked in soapy water.
• If plastic or sugary substances have accidentally
been melted on the hob, remove them immediately
with the scraper, while the surface is still hot.
• Once it is clean, the hob may be treated with a special
protective maintenance product: the invisible film left
by this product protects the surface from drips during
cooking. This maintenance should be carried out
while the appliance is warm (not hot) or cold.
• Always remember to rinse the appliance well with
clean water and dry it thoroughly: residues can
become encrusted during subsequent cooking
processes.
Glass ceramic hob cleaners Available from
Window scraper Razor blade
scrapers
DIY Stores
Replacement blades DIY Stores,
supermarkets,
chemists
COLLO luneta
HOB BRITE
Hob Clean
SWISSCLEANER
Boots, Co-op stores,
department st ores, Regional
Electricity Company shops,
supermarkets
Cleaning stainless steel
Stainless steel can be marked by hard water that has
been left on the surface for a long time, or by aggressive
detergents that contain phosphorus. We recommend
that the steel surfaces are rinsed well then dried
thoroughly.
Assistance
Please have the following information handy:
• The appliance model (Mod.).
• The serial number (S/N).
This information can be found on the data plate
located on the appliance and/or on the packaging.
Care and maintenance
К УХОННАЯ ПЛИТА С ДУХОВЫМ ШКАФОМ
Содержание
Монтаж, 13-14
Расположение и нивелировка
Электрическое подсоединение
Технические данные
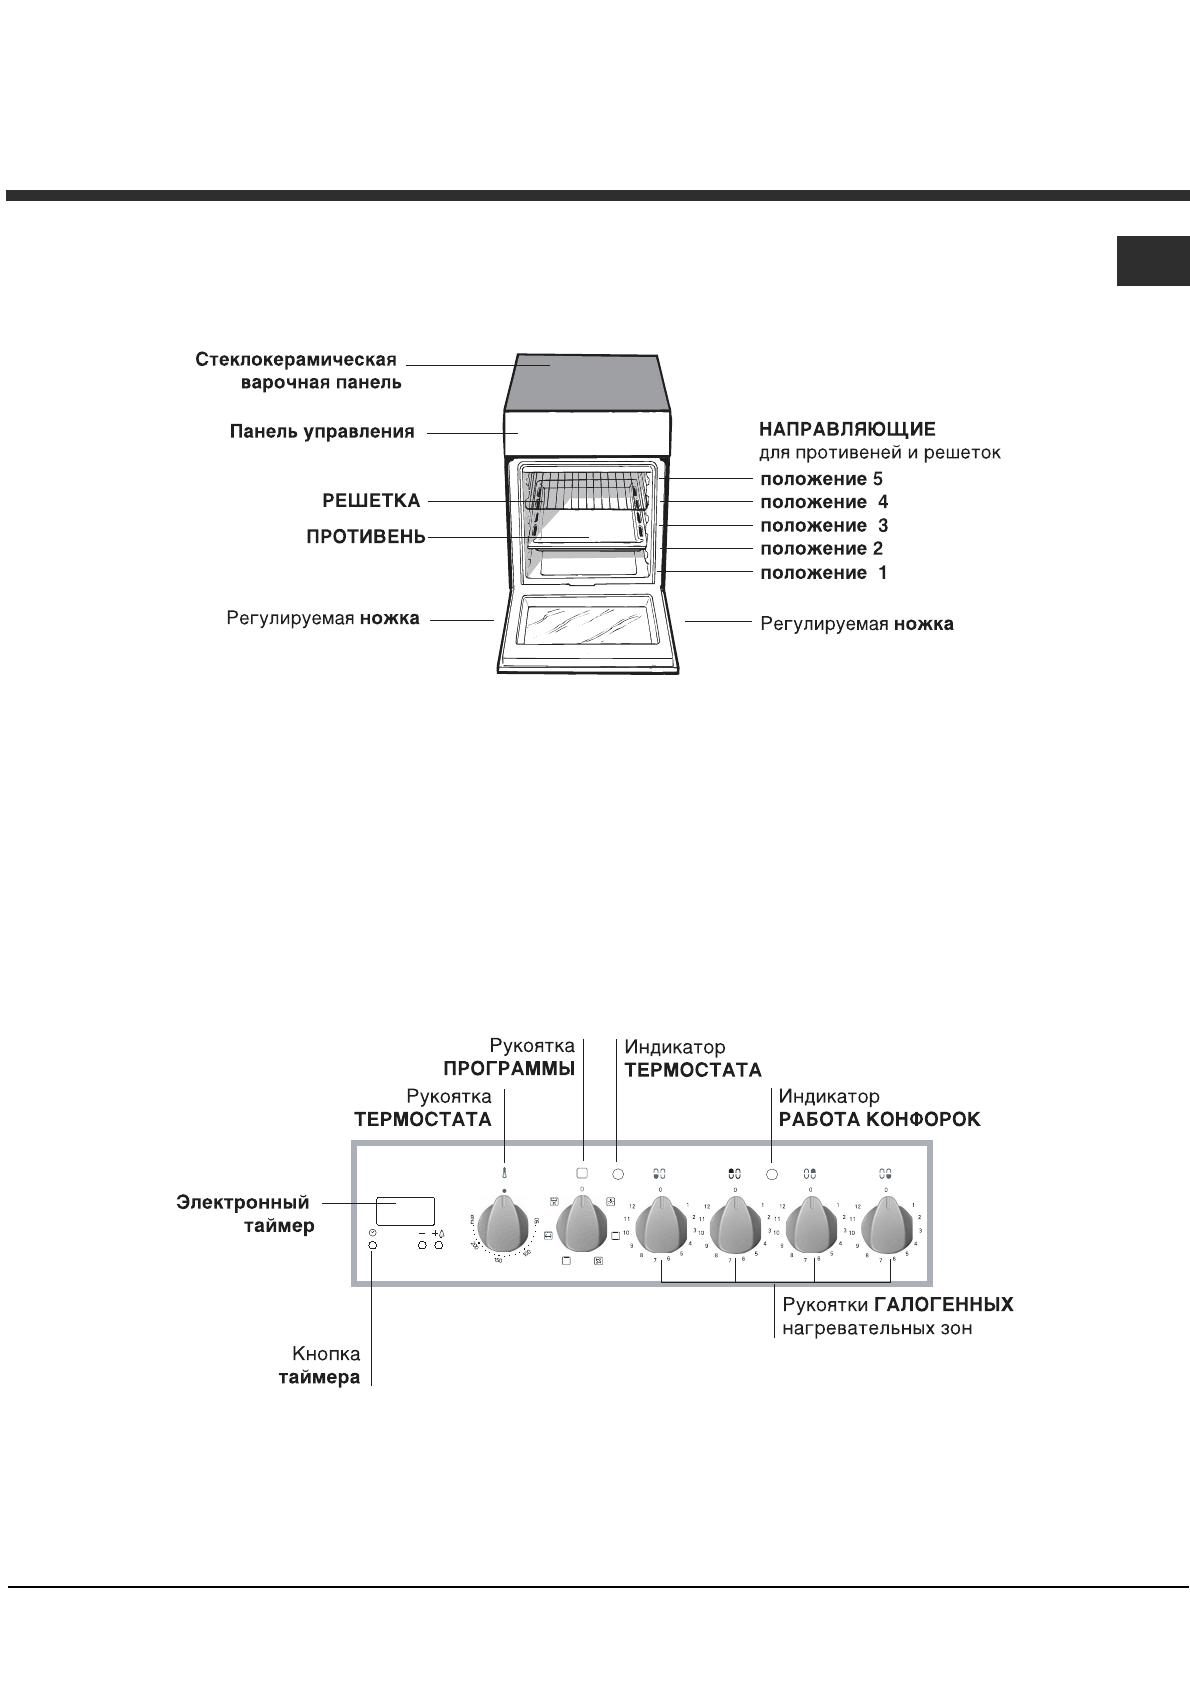
Описание изделия, 15
Общии вид
Панель управления
Включение и эксплуатация, 16-19
Включение духового шкафа
Программы приготовления
Электронныи таимер
Таблица приготовления в духовом шкафу
Стеклокерамическая варочная панель, 20
Включение и выключение нагревательных зон
Нагревательные зоны
Предосторожности и рекомендации, 21
Общие требования к безопасности
Утилизация
Экономия электроэнергии и охрана окружающеи
среды
Техническое обслуживание и уход, 22-23
Отключение электропитания
Чистка духового шкафа
Замена лампочки в духовом шкафу
Чистка стеклокерамическои варочнои панели
Техническое обслуживание
Руководство по эксплу атации
English, 1 РУССКИЙ,12
GB RS
C3VM57RU /HA
RS
13
! Важно сохранить данное руководство для его
последующих консультации. В случае продажи,
передачи или переезда проверьте , чтобы данное
руководство сопровождало изделие.
! Внимательно прочитаите инструкции: в них
содержатся важные сведения об установке,
эксплуатации и безопасности изделия.
! Установк а изделия производится в соответствии
с данными инструкциями квалифицированными
специалистами.
! Любая операция по регуляции или
техническому
обслуживанию должна производиться только
после отсоединения электроприбора от сети
электропитания.
Расположение и нивелировка
! Изделие может быть установлено рядом с
кухонными элементами, высота которых не
превышает поверхность варочнои панели.
! Проверьте, чтобы стена, к к оторои прилегает
задняя часть изделия, была из невозгораемого
материала и устоичивои к теплу (Т 90°C).
Порядок монтажа:
• изделие может быть установлено на кухне, в
столовои или в однокомнатнои квартире (не в
ваннои комнате);
• если варочная панель кухоннои плиты выше
мебельных элементов, необходимо отодвинуть
их от плиты на расстояние не менее 200 мм.
• если кухонная
плита устанавливается
под навесным шкафом,
он должен
располагаться на
высоте не менее 420
мм от поверхности
варочнои панели.
Это расстояние
должно быть 700 мм,
если навесные шкафы
выполнены из возгораемого материала (см.
рисунок);
• не заправляите
занавески за кухонную плиту и
не приближаите их на расстояние меньше 200
мм.
• возможная кухонная вытяжка должна быть
установлена в соответствии с инструкциями,
приведенными в техническом руководстве к
вытяжке.
Выравнивание
При необходимости
выровнять изделие вкрутите
в специальные отверстия по
углам в основании кухоннои
плиты прилагающиеся
регуляционные ножки* по
(см. рисунок).
Прилагающиеся ножки*
вставляются под основание
кухоннои
плиты.
Электрическое подсоединение
Подсоединение кабеля электропитания
Кабель расчитывается в зависимости от типа
электрического соединения по следующеи
электрическои схеме:
Порядок подсоединения кабеля электропитания:
1. Отвинтите шуруп V
на зажимнои коробке и
снимите крышку (см.
рисунок).
2. установите
соединительную
перемычку А (см.
рисунок) по
приведеннои выше
электрическои схеме
Зажимная коробка
расчитана на
монофазное
соединение 230 В:
зажимы 1, 2 и 3
соединены друг с другом; перемычка 4-5
Установка
HOOD
420
Min.
min.
650
mm. with hood
min.
700
mm. without hood
mm.
600
Min. mm.
420
Min. mm.
V
1
2
3
N
A
B
1 2
3
4
5
12345
1
2
3
4
5
R
S
T
N
R
S
N
R
N
400 3N
H05RR-F 5×2.5 CEI-UNEL 35363
400V 2N
H05RR-F 4×4 CEI-UNEL 35363
230V
H05RR-F 3×4 CEI-UNEL 35363
14
RS
расположена в нижнеи части зажимнои коробки.
3. подсоедините провода N и
66
66
6
в соответствии
со схемои (см. рисунок) и до упора закрутите
винты зажимов.
4. подсоедините оставшиеся провода к зажимам
1-2-3 и закрутите винты.
5. закрепите кабель электропитания в
специальном кабельном сальнике.
6. закроите крышку зажимнои коробки, закрутив
винт V.
Подсоединение кабеля к сети электропитания
У становите на ка б ель электропитания нормализов анную
штепсе льную вилку, расчитанную на нагрузку,
указанную на заводскои
таб личке изделия.
В случае прямого подключения к сети электропитания
между кухоннои плитои и сетью необходимо установить
мультиполярныи выключ ат ель с минимальным
расстоянием между контактами 3 мм, расчитанныи на
данную нагрузку и соответствующии деиствующим
нормативам (выключатель не должен размыкать провод
заземления). Кабель электропитания должен быть
расположен таким образом, чтобы ни в однои точке его
температура не превышала температуру
помещения
более чем на 50°C.
Перед подсоединением кабе ля проверьте следующее:
• электрическая розетка должна быть соединена с
заземлением и соответствовать нормативам;
• электрическая розетка должна быть рассчитана
на максимальную потребляемую мощность
изделия, указанную на заводскои та блике;
• напряжение и частота тока сети должны
соответствовать электрическим данным изделия;
• электрическая розетка должна быть совместима
со штепсельнои вилкои
изделия. В противном
случае замените розетку или вилку; не
используите удлинители или троиники.
! Изделие должно быть установлено таким
образом, чтобы электрическии кабель и
электророзетка были легко доступны.
!Электрическии кабель изделия не должен быть
с огнут или сжат.
! Регулярно проверяите с остояние кабеля
электропитания и при необходимости поручаите
его замену только уполномоченным техникам.
! Производитель
не несет ответственности за
последствия несоблюдения перечисленных
выше требовании.
*
Имеется только в некоторых моделях
ТЕХНИЧЕСКИЕ
ДАННЫЕ
Габаритные размеры
духового шкафа
ВхШхГ
34×38x41 cм
Объем
л 53
Рабочие размеры
ящика для
разогревания пищи
ширина 42 см.
гл уб ин а 44 см.
высота 17 см.
Напряжение и частота
электропитания
см. табличку с техническими
характеристиками
Керамическая
варочная панель
Передняя левая
Задняя левая
Задняя правая
Передняя правая
Макс. поглощаемая
мощность
керамическими
варочными панелями
1200 Вт
1800 Вт
1200 Вт
1800 Вт
6000 Вт
ТАБЛИЧКА С
ЭЛЕКТРИЧЕСКИМИ
ДАННЫМИ
Директива 2002/40/СЕ об этикетках
электрических духовых шкафов. Норматив
EN 50304
Расход электроэнергии Натуральная
конвекция – функция нагревания:
a
Статическая
b
Вентилированное
Директива ЕС: 06/95/EC от 12/12/06
(Низкое напряжение) с последую щими
изменениями –
04/108/EC от 15/12/04 (Электромагнитная
совместимость) с последующ ими
изменениями
– 93/68/СЕЕ от 22/07/93 с последую щ им и
изменениями –
2002/96/ЕС.
1275/2008 Stand-by/ Off mode
Ра сход эл ект роэ не рги и —
Заявление Кл асса — На туральна я
конв екци я –
RS
15
Описание изделия
Общии вид
Панель управления

16
RS
Вклю чение и эксплу атация
! При первом включении духового шкафа
рекомендуем прокалить его примерно в течение
30 минут при максимальнои температуре с
закрытои дверцеи. Затем выключите духовои
шкаф, откроите дверцу и проветрите помещение.
Запах, которыи вы можете почувствовать, вызван
испарением веществ, использованных для
предохранения духового шкафа.
! Перед началом эксплуатации необходимо снять
пленку, нак леенную с бок ов изделия.
Включение духового шкафа
1. Выберите нужную программу приготовления при
помощи рук оятки ПРОГРАММЫ.
2. В ы берите температуру, рекомендуемую для
даннои программы или нужную вам температуру
при помощи рукоятки ТЕРМОСТАТ.
В специальнои таблице приводится перечень
типов приготовления с соответствующими
рекомендуемыми температурами (см. Таблица
приготовления в духового шкафу).
В процессе приготовления в любои момент можно:
• изменить программу приготовления при помощи
рукоятки
ПРОГРАММЫ;
• изменить температуру при помощи рукоятки
ТЕРМОСТАТ;
• запрограммировать приготовление и время
окончания приготовления (см ниже );
• прервать приготовление, повернув рукоятку
ПРОГРАММЫ в положение «0».
! Никогда не ставьте никаких предметов на дно
духового шкафа, так как они могут повредить
эмалированное покрытие. Используите положение
1 настроики духового шкафа только для
приготовления на вертеле.
! Всегда ставьте
посуду на прилагающуюся
решет ку.
Индикатор ТЕРМОСТАТА
Включение этого индикатора означает, что
духовои шкаф нагревается. Индикатор гаснет,
когда внутри духового шкафа будет достигнута
заданная температура. На данном этапе
индикатор то загорается, то гаснет, показывая, что
термостат включен и поддерживает температуру
неизменнои.
Освещение духового шкафа
Включется, когда рукоятка П РОГ РАММЫ
устанавливается в любое положение кроме “0”, и
остается включенным до
тех пор, пока работает
духовои шкаф. При выборе положения
88
88
8
при
помощи рукоятки освещение включается без
подключения нагревательных элементов.
RS
17
Программы приготовления
! Для всех программ можно задать температуру от
50°C до МАКС кроме:
• ГРИЛЬ и ДВОИНОИ ГРИЛЬ (рекомендуется
устанавливать только МАКС. температуру);
• ДВОИНОИ ВЕНТИЛИРОВАННЫИ ГРИЛЬ
(рекомендуется не превышать температуру 200°C).
aa
aa
a
Программа СТАТИЧЕСКАЯ ДУХОВКА
Включаются два нагревательных элемента: нижнии и
верхнии. При приготов лении блюд в традициональном
режиме лучше использовать только один уровень в
духовом шкафу, в противном случае распреде ление
температуры будет неоптимальным.
bb
bb
b
Программа ВЕНТИЛИРОВАННАЯ ДУХОВКА
Включаются попеременно нижнии и круглыи
нагревательные элементы и вентилятор. Так как
жар является постоянным во всем духовом шкафу,
воздух обеспечивает однородное приготовление и
подрумянивание продукта. Можно одновременно
использовать не более двух уровнеи в духовке.
cc
cc
c
Программа ГРИЛЬ
Включается центральная часть верхнего
нагревательного элемента. Высокая температура и
жар прямого деиствия гриля рекомендуется для
приготовления продуктов, нуждающихся в высокои
поверхностнои температуре (телячии и говяжих
бифштексов, вырезки, антрекотов). Это программа
не требует большого расхода энергии, идеально
подходит для приготовления на гриле небольших
порции. Поместите продукт в центр решетки, так как
жар не распространяется по
углам.
22
22
2
Программа ДВОИНОИ ГРИЛЬ
Включается верхнии нагревательныи элемент и вертел.
Это гриль большего размера особои формы,
повышающии на 50% эффективность
приготовления, позволяющии распространение
жара по углам. Используите этот режим гриля для
однородного подрумянивания.
TT
TT
T
Программа ДВОИНОИ ВЕНТИЛИРУЕМЫИ ГРИЛЬ
Включает ся верхнии нагреват е льныи элемент,
вертел и вентилятор. Сочетает однонаправленное
выделение жара с принудительнои циркуляциеи
воздуха внутри духового шкафа. Это препятствует
обгоранию поверхности продукта, повышая
проникающую способность жара. Этот режим
подходит для быстрого гриля или для приготовления
крупных кусков мяса без использования вертела.
! Для приготовления в режимах ГРИЛЬ, ДВОИНОИ
ГРИЛЬ
и ДВОИНОИ ВЕНТИЛИРУЕМЫИ ГРИЛЬ
дверца духового шкафа должна быть закрыта.
! При использовании ГРИЛЯ и ДВОИНОГО ГРИЛЯ
установите решетку на 5-ыи уровень и противень
для сбора соков (жира) на 1-ыи. При
использовании ДВОИНОГО ВЕНТИЛИРУЕМОГО
ГРИЛЯ установите решетку на 2-ои или 3-ии
уровень, а противень на 1-ыи для сбора соков.
Электронныи таимер
Показывает время и выполняет функцию таимера с
обратным отсчетом.
! Все функции включаются примерно через 7
секунд после их выбора.
Регуляция часов
После осуществления подсоединения к сети
электропитания или после отключения напряжения
на дисплее мигает значение: 0:00
• Нажмите кнопку
GG
GG
G и затем при помощи кнопок
– e + установите точное время. Для быстрои
регуляции держите кнопки нажатыми.
При необходимости откорректировать время
выполните вышеописанные операции.
Функция таимера
Эта функция открывается при нажатии кнопки
nn
nn
n и
на дисплее показывается символ
nn
nn
n. При каждом
нажатии кнопки
+ значение времени увеличивается
на 10 секунд вплоть до 99 минут и 50 секунд. Если
вы будете продолжать нажмете на эту кнопку,
значение времени будет увеличиваться на одну
минуту вплоть до 10 минут.
При помощи – значение уменьшается.
После установки нужного отрезка времени,
начинается обратныи отсчет. По истечении
заданного времени раздается звуковои сигнал,
погасить которыи вы можете,
нажав любую копку.
На дисплеи можно вывести время при помощи
кнопки
GG
GG
G, символ
nn
nn
n означает, что была в ключена
функция таимера. Примерно через 7 секунд на
дисплеи автоматически вернется визуализация
таимера.
18
RS
Порядок отмены заданного времени
Нажмите кнопку – вплот до 0:00.
Регуляция громкости звукового
сигнала
После осуществления и подтверждения регуляции
часов при помощи кнопки
– можно отрегулировать
громкость звукового сигнала.
Вертел
Порядок включения
вертела (см. рисунок):
1. установите
противень на 1-ыи
уровень;
2. установите
держатель вертела на
4-ыи уровень и
вставьте вертел в
специальное
отверстие в заднеи
стенке духового шкафа;
3. включите вертел при помощи рукоятки
ПРОГРАММЫ
22
22
2
o
TT
TT
T
.
Нижнии отсек*
Снизу духового шкафа
имеется отсек,
которыи может быть
использован для
хранения кухонных
принадлежностеи или
кастрюль. Для
открывания дверцы
поверните ее вниз (см.
рисунок).
! Не помещаите возгораемых предметов в нижнии
отсек.
! Внутренняя поверхность ящика (если он
имеется) может сильно нагреться.
Одновременное приготовление на
нескольких уровнях
При необходимости использовать две решетки
выберите программу ВЕНТИЛИРОВАННАЯ
ДУХОВКА
bb
bb
b
, единственную расчитанную на
такои тип приготовления. Кроме того
рекомендуется:
• не используите 1-ыи и 5-ыи уровни: они
подвергаются прямому воздеиствию горячего
воздуха, которыи может сжечь деликатные
продукты.
• используите в основном 2-ои и 4-ыи уровни,
помещая на 2-ои уровень продукты, требующие
большего жара.
• для продуктов, приготовление которых требует
разного времени и температуры, следует задать
среднюю
температуру из двух
рекомендованных (см. Таблицу приготовления
в духовом шкафу) и поместите более
деликатные продукты на 4-ыи уровень. Вначале
выньте из духовки продук т, требующии более
быстрого приготовления.
• при приготовлении пицц на нескольких уровнях
при температуре 220°C, следует
предварительно разогреть духовку в течение 15
минут. Обычно приготовление на 4-ом уровне
требует большего времени: поэтому
рекомендуется вначале вынуть
пиццу с более
низкого уровня, и только через несколько минут
вынуть пиццу с 4-ого уровня.
• Ус тановите проитвень снизу, а решетку сверху.
* Имеется только в некоторых моделях
RS
19
Таблица приготовления в духовом шкафу
Программы Продукты Вес
(кг)
Уровень Время
нагревания
(мин.)
Рекомендуемая
температура (°C)
Продолжит—ть
приготовления
(минуты)
Статическое
Утка
Жаркое из телятины или говядины
Жаркое из свинины
Печенье (песочное)
Песочный торт с начинкой
1
1
1
—
1
3
3
3
3
3
15
15
15
15
15
200
200
200
180
180
65-75
70-75
70-80
15-20
30-35
Вентилированное
Пицца (на 2 уровнях)
Лазанья
Баранина
Курица с картошкой
Скумбрия
Кекс
Эклеры (на 2 уровнях)
Печенье (на 2 уровнях)
Бисквитный торт (на 1 уровне)
Бисквитный торт (на 2 уровнях)
Несладкие торты
1
1
1
1+1
1
1
0.5
0.5
0.5
1
1.5
2 и 4
3
2
2 и 4
2
2
2 и 4
2 и 4
2
2 и 4
3
15
10
10
15
10
10
10
10
10
10
15
230
180
180
200
180
170
190
180
170
170
200
15-20
30-35
40-45
60-70
30-35
40-50
20-25
10-15
15-20
20-25
25-30
Гриль
Камбала и каракатицы
Кальмары и кревет ки на шампурах
Филе трески
Овощи—гриль
1
1
1
1
4
4
4
3/4
5
5
5
5
Макс.
Макс.
Макс.
Макс.
8-10
6-8
10
10-15
Телячий бифштекс
Отбивные
Гамбургер
Скумбрия
Горячие бутерброды
1
1
1
1
4 шт.
4
4
4
4
4
5
5
5
5
5
Макс.
Макс.
Макс.
Макс.
Макс.
15-20
15-20
7-10
15-20
2-3
Двойной гриль
На вертеле
Телятина на вертеле
Курица на вертеле
Баранина на вертеле
1.0
1.5
1.0
—
—
—
5
5
5
Макс.
Макс.
Макс.
80-90
70-80
70-80
Курица—гриль
Каракатицы
Курица на вертеле
картошка (на противене)
1.5
1.5
1.5
—
2
2
—
2
5
5
5
5
200
200
200
200
55-60
30-35
70-75
70-75
На вертеле
Телятина на вертеле
Курица на вертеле
Баранина на вертеле
1.5
1.5
1.5
—
—
—
5
5
5
200
200
200
70-80
70-80
70-80
Двойной
вентилированный
гриль
На вертеле с несколькими
шампурами (где имеется)
Шашлык
Овощной шашлык
1.0
0.8
—
—
5
5
200
200
40-45
25-30
20
RS
Э лектрическая в аро чная панель
! на стекляннои поверхности варочнои панели
могут быть видны сальные следы от клея,
нанесенного на прокладки. Перед началом
эксплуатации изделия следует удалить следы
клея при помощи специального неабразивного
моющего средства. В первые часы работы вы
можете почувствовать запах жженои резины,
которыи быстро пропадает.
Включение и выключение
нагревательных зон
Для включения нагревательнои зоны поверните по
часовои стрелке соответствующую рукоятку.
Для выключения поверните рукоятку против
часовои стрелки на «0».
Включение индикатора ЗОНЫ ВКЛЮЧЕНЫ
показывает, что какая—то из нагревательных зон на
варочнои панели включена.
Нагревательные зоны
На варочнои панели
находятся электрические
галогенные нагревательные
элементы. В рабочем
режиме она раскалаются до
красна:
A. Нагревательная зона с
галогенными элементами.
B. Индикатор нагрева: показывает, что
температура в соответствующеи нагревательнои
зоне превышает 60°C, также в случае, если
элемент выключен, но еще не остыл.
Нагревательные зоны с галогенными
элементами.
Передают тепло посредством излучения
внутреннеи галогеннои лампы. Такои принцип
нагревания по
своим характеристикам аналогичен
типичным газовым конфоркам: быстрая реакция на
управление и мгновенная визуализация
мощности.
! Не следует долго смотреть на включенные
галогенные элементы.
Поверните соответствующую рукоятку по часовои
стрелки из положения 1 в положение 12.
Практические рекомендации по
использованию варочнои панели
• Используите посуду с плоским толстым дном,
идеально прилегающим к зоне нагревания;
• Используите кастрюли с
дном такого диаметра,
чтобы полностью закрыть зону нагревания для
оптимального использования всего
выделяемого тепла;
• провер ьте, чтобы дно к астрюль было всегда
сухим и чистым: таким образом гарантируется
оптимальное прилегание к нагревательным
зонам, а также продлевает срок службы
варочнои панели и кастрюль;
• не следует использ овать на посуду,
использованную на газовых конфорках:
концентрация тепла на
газовых конфорках
может деформировать дно посуды и нарушить
прилегание к нагревательнои зоне;
• никогда не оставляите нагревательные зоны
включенными без посуды, так как это может
повредить их.
A
A
A
A
B
Поз. Электрическая канфорка
0
Выключено
1 Для топления сливочного масла, шок олада
2
3
Для разогревания жидкостей
4
5
Для кремов и соусов
6
7
Для приготовления при температур е кипения
8
9
Для жаркого
10
11
Для крупных вареных блюд
12 Для фритюра
/