Operation Manual
CONTENTS
• • • • • • • • • • • • • • • • • • • • • • • • • • • • • • • • • • • • • • • • • • • • • • •
• • • • • • • • • • • • • • • • • • • • • • • • • • • • • • • • • • • • • • • • • • • •
• • • • • • • • • • • • • • • • • • • • • • • • • • • • • • • • • • • • • • • • • • • • • • •
• • • • • • • • • • • • • • • • • • • • • • • • • • • • • • • • • • • • • • • • • • • • • • •
• • • • • • • • • • • • • • • • • • • • • • • • • • • • • • • • • • • • • • • • • • • • • • •
• • • • • • • • • • • • • • • • • • • • • • • • • • • • • • • • • • • • • • •
• • • • • • • • • • • • • • • • • • • • • • • • • • • • • • • • • • • • • • • • •
• • • • • • • • • • • • • • • • • • • • • • • • • • • • • • • • • • • • • • • • • •
• • • • • • • • • • • • • • • • • • • • • • • • • • • • • • • • • • • • • • • •
• • • • • • • • • • • • • • • • • • • • • • • • • • • • • • • • • • • • •
• • • • • • • • • • • • • • • • • • • • • • • • • • • • • • • • • • • • • • •
• • • • • • • • • • • • • • • • • • • • • • • • • • • • • • • • • • • • • • • • • • •
• • • • • • • • • • • • • • • • • • • • • • • • • • • • • • • • • • • • • • • • • • •
• • • • • • • • • • • • • • • • • • • • • • • • •
• • • • • • • • • • • • • • • • • • • • • • • • • • • • • • • • • • • •
• • • • • • • • • • • • • • • • • • • • • • • • • • • • • • • • • • • •
• • • • • • • • • • • • • • • • • • • • • • • • • • • •
• • • • • • • • • • • • • • • • • • • • • • • • • • • • •
• • • • • • • • • • • • • • • • • • •
• • • • • • • • • • • • • • • • • • • • • • • • • • • • • • • • • • •
• • • • • • • • • • • • • • • • • • • • •
• • • • • • • • • • • • • • • • • • • • • • • • • •
• • • • • • • • • • • • • • • • • • • • • • • • • • • • • • • • • •
• • • • • • • • • • • • • • • • • • • • • • • • • • • • • • • • •
• • • • • • • • • • • • • • • • • • • • • • •
• • • • • • • • • • • • • • • • • • • • • • • • • • • • • • • •
• • • • • • • • • • • • • • • • • • • • • • • • • • • • • • • •
• • • • • • • • • • • • • • • • • • • • • • • • • • • • • • •
• • • • • • • • • • • • • • • • • • • • •
• • • • • • • • • • • • • • • • •
• • • • • • • • • • • • • • • • • • • • • • • • • • • • • • • • • • •
• • • • • • • • • • • • • • • • • • • • • • • • • • • • • • •
• • • • • • • • • • • • • • • • • • • • • • • • •
• • • • • • • • • • • • • • • • • • • • • • • • • • • • • • • • •
• • • • • • • • • • • • • • • • • • • • • • • • • • • •
2
3
4
4
4
4
4
5
6
8
8
8
9
9
9
10
11
12
13
14
14
15
• • • • • • • • • •
15
15
16
17
17
17
18
19
20
20
21
22
23
23
18
Отдел
технической поддержки фирмы «GUITAR
COLLEGE»
предлагает полный
перевод на русский язык руководства по
эксплуатации популярного гитарного
процессора ZOOM
707II.
По всем вопросам об этом процессоре, о
других моделях ZOOM,
а также вообще о приборах обработки
пишите [mailto:]
gc@guitarcollege.ru
, [subject]
К.Кремнёву.
<Номера
страниц (СТР) = номера страниц мануала
на английском языке>
СТР
1
СОДЕРЖАНИЕ
МЕРЫ БЕЗОПАСНОСТИ
2
Вступление
3
Регуляторы
и функции 4
Верхняя
панель 4
Задняя
панель 4
Подготовка
к работе 6
Установка
батареек и карты SmartMedia 6
Коммутация
7
Беглое
освоение 8
Работа
с патчами 10
Панель
дисплея в режиме PLAY 10
Выбор
патча 10
Включение
тюнера 11
Функция
Easy Edit (лёгкое редактирование)
12
Работа
с сэмплером 13
Функция
ритм-машинки 16
Список
ритм-паттернов 17
Редактирование
параметров патча (режим EDIT)
18
Конфигурация
патча 18
Основные
этапы редактирования 18
Сохранение
и перемещение патчей 20
Другие
функции 21
Функция
Hold Delay (долгая задержка)
21
Изменение
режима вызова патчей 23
Назначение
параметров на педаль экспрессии 23
Регулировка
педали экспрессии 25
Сохранение
ритм-паттернов и сэмплов как часть
патча 26
Назначение
сэмпла на патч 27
Назначение
ритм-паттерна на патч 26
Использование
карты SmartMedia (режим Utility)
28
Основные
действия в режиме Utility
28
Функции
режима Utility
29
Инициализация/Возврат
заводских настроек 32
Типы и параметры эффектов 33
Модуль
BOOSTER (уровень чувствительности)
33
Модуль
ISOLATOR/COMP (компрессор) 33
Модуль
DRIVE (предусилитель и перегрузка) 33
Модуль
EQ (эквалайзер) 34
Модуль
ZNR/D GATE (шумоподавитель/гейт) 35
Модуль
CABINET (акустический кабинет) 35
Модуль
MODULATION (модуляционные эффекты) 35
Модуль
DLY/REV (дилэй/ревербератор) 37
Модуль
TOTAL (общие настройки) 38
Устранение
неполадков 39
Технические
характеристики 39
Список
патчей 40
СТР
2
Меры безопасности
В
настоящем «Руководстве» использованы
следующие символы, предупреждающие об
опасности:
[!Warning]=[!Опасно]
Знак особой опасности. Невнимание
к инструкциям Руководства, помеченным
этим символом, опасно для здоровья и
жизни.
[!Caution]=[!Осторожно]
Предупреждение об осторожном
обращении с прибором. Несоблюдение
пунктов Руководства, помеченных таким
знаком, может привести к увечьям, а
также к повреждению и выходу прибора
из строя.
Пожалуйста,
ознакомьтесь со следующими инструкциями
по технике безопасности в обращении с
707II.
Подключение
электропитания
[!Опасно]
Поскольку потребляемая мощность
устройства сравнительно высока, мы
рекомендуем использовать, где это
возможно, сетевой АС-адаптер. При питании
от батарей используйте только алкалайновые
батареи.
0[Питание от ас-адаптера]
Используйте
только сетевой адаптер переменного
тока (АС-адаптер), выдающий постоянный
ток напряжением 9 вольт (9 V
DC), силой тока 300 миллиампер (300 мА),
с «минусом» внутри выходного
разъёма (Zoom AD-0006).
Использование адаптера с иными
характеристиками приведёт к повреждению
прибора, а также подвергнет
Вас риску.
Перед
подключением адаптера к сети переменного
тока убедитесь, что напряжение
сети (~220 V АС) соответствует характеристикам
адаптера.
Выключая
адаптер из сети, никогда не тяните его
за шнур, а вынимайте сам адаптер.
Если
Вы не используете процессор, выключайте
адаптер из сети.
[Питание
от батареек]
Используйте
4 алкалайновых «пальчиковых»
батарейки (размер АА). Внимательно
посмотрите на маркировку батареек.
707II
не может быть использован для
подзарядки батарей.
Если
Вы не используете процессор в
течение долгого времени, вынимайте
батарейки.
Если
батарейки «потекли», аккуратно
насухо протрите батареечный отсек и
контакты мягкой тряпкой, после чего
тщательно вымойте руки с мылом. Попадание
электролита в глаза опасно!
При
эксплуатации прибора крышка батареечного
отсека должна быть закрыта.
Условия
хранения и эксплуатации
[!Осторожно]
Оберегайте устройство от высоких
температур, сырости и влажности, пыли,
песка, ударов и сильных вибраций. 707II
является сложным электронным
устройством, и требует аккуратного
обращения. Не прилагайте чрезмерных
усилий к регуляторам и кнопкам, не
давите сильно на педаль экспрессии и
ножные переключатели, не роняйте прибор.
Ни
при каких обстоятельствах не открывайте
корпус прибора, это может привести к
его поломке.
Перед
подсоединием кабелей к 707II
и другим устройствам (а также перед
отсоединением кабелей) выключите
питание 707II и других
устройств. Не забудьте отсоединить все
кабели и АС-адаптер от 707II
перед транспортировкой прибора.
Предостережения
по эксплуатации
Электрические
помехи
В
соответствии с требованиями техники
безопасности, в 707II предусмотрена
максимальная защита как от внутреннего,
так и от внешнего электромагнитного
излучения. Однако, поскольку не
существует возможности полностью
избавится от всех помех, не следует
располагать рядом с 707II
устройства, излучающие сильные
электромагнитные поля, а также устройства,
чуствительные к таким излучениям.
Электромагнитные поля
способны нарушить работу и привести к
утере информации любого цифрового
устройства, в том числе 707II.
Уход
за прибором
Для
очистки корпуса 707II используйте
мягкую сухую, или, при необходимости,
слегка увлажнённую ткань. Не используйте
наждачную бумагу, воск, растворитель
или чистящие препараты на спиртовой
основе.
Пожалуйста,
храните настоящее «Руководство»
в доступном месте.
СТР
3
Вступление
Благодарим
за приобретение процессора ZOOM 707II GUITAR
(в
дальнейшем – «707II»).
707II
является цифровым
мультиэффект-процессором
для гитары.
Прибор обладает многосторонними
возможностями:
74
различных эффекта. Огромный
выбор эффектов, среди которых:
разнообразные дисторшн, модуляционные
эффекты (такие, как хорус и флэнджер),
реверберационные эффекты и задержка,
бустер, кабинет-симулятор и другие.
Система Моделирования с Изменяемой
Архитектурой (VAMS, Variable Architecture Modeling
System) оптимизирует внутреннюю конфигурацию
прибора для достижения наилучшего
звучания.
120
патчей с великолепным звучанием.
Комбинации настроек
эффектовых модулей могут быть сохранены
в виде отдельных патчей. 707II содержит
60 пользовательских, редактируемых
патчей, плюс 60 заводских, неизменяемых,
благодаря которым Вы сможете использовать
прибор сразу после первого включения!
33
типа дисторшн и перегрузок различных
типов. Полный комплект эффектов
дисторшн воссоздаёт звучание не только
знаменитых гитарных усилителей, но и
современных педалей дисторшн. Специальные
регуляторы и кнопки обеспечивают
быстрое и удобное управление эффектами.
11
часов работы от батареек. 707II
питается как от АС-адаптера, так и
от батареек. Одного комплекта из четырёх
алкалайновых «пальчиковых» батареек
хватает на 11 часов работы.
Педаль
экспресии. Прибор разработан для
«живой» работы на сцене. Названия
патчей высвечиваются на большом дисплее,
а педаль экспрессии позволяет регулировать
заданные на неё параметры эффекта прямо
во время игры!
3
ручки «быстрой» регулировки
параметров. Вы можете «на ходу»
отрегулировать основные параметры
эффектов с помощью регуляторов, как на
обычных педалях. Все изменения могут
быть сохранены в патче.
Встроенный
сэмплер. Вы можете засэмплировать
гитарную фразу или сигнал с CD-плеера,
который тоже можно подключить к
дополнительному стерео-входу. Записанный
сэмпл (до 6 секунд) хранится в памяти
устройства и может быть проигран в
замедленном темпе без изменения высоты
тона, а также в обратном направлении.
SmartMedia-дисковод.
Патчи и сэмплы можно
сохранять на картах SmartMedia. Хранящаяся
на них информация может быть в любой
момент загружена обратно в 707II. Это
позволит Вам легко составлять и хранить
целые библиотеки сэмплов и патчей. На
карту SmartMedia объёмом 16 МB
поместится до 300 патчей или до 60
сэмплов общим звучанием до 4 минут.
60
ритм-паттернов во встроенной ритм-машинке.
Барабанные ритм-паттерны в различных
стилях прекрасно подходят и для занятий,
и для джемов с друзьями.
Возможность
назначения сэмплов и ритм-паттернов
на патч. В патч заносится не только
конфигурация эффектов и их параметры,
но и выбранный ритм-паттерн или особая
настройка педали экспрессии. Сэмплы
также можно назначать на патчи, а также
управлять их воспроизведением с помощью
педали экспрессии.
Чтобы
извлечь максимум пользы из этого
сложного прибора, пожалуйста, внимательно
ознакомьтесь с «Руководством
пользователя». Рекомендуем сохранить
«Руководство» на будущее.
СТР
4
Соседние файлы в предмете [НЕСОРТИРОВАННОЕ]
- #
- #
- #
- #
- #
- #
- #
- #
- #
- #
- #
Immediately after being turned on, the GFX-707 is in the so-called «play mode». The Quick Guide explains the basic
steps in play mode. This will let you use the unit right away.
1
Selecting the effect sound (patch)
To select a patch in play mode, press one of the
/
foot switches.
The name of the currently selected patch appears on the
display. The bank and patch number can be checked
using the BANK/PATCH indicator.
PATCH NAME
Patch name
To directly switch the bank, use the TYPE(BANK)
/
keys.
• For a detailed explanation of patch switching,
• To fix the bank,
• To reserve a patch,
[ Patches, groups and banks ]
A collection of effect modules, each with
distinct parameter settings, is called a patch.
The GFX-707 has memory capacity for 60
patches which are immediately available for
use. These are divided into two groups of 30
patches each. The PRESET group comprises
read-only patches that cannot be changed by
the user. The USER group contains read-and-
write patches that can be freely overwritten by
the user.
Each patch is given a patch name of up to 6
characters, and patches are organized in
banks (A — F, 0 — 5) and patch numbers (1 — 5).
BANK F
PATCH 1
BANK A
BANK A
PATCH 2
BANK A
PATCH 1
BANK b
PATCH 1
PATCH 3
PATCH 1
PATCH 2
PATCH 1
PATCH 2
PATCH 4
PATCH 2
PATCH 3
PATCH 2
BANK A
PATCH 3
PATCH 5
PATCH 3
PATCH 4
PATCH 3
PATCH 4
PATCH 1
PATCH 4
PATCH 5
PATCH 4
PATCH 5
PATCH 2
PATCH 5
PATCH 5
PATCH 3
PATCH 4
PATCH 5
USER group
6
BANK
PATCH
BOTH
EDITED
( VALUE )
Bank
Patch number
p. 14
p. 14
BANK 5
PATCH 1
BANK A
BANK A
PATCH 2
BANK A
PATCH 1
BANK 1
PATCH 1
PATCH 3
PATCH 1
PATCH 2
PATCH 1
PATCH 2
PATCH 4
PATCH 2
PATCH 3
PATCH 2
BANK 0
PATCH 3
PATCH 5
PATCH 3
PATCH 4
PATCH 3
PATCH 4
PATCH 1
PATCH 4
PATCH 5
PATCH 4
PATCH 5
PATCH 2
PATCH 5
PATCH 5
PATCH 3
PATCH 4
PATCH 5
PRESET group
OUTPUT
PATCH NAME
COMP
DIST
•
MODULE
( ON/OFF )
p. 9
2
Altering an effect with the pedal
To alter an effect in real time, move the
expression pedal while playing your
instrument with the GFX-707 in play mode.
The aspect of the patch that is changed by the
expression pedal can be programmed for each
patch. To get a feel for this, select various patches
and try out the pedal to see what it does.
Push the expression pedal fully down
The expression pedal also incorporates a push-
down switch that allows on/off control of a preset
effect. The effect that is switched by the push-down
switch can be programmed for each patch.
• To set the effect to be altered by the expression
pedal,
p. 22
• To readjust the expression pedal,
AMP SIM
COMP
DIST/PARM1
MOD/PARM2
•
OFF
ZNR/EQ
MOD
REV
TOTAL
PEDAL
EDIT
STORE
TYPE
(BANK)
(CANCEL)
( GROUP )
p. 23
ZOOM GFX-707
REV
BANK
PA
BOTH
EDI
( VALUE )
RHYTHM
S
/
![]()
Operation Manual
CONTENTS
|
USAGE AND SAFETY PRECAUTIONS • • • • • • • • • • • • • • • • • • • • • • • • • |
2 |
||||
|
Introduction • • • • • • • • • • • • • • • • • • • • • • • • • • • • • • • • • • • • • • • • • • • • • • • |
3 |
||||
|
Naming of Parts • • • • • • • • • • • • • • • • • • • • • • • • • • • • • • • • • • • • • • • • • • • • |
4 |
||||
|
Front Panel • • • • • • • • • • • • • • • • • • • • • • • • • • • • • • • • • • • • • • • • • • • • • • • |
4 |
||||
|
Rear Panel • • • • • • • • • • • • • • • • • • • • • • • • • • • • • • • • • • • • • • • • • • • • • • • |
4 |
||||
|
Preparations • • • • • • • • • • • • • • • • • • • • • • • • • • • • • • • • • • • • • • • • • • • • • • • |
4 |
||||
|
Inserting the Batteries • • • • • • • • • • • • • • • • • • • • • • • • • • • • • • • • • • • • • • • |
4 |
||||
|
Getting Connected • • • • • • • • • • • • • • • • • • • • • • • • • • • • • • • • • • • • • • • • • |
5 |
||||
|
Quick Guide (Let’s Play) |
• • • • • • • • • • • • • • • • • • • • • • • • • • • • • • • • • • • • |
6 |
|||
|
Amp Simulator Settings |
• • • • • • • • • • • • • • • • • • • • • • • • • • • • • • • • • • • • |
8 |
|||
|
Setting Up the Playback Equipment |
• • • • • • • • • • • • • • • • • • • • • • • • • • • • |
8 |
|||
|
Selecting the Amp Simulator Type • • • • • • • • • • • • • • • • • • • • • • • • • • • • • |
8 |
||||
|
Listening to Patches (Play Mode Operation) • • • • • • • • • • • • • • • • • • • |
9 |
||||
|
Panel Display in Play Mode • • • • • • • • • • • • • • • • • • • • • • • • • • • • • • • • • • • |
9 |
||||
|
Selecting a Patch • • • • • • • • • • • • • • • • • • • • • • • • • • • • • • • • • • • • • • • • • • |
9 |
||||
|
Using the Bypass (Mute) and Tuner Function • • • • • • • • • • • • • • • • • • • • • |
10 |
||||
|
Playing With Rhythm Accompaniment • • • • • • • • • • • • • • • • • • • • • • • • • • |
11 |
||||
|
Using the Sampler Function • • • • • • • • • • • • • • • • • • • • • • • • • • • • • • • • • • |
12 |
||||
|
Using the Easy Edit Function • • • • • • • • • • • • • • • • • • • • • • • • • • • • • • • • • |
13 |
||||
|
Reserving the Next Patch (DIRECT LOAD) • • • • • • • • • • • • • • • • • • • • • • • |
14 |
||||
|
Fixing the Bank (BANK HOLD) • • • • • • • • • • • • • • • • • • • • • • • • • • • • • • • • |
14 |
||||
|
Altering the Sound of a Patch (Edit Mode Operation) • • • • • • • • • • |
15 |
||||
|
Patch Configuration • • • • • • • • • • • • • • • • • • • • • • • • • • • • • • • • • • • • • • • • |
15 |
||||
|
Basic Edit Mode Steps • • • • • • • • • • • • • • • • • • • • • • • • • • • • • • • • • • • • • |
15 |
||||
|
Storing and Copying Patches • • • • • • • • • • • • • • • • • • • • • • • • • • • • • • • • |
16 |
||||
|
Effect Types and Parameters • • • • • • • • • • • • • • • • • • • • • • • • • • • • • • • |
17 |
||||
|
COMP•DIST (compressor/distortion) module • • • • • • • • • • • • • • • • • • • • • |
17 |
||||
|
ZNR/EQ (Zoom Noise Reduction/Equalizer) module• • • • • • • • • • • • • • • • • |
17 |
||||
|
MOD (modulation) module • • • • • • • • • • • • • • • • • • • • • • • • • • • • • • • • • • • |
18 |
||||
|
REV (Reverb) module • • • • • • • • • • • • • • • • • • • • • • • • • • • • • • • • • • • • • • • |
19 |
||||
|
TOTAL module • • • • • • • • • • • • • • • • • • • • • • • • • • • • • • • • • • • • • • • • • • • |
20 |
||||
|
PEDAL module • • • • • • • • • • • • • • • • • • • • • • • • • • • • • • • • • • • • • • • • • • • |
20 |
||||
|
Using the Jam Play Function • • • • • • • • • • • • • • • • • • • • • • • • • • • • • • • |
21 |
||||
|
Controlling an Effect With the Pedal • • • • • • • • • • • • • • • • • • • • • • • • • |
22 |
||||
|
All Initialize/Factory Recall • • • • • • • • • • • • • • • • • • • • • • • • • • • • • • • • • |
23 |
||||
|
Adjusting the Expression Pedal |
• • • • • • • • • • • • • • • • • • • • • • • • • • • • |
23 |
|||
|
Troubleshooting |
|||||
|
GFX-707 Specifications |
|||||

PRECAUTIONS SAFETY AND USAGE
USAGE AND SAFETY PRECAUTIONS
USAGE AND SAFETY PRECAUTIONS
In this manual, symbols are used to highlight warnings and cautions for you to read so that accidents can be prevented. The meanings of these symbols are as follows:
This symbol indicates explanations about extremely dangerous matters. If users ignore this symbol and handle the
Warning device the wrong way, serious injury or death could result.
This symbol indicates explanations about dangerous matters. If users ignore this symbol and handle the
Caution device the wrong way, bodily injury and damage to the equipment could result.
Please observe the following safety tips and precautions to ensure hazard-free use of the GFX-707.
•Excessive dust or sand
•Excessive vibration or shock
•Handling
Since the GFX-707 is a precision electronic device, avoid applying excessive force to the switches and buttons. Also
Caution
take care not to drop the unit, and do not subject it to shock or excessive pressure.
• Alterations
Never open the case of the GFX-707 or attempt to modify the product in any way since this can result in damage to the
Caution
unit.
• Connecting cables and input and output jacks
You should always turn off the power to the GFX-707 and all other equipment before connecting or disconnecting any
|
Caution |
cables. Also make sure to disconnect all cables and the AC |
|
adapter before moving the GFX-707. |
• Power requirements
Since power consumption of this unit is fairly high, we
recommend the use of an AC adapter whenever possible.
Warning
When powering the unit from a battery, use only an alkaline type.
[AC adapter operation]
•Be sure to use only an AC adapter which supplies 9 V DC, 300 mA and is equipped with a «center minus» plug (Zoom AD-0006). The use of an adapter other than the specified type may damage the unit and pose a safety hazard.
•Connect the AC adapter only to an AC outlet that supplies the rated voltage required by the adapter.
•When disconnecting the AC adapter from the AC outlet, always grasp the adapter itself and do not pull at the cable.
•When not using the unit for an extended period, disconnect the AC adapter from the AC outlet.
[Battery operation]
•Use four conventional IEC R6 (size AA) batteries (alkaline).
•The GFX-707 cannot be used for recharging.
Pay close attention to the labelling of the battery to make sure you choose the correct type.
•When not using the unit for an extended period, remove the batteries from the unit.
•If battery leakage has occurred, wipe the battery compartment and the battery terminals carefully to remove all remnants of battery fluid.
•While using the unit, the battery compartment cover should be closed.
•Environment
Avoid using your GFX-707 in environments where it will be
exposed to:
Caution
•Extreme temperature
•High humidity or moisture
Usage Precautions
• Electrical interference
For safety considerations, the GFX-707 has been designed to provide maximum protection against the emission of electromagnetic radiation from inside the device, and protection from external interference. However, equipment that is very susceptible to interference or that emits powerful electromagnetic waves should not be placed near the GFX-707, as the possibility of interference cannot be ruled out entirely.
With any type of digital control device, the GFX-707 included, electromagnetic interference can cause malfunctioning and can corrupt or destroy data. Care should be taken to minimize the risk of damage.
• Cleaning
Use a soft, dry cloth to clean the GFX-707. If necessary, slightly moisten the cloth. Do not use abrasive cleanser, wax, or solvents (such as paint thinner or cleaning alcohol), since these may dull the finish or damage the surface.
Please keep this manual in a convenient place for future reference.

Introduction
Thank you for selecting the ZOOM GFX-707 (hereafter simply called the «GFX-707«). The
GFX-707 is a sophisticated multi-effect device with the following features and functions:
|
• Large variety of built-in effects |
Introduction |
|
|
Four separate effect modules (single/combined effects) can be used at the same time, together with |
||
|
ZNR (Zoom Noise Reduction) and the built-in amp simulator. Effects include analog distortion, |
||
|
various modulation effects such as chorus and flanger, and reverberation effects such as reverb and |
||
|
delay. In total, you have a choice of 48 types of effects. |
||
|
• 60 immediately usable patches |
||
|
A combination of effect modules and parameter settings stored in memory is called a «patch». The |
||
|
GFX-707 has room for 30 patches that are read-only and 30 that can be freely modified by the user. |
||
|
So you have a total of 60 patches readily available. Patches are organized in banks (A — F, 0 — 5), |
||
|
each with five patches. It is even possible to assign a distinctive name of up to 6 characters to each |
||
|
patch. |
||
|
• Designed for use on stage |
||
|
The GFX-707 will operate continuously for up to 14 hours on one set of alkaline batteries. The large |
||
|
display showing patch names is easy to read at a distance, and the built-in expression pedal is great |
||
|
for enhancing any performance. For extended use, the unit can also be powered by an AC adapter. |
||
|
• Rotary knobs allow speedy parameter editing |
||
|
When editing a patch, the three knobs on the top panel let you change parameters with a quick and |
||
|
direct feel. Even during a performance, fine-tuning an effect is no problem at all. The edited patch |
||
|
can be stored for later use. |
||
|
• A first in this class: built-in rhythm section |
||
|
A high quality PCM sound source creates realistic rhythm patterns that are handy for practicing or |
||
|
for small jam sessions. You can choose from as many as 45 rhythm patterns. |
||
|
• |
6-second sampler |
|
|
Another advantage is the integrated sampler with a recording duration of up to six seconds. It even |
||
|
allows half-speed playback without altering the pitch. This feature comes in handy when copying |
||
|
phrases. |
||
|
• |
Jam Play |
|
|
With a simple foot switch operation, you can record and play a phrase of up to 2 seconds during a |
||
|
gig. This is great for creating scratch effects such as used by DJs, doing reverse playback or |
||
|
producing other special effects. |
||
|
• |
Integrated amp simulator |
|
|
Simulates the cabinet sound of a guitar amplifier for a dynamic sound also when sending the line |
||
|
output to a mixer or recorder. |
Please take the time to read this manual carefully, in order to get the most out of your GFX-
707 and to ensure optimum performance and reliability.

|
Naming of Parts |
|||||||||||||||||
|
Front Panel |
|||||||||||||||||
|
OUTPUT knob |
|||||||||||||||||
|
AMP SIM (simulator) knob |
|||||||||||||||||
|
PARM (Parameter) knob 1 — 3 |
|||||||||||||||||
|
Naming |
Display |
BANK/PATCH indicator |
|||||||||||||||
|
of |
|||||||||||||||||
|
Parts |
Module LEDs |
Pedal status LED |
|||||||||||||||
|
/Preparations |
COMP-DIST |
ZNR/EQ |
MOD |
REV |
TOTAL |
PEDAL |
COMP-DIST ZNR/EQ |
MOD |
REV |
TOTAL |
PEDAL |
||||||
|
OUTPUT |
OFF |
AMP SIM |
COMP•DIST/PARM1 |
MOD/PARM2 |
REV/PARM3 |
PATCH NAME |
BANK |
PATCH |
|||||||||
|
PATCH NAME |
BANK |
PATCH |
|||||||||||||||
|
BOTH |
EDITED |
||||||||||||||||
|
BOTH |
EDITED |
(VALUE) |
|||||||||||||||
|
(VALUE) |
|||||||||||||||||
|
MODULE |
TYPE (BANK) |
EDIT |
STORE RHYTHM |
SAMPLER |
MODULE |
TYPE (BANK) |
EDIT |
STORE |
RHYTHM |
SAMPLER |
|||||||
|
(CANCEL) |
(CANCEL) |
||||||||||||||||
|
(ON/OFF) |
(GROUP) |
/ |
(ON/OFF) |
(GROUP) |
/ |
||||||||||||
|
SAMPLER key |
|||||||||||||||||
|
RHYTHM key |
|||||||||||||||||
|
STORE key |
|||||||||||||||||
|
EDIT (CANCEL) key |
|||||||||||||||||
|
TYPE(BANK) |
/ |
keys |
|||||||||||||||
|
MODULE |
/ |
keys |
|
/ foot switches |
Expression pedal |
Rear Panel
Inserting the Batteries
The GFX-707 can be powered either by alkaline batteries or by an AC adapter. To use the unit
on batteries, insert them as follows.
|
1 |
Turn the unit over and open the battery |
3 Close the battery compartment cover. |
|||
|
compartment cover. |
If the indication «BATT» appears on the display |
||||
|
2 |
Insert four new IEC R6 (size AA) alkaline |
during battery-powered operation, the batteries |
|||
|
batteries into the battery compartment. |
are exhausted. Replace all four batteries with |
||||
|
fresh ones. |
|||||
|
Battery |
Four IEC R6 (size AA) batteries |
||||
|
PATCH NAME |
|||||
|
compartment |
|||||
cover
GFX-707 rear
OPEN
|
Adjacent batteries |
• |
If the unit is not to be powered from batteries |
|
|
NOTE |
for an extended period, remove the batteries |
||
|
are inserted with |
|||
|
opposite polarity. |
from the battery compartment. Otherwise |
||
|
Battery |
battery fluid may leak and cause damage to |
||
|
compartment |
the unit. |
||
|
cover |
|||
|
Tab |
• |
An AC adapter is not supplied with the unit. |
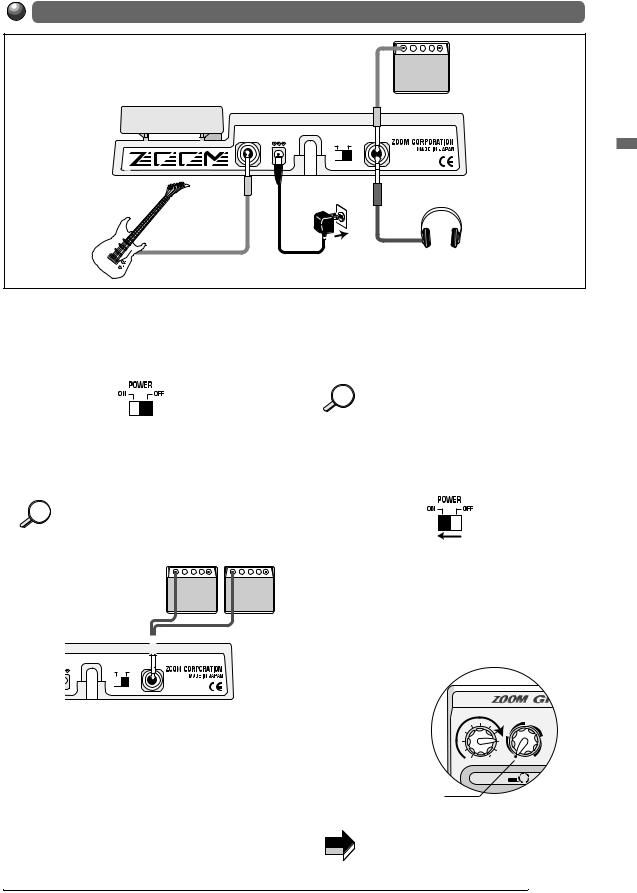
Getting Connected
Monaural cable
Guitar amplifier
|
INPUT |
DC9V |
OUTPUT |
|
|
(AUX IN) |
300mA |
POWER |
(PHONES) |
|
ON |
OFF |
Preparations
Monaural cable
Headphones
AC adapter
Guitar
1Use a monaural cable to connect the guitar to the INPUT jack of the GFX-707.
At this time, the amplifier power switch and the power switch of the GFX-707 should be OFF.
2Use a monaural cable to connect the OUTPUT jack of the GFX-707 to the input of the amplifier.
By using two amplifiers, you can get great HINT stereo sound from stereo effects. Use a stereo
Y cable to connect the OUTPUT jack to the two amplifiers.
Two guitar amplifiers

 Stereo Y cable
|
9V |
OUTPUT |
|
|
mA |
POWER |
(PHONES) |
|
ON |
OFF |
3To monitor the sound with headphones, connect the headphones to the OUTPUT jack.
5When using an AC adapter, plug the output cable from the adapter into the DC 9V jack on the GFX-707 and plug the adapter into an AC outlet.
To guard against inadvertently disconnecting HINT the AC adapter cable, wind the cable once
around the hook on the rear panel of the GFX707.
6Turn on power in the order GFX-707 → amplifier (playback equipment).
7Adjust the volume of the amplifier and the GFX-707 to a suitable position while playing the instrument.
The OUTPUT knob of the GFX-707 should be set to about the 3 o’clock position, and the AMP SIM knob should be set to the OFF position.
4Verify that the amplifier is turned off and that the volume control is turned to minimum. Also verify that the power switch of the GFX-707 is set to OFF.
OFF
When the GFX-707 is in the bypass state (all NOTE effects are temporarily turned off; see page 10), the output level will be the same as the input level if the OUTPUT knob is turned fully
clockwise.

Play) (Let’s Guide Quick
Quick Guide (Let’s Play)
Immediately after being turned on, the GFX-707 is in the so-called «play mode». The Quick Guide explains the basic
steps in play mode. This will let you use the unit right away.
1 Selecting the effect sound (patch)
To select a patch in play mode, press one of the /▼ foot switches.
The name of the currently selected patch appears on the display. The bank and patch number can be checked using the BANK/PATCH indicator.
|
PATCH NAME |
BANK |
PATCH |
|
BOTH |
EDITED |
|
|
(VALUE) |
||
|
Patch name |
Bank |
Patch number
directly switch the bank, use the TYPE(BANK) /▲ keys.
|
• For a detailed explanation of patch switching, |
9 |
|
|
• To fix the bank, |
14 |
|
|
• To reserve a patch, |
14 |
BANK P
|
BOTH |
ED |
||
|
TOTAL |
PEDAL |
(VALUE) |
|
|
EDIT |
STORE |
RHYTHM |
S |
|
(CANCEL) |
|||
|
/ |
[ Patches, groups and banks ]
A collection of effect modules, each with distinct parameter settings, is called a patch. The GFX-707 has memory capacity for 60 patches which are immediately available for use. These are divided into two groups of 30 patches each. The PRESET group comprises read-only patches that cannot be changed by the user. The USER group contains read-and- write patches that can be freely overwritten by the user.
Each patch is given a patch name of up to 6 characters, and patches are organized in banks (A — F, 0 — 5) and patch numbers (1 — 5).
|
BANK F |
||
|
BANK b |
||
|
PATCH 1 |
||
|
BANK A |
PATCH 2 |
|
|
PATCH 3 |
||
|
PATCH 1 |
||
|
PATCH 4 |
||
|
PATCH 2 |
||
|
PATCH 5 |
||
|
PATCH 3 |
||
|
PATCH 4 |
||
|
PATCH 5 |
USER group
|
BANK 5 |
||
|
BANK 1 |
||
|
PATCH 1 |
||
|
BANK 0 |
PATCH 2 |
|
|
PATCH 3 |
||
|
PATCH 1 |
||
|
PATCH 2 |
PATCH 4 |
|
|
PATCH 5 |
||
|
PATCH 3 |
||
|
PATCH 4 |
||
|
PATCH 5 |
PRESET group
2 Altering an effect with the pedal
alter an effect in real time, move the expression pedal while playing your instrument with the GFX-707 in play mode.
The aspect of the patch that is changed by the expression pedal can be programmed for each patch. To get a feel for this, select various patches and try out the pedal to see what it does.
Push the expression pedal fully down
The expression pedal also incorporates a pushdown switch that allows on/off control of a preset effect. The effect that is switched by the push-down switch can be programmed for each patch.
•To set the effect to be altered by the expression pedal, . 22
|
• To readjust the expression pedal, |
. 23 |
|
3 Adjusting an effect (Easy Edit function) |
|
|
The GFX-707 incorporates a function called «Easy Edit» that |
|
|
allows adjusting effect parameters during play. This is done |
|
|
with three knobs on the front panel. You can vary the patch |
|
|
sound with the ease of a compact effect device. |
|
|
In play mode, select the patch whose sound you want |
|
|
to alter, and operate the parameter knob 1 — 3. |
|
|
The types of parameters assigned to the knobs are as follows. |
|
|
Depth of distortion and compressor effects |
|
|
Depth of chorus and flanger intensity |
|
|
V/PARM3 |
For some effects, echo amount |
|
ATCH |
Reverb and echo amount |
|
PARM1 knob |
PARM2 knob PARM3 knob |
|
[COMP•DIST] |
[MOD] |
[REV] |
|
ITED |
|
SAMPLER |
NOTE The actual parameter that is adjusted depends on the |
|
|
patch. |
||
•For a detailed explanation of Easy Edit,  p. 13
p. 13
•For full-fledged editing,  p. 15
p. 15
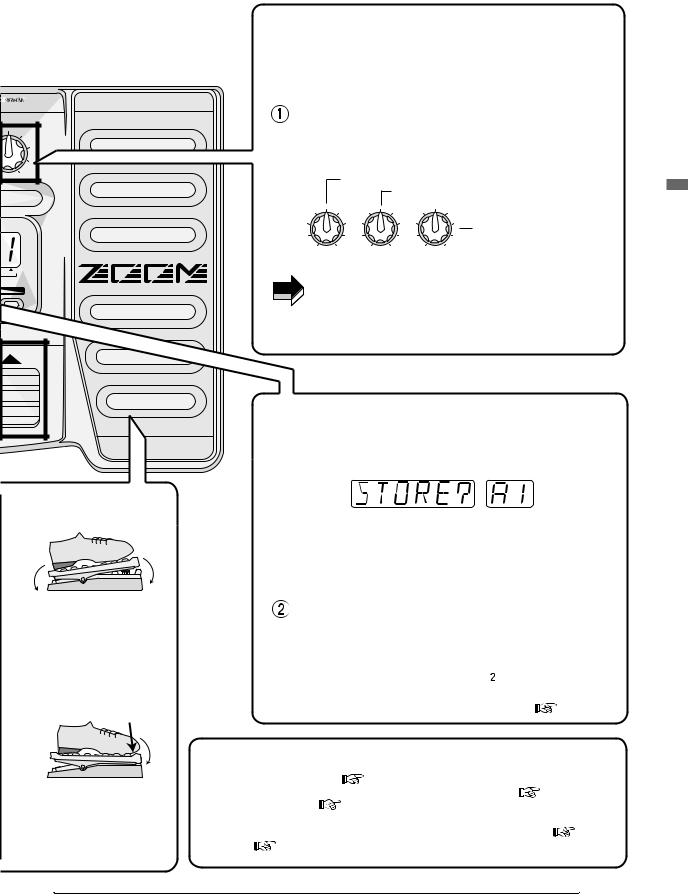
4 Storing the adjusted effect sound (patch)
 Press the STORE key.
The GFX-707 goes into store standby mode.
If the store location is not specified, the original bank/patch number is selected. If a patch from the PRESET group was edited, the store location «A1» will be selected. If required, use the TYPE(BANK) ▼/▲ keys and the ▼/▲ foot switches to specify the patch.
Confirm the store action by pressing the STORE key
|
Move back and forth |
once more. |
|
|
The patch is stored and the unit automatically reverts to play |
||
|
mode. To cancel the store action, press the EDIT (CANCEL) |
||
|
key instead of the STORE key in step . |
||
|
• For a detailed explanation of storing a patch, |
p. 16 |
5 Using other handy functions
|
• Using the Amp Simulator, |
p. 8 |
• Practicing while listening to a CD |
|||
|
Push down all the way |
p. 10 |
or other source, |
p. 12 |
||
|
• Using the auto tuner, |
|||||
|
• Using hold delay, reverse playback, |
|||||
|
• Practicing with the built-in rhythm |
and scratch playback , |
p. 21 |
|||
|
pattern, |
p. 11 |
Play) (Let’s Guide Quick
Settings Simulator Amp
Amp Simulator Settings
The GFX-707 incorporates an amp simulator that recreates the sound of a guitar amplifier or speaker enclosure. This
section explains how to set up the amp simulator.
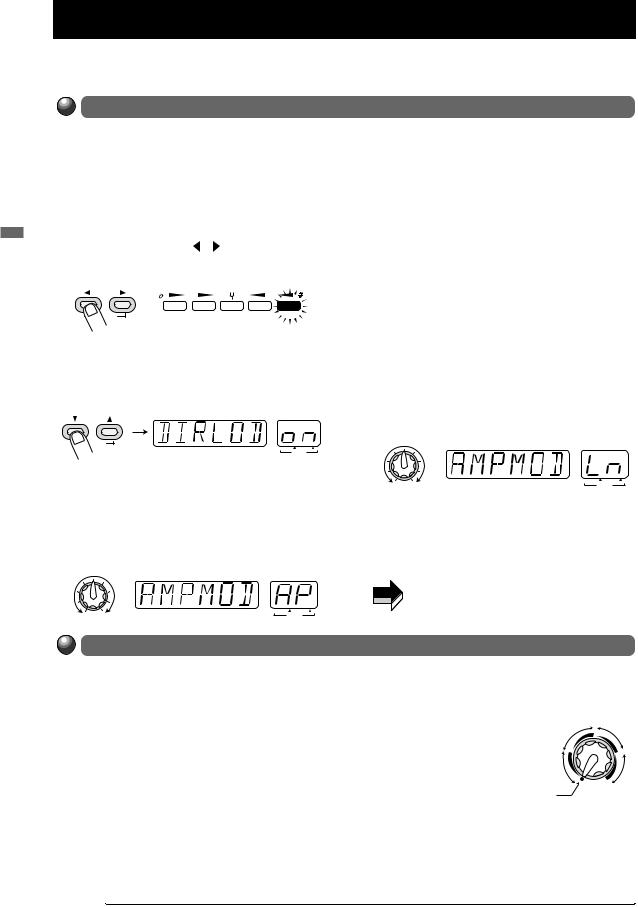
Setting Up the Playback Equipment
To get the best out of the amp simulator, the playback equipment must be set up correctly. Proceed as described below. After power-up, the GFX-707 is always set up for use with a guitar amplifier. When a guitar amplifier is used exclusively, the following steps are not necessary.
1 In
2
3
4
As
Selecting the Amp Simulator Type
Use the AMP SIM knob to select one of the following amp simulator types. When the knob is operated, the name of the currently selected type is shown on the display, and the indication A or b appears on the BANK/PATCH indicator.
|
• OFF |
• STACK A, b |
BRIGHT |
STACK |
|
|
Amp simulator is turned off. |
This is a stack type |
|||
|
• COMBO A, b |
amplifier simulation. The |
COMBO |
FL STK |
|
|
This is a combo type amplifier simulation. The |
«b» position will result in |
|||
|
a stronger cabinet sound. OFF |
||||
|
«b» position will result in a stronger cabinet |
AMP SIM |
|||
|
sound. |
• FL STK A, b |
|||
|
• BRIGHT A, b |
This is a triple-decker stack type amplifier |
|||
|
This is a combo type amplifier simulation with |
simulation. The «b» position will result in a |
|||
|
a bright sound character. The «b» position will |
stronger cabinet sound. |
|
result in a stronger cabinet sound. |
 Loading…
|
Detail Specifications: 145/145498-gfx707_operation_manual.pdf file (14 Dec 2022) |
Accompanying Data:
Zoom GFX-707 Musical Instrument Amplifier PDF Operation Manual (Updated: Wednesday 14th of December 2022 12:39:11 PM)
Rating: 4.3 (rated by 72 users)
Compatible devices: GFX-4, RFX-2000, G7.1ut, GFX-8, MultiStomp MS-50G, FIRE-36, FIRE-30, GFX-1.
Recommended Documentation:
Text Version of Operation Manual
(Ocr-Read Summary of Contents, UPD: 14 December 2022)
-
4, ZOOM GFX-707 Naming of Parts Front Panel 4 Naming of Parts /Preparations STORE EDIT (CANCEL) MODULE ( ON/OFF ) TYPE (BANK) COMP-DIST ZNR/EQ MOD REV TOTAL RHYTHM SAMPLER ( GROUP ) OUTPUT AMP SIM COMP•DIST/PARM1 MOD/PARM2 REV/PARM3 PEDAL OFF / PATCH NAME BANK PATCH ( VALUE ) BOTH EDITED STORE EDIT (CANCEL) MODULE ( ON/OFF ) TYPE (BANK) COMP-DIST ZNR/EQ MOD REV TOTAL RHYTHM SAM…
-
15, Zoom GFX-707 ZOOM GFX-707 1 In play mode, select the patch you want to edit. Patches for editing can be selected from either the USER group or the PRESET group. However, the PRESET group does not allow storing. When you have altered a patch from the PRESET group and want to store it, you must select a location in the USER group. 2 Press the EDIT (CANCEL) key. The GFX-707 switches to …
-
22, Zoom GFX-707 ZOOM GFX-707 In play mode, when a patch where JAM Play can be used is selected, the REV and PEDAL module LEDs are flashing. 7 Push down the expression pedal fully. The GFX-707 enters the Jam Play mode and goes into the recording standby condition. The indication «JP» is shown on the BANK/PATCH indicator. 8 While playing your instrument, press the …
-
17, This module contains a 4-band equalizer for making tone adjustments. The equalizer has only one effect type, but because there are many parameters, it is divided into two pages titled EQ P1 and EQ P2. (Use the MODULE / keys to switch between pages.) This module also comprises the ZNR settings. The original noise reduction developed by Zoom cuts noise during performance pau…
-
9, The condition where you call up patches stored in the memory of the GFX-707 and use them for playing your instrument is called «play mode». This is the condition the unit is in when you turn the power on. The various operations possible in play mode are described in this section. In play mode, the panel shows the following information. 1 To switch patches in play…
-
13, Zoom GFX-707 Normally, for editing a patch of the GFX-707, you set the unit to edit mode, call up the target parameter, and change the setting. However, it is possible to use the parameter knobs 1 — 3 in play mode to change certain effect parameters. This is called «Easy Edit». 1 To change the sound of a patch in play mode, turn parameter knobs 1 — 3. The parameters controlled by the…
-
5, Zoom GFX-707 ZOOM GFX-707 5 Preparations 1 Use a monaural cable to connect the guitar to the INPUT jack of the GFX-707. At this time, the amplifier power switch and the power switch of the GFX-707 should be OFF. 2 Use a monaural cable to connect the OUTPUT jack of the GFX-707 to the input of the amplifier. By using two amplifiers, you can get great stereo sound from stereo effects. Use…
-
11, The GFX-707 incorporates various realistic rhythms using a PCM sound source. There are 45 different rhythm patterns from which you can choose. This is great not only for parts practice but also for simple play sessions. 1 To activate a rhythm pattern, press the RHYTHM key in play mode, bypass/mute mode, or edit mode. Rhythm playback starts. In play mode, the…
-
6, ZOOM GFX-707 6 Quick Guide (Let’s Play) STORE EDIT (CANCEL) MODULE ( ON/OFF ) TYPE (BANK) COMP • DIST ZNR/EQ MOD REV TOTAL RHYTHM S ( GROUP ) OUTPUT AMP SIM COMP • DIST/PARM1 MOD/PARM2 REV PEDAL OFF / PATCH NAME BANK PA ( VALUE ) BOTH EDI To select a patch in play mode, press one of the ▲/▼ foot switches. The name of the currently selected patch a…
-
1, Operation Manual USAGE AND SAFETY PRECAUTIONS ••••••••••••••••••••••••• 2 Introduction ••••••••••••••••••••••••••••••••••••••••••••••• 3 Naming of Parts ••••••••••••••••••••••…
-
10, The GFX-707 incorporates an auto-chromatic tuner for guitars. To use the tuner function, the built-in effects must be bypassed (temporarily turned off) or muted (original sound and effect sound turned off). 1 To set the GFX-707 to the bypass (mute) mode, press and immediately release both ▼/▲ foot switches in play mode. The indication «BYPASS» w…
-
19, ZOOM GFX-707 Regardless of the MODE parameter setting of the PEDAL module ( p. 20), this effect type causes the same operation as «UP». This effect produces a metallic sound. Selects connection order of COMP•DIST module and MOD module. Sets frequency for ring modulation effect. The tone changes considerably depending on the frequency setting. Adjusts balance between ef…
Recommended Instructions:
HDDVR0404-SDI, GH68-23902A, 501440 Rev. G, NBG-419N


-
Wounded PawBASS701 AmplifierOwner’s GuideThe BASS701 is a compact but powerful bass amp with a TON of overdrive on tap and massiveflexibility to shape your tone. The pre-amp features a 6 band overdrive section that allows you to carefully tailor the gain. The power amp has 700 watts of power to deliver that tone.Features• 6 Band Overdrive: In the overdrive section the instrument si …
BASS701 4
-
www.ampeg.com©2005 SLM Electronics, 1400 Ferguson Avenue, St. Louis, MO 63133 U.S.A.TECHNICAL SPECIFICATIONS:OUTPUT POWER RATING 100 Watts at 4 ohms MAX INPUT LEVELS 0dB Input: 1.75V RMS-15dB Input: 9.75V RMSCD Input: 5V RMSLINE OUT LEVEL 120mV RMSHEADPHONE OUT LEVEL 3.75V RMSGAIN 39dB PREAMP TUBE TYPE (1) 12AU7 STYLE 1 = -25dB @500Hz2 = -12dB @500Hz3 = flat4 = +5dB @2kHz and a …
BA-115T 4
-
U.S.A. Yorkville Sound Inc. 4625 Witmer Industrial Estate Niagara Falls, New York 14305 USA Voice: (716) 297-2920 Fax: (716) 297-3689 WORLD HEADQUARTERS WEB ACCESS: http://www.yorkville.com CANADA Yorkville Sound 550 Granite Court Pickering, Ontario L1W-3Y8 CANADA Voice: (905) 837-8481 Fax: (905) 837-8746 Quality and Innovation Since 1963Printed in Canada SERVICE MANUAL DH40HMODEL TYPE: YS109 …
IronHorse DH40H 9
-
Behringer Bass V-AMP Pro – Quick Start Guide Author: CharlieC, TalkBass.com Registered User Revised: 2/28/2011 Source: http://www.talkbass.com/forum/showthread.php?t=687422 Introduction This document should help you take control of Behringer’s Bass V-AMP Pro unit and allow you to truly hear what it sounds like when properly and plainly configured. Connections Connect …
Bass V-Amp Pro 2