![]()
Компания Husqvarna сумела выстроить на машинки широкий ценовой диапазон, что значительно повысило спрос на продукцию. Это нисколько не повлияло на качество работы машин, выставленных по вполне демократической стоимости – экономия стала возможной благодаря некоторому уменьшению рабочих операций.
История
Более 300 лет назад король Швеции велел построть фабрику по производству огнестрельного оружия в живописном местечке Хускварна, однако спустя 200 лет знаменитый производитель перешел на вполне мирное производство. Несмотря на то, что современный ассортимент продукции Husqvarna весьма разнообразен, название компании из Швеции ассоциируется не только с бензопилами, садовой техникой и мотоциклами, но и качественными швейными машинами.
Даже модели швейных машин Husqvarna с богатыми техническими возможностями просты в управлении, которое может быть и электромеханическим, и полностью электронным.
Модели
Швейная машина Husqvarna Emerald 118
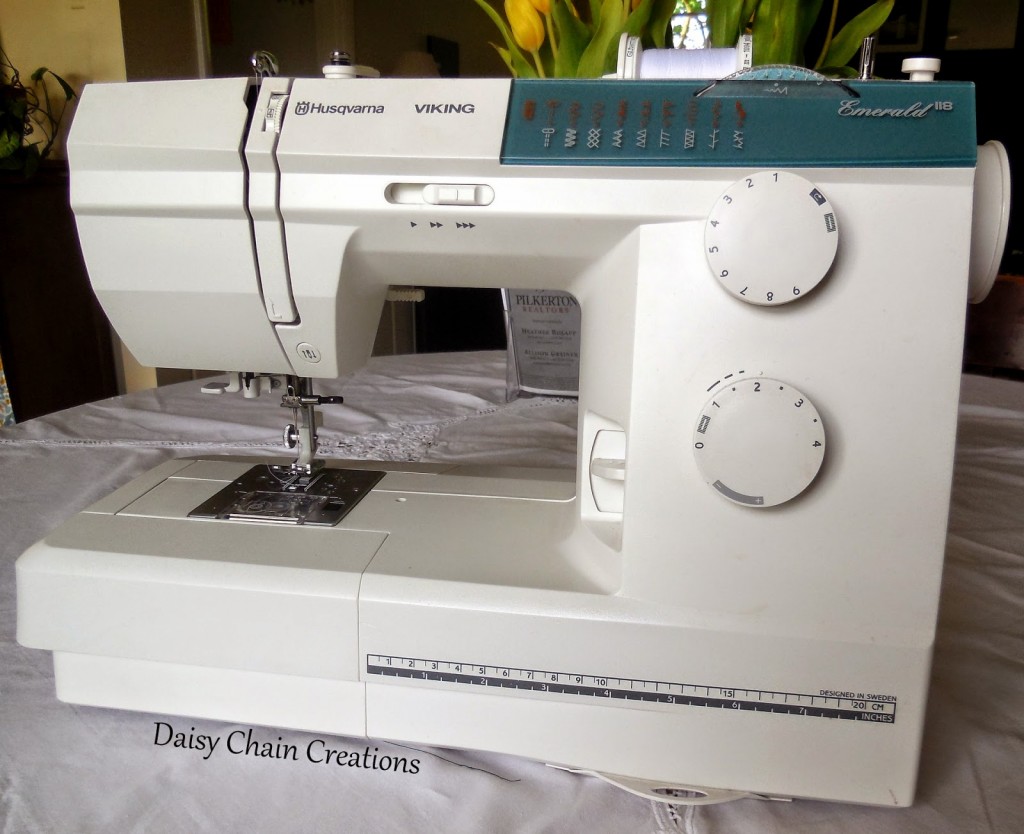
- Тип: электромеханическая швейная машина
- Тип челнока: горизонтальный
- Кол-во швейных операций: 18
- Длина/ширина стежка: 4/5 мм. (макс.)
- Регулировка давления лапки: есть
- Строчки: потайная, обмёточная, эластичная
Среди всех швейных машин от производителя, модель Emerald 118, по отзывам пользователей, считается одной из самых производительных и популярных. Признание и любовь опытных мастериц машинка завоевала благодаря следующим техническим характеристикам:
- плавный ход работы без рывков и вибрации;
- наличие электронного стабилизатора, регулирующего усилие прокола;
- наличие системы измерения размера пуговиц;
- возможность регулировки скорости;
- возможность автостопа при намотке нити на шпульку;
- горизонтальное положение катушки.
Несмотря на отсутствие вышивального блока и электронного дисплея, Эмеральд 118 покоряет мастериц богатой дополнительной комплектацией лапок. Кроме стандартного варианта, здесь присутствуют обметочная лапка, для подрубки ткани и вшивания молнии.
Весь рабочий арсенал легко помещается в просторном отсеке для аксессуаров, а на самом корпусе присутствует измерительная линейка.
Представленную модель можно с уверенностью назвать оптимальным сочетанием привлекательной цены, качества и богатого функционала.
Швейная машина Husqvarna Viking E10
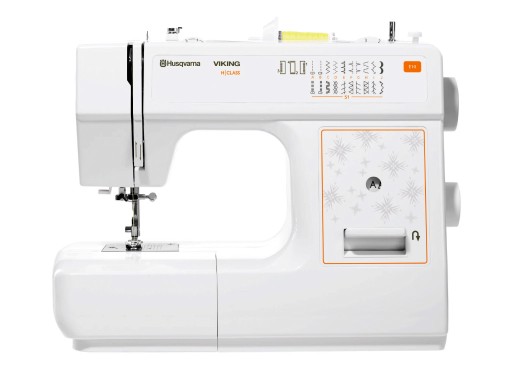
- Тип челнока: вертикальный, качающийся
- Длина/ширина стежка: 4/5 мм. (макс.)
- Кол-во швейных операций: 21
- Режим вымётывания петель: полуавтомат
- Мощность: 85 Вт.
- Освещение: лампа 15 Вт.
- Масса: 7,1 кг.
- Где купить педаль – https://aliexpress.ru/item/32922519297.html;
- Где купить винт иглодержателя – https://aliexpress.ru/item/32954311692.html.
Модель швейной машины Викинг Е10 предусматривает электромеханическое управление при отсутствии электронного дисплея. К её основным техническим параметрам относятся следующие характеристики:
- возможность полуавтоматического выполнения петли;
- наличие рукавной платформы;
- металлическая внутренняя конструкция;
- наличие дополнительного освещения и кнопки реверса;
- выполнение потайной и эластичной строчки;
- возможность обметки.
Чехол жёсткий, вышивальный блок отсутствует.
Инструкция к швейной машине Husqvarna Viking E10
Скачать инструкцию с Яндекс Диска
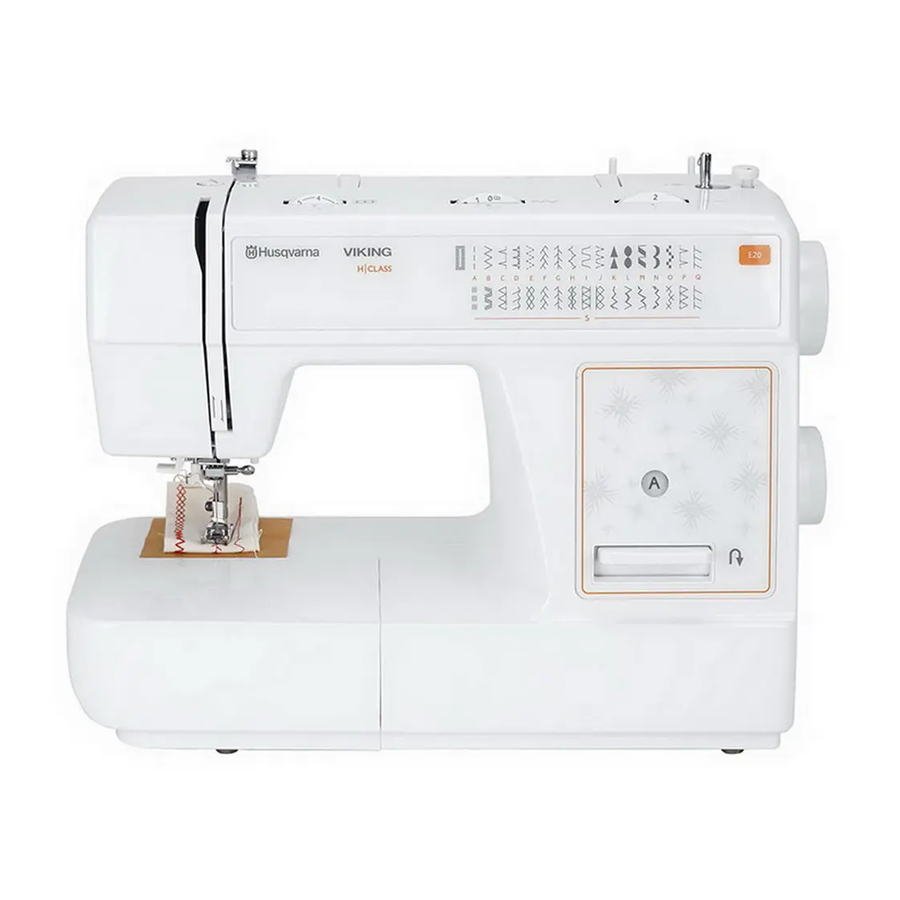
Швейная машина Husqvarna Viking E20
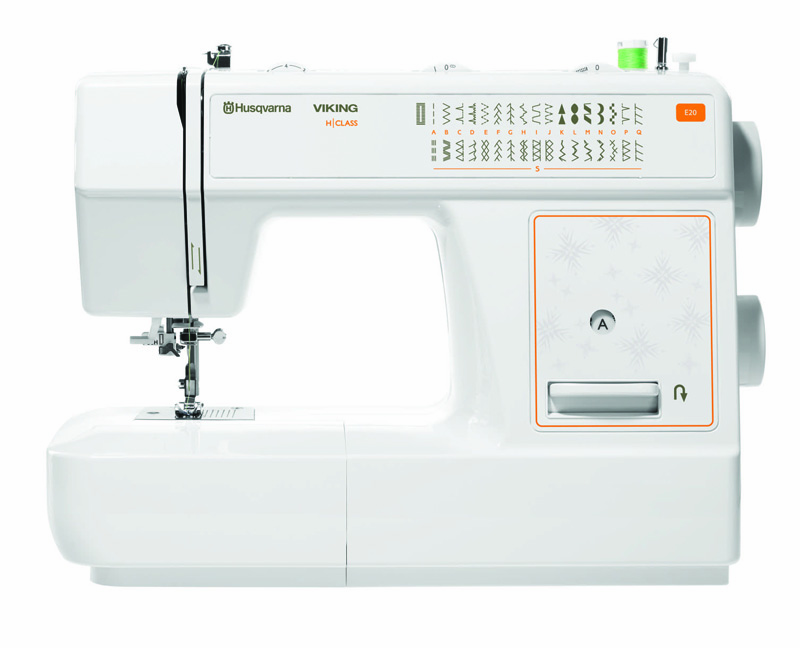
- Тип: электромеханическая швейная машина
- Длина/ширина стежка: 4/5 мм. (макс.)
- Кол-во швейных операций: 34
- Режим вымётывания петель: автоматический
- Вышивальный блок: отсутствует
- Встроенный заправщик нити: да
- Освещение: светодиод
- Мощность: 70 Вт.
- Масса: 6,4 кг.
Viking E 20 – улучшенный и усовершенствованный аналог Е10. Количество швейных операций увеличилось до 34, а выполнение петли стало полностью автоматическим. У обеих моделей отсутствует вышивальный блок, они обе довольно тяжелые благодаря металлическим внутренним деталям. Существует и внешнее различие – чехол E 20 стал мягким в отличие жесткого E 10. При этом максимальная длина и ширина стежка не изменились.
Машинка имеет очень большой набор рабочих и декоративных строчек, и поможет Вам создать настоящий шедевр!
Инструкция к швейной машине Husqvarna Viking E20
Скачать инструкцию с Яндекс Диска
Швейная машина Husqvarna Opal 670
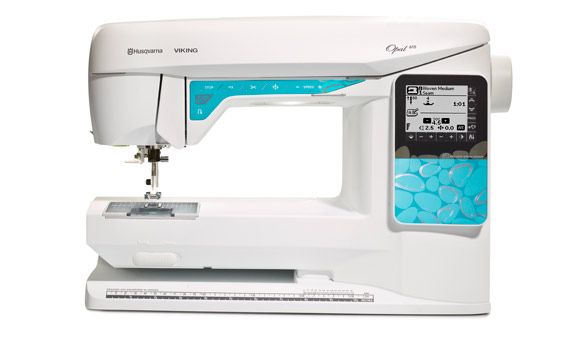
- Тип: электронная швейная машина
- Челнок: горизонтальный ротационный
- Выполнение петли: автомат
- Кол-во швейных операций: 200
- Кол-во видов петель: 7 шт.
- Переключатель положения иглы: есть
- Мощность: 90 Вт.
- Масса: 10 кг.
Для профессиональной швейной деятельности идеальным вариантом станет Опал 670. Опытные мастерицы смогут по достоинству оценить все положительные качества модели:
- Возможность определять длину стежка;
- Регулировка длины стежка с максимальным шагом в 6 мм;
- Дополнительная комплектация нитевдевателем и лапками для вшивания молнии и обметки;
- Возможность регулирования давления лапки на ткань;
- Легко справляется даже с очень плотными тканями.
Машинка работает тихо и плавно, без вибрации. Необычный современный дизайн, измерительная линейка на корпусе и освещение – дополнительные приятные бонусы. Единственное, чего не предусматривает данная модель – это вышивальный блок.
Благодаря многовековому опыту торговая марка “Хускварна” стала достойным конкурентом современным производителям аналогичной продукции.
- Manuals
- Brands
- Husqvarna Viking Manuals
- Sewing Machine
- Viking E20
- User manual
H-class
-
Contents
-
Table of Contents
-
Bookmarks
Quick Links
Related Manuals for Husqvarna Viking Viking E20
Summary of Contents for Husqvarna Viking Viking E20
-
Page 1
USER’S GUIDE… -
Page 2: Important Safety Instructions
This household sewing machine is designed to comply with IEC/EN 60335-2-28 and UL1594 IMPORTANT SAFETY INSTRUCTIONS When using an electrical appliance, basic safety precautions should always be followed, including the following: Read all instructions before using this household sewing machine. DANGER — To reduce the risk of electric shock: •…
-
Page 3
CONTENTS ………………….4 ……………………6 …………..7 …………8 ………………….9 …………….10 ………….10 ………………..11 …………………12 ………………..13 ………….14 ……………..15 ………………16 …………….17 ……….18 ………………….19 ……………..19 ………………..19 ………………..19 …………….20 ……………21 ………………….22 …………23 …………………24 ……………………25 ………………..26 ……….27 …………………..28 …………………..29 ………………30 ………………..31 ………………………32 ………………………33 …………………….34 ……………….35… -
Page 4: Principal Parts
PRINCIPAL PARTS Thread tension dial Presser foot pressure Thread take-up lever Thread cutter 12. Reverse sewing lever Presser foot Needle plate Accessory box…
-
Page 5
16. Handle 19. Handwheel 20. Pattern selector dial 21. Power switch 24. Upper thread guide 25. Presser foot lever… -
Page 6
ACCESSORIES All purpose foot L-screwdriver Zipper foot 10. Pack of needles Quilting foot… -
Page 7: Slide On The Snap-In Accessory Box
SLIDE ON THE SNAP-IN ACCESSORY BOX Hold the snap-in accessory box horizontal, and push it in the direction of the arrow. (1) To open, lift up at the point of the arrow. (2)
-
Page 8: Connecting The Machine To Power Source
CONNECTING THE MACHINE TO POWER SOURCE Caution: Always make sure that the machine is unplugged from power source and the main switch is on “O”. when the machine is not in use and before inserting or removing parts. Connect the machine to a power source as illustrated (1/2). To start the machine, press on the foot control (3).
-
Page 9: Changing The Bulb
CHANGING THE BULB Caution: Make sure to disconnect the electrical supply plug from wall outlet before changing light bulb. Replace bulb with same type rated: 10 watts (110-120V) 15 watts (220-240V) Loosen screw (A) as illustrated. (1) Unscrew the bulb and put in a new one (C). Replace the cover and tighten screw.
-
Page 10: Two-Step Presser Foot Lever
TWO-STEP PRESSER FOOT LEVER When sewing several layers or thick fabrics, the presser foot can be raised a second stage for easy positioning of the work. (A) ADJUSTING THE PRESSER FOOT PRESSURE The presser foot pressure of the machine has been fabrics (light-or-heavy weight).
-
Page 11: Presser Foot Shank
PRESSER FOOT SHANK Attention: Turn power switch to “O” before carrying out any of the operations below. Attaching the presser foot shank: Raise the needle to its highest position and raise the presser foot lever. Attach the presser foot shank (b) to the presser foot bar (a).
-
Page 12: Winding The Bobbin
WINDING THE BOBBIN Place spool on spool pin with spool pin felt underneath (a). Take the thread from the spool around the bobbin winder tension disc clockwise. (1) Thread bobbin as illustrated and place it on the spindel. Push the bobbin to the right towards the bobbin winding position.
-
Page 13: Inserting The Bobbin
INSERTING THE BOBBIN Attention: Turn power switch to “O” before inserting or removing the bobbin. When inserting or removing the bobbin, the needle must be fully raised. Hold the bobbin case with one hand. Insert the bobbin so that the bobbin runs in a clockwise direction (arrow). (2) Pull the thread through the slot, down and to the left until it enters the delivery eyelet (rectangular opening) under the tension spring.
-
Page 14
CHANGING THE NEEDLE (SYSTEM 130/705H) Caution: Turn power switch to “O” before inserting or removing the needle. thread breakage or skipped stitches. needle for the fabric to be sewn. Turn the hand wheel towards you until the needle is at highest position. Loosen the needle clamp screw (A) and tighten again after inserting the new needle. -
Page 15: Threading The Upper Thread
THREADING THE UPPER THREAD Caution: Before threading, turn power switch to “O”. Raise the needle bar to its exactly the numbered illustrated below. If you skip a step or fail to properly engage the thread in any of the thread guides, the machine will not sew properly.
-
Page 16: Built-In Needle Threader
BUILT-IN NEEDLE THREADER The needle must be in the up position to use the built-in needle threader. We also recommend lowering the presser foot. 1a. Use the handle to pull the needle threader down, catching the thread under the guide. 1b.
-
Page 17: Bringing Up The Bobbin Thread
BRINGING UP THE BOBBIN THREAD Hold the upper thread with your left hand. Turn the handwheel towards you with your right hand until the needle goes down and comes up again to the highest position. (1) Pull the upper thread to bring up the bobbin thread.
-
Page 18
THREAD TENSION / RAISE OR LOWER THE FEED DOG Upper thread tension To increase the tension, turn the dial up to a higher number. To reduce the tension, turn the dial to a lower number. A. Normal thread tension — upper and bobbin thread join in fabric. -
Page 19: Reverse Sewing
REVERSE SEWING Reverse sewing is used for locking the end of seams and where reinforcement is needed. At the end of seam, press down the reverse sewing lever and touch the foot control machine will sew forward again (A). CHANGING SEWING DIRECTIONS directions with the needle in the fabric.
-
Page 20: How To Choose Your Pattern
HOW TO CHOOSE YOUR PATTERN with pattern selector dial (4). Adjust the stitch length with the stitch any needle position, by turning the stitch width dial (1). with pattern selector dial (4). Adjust the stitch length (2) and stitch width (1) according to the fabric being used.
-
Page 21: Matching Needle / Fabric / Thread
MATCHING NEEDLE / FABRIC / THREAD Needle, fabric, thread selection guide THREAD Lightweight fabrics-thin cottons, voile, silk , muslin, interlocks, cotton Light-duty thread in cotton, nylon or 9-11(65-75) knits, tricots, jerseys, crepes, woven polyester. polyester, shirt & blouse fabrics. 12(80) kettleclote, sailcloth, double knits, lightweight woollens.
-
Page 22: Zig Zag Sewing
ZIG ZAG SEWING Function of stitch width dial The maximum zigzag stitch width for zigzag stitching is Function of stitch length dial while zigzaging The density of zigzag stitches increase as the setting Satin stitch decorative stitches. Sewing thin fabrics When sewing very thin fabrics, it is suggested that you use stabilizer on the wrong side of the fabric.
-
Page 23: Straight Stitching And Needle Position
STRAIGHT STITCHING AND NEEDLE POSITION Turn the pattern selector dial so that the stitch display shows the straight stitch position (A). the fabric, thread and needle, the longer the stitch should be. Choose your needle position, from center position to left needle position by changing the stitch Pattern selector dial Reverse sewing lever…
-
Page 24: Overlock Stitches
OVERLOCK STITCHES Seams, overcasting, visible hems. The stitch width can be adjusted to suit the fabric. Double overlock stitch: Standard overlock: Stretch overlock: overcasting edges in one step. When overcasting, the needle should just go over the edge of the fabric.
-
Page 25: Blind Hem
BLIND HEM Note: It takes practice to sew blind hems. Always make a test on scraps. Place the fabric under the foot. Turn the handwheel towards you by hand until the needle swings fully to the left. It should just pierce the fold of the fabric.
-
Page 26: One Step Buttonholes
ONE STEP BUTTONHOLES Always sew a practice buttonhole on a sample of your fabric and interfacing. Making a Buttonhole Using tailor’s chalk, mark the position of the buttonhole on the fabric. Attach the buttonhole foot and set the pattern selector dial to . .
-
Page 27: Left And Right Side Balance For Buttonhole
Hook the heavy thread onto the back of the buttonhole foot, then bring the two heavy thread ends to the front of the foot, insert them into the grooves and temporarily tie them there. Lower the presser foot and start sewing. off the excess.
-
Page 28: Zippers And Piping
ZIPPERS AND PIPING fabric). The zipper foot can be snapped onto the right or left of the shank/ ankle, depending on which side of the zipper you are going to sew. To sew past the zipper pull, lower the needle into the fabric, raise the presser foot and push the zipper pull behind the presser foot.
-
Page 29
3-STEP ZIG-ZAG Place patch in position. The stitch length can be shortened to produce very close stitches. (1) When mending tears, it is advisable to use a piece of backing fabric to reinforce. The stitch density can be varied by adjusting the stitch Depending on the type of fabric and damage, sew between 3 and 5 rows. -
Page 30: Stretch Stitch Selection
STRETCH STITCH SELECTION Triple straight stitch: (1/3) The machine sews two stitches forwards and one stitch backwards. This gives triple reinforcement. Triple zig-zag: (2/4) seams. corduroy, etc.
-
Page 31: Free Motion Darning
FREE MOTION DARNING dogs. (1) Remove the presser foot shank. (2) Attach the darning foot to the presser foot bar. The lever (A) should oversew. A darning hoop is recommended for easier sewing and better results.
-
Page 32
DARNING Turn stitch length dial to the desired length. Turn stitch selector to straight stitch, center needle position. Position the fabric to be darned under the presser foot with the underlay fabric. Lower the presser foot and alternately sew forward and reverse using the reverse lever. -
Page 33
QUILTING you desired. along on the previous row of stitching. -
Page 34: Maintenance
MAINTENANCE Caution: Always make sure the machine is unplugged from the power source and the main switch is on “O” before inserting or removing any parts and before cleaning. Remove the stitch plate: Turn the handwheel until the needle is fully raised. plate screw with the screw driver.
-
Page 35: Troubleshooting Guide
TROUBLESHOOTING GUIDE Problem Cause Correction Upper thread 1.The machine is not threaded correctly 1. Rethread the machine breaks 2.The thread tension is too tight 2. Reduce the thread tension (lower number) 3.The thread is too thick for the needle 4.The needle is not inserted correctly towards the back) 5.The thread is wound around the spool holder pin…
-
Page 36
www.husqvarnaviking.com…
Выберите свой регион
Мы покажем вам актуальные контакты и цены на доставку
Купить курс могут только авторизованные пользователи
- Состав курса
- Отзывы
- Вопросы
- Состав курса
- Отзывы
- Вопросы
Оставить отзыв
Видео инструкция Husqvarna Viking E20
Загрузить изображения
Можно перетащить с помощью Drag’n’drop

Спасибо!
Видео инструкция Husqvarna Viking E20
Ваш отзыв отправлен! Скоро мы опубликуем его на сайте
- Состав курса
- Отзывы
- Вопросы
Задать вопрос о товаре
Видео инструкция Husqvarna Viking E20
Спасибо!
Видео инструкция Husqvarna Viking E20
Ваш вопрос отправлен! Мы ответим на вопрос и опубликуем его на сайте.
Для ознакомления с инструкцией необходимо нажать на ссылку «ЗАГРУЗИТЬ», чтобы скачать pdf файл. Если есть кнопка «ПРОСМОТР», то можно просто посмотреть документ онлайн.
Для удобства, Вы можете сохранить данную страницу с файлом руководства по эксплуатации в свой список «избранное» прямо на сайте (доступно для зарегистрированных пользователей).
Смотрите инструкцию для похожих моделей:

Вы можете задать вопрос посетителям сайта по модели HUSQVARNA Viking E20. Если Вы являетесь её пользователем, то пожалуйста оставьте, по возможности развёрнутый отзыв:
-
Page 1
USER’S GUIDE… -
Page 2: Important Safety Instructions
This household sewing machine is designed to comply with IEC/EN 60335-2-28 and UL1594 IMPORTANT SAFETY INSTRUCTIONS When using an electrical appliance, basic safety precautions should always be followed, including the following: Read all instructions before using this household sewing machine. DANGER — To reduce the risk of electric shock: •…
-
Page 3
CONTENTS ………………….4 ……………………6 …………..7 …………8 ………………….9 …………….10 ………….10 ………………..11 …………………12 ………………..13 ………….14 ……………..15 ………………16 …………….17 ……….18 ………………….19 ……………..19 ………………..19 ………………..19 …………….20 ……………21 ………………….22 …………23 …………………24 ……………………25 ………………..26 ……….27 …………………..28 …………………..29 ………………30 ………………..31 ………………………32 ………………………33 …………………….34 ……………….35… -
Page 4: Principal Parts
PRINCIPAL PARTS Thread tension dial Presser foot pressure Thread take-up lever Thread cutter 12. Reverse sewing lever Presser foot Needle plate Accessory box…
-
Page 5
16. Handle 19. Handwheel 20. Pattern selector dial 21. Power switch 24. Upper thread guide 25. Presser foot lever… -
Page 6
ACCESSORIES All purpose foot L-screwdriver Zipper foot 10. Pack of needles Quilting foot… -
Page 7: Slide On The Snap-In Accessory Box
SLIDE ON THE SNAP-IN ACCESSORY BOX Hold the snap-in accessory box horizontal, and push it in the direction of the arrow. (1) To open, lift up at the point of the arrow. (2)
-
Page 8: Connecting The Machine To Power Source
CONNECTING THE MACHINE TO POWER SOURCE Caution: Always make sure that the machine is unplugged from power source and the main switch is on “O”. when the machine is not in use and before inserting or removing parts. Connect the machine to a power source as illustrated (1/2). To start the machine, press on the foot control (3).
-
Page 9: Changing The Bulb
CHANGING THE BULB Caution: Make sure to disconnect the electrical supply plug from wall outlet before changing light bulb. Replace bulb with same type rated: 10 watts (110-120V) 15 watts (220-240V) Loosen screw (A) as illustrated. (1) Unscrew the bulb and put in a new one (C). Replace the cover and tighten screw.
-
Page 10: Two-Step Presser Foot Lever
TWO-STEP PRESSER FOOT LEVER When sewing several layers or thick fabrics, the presser foot can be raised a second stage for easy positioning of the work. (A) ADJUSTING THE PRESSER FOOT PRESSURE The presser foot pressure of the machine has been fabrics (light-or-heavy weight).
-
Page 11: Presser Foot Shank
PRESSER FOOT SHANK Attention: Turn power switch to “O” before carrying out any of the operations below. Attaching the presser foot shank: Raise the needle to its highest position and raise the presser foot lever. Attach the presser foot shank (b) to the presser foot bar (a).
-
Page 12: Winding The Bobbin
WINDING THE BOBBIN Place spool on spool pin with spool pin felt underneath (a). Take the thread from the spool around the bobbin winder tension disc clockwise. (1) Thread bobbin as illustrated and place it on the spindel. Push the bobbin to the right towards the bobbin winding position.
-
Page 13: Inserting The Bobbin
INSERTING THE BOBBIN Attention: Turn power switch to “O” before inserting or removing the bobbin. When inserting or removing the bobbin, the needle must be fully raised. Hold the bobbin case with one hand. Insert the bobbin so that the bobbin runs in a clockwise direction (arrow). (2) Pull the thread through the slot, down and to the left until it enters the delivery eyelet (rectangular opening) under the tension spring.
-
Page 14
CHANGING THE NEEDLE (SYSTEM 130/705H) Caution: Turn power switch to “O” before inserting or removing the needle. thread breakage or skipped stitches. needle for the fabric to be sewn. Turn the hand wheel towards you until the needle is at highest position. Loosen the needle clamp screw (A) and tighten again after inserting the new needle. -
Page 15: Threading The Upper Thread
THREADING THE UPPER THREAD Caution: Before threading, turn power switch to “O”. Raise the needle bar to its exactly the numbered illustrated below. If you skip a step or fail to properly engage the thread in any of the thread guides, the machine will not sew properly.
-
Page 16: Built-In Needle Threader
BUILT-IN NEEDLE THREADER The needle must be in the up position to use the built-in needle threader. We also recommend lowering the presser foot. 1a. Use the handle to pull the needle threader down, catching the thread under the guide. 1b.
-
Page 17: Bringing Up The Bobbin Thread
BRINGING UP THE BOBBIN THREAD Hold the upper thread with your left hand. Turn the handwheel towards you with your right hand until the needle goes down and comes up again to the highest position. (1) Pull the upper thread to bring up the bobbin thread.
-
Page 18
THREAD TENSION / RAISE OR LOWER THE FEED DOG Upper thread tension To increase the tension, turn the dial up to a higher number. To reduce the tension, turn the dial to a lower number. A. Normal thread tension — upper and bobbin thread join in fabric. -
Page 19: Reverse Sewing
REVERSE SEWING Reverse sewing is used for locking the end of seams and where reinforcement is needed. At the end of seam, press down the reverse sewing lever and touch the foot control machine will sew forward again (A). CHANGING SEWING DIRECTIONS directions with the needle in the fabric.
-
Page 20: How To Choose Your Pattern
HOW TO CHOOSE YOUR PATTERN with pattern selector dial (4). Adjust the stitch length with the stitch any needle position, by turning the stitch width dial (1). with pattern selector dial (4). Adjust the stitch length (2) and stitch width (1) according to the fabric being used.
-
Page 21: Matching Needle / Fabric / Thread
MATCHING NEEDLE / FABRIC / THREAD Needle, fabric, thread selection guide THREAD Lightweight fabrics-thin cottons, voile, silk , muslin, interlocks, cotton Light-duty thread in cotton, nylon or 9-11(65-75) knits, tricots, jerseys, crepes, woven polyester. polyester, shirt & blouse fabrics. 12(80) kettleclote, sailcloth, double knits, lightweight woollens.
-
Page 22: Zig Zag Sewing
ZIG ZAG SEWING Function of stitch width dial The maximum zigzag stitch width for zigzag stitching is Function of stitch length dial while zigzaging The density of zigzag stitches increase as the setting Satin stitch decorative stitches. Sewing thin fabrics When sewing very thin fabrics, it is suggested that you use stabilizer on the wrong side of the fabric.
-
Page 23: Straight Stitching And Needle Position
STRAIGHT STITCHING AND NEEDLE POSITION Turn the pattern selector dial so that the stitch display shows the straight stitch position (A). the fabric, thread and needle, the longer the stitch should be. Choose your needle position, from center position to left needle position by changing the stitch Pattern selector dial Reverse sewing lever…
-
Page 24: Overlock Stitches
OVERLOCK STITCHES Seams, overcasting, visible hems. The stitch width can be adjusted to suit the fabric. Double overlock stitch: Standard overlock: Stretch overlock: overcasting edges in one step. When overcasting, the needle should just go over the edge of the fabric.
-
Page 25: Blind Hem
BLIND HEM Note: It takes practice to sew blind hems. Always make a test on scraps. Place the fabric under the foot. Turn the handwheel towards you by hand until the needle swings fully to the left. It should just pierce the fold of the fabric.
-
Page 26: One Step Buttonholes
ONE STEP BUTTONHOLES Always sew a practice buttonhole on a sample of your fabric and interfacing. Making a Buttonhole Using tailor’s chalk, mark the position of the buttonhole on the fabric. Attach the buttonhole foot and set the pattern selector dial to . .
-
Page 27: Left And Right Side Balance For Buttonhole
Hook the heavy thread onto the back of the buttonhole foot, then bring the two heavy thread ends to the front of the foot, insert them into the grooves and temporarily tie them there. Lower the presser foot and start sewing. off the excess.
-
Page 28: Zippers And Piping
ZIPPERS AND PIPING fabric). The zipper foot can be snapped onto the right or left of the shank/ ankle, depending on which side of the zipper you are going to sew. To sew past the zipper pull, lower the needle into the fabric, raise the presser foot and push the zipper pull behind the presser foot.
-
Page 29
3-STEP ZIG-ZAG Place patch in position. The stitch length can be shortened to produce very close stitches. (1) When mending tears, it is advisable to use a piece of backing fabric to reinforce. The stitch density can be varied by adjusting the stitch Depending on the type of fabric and damage, sew between 3 and 5 rows. -
Page 30: Stretch Stitch Selection
STRETCH STITCH SELECTION Triple straight stitch: (1/3) The machine sews two stitches forwards and one stitch backwards. This gives triple reinforcement. Triple zig-zag: (2/4) seams. corduroy, etc.
-
Page 31: Free Motion Darning
FREE MOTION DARNING dogs. (1) Remove the presser foot shank. (2) Attach the darning foot to the presser foot bar. The lever (A) should oversew. A darning hoop is recommended for easier sewing and better results.
-
Page 32
DARNING Turn stitch length dial to the desired length. Turn stitch selector to straight stitch, center needle position. Position the fabric to be darned under the presser foot with the underlay fabric. Lower the presser foot and alternately sew forward and reverse using the reverse lever. -
Page 33
QUILTING you desired. along on the previous row of stitching. -
Page 34: Maintenance
MAINTENANCE Caution: Always make sure the machine is unplugged from the power source and the main switch is on “O” before inserting or removing any parts and before cleaning. Remove the stitch plate: Turn the handwheel until the needle is fully raised. plate screw with the screw driver.
-
Page 35: Troubleshooting Guide
TROUBLESHOOTING GUIDE Problem Cause Correction Upper thread 1.The machine is not threaded correctly 1. Rethread the machine breaks 2.The thread tension is too tight 2. Reduce the thread tension (lower number) 3.The thread is too thick for the needle 4.The needle is not inserted correctly towards the back) 5.The thread is wound around the spool holder pin…
-
Page 36
www.husqvarnaviking.com…