
R
CTK6200/WK6600RU1A
CTK-6200
WK-6600
ИНСТРУКЦИЯ ПО ЭКСПЛУАТАЦИИ
Сохраните всю информацию, чтобы обращаться к ней в будущем.
Правила безопасности
Прежде чем приступать к эксплуатации
синтезатора, обязательно прочитайте брошюру
«Правила безопасности».
MA1201-A Printed in China
CTK6200/WK6600RU1A
K
CTK6200_r_Cover1-4.fm Page 1 Wednesday, December 28, 2011 1:06 PM
 09:12
09:12
Синтезатор CASIO CTK-6200
 08:39
08:39
Обзор синтезатора CASIO CTK-6200
 12:55
12:55
Обзор синтезатора Casio CTK 6200
 10:45
10:45
Создание стиля на CASIO 6200
 04:02
04:02
Седая ночь на синтезаторе. Ю. Шатунов Casio CTK-6200
 12:11
12:11
Видео урок на Casio 6200, как сделать красивые тембры и (звуки)
 12:26
12:26
Честный обзор Casio CTK 6250!!!
 03:18
03:18
Как загрузить стиль в синтезатор Casio стк-6200
ИНСТРУКЦИЯ ПО ЭКСПЛУАТАЦИИ Сохраните всю информацию, чтобы…
Инструкция по эксплуатации
- Изображение
- Текст
R
CTK6200/WK6600RU1A
CTK-6200
WK-6600
ИНСТРУКЦИЯ ПО ЭКСПЛУАТАЦИИ
Сохраните всю информацию, чтобы обращаться к ней в будущем.
Правила безопасности
Прежде чем приступать к эксплуатации
синтезатора, обязательно прочитайте брошюру
«Правила безопасности».
MA1201-A Printed in China
CTK6200/WK6600RU1A
K
CTK6200_r_Cover1-4.fm Page 1 Wednesday, December 28, 2011 1:06 PM

Внимание!
Прежде чем приступать к эксплуатации данного изделия, ознакомьтесь со следующей важной информацией.
•
Прежде чем приступать к эксплуатации адаптера переменного тока (приобретается дополнительно) для подачи
питания на устройство, проверить адаптер на предмет повреждений. Сетевой шнур тщательно проверить на предмет
разрывов, порезов, оголения провода, других серьезных повреждений. Если адаптер серьезно поврежден, не давать
его детям.
•
Не пытаться перезаряжать батареи.
•
Не вставлять аккумуляторные батареи.
•
Не вставлять старые батареи вместе с новыми.
•
Вставлять батареи рекомендованного типа или аналогичные.
•
Ориентация положительного (+) и отрицательного (–) полюсов батарей должна соответствовать обозначениям у
батарейного отсека.
•
При первых же признаках разрядки батарей как можно скорее их заменять.
•
Не допускать короткого замыкания полюсов батарей.
•
Изделие не предназначено для детей в возрасте до 3 лет.
•
Применять только адаптер «CASIO» AD-A12150LW.
•
Адаптер переменного тока — не игрушка!
•
Перед протиранием изделия отсоединять от него адаптер переменного тока.
Manufacturer:
CASIO COMPUTER CO., LTD.
6-2, Hon-machi 1-chome, Shibuya-ku, Tokyo 151-8543, Japan
Responsible within the European Union:
CASIO EUROPE GmbH
Casio-Platz 1, 22848 Norderstedt, Germany
● Воспроизведение содержания данной инструкции, как частично, так и полностью, запрещается. Любое
использование содержания данной инструкции, помимо личного пользования, без согласия «CASIO» запрещено
законами об авторском праве.
● КОМПАНИЯ «CASIO» НИ ПРИ КАКИХ ОБСТОЯТЕЛЬСТВАХ НЕ НЕСЕТ ОТВЕТСТВЕННОСТИ НИ ЗА КАКОЙ
УЩЕРБ (ВКЛЮЧАЯ, В ЧАСТНОСТИ, УБЫТКИ В СВЯЗИ С УПУЩЕННОЙ ВЫГОДОЙ, ПЕРЕРЫВОМ В
ДЕЯТЕЛЬНОСТИ, ПОТЕРЕЙ ИНФОРМАЦИИ), ВОЗНИКАЮЩИЙ В РЕЗУЛЬТАТЕ ИСПОЛЬЗОВАНИЯ ИЛИ
НЕВОЗМОЖНОСТИ ИСПОЛЬЗОВАНИЯ ДАННОЙ ИНСТРУКЦИИ ИЛИ ИЗДЕЛИЯ, ДАЖЕ ЕСЛИ КОМПАНИЯ
«CASIO» БЫЛА УВЕДОМЛЕНА О ВОЗМОЖНОСТИ ТАКОГО УЩЕРБА.
● Содержание данной инструкции может быть изменено без предупреждения.
● Внешний вид изделия может отличаться от показанного на иллюстрациях в данной инструкции по эксплуатации.
● Упоминаемые в данной инструкции названия компаний и наименования изделий могут являться
зарегистрированными торговыми марками других компаний.
R-1
CTK6200_r.book Page 3 Tuesday, January 10, 2012 9:15 AM

Оглавление, Общие указания …………………… r-4, Подготовка к игре ……………….. r-9
Подключения …………………….. r-11, Применение автоаккомпанемента…………..r-24, Работа с микшером …………….r-38
- Изображение
- Текст
R-2
Оглавление
Общие указания …………………… R-4
Чтение информации на дисплее ……………….. R-6
Режимы …………………………………………………… R-7
Меню……………………………………………………….. R-7
, Меры предосторожности во время
отображения на дисплее сообщения
«Please Wait» …………………………………………… R-7
Сохранение показателей настройки…………. R-8
Восстановление заводских показателей
настройки синтезатора…………………………….. R-8
Подготовка к игре ……………….. R-9
Подготовка пюпитра ………………………………… R-9
Источник питания…………………………………….. R-9
Подключения …………………….. R-11
Подключение наушников ……………………….. R-11
Подключение педали……………………………… R-11
Подключение микрофона
(только к модели WK-6600)…………………….. R-11
Подключение аудиоаппаратуры,
усилителя ………………………………………………. R-12
Принадлежности из комплекта изделия и
продаваемые отдельно ………………………….. R-12
Выбор и воспроизведение
тембра ………………………………… R-13
Как включить синтезатор ………………………. R-13
Прослушивание демонстрационных
мелодий…………………………………………………. R-14
Выбор тембра ………………………………………… R-14
Наложение тембров и тембральное
разделение ……………………………………………. R-15
Повышение и понижение строя
клавиатуры (транспонирование) …………….. R-18
Применение функции „октавный сдвиг“….. R-18
Работа с метрономом …………………………….. R-19
Управление колесом высоты тона ………….. R-20
Выбор темперации и точная
настройка строя …………………………………….. R-21
Автоматическое воспроизведение
арпеджио (арпеджиатор) ……………………….. R-23
Применение
автоаккомпанемента…………..R-24
Воспроизведение автоаккомпанемента ….. R-24
Выбор режима взятия аккордов ……………… R-26
Изменение моделей
автоаккомпанемента………………………………. R-27
Работа с установками мгновенного
вызова……………………………………………………. R-27
Применение автогармонизации……………….. R-28
Работа с редактором стилей …………………… R-29
Применение эффектов к
звуку ……………………………………R-32
Программирование эффектов…………………. R-32
Выбор эффекта ……………………………………… R-34
Создание пользовательского
ЦОС-эффекта ………………………………………… R-36
Работа с микшером …………….R-38
Общее описание микшера ………………………. R-38
Управление микшером ……………………………. R-39
Параметры настройки микшера ………………. R-41
Работа с редактором
тембров……………………………….R-44
Коротко о создании тембров …………………… R-44
Создание пользовательского тембра………. R-45
Параметры программирования тембров ….. R-47
Музыкальные
предустановки…………………….R-49
Применение музыкальных
предустановок ……………………………………….. R-49
Создание пользовательской
предустановки ……………………………………….. R-53
Редактирование аккордовой
последовательности……………………………….. R-57
Сохранение наборов настроек в
регистрационной памяти…….R-61
Как сохранить набор настроек в
регистрационной памяти …………………………. R-62
Как вызвать набор настроек из
регистрационной памяти …………………………. R-62
CTK6200_r.book Page 2 Tuesday, January 10, 2012 9:15 AM

Работа с меню функций …….. r-95, Работа с картой памяти …… r-101, Справочная информация ….r-113
Midi implementation chart
- Изображение
- Текст
Оглавление
R-3
Работа с секвенсором
композиций………………………… R-63
Включение записи в одно касание
(«EASY REC») ………………………………………… R-63
Возможности секвенсора композиций…….. R-65
Запись отдельных дорожек ……………………. R-67
Перезапись заголовочных показателей
настройки композиции путем записи с
панельными показателями……………………… R-71
Воспроизведение записанной
композиции ……………………………………………. R-72
Редактирование композиции ………………….. R-74
Редактирование дорожки ………………………. R-78
Редактирование событий ……………………….. R-80
Прямой ввод событий «нота»
(поэтапный ввод)……………………………………. R-93
Работа с меню функций …….. R-95
Работа с меню функций …………………………. R-95
Показатели настройки в меню функций….. R-96
Работа с картой памяти …… R-101
Загрузка и извлечение карты памяти ……. R-102
Вход в картовый режим ……………………….. R-102
Форматирование карты памяти …………….. R-102
Сохранение данных из синтезатора на
карте памяти ……………………………………….. R-103
Загрузка данных с карты памяти ………….. R-105
Как удалить файл с карты памяти ………… R-106
Как переименовать файл на карте
памяти …………………………………………………. R-106
Воспроизведение музыкального файла
с карты памяти …………………………………….. R-107
Подключение к
компьютеру………………………. R-110
Минимальные требования к компьютерной
системе………………………………………………… R-110
Сохранение и загрузка данных из памяти
синтезатора …………………………………………. R-111
Применение стилей (автоаккомпанемента)
из других моделей………………………………… R-111
Импорт данных с различных
носителей…………………………………………….. R-112
Справочная информация ….R-113
Сообщения об ошибках …………………………. R-113
Поиск и устранение неисправностей ……… R-114
Технические характеристики ………………… R-116
Правила безопасности ………………………….. R-118
Перечень ЦОС-эффектов ……………………… R-119
Указатель способов взятия аккордов……. R-124
Разрешенные к вводу символы……………… R-124
Соотношение MIDI-каналов и партий …….. R-125
Перечень параметров……………………………. R-126
Примеры аккордов ……………………………….. R-127
MIDI Implementation Chart
CTK6200_r.book Page 3 Tuesday, January 10, 2012 9:15 AM

R-4
Общие указания
•
На иллюстрациях в данной инструкции по эксплуатации изображена модель WK-6600.
Тыльная панель
Дисковый
регулятор
L-1 — L-17
C-1 — C-13
R-1 — R-20
T-1 — T-9
S-1
CTK6200_r.book Page 4 Tuesday, January 10, 2012 9:15 AM

Общие указания
R-5
•
В данной инструкции термином «синтезатор» обозначаются модели инструмента CTK-6200 и WK-6600.
•
В данной инструкции органы управления обозначаются нижеуказанными числами и названиями.
•
Ниже дается объяснение значения знаков # и $, нанесенных на пульте управления изделия и рядом с
названиями нижеперечисленных клавиш.
# Обозначает функцию, которая включается в результате нажатия на соответствующую кнопку, если нажать и не отпускать кнопку
R-13 (FUNCTION). Например, «SONG SEQUENCER, # EDIT» означает, что функция «EDIT» включается при нажатии на кнопку
R-13 (FUNCTION).
$
Обозначает функцию, которая включается, если на соответствующую кнопку нажать и некоторое время ее не отпускать.
Например, «METRONOME, BEAT $» означает, что функция «BEAT» включается, если на кнопку нажать и некоторое время ее не
отпускать.
L-1
кнопка «POWER» . . . . . . . . . . . . . . . . . . . . . . . . . .
☞13
L-2
ручка «VOLUME». . . . . . . . . . . . . . . . . . . . . . . . . . .
☞13
Кнопки «RHYTHM»
L-3
кнопка «[A] POPS/ROCK/DANCE» . . . . . . .
☞14, 24
L-4
кнопка «[B] JAZZ/EUROPEAN» . . . . . . . . . . . .
☞24
L-5
кнопка «[C] LATIN» . . . . . . . . . . . . . . . . . . . . . .
☞24
L-6
кнопка «[D] WORLD/VARIOUS,
MUSIC PRESET
» . . . . . . . . . . . . . . . . . . . . . .
☞24, 49
L-7
кнопка «[E] PIANO RHYTHMS,
ONE TOUCH PRESET
» . . . . . . . . . . . . . .
☞24, 27, 49
L-8
кнопка «[F] USER RHYTHMS» . . . . . . . . . .
☞24, 27
L-9
кнопка «METRONOME, $BEAT» . . . . . . . . . . . . .
☞19
L-10
кнопка «TEMPO w» . . . . . . . . . . . . . . . . . . . . . . . .
☞19
L-11
кнопка «TEMPO q, #TAP» . . . . . . . . . . . . . . .
☞19
Кнопки «RHYTHM/SONG CONTROLLER»
L-12
кнопка «INTRO, REPEAT» . . . . . . . . . .
☞27, 73, 109
L-13
кнопка «NORMAL/FILL-IN, sREW»
. . . . . . . . . . . . . . . . . . . . . . . . . . . . .
☞14, 27, 72, 107
L-14
кнопка «VARIATION/FILL-IN, dFF»
. . . . . . . . . . . . . . . . . . . . . . . . . . . . .
☞14, 27, 72, 107
L-15
кнопка «SYNCHRO/ENDING, PAUSE»
. . . . . . . . . . . . . . . . . . . . . . . . . . . . .
☞24, 27, 72, 107
L-16
кнопка «START/STOP,
PLAY/STOP, DEMO
». . . . . . . . . . . .
☞14, 24, 72, 107
L-17
кнопка «ACCOMP ON/OFF, $CHORDS, PART
SELECT, DEMO
» . . . . . . . . . . . . . . .
☞14, 24, 26, 108
C-1
дисплей . . . . . . . . . . . . . . . . . . . . . . . . . . . . . . . . . . . .
☞6
C-2
кнопка «RECORD» . . . . . . . . . . . . . . . . . . .
☞63, 67, 68
C-3
кнопка «SONG SEQUENCER, #EDIT» . .
☞7, 67, 74
C-4
кнопка «RHYTHM EDITOR» . . . . . . . . . . . . . . . . . .
☞29
C-5
кнопка «MIXER, #EFFECT» . . . . . . . . . . . . .
☞34, 39
C-6
кнопка «TONE EDITOR, #SCALE» . . . . . . .
☞21, 45
C-7
кнопка «CARD, #LOAD/SAVE» . .
☞7, 102, 103, 105
Дисковый регулятор . . . . . . . . . . . . . . . . . . .
☞6, 14, 24
Кнопки «REGISTRATION»
C-8
кнопка «BANK, DELETE» . . . . . . . .
☞58, 61, 85, 92
C-9
кнопка «1, INSERT» . . . . . . . . . . . . .
☞58, 61, 87, 93
C-10
кнопка «2, COPY». . . . . . . . . . . . . . . . . . . . .
☞61, 87
C-11
кнопка «3, QUANTIZE» . . . . . . . . . . . . . . . .
☞61, 88
C-12
кнопка «4, STEP» . . . . . . . . . . . . . . . . . .
☞59, 61, 93
C-13
кнопка «STORE, #MENU» . . . . . . . . . . . .
☞7, 62
Кнопки «TONE»
R-1
кнопка «[A] PIANO, 5». . . . . . . . . . . . . .
☞14, 58, 87
R-2
кнопка «[B] E. PIANO, 1». . . . . . . . . . . .
☞14, 58, 87
R-3
кнопка «[C] ORGAN, 2» . . . . . . . . . .
☞14, 58, 87, 88
R-4
кнопка «[D] GUITAR, •». . . . . . . . . . . . .
☞14, 58, 87
R-5
кнопка «[E] BASS, REST» . . . . . . . . . . . . . .
☞14, 93
R-6
кнопка «[F] STRINGS». . . . . . . . . . . . . . . . . . . .
☞14
R-7
кнопка «[G] BRASS, 6». . . . . . . . . .
☞14, 58, 87, 88
R-8
кнопка «[H] REED/PIPE, 7» . . . . . .
☞14, 58, 87, 88
R-9
кнопка «[I] SYNTH, 8» . . . . . . . . . . . . . .
☞14, 87, 88
R-10
кнопка «[J] OTHERS, ,» . . . . . . .
☞14, 58, 87, 88
R-11
кнопка «[K] GM/DRUMS, ..» . . . . . . .
☞14, 93
R-12
кнопка «[L] USER TONES» . . . . . . . . . . . . .
☞14, 45
R-13
кнопка «FUNCTION». . . . . . . . . . . . . . . . . . . . . . . .
☞95
R-14
кнопки «NO/–», «YES/+»,
«
#TRANSPOSE» . . . . . . . . . . . . . . . .
☞6, 14, 18, 24
R-15
кнопка «EXIT»
R-16
кнопка «ENTER»
R-17
кнопки u, t, y, i . . . . . . . . . . . . . . . . . . . . . . . .
☞7
R-18
кнопка «AUTO HARMONIZE/ARPEGGIATOR,
$TYPE» . . . . . . . . . . . . . . . . . . . . . . . . . . . . . .
☞23, 28
R-19
кнопка «SPLIT» . . . . . . . . . . . . . . . . . . . . . . . . . . . .
☞14
R-20
кнопка «LAYER, $OCTAVE». . . . . . . . . . . . .
☞14, 18
S-1
колесо «PITCH BEND» . . . . . . . . . . . . . . . . . . . . . .
☞20
T-1
SD CARD SLOT
(картоприемник) . . . . . . . . . . .
☞101
T-2
гнездо «USB» . . . . . . . . . . . . . . . . . . . . . . . . . . . .
☞110
T-3
SUSTAIN/ASSIGNABLE
JACK . . . . . . . . . . . . . . . .
☞11
T-4
гнездо «AUDIO IN» . . . . . . . . . . . . . . . . . . . . . . . . .
☞12
T-5
гнездо «MIC IN» (только у модели WK-6600) . . . .
☞11
T-6
ручка «MIC VOLUME»
(только у модели WK-6600) . . . . . . . . . . . . . . . . . .
☞11
T-7
гнезда «LINE OUT R, L/MONO» . . . . . . . . . . . . . . .
☞12
T-8
гнездо «PHONES». . . . . . . . . . . . . . . . . . . . . . . . . .
☞11
T-9
гнездо «DC 12V» . . . . . . . . . . . . . . . . . . . . . . . . . . . .
☞9
CTK6200_r.book Page 5 Tuesday, January 10, 2012 9:15 AM

Общие указания
R-6
В этом разделе разъясняется, что означает индикация
на дисплее синтезатора.
1
Область детальной информации
В этой области в процессе работы синтезатора
отображается различная информация. Эта область
предназначена для проверки правильности ввода
новых значений, для выбора пункта меню, других
действий.
2
Область индикатора уровня
Индикатор уровня показывает уровень громкости
звуков при игре на клавиатуре и при воспроизведении
автоаккомпанемента. В общей сложности имеется 32
партии: по 16 в группе A и в группе B. При
отображении индикатором уровня звука партий из
группы A в левом нижнем углу горит индикатор L,
партий из группы B — индикатор M.
Подробную информацию о партиях см. в подразделе
«Как организованы партии» (стр. R-38).
3
Области индикаторов
В областях индикаторов отображается такая
информация, как текущий режим (стр. R-7),
показатели настройки, состояние
автоаккомпанемента, другая информация.
Имеются два вида индикаторов: текстовые, такие как
:, и индикаторы-указатели (K).
Индикатор-указатель представляет собой знак K,
который появляется у границы дисплея рядом с
надписью и указывает на заданный показатель
настройки или статус. Так, в нижеприведенном
примере указателем (K) у правой границы дисплея
отмечен эффект «REVERB».
4
Область банков регистрационной памяти
В этой области отображается номер выбранного
банка регистрационной памяти (стр. R-61).
5
Область аккордов
При применении автоаккомпанемента (стр. R-24) или
музыкальной предустановки (стр. R-49) в этой
области отображается обозначение взятого аккорда.
Она рассчитана и на обозначения аккордов с
самостоятельным басом, состоящие из символа корня
аккорда (C, G и т. п.) и его типа (m, 7 и т. п.).
6
Область темпа, такта, доли
Темп отображается заданным значением в виде
ударов в минуту. В темпе, величина которого здесь
отображается, воспроизводятся автоаккомпанемент,
сигнал метронома (стр. R-19) и др. Значения
«MEASURE» и «BEAT» отсчитываются по мере
воспроизведения автоаккомпанемента, сигнала
метронома и др.
Элемент, выбранный на дисплее, отмечается жирными
скобками (%) и кружком (0). Именно на выбранный
элемент влияют действия кнопками R-14 (–, +) и
дисковым регулятором.
На этой экранной странице выбран показатель
настройки «RHYTHM» (стиль), так как он заключен в
жирные скобки. Это указывает на возможность смены
заданного стиля.
На этой экранной странице выбран показатель
настройки «Touch» (динамическая чувствительность
клавиатуры), так как рядом с ним имеется кружок (0).
Это указывает на возможность изменения значения,
заключенного в жирные скобки, справа от слова
«Touch».
Чтение информации на дисплее
6
5
4
3
2
1
Индикация выбранного элемента
CTK6200_r.book Page 6 Tuesday, January 10, 2012 9:15 AM

Общие указания
R-7
Синтезатор имеет три режима: стилевый, картовый и
секвенсорный. Выбранный режим отмечается
индикатором на дисплее.
•
Стилевый режим (горит индикатор :)
Стилевый режим включается по умолчанию после
включения синтезатора. Это основной режим. В этот
режим требуется войти для того, чтобы поиграть на
клавиатуре или включить автоаккомпанемент.
•
Картовый режим (горит индикатор ;)
Для работы с картой памяти требуется войти в
картовый режим. Дополнительную информацию см. в
главе «Работа с картой памяти» (стр. R-101).
–
Войти в картовый режим из стилевого позволяет
нажатие на кнопку C-7 (CARD).
–
В картовом режиме нажатие на кнопку C-7 (CARD)
или R-15 (EXIT) позволяет возвратиться в стилевый
режим.
•
Секвенсорный режим (горит индикатор <)
В секвенсорный режим требуется войти для записи
исполнения на клавиатуре и с помощью
автоаккомпанемента, а также для воспроизведения
электронной композиции. Подробности см. в разделе
«Работа с секвенсором композиций» (стр. R-63).
–
Войти в секвенсорный режим из стилевого
позволяет нажатие на кнопку C-3 (SONG
SEQUENCER).
–
В секвенсорном режиме нажатие на кнопку C-3
(SONG SEQUENCER) или R-15 (EXIT) позволяет
возвратиться в стилевый режим.
•
После выполнения нужных действий в любом из
режимов кроме стилевого обязательно
возвратитесь в стилевый режим. Стилевый режим
включается по умолчанию после включения
синтезатора.
•
Если особо не указано, все действия, описанные в
этой инструкции по эксплуатации, выполняются в
стилевом режиме.
Меню режима и меню отдельных функций можно
выводить на дисплей таким же образом. Для
отображения меню, нажав на кнопку R-13 (FUNCTION) и
не отпуская ее, нажать на кнопку C-13 (MENU). Так,
выполнение этого действия в стилевом режиме приводит
к отображению меню «Performance», показанного ниже.
Это меню обеспечивает прямой доступ к функциям
регулирования особенностей исполнения.
•
Рядом с выбранным показателем настройки имеется
кружок (0). Перевод его по вертикали выполняется
кнопками R-17 (t, y). Перелистывание страниц меню
выполняется кнопками R-17 (u, i).
•
Для выхода из отображенного меню нажать на кнопку
R-15 (EXIT). В некоторых случаях на кнопку R-15 (EXIT)
требуется нажимать несколько раз.
•
Описание пунктов меню и действий для определенных
режимов и функций приводится в соответствующих
разделах данной инструкции по эксплуатации.
Пока на дисплее отображается сообщение «Please Wait»,
не выполняйте никаких действий, не вставляйте и не
извлекайте карту памяти. Подождите, пока сообщение
не погаснет.
•
Сообщение «Please Wait» означает, что синтезатор
выполняет сохранение данных. Выключение
синтезатора, а также извлечение карты памяти может
привести к удалению или повреждению данных. Это
может также привести к невключению синтезатора
при нажатии на кнопку L-1 (POWER).
•
В этом случае см. раздел «Поиск и устранение
неисправностей» (стр. R-114).
Режимы
кнопка C-7 (CARD)
Стилевый режим
кнопка C-3 (SONG
SEQUENCER)
кнопка C-7 (CARD) или
R-15 (EXIT)
Картовый режим
Секвенсорный режим
кнопка C-3 (SONG
SEQUENCER) или R-15 (EXIT)
Меню
, Меры предосторожности во
время отображения на дисплее
сообщения «Please Wait»
CTK6200_r.book Page 7 Tuesday, January 10, 2012 9:15 AM

Синтезатор оснащен секвенсором композиций и другими функция…
Страница 9
- Изображение
- Текст
Общие указания
R-8
Синтезатор оснащен секвенсором композиций и другими
функциями, позволяющими хранить создаваемые
данные. Сохраненные данные не утрачиваются и после
выключения синтезатора.
*
Однако у тембров, стилей и других показателей
настройки, обычно выставляемых на пульте
синтезатора, после выключения синтезатора всегда
восстанавливаются начальные значения,
устанавливающиеся по умолчанию при включении
синтезатора.
Синтезатор можно запрограммировать так, чтобы он
запоминал последний набор настроек, а можно при
каждом включении синтезатора применять
определенный набор настроек, заданный по умолчанию.
Подробности см. в частях «AutoResume
(автовозобновление)» (стр. R-99) и «Default (показатели
настройки по умолчанию)» (стр. R-99).
* Данные и показатели настройки, перечисленные ниже,
всегда сохраняются и при выключении синтезатора.
–
Набор настроек из регистрационной памяти
(стр. R-61)
–
Данные секвенсора композиций (стр. R-63)
–
Пользовательские стили (стр. R-29)
–
Пользовательские предустановки (стр. R-53)
–
Пользовательские тембры (стр. R-44)
–
Пользовательские ЦОС-эффекты (стр. R-36)
–
Величина контраста ЖКД (стd. R-98)
–
Настройка автовозобновления (стр. R-99)
Из памяти синтезатора можно удалить все данные и
восстановить все заводские показатели настройки.
Подробности см. в разделе «Как инициализировать все
данные и показатели настройки (или только
параметры)» (стр. R-100).
Сохранение показателей
настройки
Восстановление заводских
показателей настройки
синтезатора
CTK6200_r.book Page 8 Tuesday, January 10, 2012 9:15 AM

Подготовка к игре, Подготовка пюпитра источник питания
Страница 10
- Изображение
- Текст
R-9
Подготовка к игре
Подготовьте бытовую сетевую розетку или батареи.
•
Обязательно соблюдайте правила, изложенные в
брошюре «Правила безопасности». Неправильная
эксплуатация изделия создает риск поражения
электрическим током и возгорания.
•
Перед подключением и отключением адаптера
переменного тока, а также перед установкой и
извлечением батарей удостоверяйтесь, что
изделие выключено.
Подключайте изделие к сети только через
предписанный для него адаптер переменного тока
(стандарт JEITA, с унифицированной поляризованной
вилкой). Подключение через адаптер переменного тока
другого типа может вызвать повреждения изделия.
Предписанный адаптер переменного тока —
AD-A12150LW
Адаптер переменного тока подключайте через сетевой
шнур из комплекта изделия, как показано на
иллюстрации ниже.
•
После очень длительной работы адаптер
переменного тока нагревается. Это нормальное
явление, не являющееся признаком
неисправности.
•
Для предотвращения разрыва провода не
допускайте, чтобы на сетевой шнур
воздействовала какая-либо механическая
нагрузка.
•
Не вставляйте в гнездо «DC 12V» изделия
металлические предметы, карандаши, любые иные
предметы. Это может привести к несчастному
случаю.
Подготовка пюпитра
Источник питания
пюпитр
Питание от бытовой сетевой розетки
Не перегибать!
Не наматывать!
бытовая сетевая розетка
адаптер переменного тока
•
Компоновка и типы разъемов
зависят от региона.
гнездо T-9 (DC 12V)
сетевой шнур
CTK6200_r.book Page 9 Tuesday, January 10, 2012 9:15 AM

Комментарии
- Manuals
- Brands
- Casio Manuals
- Electronic Keyboard
- CTK-6200
- User manual
-
Contents
-
Table of Contents
-
Troubleshooting
-
Bookmarks
Quick Links
CTK — 6200
WK — 6600
USER’S GUIDE
Please keep all information for future reference.
Safety Precautions
Before trying to use the keyboard, be sure to read the
separate «Safety Precautions».
CTK6200/WK6600E1A
E
Related Manuals for Casio CTK-6200
Summary of Contents for Casio CTK-6200
-
Page 1
CTK — 6200 WK — 6600 USER’S GUIDE Please keep all information for future reference. Safety Precautions Before trying to use the keyboard, be sure to read the separate “Safety Precautions”. CTK6200/WK6600E1A… -
Page 2: Declaration Of Conformity
Changes or modifications not expressly approved by the party responsible for compliance could void the user’s authority to operate the equipment. Declaration of Conformity Model Number: CTK-6200/WK-6600 Trade Name: CASIO COMPUTER CO., LTD. Responsible party: CASIO AMERICA, INC. Address: 570 MT. PLEASANT AVENUE, DOVER, NEW JERSEY 07801 Telephone number: 973-361-5400…
-
Page 3
● Any reproduction of the contents of this manual, either in part or its entirety, is prohibited. Except for your own, personal use, any other use of the contents of this manual without the consent of CASIO is prohibited under copyright laws. -
Page 4: Table Of Contents
Contents General Guide ……E-4 Applying Effects to a Sound ..E-32 Reading the Display ………..E-6 Configuration of Effects……..E-32 Modes…………..E-7 Selecting an Effect ……….. E-34 Menus…………..E-7 Creating a User DSP ……..E-36 , Precautions while “Please Wait” is Using the Mixer ……E-38 displayed …………E-7 Saving Settings ……….E-8 Mixer Overview ……….
-
Page 5
Contents Using a Memory Card….. E-101 Loading and Removing a Memory Card..E-102 Entering the Card Mode ………E-102 Formatting a Memory Card……E-102 Saving Digital Keyboard Data to a Memory Card……….E-103 Loading Data from a Memory Card ….E-105 To delete a file from a memory card….E-106 To rename a file on a memory card….E-106 Playing a Music File from a Memory Card..E-107 Connecting to a Computer .. -
Page 6: General Guide
General Guide • Illustrations in this User’s Guide show the WK-6600. L-1 — L-17 C-1 — C-13 Dial T-1 — T-9 R-1 — R-20 Back…
-
Page 7
General Guide • In this manual, the term “Digital Keyboard” refers to the CTK-6200/WK-6600. • This manual uses the numbers and names below to refer to buttons and controllers. • The following explains the meanings of the # and $ symbols that appear on the product console and with the key names below. -
Page 8: Reading The Display
General Guide Tempo, measure, beat area Reading the Display Tempo is shown as the current setting value, as beats per minute. Auto Accompaniment, the metronome (page This section explains the contents of the Digital Keyboard’s E-19), and other playback is performed at the tempo display screen.
-
Page 9: Modes
General Guide Modes Menus Your Digital Keyboard has three modes: a rhythm mode, a You can use the same operations to display mode and card mode, and a song sequencer mode. The currently function specific menus. To display a menu, hold down the selected mode is shown as an indicator on the display.
-
Page 10: Saving Settings
General Guide Saving Settings Your Digital Keyboard is equipped with a song sequencer and other features that you can use to store data you create. This stored data is retained even when the Digital Keyboard is turned off. However, the tone, rhythm, and other settings you configure on the Digital Keyboard’s console normally are returned to their initial power on defaults whenever you turn off power.
-
Page 11: Getting Ready To Play
Getting Ready to Play Using a Household Power Outlet Preparing the Music Stand Make sure that you use only the AC adaptor (JEITA Standard, with unified polarity plug) specified for this product. Use of a different type of AC adaptor can cause malfunction. Music stand Specified AC Adaptor: AD-A12150LW Use the supplied power cord to connect the AC adaptor as…
-
Page 12: Using Batteries
Getting Ready to Play ■ Low Battery Indication Using Batteries The following shows the approximate battery life. You can use six D-size batteries for power. 4 hours on alkaline batteries • Use alkaline or zinc-carbon batteries. * The above values are standard battery life at normal Never use oxyride or any other nickel based batteries.
-
Page 13: Connections
Connections Connecting Headphones Connecting a Microphone (WK-6600 only) Using headphones cuts off output from the built-in speakers, which means you can practice playing even late at night You can connect a dynamic microphone (only) to the Digital without disturbing others. Keyboard for output thorough the Digital Keyboard’s •…
-
Page 14: Connecting Audio Equipment Or An Amplifier
RIGHT (Red) • You can get information about accessories that are sold Pin plug separately for this product from the CASIO catalog available from your retailer, and from the CASIO website at the following URL. Outputting Keyboard Notes to Audio http://world.casio.com/…
-
Page 15: Selecting And Playing A Tone
Selecting and Playing a Tone R-1 — R-12 R-1 — R-12 R-14 R-14 L-13 L-13 L-17 L-17 R-19 R-19 L-14 L-14 L-16 L-16 R-20 R-20 To turn on Digital Keyboard power • If you press the L-1 (POWER) button only lightly, the Rotate the L-2 (VOLUME) knob towards MIN to display will light up momentarily but power will not turn set the volume to a low level.
-
Page 16: Listening To Demo Tunes
Selecting and Playing a Tone ■ To disable Auto Power Off Selecting a Tone While the Digital Keyboard is turned on, press The tones of this Digital Keyboard are divided among groups, the L-1 (POWER) button to turn it off. each of which corresponds to one of the 12 TONE buttons.
-
Page 17: Layering And Splitting Tones
Selecting and Playing a Tone Now you can play on the keyboard using the • Three tones, two layered tones for the right range and one tone for the left range of the keyboard (page E-17) tone you selected. This configuration uses the UPPER 1 part, UPPER 2 part, and LOWER part (Layer: On, Split: On).
-
Page 18
Selecting and Playing a Tone R-15 R-15 R-16 R-16 R-17 R-17 R-14 R-14 L-10 L-10 R-13 R-13 L-11 L-11 R-19 R-19 R-18 R-18 R-20 R-20 To layer two tones To split the keyboard between two tones Refer to the separate “Appendix” to look up the Refer to the separate “Appendix”… -
Page 19
Selecting and Playing a Tone To specify the keyboard split point To use layer and split together While holding down the R-19 (SPLIT) button, Perform steps 1 through 6 of the procedure press the keyboard key that you want to be the under “To layer two tones”… -
Page 20: Raising And Lowering Keyboard Tuning (Transpose
Selecting and Playing a Tone Raising and Lowering Keyboard Using Octave Shift Tuning (Transpose) You can use octave shift to individually change the octave of the UPPER 1, UPPER 2, and LOWER parts. You can use The transpose feature lets you raise or lower the overall octave shift to raise or lower the octave of a song, to assign tuning of the keyboard in semitone steps.
-
Page 21: Using The Metronome
Selecting and Playing a Tone To change the tempo setting Using the Metronome There are two different methods you can use to change the Press the L-9 (METRONOME) button. tempo setting: using the TEMPO buttons or tapping a beat with a button. ■…
-
Page 22: Using The Pitch Bend Wheel
Selecting and Playing a Tone ■ To adjust the tempo by tapping a beat Using the Pitch Bend Wheel While holding down the R-13 (FUNCTION) The PITCH BEND wheel (S-1) lets you change the pitch of button, tap the L-11 (TAP) button four times at notes you are playing by rotating the wheel forward or back.
-
Page 23: Selecting A Temperament And Fine Tuning Its Scale
Selecting and Playing a Tone Use the dial or the R-14 (–, +) buttons to select a Selecting a Temperament and temperament. Fine Tuning Its Scale • Selecting a temperament other than 01: Equal will cause the C indicator to appear on the display. Use the scale function to select one of the 17 preset •…
-
Page 24
Selecting and Playing a Tone When you are finished, press the R-15 (EXIT) When you are finished making adjustments, button twice. press the R-15 (EXIT) button twice. • This will return to the screen that was displayed before • This will return to the screen that was displayed before you displayed the scale screen. -
Page 25: Playing Arpeggio Phrases Automatically (Arpeggiator
Selecting and Playing a Tone Press the R-18 (AUTO HARMONIZE/ Playing Arpeggio Phrases ARPEGGIATOR) button. Automatically (Arpeggiator) • This causes a pointer indicator to appear on the display next to ARPEG. With the arpeggiator, you can play various arpeggios and other phrases automatically by simply pressing keys on the keyboard.
-
Page 26: Using Auto Accompaniment
Using Auto Accompaniment R-15 R-15 L-3 — L-8 L-3 — L-8 R-16 R-16 R-17 R-17 L-10 L-10 R-14 R-14 L-11 L-11 R-13 R-13 L-12 L-12 L-13 L-13 L-15 L-15 L-17 L-17 L-14 L-14 L-16 L-16 C-13 C-13 R-18 R-18 With Auto Accompaniment, simply select the accompaniment Use the dial to scroll through the rhythm rhythm you want and the matching accompaniment (drums, numbers until the one you want is displayed.
-
Page 27
Play other chords with your left hand as you play the melody with your right hand. • You can use “CASIO Chord” or other simplified chord fingering modes to play chords. For details, see “Selecting a Chord Fingering Mode” in the following section. -
Page 28: Selecting A Chord Fingering Mode
You can select from among the following five chord fingering ■ CASIO Chord modes. With “CASIO Chord”, you can use simplified fingerings to play the four types of chords described below. 1: Fingered 1 2: Fingered 2…
-
Page 29: Modifying Auto Accompaniment Patterns
Using Auto Accompaniment Modifying Auto Accompaniment Using One-Touch Presets Patterns One-Touch Preset gives you one-touch access to tone and tempo settings that go well with the currently selected Auto There are six different Auto Accompaniment patterns, shown Accompaniment rhythm pattern. below.
-
Page 30: Using Auto Harmonize
Using Auto Accompaniment Use the dial or R-14 (–, +) buttons to select the Using Auto Harmonize auto harmonize type you want to use. Auto harmonize lets you add harmony to melody notes you • You can select one of the type numbers (001 through play with your right hand.
-
Page 31: Using The Rhythm Editor
Using Auto Accompaniment To turn off auto harmonize, press the R-18 Use buttons L-12 (INTRO) through L-15 (AUTO HARMONIZE/ARPEGGIATOR) button (SYNCHRO/ENDING) to select the again. accompaniment pattern you want to edit. If you • This causes the pointer indicator next to A.HAR. to want to edit the intro accompaniment pattern, disappear.
-
Page 32
Using Auto Accompaniment Edit the selected accompaniment pattern *1 Only drum set sounds (tone numbers K:129 through instrument part as desired. K:145) can be selected for drum parts and percussion parts. Drum set sounds cannot be selected for the bass •… -
Page 33
Using Auto Accompaniment After everything is the way you want, press the R-16 (ENTER) button. • Pressing the R-15 (EXIT) button in place of step 8 displays • This displays a screen for specifying the destination the confirmation screen shown below. Pressing the R-14 user rhythm number and rhythm name. -
Page 34: Applying Effects To A Sound
Applying Effects to a Sound You can apply a variety of different acoustic effects to the sounds produced by the Digital Keyboard. The built-in effects include a wide variety of variations that give you access to a selection of general digital effects. •…
-
Page 35
Applying Effects to a Sound ■ DSP Effect Mode Configuration The DSP effect mode is enabled while “DSP” is selected for the “Chorus/DSP” effect parameter. DSP and reverb can be used in the DSP effect mode. Part A01-A16, B01-B16 Output Part Volume/Pan Master Tone… -
Page 36: Selecting An Effect
Applying Effects to a Sound R-15 R-15 R-16 R-16 R-17 R-17 R-14 R-14 R-13 R-13 Selecting an Effect • A pointer indicator is displayed next to REVERB when Effects are divided among different types (reverb, chorus, anything other than “oFF” is selected for the reverb type. DSP), so first you need to use the procedure below to select The pointer indicator is not displayed next to REVERB an effect type.
-
Page 37
Applying Effects to a Sound Use the R-17 (t, y) buttons to move the thick brackets (%) to the “Chorus/DSP” setting. • Selecting a tone with DSP causes the “Chorus/DSP” setting to change automatically to the “DSP” (DSP Use the R-14 (–, +) buttons to select “Chorus”. effect mode), so the chorus effect will not be available. -
Page 38: Creating A User Dsp
Applying Effects to a Sound Use the dial or R-14 (–, +) buttons to select the Creating a User DSP preset DSP you want to use. • DSPs with the leading numbers 001 through 100 (and You can create a user DSP by editing one of the built-in “ton”) are preset DSPs.
-
Page 39
Applying Effects to a Sound Use the R-17 (t, y) buttons to move the thick Press the R-14 (YES) button. brackets (%) to the parameter you want to • This displays a screen for specifying the destination user DSP number and DSP name. change. -
Page 40: Using The Mixer
Using the Mixer R-15 R-15 R-16 R-16 R-17 R-17 R-14 R-14 R-13 R-13 C-13 C-13 This Go here for more Mixer Overview Is used for this: part: information: The sound source of this Digital Keyboard is capable of Auto Accompaniment “Using Auto sounding up to 32 individual parts simultaneously.
-
Page 41: Mixer Operation
Using the Mixer Use the R-17 (t, y) buttons to move the thick Mixer Operation brackets (%) to the parameter you want to change. To change mixer parameters • The parameters that can be configured depend on the currently selected setting. For details, refer to the Press the C-5 (MIXER) button.
-
Page 42
Using the Mixer To initialize all mixer parameters To change the information displayed by the level meter while configuring part parameter settings • For details about how initial default settings are configured While the mixer screen is displayed, hold down when you perform the following procedure, see “Parameter List”… -
Page 43: Mixer Parameter Settings
Using the Mixer Mixer Parameter Settings The tables below show the parameters that can be configured on the mixer screen. The settings marked with an asterisk (*) in the “Setting Range” column are initial defaults. MASTER Parameters MASTER parameters include items for adjusting the volume level, pan position, and other settings that are applied globally to all parts.
-
Page 44
Using the Mixer MIC Parameters (WK-6600 Only) The MIC parameters include microphone input (input via T-5 (MIC IN) jack) related settings. Parameter Name Description Setting Range Part Specifies if sound input via a microphone should be output (on) or not output oFF, on (Mic Enable) (oFF). -
Page 45: Part Parameters
Using the Mixer Part Parameters Part parameters include setting items that can be adjusted for parts A01 through A16 and B01 through B16. Parameter Name Description Setting Range TONE Specifies a tone for each part. When configuring this parameter, you can use the A:001 to L:010 (Part Tone) buttons from R-1 ([A] PIANO) through R-12 ([L] USER TONES) to select a tone…
-
Page 46: Using The Tone Editor
Using the Tone Editor R-15 R-15 R-12 R-12 R-16 R-16 R-17 R-17 R-14 R-14 R-13 R-13 C-13 C-13 You can create a user tone by editing one of the built-in preset (1) Tone Characteristic Waveform tones. • Tone Setting Specifies which of the preset tones should be used as the Tone Creation Overview original tone.
-
Page 47: Creating A User Tone
Using the Tone Editor • Cutoff Frequency Creating a User Tone The cutoff frequency is a parameter for adjusting timbre by cutting any frequency that is higher than a specific frequency. A larger cutoff frequency produces a brighter (harder) timbre, User Tone Numbers while a smaller frequency produces a darker (softer) timbre.
-
Page 48
Using the Tone Editor To save a rhythm after you edit it, hold down the R-13 (FUNCTION) button as you press the • Pressing the R-15 (EXIT) button in place of step 6 displays C-13 (MENU) button. the confirmation screen shown below. Pressing the R-14 •… -
Page 49: Tone Parameter Settings
Using the Tone Editor Tone Parameter Settings The table below shows the parameters that can be configured on the tone editor screen. For information about each parameter, also refer to “Tone Creation Overview” (page E-44). The settings marked with an asterisk (*) in the “Setting Range” column are initial defaults. Parameter Name Description Setting Range…
-
Page 50
Using the Tone Editor Parameter Name Description Setting Range DSP On Off Specifies whether DSP should be applied (on) or not applied (oFF) to notes. , on (DSP On/Off) The following four settings become enabled when “on” is selected for this setting. -
Page 51: Music Presets
Music Presets R-15 R-15 L-3 — L-8 L-3 — L-8 R-1 — R-12 R-1 — R-12 R-16 R-16 R-17 R-17 R-14 R-14 R-13 R-13 L-13 L-13 L-15 L-15 L-17 L-17 C-12 C-12 L-14 L-14 L-16 L-16 C-13 C-13 While holding down the L-6 ([D] WORLD/ Using Music Presets VARIOUS) button, press the L-7 ([E] PIANO Music presets provide one-touch access to Auto…
-
Page 52
Music Presets Use the buttons from L-3 ([A] POPS/ROCK/ To stop playing, press the L-15 (SYNCHRO/ DANCE) to L-8 ([F] USER RHYTHMS) to select a ENDING) button or the L-16 (START/STOP) music preset group. button. • The D indicator continues to flash on the display even after you stop playing. -
Page 53
Music Presets Music Preset Settings The settings listed in the table below are recalled when a music preset is selected. • Except for the chord progression, all of the settings can be modified after a music preset is selected. Refer to the information noted in the “Go here for more information”… -
Page 54
Music Presets To change music preset Auto To change the rhythm while using a music Accompaniment settings preset While the music preset screen is displayed, you can use the While the music preset screen is displayed, buttons L-3 ([A] L-17 (ACCOMP ON/OFF) button to change Auto POPS/ROCK/DANCE) to L-8 ([F] USER RHYTHMS) function Accompaniment settings. -
Page 55: Creating A User Preset
Music Presets You can change each of the parameters on the Creating a User Preset parameter menu as required. (1) Use the R-17 (t, y, u, i) buttons to move 0 to the parameter you want to change. User Preset Numbers (2) Use the dial or the R-14 (–, +) buttons to change the Preset areas numbered F:001 through F:050 are for storage setting value.
-
Page 56
Music Presets Use the R-17 (y) button to move the 0 to “Store” and then press the R-16 (ENTER) • Pressing the R-15 (EXIT) button in place of step 6 displays button. the confirmation screen shown below. Pressing the R-14 •… -
Page 57
Music Presets Timing Setting and Chord Progression Playback This section explains how chord progressions are played in accordance with the “Timing” (Timing set) settings in step 5 under “To create and save a user preset” (page E-53). Note that this setting affects playback only. It does not change the chord progression data. -
Page 58
Music Presets • 3/4 Plays chords measure-by-measure at a timing that is 3/4 times that of the recording. This setting is best for use with a 6/8 time rhythm. Playing back a chord progression like that shown for “Half” above while “3/4” is specified results in the progression shown below. 3/4 Playback when a 4/4 time rhythm is assigned to the user preset Measure Beat… -
Page 59: Editing A Chord Progression
Music Presets Perform the following chord progression Editing a Chord Progression editing operations. You can modify the preset chord progression and save it as a • Change an existing chord (“To modify recorded chord user preset, or you can create a new chord progression from data”, page E-58) scratch and save it.
-
Page 60
Music Presets To modify recorded chord data To delete recorded chord data Perform steps 1 through 4 of the procedure Perform steps 1 through 4 of the procedure under “Chord Progression Editing Flow” on under “Chord Progression Editing Flow” on page E-57. -
Page 61
Music Presets Specify the location of the new chord insert as a To perform step input of chords number of beats after the current cursor Perform steps 1 through 4 of the procedure position. under “Chord Progression Editing Flow” on To specify this number of beats Press this button: page E-57. -
Page 62
Music Presets To perform menu operations *1 Deletes all existing chords, and replaces it with four measures of data with a C-chord at the first beat of the first Perform steps 1 through 4 of the procedure measure (user preset initial data). *2 You will not be able to execute this operation if the number under “Chord Progression Editing Flow”… -
Page 63: Saving Keyboard Setups To Registration Memory
Saving Keyboard Setups to Registration Memory R-14 R-14 C-12 C-12 C-10 C-10 C-11 C-11 C-13 C-13 Registration memory lets you store Digital Keyboard setups (tone, rhythm, etc.) for instant recall whenever you need them. • For information about items that can be part of a registration setup, see “Parameter List”…
-
Page 64: To Save A Setup To Registration Memory
Saving Keyboard Setups to Registration Memory To save a setup to registration To recall a setup from registration memory memory Configure the tone, rhythm, and other settings Press the C-8 (BANK) button to select the bank you want to include in the setup. that contains the setup you want to recall.
-
Page 65: Using The Song Sequencer
Using the Song Sequencer R-15 R-15 R-1 — R-12 R-1 — R-12 R-16 R-16 R-17 R-17 R-14 R-14 R-13 R-13 L-12 L-12 L-13 L-13 L-15 L-15 C-12 C-12 L-14 L-14 L-16 L-16 C-10 C-10 C-11 C-11 C-13 C-13 You can use the song sequencer to record keyboard play Starting One-touch Recording (including Auto Accompaniment), or to record individual parts (EASY REC)
-
Page 66
Using the Song Sequencer Press the C-2 (RECORD) button. (4) Use the R-17 (y) button to move the 0 to “Precount” and then use the R-14 (–, +) buttons to turn the precount on or off. Turing on the precount inserts a one-measure count before the start of recording when you press the L-16 (START/STOP) button in step 4. -
Page 67: What You Can Do With The Song Sequencer
Using the Song Sequencer To use EASY REC to record a performance What you can do with the song using a music preset sequencer Perform steps 1 through 4 under “To perform The simplest use of the song sequencer is to record a using a music preset”…
-
Page 68
Using the Song Sequencer System Track and Track 01 through 16 Common Recording Content • Due to the way song parts are configured, settings configured by a recalled registration are applied to different ■ Recording Start numbered parts than they were assigned to when the setup •… -
Page 69: Recording Individual Tracks
Using the Song Sequencer Use the R-17 (u, i) buttons to select the Recording Individual Tracks system track. This section explains how to record to the system track and • If the system track already contains recorded data, how to record to Tracks 01 through 16. For details about track starting recording in step 7 below will cause the current configuration and what is recorded to each track, see “What system track data to be deleted.
-
Page 70
Using the Song Sequencer Start playing something on the keyboard. To record to Tracks 01 through 16 • Recording starts automatically when you perform any one of the following operations. Press the C-3 (SONG SEQUENCER) button to – Playing on the keyboard enter the song sequencer mode. -
Page 71
Using the Song Sequencer Use the R-17 (u, i) buttons to select a track (5) Use the R-17 (y) button to move the 0 to “RecType”, (Track 01 through Track 16). and then use the R-14 (–, +) buttons to select “REPL” or “OVDB”. -
Page 72
Using the Song Sequencer To clear the content of a single track To clear a single song immediately after immediately after recording it recording it While the song sequencer mode initial screen is While the song sequencer mode initial screen is on the display after track recording is complete, on the display after track recording is complete, hold down the R-13 (FUNCTION) button as you… -
Page 73: Using Panel Record To Rewrite Song Header Settings
Using the Song Sequencer Mixer Settings in the Song Sequencer Mode Using Panel Record to Rewrite You can access the mixer during playback, playback standby, Song Header Settings or record standby (C-2 (RECORD) button flashing), or while recording is in progress (C-2 (RECORD) button lit). Press the The header of each song contains “header settings”, which C-5 (MIXER) button to display the mixer screen.
-
Page 74: Playing A Recorded Song
Using the Song Sequencer Use the R-17 (y) button to move the 0 to Press the L-16 (START/STOP) button. “PanelRecord”. • This starts playback. The following operations are supported during playback. To do this: Do this: Skip Forward Hold down the L-14 (dFF) button. Skip Back Hold down the L-13 (sREW) button.
-
Page 75
Using the Song Sequencer To play back a particular part alone To repeat play a specific phrase Press the C-3 (SONG SEQUENCER) button to Hold down the R-13 (REPEAT) button until the enter the song sequencer mode. locator screen shown below appears on the display. -
Page 76: Editing A Song
Using the Song Sequencer To stop playback, press the L-16 (START/STOP) Editing a Song button. The following operations are supported during song editing. • Deleting a specific song or all songs • Copying a song from one area to another •…
-
Page 77
Using the Song Sequencer Press the R-17 (y) button to move the thick To clear a song brackets (%) to “To”. Perform the procedure under “To start a song editor operation” on page E-74 to display the song editor menu, with the 0 located at “Clear”. -
Page 78
Using the Song Sequencer To delete a specific measure from a song To insert blank measures into a song Perform the procedure under “To start a song Perform the procedure under “To start a song editor operation” on page E-74 to display the editor operation”… -
Page 79
Using the Song Sequencer In response to the “Sure?” message that To extract system track recorded content to appears, press the R-14 (YES) button to start track 04 through 07 or 09 through 16 extraction or the R-14 (NO) button to cancel. As explained in detail under “Songs, tracks, and parts”… -
Page 80: Editing A Track
Using the Song Sequencer To clear a single track Editing a Track Perform the procedure under “To start a track The following operations are supported during track (system track, Tracks 01 through 16) editing. editor operation” on page E-78 to display the •…
-
Page 81
Using the Song Sequencer To copy one track to another track (Tracks 01 To combine two tracks into a single track through 16 only) (Tracks 01 through 16 only) Perform the procedure under “To start a track In the song sequencer mode, use the R-17 (u, i) buttons to select the lower numbered track editor operation”… -
Page 82: Editing Events
Using the Song Sequencer After everything is the way you want, press the To start an event editor operation R-16 (ENTER) button. Press the C-3 (SONG SEQUENCER) button to • If the destination track does not contain recorded data, combination of the tracks starts immediately. enter the song sequencer mode.
-
Page 83
Using the Song Sequencer The following explains the meaning of each screen position. Event Types and Screen Content Number Description The event editor screen displays the individual events that make up a song as values and characters as shown in the For all event types, indicates the even location sample screen below. -
Page 84
Using the Song Sequencer ■ Event Data List The following table shows the event types that correspond to the abbreviations that appear on the display, as well as the parameters of each event type and setting ranges. • “ display” and “ display”… -
Page 85
Using the Song Sequencer ■ System Track Events Event Type display during display Parameter Name Setting Range insert display Event Name [Tone_U1] TnU1 UPPER 1 Tone VALU Tone Number A:001 — L:010 [Tone_U2] TnU2 UPPER 2 Tone VALU Tone Number A:001 — L:010 [Tone_Lo] TnLo… -
Page 86
Using the Song Sequencer Event Type display during display Parameter Name Setting Range insert display Event Name HARM, UPP1, UPP2, PART Part LOWR [CrsTune] CTun Part Coarse Tune VALU Part Coarse Tune –24 — 00 — +24 HARM, UPP1, UPP2, PART Part LOWR… -
Page 87
Using the Song Sequencer To select the types of events that appear on To edit an existing event the Event Editor screen (View Select) Display the event editor screen of the track that Perform the procedure under “To start an event includes the event you want to edit. -
Page 88
Using the Song Sequencer While holding down the R-13 (FUNCTION) To delete all events in a track button, press the C-13 (MENU) button to display Display the event editor screen of the track that the event editor menu. includes the events you want to delete. Use the R-17 (t, y) button to move the 0 to •… -
Page 89
Using the Song Sequencer After everything is the way you want, press the To insert an event R-16 (ENTER) button. Display the event editor screen of the track • This inserts the specified event. where you want to insert the event. •… -
Page 90
Using the Song Sequencer Press the C-10 (COPY) button. To quantize an individual note event • This displays the “Copy” screen. • If you have already specified a range using the locator Display the event editor screen of the track that screen (page E-73), that range will be displayed on the includes the event you want to quantize. -
Page 91
Using the Song Sequencer Use the dial or R-14 (–, +) buttons to change the To quantize all note events in a track setting in the thick brackets (%) to “Locator”. Display the event editor screen of the track you •… -
Page 92
Using the Song Sequencer ■ To delete all pitch bender events within a specific Deleting Pitch Bender Events range of a track You can use the procedures in this section to delete all pitch bender events from a track or from a specific range in a track. Display the event editor screen of the track whose pitch bender events you want to delete. -
Page 93
Using the Song Sequencer Press the R-16 (ENTER) button. To adjust the velocity value of a note event • This will display the setting screen like the one shown Display the event editor screen of the track you below. want to edit. •… -
Page 94
Using the Song Sequencer To adjust the gate time value of a note event To delete a beat event Perform steps 1 through 5 under “To adjust the Perform the procedure under “To start an event velocity value of a note event” on page E-91. In editor operation”… -
Page 95: Directly Inputting Note Events (Step Input
Using the Song Sequencer To insert a beat event To perform step input Perform steps 1 and 2 under “To delete a beat Display the event editor screen of the track event” (page E-92). where you want to perform step input. •…
-
Page 96
Using the Song Sequencer Use buttons R-1 (5) to R-4 ( • ) and buttons R-7 (6) to R-10 (,) to specify the length of the note you want to input. • For information about how to specify note lengths, see step 4 under “To insert an event” (page E-87). •… -
Page 97: Using The Function Menu
Using the Function Menu R-15 R-15 R-16 R-16 R-17 R-17 R-14 R-14 R-13 R-13 C-13 C-13 R-18 R-18 The function menu includes settings that normally need to be To adjust the “Tune” (Tuning) and “EQ” accessed relatively infrequently, such as overall tuning, (Equalizer) settings, use the R-17 (t, y) equalizer, touch response, local control on/off, etc.
-
Page 98: Function Menu Settings
Using the Function Menu To exit the function menu, press the R-13 Performance (Performance/Accompaniment) (FUNCTION) button or R-15 (EXIT) button. Group • Note that all function menu settings you configure are • You can directly display this group screen without going returned to their initial defaults whenever you turn off through the function menu.
-
Page 99
Using the Function Menu Play/CardUtl (Playback, Card Utility) Group ArpegHold (Arpeggiator Hold) Specifies the how arpeggio is played in accordance with pressed keyboard keys when the arpeggiator (page E-23) is being used. • You can directly display this group screen without going : Arpeggio played while the keys of a chord are through the function menu. -
Page 100: Midi Group
Using the Function Menu Volume (Volume) Group MIDI Group KeyboardCh (Keyboard Channel) • For details about “parts” mentioned here, see “How Parts Selects the channel for sending keyboard play MIDI data to an are Organized” (page E-38). external device (keyboard channel). — 16 AccompVol.
-
Page 101
Using the Function Menu Use the R-17 (t, y) buttons to select the AutoResume (Auto Resume) operation you want. Specifies whether the Digital Keyboard should remember its setup when turned off and restore it the next time it is turned Move the 0 here: To do this: Return the power on default settings… -
Page 102
Using the Function Menu ■ To initialize all data and settings (or parameter settings only) Press the R-13 (FUNCTION) button to display the function menu. Use the R-17 (i, y) buttons to move the 0 to “General” and then press the R-16 (ENTER) button. -
Page 103: Using A Memory Card
Using a Memory Card R-12 R-12 R-16 R-16 R-17 R-17 R-14 R-14 R-13 R-13 C-13 C-13 You can save Digital Keyboard user area data to a memory • For details about saving and loading all data, see “To batch card and load data from a memory card to Digital Keyboard save all Digital Keyboard data to a memory card”…
-
Page 104: Loading And Removing A Memory Card
Using a Memory Card • A memory card can become quite warm after very long use Entering the Card Mode in the card slot. This is normal and does not indicate malfunction. Enter the card mode when you want to perform memory card operations.
-
Page 105: Saving Digital Keyboard Data To A Memory Card
Using a Memory Card Use the R-17 (t, y) buttons to move the 0 to Depending on the type of data you want to save “CardFormat”. to the memory card, perform one of the steps shown below. • All setup registration banks are saved as a batch. Other data is saved in area (data item) units.
-
Page 106
Using a Memory Card Press the R-17 (y) button to change to the To batch save all Digital Keyboard data to a “Xxxx Save” screen. memory card Press the C-7 (CARD) button to enter the card mode. While holding down the R-13 (FUNCTION) button, press the C-13 (MENU) button. -
Page 107: Loading Data From A Memory Card
Using a Memory Card To batch load all Digital Keyboard memory Loading Data from a Memory data from a memory card Card Press the C-7 (CARD) button to enter the card mode. • Make sure that all of the data you want to load is in the While holding down the R-13 (FUNCTION) MUSICDAT folder on the memory card.
-
Page 108: To Delete A File From A Memory Card
Using a Memory Card To delete a file from a memory To rename a file on a memory card card Insert the memory card into the card slot. Insert the memory card into the card slot. Press the C-7 (CARD) button to enter the card Press the C-7 (CARD) button to enter the card mode.
-
Page 109: Playing A Music File From A Memory Card
Using a Memory Card R-16 R-16 R-17 R-17 R-14 R-14 L-12 L-12 L-13 L-13 L-15 L-15 L-17 L-17 L-14 L-14 L-16 L-16 Use the dial or R-14 (–, +) buttons to select the Playing a Music File from a music file you want to play. Memory Card You can use the Digital Keyboard to play music files you saved to a memory card with your computer.
-
Page 110
Using a Memory Card To start playback, press the L-16 (PLAY/STOP) Turning Off One Hand Part and Playing the button. Other Hand Part on the Keyboard (Part Off) • This starts playback of the part you turned on in step 3. When playing a music file of a piano piece that has the left hand and the right hand parts recorded in separate MIDI To stop playback, press the L-16 (PLAY/STOP) -
Page 111
Using a Memory Card Playing on the Keyboard Along with To repeat play a specific section of a song Playback of a Music File on a memory card Enter the card mode and select the MIDI file you You can perform the following operations and play on the want to play. -
Page 112: Connecting To A Computer
Configure the music software settings to select one of the following as the MIDI device. • USB jack CASIO USB-MIDI : (For Windows 7, Windows Vista, Mac OS X) USB Audio Device : (For Windows XP) • Never connect to a computer that does not conform to •…
-
Page 113: Storing And Loading Digital Keyboard Memory Data
You can use the procedures in this section to import and use storage. You also can load Auto Accompaniment data you rhythm data from another model. download from the CASIO website to the Digital Keyboard, which greatly expands the Auto Accompaniment patterns Rhythm Data Compatibility available to you.
-
Page 114: Importing Data From Various Storage Media
Connecting to a Computer Importing and Transferring Rhythm Data To load rhythm data into Digital Keyboard from Other Models memory You can transfer rhythm data from other models by loading it Perform one of the procedures below, depending on the type from a memory card, or by using Data Manager to transfer the of data you want to load.
-
Page 115: Reference
Reference Error Messages Display Message Cause Required Action Format 1. The current memory card format is not compatible with this 1. Format the memory card on the Digital Keyboard (page Digital Keyboard. E-102). 2. The memory card capacity is greater than 32GB. 2.
-
Page 116: Troubleshooting
Reference Troubleshooting Symptom Action Included Accessories I can’t find something that should be Carefully check inside all of the packing materials. included with the product. Power Requirements Power will not turn on. • Check the AC adaptor or make sure that the batteries are facing correctly (page E-9).
-
Page 117
Reference Symptom Action Notes keep sounding, without stopping. • Turn power off and then back on to initialize all Digital Keyboard settings (page E-13). • Replace the batteries with new ones or switch over to AC adaptor power (page E-9). Some notes are cut off while they are Notes are cut off whenever the number of notes being sounded exceeds the playing. -
Page 118: Specifications
Keyboard Play 5 songs, 17 tracks Memory Capacity Approximately 12,000 notes (total for 5 songs) Mixer 32 parts (A01-A16/B01-B16) Master parameters, DSP parameters, Part parameters (CTK-6200/WK-6600), MIC parameters (WK-6600 only) Other Functions Transpose ±1 octaves (–12 to +12 semitones) Octave Shift UPPER 1/UPPER 2/LOWER, ±2 octaves…
-
Page 119
Speakers 12cm × 2 + 3cm × 2 (Output: 6.0W + 6.0W) 12V = 18W Power Consumption Dimensions CTK-6200: 94.8 × 38.4 × 12.2 cm (37 × 15 × 4 inch) WK-6600: 116.1 × 38.5 × 14.7 cm (45 × 15 ×… -
Page 120: Operating Precautions
Reference Operating Precautions Be sure to read and observe the following operating precautions. ■ Location Avoid the following locations for this product. • Areas exposed to direct sunlight and high humidity • Areas subjected to temperature extremes • Near a radio, TV, video deck, or tuner The above devices will not cause malfunction of the product, but the product can cause interference in the audio or video of a nearby device.
-
Page 121: Dsp Effect List
Reference DSP Effect List Preset DSP List The table below shows the preset DSPs that can be selected by the procedure under “To use a DSP” (page E-35). • The “Number” column shows DSP numbers, while the “Screen Name” shows the DSP name that appears on the display. •…
-
Page 122
Reference DSP Type List All of the Digital Keyboard’s preset DSPs belong to one of the DSP types shown in the table below. When creating a user DSP (page E-36) or when using the tone editor (page E-44) to edit the DSP applied to a tone, you need to select one of the DSP types in the table. -
Page 123
Reference 04: Enhancer DSP Parameter List Phase shifts low-range sounds and high-range sounds of the ■ Single Type DSP Parameters input signal to enhance their profiles. Parameters and Value Ranges: 01: Wah 1 :Low Frequency (0 to 127) Adjusts the low range enhancer frequency. This is a “wah”… -
Page 124
Reference 08: Flanger 11: Reflection Applies wildly pulsating and metallic reverberation to sounds. An effector that extracts early reflections from reverb. Applies LFO waveform is selectable. acoustic presence to sounds. Parameters and Value Ranges: Parameters and Value Ranges: 1 :LFO Rate (0 to 127) 1 :Type (1, 2, 3, 4, 5, 6, 7, Adjusts the LFO rate.
 -
Page 125
Reference ■ Dual Type DSP Parameters 14: Lo-Fi Dual type DSPs are configured by combining two different Applies various types of noise to the input signal to reproduce single type DSPs. Use the procedure below to determine what a retro Lo-Fi sound. parameters that can be configured for each dual type DSP, Includes wow and flutter for rotational fluctuation like that in and the operation, and setting ranges of dual type DSPs. -
Page 126: Fingering Guide
Reference Fingered 3, Full Range Chords Fingering Guide In addition to the chords that can be fingered with Fingered 1 and Fingered 2, the following chords also are recognized. Fingered 1, Fingered 2 Chords Ddim add9 Cdim • With Fingered 3, the lowest note fingered is interpreted as Caug the base note.
-
Page 127: Assigning A Midi Channel To Each Part
Reference Assigning a MIDI Channel to Each Part The following shows the relationship between MIDI IN and MIDI OUT channels and each part. MIDI Channel MIDI Channel This part: Part name This part: Part name Upper1 Track /MIDI 01 Upper2 Track /MIDI 02 Lower…
-
Page 128: Parameter List
Reference Parameter List Refer to this column in To check this setting item: the table below: Setting items that are always saved when power is turned off Setting items stored in registration memory (page E-61) When “on” is selected for the “AutoResume (Auto Resume)” setting (page E-99), setting items that are restored to those in effect the last time power was turned off Items that are stored as “Default (Default Settings)”…
-
Page 129
Reference E-127… -
Page 132
This recycle mark indicates that the packaging conforms to the environmental protection legislation in Germany. MA1201-A Printed in China CTK6200/WK6600E1A…
 Adjusts the LFO rate.
 This manual is also suitable for:
Wk-6600
CTK6200_r_Cover1-4.fm Page 1 Wednesday, December 28, 2011 1:06 PM
R
—
CTK
6200
—
WK
6600
ИНСТРУКЦИЯ ПО ЭКСПЛУАТАЦИИ
Сохраните всю информацию, чтобы обращаться к ней в будущем.
Правила безопасности
Прежде чем приступать к эксплуатации
синтезатора, обязательно прочитайте брошюру
«Правила безопасности».
MA1201-A Printed in China
K
CTK6200/WK6600RU1A
CTK6200/WK6600RU1A
CTK6200_r.book Page 3 Tuesday, January 10, 2012 9:15 AM
Внимание!
Прежде чем приступать к эксплуатации данного изделия, ознакомьтесь со следующей важной информацией.
• Прежде чем приступать к эксплуатации адаптера переменного тока (приобретается дополнительно) для подачи
питания на устройство, проверить адаптер на предмет повреждений. Сетевой шнур тщательно проверить на предмет
разрывов, порезов, оголения провода, других серьезных повреждений. Если адаптер серьезно поврежден, не давать
его детям.
• Не пытаться перезаряжать батареи.
• Не вставлять а
ккумуляторные батареи.
• Не вставлять старые батареи вместе с новыми.
• Вставлять батареи рекомендованного типа или аналогичные.
• Ориентация положительного (+) и отрицательного (–) полюсов батарей должна соответствовать обозначениям у
батарейного отсека.
• При первых же признаках разрядки батарей как можно скорее их заменять.
• Не допускать короткого замыкания полюсов батарей.
• Изделие не предназначено д
ля детей в возрасте до 3 лет.
• Применять только адаптер «CASIO» AD-A12150LW.
• Адаптер переменного тока — не игрушка!
• Перед протиранием изделия отсоединять от него адаптер переменного тока.
Manufacturer:
CASIO COMPUTER CO., LTD.
6-2, Hon-machi 1-chome, Shibuya-ku, Tokyo 151-8543, Japan
Responsible within the European Union:
CASIO EUROPE GmbH
Casio-Platz 1, 22848 Norderstedt, Germany
● Воспроизведение содержания данной инструкции, как частично, так и полностью, запрещается. Любое
использование содержания данной инструкции, помимо личного пользования, без согласия «CASIO» запрещено
законами об авторском праве.
● КОМПАНИЯ «CASIO» НИ ПРИ КАКИХ ОБСТОЯТЕЛЬСТВАХ НЕ НЕСЕТ ОТВЕТСТВЕННОСТИ НИ ЗА КАКОЙ
УЩЕРБ (ВКЛЮЧАЯ, В ЧАСТНОСТИ, УБЫТКИ В СВЯЗИ С УПУЩЕННОЙ ВЫГОДОЙ, ПЕРЕРЫВОМ В
ДЕЯТЕЛЬНОСТИ, ПОТЕРЕЙ ИНФОРМАЦИИ), ВОЗНИКАЮЩИЙ В РЕЗУЛЬТАТЕ ИСПОЛЬЗОВАНИЯ ИЛИ
НЕВОЗМОЖНОСТИ ИСПОЛЬЗОВАНИЯ ДАННОЙ ИНСТРУКЦИИ ИЛИ ИЗДЕЛИЯ, ДАЖЕ ЕСЛИ КОМПАНИЯ
«CASIO» БЫЛА УВЕДОМЛЕНА О ВОЗМОЖНОСТИ ТАКОГО УЩЕРБА.
● Содержание данной инструкции может быть изменено без предупреждения.
● Внешний вид изделия может отличаться от показанного на иллюстрациях в данной инструкции по эксплуатации.
● Упоминаемые в данной инструкции названия компаний и н
аименования изделий могут являться
зарегистрированными торговыми марками других компаний.
R-1
CTK6200_r.book Page 2 Tuesday, January 10, 2012 9:15 AM
Оглавление
Общие указания …………………… R-4
Применение
Чтение информации на дисплее………….……. R-6
автоаккомпанемента…………..R-24
Режимы ………………..……………….……………..…. R-7
Воспроизведение автоаккомпанемента …..R-24
Меню……………….………………..……………….……. R-7
Выбор режима взятия аккордов …………..….R-26
, Меры предосторожности во время
Изменение моделей
отображения на дисплее сообщения
автоаккомпанемента………………….……………R-27
«Please Wait» …………………….……………….……. R-7
Работа с установками мгновенного
Сохранение показателей настройки…………. R-8
вызова……………………………..………………..……R-27
Восстановление заводских показателей
Применение автогармонизации………………..R-28
настройки синтезатора…………..……………..…. R-8
Работа с редактором стилей……………………R-29
Подготовка к игре ……………….. R-9
Применение эффектов к
Подготовка пюпитра ……….………………..……… R-9
звуку ………………….………………..R-32
Источник питания…………………………..………… R-9
Программирование эффектов…………….……R-32
Выбор эффекта ………….………………..…………R-34
Подключения …….………………. R-11
Создание пользовательского
Подключение наушников ………….………..….. R-11
ЦОС-эффекта ..………………..………………..……R-36
Подключение педали……………………………... R-11
Подключение микрофона
Работа с микшером …………….R-38
(только к модели WK-6600)…….…………..….. R-11
Общее описание микшера ……………….………R-38
Подключение аудиоаппаратуры,
Управление микшером…………….………………R-39
усилителя……………….………………..……………. R-12
Параметры настройки микшера ………….……R-41
Принадлежности из комплекта изделия и
продаваемые отдельно ………….………………. R-12
Работа с редактором
Выбор и воспроизведение
тембров……………..………………..R-44
тембра………………………………… R-13
Коротко о создании тембров……………………R-44
Как включить синтезатор ………………………. R-13
Создание пользовательского тембра……….R-45
Прослушивание демонстрационных
Параметры программирования тембров …..R-47
мелодий………………….………………..……………. R-14
Выбор тембра ….………………..……………….….. R-14
Музыкальные
Наложение тембров и тембральное
предустановки…..………………..R-49
разделение …………..……………….………………. R-15
Применение музыкальных
Повышение и понижение строя
предустановок ………….……………….……………R-49
клавиатуры (транспонирование) ……….……. R-18
Создание пользовательской
Применение функции „октавный сдвиг“….. R-18
предустановки ………….……………….……………R-53
Работа с метрономом ………..………..…………. R-19
Редактирование а ккордовой
Управление колесом высоты тона ………….. R-20
последовательности…………………..……………R-57
Выбор темперации и точная
настройка строя …………………..………………... R-21
Сохранение наборов настроек в
Автоматическое воспроизведение
арпеджио (арпеджиатор) …………….…………. R-23
регистрационной памяти…….R-61
Как сохранить набор настроек в
регистрационной памяти………….………………R-62
Как вызвать набор настроек из
регистрационной памяти………….………………R-62
R-2

CTK6200_r.book Page 3 Tuesday, January 10, 2012 9:15 AM
Оглавление
Работа с секвенсором
Справочная информация ….R-113
композиций………………………… R-63
Сообщения об ошибках …….……………..…….R-113
Поиск и устранение неисправностей………R-114
Включение записи в одно касание
(«EASY REC»)……….……………….………………. R-63
Технические характеристики …………………R-116
Возможности секвенсора композиций…….. R-65
Правила безопасности …………..………………R-118
Запись отдельных дорожек ……………………. R-67
Перечень ЦОС-эффектов……………..……….R-119
Перезапись заголовочных показателей
Указатель способов взятия аккордов…….R-124
настройки композиции путем записи с
Разрешенные к вводу символы………………R-124
панельными показателями……………………... R-71
Соотношение MIDI-каналов и партий ……..R-125
Воспроизведение записанной
Перечень параметров…………………………….R-126
композиции ……………………….……………….….. R-72
Примеры аккордов …………………….………….R-127
Редактирование композиции………………….. R-74
Редактирование дорожки ………………………. R-78
MIDI Implementation Chart
Редактирование событий………………….……. R-80
Прямой ввод событий «нота»
(поэтапный ввод)……………………………………. R-93
Работа с меню функций …….. R-95
Работа с меню функций ……….…………..……. R-95
Показатели настройки в меню функций….. R-96
Работа с картой памяти …… R-101
Загрузка и извлечение карты памяти……. R-102
Вход в картовый режим ….………………..….. R-102
Форматирование карты памяти…………..… R-102
Сохранение данных из синтезатора на
карте памяти ……..………………..…………….… R-103
Загрузка данных с карты памяти ………….. R-105
Как удалить файл с карты памяти ………… R-106
Как переименовать файл на карте
памяти ………………….……………….…………….. R-106
Воспроизведение музыкального файла
с карты памяти …………….………………..…….. R-107
Подключение к
компьютеру………..…………….. R-110
Минимальные требования к компьютерной
системе……………………………..……………….… R-110
Сохранение и загрузка данных из памяти
синтезатора ….………………..………………..….. R-111
Применение стилей (автоаккомпанемента)
из других моделей………………….…………….. R-111
Импорт данных с различных
носителей………………….………………..……….. R-112
R-3
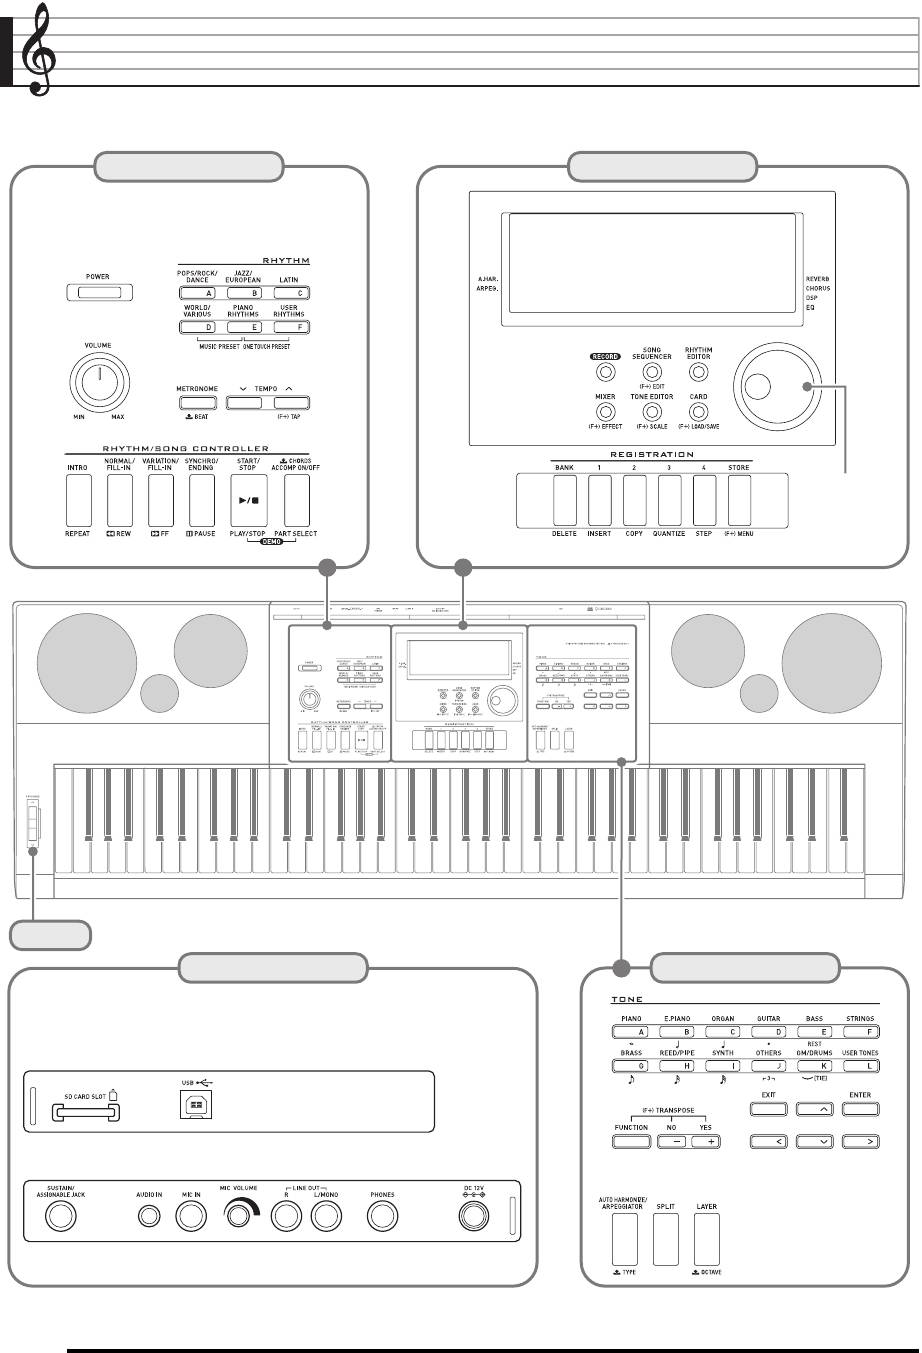
CTK6200_r.book Page 4 Tuesday, January 10, 2012 9:15 AM
Общие указания
• На иллюстрациях в данной инструкции по эксплуатации изображена модель WK-6600.
L-1
—
L-17 C-1
—
C-13
Дисковый
регулятор
S-1
—
T-9
R-1
—
R-20T-1
Тыльная панель
R-4
CTK6200_r.book Page 5 Tuesday, January 10, 2012 9:15 AM
Общие указания
• В данной инструкции термином «синтезатор» обозначаются модели инструмента CTK-6200 и WK-6600.
• В данной инструкции органы управления обозначаются нижеуказанными числами и названиями.
• Ниже дается объяснение значения знаков # и $, нанесенных на пульте управления изделия и рядом с
названиями нижеперечисленных клавиш.
# Обозначает функцию, которая включается в результате нажатия на соответствующую кнопку, если нажать и не отпускать кнопку
R-13 (FUNCTION). Например, «SONG SEQUENCER, # EDIT» означает, что функция «EDIT» включается при нажатии на кнопку
R-13 (FUNCTION).
$ Обозначает функцию, которая включается, если на соответствующую кнопку нажать и некоторое время ее не отпускать.
Например, «METRONOME, BEAT $» означает, что функция «BEAT» включается, если на кнопку нажать и некоторое время ее не
отпускать.
L-1
кнопка «POWER» . . . . . . . . . . . . . . . . . . . . . . . . . . ☞13
Кнопки «TONE»
L-2
ручка «VOLUME». . . . . . . . . . . . . . . . . . . . . . . . . . . ☞13
R-1
кнопка «[A] PIANO, 5». . . . . . . . . . . . . . ☞14, 58, 87
Кнопки «RHYTHM»
R-2
кнопка «[B] E. PIANO, 1». . . . . . . . . . . . ☞14, 58, 87
R-3
кнопка «[C] ORGAN, 2» . . . . . . . . . . ☞14, 58, 87, 88
L-3
кнопка «[A] POPS/ROCK/DANCE» . . . . . . . ☞ 14, 24
R-4
кнопка «[D] GUITAR, •». . . . . . . . . . . . . ☞14, 58, 87
L-4
кнопка «[B] JAZZ/EUROPEAN» . . . . . . . . . . . . ☞24
R-5
кнопка «[E] BASS, REST». . . . . . . . . . . . . . ☞14, 93
L-5
кнопка «[C] LATIN» . . . . . . . . . . . . . . . . . . . . . . ☞24
R-6
кнопка «[F] STRINGS». . . . . . . . . . . . . . . . . . . . ☞14
L-6
кнопка «[D] WORLD/VARIOUS,
MUSIC PRESET». . . . . . . . . . . . . . . . . . . . . . ☞24, 49
R-7
кнопка «[G] BRASS, 6». . . . . . . . . . ☞14, 58, 87, 88
L-7
кнопка «[E] PIANO RHYTHMS,
R-8
кнопка «[H] REED/PIPE, 7» . . . . . . ☞14, 58, 87, 88
ONE TOUCH PRESET». . . . . . . . . . . . . . ☞24, 27, 49
R-9
кнопка «[I] SYNTH, 8». . . . . . . . . . . . . . ☞14, 87, 88
L-8
кнопка «[F] USER RHYTHMS» . . . . . . . . . . ☞24, 27
R-10
кнопка «[J] OTHERS, ,» . . . . . . . ☞14, 58, 87, 88
L-9
кнопка «METRONOME, $BEAT». . . . . . . . . . . . . ☞19
R-11
кнопка «[K] GM/DRUMS, ..» . . . . . . . ☞14, 93
L-10
кнопка «TEMPO w» . . . . . . . . . . . . . . . . . . . . . . . . ☞19
R-12
кнопка «[L] USER TONES» . . . . . . . . . . . . . ☞14, 45
L-11
кнопка «TEMPO q, #TAP» . . . . . . . . . . . . . . . ☞19
R-13
кнопка «FUNCTION». . . . . . . . . . . . . . . . . . . . . . . . ☞95
R-14
кнопки «NO/–», «YES/+»,
Кнопки «RHYTHM/SONG CONTROLLER»
« #TRANSPOSE» . . . . . . . . . . . . . . . . ☞6, 14, 18, 24
L-12
кнопка «INTRO, REPEAT» . . . . . . . . . . ☞27, 73, 109
R-15
кнопка «EXIT»
L-13
кнопка «NORMAL/FILL-IN, s REW»
R-16
кнопка «ENTER»
. . . . . . . . . . . . . . . . . . . . . . . . . . . . . ☞14, 27, 72, 107
R-17
кнопки u, t, y, i . . . . . . . . . . . . . . . . . . . . . . . . ☞7
L-14
кнопка «VARIATION/FILL-IN, dFF»
R-18
кнопка «AUTO HARMONIZE/ARPEGGIATOR,
. . . . . . . . . . . . . . . . . . . . . . . . . . . . . ☞14, 27, 72, 107
$TYPE» . . . . . . . . . . . . . . . . . . . . . . . . . . . . . . ☞23, 28
L-15
кнопка «SYNCHRO/ENDING, PAUSE»
R-19
кнопка «SPLIT» . . . . . . . . . . . . . . . . . . . . . . . . . . . . ☞14
. . . . . . . . . . . . . . . . . . . . . . . . . . . . . ☞24, 27, 72, 107
R-20
кнопка «LAYER, $OCTAVE». . . . . . . . . . . . . ☞ 14, 18
L-16
кнопка «START/STOP,
PLAY/STOP, DEMO». . . . . . . . . . . . ☞14, 24, 72, 107
S-1
колесо «PITCH BEND» . . . . . . . . . . . . . . . . . . . . . . ☞20
L-17
кнопка «ACCOMP ON/OFF, $CHORDS, PART
T-1
SD CARD SLOT (картоприемник) . . . . . . . . . . . ☞101
SELECT, DEMO». . . . . . . . . . . . . . . ☞14, 24, 26, 108
T-2
гнездо «USB» . . . . . . . . . . . . . . . . . . . . . . . . . . . . ☞110
T-3
SUSTAIN/ASSIGNABLE JACK . . . . . . . . . . . . . . . . ☞11
C-1
дисплей. . . . . . . . . . . . . . . . . . . . . . . . . . . . . . . . . . . . ☞6
T-4
гнездо «AUDIO IN» . . . . . . . . . . . . . . . . . . . . . . . . . ☞12
C-2
кнопка «RECORD» . . . . . . . . . . . . . . . . . . . ☞63, 67, 68
T-5
гнездо «MIC IN» (только у модели WK-6600) . . . . ☞11
C-3
кнопка «SONG SEQUENCER, #EDIT» . . ☞7, 67, 74
T-6
ручка «MIC VOLUME»
C-4
кнопка «RHYTHM EDITOR» . . . . . . . . . . . . . . . . . . ☞29
(только у модели WK-6600) . . . . . . . . . . . . . . . . . . ☞11
C-5
кнопка «MIXER, #EFFECT». . . . . . . . . . . . . ☞34, 39
T-7
гнезда «LINE OUT R, L/MONO» . . . . . . . . . . . . . . . ☞12
C-6
кнопка «TONE EDITOR, #SCALE» . . . . . . . ☞21, 45
T-8
гнездо «PHONES». . . . . . . . . . . . . . . . . . . . . . . . . . ☞11
C-7
кнопка «CARD, #LOAD/SAVE». . ☞7, 102, 103, 105
T-9
гнездо «DC 12V» . . . . . . . . . . . . . . . . . . . . . . . . . . . . ☞9
Дисковый регулятор . . . . . . . . . . . . . . . . . . . ☞6, 14, 24
Кнопки «REGISTRATION»
C-8
кнопка «BANK, DELETE» . . . . . . . . ☞58, 61, 85, 92
C-9
кнопка «1, INSERT» . . . . . . . . . . . . . ☞58, 61, 87, 93
C-10
кнопка «2, COPY». . . . . . . . . . . . . . . . . . . . . ☞61, 87
C-11
кнопка «3, QUANTIZE» . . . . . . . . . . . . . . . . ☞61, 88
C-12
кнопка «4, STEP» . . . . . . . . . . . . . . . . . . ☞59, 61, 93
C-13
кнопка «STORE, #MENU» . . . . . . . . . . . . ☞7, 62
R-5
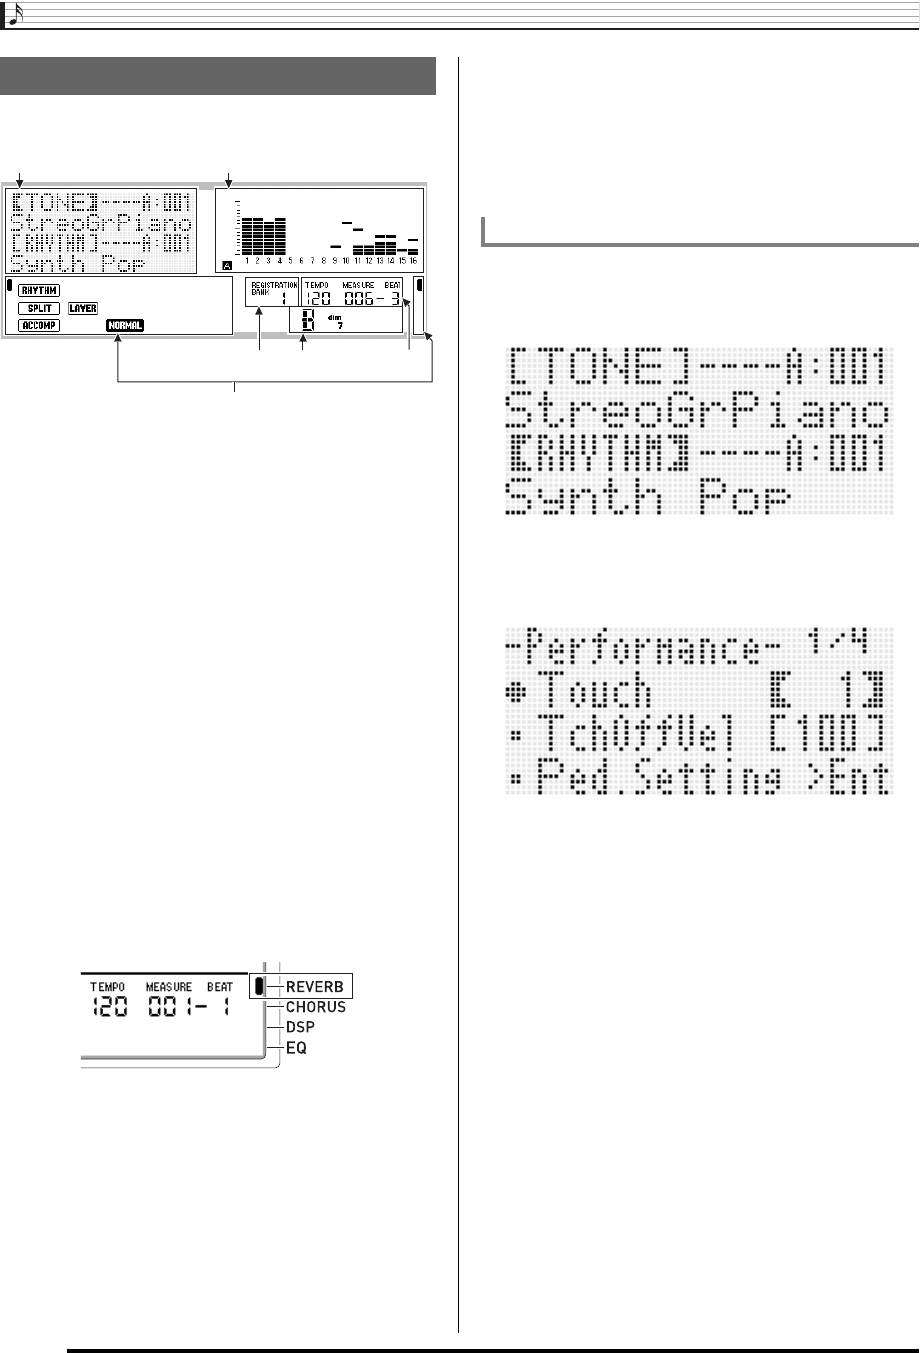
Общие указания
6
Область темпа, такта, доли
Чтение информации на дисплее
Темп отображается заданным значением в виде
ударов в минуту. В темпе, величина которого здесь
В этом разделе разъясняется, что означает индикация
отображается, воспроизводятся автоаккомпанемент,
на дисплее синтезатора.
сигнал метронома (стр. R-19) и др. Значения
«MEASURE» и «BEAT» отсчитываются по мере
воспроизведения автоаккомпанемента, сигнала
метронома и др.
Элемент, выбранный на дисплее, отмечается жирными
скобками (%) и кружком (0). Именно на выбранный
элемент влияют действия кнопками R-14 (–, +) и
дисковым регулятором.
54
6
3
1
Область детальной информации
В этой области в процессе работы синтезатора
отображается различная информация. Эта область
предназначена для проверки правильности ввода
новых значений, для выбора пункта меню, других
действий.
2
Область индикатора уровня
На этой экранной странице выбра
н показатель
Индикатор уровня показывает уровень громкости
настройки «RHYTHM» (стиль), так как он заключен в
звуков при игре на клавиатуре и при воспроизведении
жирные скобки. Это указывает на возможность смены
автоаккомпанемента. В общей сложности имеется 32
заданного стиля.
партии: по 16 в группе A и в группе B. При
отображении индикатором уровня звука партий из
группы A в левом нижнем углу горит индикатор L,
партий из группы B — индикатор M.
Подробную информацию о партиях см. в подразделе
«Как организованы партии» (стр. R-38).
3
Области индикаторов
В областях индикаторов отображается такая
информация, как текущий режим (стр. R-7),
показатели настройки, состояние
автоаккомпанемента, другая информация.
Имеются два вида индикаторов: текстовые, такие как
На этой экранной странице выбран показатель
:, и индикаторы-указатели (K).
настройки «Touch» (динамическая чувствительность
Индикатор-указатель представляет собой знак K,
клавиатуры), так как рядом с ним имеется кружок (0).
который появляется у границы дисплея рядом с
Это указывает на возможность изменения значения,
надписью и указывает на
заданный показатель
заключенного в жирные скобки, справа от слова
настройки или статус. Так, в нижеприведенном
«Touch».
примере указателем (K) у правой границы дисплея
отмечен эффект «REVERB».
4
Область банков регистрационной памяти
В этой области отображается номер выбранного
банка регистрационной памяти (стр. R-61).
5
Область аккордов
При применении автоаккомпанемента (стр. R-24) или
музыкальной предустановки (стр. R-49) в этой
области отображается обозначение взятого аккорда.
Она рассчитана и на обозначения аккордов с
самостоятельным басом, состоящие из символа корня
аккорда (C, G и т. п.) и его типа (m, 7 и т. п.).
R-6
21
CTK6200_r.book Page 6 Tuesday, January 10, 2012 9:15 AM
Индикация выбранного элемента
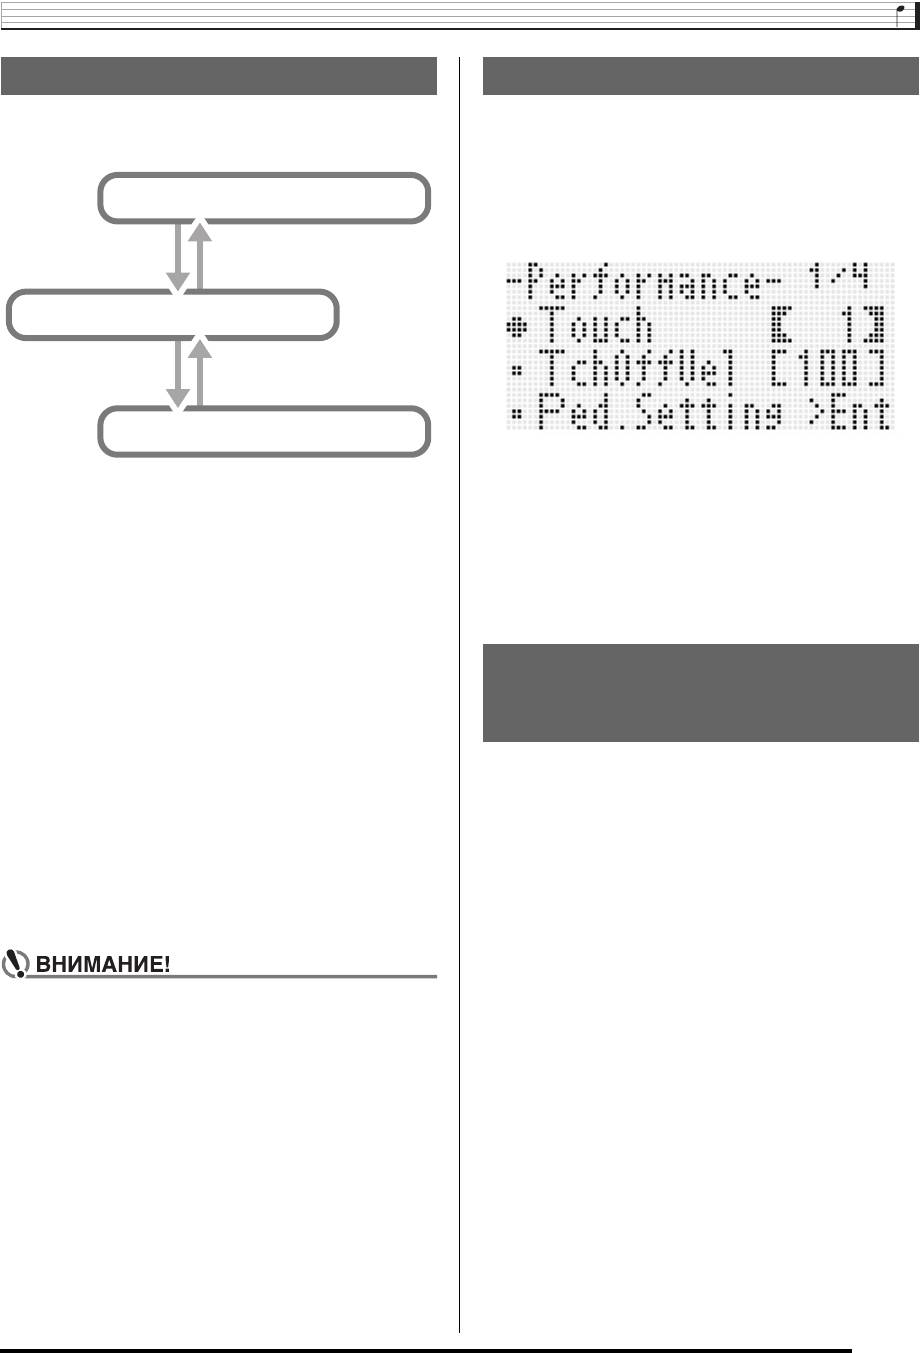
CTK6200_r.book Page 7 Tuesday, January 10, 2012 9:15 AM
Общие указания
Режимы
Меню
Синтезатор имеет три режима: стилевый, картовый и
Меню режима и меню отдельных функций можно
секвенсорный. Выбранный режим отмечается
выводить на дисплей таким же образом. Для
индикатором на дисплее.
отображения меню, нажав на кнопку R-13 (FUNCTION) и
не отпуская ее, нажать на кнопку C-13 (MENU). Так,
выполнение этого действия в стилевом режиме приводит
Картовый режим
к отображению меню «Performance», показанного ниже.
Это меню обеспечивает прямой доступ к функциям
регулирования особенностей исполнения.
кнопка C-7 (CARD) или
кнопка C-7 (CARD)
R-15 (EXIT)
Стилевый режим
кнопка C-3 (SONG
кнопка C-3 (SONG
SEQUENCER)
SEQUENCER) или R-15 (EXIT)
Секвенсорный режим
• Рядом с выбранным показателем настройки имеется
кружок (0). Перевод его по вертикали выполняется
• Стилевый режим (горит индикатор :)
кнопками R-17 (t, y). Перелистывание страниц меню
Стилевый режим включается по умолчанию после
выполняется кнопками
R-17 (u, i).
включения синтезатора. Это основной режим. В этот
• Для выхода из отображенного меню нажать на кнопку
режим требуется войти для того, чтобы поиграть на
R-15 (EXIT). В некоторых случаях на кнопку R-15 (EXIT)
клавиатуре или включить автоаккомпанемент.
требуется нажимать несколько раз.
• Картовый режим (горит индикатор ;)
• Описание пунктов меню и действий для определенных
Для работы с картой памяти требуется войти в
режимов и функций приводится в соответствующих
картовый режим. Дополнительную информацию см. в
разделах данной инструкции по эксплуатации.
главе «Работа с картой памяти» (стр. R-101).
– Войти в картовый режим из стилевого позволяет
нажатие на кнопку C-7 (CARD).
,
Меры предосторожности во
– В картовом режиме нажатие н
а кнопку C-7 (CARD)
или R-15 (EXIT) позволяет возвратиться в стилевый
время отображения на дисплее
режим.
• Секвенсорный режим (горит индикатор < )
сообщения «Please Wait»
В секвенсорный режим требуется войти для записи
Пока на дисплее отображается сообщение «Please Wait»,
исполнения на клавиатуре и с помощью
не выполняйте никаких действий, не вставляйте и не
автоаккомпанемента, а также для воспроизведения
извлекайте карту памяти. Подождите, пока сообщение
электронной композиции. Подробности см. в разделе
не погаснет.
«Работа с секвенсором композиций» (стр. R-63).
• Сообщение «Please Wait» означает, что синтезатор
– Войти в секвенсорный режим из стилевого
выполняет сохранение данных. Выключение
позволяет нажатие на кнопку C-3 (SONG
синтезатора, а также извлечение карты памяти может
SEQUENCER).
привести к удалению или повреждению данных. Это
– В секвенсорном режиме нажатие на кнопку C-3
может также привести к невключению синтезатора
(SONG SEQUENCER) или R-15 (EXIT) позволяет
при нажатии на кнопку L-1 (POWER).
возвратиться в стилевый режим.
• В этом случае см. раздел «Поиск и устранение
неисправностей» (стр. R-114).
• После выполнения нужных действий в любом из
режимов кроме стилевого обязательно
возвратитесь в стилевый режим. Стилевый режим
включается по умолчанию после включения
синтезатора.
• Если особо не указано, все действия, описанные в
этой инструкции по эксплуатации, выполняются в
стилевом режиме.
R-7
CTK6200_r.book Page 8 Tuesday, January 10, 2012 9:15 AM
Общие указания
Сохранение показателей
настройки
Синтезатор оснащен секвенсором композиций и другими
функциями, позволяющими хранить создаваемые
данные. Сохраненные данные не утрачиваются и после
*
выключения синтезатора.
Однако у тембров, стилей и других показателей
настройки, обычно выставляемых на пульте
синтезатора, после выключения синтезатора всегда
восстанавливаются начальные значения,
устанавливающиеся по умолчанию при включении
синтезатора.
Синтезатор можно запрограммировать так, чтобы он
запоминал последний набор настроек, а можно при
каждом включении синтезатора применять
определенный набор настроек, заданный по умолчанию.
По
дробности см. в частях «AutoResume
(автовозобновление)» (стр. R-99) и «Default (показатели
настройки по умолчанию)» (стр. R-99).
* Данные и показатели настройки, перечисленные ниже,
всегда сохраняются и при выключении синтезатора.
– Набор настроек из регистрационной памяти
(стр. R-61)
– Данные секвенсора композиций (стр. R-63)
– Пользовательские стили (стр. R-29)
– Пользовательские предустановки (стр. R-53)
– Пользовательские тембры (стр. R-44)
– Пользовательские ЦОС-эффекты (стр. R-36)
– Величина контраста ЖКД (стd. R-98)
– Настройка автовозобновления (стр. R-99)
Восстановление заводских
показателей настройки
синтезатора
Из памяти синтезатора можно удалить все данные и
восст
ановить все заводские показатели настройки.
Подробности см. в разделе «Как инициализировать все
данные и показатели настройки (или только
параметры)» (стр. R-100).
R-8
Пepeд началом использования настоящего изделия, внимательно ознакомьтесь с инструкцией для синтезатора Casio CTK-6200 и следуйте предлагаемым в ней указаниям и рекомендациям.
Рекомендации: Протирайте изделие мягкой тканью, сухой или смоченной в слабом водном растворе умеренного нейтрального моющего средства.
В мануале Casio CTK-6200 содержатся ответы на часто задаваемые вопросы: дисплей, режимы, меню, подготовка к игре, применение автоаккомпанемента и эффектов к звуку, работа с микшером и редактором тембров, музыкальные предустановки (применение, создание, редактирование), секвенсор композиций и моделей, запись и воспроизведение звуковых файлов, работа с картой памяти, подключение к компьютеру, сообщения об ошибках, поиск и устранение неисправностей, указатель способов взятия аккордов, уход за инструментом.