![]()
®
POD® HD Pro
Advanced Guide
An in-depth exploration of the features & functionality of POD HD Pro
Electrophonic Limited Edition
|
Table of Contents |
|
|
Overview……………………………………………………………………… |
1•1 |
|
Home Views………………………………………………………………………………………. |
1•1 |
|
Tuner Mode………………………………………………………………………………………. |
1•4 |
|
Tap Tempo………………………………………………………………………………………… |
1•5 |
|
Connections………………………………………………………………………………………. |
1•5 |
|
POD HD Edit Pro Software…………………………………………………………………. |
1•6 |
|
System Setup……………………………………………………………….. |
2•1 |
|
Accessing System Setup……………………………………………………………………… |
2•1 |
|
Page 1, Setup:Utilities Options……………………………………………………………. |
2•2 |
|
Page 2, Setup:Utilities Options……………………………………………………………. |
2•3 |
|
Page 3, Setup: Input Options……………………………………………………………….. |
2•4 |
|
Page 4, Setup: Output Options…………………………………………………………….. |
2•8 |
|
Page 5, Setup: Digital Output Options………………………………………………….. |
2•9 |
|
Page 6, MIDI/Tempo Options…………………………………………………………… |
2•10 |
|
Page 7, Setup: Variax Options……………………………………………………………. |
2•11 |
|
Page 8, James Tyler Variax Tuning Options…………………………………………. |
2•16 |
|
Page 9, Setup: L6 LINK Audio…………………………………………………………… |
2•17 |
|
Page 10, Setup: L6 LINK Control………………………………………………………. |
2•17 |
|
Features & Functionality………………………………………………. |
3•1 |
|
FX Blocks………………………………………………………………………………………….. |
3•1 |
|
Mixer Block………………………………………………………………………………………. |
3•4 |
|
Moving FX Blocks……………………………………………………………………………… |
3•5 |
|
FX & Amp Block FBV Footswitch Assignment…………………………………….. |
3•7 |
|
Dynamic DSP……………………………………………………………………………………. |
3•8 |
|
Set Lists & Presets |
………………………………………………………… 4•1 |
|
Working with Set Lists……………………………………………………………………….. |
4•1 |
|
Working with Presets………………………………………………………………………….. |
4•5 |
|
Saving Presets……………………………………………………………………………………. |
4•6 |
|
FX Edit Mode……………………………………………………………….. |
5•1 |
|
Accessing FX Edit Mode……………………………………………………………………… |
5•1 |
|
Amp, Cab & Mic Models………………………………………………… |
6•1 |
|
Amp Model Positioning……………………………………………………………………… |
6•1 |
|
Selecting Amp, Cab & Mic Models……………………………………………………… |
6•3 |
|
Editing Amp Parameters……………………………………………………………………… |
6•6 |
|
Amp & Cab Edit Display…………………………………………………………………….. |
6•7 |
|
Amp/Preamp Models………………………………………………………………………… |
6•12 |
|
Cab Models…………………………………………………………………………………….. |
6•14 |
|
FX Models……………………………………………………………………. |
7•1 |
|
Dynamics Models……………………………………………………………………………….. |
7•1 |
|
Distortion Models………………………………………………………………………………. |
7•2 |
|
Modulation Models……………………………………………………………………………. |
7•3 |
|
Filter Models……………………………………………………………………………………… |
7•5 |
|
Pitch Models……………………………………………………………………………………… |
7•6 |
|
Preamp & EQ Models…………………………………………………………………………. |
7•9 |
|
Delay Models…………………………………………………………………………………… |
7•10 |
|
Reverb Models…………………………………………………………………………………. |
7•12 |
|
Volume/Pan & Wah Models………………………………………………………………. |
7•14 |
|
Looper Mode………………………………………………………………… |
8•1 |
|
Looper Controls & Performance View………………………………………………….. |
8•1 |
|
Looper Settings………………………………………………………………………………….. |
8•4 |
|
USB Audio……………………………………………………………………. |
9•1 |
|
The Line 6 USB Audio Driver…………………………………………………………….. |
9•1 |
|
The Line 6 Audio-MIDI Devices Panel………………………………………………… |
9•3 |
|
Mac® — Line 6 Audio-MIDI Devices……………………………………………………. |
9•4 |
|
Windows® — Line 6 Audio-MIDI Devices…………………………………………….. |
9•8 |
|
Appendix A: Line 6 Monkey |
………………………………………….. A•1 |
|
Launch Line 6 Monkey………………………………………………………………………. |
A•1 |
|
Grab Those Updates………………………………………………………………………….. |
A•2 |
|
Line 6 Variax Updates……………………………………………………………………….. |
A•4 |
|
Appendix B: FBV Foot Controllers………………………………… |
B•1 |
|
FBV MkII & FBV Series Controllers……………………………………………………. |
B•1 |
|
Setup Options for FBV……………………………………………………………………….. |
B•2 |
|
FBV Controller Devices — Footswitch & Pedal Mapping ………………………… |
B•5 |
|
FBV Shortboard MkII…………………………………………………………………………. |
B•5 |
|
FBV Express MkII………………………………………………………………………………. |
B•8 |
|
FBV Longboard………………………………………………………………………………… |
B•10 |
|
FBV Shortboard……………………………………………………………………………….. |
B•13 |
|
Expression Pedal & Variax® Knob Controller Assignment…………………… |
B•16 |
|
Amp & FX Block Footswitch Assignment…………………………………………… |
B•18 |
|
Set List Select………………………………………………………………………………….. |
B•22 |
|
Tap Tempo………………………………………………………………………………………. |
B•22 |
|
Tuner Mode…………………………………………………………………………………….. |
B•23 |
|
Appendix C: MIDI………………………………………………………… |
C•1 |
|
Controlling POD HD Pro Functions via MIDI………………………………………. |
C•2 |
|
Bank & Program Change Messages………………………………………………………. |
C•3 |
|
Using POD HD Pro/FBV as a MIDI Controller……………………………………… |
C•5 |
Line 6, POD, DT50, DT25, Variax, James Tyler, Vetta, L6 LINK, CustomTone and Line 6 Monkey are trademarks of Line 6, Inc. All other product names, trademarks and artists’ names are the property of their respective owners, which are in no way associated or affiliated with Line 6. Product names, images, and artists’ names are used solely to identify the products whose tones and sounds were studied during the Line 6 sound model development for this product. The use of these products, trademarks, images, and artists’ names does not imply any cooperation or endorsement.
Copyright © 2012 Line 6, Inc.

Overview
Overview
|
Welcome to the POD® HD Pro Advanced Guide. This guide contains in-depth details |
1•1 |
of the POD HD Pro features and functionality. Please be sure to also read through your POD HD Pro Pilot’s Handbook for basic info on POD HD Pro and this Guide will take it from there! In this chapter, we’ll present an overview of the main screens and features to get you started.
This Guide covers POD HD Pro with Flash Memory version 2.0 (or later) installed.
Please use Line 6 Monkey to check for and install the latest updates for your device — see
“Appendix A: Line 6 Monkey” on page A•1.
HomeViews
SAVE
PRESETS
HOLD FOR SYSTEM & I/O
VIEW
The place to start is in one of the Home View screens. Press the VIEW button to rotate through the available Home Views. While in any of these Home View screens, you can turn the PRESETS knob and call up a Preset in the current Setlist, or push the PRESETS knob to select from among other Set Lists!
Signal FlowView
The Signal Flow View displays all Amp & FX “Blocks” and their ordering for the current Preset. As you’ll see in several of the following chapters, this is the screen where you’ll “select” the desired Block to perform other actions, such as choose a new Amp or FX Model, edit its parameters, move its position, and more.
Currently loaded Preset location and title 
Use the  and Nav.
  Pad buttons to select the desired Block
FX Blocks within “Pre” position
|
Amp Blocks |
FX Blocks within |
|
“Post” position |
The items within the Signal Flow View
Parallel Paths A (upper) and B (lower) with Mixer Block
Looper
The signal flow architecture of each Preset is comprised of 3 main sections where Amp & FX Blocks can be positioned: Pre, Post and parallel Paths A & B.
Overview
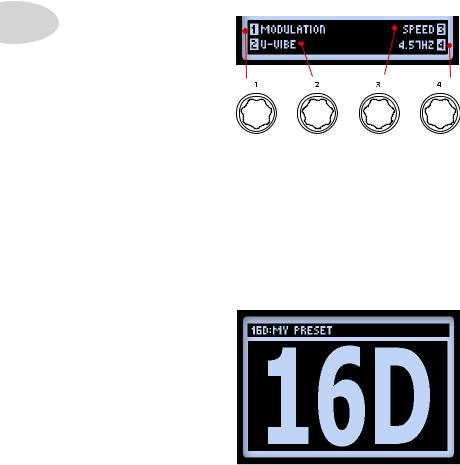
At the bottom of the Signal Flow View screen, you’ll see up to four parameters that are accessed using the Multi-function knobs 1-4.
1•2
Accessing parameters with the Multi-select Knobs
These parameters are specific to the currently selected Block and allow you to choose new Models & edit parameters. Or, you can dive deeper using the Edit Mode and access additional settings in other screens, as covered in the following chapters.
Big UserView
This screen simply provides you with one BIG display of the currently loaded Preset number — convenient for dark stages!
The Big User View

Overview
PerformanceView
This screen displays the functions available for a Line 6 FBV™ Controller’s footswitch functions, if an FBV is connected. This screen appears in three different variations, 1•3 depending on your device settings. The four options on the lower half of the screen pertain
to the FBV A, B, C & D footswitches.
You’ll see one of the following screens appear, dictated by the current POD HD Pro Setup — FS MODE setting — Also see “Page 1, Setup:Utilities Options” on page 2•2 for details.
|
“ABCD” Mode |
“FS 5-8” Mode |
When POD HD Pro is in Looper Mode (Looper Mode is available when an FBV device is connected), a 3rd variation of the screen displays the Looper functions that are accessed by the FBV A, B, C & D footswitches. Also see “Looper Controls & Performance View” on page 8•1.
The Performance View with Looper Mode active
Overview
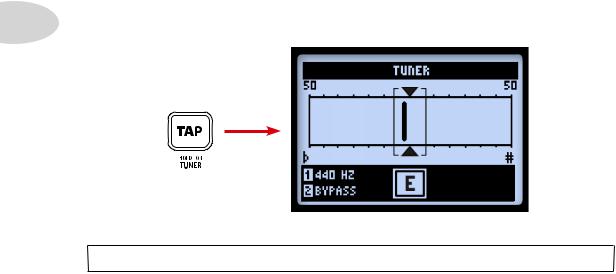
Tuner Mode |
|
|
1•4 |
To enter Tuner mode, press and hold the TAP button. A few options are available, adjusted |
|
using the Multi-function knobs. |
The Tuner screen
Note that the Tuner receives a signal only from the POD HD Pro Input 1 source.
Pluck an individual string on your guitar and you’ll see the name of the note displayed. When the graphic bar is to the left of center, your string is flat; when it is to the right, your string is sharp. When the bar is within the center range, triangles will appear above and below it, indicating your string is in tune.
•Reference (Knob 1): If you’d like to tune to a reference other than standard 440Hz, select from 425 to 455Hz.
•Audio (Knob 2): Select Mute to silence POD HD Pro output while tuning, or select Bypass to hear your guitar dry.
Press the TAP switch, or any other button, to exit Tuner Mode.

Overview
TapTempo
Tap Tempo is the term we use to refer to the “System Tempo” value that is
accessed via the TAP button on your device. Tap rhythmically to set your Tempo. 1•5 Alternatively, you can set a numerical Tempo value within Setup (see “Page 6,
MIDI/Tempo Options” on page 2•10). This setting is saved per Preset.
You’ll see the TAP switch blink to indicate your current Tap Tempo BPM (if your Tap LED option is set to “On” — see “Page 6, MIDI/Tempo Options” on page 2•10). Tempo-based FX (Modulation, Filter & Delay FX) that offer a Tempo Sync parameter can optionally be set to a note division of this Tap Tempo value.
Connections
Please refer to your POD HD Pro Pilot’s Guide for descriptions of the Input & Output connections. You’ll find more details on their specific uses within the following chapters as well!

Overview
POD HD Edit Pro Software
Be sure to visit line6.com/software to download the Line 6 POD® HD Pro Edit software
1•6 — the free patch editor/librarian for Mac® and Windows® computers. Using POD HD Pro Edit and a USB connection you can easily create, audition, customize, backup/restore and save an unlimited number of Tone Presets for your device.
The POD HD Pro Edit application
![]()
System Setup
System Setup
In this chapter, we’ll cover the options for configuring your POD® HD Pro system settings.
Note that some System Setup options are “global” settings (they persist always, regardless of
the current Preset) while others are saved individually per Preset, as noted in the following 2•1 sections. You’ll want to be sure to save your Preset after changing settings of the latter type
in order to retain them. To restore all global settings to their factory default value, hold down the Nav. Pad — left arrow button while powering on POD HD Pro.
Accessing System Setup
To access the System Setup options, press and hold the VIEW button. Here you can configure several device functions, Input & Output settings and more.
SAVE
HOLD FOR SYSTEM & I/O
VIEW
Use the  Nav Pad buttons to navigate through the several Setup pages.

System Setup
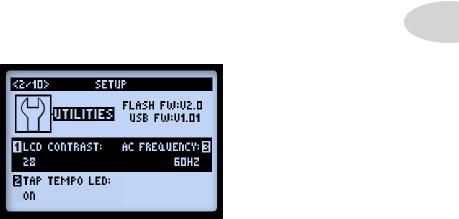
Page 1, Setup:Utilities Options
2•2
The top portion of the screen lists the Flash Memory and USB Firmware versions currently installed on your POD HD Pro device. The lower portion of the screen offers four options, adjustable using the Multi-function Knobs 1 — 4.
•Footswitch Mode (Knob 1): This option applies to a connected Line 6 FBV Controller’s A, B, C & D footswitches (also see “Appendix B: FBV Foot Controllers” on page B•1). You’ll see your POD HD Pro Performance View screen reflect the functions of these buttons according to the mode selected here (see “Performance View” on page 1•3). This setting is global.
•In “ABCD” Mode: The A, B, C & D FBV footswitches recall the current Bank’s Presets A—D.
•In “FS 5-8” Mode: The A, B, C & D FBV footswitches toggle the FS 5-8 assigned Models On/Off.
•Amp Knobs Display (Knob 2): When set to “On,” allows the LCD screen to momentarily display the actual Amp Tone Knob values whenever adjusting any physical amp knob. This setting is global.
•Looper FS Display (Knob 3): When Looper Mode is active (Looper Mode can be accessed when an FBV device is connected), this option determines how and when the Looper screen is displayed (see page 8•1). This setting is global.
•All Views: When Looper Mode is On, the Looper screen is always displayed.
•Performance View: When Looper Mode is On, displays the Looper screen, or the other Performance View (Signal Flow or Big User) screens, by toggling the VIEW button. This option can be useful for referencing your Presets or adjusting Models while Looping.
System Setup
•Trails (Knob 4): When set to “On,” allows the echo repeats and/or decay of Delay and Reverb FX to continue when the Model is toggled Off. With the Trails option “Off” the decay is muted instantly when toggling the Model Off. This setting is saved per Preset. (Note that this feature does not provide a “spillover” of the FX decay when changing Presets.)
2•3
Page 2, Setup:Utilities Options
The options at the bottom of the screen are as follows — all are global settings.
•LCD Contrast (Knob 1): Adjusts the screen’s contrast.
•Tap Tempo LED (Knob 2): Choose “On” to have the LED light for the TAP button (or connected FBV TAP footswitch) flash to indicate the current Tap Tempo value. Choose “Off” to have it remain unlit.
•AC Frequency (Knob 3): All HD Amp Models include simulation of AC hum, typical of the AC Vacuum Tube Heater component — an important part of the tonality of a tube amplifier. Set the AC Rate to match that of the USA (60Hz) or UK (50Hz) frequency for authenticity. (This setting may be subtle depending on the current Amp Model settings, and may be more apparent when synchronizing this setting with the AC rate of any tube amplifier that POD HD Pro may be plugged into.)
•FBV Express (Knob 4): This option applies only to a connected Line 6 FBV Controller. It should only be set to “On” specifically for a FBV Express MkII model device. Please see “Setup Options for FBV” on page B•2.

System Setup
Page 3, Setup: Input Options
The Inputs Setup page allows you to select which of the device’s audio inputs are used as the “source” – sort of like a built-in, programmable patchbay. There is also a control which adjusts the Guitar input impedance.
2•4
•Input 1 and Input 2 Source (Knobs 1 & 2) — Select the physical input(s) that you want to be the “source” which feeds into the signal path. Note that you can choose different Sources to independently feed each signal path, or choose Same to feed a common Source into both paths.
•The Variax and Variax Mag Input Source options are provided for Line 6 Variax® guitars when connected into the POD HD Pro VARIAX Digital Input (VDI).
•With a James Tyler® Variax® (JTV), the “Variax” Input Source receives the Model or Magnetic signal, depending on the JTV’s Model switch settings.* The “Variax Mag” Input Source receives only the JTV’s Magnetic Pickup signal.
*Note: With a JTV in use, the “Variax” Input Source selection also recalls whether you were using mags or models per preset, allowing you to pick up exactly where you left off – no need for manual selection or input changes.
•If you own a first-generation Variax instrument, it is recommended to choose the Variax Input Source option. Please also refer to your Variax documentation.
•Guitar In-Z — Select the input impedance of the Guitar input. This feature affects tone and feel because your guitar pickups are being loaded as they would be by an effect pedal or a tube amplifier.
Note: The Guitar In-Z setting affects the GUITAR IN input only. Please see the Impedance Ratings table at the end of this section to reference the input impedance of each individual model.

System Setup
•The Auto option dynamically sets the input impedance to match the input impedance of the very first Amp or FX model in your POD HD signal chain.
•Or, you can manually select from a variety of impedance values from low to high
(22k, 32k, 70k, 90k, 136k, 230k, 1M, or 3.5M). A lower value will typically result in some high frequency attenuation, lower gain and overall “softer” feel. A higher value provides full frequency response, higher gain and overall “tighter” feel.
|
• Inputs Setup — Determines whether the other 3 options in this Inputs screen are |
2•5 |
applied per Preset, or globally.
•Preset — Recalling a preset will load the Input 1 Source, Input 2 Source and Guitar In-Z parameter settings as last saved with the individual preset.
•Global — Once the “Global” option is selected here, the other three Input options’ values on this Setup page (Input Sources 1 and 2, and Guitar In-Z) are utilized globally, regardless of their values that are saved with each individual preset. The Input values you choose on this Setup page are then retained independently for the Inputs Setup — Global option. When you change the Inputs Setup back to “Preset,” the Input options’ values saved with each individual preset are once again utilized.
Note: Saving a preset while this option is set to “Global” will write the current global Inputs and Guitar In-Z values to the individual, saved preset.
Amp & FX Model — Guitar Input Impedance Ratings
|
Model |
Guitar Input Impedance |
|
|
(Ohms) |
||
|
Amps & Preamps |
||
|
All Amp & Preamp Models |
1M |
|
|
Distortion FX |
||
|
Screamer |
230k |
|
|
Color Drive |
136k |
|
|
Buzz Saw |
230k |
|
|
Facial Fuzz |
22k |
|
|
Jumbo Fuzz |
90k |
|
|
Fuzz Pi |
22k |
|
|
Octave Fuzz |
230k |
|
|
All Other Distortion Models |
1M |
Amp & FX Model — Guitar Input Impedance Ratings
|
Model |
Guitar Input Impedance |
|
|
(Ohms) |
||
|
Dynamics FX |
||
|
All Dynamics Models |
1M |
|
|
Modulation FX |
||
|
Dual Phaser |
230k |
|
|
U-Vibe |
90k |
|
|
Analog Choruis |
22k |
|
|
All Other Modulation Models |
1M |
|
|
Filter FX |
||
|
All Filter Models |
1M |
|
|
Pitch FX |
||
|
All Pitch Models |
1M |
|
|
Delay FX |
||
|
Multi Head |
22k |
|
|
Analog Echo |
230k |
|
|
Analog w/Mod |
90k |
|
|
All Other Delay Models |
1M |
|
|
Preamp + EQ FX |
||
|
All Preamp & EQ Models |
1M |
|
|
Reverb FX |
||
|
All Reverb Models |
1M |
|
|
Wah FX |
||
|
Weeper |
90k |
|
|
All Other Wah Models |
1M |
|
|
Volume & Pan FX |
||
|
All Volume and Pan Models |
1M |
|
|
FX Loop |
||
|
FX Loop |
1M |

System Setup
About Source Input Signal Routing
It is important to note how POD HD Pro actually routes Source Inputs 1 and 2 through
Amp & FX Blocks that are positioned “Pre” position. The following behaviors apply:
|
• In a configuration with no Amp or FX Blocks in Pre, Input 1 is fed only to Path A |
|
|
and Input 2 only to Path B. Therefore, this is the best configuration if you want to |
2•7 |
|
retain discrete Input Sources into Paths A & B. |
•Placing an Amp Block or an active mono FX Model in Pre results in a “summing” of Input Sources 1 & 2, feeding the same, combined signal into these Pre-positioned
Models, and thus into each Path A & B. You may need to adjust your instrument’s volume level to avoid overloading your Pre-positioned Amp or FX Models.
•Placing a Stereo FX Model in Pre results in the left channel FX output being fed to Path A and its right output to Path B.*
•The Mixer Block’s Volume and Pan options provide independent control for Path A & B outputs before they are fed through any Blocks positioned “Post” the Mixer.
•By setting Input 2 to “Same,” this effectively routes your Input Source to both stereo
Paths A & B (which is how you can feed one guitar input into two Amp Models and/ or parallel FX, for example).
*Please also see “Model Types and Mono/Stereo Signal Routing” on page 3•6 for more about how mono and stereo FX affect your signal chain.
System Setup
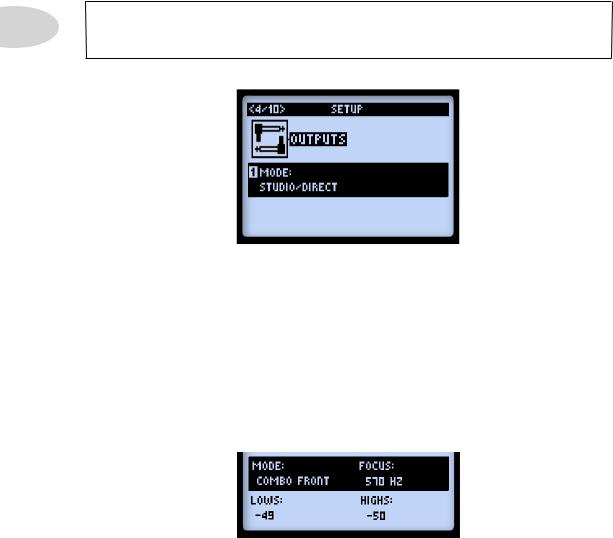
Page 4, Setup: Output Options
The Mode setting on this page allows you to configure the type of signal fed to your POD HD Pro outputs to optimize for direct recording versus connecting to an external amplifier.
Note that this Mode setting affects the signal fed to the POD HD Pro Left & Right 2•8 Balanced, Unbalanced, Digital & Headphone outputs, as well as the signal fed to the USB
Record Send & L6 LINK™ output.
Knob 1 selects the Output Mode. This is a global setting.
•Studio/Direct: Typically the best option when connecting “Direct” to a mixing console or recording device. This signal includes “Studio” Cab Models, Mic Model and an “AIR” convolution to best emulate a mic’ed amp within a room.
•Combo and Stack settings: Optimizes your tone for connecting to an external amplifier. The signal includes “Live” Cab Models,with no Mic Model or “AIR” convolution, with a special EQ curve added for each.
•Combo Front & Stack Front: For connecting into the front input of a typical combo amp or amp head + external cab, respectively. When choosing either of these Modes, you’ll see these additional options for further tone shaping:
•Lows (Knob 2): Attenuates the low frequencies.

System Setup
•Focus (Knob 3): Increases the overall midrange.
•Highs (Knob 4): Attenuates the high frequencies.
•Combo Power Amp & Stack Power Amp: For connecting to the power amp of a combo or head amp.
|
TIP: When using the Combo or Stack options and connecting into a tube amplifier, we also |
2•9 |
recommend that you choose a Preamp Model from the Amp Model menu (rather than one of the “Full” Amp Models). HD Preamp Models include no power amp emulation, making them typically better suited for this connection. That said, there is no wrong choice! PODs have always been about flexibility… Check out all the possibilities and decide which Models work best for your tone!
Page 5, Setup: Digital Output Options
These options are strictly for configuring the signal fed to the 24-bit digital outputs (S/ PDIF or AES/EBU). All settings are global. When connecting to another digital device, it is best to clock the external device to follow POD HD Pro (with POD HD Pro as the “master” device) to maintain proper synchronization — please see your digital device’s documentation for its digital clock features.
Note: The AES/EBU — L6 LINK output is an XLR jack that can be used for either type of connection (also see “Page 9, Setup: L6 LINK Audio” on page 2•17). The AES/EBU
options in this screen apply only the AES/EBU output and do not affect the L6 LINK audio signal when connected to a Line 6 DT Series amplifier.

System Setup
•Digital Output (Knob 1): Selects the type of output mode signal.
•Match Outputs: Uses the setting as configured on the Setup:Outputs screen — see page 2•8.
•Dry Input: Your Source Input signal with no Amp, Cab, Mic, “E.R.” or FX processing applied. (Handy for recording a dry signal in your DAW, to which you
|
2•10 |
can add a Plug-In or “re-amp” later!) |
•Sample Rate (Knob 2): Selects the sample rate: 44.1kHz, 48kHz, 88.2kHz or 96kHz.
When connecting to another device’s S/PDIF or AES/EBU input, always be sure to set both units to utilize the same sample rate.
•Digital Level (Knob 3): Increases the amplitude of the S/PDIF or AES/EBU signal:
0 dB to +12 dB.
•Digital Format (Knob 4): Choose between settings for the S/PDIF or AES/EBU digital outputs.
Page 6, MIDI/Tempo Options
•MIDI Channel (Knob 1): Sets the “System” MIDI Channel that POD HD Pro utilizes for both receiving and sending MIDI communication via the MIDI DIN Input/Output. Choose any individual Channel 1 — 16, or “Omni” for all Channels.* This is a global setting.
*Note: The MIDI Channel selected here also affects the MIDI Channel settings utilized by L6 LINK — see “Page 10, Setup: L6 LINK Control” on page 2•17.
•MIDI Out/Thru (Knob 2): Allows the MIDI Out DIN to be switched between a MIDI Output versus MIDI Output + Thru.
![]()
System Setup
• Tempo Sync (Knob 3): The “Speed” or “Time” parameters of all tempo-based FX (Modulation, Pitch & Delays) can optionally be set to a note value to follow the (Knob 4) Tempo BPM value. This Tempo Sync option is a global setting that allows you to choose whether the FX follow the Tap Tempo as a per-Preset value or globally.
|
• |
Preset: Tempo settings are saved and recalled on a per Preset basis. |
|
|
• |
Global: Tempo information stored within any Preset is ignored. When saving a |
2•11 |
|
Preset while this option is set to “Global,” the current tempo value will be saved |
with the Preset.
•Tempo (Knob 4): Enter in a specific “Tap Tempo” for your current Preset (as opposed to pressing rhythmically on the TAP button). This value is saved individually per Preset.
Page 7, Setup:Variax Options
|
Setup Page 7 — No Variax connected |
Setup Page 7 — James Tyler Variax connected |
As illustrated above, Setup page 7 will display additional, model-specific options when a
Variax instrument is connected to the POD HD Pro VARIAX (VDI) input. The specific Variax family and firmware version are displayed at the top right of the screen when the Variax is connected. Available options and behaviors displayed will differ depending on the Variax type and model you have connected, as described in the following sections. With any Variax connected to the VDI input, the Knob 1 option functionality is as follows.
•Variax Control (Knob 1): Choose whether you want to assign all your Variax settings on this Setup pg 7 screen on a per Preset basis or Globally.*
•When set to “Preset,” all the parameter settings shown on the Variax Setup screens (Setup pages 7 &  are saved and recalled individually per POD HD
Pro preset. You’ll see additional options in the screen when you have a Variax connected and choose “Preset.”
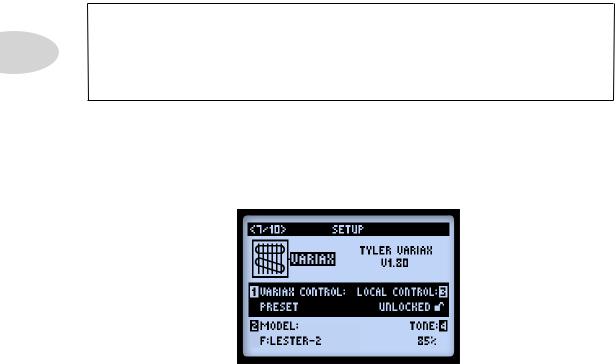
System Setup
•When set to “Global,” this provides complete manual control over all Variax functions, regardless what Variax settings you may have saved within the POD HD Pro presets.
|
*Note: For a James Tyler Variax (JTV) this will also determine whether the guitar’s Mag/ |
|
|
Model switch selection (as heard through the “Variax” Input Source option) will be recalled |
|
|
2•12 |
per Preset or Globally. |
|
Also note that the Setup Pg 8 — JTV Tuning Options are not affected by this Variax Control |
|
|
setting — the Tuning settings are saved per Preset. |
JamesTyler®Variax®
All James Tyler Variax Electric Guitars are supported. (Also see “Page 8, James Tyler Variax Tuning Options” on page 2•16 for more options!)
•Variax Control (Knob 1): See page 2•11.
•Model (Knob 2): Selects the Variax Model & pickup position setting. Choose the “Don’t Force” option if you prefer to not have the JTV local Model changed by the Model value saved within the POD HD Pro presets.
•Local Control (Knob 3): Determines whether the JTV Volume and Tone knobs, and/ or toggle switch are to remain active or be “locked.” When locked, the knob/switch no longer controls the JTV guitar’s local functions for the Modeled output of the guitar.*
James Tyler® is a registered trademark of James Tyler Guitars.

System Setup
|
*Note: When utilizing the Magnetic output mode on the JTV guitar, only the Volume knob |
|
|
is “Locked” by any of the Local Control — Locked settings. For the Magnetic output, the |
|
|
Tone and Pickup switch functions remain unlocked even when set to “Locked” via Knob |
|
|
3. This feature allows you to freely use the JTV Tone knob or Pickup selector switch when |
|
|
the JTV is in the Magnetic pickup output mode, while keeping the Modeled settings still |
|
|
“locked” if you prefer these Modeled settings to remain unchanged when you toggle back |
2•13 |
|
to Modeled output mode! |
Also note that when any of these JTV controls are locked, changing the JTV guitar’s Model Encoder knob automatically always resets all to unlocked.
•Setting the JTV Volume and/or Tone knobs to “Locked” can be desirable when the knobs are assigned to remotely control any POD HD Pro Amp or FX parameters — see “Expression Pedal & Variax® Knob Controller Assignment” on page B•16 for details.
•It can also be handy to “Lock” the JTV Pickup Toggle switch — for example, when switching between Acoustic (Model) and Electric (Mag) tones, you can lock the Acoustic Model controls so that tweaking knobs and switching pickups when playing the Electric sound won’t affect the sound of the Acoustic when you switch back.
•Tone (Knob 4): Allows the JTV Tone knob value to be saved with the current preset, or applied Globally, per the Variax Control (Knob 1) setting.
Variax Electric
All first generation Variax Electric Guitars are supported.
System Setup
•Variax Control (Knob 1): See page 2•11.
•Model (Knob 2): Selects the Variax Model & pickup position setting. Choose the “Don’t Force” option if you prefer to not have the Variax guitar’s model changed by the Model value saved within the POD HD Pro presets.
•Local Control (Knob 3): This feature is not applicable for first generation Variax
|
2•14 |
instruments, therefore, no options are available. |
•Tone (Knob 4): Allows the Variax guitar’s Tone knob value to be saved with the current preset, if desired.
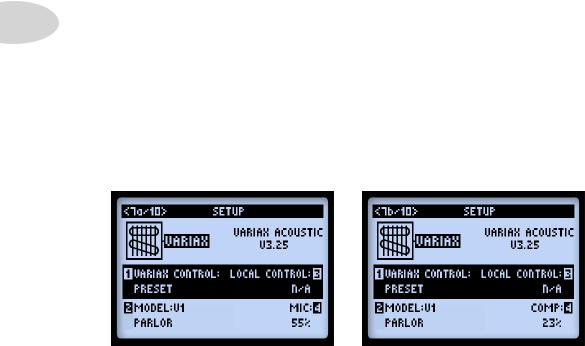
Variax Acoustic 700
For a Variax Acoustic Guitar, you’ll see two Setup pages, 7a and 7b, to accommodate the additional controls. Multifunction Knobs 1, 2 & 3 are common controls, shown on both
Setup pages. Knob 4 is unique on each page.
•Variax Control (Knob 1): See page 2•11.
•Model (Knob 2 — pgs. 7a & b): Selects the Variax Acoustic Model. Choose the “Don’t Force” option if you prefer to not have the JTV local Model changed by the Model value saved within the POD HD Pro presets.
•Local Control (Knob 3 — pgs. 7a & b): This feature is not applicable for Variax Acoustic, therefore, no options are available.
•Mic Position (Knob 4 — pg 7a): Changing this value simulates changing the mic position on the acoustic from closer to further from the soundhole.
•Comp (Knob 4 on pg 7b): Selects the amount of compression effect applied to the Variax Acoustic tone.

System Setup
Variax Bass 700 & 705
For a Variax Bass, you’ll see three Setup pages, 7a, 7b & 7c to accommodate all the controls on the Bass. Multifunction Knobs 1, 2 & 3 on all pages are common controls. Knob 4 on each page is unique.
2•15
•Variax Control (Knob 1 — pgs. 7a, b & c): See page 2•11.
•Model (Knob 2 — pgs. 7a, b & c): Selects the Variax Bass Guitar Model. Choose the “Don’t Force” option if you prefer to not have the Variax Bass Model changed by the Model value saved within any POD HD Pro preset.
•Blend (Knob 4 — pg. 7a): Adjust this controls the balance between a neck and bridge pickup tone on the Bass.
•Bass (Knob 4 — pg. 7b): Adjusts the amount of bass frequencies.
•Treble (Knob 4 — pg. 7c): Adjusts the amount of treble frequencies.
System Setup
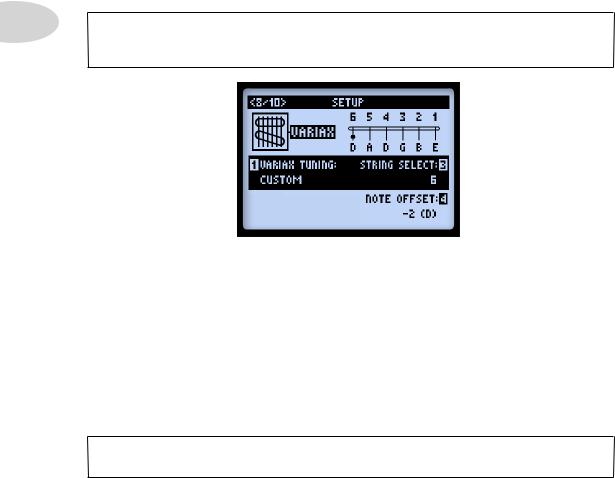
|
Page 8, JamesTylerVariaxTuning Options |
|
|
The Page 8 Setup screen offers Tuning options for James Tyler Variax guitars.* These allow |
|
|
you to configure and edit alternate tunings for your connected JTV guitar, which can be |
|
|
saved right along with any POD HD Pro preset! |
|
|
2•16 |
*Note: This tuning functionality is only available for James Tyler Variax family guitars. |
|
If no JTV (or any first-generation Variax) is connected, this screen offers no accessible |
|
|
options. |
•Variax Tuning (Knob 1): Choose “Don’t Force” if you do not want the POD HD Pro preset to affect the local tuning on your JTV guitar. Choose “Custom” to create a tuning of your own, which can be saved with the current preset.
•String Select (Knob 3): Select the desired guitar string, 1 though 6, for which you want to change the pitch.
•Note Offset (Knob 4): Choose the amount of half-steps, positive or negative, for which you want to raise or lower the pitch of the selected string. The resulting note will then be displayed on the tuning graphic at the top of the screen. For example, in the screenshot above, we’ve altered the low E string down two half-steps to a D note.*
*Note: The offset value will always be accurate — the note labels displayed assume the guitar is tuned to standard pitch (E, A, D, G, B, E), with the A using a 440Hz reference pitch.

System Setup
Page 9, Setup: L6 LINK Audio
2•17
These options configure the POD HD Pro audio signal fed to up to four Line 6 DT Series amplifiers using the L6 Link connection.* These settings are saved per Preset.
*Note: For details on using the L6 LINK connection with DT Series amplifiers, please see the additional POD HD documentation available at http://line6.com/support/manuals/.
•Amp 1 — Amp 4 — Select the audio signal you want fed to each DT Series amplifier:
•Choose the main output signal — Left, Right or Left/Right (summed).
•Choose the output of one or two specific Amp Models — Amp Model A, Amp Model B, or both Amp Model A/B.
Page 10, Setup: L6 LINK Control
These options allow you to dictate how up to four connected Line 6 DT Series amplifiers each “follow” the POD HD Pro Amp Models & settings. Parameters 1 — 4 correspond to L6 LINK connected DT amplifiers 1 — 4, respectively.

System Setup
•Each DT amplifier can be set independently to follow either the current Preset’s Amp Model A or Amp Model B.
•The DT amplifier automatically configures its power amp Topology settings to match the selected Amp Model A or B.
•The DT amp controls are also synced to the selected Amp Model A or B.
2•18 • Alternatively, you can select a MIDI Channel to set the DT amp’s MIDI communication channel. This effectively sets the respective DT amp to utilize its own internal Amp Model (rather than the POD HD Pro Amp Model), and “syncs” its front panel controls with other DT Series amps that are set to the same MIDI Channel.

Features & Functionality
Features & Functionality
Ready to dive deeper? In this chapter, we’ll go into more detail on the major features & functionality offered on POD® HD Pro.
FX Blocks
|
For each Preset there is always a total of 8 FX Blocks, each capable of loading any FX |
3•1 |
|
Model, (or the FX Loop — see next section). When in the Signal Flow View screen, select |
any FX Block and you’ll see options at the bottom of the screen, adjustable using the Multi-Function Knobs 1-4.
The Signal Flow View with an FX Block selected
•Model Type (Knob 1): Select from among the FX Model categories.
•To load no effect in the selected Block, choose “None.” You’ll see the Block then appear “Null,” as shown below. A Null FX Block can still be moved and loaded with a new Model at any time. Setting unneeded FX Blocks to None is a great way to minimize your tone’s DSP usage (see “Dynamic DSP” on page
3•8).
FX Blocks with the Model set to “None”
• FX Model (Knob 2): Choose the desired Model from the Model Type list.

Features & Functionality
•FX Parameters (Knob 3): Choose from up to 5 adjustable parameters. Alternatively, double-press the ENTER button to access all the Model’s parameters in one screen — see “FX Edit Mode” on page 5•1.
•Parameter Value (Knob 4): Adjusts the value for the currently selected parameter.
|
Each FX Block also offers the following features: |
|
|
3•2 |
• On/Off: Toggle the FX Block “On” or “Off” by pressing the ENTER button once. |
|
When Off, your signal flows through the FX Block unprocessed. |
|
|
• Move FX Position: Each FX Block can be moved throughout the signal chain, |
|
|
providing complete routing flexibility. Place any FX Model before the Amp (“Pre”), |
|
|
after the Amp (“Post”), or within one of the parallel Paths A & B — see “Amp Model |
|
|
Positioning” on page 6•1 for details. |
|
|
• Saved Per Preset: All FX Block positions, their loaded FX Models and all FX |
|
|
parameter values within the tone are saved with each Preset. |
FX Loop
For any one of the 8 FX Blocks, you can load the FX Loop rather than an FX Model. This allows you to position the POD HD Pro hardware FX Loop anywhere you like within the current signal path — even within one of the parallel Paths A or B!
The Signal Flow View with the FX Loop selected
Note that it is necessary to set one of the FX Blocks within your Preset to the “FX Loop” before you’ll hear the signal fed through your SEND & RETURN device connections.
![]()
Features & Functionality
Access options for the FX Loop at the bottom of the Signal Flow View, or in the Edit Mode screen. You can also toggle the FX Loop “On” or “Off” by pressing the ENTER button once. The FX Loop’s position and all its parameter values are saved per Preset. Please also see “FX Loop” on page 5•4.
Amp Blocks
A single Amp Block can be placed in the “Pre” or “Post” signal flow positions, or within parallel “Path A.” Or, two Amps can be used if positioned within Paths A & B, as shown 3•3 below. Much like FX Blocks, Amp Blocks can be toggled On/Off and include several editable parameters. But there’s quite a bit more available for Amps as well, so please refer
to the dedicated chapter “Amp, Cab & Mic Models” on page 6•1 for details!
A Preset with two Amp Blocks

Features & Functionality
Mixer Block
The Mixer is permanently positioned at the end of the parallel Paths A & B and provides individual Level and Pan controls for each Paths’ output before fed to the “Post” position. When the Mixer is selected in the Signal Flow View, its four parameters are available at the bottom of the screen, accessible using the Multi-function Knobs 1-4.
3•4
The Signal Flow View with the Mixer Block selected, showing its 4 parameters
•Volume A (Knob 1): Controls the volume level of the Path A output. 0 dB is unity gain.
•Volume B (Knob 2): Controls the volume level of the Path B output. 0 dB is unity gain.
•Pan A (Knob 3): Adjusts the left/right stereo balance of the Path A output.
•Pan B (Knob 4): Adjusts the left/right stereo balance of the Path B output.

Features & Functionality
Moving FX Blocks
Any of the 8 FX Blocks can be moved throughout your tone’s signal flow, providing tremendous routing flexibility. To move any FX Block, start within the Signal Flow View and select the FX Block to be moved. Press the MOVE button and you’ll see the selected FX Block appear “raised” to indicate it is now moveable.
|
AMP & FX ON / OFF |
3•5 |
|
ENTER |
DBL PRESSTO ASSIGN CTL
MOVE
Pressing the Move button to reposition an FX Block
The FX Block can now be moved as follows:
•Use the  Nav. Pad buttons to move the FX Block to the desired position.
•Move the FX Block into either Path A or B, and place it before or after an Amp
Model within the path. Use the Nav. Pad buttons to move the FX Block to the opposite path. This allows you to run your effect in “parallel” and blend the individual Path A & B outputs using the Mixer’s Level & Pan options!
•Once the FX Block is in the desired position, press the MOVE button again to drop it into place.
•Amp Blocks can be moved into fixed positions within the Pre or Post signal path areas, or within the Paths A & B — see “Amp Model Positioning” on page 6•1.
•The Looper can also be selected and moved either to the start (“Pre”) or end (“Post”) of the signal flow — see “Looper Mode” on page 8•1.

Features & Functionality
ModelTypes and Mono/Stereo Signal Routing
It is important to note that some Models (all EQs, Wahs, Volume & FX Loop, and some Modulations, Filters, Pitches & Delays) preserve a stereo output within the signal chain, while others (all Dynamics, Distortions, all Amps & Preamps, and other various Models) are mono FX and do not. The POD HD Pro Inputs 1 & 2 are fed into the signal chain as stereo (see “Page 3, Setup: Input Options” on page 2•4). Therefore, wherever a mono FX or Amp Model is inserted, the Left & Right channels of this stereo signal is “monoized” and heard as a two-channel mono signal at the Model’s output. To follow are a few
3•6 examples:
Ping Pong Delay
No mono-output FX or Amp follows Delay
•As shown above, if you place the Ping Pong Delay (a stereo-output FX Model) after any other FX and/or Amp Models, you’ll hear its delay repeats bounce back and forth between your Left and Right outputs.
|
Ping Pong Delay |
Ping Pong Delay |
|
A Distortion (mono) FX Model follows Delay |
An Amp Model Follows Delay, within same Path |
•If you place the Ping Pong Delay immediately before a mono FX Model (as shown above, left) or Amp Model within the same Path (shown above, right), you’ll hear its delays “mono-ized,” equally through both the Left and Right outputs.

Features & Functionality
•The FX Loop is capable of stereo, just like any stereo-output FX Model, provided that you utilize both stereo pairs of the SEND & RETURN jacks. If you use only the Left SEND or RETURN jack, the FX Loop signal is summed to mono.
•The above rules also apply within each of the parallel Paths A and B, since these are each stereo signal paths as well. The Mixer Block offers Pan controls to independently adjust the stereo balance of each of these Paths before they are fed into the first “Post” FX (or Amp Block, if the Amp is placed here), immediately following the Mixer.
|
• Please also see “Amp Model Positioning” on page 6•1 for additional signal flow |
3•7 |
|
information. |
FX & Amp Block FBV Footswitch Assignment
Any of the FX and Amp Blocks can also be configured with a “FS” (Footswitch) assignment to utilize a connected Line 6 FBV™ Controller to remotely toggle the Block’s Model On/ Off. For details, please see “Amp & FX Block Footswitch Assignment” on page B•18.
It is worth noting here that, when the Setup — FS MODE option (see “Page 1, Setup:Utilities Options” on page 2•2) is set to “FS 5-8,” your FBV device’s A, B, C & D footswitches will trigger the FS 5-8 assigned Blocks. To create and edit FS assignments, select the desired FX or Amp Block within the Signal Flow View, then hold the VIEW button. This displays the FS ASSIGN screen. All assignments are saved per Preset.
The Footswitch Assign screen — use Knob 1 to create or edit a Block’s FS assignment

Features & Functionality
Dynamic DSP
|
We’ve offered up a whole lot of sound possibilities in POD HD Pro and it can take some |
|
|
serious Digital Signal Processing (DSP) to run these goodies. Rather than limit your |
|
|
creative potential with fewer Models or signal routing options, we chose to implement a |
|
|
“Dynamic DSP” system, which dynamically assigns DSP resources to accommodate your |
|
|
tone configurations. When creating a tone that utilizes several heavy-hitting DSP Models, |
|
|
it is possible to surpass the amount of processing power available. In these cases, you’ll see |
|
|
3•8 |
the DSP LIMIT REACHED indicator appear, and the current Model is bypassed to allow |
|
your tone to remain active. |
DSP Limit alert is temporarily displayed
Currently selected Model is automatically bypassed, with DSP message shown here
Signal Flow View — displaying DSP Limit alert
In the above example, trying to change the Model for a 2nd Amp placed our tone over the DSP limit. Therefore, the DSP LIMIT REACHED message is shown temporarily, and the Amp B Model we selected is automatically bypassed, as indicated by the DSP Over message. When the DSP Limit is reached, you have a few options to free up DSP resources.
•Try using different Amp Models. Some of the HD Amp Models require more DSP power than others, so try switching to a different Amp Model.
•Use only one Amp Model rather than two.
•Try toggling Amp and/or FX Models “Off” or set the Block’s Model to “None,” (see “FX Blocks” on page 3•1). Some FX types, such as Pitch Shifters and Reverbs, utilize DSP more heavily.
Note: Setting an Amp or FX Block to “None” more substantially reduces the Block’s DSP usage than toggling its Model to “Off.”
• Once you’re happy with your customized tone, save it so that you can recall it later.

Set Lists & Presets
Set Lists & Presets
This chapter covers all you need to know about working with Set Lists and Presets to manage your POD® HD Pro Tones.
|
Be sure to also check out the free Line 6 POD HD Pro Edit software. It can be used to |
|
|
create, customize & manage an unlimited library of POD HD Pro Set Lists & Presets right |
|
|
on your Mac® or Windows® computer! See “POD HD Edit Pro Software” on page 1•6. |
4•1 |
Working with Set Lists
POD HD Pro stores 64 Presets within each of its 8 Set Lists. The big idea here is that you can load any one of these Set Lists to then gain access to any of its Preset locations — where you can save your complete settings to, or load a Preset from.
Accessing Set Lists
Push the PRESETS knob to display the Set Lists screen.
SAVE
HOLD FOR SYSTEM & I/O
VIEW
The Set Lists screen
DT Series Amp Owners… The “L6 LINK<->DT” Set List is filled with Presets specifically designed for use with POD HD Pro connected to a DT Series amp utilizing the L6 LINK connection. Also, the Presets within this Set List that include “LVM” within their titles are designed for use with your DT Series amp set to its “Low Power Mode.”

Set Lists & Presets
Load a Set List: Use the and  Nav. Pad buttons, or turn the PRESETS knob to select any Set List, then press the ENTER button. This immediately loads the selected Set List, making all its Presets available. Note that your previously loaded Preset is automatically closed, and the Preset of the same Bank/Channel location number from the new Set List is loaded.
Rename a Set List: With the desired Set List selected, press the SAVE button to display the Rename Set List screen.
4•2
SAVE
PRE
S
E
TS
HOLD FOR SYSTEM & I/O
VIEW
To edit the Set List name, use Multi-function Knob 3 to select the desired character, then use Knob 4 to edit the character. Once complete, press SAVE again to commit your new name, and you’ll be returned to the Set Lists screen. Or, just press PRESETS button to return to the Set Lists screen without committing any name changes.

Set Lists & Presets
Arranging Presets within Set Lists
While in the Set Lists screen, double-press the ENTER button to display the list of Presets in the current Set List, where you can reference each Preset’s Bank/Channel location, load a Preset, or rearrange the Presets into in any order you like.
4•3
The Set List — Presets screen
Load a Preset: Use the Nav. Pad buttons, or turn the PRESETS knob to select any of the 64 locations, or use the  Nav. Pad buttons to navigate through the list one Bank at a time. Press the ENTER button to immediately load the selected location’s Preset.
Move a Preset: Here is an example where we’ll move the “HIWAY 100” Preset from location 2A to location 2C.
•Select location 2A for the “HIWAY 100” Preset, then press the MOVE button. You’ll see the selected Preset appear “raised” to indicate it is now moveable:
DBL PRESSTO ASSIGN CTL
MOVE

Set Lists & Presets
•Use the Nav. Pad buttons or PRESETS knob to select the 2C destination location. Note that as you select a new Bank/Channel location, the resulting Preset order is displayed on the screen. For our example, “HIWAY 100” is inserted into 2C, resulting in the Presets from the original location (2A) to the destination (2C) to move up one slot:
4•4
“Hiway 100” moved from 2A to 2C
•Once you’ve placed the Preset over the desired channel location, press the MOVE button again to “drop” it into the slot.
•Repeat the above steps to rearrange any additional Presets as desired. To commit all your changes, you must next press the PRESETS button — you’ll see the “Saving” screen displayed to indicate this process.
The Set List Saving screen
![]()
Set Lists & Presets
Working with Presets
Each of the 8 Set Lists within POD HD Pro includes 64 Channel locations for holding
Presets. These Set Lists and Presets are all retained in your POD HD Pro internal memory. Each Preset includes all current FX & Amps in use, all their parameter settings, their position within the signal flow, footswitch & pedal assignments, Mixer settings, as well as input & output and other Setup options, as indicated throughout this Guide.
|
Accessing Presets |
4•5 |
|
|
From any of the Home View screens, simply turn the PRESETS knob to increment through |
||
|
the current Set List. The currently loaded Bank/Channel number and Preset name are |
||
|
displayed at the top of the Home View screen. (Note that you’ll need to save your current |
||
|
Preset before loading a different one if you wish to retain any changes made!) |
SAVE
HOLD FOR SYSTEM & I/O
VIEW
Turn the PRESETS knob to increment through Presets
Alternatively, you can access Presets that reside within any Set List from within the Set List — Preset screen (see page 4•2).
 Loading…
Table of Contents for Line 6 POD HD Pro:
-
Set Lists & Presets 4•5 Working with Presets Each of the 8 Set Lists within POD HD Pro includes 64 Channel locations for holding Presets. These Set Lists and Presets are all retained in your POD HD Pro internal memory. Each Preset includes all current FX & Amps in use, all their parameter settings, their position within the signal flow, footswitch & pedal assignments, Mixer settings, as well as input & output and other Setup options, as indicated throughout this Guide. Accessing Presets Fr
-
Appendix C: MIDI C•2 Controlling POD HD Pro Functions via MIDI POD HD Pro Footswitch & Pedal assignments, Looper functions and more can be can controlled remotely via a MIDI Controller device connected to the POD HD Pro MIDI IN port. The following reference table shows the necessary MIDI CC settings to configure your MIDI Controller device to access these POD functions. POD HD Pro — MIDI Control Reference MIDI CC # Valu
-
Overview 1•2 At the bottom of the Signal Flow View screen, you’ll see up to four parameters that are accessed using the Multi-function knobs 1-4. Accessing parameters with the Multi-select Knobs These parameters are specific to the currently selected Block and allow you to choose new Models & edit parameters. Or, you can dive deeper using the Edit Mode and access additional settings in other screens, as covered in the following chapters. Big User View This screen simply provides you with one B
-
System Setup 2•11 Page 7, Setup: Variax Options These options are for use with a Line 6 Variax® guitar when connected to the VARIAX input on the back of POD HD Pro. • Variax Control (Knob 1): The option determines whether your Variax Model and Tone Knob settings are controlled by POD HD Pro. This is a global setting. • Set to Enabled if you’d like POD HD Pro to control your Variax. You’ll see additional options in the screen when you have a Variax connected and choose Enabled. These options differ depending on the specific Variax
-
Line 6, POD, DT50, DT25, Variax, Vetta, L6 LINK, FBV, CustomTone and Line 6 Monkey are trademarks of Line 6, Inc. All other product names, trademarks and artists’ names are the property of their respective owners, which are in no way associated or affiliated with Line 6. Product names, images, and artists’ names are used solely to identify the products whose tones and sounds were studied during the Line 6 sound model development for this product. The use of these products, trademarks, images, and artists’ names does not imply any cooperation or endo
-
Appendix B: FBV Foot Controllers B•8 EXP 1 and EXP 2 with Pedal 2 Connected Whena2ndExpressionPedal(suchasaLine6EX-1ExpressionPedal)isconnected,the on-board Pedal remains mapped to only EXP 1, and Pedal 2 to only EXP 2. Whenever a Pedal 2 is connected, you’ll see the EXP 1 & EXP 2 LEDs both lit. FBV Express MkII FBV Express MkII — Footswitch & Pedal Mappings Footswitch Label POD HD Pro Function 7-Segment LED Display Footswitch LED Description A Selects Preset A (ABCD Mode) Displays “A” to
-
Appendix A : Line 6 Monkey A•2 FBV MkII Users: If you are using a Line 6 FBV MkII Controller then it is recommended to install any available updates for it as well. Just connect your FBV MkII directly to your computer’s USB port and use Line 6 Monkey as described above. Grab Those Updates If you see any items where a newer version is available, then you should click on that item and let the little Monkey fellow walk
-
USB Audio 9•5 6 Sample Rate Converter Active: You’ll see this indicator light up whenever the device is operating at a sample rate other than its native 48kHz rate. In addition to 48kHz, POD HD Pro supports 44.1kHz, 88.2kHz and 96kHz rates by utilizing an internal sample rate converter. Please check your specific software’s documentation for details on configuring its audio sample rate. 7 USB Audio Streaming Buffer: Adjusts the buffer size for the aud
-
USB Audio 9•4 Mac® — Line 6 Audio-MIDI Devices Launch the Line 6 Audio-MIDI Devices utility from within the Mac® System Preferences. This utility provides access to several driver options. Line 6 Audio-MIDI Settings — Driver Options (Mac®) 3 2 1 4 7 6 5 The Line 6 Audio-MIDI Settings window — Driver page 1 Device Selector: Select your POD HD Pro here. If you have more than one supported Line 6 audio device connected, each will be selectable in this list. 2 Driver Version: Displays the current device’s installed drive
-
Appendix B: FBV Foot Controllers B•6 FBV Shortboard MkII — Footswitch & Pedal Mappings Footswitch Label POD HD Pro Function FBV LCD Screen Footswitch LED Description DELAY FS3 On/Off No change Lit when Block active Toggles the “FS3” assigned Amp/FX Block REVERB FS4 On/Off No change Lit when Block active Toggles the “FS4” assigned Amp/FX Block A Selects Preset A (ABCD Mode) Displays current Preset name Lit when selected Loads Preset A of current Bank FS5 On/Off (FS 5-8 Mode) Displays current Preset name Lit when Block active Toggles t
-
USB Audio 9•3 The POD HD Pro Record Send As shown above, the Record Send is the virtual “pipeline” that carries your POD HD- processed, 24-bit digital signal across the USB connection, making it available to your audio software as an input signal for recording. The Record Send appears as an available audio input/recording device within your audio software. Simply select this Send as the input for your audio track and you’ll be able to record
Questions, Opinions and Exploitation Impressions:
You can ask a question, express your opinion or share our experience of Line 6 POD HD Pro device using right now.
На этой странице вы можете совершенно бесплатно скачать Руководство по эксплуатации Line 6 POD HD Pro.
У документа PDF Руководство по эксплуатации 135 страниц, а его размер составляет 6.36 Mb.
Читать онлайн Аудио Line 6 POD HD Pro Руководство по эксплуатации

Скачать файл PDF «Line 6 POD HD Pro Руководство по эксплуатации» (6.36 Mb)
Популярность:
14797 просмотры
Подсчет страниц:
135 страницы
Тип файла:
Размер файла:
6.36 Mb


