-
Инструкции по эксплуатации
2

Janome 419S инструкция по эксплуатации
(34 страницы)
- Языки:Русский
-
Тип:
PDF -
Размер:
2.9 MB -
Описание:
Швейная машина
Просмотр

Janome 419S инструкция по эксплуатации
(34 страницы)
- Языки:Русский
-
Тип:
PDF -
Размер:
2.9 MB -
Описание:
Швейная машина
Просмотр
На NoDevice можно скачать инструкцию по эксплуатации для Janome 419S. Руководство пользователя необходимо для ознакомления с правилами установки и эксплуатации Janome 419S. Инструкции по использованию помогут правильно настроить Janome 419S, исправить ошибки и выявить неполадки.

- Manuals
- Brands
- Janome Manuals
- Sewing Machine
- 419S
- Instruction book
-
Contents
-
Table of Contents
-
Troubleshooting
-
Bookmarks
Quick Links
Related Manuals for Janome 419S
Summary of Contents for Janome 419S
-
Page 1
Models 419S & 423S… -
Page 2: Important Safety Instructions
IMPORTANT SAFETY INSTRUCTIONS When using an electrical appliance, basic safety precautions should always be followed, including the followings: Read all instructions before using this appliance. DANGER – To reduce the risk of electric shock: An appliance should never be left unattended when plugged in. Always unplug this sewing machine from the electric outlet immediately after using and before cleaning.
-
Page 3: Table Of Contents
TABLE OF CONTENTS SECTION 1. ESSENTIAL PARTS Name of Parts ………………………. SECTION 2. GETTING READY TO SEW Extension Table ……………………..Standard Accessories ……………………Accessory Storage Box ……………………Connecting the Machine to the Power Supply ………………. Foot Control ……………………….Presser Foot Lifter ……………………..To Attach and Remove the Presser Foot ………………
-
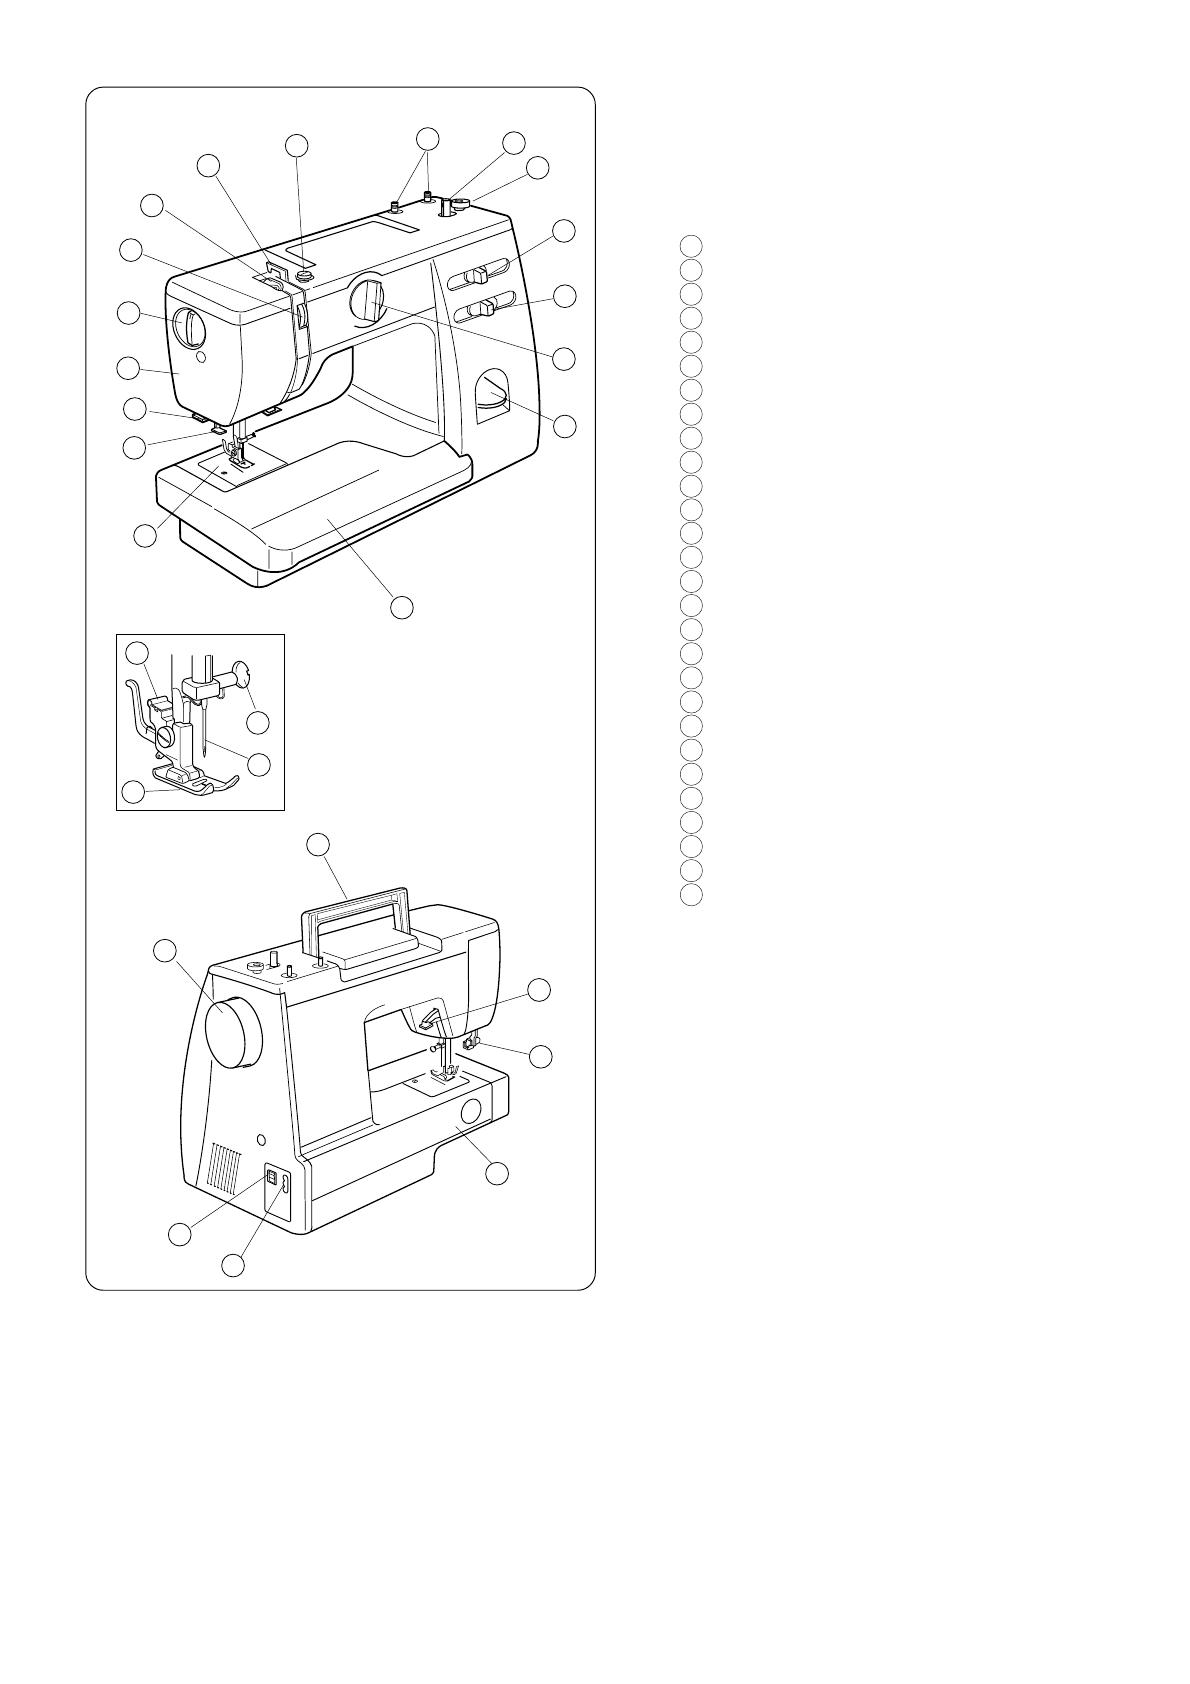
Page 4: Section 1. Essential Parts
SECTION 1. ESSENTIAL PARTS Name of Parts Reverse stitch button Pattern selector dial Stitch width control Stitch length control Bobbin winder stopper Bobbin winder spindle Spool pins Bobbin winder thread guide Thread guide Thread take-up lever Thread tension dial Pressure adjusting dial Face plate Thread cutter Needle threader…
-
Page 5: Section 2. Getting Ready To Sew
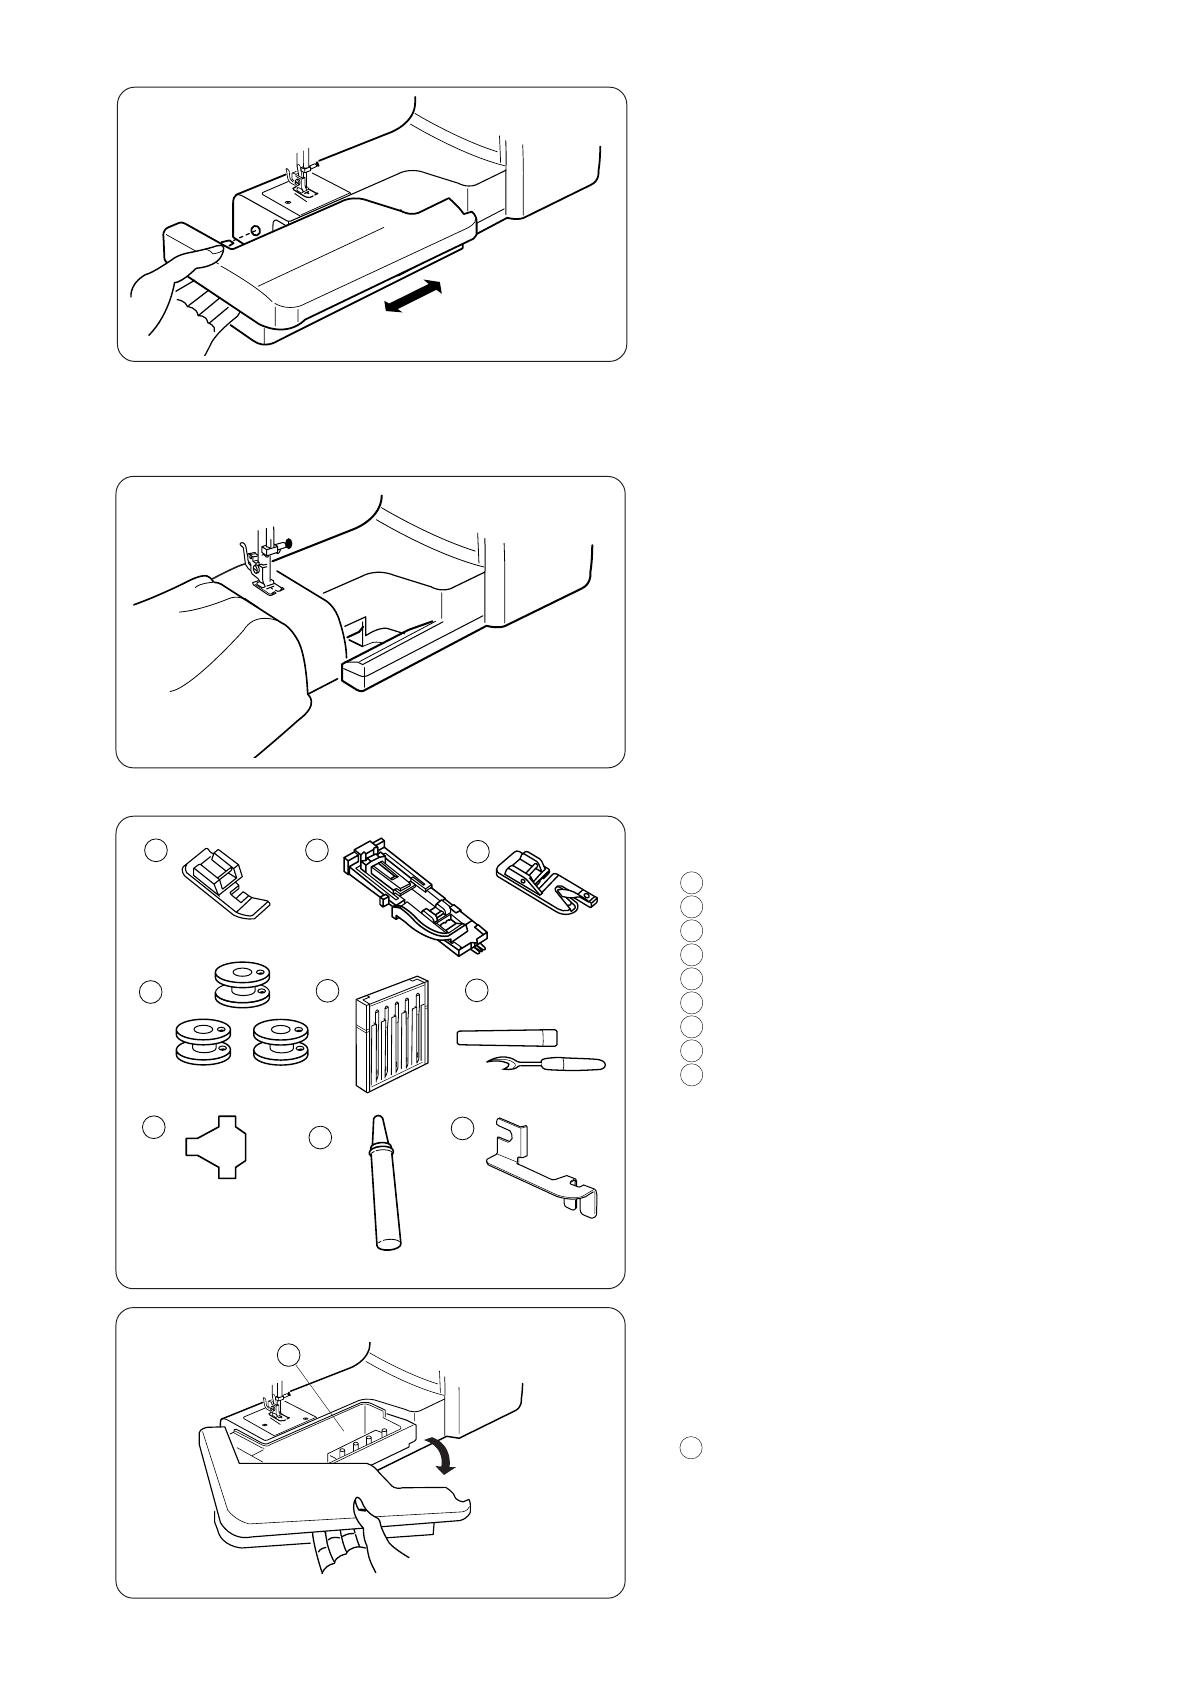
SECTION 2. GETTING READY TO SEW Extension Table The extension table provides added sewing surface and can be easily removed for free arm sewing. Detaching the table: Pull the table away from the machine. Attaching the table: Push the extension table until it snaps into the machine. Advantages and uses of free arm sewing: Å[ Avoid fabric bunching around the needle when bartacking to reinforce pockets, plackets and waistlines.
-
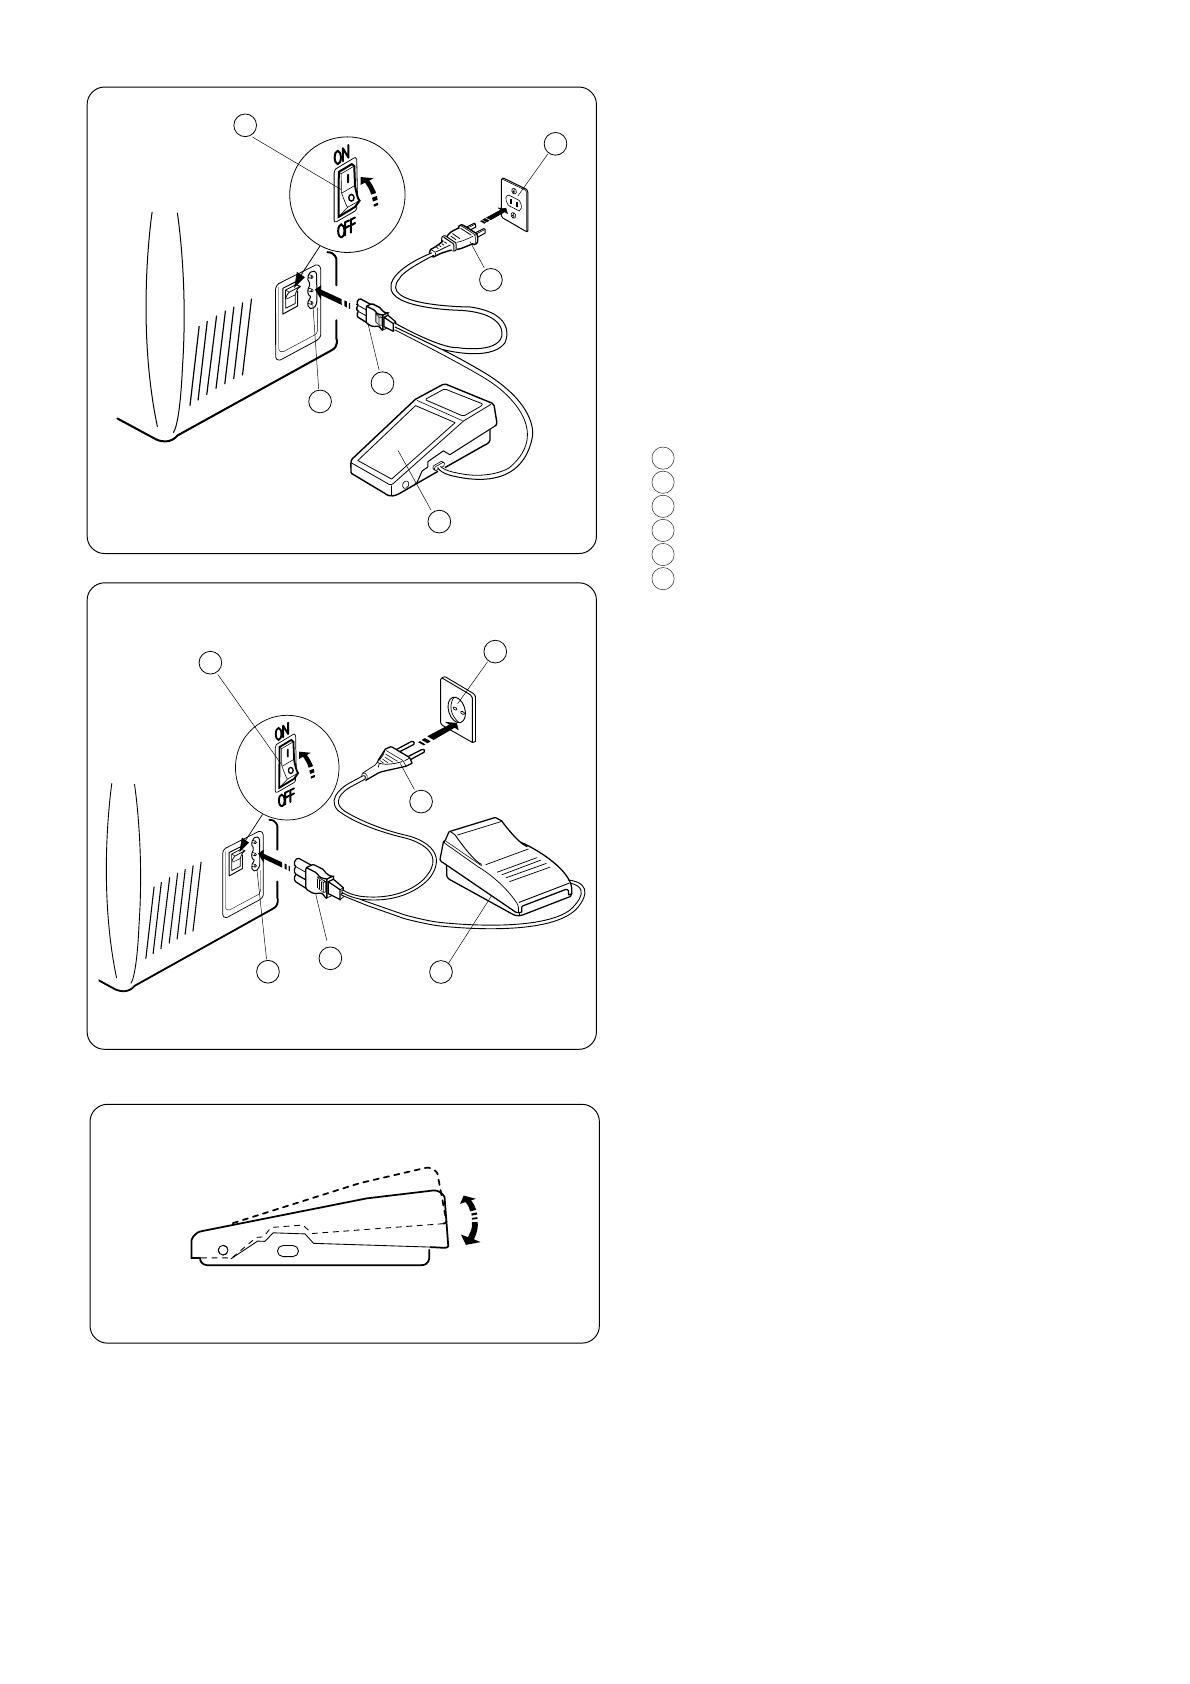
Page 6: Connecting The Machine To The Power Supply
Do not modify the plug in any way. Foot Control Model YC-482J or TJC-150 is used with Sewing Machine Models 419S and 423S. (For U.S.A. market only) Foot control Sewing speed can be varied by the foot control.
-
Page 7: Presser Foot Lifter
Presser Foot Lifter The presser foot lifter raises and lowers your presser foot. You can raise it about 0.6 cm (1/4″) higher than the normal up position for easy removal of the presser foot or to help you to place heavy fabric under the foot. Normal up position Highest position To Attach and Remove the Presser Foot…
-
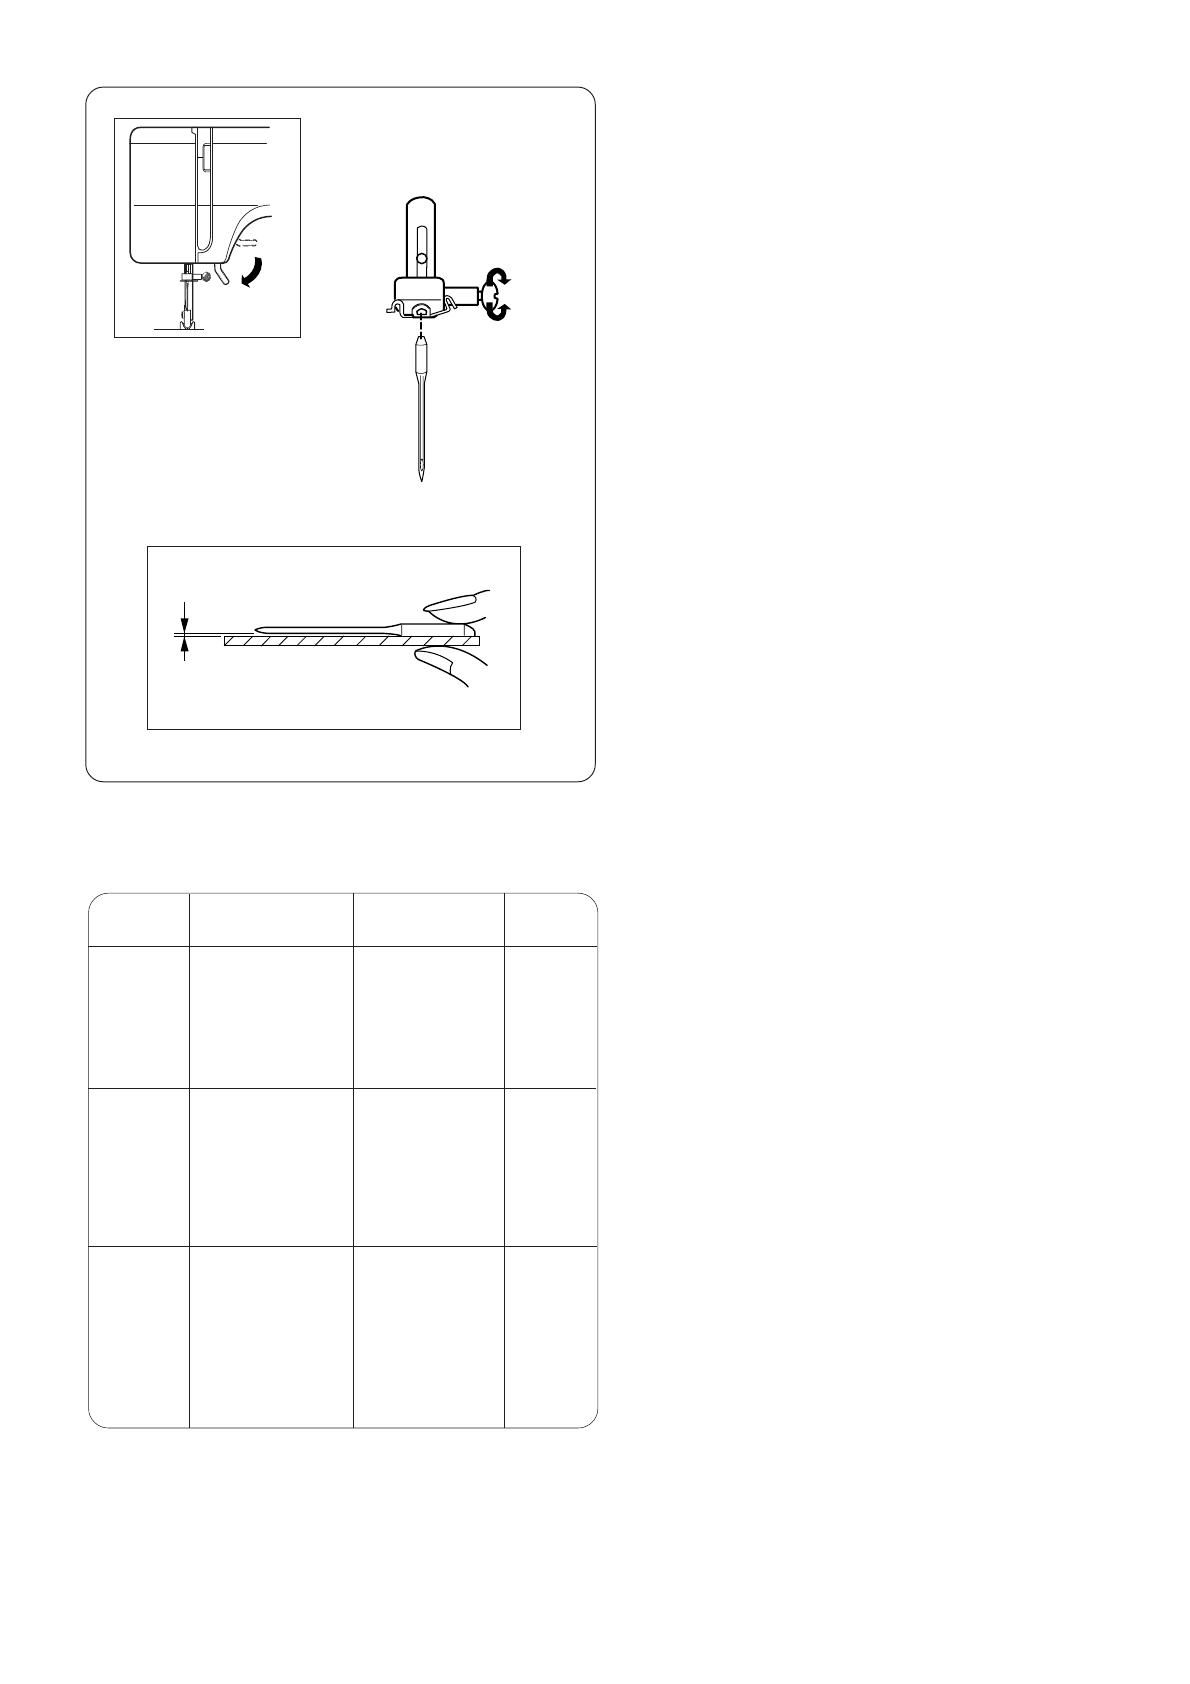
Page 8: Changing Needle
Changing Needle Raise the needle by turning the handwheel toward you and lower the presser foot. Loosen the needle clamp screw by turning it counterclockwise. Remove the needle from the clamp. Insert a new needle into the clamp with the flat side away from you.
-
Page 9: Setting Spool Pins
Setting Spool Pins The spool pins are used for holding the spool of thread in order to feed thread to the machine. To use, pull up the spool pin. Push down for storage. Needle thread Hole Tangle Note : When using thread which has tendency to tangle around spool pin, thread through the hole of spool pin as shown.
-
Page 10: Winding The Bobbin
Winding the Bobbin Draw the thread from spool. Guide the thread around the bobbin winder thread guide. Insert the thread through the hole in the bobbin from the inside to the outside. Put the bobbin on the bobbin winder spindle. Push it to the right.
-
Page 11: Threading The Machine
Threading the Machine Raise the take–up lever to its highest position by turning the handwheel toward you. Raise the presser foot. Place a spool on the spool pin as shown, with thread coming from back of the spool. Draw the thread into thread guide. While holding the thread near spool, draw thread down into the tension area and then around the check spring holder.
-
Page 12: Needle Threader
Note: The needle threader can be used with a #11/75 to #16/100 needle or Janome Blue Tipped needle. Thread size 50 to 100 would work well. Caution: Be sure to raise the needle to its highest…
-
Page 13: Balancing Needle Thread Tension
Balancing Needle Thread Tension Correct tension The thread tension is adjusted depending on the sewing materials, layers of fabric and other sewing conditions. * The ideal straight stitch has threads looked between two layers of fabric, as illustrated (magnifies to show detail). * For an ideal zigzag stitch, the bobbin thread does not show on the right side (top side) of the fabric, and the needle thread shows slightly on the wrong side (bottom side) of…
-
Page 14: Pattern Selector Dial
Raise the needle and presser foot. Turn the pattern selector dial to set the setting mark at the symbol corresponding to the desired pattern. Setting mark (A): Model 419S (B): Model 423S Stitch Length Control Slide the stitch length control to set the setting mark at the desired stitch length.
-
Page 15: Reverse Stitch Button
Reverse Stitch Button As long as you keep the reverse stitch button depressed, the machine sews backwards. Dropping the Feed Dog Remove the extension table. Raise the presser foot. To drop the feed dog, push the lever to the right . Drop feed lever To raise the feed dog, push the lever to the left.
-
Page 16: Section 3. Basic Sewing
SECTION 3. BASIC SEWING Straight Stitch Sewing Pattern selector: Presser foot: Zigzag foot Thread tension: 2–6 Stitch length: 1.5–4 Stitch width: (0) or Raise the presser foot and position the fabric with its edge lining up with a seam guide line on the needle plate.
-
Page 17: Seam Guides Line
Seam Guides Line The numbers on the needle plate indicate the distance between the center needle position and the line. The numbers in front are millimeters. The numbers in back are fractions of an inch. Variable Needle Position When the straight stitch (pattern A) is selected, you can move the needle drop position between center and left by sliding the stitch width control.
-
Page 18: Zigzag Stitching
Zigzag Stitching Pattern selector: Presser foot: Zigzag foot Thread tension: 2–5 Stitch length: 0.5–4 Stitch width: Simple zigzag stitching is widely used for overcasting, sewing on buttons etc. SECTION 4. UTILITY STITCHING Overcasting Pattern selector: Presser foot: Zigzag foot Thread tension: 1–4 Stitch length: 1–2…
-
Page 19: Tricot Stitch
Tricot Stitch Pattern selector: Presser foot: Zigzag foot Thread tension: 1–4 Stitch length: 0.5–1.5 Stitch width: This stitch is used to finish the raw edge on synthetics and other fabrics that tend to pucker. Place your fabric to allow 1.6 cm (5/8″) seam. Trim the seam allowance after sewing.
-
Page 20: Straight Stretch Stitch
Straight Stretch Stitch Pattern selector: Presser foot: Zigzag foot Thread tension: 2–6 Stitch length: S.S. Stitch width: (0) or The stitch is sewn with two stitches forward and one stitch backward forming a seam that does not rip easily.
-
Page 21: Sewing On Buttons
Sewing on Buttons Pattern selector: Presser foot: Zigzag foot Thread tension: 1–3 Stitch length: Stitch width: Adjust as necessary Feed dog: Dropped Push the drop feed lever to the right to lower the feed dog. Set the pattern selector dial at «C» and stitch width control at 0.
-
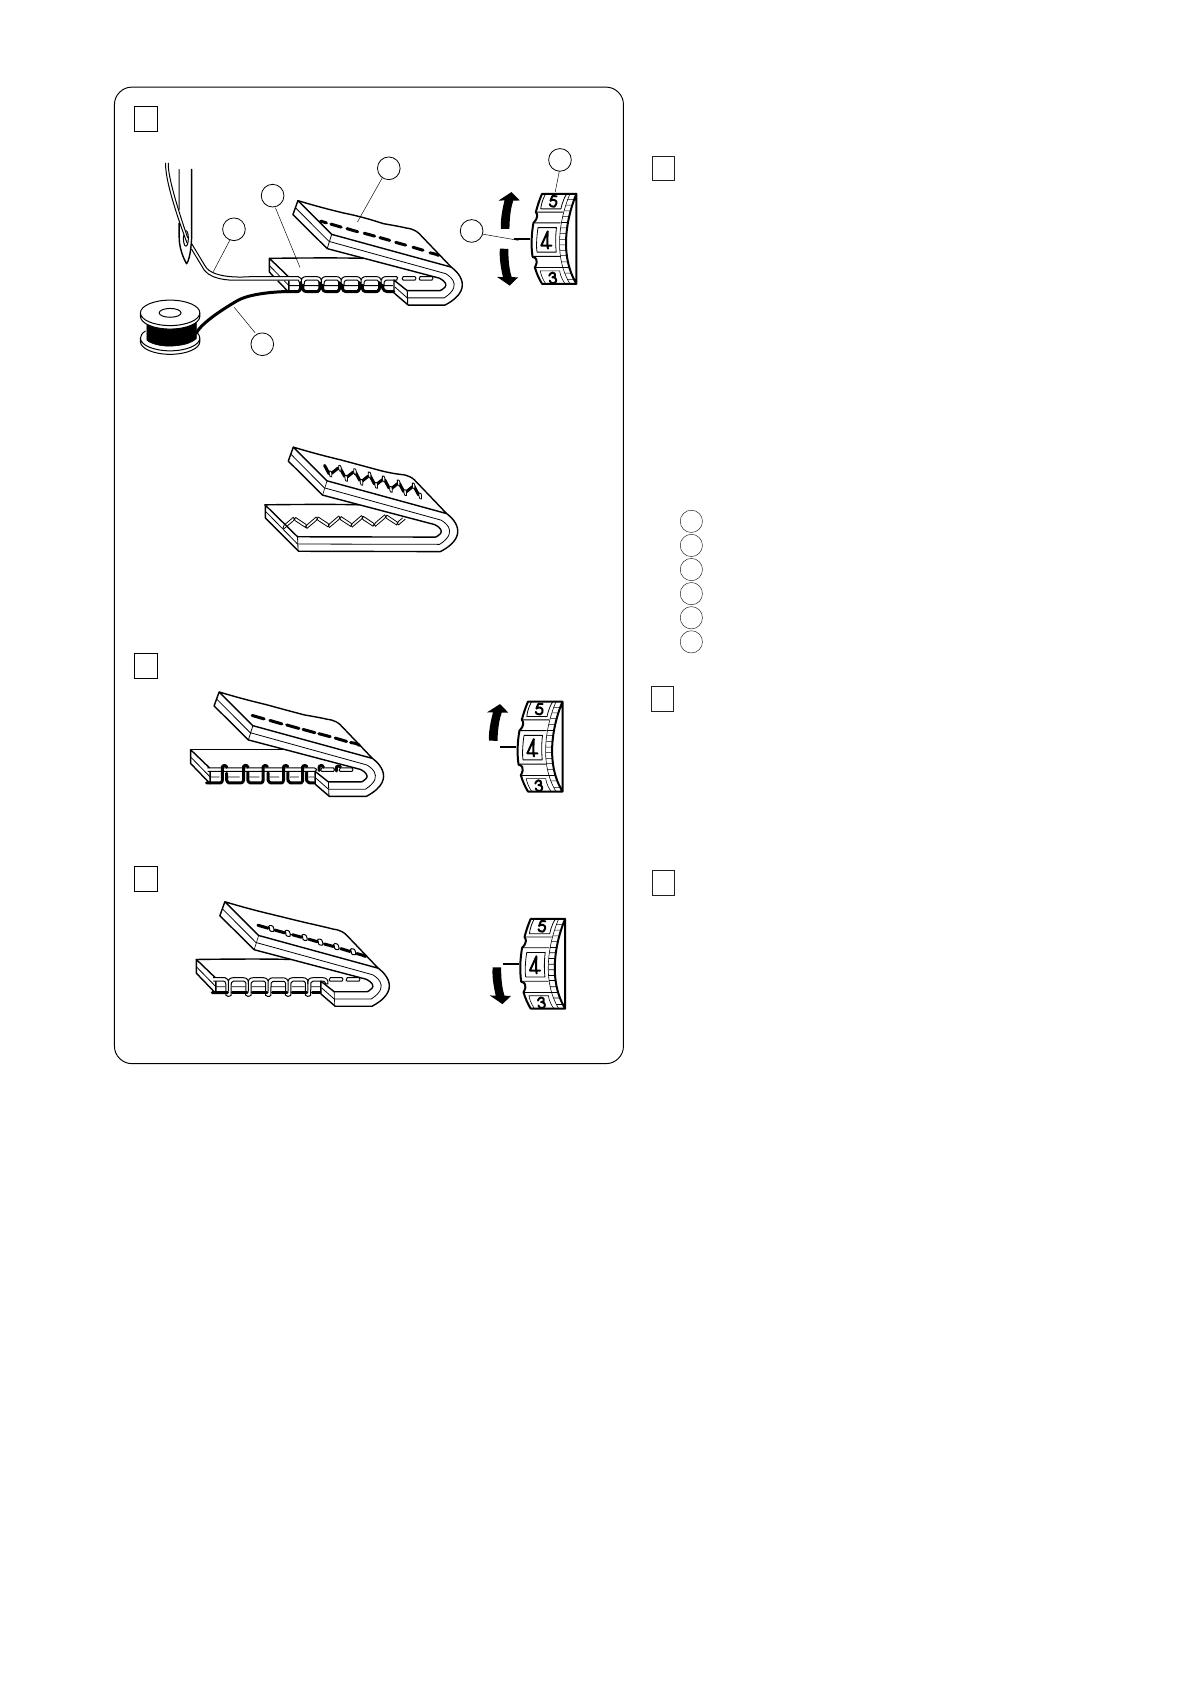
Page 22: Buttonhole
Buttonhole Pattern selector: Presser foot: Automatic buttonhole foot Thread tension: 1–5 Stitch length: (0.5–1) Stitch width: * The size of buttonhole is automatically set by placing the button in the automatic buttonhole foot. * The button holder of the foot takes a button size up to 2.5 cm (1″) in diameter.
-
Page 23: To Adjust Buttonhole Stitch Density
Sew slowly and stop the machine when a buttonhole is completed. The machine sews the front bartack and left row first, then the back bartack and right row. Cut both needle and bobbin threads leaving about 10 cm (4″) thread ends. Draw the needle thread to wrong side of fabric by pulling the bobbin thread.
-
Page 24: Corded Buttonhole
Corded Buttonhole Pattern selector: Presser foot: Automatic buttonhole foot Thread tension: 1–5 Stitch length: (0.5–1) Stitch width: Use the same procedure as automatic buttonhole. * Set the stitch width to match with the thickness of the cord used. With the buttonhole foot raised, hook the filler cord on the spur at the back of the buttonhole foot.
-
Page 25: Zipper Application
Zipper Application Pattern selector: Presser foot: Zipper foot Thread tension: 3 – 6 Stitch length: 1.5 – 4 Stitch width: Pin or baste zipper tape to fabric and place it under the foot. Smooth the threads toward the back and lower the foot. To sew the left side of the zipper, guide the zipper teeth along the edge of the foot and stitch through the garment and zipper tape.
-
Page 26: Blind Stitch Hemming
Blind Stitch Hemming Pattern selector: E or F Presser foot: Zigzag foot Thread tension: 2–4 Stitch length: 1–3 Stitch width: Hem guide Fold up the hem and fold it back to from a 0.4 to 0.7cm (1/4″) allowance as illustrated. Wrong side of the fabric 0.4 to 0.7 cm (1/4″) [A] Heavy weight fabrics (The raw edge should be…
-
Page 27: Rolled Hem
Rolled Hem Pattern selector: Presser foot: Hemmer foot Thread tension: 2–6 Stitch length: 1.5–4 Stitch width: Make a double 0.25 cm (1/8″) fold approximately 8 cm (3″) in length. 0.25 cm (1/8″) 8 cm (3″) Lower the needle into the fabric at the point where sewing is to begin, then lower the hemmer foot.
-
Page 28: Section 5. Decorative Stitching
Place the folded edge along the slot of foot. The needle should fall off the edge of the fabric on the right forming tucks. Stretch Stitch Patterns Pattern selector: A–J (Model 419S) A–L (Model 423S) Presser foot: Zigzag foot Thread tension: 1–4…
-
Page 29: Smocking
Smocking Pattern selector: Presser foot: Zigzag foot Thread tension: 1–4 Stitch length: S.S. Stitch width: With the stitch length at «4», sew straight stitching lines 1 cm (3/8″) apart, across the area to be smocked. Note : Loosen the needle thread tension to make gathering easier.
-
Page 30: Applique
When sewing corners, lower the needle down into the fabric. Raise the presser foot and pivot fabric to the right or left. Decorative Satin Stitch Patterns Pattern selector: I–J (Model 419S) I–L (Model 423S) Presser foot: Zigzag foot Thread tension: 2–5…
-
Page 31: Section 6. Care Of Your Machine
SECTION 6. CARE OF YOUR MACHINE Dismantling and Assembling Hook Race Unit Note : Turn off the power switch and/or unplug the machine. To dismantle hook race unit: Raise the needle to its highest position and open the hook cover. Open the hinged latch of bobbin case and take it out of the machine.
-
Page 32: Oiling The Machine
Oiling the Machine Note:Turn off the power switch when oiling the machine. Oil the points as shown at least once a year. Use good quality sewing machine oil. One or two drops of oil is sufficient. Wipe off excess oil, otherwise it may stain fabric. If machine has not been used for an extended time, oil it before sewing.
-
Page 33: Troubleshooting
Troubleshooting Cause Condition Reference 1. The needle thread is not threaded properly. The needle thread See Page 9 breaks. 2. The needle thread tension is too tight. See Page 11 3. The needle is bent or blunt. See Page 6 4.
This manual is also suitable for:
423s
Janome 419S Instruction Manual Janome 419s sewing machine
Janome 419S
Instruction Manual
www.toews.com
www.toews.com
Models 419S & 423S
419s Owners Manual/ User Guide
Janome 419S Instruction Manual Janome 419s sewing machine
IMPORTANT SAFETY INSTRUCTIONS
When using an electrical appliance, basic safety precautions should always be followed, including the followings:
Read all instructions before using this appliance.
DANGER
–
To reduce the risk of electric shock:
1.
An appliance should never be left unattended when plugged in. Always unplug this sewing machine from the electric outlet immediately after using and before cleaning.
2.
Always unplug before replacing a sewing machine bulb. Replace bulb with same type rated 15 Watts.
WARNING
–
To reduce the risk of burns, fire, electric shock, or injury to persons:
1.
Do not allow to be used as a toy. Close attention is necessary when this sewing machine is used by or near children.
2.
Use this appliance only for its intended use as described in this manual.
Use only attachments recommended by the manufacturer as contained in this manual.
3.
Never operate this sewing machine if it has a damaged cord or plug, if it is not working properly, if it has been dropped or damaged, or dropped into water.
Return this sewing machine to the nearest authorized dealers or service center for examination, repair, electrical or mechanical adjustment.
4.
Never operate the appliance with any air opening blocked. Keep ventilation openings of this sewing machine and foot control free from accumulation of lint, dust and loose cloth.
5.
Never drop or insert any object into any opening.
6.
Do not use outdoors.
7.
Do not operate where aerosol (spray) products are being used or where oxygen is being administered.
8.
To disconnect, turn all controls to the off («O») position, then remove plug from outlet.
9.
Do not unplug by pulling on cord. To unplug, grasp the plug, not the cord.
10. Keep fingers away from all moving parts. Special care is required around the sewing machine needle.
11. Always use the proper needle plate. The wrong plate can cause the needle to break.
12. Do not use bent needles.
13. Do not pull or push fabric while stitching. It may deflect the needle causing it to break.
14. Switch this sewing machine off («O») when making any adjustment in the needle area, such as threading the needle, changing the needle, threading the bobbin or changing the presser foot, and the like.
15. Always unplug this sewing machine from the electrical outlet when removing covers, lubricating, or when www.toews.com
www.toews.com
419s Owners Manual/ User Guide
Janome 419S Instruction Manual Janome 419s sewing machine
TABLE OF CONTENTS
SECTION 1. ESSENTIAL PARTS
Name of Parts ……………………………………………………………………………………………………………………
2
SECTION 2. GETTING READY TO SEW
Extension Table …………………………………………………………………………………………………………………
3
Standard Accessories …………………………………………………………………………………………………………
3
Accessory Storage Box ………………………………………………………………………………………………………
3
Connecting the Machine to the Power Supply ………………………………………………………………………..
4
Foot Control ………………………………………………………………………………………………………………………
4
Presser Foot Lifter ……………………………………………………………………………………………………………..
5
To Attach and Remove the Presser Foot ………………………………………………………………………………
5
Presser Foot Pressure Adjusting Dial ……………………………………………………………………………………
5
Changing Needle ……………………………………………………………………………………………………………….
6
To check the needle ……………………………………………………………………………………………………….
6
Thread and Needle Chart ……………………………………………………………………………………………………
6
Setting Spool Pins ……………………………………………………………………………………………………………..
7
Removing or Inserting the Bobbin Case ………………………………………………………………………………..
7
Winding the Bobbin …………………………………………………………………………………………………………….
8
Threading Bobbin Case ………………………………………………………………………………………………………
8
Threading the Machine ……………………………………………………………………………………………………….
9
Needle Threader ……………………………………………………………………………………………………………….. 10
Drawing Up Bobbin Thread ………………………………………………………………………………………………… 10
Balancing Needle Thread Tension ………………………………………………………………………………………. 11
Pattern Selector Dial ………………………………………………………………………………………………………….. 12
Stitch Length Control …………………………………………………………………………………………………………. 12
Stitch Width Control …………………………………………………………………………………………………………… 12
Reverse Stitch Button ………………………………………………………………………………………………………… 13
Dropping the Feed Dog ……………………………………………………………………………………………………… 13
SECTION 3. BASIC SEWING
Straight Stitch Sewing ………………………………………………………………………………………………………… 14
To Change Sewing Direction ………………………………………………………………………………………………. 14
Seam Guides Line …………………………………………………………………………………………………………….. 15
Variable Needle Position ……………………………………………………………………………………………………. 15
Zigzag Stitching ………………………………………………………………………………………………………………… 16
SECTION 4. UTILITY STITCHING
Overcasting ………………………………………………………………………………………………………………………. 16
Tricot Stitch ………………………………………………………………………………………………………………………. 17
Knit Stitch …………………………………………………………………………………………………………………………. 17
Straight Stretch Stitch ………………………………………………………………………………………………………… 18
Sewing on Buttons …………………………………………………………………………………………………………….. 19
Buttonhole ………………………………………………………………………………………………………………………… 20–21
To adjust buttonhole stitch density ……………………………………………………………………………………. 21
Corded Buttonhole …………………………………………………………………………………………………………….. 22
Zipper Application ……………………………………………………………………………………………………………… 23
Blind Stitch Hemming ………………………………………………………………………………………………………… 24 www.toews.com
Box Stitching …………………………………………………………………………………………………………………….. 27
Applique …………………………………………………………………………………………………………………………… 28
Decorative Satin Stitch Patterns ………………………………………………………………………………………….. 28
SECTION 6. CARE OF YOUR MACHINE
Dismantling and Assembling Hook Race Unit ……………………………………………………………………….. 29
Cleaning the Feed Dog ………………………………………………………………………………………………………. 29
Oiling the Machine …………………………………………………………………………………………………………….. 30
Oiling behind the face plate ……………………………………………………………………………………………… 30
Oiling the shuttle hook area ……………………………………………………………………………………………… 30
Sewing Light …………………………………………………………………………………………………………………….. 30
Troubleshooting ………………………………………………………………………………………………………………… 31
1 www.toews.com
419s Owners Manual/ User Guide
11
10
12
13
14
15
16
17
20
Janome 419S Instruction Manual
9
18
19
8
22
21
7
6
5
4
3
2
1
Janome 419s sewing machine
SECTION 1. ESSENTIAL PARTS
Name of Parts
6
7
4
5
1
2
3
Reverse stitch button
Pattern selector dial
Stitch width control
Stitch length control
Bobbin winder stopper
Bobbin winder spindle
Spool pins
8
9
Bobbin winder thread guide
Thread guide
10 Thread take-up lever
11 Thread tension dial
12 Pressure adjusting dial
13 Face plate
14 Thread cutter
15 Needle threader
16 Needle plate
17 Presser foot holder
18 Needle clamp
19 Needle
20 Presser foot
21 Extension table
22 Carrying handle
23 Handwheel
24 Power switch
25 Machine socket
26 Free arm
27 Buttonhole lever
28 Presser foot lifter
23
28
24
27
25
www.toews.com
Note :
The design and specifications are subject to change without
prior notice.
2 www.toews.com
419s Owners Manual/ User Guide
Janome 419S Instruction Manual Janome 419s sewing machine
SECTION 2. GETTING READY TO SEW
Extension Table
The extension table provides added sewing surface and can be easily removed for free arm sewing.
Detaching the table:
Pull the table away from the machine.
Attaching the table:
Push the extension table until it snaps into the machine.
Advantages and uses of free arm sewing:
Å[ Avoid fabric bunching around the needle when bartacking to reinforce pockets, plackets and waistlines.
Å[ For stitching sleeves, waistbands, pant legs or any circular garment area
Å[ For darning socks or mending knees, elbows or areas of wear in children’s clothes
4
7
1 2
5
3
6
Standard Accessories
1
2
3
4
7
8
9
5
6
Zipper foot
Automatic buttonhole foot
Hemmer foot
Bobbins
Set of needles
Seam ripper screwdriver
Oil
Hem guide
9
8
1
www.toews.com
Sewing accessories are conveniently located in the extension table.
1
Accessory storage box
3 www.toews.com
419s Owners Manual/ User Guide
Janome 419S Instruction Manual
2
2
4
5
6
1
3
3
Janome 419s sewing machine
Connecting the Machine to the Power Supply
Before connecting the power cord, make sure the voltage and frequency shown on the machine conform to your electrical power.
1. Turn off the power switch.
2. Insert the machine plug into the machine socket.
3. Insert the power supply plug into the outlet .
4. Turn on the power switch to turn on the power and sewing light.
1
3
5
Power supply plug
Outlet
Machine plug
2
4
6
Power switch
Machine socket
Foot control
Operating Instruction:
The symbol “0” on a switch indicates the “off” position of a switch.
For appliances with a polarized plug
(one blade wider than the other):
To reduce the risk of electric shock, this plug is intended to fit in a polarized outlet only one way.
If the plug does not fit fully in the outlet, reverse the plug.
If it still does not fit, contact a qualified electrician to install the proper outlet.
Do not modify the plug in any way.
Foot Control Model YC-482J or TJC-150 is used with Sewing
Machine Models 419S and 423S. (For U.S.A. market only)
1
4
5
6
Foot control
Sewing speed can be varied by the foot control.
www.toews.com
the machine will start advertently.
4 www.toews.com
419s Owners Manual/ User Guide
Janome 419S Instruction Manual
2
1
Janome 419s sewing machine
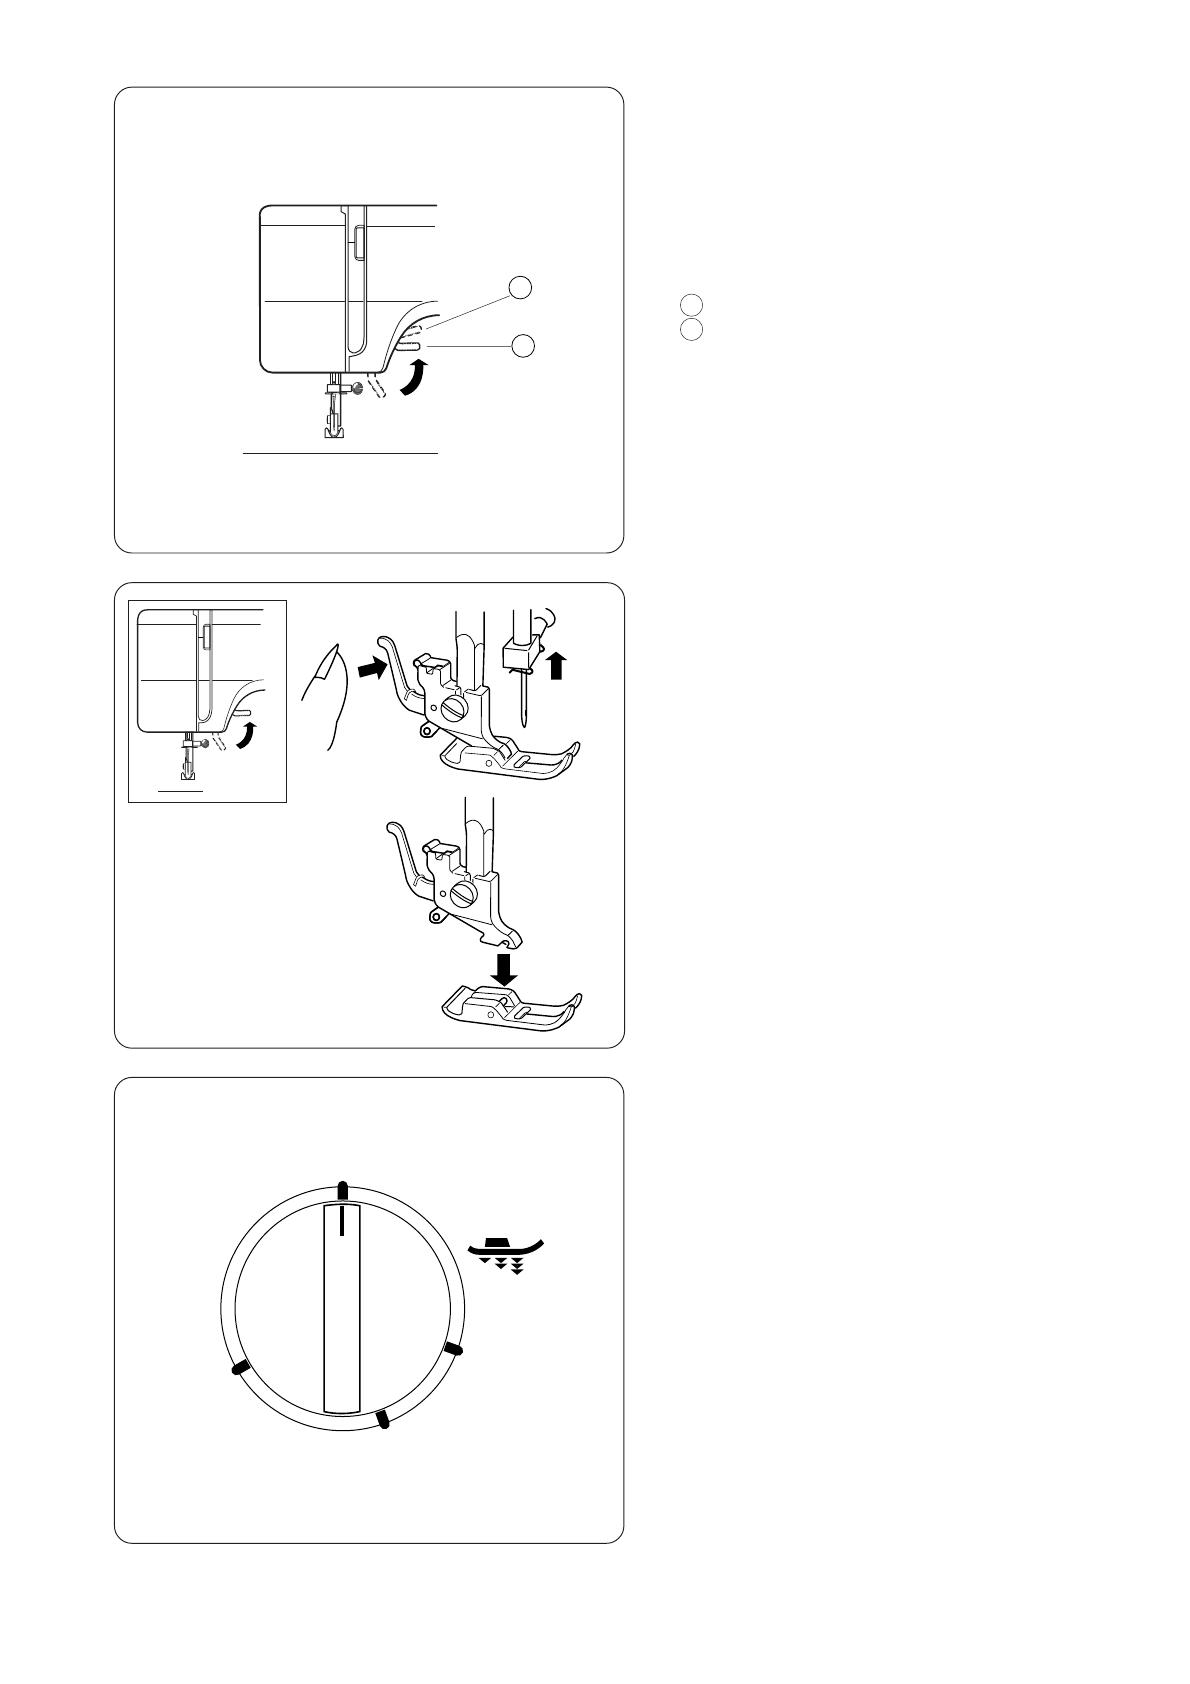
Presser Foot Lifter
The presser foot lifter raises and lowers your presser foot.
You can raise it about 0.6 cm (1/4″) higher than the normal up position for easy removal of the presser foot or to help you to place heavy fabric under the foot.
1
2
Normal up position
Highest position
To Attach and Remove the Presser Foot
To remove
Turn the handwheel toward you to raise the needle to its highest position.
Raise the presser foot.
Press the lever on the back of the foot holder.
The presser foot will drop off.
To attach
Place the presser foot so the pin on the foot lies just under the groove of the foot holder.
Lower the foot holder to lock the foot in place.
2
Presser Foot Pressure Adjusting Dial
The Presser foot pressure adjusting dial should be set at 3 www.toews.com
Velours and knit with a lot of stretch may require a 1 setting.
0
1
5 www.toews.com
419s Owners Manual/ User Guide
Janome 419S Instruction Manual Janome 419s sewing machine
Changing Needle
Raise the needle by turning the handwheel toward you and lower the presser foot.
Loosen the needle clamp screw by turning it counterclockwise.
Remove the needle from the clamp.
Insert a new needle into the clamp with the flat side away from you.
When inserting the needle into the clamp, push it up as far as it will go and tighten the clamp screw firmly with the screwdriver.
* Check your needles frequently for barbed or blunted points.
Snags and runs in knits, fine silks and silk-like fabrics are permanent and are almost always caused by a damaged needle.
To check the needle
Place the flat side of the needle on something flat (needle plate, glass etc.). The clearance between the needle and flat surface should be consistent. Never use a bent or blunt needle.
Fabrics Thread
Needle Size
Light weight
Medium weight
Heavy weight
Crepe de Chine, Voile, Fine Silk
Lawn, Organdy, Fine Cotton
9/65 or
Georgette, Fine Synthetic 11/75
Tricot
Serge, Double Knits,
Fine Cotton
Covered
Polyester or
Percale 14/90 50 to 60
Synthetic
Cotton Covered
Polyester
14/90 Denim, Tweed,
Upholstery Fabric
50 Silk
Gabardine,
Coating, Drapery and 40 to 50 Cotton
40 to 50
Synthetic
Cotton Covered
Polyester
16/100
Thread and Needle Chart
* In general, fine threads and needles are used for sewing thin fabrics, and thicker threads and needles are used for sewing heavy fabrics. Always test thread and needle size on a small piece of fabric which will be used for actual sewing.
* Use the same thread for needle and bobbin.
* When sewing stretch, very fine fabrics and synthetics,use a BLUE TIPPED needle.
The blue tipped needle effectively prevents skipped stitches.
* When sewing very fine fabrics, sew over a piece of paper to prevent seam puckering.
6 www.toews.com
419s Owners Manual/ User Guide
Janome 419S Instruction Manual
1
3
1
2
Janome 419s sewing machine
Setting Spool Pins
The spool pins are used for holding the spool of thread in order to feed thread to the machine.
To use, pull up the spool pin. Push down for storage.
1
Needle thread
2
Hole
3
Tangle
Note :
When using thread which has tendency to tangle
around spool pin, thread through the hole of spool
pin as shown.
The hole should face the thread spool.
Removing or Inserting the Bobbin Case
Open the hook cover.
1
Hook cover
1
Raise the needle by turning the handwheel toward you.
Take out the bobbin case by holding the latch.
2
Latch
2
3
3
Horn
7 www.toews.com
419s Owners Manual/ User Guide
1
Janome 419S Instruction Manual
4
5
1
3
2
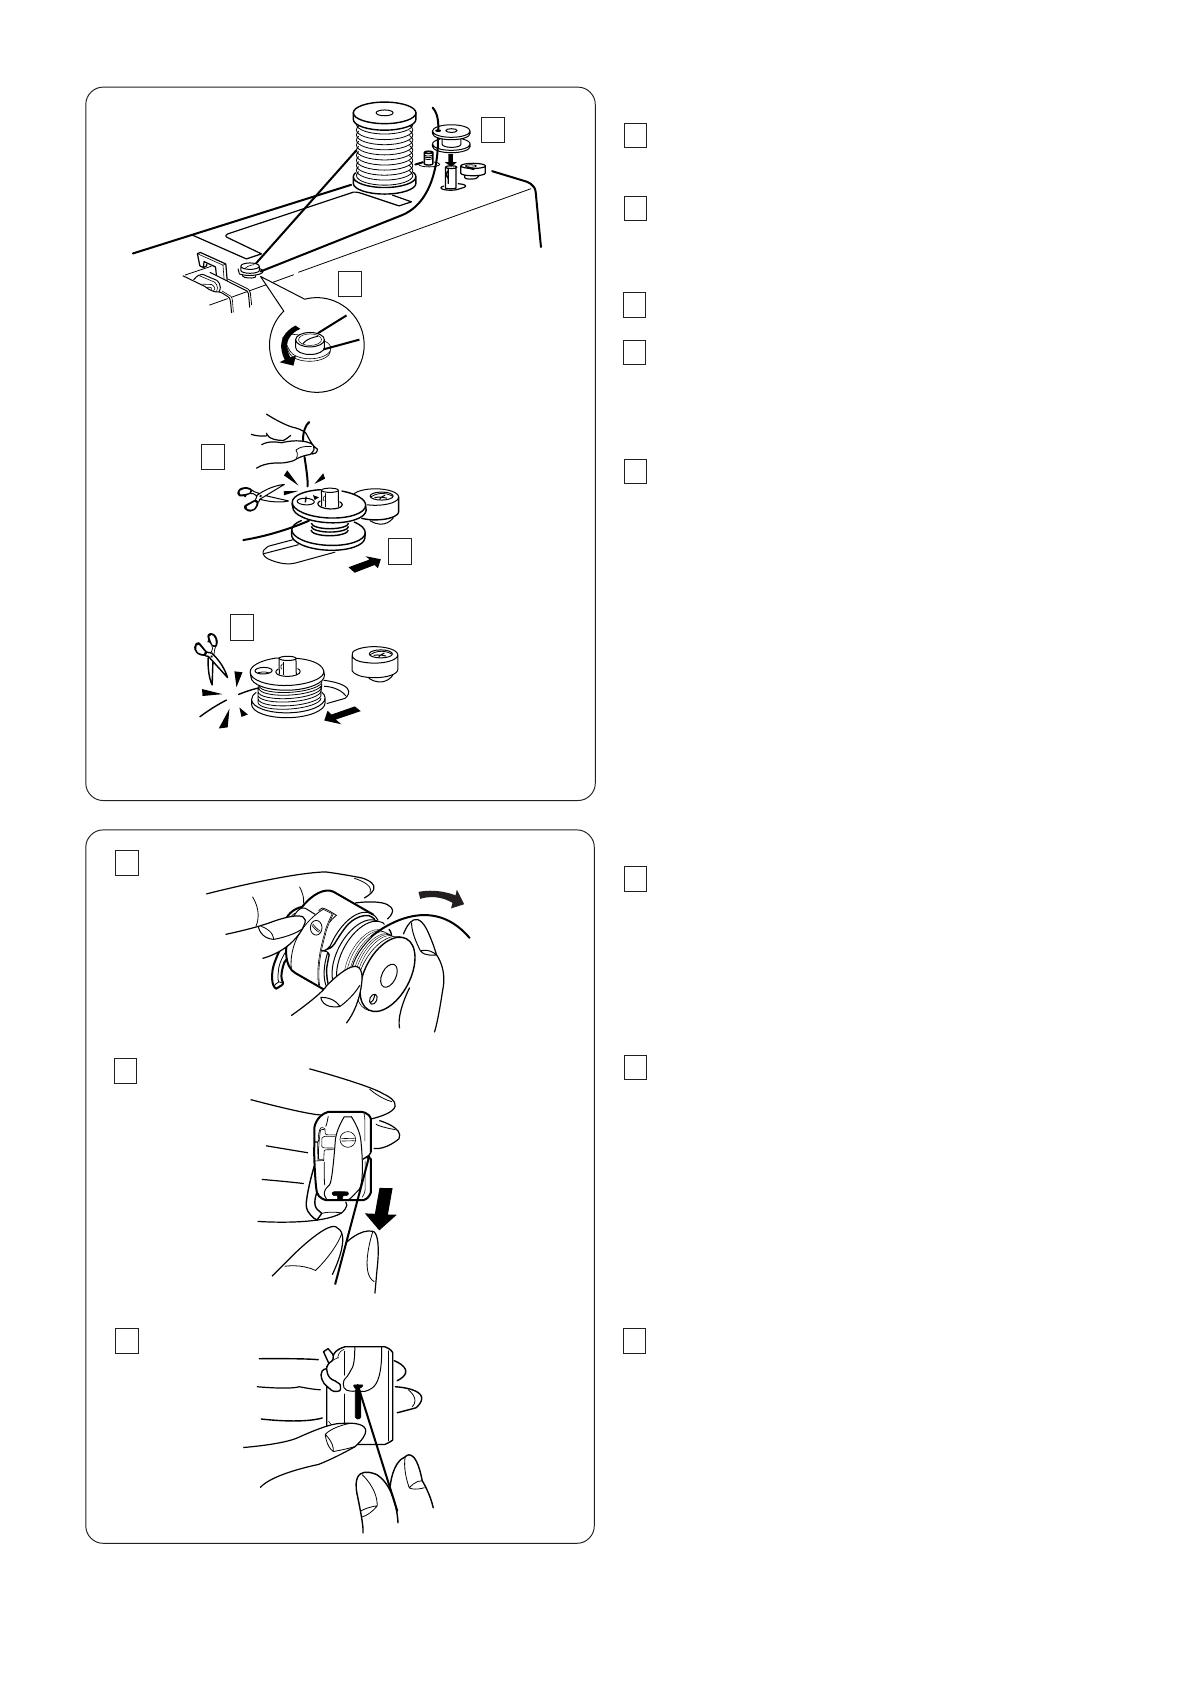
Winding the Bobbin
Janome 419s sewing machine
1
2
Draw the thread from spool.
Guide the thread around the bobbin winder thread guide.
Insert the thread through the hole in the bobbin from the inside to the outside.
Put the bobbin on the bobbin winder spindle.
Push it to the right.
3
4 With the free end of the thread held in your hand, depress the foot control.
Stop the machine when the bobbin has made a few
turns, and cut the thread close to the hole on the
bobbin.
5 Depress the foot control again.
When the bobbin is fully wound, stop the machine.
Return the bobbin winder spindle to its original position by moving the spindle to the left, and cut the thread.
Note :
Return the bobbin winder spindle when the machine stops.
Threading Bobbin Case
1 Place the bobbin into the bobbin case.
Make sure the thread unwinds in the direction of arrow.
2
3
Pull the thread into the bobbin case slot.
2 www.toews.com
3 Draw the thread under the tension spring and into the delivery eye.
* Leave about 10 cm (4″) of free thread.
8 www.toews.com
419s Owners Manual/ User Guide
Janome 419S Instruction Manual
3
1
Janome 419s sewing machine
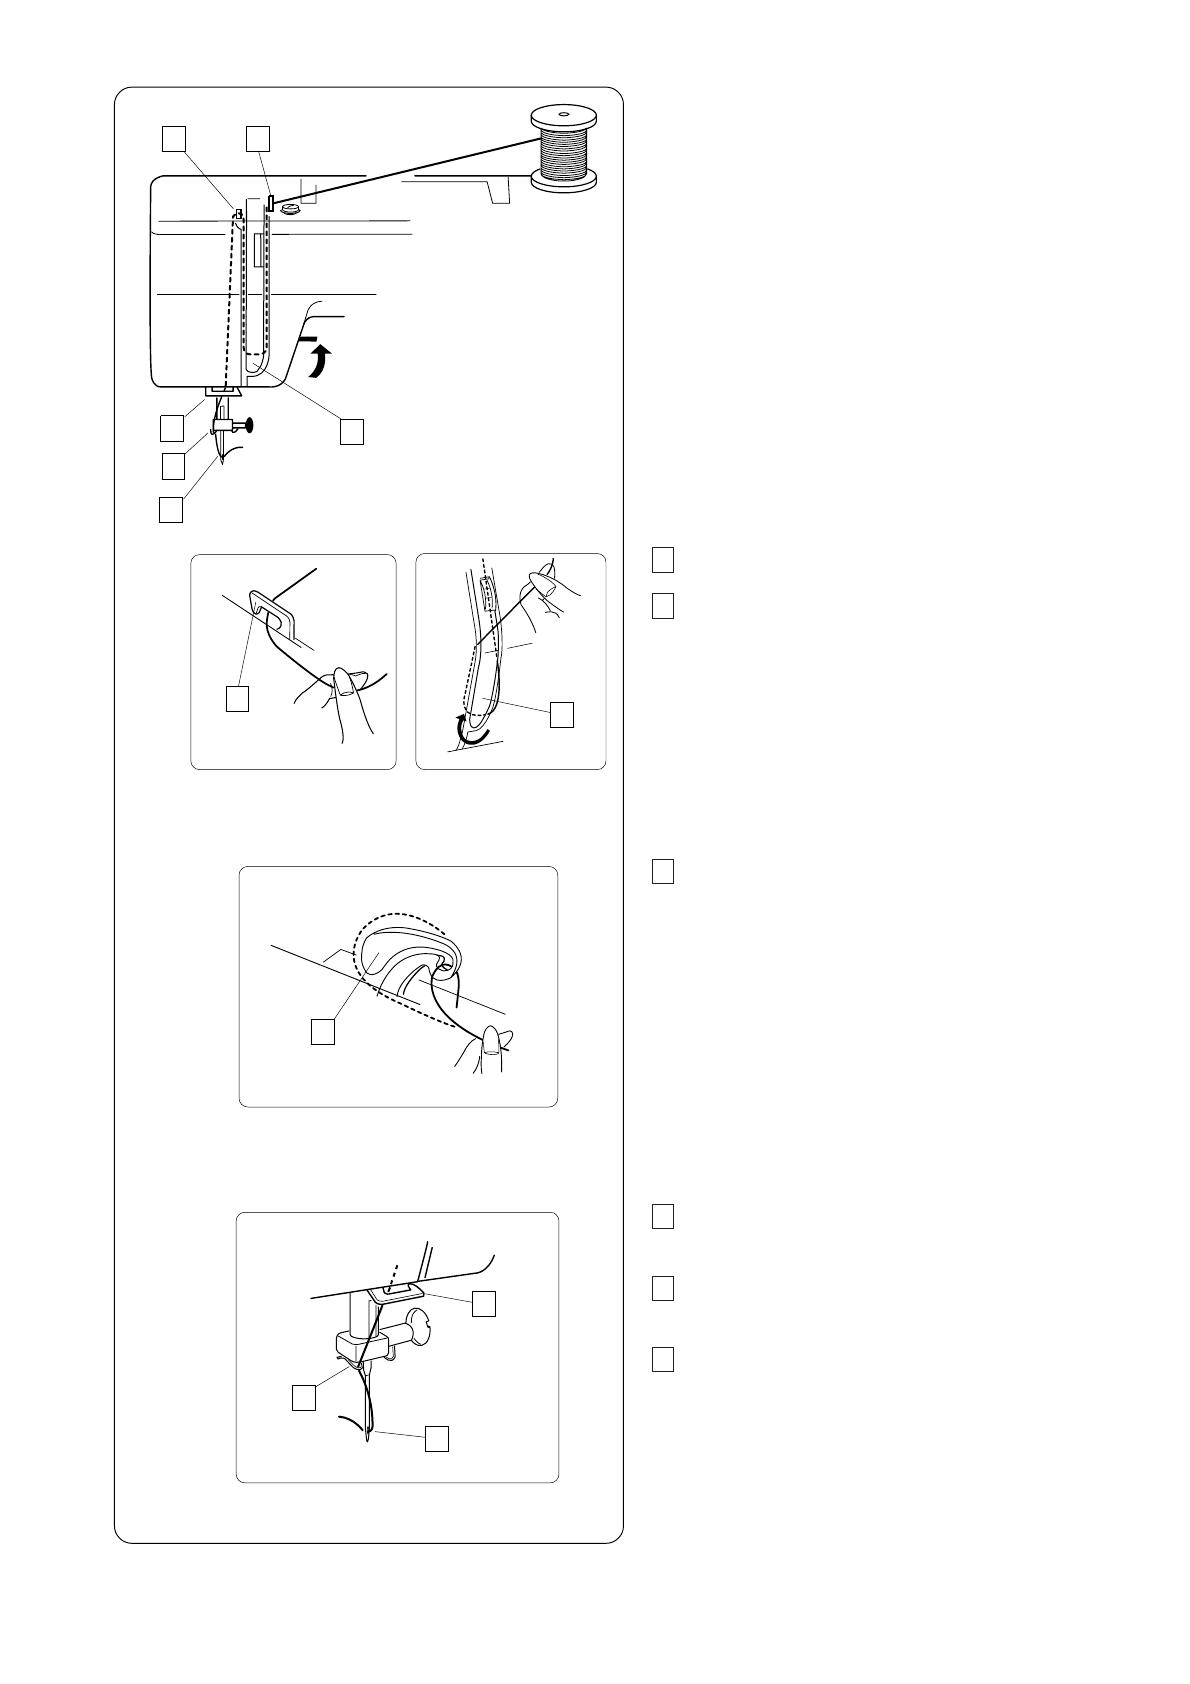
Threading the Machine
Raise the take–up lever to its highest position by turning the handwheel toward you.
Raise the presser foot.
Place a spool on the spool pin as shown, with thread coming from back of the spool.
4
5
6
2
1
2
1
2
Draw the thread into thread guide.
While holding the thread near spool, draw thread down into the tension area and then around the check spring holder.
3 Firmly draw the thread up and through the take–up lever from right to left.
3 www.toews.com
5
6
4
Draw the thread down and slip it into needle bar thread guide on the left.
6 Thread the needle eye from front to back.
* Refer to page 10 for the built-in needle threader.
9
Note :
You may want to cut the end of thread with sharp scissors for easier needle threading.
419s Owners Manual/ User Guide
1
Janome 419S Instruction Manual
2
3 4
1
Janome 419s sewing machine
Needle Threader
1
Raise the needle to its highest position.
Press down the needle threader knob as far as it will go.
The hook comes out through the needle eye from behind.
2 Pull the thread down around the thread guide then pass
it from the left and under the hook.
3 Release the knob slowly while holding the thread end
with your hand.
A loop of the thread is pulled up through the needle eye.
4 Remove the loop from the threader and pull out the
thread end from the needle eye.
Note:
The needle threader can be used with a #11/75 to #16/100 needle or Janome Blue Tipped needle.
Thread size 50 to 100 would work well.
Caution:
Be sure to raise the needle to its highest position when using the needle threader, otherwise the hook will miss the needle eye and will be damaged.
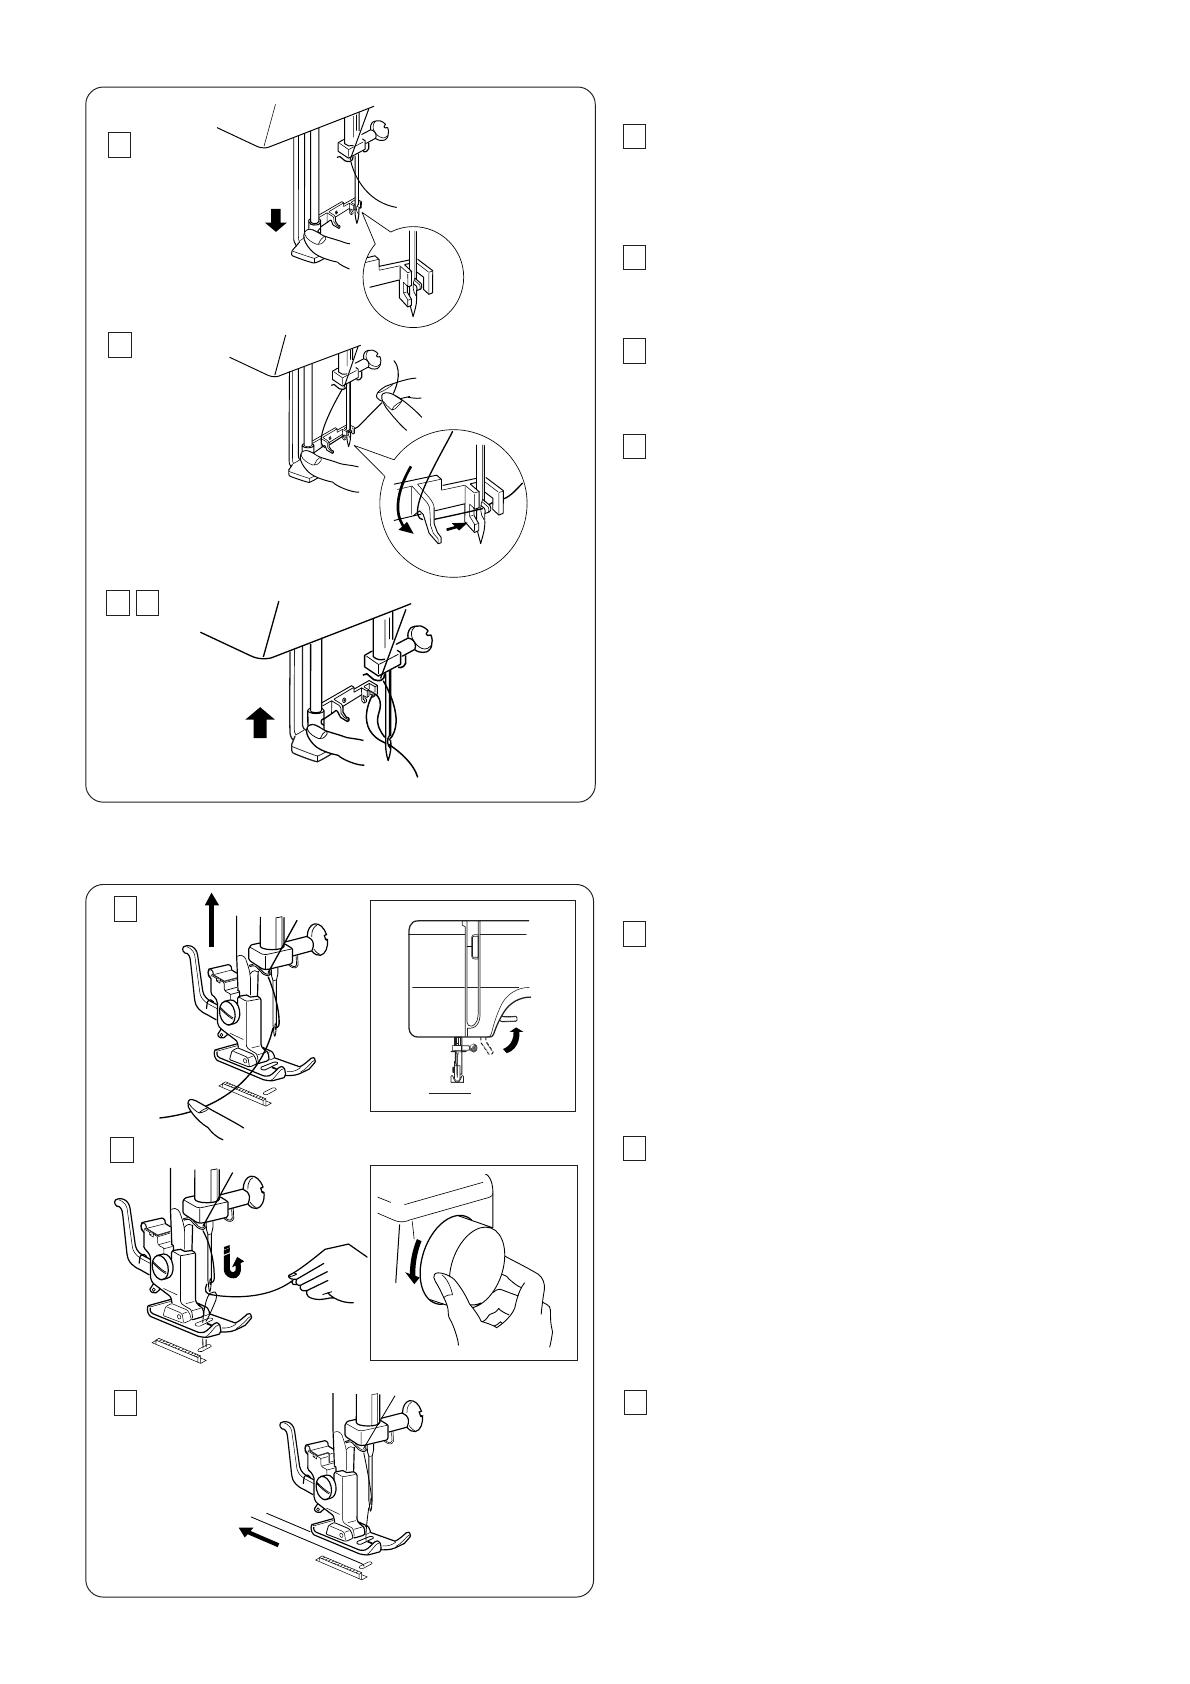
Drawing Up Bobbin Thread
1 Raise the presser foot and hold the needle thread lightly with your left hand.
2
3
2 Turn the handwheel one complete turn toward you
and raise the needle to its highest position.
Pull the needle thread to pick up a loop of the bobbin www.toews.com
3 Pull 15 cm (6″) of both threads back and under the presser foot.
10 www.toews.com
419s Owners Manual/ User Guide
1
Janome 419S Instruction Manual
4
1
3
6
5
2
Janome 419s sewing machine
Balancing Needle Thread Tension
1
Correct tension
The thread tension is adjusted depending on the sewing materials, layers of fabric and other sewing
conditions.
* The ideal straight stitch has threads looked between two layers of fabric, as illustrated (magnifies to show detail).
* For an ideal zigzag stitch, the bobbin thread does not show on the right side (top side) of the fabric, and the needle thread shows slightly on the wrong side (bottom side) of the fabric.
1
2
3
Needle thread (Top thread)
Bobbin thread (Bottom thread)
Right side (Top side) of fabric
Wrong side (Bottom side) of fabric
4
5
6
Thread tension dial
Setting mark
2
2
Needle thread tension is too tight
If the bobbin thread (bottom thread) appears on the right side (top side) of the fabric, loosen the needle thread tension by moving the dial to a lower number.
3
3
Needle thread tension is too loose
If the needle thread (top thread) appears on the wrong side (bottom side) of the fabric, tighten the needle thread tension by moving the dial to a higher number.
www.toews.com
11
419s Owners Manual/ User Guide www.toews.com
Janome 419S Instruction Manual
(B)
(A)
1
Janome 419s sewing machine
Pattern Selector Dial
Raise the needle and presser foot. Turn the pattern selector dial to set the setting mark at the symbol corresponding to the desired pattern.
1
Setting mark
(A): Model 419S
(B): Model 423S
(A)
1
(B)
Stitch Length Control
Slide the stitch length control to set the setting mark at the desired stitch length.
The higher the number, the longer the stitch
Setting mark
» » is the recommended setting for buttonhole stitching.
Adjust the stitch length control in the 0.5–4 range when you sew the zigzag stitch.
Set the stitch length control at «S.S.» to sew the stretch stitch pattern.
If the stretch stitch pattern is uneven, slide the stitch length control in the direction of «–» to compress it, or «+» to expand it.
S.S.
www.toews.com
0 1
www.toews.com
1
Slide the stitch width control to set the setting mark at the desired stitch width.
The higher the number, the wider the stitch width
1
Setting mark
When the stitch width is narrow, the right side of the pattern is cut off.
(Example: Pattern E)
Width [5] Width [3]
12
Note :
Raise the needle above the fabric, when you slide
the stitch width control.
419s Owners Manual/ User Guide
Janome 419S Instruction Manual Janome 419s sewing machine
Reverse Stitch Button
As long as you keep the reverse stitch button depressed, the machine sews backwards.
2
3
1
2
1
3
Dropping the Feed Dog
1 Remove the extension table.
Raise the presser foot.
2 To drop the feed dog, push the lever to the right .
1
Drop feed lever
3 To raise the feed dog, push the lever to the left.
* The feed dog must be up for normal sewing.
* The feed dog will return to the up position when the machine starts running.
1
1
www.toews.com
13
419s Owners Manual/ User Guide www.toews.com
2
1
Janome 419S Instruction Manual
1
2
3
4
5
Janome 419s sewing machine
SECTION 3. BASIC SEWING
Straight Stitch Sewing
1
2
3
4
5
Pattern selector:
Presser foot:
Thread tension:
Stitch length:
Stitch width:
A
Zigzag foot
2–6
1.5–4
(0) or (5)
1
2
Raise the presser foot and position the fabric with its edge lining up with a seam guide line on the needle plate.
Lower the needle into the fabric.
Lower the presser foot and smooth the threads toward the back. Depress the foot control.
Gently guide the fabric along the guide line letting the fabric feed by itself.
For fastening the end of seams, press the reverse stitch button and sew several reverse stitches.
Raise the presser foot and remove the fabric, drawing the threads to the back.
3 3 Draw the threads up and into the thread cutter.
The threads are cut the proper length for starting the next seam.
www.toews.com
Stop the machine and turn the handwheel toward you to bring the needle down into the fabric.
Raise the presser foot.
Pivot the fabric around the needle to change sewing direction as desired. Lower the presser foot and continue sewing.
14 www.toews.com
419s Owners Manual/ User Guide
Janome 419S Instruction Manual Janome 419s sewing machine
Seam Guides Line
The numbers on the needle plate indicate the distance between the center needle position and the line.
The numbers in front are millimeters.
The numbers in back are fractions of an inch.
0 1 2 3 4 5
Variable Needle Position
When the straight stitch (pattern A) is selected, you can move the needle drop position between center and left by sliding the stitch width control.
www.toews.com
www.toews.com
15
419s Owners Manual/ User Guide
1
Janome 419S Instruction Manual
2
3
4
5
Janome 419s sewing machine
Zigzag Stitching
1
2
3
4
5
Pattern selector:
Presser foot:
Thread tension:
Stitch length:
Stitch width:
C
Zigzag foot
2–5
0.5–4
5
Simple zigzag stitching is widely used for overcasting, sewing on buttons etc.
1
4
2
3
SECTION 4. UTILITY STITCHING
Overcasting
3
4
1
2
5
Pattern selector:
Presser foot:
Thread tension:
Stitch length:
Stitch width:
C
Zigzag foot
1–4
1–2
5 www.toews.com
16
419s Owners Manual/ User Guide
1
Janome 419S Instruction Manual
2
3
Janome 419s sewing machine
Tricot Stitch
1
2
3
4
5
Pattern selector:
Presser foot:
Thread tension:
Stitch length:
Stitch width:
D
Zigzag foot
1–4
0.5–1.5
5
4
5
This stitch is used to finish the raw edge on synthetics and other fabrics that tend to pucker.
Place your fabric to allow 1.6 cm (5/8″) seam.
Trim the seam allowance after sewing.
Note :
Be careful not to cut the stitches.
It is also handy for darning and mending tears.
1
Knit Stitch
2
3
4
1
2
3
4
5
Pattern selector:
Presser foot:
Thread tension:
Stitch length:
Stitch width:
G
Zigzag foot
1–4
S.S.
5
5
www.toews.com
strength.
Place your fabric to allow a 1.6 cm (5/8″) seam.
Trim the seam allowance after sewing.
Note :
Be careful not to cut the stitches.
17 www.toews.com
419s Owners Manual/ User Guide
Janome 419S Instruction Manual
2
1
3
4
5
Janome 419s sewing machine
Straight Stretch Stitch
4
5
1
2
3
Pattern selector:
Presser foot:
Thread tension:
Stitch length:
Stitch width:
A
Zigzag foot
2–6
S.S.
(0) or (5)
The stitch is sewn with two stitches forward and one stitch backward forming a seam that does not rip easily.
www.toews.com
www.toews.com
18
419s Owners Manual/ User Guide
Janome 419S Instruction Manual
2
1
3
Janome 419s sewing machine
Sewing on Buttons
1
2
3
4
5
6
Pattern selector:
Presser foot:
Thread tension:
Stitch length:
Stitch width:
Feed dog:
C
Zigzag foot
1–3
Any
Adjust as necessary
Dropped
6
4
5
1 2
3 4 5
1 Push the drop feed lever to the right to lower the feed dog.
Set the pattern selector dial at «C» and stitch width control at 0.
Place the button under the foot. Unthread the needle and
turn the handwheel slowly to lower the needle into the left
hole on the button.
Align the right hole on the button with the slot of the foot
and lower the foot to hold the button in place.
2 Raise the needle and adjust the stitch width so that the
needle enters into the right hole on the button.
3 Rethread the needle and sew 10 stitches. A pin can
be placed on top of the foot to form a shank
.
4
5
Raise the needle and set the stitch width control to 0 www.toews.com
Note:
When button sewing is finished, raise the feed dog.
19
419s Owners Manual/ User Guide www.toews.com
1
Janome 419S Instruction Manual
2
1 2 3
4
5
1
6 7 8 www.toews.com
4
5
2
6
3
Janome 419s sewing machine
Buttonhole
3
4
1
2
5
Pattern selector:
Presser foot:
Thread tension:
Stitch length:
Stitch width:
Automatic buttonhole foot
1–5
(0.5–1)
5
* The size of buttonhole is automatically set by placing the button in the automatic buttonhole foot.
* The button holder of the foot takes a button size up to
2.5 cm (1″) in diameter.
* Make a test buttonhole on a sample duplicating the fabric, interfacing and seams of the actual garment.
* Place the button on the fabric sample and mark the top and bottom to determine the position of buttonhole.
* Use interfacing on stretch fabrics.
4
3
5
20
1
2
Turn the handwheel toward you to raise the needle to its highest position.
Raise the presser foot lifter.
Select the pattern «BH» by turning the pattern selector dial.
If the BH pattern is already selected, reset the dial once
3
4
5 according to the procedure in 12 .
Attach the automatic buttonhole foot.
Pull the button holder to the back, and place the button in it. Push back the button holder toward you as far as it will go.
Pull the buttonhole lever downward as far as it will go.
1
Buttonhole lever
Insert fabric under the foot.
6
Turn the handwheel slowly towards you with your right hand until the needle goes down and continue turning
7
8 handwheel until the take-up lever is at its highest position.
Remove the fabric to the left to draw both threads to the left.
at the starting point.
Then lower the automatic buttonhole foot.
Note :
Make sure there is no gap between the slider and the
spring holder. If there is a gap, the length of the rows
will be different, as shown.
4
5
2
3
6
Starting point
Slider
There should be no gap
Spring holder
Difference
419s Owners Manual/ User Guide
10 11
12
9
Janome 419S Instruction Manual Janome 419s sewing machine
9 Sew slowly and stop the machine when a buttonhole is completed.
* The machine sews the front bartack and left row first, then the back bartack and right row.
10 Cut both needle and bobbin threads leaving about 10 cm
(4″) thread ends.
Draw the needle thread to wrong side of fabric by pulling the bobbin thread.
Then, knot the threads.
11 Insert a pin inside the bartack.
Then cut the opening with seam ripper.
Take care not to cut the stitches.
12 To repeat buttonhole sewing, turn the stitch selector to
, then back to again, as shown.
Now, simply step on the foot control to sew an identical buttonhole.
13 When buttonhole sewing is finished, push the buttonhole lever upward as far as it will go.
13 www.toews.com
S.S.
www.toews.com
To adjust buttonhole stitch density.
Set the stitch length control between 0.5 and 1.0 to adjust the buttonhole stitch density.
0 1 2 3 4
21
419s Owners Manual/ User Guide
1
1
Janome 419S Instruction Manual
2
3
4
5
2
3
1
Janome 419s sewing machine
Corded Buttonhole
3
4
1
2
5
Pattern selector:
Presser foot:
Thread tension:
Stitch length:
Stitch width:
Automatic buttonhole foot
1–5
(0.5–1)
5
1 Use the same procedure as automatic buttonhole.
* Set the stitch width to match with the thickness of the cord used.
2
With the buttonhole foot raised, hook the filler cord on the spur at the back of the buttonhole foot.
Bring the ends toward you under the buttonhole foot, clearing the front end.
Hook the filler cord into the forks on the front of the automatic buttonhole foot to hold them tight.
Lower the needle into the garment where the buttonhole will start and lower the foot.
1
Spur
Depress the foot control gently and sew the buttonhole.
Each side of the buttonhole and the bartacks will be sewn over the cord.
Remove the fabric from the machine and cut the sewing threads only.
3
*
Pull the left end of the filler cord to tighten it.
Thread the end through a darning needle, draw to the page 21.
www.toews.com
22
419s Owners Manual/ User Guide
Janome 419S Instruction Manual
1
2
5
4
3
Janome 419s sewing machine
Zipper Application
3
4
1
2
5
Pattern selector:
Presser foot:
Thread tension:
Stitch length:
Stitch width:
A
Zipper foot
3 – 6
1.5 – 4
(5)
Pin or baste zipper tape to fabric and place it under the foot.
Smooth the threads toward the back and lower the foot.
To sew the left side of the zipper, guide the zipper teeth along the edge of the foot and stitch through the garment and zipper tape.
Turn the fabric and sew the other side of the zipper in the same way as you did the left side.
www.toews.com
www.toews.com
23
419s Owners Manual/ User Guide
1
Janome 419S Instruction Manual
2
3
4
5
6
Janome 419s sewing machine
Blind Stitch Hemming
1
2
3
4
5
6
Pattern selector:
Presser foot:
Thread tension:
Stitch length:
Stitch width:
Hem guide
E or F
Zigzag foot
2–4
1–3
5
1
[A]
1
2
[B]
1
2
1 Fold up the hem and fold it back to from a 0.4 to 0.7cm
(1/4″) allowance as illustrated.
1
2
Wrong side of the fabric
0.4 to 0.7 cm (1/4″)
[A] Heavy weight fabrics (The raw edge should be
overcast.)
[B] Fine or medium weight fabrics
2
3
4 www.toews.com
2 Lower the presser foot, then loosen the foot holder screw to place the hem guide between the screw and the shank of foot holder.
Tighten the screw making sure the wall of hem guide is placed between the toes of the presser foot.
3
4
Screw
Hem guide
3
4
3 Raise the presser foot and place the fabric under the
foot so that the folded edge rests against the wall of
the hem guide.
Lower the foot, then stitch slowly for better control so www.toews.com
4 Open the fold flat.
5
Right side of the fabric
5
* If the needle drops far left, the stitches will show on the right side of the fabric.
24
419s Owners Manual/ User Guide
1
Janome 419S Instruction Manual
2
4
5
1
1
2
2
3
3
Janome 419s sewing machine
Rolled Hem
3
4
5
1
2
Pattern selector:
Presser foot:
Thread tension:
Stitch length:
Stitch width:
A
Hemmer foot
2–6
1.5–4
(5)
1 Make a double 0.25 cm (1/8″) fold approximately
8 cm (3″) in length.
2 Lower the needle into the fabric at the point where sewing is to begin, then lower the hemmer foot.
Sew 3 or 4 stitches while pulling the needle and bobbin threads.
3 Lower the needle into the fabric and lift the hemmer foot. Insert the folded portion of the fabric into the curl of the hemmer foot.
4
5
3
4 Lower the hemmer foot, then sew by lifting up the edge
3
and evenly.
of the fabric to keep it feeding into the curl smoothly www.toews.com
5 Trim about 0.7 cm (1/4″) from corners as illustrated, to reduce bulk.
25 www.toews.com
419s Owners Manual/ User Guide
1
Janome 419S Instruction Manual
2
3
Janome 419s sewing machine
SECTION 5. DECORATIVE STITCHING
Shell Tuck
3
4
5
1
2
Pattern selector:
Presser foot:
Thread tension:
Stitch length:
Stitch width:
G
Zigzag foot
6–8
2–3
5
4
5
Fold the fablic in bias.
Place the folded edge along the slot of foot.
The needle should fall off the edge of the fabric on the right forming tucks.
1
www.toews.com
Stretch Stitch Patterns
2
3
1
2
3
4
5
Pattern selector: A–J (Model 419S)
A–L (Model 423S)
Presser foot: Zigzag foot
Thread tension: 1–4
Stitch length:
Stitch width:
S.S.
5
4
5
www.toews.com
the type of fabric, adjust the balance by slide the stitch length control as follows:
If patterns are compressed, slide the stitch length control toward » + «.
If patterns are drawn, slide the stitch length control toward
» – «.
(See page 12 )
26
419s Owners Manual/ User Guide
1
1
Janome 419S Instruction Manual
2
4
3
Janome 419s sewing machine
Smocking
1
2
3
4
5
Pattern selector:
Presser foot:
Thread tension:
Stitch length:
Stitch width:
D
Zigzag foot
1–4
S.S.
5
5
1
4
2
3
With the stitch length at «4», sew straight stitching lines 1 cm
(3/8″) apart, across the area to be smocked.
Note :
Loosen the needle thread tension to make gathering
easier.
Knot the threads along one edge. Pull the bobbin threads and distribute the gathers evenly.
Secure the threads at the other end.
Sew the decorative stitch pattern between the gathering stitches.
Pull out the gathering stitches.
1
1 cm
(3/8″)
Box Stitching
3
4
5
1
2
Pattern selector:
Presser foot:
Thread tension:
Stitch length:
Stitch width:
H
Zigzag foot
1–4
0.5–2
5
5
www.toews.com
27
419s Owners Manual/ User Guide www.toews.com
1
Janome 419S Instruction Manual
2
4
5
6
2
3
1
0
3
Janome 419s sewing machine
Applique
1
2
5
6
3
4
Pattern selector:
Presser foot:
Thread tension:
Stitch length:
Stitch width:
Presser dial:
C
Zigzag foot
1–4
0.5–1
5
2
Baste (or fuse with iron-on fabric joiner) applique pieces on the fabric. Stitch around the applique making sure the needle falls along the outer edge of the applique.
When sewing corners, lower the needle down into the fabric. Raise the presser foot and pivot fabric to the right or left.
1
www.toews.com
4
2
3
Decorative Satin Stitch Patterns
1
Pattern selector:
2
3
4
5
Presser foot:
Thread tension:
Stitch length:
Stitch width:
I–J (Model 419S)
I–L (Model 423S)
Zigzag foot
2–5
0.5–1
3–5
5
www.toews.com
Note: Use tear-away stabilizer under fabric.
Sew a row of stitches and adjust the thread tension so the needle thread appears on the reverse side of the fabric.
Test the stitch on a sample of the actual fabric first.
28
419s Owners Manual/ User Guide
Janome 419S Instruction Manual
7
1
5
4
3
6
2
Janome 419s sewing machine
SECTION 6. CARE OF YOUR MACHINE
Dismantling and Assembling
Hook Race Unit
Note :
Turn off the power switch and/or unplug the machine.
To dismantle hook race unit:
Raise the needle to its highest position and open the hook cover.
Open the hinged latch of bobbin case and take it out of the machine.
Open the hook race ring holders and remove the hook race ring.
Remove the hook.
* Clean the hook race with a brush and a soft dry cloth.
1
2
3
4
5
Bobbin case
Hook race ring holder
Hook race ring
Hook
Hook race
To assemble hook race unit:
Hold the hook by the center pin and fit it carefully back into the hook race, forming a perfect circle with the shuttle driver.
Attach the hook race ring making sure the bottom pin fits into the notch.
Lock the hook race ring by turning the holders back into position.
Insert the bobbin case.
6
Pin
7
Notch
Cleaning the Feed Dog
Note :
Turn off the power switch and/or unplug the machine
before cleaning the feed dog.
Remove the needle and the presser foot.
plate.
Remove the needle plate set screw and remove the needle www.toews.com
With a brush, clean out dust and lint clogging on the feed dog teeth.
Reset the needle plate.
29 www.toews.com
419s Owners Manual/ User Guide
Janome 419S Instruction Manual
1
2
3
Janome 419s sewing machine
Oiling the Machine
Note:Turn off the power switch when oiling the machine.
Oil the points as shown at least once a year.
Use good quality sewing machine oil.
One or two drops of oil is sufficient.
Wipe off excess oil, otherwise it may stain fabric.
If machine has not been used for an extended time, oil it before sewing.
Oiling behind the face plate
Remove the cap,screw and face plate.
Oil the points indicated in the illustration.
2
3
Screw
Face plate
Oiling the shuttle hook area
Open the hook cover.
Oil the point indicated in the illustration.
Hook cover
4
www.toews.com
Sewing Light
The sewing light is located behind the face plate.
To change the bulb, take the face plate off the sewing machine by removing the setscrew.
* Unplug the power supply before changing the bulb.
www.toews.com
(B) To remove …….. Push and twist to the left.
To replace …….. Push and twist to the right.
(A) (B)
30
Warning :
The bulb could be HOT. Protect your fingers when handling it.
419s Owners Manual/ User Guide
Janome 419S Instruction Manual Janome 419s sewing machine
Troubleshooting
Condition
The needle thread breaks.
The bobbin thread breaks.
The needle breaks.
Cause
1. The needle thread is not threaded properly.
2. The needle thread tension is too tight.
3. The needle is bent or blunt.
4. The needle is incorrectly inserted.
5. The fabric is not being drawn to the back when sewing is finished.
6. The thread is either too heavy or too fine for the needle.
Reference
See Page 9
See Page 11
See Page 6
See Page 6
See Page 14
See Page 6
1. The bobbin thread is not threaded properly in the bobbin case.
2. Lint has collected in the bobbin case.
3. The bobbin is damaged and doesn’t turn smoothly.
See Page 8
Clean the bobbin case.
Exchange bobbin.
1. The needle is incorrectly inserted.
2. The needle is bent or blunt.
3. The needle clamp screw is loose.
4. The tension of the needle thread is too tight.
5. The fabric is not drawn to the back when sewing is finished.
6. The needle is too fine for the fabric being sewn.
7. The pattern selector dial had been turned while the needle was in the material.
See Page 6
See Page 6
See Page 6
See Page 11
See Page 14
See Page 6
See Page 12
Skipped stitches
Seam puckering
1. The needle is incorrectly inserted.
2. The needle is bent or blunt.
See Page 6
See Page 6
3. The needle and/or threads are not suitable for the work being
See Page 6 sewn.
4. A BLUE TIPPED needle is not being used for sewing stretch, very
See Page 6 fine fabrics and synthetics.
5. The needle thread is not threaded properly.
See Page 9
1. The needle thread tension is too tight.
2. The machine is not threaded correctly.
3. The needle is too heavy for the fabric being sewn.
4. The stitches are too coarse for the fabric being sewn.
* When sewing extremely light weight materials, place a sheet of paper underneath the fabric.
See Page 11
See Page 9
See Page 6
Make the stitches denser.
Stitches form loops below the work
The cloth is not feeding smoothly.
1. The needle thread tension is too loose.
2. The needle is either too heavy or too fine for the thread.
1. The feed dog is packed with lint.
2. The stitches are too fine.
The machine does not work.
1. The machine is not plugged in.
2. Thread is caught in the hook race.
The machine does not run smoothly and is noisy.
1. Threads have been caught in hook mechanism.
2. The feed dog is packed with lint.
See Page 29
Make the stitches coarser.
See Page 4
See Page 29
See page 29
See Page 29
31 www.toews.com
419s Owners Manual/ User Guide
Janome 419S Instruction Manual Janome 419s sewing machine www.toews.com
www.toews.com
Printed in Taiwan
303-800-051
419s Owners Manual/ User Guide

1
ÑÎÄÅÐÆÀÍÈÅ
ÐÀÇÄÅË 1. ÎÑÍÎÂÍÛÅ ×ÀÑÒÈ
Íàçâàíèÿ ÷àñòåé …………………………………………………………………………………………………….2
ÐÀÇÄÅË 2. ÏÎÄÃÎÒÎÂÊÀ Ê ØÈÒÜÞ
Ñúåìíûé ñòîëèê ………………………………………………………………………………………………….…3
Ñòàíäàðòíûå àêñåññóàðû ………………………………………………………………………………………. 3
ßùèê äëÿ õðàíåíèÿ àêñåññóàðîâ …………………………………………………………………………… 3
Ïîäêëþ÷åíèå ïèòàíèÿ …………………………………………………………………………………………….4
Êîíòðîëü ñêîðîñòè øèòüÿ ……………………………………………………………………………………….4
Ðû÷àã ïîäúåìà ïðèæèìíîé ëàïêè ……………………………………………………………………………5
Ñìåíà ïðèæèìíîé ëàïêè ……………………………………………………………………………………….. 5
Ðåãóëèðîâêà äàâëåíèÿ ëàïêè íà òêàíü ……………………………………………………………………. 5
Çàìåíà èãë ……………………………………………………………………………………………………..……..6
z Ïðîâåðêà êà÷åñòâà èãëû …………………………………………………………………………………….. 6
Òàáëèöà ñîîòíîøåíèé èãë è íèòåé …………………………………………………………………………. 6
Óñòàíîâêà êàòóøå÷íûõ ñòåðæíåé …………………………………………………………………………….7
Çàìåíà øïóëüíîãî êîëïà÷êà ………………………………………………………………………………….. 7
Íàìîòêà øïóëüêè ………………………………………………………………………………………………….. 8
Çàïðàâêà íèæíåé íèòè …………………………………………………………………………………………… 8
Çàïðàâêà âåðõíåé íèòè …………………………………………………………………………………………..9
Íèòåâäåâàòåëü ………………………………………………………………………………………………….... 10
Âûòÿãèâàíèå íèæíåé íèòè ……………………………………………………………………………………. 10
Ðåãóëèðîâêà íàòÿæåíèÿ âåðõíåé íèòè …………………………………………………………………… 11
Ðó÷êà âûáîðà îáðàçöà ñòðî÷åê …………………………………………………………………………….. 12
Ðåãóëèðîâêà äëèíû ñòåæêà ……………………………………………………………………………………12
Ðåãóëèðîâêà øèðèíû çèãçàãà …………………………………………………………………………………12
Êíîïêà ðåâåðñà …………………………………………………………………………………………………... 13
Îòêëþ÷åíèå òðàíñïîðòåðà òêàíè …………………………………………………………………………..13
ÐÀÇÄÅË 3. ÎÑÍÎÂÍÛÅ ØÂÅÉÍÛÅ ÒÅÕÍÈÊÈ
Ïðÿìîé ñòåæîê ………………………………………………………………………………………………….... 14
Èçìåíåíèå íàïðàâëåíèÿ øèòüÿ …………………..………………………………………………………..14
Íàïðàâèòåëüíûå ëèíèè ……………………………………………………………………………………….. 15
Ðàçëè÷íûå ïîëîæåíèÿ èãëû …………………………………………………………………………………. 15
Çèãçàã …………………………………………………………………………………………………………………..16
ÐÀÇÄÅË 4. ÄÎÏÎËÍÈÒÅËÜÍÛÅ ÒÅÕÍÈÊÈ
Îâåðëî÷íàÿ ñòðî÷êà ……………………………………………………………………………………………. 16
Òðèêîòàæíûé ñòåæîê ……………………………………………………………………………………………. 17
Ñøèâàíèå òðèêîòàæà …………………………………………………………………………………………… 17
Ïðÿìîé ñòåæîê ñòðå÷ …………………………………………………………………………………………… 18
Ïðèøèâàíèå ïóãîâèö …………………………………………………………………………………………….19
Èçãîòîâëåíèå ïåòëè ………………………………………………………………………………………… 20-21
z Ðåãóëèðîâêà ïëîòíîñòè ïåòëè ……………………………………………………………………………. 21
Çàæãóòîâàííàÿ ïåòëÿ …………………………………………………………………………………………… 22
Âøèâàíèå ìîëíèè ……………………………………………………………………………………………….. 23
Ïîòàéíîé øîâ ………………………………………………………………………………………………………24
Ðîëèêîâûé øîâ …………………………………………………………………………………………………....25
ÐÀÇÄÅË 5. ÄÅÊÎÐÀÒÈÂÍÛÅ ÒÅÕÍÈÊÈ
Øîâ-ðàêóøêà …………………………………………………………………………………………………….….26
Îáðàçöû ðàñòÿãèâàþùèõñÿ ñòåæêîâ …………………………………………………………………….. 26
Ñáîðêè …………………………………………………………………………………………………………………27
Ñòåæîê «Êîðîáî÷êà» ………………………………………………………………………………………………27
Àïïëèêàöèÿ ………………………………………………………………………………………………………….28
Îáðàçöû äåêîðàòèâíûõ àòëàñíûõ ñòåæêîâ …………………………………………………………….28
ÐÀÇÄÅË 6. ÓÕÎÄ ÇÀ ÌÀØÈÍÎÉ
Ñáîðêà ÷åëíî÷íîãî ìåõàíèçìà …………………………………………………………………………….. 29
×èñòêà òðàíñïîðòåðà òêàíè ………………………………………………………………………………….. 29
Ñìàçêà ìàøèíû …………………………………………………………………………………………………...30
z Ñìàçêà îòñåêà çà ïåðåäíåé ïàíåëüþ …………………………………………………………………. 30
z Ñìàçêà îáëàñòè ÷åëíîêà …………………………………………………………………………………… 30
Çàìåíà øâåéíîé ëàìïî÷êè ……………………………………………………………………………………30
Óñòðàíåíèå íåïîëàäîê ………………………………………………………………………………………….31
2
ÐÀÇÄÅË 1.
ÎÑÍÎÂÍÛÅ ×ÀÑÒÈ
Íàçâàíèÿ ÷àñòåé
1 Êíîïêà ðåâåðñà
2 Ðó÷êà âûáîðà îáðàçöîâ ñòðî÷åê
3 Ðåãóëÿòîð øèðèíû ñòåæêà
4 Ðåãóëÿòîð äëèíû ñòåæêà
5 Ñòîïîð íàìîòêè øïóëüêè
6 Øïèíäåëü íàìîòêè øïóëüêè
7 Êàòóøå÷íûå ñòåðæíè
8 Íèòåíàïðàâèòåëü íàìîòêè øïóëüêè
9 Íèòåâîäèòåëü
10 Ðû÷àã íèòåâîäèòåëÿ
11 Ðåëå íàòÿæåíèÿ íèòè
12 Ðåãóëÿòîð äàâëåíèÿ ëàïêè íà òêàíü
13 Ïåðåäíÿÿ ïàíåëü
14 Íèòåîáðåçàòåëü
15 Íèòåâäåâàòåëü
16 Èãîëüíàÿ ïëàñòèíà
17 Äåðæàòåëü ïðèæèìíîé ëàïêè
18 Èãîëüíûé ñòåðæåíü
19 Èãëà
20 Ïðèæèìíàÿ ëàïêà
21 Äîïîëíèòåëüíûé ñòîëèê
22 Ðó÷êà äëÿ ïåðåíîñà
23 Ìàõîâîå êîëåñî
24 Âûêëþ÷àòåëü ïèòàíèÿ
25 Ðàçúåì ìàøèíû
26 Ñâîáîäíûé ðóêàâ
27 Ðû÷àã ïåòëè
28 Ðû÷àã ïîäúåìà ïðèæèìíîé ëàïêè
ÏÐÈÌÅ×ÀÍÈÅ: Äèçàéí è îñîáåííîñòè
ìàøèíû ìîãóò ìåíÿòüñÿ áåç
ïðåäâàðèòåëüíîãî óâåäîìëåíèÿ.
1
2
3
4
5
6
7
8
9
10
11
12
13
14
15
16
17
18
19
20
21
22
23
24
25
26
27
28
3
ÐÀÇÄÅË 2. ÏÎÄÃÎÒÎÂÊÀ Ê
ØÈÒÜÞ
Ñúåìíûé ñòîëèê
Ñúåìíûé ñòîëèê îáåñïå÷èâàåò äîïîëíèòåëüíîå
ïðîñòðàíñòâî ïðè øèòüå, à òàêæå ëåãêî
ñíèìàåòñÿ, îáðàçóÿ ñâîáîäíûé ðóêàâ.
×òîáû ñíÿòü äîïîëíèòåëüíûé ñòîëèê,
äâèãàéòå åãî â ñòîðîíó îò ìàøèíû.
×òîáû ïðèñòåãíóòü ñòîëèê íà ìåñòî,
äâèãàéòå åãî â ñòîðîíó ìàøèíû è âñòàâüòå íà
ìåñòî.
zz
zz
z Ïðåèìóùåñòâà øèòüÿ ñî ñâîáîäíûì
ðóêàâîì:
Òêàíü íå ñîáèðàåòñÿ âîêðóã èãëû ïðè
ñîçäàíèè çàêðåïîê äëÿ óñèëåíèÿ
êàðìàíîâ, ðàçðåçîâ è îáëàñòè ïîÿñà.
Óäîáíî îáðàáàòûâàòü ðóêàâà, îáëàñòü
ïîÿñà, áðþêè è äðóãèå èçäåëèÿ ïî êðóãó.
Ëåãêî øòîïàòü íîñêè èëè íàíîñèòü
çàïëàòêè íà îáëàñòè êîëåí, ëîêòåé èëè
ëþáóþ äåòñêóþ îäåæäó.
Ñòàíäàðòíûå àêñåññóàðû
1 Ëàïêà âøèâàíèÿ ìîëíèè
2 Ëàïêà äëÿ àâòîìàòè÷åñêîé ïåòëè
3 Ëàïêà ïîäðóáêè êðàÿ
4 Øïóëüêè
5 Íàáîð èãë
6 Âñïàðûâàòåëü
7 Îòâåðòêà
8 Ìàñëî
9 Íàïðàâèòåëü øâîâ
ßùèê äëÿ õðàíåíèÿ àêñåññóàðîâ
Øâåéíûå àêñåññóàðû óäîáíî ðàñïîëîæåíû â
äîïîëíèòåëüíîì ñòîëèêå.
1 ßùèê äëÿ àêñåññóàðîâ
1 2
3
4
5
6
7
8
9
1
4
Ïîäêëþ÷åíèå ïèòàíèÿ
Ïåðåä ïîäêëþ÷åíèåì øíóðà, óáåäèòåñü, ÷òî
íàïðÿæåíèå è ÷àñòîòà â Âàøåé ñåòè
ñîîòâåòñòâóþò íàïðÿæåíèþ è ÷àñòîòå,
óêàçàííûì íà ìàøèíå.
1. Âûêëþ÷èòå ïèòàíèå.
2. Âñòàâüòå âèëêó ìàøèíû â ðàçúåì ìàøèíû.
3. Âñòàâüòå âèëêó ïîäêëþ÷åíèÿ ïèòàíèÿ
â ýëåêòðè÷åñêóþ ðîçåòêó.
4. Íàæìèòå íà âûêëþ÷àòåëü: âêëþ÷èòå ïèòàíèå
è ñâåò.
1 Âèëêà ïîäêëþ÷åíèÿ ïèòàíèÿ
2 Âûêëþ÷àòåëü ïèòàíèÿ
3 Ýëåêòðè÷åñêàÿ ðîçåòêà
4 Ðàçúåì ìàøèíû
5 Âèëêà ìàøèíû
6 Ïåäàëü
Èíñòðóêöèè ïî ïîëüçîâàíèþ:
Ñèìâîë «0» íà âûêëþ÷àòåëå ìàøèíû îçíà÷àåò,
÷òî ïèòàíèå îòêëþ÷åíî.
Âî èçáåæàíèå ðèñêà óäàðà ýëåêòðè÷åñêèì
òîêîì, äëÿ øâåéíûõ ìàøèí ïîëÿðèçîâàííàÿ
âèëêà (îäèí êîíòàêò øèðå äðóãîãî) ðàçðàáîòàíà
òàêèì îáðàçîì, ÷òîáû îíà âõîäèëà â ðîçåòêó
îäíèì ñïîñîáîì. Åñëè âèëêà ïîëíîñòüþ íå
âõîäèò â ðîçåòêó, ïåðåâåðíèòå å¸. Åñëè è íà ýòîò
ðàç âèëêà íå ïîäõîäèò, âûçîâèòå
êâàëèôèöèðîâàííîãî ýëåêòðèêà äëÿ óñòàíîâêè
íóæíîé ðîçåòêè.
Íèêîãäà íå ïåðåäåëûâàéòå âèëêó.
Íîæíàÿ ïåäàëü YC-482J èëè TJC-150
èñïîëüçóåòñÿ äëÿ øâåéíîé ìàøèíû 419S è
423S.
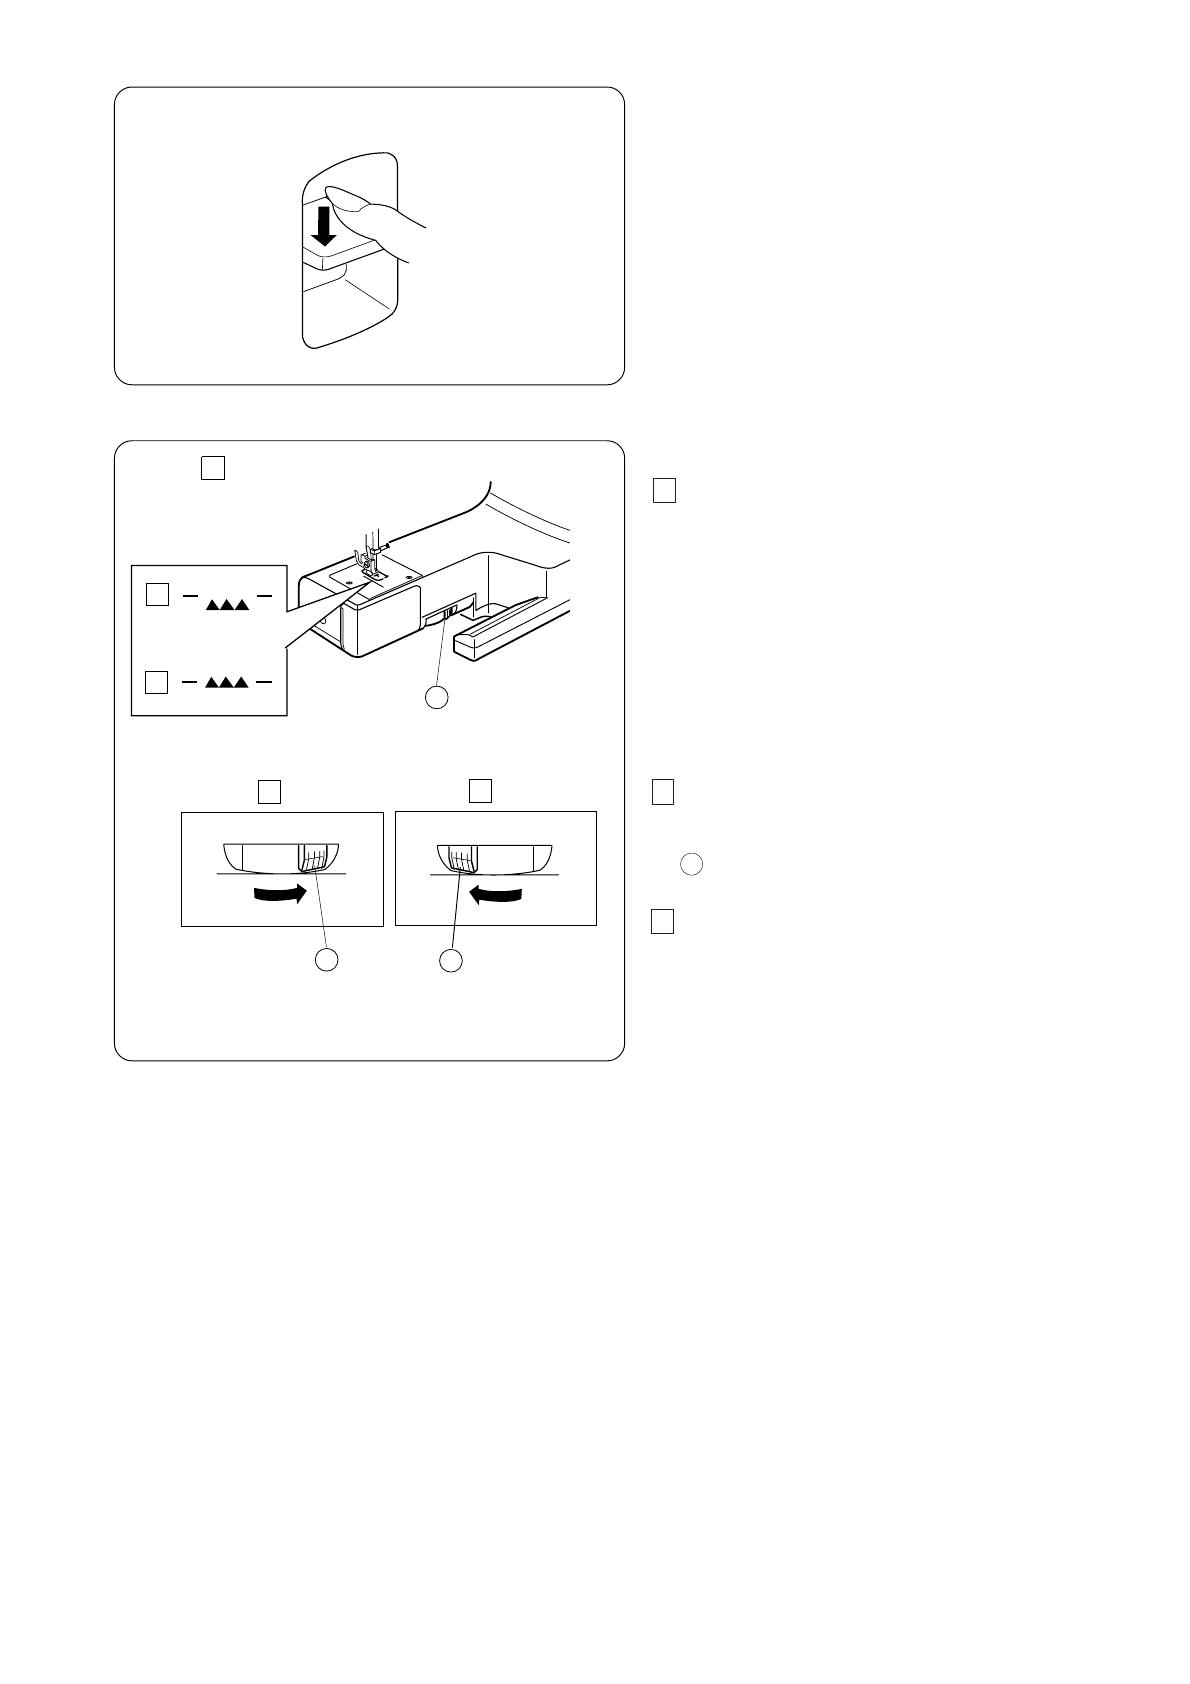
Êîíòðîëü ñêîðîñòè øèòüÿ
Ñêîðîñòü øèòüÿ ðåãóëèðóåòñÿ íîæíîé ïåäàëüþ.
×åì ñèëüíåå íàæèìàòü íà ïåäàëü, òåì áûñòðåå
ðàáîòàåò ìàøèíà.
ÂÍÈÌÀÍÈÅ: Íå êëàäèòå íè÷åãî íà íîæíóþ
ïåäàëü.  ïðîòèâíîì ñëó÷àå
ìàøèíà çàðàáîòàåò íåîæèäàííî.
1
2
3
4
5
6
1
2
3
4
5
6
5
Ðû÷àã ïîäúåìà ïðèæèìíîé ëàïêè
Ðû÷àã ïîäúåìà ïðèæèìíîé ëàïêè ïîäíèìàåò è
îïóñêàåò ïðèæèìíóþ ëàïêó. Ìîæíî ïîäíÿòü
ïðèæèìíóþ ëàïêó íà 0.6 ñì âûøå îáû÷íîãî åå
ïîëîæåíèÿ äëÿ ëåãêîé ñìåíû ëàïêè è ïðè
ðàáîòå ñ òÿæåëûìè òêàíÿìè.
1 Îáû÷íîå ïîäíÿòîå ïîëîæåíèå
2 Íàèâûñøåå ïîëîæåíèå
Ñìåíà ïðèæèìíîé ëàïêè
Êàê îòñòåãíóòü ëàïêó
Ïîâåðíèòå íà ñåáÿ ìàõîâîå êîëåñî è ïîäíèìèòå
èãëó â âåðõíåå ïîëîæåíèå.
Ïîäíèìèòå ïðèæèìíóþ ëàïêó.
Íàæìèòå íà ðû÷àã ïîçàäè äåðæàòåëÿ
ïðèæèìíîé ëàïêè. Ëàïêà îòñêî÷èò.
Êàê ïðèñòåãíóòü ïðèæèìíóþ ëàïêó
Ðàñïîëîæèòå ëàïêó òàê, ÷òîáû êàíàâêà íà ëàïêå
íàõîäèëàñü ïðÿìî ïîä æåëîáêîì äåðæàòåëÿ
ëàïêè.
Îïóñòèòå äåðæàòåëü âíèç è ïðèñòåãíèòå ëàïêó.
Ðåãóëèðîâêà äàâëåíèÿ ëàïêè
íà òêàíü
Ïðè îáû÷íîì øèòüå ðåãóëÿòîð äàâëåíèÿ ëàïêè
íà òêàíü ñëåäóåò óñòàíîâèòü íà îòìåòêå 3.
Óìåíüøèòå äàâëåíèå ëàïêè äî 2 ïðè ñîçäàíèè
àïïëèêàöèè, øòîïêå, íàìåòêå, âûøèâêå äëÿ
ëó÷øåé ìàíåâðåííîñòè òêàíè.
Ïðè ðàáîòå ñ áàðõàòîì è òðèêîòàæåì, êîòîðûå
ñèëüíî ðàñòÿãèâàþòñÿ, ïîòðåáóåòñÿ óñòàíîâèòü
ðåãóëÿòîð íà 1.
1
2
0
1
2
3
6
Çàìåíà èãë
Ïîâåðíèòå íà ñåáÿ ìàõîâîå êîëåñî, ïîäíèìèòå
èãëó è îïóñòèòå ïðèæèìíóþ ëàïêó.
Îñëàáüòå èãîëüíûé âèíò, ïîâîðà÷èâàÿ åãî
ïðîòèâ ÷àñîâîé ñòðåëêè.
Âûíüòå èãëó èç çàæèìà.
Âñòàâüòå íîâóþ èãëó ïëîñêîé ñòîðîíîé îò ñåáÿ.
Âñòàâëÿÿ íîâóþ èãëó, ïîäòîëêíèòå åå ââåðõ è
îòâåðòêîé çàòÿíèòå èãîëüíûé âèíò.
* Ïåðèîäè÷åñêè ïðîâåðÿéòå êà÷åñòâî èãëû íà
íàëè÷èå çàóñåíöåâ èëè ïîâðåæäåíèé.
Íåêà÷åñòâåííûå è ïîâðåæäåííûå èãëû ìîãóò
ïîðâàòü èëè èñïîðòèòü òðèêîòàæ, øåëê è
äðóãèå òîíêèå òêàíè.
zz
zz
z Ïðîâåðêà êà÷åñòâà èãëû
Ïîëîæèòå èãëó ïëîñêîé ñòîðîíîé íà êàêóþ-
íèáóäü ðîâíóþ ïîâåðõíîñòü (èãîëüíàÿ ïëàñòèíà,
ñòåêëî è ò.ä.). Çàçîð ìåæäó èãëîé è ðîâíîé
ïîâåðõíîñòüþ äîëæåí áûòü ïîñòîÿííûì.
Íèêîãäà íå ïîëüçóéòåñü ãíóòûìè èëè òóïûìè
èãëàìè.
Òàáëèöà ñîîòíîøåíèé èãë è íèòåé
* Îáùèå ïðàâèëà: òîíêèå íèòè è èãëû
èñïîëüçóþòñÿ ïðè ðàáîòå ñ òîíêèìè òêàíÿìè,
òîëñòûå íèòè è èãëû — ïðè ðàáîòå ñ òîëñòûìè
òêàíÿìè. Ïåðåä íà÷àëîì ðàáîòû âñåãäà
ïðîáóéòå èãëó è íèòü íà îòäåëüíîì êóñî÷êå
òêàíè.
* Âåðõíÿÿ è íèæíÿÿ íèòè äîëæíû áûòü
îäèíàêîâûìè ïî ñâîéñòâàì.
* Ïðè ðàáîòå ñ î÷åíü òîíêèìè, ñèíòåòè÷åñêèìè
è ðàñòÿãèâàþùèìèñÿ òêàíÿìè èñïîëüçóéòå
èãëû ñ ÃÎËÓÁÛÌ ÍÀÊÎÍÅ×ÍÈÊÎÌ.
Èãëà ñ ãîëóáûì íàêîíå÷íèêîì ïðåäîòâðàùàåò
ïðîïóñêè ñòåæêîâ.
* Ïðè øèòüå î÷åíü òîíêèõ òêàíåé
ïîäêëàäûâàéòå êóñî÷åê áóìàãè, ÷òîáû òêàíü
íå ìîðùèëàñü.
Ëåãêèå
òêàíè
Ñðåäíèå
Òêàíè
Òÿæåëûå
òêàíè
Òêàíü
Êðåïäåøèí,
âóàëü, îðãàíçà,
áàòèñò, æîðæåò,
òðèêî
Ëåí, õëîïîê,
äâîéíîé òðèêîòàæ,
ïèêå, ïåðêàëü,
ñàðæ
Äæèíñà, òâèä,
ãàáàðäèí, ðåïñ,
ïàëüòîâàÿ,
äðàïèðîâî÷íàÿ
Íèòêè
Òîíêèé øåëê
Òîíêèé õëîïîê
Òîíêèé ïîëèýñòåð
Òîíêèé õëîïîê
ñ ïîëèýñòåðîì
Øåëê 50
Õëîïîê 50-80
Ñèíòåòèêà 50-60
Õëîïîê
ñ ïîëèýñòåðîì
Øåëê 50
Õëîïîê 40-50
Ñèíòåòèêà 40-50
Õëîïîê
ñ ïîëèýñòåðîì
Ðàçìåð
èãëû
9/65
èëè
11/75
11/75
èëè
14/90
14/90
16/100

7
1
1
2
3
3
2
1
Óñòàíîâêà êàòóøå÷íûõ ñòåðæíåé
Êàòóøå÷íûå ñòåðæíè íóæíû äëÿ óäåðæàíèÿ
êàòóøåê ñ íèòêàìè, ÷òîáû íèòêà íå çàòÿíóëàñü
â ìàøèíó.
Ïðè ðàáîòå âûòÿíèòå èõ ââåðõ. Ïðè õðàíåíèè —
óòîïèòå âíèç.
1 Âåðõíÿÿ íèòü
2 Îòâåðñòèå
3 Íèòü çàïóòàëàñü
ÏÐÈÌÅ×ÀÍÈÅ: Ïðè èñïîëüçîâàíèè íèòêè,
êîòîðàÿ ìîæåò çàïóòàòüñÿ âîêðóã
ñòåðæíÿ, ïðîäåíüòå íèòü â
îòâåðñòèå êàòóøå÷íîãî ñòåðæíÿ
êàê ïîêàçàíî íà ðèñóíêå.
Çàìåíà øïóëüíîãî êîëïà÷êà
Îòêðîéòå êðûøêó ÷åëíî÷íîãî ìåõàíèçìà.
1 Êðûøêà ÷åëíî÷íîãî ìåõàíèçìà
Ïîâåðíèòå ìàõîâîå êîëåñî è ïîäíèìèòå èãëó.
Âûòàùèòå øïóëüíûé êîëïà÷îê çà ÿçû÷îê.
2 ßçû÷îê
Ïîñòàâüòå íà ìåñòî øïóëüíûé êîëïà÷îê,
ðàñïîëîæèòå âûñòóï â âûåìêå.
3 Âûñòóï
8
Íàìîòêà øïóëüêè
1 Îòìîòàéòå íèòêó ñ êàòóøêè. Ïðîâåäèòå åå
÷åðåç íàïðàâèòåëü íàìîòêè.
2 Ïðîäåíüòå íèòü ñêâîçü îòâåðñòèå â øïóëüêå
èçíóòðè íàðóæó êàê ïîêàçàíî íà ðèñóíêå.
Íàäåíüòå øïóëüêó íà ñòåðæåíü íàìîòêè.
3 Îòîäâèíüòå åå âïðàâî.
4 Óäåðæèâàÿ ðóêîé ñâîáîäíûé êîíåö íèòè,
íàæìèòå íà ïåäàëü. Êîãäà ìàøèíà ñäåëàåò
íåñêîëüêî îáîðîòîâ, îñòàíîâèòå åå è
îáðåæüòå íèòü áëèçêî ê îòâåðñòèþ.
5 Ñíîâà íàæìèòå íà ïåäàëü. Îñòàíîâèòå
ìàøèíó, êîãäà øïóëüêà áóäåò ïîëíîñòüþ
íàìîòàíà. Âåðíèòå ñòåðæåíü íàìîòêè â
ïåðâîíà÷àëüíîå ïîëîæåíèå, ïåðåäâèíóâ åãî
âëåâî, è îáðåæüòå íèòü.
ÏÐÈÌÅ×ÀÍÈÅ: Ìåíÿéòå ïîëîæåíèå ñòåðæíÿ
íàìîòêè òîëüêî, êîãäà ìàøèíà
îñòàíîâèòñÿ.
Çàïðàâêà íèæíåé íèòè
1 Âñòàâüòå øïóëüêó â øïóëüíûé êîëïà÷îê.
Íèòü äîëæíà ðàçìàòûâàòüñÿ â íàïðàâëåíèè,
óêàçàííîì ñòðåëêîé.
2 Âûòÿíèòå íèòü ñêâîçü ùåëü øïóëüíîãî
êîëïà÷êà.
3 Ïðîòÿíèòå íèòü ïîä ïðóæèíîé íàòÿæåíèÿ è â
óøêî ïîäà÷è.
* Âûòÿíèòå íèòü ïðèáëèçèòåëüíî íà 10 ñì.
1
2
3
4
5
1
2
3
9
Çàïðàâêà âåðõíåé íèòè
Ïîäíèìèòå íèòåíàïðàâèòåëüíûé ðû÷àã â
âûñøåå ïîëîæåíèå, ïîâåðíóâ íà ñåáÿ ìàõîâîå
êîëåñî.
Ïîäíèìèòå ïðèæèìíóþ ëàïêó.
Óñòàíîâèòå êàòóøêó íà êàòóøå÷íûé ñòåðæåíü,
êàê ïîêàçàíî íà ðèñóíêå. Íèòü äîëæíà
îòìàòûâàòüñÿ ñçàäè êàòóøêè.
1 Ïðîïóñòèòå íèòü ÷åðåç íèòåíàïðàâèòåëü.
2 Óäåðæèâàÿ íèòü îêîëî êàòóøêè, ïðîïóñòèòå
åå âíèç â îáëàñòü íàòÿæåíèÿ, à çàòåì âíèç â
íàòÿæèòåëü.
3 Ïîäòÿíèòå íèòü ââåðõ è ïðîïóñòèòå ÷åðåç
ðû÷àã íèòåíàïðàâèòåëÿ ñïðàâà íàëåâî.
4 Çàòåì ïðîâåäèòå íèòü âíèç ñêâîçü íèæíèé
íèòåíàïðàâèòåëü.
5 Ïðîâåäèòå åå âíèç ÷åðåç íèæíèé
íèòåâîäèòåëü ñ ëåâîé ñòîðîíû.
6 Âäåíüòå íèòü â èãëó ñïåðåäè íàçàä.
* Ñì. èíôîðìàöèþ î âñòðîåííîì
íèòåçàïðàâèòåëå íà ñòð. 10
ÏÐÈÌÅ×ÀÍÈÅ: ×òîáû ëåã÷å âäåòü íèòü â óøêî
èãëû, îáðåæüòå íèòü îñòðûìè
íîæíèöàìè.
1
3
2
4
5
6
1
2
3
4
5
6
10
Íèòåâäåâàòåëü
1 Ïîäíèìèòå èãëó â íàèâûñøåå ïîëîæåíèå.
Îïóñòèòå âíèç íàñêîëüêî âîçìîæíî ðû÷àã
íèòåâäåâàòåëÿ. ×åðåç óøêî èãëû ñçàäè
âûéäåò êðþ÷îê.
2 Ïîòÿíèòå íèòü âíèç, çàòåì îáâåäèòå âîêðóã
íèòåíàïðàâèòåëÿ è ïðîïóñòèòå ñëåâà ïîä
êðþ÷îê.
3 Óäåðæèâàÿ êîí÷èê íèòè ðóêîé, ìåäëåííî
îòïóñêàéòå ðû÷àã. Ïåòëÿ íèòè âûòÿíåòñÿ
ñêâîçü óøêî èãëû.
4 Ñíèìèòå ïåòëþ ñ íèòåâäåâàòåëÿ è âûòÿíèòå
êîíåö íèòè èç èãîëüíîãî óøêà.
ÏÐÈÌÅ×ÀÍÈÅ: Íèòåâäåâàòåëü ìîæíî
èñïîëüçîâàòü òîëüêî ñ èãëàìè
îò ¹11/75 äî ¹16/100 èëè
èãëàìè Janome ñ ãîëóáûì
íàêîíå÷íèêîì. Íèòêè òîëùèíîé
îò 50 äî 100 áóäóò õîðîøî
ïðîäåâàòüñÿ.
ÂÍÈÌÀÍÈÅ: Ïðè ðàáîòå ñ íèòåâäåâàòåëåì
ïðîâåðüòå, ïîäíÿòà ëè èãëà â
âåðõíåå ïîëîæåíèå. Â ïðîòèâíîì
ñëó÷àå êðþ÷îê íå ïîïàäåò â óøêî
èãëû è ñëîìàåòñÿ.
Âûòÿãèâàíèå íèæíåé íèòè
1 Ïîäíèìèòå ïðèæèìíóþ ëàïêó, ëåâîé ðóêîé
ñëåãêà óäåðæèâàéòå èãîëüíóþ íèòü.
2 Ïðàâîé ðóêîé ïîâåðíèòå íà ñåáÿ ìàõîâîå
êîëåñî è ïîäíèìèòå èãëó è èãëîâîäèòåëü â
íàèâûñøåå ïîëîæåíèå. Ñëåãêà ïîòÿíèòå çà
èãîëüíóþ íèòü, ñôîðìèðóéòå ïåòëþ èç
íèæíåé íèòè.
3 Âûòÿíèòå ïî 15 ñì êàæäîé íèòè è îòâåäèòå èõ
íàçàä ïîä ïðèæèìíóþ ëàïêó.
1
2
3 4
1
2
3
11
Ðåãóëèðîâêà íàòÿæåíèÿ
âåðõíåé íèòè
1 Ïðàâèëüíîå íàòÿæåíèå
Íàòÿæåíèå íèòè ïðè øèòüå çàâèñèò îò
îáðàáàòûâàåìîé òêàíè, êîëè÷åñòâà ñëîåâ è
äðóãèõ ðàçëè÷íûõ óñëîâèé.
* Íèòè èäåàëüíîãî ïðÿìîãî ñòåæêà ëîæàòñÿ
ìåæäó äâóìÿ ñëîÿìè òêàíè òàê, êàê ïîêàçàíî
íà ðèñóíêå (óâåëè÷åíî, ÷òîáû ïîêàçàòü
äåòàëè).
* Ó èäåàëüíîãî ñòåæêà çèãçàã øïóëüíàÿ íèòü íå
âûãëÿäûâàåò íà ëèöåâóþ ñòîðîíó òêàíè, à
èãîëüíàÿ íèòü ñëåãêà ïðîñìàòðèâàåòñÿ íà
èçíàíî÷íîé ñòîðîíå.
1 Èãîëüíàÿ íèòü (âåðõíÿÿ íèòü)
2 Øïóëüíàÿ íèòü (íèæíÿÿ íèòü)
3 Ëèöåâàÿ ñòîðîíà òêàíè
4 Èçíàíî÷íàÿ ñòîðîíà òêàíè
5 Äèñê íàòÿæåíèÿ íèòè
6 Óñòàíîâî÷íàÿ îòìåòêà
2 Íàòÿæåíèå èãîëüíîé íèòè ñëèøêîì
ñèëüíîå
Íèæíÿÿ (øïóëüíàÿ) íèòü âèäíà íà ëèöåâîé
ñòîðîíå èçäåëèÿ.
Óñòàíîâèòå ðåëå íà ìåíüøóþ öèôðó è
îñëàáüòå íàòÿæåíèå âåðõíåé íèòè.
3 Íàòÿæåíèå èãîëüíîé íèòè ñëèøêîì
ñëàáîå
Âåðõíÿÿ (èãîëüíàÿ) íèòü âèäíà íà
èçíàíî÷íîé ñòîðîíå èçäåëèÿ.
Óñòàíîâèòå ðåëå íà áîëüøóþ öèôðó è
óâåëè÷üòå íàòÿæåíèå âåðõíåé íèòè.
1
2
3
4
5
6
1
2
3

12
Ðó÷êà âûáîðà îáðàçöà ñòðî÷åê
Ïîäíèìèòå èãëó è ïðèæèìíóþ ëàïêó. Ñîâìåñòèòå
áóêâó íóæíîé ñòðî÷êè ñ óñòàíîâî÷íîé îòìåòêîé
íà ïàíåëè, ïîâåðíóâ ðó÷êó âûáîðà ñòðî÷åê.
1 Óñòàíîâî÷íàÿ îòìåòêà
(À): ìîäåëü 419S
(Â): ìîäåëü 423S
Ðåãóëèðîâêà äëèíû ñòåæêà
Ïåðåäâèíüòå ðû÷àã êîíòðîëÿ äëèíû ñòåæêà è
óñòàíîâèòå íóæíóþ öèôðó äëèíû ñòåæêà ó
êîíòðîëüíîé îòìåòêè.
×åì áîëüøå öèôðà, òåì äëèííåå ñòåæîê.
1 Êîíòðîëüíàÿ îòìåòêà
z « » — ðåêîìåíäîâàííàÿ óñòàíîâêà äëÿ
ñîçäàíèÿ ïåòëè.
z Ïðè øèòüå çèãçàãîì óñòàíàâëèâàéòå ðó÷êó â
ïðîìåæóòêå îò 0.5 äî 4.
z ×òîáû ïðàâèëüíî ñîçäàâàòü ñòåæêè ñòðå÷,
ñîâìåùàéòå «S.S» ñ îòìåòêîé.
z Åñëè ñòåæêè ñòðå÷ ïîëó÷àþòñÿ íåðîâíûìè,
ïîâåðíèòå ðó÷êó äëèíû ñòåæêà ïî
íàïðàâëåíèþ ê «-«, ÷òîáû ñæàòü èõ, è ê «+»,
÷òîáû èõ ðàñòÿíóòü.
Ðåãóëèðîâêà øèðèíû çèãçàãà
Ïåðåäâèíüòå ðû÷àã êîíòðîëÿ øèðèíû ñòåæêà è
óñòàíîâèòå íóæíóþ öèôðó øèðèíû çèãçàãà ó
êîíòðîëüíîé îòìåòêè.
×åì áîëüøå öèôðà, òåì øèðå çèãçàã.
1 Êîíòðîëüíàÿ îòìåòêà
Åñëè øèðèíà ñòåæêà íåäîñòàòî÷íàÿ, òî ïðàâàÿ
ñòîðîíà îáðàçöà íèâåëèðóåòñÿ.
(Ïðèìåð: Îáðàçåö Å)
Øèðèíà [5] Øèðèíà [3]
ÏÐÈÌÅ×ÀÍÈÅ: Ïðè ïåðåêëþ÷åíèè ðû÷àãà
êîíòðîëÿ øèðèíû çèãçàãà
ïîäíèìàéòå èãëó íàä òêàíüþ.
1
S.S.
1
(A)
(B)
(A) (B)
1
012345
13
Êíîïêà ðåâåðñà
Äî òåõ ïîð, ïîêà Âû óäåðæèâàåòå ýòó êíîïêó,
ìàøèíà øüåò íàçàä.
Îòêëþ÷åíèå òðàíñïîðòåðà òêàíè
1 Ñíèìèòå äîïîëíèòåëüíûé ñòîëèê.
Ïîäíèìèòå ïðèæèìíóþ ëàïêó.
2 ×òîáû îòêëþ÷èòü òðàíñïîðòåð òêàíè,
ïîäòîëêíèòå ðû÷àã âïðàâî.
1 Ðû÷àã îòêëþ÷åíèÿ òðàíñïîðòåðà òêàíè
3 ×òîáû ïîäêëþ÷èòü òðàíñïîðòåð òêàíè,
ïåðåäâèíüòå ðû÷àã âëåâî.
* Ïðè îáû÷íîì øèòüå òðàíñïîðòåð òêàíè
äîëæåí áûòü ïîäíÿò (âêëþ÷åí).
* Òðàíñïîðòåð òêàíè âîçâðàùàåòñÿ â âåðõíåå
ïîëîæåíèå (âêëþ÷àåòñÿ), êîãäà ìàøèíà
çàíîâî íà÷èíàåò ðàáîòàòü.
1
1
2
3
1
1
2
3
14
ÐÀÇÄÅË 3.
ÎÑÍÎÂÍÛÅ ØÂÅÉÍÛÅ
ÒÅÕÍÈÊÈ
Ïðÿìîé ñòåæîê
1 Âûáîð ñòðî÷êè À
2 Ëàïêà Ëàïêà çèãçàã
3 Íàòÿæåíèå íèòè 2 ~ 6
4 Äëèíà ñòåæêà 1.5 ~ 4
5 Øèðèíà çèãçàãà (0) èëè (5)
1
2
3
4
5
3
1
2
1 Ïîäíèìèòå ïðèæèìíóþ ëàïêó è ðàñïîëîæèòå
òêàíü â ñîîòâåòñòâèè ñ íàïðàâèòåëüíûìè
ëèíèÿìè íà èãîëüíîé ïëàñòèíå.
Îïóñòèòå èãëó â òêàíü.
Îïóñòèòå ïðèæèìíóþ ëàïêó è îòâåäèòå íèòè
íàçàä. Íàæìèòå íà íîæíóþ ïåäàëü.
Ñëåãêà òîëüêî íàïðàâëÿéòå òêàíü âäîëü
ëèíèé íà èãîëüíîé ïëàñòèíå, òêàíü äîëæíà
ñàìà ïðîõîäèòü ïîä ëàïêó.
2 Äëÿ çàêðåïëåíèÿ êîíöà øâà íàæìèòå íà
êíîïêó ðåâåðñà è ïðîøåéòå íåñêîëüêî
îáðàòíûõ ñòåæêîâ.
Ïîäíèìèòå ïðèæèìíóþ ëàïêó è ñíèìèòå
òêàíü, îòâåäÿ íèòè íàçàä.
3 Ïîäâåäèòå íèòè ââåðõ ê íèòåîáðåçàòåëþ.
Îáðåçàéòå íèòè íà äîñòàòî÷íîé äëèíå äëÿ
íà÷àëà íîâîãî øâà.
Èçìåíåíèå íàïðàâëåíèÿ øèòüÿ
Îñòàíîâèòå ìàøèíó, ïîâåðíèòå íà ñåáÿ ìàõîâîå
êîëåñî è îïóñòèòå èãëó â òêàíü.
Ïîäíèìèòå ïðèæèìíóþ ëàïêó.
Ïîâåðíèòå òêàíü âîêðóã èãëû è ñìåíèòå ïî
æåëàíèþ íàïðàâëåíèå øèòüÿ. Îïóñòèòå
ïðèæèìíóþ ëàïêó è ïðîäîëæàéòå øèòü.
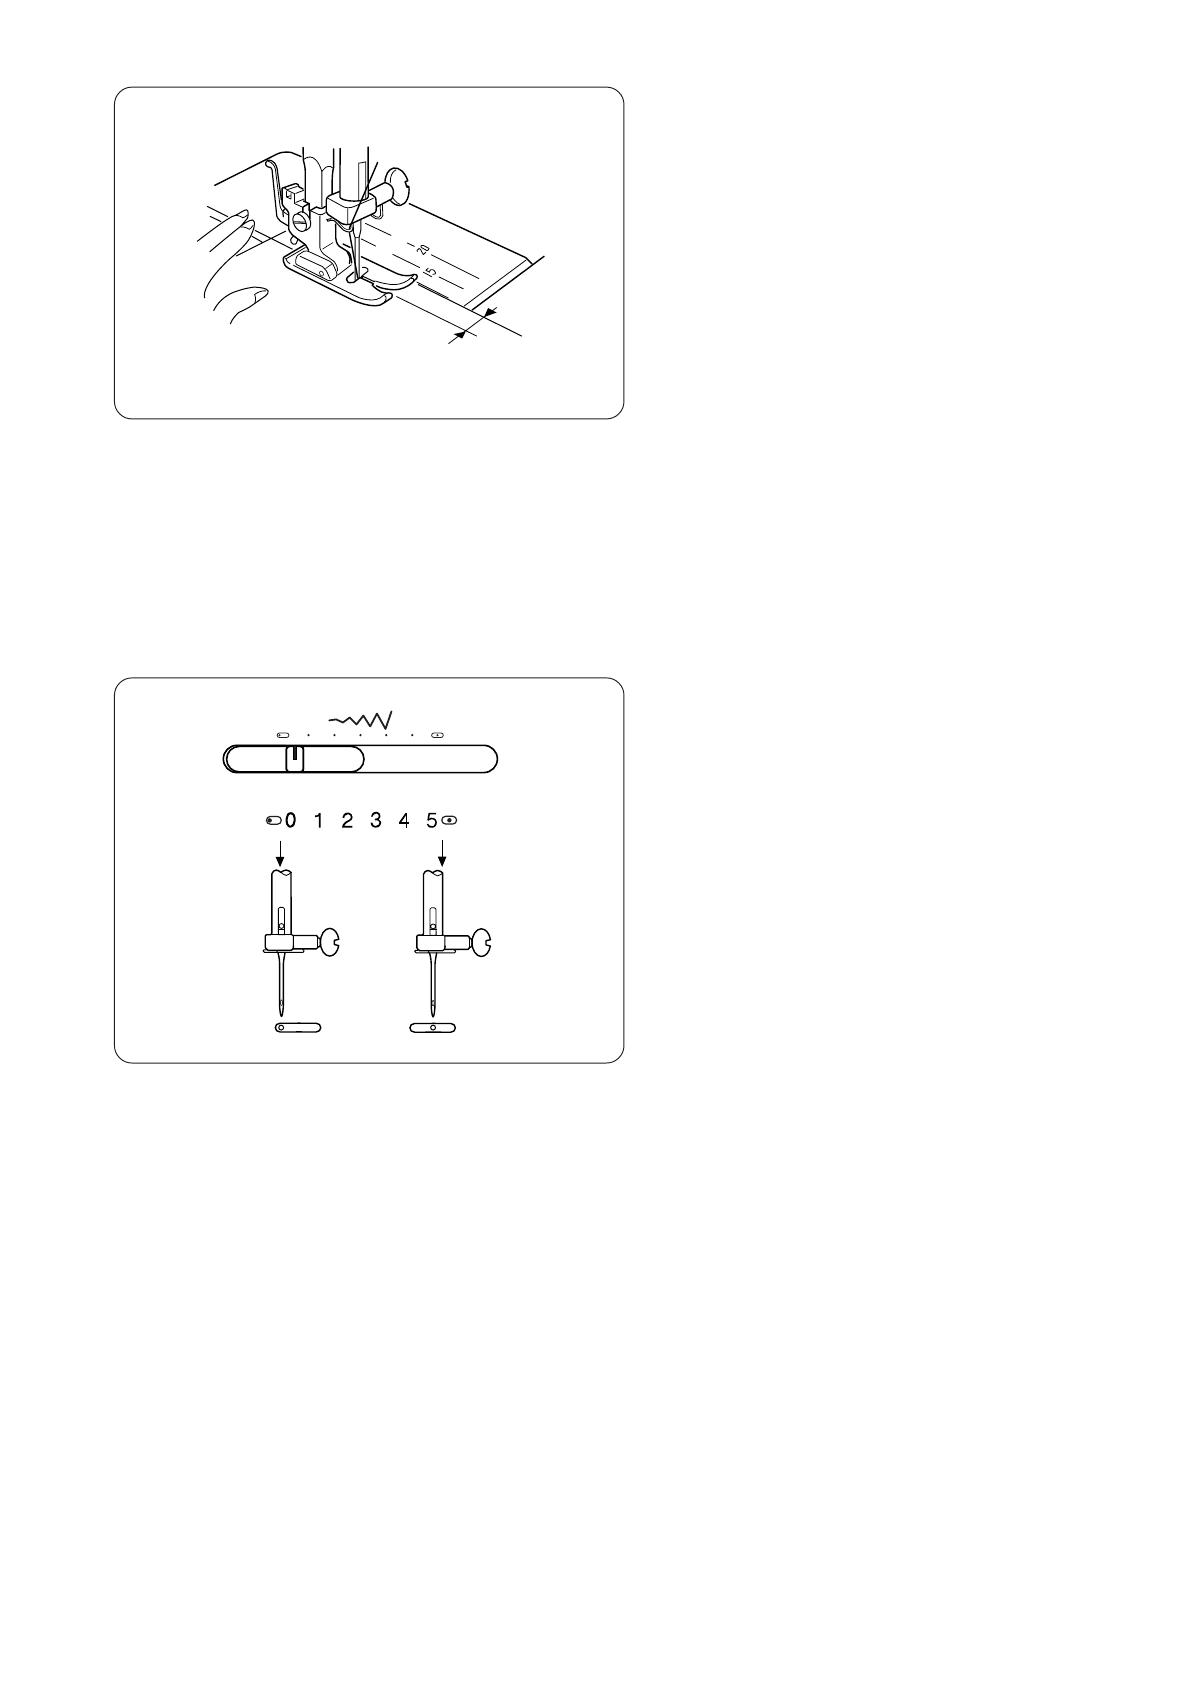
15
Íàïðàâèòåëüíûå ëèíèè
Öèôðû íà èãîëüíîé ïëàñòèíå îïðåäåëÿþò
ðàññòîÿíèè ìåæäó öåíòðàëüíîé ïîçèöèåé èãëû è
ëèíèåé.
Ïåðåäíèå öèôðû äàíû â ìèëëèìåòðàõ, çàäíèå —
â äþéìàõ.
Ðàçëè÷íûå ïîëîæåíèÿ èãëû
Ïðè âûáîðå ïðÿìîãî ñòåæêà (îáðàçåö À), Âû
ìîæåòå èçìåíèòü ïîëîæåíèå èãëû íà
öåíòðàëüíîå èëè ëåâîå, ïåðåäâèíóâ ðû÷àã
êîíòðîëÿ øèðèíû çèãçàãà.
012345
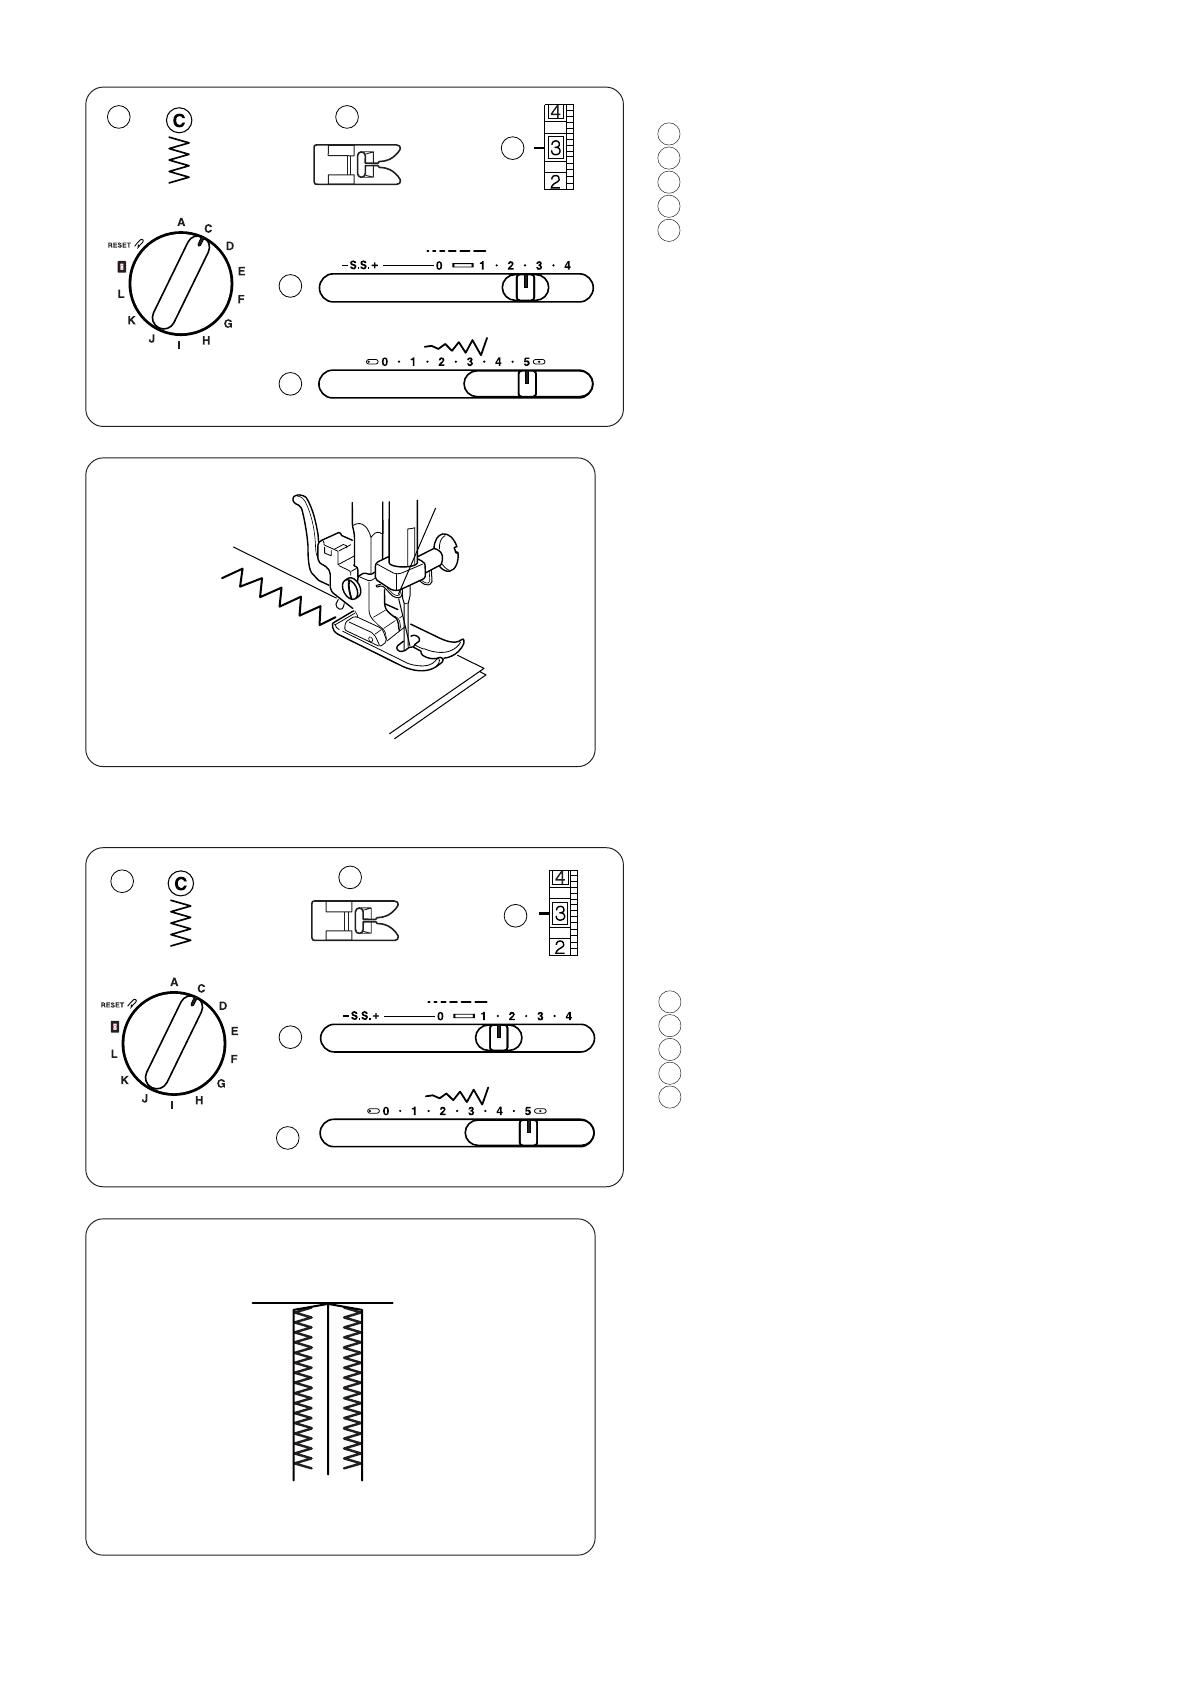
16
Çèãçàã
1 Âûáîð ñòðî÷êè Ñ
2 Ëàïêà Ëàïêà çèãçàã
3 Íàòÿæåíèå íèòè 2 ~ 5
4 Äëèíà ñòåæêà 0.5 ~ 4
5 Øèðèíà çèãçàãà 5
1 2
3
4
5
Ïðîñòîé çèãçàã øèðîêî èñïîëüçóåòñÿ äëÿ
îáðàáîòêè êðàåâ, ïðèøèâàíèÿ ïóãîâèö è ò.ä.
ÐÀÇÄÅË 4.
ÄÎÏÎËÍÈÒÅËÜÍÛÅ
ÒÅÕÍÈÊÈ
Îâåðëî÷íàÿ ñòðî÷êà
1 Âûáîð ñòðî÷êè Ñ
2 Ëàïêà Ëàïêà çèãçàã
3 Íàòÿæåíèå íèòè 1 ~ 4
4 Äëèíà ñòåæêà 1 ~ 2
5 Øèðèíà çèãçàãà 5
Ýòèì ñòåæêîì îòäåëûâàþòñÿ êðàÿ ìàòåðèàëà
äëÿ ïðåäîòâðàùåíèÿ îáñûïàíèÿ íèòåé.
1
2
3
4
5
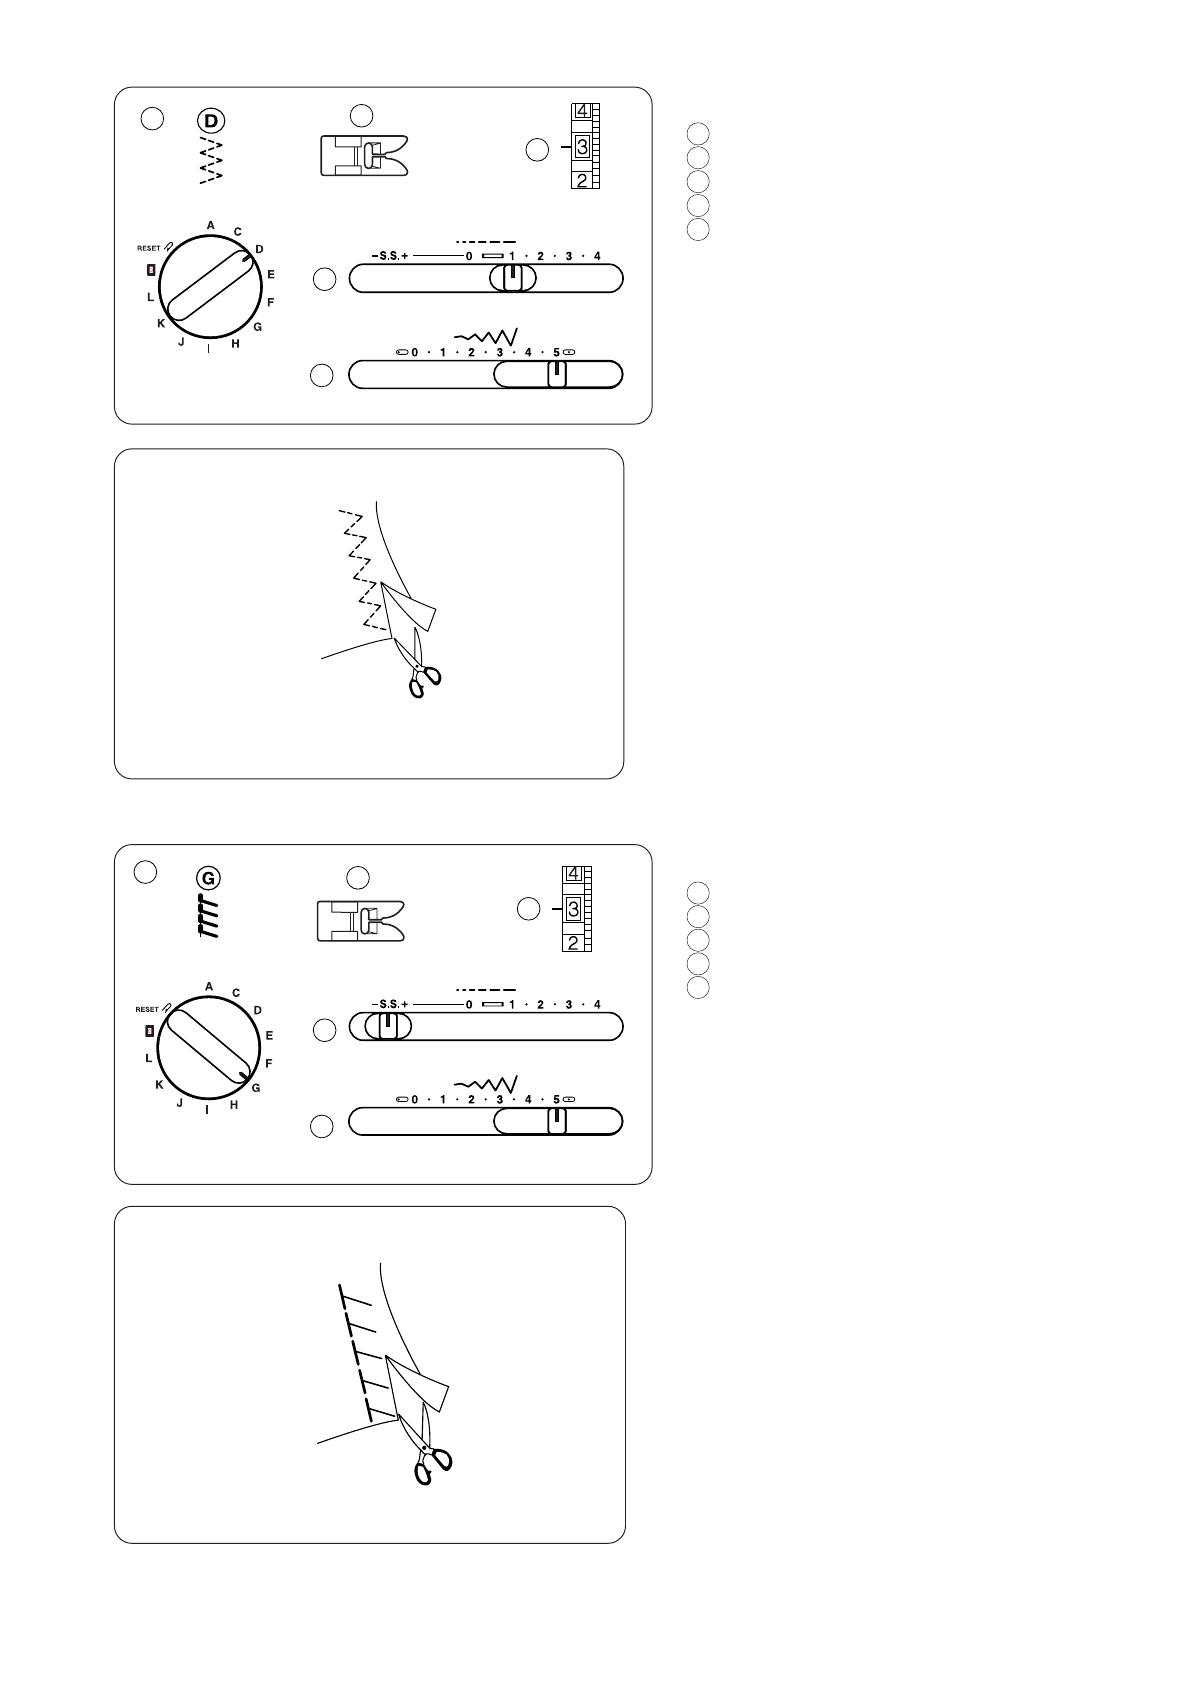
17
Òðèêîòàæíûé ñòåæîê
1 Âûáîð ñòðî÷êè D
2 Ëàïêà Ëàïêà çèãçàã
3 Íàòÿæåíèå íèòè 1 ~ 4
4 Äëèíà ñòåæêà 0.5 ~ 1.5
5 Øèðèíà çèãçàãà 5
1
2
3
4
1
2
3
4
5
5
Ýòîò ñòåæîê èñïîëüçóåòñÿ äëÿ îòäåëêè êðàåâ
ñèíòåòè÷åñêèõ è äðóãèõ òêàíåé, ñêëîííûõ
ñîáèðàòüñÿ â ñêëàäêè.
Ðàñïîëîæèòå òêàíü è ñîçäàéòå øîâ â 1.6 ñì.
Ïîñëå øèòüÿ îòðåæüòå ëèøíþþ òêàíü.
ÏÐÈÌÅ×ÀÍÈÅ: Áóäüòå îñòîðîæíû,
íå ðàçðåæüòå ñòåæêè.
Òàêæå îí ïðåâîñõîäíî ïîäõîäèò äëÿ øòîïêè.
Ñøèâàíèå òðèêîòàæà
1 Âûáîð ñòðî÷êè G
2 Ëàïêà Ëàïêà çèãçàãà
3 Íàòÿæåíèå íèòè 1 ~ 4
4 Äëèíà ñòåæêà S.S.
5 Øèðèíà çèãçàãà 5
Ýòîò ñòåæîê èäåàëüíî ïîäõîäèò äëÿ
ðàñòÿãèâàþùèõñÿ òêàíåé, òàêèõ êàê ñïîðòèâíûå,
è òêàíè äëÿ êóïàëüíèêîâ, òàê êàê îí ïðèäàåò
ïðî÷íîñòü è ýëàñòè÷íîñòü.
Ðàñïîëîæèòå òêàíü è ïðîøåéòå øîâ â 1.6 ñì.
Ïîñëå øèòüÿ îòðåæüòå ëèøíþþ òêàíü.
ÏÐÈÌÅ×ÀÍÈÅ: Áóäüòå îñòîðîæíû,
íå ðàçðåæüòå ñòåæêè.

18
Ïðÿìîé ñòåæîê ñòðå÷
1 Âûáîð ñòðî÷êè À
2 Ëàïêà Ëàïêà çèãçàã
3 Íàòÿæåíèå íèòè 2 ~ 6
4 Äëèíà ñòåæêà S.S.
5 Øèðèíà çèãçàãà (0) èëè (5)
1
2
3
4
5
Ýòà ñòðî÷êà ôîðìèðóåòñÿ èç äâóõ ñòåæêîâ
âïåðåä è îäíîãî íàçàä. Òàêîé øîâ íåëåãêî
ðàçîðâàòü.
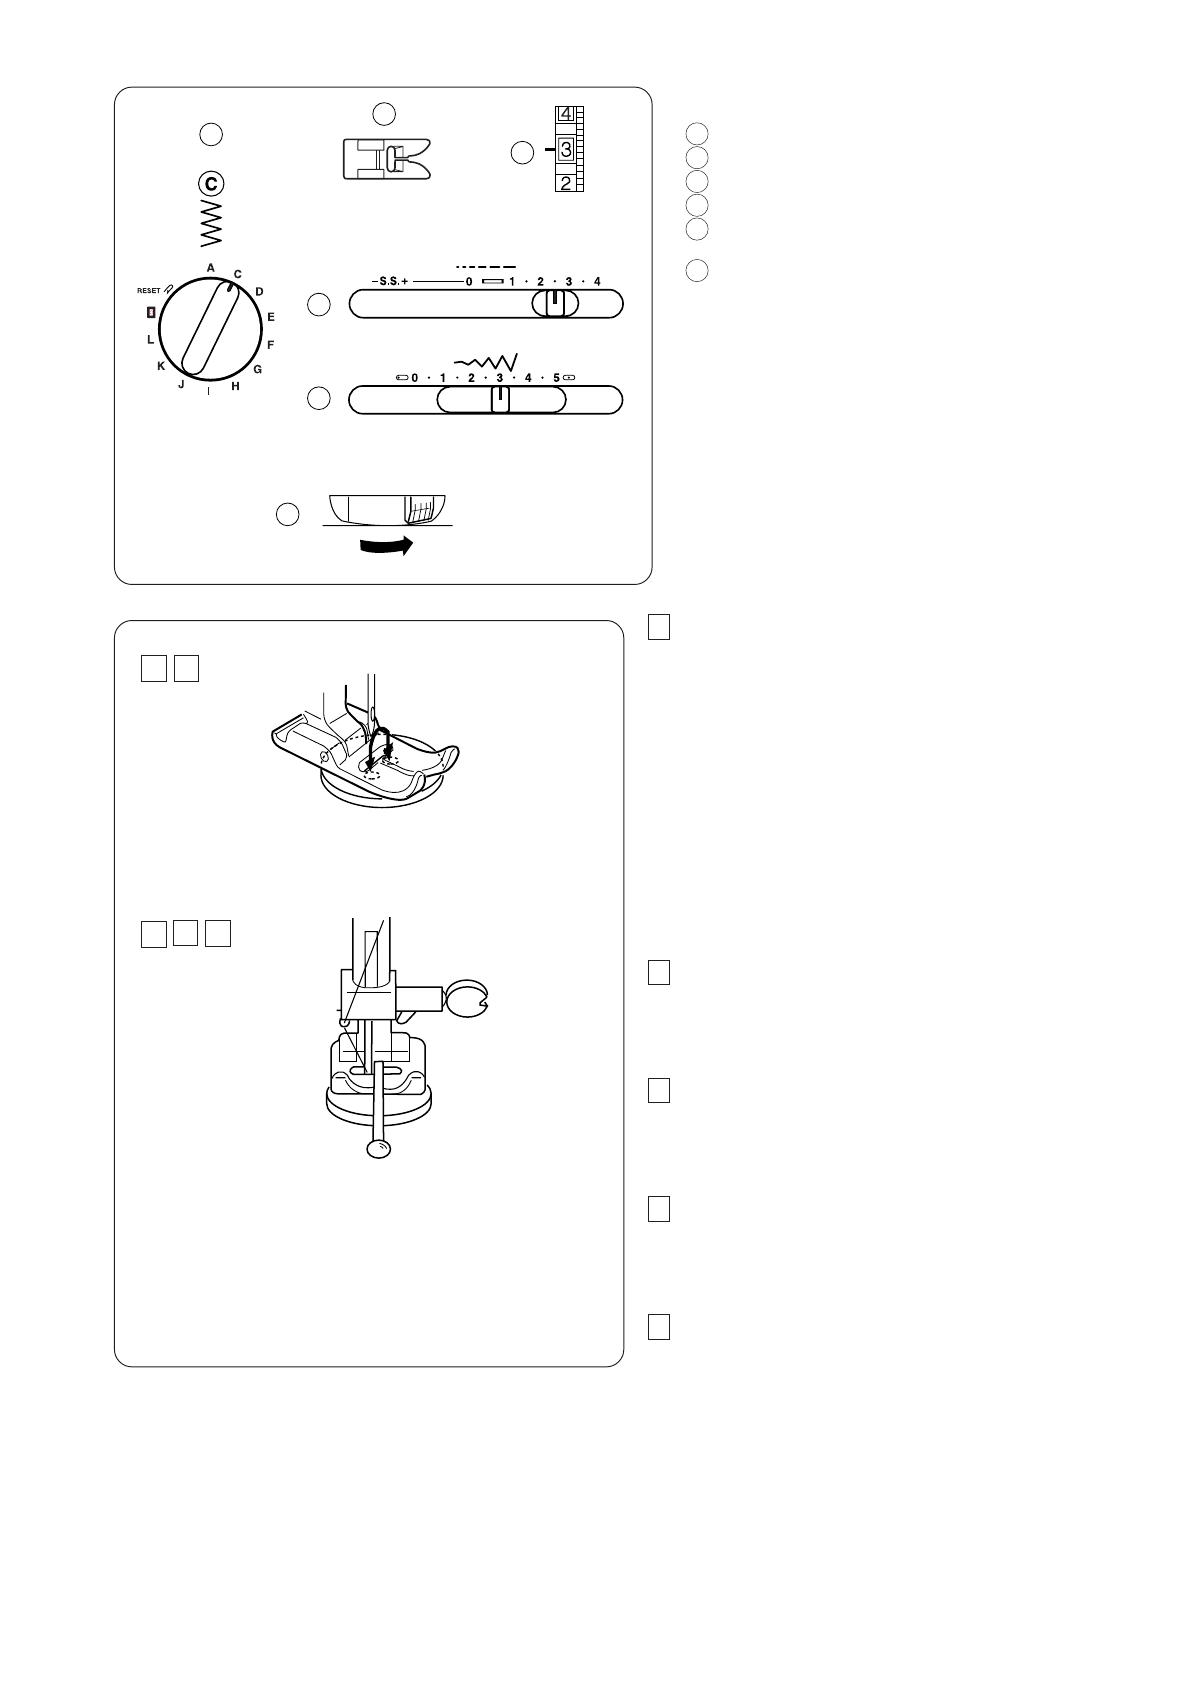
19
Ïðèøèâàíèå ïóãîâèö
1 Âûáîð ñòðî÷êè Ñ
2 Ëàïêà Ëàïêà çèãçàã
3 Íàòÿæåíèå íèòè 1 ~ 3
4 Äëèíà ñòåæêà Ëþáàÿ
5 Øèðèíà çèãçàãà Ìîæíî
îòðåãóëèðîâàòü
6 Òðàíñïîðòåð òêàíè Îòêëþ÷åí
1
2
3
4
5
6
1 2
3
4 5
1 Îòâåäèòå ðû÷àã îòêëþ÷åíèÿ òðàíñïîðòåðà
òêàíè âïðàâî è îïóñòèòå òðàíñïîðòåð.
Óñòàíîâèòå ðó÷êó âûáîðà ñòåæêîâ íà «Ñ», à
øèðèíó ñòåæêà — íà 0.
Ïîëîæèòå ïóãîâèöó ïîä ëàïêó. Óäàëèòå íèòü
èç èãëû, ïîâåðíèòå ìàõîâîå êîëåñî è
ìåäëåííî îïóñòèòå èãëó â ëåâîå îòâåðñòèå
ïóãîâèöû.
Ñîâìåñòèòå ïðàâîå îòâåðñòèå ïóãîâèöû ñ
ïðîðåçüþ íà ëàïêå è îïóñòèòå ïðèæèìíóþ
ëàïêó, ÷òîáû çàêðåïèòü ïóãîâèöó íà ìåñòå.
2 Ïîäíèìèòå èãëó è èçìåíèòå øèðèíó çèãçàãà
òàê, ÷òîáû èãëà ñìîãëà ïðîéòè ñêâîçü ïðàâîå
îòâåðñòèå ïóãîâèöû.
3 Çàïðàâüòå íèòü â èãëó è ïðîøåéòå 10
ñòåæêîâ. Ñâåðõó íà ëàïêó ïîëîæèòå áóëàâêó,
÷òîáû ñôîðìèðîâàòü íîæêó.
4 Ïîäíèìèòå èãëó è óñòàíîâèòå ðû÷àã êîíòðîëÿ
øèðèíû çèãçàãà íà 0. Çàòåì ïðîøåéòå
íåñêîëüêî ñòåæêîâ äëÿ çàêðåïëåíèÿ.
5 Ïîäíèìèòå ëàïêó è îáðåæüòå ëèøíèå íèòè.
ÏÐÈÌÅ×ÀÍÈÅ: Ïî îêîí÷àíèè ïðèøèâàíèÿ
ïóãîâèö ïîäíèìèòå òðàíñïîðòåð
òêàíè.