Для ознакомления с инструкцией необходимо нажать на ссылку «ЗАГРУЗИТЬ», чтобы скачать pdf файл. Если есть кнопка «ПРОСМОТР», то можно просто посмотреть документ онлайн.
Для удобства, Вы можете сохранить данную страницу с файлом руководства по эксплуатации в свой список «избранное» прямо на сайте (доступно для зарегистрированных пользователей).
Смотрите инструкцию для похожих моделей:

Вы можете задать вопрос посетителям сайта по модели RICOH SP 100SU. Если Вы являетесь её пользователем, то пожалуйста оставьте, по возможности развёрнутый отзыв:
-
Руководства по ремонту
3
-
Инструкции по эксплуатации
1

Ricoh Aficio SP 100SU инструкция по эксплуатации
(52 страницы)
- Языки:Английский
-
Тип:
PDF -
Размер:
796.99 KB
Просмотр
На NoDevice можно скачать инструкцию по эксплуатации для Ricoh Aficio SP 100SU. Руководство пользователя необходимо для ознакомления с правилами установки и эксплуатации Ricoh Aficio SP 100SU. Инструкции по использованию помогут правильно настроить Ricoh Aficio SP 100SU, исправить ошибки и выявить неполадки.
-
Contents
-
Table of Contents
-
Troubleshooting
-
Bookmarks
Quick Links
Operating Instructions
User Guide
For safe and correct use, be sure to read «Safety Information» before using the machine.
Related Manuals for Ricoh Aficio SP 100SU e
Summary of Contents for Ricoh Aficio SP 100SU e
-
Page 1: Operating Instructions
Operating Instructions User Guide For safe and correct use, be sure to read «Safety Information» before using the machine.
-
Page 3: Table Of Contents
TABLE OF CONTENTS 1. Guide to the Machine How to Read This Manual……………………..5 Introduction…………………………5 Legal Prohibition………………………..5 Disclaimer…………………………..5 Model-Specific Information……………………..6 Guide to Components……………………….7 Exterior…………………………..7 Interior…………………………..8 Control Panel…………………………8 Installing the Driver and Software……………………11 Quick Install…………………………11 Upgrading or Deleting the Printer Driver………………..11 Installing the Smart Organizing Monitor………………..12 What is Smart Organizing Monitor?………………….13 2.
-
Page 4
Canceling a Copy……………………….32 Making Enlarged or Reduced Copies………………….33 Specifying Reduce/Enlarge……………………33 Copying Both Sides of an ID Card onto One Side of Paper…………….35 Copying an ID Card……………………….35 Specifying the Scan Settings………………………37 Adjusting Image Density……………………..37 Selecting the Document Type According to Original…………….37 5. -
Page 5
Scanner Problems………………………..60 Error and Status Indicate on the Control Panel………………..61 Codes on the Screen………………………61 Error and Status Messages Appear on the Smart Organizing Monitor…………62 9. Appendix Notes About the Toner………………………..63 Moving and Transporting the Printer………………….64 Disposal…………………………..64 Where to Inquire……………………….64 Consumables…………………………65 Print Cartridge…………………………65 Specifications of the Machine…………………….66 General Function Specifications…………………….66… -
Page 7: Guide To The Machine
1. Guide to the Machine How to Read This Manual Introduction This manual contains detailed instructions and notes on the operation and use of this machine. For your safety and benefit, read this manual carefully before using the machine. Keep this manual in a handy place for quick reference.
-
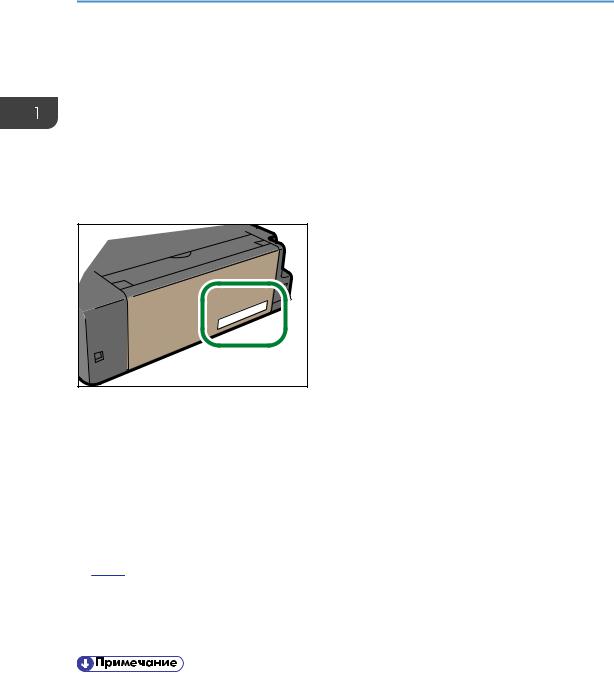
Page 8: Model-Specific Information
1. Guide to the Machine Model-Specific Information This section explains how you can identify the region your machine belongs to. There is a label on the rear of the machine, located in the position shown below. The label contains details that identify the region your machine belongs to. Read the label. CHZ966 The following information is region-specific.
-
Page 9: Guide To Components
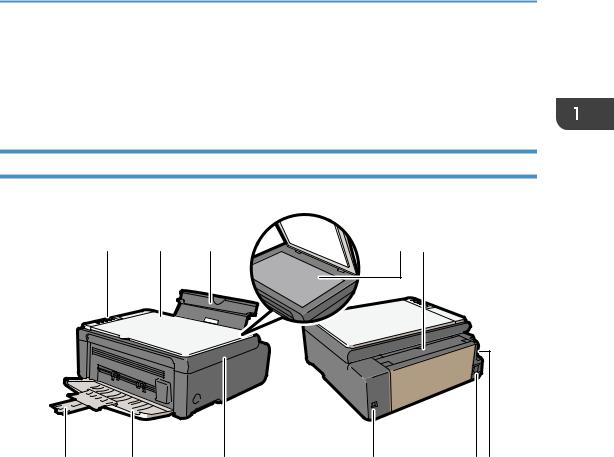
Guide to Components Guide to Components This section introduces the names of the various parts on the front and rear side of the machine and outlines their functions. Exterior CHZ968 1. Control Panel Contains a screen and keys for machine control. 2.
-
Page 10: Interior
1. Guide to the Machine 8. Maintenance Cover Lift up this cover to replace consumables or clear a paper jam. 9. USB Port Use this port to connect the machine to a computer using a USB cable. 10. Power Connector Connect the power cord to the machine here.
-
Page 11
Guide to Components CHZ951 1. Screen Shows the number of copies and the error code. 2. [Number of copies] Key Use this button to change the number of copies. 3. Density Screen Displays the copy density in three levels. The print density is indicated by which segment is lit on this indicator. •… -
Page 12
1. Guide to the Machine 7. [Start] Key Use this button to start copying. 8. Power Indicator This indicator lights up blue when the machine is turned on. It flashes when a print job is received and while printing or scanning is in progress. 9. -
Page 13: Installing The Driver And Software
Installing the Driver and Software Installing the Driver and Software You can install the necessary driver for this machine using the included CD-ROM. The operating systems compatible with the drivers and software for this machine are: Windows XP/ Vista/7 and Windows Server 2003/2003 R2/2008/2008 R2. The procedure in this section is an example based on Windows 7.
-
Page 14: Installing The Smart Organizing Monitor
1. Guide to the Machine Restart the computer. Deleting the printer driver On the [Start] menu, click [Devices and Printers]. Right-click the icon of the printer you want to delete, and then click [Remove device]. Click [Yes]. Click any printer icon, and then click [Print server properties]. Click the [Drivers] tab.
-
Page 15: What Is Smart Organizing Monitor
What is Smart Organizing Monitor? What is Smart Organizing Monitor? Install this utility on your computer from the included CD-ROM before using it. Smart Organizing Monitor provides the following functions: • Displays the status of the machine Displays paper jam messages and other error messages. •…
-
Page 16
1. Guide to the Machine… -
Page 17: Loading Paper
2. Loading Paper Supported Paper Paper Size • A4 • 8 » × 11 » (Letter) • B5 • 5 » × 8 » (Half Letter) • 7 » × 10 » (Executive) • A5 • A6 • B6 • 16K (197 × 273 mm) •…
-
Page 18: Non-Recommended Paper Types
2. Loading Paper Non-Recommended Paper Types Do not use the following types of paper: • Ink-jet printer paper • GelJet special paper • Bent, folded, or creased paper • Curled or twisted paper • Wrinkled paper • Damp paper • Dirty or damaged paper •…
-
Page 19: Print Area
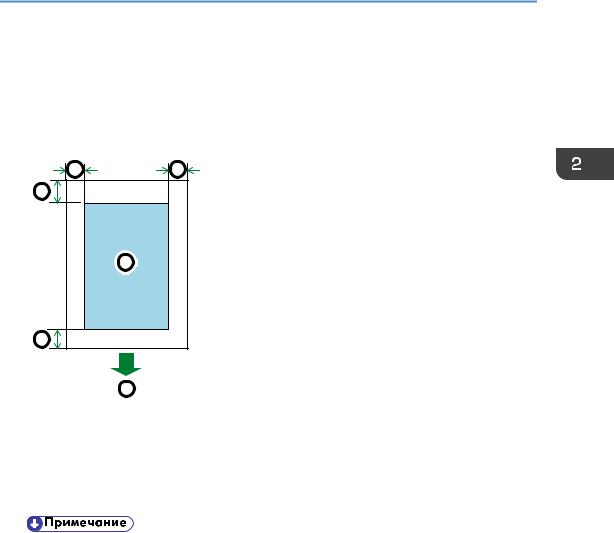
Print Area Print Area The diagram below shows the area of the paper that the machine can print on. From the printer driver CHZ904 1. Print area 2. Feed direction 3. Approx. 4.2 mm (0.2 inches) 4. Approx. 4.2 mm (0.2 inches) •…
-
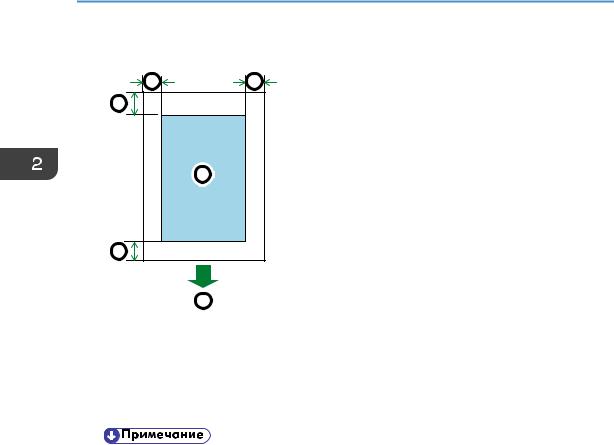
Page 20
2. Loading Paper Copier function CHZ904 1. Print area 2. Feed direction 3. Approx. 4 mm (0.2 inches) 4. Approx. 3 mm (0.1 inches) • The print area may vary depending on the paper size. -
Page 21: Loading Paper
Loading Paper Loading Paper Load a stack of paper for printing in the input tray on the back of the machine. • When loading paper, be sure to configure the size and type of paper. When printing a document, specify the paper size and type in the printer driver so that the settings configured when paper is loaded can be used for printing.
-
Page 22
2. Loading Paper Fan the paper before loading it in the tray. CBK254 Slide the paper guide on both sides outward, and then load the paper print side up until it stops. CHZ007 Adjust the paper guide on both sides to fit the paper width. CHZ008… -
Page 23: Specifying Paper Type And Paper Size Using Smart Organizing Monitor
Loading Paper Open the front cover and tray extension. CHZ027 Specifying Paper Type and Paper Size Using Smart Organizing Monitor The procedure in this section is an example based on Windows 7. The actual procedure may vary depending on the operating system you are using. Specifying the paper type and paper size On the [Start] menu, click [All Programs].
-
Page 24: Placing Originals
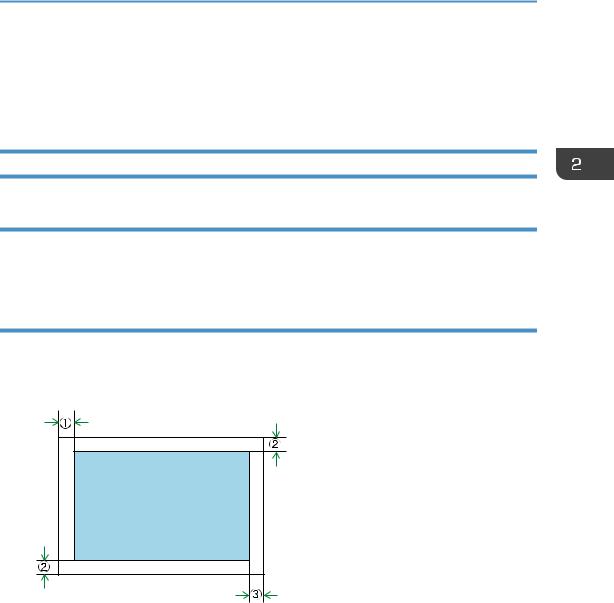
2. Loading Paper Placing Originals This section describes the types of originals you can set and how to place them. About Originals Recommended size of originals Exposure glass • Up to 216 mm (8.5 «) in width, up to 297 mm (11.7 «) in length Unscannable image area Even if you correctly place originals, margins of a few millimeters on all four sides of the original may not be scanned.
-
Page 25
Placing Originals Lift the exposure glass cover. Place the original face down on the exposure glass. The original should be aligned to the rear left corner. CHZ009 Lower the exposure glass cover. Hold down the cover with your hands when using thick, folded, or bound originals and when the cover cannot be lowered completely. -
Page 26
2. Loading Paper… -
Page 27: Printing Documents
3. Printing Documents Basic Operation Use the printer driver to print a document from your computer. After creating a document, open the [Printing Preferences] dialog box in the document’s native application. Change any print settings if necessary. The following print settings can be specified using the printer driver: •…
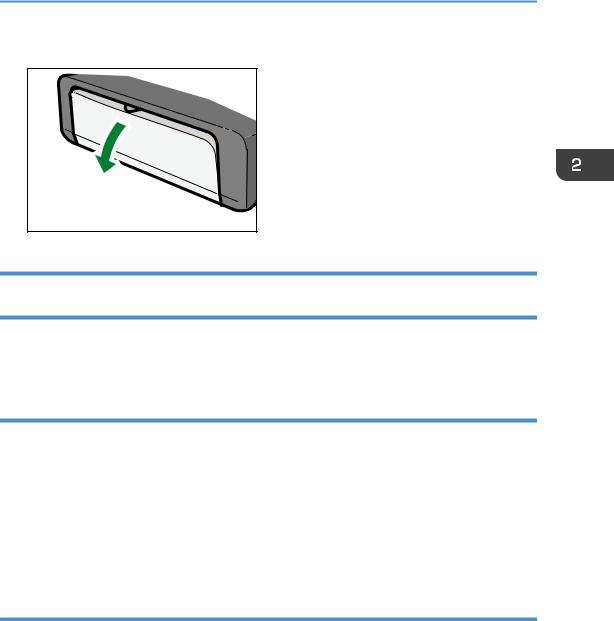
-
Page 28: Printing On Both Sides Of Sheets
3. Printing Documents When setting changes are completed, click [OK]. Print the document using the print function in the document’s native application. • If a paper jam occurs, printing stops when the current page has printed. Open the maintenance cover to remove the jammed paper. Printing will resume automatically after the maintenance cover is closed.
-
Page 29: Canceling A Print Job
Basic Operation Landscape CHZ922 Press the [Start] key. Canceling a Print Job You can cancel print jobs using either the machine’s control panel or your computer, depending on the status of the job. Canceling a print job before printing has started Double-click the printer icon on the task tray of your computer.
-
Page 30
3. Printing Documents Canceling a print job while printing Press the [Clear/Stop] key. CHZ955… -
Page 31: If A Paper Mismatch Occurs
If a Paper Mismatch Occurs If a Paper Mismatch Occurs If the paper size or type does not match the print job’s settings, the machine reports an error. There are two ways to resolve this error: Continue printing using mismatched paper Use the form-feed function to ignore the error and print using mismatched paper.
-
Page 32
3. Printing Documents… -
Page 33: Copying Originals
4. Copying Originals Basic Operation Place the original on the exposure glass. To print multiple copies, press the [Number of copies] key until the number of copies you want to print is displayed. CHZ952 Holding down the [Number of copies] key increases the number in increments of 10. Press the [Start] key.
-
Page 34: Canceling A Copy
4. Copying Originals Canceling a Copy If copying is canceled while the machine is scanning the original, copying is canceled immediately and there is no printout. If copying is canceled during printing, the photocopy process is canceled after the current page has been printed out.
-
Page 35: Making Enlarged Or Reduced Copies
Making Enlarged or Reduced Copies Making Enlarged or Reduced Copies There are two ways to set the scaling ratio: using a preset ratio or manually specifying a customized ratio. Preset ratio CES103 (mainly Europe and Asia) 50%, 71%, 82%, 93%, 122%, 141%, 200% (mainly North America) 50%, 65%, 78%, 93%, 129%, 155%, 200% Custom ratio…
-
Page 36
4. Copying Originals On the [User Tool] tab, click [Printer Configuration]. On the [Copy] tab, select the ratio in the [Reduce / Enlarge:] list. If [Zoom: (25 to 400%)] has been selected, enter the ratio. Click [OK]. Click [Close]. -
Page 37: Copying Both Sides Of An Id Card Onto One Side Of Paper
Copying Both Sides of an ID Card onto One Side of Paper Copying Both Sides of an ID Card onto One Side of Paper This section describes how to copy the front and back sides of an ID card or other small documents onto either side of a sheet of paper.
-
Page 38
4. Copying Originals To print multiple copies, press the [Number of copies] key until the number of copies you want is displayed. CHZ952 Place the original front side down with the top to the rear of the machine on the exposure glass. -
Page 39: Specifying The Scan Settings
Specifying the Scan Settings Specifying the Scan Settings This section describes how to specify image density and scan quality for the current job. Adjusting Image Density There are three image density levels. The higher the density level, the darker the printout. Press the [Density] key until the density level you want is displayed.
-
Page 40
4. Copying Originals Specifying the Original Type Use this procedure to specify the original type for the current job from Smart Organizing Monitor. The procedure in this section is an example based on the Windows 7 OS. The actual procedure may vary depending on the operating system you are using. -
Page 41: Scanning From A Computer
5. Scanning from a Computer Basic Operation Scanning from a computer (TWAIN scanning and WIA scanning) allows you to operate the machine from your computer and scan originals into your computer directly. TWAIN Scanning TWAIN scanning is possible if your computer is running a TWAIN-compatible application. Place the original.
-
Page 42: Basic Operation For Wia Scanning
5. Scanning from a Computer • [Filing] (Auto change to Text, 200dpi × 200dpi) • [OCR] (Auto change to Text, 400dpi × 400dpi) 2. Original Scan Method Specify the method to scan originals. 3. Image Quality Adjustment You can adjust the image quality. The scan settings that can be adjusted are as follow: Rotation, Curve, Brightness/Contrast, Level, Color Balance, and Hue/Saturation.
-
Page 43: Configuring The Machine Using Smart Organizing Monitor
6. Configuring the Machine Using Smart Organizing Monitor Checking the System Information The state and status information of the machine can be checked using Smart Organizing Monitor. Checking the Status Information CHZ971 1. Image area Displays the status of this machine with an icon. 2.
-
Page 44: Printing The Configuration Page
6. Configuring the Machine Using Smart Organizing Monitor 3. Message area Displays the status of this machine with a message. For details about error messages, see p.62 «Error and Status Messages Appear on the Smart Organizing Monitor». Printing the Configuration Page On the [Start] menu, click [All Programs].
-
Page 45: Configuring The Machine Settings
Configuring the Machine Settings Configuring the Machine Settings Smart Organizing Monitor is used to modify the machine’s settings. On the [Start] menu, click [All Programs]. Click [Smart Organizing Monitor for SP 100 Series]. Click [Smart Organizing Monitor for SP 100 Series Status]. On the [User Tool] tab, click [Printer Configuration].
-
Page 46: Updating The Firmware
6. Configuring the Machine Using Smart Organizing Monitor Updating the Firmware • In no event shall the company be held liable to customers for damages of any kind resulting from use or loss of use of this software. • The company shall also not be held liable for any disputes between the customer and third parties resulting from any use or loss of use of this software.
-
Page 47: Maintaining The Machine
7. Maintaining the Machine Replacing the Print Cartridge • If «E7» is displayed in the control panel, replace the print cartridge by following the procedure described below. • Store print cartridges in a cool dark place. • Actual printable numbers vary depending on image volume and density, number of pages printed at a time, paper type and size, and environmental conditions such as temperature and humidity.
-
Page 48
7. Maintaining the Machine Hold the grips of the print cartridge, and then insert it into the machine until it stops. CHZ017 Close the maintenance cover. -
Page 49: Cautions When Cleaning
Cautions When Cleaning Cautions When Cleaning Clean the machine periodically to maintain high print quality. Dry wipe the exterior with a soft cloth. If dry wiping is not sufficient, wipe with a soft, damp cloth that has been wrung out thoroughly. If you still cannot remove the stain or grime, use a neutral detergent, wipe over the area with a thoroughly-wrung damp cloth, and then dry wipe the area and allow it to dry.
-
Page 50: Cleaning The Inside Of The Machine
7. Maintaining the Machine Cleaning the Inside of the Machine Open the maintenance cover. Hold the grips of the print cartridge, and then pull it out of the machine. CHZ013 Using a cloth, wipe the inside of the machine. CHZ028 Hold the grips of the print cartridge, and then insert it into the machine until it stops.
-
Page 51: Cleaning The Exposure Glass
Cleaning the Exposure Glass Cleaning the Exposure Glass Lift the exposure glass cover. Be careful not to hold the input tray when lifting the exposure glass cover, for the tray might be damaged. Clean the parts indicated with arrows with a soft damp cloth and then wipe the same parts with a dry cloth to remove any remaining moisture.
-
Page 52
7. Maintaining the Machine… -
Page 53: Troubleshooting
8. Troubleshooting Common Problems This section describes how to troubleshoot common problems that may occur while operating the machine. Problem Possible cause Solution • Make sure that the power plug is firmly inserted into the wall outlet. The power cord is not The machine does not turn on.
-
Page 54: Paper Feed Problems
8. Troubleshooting Paper Feed Problems If the machine is operating but paper will not feed or paper jams occur frequently, check the condition of the machine and paper. Problem Solution • Use supported types of paper. See p.15 «Supported Paper». •…
-
Page 55: Removing Printing Jams
Paper Feed Problems Problem Solution • Paper is damp. Use paper that has been stored properly. See p.15 «Supported Paper». Paper gets wrinkles. • Paper is too thin. See p.15 «Supported Paper». • If there are gaps between the paper and the paper guides, adjust the paper guides to remove the gaps.
-
Page 56
8. Troubleshooting Pull out the jammed paper carefully. CHZ024 If you cannot find the misfed paper, look inside the machine. Open the maintenance cover. Hold the grips of the print cartridge, and then pull it out of the machine. CHZ013 Pull out the misfed paper by holding both sides of paper. -
Page 57
Paper Feed Problems CHZ025 If it is difficult to remove the jammed paper out of the main unit, remove the jammed paper from the output tray side. CHZ026 Hold the grips of the print cartridge, and then insert it into the machine until it stops. CHZ017 Close the maintenance cover. -
Page 58: Print Quality Problems
8. Troubleshooting Print Quality Problems Checking the Condition of the Machine If there is a problem with the quality of printing, first check the condition of the machine. Possible Cause Solution There is a problem with the Make sure that the machine is on a level surface. Place the machine’s location.
-
Page 59: Printer Problems
Printer Problems Printer Problems Problem Solution If an error occurs when printing, change the computer or printer driver settings. • Check the printer icon name does not exceed 32 alphanumeric characters. If it does, shorten it. An error occurs. • Check whether other applications are operating. Close any other applications, as they may be interfering with printing.
-
Page 60: Print Positions Do Not Match Display Positions
8. Troubleshooting Print Positions Do Not Match Display Positions If the position of items on the printed page differs from the position displayed on the computer screen, the cause may be one of the following. Possible Cause Solution Check that the page layout settings are properly Page layout settings have not been configured.
-
Page 61: Copier Problems
Copier Problems Copier Problems Problem Solution The original was placed with the front and back reversed. Photocopied paper is blank. See p.22 «Placing Originals». Copied pages are too dark or too Adjust the image density. light. Copied pages do not look the same Select the correct scan mode according to the type of original.
-
Page 62: Scanner Problems
8. Troubleshooting Scanner Problems Problem Solution • The scanning part is dirty. The scanned image is dirty. • Before placing originals on the exposure glass, make sure that toner or correction fluid is dry. The scanned image is distorted or The original was moved during scanning.
-
Page 63: Error And Status Indicate On The Control Panel
Error and Status Indicate on the Control Panel Error and Status Indicate on the Control Panel Codes on the Screen Code Causes Solutions • Remove the jammed paper. See p.52 Paper has been jammed in the machine. «Paper Feed Problems». •…
-
Page 64: Error And Status Messages Appear On The Smart Organizing Monitor
8. Troubleshooting Error and Status Messages Appear on the Smart Organizing Monitor Message Causes Solutions • The power cable of the machine is not plugged in. • Check the printer power cord. Printer Power Off • The power of the machine •…
-
Page 65: Appendix
9. Appendix Notes About the Toner • Proper operation cannot be guaranteed if any third-party toner is used. • Depending on printing conditions, there are cases where the printer cannot print the number of sheets indicated in the specifications.
-
Page 66: Moving And Transporting The Printer
9. Appendix Moving and Transporting the Printer This section provides cautions that you must follow when moving the machine both short and long distances. Repack the machine in its original packing materials when moving it a long distance. • Be sure to disconnect all cables from the machine before transporting it. •…
-
Page 67: Consumables
Consumables Consumables Print Cartridge Print cartridge Average printable number of pages per cartridge Black 2,000 pages *1 The printable number of pages is based on pages that are compliant with ISO/IEC 19752 with the image density set as the factory default. ISO/IEC 19752 is an international standard for measurement of printable pages, set by the International Organization for Standardization.
-
Page 68: Specifications Of The Machine
9. Appendix Specifications of the Machine This section lists the machine’s specifications. General Function Specifications Configuration Desktop Print process Laser electrostatic transfer Maximum paper size for scanning of exposure glass 216 mm × 297 mm (8.5 × 11.7 inches) Maximum paper size for printing 216 mm ×…
-
Page 69: Printer Function Specifications
Specifications of the Machine 220-240 V, 4 A, 50/60 Hz (mainly North America) 120 V, 8 A, 60 Hz Power consumption • Maximum power consumption 70 W • Energy Saver mode 1 60 W or less • Energy Saver mode 2 5 W or less Machine dimensions (Width ×…
-
Page 70: Scanner Function Specifications
9. Appendix First copy speed (A4/Letter, at 23 °C, 71.6 °F) 32 seconds or less Multiple copy speed 13 pages per minute Reproduction ratio • Fixed ratio: (mainly Europe and Asia) 50%, 71%, 82%, 93%, 122%, 141%, 200% (mainly North America) 50%, 65%, 78%, 93%, 129%, 155%, 200% •…
-
Page 71: Trademarks
Trademarks Trademarks ® ® ® ® Microsoft , Windows , Windows Server , and Windows Vista are either registered trademarks or trademarks of Microsoft Corporation in the United States and/or other countries. Other product names used herein are for identification purposes only and might be trademarks of their respective companies.
-
Page 72
9. Appendix ® ® Microsoft Windows Server 2008 Standard ® ® Microsoft Windows Server 2008 Enterprise ® ® Microsoft Windows Server 2008 Datacenter ® ® Microsoft Windows Server 2008 for Itanium-based Systems ® ® Microsoft Windows Web Server 2008 ® ®… -
Page 73: Index
INDEX Basic operation……….Machine settings………… 25, 31 Models…………..Moving…………..Canceling a copy……….Changing the custom paper size……Cleaning………… Non-recommended paper……..47, 48, 49 Codes…………..Notes…………..Common problems……….Condition of the machine……..Original type…………Configuration page……….Originals…………..Consumables…………Control panel…………Copier function…………Paper feed problems……….
-
Page 74
Toner…………… Trademarks…………Troubleshooting….51, 52, 56, 57, 58, 59, 60 TWAIN…………..Unscannable image area……..Upgrade…………..WIA……………. M102-8651… -
Page 76
M102-8651 © 2011…
This manual is also suitable for:
Sp 100su
![]()
Руководства Пользователя
Руководство Пользователя
Для безопасного и правильного использования аппарата обязательно прочтите раздел «Техника безопасности» до его эксплуатации.

СОДЕРЖАНИЕ |
|
|
1. Руководство к аппарату |
|
|
Как пользоваться данным руководством………………………………………………………………………………………… |
5 |
|
Введение…………………………………………………………………………………………………………………………………….. |
5 |
|
Правовой запрет………………………………………………………………………………………………………………………… |
5 |
|
Отказ от ответственности…………………………………………………………………………………………………………… |
5 |
|
Информация, относящаяся к разным моделям………………………………………………………………………………. |
6 |
|
Руководство по компонентам…………………………………………………………………………………………………………. |
7 |
|
Наружные компоненты……………………………………………………………………………………………………………….. |
7 |
|
Внутренняя часть…………………………………………………………………………………………………………………………. |
8 |
|
Панель управления…………………………………………………………………………………………………………………….. |
8 |
|
Установка драйвера и ПО…………………………………………………………………………………………………………… |
11 |
|
Быстрая установка……………………………………………………………………………………………………………………. |
11 |
|
Обновление или удаление драйвера принтера……………………………………………………………………….. |
11 |
|
Установка приложения Smart Organizing Monitor……………………………………………………………………. |
12 |
|
Что такое Smart Organizing Monitor?…………………………………………………………………………………………… |
13 |
|
2. Загрузка бумаги |
|
|
Пригодная для использования бумага………………………………………………………………………………………….. |
15 |
|
Нерекомендуемые типы бумаги……………………………………………………………………………………………………. |
16 |
|
Область печати…………………………………………………………………………………………………………………………….. |
17 |
|
Загрузка бумаги…………………………………………………………………………………………………………………………… |
19 |
|
Указание типа и формата бумаги с помощью приложения Smart Organizing Monitor…………….. |
21 |
|
Размещение оригиналов………………………………………………………………………………………………………………. |
23 |
|
Сведения об оригиналах………………………………………………………………………………………………………….. |
23 |
|
Размещение оригиналов на стекле экспонирования………………………………………………………………… |
24 |
|
3. Печать документов |
|
|
Базовые операции……………………………………………………………………………………………………………………….. |
25 |
|
Печать на обеих сторонах листа……………………………………………………………………………………………… |
26 |
|
Отмена задания печати……………………………………………………………………………………………………………. |
27 |
|
Действия при несоответствии параметров бумаги………………………………………………………………………. |
29 |
|
Продолжение печати на бумаге, не соответствующей требованиям……………………………………….. |
29 |
|
Сброс задания печати……………………………………………………………………………………………………………… |
30 |
|
4. Копирование оригиналов |
|
|
Базовые операции……………………………………………………………………………………………………………………….. |
31 |
1

|
Отмена копирования……………………………………………………………………………………………………………….. |
32 |
|
Выполнение увеличенных или уменьшенных копий………………………………………………………………………. |
33 |
|
Задание увеличения или уменьшения………………………………………………………………………………………. |
33 |
|
Копирование обеих сторон удостоверения личности на одну сторону листа бумаги…………………. |
35 |
|
Копирование удостоверения личности…………………………………………………………………………………….. |
35 |
|
Настройка параметров сканирования…………………………………………………………………………………………. |
37 |
|
Регулировка плотности изображения……………………………………………………………………………………….. |
37 |
|
Выбор типа документа согласно оригиналу…………………………………………………………………………….. |
37 |
|
5. Сканирование с помощью компьютера |
|
|
Базовые операции……………………………………………………………………………………………………………………….. |
39 |
|
Сканирование TWAIN……………………………………………………………………………………………………………… |
39 |
|
Базовые операции по сканированию WIA………………………………………………………………………………. |
41 |
|
6. Настройка аппарата с помощью приложения Smart Organizing Monitor |
|
|
Просмотр сведений о системе……………………………………………………………………………………………………… |
43 |
|
Просмотр сведений о состоянии………………………………………………………………………………………………. |
43 |
|
Распечатывание страницы конфигурации………………………………………………………………………………… |
44 |
|
Конфигурирование настроек аппарата……………………………………………………………………………………….. |
45 |
|
Вкладки окна настройки…………………………………………………………………………………………………………… |
45 |
|
Обновление прошивки…………………………………………………………………………………………………………………. |
46 |
|
7. Техническое обслуживание аппарата |
|
|
Замена картриджа печати……………………………………………………………………………………………………………. |
47 |
|
Меры предосторожности во время очистки…………………………………………………………………………………. |
49 |
|
Очистка внутренних компонентов аппарата……………………………………………………………………………….. |
50 |
|
Очистка стекла экспонирования………………………………………………………………………………………………….. |
51 |
|
8. Устранение неполадок |
|
|
Распространенные неполадки……………………………………………………………………………………………………… |
53 |
|
Неполадки, связанные с подачей бумаги…………………………………………………………………………………….. |
54 |
|
Извлечение бумаги, замятой при распечатывании………………………………………………………………….. |
55 |
|
Неудовлетворительное качество печати………………………………………………………………………………………. |
59 |
|
Проверка состояния аппарата…………………………………………………………………………………………………. |
59 |
|
Неполадки, связанные с печатью…………………………………………………………………………………………………. |
60 |
|
Расположение распечатываемого изображения на бумаге не соответствует его расположению |
|
|
на экране монитора…………………………………………………………………………………………………………………. |
61 |
2

|
Неполадки, связанные с копированием……………………………………………………………………………………….. |
62 |
|
Неполадки, связанные со сканированием…………………………………………………………………………………… |
64 |
|
Сообщения об ошибках и состоянии, появляющиеся на панели управления……………………………… |
65 |
|
Коды, отображаемые на экране………………………………………………………………………………………………. |
65 |
|
Сообщения об ошибках и состоянии, отображаемые в окне приложения Smart Organizing Monitor |
|
|
……………………………………………………………………………………………………………………………………………………… |
67 |
|
9. Приложение |
|
|
Примечания по поводу тонера…………………………………………………………………………………………………….. |
69 |
|
Перемещение и транспортировка принтера……………………………………………………………………………….. |
70 |
|
Утилизация……………………………………………………………………………………………………………………………….. |
70 |
|
Куда обращаться……………………………………………………………………………………………………………………… |
71 |
|
Расходные материалы………………………………………………………………………………………………………………….. |
72 |
|
Картридж для печати………………………………………………………………………………………………………………… |
72 |
|
Технические характиристики аппарата……………………………………………………………………………………….. |
73 |
|
Технические характеристики основных функций……………………………………………………………………… |
73 |
|
Технические характеристики функции принтера……………………………………………………………………… |
74 |
|
Технические характеристики функции копира…………………………………………………………………………. |
74 |
|
Технические характеристики функции сканера……………………………………………………………………….. |
75 |
|
Торговые знаки…………………………………………………………………………………………………………………………….. |
76 |
|
ИНДЕКС……………………………………………………………………………………………………………………………………… |
79 |
3

4

1. Руководство к аппарату
Как пользоваться данным руководством
Введение
Это руководство содержит подробные инструкции и примечания по эксплуатации и использованию данного аппарата. Для безопасности и удобства, внимательно прочтите это руководство до начала эксплуатации данного аппарата. Храните данное руководство в легкодоступном месте для быстрого получения справки.
Правовой запрет
Копирование или печать любого материала, распространение которого недопустимо в соответствии с применимыми законодательными актами, запрещено.
Местными законодательными актами, как правило, запрещено копирование или печать следующего материала:
банкнот, гербовых марок, облигаций, сертификатов о праве собственности на акции, банковских тратт, чеков, паспортов, водительских прав.
Приведенный список является ориентировочным и не может рассматриваться как исчерпывающий. Производитель не несет ответственности за полноту и точность приведенного списка. В случае возникновения вопросов в отношении легальности копирования того или иного материала, обратитесь в местную юридическую консультацию.
Отказ от ответственности
Информация, приведенная в данном руководстве, может быть изменена без предварительного уведомления.
Ни при каких обстоятельствах компания не несет ответственности за прямой, косвенный, фактический, случайный или последовавший ущерб, возникший в результате использования данного аппарата или обращения с ним.
Для обеспечения высокого качества готовых отпечатков производитель настоятельно рекомендует использовать оригинальный тонер, поставляемый производителем.
В данном руководстве размеры указаны в двух системах измерения.
Некоторые иллюстрации или пояснения в этом руководстве могут отличаться от приобретенного продукта вследствие улучшения или изменения данного продукта.
5
1. Руководство к аппарату
Информация, относящаяся к разным моделям
В данной главе описано, каким образом можно определить регион, к которому относится аппарат.
На задней стороне аппарата имеется наклейка, расположение которой указано ниже. На наклейке приведены данные, определяющие регион, к которому относится аппарат. Прочтите данные на наклейке.
Следующая информация зависит от региона. Прочтите информацию под символом, соответствующему региону использования аппарата.


 (в основном Европа и Азия)
Если на этикетке имеется следующая информация, ваше устройство является моделью для региона A:
•КОД XXXX -22, -27
•220-240 В


 (в основном Северная Америка)
Если на наклейке имеется следующая информация, ваш аппарат является моделью для региона Б:
•КОД XXXX -11, -17
•120 В
•Размеры в этом руководстве даются в двух системах единиц измерения: метрической и дюймовой. Если аппарат является моделью для региона A, то используется метрическая система. Если аппарат является моделью для региона Б, то используется дюймовая система.
6
Руководство по компонентам
Руководство по компонентам
В данном разделе приводятся названия различных компонентов, находящихся с передней и задней стороны аппарата, а также описание их функций.
Наружные компоненты
|
1 |
2 |
3 |
4 |
5 |
|
6 |
7 |
8 |
9 |
10 11 |
|
CHZ968 |
1.Панель управления
Здесь находится экран и клавиши для управления аппаратом.
2.Крышка стекла экспонирования
Откройте эту крышку, чтобы поместить оригинал на стекло экспонирования.
3.Входной лоток
В этот лоток можно загрузить до 50 листов обычной бумаги.
4.Стекло экспонирования
Поочередно помещайте сюда оригиналы.
5.Крышка входного лотка
Поднимите эту крышку и вытяните лоток, из которого подается бумага, чтобы загрузить бумагу.
6.Удлинитель лотка
Вытяните и раздвиньте этот удлинитель, чтобы обеспечить поддержку бумаги на выходе из аппарата.
7.Передняя крышка
Откройте эту крышку, чтобы вытянуть выходной лоток перед началом печати.
7
1.Руководство к аппарату
8.Служебная крышка
Поднимите эту крышку, чтобы заменить расходные материалы или устранить замятие бумаги.
9.USB порт
Используйте этот порт для подключения аппарата к компьютеру с помощью кабеля USB.
10.Разъем питания
Подключите сюда шнур питания аппарата. Вставьте вилку на другом конце шнура в ближайшую розетку.
11.Выключатель питания
Этот выключатель служит для включения и выключения питания.
Внутренняя часть
1
CHZ004
1.Картридж принтера
Сменный расходный материал, который необходим для печати на бумаге. Менять картридж, как правило, приходится после распечатывания примерно 2000 страниц. Подробные сведения о замене картриджа см. стр.47 «Замена картриджа печати».
Панель управления
•Внешний вид панели может отличаться от изображенного на следующем рисунке в зависимости от страны, в которой используется аппарат.
8
![]()
Руководство по компонентам
1
2
3
4
5
6
7
8
9
CHZ951
1.Экран
Служит для отображения количества копий или кода ошибки.
2.Клавиша [Количество копий]
Используйте эту клавишу для изменения количества копий.
3.Экран указания плотности
Служит для отображения одного из трех уровней плотности
Плотность печати соответствует тому сегменту этого индикатора, который светится в настоящий момент.
•Левый: светлее обычного
•Средний: нормальная плотность
•Правый: темнее обычного
4.Клавиша [Плотность]
Используйте эту клавишу для регулирования плотности распечатываемого документа.
5.Клавиша [Копия удостоверения личности]
Используйте эту клавишу для копирования удостоверения личности.
9

1.Руководство к аппарату
6.Клавиша [Сброс/Стоп]
Когда аппарат находится в режиме онлайн, нажмите эту клавишу, чтобы отменить выполняющееся задание печати.
7.Клавиша [Пуск]
Используйте эту клавишу, чтобы начать копирование.
8.Индикатор питания
Этот индикатор загорается синим светом при включении питания аппарата. Индикатор мигает при получении и выполнении задания печати или во время сканирования.
9.Индикатор предупреждения
Этот индикатор загорается красным светом, если в аппарате заканчивается бумага или расходные материалы; если параметры бумаги не соответствуют настройкам драйвера или при обнаружении другого отклонения от нормы. Если тонер в аппарате почти израсходован, индикатор начинает мигать с продолжительными интервалами.
10

Установка драйвера и ПО
Установка драйвера и ПО
Чтобы установить драйвер, необходимый для работы описываемого аппарата, нужно воспользоваться компакт-диском, который входит в комплект поставки.
С драйверами и ПО, необходимыми для работы описываемого аппарата, совместимы следующие операционные системы: Windows XP/Vista/7 и Windows Server 2003/2003 R2/2008/2008 R2.
В настоящем разделе в качестве примера приведена процедура для ОС Windows 7. Процедуры для других ОС могут отличаться от описываемой.
•Прежде чем приступать к установке, обязательно выключите аппарат и отсоедините от него кабель USB.
Быстрая установка
Используйте процедуру быстрой установки для установки драйвера принтера, драйвера TWAIN
идрайвера WIA с компакт-диска.
1.Закройте все приложения за исключением данного руководства.
2.Вставьте компакт-диск в дисковод компакт-дисков.
3.В меню компакт-диска выберите пункт [Быстрая установка через USB].
4.Следуйте инструкциям мастера установки.
Обновление или удаление драйвера принтера
Обновление драйвера принтера
1.В меню [Пуск] нажмите [Устройства и принтеры].
2.Нажмите правую кнопку мыши на значке принтера, который нужно обновить, затем выберите пункт [Свойства принтера].
3.Перейдите на вкладку [Дополнительно].
4.Щелкните [Новый драйвер…], затем [Далее].
5.Нажмите кнопку [Установить с диска…].
6.Нажмите [Обзор…] и выберите местоположение драйвера принтера.
7.Нажмите кнопку [OK] и укажите модель принтера.
8.Нажмите [Далее].
11

1.Руководство к аппарату
9.Щелкните [Готово].
10.Нажмите [OK], чтобы закрыть окно свойств принтера.
11.Перезапустите компьютер.
Удаление драйвера принтера
1.В меню [Пуск] нажмите [Устройства и принтеры].
2.Нажмите правую кнопку мыши на значке принтера, котороый нужно удалить, затем выберите пункт [Удалить устройство].
3.Нажмите [Да].
4.Нажмите значок принтера и выберите пункт [Свойства сервера печати].
5.Щелкните на вкладке [Драйверы].
6.Нажмите на кнопку [Изменить параметры драйвера], если она появится.
7.Нажмите кнопку [Удалить…].
8.Выберите [Удалить драйвер и пакет драйвера], затем щелкните [OK].
9.Нажмите [Да].
10.Щелкните на [Удалить].
11.Щелкните [OK].
12.Нажмите [Закрыть], чтобы закрыть окно свойств сервера принтера.
Установка приложения Smart Organizing Monitor
Smart Organizing Monitor — это служебная программа, которая позволяет изменять настройки аппарата или просматривать состояние аппарата с помощью компьютера.. Подробные сведения см. стр.13 «Что такое Smart Organizing Monitor?».
1.Закройте все приложения за исключением данного руководства.
2.Вставьте компакт-диск в дисковод компакт-дисков.
3.В меню компакт-диска выберите пункт [Smart Organizing Monitor].
4.Выберите язык для приложения Smart Organizing Monitor.
5.Следуйте инструкциям мастера установки.
12

Что такое Smart Organizing Monitor?
Что такое Smart Organizing Monitor?
Прежде чем приступить к использованию этой утилиты, установите ее с компакт-диска, который входит в комплект поставки аппарата.
Приложение Smart Organizing Monitor служит для выполнения следующих функций:
•Отображение состояния аппарата Отображение сообщений о замятии бумаги и других сообщений об ошибках.
•Параметры формата и типа бумаги Отображение параметров формата и типа бумаги, доступных для данного аппарата.
•Печать тестовой страницы и страницы конфигурации
Распечатывание списков (отчетов) для просмотра параметров настройки аппарата и других сведений.
•Изменение параметров системы.
Применяется для установки индивидуальных параметров формата бумаги и других параметров аппарата.
•Изменение настройки принтера
Используется для изменения таких настроек функции принтера, как [Пропустить ошибку:] или [Тайм-аут ввода/вывода:] на данном аппарате.
•Изменение настроек копирования
Используется для изменения таких настроек копирования, как [Тип документа:] или [Уменьшить/Увеличить:] на данном аппарате.
Для получения подробных сведений об использовании приложения Smart Organizing Monitor см. стр.43 «Настройка аппарата с помощью приложения Smart Organizing Monitor».
13

1. Руководство к аппарату
14

2. Загрузка бумаги
Пригодная для использования бумага
Размер бумаги
•A4
•8 1/2 × 11 дюймов (Letter)
•B5
•5 1/2 × 8 1/2 дюймов (Half Letter)
•7 1/4 × 10 1/2 дюймов (Executive)
•A5
•A6
•B6
•16K (197 × 273 мм)
•16K (195 × 270 мм)
•16K (184 × 260 мм)
•Бумага нестандартного формата Следующие форматы бумаги можно использовать в качестве нестандартных:
•Порядка 90-216 мм (3,6-8,5 дюйма) в ширину
•Порядка 148-297 мм (5,8-11,7 дюйма) в длину
Тип бумаги
•Обычная бумага (65-104 г/м2 (20-24 фунтов))
•Переработанная бумага (65-104 г/м2 (20-24 фунтов))
•Тонкая бумага (60-64 г/м2 (16 фунтов))
•Плотная бумага (105 г/м2 (28 фунтов))
Емкость бумаги
50 листов
(80 г/м2, 20 фунтов)
15

2. Загрузка бумаги
Нерекомендуемые типы бумаги
Не используйте бумагу следующих типов:
•Бумага, предназначенная для струйного принтера
•Специальная бумага под гель GelJet
•Имеющая перегибы, сложенная или мятая бумага
•Скрученная или изогнутая бумага
•Бумага со складками
•Влажная бумага
•Грязная или поврежденная бумага
•Бумага настолько сухая, что может служить источником статического электричества
•Бумага, на которой уже печатали, за исключением бумаги с предварительной печатью бланка.
Сбои особенно вероятны при использовании бумаги, на которой уже печатали устройством, отличным от лазерного принтера (например, монохромным или цветным копиром, струйными принтерами и т.д.)
•Специальная бумага, такая как термобумага и копировальная бумага
•Бумага, вес которой больше или меньше указанного предела
•Бумага с окнами, отверстиями, перфорацией, вырезами и рельефными (выпуклыми) изображениями.
•Этикеточная самоклеющаяся бумага, на которой выступает клей или видна бумага-основа
•Бумага со скрепками и скобками
•При загрузке бумаги не прикасайтесь к ее поверхности.
•Даже соответствующая требованиям, но хранившаяся в неподобающих условиях бумага может приводить к нарушению подачи, ухудшению качества печати или неисправностям.
16
Область печати
Область печати
На следующей схеме изображена область бумаги, на которой можно печатать с помощью описываемого аппарата.
С помощью драйвера принтера
3
1
3
2
CHZ904
1.Область печати
2.Направление подачи
3.Около 4,2 мм (0,2 дюйм)
4.Около 4,2 мм (0,2 дюйм)
•Область печати может быть разной для разных форматов бумаги и настроек драйвера принтера.
17
2. Загрузка бумаги
Функция копира
3
1
3
2
CHZ904
1.Область печати
2.Направление подачи
3.Около 4 мм (0,2 дюйм)
4.Около 3 мм (0,1 дюйм)
• Область печати может быть разной для разных форматов бумаги.
18
![]()
Загрузка бумаги
Загрузка бумаги
Загрузите стопку бумаги для печати во входной лоток, расположенный с задней стороны аппарата.
•Загружая бумагу, проследите, чтобы были заданы должные формат и тип бумаги. При печати документа установите формат и тип бумаги с помощью драйвера принтера, чтобы установленные параметры можно было использовать при загрузке бумаги для печати.
1. Откройте крышку входного лотка и вытяните лоток.
2.Вытянув лоток, покачайте его взад и вперед и закрепите конец входного лотка на аппарате.
19

2.Загрузка бумаги
3.Пролистайте листы бумаги перед их загрузкой в лоток.
CBK254
4.Раздвиньте боковые направляющие бумаги, затем загрузите бумагу до упора печатной стороной вверх.
2
1
1
CHZ007
5. Отрегулируйте боковые направляющие бумаги по ширине бумаги.
CHZ008
20
Загрузка бумаги
6. Откройте переднюю крышку и вытяните удлинитель лотка.
Указание типа и формата бумаги с помощью приложения Smart Organizing Monitor
В настоящем разделе в качестве примера приведена процедура для ОС Windows 7. Процедуры для других ОС могут отличаться от описываемой.
Указание типа и формата бумаги
1.В меню [Пуск] выберите пункт [Все программы].
2.Выберите пункт [Smart Organizing Monitor for SP 100 Series].
3.Выберите пункт [Smart Organizing Monitor for SP 100 Series Status].
4.На вкладке [Статус] нажмите кнопку [Изменить…].
5.Выберите тип и формат бумаги и нажмите кнопку [OK].
6.Щелкните [Закр.].
Изменение нестандартного формата бумаги
1.В меню [Пуск] выберите пункт [Все программы].
2.Выберите пункт [Smart Organizing Monitor for SP 100 Series].
3.Выберите пункт [Smart Organizing Monitor for SP 100 Series Status].
4.На вкладке [Инструмент пользователя] нажмите кнопку [Конфигурация принтера].
5.На вкладке [Система] выберите вариант [мм] или [дюйм] в списке [Единица измерения:].
6.В поле [По горизонтали: (90-216 мм)] укажите ширину.
7.В поле [По вертикали: (148-297 мм)] укажите длину.
21

2.Загрузка бумаги
8.Щелкните [OK].
9.Щелкните [Закр.].
22
Размещение оригиналов
Размещение оригиналов
В этом разделе описаны типы оригиналов, которые можно установить, и порядок размещения оригиналов.
Сведения об оригиналах
Рекомендуемые форматы оригиналов
Стекло экспонирования
• До 216 мм (8,5 дюймов) в ширину, до 297 мм (11,7 дюймов) в длину
Область изображения, сканирование которой невозможно
Даже при правильном размещении оригиналов, со всех четырех сторон на них остаются участки, сканирование которых невозможно.
Поля при использовании стекла экспонирования
CHZ916
1.Около 4,1 мм (0,2 дюйм)
2.Около 3 мм (0,1 дюйм)
3.Около 4 мм (0,2 дюйм)
23
2. Загрузка бумаги
Размещение оригиналов на стекле экспонирования
•Не рамещайте оригиналы на стекле экспонирования до тех пор, пока жидкость для коррекции ошибок или тонер не высохнет полностью. В противном случае возможно появление пятен на стекле экспонирования, которые отпечатаются на копиях.
1.Поднимите крышку стекла экспонирования.
2.Установите оригинал на стекло экспонирования лицевой стороной вниз. Размещайте оригинал впритык к левому дальнему углу.
3.Опустите крышку стекла экспонирования.
Если крышку невозможно полностью опустить из-за использования плотных, сложенных или переплетенных оригиналов, нажмите на крышку.
24
 Loading…
-
�������
-
������
-
��������
-
��� ������ -
������� �������
-
����������
-
������ � �������
-
��� � �����
-
��� �������
-
Hi-Tech
-
���������� � ��������
-
��������, ����� �����
-
������� � ���
-
��������
-
������� ������
-
�����
-
������ � �������
-
������
-
��������� � �������
-
Email-��������� -
����� �����������
- ��� � ����� → �������� ������ → ������� �������
������������
- �������
- ����������

- Ricoh Aficio SP 100

����������� ������������
����: �������
������: PDF
- Ricoh SP 100 — [491 KB];
- Ricoh SP 100SU — [734 KB];
- Ricoh SP 100SF — [1170 KB].
����������� ������������ ������� �� ���������� ��������: ����������� � ��������, �������� ������,
������ ����������, ����������� ���������� (�� ��� ��������), ������������ � ������� ���������� (������ ���), �������� ����� (������ Ricoh SP 100SF), ��������� ���������� � ������� Smart Organizing Monitor, ����������� ������������ ��������, ���������� ��������� � ����������. ��� �� ������� ����������� ��� ������ �� �������, ������� ����� ���������� � �������� ������������ ���������� ������� �� ��������� ��������� � ���������� �����������.
������� PDF ��������� ����� � ������� �������� Google Chrome ��� ������� ��������������� ���� ������.
������� � ��������
����: �������
������: PDF
- Ricoh SP 100, SP 100SU, SP 100SF — [1.7
MB].
����� ����������� �������� ����������� ��������� � ��������������.
����������� �� �������� ���������
����: �������
������: PDF
- �������� ��������� Ricoh SP 101E — [593 ��].
�������� ������� ��������� ����������
���������� ��������� (Ricoh SP 101E, � ���������) ������������ �������. ������ �������� �� ���������� �����������.
ricohprinters.ru — ���� ��� ����� ������ ���� ���������� ��� �� ���������� ������, ��� � � ����� Ricoh.
http://www.youtube.com/watch?v=r9TPwOIHCIo
http://www.youtube.com/watch?v=17g5izFmN38
- ������� ��� Ricoh Aficio SP 100SU
��������� � �������������.