Автосервис Москва, Авиамоторная
Автосервис ЮВАО, ВАО — метро Авиамоторная:
Автосервис Серп и Молот | Автосервис Красноказарменная | Автосервис Лефортово
Ближайшие станции метро — Авиамоторная, Площадь Ильича, Шоссе Энтузиастов, Чкаловская, Бауманская, Семеновская. Ближайшие для подъезда улицы — третье транспортное кольцо (ТТК), проезд завода Серп и Молот, Лефортовский вал, Красноказарменная улица.
Автосервис Москва, Октябрьское поле
Автосервис СЗАО, САО — метро Октябрьское поле, станция Зорге МЦК (район Щукино, Хорошёво—Мнёвники)
Ближайшие станции метро — Октябрьское поле, Полежаевская. Станция Московского Центрального Кольца — Зорге. Ближайшие для подъезда улицы — Маршала Бирюзова, Берзарина, Народного ополчения, Зорге, Куусинена, Расплетина.
Автосервис Москва, Измайлово
Автосервис ВАО — метро Соколиная гора (район Измайлово)
Ближайшие станции метро — Соколиная гора, Партизанская, Измайлово, Шоссе Энтузиастов, Черкизовская. Ближайшие для подъезда улицы — Вернисажная, Шоссе Энтузиастов, проспект Будённого, Северо-Восточная хорда, Щербаковская улица, Большая Черкизовская улица.
Автосервис Москва, Щелковская
Автосервис ВАО — метро Щелковская (район Гольяново)
Ближайшие станции метро — Щелковская, Черкизовская, Бульвар Рокоссовского, Первомайская, Партизанская, Измайловская. Ближайшие для подъезда улицы — Щелковское шоссе, Амурская, Сиреневый бульвар, Монтажная улица, Байкальская улица, Открытое шоссе.
AUTO-TEXCENTER.RU
Франшиза автосервиса, Вакансии автосервиса
Ремонт (сервис) корейских автомобилей. Специализированный техцентр (автосервис) в Москве. Copyright © 2000-2023. Все права сохранены. Обращаем Ваше внимание на то, что данный сайт носит исключительно информационный характер и ни при каких условиях не является публичной офертой, определяемой положениями Статьи 437 (2) Гражданского кодекса Российской Федерации.
Компания «АвтоМиг» является НЕОФИЦИАЛЬНЫМ техническим центром по обслуживанию и ремонту автомобилей марок KIA и HYUNDAI. Никакого отношения ни к официальным представителям (дилерам), ни к самим производителям транспортных средств автосервис не имеет! Все упоминания торговых знаков (марок автомобилей) на данном сайте носят исключительно ИДЕНТИФИЦИРУЮЩИЙ характер (используются не в качестве средства индивидуализации), указывают, какие именно автомобили обслуживает техцентр (в соответствии со ст. 1474, 1487 Гражданского Кодекса РФ).
Посмотреть инструкция для Kia Soul EV (2016) бесплатно. Руководство относится к категории автомобили, 3 человек(а) дали ему среднюю оценку 9.2. Руководство доступно на следующих языках: английский. У вас есть вопрос о Kia Soul EV (2016) или вам нужна помощь? Задайте свой вопрос здесь
Не можете найти ответ на свой вопрос в руководстве? Вы можете найти ответ на свой вопрос ниже, в разделе часто задаваемых вопросов о Kia Soul EV (2016).
Как перевести мили в километры?
Где я могу узнать идентификационный номер транспортного средства Kia?
Что такое идентификационный номер транспортного средства (VIN)?
Когда транспортному средству Kia требуется техническое обслуживание?
Когда следует заменять тормозную жидкость на Kia?
В чем разница между топливом E10 и E5?
Одна или несколько дверей не открываются изнутри. Что мне делать?
Автомобильный радиоприемник не включается, что делать?
Инструкция Kia Soul EV (2016) доступно в русский?
Не нашли свой вопрос? Задайте свой вопрос здесь
![]()
О КОМПАНИИ Kia
Поздравляем вас с приобретением нового автомобиля Kia.
Являясь признанным в мире производителем автомобилей, известных своим высоким качеством и справедливой ценой, компания Kia Motors считает своим долгом предоставлять клиентам услуги на уровне выше их ожиданий и полностью удовлетворяющем их потребности.
В дилерской сети Kia вас ожидает “семейное” отношение, которое создает ощущение тепла, гостеприимства и доверия – ощущения, что за тобой ухаживают заботливые люди.
Вся информация, содержащаяся в этом руководстве пользователя, является точной на момент ее опубликования. Тем не менее, Kia оставляет за собой право в любое время вносить изменения, потому что таким образом реализуется наша политика непрерывного усовершенствования продукции.
Данное руководство относится ко всем моделям этого автомобиля и включает в себя описания и пояснения дополнительного и стандартного оборудования. В результате этого в руководстве могут встречаться материалы, которые не соответствуют вашей конкретной модели автомобиля Kia.
Наслаждайтесь вашим автомобилем и «семейной» заботой от Kia! 

 Предисловие
Спасибо за то, что вы выбрали автомобиль Kia.
В этом руководстве вы найдете сведения по эксплуатации, техническому обслуживанию и безопасности автомобиля. Оно также дополнено буклетом “Гарантийные обязательства и техническое обслуживание”, который содержит важную информацию по вопросам гарантийного обслуживания вашего автомобиля. Для обеспечения приятной и безопасной эксплуатации вашего нового автомобиля Kia настоятельно просит внимательно ознакомиться с этими материалами и выполнять приведенные рекомендации.
Kia предлагает Вам большое разнообразие вариантов исполнения, компонентов и комплектующих для различных моделей. Следовательно, оборудование, описанное в данном руководстве, наряду с иллюстрациями, может отличаться от комплектации Вашего автомобиля.
Информация и технические характеристики, приведенные в данном руководстве, были абсолютно точными на момент издания. Kia оставляет за собой право вносить изменения в технические характеристики или конструкцию в любое время без уведомления и каких-либо обязательств. Если у Вас возникают вопросы, всегда обращайтесь к авторизованному дилеру компании Kia.
Компания Kia заявляет о своем постоянном стремлении к тому, чтобы вы получали удовольствие от использования автомобиля Kia.
© 2013 Kia MOTORS Corp.
Все права защищены. Воспроизведение или перевод целого документа или какой-либо его части в любой форме, электронной или печатной, включая фотокопирование, запись или внесение в информационно-поисковую систему, запрещено без предварительного письменного разрешения компании Kia MOTORS.
Отпечатано в Корее.
i

|
Введение |
1 |
|||||
|
Знакомство с вашим автомобилем |
2 |
|||||
|
Системы безопасности автомобиля |
3 |
|||||
|
Характеристики автомобиля |
4 |
|||||
|
Управление автомобилем |
5 |
|||||
|
СОДЕРЖАНИЕ |
||||||
|
Действия в непредвиденных случаях |
6 |
|||||
|
Техническое обслуживание |
7 |
|||||
|
Технические характеристики & Информация для потребителя |
8 |
|||||
|
Приложение I |
9 |
|||||
|
Приложение II |
10 |
|||||
|
Предметный указатель |
I |
|||||
ii

Введение
|
Как пользоваться настоящим руководством . . 1-2 |
1 |
|
|
. . . . . . . . . . . . . . . . . . . . . .Требования к топливу |
1-3 |
• Автомобили с бензиновым двигателем. . . . . . . . . . 1-3
• Автомобили с дизельным двигателем. . . . . . . . . . . 1-6 Порядок обкатки автомобиля . . . . . . . . . . . . . . . 1-8

Введение
КАК ПОЛЬЗОВАТЬСЯ НАСТОЯЩИМ РУКОВОДСТВОМ
|
Мы хотим помочь Вам получить |
Общая |
структура |
руководства |
||||||||||||
|
максимально |
возможное |
приведена в |
содержании. Неплохим |
||||||||||||
|
удовольствие |
от вождения |
данного |
местом |
для |
начала |
знакомства |
|||||||||
|
автомобиля. Настоящее Руководство |
является предметный указатель; в нем |
||||||||||||||
|
пользователя |
может |
оказать |
приведен |
в |
алфавитном |
порядке |
|||||||||
|
содействие |
в |
этом |
различными |
перечень |
всей |
информации, |
|||||||||
|
способами. |
Мы |
настойчиво |
содержащейся в руководстве. |
||||||||||||
|
рекомендуем |
прочитать |
руководство |
Разделы: Настоящий |
мануал |
имеет |
||||||||||
|
полностью. С целью уменьшения до |
восемь разделов и индекс. В начале |
||||||||||||||
|
минимума вероятности гибели людей |
каждого |
раздела указано |
короткое |
||||||||||||
|
и травматизма |
следует |
обязательно |
содержание, так что заглянут в него, |
||||||||||||
|
прочитать |
разделы, |
отмеченные |
вы сразу можете узнать, находится ли |
||||||||||||
|
заголовками |
ОСТОРОЖНО |
и |
в нем информация, которая Вам |
||||||||||||
|
ВНИМАНИЕ, которые присутствуют во |
нужна. |
||||||||||||||
|
всем руководстве. |
|||||||||||||||
|
Иллюстрации |
дополняют словесные |
В данном |
руководстве |
находятся |
|||||||||||
|
описания, приведенные в настоящем |
|||||||||||||||
|
разнообразные |
сведения |
под |
|||||||||||||
|
руководстве, |
для |
того, |
чтобы |
||||||||||||
|
заголовками |
ОСТОРОЖНО, |
||||||||||||||
|
наилучшим |
образом |
показать, |
как |
||||||||||||
|
ВНИМАНИЕ и К СВЕДЕНИЮ. Они |
|||||||||||||||
|
получить удовольствие |
от |
данного |
|||||||||||||
|
были |
подготовлены |
с |
целью |
||||||||||||
|
автомобиля. |
Прочтя |
данное |
|||||||||||||
|
повышения |
уровня |
личной |
|||||||||||||
|
руководство, |
владелец |
автомобиля |
|||||||||||||
|
безопасности владельца автомобиля. |
|||||||||||||||
|
ознакомится |
с |
его |
характерными |
||||||||||||
|
Необходимо |
внимательно |
прочитать |
|||||||||||||
|
особенностями, важной информацией |
|||||||||||||||
|
ВСЕ |
процедуры |
и |
рекомендации, |
||||||||||||
|
о безопасности и с советами по его |
|||||||||||||||
|
приведенные |
под |
заголовками |
|||||||||||||
|
эксплуатации в различных дорожных |
|||||||||||||||
|
ОСТОРОЖНО, |
ВНИМАНИЕ |
и К |
|||||||||||||
|
условиях. |
СВЕДЕНИЮ, и соблюдать их. |
 ОСТОРОЖНО
Обозначенная под заголовком ОСТОРОЖНО ситуация может привести к нанесению вреда, причинению тяжелых травм или к гибели людей в случае игнорирования данного предупреждения.
 ВНИМАНИЕ
Обозначенная под заголовком ВНИМАНИЕ ситуация может привести к нанесению вреда автомобилю при игнорировании данного предупреждения.
К СВЕДЕНИЮ
Информация, представленная под заголовком К СВЕДЕНИЮ, может представить интерес для владельца автомобиля или оказаться ему полезной.
1 2

ТРЕБОВАНИЯ К ТОПЛИВУ
Автомобили с бензиновым двигателем
Неэтилированный бензин
B Еврoпе
Для достижения оптимальных рабочих характеристик автомобиля мы рекомендуем вам применять неэтилированный бензин с октановым числом RON (по исследовательскому методу) 95/антидетонационным показателем AKI 91, или выше.
Вы можете использовать неэтилированный бензин с октановым числом RON от 91 до 94/показателем AKI от 87 до 90, однако это может привести к незначительному снижению рабочих характеристик автомобиля.
Bнe Еврoпы
Для достижения оптимальных рабочих характеристик автомобиля мы рекомендуем вам применять неэтилированный бензин с октановым числом RON (по исследовательскому методу) 91/антидетонационным показателем AKI 87, или выше.
Автомобиль разработан таким образом, чтобы достигать максимальных эксплуатационных характеристик при использовании НЕЭТИЛИРОВАННОГО БЕНЗИНА, что также приводит к минимизации выхлопа вредных веществ и загрязнения свечей зажигания.
 ВНИМАНИЕ
НИКОГДА НЕ ИСПОЛЬЗУЙТЕ ЭТИЛИРОВАННОЕ ТОПЛИВО. Использование этилированного топлива наносит ущерб каталитическому нейт— рализатору и приведет к повреждению кислородного датчика системы управления двигателя, негативно сказавшись на контроле выброса вредных веществ.
Никогда не добавляйте какие— либо присадки для очистки топливной системы в топливо за исключением тех, которые были рекомендованы производителем автомобиля. (Рекомендуем обратиться к уполномоченному дилеру Kia.)
Введение
 ОСТОРОЖНО
•Не выполняйте дозаправку после того как сопло автоматически закрылось.
•Всегда убеждайтесь в том, что крышка топливозаливной горловины надежно закрыта во избежание пролива топлива во время дорожно-транспортного происшествия.
1 3

Введение
Этилированный бензин (при наличии)
В исполнении для некоторых стран автомобили этой модели рассчитаны на использование этилированного бензина. Если планируется использовать этилированное топливо, рекомендуем обратиться к уполномоченному дилеру Kia.
Октановые числа этилированного и неэтилированного бензина одинаковые.
Бензин, содержащий этиловый и метиловый спирт
Бензоспирт, смесь, состоящая из бензина и этилового спирта (также известного под названием пищевой спирт), и бензин или бензоспирт с содержанием метилового спирта (также известного под названием древесный спирт) продаются на рынке одновременно с этилированным или неэтилированным бензином или вместо них.
Не допускается использование бензоспирта, содержащего более 10% этилового спирта, и использование бензина или бензоспирта, содержащего какую-либо долю метилового спирта. Все эти виды топлива могут вызвать проблемы при управлении автомобилем и привести к повреждению топливной системы.
Прекратите использовать бензоспирт любого типа при возникновении проблем при управлении автомобилем.
Повреждение автомобиля или проблемы при управлении им могут не покрываться гарантией производителя в случае, если они вызваны использованием следующих видов топлива:
1.Бензоспирт, содержание этилового спирта в котором превышает 10%.
2.Бензин или бензоспирт, содержащие метиловый спирт.
3.Этилированное топливо или этилированный бензин.
 ВНИМАНИЕ
Никогда не используйте бензоспирт, содержащий метиловый спирт. Прекратите использовать любой продукт типа бензоспирта, который негативно сказывается на управлении автомобилем.
1 4

Введение
Использование метилтербутилэфира (MTBE)
Не рекомендуется использовать в данном автомобиле топлива, объемная доля метилтербутилэфира (MTBE) в которых превышает 15,0% (весовая доля кислорода — 2,7%).
Использование топлив, объемная доля метилтербутилэфира (MTBE) в которых превышает 15,0% (весовая доля кислорода — 2,7%), может привести к снижению эксплуатационных характеристик автомобиля и привести к образованию паровых пробок или проблем при запуске.
 ВНИМАНИЕ
Предоставленная произво— дителем ограниченная гарантия на новый автомобиль может не распространяться на повреждение топливной сис— темы и ухудшение эксплуатационных характе— ристик, которые появились в результате использования видов топлива, объемная доля метилтербутилэфира (MTBE) в которых превышает 15,0% (весовая доля кислорода — 2,7%).
Не используйте метиловый спирт
Для заправки данного автомобиля не следует использовать виды топлива с содержанием метанола (древесного спирта). Этот класс топлива может ухудшить эксплуатационные характеристики автомобиля и привести к повреждению деталей и агрегатов топливной системы.
|
Присадки к топливу |
||
|
Kia |
рекомендует |
использовать |
|
высококачественный |
бензин, |
отвечающий требованиям европейского топливного стандарта (EN228) или другим аналогичным требованиям.
Если у клиента, не использующего высококачественный бензин с присадками на регулярной основе, возникают проблемы с пуском двигателя или его перебоями, следует вливать в топливный бак одну бутылку присадки через каждые 15 000 км (для Европы) / 5 000 км (кроме Европы, Для России). Присадки можно приобрести у авторизованного дилера Kia. Там же можно получить рекомендации по их использованию. Не смешивайте разные присадки.
1 5

Введение
Эксплуатация автомобиля за рубежом
При поездке в другую страну на данном автомобиле следует обеспечить:
•соблюдение всех требований в отношении регистрации и страховки;
•определение наличия в продаже топлива необходимого качества.
Автомобили с дизельным двигателем
Дизельный двигатель должен работать только на имеющемся на рынке дизельном топливе, соответствующем стандарту EN 590 или аналогичному. (EN обозначает “Европейский стандарт”) Не используйте судовое дизельное топливо, печное топливо или неутвержденные топливные присадки, т.к. это повысит износ и вызовет повреждение двигателя и топливной системы. Применение неутвержденных марок топлива и/или присадок приведет к ограничению ваших гарантийных прав.
А автомобиле используется дизельное топливо с цетановым числом более 51. При наличии двух видов дизельного топлива используйте летнее или зимнее топливо в соответствии со следующими рекомендациями применительно к температуре окружающего воздуха.
•Выше -5°C (23°F) … Летнее дизельное топливо
•Ниже -5°C (23°F) … Зимнее дизельное топливо
Внимательно следите за уровнем топлива в баке: Остановка двигателя из-за отсутствия топлива в баке обязательно потребует полной прочистки магистралей для последующего запуска.
 ВНИМАНИЕ
Не допускайте попадания бензина или воды в топливный бак. В результате потребуется слив топлива из бака и удаление его из магистралей для исключения засорения насоса высокого давления и повреждения двигателя.
1 6

 ВНИМАНИЕ — Дизельное топливо
(при наличии c DPF)
Для автомобилей с дизельным двигателем, оборудованным системой DPF, рекомендуется использовать соответст— вующее стандартам автомобильное дизельное топливо. Если использовать дизельное топливо с высоким содержанием серы (серы более 50 промилле) и присадки, не соответствующие техническим условиям, возможно повреждение системы DPF и выделение белого дыма.
Биодизель
В вашем транспортном средстве могут использоваться поставляемые коммерческим путем смеси дизельного топлива с содержанием биологического дизельного топлива, обычно называемого «B7 Diesel», не выше 7 %, если биологическое дизельное топливо соответствует EN 14214 или аналогичным нормам. (EN означает «Европейская норма»). Использование биологического топлива, в котором концентрация добавок из рапсового метилового эфира (RME), сложного метилового эфира жирной кислоты (FAME), метилового эфира растительного масла (VME) и т. д. превышает 7 %, или смеси дизельного топлива и биологического дизельного топлива с концентрацией больше 7 %, может вызвать повышенный износ или привести к повреждению двигателя и топливной системы.
Ремонт или замена изношенных или поврежденных деталей, если использовалось несоответствующее топливо, не будут производиться по гарантии изготовителя.
Введение
 ВНИМАНИЕ
•Никогда не используйте топливо (дизельное топливо, биологическое дизельное топливо B7 или любое другое), которое не соответствует последним стандартам.
•Никогда не используйте никакие топливные присадки или присадки-очистители, не рекомендуемые либо не одобренные изготовителем автомобиля.
1 7
![]()
Введение
ПОРЯДОК ОБКАТКИ АВТОМОБИЛЯ
Не требуется специального периода обкатки нового автомобиля. Соблюдение нескольких простых мер предосторожности в течение первых 1000 км (600 миль) пробега может позитивно сказаться на эксплуатационных характеристиках, экономичности и сроке службы автомобиля
•Не заставляйте двигатель работать на очень высоких оборотах.
•Во время движения поддерживайте частоту вращения двигателя (об/мин или обороты в минуту) в пределах от 2000 до 4000 об/мин.
•Не двигайтесь с одной скоростью (как высокой, так и низкой) в течение длительного времени. Изменение частоты вращения двигателя необходимо для его правильной обкатки.
•Избегайте резких торможений, за исключением экстренных случаев, с целью обеспечения правильного контакта тормозных колодок.
•Не следует буксировать прицеп в течение первых 2000 км (1200 миль) пробега автомобиля.
1 8

Знакомство с вашим автомобилем
Внешний вид . . . . . . . . . . . . . . . . . . . . . . . . . . . . . . 2-2 Общий вид салона . . . . . . . . . . . . . . . . . . . . . . . . . 2-4
Общий вид приборной панели . . . . . . . . . . . . . . 2-5 2 Моторный отсек . . . . . . . . . . . . . . . . . . . . . . . . . . . 2-6
Знакомство с вашим автомобилем
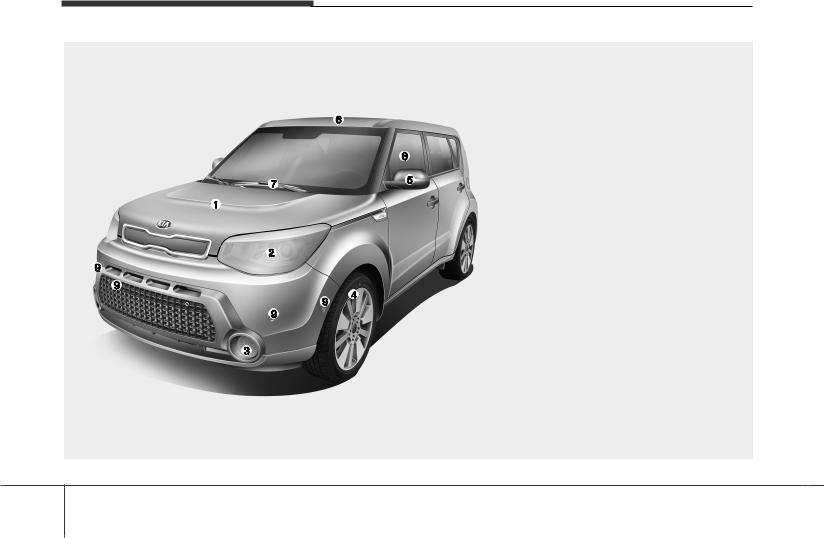
ВНЕШНИЙ ВИД
Вид спереди
|
1. |
Капот……………………………………………… |
4-32 |
|
|
2. |
Фара……………………………………. |
4-132,7-117 |
|
|
3. |
Противотуманная фара ……….. |
4-138,7-122 |
|
|
4. |
Колеса и шины……………………………….. |
7-87 |
|
|
5. |
Наружное зеркало заднего вида……… |
4-51 |
|
|
6. |
Панорамный люк в крыше ………………. |
4-38 |
|
|
7. |
Щетки очистителя ветрового стекла |
||
|
…………………………………………….. |
4-141,7-79 |
||
|
8. |
Стекла……………………………………………. |
4-27 |
|
|
9. |
Система помощи при парковке ……….. |
4-99 |
Реальная форма может отличаться от показанной на рисунке.
OPS013001L
2 2
Знакомство с вашим автомобилем
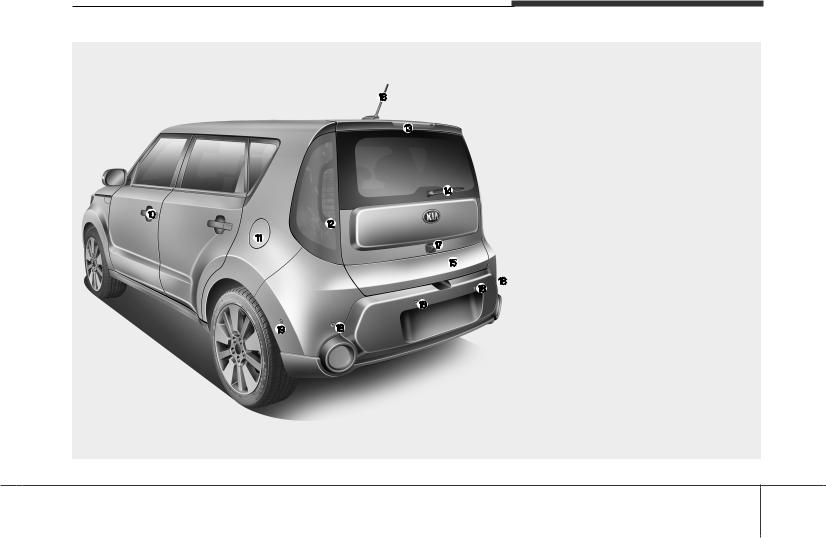
Вид сзади
|
10. Замки дверей ……………………………….. |
4-18 |
11. Крышка горловины топливного бака…4-34
|
12. |
Задний комбинированный |
|
|
фонарь………………………………………. |
7-130 |
|
|
13. |
Фонарь дополнительного сигнала |
|
|
торможения ………………………………… |
7-132 |
|
|
14. |
Щетка стеклоочистителя заднего |
|
|
стекла …………………………………. |
4-141,7-82 |
|
|
15. |
Крышка багажника………………………… |
4-24 |
|
16. |
Антенна ……………………………………… |
4-202 |
|
17. |
Камера заднего вида…………………… |
4-128 |
|
18. |
Система помощи при |
|
|
парковке ……………………………….. |
4-95,4-99 |
|
|
19. |
Интеллектуальная система помощи при |
|
|
парковке …………………………………….. |
4-105 |
Реальная форма может отличаться от показанной на рисунке.
OPS013002
2 3
Знакомство с вашим автомобилем
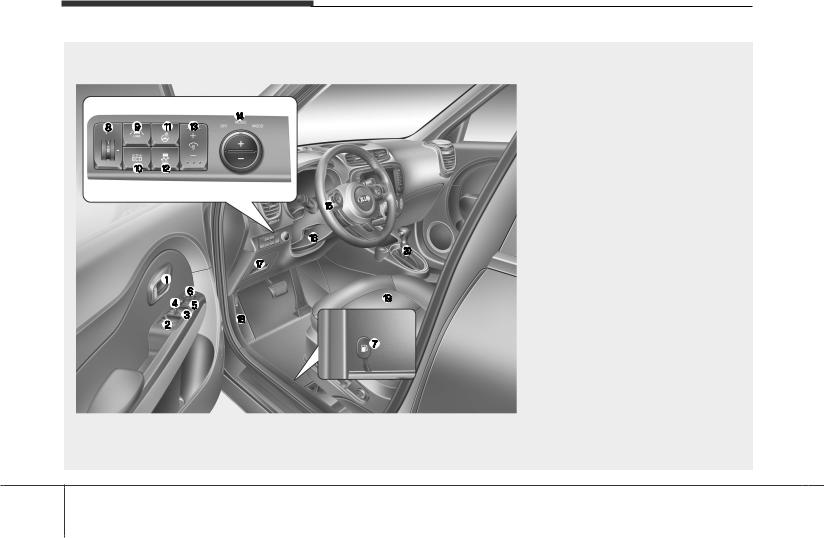
ОБЩИЙ ВИД САЛОНА
Реальная форма может отличаться от показанной на рисунке.
|
1. |
Внутренняя ручка двери………………… |
4-19 |
|
2. |
Переключатель |
|
|
электростеклоподъемника …………….. |
4-27 |
|
|
3. |
Переключатель блокировки |
|
|
электростеклоподъемников……………. |
4-30 |
|
|
4. |
Переключатель блокировки |
|
|
центрального замка ………………………. |
4-20 |
|
|
5. |
Управление наружными зеркалами |
|
|
заднего вида…………………………………. |
4-52 |
|
|
6. |
Складывание наружных зеркал |
|
|
заднего вида…………………………………. |
4-53 |
|
|
7. |
Рычаг открытия крышки топливного |
|
|
бака ……………………………………………… |
4-34 |
|
|
8. |
Корректор наклона фар……………….. |
4-140 |
9.Кнопка включения/выключения LDWS..5-65
10.Кнопка системы активной
|
экономии топлива ……………………….. |
5-63 |
|
|
Кнопка выключения ISG (остановки и |
||
|
запуска на холостом ходу) …………… |
5-57 |
|
|
11. Кнопка включения/выключения |
||
|
обогревателя рулевого колеса |
………4-45 |
|
|
12. |
Кнопка выключения ESC……………… |
5-37 |
|
13. |
Регулятор подсветки приборной |
|
|
панели ………………………………………… |
4-55 |
|
|
14. |
Динамик с интеллектуальной |
|
|
подсветкой ………………………………… |
4-204 |
|
|
15. |
Рулевое колесо …………………………… |
4-43 |
|
16. |
Рычаг наклона и выдвижения |
|
|
рулевого колеса…………………………… |
4-44 |
|
|
17. |
Внутрення панель |
|
|
предохранителей……………………….. |
7-103 |
|
|
18. |
Рычаг открытия капота ………………… |
4-32 |
|
19. |
Сиденье ……………………………………….. |
3-2 |
|
20. |
Рычаг переключения передач… |
5-18, 5-23 |
|
OPS013004L |
2 4
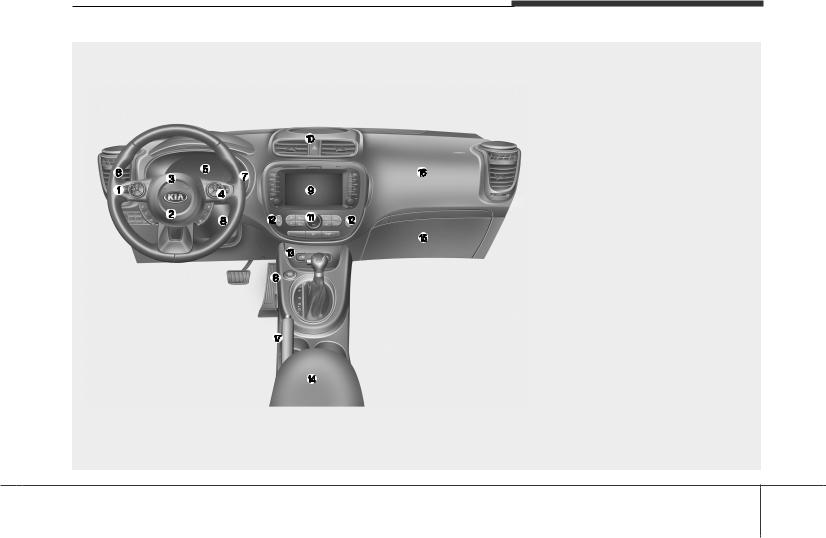
ОБЩИЙ ВИД ПРИБОРНОЙ ПАНЕЛИ
Реальная форма может отличаться от показанной на рисунке.
Знакомство с вашим автомобилем
|
1. |
Кнопки дистанционного |
|
|
управления аудиосистемой …………. |
4-203 |
|
|
2. |
Передняя подушка безопасности |
|
|
водителя ………………………………………. |
3-55 |
|
|
3. |
Звуковой сигнал……………………………. |
4-46 |
|
4. |
Кнопка круиз-контроля ………………….. |
5-46 |
|
5. |
Приборная панель ………………………… |
4-54 |
|
6. |
Рычаг управления световыми |
|
|
приборами ………………………………….. |
4-131 |
7.Рычаг управления стеклоочистителями и
|
стеклоомывателем ……………………… |
4-141 |
|
|
8. |
Замок зажигания или кнопка |
|
|
запуска и остановки двигателя… |
5-6, 5-11 |
|
|
9. |
Аудиосистема……………………………… |
4-202 |
10.Световая аварийная сигнализация…6-2
11.Система климат-контроля…4-154, 4-166
12.Обогреватель переднего сиденья /
|
вентиляция сиденья………… |
4-191, 4-193 |
|
|
13. |
Электрическая розетка………………. |
4-194 |
|
14. |
Отделение для хранения в |
|
|
центральной консоли ………………… |
4-185 |
|
|
15. |
Перчаточный ящик…………………….. |
4-185 |
|
16. |
Передняя подушка безопасности |
|
|
пассажира…………………………………… |
3-55 |
|
|
17. |
Стояночный тормоз …………………….. |
5-33 |
OPS013003N
2 5

Знакомство с вашим автомобилем
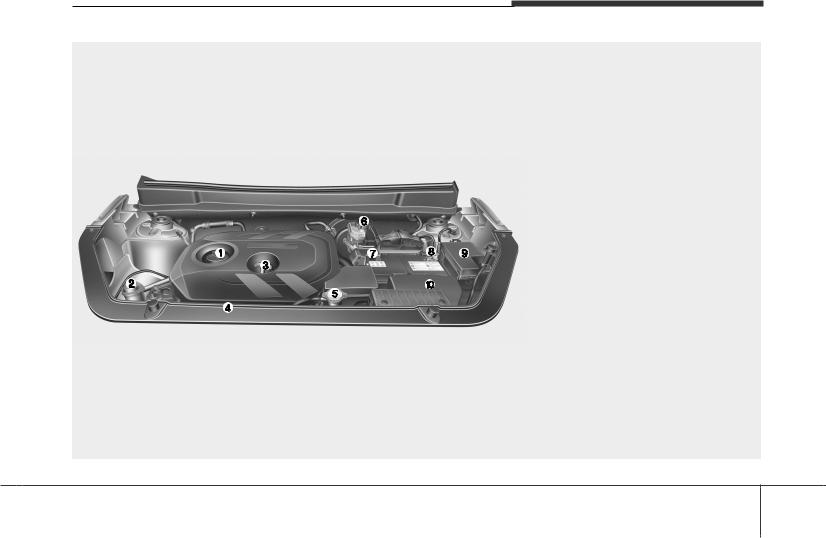
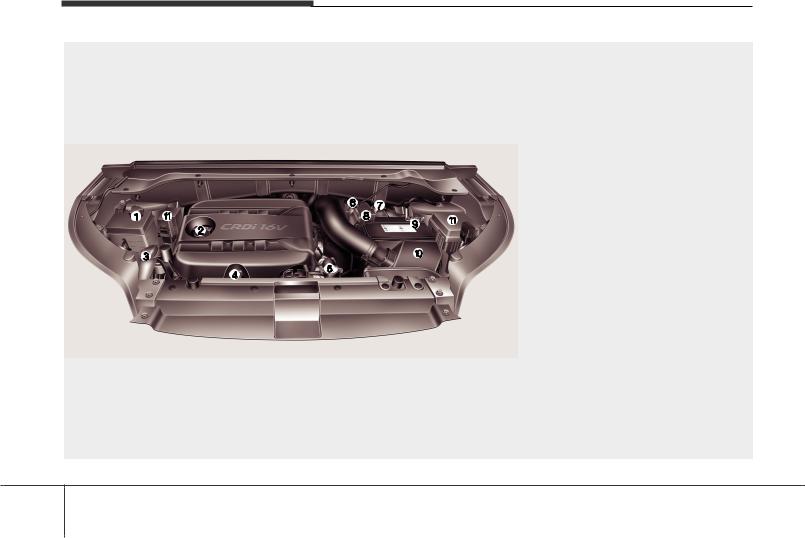
МОТОРНЫЙ ОТСЕК
■ Бензиновый двигатель (1,6 GDI)
■ Бензиновый двигатель (1,6 MPI)
|
1. |
Крышка маслозаливной горловины |
|
|
двигателя ………………………………….. |
7-64 |
|
|
2. |
Бачок для жидкости омывателя |
|
|
ветрового стекла ……………………….. |
7-72 |
|
|
3. |
Масляный щуп ………………………….. |
7-63 |
|
4. |
Бачок для охлаждающей жидкости |
|
|
двигателя ………………………………….. |
7-66 |
|
|
5. |
Крышка радиатора…………………….. |
7-68 |
|
6. |
Бачок для тормозной жидкости/ |
|
|
сцепления…………………………………. |
7-70 |
|
|
7. |
Положительная клемма |
|
|
аккумуляторной батареи ……………. |
7-83 |
|
|
8. |
Отрицательная клемма |
|
|
аккумуляторной батареи ……………. |
7-83 |
|
|
9. |
Блок предохранителей …………….. |
7-101 |
|
10. Воздушный фильтр………………….. |
7-75 |
Реальная форма может отличаться от показанной на рисунке.
OAM012003/OAM012103
2 6
Знакомство с вашим автомобилем
Бензиновый двигатель (2,0 MPI)
|
1. |
Крышка маслозаливной горловины |
|
|
двигателя ………………………………….. |
7-64 |
|
|
2. |
Бачок для жидкости омывателя |
|
|
ветрового стекла ……………………….. |
7-72 |
|
|
3. |
Масляный щуп ………………………….. |
7-63 |
|
4. |
Бачок для охлаждающей жидкости |
|
|
двигателя ………………………………….. |
7-66 |
|
|
5. |
Крышка радиатора…………………….. |
7-68 |
|
6. |
Бачок для тормозной жидкости/ |
|
|
сцепления…………………………………. |
7-70 |
|
|
7. |
Положительная клемма |
|
|
аккумуляторной батареи ……………. |
7-83 |
|
|
8. |
Отрицательная клемма |
|
|
аккумуляторной батареи ……………. |
7-83 |
|
|
9. |
Блок предохранителей …………….. |
7-101 |
|
10. Воздушный фильтр………………….. |
7-75 |
Реальная форма может отличаться от показанной на рисунке.
OAM072100L
2 7
Знакомство с вашим автомобилем
Дизельный двигатель (1,6L)
|
1. |
Бачок для охлаждающей жидкости |
|
|
двигателя ………………………………….. |
7-66 |
|
|
2. |
Крышка маслозаливной горловины |
|
|
двигателя ………………………………….. |
7-64 |
|
|
3. |
Бачок для жидкости омывателя |
|
|
ветрового стекла ……………………….. |
7-72 |
|
|
4. |
Масляный щуп ………………………….. |
7-63 |
|
5. |
Крышка радиатора…………………….. |
7-68 |
|
6. |
Бачок для тормозной жидкости/ |
|
|
сцепления…………………………………. |
7-70 |
|
|
7. |
Топливный фильтр…………………….. |
7-74 |
|
8. |
Положительная клемма |
|
|
аккумуляторной батареи ……………. |
7-83 |
|
|
9. |
Отрицательная клемма |
|
|
аккумуляторной батареи ……………. |
7-83 |
|
|
10. Воздушный фильтр………………….. |
7-75 |
|
|
11. Блок предохранителей …………… |
7-101 |
Реальная форма может отличаться от показанной на рисунке.
OPS073056
2 8

Системы безопасности автомобиля
Сиденье. . . . . . . . . . . . . . . . . . . . . . . . . . . . . . . . . . . 3-2
• Регулировка переднего сиденья — механическая . . . . . . . . . . . . . . . . . . . . . . . . . . . . . . . 3-5
• Регулировка переднего сиденья — электроприводом. . . . . . . . . . . . . . . . . . . . . . . . . . . . 3-7
• Подголовник (переднее сиденье) . . . . . . . . . . . . . . . 3-9
• Карман на спинке сиденья . . . . . . . . . . . . . . . . . . . 3-11
• Регулировка заднего сиденья . . . . . . . . . . . . . . . . . 3-12
• Подлокотник. . . . . . . . . . . . . . . . . . . . . . . . . . . . . . . . 3-15
• Подголовник (заднее сиденье). . . . . . . . . . . . . . . . . 3-15 Ремни безопасности . . . . . . . . . . . . . . . . . . . . . . . 3-17
• Система крепления ремней безопасности . . . . . . 3-17
• Ремни безопасности с преднатяжителем . . . . . . . 3-25
• Меры предосторожности при обращении с ремнем безопасности . . . . . . . . . . . . . . . . . . . . . . . 3-29
• Уход за ремнями безопасности . . . . . . . . . . . . . . . . 3-31 Детское сиденье . . . . . . . . . . . . . . . . . . . . . . . . . . 3-33
• Использование детского удерживающего устройства. . . . . . . . . . . . . . . . . . . . . . . . . . . . . . . . . 3-35
•Закрепление детского удерживающего устройства с использованием крепления
привязного ремня . . . . . . . . . . . . . . . . . . . . . . . . . . 3-39
•Закрепление детского удерживающего устройства при помощи систем ISOFIX и
Tether Anchorage . . . . . . . . . . . . . . . . . . . . . . . . . . . 3-40
Подушка безопасности — система пассивной безопасности . . . . . . . . . . . . . . . . . . . . . . . . . . . . 3-46
• Не допускается установка детского кресла на переднем пассажирском сиденье . . . . . . . . . . . . . 3-49
• Контрольная лампа и индикатор подушки безопасности . . . . . . . . . . . . . . . . . . . . . . . . . . . . . . . . 3-50 3
• Компоненты и функции системы SRS . . . . . . . . . 3-52
• Фронтальная подушка безопасности водителя и переднего пассажира . . . . . . . . . . . . . . . . . . . . . . . 3-55
• Боковая подушка безопасности . . . . . . . . . . . . . . . 3-61
• Шторка безопасности . . . . . . . . . . . . . . . . . . . . . . . . 3-62
• Условия, при которых раскрываются или не раскрываются подушки безопасности . . . 3-64
• Уход за системой srs . . . . . . . . . . . . . . . . . . . . . . . . . 3-69
• Дополнительные меры предосторожности . . . . . 3-70
• Предупреждающая этикетка подушек безопасности . . . . . . . . . . . . . . . . . . . . . . . . . . . . . . 3-71
![]()
Системы безопасности автомобиля
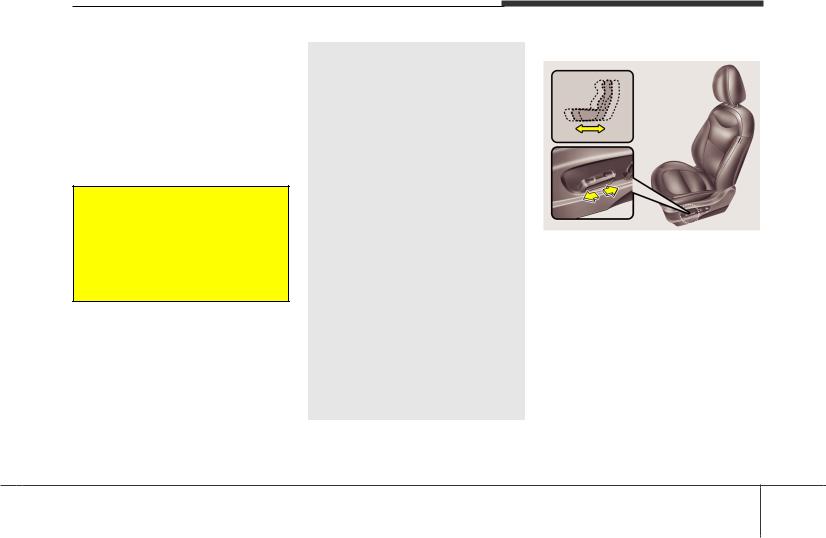
СИДЕНЬЕ
Механическая
Электроприводом
Переднее сиденье
(1)Вперед и назад
(2)Наклон спинки сиденья
(3)Высота положения подушки сиденья (сиденье водителя)
(4)Поясничная опора (сиденье водителя)
(5)Подголовник
Заднее сиденье
(6)Наклон спинки сиденья
(7)Подголовник
OPS033001L
3 2
 ОСТОРОЖНО
—Незакрепленные
предметы
Незакрепленные предметы в зоне ступней водителя могут помешать работе ножных педалей, что может привести к аварии. Запрещается помещать предметы по передние сиденья.
Системы безопасности автомобиля
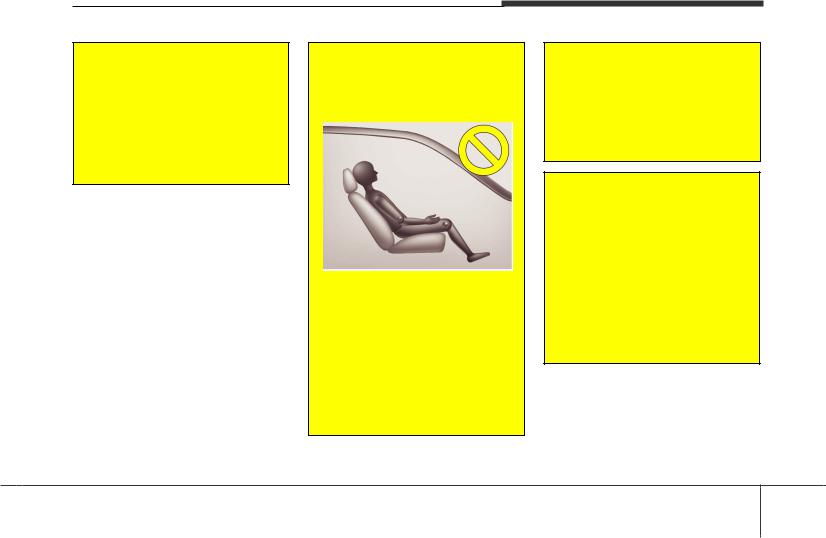
 ОСТОРОЖНО
—Ответственность водителя за пассажира переднего сиденья
1KMN3661
Вождение автомобиля с откинутой назад спинкой переднего сиденья может привести к серьезной или смертельной травме во время аварии. Если спинка переднего сиденья откинута назад, бедра пассажира могут выскользнуть изпод поясной части ремня безопасности и сильный удар придется на незащищенный живот.
(продолжение)
(продолжение)
Это может привести к тяжелой или смертельной травме. Водитель должен дать указания переднему пассажиру привести спинку сиденья в вертикальное положение во время движения автомобиля.
 ОСТОРОЖНО
Не используйте дополнительные подушки, уменьшающие трение между сидением и пассажиром. Бедра пассажира могут выскользнуть из-под ремня во время аварии или резкого торможения. Ремень безопасности может не сработать должным образом и это может привести к серьезным или смертельным повреждениям внутренних органов.
3 3

Системы безопасности автомобиля
 ОСТОРОЖНО
—Сиденье водителя
•Никогда не пытайтесь отрегулировать сиденье во время движения автомобиля. Это может привести к потере управления и созданию аварийной ситуации со смертельным исходом, серьезными травмами и повреждением имущества.
•Никому не позволяйте изменять нормальное положение спинки сиденья. Предметы, размещенные напротив спинки сиденья или другим способом, могут помешать правильной блокировке спинки сиденья, что может привести к тяжелой или смертельной травме в случае резкой остановки или столкновения.
(продолжение)
(продолжение)
•Перед началом движения всегда устанавливайте спинку сиденья в вертикальное положение, поясную часть ремня безопасности отрегулируйте таким образом, чтобы она плотно прилегала к телу и опустите на бедра. Эта наилучшее положение для Вашей защиты в случае аварии.
•Чтобы избежать возможной тяжелой травмы при контакте с подушкой безопасности, всегда садитесь как можно дальше от рулевого колеса, сохраняя при этом наиболее удобное положение для управления автомобилем. Рекомендуется, чтобы грудная клетка находилась на расстоянии не менее 250 мм (10 дюймов) от рулевого колеса.
 ОСТОРОЖНО
—Спинки задних сидений
•Спинка заднего сиденья должна быть прочно закрыта на защелку. В противном случае пассажиры и предметы багажа могут быть выброшены вперед и стать причиной тяжелой травмы или смерти в случае резкого торможения или столкновения.
•Багаж и другие предметы должны быть уложены горизонтально в багажной зоне. Крупные, тяжелые или объемные предметы должны быть закреплены.
Ни при каких обстоятельствах не допускается размещение груза, превышающего высоту спинки сидений. Несоблюдение этих мер предосторожности может привести к тяжелой травме или смерти в случае резкой остановки, столкновения или переворачивания автомобиля.
(продолжение)
3 4

(продолжение)
•Во время движения автомобиля запрещается нахождение пассажира в багажной зоне и на сложенных спинках сидений. Все пассажиры должны правильно сидеть на сиденьях и быть пристегнуты во время движения.
•После возврата спинки сиденья в вертикальное положение, убедитесь, что она надежно зафиксирована защелкой, для этого толкните ее вперед и назад.
 ОСТОРОЖНО
После регулировки сиденья всегда проверяйте, что оно надежно закреплено на месте, для этого попытайтесь переместить сиденье вперед или назад, не используя рычаг перемещения сиденья. Резкое или неожиданное движение сиденья водителя может стать причиной потери контроля над автомобилем и аварии.
Системы безопасности автомобиля
 ОСТОРОЖНО
•Будьте крайне внимательны, следите за тем, чтобы Ваши руки или другие предметы не попали в механизм сиденья во время его перемещения.
•Не оставляйте зажигалку на полу или на сиденье. При изменении положения сиденья газ может выйти из зажигалки и это может привести к возгоранию.
•При регулировке положения передних сидений следует соблюдать осторожность, если на задних сиденьях находятся люди.
Регулировка переднего сиденья — механическая
Вперед и назад
OPS033002
Для перемещения сиденья вперед или назад:
1.Потяните вверх рычаг регулировки продольного положения сиденья и удерживайте его.
2.Переместите сиденье на салазках в желаемое положение.
3.Отпустите рычаг и убедитесь, что сиденье заблокировано на месте.
3 5
Системы безопасности автомобиля
|
Перед |
началом |
движения Угол наклона спинки сиденья |
Высота подушки сиденья |
|
отрегулируйте положение |
сиденья и |
(при наличии) |
|
|
убедитесь, |
что сиденье |
надежно |
заблокировано на месте, для этого попытайтесь переместить его вперед и назад, не используя рычаг. Если сиденье перемещается, это означает, что оно неправильно заблокировано.
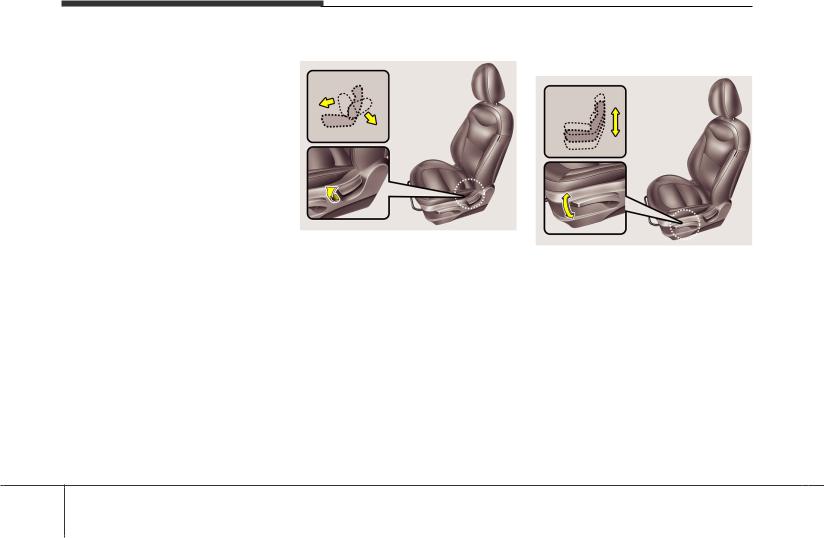
OPS033003
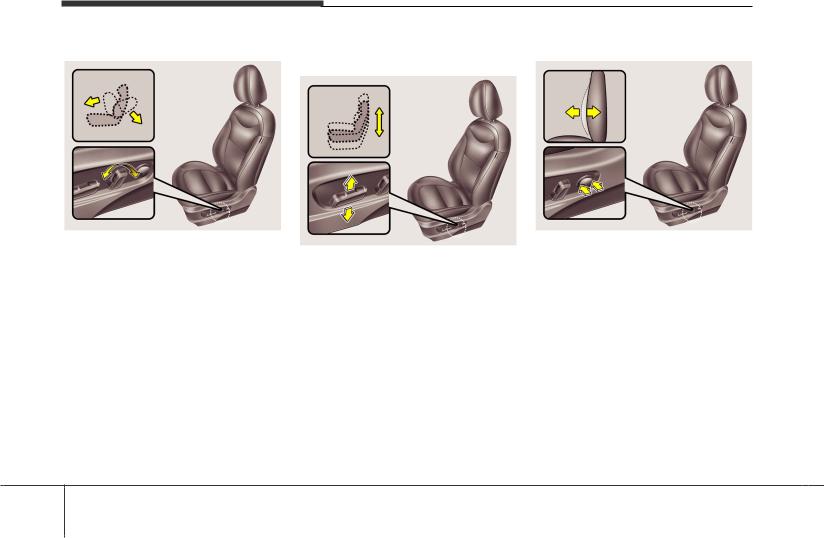
Для отклонения назад спинки сиденья:
1.Слегка наклонить вперед и поднять рычаг наклона сидения.
2.Осторожно наклонитесь назад и установите спинку сиденья в требуемое положение.
3.Отпустите рычаг и убедитесь в том, что спинка сиденья зафиксирована на своем месте. (Рычаг ДОЛЖЕН вернуться в исходное положение для того, чтобы зафиксировать спинку сиденья.)
OPS033004
Для регулировки высоты подушки сиденья потяните рычаг вверх или вниз.
•Для опускания подушки сиденья несколько раз потяните вниз рычаг.
•Для поднимания подушки сиденья несколько раз потяните вверх рычаг.
3 6
Регулировка переднего сиденья — электроприводом (при наличии)
Сиденье водителя регулируется переключателями на внешней стороне подушки. Перед началом движения отрегулируйте положение сиденья таким образом, чтобы была возможность легко управлять рулевым колесом, педалями и переключателями на панели приборов.
 ОСТОРОЖНО
Сиденье с электроприводом управляется при выключенном зажигании.
Поэтому никогда не следует оставлять детей в салоне автомобиля без присмотра.
Системы безопасности автомобиля
 ВНИМАНИЕ
•Сиденье с электроприводом приводится в движение электрическим двигателем. Прекратите его работу сразу после завершения регулировки. Чрезмерно длительная работа электропривода может повредить электрическое оборудование.
•Сиденье с электроприводом приводится в движение электрическим двигателем. Прекратите его работу сразу после завершения регулировки. Чрезмерно длительная работа электропривода может повредить электрическое оборудование.
•Не управляйте двумя или более переключателями сиденья с электроприводом одновременно. Это может привести к неисправности электродвигателя или другого электрического компонента сиденья.
Вперед и назад
OPS033005
1.Для перемещения сиденья в желаемое положение нажмите на переднюю или заднюю часть переключателя управления.
2.Отпустите переключатель как только добьетесь нужного положения.
3 7
Системы безопасности автомобиля
|
Угол наклона спинки сиденья |
Высота подушки сиденья |
Поясничная опора (при наличии) |
|
(при наличии) |
|
OPS033006 |
OPS033008 |
||||||||
|
1. Для выбора |
желаемого |
угла |
OPS033007 |
Поясничную |
опору |
можно |
|||
|
наклона спинки сиденья нажмите на |
1. Потяните |
переднюю |
часть |
отрегулировать, |
нажав |
на |
|||
|
переднюю |
или |
заднюю |
часть |
контрольного переключателя вверх, |
соответствующий |
переключатель, |
|||
|
переключателя управления. |
чтобы поднять или вниз, чтобы |
расположенный сбоку сиденья. |
|||||||
|
2. Отпустите |
переключатель |
как |
опустить переднюю часть подушки |
1. Нажмите |
на |
переднюю |
часть |
||
|
только |
добьетесь |
нужного |
сиденья. Потяните заднюю часть |
переключателя, |
чтобы |
поднять |
|||
|
положения. |
контрольного переключателя вверх, |
опору или на заднюю часть |
|||||||
|
чтобы поднять или вниз, чтобы |
переключателя, чтобы опустить. |
||||||||
|
опустить |
нижнюю часть |
подушки |
2. После |
достижения требуемого |
|||||
|
сиденья. |
положения отпустите переключатель. |
|
2. Отпустите переключатель как только |
|
|
добьетесь нужного положения. |
3 8
Подголовник (Переднее сиденье)
OPA039052
Сиденья водителя и переднего пассажира оснащены подголовниками для обеспечения безопасности и комфорта.
Подголовники не только обеспечивают комфорт водителю и пассажиру переднего сиденья, но и помогают защитить голову и шею в случае столкновения.
Системы безопасности автомобиля
 ОСТОРОЖНО
•Для максимальной эффективности в случае аварии подголовник следует отрегулировать таким образом, чтобы его средняя часть была на высоте центра тяжести головы пассажира. В целом, центр тяжести головы у большинства людей находится на уровне глаз. Кроме того, регулировка подголовника должна быть такой, чтобы он находился как можно ближе к голове. По этой причине не рекомендуется использовать подушку, которая удерживает тело на некотором расстоянии от спинки сиденья.
•Не управляйте автомобилем со снятыми подголовниками, поскольку в случае аварии возможны тяжелые травмы пассажиров.
При надлежащей регулировке подголовники могут обеспечить защиту от травм шеи.
•Не регулируйте положение подголовника сиденья водителя во время движения автомобиля.
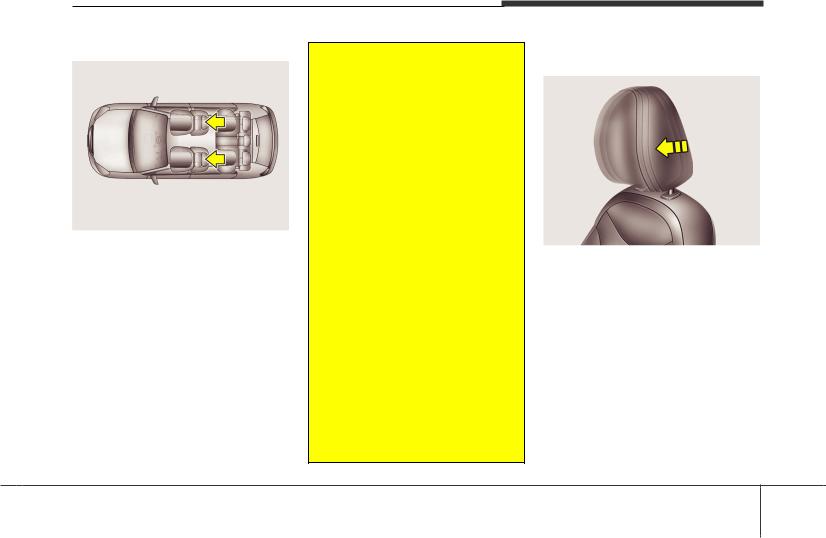
Регулировка вперед и назад (при наличии)
OPS033009
Положение подголовника с наклоном вперед можно отрегулировать, установив до 4 разных положений. Для этого следует потянуть подголовник вперед до фиксации в выбранном положении. Для установки подголовника в крайнее заднее положение необходимо потянуть его в крайнее заднее положение и отпустить. Отрегулируйте положение таким образом, чтобы обеспечить надлежащую опору для головы и шеи.
3 9
Системы безопасности автомобиля
|
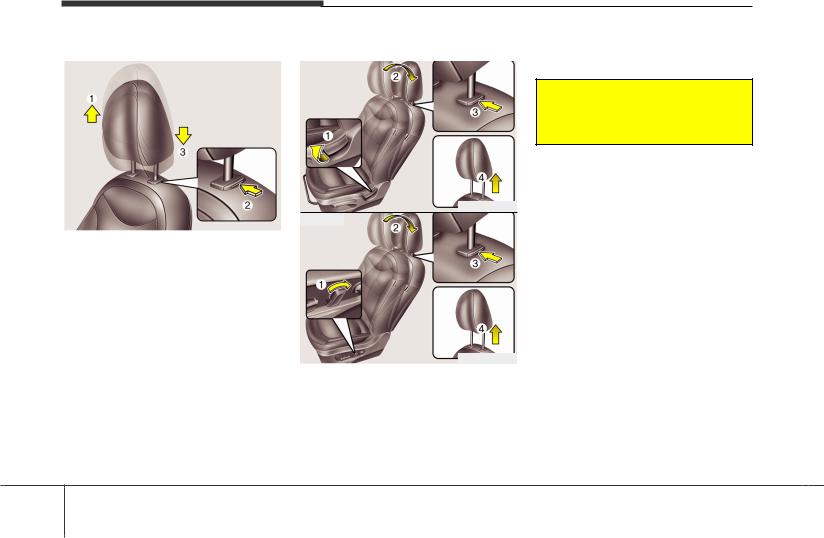
Регулировка по высоте вверх и вниз Снятие/установка |
3. Поднимая подголовник вверх (4), |
||
|
нажмите кнопку фиксатора (3). |
|||
|
■ Tип A |
|||
 ОСТОРОЖНО
Поездка на сиденье со снятым подголовником НЕДОПУСТИМА.
OPS033047L
■ Tип B
OPS033010
Чтобы поднять подголовник, потяните его вверх до желаемого положения (1). Чтобы опустить подголовник, нажмите и удерживайте кнопку разблокирования
(2) на опоре и опустите подголовник до желаемого положения (3).
OPS033049L
Снятие подголовника:
1.Наклоните спинку сиденья (2) с помощью рычага или регулятора (1) наклона спинки.
2.Поднимите подголовник, насколько это возможно.
3 10
|
Системы безопасности автомобиля |
|||||
|
Карман на спинке сиденья |
|||||
|
■ Tип A |
|||||
|
ОСТОРОЖНО |
(при наличии) |
||||
|
После установки и регулировки |
|||||
|
убедитесь, что |
подголовник |
||||
|
зафиксирован в |
требуемом |
||||
|
положении. |
|||||
OPS033048L
■ Tип B
OPS033050L
Установка подголовника:
1.Вставьте стойки подголовника (2) в отверстия, нажав кнопку фиксатора
(1).
2.Наклоните спинку сиденья (4) с помощью рычага или регулятора (3) наклона спинки.
3.Отрегулируйте высоту подголовника.
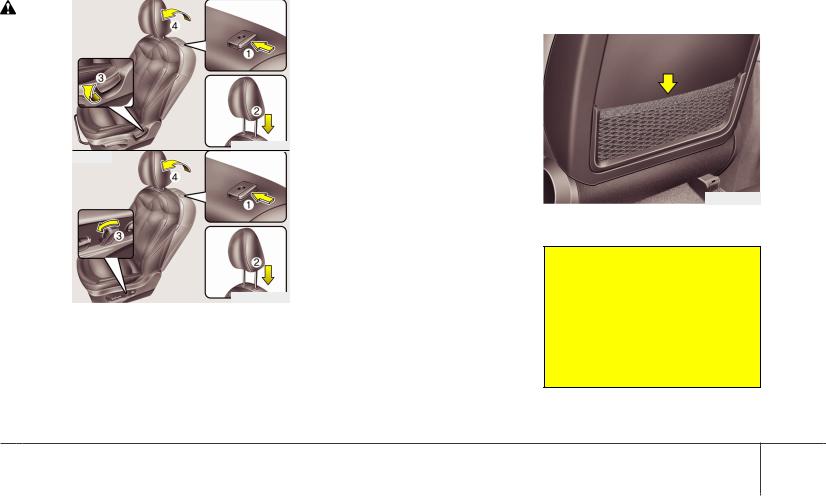
ORP032013
На спинке переднего сиденья пассажира предусмотрен карман.
 ОСТОРОЖНО
—Карманы на спинках сидений
Не кладите в карманы на спинках сидений тяжелые или острые предметы. Во время ДТП они могут выпасть из кармана и травмировать водителя или пассажиров.
3 11
![]()
Системы безопасности автомобиля
Регулировка заднего сиденья
Складывание заднего сиденья
Спинки задних сидений могут быть сложены для упрощения перевозки длинномерных предметов или для увеличения объема багажного отделения автомобиля.
 ОСТОРОЖНО
Складывающиеся спинки задних сидений предназначены для того, чтобы в автомобиле можно было перевозить более длинные предметы, чем те, которые помещаются в багажное отделение. Во время движения автомобиля никогда не позволяйте пассажирам садиться на верхнюю часть спинки, когда она находится в сложенном состоянии, поскольку это неправильное положение для сидения, и в таком случае нельзя пристегнуться ремнями бе— зопасности.
(продолжение)
(продолжение)
Это может привести к получению серьезных травм или к гибели людей в случае дорожнотранспортного происшествия или внезапной остановки автомобиля. Предметы, которые перевозятся в автомобиле со сложенной спинкой заднего сиденья, не должны выступать выше верхней кромки передних сидений. В противном случае груз может переместиться вперед и привести в получению травм или повреждений при внезапной остановке ав— томобиля.
OPS033017
OPS033015
Процедура складывания спинки заднего сиденья:
1.Вставьте пряжку ремня безопасности заднего сиденья в карман между спинкой и подушкой заднего сиденья, а сам ремень — в направляющий кожух для предотвращения его повреждения.
3 12

Системы безопасности автомобиля
2.Установите спинку переднего сиденья в вертикальное положение и, при необходимости, сдвиньте переднее сиденье вперед.
3.Опустите подголовники задних сидений в крайнее нижнее положение.
OPS033018L
4. Потяните рычаг отклонения спинки сидения и наклоните спинку сидения вперед. Возвращая спинку сиденья в вертикальное положение, убедитесь, что она зафиксирована, перемещая верхнюю часть спинки сиденья.
5. Для использования заднего сиденья необходимо потянуть за рычаг отклонения и поднять и потянуть спинку сиденья назад. Тяните за спинку сиденья до щелчка. Убедитесь, что сиденье зафиксировано на месте.
6. Верните ремень безопасности заднего сиденья в правильное положение.
 ОСТОРОЖНО
—Возвращение спинки сиденья в вертикальное положение
При возвращении спинки сиденья в вертикальное положение удерживайте ее и перемещайте медленно. Если не удерживать спинку сиденья при ее возврате в исходное положение, она может резко переместиться вперед, приведя к получению случайной травмы человеком, которому она нанесет удар.
3 13

Системы безопасности автомобиля
 ВНИМАНИЕ
—Повреждение пряжек ремней безопасности задних сидений
При складывании спинки заднего сиденья или размещения багажа на его подушке вставьте пряжку в карман между спинкой и подушкой заднего сиденья. Это может предотвратить повреждение пряжки спинкой заднего сиденья или багажом.
 ВНИМАНИЕ
—Ремни безопасности заднего сиденья
При возвращении спинок задних сидений в вертикальное положение не забудьте вернуть ремни безопасности задних сидений в исходное положение. Размещение ремней безопас— ности внутри направляющих поможет предотвратить защемление ремня за сиденьем или под ним.
 ОСТОРОЖНО — Багаж
Необходимо всегда фиксировать положение багажа для предотвращения его резкого перемещения по автомобилю при столкновении, что может вызвать нанесение травм людям, находящимся в транспортном средстве. Особую осторожность следует соблюдать в отношении предметов, расположенных на задних сиденьях, поскольку они могут ударить людей, находящихся на передних сиденьях, при лобовом столкновении.
 ОСТОРОЖНО
— Погрузка багажа
При погрузке или выгрузке багажа всегда убедитесь в том, что двигатель выключен, селектор коробки передач находится в положении Р (Парковка), и автомобиль зафиксирован стояночным тормозом. Если этого не сделать и случайно перевести селектор коробки передач в любое другое положение, можно привести автомобиль в движение.
3 14

Системы безопасности автомобиля
|
Подлокотник (при наличии) |
Подголовник (Заднее сиденье) |
OPS033032
Для использования подлокотника потяните его вперед в направлении от спинки сиденья.
*
* при наличии
OPA039053/Q
Задние сидения оборудованы подголовниками на всех позициях посадки пассажиров для их безопасности и комфорта.
Подголовники не только служат для удобства пассажиров, но и помогают обеспечить защиту головы и шеи в случае столкновения.
 ОСТОРОЖНО
•Для максимальной эффективности в случае аварии подголовник должен быть отрегулирован таким образом, чтобы его середина располагалась на той же высоте, что и центр тяжести головы пассажира. В общем случае, центр тяжести головы большинства людей располагается на уровне верха их глаз. Кроме того, необходимо отрегулировать подголовник так, чтобы он находился как можно ближе к голове. По этой причине использование подушки, которая удерживает тело в отдалении от спинки сидения, не рекомендуется.
(продолжение)
3 15

Системы безопасности автомобиля
(продолжение)
•Запрещается пользоваться автомобилем со снятыми подголовниками. В случае аварии возможно тяжелое травмирование водителя или пассажира. Подголовники могут предотвратить получение серьезной травмы шеи при правильной их установке.
•Если на задних сиденьях нет пассажиров, подголовники следует опустить в самое нижнее положение. Подголовником заднего сиденья может ограничиваться видимость задней зоны.
Регулировка по высоте вверх и вниз Демонтаж и монтаж
|
OPS033033L |
OPS033034L |
|||
|
Чтобы поднять подголовник, потяните |
Для снятия подголовника, |
извлеките |
||
|
его вверх до желаемого положения (1). |
его, нажав кнопку разблокирования (1) и |
|||
|
Чтобы опустить подголовник, нажмите |
одновременно вытягивая его вверх (2). |
|||
|
и удерживайте кнопку разблокирования |
Для установки подголовника вставьте |
|||
|
(2) на опоре и опустите подголовник до |
опоры подголовника (3) в отверстия, |
|||
|
желаемого положения (3). |
одновременно |
нажав |
кнопку |
|
|
разблокирования |
(1). |
Затем |
отрегулируйте его по высоте.
 ОСТОРОЖНО
Для обеспечения надлежащей защиты пассажира после регулировки убедитесь, что подголовник заблокирован в выбранном положении.
3 16

РЕМНИ БЕЗОПАСНОСТИ
Система крепления ремней безопасности
 ОСТОРОЖНО
•Для максимальной защиты, создаваемой системой, ремни безопасности следует использовать каждый раз, когда автомобиль находится в движении.
•Ремни безопасности наиболее эффективны, когда спинки сидений находятся в вертикальном положении.
•Дети в возрасте 12 лет и младше всегда должны быть надлежащим образом пристегнуты на заднем сиденье. Никогда не позволяйте детям ездить на переднем пассажирском сиденье. Если ребенка младше 12 лет необходимо перевозить на переднем сиденье, он должен быть правильно пристегнут, а сиденье должно быть отодвинуто как можно дальше.
(продолжение)
Системы безопасности автомобиля
(продолжение)
•Никогда не надевайте плечевой ремень, закрепляя его под рукой или за спиной. Неправильно расположенный плечевой ремень может стать причиной тяжелых травм в случае аварии. Плечевой ремень следует перекинуть через плечо и расположить поперек ключицы в средней части плеча.
•Недопустимо накидывать ремень безопасности поверх хрупких предметов. В случае резкого торможения или столкновения они могут быть повреждены ремнем.
•Избегайте скручивания ремней безопасности во время их надевания. Скрученный ремень безопасности не сможет обеспечить эффективную защиту. В случае столкновения он может даже врезаться в тело. Следите за тем, чтобы корд ремня не был скручен.
•Берегите корд ремня или крепление от повреждений. Если корд ремня или крепление повреждены, замените их.
 ОСТОРОЖНО
Ремни безопасности рассчитаны на костную структуру тела и должны быть расположены на уровне таза, грудной клетки и плеч, в зависимости от ситуации; следует избегать размещения поясной части ремня поперек области живота.
Для обеспечения надлежащей защиты ремни безопасности должны быть натянуты как можно сильнее при сохранении комфорта для пассажира.
Незатянутый ремень значительно снизит защиту пассажира. Следите за тем, чтобы корд ремня безопасности не был загрязнен лаками, маслами или химическими препаратами, в частности, кислотой аккумуляторной батареи.
(продолжение)
3 17

Системы безопасности автомобиля
(продолжение)
Ремни можно безопасно почистить с использованием слабого раствора мыла в воде. Если корд ремня изношен, загрязнен или поврежден, то ремень следует заменить. Важно заменить весь узел целиком после того, как ремень надевали во время сильного столкновения, даже если повреждение узла незаметно. Ленты ремней не должны быть перекручены во время надевания. Каждый узел ремня должен использоваться только одним пассажиром; опасно размещать ремень вокруг ребенка, сидящего на коленях пассажира.
 ОСТОРОЖНО
•Пользователю запрещается изменять или вносить дополнения в конструкцию, которые будут препятствовать работе устройства регулировки ремня по устранению провисания, и запрещается препятствовать регулировке узла ремня безопасности, направленной на устранение провисания ремня.
•Пристегивая ремень безопасности будьте внимательны, закрепляйте его в соответствующем замке, не спутайте с замком соседнего сидения. Это очень опасно и ремень безопасности может не защитить должным образом во время аварии.
(продолжение)
(продолжение)
•Не отстегивайте ремень безопасности и не пытайтесь застегнуть и расстегнуть ремень безопасности по время езды. Это может привести к потере управления и созданию аварийной ситуации со смертельным исходом, серьезными травмами и повреждением имущества.
•Пристегивая ремень безопасности убедитесь в том, что он не попадает на твердые предметы или предметы, которые могут легко разбиться.
•Убедитесь в том, что в замок ремня безопасности не попали никакие посторонние предметы. В противном случае ремень может не пристегнуться должным образом.
3 18

Системы безопасности автомобиля
|
Предупреждение о непристегнутых |
Если |
при |
непристегнутом |
ремне |
|||
|
ремнях безопасности |
безопасности |
водителя |
скорость |
||||
|
превысит 9 км/ч, постоянный режим |
|||||||
|
включения |
контрольный |
лампы |
|||||
|
сменится |
мигающим, который |
будет |
|||||
|
сохраняться до тех пор, пока скорость |
|||||||
|
не опустится ниже 6 км/ч. (при наличии) |
|||||||
|
Если |
водитель |
с непристегнутым |
|||||
|
ремнем |
безопасности |
превысит |
|||||
|
скорость 20 км/ч, в течение 100 с |
|||||||
|
будет |
звучать |
предупредительный |
|||||
|
звуковой сигнал и будет мигать |
|||||||
|
контрольная лампа. (при наличии) |
OAM032161L
Контрольная лампа (1) ремня безопасности водителя
В качестве напоминания для водителя контрольная лампа ремня безопасности будет гореть в течение приблизительно 6 с при каждом включении зажигания, независимо от того, застегнут ремень или нет.
Если ремень безопасности водителя остается непристегнутым после включения зажигания, контрольная лампа ремня безопасности будет гореть до тех пор, пока ремень не будет пристегнут.
OPS033043L/Q
Контрольная лампа (2) ремня безопасности переднего пассажира (при наличии)
Независимо от того, пристегнут ремень безопасности пассажира на переднем сиденье или нет, при каждом включении зажигания в качестве напоминания включаются контрольные лампы ремня безопасности.
Если перед включением зажигания пассажир на переднем сиденье не пристегнулся ремнем безопасности, а также в случае отстегивания ремня после включения зажигания, контрольная лампа загорается и продолжает гореть до тех пор, пока ремень не будет пристегнут.
3 19

Системы безопасности автомобиля
Если при непристегнутом ремне безопасности водителя скорость превысит 9 км/ч, постоянный режим включения контрольный лампы сменится мигающим, который будет сохраняться до тех пор, пока скорость не опустится ниже 6 км/ч.
Если водитель с непристегнутым ремнем безопасности превысит скорость 20 км/ч, в течение 100 с будет звучать предупредительный звуковой сигнал и будет мигать контрольная лампа.
 ОСТОРОЖНО
Неправильная посадка во время движения неблагоприятно влияет на систему сигнализации ремня безопасности переднего пассажира. Важно, чтобы водитель проинструктировал пассажира о надлежащей посадке в соответствии с инструкциями, приведенным в данном руководстве.
К СВЕДЕНИЮ
•Сигнальная лампа ремня безопасности пассажира переднего сиденья находится в центре фронтальной панели.
•Несмотря на то, что сиденье пассажира переднего ряда свободно, сигнальная лампа ремня безопасности будет мигать или гореть в течение 6 секунд.
•Предупреждение о необходимости пристегнуть ремень безопасности для пассажирского сиденья переднего ряда могут срабатывать если на это место положен багаж.
OPS033044L
Контрольные лампы (3, 4, 5) ремней безопасности заднего ряда (при наличии)
Если при включенном зажигании и неработающем двигателе ремень безопасности заднего ряда окажется непристегнутым, загорится соответствующая контрольная лампа и будет гореть до тех пор, пока ремень не будет пристегнут.
И затем, сигнальная лампа ремней безопасности сидений заднего ряда будет гореть в течение 35 с, если случится что-то из перечисленного ниже:
—пуск двигателя при непристегнутом ремне безопасности заднего ряда.
—превышение скорости 9 км/ч при непристегнутом ремне безопасности заднего ряда.
3 20

Системы безопасности автомобиля
—отстегивание ремня безопасности при скорости ниже 20 км/ч.
Если ремни безопасности заднего ряда пристегиваются, сигнальная лампа сразу же гаснет.
При отстегивании ремня безопасности заднего ряда на скорости выше 20 км/ч загорится соответствующая контрольная лампа и в течение 35 с будет звучать предупредительный колокольчик.
Но если поясной/плечевой ремень безопасности заднего ряда сидений будет пристегнут и расстегнут дважды в течение 9 секунд после того, как ремень пристегнут, соответствующая сигнальная лампа ремня безопасности не будет работать.
Поясной/плечевой ремень безопасности
■ Передний пассажир
OLM039026
Регулировка высоты
Для максимального комфорта и безопасности Вы можете отрегулировать высоту точки крепления плечевого ремня, установив его в одном из 3 положений.
Высота отрегулированного ремня безопасности должна быть такой, чтобы он не находился слишком близко к шее. В противном случае не будет обеспечена наиболее эффективная защита. Плечевая часть ремня должна быть отрегулирована таким образом, чтобы ремень пересекал грудную клетку и плечо в его средней части ближе к двери, а не к шее.
Чтобы отрегулировать якорь крепления ремня безопасности, опустите или поднимите регулятор в соответствующее положение.
Чтобы поднять регулятор высоты, потяните его вверх (1). Чтобы опустить, потяните его вниз (3), одновременно нажав кнопку регулировки высоты (2).
Отпустите кнопку, чтобы зафиксировать якорь в выбранном положении. Попытайте сдвинуть регулятор высоты, чтобы убедиться, что он заблокирован в выбранном положении.
3 21
![]()
Системы безопасности автомобиля
 ОСТОРОЖНО
•Убедитесь, что якорь плечевого ремня заблокирован
ввыбранном положении на надлежащей высоте. Никогда не размещайте плечевой ремень поперек шеи или лица. Неправильное размещение ремней безопасности может привести к тяжелым травмам в случае аварии.
•Несоблюдение требования заменить ремни безопасности, которые могли быть повреждены в случае аварии, не позволит обеспечить защиту
вслучае другого столкновения и может привести к травме или смерти. Как можно скорее замените ремни безопасности, которые были задействованы во время аварии.
1
2
B180A01NF
Для закрепления ремня безопасности:
Для закрепления ремня безопасности вытяните его из натяжителя ремня и вставьте металлический язычок (1) в пряжку (2). При фиксации язычка в пряжке раздастся звук “щелчка”.
Ремень безопасности автоматически регулирует правильную длину только после того, как поясная часть ремня отрегулирована вручную таким образом, чтобы она плотно прилегала к бедрам. Если ремень вытягивать медленным, плавным движением, он удлинится и даст большую свободу движения. Однако в случае резкого торможения или столкновения ремень будет заблокирован на месте. Он также будет заблокирован, если пытаться вытягивать его слишком быстро.
К СВЕДЕНИЮ
Если невозможно вытянуть ремень безопасности из натяжителя, с силой вытяните его и отпустите. Тогда можно будет плавно вытянуть ремень.
3 22

Системы безопасности автомобиля
B200A01NF
 ОСТОРОЖНО
Вы должны размещать поясную часть ремня как можно ниже и плотнее вокруг бедер, но не вокруг талии. Если поясной ремень расположен слишком высоко на талии, это может увеличить риск травмы в случае столкновения. Обе руки не должны находиться под ремне или поверх него. Одна рука должна находиться под ремнем, а другая над ним, как показано на рисунке.
Никогда не надевайте ремень безопасности таким образом, чтобы рука со стороны двери была под ремнем.
A
B210A01NF
Чтобы свернуть ремень безопасности:
Ремень безопасности убирается путем нажатия на кнопку (A) на пряжке.
При нажатии ремень должен автоматически убраться в натяжитель. Если это не произойдет, проверьте ремень и убедитесь, что он не перекручен, затем повторите попытку.
Три точки прикрепления заднего центрального ремня
OPS033053L
Чтобы затянуть центральный ремень
1.Вставьте мини-язычок (A) в отверстие мини-пряжки (C) до «щелчка», указывающего на то, что защелка зафиксирована. Убедитесь, что ремень не перекручен.
3 23

Системы безопасности автомобиля
 ОСТОРОЖНО — Ремень безопасности центрального заднего сиденья
Не отстегивайте миниатюрный язычок и замок, даже если они не используются.
Если ремень отстегнут, то он может ударить пассажиров на заднем сиденье в случае столкновения или внезапной остановки.
OPS033054L
2.Вынуть плоское кольцо (В) и ввести его в открытый конец пряжки (D) при его защелкивании в закрытом положении. Убедитесь в том, что ремень на перекручен.
 ВНИМАНИЕ
При использовании ремня безопасности пассажирами, находящимися на заднем сиденье, необходимо использовать пряжку с маркировкой CENTER (Центральный).
О блокировке элементов в закрытой пряжке свидетельствует звуковой щелчок. Ремень сидения оснащен автоматической регулировкой надлежащей длины, вручную регулируется лишь длина поясничного ремня для достижения надлежащего положения в области бедер с тем, что при легком наклоне вперед ремень поддается соответственно движениям тела. При резкой остановке или при внезапном встряхивании произойдет автоматическая фиксация ремня в закрытом положении. Ремень также автоматически фиксируется, если происходит слишком резкий наклон тела.
 ОСТОРОЖНО
При использовании среднего заднего ремня безопасности необходимо вставить все металлические пластины в соответствующие пряжки. В противном случае увеличивается риск получения травм при аварии автомобиля.
3 24

Системы безопасности автомобиля
OPS033055L
Для снятия центрального ремня
1.Нажать на фасетку пряжки (D) и вынуть из нее плоское кольцо (В).
OPS033056L
2.Чтобы вернуть в исходное положение ремень безопасности центрального заднего кресла, вставьте пластинку с язычком или ключ или похожий жесткий предмет в отверстие (С). Потяните ремень вверх на стороне катушки (A), после чего дайте ремню автоматически втянуться.
Ремни безопасности с преднатяжителем (при наличии)
OXMA033101
Автомобиль оснащен преднатяжителями ремней безопасности водителя и пассажира на переднем сиденье (втягивающими преднатяжителями и EFD (устройством аварийной фиксации)).
Преднатяжители ремней безопасности могут сработать при достаточно серьезных фронтальных столкновениях, одновременно с подушками безопасности.
3 25

Системы безопасности автомобиля
|
В случае резкого торможения или |
Если |
система |
зарегистрирует |
|||||
|
слишком быстрого движения пассажира |
чрезмерное |
натяжение |
ремня |
|||||
|
вперед натяжитель ремня безопасности |
безопасности водителя или пассажира |
|||||||
|
блокируется. |
При |
определенных |
при |
срабатывании |
преднатяжителя, |
|||
|
фронтальных |
столкновениях |
ограничитель |
нагрузки |
внутри |
||||
|
преднатяжитель |
сработает и |
втянет |
втягивающего |
преднатяжителя |
||||
|
ремень безопасности |
для |
более |
частично |
снизит |
давление |
|||
|
плотного контакта с телом водителя или |
соответствующего |
ремня |
||||||
|
пассажира. |
безопасности. (при наличии) |
(1)Втягивающий преднатяжитель Втягивающий преднатяжитель предназначен для обеспечения плотного прилегания плечевого ремня к верхней части тела водителя или пассажира при определенных фронтальных столкновениях.
(2)EFD
(устройство аварийной фиксации) Устройство EFD предназначено для обеспечения плотного прилегания поясного ремня к нижней части тела водителя или пассажира при определенных фронтальных столкновениях. (при наличии)
К СВЕДЕНИЮ
Предварительный натяжитель активируется не только при фронтальном, но и при боковом ударе, если автомобиль оснащен боковой подушкой безопасности.
 ОСТОРОЖНО
Для вашей безопасности убедитесь в том, что лента ремня не ослаблена и не перекручена и всегда хорошо установлена на вашем сиденье.
OMD030051N-1
Система преднатяжителей ремней безопасности состоит из следующих основных элементов. Их расположение показано на иллюстрации:
1.Контрольная лампа неисправности подушек безопасности (SRS)
2.Преднатяжитель, расположенный на катушке ремня
3.Блок управления подушками безопасности (SRS)
4.Устройство аварийной фиксации (EFD)*
* : при наличии
3 26

 ОСТОРОЖНО
Для максимальной эффектив— ности работы ремней безо— пасности, оснащенных преднатяжителями:
1.Ремень безопасности должен работать в соответствии с требованиями и должен быть нормально отрегулирован. Ознакомьтесь со всей важной информацией и мерами безопасности, имеющими отношение к обеспечению безопасности людей, находящихся в автомобиле, — в том числе к ремням безо— пасности и подушкам безопасности, — которые приведены в данном руководстве.
2.Водитель и пассажиры должны всегда быть пристегнуты ремнями безопас— ности должным образом.
Системы безопасности автомобиля
К СВЕДЕНИЮ
•Срабатывания преднатяжителей ремней безопасности при аварии может сопровождаться громким шумом и появлением в салоне облачка тонкодисперсной пыли, которое может быть похоже на дым. Все это является нормальным следствием работы устройства и не несет в себе никакой опасности.
•Несмотря на свою безвредность, мелкодисперсная пыль может вызывать раздражение кожи; нежелательным является ее попадание в органы дыхания в большом количестве. После дорожнотранспортного происшествия, которое сопровождалось срабатыванием устройства дополнительного натяжения ремня во время столкновения, тщательно вымойте все открытые участки кожи.
(продолжение)
(продолжение)
•Поскольку датчик, который дает команду на раскрытие подушек безопасности, соединен с преднатяжи-телями ремней безопасности, лампа, сигнализирующая об отказе системы подушек безопасности SRS на приборной панели, будет гореть в течение около 6 секунд после включения зажигания (поворота ключа в замке зажигания в положение ON); после этого она должна погаснуть.
 ВНИМАНИЕ
Если преднатяжитель ремня безопасности работает неправильно, контрольная лампа неисправности подушек безопасности будет гореть даже при исправной подушке безопасности. Если контрольная лампа неисправности подушек безопасности не загорается при включении зажигания, остается включенной более примерно 6 с или горит во время движения автомобиля, рекомендуем обратиться к авторизованному дилеру Kia для проверки системы.
3 27

Системы безопасности автомобиля
 ОСТОРОЖНО
•Преднатяжители рассчитаны только на однократное срабатывание. После активации преднатяжитель ремня безопасности должен быть заменен. Все ремни безопасности любого типа, которые были задействованы во время столкновения, должны быть заменены.
•Механизмы узла преднатяжителя ремня безопасности становятся горячими во время срабатывания. Не касайтесь узлов преднатяжителей ремней безопасности в течение нескольких минут после их срабатывания.
•Не пытайтесь самостоятельно выполнить проверку или замену преднатяжителей ремней безопасности. Рекомендуем обратиться к авторизованному дилеру Kia для проверки системы.
(продолжение)
(продолжение)
•Не пытайтесь любыми способами выполнять обслуживание или ремонт системы преднатяжителя ремня безопасности.
•Ненадлежащее обращение с узлами преднатяжителей ремней безопасности и несоблюдение предупреждений в отношении ударов, изменения, проверки, замены, обслуживания или ремонта узлов преднатяжителем ремней безопасности может привести к ненадлежащей работе или непреднамеренной активации устройства и тяжелой травме.
•Всегда надевайте ремни безопасности во время вождения или поездки в автомобиле.
•Для утилизации автомобиля или преднатяжителя ремня безопасности рекомендуем обращаться к авторизованному дилеру Kia.
 ВНИМАНИЕ
При выполнении кузовных работ на передней части транспортного средства может быть повреждена система предварительного натяжения ремней безопасности. Поэтому рекомендуем обслуживать систему у официального дилера Kia.
3 28

Системы безопасности автомобиля
Меры предосторожности при обращении с ремнем безопасности
 ОСТОРОЖНО
Все пассажиры автомобиля всегда должны надевать ремни безопасности. Ремни безопасности и детские кресла снижают риск тяжелых или смертельных травм для всех пассажиров в случае столкновения или резкого торможения. Без ремней безопасности пассажиры могут слишком близко сместиться к сработавшей подушке безопасности, удариться о внутреннюю конструкцию или выпасть из автомобиля. Правильно надетые ремни безопасности значительно снижают эти риски.
Соблюдайте все предупреждения данного руководства о ремнях безопасности, подушках безопасности и сиденьях пассажиров, изложенные в этом руководстве.
Младенцы и маленькие дети
Вы должны соблюдать принятые в Вашей стране требования. Кресла для детей и/или младенцев должны быть правильно размещены и закреплены на заднем сиденье. Подробнее об этих креслах см. п. “Система безопасности для детей” в этом главе.
 ОСТОРОЖНО
Каждый пассажир, включая младенцев и детей, автомобиля всегда должен быть правильно пристегнут в автомобиле. Никогда не держите ребенка на руках или коленях во время поездки в автомобиле. Неконтролируемые силы, возникающие во время столкновения, вырвут ребенка из Ваших рук и ударят его отбросят его внутрь салона автомобиля. Всегда используйте правильную систему безопасности для детей, в зависимости от роста и веса ребенка.
К СВЕДЕНИЮ
Маленькие дети лучше всего защищены от травмы в случае аварии, когда они правильно пристегнуты на заднем сиденье в специальном кресле, которое соответствует стандартам безопасности Вашей страны. Перед покупкой любой системы безопасности для детей убедитесь, что на ней имеется маркировка, удостоверяющая, что она соответствует стандартам безопасности Вашей страны. Кресло должно соответствовать росту и весу ребенка. Проверьте эту информацию на маркировке кресла для детей. См. пункт «Система безопасности для детей» в этом главе.
3 29

Системы безопасности автомобиля
Дети старшего возраста
Дети, которые слишком велики для размещения в кресле для детей, всегда должны размещаться на заднем сиденье и использовать доступные поясничные/плечевые ремни. Поясную часть ремня следует защелкнуть и затянуть таким образом, чтобы она плотно прилегала к бедрам, и опустить как можно ниже. Периодически проверяйте ремень. Непоседливость ребенка может привести к изменению положения ремня. При аварии наибольшая защита детей обеспечивается в том случае, когда они правильно пристегнуты в специальном кресле для детей на заднем сиденье.
Если ребенок более старшего возраста (старше 12 лет) должен сиденье на переднем сиденье, то он должен быть надежно пристегнут поясным/плечевым ремнем безопасности, а сиденье должно быть отодвинуто в крайнее заднее положение. Дети младше 12 лет должны быть надежно пристегнуты на заднем сиденье. НИКОГДА не сажайте ребенка в возрасте 12 лет и младше на переднее сиденье. НИКОГДА не размещайте кресло для ребенка задней частью вперед на переднем сиденье автомобиля.
Если плечевая часть ремня слегка касается шеи или лица ребенка, попробуйте посадить его ближе к центру автомобиля. Если плечевая часть ремня продолжает касаться лица или шеи ребенка, следует вернуть его в кресло для детей.
 ОСТОРОЖНО
—Плечевые ремни на маленьких детях
•Никогда не допускайте контакта плечевого ремня с шеей или лицом ребенка во время движения автомобиля.
•Если ремни безопасности неправильно надеты и отрегулированы на ребенке, существует риск его смерти или тяжелой травмы.
Беременные женщины
Беременным женщинам рекомендуется использовать ремень безопасности для уменьшения вероятности травмы в случае аварии. При использовании ремня безопасности поясную часть следует разместить как можно ниже и затянуть как можно плотнее на бедрах, но не поперек живота. Специальные рекомендации можно получить у врача.
 ОСТОРОЖНО
— Беременные женщины
Беременные женщины никогда не должны размещать поясную часть ремня безопасности над областью живота, в которой расположен плод, или выше живота, т. к. в во время столкновения ремень может нанести повреждения плоду.
3 30

Травмированный человек
При транспортировке травмированного человека на него следует надеть ремень безопасности.
При необходимости Вы должны получить рекомендации у врача.
Один ремень — для одного человека
Никогда не пытайтесь использовать один ремень для двоих человек (включая детей). Это может утяжелить травмы в случае аварии.
Не ложитесь на сиденье
Для снижения вероятности травмы в случае аварии и для обеспечения максимальной эффективности системы безопасности, все пассажиры должны сидеть во время движения автомобиля, а передние сиденья должны находиться в вертикальном положении. Ремень безопасности не может обеспечить надлежащую защиту, если человек лежит на заднем сиденье или переднее сиденье откинуто назад.
Системы безопасности автомобиля
 ОСТОРОЖНО
Движение с откинутым назад сиденьем увеличивает риск тяжелых или смертельных травм в случае столкновения или резкого торможения. Защита, обеспечиваемая системой безопасности автомобиля (ремни безопасности и подушки безопасности), значительно снижается, если сиденье откинуто назад. Для правильной работы ремни безопасности должны плотно прилегать к бедрам и груди.
Чем больше отклонено сиденье назад, тем выше вероятность того, что бедра пассажира выскользнут из-под поясной части ремня, а шея пассажира ударится о плечевую часть ремня, что приведет к серьезным травмам. Водители и пассажиры всегда должны сидеть, касаясь спиной сидений, правильно надев ремни и расположив спинки кресел вертикально.
Уход за ремнями безопасности
Запрещается разбирать систему ремней безопасности и вносить в нее изменения. Кроме того, необходимо соблюдать осторожность, чтобы не повредить ремни безопасности и крепежные приспособления петлями сидений, дверьми и другими способами.
 ОСТОРОЖНО
При возврате спинки заднего сиденья после того, как оно было сложено, следите за тем, чтобы не повредить корд ремня безопасности или пряжку. Убедитесь, что корд ремня или пряжка не защемлены в заднем сиденье.
Ремень безопасности с поврежденным кордом или пряжкой потеряют свою прочность и могут не сработать во время столкновения или резкого торможения, приведя к тяжелой травме. Если корд ремня или пряжка повреждены, их следует немедленно заменить.
3 31
 Loading…
-
Page 2
Kia, THE COMPANY Thank you for becoming the owner of a new Kia vehicle. As a global car manufacturer focused on building high-quality vehi- cles with exceptional value, Kia Motors is dedicated to providing you with a customer service experience that exceeds your expectations. -
Page 3
Thank you for choosing a Kia vehicle. The information and specifications provided in this manual were accurate at the time of printing. Kia reserves the right to When you require service, remember that your Kia dealer discontinue or change specifications or design at any time knows your vehicle best. -
Page 4: Table Of Contents
Introduction How to use this manual / Fuel requirements / Vehicle break-in process / Vehicle data collection and event data recorders Your vehicle at a glance Exterior overview / Interior overview / Instrument panel overview / Engine compartment Safety features of your vehicle Seats / Seat belts / Child restraint system / Air bag Features of your vehicle Keys / Door locks / Tailgate / Windows / Hood / Fuel filler lid / Panoramic sunroof / Steering wheel / Mirrors…
-
Page 5: Introduction
Introduction How to use this manual ……….1-2 Fuel requirements …………1-3 • Gasoline containing alcohol and methanol ….1-3 • Do not use methanol …………1-4 • Fuel Additives …………..1-4 Vehicle data collection and event data recorders ..1-6…
-
Page 6: How To Use This Manual
Introduction HOW TO USE THIS MANUAL We want to help you get the greatest The general layout of the manual is You will find various types of safety possible driving pleasure from your provided in the Table of Contents. instructions in this manual. These vehicle.
-
Page 7: Fuel Requirements
Introduction FUEL REQUIREMENTS Gasoline containing alcohol and Your new Kia vehicle is designed to WARNING — Refueling use only unleaded fuel having a methanol pump octane number ((R+M)/2) of • Do not «top off» after the noz- Gasohol, a mixture of gasoline and…
-
Page 8: Do Not Use Methanol
Manganese Tricarbonyl). Detergent Gasoline, which helps ble with your vehicle. Use of “E85” prevent deposit formation in the Kia does not recommend the use of may result in poor engine perform- engine. These gasolines will help the gasoline containing MMT.
-
Page 9
Introduction VEHICLE HANDLING VEHICLE BREAK-IN INSTRUCTIONS PROCESS Operation in foreign countries As with other vehicles of this type, No special break-in period is needed. If you are going to drive your vehicle failure to operate this vehicle correct- By following a few simple precautions in another country, be sure to: ly may result in loss of control, an for the first 600 miles (1,000 km) you… -
Page 10: Vehicle Data Collection And Event Data Recorders
Introduction VEHICLE DATA COLLECTION AND EVENT DATA RECORDERS This vehicle is equipped with an These data can help provide a bet- To read data recorded by an EDR, event data recorder (EDR). The ter understanding of the circum- special equipment is required, and stances in which crashes and access to the vehicle or the EDR is main purpose of an EDR is to…
-
Page 11: Your Vehicle At A Glance
Your vehicle at a glance Exterior overview ……2-2 Interior overview ……2-4 Instrument panel overview .
-
Page 12: Exterior Overview
Your vehicle at a glance EXTERIOR OVERVIEW ■ Front view 1. Hood ………….4-30 2. Head lamp ……..4-88, 7-78 3. Fog lamp ……..4-91, 7-81 4. Tire and wheel…….7-47, 8-4 5. Outside rearview mirror ……4-49 6. Panoramic sunroof……..4-35 7. Front windshield wiper blades ..4-92, 7-40 8.Windows ……….4-24 ❈…
-
Page 13
Your vehicle at a glance ■ Rear view 9. Door …………4-17 10. Fuel filler lid ……..4-32 11. Rear combination lamp…….7-83 12. Tail gate ……….4-22 13. High mounted stop lamp ….7-85 14. Rear window defroster……4-100 15. Antenna ……….4-143 16. Rearview camera……..4-86 ❈… -
Page 14: Interior Overview
Your vehicle at a glance INTERIOR OVERVIEW 1. Inside door handle ……..4-18 2. Power window switch ……4-24 3. Power window lock button…..4-28 4. Central door lock switch……4-19 5. Outside rearview mirror control…..4-50 6. Outside rearview mirror folding …..4-51 7. Fuel filler lid open lever ……4-32 8.
-
Page 15: Instrument Panel Overview
Your vehicle at a glance INSTRUMENT PANEL OVERVIEW 1. Audio remote control buttons….4-144 2. Driver’s front air bag ……3-52 3. Horn…………4-43 4. Cruise control button ……5-40 5. Instrument cluster ………4-52 6. Lighting control lever……4-88 7.Wiper and washer control lever …..4-92 8.
-
Page 16: Engine Compartment
Your vehicle at a glance ENGINE COMPARTMENT ■ ■ 1.6L GDI 1. Windshield washer fluid reservoir ..7-34 2. Engine oil filler cap ……7-27 3. Engine oil dipstick ……7-27 4. Engine coolant reservoir ….7-29 5. Radiator cap ……..7-31 6. Brake/clutch fluid reservoir ….7-32 7.
-
Page 17
Your vehicle at a glance ■ ■ 2.0L GDI 1. Windshield washer fluid reservoir ..7-34 2. Engine oil filler cap ……7-27 3. Engine oil dipstick ……7-27 4. Engine coolant reservoir ….7-29 5. Radiator cap ……..7-31 6. Brake/clutch fluid reservoir ….7-32 7. -
Page 18: Safety Features Of Your Vehicle
Safety features of your vehicle Seats ……..3-2 •…
-
Page 19
Safety features of your vehicle SEATS Front seat (1) Forward and backward (2) Seatback angle (3) Seat cushion height Manual seat (Driver’s seat) (4) Lumbar support (Driver’s seat) (5) Headrest Rear seats (6) Seatback folding Power seat (7) Headrest OPS033001N… -
Page 20
Safety features of your vehicle WARNING WARNING WARNING — Loose Driver — Driver’s seat objects responsibility for front seat • Never attempt to adjust the passenger Loose objects in the driver’s seat while the vehicle is mov- foot area could interfere with ing. -
Page 21
Safety features of your vehicle (Continued) (Continued) WARNING — Rear seat- • In order to avoid unnecessary • When resetting the seatback to backs and perhaps severe air bag the upright position, make sure • The rear seatback must be injuries, always sit as far back it is securely latched by push- securely latched. -
Page 22: Front Seat Adjustment — Manual
— Damaged Forward and backward seats If your vehicle has been in an accident, have system checked by an authorized Kia dealer. WARNING • Do not adjust the seat while wearing seat belts. Moving the seat cushion forward may OPS033003…
-
Page 23: Front Seat Adjustment — Power
Safety features of your vehicle Seat height (for driver’s seat) Front seat adjustment — power CAUTION (if equipped) • The power seat is driven by an The front seat can be adjusted by electric motor. Stop operating using the control switches located on once the adjustment is com- the outside of the seat cushion.
-
Page 24
Safety features of your vehicle Forward and backward Seatback angle Seat height (for driver’s seat) OPS033005 OPS033006 OPS033007 Push the control switch forward or Push the control switch forward or Pull the front portion of the control backward to move the seat to the backward to move the seatback to switch up to raise or press down to desired position. -
Page 25
Safety features of your vehicle Lumbar support (for driver’s seat) Headrest (for front seat) WARNING • For maximum effectiveness in case of an accident, the head- rest should be adjusted so the middle of the headrest is at the same height of the center of gravity of an occupant’s head. -
Page 26
Safety features of your vehicle OPS033009 OPS033010 OPS033011 Forward and rearward adjustment Adjusting the height up and down Removal and installation The headrest may be adjusted for- To raise the headrest, pull it up to the To remove the headrest, raise it as ward to 4 different positions by desired position (1). -
Page 27: Seatback Pocket
Safety features of your vehicle Seatback pocket Rear seat adjustment WARNING — Objects Folding the rear seat Objects carried on the folded The rear seatbacks can be folded to down seatback should not facilitate carrying long items or to extend higher than the top of increase the luggage capacity of the the front seatbacks.
-
Page 28
Safety features of your vehicle 2. Set the front seatback to the upright position and if necessary, slide the front seat forward. 3. Lower the rear headrests to the lowest position. OPS033017 OPS033018 4.Pull on the seatback folding lever, then fold the seat toward the front of the vehicle. -
Page 29
Safety features of your vehicle Headrest WARNING — WARNING — Uprighting Cargo loading seat Make sure the engine is off, the When you return the seatback automatic transaxle is in P (Park) or the manual transaxle is in R to its upright position, hold the (Reverse) or 1st, and the parking seatback and return it slowly. -
Page 30
Safety features of your vehicle Adjusting the height up and down (Continued) WARNING — Headrest • Do not operate the vehicle adjustment with the headrests removed. Severe injury to an occupant may occur in the event of an accident. Headrests may pro- vide protection against severe neck injuries when properly •… -
Page 31
Safety features of your vehicle Removal and installation Armrest WARNING After installing the headrest, make sure that it is installed in the right direction. A headrest installed reversely could increase whiplash injury during rear impact. OPS033034 OPS033032 To use the armrest, pull it forward To remove the headrest : from the seatback. -
Page 32: Seat Belts
Safety features of your vehicle SEAT BELTS Seat belt restraint system (Continued) WARNING • Never wear the shoulder belt Seat belts are designed to bear WARNING under your arm or behind upon the bony structure of the your back. An improperly •…
-
Page 33
Safety features of your vehicle Seat belt warning (for driver’s seat) (Continued) WARNING It is essential to replace the • No modifications or additions entire assembly after it has been should be made by the user worn in a severe impact even if which will either prevent the damage to the assembly is not seat belt adjusting devices… -
Page 34
Safety features of your vehicle Seat belt — Driver’s 3-point system The seat belt automatically adjusts to Conditions Warning Pattern with emergency locking retractor the proper length only after the lap Vehicle Chime- Seat Belt Light-Blink belt portion is adjusted manually so Speed Sound that it fits snugly around your hips. -
Page 35
Safety features of your vehicle Release the button to lock the Front seat anchor into position. Try sliding the height adjuster to make sure that it has locked into position. WARNING • Verify that the shoulder belt anchor is locked into position at the appropriate height. -
Page 36
Safety features of your vehicle Seat belts — Front passenger and It automatically adjusts to the proper CAUTION rear seat 3-point system with length only after the lap belt portion of the seat belt is adjusted manually combination locking retractor Do NOT fold down the left por- so that it fits snugly around your hips. -
Page 37
Safety features of your vehicle Stowing the rear seat belt B210A01NF-1 OPS033015 To release the seat belt: Routing the seat belt webbing OPS033017 through the rear seat belt guides will The seat belt is released by pressing The rear seat belt buckles can be help keep the belts from being the release button (1) on the locking stowed in the pocket between the… -
Page 38
Safety features of your vehicle 3 Point rear center belt WARNING — Rear center seat belt Do not separate mini tongue and mini buckle even if there is not an occupant. If it is separated, It may hit the rear seat occupants in a collision or sudden stops. -
Page 39
Safety features of your vehicle To unfasten the rear center belt There will be an audible “click” when the tab locks in the buckle. The seat belt automatically adjusts to the proper length only after the lap belt is adjusted manually so that it fits snug- ly around your hips, if you lean for- ward in a slow, easy motion, the belt will extend and let you move around. -
Page 40: Pre-Tensioner Seat Belt
Safety features of your vehicle Pre-tensioner seat belt (1) Retractor Pretensioner WARNING The purpose of the retractor pre- tensioner is to make sure that the • Do not put anything near the shoulder belts fit in tightly against buckle. Placing objects near the buckle may increase the the occupant’s upper body in cer- risk of personal injury in the…
-
Page 41
Safety features of your vehicle ✽ ✽ NOTICE WARNING • Both the driver’s and front pas- To obtain maximum benefit senger’s seat belt pre-tensioner from a pre-tensioner seat belt: system may be activated not only in certain frontal collision but also 1. -
Page 42
Do not the vehicle is being driven, have when driving or riding in a touch the pre-tensioner seat an authorized Kia dealer inspect motor vehicle. belt assemblies for several min- the pre-tensioner seat belt and • If the vehicle or pre-tensioner… -
Page 43: Seat Belt Precautions
Safety features of your vehicle ✽ ✽ NOTICE Infant or small child Seat belt precautions All 50 states have child restraint Small children are best protected laws. You should be aware of the from injury in an accident when WARNING specific requirements in your state.
-
Page 44
Safety features of your vehicle Larger children Restraint of pregnant women If the shoulder belt portion slightly touches the child’s neck or face, try Children who are too large for child Pregnant women should wear placing the child closer to the center of restraint systems should always lap/shoulder belt assemblies when- the vehicle. -
Page 45
Safety features of your vehicle Injured person Do not lie down WARNING A seat belt should be used when an To reduce the chance of injuries in injured person is being transported. the event of an accident and to Riding with a reclined seatback When this is necessary, you should achieve maximum effectiveness of increases your chance of seri-… -
Page 46
This should be done even if den stop, resulting in serious no damage is visible. Additional injury. If the webbing or buckles questions concerning seat belt oper- are damaged, get them replaced ation should be directed to an immediately. authorized Kia dealer. 3 29… -
Page 47: Child Restraint System
Safety features of your vehicle CHILD RESTRAINT SYSTEM Children riding in the vehicle should Children could be injured or killed in (Continued) sit in the rear seat and must always a crash if their restraints are not • A seat belt or child restraint be properly restrained to minimize properly secured.
-
Page 48
• After an accident, have an child seat. authorized Kia dealer check • Children often squirm and • Never hold a child in your the child restraint system, seat reposition themselves improp-… -
Page 49: Using A Child Restraint System
Kia dealer. mode to secure a child restraint. • Failure to observe this manu- al’s instructions regarding child restraint systems and…
-
Page 50
Safety features of your vehicle Placing a passenger seat belt into the auto lock mode OEN036101 OEN036102 To install a child restraint system on 3. Pull the shoulder portion of the the outboard or center rear seats, do seat belt all the way out. When the E2MS103005 the following: shoulder portion of the seat belt is… -
Page 51
Safety features of your vehicle To remove the child restraint, press the release button on the buckle and then pull the lap/shoulder belt out of the restraint and allow the seat belt to retract fully. WARNING — Auto lock mode The lap/shoulder belt automati- cally returns to the “emergency lock mode”… -
Page 52
Safety features of your vehicle Securing a child restraint seat When the seat belt is allowed to retract to its fully stowed position, with tether anchor system the retractor will automatically switch from the “Auto Lock” mode to the emergency lock mode for normal adult usage. -
Page 53
Safety features of your vehicle Securing a child restraint seat with WARNING WARNING — Child child seat lower anchor system restraint check A child can be seriously injured or killed in a collision if the Check that the child restraint child restraint is not properly system is secure by pushing anchored to the vehicle and the… -
Page 54
Safety features of your vehicle Lower Anchor Position Indicator WARNING WARNING • When using the vehicle’s Install the child restraint seat «LATCH» system to install a fully rearward against the seat- child restraint system in the back with the seatback reclined rear seat, all unused vehicle two positions from the most rear seat belt metal latch… -
Page 55
Safety features of your vehicle Once you have installed the LATCH WARNING child restraint, assure that the seat is properly attached to the LATCH and If the child restraint is not tether anchors. anchored properly, the risk of a child being seriously injured or Also, test the child restraint seat killed in a collision greatly before you place the child in it. -
Page 56
Safety features of your vehicle AIR BAG — ADVANCED SUPPLEMENTAL RESTRAINT SYSTEM (1) Driver’s front air bag (2) Passenger’s front air bag (3) Side air bag (4) Curtain air bag WARNING Even in vehicles with air bags, you and your passengers must always wear the safety belts provided in order to minimize the risk and severity of injury in… -
Page 57: Air Bag
Safety features of your vehicle How does the air bag system • The front air bags will completely • In order to help provide protection, operate the air bags must inflate rapidly. inflate and deflate in an instant. The speed of the air bag inflation is It is virtually impossible for you to •…
-
Page 58
Safety features of your vehicle Noise and smoke WARNING WARNING When inflated, the air bags make a • To avoid severe personal loud noise and leave smoke and When the air bags deploy, the injury or death caused by powder in the air inside the vehicle. air bag related parts in the deploying air bags in a colli- steering wheel and/or instru-… -
Page 59: Air Bag Warning Light
Safety features of your vehicle Do not install a child restraint on Air bag warning light WARNING the front passenger’s seat. • Extreme Hazard! Do not use a rearward facing child restraint on a seat protected by an air bag in front of it! •…
-
Page 60: Srs Components And Functions
2. Passenger’s front air bag module your vehicle checked by an author- 3. Side air bag modules ized Kia dealer. 4. Curtain air bag modules 5. Retractor pre-tensioner assemblies 6. Air bag warning light 7.
-
Page 61
If any of the following condi- tions occurs, this indicates a malfunction in the air bag sys- tem. Have an authorized Kia dealer inspect the air bag sys- tem as soon as possible. • The light does not turn on briefly when you turn the igni- tion ON. -
Page 62
Safety features of your vehicle Driver’s front air bag (3) Passenger’s front air bag (Continued) • When installing a container of liquid air freshener inside the vehicle, do not place it near the instrument cluster nor on the instrument panel surface. It may become a dangerous projectile and cause injury if the passenger’s air bag inflates. -
Page 63: Occupant Detection System (Ods)
OPS033020 immediately inspected by an water and a mild soap after an Your vehicle is equipped with an authorized Kia dealer. accident in which the air bags occupant detection system in the • Before you replace a fuse or were deployed.
-
Page 64
Safety features of your vehicle Main components of the occu- If the front passenger seat is occu- • The ODS (Occupant Detection pant detection system pied by a person that the system System) may not function properly if determines to be of appropriate size, the passenger takes actions which •… -
Page 65
Safety features of your vehicle Condition and operation in the front passenger occupant detection WARNING system Riding in an improper position Indicator/Warning light Devices Condition detected by the or placing weight on the front «PASSENGER AIR occupant detection passenger’s seat when it is Front passenger SRS warning light BAG OFF»… -
Page 66
Safety features of your vehicle (Continued) OVQ036013N 1KMN3663 1KMN3665 — Never put a heavy load or an — Never sit with hips shifted — Never place feet on the dash- active electronic device on towards the front of the seat. board. -
Page 67
Safety features of your vehicle ✽ ✽ NOTICE If the PASSENGER AIR BAG “OFF” Proper position indicator is still on, ask the passen- The PASSENGER AIR BAG “OFF” ger to move to the rear seat. indicator illuminates for about 4 sec- onds after the ignition switch is turned to the ON position or after WARNING… -
Page 68
• Air bags can only be used the available lap/shoulder belts. anything such as a blanket or once – have an authorized Kia No matter what type of crash, seat heater to the front pas- dealer replace the air bag children of all ages are safer senger seat. -
Page 69: Driver’s And Passenger’s Front Air Bag
Your vehicle is equipped with an being driven, have an author- Advanced Supplemental Restraint ized Kia dealer inspect the occu- (Air Bag) System and lap/shoulder pant detection system and the belts at both the driver and passen- SRS air bag system as soon as ger seating position.
-
Page 70
However, children are safer if they is being driven, have an author- of sufficient severity. The SRS uses are restrained in the rear seat. ized Kia dealer inspect the sensors to gather information about advanced SRS air bag system the driver’s and front passenger’s as soon as possible. -
Page 71
1-800-333-4Kia. However, WARNING advanced air bags. For the Kia does not endorse nor will it same reason, do not attach any- • Modification to the seat struc- support any changes to any thing to the seat, dashboard or… -
Page 72
Safety features of your vehicle ✽ ✽ NOTICE (Continued) WARNING • Be sure to read information about • Front and side air bags can Always use seat belts and child the SRS on the labels provided on injure occupants improperly restraints –… -
Page 73
• Air bags can only be used vehicle is in a crash severe once – have an authorized Kia (Continued) enough to cause the air bags dealer replace the air bag to deploy. -
Page 74
Safety features of your vehicle Rear impact (Continued) (Continued) • Even though your vehicle is • For maximum safety protection equipped with the occupant in all types of crashes, all occu- detection system, do not pants including the driver install a child restraint system should always wear their seat in the front passenger seat… -
Page 75: Side Air Bag
Safety features of your vehicle Side air bag • The side air bags are designed to (Continued) deploy during certain side-impact • The SRS air bag system must collisions, depending on the crash deploy very rapidly to provide severity, angle, speed and point of protection in a crash.
-
Page 76: Curtain Air Bag
• Do not use any accessory and repaired by an authorized seat covers. fer from the illustration. Kia dealer. Inform the dealer that your vehicle is equipped Curtain air bags are located along • Use of seat covers could with side air bags and an occu-…
-
Page 77
Make • Also, the curtain air bags on both authorized Kia dealer. sure to position the child sides of the vehicle will deploy in Failure to follow the above men- restraint system as far away certain rollover situations. -
Page 78
Safety features of your vehicle Air bag collision sensors Why didn’t my air bag go off in a collision? (Inflation and non-infla- tion conditions of the air bag) There are many types of accidents in which the air bag would not be expected to provide additional protection. -
Page 79
Therefore, do not try to per- and air bag deployment per- impact of the front collision. form maintenance formance. around the air bag sensors. Have the vehicle checked and repaired by an authorized Kia dealer. (Continued) -
Page 80
Safety features of your vehicle Also, the side and curtain air bags are If the vehicle chassis is impacted by designed to inflate when a rollover is bumps or objects on unimproved detected by a rollover sensor. roads, the air bags may deploy. Drive carefully on unimproved roads or on Although the front air bags (driver’s surfaces not designed for vehicle… -
Page 81
Safety features of your vehicle Air bag non-inflation conditions OUN036087 OVQ036018N • Air bags are not designed to inflate • Front air bags may not inflate in 1VQA2086 in rear collisions, because occu- side impact collisions, because • In certain low-speed collisions the pants are moved backward by the occupants move to the direction of air bags may not deploy. -
Page 82
Safety features of your vehicle 1VQA2089 1VQA2090 1VQA2091 • In an angled collision, the force of • Just before impact, drivers often • Front air bags may not inflate in impact may direct the occupants in brake heavily. Such heavy braking rollover accidents because front a direction where the air bags lowers the front portion of the vehi-… -
Page 83: Srs Care
SRS per- inspected by an authorized Kia dealer. formance and lead to possible injury. Any work on the SRS system, such • For cleaning the air bag pad as removing, installing, repairing, or…
-
Page 84: Additional Safety Precautions
• Each seat belt is designed to cautions must be observed. Any object attached to or placed restrain one occupant. If more An authorized Kia dealer on the front or side air bag covers than one person uses the same knows these precautions and…
-
Page 85: Adding Equipment To Or Modifying Your Air Bag
Safety features of your vehicle • Do not place items under the Adding equipment to or modi- WARNING front seats. Placing items under fying your air bag-equipped the front seats could interfere with vehicle • Sitting improperly or out of the operation of the supplemental position can cause occupants If you modify your vehicle by changing…
-
Page 86: Air Bag Warning Label
Safety features of your vehicle Air bag warning label OAM039041 OPS033030 Air bag warning labels, some required by the U.S. National Highway Traffic Safety Administration (NHTSA), are attached to the sunvisor to alert the driver and passengers of potential risks of the air bag system. 3 69…
-
Page 87: Features Sunroof Your Vehicle
Features of your vehicle Key ……..4-4 Windows .
-
Page 88
Instrument cluster ……4-52 • Lighting control ……4-88 •… -
Page 89
• Checking the amount of Interior features ……4-133 air conditioner refrigerant and • Cup holder ……. . . 4-133 compressor lubricant . -
Page 90: Key
Should lose your keys, this number will CAUTION enable an authorized Kia dealer to Do not fold the key without duplicate the keys easily. Remove pressing the release button. the key code tag and store it in a safe This may damage the key.
-
Page 91
Features of your vehicle Door Lock (1) Door Unlock (2) WARNING — Ignition key 1. Press the unlock button(2). (smart key) 2. The driver’s door will unlock. The Leaving children unattended in hazard warning lights will blink two a vehicle with the Ignition key times. -
Page 92: Transmitter Precautions
If you have a uids, it will not be covered by problem with the transmitter, contact your manufacturer’s vehicle an authorized Kia dealer. warranty. (Continued)
-
Page 93: Battery Replacement
Features of your vehicle Battery replacement For replacement transmitters, see an Immobilizer system authorized Kia dealer for transmitter (if equipped) reprogramming. Your vehicle is equipped with an • The transmitter is designed to give electronic engine immobilizer system you years of trouble-free use, how-…
-
Page 94
Your ✽ ✽ NOTICE should only be serviced by an Immobilizer password is a cus- authorized Kia dealer. If you need additional keys or lose tomer unique password and Malfunctions caused by improp- your keys, contact an authorized should be kept confidential. -
Page 95
Features of your vehicle This device complies with Part 15 of the FCC rules. Operation is subject to the following two conditions: 1. This device may not cause harm- ful interference, and 2. This device must accept any inter- ference received, including inter- ference that may cause undesired operation. -
Page 96: Smart Key
WARNING — Smart key lose your keys, this number will Leaving children unattended in enable an authorized Kia dealer to a vehicle with the smart key is duplicate the keys easily. Remove dangerous. Unattended children the key code tag and store it in a safe mimic adults and they could place.
-
Page 97
Features of your vehicle ✽ ✽ NOTICE Door Lock • The button will only operate when the smart key is within 28~40 in. (0.7~1m) from the outside door handle. • Even though you press the outside door handle button, the doors will not lock and the chime will sound for 3 seconds if any of following occur:… -
Page 98
Features of your vehicle ✽ ✽ NOTICE Unlocking Using the button on the smart key 1. Press the unlock button(2) of the Using the door handle button • The button will only operate when smart key. the smart key is within 28~40 in. 1. -
Page 99: Loss Of The Smart Key
✽ ✽ NOTICE Once the tailgate is opened and authorized Kia dealer(tow the vehi- then closed, the tailgate will lock cle, if necessary) to protect it from To stop the horn and lights, press automatically.
-
Page 100: Smart Key Precautions
Keep the smart key away from an authorized Kia dealer. If the key is determined to be invalid, water or any liquid. If the key- the engine will not start.
-
Page 101
Your ✽ ✽ NOTICE should only be serviced by an Immobilizer password is a cus- authorized Kia dealer. tomer unique password and If you need additional keys or lose should be kept confidential. Do your keys, contact an authorized… -
Page 102: Battery Replacement
2. This device must accept any inter- replace the battery, contact an ference received, including inter- authorized Kia dealer. ference that may cause undesired • Using the wrong battery can cause operation. the smart key to malfunction. Be sure to use the correct battery.
-
Page 103: Door Locks
Features of your vehicle DOOR LOCKS ✽ ✽ NOTICE O perating door locks from • From the driver’s door outside the vehicle — turn the key to the left once to • In cold and wet climates, door lock unlock the door and once more and door mechanisms may not ■…
-
Page 104
Features of your vehicle Operating door locks from • To open a door, pull the door han- inside the vehicle dle (3) outward. • If the inner door handle of the dri- With the door lock button ver’s (or front passenger’s) door is pulled when the door lock button is in the lock position, the button will unlock and the door will open. -
Page 105
Features of your vehicle With central door lock switch • When pressing the rear portion (2) WARNING — Door lock of the switch, all vehicle doors will Driver’s door malfunction unlock. If a power door lock ever fails to • If the key is in the ignition switch function while you are in the and any front door is opened, the vehicle, try one or more of the… -
Page 106: Impact Sensing Door Unlock System
Features of your vehicle Impact sensing door unlock WARNING — WARNING Doors Unlocked system vehicles • The doors should always be In the event of air bag deployment fully closed and locked while Leaving your vehicle unlocked resulting from a vehicle impact, all the vehicle is in motion to pre- can invite theft or possible harm doors will automatically unlock.
-
Page 107: Speed Sensing Door Lock System
Features of your vehicle Speed sensing door lock sys- Child-protector rear door lock 3. Close the rear door. tem (if equipped) To open the rear door, pull the out- side door handle. All doors will be automatically locked after the vehicle speed exceeds 9.3 Even though the doors may be mph (15 km/h).
-
Page 108: Tailgate
Features of your vehicle TAILGATE ✽ ✽ NOTICE Opening the tailgate Closing the tailgate In cold and wet climates, door lock and door mechanisms may not work properly due to freezing conditions. WARNING The tailgate swings upward. Make sure no objects or people are near the rear of the vehicle when opening the tailgate.
-
Page 109: Emergency Tailgate Safety Release
Features of your vehicle Emergency tailgate safety WARNING WARNING Exhaust release fumes • For emergencies, be fully If you drive with the tailgate aware of the location of the emergency tailgate safety open, you may draw dangerous release lever in the vehicle exhaust fumes into your vehicle and how to open the tailgate if which can cause serious injury…
-
Page 110: Windows
Features of your vehicle WINDOWS (1) Driver’s door power window switch (2) Front passenger’s door power window switch (3) Rear door (left) power window switch (4) Rear door (right) power window switch (5) Window opening and closing (6) Automatic power window up/down (7) Power window lock switch ✽…
-
Page 111: Power Windows
Features of your vehicle ✽ ✽ NOTICE Window opening and closing Power windows While driving with the rear windows The ignition switch must be in the ON down or with the sunroof (if position for power windows to operate. equipped) in an open (or partially Each door has a power window open) position, your vehicle may switch that controls the door’s win-…
-
Page 112
Features of your vehicle Auto down window (if equipped) Auto up/down window 1. Turn the ignition switch to the ON (if equipped) position. 2. Close the driver’s window and continue pulling up the driver’s power window switch for at least 1 second after the window is com- pletely closed. -
Page 113
Features of your vehicle And if the power window switch is WARNING pulled up continuously again within 5 seconds after the window is lowered Always check for obstructions by the automatic window reversal before raising any window to feature, the automatic window rever- avoid injuries or vehicle damage. -
Page 114
Features of your vehicle Power window lock button • When the power window lock CAUTION switch is pressed : • To prevent possible damage — The driver’s master control can to the power window system, operate all the power windows. do not open or close two win- — The front passenger’s control can dows or more at the same… -
Page 115
Features of your vehicle (Continued) WARNING — Windows • Do not allow children to play • Never leave the keys in your with the power windows. Keep vehicle with unsupervised the driver’s door power win- children, when the engine is dow lock button in the LOCK running. -
Page 116: Hood
Features of your vehicle HOOD Opening the hood Closing the hood 1. Before closing the hood, check the following: • All filler caps in the engine com- partment must correctly installed. 2. Lower the hood halfway and push down to securely lock in place. WARNING OPS043025 •…
-
Page 117
Features of your vehicle WARNING WARNING • Always double check to be sure that the hood is firmly latched before driving away. If it is not latched, the hood could open while the vehicle is being driven, causing total loss of visibility, which might result in an accident. -
Page 118: Fuel Filler Lid
Features of your vehicle FUEL FILLER LID Opening the fuel filler lid Closing the fuel filler lid 1. To install the cap, turn it clockwise until it “clicks” once. This indicates that the cap is securely tightened. 2. Close the fuel filler lid and push it in lightly making sure that it is securely closed.
-
Page 119
Features of your vehicle (Continued) WARNING — WARNING Refueling — Refueling • Do not get back into a vehicle dangers • If pressurized fuel sprays out, once you have begun refuel- Automotive fuels are flammable it can cover your clothes or ing since you can generate skin and subject you to the materials. -
Page 120
Once refueling is com- replacement, use only a gen- fuel vapors causing a fire. plete, check to make sure the uine Kia cap or the equivalent Once refueling has begun, filler cap and filler door are specified for your vehicle. An… -
Page 121: Panoramic Sunroof
Features of your vehicle PANORAMIC SUNROOF (IF EQUIPPED) ✽ ✽ NOTICE WARNING • In cold and wet climates, the sun- • Never adjust the sunroof or roof may not work properly due to sunshade while driving. This freezing conditions. could result in loss of control •…
-
Page 122: Sunroof Open Warning
Features of your vehicle When the sunshade is opened Sunroof open warning Sliding the sunroof (if equipped) If you pull the sunroof glass control lever backward, the sunroof glass will slide all the way open. To stop the sunroof glass movement at any point, pull or push the sunroof control lever momentarily.
-
Page 123: Tilting The Sunroof
Features of your vehicle Automatic reversal Tilting the sunroof To tilt down (or close) the sunroof — Push the sunroof glass control lever forward or pull it downward • Type A When you push the sunroof glass control lever forward or pull it downward while the sunshade opened, the sunshade will be closed halfway and then glass will…
-
Page 124: Sunshade
Features of your vehicle Sunshade CAUTION WARNING — Sunroof • Periodically remove any dirt • Be careful that no head, hands that may accumulate on the and body parts are obstructed guide rail. by a closing sunroof. • If you try to open the sunroof •…
-
Page 125: Resetting The Sunroof
Features of your vehicle ✽ ✽ NOTICE To close the sunshade when the Resetting the sunroof sunroof glass is closed Wrinkles formed on the sunshade as Whenever the vehicle battery is dis- — Press the sunshade close button (2). material characteristic are normal. connected or discharged, you must ❈…
-
Page 126
Features of your vehicle 5.Push the sunroof control lever for- ward in the direction of close, until the sunroof operates as follows again: The sunshade and sunroof glass slide open → The sunroof glass slide close → The sunshade close Then, release the lever. -
Page 127: Steering Wheel
Take your vehicle to an authorized As time passes, the steering Kia dealer and have the vehicle wheel return to its normal checked as soon as possible. condition. (Continued)
-
Page 128: Tilt And Telescopic Steering
Features of your vehicle (Continued) Tilt and telescopic steering • When you operate the steering Tilt and telescopic steering allows wheel in low temperature, abnor- you to adjust the steering wheel mal noise may occur. If tempera- before you drive. You can also raise it ture rises, the noise will likely dis- to give your legs more room when appear.
-
Page 129: Heated Steering Wheel
Features of your vehicle ✽ ✽ NOTICE Heated steering wheel Horn (if equipped) The heated steering wheel will turn off automatically approximately 30 minutes after the heated steering wheel is turned on. CAUTION • Do not install any grip to oper- ate the steering wheel.
-
Page 130: Flex Steer
Features of your vehicle FLEX STEER CAUTION Do not strike the horn severely to operate it, or hit it with your fist. Do not press on the horn with a sharp-pointed object. OPS043209 When the steering mode button is OPS043036 pressed, the selected steering mode The FLEX STEER controls steering will appear on the instrument cluster.
-
Page 131
Features of your vehicle Normal mode Sport mode Comfort mode OPS043129 OPS043130 OPS043131 The normal mode offers medium The steering wheel becomes heav- The steering wheel becomes lighter. steering effort. ier. The sport mode is usually used The comfort mode is usually used when driving on the highway. -
Page 132
Features of your vehicle CAUTION • For your safety, if you press the steering mode button while operating the steering wheel, but the steering effort will not change immediately. After operating the steering wheel, the steering effort will change automatically to the selected mode. -
Page 133: Mirrors
Features of your vehicle MIRRORS Day/night rearview mirror Inside rearview mirror WARNING (if equipped) Adjust the rearview mirror so that the Do not adjust the rearview mir- center view through the rear window ror while the vehicle is moving. is seen. Make this adjustment before This could result in loss of con- you start driving.
-
Page 134
Features of your vehicle Electric chromic mirror (ECM) CAUTION — Cleaning (if equipped) mirror The electric rearview mirror automat- When cleaning the mirror, use a ically controls the glare from the paper towel or similar material headlights of the vehicles behind you dampened with glass cleaner. -
Page 135
Features of your vehicle Outside rearview mirror CAUTION WARNING Be sure to adjust the mirror angles Do not scrape ice off the mirror Do not adjust or fold the outside before driving. face; this may damage the sur- rearview mirrors while the vehi- Your vehicle is equipped with both face of the glass. -
Page 136
Features of your vehicle Remote control Folding the outside rearview mirror CAUTION • The mirrors stop moving when they reach the maximum adjusting angles, but the motor continues to operate while the switch is pressed. Do not press the switch longer than necessary, the motor may be damaged. -
Page 137: Outside Rearview Mirror
Features of your vehicle Center (AUTO, 3) : CAUTION — Electric type The mirror will fold or unfold auto- outside matically as follows: rearview mirror • Without smart key system electric type outside — The mirror will fold or unfold when rearview mirror operates even the door is locked or unlocked by though the ignition switch is in…
-
Page 138: Instrument Cluster
Features of your vehicle INSTRUMENT CLUSTER ■ ■ Type A 1. Tachometer 2. Speedometer 3. Engine coolant temperature gauge 4. Fuel gauge 5. LCD display 6. Warning and indicator lights (if equipped) ■ ■ Type B 7. Turn signal indicator lights ❈…
-
Page 139: Instrument Cluster Control
Features of your vehicle Instrument Cluster Control LCD Display Control ■ Type A Adjusting Instrument Cluster ■ Type A Illumination OPS043117 ■ Type B OPS043202 ■ Type B OPS043039 The brightness of the instrument panel illumination is changed by pressing the illumination control button («+»…
-
Page 140: Gauges
Features of your vehicle Tachometer [For type A cluster] Gauges (1) TRIP : TRIP button for changing Speedometer ■ Type A trip modes ■ Type A (2) RESET : RESET button resetting items [For type B cluster] : MODE button for changing modes or SELECT button for setting the selected item : MOVE button for changing…
-
Page 141
Features of your vehicle Engine Coolant Temperature Use the tachometer to select the cor- CAUTION rect shift points and to prevent lug- Gauge ging and/or over-revving the engine. If the gauge pointer moves ■ Type A beyond the normal range area toward the “H”… -
Page 142
Features of your vehicle ✽ ✽ NOTICE Fuel Gauge WARNING — Fuel Gauge • The fuel tank capacity is given in ■ Type A Running out of fuel can expose chapter 8. vehicle occupants to danger. • The fuel gauge is supplemented by a low fuel warning light, which You must stop and obtain addi- will illuminate when the fuel tank… -
Page 143
Features of your vehicle Odometer Outside Temperature Gauge The outside temperature on the dis- play may not change immediately ■ ■ Type A Type A like a gv thermometer to prevent the driver from being inattentive. To change the temperature unit (from °C to °F or from °F to °C) •… -
Page 144: Transaxle Shift Indicator
Features of your vehicle Manual Transaxle Shift Indicator Transaxle Shift Indicator • Park : P (if equipped) • Reverse : R Automatic Transaxle Shift Indicator • Neutral : N ■ ■ Type A Type A • Drive : D • Sports Mode : 1, 2, 3, 4, 5, 6 OPS043115 OPS043116 ■…
-
Page 145
Features of your vehicle For example : Indicates that shifting up to the 3rd gear is desired (currently the shift lever is in the 2nd or 1st gear). : Indicates that shifting down to the 3rd gear is desired (current- ly the shift lever is in the 4th, 5th, or 6th gear). -
Page 146: Lcd Display
Features of your vehicle LCD DISPLAY (IF EQUIPPED) LCD Modes (for type B cluster) Modes Symbol Explanation This mode displays driving information like the tripmeter, fuel economy, and so on. Trip Computer For more details, refer to “Trip Computer” in this chapter. Turn By Turn This mode displays the state of the navigation.
-
Page 147: Service Mode
Features of your vehicle Service Mode Service Interval OTF044196L OTF044192L Service in OFF Service required If you do not have your vehicle serv- If the service interval is not set, OPS043134N iced according to the already inputted “Service in OFF” message is dis- Service in service interval, “Service required”…
-
Page 148: User Settings Mode
Features of your vehicle Master Warning Mode Door User Settings Mode (if equipped) Auto Door Lock (if equipped) Description • Off: • This warning light informs the driv- The auto door lock operation will er the following situations be deactivated. — TPMS (if equipped) •…
-
Page 149
Features of your vehicle Lamp Auto Door Unlock (if equipped) Two Press Unlock (if equipped) • Off: • Off: One Touch Turn Lamp (if equipped) The auto door unlock operation will The two press unlock function will If this item is checked, the lane be canceled. -
Page 150: A/V Mode
Features of your vehicle Settings Service Interval A/V Mode (if equipped) Language Choose the language you prefer within the LCD. Temperature Unit Convert the temperature unit from °C to °F or from °F to °C. Welcome Sound If this item is checked, the welcome OPS043133 OTF044129 sound function will be activated.
-
Page 151: Turn By Turn Mode
Features of your vehicle Low Key Battery Turn By Turn Mode (if equipped) Warning Messages (for smart key system) Shift to «P» position (for smart key system and automatic transaxle) OPS043208N OTF044142L This mode displays the state of the OTF044148L navigation.
-
Page 152
Features of your vehicle Press brake pedal to start engine Press clutch pedal to start engine Key not in vehicle (for smart key system and auto- (for smart key system and manual (for smart key system) matic transaxle) transaxle) OTF044138L OTF044152L OTF044190L •… -
Page 153
• It means that you could start the tor light blinks. engine by pressing the Engine Start/ Stop Button once more. • If the warning illuminates each time press Engine Start/Stop Button, have your vehi- cle inspected by an authorized Kia dealer. 4 67… -
Page 154
Features of your vehicle Check fuse «BRAKE SWITCH» Shift to «P» or «N» to start engine Door Open (for smart key system and auto- (for smart key system and auto- matic transaxle) matic transaxle) OPS043121 • It means that any door is open. OTF044157L OTF044150L •… -
Page 155
Features of your vehicle Tailgate Open Sunroof Open (if equipped) Turn on «FUSE SWITCH» (if equipped) OPS043122 OPS043120 OTF044154L • The warning message illuminates • It means that the tailgate is open. if you turn off the engine when the •… -
Page 156: Trip Computer
Features of your vehicle TRIP COMPUTER Trip Modes (for Type A cluster) Overview Trip Modes (for Type B cluster) Description Tripmeter A FUEL ECONOMY The trip computer is a microcomput- • Range er-controlled driver information sys- Tripmeter B tem that displays information related •…
-
Page 157: Trip A/B
Features of your vehicle ✽ ✽ NOTICE Tripmeter (1) Trip A/B • The tripmeter is the total driving dis- • The average vehicle speed is not dis- ■ Type A tance since the last tripmeter reset. played if the driving distance is less than 0.03 miles (50 meters) or the — Distance range: 0.0 ~ 9999.9 mi.
-
Page 158: Fuel Economy
Features of your vehicle Average Fuel Economy (2) Fuel Economy • If the estimated distance is below 30 mi. (50 km), the trip computer will • The average fuel economy is calcu- Range (1) display “—” as distance to empty. lated by the total driving distance ■…
-
Page 159
Features of your vehicle Instant Fuel Economy (3) Automatic reset To make the average fuel economy • This mode displays the instant fuel be reset automatically whenever refu- economy during the last few sec- eling, select the “Auto Reset” mode in onds when the vehicle speed is User Setting menu of the LCD display more than 6.2 MPH (10 km/h). -
Page 160: Warning And Indicator Lights
Belts” in chapter 3. situation that needs attention. — It illuminates for approximately 6 seconds and then goes off. • When there is a malfunction with the SRS. In this case, have your vehicle inspected by an authorized Kia dealer.
-
Page 161
If the brakes fail while you are driv- reservoir is low. In this case, have your vehicle ing, shift to a lower gear for addition- towed to an authorized Kia dealer al engine braking and stop the vehi- — If the warning light illuminates and inspected. -
Page 162
In this case, have your vehicle • When there is a malfunction with In this case, have your vehicle inspected by an authorized Kia the ABS (The normal braking sys- inspected by an authorized Kia dealer. tem will still be operational without dealer. -
Page 163
EPS. the emission control system. In this case, have your vehicle inspect- ed by an authorized Kia dealer as In this case, have your vehicle In this case, have your vehicle soon as possible. inspected by an authorized Kia inspected by an authorized Kia dealer. -
Page 164
— It remains on until the engine is In this case, have your vehicle If the belt is adjusted properly, started. inspected by an authorized Kia there may be a problem in the dealer as soon as possible. • When there is a malfunction with electrical charging system. -
Page 165
Kia dealer as the engine off immediately. soon as possible. In this case, have your vehi- cle inspected by an author- ized Kia dealer. -
Page 166
In this case, have your vehicle position. braking distances. inspected by an authorized Kia — It illuminates for approximately 3 dealer as soon as possible. • Continued driving or low pres- seconds and then goes off. -
Page 167: Indicator Lights
ESC system. • When the fuel filler cap is not tight- In this case, have your vehicle en securely. inspected by an authorized Kia Always make sure that the fuel dealer. filler cap is tight. This indicator light blinks: While the ESC is operating.
-
Page 168
This indicator light blinks: For more details, refer to “Electronic • When there is a malfunction with Stability Control (ESC)” in chapter 5. the immobilizer system. In this case, have your vehicle inspected by an authorized Kia dealer. -
Page 169
• When you turn the turn signal light to 30 seconds: In this case, have your vehicle • When the vehicle detects the inspected by an authorized Kia smart key in the vehicle properly dealer. while the Engine Start/Stop Button If any of the following occurs, there is ACC or ON. -
Page 170
Features of your vehicle High Beam Indicator Light ON Indicator Light Cruise Indicator Light CRUISE Light (if equipped) This indicator light illuminates: This indicator light illuminates: This indicator light illuminates: • When the headlights are on and in • When the tail lights or headlights •… -
Page 171
Features of your vehicle Cruise SET Indicator FLEX STEER indicator Light (if equipped) (if equipped) NORMAL SPORT COMPORT This indicator light illuminates: • When the cruise control speed is set. This indicator light illuminates: For more details, refer to “Cruise •… -
Page 172: Rear Camera Display
Features of your vehicle REAR CAMERA DISPLAY (IF EQUIPPED) This system is a supplemental sys- WARNING — Relying on tem that helps the driver by display- the Rear-Camera Display ing objects behind the vehicle when backing up. Never rely solely on the rear camera display when backing.
-
Page 173: Lighting
Features of your vehicle LIGHTING Headlamp escort (if equipped) Battery saver function Daytime running light (if equipped) • The purpose of this feature is to If you turn the ignition switch to the prevent the battery from being dis- ACC or OFF position with the head- Daytime Running Lights (DRL) may charged.
-
Page 174: Lighting Control
Features of your vehicle Lighting control Parking light position ( Headlight position ( OXM049110 OAM049041 OAM049042 When the light switch is in the park- When the light switch is in the head- The light switch has a Headlight and ing light position (1st position), the light position (2nd position), the a Parking light position.
-
Page 175: High Beam Operation
Features of your vehicle Auto light position (if equipped) • Never place anything over sensor High beam operation (1) located on the instrument panel. This will ensure better auto- light system control. • Don’t clean the sensor using a win- dow cleaner.
-
Page 176: Turn Signals And Lane Change Signals
Features of your vehicle Turn signals and lane change To signal a lane change, move the signals turn signal lever slightly and hold it in position (B). The lever will return to the OFF position when released. If an indicator stays on and does not flash or if it flashes abnormally, one of the turn signal bulbs may be burned out and will require replacement.
-
Page 177: Front Fog Light
Features of your vehicle One-touch lane change function Front fog light (if equipped) To activate an one-touch lane change function, move the turn sig- nal lever slightly and then release it. The lane change signals will blink 3, 5 or 7 times. You can choose one-touch lane change blinking function in «One touch turn lamp»…
-
Page 178: Wipers And Washers
Features of your vehicle WIPERS AND WASHERS Windshield wipers Windshield wiper/washer Rear window wiper/washer (if equipped) OAM049101N Operates as follows when the igni- OAM049100N/OAM049048N tion switch is turned ON. A : Wiper speed control D : Rear wiper/washer control MIST : For a single wiping cycle, push ·…
-
Page 179: Windshield Washers
Features of your vehicle LO : Normal wiper speed Windshield washers The reservoir filler neck is located in the front of the engine compartment HI : Fast wiper speed on the passenger side. If there is heavy accumulation of snow or ice on the windshield, defrost CAUTION — Washer the windshield for about 10 minutes,…
-
Page 180: Rear Window Wiper And Washer Switch
Features of your vehicle Rear window wiper and washer CAUTION — Wipers& switch (if equipped) windshields • To prevent possible damage to the wipers or windshield, do not operate the wipers when the windshield is dry. • To prevent damage to the wiper blades, do not use gaso- line, kerosene, paint thinner, or other solvents on or near…
-
Page 181: Interior Light
Features of your vehicle INTERIOR LIGHT Do not use the interior lights for Interior lamp AUTO cut Map lamp extended periods when the engine is • When all entrances are closed, if ■ Type A not running. you lock the vehicle by using the It may cause battery discharge.
-
Page 182: Room Lamp
Features of your vehicle • ROOM (2) : — The map lamp and room lamp will Room lamp go out immediately if the ignition — The map lamp and room lamp ■ Type A switch is changed to the ON posi- stays on at all times.
-
Page 183: Luggage Room Lamp
Features of your vehicle ❈ If the portable lamp does not turn Luggage room lamp Portable lamp usage (if equipped) on, it means the portable lamp ■ Type A needs to be charged. Insert the lamp holder and then charge it again.
-
Page 184
Features of your vehicle Battery replacement (Continued) CAUTION 7. Do not place the lamp or bat- 1. Remove the batteries when teries near fire or heat. It can not in use for a long time. cause internal leakage of a 2. -
Page 185: Glove Box Lamp
Features of your vehicle Glove box lamp (if equipped) Vanity mirror lamp (if equipped) OPS043057 OAM042336 The glove box lamp comes on when the glove box is opened. Pull the sunvisor downward and you can turn the vanity mirror lamp ON or To prevent unnecessary charging OFF by pushing the button.
-
Page 186: Defroster
Features of your vehicle DEFROSTER Rear window defroster The defroster heats the window to CAUTION — Conductors remove frost, fog and thin ice from ■ Type A the rear window, while the engine is To prevent damage to the con- running.
-
Page 187
Features of your vehicle Outside rearview mirror defroster (if equipped) If your vehicle is equipped with the outside rearview mirror defrosters, they will operate at the same time you turn on the rear window defroster. Front wiper deicer (if equipped) The front wiper deicer will operate at the same time you turn on the front windshield defroster. -
Page 188: Manual Climate Control System
Features of your vehicle MANUAL CLIMATE CONTROL SYSTEM 1. Fan speed control knob 3. Mode selection knob 5. Temperature control knob 2. Air intake control button 4. Rear window defroster button 6. Air conditioning button (if equipped) OPS043154…
-
Page 189: Heating And Air Conditioning
Features of your vehicle Heating and air conditioning 1. Start the engine. 2. Set the mode to the desired posi- tion. For improving the effectiveness of heating and cooling; — Heating: — Cooling: 3. Set the temperature control to the desired position.
-
Page 190
Features of your vehicle Mode selection Vent mode (B, D) Floor/Defrost mode (A, C, E, D) Most of the air flow is directed to the Air flow is directed toward the upper floor and the windshield with a small body and face. Additionally, each amount directed to the side window outlet can be controlled to direct the defrosters. -
Page 191
Features of your vehicle Temperature control OPS043059 OPS043159 Instrument panel vents To operate the MAX A/C, turn the OPS043156 temperature knob to extreme left. Air The outlet vents can be opened or The temperature control knob allows flow is directed toward the upper closed separately using the thumb- you to control the temperature of the body and face. -
Page 192
Features of your vehicle Air intake control Recirculated air position In addition, prolonged use of the air conditioning with the recirculated air With the recirculated air position selected will result in exces- position selected, sively dry air in the passenger com- from the passenger com- partment. -
Page 193
Features of your vehicle Fan speed control To turn off the blowers Air conditioning (if equipped) OPS043157 OPS043158 OPS043161 The ignition switch must be in the ON To turn off the blowers, turn the fan Press the A/C button to turn the air position for fan operation. -
Page 194: System Operation
Features of your vehicle Air conditioning (if equipped) System operation Operation Tips • To keep dust or unpleasant fumes All Kia Air Conditioning Systems are Ventilation from entering the vehicle through filled with R-134a refrigerant. 1. Set the mode to the position.
-
Page 195
Features of your vehicle Air conditioning system operation tips • When using the air conditioning CAUTION — Excessive system, you may notice clear water • If the vehicle has been parked in dripping (or even puddling) on the direct sunlight during hot weather, ground under the passenger side When using the air conditioning open the windows for a short time… -
Page 196: Climate Control Air Filter
• When the air flow rate suddenly Therefore, if abnormal operation is decreases, the system should be found, have the system inspected by checked at an authorized Kia an authorized Kia dealer. dealer. Blower Heater core Climate control…
-
Page 197: Air Conditioning Refrigerant Label
Features of your vehicle Air Conditioning refrigerant Each symbols and specification on label air conditioning refrigerant label means as below ; ■ Example 1. Classification of refrigerant 2. Amount of refrigerant 3. Classification of Compressor lubri- cant Refer to chapter 8 for more detail location of air conditioning refrigerant label.
-
Page 198: Automatic Climate Control System
Features of your vehicle AUTOMATIC CLIMATE CONTROL SYSTEM (IF EQUIPPED) ■ Type A 1. Temperature control button / knob 2. Front windshield defroster button 3. Rear windshield defroster button 4. Climate control display 5. Air intake control button 6. Air conditioning button (if equipped) ■…
-
Page 199: Automatic Heating And Air Conditioning
Features of your vehicle ✽ ✽ NOTICE ■ Type A Automatic heating and air con- ditioning • To turn the automatic operation off, select any button or switch of ■ Type A the following: — Mode selection button — Air conditioning button — Front windshield defroster button — Air intake control button — Fan speed control switch…
-
Page 200: Manual Heating And Air Conditioning
Features of your vehicle Mode selection Manual heating and air condi- tioning ■ Type A The heating and cooling system can be controlled manually by pushing buttons other than the AUTO button. In this case, the system works sequentially according to the order of buttons selected.
-
Page 201
Features of your vehicle The air flow outlet port is converted as follows: Vent mode (B, D) Floor mode (C, E, A, D) Air flow is directed toward the upper Most of the air flow is directed to the body and face. Additionally, each out- floor, with a small amount of the air let can be controlled to direct the air being directed to the windshield and… -
Page 202
Features of your vehicle ■ Type A Temperature control ■ Type A OPS043168 ■ Type B OPS043059 OPS043170 ■ Type B Instrument panel vents The outlet port can be opened or closed separately using the thumb- wheel. Also, you can adjust the direction of air delivered from these vents using the vent control lever as shown. -
Page 203
Features of your vehicle Air intake control The temperature will decrease to the Temperature scale conversion minimum (Lo) by pushing the button If the battery has been discharged or ■ Type A disconnected, the temperature mode When pushing the button, the tem- display will reset to Centigrade. -
Page 204
Features of your vehicle Recirculated air position It should be noted that prolonged WARNING — Recirculated operation of the heating in recirculat- The indicator light on the ed air position will cause fogging of button illuminates when the windshield and side windows and Continuous use of the climate the recirculated air posi- the air within the passenger com-… -
Page 205
Features of your vehicle Fan speed control In addition, prolonged use of the air To change the fan speed, press the conditioning with the recirculated air button ( ) for higher speed, or push ■ Type A position selected, will result in exces- the button ( ) for lower speed. -
Page 206
Features of your vehicle Air conditioning Blower OFF Climate information screen selection (if equipped) ■ Type A ■ Type A ■ Type B OPS043174 OPS043178 ■ Type B ■ Type B OPS043180 Press the climate information screen selection button to view climate infor- mation in full screen mode. -
Page 207: System Operation
Features of your vehicle Air conditioning (if equipped) System operation Operation Tips • To keep dust or unpleasant fumes All Kia Air Conditioning Systems are Ventilation from entering the vehicle through filled with R-134a refrigerant. 1. Set the mode to the position.
-
Page 208
Features of your vehicle Air conditioning system operation tips • When using the air conditioning CAUTION — Excessive system, you may notice clear water • If the vehicle has been parked in dripping (or even puddling) on the direct sunlight during hot weather, ground under the passenger side When using the air conditioning open the windows for a short time… -
Page 209: Climate Control Air Filter
• When the air flow rate suddenly Therefore, if abnormal operation is decreases, the system should be found, have the system inspected by checked at an authorized Kia an authorized Kia dealer. dealer. Blower Heater core Climate control…
-
Page 210: Air Conditioning Refrigerant Label
Features of your vehicle Air Conditioning refrigerant Each symbols and specification on label air conditioning refrigerant label means as below ; ■ Example 1. Classification of refrigerant 2. Amount of refrigerant 3. Classification of Compressor lubri- cant Refer to chapter 8 for more detail location of air conditioning refrigerant label.
-
Page 211: Windshield Defrosting And Defogging
Features of your vehicle WINDSHIELD DEFROSTING AND DEFOGGING • For maximum defrosting, set the Manual climate control system WARNING — Windshield temperature control to the extreme To defog inside windshield heating right/hot position and the fan speed control to the highest speed. Do not use the posi- tion during cooling operation in…
-
Page 212
Features of your vehicle To defrost outside windshield Automatic climate control 3. Press the defrost button ( system 4. The air-conditioning will be turned To defog inside windshield on according to the detected ambi- ent temperature, outside (fresh) air ■ Type A position and higher fan speed will be selected automatically. -
Page 213: Defogging Logic
Features of your vehicle To defrost outside windshield 4. The air-conditioning will be turned Defogging logic on according to the detected To reduce the possibility of fogging ■ Type A ambient temperature and outside up the inside of the windshield, the (fresh) air position will be selected air intake or air conditioning are con- automatically.
-
Page 214: Automatic Climate Control System
Features of your vehicle Manual climate control system Automatic climate control system If the battery has been discharged or disconnected, it will be reset to the ■ Type A defog logic status. OPS043189 ■ Type B OPS043187 1. Turn the ignition switch to the ON position.
-
Page 215: Clean Air
Features of your vehicle CLEAN AIR (IF EQUIPPED) 3. While pressing the air conditioning button (A/C), press the air intake control button ( ) at least 5 times within 3 seconds. The indicator on the air intake button blinks 3 times with 0.5 seconds of interval.
-
Page 216: Storage Compartment
Features of your vehicle STORAGE COMPARTMENT These compartments can be used to Center console storage Glove box store small items. ■ Type A • To avoid possible theft, do not leave valuables in the storage compartment. • Always keep the storage compart- ment covers closed while driving.
-
Page 217: Cool Box
Features of your vehicle ✽ ✽ NOTICE Cool box (if equipped) Sunglass holder Do not put perishable food in the cool box because it may not main- tain the necessary consistent tem- perature to keep the food fresh. ✽ ✽ NOTICE If the temperature control knob is in the warm or hot position, warm or hot air will flow into the glove box.
-
Page 218: Luggage Box
Features of your vehicle Luggage box (if equipped) WARNING — Avoid distracted driving • Do not keep objects except sunglasses inside the sun- glass holder. Such objects can be thrown from the holder in the event of a sudden stop or an accident, possibly injuring the passengers in the vehicle.
-
Page 219: Interior Features
Features of your vehicle INTERIOR FEATURES Cup holder Sunvisor WARNING — Hot liquids Do not place uncovered cups with hot liquid in the cup holder while the vehicle is in motion. If the hot liquid spills, you burn yourself. Such a burn to the driver could lead to loss of con- OPS043067 trol of the vehicle.
-
Page 220: Seat Warmer
Features of your vehicle Seat warmer (if equipped) During mild weather or under condi- CAUTION — Vanity tions where the operation of the seat ■ Type A mirror lamp warmer is not needed, keep the (if equipped) switches in the «OFF» position. If you use the vanity mirror •…
-
Page 221: Seat Air Ventilation
Features of your vehicle Seat air ventilation (if equipped) CAUTION WARNING — Seat warmer burns • When cleaning the seats, do not use an organic solvent Never allow passengers who such as paint thinner, ben- may not be able to take care of zene, alcohol and gasoline.
-
Page 222: Rear Seat Warmer
Features of your vehicle • When pressing the switch for more Rear seat warmer (if equipped) • When pressing the switch for more than 1.5 seconds with the seat air than 1.5 seconds with the seat ventilation operating, the seat air warmer operating, the seat warmer ventilation will turn OFF.
-
Page 223: Power Outlet
Features of your vehicle Power outlet (if equipped) CAUTION WARNING — Seat warmer ■ Front (Type A) burns • When cleaning the seats, do not use an organic solvent Never allow passengers who such as thinner, benzene, alco- may not be able to take care of hol and gasoline.
-
Page 224: Clothes Hanger
Features of your vehicle • Use the power outlet only when the Clothes hanger (if equipped) Floor mat anchor(s) engine is running and remove the ■ Driver’s side ■ Passenger’s side accessory plug after use. Using the accessory plug for prolonged peri- ods of time with the engine off could cause the battery to discharge.
-
Page 225: Luggage Net Holder
If necessary, contact your authorized To avoid any interference with pedal Kia dealer to obtain a luggage net. operation, Kia recommends that only the Kia floormat designed for use in To prevent damage to the goods or your vehicle be installed.
-
Page 226: Cargo Area Cover
Features of your vehicle Cargo area cover (if equipped) WARNING — Objects • Do not place objects on the cargo area cover. Such objects may be thrown about inside the vehicle and possi- bly injure vehicle occupants during an accident or when braking.
-
Page 227: Exterior Features
Features of your vehicle EXTERIOR FEATURES Mounting bracket for roof carrier WARNING (if equipped) Use a coin or flat blade driver when you remove the roof carri- er cover. If you use your fingernail, it may injure your finger. OED046091 2.
-
Page 228
Features of your vehicle ✽ ✽ NOTICE WARNING If the vehicle is equipped with a sun- • The vehicle center of gravity will roof, be sure not to position cargo be higher when items are onto the roof in such a way that it loaded onto the roof. -
Page 229: Audio System
Features of your vehicle AUDIO SYSTEM If you install aftermarket HID head Antenna (if equipped) CAUTION — Antenna lamps, your vehicle’s audio and elec- tronic devices may malfunction. Before entering a place with a low height clearance or a car wash, remove the antenna by rotating it counterclockwise.
-
Page 230: Audio Remote Control
Features of your vehicle VOLUME (VOL+/ VOL-) (1) Audio remote control WARNING (if equipped) • Push the VOL + to increase volume. Driving while distracted can • Push the VOL — to decrease volume. result in a loss of vehicle con- trol that may lead to an acci- SEEK/PRESET ( ) (2)
-
Page 231: Aux, Usb And Ipod ® Port
Features of your vehicle ® RADIO mode Aux, USB and iPod * port When using a portable audio device (if equipped) connected to the power outlet, noise It will function as the PRESET STA- may occur during playback. If this TION select buttons.
-
Page 232: Advanced Lighting Speaker
Features of your vehicle ✽ ✽ NOTICE Advanced lighting speaker 1. OFF : The light turns off. (if equipped) 2. MUSIC : When the doors are opened, the lighting system will not operate. The light blinks or changes shade according to the sound of the audio. If the audio is not turned on, the light does not turn on.
-
Page 233
Features of your vehicle How vehicle audio works This can be due to factors, such as AM reception the distance from the radio station, FM reception closeness of other strong radio sta- tions or the presence of buildings, bridges or other large obstructions in the area. -
Page 234
Features of your vehicle FM radio station JBM003 JBM004 JBM005 • Station Swapping — As an FM sig- FM broadcasts are transmitted at • Fading — As your vehicle moves high frequencies and do not bend to away from the radio station, the nal weakens, another more power- follow the earth’s surface. -
Page 235
Features of your vehicle Using a cellular phone or a two- WARNING WARNING way radio Do not use a cellular phone • Do not stare at the screen When a cellular phone is used inside while driving. Stop at a safe while driving. -
Page 236
Features of your vehicle (Continued) (Continued) CAUTION • Turn on the car ignition before • Please refrain from use if the • Using the audio system while using the audio system Do not screen is blank or no sound driving could lead to acci- operate the audio system for can be heard as these signs dents due to a lack of atten-… -
Page 237
Features of your vehicle (Continued) • Do not place beverages close to the audio system. Spilling beverages may lead to system malfunction. • In case of product malfunction, please contact your place of pur- chase or After Service center. • Placing the audio system within electromagnetic environment may result in… -
Page 238
Features of your vehicle USING THE USB DEVICE (Continued) (Continued) • An encrypted MP3 PLAYER is • You may hear a strange noise • To use an external USB device, not recognizable. when connecting or disconnect- make sure the device is not con- ing a USB device. -
Page 239
Features of your vehicle (Continued) (Continued) • If you use devices such as a • Some USB flash memory read- USB hub purchased separately, ers (such as CF, SD, micro SD, the vehicle’s audio system may etc.) external-HDD type not recognize the USB device. In devices can be unrecognizable. -
Page 240
Features of your vehicle ® USING iPod DEVICE (Continued) (Continued) • Some iPod devices, such as the • When connecting iPod with the ® ® iPod is a registered trademark of ® iPhone connected iPod Power Cable, insert the con- ®… -
Page 241
Bluetooth SIG, lnc. and any use of wireless networking technology receive calls and use contacts. such marks by Kia is under license. which uses a 2.4GHz ~ 2.48GHz Before using Bluetooth , carefully ®… -
Page 242
Features of your vehicle When connecting a Bluetooth ® • Park the vehicle when connecting Phone the head unit with the mobile phone. • Bluetooth connection ® • Before connecting the head unit become intermittently disconnect- with the mobile phone, check to ed in some mobile phones. -
Page 243
Features of your vehicle Voice Recognition (Continued) — When driving on rugged and uneven roads • When using the voice recognition — During severe rain (heavy rains, feature, only commands listed windstorms) within the user’s manual are sup- ported. • Phone related voice commands used only when… -
Page 244
Features of your vehicle ■ ■ AUDIO : AM1A0B2AN, AM1A0B2KN PS34001N 4 158… -
Page 245
Features of your vehicle ❈ In Setup>Display, the radio pop up SYSTEM CONTROLLERS SETUP CLOCK screen will be displayed when AND FUNCTIONS Briefly press the key (under 0.8 sec- [Mode Pop up] is turned onds) : Moves to the Display, Sound, When the pop up screen is dis- ❈… -
Page 246
Features of your vehicle (6) PWR/VOL knob SCAN Power : Turns power On/Off by Radio mode pressing the knob — Shortly press the key : Previews Volume : Sets volume by turning each broadcast for 5 seconds the knob left/right each. -
Page 247
Features of your vehicle (11) BACK (13) TUNE knob Go to previous depth(no previous AM/FM mode : screen) — Changes frequency by turning the knob left/right. (12) SiriusXM Radio Mode: FOLDER Radio mode — Changes the station by turning the knob left/right. -
Page 248
Features of your vehicle SETUP Mode Pop up [Mode Pop up] Changes selection mode Display Settings • During On state, press the RADIO key to display the mode MEDIA Press the key Select [Display] change pop up screen. SETUP through TUNE knob or Select menu through TUNE knob… -
Page 249
Features of your vehicle SOUND SETTINGS Sound Settings Speed Dependent Volume Control This menu allows you to set the This feature will gradually increase ‘Bass, Middle, Treble’ and the Sound Press the key Select [Sound] SETUP the volume as speed increases to Fader and Balance. -
Page 250
Features of your vehicle ❈ Adjust the number currently in CLOCK SETTINGS Sound Settings focus to make the settings and This menu is used to set the time. press the tune knob to move to the Select [Clock Settings] Set through SETUP next setting. -
Page 251
Features of your vehicle SYSTEM SETTINGS Memory Information • Off : This mode is for expert users and omits some information during Displays currently used memory and voice command operation. (When total system memory. using Expert mode, guidance Press key Select SETUP Select [Memory Information] OK instructions can be heard through… -
Page 252
Features of your vehicle RADIO : FM, AM OR SIRIUS Preset SEEK Selecting through manual search Press the Turn the TUNE knob left/right to • Briefly pressing the key (under 0.8 adjust the frequency. seconds): Plays the frequency saved in the corresponding key. •… -
Page 253
Features of your vehicle MENU Within key are the A.Store MENU (Auto Store) and Info functions. A.Store Press the key Set [A.Store] MENU through TUNE knob or key. Saves broadcasts with superior reception to keys. If no frequencies are received, then the most recently received frequency will be broadcast. -
Page 254
Features of your vehicle SiriusXM Satellite Radio information Satellite Radio channels: • Terrain: Hills, mountains, tall build- NOTE: ings, bridges, tunnels, freeway over- SiriusXM Satellite Radio offers All SiriusXM services require a passes, parking garages, dense 150+ channels with 100% commer- subscription, sold separately or tree foliage and thunderstorms can cial-free music, plus sports, news,… -
Page 255
Radio seconds): Previews each broad- activation signal. cast for 10 seconds each Your Kia vehicle is equipped with a 3 ❈ Press the month complimentary period of key again to SCAN SEEK… -
Page 256
Info (Information) na or antenna cable is broken or unplugged. Please consult with your Displays the Artist/Song info of the Kia dealership. current song. 2. Acquiring Signal If this message is displayed, it means that the antenna is covered and that… -
Page 257
Features of your vehicle BASIC METHOD OF USE : Repeat Random While song (file) is playing While song (file) is playing USB / iPod / My Music ® (RPT) key (RDM) key USB, iPod , My Music mode: RPT on My Music mode: RDM on screen ®… -
Page 258
Features of your vehicle Changing Song/File Scan Folder Search : USB Mode While file playing While song (file) playing While song (file) is playing SCAN FOLDER (Folder Up) key SEEK TRACK • Searches the next folder. • Shortly pressing the key : Scans all •… -
Page 259
Features of your vehicle MENU : USB Folder Random Information Press the USB mode key to Press the key Set [ Info] MENU MENU Press the key Set [ F.RDM] MENU set the Repeat, Folder Random, through the TUNE knob or through the TUNE knob or Folder… -
Page 260
Features of your vehicle Copy MENU : iPod Information ® Press the key Set [ In iPod mode, press the key to Press the key Set [ Info] ® MENU MENU MENU Copy] through the TUNE knob set the Repeat, Random, Information through the TUNE knob or and Search features. -
Page 261
Features of your vehicle ➀ Select the file you wish to delete MENU : My Music Mode Information by using the TUNE knob. Press the key Set [ Info] MENU ➁ Press the key and select MENU through the TUNE knob or In My Music mode, press the MENU the delete menu to delete the… -
Page 262
Features of your vehicle ➁ After selecting, press MENU and select the delete menu. AUX is used to play external MEDIA currently connected with the AUX terminal. AUX mode will automatically start when an external device is connect- ed with the AUX terminal. If an external device is connected, you can also press the key to… -
Page 263
Bluetooth SIG, Inc. and any use of [Audio Streaming] of Phone is such marks by Kia is under license. turned What is Bluetooth Wireless Other trademarks and trade names ®… -
Page 264
Features of your vehicle Starting Bluetooth Using the Bluetooth ® Wireless ® Wireless Technology Audio Technology audio features • Press the key to change • Play / Stop MEDIA the mode in order of USB➟AUX Press the TUNE knob to play and ➟My Music➟BT Audio. -
Page 265
Features of your vehicle PHONE(IF EQUIPPED) Making a call using the USB, iPod, My Music Modes Steering-wheel mounted controls — Briefly press the key: Move to next or previous song. Before using the Bluetooth Wireless ® — Press and hold the key: Rewinds Technology phone features or fast-forwards the current song. -
Page 266
® word mark and logos is redialed. are registered trademarks owned by Bluetooth SIG, Inc. and any use of such marks by Kia is under license. Other trademarks and trade names are those of their respective owners. A Bluetooth ®… -
Page 267
Features of your vehicle 2.Select [OK] button to enter the Pair [Non SSP supported device] Pairing Key / PHONE Phone screen. on the Steering Remote (SSP: Secure Simple Pairing) Controller 4.After a few moments, a screen is displayed where the passkey is entered. -
Page 268
During the pairing process, make sure that all connection requests on the phone are accepted for phonebook download and to allow acceptance of all future connection requests. » and «Visit http://www.kia.com/us/#/blue- tooth for additional information on pairing your Bluetooth-enabled mobile phone, and to view a phone compatibility list. -
Page 269
Features of your vehicle • Bluetooth Bluetooth Pairing through [PHONE] Wireless Technology • Only ® Wireless ® Setup features supported within the vehi- Technology Handsfree cle are as follows. Some features Bluetooth audio related features may not be supported depending are supported. -
Page 270
Features of your vehicle • After pairing is complete, a con- Connecting a Device From the paired phone list, select the tacts download request is sent device you want to connect and once to the mobile phone. Some select [Connect]. Press key Select mobile phones may require confir-… -
Page 271
Features of your vehicle Changing Priority From the paired phone list, select • Priority icon will be displayed when the phone you want to switch to the the selected phone is set as a pri- highest priority, then select [Change ority phone. -
Page 272
Features of your vehicle Disconnecting a Device Deleting a Device • When deleting the currently con- nected device, the device will auto- matically be disconnected to pro- Press key Select Press key Select SETUP SETUP ceed with the deleting process. [Phone] Select [Phone List] [Phone] Select [Phone List] •… -
Page 273
Features of your vehicle • If you select the [Call History] but- Answering Calls USING Bluetooth Wireless ® ton but there is no call history data, Technology(if equipped) a prompt is displayed which asks to download call history data. Answering a Call Phone Menu Screen Answering a call with a Bluetooth ®… -
Page 274
Features of your vehicle • When an incoming call pop-up is Favorites Call History displayed, most Audio and SETUP mode features are disabled. Only Press the Select Press the Select [Call the call volume will operate. PHONE PHONE [Favorites] History] •… -
Page 275
Features of your vehicle Contacts • Up to 1,000 contacts saved in your • It is not possible to begin down- Bluetooth Wireless Technology loading a contact list when the con- ® phone can be downloaded into the tact download feature has been Press key Select PHONE… -
Page 276
® are registered trademarks owned by Bluetooth SIG, Inc. and any use of such marks by Kia is under license. Other trademarks and trade names are those of their respective owners. A Bluetooth enabled cell phone is ®… -
Page 277
Features of your vehicle Downloading Contacts Auto Download (Contacts) 1) Connect/Disconnect Phone Connect/ disconnects currently Press key Select Press key Select SETUP SETUP selected phone [Phone] Select [Contacts Download] [Phone] Select [Auto Download] 2) Change Priority : Sets currently selected phone to highest connec- tion priority 3) Delete : Deletes the currently selected phone… -
Page 278
Features of your vehicle Audio Streaming Outgoing Volume Turning Bluetooth System Off Press key Select Press key Select Press the key Select SETUP SETUP SETUP [Phone] Select [Outgoing Volume] [Phone] Select [Bluetooth System [Phone] Select [Audio Streaming] Off] Once Bluetooth Wireless ®… -
Page 279
Features of your vehicle Skipping Prompt Messages VOICE RECOGNITION If prompt feedback is in [ON], then the system will say “Please say a While prompt message is being stat- command after the beep (BEEP)” ed Shortly press the key on the Using Voice Recognition •… -
Page 280
Contact Tips: “County Finance Department” instead of “CFD”). The Kia Voice Recognition System • If a name is not recognized from may have difficulty understanding While Voice Recognition is operating the contact list, change it to a more some accents or uncommon… -
Page 281
Features of your vehicle Illustration on using voice commands More Help Here are some examples of mode commands. • Starting voice command. You can say a radio type like ‘FM’, ‘AM’, or ‘Satellite’. Shortly pressing the key (under 0.8 seconds): You can also say a media source like ‘USB’, ‘My Music’, or ‘iPod’. -
Page 282: Voice Command List
Features of your vehicle Voice Command List • Common Commands: These commands can be used in most operations. (However a few commands may not be available during certain operations) Command Function Command Function • More Help Provides guidance on commands that can be When listening to the radio, displays the next ➟…
-
Page 283
Features of your vehicle Command Function Command Function SiriusXM (Satellite) Displays the selected SiriusXM screen. My Music Plays the music saved in My Music. AUX (Auxiliary) Plays the connected external device. SiriusXM Channel Plays the selected SiriusXM channel. Bluetooth ® Audio Plays the music saved in connected Bluetooth ®… -
Page 284
Features of your vehicle • FM/AM radio commands: Commands available during • Satellite radio commands: Commands that can be FM, AM radio operation. used while listening to Satellite Radio. Command Function Command Function Preset 1~6 Plays the broadcast station saved in Preset 1~6. Channel 0~223 Plays the selected Satellite Radio channel. -
Page 285
Features of your vehicle • USB commands: Commands available during USB • iPod Commands: Commands available during iPod ® ® operation. operation. Command Function Command Function Random Randomly plays the files within the current Random Randomly plays the songs within the current folder. -
Page 286
Features of your vehicle • Bluetooth ® • My Music Commands: Commands available during Wireless Technology Audio Commands: Commands available during Bluetooth My Music operation. Wireless ® Technology audio streaming from mobile phone oper- ation Command Operation. Command Function Random Randomly plays all saved files. -
Page 287
The Bluetooth ® word mark and logos are reg- istered trademarks owned by Bluetooth SIG, Inc. and any use of such marks by Kia is under license. A Bluetooth ® enabled cell phone is required to use Bluetooth ®… -
Page 288: Driving Your Vehicle
Driving your vehicle Before driving ……5-4 • Hill-start assist control (HAC) ….5-37 •…
-
Page 289
Economical operation ….. . 5-51 Vehicle load limit ……5-64 •… -
Page 290
If you hear a change in the sound of the exhaust or if you drive over something that strikes the underneath side of the vehicle, have the exhaust system checked as soon as possible by an authorized Kia dealer. • Do not run the engine in an enclosed area. -
Page 291: Before Driving
Driving your vehicle BEFORE DRIVING Before entering vehicle Necessary inspections CALIFORNIA PROPO- • Be sure that all windows, outside Fluid levels, such as engine oil, SITION 65 WARNING mirror(s), and outside lights are engine coolant, brake fluid, and Engine exhaust and a wide vari- clean.
-
Page 292: Before Starting
Driving your vehicle Before starting WARNING WARNING — Driving • Close and lock all doors. under the influence of All passengers must be proper- • Position the seat so that all con- alcohol or drugs ly belted whenever the vehicle trols are easily reached.
-
Page 293
Driving your vehicle WARNING • When you intend to park or stop the vehicle with the engine on, be careful not to depress the accelerator pedal for a long period of time. It may overheat the engine or exhaust system and ignite a fire. -
Page 294: Key Positions
Driving your vehicle KEY POSITIONS (IF EQUIPPED) ✽ ✽ NOTICE Illuminated ignition switch Ignition switch position If difficulty is experienced turning LOCK the ignition switch to the ACC posi- tion, turn the key while turning the steering wheel right and left to release the tension.
-
Page 295
Driving your vehicle (Continued) WARNING — Ignition The warning lights can be checked • Never reach for the ignition switch before the engine is started. This is switch, or any other controls the normal running position after the • Never turn the ignition switch through the steering wheel engine is started. -
Page 296: Starting The Engine
Driving your vehicle Starting the engine 4.In extremely cold weather (below CAUTION 0°F / -18°C) or after the vehicle has not been operated for several days, If the engine stalls while you are WARNING let the engine warm up without in motion, do not attempt to Always wear appropriate shoes depressing the accelerator.
-
Page 297: Engine Start/Stop Button
Driving your vehicle ENGINE START/STOP BUTTON (IF EQUIPPED) Illuminated ENGINE ENGINE START/STOP button CAUTION START/STOP button position You are able to turn off the engine (START/RUN) or vehicle power (ON), only when the vehi- cle is not in motion. In an emer- gency situation while the vehi- cle is in motion, you are able to Not illuminated…
-
Page 298
Driving your vehicle ACC(Accessory) START/RUN Amber Redish orange Not illuminated • With manual transaxle • With manual transaxle • With manual transaxle Press the engine start/stop button Press the engine start/stop button To start the engine, depress the when the button is in the OFF posi- when the button is in the ACC posi- clutch pedal and brake pedal, then tion without depressing the clutch… -
Page 299
Driving your vehicle ✽ ✽ NOTICE ✽ ✽ NOTICE (Continued) press ENGINE If you leave the ENGINE START/ • Never reach for the ENGINE START/STOP button without STOP button in the ACC or ON START/STOP button or any depressing the clutch pedal for man- position for a long time, the battery other controls through the ual transaxle vehicles or without… -
Page 300: Starting The Engine With A Smart Key
Driving your vehicle Starting the engine with a • Even if the smart key is in the vehi- WARNING smart key (if equipped) cle, if it is far away from you, the engine may not start. The engine will start, only when 1.Carry the smart key or leave it •…
-
Page 301
Driving your vehicle (Continued) • When the stop lamp fuse is blown, you can’t start the engine normal- ly. Replace the fuse with a new one. If it is not possible, you can start the engine by pressing the ENGINE START/STOP button for 10 seconds while it is in the ACC position. -
Page 302: Manual Transaxle
Driving your vehicle MANUAL TRANSAXLE (IF EQUIPPED) Manual transaxle operation CAUTION • The manual transaxle has 6 for- • When downshifting from fifth ward gears. gear to fourth gear, caution This shift pattern is imprinted on should be taken not to inad- the shift knob.
-
Page 303
Driving your vehicle Using the clutch • During cold weather, shifting may WARNING be difficult until the transaxle lubri- The clutch should be pressed all the cant has warmed up. This is nor- • Before leaving the driver’s way to the floor before shifting, then mal and not harmful to the seat, always set the parking released slowly. -
Page 304: Good Driving Practices
Driving your vehicle Downshifting Good driving practices • Exercise extreme caution when driving on a slippery surface. Be When you must slow down in heavy • Never take the vehicle out of gear especially careful when braking, traffic or while driving up steep hills, and coast down a hill.
-
Page 305
Driving your vehicle WARNING • Always buckle-up! In a colli- sion, an unbelted occupant is significantly more likely to be seriously injured or killed than a properly belted occupant. • Avoid high speeds when cor- nering or turning. • Do not make quick steering wheel movements, such as sharp lane changes or fast, sharp turns. -
Page 306: Automatic Transaxle
Driving your vehicle AUTOMATIC TRANSAXLE (IF EQUIPPED) Automatic transaxle operation The automatic transaxle has 6 for- ward speeds and one reverse speed. The individual speeds are selected automatically, depending on the position of the shift lever. ✽ ✽ NOTICE The first few shifts on a new vehicle, if the battery has been disconnected, may be somewhat abrupt.
-
Page 307
Driving your vehicle For smooth operation, depress the Transaxle ranges CAUTION brake pedal and the lock release but- The indicator in the instrument clus- ton when shifting from N (Neutral) to • To avoid damage to your ter displays the shift lever position a forward or reverse gear. -
Page 308
Driving your vehicle N (Neutral) CAUTION The wheels and transaxle are not The transaxle may be damaged engaged. The vehicle will roll freely if you shift into P (Park) while even on the slightest incline unless the vehicle is in motion. the parking brake or service brakes are applied. -
Page 309
Driving your vehicle Shift lock system Up (+) : Push the lever forward once (Continued) to shift up one gear. • To maintain the required levels of For your safety, the automatic vehicle performance and safety, Down (-) : Pull the lever backwards transaxle has a shift lock system the system may not execute cer- once to shift down one… -
Page 310
1.Carefully remove the cap covering the shift-lock access hole (1). 2.Insert a screwdriver into the access hole and press down on the screwdriver. 3.Move the shift lever. 4.Have your vehicle inspected by an authorized Kia dealer immediately. 5 23… -
Page 311: Good Driving Practices
Driving your vehicle Good driving practices • Always use the parking brake. Do WARNING depend placing • Never move the gear shift lever transaxle in P (Park) to keep the • Always buckle-up! In a colli- from P (Park) to any other position vehicle from moving.
-
Page 312
Driving your vehicle Moving up a steep grade from a WARNING standing start If your vehicle becomes stuck in To move up a steep grade from a snow, mud, sand, etc., then you standing start, depress the brake may attempt to rock the vehicle pedal, shift the shift lever to D free by moving it forward and (Drive). -
Page 313: Brake System
Driving your vehicle BRAKE SYSTEM Power brakes (Continued) WARNING — Brakes Your vehicle has power-assisted • Wet brakes may impair the • Do not drive with your foot brakes that adjust automatically vehicle’s ability to safely slow resting on the brake pedal. through normal usage.
-
Page 314
Driving your vehicle In the event of brake failure Disc brakes wear indicator WARNING — Brake wear If service brakes fail to operate while When your brake pads are worn and the vehicle is in motion, you can new pads are required, you will hear This brake wear warning sound make an emergency stop with the a high-pitched warning sound from… -
Page 315: Parking Brake — Hand Type
Driving your vehicle Releasing the parking brake Parking brake — Hand type CAUTION Applying the parking brake Driving with the parking brake applied will cause excessive brake pad and brake rotor wear. OPS053012 OPS053011 To release the parking brake, first apply the foot brake and pull up the To engage the parking brake, first parking brake lever slightly.
-
Page 316
Driving your vehicle If at all possible, cease driving the WARNING vehicle immediately. If that is not pos- sible, use extreme caution while • To prevent unintentional operating the vehicle and only con- movement when stopped and tinue to drive the vehicle until you leaving the vehicle, do not use can reach a safe location or repair the shift lever instead of the… -
Page 317: Anti-Lock Brake System (Abs)
Driving your vehicle Anti-lock brake system (ABS) The ABS continuously senses the (Continued) speed of the wheels. If the wheels During these conditions the are going to lock, the ABS system WARNING vehicle should be driven at repeatedly modulates the hydraulic reduced speeds: ABS (or ESC) will not prevent brake pressure to the wheels.
-
Page 318
ABS. prevent accidents resulting from and stays on, you may have a Contact an authorized Kia excessive speeds. problem with the ABS. In this dealer as soon as possible. case, however, your regular • On loose or uneven road surfaces, brakes will work normally. -
Page 319: Electronic Stability Control (Esc)
Driving your vehicle ✽ ✽ NOTICE Electronic stability control WARNING (ESC) When you jump start your vehicle Never drive too fast according because of a drained battery, the to the road conditions or too engine may not run as smoothly and quickly when cornering.
-
Page 320
Driving your vehicle ESC operation The Electronic Stability Control When operating (ESC) system is an electronic sys- When the ESC is in opera- ESC ON condition tem designed to help the driver main- tion, the ESC indicator light • When the ignition is turned tain vehicle control under adverse blinks. -
Page 321
Driving your vehicle ESC operation off ESC OFF state This car has 2 kinds of ESC off states. If the engine stops when ESC is off, ESC remains off. Upon restarting the engine, the ESC will automatically turn on again. OPS053022 OPS053023 •… -
Page 322
Driving your vehicle Indicator light ESC OFF usage CAUTION When driving ■ ESC indicator light Driving with varying tire or • ESC should be turned on for daily wheel sizes may cause the ESC driving whenever possible. system to malfunction. When •… -
Page 323: Vehicle Stability Management (Vsm)
Driving your vehicle ✽ ✽ NOTICE Vehicle stability management The VSM does not operate when: (VSM) • Driving on bank road such as gra- • When operating the vehicle on a dient or incline dynamometer, ensure that the This system provides further ESC is turned off (ESC OFF light…
-
Page 324: Hill-Start Assist Control (Hac)
2 seconds. ahead. Always hold the steer- authorized Kia dealer and have the ing wheel firmly while driving. system checked. WARNING • Your vehicle is designed to ✽…
-
Page 325: Good Braking Practices
If the braking action does engaged when parking to not return to normal, stop as soon avoid inadvertent movement as it is safe to do so and call an of the vehicle which can injure authorized Kia dealer for assis- occupants or pedestrians. tance.
-
Page 326
Driving your vehicle • Don’t coast down hills with the • If your vehicle is equipped with an • Under some conditions your park- vehicle out of gear. This is extreme- automatic transaxle, don’t let your ing brake can freeze in the ly hazardous. -
Page 327: Cruise Control System
Driving your vehicle CRUISE CONTROL SYSTEM (IF EQUIPPED) (Continued) WARNING • Be careful when driving • If the cruise control is left on downhill using the cruise con- (CRUISE indicator light in the trol system, which instrument cluster illuminat- increase the vehicle speed. ed), the cruise control can be switched accidentally.
-
Page 328: Cruise Control Switch
Driving your vehicle ✽ ✽ NOTICE Cruise control switch To set cruise control speed: • During normal cruise control operation, when the SET switch is activated or reactivated after applying the brakes, the cruise control will energize after approx- imately 3 seconds. The delay is normal.
-
Page 329: To Increase Cruise Control Set Speed
Driving your vehicle To increase cruise control set To decrease the cruising speed: speed: OPS053018 3. Push the SET — switch, and release it at the desired speed. OPS053019 OPS053018 The SET indicator light in the Follow either of these procedures: Follow either of these procedures: instrument cluster will illuminate.
-
Page 330: To Temporarily Accelerate With The Cruise Control On
Driving your vehicle Each of these actions will cancel To temporarily accelerate with To cancel cruise control, do cruise control operation (the SET the cruise control on: one of the following: indicator light in the instrument clus- If you want to speed up temporarily ter will go off), but it will not turn the when the cruise control is on, system off.
-
Page 331: To Resume Cruising Speed At More Than
Driving your vehicle To resume cruising speed at To turn cruise control off, do more than approximately 20 one of the following: mph (30 km/h): OPS053017 OPS053019 • Press the CRUISE button (the CRUISE indicator light in the If any method other than the instrument cluster will go off).
-
Page 332: Active Eco System
Driving your vehicle ACTIVE ECO SYSTEM (IF EQUIPPED) Active ECO operation • When the Active ECO is activated, Limitation of Active ECO oper- it will remain on until the Active ation: ECO button is pressed again. If the following conditions occur while Active ECO does not turn off when Active ECO is operating, the system the engine is restarted.
-
Page 333: Auto Stop
Driving your vehicle ISG (IDLE STOP AND GO) SYSTEM (IF EQUIPPED) Your vehicle may be equipped with Auto stop You must reach a speed of at least the ISG system, which reduces fuel 5 mph (8 km/h) since last idle stop. To stop the engine in idle stop consumption by automatically shut- The engine will stop and the green…
-
Page 334: Auto Start
Driving your vehicle Auto start To restart the engine from idle stop mode • Release the brake pedal. • Move the shift gear to the R (Reverse) position or the sports mode while depressing the brake pedal. OPS053014 The engine will start and the green OTF054124 AUTO STOP indicator ( ) on the…
-
Page 335: Condition Of Isg System Operation
Driving your vehicle The engine will also restart auto- Condition of ISG system oper- matically without the driver’s any ation actions if the following occurs: The ISG system will operate — When a certain amount of time has under the following condition: passed with the climate control sys- — The driver’s seat belt is fastened.
-
Page 336: Isg System Deactivation
Driving your vehicle ISG system deactivation • If you press the ISG OFF button again, the system will be activated and the light on the ISG OFF but- ton will turn off. OPS053026 OPS053014 • If the ISG system does not meet the operation condition, the ISG system is deactivated.
-
Page 337: Isg System Malfunction
Turn the ignition switch to the rectly, please contact an author- LOCK (OFF) position or remove ized Kia dealer as soon as possi- the key from the ignition com- ble. pletely before performing work on the vehicle in the engine area.
-
Page 338: Economical Operation
Driving your vehicle ECONOMICAL OPERATION Your vehicle’s fuel economy depends • Don’t «ride» the brake or clutch • Keep your vehicle in good condi- mainly on your style of driving, where pedal. This can increase fuel con- tion. For better fuel economy and reduced maintenance costs, main- you drive and when you drive.
-
Page 339
Driving your vehicle • Remember, your vehicle does not • Use your air conditioning sparingly. WARNING — Engine off require extended warm-up. After The air conditioning system is the engine has started, allow the operated by engine power so your during engine to run for 10 to 20 seconds fuel economy is reduced when you… -
Page 340: Special Driving Conditions
Driving your vehicle SPECIAL DRIVING CONDITIONS Hazardous driving conditions • If stalled in snow, mud, or sand, Reducing the risk of a rollover use second gear. Accelerate slow- When hazardous driving conditions This multi-purpose passenger vehi- ly to avoid spinning the drive are encountered such as water, cle is defined as a Crossover Utility wheels.
-
Page 341: Rocking The Vehicle
• Avoid sharp turns or abrupt CAUTION combination not recommended maneuvers. by Kia for off road driving, you Prolonged rocking may cause • In a rollover crash, an unbelt- should not use these tires for engine overheating, transaxle ed person is significantly highway driving.
-
Page 342: Smooth Cornering
Driving your vehicle Smooth cornering WARNING WARNING — Spinning tires If your vehicle becomes stuck in Do not spin the wheels, espe- snow, mud, sand, etc., then you may attempt to rock the vehicle cially at speeds more than 35 free by moving it forward and mph (56 km/h).
-
Page 343: Driving At Night
Driving your vehicle Driving at night • Adjust your mirrors to reduce the Driving in the rain glare from other driver’s head- lights. • Keep your headlights clean and properly aimed. (On vehicles not equipped with the automatic head- light aiming feature.) Dirty or improperly aimed headlights will make it much more difficult to see at night.
-
Page 344: Driving In Flooded Areas
Driving your vehicle • If your tires are not in good condi- Driving off-road WARNING tion, making a quick stop on wet Drive carefully off-road because your pavement can cause a skid and • Underinflated or overinflated vehicle may be damaged by rocks or possibly lead to an accident.
-
Page 345
Driving your vehicle Fuel, engine coolant and engine High speed travel consumes more fuel than urban motoring. Do not for- get to check both the engine coolant and engine oil. Drive belt A loose or damaged drive belt may result in overheating of the engine. -
Page 346: Winter Driving
Driving your vehicle WINTER DRIVING Snow tires Snowy or icy conditions If you mount snow tires on your vehi- To drive your vehicle in deep snow, it cle, make sure they are radial tires of may be necessary to use snow tires the same size and load range as the or to install tire chains on your tires.
-
Page 347
Driving your vehicle Tire chains When using tire chains, install them CAUTION on the front tires only. • Make sure the snow chains are the correct size and type for your tires. Incorrect snow chains can cause damage to the vehicle body and suspen- sion and may not be covered by your vehicle manufacturer warranty. -
Page 348
Driving your vehicle Chain installation CAUTION WARNING — Tire chains When installing chains, follow the • Chains that are the wrong size manufacturer’s instructions • The chains or improperly installed can mount them as tightly as you can. adversely affect vehicle han- damage your vehicle’s brake dling. -
Page 349: Use High Quality Ethylene Glycol Coolant
Winter puts additional burdens on er anti-freeze is available from an the battery system. Visually inspect authorized Kia dealer and most auto the battery and cables as described parts outlets. Do not use engine in section 7. The level of charge in…
-
Page 350: Don’t Let Your Parking Brake Freeze
Driving your vehicle TRAILER TOWING Don’t let your parking brake Carry emergency equipment We do not recommend using this freeze vehicle for trailer towing. Depending on the severity of the Under some conditions your parking weather, you should carry appropri- brake can freeze in the engaged ate emergency equipment.
-
Page 351: Vehicle Load Limit
Driving your vehicle VEHICLE LOAD LIMIT Tire and loading information label OPS053100N/OPS053104N/OPS053102N/OPS053101N/OPS053103N/OPS053105N The label located on the driver’s door sill gives the original tire size, cold tire pressures recom- mended for your vehicle, the number of people that can be in your vehicle and vehicle capacity weight.
-
Page 352
Driving your vehicle Vehicle capacity weight: Seating capacity: Towing capacity: We do not recommend using this 827 lbs. (375 kg) Total — 5 persons (Front seat : 2 persons, vehicle for trailer towing. Vehicle capacity weight is the maxi- Rear seat : 3 persons) mum combined weight of occupants and cargo. -
Page 353
Driving your vehicle Cargo capacity: Steps for determining correct 6.If your vehicle will be towing a trail- load limit er, load from your trailer will be The cargo capacity of your vehicle transferred to your vehicle. Consult will increase or decrease depending 1.Locate the statement «The com- this manual to determine how this on the weight and the number of… -
Page 354
Driving your vehicle Example 1 Example 2 Example 3 C190F01JM C190F02JM C190F03JM Item Description Total Item Description Total Item Description Total Vehicle Capacity 1400 lbs Vehicle Capacity 1400 lbs Vehicle Capacity 1400 lbs Weight (635 kg) Weight (635 kg) Weight (635 kg) Subtract Occupant Subtract Occupant… -
Page 355: Certification Label
Driving your vehicle Certification label To find out the actual loads on your (Continued) front and rear axles, you need to go • Do not load your vehicle any to a weigh station and weigh your heavier than the GVWR, either vehicle.Your dealer can help you with the maximum front or rear this.
-
Page 356
Driving your vehicle CAUTION WARNING WARNING — Loose cargo • Overloading your vehicle may • Overloading your vehicle can Items you carry inside your cause damage. Repairs would cause heat buildup in your vehicle can strike and injure not be covered by your war- vehicle’s tires and possible occupants in a sudden stop or ranty. -
Page 357: Vehicle Weight Glossary
Driving your vehicle VEHICLE WEIGHT GLOSSARY This section will guide you in the Cargo weight GVWR proper loading of your vehicle and/or (Gross vehicle weight rating) This figure includes all weight added trailer, to keep your loaded vehicle to the Base Curb Weight, including This is the maximum allowable weight within its design rating capa- cargo and optional equipment.
-
Page 358: What To Do In An Emergency
What to do in an emergency Road warning ……6-2 If you have a flat tire (with Tire Mobility Kit) . . 6-22 •…
-
Page 359: Road Warning
What to do in an emergency ROAD WARNING Hazard warning flasher Depress the flasher switch with the ignition switch in any position. The flasher switch is located in the center console switch panel. All turn signal lights will flash simultaneously. •…
-
Page 360: In Case Of An Emergency While Driving
Be sure they all get out on If you have a flat tire while vehicle will not start, contact an the side of the vehicle that is away authorized Kia dealer or seek other driving from traffic. qualified assistance.
-
Page 361: If The Engine Will Not Start
4.If the engine still does not start, call charged. an authorized Kia dealer or seek 4.Check the starter connections to other qualified assistance. be sure they are securely tight- ened.
-
Page 362: Emergency Starting
What to do in an emergency EMERGENCY STARTING Jump starting Jumper Cables WARNING — Battery Jump starting can be dangerous if • Keep all flames or sparks done incorrectly. Therefore, to avoid away from the battery. The harm to yourself or damage to your battery produces hydrogen vehicle or battery, follow these jump gas which may explode if…
-
Page 363: Push-Starting
If the cause of your battery discharg- from the battery (4). Do not con- ing is not apparent, you should have nect it to or near any part that your vehicle checked by an author- moves when the engine is cranked. ized Kia dealer.
-
Page 364: If The Engine Overheats
If overheating happens again, running or the steaming has 5.If the water pump drive belt is bro- call an authorized Kia dealer for stopped. If there is no visible loss ken or engine coolant is leaking assistance.
-
Page 365: Tire Pressure Monitoring System (Tpms)
What to do in an emergency TIRE PRESSURE MONITORING SYSTEM (TPMS) As an added convenience feature, Your vehicle has also been equipped your vehicle has been equipped with with a TPMS malfunction indicator to a tire pressure monitoring system indicate when the system is not (TPMS) that illuminates a low tire operating properly.
-
Page 366
3 seconds, take your vehicle If the telltale illuminates, immediately to your nearest authorized Kia deal- reduce your speed, avoid hard cor- CAUTION er and have the system checked. nering and anticipate increased stop- In winter or cold weather, the ping distances. -
Page 367: Tpms Malfunction Indicator
Monitoring System. Have the system police stations, government Continued driving on low pres- checked by an authorized Kia dealer and public offices, broadcast- sure tires can cause the tires to as soon as possible to determine the ing stations, military installa- overheat and fail.
-
Page 368: Changing A Tire With Tpms
TPMS sensor on the replaced Kia dealer as soon as possible or spare wheel should be initiated After you replace the low pressure replace the flat tire with the spare…
-
Page 369
What to do in an emergency You may not be able to identify a low WARNING WARNING — TPMS — Protecting tire by simply looking at it. Always TPMS use a good quality tire pressure • The TPMS cannot alert you to gauge to measure the tire’s inflation severe and sudden tire dam- Tampering with, modifying, or… -
Page 370
What to do in an emergency This device complies with Part 15 of the FCC rules. Operation is subject to the following two conditions: 1.This device may not cause harmful interference, and 2.This device must accept any inter- ference received, including inter- ference that may cause undesired operation. -
Page 371: If You Have A Flat Tire (With Spare Tire)
What to do in an emergency IF YOU HAVE A FLAT TIRE Jacking instructions Jack and tools (if equipped) WARNING — Changing The jack is provided for emergency tires tire changing only. • Never attempt vehicle repairs To prevent the jack from “rattling” in the traffic lanes of a public while the vehicle is in motion, store it road or highway.
-
Page 372: Removing And Storing The Spare Tire
What to do in an emergency Removing and storing the Changing tires (Continued) spare tire (if equipped) • The vehicle can easily roll off jack causing serious injury or death. No person should place any portion of their body under a vehicle that is supported only by a jack;…
-
Page 373
What to do in an emergency WARNING — Changing a tire • To prevent vehicle movement while changing a tire, always set the parking brake fully, and always block the wheel diagonally opposite the wheel being changed. • We recommend that wheels of the vehicle be 1VQA4023… -
Page 374
What to do in an emergency WARNING — Jack location To reduce the possibility of injury, be sure to use only the jack provided with the vehicle and in the correct jack position; never use any other part of the vehicle for jack support. -
Page 375
What to do in an emergency 9.Loosen the wheel nuts and remove 10. To install the wheel, hold it on the WARNING them with your fingers. Slide the studs, put the wheel nuts on the wheel off the studs and lay it flat so studs and tighten them finger Wheels may have sharp edges. -
Page 376
If in doubt, consult an author- they are all tight. Then double-check ized Kia dealer. each nut for tightness. After changing wheels, have an authorized Kia deal- er tighten the wheel nuts to their proper torque as soon as possible. Wheel nut tightening torque: 65~79 lb·ft (9~11 kg·m) -
Page 377
What to do in an emergency Important — use of compact spare WARNING WARNING — Wheel studs tire (if equipped) If the studs are damaged, they The compact spare tire is for Your vehicle is equipped with a com- may lose their ability to retain emergency use only. -
Page 378
What to do in an emergency When using a compact spare tire, • Do not take this vehicle through an • The compact spare tire should not observe the following precautions: automatic vehicle wash while the be used on any other wheels, nor compact spare tire is installed. -
Page 379: Introduction
Have your tire repaired as soon fortably seals most punctures in a inspected by an authorized Kia deal- as possible. The tire may loose passenger car tire caused by nails er as soon as possible.
-
Page 380
• Use of the Tire Mobility Kit may not be effective for tire damage larger than approximately 0.24 in (6 mm). Please contact the nearest Kia dealership if the tire cannot be made roadworthy with the Tire Mobility Kit. -
Page 381: Components Of The Tire Mobility Kit
What to do in an emergency 9. Hose to connect compressor and Components of the Tire Mobility Kit sealant bottle or compressor and wheel Connectors, cable and connection hose are stored in the compressor housing. WARNING — Expired sealant Do not use the Tire sealant after the sealant has expired (i.e.
-
Page 382: Using The Tire Mobility Kit
What to do in an emergency Using the Tire Mobility Kit 1. Detach the speed restriction label (0) from the sealant bottle (1), and place it in a highly visible place inside the vehicle such as on the steering wheel to remind the driv- er not to drive too fast.
-
Page 383: Distributing The Sealant
What to do in an emergency 8. With the engine start/stop button 9. Switch off the compressor. Distributing the sealant position on or ignition switch posi- 10. Detach the hoses from the 11. Immediately drive approximately tion on, switch on the compressor sealant bottle connector and 4~6miles (7~10km or, about and let it run for approximately 5~7…
-
Page 384: Notes On The Safe Use Of The Tire Mobility Kit
: Switch on the compressor, approved by Kia, the tire pres- • Do not remove any foreign objects- position I. To check the current sure sensors may be damaged such as nails or screws -that have inflation pressure setting, briefly by sealant.
-
Page 385: Technical Data
What to do in an emergency • Never leave the TMK unattended Technical Data while it is being used. System voltage: DC 12 V Working voltage: DC 10 — 15 V • Do not leave the compressor run- Amperage rating: max. 15 A ning for more than 10 min.
-
Page 386: Towing
OXM069028 If emergency towing is necessary, we recommend having it done by an authorized Kia dealer or a commer- cial tow-truck service. Proper lifting and towing procedures are neces- sary to prevent damage to the vehi- cle. The use of wheel dollies or flatbed is recommended.
-
Page 387: Removable Towing Hook (Front)
What to do in an emergency When towing your vehicle in an Removable towing hook (front) emergency without wheel dollies : (if equipped) 1. Set the ignition switch in the ACC position. 2. Place the transaxle shift lever in N (Neutral).
-
Page 388: Emergency Towing
OPS063012 • The drivers of both vehicles should communicate with each other fre- If towing is necessary, we recom- quently. mend you to have it done by an authorized Kia dealer or a com- mercial tow truck service. 6 31…
-
Page 389
• Before emergency towing, check easy visibility. Contact an authorized Kia that the hook is not broken or dam- aged. dealer or a commercial tow • Drive carefully so that the towing truck service for assistance. -
Page 390
What to do in an emergency Emergency towing precautions CAUTION — Automatic • Turn the ignition switch to ACC so transaxle the steering wheel isn’t locked. • If the car is being towed with • Place the transaxle shift lever in N all four wheels on the ground, (Neutral). -
Page 391: Maintenance
Maintenance Engine compartment ……7-3 Wiper blades ……7-40 Maintenance services .
-
Page 392
• License plate light bulb replacement… . . 7-86 • Interior light bulb replacement ….7-87 Appearance care. -
Page 393: Engine Compartment
Maintenance ENGINE COMPARTMENT ■ ■ 1.6L GDI 1. Windshield washer fluid reservoir 2. Engine oil filler cap 3. Engine oil dipstick 4. Engine coolant reservoir 5. Radiator cap 6. Brake/clutch fluid reservoir 7. Positive battery terminal 8. Negative battery terminal 9.
-
Page 394
Maintenance ■ ■ 2.0L GDI 1. Windshield washer fluid reservoir 2. Engine oil filler cap 3. Engine oil dipstick 4. Engine coolant reservoir 5. Radiator cap 6. Brake/clutch fluid reservoir 7. Positive battery terminal 8. Negative battery terminal 9. Fuse box 10. -
Page 395: Maintenance Services
Kia dealer meets Kia’s high service tion procedures. quality standards and receives tech- Maintenance Service and Record nical support from Kia in order to pro- Retention are the owner’s responsi- Should you have any doubts con- vide you with a high level of service bility.
-
Page 396: Owner Maintenance Precautions
As explained earlier in this section, maintenance procedures. If several procedures can be done only you lack sufficient knowledge by an authorized Kia dealer with spe- and experience or the proper cial tools. tools and equipment to do the work, have it done by an ✽…
-
Page 397: Owner Maintenance
• Check the engine oil level. ized Kia dealer at the frequencies exhaust fumes in the vehicle. indicated to help ensure safe, • Check the coolant level in the •…
-
Page 398
Maintenance At least monthly: At least once a year: • Check the coolant level in the • Clean the body and door drain engine coolant reservoir. holes. • Check the operation of all exterior • Lubricate the door hinges and lights, including the stoplights, turn checks, and hood hinges. -
Page 399: Scheduled Maintenance Service
Maintenance SCHEDULED MAINTENANCE SERVICE If your vehicle is operated under the Follow the Normal Maintenance above conditions, should Schedule if the vehicle is usually inspect, replace or refill more fre- operated where none of the following conditions apply. If any of the follow- quently than the following Normal ing conditions apply, follow the Maintenance Schedule.
-
Page 400
Additives are avail- starting problem etc, replace the fuel filter immediately able from your authorized Kia dealer along with infor- regardless of maintenance schedule and consult an mation on how to use them. Do not mix other additives. -
Page 401
Maintenance NORMAL MAINTENANCE SCHEDULE (CONT.) 7,500 miles or 6 months (Continued) ❑ Inspect air cleaner filter ❑ Replace engine oil and filter ❑ Inspect air conditioning compressor, air conditioner refriger- (Every 7,500 miles or 12 months) ant and performance (if equipped) ❑… -
Page 402
Maintenance NORMAL MAINTENANCE SCHEDULE (CONT.) 15,000 miles or 12 months (Continued) ❑ Inspect air cleaner filter ❑ Add fuel additive * ❑ Inspect air conditioning compressor, air conditioner refriger- (Every 7,500 miles or 12 months) ant and performance (if equipped) ❑… -
Page 403
Maintenance NORMAL MAINTENANCE SCHEDULE (CONT.) 30,000 miles or 24 months (Continued) ❑ Inspect air conditioning compressor, air conditioner refrig- 12) Parking brakes erant and performance (if equipped) 13) Steering operation and linkage 14) Suspension mounting bolts ❑ Inspect cooling system * ❑… -
Page 404
Maintenance NORMAL MAINTENANCE SCHEDULE (CONT.) 45,000 miles or 36 months (Continued) ❑ Replace climate control air filter (if equipped) ❑ Inspect air cleaner filter ❑ Replace engine oil and filter ❑ Inspect air conditioning compressor, air conditioner refrig- (Every 7,500 miles or 12 months) erant and performance (if equipped) ❑… -
Page 405
Maintenance NORMAL MAINTENANCE SCHEDULE (CONT.) 60,000 miles or 48 months (Continued) ❑ Inspect air conditioning compressor, air conditioner refrig-Exhaust pipe and muffler 9) Front suspension ball joints erant and performance (if equipped) 10) Fuel tank, cap, lines and hoses ❑…
-
Page 406
Maintenance NORMAL MAINTENANCE SCHEDULE (CONT.) 75,000 miles or 60 months (Continued) ❑ Inspect air cleaner filterExhaust pipe and muffler 9) Front suspension ball joints ❑ Inspect air conditioning compressor, air conditioner refrig- 10) Fuel tank, cap, lines and hoses erant and performance (if equipped) 11) Lubricate all locks and hinges ❑…
-
Page 407
Maintenance NORMAL MAINTENANCE SCHEDULE (CONT.) 90,000 miles or 72 months (Continued) ❑ Inspect air conditioning compressor, air conditioner refriger-Exhaust pipe and muffler ant and performance (if equipped) 9) Front suspension ball joints ❑ Inspect cooling system * 10) Fuel tank, cap, lines and hoses ❑…
-
Page 408
Maintenance NORMAL MAINTENANCE SCHEDULE (CONT.) 105,000 miles or 84 months (Continued) ❑ Inspect air cleaner filter 11) Lubricate all locks and hinges ❑ Inspect air conditioning compressor, air conditioner refrig- 12) Parking brakes 13) Steering operation and linkage erant and performance (if equipped) 14) Suspension mounting bolts ❑… -
Page 409
Maintenance NORMAL MAINTENANCE SCHEDULE (CONT.) 120,000 miles or 96 months (Continued) ❑ Inspect air conditioning compressor, air conditioner refrig- 10) Fuel tank, cap, lines and hoses erant and performance (if equipped) 11) Lubricate all locks and hinges 12) Parking brakes ❑… -
Page 410
Maintenance NORMAL MAINTENANCE SCHEDULE (CONT.) 135,000 miles or 108 months (Continued) ❑ Inspect air cleaner filter ❑ Replace climate control air filter (if equipped) ❑ Inspect air conditioning compressor, air conditioner refrig- ❑ Replace engine oil and filter erant and performance (if equipped) (Every 7,500 miles or 12 months) ❑… -
Page 411
Maintenance NORMAL MAINTENANCE SCHEDULE (CONT.) 150,000 miles or 120 months (Continued) ❑ Inspect air conditioning compressor, air conditioner refrig-Exhaust pipe and muffler erant and performance (if equipped) 9) Front suspension ball joints 10) Fuel tank, cap, lines and hoses ❑…
-
Page 412: Maintenance Under Severe Usage Conditions
Maintenance MAINTENANCE UNDER SEVERE USAGE CONDITIONS The following items must be serviced more frequently on cars normally used under severe driving conditions. Refer to the chart below for the appropriate maintenance intervals. R : Replace I : Inspect and, after inspection, clean, adjust, repair or replace if necessary MAINTENANCE MAINTENANCE DRIVING…
-
Page 413: Explanation Of Scheduled Maintenance Items
Have an authorized Kia dealer ditions, more frequent oil and filter starting. If an excessive amount of replace any damaged or leaking changes are required.
-
Page 414
Vacuum crankcase ventilation Air cleaner filter Cooling system hoses (if equipped) A Genuine Kia air cleaner filter is Check the cooling system compo- Inspect the surface of hoses for evi- recommended when the filter is nents, such as the radiator, coolant dence of heat and/or mechanical replaced. -
Page 415
For more information on checking ✽ ✽ NOTICE the pads or lining wear limit, we rec- Brake/clutch (if equipped) fluid ommend you to refer to the Kia web- Automatic transaxle fluid color is Check the brake fluid level in the site. -
Page 416
Maintenance Suspension mounting bolts Power steering pump, belt and Air conditioning refrigerant hoses (if equipped) Check the suspension connections Check the air conditioning lines and for looseness or damage. Retighten Check the power steering pump and connections for leakage and dam- to the specified torque. -
Page 417: Engine Oil
Maintenance ENGINE OIL ■ Type A Checking the engine oil level 3. Turn the engine off and wait for a few minutes (about 5 minutes) for ■ Type A the oil to return to the oil pan. 4. Pull the dipstick out, wipe it clean, and re-insert it fully.
-
Page 418: Changing The Engine Oil And Filter
Changing the engine oil and (Refer to “Recommended lubricants filter and capacities” in chapter 8.) Have engine oil and filter changed by an authorized Kia dealer according to the Maintenance Schedule at the beginning of this chapter. CALIFORNIA PROPO- SITION 65 WARNING…
-
Page 419: Engine Coolant
Maintenance ENGINE COOLANT The high-pressure cooling system Checking the coolant level Turn the engine off and wait until it has a reservoir filled with year round cools down. Use extreme care when antifreeze coolant. The reservoir is removing the radiator cap. Wrap a WARNING filled at the factory.
-
Page 420
Bring the level to F, but do not over- fill. If frequent additions are required, see an authorized Kia dealer for a cooling system inspection. -
Page 421: Changing The Coolant
Maintenance For mixture percentage, refer to the Changing the coolant following table. Have the coolant changed by an authorized Kia dealer according to Mixture Percentage the Maintenance Schedule at the Ambient (volume) beginning of this chapter. Temperature Antifreeze Water 5°F (-15°C) CAUTION -13°F (-25°C)
-
Page 422: Brake/Clutch Fluid
Check the fluid level in the reservoir brake/clutch* system checked by an periodically. The fluid level should be authorized KIA dealer. between MAX and MIN marks on the side of the reservoir. Use only the specified brake/clutch* Before removing the reservoir cap fluid.
-
Page 423
Maintenance CAUTION Brake/clutch* WARNING — Brake/ fluid clutch* fluid Do not allow brake/clutch* fluid When changing and adding to contact the vehicle’s body brake/clutch* fluid, handle it paint, as paint damage will carefully. Do not let it come in result. contact with your eyes. -
Page 424: Washer Fluid
Maintenance WASHER FLUID Checking the washer fluid Check the fluid level in the washer WARNING — Coolant level fluid reservoir and add fluid if neces- sary. Plain water may be used if • Do not use radiator coolant or ■ Type A washer fluid available.
-
Page 425: Parking Brake
If the stroke is more or less than specified, have the parking brake adjusted by an authorized Kia dealer. Stroke : 6~8 “clicks’’ at a force of 44 lbs (20 kg, 196 N).
-
Page 426: Air Cleaner
Maintenance AIR CLEANER Filter replacement OAM079044 OAM079046 1. Loosen the air cleaner cover 2. Wipe the inside of the air cleaner. OAM079043 attaching clips and open the cover. 3. Replace the air cleaner filter. It must be replaced when necessary, 4.
-
Page 427
• Use a Kia genuine part. Use of non-genuine parts could dam- age the air flow sensor. 7 37… -
Page 428: Climate Control Air Filter
Maintenance CLIMATE CONTROL AIR FILTER (IF EQUIPPED) Filter inspection The climate control air filter should be replaced according to the mainte- nance schedule. If the vehicle is operated in severely air-polluted cities or on dusty rough roads for a long period, it should be inspected more frequently and replaced earlier.
-
Page 429
Maintenance OPS073010 OPS073011 3. Remove the climate control air fil- 4. Replace the climate control air filter. ter case by pulling out both sides 5. Reassemble in the reverse order of the cover. of disassembly. ✽ ✽ NOTICE When replacing the climate control filter install properly. -
Page 430: Wiper Blades
Maintenance WIPER BLADES Blade inspection Contamination of either the wind- Blade replacement shield or the wiper blades with for- When the wipers no longer clean eign matter can reduce the effective- adequately, the blades may be worn ness of the windshield wipers. or cracked, and require replacement.
-
Page 431
Maintenance Front windshield wiper blade 1JBA7037 OHM078059 Type B 1LDA5023 1. Raise the wiper arm. Type A 1. Raise the wiper arm and turn the CAUTION wiper blade assembly to expose the plastic locking clip. Do not allow the wiper arm to fall against the windshield, since it may chip or crack the CAUTION… -
Page 432
Maintenance Rear window wiper blade OHM078060 OHM078061 2. Lift up the wiper blade clip. Then 3. Install the new blade assembly in OHM078062 pull down the blade assembly and the reverse order of removal. 1. Raise the wiper arm and pull out remove it. -
Page 433
3. Make sure the blade assembly is installed firmly by trying to pull it slightly. To prevent damage to the wiper arms or other components, have an authorized Kia dealer replace the wiper blade. 7 43… -
Page 434: Battery
Maintenance BATTERY For best battery service (Continued) WARNING Battery dan- gers If any electrolyte gets into your eyes, flush Always read the follow- your eyes with clean ing instructions carefully water for at least 15 min- when handling a battery. utes and get immediate Keep lighted cigarettes medical attention.
-
Page 435: Battery Recharging
Maintenance Battery recharging (Continued) CALIFORNIA PROPO- Your vehicle has a maintenance-free, SITION 65 WARNING An inappropriately dis- calcium-based battery. posed battery can be Battery posts, terminals, and • If the battery becomes discharged harmful to the environ- related accessories contain in a short time (because, for exam- ment and human health.
-
Page 436: Reset Items
Maintenance Reset items (Continued) WARNING Recharging Items should be reset after the bat- 1. Turn off the battery charger battery tery has been discharged or the bat- main switch. When recharging the battery, tery has been disconnected. 2. Unhook the negative clamp observe the following precau- •…
-
Page 437: Tires And Wheels
If a tire frequently needs refilling, Recommended cold tire infla- have it checked by an author- tion pressures ized Kia dealer. • Overinflation produces All tire pressures (including the OXM079101L harsh ride, excessive wear at…
-
Page 438: Checking Tire Inflation Pressure
Maintenance Checking tire inflation pres- CAUTION CAUTION Tire pressure sure • Warm tires normally exceed Always observe the following: Check your tires once a month or recommended cold tire pres- • Check tire pressure when the more. sures by 4 to 6 psi (28 to 41 tires are cold.
-
Page 439: Tire Rotation
Refer to “Tire and wheels” in chapter • Remember to check the pres- sure of your spare tire. Kia recommends that you check the spare every time you check the pressure of the other tires on your vehicle.
-
Page 440: Wheel Alignment And Tire Balance
Maintenance Disc brake pads should be inspected Wheel alignment and tire bal- Without a spare tire for wear whenever tires are rotated. ance The wheels on your vehicle were ✽ ✽ NOTICE aligned and balanced carefully at the factory to give you the longest tire life Rotate radial tires that have an and best overall performance.
-
Page 441: Tire Replacement
• Replace tires that are worn, • Wheels that do not meet Kia’s show uneven wear, or are specifications may fit poorly damaged. Worn tires can and result in damage to the…
-
Page 442: Wheel Replacement
Maintenance Compact spare tire replacement Wheel replacement Tire traction A compact spare tire has a shorter When replacing the metal wheels for Tire traction can be reduced if you tread life than a regular size tire. any reason, make sure the new drive on worn tires, tires that are Replace it when you can see the wheels are equivalent to the original…
-
Page 443: Tire Sidewall Labeling
Maintenance 2. Tire size designation Tire sidewall labeling 108 — Load Index, a numerical code associated with the maximum A tire’s sidewall is marked with a tire load the tire can carry. size designation. You will need this information when selecting replace- T — Speed Rating Symbol.
-
Page 444
Maintenance 3. Checking tire life (TIN : Tire Tire speed ratings WARNING — Tire age Identification Number) The chart below lists many of the dif- ferent speed ratings currently being Tires degrade over time, even Any tires that are over 6 years old, used for passenger vehicle tires. -
Page 445
Maintenance 4. Tire ply composition and mate- 6. Maximum load rating Tread wear rial This number indicates the maximum The tread wear grade is a compara- load in kilograms and pounds that tive rating based on the wear rate of The number of layers or plies of rub- can be carried by the tire. -
Page 446
Maintenance Traction — AA, A, B & C Temperature -A, B & C WARNING — Tire The traction grades, from highest to The temperature grades are A (the tempera- lowest, are AA, A, B and C. Those highest), B and C representing the ture grades represent the tire’s ability to tire’s resistance to the generation of… -
Page 447
Maintenance Tire terminology and definitions Cold Tire Pressure: The amount of Intended Outboard Sidewall: The side of an asymmetrical tire, that air pressure in a tire, measured in Air Pressure: The amount of air pounds per square inch (psi) or kilo- must always face outward when inside the tire pressing outward on pascals (kPa) before a tire has built… -
Page 448
Maintenance Occupant Distribution: Designated Speed Rating: An alphanumeric Vehicle Maximum Load on the Tire: Load on an individual tire due to seating positions. code assigned to a tire indicating the maximum speed at which a tire can curb and accessory weight plus Outward Facing Sidewall: The side operate. -
Page 449: Snow Tires
Maintenance All season tires Snow tires Tire chains Kia specifies all season tires on If you equip your vehicle with snow Tire chains, if necessary, should be some models to provide good per- tires, they should be the same size installed on the front wheels.
-
Page 450
Maintenance Radial-ply tires Longer wearing tires can be more WARNING — Snow or ice susceptible to irregular tread wear. It Radial-ply tires provide improved is very important to follow the tire • When driving on roads cov- tread life, road hazard resistance and rotation interval shown in this section ered with snow or ice, drive at smoother high speed ride. -
Page 451: Low Aspect Ratio Tire
— If the tire is impacted, we rec- ommend that you inspect the tire condition or contact an authorized Kia dealer. — To prevent damage to the tire, inspect the tire condition and pressure every 3,000km.
-
Page 452: Fuses
(-) terminal from indicates an electrical problem. Avoid the battery in a safe place. using the system involved and imme- Normal diately consult an authorized Kia dealer. OPS073054 Three kinds of fuses are used: micro mini type for lower amperage rating, cartridge type, and multi fuse for higher amperage ratings.
-
Page 453
2. Open the fuse panel cover. with bolts or nuts are blown, we recommend that you con- sult with an authorized Kia WARNING dealer. Be careful not to hurt your • Do not input any other objects… -
Page 454
(or smart key) may not engine compartment fuse panel. work properly. 5. Push in a new fuse of the same rating, and make sure it fits tightly in the clips. If it fits loosely, consult an authorized Kia dealer. -
Page 455
4. Push in a new fuse of the same rating, and make sure it fits tightly in the clips. If it fits loosely, consult an authorized Kia dealer. 7 65… -
Page 456
3. Remove the nuts shown in the pic- ture above. 4. Replace the fuse with a new one of the same rating. 5. Reinstall in the reverse order of removal. ✽ ✽ NOTICE If the multi fuse is blown, consult an authorized Kia dealer. -
Page 457: Fuse/Relay Panel Description
Maintenance Fuse/relay panel description OPS073014 Inside the fuse/relay panel covers, you can find the fuse/relay label describing fuse/relay name and capacity. ✽ ✽ NOTICE OPS073018 Not all fuse panel descriptions in this manual may be applicable to your vehicle. It is accurate at the time of printing.
-
Page 458
Maintenance Inner fuse panel Description Fuse rating Protected component POWER OUTLET 2 P_OUTLET O_S_MIRR_SW, AMP, AUDIO/UVO/AVN 4.0_HEAD UNIT, BCM, TMU, MOOD_LAMP_UNIT, SMK_UNIT, LDC_AMP(400W), LDC_AMP(200W) POWER OUTLET 1 C/LIGHT, REAR_P_OUTLET BCM(DAY_RUNNNIG_LIGHT_LAMP_POWER) SUNROOF_MOTOR, LUGGAGE_PORTABLE_LAMP(CHARGE_POWER), SEAT_EXTN_DRV(HEAT- MODULE 6 7.5A ED), REAR_SEAT(IGN2) WIPER FRT 2 FRONT_WIPER_MOTOR(POWER), FRONT_WIPER_RLY(LOW) REAR_WIPER_MOTOR, MULTI_FUNCTION_SW(WIPER), REAR_WIPER_RLY, WIPER RR… -
Page 459
Maintenance Description Fuse rating Protected component T/GATE OPEN T/GATE_OPEN_RLY(T/GATE_LATCH_MOTOR), T/GATE_OPEN_RLY_COIL S/HEATER FRT FRONT_SEAT_EXTN(HEATED_POWER) DOOR_LOCK_RLY, DOOR_LOCK_RLY_COIL, DOOR_UNLOCK_RLY_COIL, DEAD_LOCK_RLY, DR LOCK DEAD_LOCK_RLY_COIL A/BAG IND 7.5A CLUSTER A/BAG ACU, WCS_ECU MODULE 4 I_S_MIRR_ECM, AUTO_HLLD_ECU STOP LAMP HAZARD_SW(ESS_INDICATOR_POWER), STOP_SIGNAL_ELECTRONIC_MODULE MODULE 7 SPORTS_MODE_SW(ATM_SHIFT_LOCK_SOLENOID), KEY_LOCK_SOLENOID S/HEATER RR REAR_SEAT(HEATED_POWER) P/WDW RH FRONT_P/WINDOW_SW(POWER), P/WINDOW_SAFETY_ECU(POWER) -
Page 460
Maintenance Description Fuse rating Protected component SHIFT_LEVER_MODULE, REAR_SEAT_WARMER_SW, REAR_SEAT_WARMER, DIAGNOSIS, AVN MODULE 3 4.0_HEAD_UNIT, LDC_AMP(200W), TMU, HLLD_SW, HLLD_ACTR, OIL_LEVEL_SNSR, ENGINE_CONTROL_UNIT, AIR_FLOW_SNSR, START_RLY_COIL, SMK_UNIT, SMATRA_IMMOBI- 7.5A LIZATION I.O.D 2 LDC_AMP(200W), AUDIO/UVO/AVN4.0_HEAD_UNIT, TMU OUTSIDE_MIRROR_FOLDING_RLY, OUTSIDE_MIRROR_FOLDING_RLY_COIL, OUTSIDE_MIR- I.O.D 3 7.5A ROR_UNFOLDING_RLY, OUTSIDE_MIRROR_UNFOLDING_RLY_COIL CLUSTER CLUSTER SPEED_SNSR (MT), BACK_UP_LAMP_SW, OIL_PUMP_INVERTER, INHIBITOR, TRANSMISSION_CONTROL_UNIT… -
Page 461
Maintenance Description Fuse rating Protected component GLOVE_BOX_LAMP, DOOR_WARNING_SW, OVER_HEAD_CONSOLE_LAMP, PERSONAL_LAMP, I.O.D 1 7.5A SUNVISOR_LAMP, LUGGAGE_LAMP, PORTABLE_LAMP(DOOR) PDM 2 7.5A SMK_UNIT(BATT_CPU), SMATRA_IMMOBILIZATION(BATT) PDM 1 SMK_UNIT(POWER) BRAKE SWITCH 2 STOP_LAMP_SW(NORMAL_OPEN), SMK_UNIT 7 71… -
Page 462
Maintenance Engine compartment fuse panel OPS073013 OPS073019… -
Page 463
Maintenance Engine compartment fuse panel Description Fuse rating Protected component IGN_SW(B1), BUTTON_START_RLY(IG1), BUTTON_START_RLY(ACC) BLOWER BLOWER_RLY, BLOWER_MOTOR RR HTD REAR_GLASS_HEATED_RLY, ECU 2 MAIN_RLY, MAIN_RLY_COIL ECU 3 ECU(AFTER_AIN_RELAY) IGN COIL IGNITION_COIL(POWER) ECU 1 ECU(AFTER_MAIN_RELAY) SENSOR 1 STOP_LAMP_SW(NORMAL_CLOSE), O2_SNSR, PURGE_CONTROL_SOLENOID_VALVE, OCV, SENSOR 2 CMP, COOLING_FAN_LOW_RLY_COIL INJECTOR B/UP LAMP… -
Page 464
Maintenance Description Fuse rating Protected component B+ 1 SMART_JUNCTION_BLOCK(B+1) B+ 2 SMART_JUNCTION_BLOCK(B+2) B+ 3 SMART_JUNCTION_BLOCK(B+3) IGN_SW(IG2), BUTTON_START_RLY(IG2), START_RLY MDPS MDPS_UNIT 125A ALTERNATOR TRANSMISSION_CONTROL_UNIT DEICER DEICER ECU 4 ECU(BATT_DIRECT) ECU 5 ECU(BATT_DIRECT) A/CON A/CON_RLY C/FAN COOLING_FAN_MOTOR, SUB_FUEL_PUMP, SUB_FUEL_VALVE INVERTER OIL_PUMP_INVERTER ABS 1 ABS/ESP_UNIT(MOTOR) ABS 2 ABS/ESP_UNIT(SOLENOID) -
Page 465: Light Bulbs
If the water leaks into the lamp cially true if you have to bulb circuitry, have the vehicle remove the headlight assem- checked by an authorized Kia deal- bly to get to the bulb(s). Use only the bulbs of the specified Removing/installing the head- wattage.
-
Page 466
(6) Front fog light (if equipped) If the headlight aiming adjustment is necessary after headlight assembly is reinstalled, consult an OHD076046 authorized Kia dealer. WARNING — Halogen bulbs • Halogen bulbs contain pres- OPS073020 surized gas that will produce ■ Type B flying pieces of glass if bro- ken. -
Page 467
A bulb should be operated recommend that you checked by an ance vs. halogen bulbs. HID lamps only when installed in a head- authorized Kia dealer. are estimated by the manufacturer light. to last twice as long or longer than •… -
Page 468
Maintenance Headlight bulb (High) ■ Type A OPS073051 OPS073047 OPS073046 ■ Type B 4. Pull out the end of the front bumper. 5. Remove the headlight assembly from the body of the vehicle. If you can reach the bulb without removing the headlight assembly, you do not need to do step 3,4 and 5. -
Page 469
Maintenance Headlight bulb (Low) 8.Unsnap the headlight bulb retain- 8.Insert a new bulb by inserting it into ing wire by depressing the end and the housing and rotating in until it ■ Type A pushing it upward. locks into place. 9.Remove the bulb from the head- 9.Install the headlight bulb cover by light assembly. -
Page 470
If the light bulb is not operating, have ■ Type A vious page. the vehicle checked by an authorized Kia dealer. 6. Remove the socket from the assembly by turning the socket counterclockwise until the tabs on the socket align with the slots on Position&Turn signal… -
Page 471
7.Pull the bulb out of the socket. assembly is reinstalled, consult an 8.Insert a new bulb into the socket. OPS073027 authorized Kia dealer. 9.Install the socket into the assembly 1. Remove the front bumper under by aligning the tabs on the socket cover. -
Page 472
If the light bulb is not operating, have the vehicle by prying the lens and the vehicle checked by an authorized pulling the assembly out. Kia dealer. 2. Disconnect the bulb electrical con- nector. 3. Separate the socket and the lens… -
Page 473: Rear Combination Light Bulb Replacement
Maintenance Rear combination light bulb (5) Tail light replacement (6) Tail/Stop light and side marker (LED) ■ Type A OPS073031 1. Open the tailgate. OPS073030 ■ Type B 2. Loosen the light assembly retain- ing screws with a philips head screwdriver.
-
Page 474
Maintenance Tail light and side marker, Turn Back-up light 5. Remove the bulb from the socket signal light and Stop and tail light by pressing it in and rotating it counterclockwise until the tabs on ■ Type A the bulb align with the slots in the socket. -
Page 475
Maintenance Bulb type 5. Pull the bulb out of the socket. High mounted stop light replacement 6. Insert a new bulb into the socket. 7. Install the socket into the assem- bly by aligning the tabs on the socket with the slots on the assembly and turning the socket clockwise. -
Page 476: License Plate Light Bulb Replacement
Maintenance LED type (if equipped) License plate light bulb replacement OPS073053 OPS073050 5.Replace the LED with new one. 6.Reinstall in the reverse order. 1. Remove the lens by pressing the tabs. 2. Remove the socket from the lens. 3. Remove the bulb by turning it counter clockwise.
-
Page 477: Interior Light Bulb Replacement
Maintenance Interior light bulb replacement Map lamp Luggage lamp 1. Using a flat-blade screwdriver, gently pry the lens from the interi- or light housing. 2. Remove the bulb by pulling it straight out. WARNING Room lamp Prior to working on the Interior Lights, ensure that the “OFF”…
-
Page 478: Appearance Care
Maintenance APPEARANCE CARE Finish maintenance Exterior care CAUTION Washing Exterior general caution • Do not use strong soap, chem- To help protect your vehicle’s finish It is very important to follow the label ical detergents or hot water, from rust and deterioration, wash it directions when using any chemical and do not wash the vehicle in thoroughly and frequently at least…
-
Page 479
Maintenance Waxing CAUTION Wax the vehicle when water will no • Wiping dust or dirt off the longer bead on the paint. body with a dry cloth will Always wash and dry the vehicle scratch the finish. before waxing. Use a good quality •… -
Page 480
Maintenance Finish damage repair Bright-metal maintenance Underbody maintenance Deep scratches or stone chips in the • To remove road tar and insects, Corrosive materials used for ice and painted surface must be repaired use a tar remover, not a scraper or snow removal and dust control may promptly. -
Page 481
Maintenance Aluminum or chrome wheel main- Corrosion protection WARNING tenance Protecting your vehicle from corro- The aluminum or chrome wheels are sion After washing the vehicle, test coated with a clear protective finish. the brakes while driving slowly By using the most advanced design to see if they have been affected •… -
Page 482
Maintenance High-corrosion areas High temperatures can also acceler- Keep your vehicle clean ate corrosion of parts that are not If you live in an area where your vehi- The best way to prevent corrosion is properly ventilated so the moisture cle is regularly exposed to corrosive to keep your vehicle clean and free can be dispersed. -
Page 483: Interior Care
Maintenance • When cleaning lower door panels, Keep paint and trim in good con- Interior care rocker panels and frame members, dition Interior general precautions be sure that drain holes are kept Scratches or chips in the finish Prevent chemicals such as perfume, open so that moisture can escape should be covered with «touch-up»…
-
Page 484
Maintenance Cleaning the upholstery and inte- Cleaning the lap/shoulder belt CAUTION rior trim webbing When cleaning leather products Clean the belt webbing with any mild Vinyl (steering wheel, seats etc.), use soap solution recommended for Remove dust and loose dirt from neutral detergents or low alco- cleaning upholstery or carpet. -
Page 485: Emission Control System
(The ORVR system is designed to an authorized Kia dealer in accor- allow the vapors from the fuel tank to dance with the maintenance sched- be loaded into a canister while refu- ule in this manual.
-
Page 486
Maintenance Canister Engine exhaust gas precautions 3. Exhaust emission control system (carbon monoxide) Fuel vapors generated inside the fuel tank are absorbed and stored in the • Carbon monoxide can be present Exhaust Emission Control onboard canister. When the engine is with other exhaust… -
Page 487
Maintenance Operating precautions for catalyt- • Do not operate the engine in con- CALIFORNIA PROPO- fined or closed areas (such as ic converters SITION 65 WARNING garages) any more than what is necessary to move the vehicle in or Engine exhaust and a wide vari- WARNING — Fire out of the area. -
Page 488: California Perchlorate Notice
All inspections and adjustments must be made by an authorized Kia dealer. • Avoid driving with a extremely low fuel level. Running out of fuel could cause the engine to misfire, dam- aging the catalytic converter.
-
Page 489: Specifications, Consumer Information And Reporting Safety Defects
Specifications, Consumer information and Reporting safety defects Dimensions ……. . 8-2 Engine .
-
Page 490: Dimensions
Specifications, Consumer information, Reporting safety defects DIMENSIONS in (mm) Item Overall length 162.9 (4,140) Overall width 70.9 (1,800) Overall height 62.9 (1,600) * /63.6 (1,615) * /63.5 (1,612) * 205/60R16 62.1 (1,576) Front tread 215/55R17 61.7 (1,568) 235/45R18 61.4 (1,560) 205/60R16 62.5 (1,588) Rear tread…
-
Page 491: Bulb Wattage
Specifications, Consumer information, Reporting safety defects BULB WATTAGE Light Bulb Wattage Bulb type Headlamps (Low/High) 55/60 Headlamps (Low) H7SLL Headlamps (Low)-HID type* Headlamps (High) H7LL Front Front turn signal lamps PY28/8W Front position lamps 8 (Opt : LED) PY28/8W (Opt : LED) Front fog lamps* Front side marker Side Repeater lamps (Outside Mirror)*…
-
Page 492: Tires And Wheels
Specifications, Consumer information, Reporting safety defects TIRES AND WHEELS Inflation pressure bar psi (kPa) Normal load Maximum load Wheel lug nut torque Item Tire size Wheel sizee lb•ft, N•mk (g•m) Front Rear Front Rear 205/60R16 6.5JX16 Full size tire 215/55R17 6.5JX17 33 (230) 33 (230)
-
Page 493: Gross Vehicle Weight
Specifications, Consumer information, Reporting safety defects CAPACITY/WEIGHT 1.6 Engine 2.0 Engine Item Gross vehicle weight 3,836 (1,740) 3,902 (1,770) 3,902 (1,770) 4,100 (1,860) lbs. (kg) Luggage volume (SAE) Min : 24.2 (686) Max : 61.3 (1,735) cu ft (l) Min : Behind rear seat to upper edge of the seat back. Max : Behind front seat to roof.
-
Page 494: Recommended Lubricants And Capacities
2.0 Engine above specification approved by Kia motors corp. Refer to the recommended SAE viscosity numbers on the next page. Engine oils labeled Energy Conserving Oil are now available. Along with other additional benefits, they contribute to fuel economy by reducing the amount of fuel necessary to overcome engine friction.
-
Page 495
Specifications, Consumer information, Reporting safety defects Lubricant Volume Classification 5.39 US qt. (5.1 l) 1.6 Engine Mixture of antifreeze and distilled water 5.29 US qt. (5.0 l) Coolant (Ethylene glycol base coolant for aluminum 5.39 US qt. (5.1 l) radiator) 2.0 Engine 5.29 US qt. -
Page 496: Recommended Sae Viscosity Number
Specifications, Consumer information, Reporting safety defects Recommended SAE viscosity Engine oil viscosity (thickness) has Using oils of any viscosity other than number an effect on fuel economy and cold those recommended could result in weather operating (engine start and engine damage. Always be sure to clean the area engine oil flowability).
-
Page 497: Vehicle Identification Number (Vin)
Specifications, Consumer information, Reporting safety defects VEHICLE IDENTIFICATION NUMBER (VIN) VEHICLE CERTIFICATION LABEL OUN088001 OVQ076002N The VIN is also on a plate attached The vehicle identification number OUN086004 to the top of the dashboard. The (VIN) is the number used in register- vehicle certification label…
-
Page 498: Tire Specification And Pressure Label
Specifications, Consumer information, Reporting safety defects ENGINE NUMBER REFRIGERANT LABEL TIRE SPECIFICATION AND (IF EQUIPPED) PRESSURE LABEL ■ Engine 1.6 ORB080005 ■ Engine 2.0 OPS073040 OUN086005 The refrigerant label is located on The tires supplied on your new vehi- the underside of the hood. cle are chosen to provide the best performance for normal driving.
-
Page 499: Consumer Assistance (U.s. Only)
Roadside Assistance is provided on all new current Emergency roadside assistance model year Kia Vehicles from the date the vehicle is deliv- Kia’s toll free Roadside Assistance hot line is staffed 24 ered to the first retail buyer or otherwise put into use (in-…
-
Page 500
Trip interruption expense benefits are provided in the ice. In the event that Kia does not have a dealer or an event that a warranty-related disablement occurs more alternative service location available in a particular loca-… -
Page 501
Specifications, Consumer information, Reporting safety defects Registering your vehicle in a foreign country 3. There may not be an Authorized Kia Dealer in the area in which you plan to register your vehicle. You may If you plan to register your vehicle in a foreign country,… -
Page 502: Electrical Equipment (U.s. Only)
Authorized Kia electronic systems may be adversely affected. To avoid Dealer, in order to ensure that you do not void your war- damage to your vehicle, consult an Authorized Kia Dealer ranty. concerning the proper equipment and installation.
-
Page 503: Reporting Safety Defects (U.s. Only)
However, NHTSA cannot become involved in indi- vidual problems between you, your dealer, or Kia Motors America, Inc. Electrical troubleshooting manual: This manual complements the Service Manual by provid-…
-
Page 504
Index… -
Page 505
Index Automatic climate control system … . . 4-112 Antenna……..4-143 Anti-lock brake system (ABS) . -
Page 506
Index Shift-lock override ……5-23 Ignition key interlock system ….5-23 Good driving practices . -
Page 507
Index Crankcase emission control system ….7-95 Dimensions ……..8-2 Cruise control system . -
Page 508
Index Engine ……..8-2 Floor mat anchor(s) . -
Page 509
Index Tachometer ……. . 4-54 Highway driving ……5-57 Engine Coolant Temperature guage . -
Page 510
Index Rear seat warmer ……4-136 Power outlet ……4-137 Clothes hanger . -
Page 511
Index Turn By Turn Mode ……4-65 Warning Messages ……4-65 LCD Display Control . -
Page 512
Index Mounting bracket for roof carrier….4-141 Multi fuse ……..7-66 Rear camera display . -
Page 513
Index Seat belts……..3-15 Changing tires ……6-15 Seat belt warning . -
Page 514
Index Cool box ……. . . 4-131 Tire sidewall labeling ……7-53 Sunglass holder . -
Page 515
Index Vehicle stability management (VSM) … . . 5-36 Check battery and cables ….. 5-62 Vehicle weight glossary .

Ничего не открывается, думал может винда 11, слишком новая. Но нет, на трех компах с разными ос пустой экран справки, хотя если зайти в файл, там все на месте и даже открывается по отдельности.

Действительно, не открывается. Хотя тот же самый файл на компе работает. Перезагрузил в другое место. Попробуйте там.

А чем его удобнее открывать на мобильном устройстве пендосской марки?
Вот вообще без понятия. А этот не открывается?
Дык санкции жеж! А если без шуток, то всё логично, делалось на компе под виндой, на ней и работает. На телефонах получается только онлайн смотреть

На просторах интернета полно бесплатных ковекторов из формата CHM в PDF
