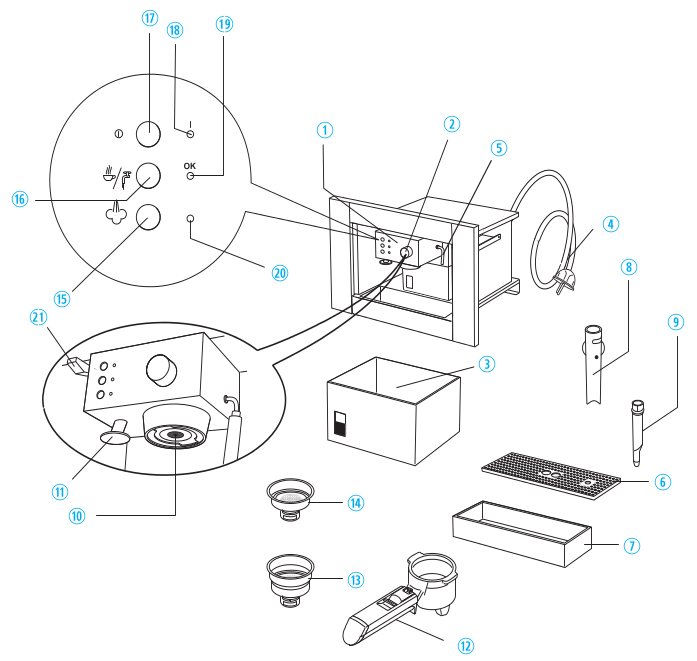
Друзья, я приобрел кофе-машину и хочу поделиться с Вами инструкцией по работе с ней, но для начала парочку концептуальных параграфов вводной, о том как она готовит кофе, а готовить она может только из уже молотого кофе или из чалдов.
Кофе в чалдах – что это такое и как выбрать
Чалдовый кофе (от итал. cialda «таблетка») — упаковка (фильтр-пакет) молотого жареного спрессованного кофе для приготовления одной порции напитка в специальных кофемашинах (чалдовых кофеварках).
Таблетированный кофе создавался для ресторанов, кофеен, где важна точность порции и учет. Пакетики с молотыми обжаренными зернами оценили люди, которым не хватает времени, чтобы сварить настоящий качественный напиток. В офисах тоже переходят на чалдовый кофе. Он относительно недорого стоит, не отличается по вкусу от профессионально приготовленного эспрессо. Вкусовые свойства свежемолотого кофе ухудшаются через несколько дней. Герметичные сашеты сохранят вкус и аромат обжаренных и перемолотых зерен несколько месяцев. Чашечка бодрящего напитка готовится 20-30 секунд, за это время успевают экстрагироваться ароматические вещества и вкусовые компоненты, а вредные смолы остаются в фильтр-пакете с кофейной гущей. После удаления пакетика кофеварка сразу готова для приготовления следующей порции.
В перфорированном бумажном пакетике находится 7-9 граммов спрессованного кофе. Это стандартная классическая порция напитка со сбалансированным вкусом. При смешивании разных сортов арабики и робусты купажисты создают удивительные вкусовые букеты. Смесь кофейных зерен подвергается обжарке, отстаивается несколько дней. После помола кофейный порошок сразу расфасовывается и спрессовывается в автомате. Чтобы сохранить вкус и запах кофе, готовые чалды упаковываются в фольгированные сашеты. Для приверженцев здорового образа жизни выпускаются пакетики с декофеинизированным кофе.
Фильтр-пакеты таблетированного кофе различных производителей отличаются плотностью бумаги, формой и диаметром. Чалды стандарта ESE выпускаются диаметром 44 мм. Пакет рассчитан на 30-60 мл воды. Следует учитывать это ограничение. При большем количестве воды бумага размокает, и чалда (в простонародье таблетка) разрушается. В Whirlpool ACE 010 IX используются чалды стандарта ESE. Чалды стандарта Senseo отличаются большим диаметром (от 55 мм до 62 мм), состоят из рыхлого кофейного порошка. Пакеты подходят для приготовления эспрессо, американо, лунго. Получается насыщенный напиток с плотной пенкой. За счет более прочной бумаги фильтры сохраняют прочность, через них можно пропустить до 150 мл воды.
Напиток можно готовить в специальных и рожковых кофеварках, оснащенных переходником для кофейных пакетиков.
Чалдовые кофеварки компактные, бесшумно работают, просты в применении. Фильтр-пакет закладывается в холдер, выбирается параметр приготовления и через 20-30 секунд душистый бодрящий напиток готов. После приготовления чалда легко удаляется, и можно готовить следующую порцию. Есть кофемашины, готовящие одновременно две чашки кофе. Для каждой кофеварки определенной торговой марки нужно выбирать фильтр-пакеты рекомендованные производителем.
Советы
При покупке обращайте внимание на степень помола. Отличный кофе получается из зерен среднего помола. Порошок хорошо пропускает воду, подходит для рожковых и чалдовых кофеварок.
Чалды из зерен мелкого помола идеальны для приготовления эспрессо. За 30 секунд спрессованная таблетка отдает напитку весь вкус и аромат.
Сварить хороший кофе можно из смеси арабики и робусты в соотношении 80% к 20%. Чем больше содержание робусты, тем дешевле чалды, но выше крепость напитка. Обращайте внимание на процентное содержание и выбирайте мягкий или горьковатый напиток с бодрящим эффектом.
Чтобы не ошибиться с выбором, отдавайте предпочтение продукции известных компаний:
- Buscaglione — удачное сочетание мягких бразильских, цветочных эфиопских, терпковатых индийских, сортов.
- Lavazza — мягкие и достаточно крепкий кофе с нежным шоколадным послевкусием и стойким ароматом.
- Illy caffe — смесь из нескольких сортов высокогорной арабики.
- Poli Monodose Nera — глубокий тонкий вкус достигается за счет уникального метода обжарки.
- Bristot — отличный вариант для приготовления эспрессо (75% бразильской арабики и 25% альпийской робусты).
Руководство пользователя
Не используйте прибор, если поврежден сетевой шнур или вилка, если он не работает должным образом, или если он был поврежден или удален. Не погружайте сетевой шнур или вилку в воду. Держите шнур вдали от горячих поверхностей. Это может привести к поражению электрическим током, пожару или другим опасностям.
Заземление данного прибора является обязательным. Производитель не несет ответственности за вред, причиненный людям, животным или предметам в результате несоблюдения данного требования.
Внимательно прочитайте и сохраните для дальнейшего использования не нагревайте и не используйте легковоспламеняющиеся жидкости в приборе или рядом с ним. Испарения могут создать опасность пожара или взрыва. Не оставляйте прибор без присмотра не используйте в нем агрессивные химические вещества или пары. Этот тип прибора специфически конструирован для того чтобы нагреть воду. Он не предназначен для промышленного или лабораторного использования. O разрешать детям пользоваться прибором только под присмотром взрослых и после получения соответствующих инструкций, чтобы ребенок мог безопасно пользоваться прибором и осознавал опасность неправильного использования. Данное устройство не предназначено для использования лицами (включая детей) с ограниченными физическими, сенсорными или психическими возможностями, за исключением случаев использования под наблюдением лица, ответственного за их безопасность. Внимание ! Доступные части могут стать горячими во время использования, маленькие дети не должны иметь доступ к ним.
ЭТОТ ПРИБОР ПРЕДНАЗНАЧЕН ТОЛЬКО ДЛЯ ДОМАШНЕГО ИСПОЛЬЗОВАНИЯ ! Во избежание ожогов при соприкосновении с горячими деталями используйте горячие подушки или рукавицы. Этот прибор конструирован для того чтобы сделать кофе или нагреть напитки. Будьте осторожны, чтобы избежать ошпаривания распылением водой или паром.
АКСЕССУАРЫ & ЧАСТИ
|
11. ЛАПКА ПОМОГАЮЩАЯ ВРУЧНУЮ ТРАМБОВАТЬ КОФЕ |
ЗАПОЛНЕНИЕ РЕЗЕРВУАРА ДЛЯ ВОДЫ
Никогда не используйте прибор без воды в резервуаре и не забывайте пополнять его, когда уровень воды падает на несколько сантиметров от дна.
АВТО ВЫКЛ.
 |
В целях экономии электроэнергии прибор имеет функцию автоматического отключения (индикатор питания гаснет), если он не используется в течение длительного времени. Чтобы включить прибор, нажмите кнопку включения/выключения. |
ПРЕДВАРИТЕЛЬНЫЙ ПОДОГРЕВ КОФЕВАРКИ
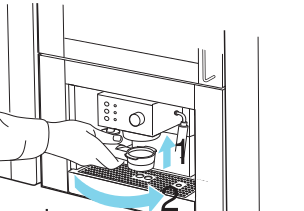 |
Для того чтобы прикрепить держатель фильтра, расположите его под выпускным отверстием котла слева, сдвиньте вверх и одновременно поверните ручку вправо. 1. Включите прибор, нажав кнопку включения / выключения, и прикрепите держатель фильтра к прибору, не добавляя молотый кофе. 2. ПОМЕСТИТЕ ЧАШКУ ПОД ДЕРЖАТЕЛЬ ФИЛЬТРА . Используйте ту же чашку, которая будет использоваться для приготовления кофе, чтобы разогреть чашку. |
 |
3. Подождите, пока загорится индикатор OK, затем нажмите кнопку 16. Вода стекает до тех пор, пока » ОК » индикатор гаснет, затем остановите подачу повторным нажатием на кнопку кофе. |
 |
4. ВЫЛЕЙТЕ СТАКАН. Подождите, пока снова не загорится индикатор OK, затем повторите ту же операцию. (Нормально для небольшой и безвредной слойки пара, который нужно дать извлекая держатель фильтра) |
КАК ПРИГОТОВИТЬ КОФЕ ЭСПРЕССО С ПОМОЩЬЮ ДЕРЖАТЕЛЯ ФИЛЬТРА ДЛЯ МОЛОТОГО КОФЕ
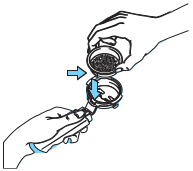 |
1. После предварительного нагрева прибора, как описано выше, поместите фильтр молотого кофе в держатель фильтра, убедившись, что проекция правильно вставлена в паз. Используйте меньший фильтр, чтобы сделать один кофе или больший фильтр, чтобы сделать два кофе. |
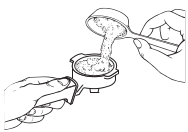 |
2. Чтобы сделать только один кофе, поместите в фильтр одну мерку уровня (около 7 г) молотого кофе. Для приготовления двух сортов кофе поместите в фильтр две свободно заполненные мерки (около 6+6 г) молотого кофе. Заполняйте фильтр понемногу, чтобы предотвратить переполнение молотого кофе. Важно: для правильной работы перед добавлением молотого кофе в фильтродержатель очистите фильтр от остатков молотого кофе от предыдущего настоя. |
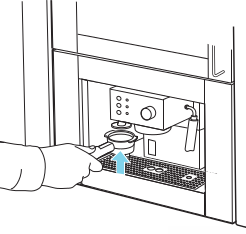 |
3. Равномерно распределите молотый кофе и слегка надавите с помощью пресса NB: для получения хорошего эспрессо необходимо правильное прессование молотого кофе. Если отжимать чрезмерно, то доставка кофе будет медленна и пена будет темна. Если отжимать слишком мало, то доставка кофе будет слишком быстра и пена будет скудна и светла. |
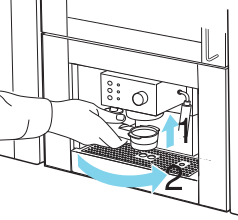 |
4. Удалите излишки кофе с края держателя фильтра и прикрепите держатель фильтра к прибору. Вращайте твердо для избежания утечек воды. |
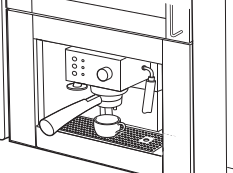 |
5. Поместите чашку или чашки под носики держателя фильтра. Рекомендуется нагреть чашки перед приготовлением кофе, ополоснув их небольшим количеством горячей воды. |
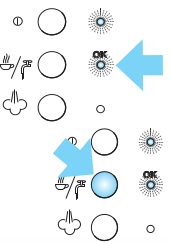 |
6. Убедитесь, что индикатор OK горит (если он выключен, подождите, пока он загорится), затем нажмите кнопку кофе. Когда требуемое количество кофе закончится, нажмите ту же кнопку еще раз. (После этого не нажимайте кнопку «кофе» в течении 45 секунд). 7. Чтобы снять держатель фильтра, поверните ручку справа налево. Важно: во избежание брызг не снимайте держатель фильтра во время подачи кофе. |
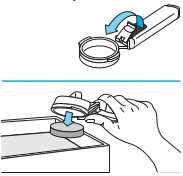 |
8. Для устранения использованный кофе, заблокируйте фильтр на месте с помощью рычага включены в ручке и пустой кофе поворотный держатель фильтра вверх ногами и постукивая. |
 |
9. Чтобы выключить кофемашину, нажмите кнопку включения/выключения. Важно: при первом использовании прибора все принадлежности и внутренние цепи необходимо промыть, сделав не менее пяти чашек кофе без использования молотого кофе. |
КАК ПРИГОТОВИТЬ КОФЕ ЭСПРЕССО С ПОМОЩЬЮ ЧАЛДОВ (ТАБЛЕТОК)
 |
1. Разогрейте прибор, как описано в разделе «предварительный подогрев кофе», убедившись, что держатель фильтра установлен. Это сделает кофе более горячим. NB: используйте таблетку соответствуя стандарту ESE показанному на пакете с следующим Логотипом: стандарт ESE система принятая ведущими производителями таблетированного кофе и позволяет кофе espresso быть подготовленным просто и чисто. |
 |
2. Поместите небольшой фильтр (стакан или чалд-таблетку) в держатель фильтра, убедившись, что проекция правильно вставлена в слот. |
 |
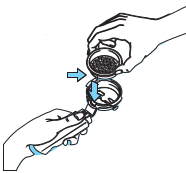
3. Введите чалд (таблетку), центризуя его насколько возможно на фильтре. Всегда следуйте инструкциям на упаковке модуля, чтобы правильно расположить модуль на фильтре. |
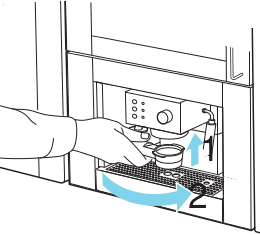 |
4. Прикрепите держатель фильтра к прибору. Всегда вращайте, насколько это будет идти. |
5. Действуйте, как указано в пунктах 5, 6 и 7 предыдущего пункта.
КАК ПРИГОТОВИТЬ КАПУЧИНО
1. Приготовьте кофе эспрессо, как описано в предыдущих параграфах, используя достаточно большие чашки чтобы в них можно было добавить вспененное молоко.
7. Налейте вспененное молоко в чашки, содержащие приготовленный ранее кофе эспрессо. Капучино готово. Подсластите по вкусу и при желании посыпьте пену небольшим количеством какао-порошка. NB: чтобы приготовить более одного капучино, сначала сделайте все кофе, а затем в конце подготовьте вспененное молоко для всех капучино. NB: чтобы снова приготовить кофе после вспенивания молока, сначала охладите котел, иначе кофе сгорит. Чтобы охладить котел, поместите пустую емкость под котел и убедившись что воды в кофемашине достаточно (индикатор ОК — лампа не горит), нажмите кнопку «пар». Теперь снова можно делать кофе как описано в предыдущих пунктах.
ЧИСТКА КАПУЧИНАТОРА
Важно: всегда очищайте кофеварку капучино после использования. Выполните следующее:
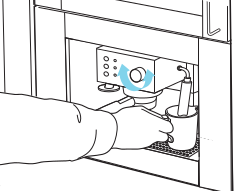 |
1. Выпустите немного пара в течение нескольких секунд, вращая ручку пара. Это опорожняет любое молоко выйденное внутри парового носика. Важно: чтобы обеспечить гигиену, рекомендуется следовать этой процедуре каждый раз, когда вы делаете капучино, чтобы избежать застоя молока по контуру. |
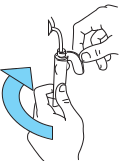 |
2. С одной стороны, держите трубку капучинатора твердо и с другим вывинтите создателя самого капучино путем поворачивания по часовой стрелке и извлекая вниз. |
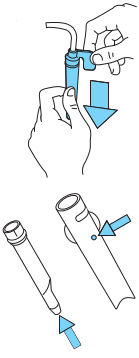 |
3. Извлеките сопло из паровой трубки, потянув его вниз. 5. Убедитесь, что два отверстия не заблокированы. При необходимости очистите булавкой. |
ПРОИЗВОДСТВО ГОРЯЧЕЙ ВОДЫ
|
|
1. Включите прибор, нажав кнопку включения/выключения. |
 |
Подождите, пока загорится индикатор OK. |
 |
2. Поместите получателя под капучино. |
 |
4. Чтобы прервать подачу горячей воды, закройте ручку подачи пара вращением по часовой стрелке и снова нажмите кнопку подачи кофе. (Вы не должны включать горячуя воду на более чем 45 секунд). |
ЧИСТКА И ОБСЛУЖИВАНИЕ
1. Перед выполнением любых операций по очистке оставьте прибор остывать и выньте вилку из розетки.
2. Не используйте для очистки прибора растворители или абразивные чистящие средства. Достаточно мягкой влажной ткани.
3. Опорожняйте и часто мойте поддон для капель и капельницу.
4. Регулярно очищайте резервуар для воды. Важно: никогда не погружайте прибор в воду. Это электрический прибор.
ОЧИСТКА ДЕРЖАТЕЛЯ ФИЛЬТРА
ОЧИСТКА КОТЛА
Примерно после каждой 300-ой чашки кофе необходимо очищать котел следующим образом:
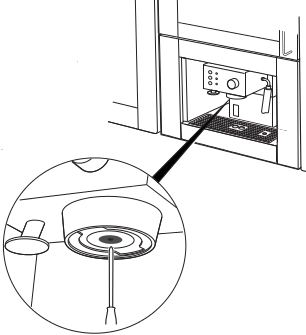 |
1. Убедитесь, что прибор не нагревается и что он отключен от электросети. |
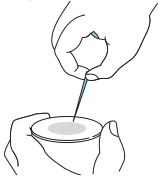 |
3. Очистите котел влажной тканью |
УДАЛЕНИЕ НАКИПИ
Рекомендуется очищать кофемашину от накипи примерно каждые 200 кофе или максимум каждые два месяца.
ДЛЯ УДАЛЕНИЯ НАКИПИ ВЫ ДОЛЖНЫ ИСПОЛЬЗОВАТЬ ИМЕЮЩИЕСЯ НА РЫНКЕ ПРОДУКТЫ ПРЕДНАЗНАЧЕННЫЕ ДЛЯ КОФЕ-МАШИН ESPRESSO .
Если такой продукт недоступен, выполните следующие действия.
1. Наполните бак половиной литра воды.
2. Растворите 2 ложки (около 30 г) лимонной кислоты (можно купить в аптеках)
3. Нажмите кнопку включения / выключения и подождите, пока загорится индикатор OK.
4. Убедитесь в том, что держатель фильтра не прикреплен, и поместите его котел.
5. Нажмите кнопку кофе, наполовину опустошите резервуар, поворачивая ручку пара время от времени, чтобы запустить небольшое решение. Остановите стекание, снова нажав кнопку.
6. ВЫКЛЮЧИТЕ ЭЛЕКТРОПРИБОР.
7. Прекратите работу с прибором на 15 минут, затем снова включите прибор.
8. Нажмите кнопку кофе, чтобы полностью опорожнить резервуар.
9. Для устранения остатков раствора и накипи хорошо промойте резервуар, залейте чистой водой (без лимонной кислоты) и установите на место.
10. Нажмите кнопку кофе и вода будет стекать, до опорожнения бака
11. Прервите сток воды и повторите пункты 9, 10 и 11 снова. Ремонт повреждений кофемашины, вызванных накипью, не покрывается гарантией, если очистка от накипи не производится регулярно, как описано выше.
|
ПРОБЛЕМА |
ВОЗМОЖНАЯ ПРИЧИНА | РЕШЕНИЕ |
| КОФЕ ЭСПРЕССО НЕ ТЕЧЕТ |
|
|
| Кофе эспрессо капает с краев держателя фильтра, а не из отверстий. |
|
|
| КОФЕ ЭСПРЕССО ХОЛОДНЫЙ |
|
|
|
НАСОС ЧРЕЗМЕРНО ШУМНЫЙ |
|
|
|
Пена кофе слишком легкая (доставляется из носика слишком быстро) |
|
|
|
Пена кофе слишком темная (подается из носика слишком медленно) |
|
|
|
МОЛОЧНАЯ ПЕНА НЕ ОБРАЗУЕТСЯ ПРИ |
|
|
Надеюсь, кому-то помог разобраться в работе, удачки господа.
Мануал на английском
07.10.2018 19:20
Whirlpool AKM 702/NB/02 Owner’s Manual
Бренд:
Whirlpool
Размер:
82 KB
Страниц:
2
Язык(и):
Болгарский, Чешский, Датский, Немецкий, Греческий, Английский, Испанский, Финский, Французский, Венгерский, Итальянский, Голландский, no, Польский, Португальский, Румынский, Русский, Словацкий, Шведский
Открыть в новой вкладке
Посмотреть инструкция для Whirlpool ACE 010 IX бесплатно. Руководство относится к категории кофеварки, 8 человек(а) дали ему среднюю оценку 8.2. Руководство доступно на следующих языках: английский. У вас есть вопрос о Whirlpool ACE 010 IX или вам нужна помощь? Задайте свой вопрос здесь
Не можете найти ответ на свой вопрос в руководстве? Вы можете найти ответ на свой вопрос ниже, в разделе часто задаваемых вопросов о Whirlpool ACE 010 IX.
Какой вес Whirlpool ACE 010 IX?
Как часто следует очищать кофеварку от накипи?
Какой лучший способ очистки кофеварки от накипи?
Как долго можно хранить кофе в зернах?
Как лучше всего хранить кофе?
Как помол сказывается на вкусе кофе?
Какая высота Whirlpool ACE 010 IX?
Какая ширина Whirlpool ACE 010 IX?
Какая толщина Whirlpool ACE 010 IX?
Инструкция Whirlpool ACE 010 IX доступно в русский?
Не нашли свой вопрос? Задайте свой вопрос здесь
Форум о кофемашинах — ремонт, обслуживание, использование кофемашин, выбор кофе и кофемашины

Пожалуйста, войдите или зарегистрируйтесь.
- Документация
- Кофе и кофемашины
- Карта сервисов
- Магазин запчастей
- Инструкции
- Ремонт
-
Начало
-
Помощь
-
Поиск
-
Вход
-
Регистрация
- Форум о кофемашинах — ремонт, обслуживание, использование кофемашин, выбор кофе и кофемашины
рейтинг кофемашин » Whirlpool
| Обзор кофемашины | |
Кофемашина Whirlpool ACE 010 IX Характеристики и функцииНастройкиТехническое обслуживание и уходОсновные компонентыТехнические условияДругоеДизайн и ценаОписание |
|
| Руководство пользователя, инструкция схемы для Кофемашина Whirlpool ACE 010 IX | |||
| Имя файла | Тип файла | Размер файла | |
|
|
Инструкция для кофеварки Whirlpool ACE 010 IX (англ.) |
|
946.8 KB |
|
|
Инструкция по установке кофеварки Whirlpool ACE 010 IX |
|
112.0 KB |
| Вопросы для голосования | Пользователи | Специалисты | |
| Качество приготовления кофе |
|
|
Для оценки этой машины, пожалуйста, авторизуйтесь. Впервые на сайте? Зарегистрируйтесь сейчас, бесплатно! |
| Внешний вид, дизайн |
|
|
|
| Сервисное обслуживание и уход |
|
|
|
| Надежность и ремонтопригодность кофемашины |
|
|
|
| Рекомендуете купить? |
|
|
|
| Цена кофемашины |
|
|
| Новый отзыв |

|

|
Displayed below is the user manual for ACE010IX by Whirlpool which is a product in the Coffee Makers category.
This manual has pages.
1
ACE 010
www.whirlpool.com
2
INSTALLATION
PRIOR TO CONNECTING
ENSURE THAT THE APPLIANCE IS NOT DAMAGED.
AFTER CONNECTING
THE EARTHING OF THIS APPLIANCE is compulso—
ry. The manufacturer will accept no re-
sponsibility for injury to persons, ani—
mals or damage to objects arising from
the non—observance of this requirement.
The manufacturers are not liable for any
problems caused by the user’s failure to ob—
serve these instructions.
DO NOT OPERATE THIS APPLIANCE if it has a
damaged mains cord or plug, if it is not
working properly, or if it has been dam—
aged or dropped. Do not immerse the
mains cord or plug in water. Keep the
cord away from hot surfaces. Electrical
shock, fi re or other hazards may result.
CHECK THAT THE VOLTAGE on the rating
plate corresponds to the voltage in your
home.
MOUNTING THE APPLIANCE
FOLLOW THE SUPPLIED separate mounting in-
structions when installing the appliance.
THIS APPLIANCE IS DESIGNED TO WORK
in ambient temperatures above
freezing point of water (0°C).
If residual water is allowed to
freeze, the appliance may be
damaged.
3
IMPORTANT SAFETY INSTRUCTIONS
DO NOT HEAT, OR USE FLAMMABLE LIQUIDS in or
near the appliance. Fumes can create a
fi re hazard or explosion.
DO NOT LEAVE THE APPLIANCE UNATTENDED
READ CAREFULLY AND KEEP FOR FUTURE REFERENCE
ONLY ALLOW CHILDREN to use the appliance
without adult supervision after adequate
instructions have been given, so that the
child is able to use the appliance in a safe
way and understands the hazards of im—
proper use.
The appliance is not intended for use by
young children or infirm persons without
supervision. Young children should be su-
pervised to ensure that they do not play
with the appliance.
Children should only use the appliance un-
der adult supervision due to the high tem-
peratures generated.
DO NOT USE corrosive chemicals or vapors
in this appliance. This type of appliance
is specifi cally designed to heat water. It
is not designed for industrial or labora—
tory use.
THIS APPLIANCE IS DESIGNED FOR DOMESTIC USE ONLY!
PRECAUTIONS
USE HOT PADS OR OVEN MITTS to prevent
burns, when touching hot parts.
THIS APPLIANCE IS DESIGNED TO MAKE COFFEE or heat
drinks. Be careful to avoid being scalded by
sprays of water or steam or due to improper
use of the appliance.
4
ACCESSORIES & PARTS
q CONTROL PANEL
w STEAM KNOB
e WATER TANK
r POWER CABLE
t STEAM/HOT WATER TUBE
y DRIP MESH
u DRIP TRAY
i CAPPUCCINO MAKER
o NOZZLE
a BOILER OUTLET
s PRESSER
d FILTER HOLDER
1# LARGE TWO—CUP FILTER
g SMALL ONE—CUP OR POD FILTER
h STEAM SELECTOR BUTTON
j COFFEE/HOT WATER BUTTON
k ON/OFF BUTTON
l ON LIGHT
1( TEMPERATURE OK LIGHT (COFFEE
OR HOT WATER)
2) STEAM INDICATOR LIGHT
2! LIGHT SWITCH
qw
e
r
t
y
u
i
o
a
s
d
f
g
h
j
kl1(
2)
2!
5
1
2
FILLING THE WATER TANK
1. TURN THE APPLIANCE on by pressing the ON/OFF
BUTTON AND ATTACH THE FILTER HOLDER TO THE APPLI—
ANCE WITHOUT ADDING GROUND COFFEE.
q REMOVE THE WATERTANK by pulling it out (to-
wards the front).
NEVER USE THE APPLIANCE WITHOUT WATER IN
THE TANK and always remember to top up
when the level drops to a couple of cen-
timetres from the bottom.
w FILL THE TANK with fresh
clean water taking care
not to exceed the MAX
level. Refi t the tank.
PREHEATING THE COFFEE UNIT
TO ATTACH THE FILTER HOLDER, position it under the
boiler outlet
with the han—
dle towards
the left,
push it
upwards
and at the
same time rotate the
handle fi rmly towards the right.
Check that the steam knob is closed.
2. PLACE A CUP UNDER THE FILTER HOLDER. Use the
same cup as will be used to prepare the coff ee
in order to preheat it.
3. WAIT FOR THE OK INDICATOR
LIGHT to come on, then imme—
diately press the coff ee knob.
Run the water off until the OK
indicator light goes out, then inter-
rupt delivery by pressing the coff ee
button again.
4. EMPTY THE CUP. Wait until the OK
indicator light comes on again then repeat the
same operation. (It is normal for a small and
harmless puff of steam to be given off when
removing the fi lter holder).
6
1
2
1. AFTER PREHEATING the appliance as described
above, place the ground coff ee fi lter
in the fi lter holder, making sure the
projection is correctly inserted in
the slot. Use the smaller fi lter to
make one coff ee or the larg-
er fi lter to make two coff ees.
HOW TO PREPARE ESPRESSO COFFEE USING THE
FILTER HOLDER FOR GROUND COFFEE
2. TO MAKE A SINGLE COFFEE ONLY, place one level
measure (about 7 g) of ground cof-
fee in the fi lter. To prepare two cof-
fees, place two loosely fi lled
measures (about 6+6 g)
of ground coff ee in the fi l-
ter. Fill the fi lter a little at a time to prevent the
ground coff ee from overfl owing.
IMPORTANT: for correct operation, before
adding the ground coff ee to the fi lter holder,
clean the fi lter from residues of ground coff ee
from the previous infusion.
5. PLACE THE CUP or cups under the fi lter holder
spouts.
You are rec—
ommended to
heat the cups
before mak—
ing the cof-
fee by rinsing
them with a little
hot water.
6. MAKE SURE THE OK LIGHT IS ON
(if off , wait until it comes on),
then press the coff ee button.
When the required quantity of
coff ee has been run off , press
the same button again. (You should
not run off coff ee for more than 45
seconds at a time).
7. TO REMOVE THE FILTER HOLDER, rotate the handle
from right to left.
IMPORTANT: to avoid splashes, never remove
the fi lter holder while the appliance is deliver-
ing coff ee.
8. TO ELIMINATE THE USED COFFEE GROUNDS, block
the fi lter in place using the lever incor-
porated in the handle and empty
the coff ee by turning the fi l-
ter holder upside down and
tapping.
9. TO TURN THE COFFEE MACHINE OFF,
press the ON/OFF button.
IMPORTANT: the fi rst time the
appliance is used, all accessories
and the internal circuits must be
washed through by making at least
fi ve coff ees without using ground coff ee.
3. DISTRIBUTE THE GROUND COFFEE evenly and press
lightly with the
presser
NB: Correct
pressing of the
ground coff ee
is essen—
tial to
obtain a
good espresso. If pressing is ex-
cessive, coff ee delivery will be slow and the
froth will be dark. If pressing is too light, coff ee
delivery will be too rapid and the froth will be
skimpy and light coloured.
4. REMOVE ANY
EXCESS COFFEE
from the rim
of the fi l-
ter hold—
er and
attach the fi l-
ter holder to the appli—
ance. Rotate fi rmly to avoid leaks of
water.
7
1
2
HOW TO PREPARE ESPRESSO COFFEE USING PODS
1. PREHEAT THE APPLIANCE as described in the sec—
tion “PREHEATING THE COFFEE UNIT”, making
sure the fi lter holder is attached. This obtains a
hotter coff ee.
NB: Use pods conforming to the
ESE standard indicated on the
pack with the following logo:
THE ESE STANDARD is a system ac—
cepted by leading pod producers
and enables espresso coff ee to be prepared
simply and cleanly.
2. PLACE THE SMALL FILTER (1 cup or pods)
in the fi lter holder, making sure the
projection is correctly inserted in
the slot.
3. INSERT A POD, centring it as far as possible
on the fi lter. Always follow the instruc—
tions on the pod pack to position the
pod on the fi lter correctly.
4. ATTACH THE FILTER HOLDER to the appliance. Al-
ways rotate
as far as it will
go.
5. PROCEED AS in points 5, 6 and 7 in the previ—
ous paragraph.
8
HOW TO MAKE CAPPUCCINO COFFEE
1. PREPARE THE ESPRESSO COFFEES as described in
the previous paragraphs, using suffi ciently
large cups.
2. PRESS THE STEAM BUTTON and wait
for the OK light to come on. This in—
dicates that the boiler has reached
the ideal temperature for steam
production.
3. IN THE MEANTIME, fi ll a recipi-
ent with about 100 grams of
milk for each cappuccino to be
prepared. The milk must be at
refrigerator temperature (not
hot!). In choosing the size of the recipient, bear
in mind that the milk doubles or triples
in volume.
NB: YOU ARE RECOMMENDED TO USE
SEMISKIMMED MILK AT REFRIGERATOR
TEMPERATURE.
4. PLACE THE RECIPIENT containing the
milk under the cappuccino maker.
7. POUR THE FROTHED MILK into the cups contain—
ing the espresso coff ee prepared previously.
The cappuccino is ready. Sweeten to taste and,
if desired, sprinkle the froth with a little cocoa
powder.
NB: To prepare more than one cappuccino,
fi rst make all the coff ees then at the end pre—
pare the frothed milk for all the cappuccinos.
NB: to make coff ee again after the milk has
been frothed, cool down the boiler fi rst or the
coff ee will be burnt. To cool it, place a contain—
er under the boiler outlet, press the steam but-
ton and run off water until the OK light goes
out. Make the coff ee as described in the previ-
ous paragraphs.
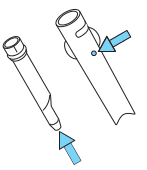
5. DIP THE CAPPUCCINO MAKER into
the milk for about 5 mm and
turn the steam knob anti—
clockwise, taking care not to
immerse the raised line on the
cappuccino maker (indicated by
the arrow).
Turn the steam knob at least a half turn anti-
clockwise. Steam is discharged from the cap—
puccino maker, giving the milk a creamy frothy
appearance. To obtain a creamier froth, dip the
cappuccino maker into the milk and rotate the
container with slow movements from the bot-
tom upwards.
6. WHEN THE REQUIRED TEMPERATURE
IS REACHED (60°C is ideal), interrupt
steam delivery by rotating the
steam knob clockwise and at the
same time pressing
the steam button.
9
IMPORTANT: always clean the cappuccino
maker after use. Proceed as follows:
1. DISCHARGE A LITTLE STEAM for a few seconds by
rotat-
ing the
steam
knob.
This
emp—
ties any
milk left
inside the
steam spout.
IMPORTANT: To ensure hy-
giene, you are recommended to follow
this procedure each time you make cappucci-
no to avoid milk stagnating in the milk circuit.
3. REMOVE THE NOZZLE from the steam
tube by pulling it downwards.
4. WASH THE CAPPUCCINO MAKER and
steam nozzle thoroughly with
warm water.
5. MAKE SURE the two holes shown
in are not blocked. If necessary,
clean with a pin.
6. REPLACE THE STEAM NOZZLE by in—
serting it onto the steam tube
and rotating fi rmly towards the
top of the tube.
7. REPLACE THE CAPPUCCINO MAKER by
inserting it and rotating anticlockwise.
HOT WATER PRODUCTION
1. TURN THE APPLIANCE ON by pressing
the ON/OFF button. Wait until the
OK indicator light comes on.
2. PLACE A RECIPIENT under the cappuccino mak-
er.
3. PRESS THE COFFEE BUTTON and at the same time
turn the steam knob anticlockwise.
Water comes out of the cappucci-
no maker;
4. TO INTERRUPT DELIVERY OF HOT WATER, close the
steam knob by rotating clockwise
and press the coff ee button again.
(You should not run off hot water
for more than 45 seconds at a time).
2. WITH ONE HAND, HOLD THE CAP—
PUCCINO TUBE FIRMLY and with the
other unscrew the cappuccino
maker itself by rotating clock-
wise and extracting downwards.
10
CLEANING AND MAINTENANCE
1. BEFORE PERFORMING ANY CLEANING operations,
leave the appliance to cool down and unplug
from the mains socket.
2. DO NOT USE SOLVENTS OR ABRASIVE cleaning
products to clean the appliance. A soft, damp
cloth is suffi cient.
3. EMPTY AND WASH the drip tray and drip mesh
frequently.
4. CLEAN THE WATER TANK regularly.
IMPORTANT: Never immerse the appliance in
water. It is an electrical appliance.
CLEANING THE FILTER HOLDER
ABOUT EVERY 200 COFFEES, clean the fi lter holder
for ground coff ee as follows:
Remove the filter with frother.
Clean the inside of the filter holder. Never
wash in a dishwasher.
Unscrew the cap of the frother
by turning anticlockwise.
Remove the frother from
the container by pushing it
from the cap end.
Remove the gasket.
RINSE ALL COMPONENTS and clean
the metal fi lter thoroughly in
hot water using a brush.
MAKE SURE the holes in the metal fi lter are not
blocked. If necessary, clean with a
pin.
Replace the filter and gasket on
the plastic disk. Make sure to in—
sert the pin on the plastic disk into
the hole in the gasket indicated by
the arrow.
Replace the assembly in the steel
filter container, making sure the
pin is inserted in the hole in the
support.
Finally, screw on the cap by
turning clockwise. Failure to
clean as described above in—
validates the guarantee.
11
CLEANING THE BOILER OUTLET
ABOUT EVERY 300 COFFEES, the espresso boil-
er outlet must be
cleaned as follows:
1. MAKE SURE the ap—
pliance is not hot and
that it is unplugged
from the mains.
DESCALING
3. CLEAN THE BOILER with a damp cloth
4. CLEAN THE OUTLET thoroughly in
hot water using a brush. Make sure
the holes are not blocked. If neces-
sary, clean with a pin.
5. RINSE UNDER RUNNING WATER, rubbing all the
time.
6. SCREW THE BOILER OUTLET BACK ON. Failure to
clean as described above invalidates the guar-
antee.
YOU ARE RECOMMENDED TO DESCALE the coff ee ma-
chine about every 200 coff ees or a maximum
of every two months.
YOU SHOULD USE A COMMERCIALLY AVAILABLE PROD—
UCT SPECIFICALLY FOR DESCALING ESPRESSO COFFEE MA—
CHINES.
IF SUCH A PRODUCT IS NOT AVAILABLE, proceed as fol-
lows.
1. FILL THE TANK with half a litre of water.
2. DISSOLVE 2 spoonfuls (about 30 grams) of cit-
ric acid (obtainable from chemist’s or drug
stores)
3. PRESS THE ON/OFF BUTTON and wait for the OK
indicator light to come on.
4. MAKE SURE the fi lter holder is not attached
and position a recipient under the boiler out-
let.
5. PRESS THE COFFEE BUTTON, half empty the tank
by turning the steam knob every now and
then to run off a little solution. Stop run-off by
pressing the button again.
6. TURN THE APPLIANCE OFF.
7. LEAVE THE SOLUTION TO WORK for 15 minutes
then turn the appliance on again.
8. PRESS THE COFFEE BUTTON to empty the tank
completely.
9. TO ELIMINATE RESIDUES of solution and scale,
rinse the tank well, fi ll with clean water (with—
out citric acid) and replace in position.
10. PRESS THE COFFEE BUTTON and run the water
off until the tank is completely empty
11. INTERRUPT water run-off and repeat opera-
tions 9, 10 and 11 again. Repair of damage to
the coff ee machine caused by scale is not cov-
ered by the guarantee unless descaling is per-
formed regularly as described above.
2. USING A SCREWDRIVER, unscrew the screw fi xing
the espresso boiler outlet fi lter
12
NO ESPRESSO COFFEE IS DELIVERED No water in the tank
The holes in the fil-
ter holder spouts are
blocked.
The espresso boiler outlet
is blocked
The filter is blocked
The tank is incorrectly in—
serted
PROBLEM POSSIBLE CAUSE SOLUTION
Fill the tank with water
Clean the spout holes.
Clean as described in the
chapter “Cleaning the
boiler outlet”
Clean as described in the
section “cleaning the filter
holder”.
Insert tank correctly.
THE ESPRESSO COFFEE DRIPS from
the edges of the fi lter holder
rather than the holes.
The filter holder is insert-
ed incorrectly
The espresso boiler gas-
ket has lost elasticity
The holes in the filter
holder spouts
Attach the filter holder
correctly and rotate firmly
as far as it will go.
Have the espresso boiler
gasket elasticity replaced
at a service centre
Clean the spout holes.
THE ESPRESSO COFFEE IS COLD The espresso OK indicator
light was not on when the
coffe switch was pressed
No preheating performed
The cups were not pre—
heated
Wait until the OK light
comes on not on when
the coffee switch was
pressed.
Preheat as described in
the paragraph “Preheat-
ing the appliance”.
Preheat the cups by rins-
ing them in hot water.
THE PUMP IS EXCESSIVELY NOISY The water tank is empty
The tank is incorrectly in-
serted.
Fill tank
Insert tank correctly.
13
THE COFFEE FROTH IS TOO LIGHT
(delivered from the spout too
fast)
PROBLEM POSSIBLE CAUSE SOLUTION
The ground coffee is
not pressed down firmly
enough
There is not enough
ground coffee
The ground coffee is too
coarse
Incorrect type of ground
coffee.
Press the ground coffee
down more firmly).
Increase the quantity of
ground coffee
Use ground coffee for
espresso coffee ma—
chines only
Change the type of
ground coffee.
THE COFFEE FROTH IS TOO DARK
(delivered from the spout too
slowly)
The ground coffee is
pressed down too firmly
There is too much ground
coffee
The espresso boiler outlet
is blocked
The filter is blocked
The ground coffee is too
fine
The coffee is damp or
ground too fine
Incorrect type of ground
coffee.
Press the coffee down less
firmly.
Reduce the quantity of
ground coffee
Clean as described in the
chapter “Cleaning the
boiler outlet”
Clean as described in the
section “cleaning the fil—
ter holder”.
Use ground coffee for
espresso coffee machines
only
Use only ground coffee
for espresso coffee ma-
chines. Make sure it is not
damp
Change the type of
ground coffee.
NO MILK FROTH IS FORMED WHEN
MAKING CAPPUCCINO
Milk not cold enough.
Cappuccino maker dirty.
Always use semi-skimmed
milk at refrigerator tem—
perature.
Thoroughly clean the
holes in the cappucci-
no maker in
particular
those indi—
cated by the
arrows.
14
15
16
Whirlpool Sweden AB
GB
4619- 694- 61932
ENVIRONMENTAL HINTS
THE PACKING BOX may be fully recy-
cled as confi rmed by the recy—
cling symbol. Follow local
disposal regulations. Keep
potentially hazardous pack-
aging (plastic bags, polysty—
rene etc.) out of the reach of children.
THIS APPLIANCE is marked according to the Euro—
pean directive 2002/96/EC on Waste Electrical
and Electronic Equipment (WEEE). By ensuring
this product is disposed of correctly, you will
help prevent potential negative consequences
for the environment and human health, which
could otherwise be caused by inappropriate
waste handling of this product.
THE SYMBOL on the product, or on the docu—
ments accompanying the
product, indicates that this
appliance may not be treat-
ed as household waste. In-
stead it shall be handed over
to the applicable collection
point for the recycling of elec-
trical and electronic equip—
ment.
DISPOSAL must be carried
out in accordance with lo—
cal environmental regula-
tions for waste disposal.
For more detailed information about treat-
ment, recovery and recycling of this prod-
uct, please contact your local city office, your
household waste disposal service or the shop
where you purchased the product.
Before scrapping, cut off the mains cord so
that the appliance cannot be connected to the
mains.
TROUBLE SHOOTING GUIDE
WHEN CALLING FOR SERVICE, please give the se—
rial number and type number of the appli—
ance (see Service label). Consult your warranty
booklet for further advice.
IF THE MAINS CORD NEEDS REPLACING it should
be replaced by the original mains cord,
which is available via our service organi-
zation. The mains cord may only be re—
placed by a trained service technician.
SERVICE ONLY TO BE CARRIED OUT
BY A TRAINED SERVICE TECHNICIAN.
It is hazardous for anyone oth—
er than a trained person to car-
ry out any service or repair op—
eration, which involves the
removal of any cover.
DO NOT REMOVE ANY COVER.
SUPPLY VOLTAGE 220 — 230 V/50 HZ
RATED POWER INPUT 1100 W
FUSE 10 A (UK 13 A)
OUTER DIMENSIONS (HXWXD) 382 X 595 X 305

ACE 010
www.whirlpool.com
1

INSTALLATION
INSTALLATION DE L’APPAREIL
LORS DE L’INSTALLATION DE L’APPAREIL, RESPECTEZ
les instructions fournies séparément.
AVANT DE BRANCHER L’APPAREIL
VÉRIFIEZ QUE LA TENSION indiquée sur la pla-

ASSUREZ—VOUS QUE L’APPAREIL N’EST PAS ENDOMMAGÉ.
CET APPAREIL EST CONÇU POUR FONC—
TIONNER à une température ambiante supérieure au point de congélation de l’eau (0 °C). Si une quantité d’eau résiduelle gèle, il peut être endommagé.
APRÈS LE BRANCHEMENT DE L’APPAREIL
LA MISE À LA TERRE DE L’APPAREIL est obliga-

N’UTILISEZ EN AUCUN CAS CET APPAREIL si le

Le fabricant décline toute responsabilité si l’utilisateur ne respecte pas ces instructions.
2

CONSIGNES DE SÉCURITÉ IMPORTANTES
LISEZ CES CONSIGNES ATTENTIVEMENT ET CONSERVEZ LES EN LIEU SÛR POUR TOUTE CONSULTA
TION ULTÉRIEURE
VEILLEZ À NE PAS CHAUFFER OU UTILISER DE LIQ—

NE LAISSEZ PAS L’APPAREIL SANS SURVEILLANCE.
N’UTILISEZ PAS de produits chimiques ou 
Cette machine à expresso a été spécialement conçue pour réchau er de l’eau. Elle n’est pas prévue pour un usage industriel ou de laboratoire.
NE LAISSEZ LES ENFANTS utiliser l’appareil sans

L’appareil ne doit pas être utilisé par de jeunes enfants ou des personnes handicapées sans surveillance. Les enfants doivent être encadrés pour s’assurer qu’ils ne jouent pas avec l’appareil.
Les enfants ne doivent se servir de l’appareil qu’en présence d’un adulte à cause des hautes températures qui sont atteintes.
PRÉCAUTIONS
N’UTILISEZ CET APPAREIL QUE POUR UN USAGE DOMESTIQUE !
AFIN D’ÉVITER DE VOUS BRÛLER, UTILISEZ DES

cher les parties chaudes de l’appareil.
CET APPAREIL EST CONÇU POUR FAIRE DU CAFÉ ou ré-
chau er des boissons. Prenez garde à ne pas vous ébouillanter avec de la vapeur d’eau ou des éclaboussures ou à cause d’un usage incorrect de l’appareil.
3

ACCESSOIRES ET COMPOSANTS
q w
t
j
|
r |
||
|
2) |
i |
|
|
h |
||
|
2! |
o |
|
|
e |
|
s |
y |
|
|
g |
||
|
a |
||
|
u |
||
|
f |
||
|
d |
|
q BANDEAU DE COMMANDES |
i BUSE À CAPPUCCINO |
h SÉLECTEUR VAPEUR |
|
|
w BOUTON DE VAPEUR |
o BUSE |
j TOUCHE CAFÉ/EAU CHAUDE |
|
|
e RÉSERVOIR D’EAU |
a SORTIE DE LA CHAUDIÈRE |
k TOUCHE MARCHE/ARRÊT |
|
|
r CORDON D’ALIMENTATION |
s COMPACTEUR |
l VOYANT MARCHE |
|
|
t TUBE VAPEUR/EAU CHAUDE |
d PORTE—FILTRE |
1( VOYANT TEMPÉRATURE OK (CAFÉ |
|
|
y GRILLE ÉGOUTTOIR |
1# GRAND FILTRE DEUX TASSES |
OU EAU CHAUDE) |
|
|
2) VOYANT VAPEUR |
|||
|
u BAC COLLECTEUR |
g PETIT FILTRE UNE TASSE OU DO— |
||
|
2! INTERRUPTEUR D’ÉCLAIRAGE |
|||
|
SETTE |
4

REMPLISSAGE DU RÉSERVOIR D’EAU
qDÉPOSEZ LE RÉSERVOIR D’EAU en le tirant vers
vous (vers l’avant de l’appareil).
N’UTILISEZ JAMAIS L’APPAREIL SI LE RÉSERVOIR

w REMPLISSEZ LE RÉSERVOIR
d’eau claire et fraîche en prenant soin de ne pas dépasser le niveau MAX. Remettez le réservoir en place.
PRÉCHAUFFAGE DE LA MACHINE À EXPRESSO
1. ALLUMEZ L’APPAREIL en appuyant sur la touche Marche/Arrêt et fixez le porte-filtre sans ajouter de café moulu.
|
POUR FIXER LE PORTE—FILTRE, placez-le sous la sortie |
|
|
de la chaudiè- |
|
|
re en orien- |
|
|
tant la poi- |
|
|
gnée |
|
|
vers la |
1 |
|
gauche |
|
|
puis poussez- |
2 |
|
le vers le haut tout en |
|
|
faisant fermement pivoter la poi- |
gnée vers la droite. Vérifiez que le bouton de vapeur est en position fermée.
2.PLACEZ UNE TASSE SOUS LE PORTE—FILTRE. Pour le
préchau age, servez-vous de la tasse que vous utiliserez pour préparer le café.
3.ATTENDEZ QUE LE VOYANT TEMPÉRATURE OK s’allu-
me puis appuyez immédiatement sur la tou-
che du café. Faites couler de l’eau jusqu’à ce que le voyant s’éteigne puis arrêtez le flux
en appuyant à nouveau sur la touche du café.
4. VIDEZ LA TASSE. Attendez que le voyant Température OK s’allume à nouveau pour répéter l’opération.
(Il est normal que l’appareil émette
une petite bou ée de vapeur ino ensive lorsque vous retirez le porte-filtre.)
5

You can only view or download manuals with
Sign Up and get 5 for free
Upload your files to the site. You get 1 for each file you add
Get 1 for every time someone downloads your manual
Buy as many as you need
|
Detail Specifications: 193/193245-ace_010_ix_instruction_for_use.pdf file (19 Oct 2022) |
Accompanying Data:
Whirlpool ACE 010 IX Coffee Maker PDF User Manual Manual (Updated: Wednesday 19th of October 2022 03:50:30 PM)
Rating: 4.8 (rated by 51 users)
Compatible devices: STRADA MP, INCANTO SUP021R, Y 1.1 Touch, ESA, ACE 102 IX, BXCO1470E, W11 CM145, ACE 010.
Recommended Documentation:
Text Version of User Manual Manual
(Ocr-Read Summary of Contents, UPD: 19 October 2022)
-
7, 7 1 2 HOW TO PREPARE ESPRESSO COFFEE USING PODS 1. PREHEAT THE APPLIANCE as described in the sec- tion “PREHEATING THE COFFEE UNIT”, making sure the fi lter holder is attached. This obtains a hotter coff ee. NB: Use pods conforming to the ESE standard indicated on the pack with the following logo: T HE ESE STANDARD is a system ac- cepted by leading pod producer…
-
12, Whirlpool ACE 010 IX 12 NO ESPRESSO COFFEE IS DELIVERED No water in the tank The holes in the fil- ter holder spouts are blocked. The espresso boiler outlet is blocked The filter is blocked The tank is incorrectly in- serted PROBLEM POSSIBLE CAUSE SOLUTION Fill the tank with water Clean the spout holes. Clean as described in the chapter “Cleaning the boiler…
-
3, 3 IMPORTANT SAFETY INSTRUCTIONS DO NOT HEAT, OR USE FLAMMABLE LIQUIDS in or near the appliance. Fumes can create a fi re hazard or explosion. DO NOT LEAVE THE APPLIANCE UNATTENDED READ CAREFULLY AND KEEP FOR FUTURE REFERENCE O NLY ALLOW CHILDREN to use the appliance without adult supervision after adequate instructions have been given, so that the child is able to use the appliance in …
-
11, 11 CLEANING THE BOILER OUTLET ABOUT EVERY 300 COFFEES, the espresso boil- er outlet must be cleaned as follows: 1. MAKE SURE the ap- pliance is not hot and that it is unplugged from the mains. DESCALING 3. CLEAN THE BOILER with a damp cloth 4. C LEAN THE OUTLET thoroughly in hot water using a brush. Make sure the holes are not blocked. If neces- sary, cl…
-
10, 10 CLEANING AND MAINTENANCE 1. BEFORE PERFORMING ANY CLEANING operations, leave the appliance to cool down and unplug from the mains socket. 2. DO NOT USE SOLVENTS OR ABRASIVE cleaning products to clean the appliance. A soft, damp cloth is suffi cient. 3. E MPTY AND WASH the drip tray and drip mesh frequently. 4. C LEAN THE WATER TANK regularly. IMPORTAN…
-
2, 2 INSTALLATION PRIOR TO CONNECTING E NSURE THAT THE APPLIANCE IS NOT DAMAGED. AFTER CONNECTING T HE EARTHING OF THIS APPLIANCE is compulso- ry. The manufacturer will accept no re- sponsibility for injury to persons, ani- mals or damage to objects arising from the non-observance of this requirement. The manufacturers are not liable for any problems caused by the us…
-
6, 6 1 2 1. AFTER PREHEATING the appliance as described above, place the ground coff ee fi lter in the fi lter holder, making sure the projection is correctly inserted in the slot. Use the smaller fi lter to make one coff ee or the larg- er fi lter to make two coff ees. HOW TO PREPARE ESPRESSO COFFEE USING THE FILTER HOLDER FOR GROUND COFFEE 2. TO MAKE A SINGLE COFFEE ONLY…
-
13, Whirlpool ACE 010 IX 13 THE COFFEE FROTH IS TOO LIGHT (delivered from the spout too fast) PROBLEM POSSIBLE CAUSE SOLUTION The ground coffee is not pressed down firmly enough There is not enough ground coffee The ground coffee is too coarse Incorrect type of ground coffee. Press the ground coffee down more firmly). Increase the quantity of ground coffee …
-
9, Whirlpool ACE 010 IX 9 IMPORTANT: always clean the cappuccino maker after use. Proceed as follows: 1. DISCHARGE A LITTLE STEAM for a few seconds by rotat- ing the steam knob. This emp- ties any milk left inside the steam spout. IMPORTANT: To ensure hy- giene, you are recommended to follow this procedure each time you make cappucci- no to avoid milk stagnating in the milk circuit. 3. REM…
Recommended Instructions:
KIT34704BEPEVBE, FC9A, Panther II 1032, TD-W8151N, KS 37472 iD
-
INSTRUCTION MANUAL40v Max* Lithium Cordless MowerThank you for choosing BLACK+DECKER! PLEASE READ BEFORE RETURNING THIS PRODUCT FOR ANY REASON.If you have a question or experience a problem with your BLACK+DECKER purchase, go to http://www.blackanddecker.com/instantanswers If you can’t find the answer or do not have access to the Internet, call 1-800-544-6986 from 8 a.m. to 5 p.m. …
CM2045 56
-
FETCO® and LUXUS® are trademarks or trade names of Food Equipment Technologies Company. © 2008 Food Equipment Technologies Company Part # P105 September 18, 2008 www.fetco.com User’s Guide CBS-52H Coffee Brewers Table of Contents Contact Information ……………………………………2 Product Des …
CBS-52H 20
-
INSTRUCTION MANUAL COFFEE MAKER MODEL:CEM-1518 Read this booklet thoroughly before using and save it for future reference …
CEM-1518 8
-
ISTRUZIONI PER L’USOOPERATING INSTRUCTIONSmode DEMPLOIbeDIENUNGSANLEITUNGINSTRUCCIONES DE USOINSTRUÇÕES PARA USOGEBRUIKSAANWIJZINGPER LA VOSTRA SICUREZZA LEGGERE ATTENTAMENTE LE ISTRUZIONI PER L’USO.FOR YOUR SAFETY CAREFULLY READ THE OPERATING INSTRUCTIONS.POUR VOTRE SÉCURITÉ, LISEZ SOIGNEUSEMENT LES INSTRUCTIONS D’EMPLOI.FÜR IHRE SICHERHEIT LESEN SIE BITTE SORGFÄLT …
TYPE SIN 017 46


