инструкцияPeg Perego Pliko Mini

pliko mini
IT Istruzioni d’uso
EN Instructions for use
FR Notice d’emploi
DE Gebrauchsanleitung
ES Instrucciones de uso
PT Instruções de uso
NL Gebruiksaanwijzing
DK Brugsanvisning
FI Käyttöohjeet
CZ Návod na použití
SK Návod na použitie
HU Használati útmutató
SL Navodila za uporabo
RU Инструкции по пользованию
TR Kullanim kilavuzu
HR/SRB/MNE/BiH Upute za uporabu
PL Instrukcja obsługi
UA Інструкція з використання
EL Οδηγιεσ χρησεωσ
RO Instrucțiuni de utilizare
BG Инструкции за употреба
AR
FA
Посмотреть инструкция для Peg Perego Pliko Mini бесплатно. Руководство относится к категории коляски, 3 человек(а) дали ему среднюю оценку 7.9. Руководство доступно на следующих языках: русский, английский. У вас есть вопрос о Peg Perego Pliko Mini или вам нужна помощь? Задайте свой вопрос здесь
Главная
| Peg Perego | |
| Pliko Mini | 8005475365182 | |
| коляска | |
| 8005475365182 | |
| русский, английский | |
| Руководство пользователя (PDF) |
Свойства
| Тип | Легкая коляска |
| Рекомендуемый возраст (мин) | 0 мес |
| Рекомендуемый возраст (макс) | 36 мес |
| Количество мест | 1 место(а) |
| Количество в упаковке | 1 шт |
| Складной | Да |
| Стиль складывания | Плоский |
| Балдахин | Да |
| Тип колес | цельные колеса |
| Сертификация | EN1888 |
| Цвет товара | Красный |
| Количество передних колес | 2 |
| Регулируемая ручка | Да |
| Материал чехла | Полиэстер |
| Аксессуары для коляски включены | Накрытие |
Содержимое упаковки
| Детское автомобильное кресло в комплекте | Нет |
Вес и размеры
| Ширина | 500 mm |
| Глубина | 840 mm |
| Высота | 1010 mm |
| Вес | 5700 g |
| Ширина в сложенном виде | 340 mm |
| Глубина в сложенном виде | 320 mm |
| Высота в сложенном виде | 940 mm |
показать больше
Не можете найти ответ на свой вопрос в руководстве? Вы можете найти ответ на свой вопрос ниже, в разделе часто задаваемых вопросов о Peg Perego Pliko Mini.
Какой вес Peg Perego Pliko Mini?
Какие сертификаты Peg Perego Pliko Mini имеет?
Какой коляска подходит для новорожденного ребенка?
Как долго следует пользоваться коляской?
Безопасно ли ребенку спать в коляска?
Какая высота Peg Perego Pliko Mini?
Какая ширина Peg Perego Pliko Mini?
Какая толщина Peg Perego Pliko Mini?
Инструкция Peg Perego Pliko Mini доступно в русский?
Не нашли свой вопрос? Задайте свой вопрос здесь
- Manuals
- Brands
- Peg-Perego Manuals
- Stroller
- Pliko mini
- Instructions for use manual
-
Contents
-
Table of Contents
-
Bookmarks
Quick Links
U.S.A.
EN Instructions for use
ES Instrucciones de uso
Related Manuals for Peg-Perego Pliko Mini
Summary of Contents for Peg-Perego Pliko Mini
-
Page 1
U.S.A. EN Instructions for use ES Instrucciones de uso… -
Page 9
Pliko Mini — 9 -… -
Page 10
Pliko Mini EN_English Thank you for choosing a Peg-Pérego product. WARNING _ CAREFULLY READ INSTRUCTIONS AND KEEP FOR FUTURE USE. THE CHILD’S SAFETY COULD BE PUT AT RISK IF THE INSTRUCTIONS ARE NOT FOLLOWED. _ THIS PRODUCT IS DESIGNED FOR A CHILD WHOSE MAXIMUM WEIGHT IS 45 POUNDS (20 KG) AND WHOSE MAXIMUM HEIGHT IS 43 INCHES (110 CM). THIS SHOPPER BASKET IS DESIGNED TO CARRY A MAXIMUM WEIGHT OF 11 POUNDS (5 KG). ANY CUPHOLDER EVENTUALLY PROVIDED WITH THIS UNIT IS DESIGNED TO CARRY A MAXIMUM WEIGHT SPECIFIED ON THE CUPHOLDER ITSELF. ANY POACH OR POCKET… -
Page 11: Product Parts
CORRECTLY AND LOCKED IN POSITION holder, push until it clicks into place (fig_b). OF USE. ADJUSTING THE HANDLES: the height of the handles can be adjusted. Press the little _ DO NOT DRIVE THIS PRODUCT button behind the handles and pull upwards. AROUND STAIRS OR STEPS; CARE To lower the handles, do the opposite (Fig. c). MUST BE TAKEN IF UNIT IS USED ON 6• SWIVEL WHEELS: In order to make the wheels STAIRS OR ESCALATORS. swivel, the lever (arrow 1) must be lowered. To secure the wheels, move the lever to the _ DO NOT USE THE PRODUCT IF IT HAS opposite direction (arrow 2). The rear wheels BROKEN OR MISSING PARTS. are fixed. BRAKE: To set the brake on the stroller, lower _ DO NOT USE NEAR FIRE OR EXPOSED the lever on the rear wheel unit with your FLAME. foot. To release the brake, lift the lever (fig_b). When stationary, always apply the brake. 7• HOOD: To fit the hood, click the fasteners NOTICE onto the appropriate points and button down the hood on the rear of the stroller’s backrest THIS ARTICLE MEETS OR EXCEEDS (fig_a). ALL REQUIREMENTS COVERED IN The hood can be set to 2 positions (fig_b), ASTM F833 STANDARD AND LATEST simply by pulling it backwards or forwards. REVISIONS. 8• 5-POINT SAFETY HARNESS: to fasten, insert the two buckles of the waist strap (with PRODUCT PARTS attached shoulder straps, arrow a) into the leg divider strap until they click into place (arrow…
-
Page 12: Serial Numbers
1 8• The Stroller PLIKO MINI has all the following relevant information behind the backrest: product name, date of manufacture and serial USA: number. This information is required for any tel. 800.671.1701 complaints. fax: 260.471.6332 call us toll free: 1.800.671.1701 ACCESSORIES web site: www.pegperego.com 1 9• COVER: practical cover. RAIN CANOPY: can be applied to the hood. Peg-Perego reserves the right to make any MOSQUITO NETTING: can be fastened to the necessary changes or improvements to the hood. products shown at any time without notice. 2 0• TRAVEL BAG: practical duffle bag for transporting the stroller by plane (fig_a). UMBRELLA: practical umbrella to match (fig_b). CLEANING AND MAINTENANCE PRODUCT MAINTENANCE: protect from the weather: water, rain, or snow; prolonged and continuous exposure to bright sunlight may give rise to colour changes of various different materials; store this product in a dry place.
-
Page 13: Instrucciones De Uso
ES_Español MIENTRAS SE REGULA EL PRODUCTO. _ TODAS LAS OPERACIONES DE Le agradecemos haber elegido un producto ENSAMBLAJE DEBE REALIZARLAS Peg-Pérego. SOLO UN ADULTO. _ ASEGURARSE DE QUE LA ADVERTENCIA SILLA DE PASEO ESTÉ ABIERTA CORRECTAMENTE Y BLOQUEADA EN _ LEER ATENTAMENTE ESTAS LA POSICIÓN CORRECTA PARA SU INSTRUCCIONES Y CONSERVARLAS UTILIZACIÓN. PARA FUTURAS CONSULTAS. _ NO USAR LA SILLA DE PASEO CERCA LA SEGURIDAD DEL NIÑO PUEDE DE ESCALERAS O ESCALONES; PONERSE EN PELIGRO SI NO SE PRESTAR ATENCIÓN CUANDO SE SIGUEN ESTAS INSTRUCCIONES. UTILIZA EN ESCALERAS O ESCALERAS _ ESTE PRODUCTO HA SIDO DISEÑADO MECÁNICAS. PARA UN NIÑO CON UN PESO _ NO UTILIZAR EL PRODUCTO SI MÁXIMO DE 20 KG Y UNA ALTURA PRESENTA PARTES DAÑADAS O SI MÁXIMA DE 110 CM. LA CESTILLA HA FALTA ALGUNA PARTE. SIDO REALIZADA PARA SOPORTAR _ NO USAR EN PRESENCIA DE LLAMAS UN PESO MÁXIMO DE 5 KG. LOS O FUENTES DE CALOR.
-
Page 14
oír el clic de enganche. La correa de la cintura puede apretarse hasta Ejercer presión hacia abajo con el pie sobre el tope de seguridad (Fig b). PUSH (fig_e). 1 0•Se pueden reglar los cinturones de seguridad 3• ENSAMBLAJE: para montar las ruedas en 3 alturas según la altura del bebé. Se delanteras, comprobar que esté puesta la deberá usar la posición más alta cuando el arandela, como en la figura, bajar la palanca A bebé sea más grande. y colocar la rueda B, hasta el clic. 1 1•Para regular la altura de los cinturones de 4• Para montar las ruedas traseras unidas por seguridad es necesario desenganchar en la barra de freno, colocarlas sosteniendo el la parte posterior del respaldo de las dos freno externo (fig_a). hebillas. ATENCIÓN: comprobar que el enganche sea Tire hacia sí los tirantes (flecha a) hasta correcto, como indica la figura (Fig.b); se desenganchar las hebillas y pasarlas por las debe oír un clic. ranuras del respaldo (flecha b). Saque los tirantes del saco (flecha c) y páselos por la 5• CESTA: para montar la cesta, hacer pasar por ranura más adecuada (flecha d), finalmente las ranuras los ganchos traseros 1 y 2 y el vuelva a enganchar las dos hebillas detrás del gancho delantero 3, (fig_a). respaldo (flecha e). Un clic determina que se PORTABEBIDAS: Sólo puede colocarse en el han enganchado correctamente las hebillas lado derecho de la silla de paseo gracias al (Fig. f). -
Page 15: Números De Serie
USA: reclamación. tel.: 800.225.1558 (Español) fax: 260.471.6332 ACCESORIOS: Número de teléfono gratis: 1.800.225.1558 (Español) 1 9• CUBIERTA: práctica cubierta. sito internet: www.pegperego.com PARALLUVIA: aplicable a la capota. MOSQUITERA: aplicable a la capota. 2 0• BOLSA DE VIAJE: Práctica bolsa para el Peg-Perego se reserva el derecho para hacer transporte aéreo de la silla de paseo (fig_a). cambios necesarios o mejorar los productos SOMBRILLA: práctica sombrilla coordinada al cualquier tiempo sin notificación. (fig_b). LIMPIEZA Y MANTENIMIENTO MANTENIMIENTO DEL PRODUCTO: proteger contra agentes atmosféricos (agua, lluvia o nieve). Una exposición contínua y prolongada al sol podría causar cambios de color de muchos materiales. Conservar este producto en un lugar seco. LIMPIEZA DEL CHASIS: Limpiar periódicamente las partes de plástico con un paño húmedo sin usar solventes u otros productos similares.
-
Page 16
PEG PEREGO S.p.A. VIA DE GASPERI 50 20043 ARCORE MI ITALIA tel. 0039 039 60881 fax 0039 039 615869/616454 Servizio Post Vendita — After Sale: tel. 0039 039 6088213 fax: 0039 039 3309992 Conforms to ASTM F833 Safety Standards PEG PEREGO U.S.A. Inc. 3625 INDEPENDENCE DRIVE FORT WAYNE INDIANA 46808 phone 260 482 8191 fax 260 484 2940 Call us toll free: 1 800 671 1701 PEG PEREGO CANADA Inc. 585 GRANITE COURT PICKERING ONTARIO CANADA L1W3K1 phone 905 839 3371 fax 905 839 9542 Call us toll free: 1 800 661 5050 www.pegperego.com WARNING AVOID SERIOUS INJURY FROM FALLING OR SLIDING OUT.
-
Contents
-
Table of Contents
-
Bookmarks
-
ENGLISH, page 12
-
РУССКИЙ, страница 36
-
FRANÇAIS, page 13
-
ESPAÑOL, página 17
-
DEUTSCH, seite 15
-
ITALIANO, pagina 10
-
DUTCH, pagina 23
-
PORTUGUÊS, página 20
-
POLSKI, strona 41
-
DANSK, side 25
-
SUOMI, sivu 27
-
ČEŠTINA, strana 28
-
ΕΛΛΗΝΙΚΆ, σελίδα 45
-
MAGYAR, oldal 32
-
SLOVENČINA, strana 30
-
TÜRKÇE, sayfa 38
-
SLOVENŠČINA, stran 34
-
УКРАЇНСЬКА, сторінка 43
-
العربية, الصفحة 49
-
فارسی, صفحه 51
Quick Links
IT Istruzioni d’uso
EN Instructions for use
FR Notice d’emploi
DE Gebrauchsanleitung
ES Instrucciones de uso
BR-PT Instruções para uso
NL Gebruiksaanwijzing
DK Brugsanvisning
FI Käyttöohjeet
CZ Návod na použití
SK Návod na použitie
HU Használati útmutató
SL Navodila za uporabo
RU Инструкции по пользованию
TR Kullanim kilavuzu
HR/SRB/MNE/BiH Upute za uporabu
PL Instrukcja obsługi
UA Інструкція з використання
EL Οδηγιεσ χρησεωσ
: تعليمات االستخدامAR
:دستورالعم لهای استفادهFA
Summary of Contents for Peg-Perego pliko mini
Весной, когда крохе было 1,5 года, я временно осталась без авто. Мне нужна была легкая и маленькая колсяка, с которой можно бегать за малышом и ездить в троллейбусах. Живу в квартире, коляску оставляю в колясочной, двор и прилежащие территории у меня достаточно ровные — тротуарная плитка и прорезиненное покрытие.
Я выбрала коляску Peg perego plico mini за самый легкий вес (около 3 кг) и одновременно самую высоую нагрузку веса ребенка (до 20 кг, тогда как большинство до 15 кг).
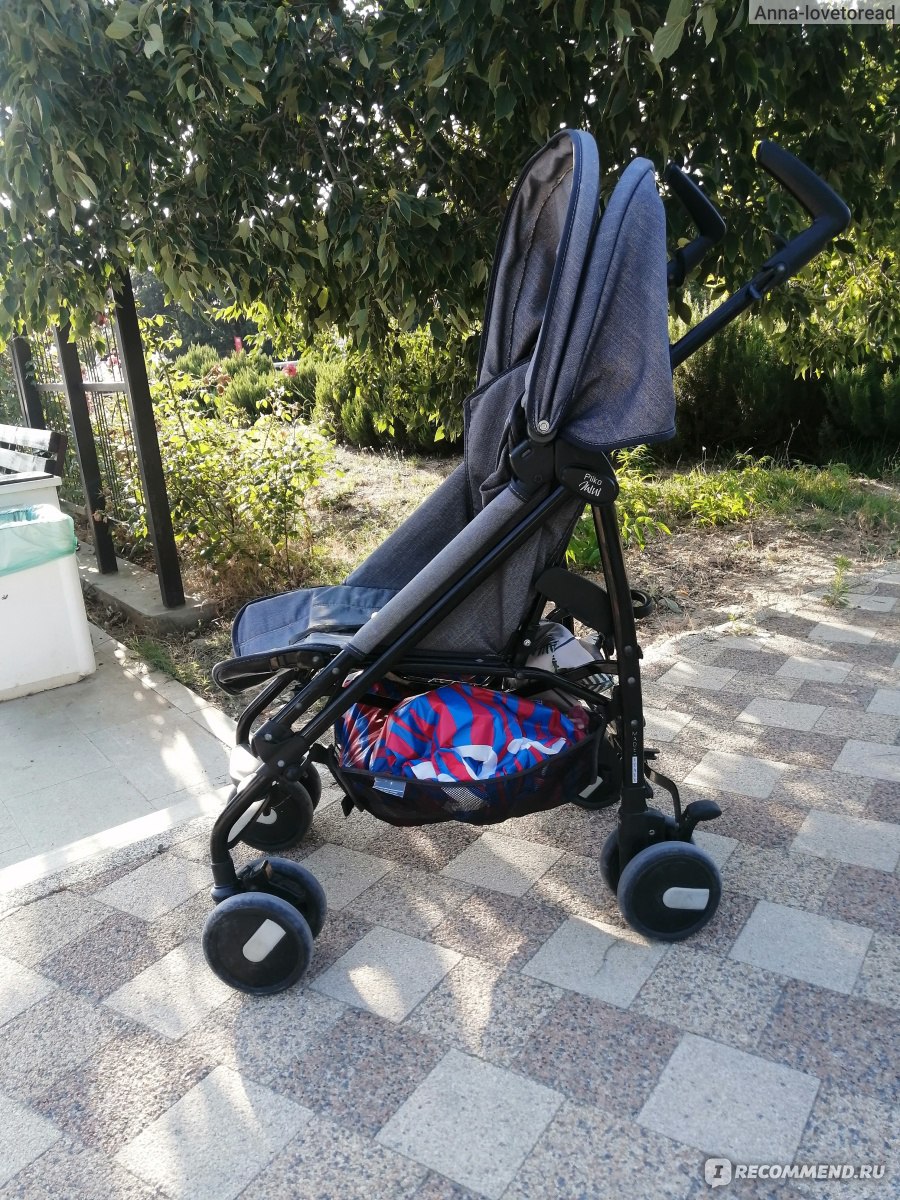
Коляска — трость Peg Perego Pliko mini
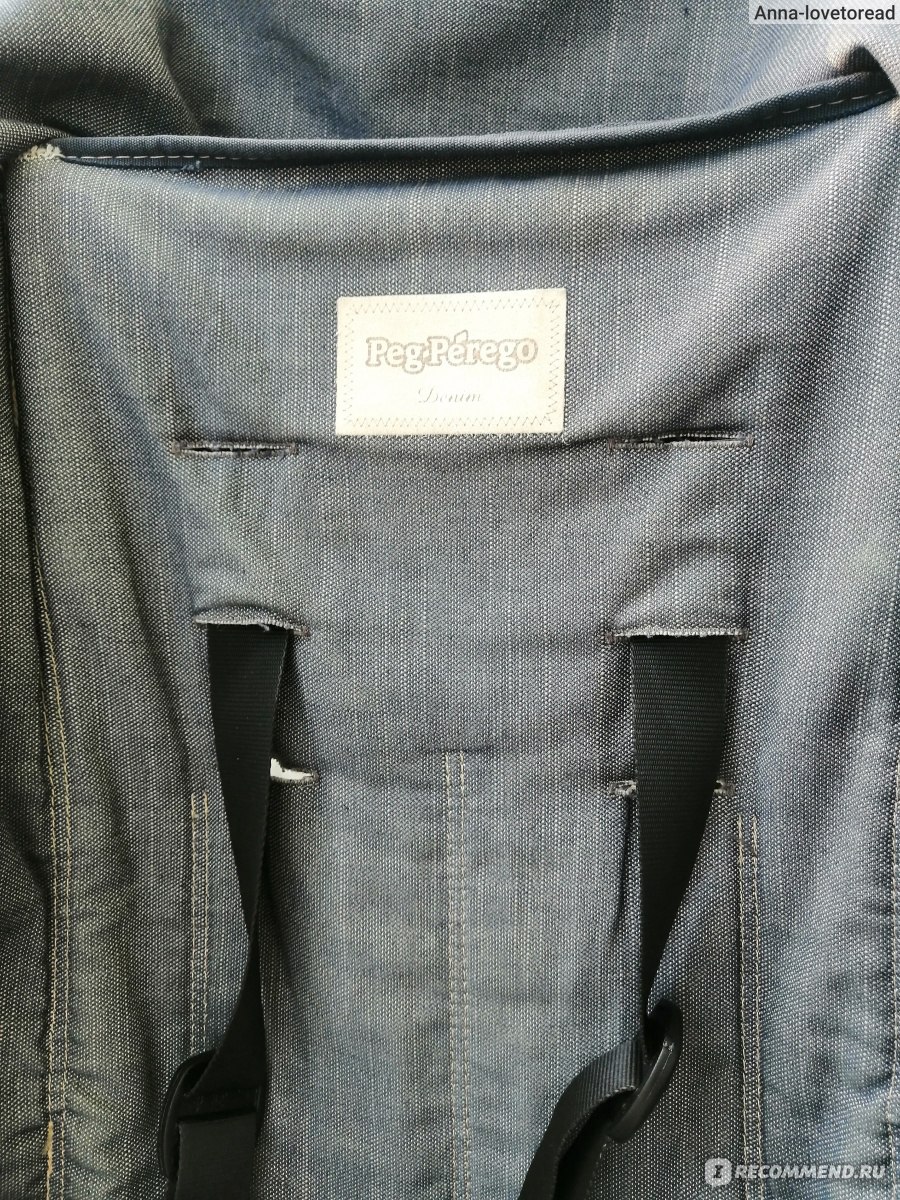
Внешний вид
Честно говоря, мне эстетика не принципиальна, важен функционал. У меня чехлы из плотного материала хб, похожего на джинс. Вот поближе текстура ткани и срез швов:

Коляска — трость Peg Perego Pliko mini — материал чехла
и правда похоже на джинсы. Ткань плотная, фактурная, хорошо стирается.
Комплектация и основные фишки:
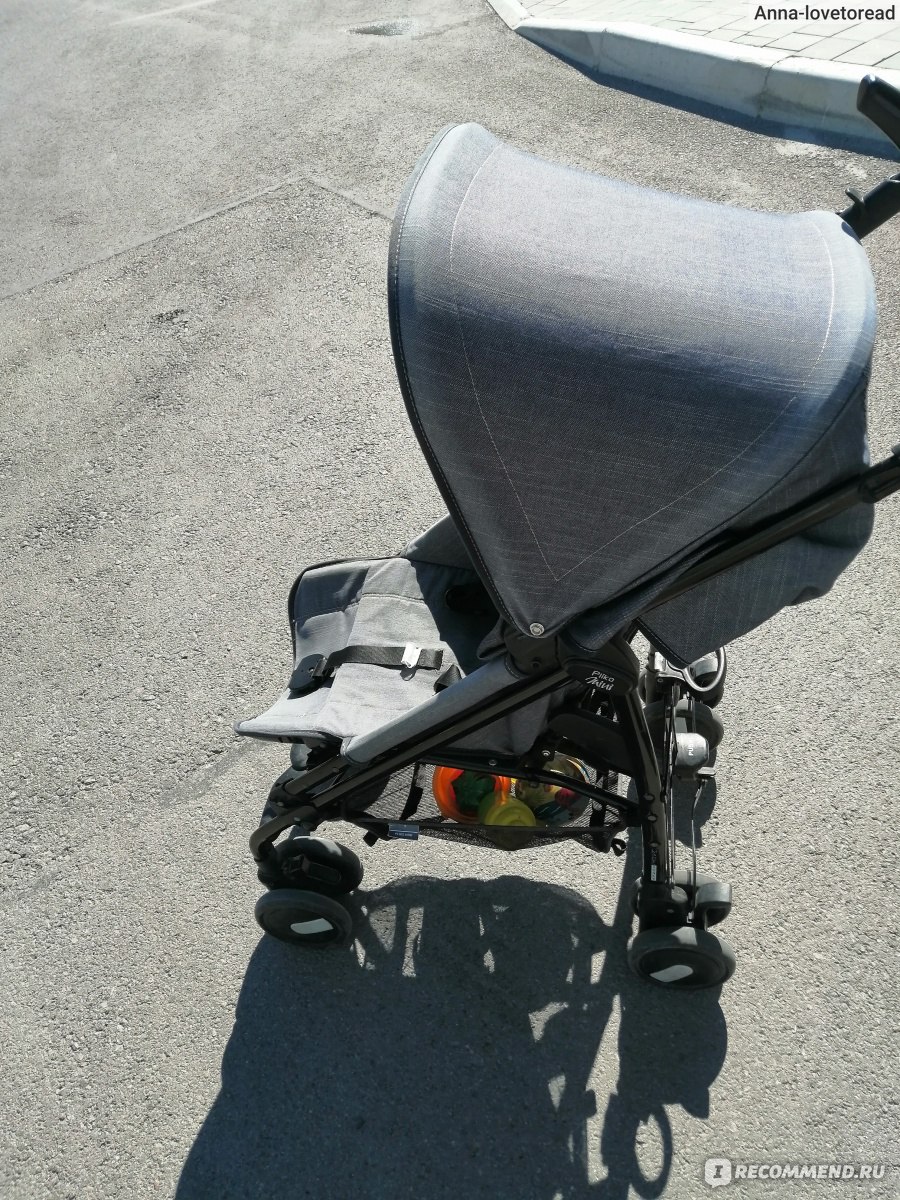
Козырек
Над головой ребенка накидывается защита от солнца, закрывает только верхнюю часть туловища. Летом это не особо удобно — ноги на солнце, приходится либо одежду длинную надевать, либо быстро проезжать участки пути под открытым солнцем.
Коляска — трость Peg Perego Pliko mini
Укрывания пледом мой ребенок не приемлет.
Окошко для мамы
Есть, но оно для меня не особо функциональное. Я не могла нормально разглядеть сквозь него ребенка. Давайте честно: вы можете рассмотреть что-то сквозь это окошко?

Коляска — трость Peg Perego Pliko mini — окошко для мамы
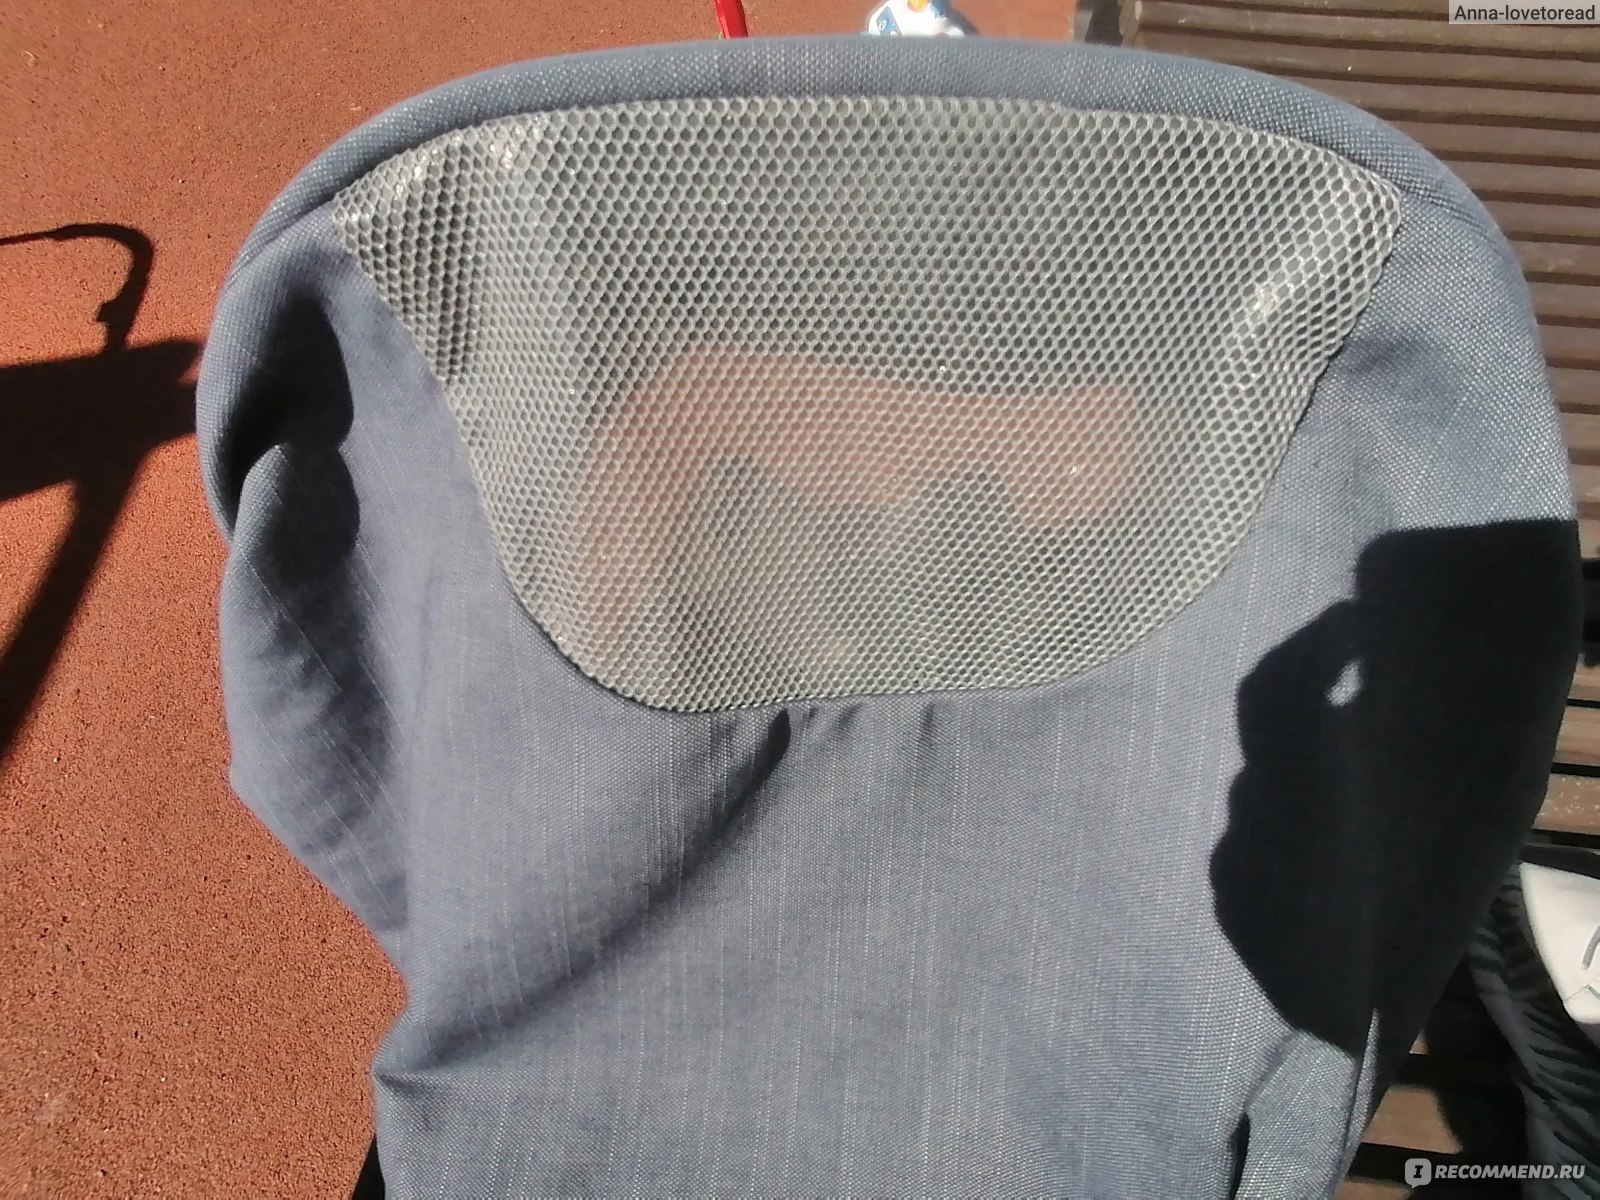
Коляска — трость Peg Perego Pliko mini — окошко для мамы
Мне сквозь него видно только очертания темных и светлых пятен. Поэтому мне такое окошко кажется бесполезным. Пережило несколько стирок и почти не облущилось. И на том спасибо.
Карман для мамы
Отсутствует. Когда козырек сложен, в него можно положить бутылочку воды, небольшую игрушку или клатч. Но опасность в том, что о вещах можно забыть. И если откинуть капюшон, то все имущество высыпется на ребёнка.
Ремень
5-точечный. Для тех, кто до последнего не понимал, о каких 5 точках идет речь (как я), поясняю: ремень крепится слева и справа от бедер ребенка, сверху 2 лямки держат плечи, один хлястик выходит между ножек, и все эти концы сходятся и защелкиваются в районе живота.

Коляска — трость Peg Perego Pliko mini — ремни
Строго говоря, ремня 3: левая часть с креплением бедра и плеча, симметричная правая и 1 по центру. Надеюсь, понятно объяснила)
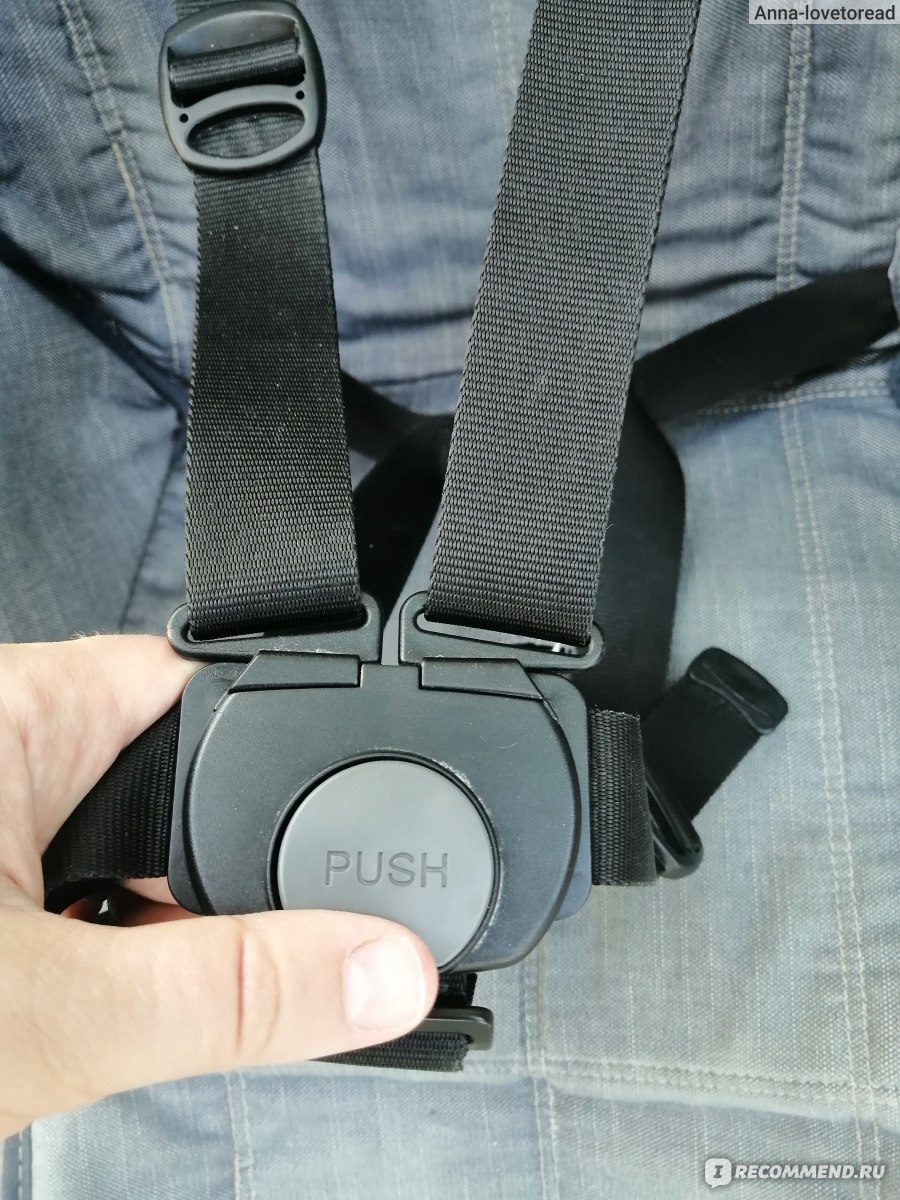
Коляска — трость Peg Perego Pliko mini — ремень и точка фиксации
Ремни хорошие, надежные. Защелка прочная. Ребенок в 2 года не мог расстегнуть ремни — ещё нехватает силы в пальчиках. В этом смысле безопасность меня порадовала.
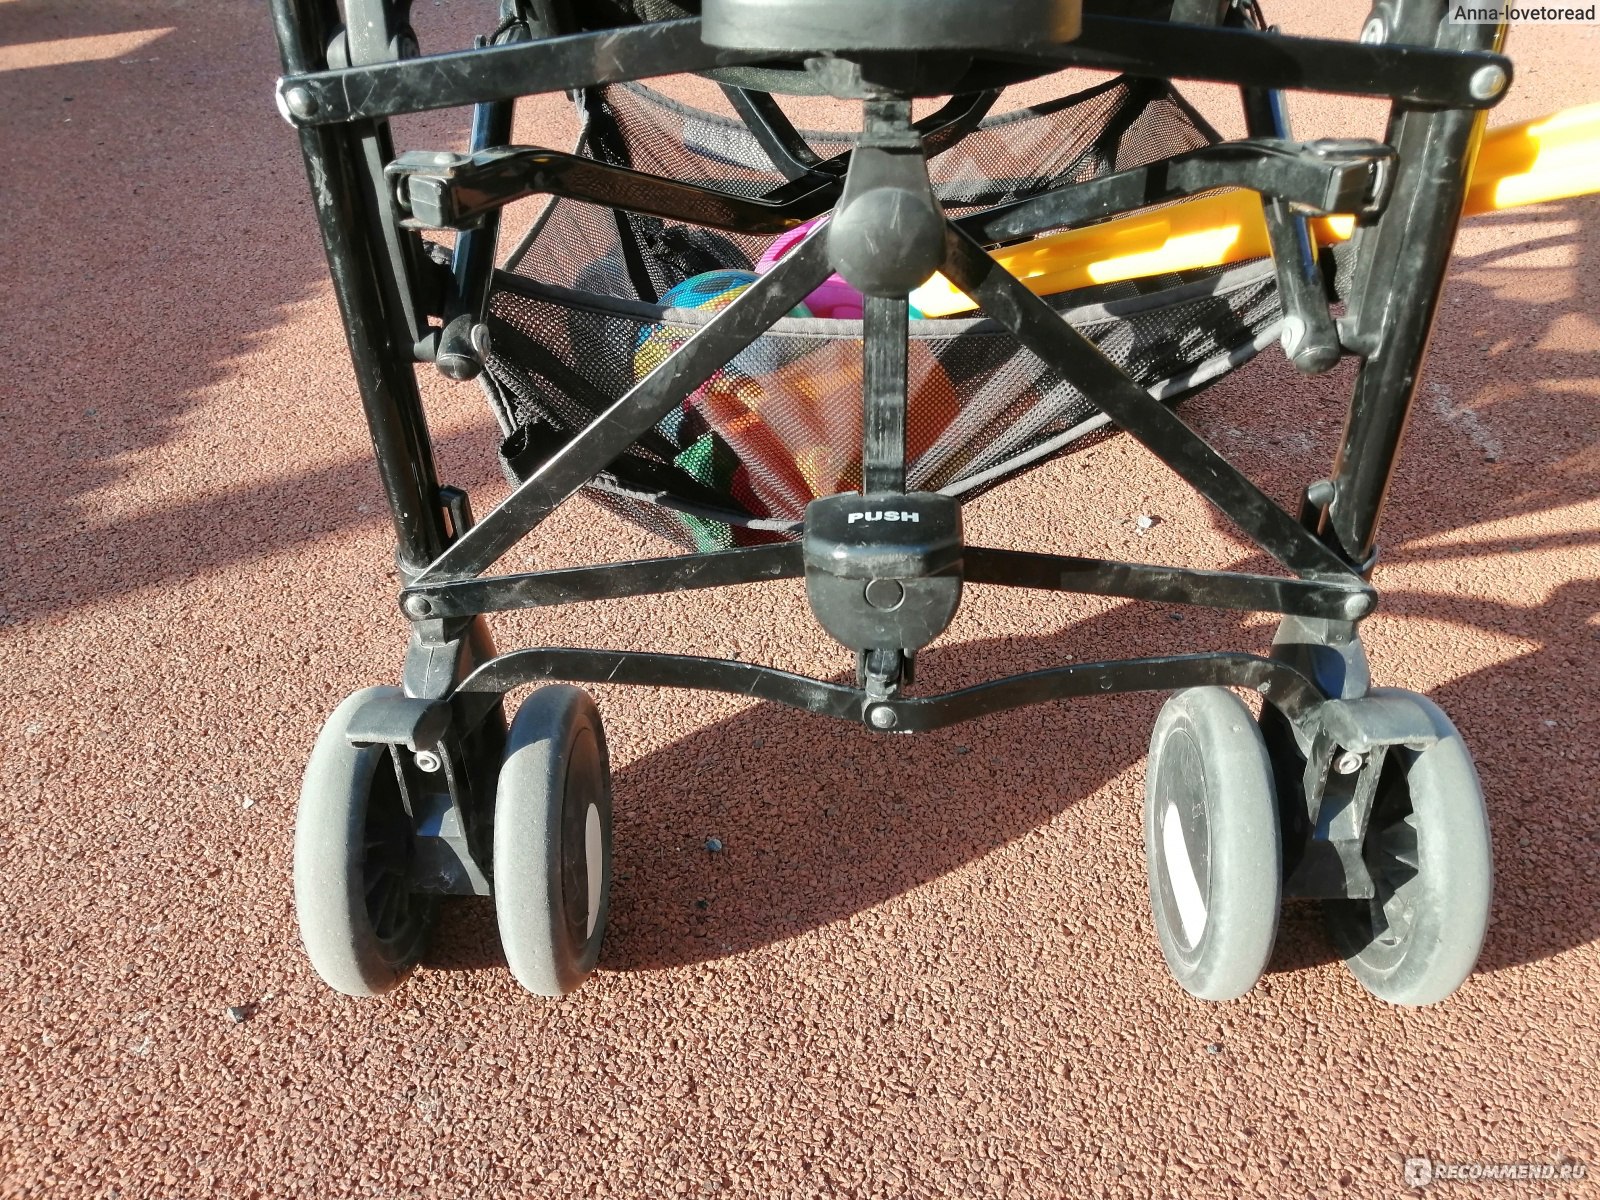
Колеса
Маленькие, пластиковые, сдвоенные. Достаточно маневренные. Передние можно зафиксировать, чтобы не вращались и ехали строго прямо. Вот так это выглядит:

Коляска — трость Peg Perego Pliko mini — тормоза в свободном и нажатом состоянии
Корзина
Сравнительно небольшая. Мелкие игрушки туда влезают, а машинки размером 20×15 см помещаются уже с трудом. Сделана из сетки с крупными дырками. Форму держит, но может порваться об острые углы пластмасмовой машинки.
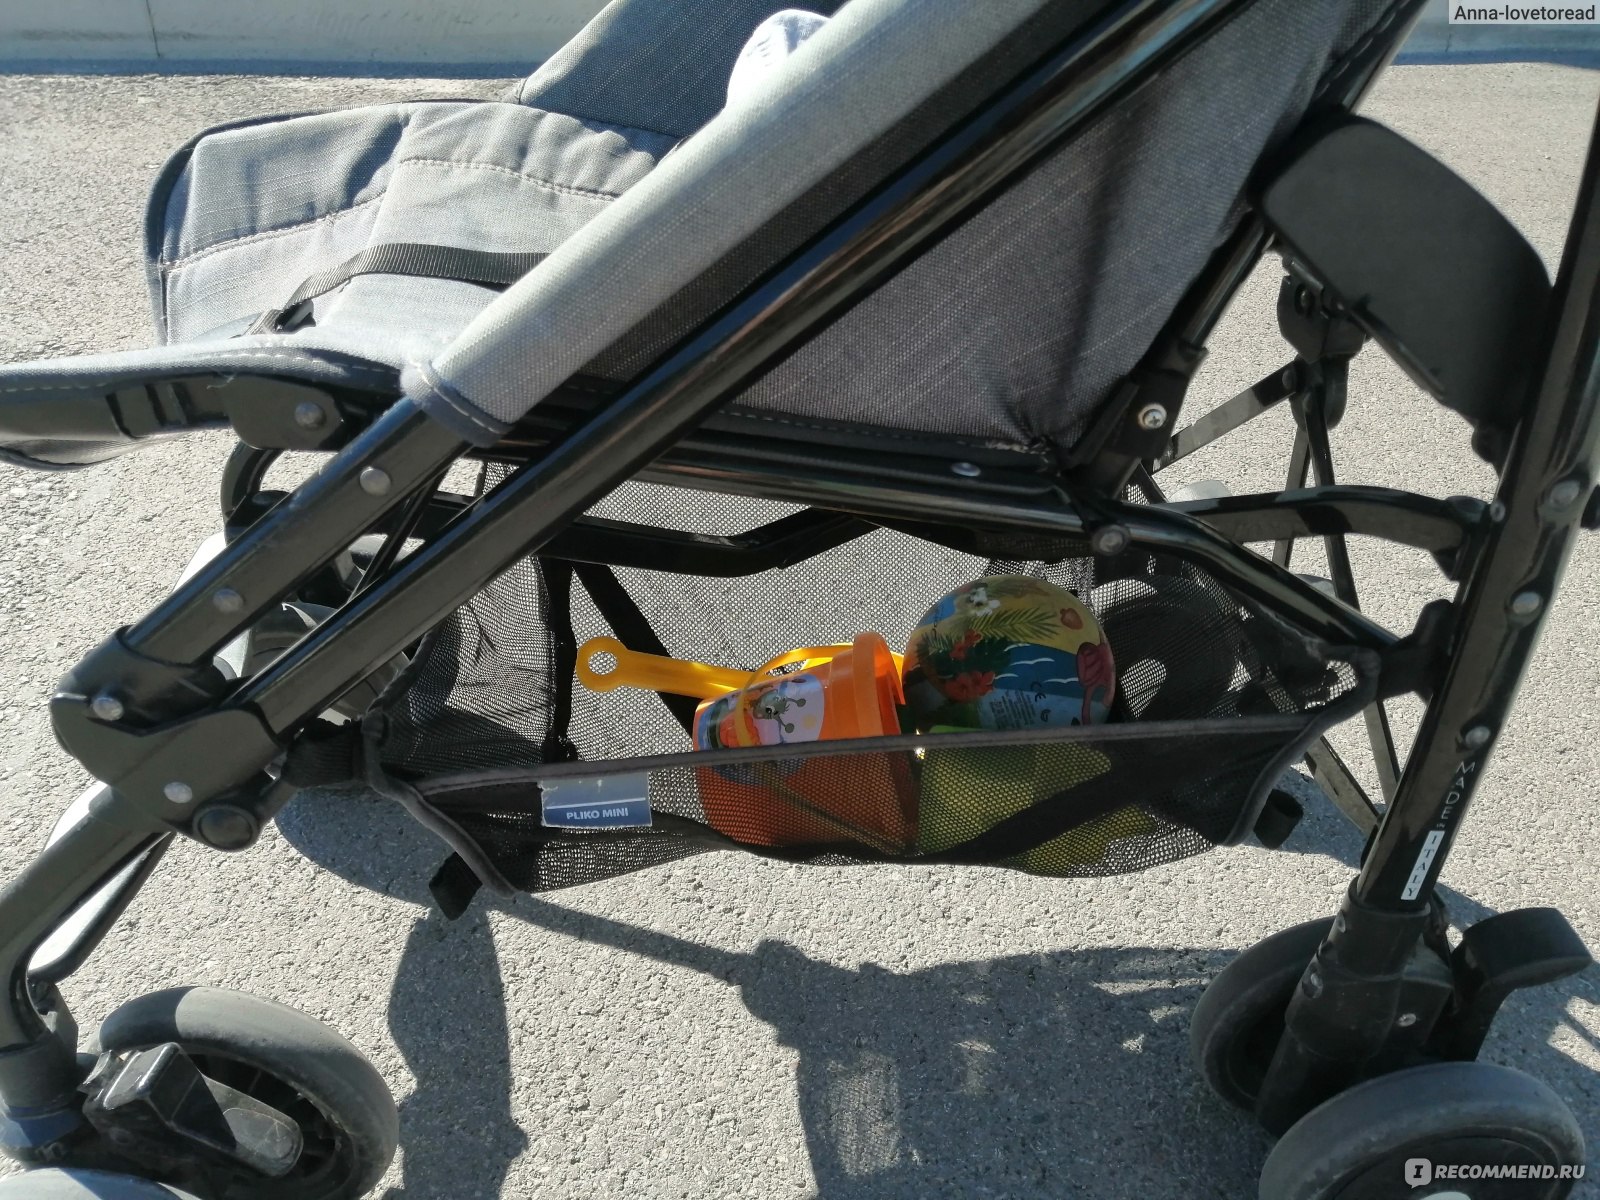
Коляска — трость Peg Perego Pliko mini — игпушки в корзине
От корзины я не в восторге, для меня она слишком маленькая. Хотя, песочные игрушки и маленький мячик помещаются.
Складной механизм
Удобно складывается — нужно одновременно потянуть на себя два выступа на ручках, вот эти:

Коляска — трость Peg Perego Pliko mini — механизм закрытия
затем потянуть специальное кольцо сзади. Получается вот такая компактная конструкция, которая стоит самостоятельно:
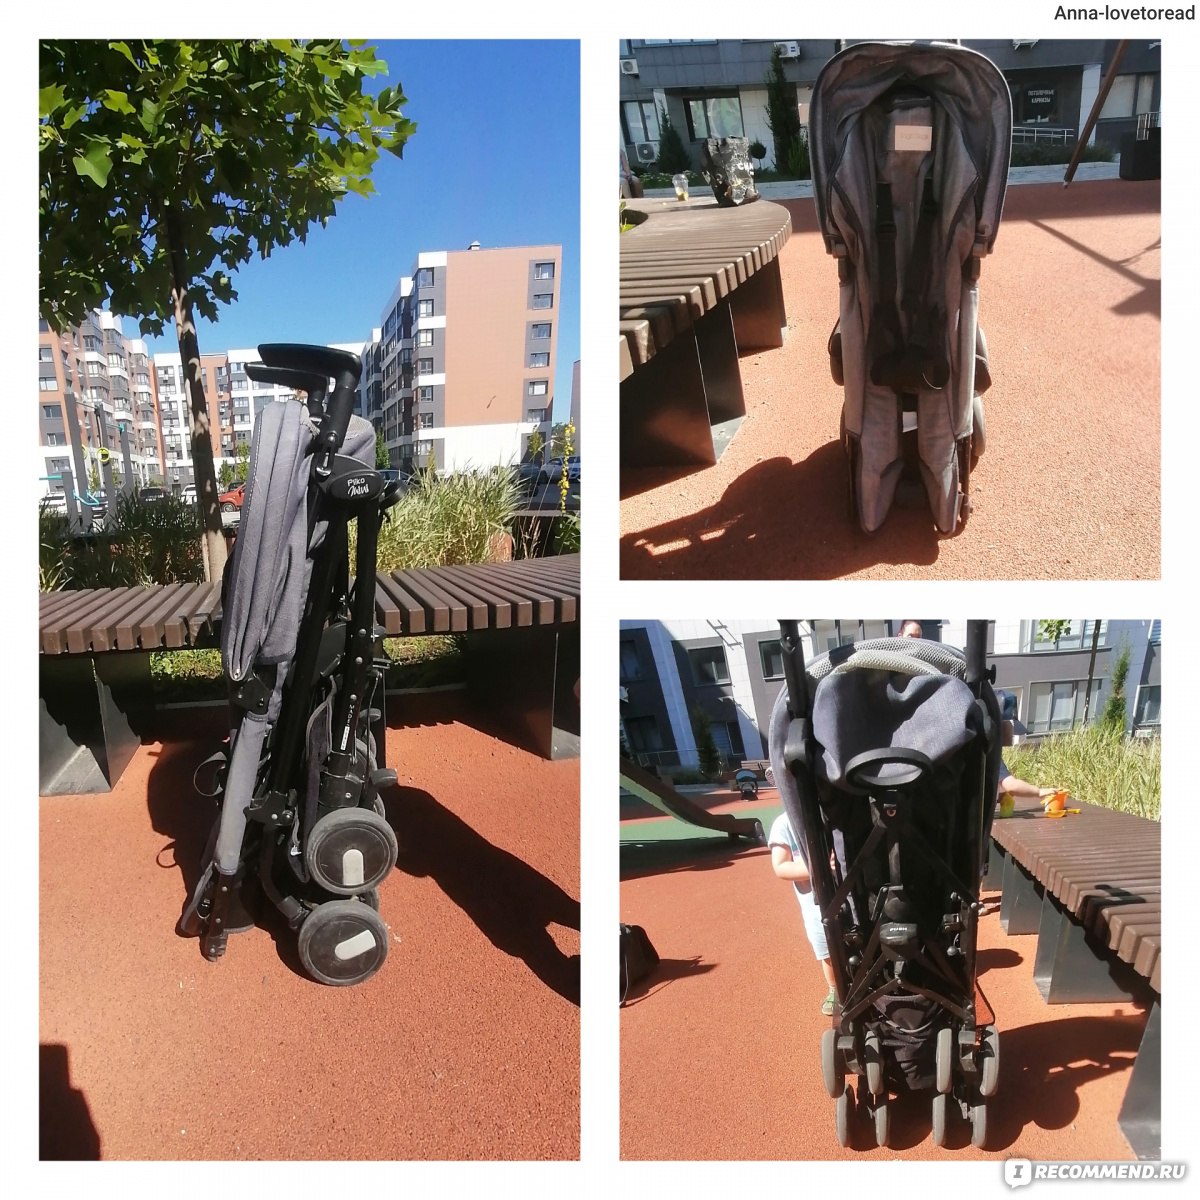
Коляска — трость Peg Perego Pliko mini — в сложенном виде
Чтобы разложить ее обратно, нужно потянуть вот за это ушко:

Коляска — трость Peg Perego Pliko mini — часть скрадного механизма
оно только с одной стороны ручки. Коляска сама начинает разъезжаться.
Важно! Нужно хорошо защелкнуть ее внизу, над передними колесами. А также проверить, не слетели ли петельки-крепления корзины.
Это гораздо проще, чем разбирать и грузить в машину коляску-трансформер. Коляска Peg Perego pliko mini помещается в багажник любой машины такси, которая за мной приезжала. Ее и хранить было удобно в таком виде.
Другие мелкие фишки:
1. Регулируется высота ручек. Нужно чем-то тонким надавить на кнопочку на внутренней стороне ручки (бамбуковой шпажкой, веточкой, толстой проволочкой) .
2. Можно приподнять или опустить ножки малышу.
3. Ремни безопасности, которые спускаются на плечи, регулируются по высоте в три положения. На фото видно прорези для них:
Коляска — трость Peg Perego Pliko mini — регулировка высоты ремней
Тормоза
Расположены над задними колесами, нажимаются ногой, можно нажать только с одной стороны, а можно с обеих:

Коляска — трость Peg Perego Pliko mini — педаль фиксации передних колес
Как практически во всех колясках, они могут соскакивать, если резко толкнуть. Во время прогулки мне хватало. В транспорте иногда отщелкивались, когда резко качало.
Для каких дорог
Для идеальных. Коляску сильно трясет даже на тротуарной плитке, нет амортизации никакой. Я заметила, что по одному и тому же маршруту ребёнку гораздо удобнее ехать в большой прогулочной коляске с надувными колесами. А из этой он периодически просится на волю.
В общественном транспорте
Просто сказка. Закатить в троллейбус могу сама без труда. Выкатить тоже, причем инвалидный люк мамам не открывают. Даже если остановка, мягко скажем, оборудована не до конца и спускаться неудобно, я могу приподнять коляску вместе с ребенком. Не самая лучшая затея для больной поясницы. Но перемещаться по городу можно, это главное.
Внутри троллейбуса коляска тоже размещается очень хорошо. Однажды рядом со мной ехала ещё одна похожая компактная коляска и человек в инвалидном кресле. И мы все поместились в один ряд между креслами, на площадке для колясок у центрального входа. Я тогда себя мысленно похвалила за выбор такой миниатюрной коляски)
Кстати, у нас за проезд детской коляски платить не нужно, только за себя)
Пользуясь случаем, посылаю лучи добра всем пассажирам, случайным прохожим и кондукторам, которые помогают закатить/выкатить коляску с ребенком. Вы очень нужны молодым мамам. Спасибо, что вы есть ✨💚
На море
Я живу в городе у моря. Добираться до пляжа далеко. Но с этой коляской удобно. Ее размеры очень дисциплинируют.
Я беру только самое необходимое:
— 2 полотенца (сидеть и вытирать ребенка),
— крем с spf, для тела у меня с сыном один на двоих, себе беру еще стик для лица,
— сменный комплект одежды малышу и теплую кофту, если едем вечером + белье для себя,
— одноразовый подгузник,
— 0,3 л воды и маленький пакетик галетного печенья крохе,
— 1-2 маленьких резиновых игрушки,
— пакет для мусора и мокрого белья.
В последнее время задумалась о кроксах для себя и малыша. Вот с таким нехитрым набором можно добраться к воде и не оборвать плечи:

Коляска — трость Peg Perego Pliko mini — козырек накрывает максимально
Вещи и полотенца помещаются в корзину (на фото — в красно-синем пакете), остальное — в мамский рюкзак. Хватает, чтобы провести час-полтора у воды. Я не маринуюсь на пляже — приехали, покисли в воде, поплавали, обсохли, и домой.
Что мне понравилось:
— легкость. Коляску можно без проблем поднять и перенести через ступеньки, газон и другие преграды. Даже с больной спиной можно носить коляску и не получать обострений;
— маневренность. Коляска показалась мне достаточно юркой. Колеса очень послушные. Это как сравнивать обычный самокат и трюковой.
— миниатюрность. Реально проехать в троллейбусе без посторонней помощи. Да, я из этих… сильных и независимых)
— прочность. Это с виду коляска маленькая. На самом деле это целая сеть продуманных узлов из достаточно толстого металла:
Коляска — трость Peg Perego Pliko mini — колеса
Я взяла б/у, за все время пользования коляска практически не износилась. Я очень ценю долговечные вещи из экологических соображений.
— все чехлы съемные, можно постирать.
Чего не хватило:
— докомплектовать бампером, дождевиком, защитным козырьком для ног от солнца.
— организовать более прозрачное окошко для мамы, но сохранить защиту от солнца.
— карман или отдельная отстегивающаяся сумка для мелочей.
— иногда хочется корзину повместительнее и поглубже.
— со временем чехлы могут прорываться от каркаса:

Коляска — трость Peg Perego Pliko mini — недостаток, прорвался чехол
— на рост мамы 175 см не очень удобно, хотя ручки я выставила на максимальную высоту.

Коляска — трость Peg Perego Pliko mini — высота
Если ваш рост 93 см и меньше, вероятно, вам будет высоковато 😂
Итоги
Коляска в целом не идеальная, но хорошая. Мне она подошла потому, что я искала минимальный вес, компактность и возможность управляться самой со складываниями и раскладываниями. Чтоб сократить вес, пришлось пожертвовать многими деталями. Я обошлась без бампера, полиэтиленовый дождевик иногда брала от другой коляски, а игрушки выбирала под размер корзины. Брала с собой рюкзак, раз сумки нет. И даже подстаканник не покупала.
Зато коляска без лишних наворотов замечательно ездит в транспорте и бережет мою спину (я уже рассказывала, как после родов делала рентген поясницы и спасалась гомеопатической мазью). Да, ребенка трясет сильнее, чем на надувных колесах. Но 1,5-годовалый ребенок уже не хочет подолгу сидеть в любой коляске. Ему интересно бегать, лазить, все трогать и рассматривать.
Ещё мне понравилось, что ребенку самому почти невозможно выбраться из ремней. По крайней мере, у мамы есть достаточно времени, чтобы среагировать.
Если ваши запросы (вес, маневренность, миниатюрность) схожи с моими, то я смело могу коляску посоветовать. О покупке я не пожалела, хотя и недоумеваю, за что там платить 16-20к, это цена новых.

Коляска — трость Peg Perego Pliko mini
![]()
IT Istruzioni d’uso
EN Instructions for use FR Notice d’emploi
DE Gebrauchsanleitung ES Instrucciones de uso PT Instruções para uso NL Gebruiksaanwijzing DK Brugsanvisning
FI Käyttöohjeet
CZ Návod na použití SK Návod na použitie HU Használati útmutató
SL Navodila za uporabo
RU Инструкции по пользованию TR Kullanim klavuzu
EL Οδηγίες χρήσεως
pliko mini

B
 NO OK
NO OK
E

|
5 |
||||
|
2 |
3 |
|||
|
1 |
4 |
|||
|
6 |
A |
B |
||
|
1 |
3 |
C |
||
|
2 |

 2
2

|
12 |
|||
|
C |
D |
||
|
F |
|||
|
A |
B |
E |


16

19
|
20 |
A |
B |
C |
|
21 |
|||
|
A |
B |

Pliko Mini
1
3
2
4
5
|
6 |
11 |
||
|
7 |
|||
|
8 |
|||
|
10 |
14 |
||
|
9 |
|||
|
12 |
13 |
||
— 9 —

Pliko Mini
|
16 |
|
|
15 |
|
|
17 |
|
|
18 |
|
|
1) SAPI6957NP |
10) SAPI5367KNPGO |
|
2) MUCI5P22N |
11) SAPI5377L76NPGO |
|
3) SAPI6430NP |
12) SPST6951NP |
|
4dx) SPST6669KDGOS |
13) SPST6942• |
|
4sx) SPST6669KSGOS |
14) ITPKMR00NPL76 |
|
5) SPST6501GO |
15) BCAMIN• |
|
6) SPST6502DNP |
16) IRBELV0007 |
|
7) SPST6502SNP |
17) IRCOMI00—NL53 |
|
|
18) BSAMIN• |
|
9) ERSHMI00-RE01 |
 SPST6500NP
IT• Ricambi disponibili in piú colori da specificare nella richiesta.
EN• Spare parts available in different colours to be specified when ordering.
FR• Pièces de rechange disponibles en plusieurs couleurs à spécifier dans la demande.
DE• Ersatzteile in mehr Farben vorhanden, die in der Anfrage spezifiziert werden müssen.
ES• Repuestos disponibles en otros colores que se especificarán en el pedido.
PT• Peças de reposição disponíveis em cores alternativas a serem especificadas no pedido.
NL• Reserveonderdelen verkrijgbaar in meerdere kleuren, bij bestelling te specificeren.
DK• Reservedele kan leveres i flere farver som bør specificeres ved bestillingen.
FI• Varaosia saatavana eri värisinä: ilmoita väri tilauksessa.
CZ• U náhradních dílů, které jsou k dispozici ve více barvách, je nutné na objednávce specifikovat příslušnou barvu.
SK• Pri náhradných dieloch, ktoré sú k dispozícii vo viacerých farbách, je potrebné pri objednávke špecifikovať želanú farbu.
HU• A tartalék alkatrészek különböző színekben elérhetők, melyeket rendeléskor kell kiválasztani.
SL• Rezervni deli so na voljo v več barvah, ki jih je treba navesti pri naročilu.
RU• Запчасти имеются различных цветов, необходимый указать в запросе.
TR• Siparişte belirtilen değişik renklerdeki yedek parçalari mevcuttur.
EL• Ανταλλακτικά διαθέσιμα σε διάφορα χρώματα. Προσδιορίστε όταν παραγγείλετε.
IT_Italiano
Grazie per aver acquistato un prodotto Peg-Pérego.
 ATTENZIONE
_ IMPORTANTE: leggere attentamente queste istruzioni e conservarle per un futuro utilizzo. La sicurezza del bambino potrebbe essere messa a rischio se non si eseguono queste istruzioni.
_ Questo articolo è stato progettato per il trasporto di 1 bambino nella seduta.
_ Non utilizzare questo articolo per un numero di occupanti superiori a quanto previsto dal costruttore.
_ Questo articolo e’ omologato per bambini dalla nascita fino a 15 kg nella seduta.
_ Potrebbe essere pericoloso lasciare il vostro bambino incustodito.
_ Utilizzare sempre la cintura di sicurezza a cinque punti, agganciare sempre il cinturino girovita al cinturino spartigambe.
_ Prestare attenzione alla presenza del bambino quando si effettuano operazioni di regolazione dei meccanismi (maniglione, schienale).
_ Azionare sempre il freno quando si è fermi e durante le operazioni di carico e scarico del bambino.
_ Le operazioni di assemblaggio, preparazione dell’articolo, di pulizia e manutenzione devono essere effettuate solo da adulti.
_ Non utilizzate questo articolo se presenta parti mancanti o rotture.
_ Prima dell’ uso assicurarsi che tutti i meccanismi di aggancio siano inseriti correttamente.
_ Evitare di introdurre le dita nei meccanismi. _ AVVERTENZA: Non aggiungere materassini.
_ Ogni carico appeso al maniglione o alle maniglie può rendere instabile l’articolo; seguire le indicazioni del costruttore riguardo ai massimi carichi utilizzabili.
_ Non introdurre nel cestello carichi per un peso superiore a 5 kg. Non inserire nei portabibite pesi superiori a quanto specificato nel portabibite stesso e mai bevande calde. Non inserire nelle tasche delle capotte (se presenti) pesi superiori a 0.2 Kg.
_ Non utilizzare l’articolo in vicinanza di scale o gradini; non utilizzare vicino a fonti di calore, fiamme libere od oggetti pericolosi a portata delle braccia del bambino.
_ Potrebbe essere pericoloso utilizzare accessori non approvati dal costruttore.
_ Questo articolo non e’ adatto per il jogging o la corsa coi pattini.
_ Non utilizzare il parapioggia (se presente) in ambienti chiusi e controllare sempre che il bambino non sia accaldato; non collocare mai vicino a fonti di calore e fare attenzione alle sigarette. Assicurarsi che il parapioggia non interferisca con nessun meccanismo in movimento del carrello o passeggino; togliere sempre il parapioggia prima di chiudere il vostro carrello o passeggino.
COMPONENTI DELL’ ARTICOLO
Verificare il contenuto presente nell’imballo e in caso di reclamo prego contattare il Servizio Assistenza.
— 10 —
_ Passeggino PLIKO MINI è composto da:
2 set ruote anteriori piroettanti o bloccabili, 2 set ruote posteriori, cestello, portabibite, capottina.
ISTRUZIONI D’USO
1• APERTURA: per aprire il passeggino, sganciare sul lato sinistro la leva laterale (fig_a), impugnare i manici e contemporaneamente sollevare il passeggino . Verificare la corretta apertura, controllando che i ganci
lateriali siamo ben agganciati (fig_b).
2• Se i ganci non si fossero agganciati correttamente, fare pressione sulla seduta (fig_d) fino al click di aggancio. Infine premere verso il basso col piede su PUSH (fig_e).
3• ASSEMBLAGGIO: per montare le ruote anteriori, verificare inizialmente che sia presente la rondella, come in figura, abbassare la leva A e infilare la ruota B, fino al click.
4• Per montare le ruote posteriori unite dalla barra freno, posizionarle tenendo il freno esterno (fig_a). ATTENZIONE controllare che l’aggancio sia avvenuto correttamente, fino al click, come in figura (Fig.b).
5• Infine agganciare l’elemento centrale sulla barra freno al telaio, controllando che l’aggancio sia avvenuto correttamente, come in figura.
6• CESTELLO: per montare il cestello, infilare le asole ai ganci posteriori 1 e 2 e al gancio anteriore 3, (fig_a).
PORTABIBITE: é applicabile solamente sul lato destro del passeggino, grazie al gancio già presente sul telaio. Per applicare il portabibite, agganciarlo fino al click (fig_b).
REGOLAZIONE MANICI: è possibile regolare i manici in altezza. Premere il bottoncino posto dietro la maniglia e alzarla verso l’alto.
Per abbassarla agire in senso contrario (Fig.c)
7• RUOTE PIROETTANTI: Per rendere le ruote anteriori piroettanti, occorre abbassare la leva (freccia 1). Per renderle fisse, agire sulla leva in senso contrario
(freccia 2). Le ruote posteriori sono fisse.
FRENO: per frenare il passeggino abbassare col piede la leva freno posizionata sul gruppo ruote posteriori. Per sbloccare il freno, agire in senso opposto (fig_b).
Da fermi, azionare sempre il freno.
8• CAPOTTINA: per applicare la capottina, inserire gli attacchi nelle apposite sedi fino al click e abbottonare la capottina sul retro dello schienale del passeggino (fig_a).
La capottina è regolabile in 2 posizioni (fig_b) semplicemente tirandola in avanti o in dietro.
9• CINTURA DI SICUREZZA 5 PUNTI: per agganciarle, inserire le due fibbie del cinturino girovita (con bretelle agganciate freccia a) nel cinturino spartigambe fino al click (freccia b). Per sganciarle, spingere verso l’alto il pulsante tondo posto centralmente alla fibbia (freccia c) e tirare verso l’esterno il cinturino girovita (freccia d).
10• Per stringere il cinturino girovita tirare, da entrambi i lati, nel senso della freccia (Fig.a), per allentarlo agire in senso contrario. Il cinturino girovita può essere stretto fino al fermo di sicurezza (Fig.b).
11• E’ possibile regolare le cinture di sicurezza in 3 altezze in base all’altezza del bambino. E’ necessario passare alla posizione più alta, quando il bambino è più grande.
12• Per regolare l’altezza delle cinture di sicurezza è necessario sganciare sul retro dello schienale le due fibbie. Tirare verso di se le bretelle (freccia a) fino a sganciare la fibbie e infilarle nelle asole dello schienale (freccia b). Sfilare
le bretelle dalla sacca (freccia c) e infilarle nell’asola più idonea (freccia d), infine riagganciare le due fibbie dietro
lo schienale (freccia e). Il corretto aggancio delle fibbie è determinato dal click (fig f).
13• REGOLAZIONE POGGIAGAMBE: Il poggiagambe é regolabile in 2 posizioni. Per abbassare il poggiagambe, tirare le due levette laterali verso il
basso e contemporaneamente abbassarlo. Per alzare il poggiagambe, spingerlo verso l’alto fino al click.
REGOLAZIONE SCHIENALE: Lo schienale é reclinabile in 3 posizioni. Per abbassare lo schienale, sollevare la levetta laterale contemporaneamente su entrambi i lati e abbassare lo schienale, bloccandolo nella posizione
desiderata. Per alzarlo, spingere lo schienale verso l’alto.
14• CHIUSURA: tirare verso l’alto prima una leva e poi l’altra fino allo scatto (fig_a), impugnare la maniglia centrale (fig_b) e tirarla verso l’alto fino alla chiusura. Il passeggino chiuso rimane in piedi da solo (fig_c).
15• TRASPORTO: Il passeggino si può trasportare comodamente (tenendo le ruote anteriori fisse) impugnando la maniglia centrale (fig_a). E’ possibile trasportarlo anche grazie alla maniglia laterale (fig_b).
16• SFODERABILITA’: per sfoderare il passeggino: sganciare sul retro dello schienale le due fibbie (fig_1), sfilare da sotto, la fibbia dello spartigambe (fig_2),
svitare (da entrambi i lati) le due viti utilizzando un cacciavire per tenere fermo il dado (fig_3),
17• sganciare l’elastico dal telaio (fig_4),
sganciare il telaio (fig_5); vedi paragrafo apertura punto1,
sfilare la sacca attorno al telaio (fig_6), 18• sfilare la sacca dalla pedanetta (fig_7).
Tirar la sacca verso l’alto (fig_8).
NUMERI DI SERIE
19• Passeggino PLIKO MINI, riporta dietro lo schienale, informazioni relative: nome del prodotto, data di produzione e numerazione seriale dello stesso. Queste informazioni sono indispensabili in caso di
reclamo.
ACCESSORI
20• COPERTINA: pratica copertina. PARAPIOGGIA: applicabile alla capottina.
ZANZARIERA: applicabile alla capottina.
21• BORSA VIAGGIO: Pratica borsa per il trasporto aereo del passeggino (fig_a).
OMBRELLINO: pratico ombrellino coordinato (fig_b).
PULIZIA E MANUTENZIONE
MANUTENZIONE DELL’ARTICOLO: proteggere da agenti atmosferici: acqua, pioggia o neve; l’esposizione continua e prolungata al sole potrebbe causare cambiamenti di colore in molti materiali; conservare questo articolo in un posto asciutto. Eseguire controlli ed interventi di manutenzione sulle parti principali ad intervalli regolari.
PULIZIA DEL TELAIO: periodicamente pulire le parti in plastica con un panno umido senza utilizzare solventi o altri prodotti simili; mantenere asciutte tutte le parti in metallo per prevenire la ruggine; mantenere pulite tutte le parti in movimento (meccanismi di regolazione, meccanismi di aggancio, ruote…) da
— 11 —

polvere o sabbia e se occorre, lubrificarle con olio leggero.
PULIZIA DEL PARAPIOGGIA: lavare con una spugna e dell’acqua saponata, senza utilizzare detersivi.
PULIZIA DELLE PARTI IN TESSUTO: spazzolare le parti in tessuto per allontanare la polvere e lavare a mano a una temperatura massima di 30° non torcere; non candeggiare al cloro; non stirare; non lavare a secco; non smacchiare con solventi e non asciugare a mezzo
di asciugabiancheria a tamburo rotativo.
PEG-PÉREGO S.p.A.
Peg-Pérego S.p.A. è certificata ISO 9001. La certificazione offre ai clienti e ai consumatori la garanzia di una trasparenza e fiducia nel modo di lavorare dell’impresa. Peg Pérego potrà
apportare in qualunque momento modifiche ai modelli descritti in questa pubblicazione, per ragioni di natura tecnica o commerciale. Peg Pérego è a disposizione dei suoi Consumatori per soddisfare al meglio ogni loro esigenza. Per questo, conoscere il parere dei ns. Clienti, è per noi estremamente importante e prezioso. Le saremo quindi molto grati se, dopo aver utilizzato un ns. prodotto, vorrà compilare il QUESTIONARIO SODDISFAZIONE CONSUMATORE, segnalando eventuali osservazioni o suggerimenti, che troverà nel nostro sito internet:
www.pegperego.com
SERVIZIO ASSISTENZA PEG-PÉREGO
Se fortuitamente parti del modello vengono perse o danneggiate, usare solo pezzi di ricambio originali Peg Pérego. Per eventuali riparazioni, sostituzioni, informazioni sui prodotti, vendita di ricambi originali
e accessori, contatta il Servizio Assistenza Peg Pérego indicando, qualora fosse presente, il numero seriale del prodotto.
tel. 0039/039/60.88.213
numero verde: 800/147.414 (contattabile da rete fissa) fax 0039/039/33.09.992
e-mail assistenza@pegperego.it sito internet www.pegperego.com
EN_English
Thank you for choosing a Peg-Pérego product.
 WARNING
_ IMPORTANT: read the instructions carefully before use and keep them for future reference. The child may be hurt if you do not follow these instructions.
_ This item was designed for the transport of 1 child in the seat.
_ Do not use this item for a number of occupants greater than that intended by the manufacturer.
_ This item is approved for children from birth up to a weight of 15 kg in the seat.
_ It may be dangerous to leave your child unattended.
_ Always use the 5-point harness and attach the waist strap to the leg divider strap.
_ Be careful not to hurt the child when adjusting the mechanisms (handlebar, backrest).
_ Always apply the brake when stopped and when positioning the child in the seat or when removing the child from the seat.
_ Assembly and preparation of the product, plus cleaning and maintenance operations, must be carried out exclusively by adults.
_ Do not use this item if there are parts missing or signs of breakage.
_ Before use check that all the attachment mechanisms are correctly insert.
_ Do not insert fingers into the mechanisms. _ WARNING: Do not add a mattress.
_ Any load hanging on the handlebar or the handles can make the stroller/carriage unstable; follow the manufacturer’s instructions for max load capacity.
_ Do not place loads over 5 kilos in the basket. Do not place in the bottle holder weights heavier than stated or hot drinks. Do not place in the hood pockets (if applicable) weights over 0.2 Kg.
_ Do not use the item near to stairs or steps, heat sources, naked flames or dangerous objects within reach of the child.
_ The use of accessories not approved by the manufacturer could be dangerous.
_ This item is not suitable for jogging or roller skating.
_ Do not use the rain canopy (if present) indoors and regularly check to ensure the child is not too warm; do not park the stroller close to heat sources and keep well away from lighted cigarettes. Ensure the rain canopy is not interfering with any moving parts of the carriage or stroller; always remove the rain canopy
before folding your carriage or stroller.
PRODUCT PARTS
Check the package contents and contact our Customer Service for any claim.
_ The PLIKO MINI stroller is composed of:
2 swivel or locking front wheel sets, 2 rear wheel sets, basket, cup holder, hood.
— 12 —
INSTRUCTIONS
1• OPENING: to open the stroller, unhook the left hand side lever (fig_a), hold the handles and at the same time lift the stroller.
Check that the stroller has opened properly by ensuring that the side hooks are well secured (fig_b).
2• If the hooks are not secured properly, press the seat downwards (fig_d) until they click into place. Finally, press downwards on PUSH with your foot (fig_e).
3• ASSEMBLING: to mount the front wheels, firstly check that the washer is present, as shown in the figure, then lower lever A and slip wheel B on until it clicks into place.
4• To mount the rear wheels connected by the brake cable, place them with the brake facing externally (fig_a).
WARNING: ensure the hooks have clicked into place, as in figure b.
5• Finally, hook the central element of the brake cable onto the chassis, ensuring it clicks into place, as in the figure.
6• BASKET: to mount the basket, slip the loops over the
rear hooks 1 and 2 and the front hook 3 (fig_a). CUP HOLDER: It can only be fitted to the right hand side of the stroller, using the clip which is already
present on the chassis. To fit the cup holder, push until it clicks into place (fig_b).
ADJUSTING THE HANDLES: the height of the handles can be adjusted. Press the little button behind the handles and pull upwards. To lower the handles, do the opposite (Fig. c).
7• SWIVEL WHEELS: In order to make the wheels swivel, the lever (arrow 1) must be lowered. To secure the wheels, move the lever to the opposite direction (arrow 2). The rear wheels are fixed.
BRAKE: To set the brake on the stroller, lower the lever on the rear wheel unit with your foot. To release the brake, lift the lever (fig_b). When stationary, always apply the brake.
8• HOOD: To fit the hood, click the fasteners onto the appropriate points and button down the hood on the rear of the stroller’s backrest (fig_a).
The hood can be set to 2 positions (fig_b), simply by pulling it backwards or forwards.
9• 5-POINT SAFETY HARNESS: to fasten, insert the two buckles of the waist strap (with attached shoulder straps, arrow a) into the leg divider strap until they click into place (arrow b). To unfasten, push the round button placed in center of the buckle upwards (arrow_ c) and pull the waist strap outwards (arrow d).
10• To tighten the waist strap, pull on both sides in the direction of the arrow (Fig. a). To loosen it do the opposite. The waist strap can be tightened as far as the safety lock (Fig. b).
11• It is possible to set the safety harness at 3 different heights, depending on how tall the child is. As the child gets bigger, the harness must be moved to a higher position.
12• To adjust the height of the safety harnesses, release the two buckles on the rear of the backrest.
Pull the shoulder straps towards you (arrow a) until the buckles are released and insert them in the backrest loops (arrow b). Remove the shoulder straps from the sack (arrow c) and insert them in the most appropriate buckle (arrow d), then reattach the two buckles behind the backrest (arrow e). The buckles are securely attached when a click is heard (fig f).
13• LEG REST ADJUSTMENT: The leg rest can be set in 2 different positions. To lower the leg rest, pull the two side levers downwards and at the same time lower the
leg rest. To raise the leg rest, push it upwards until it clicks into position.
BACKREST ADJUSTMENT: The backrest can be set in 3 positions: To lower the backrest, lift the levers on both sides at the same time and lower it, locking it in the position required. To lift the backrest, push it upwards.
14• FOLDING UP: pull one lever followed by the second lever upwards until you hear them click (fig_a); then, hold the central handle (fig_b) and pull it upwards until the stroller folds up.
When folded, the stroller will stand upright (fig_c). 15• CARRYING: The stroller can be conveniently carried
(with the front wheels set on stationary) by the central handle (fig_a). It can also be carried by the side handle (fig_b).
16• REMOVABLE LINING: to remove the lining from the stroller, unhook the fasteners on the rear of the backrest (fig_1), slip the fastener of the leg divider out from under the seat (fig_2), loosen the two screws (on both sides) using a screwdriver to keep the nut fastened (fig_3),
17• unhook the elastic from the chassis (fig_4), unhook the chassis (fig_5, see OPENING paragraph, point 1), slide the sack off the chassis (fig_6),
18• slide the sack off the footboard (fig_7). and pull the sack upwards (fig_8).
SERIAL NUMBERS
19• The Stroller PLIKO MINI has all the following relevant information behind the backrest: product name, date of manufacture and serial number. This information is required for any complaints.
ACCESSORIES
20•COVER: practical cover.
RAIN CANOPY: can be applied to the hood.
MOSQUITO NETTING: can be fastened to the hood.
21• TRAVEL BAG: practical duffle bag for transporting the stroller by plane (fig_a).
UMBRELLA: practical umbrella to match (fig_b).
CLEANING AND MAINTENANCE
PRODUCT MAINTENANCE: protect from the weather: water, rain, or snow; prolonged and continuous exposure to bright sunlight may give rise to colour changes of various different materials; store this product in a dry place. The maintenance have to be regularly.
CLEANING THE CHASSIS: periodically clean all plastic parts with a damp cloth. Do not use solvent or similar cleaning products; keep all metal parts dry to prevent rusting; keep moving parts clean (adjustment mechanisms, locking mechanisms, wheels, …) and free of dust and sand and, if necessary, lubricate with light machine oil.
CLEANING THE RAIN CANOPY: wash with a sponge and soapy water; do not use detergents.
CLEANING FABRIC PARTS: brush fabric parts to remove dust and wash by hand at a maximum temperature of 30°C; do not wring; do not use chlorine bleach, do not iron; do not dry clean; do not apply solvent-based stain removers and do not dry in a tumble dryer.
— 13 —

PEG-PÉREGO S.p.A.
Peg-Pérego S.p.A. is an ISO 9001 certified company. This certification is a guarantee for customers and consumers of the transparency and trustworthiness of the company’s procedures and working methods. Peg
Pérego can make changes at any time to the models described in this publication for technical or commercial reasons. Peg Pérego is at the disposal of its customers and consumers to ensure that all their demands and queries are fully satisfied. It is a key part of our policy to ensure we are always aware of our customers’ views and requirements. We would therefore be very grateful if, after using a Peg Pérego product, you take the time to fill in our CUSTOMER SATISFACTION QUESTIONNAIRE, making a note of any comments or suggestions you might have. You can find the questionnaire on the Peg Pérego website:
www.pegperego.com
PEG-PÉREGO AFTER-SALES SERVICE
If any parts of the item get lost or damaged, only use genuine Peg Pérego spare parts. For any repairs, replacements, information on the products and sales of genuine spare parts and accessories, contact the Peg Pérego Assistance Service and state the serial number of the product, if present.
tel. 0039/039/60.88.213 fax 0039/039/33.09.992
e-mail assistenza@pegperego.it website www.pegperego.com
FR_Français
Merci d’avoir choisi un produit Peg-Pérego.
 AVERTISSEMENT
_ IMPORTANT : lire ces instructions avec attention et les conserver pour toute référence future. La sécurité de l’enfant pourrait être menacée si ces instructions ne sont pas suivies.
_ Cet article a été conçu pour transporter 1 enfant dans le siège.
_ Ne pas utiliser lorsque le nombre d’occupants est supérieur aux prescriptions du fabricant.
_ Cet article est homologué pour des enfants depuis la naissance jusqu’à 15 kg.
_ Il peut être dangereux de laisser l’enfant sans surveillance.
_ Toujours utiliser la ceinture de sécurité à cinq points; toujours accrocher la sangle ventrale à la sangle d’entrejambes.
_ Prêter attention à la position de l’enfant lors des opérations de réglage des éléments mobiles (poignée, dossier).
_ Toujours actionner le frein lorsque l’article est à l’arrêt et pendant l’installation ou la sortie de l’enfant.
_ Les opérations d’assemblage, de préparation de l’article, de nettoyage et d’entretien doivent être réalisées uniquement par des adultes.
_ Ne pas utiliser cet article si des pièces sont manquantes ou cassées.
_ Avant l’utilisation, s’assurer que tous les mécanismes de fixation sont correctement enclenchés.
_ Éviter de mettre les doigts dans les mécanismes. _ AVVERTISSEMENT: Ne pas ajouter de matelas.
_ Toute charge suspendue aux poignées peut déstabiliser le produit, suivre les recommandations du fabrication sur les charges maximales admises.
_ Ne pas utiliser le panier pour transporter des charges dont le poids dépasse 5 kg. Ne pas introduire dans le porte-boisson des charges supérieures à celles indiquées sur le porte-boisson lui-même et ne jamais
introduire de boissons chaudes. Ne pas introduire dans les poches de la capote (lorsqu’elles sont présentes) des objets dont le poids dépasse 0.2 kg.
_ Ne pas utiliser l’article à proximité d’escaliers ou de marches; ne pas l’utiliser à proximité de sources de chaleur, de flammes directes ou d’objets dangereux se trouvant à la portée de l’enfant.
_ L’utilisation d’accessoires n’ayant pas été approuvés par le fabricant peut se révéler dangereuse.
_ Ne pas utiliser ce produit lors d’un jogging ou avec des patins à roulettes.
_ Ne pas utiliser l’habillage pluie (lorsqu’il est présent sur l’article) dans des milieux clos et toujours contrôler que l’enfant n’ait pas trop chaud; ne jamais placer à proximité de sources de chaleur et prendre garde aux cigarettes. S’assurer que l’habillage pluie n’interfère avec aucun mécanisme en mouvement du châssis ou de la poussette; toujours retirer l’habillage pluie avant de refermer le châssis ou la poussette.
_ Conforme aux exigences de sécurité.
— 14 —
 Loading…
Peg-Perego Manuals and Guides:
The main types of Peg-Perego pliko mini instructions: user guide — rules of useing and characteristics, service manual — repair, diagnostics, maintenance, operation manual — description of the main functions of Peg-Perego pliko mini equipment, etc.
Most of the instructions, that you can see on the site are uploaded by our users. If you have available a manual or document for Peg-Perego pliko mini, which is currently not on the site or present in a different language version, we ask you to upload your document on website, using the «uploading form» available to all registered users.