
")
14 точек дискретного ввода/вывода (8DI + 6DO)

Шина расширения до 480 вх/вых

Выгодная цена

ModBUS COMx2, RS-232 / RS-485

Высокоскоростные входы, < 20 кГц
- ЦПУ: 14 точек дискретного ввода/вывода (8DI + 6DO).
- Расширение до 480 вх/вых.
- Память: программа – 8 К шагов, регистры данных – 5 К слов.
- Время обработки инструкций: базовая – 0,35…1 мкс, прикладная (MOV) – 3,4 мкс.
- Два COM-порта: RS-232, RS-485 (Modbus, ASCII / RTU).
- 4 высокоскоростных импульсных выхода: 10 кГц.
- 8 каналов высокоскоростного счета и внешних прерываний: 4 входа по 20 кГц и 4 выхода по 10 кГц.
- Бесплатное ПО.
| Артикул | DVP14SS211R | DVP14SS211T |
|---|---|---|
| Напряжение питания | =24 В (-15%, +20%), с защитой от переполюсовки | |
| Потребляемая мощность | 1,8 Вт | |
| Входы | ||
| Тип входа | PNP или NPN | |
| Потребляемый ток | 5 мА при =24 В | |
| Время фильтрации | 10 мс (регулируется в диапазоне 0-20 мс, регистр D1020) | |
| Выходы | Реле | Транзистор |
| Максимальный ток | 1,5 А / 1 точка (5 А общий) | 0,5 А / 1 точка (3 А общий) |
| Рабочее напряжение | ~250 В, < =30 В | =5…30 В |
| Максимальная нагрузка (индуктивная) | см. руководство по эксплуатации | 15 Вт (=30 В) |
| Время реакции | около 10 мс | выкл. – вкл. (Y0-Y3) 20 мкс, (Y4, Y5) 100 мкс вкл. – выкл. (Y0-Y3) 30 мкс, (Y4, Y5) 100 мкс |

![]()
![]()
![]()
![]()
![]()
DVP14SS211R Контроллер (серия SS2) 8 вх. (NPN/PNP, 4 по 20кГц/4 по 10кГц)/6 вых. (реле 1,5А), =24VDC, макс 480вх/вых, 8К, COM1(RS-232)/COM2(RS-485)
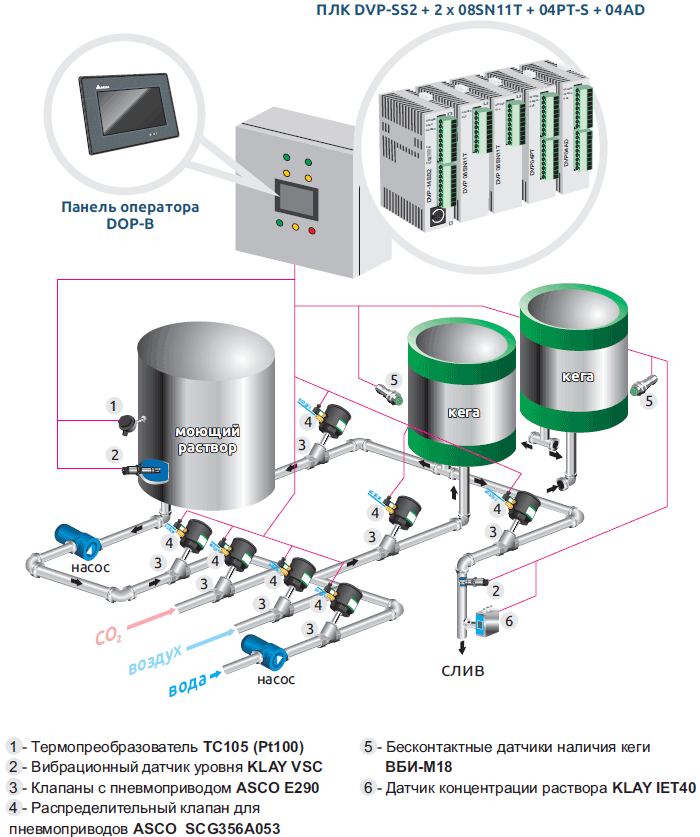
Базовый ПЛК серии S. Простой, недорогой и очень компактный программируемый контроллер для решения несложных задач, с возможностями расширения. Один процессорный модуль поддерживает до 480 точек ввода/вывода и до 8 специальных модулей (аналоговые, температурные). Поддерживается протокол Modbus Master / Slave ASCII / RTU.
Особенности базового ПЛК со стандартным набором функций DVP-SS2
- ЦПУ: 14 точек дискретного ввода/вывода (8DI + 6DO).
- Расширение: до 480 вх/вых.
- Память: программа – 8 К шагов, регистры данных – 5 К слов.
- Время обработки инструкций: базовая – 0,35…1 мкс, прикладная (MOV) – 3,4 мкс.
- Два COM-порта: RS-232, RS-485 (Modbus, ASCII / RTU).
- 4 высокоскоростных импульсных выхода: 10 кГц.
- 8 каналов высокоскоростного счета и внешних прерываний: 4 входа по 20 кГц и 4 выхода по 10 кГц.
- Бесплатное ПО.
 |
Библиотека EPLAN для DELTA |
 |
Руководство по среде ISPSoft eng. (20130118) |
|
Руководство по программированию DVP-PLC ES2 / EX2 / SS2 / SA2 / SX2 / SE (eng) |
|
DVP-PLC рук. по программированию (рус) |
|
PLC LINK описание |
 |
ISPSoft 2.04 |
|
WPLSoft-V2.39 |
|
COMMGR v.1.03 — коммуникационная программа |
 |
Разрешение на применение Программируемые контроллеры серии DVP, операторские панели DOP и ТР |
 |
Руководство по эксплуатации контроллеров DVP-SS |
 |
Сертификат соответствия Программируемые логические контроллеры серии AH, DVP |
 |
Сертификат средств измерений Delta DVP |
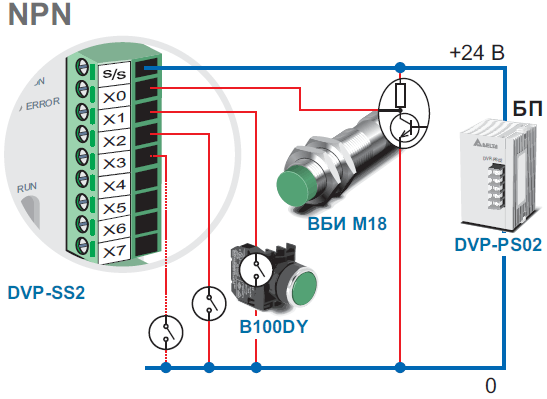
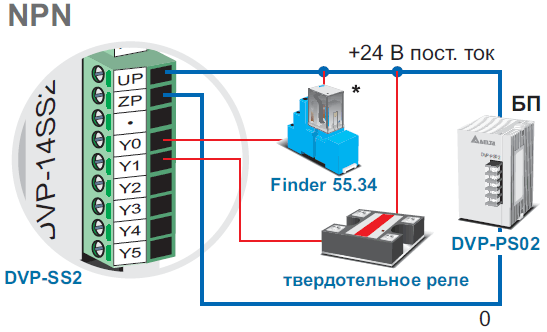
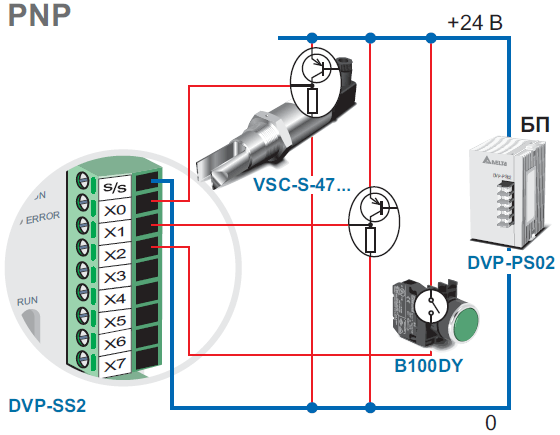
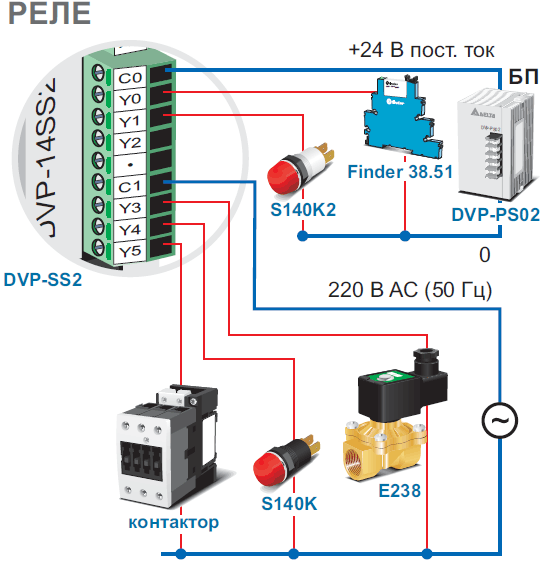
Схема подключения входов / выходов
207e7e
| Код заказа | DVP14SS211R | DVP14SS211T |
| Напряжение питания | =24 В (-15%, +20%), с защитой от переполюсовки | |
| Потребляемая мощность | 1,8 Вт | |
| ВХОДЫ | ||
| Тип входа | PNP или NPN | |
| Потребляемый ток | 5 мА при =24 В | |
| Время фильтрации | 10 мс (регулируется в диапазоне 0-20 мс, регистр D1020) | |
| ВЫХОДЫ | Реле | Транзистор |
| Максимальный ток | 1,5 А / 1 точка (5 А общий) | 0,5 А / 1 точка (3 А общий) |
| Рабочее напряжение | ~250 В, < =30 В | =5…30 В |
| Максимальная нагрузка (индуктивная) | см. руководство по эксплуатации | 15 Вт (=30 В) |
| Время реакции | около 10 мс | выкл. – вкл. (Y0-Y3) 20 мкс, (Y4, Y5) 100 мкс вкл. – выкл. (Y0-Y3) 30 мкс, (Y4, Y5) 100 мкс |
Модули расширения для ПЛК DVP-SS2
- Модуль аналогового ввода DVP04AD-S
- Модуль аналогового вывода DVP04DA-S
- Температурный модуль DVP04-PT/TC
- Модуль аналогового ввода/вывода DVP06XA-S
- Модули дискретного ввода/вывода DVP SM/SN/SP
Использование логического контроллера DVP-SS2 на рабочих примерах

Габаритные размеры, мм
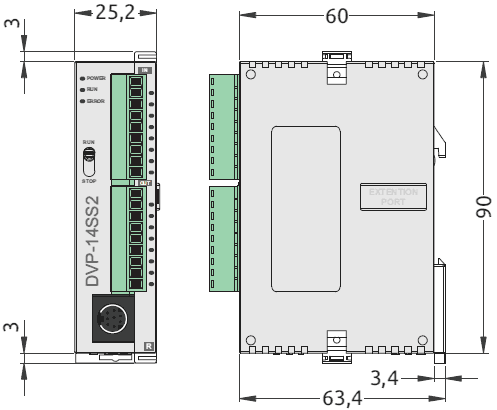
Контроллер (серия SS2) 8 вх. (NPN/PNP, 4 по 20кГц/4 по 10кГц)/6 вых. (реле 1,5А), =24VDC, макс 480вх/вых, 8К, COM1(RS-232)/COM2(RS-485)
Тип выхода: Реле
Реле
Не корректная комбинация
Транзистор NPN
Не корректная комбинация
В наличии
Товар есть в наличии на нашем складе.
Характеристики товара
Общие характеристики
| Серия | SS2 |
| Тип устройства | ПЛК |
Входы и выходы
| Дискретные входы | 8 |
| Дискретные выходы | 6 |
| Тип выхода | Реле |
Интерфейсы
| RS-485 | 1 |
| Ethernet | нет |
| RS-232 | 1 |
| USB | нет |
Документация и ПО
Пользовательская документация и ПО
Допускающая к эксплуатации документация

◎ Standard Function MPU
Model
Model
Power
DVP14SS11R2
DVP-PLC
8
DVP14SS11T2
Item
Output Unit
Point
Type
6
Profile Reference
8
6
Relay
Transistor
◎ Digital I/O Expansion Unit
Model
Instruction Sheet
Power
Input/Output
Input Unit
Point
Type
Output Unit
Point
Type
DVP08SM11N
8
0
None
DVP08SN11R
0
8
Relay
DVP08SN11T
0
8
Transistor
Profile Reference
WARNING
Always read this manual thoroughly before using the DVP PLC.
Power Supply Voltage
Motion Specifications
Capacity of the Power
Supply Fuse
Power Consumption
Insulation Resistance
DC Type
Sink or Source
24VDC
DVP-14SS 11R2/11T2
Programmable Logic Controller
1
Input/Output
Input Unit
Point
Type
DVP14SS
DVP08SM11N DVP08SN11R/T DVP08SP11R/T DVP16SP11R/T
11R2/T2
100~240VAC 24VDC (-15%~20%) (the counter-connection protection towards the DC input
(50/60Hz)
power polarity is included)
Within 5ms of the momentary power loss, the device will keep on operating
DVPPS01
2A / 250VAC
--5W
8W
Above 5 MΩ (500VDC between the ground and all the I/O points)
--ESD: 8KV Air Discharge
EFT: Power Line: 2KV, Digital I/O: 1KV, Analog & Communication I/O: 250V
Noise Immunity
Damped-Oscillatory Wave: Power Line: 1KV, Digital I/O: 1KV
RS: 26MHz~1GHz, 10V/m
The diameter of the grounding wire cannot be smaller than that of terminals L and N (if numerous
Grounding
PLCs are used at the same time, make sure that each PLC is grounded respectively to the
ground poles)
For operation: 0℃~55℃ (temperature), 50~95% (humidity), the 2nd degree pollution.
Ambient
Temperature/Humidity Storage: -25℃~70℃ (temperature), 5~95% (humidity)
Vibration/Shock
International Standard Regulations: IEC1131-2, IEC 68-2-6 (TEST Fc) / IEC1131-2 & IEC 68-2-27
Immunity
(TEST Ea)
Weight
210(g)
214(g)/208(g)
128(g)
154(g)/146(g)
141(g)/136(g)
162(g)/154(g)
(approximation)
The AC input power must be disconnected before any maintenance.
This is an OPEN-TYPE built-in PLC, and the PLC is certified to meet the safety requirements of IEC 61131-2 (UL
508) when installed in the enclosure to avoid high temperature, high humidity, exceessive vibration, corrosive
gases, liquids, airbome dust or metallic particles. Also, it is equipped with protective methods such as some
special tool or key to open the enclosure, so as to avoid the hazard to users and the damage to the PLC.
DVP08SP11R
Do not connect the AC power to any of the input/output terminals, as it might cause damage to the PLC. Make
sure that all the wiring is well conducted prior to power on.
DVP08SP11T
Do not touch the internal circuit for at least 1 minute after the power supply is disconnected.
Make sure that the PLC is properly grounded
2
, to avoid any electromagnetic noise.
INTRODUCTION
2.1 Model Explanation and Peripherals
Thank you for choosing DELTA’s PLC DVP Series. The DVP-SS series provides the 14-point Main Processing
Unit and the expansion unit with 8~16 points, and the maximum input/output points could be extended up to 128
points. Since the power supply unit is independent of the main unit, and with the volume of the device being
smaller, the installation is thus easier.
Nameplate Explanation
PLC Model
Input Power Supply Specification
Output Module Specification
Bar Code and Serial Number
Software Version
24VDC
4
DC Type
Sink or Source
4
Relay
4
4
Transistor
DVP16SP11R
8
8
Relay
DVP16SP11T
8
8
Transistor
Input Point Electric Specifications
Input Type
Input Current
Motion Level
Responding Time
Please refer to user manuals that put with machines.
◎ Power Supply Module
Input/Output
Input Power
Output Power
100~240VAC
( 50/60Hz )
Output voltage: 24VDC
Output current (max.): 1A
DC (SINK or SOURCE)
24VDC 5mA
Off→On, above 16VDC
On→Off, below 14.4VDC
About 10ms (An adjustment range of 0~15ms could be selected through D1020 and D1021)
Output Point Electric Specifications
◎ Analog/temperature module expansion unit
Model
Profile Reference
Output Type
Relay-R
Current Specifications
1.5A/1 point (5A/COM)
Voltage
Specifications
Below 250VAC, 30VDC
Maximum Loading
75 VA (Inductive)
Responding Time
About 10 ms
DVPPS01
CE
Power Module
MPU
DVPPS01
DVP14SS
Production Week
Production Year (2002)
Production Place (Taoyuan)
Version
DC Power Input
Production Model
4
5
3.00
25.20
POWER
60.00
s
s
6
11
7
RUN
ERROR
X0
X1
14
X2
X3
RUN
8
X4
10
X5
12
X6
STOP
X7
C0
Y0
90.00
9
13
C1
Y1
2
C2
Y2
Y3
3
Y4
Y5
3
4.00
1. Status indicator (Power, RUN and ERROR)
8. Expansion port
2. I/O port for program communication (RS-232)
9. Expansion unit clip
3. DIN rail clip
10. DIN rail (35mm)
4. I/O terminals
11. RS-485 Communication port
5. I/O point indicator
12. Mounting rail of the expansion unit
6. Mounting hole of the expansion unit
13. DC Power input
7. Nameplate
14. RUN/STOP switch
2.3 Model Numbers
Item
Control Method
Specification
Remark
Stored program, cyclic scan system
Immediate refresh command available
only with I/O of the MPU
Basic command (several μs)
Application command (10~hundredsμs)
Execution Speed
Program Language
Instructions + Ladder Diagram + SFC Step instructions included
Program Capacity
3792 Steps
Built-in EEPROM
Basic commands: 32 (including the
Instructions
Application commands: 107
STL commands)
Step Relay Primary step point 10 Points
S0~S9
(Latched)
General step point 118 Points
S10~S127
General
512+232 Points
M000~M511 + M768~M999
Auxiliary
Latched
256 Points
M512~M767
Relay
Special
280 Points
M1000~M1279
64 Points
T0~T63 (100 ms time base)
T64~T126 (10 ms time base, when
Timer
Digital
63 Points
M1028 is On)
1 Point
T127 (1 ms time base)
General
112 Points
C0~C111
Latched
16 Points
C112~C127
Counter
13 Points 1-Phase 10KHz, 2-Phase
High-Speed
C235~C254 (all of which are latched type)
7KHz
General
408 Points
D0 ~ D407
Data
Latched
192 Points
D408~D599
Register
Special
144 Points
D1000~D1143
Pointer
P
64 Points
P0~P63
Index Relay E/F
2
E (=D1028), F (=D1029)
Decimal K
16 bit: -32768~+32767
32 bit: -2147483648~+2147483647
Constant
Hexadecimal H
16 bit: 0000~FFFF
32 bit: 00000000~FFFFFFFF
Program write/read communication port: RS-232C. General function
Serial Communication Port
communication port: RS-485 (controlled by the RS command). The DELTA’s
inverter-specific drive commands are included as well.
I/O Processing Method
Periphery Equipment
◎ DVPHPP Handheld Programming Panel
◎ WPLSoft (WINDOWS) Ladder Diagram Editor
◎ DVPACAB115 Cable (HPP PLC, 1.5m)
◎ DVPACAB215 Cable (PC PLC, 1.5m)
◎ DVPACAB315 Cable (HPP PC, 1.5m)
◎ DVPAADP01 (The HPP-Specific Power Supply)
2.2 Product Profile and Outline
1
STOP
3.1 Function Specifications
Batch I/O (refresh)
* Additional remark: Refer to the PLC Technique Application Manual for relevant special relays and data registers.
3.2 General Specifications
DVP16SP
S01234567 001234567
/
XXXXXXXX CYYYYYYYY
S
S TYPE
STANDARD SPECIFICATIONS
DVP08SP
0Y
0C
1Y
1C
2Y
2C
3Y
3
C
Input+Output point
3
DVP08SN
S0123
/
XXXX
S
RUN
Version
R: Relay
T: Transistor
N: No Output Module
Digital I/O Expansion Unit
DVP08SM
0Y
0Y
1Y
2Y
3Y
4Y
5Y
6Y
7
C
Output voltage: 24VDC
Output current (max.): 2A
DVP-PS01
Product Series
On→Off 25us
INSTALLATION & WIRING
S01234567
/X
XXXXXXX
S
Serial Number Explanation
9W
Off→On 15us
S01234567 001122345
/X
XXXXXXX CYCYCYYYY
S
Model
100~240VAC
( 50/60Hz )
30VDC
4.1 Terminal Wiring of the Standard Function MPU and the Digital I/O Expansion Unit
V4.9
DVPPS02
Transistor-T
55℃ 0.1A/1point, 50℃ 0.15A/1point
45℃ 0.2A/1 point, 40℃ 0.3A/1 point (2A/COM)
90 W
(Resistive)
4
Model Explanation
Model type
S: Standard Function MP U
M: Input Point Expansion Unit
N: Output Point Expansion Unit
P: I/O Point Expansion Unit
---
POWER
4.2 Mounting Arrangements and Wiring Notes
When installing the DVP series PLC, make sure that it is installed in an enclosure
with sufficient space (as shown in the right diagram) to its surroundings so as to
allow heat dissipation.
50mm or more
50mm
or more
DVP MPU
50mm
or more
50mm or more
Installation of the DIN Rail
The DVP-PLC can be secured to a cabinet by using the DIN rail. This DIN rail should be 35mm high with a
depth of 7.5mm, and when mounting the PLC on the DIN rail, be sure to use the end bracket to stop any
side-to-side motion of the PLC, which will reduce the chance of the wires being pulled loose. At the bottom
of the PLC is a small retaining clip. To secure the PLC to the DIN rail, place it onto the rail and gently push
up the clip. To remove it, pull down the retaining clip and gently pull the PLC away from the DIN rail.
Wiring
Use the 22-16AWG (1.5mm) single-core bare wire or the multi-core wire for the
I/O wiring, and the specifications of the terminal are shown in the left diagram.
22-16AWG
The twisting power of the screw for the PLC terminal is 5~8 kgf-cm (4.3~6.9
in-lbs).
Be sure not to place power wires such as the input point signal wire and the
output point wire at the same conduit or to use the same multi-core wire.
< 1.5mm
Be sure not to place power wires such as the input point signal wire and the
output point wire, or the power supply, at the same conduit during wiring.
Points of Attention
Environment
1. DO NOT install the PLC in a dusty, smoky, or corrosive atmosphere.
2. DO NOT install the PLC in an environment with high temperature or high condensation.
3. DO NOT install the PLC in an environment with immediate vibration and shock.
DVP-**-**-11-R2
Construction
1. Avoid the accidental drop of conductive debris into the PLC during screwing and wiring.
2. Allow a minimum space of 50mm between the PLC and other control components, and keep the PLC away
from the high-voltage lines and the power equipment.
4.3
LED
S/S
X0
X1
Sink = the common terminal for the current
inflow S/S
Source = the common terminal for the
current outflow S/S
X0
S/S
Sinking
◎ Wiring
Equivalent Circuit of the Input Point
Wiring Circuit
+24V
24VDC
DC Type
(DC Signal IN)
0V
SINK
+5V
S/S
+24V OV
X0
24VDC
S/S X0
X1 X2
Sink Type
SINK Mode
Equivalent Circuit of the Input Point
S/S
X0
Y2
Y3
Y4
Y5
Fig.
B
Transistor output Example (sink output wiring)
1
4
5
6
6
C0 Y0
C1 Y1
C2 Y2
Y3
MC1
MC2
2
3
3
Fig.
C
5
Y4
Y5
DC Power Supply
Emergency Stop
Circuit Protection Fuse
Since the transistor module output is of the Open Collector output
and that if Y0 is set as the pulse series output (use the PLSY
command), and in order to ensure that the transistor module is
functioning normally, the output elevation resistance has to be great
enough to maintain the an output current greater than 0.1A.
Since the transistor module output is of the Open Collector output
and that if Y1 is set as the pulse series output (use the PWM
command), and in order to ensure that the transistor module is
functioning normally, the output elevation resistance has to be great
enough to maintain the an output current greater than 0.1A.
Mutually Exclusive Output: utilize the external circuit to form an
interlock, and accommodating the internal program of the PLC, to
provide safety protection when unexpected errors occurred.
6.2
TRIAL RUN
Power Indication
1. At the front of the MPU or the expansion unit, there is a “POWER” LED. When the MPU is powered On, the
LED (in green) will be on. If the indicator is not on when the MPU is powered up, it means that there is some
problem with DC power supply of the PLC, and it is thus important to check whether the wirings of the +24V and
the 0V terminals are properly conducted. If the ERROR LED is blinking swiftly, it means that the +24V power
supply to the PLC is insufficient.
2. If the other indicator, “L. V”, that locates at the front of the expansion unit is on, it means that the input power
voltage to the expansion unit is insufficient, and the output from the expansion unit should be prohibited.
Operation & Test
1. If the ERROR LED of the MPU is not blinking, use the peripheral device to give the RUN command, and the
RUN indicator will then be on.
2. HPP could be utilized to monitor the settings and the registered values of the timer, the counter and the data
register during operation, and moreover, to force the I/O contacts to conduct the On/Off motion. If the ERROR
LED is on (but not blinking), it means that the setting of the user’s program has exceeded the preset overtime
limit, and users have to double check the program and perform the On/Off function again. (The PLC is then back
at STOP automatically)
The PLC I/O Responding Time:
The total responding time of the PLC from the input signal to the output motion is calculated as follows:
Output motion delay time
SOURCE
+5V
0V
C2
The Transistor Output Circuit Wiring
◎
24VDC
0V
+24V
Y1
“Responding Time” = “input interface delay time” + “user’s program scan time” + “output motion delay time”
10ms (factory setting), 0~15ms adjustable. Refer to the usage on special
Input interface delay time
registers D1020~1021 for detail.
User’s program scan
Refer to the usage on special register D1010 for detail.
time
Wiring Circuit
+24V
DC Type
(DC Signal IN)
C1
Preparation
1. Make sure that the power wiring and the I/O wiring are both conducted properly before the power is turned On.
And be advised not to supply AC110V or AC220V into the I/O terminals, or it might short circuit the wiring and
would cause direct damage to the PLC.
2. After using the peripheral devices to write the program into the MPU and that the ERROR LED of the MPU is not
on, it means that the program in use is legitimate, and it is now waiting for the user to give the RUN command.
3. Use HPP to execute the forced On/Off test of the output contact.
S/S
Sourcing
X0
Y0
TRANSISTOR OUTPUT
Fig. A
5V
Wiring of the Input Point
The input signal of the input point is of the DC power DC input, and there are two types of wiring to the DC type:
SINK and SOURCE.
◎ The DC Type, there are two types of wiring to the DC type: SINK and SOURCE, and they are defined as follows:
C0
When actual wiring is conducted at the output terminal, pay special attention to the wiring at the common end.
Take DVP14SS11R2 as an example, the output terminal Y0 utilizes the common end C0, and Y2 uses C1,
whereas Y2~Y5 use C2, as shown in Fig. C.
Isolation Circuit: the photocoupler is utilized as the signal isolation between the internal circuit of the PLC and
input module.
The Relay Output Circuit Wiring
Surge Absorbing Diode: increase the contact life of the relay
Emergency Stop: use the external switch
Fuse: use the fuse with a 5~10A capacity at the common end of the
C0 Y0 C1 Y1 C2 Y2 Y3 Y4 Y5
2
3
output contact to protect the output circuit.
Surge Absorber: reduce the interferences from the AC loading
8
1
5
MC1 MC2
DC Power Supply
3
9
Indicator: neon indicator
2
AC Power Supply
2
3
4
6
7
5
Incandescent Lamp (resistive loading)
Mutually Exclusive Output: utilize the external circuit to form an
interlock, and accommodating the internal program of the PLC, to
provide safety protection when unexpected errors occurred.
X2
Safety Guidelines
Since the PLC is in control of numerous devices, motion of either one device could affect the motion of other
devices, and the breakdown of either one device would consequently be detrimental to the whole auto control
system, and danger will thus be resulted. What follow is the recommended wiring for the power input:
AC Power Loading
Power Circuit Protection Fuse (2A)
5
Power Indicator
1
7
4
Emergency Stop
An “Emergency Stop” button is installed to prevent unexpected
8
Guard
2
situations. If it does occur, the power will be disconnected
Limit
immediately.
MC
3
MC
Isolation Unit of the System Circuit
24V 0V
1
Utilize the electromagnetic contactor and the relay to be the
isolation unit of the power circuit to prevent the possible
instability of the system when the power is supplied on and off.
L N
24V 0V
6
DVPPS01/24VDC Power Module
DVP PLC
Power Supply: 24VDC
< 0.3A
C0
2.5A
DC/DC
LED
Y0
T
R
G
RELAY OUTPUT
◎
+24V 24G
POWER
RY
C0
20.4VDC~28.8VDC
OV
LOAD
Y0
Wiring and Specifications of the Power Terminals
This PLC model is of the DC power input, and when the power is supplied, and make sure that it is connected
to terminals 24VDC and 0V (power range 20.4VDC~28.8VDC). And when the power voltage is lower than
20.4VDC, the PLC will stop the operation and the output will be Off, and consequently, the ERROR LED will
blink swiftly.
24VDC
DVP-**-**-11-T2
LOAD
S/S X0
X1
X2
24VDC
Source Type
SOURCE Mode
Overload Capacity of the Output Terminal
Every output contact possesses the overload capacity that is twice the rated current within 5 minutes, and as
for the common contact, the overload capacity is 1.5 times the rated current within 2 minutes. And if the range
is exceeded, it might result in the contact’s malfunctioning, or even cause internal wire burnt.
There are two types of output modules for the DVP-S Series PLC: the relay and the transistor. Refer to
Functions & Specifications for relevant electric specifications.
The relay module is about 10ms.
The transistor module is about 20~30μs.
Basic Commands and Application Commands of the PLC:
◎ The basic commands and the application commands of the MPU of this series are totally applicable to the
DELTA DVP-PLC ES Series MPU. Refer to the DELTA PLC Technique Application Manual for relevant basic
commands and application commands.
◎ The DVPHPP hand-held programming panel, the DPLSoft (the DOS version) ladder diagram editing program or
the WPLSoft (the Windows version) ladder diagram editing program are all good for use with the DELTA
DVP-PLC, also the PLC could connect with the DVP14SS MPU through specific transmission wire, and then,
the program transmission, the MPU control and the program monitoring could all be executed.
6
6.1
FAULT CHECK & MAINTENANCE
Judge the Error through the Indicator at the Front Panel
When error occurred for the DVP PLC, please check:
6.3
“POWER” LED
There is a “POWER” LED at the front of the MPU. When the MPU is powered On, the green LED
light will be on. If the indicator is not on when the MPU is powered up and with the input power being
normal, it is an indication that the PLC is out of order. Please have this machine replaced or have it
repaired at a dealer near you.
“RUN” LED
Identify the status of the PLC. When the PLC is in operation, this light will be on, and users could
thus use HPP or the ladder diagram editing program to give commands to make the PLC “RUN” or
“STOP”.
“ERROR” LED
y If illegitimate program is input to the MPU, or that the commands and devices of the program exceed
the allowable range, the indicator will thus be blinking. At the moment, the user should inquire about
the error code from the special data register D1004 in the MPU and look it up in the Error Code Table.
After the error is found and the program is revised, send the revised version to the MPU.
y If not being able to be connected with the PLC, and that the LED is blinking swiftly, it is an indication
that the 24VDC power supply is insufficient. To check whether the power supply of 24VDC is normal
or not.
y When the ERROR LED is on (not blinking), it is an indication that the execution time of the program
circuit has exceeded the preset overtime limit (setting of D1000). To check the program circuit or use
the ”WDT” command when this occurred. If the light is still on, conduct the On/Off function of the
DVP MPU again and then check whether the RUN LED is off. If it is not off, check whether there are
interferences or are there resistive objects in the interior of the PLC.
“Input” LED
The On/Off signals of the input point could be displayed through the “Input” LED, or to monitor the
status of the input point through the device monitoring function of HPP. And once the motion of the
input point is valid, the LED is on. Therefore, if errors are detected, use HPP, the LED and the input
signal circuits to check whether the status is normal. Especially when the electronic switch of great
electric leakage is utilized, the input point is usually witnessed with unexpected motions.
“Output” LED
The “Output” LED is designed especially for displaying the On/Off status of the output signals.
And when the “Output” LED is On or Off and that the loading is of an opposite motion, the following
conditions should be attended to:
For the output contact, the contact might be melted down and blocked up due to overload or
loading short-circuit, and would consequently be defected.
If the output contact is functioning undesirably, be sure to check the output wiring circuit and
whether the screw is tightened or not.
Error Code Table
Error
Error
Explanation
Explanation
Code
Code
0001 Device S exceeds the usage limit
0F05 Misused Operand DXXX of DCNT
Label P has been used repetitively or
0F06 Misused SFTR operands
0002
exceeds the usage limit
0003 KnSm exceeds the usage limit
0F07 Misused SFTL operands
Interrupt Pointer, I, has been used
0F08 Misused REF operands
0102
repetitively or exceeds the usage limit
0202 Instruction MC exceeds the usage limit
1000 Misused ZRST operands
Instruction MCR exceeds the usage C400 Illegitimate commands
0302
limit
0401 Device X exceeds the usage limit
C401 General circuit error
C402 LD / LDI commands have been used for
0403 KnXm exceeds the usage limit
more than 9 times consecutively
C403 MPS has been used for more than 9 times
0501 Device Y exceeds the usage limit
consecutively
0503 KnYm exceeds the usage limit
C404 FOR-NEXT over 6 steps and above
0601 Device T exceeds the usage limit
C405 STL/RST used between FOR-NEXT
0604 T register exceeds the usage limit
SRET/IRET used between FOR-NEXT
0801 Device M exceeds the usage limit
MC/MCR used between FOR-NEXT
0803 KnMm exceeds the usage limit
END / FEND used between FOR-NEXT
C407 STL has been used for more than 9 times
0D01 Misused DECO operands
consecutively
0D02 Misused ENCO operands
C408 MC/MCR used within STL
0D03 Misused DHSCS operands
I/P used within STL
0D04 Misused DHSCR operands
C409 STL/RET used within the Subroutine
STL/RET used within the Interrupt Service
0D05 Misused PLSY operands
Routine
0D06 Misused PWM operands
C40A MC/MCR used within the Subroutine,
MC/MCR used within the Interrupt Service
0D07 Misused FROM/TO operands
Routine
C40B MC/MCR does not start from N0 nor of the
0D08 Misused PID operands
discontinuous status
0E01 Component C exceeds the usage limit
C40C The relative N value of MC/MCR is different
0E04 C register exceeds the usage limit
C40D I/P not used properly
C40E IRET should not appear following the last
0E05 Misused Operand CXXX of DCNT
FEND command.
SRET should not appear following the last
0E18 BCD conversion error
FEND command
C41C I/O points of the expansion unit exceed the
0E19 Division error (divisor=0)
limit.
C4EE END command not existed within the
0F04 D register exceeds the usage limit
program
Periodic Inspection
Since the DVP series PLC does not utilize disposable components, there is thus no need to replace most of
the components. However, if the output relay is turned on/off frequently, or that it is often used in driving up
great current load, life of the output contact will thus be decreased. Under a condition like this, periodic
inspection is then needed to check whether the contact is of the “Permanently Open” status or of the
short-circuit status, and moreover, the following precautions should be noted:
Do not mount the DVP under direct sunlight or near any heat-radiation objects.
Do not install the DVP-PLC in places subject to high temperature, high humidity, excessive
vibration, corrosive gasses, liquids, airborne dust and metallic particles.
Check periodically whether the wiring and terminals are tightened and conducted properly.