Инструкция и руководство для
Korg TRITON  на русском

4 страницы подробных инструкций и пользовательских руководств по эксплуатации
 09:51
09:51
KORG TRITON VST ( KORG COLLECTION ) FINALLY RELEASED
 09:46
09:46
Korg Triton — Combi demo
![Видео KORG TRITON VST (TEST) By Tiago mallen #korg #korgtriton (автор: Tiago Mallen [Oficial])](https://i.ytimg.com/vi/AnL33kRxIUs/mqdefault.jpg) 29:57
29:57
KORG TRITON VST (TEST) By Tiago mallen #korg #korgtriton
![Видео KORG TRITON RACK - REVIEW FACTORY SOUNDS BY TIAGO MALLEN #KORG #KORGTRITON (автор: Tiago Mallen [Oficial])](https://i.ytimg.com/vi/XUWyJaL5iA8/mqdefault.jpg) 30:11
30:11
KORG TRITON RACK — REVIEW FACTORY SOUNDS BY TIAGO MALLEN #KORG #KORGTRITON
 13:56
13:56
KORG Collection TRITON vs TRITON Rack Demo & Review.
![Видео Korg Triton Extreme - Test Sounds- ( Parte 1) (автор: Tiago Mallen [Oficial])](https://i.ytimg.com/vi/7szluTM9EOw/mqdefault.jpg) 29:48
29:48
Korg Triton Extreme — Test Sounds- ( Parte 1)
 15:20
15:20
Korg Triton VST Plugin! Expensive but….
 04:47
04:47
KORG Triton 2018 Set Emir +90 544 574 2192
Основные возможности
•
Великолепный звук: 32 Мб волновых форм ROM, возможность расширения картами EXB-PCM, а также EXB-MOSS.
•
Замечательные эффекты: 102 алгоритма, 5 разрывов, 2 мастер-эффекта, трехполосный эквалайзер.
•
Мощная система сэмплирования: 16 Мб сэмплерной памяти RAM (расширяемой до 64 Мб), частота дискретизации 48 кГц,
функции временного разбиения/растяжения, циклы с кроссфейдом.
•
Доступный секвенсер: 16 треков, 200000 событий, функции Cue List è RPPR, шаблоны песен, пресетные ритмические паттер-
ны, независимое зацикливание треков.
•
Два полифонических арпеджиатора, синхронизирующихся по MIDI Clock, 237 пользовательских ячеек памяти.
•
Графический интерфейс TouchView, упрощающий навигацию.
Содержание
Загрузка начальных данных . . . . . . . . . . . . . . . . . . . . . . . . . . . . . . . . . . . . . . . . . . . . . . 2
Прослушивание демо песен . . . . . . . . . . . . . . . . . . . . . . . . . . . . . . . . . . . . . . . . . . . . . . . 2
Выбор и воспроизведение программ и комбинаций . . . . . . . . . . . . . . . . . . . . . . . . . . . . 2
Режим арпеджиатора . . . . . . . . . . . . . . . . . . . . . . . . . . . . . . . . . . . . . . . . . . . . . . . . . . . . 2
Режим секвенсера . . . . . . . . . . . . . . . . . . . . . . . . . . . . . . . . . . . . . . . . . . . . . . . . . . . . . . . 3
Режим сэмплирования . . . . . . . . . . . . . . . . . . . . . . . . . . . . . . . . . . . . . . . . . . . . . . . . . . . 4
Korg TRITON. Руководство пользователя. Начало работы
1
Музыкальная рабочая станция / сэмплер
Korg TRITON. Руководство пользователя. Начало работы.

Загрузка начальных данных, Прослушивание демо песен, Выбор и воспроизведение программ и комбинаций
Режим арпеджиатора
- Изображение
- Текст
Загрузка начальных данных
Архивируйте все собственные наработки перед выполнением данной процедуры!
1. Вставьте диск TNFD-00P в дисковод. Нажмите кнопку [DISK].
2. Нажмите ярлык Load в нижней левой части дисплея. Отобразится содержимое диска.
a. Для одновременной загрузки всех заводских данных: Нажмите любой из файлов с именем PRELOAD. Нажмите кнопку
Load в верхнем правом углу дисплея. Нажмите в меню Load selected. Отметьте поля для двух других позиций Load PRELOAD.
Убедитесь, что отмечена кнопка Clear в позиции “Select KSC Allocation”. Нажмите кнопку OK. При выводе на дисплей запроса
“Where is a GOSPE000.KMP file” выньте первый диск и вставьте диск TNFD-01P. Нажмите кнопку Select; когда директория PRE-
LOAD подсветится, нажмите Select еще раз.
b. Для загрузки только заводских демо-песен: Нажмите файл с именем PRELOAD.SNG. Отметьте поле для Load
PRELOAD.KSC. Убедитесь, что отмечена кнопка Clear в позиции “Select KSC Allocation”. Нажмите кнопку OK. При выводе на
дисплей запроса “Where is a GOSPE000.KMP file” выньте первый диск и вставьте диск TNFD-01P. Нажмите кнопку Select; когда
директория PRELOAD подсветится, нажмите Select еще раз.
c. Для загрузки только заводских тембров: Нажмите файл с именем PRELOAD.PCG. Нажмите кнопку Load в верхнем правом
углу дисплея. Нажмите в ниспадающем меню Load selected. Нажмите OK.
Прослушивание демо песен
1. После загрузки заводских демо-песен нажмите кнопку [SEQ]. Нажмите кнопку [START/STOP] для воспроизведения первой
песни, “Deep Cut”, содержащей сэмплы на втором диске. Воспроизведение автоматически остановится в конце песни, или для
останова в любой момент нажмите кнопку [START/STOP].
2. Для выбора другой песни нажмите кнопку
! слева от S000. Нажмите имя прослушиваемой песни. Нажмите [START/STOP].
Для воспроизведения демонстрационного списка воспроизведения:
1. Нажмите кнопку [MENU]. Нажмите P1: Cue List (или нажмите 1 на цифровой клавиатуре). Нажмите кнопку [START/STOP] — все
песни будут последовательно воспроизводиться в бесконечном цикле с начала списка. Нажмите кнопку [START/STOP] для ос-
танова воспроизведения в любой момент.
Выбор и воспроизведение программ и комбинаций
1. Для выбора программ нажмите кнопку [PROG]. Для выбора комбинаций нажмите кнопку [COMBI].
2. Нажмите одну из кнопок [BANK] для выбора банка тембров, затем колесом ввода, кнопками
«/#$или цифровыми кнопками
выберите тембр внутри банка.
Заводские программы находятся в банках A-D (è G äëÿ General MIDI). Заводские комбинации находятся в банках A-D.
Выбор программ и комбинаций по группам
1. Нажмите кнопку CATEGORY над именем программы или комбинации. Переместитесь и нажмите название любого тембра в те-
кущей группе, а затем воспроизведите звук с клавиатуры. Выберите другую группу нажатием одного из ярлыков Category сле-
ва или справа от центрального меню; затем аналогично прослушайте тембры. Нажмите кнопку OK для перехода к страницам
режимов исполнения и редакции выбранного тембра.
Работа с программами и комбинациями TRITON
Режим арпеджиатора
TRITON имеет двойной полифонический арпеджиатор с полными возможностями редакции и синхронизации по MIDI Clock. Одна
программа использует один арпеджиаторный паттерн — режимы комбинации или секвенсера могут использовать до двух арпед-
жиаторных паттернов одновременно.
1. Арпеджиаторный паттерн будет назначен на программу, даже если кнопка Arpeggiator [ON/OFF] не находится в положении ON.
Например: Выберите программу A35 Arco Strings. Включите кнопку Arpeggiator [ON/OFF] (она засветится). Оперируйте кон-
троллерами реального времени: TEMPO, GATE (общая длина шага) и VELOCITY (громкость нот арпеджио). Нажмите ярлык
Arpeggio внизу экрана. Кнопкой Octave смените параметр Reso (разрешение), отметьте поле Latch.
2. Смотрите на сетку арпеджио: Нажмите кнопку [GLOBAL], нажмите [MENU], нажмите P.6 User Arpeggio.
3. Два арпеджиаторных паттерна будут назначены на комбинацию, даже если кнопка Arpeggiator [ON/OFF] не находится в поло-
жении ON. Например: Выберите комбинацию COMBI A12, Bell Amis. Имейте в виду, что контроллеры реального времени дейст-
вуют одновременно на оба арпеджиатора. Нажмите ярлык Arpegg. A èëè Arpegg. B внизу экрана для работы с индивидуальны-
ми параметрами. Нажмите кнопку
! в поле Pat: (паттерн) и переключайте арпеджиаторные паттерны.
2
Korg TRITON. Руководство пользователя. Начало работы
Программа
Название
Советы по исполнению
A003
Legato Strings
JS-Y: Tremolo; Knob1: Attack; Ribbon: Filter
A034
Arp Angeles
SW1: Pitch; JS-Y: Filter; Knob1: Decay
A054
SuperSwitch Bass
Ribbon: Pitch bend; Knob 2: Decay; Включайте Arp!
A087
Perc Short Decay
Ribbon: Volume; JS+Y: Rotary speed; Knob 4: Reverb
B017
Dyno Tine EP
JS+Y: Tremolo; Knob2: Stereo pan; Ribbon: Filter
B027
Vocalesque
SW1: Portamento; Knobs 3-4: FX level; Slider: Pitch
B085
Feedback D. Gtr.
JS-Y: Feedback; Ribbon: “whammy”; Knob1: Attack
Комбинация
Название
Советы по исполнению
A006
Ugly Momma D.Kit
JS+Y: Decay; Ribbon: Filter; Включайте Arp!
A007
My Baby’s Asleep
SW1: “mute” strings; Knob 4: Reverb; Включайте Arp!
A011
Big Jazz Band
SW1: Adds octave; Slider: Pitch; Knob2: Level of some layers
A126
Life Together
JS-Y: Feedback; SW2 & JS+Y: Wah; Включайте Arp!
B000
Famous Layer EP
Ribbon: Strings filter; Knob3: Strings volume; SW1:
D012
Modern Monastery
Ribbon: Filter; SW1: Octave up; Включайте Arp!

Режим секвенсера: быстрое создание песен с помощью шаблонов…
Страница 3
- Изображение
- Текст
Режим секвенсера: быстрое создание песен с помощью шаблонов
1. Нажмите кнопку [SEQ]. Нажмите кнопку
! около символов S### (номер песни) и нажмите любой неиспользуемый номер. На-
жмите OK в ответ на сообщение “Create new song this Song #”.
2. Нажмите верхнюю правую кнопку
#, а затем нажмите “Load Template Song”. Нажмите кнопку ! в поле From: и выберите один
из пресетных шаблонов песен (P00, и т.д.) нажатием на него. После каждого выбора в первые 8 треков будут загружены 8 про-
грамм с соответствующими эффектами и маршрутизацией. Перед нажатием OK…
3. Отметьте поле “Copy Pattern to Track too?” и затем нажмите OK. Убедитесь, что кнопка Pattern:
! установлена в “Preset”. На-
жмите кнопку
! около символов P### и выберите паттерн соответствующего шаблону стиля. Нажмите OK от 4 до 8 раз для
копирования паттерна в необходимое количество тактов трека (определяемое параметром Measure), а затем нажмите Exit. На-
жмите кнопку [START/STOP] для прослушивания скопированного барабанного паттерна. Нажмите кнопку [START/STOP] еще
раз для останова.
Перед нажатием OK для копирования паттерна вы сперва можете выбрать новый паттерн для создания последовательности пат-
тернов в треке.
Запись и цикличное воспроизведение трека:
1. Нажмите кнопку [LOCATE] для возврата к началу песни. Нажмите кнопку
! слева от слова Track и выберите Track 2 (кроме
шаблона Orchestral, ãäå Track 2 — всегда басовый). Нажмите кнопку [REC/WRITE], а затем кнопку [START/STOP] и запишите от
2 до 4 тактов. По окончании, нажмите кнопку [START/STOP] для останова записи.
2. Нажмите ярлык PlyLoop 1-8 внизу дисплея. Отметьте поле Track Play Loop для трека 2. Оставьте Loop Start Measure в “001”. На-
жмите Loop End Measure (“001”) и установите номер последнего такта трека 2 (используя кнопку
«, колесо ввода или цифро-
вые кнопки). Нажмите кнопку [START/STOP] для воспроизведения песни и зацикливания басового трека. Нажмите кнопку
[START/STOP] еще раз для останова.
3. Повторите шаги 4 и 5 для записи дополнительных треков и установки выбранных циклов.
Установка флажка в поле Play Intro позволяет воспроизводить трек от такта 1 до такта, определенного параметром Loop Start
Measure, и затем зацикливать трек в выбранном регионе.
Автоматизация микса:
4. Нажмите ярлык Preference, затем нажмите кнопку Overdub ïîä Recording Setup.
5. Нажмите ярлык Mixer 1-8 внизу экрана и выберите трек для микширования нажатием ее “фейдера”.
6. Нажмите кнопку [REC/WRITE] после [START/STOP] и запишите изменения громкости в треке колесом ввода или слайдером
VALUE. Нажмите кнопку [START/STOP] по окончании.
4. Нажмите кнопку [START/STOP] еще раз для прослушивания результата — уровень громкости будет изменяться в процессе
воспроизведения. Аналогично можно записать изменения панорамы.
Использование в режиме секвенсера функции сравнения а качестве отмены “UNDO”:
Для отмены записанного дубля нажмите кнопку [COMPARE], она засветится: это равносильно одному уровню отмены. Повторите
запись на текущий трек при светящейся кнопке [COMPARE]. Переключайте кнопку [COMPARE] для прослушивания обоих дублей.
Переключение или запись/редакция другого трека (или выход из режима секвенсера) очищает буфер сравнения. Перед началом
работы с другим треком убедитесь, что текущее состояние функции сравнения содержит сохраняемые данные!
Использование эффектов в шаблоне песни: 5 разрывов, 2 мастер эффекта и общий 3
полосный эквалайзер!
1. Нажмите кнопку [MENU], затем P.8 Insert Effect для просмотра до 5 стерео разрыв-эффектов, загруженных вместе с шабло-
ном. Посмотрите на поле IFX/Indiv. Out BUS Select. Треки, кнопка
! которых указывает на L/R, назначены непосредственно на
мастер-эффекты со значениями посылов Send1 (MFX1) è Send 2 (MFX2). Треки, кнопка
! которых указывает на IFX#, назначе-
ны на разрыв-эффекты, отображаемые в верхней половине дисплея.
2. Нажмите кнопку
! для трека 2 (трек баса): вторая колонка содержит варианты назначения трека на один или два из 4 дополни-
тельных выходов.
3. Нажмите ярлык Insert FX внизу дисплея для подробного просмотра выбранных разрыв-эффектов. Линии Send1 è Send2 озна-
чают уровни посылов с разрыв-эффектов на мастер-эффекты. Нажмите одну из кнопок 4 в линии разрыв-эффектов: как и в
случае тембров TRITON STUDIO, эффекты организованы в группы. Нажмите любой другой алгоритм в текущей группе или на-
жмите один из ярлыков групп эффектов в левой части дисплея для выбора эффекта из другой группы. Нажмите один из 5 яр-
лыков IFX для просмотра всех параметров текущего выбранного разрыв-эффекта. Нажмите любую кнопку
! (кроме Control
Ch.) для просмотра 32 доступных источников динамической модуляции. (Имейте в виду, что кнопка the Control Ch.
! позволяет
управлять данным эффектом по выделенному MIDI-каналу секвенсера.)
4. Нажмите P.9 Master Effect для просмотра двух мастер-эффектов шаблона песни. Нажмите одну из кнопок
! MFX1 èëè MFX 2 для
оценки алгоритмов эффектов, аналогично странице IFX. Нажмите ярлык [MFX1] èëè [MFX2] внизу дисплея для просмотра и ре-
дакции параметров текущего эффекта. Нажмите ярлык Master EQ для просмотра и редакции общего 3-полосного эквалайзера.
Korg TRITON. Руководство пользователя. Начало работы
3

Режим сэмплирования
TRITON производит сэмплирование 16 бит/48 кГц в моно или стерео. При установленных 16 Мб памяти TRITON может записать до
174 секунд в моно или 87 секунд в стерео. Память расширяется модулями SIMM до 64 Мб, что дает около 11.5 минут моно- или 5.8
минут стереосэмплирования.
Подходящими являются 72-контактные модули EDO èëè Fast Page (FPM) DRAM SIMM без четности с временем доступа 60 нс и вы-
ше, 11-битной адресацией.
Запись вокальных сэмплов
Перед работой очистите сэмплерную память TRITON выключением/включением питания.
1. Подключите микрофон к разъему [AUDIO INPUT 1] тыльной панели, установите переключатель MIC/LINE в положение MIC и ус-
тановите регулятор LEVEL в положение “12 часов”.
2. Нажмите кнопку [SAMPLING]. Нажмите ярлык Input Setup. В поле Input 1 нажмите кнопку
! около BUS(IFX) Select: и выберите
L/R. Колесом ввода или цифровыми кнопками установите Input 1 Pan: â “C064”. В поле Recording Setup нажмите кнопку Auto,
колесом ввода или цифровыми кнопками установите Threshold â -30 db, à Pre Trigger REC: — â 5 ms.
3. Нажмите ярлык Recording и убедитесь, что “MS” (мультисэмпл) установлен в “000:new MS____000”. Установите в полях OrigKey
è TopKey значение “C2”. Наиболее простым способом является удержание нажатой кнопки [ENTER] и нажатие клавиши [C2] на
клавиатуре. В поле REC Sample Setup нажмите кнопку
! за Sample Mode: и установите здесь “L-Mono”.
4. Нажмите ярлык Preference и колесом ввода или цифровыми кнопками установите Zone Range â 1key.
5. Нажмите ярлык Recording. Нажмите кнопку [REC/WRITE] для активизации сэмплера, а затем говорите в микрофон. Если над
индикаторами уровня вспыхивает надпись “ADC Overload”, уменьшите уровень регулятором LEVEL до момента отсутствия по-
явления данной надписи. Нажмите “фейдер” dB в поле Recording Level и, говоря в микрофон, колесом ввода установите мак-
симально возможный уровень записи без появления надписи “CLIP”.
6. Нажмите кнопку [START/STOP] и скажите слово “Sampling”. Нажмите кнопку [START/STOP] еще раз для останова сэмплирова-
ния и затем нажмите на дисплее кнопку Create. После этого “клавиатурный” дисплей передвинется на следующую клавишу.
7. Нажмите кнопку [REC/WRITE]. Нажмите кнопку [START/STOP] и скажите “is easy”. Нажмите кнопку [START/STOP] еще раз для
останова сэмплирования, затем нажмите Create.
8. Нажмите кнопку [REC/WRITE]. Нажмите кнопку [START/STOP] и скажите “with”. Нажмите кнопку [START/STOP] еще раз для ос-
танова сэмплирования, затем нажмите Create.
9. Нажмите кнопку [REC/WRITE]. Нажмите кнопку [START/STOP] и скажите “TRITON”. Нажмите кнопку [START/STOP] еще раз для
останова сэмплирования.
10. Теперь последовательно берите на клавиатуре ноты от [C2] äî [D#2] с шагом в полутон и вы услышите фразу “Sampling is easy
with TRITON“.
Сэмплирование через один из 102 разрыв эффектов:
11. Нажмите ярлык Input Setup. В поле Input 1 нажмите кнопку
! около BUS(IFX) Select и выберите IFX1.
12. Нажмите кнопку [MENU] и затем нажмите P8: Insert Efffect. Нажмите кнопку OFF в поле IFX1 для перевода ее в ON, а затем убе-
дитесь, что подсвечено 000: “No Effect”. Цифровыми кнопками введите 5 > 2, а затем нажмите кнопку [ENTER] (“52: Reverb
Hall”). Говорите в микрофон для прослушивания эффекта. Нажмите ярлык IFX1 внизу экрана для просмотра и редакции пара-
метров эффекта.
13. Нажмите кнопку [MENU], затем нажмите P0: Recording. Нажмите ярлык Recording, затем нажмите кнопку [REC/WRITE] для ак-
тивизации сэмплера. Говоря в микрофон, установите уровень записи.
14. Нажмите Create для создания нового индекса мультисэмпла. Нажмите кнопку [START/STOP], скажите фразу. Нажмите
[START/STOP] еще раз для останова сэмплирования. Новый сэмпл будет воспроизводиться на ноте [E2] — следующем до-
ступном индексе.
4
Korg TRITON. Руководство пользователя. Начало работы

Комментарии
Для ознакомления с инструкцией необходимо нажать на ссылку «ЗАГРУЗИТЬ», чтобы скачать pdf файл. Если есть кнопка «ПРОСМОТР», то можно просто посмотреть документ онлайн.
Для удобства, Вы можете сохранить данную страницу с файлом руководства по эксплуатации в свой список «избранное» прямо на сайте (доступно для зарегистрированных пользователей).
Смотрите инструкцию для похожих моделей:

Вы можете задать вопрос посетителям сайта по модели KORG TRITON. Если Вы являетесь её пользователем, то пожалуйста оставьте, по возможности развёрнутый отзыв:

Основные возможности
•
Великолепный звук: полифония до 120 нот, 48 Мб волновых форм ROM (включая 16 Мб новых сэмплов стереофонического
фортепиано с переключаемой динамикой звукоизвлечения), возможность расширения до 256 Мб семью картами EXB-PCM, а
также платой синтезатора EXB-MOSS DSP.
•
1280 встроенных звуков с возможностью расширения о 3584.
•
Графический интерфейс TouchView, упрощающий навигацию, и новый мощный процессор, работающий в 6 раз быстрее, чем в
“классическом” TRITON и в 2 раза быстрее, чем в Karma!
•
Замечательные эффекты: 102 алгоритма, 5 разрывов, 2 мастер-эффекта с возможностью синхронизации, трехполосный эква-
лайзер.
•
Открытая система сэмплирования, позволяющая осуществлять сэмплирование и ресэмплирование во всех режимах: 16 Мб
сэмплерной памяти RAM (расширяемой до 96 Мб), частота дискретизации 48 кГц, функции временного разбиения/растяже-
ния, циклы с кроссфейдом, сэмплирование/ресэмплирование с учетом всех разрывов и мастер-эффектов, “сграбливание” ау-
диоматериала с CD, ресэмплирование всей песни на внутренний хард-диск в WAV-файлы.
•
Доступный секвенсер: 16 треков, 200000 событий, функции Cue List è RPPR, шаблоны песен, пресетные ритмические паттер-
ны, независимое зацикливание треков.
•
Функция “In-Track”, позволяющая производить сэмплирование непосредственно в секвенсер в качестве MIDI-событий —
сэмплирование на внутренний хард-диск!
•
Два полифонических арпеджиатора, синхронизирующихся по MIDI Clock, 507 пользовательских ячеек памяти.
•
Возможности хранения данных: внутренний хард-диск 5 Гб, дискета, SCSI и опциональный внутренний привод CDRW1x8.
•
6 выходов с возможностью направления любого сигнала на любой из них или стереопару с любыми эффектами!
•
Цифровой вход/выход S/PDIF 48 кГц, совместимый с 96 кГц.
•
Опциональный 6-канальный ADAT-интерфейс EXB-DI и 6-канальный цифровой аудио/MIDI вход/выход EXB-mLAN.
Содержание
Коммутация и загрузка начальных данных . . . . . . . . . . . . . . . . . . . . . . . . . . . . . . . . . . 2
Выбор и воспроизведение программ и комбинаций . . . . . . . . . . . . . . . . . . . . . . . . . . . . 2
Режим арпеджиатора . . . . . . . . . . . . . . . . . . . . . . . . . . . . . . . . . . . . . . . . . . . . . . . . . . . . 3
Режим секвенсера . . . . . . . . . . . . . . . . . . . . . . . . . . . . . . . . . . . . . . . . . . . . . . . . . . . . . . . 3
Режим сэмплирования . . . . . . . . . . . . . . . . . . . . . . . . . . . . . . . . . . . . . . . . . . . . . . . . . . . 4
Сэмплирование в режимах программы, комбинации и секвенсера . . . . . . . . . . . . . . . . 5
Создание аудио CD из WAV файлов . . . . . . . . . . . . . . . . . . . . . . . . . . . . . . . . . . . . . . . . . 6
Сграбливание аудиоматериала с CD . . . . . . . . . . . . . . . . . . . . . . . . . . . . . . . . . . . . . . . . . 6
Korg TRITON STUDIO. Руководство пользователя. Начало работы
1
Музыкальная рабочая станция / сэмплер
Korg TRITON STUDIO. Руководство пользователя. Начало работы.

Загрузка начальных данных
Архивируйте все собственные наработки перед выполнением данной процедуры!
1. Вставьте диск TNFD-00P в дисковод. Нажмите кнопку [DISK].
2. Нажмите ярлык Load в нижней левой части дисплея. Отобразится содержимое диска.
a. Для одновременной загрузки всех заводских данных: Нажмите любой из файлов с именем PRELOAD. Нажмите кнопку
Load в верхнем правом углу дисплея. Нажмите в меню Load selected. Отметьте поля для двух других позиций Load PRELOAD.
Убедитесь, что отмечена кнопка Clear в позиции “Select KSC Allocation”. Нажмите кнопку OK. При выводе на дисплей запроса
“Where is a GOSPE000.KMP file” выньте первый диск и вставьте диск TNFD-01P. Нажмите кнопку Select; когда директория PRE-
LOAD подсветится, нажмите Select еще раз.
b. Для загрузки только заводских демо-песен: Нажмите файл с именем PRELOAD.SNG. Отметьте поле для Load
PRELOAD.KSC. Убедитесь, что отмечена кнопка Clear в позиции “Select KSC Allocation”. Нажмите кнопку OK. При выводе на
дисплей запроса “Where is a GOSPE000.KMP file” выньте первый диск и вставьте диск TNFD-01P. Нажмите кнопку Select; когда
директория PRELOAD подсветится, нажмите Select еще раз.
c. Для загрузки только заводских тембров: Нажмите файл с именем PRELOAD.PCG. Нажмите кнопку Load в верхнем правом
углу дисплея. Нажмите в ниспадающем меню Load selected. Нажмите OK.
Прослушивание демо песен
1. После загрузки заводских демо-песен нажмите кнопку [SEQ]. Нажмите кнопку [START/STOP] для воспроизведения первой
песни, “Deep Cut”, содержащей сэмплы на втором диске. Воспроизведение автоматически остановится в конце песни, или для
останова в любой момент нажмите кнопку [START/STOP].
2. Для выбора другой песни нажмите кнопку
! слева от S000. Нажмите имя прослушиваемой песни. Нажмите [START/STOP].
Для воспроизведения демонстрационного списка воспроизведения:
1. Нажмите кнопку [MENU]. Нажмите P1: Cue List (или нажмите 1 на цифровой клавиатуре). Нажмите кнопку [START/STOP] — все
песни будут последовательно воспроизводиться в бесконечном цикле с начала списка. Нажмите кнопку [START/STOP] для ос-
танова воспроизведения в любой момент.
Выбор и воспроизведение программ и комбинаций
1. Для выбора программ нажмите кнопку [PROG]. Для выбора комбинаций нажмите кнопку [COMBI].
2. Нажмите одну из кнопок [BANK] для выбора банка тембров, затем колесом ввода, кнопками
«/#$или цифровыми кнопками
выберите тембр внутри банка.
Заводские программы находятся в банках A-D (è G äëÿ General MIDI). Заводские комбинации находятся в банках A-D.
Выбор программ и комбинаций по группам
1. Нажмите кнопку CATEGORY над именем программы или комбинации. Переместитесь и нажмите название любого тембра в те-
кущей группе, а затем воспроизведите звук с клавиатуры. Выберите другую группу нажатием одного из ярлыков Category сле-
ва или справа от центрального меню; затем аналогично прослушайте тембры. Нажмите кнопку OK для перехода к страницам
режимов исполнения и редакции выбранного тембра.
Работа с программами и комбинациями TRITON
Режим арпеджиатора
TRITON имеет двойной полифонический арпеджиатор с полными возможностями редакции и синхронизации по MIDI Clock. Одна
программа использует один арпеджиаторный паттерн — режимы комбинации или секвенсера могут использовать до двух арпед-
жиаторных паттернов одновременно.
1. Арпеджиаторный паттерн будет назначен на программу, даже если кнопка Arpeggiator [ON/OFF] не находится в положении ON.
Например: Выберите программу A35 Arco Strings. Включите кнопку Arpeggiator [ON/OFF] (она засветится). Оперируйте кон-
троллерами реального времени: TEMPO, GATE (общая длина шага) и VELOCITY (громкость нот арпеджио). Нажмите ярлык
Arpeggio внизу экрана. Кнопкой Octave смените параметр Reso (разрешение), отметьте поле Latch.
2. Смотрите на сетку арпеджио: Нажмите кнопку [GLOBAL], нажмите [MENU], нажмите P.6 User Arpeggio.
3. Два арпеджиаторных паттерна будут назначены на комбинацию, даже если кнопка Arpeggiator [ON/OFF] не находится в поло-
жении ON. Например: Выберите комбинацию COMBI A12, Bell Amis. Имейте в виду, что контроллеры реального времени дейст-
вуют одновременно на оба арпеджиатора. Нажмите ярлык Arpegg. A èëè Arpegg. B внизу экрана для работы с индивидуальны-
ми параметрами. Нажмите кнопку
! в поле Pat: (паттерн) и переключайте арпеджиаторные паттерны.
2
Korg TRITON. Руководство пользователя. Начало работы
Программа
Название
Советы по исполнению
A003
Legato Strings
JS-Y: Tremolo; Knob1: Attack; Ribbon: Filter
A034
Arp Angeles
SW1: Pitch; JS-Y: Filter; Knob1: Decay
A054
SuperSwitch Bass
Ribbon: Pitch bend; Knob 2: Decay; Включайте Arp!
A087
Perc Short Decay
Ribbon: Volume; JS+Y: Rotary speed; Knob 4: Reverb
B017
Dyno Tine EP
JS+Y: Tremolo; Knob2: Stereo pan; Ribbon: Filter
B027
Vocalesque
SW1: Portamento; Knobs 3-4: FX level; Slider: Pitch
B085
Feedback D. Gtr.
JS-Y: Feedback; Ribbon: “whammy”; Knob1: Attack
Комбинация
Название
Советы по исполнению
A006
Ugly Momma D.Kit
JS+Y: Decay; Ribbon: Filter; Включайте Arp!
A007
My Baby’s Asleep
SW1: “mute” strings; Knob 4: Reverb; Включайте Arp!
A011
Big Jazz Band
SW1: Adds octave; Slider: Pitch; Knob2: Level of some layers
A126
Life Together
JS-Y: Feedback; SW2 & JS+Y: Wah; Включайте Arp!
B000
Famous Layer EP
Ribbon: Strings filter; Knob3: Strings volume; SW1:
D012
Modern Monastery
Ribbon: Filter; SW1: Octave up; Включайте Arp!
Перед вами файл pdf, где представлена инструкция (руководство) на русском для KORG TRITON. Вы можете скачать ее либо изучить в онлайн режиме.
Подробные сведения об инструкции:
Устройство из раздела: синтезатор
Бренд-производитель: KORG
Наименование модели: KORG TRITON
Язык: Руководство на русском языке
Файл: pdf
Размер файла: 18,95 MB

Скачать инструкцию к HARPER HDT2-1110
ЗАГРУЗИТЬ
Просмотр инструкции онлайн
Основные возможности
•
Âåëèêîëåïíûé çâóê: 32 Ìá âîëíîâûõ ôîðì ROM, âîçìîæíîñòü ðàñøèðåíèÿ êàðòàìè EXB-PCM, à òàêæå EXB-MOSS.
•
Çàìå÷àòåëüíûå ýôôåêòû: 102 àëãîðèòìà, 5 ðàçðûâîâ, 2 ìàñòåð-ýôôåêòà, òðåõïîëîñíûé ýêâàëàéçåð.
•
Ìîùíàÿ ñèñòåìà ñýìïëèðîâàíèÿ: 16 Ìá ñýìïëåðíîé ïàìÿòè RAM (ðàñøèðÿåìîé äî 64 Ìá), ÷àñòîòà äèñêðåòèçàöèè 48 êÃö,
ôóíêöèè âðåìåííîãî ðàçáèåíèÿ/ðàñòÿæåíèÿ, öèêëû ñ êðîññôåéäîì.
•
Äîñòóïíûé ñåêâåíñåð: 16 òðåêîâ, 200000 ñîáûòèé, ôóíêöèè Cue List è RPPR, øàáëîíû ïåñåí, ïðåñåòíûå ðèòìè÷åñêèå ïàòòåð-
íû, íåçàâèñèìîå çàöèêëèâàíèå òðåêîâ.
•
Äâà ïîëèôîíè÷åñêèõ àðïåäæèàòîðà, ñèíõðîíèçèðóþùèõñÿ ïî MIDI Clock, 237 ïîëüçîâàòåëüñêèõ ÿ÷ååê ïàìÿòè.
•
Ãðàôè÷åñêèé èíòåðôåéñ TouchView, óïðîùàþùèé íàâèãàöèþ.
Содержание
Загрузка начальных данных . . . . . . . . . . . . . . . . . . . . . . . . . . . . . . . . . . . . . . . . . . . . . . 2
Прослушивание демо песен . . . . . . . . . . . . . . . . . . . . . . . . . . . . . . . . . . . . . . . . . . . . . . . 2
Выбор и воспроизведение программ и комбинаций . . . . . . . . . . . . . . . . . . . . . . . . . . . . 2
Режим арпеджиатора . . . . . . . . . . . . . . . . . . . . . . . . . . . . . . . . . . . . . . . . . . . . . . . . . . . . 2
Режим секвенсера . . . . . . . . . . . . . . . . . . . . . . . . . . . . . . . . . . . . . . . . . . . . . . . . . . . . . . . 3
Режим сэмплирования . . . . . . . . . . . . . . . . . . . . . . . . . . . . . . . . . . . . . . . . . . . . . . . . . . . 4
Korg TRITON. Ðóêîâîäñòâî ïîëüçîâàòåëÿ. Íà÷àëî ðàáîòû
1
Ìóçûêàëüíàÿ ðàáî÷àÿ ñòàíöèÿ / ñýìïëåð
Korg TRITON. Ðóêîâîäñòâî ïîëüçîâàòåëÿ. Íà÷àëî ðàáîòû.
-
Contents
-
Table of Contents
-
Bookmarks
Quick Links
Related Manuals for Korg TRITON Musical Instrument
Summary of Contents for Korg TRITON Musical Instrument
-
Page 1
User Guide… -
Page 3: Table Of Contents
e U ser Guide Features and Benefits «Overview» Connections Disk Mode: Loading the Preload Disks Playing the Factory Demos Basic Navigation: Front Panel Overview, Touchview Graphic Interface Program Mode: Overview Select-By-Bank, Select-By-Category Performance Editing, Realtime Controllers AMS and Effect Dynamic Modulation Very Cool Demo Programs Arpeggiator Mode: Overview and Tour in Program mode…
-
Page 4: Features And Benefits
Everyone is looking for a large variety of sounds and TRITON delivers the largest selection of great Korg sounds ever! *Except GM This is a huge memory area, giving the user a full gamut of imitative and synthetic wave data.
-
Page 5
Loads Korg*, Akai S3000/1000, AIFF and Loads Korg*, Akai S3000/1000, AIFF and . -
Page 6
F e a t u r e F e a t u r e I n n o v a t i v e R P P R I n n o v a t i v e R P P R (Realtime Pattern Play f u n c t i o n f u n c t i o n… -
Page 7
16 Mbytes sample RAM, and is expandable to 64 Mbytes with user-installable 72-pin SIMM modules! The sample RAM area also lets you load Akai S1000/3000, AIFF, WAV and Korg samples. Recording and editing your own samples has never been easier, thanks to TRITON’s intuitive user interface! New Version 2 OS adds Time Slice (works on stereo samples!), Time Stretch and Crossfade Looping features. -
Page 8
TRITON Training Guide Easy and Creative Sequencing A totally new 16-track sequencer with an awesome 200,000 event capacity gives you incredible ways to create music in an easy, yet extremely powerful song writing environment! TRITON’s new Cue List, Song Templates, Preset Rhythm Patterns, independently-loopable tracks and RPPR functions make music production speedier and easier than ever! Dual Polyphonic Arpeggiators… -
Page 9
TRITON Training Guide User-Installable, Affordable Options EXB-MOSS: Add Korg’s world-famous Z1 DSP technology to the TRITON with the EXB- MOSS option! Six voices of physical modeled / synthesis sounds adds even more power to TRITON’s HI synthesis system, and you can use up to six MOSS sounds in a… -
Page 10: Connections
Connections 1. Connect TRITON’s L/MONO and R outputs to a stereo monitoring system, or connect headphones to the headphone jack. 2. Lower the VOLUME fader, then power-up the TRITON. Raise the VOLUME fader and play the keyboard to set a comfortable monitoring level. The display will indicate the model and software version number, as well as any installed options.
-
Page 11
Loading the Factory Demos and Sounds The following steps show you how to restore the factory preload demo songs, .PCG files and samples. Note: The following procedure will rewrite the TRITON’s internal memory. Make sure to backup your internal data before proceeding! 1. -
Page 12: Playing The Factory Demos
7. Press Select at the lower-right of the display. All of the sample data in the PRELOAD folder will load. The display will then indicate «Writing into memory» — the data is loading into the TRITON’s flash memory area. Tip: The TEMPO LED in the ARPEGGIATOR section of the front panel goes dark while loading, and begins to flash when the loading process is complete.
-
Page 13: Basic Navigation
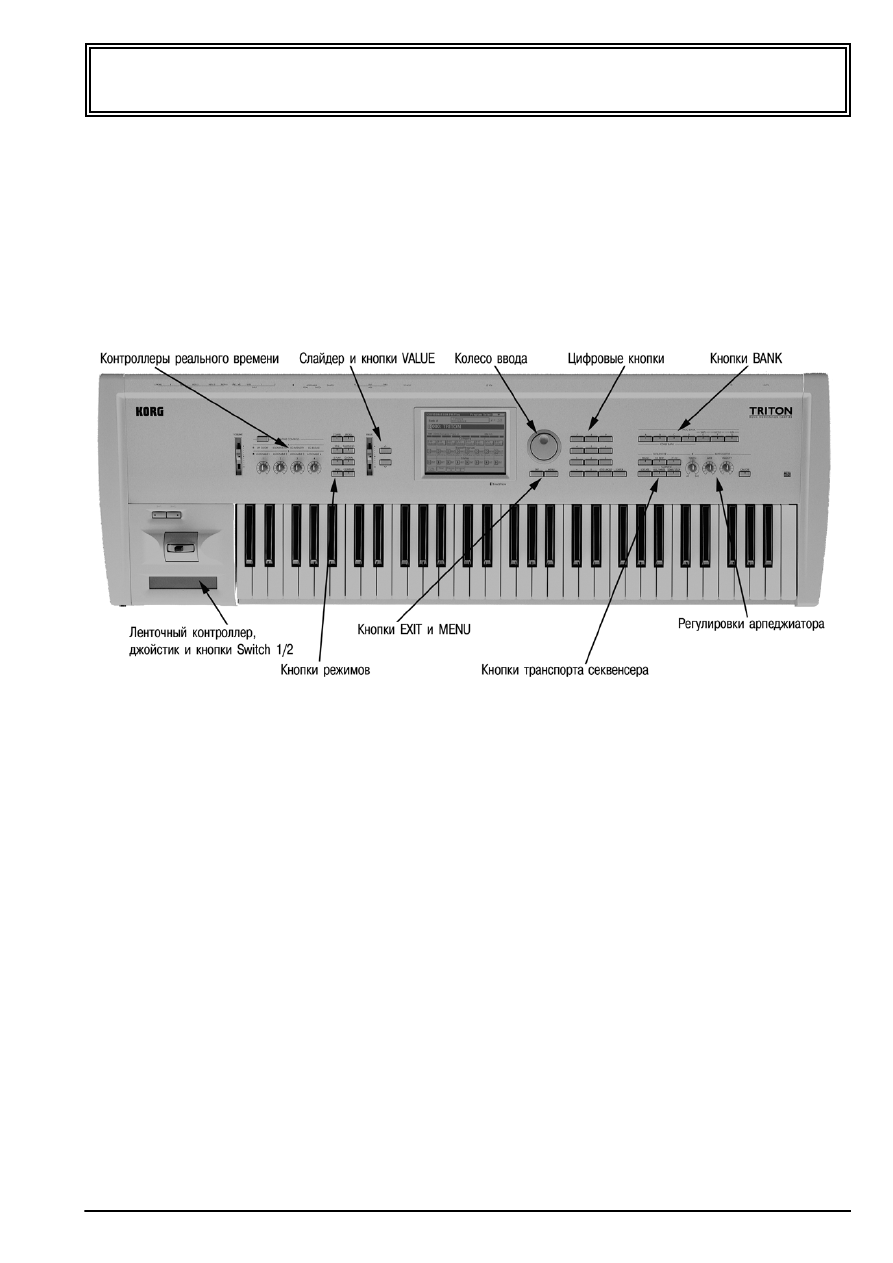
TRITON Training Guide Basic Navigation Front Panel Overview 1> SW1 / 2 2> Joystick 3> Ribbon: These controllers are used to control tone, pitch, volume, effects, the arpeggiators and more — in realtime, while you play and record. 4> Headphone Jack 5>…
-
Page 14
8> Mode keys: Press these keys to enter a desired mode of operation — the LED’s for each mode will light. Seven modes of operation are available 9> COMPARE key: Used to compare an un-edited sound with an edited sound when in Program or Combination modes, as well as comparing when recording and editing in Sequencer mode. -
Page 15: Program Mode
TRITON Training Guide 16> ARPEGGIATOR section: This section of the front panel controls the operation of the arpeggiators. It includes the TEMPO, GATE and VELOCITY knobs and the ARPEGGIATOR ON/OFF key. The TEMPO knob can also be used to change song tempo. 17>…
-
Page 16
TRITON features two great ways to quickly-locate Programs: Select-By-Bank 1. Press to highlight the Program name field, press 0, then press the ENTER key on the Numeric keypad to select Program A000. 2. Press the popup button to the left of the Program name. A popup menu will appear — the center area shows 16 of the A-bank programs, beginning with A000. -
Page 17
2. Press the Category popup button. A new popup menu appears, and because you selected Program B033 Piano Pad, you can now view, scroll and select any of the Programs in the Keyboard category. Notice that the categories are listed as tabs on the left and right sides of the center menu. 3. -
Page 18
Performance Editing In addition to the variety of controllers TRITON has to offer, you can do quick and easy edits of main Program parameters with TouchView! In any Program Play page (P0), you’ll see eight Performance Editor «faders» that function in a + or — direction Octave: Raises or lowers the octave of the Program. -
Page 19: Ams And Effect Dynamic Modulation
When you edit a Program with the Performance Editors and want to update the Program quickly — press the REC/WRITE key. A popup menu prompts you with the famous Korg words: «Are You Sure», and you can confirm the update by pressing OK. If you want to write your edited Program to another location, versus overwriting the existing Program, press the Performance Edit page menu command in the upper-right of the display, press «Write Program», choose the destination bank, category and Program number, then…
-
Page 20
Check out AMS and Effect Dynamic Modulation: Although you haven’t been introduced to TRITON’s Polyphonic Arpeggiators yet, we’ll give you a «sneak preview» in the next few steps, and you can work with an arpeggiated Program — this will give you a good idea of how AMS can be used to control the sound: 1. -
Page 21
Tip: As you go through the Programs and Combinations in TRITON, make sure to work with the various controllers! Every Program has many controller functions already programmed, plus you’ll find lots more information on the controllers and AMS and Dynamic Modulation in the TRITON Owner manuals! Tip: All Program Play pages provide you with quick visual information about SW1 / 2, the real-time Control knob B-mode functions, and the Insert / Master effects — another great feature of TouchView! -
Page 22: Very Cool Demo Programs
— Korg’s fantastic programming team spent untold hours of painstaking controller edits and voicing — to get each Program and Combination just right! We at Korg want you to explore TRITON — you’ll find many great sounds from all the categories.
-
Page 23
The TRITON features dual polyphonic arpeggiators, fully-editable and syncable to MIDI clock and the internal sequencer. There are 237 patterns in memory, including 5 preset and 232 user-patterns. Many of the user-patterns have been pre-programmed, however you can edit any pattern in memory — even copy a pre-programmed pattern to a new user location and edit it, or create your own patterns from scratch! You’ll find that Programs and Combinations have arpeggio patterns already assigned to them — some will trigger as soon as you select the sound and play the keyboard, while other patterns are there, waiting to be… -
Page 24
(CUTOFF, RESONANCE, EG INTENSITY) !!! And don’t forget to check out the knobs used in conjunction with many B-mode REALTIME CONTROL functions!!! Tip: If you want the selected Program to automatically — trigger arpeggio patterns in performance, first select the Program, then turn ON the Arpeggiator, then press the REC/WRITE key — a dialog box prompts you with «Update Program». -
Page 25
Take a «tour» of Program A034’s arpeggio setup: For now, we’ll take you through the Arpeggio tab settings — the «performance edit» functions of an arpeggio pattern in Program mode. This tab is great to go to when you want to edit the arpeggio pattern «on the fly», in performance, or simply to try new patterns! 1. -
Page 26: Work With Another Program / Pattern
Now to work with another Program / Pattern: 1. Press the name field: 034:Arp Angeles then, using the Numeric keys, press 83. The display will change to select Program A083: Few Bows Here. Note: When you change the Program in this way, the Arpeggio tab page remains in the display. Check out the Sort function 2.
-
Page 27
Tip: Whenever you make changes to the functions in the Arpeggio tab page, you are NOT editing the original arpeggio pattern. Extensive editing and creating of patterns is done in the GLOBAL mode (P6 User Arpeggio) — overviewed in the Advanced Arpeggiator Tour later in this guide. Tip: Any changes you make to an arpeggio pattern’s functions or tempo in the Arpeggio tab page can be quickly-saved to the same Program — press the REC/WRITE key, and then press OK to update the Program. -
Page 28: Combination Mode
Combination Mode In Combination mode, you can layer, split or velocity-switch up to eight Programs. There are 512 Combinations in TRITON’s internal memory (4 Banks of 128 each). As in Program mode, Combinations can Selected-By-Bank Selected-By-Category. simultaneously in a Combination, and AMS / controller functions are also available in this mode. Each Combination can have up to 5 Insert effects and 2 Master effects, plus stereo3-band EQ.
-
Page 29
TRITON features two great ways to quickly-locate Combinations: Select-By-Bank 1. Select Combination A000: Romance Layers. 2. Press the popup button to the left of the name field. A popup menu will appear — the center area shows 16 of the A-bank Combinations, beginning with A000. You can press to select Combinations here, and use the scroll bar to move through the center menu pages and select more A-bank Combinations. -
Page 30
Working with a Combination Combinations have been a big part of the Korg sound legacy over the years, and the TRITON offers a huge palette of Combinations with many new features! 1. Press the EXIT key to go to the Combination Play page, then press BANK key A. -
Page 31
Tip: Almost all of TRITON’s Combinations have arpeggio patterns assigned to them! Some of these patterns will automatically trigger when you select and play a Combination, while others are accessed simply by turning on the Arpeggiator after you select a Combination — a great way to try out Combinations in a «song context»… -
Page 32
Hot — Tip: TRITON COMBINATIONS RULE !!!!!!!!!!!!!!!!!!!!!!!!!!!!!!!!!!!!!!!!! Tip: If you want a Combination to automatically — trigger arpeggio patterns in performance, first select the Combination, then turn ON the Arpeggiator, then press the REC/WRITE key — a popup menu prompts you with «Update Combination». -
Page 33
TRITON Training Guide Quick Tour of the Combination Edit Pages Now to take a quick look at the edit pages in Combination A086 SciFi Chase Scene. You’ll tour the Effect pages later — in the Insert and Master Effect section of this guide. 14. -
Page 34
TRITON Training Guide P4: Edit -Zone / Ctrl Tabs in this page let you set Key and Velocity zones for each timbre, and if the EXB -MOSS board is installed, a tab for voice allocation of MOSS timbres is provided. The Controller tab on this page let’s you set assignments for SW1 and SW2, plus Real-time Control knob assignments for B-mode functions. -
Page 35: Very Cool Demo Combinations
KORG’s fantastic programming team spent untold hours of painstaking controller edits and voicing — to get each Program and Combination just right! We at Korg want you to explore TRITON — you’ll find many great sounds in all the categories.
-
Page 36: Inserts And Masters, Eq
Effect Dynamic Modulation lets you control TRITON’s effects in real-time — for performance and sequencing, and many of the delay and LFO modulation effects feature BPM / MIDI-sync functions for precise control with tempo! Highlighting just a few of TRITON’s many Effect Features: Insert Effect Chaining: Audio Input Processing: Powerful Routing:…
-
Page 37
5. The insert effect selections are posted in the upper -right of the display. The arrow is pointing to IFX1 because the BUS Select has been set to send the oscillator signal to insert effect 1. In Program D071, insert effect 1 is a St. Graphic 7 -band EQ, and it is chained to insert effect 2 (IFX2) — this means the signal passes through IFX1 to IFX2 (Rotary Speaker), as denoted by the arrow in the upper — right and (Chain) in the display. -
Page 38
Tip: Controlling the effects in real-time is a great feature! And remember — the changes you make in real- time can also be recorded to TRITON’s internal — or an external sequencer! More examples of Dynamic Modulation: 8. Press the EXIT key, then select Program B005 Fingertips Guitar (BANK B >5 >ENTER). 9. -
Page 39
TRITON’s effects are grouped by category, and the tabs at the left of the center menu list the seven available effect categories. 18. From the center menu, press 011: StExciter/Enhncr, then press OK. 19. Play the keyboard to hear the newly — applied insert effect — a stereo exciter / enhancer. Note that there are now four stereo insert effects in this Program. -
Page 40
Rename the edited Program, then write it: 31. Press the T Text Edit (T) button to the left of FingertipsGuitar. A text edit window appears. Press the Clear button — the name field in the upper — left clears. Now press the Shift button, then press each text box to rename the Program: BOB’S GUITAR., then press OK (if you make a mistake, and want to move through the new name field and change characters, use the <… -
Page 41
2. Press the MFX1 tab to view the settings for the Stereo Chorus — the Src of Wet/Dry control is set to KnobM3. As you play, rotate Knob 3 to hear the wet/dry balance change. 3. Press the MFX2 tab to view the Reverb SmoothHall parameters, and view the Src of Wet/Dry control. As you play, rotate Knob 4 to increase / decrease the reverb intensity. -
Page 42
box asks if you want to Update Program. Press OK to update the selected Program with the new EQ gain settings. Note: In the Master Effects tab page, the L/R signal path is indicated by an arrow, through the Return 1 /2 and EQ gain settings — to the L/ Mono/ R outputs. -
Page 43
2. Press the MENU key, then press P8 Edit — Insert Effect, and press the Routing tab. You’ll see five stereo Insert effects, chained, at the upper — right of the display. There are eight columns of timbres 1-8 in the lower field, each with specific routing and send parameters: Timbre 1 Drums: Timbre 2 Drums: Timbre 3 Drums:… -
Page 44: Working With The Audio Inputs And Effects
A Word About Output Bussing The ability to send oscillators, timbres and tracks to individual outputs has never been easier! As an example, in Combination mode, just select the bus for each timbre — in the P8: Edit — Insert Effects Routing page (as viewed in the previous section) to outputs L/R, 1-4, 1/2 or 3/4, patch from the selected output to your mixer or amplifier, and you’re all set! You can even send a timbre through Insert effects before going to an Individual output — we’ll look at that later in this guide.
-
Page 45
signal, from the COMBI MENU key, press P9 — Edit Master Effect, then select the MFX tab you’ve bussed the input signal to. Tip: Always be sure to turn off the audio input (Global, P0, Audio Input Tab) after demoing so you don’t leave the TRITON «open»… -
Page 46: Sampling Mode
RAM, and 2 — 32 Mbyte SIMMS take TRITON to 64 Mbytes sample RAM — this allows total recording time of well over 11 minutes, giving you four mono samples of almost 3 minutes each, or four stereo samples of well over 1 minute each. Just a bit of Korg sampling terminology… Sample: Multisample: Index: More sampling terms to come…for now, let’s get started:…
-
Page 47
Recording One -Shot Vocal Samples Here’s a quick and easy way to make a sample — all it takes is a microphone: 1. Clear the TRITON’s sample RAM by powering — OFF, then ON (when you get more comfortable with TRITON you can learn how to erase all samples without powering off). -
Page 48
Preference Tab: 9. Press the Preference tab and set the Zone Range to 1 key with the DIAL or Numeric keys. This setting means that each new index you’ll be creating in the Recording Tab: 10. Press the Recording tab. 11. -
Page 49
Sampling Through an Insert Effect You can sample any audio source through any of TRITON’s 102 available Insert effects! Let’s continue on from the previous steps: 20. Press the Input Setup tab, then, from Input 1’s BUS Select popup menu, press IFX1. 21. -
Page 50
Naming Your Samples and Multi-samples TRITON features the ability to name your samples and multi-samples, and since you can record up to 4000 samples and 1000 multi-samples in internal memory (with 64 Mbytes sample RAM), this feature becomes pretty important! In the previous steps you recorded one multi-sample containing eight samples, beginning with sample number 0000. -
Page 51: Working With Grooves, Loops And Tempo
Converting a Multi-sound to a Program OK, so you’ve got a new Multi-sound, and you want to use it in a Program, Combination, or even as a track in the Sequencer… what to do? Convert it to a Program! TRITON makes it easy! Using the Multi-sample you just recorded: 1.
-
Page 52
7. Press the Recording tab, and in the REC Sample Setup field, select and set the Sample Mode: to Stereo. 8. Press the REC/WRITE key to «arm» the sampler. 9. Start playback on your audio source device, and watch the Recording Level indicators in TRITON’s display — if «ADC OVERLOAD»… -
Page 53
Work with the Loop Edit page: 16. Press the MENU key, then press P2: Loop Edit. On this page, you can work with the sample length and set sampling parameter values. Again, in TRITON’s display, you’ll see the waveform in stereo. Let’s check out a few more functions…… -
Page 54
22. Press the Grid: 120 BPM value, and set it to your original source device BPM value. Note that if needed, you can re — adjust the BPM value here to set more accurate references to the divisions on the waveform display. -
Page 55
Hot -Tip : When checking the timing of a loop in a long phrase it’s handy to give the sample more than a 1-step range and play the sample higher than its normal pitch. This fast playback gets you through the phrase quickly, saving a lot of time! Hot — Tip: Want to turn a 4 bar Groove into a 2 bar Groove? Go to P2 Loop Edit and set the Grid to… -
Page 56: Sequencer Mode
Sequencer Mode TRITON contains a 16-track, 200,000 event sequencer, with an astonishing capacity of up to 200 songs! Each song can be arranged in a Cue List of up to 100 songs, and up to 20 Cue Lists can be created internally.
-
Page 57
5. Play the keyboard — you’ll hear Track 1 and it’s assigned Drum Program, «brought to you» by the Template Song! 6. Below the Song name field, you’ll see Track 01: Drums. Press the Track 01: Drums, and a popup menu appears. Now press the Safety Pin in the top -left of this popup menu — to «lock»… -
Page 58
Note: «Put» pattern to track differs from «Copy» pattern to track in that the only note memory consumed is for the original pattern length — each time you «Put» a pattern, the sequencer points to the pattern itself. «Copy» pattern actually copies the note data from the pattern to the track. 13. -
Page 59
25. Make sure you’re still on the PlyLoop 1-8 tab, then press the Track Play Loop checkbox below Bass column). In the Bass (Track 2) Loop Start Measure field, set the value to 005, and in the Loop End Measure for this track, set the value to 008, Press the START/STOP key, and the Track 1 and 2 will Play Loop continually — each with different Loop Start and End measures! Later on, you can experiment with the Play Loops — just set the Loop Start and End measures to new values! Note:… -
Page 60
Record a couple more tracks: 31. First, for the Guitar track — set the Play Loop measures you want (see step 25). 32. Now select Track03 from the Track Select popup menu, and rehearse and record the Electric Piano track for at least 16 bars! When you’re finished recording, press START/STOP. 33. -
Page 61
Creating a Cue List This is where everything comes together! You’ve got a song — or the basis for one, right? You could real-time, loop, step-time or pattern — record your tracks, cut and paste sections together, overdub, event edit, add more patterns — traditional songwriting in the «sequencing»… -
Page 62
Now you’ve got 3 identical songs, and can start to create a Cue List: First, let’s name the songs, beginning with the currently — selected song: 1. Press the Page menu button (upper — right), and select Rename Song from the popup menu. 2. -
Page 63
Now, from the Track Select popup menu (below the song name), select Track02: Bass. 9. Press the Track Edit Page menu button, then press Shift / Erase Note. Set the From Measure: to 001, and the To Measure: to 016. 10. -
Page 64
4. Finally, in the upper -right area of the display, press the use the Master Track — the original tempo of the songs in the Cue List. 5. Press the LOCATE key to reset the Cue List to Step 01, and press START/STOP. Your Cue List will play until the end of Step 03 and stop. -
Page 65: Rppr ( Realtime Pattern Play Record)
RPPR (Real-time Pattern Play Record) With TRITON’s RPPR function, you can assign a preset or user pattern from a song to each key, and playback the assigned patterns by pressing keys on the keyboard. Patterns can be assigned to 72 keys (C#2 — C8).
-
Page 66
Now to create a new song using RPPR In the following exercise, you’ll load a Template song, view and work with the RPPR Setup page, and assign some patterns to be triggered. Load the Template Song: 1. Press the popup button to the left of the S00X: FEVER song field, and select the next — available empty song number from the popup menu. -
Page 67
13. Play and hold key D2 to trigger the assigned Pattern 122 HipHop 2 / HipHop. To stop playback of the pattern, press the C2 key — it’s reserved as a Shutdown Key, and patterns can’t be assigned to it. 14. -
Page 68
Tip: As you work with and learn TRITON’s sequencer functions and more about RPPR, you’ll discover that you can select new tracks with different Programs, create patterns based on the Programs in each track, and Multi-record them to the internal (or external) sequencer with their assigned RPPR patterns! You can overdub on any recorded tracks, as well as adding real-time solo lines, etc. -
Page 69
Add a new solo track to the song: 6. First, take the sequencer out of Multi-record status: Press the Preference tab, then press to un -check the Multi REC checkbox. Press the Prog. 9-16 tab — you’ll record a new track using Track 9). 7. -
Page 70: Advanced Arpeggiator Tour
Advanced Arpeggiator Tour Editing the Arpeggiator in Program mode: In addition to the functions you learned in the Arpeggiator section of this guide, The Arpeggiator — Edit page covers a few more functions that pertain to the pattern assigned to the selected Program. 1.
-
Page 71
Adjust the Swing function: 1. Press the COMPARE key (left of the VALUE slider) once. The original settings for all functions in the pattern will be recalled. 2. Press to highlight the Swing: +000 % parameter in the display. 3. While holding notes on the keyboard, Rotate the DIAL slowly — in both directions — to shift the timing of the odd-numbered notes in the pattern. -
Page 72
Tip: If you’re working with a Program, Combination or Song, and want to use the assigned arpeggio pattern in another Program, Combination or Song, select the destination Program, Combination or Song, then, in the Edit -Arpeggiator page menu command, copy the arpeggiator pattern from the source Program, Combination or Song to the currently — selected Program, Combination or Song. -
Page 73
3. On the left side of the display notice the (very tiny) numbers — bottom to top — on the grid (0-9, — and .) The — and . are symbols for the numbers 10 and 11. All of these characters represent 12 Tones, and this means Polyphony, brothers and sisters! Up to 12 tones can be entered for each step in the grid. -
Page 74
Now back to the Pattern Setup Tab: 1. Press the Pattern Setup tab button (lower-left). Let’s take a look at these parameters in the display: Arpeggio Pattern Setup Arpeggio Tone Mode: Normal — This is the normal setting for patterns. Pitches for the pattern will be developed and played according to the note that is pressed. -
Page 75
«So how do I determine which drum sounds (notes) play a specific tone?» 8. On the Pattern Edit page, press to highlight the Tone No.: >00 parameter (lower-right of the display). Make sure that this parameter is set to 00 (Tone 0) — if not, press the 6value key, or press the Numeric key 0, then ENTER to select Tone 00. -
Page 76
21. Press to highlight the Step No. 00, and use the 56value keys or the DIAL to move to the step (s) you want to edit, then make edits for each step by highlighting and changing the Pitch Offset, Gate, Velocity and Flam parameters. -
Page 77
4. Press the MENU key, then press P7: Edit — Arpeggiator. Take a close look at timbres 4 and 8. They are both set to trigger the A Arpeggiator in the Arpeggiator Assign field of the display. None of the other timbres are assigned to trigger either Arpeggiator A or B. -
Page 78
10. Press the MENU key, then press P7: Edit — Arpeggiator. The Setup tab displays the Arpeggiator Assignments and Run status boxes for each timbre: 11. Press the Arpegg.A tab button in this page. Here again, you can set those familiar functions — tempo, the pattern assigned, and in addition you’ll see settings for Gate (length of pattern steps), Velocity (loudness of pattern steps), and Swing (timing — shift of odd-numbered notes). -
Page 79
TRITON Training Guide 6 of a Combination, and so on. Bearing in mind that Combinations all fall on the same MIDI channel, the question arises… …How can the Sequencer keep track of these separate assignments and only record and playback the notes for an intended Track, if all the Tracks are on the same MIDI channel? The answer is…… -
Page 80
TRITON Training Guide 4. Using the value wheel, slider or buttons, select the Combination A33: «After-T-House». 5. Touch the box next to «With Effects» so that it is checked. 6. Touch «O.K.». The Combination will load into the first 8 tracks. Next, we’ll prepare to record: 7. -
Page 81
TRITON Training Guide 9. Press the MENU button. 10. Touch «Track Param» on the screen. You will see the Track Status and MIDI channel information for the first 8 tracks, which contains the Combination. They are numbered 1-8 on a dark blue line in the middle of the screen for reference. 1. -
Page 82
Now, we’re ready to record: 1. Press the MENU button. 2. Press the EXIT button. This will take you out to the first Sequencer Screen. 3. Touch the «Pref.» Tab at the bottom right hand side of the screen. 4. Touch the box next to «Multi REC» so that it is checked. 5. -
Page 83: Output Routing
This concludes the Advanced Arpeggiator Tour — for more tips and tricks our Web Site at www.korgusa.com: The TRITON Owner manuals are packed with good information — check ’em out !!!!!! Output Routing TRITON provides six audio outputs — L/mono, R, plus 4 i n dividual outputs. Here’s a quick way for you to demonstrate how easy it is to send a song track to an individual output.
-
Page 84
Copy a preset drum kit to a user drum kit and set a new output bus for a drum sound: 1. Move the R output cable to the INDIV.1 output jack. 2. Press the PROG key to enter Program mode. 3. -
Page 85
EXB-SCSI option)!!! Tip: As you view the functions available in GLOBAL P5 Drum Kit, you’ll see many new additions to KORG’s drum kit parameters, like being able to select samples from ROM, RAM, EXB1 / 2, Cutoff and Resonance… -
Page 86
— fast speed for loading and saving user — samples, sounds and songs to removable or fixed media! EXB — SCSI also gives you access to CD ROM — for loading Akai S1000 / 30000, Korg, AIFF and WAVE format samples files! EXB — PCM01, 02, 03, 04. -
Page 87: Song Play Mode
TRITON Training Guide When you first power — up TRITON, the currently — installed expansion boards / memory will be indicated in the display. Additional Information — OM References: Save and Load Procedures Refer to the TRITON Basic Guide, page 92 Song Play Mode Refer to the TRITON Basic Guide, page 85 Global Mode…
-
Page 89
Very Cool TRITON Programs! Category Program Keyboard A001 Acoustic Piano B001 Attack Piano B017 Dyno Tine EP B104 L/R Piano(Knob1) Organ A007 BX3 Velo Switch A023 M1 Organ A087 Perc Short Delay Bell / Mallet A015 Monkey Skulls A063 Moving Bellz B063 Magical Bells Strings A003 Legato Strings… -
Page 90
Very Cool TRITON Combinations! Category Combination Controllers: Keyboard A000 Romance Layers A001 Lonely Moon B000 Famous Layer EP B064 Wide L/R Piano K2-4 C025 SlowDance Piano Organ A008 Knob as Drawbar1 K1-4 A072 Rock Organ JS+Y B104 Pipes on Knobs K1-4 C088 ReggaeAlvinBlues Bell / Mallet… -
Page 91
TRITON Training Guide…
This manual is also suitable for:
Triton