This is a quick start guide for the Kerbal Operating System (kOS). It is intended for those who are just starting with using kOS. It does presume you have played Kerbal Space Program before and know the basics of how to fly a rocket under manual control. It does NOT assume you know a lot about computer programming, and it will walk you through some basic first steps.
Contents
-
First example: Hello World
-
Step 1: Start a new sandbox-mode game
-
Step 2: Make a vessel in the Vehicle Assembly Bay
-
Step 3: Put the vessel on the launchpad
-
Step 4: Invoke the terminal
-
Step 5: See what an interactive command is like
-
Step 6: Okay that’s great, but how can you make that happen in a program script instead?
-
Step 7: Okay, but where is this program?
-
Step 8: I don’t like the idea that the program is stored only on this vessel. Can’t I save it somewhere better? More permanent?
-
-
Second Example: Doing something real
-
Step 1: Make a vessel
-
Step 2: Make the start of the script
-
Step 3: Make the script actually do something
-
Step 4: Make the script actually control steering
-
Step 5: Add staging logic
-
Step 6: Now to make it turn
-
Step 7: Putting it all together
-
First example: Hello World
In the grand tradition of programming tutorials, the first example will be how to make a script that does nothing more than print the words “Hello World” on the screen. The purpose of this example is to show where you should put the files, how to move them about, and how to get one to run on the vessel.
Step 1: Start a new sandbox-mode game
(You can use kOS in a career mode game, but it requires a part that you have to research which isn’t available at the start of the tech tree, so this example will just use sandbox mode to keep it simple.)
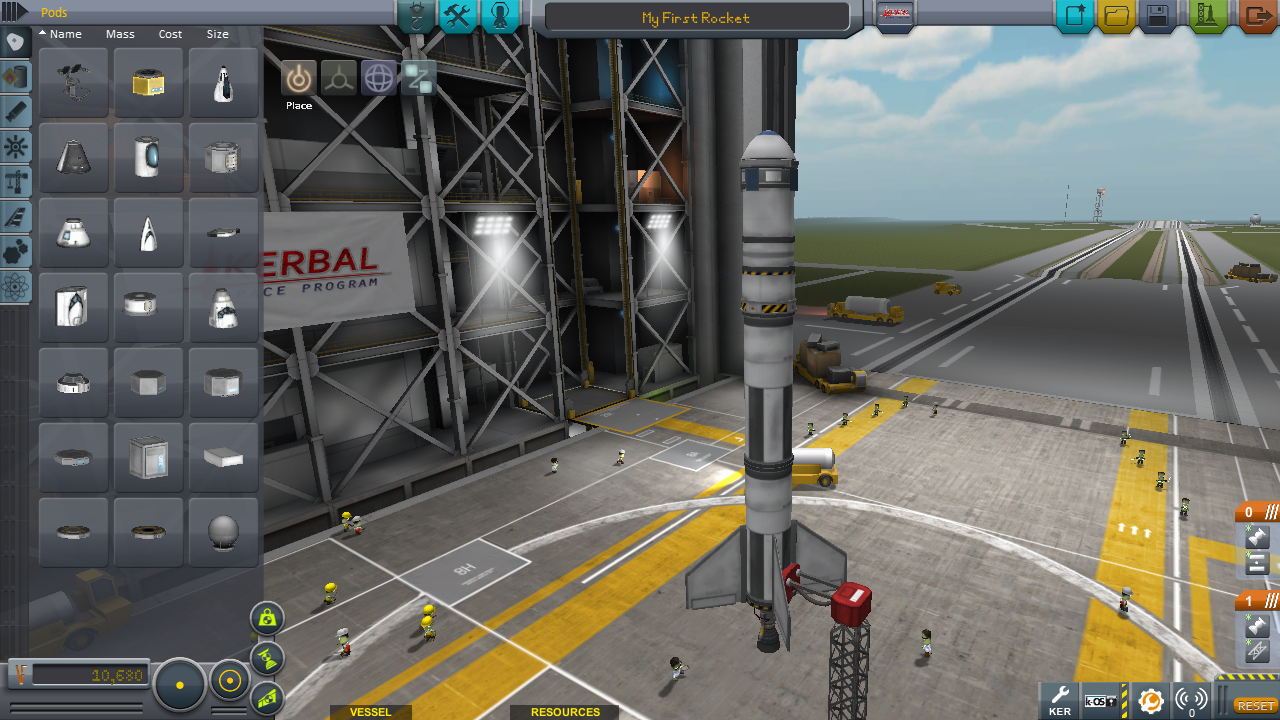
Step 2: Make a vessel in the Vehicle Assembly Bay
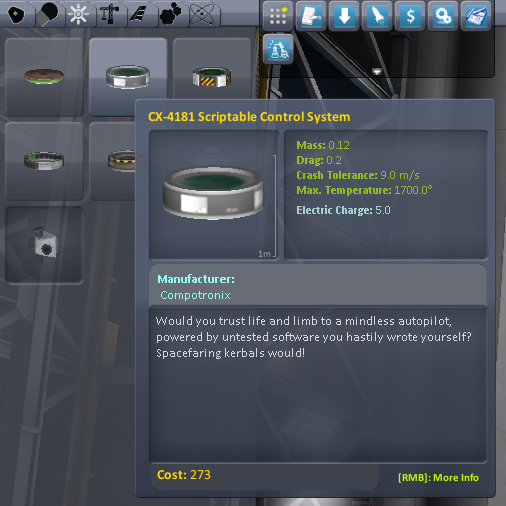
Make the vessel contain any unmanned command core, a few hundred units of battery power, a means of recharging the battery such as a solar panel array, and the “Comptronix CX-4181 Scriptable Control System”. (From this point onward the CX-4181 Scriptable Control System part will be referred to by the acronym “SCS”.) The SCS part is located in the parts bin under the “Control” tab (the same place where RCS thrusters and Torque Wheels are found.)
Step 3: Put the vessel on the launchpad
Put the vessel on the launchpad. For this first example it doesn’t matter if the vessel can actually liftoff or even has engines at all.
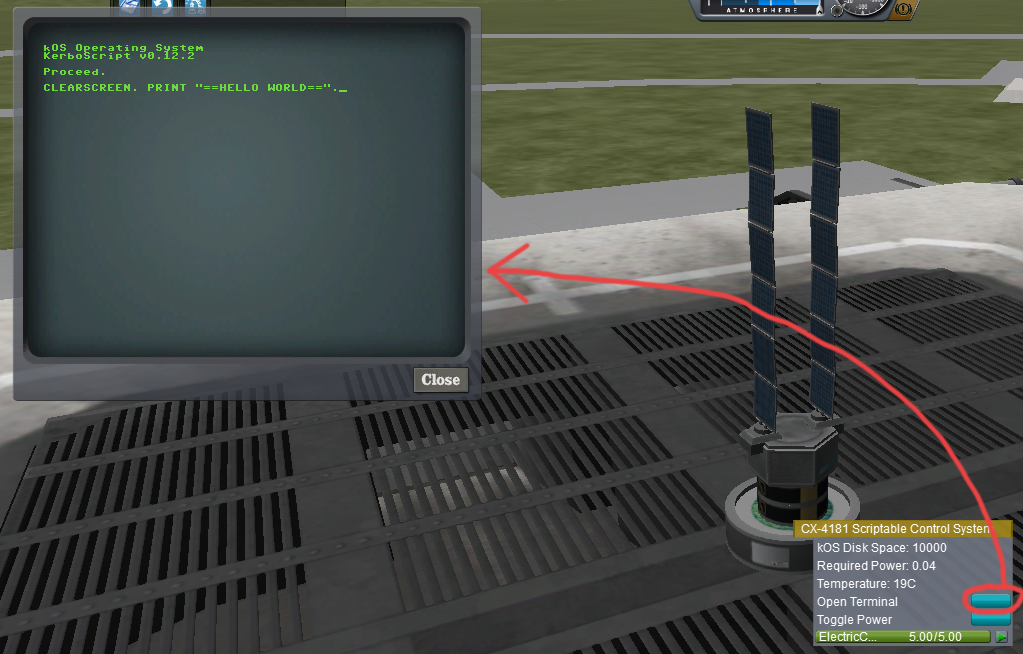
Step 4: Invoke the terminal
Right click for the SCS part on the vessel and then click the button that says “Open Terminal”.
Note that if the terminal is semi-transparent, this means it’s not currently selected. If you click on the terminal, then your keyboard input is directed to the terminal INSTEAD of to piloting. In other words if you type W A S D, you’ll actually get the word “wasd” to appear on the terminal, rather than the W A S D keys steering the ship. To switch back to manual control of the game instead of typing into the terminal, click outside the terminal window anywhere on the background of the screen.
Step 5: See what an interactive command is like
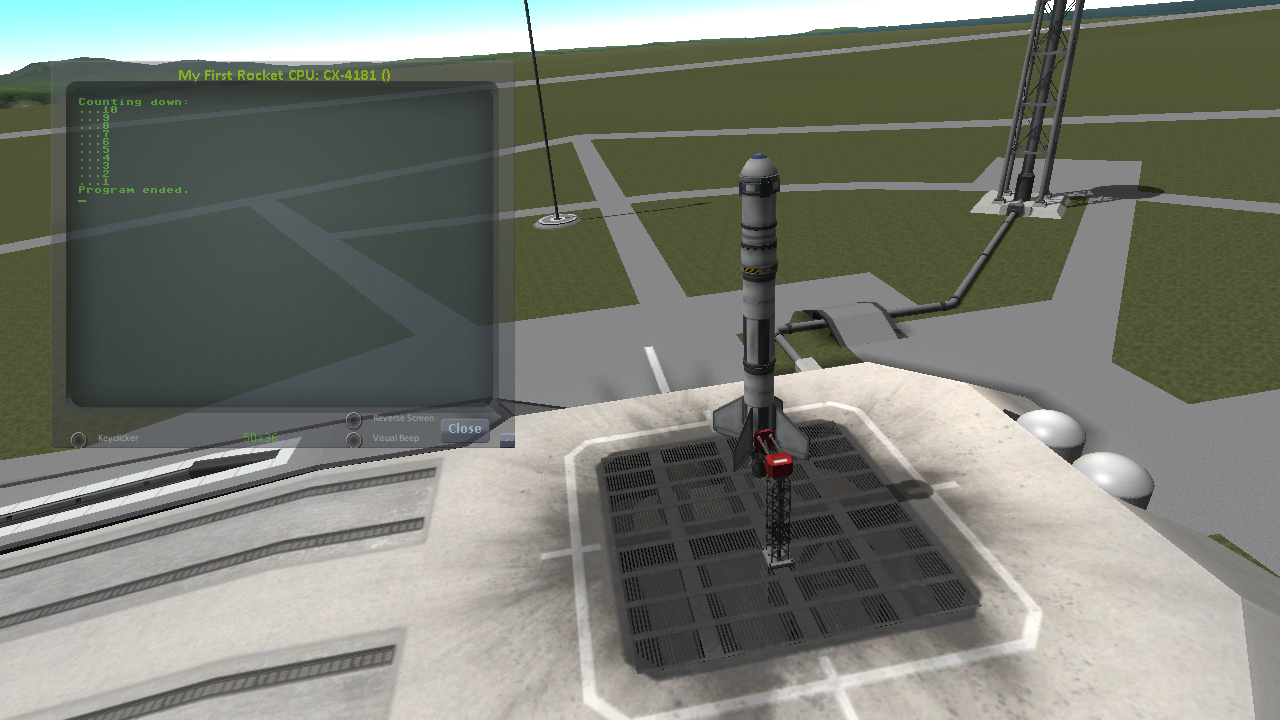
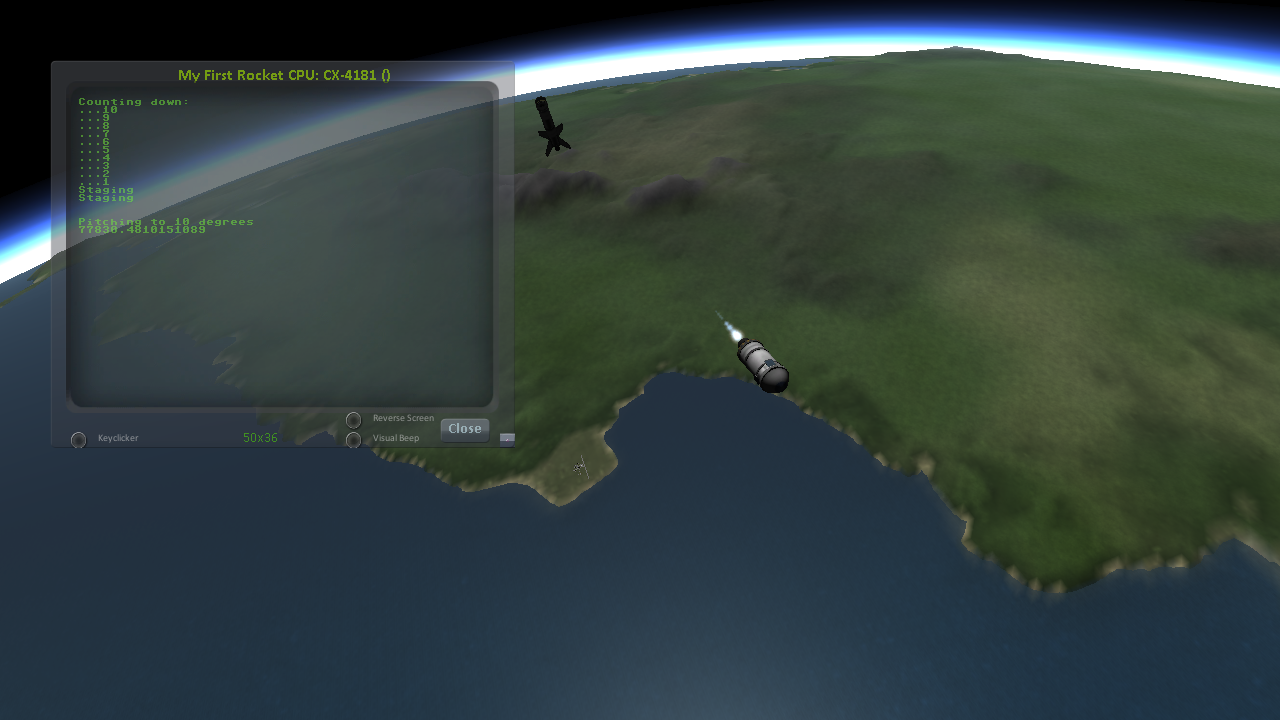
You should now see an old-school looking text terminal like the one shown below. Type the line:
CLEARSCREEN. PRINT "==HELLO WORLD==".
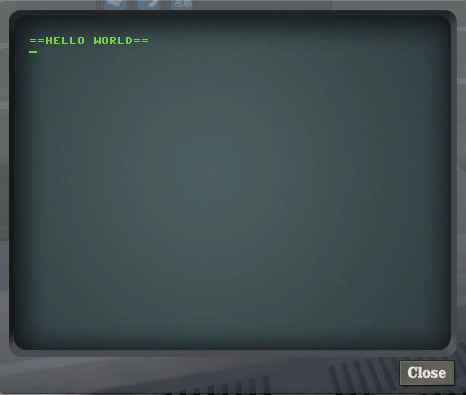
into the terminal (make sure to actually type the periods (“.”) as shown) and hit ENTER. Note that you can type it in uppercase or lowercase. kOS doesn’t care.
The terminal will respond by showing you this:
Step 6: Okay that’s great, but how can you make that happen in a program script instead?
Like so: Enter this command:
(Don’t forget the period (“.”). All commands in kOS are ended with a period. Again, you can type it in uppercase or lowercase. kOS doesn’t care.)
You should see an editor window appear, looking something like this (without the text inside because you’re starting a blank new file):
Type this text into the window:
PRINT "=========================================".
PRINT "      HELLO WORLD".
PRINT "THIS IS THE FIRST SCRIPT I WROTE IN kOS.".
PRINT "=========================================".
Click “Save” then “Exit” in the editor pop-up window.
-
Side Note: The editor font — Experienced programmers may have noticed that the editor’s font is proportional width rather than monospaced and that this is not ideal for programming work. You are right, but there is little that can be done about it for a variety of technical reasons that are too complex to go into right now.
Then on the main text terminal Enter:
And you will see the program run, showing the text on the screen like so.

Note
You can also type RUNPATH("hello") instead of RUN HELLO. The
commands are slightly different but should have the same effect. You can
learn about the specific difference between them later here.
Step 7: Okay, but where is this program?
To see where the “HELLO” program has been saved, Issue the command LIST FILES like this:
(Note, that the default for the LIST command is to list FILES, so you can leave the word “FILES” off if you like.)
It should look like this, showing you the HELLO program you just wrote:
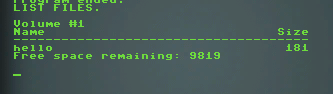
This is a list of all the files on the currently selected VOLUME. By default, when you launch a new vessel, the currently selected VOLUME is called “1” and it’s the volume that’s stored on THAT SCS part that you are running all these commands in.
This is the local volume of that SCS part. Local volumes such at this tend to have very small limited storage, as you can see when you look at the space remaining in the list printout.
If you’re wondering where the file is stored physically on your computer, it’s represented by a section inside the persistence file for your saved game, as a piece of data associated with the SCS part. This is important because it means you can’t access the program from another vessel, and if this vessel ever crashes and the SCS part explodes, then you’ve lost the program.
Step 8: I don’t like the idea that the program is stored only on this vessel. Can’t I save it somewhere better? More permanent?
Yes. Yes you can.
There is another VOLUME that always exists called the Archive, which is also referred to as volume 0. (either name can be used in commands). The archive is conceptually stored somewhere back at Kerbin home base in the Space Center rather than on your vessel. It has infinite storage space, and does not disappear when your vessel is gone. ALSO, it actually exists across saved games — if you launch one saved game, put a new file in the Archive, and then later launch a different saved game, that file will be there in that game too.
To use the Archive, first we’ll have to introduce you to a new command, called SWITCH TO. The SWITCH TO command changes which VOLUME is the one that you are doing your work with.
To work with the archive, and create a second “hello world” file there, you issue these commands and see what they do:
SWITCH TO 0.
EDIT HELLO2. // Make a new file here that just says: PRINT "hi again".
LIST FILES.
RUN HELLO2.
SWITCH TO 1.
LIST FILES.
RUN HELLO.
But where is it stored behind the scenes? The archive is currently slightly violating the design of KSP mods that puts everything in the GameData folder. The kSP Archive is actually stored in the Ships/Script folder of your MAIN KSP home, not inside GameData.
If a file is stored inside the archive, it can actually be edited by an external text editor of your choice instead of using kOS’s in-game editor. This is usually a much better practice once you start doing more complex things with kOS. You can also make new files in the archive folder. Just make sure that all the files end with a .ks file name suffix or kOS won’t use them.
Further reading about files and volumes:
-
Volumes
-
File Control
-
VolumeFile structure
Step 9: But can I make it boot automatically when I launch the vessel?
Yes. It is possible to create a boot file and have kOS automatically
copy it to the vessel, then run it, when the vessel is first put on
the launchpad. You don’t have to do so right now to follow this
tutorial, but be aware that this feature exists and it’s one you will
probably want to make use of eventually. It’s described in
more detail here.
Second Example: Doing something real
Okay that’s all basic setup stuff but you’re probably clamoring for a real example that actually does something nifty.
This example will show the crudest, most basic use of kOS just to get started. In this example we’ll make a program that will launch a vessel using progressively more and more complex checks. kOS can be used at any stage of a vessel’s flight — launching, circularizing, docking, landing,… and in fact launching is one of the simpler piloting tasks that you can do without much need of automation. Where kOS really shines is for writing scripts to do touchy sensitive tasks like landing or docking or hovering. These are the areas that can benefit from the faster reaction speed that a computer script can handle.
But in order to give you an example that you can start with from scratch, that’s easy to reload and retry from an initial point, we’ll use an example of launching.
Step 1: Make a vessel
This tutorial is designed to work with a very specific rocket design.
You need to make the vessel you see here:
If you prefer, you can instead download the
.craft file here
Step 2: Make the start of the script
Okay, so type the lines below in an external text editor of your choice (i.e. Notepad on Windows, or TextEdit on Mac, or whatever you fancy):
//hellolaunch

//First, we'll clear the terminal screen to make it look nice
CLEARSCREEN.

//This is our countdown loop, which cycles from 10 to 0
PRINT "Counting down:".
FROM {local countdown is 10.} UNTIL countdown = 0 STEP {SET countdown to countdown - 1.} DO {
    PRINT "..." + countdown.
    WAIT 1. // pauses the script here for 1 second.
}
See those things with the two slashes (“//”)? Those are comments in the Kerboscript language and they’re just ways to write things in the program that don’t do anything — they’re there for humans like you to read so you understand what’s going on. In these examples you never actually have to type in the things you see after the slashes. They’re there for your benefit when reading this document but you can leave them out if you wish.
Save the file in your Ships/Script folder of your KSP installation under the filename “hellolaunch.ks”. DO NOT save it anywhere under GameData/kOS/. Do NOT. According to the KSP standard, normally KSP mods should put their files in GameData/[mod name], but kOS puts the archive outside the GameData folder because it represents content owned by you, the player, not content owned by the kOS mod.
By saving the file in Ships/Script, you have actually put it in your archive volume of kOS. kOS will see it there immediately without delay. You do not need to restart the game. If you do:
after saving the file from your external text editor program, you will see a listing of your file “hellolaunch” right away. Okay, now copy it to your local drive and give it a try running it from there:
SWITCH TO 1.
COPYPATH("0:/HELLOLAUNCH", ""). // copies from 0 (archive) to current default location (local drive (1)).
RUN HELLOLAUNCH.
Okay so the program doesn’t actually DO anything yet other than just countdown from 10 to 0. A bit of a disappointment, but we haven’t written the rest of the program yet.
You’ll note that what you’ve done is switch to the local volume (1) and then copy the program from the archive (0) to the local volume (1) and then run it from the local volume. Technically you didn’t need to do this. You could have just run it directly from the archive. For those looking at the KSP game as a bit of a role-play experience, it makes sense to never run programs directly from the archive, and instead live with the limitation that software should be copied to the craft for it to be able to run it.
Step 3: Make the script actually do something
Okay now go back into your text editor of choice and append a few more lines to the hellolaunch.ks file so it now looks like this:
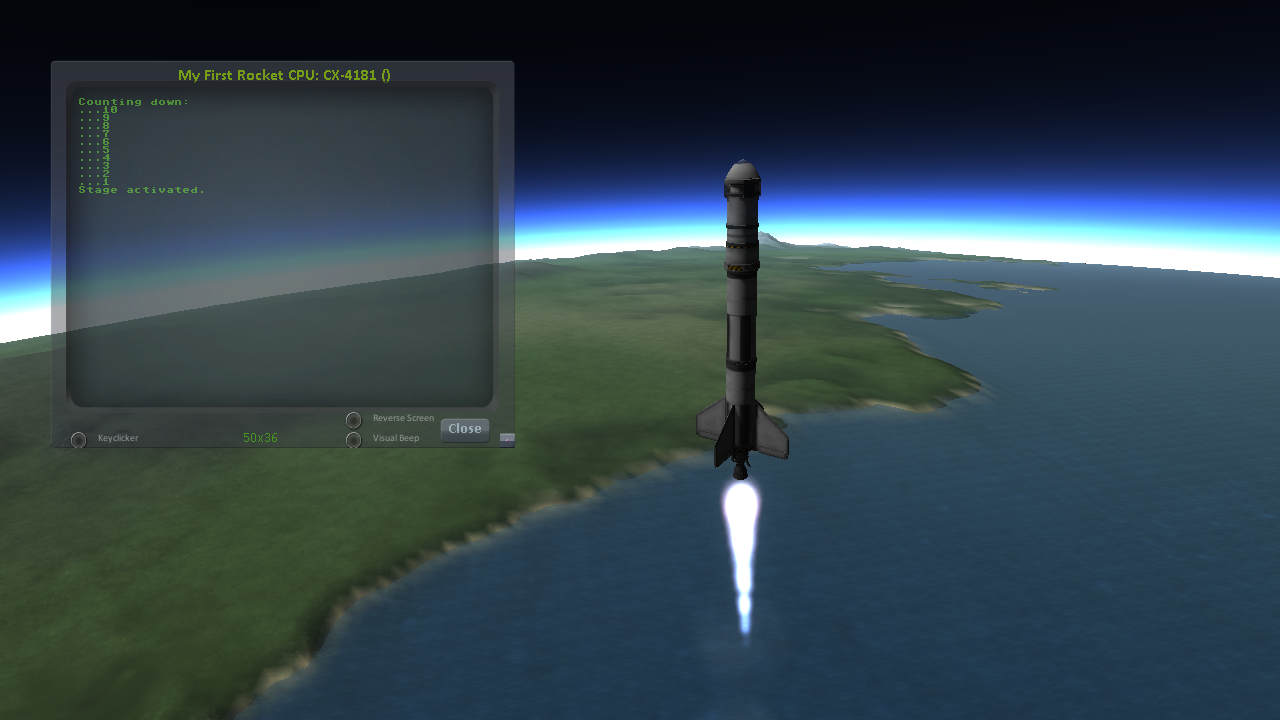
//hellolaunch

//First, we'll clear the terminal screen to make it look nice
CLEARSCREEN.

//Next, we'll lock our throttle to 100%.
LOCK THROTTLE TO 1.0.   // 1.0 is the max, 0.0 is idle.

//This is our countdown loop, which cycles from 10 to 0
PRINT "Counting down:".
FROM {local countdown is 10.} UNTIL countdown = 0 STEP {SET countdown to countdown - 1.} DO {
    PRINT "..." + countdown.
    WAIT 1. // pauses the script here for 1 second.
}

UNTIL SHIP:MAXTHRUST > 0 {
    WAIT 0.5. // pause half a second between stage attempts.
    PRINT "Stage activated.".
    STAGE. // same as hitting the spacebar.
}

WAIT UNTIL SHIP:ALTITUDE > 70000.

// NOTE that it is vital to not just let the script end right away
// here.  Once a kOS script just ends, it releases all the controls
// back to manual piloting so that you can fly the ship by hand again.
// If the program just ended here, then that would cause the throttle
// to turn back off again right away and nothing would happen.
Save this file to hellolaunch.ks again, and re-copy it to your vessel that should still be sitting on the launchpad, then run it, like so:
COPYPATH("0:/HELLOLAUNCH", "").
RUN HELLOLAUNCH. // You could also say RUNPATH("hellolaunch") here.
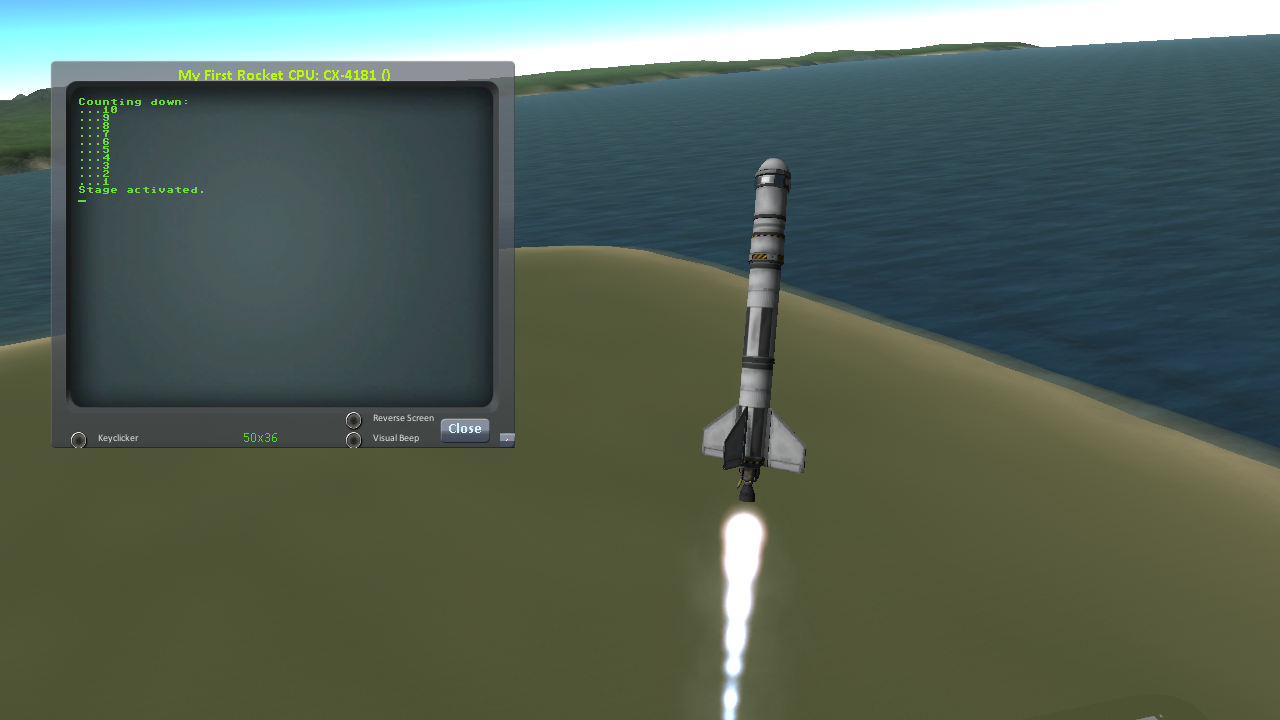
Hey! It does something now! It fires the first stage engine and launches!
But.. but wait… It doesn’t control the steering and it just lets it go where ever it will.
Most likely you had a crash with this script because it didn’t do anything to affect the steering at all, so it probably allowed the rocket to tilt over.
Step 4: Make the script actually control steering
So to fix that problem, let’s add steering control to the script.
The easy way to control steering is to use the LOCK STEERING command.
Once you have mastered the basics of kOS, you should go and read the documentation on ship steering techniques, but that’s a more advanced topic for later.
The way to use the LOCK STEERING command is to set it to a thing called a Vector or a Direction. There are several Directions built-in to kOS, one of which is called “UP”. “UP” is a Direction that always aims directly toward the sky (the center of the blue part of the navball).
So to steer always UP, just do this:
So if you just add this one line to your script, you’ll get something that should keep the craft aimed straight up and not let it tip over. Add the line just after the line that sets the THROTTLE, like so:
//hellolaunch

//First, we'll clear the terminal screen to make it look nice
CLEARSCREEN.

//Next, we'll lock our throttle to 100%.
LOCK THROTTLE TO 1.0.   // 1.0 is the max, 0.0 is idle.

//This is our countdown loop, which cycles from 10 to 0
PRINT "Counting down:".
FROM {local countdown is 10.} UNTIL countdown = 0 STEP {SET countdown to countdown - 1.} DO {
    PRINT "..." + countdown.
    WAIT 1. // pauses the script here for 1 second.
}

//This is the line we added
LOCK STEERING TO UP.

UNTIL SHIP:MAXTHRUST > 0 {
    WAIT 0.5. // pause half a second between stage attempts.
    PRINT "Stage activated.".
    STAGE. // same as hitting the spacebar.
}

WAIT UNTIL SHIP:ALTITUDE > 70000.

// NOTE that it is vital to not just let the script end right away
// here.  Once a kOS script just ends, it releases all the controls
// back to manual piloting so that you can fly the ship by hand again.
// If the program just ended here, then that would cause the throttle
// to turn back off again right away and nothing would happen.
Again, copy this and run it, like before. If your craft crashed in the previous step, which it probably did, then revert to the VAB and re-launch it.:
SWITCH TO 1. // should be the default already, but just in case.
COPYPATH("0:/HELLOLAUNCH", "").
RUN HELLOLAUNCH. // You could also say RUNPATH("hellolaunch") here.
Now you should see the same thing as before, but now your craft will stay pointed up.
But wait — it only does the first stage and then it stops without
doing the next stage? how do I fix that?
Step 5: Add staging logic
The logic for how and when to stage can be an interesting and fun thing to write yourself. This example will keep it very simple, and this is the part where it’s important that you are using a vessel that only contains liquidfuel engines. If your vessel has some booster engines, then it would require a more sophisticated script to launch it correctly than this tutorial gives you.
To add the logic to check when to stage, we introduce a new concept called the WHEN trigger. To see full documentation on it when you finish the tutorial, look for it on the Flow Control page
The quick and dirty explanation is that a WHEN section is a short section of code that you set up to run LATER rather than right now. It creates a check in the background that will constantly look for some condition to occur, and when it happens, it interrupts whatever else the code is doing, and it will run the body of the WHEN code before continuing from where it left off in the main script.
There are some complex dangers with writing WHEN triggers that can cause KSP itself to hang or stutter if you are not careful, but explaining them is beyond the scope of this tutorial. But when you want to start using WHEN triggers yourself, you really should read the section on WHEN in the Flow Control page before you do so.
The WHEN trigger we are going to add to the launch script looks like this:
WHEN MAXTHRUST = 0 THEN {
    PRINT "Staging".
    STAGE.
    PRESERVE.
}.
It says, “Whenever the maximum thrust of our vehicle is zero, then activate the next stage.” The PRESERVE keyword says, “don’t stop checking this condition just because it’s been triggered once. It should still keep checking for it again in the future.”
If this block of code is inserted into the script, then it will set up a constant background check that will always hit the next stage as soon as the current stage has no thrust.
UNLIKE with all the previous edits this tutorial has asked you to make to the script, this time you’re going to be asked to delete something and replace it. The new WHEN section above should actually REPLACE the existing “UNTIL SHIP:MAXTHRUST > 0” loop that you had before.
Now your script should look like this:
//hellolaunch

//First, we'll clear the terminal screen to make it look nice
CLEARSCREEN.

//Next, we'll lock our throttle to 100%.
LOCK THROTTLE TO 1.0.   // 1.0 is the max, 0.0 is idle.

//This is our countdown loop, which cycles from 10 to 0
PRINT "Counting down:".
FROM {local countdown is 10.} UNTIL countdown = 0 STEP {SET countdown to countdown - 1.} DO {
    PRINT "..." + countdown.
    WAIT 1. // pauses the script here for 1 second.
}

//This is a trigger that constantly checks to see if our thrust is zero.
//If it is, it will attempt to stage and then return to where the script
//left off. The PRESERVE keyword keeps the trigger active even after it
//has been triggered.
WHEN MAXTHRUST = 0 THEN {
    PRINT "Staging".
    STAGE.
    PRESERVE.
}.

LOCK STEERING TO UP.

WAIT UNTIL ALTITUDE > 70000.

// NOTE that it is vital to not just let the script end right away
// here.  Once a kOS script just ends, it releases all the controls
// back to manual piloting so that you can fly the ship by hand again.
// If the program just ended here, then that would cause the throttle
// to turn back off again right away and nothing would happen.
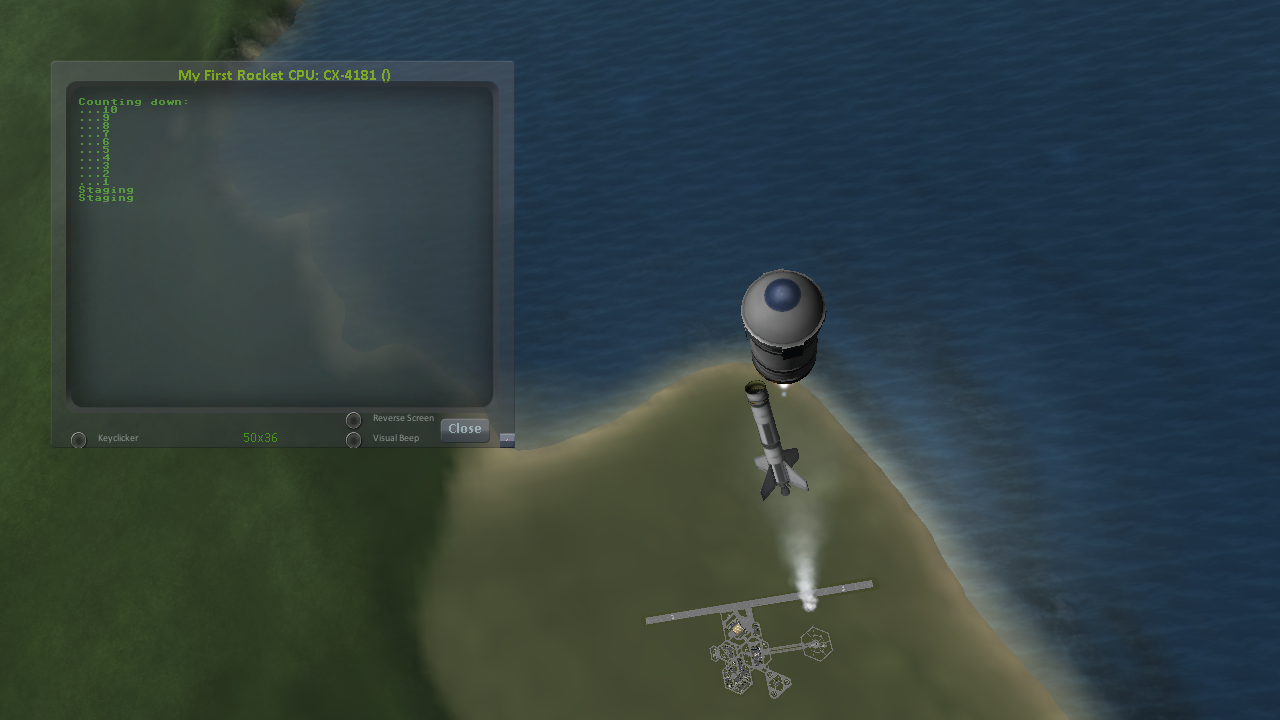
Again, relaunch the ship, copy the script as before, and run it again. This time you should see it activate your later upper stages correctly.
Step 6: Now to make it turn
Okay that’s fine but it still just goes straight up! What about a
gravity turn?
Well, a true and proper gravity turn is a very complex bit of math that is best left as an exercise for the reader, given that the goal of kOS is to let you write your OWN autopilot, not to write it for you. But to give some basic examples of commands, lets just make a crude gravity turn approximation that simply flies the ship like a lot of new KSP pilots learn to do it for the first time:
-
Fly straight up until your velocity is 100m/s.
-
Pitch ten degrees towards the East.
-
Continue to pitch 10 degrees down for each 100m/s of velocity.
To make this work, we introduce a new way to make a Direction, called the HEADING function. Whenever you call the function HEADING(a,b), it makes a Direction oriented as follows on the navball:
-
Point at the compass heading A.
-
Pitch up a number of degrees from the horizon = to B.
So for example, HEADING(45,10) would aim northeast, 10 degrees above the horizon. We can use this to easily set our orientation. For example:
//This locks our steering to due east, pitched 45 degrees above the horizon.
LOCK STEERING TO HEADING(90,45).
Instead of using WAIT UNTIL to pause the script and keep it from exiting, we can use an UNTIL loop to constantly perform actions until a certain condition is met. For example:
SET MYSTEER TO HEADING(90,90). //90 degrees east and pitched up 90 degrees (straight up)
LOCK STEERING TO MYSTEER. // from now on we'll be able to change steering by just assigning a new value to MYSTEER
UNTIL APOAPSIS > 100000 {
    SET MYSTEER TO HEADING(90,90). //90 degrees east and pitched up 90 degrees (straight up)
    PRINT ROUND(SHIP:APOAPSIS,0) AT (0,16). // prints new number, rounded to the nearest integer.
    //We use the PRINT AT() command here to keep from printing the same thing over and
    //over on a new line every time the loop iterates. Instead, this will always print
    //the apoapsis at the same point on the screen.
}.
This loop will continue to execute all of its instructions until the apoapsis reaches 100km. Once the apoapsis is past 100km, the loop exits and the rest of the code continues.
We can combine this with IF statements in order to have one main loop that only executes certain chunks of its code under certain conditions. For example:
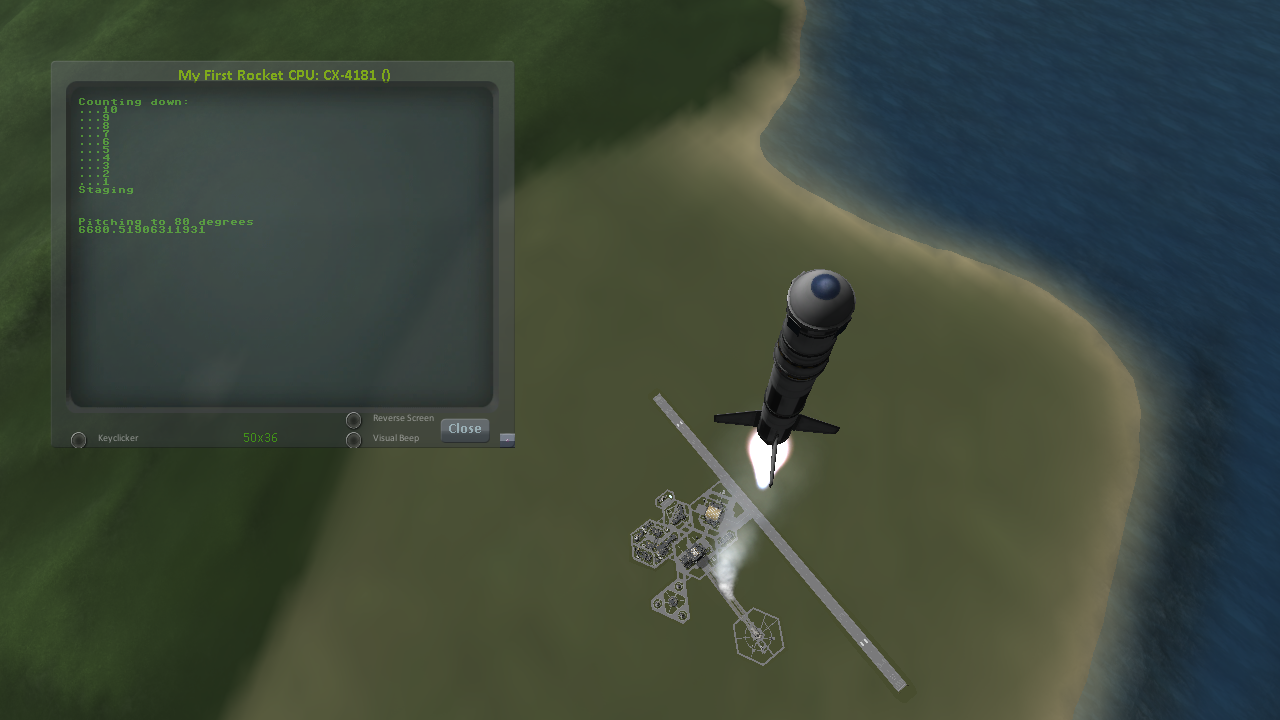
SET MYSTEER TO HEADING(90,90).
LOCK STEERING TO MYSTEER.
UNTIL SHIP:APOAPSIS > 100000 { //Remember, all altitudes will be in meters, not kilometers

    //For the initial ascent, we want our steering to be straight
    //up and rolled due east
    IF SHIP:VELOCITY:SURFACE:MAG < 100 {
        //This sets our steering 90 degrees up and yawed to the compass
        //heading of 90 degrees (east)
        SET MYSTEER TO HEADING(90,90).

    //Once we pass 100m/s, we want to pitch down ten degrees
    } ELSE IF SHIP:VELOCITY:SURFACE:MAG >= 100 AND SHIP:VELOCITY:SURFACE:MAG < 200 {
        SET MYSTEER TO HEADING(90,80).
        PRINT "Pitching to 80 degrees" AT(0,15).
        PRINT ROUND(SHIP:APOAPSIS,0) AT (0,16).
    }.
}.
Each time this loop iterates, it will check the surface velocity. If the velocity is below 100m/s, it will continuously execute the first block of instructions.
Once the velocity reaches 100m/s, it will stop executing the first block and start executing the second block, which will pitch the nose down to 80 degrees above the horizon.
Putting this into your script, it should look like this:
//hellolaunch

//First, we'll clear the terminal screen to make it look nice
CLEARSCREEN.

//Next, we'll lock our throttle to 100%.
LOCK THROTTLE TO 1.0.   // 1.0 is the max, 0.0 is idle.

//This is our countdown loop, which cycles from 10 to 0
PRINT "Counting down:".
FROM {local countdown is 10.} UNTIL countdown = 0 STEP {SET countdown to countdown - 1.} DO {
    PRINT "..." + countdown.
    WAIT 1. // pauses the script here for 1 second.
}

//This is a trigger that constantly checks to see if our thrust is zero.
//If it is, it will attempt to stage and then return to where the script
//left off. The PRESERVE keyword keeps the trigger active even after it
//has been triggered.
WHEN MAXTHRUST = 0 THEN {
    PRINT "Staging".
    STAGE.
    PRESERVE.
}.

//This will be our main control loop for the ascent. It will
//cycle through continuously until our apoapsis is greater
//than 100km. Each cycle, it will check each of the IF
//statements inside and perform them if their conditions
//are met
SET MYSTEER TO HEADING(90,90).
LOCK STEERING TO MYSTEER. // from now on we'll be able to change steering by just assigning a new value to MYSTEER
UNTIL SHIP:APOAPSIS > 100000 { //Remember, all altitudes will be in meters, not kilometers

    //For the initial ascent, we want our steering to be straight
    //up and rolled due east
    IF SHIP:VELOCITY:SURFACE:MAG < 100 {
        //This sets our steering 90 degrees up and yawed to the compass
        //heading of 90 degrees (east)
        SET MYSTEER TO HEADING(90,90).

    //Once we pass 100m/s, we want to pitch down ten degrees
    } ELSE IF SHIP:VELOCITY:SURFACE:MAG >= 100 {
        SET MYSTEER TO HEADING(90,80).
        PRINT "Pitching to 80 degrees" AT(0,15).
        PRINT ROUND(SHIP:APOAPSIS,0) AT (0,16).
    }.
}.
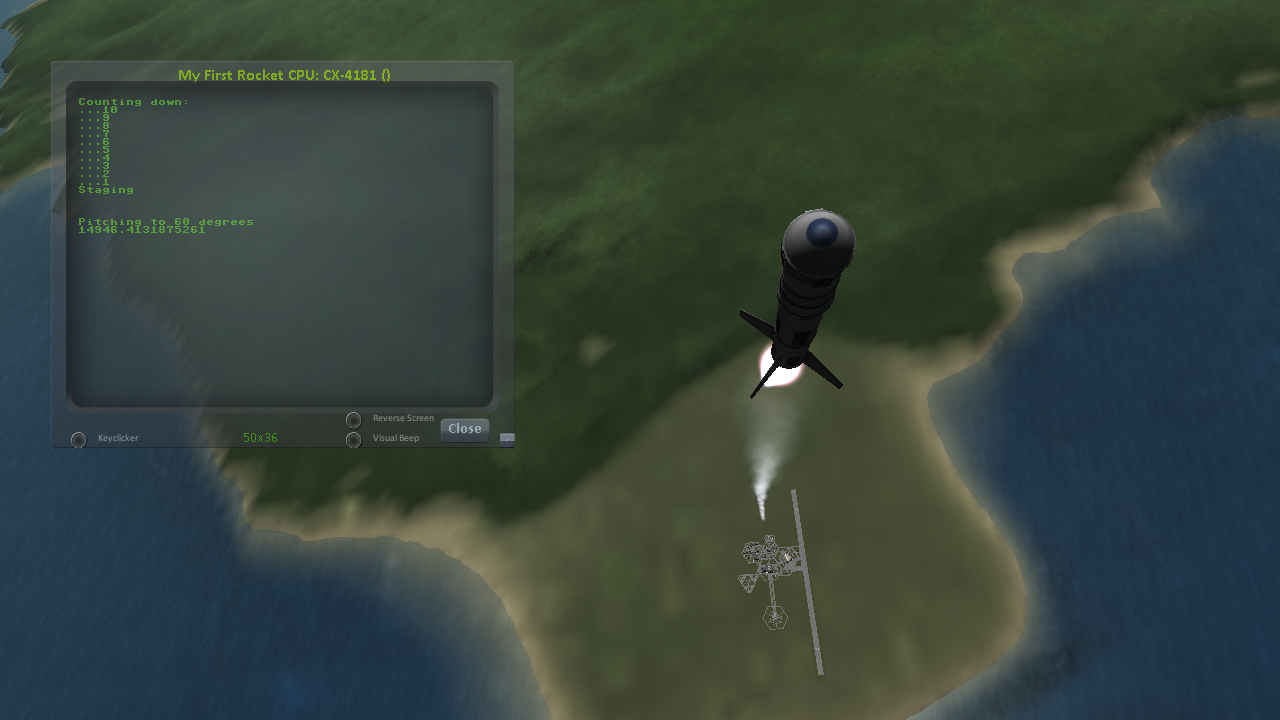
Again, copy this into your script and run it. You should see your countdown occur, then it will launch. Once the ship passes 100m/s surface velocity, it will
pitch down to 80 degrees and continuously print the apoapsis until the apoapsis reaches 100km, staging if necessary. The script will then end.
Step 7: Putting it all together
We now have every element of the script necessary to do a proper (albeit simple) gravity turn. We just need to extend it all the way through the ascent.
Adding additional IF statements inside our main loop will allow us to perform further actions based on our velocity. Each IF statement you see in the script below
covers a 100m/s block of velocity, and will adjust the pitch 10 degrees farther down than the previous block.
You can see that with the AND statement, we can check multiple conditions and only execute that block when all of those conditions are true. We can carefully set up
the conditions for each IF statement to allow a block of code to be executed no matter what our surface velocity is.
Copy this into your script and run it. It should take you nearly to orbit:
//hellolaunch

//First, we'll clear the terminal screen to make it look nice
CLEARSCREEN.

//Next, we'll lock our throttle to 100%.
LOCK THROTTLE TO 1.0.   // 1.0 is the max, 0.0 is idle.

//This is our countdown loop, which cycles from 10 to 0
PRINT "Counting down:".
FROM {local countdown is 10.} UNTIL countdown = 0 STEP {SET countdown to countdown - 1.} DO {
    PRINT "..." + countdown.
    WAIT 1. // pauses the script here for 1 second.
}

//This is a trigger that constantly checks to see if our thrust is zero.
//If it is, it will attempt to stage and then return to where the script
//left off. The PRESERVE keyword keeps the trigger active even after it
//has been triggered.
WHEN MAXTHRUST = 0 THEN {
    PRINT "Staging".
    STAGE.
    PRESERVE.
}.

//This will be our main control loop for the ascent. It will
//cycle through continuously until our apoapsis is greater
//than 100km. Each cycle, it will check each of the IF
//statements inside and perform them if their conditions
//are met
SET MYSTEER TO HEADING(90,90).
LOCK STEERING TO MYSTEER. // from now on we'll be able to change steering by just assigning a new value to MYSTEER
UNTIL SHIP:APOAPSIS > 100000 { //Remember, all altitudes will be in meters, not kilometers

    //For the initial ascent, we want our steering to be straight
    //up and rolled due east
    IF SHIP:VELOCITY:SURFACE:MAG < 100 {
        //This sets our steering 90 degrees up and yawed to the compass
        //heading of 90 degrees (east)
        SET MYSTEER TO HEADING(90,90).

    //Once we pass 100m/s, we want to pitch down ten degrees
    } ELSE IF SHIP:VELOCITY:SURFACE:MAG >= 100 AND SHIP:VELOCITY:SURFACE:MAG < 200 {
        SET MYSTEER TO HEADING(90,80).
        PRINT "Pitching to 80 degrees" AT(0,15).
        PRINT ROUND(SHIP:APOAPSIS,0) AT (0,16).

    //Each successive IF statement checks to see if our velocity
    //is within a 100m/s block and adjusts our heading down another
    //ten degrees if so
    } ELSE IF SHIP:VELOCITY:SURFACE:MAG >= 200 AND SHIP:VELOCITY:SURFACE:MAG < 300 {
        SET MYSTEER TO HEADING(90,70).
        PRINT "Pitching to 70 degrees" AT(0,15).
        PRINT ROUND(SHIP:APOAPSIS,0) AT (0,16).

    } ELSE IF SHIP:VELOCITY:SURFACE:MAG >= 300 AND SHIP:VELOCITY:SURFACE:MAG < 400 {
        SET MYSTEER TO HEADING(90,60).
        PRINT "Pitching to 60 degrees" AT(0,15).
        PRINT ROUND(SHIP:APOAPSIS,0) AT (0,16).

    } ELSE IF SHIP:VELOCITY:SURFACE:MAG >= 400 AND SHIP:VELOCITY:SURFACE:MAG < 500 {
        SET MYSTEER TO HEADING(90,50).
        PRINT "Pitching to 50 degrees" AT(0,15).
        PRINT ROUND(SHIP:APOAPSIS,0) AT (0,16).

    } ELSE IF SHIP:VELOCITY:SURFACE:MAG >= 500 AND SHIP:VELOCITY:SURFACE:MAG < 600 {
        SET MYSTEER TO HEADING(90,40).
        PRINT "Pitching to 40 degrees" AT(0,15).
        PRINT ROUND(SHIP:APOAPSIS,0) AT (0,16).

    } ELSE IF SHIP:VELOCITY:SURFACE:MAG >= 600 AND SHIP:VELOCITY:SURFACE:MAG < 700 {
        SET MYSTEER TO HEADING(90,30).
        PRINT "Pitching to 30 degrees" AT(0,15).
        PRINT ROUND(SHIP:APOAPSIS,0) AT (0,16).

    } ELSE IF SHIP:VELOCITY:SURFACE:MAG >= 700 AND SHIP:VELOCITY:SURFACE:MAG < 800 {
        SET MYSTEER TO HEADING(90,11).
        PRINT "Pitching to 20 degrees" AT(0,15).
        PRINT ROUND(SHIP:APOAPSIS,0) AT (0,16).

    //Beyond 800m/s, we can keep facing towards 10 degrees above the horizon and wait
    //for the main loop to recognize that our apoapsis is above 100km
    } ELSE IF SHIP:VELOCITY:SURFACE:MAG >= 800 {
        SET MYSTEER TO HEADING(90,10).
        PRINT "Pitching to 10 degrees" AT(0,15).
        PRINT ROUND(SHIP:APOAPSIS,0) AT (0,16).

    }.

}.

PRINT "100km apoapsis reached, cutting throttle".

//At this point, our apoapsis is above 100km and our main loop has ended. Next
//we'll make sure our throttle is zero and that we're pointed prograde
LOCK THROTTLE TO 0.

//This sets the user's throttle setting to zero to prevent the throttle
//from returning to the position it was at before the script was run.
SET SHIP:CONTROL:PILOTMAINTHROTTLE TO 0.
And here is it in action:
And toward the end:
This script should, in principle, work to get you to the point of leaving the atmosphere. It will probably still fall back down, because this script makes no attempt to ensure that the craft is going fast enough to maintain the orbit.
As you can probably see, it would still have a long way to go before it would become a really GOOD launching autopilot. Think about the following features you could add yourself as you become more familiar with kOS:
-
You could change the steering logic to make a more smooth gravity turn by constantly adjusting the pitch in the HEADING according to some math formula. The example shown here tends to create a “too high” launch that’s a bit inefficient. In addition, this method relies on velocity to determine pitch angle, which could result in some very firey launches for other ships with a higher TWR profile.
-
This script just stupidly leaves the throttle at max the whole way. You could make it more sophisticated by adjusting the throttle as necessary to avoid velocities that result in high atmospheric heating.
-
This script does not attempt to circularize. With some simple checks of the time to apoapsis and the orbital velocity, you can execute a burn that circularizes your orbit.
-
With even more sophisticated checks, the script could be made to work with fancy staging methods like asparagus.
-
Using the PRINT AT command, you can make fancier status readouts in the terminal window as the script runs.
Всем доброго времени суток.
Данный гайд — практически полностью переведенная официальная английская инструкция по kOS. Теперь вы можете ознакомится с ней в полном русском варианте с моими комментариями
для самых маленьких
.
Руководство полностью переведено, разъяснено и дополнено мною (Finn163), и по сути является дословным переводом английского руководства с некоторыми комментариями. Надеюсь всем вам оно окажется полезным.
Всем приятного изучения замечательного языка kOS.
Правка от 20.06.14
За последний год язык неплохо оброс, в ближайшее время адаптирую инструкцию к новой версии
Русскоязычная инструкция по моду kOS.
Описание мода kOS
kOS — мод на скриптовый автопилот для Kerbal Space Program. Он позволит вам писать небольшие программы для автоматизации некоторых задач.
Установка.
Как и останльные моды, распаковать zip архив в папку с игрой.
Как использовать?
Добавьте модуль kOS в ангаре на свой корабль, он находится во вкладке «Контроль». После перехода на стартовый столвзлетную полосу,
кликаем на модуль правой кнопкой мыши и выбираем функцию «Open Terminal». Это предоставит нам доступ к интерфейсу мода kOS, в нем вы как в командной строке, можете начать с ним работу.
Кербоскрипт.
Кербоскрипт — это язык програмирования планеты кербин, звучащий как Английский. Синтаксис языка «показательный»(имеется ввиду, что всё названо своими именами).
Язык достаточно прост, даже для начинающих програмистов, поэтому язык НЕ зависит от регистра и автоматически коректирует некоторые команды.
Типичные команды Кербоскрипта выглядят примерно так:
PRINT «Hello World”. \ Напечатай «Привет мир»
Выражения.
Кербоскрипт использует систему оценки выражений, которая позволяет выполнять математические операции над переменными.
Некоторые переменные определены Вами. Другие определяется системой.
Базовых типов всего три:
1.
Числа
.
Вы можете использовать математические операции с числами, например вот так:
SET X TO 4 + 2.5. // сделай Х равным 4+2,5; Заметьте Несмотря на то, что все команды кончаются точками, нецелые числа так же используют точку как разделитель.
PRINT X. // Напечатай Х. Напечатается «6.5»
Система соответствует порядку операций, но в настоящее время реализация несовершенна. Например, умножение всегда будет выполняться до разделения, независимо от «физического» положения операторов. Это будет исправлено в будущих версиях.
2.
Строчные данные
(Strings). // по сути слова
Строчные данные — это текст, который к примеру надо написать на мониторе. Например:
PRINT «Hello World!”. // Напиши «Привет мир!».
Для объединения строк, вы можете использовать оператор «+». Это так же работает со смесями чисел и строк.
3.
Directions
(Направления)
Направление(Direction) существуют прежде всего для включения автоматического рулевого управления. Вы можете инициализировать направление с помощью вектора или вращения.
SET Direction TO V(0,1,0). // Установить направление — вектор
SET Direction TO R(0,90,0). // Установить направление поворотом в градусах
Также, вы можете использовать математические операции направлений. Следующий пример использует вращение «UP» (системная переменная, описывающая вектор непосредственно от небесного тела во влиянии которого вы находитесь).
SET Direction TO UP + R(0,-45,0). // Установить направление на 45 градусов западней от «UP» (верха).
Справочник по командам
— Математические функции.
— Полет.
— Файлы ввода/вывода (имеется ввиду работа с файлами в которых вы пишите программу из самой игры)
— Управление потоком (имеется ввиду поток информации поступающей в консоль от программы во время её работы)
— Команды вывода и т.п.
Справочник по структурам.
Структуры это элементы, которые могут содержать больше одной единицы информации. Структуры можно использовать с командой SET.. TO как и с обычными переменными.
К их под элементам можно получить доступ через имя вложенного элемента
.
— Atmosphere // атмосфера
— Body // Тело
— Direction // Направление
— Engine //Двигатель
— GeoCordinates // Геокоординаты
— List // Список
— Node // Узел
— Orbit // Орбита
— Time // Время
— Vector // Вектор
— Vessel // Корабль
Летная статистика.
Вы можете получить полезную статистику во время полета вашего корабля.
ALTITUDE // Абсолютная высота (над грунтом)
ALT:RADAR // Радарная высота (Та же что на счетчике сверху)
BODY // Текущее тело у которого ты под влиянием.
MISSIONTIME // Текущее время миссии.
VELOCITY // Текущая ОРБИТАЛЬНАЯ скорость
VERTICALSPEED // Вертикальная скорость
SURFACESPEED // Горизонтальная скорость
STATUS // Статус (посажен, разбился, летишь на орбите и т.п.): LANDED, SPLASHED, PRELAUNCH, FLYING, SUB_ORBITAL, ORBITING, ESCAPING, or DOCKED
INLIGHT // Возвращает единицу если никакие небесные тела не блокирует свет Кербола.(выдает 1 если ты не в тени).
INCOMMRANGE // Не понял точно, но скорее всего возвращает расстояние необходимое для вхождения в зону влияния
COMMRANGE // Непонятно
MASS // Масса
MAXTHRUST // Максимальная тяга всех активных двигателей
VESSELNAME // Название аппарата
Вектора
Это возвращает векторные значения. Может быть использовано с командой LOCK для осуществления управления аппаратом.
PROGRADE
RETROGRADE
UP // Направление от текущего небесного тела (как я понимаю есть и Down и Forward и т.д.)
Геометрические значения орбиты.
Возвращает необходимые значения
APOAPSIS // Высота апогея
ALT:APOAPSIS // Так же высота апогея
PERIAPSIS // Высота перегея
ALT:PERIAPSIS // Так же высота перегея
ETA:APOAPSIS // Время до апогея
ETA:PERIAPSIS // Время до перегея.
Маневровые узлы
NODE // Направление следующего маневрового узла(нода), может быть использовано для команды LOCK STEERING (Закрепление ориентации)
ETA:NODE // Время до следующего нода.
ENCOUNTER // Возвращает небесное тело которое встретишь.
NEXTNODE // Следующий нод.
Ресурсы
Типы ресурсов
LIQUIDFUEL
OXIDIZER
ELECTRICCHARGE
MONOPROPELLANT
INTAKEAIR
SOLIDFUEL //В принципе можно задать цикл, который пишет в консоль каждую секунду и указать например любой из этих ресурсов.
Конкретные значения ступеней
STAGE:LIQUIDFUEL // Жидкое топливо в данной ступени.
STAGE:OXIDIZER
Глобальные значения
PRINT
. // Пишет всё жидкое топливо во всех баках. УСТАРЕЛО
PRINT SHIP:LIQUIDFUEL. // Пишет всё жидкое топливо во всех баках..
PRINT VESSEL(«kerbRoller2»):LIQUIDFUEL. // Пишет всё жидкое топливо во всех баках аппарата с именем «kerbroller2».
PRINT TARGET:LIQUIDFUEL. // Пишет всё жидкое топливо во всех баках цели.
Контроль полёта
Эти значения могут быть использованы с командами SET, TOGGLED, или LOCKED. Некоторые значения, такие как THROTTLE(Дроссель) и STEERING(Управление ориентацией), явно требуют использования команды LOCK(закрепить).
Контроль с использованием команд ON и OFF
SAS // Для этих пяти, используй ON и OFF, например: SAS ON. RCS OFF.
GEAR
RCS
LIGHTS
BRAKES
LEGS
CHUTES // Не могут быть не развернуты(?)
PANELS
Элементы управления использующие команду TOGGLE
ABORT
AGX // Х — номер Экшен группы(может быть от 1 до 10). Используй toggle, например: TOGGLE AG1.(Переключить Экшн группу №1)
Контроль который должен использвать команду LOCK
THROTTLE // Закрепляй(LOCK) значение от 0 до 1(если надо половину то пиши так(LOCK THROTTLE TO 0.5.)).
STEERING // Закрепление направление.
WHEELTHROTTLE // Отдельные дроссельные заслонки для колес
WHEELSTEERING // Отдельная управляющая система для колёс
Система кОС
Возвращает значения версий
Полная сборка симуляции довольно требовательная к ресурсам компьютера — в основном в плане оперативной памяти (минимум нужно 12 гигабайт ОЗУ).
Поэтому попробовать процесс симуляции можно на стоковом KSP с минимальным набором нужных модов.
Содержание
- 1 Что понадобится
- 1.1 Необходимое ПО
- 1.2 Необходимые моды
- 1.3 kOS скрипты
- 1.4 Стартовый сейв для KSP
- 1.5 Шаблоны для Mission Architect
- 2 Установка
- 2.1 Установка КСП
- 2.2 Установка начального сейва симуляции
- 2.3 Установка KSP TOT
- 2.4 Установка модов
- 2.5 Установка скриптов kOS
- 2.6 Настройка голосового канала
- 3 Запуск симуляции
- 4 Как работает симуляция
- 5 Приступаем к симуляции полета
Что понадобится
Необходимое ПО
- Kerbal Space Program 1.6.0+ [1].
- KSPTOT 1.6.0+ [2].
- Putty [3].
- Zello — mobile push-to-talk рация (или настоящая рация).
Необходимые моды
- kOS [4].
- KSPTOTConnect [5].
kOS скрипты
- kos/warput из архива.
- kos/res из архива.
Стартовый сейв для KSP
saves/initial_save.sfs из архива.
Шаблоны для Mission Architect
ma/duna-depature.mat из архива.
ma/duna-correction-burn.mat из архива.
Установка
Установка КСП
Купите KSP в одном из магазинов (Steam, GOG, cайт разработчиков) и установите на ваш компьютер.
Запомните путь к папке, куда была установлена игра (далее он будет указываться как $KSP_PATH).
Установка начального сейва симуляции
- Запустите KSP
- В главном меню выберите «Начать игру»
- Далее выберите «Новая игра»
- Выберите тип игры «Песочница», название «Симуляция»
- Нажмите «Пуск!»
- Скопируйте файл initial_save.sfs из папки saves из архива в папку $KSP_PATH/saves/Симуляция
Установка KSP TOT
- Скачайте архив с релизом KSP TOT под вашу версию KSP. Распакуйте архив в удобную вам папку.
- Кроме программы KSP TOT в этом же архиве лежит плагин KSPTOTConnect.
- Скопируйте сценарии duna-depature.mat и ma/duna-correction-burn.mat из папки ma архива в папку KSPTOT.
Установка модов
- Скачайте архив с релизом kOS под вашу версию KSP. Распакуйте архив в папку $KSP_PATH.
- Скопируйте папку GameData из папки куда разархивировали KSP TOT в папку $KSP_PATH.
Установка скриптов kOS
Скопируйте файлы warpup и res из папки kos из архива в папку $KSP_PATH/Ships/Script.
Настройка голосового канала
Установите приложение Zello на смартфон или используйте настоящую рацию.
Запуск симуляции
- Запустите начальный сейв в KSP:
- Запустите KSP.
- Нажмите «Начать игру».
- Нажмите «Сохраненная игра».
- Выберите «Симуляция» и нажмите «Загрузить».
- Нажмите Alt+F9 и выберите initial_save из списка.
- Включите kOS сервер

- Запустите Putty (putty.exe)
- Подключитесь к kOS серверу

Подключение к kOS серверу
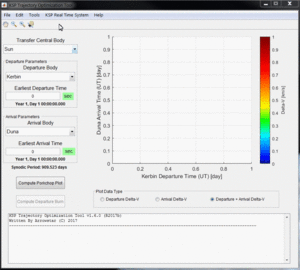
- Запустите KSP TOT (KSPTrajectoryOptimizationTool.exe)
- Подключитесь к KSPTOTConnect

- Запустите Mission Architect в KSPTOT
- Убедитесь что работает голосовая связь через Zello или рацию.
Как работает симуляция
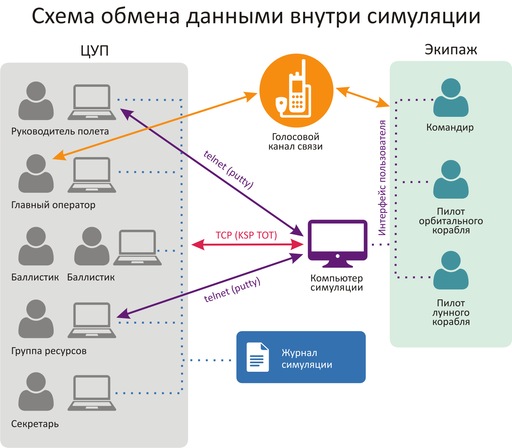
На схеме показаны каналы обмена информацией внутри симуляции:
- Через putty терминал ЦУП запускает kOS команды на компьютере симуляции:
- Команда warput используется для ускорения времени до нужного момента. Команда принимает один аргумент — дату до которой нужно ускорить время в формате количества секунд с начала эпохи. Даты в этом формате получаются из KSPTOT.
- Команда res выдает в терминал информацию о запасах ресурсов на борту.
- С помощью KSPTOT ЦУП делает следующее:
- Утилита Mission Architector (MA) используется для расчета маневров и контроля их выполнения экипажем.
- Утилита Maneuver Execution Assistant используется для получения времени включения двигателей.
- Любое поле для ввода даты используется для получения даты в формате «количество секунд с начала эпохи» для команды warput.
- Загружает данные маневра в KSP
- MCC Real Time System может использоваться для получения телеметрии из KSP
- Связь между ЦУПом и Экипажем идет через голосовой канал связи (Zello или рацию).
Приступаем к симуляции полета
Итак:
- В KSP идет симуляция полета.
- Запущен kOS сервер.
- У нас есть kOS терминал, с помощью которого мы можем контролировать симуляцию.
- KSPTOT подключен к KSP через KSPTOTConnect и запущен Mission Architect.
- Голосовой канал связи готов к использованию.
Далее назначаем роли. Минимум вам понадобится два человека:
- Один (далее ЦУП) будет совмещать роли Руководителя Полета, Главного оператора, Менеджера ресурсов и Баллистика
- Другой (далее Экипаж) будет выполнять все роли в экипаже: Командира и пилота.
Наш план полета:
- Мы начинаем на орбите Кербина в период, удобный для отлета к Дюне.
- Наша задача:
- Рассчитать маневр отлета к Дюне.
- Выполнить его.
- Проверить параметры орбиты после выполнения маневра.
- Если нужно, рассчитать коррекцию.
Как выполнить план полета:
- ЦУП связывается с Экипажем и сообщает что начинает расчет маневра
- Для для расчета маневра нужно:
- Загрузить в MA сценарий расчет отлета к Дюне (duna-depature.mat)
- Импортировать параметры начальной орбиты из KSP
- Запустить оптимизацию
- После завершения оптимизации ЦУП связывается с Экипажем и сообщает что маневр готов
- Экипаж подтверждает готовность принять маневр.
- ЦУП загружает маневр в KSP и сообщает Экипажу что маневр загружен
- Экипаж подтверждает, что видит маневр и для проверки называет величину маневра
- ЦУП теперь должен рассчитать время включения двигателя
- Для этого в утилиту Maneuver Execution Assistant импортируются параметры текущей орбиты
- Импортируются параметры маневра.
- В терминале запускается команда «run res.», которая выводит текущую массу корабля
- Масса корабля и параметры двигательной установки (Isp=350s, Thrust=250kN) вводятся в Maneuver Execution Assistant.
- Нажимается кнопка «Compute Burn Timing Information»
- ЦУП вызывает экипаж и сообщает ему время включения двигателя относительно времени выполнения маневра (Burn Start Time = T-100 sec -> Время включения двигателя 100 секунд до времени маневра).
- Экипаж подтверждает получение времени включения двигателя.
- ЦУП запрашивает у экипажа, сколько времени ему нужно на подготовку к маневру
- Экипаж оценивает время на построение ориентации корабля для выполнения маневра (в минутах, например 1 минута) и сообщает ЦУПу.
- ЦУП рассчитывает дату для ускорения времени по формуле: T = Время маневра — Время включения двигателя — Время на подготовку. Допустим время маневра — 40210 секунд, время включения двигателя — 100 секунд до маневра и экипаж просит 1 минуту (60 секунд) на подготовку. Дата для перемотки времени = 40050.
- ЦУП запрашивает у Экипажа готовность к ускорению времени.
- Экипаж подтверждает
- ЦУП вводит в терминале команду «run warput(40050).» — начинается ускорение времени в игре.
- ЦУП запрашивает у Экипажа, видит ли тот ускорение времени.
- Экипаж подтверждает.
- Когда ускорение времени заканчивается, Экипаж сообщает об этом ЦУПу.
- Экипаж выполняет маневр:
- Строит ориентацию для маневра.
- В установленный момент времени запускает двигатель.
- ЦУП наблюдает за выполнением маневра с помощью телеметрии KSPTOT.
- Ждет когда индикатор dV маневра дойдет до нуля.
- Экипаж сообщает ЦУПу о успешном выполнении маневра.
- ЦУП проверяет результат выполнения маневра:
- Загружает в MA сценарий duna-correction-burn.mat
- Смотрит на параметры орбиты в боксе Final Spacecarft State: если там Orbiting about = Duna и в попапе при наведении Periapsis Alt. = 100-200 км, то коррекция не нужна. Если нет, то:
- Запускается оптимизация
- Если в результате оптимизации получается орбита, удовлетворяющая граничным условиям (Periapsis Alt. = 100 km, Inclanation = 0-10 degree), то маневр передается экипажу для исполнения как и было сделано ранее. Если нет, то:
- Надо попробовать увеличить диапазоны переменных оптимизации или время маневра
- План полета считается выполненным, если после коррекции корабль оказывается на курсе, ведущем к Дюне с перицентром орбиты ~100 км и небольшим наклонением.
KOS and programming introduction
This tutorial is for people who are new to programming and want to start programming using KOS.
Contents
- Accessing the KOS terminal
- Making scripts in-game
- Making scrips with an editor
- Print and set
- If statements
ifvselse if- Example 1, using
else if - Example 2, only using
if
- Example 1, using
- Until, lock and wait
- Using until, lock and wait in an example
- Wait until
- Lists and lexicons
- Lexicons
- Functions
- A working example of a function
- A more complex function
Accessing the KOS terminal
To use KOS you need to have a KOS processor on your vessel, they can be found under the ‘control’ tab in the editor and are under
the same tab as the RCS thrusters and the reaction wheels.
Right clicking the KOS processor in the editor after adding it to your vessel shows a screen where you can tweak settings of the
KOS processor.
There are two ways you can create KOS scripts: either you make them in game and edit them in game or you use a text editor.
Making scripts in-game
First we’ll look at making and editing scripts in-game.
Put your vessel with KOS processor on the launchpad and right click the processor.
Press the button that says ‘open terminal’ and click on the window that just popped up.
typing the following will create a file called ‘hello’, to enter the command press ENTER (don’t forget the period at the end):
edit hello.
you can now edit the file and make your script for the processor to execute, the other tutorials will show how you can make a
working script. Keep in mind that files made in game dissapear after the vessel is gone. This happens because you locally made a file on the ship’s processor.
To run the file, type:
run hello.
Making scrips with an editor
To use a text editor instead go to your KSP folder and go to Ships/Script/ and create an empty file and name it whatever you want
(be cautious using spaces in filenames because this might mess stuff up, also, avoid using capital letters in .ks files if you are running Linux). Not sure where your KSP folder is? If you used steam to install KSP, go to your steam library and right click Kerbal Space Program in the list of games. Next click on properties and go to the local files tab. Finally, press on the browse local files button. (KSP doesn’t require you to use steam, you can copy the KSP folder from the Steam folder to your desktop so you can play without using Steam).
All KOS script files should end with .ks.
An example of a valid KOS script file name would be:
hello.ks
Running files you made using text editors is a bit more complex than if you’d make a file in game.
This is because when you make a script in game the script is locally stored on the ship.
Files you made with a text editor are saved in the archive, can be accessed from different saved games and won’t be lost after
the vessel is gone. You could compare it with ground control, which has infinite data storage and a spaceship which has limited
space for data.
To access the archive type:
switch to 0.
To run hello.ks type the same as above:
run hello.
Print and set
Before we can send ships to space we first need to know the basic features of KOS.
Let’s begin with the print command. Type the following in your terminal and press ENTER to enter the piece of code. Keep in mind that ALL lines of code require a period
at the end of the line, there are some exceptions but more about that later.
print "hello world". // shows: hello world
See those two forward slashes? That means that a comment has been made, anything
after the double slashes won’t be read by the script so you don’t have to worry
about what it says. Here’s an example of what happens if you make something a comment:
// print "hello world 1".
print "hello world 2".
If you’d run these two lines of code you’d ONLY see:
hello world 2
You’d might be wondering why you’d want to use the forward slashes if the script doesn’t read them.
The computer ignores them, but they’re there to help leave explanations for the humans to see who might have to read your program.
To clear the screen type:
clearscreen.
Now say that we really like to use our hello world command but don’t want to type
the entire sentence every time, we could use the set command.
set x to "hello world".
The set command ‘sets’ a certain value to the given variable. Everytime we refer
to x we will actually refer to "hello world".
set x to "hello world".
print x. // shows: hello world
Of course we can choose other things to print other than hello world.
Keep in mind that ‘normal’ text requires "" and variables you made using the
set command, numbers and booleans (true or false) don’t need "".
set x to "hello world".
set y to true.
set z to 123.

print x.   // shows: hello world
print "x". // shows: x
print y.   // shows: true
print "y". // shows: y
print z.   // shows: 123
print "z". // shows: z
You can also replace a variable you’ve made:
set x to "hello world".
set x to "updated text".
print x. // shows: updated text

set x to "hello world".
print x. // shows: hello world
set x to "updated text".
print x. // shows: updated text
As you can see hello world doesn’t exist anymore. If you’d want to print
both you could do:
set x to "hello world".
set y to x.
set x to "updated text".

print y. // shows: hello world
print x. // shows: updated text
Variables don’t just have to be one letter you could also use a word as a variable, don’t use spaces when naming variables.
set WhateverThisVariableIs to false.
print WhateverThisVariableIs. // shows: false
If statements
Now we know how to set certain text to a variable we can explore more stuff.
For instance if, this checks if a certain value matches the given value.
set x to 1.

if x = 1 {
  print "x is one".
}
This will show: x is one.
You’ve probably noticed the curly brackets { } after an if statement. You don’t need a period at the end of an if statement but you need these brackets if you have more than one statement in the body, otherwise they’re optional.
This is valid:
if x = 1
  print "x is one".
You could cover the piece the code within the curly brackets with your hand and say: if x is equal to 1, then do whatever
I covered with my hand. If statements can also be used for booleans:
set SomeBoolean to true.

if SomeBoolean = true {
  print "this is a true".
}
This will show: this is true.
Ofcourse the equals sign isn’t the only symbol you can use, other symbols are:
Equals to or bigger than:
1 >= 1
2 >= 1
Equals to or smaller than
1 <= 1
1 <= 2
Is not equal to:
1 <> 2
So as you have seen, we created some commands that will only happen if a condition is true, otherwise nothing happens and we move
on. But what if you want to do some commands when the condition is true and instead of doing nothing when it’s false,
you’d give it commands to do instead. The else statement also requires curly brackets { }.
set SomeAnimal to "Dog".

if SomeAnimal = "Cat" {
  print "this is a cat".
} else {
  print "this is not a cat".
}
Since SomeAnimal isn’t Cat, it skips whatever would happen if SomeAnimal would be Cat. Then it checks what else to do, which is
to print this is not a cat. You could expand this by using else if, which means that if the first if statement isn’t true
then check the following if statement.
set SomeAnimal to "Dog".

if SomeAnimal = "Cat" {
  print "this is a cat".
} else if SomeAnimal = "Dog" {
  print "this is a dog".
} else {
  print "this is neither a cat nor a dog".
}
This would print this is a dog.
if vs else if
Hopefully you now know the basics of how if works. You might be wondering why use else if if it’s the same as if.
Example 1, using else if
if distance <= 1 {
  print "Distance is within a meter.".
} else if distance <= 100 {
  print "Distance is within 100 meters.".
} else {
  print "Distance is farther than 100 m.".
}
Example 2, only using if
if distance <= 1 {
  print "Distance is within a meter.".
}
if distance <= 100 {
  print "Distance is within 100 meters.".
}
if distance > 1000 {
  print "Distance is farther than 1 kilometer.".
}
Using example 1, if your distance is less than a meter you’ll get the following message:
Distance is within a meter.
Using example 2, if your distance is less than a meter you’ll get the following messages:
Distance is within a meter.
Distance is within 100 meters.
As you can imagine the second example isn’t good. If we’re at less than a meter away from something and the messages for if we would be farther
than 100 meters show up we have a big problem. This could be fixed by doing the following, but THIS IS UNNECESSARILY COMPLEX:
set Done to false.

if Done = false {
  if distance <= 1 {
    print "Distance is within a meter.".
    set Done to true.
  }
}

if Done = false {
  if distance <= 100 {
    print "Distance is within 100 meters.".
    set Done to true.
  }
}

if Done = false {
  if distance > 1000 {
    print "Distance is farther than 1 kilometer.".
    set Done to true.
  }
}
Now this essentially does the same as the else if script but it’s way more confusing and complicating.
Until, lock and wait
The wait command is pretty straight forward:
wait 10.
print "done waiting".
It will take 10 seconds before done waiting shows up.
Using wait 0 will let the script wait for one physics tick (a physics tick is the time it takes for KSP to update its physics), this can be handy for when you’re doing stuff with maneuvers. Maneuvers don’t show up instantly but show up
after one physics tick. More about maneuvers in a future tutorial.
The until command will keep looping a piece of code until the given value has been met. Here’s a simple example of what you can do with an until command:
set x to 0.
until x > 100 {
  print x.
  set x to x + 1.
}
This first sets x to 0 and until x is bigger than 100 it does whatever happens within the brackets.
In this case it prints x and then it increases x by 1. This loop repeats itself until x is bigger than 100.
Before we can talk about more complex until loops let’s first talk about time:seconds and the lock command.
print time:seconds.
Will print the current time in seconds. Let’s say the in-game time is 1 minute.
It would print 60. You can also set the current in-game time as a variable:
set CurrentTime to time:seconds.
The variable CurrentTime will stay 60 seconds. Eventhough the in-game time changes:
set CurrentTime to time:seconds.
print CurrentTime. // shows: 60
wait 10.
print CurrentTime. // shows: 60
As you can see, eventhough the in-game time has changed the variable CurrentTime is still 60. The set command does NOT constantly update the variable. If you want a constantly updating variable you have to use the lock command.
Here’s an example of what the lock command can do:
lock TimeSecondsPlusTen to time:seconds + 10.
If you print TimeSecondsPlusTen at 60 seconds it will show 70, if you print
TimeSecondsPlusTen at 4000 seconds it will show 4010.
Using until, lock and wait in an example
If we now combine all the command we can make the following piece of code:
set Adder to 0.
lock Multiplier to Adder * 2.
set TimePlusFive to time:seconds + 5.

until time:seconds > TimePlusFive {
  print Multiplier.
  set Adder to Adder + 1.
  wait 1.
}
So an easy way to read the until loop is to cover what ever is inside of the curly brackets
and say: until time:seconds is bigger than our current time plus 5 seconds, repeat whatever I covered with my hand.
In this case that’d be: print Multiplier, increase the value of Adder and wait 1 second.
The outcome of this piece of code is:
0
2
4
6
8
10
Wait until
You can also use the wait until command, this pauses the current script until the
conditions have been met.
set TimePlusFive to time:seconds + 5.
wait until time:seconds > TimePlusFive.
print "done waiting".
It will take 5 seconds for done waiting to show up.
Note: the wait until command only checks the condition once per physics tick. Using wait until for a fraction of a physics tick will round up to the start of a new physics tick.
Lists and lexicons
set Value1 to 0.
set Value2 to 5.
set Value3 to 10.
set Value4 to 15.
set Value5 to 20.
Let’s say we want to put these values in a list we want to edit later we can put them into a list by typing the following:
set ValueList to list(Value1, Value2, Value3, Value4, Value5).
print ValueList.
This will show:
[0] = 0
[1] = 5
[2] = 10
[3] = 15
[4] = 20
As you can see the list goes from 0-4 instead of 1-5. So if you’d want to access Value3 you’d need to look for [2].
This can be done as follows:
print ValueList[2]. // shows 10
But let’s say you want to print every item in the list you could do:
print ValueList[0]. // shows 0
print ValueList[1]. // shows 5
print ValueList[2]. // shows 10
print ValueList[3]. // shows 15
print ValueList[4]. // shows 20
But the problem with this is that you have to know how big the list is and it’d take up a lot space when dealing with big lists.
for Whatever in ValueList {
  print Whatever.
}

for Value in ValueList {
  print Value.
}
Both pieces of code do EXACTLY the same.
This checks each item in a given list (now called Whatever) and does what the curly brackets contains.
(For each item in the list called ValueList, which we call Whatever, do whatever is inside of the brackets).
In this case it prints:
0
5
10
15
20
You can also use variables to check an item in a list:
set x to 3.
print ValueList[x]. // shows 15
Does the same as:
print ValueList[3]. // also shows 15
Lexicons
Lexicons are in a way the same as lists but they have some crucial differences.
Lexicons can store a pair of information, for example:
set MyLexicon to lexicon("MyValue1", 100, "MyValue2", 200, "MyValue3", 300).
The following piece of code acts EXACTLY the same as the piece of code above but is easier to read:
set MyLexicon to lexicon(
  "MyValue1", 100,
  "MyValue2", 200,
  "MyValue3", 300
).
print MyLexicon["MyValue1"]. // shows 100
print MyLexicon["MyValue2"]. // shows 200
print MyLexicon["MyValue3"]. // shows 300
NOTE: print MyLexicon[100]. will NOT work.
Functions
Imagine you’re driving in a manual shift car for with an instructor for the first time.
He helps you getting into first gear and tells you the following when you want to accelerate:
Let go of the gas pedal.
Press in the clutch pedal.
Shift the gear stick from first to second.
Let go of the clutch pedal.
Press in the gas pedal.
After a while he tells you:
Let go of the gas pedal.
Press in the clutch pedal.
Shift the gear stick from second to third.
Let go of the clutch pedal.
Press in the gas pedal.
Not long after that he tells you:
Let go of the gas pedal.
Press in the clutch pedal.
Shift the gear stick from third to fourth.
Let go of the clutch pedal.
Press in the gas pedal.
Wouldn’t it be easier if instead of telling you the entire procedure he’d tell you the following:
Shift from first to second.
And after a after he tells you:
Shift from second to third.
And not long after that he tells you:
Shift from third to fourth.
As you can see you only need to know how to shift once (if you’re a quick learner) and after that telling the whole process is
repetitive. The same goes for code in KOS, you might want to use a piece of code more than once without typing it out everytime.
This is called a function and functions often have parameters (similar to starting conditions).
Keep in mind that the following piece of code is pseudo-code and is not actual working code but an example of what functions
are like:
Function ShiftGearFirstToSecond {
  Let go of the gas pedal.
  Press in the clutch pedal.
  Shift the gear stick from first gear to second gear.
  Let go of the clutch pedal.
  Press in the gas pedal.
}
Your instructor could now say ShiftGearFirstToSecond() and you’d know how to go from the first gear to the second.
But this is only about going from the first gear to the second and not from the second gear to the third.
To do that you’d need to have blank spaces for you to fill in with your desired gears.
Function ShiftGear {
  Let go of the gas pedal.
  Press in the clutch pedal.
  Shift the gear stick from ____ to ____.
  Let go of the clutch pedal.
  Press in the gas pedal.
}
On paper this sounds like a great idea but if your instructor tells you ShiftGear() first gear, second gear. But you’re not sure where to
put first gear and where to put second gear. Wouldn’t it be handy if you made rule that the first word your instructor says is the
gear you start in and the second word he says is the gear you end in? Well luckily there’s a way to apply that rule.
This is were parameters come into play, all functions get called using () after the function name and inside of the brackets
you put the parameters.
Function ShiftGear {
  Parameter StartGear.
  Parameter EndGear.

  Let go of the gas pedal.
  Press in the clutch pedal.
  Shift the gear stick from StartGear to EndGear.
  Let go of the clutch pedal.
  Press in the gas pedal.
}
As you can see we replaced the blank spaces with variables (parameters are also variables).
So to go from first gear to second gear you’d use:
ShiftGear(first, second).
To go from second to third you’d use:
ShiftGear(second, third).
To go from third to second you’d use:
ShiftGear(third, second).
A working example of a function
Here’s an example of a simple function which works in KOS:
Function OneThroughFivePrint {
  print 1.
  print 2.
  print 3.
  print 4.
  print 5.
  }
Functions can have any name but avoid making functions and variables the same name as this will very likely cause problems.
A function will do anything that’s inside of the curly brackets. To use this function type the following:
OneThroughFivePrint().
This will show:
1
2
3
4
5
A more complex function
Here’s an example of a more complex function which has a parameter and will also work in KOS:
Let’s say we’re in a perfectly circular orbit around kerbin, we can use the following formula:
velocity = (2 * pi * radius) / orbital period
(https://en.wikipedia.org/wiki/Circular_motion#Formulas)
Ignore how ship:orbit:period works for now, that will be discussed in the next chapter.
Function VelocityCalculator {
  Parameter OrbitHeight.

  set KerbinRadius to 600000.
  set TotalRadius to OrbitHeight + KerbinRadius.
  set OrbitalPeriod to ship:orbit:period.
  print (2 * 3.1416 * TotalRadius) / OrbitalPeriod.
}
If you’re in a 400 km circular orbit and type:
VelocityCalculator(400000).
Will show your orbital velocity.
Now what if you want to use the velocity for other calculations, is that possible? Yes of course that’s possible!
The return command is very helpful is these situations. The return function returns a value, piece of text, boolean etc and ends
the function it is in.
Function VelocityCalculator {
  Parameter OrbitHeight.

  set KerbinRadius to 600000.
  set TotalRadius to OrbitHeight + KerbinRadius.
  set OrbitalPeriod to ship:orbit:period.
  return (2 * 3.1416 * TotalRadius) / OrbitalPeriod.
  // everything after the return command will be skipped because a return command ends a function.
  print "this will be skipped".
}

set CurrentVelocity to VelocityCalculator(400000).
print CurrentVelocity.
Will show your orbital velocity for a circular orbit at 400 kilometers.
Suffixes
In KOS you can access information about orbits using special structures.
Let’s start with things we can check about our ship’s orbit.
print ship:orbit:apoapsis. // shows the ship's apoapsis
print kerbin:orbit:apoapsis. // shows kerbin's apoapsis
print ship:body:orbit:apoapsis. // shows kerbin's apoapsis if you're currently orbiting kerbin
You could compare these structures to a fill in the blanks story:
print ___:orbit:apoapsis. // shows the apoapsis of whatever you fill in the blank
There are also other things you can get instead of just apoapsis, for example:
print ship:orbit:periapsis. // shows the ship's periapsis
print ship:orbit:period. // shows the ship's period
print ship:orbit:inclination. // shows the ship's inclination
print ship:orbit:eccentricity. // shows the ship's eccentricity
print ship:orbit:semimajoraxis. // shows the ship's semimajoraxis
The full list of things you can add after :orbit can be found here:
https://ksp-kos.github.io/KOS/structures/orbits/orbit.html
Taking a step back, you can also look up values of planets
print kerbin:name. // shows kerbin
print kerbin:mass. // shows kerbin's mass
print kerbin:radius // shows kerbin's radius
print kerbin:mu // shows kerbin's gravitational parameter
If you’re currently orbiting kerbin, the following is true:
print ship:body:name. // shows kerbin
print ship:body:mass. // shows kerbin's mass
print ship:body:radius // shows kerbin's radius
print ship:body:mu // shows kerbin's gravitational parameter
More information about that here:
https://ksp-kos.github.io/KOS/structures/orbits/orbitable.html
A list of examples and tutorials.
Examples taken from the videos posted by the mod author, Kevin Laity:
- Example — Simple Autolaunch
- Example — More Complex Launch Sequence
- Example — Launch Sequence Utilizing Loops
From other Wiki contributors:
-
Short single-purpose tutorials and examples
-
-
Coordinate systems used in the game.
-
-
-
- Tutorial — XYZ system of KSP (Needed to make sense of some of the data coming out of KOS).
- Tutorial with example — Conversion from Directions to XYZs
-
-
-
-
Finding surface-related dynamic data (velocity relative to the ground):
-
-
-
-
-
- Prior to verison 0.61 of KOS
- In version 0.61 of KOS and above.
-
-
-
-
- Tutorial — Getting the Normal Vector.
-
-
Larger full-scale complex examples:
-
- Descend a Lander or Skycrane Descent into skycrane or lander drop, seeking flat terrain.
- Space Computer (KSP Forum) by Payload.
- Cruise missile controlled with the kOS mod by Check
- Another Skycrane demo by Check
- To the Mun and back by TheGreatFez from Reddit
-
Mission toolkit:
- Mission toolkit v3 (supports: Mun and Minmus missions) by baloan
- Mission toolkit v2 (supports: Launch to Orbit, Orbital maneuvers) by baloan
- (Mission toolkit, previous versions)
Other sources of scripts
- kOS Data Store (WIP)