Требуется руководство для вашей IKEA RYKENE Каркас кровати? Ниже вы можете просмотреть и загрузить бесплатно руководство в формате PDF. Кроме того, приведены часто задаваемые вопросы, рейтинг изделия и отзывы пользователей, что позволит оптимально использовать ваше изделие. Если это не то руководство, которое вы искали, – свяжитесь с нами.
Ваше устройство неисправно, и в руководстве отсутствует решение? Перейдите в Repair Café для получения бесплатных ремонтных услуг.
Руководство

Рейтинг
Сообщите нам, что вы думаете о IKEA RYKENE Каркас кровати, оставив оценку продукта. Хотите поделиться вашими впечатлениями от данного изделия или задать вопрос? Вы можете оставить комментарий в нижней части страницы.
Довольны ли вы данным изделием IKEA?
Да Нет
12 голоса
Часто задаваемые вопросы
Наша служба поддержки выполняет поиск полезной информации по изделиям и отвечает на часто задаваемые вопросы. Если вы заметили неточность в наших часто задаваемых вопросах, сообщите нам об этом с помощью нашей контактной формы.
Как лучше всего разобрать мебель из IKEA? Проверенный
IKEA советует разбирать мебель, используя инструкцию по сборке в обратном порядке.
Это было полезно (16918)
У моей мебели из IKEA не достает винтика/заглушки/гвоздя. Где я могу найти замену? Проверенный
В каждом магазине IKEA есть отдел, где можно бесплатно взять винтики, заглушки и другие расходные материалы.
Это было полезно (8279)
Не могу извлечь шкант из изделия IKEA. Что делать? Проверенный
Лучше всего воспользоваться пассатижами и постараться не сжимать шкант слишком сильно, в противном случае он не будет сидеть так плотно.
Это было полезно (1316)
У меня есть каркас кровати IKEA. Согласно инструкции мне нужна центральная перекладина, но в комплекте ее нет. Что мне делать? Проверенный
Во многих кроватях IKEA используются центральные перекладины SKORVA. Их покупают отдельно в магазине.
Это было полезно (697)
Какая минимальная толщина матраса? Проверенный
Рекомендуется, чтобы все типы матрасов имели толщину не менее 16 см для обеспечения достаточного комфорта.
Это было полезно (334)
Могу ли я использовать двуспальный матрас на двуспальной кровати с индивидуально регулируемым решетчатым основанием кровати? Проверенный
Нет. Невозможно поставить двойной матрас на двуспальную кровать с индивидуальным решетчатым основанием из-за возможной разницы в высоте между обеими половинами. Каждой половине понадобится по одному матрасу. Также нельзя использовать двойной наматрасник.
Это было полезно (166)
В чем разница между каркасом кровати и коробчатой пружиной? Проверенный
Каркас кровати вмещает только матрас, но не обеспечивает демпфирования или другого комфорта. Пружинный короб — это наматрасник, наполненный металлическими витками. Пространство между змеевиками обеспечивает дополнительную вентиляцию. Поверх пружинного блока вы добавляете матрас и, возможно, наматрасник. Комбинация пружинного блока и матраса обеспечивает хорошее распределение веса и хорошую вентиляцию.
Это было полезно (126)
В чем разница между деревянным и металлическим каркасом кровати? Проверенный
Деревянные каркасы кроватей обычно прочнее металлических. Это означает, что с металлическим каркасом кровати нужно чаще проверять прочность и чаще затягивать винты.
Это было полезно (106)
Порядок работы:
Для добавления товара в корзину нажмите «Купить». После наполнения корзины, оформите заказ, заполнив простую форму.
Менеджер свяжется с Вами в ближайшее время.
Комплектация заказа
Мы проверяем наличие и комплектуем заказы по всем складам ИКЕА:
- — ИКЕА Москва Химки
- — ИКЕА Москва Теплый Стан
- — ИКЕА Москва Белая Дача
- — ИКЕА Москва Ходынское поле
- — Официальный интернет-магазин ИКЕА
- — Магазины ИКЕА в городах России
- — Магазины ИКЕА в Европе
У нас самое полное наличие товаров ИКЕА!
Доставка по Москве и в города России
Доставка по Москве выполняется в день заказа при условии оформления заказа до 14:00, либо на следующий день с 14:00 до 18:00 или вечером с 18:00 до 22:00.
Доставка в города России выполняется через транспортные компании: Деловые Линии, Энергия, СДЭК и другие.
Бюджетный каркас кровати из натурального дерева мы купили три года назад, как дачный вариант.
Матрас использовали старый, но дорогой — Султан. Размер спального места 160см на 200см.
Выглядит всё это просто великолепно, спать удобно:

Недавно у нас были гости, молодая пара. Они эксплуатировали кровать меньше недели.
Но последствия оказались необратимы((
Когда я присела на кровать, матрас подо мной провалился. А вешу я всего 54 кг.
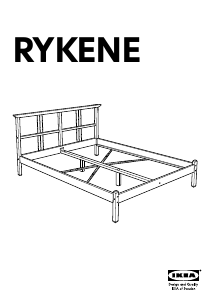
Сняли матрас — оказалось, что продольная деревянная планка, на которой лежит реечное дно, провернулась. И рейки уже не удерживаются, соскальзывают.
Вот как выглядит конструкция:
1 — деревянная тонкая рейка
2 — элементы реечного дна
3 — винт со втулкой
4 — саморезы
Всё это разболталось и провернулось.
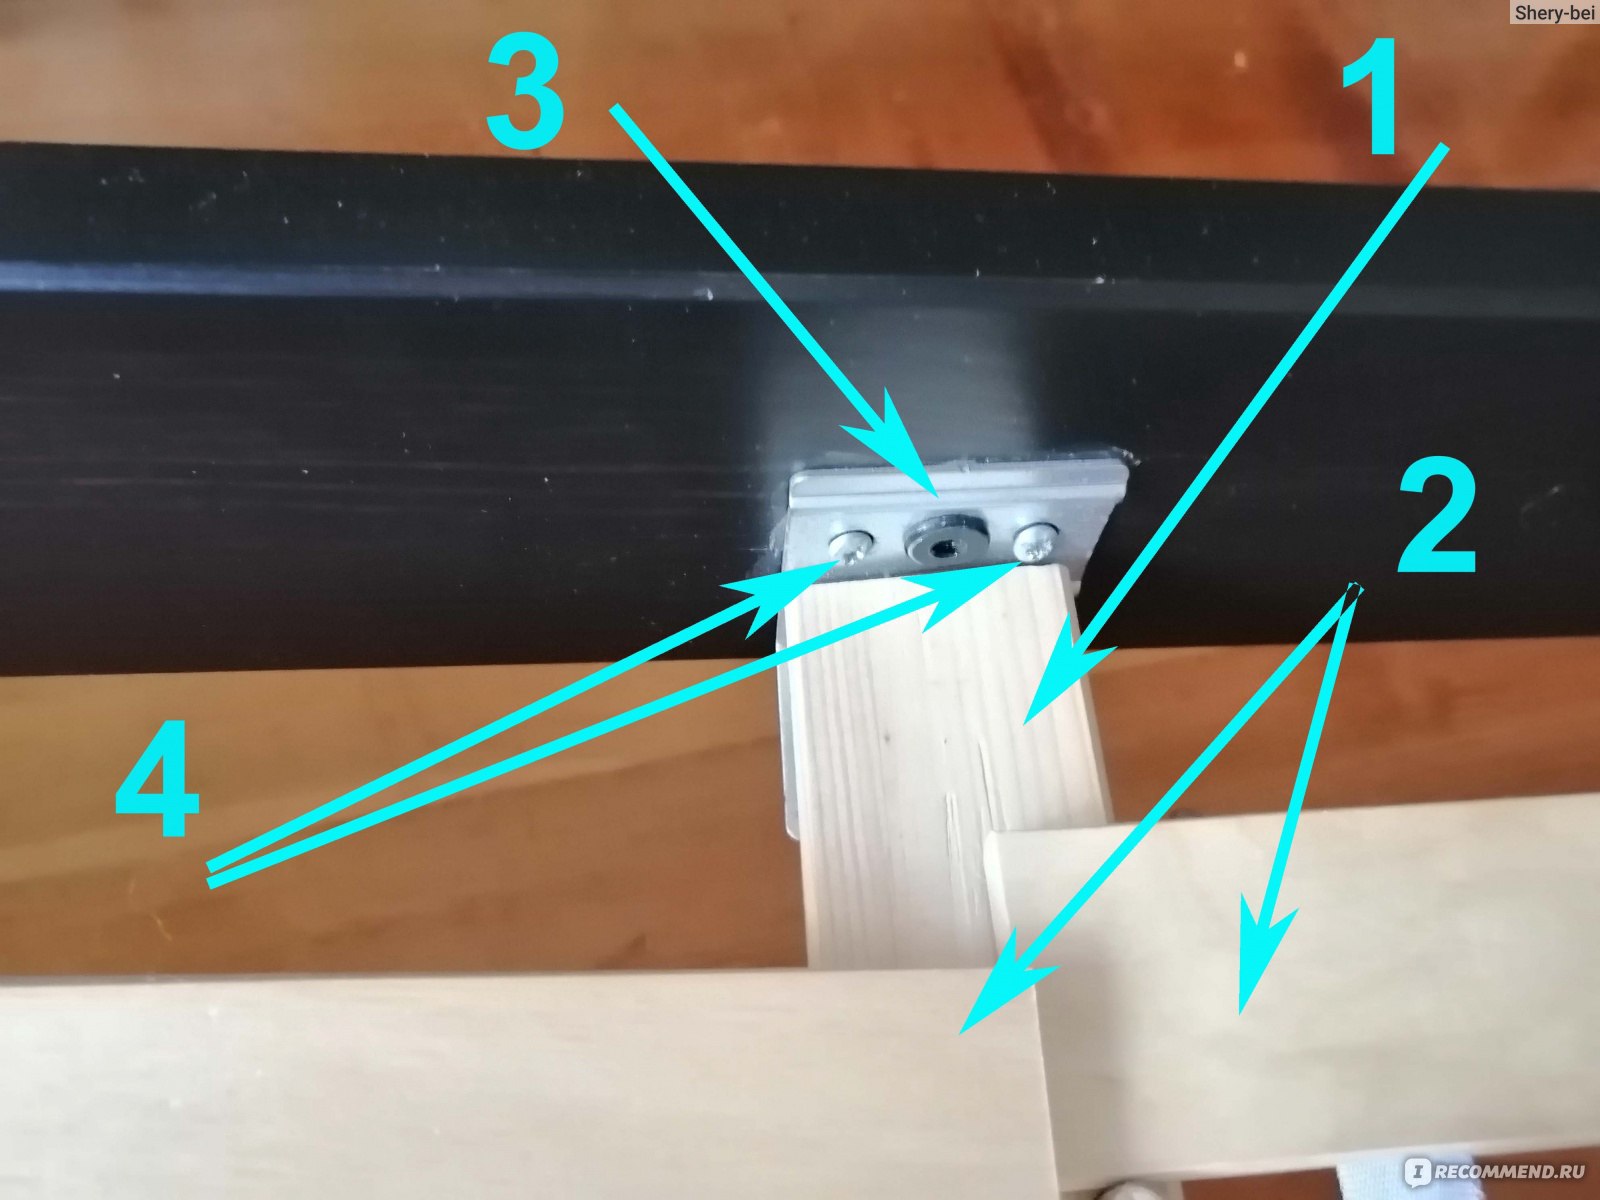
Муж, конечно, закрутил крепёж. Но окончательно выровнять планку не получилось. Погнулся сам поддерживающий уголок.
Посмотрите на фото:
1 — руки обычного человека
2 — металлический уголок
3 — рейка, на которой всё держится
В сравнении с руками видно, какая деревянная планка узкая и тонкая. И уголок совсем хилый.
Вот вам пример шведской экономии. Такое крепление даже ребёнка не выдержит, если он решит попрыгать на кровати.
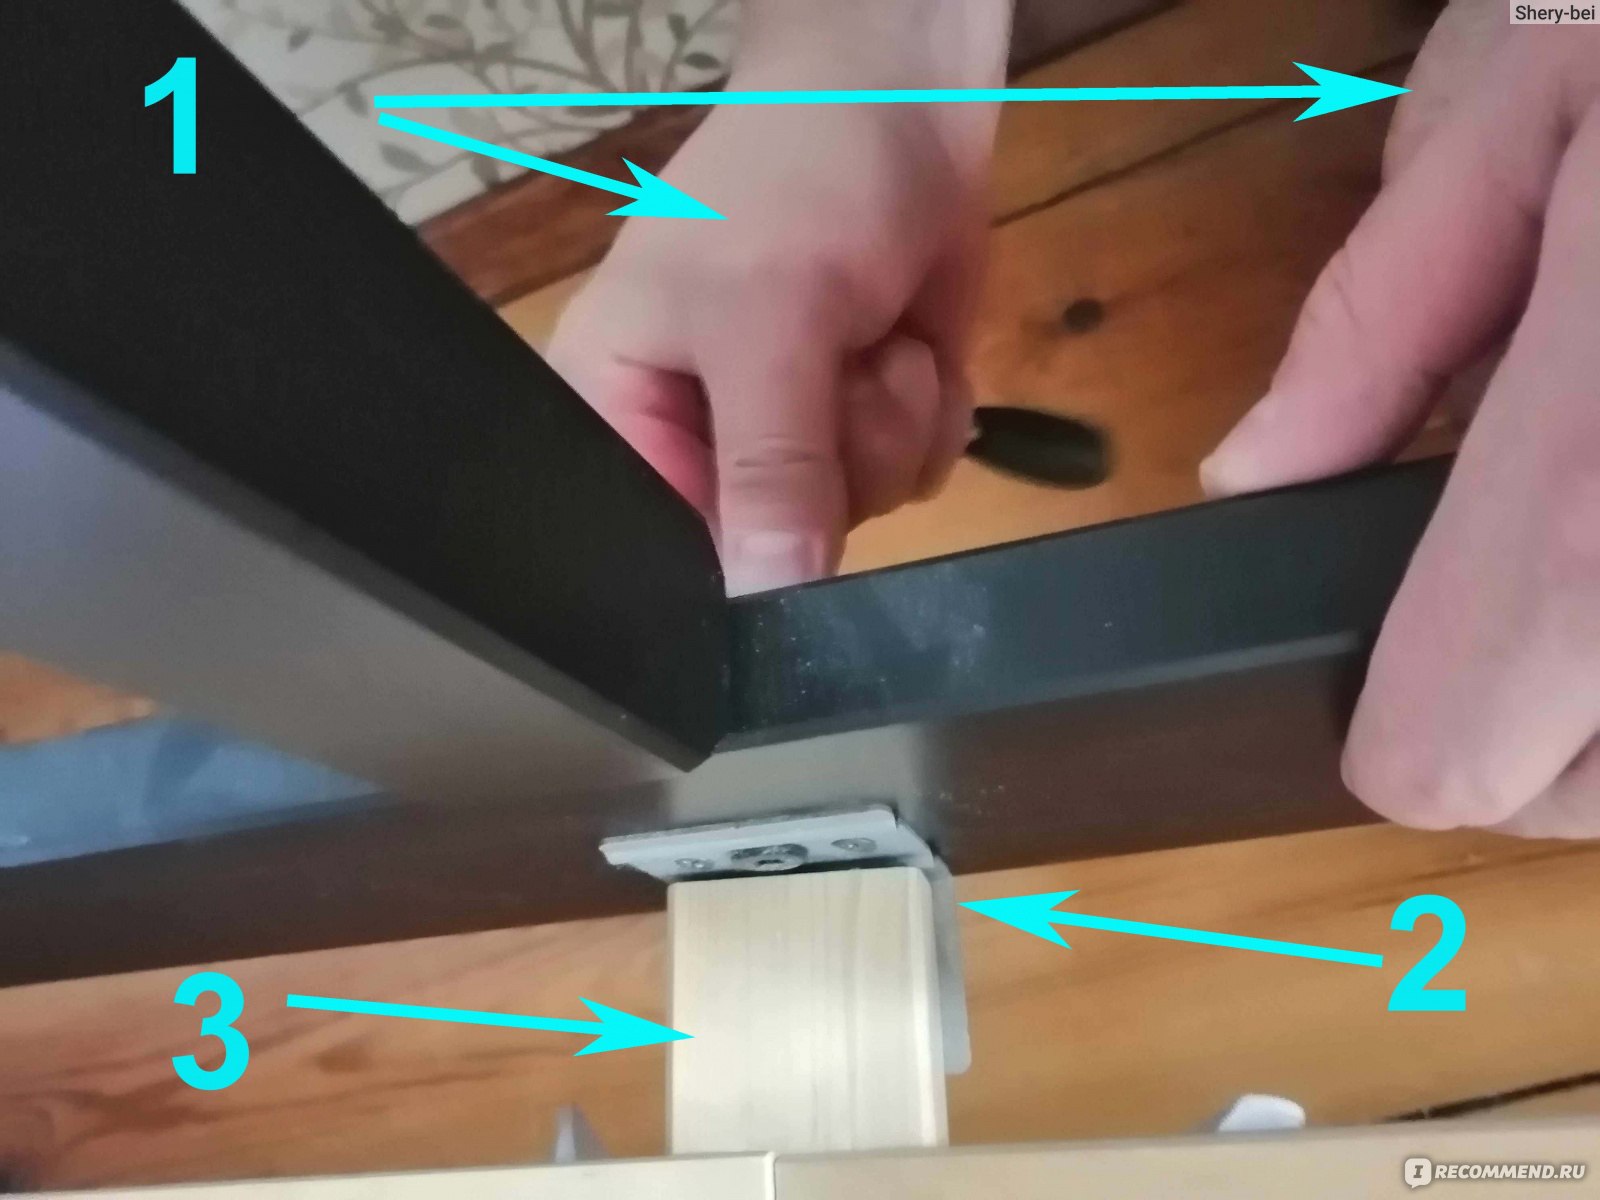
Муж решил заняться починкой всерьёз и укрепил каркас. Заменил все саморезы, подтянул весь крепёж. Но этого оказалось не достаточно. Каркас кровати болтался и шатался.
Тогда муж распилил сосновую вагонку вдоль. Две получившиеся рейки прикрутил к каркасу саморезами. Конструкция сразу стала жёсткой и безопасной.
Вид снизу, кровать перевёрнута:
Ещё и уголком металлическим к ножке притянул эту рейку.
Но это ещё не всё. Реечное дно тоже рассыпалось. Пришлось чинить, вот отзыв: Лурой
Короче, не кровать, а г*. Полностью развалилась. Столько возни с ремонтом.
Introduction: Ikea Bed Hack (RYKENE)
I bought this bed frame a few years ago. Since then, I have always wanted to alter the bed to make it stronger and a little more sophisticated.
The revisions that I have made:
— Increased the height to approximately 20″ from the top of the mattress to the floor
— Upholstered the headboard
— Painted the unfinished frame
— Added a custom made removable bed skirt
Level of Difficulty
I found this project to be very rewarding as it involves a few skills; Woodworking and sewing mainly. I have never really upholstered anything before, so it was very fun to work with new materials and experience new challenges. If i had to give this a rating, I would give it a 7 out of 10. That might drop a bit if you sew frequently and have a similar level of woodworking knowledge.
Cost
The total cost of the project is approximately $200 (not including the mattress)
Recommendation
I strongly recommend that you take on this project if you already have a RYKENE bed and you want to make it look a little more grown-up.
Warnings:
Please read and understand the owner’s/safety manual of all your tools before using them. Some guards and safety devices were removed for the making of this instructable, I DO NOT recommend you remove any safety devices or guides from your tools. Safety comes first. Never put yourself in danger.
Note: I believe that this bed was previously named DALSELV
Step 1: Materials
— RYKENE Bed Frame from IKEA — [1 piece] $129 Current Canadian price
— 2″x4″x8′ pine — [1 piece] $10 approx.
— 2.5″ #8 screws — [12 pieces] $0.50
— Utility Shelf Brackets (3″x5″ approx) [4 pieces] $2/each approx.
— Black Paint and Primer in One [less than 1 quart]
— Fabric for the skirt — $6 [3 meters]
— Fabric for the headboard — $8 [1.5 meters]
— 1/2″ velcro, black — $15 [5 meters]
— Foam mattress pad, full/double size -$15 [1 piece] *thanks to jessandstavro for this tip
— Flat Bed Sheet — [1 piece] $8 I used this to cover the back of the headboard,
— Thread
— Chalk (Fabric Chalk is best, but I didn’t have any and was able to do with regular chalk)
Step 2: Tools
— Table Saw
— Router
— Cordless Drill *with allen wrench attachment
— Sewing Machine
— Chamfering bit
— Chisel
— Hammer
— Staple Gun
— Iron
— Pliers
— Hot glue gun
Step 3: Assembly
For me, this step was completed a couple of years ago.
If you have just purchased the bed from IKEA and haven’t assembled it yet, then I would definitely recommend that you assemble the bed entirely before moving on to the other steps. This will allow you to get an idea of how the bed is constructed, understand how it is assembled, and also make the appropriate marks.
While you are assembling the bed you will notice that there are 4 permanent pieces to the bed frame. These 4 pieces are designed to remain in tact while transporting the bed from one location to another. I have listed them below:
— Headboard
— Footboard
— Side Rail 1
— Side Rail 2
*I have indicated the 4 permanent pieces on the attached image.
Step 4: Planning and Disassembly
While the bed was assembled I studied the original IKEA construction and figured out a plan to raise the height of the bed.
I knew that I didn’t want to change the configuration of the original joinery. IKEA did a good job of engineering the way the side rails attached to the headboard and footboard. It is strong and makes it easy to assemble and disassemble when moving.
Therefore, to raise the bed I would have to make all of my modifications below the rails (mattress support).
Before removing the legs, I had to mark where to make my cuts and where to add extra material (wood). I made my marks on the legs where they meet with the side rails.
Note that the top rail on the headboard extends past the legs. In order to upholster the head board I needed to mark and cut off those nibs.
Once I made all of my marks, I was ready to disassemble the frame. I then had 5 pieces ready to cut (see image attached)
Step 5: Designing the Leg Extension
The design is quite simple. The idea is to notch the new piece of wood around the old one. Then glue and screw the two pieces together. At first glance one might assume that this will not be enough to hold the two pieces together. However, the pieces will be glued together «edge to edge». This makes for a very strong joint. If had enough clamps on hand I would have skipped the screws.
The following steps will describe how I made the new pieces and what modifications were made to the original legs.
Step 6: Preparing the Original Legs
The first step in making the leg extensions was to prepare the old legs. The original legs had chamfered corners (corners cut off). In order to make the joint between the leg and the leg extension (new piece) as seamless and as strong as possible I needed to square off that corner, which meant cutting off approximately 3/16″ of material along the length of the leg.
The first step to squaring off the corner was to cross-cut the legs on the table saw. The position of this cut was determined by the marks I made in the previous step (where the rails met the legs). The depth of the cut was very shallow (approximately 3/16″) just enough to square off the corner. I repeated this on all four legs.
The second part to squaring off the corner was to rip the legs on the table saw, removing approximately 3/16″ of the material. The key to this step was stopping just short of the mark. See image attached. You don’t want to go past the mark.
As you can see the table saw cannot remove all the material without going past my mark. So, the third step was to chisel the remainder of the material. Being that the wood is pine and having used a sharp chisel, it was quick and painless.
Preparing the legs also involved removing the ends (or bottom) of the legs, which had all four corners chamfered.
Step 7: Making the Leg Extensions
I bought a piece of 2″x4″x8′ machined pine from the Home Depot. I cut four pieces at approximately 16″ in length.
I then took my first measurement from the original legs (that I prepared in the previous step). I measured from the bottom of the leg to the start of notch. My second measurement was to figure out the width of the notch (Both are shown in the attached image).
WIth this information I headed for the table saw again.
The first cut: Cutting the length of the notch
— I set the height of the saw blade to the same height as the width of the notch (tip. use the original leg as a guide)
— I then used the miter guide set to 90 degrees to cross cut the pieces at their marks. (see attached)
The second cut: Cutting the width of the notch
— I set the table saw to rip the width notch.
— I also setup a stop that would prevent me from over cutting the piece. (You have to understand that when cutting on a table saw the amount of the material removed from the underside will be greater than what is visible from the top of the material, as show in the «Table Saw Cross Section» .
The third cut: Finishing the notch on the table saw
— I then flipped the piece over and moved the fence to the opposite side of the blade. (The reason I do this, is to be as safe as possible. You never want to have a small loose piece stuck between the blade and the fence. Chances are that it will shoot back at you).
— I setup the stop again to prevent me from over cutting.
Once the third cut was complete a small amount of material was left where the blade couldn’t reach. I removed the material with a sharp chisel.
I then drilled two holes in each leg of the original legs. This will be for the screws.
I was now ready to glue and screw the leg extensions to the original legs.
Step 8: Glueing and Screwing
I applied glue to both pieces and then temporarily clamped them together with two F-clamps. While the pieces were clamped together I screwed them together with two #8 2-1/2″ Screws. I removed the clamps and let them dry for approximately 30 minutes.
I cleaned off the glue squeez-out and then chamfered the corners with a router and a chamfering bit..
Step 9: Reinforcing the MIddle Support
Over the past couple years I noticed that the weak point in the construction of the original IKEA bed was the two legs that hold up the middle support.
The original pieces were much thinner. They were probably 1″x3″ pieces so, i decided to replace them with 2″x4″ pieces. I also turned them the opposite way.
I also decided to add four utility shelf brackets (2 per leg). I felt the would help stabilize the leg without adding much weight or bulkiness.
Step 10: Upholstering the Headboard
The first step was to cut off the nibs on the top rail that extend past the legs.
Once the headboard was re-assemble I stapled a piece of cardboard to the front face of the headboard.
Adding the foam:
— I rolled out the foam (mattress pad) on the floor.
— Placed the headboard face down on the foam.
— Marked where to cut off the excess foam.
— Cut the Foam to size.
— Placed the foam on the floor
— Placed the headboard face down on the foam.
— I started by attaching the foam with a staple gun securely to 1 of the 4 sides.
— I then went to the direct opposite side and pulled on the foam tightly and secured it with staples.
— I repeated this for the two remming sides.
Adding the fabric:
-This step is pretty much the same as the foam but actually a little bit easier.
— I was extra careful to ensure that the fabric was pulled tot so that there were no wrinkles.
— You also want to make sure your fabric is square with the frame. Especially if your fabric has a pattern with straight lines running through it. Even if your fabric doesn’t have a pattern, the fabric still has a grain. The grain can be noticeable so try to keep it as square as possible.
Step 11: Paint
The next step for me was to paint the wood. I purchased a quart of black paint & primer in one and applied it using a foam roller. I was very surprised to see how the paint reacted with the wood. I was expecting it to be a solid colour but after one coat the wood grain still showed through the paint. I really liked the way it looked so I stopped after the one coat. I’m not sure if that’s how it always is, or if it was the type of paint that i was using, or if it was the foam roller. If I had to guess, I would put my money on the foam roller.
This was a bonus for me because I originally wanted to stain the wood but decided not to because it would involve the extra step of adding the clear coat. Going with the black paint meant saving one step, about 12 hours of dry time, and also a few bucks. This might be a helpful time-saving tip for anybody trying to achieve similar results.
Step 12: Sewing the Skirt
The first step to sewing the skirt was to assemble the completed frame. Once assembled, I was able to take my measurements.
I determined the finished height of the skirt by measuring from the bottom of the side rail to the floor and deducting 1-inch. I then added 1/2-inch to that measurement and cut three pieces. The length of each piece was about 12-inches longer than the actual length of the bed.
I then folded over one side of the fabric 1/2-inch and sewed it down with a sewing machine.
On the opposite side I sewed on the loop-side (soft side) of the velcro. See the diagram attached.
I then attached the hook side (hard side) of the velcro to the underside of the side rails using a staple gun.
Then I attached the three pieces of fabric to the three rails and marked where to seam the three pieces together. This was a little difficult for me as I wasn’t really sure how to do this properly. After a few attempts, some pins, and a bit of chalk I was able to make my mark.
Step 13: Covering the Back of the Headboard
I wanted to finish off the back of the headboard so I purchased a flat bead sheet. I lined up two finished edges of the sheet on the back headboard. I pinned it in place while I marked my cuts. I then folded and sewed the two freshly cut sides to give it a clean look. I then pinned the sheet back up and hot glued it to the headboard.
Step 14: Conclusions
Now that the bed is at an appropriate height for an adult, it is far more comfortable. It is stronger than it was originally and is much more stylish and sophisticated. I am very pleased with my decision to Hack my IKEA bed.
Since completing the bed I have realized that it will be quite easy now to make slip covers with different fabrics for the headboard. The idea is that they will just slide over the existing board. It’s a great idea if you ever get tired of the permanent fabric that you attached to the headboard. I plan on doing this, so if I do actually get around to it i will definitely post an instructable.
Thanks for reading through my instructable. If you have any questions or comments send them my way and I will do my best to respond to them.

Доступность: Нет на складе
Артикул: 701.900.54
Будьте первым кто оставит отзыв об этом товаре
Краткая информация
Массив дерева – прочный натуральный материал.Центральная перекладина прилагается.Реечное дно кровати, матрас и постельное белье продаются отдельно.
Нет в наличии

Доставка в Минск
Бесплатная доставка курьером по г. Минск* доставка 25 мая — бесплатно
Платная доставка курьером по Беларуси от 17 руб. доставка 25 мая
Подъем на этаж
Сборка и установка
- Описание
- Отзывы (0)
Размеры RYKENE РИКЕНЕ
- Длина:
- 209 см
- Ширина:
- 181 см
- Высота изножья:
- 33 см
- Высота изголовья:
- 97 см
- Длина матраса:
- 200 см
- Ширина матраса:
- 160 см
Сопроводительные документы по сборке и установке. (Скачать PDF)
Руководство по эксплуатации товара. Вы можете загрузить только последние версии документов. Это означает, что между этой версией файла и печатной версией могут быть различия.
| Артикул | Инструкции по сборке |
|---|---|
| 701.900.54 | RYKENE РИКЕНЕ Каркас кровати (PDF) |
Основные характеристики
Особенности «RYKENE РИКЕНЕ Каркас кровати — серо-коричневый 160×200 см» заявленные производителем IKЕА:
Массив дерева – прочный натуральный материал.
Центральная перекладина прилагается.
Реечное дно кровати, матрас и постельное белье продаются отдельно.
Каркас кровати следует использовать только с реечным дном ЛУРОЙ, чтобы матрас был расположен на правильной высоте.
Кроватные ящики ГИМСЕ обеспечат под кроватью дополнительное место для хранения.
При полном или частичном расхождении с заявленными особенностями, продукт подлежит гарантийному обмену.
Условия возврата по гарантии действует на товар ТОЛЬКО при надлежащем уходе. Подробнее Гарантии и возврат
Размеры и вес упаковки
RYKENE РИКЕНЕ
Каркас кровати
701.900.54
Ширина: 16 см
Высота: 14 см
Длина: 204 см
Вес: 20.77 кг
Упаковки: 1
Экологическая информация
*Хотим обратить Ваше внимание, что не все изделия бренда IKEA подлежат вторичной переработке в РБ.
Руководство по уходу RYKENE РИКЕНЕ
Протирать тканью, смоченной мягким моющим средством.
Вытирать чистой сухой тканью.
При не соблюдении правил эксплуатации, гарантия на изделие НЕ распространяется.
Описание и размеры товара
Каркас кровати, серо-коричневый 160×200 см IKEA RYKENE РИКЕНЕ включает в себя следующие материалы:
- Основные части/ Боковина кровати/ Обвязка:
- Массив сосны, Морилка, Прозрачный акриловый лак
- Средняя балка:
- Массив сосны
- Металлическая трубка:
- Сталь, Эпоксидное/полиэстерное порошковое покрытие
Экологическая информация
Используя в этом товаре возобновляемый материал, такой как древесина, мы можем обходиться без материалов на основе исчерпаемого сырья.
Мы хотим оказывать позитивное воздействие на экологию планеты. Вот почему мы планируем к 2030 году использовать для изготовления наших товаров только переработанные, возобновляемые и полученные из ответственных источников материалы.
Товар произведен на территории стран СНГ и ЕС под наблюдением компании Inter IKEA Systems B.V.
Модель RYKENE РИКЕНЕ можно купить в любом из доступных вариантов расцветок. Заказать товар из каталога IKEA без предоплаты легко. Для этого нужно заполнить Ваши имя и телефон. Наш продавец консультант перезвонит Вам.
Доставка заказа из магазина IKEA в Минск, Гродно, Витебск, Могилев, Брест, Гомель и другим 156 городам Беларуси в течении 6-7 дней. Оплата производится по факту получения товара
-
Рекомендуем