
Фиксируйте детали любой миссии с Mavic 2 Enterprise Advanced — универсальным компактным инструментом, который порадует вас целым рядом новых функций и улучшенной производительностью. Оснащенный тепловизором и визуальной камерой с высоким разрешением, M2EA поддерживает цифровое увеличение до 32 раз и обеспечивает точность позиционирования до сантиметра с помощью модуля RTK.
Документация
- Mavic 2 Enterprise Advanced — Пояснительная записка 2022-06-20
- Mavic 2 Enterprise Advanced — Руководство пользователя v1.02021-03-31
- Mavic 2 Enterprise — Комплект поставки (Smart_Controller)2021-03-09
- Mavic 2 Enterprise Advanced — Краткое руководство v1.02021-03-09
- Mavic 2 Enterprise — Заявление об отказе от ответственности и руководство по технике безопасности 2021-03-09
- Mavic 2 Enterprise — Руководство по технике безопасности для аккумулятора Intelligent Flight Battery 2021-03-09
- Mavic 2 Enterprise Advanced Known Issue List 2021-03-31
Программное обеспечение
![]()
DJI Assistant 2 (Enterprise Series)
Compatible with Matrice,The Mac version does not support the M300 M350 and Zenmuse H20 series at this time.
Программное обеспечение
Документы
- DJI Assistant 2 (Enterprise Series) Пояснительная записка V2.1.92023-05-18
![]()
DJI Thermal SDK
TSDK (DJI Thermal SDK) is mainly used to analyze and process infrared photos. Users can develop their own software based on TSDK in Windows or Linux environment to develop such as R-JPEG infrared photo processing and temperature measurement.
For details, please check the files:
Readme.md: Introduce the development environment of TSDK and the usage of executable programs under utility directory
License.txt: Declare the license information of TSDK
doc/index.html: List the detailed interface information of TSDK API (tsdk-core/api/dirp_api.h)
sample/build.sh, sample/build.bat: are scripts for automatic compilation of test programs under Linux and Windows
dataset: several R-JPEG samples for testing
Программное обеспечение
![]()
DJI Thermal Analysis Tool 3.0
The DJI Thermal Analysis Tool 3.0 can be used to analyze and process thermal images. By identifying the temperature information of critical areas of the target, the software can be used to analyze objects across many industrial applications. Major incidents can be prevented or addressed quickly by using the software to detect and pinpoint temperature abnormalities in equipment in routine inspections.
Программное обеспечение
Документы
- DJI Thermal Analysis Tool 3.0 Пояснительная записка 2022-11-09
- DJI Thermal Analysis Tool 3.0 Руководство пользователя 2022-11-09

- Manuals
- Brands
- dji Manuals
- Quadcopters
- Mavic 2 Enterprise
- User manual
-
Contents
-
Table of Contents
-
Bookmarks
Quick Links
MAVIC 2
ENTERPRISE
Advanced
User Manual
v1.0
2021.03
Related Manuals for dji MAVIC 2 ENTERPRISE Advanced
Summary of Contents for dji MAVIC 2 ENTERPRISE Advanced
-
Page 1
MAVIC 2 ENTERPRISE Advanced User Manual v1.0 2021.03… -
Page 2
Searching for Keywords Search for keywords such as “battery” and “install” to find a topic. If you are using Adobe Acrobat Reader to read this document, press Ctrl+F on Windows or Command+F on Mac to begin a search. Navigating to a Topic View a complete list of topics in the table of contents. -
Page 3: Using This Manual
* For increased safety, flight is restricted to a height of 98.4 ft (30 m) and range of 164 ft (50 m) when not connected or logged into the app during flight. This applies to DJI Pilot and all apps compatible with DJI aircraft.
-
Page 4: Table Of Contents
Contents Using This Manual Legend Read Before the First Flight Download the DJI Pilot App Download DJI Assistant 2 (Enterprise Series) Product Profile Introduction Preparing the Aircraft Preparing the Remote Controller Diagram Activation Aircraft Flight Modes Aircraft LEDs and Status Indicator…
-
Page 5
DJI Pilot App Manual Flight Mission Flight Album Flight Flight Environment Requirements Flight Limits and GEO Zones Pre-Flight Checklist Starting/Stopping the Motors Flight Test Appendix Specifications Calibrating the Compass Updating Firmware After-Sales Information © 2021 DJI All Rights Reserved. -
Page 6
Product Profile This section introduces Mavic 2 Enterprise Advanced and lists the components of the aircraft and remote controller. © 2021 DJI All Rights Reserved. -
Page 7: Product Profile
2.0, offering a maximum transmission range of 6.2 mi (10 km) and displaying video from the aircraft to DJI Pilot on a mobile device at up to 720p. The remote controller works at both 2.4 GHz and 5.8 GHz and can automatically select the best transmission channel without any latency.
-
Page 8
MAVIC 2 ENTERPRISE Advanced User Manual * Attach the gimbal cover when not in use. Gimbal clamp 1) Hold the gimbal in place and insert the gimbal clamp between the aircraft and the gimbal. 2) Make sure the hooks on the gimbal protector are locked in the grooves of the aircraft. -
Page 9: Preparing The Remote Controller
MAVIC 2 ENTERPRISE Advanced User Manual Preparing the Remote Controller Two pairs of control sticks are included in the packaging for the Smart Controller. One pair is stored in the sticks storage slot on the back of the remote controller. Follow the steps below to attach the control sticks stored in the sticks storage slot to the remote controller.
-
Page 10: Diagram
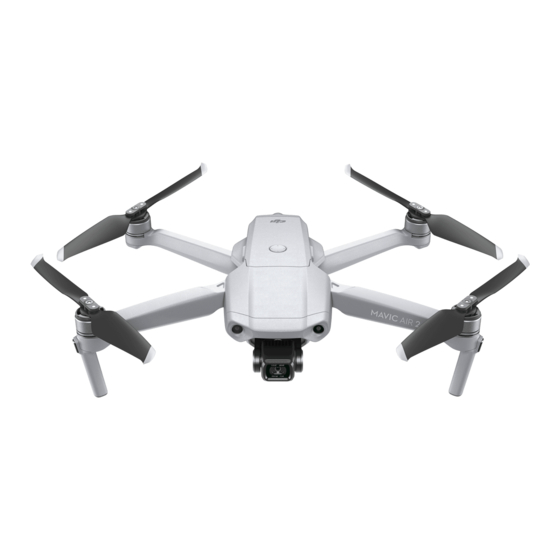
MAVIC 2 ENTERPRISE Advanced User Manual Diagram Mavic 2 Enterprise Advanced (L1TE) 1. Forward Vision System 2. Propellers 3. Motors 4. Front LEDs 5. Gimbal and Camera A. Thermal Camera B. Visual Camera 6. Antennas 7. Backward Vision System 8. Aircraft Status Indicator 9.
-
Page 11
9. 5D Button Relays aircraft control and video signal. The default configuration is listed below. The configuration can be adjusted in DJI Pilot. 2. Back Button/Function Button Press once to return to the previous screen Up: Recenter gimbal/move gimbal downward… -
Page 12
27. Customizable Button C1 The default configuration is center focus. 24. Sticks Storage Slot The configuration can be set in DJI Pilot. Use to store a pair of control sticks. 28. Air Intake 25. Customizable Button C2 Used for heat dissipation. -
Page 13: Activation
2. Connect the remote controller to the internet via Wi-Fi. After connecting, tap Next to continue and select the time zone, date, and time. 3. Log in with a DJI account. If you do not have an account, create a DJI account and log in. 4. Tap Activate on the activation page.
-
Page 14
Aircraft This section introduces the flight controller, Intelligent Flight Battery, and the Forward, Backward, and Downward Vision Systems. © 2021 DJI All Rights Reserved. -
Page 15: Aircraft
Intelligent Flight Battery. Refer to the aircraft diagram in the Product Profile section. Flight Modes Mavic 2 Enterprise Advanced has three flight modes, plus a fourth flight mode that the aircraft switches to in certain circumstances: P-mode (Positioning): P-mode works best when the GPS signal is strong. The aircraft utilizes GPS and the Vision Systems to locate itself, stabilize, and navigate between obstacles.
-
Page 16: Aircraft Leds And Status Indicator
The Front LEDs show the orientation of the aircraft and glow solid red when the aircraft is powered on to indicate the front of the aircraft. Go to settings in DJI Pilot to turn the Front LEDs on or off.
-
Page 17: Return To Home
Return home or land the aircraft immediately when prompted. DJI Pilot displays a warning prompt when the battery level is low. The aircraft will automatically return to the Home Point if no action is taken after a 10 second countdown.
-
Page 18
MAVIC 2 ENTERPRISE Advanced User Manual Aircraft Status Warning Scenario DJI Pilot App Actions Indicator Choose RTH or Select an option. If no Remaining battery level resume normal action is taken, the aircraft supports RTH. flight. will enter RTH. Select an option. -
Page 19
During RTH, the orientation and direction of the aircraft cannot be controlled, but the remote controller or DJI Pilot can be used to control the speed and altitude. During RTH, obstacles on either side of the aircraft cannot be detected or avoided. -
Page 20: Vision Systems And Infrared Sensing Systems
RTH. When the current terrain matches the Home Point terrain, the aircraft will start landing. A prompt will appear in DJI Pilot if the aircraft is unable to match the terrain. Landing protection is available during precision landing.
-
Page 21
DJI Pilot or DJI Assistant 2 (Enterprise Series) for Mavic. The most accurate way to calibrate the Vision System cameras is by using DJI Assistant 2 (Enterprise Series) for Mavic. Follow the steps below to calibrate the Forward Vision System cameras and repeat the steps to calibrate other Vision System cameras. -
Page 22
Make sure to maintain line of sight with the aircraft and pay attention to prompts in DJI Pilot. DJI takes no responsibility for any aircraft that is damaged or lost while using the Lateral Vision Systems. -
Page 23: Flight Recorder
Systems. Do not use any cleaning products that contains alcohol. c) Contact DJI Support if there is any damage to the glass of the Infrared Sensing and Vision Systems. The Upward Infrared Sensing System only detects in a straight line directly above the sensor and not the entire area above the aircraft.
-
Page 24: Attaching And Detaching The Propellers
User Manual The password is stored in the aircraft only and will not be uploaded to the DJI server. Therefore, the aircraft needs to be reformatted if the password is lost. The data stored in the aircraft will be deleted once the aircraft is formatted.
-
Page 25: Intelligent Flight Battery
11. Communication: information about the voltage, capacity, and current of the battery is transmitted to the aircraft. 12. Heating: the batteries of the Mavic 2 Enterprise Advanced are self-heating, enabling them to work in harsh and cold weather conditions as low as -4° F (-20° C).
-
Page 26
MAVIC 2 ENTERPRISE Advanced User Manual Refer to the Mavic 2 Intelligent Flight Battery Safety Guidelines before use. Users take full responsibility for all operations and usage. Using the Battery Battery Level LEDs Power Button High Checking Battery Level The battery level LEDs display how much charge is remaining. If the battery is powered off, press the power button to make the battery level LEDs light up to display the current battery level. -
Page 27
41° to 104° F (5° to 40° C). The ideal charging temperature is 71.6° to 82.4° F (22° to 28° C). The Battery Charging Hub (not included) can charge up to four batteries. Visit the official DJI online store for more information. -
Page 28: Gimbal And Camera
Use the gimbal dial on the remote controller to control the tilt of the camera. Alternatively, enter the live view in DJI Pilot. Double tap to center or press the screen until a blue circle appears and drag the circle up and down to control the tilt of the camera and left and right to control the orientation of the aircraft.
-
Page 29
For Mavic 2 Enterprise Advanced, only the photos and videos recorded by the visual camera will have a timestamp and GPS info. -
Page 30: Dji Airsense
ADS-B out devices. 2. If there is an obstacle or steel structure between a manned aircraft and DJI aircraft, DJI AirSense will not be able to receive ADS-B messages sent by the manned aircraft or send warning prompts to the user.
-
Page 31: Modular Accessories
MAVIC 2 ENTERPRISE Advanced User Manual Modular Accessories Mavic 2 Enterprise Advanced features an extended port for mounting additional compatible DJI modular accessories that are listed below: M2E Beacon: helps to identify aircraft during flight at night or in low light areas.
-
Page 32: Using The Rtk Module
MAVIC 2 ENTERPRISE Advanced User Manual Make sure that the accessories are correctly and securely mounted on the aircraft before use. Otherwise, they may fall from the aircraft during flight. DO NOT point the spotlight or the beacon directly at people’s eyes.
-
Page 33
Smart Controller This section describes the features of the remote controller and includes instructions for controlling the aircraft and the camera. © 2021 DJI All Rights Reserved. -
Page 34: Smart Controller
The DJI Smart Controller uses DJI’s OcuSync 2.0 long-range transmission technology, offering a maximum transmission range of 6.2 mi (10 km) and displaying video from the aircraft to DJI Pilot on a mobile device at up to 720p resolution. The onboard buttons make controlling the aircraft easy and its detachable control sticks make it convenient to store.
-
Page 35
There are three pre-programmed modes as well as custom modes that can be configured in DJI Pilot. The modes are Mode 1, Mode 2, and Mode 3. The default mode is Mode 2. In each of the three pre-programmed modes, the aircraft hovers in place at a constant orientation when both sticks are centered. -
Page 36
MAVIC 2 ENTERPRISE Advanced User Manual Mode 1 Left Stick Right Stick Forward Down Backward Left Right Turn Left Turn Right Mode 2 Left Stick Right Stick Forward Down Backward Left Right Turn Left Turn Right Mode 3 Left Stick… -
Page 37
MAVIC 2 ENTERPRISE Advanced User Manual Remote Aircraft Controller Remarks Indicates Nose Direction) (Mode 2) Moving the left stick up or down changes the altitude of the aircraft. Push the stick up to ascend and down to descend. The more the stick is pushed away from the center, the faster the aircraft changes altitude. -
Page 38
DJI Pilot. The functions of the C1 and C2 buttons are set in DJI Pilot. The default configuration for the C1 button is center focus and the default configuration for the C2 button is playback. -
Page 39: Linking The Smart Controller
Note that the illustrations above do not reflect the actual distances between the user and aircraft and are for reference only. A warning prompt appears in DJI Pilot if the transmission signal is weak. Adjust the antennas to make sure that the aircraft is within the optimal transmission range.
-
Page 40: Status Led And Battery Level Leds Description
MAVIC 2 ENTERPRISE Advanced User Manual Make sure the antennas of the remote controller are unfolded and adjusted to the proper position to achieve optimal transmission quality. Repair or replace the remote controller if damaged. A damaged remote controller antenna greatly decreases performance.
-
Page 41: Smart Controller Warning Sounds
MAVIC 2 ENTERPRISE Advanced User Manual Smart Controller Warning Sounds The Smart Controller will vibrate and/or beep when there is a warning prompt. If the error is related to the aircraft or flight status, the remote controller beeps and the status LED is solid green. If the error is related to the Smart Controller, a warning prompt will appear on the screen of the remote controller.
-
Page 42
DJI Pilot App This section introduces the main functions of the DJI Pilot app. © 2021 DJI All Rights Reserved. -
Page 43: Dji Pilot App
DJI Pilot App DJI Pilot is specifically developed for enterprise users and offers two types of flight. Manual flight integrates a variety of professional features that make flying simple and intuitive. Mission flight supports flight planning, and allows users to control the drone automatically, making workflows much simpler and more efficient.
-
Page 44
5. DJI AirSense Status : displays information about nearby manned aircraft to ensure flight safety, including the distance between DJI aircraft and manned aircraft. DJI AirSense will instruct users to land if nearby aircraft are detected. 6. GPS Signal Strength : displays the current GPS signal strength. -
Page 45
MAVIC 2 ENTERPRISE Advanced User Manual 11. General Settings : tap to enter the General Settings to set units of measurement, enable or disable livestream, and more. 12. Display Mode Tap to switch between the Visible, IR, and Split display modes. -
Page 46
MAVIC 2 ENTERPRISE Advanced User Manual 21. Map Tap to view the map. 22. Time and GPS Information Displays current date, time, and the longitude and latitude of the aircraft. Only available in Visible mode. 23. Accessory Shows if an accessory is connected such as the beacon… -
Page 47
+ 147.498992, — 122.274800 1. Palette : Mavic 2 Enterprise Advanced offers a variety of palette options. Distinct colors are used to show temperature differences in the thermal image, which are related to grayscale intensity. The temperature range of the image is mapped to 256 colors and displayed in 8-bit JPEG or MP4 format. -
Page 48
MAVIC 2 ENTERPRISE Advanced User Manual b) Area Measurement: drag an area within the temperature measurement area on the screen. The average temperature, lowest temperature, highest temperature, and corresponding locations of this area will be displayed. The temperature measurement accuracy is affected by various factors: a) Reflectivity of objects –… -
Page 49: Mission Flight
MAVIC 2 ENTERPRISE Advanced User Manual Mission Flight Introduction Tap to enter the mission library. View created flight routes or the most recent Waypoint flights, Mapping missions, or Oblique Photography missions. Mapping and Oblique Photography missions are generated using the app and Waypoint flights can be created by selecting Set Waypoints or Live Mission Recording.
-
Page 50
4. Delete Selected Waypoint : tap to delete the selected waypoint. 5. Parameters List Edit the route name, set the aircraft type as Mavic 2 Enterprise Advanced, and configure the gimbal and camera. 6. Route Settings Route settings are applied to the entire route including action upon completion, gimbal control, and aircraft speed, height, and yaw. -
Page 51
MAVIC 2 ENTERPRISE Advanced User Manual waypoint. The settings are applied to the selected waypoint including aircraft speed, height, yaw, longitude, latitude, and waypoint type and actions. 8. Mission Information Displays the flight length, estimated flight time, waypoint quantity, photo quantity, longitude, and latitude. -
Page 52
MAVIC 2 ENTERPRISE Advanced User Manual 5. Clear Screen : tap to clear the flight path currently shown on the map. Live Mission Recording In-Flight(GPS) 2.4G 19:29 Shutter Shutter VISIBLE 1.0x 1/1000 1/1000 MENU Waypoints 1 SPLIT 00:05 VISIBLE 123456 123456 16.0… -
Page 53: Album
MAVIC 2 ENTERPRISE Advanced User Manual Album Jan27,2021 4:21:23 PM Single Shot (3 photos) Tap to view photos or videos that can be saved to a mobile device. When saving a photo or video, the format will vary depending on the display mode. Refer to the Storing the Photos and Videos section for more information.
-
Page 54
Flight This section describes safe flight practices and flight restrictions. © 2021 DJI All Rights Reserved. -
Page 55: Flight
Flight Altitude and Distance Limits The flight altitude and distance limits can be set in DJI Pilot. The maximum flight altitude setting cannot exceed 1,640 ft (500 m). Based on these settings, the aircraft will fly in a restricted cylinder as shown below.
-
Page 56
Only fly the aircraft within visual line of sight. GEO Zones All GEO Zones are listed on the DJI official website at http://www.dji.com/flysafe. GEO Zones are divided into different categories and include locations such as airports, flight areas where manned aircraft operate at low altitudes, international borders, and sensitive locations such as power plants. -
Page 57: Pre-Flight Checklist
8. Make sure all accessories are correctly and securely mounted on the aircraft before use. 9. Use only genuine DJI parts or parts certified by DJI. Unauthorized parts or parts from non-DJI certified manufacturers may cause system malfunctions and compromise safety.
-
Page 58: Flight Test
1. Place the aircraft in an open, flat area with the Aircraft Status Indicators facing towards you. 2. Power on the aircraft and the remote controller. 3. Launch DJI Pilot and enter the live view. 4. Wait until the Aircraft Status Indicator blinks green indicating that the Home Point has been recorded and it is now safe to fly.
-
Page 59
Appendix © 2021 DJI All Rights Reserved. -
Page 60: Appendix
2.4-2.4835 GHz; 5.725-5.850 GHz Transmitter Power (EIRP) 2.4 GHz FCC: ≤26 dBm; CE: ≤20 dBm; SRRC: ≤20 dBm; MIC: ≤20 dBm 5.8 GHz FCC: ≤26 dBm; CE: ≤14 dBm; SRRC: ≤26 dBm Internal Storage 24 GB © 2021 DJI All Rights Reserved.
-
Page 61
MAVIC 2 ENTERPRISE Advanced User Manual Thermal Camera Sensor Uncooled VOx Microbolometer Focal Length Approx. 9 mm 35mm Format Equivalent: Approx. 38 mm Sensor Resolution 640×512 @30Hz Digital Zoom 16× Pixel Pitch 12 μm Spectral Band 8-14 μm Photo Format 640×512… -
Page 62
MAVIC 2 ENTERPRISE Advanced User Manual Stabilization 3-axis (tilt, roll, pan) Max Controllable Speed 120°/s Angular Vibration Range ±0.005° Sensing System Sensing System Omnidirectional Obstacle Sensing (Forward) Horizontal: 40°, Vertical: 70° (Backward) Horizontal: 60°, Vertical: 77° (Downward) Front and Back: 100°, Left and Right: 83°… -
Page 63
MAVIC 2 ENTERPRISE Advanced User Manual Operating Frequency 2.400-2.4835 GHz Transmission Power (EIRP) 4 dBm (FCC); 4 dBm (CE) 4 dBm (SRRC); 4 dBm (MIC) Others Battery 18650 Li-ion (5000 mAh @ 7.2 V) Charging Mode Charged with USB charger at 12 V/2 A… -
Page 64
USB Micro-B Power Max. 10 W Decibel 100 dB at 1 m (international standard) Bit Rate 16 kbps * The DJI Smart Controller supports a microSD with a capacity of up to 128 GB. © 2021 DJI All Rights Reserved. -
Page 65: Calibrating The Compass
Choose an open area to carry out the following procedure. 1. Tap the System Status Bar in DJI Pilot, select Calibrate, and follow the on-screen instructions. 2. Hold the aircraft horizontally and rotate it 360°. The Aircraft Status Indicator will turn solid green.
-
Page 66: Updating Firmware
Use DJI Pilot or DJI Assistant 2 (Enterprise Series) to update the aircraft firmware. Using DJI Pilot When the aircraft or remote controller is connected to DJI Pilot, a prompt will appear if a new firmware update is available. To update, connect the mobile device to the internet and follow the onscreen instructions.
-
Page 67: After-Sales Information
If a firmware update is available, users will be prompted to update immediately or within three days. If the firmware update is ignored, users are required to agree to the disclaimer. The user’s decision not to update to the latest firmware is recorded to be uploaded and maintained on a DJI designated server.
-
Page 68
This content is subject to change. Download the latest version from www.dji.com/mavic-2-enterprise-advanced If you have any questions about this document, please contact DJI by sending a message to DocSupport@dji.com. MAVIC is a trademark of DJI. Copyright © 2021 DJI All Rights Reserved.
dji Mavic 2 Enterprise Advanced Aircraft

Самолет
Взлетная масса (без аксессуаров)
- 909g
Максимальный взлетный вес
- 1100g
Размеры (Д × Ш × В)
- В сложенном виде: 214 × 91 × 84 мм
- В разложенном виде: 322 × 242 × 84 мм
- В разложенном виде+прожектор: 322×242×114 мм
- В разложенном виде+маяк: 322×242×101 мм
- В разложенном виде+динамик: 322×242×140 мм
- Разложенный + модуль RTK: 322x242x125 мм
Диагональное расстояние
- 354 мм
Максимальная скорость подъема
- 6 м / с (S-режим)
- 5 м / с (режим P)
- 4 м/с (S-режим с аксессуарами)
- 4 м/с (режим P с принадлежностями)
Максимальная скорость спуска
- Спуститься вертикально
- 5 м / с (S-режим)
- 4 м / с (режим P)
- Наклон
- 7 м / с (S-режим)
- 4 м / с (режим P)
Максимальная Скорость
- 72 км/ч (режим S, без ветра)
- 50 км/ч (режим P, без ветра)
Максимальный уровень обслуживания над уровнем моря
- 6000 m
Максимальное время полета
- 31 мин (измерено при полете со скоростью 25 км/ч в безветренных условиях)
- 28 мин (модуль RTK подключен)
- 29 мин (с включенным маяком)
- 30 мин (с выключенным маяком)
- 24 мин (с включенным прожектором)
- 28 мин (с выключенным прожектором)
- 27 мин (с включенным динамиком)
- 28 мин (с выключенным динамиком)
Максимальное сопротивление скорости ветра
- 10 м/с (шкала 5)
Макс. Угол наклона
- 35°(S-режим, с пультом дистанционного управления)
- 25 ° (режим P)
Максимальная угловая скорость
- 200°/с (S-режим)
- 100°/с (P-режим)
Рабочая Температура
- -10 ° в 40 ° C
GNSS
- GPS + ГЛОНАСС
Диапазон точности наведения
- По вертикали:
- ± 0.1 м (с RTK)
- ± 0.1 м (с визуальным позиционированием)
- ± 0.5 м (с GPS-позиционированием)
- По горизонтали:
- ± 0.1 м (с RTK)
- ± 0.3 м (с визуальным позиционированием)
- ± 1.5 м (с GPS-позиционированием)
Рабочая частота
- 2.400–2.4835 ГГц;
- 5.725-5.850 ГГц
Мощность передатчика (EIRP)
- 2.400 — 2.4835 GHz
- FCC: ≤26 дБм;
- CE: ≤20 дБм;
- SRRC: ≤20 дБм;
- MIC: ≤20 дБм
- 5.725 — 5.850 GHz
- FCC: ≤26 дБм;
- CE: ≤14 дБм;
- SRRC: ≤26 дБм
Внутренние хранения
- 24 GB
Тепловизионная камера M2EA
датчик
- Неохлаждаемый микроболометр VOx
Фокусное расстояние
- Прибл. 9mm
- Эквивалент формата 35 мм: прибл. 38мм
- Разрешение сенсора
- 640 × 512 при 30 Гц
Точность тепловой температуры
- Измерение: ±2℃ или ±2%, в зависимости от того, что больше.
Диапазон сцены
- от -40 °C до 150 °C (высокое усиление)
- от 40 °C до 550 °C (низкий коэффициент усиления)
Цифровой зум
- 16 ×
Pixel Pitch
- 12 мкм
Спектральный диапазон
- 8-14 мкм
Формат фотографии
- R-JPEG
Формат видео
- MP4
Метод измерения
- Точечный измеритель, измерение площади
FFC
- Автоматический / ручной
Визуальная камера M2EA
датчик
- 1/2-дюймовый CMOS, эффективные пиксели: 48 мегапикселей
объектив
- FOV: 84 °
- Эквивалент формата 35 мм: 24 мм
- Диафрагма: f / 2.8
- Фокус: от 1 м до ∞
Диапазон ISO
- Видео: 100-12800 (авто)
- фото: 100-1600 (авто)
Цифровой зум
- 32 ×
Максимальный размер изображения
- 8000 × 6000
Режимы фотосъемки
- Single shot interval: 2/3/5/7/10/15/20/30/60 s
- Панорама: Сфера
Разрешение видео
- 3840 × 2160 @ 30fps
- 1920 × 1080 @ 30fps
Формат фотографии
- JPEG
Формат видео
- MP4
карданный подвес
Механический диапазон
- Наклон: -135°- +45°
- Панорамирование: -100°- +100°
Контролируемый диапазон
- Наклон: -90°- +30°
- Панорамирование: -75°- +75°
Стабилизация
- Ось 3 (наклон, рулон, кастрюля)
Максимальная скорость управления
- 120 ° / с
Угловой диапазон вибрации
- ± 0.005 °
считывание Система
Сенсорная система
- Всенаправленное обнаружение препятствий[2]
вперед
- Диапазон измерения точности: 0.5 — 20 м
- Диапазон обнаружения: 20 — 40 м
- Эффективная скорость обнаружения: ≤ 14m / s
- FOV: Горизонтальное: 40 °, Вертикальное: 70 °
назад
- Диапазон измерения точности: 0.5 — 16 м
- Диапазон обнаружения: 16 — 32 м
- Эффективная скорость обнаружения: ≤ 12m / s
- FOV: Горизонтальное: 60 °, Вертикальное: 77 °
Вверх
- Диапазон измерения точности: 0.1-8 м
Вниз
- Диапазон точного измерения: 0.5-11 м
- Обнаруживаемый диапазон: 11-22 м
Стороны
- Диапазон измерения точности: 0.5 — 10 м
- Эффективная скорость обнаружения: ≤ 8m / s
- FOV: Горизонтальное: 80 °, Вертикальное: 65 °
Условия эксплуатации
- Вперед, назад и по сторонам:
- Поверхность с четким рисунком и достаточным освещением
- (люкс > 15)
- Вверху: Обнаруживает диффузно отражающие поверхности (> 20%) (стены, деревья, люди и т. д.)
- Вниз: поверхность с четким рисунком и достаточным освещением
- (люкс > 15) Обнаруживает диффузно отражающие поверхности (> 20%) (стены, деревья, люди и т. д.)
Пульт дистанционного управления
Рабочая частота
- 2.400-2.483 ГГц;
- 725 – 5.850 ГГц
Максимальное расстояние передачи (беспрепятственно, без помех)
- 2.400-2.483 ГГц; 5.725 — 5.850 ГГц
- FCC: 10000m
- CE: 6000m
- SRRC: 6000m
- Микрофон: 6000 м
Мощность передачи (EIRP)
- 2.400–2.4835 ГГц:
- 25.5 дБм (FCC), 18.5 дБм (CE), 19 дБм (SRRC), 18.5 дБм (MIC)
- 5.725–5.850 ГГц:
- 25.5 дБм (FCC), 12.5 дБм (CE), 18.5 дБм (SRRC)
Хранилище
- ПЗУ 16 ГБ + Расширяемое хранилище MicroSD
Порт видеовыхода
- Порт HDMI
Встроенный аккумулятор
- Тип: 18650 Li-Po (5000 мАч при 7.2 В)
- Режим зарядки: заряжается от USB-зарядного устройства на 12 В/2 А.
- Номинальная мощность 15 Вт
- Время зарядки: 2 часа (от зарядного устройства USB на 12 В/2 А)
Рабочий ток / об.tage
- 1800 мА ⎓ 3.83 В
Срок службы батареи
- Встроенный аккумулятор прибл. 2.5 часа
Рабочая Температура
- -20 ° С — 40 ° С
Размер пульта дистанционного управления
- В сложенном виде без джойстика: 177.5 x 121.3 x 40 мм
- В разложенном виде с джойстиком: 177.5 x 181 x 60 мм
Вес
- Прибл. 630 g
Интеллектуальная батарея полета
- Основное звено: 17.6 В ⎓ 3.41 А или 17.0 В ⎓ 3.53 А
- USB: 5.0 V ⎓ 2.0 A
Интеллектуальная батарея полета
Пропускная способность
- 3850 мАч
Voltage
- 15.4V
Максимальный объем зарядкиtage
- 17.6V
Тип батареи
- LiPo
Энергия
- 59.29 Wh
вес нетто
- 297g
Температура зарядки
- 5 ℃ — 40 ℃
Диапазон рабочих температур:
- -10 ℃ — 40 ℃
Методы нагрева:
- Ручной нагрев, автоматический нагрев
температура нагрева
- -20 ℃ — 6 ℃
Продолжительность нагрева
- 500 с (макс.)
Мощность нагрева
- 5W (Макс.)
Время зарядки
- 90 минут
Максимальная зарядная мощность
- 80W
Модули RTK
Размеры
- 69 мм x 69 мм x 59mm
Коммутация
- Micro USB-порт
- Точность позиционирования RTK
- В РТК ФИКС
- 1 см+1 стр/мин (по горизонтали)
- 1.5 см + 1 часть на миллион (по вертикали)
В центре внимания M2EA
Размеры
- 68×60×41мм
Коммутация
- Micro USB-порт
рабочий диапазон
- 30 m
Питания
- Макс 26W
Освещенность
- FOV17°, макс.: 11 люкс на 30 м по прямой
Маяк M2EA
Размеры
- 68mm × 40mm × 27.8mm
Коммутация
- Micro USB-порт
Питания
- Сред. 1.6 Вт
Контролируемый диапазон
- 5000 m
Интенсивность света
- Минимальный угол: 55 кд;
- Интенсивность света: 157 кд
Динамик M2EA
Размеры
- 68 × 55 × 65 мм
Коммутация
- Micro USB-порт
Питания
- Макс 10W
Децибел
- 100 дБ на расстоянии 1 метр
Максимальный битрейт
- 16kbps
Карты SD
Поддерживаемые SD-карты
-
- Micro SD ™
- Поддерживает microSD емкостью до 128 ГБ.
- Требуется карта microSD UHS-I Speed Grade 3.
- Micro SD ™
ПРИЛОЖЕНИЕ / В прямом эфире View
Система видеопередачи
- OcuSync 2.0
Мобильное приложение
- DJI PILOT (версия для Android)
Концерты View Качество
- Пульт:
- 720p при 30 кадрах в секунду / 1080p при 30 кадрах в секунду
Макс Живой View Поток
- 40Mbps
Задержка
- 120 — 130 мс
Требуемая операционная система
- iOS 10.0 или новее Android 5.0 или новее
Другое
Сноски
[1] Точность измерения температуры измеряется на расстоянии 5 м от абсолютно черного тела с коэффициентом излучения 0.95 в идеальных условиях. Фактическая точность также зависит от различных факторов окружающей среды, таких как температура и влажность, и ее необходимо корректировать с помощью программного обеспечения для постобработки. В идеальных условиях точность измерения температуры может достигать ±2℃ или ±2%, в зависимости от того, что больше. [2] Всенаправленное обнаружение препятствий включает обнаружение препятствий влево/вправо, вверх/вниз и вперед/назад. Определение направлений влево/вправо доступно только в режиме штатива. Всенаправленное обнаружение препятствий не полностью охватывает окружность 360-градусной дуги. А система обнаружения препятствий слева и справа работает только в определенных режимах и условиях. Гарантия DJI не распространяется на любые убытки, вызванные аварией при полете влево или вправо, даже если активирован режим штатива. Пожалуйста, следите за своим окружением и уведомлениями приложений при работе с Mavic 2, чтобы обеспечить безопасность.
Документы / Ресурсы
Посмотреть инструкция для DJI Mavic 2 Enterprise Advanced бесплатно. Руководство относится к категории дроны, 1 человек(а) дали ему среднюю оценку 9.3. Руководство доступно на следующих языках: английский. У вас есть вопрос о DJI Mavic 2 Enterprise Advanced или вам нужна помощь? Задайте свой вопрос здесь
Не можете найти ответ на свой вопрос в руководстве? Вы можете найти ответ на свой вопрос ниже, в разделе часто задаваемых вопросов о DJI Mavic 2 Enterprise Advanced.
Какой вес DJI Mavic 2 Enterprise Advanced?
Могу ли я запускать дрон в ближайших аэропортах?
Может ли аккумулятор моего дрон взорваться?
Какая высота DJI Mavic 2 Enterprise Advanced?
Какая ширина DJI Mavic 2 Enterprise Advanced?
Какая толщина DJI Mavic 2 Enterprise Advanced?
Инструкция DJI Mavic 2 Enterprise Advanced доступно в русский?
Не нашли свой вопрос? Задайте свой вопрос здесь
- Manuals
- Brands
- dji Manuals
- Drones
- Mavic 2 Enterprise
- Quick start manual
-
Contents
-
Table of Contents
-
Bookmarks
Quick Links
MAVIC 2
ENTERPRISE
Advanced
Quick Start Guide
快速入门指南
快速入門指南
クイックスタートガイド
퀵 스타트 가이드
Kurzanleitung
Guía de inicio rápido
Guide de démarrage rapide
Guida di avvio rapido
Snelstartgids
Guia de início rápido
Guia de Início Rápido
Краткое руководство пользователя
v1.0
Related Manuals for dji MAVIC 2 ENTERPRISE Advanced
Summary of Contents for dji MAVIC 2 ENTERPRISE Advanced
-
Page 1
MAVIC 2 ENTERPRISE Advanced Quick Start Guide 快速入门指南 快速入門指南 クイックスタートガイド 퀵 스타트 가이드 Kurzanleitung Guía de inicio rápido Guide de démarrage rapide Guida di avvio rapido Snelstartgids Guia de início rápido Guia de Início Rápido Краткое руководство пользователя v1.0… -
Page 2
Contents Quick Start Guide 快速入门指南 快速入門指南 クイックスタートガイド 퀵 스타트 가이드 Kurzanleitung Guía de inicio rápido Guide de démarrage rapide Guida di avvio rapido Snelstartgids Guia de início rápido PT-PT Guia de Início Rápido PT-BR Краткое руководство пользователя… -
Page 3
Infrared Sensing Systems*, and comes with a fully stabilized 3-axis gimbal camera with a thermal camera and a visual camera, providing both infrared and visual images simultaneously. DJI’s Obstacle Sensing technology helps users to fly and capture complex shots while AirSense provides awareness of the surrounding airspace and password protection ensures access to the aircraft and all data is secure. -
Page 4
DJI Smart Controller The DJI Smart Controller is a remote controller built with DJI’s long-range transmission technology OCUSYNC 2.0, offering a maximum transmission range of 6.2 mi (10 km) and provides a live HD view from the aircraft’s camera. The Smart Controller comes with a number of aircraft and gimbal controls as well as customizable buttons and has a built-in 5.5-inch high-brightness screen with multiple functions such as Bluetooth and… -
Page 5: Preparing The Aircraft
1. Preparing the Aircraft Remove the gimbal Unfold the front arms. Unfold the rear arms. cover from the camera. Marked Unmarked Match the propellers Press the propellers Unfolded to motors. down and rotate until they click in place. Unfold the front arms and the propellers before the rear ones. All arms and propellers must be unfolded before takeoff.
-
Page 6: Preparing The Remote Controller
Ensure the control sticks are firmly mounted. In real operation, the DJI Pilot app will prompt to warn that the transmission signal is weak, and please adjust the antennas to ensure that the aircraft is back to the…
-
Page 7: Preparing For Takeoff
Hold a few seconds to stop the motors Only stop motors mid-flight in emergency situations when doing so can reduce the risk of damage or injury. The method to stop the motor can be set in DJI Pilot.
-
Page 8
Remote Controller Operation The default flight control is known as Mode 2. The left stick controls the aircraft’s altitude and heading, while the right stick controls its forward, backward, left and right movements. The gimbal dial controls the camera’s tilt. Left Stick Right Stick Forward… -
Page 9
No Fly Zone Learn more at: Stay away from the rotating propellers http://www.dji.com/flysafe and motors. It’s important to understand basic flight guidelines, for the safety of both you and those around you. Don’t forget to read the Disclaimer and Safety Guidelines. -
Page 10: Specifications
Specifications Aircraft Takeoff Weight 909 g Max Speed 72 km/h (S-mode) (near sea level, no wind) Max Service Ceiling Above Sea Level 6000 m Operating Temperature Range 14° to 104° F (-10° to 40° C) GNSS GPS+GLONASS Operating Frequency 2.4-2.4835 GHz; 5.725-5.850 GHz Transmission Power (EIRP) 2.4 GHz FCC: ≤26 dBm;…
-
Page 11
USB: 5 V Rated Power 60 W For more information, read the User Manual: www.dji.com/mavic-2-enterprice-advanced ※ This content is subject to change without prior notice. MAVIC is a trademark of DJI. Copyright © 2021 DJI All Rights Reserved. Printed in China. -
Page 12
认识 Mavic 2 行业进阶版 MAVIC 2 行业进阶版飞行器配备先进的全方位视觉系统及红外传感系统 *,可在室内外 稳定悬停、飞行,具备自动返航以及障碍物感知功能。飞行器内置 DJI AirSense 可检测 周围航空器情况,支持密码保护以保障设备及数据安全,并且可搭载指定配件以适应不同 应用场景。进阶版飞行器拥有更高清、流畅的热成像传感器和更高像素的可见光传感器, 最高支持 32 倍数码变焦。最大飞行速度为 72 km/h,最长飞行时间 ** 约为 31 分钟。 1. 一体式云台相机 A. 红外相机 B. 可见光相机 9. 电机 2. 前视视觉系统 10. 螺旋桨 17. 电池开关 3. 下视视觉系统 11. 天线… -
Page 13
DJI 带屏遥控器 DJI 带屏遥控器采用 OCUSYNC 2.0 高清图传技术,配合完备的功能按键可在最大 10 千 米 * 通信距离内完成飞行器与相机的操作与设置。遥控器内置 5.5 英寸高亮触摸屏,具备 蓝牙及卫星定位等功能,并支持通过 Wi-Fi 连接至互联网。可拆卸摇杆设计更便于遥控器 收纳。最长工作时间 * 约为 2.5 小时。 10 10 10 10 10 10 10 10 10 10 10 10 10 10 9 9 9 9… -
Page 14
1. 准备飞行器 移除云台保护罩 展开前机臂 展开后机臂 白色标记 无标记 匹配标记安装螺旋桨 嵌入桨座按压到底,沿锁 展开状态 紧方向旋转直至弹起锁定 请确保按顺序展开机臂,在机臂与桨叶全部展开之后再开启飞行器。 2. 充 电 首次使用需给智能飞行电池充满电以 激活电池。 取出智能飞行电池 完全充满约需 1 小时 30 分钟 充电器 交流电源 完全充满约需 100~240 V 2 小时 USB-C 连接线 24W USB 充电器 请使用官方 24W USB 充电器对带屏遥控器进行充电。如不使用官方充电器,推荐使用符合 FCC/CE 标准,规格为 12V/2A 的 USB 充电器。… -
Page 15
检查电量与开启 / 关闭 低 高 低 高 短按一次检查电量。 短按一次电源按键查看电量。 短按一次,再长按 2 秒可开启、 短按一次电源按键,再长按 2 秒以开启、 关闭飞行器。 关闭遥控器。 安装电池至飞行器后并开启电源后,一旦电池温度低于 6℃,电池将开启自动加热功能,保持 电池温度在 8-10℃之间。详细内容请参考用户手册。 3. 准备遥控器 向上抬起天线 取出摇杆 安装摇杆 80° 获取最佳通信范围,遥控器与飞行器的相对位置如图所示,当天线与遥控器背面呈 80°或 180°夹角时,且天线平面正对飞行器,可让遥控器与飞行器的信号质量达到 最佳状态。 注意将摇杆拧紧,确保安装到位。 实际操作中,DJI Pilot App 在图传信号不佳时将会进行提示,请根据提示调整天线位置,确 保飞行器处于最佳通信范围。… -
Page 16
4. 准备飞行 DJI Pilot 运行 DJI Pilot App 开启遥控器 开启飞行器 全新的设备需激活才能使用。请先开启遥控器并根据提示完成激活,再使用 DJI Pilot App 激 活飞行器。激活时请确保设备可以接入互联网。 Internet 可在 DJI Pilot App 中对飞行器设置安全密码以保证飞行器的使用安全。 5. 飞行 起飞前请务必等待 DJI Pilot App 相机界面显示 起飞准备完毕(GPS) “ 起飞准备完毕”。 手动起飞/降落 或 掰杆动作: 电机启动/停止 起 飞: 降 落:… -
Page 17
遥控器操作 遥控器出厂默认操控方式为“美国手”。左摇杆控制飞行高度与方向,右摇杆控制飞 行器的前进、后退以及左右飞行方向。云台俯仰控制拨轮可控制相机的俯仰拍摄角度。 左摇杆 右摇杆 前 上升 下降 后 左转 右转 左 右 请预先在 DJI Pilot App 设置合适的自动返航高度。 飞行过程中遇到需要紧急刹车的情况,请按急停按键使飞行器悬停。 * 可扩展配件 M2E 夜航灯 M2E 探照灯 M2E 喊话器 M2EA RTK 模块 ( 需自行购买 ) -
Page 18
6. 飞行安全 120米 在开阔无遮挡 GPS信号良好 在目视范围内飞行 控制飞行高 的环境中飞行 度低于120米 飞行时请远离人群、树木、电线、高大建筑物、机场和信号发射塔等。无线电发 射塔、高压线、变电站以及具有磁性的大块金属可能会对遥控信号及指南针产生 干扰,威胁飞行安全。 ≥ 10米/秒 下雨、大雾、下雪、雷电、大风(风速每秒10米及以上)等天气请勿飞行。 禁飞区 切勿接触旋转中的螺旋桨, 详情请访问以下网址: 否则可能受到严重人身财产损害。 http://www.dji.com/flysafe 禁飞区、飞行安全认识对于您、周围人群与环境的安全非常重要。 请务必仔细阅读《免责声明和安全概要》。… -
Page 19
规格参数 飞行器 909 g 起飞重量 72 km/h(运动模式,海平面附近无风环境) 最大水平飞行速度 6000 m 最大飞行海拔高度 -10℃至 40℃ 工作环境温度 GNSS GPS+GLONASS 2.4-2.4835 GHz; 5.725-5.850 GHz 工作频率 2.4 GHz 发射功率(EIRP) FCC: ≤26 dBm; CE/MIC: ≤20 dBm; SRRC: ≤20 dBm 5.8 GHz FCC: ≤26 dBm; CE: ≤14 dBm; SRRC: ≤26 dBm 24 GB 机载内存… -
Page 20
加热时间 55 W(最大) 加热功率 智能飞行电池充电器 100-240 V,50-60 Hz,1.8 A 输入 主路:17.6 V 3.41 A 或 17.0 V 3.53 A 输出 USB:5 V 60 W 额定功率 了解产品详细信息,请访问以下网址下载 《用户手册》 www.dji.com/mavic-2-enterprice-advanced ※ 内容如有更新,恕不另行通知。 MAVIC 是大疆创新的商标。 Copyright © 2021 大疆创新 版权所有 Printed in China. -
Page 21
認識 MAVIC 2 企業進階版 MAVIC 2 企業進階版航拍機配備先進的全方位視覺系統及紅外線感應系統 *,可在室 內外穩定懸停、飛行,具備自動返航以及障礙物感應功能。航拍機內建 DJI AirSense 可 檢測周圍航空器情況,支援密碼保護以保障設備及資料安全,並且可搭載指定配件以適應 不同的應用場景。進階版航拍機擁有更高解析、流暢的熱成像感測器和更高畫素的可見光 感測器,最高支援 32 倍數位變焦。最大飛行速度為每小時 72 公里,最長飛行時間 ** 約 31 分鐘。 1. 整合式雲台相機 8. 航拍機機頭指示燈 A. 紅外線相機 9. 馬達 B. 可見光相機 10. 螺旋槳 17. 電池開關 2. 前視視覺系統 11. 天線 18. 電池卡扣 3. 下視視覺系統 12. 航拍機狀態指示燈 19. 調參 / 數據連接埠… -
Page 22
DJI 附螢幕遙控器 DJI 附螢幕遙控器採用 OCUSYNC 2.0 高解析圖像傳遞技術,配合完備的功能按鍵,可 在最大 10 公里 * 通訊距離內完成空拍機與相機的操作與設置。遙控器內置 5.5 英寸高亮 度觸控螢幕,具備藍牙及衛星定位等功能,並支援 Wi-Fi 連線至網際網路。可拆卸搖桿設 計更有利於遙控器收納。最長運轉時間 * 約為 2.5 小時。 10 10 10 10 10 10 10 10 10 10 10 10 10 10 9 9 9 9… -
Page 23
1. 準備航拍機 移除雲台保護罩 展開前機臂 展開後機臂 白色標記 無標記 匹配标记安装螺旋桨 嵌入槳座並按壓到底,沿鎖 展開狀態 緊方向旋轉直到彈起鎖定 請確保按順序展開機臂,在機臂與槳葉全部展開之後再開啟航拍機。 2. 充電 首次使用時,必須為智能飛行電池充 電以啟動電池。 取出智能飛行電池 完 全 充 飽 電 約 需 1 小時 30 分鐘 充電器 交流電源 完全充飽電約需 100~240 V USB-C 數據傳輸線 2 小時 24W USB 充電器 使用官方… -
Page 24
檢查電量與開啓 / 關閉 低 高 低 高 電量 短按一次檢查電量。 短按一次電源按鈕以查看電量。 短按一次,再長按 2 秒可開啟、 短按一次電源按鈕,再長按 2 秒以開啟、 關閉航拍機。 關閉遙控器。 在航拍機上安裝電池並開啟電源後,一旦電池溫度低於 6℃,電池將開啟自動加熱功能,讓電 池溫度保持在 8 — 10℃ 之間。詳細內容請參閱使用者手冊。 3. 準備遙控器 向上抬起天線 取出搖桿 安裝搖桿 80° 取得最佳通訊範圍,遙控器與空拍機的相對位置如圖所示,當天線與遙控器背面呈 80°或 180°夾角時,且天線平面正對空拍機,可讓遙控器與空拍機的訊號品質達到 最佳狀態。 注意將搖桿鎖緊,以確保安裝到位。 實際操作中,DJI Pilot App 在圖傳訊號不佳時將會進行提示,請根據提示調整天線位置, 確保空拍機處於最佳通訊範圍。… -
Page 25
4. 準備飛行 DJI Pilot 執行 DJI Pilot App 開啟遙控器 開啟航拍機 應用程式 全新的設備需啟動才能使用。請先開啓遙控器並根據提示完成啟動,再使用 DJI Pilot App 啟 動空拍機。啟動時請確認設備已連線至網際網路。 Internet 可在 DJI Pilot 應用程式中設定航拍機安全密碼以確保航拍機的使用安全。 5. 飛行 起飛前,請務必等待 DJI Pilot 應用程式相機介 起飛準備完畢 (GPS) 面顯示「起飛準備完畢」( 起飞准备完毕 )。 手動起飛 / 降落 或 綜合控制桿指令: 馬達啟動 / 停止… -
Page 26
遙控器操作 遙控器出廠預設操控方式為「美國手」。左搖桿控制飛行高度與方向,右搖桿控制航 拍機的前進、後退以及左右飛行方向。雲台俯仰控制轉盤可控制相機的俯仰拍攝角度。 左搖桿 右搖桿 前 上升 下降 後 左轉 右轉 左 右 请预先在 DJI Pilot App 设置合适的自动返航高度。 飞行过程中遇到需要紧急刹车的情况,请按急停按键使飞行器悬停。 * 擴充配件 M2E 夜航燈 M2E 探照燈 M2E 擴音器 M2EA RTK 模組 (需自行購買)… -
Page 27
6. 飛行安全 120 公尺 在開闊無遮蔽 GPS 訊號良好 在視線範圍內 將飛行高度控制 的環境中飛行 飛行 在 120 公尺以下 飛行時請遠離人群、樹木、電線、高大建築物、機場和訊號發射塔等。無線電發 射塔、高壓線、變電站及具有磁性的大型金屬物體均可能對遙控訊號及指南針產 生干擾,進而威脅飛行安全。 ≥10 公尺/秒 請勿在下雨、起大霧、下雪、打雷閃電、大風 (風速每秒 10 公尺以上) 等天氣下飛行。 禁航區 請遠離旋轉中的螺旋槳, 詳情請參閱以下網站: 否則可能會嚴重危及人身及財產安全。 http://www.dji.com/flysafe 了解禁飛區及飛行安全知識,對於您、周圍人群與環境的安全非常重要。 請務必詳讀《免責聲明與安全總覽》。… -
Page 28
規格參數 航拍機 起飛重量 909 g 最大水平飛行速度 每小時 72 公里(運動模式,海平面附近無風環境) 最大飛行海拔高度 6000 m 運作環境溫度 -10℃ 至 40℃ GNSS GPS+GLONASS 運作頻率 2.4-2.4835 GHz;5.725-5.850 GHz 發射功率(EIRP) 2.4 GHz FCC: ≤ 26 dBm; CE/MIC: ≤ 20 dBm; SRRC: ≤ 20 dBm 5.8 GHz FCC: ≤ 26 dBm; CE: ≤ 14 dBm; SRRC: ≤ 26 dBm 機載儲存容量 24 GB 雲台 可操控轉動範圍 俯仰:-90°至 +30° 紅外線相機 感應器 非製冷氧化釩微測輻射熱計 鏡頭焦距 約 9 mm 等效焦距:約 38 mm 感測器解析度 640×512 @30Hz 數位變焦 16× 像素間距… -
Page 29
電池類型 LiPo 能量 59.29 Wh 電池整體重量 約 297 g 充電環境溫度 5℃ 至 40℃ 加熱方式 手動加熱、自動加熱 加熱溫度 -20℃ 至 6℃ 加熱時間 500 s(最大) 加熱功率 55 W(最大) 智能飛行電池充電器 輸入 100-240 V,50-60 Hz,1.8 A 輸出 主路:17.6 V 3.41 A 或 17.0 V 3.53 A USB:5 V 額定功率 60 W 要了解產品詳細資訊,請造訪以下網址下載《使用者手冊》 www.dji.com/mavic-2-enterprice-advanced ※ 内容如有更新,恕不另行通知。 MAVIC 是大疆創新的商標。 Copyright © 2021 大疆創新 版權所有 Printed in China. -
Page 30
機体 MAVIC 2 Enterprise Advanced は全方向性ビジョンシステムおよび赤外線検知 システム * を備え、サーマルカメラとビジュアルカメラ搭載の高度安定化 3 軸ジンバ ルカメラを搭載しています。これにより赤外線画像と視覚画像を同時に撮影すること が可能になります。DJI の障害物検知技術は複雑な飛行や写真撮影をサポートし、一方 AirSense による周辺空域の認識を実施し、パスワード保護により機体へのアクセスやす べてのデータの安全性を確保します。Mavic 2 Enterprise Advanced は最大 32 倍のデジ タルズームに対応し、超高解像度の滑らかなサーマル イメージセンサーと高画素ビジュ アルセンサーを搭載しています。この機体の最大飛行速度は 72 km/h、最大飛行時間 ** は 31 分です。 1. ジンバルカメラ A. サーマルカメラ 10. プロペラ B. ビジュアルカメラ 11. アンテナ 2. 前方ビジョンシステム 12. 機体ステータスインジ 18. バッテリーバックル… -
Page 31
8. バッテリー残量 LED 9. 5D ボタン 10. 電源ボタン 22. 通気口 11. 確認ボタン/カスタムボタン C3 23. スティック格納スロット 12. タッチスクリーン 24. カスタムボタン C2 13. USB-C ポート 25. スピーカー 14. マイク 26. カスタムボタン C1 15. ジンバルダイヤル 27. 吸気口 * DJI スマート送信機は、高度約 120m で広くて開けた電磁干渉のない場所で、最大伝送距離 (FCC) を実現します。 最大稼働時間は、ラボ環境でテストされています。この値は参考値です。… -
Page 32
を完全に充電しておきます。 インテリジェント・フライト・ バッテリーの取り外し 充電時間: 〜 1 時間 30 分 バッテリー充電器 充電時間: 電源コンセント 〜 2 時間 100 — 240V USB-C ケーブル 24W USB 充電器 DJI スマート送信機を充電する場合、 24W USB 充電器 (純正品) を使用してください。 標準の 24W USB 充電器がお手元にない場合、FCC/CE 認定の定格 12V/2A の USB 充 電器のご使用を推奨します。… -
Page 33
ボタンを 1 回押すと、液晶画面でバッテリ ー残量を確認できます。 確認できます。 ボタンを押してから、次に長押しすると、 ボタンを 1 回押し、次に長押しすると、送 信機の電源がオンまたはオフになります。 電源がオンまたはオフになります。 バッテリーを機体に取り付け、電源を入れてください。バッテリー温度が 6℃以下 になると、自動発熱機能により温度を 8 〜 10℃に維持します。 詳しくはユーザー マニュアルをご覧ください。 3. 送信機の準備 アンテナを持ち スティック 回転させてス 上げる を取り外す ティック を取り付ける 80° 80° 最適な伝送範囲は上図に示されています。アンテナが機体の方に向いていることを確 認してください。アンテナとスマート送信機の背面との間の角度が 80°または 180° である場合、スマート送信機と機体の間の接続は最適な性能に到達できます。 コントロールスティックをしっかり取り付けてください。 実際の操作では、 DJI Pilot アプリは伝送信号が弱いことを警告します。 機体が最適 な伝送範囲に戻るようにアンテナを調整してください。… -
Page 34
4. 離陸の準備 DJI Pilot 送信機の電源を入れる 機体の電源を入れる DJI Pilot を起動する DJI アカウントを使用して、機体と DJI スマート送信機をアクティベーシ ョンします。アクティベーションにはインターネット接続が必要です。DJI Pilot で機体をアクティベーションする前に、DJI スマート送信機の電源を入 インターネット れ、指示に従ってアクティベーションしてください。 安全なアクセスと内蔵データの保護を確実にするため、DJI Pilot アプリで機 体のパスワードを設定してください。 5. 飛行 離陸する前に、DJI Pilot の機体ステータスバーに「Ready Ready to Go (GPS) to Go」が表示されていることを確認してください。 手動での離陸/着陸 または コンビネーション・スティック・コ マンドでモーター始動/停止 地面に着くまで、左スティックを(ゆっくり 左スティックを… -
Page 35
送信機操作 デフォルトのフライトコントロールはモード 2 です。左スティックで機体の高度と進 行方向、右スティックで前進、後退、右回転、左回転をコントロールします。ジンバ ルダイヤルでカメラのチルト操作をコントロールします。 左スティ ック 右スティック 前方 上昇 下降 後方 左 右旋回 右 左旋回 離陸前に、必ず適切な Return-to-Home(RTH)高度を設定してください。機体をホ ームポイントに戻す際は、コントロールスティックで誘導してください。 飛行中に緊急ブレーキをかけるときは、フライト一時停止ボタンを押します。 * モジュラーアクセサリー M2E ビーコン M2E スポットライト M2E スピーカー M2EA RTK モジュール ( 別売 ) -
Page 36
6. 安全なフライトのために 120m 強いGPS信号 視界の維持 開けた場所での 120m未満の高度で 飛行 飛行 障害物、 人混み、 高電圧線、 樹木、 水域の近く で飛行させないでください。 電線や基地局などの強い電磁波域の周辺では、 機体のコンパスが性能を発揮で きないことがあるため、 飛行させないでください。 10 m/s以上 雨、 雪、 霧、 風速10m/s超などの悪天候時に機体を使用しないでください。 飛行禁止区域 詳細については、 以下でご確認ください。 回転中のプロペラやモーターから 離れてください。 http://www.dji.com/flysafe ご自身の安全と周りの人々の安全のため、基本的なフライトガイドラインを理解することが 重要です。免責事項および安全に関するガイドラインを必ずお読みください。… -
Page 37
仕様 機体 離陸重量 909 g 最大速度 72 km/h(S モード)(海抜 0m、無風) 運用限界高度(海抜) 6000 m 動作環境温度範囲 -10 ~ 40° C GNSS GPS + GLONASS 動作周波数 2.4 ~ 2.4835 GHz、 5.725 ~ 5.850 GHz(日本では 2.4 ~ 2.4835 GHz のみ) 伝送電力(EIRP) 2.4 GHz FCC:≤ 26 dBm、CE/MIC ( 日本 ):≤ 20 dBm、SRRC:≤ 20 dBm 5.8 GHz FCC:≤ 26 dBm、CE:≤ 14 dBm、SRRC:≤ 26 dBm 内部ストレージ 24 GB ジンバル 操作可能範囲 チルト:-90°~ +30° サーマルカメラ… -
Page 38
マニュアル/オート 発熱温度範囲 -20°~ 6℃ 発熱時間 500 秒(最大) 発熱電力 55 W(最大) インテリジェント フライトバッテリー充電器 入力 100 ~ 240 V、50-60 Hz、1.8 A 出力 メイン:17.6V 3.41 A または 17.0 V 3.53 A USB:5 V 2 A 定格出力 60 W 詳細については、以下にあるユーザーマニュアルを参照してください。 www.dji.com/mavic-2-enterprice-advanced ※ このコンテンツは予告なく変更される場合があります。 MAVIC は DJI の商標です。 Printed in China. Copyright © 2021 DJI All Rights Reserved. -
Page 39
며, 완전히 안정화된 3축 짐벌에 열화상 카메라와 가시광선 카메라를 장착하여 적외선 및 가시광선 이 미지 둘 모두를 동시에 제공합니다. DJI의 장애물 감지 기술이 적용된 AirSense는 사용자가 주위 영 공을 인지하여 복잡한 환경에서 비행 및 촬영할 수 있도록 지원하며, 암호 보호 기능은 사용자가 기… -
Page 40
DJI 스마트 조종기 DJI 스마트 조종기는 DJI의 원거리 전송 기술인 OCUSYNC 2.0으로 구축된 조종기로 10km의 최대 전송 거리를 갖추고 있으며 기체의 카메라로부터 실시간 HD 뷰를 제공합니다. 스마트 조종기에는 여러 기체 및 짐벌 제어 장치와 사용자 설정 버튼이 있으며 블루투스 및 GNSS와 같은 여러 기능을 갖춘 5.5인치 고휘도… -
Page 41
1. 기체 준비 카메라에서 짐벌 커버를 전방 암을 폅니다. 후방 암을 폅니다. 분리합니다. 표시됨 표시되지 않음 모터에 프로펠러를 연결합 프로펠러를 아래로 누르고 딸 편 상태 니다. 깍하며 제자리에 고정될 때까지 돌립니다. 앞쪽 암과 프로펠러를 펴고 뒤쪽 암을 폅니다. 이륙 전에 모든 암과 프로펠러를 펴야 합니다. 2. -
Page 42
테나와 스마트 조종기 후면의 각도가 80° 또는 180°인 경우 스마트 조종기와 기체 간의 연결 이 최적의 성능에 도달할 수 있습니다 . 조종 스틱이 단단히 장착되었는지 확인하십시오. 실제 작동 시, DJI Pilot 앱이 송신 신호가 약하다는 경고를 보내면 기체가 최적의 전송 범위로 돌 아오도록 안테나를 조정하십시오. -
Page 43
지면에 닿을 때까지 왼쪽 스틱을 천천히 아래로 내 왼쪽 스틱을 위로 움직여(느리게) 립니다. 몇 초 동안 유지하면 모터가 중지됩니다. 이륙합니다. 손상 또는 부상의 위험을 줄일 수 있도록 긴급 상황에서만 비행 중에 모터를 중지하십시오. DJI Pilot 앱에서 모터 중지 방법을 설정할 수 있습니다. -
Page 44
조종기 조작 기본 비행 제어 방법은 모드 2입니다. 왼쪽 스틱은 기체의 고도 및 방향을 제어하고 오른쪽 스틱은 전진, 후진, 왼쪽 또는 오른쪽 이동을 제어합니다. 짐벌 다이얼은 카메라의 틸트를 제어합니다. 왼쪽 스틱 오른쪽 스틱 전방 위로 아래로 후방 왼쪽 오른쪽으로 오른쪽 왼쪽으로… -
Page 45
비, 눈, 안개, 10m/초(22mph) 이상의 강풍이 부는 악천후에서는 기체를 사용하지 마십시오. 비행 금지 구역 자세한 정보: 회전하는 프로펠러와 모터에서 멀리 떨어져 http://www.dji.com/flysafe 계십시오. 본인과 주변의 안전을 위해 기본 비행 지침을 반드시 숙지해야 합니다. 고지 사항 및 안전 가이드를 잊지 말고 읽어보십시오. -
Page 46
사양 기체 이륙 무게 909 g 최대 속도 72 km/h (S 모드) (해수면 근처, 무풍 시) 최대 실용 상승 한계 고도 (해발) 6000 m 작동 온도 범위 -10~40 °C GNSS GPS+GLONASS 작동 주파수 2.4~2.4835 GHz, 5.725~5.850 GHz 전송 출력 (EIRP) 2.4 GHz FCC: ≤26 dBm, CE/MIC: ≤20 dBm, SRRC: ≤20 dBm 5.8 GHz… -
Page 47
3.41 A 또는 17.0 V 3.53 A USB: 5 V 정격 출력 60 W 자세한 내용은 사용자 매뉴얼을 확인하십시오. www.dji.com/mavic-2-enterprice-advanced ※ 본 내용은 사전 고지 없이 변경될 수 있습니다. MAVIC은 DJI의 상표입니다. Printed in China. Copyright © 2021 DJI All Rights Reserved. -
Page 48
Fliegen und dem gleichzeitigen Erfassen von komplizierten Aufnahmen, während der nähere Luftraum mithilfe von AirSense bewusst wahrgenommen wird. Der Passwortschutz gewährleistet den Zugang zum Fluggerät und die Sicherheit aller Daten. Die Mavic 2 Enterprise Advanced unterstützt einen bis zu 32-fachen Digitalzoom und ist mit einem deutlich verbesserten Wärmebildsensor ausgestattet. -
Page 49
DJI Smart-Fernsteuerung Die DJI Smart-Fernsteuerung ist mit der Übertragungstechnologie OCUSYNC 2.0 ausgestattet, diese ermöglicht eine maximale Reichweite von 10 Kilometern und eine HD-Liveübertragung von der Hauptkamera. Sie bietet eine Vielzahl an Steuerungsmöglichkeiten für das Fluggerät und den Gimbal, mehrere frei belegbare Tasten, einen besonders hellen Bildschirm wie auch weitere Funktionalitäten wie Bluetooth oder GNSS. -
Page 50
1. Fluggerät vorbereiten Entfernen Sie die Gimbal- Klappen Sie die Klappen Sie die Abdeckung von der Kamera. vorderen Arme aus. hinteren Arme aus. Markiert Nicht markiert Ordnen Sie die Propeller Drücken Sie die Propeller nach Ausgeklappt den richtigen Motoren zu. unten und drehen Sie solange, bis diese einrasten. -
Page 51
Fernsteuerung und dem Fluggerät ihre optimale Leistung erbringen. Stellen Sie sicher, dass die Steuerknüppel fest montiert sind. Im realen Betrieb wird die DJI Pilot App eine Warnung ausgeben, dass das Übertragungssignal schwach ist. Richten Sie dann die Antennen so aus, dass das… -
Page 52
Aktivierung des Fluggeräts in DJI Pilot die Smart-Fernsteuerung ein und folgen Sie den Anweisungen zur Aktivierung. Internet Legen Sie in der DJI Pilot App bitte ein Passwort für die Drohne fest und sichern somit den Zugriff auf den internen Speicher ab. 5. Flug… -
Page 53
Die Fernsteuerung verwenden Die Standard-Flugsteuerung wird als Modus 2 bezeichnet. Mit dem linken Steuerknüppel steuern Sie die Höhe und Flugrichtung des Fluggeräts, und mit dem rechten Steuerknüppel steuern Sie ihre Vorwärts-, Rückwärts-, Links- oder Rechtsbewegung. Mit dem Gimbal-Rädchen wird die Neigung der Kamera verstellt. -
Page 54
(GEO-Zone) Mehr Informationen: Halten Sie ausreichend Abstand zu den http://www.dji.com/flysafe drehenden Propellern und Motoren. Um Ihre eigene Sicherheit und die Sicherheit der Menschen in Ihrer Umgebung zu gewährleisten, ist es wichtig, dass Sie die nötigen Grundregeln kennen. Lesen Sie sich den… -
Page 55: Technische Daten
Technische Daten Fluggerät Startgewicht 909 g Höchstgeschwindigkeit 72 km/h (S-Modus, auf Höhe des Meeresspiegels, bei Windstille) Max. Flughöhe über dem 6.000 m Meeresspiegel Betriebstemperatur -10 °C bis +40 °C GNSS GPS + GLONASS Betriebsfrequenz 2,4 – 2,4835 GHz; 5,725 – 5,850 GHz Strahlungsleistung (EIRP) 2,4 GHz FCC: ≤26 dBm;…
-
Page 56
3,53 A USB: 5 V Nennleistung 60 W Nähere Informationen finden Sie in der Bedienungsanleitung: www.dji.com/mavic-2-enterprice-advanced ※ Der Inhalt kann jederzeit unangekündigt geändert werden. MAVIC is a trademark of DJI. Copyright © 2021 DJI All Rights Reserved. Gedruckt in China. -
Page 57
La tecnología de detección de obstáculos de DJI ayuda a los usuarios a volar y capturar tomas complejas, mientras que AirSense proporciona información sobre el espacio aéreo circundante. Además, la protección con contraseña garantiza que el acceso a la aeronave y todos los datos sean seguros. -
Page 58
2.0, la tecnología de transmisión de largo alcance de DJI, gracias al cual permite tener una visión en HD de lo que ve la cámara de la aeronave a una distancia de 10 km (6.2 millas). El Smart Controller incluye controles para varias aeronaves y cámaras, además de botones configurables. -
Page 59: Carga De Las Baterías
2. Preparación de la aeronave Retire la cubierta del Despliegue los brazos Despliegue los brazos estabilizador de la cámara. delanteros. traseros. Con marca Sin marca Empareje las hélices con Presione las hélices hacia Desplegado los motores. abajo y gírelas hasta que encajen en su lugar.
-
Page 60: Preparación Del Controlador Remoto
óptimo. Compruebe que las palancas de control estén bien montadas. Durante el funcionamiento real, la aplicación DJI Pilot le mostrará una advertencia cuando la señal de transmisión sea débil. En ese caso, ajuste las antenas para asegurarse de que la…
-
Page 61
Inicie DJI Pilot. Utiliza una cuenta DJI para activar la aeronave y el Smart Controller. Se requiere una conexión a Internet para la activación. Antes de activar la aeronave en DJI Pilot, encienda el Smart Controller y siga las indicaciones para activarlo. -
Page 62
Funcionamiento del control remoto El control de vuelo predeterminado se conoce como Modo 2. La palanca izquierda controla la altitud y la dirección de la aeronave, mientras que la derecha controla los movimientos hacia delante, atrás, izquierda y derecha. El selector del estabilizador controla la inclinación de la cámara. -
Page 63
Zona GEO Obtenga más información en: Manténgase alejado de las hélices y los http://www.dji.com/flysafe motores en rotación. Es importante conocer las directrices básicas de vuelo para su propia seguridad y la de quienes le rodean. No olvide leer la Renuncia de responsabilidad y las directrices… -
Page 64: Especificaciones
Especificaciones Aeronave Peso de despegue 909 g Velocidad máx. 72 km/h (modo S) (cerca del nivel del mar, sin viento) Altitud máx. de vuelo 6000 m Rango de temperatura de De −10 a 40 °C (de 14 a 104 °F) funcionamiento GNSS GPS+GLONASS…
-
Page 65
Potencia nominal 60 W Para obtener más información, lea el manual del usuario: www.dji.com/mavic-2-enterprice-advanced ※ Este contenido puede modificarse sin notificación previa. MAVIC es una marca comercial de DJI. Copyright © 2021 DJI Todos los derechos reservados. Impreso en China. -
Page 66
à l’appareil et la sécurité de toutes les données. Mavic 2 Enterprise Advanced prend en charge un zoom numérique atteignant jusqu’à 32× et dispose d’un capteur d’imagerie thermique plus fluide doté… -
Page 67
Radiocommande Smart Controller de DJI La DJI Smart Controller est une radiocommande conçue avec la technologie de transmission longue portée OCUSYNC 2.0 de DJI, offrant une portée de transmission maximale de 10 km et des images HD en direct depuis la caméra de l’appareil. La Smart Controller intègre un certain nombre de commandes de drone et de nacelle ainsi que des boutons personnalisables. -
Page 68: Préparation De L’appareil
1. Préparation de l’appareil Retirez le cache de la Dépliez les bras avant. Dépliez les bras arrière. nacelle de la caméra. Marqué Non marqué Associez les hélices aux Appuyez sur les hélices vers le bas et Déplié moteurs correspondants. faites-les tourner jusqu’à ce qu’elles se mettent en place.
-
Page 69
Smart Controller. Assurez-vous que les manches de contrôle sont bien en place. En fonctionnement réel, l’application DJI Pilot vous avertira si le signal de transmission devient faible. Dans ce cas, ajustez les antennes pour retrouver la portée de transmission optimale. -
Page 70
à Internet. Avant d’activer l’appareil sur DJI Pilot, allumez la Smart Controller et suivez les instructions d’activation. Internet Définissez un mot de passe pour le drone dans l’application DJI Pilot afin de sécuriser l’accès et de protéger vos données embarquées. 5. Vol Avant de procéder au décollage, vérifiez dans DJI Pilot… -
Page 71
Fonctionnement de la radiocommande Le contrôle de vol par défaut est connu sous le nom de Mode 2. Le manche gauche agit sur l’altitude et l’orientation de l’appareil, tandis que le manche droit contrôle ses mouvements vers l’avant, l’arrière, la gauche et la droite. La molette de la nacelle contrôle l’inclinaison de la caméra. Manche gauche Manche droit Avant… -
Page 72
Tenez-vous à distance des hélices et des rendez-vous sur le site : moteurs en rotation. http://www.dji.com/flysafe Il est important que vous compreniez les consignes de vol fondamentales afin d’assurer votre sécurité et celle de votre entourage. N’oubliez pas de lire la Clause d’exclusion de… -
Page 73: Caractéristiques Techniques
Caractéristiques techniques Appareil Poids au décollage 909 g Vitesse max. 72 km/h (Mode S, proche du niveau de la mer, sans vent) Plafond pratique max. au-dessus 6 000 m du niveau de la mer Plage de températures de de -10° à 40 °C (14° à 104 °F) fonctionnement GNSS GPS + GLONASS…
-
Page 74
Puissance nominale 60 W Pour en savoir plus, consultez le guide de l’utilisateur : www.dji.com/mavic-2-enterprice-advanced ※ Ce contenu peut être modifié sans préavis. MAVIC est une marque commerciale de DJI. Imprimé en Chine. Copyright © 2021 DJI Tous droits réservés. -
Page 75
Mavic 2 Enterprise Advanced dispone di zoom digitale fino a 32× e ospita un sensore di immagini termiche più sensibile dalla risoluzione significativamente più elevata, così come più… -
Page 76
15. Tasto di controllo del gimbal 27. Presa d’aria * Il radiocomando DJI Smart può raggiungere la sua massima distanza di trasmissione (a norma FCC) in aree aperte senza interferenze elettromagnetiche e a un’altitudine di circa 120 metri. Il runtime massimo è testato in ambiente di laboratorio. Questo valore viene fornito soltanto come riferimento. -
Page 77: Ricarica Delle Batterie
100 — 240 V Caricatore USB 24W Si raccomanda di usare il caricatore USB 24W ufficiale per ricaricare il radiocomando DJI Smart. Qualora un caricatore USB 24W non fosse disponibile, si consiglia di usare un caricabatterie USB da 12V/2A certificato FCC/CE.
-
Page 78
Smart Controller and the aircraft can reach its optimal performance. Accertarsi che le levette di comando siano montate saldamente. Durante il reale funzionamento, l’app DJI Pilot si attiverà per avvertire che il segnale di trasmissione è debole, e sarà necessario regolare le antenne per garantire che il velivolo… -
Page 79
Tenere premuto alcuni secondi per arrestare i per il decollo motori Arrestare i motori durante il volo solo in situazioni di emergenza e allo scopo di ridurre il rischio di danni o lesioni. L’opzione di blocco dei motori è disponibile tra le impostazioni di DJI Pilot. -
Page 80
Funzionamento del dispositivo di controllo remoto La modalità predefinita di controllo di volo è «Mode 2». La levetta sinistra controlla l’altitudine e la direzione del velivolo, mentre la levetta destra ne controlla i movimenti in avanti, all’indietro, a sinistra e a destra. Il quadrante del gimbal controlla l’inclinazione della telecamera. Levetta sinistra Levetta destra In avanti… -
Page 81
Zona interdetta al volo Per saperne di più: Mantenere la distanza dalle eliche rotanti e http://www.dji.com/flysafe dai motori. Per la sicurezza propria e delle altre persone presenti nelle vicinanze, è importante comprendere le linee guida di base del volo. Ricordare di leggere le Limitazioni di… -
Page 82: Specifiche Tecniche
Specifiche tecniche Aeromobile Peso al decollo 909 g Velocità massima 72 km/h (modalità S) (vicino al livello del mare, senza vento) Quota massima di tangenza sopra 6.000 m il livello del mare Intervallo di temperatura operativa Da -10°C a 40°C GNSS GPS+GLONASS Frequenza operativa…
-
Page 83
USB: 5 V Potenza nominale 60 W Per ulteriori informazioni, consultare il Manuale utente: www.dji.com/mavic-2-enterprice-advanced ※ Questi contenuti sono soggetti a modifiche senza preavviso. MAVIC è un marchio registrato di DJI. Stampato in Cina. Copyright © 2021 DJI Tutti i diritti riservati. -
Page 84
AirSense zorgt voor inzicht in het omringende luchtruim en wachtwoordbeveiliging zorgt voor toegang tot het vliegtuig en de veiligheid van alle gegevens. De Mavic 2 Enterprise Advanced ondersteunt tot 32× digitale zoom en heeft een soepeler warmtebeeldsensor met een aanzienlijk hogere resolutie en een visuele sensor met meer pixels. -
Page 85
De DJI Smart Controller is een afstandsbediening gebouwd met de langeafstands-transmissietechnologie OCUSYNC 2.0 van DJI, die een maximaal zendbereik van 10 km biedt en een live HD-weergave geeft van de camera van het vliegtuig. De Smart Controller wordt geleverd met een aantal bedieningselementen voor vliegtuigen en gimbals en een aantal aanpasbare knoppen, en heeft een ingebouwd 5,5-inch scherm met hoge helderheid en meerdere functies zoals Bluetooth en GNSS. -
Page 86
1. Drone voorbereiden Verwijder de gimbal-afdekking Klap de voorarmen uit. Klap de achterarmen uit. van de camera. Gemarkeerd Ongemarkeerd Combineer de juiste propellers Druk de propellers naar Uitgeklapt met de motoren. beneden en draai ze totdat ze op hun plaats klikken. Klap de voorarmen en de propellers uit vóór de achterste. -
Page 87: Voorbereiding Van De Afstandsbediening
Smart Controller and the aircraft can reach its optimal performance. Zorg dat de joysticks stevig zijn aangebracht. In de praktijk zal de DJI Pilot-app waarschuwen dat het transmissiesignaal zwak is, en dat de antennes aangepast dienen te worden om ervoor te zorgen dat het vliegtuig…
-
Page 88
Zet de Smart Controller aan en volg de aanwijzingen voor het activeren voordat u het vliegtuig daadwerkelijk activeert in DJI Pilot. Internet Stel een wachtwoord in voor de drone in de DJI Pilot-app om veilige toegang te waarborgen en je boordgegevens te beschermen. 5. Vlucht Zorg er vóór het opstijgen voor dat de statusbalk van de… -
Page 89
Besturing met de afstandsbediening De standaard vluchtregeling staat bekend als modus 2. Met de linkerjoystick regel je de hoogte en koers, terwijl je met de rechterjoystick vooruit, achteruit, naar links en rechts kunt bewegen. Met de gimbal regel je de kanteling van de camera. Linkerjoystick Rechterjoystick Vooruit… -
Page 90
No-fly zone Meer informatie vind je op: Blijf uit de buurt van de roterende propellers http://www.dji.com/flysafe en motoren. Het is belangrijk de basisvluchtrichtlijnen te begrijpen voor je veiligheid en die van je medemens. Vergeet niet de disclaimer en veiligheidsrichtlijnen te lezen. -
Page 91: Technische Gegevens
Technische gegevens Drone Startgewicht 909 g Max. snelheid 72 km/u (S-stand) (dicht bij zeeniveau, geen wind) Max. servicehoogte boven 6000 m zeeniveau Bedrijfstemperatuurbereik -10 tot 40 °C GNSS GPS+GLONASS Bedieningsfrequentie 2,4-2,4835 GHz; 5,725-5,850 GHz Transmissievermogen (EIRP) 2,4 GHz FCC: ≤26 dBm; CE/MIC: ≤20 dBm; SRRC: ≤20 dBm 5,8 GHz FCC: ≤26 dBm;…
-
Page 92
USB: 5 V Nominaal vermogen 60 W Lees de gebruikershandleiding voor meer informatie: www.dji.com/mavic-2-enterprice-advanced ※ Deze inhoud is onderhevig aan wijzigingen zonder voorafgaande kennisgeving. MAVIC is een handelsmerk van DJI. Copyright © 2021 DJI Alle rechten voorbehouden. Gedrukt in China. -
Page 93
à aeronave e que todos os dados estão seguros. A Mavic 2 Enterprise Advanced suporta zoom digital de até 32× e tem um sensor de imagem térmico mais suave, com uma resolução significativamente mais elevada, bem como um sensor visual com mais pixéis. -
Page 94
O DJI Smart Controller é um controlador remoto construído com a tecnologia OCUSYNC 2.0 de transmissão de longo alcance da DJI, oferecendo um alcance máximo de transmissão de 6.2 milhas (10 km) e oferece uma visualização HD ao vivo da câmara da aeronave. O Smart Controller vem com vários controlos de aeronaves e cardã, assim como botões personalizáveis e possui um ecrã… -
Page 95: Carregamento Das Baterias
1. Preparar a aeronave Retire a cobertura da suspensão Desdobre os braços Desdobre os braços cardã da câmara. dianteiros. traseiros. Com marcas Sem marcas Faça corresponder as Pressione as hélices para baixo Desdobrados hélices aos motores. e rode-as até ouvir um clique. Desdobre os braços dianteiros e as hélices antes dos traseiros.
-
Page 96: Preparar O Telecomando
Certifique-se de que os manípulos de controlo estão firmemente montados. Em operação real, a aplicação DJI Pilot avisa que o sinal de transmissão está fraco e ajuste as antenas para garantir que a aeronave esteja de volta à faixa ideal de transmissão.
-
Page 97
Inicie a DJI Pilot Use uma conta DJI para ativar a aeronave e o Smart Controller. A ativação requer uma ligação à Internet. Antes de ativar a aeronave no DJI Pilot, ligue o Smart Controller e siga as instruções para ativar. -
Page 98
Operação do telecomando O controlo de voo predefinido é conhecido como Modo 2. O manípulo esquerdo controla a altitude e o rumo da aeronave e o manípulo direito controla os movimentos para a frente, para trás, para a esquerda e para a direita. O botão da suspensão cardã controla a inclinação da câmara. -
Page 99
Zona de exclusão aérea Saiba mais em: Mantenha-se afastado das hélices e dos http://www.dji.com/flysafe motores em rotação. É importante compreender as diretrizes básicas de voo para a segurança do utilizador e dos que o rodeiam. Não se esqueça de ler a Declaração de exoneração de… -
Page 100
Especificações Aeronave Peso de descolagem 909 g Velocidade máxima 72 km/h (modo S) (próximo do nível do mar, sem vento) Limite de funcionamento máximo 6000 m acima do nível do mar Intervalo de temperaturas de 14 °F a 104 °F (-10 °C a 40 °C) funcionamento GNSS GPS+GLONASS… -
Page 101
Potência nominal 60 W Para mais informações, consulte o manual do utilizador: www.dji.com/mavic-2-enterprice-advanced ※ Este conteúdo está sujeito a alterações sem aviso prévio. MAVIC é uma marca comercial da DJI. Impresso na China. Copyright © 2021 DJI Todos os direitos reservados. -
Page 102
à aeronave, mantendo todos os dados em segurança. O Mavic 2 Enterprise Advanced suporta zoom digital de até 32× e possui um sensor de imagem térmica mais suave com resolução significativamente maior, bem como um sensor visual de píxeis maior. -
Page 103
Controle Inteligente DJI O Controle Inteligente DJI é um controle remoto fabricado com a tecnologia de transmissão de longo alcance da DJI, OCUSYNC 2.0, oferecendo um alcance máximo de transmissão de até 10 km e concedendo visualização ao vivo em HD diretamente da câmera da aeronave. O Controle Inteligente vem equipado com múltiplos controles de aeronaves e estabilizadores, assim como… -
Page 104
1. Preparo da aeronave Remova o grampo do Desdobre os braços Desdobre os braços estabilizador da câmera. frontais. traseiros. Marcado Desmarcado Pressione as hélices para baixo Corresponda as hélices Desdobrados e gire-as até que se encaixem aos motores. no lugar certo. Desdobre os braços e as hélices frontais antes dos traseiros. -
Page 105
Confira se os joysticks estão colocados firmemente. Em ação, o aplicativo DJI Pilot avisará que o sinal de transmissão está fraco e pedirá para ajustar as antenas para garantir que a aeronave volte ao alcance de transmissão ideal. -
Page 106
Inicie o DJI Pilot Use uma conta da DJI para ativar a aeronave e o Controle Inteligente. Ativar requer conexão com a internet. Antes de ativar a aeronave no DJI Pilot, ligue o Controle Inteligente e siga as instruções de ativação. -
Page 107
Operação do controle remoto O padrão de controle de voo é conhecido como Modo 2. O joystick esquerdo controla a altitude e a direção da aeronave, enquanto o joystick direito controla os movimentos para frente, para trás, para a esquerda e para a direita. O botão giratório do gimbal controla a inclinação da câmera. -
Page 108
Zona de exclusão aérea Saiba mais em: Fique longe das hélices giratórias e dos http://www.dji.com/flysafe motores. É importante que você compreenda as diretrizes básicas de voo, tanto para a sua proteção como para a segurança das pessoas à sua volta. Não se esqueça de ler a… -
Page 109
Especificações Aeronave Peso de decolagem 909 g Velocidade máx. 72 km/h (modo S) (próximo ao nível do mar, sem vento) Altura máx. de serviço acima do 6000 m nível do mar Alcance da temperatura de -10 a 40 °C funcionamento GNSS GPS+GLONASS Frequências de funcionamento… -
Page 110
Potência nominal 60 W Para mais informações, consulte o manual do usuário: www.dji.com/mavic-2-enterprice-advanced ※ Este conteúdo está sujeito a alterações sem prévio aviso. MAVIC é uma marca comercial da DJI. Copyright © 2021 Todos os direitos reservados. Impresso na China. -
Page 111
с тепловизионной камерой и оптической камерой, благодаря которым можно получать инфракрасные и визуальные изображения одновременно. Благодаря технологии сканера препятствий DJI пользователи могут запечатлеть сложные кадры в полете, в то время как AirSense информирует их об окружающем воздушном пространстве, а защита паролем… -
Page 112
Пульт DJI Smart Controller DJI Smart Controller – пульт дистанционного управления с встроенной технологией передачи сигнала на дальние расстояния DJI OCUSYNC 2.0. Максимальное значение передачи сигнала HD с камеры летательного аппарата составляет 10 км. Интеллектуальный пульт позволяет управлять летательным аппаратом и стабилизатором. Он оснащен настраиваемыми кнопками, встроенным… -
Page 113: Зарядка Аккумуляторов
2. Подготовка дрона Снимите чехол стабилизатора с Разложите передние Разложите задние лучи. камеры. лучи. С маркировкой Без маркировки Соблюдайте цветовую Нажмите на пропеллеры и Разложенное кодировку пропеллеров и поверните их до щелчка. состояние электродвигателей. Всегда раскладывайте сначала передние лучи, затем — задние. Все лучи и пропеллеры должны…
-
Page 114: Подготовка Пульта Дистанционного Управления К Работе
дроном будет считаться оптимальным, когда угол между антеннами и задней панелью пульта составляет 80°…180°. Убедитесь, что джойстики надежно закреплены. Если приложение DJI Pilot выдает предупреждение о том, что сигнал слабый, необходимо поменять положение антенн для достижения оптимального значения дальности передачи сигнала.
-
Page 115
запись DJI. Необходимо подключение к интернету. Перед активацией летательного аппарата в приложении DJI Pilot включите интеллектуальный пульт и следуйте пошаговой инструкции. Интернет Установите пароль для дрона в приложении DJI Pilot, чтобы обеспечить защиту доступа данных. 6. Полет Перед взлетом убедитесь, что в строке состояния дрона в… -
Page 116
Эксплуатация пульта дистанционного управления Режим 2 является режимом управления по умолчанию. Левый джойстик используется для управления высотой и поворотом дрона, правый — для управления движением вперед, назад, влево и вправо. Колесико стабилизатора управляет наклоном камеры. Вперед Левый джойстик Правый джойстик Вверх… -
Page 117
Более подробная информация Не приближайтесь к вращающимся приведена на веб-сайте: пропеллерам и электродвигателям. http://www.dji.com/flysafe Для обеспечения своей безопасности и безопасности окружающих важно понимать основные принципы полета. Для получения дополнительной информации обратитесь к отказу от ответственности и руководству по технике безопасности. -
Page 118: Технические Характеристики
Технические характеристики Дрон Взлетная масса 909 г Макс. скорость 72 км/ч (режим S) (на уровне моря в штиль) Макс. высота полета над 6000 м уровнем моря Диапазон рабочих температур −10…40 °C Спутниковые системы GPS + ГЛОНАСС позиционирования Диапазон рабочих частот 2,4–2,4835 ГГц…
-
Page 119
USB: 5 В Номинальная мощность 60 Вт Дополнительную информацию можно найти в руководстве пользователя: www.dji.com/mavic-2-enterprice-advanced ※ Эта отметка означает, что содержание может быть изменено без предварительного уведомления. MAVIC является товарным знаком компании DJI. © 2021 DJI Все права защищены. Напечатано в Китае. -
Page 120
WE ARE HERE FOR YOU 在线技术支持 Contact DJI SUPPORT 微信扫一扫 via Facebook Messenger 获取技术支持 4GCDMURM03TY…