Центр скачивания
Убедитесь в правильности наименования продукта, выберите файл для скачивания и нажмите кнопку «Загрузить». Начнется загрузка.
Ознакомьтесь перед скачиванием.
Краткое руководство
См. краткое руководство для начала работы с продуктом.
Видео по установке
Просмотреть все видео
Закрыть
Скачать
Название файла
Версия
Дата выпуска
Размер файла
Просмотреть все

Закрыть<

Название файла
Версия
Дата выпуска
Размер файла
Просмотреть все
Закрыть
Название файла
Версия
Дата выпуска
Размер файла
Просмотреть все
Закрыть
Название файла
Версия
Дата выпуска
Размер файла
Просмотреть все
Закрыть
Название файла
Версия
Дата выпуска
Размер файла
Просмотреть все
Закрыть
Выберите операционную систему
Простая установка
Вы можете скачать веб-установщик, который упрощает установку нужных драйверов (только для Windows).
Процедуру скачивания Web-установщика см. в руководстве по эксплуатации продукта.
-
Contents
-
Table of Contents
-
Troubleshooting
-
Bookmarks
Related Manuals for Kyocera ECOSYS FS-1035MFP/DP
Summary of Contents for Kyocera ECOSYS FS-1035MFP/DP
-
Page 1
FS-1030MFP/FS-1130MFP FS-1035MFP/FS-1135MFP… -
Page 2
Describes how to load paper, basic copy, print and scan operations, and troubleshooting. FAX Operation Guide Describes how to operate FAX, check transmission results, print reports, and use Network FAX. KYOCERA COMMAND CENTER Operation Guide Printer Driver User Guide Network FAX Driver Operation Guide… -
Page 3: Safety Conventions In This Guide
Safety Conventions in This Guide The sections of this guide and parts of the machine marked with symbols are safety warnings meant to protect the user, other individuals and surrounding objects, and ensure correct and safe usage of the machine. The symbols and their meanings are indicated below.
-
Page 4: Table Of Contents
Contents Contents Quick Guide …………..v Menu Map .
-
Page 5
Contents Sending Functions Original Size …………..5-2 Sending Size . -
Page 6
Contents Management User Login Administration ……….. . . 11-2 Job Accounting . -
Page 7: Quick Guide
Quick Guide Be sure to read Legal and Safety Information before using this machine. Administrator tasks To make copies To print Simply press the Start key to make You can print via a network and copies. You can also fine tune the over the USB connection or print a It copies.
-
Page 8
Administrator tasks To send documents You can send scanned images via a network and over the USB connection. Or, you can also store scanned images in USB memory. It sends. Send to Saving Send Send to Folder What Documents to (SMB) you want E-mail… -
Page 9
Administrator tasks To send a FAX(FAX functions available only on products with the FAX function installed.) As well as sending a FAX via the telephone lines, you can also send a FAX via a network. NOTE: For more information on setting up and sending a FAX, refer to the FAX Operation It faxes. -
Page 10: Menu Map
Menu Map Copy key Function Menu key …page 4-3 Paper Selection …page 3-15 Collate …page 3-12 Duplex …page 3-10 Zoom …page 4-9 Combine …page 4-2 Original Size …page 4-6 Orig.Orientation …page 3-9 Original Image …page 3-8 Density …page 4-8 EcoPrint …page 4-13 Continuous Scan …page 4-16…
-
Page 11: Function Menu Key
Send key Function Menu key …page 5-6 Duplex (Continued from (Continued from previous …page 5-21 FTP Encrypted TX previous page) page) …page 5-22 File Separation Document Box key …Refer to the FAX Operation Guide Sub Address Box …Refer to the FAX Operation Guide Polling Box …page 6-8 Job Box…
-
Page 12
Status/Job Cancel key …page 7-2 Print Job Status …page 7-2 Send Job Status …page 7-2 Store Job Status …page 7-8 Scheduled Job …page 7-8 Print Job Log …page 7-8 Send Job Log …page 7-8 Store Job Log …page 7-19 Scanner …page 7-19 Printer …page 7-19… -
Page 13
System Menu/ …page 11-37 Counter Counter key …page 8-117 System Network TCP/IP TCP/IP (Continued from Setting Settings previous page) …page 8-117 IPv4 Setting …page 8-126 IPv6 Setting …page 8-132 Protocol Detail …page 8-127 NetWare …page 8-128 AppleTalk …page 8-129 WSD-SCAN …page 8-130 WSD-PRINT …page 8-135… -
Page 14
System Menu/ — User Property Counter key …page 8-3 Common Language Settings …page 8-5 Default Screen …page 8-6 Sound Buzzer …page 8-6 FAX Speaker …page 8-6 FAX Monitor …page 8-7 Display Bright..page 8-7 Orig./Paper Custom Orig.Size Set..page 8-9 Def. -
Page 15: Ecoprint
System Menu/ …page 8-43 Common Function Color Selection Settings Default Counter key …page 8-44 (Continued from Scan Resolution (Continued from previous page) previous page) …Refer to the FAX FAX Resolution Operation Guide …page 8-45 Original Image …page 8-46 Density …page 8-47 Zoom …page 8-48 Collate…
-
Page 16
System Menu/ …page 8-75 Printer Emulation Set. Counter key …page 8-78 EcoPrint (Continued from previous page) …page 8-79 Override A4/LTR …page 8-80 Duplex …page 8-81 Copies …page 8-82 Orientation …page 8-83 FormFeed TimeOut …page 8-83 LF Action …page 8-84 CR Action …page 8-85 Paper Feed Mode …page 8-87… -
Page 17: Environment
Environment The service environmental conditions are as follows: • Temperature: 50 to 90.5 °F (10 to 32.5 °C) • Humidity: 15 to 80 % However, adverse environmental conditions may affect the image quality. Avoid the following locations when selecting a site for the machine. •…
-
Page 18: Other Precautions
Other precautions Return the exhausted toner container and waste toner box to your dealer or service representative. The collected toner container and waste toner box will be recycled or disposed in accordance with the relevant regulations. Store the machine while avoiding exposure to direct sunlight. Store the machine in a place where the temperature stays below 40ºC while avoiding sharp changes of temperature and humidity.
-
Page 19: Safety Of Laser Beam (Usa)
SAFETY OF LASER BEAM (USA) 1. Safety of laser beam This machine has been certified by the manufacturer to Class 1 level under the radiation performance standards established by the U.S.DHHS (Department of Health and Human Services) in 1968. This indicates that the product is safe to use during normal operation and maintenance.
-
Page 20: Safety Instructions Regarding The Disconnection Of Power (Usa)
Safety Instructions Regarding the Disconnection of Power (USA) Caution: The power plug is the main isolation device! Other switches on the equipment are only functional switches and are not suitable for isolating the equipment from the power source. Attention: Le débranchement de la fiche secteur est le seul moyen de mettre l’appareil hors tension. Les interrupteurs sur l’appareil ne sont que des interrupteurs de fonctionnement: ils ne mettent pas l’appareil hors tension.
-
Page 21
(1) year, or 200,000 copies/prints from date of installation, whichever first occurs. In the event the MFP or an accessory is found to be defective within the warranty period, Kyocera’s only obligation and the Customer’s exclusive remedy shall be replacement of any defective parts. -
Page 22: Laser Safety (Europe)
Laser Safety (Europe) Laser radiation could be hazardous to the human body. For this reason, laser radiation emitted inside this machine is hermetically sealed within the protective housing and external cover. In the normal operation of the product by user, no radiation can leak from the machine.
-
Page 23: Legal And Safety Information
Legal and Safety Information Please read this information before using your machine. This chapter provides information on the following topics. • Legal Information…………xxii • Regarding Trade Names ……….xxii • Energy Saving Control Function……..xxvi • Automatic 2-Sided Copy Function……. xxvi •…
-
Page 24: Legal Information
Legal Information Copying or other reproduction of all or part of this guide without the prior written consent of Kyocera Mita Corporation is prohibited. Regarding Trade Names • PRESCRIBE and ECOSYS are trademarks of Kyocera Corporation. • KPDL is a trademark of Kyocera Corporation.
-
Page 25
GPL/LGPL This product contains GPL (http://www.gnu.org/licenses/gpl.html) and/or LGPL (http://www.gnu.org/licenses/ lgpl.html) software as part of its firmware. You can get the source code, and you are permitted to copy, redistribute and modify it under the terms of GPL/LGPL. For further information including availability of the source code, visit http:/ /www.kyoceramita.com/gpl/. -
Page 26: Original Ssleay License
Original SSLeay License Copyright (C) 1995-1998 Eric Young (eay@cryptsoft.com) All rights reserved. This package is an SSL implementation written by Eric Young (eay@cryptsoft.com). The implementation was written so as to conform with Netscapes SSL. This library is free for commercial and non-commercial use as long as the following conditions are aheared to. The following conditions apply to all code found in this distribution, be it the RC4, RSA, lhash, DES, etc., code;…
-
Page 27
Monotype Imaging License Agreement Software shall mean the digitally encoded, machine readable, scalable outline data as encoded in a special format as well as the UFST Software. You agree to accept a non-exclusive license to use the Software to reproduce and display weights, styles and versions of letters, numerals, characters and symbols (Typefaces) solely for your own customary business or personal purposes at the address stated on the registration card you return to Monotype Imaging. -
Page 28: Energy Saving Control Function
Energy Saving Control Function The device comes equipped with a Sleep Mode where printer and fax functions remain in a waiting state but power consumption is still reduced to a minimum after a certain amount of time elapses since the device was last used. Sleep The device automatically enters Sleep when 1 minute has passed since the device was last used.
-
Page 29: About This Operation Guide
About this Operation Guide This Operation Guide contains the following chapters. Chapter 1 — Part Names Identifies machine parts and operation panel keys. Chapter 2 — Preparation before Use Explains adding paper, placing originals, connecting the machine, and necessary configurations before first use. Chapter 3 — Basic Operation Describes the procedures for basic copying, printing and scanning.
-
Page 30: Conventions In This Guide
Conventions in This Guide The following conventions are used depending on the nature of the description. Convention Description Example Bold Indicates the operation panel Press the Start key. keys or a computer screen. [Regular] Indicates a selection item on the Select [System].
-
Page 31: Part Names
1 Part Names This chapter identifies the machine parts and operation panel keys. • Operation Panel …………1-2 • Machine……………. 1-4…
-
Page 32: Part Names
Part Names Operation Panel Displays the Address Book screen, where you can add, edit and delete destinations. Calls the previous destination. Also used to enter a Displays the System Menu/Counter menu screen, pause when entering a FAX number.* where you can check the system settings and Displays the Confirm Destination screen, where you can edit and counters.
-
Page 33
Part Names Clears entered numbers and characters. Used to select a menu item, move the cursor when entering characters, change a value, etc. Resets settings and displays the basic screen. Selects the chosen item or finalizes the entered value. Displays the function menu for copy, print, transmission and document box. -
Page 34: Machine
Part Names Machine Document Processor Platen Power Switch Slit Glass Operation Panel Top Cover Front Cover Duplex Front Cover Drum Unit Main Charger Cleaner Lock Lever Toner Container…
-
Page 35
Part Names Inner Tray Paper Length Adjusting Tab Paper Length Guide Paper Width Guides Cassette 1 Paper Width Adjusting Tab Paper Width Guides (MP Tray) MP (Multi-Purpose) Tray Support Tray Section of the Multi Purpose Tray… -
Page 36: Document Processor
Part Names Network Interface Connector USB Interface Connector Fuser Cover Handholds Rear Cover Power Cord Connector Document Processor Document Processor Cover Original Width Guides Original Table Original Eject Table Original Stopper Document Processor Open/Close Handle…
-
Page 37: Preparation Before Use
2 Preparation before Use This chapter explains the preparations before using this equipment for the first time as well as the procedures for loading papers and originals. • Check bundled items………… 2-2 • Determining the Connection Method and Preparing Cables . 2-3 •…
-
Page 38: Check Bundled Items
The following documents are contained in the included DVD (Product Library). Refer to them as necessary. Documents Operation Guide (This Guide) FAX Operation Guide KYOCERA COMMAND CENTER Operation Guide Printer Driver User Guide Network FAX Driver Operation Guide KMnet Viewer User Guide…
-
Page 39: Determining The Connection Method And Preparing Cables
Preparation before Use Determining the Connection Method and Preparing Cables Check the method to connect the equipment to a PC or network, and prepare the necessary cables. Connection Example Determine the method to connect the equipment to a PC or network by referring to the illustration below. Connecting a scanner to your PC network with a network cable (100BASE-TX or 10BASE-T) COMMAND CENTER…
-
Page 40: Preparing Necessary Cables
Preparation before Use Preparing Necessary Cables The following interfaces are available to connect the equipment to a PC. Prepare the necessary cables according to the interface you use. Available Standard Interfaces Function Interface Necessary Cable Printer/Scanner/ Network interface LAN (10Base-T or TWAIN Scanning/ 100Base-TX, Shielded) WIA Scanning/…
-
Page 41: Connecting Cables
Preparation before Use Connecting Cables Follow the steps below to connect cables to the machine. Connect the machine to the PC or your network device. When using the network interface, remove the cap. When connecting the network cable, configure the network.
-
Page 42: Power On/Off
Preparation before Use Power On/Off Power On Press the Power switch. IMPORTANT: When turning off the power switch, do not turn on the power switch again immediately. Wait more than 5 seconds, and then turn on the power switch. Power Off Make sure that the memory indicator is off, then press the Power switch.
-
Page 43: Sleep
Preparation before Use Power Off Timer If the machine is not used while in sleep mode, the power automatically turns off. The Power Off Timer is used to set the time until the power turns off. The factory setting for the time until the power turns off is 1 hour. IMPORTANT: You can set the power off rule and power off timer.
-
Page 44: Switching The Language For Display [Language]
Preparation before Use Switching the Language for Display [Language] Select the language displayed on the Message Display. Use the procedure below to select the language. Press the Power switch. Press the System Menu/Counter key on the main unit operation panel. When you are performing user management and have Login User Name: L b not logged in, a login screen will appear.
-
Page 45
Preparation before Use Press the OK key. Language appears. Language: 1 *English ********************* Deutsch Français Press the key to select the desired language and then press the OK key. Completed. is displayed and the screen returns to the Common Settings menu. -
Page 46: Setting Date And Time
Preparation before Use Setting Date and Time Follow the steps below to set the local date and time at the place of installation. When you send an E-mail using the transmission function, the date and time as set here will be printed in the header of the E-mail message.
-
Page 47
Preparation before Use Press the OK key. Time Zone appears. Time Zone: GMT Casablanca ********************* *GMT Greenwich +01:00 Amsterdam Press the key to select your region and then press the OK key. Completed. is displayed and the screen returns to the Date Setting menu. -
Page 48
Preparation before Use Press the key to move the cursor position, press Date/Time: key to enter hours, minutes and seconds, and then press the OK key. Hour Min. Second Completed. is displayed and the screen returns to the (Time Zone:Greenwich) Date Setting menu. -
Page 49: Network Setup (Lan Cable Connection)
Preparation before Use Network Setup (LAN Cable Connection) The machine is equipped with network interface, which is compatible with network protocols such as TCP/IP (IPv4), TCP/IP (IPv6), IPX/SPX, NetBEUI, IPSec, and AppleTalk. It enables network printing on the Windows, Macintosh, UNIX, NetWare and other platforms.
-
Page 50
Preparation before Use NetWare On/Off Frame Type AppleTalk On/Off WSD-SCAN On/Off WSD-PRINT On/Off IPSec IPSec On/Off Rule Setting On/Off Secure On/Off Protocol IPP Security IPP/IPP over SSL IPPoverSSL only HTTP Security HTTP/HTTPS HTTPS only LDAP Security SSL/TLS STARTTLS SMTP Security SSL/TLS STARTTLS POP3 Security 1 (2, 3) -
Page 51: Installing Software
Preparation before Use Installing Software Install appropriate software on your PC from the included Product Library DVD (Product Library) if you want to use the printer function of this machine or perform TWAIN / WIA transmission or FAX transmission from your computer. Ensure the printer is plugged in and connected to the PC before installing the printer driver from the DVD.
-
Page 52
Preparation before Use Click Install software. The software install wizard starts up. From this point, the procedure differs depending on your version of Windows and your connection method. Proceed to the correct procedure for your connection type. • Express Mode •… -
Page 53
Preparation before Use Select the printer you want to be installed, and click Next. NOTE: If the Found New Hardware Wizard appears, click Cancel. If a hardware installation warning message appear, click Continue. You can customize the print system name in the installation settings window. This will be the name displayed in the Printer window and in the printer lists displayed in applications. -
Page 54: Installation On A Macintosh
Preparation before Use Custom Mode Use Custom Mode if you want to specify the printer port and select the software to be installed. For example, if you do not want fonts installed on your computer to be replaced, select Custom Mode and deselect the Fonts checkbox in the utility tab.
-
Page 55
Preparation before Use Double-click either OS X 10.2 and 10.3 Only, OS X 10.4 Only or OS X 10.5 or higher depending on your Mac OS version. Double-click Kyocera OS X x.x. The printer driver installation program starts up. 2-19… -
Page 56
Preparation before Use Choose Select Destination, Installation Type and then install the printer driver as directed by the instructions in the installation software. NOTE: In addition to Easy Install (Standard Install: OS X 10.5 or higher), the Installation Type options include Custom Install, which allows you to specify the components to be installed. -
Page 57
Preparation before Use Click the IP icon for an IP connection and then enter the IP address and printer name. When you click the AppleTalk icon for an AppleTalk connection, enter the printer name. NOTE: AppleTalk icon is not displayed on Mac OS X 10.6. For a Bonjour connection, click the default icon and select the printer for which Bonjour appears in Connection. -
Page 58
Insert the enclosed DVD (Product Library) into the DVD drive. In Windows 7, Windows Server 2008 and Windows Vista, the user account control window may appear. Click Allow. Following the procedure used to install the printer driver, click Remove Software. The Kyocera Uninstaller wizard appears. -
Page 59: Setting Twain Driver
If Restart Your System screen appears, select whether you restart your computer or not, and click Finish. NOTE: The software can be uninstalled from the Start menu. Start the uninstaller by clicking start > All Programs > Kyocera > Uninstall Kyocera Product Library, and uninstall the software. Setting TWAIN Driver Register this machine to the TWAIN Driver.
-
Page 60
Preparation before Use Click next to the Model field and select this machine from the list. Enter the machine’s IP address or host name in the Scanner Address. NOTE: When the machine’s IP address is unknown, contact Administrator. Click User Authentication Settings. If user login administration is invalid, go to Step 8. Select the checkbox beside Authentication, enter Login User Name (up to 64 characters) and Password (up to 64 characters) and then click OK. -
Page 61
Preparation before Use Setting the WIA Driver (Windows Vista™, Windows® Server 2008 and Windows 7) Register this machine to the WIA Driver. NOTE: The following is not necessary to register when using the machine possesses an IP address or host name that you have specified during installation of WIA Driver. -
Page 62: Command Center (Settings For E-Mail)
Select a category from the navigation bar on the left of the screen. The values for each category must be set separately. Enter the correct password to access pages other than the startup page. The default setting is admin00. The password can be changed. For details, refer to the KYOCERA COMMAND CENTER Operation Guide. 2-26…
-
Page 63: Sending E-Mail
Preparation before Use Sending E-mail Specifying the SMTP settings allows you to send images loaded onto this machine as E-mail attachments. To use this function, this machine must be connected to a mail server using the SMTP protocol. Before sending images loaded onto this machine as E-mail attachments, check the following: •…
-
Page 64
SSL/TLS and 25 or 587 for STARTTLS are well-known SMTP ports. Be sure that SSL of Secure Protocol Settings is On. For details, refer to the KYOCERA COMMAND CENTER Operation Guide. POP before SMTP Timeout Enter the timeout (in seconds) if you chose POP before SMTP as the Authentication Protocol. -
Page 65: Preparation For Sending A Document To A Pc
Preparation before Use Preparation for sending a document to a PC Check the information that needs to be set on the machine and create a folder to receive the document on your computer. Screens of Windows 7 are used in the following explanation. The details of the screens will vary in other versions of Windows.
-
Page 66: Creating A Shared Folder
Preparation before Use At the Command Prompt, enter «net config workstation» and then click Enter. Screen example: user name «james.smith» and domain name «ABCDNET» Creating a Shared Folder Check the domain name and user name for logging onto Windows. NOTE: If there is a workgroup in System Properties, configure the settings below to limit folder access to a specific user or group.
-
Page 67
Preparation before Use Create a folder on the local disk (C). NOTE: For example, create a folder with the name «scannerdata» on the local disk (C). Right-click the scannerdata folder and click Share and Advanced sharing. Click the Advanced Sharing button. -
Page 68
Preparation before Use Enter the user name which you confirmed on Checking what to enter for [Login User Name] on 2-29 in the text box and click the OK button. Select the entered user, select the Change and Read permissions, and click the OK button. In Windows XP, go to step 8. -
Page 69
Preparation before Use Click the Security tab and then click the Edit button. In Windows XP, click the Security tab and then click the Add button. Proceed in the same way as in step 5 to add a user to Group or user names. -
Page 70
Preparation before Use Checking the [Path] Check the share name of the shared folder that will be the destination for the document. Enter the computer name (ex. \pc4050) in «Program and File Search» in the Start menu. The Search Results screen opens. In Windows XP, click Search in the Start menu, select All files and folders, and search for the destination computer to which the file will be sent. -
Page 71
Preparation before Use Configuring Windows Firewall (for Windows 7) Permit sharing of files and printers and set the port used for SMB transmission. NOTE: Log on to Windows with administrator privileges. Checking file and printer sharing From the Start menu, select Control Panel, System and Security, and Allow a program through Windows Firewall. -
Page 72
Preparation before Use Click Advanced settings. Click Inbound Rules. Click New Rule. Select Port and click Next. Select TCP, select Specific local ports, enter «139», and click Next. 2-36… -
Page 73
Preparation before Use Select Allow the connection and click Next. Make sure all checkboxes are selected and click Next. Enter «Scan to SMB» in «Name» and click Finish. 2-37… -
Page 74
Preparation before Use NOTE: In Windows XP or Windows Vista, follow the procedure below to set the port. 1 From the Start menu, select Control Panel, System and Security (or Security Center), and then Check Firewall Status (or Windows Firewall). If the User Account Control dialog box appears, click the Continue button. -
Page 75: Loading Paper
Preparation before Use Loading Paper Paper can be loaded standardly in the cassette and the multi purpose tray. A paper feeder is also available as an option (refer to Optional Equipment on Appendix-2). Before Loading Paper When you open a new package of paper, fan the sheets to separate them slightly prior to loading in the following steps.
-
Page 76: Loading Paper In The Cassettes
Preparation before Use Loading Paper in the Cassettes The standard cassette will each hold plain paper, recycled paper or color paper. The standard cassette holds up to 250 sheets of A4 or smaller plain paper (80 g/m The following paper sizes are supported: Legal, Oficio II, Letter, Executive, Statement, A4, B5, A5, A6, Folio, 216 x 340 mm, 16K, ISO B5, Envelope C5 and Custom.
-
Page 77
Preparation before Use Adjust the position of the paper width guides located on the left and right sides of the cassette. Press the paper width adjusting tab on the left guide and slide the guides to the paper size required. NOTE: Paper sizes are marked on the cassette. -
Page 78
Preparation before Use Load the paper in the cassette. Ensure the side to be printed is facing down and the paper is not folded, curled, or damaged. IMPORTANT: Do not load paper above the triangle mark located on the width guide. •… -
Page 79: Loading Paper In The Multi Purpose Tray
Preparation before Use Loading Paper in the Multi Purpose Tray The multi purpose tray will hold up to 50 sheets of A4 or smaller plain paper (80 g/m The multi purpose tray accepts paper sizes from A4 to A6 and Hagaki and from Legal to Statement-R, 216 x 340 mm, and 16K.
-
Page 80: Loading Envelopes
Preparation before Use Adjust the position of the paper guides on the MP tray. Standard paper sizes are marked on the MP tray or Manual Feed tray. For standard paper sizes, slide the paper guides to the corresponding mark. Align the paper with the paper guides and insert as far as it will go.
-
Page 81
Preparation before Use Pull the MP tray towards you until it stops. Pull out the subtray. Adjust the position of the paper guides on the MP tray. Standard paper sizes are marked on the MP tray or Manual Feed tray. For standard paper sizes, slide the paper guides to the corresponding mark. -
Page 82
Preparation before Use For landscape form envelopes, close the flap. Insert the envelope all the way along the width guides, keeping the printing side face-up and the edge with the flap facing towards you. For portrait form envelopes, close the flap. Insert the envelope all the way along the width guides, keeping the printing side face-up and the edge with the flap facing the insertion slot. -
Page 83
Preparation before Use Specifying Paper Size and Media The default paper size setting for cassette, for multi purpose tray and for the optional paper feeder (cassettes 2 and 3) is [Letter], and the default media type setting is [Plain]. To fix the type of paper to be used in cassettes, specify the paper size and media type setting. (Refer to Specifying Paper Size and Media Type for the Cassettes on this page.) To fix the type of paper to be used in multi purpose tray, specify the paper size setting. -
Page 84: Default Screen
Preparation before Use Press the OK key. The Common Settings menu appears. Common Settings: a b ********************* Language Default Screen 3 Sound [ Exit Press the key to select [Orig./Paper Set.]. Press the OK key. The Orig./Paper Set. menu appears. Orig./Paper Set.: a b ********************* Custom Orig.Size…
-
Page 85
Preparation before Use Press the key to select [Cassette 1 Type]. Cassette 1 Set.: a b Cassette 1 Size ********************* Cassette 1 Type [ Exit Press the OK key. Cassette 1 Type appears. Cassette 1 Type: 1 *Plain ********************* Rough Recycled Press the key to select the desired paper type… -
Page 86
Preparation before Use NOTE: If using the machine with the FAX function installed and the multi purpose tray is used to print a received FAX, the available media types are as shown below. Plain, Recycled, Bond, Color, High Quality, Rough, Labels, Envelope, Cardstock, and Thick Press the System Menu/Counter key on the main unit operation panel. -
Page 87
Preparation before Use Press the OK key. MP Tray Size appears. MP Tray Size: 1 *Lettera ********************* Legala Statementa Press the key to select the desired paper size and then press the OK key. Completed. is displayed and the screen returns to the MP Tray Set. -
Page 88: Loading Originals
Preparation before Use Loading Originals Follow the steps below to load originals for copying, sending or storing. Placing Originals on the Platen You may place books or magazines on the platen in addition to ordinary sheet originals. Open the original cover or the document processor. NOTE: Before opening the document processor, be sure that there are no originals left on the original table or on the…
-
Page 89: Loading Originals In The Document Processor
Preparation before Use Loading Originals in the Document Processor The document processor automatically scans each sheet of multiple originals. Both sides of two-sided originals are scanned. Originals Supported by the Document Processor The document processor supports the following types of originals. Weight 50 to 120 g/m (duplex: 50 to 110 g/m…
-
Page 90
Preparation before Use Place the originals. Put the side to be scanned (or the first side of two-sided originals) face-up. Slide the leading edge into the document processor as far as it will IMPORTANT: Confirm that the original width guides exactly fit the originals. -
Page 91
3 Basic Operation This chapter explains the following operations. • Login/Logout…………..3-2 • One-Touch Keys and Program Keys ……3-3 • Message Display …………3-6 • Copying ……………. 3-7 • Printing — Printing from Applications ……3-16 • Sending …………..3-18 •… -
Page 92: Basic Operation
Basic Operation Login/Logout If user login administration is enabled, it is necessary to enter the login user name and password to use the machine. NOTE: You will be unable to log in if you forget your login user name or login password. In this event, log in with administrator privileges and change your login user name or login password.
-
Page 93: One-Touch Keys And Program Keys
Basic Operation One-Touch Keys and Program Keys The one-touch keys and program keys on the operation panel are described below. One-Touch Key Register destinations to one-touch keys, and you can enter the desired destination by pressing the applicable one- touch key. For registering a destination to a one-touch key, refer to Adding a Destination on One-touch Key on page 8-113.
-
Page 94
Basic Operation ID Card Copy is printed on the Program 1 key. When the functions are deleted by overwriting Program 1 key, seal the label supplied with the machine and write the function name in it. Registering Settings After making settings, press and hold the one of the Program Registered. -
Page 95
Basic Operation ID Card Copy The procedure for using ID Card copying is explained below. Press the Copy key when the Copy key/indicator is off. NOTE: If the Message Display is turned off, press the any key on the operation panel and wait for the machine to warm Place the original on the platen. -
Page 96: Message Display
Basic Operation Message Display The following examples explain the messages and icons used on the message display. Ready to copy. Ready to send. Copies: Dest.: p :sally@###########N 100% 1-sided Zoom [ Duplex ] [ Copier Screen Send Screen Reference Meaning number Indicates the current status of the machine.
-
Page 97: Copying
Basic Operation Copying Follow the steps as below for basic copying. Press the Copy key when the Copy key/indicator is off. NOTE: If the Message Display is turned off, press the any key on the operation panel and wait for the machine to warm Place the originals on the platen or in the document processor.
-
Page 98: Adjusting Density
Basic Operation Remove the finished copies from the inner tray. Adjusting Density Use this procedure to adjust the density when copying. Density Adjustment Option Description Manual Adjust density using 7 levels. Auto Optimum density is selected according to the density of the original. NOTE: You may choose Auto mode as the default setting (refer to Density on page 8-46).
-
Page 99: Selecting Image Quality
Basic Operation Selecting Image Quality Select image quality suited to the type of original. The table below shows the quality options. Image Quality Option Description Text+Photo For originals with both text and photographs. Photo For photos taken with a camera. Text For originals primarily consisting of text.
-
Page 100: Zoom Copying
Basic Operation Zoom Copying Adjust the magnification to reduce or enlarge the original image. The following zoom options are available. Auto Zoom Automatically reduces or enlarges the original image suitably to the selected paper size. Letter-R Statement-R 129 % 141 % 64 % 70 % Zoom Entry…
-
Page 101
Basic Operation The procedure for using zoom copying is explained below. Press the Function Menu key. Function Menu appears. Function Menu: Paper Selection T ********************* Collate Duplex [ Exit Press the key to select [Zoom]. Press the OK key. Zoom appears. Zoom: 1 *100% *********************… -
Page 102: Duplex Copying
Basic Operation Duplex Copying Produce two-sided copies. The following duplex options are available. You can also create single-sided copies from two-sided originals or originals with facing pages such as books. The following modes are available. One-sided to Two-sided Produces two-sided copies from one-sided originals. In case of an odd number of originals, the back side of the last copy will be blank.
-
Page 103
Basic Operation The procedure for using two-sided/duplex copying is explained below. Press the Function Menu key. Function Menu appears. Function Menu: Paper Selection T ********************* Collate Duplex [ Exit Press the key to select [Duplex]. Press the OK key. Duplex appears. Duplex: 1 *1-sided>>1-sided *********************… -
Page 104
Basic Operation If you select [2-sided>>2-sided], press [Detail] (the Right Orig. Binding: Select key) and you can select the binding edge of the 1 *o Left/Right ********************* original. p Top After pressing the OK key, select the binding edge of the Finish. -
Page 105: Collate Copying
Basic Operation Collate Copying The machine can collate at the same time as it copies. You can use the Collate copy function for tasks such as those shown below. Scan multiple originals and deliver complete sets of copies as required according to page number. Original Copy The procedure for using collate copying is explained below.
-
Page 106: Printing — Printing From Applications
Basic Operation Printing — Printing from Applications Follow the steps below to print documents from applications. NOTE: To print the document from applications, install the printer driver on your computer from the supplied DVD (Product Library). Create a document using an application. Click File and select Print in the application.
-
Page 107
Basic Operation Click Source and select the paper source. NOTE: If you choose Auto source selection, papers are supplied automatically from the paper source loaded with paper of optimum size and type. To print on special paper such as envelope or thick paper, place it on the multi purpose tray and select MP Tray. -
Page 108: Sending
Basic Operation Sending This machine can send a scanned image as an attachment to an E-mail message or to a PC linked to the network. In order to do this, it is necessary to register the sender and destination (recipient) address on the network. A network environment which enables the machine to connect to a mail server is required.
-
Page 109: Send As E-Mail
Basic Operation Send as E-mail Sends a scanned original image as an E-mail attachment. NOTE: • You must have a network environment in which this machine can connect to a mail server. It is recommended that the machine be used in an environment in which it can connect to the mail server at any time over a LAN. •…
-
Page 110
Basic Operation Press the OK key. Completed. is displayed and the Ready to send. screen returns to the basic screen. Dest.: p :sally@###########N NOTE: If the screen for confirming the entry of a new 1-sided 300x300dpi destination (page 8-89) is set to [On], a screen to confirm the [ Duplex ] [ScanRes.] entered e-mail address appears. -
Page 111
Refer to Help of your operating system for details on how to share a folder. • Be sure that SMB Protocol or FTP in the COMMAND CENTER is On. For details, refer to the KYOCERA COMMAND CENTER Operation Guide. •… -
Page 112
Basic Operation Enter the path name. Consider, that the share name but Path: not the folder name on the destination PC has to be typed in. RD3report* [ Text Press the OK key. Login User Name appears. Enter the login user name. You have to enter the account Login User Name: name of the destination PC. -
Page 113
Basic Operation For send to folder (SMB) Max. Item Data to be entered characters Host Name Host name or IP address of the PC to Up to 64 (SMB)* receive the data. characters Path Path to the receiving folder such as Up to 128 follows. -
Page 114
Basic Operation If the connection is successful, Connected. is displayed on the screen. Press [OK] (the Right Select key). Completed. is displayed and the screen returns to the basic screen. If the connection failed, Cannot connect. is displayed. Press [OK] (the Right Select key). The screen shown in step 3 reappears. -
Page 115: Specifying Destination
Basic Operation Specifying Destination When specifying destination, choose from the Address Book or use the One-touch keys. Choosing from the Address Book Select a destination registered in the Address Book. In the basic screen for sending, press the Address Select Addr Book: a b Book key.
-
Page 116
Basic Operation Search in Address Book In Address Book, press [Menu] (the Right Select key). Address Book: Menu appears. Design ********************* Fiala Maury [ Menu Press the key to select [Search(Name)] and then Menu: press the OK key. A search screen appears. Select ********************* Detail… -
Page 117
Basic Operation Enter the characters you want to search. Search(Name): If you press [Menu] (the Right Select key) and then the OK key, Search by appears where you can specify the search key and match condition. Select the desired item for each and then press the OK key. -
Page 118: Canceling Jobs
Basic Operation Canceling Jobs Follow the steps below to cancel any print or send job being executed. Canceling Jobs You can also cancel jobs by pressing the Stop key. During a printing or sending job, press the Stop key. The Job Cancel List: Job Cancel List menu appears.
-
Page 119: Checking Remaining Toner And Paper
Basic Operation Checking Remaining Toner and Paper You can check the remaining amount of toner and that of paper in each feeder cassette. Checking Remaining Toner Press the Status/Job Cancel key. The Status menu Status: appears. ********************* Print Job Status Send Job Status Store Job Status [ Pause ]…
-
Page 120
Basic Operation 3-30… -
Page 121
4 Copying Functions This chapter explains the functions available for copying. • Original Size ………………4-2 • Paper Selection ………………4-3 • Original Orientation …………….4-6 • EcoPrint………………..4-8 • Combine Mode ………………4-9 • Continuous Scan …………….4-13 • Job Finish Notice…………….4-14 • File Name Entry………………4-16 •… -
Page 122: Copying Functions
Copying Functions Original Size Specify the size of originals being scanned. Be sure to select the original size before starting the copying process. The following options are available. Item Sizes Original Letter, Legal, Statement, Executive, Officio II, A4, A5, Sizes A6, B5, B6, Folio, 216 ×…
-
Page 123: Paper Selection
Copying Functions Paper Selection Select the paper source that contains the required paper size. NOTE: Specify in advance the size and type of the paper loaded in the cassette (refer to Original/Paper Settings on page 8-7). Selecting the Cassette Use the procedure below to select the paper supply cassette. Press the Copy key.
-
Page 124
Copying Functions Selecting the Multi Purpose Tray Change the paper size and media type. The available paper sizes and media types are shown in the table below. Category Item Sizes Paper Standard Letter, Legal, Statement, Executive, Oficio II, Size Sizes A4, A5, A6, B5, B6, Folio, 216 ×… -
Page 125
Copying Functions Press the OK key. Paper Selection appears. Paper Selection: a b Auto ********************* Plain Plain Press the key to select [MP Tray Set.]. Press the OK key. MP Tray Set. appears. MP Tray Set.: 1 *Standard Size ********************* Size Entry Press the key to select [Standard Size] or [Size… -
Page 126: Original Orientation
Copying Functions Original Orientation Select the original orientation to use the following functions. • Duplex • Combine mode When placing originals on the platen [Top Edge Top] [Top Edge Left] When placing originals on the document processor [Top Edge Left] [Top Edge Top] NOTE: To change the default setting for the original orientation, refer to Function Defaults on page 8-43.
-
Page 127
Copying Functions Use the procedure below to select the orientation when placing the originals on the platen. Press the Copy key. Place the original. Press the Function Menu key. Function Menu appears. Function Menu: Paper Selection T ********************* Collate Duplex [ Exit Press the key to select [Orig.Orientation]. -
Page 128: Ecoprint
Copying Functions EcoPrint Use EcoPrint to save toner when printing. Use this function for test copies or any other occasion where high quality print is unnecessary. The procedure for making copies using EcoPrint is explained below. Press the Copy key. Place the original.
-
Page 129: Combine Mode
Copying Functions Combine Mode This mode allows you to copy 2 or 4 originals combined onto a single page. 2-in-1 mode or 4-in-1 mode. The page boundary of each original can be indicated. NOTE: Combine mode is available for the copy paper sizes of Folio, A4, A5, B5, Legal, Oficio II, Letter, Statement, 16K and 216 x 340 mm.
-
Page 130
Copying Functions 4-in-1 Mode For copying four originals onto a single sheet. This mode can be used with Duplex mode to copy eight originals onto one sheet. The following 4-in-1 options and output orientations are available. Original Copy Orientation of Original Platen Document processor NOTE:… -
Page 131
Copying Functions Types of Page Boundary Lines The following types of the boundary lines are available. None Solid Dotted Positioning Mark The procedure for using Combine mode copying is explained below. Press the Copy key. Place the original. Press the Function Menu key. Function Menu appears. Function Menu: Paper Selection T *********************… -
Page 132
Copying Functions Press the key to select the desired border line Border Line: type and then press the OK key. ********************* None l Solid Line m Dotted Line Press the key to select the orientation of the Orig.Orientation: a b original and then press the OK key. -
Page 133: Continuous Scan
Copying Functions Continuous Scan When a large number of originals cannot be placed in the document processor at one time, the originals can be scanned in separate batches and then copied as one job. With this function, originals are scanned until you press [End Scan] (the Right Select key).
-
Page 134: Job Finish Notice
Copying Functions Job Finish Notice Sends a notice by E-mail when a copy job is complete. User can be notified of the completion of a copy job while working at a remote desk, saving the time spent waiting beside the machine for copying to finish. NOTE: PC should be configured in advance so that E-mail can be used.
-
Page 135
Copying Functions Press the key to select [Address Book] or Destination: [Address Entry], and then press the OK key. 1 *Address Book ********************* Address Entry If you select [Address Book], select [Address Book] on Address Book: the next screen and press the OK key, and then select Fiala ********************* the notice destination. -
Page 136: File Name Entry
Copying Functions File Name Entry Names a copy job. Add other information such as date and time or job number as necessary. You can check a job history or job status using the job name, date and time, or job number specified here. Use the procedure below to assign a name to your copy job.
-
Page 137: Print Override
Copying Functions Print Override This function allows you to suspend the current print job when you need to make copies immediately. When the interrupt copy job is completed, the machine resumes the suspended print job. Press the Function Menu key. Function Menu appears. Function Menu: Paper Selection T *********************…
-
Page 138
Copying Functions 4-18… -
Page 139
5 Sending Functions This chapter explains the functions available for sending originals. • Original Size …………..5-2 • Sending Size …………..5-3 • Zoom …………….5-5 • Duplex Sending …………5-6 • Original Orientation …………5-7 • File Format …………..5-9 •… -
Page 140: Sending Functions
Sending Functions Original Size Select the size of originals that will serve as the basis for scanning. Be sure to select the original size before starting the sending process. Choose the original size from the following groups of original size. Item Size Original…
-
Page 141: Sending Size
Sending Functions Sending Size Select the sending size (the size of image to be sent). The table below lists the sizes. Item Size Sending Same as OrigSize, Legal, Letter, Statement, Executive, Sizes Offcio II, A4, A5, A6, B5, B6, Folio, 216 × 340mm, 16K, ISO B5, Envelope #10, Envelope #9, Envelope #6, Envelope Monarch, Envelope DL, Envelope C5, Hagaki, Oufuku Hagaki, Youkei 4 and Youkei 2…
-
Page 142
Sending Functions Press the OK key. Completed. is displayed and the screen returns to the basic screen for sending. Specify the destination, and press the Start key to start sending. NOTE: Press the Reset key to reset the settings selected in Function Menu. -
Page 143: Zoom
Sending Functions Zoom Scans the original by automatically zooming it depending on the sending size. The table below lists the available options. Item Detail 100% No Zoom (to be scanned at actual size) Auto Zoomed automatically according to the specified sending size.
-
Page 144: Duplex Sending
Sending Functions Duplex Sending Select the type and binding of original depending on the original. The table below lists the binding directions for each original type. Original Type Binding Binding 1-sided Sheet Original 1-sided — — 2-sided Sheet Original 2-sided Binding Left/Right, Top Edge Top, Binding Top…
-
Page 145: Original Orientation
Sending Functions Original Orientation To send the document in the orientation that can be read properly, specify the upper orientation of original. To use the functions below, select the orientation in which the original is set on the platen. • 1-sided / 2-sided Selection When placing the original on the platen [Top Edge Top]…
-
Page 146
Sending Functions Press the key to select [Top Edge Top] or [Top Edge Left]. Press the OK key. Completed. is displayed and the screen returns to the basic screen for sending. Specify the destination, and press the Start key to start sending. -
Page 147: File Format
Sending Functions File Format Select the file format of the image to send. The table below lists the file formats and their details. Adjustable range of image File Format Color mode quality 1 Low Quality (High Comp.) to Full Color, Grayscale, Black 5 High Quality (Low Comp.) and White TIFF…
-
Page 148: Original Image
Sending Functions Original Image Select image quality suitable to the type of original. The table below shows the quality options. Item Detail Text+Photo Text and photos together. Photo For photos taken with a camera. Text Only text, no photos. For OCR For documents to be read by OCR*.
-
Page 149: Adjusting Density
Sending Functions Adjusting Density Use the procedure below to adjust the density when scanning the originals. The table below shows the available settings. Item Detail Manual Adjust density using 7 levels. Auto Optimum density is selected according to the density of the original. The procedure for adjusting the density is explained below.
-
Page 150: Scan Resolution
Sending Functions Scan Resolution Select the fineness of scanning resolution. The finer the scanning becomes (the larger the number becomes), the better the image quality becomes. However, better resolution also results in larger file size (file capacity) and longer scanning and sending times. The selectable resolution is 200x100dpi Normal, 200x200dpi Fine, 200x400dpi Super Fine, 300x300dpi, 400x400dpi Ultra Fine, or 600x600dpi.
-
Page 151: Color / Grayscale / Black And White Selection
Sending Functions Color / Grayscale / Black and White Selection This feature allows you to select the select the color mode used for scanning when sending images. You can select from Full Color, Grayscale or Black & White. Use the procedure below to select the color mode when sending scanned images. Press the Send key.
-
Page 152: Continuous Scan
Sending Functions Continuous Scan When the multi-page originals cannot be placed in the document processor at one time, the originals can be scanned in separate batches and then sent as one job. With this function, originals can be scanned one after another until you press [End Scan] (the Right Select key).
-
Page 153: File Name Entry
Sending Functions File Name Entry This setting allows you to assign a document name to scanned images. You can specify a default for the document name. Use the procedure below to assign names to scanned documents that you are sending. Press the Send key.
-
Page 154: Subject And Body Entry
Sending Functions Subject and Body Entry When sending E-mail, enter the subject and body of the E-mail. Use the procedure below to enter the subject and body for an E-mail message and then send the E-mail. NOTE: Refer to Character Entry Method on Appendix-5 for details on entering characters. Press the Send key.
-
Page 155: Wsd Scan
Sending Functions WSD Scan WSD Scan saves images of originals scanned on this machine as files on a WSD-compatible computer. NOTE: For information on operating the computer, refer to the operating system help for your computer. To use WSD Scan, WSD Scan Setup (page 8-129) must be set to [On] in the network settings. Installing Driver Software to the destination machine The example shows you how to install the driver software to a Windows Vista PC.
-
Page 156
Sending Functions Press the key to select [From Oper. Panel]. Select the destination computer from the computer list. Select Computer: a b Press [Detail] (the Right Select key) to see the P Computer01 ********************* information of the selected computer. P Computer02 P Computer03 [ Cancel ] [ Detail ] Press the OK key to confirm the destination, and then… -
Page 157: Job Finish Notice
Sending Functions Job Finish Notice This feature sends an e-mail providing notification that transmission has been completed. Use the procedure below to specify the Job Finish Notice settings. Press the Send key. Place the original. Press the Function Menu key. Function Menu appears. Function Menu: Color Selection T *********************…
-
Page 158
Sending Functions Specify the destination, and press the Start key to start sending. When the sending is completed, the finish notice is sent to the specified E-mail address. NOTE: Press the Reset key to reset the settings selected in Function Menu. 5-20… -
Page 159: Ftp Encrypted Tx
Click Advanced -> Secure Protocols in the COMMAND CENTER. Be sure that SSL of Secure Protocol Settings is On and more than two effective encryptions are selected in Clientside Settings. For details, refer to the KYOCERA COMMAND CENTER Operation Guide. 5-21…
-
Page 160: File Separation
Sending Functions File Separation Create several files by dividing scanned original data page by page, and send the files. Use the procedure below to split scanned original data into separate files when sending scanned originals. Press the Send key. Place the originals in the document processor or on the platen.
-
Page 161: Scanning Image Using Application
Scanning Image using Application Be sure that you connect your PC with the machine using the USB cable or network cable and install the Kyocera TWAIN or WIA Driver. The scan can be carried out from any TWAIN or WIA compatible application program. For details of installation for TWAIN or WIA driver, see Installing Software on page 2-15.
-
Page 162
Sending Functions 5-24… -
Page 163: Printing Documents Stored In Usb Memory
6 Document Box This chapter explains the typical procedure for utilizing Document Box. • Printing Documents Stored in USB Memory ….6-2 • Saving Documents to USB Memory (Scan to USB)..6-5 • Removing USB Memory……….6-7 • Printing from a Job Box ……….6-8…
-
Page 164: Document Box
Document Box Printing Documents Stored in USB Memory Plugging USB memory directly into the machine enables you to quickly and easily print the files stored in the USB memory without having to use a computer. Limitations • The following file types can be printed: •…
-
Page 165
Document Box Press [Select] (the Right Select key). The selected file USB Memory: name is indicated by a checkmark next to it. N Store File i Folder-1 j File-1 ********************* [ Menu ] [ Select ] When you want to print additional files, repeat steps 5 to 6 to select them. -
Page 166
Document Box Press the OK key. TIFF Print appears. TIFF Print: 1 *Paper Size ********************* Image Resolution Print Resolution Press the key to select the the desire print mode. The print modes are as follows: Paper Size (scaled to fit the paper size) Image Resolution (matched to the image resolution) Print Resolution (matched to the print resolution) Press the OK key. -
Page 167: Saving Documents To Usb Memory (Scan To Usb)
Document Box Saving Documents to USB Memory (Scan to USB) This function allows you to store scanned image files in USB memory connected to the machine. You can store files in PDF, TIFF, JPEG or XPS format. NOTE: The maximum number of the storable files is 100. Storing Documents The procedure for storing documents in removable USB memory is explained below.
-
Page 168: Removing Usb Memory
Document Box Press the Start key. The original is scanned and the data is stored in the USB memory. IMPORTANT: When removing the USB memory, ensure that you use the correct removal procedure, as described in Removing USB Memory on page 6-7.
-
Page 169: Removing Usb Memory
Document Box Removing USB Memory Remove the USB memory. IMPORTANT: Be sure to follow the proper procedure to avoid damaging the data or USB memory. Press the Document Box key. The Document Box Document Box: menu appears. Sub Address Box Polling Box ********************* USB Memory…
-
Page 170: Printing From A Job Box
Document Box Printing from a Job Box When optional memory is installed and RAM Disk Mode is enabled, you can use a Job Box to print. Job Box is a function that stores print data on the set RAM disk in the machine, enabling the data to be printed as needed from the operation panel of the machine.
-
Page 171
Document Box Press the key to select the file to be printed, and then press [Select] (the Right Select key). The selected file will be marked. If you need to add another file, repeat this procedure to select the file. NOTE: To select all files, press Menu (the Left Select key) Menu:… -
Page 172: Polling Box
Document Box Quick Copy mode This mode is used to print an additional copy of a document that has already been printed. If a document is printed with Proof and hold selected in the printer driver, the document will be simultaneously stored on the RAM disk. The required number of copies can be printed whenever needed from the operation panel.
-
Page 173
Document Box Press the key to select the file to be printed, and then press [Select] (the Right Select key). The selected file will be marked. If you need to add another file, repeat this procedure to select the file. NOTE: To select all files, press Menu (the Left Select key) Menu:… -
Page 174
Document Box 6-12… -
Page 175
7 Status / Job Cancel This chapter explains how to check the status and history of jobs and pause or resume the jobs being processed or waiting to be printed. This chapter also explains how to check the status of devices. •… -
Page 176: Status / Job Cancel
Status / Job Cancel Checking Job Status Check the status of jobs being processed or waiting to be printed. Available Status Screens The processing and waiting statuses of jobs are displayed as a list on the Message Display in four different screens — Print Job, Send Job, Store Job, and Scheduled Job.
-
Page 177
Status / Job Cancel Press the OK key to check detailed information of the 0009 Detail: selected job. Status: Processing NOTE: You can also check the job information by pressing [Menu] (the Right Select key) and selecting [Detail] in the menu that appears. -
Page 178
Status / Job Cancel Send Job Status screen Press the Status/Job Cancel key. The Status menu Status: appears. ********************* Print Job Status Send Job Status Store Job Status [ Pause Press the key to select [Send Job Status]. Press the OK key. Send Job Status appears. Press the Send Job Status: key to check the send queue. -
Page 179
Status / Job Cancel When complete job name not displayed in detailed information Press [Detail] (the Right Select key) in Job Name to see the complete job name. Press the OK key to return to the original screen. When complete destination name not displayed in detailed information When there is only one destination, press [Detail] (the Right Select key) in Destination to see the complete destination name. -
Page 180
Status / Job Cancel Store Job Status screen Press the Status/Job Cancel key. The Status menu Status: appears. ********************* Print Job Status Send Job Status Store Job Status [ Pause Press the key to select [Store Job Status]. Press the OK key. Store Job Status appears. Press the Store Job Status: a b key to check the store queue. -
Page 181
Status / Job Cancel When complete job name not displayed in detailed information Press [Detail] (the Right Select key) in Job Name to see the complete job name. Press the OK key to return to the original screen. When complete destination information not displayed in detailed information Press [Detail] (the Right Select key) in Sender Info. -
Page 182: Checking Job History
Status / Job Cancel Checking Job History Check the history of completed jobs. NOTE: Job history is also available by COMMAND CENTER or KMnet Viewer from the computer. Available Job History Screens The job histories are displayed separately in three screens — Print Jobs, Send Jobs, Store Jobs, and Scheduled Jobs. The following job histories are available.
-
Page 183
Status / Job Cancel A job result icon is displayed on the extreme right of each job. u : Job completed normally v : Job error t : Job aborted NOTE: For details of other items, refer to Print Job Status Screen on page 7-2. -
Page 184
Status / Job Cancel Displaying Send Job Log Press the Status/Job Cancel key. The Status menu Status: appears. Print Job Status ********************* Send Job Status Store Job Status [ Pause Press the key to select [Send Job Log]. Press the OK key. Send Job Log appears. Press the Send Job Log: key to check the send log. -
Page 185
Status / Job Cancel When complete job name not displayed in detailed information Press [Detail] (the Right Select key) in Job Name to see the complete job name. Press the OK key to return to the original screen. When complete destination name not displayed in detailed information When there is only one destination, press [Detail] (the Right Select key) in Destination to see the complete destination name. -
Page 186
Status / Job Cancel Press the key to switch the display to other information items. The items displayed are as follows: Result Accepted Time End Time Job Name Job Type User Name Original Pages (number of pages of the original) Color/B &… -
Page 187: Sending The Job Log History
Status / Job Cancel Sending the Job Log History You can send the job log history by e-mail. You can either send it manually as needed or have it sent automatically whenever a set number of jobs is reached. Displaying Job Log History Menu Press the System Menu/Counter key on the main unit Sys.
-
Page 188: Setting The Destination
Status / Job Cancel Setting the destination Set the destination to which job log histories are sent. Use the procedure below to set the destination. In the Job Log History menu, press the key to Job Log History: select [Destination]. Auto Sending Send History *********************…
-
Page 189
Status / Job Cancel Registering Destination In the Destination menu, press the key to select Destination: [Register]. Confirmation ********************* Register [ Exit Press the OK key. Register appears. Register: Address Book ********************* Address Entry To select a destination from the address book, press the key to select [Address Book] and then press the OK key. -
Page 190
Status / Job Cancel Automatic Job Log History Transmission This function automatically sends the job log history to the specified destinations whenever a set number of jobs has been logged. Use the procedure below to set automatic job log history transmission. In the Job Log History menu, press the key to Job Log History:… -
Page 191
Status / Job Cancel IMPORTANT: If no destination is registered, Enter Enter destination. destination is displayed. Refer to Registering Destination on page 7-15 and register the desired destination Press [Yes] (the Left Select key). Accepted. is displayed and the job log is sent to the registered destination before the screen returns to the Job Log History menu. -
Page 192: Pause And Resumption Of Jobs
Status / Job Cancel Pause and Resumption of Jobs Pause /resume all printing jobs in printing/waiting. The procedure for pausing and resuming jobs is explained below. Press the Status/Job Cancel key. The Status menu Status: appears. Print Job Status ********************* Send Job Status Store Job Status [ Pause…
-
Page 193: Device/Communication
Status / Job Cancel Device/Communication Configure the devices/lines installed or connected to this machine or check their status. You can also control devices depending on their status. Check of Device Status Press the Status/Job Cancel key. The Status menu Status: appears.
-
Page 194: Memory Card
Status / Job Cancel If you press [Log] (the Right Select key), the Log menu Log: appears. From this screen, you can check or print the ********************* Outgoing FAX Log transmission/reception history. Incoming FAX Log Outgoing FAX Rpt NOTE: If you are using a user management function, the menu for printing the transmission/reception history appears only when you have logged in as an administrator.
-
Page 195: Default Setting (System Menu)
8 Default Setting (System Menu) This chapter explains how to configure various settings of the machine using the menus on the operation panel. • Common Settings…………8-2 • Copy Settings …………. 8-69 • Printer Settings…………8-75 • Sending Settings …………8-87 •…
-
Page 196: Common Settings
Default Setting (System Menu) Common Settings Common settings include; • How to display the Sys. Menu/Count. menu …8-2 • Switching the Language for Display [Language] …8-3 • Default Screen …8-5 • Sound …8-6 • Display Bright. …8-7 • Original/Paper Settings …8-7 •…
-
Page 197
Default Setting (System Menu) Switching the Language for Display [Language] You can select the language of the message display by following the procedure given below. You can optionally download messages in other languages. Contact your service technician for information. In the Sys. Menu/Count. menu, press the key to Sys. -
Page 198
Default Setting (System Menu) Optional language Message display Korean Simplified Chinese Traditional Chinese If you are using one of the optional languages, it is displayed in place of Portugues. Press the key to select a language. Press the OK key. Completed. is displayed and the screen returns to the Common Settings menu. -
Page 199
Default Setting (System Menu) Default Screen Select the screen appearing right after start-up (default screen). The options are as follows. The table below lists the available screens. Item Description Status The Status/Job Cancel screen (the screen shown when the Status/Job Cancel key is pressed) appears. -
Page 200
Default Setting (System Menu) Sound Set options for buzzer sound during the machine operations. The table below lists the buzzer types and their settings and details. The asterisk in the table is a default setting. Item Value Description Off, On * Emit a sound when the Confirmation control panel are pressed. -
Page 201: Display Bright
Default Setting (System Menu) Press the OK key. Key Confirmation appears. Key Confirmation: a b ********************* 2 *On Press the key to select [On] or [Off]. Press the OK key. Completed. is displayed and the screen returns to the Buzzer menu. Display Bright.
-
Page 202
Default Setting (System Menu) The table below lists the sizes that can be registered. Input units Dimensions Inch models X: 1.97 to 14.02″ (in 0.01″ increments) Y: 1.97 to 8.50″ (in 0.01″ increments) Metric models X: 50 to 356 mm (in 1 mm increments) Y: 50 to 216 mm (in 1 mm increments) Use the procedure below to set a custom original size. -
Page 203
Default Setting (System Menu) Default Original Size Setup In the screen for setting the paper size for the paper feed cassette or multi purpose tray, select the paper size to be used as the default value. Use the procedure below to select the paper size to be used as the default value. In the Sys. -
Page 204
Default Setting (System Menu) Adding a Custom Size and Media Type for Paper to Print Set up a frequently-used custom paper size. The custom size options are displayed on the screen to select paper. The table below lists the sizes that can be registered. Input units Dimensions Inch models… -
Page 205
Default Setting (System Menu) Press the OK key. The Custom PaperSize menu Custom PaperSize a b appears. Cassette 1 Size ********************* Cassette 2 Size Cassette 3 Size Select the paper source in which you want to set the Size Entry(Y): custom size and press the OK key. -
Page 206
Default Setting (System Menu) Paper Size and Media Type Setup for Cassettes Select paper size and media type for Cassette 1 and optional paper feeders (Cassette 2 and 3). The available paper sizes and media types are shown in the table below. Item Description Paper Size… -
Page 207
Default Setting (System Menu) The Cassette 1 Set. menu appears. Cassette 1 Set.: Cassette 1 Size ********************* Cassette 1 Type [ Exit Press the key to select [Cassette 1 Size]. Press the OK key. Cassette 1 Size appears. Cassette 1 Size: a b 1 *A4a ********************* Press the… -
Page 208
Default Setting (System Menu) Paper Size and Media Type Setup for Multi Purpose Tray Select size and media type for multi purpose tray. Set up frequently-used size and media type before use. The available paper sizes and media types are shown in the table below. Item Description Paper… -
Page 209
Default Setting (System Menu) Press the OK key. The MP Tray Set. menu appears. MP Tray Set.: MP Tray Size ********************* MP Tray Type [ Exit Press the key to select [MP Tray Size]. Press the OK key. MP Tray Size appears. MP Tray Size: 1 *A4a *********************… -
Page 210
Default Setting (System Menu) Media Type Set Useable paper types and print densities can be set on the machine for printing. In addition to pre-selected paper, custom paper can be selected and the weight and print density can be defined. A paper type can be defined from the operation panel. -
Page 211
Default Setting (System Menu) In the Sys. Menu/Count. menu, press the key to Sys. Menu/Count.: a b select [Common Settings]. System User/Job Account Common Settings ********************* [ Exit Press the OK key. The Common Settings menu appears. Common Settings: a b Language ********************* Default Screen… -
Page 212
Default Setting (System Menu) Press the OK key. Completed. is displayed and the Plain: screen returns to the menu for the selected paper type. ********************* Paper Weight Print Density [ Exit Press the key to select [Print Density]. Plain: Paper Weight ********************* Print Density [ Exit… -
Page 213
Default Setting (System Menu) Press the OK key. Completed. is displayed and the Custom X: screen returns to the menu for the selected custom Paper Weight ********************* paper type. Print Density Duplex [ Exit Press the key to select [Name]. Press the OK key. -
Page 214
Default Setting (System Menu) Media for Auto Selection When [Auto] is selected in Paper Selection, the paper source that is automatically selected can be limited by media types.If Plain is selected, the paper source with plain paper loaded in the specific size is selected. Select [All Media Types] for the paper source with any kind of paper loaded in the specific size. -
Page 215
Default Setting (System Menu) Default Paper Source Select the default paper source from Cassette 1-4 and Multi Purpose Tray. NOTE: [Cassette 2] and [Cassette 3] are displayed when the optional paper feeder installed. Use the procedure below to select the default paper source. In the Sys. -
Page 216
Default Setting (System Menu) Special Paper Action When printing on Prepunched, Preprint, and Letterhead, punch-holes might not be aligned or the print direction might be upside-down depending on how originals are set and the combination of copying functions. In such a case, select [Adj. -
Page 217
Default Setting (System Menu) Press the OK key. The Common Settings menu appears. Common Settings: a b Language ********************* Default Screen Sound [ Exit Press the key to select [Orig./Paper Set.]. Press the OK key. The Orig./Paper Set. menu appears. Orig./Paper Set.: a b ********************* Custom Orig.Size… -
Page 218
Default Setting (System Menu) Preset Limit Restrict the number of copies that can be made at one time. Options are 1-999 copies. Use the procedure below to set the limit on the number of copies. In the Sys. Menu/Count. menu, press the key to Sys. -
Page 219: Switching Unit Of Measurement
Default Setting (System Menu) Switching Unit of Measurement Select inch or metric for the unit for paper dimensions. Use the procedure below to change the input units. In the Sys. Menu/Count. menu, press the key to Sys. Menu/Count.: a b select [Common Settings].
-
Page 220: Error Handling
Default Setting (System Menu) Error Handling Select whether to cancel or continue the job when error has occurred. The possible errors and what to do for the errors are as follows. Duplexing Error Select what to do when duplex printing is not possible for the selected paper size and media type. Item Description 1-sided…
-
Page 221
Default Setting (System Menu) Press the OK key. DuplexPaperError appears. DuplexPaperError: a b 1-sided 2 *Display Error ********************* Press the key to select the method to handle if duplex is disabled. Press the OK key. Completed. is displayed and the Error Handling: screen returns to the Error Handling menu. -
Page 222
Default Setting (System Menu) Date/Timer Date/Timer settings include: • Date/Time …8-28 • Date Format …8-30 • Time Zone …8-31 • Summer Time …8-32 • Auto Error Clear …8-33 • Power Off Rule …8-35 • Power Off Timer …8-37 • Auto Panel Reset …8-39 •… -
Page 223
Default Setting (System Menu) The Date Settings menu appears. Date Setting: Date/Time ********************* Date Format Time Zone [ Exit Press the key to select [Date/Time]. Press the OK key. The screen to enter the date of Date/ Date/Time: Time appears. Year Month *2011*… -
Page 224
Default Setting (System Menu) Date Format Select the display format of year, month, and date. The year is displayed in Western notation. Use the procedure below to select the date format. In the Sys. Menu/Count. menu, press the key to Sys. -
Page 225
Default Setting (System Menu) Time Zone Set the time difference in the location you are from GMT. Use the procedure below to set the time difference. In the Sys. Menu/Count. menu, press the key to Sys. Menu/Count.: a b select [Common Settings]. System User/Job Account Common Settings… -
Page 226
Default Setting (System Menu) Summer Time Set whether or not to apply summer time to the display of the date. Use the procedure below to set Summer Time. In the Sys. Menu/Count. menu, press the key to Sys. Menu/Count.: a b select [Common Settings]. -
Page 227
Default Setting (System Menu) Auto Error Clear If an error occurs during printing, the print job stops to wait for the next step to be taken by the user. In the Auto Error Clear mode, automatically clear the error after a set amount of time elapses. The following errors are automatically cleared. -
Page 228
Default Setting (System Menu) The Timer Settings menu appears. Timer Setting: ********************* Sleep Timer PanelReset Timer Power Off Rule [ Exit Press the key to select [Auto Err. Clear]. Press the OK key. Auto Err. Clear appears. Auto Err. Clear: a b 1 *Off ********************* Press the… -
Page 229
Default Setting (System Menu) A login screen will appear. Then, enter the user ID and Login User Name: password with administrator privileges to log in, and ******************* press [Login] (the Right Select key). Login Password: [ Login The Timer Settings menu appears. Timer Setting: Err. -
Page 230
Default Setting (System Menu) In the Sys. Menu/Count. menu, press the key to Sys. Menu/Count.: a b select [Common Settings]. System User/Job Account Common Settings ********************* [ Exit Press the OK key. The Common Settings menu appears. Common Settings: a b ********************* Language Default Screen… -
Page 231
Default Setting (System Menu) Power Off Timer The time until the power turns off can be set. Use the procedure below to set the Power Off Timer. The default setting is 1 hours. In the Sys. Menu/Count. menu, press the key to Sys. -
Page 232
Default Setting (System Menu) Sleep Timer The time until the machine enters sleep mode can be set. Options are between 1 and 240 minutes (every one minute). Use the procedure below to set the Sleep Timer. The default setting is 1 minute. In the Sys. -
Page 233
Default Setting (System Menu) Auto Panel Reset If no jobs are run for a certain period of time, automatically reset settings and return to the default setting. NOTE: Refer to page 8-43 for the default settings. • Auto Panel Reset ON/OFF Select to use Auto Panel Reset or not. -
Page 234
Default Setting (System Menu) Press the key to select [Off] or [On]. Press the OK key. Completed. is displayed and the screen returns to the Timer Settings menu. • Panel Reset Timer If you select [On] for Auto Panel Reset, set the amount of time to wait before Auto Panel Reset. Options are between 5 and 495 seconds (every five seconds). -
Page 235
Default Setting (System Menu) Press the OK key. Panel Reset Timer appears. PanelReset Timer:D b (5 — 495) ******90*sec. Press the key to set the Panel Reset Timer. Set the amount of time before resetting the message display on the panel in seconds. You cannot use the numeric keys to enter this value. -
Page 236
Default Setting (System Menu) The Timer Settings menu appears. Timer Setting: ********************* Err. Clear Timer Sleep Timer PanelReset Timer [ Exit Press the key to select [Unusable Time]. Press the OK key. Unusable Time appears. Unusable Time: 7 *Off ********************* [ Exit Press the key to select [On]. -
Page 237: Function Defaults
Default Setting (System Menu) Function Defaults Defaults are the values automatically set after the warm-up is completed or the Reset key is pressed. Set the defaults for available settings such as copying and sending. Setting the frequently-used values as defaults makes subsequent jobs easier.
-
Page 238
Default Setting (System Menu) Press the key to select [Full Color], [Grayscale] or [Black & White]. Press the OK key. Completed. is displayed and the screen returns to the Function Default menu. Scan Resolution Select the default scanning resolution. The options are 600x600dpi, 400x400dpi U.Fin (Ultra Fine), 300x300dpi, 200x400dpi S.Fin (Super Fine), 200x200dpi Fine, 200x100dpi Norm. -
Page 239
Default Setting (System Menu) Original Image Set the default original document type. The available default settings are shown below. Item Description Text+Photo Text and photos together. Photo For photos taken with a camera. Text Only text, no photos. for OCR Image quality suitable for OCR software. -
Page 240
Default Setting (System Menu) Density Set the default density. The available default settings are shown below. Item Description Manual (Normal 0) Set to (Normal 0) in the Manual density. Auto Set to Auto density. Use the procedure below to select the default zoom setting. In the Sys. -
Page 241
Default Setting (System Menu) Zoom Select the enlarged/reduced default when paper size/sending size changed after the originals set. The available default settings are shown below. Item Description 100% Copy (send/save) at actual size (100%). Auto Automatically reduce or enlarge the originals to match paper size/ sending size. -
Page 242
Default Setting (System Menu) Collate Set the defaults for Collate. The table below shows the available settings. Item Description Collate Collate not performed. Collate performed. NOTE: Refer to page 3-15 for Collate/Offset. Use the procedure below to set the default Collate/Offset settings. In the Sys. -
Page 243
Default Setting (System Menu) Orig.Orientation Set the original orientation defaults. The available default settings are shown below. Item Description c Top Edge Top Select the original’s top edge at the top. d Top Edge Left Select the original’s top edge at the left. Refer to page 4-6 for Original Orientation. -
Page 244
Default Setting (System Menu) EcoPrint Select the EcoPrint default. The table below shows the available settings. Item Description No EcoPrint performed. EcoPrint performed. NOTE: Refer to page 4-8 for EcoPrint. Use the procedure below to set the default EcoPrint setting. In the Sys. -
Page 245
Default Setting (System Menu) File Name Entry Set an automatically entered name (default) for jobs. Additional information such as Date and Time and Job No. can also be set. The table below lists the additional information available. Item Description None No additional information available. -
Page 246
Default Setting (System Menu) Press the OK key. File Name Entry appears. Enter the File name Entry: document name (up to 32 characters). doc 1* [ Text Press the OK key. Additional Info appears. Additional Info.: a b Job No. 4 *Job No.+Date ********************* Date+Job No. -
Page 247
Default Setting (System Menu) Press the OK key. The Function Default menu appears. Function Default: a b Color Selection ********************* Scan Resolution FAX Resolution [ Exit Press the key to select [Subject/Body]. Press the OK key. Subject Entry appears. Enter the e- Subject Entry: mail subject (up to 60 characters). -
Page 248
Default Setting (System Menu) Press the OK key. The Common Settings menu appears. Common Settings: a b ********************* Language Default Screen Sound [ Exit Press the key to select [Function Default]. Press the OK key. The Function Default menu appears. Function Default: a b ********************* Color Selection… -
Page 249
Default Setting (System Menu) In the Sys. Menu/Count. menu, press the key to Sys. Menu/Count.: a b select [Common Settings]. System User/Job Account Common Settings ********************* [ Exit Press the OK key. The Common Settings menu appears. Common Settings: a b Language ********************* Default Screen… -
Page 250
Default Setting (System Menu) Press the OK key. The Common Settings menu appears. Common Settings: a b ********************* Language Default Screen Sound [ Exit Press the key to select [Function Default]. Press the OK key. The Function Default menu appears. Function Default: a b ********************* Color Selection… -
Page 251
Default Setting (System Menu) Press the OK key. The Common Settings menu appears. Common Settings: a b Language ********************* Default Screen Sound [ Exit Press the key to select [Function Default]. Press the OK key. The Function Default menu appears. Function Default: a b ********************* Color Selection… -
Page 252
Default Setting (System Menu) Press the key to select [Function Default]. Press the OK key. The Function Default menu appears. Function Default: a b Color Selection ********************* Scan Resolution FAX Resolution [ Exit Press the key to select [XPS FitTo Page]. Press the OK key. -
Page 253
Default Setting (System Menu) Press the OK key. The Function Default menu appears. Function Default: a b Color Selection ********************* Scan Resolution FAX Resolution [ Exit Press the key to select [Detail Setting]. Press the OK key. The Detail Setting menu appears. Detail Setting: ********************* 2 in 1 layout… -
Page 254
Default Setting (System Menu) Press the OK key. The Common Settings menu appears. Common Settings: a b ********************* Language Default Screen Sound [ Exit Press the key to select [Function Default]. Press the OK key. The Function Default menu appears. Function Default: a b ********************* Color Selection… -
Page 255
Default Setting (System Menu) Border Line Select the default value for border line when [2 in 1] is selected for Combine. Items available for the default value are as follows: Item Description None No border line. l Solid Line Draws solid border lines. m Dotted Line Draws dotted border lines. -
Page 256
Default Setting (System Menu) Press the OK key. Border Line appears. Border Line: ********************* None Solid Line Dotted Line Press the key to select [ None], [l Solid Line], [m Dotted Line] or [n Positioning Mark]. Press the OK key. Completed. is displayed and the screen returns to the Detail Setting menu. -
Page 257
Default Setting (System Menu) Press the OK key. The Detail Setting menu appears. Detail Setting: 2 in 1 layout ********************* 4 in 1 Layout Border Line [ Exit Press the key to select [Orig. Binding]. Press the OK key. Orig. Binding appears. Orig. -
Page 258
Default Setting (System Menu) Press the OK key. The Function Default menu appears. Function Default: a b ********************* Color Selection Scan Resolution FAX Resolution [ Exit Press the key to select [Detail Setting]. Press the OK key. The Detail Setting menu appears. Detail Setting: ********************* 2 in 1 layout… -
Page 259
Default Setting (System Menu) Press the OK key. The Function Default menu appears. Function Default: a b Color Selection ********************* Scan Resolution FAX Resolution [ Exit Press the key to select [Detail Setting]. Press the OK key. The Detail Setting menu appears. Detail Setting: ********************* 2 in 1 layout… -
Page 260
Default Setting (System Menu) Press the OK key. The Function Default menu appears. Function Default: a b ********************* Color Selection Scan Resolution FAX Resolution [ Exit Press the key to select [Detail Setting]. Press the OK key. The Detail Setting menu appears. Detail Setting: ********************* 2 in 1 layout… -
Page 261: Login Operation
Default Setting (System Menu) Login Operation Specify the character entry method in the login screen that appears when user management is enabled. Item Description Use Numeric Key Use the numeric keys to select and enter characters. Select Character Enter characters by selecting them from.the character palette that appears.
-
Page 262: Ram Disk Mode
Default Setting (System Menu) RAM Disk Mode When optional memory is installed, a RAM disk can be created and its size can be set. Creating a RAM disk makes it possible to print from a Job Box. The procedure for setting the RAM Disk Mode is explained below. In the Sys.
-
Page 263: Copy Settings
Default Setting (System Menu) Copy Settings The following settings are available for copying functions. • Photo Processing …8-69 • Paper Selection …8-70 • Auto Paper Selection …8-71 • Auto % Priority …8-72 • Select Key Set …8-73 NOTE: If user login administration is enabled, you can only change the settings by logging in with administrator privileges.
-
Page 264
Default Setting (System Menu) Press the OK key. Completed. is displayed and the screen returns to the Copy menu. Paper Selection Set the default paper selection. The table below shows the available settings. Item Description Auto Automatically select the cassette containing paper in the same size as originals. -
Page 265: Auto Paper Selection
Default Setting (System Menu) Auto Paper Selection If [Auto] is selected for Paper Selection, set the paper size selection method when the zoom changes. The table below shows the available settings. Item Description MostSuitableSize Select paper based on the current zoom and the size of the original.
-
Page 266
Default Setting (System Menu) Auto % Priority When a paper source of different size from the original is selected, select whether automatic zoom (reduce/zoom) is performed. The table below shows the available settings. The default setting is Off. Item Detail No zoom performed (copied in original size). -
Page 267
Default Setting (System Menu) Select Key Set If you register a function to the Left Select key or Right Select key, you can quickly set the function when using copy functions. You can register one of the following functions to each key. •… -
Page 268
Default Setting (System Menu) Press the OK key. This displays the function selection Left: screen for the flexible key selected in step 5. The screen shown is the one when [Left] is selected. Duplex 5 *Zoom ********************* Combine Press the key to select the function you want to register to the flexible key. -
Page 269: Printer Settings
Default Setting (System Menu) Printer Settings Printing from computers, settings are generally made on the application software screen. However, the following settings are available for configuring the defaults to customize the machine. • Emulation Set …8-75 • EcoPrint …8-78 • Override A4/LTR …8-79 •…
-
Page 270
Default Setting (System Menu) Use the procedure below to select the emulation. In the Sys. Menu/Count. menu, press the key to Sys. Menu/Count.:a b select [Printer]. Common Settings CoPy ********************* Printer [ Exit Press the OK key. The Printer menu appears. Printer: ********************* Emulation Set. -
Page 271
Default Setting (System Menu) When KPDL Is Selected for Emulation When you use the KPDL emulation mode, set whether or not to output KPDL error reports. The default setting is Off. Use the procedure below to make the setting. In Emulation Set, press the key to select [KPDL]. -
Page 272
Default Setting (System Menu) Press the OK key. Alt. Emulation appears. Alt. Emulation: DIABLO 630 EPSON LQ-850 5 *PCL6 ********************* Press the key to select the printer for alternative emulation. Press the OK key. KPDL Error Rpt appears. KPDL Error Rpt: 1 *Off ********************* Press the… -
Page 273
Default Setting (System Menu) Press the OK key. Completed. is displayed and the screen returns to the Printer menu. Override A4/LTR If A4 size data is printed and there is only a letter-size cassette, the data is printed on letter paper. If letter-size data is printed and there is only an A4 size cassette, the data is printed on A4 paper. -
Page 274
Default Setting (System Menu) Duplex Select binding orientation for duplex mode. The table below shows the available settings. Item Description Finish No duplex mode Bind Long Longer edge Edge bound Bind Short Shorter edge Edge bound Use the procedure below to select a duplex setting. In the Sys. -
Page 275
Default Setting (System Menu) Copies Set the default number of copies, from 1 to 999. Use the procedure below to specify the default number of copies. In the Sys. Menu/Count. menu, press the key to Sys. Menu/Count.:a b select [Printer]. Common Settings Copy *********************… -
Page 276
Default Setting (System Menu) Orientation Set the default orientation, Portrait or Landscape. Portrait Landscape Printer Printer Use the procedure below to set the default orientation for printing. In the Sys. Menu/Count. menu, press the key to Sys. Menu/Count.:a b select [Printer]. Common Settings Copy *********************… -
Page 277
Default Setting (System Menu) FormFeed Timeout Receiving print data from the computer, the machine may sometimes wait if there is no information signalling that the last page does not have any more data to be printed. When the preset timeout passes, the machine automatically prints paper. -
Page 278: Cr Action
Default Setting (System Menu) In the Sys. Menu/Count. menu, press the key to Sys. Menu/Count.:a b select [Printer]. Common Settings Copy ********************* Printer [ Exit Press the OK key. The Printer menu appears. Printer: ********************* Emulation Set. EcoPrint Override A4/LTR [ Exit Press the key to select [LF Action].
-
Page 279
Default Setting (System Menu) Press the OK key. The Printer menu appears. Printer: Emulation Set. ********************* EcoPrint Override A4/LTR [ Exit Press the key to select [CR Action]. Press the OK key. CR Action: 1 *CR Only ********************* LF and CR Ignore CR Press the key to select [CR Only], [LF and CR]… -
Page 280
Default Setting (System Menu) Press the OK key. Paper Feed Mode appears. Paper Feed Mode: a b 1 *Auto ********************* Fixed Press the key to select [Auto] or [Fixed]. Press the OK key. Completed. is displayed and the screen returns to the Printer menu. 8-86… -
Page 281: Sending Settings
Default Setting (System Menu) Sending Settings The sending settings allow you to specify the following sending function options. • Select Key Set …8-87 NOTE: If user login administration is enabled, you can only change the settings by logging in with administrator privileges.
-
Page 282
Default Setting (System Menu) Use the procedure below to set Select Key Set. In the Sys. Menu/Count. menu, press the key to Sys. Menu/Count.:a b select [Send]. Copy Printer ********************* Send [ Exit Press the OK key. The Send menu appears. Send: ********************* Select Key Set. -
Page 283: Document Box Settings
Default Setting (System Menu) Document Box Settings The following settings are available for Document Box. • Job Box …8-89 • Select Key Set …8-91 Job Box Job Box settings can be set. Select settings for Quick Copy Jobs and Job Retention Deletion. Quick Copy Jobs sets the number of files that can be saved using Quick Copy.
-
Page 284
Default Setting (System Menu) Press the OK key. The screen returns to the Job Box screen. Job Retention Deletion The procedure for setting Job Retention Deletion is explained below. In the Sys. Menu/Count. menu, press the key to Sys. Menu/Count.:a b select [Document Box]. -
Page 285: Select Key Set
Default Setting (System Menu) Select Key Set If you register a function to the Left Select key or Right Select key, you can quickly set the function when printing from or saving to a document box. You can register one of the following functions to each key for either of printing from and saving to a document box. Print •…
-
Page 286
Default Setting (System Menu) Use the procedure below to set Select Key Set. In the Sys. Menu/Count. menu, press the key to Sys. Menu/Count.:a b select [Document Box]. Send ********************* Document Box [ Exit Press the OK key. The Document Box menu appears. Document Box: Press the key to select [Select Key Set.]. -
Page 287: Printing Reports/Sending Notice
Default Setting (System Menu) Printing Reports/Sending Notice Print reports to check the machine settings and status. Default settings for printing the result reports can also be configured. NOTE: If user login administration is enabled, you can only print by logging in with administrator privileges. Printing Reports Printable reports are as follows.
-
Page 288
Default Setting (System Menu) Font List Check the font samples installed in the machine. Use the procedure below to print a Menu Map / Status Page / Font List. In the Sys. Menu/Count. menu, press the key to Sys. Menu/Count.:a b select [Report]. -
Page 289: Status Page
Default Setting (System Menu) Press the OK key. A confirmation screen appears. Print. The screen shown is the one when Status Page is Are you sure? selected. z Status Page Press [Yes] (the Left Select key). The selected report is output.
-
Page 290: Network Status
Default Setting (System Menu) Press the key to select [Service Setting]. Press the OK key. Service Setting appears. Service Setting: a b Service Status ********************* Network Status New Developer [ Exit Press the key to select [Service Status] or [Network Status]. Press the OK key.
-
Page 291
Default Setting (System Menu) Press the OK key. The Report menu appears. Report: Report Print ********************* Admin Rpt Set. Result Rpt Set. [ Exit Press the key to select [Result Rpt Set.]. Press the OK key. The Result Rpt Set. menu appears. Result Rpt Set.: a b ********************* Send Result… -
Page 292: Adjustment/Maintenance
Default Setting (System Menu) Adjustment/Maintenance Adjust printing quality and conduct machine maintenance. • Copy Denst. Adj. …8-98 • Send/Box Density …8-99 • Correct. Bk Line …8-100 • New Developer…8-101 NOTE: If user login administration is enabled, you can only change the settings by logging in with administrator privileges.
-
Page 293
Default Setting (System Menu) Press the key to select the density from [-3 Lighter] to [+3 Darker]. Press the OK key. Completed. is displayed and the screen returns to the Copy Denst. Adj. menu. Send/Box Density Adjust scan density when sending or storing the data in Document Box. Adjustment can be made in 7 levels both in auto and manual density modes. -
Page 294
Default Setting (System Menu) Correct. Bk Line Correct fine black lines (black streaks caused by contamination), which may appear on the copies, when the document processor used. Paper feed direction The table below shows the available settings. Item Description No correction performed. On(Low) Correction performed. -
Page 295
Default Setting (System Menu) Press the OK key. Correct. Bk Line appears. Correct. Bk Line: a b 1 *Off ********************* On(Low) On(High) Press the key to select [Off], [On(Low)] or [On(High)]. Press the OK key. Completed. is displayed and the screen returns to the Adjust/Maint. -
Page 296: Editing Destination (Address Book/Adding One-Touch Keys)
Default Setting (System Menu) Editing Destination (Address Book/Adding One-Touch Keys) Save frequently used destinations to Address Book or One-touch keys. The saved destinations can be changed. The destinations are available for Send as E-mail, Send to Folder, and Fax Transmission. NOTE: COMMAND CENTER can be used to efficiently save and edit multiple destinations.
-
Page 297
Default Setting (System Menu) Press the key to select [Add Address]. Press the OK key. Add Address appears. Add Address: ********************* Contact Group Press the key to select [Contact]. Press the OK key. This displays the screen for editing Detail: destinations. -
Page 298
Default Setting (System Menu) Entering E-mail Address Press the key to display E-mail Address. Detail: p E-mail Address: 4/7 t_maury@###########.N [ Edit Press [Edit] (the Right Select key). An entry screen Address Entry: appears. [ Text Enter the e-mail address. NOTE: Destination can be specified using the Address Book or the One-touch keys. -
Page 299
Default Setting (System Menu) Folder (FTP) Address The table below explains the items to be entered. Item Description Max. No. of Characters Host Name* Host name or IP address of the 64 chars sending computer Path Path to the folder used to save 128 chars files E.g. -
Page 300
Default Setting (System Menu) Press the OK key. Login User Name appears. Login User Name: A b Maury* [ Text Enter the login user name. Press the OK key. Login Password appears. Login Password: OOOOOOOOOOO* [ Text Enter the login password. Press the OK key. -
Page 301: Adding A Group
Default Setting (System Menu) Address Number Address Number is an ID for a destination. When creating a new destination, the smallest unused address number is automatically allocated. You can select any available number out of 100 numbers for individuals and 20 numbers for groups.
-
Page 302: Print List
Default Setting (System Menu) Press the OK key. The Edit Destination menu appears. Edit Destination:a b ********************* Addressbook Print List [ Exit Press the key to select [Address Book]. Press the OK key. The Address Book list screen Addressbook: appears. k Design ********************* l Fiala…
-
Page 303
Default Setting (System Menu) Entering Group Name Press the key to display Group Name. Detail: Group Name: Sales Section [ Edit Press [Edit] (the Right Select key). An entry screen Group Name: appears. Sales* [ Text Enter the group name. If creating a new group name, the address number allocated to the destination is already entered. -
Page 304
Default Setting (System Menu) Press the OK key. This displays the list of destinations Contacts: registered in the Address Book. l Fiala ********************* l Maury NOTE: If 100 members have already been registered in the l Morgan group, the screen will display Registered numbers [ Menu exceeded. -
Page 305
Default Setting (System Menu) Press the OK key. A confirmation message appears. Delete. Are you sure? z p Sally Press [Yes] (the Left Select key). Completed. is displayed and the screen returns to Group Member. Entering Address Number Address Number is an ID for a destination. When creating a new destination, the smallest unused address number is automatically allocated. -
Page 306
Default Setting (System Menu) Press the OK key. The Edit Destination menu appears. Edit Destination:a b ********************* Addressbook Print List [ Exit Press the key to select [Address Book]. Press the OK key. The Address Book list screen Addressbook: appears. k Design ********************* l Fiala… -
Page 307
Default Setting (System Menu) Adding a Destination on One-touch Key This machine has 11 one-touch keys and you can register 2 destinations to each of them. The one-touch keys are arranged as shown below: No.1 No.2 No.3 No.4 No.12 No.13 No.14 No.15 No.5… -
Page 308
Default Setting (System Menu) Editing One-touch Key Edit/delete the destinations you added to One-touch Key. Use the procedure below to edit the one-touch key. In the Send or FAX screen, press the one-touch key Select Key No.: where you want to edit the destination and hold it (2 No. -
Page 309: Restarting The System
Default Setting (System Menu) Restarting the System Restart the printer without turning the power switch off. Use this to deal with any unstable operation by the machine. (Same as the computer restart.) Use the procedure below to restart the system. In the Sys.
-
Page 310: Network Setup
Default Setting (System Menu) Network Setup The following network settings are available. • LAN Interface Setup …8-116 • TCP/IP (IPv4) Setup …8-117 • TCP/IP (IPv6) Setup …8-126 • NetWare Setup …8-127 • AppleTalk Setup …8-128 • Protocol Detail …8-132 LAN Interface Setup Specify the settings for the LAN interface to be used.
-
Page 311
Default Setting (System Menu) Press the OK key. LAN Interface appears. LAN Interface: 1 *Auto ********************* 10Base-Half 10Base-Full Press the key to select the desired LAN interface. The available LAN interfaces are as follows: Auto 10Base-Half 10Base-Full 100Base-Half 100Base-Full Press the OK key. Completed. is displayed and the screen returns to the Network Setting menu. -
Page 312
Default Setting (System Menu) Press the key to select [Network Setting]. Press the OK key. The Network Setting menu appears. Network Setting: a b TCP/IP Settings ********************* NetWare AppleTalk [ Exit Press the key to select [TCP/IP Settings]. Press the OK key. The TCP/IP Settings menu appears. TCP/IP Settings: a b ********************* TCP/IP… -
Page 313
Default Setting (System Menu) Press the OK key. DHCP appears. DHCP: 2 *On ********************* Press the key to select [Off] and then press the OK key. Completed. is displayed and the screen returns to the IPv4 Setting menu. Press the key to select [Bonjour]. -
Page 314: Default Gateway
Default Setting (System Menu) Press the key or the numeric keys to enter the IP Address. Each 3 digits can be set between 000 and 255. IMPORTANT: When the DHCP Setting (page 8-122) is [On], IP Address: the current IP address is displayed and cannot be changed. When setting an IP address, set the DHCP Setting (page 8- 123.145.167.189 122) to Off.
-
Page 315
Default Setting (System Menu) Press the OK key. Default Gateway appears. Default Gateway: a b 000.000.000.000 Use the arrow keys to enter the Default Gateway. Press the key to move the cursor position horizontally. Press the key or the numeric keys to enter the Default Gateway. -
Page 316
Default Setting (System Menu) DHCP Settings Select whether or not to use the DHCP server. The default setting is On. Use the procedure below to specify the DHCP setting. In the Sys. Menu/Count. menu, press the key to Sys. Menu/Count.:a b select [System], and press the OK key. -
Page 317
Default Setting (System Menu) Press the OK key. TCP/IP appears. TCP/IP: 2 *On ********************* Press the key to select [On] and then press the OK key. Completed. is displayed and the screen returns to the TCP/IP Settings menu. Press the key to select [IPv4 Setting]. -
Page 318
Default Setting (System Menu) Bonjour Settings Select whether or not to use Bonjour. The default setting is Off. Use the procedure below to specify the Bonjour setting. In the Sys. Menu/Count. menu, press the key to Sys. Menu/Count.:a b select [System], and press the OK key. Report Counter *********************… -
Page 319
Default Setting (System Menu) Press the OK key. TCP/IP appears. TCP/IP: ********************* 2 *On Press the key to select [On] and then press the OK key. Completed. is displayed and the screen returns to the TCP/IP Settings menu. Press the key to select [IPv4 Setting]. -
Page 320
Default Setting (System Menu) TCP/IP (IPv6) Setup Set up TCP/IP (IPv6) to connect to the network. The default setting is Off. Use the procedure below to setup the TCP/IP (IPv6) setting. In the Sys. Menu/Count. menu, press the key to Sys. -
Page 321
Default Setting (System Menu) Press the OK key. IPv6 Setting appears. IPv6 Setting: 1 *Off ********************* [ Exit Press the key to select [On] or [Off]. Press the OK key. Completed. is displayed and the screen returns to the TCP/IP Settings menu. NetWare Setup Select the NetWare network connection. -
Page 322: Appletalk Setup
Default Setting (System Menu) Press the OK key. NetWare appears. NetWare: 2 *On ********************* Press the key to select [On] or [Off]. If you select [On] and press the OK key, Frame Type Frame Type: appears. Press the key to select the desired 1 *Auto ********************* frame type.
-
Page 323
Default Setting (System Menu) Press the key to select [Network Setting]. Press the OK key. The Network Setting menu appears. Network Setting: a b ********************* TCP/IP Settings NetWare AppleTalk [ Exit Press the key to select [AppleTalk]. Press the OK key. AppleTalk appears. AppleTalk 2 *On *********************… -
Page 324
Default Setting (System Menu) Press the OK key. The Network Setting menu appears. Network Setting: a b ********************* TCP/IP Settings NetWare AppleTalk [ Exit Press the key to select [WSD-SCAN]. Press the OK key. The WSD-SCAN menu appears. WSD-SCAN 2 *On ********************* Press the key to select [On] or [Off]. -
Page 325
Default Setting (System Menu) Press the OK key. The Network Setting menu appears. Network Setting: a b TCP/IP Settings ********************* NetWare AppleTalk [ Exit Press the key to select [WSD-PRINT]. Press the OK key. The WSD-PRINT menu appears. WSD-PRINT: 2 *On ********************* Press the key to select [On] or [Off]. -
Page 326
Default Setting (System Menu) Protocol Detail Make other network related settings. Restarting the Item Description Default Setting System* NetBEUI Selects whether or not to × receive documents using NetBEUI. SNMPv3 Set SNMPv3. FTP (Server) Select whether or not to receive documents using FTP. -
Page 327
Default Setting (System Menu) Restarting the Item Description Default Setting System* LDAP Select whether or not to use × LDAP. : The machine must be restarted after the setting is changed. ×: The machine does not need to be restarted after the setting is changed. Use the procedure below. -
Page 328
Default Setting (System Menu) Press the OK key. The Protocol Detail menu appears. Protocol Detail: a b ********************* NetBEUI SNMPv3 FTP(Server) Press the key to select the item for which you want to make settings. Press the OK key. This displays the setting screen for FTP(Client) the item selected in step 9. -
Page 329: Network Security
Default Setting (System Menu) Network Security The network security functions can be set up to protect printer operation and the print data. The following network security settings are available. • IPSec Setting …8-135 • SSL Setting …8-136 • SNMPv3 Setting …8-144 IPSec Setting Make this setting when you use IPSec.
-
Page 330: Ssl Setting
Default Setting (System Menu) Press the OK key. IPSec appears. IPSec: 1 *Off ********************* Press the key to select [On] or [Off]. If you select [On] and press the OK key, Rule Setting Rule Setting: appears. Press the key to select [On] or [Off]. 1 *Off ********************* Press the OK key.
-
Page 331
Default Setting (System Menu) Press the OK key. The Network Setting menu appears. Network Setting: a b Secure Protocol ********************* Host Name LAN Interface [ Exit Press the key to select [Secure Protocol]. Press the OK key. Secure Protocol appears. Secure Protocol: a b ********************* IPP Security… -
Page 332
Default Setting (System Menu) The System menu appears. System: ********************* Network Setting I/F Block Set. Security Level [ Exit Press the key to select [Network Setting]. Press the OK key. The Network Setting menu appears. Network Setting: a b ********************* Secure Protocol Host Name LAN Interface… -
Page 333
Default Setting (System Menu) A login screen will appear. Then, enter the user ID and Login User Name: password with administrator privileges to log in, and ******************* press [Login] (the Right Select key). Login Password: [ Login The System menu appears. System: Network Setting *********************… -
Page 334: Lan Interface
Default Setting (System Menu) LDAP Security Select the communication protocol according to the type of security employed by the LDAP server. The default setting is Off. NOTE: LDAP must be set to On in Protocol Detail on page 8-132. The table below shows the available settings. Item Description Do not use security employed by the LDAP server.
-
Page 335
Default Setting (System Menu) Press the key to select [Secure Protocol]. Press the OK key. Secure Protocol appears. Secure Protocol: a b IPP Security HTTP Security ********************* LDAP Security [ Exit Press the key to select [LDAP Security]. Press the OK key. LDAP Security appears. LDAP Security: 1 *Off *********************… -
Page 336
Default Setting (System Menu) A login screen will appear. Then, enter the user ID and Login User Name: password with administrator privileges to log in, and press [Login] (the Right Select key). ******************* Login Password: [ Login The System menu appears. System: ********************* Network Setting… -
Page 337
Default Setting (System Menu) POP3 Security Select the communication protocol according to the type of security employed by the POP3 server. The default setting is Off. NOTE: POP3 (E-mail RX) must be set to On in Protocol Detail on page 8-132. The table below shows the available settings. -
Page 338
Default Setting (System Menu) Press the key to select [Secure Protocol]. Press the OK key. Secure Protocol appears. Secure Protocol: a b LDAP Security SMTP Security ********************* POP3 Security 1 [ Exit Press the key to select [POP3 Security 1], [POP3 Security 2] or [POP3 Security 3]. -
Page 339: Interface Block Setting
Default Setting (System Menu) Interface Block Setting This allows you to protect this machine by blocking the interface with external devices such as USB hosts or optional interfaces. The following interface block settings are available: • USB Host (USB memory slot setting) •…
-
Page 340: Security Level
Default Setting (System Menu) Press the OK key. USB Host appears. USB Host: 1 *Unblock ********************* Block Press the key to select [Unblock] or [Block]. Press the OK key. Completed. is displayed and the screen returns to the I/F Block Set. menu. USB Device (USB interface setting) This locks and protects the USB interface connector (B1) (USB Device).
-
Page 341
Default Setting (System Menu) Press the OK key. USB Device appears. USB Device: 1 *Unblock ********************* Block Press the key to select [Unblock] or [Block]. Press the OK key. Completed. is displayed and the screen returns to the System menu. Optional interface (Optional interface card setting) This locks and protects the optional interface slot. -
Page 342
Default Setting (System Menu) Press the OK key. Option I/F appears. Option I/F: 1 *Unblock ********************* Block Press the key to select [Unblock] or [Block]. Press the OK key. Completed. is displayed and the screen returns to the System menu. 8-148… -
Page 343: Security Level (Security Level Setting)
Default Setting (System Menu) Security Level (Security Level setting) The Security Level setting is primarily a menu option used by service personnel for maintenance work. There is no need for customers to use this menu. Optional Functions You can use the optional applications installed on this machine. Opt.
-
Page 344
Default Setting (System Menu) 8-150… -
Page 345: Maintenance
9 Maintenance This chapter describes cleaning and toner replacement. • Cleaning …………… 9-2 • Toner Container Replacement……..9-5…
-
Page 346: Cleaning
Maintenance Cleaning Clean the machine regularly to ensure optimum output quality. CAUTION: For safety, always unplug the power cord before cleaning the machine. Glass Platen Wipe the inside of the document processor and the glass platen with a soft cloth dampened with alcohol or mild detergent.
-
Page 347: Cleaning The Machine
Maintenance Cleaning the Machine To avoid print quality problems, the interior of the machine must be cleaned with every toner container replacement. Open the front cover. Lift the developer unit together with the toner container out of the machine. Remove the drum unit from the machine by holding the green levers with both hands.
-
Page 348
Maintenance On the drum unit, slide the main charger cleaner (green) back and forth 2 or 3 times to clean the charger wire, then return it to its original position (CLEANER HOME POSITION ). IMPORTANT: Remove the fixing tape on the main charger cleaner before cleaning for the first time. -
Page 349: Toner Container Replacement
Maintenance Toner Container Replacement When the message display displays Add toner, replace the toner. Every time you replace the toner container, be sure to clean the parts as instructed below. Dirty parts may deteriorate output quality. CAUTION: Do not attempt to incinerate the toner container. Dangerous sparks may cause burns. Toner Container Replacement Open the front cover.
-
Page 350
Maintenance Install the new toner container in the machine. Push firmly on the top of the container at the positions marked PUSH, until you hear a click. Turn the toner container lock lever to the lock position. Close the front cover. NOTE: Return the exhausted toner container to your dealer or service representative. -
Page 351: 10 Troubleshooting
10 Troubleshooting This chapter explains how to solve problems with the machine. • Solving Malfunctions ……….10-2 • Responding to Error Messages……..10-6 • Clearing Paper Jams……….10-13 10-1…
-
Page 352: Solving Malfunctions
Troubleshooting Solving Malfunctions The table below provides general guidelines for problem solving. If a problem occurs with your machine, look into the checkpoints and perform procedures indicated on the following pages. If the problem persists, contact your Service Representative. Reference Symptom Check Points Corrective Actions…
-
Page 353
Troubleshooting Reference Symptom Check Points Corrective Actions Page Printouts are dirty. Is the platen or the document Clean the platen or the document processor dirty? processor. Printouts are fuzzy. Is the machine being used in Use in a location that has suitable —… -
Page 354
Troubleshooting Reference Symptom Check Points Corrective Actions Page Cannot print with USB Is the USB host blocked? Select Unblock in the USB host 8-145 memory. settings. — Check that the USB memory is — securely plugged into the machine. When displaying an Have you selected Select a scan resolution other than 5-12… -
Page 355
Troubleshooting Reference Symptom Check Points Corrective Actions Page Cannot send via SMB. Is the network cable Connect the correct network cable connected? securely. Have the network settings for Configure the TCP/IP settings 8-117 the equipment been properly. configured properly? Have the folder sharing Check sharing settings and access 2-30 settings been configured… -
Page 356: Responding To Error Messages
Troubleshooting Responding to Error Messages If the control panel displays any of these messages, follow the corresponding procedure. Alphanumeric Reference Error Message Check Points Corrective Actions Page Account error. – Set the accounting settings using — PRESCRIBE again. Add toner. Is the displayed message Replace the toner container.
-
Page 357
Troubleshooting Reference Error Message Check Points Corrective Actions Page Failed to store job Is there insufficient space Printing using the Job Box function 8-68 retention data. Job is available on the RAM disk? failed because there was insufficient canceled. space available on the RAM disk. Change the size of RAM disk with the numeric keys. -
Page 358
Troubleshooting Reference Error Message Check Points Corrective Actions Page Load paper in MP Is the paper of the selected Load the paper in the multi purpose 2-43 Tray. size loaded in the multi tray which is of the size and type purpose tray? indicated on the Message Display. -
Page 359
Troubleshooting Reference Error Message Check Points Corrective Actions Page Paper jammed. – If a paper jam occurs, the machine 10-13 will stop and the location of the jam will be indicated on the Message Display. Leave the machine on and follow the instruction to remove the jammed paper. -
Page 360
Troubleshooting Reference Error Message Check Points Corrective Actions Page Send error. – An error has occurred during #### transmission. The possible error codes and their descriptions are as follows. 1101: The server name of the SMTP server is not set correctly or the host name is incorrect when sending scan data to an FTP server. -
Page 361
Troubleshooting Reference Error Message Check Points Corrective Actions Page Send error. 2101, 2102, 2103, 2201, 2202, 2203, #### 3101: The network cable is disconnected or the hub that it is connected to is not operating properly. Check the cable and the hub. -
Page 362
Troubleshooting Responding to the flashing Attention LED If the Attention LED flashes, press [Status/Job Cancel] to check an error message. If the message is not indicated on the Message Display when [Status/Job Cancel] is pressed or the Attention LED flashes for 1.5 seconds, check the following. -
Page 363: Clearing Paper Jams
Troubleshooting Clearing Paper Jams If a paper jam occurs, a message will be displayed about the jam and copying or printing will stop. Leave the power switch on and to remove the jammed paper refer to the following information below. Jam Location Indicators If a paper jam occurs, the error message displays the location of the jam.
-
Page 364: Mp Tray
Troubleshooting MP Tray Follow the steps below to clear paper jams in the MP tray. Remove the paper jammed at the MP tray. Open and close the top cover and front cover to clear the error. Cassette/Paper Feeder Follow the steps below to clear paper jams in cassette or paper feeder. Pull out the cassette or optional paper feeder.
-
Page 365: Inside The Machine
Troubleshooting Duplexer Paper is jammed in the duplexer. Remove the jammed paper using the procedure given below. Pull the paper cassette all the way out of the machine. Open the duplexer’s cover in front of the machine and remove any jammed paper. Open the duplexer’s cover at the rear of the machine and remove any jammed paper.
-
Page 366
Troubleshooting Remove the drum unit from the machine by holding the green levers with both hands. CAUTION: The fuser unit inside the machine is hot. Do not touch it, as it may result in burn injury. NOTE: The drum is sensitive to light. Never expose the drum unit to light for more than five minutes. -
Page 367: Rear Cover
Troubleshooting Rear Cover Follow the steps below to clear paper jams of the rear cover. Open the rear cover and remove the jammed paper by pulling it out. CAUTION: The fuser unit inside the machine is hot. Do not touch it, as it may result in burn injury. If the paper is jammed inside the fuser unit, open the fuser cover and remove the paper by pulling it out.
-
Page 368
Troubleshooting Remove the jammed original. If the original is caught in the rollers or difficult to remove, proceed to the next step. Open the document processor. Remove the jammed original. If the original tears, remove every loose scrap from inside the machine. Close the document processor. -
Page 369: 11 Management
11 Management This chapter explains the following operations. • User Login Administration ………. 11-2 • Job Accounting…………11-15 • Checking the Counter……….11-37 11-1…
-
Page 370: User Login Administration
Management User Login Administration User login administration specifies how the user access is administered on this machine. Enter correct login user name and password for user authentication to log in. Access are in three levels — User, Administrator, and Machine Administrator. The security levels can be modified only by the machine administrator.
-
Page 371
Management Use the procedure below to enable user login administration. NOTE: Refer to Character Entry Method on Appendix-5 for details on entering characters. Press the System Menu/Counter key on the main unit operation panel. Press the key to select [User/Job Account]. Sys. -
Page 372
Management Select [Off] to disable user login administration. When «Network Authentication» is selected, select Server Type: [NTLM], [Kerberos], or [Ext.] for the server type and press the OK key. NTLM 2 *Kerberos ********************* Ext. If [NTLM] or [Kerberos] is selected for the server type, Host Name: enter the host name (up to 64 characters) and domain name (up to 256 characters) of the authentication server,… -
Page 373
Management Login/Logout Once you enable user login administration, a login user name and password entry screen appears each time you use this machine. Login Log in using the procedure below. NOTE: Refer to Character Entry Method on Appendix-5 for details on entering characters. If the screen below appears during the operations, Login User Name perform the following login operations. -
Page 374: Adding A User
Management Adding a User This adds a new user. You can add Up to 21 users (including the default login user name). The table below explains the user information to be registered. Item Description User Name* Enter the name displayed on the user list (up to 32 characters).
-
Page 375
Management A login screen will appear. Then, enter the user ID and Login User Name: password with administrator privileges to log in, and ******************* press [Login] (the Right Select key). Login Password: [ Login The User/Job Account menu appears. Press the key to select [User Login Set.]. -
Page 376
Management Press the key to select [Exit] and then press the l User01: OK key. ********************* Exit Select [Detail] and press the OK key to see information Detail of the registered users. In Local User List, press the key to select the Local User List: a b added user and then press the OK key. -
Page 377: Changing User Properties
Management Changing User Properties User information can be changed. It can be changed only by a user with administrator privileges. Use the procedure below to change the user properties. NOTE: Refer to Character Entry Method on Appendix-5 for details on entering characters. Press the System Menu/Counter key on the main unit operation panel.
-
Page 378: Add User
Management Press the OK key. Local User List appears. Local User List: a b l DeviceAdmin ********************* l Admin l User1 [ Menu The procedure differs depending on the details to be edited. Changing user information Press the key to select the user whose Local User List: a b information you want to change, and then press the OK l DeviceAdmin…
-
Page 379
Management In the delete confirmation screen, press [Yes] (the Left Select key). The user is deleted and the screen returns to Local User List. Enabling/Disabling Group Authentication This enables group authentication using the LDAP server. This menu can be used only when [Netwk Authentic.] is selected as the user authentication method. -
Page 380
Management Press the OK key. Group Auth. appears. Group Auth.: 1 *Off ********************* Press the key to select [On] or [Off]. Press the OK key. Completed. is displayed and the screen returns to the User/Job Account menu. Displaying Network User Propertiy Use the procedure below to display the property of the user logged on using the network authentication. -
Page 381: Unknown Login User Name Job
Management Press the OK key. The User Login Set. menu appears. User Login Set.: User Login ********************* Local User List Group Auth. [ Exit Press the key to select [NW User Property]. Press the OK key. NW User Property appears. NW User Property: a b 1 *Off *********************…
-
Page 382
Management A login screen will appear. Then, enter the user ID and Login User Name: password with administrator privileges to log in, and ******************* press [Login] (the Right Select key). Login Password: [ Login The User/Job Account menu appears. Press the key to select [Unknown ID Job]. -
Page 383: Job Accounting
Management Job Accounting Job accounting Manages the copy/print count accumulated by individual accounts by assigning an ID to each account. Job accounting helps the following activities in business organizations. • Manageability of up to 20 individual accounts. • Availability for account IDs with as many as eight digits (between 0 and 99999999) for security. •…
-
Page 384: Unknown Id Job
Management NOTE: Refer to Character Entry Method on Appendix-5 for details on entering characters. The User/Job Account menu appears. Press the key to select [Job Account. Set.]. User/Job Account:a b User Login Set. ********************* Job Account.Set. Unknown ID Job [ Exit Press the OK key.
-
Page 385
Management Login/Logout If job accounting is enabled, an account ID entry screen appears each time you use this machine. Use the procedure below to login and logout. Login NOTE: Refer to Character Entry Method on Appendix-5 for details on entering characters. In the screen below, enter the account ID using the Account ID: numeric keys and press the OK key. -
Page 386: Managing Accounts
Management Managing Accounts This section explains how to add a new account. The following entries are required. Item Description Account Name Enter the account name (up to 32 characters). Account ID Enter the account ID as many as eight digits (between 0 and 99999999).
-
Page 387
Management Press the OK key. The Job Account. Set. menu appears. Job Account.Set.:a b Each Job Account ********************* Account. List Default Setting [ Exit Press the key to select [Account. List]. Press the OK key. Account. List appears. Account. List: k UI R&D DEP. -
Page 388
Management Use the procedure below to manage accounts. NOTE: Refer to Character Entry Method on Appendix-5 for details on entering characters. Press the System Menu/Counter key on the main unit operation panel. Press the key to select [User/Job Account]. Sys. Menu/Count.: a b User/Job Account ********************* User Property… -
Page 389
Management Changing account information Press the key to select the account whose information you want to change, and then press the OK Account. List: key. k UI R&D DEP. k GUI Design ********************* k RD Center [ Menu Press the key to select the item you want to Detail: change, press [Edit] (the Right Select key), change… -
Page 390
Management Press the OK key. A confirmation screen appears. Delete. Are you sure? z k UI R&D DEPT. Press [Yes] (the Left Select key). The account is deleted.Completed. is displayed and the screen returns to Account. List. Managing the Copier/Printer Counts You can select how the copying and printing page counts are shown — either the total of both or each of copying and printing individually. -
Page 391
Management Press the OK key. The Job Account. Set. menu appears. Job Account.Set: a b Job Accounting ********************* Account Report Total Accounting [ Exit Press the key to select [Default Setting]. Press the OK key. The Default Setting menu appears. Default Setting: a b ********************* Apply Limit… -
Page 392
Management Restriction Items [Split] selected for Copier/Printer Count Item Detail Print Restriction Limits the number of sheets used for copying. (Copier) Print Restriction Limits the number of sheets used for printing. (Printer) Scan Restriction Limits the number of sheets scanned (excludes (Others) copying and sending fax). -
Page 393
Management Press the key to select the item to be restricted Detail: and then press [Edit] (the Right Select key). Print Restrict.: Total [ Edit When selecting [Split] in Copy/Print Count, screen changes Detail: as shown in the left. Print Restrict.: Copier [ Edit Press the… -
Page 394
Management Applying Limit of Restriction This specifies how the machine behaves when the counter has reached the limit of restriction. The table below describes the action taken. Item Description Immediately * Job stops when the counter reaches its limit. Subsequently Printing/scanning of the job continues but the subsequent job will be rejected. -
Page 395
Management Press the key to select [Default Setting]. Press the OK key. The Default Setting menu appears. Default Setting: a b ********************* Apply Limit Copy/Print Count Counter Limit [ Exit Press the key to select [Apply Limit]. Press the OK key. Apply Limit appears. Apply Limit: Immediately 2 *Subsequently… -
Page 396
Management Default Counter Limit When you add a new account, you can change the default restrictions on the number of sheets used. You can set any number from 1 to 9,999,999 in 1-sheet increments. The items that can be set differ depending on whether [Split] or [Total] is selected for Managing the Copier/Printer Counts on page 11-22. -
Page 397
Management A login screen will appear. Then, enter the user ID and Login User Name: password with administrator privileges to log in, and ******************* press [Login] (the Right Select key). Login Password: NOTE: Refer to Character Entry Method on Appendix-5 for [ Login details on entering characters. -
Page 398
Management Repeat steps 10 to 11 set other default restrictions on the number of sheets. 11-30… -
Page 399
Management Counting the Number of Pages Printed This counts the number of pages printed. Counts are classified into Total Job Accounting and Each Job Accounting. A new count can also be started after resetting the count data which was stored for a certain period of time. Types of the counts are as follows. -
Page 400
Management Press the key to select [Job Account. Set.]. User/Job Account:a b User Login Set. Job Account.Set. ********************* Unknown ID Job [ Exit Press the OK key. The Job Account. Set. menu appears. Job Account.Set: a b ********************* Job Accounting Account. -
Page 401
Management Press [Yes] (the Left Select key). The counter is reset. Completed. is displayed and the screen returns to the Total Accounting menu. Each Job Accounting/Resetting the Counter This counts the number of pages for each account and resets the counts by account. Use the procedure below to display and reset the counter. -
Page 402
Management Press the OK key. The Each Job Accounting menu Each Job Account: a b appears. k GUI DESIGN ********************* k RD Center k UI R&D DEPT. Press the key to select the account of which you want to check counts. Press the OK key. -
Page 403: Printing An Accounting Report
Management Printing an Accounting Report Total pages counted at all relevant accounts can be printed as an accounting report. Reports have different formats depending on how the count of copiers and printers is administered. When Split is selected for Managing the Copier/Printer Count For the count by paper size, the report will be printed by size.
-
Page 404
Management Press the key to select [Job Account. Set.]. User/Job Account:a b User Login Set. Job Account.Set. ********************* Unknown ID Job [ Exit Press the OK key. The Job Account. Set. menu appears. Job Account.Set: a b ********************* Job Accounting Account. -
Page 405: Checking The Counter
Management Checking the Counter You can check the number of pages printed and scanned. The number is counted by the following items: Item Description Printed By Function You can check the number of pages copied, Pages faxed*, and printed, and the total number of pages used.
-
Page 406
Management After completing checking the count, press the OK key. The screen returns to the menu for the account. 11-38… -
Page 407: Appendix
Appendix • Optional Equipment……… Appendix-2 • Character Entry Method ……..Appendix-5 • Paper…………… Appendix-9 • Specifications ……….Appendix-18 • Glossary …………Appendix-23 Appendix-1…
-
Page 408: Optional Equipment
Optional Equipment Overview of Optional Equipment The following optional equipment is available for the machine. Expansion Memory Paper Feeder Paper Feeder The paper feeder allows you to add three more paper cassettes to the bottom of the machine for continuous feeding of a large volume of paper.
-
Page 409
Precautions for Handling the Memory Module To protect electronic parts, discharge static electricity Correct from your body by touching a water pipe (faucet) or other Incorrect large metal object before handling the memory module. Or, wear an antistatic wrist strap, if possible, when you install the memory module. -
Page 410
Removing the Memory Module To remove a memory module, remove the right cover and the memory slot cover from the machine. Then, carefully push out the two socket clamps. Ease the memory module out of the socket to remove. Verifying the expanded memory To verify that the memory module is working properly, test it by printing a status page. -
Page 411: Character Entry Method
Character Entry Method In character entry screens, use the procedure below to enter characters. Keys Used Use the following keys to enter characters. 1. OK Key Press this key to finalize the entered character(s). 2. Clear Key Press this key to delete the character at the cursor position. If the cursor is at the end of the line, the character to the left of it is deleted.
-
Page 412: Selecting Type Of Characters
Selecting Type of Characters To enter characters, the following three types are available: To enter alphabets. To enter numerals. Symbols To enter symbols. In a character entry screen, press [Text] (the Right File name input: Select key) to select the type of characters you want to enter.
-
Page 413: Entering Characters
Entering Characters After selecting a character type, use the procedure below to enter characters. Entering Alphabets and Numerals Referring to the table below, press the key corresponding to the character you want to enter until it is displayed. Entry mode Available characters Alphabetic/Symbol .
-
Page 414
Characters associated with different keys can be entered consecutively. To enter a character associated with the same key after another, use cursor keys to move the cursor to the next entry position before entering it. If you use cursor keys to move the cursor to an entry position apart from the end of the line and enter a character there, spaces are automatically entered in between. -
Page 415: Paper
Paper This section explains the paper sizes and types that can be used in the paper source. Cassette Supported types Supported paper sizes No. of sheets Plain, Preprinted, Bond, Recycled, A4, JIS B5, A5, Folio, Legal, Letter, 250 (80g/m Rough, Letterhead, Color (Colour), Oficio II, Statement, Executive, A6, Prepunched, High Quality, Custom 1 16K, 216 ×…
-
Page 416
Supported types Supported paper sizes No. of sheets Envelopes ISO B5, Envelope #10, Envelope #9, Envelope #6, Envelope Monarch, Envelope DL, Envelope C5, Youkei 4, Youkei 2 Other sizes: Portrait-2.76 to 8.50″ or 70 to 216 mm Landscape-5.83 to 14.02″ or 148 to 356 mm Transparency (OHP film) Letter, A4… -
Page 417: Basic Paper Specifications
Basic Paper Specifications This machine is designed to print on standard copy paper as used in regular (‘dry’) copiers and page printers such as laser printers. It also supports a variety of other types of paper that conform to the specifications given in this appendix.
-
Page 418: Choosing The Appropriate Paper
Choosing the Appropriate Paper This section describes guidelines for choosing paper. Condition Avoid using paper with bent corners or that is curled, dirty, or torn. Do not use paper that has a rough surface or paper fiber lint, or that is especially delicate. Use of paper in any of these conditions will not only deliver poor copies but may also cause jams and shorten the useful life of the machine.
-
Page 419
Basis Weight In countries that use the metric system, basis weight is the weight in grams of one sheet of paper one square meter in area. In the United States, basis weight is the weight in pounds of one ream (500 sheets) of paper cut to the standard size (or trade size) for a specific grade of paper. -
Page 420: Special Paper
Packaging: Choose paper that is properly packaged and stacked in boxes. Ideally, the packaging itself should have been treated with a coating to inhibit moisture. Specially treated paper: We do not recommend printing onto the following types of paper, even if it conforms to the basic specifications.
-
Page 421
Transparency (OHP film) Transparencies must be able to withstand the heat of printing. Transparencies must meet the following conditions. Criteria Specifications Heat resistance Must withstand at least 190°C Thickness 0.100 to 0.110 mm Material Polyester Dimensional accuracy ±0.7 mm Squareness of corners 90°… -
Page 422
Envelopes Use the multi purpose tray for envelopes. Due to the structure of envelopes, printing evenly over the entire surface may not be possible in some cases. Thin envelopes in particular may be wrinkled by the machine in some cases as they pass through. Before purchasing envelopes in volume, try testing a sample to ensure the print quality. -
Page 423
Some label paper has large margins on the top sheet. When using such paper, do not peel these margins from the carrier sheet before completing output. Allowed Not allowed Top sheet Carrier sheet Use label paper that conforms to the following specifications. Item Specifications Top sheet weight… -
Page 424: Specifications
Specifications NOTE: Specifications are subject to change without notice. Common functions Item Description Type Desktop Printing Method Electrophotography by semiconductor laser, single drum system Image Write System Semiconductor laser (1 beam) Paper Weight Front Cassette 60 to 120 g/m (Duplex: 60 to 120 g/m MP Tray 60 to 220 g/m Paper Type…
-
Page 425
Item Description Weight FS-1030MFP* Approx. 33 lb/Approx. 15 kg (without toner FS-1035MFP container) FS-1130MFP* Approx. 40 lb/Approx. 18 kg FS-1135MFP Space FS-1030MFP* 19 29/64 × 24 1/8″ Required FS-1035MFP 494 × 613 mm (W × D) FS-1130MFP* 19 29/64 × 24 59/64″ FS-1135MFP 494 ×… -
Page 426: Copy Functions
Copy functions Item Description Copy Speed Simplex FS-1030MFP*, FS-1130MFP*: A4R/LetterR: 30/32 sheets/min Legal: 26 sheets/min B5R: 24 sheets/min A5R/A6R: 17 sheets/min FS-1035MFP, FS-1135MFP: A4R/LetterR: 35/37 sheets/min Legal: 30 sheets/min B5R: 24 sheets/min A5R/A6R: 17 sheets/min Duplex FS-1030MFP*, FS-1130MFP*: A4R/LetterR: 17/18 sheets/min Legal: 16 sheets/min FS-1035MFP, FS-1135MFP: A4R/LetterR: 19/20 sheets/min Legal: 18 sheets/min First Copy Time…
-
Page 427: Scanner Functions
Item Description Page Description Language PRESCRIBE Emulation PCL6 (PCL5e, PCL-XL), KPDL3 (PostScript 3 compatible), Line Printer, IBM Proprinter, DIABLO 630, EPSON LQ-850 The 30 ppm model may not be available in some regions. Scanner functions Item Description Operating System Windows XP, Windows Server 2003, Windows Vista, Windows Server 2008, Windows 7 System requirements IBM PC/AT compatible…
-
Page 428: En Iso 7779
Item Description Paper Size Maximum: Legal/A4 Minimum: Statement/A5 Paper Weight Simplex: 50 to 120 g/m Duplex: 50 to 110 g/m Loading Capacity 50 sheets (50 to 80 g/m ) maximum Environmental Specifications Item Description Time to Sleep mode (default setting) 1 minute Recovery time from Sleep mode 15 seconds or less…
-
Page 429: Glossary
Glossary AppleTalk AppleTalk, which comes with Apple Computer’s Mac OS, is a network protocol. AppleTalk enables file/printer sharing and also enables you to utilize application software that is on another computer on the same AppleTalk network. Auto Form Feed Timeout During data transmission, the machine may sometimes have to wait until receiving the next data.
-
Page 430
SSL server and client authentication as well as encryption. KPDL (Kyocera Page Description Language) Kyocera’s PostScript page description language compatible with Adobe PostScript Level 3. Multi Purpose (MP) Tray Use this tray instead of the cassettes when printing onto envelopes, Hagaki, transparencies, or labels. -
Page 431
Send as E-mail A function to send the image data stored in the machine as an E-mail attachment. E-mail addresses can be selected from the list or entered at each time. SMTP (Simple Mail Transfer Protocol) A protocol for E-mail transmission over the Internet or an intranet. It is used for transferring mail between mail servers as well as for sending mail from clients to their servers. -
Page 432
Appendix-26… -
Page 433: Index
Index Index Numerics LAN Cable 2-5 Power Cable 2-8 1-sided/2-sided Selection 5-6 USB Cable 2-8 Connection Method 2-3 Continuous Scan Copy 4-13 Accessibility Appendix-23 Send 5-14 Adjusting Density 5-11 Conventions in This Guide xxviii Auto 3-8 Copy Manual 3-8 Adjusting Density 3-8 Adjustment/Maintenance 8-98 Collate Copying 3-15 Copy Density Adjustment 8-98…
-
Page 434
Index Index EcoPrint 8-50 Emulation Appendix-23 E-mail Subject/Body 8-52 Selection 8-75 File Format 8-54 Energy Star Program xxvi File Name 8-51 Enter E-mail Subject and Body 5-16 File Separation 8-55 Entry Image Quality 8-64 Body 5-16 Original Image 8-45 File Name 4-16, 5-15 Original Orientation 8-49 Subject 5-16 Scan Resolution 8-44… -
Page 435
Index Job Box 8-89 LPD 8-132 Job Retention Deletion 8-90 NetBEUI 8-132 Quick Copy Jobs 8-89 NetWare 8-127 Job Finish Notice 5-19 POP3 (E-mail RX) 8-132 Copy 4-14 Raw Port 8-132 Send 5-19 SMTP (E-mail TX) 8-132 SNMP 8-132 TCP/IP (IPv4) 8-117 TCP/IP (IPv6) 8-126, 8-129, 8-130 KPDL Appendix-24 Open SSLeay xxiii… -
Page 436
Index Index Loading in the Cassettes 2-40 Font List 8-94 Loading in the Multi Purpose Tray 2-43 Network Status Page 8-95 Multi Purpose Tray 8-14 Service Status Page 8-95 Setup 8-7 Status Page 8-93 Size and Media 2-47, Appendix-9 Transmission Result Reports 8-96 Special Paper 8-22, Appendix-14 Private Print 6-8 Specifications Appendix-11… -
Page 437
Index NetWare 8-127 USB Memory Network 8-116 Printing Documents 6-2 Printer 8-75 Removing 6-7 Send 8-87 Saving Documents 6-5 Slit Glass TIFF Print 6-3 Cleaning 9-3 XPS FitTo Page 6-4 SMTP Appendix-25 User Login Administration 11-2 Solving Malfunctions 10-2 Adding 11-6 Specifications Changing Properties 11-9 Common functions Appendix-18… -
Page 438: Index
Index Index Index-6…
-
Page 442
Rev. 1 2011.11 2MHKMEN001…
Для ознакомления с инструкцией необходимо нажать на ссылку «ЗАГРУЗИТЬ», чтобы скачать pdf файл. Если есть кнопка «ПРОСМОТР», то можно просто посмотреть документ онлайн.
Для удобства, Вы можете сохранить данную страницу с файлом руководства по эксплуатации в свой список «избранное» прямо на сайте (доступно для зарегистрированных пользователей).
Смотрите инструкцию для похожих моделей:

Вы можете задать вопрос посетителям сайта по модели KYOCERA FS-1035MFP. Если Вы являетесь её пользователем, то пожалуйста оставьте, по возможности развёрнутый отзыв:
-
Драйверы
12
-
Руководства по ремонту
7
-
Инструкции по эксплуатации
13
Языки:


Kyocera FS-1035MFP/DP инструкция по эксплуатации
(96 страниц)
- Языки:Английский
-
Тип:
PDF -
Размер:
548.12 KB -
Описание:
Kyocera Net Viewer User Guide
The KYOCERA Net Viewer application lets you organize and monitor network device information. This guide provides instructions on how to use the features and settings of the application.

Kyocera FS-1035MFP/DP инструкция по эксплуатации
(119 страниц)
- Языки:Английский
-
Тип:
PDF -
Размер:
816.87 KB -
Описание:
Command Center RX User Guide
Command Center RX (Remote eXtension), is the web server that is built into the printing device. It allows you to verify the operating status of the device and make settings related to security, network printing, E-mail transmission and advanced networking.


На NoDevice можно скачать инструкцию по эксплуатации для Kyocera FS-1035MFP/DP. Руководство пользователя необходимо для ознакомления с правилами установки и эксплуатации Kyocera FS-1035MFP/DP. Инструкции по использованию помогут правильно настроить Kyocera FS-1035MFP/DP, исправить ошибки и выявить неполадки.
![]()
РУКОВОДСТВО ПО ЭКСПЛУАТАЦИИ
FS-1030MFP/FS-1130MFP FS-1035MFP/FS-1135MFP

Введение
Спасибо Вам за покупку FS-1030MFP/FS-1130MFP/FS-1035MFP/FS-1135MFP.
Настоящееруководство содержит сведения поэксплуатации и техобслуживанию аппарата, а также описание несложных действий по устранению возникающих неполадок и поддержанию аппарата в исправном состоянии.
Ознакомьтесь с данным руководствомпоэксплуатации перед началом работы с аппаратом и храните его под рукой в качестве справочника.
Рекомендуется использовать расходуемые материалы только с нашим торговым знаком. Мы не несем ответственности за любое повреждение, вызванное использованием в этом аппарате расходуемых материалов третьей стороны.
Наличие этикетки, изображенной на рисунке, означает, что расходные материалы принадлежат нашей товарной марке.
Вданное руководство по эксплуатации также входят инструкции для моделей FS-1030MFP/DP и FS-1035MFP/DP.
Вданном руководстве по эксплуатации модели FS-1030MFP/FS-1130MFP далее будут именоваться моделями со скоростью печати 30 стр/мин, а модели FS-1035MFP/FS-1135MFP — моделями со скоростью печати 35 стр/мин.
Прилагаемые руководства
В комплект поставки аппарата входят следующие руководства. Обращайтесь к ним по мере необходимости.
Quick Installation Guide
Описывает часто используемые операции, удобные операции, плановое обслуживание, поиск и устранение неисправностей.
Safety Guide
Предоставляет информацию по безопасности и предостережения относительно установки и эксплуатации аппарата. Обязательно прочитайте это руководство перед использованием данного аппарата.
Safety Guide (FS-1030MFP/FS-1130MFP/FS-1035MFP/FS-1135MFP)
Описывает место для установки аппарата, этикетки с предостережениями и другую информацию. Обязательно прочитайте это руководство перед использованием данного аппарата.
DVD (Product Library)
Руководство по эксплуатации (данный документ)
В данном руководстве приведено описание процедур загрузки бумаги, простого копирования, печати и сканирования, а также поиска и устранения неисправностей.
Руководство по эксплуатации факса
Описывает эксплуатацию факса, проверку результатов передачи, печать отчетов и использование сетевого факса.
KYOCERA COMMAND CENTER Operation Guide Printer Driver User Guide
Network FAX Driver Operation Guide KMnet Viewer User Guide
KM-NET for Direct Printing Operation Guide PRESCRIBE Commands Technical Reference PRESCRIBE Commands Command Reference
Условные обозначения по технике безопасности в этом руководстве
Специальные предупреждающие символы в разделах настоящего руководства и на компонентах аппарата призваны обратить внимание пользователя на возможную опасность как для него самого, так и для других людей и окружающих объектов, связанную с эксплуатацией данного аппарата, а также помочь обеспечить правильную и безопасную его эксплуатацию. Символы и их описания приведены ниже.
ПРЕДУПРЕЖДЕНИЕ: Предупреждает о вероятности тяжелой травмы или даже летального исхода при недостаточном внимании или несоблюдении соответствующих правил.
ВНИМАНИЕ: Предупреждает о вероятности травмы или механического повреждения при недостаточном внимании или несоблюдении соответствующих правил.
Символы
Символ показывает, что соответствующий раздел включает в себя предупреждения относительно безопасности. Знаки внутри символа призваны привлечь внимание пользователя.
…. [Общее предупреждение]
…. [Предупреждение о возможности ожога]
Символ  указывает, что соответствующий раздел содержит информацию о запрещенных действиях. Внутри символа приводится условное обозначение запрещенного действия.
…. [Предупреждение о запрещенном действии]
…. [Разборка запрещена]
Символ указывает, что соответствующий раздел содержит информацию о действиях, которые должны быть выполнены. Внутри символа приводится условное обозначение обязательного действия.
…. [Уведомление об обязательном действии]
…. [Выньте вилку питания из сетевой розетки]
…. [Обязательно подключайте аппарат к сетевой розетке с заземлением]
В случае, если предупреждения по технике безопасности в данном руководстве напечатаны неразборчиво или в случае потери самого руководства, обратитесь к представителю сервисной службы и закажите новое руководство (услуга платная).
ПРИМЕЧАНИЕ: Оригинал, имеющий близкое сходство с банковским билетом, может в некоторых необычных случаях копироваться неправильно, так как данный аппарат имеет специальную функцию предотвращения изготовления подделок.
i

Cодержание
Cодержание
Карта меню . . . . . . . . . . . . . . . . . . . . . . . . . . . . . . . . . . . . . . . . . . . . . . . . . . . . . . . . . . . . . . . . . iii Окружающая среда. . . . . . . . . . . . . . . . . . . . . . . . . . . . . . . . . . . . . . . . . . . . . . . . . . . . . . . . . . . xi
Меры предосторожности при обращении с расходными материалами . . . . . . . . . . . . . . . . . xi Меры безопасности при работе с лазером (Европа) . . . . . . . . . . . . . . . . . . . . . . . . . . . . . . . xiii Законодательные ограничения на копирование и сканирование . . . . . . . . . . . . . . . . . . . . . xiii Правовая информация и правила техники безопасности . . . . . . . . . . . . . . . . . . . . . . . . . . . xiv
1 Наименования компонентов
Панель управления. . . . . . . . . . . . . . . . . . . . . . . . . . . . . . . . . . . . . . . . . . . . . . . . . . . . . . . . . . 1-2 Аппарат . . . . . . . . . . . . . . . . . . . . . . . . . . . . . . . . . . . . . . . . . . . . . . . . . . . . . . . . . . . . . . . . . . . 1-4 Автоподатчик оригиналов. . . . . . . . . . . . . . . . . . . . . . . . . . . . . . . . . . . . . . . . . . . . . . . . . . . . . 1-6
2 Подготовка к использованию
Проверка комплектации . . . . . . . . . . . . . . . . . . . . . . . . . . . . . . . . . . . . . . . . . . . . . . . . . . . . . . 2-2
Определение способа подключения и подготовка кабелей. . . . . . . . . . . . . . . . . . . . . . . . . . 2-3
Подсоединение кабелей. . . . . . . . . . . . . . . . . . . . . . . . . . . . . . . . . . . . . . . . . . . . . . . . . . . . . . 2-5 Включение/выключение питания . . . . . . . . . . . . . . . . . . . . . . . . . . . . . . . . . . . . . . . . . . . . . . . 2-6 Режим ожидания . . . . . . . . . . . . . . . . . . . . . . . . . . . . . . . . . . . . . . . . . . . . . . . . . . . . . . . . . . . . 2-7 Переключение языка дисплея [Язык] . . . . . . . . . . . . . . . . . . . . . . . . . . . . . . . . . . . . . . . . . . . 2-8 Установка даты и времени . . . . . . . . . . . . . . . . . . . . . . . . . . . . . . . . . . . . . . . . . . . . . . . . . . . 2-10
Настройка сети (подключение с помощью сетевого кабеля). . . . . . . . . . . . . . . . . . . . . . . . 2-13
Установка программного обеспечения . . . . . . . . . . . . . . . . . . . . . . . . . . . . . . . . . . . . . . . . . 2-15 COMMAND CENTER (настройки для E-mail). . . . . . . . . . . . . . . . . . . . . . . . . . . . . . . . . . . . . 2-26 Передача E-mail. . . . . . . . . . . . . . . . . . . . . . . . . . . . . . . . . . . . . . . . . . . . . . . . . . . . . . . . . . . . 2-27 Подготовка к отправке документа на ПК . . . . . . . . . . . . . . . . . . . . . . . . . . . . . . . . . . . . . . . . 2-30 Загрузка бумаги. . . . . . . . . . . . . . . . . . . . . . . . . . . . . . . . . . . . . . . . . . . . . . . . . . . . . . . . . . . . 2-40 Загрузка оригиналов . . . . . . . . . . . . . . . . . . . . . . . . . . . . . . . . . . . . . . . . . . . . . . . . . . . . . . . . 2-54
3 Основные операции
Вход в систему/выход из системы . . . . . . . . . . . . . . . . . . . . . . . . . . . . . . . . . . . . . . . . . . . . . . 3-2
Клавиши одним нажатием и программные клавиши . . . . . . . . . . . . . . . . . . . . . . . . . . . . . . . 3-3
Дисплей сообщений . . . . . . . . . . . . . . . . . . . . . . . . . . . . . . . . . . . . . . . . . . . . . . . . . . . . . . . . . 3-6 Копирование . . . . . . . . . . . . . . . . . . . . . . . . . . . . . . . . . . . . . . . . . . . . . . . . . . . . . . . . . . . . . . . 3-7 Печать — Печать из приложений. . . . . . . . . . . . . . . . . . . . . . . . . . . . . . . . . . . . . . . . . . . . . . 3-16 Передача . . . . . . . . . . . . . . . . . . . . . . . . . . . . . . . . . . . . . . . . . . . . . . . . . . . . . . . . . . . . . . . . . 3-18 Задание адресата . . . . . . . . . . . . . . . . . . . . . . . . . . . . . . . . . . . . . . . . . . . . . . . . . . . . . . . . . . 3-25 Отмена заданий. . . . . . . . . . . . . . . . . . . . . . . . . . . . . . . . . . . . . . . . . . . . . . . . . . . . . . . . . . . . 3-28
Проверка оставшегося тонера и оставшейся бумаги. . . . . . . . . . . . . . . . . . . . . . . . . . . . . . 3-29
4 Уход и обслуживание
Очистка . . . . . . . . . . . . . . . . . . . . . . . . . . . . . . . . . . . . . . . . . . . . . . . . . . . . . . . . . . . . . . . . . . . 4-2 Замена картриджа с тонером. . . . . . . . . . . . . . . . . . . . . . . . . . . . . . . . . . . . . . . . . . . . . . . . . . 4-5
5 Устранение неисправностей
Устранение сбоев . . . . . . . . . . . . . . . . . . . . . . . . . . . . . . . . . . . . . . . . . . . . . . . . . . . . . . . . . . . 5-2 Действия в ответ на сообщения об ошибках . . . . . . . . . . . . . . . . . . . . . . . . . . . . . . . . . . . . . 5-7 Устранение застревания бумаги . . . . . . . . . . . . . . . . . . . . . . . . . . . . . . . . . . . . . . . . . . . . . . 5-16
Приложение
Дополнительное оборудование . . . . . . . . . . . . . . . . . . . . . . . . . . . . . . . . . . . . . . Приложение-2 Способ ввода символов . . . . . . . . . . . . . . . . . . . . . . . . . . . . . . . . . . . . . . . . . . . . Приложение-3 Технические характеристики . . . . . . . . . . . . . . . . . . . . . . . . . . . . . . . . . . . . . . . . Приложение-4 EN ISO 7779 . . . . . . . . . . . . . . . . . . . . . . . . . . . . . . . . . . . . . . . . . . . . . . . . . . . . . . Приложение-9 EK1-ITB 2000 . . . . . . . . . . . . . . . . . . . . . . . . . . . . . . . . . . . . . . . . . . . . . . . . . . . . . Приложение-9
Алфавитный указатель. . . . . . . . . . . . . . . . . . . . . . . . . . . . . . . . . . . . Алфавитный указатель-1
ii

Карта меню
|
Клавиша |
Клавиша Меню функций |
Выбор бумаги |
||||
|
Копировать |
…стр. 3-15 |
|||||
|
Разбор по копиям |
||||||
|
…стр. 3-12 |
||||||
|
Дуплекс |
||||||
|
…стр. 3-10 |
||||||
|
Масштаб |
||||||
|
Совместить |
||||||
|
Формат оригинала |
||||||
|
Ориентация оригинала |
||||||
|
…стр. 3-9 |
||||||
|
Оригинал изображения |
||||||
|
…стр. 3-8 |
||||||
|
Плотность |
||||||
|
EcoPrint |
||||||
|
Непрерывное |
||||||
|
сканирование |
||||||
|
Ввод имени файла |
||||||
|
Уведомление о |
||||||
|
завершении задания |
||||||
|
Отмена команды печати |
||||||
|
Клавиша |
Клавиша Меню |
Выбор цвета |
||||
|
Отправить |
функций |
|||||
|
Формат оригинала |
||||||
|
Оригинал изобр. |
||||||
|
Разрешение сканирования |
||||||
|
Формат для передачи |
||||||
|
Масштаб |
||||||
|
Ориентация ориг. |
||||||
|
Непрерывное скан |
||||||
|
Формат файла |
||||||
|
Ввод имени файла |
||||||
|
Тема/Основной текст |
||||||
|
Увед. о зав. здн |
||||||
|
См. Руководство по эксплуатации факса |
||||||
|
Разрешение факса |
||||||
|
См. Руководство по эксплуатации факса |
||||||
|
Передача факса с |
||||||
|
задержкой |
||||||
|
Прямая передача факса |
См. Руководство по эксплуатации факса |
|||||
|
(Продолжение |
(Продолжениена |
См. Руководство по эксплуатации факса |
||||
|
Прием факса с опросом |
||||||
|
на следующей |
следующей |
|||||
|
странице) |
странице) |
Плотность |
||||
iii

|
Клавиша |
Клавиша Меню |
Дуплекс |
|||||
|
Отправить |
функций |
||||||
|
FTP-передача с |
|||||||
|
(Продолжение |
(Продолжение |
||||||
|
предыдущей |
предыдущей |
шифрованием |
|||||
|
Разделение файлов |
|||||||
|
страницы) |
страницы) |
||||||
|
См. Руководство по эксплуатации факса |
|||||||
|
Клавиша Ящик |
Ящик дополнительного |
||||||
|
документов |
адреса |
||||||
|
Ящик опроса |
См. Руководство по эксплуатации факса |
||||||
|
Поле заданий |
|||||||
|
Модуль памяти USB |
|||||||
|
Клавиша Ящик |
Клавиша Меню функций |
Разбор по копиям |
…стр. 3-15 |
||||
|
документов |
|||||||
|
Выбор бумаги |
|||||||
|
(При печати с модуля |
|||||||
|
памяти USB) |
Дуплекс |
…стр. 3-12 |
|||||
|
Ввод имени файла |
|||||||
|
Увед. о зав. здн |
|||||||
|
Замещ приоритета |
|||||||
|
Шифрованный PDF |
|||||||
|
Печать TIFF |
|||||||
|
Подгонка на странице |
|||||||
|
XPS |
|||||||
|
Клавиша Ящик |
Клавиша Меню функций |
Выбор цвета |
|||||
|
документов |
|||||||
|
Формат оригинала |
|||||||
|
(При сохранении на |
|||||||
|
модуль памяти USB) |
Оригинал изобр. |
||||||
|
Разрешение скан. |
|||||||
|
Формат сохранения |
|||||||
|
Масштаб |
|||||||
|
Ориентация ориг. |
|||||||
|
Непрерывное скан |
|||||||
|
Формат файла |
|||||||
|
Ввод имени файла |
|||||||
|
Увед. о зав. здн |
|||||||
|
Плотность |
|||||||
|
Дуплекс |
|||||||
iv

|
Клавиша Состояние/ |
заданияПечать состояния |
|
|
Отмена задания |
||
|
Отправка состояния |
||
|
задания |
||
|
Сохранение состояния |
||
|
задания |
||
|
Запланированное задание |
||
|
Журнал заданий печати |
||
|
Отправка журнала |
||
|
заданий |
||
|
Сохранение журнала |
||
|
заданий |
||
|
Сканер |
||
|
Принтер |
||
|
Факс |
||
|
…стр. 3-29 |
||
|
Состояние тонера |
||
|
…стр. 3-29 |
||
|
Состояние бумаги |
||
|
Модуль памяти USB |
||
v

|
Клавиша |
Отчет |
Печать отчета |
Карта меню |
|||
|
Системное |
||||||
|
Страница состояния |
||||||
|
меню/Счетчик |
||||||
|
Список шрифтов |
||||||
|
См. Руководство |
||||||
|
Парам. адм. |
Отчет об исходящем факсе |
|||||
|
отч. |
по эксплуатации |
|||||
|
факса |
||||||
|
См. Руководство |
||||||
|
Отчет о входящем факсе |
||||||
|
по эксплуатации |
||||||
|
факса |
||||||
|
Настр. отч. |
Результат |
Адрес эл. |
||||
|
рез. |
отправки |
почты/Папка |
||||
|
ФАКС |
||||||
|
Отмена до |
||||||
|
отправки |
||||||
|
Результат приема факса |
См. Руководство |
|||||
|
по эксплуатации |
||||||
|
факса |
||||||
|
См. Руководство |
||||||
|
Увед. о зав. здн |
||||||
|
по эксплуатации |
||||||
|
факса |
||||||
|
История |
Автом. передача |
|||||
|
журнала |
||||||
|
заданий |
История передач |
|||||
|
Адресат |
Подтверждение |
|||||
|
Регистрация |
||||||
|
(Продолжение |
||||||
|
Тема |
||||||
|
на следующей |
||||||
|
Тема журнала SSFC |
||||||
|
странице) |
||||||
vi

Клавиша
Системное меню/Счетчик
(Продолжение предыдущей страницы)
(Продолжение на следующей странице)
Счетчик
|
передачи |
Настройка сети |
Настройки TCP/ |
TCP/IP |
||
|
IP |
|||||
|
Настр. IPv4 |
|||||
|
Настр. IPv6 |
|||||
|
Детали |
|||||
|
протокола |
|||||
|
NetWare |
|||||
|
AppleTalk |
|||||
|
WSD Сканирование |
|||||
|
WSD Печать |
|||||
|
IPSec |
|||||
|
Безоп. протокол |
|||||
|
Имя хоста |
|||||
|
Интерфейс LAN |
|||||
|
Уст. блок. и/ф. |
|||||
|
УРОВ. БЕЗОПАСН. |
|||||
|
ПЕРЕЗАПУСТИТЬ |
|||||
|
Доп. функции |
|||||
|
Польз./Учет. |
Настройка |
Вход пользователя с систему |
|||
|
задан. |
учетных |
||||
|
записей |
Список локальных |
||||
|
пользователей |
|||||
|
пользователей |
|||||
|
Настройка карты IC |
|||||
|
Аутентификация группы |
|||||
|
Свойство пользователя NW |
|||||
|
Настройка |
Превышено ограничение |
||||
|
учета заданий |
|||||
|
Учет. Отчет |
|||||
|
Общий подсчет |
|||||
|
Учет по каждому заданию |
|||||
|
Учет. Список |
Подробнее/ |
||||
|
Редактировать |
|||||
|
Удалить |
|||||
|
Добавить |
|||||
|
учетную запись |
|||||
|
Настройка по |
Применить |
||||
|
умолчанию |
ограничение |
||||
|
Подсчет копий/ |
|||||
|
печати |
|||||
|
Предельное |
|||||
|
значение |
|||||
|
счетчика |
|||||
|
Неизвестный ИН задания |
|||||
vii

Клавиша
Системное меню/Счетчик
(Продолжение предыдущей страницы)
(Продолжение на следующей странице)
Свойство пользователя
Общие Язык параметры
Экран по умолчанию
|
Звук |
Устройство звукового |
|||
|
оповещения |
||||
|
Динамик факса |
||||
|
Монитор факса |
||||
|
Яркость дисплея |
||||
|
Ориг./Пар. |
Пользват. размер ориг. |
|||
|
бум. |
||||
|
Разм.ориг.умолч. |
||||
|
Пользовательский размер |
||||
|
бумаги |
||||
|
Настр. кассеты 1 |
||||
|
Настр. кассеты 2 |
||||
|
Настр. кассеты 3 |
||||
|
Настр. универсального лотка |
||||
|
Настр. типа материала |
||||
|
Материал для авто |
||||
|
Источник бумаги по умолчанию |
||||
|
Исп. спец. бумаги |
||||
|
Заранее заданный предел |
||||
|
Измерение |
||||
|
Обработка ошибок |
||||
|
Установка даты |
||||
|
Настр. таймера |
Таймер очистки ошибок |
|||
|
Таймер режима сна |
||||
|
Таймер сброса панели |
||||
|
Правило выключ. |
||||
|
Таймер выключ. |
||||
|
(Продолжение |
Авт. очистка ошибок |
|||
|
на следующей |
Авт. сброс панели |
|||
|
странице) |
||||
|
Неиспользованное время |
||||
viii
![]()
Клавиша
Системное меню/Счетчик
(Продолжение предыдущей страницы)
(Продолжение на следующей странице)
|
Общие |
Функция по |
Выбор цвета |
||||
|
параметры |
умолчанию |
|||||
|
(Продолжение |
Разрешение скан. |
|||||
|
предыдущей |
См. Руководство |
|||||
|
Разрешение факса |
||||||
|
страницы) |
||||||
|
по эксплуатации |
||||||
|
факса |
||||||
|
Оригинал изобр. |
||||||
|
Плотность |
||||||
|
Масштаб |
||||||
|
Разбор по копиям |
||||||
|
Ориентация ориг. |
||||||
|
EcoPrint |
||||||
|
Ввод имени файла |
||||||
|
Тема/Основной текст |
||||||
|
Непрерывное скан |
||||||
|
Формат файла |
||||||
|
Разделен. файлов |
||||||
|
Печать TIFF |
||||||
|
XPS впис.по стр. |
||||||
|
Настройка |
Расположение 2 |
|||||
|
сведений |
в 1 |
|||||
|
Расположение 4 |
||||||
|
в |
1 |
|||||
|
Линия границы |
||||||
|
Ориг. переплет |
||||||
|
Окон. переплет |
||||||
|
Качество |
||||||
|
изображения |
||||||
|
Сжатие цв. |
||||||
|
TIFF |
||||||
|
Выполнение входа в систему |
||||||
|
РЕЖ. RAM ДИСКА |
||||||
|
Копия |
Обработка фото |
|||||
|
Выбор бумаги |
||||||
|
Авт. выбор бумаги |
||||||
|
Авт. % приоритета |
||||||
|
Выб. настр. ключа |
||||||
ix

|
Клавиша |
Принтер |
Настр. эмуляции |
|
|
Системное |
|||
|
EcoPrint |
|||
|
меню/Счетчик |
|||
|
(Продолжение |
Отмена A4/LTR |
||
|
предыдущей |
|||
|
страницы) |
Дуплекс |
||
|
Копии |
|||
|
Ориентация |
|||
|
Задержка между заданиями |
|||
|
Действие LF |
|||
|
Действие CR |
|||
|
Режим податчика бумаги |
|||
|
Отправить |
Выб. настр ключа |
||
|
Ящик |
Ящик доп. адреса |
||
|
документов |
|||
|
Поле заданий |
|||
|
Ящик опроса |
|||
|
Выб. настр ключа |
|||
|
Редакт. |
Адресная книга |
||
|
адресата |
|||
|
Печать списка |
|||
|
Настройка/ |
Настройка получателя копии |
||
|
обслуж. |
|||
|
Плотность передачи/ящика |
|||
|
Правильно. Линия Bk |
|||
|
Настр. сервиса |
Состояние сервиса |
||
|
Состояние сети |
|||
|
Новый проявитель |
|||
|
Код страны факса |
|||
|
Настройка факс. вызова |
|||
|
Параметры удаленной |
|||
|
диагностики |
|||
|
ИН удаленной диагностики |
|||
См. Руководство
по эксплуатации факса
См. Руководство
по эксплуатации факса
См. Руководство
по эксплуатации факса
См. Руководство
по эксплуатации факса
x

Окружающая среда
Аппарат предназначен для эксплуатации в следующих условиях окружающей среды:
•Температура: От 10 до 32,5 °C
•Влажность: От 15 до 80%
Неблагоприятные условия окружающей среды могут негативно сказаться на качестве изображения. При размещении аппарата избегайте его установки в следующих местах.
•Не располагайте его возле окна или в местах, где на него будет попадать прямой солнечный свет.
•Избегайте мест, подверженных вибрации.
•Избегайте мест с резкими перепадами температуры.
•Избегайте мест, находящихся по действием прямых потоков горячего или холодного воздуха.
•Избегайте мест с плохой вентиляцией.
Непрочный материал пола при перемещении аппарата после установки может быть поврежден роликами.
При копировании выделяется некоторое количество озона, но оно незначительно и не сказывается отрицательно на здоровье. Тем не менее, при длительном использовании аппарата в помещении с плохой вентиляцией или при изготовлении очень большого количества копий может ощущаться неприятный запах. Для обеспечения оптимальных условий окружающей среды при копировании рекомендуется хорошо проветривать помещение.
Меры предосторожности при обращении с расходными материалами
 ВНИМАНИЕ
Не пытайтесь сжечь картридж с тонером или бункер отработанного тонера. Искры от пламени могут стать причиной ожогов.
Храните картридж с тонером и бункер отработанного тонера в недоступном для детей месте.
В случае просыпания тонера из картриджа или бункера отработанного тонера избегайте его вдыхания или проглатывания, а также попадания в глаза и на кожу.
•Если вы вдохнули тонер, выйдите на свежий воздух и тщательно прополощите горло большим количеством воды. При появлении кашля обратитесь к врачу.
•Если вы проглотили тонер, прополощите рот водой и выпейте 1–2 чашки воды, чтобы разбавить содержимое желудка. При необходимости обратитесь к врачу.
•При попадании тонера в глаза тщательно промойте их водой. При продолжительном дискомфорте в глазах обратитесь к врачу.
•При попадании тонера на кожу помойте ее водой с мылом.
Не пытайтесь вскрыть либо сломать картридж с тонером или бункер для отработанного тонера.
xi

Другие меры предосторожности
Сдайте использованный картридж с тонером и бункер для отработанного тонера по месту приобретения аппарата или в службу поддержки. Переработка или утилизация использованных картриджей с тонером и бункеров для отработанного тонера производится в соответствии с установленными нормами.
Храните аппарат, избегая воздействия на него прямых солнечных лучей.
Храните аппарат в месте, где температура остается ниже 40 ºC, избегая резких изменений температуры и влажности.
Если аппарат не будет использоваться в течение длительного периода, выньте бумагу из кассеты и универсального лотка, поместите ее обратно в оригинальную упаковку и запечатайте.
Если используется МФУ FS-1130MFP/FS-1135MFP, а аппарат выключен с помощью выключателя питания, прием и передача факсов невозможны. Не выключайте аппарат с помощью выключения питания.
xii

Меры безопасности при работе с лазером (Европа)
Лазерное излучение опасно для организма человека. Поэтому лазерное излучение, создаваемое внутри аппарата, герметично закрыто защитным кожухом и наружной крышкой. При правильной эксплуатации аппарата пользователем излучение не проникает за пределы его корпуса.
Настоящий аппарат классифицирован как лазерное изделие класса 1 в соответствии со стандартом IEC 60825-1:2007.
Осторожно: Выполнение процедур, отличных от изложенных в данном руководстве, может привести к опасному воздействию лазерного излучения.
Эти наклейки прикреплены на блок лазерного сканера внутри аппарата и находятся вне зоны доступа пользователя.
Наклейка, представленная на рисунке ниже, прикреплена на правой стороне аппарата.
Законодательные ограничения на копирование и сканирование
•Может быть запрещено копирование материала, защищенного авторскими правами, без разрешения владельца тех прав.
•Копирование/сканирование следующих изображений запрещено и может быть уголовно наказуемым. Это может ограничиваться не только данными изображениями. Не копируйте/сканируйте умышленно изображения, которые не предназначены для копирования/сканирования.
Бумажные деньги Банкноты Ценные бумаги Печати Паспорта Сертификаты
•Местные законы и предписания могут запрещать или ограничивать копирование и сканирование иного, не упомянутого выше.
xiii

Правовая информация и правила техники безопасности
Перед использованием аппарата, пожалуйста, прочтите данную информацию. В этом
разделе приводится информация по следующим темам.
|
• |
Правовая информация………………………………………………………….. |
xv |
|
• В отношении торговых марок ………………………………………………… |
xv |
|
|
• |
Функция управления энергосбережением………………………………. |
xix |
|
• Функция автоматического двустороннего копирования……………. |
xix |
|
|
• |
Переработка бумаги……………………………………………………………… |
xix |
|
• Программа Energy Star (ENERGY STAR®) ……………………………… |
xix |
|
|
• Об этом руководстве по эксплуатации …………………………………… |
xx |
|
|
• Обозначения, используемые в данном руководстве……………….. |
xxi |
xiv

Правовая информация
Копирование или какое-либо иное воспроизводство настоящего руководства полностью или частично без предварительного письменного разрешения корпорации Kyocera Mita Corporation запрещено.
В отношении торговых марок
•PRESCRIBE и ECOSYS являются торговыми марками корпорации Kyocera Corporation.
•KPDL является торговой маркой Kyocera Corporation.
•Microsoft, Windows, Windows XP, Windows Server 2003, Windows Vista, Windows Server 2008, Windows 7 и Internet Explorer являются зарегистрированными товарными знаками Microsoft Corporation в США и/или других странах.
•PCL является торговой маркой Hewlett-Packard Company.
•Adobe Acrobat, Adobe Reader и PostScript являются торговыми марками Adobe Systems, Incorporated.
•Ethernet является зарегистрированной торговой маркой корпорации Xerox.
•Novell и NetWare являются зарегистрированными торговыми марками Novell, Inc.
•IBM и IBM PC/AT являются торговыми марками International Business Machines Corporation.
•AppleTalk, Bonjour, Macintosh и Mac OS являются торговыми марками Apple Inc., зарегистрированными в США и других странах.
•Все шрифты европейских языков, инсталлированные в этом аппарате, используются согласно лицензионному соглашению с Monotype Imaging Inc.
•Helvetica, Palatino и Times являются зарегистрированными торговыми марками Linotype GmbH.
•ITC Avant Garde Gothic, ITC Bookman, ITC ZapfChancery и ITC ZapfDingbats являются зарегистрированными товарными знаками International Typeface Corporation.
•В этом аппарате инсталлированы шрифты UFST™ MicroType® фирмы Monotype Imaging Inc.
•В программном обеспечении, используемом в аппарате, имеются модули, разработанные Independent JPEG Group.
Все остальные торговые марки и названия продуктов, упомянутые в настоящем руководстве, являются зарегистрированнымиторговымимаркамиилиторговымимаркамисоответствующихкомпаний. Обозначения ™ и ® в данном руководстве по эксплуатации не используются.
xv

GPL/LGPL
Это изделие содержит программное обеспечение GPL (http://www.gnu.org/licenses/gpl.html) и/или LGPL (http:/ /www.gnu.org/licenses/lgpl.html), входящее в прошивку. Можно получить исходный код, а также разрешается копировать, перераспределять и изменять его в соответствии с условиями GPL/LGPL. Для получения дополнительной информации, в том числе о доступности исходного кода, посетите веб-сайт http:// www.kyoceramita.com/gpl/.
Open SSLeay License
Copyright (c) 1998-2006 The OpenSSL Project. All rights reserved.
Redistribution and use in source and binary forms, with or without modification, are permitted provided that the following conditions are met:
1Redistributions of source code must retain the above copyright notice, this list of conditions and the following disclaimer.
2Redistributions in binary form must reproduce the above copyright notice, this list of conditions and the following disclaimer in the documentation and/or other materials provided with the distribution.
3All advertising materials mentioning features or use of this software must display the following acknowledgment:
“This product includes software developed by the OpenSSL Project for use in the OpenSSL Toolkit. (http:// www.openssl.org/)”
4The names “OpenSSL Toolkit” and “OpenSSL Project” must not be used to endorse or promote products derived from this software without prior written permission.
For written permission, please contact openssl-core@openssl.org.
5Products derived from this software may not be called “OpenSSL” nor may “OpenSSL” appear in their names without prior written permission of the OpenSSL Project.
6Redistributions of any form whatsoever must retain the following acknowledgment: “This product includes software developed by the OpenSSL Project for use in the OpenSSL Toolkit (http://www.openssl.org/)”
THIS SOFTWARE IS PROVIDED BY THE OpenSSL PROJECT “AS IS” AND ANY EXPRESSED OR IMPLIED WARRANTIES, INCLUDING, BUT NOT LIMITED TO, THE
IMPLIED WARRANTIES OF MERCHANTABILITY AND FITNESS FOR A PARTICULAR PURPOSE ARE DISCLAIMED. IN NO EVENT SHALL THE OpenSSL PROJECT OR ITS CONTRIBUTORS BE LIABLE FOR ANY DIRECT, INDIRECT, INCIDENTAL, SPECIAL, EXEMPLARY, OR CONSEQUENTIAL DAMAGES (INCLUDING, BUT NOT LIMITED TO, PROCUREMENT OF SUBSTITUTE GOODS OR SERVICES; LOSS OF USE, DATA, OR PROFITS; OR BUSINESS INTERRUPTION) HOWEVER CAUSED AND ON ANY THEORY OF LIABILITY, WHETHER IN CONTRACT, STRICT LIABILITY, OR TORT (INCLUDING NEGLIGENCE OR OTHERWISE) ARISING IN ANY WAY OUT OF THE USE OF THIS SOFTWARE, EVEN IF ADVISED OF THE POSSIBILITY OF SUCH DAMAGE.
xvi

Original SSLeay License
Copyright (C) 1995-1998 Eric Young (eay@cryptsoft.com) All rights reserved.
This package is an SSL implementation written by Eric Young (eay@cryptsoft.com). The implementation was written so as to conform with Netscapes SSL.
This library is free for commercial and non-commercial use as long as the following conditions are aheared to. The following conditions apply to all code found in this distribution, be it the RC4, RSA, lhash, DES, etc., code; not just the SSL code. The SSL documentation included with this distribution is covered by the same copyright terms except that the holder is Tim Hudson (tjh@cryptsoft.com).
Copyright remains Eric Young’s, and as such any Copyright notices in the code are not to be removed.
If this package is used in a product, Eric Young should be given attribution as the author of the parts of the library used.
This can be in the form of a textual message at program startup or in documentation (online or textual) provided with the package.
Redistribution and use in source and binary forms, with or without modification, are permitted provided that the following conditions are met:
1Redistributions of source code must retain the copyright notice, this list of conditions and the following disclaimer.
2Redistributions in binary form must reproduce the above copyright notice, this list of conditions and the following disclaimer in the documentation and/or other materials provided with the distribution.
3All advertising materials mentioning features or use of this software must display the following acknowledgement:
“This product includes cryptographic software written by Eric Young (eay@cryptsoft.com)”
The word ‘cryptographic’ can be left out if the rouines from the library being used are not cryptographic related :-).
4If you include any Windows specific code (or a derivative thereof) from the apps directory (application code) you must include an acknowledgement:
“This product includes software written by Tim Hudson (tjh@cryptsoft.com)”
THIS SOFTWARE IS PROVIDED BY ERIC YOUNG “AS IS” AND ANY EXPRESS OR IMPLIED WARRANTIES, INCLUDING, BUT NOT LIMITED TO, THE IMPLIED WARRANTIES OF MERCHANTABILITY AND FITNESS FOR A PARTICULAR PURPOSE ARE DISCLAIMED. IN NO EVENT SHALL THE AUTHOR OR CONTRIBUTORS BE LIABLE FOR ANY DIRECT, INDIRECT, INCIDENTAL, SPECIAL, EXEMPLARY, OR CONSEQUENTIAL DAMAGES (INCLUDING, BUT NOT LIMITED TO, PROCUREMENT OF SUBSTITUTE GOODS OR SERVICES; LOSS OF USE, DATA, OR PROFITS; OR BUSINESS INTERRUPTION) HOWEVER CAUSED AND ON ANY THEORY OF LIABILITY, WHETHER IN CONTRACT, STRICT LIABILITY, OR TORT (INCLUDING NEGLIGENCE OR OTHERWISE) ARISING IN ANY WAY OUT OF THE USE OF THIS SOFTWARE, EVEN IF ADVISED OF THE POSSIBILITY OF SUCH DAMAGE.
The licence and distribution terms for any publically available version or derivative of this code cannot be changed. i.e. this code cannot simply be copied and put under another distribution licence [including the GNU Public Licence.]
xvii

Monotype Imaging License Agreement
1Software shall mean the digitally encoded, machine readable, scalable outline data as encoded in a special format as well as the UFST Software.
2You agree to accept a non-exclusive license to use the Software to reproduce and display weights, styles and versions of letters, numerals, characters and symbols (Typefaces) solely for your own customary business or personal purposes at the address stated on the registration card you return to Monotype Imaging. Under the terms of this License Agreement, you have the right to use the Fonts on up to three printers. If you need to have access to the fonts on more than three printers, you need to acquire a multi-user license agreement which can be obtained from Monotype Imaging. Monotype Imaging retains all rights, title and interest to the Software and Typefaces and no rights are granted to you other than a License to use the Software on the terms expressly set forth in this Agreement.
3To protect proprietary rights of Monotype Imaging, you agree to maintain the Software and other proprietary information concerning the Typefaces in strict confidence and to establish reasonable procedures regulating access to and use of the Software and Typefaces.
4You agree not to duplicate or copy the Software or Typefaces, except that you may make one backup copy. You agree that any such copy shall contain the same proprietary notices as those appearing on the original.
5This License shall continue until the last use of the Software and Typefaces, unless sooner terminated. This License may be terminated by Monotype Imaging if you fail to comply with the terms of this License and such failure is not remedied within thirty (30) days after notice from Monotype Imaging. When this License expires or is terminated, you shall either return to Monotype Imaging or destroy all copies of the Software and Typefaces and documentation as requested.
6You agree that you will not modify, alter, disassemble, decrypt, reverse engineer or decompile the Software.
7Monotype Imaging warrants that for ninety (90) days after delivery, the Software will perform in accordance with Monotype Imaging-published specifications, and the diskette will be free from defects in material and workmanship. Monotype Imaging does not warrant that the Software is free from all bugs, errors and omissions.
The parties agree that all other warranties, expressed or implied, including warranties of fitness for a particular purpose and merchantability, are excluded.
8Your exclusive remedy and the sole liability of Monotype Imaging in connection with the Software and Typefaces is repair or replacement of defective parts, upon their return to Monotype Imaging.
In no event will Monotype Imaging be liable for lost profits, lost data, or any other incidental or consequential damages, or any damages caused by abuse or misapplication of the Software and Typefaces.
9Massachusetts U.S.A. law governs this Agreement.
10You shall not sublicense, sell, lease, or otherwise transfer the Software and/or Typefaces without the prior written consent of Monotype Imaging.
11Use, duplication or disclosure by the Government is subject to restrictions as set forth in the Rights in Technical Data and Computer Software clause at FAR 252-227-7013, subdivision (b)(3)(ii) or subparagraph (c)(1)(ii), as appropriate. Further use, duplication or disclosure is subject to restrictions applicable to restricted rights software as set forth in FAR 52.227-19 (c)(2).
12You acknowledge that you have read this Agreement, understand it, and agree to be bound by its terms and conditions. Neither party shall be bound by any statement or representation not contained in this Agreement. No change in this Agreement is effective unless written and signed by properly authorized representatives of each party. By opening this diskette package, you agree to accept the terms and conditions of this Agreement.
xviii
![]()
Функция управления энергосбережением
Данный аппарат оснащен режимом ожидания, в котором функции печати и отправки факсов остаются в режиме ожидания, но энергопотребление, тем не менее, снижается до минимума, когда в течение заданного промежутка времени с устройством не выполняется никаких действий.
Режим ожидания
Устройство автоматически переходит в режим ожидания по истечении 1 минуты с момента последнего его использования. Длительность простоя до перехода в режим ожидания может быть увеличена. Более подробная информация приведена в разделе Режим ожидания на стр. 2-7.
Функция автоматического двустороннего копирования
Для данного аппарата двустороннее копирование является стандартной функцией. Например, двустороннее копирование на один лист двух односторонних оригиналов позволяет сократить расход бумаги. Более подробная информация приведена в разделе Режим ожидания на стр. 2-7.
Переработка бумаги
Данный аппарат поддерживает использование переработанной бумаги, что уменьшает нагрузку на окружающую среду. Более подробную информацию по рекомендуемым типам бумаги можно получить у представителя сервисной службы или у торгового представителя.
Программа Energy Star (ENERGY STAR®)
Наша компания, будучи участником международной программы Energy Star, утверждает, что данный продукт соответствует стандартам, установленным этой программой.
xix

Об этом руководстве по эксплуатации
В настоящем руководстве содержатся следующие разделы.
Раздел 1 — Наименования компонентов
Содержит описание компонентов аппарата и клавиш панели управления.
Раздел 2 — Подготовка к использованию
В этом разделе приводится описание действий по загрузке бумаги и оригиналов, подключению аппарата, а также информация о необходимых настройках перед первым использованием.
Раздел 3 — Основные операции
Описываются основные процедуры копирования, печати и сканирования.
Раздел 4 — Уход и обслуживание
Приводятся процедуры очистки аппарата и замены тонера.
Раздел 5 — Устранение неисправностей
В этом разделе приводятся указания по устранению неполадок при эксплуатации аппарата, сведения об устранении замятий бумаги и указания об обработке сообщений об ошибках.
Приложение
В этом разделе описывается ввод символов и указаны технические характеристики аппарата. Описывается подходящее дополнительное оборудование для данного аппарата.
xx

Обозначения, используемые в данном руководстве
В зависимости от характера описания в тексте данного руководства используются следующие условные обозначения.
|
Условное |
Описание |
Пример |
||
|
обозначение |
||||
|
Жирный шрифт |
Клавиша на панели |
Нажмите клавишу Старт. |
||
|
управления или на экране |
||||
|
компьютера. |
||||
|
[Обычный шрифт] |
Элемент выбора на дисплее |
Выберите [Система]. |
||
|
сообщений. |
||||
|
Курсив |
Сообщение, которое |
Отображается сообщение «Готов к |
||
|
выводится на дисплей |
копированию«. |
|||
|
сообщений. |
||||
|
Используется для выделения |
Более подробная информация |
|||
|
ключевого слова, фразы или |
приведена в разделе Режим |
|||
|
источника дополнительной |
ожидания на стр. 2-7. |
|||
|
информации. |
||||
|
Примечание |
Означает ссылку на |
|||
|
дополнительнуюинформацию |
ПРИМЕЧАНИЕ: |
|||
|
или операции. |
||||
|
Важно |
Указывает на то, что следует и |
|||
|
чего не следует делать, чтобы |
ВАЖНАЯ ИНФОРМАЦИЯ: |
|||
|
избежать проблем. |
||||
|
Предостережение |
Используется для выделения |
|||
|
сведений, позволяющих |
||||
|
предотвратить получение |
ОСТОРОЖНО: |
|||
|
травмы или повреждение |
||||
|
аппарата. |
||||
xxi

1 Наименования компонентов
В этом разделе перечислены компоненты аппарата и клавиши панели управления.
|
• |
Панель управления ……………………………………………. |
1-2 |
|
• |
Аппарат …………………………………………………………….. |
1-4 |
1-1

Наименования компонентов
Панель управления
Отображение экрана «Адр. книга» с возможностью добавления, правки и удаления адресата.
Отображение экрана меню «Системное меню / счетчик» с возможностью проверки настроек и счетчиков системы.
Отображение экрана «Состояние» с возможностью проверки состояния, печати отчета о состоянии и приостановки либо отмены выполняемого задания.
Отображение
экрана «Копирование» с возможностью установки настроек, необходимых для копирования.
Вызов предыдущего адресата. Используется также для введения паузы при наборе номера факса.*
Отображение экрана «Подтвердите_адресата» с возможностью правки и удаления адресатов.
Отображение экрана «Доб. адресата», используемого для добавления адресатов.
Переключение между режимами с лежащей и снятой трубкой при ручной отправке факса.*
Дисплей сообщений. См. отображаемую здесь информацию при эксплуатации аппарата.
Выбор меню, отображаемоговправой нижней части дисплея сообщений.
|
Отображение экрана факса с |
||||||||||||||||||||||||||
|
возможностью отправки факса.* |
Выбор меню |
, |
||||||||||||||||||||||||
|
отображаемого в левой |
||||||||||||||||||||||||||
|
Отображение экрана «Передать» с возможностью |
||||||||||||||||||||||||||
|
нижней части дисплея |
||||||||||||||||||||||||||
|
отправки E-mail, папки (SMB/FTP) или факса.* |
||||||||||||||||||||||||||
|
сообщений. |
||||||||||||||||||||||||||
|
Отображение экрана «Ящик докум.» с |
Мигает, когда |
|||||||||||||||||||||||||
|
возможностью работы с ящиком документов и |
||||||||||||||||||||||||||
|
памятью USB. |
принимаются данные |
|||||||||||||||||||||||||
|
печати или передаются |
||||||||||||||||||||||||||
|
данные. |
||||||||||||||||||||||||||
|
Используется для регистрации, вызова и |
||||||||||||||||||||||||||
|
удаления адресатов, присвоенных |
||||||||||||||||||||||||||
|
клавишам набора одним нажатием (1-22). |
||||||||||||||||||||||||||
|
Переключение между номерами клавиш одним нажатием |
||||||||||||||||||||||||||
|
(от 1 до 11 и от 12 до 22). |
||||||||||||||||||||||||||
|
Во время переключения лампа светится (от 12 до 22). |
||||||||||||||||||||||||||
|
Мигает при обращении |
||||||||||||||||||||||||||
|
* Только для моделей с установленной функцией факса (FS-1130MFP/FS-1135MFP). |
аппарата к памяти. |
|||||||||||||||||||||||||
1-2
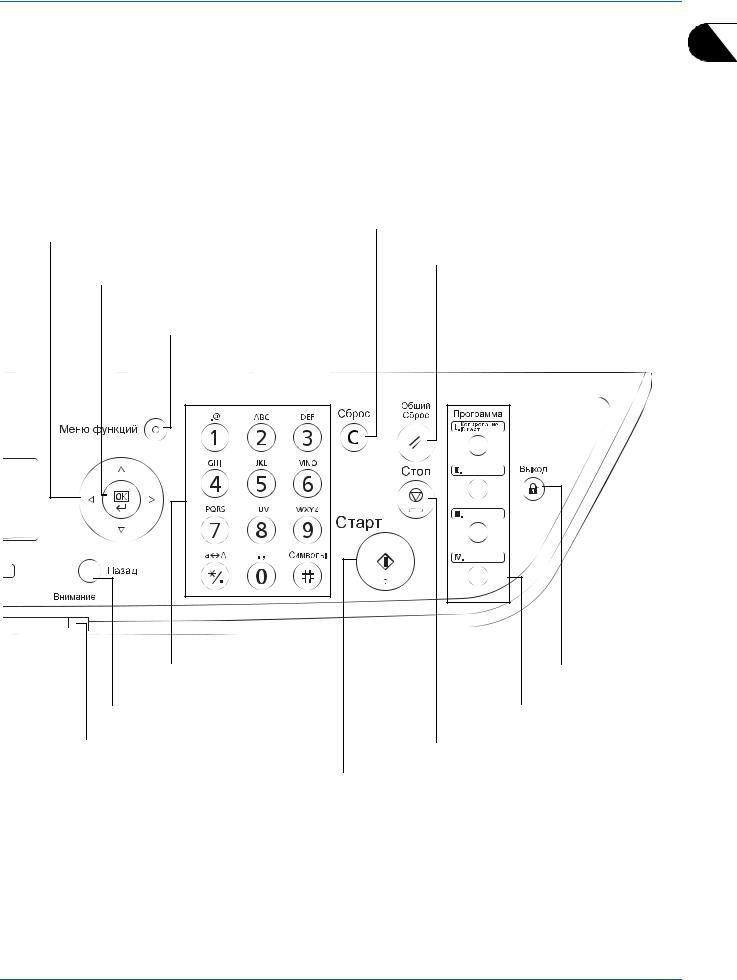
Наименования компонентов
1
Используется для выбора пункта меню, перемещения курсора при введении символов, Удаление введенных чисел и символов. изменения значения и т. д.
Сброс настроек и отображение Выбор выделенного пункта или завершение начального экрана.
ввода значения.
Отображение меню функций для копирования, печати, передачи и ящика документов.
Цифровая клавиатура. Служит для ввода цифр и символов.
Восстановление предыдущего экрана на дисплее сообщений.
Светится или мигает в случае ошибки.
Завершение операции (с выходом) на экране «Администратор».
Используетсядлясохранения или вызова программ.
Отмена выполняемого задания печати.
Запуск операции копирования и сканирования, а также выполнение настройки.
1-3
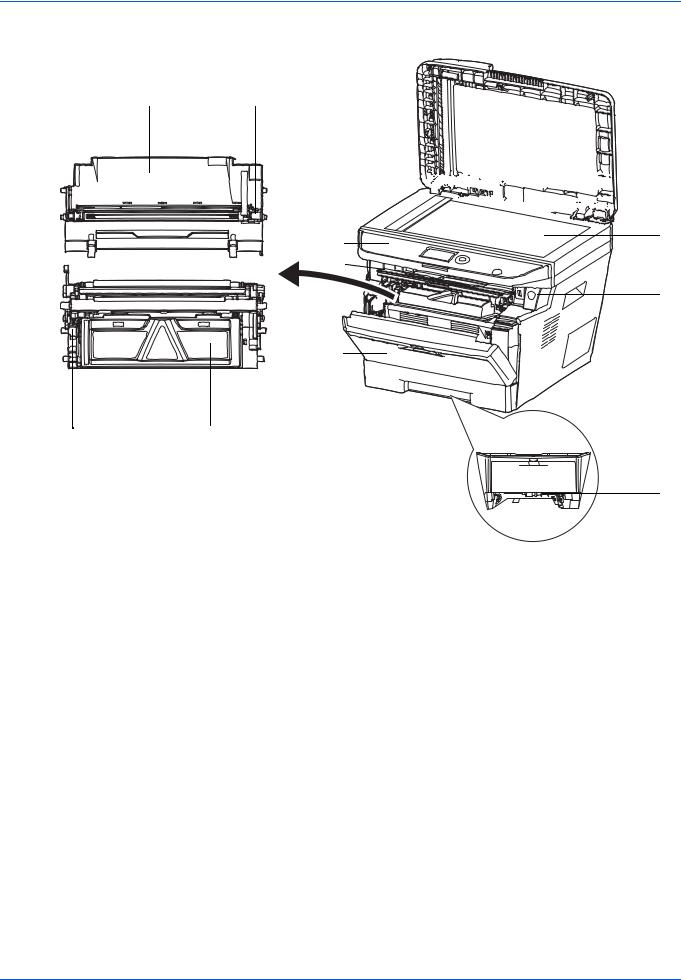
1-4
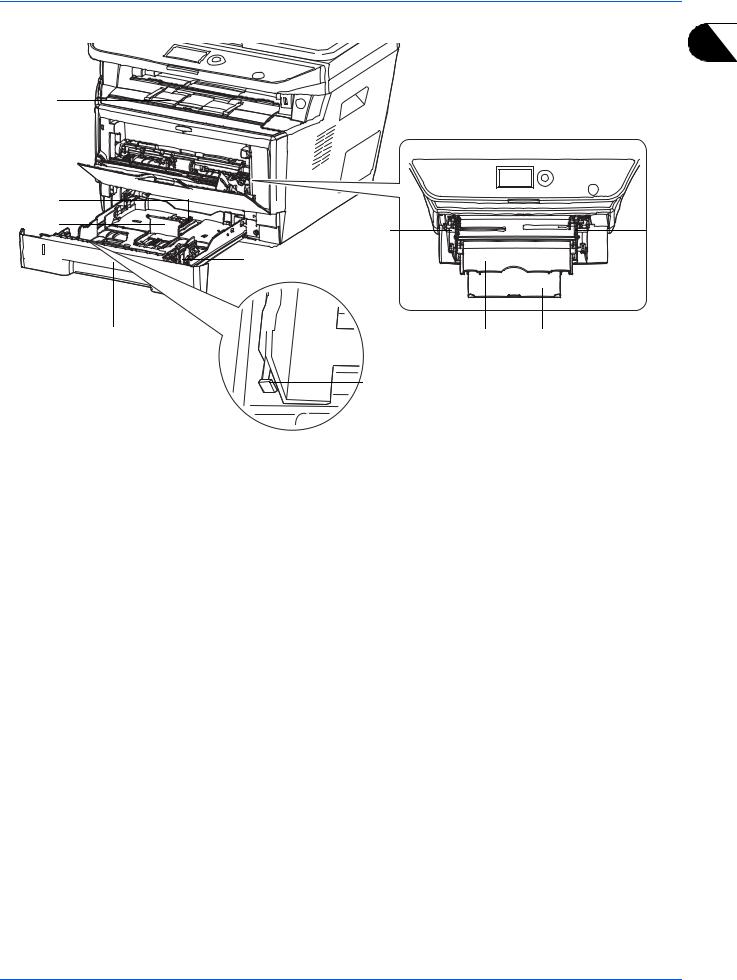
Наименования компонентов
1
13
|
14 |
||
|
15 |
19 |
19 |
|
16 |
18
13Внутренний лоток
14Регулятор длины бумаги
15Направляющая длины бумаги
16Направляющие ширины бумаги
17Кассета 1
18Регулятор ширины бумаги
19Направляющие ширины бумаги (универсальный лоток)
20Универсальный лоток
21Опорная часть универсального лотка
1-5

Наименования компонентов
22
23
24
25
22Опорный штифт
23Разъем интерфейса USB
24Разъем сетевого интерфейса
25Крышка термоблока
26Упоры для рук
27Задняя крышка
28Разъем для шнура питания
Автоподатчик оригиналов
29 30 31
29Крышка автоподатчика оригиналов
30Направляющие ширины оригиналов
31Лоток оригиналов
32Выходной лоток оригиналов
33Ограничитель оригиналов
34Ручка открытия/закрытия автоподатчика оригиналов
1-6

2 Подготовка к использованию
В этом разделе приводится информация по подготовке аппарата к эксплуатации, а также
описание действий по загрузке бумаги и оригиналов.
|
• |
Проверка комплектации……………………………………………………………. |
2-2 |
|
• Определение способа подключения и подготовка кабелей………………….. |
2-3 |
|
|
• |
Подсоединение кабелей…………………………………………………………… |
2-5 |
|
• |
Включение/выключение питания……………………………………………….. |
2-6 |
|
• |
Режим ожидания………………………………………………………………………. |
2-7 |
|
• Переключение языка дисплея [Язык] ………………………………………… |
2-8 |
|
|
• Установка даты и времени………………………………………………………. |
2-10 |
|
|
• Настройка сети (подключение с помощью сетевого кабеля) ……… |
2-13 |
|
|
• |
Установка программного обеспечения …………………………………….. |
2-15 |
|
• COMMAND CENTER (настройки для E-mail)…………………………….. |
2-26 |
|
|
• |
Передача E-mail……………………………………………………………………… |
2-27 |
|
• Подготовка к отправке документа на ПК…………………………………… |
2-30 |
|
|
• |
Загрузка бумаги……………………………………………………………………… |
2-40 |
|
• |
Загрузка оригиналов ………………………………………………………………. |
2-54 |
2-1
![]()
Подготовка к использованию
Проверка комплектации
Проверьте комплектность документации и программного обеспечения:
•Quick Installation Guide
•Safety Guide
•Safety Guide (FS-1030MFP/FS-1130MFP/FS-1035MFP/FS-1135MFP)
•DVD-диск (Product Library)
Документы, содержащиеся на DVD-диске, входящем в комплект
На прилагаемом DVD-диске (Product Library) содержатся следующие документы. Обращайтесь к ним по мере необходимости.
Документы Руководство по эксплуатации (данный документ)
Руководство по эксплуатации факса
KYOCERA COMMAND CENTER Operation Guide
Printer Driver User Guide
Network FAX Driver Operation Guide
KMnet Viewer User Guide
KM-NET for Direct Printing Operation Guide
PRESCRIBE Commands Technical Reference
PRESCRIBE Commands Command Reference
2-2

Подготовка к использованию
Определение способа подключения и подготовка кабелей
|
Для подключения оборудования к компьютеру или к сети проверьте способ подключения и подготовьте |
2 |
|
соответствующие кабели. |
Пример подключения
Определите способ подключения аппарата к компьютеру или сети (см. рисунок ниже).
Подключение сканера к компьютерной сети с помощью сетевого кабеля (100BASE-TX или 10BASE-T)
COMMAND CENTER
ПК администратор Настройки сети,
Сеть
параметры сканера по умолчанию, регистрация пользователя и адресата
МФУ
Печать


 Сеть
Сеть
USB
Сеть
|
Сетевой |
Сеть |
Сеть |
||||||||||||||||||||||||||||||||||||||||||||||||||||||||
|
факс |
||||||||||||||||||||||||||||||||||||||||||||||||||||||||||
|
ФАКС |
ФАКС |
||
|
USB |
|||
|
* |
Только для моделей с установленной |
USB |
|
|
функцией факса (FS-1130MFP/FS-1135MFP). |
Послать_E-Mail
Передача данных отсканированных оригиналовадресату в виде файла, прикрепленного к сообщению E-mail.
Передача SMB
Сохранение
отсканированного изображения в файле данных на компьютере.
Передача по FTP
Передача
отсканированного изображения в виде файла данных по
FTP.
Сканирование
TWAIN
Сканирование WIA
TWAIN и WIA – это стандартный интерфейс взаимодействия приложений и устройств приема изображений.
2-3

Подготовка к использованию
Подготовка необходимых кабелей
Для подключения оборудования к компьютеру предусмотрены следующие интерфейсы. Подготовьте необходимые кабели в соответствии с используемым интерфейсом.
Доступные стандартные интерфейсы
|
Функция |
Интерфейс |
Необходимый кабель |
|
Принтер/ |
Сетевой |
Сетевой (10Base-T или |
|
сканер/ |
интерфейс |
100Base-TX, |
|
сетевой факс* |
экранированный) |
|
|
Принтер/ |
Интерфейс USB |
Совместимый с |
|
сканирование |
интерфейсом USB 2.0 |
|
|
TWAIN/ |
(высокоскоростной, |
|
|
сканирование |
совместимый с |
|
|
WIA |
интерфейсом USB, макс. |
|
|
5,0 м, экранированный) |
||
*Функции факса и сетевого факса доступны только в моделях FS- 1130MFP/FS-1135MFP. Для получения сведений о сетевом факсе см. Руководство по эксплуатации факса.
2-4

|
Подготовка к использованию |
|||
Подсоединение кабелей |
|||
|
Для подсоединения кабелей к аппарату выполните следующие действия. |
2 |
||
|
1 |
Подсоедините аппарат к ПК или сетевому |
||
устройству. При использовании сетевого интерфейса снимите крышку.
При подключении сетевого кабеля выполните конфигурирование сети. Подробнее см. раздел
Настройка сети (подключение с помощью сетевого кабеля) на стр. 2-13.
2 Подсоедините один конец прилагаемого кабеля питания к аппарату, а другой — к розетке.
ВАЖНАЯ ИНФОРМАЦИЯ: Используйте только кабель питания, поставляемый с аппаратом.
2-5

Подготовка к использованию
Включение/выключение питания
Включение питания
Нажмите выключатель Питание.
ВАЖНАЯ ИНФОРМАЦИЯ: Выключив аппарат с помощью выключателя питания, не включайте его сразу же. Подождите более 5 секунд и только потом включайте аппарат.
Выключение питания |
|
Убедитесь в том, |
|
что индикатор не |
|
горит. |
Прежде чем нажимать выключатель Питание, убедитесь, что индикатор памяти не светится.
2-6

Подготовка к использованию
Таймер выключения
Если аппарат находится в режиме ожидания и не используется в течение некоторого времени, питание выключается автоматически. Для настройки времени задержки перед выключением питания используется 2 таймер выключения. Заводская настройка времени задержки перед выключением питания — 1 час.
Если аппарат долго не используется
ОСТОРОЖНО: Если данный аппарат не будет использоваться длительное время (например, в течение ночи), выключите его с помощью выключателя питания. Если аппарат не будет использоваться значительно больший период времени (например, во время отпуска), вытяните вилку шнура питания из розетки в качестве меры предосторожности. При использовании FS-1130MFP/ FS-1135MFP обратитевнимание, чтовыключениеаппаратаспомощьювыключателяпитаниясделает невозможным прием и передачу факсов.
ОСТОРОЖНО: Извлеките бумагу из кассет и уложите в упаковку для хранения, чтобы защитить ее от влаги.
Режим ожидания
Если аппарат не используется в течение установленного времени (заводская настройка — 1 минута), он автоматически переходит в режим ожидания. При этом подсветка дисплея сообщений и световые индикаторы выключаются для снижения потребления энергии. Такое состояние называют режимом ожидания. Когда аппарат находится в режиме ожидания, на дисплее сообщений появляется сообщение «Режим ожидания».
Если в этом режиме на аппарат поступают данные печати, задание печати выполняется без подсветки дисплея сообщений.
При использовании модели FS-1130MFP/FS-1135MFP печать принятого факсимильного сообщения выполняется также без подсветки панели управления.
Чтобы возобновить использование аппарата, нажмите любую клавишу на панели управления. Через 15 секунд аппарат будет готов к работе.
Имейте в виду, что условия окружающей среды, такие как вентиляция, могут вызвать замедленную реакцию аппарата.
2-7

Подготовка к использованию
Переключение языка дисплея [Язык]
Выберите язык, на котором будут отображаться надписи на дисплее сообщений.
Используйте описанную ниже процедуру для выбора языка.
1 Нажмите выключатель Питание.
Имя польз. д/вх.: L b
********************
Пароль при входе:
[ Вход ]
2Нажмите клавишу Системное меню/Cчетчик на панели управления главного устройства.
При выполнении управления пользователями без входа в систему появится экран входа. Введите идентификатор пользователя и пароль для входа.
ПРИМЕЧАНИЕ: Следующая учетная запись администратора регистрируется в аппарате производителем.
Имя польз. д/вх.: модель со скоростью печати 30
стр/мин: 3000, 35 стр/мин: 3500
Пароль при входе: модель со скоростью печати 30
стр/мин: 3000, 35 стр/мин: 3500
|
Сведения о вводе символов приведены в разделе |
|||
|
Способ ввода символов на Приложение-3. |
|||
|
3 В меню Сис.меню/счетч. нажмите клавишу или |
|||
|
Сис.меню/счетч.: a b |
|||
|
для выбора [Общие параметры]. |
3Система
4Польз/Учет задан
*********************5 Общие параметры
|
4 |
Нажмите клавишу OK. Появится меню «Общие |
|||
|
Общие параметры: a b |
||||
|
параметры». |
||||
|
*********************1 Язык |
||||
|
2 |
Экран по умолч. |
|||
|
3 |
Звук |
|||
|
[ Выход ] |
||||
|
5 |
Нажмите клавишу или для выбора [Язык]. |
2-8

|
Подготовка к использованию |
||||||
|
6 |
Нажмите клавишу OK. Появляется «Язык». |
|||||
|
Язык:: |
a b |
|||||
|
1 |
||||||
|
***English****************** |
2 |
|||||
|
2 |
Deutsch |
|||||
|
3 |
Français |
|||||
7Нажмите клавишу или для выбора нужного языка и затем нажмите клавишу OK.
Отображается Завершено., и на экране снова появляется меню «Общие параметры».
2-9

Подготовка к использованию
Установка даты и времени
Для установки местной даты и времени выполните следующие действия.
При передаче сообщения электронной почты с помощью функции передачи установленные здесь дата и время вставляются в заголовок сообщения. Установите дату, время и сдвиг часового пояса относительно гринвичского меридиана для региона, в котором используется аппарат.
ПРИМЕЧАНИЕ: Сдвиг часового пояса следует определить перед установкой даты и времени.
1 Нажмите клавишу Системное меню/Cчетчик на панели управления главного устройства.
|
Сис.меню/счетч.: a b |
2 В меню Сис.меню/счетч. нажмите клавишу или |
|
для выбора [Общие параметры]. |
3Система
4Польз/Учет задан
*********************5 Общие параметры
Общие параметры: a b 1*********************Язык
2Экран по умолч.
3Звук
[ Выход ]
Имя польз. д/вх.: L b
********************
Пароль при входе:
[ Вход ]
Установка даты: a b 1*********************Дата/время
2Формат даты
3Часовой пояс
[ Выход ]
3Нажмите клавишу OK. Появится меню «Общие параметры».
4Нажмите клавишу или для выбора [Установка даты], затем нажмите OK.
5Появится экран входа A. Затем введите идентификатор пользователя и пароль с правами администратора и нажмите [Вход] (правая клавиша выбора).
ПРИМЕЧАНИЕ: Следующая учетная запись администратора регистрируется в аппарате производителем.
Имя польз. д/вх.: модель со скоростью печати 30
стр/мин: 3000, 35 стр/мин: 3500
Пароль при входе: модель со скоростью печати 30
стр/мин: 3000, 35 стр/мин: 3500
6 Появится меню «Установка даты».
2-10

Подготовка к использованию
7С помощью клавиши или выберите [Часовой пояс].
|
8 |
Нажмите клавишу OK. Появится «Часовой пояс». |
2 |
|||
|
Часовой пояс: |
a b |
||||
|
GMT Касабланка |
|||||
|
***GMT******************Вр. по Гринв. |
|||||
|
+01:00 Амстердам |
|||||
|
9 |
Нажмите клавишу или для выбора региона и |
||||
|
затем нажмите клавишу OK. |
|||||
|
Отображается Завершено., и на экране снова |
|||||
|
появляется меню «Установка даты». |
|||||
|
10 |
С помощью клавиши или выберите [Летнее |
||||
|
Установка даты: |
|||||
|
a b |
время]. |
2Формат даты
3Часовой пояс
4*********************Летнее время
[ Выход ]
11 Нажмите клавишу OK. Появится «Летнее время»
Летнее время: a b 1***Выкл******************.
2 Вкл.
|
12 Нажмите клавишу или для выбора [Вкл.] или |
|||||||
|
[Откл.] и затем нажмите клавишу OK. |
|||||||
|
Отображается Завершено, и на экране снова |
|||||||
|
появляется меню «Установка даты». |
|||||||
|
13 С помощью клавиши или выберите [Дата/ |
|||||||
|
Установка даты: |
a b |
||||||
|
время]. |
|||||||
|
*********************1 Дата/время |
|||||||
|
2 |
Формат даты |
||||||
|
3 |
Часовой пояс |
||||||
|
[ |
Выход ] |
||||||
|
14 |
Нажмите клавишу OK. Появится «Дата/время». |
||||||
|
Дата/время: |
a b |
||||||
|
Год Месяц |
День |
||||||
|
2011 |
01 |
01 |
|||||
|
(Часовой |
пояс: |
по |
|||||
|
Гринвичу |
) |
15 Нажмите клавишу или для изменения положения курсора, нажмите клавишу или для введения года, месяца и дня, затем нажмите клавишу OK.
2-11
![]()
Подготовка к использованию
|
Дата/время: |
a b |
|||
|
Час Мин. |
Сек. |
|||
|
11: |
45: |
50 |
||
|
(Часовой |
пояс: |
по |
||
|
Гринвичу |
) |
|||
|
Установка даты: |
a b |
|||
|
1 |
Дата/время |
|||
|
*********************2 Формат даты |
||||
|
3 |
Часовой пояс |
] |
||
|
[ Выход |
||||
|
Формат даты: |
a b |
|||
|
1 |
ММ/ДД/ГГГГ |
|||
|
**2 *ДД******************/ММ/ГГГГ |
||||
|
3 |
ГГГГ/ММ/ДД |
] |
||
|
[ Выход |
16Нажмите клавишу или для изменения положения курсора, нажмите клавишу или для введения часов, минут и секунд и затем нажмите клавишу OK.
Отображается Завершено, и на экране снова появляется меню «Установка даты».
17Нажмите клавишу или для выбора [Формат даты].
18Нажмите клавишу OK. Появится «Формат даты».
19Нажмите клавишу или для выбора нужного формата отображения и затем нажмите клавишу OK.
Отображается Завершено, и на экране снова появляется меню «Установка даты».
2-12

Подготовка к использованию
Настройка сети (подключение с помощью сетевого кабеля)
Аппарат оборудован сетевым интерфейсом, совместимым с такими сетевыми протоколамикак TCP/IP (IPv4), TCP/IP (IPv6), IPX/SPX, NetBEUI, IPSec и AppleTalk. Он позволяет выполнять сетевую печать в Windows, 2 Macintosh, UNIX, NetWare и других платформах.
В таблице ниже представлены пункты, необходимые для каждой настройки.
Настройте сетевые параметры принтера в соответствии с техническими характеристиками ПК и сетевого окружения.
Подробную информацию об этой процедуре можно найти в Руководстве по эксплуатации (на английском языке).
ПРИМЕЧАНИЕ: При использовании COMMAND CENTER сетевые параметры и настройки безопасности можно легко изменять и проверять с помощью ПК. Дополнительная информация приведена в разделе
COMMAND CENTER (настройки для E-mail) на стр. 2-26.
|
Меню |
Подменю |
Настройки |
|||
|
Система |
Настройка |
Настройки |
TCP/IP |
Вкл./выкл. |
|
|
сети |
TCP/IP |
||||
|
Настр. IPv4 |
DHCP |
Вкл./выкл. |
|||
|
Bonjour |
Вкл./выкл. |
||||
|
IP-адрес |
IP-адрес |
||||
|
Маска подсети |
IP-адрес |
||||
|
Шлюз по умол. |
IP-адрес |
||||
|
Настр. IPv6 |
Вкл./выкл. |
||||
|
Детали |
NetBEUI |
Вкл./выкл. |
|||
|
протокола |
|||||
|
SNMPv3 |
Вкл./выкл. |
||||
|
FTP (сервер) |
Вкл./выкл. |
||||
|
FTP(Клиент) |
Вкл./выкл. |
||||
|
Номер порта: 21 |
|||||
|
SMB |
Вкл./выкл. |
||||
|
SNMP |
Вкл./выкл. |
||||
|
SMTP (Отправка E-mail) |
Вкл./выкл. |
||||
|
POP3 (Получение E- |
Вкл./выкл. |
||||
|
mail) |
|||||
|
Порт Raw |
Вкл./выкл. |
||||
|
LPD |
Вкл./выкл. |
||||
|
IPP |
Вкл./выкл. |
||||
|
Номер порта: 631 |
|||||
|
IPP через SSL |
Вкл./выкл. |
||||
|
HTTP |
Вкл./выкл. |
||||
|
HTTPS |
Вкл./выкл. |
||||
|
LDAP |
Вкл./выкл. |
||||
2-13

|
Подготовка к использованию |
|||||
|
NetWare |
Вкл./выкл. |
||||
|
Тип фрейма |
|||||
|
AppleTalk |
Вкл./выкл. |
||||
|
WSD Сканирование |
Вкл./выкл. |
||||
|
WSD Печать |
Вкл./выкл. |
||||
|
IPSec |
IPSec |
Вкл./выкл. |
|||
|
Настр. правила |
Вкл./выкл. |
||||
|
Безоп. |
SSL |
Вкл./выкл. |
|||
|
протокол |
|||||
|
Безоп. IPP |
IPP/IPP ч-з SSL |
||||
|
Только IPPч-зSSL |
|||||
|
Безоп. HTTP |
HTTP/HTTPS |
||||
|
Только HTTPS |
|||||
|
Безоп. LDAP |
Откл. |
||||
|
SSL/TLS |
|||||
|
STARTTLS |
|||||
|
Безопасность SMTP |
Откл. |
||||
|
SSL/TLS |
|||||
|
STARTTLS |
|||||
|
Защита 1 (2, 3) POP3 |
Откл. |
||||
|
SSL/TLS |
|||||
|
STARTTLS |
|||||
|
Интерфейс LAN |
Авто |
||||
|
10Base-Половина |
|||||
|
10Base-Полный |
|||||
|
100Base- |
|||||
|
Половина |
|||||
|
100Base-Полный |
|||||
ПРИМЕЧАНИЕ: После завершения сетевых настроек выключите и включите аппарат снова. Это необходимо для вступления настроек в действие!
2-14

Подготовка к использованию
Установка программного обеспечения
Прежде чем начать установку драйвера печати с диска DVD, проверьте, что принтер подключен к сети и к ПК. 2
Установка программного обеспечения в Windows
ЕслиэтотпринтерподключенкПКподуправлением Windows, выполнитеследующиешаги, чтобыустановить драйвер принтера. Данный пример демонстрирует, как подключить принтер к ПК под управлением Windows Vista.
ПРИМЕЧАНИЕ: В операционных системах Windows для установки драйвера принтера требуются права администратора.
При установке программного обеспечения можно использовать как выборочную, так и быструю установку. Режим быстрой установки автоматически обнаружит подсоединенные принтеры и установит необходимое ПО. Чтобы задать порт принтера и выбрать ПО для инсталляции, выберите выборочную установку.
1Включите компьютер и запустите Windows.
Если отображается диалоговое окно мастера установки нового оборудования, выберите Отмена.
2Вставьте диск DVD, входящий в комплект поставки данного принтера, в оптический дисковод ПК. В ОС Windows 7, Windows Server 2008 и Windows Vista возможно отображение диалогового окна контроля учетных записей пользователей. Нажмите Разрешить.
Запускается программа установки.
ПРИМЕЧАНИЕ: Если программа мастера установки не запускается автоматически, откройте окно DVD в Windows Explorer и двойным нажатием кнопки мыши запустите Setup.exe.
3Нажмите Просмотреть лицензионное соглашение и прочитайте Лицензионное соглашение. Нажмите
Принять.
2-15

Подготовка к использованию
4Нажмите Установить программное обеспечение.
Мастер установки программного обеспечения начинает установку ПО.
В этом месте процедура различается в зависимости от используемой версии Windows и метода подключения. Выберите правильную процедуру в зависимости от типа подключения.
•Быстрая установка
•Выборочная установка
Быстрая установка
В режиме быстрой установки инсталлятор автоматически обнаруживает принтер, если последний включен. Используйте быструю установку для стандартных методов подключения.
1В окне выбора метода установки выберите Быстрая установка. Появится окно определения системы печати, и инсталлятор обнаружит подключенный принтер. Если инсталлятор не обнаружит систему печати, проверьте, подключена ли система печати через USB или сеть, и убедитесь в том, что она включена. Затем щелкните Обновить для повторного поиска системы печати.
ПРИМЕЧАНИЕ: Несмотря на то, что информация, отображаемая в диалоговых окнах установки, несколько различается в Windows Vista и Windows 7/Windows XP, процедура установки одинакова.
2-16

Подготовка к использованию
2 Выберите принтер, который хотите установить, и нажмите Дальше.
|
ПРИМЕЧАНИЕ: Если появится окно «Найдено новое аппаратное оборудование», нажмите Отмена. Если |
2 |
|
появится предупредительное сообщение об установке аппаратного оборудования, нажмите Продолжить. |
3Вы можете задать имя системы печати в окне настроек инсталляции. Это имя будет отображаться в окне «Принтер» и в списках принтеров, отображаемых в приложениях. Выберите, следует ли предоставить общий доступ к системе печати или установить ее как существующий принтер, и нажмите Дальше.
ВАЖНАЯ ИНФОРМАЦИЯ: Шаг 3 появляется только в случае подключения системы печати через сеть. Данный шаг не отображается, если при первой установке система печати подключена через USB.
4Появится окно, с помощью которого можно проверить настройки. Внимательно проверьте настройки и затем нажмите Установить.
ПРИМЕЧАНИЕ: Если появится окно безопасности Windows, нажмите Установить программное обеспечение этого драйвера.
5Появится сообщение о том, что принтер успешно установлен. Нажмите Готово, чтобы выйти из мастера установки принтера, и вернитесь к главному меню DVD.
Если появится диалоговое окно установки устройства, нажмите Завершить. Можно указать настройки для таких параметров, как дополнительные функции, установленные в системе печати. После завершения инсталляции также можно указать настройки устройства. Для получения детальной информации см. раздел «Device Settings» («Настройки устройства») в printer driver operation manual наDVD.
2-17

Подготовка к использованию
Это завершит процедуру установки драйвера принтера. При необходимости следуйте отображаемым на экране инструкциям, чтобы перезагрузить систему.
Выборочная установка
Чтобы задать порт принтера и выбрать ПО для инсталляции, выберите выборочную установку.
Например, если вы не хотите, чтобы были заменены шрифты, установленные на вашем компьютере, выберите Выборочная установка и снимите флажок Шрифты на вкладке дополнительных опций.
1 Выберите Выборочная установка.
2Следуя инструкциям в окне мастера установки, выберите пакеты программного обеспечения, которые требуется установить, укажите порт и т. д.
Для получения детальной информации см. раздел «Custom Installation» («Выборочная установка») в printer driver operation manual на DVD.
Установка на Macintosh
В этом разделе описана процедура установки драйвера принтера на Mac OS.
1Включите принтер и запустите Macintosh.
2Вставьте прилагаемый диск DVD (Product Library) в DVD-дисковод.
3Дважды щелкните по значку DVD .
2-18

Подготовка к использованию
4Дважды щелкните OS X 10.2 and 10.3 Only или OS X 10.4 Only илиOS X 10.5 or higher в зависимости от версии операционной системы Mac OS.
2
5 Дважды щелкните по Kyocera OS X x.x.
6 Будет запущена программа установки драйвера принтера.
2-19
 Loading…