This tutorial will show you how to use Lazy Nezumi Pro‘s various smoothing options to get better looking lines. Whether you are doing a quick sketch, or working on meticulous line art, you will be able to find settings that will complement your style, and help you work faster.
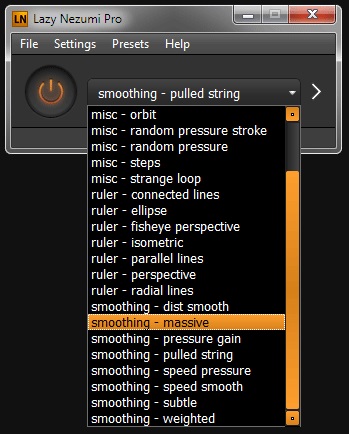
While experimenting with the settings, you can create a new empty preset via the Presets/New menu. Then click on the arrow button next to the preset list to expand the UI and see all the different sections.
Lazy Nezumi Pro works with a mouse or a graphics tablet, but for best results, using a tablet is recommended. A tablet pen is pressure sensitive, which allows you to control the thickness and/or opacity of your lines. You cannot do this with a mouse. Mice are also a lot less precise, so you will likely have to increase the smoothing amounts to get good results.
If you don’t feel like diving into all the settings, feel free to use one of the Smoothing presets that come installed with Lazy Nezumi Pro. The Subtle, Massive, and Pulled String presets are great starting points for most people. If you want to know how to fine tune the program to get the most out of it, read on!
1. Pulled String
The first mode option in the Position Smoothing section is called Pulled String.

This mode is great for slow, detailed line work. It makes your brush behave like if it was attached to a piece of string that you can pull around. You can control how long the string is via the String Length parameter slider. The longer the string, the less sensitive your brush stroke will be to digital jitter and shakiness of your hand.
The brush will only move when the string is fully extended, which makes it easy to draw sharp corners. Note that with this mode, the line ends as soon as you lift your pen.
2. Moving Average
The second mode option in the Position Smoothing section is called Moving Average.

This mode smoothes your line by continuously averaging your previous pen positions, which makes it great for curvy lines with rounded corners. You will want to adjust the Amount parameter to your preference. A higher amount will produce smoother lines, but will also increase brush lag.
When you select this mode, a Catch Up checkbox will appear.
- When Catch Up is OFF, your brush will only move when you move your pen. This can be useful when you are drawing slowly and need total control.
- When Catch Up is ON, your brush will catch up to your pen position when you stop, and at the end of your stroke when you lift your pen. This option should be used for faster drawing.
Catch Up OFF
Catch Up ON
Another thing to note about Catch Up: when it’s ON, your line endings will change depending on how much Pressure Smoothing you use (controlled via the Moving Average or Exponential Moving Average mode of the Pressure Processing section of the preset).
Before experimenting with this setting, make sure that you have mapped pen pressure to brush size or opacity in your art software, or you won’t notice any effect.

- If there is more position smoothing than pressure smoothing, your line will end in a sharp point, but will not fully reach the pen lift position.
- If both amounts are about the same, your line will end in a sharp point at the pen lift position.
- If there is more pressure smoothing than position smoothing, your line will end at the pen lift position, but not in a sharp point.
The following image illustrates this. All three lines were drawn from top to bottom using the same hand movement, with the position smoothing amount set to 30. The number underneath each line is the pressure smoothing amount used.
Generally, if you want your lines to look balanced, you should use the same amount for both position and pressure smoothing.

3. Exponential Moving Average
The third mode option in the Position Smoothing section is called Exponential Moving Average.
This mode is similar to Moving Average, but gives more importance to recent samples when computing the average. This results in a slightly different feel while drawing. The most notable difference is that curves will straighten out a lot faster while the line is catching up. This can provide better control for lines that need to be mostly straight with tight curves.
4. Weighted
The Smoothing — Weighted preset uses a custom script instead of the Position Smoothing section. This started out as an experiment, and it turned out to be really popular for calligraphy, so it will probably get moved into the Position Smoothing section in a future update!

This script smoothes your lines by giving your brush a mass, and applying a force to it based on how far away the pen is from it. The drag parameter affects the momentum of the brush. By adjusting the parameters, it’s possible to obtain auto-rotation and other gravity-like effects which can be a lot of fun!
Another special property of this preset is that the output pressure is computed directly based on how fast the brush is moving. The maxPressureSpeed parameter sets the speed at which the maximum pressure will be output, so try lowering the value if you aren’t drawing fast enough and are getting very thin lines.
5. Jittery/Aliased Lines
Some art programs do not handle tablet input correctly, and this can result in jittery or aliased looking lines (especially when zooming out), even with Lazy Nezumi Pro smoothing enabled.
If you are using Photoshop CS5 or CS6, Lazy Nezumi Pro has a setting that can help. Go to the Settings/Edit Photoshop Options menu and check the Fix Jitter Bug option. This will work as long as the plugin is loaded, even if your preset is not currently enabled.
If you are using a more recent version of Photoshop with Windows 10, make sure Windows Ink is enabled in your tablet settings, and that you are not using the PSUserConfig.txt file to revert to Wintab. If that file is in your Photoshop preference folder, back it up and delete it.

-

-
December 20 2013, 15:56
- Музыка
- Медицина
- Отзывы
- Cancel

Много лет искал что-то подобное и 2-3 года назад обнаружил, но тогда не мог использовать из-за жуткой глюкавости на грани с неработаспособностью.
Недавно вновь открыл для себя сию тулзу и был приятно удивлён произошедшими изменениями. Плагины для шопа проставились с первого раза и даже работали!
Неартистам, пришедшим почитать обычный дв-болщет, можно сразу клацать сюда.
Так вот, что за штука и чем же она может быть полезна артистам?
Если коротко, то Lazy Nezumi Pro сглаживает ваши мазки и росчерки в photoshop, zbrush, PaintTool SAI и ещё десятке пакетов. Даже если ЛНП не знает прогу, то остаётся возможность принудительного хука.
Помимо этого обладает ещё несколькими интересными функциями:
— инверсия нажатия
Сам не использовал пока на практике, но подозреваю, что это как инверсия мыши — если привык к ней, то потом никуда не денешься и пользоваться обычными настройками становится невозможно. Ни ваком, ни шоп ничего похожего предложить не могут.
— сглаживание и заострение окончания росчерка
Полезно при рисовании волос, шерсти, шипов и прочих тентаклей.
— управление нажатием через скорость
этк этк этк
Всё это настраивается, допиливается и подкручивается.
Тулза платная. НО…
Есть трайл-версия на месяц. Настоятельно рекомендую потестить, ни к чему ведь не обязывает.
Самая дешёвая лицензия — 10$, тобишь вполне по карману каждому.
Кто меня завербовал, сколько они платят и с чего я вообще LNP рекламирую?
Хех, зависит от того с какой стороны посмотреть. А это значит — пришло время обещанной дв-болщет-истории 
Обещанная дв-болщет-история
Как я писал в начале, плаги в шоп проставились сразу и без проблем, вот только подглюкивали неприятно, если таблетка в режиме мыши, а не пера используется.
Не поленился, написал автору, ещё и видео отснял наглядное с глюками этими. В тот же день тот мне ответил и прислал потенциальный фикс для тестов.
В таком режиме мы перекидывались письмами около недели, а потом он с очередным апдейтом прислал мне лицензионный ключик. Приятно!
Вот так вот. Взятку я получил лицензией, а не хрустящими банкнотами
Кроме того, штука действительно понравилась. Ручки дрожат, таблетка скользкая. В результате линии постоянно ломанные, иногда с откровенными зигзагами.
Приходилось чудовищно зумить и медленно, по несколько раз, проводить кривые. Но это было раньше! Теперь я модный. Чего и вам желаю.


- 04.10.2022
Lazy Nezumi – данное программное обеспечение представляет собой многофункциональный и очень универсальный графический редактор, который поможет вам выполнить качественную обработку графических изображений. Программа выделяется профессиональной эффективностью, удобством, и высокой скоростью работы.
Софт может использоваться как самостоятельный полнофункциональный редактор, так и как мощный плагин для популярнейшей программы — Adobe Photoshop. Утилита автоматически интегрируется в основную рабочую среду, добавляя множество уникальных инструментов.
Скачать бесплатно Lazy Nezumi Pro 22.03.1.1605 + crack
Пароль ко всем архивам: 1progs
Данное приложение позволяет заметно упростить привычные процессы редактирования и обработки изображений, предлагая более легкие и интуитивно понятные технологии. Вы сможете теперь самостоятельно создавать четкие и детализированные линии разных форм, реализуя самые интересные творческие проекты.
Управление в редакторе может производиться как при помощи обычной мыши, так и с использованием графического планшета. Так же стоит отметить отличную совместимость утилиты, что позволяет свободно распознавать все самые востребованные и распространенные форматы графических снимков.
#Теги
- Программы для обработки фотографий