Данная инструкция на русском языке предназначена для конструктора Lego
42110 Land Rover Defender, описывает принцип работы и основные моменты эксплуатации устройства.
Производитель настойчиво рекомендует перед включением конструктора Lego
внимательно изучить настоящую инструкцию.
Инструкция для конструктора Lego
представлена в формате PDF. Все современные браузеры уже поддерживают данный формат и сложностей с открытием файла возникнуть не должно.
Но если открыть инструкцию все же не удается, то необходимо установить на компьютер программу для чтения PDF файлов, например, Acrobat Reader. Если у вас возникли сложности с открытием инструкции на смартфоне под управлением Android, нужно установить, например, Adobe Acrobat Reader.
Требуются инструкции по сборке из вашего набора ЛЕГО set 42110 Technic Land Rover Defender? Ниже вы можете просмотреть и загрузить бесплатно инструкции по сборке в формате PDF. Кроме того, приведены часто задаваемые вопросы, рейтинг изделия и отзывы пользователей, что позволит оптимально использовать ваше изделие. Если это не то руководство, которое вы искали, – свяжитесь с нами.
Ваше устройство неисправно, и в руководстве отсутствует решение? Перейдите в Repair Café для получения бесплатных ремонтных услуг.
Руководство

Рейтинг
Сообщите нам, что вы думаете о ЛЕГО set 42110 Technic Land Rover Defender, оставив оценку продукта. Хотите поделиться вашими впечатлениями от данного изделия или задать вопрос? Вы можете оставить комментарий в нижней части страницы.
Довольны ли вы данным изделием ЛЕГО?
Да Нет
58 голоса
Часто задаваемые вопросы
Наша служба поддержки выполняет поиск полезной информации по изделиям и отвечает на часто задаваемые вопросы. Если вы заметили неточность в наших часто задаваемых вопросах, сообщите нам об этом с помощью нашей контактной формы.
В наборе нет одного элемента Lego, где можно заказать запасной? Проверенный
В компании Lego работает служба, где можно заказать отдельные элементы или куда можно обратиться в случае нехватки элементов в наборе. Дополнительную информацию см. на веб-сайте.
Это было полезно (4126)
Как предотвратить изменение цвета игрушек Lego? Проверенный
Цвет пластиковых игрушек Lego меняется по двум главным причинам: длительное воздействие солнечного света или сигаретного дыма. Постарайтесь минимизировать воздействие этих факторов на ваши игрушки Playmobil.
Это было полезно (1384)
Как лучше всего чистить детали конструктора Lego? Проверенный
Lego советуют чистить детали вручную с помощью воды (не выше 40°C) и щадящего чистящего средства. Никогда не мойте детали Lego в посудомоечной или стиральной машине. Оставьте детали сушиться на воздухе. Очищайте электрические детали исключительно сухой тканью.
Это было полезно (1269)
Каждый раз после сборки нового набора Lego у меня остается несколько маленьких деталей. Я забыл(-а) ими воспользоваться? Проверенный
Нет, во многих наборах Lego есть запасные детали для мелких элементов.
Это было полезно (1027)
Как лучше всего наносить наклейки на детали Lego? Проверенный
Чтобы наклейки можно было переклеить, рекомендуется обработать место нанесения наклейки средством для очистки стекол. После размещения наклейки дайте ей высохнуть, чтобы она держалась на месте.
Это было полезно (910)
Где я могу найти список деталей моего набора Lego? Проверенный
Многие современные инструкции Lego включают список деталей в конце буклета. В случае нескольких буклетов список можно найти в середине PDF-файла.
Это было полезно (865)
Можно ли использовать детали Lego и Duplo вместе? Проверенный
Да, детали Lego и Duplo совместимы. Детали Lego устанавливаются на детали Duplo с полыми шипами. Детали Duplo лучше всего устанавливаются на более крупные детали Lego, на мелких деталях они могут держаться хуже.
Это было полезно (796)
С какого возраста можно играть с Lego? Проверенный
Большинство наборов Lego предназначены для детей от 4 лет, поскольку содержат мелкие детали. Специальная серия Duplo предназначена для детей от 1,5 лет. Возрастные ограничения всегда указываются на коробке.
Это было полезно (779)
Где я могу найти инструкции для альтернативной модели моего набора Lego Technic? Проверенный
Мы объединили инструкции для альтернативных моделей с инструкциями для основной модели. Прокрутите обычные инструкции, чтобы просмотреть альтернативную модель.
Это было полезно (330)

- Главная
- Lego custom
- Улучшенная версия Land Rover Defender 42110

Автор Администратор в 05.12.2019. Опубликовано Lego custom, Внедорожники, Разное
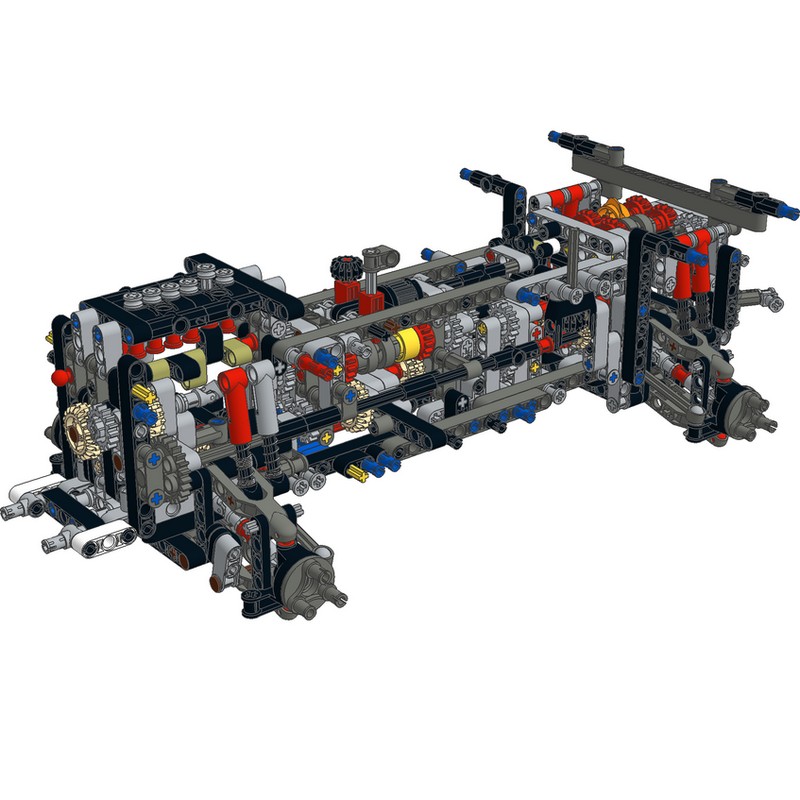
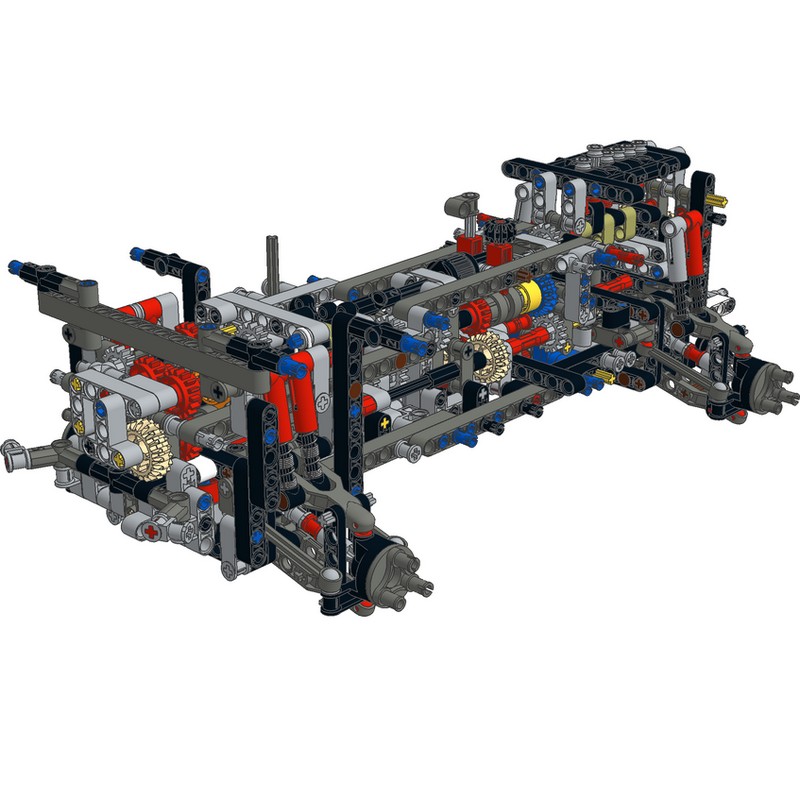
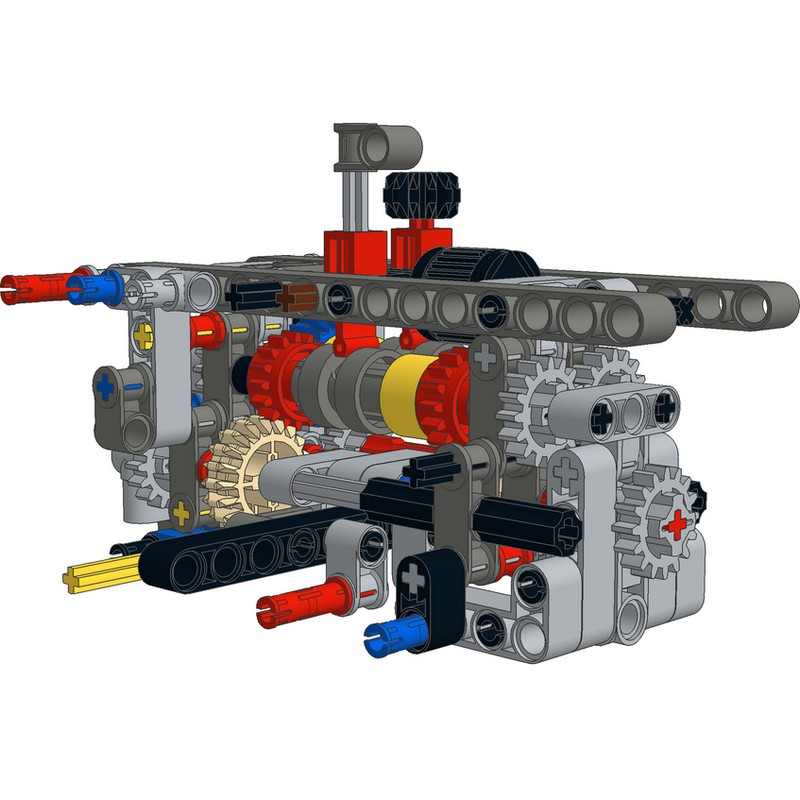
Улучшенная версия Land Rover Defender 42110 — автор: jb70. От автора — Оригинальный дизайн имел эти ошибки: смещение вверх приводит к большему обороту двигателя; переднее передаточное число было сопоставимо с 4-й передачей; Переключатель Hi / Lo не влияет на задний ход. А так же следующие недостатки: низкая частота вращения двигателя в целом; высокий крутящий момент в зубчатой передаче и проскальзывание, вызванное универсальными шарнирами.
Поэтому автор перепроектировал совершенно новую последовательность зубчатых передач, включая DNR, Hi / Lo и 4-скоростную коробку передач, которые в итоге получили прямые соединения без каких-либо универсальных шарниров:
Скачать инструкцию по сборке
Теги: Land Rover, lego technic
- Manuals
- Brands
- LIGHT MY BRICKS Manuals
- Light Fixture
- LEGO Land Rover Defender 42110
- Manual
-
Bookmarks
Quick Links
Related Manuals for LIGHT MY BRICKS LEGO Land Rover Defender 42110
Summary of Contents for LIGHT MY BRICKS LEGO Land Rover Defender 42110
-
Page 1
42110… -
Page 2: Package Contents
Package Contents: 8x Cool White 30cm Bit Lights 4x Red 30cm Bit Lights 2x White Strip Lights 1x 6-Port Expansion Board 1x 12-Port Expansion Board 1x 15cm Connecting Cables 2x 30cm Connecting Cables 6x Adhesive Squares 1x AA Battery Pack LEGO Pieces: Important things to note: Laying cables in between and underneath bricks…
-
Page 3
CAUTION: Forcing LEGO® to connect over a cable can result in damaging the cable and light. Connecting cable connectors to Expansion Boards Take extra care when inserting connectors to ports of Expansion Boards. Connectors can be inserted only one way. With the expansion board facing up, look for the soldered “=” symbol on the left side of the port. -
Page 4
Incorrectly inserting the connector can can result in bent pins inside the port or possible overheating of the expansion board when connected. Connecting cable connectors to Strip Lights Take extra care when inserting connectors to ports on the Strip Lights. Connectors can be inserted only one way. -
Page 5
Installing Bit Lights under LEGO® bricks and plates. When installing Bit Lights under LEGO® pieces, ensure they are placed the correct way up (Yellow LED component exposed). You can either place them directly on top of LEGO® studs or in between. -
Page 6
OK, Let’s Begin! Lift up the bonnet, then remove the following sections in order for us toremove the two headlight sections as shown below. -
Page 10
Take the right headlight section (passenger side) and disassemble it as perbelow, then take a Cool White 30cm Bit Light and thread the connector end of it through the front of the round dish. Thread the cable all the way through until the LED is about 1cm away from the front of the dish. -
Page 12
Take another Cool White 30cm Bit Light and thread it through the front of the dish, same way we did for the first light. -
Page 13
Continue threading another 2x Cool White 30cm Bit Lights through the dish, then take LEGO Bar we removed earlier and insert it through the technic axle hole. Ensure the cables are laid in the technic axle spaces, to prevent them from being damaged when inserting the bar. Reposition the 4 LEDs so they are evenly spaced out and positioned over the circles on the stickers behind, then reconnect the trans clear dish over the top. -
Page 14
Turn this section around and bring the 4 cables across to the right sideunderneath the technic pin. Bring this section over to the left side of the vehicle and thread the cables in between the two sections as shown below. Reconnect the headlight via the technic vertical axle. -
Page 15
Group the 4 cables together and thread them down the following space behind the front grill. Prop the vehicle up using your light kit box, then pull the cables down from underneath as shown below. -
Page 16
Flip the vehicle over and thread the four cables through the following spaceunderneath the technic bars, pulling them all the way out from the other side as shown below. -
Page 17
Turn the vehicle around to the side, and bring the cables back over and loop them around the wheel axis 3-4 times to eliminate excess cables, then connect them to the 12-Port Expansion Board… -
Page 19
Take the AA Battery Pack and insert 3x new AA batteries to it. Connect the battery pack cable to a spare port on the 12-port expansion board then turn it ON to test the right headlights are working OK. Note: If you experience any issues with the lights not working and suspect an issue with a component, please try a different port on the expansion board to verify where the fault lies (with the light, expansion board or effects board). -
Page 20
ports, please view the section addressing expansion board issues on our online troubleshooting guide. Take the following remaining head light sections and reassemble andconnect them back to the front of the vehicle. Reconnect all the sections we disconnected earlier from the right side. -
Page 22
Repeat steps 2 – 6 to install another 4x Cool White 30cm Bit Lights to the left headlight section. -
Page 24
Reconnect this section to the rest via the black technic bar, then turn thissection over and bring the cables across to the right side, underneath the technic pin. -
Page 25
Bring this section over to the left side of the vehicle and thread the cables in between the two sections as shown below. Reconnect the headlight via the technic vertical axle. Group the 4 cables together and thread them down the following spacebehind the front grill. -
Page 26
Flip the vehicle over and bring the four cables across to the right side, then thread them underneath the following technic pieces, pulling them all the way out from the other side. -
Page 28
Ensure the cables are laid around the following section, then connect them to the left ports on the 12-port expansion board. Turn the power ON to test the left headlights are working OK. -
Page 29
Note: If you experience any issues with the lights not working and suspect an issue with a component, please try a different port on the expansion board to verify where the fault lies (with the light, expansion board or effects board). To correct any issues with expansion board ports, please view the section addressing expansion board issues on our online troubleshooting guide. -
Page 30
11.) Flip the vehicle back over again and disconnect the AA Battery Pack fromthe expansion board. Pull the four cables from the left headlight all the way out near the expansion board to eliminate any excess cable, then twist them around each other to form a neat bunch. -
Page 31
Turn the vehicle over to the side, then tuck the bunched up cables through one of the technic plate holes as shown below. Take 3x Adhesive Squares and stick them to the back of the 12-port expansion board, then stick the expansion board to the following position. -
Page 33
12.) Flip the vehicle back over and disconnect the roof by first removing thefollowing two technic pins from the top as well as the two from each side. -
Page 34
Lift up the roof, then disconnect the back of it from the technic pins. -
Page 35
13.) Take out a White Strip Light and connect a 15cm Connecting Cable to it, then using it’s adhesive backing, stick the strip light underneath the roof in the following position. Ensure the 15cm cable is facing down as per below. -
Page 36
Thread the other end of the connecting cable through the following technic brick holes. Pull the cable all the way out from the other side. 14.) Disconnect the following group of technic pieces from the main section ofthe roof then continue to thread the connecting cable through the middle hole. -
Page 37
Disconnect the grey technic pieces from the back of the section we removed earlier, then reconnect it to the main roof section, ensuring the cable is laid out underneath of it. -
Page 38
Fold the tip of the connecting cable into a “hook” shape, then hook the cable through the following hole on the technic pieces, then reconnect them to the grey technic pins, while pulling the cable out from the other side. 15.) Connect the cable to a new White Strip Light, then take a 30cm Connecting Cable and connect it to the strip light’s right port. -
Page 39
Reconnect the roof to the vehicle, then secure it down by reconnecting the two grey technic pins on the top, as well as the two brown technic pins to the right side. -
Page 40
Turn the vehicle over to it’s left side and reconnect the grey technic pin on the top. Leave the two brown technic pins from the left side disconnected for now. -
Page 41
16.) Disconnect the following white technic piece, then take the 30cmconnecting cable from the roof and bring it towards the front. Slip the cable in between the white and black technic pieces. -
Page 42
Reconnect the two brown technic pins to the side to secure the roof, then reconnect the white technic piece we removed earlier. Bring the connecting cable down the left side of the windscreen, then disconnect the following tile and lay the cable under the light grey stud before reconnecting the tile over the top. -
Page 43
17.) Bring the connecting cable down and thread it through the following spacebehind the front wheel, then turn the vehicle onto it’s side so we can access underneath. -
Page 44
Pull the connecting cable down and thread it through the following technic hole near the expansion board. Pull the cable all the way out from below, then loop the cable and thread it back through the same hole. Repeat this to loop the cable through the hole twice (to eliminate excess cable), then connect the cable to a spare port on the 12-Port Expansion Board. -
Page 46
Take the AA Battery Pack and connect it to a spare port on the expansion board, then turn it ON to test the internal strip lights are working OK. -
Page 47
Note: If you experience any issues with the lights not working and suspect an issue with a component, please try a different port on the expansion board to verify where the fault lies (with the light, expansion board or effects board). To correct any issues with expansion board ports, please view the section addressing expansion board issues on our online troubleshooting guide. -
Page 48
Bring the 30cm cable toward the back of the vehicle and thread it underneath the following grey technic pieces. Pull the cable all the way down from below, then loop the cable over the technic pieces above. -
Page 49
Loop the cable around these pieces a second time, then connect it to a 6-Port Expansion Board. -
Page 50
19.) Place the AA Battery Pack inside the vehicle in the back seat, then threadthe battery pack cable down the following space on the right side of the vehicle. Pull the battery pack cable down from underneath the vehicle and connect it to a spare port on the 6-port Expansion Board. -
Page 51
Ensure you position the battery pack so that the switch is accessible. -
Page 52
20.) We will now install the tail lights starting from the left side. Disconnect thepanel above the wheel, then open the back door and disconnect the following pieces in order for us to remove the left tail light section as shown below:… -
Page 54
Disassemble the tail light section as per below and discard the two white round plates. Take out the provided LEGO pieces, 2x Round Plate 1×1 with Open Stud (Black). 21.) Take a Red 30cm Bit Light and with the LED facing up and cable to the right, place it over the inside of the following plate. -
Page 55
Repeat this step to install another Red 30cm Bit Light to this tail light section. 22.) Reconnect the tail light section to the back of the vehicle ensuring you firstthread both cables through the back, then reconnect some of the pieces we disconnected earlier. -
Page 56
Pull out both Red Bit Light cables from behind the back wheel. -
Page 57
23.) Turn the vehicle onto it’s right side so we can access underneath, then pullthe cable down and thread it underneath the wheel axle. Pull the cables all the way out from the other side. -
Page 58
Thread the cable through the middle of the wheel axle and pull it all the way out from the back side. -
Page 59
Thread the cables through the following technic hole in the axle. Loop the cables through a second time to secure and eliminate excess cabling. Connect both cables to the 6-Port Expansion Board, then turn the Battery Pack ON to test the tail lights are working OK. Note: If you experience any issues with the lights not working and suspect an issue with a component, please try a different port on the expansion board to verify where the fault lies (with the light, expansion board or effects board). -
Page 60
Reconnect the panel above the rear left wheel. 24.) Repeat steps 20-22. to install another 2x Red 30cm Bit Lights to the right tail light section using another provided 2x Round Plate 1×1 with Open Stud (Black). Ensure this time, the two bit light cables are laid in the opposite direction as we did for the left tail light section lights. -
Page 63
25.) Thread both Bit Light cables from the right tail light section through theback of the vehicle, then pull them out from behind the rear wheel. Reconnect the tail light section as well as some of the sections we removed earlier. Turn the vehicle onto it’s left side so that we can access underneath, then thread both Bit Light cables underneath the wheel axle as shown below. -
Page 64
Thread the cables through the middle of the wheel axle, pulling it all the way out from the back side. -
Page 65
Thread the cables through the following technic hole, then loop it through the same hole again to secure and eliminate excess cabling. Connect the two cables to the 6-Port Expansion Board. -
Page 66
26.) Take 3x Adhesive Squares and stick them to the back of the 6-Port Expansion Board. Mount the expansion board underneath the vehicle to the following position. -
Page 67
Eliminate any excess cables by twisting and folding them around each other into a neat bunch. Ensure that the wheels can still turn left and right.

42110


Download the LEGO® Life App
Lade dir die LEGO® Life App herunter
Télécharge l’application LEGO® Life
Télécharger l’application LEGO® Life
Scarica l’app LEGO® Life
Descarga la app LEGO® Life
Descarrega a App LEGO® Life
Töltsd le a LEGO® Life Appot!
|
Lejupielādē lietotni LEGO® Life |
|
LEGO® Life |
2Scan the code on the front cover Scanne den Code auf der Titelseite Scanne le code sur la page de couverture
Scanner le code sur la page couverture
Scansiona il codice sulla copertina Escanea el código de la portada
Faz scan do código na frente da capa Olvasd be a borítón látható kódot! Noskenē kodu uz priekšējā vāka
3Get the Building Instructions Hol dir die Bauanleitung
Obtiens les instructions de montage Obtenir les instructions de montage Scarica le istruzioni per la costruzione
Consulta las instrucciones de construcción
Obtém as Instruções de Construção Szerezd be az építési útmutatókat! Saņem būvēšanas instrukcijas
|
LEGO.com/apps |
Check for compatibility |
Verifi car a compatibilidade |
|||||||||
|
Kompatibilität prüfen |
Ellenőrizd a kompatibilitást |
||||||||||
|
Vérifi er la compatibilité |
Pārbaudīt saderību |
||||||||||
|
Controlla la compatibilità |
|||||||||||
|
Comprueba tu compatibilidad |
3

2
4

5

4x
2
|
1x |
1x |
1x |
3
 1:
1:
6

|
3 |
|||||||||||||
|
2x |
|||||||||||||
|
3x |
2x |
1x |
|||||||||||
|
5 |
|||||||||||||
|
4 |
|||||||||||||
2
3
1:
6
3
3
3
3
 3 1:
3 1:
7

8

|
7 |
||||||||||||
|
2x |
4x |
2x |
||||||||||
|
5 |
||||||||||||
|
2x |
||||||||||||
|
2x |
||||||||||||
|
4x |
9
|
2 |
3 |
4 |
5
7 
2x
5
 7 1:
7 1:
9

|
9 |
7 |
||||||||||||||
|
2x |
|||||||||||||||
|
2x |
1x |
2x |
|||||||||||||
|
1 |
|||||||||||||||
|
10 |
|||||||||||||||
29
7
7
 9
9
7
1:
9
10
![]()
1
3
|
1x |
1x |
1x |
12
1 2
3
3
1:
1
1
1
4x
|
14 |
||||
|
2x |
||||
|
1x |
||||
13
1
 1 1:
1 1:
12

2x
13

|
2 |
3 |
|
4x |
2x |
2x |
5
5
 5
5
17
5
1:
9
14
 7 1:
7 1:
15

16
2
17

|
7 |
|||||||||||
|
1x |
|||||||||||
|
1x |
|||||||||||
|
23 |
|||||||||||
|
22 |
|||||||||||
7
 7 1:
7 1:
18

19

|
3 |
||||||||||||
|
4x |
4x |
|||||||||||
|
25 |
26 |
|||||||||||
|
3 |
||||||||||||
3
2x
 3 1:
3 1:
20
![]()
|
2x |
2x |
2x |
2x |
2x |
||||||||
|
27 |
28 |
2

 2x
2x
1:

|
2x |
|||||||||||||
|
2x |
|||||||||||||
|
1x |
|||||||||||||
|
3 |
32 |
||||||||||||
23

35
7
33
|
7 |
|||||||||||||||
|
7 |
|||||||||||||||
|
1x |
1x |
||||||||||||||
|
1x |
1x |
||||||||||||||
|
36 |
|||||||||||||||
|
34 |
|||||||||||||||
 7
7
 7 1:
7 1:
24


|
3 |
|||||||||||||||||
|
4 |
|||||||||||||||||
|
1x |
1x |
||||||||||||||||
|
1x |
|||||||||||||||||
|
1x |
|||||||||||||||||
|
1x |
|||||||||||||||||
|
4 |
|||||||||||||||||
|
42 |
|||||||||||||||||
3
4
3
4 1:
8
26

8
1x 1x
|
1x |
1x |
1x |
44
43
 8
8
27
|
5 |
||||||||||||||||||||||||||
|
4 |
||||||||||||||||||||||||||
|
5 |
||||||||||||||||||||||||||
|
1x |
1x |
|||||||||||||||||||||||||
|
2x |
||||||||||||||||||||||||||
|
1x |
||||||||||||||||||||||||||
|
1x |
1x |
1x |
||||||||||||||||||||||||
|
45 |
46 |
4
3
4 1:
5
28

|
4 |
|||||||||||||||||||||
|
3 |
|||||||||||||||||||||
|
1x |
1x |
||||||||||||||||||||
|
1x |
|||||||||||||||||||||
|
1x |
|||||||||||||||||||||
|
1x |
|||||||||||||||||||||
|
1x |
|||||||||||||||||||||
|
4 |
|||||||||||||||||||||
|
47 |
|||||||||||||||||||||
|
48 |
|||||||||||||||||||||
3
29

8
4x
1x 1x
5
49
8
5
50
5
5
 8 1:
8 1:
30
![]()
1x 1x
54
1
52
1
1:
|
1x |
||||||||||
|
1x |
1x |
|||||||||
|
53 |
||||||||||
|
55 |
||||||||||
3

32

|
1 |
|||||
|
1x |
1x |
6
1
1x 1x
60
 1 1:
1 1:
33

62
34

35

 3 1:
3 1:
36

37

38

 3 1:
3 1:
39

40
![]()
|
1x |
1x |
||||||
|
70 |
7 |
4

|
1x |
1x |
3x |
1x |
||||||||||
|
7 |
|||||||||||||
|
1x |
1x |
||||||||||||
|
1x |
72
 7 1:
7 1:
42

73
43

|
1x |
2x |
2x |
||||||||||||
|
4 |
||||||||||||||
|
3 |
||||||||||||||
|
2x |
||||||||||||||
|
1x |
1x |
74
3
|
2 |
3 |
4 |
|||||||||
|
4 |
|||||||||||
3
1:
4
44

 4 1:
4 1:
45

46

47

48

49

 4 1:
4 1:
50
 Loading…
You can only view or download manuals with
Sign Up and get 5 for free
Upload your files to the site. You get 1 for each file you add
Get 1 for every time someone downloads your manual
Buy as many as you need