Спасибо Олегу (Oleg_klm) за ссылку. Думаю многим будет интересно.
Оригинал — vtsautomonitoring-ru.wikidot.com/wiki:datacapture
Снятие диагностических данных
Снятие диагностических данных — один из самых важных элементов использования системы VTS Автомониторинг.
Если данные сняты правильно, система работает гораздо эффективнее и выдаёт более точные оценки и графики.
ВНИМАНИЕ! Перед снятием данных запомните текущий пробег машины, он может понадобиться при экспорте данных.
Для снятия диагностических данных выполните следующие шаги:
Для вашей диагностической системы и машины приведенные шаги могут отличаться!
1. Подключите устройство Lexia к USB-порту компьютера и к дигностическому разъёму машины и запустите приложение DiagBox, включите зажигание машины
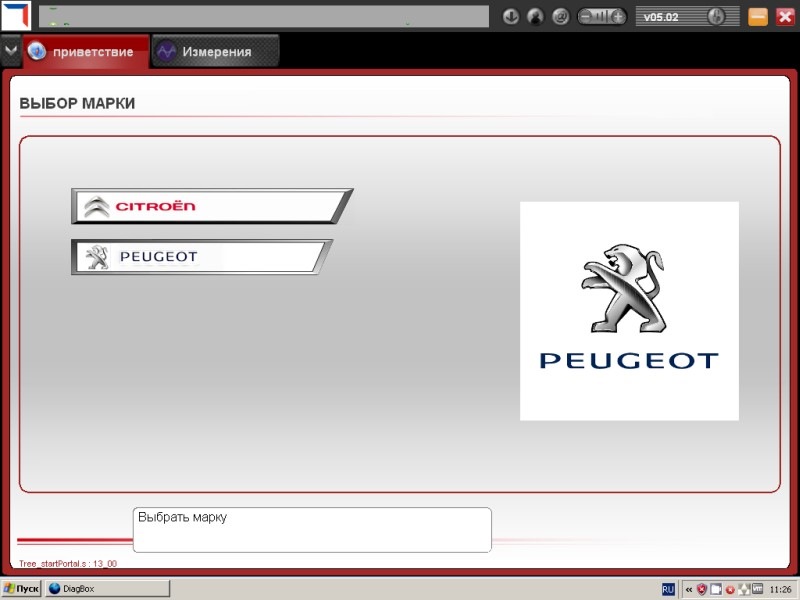
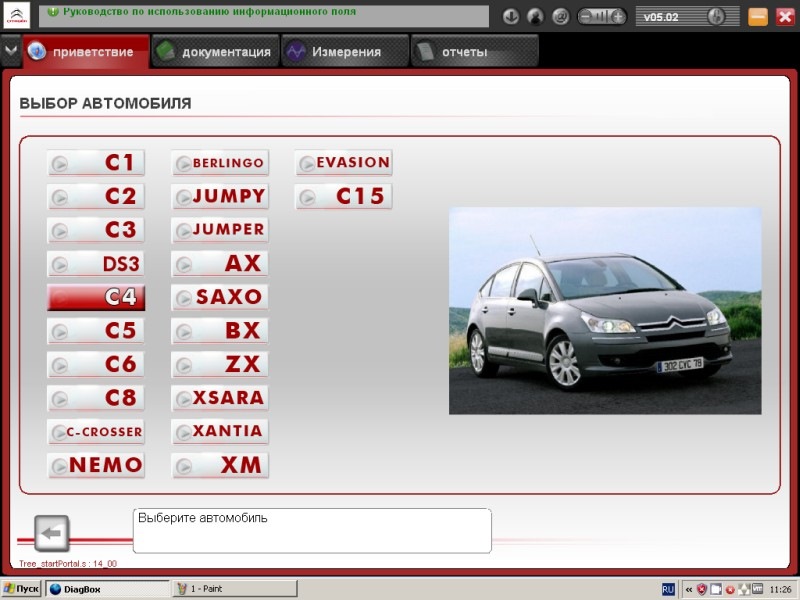
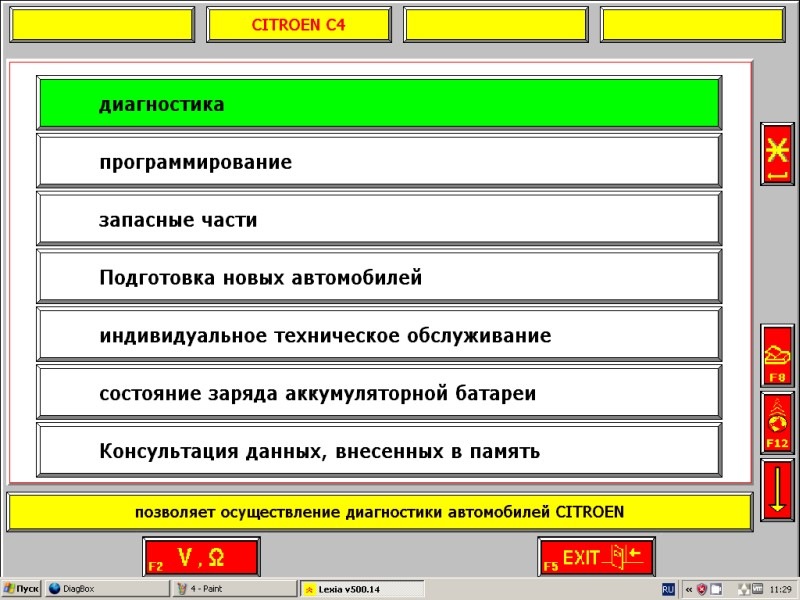
2. Выберите вашего автопроизводителя и модель, в данном примере рассмотрен Citroen C4
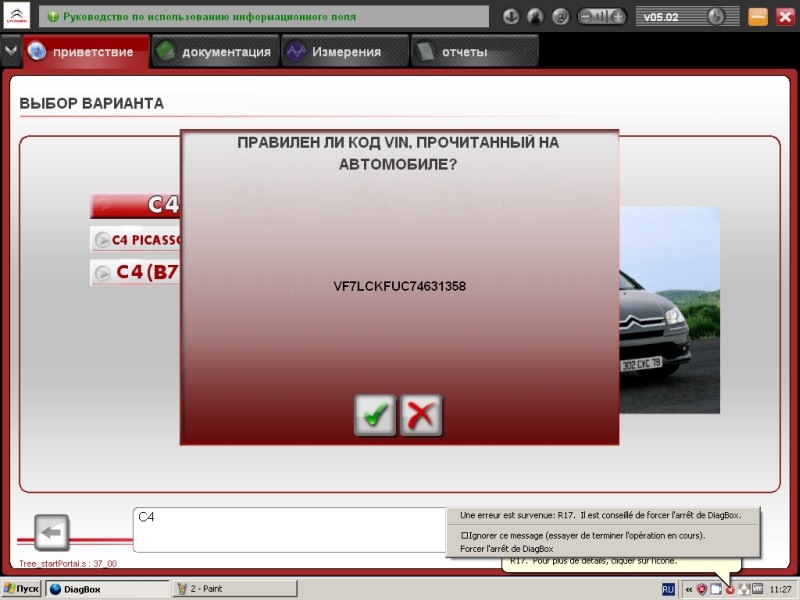
3. Убедитесь, что система правильно распознала вашу машину
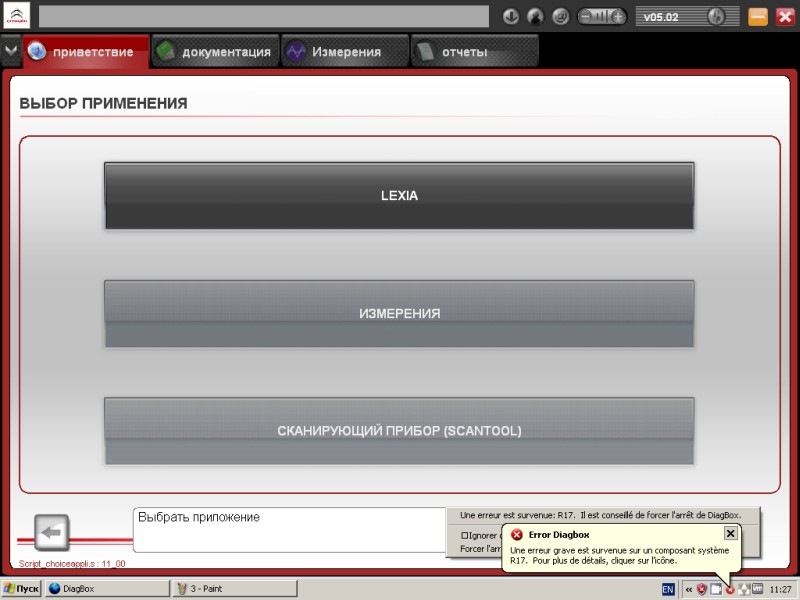
4. Выберите опцию «LEXIA»
5. Дождитесь загрузки приложения «Lexia», затем выберите опцию «Диагностика»
Система запросит у вас RPO-код, его вы можете найти на табличке, обычно расположенной в проёме водительской двери
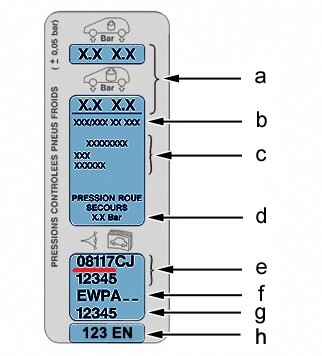
введите первые пять цифр (выделено красным)
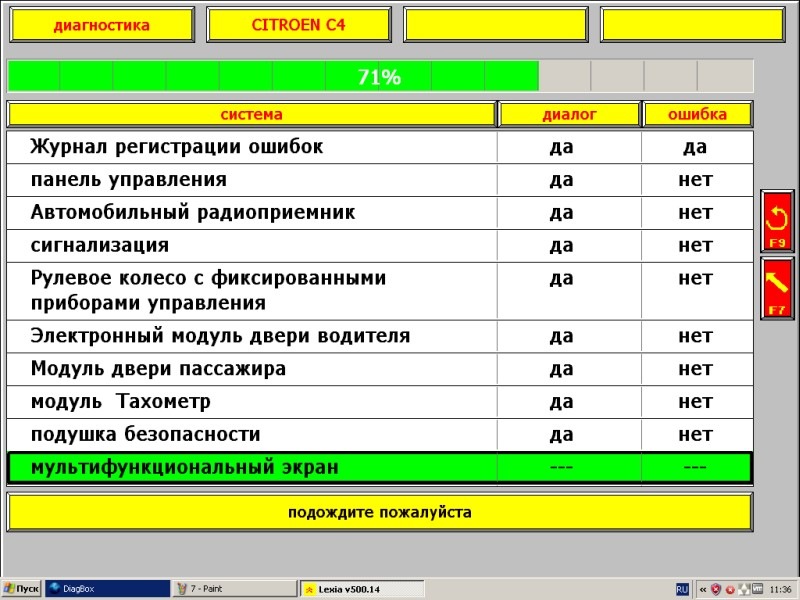
6. Выберите опцию «Глобальный тест»

7. Дождитесь завершения тестирования (На этом этапе зажигание должно быть включено, двигатель заводить не нужно, мы заведем его на шаге 14, чтобы проиллюстрировать захват значений параметров на момент старта двигателя)
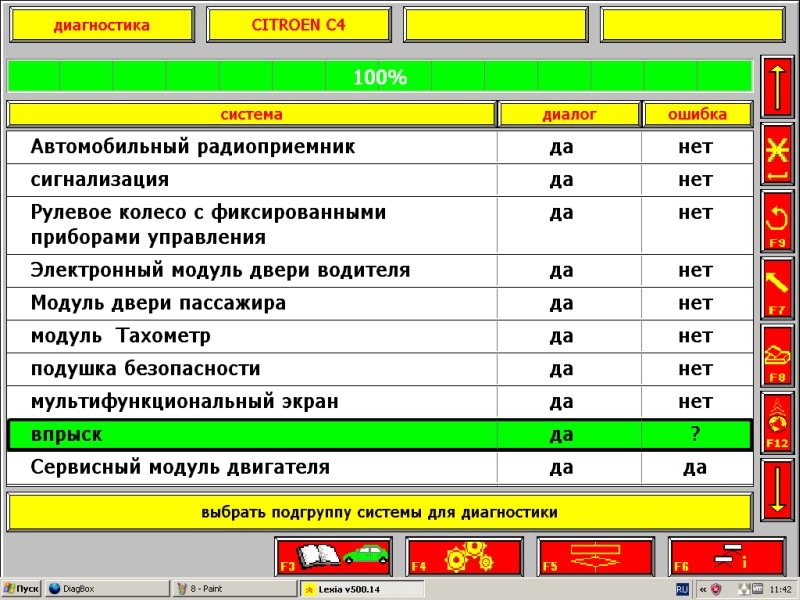
8. После завершения теста выберите интересующий раздел и нажмите»Enter» — в данном случае это «впрыск»:
9. Программа предложит выбрать тип вашего двигателя:

10. И вашу систему впрыска. Зная тип вашего двигателя, вы можете найти маркировку вашей системы впрыска (RFN, KFU, 5FX и т.д.) в интернете, пользуясь поисковиком
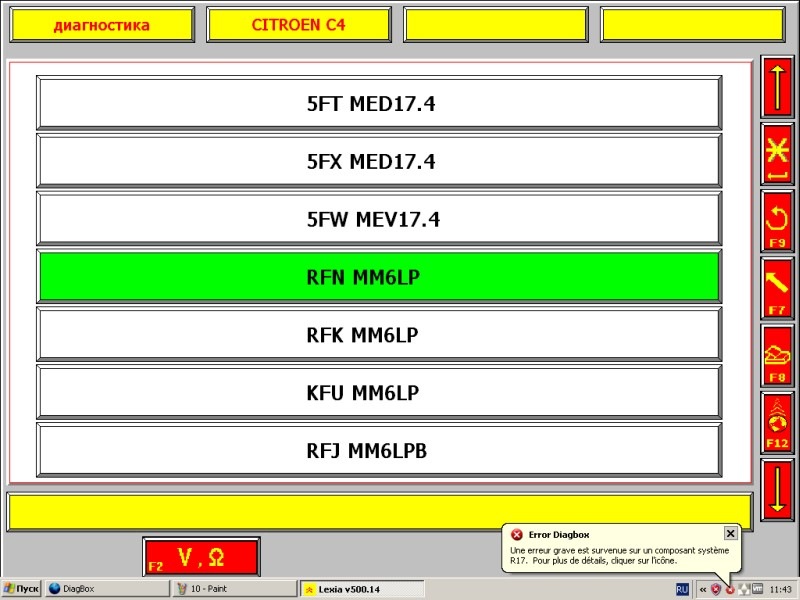
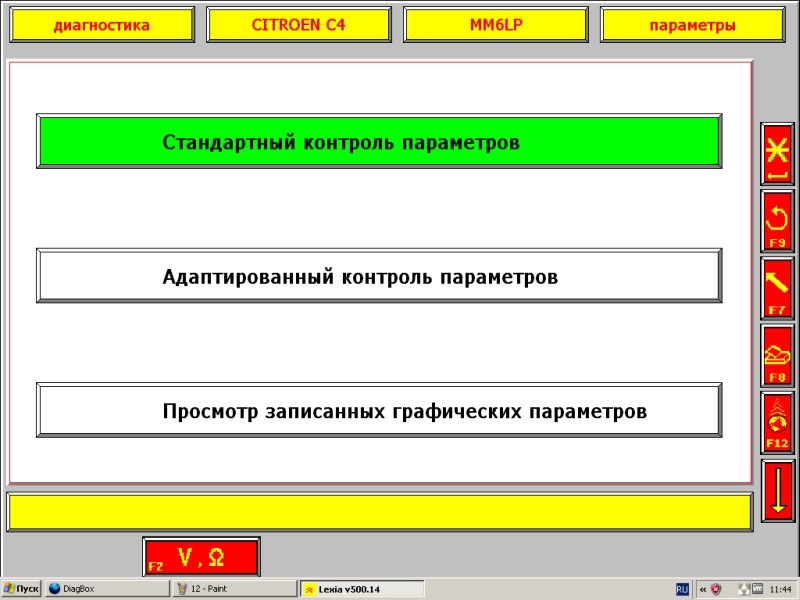
11. После выбора системы впрыска в следующем меню выберите опцию «Измерение параметров»

12. У вас есть выбор:
а) Стандартный контроль параметров – набор параметров определяется настройками программы, вы не можете его изменить
б) Адаптированный контроль параметров – вы сами выбираете какие параметры снимать с машины, этот вариант более гибкий
Рассмотрим сначала стандартный контроль параметров:
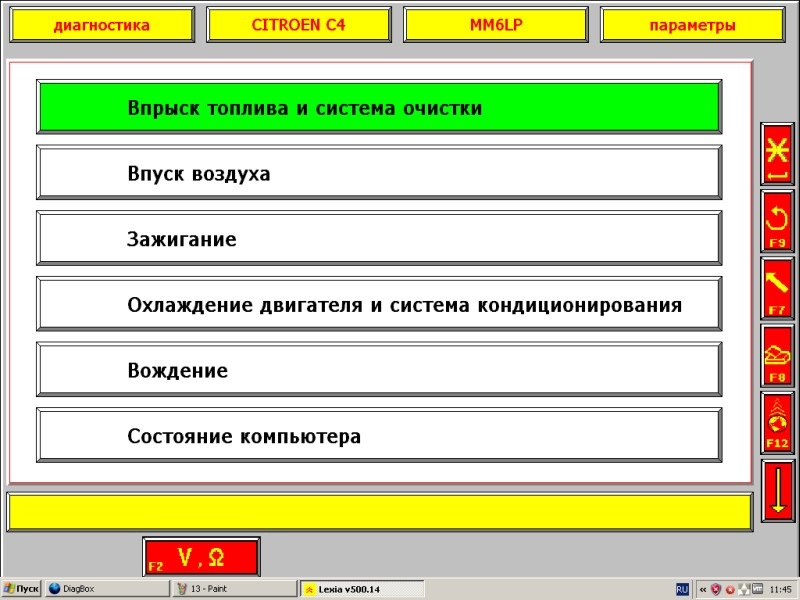
13. Выберем опцию «Впрыск топлива и система очистки»
14. Видим экран контроля параметров. Заведите двигатель, и отображённые обороты двигателя должны принять значение оборотов холостого хода
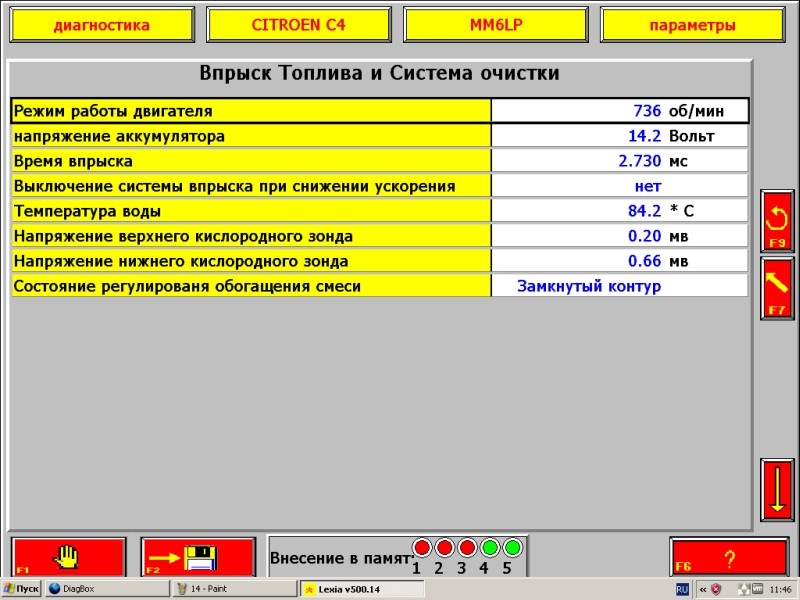
15. На данном этапе точность снятия данных во многом зависит от производительности диагностического компьютера. Обратитесь к странице Рекомендуемые параметры диагностического компьютера
После завода плавно поднимите обороты двигателя, задерживаясь на 1000, 2000 и 3000 об/мин (в идеальном случае +/-5%), затем плавно сбросьте до холостого хода, отпустите педаль газа. Система VTS, в которую вы, вероятно, будете загружать снятые данные, принимает эти обороты двигателя за базовые при вычислении оценки состояния систем машины. Если данные для одного из этих значений оборотов (100, 2000, 3000) будут отсутствовать, система зарегистрирует внесённые данные как неполные. Кроме того, рекомендуется захватить параметры в момент старта двигателя
ВАЖНО! На данный момент система VTS Автомониторинг не поддерживает данных, снятых в движении, поэтому снимайте данные с неподвижной машины.
После того, как вы прошли 1000, 2000, 3000 об/мин нажмите F2 (красная кнопка с изображением дискеты внизу экрана), чтобы сохранить только что снятые данные. Затем, нажимая F9, вернитесь на экран выбора типа контроля параметров. Выберите «Адаптированный контроль параметров»:

16. Адаптированный контроль параметров
Это более гибкий способ снятия данных с автомобиля, поскольку он позволяет выбрать какие именно параметры вы хотите снимать. При этом количество одновременно можно снимать не более шести параметров.
ВАЖНО! Практически всегда одним из снимаемых параметров должны быть обороты двигателя. Это позволит системе VTS Автомониторинг вычислить значения параметров машины на разных оборотах оптимальным способом.
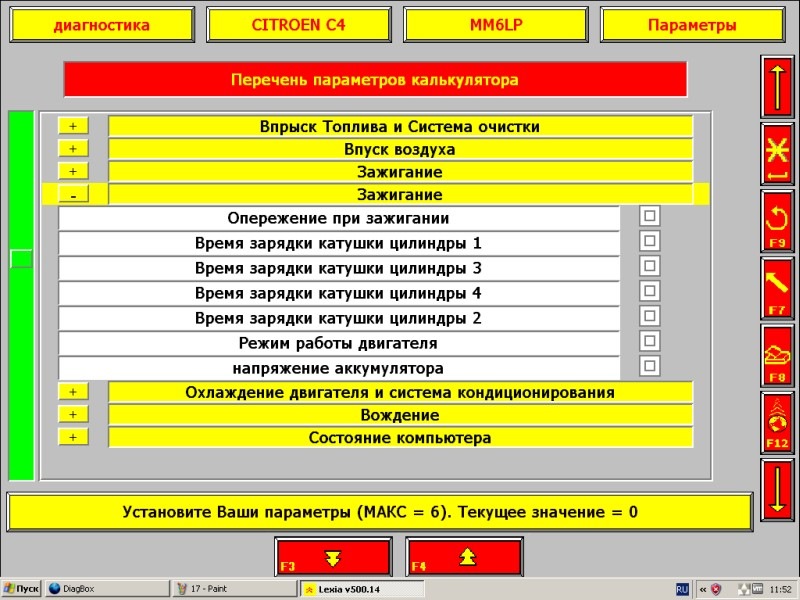
Кликните в квадратиках напротив желаемых параметров (или нажмите Enter), чтобы выбрать:

Обратите внимание, что многие параметры дублируются в нескольких разделах, и если вы выбираете их в одном из разделов, они автоматически отмечаются и в другом, таким образом один и тот же параметр нельзя выбрать два раза.
17. Снятие выбранных данных
Нажмите F6 или кликните на кнопку со схематическим изображением синусоиды в нижнем правом углу экрана.
Появится экран текущих значений выбранных параметров, на приведенной иллюстрации параметры соответствуют заглушенному двигателю. После завода двигателя они должны динамически обновляться.
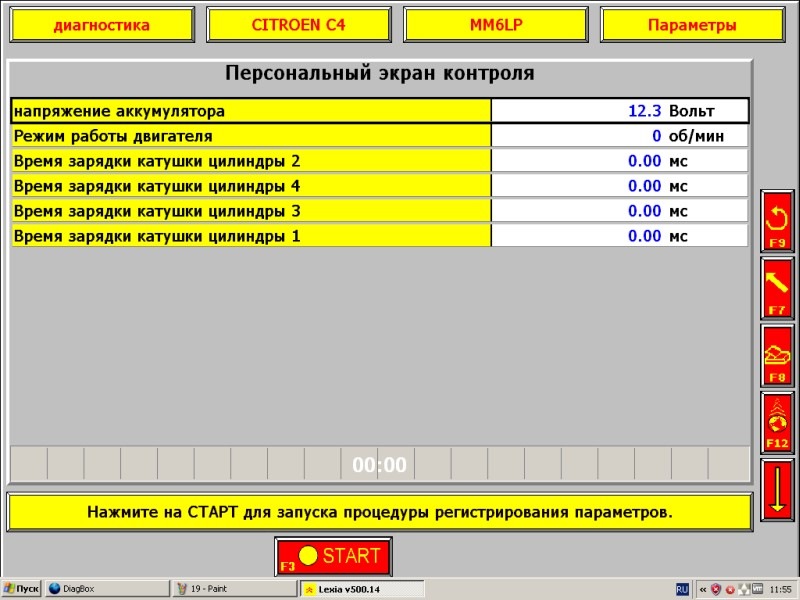
Нажмите кнопку «Старт», чтобы начать запись данных, повторите ту же процедуру, что описана в п. 15. После окончания снятия данных просмотрите их и нажмите F5 или кнопку с изображением дискеты, чтобы сохранить данные в памяти.

18. Выйдите из программы, сохранив текущий файл диагностики
-
Contents
-
Table of Contents
-
Bookmarks
Quick Links
Summary of Contents for Actia LEXIA3 EXPERT
-
Page 1
www.autokmfactory.com… -
Page 3: Table Of Contents
Table of contents 1. Preface ………………..1 1.1 Acknowledgement……………………..1 1.2 The LEXIA3 range……………………..1 1.3 Structure of technical documentation……………….. 3 1.4 Before any installation ……………………3 1.5 Glossary ……………………….4 1.6 Pictogram meanings ……………………5 2. EXPERT Pack and CHRONO Pack ……….. 7 2.1 EXPERT Pack……………………….
-
Page 4
4.7 Printer ……………………….103 4.7.1 Description ………………………………..103 4.7.2 Installing the printer without a trolley……………………….. 104 4.7.3 Installing the printer when using a trolley……………………….104 4.7.4 Checking printer operation …………………………..107 4.8 Anti-theft security……………………. 108 4.8.1 Description ………………………………..108 4.8.2 Installation………………………………..109 4.9 Carrying case…………………….. -
Page 5: Preface
Every day you need to combine reactivity and performance, to get even closer to the customer’s requirements. CITROËN and ACTIA have therefore designed a new generation of high-tech products that cover the entire spectrum of CITROËN vehicle diagnostic requirements. The various LEXIA3 packs are built around standard hardware, compatible with the current I.T.
-
Page 6
LEXIA3 User Guide documentation supplied with LEXIA3. We wish you an easy installation and successful diagnostics. ACTIA www.autokmfactory.com 2 — Preface -… -
Page 7: Structure Of Technical Documentation
LEXIA3 User Guide 1.3 Structure of technical documentation The present User Guide contains all the information necessary to install the systems supplied with LEXIA3. The Guide enables you to set up your LEXIA3 (assembly, connection), and also describes how to install and use the application software. A few helpful recommendations for assembling your LEXIA3 are given below, together with a glossary of the terms used throughout the remainder of the Guide.
-
Page 8: Glossary
LEXIA3 User Guide Do not connect any USB connectors on the PC Tablet unless specifically instructed by the present document. The USB connectors on your PC Tablet are indicated by the following logo :1.5 1.5 Glossary HUB: Common connector (HUB), providing duplicate USB ports (enabling various hardware to be connected).
-
Page 9: Pictogram Meanings
LEXIA3 User Guide 1.6 Pictogram meanings Note Caution Reminder Risk of electric shock — Preface — 5…
-
Page 10
LEXIA3 User Guide 6 — Preface -… -
Page 11: Expert Pack And Chrono Pack
LEXIA3 User Guide 2. EXPERT Pack and CHRONO Pack Installation time around: In its fullest configuration, your LEXIA3 comprises the following: www.autokmfactory.com — EXPERT Pack & CHRONO Pack — 7…
-
Page 12: Expert Pack
LEXIA3 User Guide 2.1 EXPERT Pack The EXPERT Pack comprises the following standard and optional elements: Element For Installation See … STANDARD 1 Trolley 2.3.1 Trolley 2 PC Tablet 2.3.2 PC Tablet 3 PC Tablet protection cover 2.3.3 PC Tablet protection cover 4 Multi-connectors 2.3.4 Multi-connectors — Universal adapter — Power supplies…
-
Page 13: Chrono Pack
LEXIA3 User Guide 2.2 CHRONO Pack The CHRONO Pack comprises the following standard and optional elements: Element For Installation See … STANDARD 1 Trolley 2.3.1 Trolley 2 PC Tablet 2.3.2 PC Tablet 3 PC Tablet protection cover 2.3.3 PC Tablet protection cover 4 Multi-connectors 2.3.4 Multi-connectors — Universal adapter — Power supplies…
-
Page 14: Installing The Hardware
LEXIA3 User Guide 2.3 Installing the hardware 2.3.1 Trolley The trolley conveniently carries all the LEXIA3 equipment required, and makes utilisa- tion very simple and user-friendly. The trolley comprises the following elements: 1. a stowage system for the PC Tablet and its protection cover, 2.
-
Page 15
LEXIA3 User Guide The spanner supplied in the trolley drawer enables you to adapt the PC Tablet mounting system (5) to suit your own particular utilisation. Tighten the PC Tablet mounting as follows: 1. Remove the cover. 2. Adjust the grip as required and install the cover. — EXPERT Pack &… -
Page 16: Pc Tablet
LEXIA3 User Guide 2.3.2 PC Tablet Description Front panel www.autokmfactory.com Button or Function Status indicator PC Tablet in Lights up when the PC Tablet is processing operation. data. Battery charge Green, steady: your battery is between 50% indicator. and 100% charged. Orange, steady: your battery is between 13% and 49% charged.
-
Page 17
LEXIA3 User Guide Mains power and Orange: mains power and battery are both battery charge available and system is charging. indicator. Green: — mains power and battery are both available and system is not charging (battery fully charged). — mains power available but battery not installed. -
Page 18
LEXIA3 User Guide Connector panels Installing the battery in the PC Tablet When delivered, the battery is not installed in your PC Tablet. Insert the battery into its housing, on the left side of the PC Tablet. www.autokmfactory.com The first time you use your system, the battery is not fully charged. Charge it using the external power unit supplied (Section 2.3.4). -
Page 19
LEXIA3 User Guide Installing the protection film on the PC Tablet screen A screen protection film is supplied with the PC Tablet. The film has two protective layers. To install the protection film on the PC Tablet screen: 1. Remove one of the two protective layers. 2. -
Page 20
LEXIA3 User Guide Installing the light pen To obtain another light pen, refer to Section 8.1. Use only the light pen supplied. Any other object may permanently damage the screen and will not work properly. The PC Tablet screen only works with the electro-magnetic light pen supplied. -
Page 21
LEXIA3 User Guide Disabling the Wi-Fi function Your LEXIA3 tool is equipped with a wireless function for all communication operations. However, activating this function limits the battery endurance of your tool, if there is no Wi-Fi communication terminal in your workshop (see Section 4). Thus, if you are not using the Wi-Fi option, you must disable the Wi-Fi function before continuing the installation. -
Page 22: Pc Tablet Protection Cover
LEXIA3 User Guide 2.3.3 PC Tablet protection cover Description Before using your PC Tablet, you must insert it in its protection cover, as shown below: www.autokmfactory.com Installing the PC Tablet on the trolley When the PC Tablet is equipped with its protection cover, it can be installed on the trolley mounting system.
-
Page 23: Multi-Connectors — Universal Adapter — Power Supplies
LEXIA3 User Guide 2.3.4 Multi-connectors — Universal adapter — Power supplies Your tool is supplied with the necessary multi-connectors and, for some countries, a universal adapter, which will provide the power supplies required by your LEXIA3. PC Tablet mains power supply The PC Tablet mains power kit comprises the following elements: — EXPERT Pack &…
-
Page 24
LEXIA3 User Guide Preparing the power cable before connection to the PC Tablet The power cable must be equipped with its electro-magnetic protection before it is connected to the PC Tablet. 1. Insert the power cable once into the electro-magnetic protection filter. 2. -
Page 25
LEXIA3 User Guide PC Tablet power supply for use on the trolley To install the PC Tablet on the trolley, proceed as follows: 1. Insert the power cable through the bottom of the trolley. 2. Recover the cable at the top of the duct. — EXPERT Pack &… -
Page 26
LEXIA3 User Guide 3. Connect the power cable to the PC Tablet. 4. Connect the power cable to the multi-connector. 5. Place the multi-connector behind the sliding doors on the trolley. 6. Connect the multi-connector to mains power, using the universal adapter if necessary. -
Page 27: Using The Pc Tablet For The First Time
LEXIA3 User Guide 2.3.5 Using the PC Tablet for the first time The diagnostic software is already installed on your tool. However, when using the PC Tablet for the first time, you need to configure your own environment (country, language, keyboard). To power up your PC Tablet, press the On/Off (Marche/Arrêt) button.
-
Page 28
LEXIA3 User Guide Configuring your PC Tablet To configure your PC Tablet for your own personal requirements (numerical, currency and date/time formats, place of utilisation, keyboard configuration), proceed as follows: 1. Press Start. 2. Select Control Panel. 3. Select Regional and Language Options. 24 — EXPERT Pack &… -
Page 29
LEXIA3 User Guide 4. Select the Regional Options tab. 5. In the Standards and Formats section, select the language corresponding to the numerical, currency and date/time formats required. 6. In the Location section, select the place where your PC Tablet is being used. Do not press OK or Apply — a restart will be prompted. -
Page 30
LEXIA3 User Guide 8. Then select the Settings tab. 9. In the Default input language section, select the keyboard entry language. 10. In the Language used in menus and dialogs section, select the required language. Do not press OK or Apply — a restart will be prompted. 26 — EXPERT Pack &… -
Page 31
LEXIA3 User Guide 11. Select the Advanced tab. 12. In the Language for non-Unicode programs section, select the required language. 13. Press OK. 14. Press OK. 15. Press Yes. 16. Press Yes. The PC Tablet will restart. — EXPERT Pack & CHRONO Pack — 27… -
Page 32
LEXIA3 User Guide Shutdown The shutdown procedure (software and power off) must be respected on your LEXIA3 diagnostic tool. During the shutdown phase, LEXIA3 updates its internal data. Therefore you must quit the application properly, respecting the procedure defined in Section 6.3. -
Page 33: Vehicle Adapter
LEXIA3 User Guide 2.3.6 Vehicle adapter The vehicle adapter provides a power supply for the PC Tablet when used onboard a vehicle. The adapter comprises: • a PC Tablet power connector, • a cigar-lighter connector. — EXPERT Pack & CHRONO Pack — 29…
-
Page 34: Anti-Theft Security
LEXIA3 User Guide 2.3.7 Anti-theft security The anti-theft security device keeps the diagnostic system safe from theft, both during operation and when not operating. The anti-theft security device comprises: • a locking cable. www.autokmfactory.com • two keys. To install the anti-theft security device: 1.
-
Page 35
LEXIA3 User Guide 2. Insert the end-piece into the rear panel of the PC Tablet, and turn the key to lock it. Keep the spare key in a safe place that you can easily remember. — EXPERT Pack & CHRONO Pack — 31… -
Page 36: Common Connector (Hub)
LEXIA3 User Guide 2.3.8 Common connector (HUB) Description The common connector (HUB) centralises your USB connections (DVD, modem, etc.). The common connector (HUB) comprises the following elements: Labels are supplied to indicate to which elements your equipment or options are connected.
-
Page 37
LEXIA3 User Guide Common connector (HUB) labels The following labels are available: ∙ • PC Tablet • DVD • KEYBOARD • MOUSE • MODEM • ICC for the CITROËN Communication Interface • BBP2 for the 252-way Controlled Terminal Box • MEASURE fore the Physical Measurement Interface •… -
Page 38
LEXIA3 User Guide Starting up To start up the common connector (HUB), proceed as follows: 1. Supply power to the common connector (HUB). 2. Connect the USB cable between the common connector (HUB) and the PC Tablet (which must be switched on). 3. -
Page 39: Dvd Drive
LEXIA3 User Guide 2.3.9 DVD drive The DVD drive is used to update your LEXIA3 diagnostic tool and to consult the CI- TROËN charts on the documentation CD-ROM, etc. Description The DVD drive comprises the following elements: To start up the DVD drive: 1.
-
Page 40
LEXIA3 User Guide 2. Open the drawer on the front of the trolley. 3. Connect the USB cable to the DVD drive. 4. Connect the power cable to the DVD drive. 5. Slide the DVD drive into its housing, inside the drawer. 36 — EXPERT Pack &… -
Page 41
LEXIA3 User Guide 6. Various Info bubbles appear on the screen, to indicate that the DVD drive has been recognised by the PC Tablet. To close these Info bubbles, use the light pen to press on the cross in the top RH corner. — EXPERT Pack &… -
Page 42: Keyboard And Mouse
LEXIA3 User Guide 2.3.10 Keyboard and mouse To install the keyboard, proceed as follows: 1. Pass the cables in through the top of the trolley, in the specific position, and run them down through the duct, to the common connector (HUB). 2.
-
Page 43: Citroën Communication Interface (Icc)
LEXIA3 User Guide 2.3.11 CITROËN Communication Interface (ICC) Description and adapters The CITROËN Communication Interface is your diagnostic system new external communication board, designed to provide the link between your PC Tablet and the vehicle. LEXIA3 CITROËN Communication Interface components: AC963833 Component AC963833 CITROËN Communication Interface…
-
Page 44
LEXIA3 User Guide Cable compatibility table Cable LEXIA2 LEXIA3 AC911032 ADA 03 AC9111001 Cigar lighter cable AC911312 30-way adapter AC911314 2-way adapter AC911675 2-way adapter + Power + Pretensioner AC911440 LEXIA2 OBD adapter AC911658 LEXIA3 OBD adapter AC911661 LEXIA2 USB cable AC911664 USB cable AC911662… -
Page 45
LEXIA3 User Guide 2. Press FINISH (TERMINER). Checking the operation of the CITROËN Communication Interface CITROËN Communication Interface operation can be checked by running a full test of all the computer systems, on a vehicle of your choice, using the LEXIA3 tool (see Section 5). -
Page 46: Isdn Modem
LEXIA3 User Guide 2.3.12 ISDN modem The ISDN modem provides access to the following, through Internet: • Software updates for your tool, • Remote coding and downloading data, • And remote assistance. Depending on the country in which you are using your system, the modem may be a different version.
-
Page 47
LEXIA3 User Guide Description of the OLITEC ISDN modem The OLITEC ISDN modem comprises the following elements: Description of the MULTITECH ISDN modem The MULTITECH ISDN modem comprises the following elements: — EXPERT Pack & CHRONO Pack — 43… -
Page 48
LEXIA3 User Guide Installing the modem To install the modem: 1. Place the modem in the rear compartment of the trolley. 2. Run the telephone cable out through the specific hole and connect it to the telephone socket. 44 — EXPERT Pack & CHRONO Pack -… -
Page 49
LEXIA3 User Guide 3. Connect the modem USB cable to the common connector (HUB). 4. Install the label base on the cable. 5. Bond the MODEM label on the base. 6. Bond the other MODEM label on the USB port at the common connector (HUB) level. -
Page 50
LEXIA3 User Guide Configuring the Internet connection Connect your modem before starting up the system. To configure the Internet connection, proceed as follows: 1. Press Start (Démarrer), followed by Configuration panel (Panneau de configuration). 2. Select the Internet Options (Options Internet) icon. 3. -
Page 51
LEXIA3 User Guide 6. Press the Parameters (Paramètres) button. 7. Enter the User login (Nom d’utilisateur), the Password (Mot de passe) and the Sector name (Nom de domaine) supplied by your Internet provider, and then press the Properties (Propriétés) button. — EXPERT Pack &… -
Page 52
LEXIA3 User Guide 8. Enter the Telephone number (Numéro de téléphone) of your Internet provider. Check that the connection is actually using your modem. The square corresponding to your modem must be ticked. Then click on OK to confirm. www.autokmfactory.com 9. -
Page 53
LEXIA3 User Guide 10. Select Internet Protocol (Protocole Internet — TCP/IP) and then press the Properties (Propriétés) button. 11. Select Use next DNS address (Utiliser l’adresse de serveur DNS suivante), enter the IP addresses (Adresses IP) of both primary and secondary DNS (DNS primaires et secondaires) servers and then press the OK button several times. -
Page 54
LEXIA3 User Guide Working online To use your Internet connection normally, you will need to work online. Proceed as follows: 1. Open Internet Explorer. 2. In the File (Fichier) menu, deactivate the Work offline (Travailler hors connexion) option, if it was active, if the option is not ticked then it is deactivated √… -
Page 55
PC Tablet. To test your Internet connection, proceed as follows: 1. Enter the address of a Web site (for example: www.actia.com). The remote connection dialogue box then appears. 2. Press Connection (Connexion). The connection is made and the Web site home page is opened. -
Page 56
LEXIA3 User Guide 52 — EXPERT Pack & CHRONO Pack -… -
Page 57: Mobile Pack And Light Pack
LEXIA3 User Guide 3. MOBILE Pack and LIGHT Pack Installation time around: In its fullest configuration, your LEXIA3 MOBILE Pack or LIGHT Pack comprises the following: www.autokmfactory.com — MOBILE Pack & LIGHT Pack — 53…
-
Page 58: Mobile Pack
LEXIA3 User Guide 3.1 MOBILE Pack The MOBILE Pack comprises the following standard and optional elements: Element For Installation See … STANDARD 1 PC Tablet 3.3.1 PC Tablet 2 PC Tablet protection cover 3.3.2 PC Tablet protection cover Multi-connector 3.3.4 Multi-connector — Universal adapter — Power supplies Vehicle adapter 3.3.5 Vehicle adapter…
-
Page 59: Light Pack
LEXIA3 User Guide 3.2 LIGHT Pack The LIGHT Pack comprises the following standard and optional elements: Element For Installation See … STANDARD 1 PC Tablet 3.3.1 PC Tablet 2 PC Tablet protection cover 3.3.2 PC Tablet protection cover Multi-connector 3.3.3 Multi-connectors — Universal adapter — Power supplies Vehicle adapter 3.3.5 Vehicle adapter…
-
Page 60: Installing The Hardware
LEXIA3 User Guide 3.3 Installing the hardware 3.3.1 PC Tablet Description Front panel Button or Function Status indicator PC Tablet in Lights up when the tool is processing data. operation. Battery charge Green, steady: your battery is between 50% indicator. and 100% charged.
-
Page 61
LEXIA3 User Guide Mains power and Orange: mains power and battery are both battery charge available and system is charging. indicator. Green: — mains power and battery are both available and system is not charging (battery fully charged). — mains power available but battery not installed. -
Page 62
LEXIA3 User Guide Connector panels Installing the battery in the PC Tablet When delivered, the battery is not installed in your PC Tablet. Insert the battery into its housing, on the left side of the PC Tablet. The first time you use your system, the battery is not fully charged. Charge it using the external power unit supplied (Section 2.3.4). -
Page 63
LEXIA3 User Guide Installing the protection film on the PC Tablet screen A screen protection film is supplied with the PC Tablet. The film has two protective layers. To install the protection film on the PC Tablet screen: 1. Remove one of the two protective layers. 2. -
Page 64
LEXIA3 User Guide Installing the light pen Use only the light pen supplied. Any other object may permanently damage the screen and will not work properly. The PC Tablet screen only works with the electro-magnetic light pen supplied. If you lose the light pen, you will not be able to use your LEXIA3. To obtain another light pen, refer to Section 8.1. -
Page 65
LEXIA3 User Guide Disabling the Wi-Fi function Your LEXIA3 tool is equipped with a wireless function for all communication operations. However, activating this function limits the battery endurance of your tool, if there is no Wi-Fi communication terminal in your workshop (see Section 4). Thus, if you are not using the Wi-Fi option, you must disable the Wi-Fi function before continuing the installation. -
Page 66: Pc Tablet Protection Cover
LEXIA3 User Guide 3.3.2 PC Tablet protection cover Description Before using your PC Tablet, you must insert it in its protection cover, as shown below: 3.3.3 Multi-connector — Universal adapter — Power supplies Your tool is supplied with a multi-connector and, for some countries, a universal adapter, which will provide the power supplies required by your LEXIA3.
-
Page 67
LEXIA3 User Guide PC Tablet mains power supply The PC Tablet mains power kit comprises the following elements: — MOBILE Pack & LIGHT Pack — 63… -
Page 68
LEXIA3 User Guide Preparing the power cable before connection to the PC Tablet The power cable must be equipped with its electro-magnetic protection before it is connected to the PC Tablet. 1. Insert the power cable once into the electro-magnetic protection filter. 2. -
Page 69
LEXIA3 User Guide PC Tablet power supply 1. Connect the power cable to the PC Tablet. 2. Connect the power cable to the multi-connector. 3. Connect the multi-connector to the mains power supply, using the universal adapter supplied, if necessary. — MOBILE Pack &… -
Page 70: Using The Pctablet For The First Time
LEXIA3 User Guide 3.3.4 Using the PCTablet for the first time The diagnostic software is already installed on your PC. However, when using the PC Tablet for the first time, you need to configure your own environment (country, language, keyboard). To power up your PC Tablet, press the On/Off (Marche/Arrêt) button.
-
Page 71
LEXIA3 User Guide Configuring your PC Tablet To configure your PC Tablet for your own personal requirements (numerical, currency and date/time formats, place of utilisation, keyboard configuration), proceed as follows: 1. Press Start. 2. Select Control Panel. 3. Select Regional and Language Options. — MOBILE Pack &… -
Page 72
LEXIA3 User Guide 4. Select the Regional Options tab. 5. In the Standards and Formats section, select the language corresponding to the numerical, currency and date/time formats required. 6. In the Location section, select the place where your PC Tablet is being used. Do not press OK or Apply — a restart will be prompted. -
Page 73
LEXIA3 User Guide 8. Then select the Settings tab. 9. In the Default input language section, select the keyboard entry language. 10. In the Language used in menus and dialogs section, select the required language. Do not press OK or Apply — a restart will be prompted. — MOBILE Pack &… -
Page 74
LEXIA3 User Guide 11. Select the Advanced tab. 12. In the Language for non Unicode programs section, select the required language. 13. Press OK. 14. Press OK. 15. Press Yes. 16. Press Yes. The PC Tablet will restart. 70 — MOBILE Pack & LIGHT Pack -… -
Page 75
LEXIA3 User Guide Shutdown The shutdown procedure (software and power off) must be respected on your LEXIA3 diagnostic tool. During the shutdown phase, LEXIA3 updates its internal data. Therefore you must quit the application properly, respecting the procedure defined in Section 6.3. -
Page 76: Vehicle Adapter
LEXIA3 User Guide 3.3.5 Vehicle adapter The vehicle adapter provides a power supply for the PC Tablet when used onboard a vehicle. The adapter comprises: • a PC Tablet power connector, • a cigar-lighter connector. 72 — MOBILE Pack & LIGHT Pack -…
-
Page 77: Anti-Theft Security
LEXIA3 User Guide 3.3.6 Anti-theft security The anti-theft security device keeps the diagnostic system safe from theft, both during operation and when not operating. The anti-theft security device comprises: • a locking cable. • two keys. To install the anti-theft security device: 1.
-
Page 78: Dvd Drive
LEXIA3 User Guide 3.3.7 DVD drive The DVD drive is used to update your LEXIA3 diagnostic tool and to consult the CI- TROËN charts on the documentation CD-ROM, etc. Description The DVD drive comprises the following elements: To start up the DVD drive: 1.
-
Page 79
LEXIA3 User Guide 2. Connect the USB cable to the DVD drive. 3. Connect the power cable to the DVD drive. 4. Various Info bubbles appear on the screen, to indicate that the DVD drive has been recognised by the PC Tablet. To close these Info bubbles, use the light pen to press on the cross in the top RH corner. -
Page 80: Citroën Communication Interface (Icc)
LEXIA3 User Guide 3.3.8 CITROËN Communication Interface (ICC) Description and adapters The CITROËN Communication Interface is your diagnostic system new external com- munication board, designed to provide the link between your PC Tablet and the vehi- cle. LEXIA3 CITROËN Communication Interface components: AC963833 Component AC963833 CITROËN Communication Interface…
-
Page 81
LEXIA3 User Guide Cable compatibility table Cable LEXIA2 LEXIA3 AC911032 ADA 03 AC9111001 Cigar lighter cable AC911312 30-way adapter AC911314 2-way adapter AC911675 2-way adapter + Power + Pretensioner AC911440 LEXIA2 OBD adapter AC911658 LEXIA3 OBD adapter AC911661 LEXIA2 USB cable AC911664 USB cable AC911662… -
Page 82
LEXIA3 User Guide 2. Press FINISH (TERMINER). Checking the operation of the CITROËN Communication Interface CITROËN Communication Interface operation can be checked by running a full test of all the computer systems, on a vehicle of your choice, using the LEXIA3 tool (see Section 5). 78 — MOBILE Pack &… -
Page 83: Isdn Modem
LEXIA3 User Guide 3.3.9 ISDN modem The ISDN modem provides access to the following, through Internet: • Software updates for your LEXIA3 tool, • CITROËN remote coding and downloading data, • And CITROËN remote assistance. Depending on the country in which you are using your system, the modem may be a different version.
-
Page 84
LEXIA3 User Guide Description of the OLITEC ISDN modem The OLITEC ISDN modem comprises the following elements: Description of the MULTITECH ISDN modem The MULTITECH ISDN modem comprises the following elements: 80 — MOBILE Pack & LIGHT Pack -… -
Page 85
LEXIA3 User Guide Installing the modem To install the modem: 1. Connect the telephone cable to the telephone socket. 2. Connect the modem USB cable to the PC Tablet. 3. Various Info bubbles appear on the screen, to indicate that the modem has been recognised by the PC Tablet. -
Page 86
LEXIA3 User Guide Configuring the Internet connection Connect your modem before starting up the system. To configure the Internet connection, proceed as follows: 1. Press Start (Démarrer), followed by Configuration panel (Panneau de configuration). 2. Select the Internet Options (Options Internet) icon. 3. -
Page 87
LEXIA3 User Guide 6. Press the Parameters (Paramètres) button. 7. Enter the User login (Nom d’utilisateur), the Password (Mot de passe) and the Sector name (Nom de domaine) supplied by your Internet provider, and then press the Properties (Propriétés) button. — MOBILE Pack &… -
Page 88
LEXIA3 User Guide 8. Enter the Telephone number (Numéro de téléphone) of your Internet provider. Check that the connection is actually using your modem. The square corresponding to your modem must be ticked. Then click on OK to confirm. 9. If your Internet provider has supplied DSNs, select the Network management (Gestion de réseau) tab. -
Page 89
LEXIA3 User Guide 10. Select Internet Protocol (Protocole Internet — TCP/IP) and then press the Properties (Propriétés) button. 11. Select Use next DNS address (Utiliser l’adresse de serveur DNS suivante), enter the IP addresses (Adresses IP) of both primary and secondary DNS (DNS primaires et secondaires) servers and then press the OK button. -
Page 90
LEXIA3 User Guide Working online To use your Internet connection normally, you will need to work online. Proceed as follows: 1. Open Internet Explorer. 2. In the File (Fichier) menu, deactivate the Work offline (Travailler hors connexion) option, if it was active, if the option is not ticked then it is deactivated. -
Page 91
PC Tablet. To test your Internet connection, proceed as follows: 1. Enter the address of a Web site (for example: www.actia.com). The remote connection dialogue box then appears. 2. Press Connection (Connexion). The connection is made and the Web site home page is opened. -
Page 92
LEXIA3 User Guide 88 — MOBILE Pack & LIGHT Pack -… -
Page 93: Options
LEXIA3 User Guide 4. Options 4.1 Common connector (HUB) 4.1.1 Description The common connector (HUB) centralises your USB connections (DVD, modem, etc.). The common connector (HUB) comprises the following elements: 4.1.2 Startup To start up the common connector (HUB), proceed as follows: 1.
-
Page 94
LEXIA3 User Guide 3. Various Info bubbles appear on the screen, to indicate that the common connector (HUB) has been recognised by the PC Tablet. To close these Info bubbles, use the light pen to click on the cross in the top RH corner. 90 — Options -… -
Page 95: Physical Measurement Interface
LEXIA3 User Guide 4.2 Physical Measurement Interface The physical measurement interface can be used to measure current, voltage and impedance. 4.2.1 Description and contents Composition of the LEXIA3 Physical Measurement Interface: AC964111 Element 1 AC964111 Physical Measurement Interface 2 AC911664 USB Cable 3 AC911685 Power Cable VBAT…
-
Page 96: Utilisation Recommendations
LEXIA3 User Guide Each time the physical measurement interface is connected to the PC Tablet, several Info bubbles appear on the screen, indicating that the PC Tablet has rec- ognised the elements connected. Close these Info bubbles by using the light pen to click on the cross in the top RH corner.
-
Page 97
LEXIA3 User Guide 2. Connect the power supply. Both indicators must be lit up. 3. Connect the measuring cables. • To measure current values: • To measure voltage or impedance: — Options — 93… -
Page 98: 252-Way Controlled Terminal Box
LEXIA3 User Guide 4.3 252-way controlled terminal box The 252-way controlled terminal box enables fewer test points to be used. The 252-way controlled terminal box is only used with the physical measurement interface. 4.3.1 Description and contents Your 252-way controlled terminal box comprises the following elements: 94 — Options -…
-
Page 99: Utilisation Recommendations
LEXIA3 User Guide Composition of LEXIA3 252-way Controlled Terminal Box (AC964150) Element 1 AC964150 LEXIA3 252-way Controlled Terminal Box assembly 2 AC911029 USB cable 3 AC911107 252-way Controlled Terminal Box Probe Cable 4 AY36700002 Mains Power Adapter 5 AC911702 Cable between 252-way Controlled Terminal Box and physical measurement interface 6 AC911496 Extension Cable Green/white…
-
Page 100
LEXIA3 User Guide The assembly formed can then either be used separately from the system or can be installed in the trolley. 1. Connect the USB cable (supplied with the physical measurement interface) between the physical measurement interface and the 252-way controlled terminal box. -
Page 101
LEXIA3 User Guide 2. Connect cable 5. 3. Connect the power supply. — Options — 97… -
Page 102
LEXIA3 User Guide 4. Connect cable 2 between the 252-way controlled terminal box and the PC Tablet or the common connector (HUB). The two indicators on the physical measurement interface and the indicator on the 252-way controlled terminal box should all be lit up. 5. -
Page 103: Trolley
LEXIA3 User Guide 4.4 Trolley The trolley conveniently carries all the LEXIA3 equipment required, and makes utilisa- tion very simple and user-friendly. The trolley comprises the following elements: 1. a mounting system for the PC Tablet and its protection cover, 2.
-
Page 104
LEXIA3 User Guide The spanner supplied in the trolley drawer enables you to adapt the PC Tablet mounting system to suit your own particular utilisation. Tighten the PC Tablet mounting as follows: 1. Remove the cover. 2. Adjust the grip as required and install the cover. 100 — Options -… -
Page 105: 30-Way And 2-Way Connectors
LEXIA3 User Guide 4.5 30-way and 2-way connectors Your LEXIA3 is designed to perform a diagnostic function on both new and old CITROËN vehicles. Element 1 AC911312 30-way adapter 2 AC911675 2-way cable + power + pretensioner PR : 9972 RF 30-way and 2-way kits — Options — 101…
-
Page 106: Keyboard/Mouse
LEXIA3 User Guide 4.6 Keyboard/Mouse The keyboard and mouse can be used to replace the PC Tablet virtual keyboard and its light pen, respectively. Your mouse is an optical mouse. Do not use it on shiny or reflecting surfaces. To install the mouse, proceed as follows: 1.
-
Page 107: Printer
LEXIA3 User Guide 4.7 Printer If you are using the printer recommended by ACTIA, we shall guide you through the installation of this printer. If you are using a different printer, refer to the installation guide supplied with your printer.
-
Page 108: Installing The Printer Without A Trolley
LEXIA3 User Guide 4.7.2 Installing the printer without a trolley Connect the printer power cable to the multi-connector, which should be connected to the mains power supply. Connect the printer USB cable to one of the USB ports on the PC Tablet.
-
Page 109
LEXIA3 User Guide For optimum print quality: 1. In the Start (Démarrer) menu, press Printer and telecopiers (Imprimante et télécopieurs). 2. Select your printer. 3. In the File (Fichier) menu, select Properties (Propriétés). 4. Press Print options (Options d’impression). 5. Select the Main (Principal) tab. 6. -
Page 110
LEXIA3 User Guide 7. Tick the Reduce spooler data length function (Réduire la taille des données de spouleur), and press OK. 8. Press OK. 9. Press OK and close all the subsequent windows, by clicking on the cross in the top RH corner of each window. -
Page 111: Checking Printer Operation
LEXIA3 User Guide 4.7.4 Checking printer operation 1. From the WINDOWS desktop (main screen), double-click on the LEXIA3 icon. 2. The software then starts running and is configured. 3. The main diagnostic screen appears. 4. Press F8 to print this screen. — Options — 107…
-
Page 112: Anti-Theft Security
LEXIA3 User Guide 4.8 Anti-theft security 4.8.1 Description The anti-theft security device keeps the diagnostic system safe from theft, both during operation and when not operating. The anti-theft security device comprises the following elements: • a locking cable • two keys 108 — Options -…
-
Page 113: Installation
LEXIA3 User Guide 4.8.2 Installation 1. If you are using a trolley, make a loop around one of the trolley arms. If you are not using a trolley, use another fixed element to prevent the theft of your PC Tablet. 2.
-
Page 114: Carrying Case
LEXIA3 User Guide 4.9 Carrying case The carrying case will enable you to stow the essential elements of your pack, to facilitate operation close to a broken down vehicle. The illustration below shows a non-contractual example of stowage. 110 — Options -…
-
Page 115: Communication Kits
LEXIA3 User Guide 4.10 Communication kits Your LEXIA3 is compatible with two types of communication kit: • The Wi-Fi terminal, that enables a local workshop server to be used, or Internet connections to be centralised on one telephone line. • Your movement around the workshop is thus completely unrestricted, as these radio links do not necessitate wire connections.
-
Page 116: Checking Kits
LEXIA3 User Guide 4.11 Checking kits Your LEXIA3 tool allows you to control the operation of the oxygen probe of the vehicle. Element 1 AC911687 2-way Oxygen Probe Cable 2 AC911701 4-way Oxygen Probe Cable 112 — Options -…
-
Page 117: Installing Pcanywhere
LEXIA3 User Guide 5. Installing PCAnywhere This software enables you to use Teleassistance. 1. Insert the CD containing the LEXIA3 tools, and then open the WINDOWS explorer, using the path Start/All programs/Accessories/Windows Explorer (Démarrer/ Tous les programmes/Accessoires/Windows Explorer). 2. Then run the PCAnywhere installation by double-clicking on the Setup.exe program.
-
Page 118
LEXIA3 User Guide 3. The screen shown below is then displayed. Press the Next button. 4. Tick the square: I accept the terms in the license agreement, then press the Next button. 114 — Installing PCAnywhere -… -
Page 119
LEXIA3 User Guide 5. Enter your name (User Name) and the name of your company (Organization), then press the Next button. 6. Press on the Next button. 7. Press the Install button. The screen shown below is then displayed, to indicate the installation progress status. -
Page 120
LEXIA3 User Guide 8. Wait for the end of the installation procedure. 9. Press the Next button. 10. Press the Next button. 116 — Installing PCAnywhere -… -
Page 121
LEXIA3 User Guide 11. Press the Next button. 12. Press the Next button. — Installing PCAnywhere — 117… -
Page 122
LEXIA3 User Guide 13. Press the Next button. 14. Wait for the end of the Symantec product update search procedure on Internet. 15. If you cannot obtain the Internet connection, the following screen is displayed after a few minutes. 16. Press the Finish button, to complete the installation procedure. 118 — Installing PCAnywhere -… -
Page 123
LEXIA3 User Guide 17. The installation procedure is completed. 18. Press the Skip button. You can register to receive Symantec product information and updates by pressing the Next button. The registration procedure is not described in this document. 19. Press the Yes button. — Installing PCAnywhere — 119… -
Page 124
LEXIA3 User Guide 20. Press the Finish button. 21. Press the Yes button. The system restarts automatically to finish the installation procedure. 22. Teleassistance is installed for LEXIA3. The PCAnywhere application can also be activated through the menu Start/All programs/Symantec PCAnywhere (Dé- marrer/Tous les programmes/Symantec PCAnywhere) or using the icon on the desktop. -
Page 125: Using The Lexia3 Package
Manuel d’utilisation LEXIA3 6. Using the LEXIA3 package 6.1 Running the LEXIA3 diagnostic package Preliminary operation Your CITROËN Communication Interface must already be connected. The LEXIA3 software detects the presence of this element, and will generate an error message if the software is not detected.
-
Page 126
LEXIA3 User Guide 3. The software is then run and configured. 4. When you use your LEXIA3 package for the first time, to enable us to provide the best possible service (Customer Support, Hotline, etc.), you should register your software. To register your pack, you need to contact your local agent, to obtain an activation code. -
Page 127: Description Of Lexia3 Key Functions
Manuel d’utilisation LEXIA3 6.2 Description of LEXIA3 key functions The main LEXIA3 key functions are defined in the table below. Short Function keyboard Symbol Action code Confirm Enter Confirm, or go to next screen. Return Go back to previous screen. General return Go back to LEXIA3 main menu.
-
Page 128: Shutting Down The Lexia3 Diagnostic Package
LEXIA3 User Guide 6.3 Shutting down the LEXIA3 diagnostic package To shut down the LEXIA3 software, proceed as follows: 1. Press F7 to go to the LEXIA3 main menu. 2. Press F5 to quit the application. 3. If you wish, you can save the software trace of your diagnostic session and/or record the current action method.
-
Page 129
Manuel d’utilisation LEXIA3 4. Then press the return key F9. The programme will ask you to confirm. www.autokmfactory.com 5. To confirm exit from the application, press key F3. 6. This puts you back in WINDOWS. — Using the LEXIA3 package — 125… -
Page 130: Running The Lexia3 Tutorial
LEXIA3 User Guide 6.4 Running the LEXIA3 tutorial To access the LEXIA3 User Guide, proceed as follows: 1. Press F7 to go to the LEXIA3 main menu. 2. Select Tutorial, and confirm. 3. The tutorial is then run and the various functions are displayed. 126 — Using the LEXIA3 package -…
-
Page 131: Lexia3 Package Full Update
Manuel d’utilisation LEXIA3 6.5 LEXIA3 package full update To update the LEXIA3 package, proceed as follows: 1. Power up the PC Tablet and wait for the full WINDOWS restart. 2. Check that your DVD-ROM drive is powered up. 3. Get the appropriate LEXIA3 update CD-ROM. 4.
-
Page 132
LEXIA3 User Guide 7. Tick the Install / Update option. 8. Select the installation volume. 9. Confirm your choice. 128 — Using the LEXIA3 package -… -
Page 133
Manuel d’utilisation LEXIA3 10. The update process then starts (around 10 to 15 minutes). LEXIA3 is now installed. — Using the LEXIA3 package — 129… -
Page 134: Lexia3 Package Partial Update By Internet (Update Download)
LEXIA3 User Guide 6.6 LEXIA3 package partial update by Internet (Update download) Between distributions of a new LEXIA3 CD-ROM, the package can be partially updated by downloading. This enables you to: • be informed of new computer programmes, • and obtain correction patch updates very simply. The update download facility can be accessed from the LEXIA3 main menu by selecting Download update.
-
Page 135
Manuel d’utilisation LEXIA3 1. Select Download update and confirm. 2. The ACTIA data server home page is then displayed. www.autokmfactory.com 3. Confirm your choice by pressing Enter. 4. Follow the prompts to select the update download from those that may be available on the server. -
Page 136: Diagnostics
LEXIA3 User Guide 6.7 Diagnostics 6.7.1 Basic diagnostic process — General test LEXIA3 enables you to dialogue with all the computers installed in the vehicle and to perform a diagnostic on these computers. This operation is known as the General Test and provides an initial indication of any computer faults or malfunctions.
-
Page 137
Manuel d’utilisation LEXIA3 3. Run a General Test on all the computer systems. This test will give you an overview of the vehicle status and will provide an indication of the types of computer that are performing correctly. The test will also indicate any faults that may be detected, for each computer. -
Page 138: Basic Diagnostic Process — Fault Reading
LEXIA3 User Guide 6.7.2 Basic diagnostic process — Fault reading LEXIA3 also enables you to list all the faults detected, computer by computer, and to carry out various tests and checks relating to the faults detected. A fault is the result of a failure of a computer, a wiring harness or a sensor, etc. 1.
-
Page 139: Basic Diagnostic Process — Diagnostic Charts
Manuel d’utilisation LEXIA3 6.7.4 Basic diagnostic process — Diagnostic charts To identify the causes of a particular fault, LEXIA3 allows you to display the diagnostic charts, which ask a series of questions that you answer, based on your observations (visual, audio) and/or on various measured values (voltage, resistance). 1.
-
Page 140: Basic Diagnostic Process — Value Measurement
LEXIA3 User Guide 6.7.5 Basic diagnostic process — Value measurement To complete the diagnostic analysis, LEXIA3 allows you to measure values that are directly controlled by the computer. This data provides information concerning the dynamic characteristics of the vehicle. 1. Run the General Test on the vehicle concerned (see Section 6.7.1). 2.
-
Page 141: Basic Diagnostic Process — Diagrams
Manuel d’utilisation LEXIA3 6.7.6 Basic diagnostic process — Diagrams Your LEXIA3 contains much information on CITROËN vehicle mechanics/electrics and the computers. To consult the technical documentation for the vehicle concerned, press F3. Electrical diagrams available for consultation include the circuit diagram, the wiring diagram and the layout.
-
Page 142: Guided Diagnostic Process
LEXIA3 User Guide 6.7.7 Guided diagnostic process With the increasing complexity of vehicles, certain situations can become increasingly delicate. For this reason, LEXIA3 provides a guided diagnostic facility. To obtain information corresponding to the fault symptoms described by the customer, you enter the customer’s observations, concerning the fault symptoms, into the system.
-
Page 143
Manuel d’utilisation LEXIA3 When these various elements have been entered, you can display the relationship between the vehicle mechanical/electrical systems concerned. Thus, LEXIA3 displays the links existing between the computers of the vehicle concerned, in chart format. This function is part of the core system and will help you identify the systems involved in the observed problem, and the computer types causing the fault, based on the customer’s description. -
Page 144: Using Teleassistance Between Lexia3 Applications
LEXIA3 User Guide 6.8 Using Teleassistance between LEXIA3 applications LEXIA3 enables you to share and exchange your experience. You can: • either give precedence to the remote facilities offered by your system (after contacting another technical expert or your assistance facility), so that certain operations can be carried out «…
-
Page 145: Teleassistance Menu
Manuel d’utilisation LEXIA3 6.8.2 Teleassistance menu • Case 1: Trainee mode — You want to be assisted by a colleague or technical expert from an assistance facility. Select Wait for connection to wait for a connection with the person who will assist you.
-
Page 146
LEXIA3 User Guide The screens below are displayed, successively: • Press the confirm key to continue. 142 — Using the LEXIA3 package -… -
Page 147
Manuel d’utilisation LEXIA3 • Press the Connection key to connect to Internet. • The connection is made. 2. PCAnywhere is run automatically in Wait for connection mode. PCAnywhere is run as a background task, and waits for the call from the master (colleague or technical expert). -
Page 148
LEXIA3 User Guide • You have to give this number to your colleague, or to the technical expert, by telephone. • Confirm. • Then go back to the LEXIA3 main menu. An icon indicates that a Teleassistance session is active. 5. -
Page 149: Master Mode — Call To A Remote Lexia3
Manuel d’utilisation LEXIA3 6.8.4 Master mode — Call to a remote LEXIA3 When you have selected Call remote system, in the Teleassistance menu, LEXIA3 performs the following actions: 1. Entry of Teleassistance reference of the colleague that you are assisting (trainee).
-
Page 150
LEXIA3 User Guide • Press the Connection key to connect to Internet. • The connection is made. 146 — Using the LEXIA3 package -… -
Page 151
Manuel d’utilisation LEXIA3 3. PCAnywhere is run automatically. PCAnywhere calls your colleague (trainee), using the Teleassistance reference entered. www.autokmfactory.com 4. Teleassistance session. When the connection is made, PCAnywhere displays your colleague’s (trainee’s) screen. 5. End of Teleassistance session Press F4 on your PC Tablet to terminate the Teleassistance session from your colleague’s LEXIA3. -
Page 152
LEXIA3 User Guide 148 — Using the LEXIA3 package -… -
Page 153: Utilisation Precautions
LEXIA3 User Guide 7. Utilisation precautions This PC Tablet is for professional use only, and must only be used in compliance with the ACTIA instructions given below. 7.1 Environment • The system may be used in ambient temperatures between 0°C and +45°C.
-
Page 154: Batteries
• Do not open the battery. • Do charge the battery outside LEXIA3. 7.5 Replacing the internal battery Use only a battery supplied by ACTIA customer support. To replace the PC Tablet internal battery, proceed as follows: 1. The PC Tablet must be switched off.
-
Page 155: Road Test
LEXIA3 User Guide 7.6 Road test • The road test must not be conducted by the vehicle driver. The test operator must be a passenger. • Never place the PC Tablette on an Airbag position. The Airbag function may be activated. 7.7 Sofware recommendations We recommend that no software be installed other than that supplied with LEXIA3 or by AUTOMOBILES CITROËN.
-
Page 156
LEXIA3 User Guide 152 — Utilisation precaution -… -
Page 157: Customer Support
•Technical assistance concerning the installation or utilisation of peripherals other than those recommended by ACTIA and/or AUTOMOBILES CITROËN (for example, installing a printer or modem that is not in the ACTIA catalogue). •Technical assistance concerning the installation or utilisation of software not distributed by ACTIA and/or AUTOMOBILES CITROËN.
-
Page 158
LEXIA3 User Guide CUSTOMER SUPPORT INDEPENDENT OPERATORS Address Telephone ACTIA MULLER Services LEXIA HOTLINE (33) 02-37-33-42-36 5 rue de la Taye (33) 02-37-33-42-12 28110 LUCE GARAGE EQUIPMENT HOTLINE (33) 02-37-33-42-13 LASER HOTLINE (33) 02-37-33-42-17 ACTIA U.K. (44) 168-662-1067 (44) 168-662-1068… -
Page 159
TACT (972) 893-614-77 (972) 893-633-08 Kiryat Weizmann Rabin Park Openhaimer 7st 76000 REHOVOT CUSTOMER SUPPORT CITROEN APPROVED NETWORK Address Telephone ACTIA MULLER Services LEXIA HOTLINE (33) 02-37-33-42-36 5 rue de la Taye (33) 02-37-33-42-12 28110 LUCE GARAGE EQUIPMENT HOTLINE (33) 02-37-33-42-13… -
Page 160
Pav. 10 Parque Industrial de Armés 2715 TERRUGEM SNT G.E.S. (32) 25-829-474 (32) 25-824-202 Eikveldstraat 1A B1742 TERNAT ACTIA INC (1) 817-571-0435 3233 USTIC Woods Dr. BEDFORD, TEXAS 76021 AUTO-ELEKTRIKA NOVAK (385) 406-458-61 (385) 406-481-20 T. Ujevica 29 HR — 40323 PRELOG… -
Page 161
CUSTOMER SUPPORT CITROEN APPROVED NETWORK FORMULA 1 (40) 092-398-133 (40) 094-336-450 Street Lucaci, Nb44, 1 Floor Apt. 5, Sector 3 BUCAREST ACTIA DO BRASIL (55) 513-358-02000 (55) 513-337-6081 Av. Sao Paulo, 555 90230-161 PORTO ALEGRE — RS INDUSTRIALES TELME (54) (1) 755-2811 (54) (1) 755-2811 Calle 48 N°1327 V. -
Page 162
LEXIA3 User Guide 158 — Customer support -… -
Page 163: Appendices
LEXIA3 User Guide 9. Appendices 9.1 LEXIA3 consumable part numbers The following are available from your local agent or Customer Support : Item AY14400043 2 touch pad light pens for PC Tablet FUJI ST41XX AY14400034 Screen protection films for PC Tablet FUJI ST4120 AY30030000 Standard battery for PC Tablet FUJI ST41XX…
-
Page 164: Lexia3 Available Option Part Numbers
9.2 LEXIA3 available option part numbers All the options described in this technical documentation can be obtained from your local agent or from Customer Support, under the following part numbers: PR P/N ACTIA P/N Item 9972 RC CITROËN communication interface for LEXIA3 9972 RH CITROËN communication interface for LEXIA2…
-
Page 165: Faq — Before Contacting Your Hotline
LEXIA3 User Guide 9.3 FAQ — Before contacting your HotLine PC TABLET: PC Tablet does not start up • Check battery charge level. • If battery charge low, connect an external power supply. • Check external power present and properly connected. Battery does not operate properly (short endurance) •…
-
Page 166
LEXIA3 User Guide I am unable to measure current. • Check the 10 A fuse. If it is defective, replace it by another of the same type and rating. CONTROLLED TERMINAL BOX 2: When I attempt to use the 252-way controlled terminal box. •… -
Page 167
LEXIA3 User Guide DVD: I cannot access the contents of a CD-ROM or a DVD-ROM. • Check the USB connection with the PC Tablet or the common connector (HUB). • If using with a common connector (HUB), check that the common connector (HUB) is operating properly. -
Page 168: Useful Tips And Shortcuts
LEXIA3 User Guide 9.4 Useful tips and shortcuts 9.4.1 Virtual keyboard To open the virtual keyboard, click on the keyboard icon, on the right of the Start button. To close the virtual keyboard, click on the cross, top-right in the Tablet PC Input Panel window.
-
Page 169: Calibrating The Light Pen
LEXIA3 User Guide To move the virtual keyboard using the light pen. 1. Point the light pen onto the blue part of the keyboard (top bar) without lifting the light pen. 2. Drag the virtual keyboard. 3. Drop at the required position 9.4.2 Calibrating the light pen This configuration enables you to properly configure your light pen in relation to your PC Tablet.
-
Page 170
LEXIA3 User Guide 2. Select the option PC Tablet and light pen parameters (Paramètres du Tablet PC et du stylet). 3. Press the Calibrate (Calibrer) button. 166 — Appendices -… -
Page 171
LEXIA3 User Guide 4. Touch the light pen in the centre of each target (indicated by the symbol +) and click on OK when calibrated. w w w . a u t o k m f a c t o r y . c o m 5.
Table of Contents for Actia LEXIA3 EXPERT:
-
LEXIA3 User Guide 44 — EXPERT Pack & CHRONO Pack — EXPERT Pack & CHRONO Pack Installing the modem To install the modem: 1. Place the modem in the rear compartment of the trolley. 2. Run the telephone cable out through the specific hole and connect it to the telephone socket.
-
LEXIA3 User Guide — Appendices — 163 Appendices DVD : I cannot access the contents of a CD-ROM or a DVD-ROM. • Check the USB connection with the PC Tablet or the common connector (HUB). • If using with a common connector (HUB), check that the common connector (HUB) is operating properly. • Check the external power supply. • Check that the button is set to ON .
-
LEXIA3 User Guide 162 — Appendices — Annexes Appendices I am unable to measure current. • Check the 10 A fuse. If it is defective, replace it by another of the same type and rating . CONTROLLED TERMINAL BOX 2: When I attempt to use the 252-way controlled terminal box. • Check that the indicator on the 252-way controlled terminal box is lit up. • Check the connections on the physical measurement i
-
Manuel d’utilisation LEXIA3 — Using the LEXIA3 package — 143 Using the LEXIA3 package • Press the Connection key to connect to Internet. • The connection is made. 2. PCAnywhere is run automatically in Wait for connection mode . PCAnywhere is run as a background task, and waits for the call from the master (colleague or technical expert). The icon is visible in the tool bar. 3. Request Teleassistance reference . When the connection is made, LEXIA3 automatically interrogates the Internet provider server, to obtain the reference assigned to the Teleassista
-
LEXIA3 User Guide 34 — EXPERT Pack & CHRONO Pack — EXPERT Pack & CHRONO Pack Starting up To start up the common connector (HUB), proceed as follows: 1. Supply power to the common connector (HUB). 2. Connect the USB cable between the common connector (HUB) and the PC Tablet (which must be switched on). 3. Various Info bubbles appear on the screen, to indicate that the common connector (HUB) has been recognised by the PC Tablet. To close these Info bubbles , use the light pen to press on the cross
-
LEXIA3 User Guide — EXPERT Pack & CHRONO Pack — 33 EXPERT Pack & CHRONO Pack Common connector (HUB) labels The following labels are available: ∙ • PC Tablet • DVD • KEYBOARD • MOUSE • MODEM • ICC for the CITROËN Communication Interface • BBP2 for the 252-way Controlled Terminal Box • MEASURE fore the Physical Measurement Interface • PRINTER You have to bond these labels in their appropriate positions.
-
LEXIA3 User Guide 122 — Using the LEXIA3 package — Using the LEXIA3 package 3. The software is then run and configured. 4. When you use your LEXIA3 package for the first time, to enable us to provide the best possible service (Customer Support, Hotline, etc.), you should register your software. To register your pack, you need to contact your local agent, to obtain an activation code. Your LEXIA3 package will only be operational when your activation code has been registered. 5. The main diagnostic screen is d
-
LEXIA3 User Guide — Options — 93 Options 2. Connect the power supply. Both indicators must be lit up. 3. Connect the measuring cables. • To measure current values: • To measure voltage or impedance: and
-
LEXIA3 User Guide 158 — Customer support — Customer support
-
LEXIA3 User Guide 68 — MOBILE Pack & LIGHT Pack — EXPERT Pack & CHRONO Pack MOBILE Pack & LIGHT Pack 4. Select the Regional Options tab. 5. In the Standards and Formats section, select the language corresponding to the numerical, currency and date/time formats required. 6. In the Location section, select the place where your PC Tablet is being used. Do not press OK or Apply — a restart will be prompted. 7. Then select
-
Manuel d’utilisation LEXIA3 — Using the LEXIA3 package — 121 Using the LEXIA3 package 6. Using the LEXIA3 package 6.1 Running the LEXIA3 diagnostic package Preliminary operation Your CITROËN Communication Interface must already be connected. The LEXIA3 software detects the presence of this element, and will generate an error message if the software is not detected. 1. Your PC Tablet must be powered up. 2. The LEXIA3 diagnostic application can be run in two ways, either: From the
-
LEXIA3 User Guide — EXPERT Pack & CHRONO Pack — 51 EXPERT Pack & CHRONO Pack Testing the Internet connection When you have configured your Internet connection, it will be necessary to restart your PC Tablet. To test your Internet connection, proceed as follows: 1. Enter the address of a Web site (for example: www.actia.com). The remote connection dialogue box then appears. 2. Press Connection (Connexion). The connection is made and the Web site home page is opened. You can now browse the site. Your Internet connection is prop
Questions, Opinions and Exploitation Impressions:
You can ask a question, express your opinion or share our experience of Actia LEXIA3 EXPERT device using right now.
Сохраняйте свою конфигурацию через «печать» в правом верхнем углу(сохраняйти на внешний носитель файлы для последующего чтения), а то потом сами не будите знать, чего где и как восстанавливать надо, если что.
Все приведённые тут настройки, даны как пример и не в коем случае не являются шаблоном для повторения.
В этой теме не ищут владельцев Лексий, их ищут в другом месте!
За подобные вопросы в данной теме будут раздаваться «награды».
Термины используемые при изменении параметров в ДиагБоксе
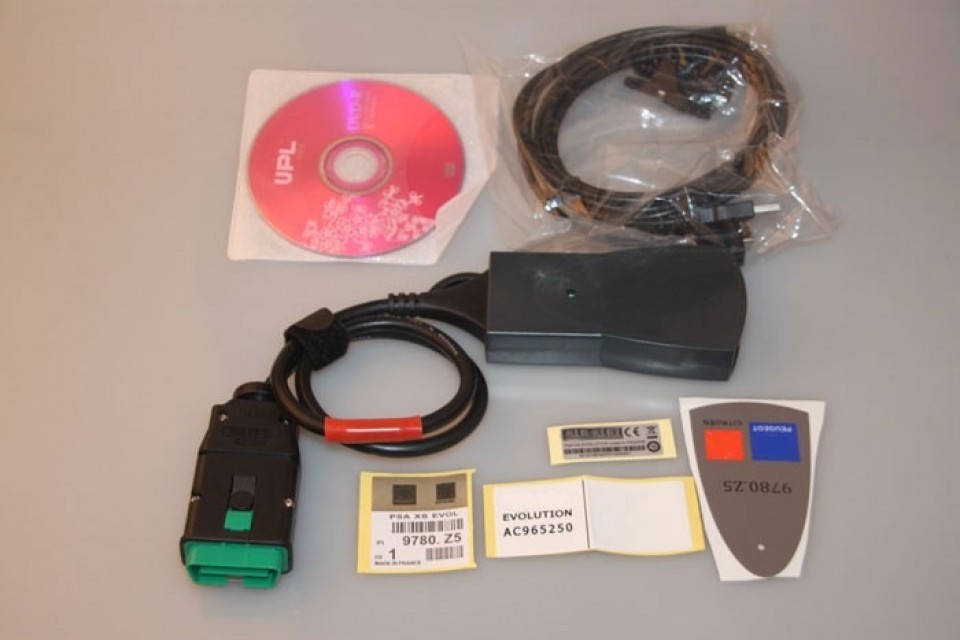
Единственное верное и полное название сканера — PSA XS Evolution, который работает с программным обеспечением:
. Lexia для автомобилей Citroen;
. Peugeot Planet 2000 для автомобилей Peugeot;
. PSA Diagbox — это новая программа, которая является оболочкой для Lexia и PP2000.
Однако в массах закрепилось название сканера Lexia 3.
Работы производятся при помощи специального программно-аппаратного комплекса, состоящего из специального оборудования (аналогу дилерского, стоящего в районе $50-100, если покупать в Китае), и ПО — DiagBox, или как его называют «в народе» — Лексия (собственно раньше ПО так и называлось, и было именно для Ситроена, для Пежо было PP2000, но сейчас ПО общее для всех моделей концерна, и носит название DiagBox).
Скачать само ПО и почитать о возможных нюансах при установке можно
здесь
.
Яндекс Диск
, и отдельные файлы, кому это надо на
Яндекс Диск
Обновления
от другого «производителя».
источник
Само оборудование бывает FullChip (дороже) и обычное. Разница в количестве распаянных на плате элементов. В принципе работают оба варианта, но фуллчип считается более надежным, менее глючным, и менее привередливым к качеству питания (в частности версии НЕфуллчип рекомендуется использовать на ноутбуках только при питании от аккумулятора, БЕЗ подключения шнура питания).
Так же есть версии (неважно фуллчип или нет) B и C. Опять же, работают обе, но версия C — более современна, по идее должна позволять работать с более широким спектром машин (включая самые новейшие). На нашей машине версия B (если шнурок сам по себе не глючный) тоже работает.
Какую версию нужно взять? Ответ здесь (начало чуть выше, продолжение чуть ниже)
Что такое Lexia, DiagBox можно развёрнуто почерпнуть у наших соседей:
Разъяснения новичкам про Lexia, DiagBox
Все, что вы делаете — вы делаете на свой страх и риск. Делай бэкапы всех пунктов прежде чем что либо менять!
Форум за ваши действия никакой ответственности не несет.
Если Вы не уверены в последствиях и своих знаниях и навыках — значит не делайте!
Готовые образы раз и два виртуальной машины и развернутой Лексии.
При импорте виртуалки не ставьте галочку регенерировать МАК
Руководство по использованию DiagBox (Lexia)
Вопрос: как в ДиагБоксе посмотреть содержание вкладки «Отчеты» (по результатам диагностики)? Ответ.
Решение возможных проблем с активацией DiagBox (плюс сообщение ниже, по этой ссылке).
Результаты тестов версий DB на зависание телекодировки на русском языке.
А здесь есть скриншоты с ДиагБокса (Лексия), чтобы в оффлайне поискать что где:
Интеллектуальный Сервисный Модуль (СМ) BSI2010
Меню «Калькулятор двигателя V46_21» и Меню «Сервисный модуль двигателя BSM_2010»
Автомобильный радиоприёмник RD5L3
Индикатор EMF_С_UDS
Индикатор EMF_A_UDS (Display A) и RD5L1
Меню «Телематика»
Инструкции:
Прописывание ключей в автомобиль
Что вообще можно активировать и вкратце — как это делать:
(зависит от комплектации)
Плюсить в репу за скрины — Technics66, Totosha.
Официальный DiagBox 9
Скачать можно
тут
Как купить жетон
Последний раз редактировалось Technics66 30 мар 2016, 12:53, всего редактировалось 2 раза.
Мое доп. оборудование: ГУ RoadNav S100 + камера ЗВ Roadnav CP6457 + WiFi COMFAST CF-WU720N; Focal ISS 165 (фронт) на усилке DLS XM20 + JBL CS-6 (тыл) от ГУ; парктроник Parkmaster 4-XJ-51; светодиодные ДХО + световодные фонари в крышке багажника.
В данной публикации будут аккумулироваться все проверенные ссылки на диагностические адаптеры Lexia 3 с Китая (сайт aliexpress). Существует 2 реферанса «B» и «С». Для большинства авто подойдет первый вариант, он же самый дешевый и позволяет диагностировать машины до 2010 г.в. Рекомендую покупать именно «B», ведь смена реферанса возможна через прошивку, обычно ценник в районе 1000 руб.
Проверенные продавцы на aliexpress

Набор программ, для работы с диагностикой
Самой свежей программой для диагностики является Diagbox. Но данная программа настолько большая, что работать с ней на слабеньких компьютерах одни нервы.
Скачать Diagbox v7.66 (виртуальная машина VirtualBox)
Самой легкой и распространенной программой диагностики является Peugeot Planet 2000. Ее скорость работы раз в 10 превосходит Diagbox, поэтому, если вам нужно быстро продиагностировать свой авто или перекодировать один из блоков (к примеру активация AUX), эта программа для вас!
Скачать Peugeot Planet 2000 (виртуальная машина VirtualBox)
Инструкция:
Добавьте страницу в избранное, информация будет добавляться и обновляться.

Спасибо Олегу (Oleg_klm) за ссылку. Думаю многим будет интересно.
Оригинал — vtsautomonitoring-ru.wikidot.com/wiki:datacapture
Снятие диагностических данных
Снятие диагностических данных — один из самых важных элементов использования системы VTS Автомониторинг.
Если данные сняты правильно, система работает гораздо эффективнее и выдаёт более точные оценки и графики.
ВНИМАНИЕ! Перед снятием данных запомните текущий пробег машины, он может понадобиться при экспорте данных.
Для снятия диагностических данных выполните следующие шаги:
Для вашей диагностической системы и машины приведенные шаги могут отличаться!
1. Подключите устройство Lexia к USB-порту компьютера и к дигностическому разъёму машины и запустите приложение DiagBox, включите зажигание машины
2. Выберите вашего автопроизводителя и модель, в данном примере рассмотрен Citroen C4
3. Убедитесь, что система правильно распознала вашу машину

Это общее руководство по эксплуатации описывает основные функции диагностического прибора DiagBox. Данное руководство пользователя подходит к любой из марок автомобилей Peugeot или Citroën. Настоятельно рекомендуем внимательно прочитать это руководство, прежде чем использовать данный прибор.
С о д е р ж а н и е
Установка и запуск 2
Описание интерфейса «человек-машина» 3
Диспетчерская панель 3
– Верхняя часть 3
– Разворачивающаяся панель 4
– Панель вкладок 5
Вход в программу 7
Выдача автомобиля владельцу 9
Поиск неисправностей 10
Техническое обслуживание 10
режим диагностики 10
Управляемый диагностический режим 10
– Этап навигации 10
– Выбор объекта (процесс диагностики) 11
– Процесс диагностики 13
Режим диагностики «Эксперт» 14
– Общая проверка 14
– Меню электронного блока управления 15
– ЖОШ (Журнал ошибок) 15
– Измерения параметров и измерения параметров в виде графиков 16
дополнительные вкладки 18
Панель быстрого доступа 21
При возникновении трудностей 22
Установка и запуск
Программное обеспечение DiagBox совместимо с оборудованием, поставляемым компаниями ACTIA и SPX с 2007 года, а также компанией PSA с 2009 года.
DiagBox работает только на сертифицированных приборах систем PPS, Lexia3 и Proxia3, которые продаются с 2007 года.
• Если у Вас уже есть прибор, установка DiagBox производится с помощью установочного DVD-диска, который предназначен для Вашей страны.
• Если Вы заказываете новый прибор, он поступит с предустановленным программным обеспечением.
Запуск DiagBox осуществляется щелчком на значке DiagBox, который находится на панели задач.
Во время первого запуска DiagBox прибор потребует произвести активацию. Для этого необходимо подключить прибор к интернету и ввести код активации.
код активации соответствует коду RRDI торговой точки.
за более подробной информацией обратитесь к инструкции по установке.
Описание интерфейса «человек-машина»
Программа имеет неизменяемую область, которую Вы видите в любой момент работы. Она расположена в верхней части экрана и называется диспетчерской панелью.
Вторая часть программы меняется в зависимости от вида использования и выбираемых операций.
Диспетчерская панель состоит из трёх элементов. Первые два из них (верхняя часть
и разворачивающаяся панель) доступны в разных видах:


Панель вкладок даёт возможность просматривать различные функции программы. Доступные вкладки отображаются в зависимости от выбранной операции и вида запуска. Ниже приведена вкладка после выбора автомобиля и операции «поиск неисправностей».


вхОд в прОграмму
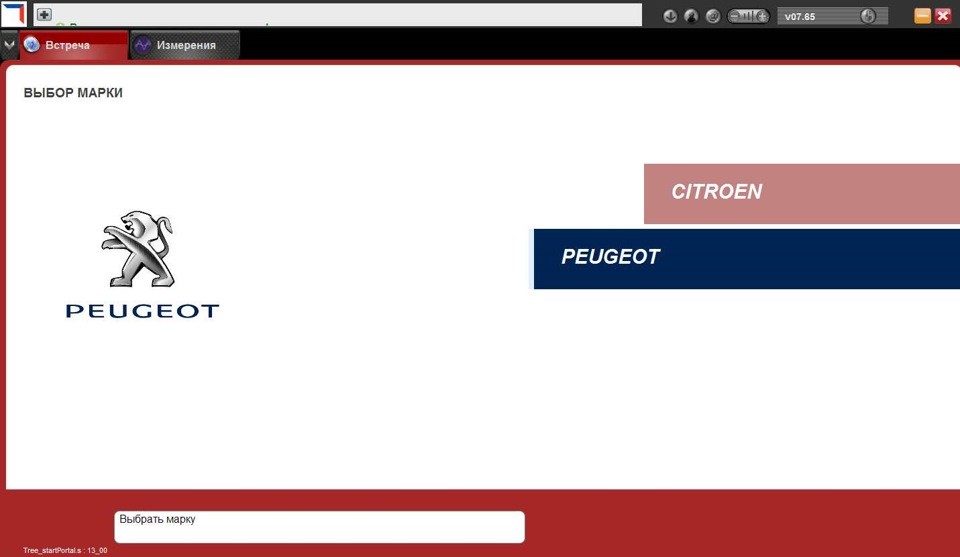
Первый экран позволяет выбрать модель автомобиля.
Если это необходимо, то второе окно предложит уточнить модификацию автомобиля.
после выбора модели. Считывается доступная информация об автомобиле, например, код VIN и пробег.
Если автоматическое определение кода VIN не произошло, окно предложит пользователю ввести данные вручную.
DiagBox – это программное обеспечение, которое всегда используется при запуске, каким бы ни был тип автомобиля, нуждающегося в диагностике. В случае, если автомобиль старый и не включён в новое программное обеспечение, при входе в программу
DiagBox следует запустить старое программное обеспечение (PP2000 или Lexia).
В этом случае программа предложит Вам выбор операций, которые могут быть осуществлены на таком автомобиле.


Это меню выбора операции «поиск неисправностей» более подробно описано в руководстве по эксплуатации далее.
После выбора операции «поиск неисправностей» автоматически запускается общая проверка, после чего становятся доступны две следующие вкладки: «Диагностика» и «Эксперт».
проверка подключения к интернету и идентификация проводятся во время общей проверки. Наличие работающей вкладки «Диагностика» зависит от результата этой проверки.
В этом случае приложение предложит начать с режима «диагностика» в соответствии с рекомендациями процесса поиска ошибок. Тем не менее, в любое время можно работать в других вкладках, в том числе в режиме «эксперт».

Это меню позволит пользователю получить
доступ к трём следующим функциям:
– Подготовка нового автомобиля.
– Проверка состояния заряда
– Операции, выполненные в меню для
дополнительного оборудования, позволяют
обновлять данные о конфигурации машины
в центральных системах производителя
(замена шин, включение/выключение
функции системы контроля давления в
Выбор этого меню запустит общую
проверку (без считывания кодов
неисправностей), результат которой будет
Выбор ЭБУ в указанном списке откроет доступ к «Ремонтному пакету»,
который предложит, в соответствии с конкретным ЭБУ, следующие
Это меню объединяет различные доступные операции ремонта для ЭБУ и его исполнительных устройств. Среди этих операций чистка, замена деталей, обкатка и т. д.
Функция автоматического дистанционного кодирования запускается только при работающем подключении к интернету. В случае необходимости она дополняется этапом ручного перезапуска.
При отсутствии подключения к интернету функция дистанционного кодирования запускается вручную.
Функция дистанционной загрузки через интернет запускается только при работающем подключении к интернету.
При отсутствии подключения к интернету дистанционная загрузка ЭБУ невозможна, и появится следующее сообщение: «Для доступа к функции дистанционной загрузки Вы должны быть подключены к интернету».примечание : доступ к этим операциям осуществляется также в режиме «Эксперт».
Это меню позволяет пользователю устранять неисправность с помощью управляемого режима «Диагностика» или режима «Эксперт». Эти два режима представлены в двух различных вкладках, а режим «Диагностика» доступен только в случае работающего подключения к интернету.
Это меню позволит пользователю получить доступ к трём следующим функциям:
– Проверка состояния заряда аккумуляторной батареи.
При выборе пользователем операции «поиск неисправностей» программа предложит два диагностических режима. Ниже Вы найдёте более подробную информацию о возможностях, предлагаемых этими двумя режимами.
Управляемый диагностический режим
Если Вы идентифицированы и подключены к интернету, то после общей проверки система автоматически переходит на вкладку «диагностика» и входит в управляемый режим диагностики. Доступ к методикам диагностики начинается с выбора области, затем одной или нескольких подобластей и, наконец, жалобы владельца. Общее замечание: в некоторых окнах имеются значки, дающие доступ к документации.
Далее описано два вида значков:


– выбор объекта (процесс диагностики)
Процедура диагностики осуществляется в четыре этапа, которые следует проводить в рекомендованном порядке:
– предварительная диагностика: этот этап позволяет понять природу проблемы и обращает Ваше внимание на базовые моменты проверки перед более подробной диагностикой.
– собственно процесс диагностики: прибор позволит Вам быстро найти решение, если неисправность регистрировалась ранее на Вашем автомобиле.
– процесс определения кодов ошибок: прибор позволяет провести проверку для диагностирования нарушений работы, которые выявляются одним или несколькими кодами ошибок, присутствующими в автомобиле.
– процесс определения симптомов: прибор позволяет провести проверку для диагностирования жалоб владельца, которые относятся процессу диагностики.
примечание: не существует единого процесса диагностики, связанного с каждым из вышеупомянутых этапов.
– Описание навигационных опций экрана:


При выборе объекта диагностики открывается доступ к вкладке «Установить условия». Это окно даёт информацию о том, какие проверки должны быть проведены и при каких условиях (например, при работающем двигателе).
Следуя этим инструкциям и подтвердив введённую информацию, Вы получаете доступ к окнам проверки. Используйте кнопки в поле подтверждения для выполнения различных этапов процесса диагностики. примечание: ход процесса диагностики может быть свободно прерван в любой момент (например, щелчком на кнопке возврата или на одной из цветных областей, выделенных кругом).
примечание:в окне проверки существует несколько типов текстов: обычные сообщения, замечания, предупреждения и сообщения, обязательные к исполнению. Также можно увидеть изображения, технические характеристики, ссылки на документацию (блок-схемы и т. п.).
Такие элементы, как считывание ошибок, измерения параметров, тестирование исполнительных механизмов и дистанционное кодирование, имеют возможность подключаться к уже текущему процессу диагностики.


Окончание процесса диагностики
Если пользователь провёл диагностику, не прерывая процесса, то существует два возможных результата:
– Неисправность определена (совпадение параметров): сообщается результат диагностики, и сеанс завершается.
– Неисправности не найдены: пользователь может выбрать новый объект для диагностики или завершить сеанс.
В обоих случаях, если сеанс завершён, откроется отчёт об его окончании. примечание: также будет предложено удалить ошибки из памяти при необходимости.
Режим диагностики «эксперт»
Во вкладке режима «Эксперт» Вы найдёте общую проверку для каждого ЭБУ, функции связи/ремонт ЭБУ (идентификация, считывание ошибок, измерение параметров, тестирование исполнительных механизмов, дистанционное кодирование/дистанционная загрузка и т. д.).
Общая проверка запускается автоматически после того, как выбрана операция «поиск неисправностей» или «ремонт». Она позволяет
идентифицировать присутствующие в автомобиле ЭБУ и связанные с ними неисправности.
Общая проверка представлена следующими функциями. Каждый объект ЭБУ состоит из 3 уровней: ЭБУ, неисправности и описание неисправности.
ЭБУ может быть определён для каждой функции. Для того чтобы перейти к меню ЭБУ, выделите его и щёлкните на зелёной галочке ().
Чтобы получить доступ к свойствам ошибки и обстоятельствам её появления, нужно щёлкнуть на значке слева от ошибки. : эта пиктограмма означает, что ЭБУ обнаружено в системах автомобиля, но не обнаружено во вспомогательном программируемом блоке.


Благодаря функциональности разворачивающейся панели вкладки «Общая проверка» результат общей проверки может быть показан в любой момент, начиная с того момента, когда проверка была запущена (клавиша быстрого доступа «F1» – см. рисунок на странице 4).- меню электронного блока управления
Меню ЭБУ запускается, если щёлкнуть на кнопке подтверждения в окне общей проверки ( – см. рисунок на странице 14). В зависимости от выбранного ЭБУ и выбранной операции у Вас будет доступ к большему или меньшему числу функций, таким как идентификация, считывание и удаление ошибок, измерения параметров, тестирование исполнительных механизмов, ремонтный пакет.- ЖОш (Журнал ошибок)
Если автомобиль оборудован вспомогательным программируемым блоком (ВПБ) с функцией «Журнал ошибок», то эта функция будет доступна через окно общей проверки во вкладке «эксперт». Этот журнал эквивалентен отчёту, в котором регистрируются каждое событие и обстоятельства, происходящие во время различных собственных проверок ВПБ.

Вы можете получить к нему доступ из окна общей проверки, выбрав специальную кнопку в нижней части. Кроме того, через боковую панель, щёлкнув на «Журнал ошибок», Вы сможете просмотреть всплывающее окно с результатами журнала ошибок, прочитанного ранее.
В таблицу внесены все события, связанные с неисправностями, то есть появления (красная стрелка) и исчезновения (зелёная стрелка) ошибок, а также условия этих событий.
Когда число ошибок становится значительным, то список делится на части (см. кнопки и для перехода от одной части к другой).Имеется также возможность изменения фильтра журнала ошибок. По умолчанию журнал ошибок сортируется в обратном хронологическом порядке. Но можно упорядочить список в хронологическом порядке, отфильтровать его по количеству событий, по выбранным ошибкам и т. п.

– измерения параметров и измерения параметров в виде графиков
Эта функция позволяет узнать в реальном времени состояние параметров, относящихся к выбранному ЭБУ.
Доступ к меню для измерения параметров виде графиков и стандартных измерений параметров осуществляется через меню «Эксперт».


Кнопка «Пауза» служит для того, чтобы приостановить измерения.Графическое представление измеренных параметров возможно для параметров ЭБУ.

Сохранить график измерений можно, открыв закладку «Отчёты»
Открывает доступ к информации и документам, которые представлены на различных информационных сайтах компаний Peugeot и Citroлn.
Вы можете открыть вкладку, щёлкнув на или нажав «F5». Содержание вкладки разделено на 3 части, как показано на рисунке рядом.
Две верхние части проверяют наличие документов или доступных сайтов документации.
Слева () указаны документы, относящиеся к автомобилю, документация сортируется по номеру VIN автомобиля во время сессии. Речь идёт о таких документах, как электрические схемы и ремонтная документация.
Справа () находятся ссылки на общую документацию. Здесь Вы найдёте доступ к таким сайтам как: Citroлn Service/Service Box, Carnet de poche.
Нижняя часть () содержит историю документов, которую можно просматривать в DiagBox. Щёлкните на одной из ссылок, чтобы открыть документ.
примечание: вкладка «Документация» появляется во время включения прибора при работе в режиме с одной маркой автомобиля или после выбора марки при работе с двумя марками.измерения
Вкладка «Измерения» позволяет в любой момент проводить с помощью Вашего диагностического прибора физические измерения. Карты измерения PPS, Lexia3 и Proxia 3 совместимы с DiagBox.


Щелчком на вкладке
«Отчёты» или нажатием клавиши «F7», Вы можете перейти к отчётам, которые подготовлены в различных сеансах.
Идентифицировать сеанс можно по типу автомобиля, его коду VIN, времени проведения сеанса.
Каждый сеанс содержит по меньшей мере отчёт о навигации.
Поиск может выполняться по типу () : •
отчёт о навигации
• отчёт об измерениях параметров
• отчёт о ремонте
• отчёт о подготовке нового автомобиля
• отчёт о физических измерениях
• отчёт об операциях записи
• отчёт о диагностике
• отчёт журнала ошибок
Отчёт о навигации создаётся в момент идентификации автомобиля и заканчивается по завершении сеанса (выбор нового автомобиля или закрытие программы DiagBox). Сохраняются все операции, произведённые во время сеанса : выдача автомобиля владельцу, поиск неисправностей (жалобы владельца и узлы, вероятно вызвавшие неисправность), техническое обслуживание, ремонт.


в случае возникновения проблем
Если возникнут какие-либо проблемы, то следует перейти в меню «техническая поддержка» разворачивающейся панели. Там находится опция EmailDiag. Ответ службы технической поддержки поступит в самые короткие сроки. Тем не менее отправка обычной почты также может решить проблему.внимание: Вы обязательно должны быть подключены к интернету, чтобы отправка сообщения состоялась!См. соответствующие замечания для получения более подробной информации относительно запроса технической поддержки.