
-
Contents
-
Table of Contents
-
Bookmarks
Quick Links
Related Manuals for Lexicon MPX 550
Summary of Contents for Lexicon MPX 550
-
Page 2: Important Safety Instructions
• Do not attempt to service the unit yourself as opening or removing covers may expose you to dangerous voltage, and will void the Limited Warranty. Only a qualified technician or an authorized lexicon distributor should perform servicing. • To prevent electric shock, do not remove the grounding plug on the power cord, or use any plug or extension cord that does not have a grounding plug provided.
-
Page 3
Fax 781-280-0499 (Service) This document should not be construed as a commitment on the part of Lexicon, Inc. The information it contains is subject to change without notice. Lexicon, Inc. assumes no responsibility for errors that may appear within this document. -
Page 4: Table Of Contents
Informações Importantes ao usuário..xiv Section 1: Getting Started About the MPX 550 ……1-2 Highlights Front Panel Overview .
-
Page 5
MPX 550 Section 3: System Mode System Mode Functions ….. 3-2 Parameters • MIDI Dumps • Restore Default Commands Section 4: Program Descriptions Single Programs. -
Page 6: Us Important Safety Instructions
Vorhandensein nicht isolierter gefährlicher Spannung im Gerät. Diese Spannung kann so hoch sein, dass das Risiko eines Stromschlags besteht. ü Dieses Dreieck, welches auf Ihrem Bauteil angebracht ist, macht Sie auf wichtige Betriebs- und Wartungshinweise in diesen Hinweisen aufmerksam. Lexicon DEUTSCH Diese…
-
Page 7: Es Instrucciones De Seguridad Importantes
MPX 550 ESPAÑOL INSTRUCCIONES DE SEGURIDAD IMPORTANTES Guarde esta instrucciones para uso posterior. • Utilice siempre el voltaje correcto. Diríjase a las instrucciones de operación del fabricante para obtener las especificaciones de potencia. Esté al tanto de que voltajes de operación distintos requieren el uso de cables y/o enchufes distintos.
-
Page 8: It Importanti Norme Di Sicurezza
Este triângulo que se aparece em seu componente o alerta à presença de uninsulated, voltagem perigosa dentro do enclosure — voltage que pode ser suficiente para constituir um risco de choque. Este triângulo que se aparece em seu componente o alerta a operando importantes e instruções de manutenção nesta literatura acompanhante. Lexicon…
-
Page 9: Dk Vigtig Information Om Sikkerhed
MPX 550 DANSK VIGTIG INFORMATION OM SIKKERHED Gem denne vejledning til senere brug. • Følg alle anvisninger og advarsler på apparatet. • Apparatet skal altid tilsluttes den korrekte spænding. Der henvises til brugsanvisningen, der indeholder specifikationer for strømforsyning. Der gøres opmærksom på, at ved varierende driftsspændinger kan det blive nødvendigt at bruge andre lednings- og/eller…
-
Page 10: No Viktig Informasjon Om Sikkerhet
Denna triangel, som visas på din komponent, varnar dig om en oisolerad farlig spänning inne i enheten. Denna spänning är eventuellt så hög att fara för elstöt föreligger. Denna triangel, som visas på din komponent, anger att viktiga bruksanvisningar och serviceanvisningar ingår i dokumentationen i fråga. Lexicon SVENSKA…
-
Page 11: Us Important User Information
MPX 550 Important User Information Lexicon is pleased to present its user guides on CD-ROM. By utilizing CD-ROM technology we are able to provide our documentation in multiple languages. The printed edition of the user guide is in English only.
-
Page 12: De Wichtige Benutzerinformation
Introduction Wichtige Benutzerinformation Lexicon ist erfreut, seine Benutzerhandbücher nun auch auf CD-ROM vorlegen zu können. Durch den Einsatz von CD-ROM-Technologie können wir unsere Dokumentation in verschiedenen Sprachen zur Verfügung stellen. Die gedruckte Ausgabe des Benutzerhandbuchs ist nur in englischer Sprache verfügbar. Die beigelegte CD-ROM enthält das Benutzerhandbuch in verschiedenen…
-
Page 13: Es Información Importante Para El Usuario
MPX 550 Información importante para el usuario Lexicon se complace en presentar sus manuales de usuario en CD-ROM. Gracias a la utilización de la tecnología de CD-ROM, nosotros podemos ofrecer nuestra documentación en múltiples idiomas. La edición impresa del manual del usuario sólo está…
-
Page 14: Fr Important — Informations Utilisateur
Prenez le temps de lire les informations relatives à la sécurité. Pour obtenir de plus amples informations sur Lexicon, Inc., nos produits et notre service clientèle, consultez notre site web à l’adresse : www.lexicon.com. Contenu de l’emballage et inspection Après avoir ouvert l’emballage, conservez-le pour tout…
-
Page 15: It Importanti Informazioni Per L’utente
MPX 550 Importanti informazioni per l’utente Lexicon è lieta di presentare i propri manuali su CD- ROM. Utilizzando la tecnologia su CD-ROM siamo stati capaci offrire la nostra documentazione in più lingue. L’edizione stampata del manuale è solamente in inglese.
-
Page 16: Pt Informações Importantes Ao Usuário
Introduction Informações Importantes ao usuário A Lexicon tem o prazer de apresentar o Guia do Usuário em CD-ROM. Através da tecnologia CD-ROM temos a possibilidade de fornecer nossa documentação em vários idiomas. A versão impressa do Guia do Usuário está apenas em Inglês.
-
Page 17
About the MPX 550 ……..1-2 Highlights Front Panel Overview . -
Page 18: About The Mpx 550
Getting Started ABOUT THE MPX 550 Thank you for purchasing the MPX 550 Dual Channel Processor, featuring Lexicon’s proprietary Lexichip®. The MPX 550 is a true stereo, dual-channel processor with 24-bit internal processing, analog-to-digital conversion, and digital-to-analog conversion. It offers 255 presets with classic Lexicon reverb, including Tremolo, Rotary, Chorus, Flange, Pitch, Detune, 5.5…
-
Page 19: Highlights
MPX 550 HIGHLIGHTS • Lexicon’s proprietary Lexichip • World-class Lexicon reverb • 24-bit internal processing • 24-bit analog-to-digital conversion • 255 presets • 64 user programs • Mastering Dynamics algorithm • Large, graphic front panel display • Four EDIT knobs for simple parameter adjustment •…
-
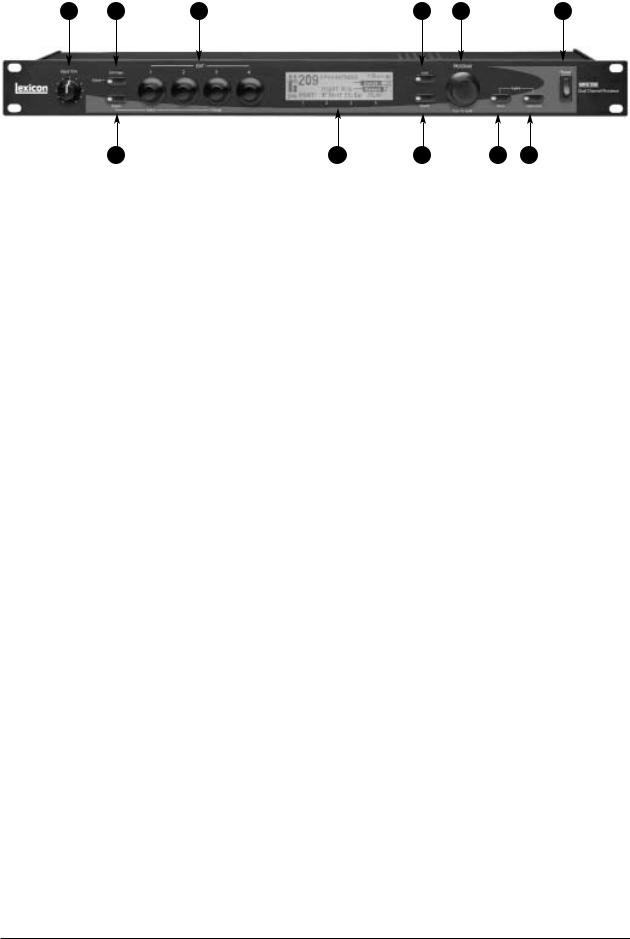
Page 20: Front Panel Overview
3. System Toggles between activating and deactivating System Mode. When System Mode is activated, EDIT knob 1 selects parameters; EDIT knob 3 changes the setting of the selected parameter. (See Section 3 for more information about System Mode.) Lexicon…
-
Page 21
MPX 550 4. EDIT Knobs Adjust parameters. Numbers 1 to 4 correspond to numbers 1 to 4 beneath the front panel display. 5. Front Panel Display Indicates information about the current program. (See page 1-6 for more information about the front panel display). -
Page 22: Front Panel Display
It is also calibrated in 2dB increments per pixel. 2. Input/OVL Indicator Reflects the input type in normal operation. The first letter indicates input type, which is selected with the System Mode parameter Input Source (see page 3-4). Lexicon…
-
Page 23
MPX 550 «S» stands for stereo, «L» stands for mono left, «R» stands for mono right, and «D» stands for digital. «NoD» appears when digital input is selected, but no valid digital audio signal is present. The number after the letter indicates the sample rate (44.1 or 48kHz). -
Page 24: Rear Panel Overview
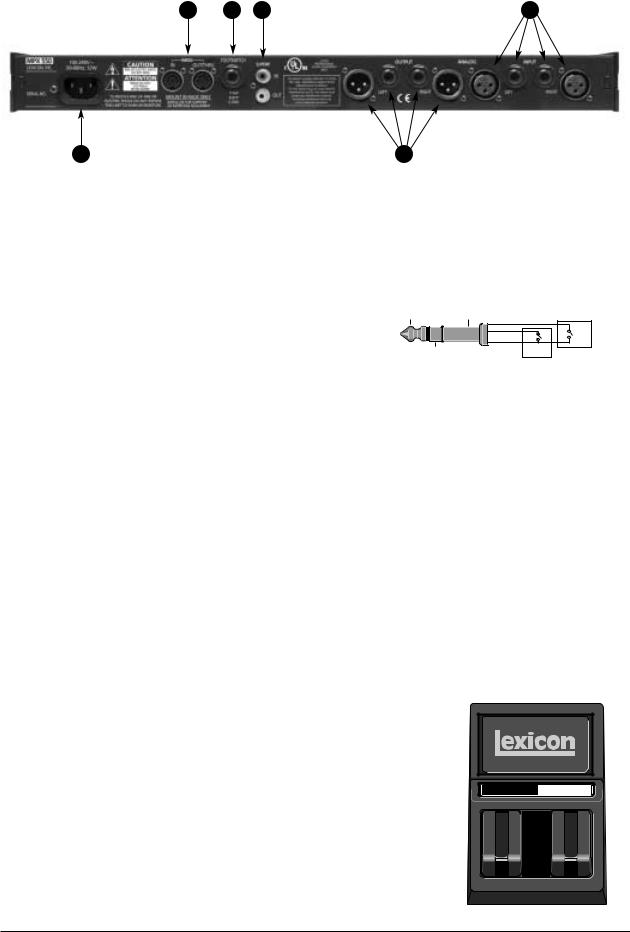
MIDI IN and software-selectable MIDI OUT/THRU. 3. FOOTSWITCH Allows footswitch control of front panel Bypass and Tap functions. A 1/4 inch Tip/Ring/Sleeve connector and a momentary contact footswitch are available. (See page 1-10 for more information.) Ring Lexicon Sleeve Ring Sleeve Bypass…
-
Page 25
MPX 550 4. S/PDIF IN and OUT Provide digital audio input and output. Two RCA S/PDIF connectors are available. The unit accepts inputs at 44.1 or 48kHz. 5. ANALOG OUTPUTs Provide analog audio output. Balanced outputs are available on either XLR or 1/4 inch Tip/Ring/Sleeve connectors. -
Page 26: Connecting The Unit
Getting Started CONNECTING THE UNIT The INPUT and OUTPUT connectors on the MPX 550 are 1/4 inch Tip/Ring/Sleeve and XLR sockets. Either may be used. Connections should be made utilizing high-quality shielded cables. The MPX 550 produces effects from either mono or stereo sources.
-
Page 27
Getting Started MPX 550 TYPICAL CONNECTIONS TO A CONSOLE LEFT Out RIGHT Out LEFT In RIGHT In Aux Send 1 Aux Send 2 1-11… -
Page 28: Setting Audio Levels
System Mode. Output Level, the first System Mode parameter, will be displayed. 2. Turn EDIT knob 3 to set the Output Level parameter. Unity gain for a +4dBu input device should be -12dB. 3. Press the System button again to deactivate System Mode. Lexicon…
-
Page 29: Basic Operation
Basic Operation Selecting and Loading Programs ……2-2 Editing Programs ……..2-3 The “Adjust”…
-
Page 30: Section 2: Basic Operation
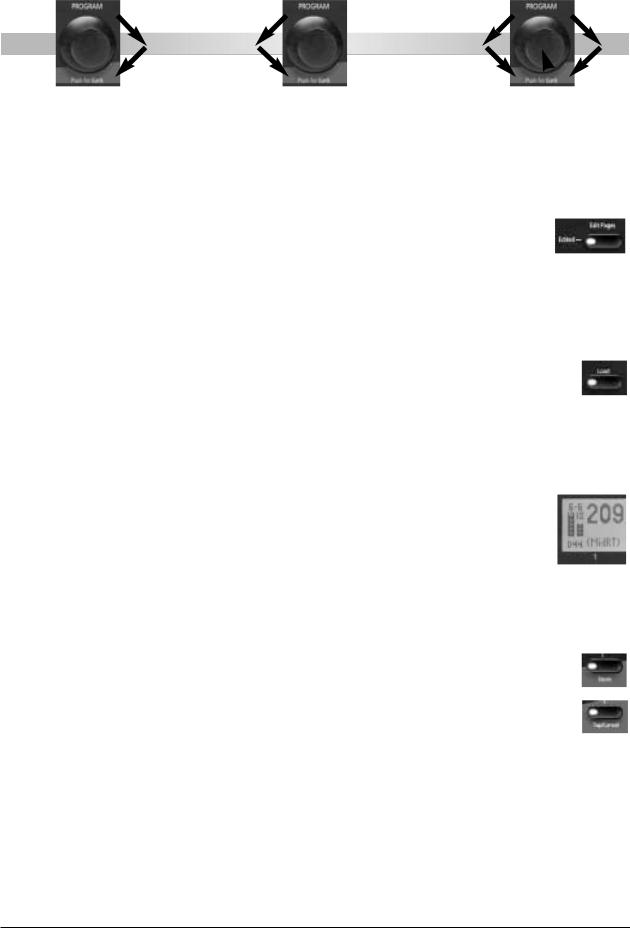
3/4 second after the PROGRAM knob stops turning. To do this, set the System Mode parameter Auto Load to Enabled (see page 3-7). Turn the PROGRAM knob counterclockwise to cycle backward through all programs. Lexicon Press and turn the PROGRAM knob to select a program bank.
-
Page 31: Editing Programs
MPX 550 EDITING PROGRAMS Each program features up to 20 parameters, which are organized into Edit Pages with as many as four parameters each. Press the front panel Edit Pages button to cycle through available Edit Pages for the loaded program.
-
Page 32: Storing Programs
Basic Operation STORING PROGRAMS The User Bank contains no programs when the MPX 550 is shipped. However, it includes 64 memory locations available for storing user-modified programs. To store a program: 1. Press the Store button. The Store and Tap/Cancel LEDs will light to indicate that the store function is armed.
-
Page 33: The Compressor
MPX 550 THE COMPRESSOR The compressor is available in all programs, except Dynamics. (Dynamics uses a different compression mechanism, explained on page 4-33.) The compressor sits in the wet component of the signal in front of the effects in the loaded program. It is controlled with four…
-
Page 34: Tap Tempo
2. Still holding the Tap/Cancel button, play two short notes in rhythm. 3. Release the Tap/Cancel button. The message «Knob 3 to change» will appear at the top of the front panel display to indicate that EDIT knob 3 is now available to adjust tempo. Lexicon…
-
Page 35: Bypass
MPX 550 4. If desired, turn EDIT knob 3 to further adjust tempo in bpm (beats per minute). 5. Press the Tap/Cancel button to exit this mode. Audio tap is a must for live performances. It offers a simple method of setting delay times and modulation rates to match the music.
-
Page 36: System Mode Functions
System Mode System Mode Functions ……. 3-2 Parameters • MIDI Dumps • Restore Default Commands…
-
Page 37
S/PDIF Digital Clock Source Internal 44.1kHz* Internal 48kHz External (S/PDIF) Digital Output Processed* Mix Mode Program* Global Bypass Mode Dry* Full Mute Input Mute Program Load Mode Bypass Dry* Full Mute Tempo Mode Program* Global Compressor Mode Program* Global Lexicon… -
Page 38
MPX 550 Parameter Settings MIDI Patches Enabled* Disabled MIDI Channel 1* to 16 Omni MIDI Program Change Enabled* Disabled R1-MPX1 MIDI Clock In Enabled* Disabled MIDI Out/Thru Out* Thru Operating Mode Normal* Demo Locked Memory Protect Enabled Disabled* Auto Load… -
Page 39
S/PDIF input signal, even if an analog source is used. «NoD» will appear in the lower-left corner of the front panel display if no valid digital input signal is present to utilize for the external clock. Clock Source parameter Lexicon will… -
Page 40
MPX 550 Digital Output Selects the source for the digital output. When set to Processed, the digital output is the same as the analog outputs. Its mix level will reflect the current setting of the Mix parameter. When set to Dry, the digital output is the input. -
Page 41
Disabled, the unit ignores Learned Patches, preventing accidental changes. MIDI Channel Selects the MIDI Channel for MPX 550 messages. When set to Off, the unit ignores messages sent on all MIDI channels. When set within a range of 1 to 16, the unit responds to messages sent on the selected MIDI channel. -
Page 42
MPX 550 • The front panel PROGRAM knob is still available for selecting user programs only. Programs stored in the User Bank are still available, but cannot be modified. • The System Mode parameter Auto Load is set to Enabled. -
Page 43: Midi Dumps
Dump System Data Executes a MIDI Dump of all System Mode settings and Learned Patches. Press the front panel Store button to execute the dump. When dumped back, the System Mode settings and Learned Patches will take effect immediately. Lexicon…
-
Page 44
System Mode MPX 550 RESTORE DEFAULT COMMANDS Clear User Bank Arms a procedure to erase the contents of the User Bank. Press the front panel Store button to execute this procedure and return the User Bank to its factory-default condition. This procedure cannot be executed when a User program is running or when the System Mode parameter Memory Protect is set to Enabled. -
Page 45
Single Programs ……..4-2 Plate •… -
Page 46: Single Programs
Plate Programs Small Plate Medium Plate springs. Large Plate Tap PreDelay Tape Slap Rich Plate Large&Bright VocalPlate Drum Plate Lexicon «Adjust» (Livenes) – (Livenes) – (Livenes) – (MidRT) PreDelay (1/32 Note) (ips) –…
-
Page 47
MPX 550 GATE/INV Gated reverbs were created by feeding a reverb, such as a metal plate, through an analog gate device. Decay time was set to instant, while hold time varied duration and sound. The Gate programs provide a fairly constant sound with no decay until the reverb is cut off abruptly. -
Page 48
Program Descriptions HALL Lexicon’s Hall programs recreate the acoustics of actual places — from grand, reverberant enclosures to small concert halls. The clean reverberation of Hall programs is designed to add spaciousness without altering source material. In addition to general instrumental and vocal applications, the Hall programs give separately recorded tracks a sense of belonging to the same performance. -
Page 49
MPX 550 CHAMBER Historically, recording studio chambers were oddly shaped rooms with a loudspeaker and set of microphones to collect ambience in various parts of the room. Stereo Chamber programs produce even, relatively dimensionless reverberation with little color change as sound decays. -
Page 50
42 Small Amb (HighCut) 43 MidSizeAmb (HighCut) 44 Studio «D» (HighCut) 45 Bright Amb (Decay) 46 Dark Amb (Decay) 47 MarbleFoyer (Livenes) 48 Smooth Amb (Decay) 49 Guitar Amb (HighCut) Lexicon – – – – – – – – – –… -
Page 51
MPX 550 ROOM Room programs simulate actual rooms where there is a strong sense of being in a small, live place. These programs are useful on drums and percussion, and can also be applied to electric guitar tracks. Program Descriptions Room Programs «Adjust»… -
Page 52
Tremolo is essentially a rhythmic effect. Tremolo Programs «Adjust» 60 RectSine Tap (Phase) 61 Square Tap (Phase) 62 Sine TapTrpl (Phase) 63 Triangle (Phase) 64 Sawtooth (Phase) Lexicon Rate (1/8 Note) Rate (1/8 Note) Rate (1/4 Note) – –… -
Page 53
MPX 550 ROTARY Rotary speaker cabinets were designed to provide a majestic vibrato/choir effect for electronic theater and church organs. The most well-known rotary speaker is the Leslie™ Model 122, which has two counter-rotating elements: a high-frequency horn and a low-frequency drum with slow and fast speeds. -
Page 54
Chorus effects are also often combined with plates, echoes, and other reverb effects. The stereo Chorus programs, inherited from Lexicon’s PCM 80, create a rich, airy effect that simulates the sound of multiple sources from a single source. These programs are stunning on acoustic or clean electric guitar. -
Page 55
MPX 550 FLANGE Flange effects were originally created by simultaneously playing back identical programs on two tape recorders, then using hand pressure against the flange of the tape reels to slow down first one machine, then the other. The result was a series of changing phase cancellations and reinforcements, with characteristic swishing, tunneling, and fading sounds. -
Page 56
Set the Mix parameter to Wet to achieve the full effect of these programs. 4-12 Detune Programs «Adjust» 80 Detune Mild (Dtuning) 81 Detune (Dtuning) Med&Warm 82 Detune Heavy (Dtuning) 83 Det Xtreme (Dtuning) 84 Pitch Detune (Dtuning) Lexicon – – – – –… -
Page 57
MPX 550 PITCH Altering the pitch of a sound produces a wide range of effects — from subtle detuning, to harmonies, to chords. The stereo polyphonic Pitch programs can be used to shift program material or monophonic sources within a range of one octave up to two octaves down. -
Page 58
«Adjust» parameter determines the delay time. With all delay and echo effects, note the way the repeats fall rhythmically to the beat. The most effective delay and echo patterns are those that lock with the tempo of the music. Lexicon Delays Echoes… -
Page 59
MPX 550 In all delay programs and dual programs, the unit uses the MstrDly parameter to scale delay times that are not controlled by Tempo. In some programs, the «Adjust» parameter controls MstrDly. MstrDly can be set within a range of 0 to 100%. It is usually set to 100% in most presets. -
Page 60: Special Fx
(HighCut) (Dtuning) (Resnce) (HighCut) (Time) (Level) (Decay) (Decay) (Resnce) (Width) (Delay) (FeedBk) (Pitch) (FeedBk) (Diffusn) Lexicon – Speed (Whole Note) – Rate (Drum/Horn) Echo – – – – Delay Time Dly Time, Pan Rate – Delay Time (Whole Note) –…
-
Page 61: Stereo Stage
Stereo Stage provides stereo reverb while preserving the dry signal. To use this program, note the following: • Use the MPX 550 in line between the mixer and house amplifiers — not as an effect mixed back into the main left and right channels on the mixer.
-
Page 62: Dual Programs
The other effect (e.g. Delay) receives input from the right channel only and sends output to the right channel only. Cascade Mono Split Flange Delay Dual Mono Flange Flange Delay Delay Lexicon…
-
Page 63
MPX 550 EFX BAL The Efx Bal parameter controls the relative balance of each effect in the dual programs. In Cascade variations, the parameter also varies the amount of the first effect or dry signal fed into the second effect. -
Page 64
Triplet (1/8 Note) Delay Time (1/4 Note) – – Delay Time (1/4 Note) – Delay Time (1/4 Note) – Lexicon Routing Dual Stereo (Parallel) Dual Stereo (Parallel) Dual Stereo (Parallel) Dual Stereo (Parallel) Dual Stereo (Parallel) Dual Stereo (Parallel) Cascade… -
Page 65
MPX 550 PCH-DLY Pch-Dly Programs 130 5th Tap 131 8ve 3pl Tap 132 8ve 8+3plTap 133 3rd4thPong 134 4th5th Xfeed 135 5th6th Xfeed 136 8ve > Xfeed 137 5th > Xfeed 138 MajMin > Fbk 139 StepUp > Tap Dual Stereo (Parallel) -
Page 66
Delay Time (Time) – (Time) – (FeedBk) Delay Time (Time) – (FeedBk) Delay Time (Time) – Lexicon Routing Dual Stereo (Parallel) Dual Stereo (Parallel) Dual Stereo (Parallel) Dual Stereo (Parallel) Dual Stereo (Parallel) Dual Stereo (Parallel) Cascade Cascade Cascade Cascade Cascade… -
Page 67
MPX 550 DLY-RVB Dly-Rvb Programs 150 Tap Small 151 3plTap MidSz 152 8+3pl Large 153 Pong Small 154 Xfeed MidSz 155 Xfeed Large 156 Tap > Room 157 8+3pl >Large 158 Xfeed > Room 159 Xfeed >Large Dual Stereo (Parallel) -
Page 68
Speed (Whole Note) Speed (Whole Note) – – – – Speed (Whole Note) Speed (Whole Note) – – Lexicon Routing Dual Stereo (Parallel) Dual Stereo (Parallel) Dual Stereo (Parallel) Dual Stereo (Parallel) Dual Stereo (Parallel) Dual Stereo (Parallel) Cascade Cascade… -
Page 69
MPX 550 PCH-RVB Pch-Rvb Programs 170 3rd4th Room 171 4th5th Room 172 5th6th Room 173 8ve MidSiz 174 Power MidSiz 175 Detune Room 176 Fine > Small 177 Power >Large 178 4th > MidSiz 179 8ve > MidSz Dual Stereo (Parallel) -
Page 70
(MidRT) – (MidRT) – (MidRT) – (Livenes) – (Livenes) – (Livenes) – (MidRT) – Lexicon Routing Dual Stereo (Parallel) Dual Stereo (Parallel) Dual Stereo (Parallel) Dual Stereo (Parallel) Dual Stereo (Parallel) Dual Stereo (Parallel) Cascade Cascade Cascade Cascade Cascade Chorus… -
Page 71
MPX 550 MSPLIT DLY MSplit Dly Programs 190 Flng + Tap 191 Flng + Pong 192 Flng + Xfeed 193 Flng + Bnce 194 DeepFl + Dly 195 5th + Tap 196 8ve + 3plTap 197 4th5th+Xfeed 198 5th6th+Xfeed 199 PchFine +Tap… -
Page 72
(Livenes) – (Pitch) – (Pitch) – (MidRT) – (MidRT) – (Pitch) – (MidRT) – Lexicon Routing Mono Split Mono Split Mono Split Mono Split Mono Split Mono Split Mono Split Mono Split Mono Split Mono Split Mono Split Mono Split… -
Page 73
MPX 550 MSplit Rvb Programs 221 Chor1+ Large 222 Chor2+MidSiz 223 Chor2+ Large 224 Chor3+MidSiz Note: The Mono Split routing configuration is illustrated on page 4-18. «Adjust» (MidRT) – (MidRT) – (MidRT) – (MidRT) – Program Descriptions Routing Mono Split… -
Page 74
Speed (1/4 Note) Speed (Dotted 1/4 Note) Delay Time Delay Time Delay Time Delay Time Speed – – – – Lexicon Routing Dual Mono Dual Mono Dual Mono Dual Mono Dual Mono Dual Mono Dual Mono Dual Mono Dual Mono… -
Page 75: Cmprssr
MPX 550 CMPRSSR In all Cmprssr programs, the «Adjust» parameter controls gain within a range of 0 to 9.5dB. It can be used to match volume levels between the dry, bypassed, and compressed output obtained with typical music material. If the System Mode parameter Mix Mode is set to…
-
Page 76: Dynamics
The parameter setting defines the maximum increase in signal level due to expansion. Higher settings increase the level of expansion applied. Maximum expansion is applied to signals that rise well above the expansion threshold for longer than 50ms. Lexicon (-31 to 0dB) (0.0dB to 5.89dB)
-
Page 77
MPX 550 Meters Selects between gain reduction (GR) and input level (In) metering. (See page 4-35 for more information.) COMPRESSION Compression is used to lower the overall level of sound sources that rise above an adjustable compression threshold. Compression can be used to match the levels of louder sources to those of quieter sources. -
Page 78
Indicates output levels. The value indicates the maximum output level of the left or right channel, whichever is greater. The tick marks are placed in 3dB increments. The right most tick mark indicates 0dB or maximum output level. Lexicon (Off, Modern, Vintage) -
Page 79
MPX 550 2. Peak Expansion Meter Indicates the level of peaks above the peak expansion threshold. Low-level peaks are shown as one or two graduated bars. Slightly higher peaks of longer duration are shown as three graduated bars. High-level peaks are shown as three solid bars. -
Page 80: Live-Foh (Front Of House)
For Live-FOH presets: • Edit Page 1 contains the four most essential parameters for the first effect, and Edit Page 2 contains the four most essential parameters for the second effect. Non-essential parameters have been removed from the Edit Pages. Lexicon…
-
Page 81
MPX 550 • In the delay programs, two delay level controls have been combined into the «Adjust» parameter: (Tap/ Dly). These programs contain two delays. The first is controlled by tempo and generally used to create longer delays and echoes. The second is set manually with the Delay parameter, and can be used to create a «slap»… -
Page 82: Parameter Graphics
Parameter Descriptions Parameter Graphics……..5-2 Parameter Glossary ……..5-4…
-
Page 83
Parameter Descriptions PARAMETER GRAPHICS The MPX 550 features graphic enhancements for each parameter, which appear on the front panel display whenever a parameter setting is changed. These graphics illustrate the point at which the selected setting falls within the entire parameter range, and provide a visual indication of the parameter’s function. -
Page 84
Parameter Descriptions MPX 550 When the Mix parameter setting is changed, the graphics pictured below appear. When a delay parameter setting is changed, the graphics pictured below appear. When the Level parameter setting is changed, the graphics pictured below appear. -
Page 85
Controls the speed at which the compressor responds when input signals increase above threshold. CmpRatio Sets the ratio of gain reduction for input signals above threshold. Lexicon (-100 to +100%) (0.2 to 4.0x) (28Hz to 19.4kHz, off) (4 to 125msec) -
Page 86
MPX 550 CmpRels Controls the rate at which the compressor relaxes when compressed input signal levels fall. Decay (73ms to 19.61sec or 24ms to 6.53sec) Controls reverb time for mid frequency signals. In Ambience programs, Decay controls the length of the ambience «tail». -
Page 87
The range of these parameters is from -100% to 100%, with negative values producing a polarity reversal. High settings can cause signal overload. HF Rlloff Sets the high-frequency cutoff of a low-pass filter. Lexicon (100:0% to 0:100%) (0ms to 1.198sec) (-100 to 100%) (28Hz to 19.4kHz, off) -
Page 88
MPX 550 HighSlope and LowSlope Determine the shape of the reverb envelope for low frequencies. HighSlope and LowSlope are found only in the Gate/Inv programs. When LowSlope is set to 0, the level of low reverb remains unchanged over its duration, then cuts off abruptly. -
Page 89
Parameter Descriptions Mix controls the ratio of unprocessed (Dry) and processed (Wet) signal in the output. When the MPX 550 is patched into a console, this parameter should almost always be set to Wet. MstrRate In Rotary programs, serves as a master rate control affecting both the horn and drum rates. -
Page 90
MPX 550 R Dly 1, 2, 3 Sets the delay time of right voice 1, 2, or 3. The Dly/Eko effect has three independent voices on each side. Rate Controls modulation speeds. Res 1, 2 In Chorus programs, control the amount of feedback signal. -
Page 91
Controls the level above which signals are compressed. (0 to 255) Tune 1, 2 In Detune programs, determines the amount of detuning applied to voices 1 and 2. (0 to 100ms) Lexicon (0 to 100ms) (-32 to -0dB) (0 to 100%) -
Page 92
MPX 550 Wavform In Tremolo programs, determines volume modulation. Settings are defined as follows: Setting Description Sine Smooth modulation with polarity reversal. Rectified Smooth modulation with no polarity Sine reversal. Triangle Linear ramp up and down. Sawtooth Linear ramp up with sudden reduction. -
Page 93
MIDI Operation Learn Mode ……..6-2 MIDI Channel Assignment . -
Page 94: Learn Mode
Press the Store and Tap/Cancel buttons simultaneously to activate and deactivate Learn Mode. MIDI CHANNEL ASSIGNMENT A single, selectable MIDI channel is used for all MPX 550 messages. This channel can be assigned in System Mode with the MIDI Channel parameter. Note: A MIDI channel should be assigned before MIDI features are used.
-
Page 95: Program Change Messages
255 presets and 64 user programs. The unit conforms to the use of MIDI Continuous Controller 32 to execute Bank Select messages. MPX 550 program banks are ordered numerically from 0 to 27, beginning with the Plate Bank. (See the table at the right for additional bank numbers.)
-
Page 96: Continuous Controllers
The front panel display will indicate the current patch on the selected control. 3. Send the MIDI Program Change message to the MPX 550. The front panel display will indicate the new patch on the control, and «Stored» will appear briefly in the message area.
-
Page 97
MPX 550 2. Turn the desired EDIT knob or press the desired button on the front panel. The front panel display will indicate which control is selected, as well as the current controller range. 3. Select the desired controller using one of the following methods: A. -
Page 98: Midi Clock
Tempo. Connect a MIDI device that outputs MIDI Clock, such as the MPX R1 foot controller or a MIDI sequencer, to the MPX 550 MIDI IN connector to have the MPX 550 automatically recognize and begin to process MIDI Clock messages.
-
Page 99: Sysex Messages
MIDI Sysex messages can be used to access all algorithm parameters. More information about using this advanced feature with the MPX 550 and other Lexicon products is available at www.lexicon.com. The website offers instructions, sample messages, and a complete table of parameter Sysex addresses.
-
Page 100: Midi Implementation Chart
Pitch Blender Control Change Transmitted Recognized 1-16 Mode 2 X (Off=9n, v=0) Lexicon Remarks Selected in System Mode Used as controller Selected in System Mode Used as controller Learned 1 to 119 (0 to 32 used as Bank Select) Learned…
-
Page 101
16 to 127 ignored; Program Change messages 1 to 15 = Program Change messages 1 to 16 for selected program bank as applicable * Lexicon ID = 6; Product ID = 22 (decimal); Device ID = MIDI Channel 0 to15 = 1 to 16 Selectable… -
Page 102: Specifications
Appendix Specifications ……..A-2 Declaration of Conformity .
-
Page 103: Specifications
MIDI Interface Connectors IN, OUT/THRU Power Requirements 90 to 250V, 50 to 60Hz; 12.5W, 3-pin IEC connector Specifications are subject to change without notice. Lexicon Dimensions (W x H x D) Width 19 inches (483mm) Height 1.75 inches (45mm) Depth…
-
Page 104
Date: DECLARATION OF CONFORMITY 73/23/EEC, 89/336/EEC, and 93/68/EEC EN 55103-1, EN 55103-2, and EN 60065: 1998 Lexicon, Inc., 3 Oak Park, Bedford, MA 01730-1441 USA The equipment identified here conforms to the Directive(s) and Standard(s) specified above. Dual Channel Processor… -
Page 105
“Adjust” Parameter … . .2-3, 5-4 AC Input Connector ….1-8 Ambience Programs ….4-6 ANALOG INPUTs . -
Page 106
Mono Split Configuration …4-18 MPX 550, About the ..1-2 to 1-3 MSplit Dly Programs ..4-18, 4-27 MSplit Rvb Programs . -
Page 107
MPX 550 Output Levels, Setting … . .1-12 Outputs, Rear Panel ..1-8 to 1-11 OVL Indicator ….1-6 to 1-7 Parallel (Dual Stereo) Configuration . -
Page 108: Limited Warranty
Do not return the unit to Lexicon, Inc. without prior authorization. When Shipping a Product for Service . . .
-
Page 109
A Harman International Company Lexicon, Inc 3 Oak Park Bedford, MA 01730-1441 USA Tel 781-280-0300 Fax 781-280-0490 www.lexicon.com Customer Support Tel 781-280-0300 Fax 781-280-0495 (Sales) Fax 781-280-0499 (Service) Lexicon Part No. 070-14912 | Rev 1 | 02/02… -
Page 110
This card lists the dry tracks included on the CD-ROM enclosed with this user guide. A Harman International Company Percussion Bass Drum ….. .(0:30) Snare Drum 1 . -
Page 111
Voice Female Vocal 1 ….(0:43) Female Vocal 2 ….(0:56) Female Vocal 3 .
![]()
Lexicon MPX 550 Руководство пользователя
Двухканальный 24-битный процессор эффектов
Гарантийное обслуживание
По всем вопросам, связанным с ремонтом или сервисным обслуживанием двухканального 24-битного процессора эффектов MPX 550, обращайтесь к представителям фирмы Lexicon — компании A&T Trade. Телефон для справок (095) 242-5325.
Содержание
Правила безопасности . . . . . . . . . . . . . . . . . . . . . . . . . 3 Введение . . . . . . . . . . . . . . . . . . . . . . . . . . . . . . . . . . . 4
Краткие сведения . . . . . . . . . . . . . . . . . . . . . . . . . . . . . . . . . . . . . . . . . . . . . . . . . . . . . 4 Характеристики . . . . . . . . . . . . . . . . . . . . . . . . . . . . . . . . . . . . . . . . . . . . . . . . . . . . . . 4 Лицевая панель . . . . . . . . . . . . . . . . . . . . . . . . . . . . . . . . . . . . . . . . . . . . . . . . . . . . . . 5
Дисплей лицевой панели.
Тыльная панель . . . . . . . . . . . . . . . . . . . . . . . . . . . . . . . . . . . . . . . . . . . . . . . . . . . . . . 7 Коммутация прибора . . . . . . . . . . . . . . . . . . . . . . . . . . . . . . . . . . . . . . . . . . . . . . . . . . 7
Ножной переключатель. Типовая коммутация с консолью.
Регулировка уровней аудиосигнала . . . . . . . . . . . . . . . . . . . . . . . . . . . . . . . . . . . . . . . 8
Вход. Выход.
Основные режимы работы . . . . . . . . . . . . . . . . . . . . . 8
Выбор и загрузка программ . . . . . . . . . . . . . . . . . . . . . . . . . . . . . . . . . . . . . . . . . . . . . 8 Редакция программ . . . . . . . . . . . . . . . . . . . . . . . . . . . . . . . . . . . . . . . . . . . . . . . . . . . 9 Параметр “ADJUST” . . . . . . . . . . . . . . . . . . . . . . . . . . . . . . . . . . . . . . . . . . . . . . . . . . . 9 Сохранение программ. . . . . . . . . . . . . . . . . . . . . . . . . . . . . . . . . . . . . . . . . . . . . . . . . . 9 Компрессор . . . . . . . . . . . . . . . . . . . . . . . . . . . . . . . . . . . . . . . . . . . . . . . . . . . . . . . . . 10 Регулировка темпа (TAP TEMPO) . . . . . . . . . . . . . . . . . . . . . . . . . . . . . . . . . . . . . . . . 10
Смена ритма. Установка темпа от входного аудиосигнала. Параметр Global Tempo.
Режим обхода . . . . . . . . . . . . . . . . . . . . . . . . . . . . . . . . . . . . . . . . . . . . . . . . . . . . . . . 11
|
Lexicon MPX 550. Руководство пользователя |
1 |

Системный режим . . . . . . . . . . . . . . . . . . . . . . . . . . . 11
Функции системного режима. . . . . . . . . . . . . . . . . . . . . . . . . . . . . . . . . . . . . . . . . . . . 11 Параметры. . . . . . . . . . . . . . . . . . . . . . . . . . . . . . . . . . . . . . . . . . . . . . . . . . . . . . . . . . 12
MIDI-дампы. Инициализация.
Описание программ . . . . . . . . . . . . . . . . . . . . . . . . . . 15
Простые программы (SINGLE) . . . . . . . . . . . . . . . . . . . . . . . . . . . . . . . . . . . . . . . . . . . 15
PLATE. GATE/INV. HALL. CHAMBER. AMBIENCE. ROOM. TREMOLO. ROTARY. CHORUS. FLANGE. DETUNE. PITCH. DLY/EKO.
Специальные эффекты . . . . . . . . . . . . . . . . . . . . . . . . . . . . . . . . . . . . . . . . . . . . . . . . 20
STEREO STAGE.
Двойные программы (DOUBLE) . . . . . . . . . . . . . . . . . . . . . . . . . . . . . . . . . . . . . . . . . . 21
Параметр EFX BAL. FLNG-DLY. PCH-DLY. CHOR-DLY. DLY-RVB. FLNG-RVB. PCH-RVB. CHOR-RVB. MSPLIT DLY. MSPLIT RVB. DUAL MONO.
CMPRSSR . . . . . . . . . . . . . . . . . . . . . . . . . . . . . . . . . . . . . . . . . . . . . . . . . . . . . . . . . . . 26 DYNAMICS . . . . . . . . . . . . . . . . . . . . . . . . . . . . . . . . . . . . . . . . . . . . . . . . . . . . . . . . . . 26
Пиковый максимайзер (PEAK EXPANSION). Компрессия (COMPRESSION). Насыщение ленты (TAPE SATURATION). Измерители. Типовые установки DYNAMICS для мастеринга.
LIVEKFOH (FRONT OF HOUSE) . . . . . . . . . . . . . . . . . . . . . . . . . . . . . . . . . . . . . . . . . . . . 28
Описание параметров . . . . . . . . . . . . . . . . . . . . . . . . . 29
Графическое представление . . . . . . . . . . . . . . . . . . . . . . . . . . . . . . . . . . . . . . . . . . . . 29 Перечень параметров . . . . . . . . . . . . . . . . . . . . . . . . . . . . . . . . . . . . . . . . . . . . . . . . . 30
Работа с MIDI . . . . . . . . . . . . . . . . . . . . . . . . . . . . . . . 34
Режим LEARN . . . . . . . . . . . . . . . . . . . . . . . . . . . . . . . . . . . . . . . . . . . . . . . . . . . . . . . 34 Назначение MIDIKканала . . . . . . . . . . . . . . . . . . . . . . . . . . . . . . . . . . . . . . . . . . . . . . . 34 Сообщения Program Change. . . . . . . . . . . . . . . . . . . . . . . . . . . . . . . . . . . . . . . . . . . . . 34
Загрузка программ. Управление функциями Bypass или Tap.
Последовательные контроллеры . . . . . . . . . . . . . . . . . . . . . . . . . . . . . . . . . . . . . . . . 35 Сообщения формата MIDI Clock . . . . . . . . . . . . . . . . . . . . . . . . . . . . . . . . . . . . . . . . . . 36 MIDIKдампы . . . . . . . . . . . . . . . . . . . . . . . . . . . . . . . . . . . . . . . . . . . . . . . . . . . . . . . . . 36 Сообщения Sysex . . . . . . . . . . . . . . . . . . . . . . . . . . . . . . . . . . . . . . . . . . . . . . . . . . . . . 36 Таблица MIDIKсообщений . . . . . . . . . . . . . . . . . . . . . . . . . . . . . . . . . . . . . . . . . . . . . . 37
Приложения . . . . . . . . . . . . . . . . . . . . . . . . . . . . . . . . 38
Технические характеристики . . . . . . . . . . . . . . . . . . . . . . . . . . . . . . . . . . . . . . . . . . . 38 Треки CDKROM . . . . . . . . . . . . . . . . . . . . . . . . . . . . . . . . . . . . . . . . . . . . . . . . . . . . . . . 39
Дополнительная информация
В комплект поставки прибора входит CD-ROM с документацией на нескольких европейских языках в формате PDF, программы Adobe Acrobat Reader для PC и Macintosh, а также несколько демонстрационных аудиотреков. За дополнительной информацией обращайтесь на сайт www.lexicon.com.
|
2 |
Lexicon MPX 550. Руководство пользователя |

Правила безопасности
Выполняйте все нижеизложенные требования.
•Следуйте инструкциям и пометкам, имеющимся на корпусе прибора.
•Всегда следите за корректностью напряжения сети. Имейте в виду, что различные рабочие напряжения могут требовать отличающиеся друг от друга сетевые шнуры и/или переходники.
•При установке прибора в рэк, убедитесь в наличии отвода тепла от работающего прибора.
•Недопустимо блокирование или перекрытие отверстий в корпусе прибора, предназначенных для вентиляции. Недопустимо попадание жидкостей или любых объектов внутрь прибора.
•Недопустимо подключение выходов усилителя мощности к разъемам прибора.
•Недопустимо попадание прибора под дождь или эксплуатация в условиях высокой влажности.
•Пользуйтесь услугами только квалифицированного персонала при повреждении прибора вследствие падения или попадания жидкости внутрь корпуса прибора, а также при нарушениях нормальной работы прибора. Самостоятельное удаление кожуха прибора может привести к поражению электрическим током.
•Не пользуйтесь сетевыми шнурами и розетками с поврежденными элементами заземления.
•Не перегружайте сетевую розетку и силовые провода, поскольку это может привести к возгоранию или поражению электрическим током.
•Оберегайте сетевой шнур от повреждений и скручивания, особенно вблизи соединительных разъемов.
•Производите очистку прибора согласно требованиям производителя.
•Отключайте прибор от сети во время грозы или при длительном перерыве в эксплуатации.
•Не удаляйте защитный кожух устройства. Детали прибора, расположенные под кожухом шасси, находятся под опасным для жизни напряжением. Внутри прибора отсутствуют элементы, предназначенные для ремонта пользователем. В случае неисправности, обращайтесь в сервисную службу.
•Используйте только рекомендованные для прибора и места установки сетевой шнур и розетку с шиной заземления.
•Во избежание повреждений, производите замену предохранителей ТОЛЬКО на аналогичные, имеющие указанный на корпусе прибора или в руководстве тип и номинал.
Радиочастотная совместимость
Данное оборудование генерирует и в процессе функционирования использует высокочастотные сигналы. Таким образом, в случае несоблюдения правил его эксплуатации, прибор может вызвать помехи и сбои в работе радио и телевизионных систем. Тестовые испытания прибора подтвердили соответствие его параметров ограничениям класса B (Class B), предъявляемым к компьютерному оборудованию, в соответствии со спецификациями части 15 FCC Rules (эти нормы устанавливаются в целях предотвращения возникновения интерференции между приборами, использующимися для стационарных инсталляций). Тем не менее полной гарантии того, что в отдельных случаях не возникнет радиочастотных помех, нет. Для того, чтобы проверить
— генерирует ли данный прибор радио-частотные помехи, мешающие остальному оборудованию комплекса, попробуйте выключить и снова включить его. Если выяснилось, что прибор влияет на работу системы, то попробуйте предпринять следующие меры:
•переориентируйте принимающую антенну;
•поменяйте взаимное расположение компьютера и приемника или разнесите их на большее расстояние друг от друга;
•подключите компьютер и принимающее устройство к розеткам, расположенных в разных контурах.
Если это не помогло, то обратитесь за помощью к дилеру или квалифицированному специалисту.
Распаковка и проверка
Сохраняйте упаковочные материалы. Они могут пригодиться в дальнейшем при транспортировке прибора. Тщательно проверяйте прибор и упаковку — не содержат ли они видимых механических повреждений. Об обнаруженных дефектах немедленно проинформируйте компанию, отвечающую за доставку прибора. О выявленных в процессе эксплуатации прибора неполадках сообщите дилеру.
|
Lexicon MPX 550. Руководство пользователя |
3 |

Введение
Краткие сведения
Двухканальный процессор MPX 550 использует 24-битную внутреннюю обработку, имеет 24-битные АЦП и ЦАП. MPX 550 имеет 255 пресетов, среди которых программы классической реверберации Lexicon, а также эффекты Tremolo (тремоло), Rotary (эффект вращающихся динамиков), Chorus (хорус), Flange (флэнжер), Pitch (транспонирование), Detune (расстройка), 5.5-секундная задержка Delay, Echo (эхо) и Compression (компрессия). Двухканальный процесс позволяет обрабатывать сигнал двумя независимыми эффектами, включенными в одну из следующих конфигураций: Dual Stereo (параллельная), Cascade (каскадная), Mono Split (раздельная монофоническая) и Dual Mono (двойная монофоническая).
Большой графический дисплей обеспечивает отображение программ и системных установок. Программы организованы в 28 банков — 27 пресетных и 1 пользовательский. Регулятор PROGRAM переключает все имеющиеся программы или банки. В каждой программе имеются до 20 настраиваемых параметров, организованных в “страницы редакции”, каждая из которых содержит 4 параметра. Соответствующая кнопка переключает страницы редакции в выбранной программе. Процесс редакции упрощается благодаря наличию специальных регуляторов EDIT, соответствующих отображаемым параметрам, а также отдельному параметру “Adjust” каждой программы, позволяющему быстро настроить наиболее важный аспект звука. Часто он предоставляет одновременную регулировку нескольких параметров. Например, он управляет свойствами пространства во многих программах Chamber и Room одновременным изменением затухания, ранних отражений и эквализации.
Темп и частоту модуляции можно устанавливать с помощью синхронизирующих сообщений MIDI Clock, кнопки Tap/Cancel, входного аудиосигнала, двойного ножного переключателя, внешнего MIDI-контроллера или MIDI-сообщений Program Change. Режим Learn позволяет настраивать расположенные на лицевой панели регуляторы и кнопки Bypass и Tap/Cancel на управление от стандартных сообщений Program Change и последовательных контроллеров.
Характеристики
•Процессор Lexichip.
•Классическая реверберация Lexicon.
•24-битная внутренняя обработка.
•24-битные ÖÀÏ è ÀÖÏ.
•255 пресетов.
•64 пользовательские программы.
•Алгоритм Mastering Dynamics.
•Большой графический дисплей.
•Четыре регулятора EDIT для непосредственного управления параметрами.
•Вход и выход S/PDIF (могут конфигурироваться для конвертации входных/выходных сигналов).
•Симметричные аналоговые входы и выходы (1/4” и XLR).
•Параллельная работа аналогового и цифрового выходов.
•Независимая обработка каждого входа.
•Возможность создания двух независимых эффектов с 4 конфигурациями.
•Комбинированные двойные эффекты: Delay с Reverb; Delay или Reverb с Chorus, Flange или Pitch.
•Эффекты задержки, модуляции и высоты тона.
•Функция Tap Tempo для непосредственной установки времени задержки и скорости модуляции (может управляться ножным переключателем).
•Полное MIDI-управление.
•Универсальный переключаемый встроенный блок питания.
•Программно-переключаемый ïîðò MIDI OUT/THRU.
•Возможность выбора прямого сигнала или мьютирование аудиовыхода с помощью кнопки или ножного переключателя.
|
4 |
Lexicon MPX 550. Руководство пользователя |
Лицевая панель
|
1 |
2 |
4 |
6 |
8 |
11 |
|
3 |
5 |
7 |
9 |
10 |
1. Регулятор Input Trim
Устанавливает уровень аналогового входного сигнала.
2. Кнопка Edit Pages
Циклически переключает доступные страницы редакции выбранной программы. Горящий светодиод индицирует модифицированную и не сохраненную программу.
3. Кнопка System
Включает/отключает системный режим. При его включении, регулятор EDIT 1 выбирает параметры; регулятор EDIT 3 изменяет значение выбранного параметра.
4. Регуляторы EDIT
Настраивают параметры. Номера 1 — 4 соответствуют номерам 1 — 4 на дисплее.
5. Дисплей
Отображает информацию о текущей программе.
6. Кнопка Load
Загружает выбранную программу. Горящий светодиод индицирует готовность к загрузке следующей программы.
7. Кнопка Bypass
Мьютирует или направляет сигнал в обход эффекта, в зависимости от значения системного параметра Bypass Mode.
8. Регулятор PROGRAM
Перелистывает доступные программы, а при нажатии — банки программ.
9. Кнопка Store
Инициирует процедуру сохранения или режим MIDI Learn при нажатии совместно с кнопкой Tap.
10. Кнопка Tap/Cancel
Мигает в соответствии с темпом выбранной программы. Для установки темпа нажмите ее дважды. Для установки темпа в зависимости от уровня входного сигнала удерживайте эту кнопку нажатой. Для входа в режим MIDI Learn ее необходимо нажать вместе с кнопкой Store.
11. Выключатель Power
Включает/отключает питание прибора.
Дисплей лицевой панели
1. Измерители входного уровня
Отображают уровни входного сигнала. Они начинают индикацию при минимуме сигнала -48 дБ полной цифровой шкалы. Измерители отображаются в инверсном виде при перегрузке (-2 дБ полной цифровой
|
Lexicon MPX 550. Руководство пользователя |
5 |

|
3 |
4 |
7 |
|||
|
1 |
8 |
59
шкалы). При входных уровнях между этими крайними значениями, измерители имеют вид, как показано на рисунке. Измерители входного уровня показывают калиброванные значения, при 0 дБ равным цифровому насыщению. Метки соответствуют значениям -6, -18 и -32 дБ. Измерители имеют одноточечное разрешение, где каждая точка соответствует 2 дБ.
Цифровые источники со входа S/PDIF, имеющие максимальные уровни, приводят к периодическому появлению пиковых значений на измерителях. Однако, прибор только принимает максимальный выходной уровень источника, достаточно громкий для пиковых значений измерителя. При неискаженном входном сигнале — это не проблема.
Уменьшение уровня компрессором индицируется опускающейся линией между двумя измерителями входного уровня. Она также откалибрована с разрешением 2 дБ на точку.
2. Индикатор Input/OVL
Отображает тип входа в обычном режиме. Первая буква обозначает тип входа, выбранного параметром Input Source системного режима:.”S” — стерео, “L” — моно левый, “R” — моно правый и “D” — цифровой. При выборе цифрового входа и отсутствии на нем корректного сигнала, отображается “NoD”. Цифра после буквы индицирует частоту дискретизации (44.1 или 48 кГц).
Когда процессор находится в состоянии насыщения, в поле типа входа высвечивается “OVL”. Это сигнализирует о необходимости снизить входные уровни или глубину регенерации. “OVL” не индицирует перегрузки по входу.
3. Номер программы
Отображает номер загруженной программы. При готовности другой программы к загрузке, ее номер через малый промежуток времени отображается в инверсном виде под номером программы.
4. Имя программы
Отображает имя выбранной программы.
5. Имя банка
Отображает имя выбранного банка.
6. Регуляторы EDIT 1 — 4
Отображают функции регуляторов EDIT 1 — 4.
7. Òåìï
Отображает текущий темп, а также текущую установку параметра Tempo Mode системного режима — “P” для программы, “G” для общего. Если текущая программа не зависит от темпа, эта область дисплея пуста.
8. Конфигурация маршрутизации
Отображает конфигурацию выбранной программы.
9. Сообщения
Здесь отображается различная дополнительная информация, типа MIDI-активности, состояния обхода, состояния S/PDIF, и т.д. Если сообщения отсутствуют, эта область дисплея пуста.
|
6 |
Lexicon MPX 550. Руководство пользователя |
Тыльная панель
1. Сетевой разъем
Предназначен для подключения прилагаемого сетевого шнура.
2. Разъемы MIDI IN и MIDI OUT/THRU
Два 5-контактных разъема DIN: один из них используется, как вход MIDI IN, второй — программнопереключаемый выход MIDI OUT/THRU.
3. Разъем FOOTSWITCH
1/4” TRS для подключения ножного переключателя мгновенного срабатывания. Ножной переключатель позволяет дублировать функции кнопок Tap и Bypass.
|
Наконечник |
Корпус |
Наконечник |
|
|
Кольцо |
Tap |
||
|
Кольцо |
Корпус |
Bypass |
4. Разъемы S/PDIF IN и OUT
Цифровые вход и выход на разъемах RCA. Прибор поддерживает по входу частоты дискретизации 44.1 или 48 кГц.
5. Разъемы OUTPUT
Симметричные XLR или 1/4” TRS аналоговые выходы.
6. Разъемы INPUT
Симметричные XLR или 1/4” TRS аналоговые входы.
Коммутация прибора
Разъемы INPUT и OUTPUT на MPX 550 организованы на гнездах 1/4” TRS и XLR. Они полностью равноправны. Для приема и передачи аудиосигналов рекомендуется использовать высококачественные экранированные кабели.
Процессор MPX 550 может обрабатывать сигналы как монофонических, так и стереофонических источников звука. При обработке источника моно сигнала прямой сигнал присутствует на обоих выходах. Рекомендуется использовать выходы в стереофоническом режиме, независимо от того, в каком режиме используются входы. Однако, если необходимо снять моно сигнал, то используйте любой выход.
Ножной переключатель
Скоммутированный с расположенным на задней панели гнездом FOOTSWITCH, ножной переключатель позволяет дублировать функции кнопок Tap и Bypass. Можно использовать любой ножной переключатель моментального срабатывания. С процессором он соединяется при помощи 1/4” джека TRS. С помощью переходника (Y-разъема) можно скоммутировать с MPX 550 два одинарных переключателя.
Коммутацию необходимо завершить до того, как будет включено питание процессора. В противном случае будет включен режим Bypass.
|
Lexicon MPX 550. Руководство пользователя |
7 |

|
Типовая коммутация с консолью |
|||
|
LEFT Out |
RIGHT Out |
||
|
Ch7 |
Ch8 |
LEFT In |
RIGHT In |
|
Aux Send 1 |
|||
|
Aux Send 2 |
Регулировка уровней аудиосигнала
При включении питания рекомендуется придерживаться следующей последовательности: сначала включаются музыкальные инструменты и обработка, затем микшер и в последнюю очередь — усилители.
Вход
1.Загрузите программу 1.
2.Установите параметр Mix в Dry (страница редакции 1, регулятор EDIT 4).
3.Используя громкий аудиоматериал, начните с низкого входного уровня и медленно его увеличивайте.
4.При заметных на слух искажениях или при постоянных срабатываниях индикаторов перегрузки, уменьшите входной уровень до загорания индикаторов перегрузки только на пиках сигнала.
Регулятор Input Trim позволяет прибору работать с входными уровнями от +8 до +20 dBu. Минимальная установка (полностью против часовой стрелки) должна быть оптимальна для +4 dBu (симметричных) входов. Максимальная установка (полностью по часовой стрелке) должна быть оптимальна для -10 dBV (несимметричных) входов.
Выход
1.Нажмите кнопку System для активации системного режима. Отобразится первый параметр системного режима — Output Level.
2.Вращайте регулятор EDIT 3 для установки параметра Output Level. Единичное усиления для +4 dBu на входе прибора должно быть -12 äÁ.
3.Нажмите кнопку System еще раз для выхода из системного режима.
Основные режимы работы
Выбор и загрузка программ
При включении питания, прибор загружает последнюю загруженную в предыдущем сеансе работы программу. Для выбора другой программы вращайте регулятор PROGRAM лицевой панели. При вращении регулятора PROGRAM по часовой стрелке, прибор последовательно переключает вперед программы текущего банка, затем следующего банка и так далее. При вращении против часовой стрелки, прибор последовательно переключает программы текущего банка назад, затем предыдущего банка и так далее. При нажатии и вращении регулятора PROGRAM, прибор последовательно переключает банки программ.
Имя и номер выбранной программы отображается на дисплее. Светодиод Load загорается, индицируя готовность выбранной программы к загрузке. Через 4 секунды дисплей возвращается к
отображению имени и номера загруженной программы. Однако, светодиод Load остается гореть, индицируя постоянную готовность выбранной программы к загрузке. Номер этой программы отображается в инверсном
|
8 |
Lexicon MPX 550. Руководство пользователя |
Вращайте регулятор PROGRAM по часовой стрелке для циклического перебора всех программ по возрастанию
|
Вращайте регулятор PROGRAM против |
Нажмите и вращайте регулятор |
|
|
часовой стрелки для циклического |
||
|
PROGRAM для выбора банка программ |
||
|
перебора всех программ по убыванию |
||
виде под номером текущей загруженной программы. Для загрузки готовой программы нажмите кнопку Load лицевой панели.
Прибор может конфигурироваться под автоматическую загрузку программ через 3/4 секунды после прекращения вращения регулятора PROGRAM. Для этого, установите параметр Auto Load системного режима в Enabled.
Редакция программ
Каждая программа имеет до 20 параметров, организованных в страницы редакции, каждая из которых может содержать до 4 параметров. Страницы редакции загруженной программы последовательно переключаются кнопкой Edit Pages.
Параметры выбранной страницы редакции располагаются вдоль нижней границы дисплея. Цифра под каждым параметром соответствует номеру регулятора EDIT, управляющего значением данного параметра. При смене значения параметра, он отображается в инверсном виде на дисплее, и загорается светодиод Edit Pages, индицирующий модификацию программы. Светодиод гаснет при загрузке другой программы или сохранении модифицированной версии текущей программы.
При выборе другой программы до сохранения модифицированной, отредактированная версия отображается в качестве загруженной программы. Однако, светодиод Load будет гореть, индицируя готовность новой программы к загрузке.
Параметр “ADJUST”
Параметр “Adjust” имеет различные назначения для индивидуальных программ и в большинстве случаев управляет одновременно несколькими параметрами для полной редакции процесса. Например, он управляет свойствами пространства во многих программах Chamber и Room одновременным изменением затухания, ранних отражений и эквализации.
Параметр “Adjust” расположен на странице редакции 1 и управляется регулятором EDIT 1. Он отображается в скобках, например (MidRT), справа. При вращении регулятора EDIT 1, нижняя линия дисплея отображает более полное описание функции параметра в программе. Параметр “Adjust” является MIDI-совместимым в диапазоне значений от 0 до 127.
Сохранение программ
После редакции программы, все произведенные изменения параметров могут быть сохранены в одну из 64 позиций пользовательского банка.
Для сохранения программы:
1.Нажмите кнопку Store. Светодиоды кнопок Store и Tap/Cancel засветятся. Будет выбрана первая пустая позиция пользовательского банка.
Для выхода из режима без выполнения операции сохранения нажмите кнопку Tap/Cancel. Это может быть произведено в любой момент до выполнения операции сохранения.
2.Регулятором PROGRAM выберите одну из позиций пользовательского банка. Если выбранная позиция уже содержит программу, дисплей отобразит соответствующее сообщение.
3.Программа отобразится на дисплее с оригинальным именем и номером. При необходимости, регуляторами EDIT 1 и 3 измените имя программы.
4.Нажмите кнопку Store для сохранения программы в выбранную позицию. Дисплей быстро отобразит сообщение “Stored”. Светодиод Edit погаснет, а сохраненная вариация станет текущей программой.
При сохранении программы, не отключайте прибор до полного завершения операции. Это может привести к уничтожению всех ранее сохраненных программ.
|
Lexicon MPX 550. Руководство пользователя |
9 |

Компрессор
Компрессор доступен для всех программ, кроме Dynamics, где используется другой алгоритм компрессии. Компрессор ставится в цепь обработанного сигнала перед эффектами загруженной программы. Он управляется 4 параметрами: CmpRatio, Threshld, CmpAttk и CmpRels. Они находятся на последней странице редакции для каждой программы, кроме банка Cmprssr.
Параметр степени компрессии (CmpRatio) может принимать значения 1:1 (отключено), 2:1, 3:1, 4:1, 5:1 и 10:1. Параметр порога (Threshld) устанавливается в диапазоне от 0 до -32 дБ. Эти установки даются относительно уровня цифрового насыщения 0 dBFS. Компрессор не активируется при степени компрессии равной 1:1 или значении порога, более высокого, чем уровень входного сигнала.
Параметра атаки (CmpAttk) и спада (CmpRels) определяют быстроту реакции компрессора при изменении выходного уровня на 3 дБ от уровня входного сигнала. В большинстве случаев время отпускания должно превышать время атаки. При большом содержании низких частот увеличивайте данные параметры. Если скорость компрессора выше скорости изменения формы волны аудиосигнала, результат работы будет изменять ее, что может приводить к нежелательным аудиоэффектам. Например, 80 Гц имеет период 12 мс. Если это — основная компонента музыки, для наилучших результатов устанавливайте атаку и спад не менее 12 мс. Компрессор одновременно обрабатывает правый и левый каналы, используя их сумму в качестве уровня запуска.
Пресеты компрессии доступны в банке Cmprssr. Для других только компрессионных эффектов, направляйте выход компрессора на программу Dly/Eko с параметром Delay равным 0. Компрессор не добавляет задержку в цепь аудиосигнала. (Имейте в виду, что конвертеры вносят задержку около 2 мс.)
Регулировка темпа (TAP TEMPO)
Смена ритма
Функция регулировки темпа процессора MPX 550 позволяет устанавливать время задержки и частоту модуляции соответствующих программ в зависимости от темпа музыкального произведения. При загрузке программ, использующих темп, кнопка Tap/Cancel начинает мигать с соответствующей скоростью. Текущий темп отображается в правом верхнем углу дисплея.
Для установки темпа с помощью расположенной на лицевой панели кнопки Tap/Cancel, необходимо нажать ее два раза в соответствии со скоростью исполнения того или иного произведения. Если снова необходимо изменить темп, то еще раз дважды нажмите с соответствующей частотой кнопку Tap/Cancel.
Темп также можно установить ножным переключателем или от внешнего MIDI-устройства.
Установка темпа от входного аудиосигнала
Время задержки программ процессора MPX 550 можно устанавливать с помощью входного аудиосигнала.
1.Удерживайте нажатой кнопку Tap/Cancel до появления в верхней части дисплея сообщения “Detecting audio…” (для этой цели можно использовать опциональный ножной переключатель). Параметры темпа, доступные для загруженной программы, также отображаются на дисплее.
2.В то время, когда кнопка Tap/Cancel удерживается нажатой, сыграйте в требуемом ритме две короткие ноты.
3.Отпустите кнопку Tap/Cancel. В верхней части дисплея отобразится сообщение “Knob 3 to change”, индицируя возможность подстройки темпа регулятором EDIT 3.
4.При необходимости, вращайте регулятор EDIT 3 для подстройки темпа в bpm (ударов в минуту).
5.Нажмите кнопку Tap/Cancel для выхода из данного режима.
Эта возможность очень удобна при работе на концерте.
Параметр Global Tempo
Во многих пресетных программах значение темпа сохраняется как один из параметров. Можно отредактировать это значение и сохранить программу в банк пользовательских программ. Для этого необходимо установить параметр Tempo Mode системного режима в Program (программный). Прибор будет настраиваться на индивидуальный темп при загрузке каждой программы.
Кроме того, можно установить такой режим работы MPX 550, что при загрузке новой программы текущий темп изменяться не будет. Для этого необходимо установить параметр Tempo Mode в значение Global (глобальный). Прибор будет игнорировать индивидуальные установки темпа при загрузке каждой программы.
|
10 |
Lexicon MPX 550. Руководство пользователя |
![]()
Режим обхода
Для включения режима необходимо нажать расположенную на лицевой панели кнопку Bypass. При этом MPX 550 будет пропускать только прямой (не обработанный эффектом) сигнал или мьютировать входы эффекта.
Выбор одной из этих двух функций определяется параметром Bypass Mode системного режима. Если параметр установлен в Input Mute, то мьютируются входы с продолжением сигнала на выходе эффекта (например при длительных затуханиях или задержках), если в Full Mute, то мьютируются выходы, если в Dry, то отключается обработка (на выходе присутствует только прямой, необработанный, сигнал).
Функцией Bypass можно управлять также с помощью ножного переключателя или по MIDI.
Системный режим
Функции системного режима
Для входа в режим редактирования системных параметров, восстановления заводских установок и пересылки MIDI-дампов необходимо нажать кнопку System. При этом загорится светодиод System, индицируя активность системного режима.
В таблице приведены параметры системного режима. Регулятор EDIT 1 выбирает функцию, и регулятор
EDIT 3 изменяет значение параметра (при возможности). Изменения параметров системного режима дает моментальный результата. MIDI-дампы и инициализация требуют подтверждения.
Для выхода из системного режима еще раз нажмите кнопку System.
|
Параметр |
Установки |
|
Output Level |
îò 0 dB* äî -31 dB |
|
Off |
|
|
Input Source |
Analog Stereo* |
|
Analog Mono L, |
|
|
Analog Mono R |
|
|
S/PDIF Digital |
|
|
Clock Source |
Internal 44.1 kHz* |
|
Internal 48 kHz |
|
|
External (S/PDIF) |
|
|
Digital Output |
Processed* |
|
Dry |
|
|
Mix Mode |
Program* |
|
Global |
|
|
Bypass Mode |
Dry* |
|
Full Mute |
|
|
Input Mute |
|
|
Program Load Mode |
Bypass Dry* |
|
Full Mute |
|
|
Tempo Mode |
Program* |
|
Global |
|
|
Compressor Mode |
Program* |
|
Global |
|
|
MIDI Patches |
Enabled* |
|
Disabled |
|
Lexicon MPX 550. Руководство пользователя |
11 |

|
MIDI Channel |
Off |
|
îò 1* äî 16 |
|
|
Omni |
|
|
MIDI Program Change |
Enabled* |
|
Disabled |
|
|
R1-MPX1 |
|
|
MIDI Clock In |
Enabled* |
|
Disabled |
|
|
MIDI Out/Thru |
Out* |
|
Thru |
|
|
Operating Mode |
Normal* |
|
Demo |
|
|
Locked |
|
|
Memory Protect |
Enabled |
|
Disabled* |
|
|
Auto Load |
Enabled |
|
Disabled* |
|
|
Display Brightness |
– |
|
* Индицирует значения по умолчанию |
|
|
MIDI-дампы |
Установки |
|
Dump User Bank |
1-16 |
|
17-32 |
|
|
33-48 |
|
|
49-64 |
|
|
Dump Current Program |
– |
|
Dump System Data |
– |
|
Инициализация |
|
|
Clear User Bank |
|
|
Factory Init |
|
Параметры
Output Level (îò 0 äî -31 dB, Off)
Устанавливает уровень ослабления выходного сигнала от 0 до -31 дБ или его отключение.
Input Source (Analog Stereo; Analog Mono L è R; S/PDIF Digital)
Выбор типа входа. Индицируется нижнем левом углу дисплея: “S” — аналоговый стерео, “L” — аналоговый моно левый, “R” — аналоговый моно правый, “D” — цифровой S/PDIF. Цифра за буквой означает частоту дискретизации (48 или 44.1 кГц). “NoD” обозначает отсутствие корректного цифрового сигнала на входе.
При установке Analog Stereo, прибор обрабатывает сигналы с обоих аналоговых входов. При установке Analog Mono L, прибор направляет сигналы с разъема ANALOG INPUT LEFT на оба входа процессора. При установке Analog Mono R, прибор направляет сигналы с разъема ANALOG INPUT RIGHT на оба входа процессора.
|
12 |
Lexicon MPX 550. Руководство пользователя |
 Loading…
Скачать файл PDF «Lexicon MPX 550 Инструкция по эксплуатации» (606 Kb)
Популярность:
4202 просмотры
Подсчет страниц:
111 страницы
Тип файла:
Размер файла:
606 Kb
-
Lexicon MPX 550 — page 1
…
-
Lexicon MPX 550 — page 2
IMPORT ANT SAFETY INSTRUCTIONS Save these instructions for later use. • Follow all instructions and adhere to warnings marked on the unit and in the operating instructions. • Always use with the correct line voltage. Refer to the manufacturer’ s operating instructions for power requirements. Be advise d that different operating voltages may r …
-
Lexicon MPX 550 — page 3
COMMUNICA TIONS NOTICE This equipment has been tested and found to comply with the limits for a Class B digital device, pursuant to Part 15 of the FCC Rules. These limits are designed to provide reasonable protection against harmful interference in a residential installation. This equipment generates, uses and can radiate radio frequency energy and …
-
Lexicon MPX 550 — page 4
Introduction Lexicon ii Introduction Important Safety Instructions . . . . . . . . . . . . . . . iv Wichtige Sicherheitshinweise . . . . . . . . . . . . . . . iv Instrucciones de seguridad importantes . . . . . . . v Instructions importantes relatives à la sécurité . . . v Importanti norme di sicurezza . . . . . . . . . . . . . . vi Instruções …
-
Lexicon MPX 550 — page 5
Introduction MPX 550 iii Section 3: System Mode System Mode Functions . . . . . . . . . . . . . . . . . . . . . 3-2 Parameters • MIDI Dumps • Restore Default Commands Section 4: Program Descriptions Single Programs . . . . . . . . . . . . . . . . . . . . . . . . . . . 4-2 Plate • Gate/Inv • Hall • Chamber • Ambience • Room • T remol …
-
Lexicon MPX 550 — page 6
Introduction Lexicon iv ENGLISH IMPORT ANT SAFETY INSTRUCTIONS Save these instructions for later use. • Follow all instructions and adhere to warnings marked on the unit and in the operating instructions. • Always use with the correct line voltage. Refer to the manufacturer’ s operating instructions for power requirements. Be advised that dif …
-
Lexicon MPX 550 — page 7
Introduction MPX 550 v ESP AÑOL INSTRUCCIONES DE SEGURIDAD IMPORT ANTES Guarde esta instrucciones para uso posterior . • Utilice siempre el voltaje correcto. Diríjase a las instrucciones de operación del fabricante para obtener las especificaciones de potencia. Esté al tanto de que voltajes de operación distintos requieren el uso de cables y …
-
Lexicon MPX 550 — page 8
Introduction Lexicon vi PORTUGUESE INSTRUÇÕES DE SEGURANÇA IMPORT ANTES Economize estas instruções para uso posterior . • Siga todas as instruções e advertências marcadas na unidade. • Sempre use com a voltagem de linha correta. Se refira ao fabricante está operando instruções para as exigências de poder . Seja aconselhado que volta …
-
Lexicon MPX 550 — page 9
Introduction MPX 550 vii DANSK VIGTIG INFORMA TION OM SIKKERHED Gem denne vejledning til senere brug. • Følg alle anvisninger og advarsler på apparatet. • Apparatet skal altid tilsluttes den korrekte spænding. Der henvises til brugsanvisningen, der indeholder specifikationer for strømforsyning. Der gøres opmærksom på, at ved varierende d …
-
Lexicon MPX 550 — page 10
Introduction Lexicon viii NORSK VIKTIG INFORMASJON OM SIKKERHET T a vare på denne veiledningen for senere bruk. • Følg alle anvisningene og advarslene som er angitt på apparatet. • Apparatet skal alltid anvendes med korrekt spenning. Produktbeskrivelsen inneholder spesifikasjoner for strømkrav . Vær oppmerksom på at det ved ulike driftssp …
-
Lexicon MPX 550 — page 11
Introduction MPX 550 ix Important User Information Lexicon is pleased to present its user guides on CD-ROM. By utilizing CD-ROM technology we are able to provide our documentation in multiple languages. The printed edition of the user guide is in English only . The enclosed CD-ROM includes the user guide in multiple languages (French, German, Itali …
-
Lexicon MPX 550 — page 12
Introduction Lexicon x Wichtige Benutzerinformation Lexicon ist erfreut, seine Benutzerhandbücher nun auch auf CD-ROM vorlegen zu können. Durch den Einsatz von CD-ROM-T echnologie können wir unsere Dokumentation in verschiedenen Sprachen zur V erfügung stellen. Die gedruckte Ausgabe des Benutzerhandbuchs ist nur in englischer Sprache verfügbar …
-
Lexicon MPX 550 — page 13
Introduction MPX 550 xi Información importante para el usuario Lexicon se complace en presentar sus manuales de usuario en CD-ROM. Gracias a la utilización de la tecnología de CD-ROM, nosotros podemos ofrecer nuestra documentación en múltiples idiomas. La edición impresa del manual del usuario sólo está disponible en inglés. El CD-ROM que …
-
Lexicon MPX 550 — page 14
Introduction Lexicon xii Important — Informations Utilisateur Nous sommes fiers de présenter nos modes d’emploi en version CD-ROM. L ’utilisation des CD-ROM nous per-mettent de décliner nos manuels en plusieurs langues. La version imprimée de ce manuel existe uniquement en anglais. Le CD-ROM regroupe les versions espagnole, française, itali …
-
Lexicon MPX 550 — page 15
Introduction MPX 550 xiii Importanti informazioni per l’utente Lexicon è lieta di presentare i propri manuali su CD- ROM. Utilizzando la tecnologia su CD-ROM siamo stati capaci offrire la nostra documentazione in più lingue. L ’edizione stampata del manuale è solamente in inglese. Il CD-ROM contiene il manuale in diverse lingue (Spagnolo, Fr …
-
Lexicon MPX 550 — page 16
Introduction Lexicon xiv Informações Importantes ao usuário A Lexicon tem o prazer de apresentar o Guia do Usuário em CD-ROM. Através da tecnologia CD-ROM temos a possibilidade de fornecer nossa documentação em vários idiomas. A versão impressa do Guia do Usuário está apenas em Inglês. O CD-ROM contém o Guia do Usuário em vários idio …
-
Lexicon MPX 550 — page 17
Getting Started 1 About the MPX 550 . . . . . . . . . . . . . . . . . . . . . . . . . . . . . . . . . . 1-2 Highlights Front Panel Overview . . . . . . . . . . . . . . . . . . . . . . . . . . . . . . . . . 1-4 Front Panel Display Rear Panel Overview . . . . . . . . . . . . . . . . . . . . . . . . . . . . . . . . . . 1-8 Connecting the Unit . . . . …
-
Lexicon MPX 550 — page 18
Getting Started Lexicon 1-2 ABOUT THE MPX 550 Thank you for purchasing the MPX 550 Dual Channel Processor , featuring Lexicon’ s proprietary Lexichip®. The MPX 550 is a true stereo, dual-channel processor with 24-bit internal processing, analog-to-digital conversion, and digital-to-analog conversion. It offers 255 presets with classic Lexicon re …
-
Lexicon MPX 550 — page 19
Getting Started MPX 550 1-3 HIGHLIGHTS • Lexicon’ s proprietary Lexichip • W orld-class Lexicon reverb • 24-bit internal processing • 24-bit analog-to-digital and digital-to-analog conversion • 255 presets • 64 user programs • Mastering Dynamics algorithm • Large, graphic front panel display • Four EDIT knobs for simple paramete …
-
Lexicon MPX 550 — page 20
Getting Started Lexicon 1-4 1. Input T rim Adjusts the level of the incoming analog input signal. 2. Edit Pages Cycles through available Edit Pages for the selected program. The LED lights to indicate that a program has been modified but not stored. 3. System T oggles between activating and deactivating System Mode. When System Mode is activated, E …
-
Lexicon MPX 550 — page 21
Getting Started MPX 550 1-5 4. EDIT Knobs Adjust parameters. Numbers 1 to 4 correspond to numbers 1 to 4 beneath the front panel display . 5. Front Panel Display Indicates information about the current program. (See page 1-6 for more information about the front panel display). 6. Load Loads the selected program. The LED lights when another program …
-
Lexicon MPX 550 — page 22
Getting Started Lexicon 1-6 1. Input Level Meters Indicate incoming signal levels. Input level meters show a minimum when the incoming signal is more than -48dB digital full-scale. Level meters appear in inverse video when the signal approaches overload (-2dB digital full-scale). When signals are between these extremes, the level meters appear as s …
-
Lexicon MPX 550 — page 23
Getting Started MPX 550 1-7 «S» stands for stereo, «L» stands for mono left, «R» stands for mono right, and «D» stands for digital. «NoD» appears when digital input is selected, but no valid digital audio signal is present. The number after the letter indicates the sample rate (44.1 or 48kHz). When …
-
Lexicon MPX 550 — page 24
Getting Started Lexicon 1-8 1. AC Input Connector Provides power to the unit with the supplied power cord. 2. MIDI IN and MIDI OUT/THRU T wo 5-pin DIN MIDI connectors are available for MIDI IN and software-selectable MIDI OUT/THRU. 3. FOOTSWITCH Allows footswitch control of front panel Bypass and T ap functions. A 1/4 inch Tip/Ring/Sleeve connector …
-
Lexicon MPX 550 — page 25
Getting Started MPX 550 1-9 4. S/PDIF IN and OUT Provide digital audio input and output. T wo RCA S/PDIF connectors are available. The unit accepts inputs at 44.1 or 48kHz. 5. ANALOG OUTPUT s Provide analog audio output. Balanced outputs are available on either XLR or 1/4 inch Tip/Ring/Sleeve connectors. 6. ANALOG INPUT s Provide analog audio input …
-
Lexicon MPX 550 — page 26
Getting Started Lexicon 1-10 CONNECTING THE UNIT The INPUT and OUTPUT connectors on the MPX 550 are 1/4 inch Tip/Ring/Sleeve and XLR sockets. Either may be used. Connections should be made utilizing high-quality shielded cables. The MPX 550 produces effects from either mono or stereo sources. Either input can be used for mono sources. It is recomme …
-
Lexicon MPX 550 — page 27
Ch7 Ch8 Aux Send 1 Aux Send 2 RIGHT Out LEFT Out RIGHT In LEFT In Getting Started MPX 550 1-11 TYPICAL CONNECTIONS TO A CONSOLE …
-
Lexicon MPX 550 — page 28
Getting Started Lexicon 1-12 SETTING AUDIO LEVELS Note: As with all audio products, it is good practice to first power on all outboard equipment, then the mixer , then the speakers. INPUT 1. Load Program 1. 2. Set the Mix parameter to Dry (Edit Page 1, EDIT knob 4). 3. Using high-level program material, begin with a low input level and advance it s …
-
Lexicon MPX 550 — page 29
Basic Operation 2 Selecting and Loading Programs . . . . . . . . . . . . . . . . . . . . . . . . . 2-2 Editing Programs . . . . . . . . . . . . . . . . . . . . . . . . . . . . . . . . . . . . 2-3 The “Adjust” Parameter . . . . . . . . . . . . . . . . . . . . . . . . . . . . . . . . 2-3 Storing Programs . . . . . . . . . . . . . . . . . . . . . …
-
Lexicon MPX 550 — page 30
Basic Operation Lexicon 2-2 SELECTING AND LOADING PROGRAMS When powered on, the unit will load the last program that was loaded during the previous operating session. T o select another program, turn the front panel PROGRAM knob. When the PROGRAM knob is turned clockwise, the unit will cycle forward through programs in the selected bank, then proce …
-
Lexicon MPX 550 — page 31
Basic Operation MPX 550 2-3 EDITING PROGRAMS Each program features up to 20 parameters, which are organized into Edit Pages with as many as four parameters each. Press the front panel Edit Pages button to cycle through available Edit Pages for the loaded program. Parameters available on the selected Edit Page appear across the bottom of the front p …
-
Lexicon MPX 550 — page 32
Basic Operation Lexicon 2-4 STORING PROGRAMS The User Bank contains no programs when the MPX 550 is shipped. However , it includes 64 memory locations available for storing user-modified programs. T o store a program: 1. Press the Store button. The Store and T ap/Cancel LEDs will light to indicate that the store function is armed. The first empty U …
-
Lexicon MPX 550 — page 33
Basic Operation MPX 550 2-5 THE COMPRESSOR The compressor is available in all programs, except Dynamics. (Dynamics uses a different compression mechanism, explained on page 4-33.) The compressor sits in the wet component of the signal in front of the effects in the loaded program. It is controlled with four parameters: CmpRatio, Threshld, CmpAttk, …
-
Lexicon MPX 550 — page 34
Basic Operation Lexicon 2-6 T AP TEMPO MA TCHING RHYTHM T ap T empo can be used to match the delay times and modulation rates of tempo-based programs with those of the music. The T ap/Cancel button LED will flash whenever a tempo-based program is loaded. The current tempo rate appears in the top-right corner of the front panel display . It is not r …
-
Lexicon MPX 550 — page 35
Basic Operation MPX 550 2-7 4. If desired, turn EDIT knob 3 to further adjust tempo in bpm (beats per minute). 5. Press the T ap/Cancel button to exit this mode. Audio tap is a must for live performances. It offers a simple method of setting delay times and modulation rates to match the music. GLOBAL TEMPO The T ap/Cancel button LED will flash when …
-
Lexicon MPX 550 — page 36
System Mode 3 System Mode Functions . . . . . . . . . . . . . . . . . . . . . . . . . . . . . . . 3-2 Parameters • MIDI Dumps • Restore Default Commands …
-
Lexicon MPX 550 — page 37
System Mode Lexicon 3-2 SYSTEM MODE FUNCTIONS System Mode can be used to set System Mode parameters, execute MIDI Dumps, and restore default settings. T o enter System Mode, press the front panel System button. The System LED will light to indicate that System Mode is active. The tables that begin at the right show System Mode functions. EDIT knob …
-
Lexicon MPX 550 — page 38
System Mode MPX 550 3-3 Parameter Settings (continued) MIDI Patches Enabled* Disabled MIDI Channel Off 1* to 16 Omni MIDI Program Change Enabled* Disabled R1-MPX1 MIDI Clock In Enabled* Disabled MIDI Out/Thru Out* Thru Operating Mode Normal* Demo Locked Memory Protect Enabled Disabled* Auto Load Enabled Disabled* Display Brightness – * Indicates …
-
Lexicon MPX 550 — page 39
System Mode Lexicon 3-4 P ARAMETERS Output Level (0 to -31dB, Off) Sets output level attenuation within a 0 to -31dB range, or off. Input Source (Analog Stereo; Analog Mono L and R; S/PDIF Digital) Selects input type. The current selection is indicated in the lower-left corner of the front panel display . «S» stands for Analog Stereo, &qu …
-
Lexicon MPX 550 — page 40
System Mode MPX 550 3-5 Digital Output (Processed, Dry) Selects the source for the digital output. When set to Processed, the digital output is the same as the analog outputs. Its mix level will reflect the current setting of the Mix parameter . When set to Dry , the digital output is the input. This setting is useful for recording dry tracks while …
-
Lexicon MPX 550 — page 41
System Mode Lexicon 3-6 MIDI Patches (Enabled, Disabled) Enables and disables Learned Patches. When set to Enabled, the unit responds to Learned Patches. When set to Disabled, the unit ignores Learned Patches, preventing accidental changes. MIDI Channel (Off, 1 to 16, Omni) Selects the MIDI Channel for MPX 550 messages. When set to Off, the unit ig …
-
Lexicon MPX 550 — page 42
System Mode MPX 550 3-7 • The front panel PROGRAM knob is still available for selecting user programs only . Programs stored in the User Bank are still available, but cannot be modified. • The System Mode parameter Auto Load is set to Enabled. • Bypass functions are still available. • T empo and Patches cannot be learned. • System Mode ca …
-
Lexicon MPX 550 — page 43
System Mode Lexicon 3-8 MIDI DUMPS Dump User Bank (1-16, 17-32, 33-48, 49-64) Executes a MIDI Dump of User Bank programs to an external MIDI device, such as a sequencer . These programs can be dumped back to the unit. This is useful to preserve User Bank programs from deletion prior to restoring default settings. User programs are dumped in groups …
-
Lexicon MPX 550 — page 44
System Mode MPX 550 3-9 RESTORE DEF AUL T COMMANDS Clear User Bank Arms a procedure to erase the contents of the User Bank. Press the front panel Store button to execute this procedure and return the User Bank to its factory-default condition. This procedure cannot be executed when a User program is running or when the System Mode parameter Memory …
-
Lexicon MPX 550 — page 45
Pr ogram Descriptions 4 Single Programs . . . . . . . . . . . . . . . . . . . . . . . . . . . . . . . . . . . . . 4-2 Plate • Gate/Inv • Hall • Chamber • Ambience • Room • T remolo • Rotar y • Chorus • Flange • Detune • Pitch • Dly/Eko Special FX . . . . . . . . . . . . . . . . . . . . . . . . . . . . . . . . . . . . . . . . …
-
Lexicon MPX 550 — page 46
Program Descriptions Lexicon 4-2 SINGLE PROGRAMS PLA TE Plate reverb began with a large, thin sheet of metal suspended upright under tension on springs. T ransducers attached to the plate transmitted a signal that made the plate vibrate, causing sounds broadcast through it to appear to be occurring in a large, open space. The Plate programs synthes …
-
Lexicon MPX 550 — page 47
Program Descriptions MPX 550 4-3 GA TE/INV Gated reverbs were created by feeding a reverb, such as a metal plate, through an analog gate device. Decay time was set to instant, while hold time varied duration and sound. The Gate programs provide a fairly constant sound with no decay until the reverb is cut off abruptly . These programs work well on …
-
Lexicon MPX 550 — page 48
Program Descriptions Lexicon 4-4 HALL Lexicon’ s Hall programs recreate the acoustics of actual places — from grand, reverberant enclosures to small concert halls. The clean reverberation of Hall programs is designed to add spaciousness without altering source material. In addition to general instrumental and vocal applications, the Hall programs …
-
Lexicon MPX 550 — page 49
Program Descriptions MPX 550 4-5 CHAMBER Historically , recording studio chambers were oddly shaped rooms with a loudspeaker and set of microphones to collect ambience in various parts of the room. Stereo Chamber programs produce even, relatively dimensionless reverberation with little color change as sound decays. The initial diffusion is similar …
-
Lexicon MPX 550 — page 50
Program Descriptions Lexicon 4-6 AMBIENCE Ambience adds warmth, spaciousness, and depth to a performance without coloring its direct sound. It is commonly used to add a room sound to recorded music and speech. In music recording, Ambience can realistically add distance to close-mic’ed signals. Ambience programs simulate reflections from room surf …
-
Lexicon MPX 550 — page 51
Program Descriptions MPX 550 4-7 ROOM Room programs simulate actual rooms where there is a strong sense of being in a small, live place. These programs are useful on drums and percussion, and can also be applied to electric guitar tracks. Room Programs «Adjust» T ap 50 Bedroom (W alls) – 51 Tiled Room (LFBoost) – 52 Studio «C&quo …
-
Lexicon MPX 550 — page 52
Program Descriptions Lexicon 4-8 TREMOLO T remolo is a rhythmic change in loudness, commonly employed as an expressive technique by vocalists and wind instrument players. It is also one of the oldest effects, frequently used with electric guitar , electric piano, and occasionally vocals. Different tremolo effects are largely determined by the rate …
-
Lexicon MPX 550 — page 53
Program Descriptions MPX 550 4-9 ROT ARY Rotary speaker cabinets were designed to provide a majestic vibrato/choir effect for electronic theater and church organs. The most well-known rotary speaker is the Leslie™ Model 122, which has two counter-rotating elements: a high-frequency horn and a low-frequency drum with slow and fast speeds. The soun …
-
Lexicon MPX 550 — page 54
Program Descriptions Lexicon 4-10 CHORUS Chorus effects create lush, full sounds by multiplying the original audio source. T raditionally , these effects were used to fatten up tracks and to add body to guitar without coloring the original tone. Chorus effects are also often combined with plates, echoes, and other reverb effects. The stereo Chorus …
-
Lexicon MPX 550 — page 55
Program Descriptions MPX 550 4-11 FLANGE Flange effects were originally created by simultaneously playing back identical programs on two tape recorders, then using hand pressure against the flange of the tape reels to slow down first one machine, then the other . The result was a series of changing phase cancellations and reinforcements, with chara …
-
Lexicon MPX 550 — page 56
Program Descriptions Lexicon 4-12 DETUNE Detune effects create delayed and pitch-shifted versions of the original source, thickening the sound. This creates a particularly effective simulation of double-tracking. These effects are also great alternatives to Chorus effects, adding the richness of a chorus without the audible sweep caused by the chor …
-
Lexicon MPX 550 — page 57
Program Descriptions MPX 550 4-13 PITCH Altering the pitch of a sound produces a wide range of effects — from subtle detuning, to harmonies, to chords. The stereo polyphonic Pitch programs can be used to shift program material or monophonic sources within a range of one octave up to two octaves down. For pitch correction, set the Mix parameter to W …
-
Lexicon MPX 550 — page 58
Program Descriptions Lexicon 4-14 DL Y/EKO Delays and echoes repeat a sound a short time after it first occurs. The simplest (and oldest) delay effect is tape slap — a single repeat about 100ms after the original sound. T ape slap was often used on Elvis Presley’ s voice and rockabilly guitar tracks. T ape slap becomes tape echo when the output o …
-
Lexicon MPX 550 — page 59
Program Descriptions MPX 550 4-15 In all delay programs and dual programs, the unit uses the MstrDly parameter to scale delay times that are not controlled by T empo. In some programs, the «Adjust» parameter controls MstrDly . MstrDly can be set within a range of 0 to 100%. It is usually set to 100% in most presets. When MstrDly is set ma …
-
Lexicon MPX 550 — page 60
Program Descriptions Lexicon 4-16 SPECIAL FX Special FX Programs «Adjust» T ap 105 Infinite (HighCut) Eko 106 The Abyss (Dtuning) – 107 Jet Flange (Resnce) Speed (Whole Note) 108 V erb>Chorus (HighCut) – 109 T apRot Dly (Time) Rate (Drum/Horn) 110 Fader V erb (Level) Echo 111 Low Rumble (Decay) – 112 Ducker V erb (Decay) – 113 …
-
Lexicon MPX 550 — page 61
Program Descriptions MPX 550 4-17 STEREO ST AGE Stereo Stage provides stereo reverb while preserving the dry signal. T o use this program, note the following: • Use the MPX 550 in line between the mixer and house amplifiers — not as an effect mixed back into the main left and right channels on the mixer . • Pan the input channels on the mixer f …
-
Lexicon MPX 550 — page 62
Program Descriptions Lexicon 4-18 DUAL PROGRAMS The dual programs combine Delay with Reverb, or either Delay or Reverb with Flange, Pitch, or Chorus. Four routing configurations are used in the variations of each dual program: Dual Stereo (Parallel), Cascade, Mono Split, and Dual Mono. • Flng-Dly , Pch-Dly , Chor-Dly , Dly-Rvb, Flng-Rvb, Pch-Rvb, …
-
Lexicon MPX 550 — page 63
Program Descriptions MPX 550 4-19 EFX BAL The Efx Bal parameter controls the relative balance of each effect in the dual programs. In Cascade variations, the parameter also varies the amount of the first effect or dry signal fed into the second effect. The illustration below uses the Pch-Dly program to show the effect of the Efx Bal parameter at ce …
-
Lexicon MPX 550 — page 64
Program Descriptions Lexicon 4-20 FLNG-DL Y Flng-Dly Programs «Adjust» T ap Routing 120 Flng T ap (FeedBk) Delay Time (1/4 Note) Dual Stereo (Parallel) 121 Flng .8T ap (FeedBk) Dotted (1/8 Note) Dual Stereo (Parallel) 122 Flng 3plT ap (FeedBk) T riplet (1/8 Note) Dual Stereo (Parallel) 123 Flng PongT ap (FeedBk) Delay Time (1/4 Note) Dual …
-
Lexicon MPX 550 — page 65
Program Descriptions MPX 550 4-21 PCH-DL Y Pch-Dly Programs «Adjust» T ap Routing 130 5th T ap (Pitch) Delay Time Dual Stereo (Parallel) 131 8ve 3pl T ap (Pitch) Delay Time Dual Stereo (Parallel) 132 8ve 8+3plT ap (Pitch) Delay Time Dual Stereo (Parallel) 133 3rd4thPong (Pitch) Delay Time Dual Stereo (Parallel) 134 4th5th Xfeed (Pitch) De …
-
Lexicon MPX 550 — page 66
Program Descriptions Lexicon 4-22 CHOR-DL Y Chor-Dly Programs «Adjust» T ap Routing 140 Chor T ap (FeedBk) Delay T ime Dual Stereo (Parallel) 141 Chor .8T ap (FeedBk) Delay Time Dual Stereo (Parallel) 142 Chor 8+3pl (FeedBk) Delay Time Dual Stereo (Parallel) 143 Chor Pong (FeedBk) Delay Time Dual Stereo (Parallel) 144 Chor Repeat (T ime) …
-
Lexicon MPX 550 — page 67
Program Descriptions MPX 550 4-23 DL Y -RVB Dly-Rvb Programs «Adjust» T ap Routing 150 T ap Small (MidRT) Delay Time Dual Stereo (Parallel) 151 3plT ap MidSz (MidRT) Delay T ime Dual Stereo (Parallel) 152 8+3pl Large (MidRT) Delay Time Dual Stereo (Parallel) 153 Pong Small (Decay) Delay Time Dual Stereo (Parallel) 154 Xfeed MidSz (Decay) …
-
Lexicon MPX 550 — page 68
Program Descriptions Lexicon 4-24 FLNG-RVB Flng-Rvb Programs «Adjust» T ap Routing 160 LiteFl Small (MidRT) Speed (Whole Note) Dual Stereo (Parallel) 161 LiteFl MidSz (MidRT) Speed (Whole Note) Dual Stereo (Parallel) 162 LiteFl Large (MidRT) – Dual Stereo (Parallel) 163 DeepFl Small (MidRT) – Dual Stereo (Parallel) 164 DeepFl MidSz (M …
-
Lexicon MPX 550 — page 69
Program Descriptions MPX 550 4-25 PCH-RVB Pch-Rvb Programs «Adjust» T ap Routing 170 3rd4th Room (Pitch) – Dual Stereo (Parallel) 171 4th5th Room (Pitch) – Dual Stereo (Parallel) 172 5th6th Room (Pitch) – Dual Stereo (Parallel) 173 8ve MidSiz (Pitch) – Dual Stereo (Parallel) 174 Power MidSiz (MidRT) – Dual Stereo (Parallel) 175 …
-
Lexicon MPX 550 — page 70
Program Descriptions Lexicon 4-26 CHOR-RVB Chor-Rvb Programs «Adjust» T ap Routing 180 Chor1 Small (MidRT) – Dual Stereo (Parallel) 181 Chor1 MidSiz (MidRT) – Dual Stereo (Parallel) 182 Chor1 Large (MidRT) – Dual Stereo (Parallel) 183 Chor2 Small (MidRT) – Dual Stereo (Parallel) 184 Chor2 MidSiz (MidRT) – Dual Stereo (Parallel) …
-
Lexicon MPX 550 — page 71
Program Descriptions MPX 550 4-27 MSPLIT DL Y MSplit Dly Programs «Adjust» T ap Routing 190 Flng + T ap (FeedBk) 1/4 Note Mono Split 191 Flng + Pong (FeedBk) 1/4 Note Mono Split 192 Flng + Xfeed (Time) – Mono Split 193 Flng + Bnce (Time) – Mono Split 194 DeepFl + Dly (Time) – Mono Split 195 5th + T ap (Pitch) Delay T ime Mono Split …
-
Lexicon MPX 550 — page 72
Program Descriptions Lexicon 4-28 MSPLIT RVB MSplit Rvb Programs «Adjust» T ap Routing 205 T ap + MidSiz (MidRT) Delay Time Mono Split 206 Pong + Large (MidRT) Delay T ime Mono Split 207 Bnce + MidSz (MidRT) Delay T ime Mono Split 208 Xfeed + Small (MidRT) Delay Time Mono Split 209 Xfeed+MidSiz (MidRT) Delay Time Mono Split 210 LiteFl+Mid …
-
Lexicon MPX 550 — page 73
Program Descriptions MPX 550 4-29 MSplit Rvb Programs «Adjust» T ap Routing 221 Chor1+ Large (MidRT) – Mono Split 222 Chor2+MidSiz (MidRT) – Mono Split 223 Chor2+ Large (MidRT) – Mono Split 224 Chor3+MidSiz (MidRT) – Mono Split Note: The Mono Split routing configuration is illustrated on page 4-18. …
-
Lexicon MPX 550 — page 74
Program Descriptions Lexicon 4-30 DUAL MONO Dual Mono Programs «Adjust» T ap Routing 225 T ap | Small (MidRT) Delay Time Dual Mono 226 T ap | MidSiz (MidRT) Delay Time Dual Mono 227 T ap | Large (MidRT) Delay T ime Dual Mono 228 T ap | Room (Livenes) Delay Time Dual Mono 229 DeepFl | T ap (FeedBk) Speed (1/4 Note) Dual Mono 230 DeepFl | D …
-
Lexicon MPX 550 — page 75
Program Descriptions MPX 550 4-31 CMPRSSR In all Cmprssr programs, the «Adjust» parameter controls gain within a range of 0 to 9.5dB. It can be used to match volume levels between the dry , bypassed, and compressed output obtained with typical music material. If the System Mode parameter Mix Mode is set to Program, the Mix parameter will …
-
Lexicon MPX 550 — page 76
Program Descriptions Lexicon 4-32 DYNAMICS Note: A few seconds after the Dynamics preset is loaded, the Dynamics name will flash briefly on the front panel display . This does not affect audio input or output. Dynamics is intended for use in the studio, when dynamic processing of stereo signals is required. Because of its long delay , this preset i …
-
Lexicon MPX 550 — page 77
Program Descriptions MPX 550 4-33 Meters (GR, In) Selects between gain reduction (GR) and input level (In) metering. (See page 4-35 for more information.) COMPRESSION Compression is used to lower the overall level of sound sources that rise above an adjustable compression threshold. Compression can be used to match the levels of louder sources to t …
-
Lexicon MPX 550 — page 78
Program Descriptions Lexicon 4-34 T APE SA TURA TION T ape saturation emulates the sound of sources recorded on analog tapes and sources recorded digitally . Because of the natural peak saturation that occurs with analog tapes, sound sources recorded on them seem louder than the same sound sources recorded digitally . T o use this effect, increase …
-
Lexicon MPX 550 — page 79
Program Descriptions MPX 550 4-35 2. Peak Expansion Meter Indicates the level of peaks above the peak expansion threshold. Low-level peaks are shown as one or two graduated bars. Slightly higher peaks of longer duration are shown as three graduated bars. High-level peaks are shown as three solid bars. Note: Use the Meters parameter to select betwee …
-
Lexicon MPX 550 — page 80
Program Descriptions Lexicon 4-36 will cause the peak expansion meter to show three solid bars for short periods of time. Increase the ExpLvl parameter until the peaks in the source material sound slightly exaggerated. Then, reduce the setting until the peaks sound natural. • Set the Ratio parameter to 4.00:1, the Attack parameter to 7.2msec, and …
-
Lexicon MPX 550 — page 81
Program Descriptions MPX 550 4-37 • In the delay programs, two delay level controls have been combined into the «Adjust» parameter: (T ap/ Dly). These programs contain two delays. The first is controlled by tempo and generally used to create longer delays and echoes. The second is set manually with the Delay parameter , and can be used …
-
Lexicon MPX 550 — page 82
Parameter Descriptions 5 Parameter Graphics . . . . . . . . . . . . . . . . . . . . . . . . . . . . . . . . . . . 5-2 Parameter Glossary . . . . . . . . . . . . . . . . . . . . . . . . . . . . . . . . . . . 5-4 …
-
Lexicon MPX 550 — page 83
Parameter Descriptions Lexicon 5-2 P ARAMETER GRAPHICS The MPX 550 features graphic enhancements for each parameter , which appear on the front panel display whenever a parameter setting is changed. These graphics illustrate the point at which the selected setting falls within the entire parameter range, and provide a visual indication of the param …
-
Lexicon MPX 550 — page 84
Parameter Descriptions MPX 550 5-3 When the Mix parameter setting is changed, the graphics pictured below appear . When a delay parameter setting is changed, the graphics pictured below appear . When the Level parameter setting is changed, the graphics pictured below appear . When the Width parameter setting is changed, the graphics pictured below …
-
Lexicon MPX 550 — page 85
Parameter Descriptions Lexicon 5-4 P ARAMETER GLOSSARY Note: System Mode parameters are described in Section 3. Dynamics parameters are described on pages 4-32 to 4-35. These parameters are not included in this glossary . «Adjust» (0 to 127) Functions differently from preset to preset. «Adjust» is a «magic» control tha …
-
Lexicon MPX 550 — page 86
Parameter Descriptions MPX 550 5-5 CmpRels (4 to 250msec) Controls the rate at which the compressor relaxes when compressed input signal levels fall. Decay (73ms to 19.61sec or 24ms to 6.53sec) Controls reverb time for mid frequency signals. In Ambience programs, Decay controls the length of the ambience «tail». Depth (0 to 100%) Controls …
-
Lexicon MPX 550 — page 87
Parameter Descriptions Lexicon 5-6 DlyT apLvl (off, -48 to 0dB) Appears in dual programs where one effect is Delay/Echo and one or more delay voice is controlled by T ap. DlyT apLvl controls the level of the T ap-controlled voice that is mixed into the Delay/Echo effect. Drum Dep (0 to 100%) In Rotary programs, determines the amount of modulation p …
-
Lexicon MPX 550 — page 88
Parameter Descriptions MPX 550 5-7 HighSlope and LowSlope (-16 to +15) Determine the shape of the reverb envelope for low frequencies. HighSlope and LowSlope are found only in the Gate/Inv programs. When LowSlope is set to 0, the level of low reverb remains unchanged over its duration, then cuts off abruptly . Setting LowSlope above 0 causes the le …
-
Lexicon MPX 550 — page 89
Parameter Descriptions Lexicon 5-8 Mix (Dry , 1 to 99%, Wet) Mix controls the ratio of unprocessed (Dry) and processed (W et) signal in the output. When the MPX 550 is patched into a console, this parameter should almost always be set to W et. MstrRate (0 to 100%) In Rotary programs, serves as a master rate control affecting both the horn and drum …
-
Lexicon MPX 550 — page 90
Parameter Descriptions MPX 550 5-9 R Dly 1, 2, 3 (0ms to 5.060sec) Sets the delay time of right voice 1, 2, or 3. The Dly/Eko effect has three independent voices on each side. Rate (0 to 50.05Hz) Controls modulation speeds. Res 1, 2 (-100 to +100%) In Chorus programs, control the amount of feedback signal. Resonanc (-100 to +100%) In Flange program …
-
Lexicon MPX 550 — page 91
Parameter Descriptions Lexicon 5-10 Speed (0 to 5000) In Flange programs, controls how rapidly the two «flange» voices move. Speed 1, 2 (0 to 5000) In Chorus programs, control the rates at which the various voices sweep through frequency . Spread (0 to 255) Controls the timing between the initial reflections that most audibly create the s …
-
Lexicon MPX 550 — page 92
Parameter Descriptions MPX 550 5-11 W avform (See Below) In T remolo programs, determines volume modulation. Settings are defined as follows: Setting Description Sine Smooth modulation with polarity reversal. Rectified Smooth modulation with no polarity Sine reversal. T riangle Linear ramp up and down. Sawtooth Linear ramp up with sudden reduction. …
-
Lexicon MPX 550 — page 93
MIDI Operation 6 Learn Mode . . . . . . . . . . . . . . . . . . . . . . . . . . . . . . . . . . . . . . . . 6-2 MIDI Channel Assignment . . . . . . . . . . . . . . . . . . . . . . . . . . . . . . 6-2 Program Change Messages . . . . . . . . . . . . . . . . . . . . . . . . . . . . . 6-3 Loading Programs • Activating Bypass or T ap Functions Continu …
-
Lexicon MPX 550 — page 94
MIDI Operation Lexicon 6-2 LEARN MODE Learn Mode enables the MPX 550 to «learn» MIDI Program Change and Continuous Controller messages. T o activate and deactivate Learn Mode, press the Store and T ap/Cancel buttons simultaneously . The Store and T ap/Cancel LEDs will light to indicate that Learn Mode is active. The front panel display wi …
-
Lexicon MPX 550 — page 95
MIDI Operation MPX 550 6-3 PROGRAM CHANGE MESSAGES LOADING PROGRAMS Standard MIDI Program Change messages can be used to load all 255 presets and 64 user programs. The unit conforms to the use of MIDI Continuous Controller 32 to execute Bank Select messages. MPX 550 program banks are ordered numerically from 0 to 27, beginning with the Plate Bank. …
-
Lexicon MPX 550 — page 96
MIDI Operation Lexicon 6-4 ACTIV A TING BYP ASS OR T AP FUNCTIONS The unit can recognize MIDI Program Change messages 100 to 127 (101 to 128 on some MIDI devices) for activating Bypass or T ap functions. T o assign a Program Change message to the Bypass or T ap controls: 1. Simultaneously press the Store and T ap buttons to activate Learn mode. 2. …
-
Lexicon MPX 550 — page 97
MIDI Operation MPX 550 6-5 2. T urn the desired EDIT knob or press the desired button on the front panel. The front panel display will indicate which control is selected, as well as the current controller range. 3. Select the desired controller using one of the following methods: A. Move the MIDI controller through its full range. T o use a portion …
-
Lexicon MPX 550 — page 98
MIDI Operation Lexicon 6-6 MIDI CLOCK The unit recognizes MIDI Clock messages and applies the tempo (40 to 400bpm) to programs that use T ap T empo. Connect a MIDI device that outputs MIDI Clock, such as the MPX R1 foot controller or a MIDI sequencer , to the MPX 550 MIDI IN connector to have the MPX 550 automatically recognize and begin to process …
-
Lexicon MPX 550 — page 99
MIDI Operation MPX 550 6-7 • Dump Current Program Executes a dump of the selected program. • Dump System Data Executes a dump of System Mode settings and Learned Patch assignments. 3. Press Store to execute the dump. 4. Press System to deactivate System Mode. Note: MIDI Dumps will not be executed unless the System Mode parameter MIDI Out/Thru i …
-
Lexicon MPX 550 — page 100
MIDI Operation Lexicon 6-8 Function T ransmitted Recognized Remarks Basic Default X 1 Selected in System Mode Channel Channel X 1-16 Mode Default Mode 2 Messages X X Altered X Note T rue V oice X X Number V elocity Note ON X X (Off=9n, v=0) Note OFF X X After Keys X X Used as controller T ouch Channels X OX Selected in System Mode Pitch X OX Used a …
-
Lexicon MPX 550 — page 101
MIDI Operation MPX 550 6-9 Function T ransmitted Recognized Remarks Program T rue # X 0 to 15 = 1 to 16 16 to 127 ignored; Program Change Change messages 1 to 15 = Program Change messages 1 to 16 for selected Bank Select X X program bank as applicable * System Lexicon O O Lexicon ID = 6; Product ID = 22 Exclusive Real Time X X (decimal); Device ID …
-
Lexicon MPX 550 — page 102
Appendix A Specifications . . . . . . . . . . . . . . . . . . . . . . . . . . . . . . . . . . . . . . . A-2 Declaration of Conformity . . . . . . . . . . . . . . . . . . . . . . . . . . . . . . A-3 …
-
Lexicon MPX 550 — page 103
Appendix Lexicon A-2 SPECIFICA TIONS Audio Inputs Connectors XLR, T/R/S balanced Level +8 to +20dBu full-scale Impedance 50K balanced 25K unbalanced A/D 24-bits 20Hz to 20kHz±1dB Dynamic Range 105dB, typical Crosstalk -96dB@1kHz Analog Audio Outputs Connectors XLR, T/R/S balanced Level +26dBu balanced +20dBu unbalanced Impedance <600 Ω D/A 24 …
-
Lexicon MPX 550 — page 104
Appendix MPX 550 A-3 DECLARA TION OF CONFORMITY Application of Council Directive(s): 73/23/EEC, 89/336/EEC, and 93/68/EEC Standard(s) to which Conformity is Declared: EN 55103-1, EN 55103-2, and EN 60065: 1998 Manufacturer: Lexicon, Inc., 3 Oak Park, Bedford, MA 01730-1441 USA The equipment identified here conforms to the Directive(s) and Standard( …
-
Lexicon MPX 550 — page 105
Index I “Adjust” Parameter . . . . . . . . . . . . .2-3, 5-4 AC Input Connector . . . . . . . . . . . . . . . .1-8 Ambience Programs . . . . . . . . . . . . . . . .4-6 ANALOG INPUT s . . . . . . . . . . . . . . . . . .1-9 ANALOG OUTPUT s . . . . . . . . . . . . . . . .1-9 Attack Parameter . . . . .4-33 (Dynamics), 5-4 Audio Levels, Setting . . …
-
Lexicon MPX 550 — page 106
Index Lexicon I-2 Dual Mono Programs . . . . . . . . .4-18, 4-30 Dual Programs . . . . . . . . . . . . .4-18 to 4-30 Dual Stereo (Parallel) Configuration . . . .4-18 Dump Current Program . . . . . . . . .3-8, 6-7 Dump System Data . . . . . . . . . . . . .3-8. 6-7 Dump User Bank . . . . . . . . . . . . . . .3-8, 6-6 Duration Parameter . . . . . . . …
-
Lexicon MPX 550 — page 107
Index MPX 550 I-3 Output Levels, Setting . . . . . . . . . . . . .1-12 Outputs, Rear Panel . . . . . . . . . .1-8 to 1-11 OVL Indicator . . . . . . . . . . . . . . .1-6 to 1-7 Parallel (Dual Stereo) Configuration . . .4-18 Parameter Glossary . . . . . . . . . .5-4 to 5-11 Parameter Graphics . . . . . . . . . . .5-2 to 5-3 Parameters, Dynamics . . . …
-
Lexicon MPX 550 — page 108
LIMITED W ARRANTY Lexicon, Inc. offers the following warranty on this product: What is the Duration of this W arranty? This warranty will remain in effect for one (1) year from the original date of purchase. Who is Covered? This warranty may be enforced by the original pur chaser and subsequent owners during the warranty period, provided the origin …
-
Lexicon MPX 550 — page 109
A Harman International Company Lexicon, Inc 3 Oak P ark Bedford, MA 01730-1441 USA T el 781-280-0300 F ax 781-280-0490 www .lexicon.com Customer Support T el 781-280-0300 F ax 781-280-0495 (Sales) F ax 781-280-0499 (Ser vice) Lexicon P ar t No. 070-14912 | Rev 1 | 02/02 …
-
Lexicon MPX 550 — page 110
Percussion 2 Bass Drum . . . . . . . . . . . . . . . . . . . . . .(0:30) 3 Snare Drum 1 . . . . . . . . . . . . . . . . . . .(0:46) 4 Snare Drum 2 . . . . . . . . . . . . . . . . . . .(0:38) 5 Stick . . . . . . . . . . . . . . . . . . . . . . . . . .(0:38) 6 Shaker . . . . . . . . . . . . . . . . . . . . . . . .(0:39) 7 Claps . . . . . . . . . . . …
-
Lexicon MPX 550 — page 111
V oice 30 Female V ocal 1 . . . . . . . . . . . . . . . . . .(0:43) 31 Female V ocal 2 . . . . . . . . . . . . . . . . . .(0:56) 32 Female V ocal 3 . . . . . . . . . . . . . . . . . .(0:20) 33 Male V ocal 1 . . . . . . . . . . . . . . . . . . . .(1:20) 34 Male V ocal 2 . . . . . . . . . . . . . . . . . . . .(0:21) 35 V ocal Group 1 . . . . . . . . …
- Инструкции и руководства
- Бренды
- Lexicon
- MPX 550
- Справочник Пользователя
![]()

249 ₽
Инструкция (руководство пользователя) на Процессор эффектов Lexicon MPX-550
Артикул: lexicon-mpx-550
Категория: Lexicon
-
Описание
-
Детали
Описание
Инструкцию по эксплуатации Lexicon MPX-550 на русском языке можно будет скачать в личном кабинете после оформления и оплаты заказа.
Детали
| Формат файла |
|
|---|---|
| Размер инструкции в кб |
369 |
|
10 898 торговых марок |
Скачайте инструкцию БЕСПЛАТНО! Diplodocs позволяет скачать несколько типов инструкций для наилучшего использования LEXICON MPX 550 |

|
Вам требуется помощь по использованию изделия? Все инструкции по категориям |
инструкция по эксплуатации LEXICON MPX 550Diplodocs поможет скачать инструкцию LEXICON MPX 550 .
Введите модель изделия LEXICON… Вы также можете скачать следующие инструкции, относящиеся к данному изделию:
Фрагмент инструкции: руководство пользователя LEXICON MPX 550
|


Copyright © 2005 — 2012 — Diplodocs —
Все права защищены.
Торговые марки принадлежат их соответствующим владельцам.