Информация о приложении Light Bulb Camera, которое поможет вам использовать Продукт.
Руководство по использованию приложения Light Bulb Camera
это приложение-руководство, которое поможет вам использовать продукт, например приложение Light Bulb Camera.
Легко использовать
Выберите камеру с лампочкой, которая проста в использовании и проста в эксплуатации. Большинство камер с лампочками просто требуют, чтобы вы установили приложение, с помощью которого вы можете управлять ими. Мы рекомендуем выбрать тот, который имеет простой в использовании интерфейс.
Совместимость
Во-первых, вы хотите убедиться, что камеру с лампочкой можно установить в любую розетку для лампочки. Для некоторых камер требуются лампы определенного типа, поэтому перед покупкой ознакомьтесь с техническими характеристиками.
Ночное видение
Одной из наиболее важных особенностей камеры с лампочкой является то, что она должна делать снимки в условиях низкой освещенности. Это связано с тем, что большинство преступлений происходит ночью, поэтому важно, чтобы камера могла четко видеть в темноте. Когда вы мирно лежите в своей постели ночью и вам хочется посмотреть, что происходит на улице, вы можете легко увидеть изображение на своем телефоне. Поиск камеры с ночным видением является ключом к полной защите.
Широкий угол
Хорошая камера с лампочкой должна иметь широкоугольный объектив, который поможет ей захватить как можно большую часть комнаты. Это облегчит вам поиск того, что происходит в вашем доме, если туда проникнут злоумышленники.
Датчик движения
Ищите камеру с лампочкой, которая имеет возможности обнаружения движения, чтобы она могла записывать, когда что-то движется в ее поле зрения.
Если кто-то перемещается по вашему дому, пока вас нет, камера обнаружит это движение и предупредит вас с помощью уведомления, текстового сообщения или телефонного звонка, чтобы вы могли отреагировать соответствующим образом.
Get it Now Приложение Light Bulb Camera App, которое поможет вам использовать Продукт
вам нужно комплексное приложение с мини-камерой Wi-Fi
больше информации о приложении Light Bulb Camera с этим приложением
В руководстве по приложению Wifi Light Bulb Camera:
лучшее приложение камеры с лампочкой
как подключить приложение Light Bulb Camera
Описание руководства по приложению Light Bulb Camera
Особенности и подробности руководства по приложению Light Bulb Camera
Приложение Light Bulb Camera направляет другие связанные элементы
Фотографии приложения Light Bulb Camera
Руководство пользователя приложения Light Bulb Camera
Отказ от ответственности:
Краткий обзор Мы не берем на себя ответственность за какой-либо продукт, если вы не знаете, где найти приложение после его загрузки
Эти изображения и имена никем не одобрены.
Читать ещё

Quick Manual For IOS and Android
Contents
- Download App
- Sign Up / Log In
- Add Device
- Install SD Card
- Camera Settings
- Add Multi-Cameras
Download The Cameras App
Step 1: Open your phones camera and Scan the QR code below.
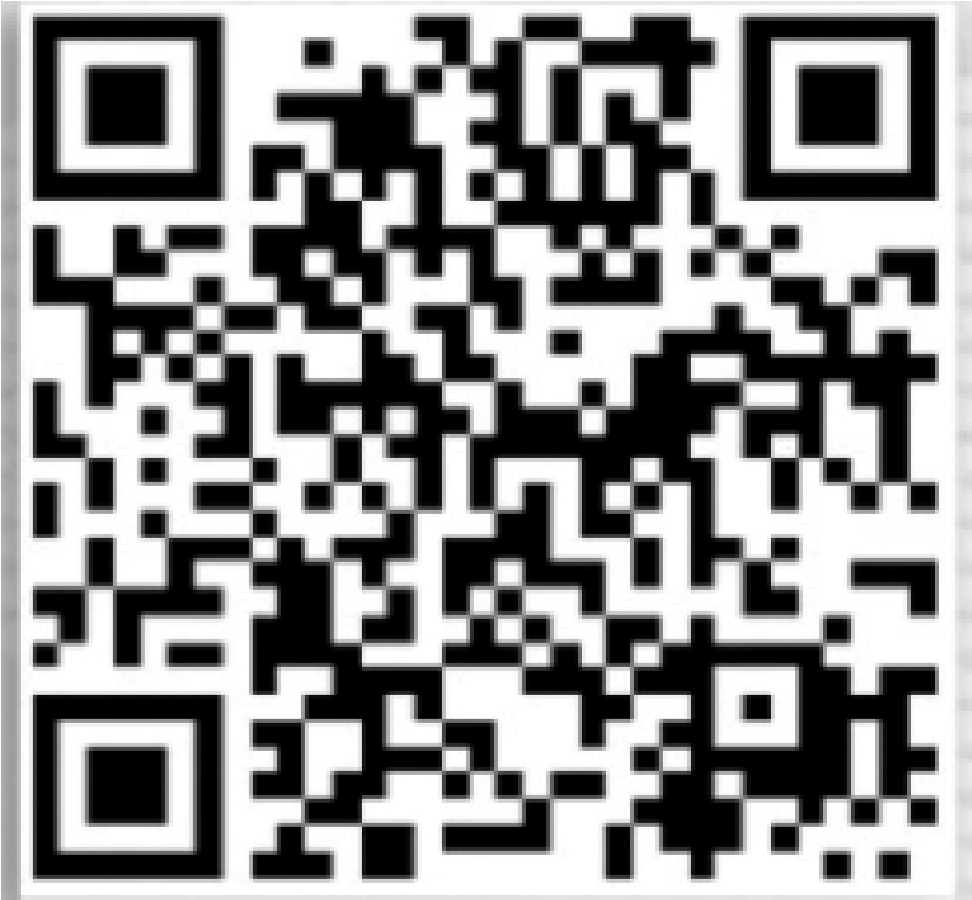
Note: If you cannot scan
the QR code, Please open
your app store and search
for Yi iOT in the app store
to download.
The app will be a blue icon with a Camera logo, you’ll
need to install this app to your phone.

For IOS Users you can also click this link: CLICK
HERE
For Android users you can click here: CLICK HERE
Once the app is installed on your
IOS phone or Android you’ll need
to sign up for an account BEFORE you can access the camera.
New users must create a new account via the Yi Iot App on their phone.
Next
A) Enter your email address you would like associated with the
account (MAKE SURE YOU CHECK SPELLING).
B) Enter a Secure Password for the account
NOTE: Password must be 8-16 characters and must include
at least: one number, one uppercase letter and one lower
case character. (Example: Camera2023)
C) Verify The Password You Just Entered
D) Type the code you see in the box.
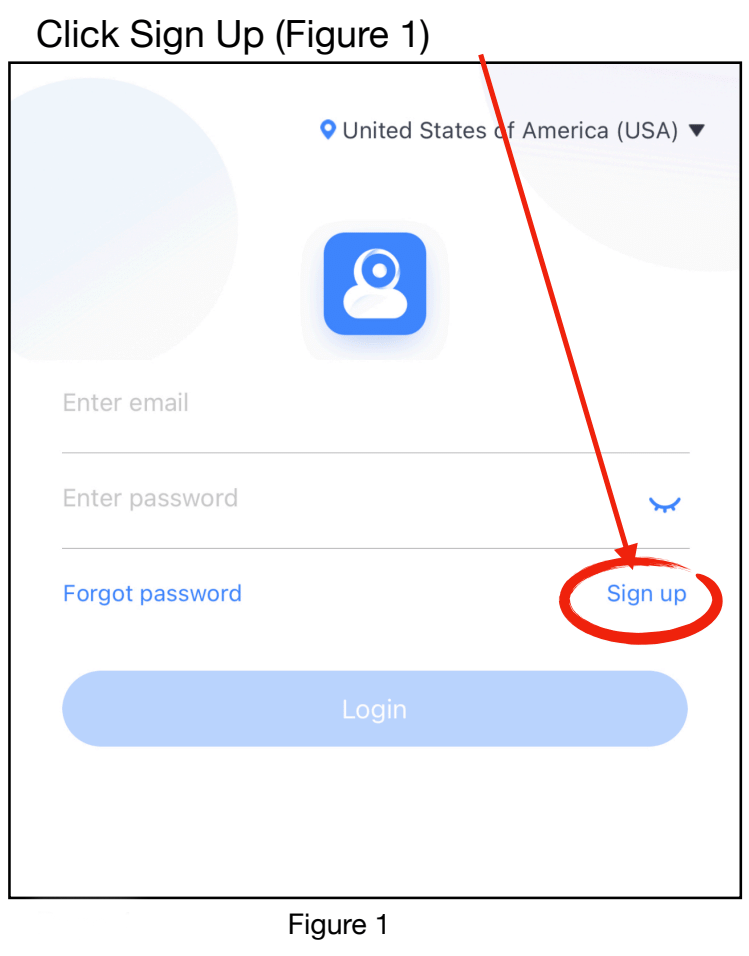
(See Figure 2)
Lastly, Click “Sign Up”

Once Signed up, you’ll be shown a screen on the app that is letting you
know an email activation link has been sent to the SAME EMAIL you
just created an account with. (See Figure 3)

Log in to your email email and you’ll see an email from:
“security-noreply-us-3@yitechnology.com» with subject line:
“Action Required to Activate Your YI IoT Account”
Open this email and click the link to activate your account.

After you’ve clicked the link from your email, you’ll see a
‘Success Screen’ that pops up verifying your account has
now been activated correctly.

Next, you’ll want to hit the ‘back arrow’ on the top left
of your phone screen to head back to the login area.

Now that you’re back at the login screen, type in your
Email and Password that you used to register your
account with to OFFICIALLY login to the app.
Once logged into the app, you’ll be able to start
registering your cameras!

ADDING A CAMERA
If you have not setup an account from the instructions above,
you’ll need to do so prior to having the ability to link a
camera.
NOTICE TO CUSTOMER: When setting up the camera you
will be asked if you like to join the cloud storage for a
monthly fee, please understand this is NOT REQUIRED in
order to view and use your cameras
Step 1: Screw the Light Socket Security Camera
into a light socket

Step 2: Make sure the power is ON.
As long as the Camera has power on and goes though a start
up sequence which includes the camera rotating and making
a few beeping noises.
Once the camera has completed its cycle (approx 60
seconds) you’ll hear two beeps. These two beeps are letting
you know the camera is ready to be added to your phone
app.
Walkthrough Video:
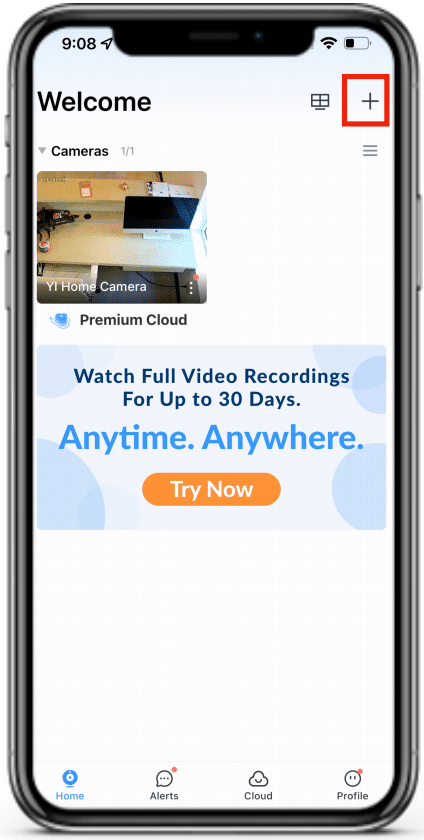
Step 2: Open your phone app and click the ‘PLUS’ sign on
the top right to add a Light Socket Security Camera

Step 3: Next, select the “Wifi Connection” Option to begin
connecting your camera to your wifi. Please make sure
the camera is NEAR a wifi connection and that you have
your Wifi NAME and Wifi PASSWORD ready.

Step 4: Wait till you hear the 2 beeps,
once you hear the 2 beeps check the box
“I Heard The Beep” and click “Next”
I DON’T HEAR THE BEEPS: If you don’t
hear the 2 beeps this means the camera
has turned off due to time limit. Please power off the
camera and re-boot by simply turning off the power to
the camera and back on via the Light Wall Switch.

Step 5: Connect To Your Wifi by selecting
your wifi network.
Once the network is selected, enter the password for your wifi network.
Once the network is selected, enter the password for your wifi network.
Step 6: Connect the camera to the app.
Make sure your PHONE brightness is on
100%, also remove any screen covers you
have on your phone for the camera to
read the QR code properly.
Hold the phone with the QR code in front
Of your camera while moving the phone
Closer and further away from the camera.
Do this until the camera has connected to
the app.


MY CAMERA IS NOT CONNECTING
1) Try rebooting your camera by
cycling the power to the camera and
letting the camera turn o
ff
and back
on, then repeat step 6.
2) If you still are having trouble
connecting your camera, you’ll need to
RESET your camera. While keeping
POWER ON to the camera use the
reset tool that came with your camera.
Near the SD Card Slot, you’ll see a
RESET PIN HOLE. Hole tool inside hole
until camera resets, then repeat back
to STEP 2.
Once you hear “Waiting To Connect” you can hit the next
button.
Step 7: Pairing process takes about 1
to 2 minutes. Please wait while your
phone communicates back and forth
with your phone app.


Step 8: Your Camera Is Now Paired!
You should see what your camera
sees in the preview window.
This is also where you’ll name your
camera.
Once named, press the ‘NEXT’ button
to continue
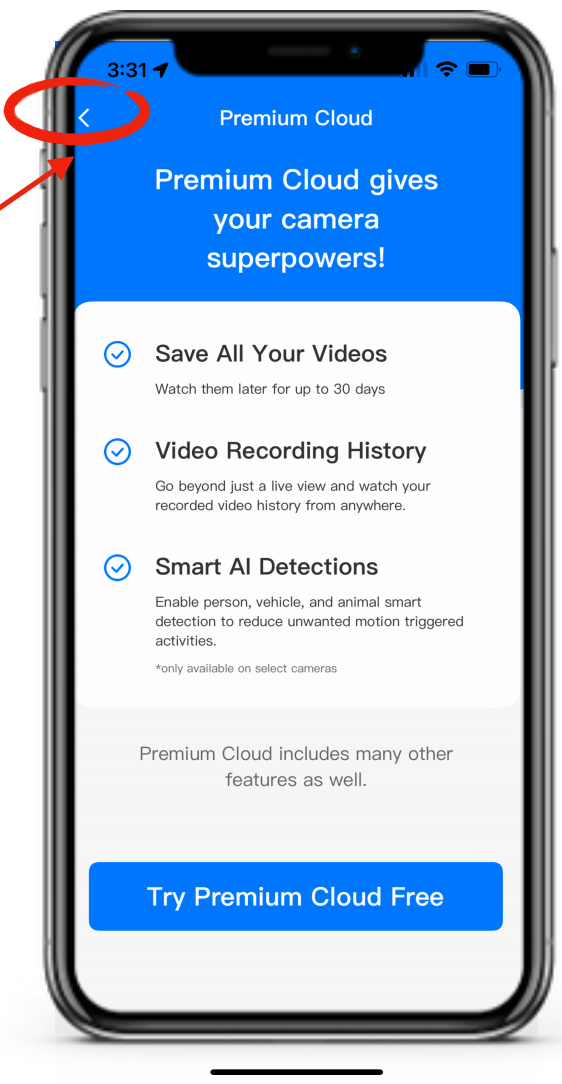
Step 9: Premium Cloud Storage
If you DO NOT WANT cloud storage
and just want to use the 64 GB SD
Card to record footage you’ll want to
OPT-OUT of the Premium Cloud.
OPTING OUT:
1) Click the ‘back’ button on the
Top right of the screen.

2) You’ll be asked if
you are sure you don’t want Cloud
Storage. Simply click the “Continue
Without Premium Cloud” to never be
charged a monthly subscription for
cloud storage. By inserting a 64 GB
SD card you’ll have access to all the
recordings through the app.
To Add Another Camera, simply
repeat STEPS 1 through 9.
Installing The Micro SD Card Into Your Camera.
To install your MICRO SD Card, you’ll want to face
the gold plated PINS pointed towards the camera
lens. (Figure 1)
Once inserted, you’ll hear the SD CARD ‘click’ into
place. Your SD CARD is now locked into the
camera for recording video & audio. (Figure 2)

Viewing Your Camera And Settings
How To Use The Phone App:
Now that your camera is setup in your phone app, you’ll
be able to set the camera up to your liking.

To access the settings for each
individual camera, you’ll need to click
on the camera you want to change
the settings in.
To access the settings for each
individual camera, you’ll need to click
on the camera you want to change
the settings in.

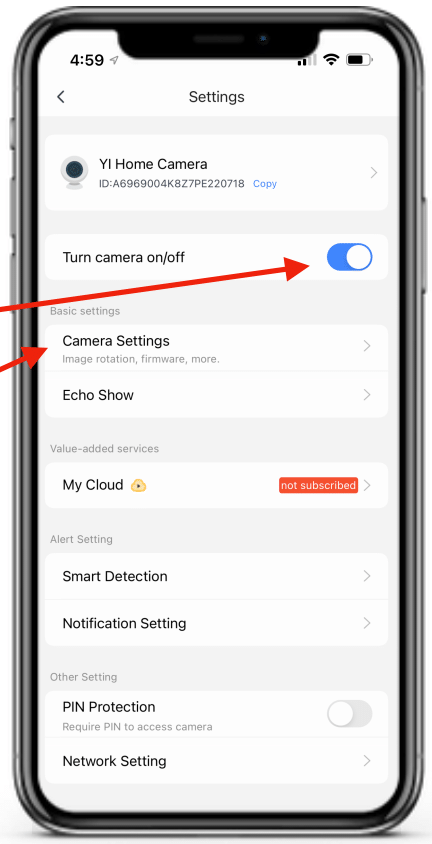
Once in the settings you have many
options to choose from!
Turn Camera on/off:
When at home or during the day you can
toggle your camera off.
Camera Settings:
Inside camera settings you’ll have
options such as Image Rotation,
Microphone On/Off, Night Mode, and
more!
Clicking inside of Camera Settings, the
first option will be “Image Rotation”. By
toggling on Image Rotation you’ll rotate
the video image by 180°. This is
particularly useful when the camera is
plugged in upside down and you need
to rotate the video image to be right
side up.
Next is the “Camera Microphone” by
enabling this to be on, you’ll be able to
capture sound.
“Night Mode” will give you (3) options.
Click on Night Mode to choose how the
camera displays video at night.

Full Color Night Vision
Full color night vision will show the
video surveillance in color, however —
to do this will have the 4 LEDs ON
constantly giving away the location of
the camera.
Infrared Night Vision
This night vision uses infrared light,
undetectable by the naked eye to see
at night. The video will be in black &
white.

**Smart Night Vision (Most Popular)
This night vision uses infrared light to DETECT motion.
Once motion is detected the camera will turn on all 4 LED
lights on alerting the intruder they are being watched.
“Motion Tracking”
With motion tracking on, once the
camera sees activity it will rotate and
follow the motion until it goes out of
sight. The camera will then return to its
original set position.

“Smart Detection”
Smart Detection will give you options
Such as tracking motion and how high
you’d like the sensitivity level to be
along with a few other options.

Inside of “Smart Detection” you’ll be
able to toggle on “Motion Detection”
which will send alerts to your phone
when turned on AND when the camera
tracks motion.
Depending if you have Trees that blow
outside or a swing that moves in the
wind and would rather not get an alert
each time you can LOWER the
sensitivity level to reduce how sensitive
the camera is to tracking movement.
The higher the sensitivity the more
smaller movements become noticed.
Alert Frequency can be set from Low, Medium, and High.
This is how often you want to receive notifications to your
phone.
Along with the schedule that you can set to receive those
alerts.
Lastly on this page is the “Camera Alarm Sound” which
when toggled on, the camera will sound an ‘ALERT’ when
motion is tracked by the camera alerting the intruder they
are being watched.
CHECKING YOUR WIFI STRENGTH
Sometimes when a camera is placed
outside, the wifi isn’t strong enough to
reach that area and can cause connections
issues with the camera and the app.

To make sure you have a
‘STRONG’ connection
between your camera and
your wifi. Simply goto
‘Network Settings’ —> ‘info’
—> And check your Signal
Intensity. If your signal intensity is
WEAK or LOW, you’ll need to move
your camera closer to your wifi
connection.

ADDING MULTIPLE CAMERAS
(WITHOUT BUYING CLOUD STORAGE)
1) Once you’ve installed your first camera.
You’ll want to go back to the home screen and click on the ‘+’ button
on the top right.
You’ll then start the entire process of adding a camera again as shown
on pages 9 through 14.
Rest assured — you do NOT have to subscribe to cloud storage to add
multiple cameras to the app. You’ll be able to view each camera
individually. (However — to view multiple cameras at the same time, you
will need to upgrade to cloud storage)
Once you’ve added the second camera, you’ll be asked again if you’d
like to ‘Try Premium Cloud Free’. To say no, all you must do is click the
back arrow on the top left to exit.

You’ll be asked if you are sure
you don’t want Cloud
Storage. Simply click the
“Continue Without Premium
Cloud” to never be charged a
monthly subscription for cloud
storage. By inserting a 64 GB
SD card you’ll have access to
all the recordings through the
app.

PzP
WiFiBulb
Surveillance camera
P2P
WiFi Bulb Surveillance camera
This user manual will introduce how to use this product briefly,
and provide you with detailed information of each step operation.
Please read carefully before using this camera. And also keep this
manual well, we hope that this product will satisfy your various
daily life needs and long-term service to you!
Product Qualitlr Assurance
This product is in line with the FCC & CE certification authority
standards, which well guarantee customers safety use.
I-Product Features
l.Stylish apperance.camera body with three-dimensional
UV treatment
2. With 24 pieces infrared night vision LED light
3.Remote control to record video by mobile APP.
4. Remote control to take photo by mobile APP.
5.7*24 hours uninterruptible working
6.Photo taking, video recording,great night vision,motion
detection function alarm
7. Point-to-point connection. can work without a network
connection
Instruction for quick operation of
network surveillance bulb camera
This'product is a 25-frame HD (1,080P) network surveillance bulb camera
with an external micro SD card and a multi-functional high-tech product
integrating functions of video recording, photographing, night vision, motion detection alarm, APP real-time monitoring, and file storage ' It is equipped with high-capacity batteries, and has functions of 5 megapixel HD
recording.It supports up to 32GB micro SD card, 7*24 hours uninterruptible
long-time work and with APP convenient control. Moreovet it work as the
best anti-theft and evidence-gathering tool with strong concealment'
I-APP software download
ForAndroid phones, please search in Google Play:P2PLiveCam to download the APP
For iphone, please search in
AppStore:P2 PliveCam to download the APP
Q. j i*.::.
*! ,S d '';
II-Wfi connection medthod one
l.Open the wifi function of your mobile,
and then turn on the bulb camera
( 30 seconds later;blue indicator light
start flickering,then the bulb camera is
turned on , and then red indicator light ;,
will keep on flickering, wchich means
fi
the bulb wifi signal is oPened
l'.'$i
)
,',
that is downloadec:.,
and installed in your mobile phone. l;;
(Specific operation steps are shown in ,,
below pictures.)
2. Open APP software
Step 1 ( open
rX
)
-2-
':ll,|'
Step3 ( Clidk
*.
,t,
re
Y
+r{!i'1n!! ' o'} )
W
ilt l3Dlj..rlld*'lr :El 3c;)
ln I 5ti-l
{-i.ri}lat rltq
,
;6i.t;*+.ltll
lvr,li15
lljr*!!
,.i i;rNt "l{? ri
* lii
l
,r'i:f..::a:i.i.t r ... :'
tl.tliiiY --::i .:., i.
;!
: ia:
reffi
Step4 ( Input the UID number or scan the QR code of this bulb camera
- u' to choose the available WIFI signal from
Step5 ( Click
your home router and input the password , Click ti;rrr i:sr{rqr;rn!i"'irrr )
, u.".,
3.After you finish the WIFI connection successfully, you will be able to
see the live video in the APP
4.When the bulb camera is connect successfully to your home router wifi
signal, the red indicator light will keep on.
fl-Wifi connection method
two
.
turn on the bulb camera ( 30 seconds later;blue indicator light
start flickering,then the bulb camera is turned on, and then red indicator
1. Then
light will keep on flickering, wchich means the bulb wifi signal is opened )
2.Turn on the WLAN of your mobile. Then use your mobile to search the
WFI signaI(WIFI name is the UID number on the bulb camera ) sended
out by this bulb camera, and input the password to connect (You need
wait about three minutes to connecl
3.After your mobile connect to the WFI signal(sended out by this bulb
camera). Then you open the APB
to search the camera,then clrck
tn.n .ti.t
ffiMl!*kt
.,11.1.ru,:,,.i !i; ri- t_,llh
,]i
*i:!7C:
...
,
reffi
4. long
clrck
'@
click C-r
rarr
'trlFleonfia
password.click "OK"
"
,th"n click 'Advance Confing
.
Select the SSID then input the
,
ftfl c€fit
st&rd B**d tufi*
trryPZPrwF*sa.!
{,
EreN
IV-Point-to-point AP direct connection(when you are in your
home, and do not need the internet to control the bulb
camera, you can just connect your mobile with the wifi
sended out by the bulb camera to control the bulb camera in
your home.)
1. You turn on the bulb camera, then you search the WIFI
signal(WFI name is the UID number on ihe light bulb camera)
sended out by the bulb camera with your mobile, and input the
password to connect to this wifi signal( It takes about three
minutes to finishi connection)
2. After your mobile connect to the WIFI signal sended out by
the bulb camera, then open the APB click Fl , then you can
control the bulb camera on your APP.
V-screen shot. video recording and alarm
1.ln lhe APP, open the live video as below picture, you can see on
thetopof thescreenwith"
1080P,720P,480P" thisthreeoptions,
you can choose according to your own preference. Also you can
adjust the color contrast degree and brightness.
,here from left to right respectively
W
represent the function: monitor, photograph, video recording,
left/right, up/down.
By
clicking "photograph"
or
"video recor-
ding" , the images or videos will be saved in the phone memory
(as
shown below).
2.Long press as below
the "Cam"
,
to start more setting options
-7-
3. Advanced configuration(To remotely change basic functions
ofthedevice)
ffi
,
::;..
Eilp2 ps6!t
LC*.tt11
G*#ffi
-B-
Administrator oPeration guide
f . installthe search
toof
ffi
(which in the disc) on the
computer.
(Note: administrator setting can only be made withinLAN)'
2.Click
Fhrt
to display the devices connected to network
Sr
!r-il+,+
"
(as below)
.u
ir
-ejdi.i,-l;:1rr::l:r:r,:rr'r,ia;j:
lil-:':5ir;-tpi;Xiy:i:l:;'i jt",:jrr"tr'r"'':' '''';::r'r':'i:r.::i:r:"'j''i
3.Double click the searched IP. Enter in the next page to type
in user name (admin) and click to confirm it. (Note: the original user name is admin, with no password)
4. Enter in setting page after completing the above steps'
Download the plug-in and select a language for first use
(click $
to download and install)'
IJ
f
u
.
t f:. 1: * -,.. . ..!
i:""4,,i_..:rr.-...,*
*gE
:e"'
I
:':1'r' '
j:
€!t:'
! *
'J
fS
5.
Ctick.
':'-
'..,.. j: ' . :!.
!:
.!
,l.,ll'.:;i,lj',,?l,i.',i'1,:ihl,il"i"Jl;Jl,:,i:i.l;';;;:;::';,;,;;.,"
again to enter in setting page (as shown below).
6.
Click
ffi
to start setting
(as shown betow)
7. System management setting: to select the item
(as shown below).
to be set
Computer remofe surveillqnce
o{ the bulb cqmro:
1 You should install the
=_H._
comouter client software first
2-After finish install, you
can
'ffi
H
find below in your computer
3-Doulb clikc on above, and then you willsee below
4-User name(Account) : admin
You do not need to input password, just left empty.
relcsre use rPflarer-a X
User l{me _
P
assw
Fffimm
ailnin
rr il:
Logir
Cmcel
5. Then ,as above the picture,
click "1" (with
red circle), then
click" 2" , then click to start search. Then you will find
an Ip
a'd'below picture, and input the UID numbqr and user name.
click "OK"
-
?s--.4'.
[email protected]
Then you will see the live video "
User
Ol-il
llue:
Fs:woril
fier Fasqoril
Confirm Ptsstoril
.
Main function description
1,Time setting
Open system management page-click time
select time zone-synchronize with host
2.
-save.
Administrator password setting
Open "change password"
-confirm
-Vpe
the new password-save.
setting-
in the new password
3.Change the password of device (original password: gggg)
Open "network setting"
setting-type in the new
password-save-return to-PZP
system management to reboot
the device. (it can also be set remotely by App).
4.Alarm setting
Open "alarm
bu
setting"
alarm setting---<lick Ip Camera
ilt-in-select the requ -start
ired sensitivity.
(Option 6 is suggested)
5. SD card
,
setting
SD card should be
formatted for the first time to insertenter in SD card setting to selectthe needed function before
setting other functions.
6. View
the content of SD card
method 1 : Plug out the card and read with a card reader.
method 2 : IE client-setting-SD card recording-SD
files-select the file to download .
Specifications
5 meqapixel CMOS
Pixl
Resolution
1-080P
Video format
AVI
Frames
25
View angle
L20"
Night vision lamp
24 super strong night vision lamps
Distance of motion detection shooting
6 m straight-line distance
Minimum illumination
lLUX
Continuous recording time
7*24 hour uninterruptible working
Compressed
format
[email protected]
Sound recording range
15rf
Power consumption
350MA/3.7V
Storage temperature
-20-80'c
Operating temperature
-10-60"c
Operating humidity
15-85%RH
Type of memory card
Micro SD card
Maximum opacity of memory card
Play
software
32GB
VLCPlayer/SMPlayer
Computer operation systen
Windows/Mac OS X
Mobile phone operation system
Android/iOS
Web browser
IE7 and above,chrome,fi refox safari.etc
suooort limited pieces client
software onlie at same time
Can
support 4 client software online
the sarhb time
-1
6-
Trouble shooting
1. Remote control is not enough,
Please select the most suitable definition according to the
current network environment,
2.SD card cannot save
files.
i.
SD must be formatted for first'use.
3.The device cannot be connected to network.
Please select the proper connection method according
to
the network nature.
4.The video in SD card cannot be played fluently on App.
It is due to different decoding capacity of mobile phones.
You can adjust the definition of recording device to fit your
mobile ohone.
5.The passwords are forgotten.
Directly click the reset key of device for j.0 Ohe reset button
forthe memory card slot on the side button)seconds to restore
factory settings.
Precautions
Use occasions: please strictly comply with relevant state decrees
and do not use it any other illegal purposes at your own risks.
Software upgrade: to achieve better product performance, the
manufacturer will make continuous improvement to the software.
This product is designed for convenient software upgrade by cus-
tomers. Please ask your local distributor for the information and
upgrading method of latest version of software.
Working temperature: please use it under natural temperature.
Do not operate it under a temperature that is not adapted for
human body.
Working humidity: please use it under an environmental humidity
that is suitable for human life. Do not put the product in a moist
working environment since the product is not designed with waterproof function.
- | o-