1
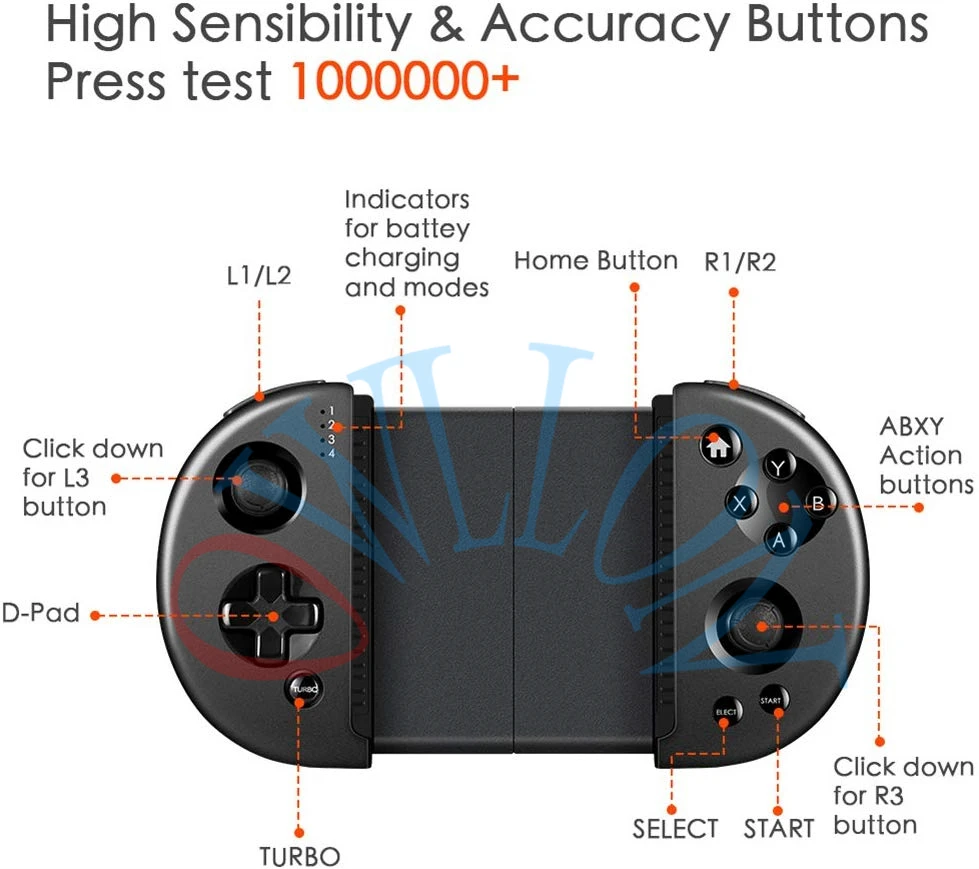
M100PLUS
READ ENTIRE INSTRUCTION MANUAL BEFORE USING
1. SAFETY INSTRUCTION
Read Instructions-All safety and operating instructions should be read before the amplifier is operated
Retain Instructions -Safety and operating instructions should be retained for future reference.
Heed warnings-All warnings on the amplifier and in the operating should be adhered to.
Follow instructions-All operating and use instructions should be followed.
Water and moisture-The equipment should not be used near water, e.g., near a bathtub, washbowl, kitchen sink,
laundry tub, in a wet basement, or near a swimming pool etc.
Ventilation-The equipment should be situated so that its location or position does not interfere with its proper
ventilation. So the equipment should not be situated on a bed, sofa, or similar surface, e.g., that may block the
ventilation openings, or placed in a built-in installation, such as a bookcase or cabinet that may impede the flow of air.
The equipment should be situated away from heat sources such as radiators, heat register, stoves, or other electronic
appliances that produce heat, so it may not suitable for commercial use.
Power sources-The equipment should be connected to a power supply only of the type described in this manual or as
marked on the equipment.
Grounding or polarization-Power-supply cords should be routed so that they are not likely to be walked on or
pinched by items placed upon or against them, paying particular attention to cords and plugs, convenience receptacles,
and the point where they exit from the amplifier.
Power lines-In case of connecting a tuner, an outdoor antenna should be located away from power lines. If an outside
antenna is connected to the system, be sure the antenna is grounded so as to provide some protection against voltage
surges and built up static charges.
Any Servicing-The user should not attempt to service the equipment r beyond that described in this manual. All other
servicing should be referred to qualified service technicians
CAUTION:
TO PREVENT THE RISK OF ELECTRIC SHOCK, DO NOT REMOVE COVER (OR BACK). NO USER-SERVICEABLE
PARTS INSIDE. REFER SERVICING TO QUALIFIED SERVICE PERSONNEL.
The lightning flash with arrowhead symbol, within an equilateral triangle, is intended to alert the user to the presence of
uninsulated
“
dangerous voltage
”
within the product’s enclosure that may be of sufficient magnitude to constitute a
risk of electric shock to persons.
The exclamation point within an equilateral triangle is intended to alert the to the presence of important operating and
maintenance (servicing) instructions in the literature accompanying the appliance.
Congratulations!
Opera Audio welcomes you to the growing number of discerning audiophiles who own Opera audio products. This
manual has been prepared to help you to maximize your enjoyment of the performance and features of your new
Consonance equipment. Please study this manual carefully and become acquainted with all the features, operation
and capabilities of your new Consonance equipment. Should you have any questions, or desire information on other
Opera audio products, please contact your local Opera dealer.
Описание
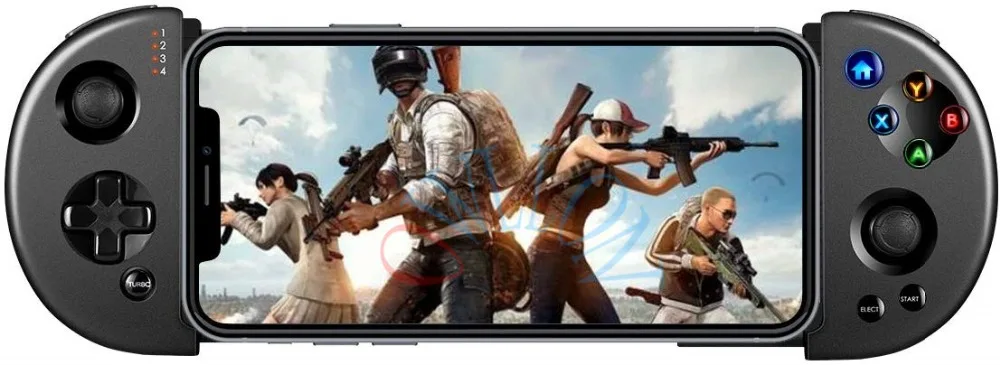
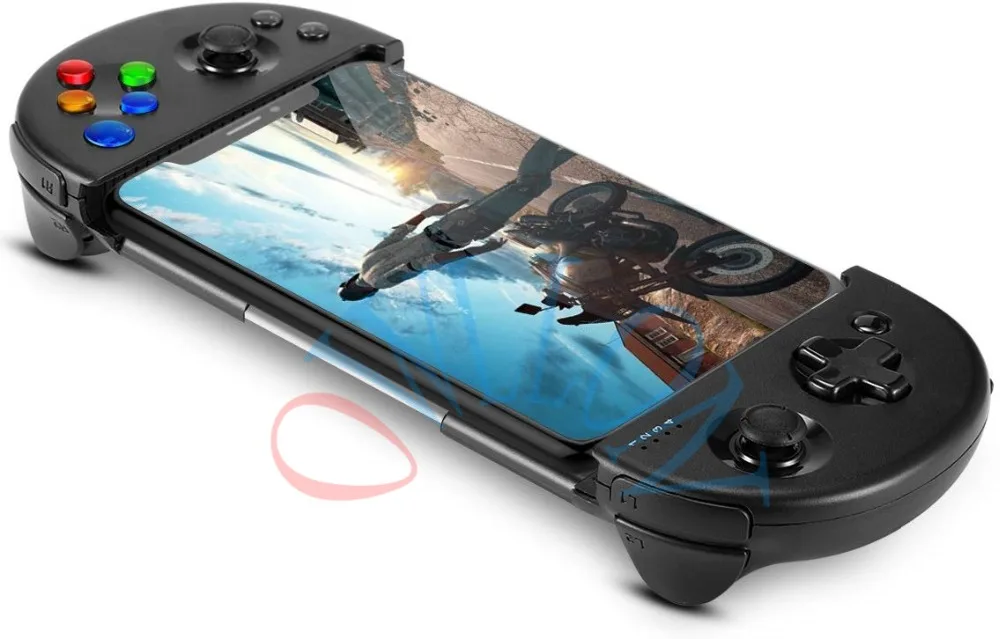
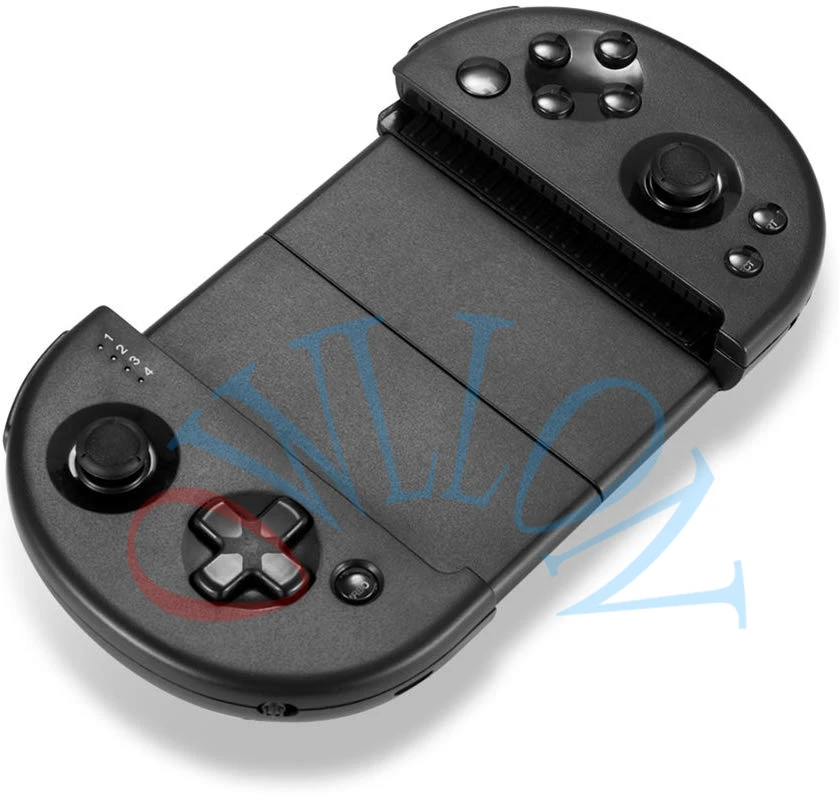
Совместимость с системой Android/IOS: этот игровой контроллер Android идеально совместим с системными устройствами android 4,4, так как это последняя обновленная версия, контроллер также отлично работает с устройствами IOS для iphone мобильных телефонов игр Телескопический дизайн: Два джойстика нажмите вниз для L3/R3, он поддерживает устройства длиной 6 дюймов с выдвижным телефонным геймпадом, и он поддерживает толщину в пределах 0,36 дюйма от устройств Беспроводное подключение: подключайте и играйте с bluetooth 4,0, расстояние дистанционного управления может достигать 10 метров, встроенный аккумулятор емкостью 400 мАч с 8 часами непрерывной игры, играя жизнь для этого игрового контроллера ПК Эргономичный дизайн: гладкое и прочно удобное ощущение руки для захвата этого игрового контроллера и все кнопки dazzle светильник чувствительны и легко нажимаются Полезные Советы: Пожалуйста, зарядите контроллер android около 5-8 часов перед первой операцией, и необходимо внимательно ознакомиться с руководством пользователя для игровых контроллеров перед любой операцией 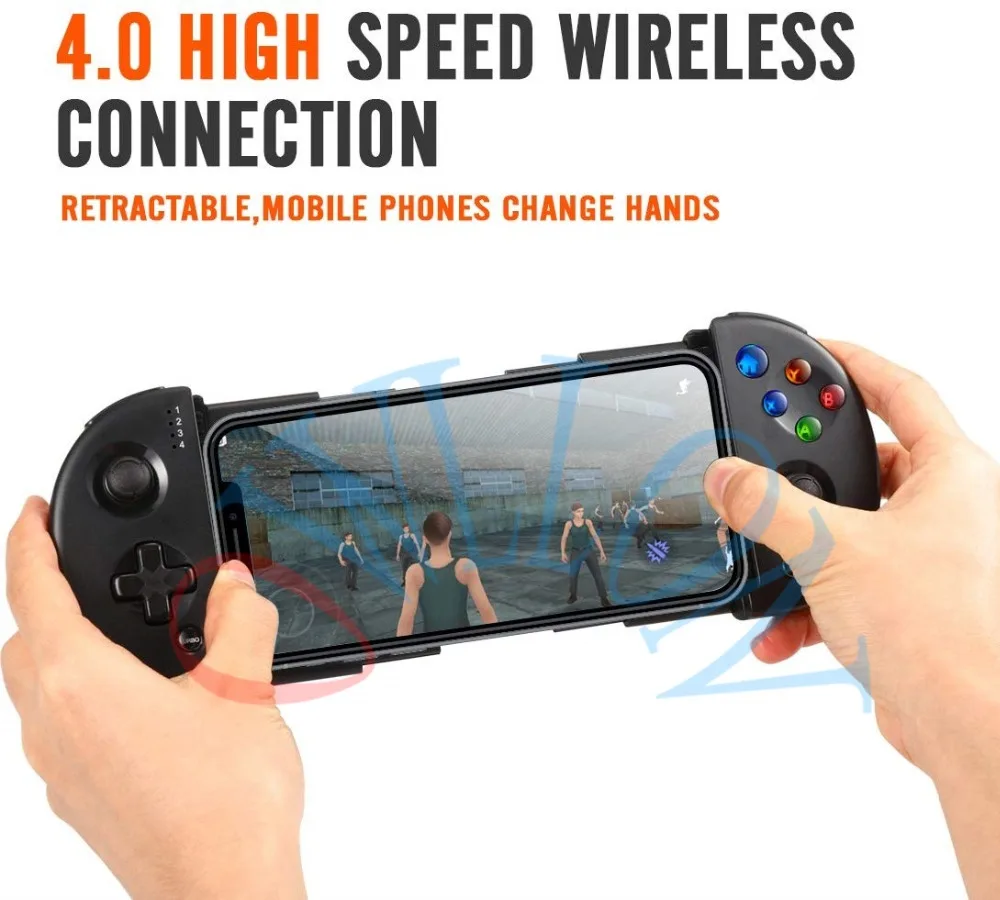
Contents:
Click question for corresponding answer.
1. How to reset?
2. How to enter HID mode to play emulator games?
3. How to play Minecraft?
4. How to get precise aiming in Call of Duty Mobile?
5. What to do if the right stick can not work?
6. What do different LED indicators status mean?
7. How to connect with cell phones?
8. Which way can I place the phone in the controller?
9. Default preset key map for PUBG Mobile and Knives Out
10. How to restore to the default setting in PUBG Mobile and Knives Out?
11. Default preset key map for PUBG Mobile and Knives Out
12. How to use preset key map on iPhone?
13. How to use preset key map on Android phones?
14. How to set customized key maps on iPhone?
15. How to set customized key maps on Android phones?
16. How to do advanced setting for each key or joystick?
17. What to do if your phone can not recognise M100plus during connection?
18. What devices and systems is M100plus compatible with?
FAQ:
1. How to reset?
— There is a reset hole under the micro USB charging port. To reset the controller, pierce into the small hole and touch the bottom with a fine needle.
2. How to enter HID mode to play emulator games?
— Press the «Android + X» button for 3 seconds until the HID indicator (No.3 indicator) flashes. Note: Only Android phones can use HID mode.
3. How to play Minecraft
— If your phone is iphone, you can play after entering iOS mode.
If your phone is Android system, you can play Minecraft only in HID mode, by pressing the «Android + X» button.
Note 1: Minecraf cannot be played in Android mode.
Note 2: Only Android phones can use HID mode.
4. How to get precise aiming in Call of Duty Mobile?
— a. Please choose “ADVANCED MODE” under «CONTROLS» setting in the game.
b. Go to ”BASIC” to trun on “GYROSCOPE”, and then you can achieve more precisely aim and shoot by motion control.
c. If it still can’t meet your requirement, go to «SENSITITY“ to adjust the «GYROSCOPE SENSITITY» range according to your operation habit after step b.
5. What to do if the right stick can not work?
— Please cancel the previous bluetooth connection and then reconnect.
Please don’t touch the Right stick when you are turning on the controller. Remap the right stick key: click R stick icon, choose «Ordinary stick», and save.
6. What do different LED indicators status mean?
— Low power — the LED4 indicator flashes
Charging — the indicator below USB port will be always on
Fully charged — the indicator below USB port will turn off
7. How to connect with cell phones?
— iOS devices:
Turn on the controller, press and hold «iOS» buttons on M100plus. LED2 indicator flashes and controller is under pairing mode. Open bluetooth on your phone, search and find «M100 plus» in the bluetooth list. Connect, LED2 indicator will be always on after connected successfully.
Android devices:
a. To enter Android mode, press and hold «Android» buttons on M100plus. LED1 indicator flahses and controller is under pairing mode. Open bluetooth connection on your phone, search and find «M100 plus». Connect, LED1 indicator will be always on after connected successfully.
b. To enter HID mode for emulaors. Press and hold «X»+»Android» button at the same time to enter HID Mode. LED3 indicator flashes and controller is under pairing mode. Open bluetooth connection on your phone, search and find «M100 plus». Connect, LED3 indicator will be always on after connected successfully. Only under HID Mode that you can get it to work with emulators games on Android.
Note: If you can not connect your phone following the stpes above, please Turn off M100plus and reopen, then go through the connection steps again. If there’s still the same problem, cancel the bluetooth list on your phone and try the connection steps again.
8. Which way should you place the phone in the controller?
— When using this controller, please placed the cell phone horizontally with home button on the right side.
9. Default preset key map for PUBG Mobile and Knives Out
10. How to restore to the default setting in PUBG Mobile and Knives Out?
— Open “Setting” in the game, enter «Customize» interface. Click «Rest, Save and Exit.
11. Default preset key map for PUBG Mobile and Knives Out
12. How to use preset key map on iPhone?
— Step 1. Download and install «ShootingPlus V3» APP from Apple store.
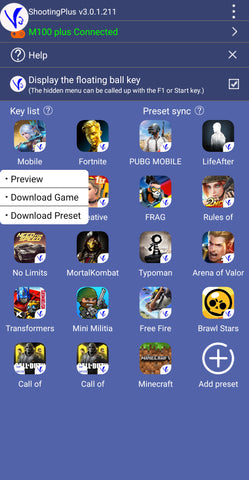
Step 2. Connect your phone with M100plus controller. Open «ShootingPlus» APP, and you will see there’s a list of preset key maps for different games. Click on the game you are going to play and choose «Download Preset» in the popup menu. You will be informed that preset has been downloaded successfully. Then all controller buttons are ready for playing.
Step 3. You can click «Preview» to see if the preset key map is your favorite setting. Or check the key map here if you forget each buttons’ features after download. NOTE: You might need some adjustments for the preset key maps, since the key positions in preset key map can not fit for all cell phones and games. The key will offset a little from the right position, which will cause no reaction when you press buttons. You need to check and adjust the key a little bit to make sure every key is in its right position. Please find detail in step 4.
Step 4. If you need to make adjustment from preset key map, you need a screenshot from the game, which shows all the keys you need in the game. For PUBG, click «Setting» — «Control», enter «Customized» interface and make a screenshot. Then get back to «ShootingPlus V3» APP, click the V3 floating ball to enter the key map editing interface. The preset key map will shown on the screen. Long press the phone screen and a menu will popup. Choose and insert the screenshot you just get. Drag the key to the right position you want. Click «Save» after you finish the adjustment.
13. How to use preset key map on Android phones?
— Step 1. Download and install «ShootingPlus V3» APP from Google Play Store. Open «ShootingPlus» APP, enable the floating window, permit drawing over other apps.
Step 2. Connect your phone with M100plus controller. Open «ShootingPlus» APP, and you will see there’s a list of preset key maps for different games. Click on the game you are going to play and choose «Download Preset» in the popup menu. You will be informed that preset has been downloaded successfully. Then all controller buttons are ready for playing.
Step 3. You can click «Preview» to see if the preset key map is your favorite setting. Or check the key map here if you forget each buttons’ features after download. NOTE: You might also need some adjustments for the preset key maps, since the key positions in preset key map can not fit for all cell phones and games. The key position will offset a little from the right position, which will cause no reaction when you press buttons. You need to check and adjust the key position a little bit to make sure every key is in its right position. Please find detail in step 4.
Step 4. If you need to make adjustment from preset key map after preset key map downloaded, go back to the game interface where shows all the keys you need in the game. For PUBG, click «Setting» — «Control», enter «Customized» interface. Click the V3 popup ball to enter the key map editing interface. (Make sure you have chose the option that allows to display the V3 floating ball in the game in «ShootingPlus V3» APP). Then the preset key map will show on the screen. Drag the key icon to the right position you want. Click «Save» after you finish the adjustment.
14. How to set customized key maps on iPhone?
— Step 1. You need a screenshot of the game, which shows all the keys you need in the game. For PUBG, click «Setting» — «Control», enter «Customized» interface and make a screenshot.
Step 2. Download and install «ShootingPlus V3» APP from Apple store.
Step 3. Connect your phone with M100plus controller. Open «ShootingPlus» APP, and you will see there’s an «Add preset» option at the end of the list of preset key maps for different games. Click «Add preset» and you will enter the key map editing interface.
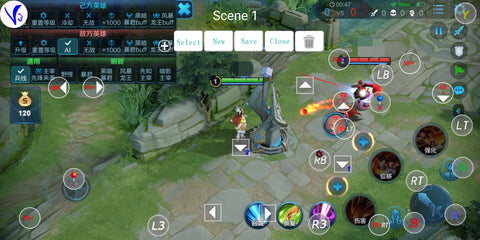
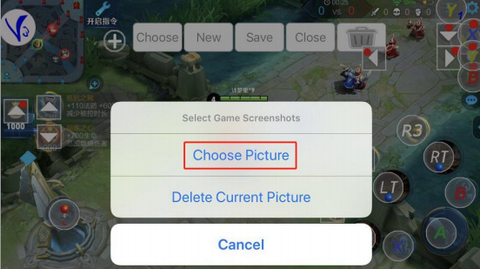
Step 4. Long press the phone screen and a menu will popup. Choose and insert the screenshot you have for the game. Press button or joystick which you want to set up. Then the corresponding key icon will appear on your phone. Drag the key icon to the right position you want. Click «Save» after you finish the customized key mapping.
«Select» — Click «Select» and you can choose the key maps you have already had.
«New» — If you want to reset all the keys from begining, click «New» and all the key icons on the screen will be cleared.
«Save»- Click «Save» after you complet your costomized key mapping.
Dustbin icon — If you want to delete any key icon on the screen, just drag it to the dustbin.
15. How to set customized key maps on Android phones?
— Step 1. Download and install «ShootingPlus V3» APP from Google Play Store. Open «ShootingPlus» APP, enable the floating window, permit drawing over other apps.
Step 2. Make sure to choose the option that allows to display the V3 floating ball in the game.
Step 3. Open the game you are going to play and go to the inteference, which shows all the keys you need in the game. For PUBG, click «Setting» — «Control», enter «Customized» interface. Click the V3 floating ball to enter the key map editing interface. Press button or joystick which you want to set up. Then the corresponding key icon will appear. Drag the key icon to the right position you want. Click «Save» after you finish the customized key mapping.
«Select» — Click «Select» and you can choose the key maps you have already had.
«New» — If you want to reset all the keys from begining, click «New» and all the key icons on the screen will be cleared.
«Save»- Click «Save» after you complet your costomized key mapping.
Dustbin icon — If you want to delete any key icon on the screen, just drag it to the dustbin.
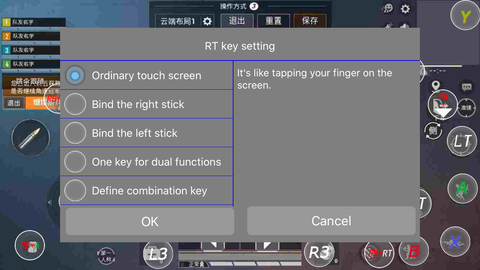
16. How to do advanced setting for each key or joystick?
— In the the key map editing interface, click on the button icon. A menu will pop up for advanced setting on this button.
17. What to do if your phone can not recognise M100plus during connection?
— Make sure M100plus is disconnected with the other phone nearby, which is previously paired. Turn off M100plus and reopen, then go through the connection steps again. If it doesn’t work, cancel the bluetooth list on your phone and try the connection steps again.
18. What devices and systems is M100plus compatible with?
— It supports Android 6.0, iOS 11.0 or above System and emulators (For Android phones ONLY). *NOT COMPATIBLE WITH MTK PHONES AND IOS 13.4 and above IOS system*
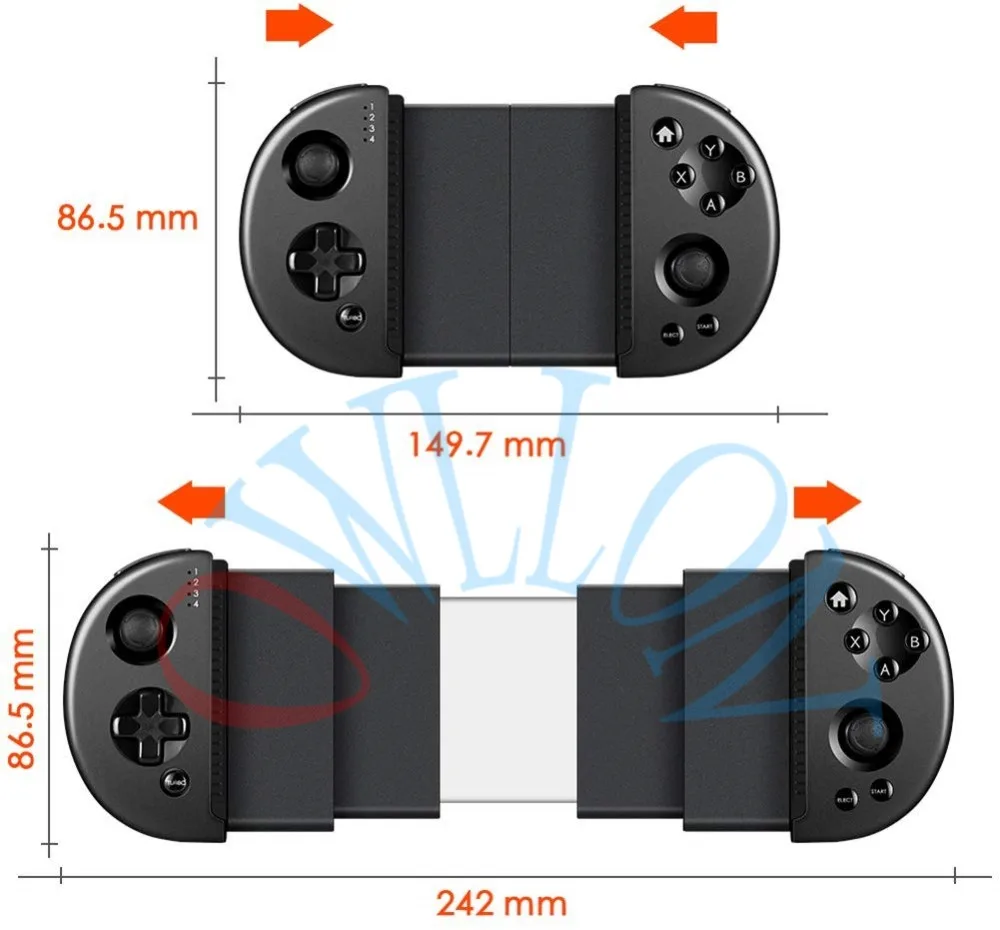
It can fit for cell phones of 3.5-6.3 inch in width and 0.3in in thickness. Cell phone models below are comptible with M100plus controller.
* Samsung Galaxy S series, Samsung Galaxy Z series, Galaxy Note series, Galaxy A series, Galaxy M series, Samsung W series
* iPhone 6,iPhone 6 Plus,iPhone 6s,iPhone 6s Plus,Iphone 7,Iphone 7p,Iphone 8,Iphone 8p,IPhone X,IPhone XR,IPhone XS,IPhone XS max, Iphone 11,IPhone pro,Ipnone 11 pro max
* Google Pixel series
* Oneplus 7 series, Oneplus 8 series
* Huawei P series, Mate series
* Moto G series, Z series, E series
- Manuals
- Brands
- coov Manuals
- Adapter
- N100 Plus
- Instruction manual
-
Contents
-
Table of Contents
-
Bookmarks
Quick Links
Content:
Ⅱ、Wireless A Mode
Ⅷ、QuickMacro
N100 Plus Instruction Manual
Related Manuals for coov N100 Plus
Summary of Contents for coov N100 Plus
-
Page 1: Table Of Contents
N100 Plus Instruction Manual Content: Ⅰ、Before use Ⅱ、Wireless A Mode Ⅲ、Wireless B Mode(Default Mode) Ⅳ、Wired Connection Ⅴ、PC end Joypad use Ⅵ、COOV assistant PC side Ⅶ、Firmware/script update Ⅷ、QuickMacro A、Button mapping B、Burst (off by default) C、Auto combo D、Auto infinite loop function (off by default) E、Joypad vibration switch and force adjustment function…
-
Page 2: Ⅰ、Before Use
5 seconds. After the N100 Plus is successfully connected, there is no need to enter the “Joypad”-“change grip/sequence” interface, otherwise the handle will be automatically disconnected. Press the N100 Plus pairing button and the handle will resume operation.
-
Page 3: Ⅲ、Wireless B Mode(Default Mode)
1. Go to the Switch and set the «Controllers and Sensors» — «Change Grips / Order» interface. 2. Connect the Joypad to the N100 Plus. 3. Connect the N100 Plus to a power source or a charging treasure (powering the N100 Plus). 4. The N100 Plus indicator 1 flashes blue.
-
Page 4
(Search for Bluetooth). 5. wait 3-5 seconds or so, the Joypad indicator light is always on, the N100 Plus indicator is always on, the game display shows that the Joypad is connected successfully and a… -
Page 5: Ⅳ、Wired Connection
5, wait 3-5 seconds or so, the first light of the Joypad indicator light is always on, the game display shows that the Joypad is connected successfully and a «USB» prompt appears, the connection is successful. Ⅳ、Wired Connection The N100 Plus is wired to the Switch host and Joypad, plug and play. (Only used in wireless B mode)
-
Page 6: Ⅴ、Pc End Joypad Use
Note: When connecting the device, connect the Switch to the last step. Ⅴ、PC end Joypad use The N100 Plus has a Bluetooth wireless connection Joypad on the PC side and the indicator light is green. (Only used in wireless B mode) Connection, usage, handle Bluetooth pairing and wireless B mode Ⅵ、COOV assistant PC side…
-
Page 7: Ⅶ、Firmware/Script Update
Ⅶ、Firmware/script update 1. Press and hold the N100 Plus pairing button, insert the N100 Plus into the computer’s USB port, and release the N100 Plus disk. 2, use the PC-side COOV assistant to perform online firmware script update Ⅷ、QuickMacro Note 1: The same button cannot be activated with the burst function 、 the auto combo and Auto infinite loop function.
-
Page 8
For example, press the button first and then press the button, so that the button has the function of button. 2.Single elimination a. Press the PS4 button / X1 button / NS Pro button + PS4 button / X1 button / NS Pro button at the same time and release to enter the button mapping function configuration mode. -
Page 9: B、Burst (Off By Default)
5.Examples 2(exchange touchpad and SHARE) a. In this configuration process, double-click PS4 button / X1 button / NS button can not be simulated into other keys, so you need ps4 handle or pro handle for this operation b. Enter key mapping function configuration mode, press the (PS4 button / button / NS Pro button)…
-
Page 10
b. Hold down the button that needs to turn off the burst function, and then press the button / X1 button / NS Pro button, so that the burst function of the corresponding button can be turned off. c. Press the PS4 button / X1 button / NS Pro button to exit the configuration mode. -
Page 11: C、Auto Combo
c. Hold down the middlePS4 button / X1 button / NS Pro button and button / X1 button / NS Pro button, and do not release d. set a value: press the , the value of a increase of 100; press the right two value increased by 20;…
-
Page 12
operation will not be shielded) c. Press the PS4 button / X1 button / NS Pro button d. Press the button used to trigger the combo. After setting up successfully, it will exit the configuration mode automatically (or press the PS4 button / X1 button / NS button once more to exit). -
Page 13: D、Auto Infinite Loop Function (Off By Default)
D、Auto infinite loop function (off by default) This function can perform infinite loop functions on selected buttons. When the button is pressed, the button is locked in the held down state until the button is pressed again and released. This function can achieve an infinite automatic operation of one button. Note: When using the infinite loop function, if you want to perform other function configuration, you need to stop the infinite loop state.
-
Page 14: E、Joypad Vibration Switch And Force Adjustment Function
configured infinite loop function will be eliminated automatically, and it will exit the configuration mode automatically. 4. Start/stop infinite loop a. Press the button that has set the infinite loop function to enter the infinite loop state. b. Press this button again to exit the infinite loop state 5.
-
Page 15: G、Calibration Function
a. the first set of configuration features default, only use the handle conversion function. b. the second group for the jet fighter 2, opened the burst function, open a one-button big move function. c. the third group for the blade of the different degrees 2, open one-click continuous strokes and button locks, used to brush reputation, etc.
-
Page 16
Linear control is used to turn off or turn on the linear response of the handle rocker and trigger to achieve a shorter bond range and faster response speed. 1.Turn off the linear a. Press the PS4 button / X1 button / NS Pro button + PS4 button / X1…
Содержание
- Этап 1: Подключение
- Проводные и беспроводные USB
- Bluetooth-решения
- Этап 2: Настройка
- Решение возможных проблем
- Андроид не распознаёт геймпад
- Часть кнопок геймпада не работают или нажимаются вместе с другими
- Игра реагирует на нажатия с задержкой
- Вопросы и ответы
Этап 1: Подключение
Начать настройку стоит, разумеется, с подключения гаджета к смартфону или планшету. Процедура в целом типовая, но отличается для устройств USB и Bluetooth.
Проводные и беспроводные USB
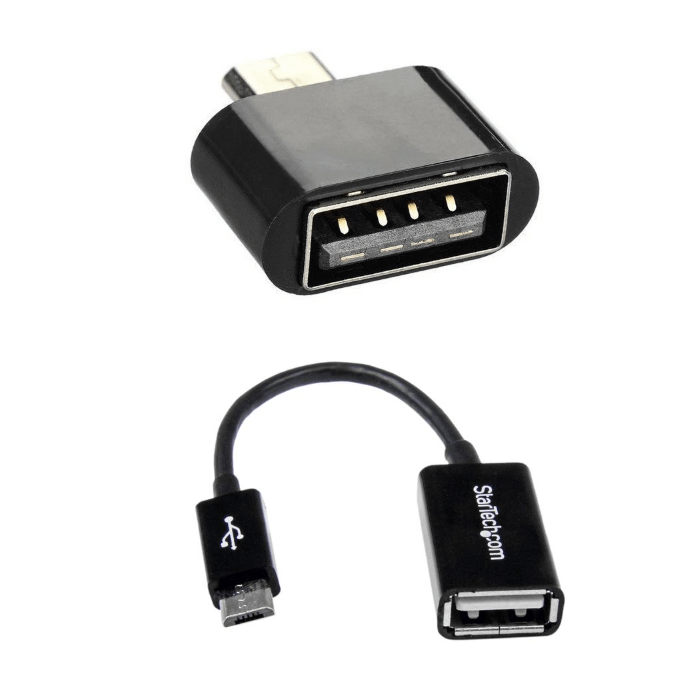
Для USB-вариантов понадобится использовать соответствующий переходник, который чаще всего выглядит так:
К этому адаптеру нужно подключать и радиомодуль беспроводных геймпадов, не использующих Bluetooth. После соединения с телефоном никаких дополнительных действий выполнять не нужно, переходите к следующему этапу.
Bluetooth-решения
Геймпады, работающие по протоколу Блютуз, требуется предварительно подключить. Делается это так:
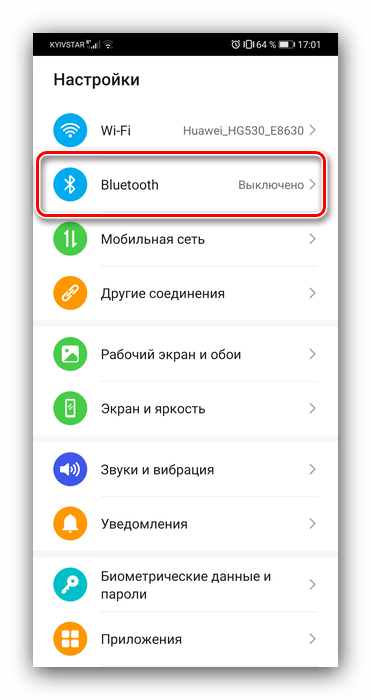
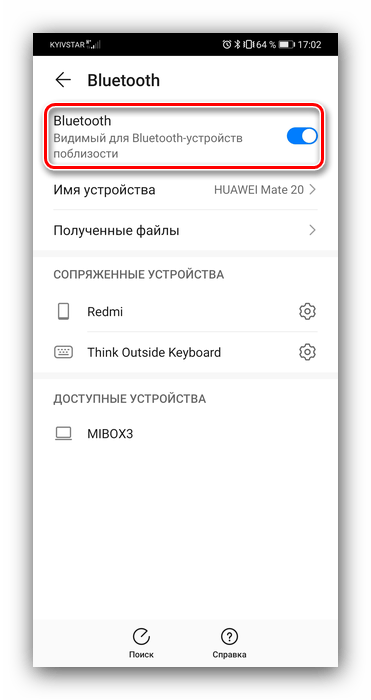
- Сначала убедитесь, что на целевом устройстве включён Bluetooth. Для этого откройте «Настройки» и перейдите к соответствующим параметрам – они могут быть как доступны сразу, так и находится внутри пунктов «Соединения» или похожем по смыслу.
Далее активируйте переключатель.
- Теперь переходим к геймпаду. Способ подключения зависит от конкретного типа – например, Xbox One Controller беспроводной ревизии и DualShock 4 достаточно просто включить и перевести в режим сопряжения. Аналогично соединяются и компьютерные игровые устройства вроде Logitech F710 или решений от других производителей.
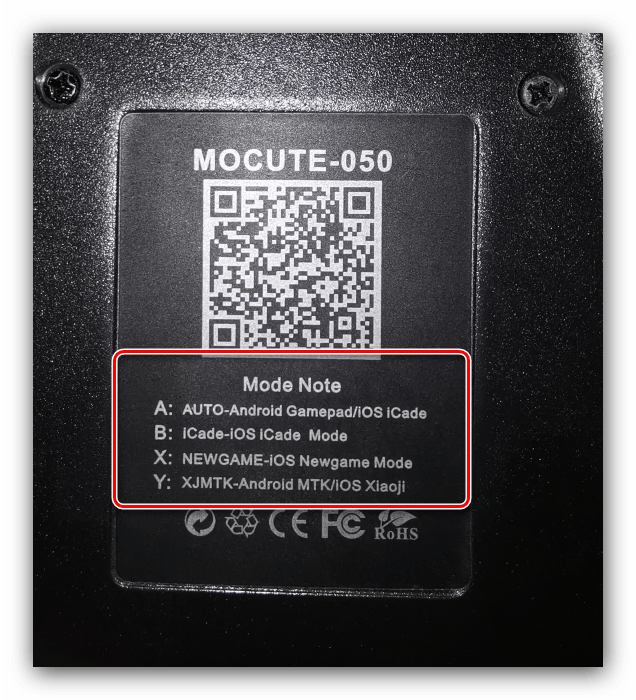
С чисто мобильными геймпадами ситуация немного другая — они нередко имеют несколько режимов работы (например, отдельные для iOS и Android), и для соединения с «зелёным роботом» требуется выбирать соответствующий. Как правило, метод включения нужного режима описан либо в инструкции к гаджету, либо на стикере, наклеенном на задней части его корпуса.
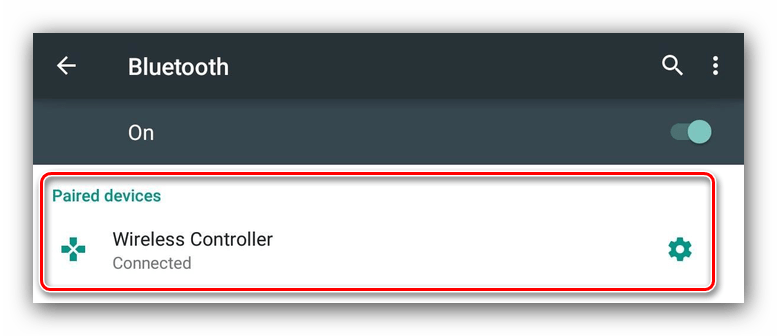
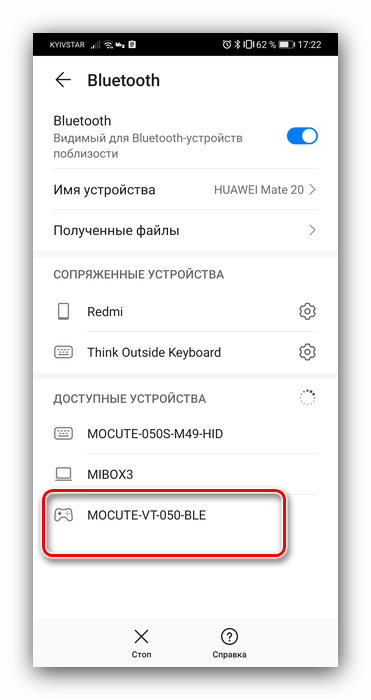
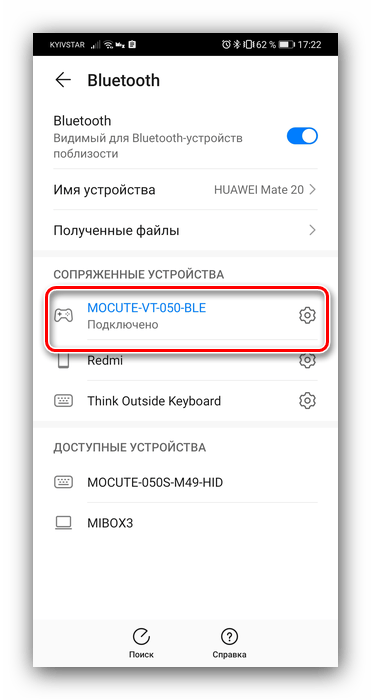
- Включите геймпад и переведите в совместимый с Андроидом режим. Подождите несколько секунд, пока в панели обнаруженных устройств Bluetooth вашего смартфона или планшета не появится запись с именем нужного, затем тапните по ней для сопряжения.
- Под именем геймпада будет надпись «Подключено» – теперь можно переходить к настройке.
Если на этом этапе вы столкнулись с проблемами, обратитесь к соответствующему разделу настоящей статьи.
Этап 2: Настройка
Конфигурирование контроллера в Android зависит от того, поддерживает ли работу с ним то или иное приложение. Если эта возможность официально заявлена, настройка совершается напрямую через него. В противном случае придётся использовать специальную оболочку. Процедура что в одном, что в другом варианте имеет тот же принцип, поэтому для примера покажем её для мультисистемного эмулятора RetroArch.
Скачать RetroArch из Google Play Маркета
- В данной программе присутствует возможность автоопределения – для её использования просто запустите РетроАрк с подключённым контроллером и нажмите на нём любую кнопку.
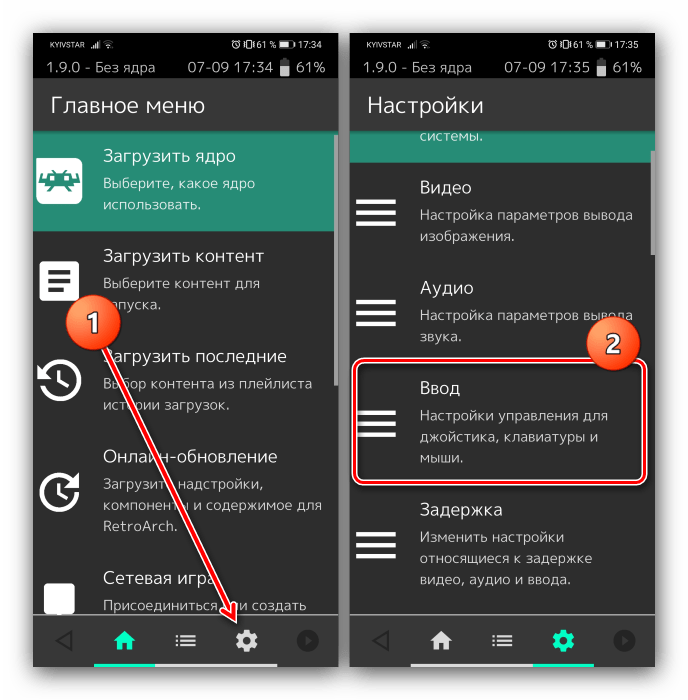
- Если же вы желаете самостоятельно назначить управление, откройте панель настроек и тапните «Ввод».
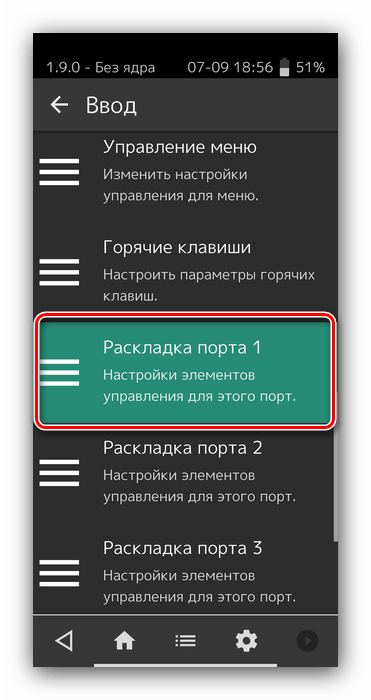
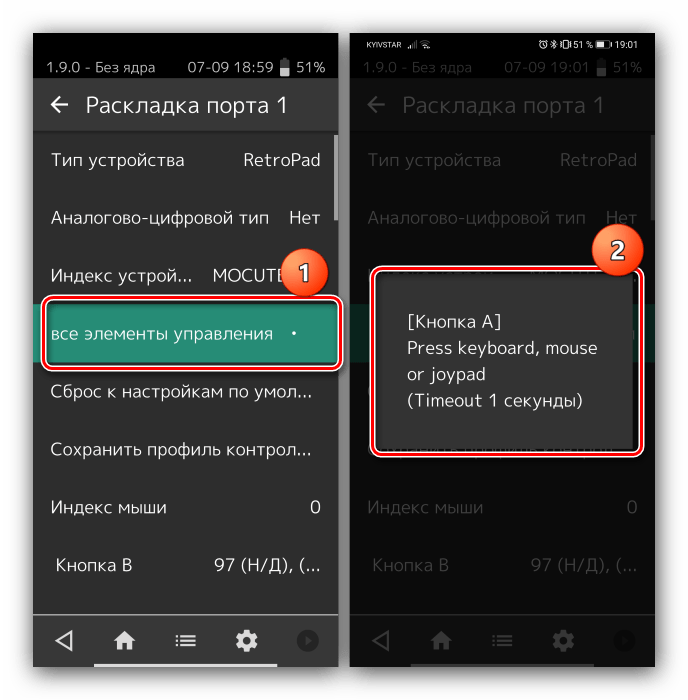
- Далее коснитесь пункта «Раскладка порта 1», который отвечает за основной геймпад.
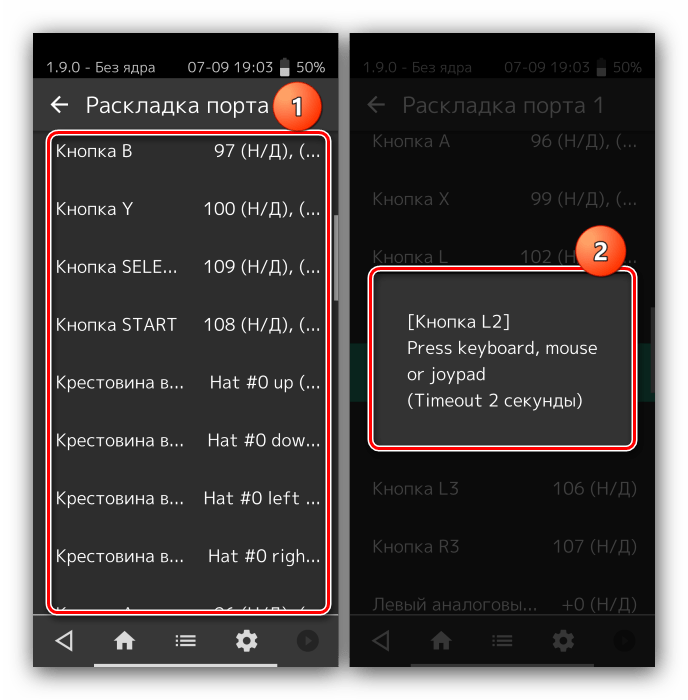
- Типов конфигурирования существует два – последовательно все разом, или каждый параметр по отдельности. Для первого воспользуйтесь опцией «Назначить все элементы управления» и следуйте инструкциям на экране.
Для установки отдельных пунктов прокрутите страницу чуть ниже, затем тапните по желаемому и выполните предложенное действие.
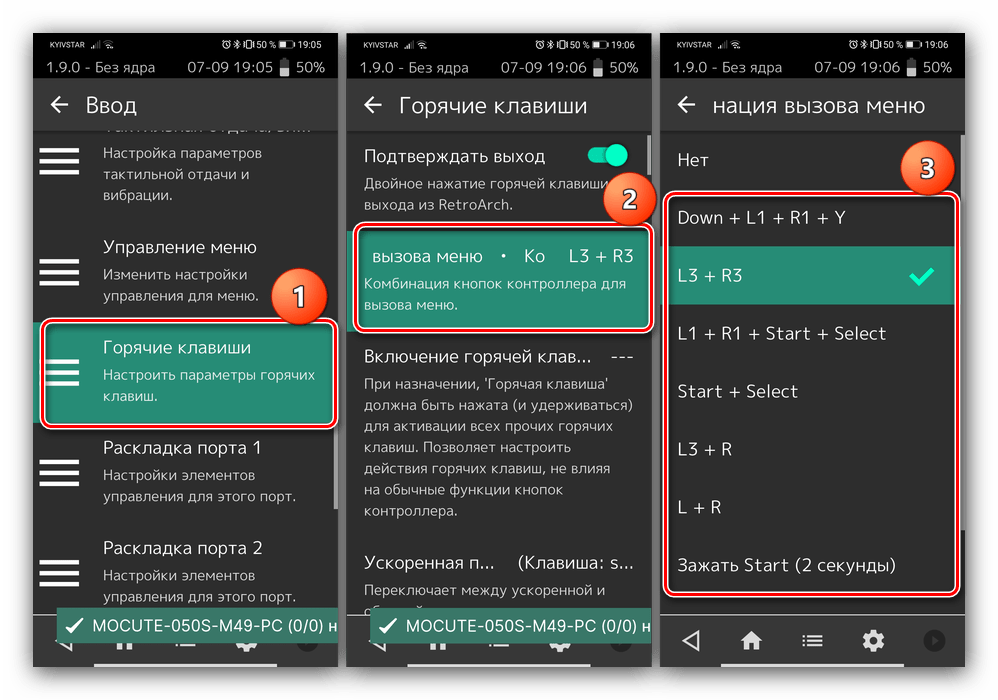
- После назначения кнопок требуется дополнительно задать сочетание для вызова меню эмулятора – вернитесь на страницу «Ввод» и воспользуйтесь пунктом «Горячие клавиши», в котором выберите «Комбинация вызова меню» и установите желаемую.
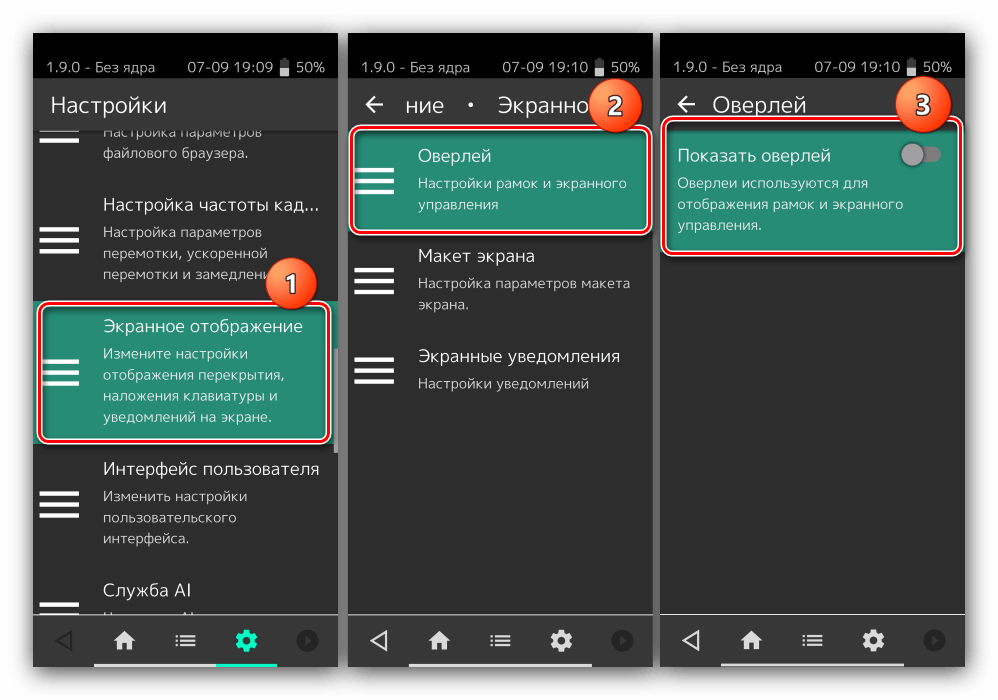
- Для отключения виртуального геймпада перейдите по пунктам «Настройки» – «Экранное отображение» – «Оверлей» и задействуйте переключатель «Показать оверлей».
Как видим, ничего сложного нет.
Решение возможных проблем
К сожалению, не всегда геймпад получается настроить и использовать – порой можно столкнуться с одной или несколькими проблемами. Рассмотрим самые распространённые и методы их устранения.
Андроид не распознаёт геймпад
Данный сбой является одним из самых частых, с множеством причин происхождения. Выполните шаги далее для диагностики и решения проблемы:
- Первым делом проверьте работоспособность геймпада: подключите его к заведомо рабочему устройству (подойдёт и компьютер) и убедитесь, что игровой девайс распознаётся и функционирует. Если наблюдаются сбои, причиной всему именно манипулятор.
- Для контроллеров с проводным подключением стоит проверить адаптер – увы, но некоторые дешёвые экземпляры могут работать с перебоями либо вовсе выйти из строя в процессе эксплуатации.
- Также убедитесь, что телефон или планшет поддерживают OTG – в некоторых ультрабюджетных решениях эта технология отсутствует, поэтому USB-устройства не будут с ними работать.
- С устройствами Bluetooth отсутствие реакции на подключение означает неполадки либо с самим геймпадом, либо с модулем смартфона (планшета). Кроме того, версии ОС от Google старше 4.1 не поддерживают работу с беспроводными средствами ввода.
Часть кнопок геймпада не работают или нажимаются вместе с другими
С этой проблемой сталкиваются владельцы мобильных геймпадов с несколькими режимами работы, и она означает неправильно выбранный. Следовательно, для устранения надо отключить девайс и переподключить его с подходящим для Андроида вариантом. В случае же компьютерных контроллеров такое поведение свидетельствует об аппаратной неисправности.
Игра реагирует на нажатия с задержкой
Проблема присутствует исключительно у беспроводных вариантов геймпадов, и в большинстве случаев не исправима собственными силами – лучшим решением в такой ситуации будет уведомить разработчиков игры о проблеме и подождать выпуска обновления.
Еще статьи по данной теме:
Помогла ли Вам статья?
Управление с помощью клавиатуры в некоторых играх сделано крайне неудобно. И, разумеется, джойстик позволяет не только повысить контроль над персонажем, но и сделать игровой процесс более приятным… 😉
В этой статье рассмотрю такой казалось бы простой вопрос, как подключение джойстика к ПК (ноутбуку). Вообще, обычно, после соединения джойстика с USB-портом (например) — Windows автоматически ставит драйвер и все настраивает (вам останется только запустить игру и до-настроить управление).
Однако, в некоторых случаях этого может не произойти и Windows (или игра) просто не увидят ваш геймпад. Более подробно о том, что и в какой последовательности делать — приведу ниже…
*
👉 Кстати!
Игры для слабых ноутбуков и ПК — [см. подборку хитов]
*
Содержание статьи
- 1 Подключение и настройка джойстика
- 1.1 ШАГ 1: подключение, установка драйвера
- 1.2 ШАГ 2: проверка и калибровка
- 1.3 ШАГ 3: что делать, если игра не видит джойстик
→ Задать вопрос | дополнить
Подключение и настройка джойстика
ШАГ 1: подключение, установка драйвера
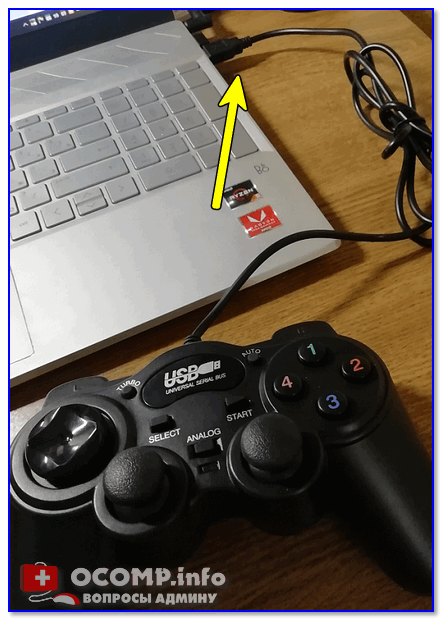
Итак, если у вас USB-джойстик — то после включения компьютера (ноутбука), его достаточно просто подключить к порту и подождать 5-10 сек. пока Windows установит на него драйвер (разумеется, речь идет о современных Windows 8/10/11, которые это делают сразу и автоматически).
Джойстик подключен
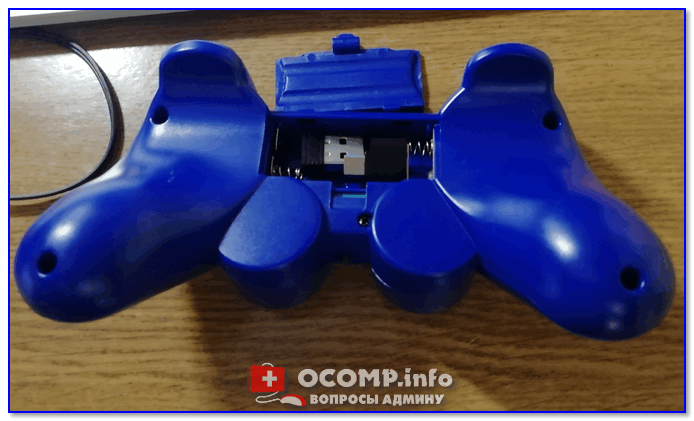
Если вы приобрели беспроводной джойстик — то для начала в него необходимо установить батарейки. Обратите внимание, что в отсеке для них производители часто «прячут» небольшой адаптер для USB-порта (чтобы не потерялся при транспортировке).
Примечание: если у вас джойстик работает на протоколе Bluetooth — то никакого адаптера в комплекте к нему может и не быть.
Джойстик (вид сзади)
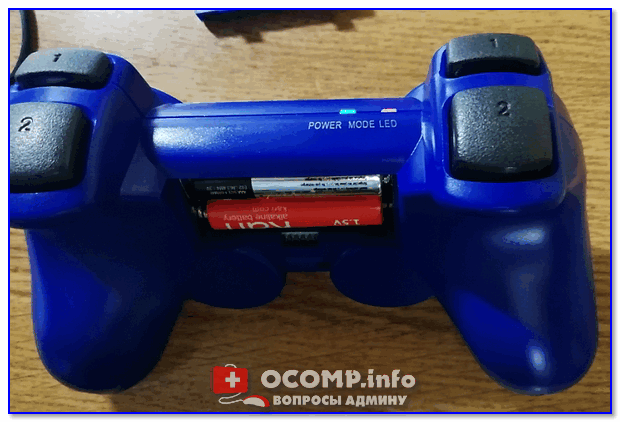
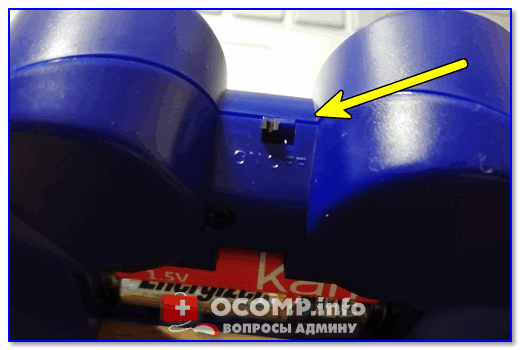
После установки батареек и включения джойстика (на некоторых моделях есть еда заметный переключатель ON/OFF) — на нем должны начать моргать светодиоды (большинство беспроводных моделей снабжены ими).
Батарейки установлены
Малозаметный переключатель ON/OFF
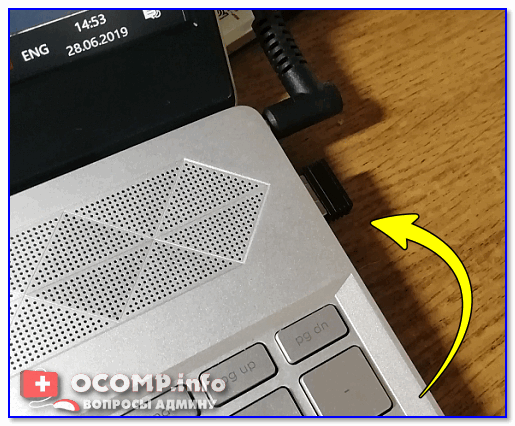
Не забудьте подключить адаптер к USB-порту.
Не забудьте подключить адаптер
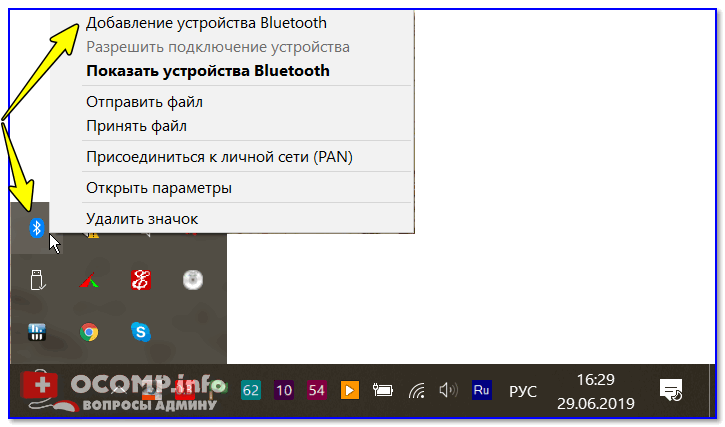
Если у вас Bluetooth джойстик (без отдельного USB-адаптера) — то просто кликните по значку Bluetooth в трее Windows и добавьте новое устройство (сопряжение джойстика с компьютером проходит буквально в 2-клика). См. пример ниже. 👇
👉 Кстати!
Если у вас нет значка Bluetooth в трее — прочитайте эту заметку (сможете настроить самостоятельно!)
Добавление устройства Bluetooth
Далее (вне зависимости от модели вашего джойстика) я рекомендую вам 👉 зайти в панель управления Windows в раздел:
Панель управленияОборудование и звукУстройства и принтеры
Если Windows смогла найти драйвер и с джойстиком не возникло проблем — вы должны увидеть его здесь (см. скриншот ниже). 👇
USB джойстик
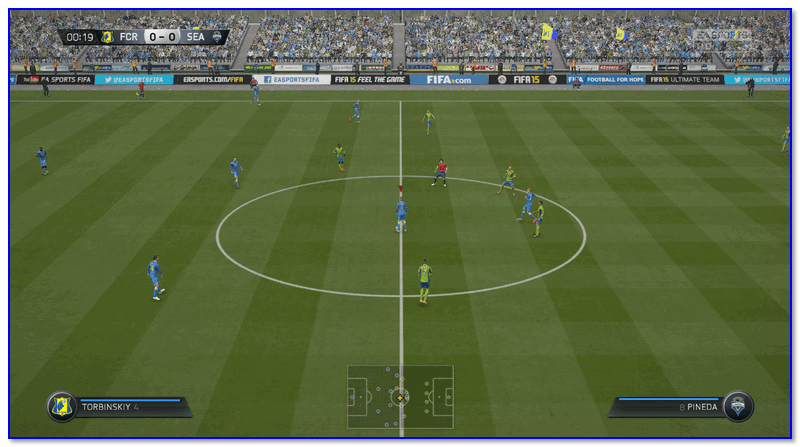
В общем-то, после этого можно запускать игру и тестировать работу девайса… ✌
Fifa
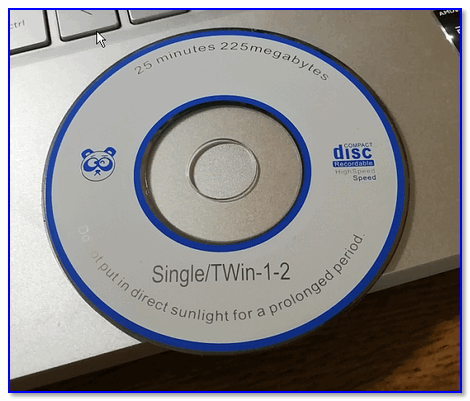
Если же драйвер не был установлен автоматически — обратите внимание на комплектацию джойстика. В комплекте к большинству нестандартных моделей идет компакт-диск (флешка) с необходимыми драйверами.
Компакт-диск с драйверами
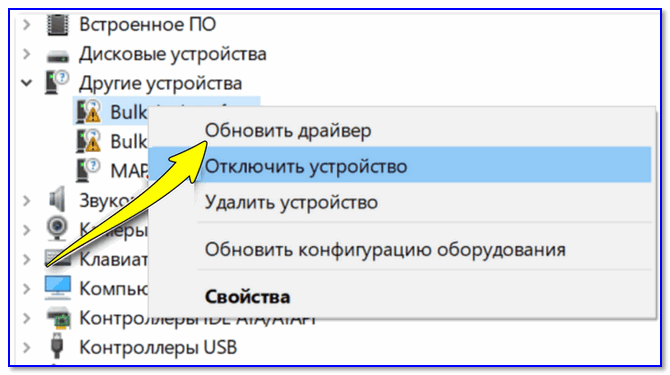
Если подобного диска нет, попробуйте 👉 открыть диспетчер устройств, и перейти во вкладку «Другие устройства» (примечание: в ней отображаются все устройства, для которых нет драйверов).
После выбрать устройство с восклицательным знаком (как на скрине ниже), нажать по нему правой кнопкой мышки и в появившемся меню выбрать «Обновить драйвер». Далее следовать указаниям мастера…
Другие устройства — обновить драйвер
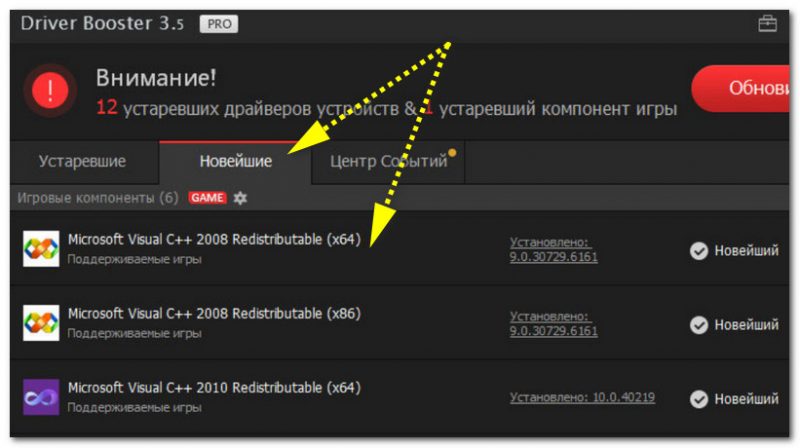
Если обновить драйвер таким способов не получилось, рекомендую попробовать спец. утилиту 👉 Driver Booster. Она автоматически определит модель вашего геймпада, а после предложит загрузить и установить для него драйвер.
Кроме того, эта утилита проверит наличие всех библиотек в системе, которые нужны играм (Visual C++, DirectX и прочие).
Driver Booster обновляет помимо драйверов все необходимые библиотеки для игр
👉 В помощь!
Как найти драйвер для «любого» устройства по его коду ИД (ID, VEN/VID, DEV/PID).
*
ШАГ 2: проверка и калибровка
Если джойстик ведет себя как-то подозрительно (например, не срабатывает какая-нибудь кнопка или его не видит игра) — для начала я бы порекомендовал проверить, а видит ли его ОС Windows, распознает ли она какие-нибудь нажатия.
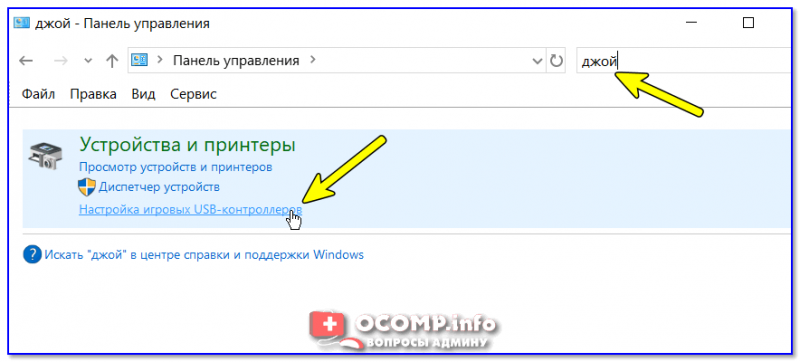
Чтобы это сделать, необходимо 👉 зайти в панель управления, в поисковую строку ввести «джойстик» и перейти по ссылке «Настройка игровых USB-контроллеров» (также можно воспользоваться разделом Панель управленияОборудование и звукУстройства и принтеры).
👉 Альтернативный способ: нажмите Win+R, и используйте команду joy.cpl
Настройка игровых USB-контроллеров
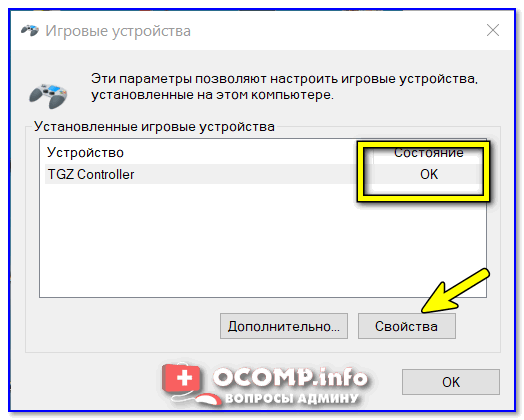
Далее обратите внимание, виден ли ваш джойстик, горит ли напротив него отметка «OK» (пример ниже). Если все так, переходите в свойства джойстика. 👇
Свойства джойстика
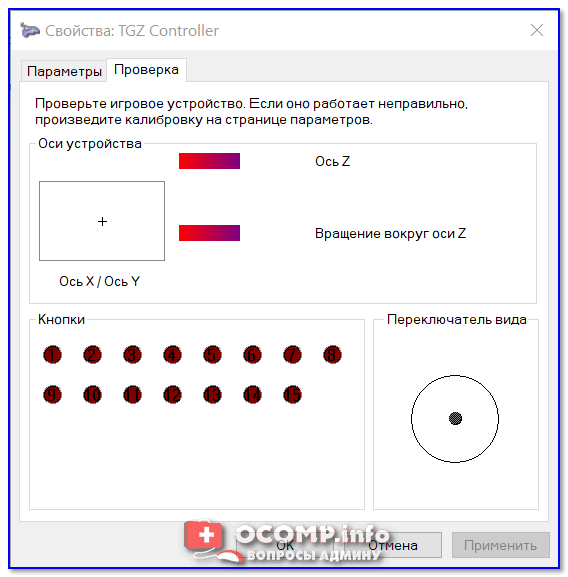
Во вкладке «Проверка» вы можете протестировать работу каждой кнопки (при нажатии кнопки на геймпаде — у вас будет загораться соответствующая кнопка в окне Windows). Если подобного не происходит, вероятные причины могут быть следующими:
- физическое повреждение кнопки;
- севшие батарейки (для беспроводных геймпадов);
- отсутствие родного драйвера (подобранный стандартный драйвер неправильно распознает работу устройства);
- устройство не откалибровано (ОС Windows по умолчанию неправильно с ним работает).
Проверка
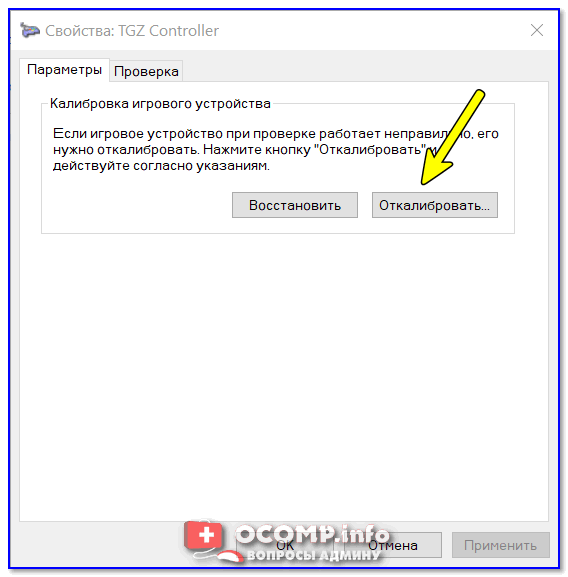
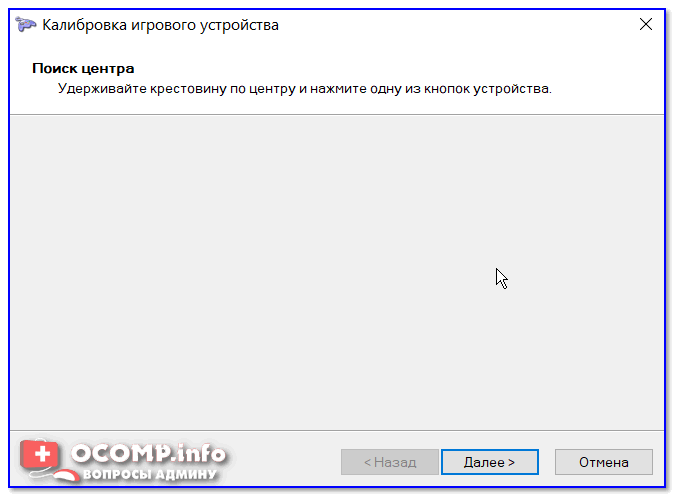
Что касается калибровки: то эта функция присутствует во вкладке параметры (свойство джойстика). После ее запуска начнет работу спец. мастер, который попросит вас несколько раз понажимать на кнопки… Нередко после калибровки джойстик начинает работать как положено.
Откалибровать
Пример калибровки (первый шаг после запуска мастера)
*
ШАГ 3: что делать, если игра не видит джойстик
Разумеется, речь идет о тех случаях, когда компьютер видит джойстик, Windows дает его откалибровать и при проверке все кнопки срабатывают (см. чуть выше), а вот непосредственно сама игра — просто не знает о его существовании (почему-то…). Кстати, такое часто бывает со старыми играми, которые видят только клавиатуру.
Если вы столкнулись с чем-то подобным — то решить проблему можно с помощью спец. утилит (своего рода эмуляторы нажатия клавиатуры). Лично я бы порекомендовал использовать 👉 JoyToKey (у нее есть аналоги AutoHotkey и Xpadder, но на Windows 10/11 они работают не стабильно).
*
JoyToKey
Сайт: https://joytokey.ru.uptodown.com/windows
Небольшое бесплатное приложение, позволяющее эмулировать нажатие кнопок клавиатуры при помощи джойстика. Вся настройка JoyToKey сводится к тому, чтобы задать какие кнопки джойстика будут отвечать за определенные клавиши клавиатуры.
Также не могу не отметить, что приложение позволяет создавать свой профиль под каждую конкретную игру. Т.е. при помощи JoyToKey вы сможете играть на джойстике в любую игру, в которую можно играть на клавиатуре.
*
Многие начинающие пользователи не могут сразу вникнуть в работу JoyToKey (к тому же она на англ.). Покажу на своем примере. 👇
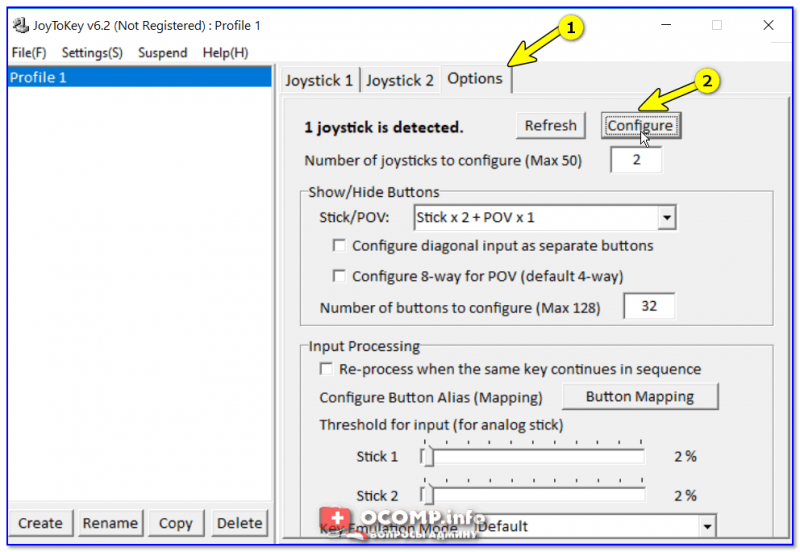
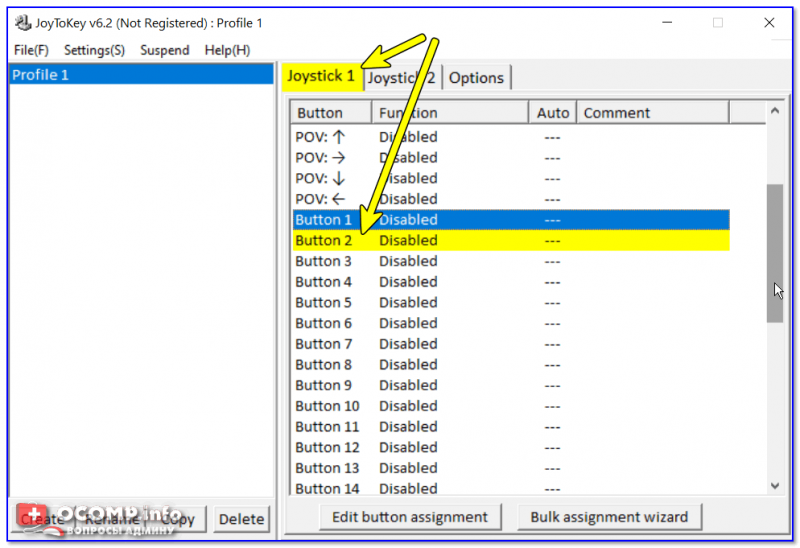
Итак, после загрузки архива с приложением просто извлеките все файлы в отдельную папку и запустите исполняемый файл JoyToKey.exe (от имени администратора). Далее перейдите в раздел «Options» и нажмите «Configure».
Configure
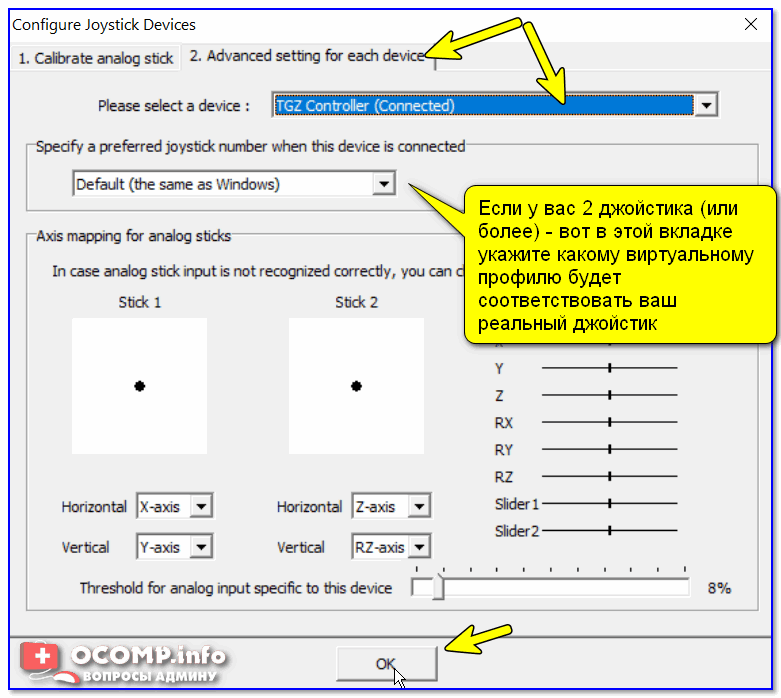
После перейдите во вкладку «Advanced Setting…» и выберите свой джойстик (select device). В моем примере джойстик «TGZ Controller» (пример на скрине ниже). 👇
Джойстик по умолчанию задан
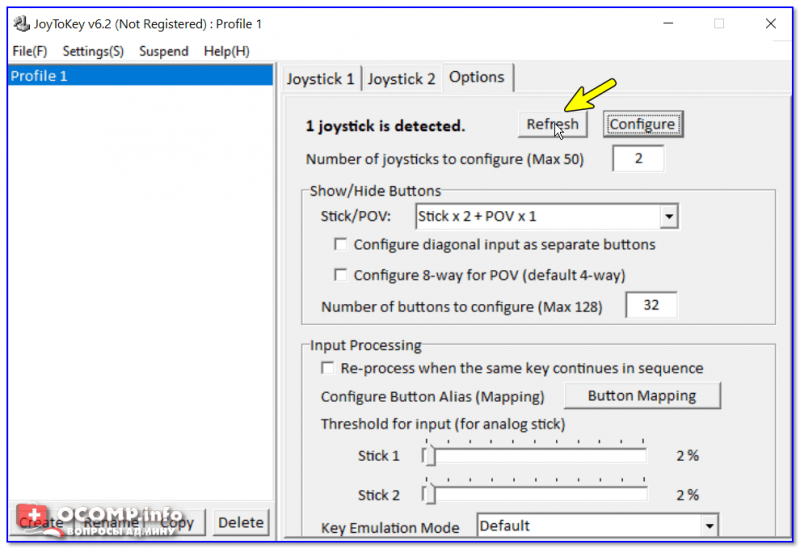
Затем нажмите на кнопку «Refresh» и попробуйте нажать на какую-нибудь кнопку джойстика. 👇
Refresh
Далее вы увидите, что утилита вам подсвечивает желтым цветом ту кнопку, которую вы нажимаете.
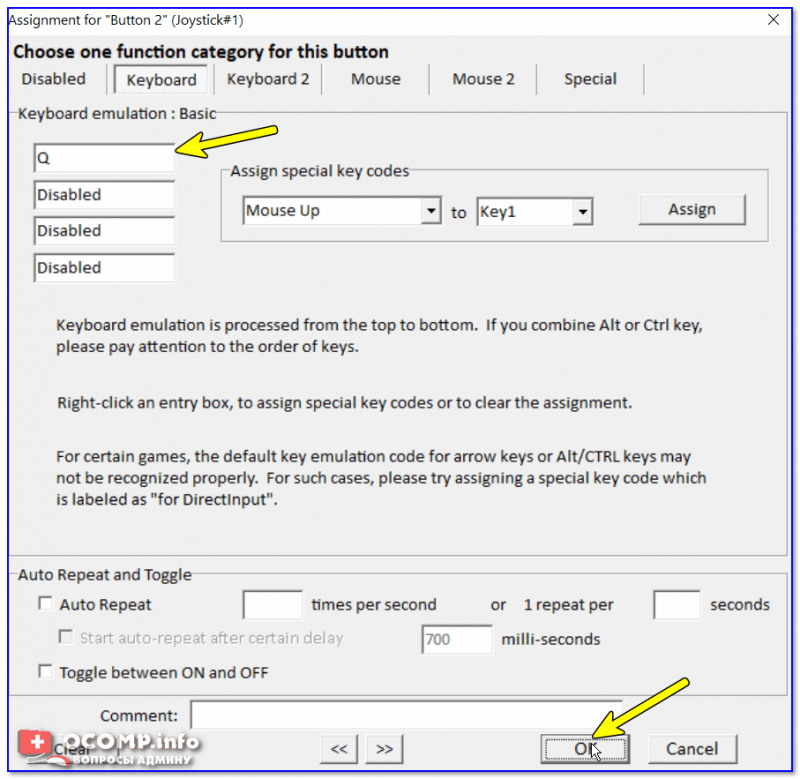
Вам осталось только определиться на какую кнопку джойстика вы хотите повесть определенную клавишу клавиатуры — а затем просто кликнуть двойным кликом мышки данную строчку и указать требуемое. См. скриншоты ниже. 👇
Нажимаете кнопку джойстика — и видите нужную строчку
На скрине ниже я на кнопку «Button 2» джойстика «повесил» клавишу Q.
Клавиша задана!
Собственно, таким образом вам нужно определиться со всеми кнопками джойстика. Делается это достаточно быстро…
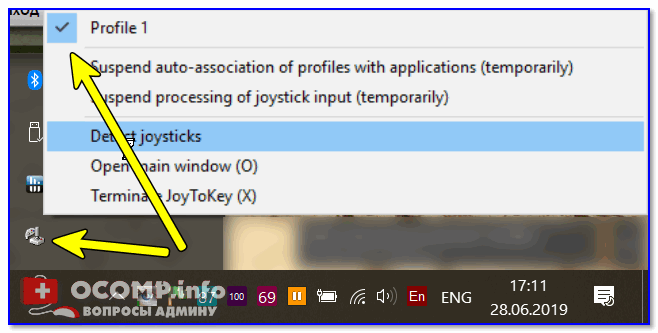
Кстати, обратите внимание, чтобы ваши заданные кнопки джойстика работали — программа JoyToKey должна быть запущена перед входом в игру! (и выбран нужный профиль (в моем примере он один, поэтому не актуально)).
Быстрое переключение профилей
*
Дополнения по теме приветствуются…
Удачи!
👌
Первая публикация: 29.06.2019
Корректировка: 20.07.2021


Полезный софт:
-
- Видео-Монтаж
Отличное ПО для создания своих первых видеороликов (все действия идут по шагам!).
Видео сделает даже новичок!
-
- Ускоритель компьютера
Программа для очистки Windows от «мусора» (удаляет временные файлы, ускоряет систему, оптимизирует реестр).

