- Manuals
- Brands
- Mitsubishi Manuals
- Engine
- 4G94-DOHC-GDI
Manuals and User Guides for Mitsubishi 4G94-DOHC-GDI. We have 2 Mitsubishi 4G94-DOHC-GDI manuals available for free PDF download: User Manual, Workshop Manual
Mitsubishi 4G94-DOHC-GDI User Manual (172 pages)
4G9 Series
Brand: Mitsubishi
|
Category: Engine
|
Size: 4.59 MB
Table of Contents
-
Table of Contents
1
-
General Information
3
-
Technical Data
3
-
Service Specifications
6
-
-
1-1
6
-
Rework Dimensions
9
-
Torque Specifications
10
-
New Tightening Method — by Use of Bolts to be Tightened in Plastic Area
16
-
Sealant
16
-
Form-In-Place Gasket
17
-
Disassembly
17
-
Surface Preparation
17
-
Form-In-Place Gasket Application
17
-
-
-
2 Special Tools
18
-
2-1
18
-
4G9 Engine (E
18
-
-
-
3 Alternator and Ignition System
21
-
3-1
21
-
Removal and Installation <SOHC> (Engines with Distributor)
21
-
Removal and Installation (SOHC for Other than Pajero) (Engines Without Distributor)
22
-
Removal and Installation <SOHC for Pajero Io> (Engines Without Distributor)
23
-
Removal and Installation (DOHC)
25
-
Removal and Installation (DOHC-MIVEC)
26
-
Removal and Installation (DOHC–GDI for Carisma, Space Star, Space Runner, Galant)
27
-
Alternator Brace (M8)
28
-
Cam Position Sensing Cylinder
28
-
Cam Position Sensor Support
28
-
Crankshaft Bolt
28
-
Ignition Coil
28
-
Oil Level Gauge
28
-
Power Steering Pump Pulley
28
-
Removal and Installation (DOHC-GDI for Pajero Io)
28
-
Spark Plug
28
-
«BA Front Flange/Crankshaft Pulley/Crankshaft Bolt Installation
29
-
Installation Service Points «AA Cam Position Sensor Support
29
-
Removal Service Point AA» Crankshaft Bolt Removal
29
-
-
4-1
30
-
Camshaft Sprocket Bolt
30
-
Engine Support Bracket, Right
30
-
Timing Belt Rear Cover
30
-
Timing Belt Removal and Installation (SOHC for Carisma (up for 1999 Model)
30
-
Timing Belt Removal and Installation (SOHC for Carisma (from 2000 Model), Lancer (from 2001 Model for Europe), Space Star)
31
-
-
Accessory Mount
33
-
Timing Belt Cover
33
-
Timing Belt Removal and Installation (SOHC for Pajero Io)
33
-
Timing Belt Removal and Installation (DOHC)
34
-
Timing Belt Removal and Installation (DOHC-MIVEC)
35
-
Timing Belt Removal and Installation (DOHC-GDI for Carisma, Space Star, Space Runner)
36
-
Timing Belt Removal and Installation (DOHC-GDI for Galant)
37
-
Timing Belt Removal and Installation (DOHC-GDI for Pajero Io)
38
-
«AA Camshaft Sprocket Bolt Installation
40
-
AA» Timing Belt Removal
40
-
AB» Camshaft Sprocket Bolt Removal
40
-
«BA Timing Belt Tensioner Installation
41
-
«CA Tensioner Spring Installation
41
-
«DA Timing Belt Installation
41
-
«EA Auto-Tensioner Installation
42
-
«FA Timing Belt Installation
43
-
«GA Crankshaft Sensing Blade/Crankshaft Spacer/Crankshaft Sprocket Installation
45
-
Timing Belt Inspection
45
-
Tensioner Pulley, Idler Pulley Inspection
46
-
-
-
5 Fuel and Emission Control System
47
-
5-1
47
-
SOHC Carburetor Removal and Installation
47
-
Fuel and Emission Control System Removal and Installation (SOHC-MPI for Other Tnan Pajero Io)
48
-
Fuel and Emission Control System Removal and Installation (SOHC-MPI for Pajero Io)
49
-
Fuel and Emission Control System Removal and Installation (DOHC)
50
-
«AA Injectors Installation
51
-
«BA Fuel Pressure Regulator Installation
51
-
«CA Gasket Installation
51
-
-
5A. THROTTLE BODY and EGR SYSTEM (GDI)
53
-
Throttle Body and EGR System Removal and Installation (up to 2000 Model for Carisma, 1999 Model for Space Star, Spacer Runner)
53
-
Throttle Body and EGR System Removal and Installation (from 2001 Model for Carisma, Space Star and Galant)
54
-
Throttle Body and EGR System Removal and Installation (for Pajero Io — 4G93)
55
-
Throttle Body and EGR System Removal and Installation (for Pajero Io — 4G94)
56
-
«BA Intake Manifold Stay Installation
57
-
-
-
6 Intake and Exhaust Manifold
58
-
Installation Service Points: «AA Throttle Body Gasket
57
-
6-1
58
-
Intake and Exhaust Manifold Removal and Installation (SOHC-Carburetor)
58
-
Intake and Exhaust Manifold Removal and Installation (SOHC-MPI-Front Wheel Drive (4G92 and 4G93–Except from 2001 Model for Europe))
59
-
Intake and Exhaust Manifold Removal and Installation (SOHC-MPI-Front Wheel Drive (4G92 and 4G93– from 2001 Model for Europe))
60
-
Intake and Exhaust Manifold Removal and Installation (SOHC-MPI-Front Wheel Drive (4G94)
61
-
Intake and Exhaust Manifold Removal and Installation (SOHC-MPI-Rear Wheel Drive (4G93 — Except from 2002 Model for Europe)
62
-
Intake and Exhaust Manifold Removal and Installation (SOHC-MPI-Rear Wheel Drive (4G93 — from 2002 Model for Europe)
63
-
Intake and Exhaust Manifold Removal and Installation (SOHC-MPI-Rear Wheel Drive (4G94)
64
-
Intake and Exhaust Manifold Removal and Installation (DOHC)
66
-
«AA Exhaust Manifold Bracket Installation
67
-
«BA Intake Manifold Stay — Installation
67
-
Rear Wheel Drive
67
-
-
6A. INTAKE MANIFOLD (GDI)
68
-
Intake Manifold (GDI) Removal and Installatoin (up to 2000 Model for CARISMA, 1999 Model for Space Star, Space Runner)
68
-
Intake Manifold (GDI) Removal and Installation (from 2001 Model for Carisma, Space Star and Galant)
69
-
Intake Manifold (GDI) Removal and Installation (for Space Runner)
71
-
Intake Manifold (GDI) Removal and Installation (for Pajero Io)
72
-
«AA Intake Manifold Stay Installation
73
-
-
6B. EXHAUST MANIFOLD (GDI)
74
-
Exhaust Manifold (GDI) Removal and Installation (for Carisma, Space Star, Space Runner)
74
-
Exhaust Manifold (GDI) Removal and Installation (for Galant)
75
-
Exhaust Manifold (GDI) Removal and Installation (for Pajero Io)
77
-
Exhaust Manifold Bracket Installation
78
-
-
6C. INJECTOR and FUEL PUMP ASSEMBLY (GDI)
79
-
Injector and Fuel Pump Assembly (GDI) (up to 2000 Mode for Carisma, 1999 Model for Space Star, Space Runner)
79
-
Injector and Fuel Pump Assembly (GDI) (from 2001 Model for Carisma, Space Star and Galant)
80
-
Injector and Fuel Pump Assembly (GDI) (for Pajero Io — 4G94)
81
-
Injector and Fuel Pump Assembly (GDI) (for Pajero Io — 4G93)
82
-
Backap Ring/O-Ring/Corrugated Washer Installation
83
-
Delivery Pipe and Injector Assembly Installation
83
-
Fuel High Pressure Regulator Installation
84
-
Fuel Pressure Sensor Installation
84
-
Pump Camshaft Case Installation
84
-
Fuel Pump/Fuel Feed Pipe Installation
85
-
O-Ring/Backup Ring/Fuel Pipe Installation
86
-
O-Ring/Fuel Pump Installation
86
-
JA O-Ring/Fuel Pump Installation
87
-
O-Ring/Backup Ring/Fuel Pressure Sensor Installation
87
-
Intake and Exhaust Manifold <4G94 — GDI for PAJERO Io> Removal and Installation
88
-
Intake Manifold Stay Installation
89
-
To Install the Exhaust Manifold Bracket
89
-
-
7-1
90
-
Water Pump and Water Hose Removal and Installation (SOHC — Front Wheel Drive)
90
-
Water Pump and Water Hose Removal and Installation (SOHC — Rear Wheel Drive)
91
-
Water Pump and Water Hose Removal and Installation (DOHC — Front Wheel Drive)
92
-
Water Pump and Water Hose Removal and Installation (DOHC — Rear Wheel Drive)
93
-
Thermostat Installation
94
-
Water Inlet Pipe (Front Wheel Drive/Water Pipe, Rear Wheel Drive/O-Ring Installation)
94
-
Water Outlet Fitting Installation
94
-
Water Pump Installation
94
-
Engine Coolant Temperature Gauge Unit Installation
95
-
Engine Coolant Temperature Sensor Installation
95
-
Water By-Pass Fitting Installation
95
-
-
8-1
96
-
Rocker Arms and Camshafts Removal and Installation (SOHC (with Adjusting Screw))
96
-
Rocker Arms and Camshafts Removal and Installation (SOHC (with Lash Adjuster))
97
-
Rocker Arms and Camshafts Removal and Installation (DOHC)
99
-
Rocker Arms and Camshafts Removal and Installation (DOHC-GDI)
100
-
Rocker Arms and Camshafts Removal and Installation (DOHC-GDI for Carisma (up to 2000 Model), Space Star (1999 Model), Space Runner)
102
-
Rocker Arms and Camshafts Removal and Installation (DOHC-GDI for Carisma, Space Star and Galant (from 2001 Model))
103
-
Rocker Arms and Camshafts Removal and Installation (DOHC-GDI for Pajero Io — 4G94)
104
-
Rocker Arms and Camshafts Removal and Installation (DOHC-GDI for Pajero Io — 4G93)
105
-
Adjusting Screw Installation
106
-
Lash Adjuster Removal
106
-
Rocker Arm Shaft Installation
106
-
Rocker Arms and Rocker Arm Shaft Installation
106
-
Bearing Cap Installation
107
-
Camshaft Installation
107
-
Lash Adjuster Installation
107
-
Oil Seal Installation
107
-
Beam Camshaft Cap Installation
108
-
O-Ring/Cover Installation
110
-
Sealant Application on Rocker Cover
110
-
Sealant Application on Semi-Circular Parking
110
-
Valve Clearance Adjustment
110
-
Camshaft Inspection
113
-
Lash Adjuster (SOHC)
113
-
Lash Adjuster (DOHC)
116
-
Rocker Cover and Camshafts (MIVEC) Removal and Installation
119
-
Camshaft — Inspection
120
-
Oil Control Valve Inspection
120
-
Camshaft Bearing Cap/Camshaft Holder Installation
121
-
Camshaft Holder Assembly Installation
121
-
Install the Camshaft
121
-
Semi-Circular Packing Installation
121
-
Installation of the Oil Seal
122
-
Oil Control Valve Installation
122
-
Rocker Arm Piston Inspection
123
-
Rocker Cover Installation
123
-
To Adjust the Valve Clearance
123
-
Rocker Arms and Rocker Shaft Caps (MIVEC) Removal and Installation
124
-
Rocker Arm Assembly Installation
125
-
-
9-1
126
-
Cylinder Head and Valves Removal and Installation (SOHC)
126
-
Cylinder Head and Valves Removal and Installation (DOHC)
127
-
Cylinder Head and Valves Removal and Installation (DOHC-MIVEC)
128
-
Cylinder Head and Valves Removal and Installation (DOHC-GDI)
129
-
Cylinder Head Bolt Removal
131
-
Retainer Lock Removal
131
-
Valve Handling Precautions
132
-
Valve Stem Seal Removal
132
-
Valve Stem Seal Installation
133
-
Cylinder Head Bolt Installation
134
-
Retainer Lock Installation
134
-
Valve Spring Installation
134
-
Sealant Application to Oil Pressure Switch
135
-
Cylinder Head Inspection
136
-
Valve Inspection
136
-
Valve Guide Inspection
137
-
Valve Seat Inspection
137
-
Valve Spring Inspection
137
-
Valve Guide Replacement
138
-
Valve Seat Reconditioning Procedure
138
-
Valve Seat Replacement Procedure
138
-
-
10-1
140
-
Front Case and Oil Pump Removal and Installation (SOHC (4G92, 4G93))
140
-
Front Case and Oil Pump Removal and Installation (SOHC (4G94 Except for Pajero Io))
141
-
Front Case and Oil Pump Removal and Installation (SOHC (4G94 for Pajero Io))
142
-
Front Case and Oil Pump Removal and Installation (DOHC (Except GDI for Pajero Io))
143
-
Front Case and Oil Pump Removal and Installation (DOHC-GDI for Pajero Io)
144
-
Inner Rotor/Outer Rotor Installation
145
-
Oil Pan Removal
145
-
Outer Rotor/Inner Rotor Removal
145
-
Sealant Application to Oil Pump Case
145
-
Crankshaft Front Oil Seal Installation
146
-
Oil Pan/Upper Oil Pan/Lower Oil Pan Installation
146
-
Oil Filter Installation
147
-
Oil Pump Inspection
147
-
-
11-1
149
-
Piston and Connecting Rod Removal and Installation
149
-
Connecting Rod Cap Removal
150
-
Piston Pin Removal
150
-
Piston Pin Installation
151
-
Oil Ring Installation
152
-
Piston and Connecting Rod Installation
153
-
Piston Ring #2/Piston Ring #1 Installation
153
-
Connecting Rod Bearing Installation
154
-
Connecting Rod Cap Installation
155
-
Connecting Rod Cap Nut Installation
155
-
Crankshaft Pin Oil Clearance (Plastigauge Method)
156
-
Piston Ring Instpection
156
-
Crankshaft, Cylinder Block, Flywheel and Drive Plate Removal and Installation (Manual Transmission)
157
-
Automatic Transmission Removal and Installation
158
-
Crankshaft, Cylinder Block, Flywheel and Drive Plate Removal and Installation (Pajero Io)
159
-
Crankshaft Bearing Installation
160
-
Oil Jet Installation
160
-
Oil Jet Removal
160
-
Bearing Cap/Bearing Cap Bolt Installation
162
-
Crankshaft Journal Oil Clearance (Plastigauge Method)
163
-
Drive Plate Bolt/Flywheel Bolt Installation
163
-
Sealant Application to Oil Seal Case
163
-
To Install the Oil Seal
163
-
Boring Cylinder Inspection
164
-
Cylinder Block Inspection
164
-
Hydro-Flywheel (DOHC-GDI for Pajero Io) Inspection
165
-
Service Bulletins
167
-
Crankshaft Weight
169
-
-
Advertisement
Mitsubishi 4G94-DOHC-GDI Workshop Manual (156 pages)
4G9 Series (E-W)
Brand: Mitsubishi
|
Category: Engine
|
Size: 5.66 MB
Table of Contents
-
Introduction
2
-
Maintenance and Servicing Procedures
2
-
Symbols for Lubrication, Sealants and Adhesives
2
-
List of Effective Pages
4
-
Engine 4G9 Series
5
-
Contents
5
-
General Information 4G92
7
-
General Information 4G93
8
-
General Information 4G94
9
-
Service Specifications
10
-
Rework Dimensions
13
-
Torque Specifications
13
-
New Tightening Method-By Use of Bolts to be Tightened in Plastic Area
20
-
Sealant
20
-
Form-In-Place Gasket
21
-
Special Tools
22
-
Alternator and Ignition System
25
-
Removal Steps
25
-
Removal and Installation-SOHC for Other than PAJERO
26
-
Removal and Installation-SOHC for PAJERO
27
-
Removal and Installation-DOHC
29
-
Removal and Installation-DOHC-MIVEC
30
-
Removal and Installation-DOHC-GDI for CARISMA, SPACE STAR, SPACE RUNNER, GALANT
31
-
Removal and Installation-DOHC-GDI for PAJERO
32
-
Crankshaft Bolt Removal
33
-
Cam Position Sensor Support Installation
33
-
Timing Belt
34
-
Removal and Installation-SOHC for CARISMA (up to 1999 Model), LANCER (up to 2000 Model), GALANT
34
-
Removal and Installation-SOHC for CARISMA (from 2000 Model), LANCER (from 2001 Model)
35
-
Removal and Installation-DOHC-GDI for CARISMA, SPACE STAR, SPACE RUNNER
40
-
Removal and Installation-DOHC-GDI for GALANT
41
-
Timing Belt Removal
44
-
Camshaft Sprocket Bolt Removal
44
-
Camshaft Sprocket Bolt Installation
44
-
Timing Belt Tensioner Installation
45
-
Tensioner Spring Installation
45
-
Timing Belt Installation
45
-
Auto-Tensioner Installation
46
-
Inspection
49
-
Tensioner Puller, Idler Pulley
50
-
Auto-Tensioner
50
-
Fuel and Emission Control System
51
-
Removal and Installation-SOHC-CARBURETOR
51
-
Removal and Installation-SOHC-MPI for Other than PAJERO
52
-
Removal and Installation-SOHC-MPI for PAJERO
53
-
Injectors Installation
55
-
Fuel Pressure Regulator Installation
55
-
Gasket Installation
55
-
Throttle Body and EGR System (GDI)
57
-
Removal and Installation-Up to 2000 Model for CARISMA, 1999 Model for SPACE STAR, SPACE RUNNER
57
-
Removal and Installation-From 2001 Model for CARISMA, from 2001 Model for SPACE STAR, GALANT
58
-
Removal and Installation-For PAJERO
59
-
Throttle Body Gasket
60
-
Intake Manifold Stay Installation
60
-
Intake and Exhaust Manifold
61
-
Removal and Installation-SOHC-MPI (up to 2000 Model)
62
-
Removal and Installation-SOHC-MPI (from 2001 Model)
63
-
Exhaust Manifold Installation
66
-
Intake Manifold (GDI)
67
-
Removal and Installation-For SPACE RUNNER
70
-
Exhaust Manifold (GDI)
73
-
Removal and Installation-For CARISMA, SPACE STAR, SPACE RUNNER
73
-
Removal and Installation-For GALANT
74
-
Exhaust Manifold Bracket Installation
77
-
Injector and Fuel Pump Assembly (GDI)
78
-
Backup Ring/O-Ring/Corrugated Washer Installation
82
-
Delivery Pipe and Injector Assembly Installation
82
-
Pump Camshaft Case Installation
83
-
Fuel Pressure Sensor Installation
83
-
Fuel Pump/Fuel Feed Pipe Installation
84
-
O-Ring/Fuel Pump Installation
85
-
O-Ring/Backup Ring/Fuel Pipe Installation
85
-
O-Ring/Backup Ring/Fuel Pressure Sensor Installation
86
-
Water Pump and Water Hose
87
-
Removal and Installation-SOHC
87
-
Water Pump Installation
90
-
Water Inlet PIPE SOHC, DOHC/WATER PIPE DOHC-GDI for PAJERO/O-RING Installation
90
-
Thermostat Case Installation
90
-
Water Outlet Fitting Installation
90
-
Engine Coolant Temperature Gauge Unit Installation
91
-
Engine Coolant Temperature Sensor Installation
91
-
Water By-Pass Fitting Installation
91
-
Water Fitting Installation
91
-
Rocker Arms and Camshafts
92
-
Removal and Installation-SOHC (up to 2000 Model)
92
-
Removal and Installation-SOHC (from 2001 Model)
93
-
Removal and Installation-DOHC-GDI for CARISMA (up to 2000 Model), SPACE STAR (1999 Model), SPACE RUNNER
96
-
Removal and Installation-DOHC-GDI for CARISMA (from 2001 Model), SPACE STAR (from 2001 Model), GALANT
97
-
Adjusting Screw Installation
100
-
Rocker Arm Shaft Installation
100
-
Rocker Arms and Rocker Arm Shaft Installation
100
-
Rocker Arm Spring Installation
100
-
Oil Seal Installation
101
-
Lash Adjuster Installation
101
-
Camshaft Installation
101
-
Bearing Cap Installation
101
-
Beam Camshaft Cap Installation
102
-
Sealant Application on Semi-Circular Packing
104
-
Sealant Application on Rocker Cover
104
-
Valve Clearance Adjustment
104
-
Camshaft
105
-
Lash Adjuster (SOHC)
105
-
(Dohc)
108
-
Rocker Cover and Camshafts (MIVEC)
111
-
Oil Control Valve
112
-
Semi-Circular Packing Installation
113
-
Camshaft Holder Assembly Installation
113
-
Camshaft Bearing Cap/Camshaft Holder Installation
113
-
Oil Control Valve Installation
114
-
Rocker Cover Installation
115
-
Rocker Arm Piston Inspection
115
-
Rocker Arms and Rocker Shaft Caps (MIVEC)
116
-
Rocker Arm Assembly Installation
117
-
Cylinder Head and Valves
118
-
Removal and Installation-DOHC-GDI
121
-
Cylinder Head Bolt Removal
123
-
Retainer Lock Removal
123
-
Valve Stem Seal Removal
124
-
Valve Handling Precautions
124
-
Valve Stem Seal Installation
125
-
Valve Spring Installation
126
-
Retainer Lock Installation
126
-
Cylinder Head Bolt Installation
126
-
Sealant Application to Oil Pressure Switch
127
-
Cylinder Head
128
-
Valve
128
-
Valve Spring
129
-
Valve Seat
129
-
Valve Guide
129
-
Valve Seat Reconditioning Procedure
130
-
Valve Seat Replacement Procedure
130
-
Valve Guide Replacement
130
-
Front Case and Oil Pump
132
-
Oil Pan Removal
135
-
Outer Rotor/Inner Rotor Removal
135
-
Inner Rotor/Outer Rotor Installation
135
-
Sealant Application to Oil Pump Case
135
-
Crankshaft Front Oil Seal Installation
136
-
Oil Pan/Upper Oil Pan/Lower Oil Pan Installation
136
-
Oil Filter Installation
137
-
Piston and Connecting Rod
139
-
Connecting Rod Cap Removal
140
-
Piston Pin Removal
140
-
Piston Pin Installation
141
-
Oil Ring Installation
142
-
Piston Ring No.2/Piston Ring No.1 Installation
142
-
Piston and Connecting Rod Installation
143
-
Connecting Rod Bearing Installation
143
-
Connecting Rod Cap Installation
144
-
Connecting Rod Cap Nut Installation
144
-
Piston Ring
145
-
Crankshaft Pin Oil Clearance (Plastigage Method)
146
-
Crankshaft, Cylinder Block, Flywheel and Drive Plate
147
-
Removal and Installation (Manual Transmission)
147
-
Removal and Installation (Automatic Transmission)
148
-
Oil Jet Removal
150
-
Oil Jet Installation
150
-
Crankshaft Bearing Installation
150
-
Bearing Cap/Bearing Cap Bolt Installation
151
-
Sealant Application to Oil Seal Case
152
-
Drive Plate Bolt/Flywheel Bolt Installation
153
-
Crankshaft Journal Oil Clearance (Plastigauge Method)
153
-
Cylinder Block
153
-
Boring Cylinder
154
-
Hydro-Flywheel DOHC-GDI for PAJERO
155
Advertisement
Related Products
-
Mitsubishi 4G9 series
-
Mitsubishi 4G93-DOHC
-
Mitsubishi 4G93-DOHC-GDI
-
Mitsubishi 4G93-SOHC
-
Mitsubishi 4G92-SOHC
-
Mitsubishi 4G92-DOHC-MIVEC
-
Mitsubishi 4G94-SOHC
-
Mitsubishi 4G92
-
Mitsubishi 4G93
-
Mitsubishi 4G6 series
Mitsubishi Categories
![]()
Air Conditioner
Controller
![]()
Projector
Automobile
Engine
More Mitsubishi Manuals
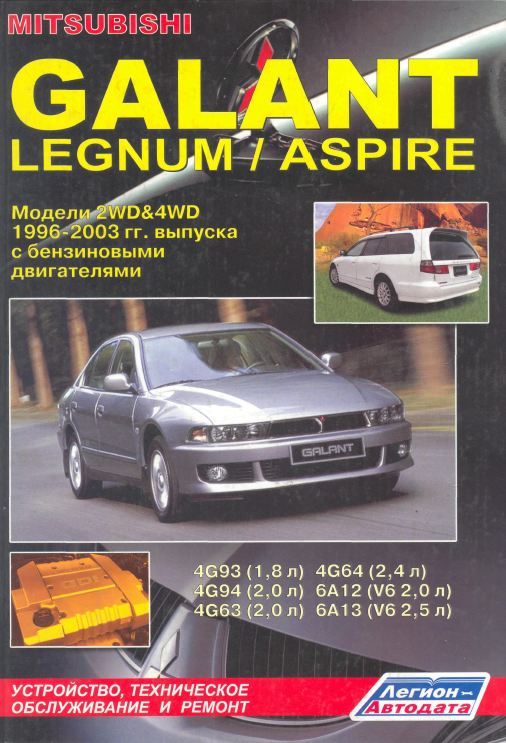
Mitsubishi Galant Mark VIII (EA1, EA2, EA3, EA7, EC1, EC5, EC7, Legnum, Aspire, MX, MF, VRG, VRM) 2WD/4WD с бензиновыми двигателями: 4G93 1.8 л (1834 см³) 138-140 л.с./102-103 кВт, 4G63 2.0 л (1997 см³) 136 л.с./100 кВт, 6A12 2.0 л (1998 см³) 145-150 л.с./107-110 кВт, 4G94 2.0 л (1999 см³) 143-145 л.с./105-107 кВт, 4G64 2.4 л (2351 см³) 140-160 л.с./103-118 кВт и 6A13 2.5 л (2498 см³) 161-163-260-280 л.с./119-120-191-206 кВт; Руководство по эксплуатации, техническому обслуживанию и ремонту, технические характеристики, электросхемы, устройство, диагностика, особенности конструкции, контрольные размеры кузова. Производственно-практическое издание легковой автомобиль среднего класса Мицубиси Галант, Легнум, Эспайер с цельнометаллическими несущими кузовами четырёхдверный седан, пятидверный универсал передне- и полноприводные модели восьмого поколения выпуска с 1996 по 2003 год
ЕСЛИ ВЫ ВИДИТЕ ОШИБКУ 406 Not Acceptable и не видите документ, то скорей всего у Вас IP РФ и его надо сменить, на любой другой страны, с помощью VPN ( Scribd и SlideShare блокируют посетителей с Российским IP).
Видео Mitsubishi Galant mk8 замена ремня и сальников ГРМ 4G93, радиатора системы охлаждения (Мицубиси Галант 96-03)
Mitsubishi Galant Mark VIII/ Legnum/ Aspire общая информация (Мицубиси Галант, Легнум, Эспайер 1996-2003)
Радиатор и электровентилятор системы охлаждения
Снятие и установка
• Перед началом снятия радиатора выполните следующие операции.
а) Слейте охлаждающую жидкость.
б) Снимите корпус воздушного фильтра и впускной воздушный шланг
в) (Двигатель 6A13-DOHC) Снимите воздушный шланг и впускной воздуховод турбокомпрессора.
• Снятие деталей производится в порядке номеров, указанном на рисунках «Электровентилятор и радиатор системы охлаждения».
• При снятии деталей обратите внимание на следующие операции.
1. Отсоединение шлангов и трубок. Перед отсоединением верхнего и нижнего шлангов радиатора нанесите установочные метки относительного положения на шланг и хомут шланга.
Внимание: после отсоединения шлангов от радиатора необходимо закрыть пробками отверстия в шлангах и радиаторе, чтобы не допустить попадания в них пыли или посторонних частиц.
2. Отверните болты крепления радиатора и снимите радиатор
Примечание: будьте осторожны, не повредите сердцевину радиатора при снятии.
Проверка
1. Проверка радиатора.
а) Проверьте отсутствие посторонних предметов между пластинами радиатора.
б) Проверьте пластины радиатора на отсутствие изгиба или повреждения.
в) Проверьте радиатор на отсутствие повреждений и отложений накипи, ржавчины или следов коррозии.
г) Проверьте шланги радиатора на отсутствие трещин, повреждений или износа.
д) Проверьте расширительный бачок на отсутствие повреждений.
е) Проверьте пружину крышки радиатора на отсутствие износа и повреждений.
ж) Проверьте прокладку крышки радиатора на отсутствие повреждений или трещин.
2. Проверка вентилятора.
а) Проверьте лопасти вентилятора на отсутствие повреждений и трещин.
б) Проверьте отсутствие трещин и повреждений вокруг отверстий под болт в ступице вентилятора.
в) Если любая часть вентилятора повреждена, замените вентилятор в сборе.
3. Проверка контроллера электровентиляторов.
а) Отверните болт на контроллере и отсоедините разъем электровентилятора радиатора от контроллера.
б) Запустите двигатель и оставьте его работать на холостом ходу.
в) Включите кондиционер и оставьте двигатель работать, чтобы прогреть охлаждающую жидкость до температуры примерно 80°С. Измерьте напряжение между выводами 2-контактного разъема контроллера и убедитесь, что величина напряжения изменяется в соответствии с указанными пунктами (1) — (3).
(1 ) 0 В
(2) «Тип 2» 8,2 ± 2,6 В
«Тип 1» 6,8 ± 2,6 В
(3) Напряжение аккумуляторной батареи (бортсети) ± 2,6 В
Примечание: тип 1 — модели с двигателем 6А13; тип 2 — другие модели (двигатели 4G63, 6А12, 4G93).
г) Если контроллер работает не так, как указано, то замените его.
4. Проверка реле управления электровентиляторами.
а) Снимите реле управления электровентиляторами с блока реле в моторном отсеке.
б) Проверьте состояние цепи между выводами (2) и (4) реле, когда питание (напряжение аккумуляторной батареи) подведено и не подведено между выводами (1) и (3) реле.
Установка
• Установка производится в порядке, обратном снятию.
• При установке деталей обратите внимание на операцию по подсоединению шлангов.
а) При подсоединении шлангов радиатора наденьте шланг на патрубок до упора в выступ патрубка, затем затяните хомут. Если выступ отсутствует, то наденьте шланг на патрубок так, чтобы расстояние от края патрубка до края шланга соответствовало 30 мм.
б) Хомут шланга следует всегда устанавливать в положение, в котором хомут был установлен ранее. Поэтому перед установкой хомута совместите установочные метки на хомуте шланга и шланги, затем подсоедините шланг.
• После установки выполните следующие операции.
а) (Двигатель 6A13-DOHC) Установите воздушный шланг и впускной воздуховод турбокомпрессора.
б) Установите корпус воздушного фильтра и впускной воздушный шланг
в) Залейте охлаждающую жидкость.
г) «Модели с АКПП» Проверьте уровень масла (ATF) в АКПП. Добавьте масло (ATF) в АКПП, если его уровень ниже нормы.
| № | Спецификация / Specs | Данные |
| Габариты (мм/mm) и масса (кг/kg) / Dimensions and Weight | ||
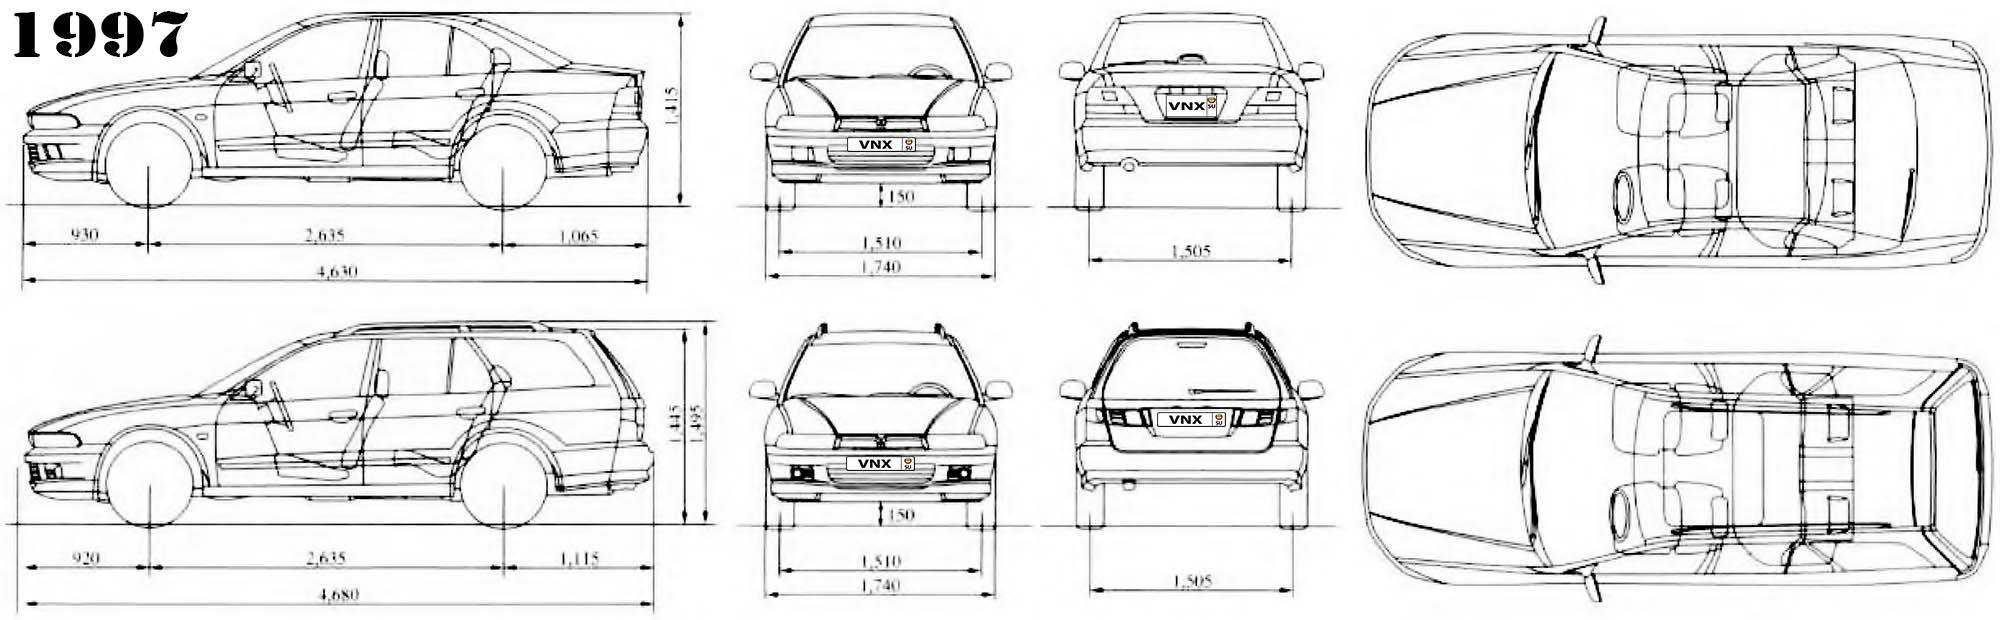
| 1 | Длина / Length | 4630 |
| 2 | Ширина (без/с зеркалами) / Width | 1740 |
| 3 | Высота (загружен/пустой) / Height | 1415 |
| 4 | Колёсная база / Wheelbase | 2635 |
| 5 | Дорожный просвет (клиренс) / Ground clearance | 150 |
| 6 | Снаряжённая масса / Total (curb) weight | 1310 |
| Полная масса / Gross (max.) weight | 1880 | |
|
Двигатель / Engine |
||
| 7 | Тип / Engine Type, Code | Бензиновый, жидкостного охлаждения, четырехтактный, 6A13 |
| 8 | Количество цилиндров / Cylinder arrangement: Total number of cylinders, of valves | 6-цилиндровый, V-образный, 24V, SOHC с верхним расположением одного распределительного вала |
| 9 | Диаметр цилиндра / Bore | 81.0 мм |
| 10 | Ход поршня / Stroke | 80.8 мм |
| 11 | Объём / Engine displacement | 2498 см³ |
| 12 | Система питания / Fuel supply, Aspiration | Распределенный впрыск топлива MPI ECI-MULTI |
| Атмосферный | ||
| 13 | Степень сжатия / Compression ratio | 9.5:1 |
| 14 | Максимальная мощность / Max. output power kW (HP) at rpm | 120 кВт (163 л.с.) при 5750 об/мин |
| 15 | Максимальный крутящий момент / Max. torque N·m at rpm | 223 Нм при 4500 об/мин |
|
Трансмиссия / Transmission |
||
| 16 | Сцепление / Clutch type | Гидротрансформатор с блокировкой/ Torque Converter |
| 17 | КПП / Transmission type | INVECS-II АКПП 4 Автоматическая, четырёхступенчатая, гидромеханическая, адаптивная |
О Книге
- Название: Mitsubishi Galant/ Legnum/ Aspire Устройство, техническое обслуживание и ремонт
- Бензиновые двигатели: 4G93 1.8 л (1834 см³) 138-140 л.с./102-103 кВт, 4G63 2.0 л (1997 см³) 136 л.с./100 кВт, 6A12 2.0 л (1998 см³) 145-150 л.с./107-110 кВт, 4G94 2.0 л (1999 см³) 143-145 л.с./105-107 кВт, 4G64 2.4 л (2351 см³) 140-160 л.с./103-118 кВт и 6A13 2.5 л (2498 см³) 161-163-260-280 л.с./119-120-191-206 кВт
- Выпуск с 1996 года
- Серия: «Ремонт Автомобилей»
- Год издания: 2005
- Автор: Коллектив авторов
- Издательство: «Ассоциация независимых издателей»
- Формат: PDF
- Страниц в книге: 560
- Размер: 146.55 МБ
- Язык: Русский
- Количество электросхем: более 50


BratArarat
Был 2 часа назад
Я езжу на ЗАЗ 968 16v Time Attack и Subaru Forester 日本語の碑文
Полысаево, Россия
Доброго времени суток!
Может есть у кого или ссылка сохранилась? На GDI все мануалы, а на MPI найти не могу…
Заранее спасибо.
7 лет

SMKZN
Я езжу на Mitsubishi Outlander (3G)
А зачем тебе мануал?
7 лет

BratArarat
Автор
Я езжу на ЗАЗ 968
Интересует замена ремня ГРМ. На ГБЦ нет меток как в инструкциях на GDI и mpi других двигателей…
7 лет

lost-root
Я езжу на Mitsubishi Lancer IX
viamobile.ru/page.php?id=2304
глянь тут. На галантах с 94ым мотором.
7 лет
BratArarat
Автор
Я езжу на ЗАЗ 968
Спасибо. Скачал, посмотрел… Но увы, там тоже только на 94 GDI…
7 лет
Войдите или зарегистрируйтесь, чтобы писать комментарии, задавать вопросы и участвовать в обсуждении.
Войти
Зарегистрироваться
4G92 SOHC and 4G92 DOHC MIVEC engine also are used on Mitsubishi Colt sixth generation (1992-2000), a supermini car built by Mitsubishi. This document mostly gives information on general maintenance on overhaul of Mitsubishi engine type above, inspecting and adjusting also given, with pictures and words work together explains things quickly.
This Workshop Manual contains procedures for removal, disassembly, inspection, adjustment, reassembly and installation, etc. for service mechanics.
All information, illustrations and product descriptions contained in this manual are current as at the time of publication. We, however, reserve the right to make changes at any time without prior notice or obligation.
CONTENTS
- GENERAL INFORMATION
- 1. SPECIFICATIONS
- SERVICE SPECIFICATIONS
- REWORK DIMENSIONS
- TORQUE SPECIFICATIONS
- NEW TIGHTENING METHOD–BY USE OF BOLTS TO BE TIGHTENED IN PLASTIC AREA
- SEALANT
- FORM-IN-PLACE GASKET
- 2. SPECIAL TOOLS
- 3. ALTERNATOR AND IGNITION SYSTEM
- 4. TIMING BELT
- 5. FUEL AND EMISSION CONTROL SYSTEM
- 5a. THROTTLE BODY AND EGR SYSTEM (GDI)
- 6. INTAKE AND EXHAUST MANIFOLD
- 6a. INTAKE MANIFOLD (GDI)
- 6b.EXHAUST MANIFOLD (GDI)
- 6c. INJECTOR AND FUEL PUMP ASSEMBLY (GDI)
- 6d.INTAKE AND EXHAUST MANIFOLD <4G94–GDI for PAJERO io>
- 7.WATER PUMP AND WATER HOSE
- 8. ROCKER ARMS AND CAMSHAFTS
- 8a.ROCKER COVER AND CAMSHAFTS (MIVEC)
- 8b.ROCKER ARMS AND ROCKER SHAFT CAPS (MIVEC)
- 9. CYLINDER HEAD AND VALVES
- 10. FRONT CASE AND OIL PUMP
- 11. PISTON AND CONNECTING ROD
- 12.CRANKSHAFT, CYLINDER BLOCK, FLYWHEEL AND DRIVE PLATE
Pub. No.: PWEE9502-I
Language: English
Format: PDF
Pages: 173
Mitsubishi 4G9 (4G92, 4G93, 4G94) Series Engine Repair Manual PWEE9502-I PDF free online
User Manuals, Guides and Specifications for your Mitsubishi 4G94–DOHC–GDI Engine. Database contains 1 Mitsubishi 4G94–DOHC–GDI Manuals (available for free online viewing or downloading in PDF): Workshop manual .

GENERAL INFORMATION
11A-0-3
. . . . . . . . . . . . . . . . . . . . . . . . . . . . . . . . . . . . . . . . . . .
1. SPECIFICATIONS
11A-1-1
. . . . . . . . . . . . . . . . . . . . . . . . . . . . . . . . . . . . . . . . . . . . . . . .
SERVICE SPECIFICATIONS
11A-1-1
. . . . . . . . . . . . . . . . . . . . . . . . . . . . . . . . . . . .
REWORK DIMENSIONS
11A-1-4
. . . . . . . . . . . . . . . . . . . . . . . . . . . . . . . . . . . . . . . .
TORQUE SPECIFICATIONS
11A-1-5
. . . . . . . . . . . . . . . . . . . . . . . . . . . . . . . . . . .
NEW TIGHTENING METHOD–BY USE OF BOLTS TO BE
TIGHTENED IN PLASTIC AREA
11A-1-7
. . . . . . . . . . . . . . . . . . . . . . . . . . . . . . .
SEALANT
11A-1-7
. . . . . . . . . . . . . . . . . . . . . . . . . . . . . . . . . . . . . . . . . . . . . . . . . . . . . . . .
FORM-IN-PLACE GASKET
11A-1-8
. . . . . . . . . . . . . . . . . . . . . . . . . . . . . . . . . . . . .
2. SPECIAL TOOLS
11A-2-1
. . . . . . . . . . . . . . . . . . . . . . . . . . . . . . . . . . . . . . . . . . . . . . . . .
3. ALTERNATOR AND IGNITION SYSTEM
11A-3-1
. . . . . . . . . . . . . . . . . . . . . . . .
4. TIMING BELT
11A-4-1
. . . . . . . . . . . . . . . . . . . . . . . . . . . . . . . . . . . . . . . . . . . . . . . . . . . . .
5. FUEL AND EMISSION CONTROL SYSTEM
11A-5-1
. . . . . . . . . . . . . . . . . . . . .
5a. THROTTLE BODY AND EGR SYSTEM (GDI)
11A-5a-1
. . . . . . . . . . . . . . . . .
6. INTAKE AND EXHAUST MANIFOLD
11A-6-1
. . . . . . . . . . . . . . . . . . . . . . . . . . . .
6a. INTAKE MANIFOLD (GDI)
11A-6a-1
. . . . . . . . . . . . . . . . . . . . . . . . . . . . . . . . . . . . . .
6b. EXHAUST MANIFOLD (GDI)
11A-6b-1
. . . . . . . . . . . . . . . . . . . . . . . . . . . . . . . . . . .
6c. INJECTOR AND FUEL PUMP ASSEMBLY (GDI)
11A-6c-1
. . . . . . . . . . . . .
6d. INTAKE AND EXHAUST MANIFOLD
<4G94–GDI for PAJERO io>
11A-6d-1
. . . . . . . . . . . . . . . . . . . . . . . . . . . . . . . . . . . .
7. WATER PUMP AND WATER HOSE
11A-7-1
. . . . . . . . . . . . . . . . . . . . . . . . . . . . . .
8. ROCKER ARMS AND CAMSHAFTS
11A-8-1
. . . . . . . . . . . . . . . . . . . . . . . . . . . . .
8a. ROCKER COVER AND CAMSHAFTS (MIVEC)
11A-8a-1
. . . . . . . . . . . . . . .
8b. ROCKER ARMS AND ROCKER SHAFT CAPS (MIVEC)
11A-8b-1
. . . . .
9. CYLINDER HEAD AND VALVES
11A-9-1
. . . . . . . . . . . . . . . . . . . . . . . . . . . . . . . . .
10. FRONT CASE AND OIL PUMP
11A-10-1
. . . . . . . . . . . . . . . . . . . . . . . . . . . . . . . . .
11. PISTON AND CONNECTING ROD
11A-11-1
. . . . . . . . . . . . . . . . . . . . . . . . . . . . . .
12. CRANKSHAFT, CYLINDER BLOCK, FLYWHEEL AND DRIVE
PLATE
11A-12-1
. . . . . . . . . . . . . . . . . . . . . . . . . . . . . . . . . . . . . . . . . . . . . . . . . . . . . . . . . . .
11A-0-1
ENGINE
4G9 SERIES
CONTENTS
PWEE9502-I
E
Mar. 2001
Mitsubishi Motors Corporation
Revised
#1
![]()
Оффлайн
LORIN
-

-
Проверенные
-
- 194 сообщений
Пользователь


- Город:Мозырь
- Автомобиль:Opel Zafira «B» 1,8-16V(140Hp)
- Имя:Сергей
Отправлено 20 Март 2013 — 17:26
Mitsubishi Galant / Legnum / Aspire (1996-2003гг).
Руководство по ремонту и техническому обслуживанию.
Год выпуска: 2009
Страна: Российская Федерация
Жанр: Руководство по ремонту и техническому обслуживанию.
Издательство: «Легион-Автодата» г. Москва
Язык: Русский
ISBN: 5888-50-213-8
Формат: PDF
Качество: Отсканированные страницы
Количество страниц: 558
Иллюстрированный справочно-информационный мануал Руководство по ремонту Mitsubishi Galant / Legnum / Aspire, а также руководство по техническому обслуживанию и эксплуатации, устройство автомобилей Mitsubishi Galant / Legnum / Aspire 1996-2003/2005 гг. выпуска с левосторонним и правосторонним рулевым управлением, оборудованных бензиновыми двигателями GDI 4G93 (1,8 л), 4G94 (2,0 л), 4G64 (2,4 л) и бензиновыми двигателями MPI 4G63 (2,0 л), 4G64 (2,4 л), 6А12 (V6 2,0 л) и 6А13 (V6 2,5 л)
1.8 л. (1834 см3) – R4 DOHC – 4G93 GDI – 101 кВт. (138 л.с.)
2.0 л. (1997 см3) – R4 SOHC – 4G63 MPI – 100 кВт. (136 л.с.)
2.0 л. (1999 см3) – R4 DOHC – 4G94 GDI – 105 кВт. (143 л.с.)
2.0 л. (1998 см3) – V6 SOHC – 6A12 MPI – 107 кВт. (145 л.с.)
2.4 л. (2351 см3) – R4 SOHC – 4G64 MPI – 103 кВт. (140 л.с.)
2.4 л. (2351 см3) – R4 DOHC – 4G64 GDI – 118 кВт. (160 л.с.)
2.5 л. (2498 см3) – V6 SOHC – 6A13 MPI – 118 кВт. (160 л.с.)
2.5 л. (2498 см3) – V6 DOHC – 6A13 GDI – 191 кВт. (260 л.с.)
В книге содержатся подробные сведения по диагностике, ремонту и регулировке двигателя, элементов систем управления бензиновыми двигателями (систем впрыска топлива MPI и GDI, зажигания), систем запуска, зарядки и турбонаддува, инструкции по использованию системы самодиагностики, в т.ч. АКПП, ABS, SRS, системы курсовой устойчивости (ASC), противобуксовочной системы (TCL) и круиз-контроля, и рекомендации по регулировке механических и автоматических коробок передач, регулировке и ремонту элементов тормозной системы (включая ABS и ASC), рулевого управления, подвески, электрооборудования.
В отдельные разделы руководства входят инструкция по эксплуатации Mitsubishi Galant / Legnum / Aspire, рекомендации по техническому обслуживанию и полный комплект электросхем.
Пособие предназначено для владельцев автомобилей Мицубиси Галант / Легнум / Эспайр, механиков, работников СТО и сотрудников автосервисов.
Ссылка на скачивание:
http://yadi.sk/d/asMd9Wnq3Q3U1

- Наверх
#2
![]()
Оффлайн
lis
lis
- Город:Mzr
- Автомобиль:ОVА
- Имя:Саша
Отправлено 21 Март 2013 — 00:01
а есть рук-во по ремонту митсу GTO/3000gt/sigma/giamant? интересует с мотором 6g72
- Наверх
#3
![]()
Оффлайн
inetryconydot
inetryconydot
-
- Пользователи
- 10 сообщений
Новичок

- Город:Quebec
- Автомобиль:Santa Fe 2.2 CRDI
Отправлено 07 Май 2017 — 11:10
Norvasc Active Ingredient: amlodipine is used for treating high blood pressure and angina (chest pain).
Amlodipine (Norvasc) is used for treating high blood pressure and angina (chest pain). It may be used alone or with other medicines. Norvasc is a calcium channel blocker. It works by relaxing (dilating) your blood vessels, lowering blood pressure, Almodipine Over The Counter and decreasing heart rate, which lowers the workload on the heart. It also dilates coronary arteries increasing blood flow to the heart.
BUY CHEAP ALMODIPINE NOW
TAGS: Norvasc 10 mg, Norvasc 5 mg
Almodipine To Buy
Buy Almodipine
Almodipine Buy Online
Almodipine Online
Can You Buy Almodipine Online
Almodipine Online
Buy Almodipine
Almodipine Without Prescriptions
Almodipine In Order Online
Almodipine Online No Prescription
Non Prescription Almodipine
Almodipine Without Prescriptions
- Наверх
#4
![]()
Оффлайн
alchi
alchi
-
- Пользователи
-
- 167 сообщений
Пользователь
- Автомобиль:Renault
- Имя:Александр
Отправлено 08 Май 2017 — 21:47
- Наверх
Mitsubishi Workshop Manual of 4G9 engine (4G92, 4G93, 4G94)
Your ADS
Mitsubishi Engine 4G9 Series Manual
General Mitsubishi Workshop Manual of 4G9 engine (4G92, 4G93, 4G94), that are mounted on Lancer, Carisma, Pajero, Galant, Space Star, Space Runner either with MIVEC, GDI, SOHC or DOHC.
4G92 SOHC and 4G92 DOHC MIVEC engine also are used on Mitsubishi Colt sixth generation (1992-2000), a supermini car built by Mitsubishi.
This document mostly gives information on general maintenance on overhaul of Mitsubishi engine type above, inspecting and adjusting also given, with pictures and words work together explains things quickly.
Inside this manual:
- General Information
- Specifications [ Service Specifications ~ Rework Dimensions ~ Torque Specifications ~ New Tightening Method by Use of Bolts to be Tightened in Plastic Area ~ Sealant ~ Form in Place Gasket]
- Special Tools
- Alternator and Ignition System
- Timing Belt
- Fuel and Emission Control System [ Throttle Body and EGR System (GDI) ]
- Intake and Exhaust Manifold [ Intake Manifold (GDI) ~ Exhaust Manifold (GDI) ~ Injector and Fuel Pump Assembly (GDI) ~ Intake and Exhaust Manifold (4G94-GDI for Pajero io)]
- Water Pump & Water Hose
- Rocker Arms and Camshafts [ Rocker Cover and Camshafts (MIVEC) ~ Rocker Arms and Rocker Shaft Caps (MIVEC)]
- Cylinder Head and Valves
- Front Case and Oil Pump
- Piston and Connecting Rod
- Crankshaft, Cylinder Block, Flywheel and Drive Plate
Your ADS
Инструкции для ремонта Mitsubishi Lancer Cedia 9 1995-2004 годов (бензин)
Данный мануал предназначен для самостоятельного технического обслуживания и ремонта японских легковых автомобилей Мицубиси Лансер 9 «Cedia», которые выпускались с 2000 года по 2007 год. Руководство описывает только бензиновые модели автомобилей с четырехцилиндровыми рядными двигателями объемом 1.5 литра (4G15) и 1.8 литра (4G93) с системой распределенного впрыска топлива MPI или с топливным насосом высокого давления GDI.
Ссылка в разных форматах на этот раздел
TEXTHTMLBB Code