
А000А01А-ОА1
Данное руководство по эксплуатации является неотемлемой принадлежностью автомобиля и должно передаваться при перепродаже следующе
му владельцу
ВЛАДЕЛЕЦ НОВОГО АВТОМОБИЛЯ:
АДРЕС:
ЛАТА ПРОДАЖИ:
ДАННЫ Е ВЛАДЕЛЬЦЕВ
ФАМИЛИЯ:
УЛИЦА:
ГОРОД:
СТРАНА:
ПОЧТОВЫЙ ИНДЕКС:
ВЛАДЕЛЕЦ ПОДЕРЖАННОГО АВТОМОБИЛЯ:
ФАМИЛИЯ:
АДРЕС:
УЛИЦА:
ГОРОД:
СТРАНА:
почтовый ИНДЕКС:
ЛАТА ПЕРЕПРОДАЖИ:
В форуме 20 тем
- Сортировка
-
Авторское право
АвторAdmin,
6 января, 2009-
0
ответов -
9,6 тыс
просмотров
-
0
-
подскажите!
Авторkott,
15 июня, 2010-
6
ответов -
3,2 тыс
просмотров
-
6
-
-
53
ответа -
62,2 тыс
просмотр
-
53
-
-
3
ответа -
5,1 тыс
просмотров
-
3
-
-
10
ответов -
4,7 тыс
просмотра
-
10
-
-
6
ответов -
2,8 тыс
просмотров
-
6
-
-
91
ответ -
33,8 тыс
просмотров
-
91
-
-
31
ответ -
12,8 тыс
просмотра
-
31
-
-
1
ответ -
3,5 тыс
просмотров
-
1
-
-
1
ответ -
4,1 тыс
просмотров
-
1
-
-
1
ответ -
2,8 тыс
просмотров
-
1
-
-
8
ответов -
15 тыс
просмотров
-
8
-
-
0
ответов -
2,7 тыс
просмотров
-
0
-
Shop Manual 2005
АвторAdmin,
6 января, 2009-
1
ответ -
3,2 тыс
просмотров
-
1
-
-
6
ответов -
3,4 тыс
просмотров
-
6
-
-
2
ответа -
4,2 тыс
просмотров
-
2
-
-
0
ответов -
3,9 тыс
просмотров
-
0
-
-
0
ответов -
2,9 тыс
просмотров
-
0
-
Shop Manual 2002
АвторAdmin,
6 января, 2009-
0
ответов -
2,8 тыс
просмотр
-
0
-
Body Repair
АвторAdmin,
6 января, 2009-
0
ответов -
2,8 тыс
просмотров
-
0
Руководство на английском языке по кузовному ремонту автомобиля Hyundai Terracan.
- Автор: —
- Издательство: Hyundai Motor Company
- Год издания: —
- Страниц: 137
- Формат: PDF
- Размер: 12,0 Mb
Руководства на английском языке по ремонту электрооборудования автомобиля Hyundai Terracan 2004-2005 годов выпуска.
- Автор: —
- Издательство: Hyundai Motor Company
- Год издания: 2003/2004
- Страниц: —
- Формат: PDF
- Размер: 106,0 Mb
Руководство на английском языке по техническому обслуживанию и ремонту автомобиля Hyundai Terracan 2002 года выпуска.
- Автор: —
- Издательство: Hyundai Motor Company
- Год издания: 2001
- Страниц: —
- Формат: PDF
- Размер: 71,4 Mb
Руководство на английском языке по техническому обслуживанию и ремонту автомобиля Hyundai Terracan 2005 года выпуска.
- Автор: —
- Издательство: Hyundai Motor Company
- Год издания: 2004
- Страниц: —
- Формат: PDF
- Размер: 29,4 Mb
Руководство по эксплуатации, техническому обслуживанию и ремонту + каталог расходных запчастей автомобиля Hyundai Terracan 2001-2007 годов выпуска с бензиновыми и дизельными двигателями.
- Автор: —
- Издательство: Легион-Автодата
- Год издания: —
- Страниц: 540
- Формат: —
- Размер: —

Руководство по эксплуатации и ремонту автомобиля Hyundai Terracan с 1999 года выпуска с бензиновыми и дизельными двигателями.
- Автор: —
- Издательство: Монолит
- Год издания: —
- Страниц: 501
- Формат: —
- Размер: —

Руководство по эксплуатации и техническому обслуживанию автомобиля Hyundai Terracan.
- Автор: —
- Издательство: Hyundai Motor Company
- Год издания: 2004
- Страниц: 195
- Формат: PDF
- Размер: 5,0 Mb
Руководство по эксплуатации и техническому обслуживанию автомобиля Hyundai Terracan.
- Автор: —
- Издательство: Hyundai Motor Company
- Год издания: —
- Страниц: 181
- Формат: PDF
- Размер: 8,1 Mb

SUV Hyundai Terracan Mark I профессиональное руководство по ремонту и техническому обслуживанию с бензиновыми двигателями: G6CV 3.5 л (3497 см³) 195-200 л.с./144-147 кВт и и дизельными D4BH 2.5 л (2467 см³) 100 л.с./74 кВт, J3 CRDi 2.9 л (2902 см³) 150-163 л.с./110-120 кВт; Руководство по эксплуатации, каталог запасных частей, технические характеристики, 144 электросхемы 57 систем, характерные неисправности, проверка и замена, моменты затяжки, техобслуживание, периодичность, объемы и жидкости диагностика — 226 кодов dtc/7 систем, устройство, особенности конструкции. Производственно-практическое издание легковой автомобиль повышенной проходимости Хендэ (Хундай) Терракан среднеразмерный кроссовер с цельнометаллическими кузовами пятидверный универсал повышенной вместимости полноприводные модели первого поколения выпуска (включая рестайлинг 2003) с 2001 по 2008 год
ЕСЛИ ВЫ ВИДИТЕ ОШИБКУ 406 Not Acceptable и не видите документ, то скорей всего у Вас IP РФ и его надо сменить, на любой другой страны, с помощью VPN ( Scribd и SlideShare блокируют посетителей с Российским IP).
Видео Hyundai Terracan замена прокладки крышки клапанов двигатель D4BH и передних тормозных дисков (Хундай Терракан 01-07)
Hyundai Terracan Mark I общая информация (Хендэ Терракан 2001-2007)
Передние дисковые тормоза
Снятие и проверка тормозных колодок
1. Проверьте толщину накладок тормозных колодок через технологические отверстия суппорта.
Толщина накладки тормозной колодки:
Номинальное значение ……….. 10 мм
Предельно допустимое значение ……….. 2 мм
Внимание:
— Если есть заметная разница в толщине накладок тормозных колодок с левой и правой сторон, то проверьте плавность перемещения поршня, направляющего и стопорного пальцев.
— При необходимости замены тормозной колодки с накладкой в сборе заменяйте весь комплект тормозных колодок с левой и правой сторон автомобиля. Не устанавливайте тормозные колодки разных типов или разных изготовителей в одном комплекте.
2. Выверните стопорный палец, поднимите вверх суппорт в сборе и подвесьте его с помощью проволоки.
Примечание: не удаляйте специальную консистентную смазку с направляющего и стопорного пальцев и не допускайте попадания грязи на стопорный палец.
3. Извлеките из скобы суппорта следующие детали:
— Тормозную колодку и индикатор в сборе.
— Тормозную колодку в сборе.
— Фиксатор.
— Наружную прокладку.
Установка тормозных колодок
1. Установите фиксаторы тормозных колодок в скобу суппорта.
2. Если тормозные колодки не заменяются, то установите их в фиксаторы тормозных колодок.
Примечание: установите тормозную
колодку с индикатором износа так, чтобы колодка была расположена со стороны поршня (т.е. внутренняя колодка) индикатором износа вверх.
3. Если тормозные колодки заменяются новыми, то:
а) С помощью специального инструмента или рукоятки пластикового молотка заведите поршень в цилиндр суппорта тормоза.
б) Установите новые тормозные колодки.
4. Установите прокладки на тормозные колодки.
Внимание: будьте внимательны, убедитесь в отсутствии замасливания поверхностей тормозных колодок и тормозного диска.
5. Аккуратно опустите и установите суппорт в сборе на место так, чтобы не повредить пыльник.
6. Затяните болты стопорного и направляющего пальцев номинальным моментом.
Момент затяжки ……….. 22-32 Нм
| № | Спецификация / Specs | Данные |
| Габариты (мм/mm) и масса (кг/kg) / Dimensions and Weight | ||
| 1 | Длина / Length | 4710 |
| 2 | Ширина (без/с зеркалами) / Width | 1860 |
| 3 | Высота (загружен/пустой) / Height | 1790 |
| 4 | Колёсная база / Wheelbase | 2750 |
| 5 | Дорожный просвет (клиренс) / Ground clearance | 211 |
| 6 | Снаряжённая масса / Total (curb) weight | 1920 |
| Полная масса / Gross (max.) weight | 2590 | |
|
Двигатель / Engine |
||
| 7 | Тип / Engine Type, Code | Дизельный, жидкостного охлаждения, четырехтактный, J3 |
| 8 | Количество цилиндров / Cylinder arrangement: Total number of cylinders, of valves | 4-цилиндровый, рядный, 16V, DOHC с верхним расположением двух распределительных валов |
| 9 | Диаметр цилиндра / Bore | 97.1 мм |
| 10 | Ход поршня / Stroke | 98.0 мм |
| 11 | Объём / Engine displacement | 2902 см³ |
| 12 | Система питания / Fuel supply, Aspiration | Непосредственный впрыск топлива насос-форсунками Common Rail CRDi |
| Турбонаддув и промежуточное охлаждение наддувочного воздуха | ||
| 13 | Степень сжатия / Compression ratio | 19.3:1 |
| 14 | Максимальная мощность / Max. output power kW (HP) at rpm | 110 кВт (150 л.с.) при 3800 об/мин |
| 15 | Максимальный крутящий момент / Max. torque N·m at rpm | 333 Нм при 2000 об/мин |
|
Трансмиссия / Transmission |
||
| 16 | Сцепление / Clutch type | Однодисковое, сухое, с диафрагменной нажимной пружиной и гасителем крутильных колебаний, постоянно замкнутого типа |
| 17 | КПП / Transmission type | МКПП 5 пятиступенчатая механическая, двухвальная, с синхронизаторами на всех передачах переднего хода, с двухступенчатой раздаткой и блокировкой межосевого дифференциала |
О Книге
- Название: Hyundai Terracan 2001-2007 Руководство по ремонту и техническому обслуживанию
- Бензиновые двигатели: G6CV 3.5 л (3497 см³) 195-200 л.с./144-147 кВт и и дизельными D4BH 2.5 л (2467 см³) 100 л.с./74 кВт, J3 CRDi 2.9 л (2902 см³) 150-163 л.с./110-120 кВт
- Выпуск с 2001 года
- Серия: «Профессионал»
- Год издания: 2012
- Автор: Коллектив авторов
- Издательство: «Ассоциация независимых издателей»
- Формат: PDF
- Страниц в книге: 538
- Размер: 447.17 МБ
- Язык: Русский
- Количество электросхем: 144

А000А01А-ОА1
Данное руководство по эксплуатации является неотемлемой принадлежностью автомобиля и должно передаваться при перепродаже следующе
му владельцу
ВЛАДЕЛЕЦ НОВОГО АВТОМОБИЛЯ:
АДРЕС:
ЛАТА ПРОДАЖИ:
ДАННЫ Е ВЛАДЕЛЬЦЕВ
ФАМИЛИЯ:
УЛИЦА:
ГОРОД:
СТРАНА:
ПОЧТОВЫЙ ИНДЕКС:
ВЛАДЕЛЕЦ ПОДЕРЖАННОГО АВТОМОБИЛЯ:
ФАМИЛИЯ:
АДРЕС:
УЛИЦА:
ГОРОД:
СТРАНА:
почтовый ИНДЕКС:
ЛАТА ПЕРЕПРОДАЖИ:
Глава 1. ИНСТРУКЦИЯ ПО ЭКСПЛУАТАЦИИ
Необходимым условием надежной работы любого автомобиля и безопасности персонала является строгое соблюдение указаний по ремонту и техническому облуживанию. Приведенные в Руководстве методики и описания дают общие принципы выполнения работ по ремонту и техническому обслуживанию с применением эффективных приемов и способов.
Применяемые способы и приемы выполнения работ, инструмент, приспособления и используемые запасные части, а также степень мастерства исполнителей весьма разнообразны. Невозможно дать указания или предупреждения по каждому случаю выполнения работ по настоящему Руководству. Поэтому каждый раз при использовании запасных деталей, методик или инструментов и приспособлений, не рекомендованных производителем автомобиля, следует предварительно твердо убедиться, что применяемые запасные части, методики или инструменты не нанесут ущерба безопасности персонала и исправности автомобиля.
ВНИМАНИЕ
— Во всех случаях пользуйтесь защитными очками.
— Во всех случаях при выполнении работ под автомобилем устанавливайте страховочные подставки.
— Убедитесь, что ключ зажигания находится в положении «OFF» (ВЫКЛЮЧЕНО), кроме особо оговоренных случаев.
— Во время работ на автомобиле включайте стояночный тормоз. На автомобилях с автоматической коробкой передач устанавливайте рычаг селектора в стояночное положение, кроме особо оговоренных случаев.
— Для предотвращения самопроизвольного перемещения автомобиля устанавливайте колодки под колеса спереди и сзади.
— Для предотвращения отравления окисью углерода работа двигателя допускается только в хорошо проветриваемом помещении.
— Следите за тем, чтобы части тела или одежда не попали в движущиеся части работающего двигателя, особенно в ремни привода.
— Чтобы избежать серьезных ожогов, не касайтесь горячих металлических частей, в том числе радиатора, выпускного коллектора, приемной трубы, каталитического нейтрализатора и глушителя системы выпуска отработавших газов.
— Для предотвращения травм, прежде чем приступить к работам на автомобиле, снимите кольца, наручные часы, ювелирные украшения на подвесках и не надевайте слишком свободную одежду.
— Во время работ в моторном отсеке следите за тем, чтобы руки и иные предметы не оказались вблизи лопастей вентилятора системы охлаждения двигателя! Автомобиль может быть оборудован электровентилятором системы охлаждения, который может включиться даже при выключенном зажигании. Поэтому при работах на остановленном двигателе следует предварительно полностью отсоединить от бортовой сети электродвигатель вентилятора.
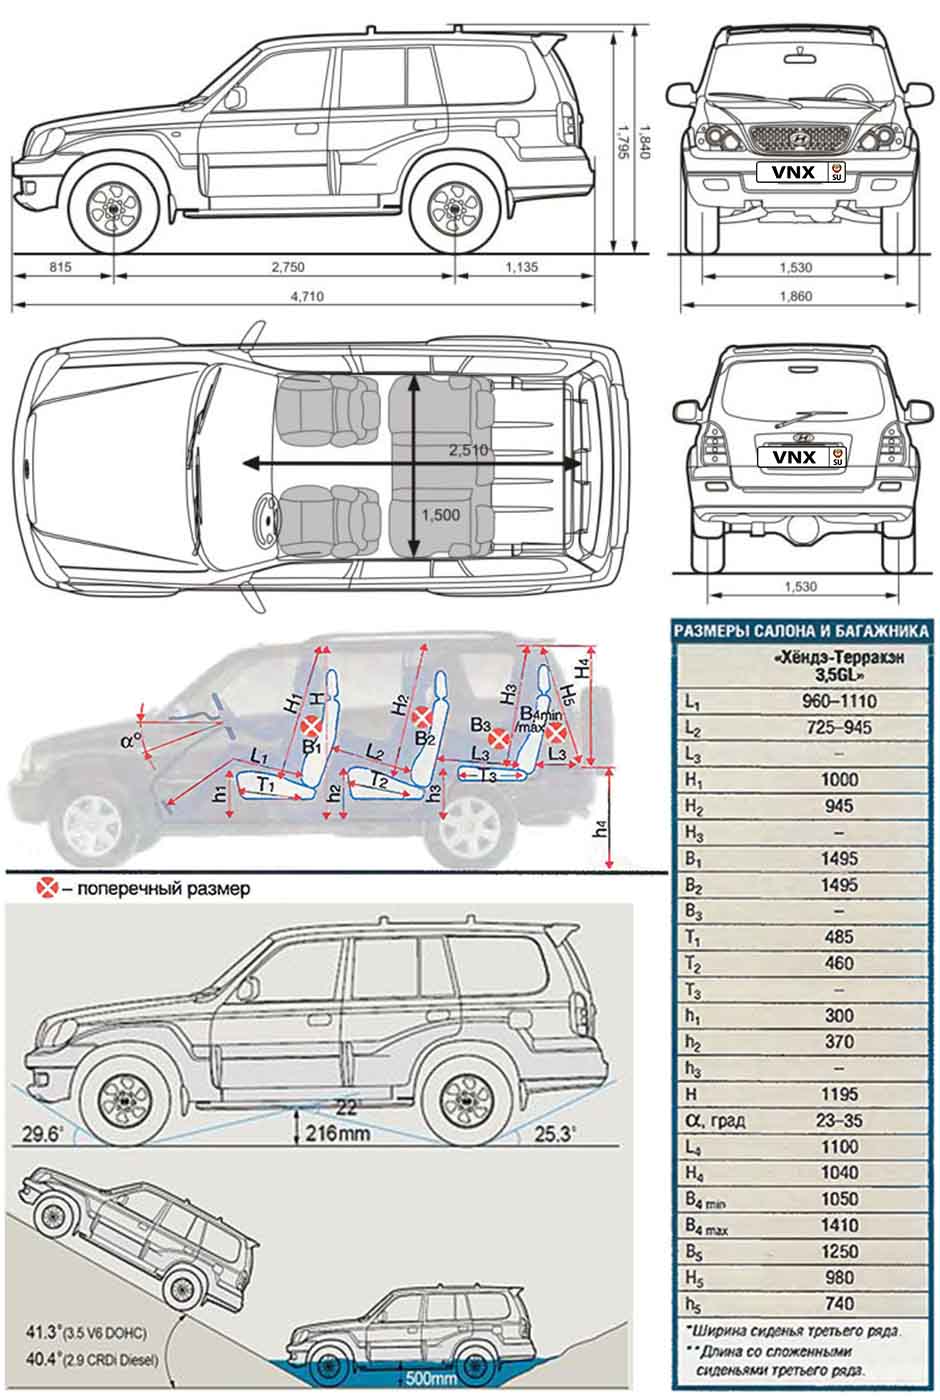
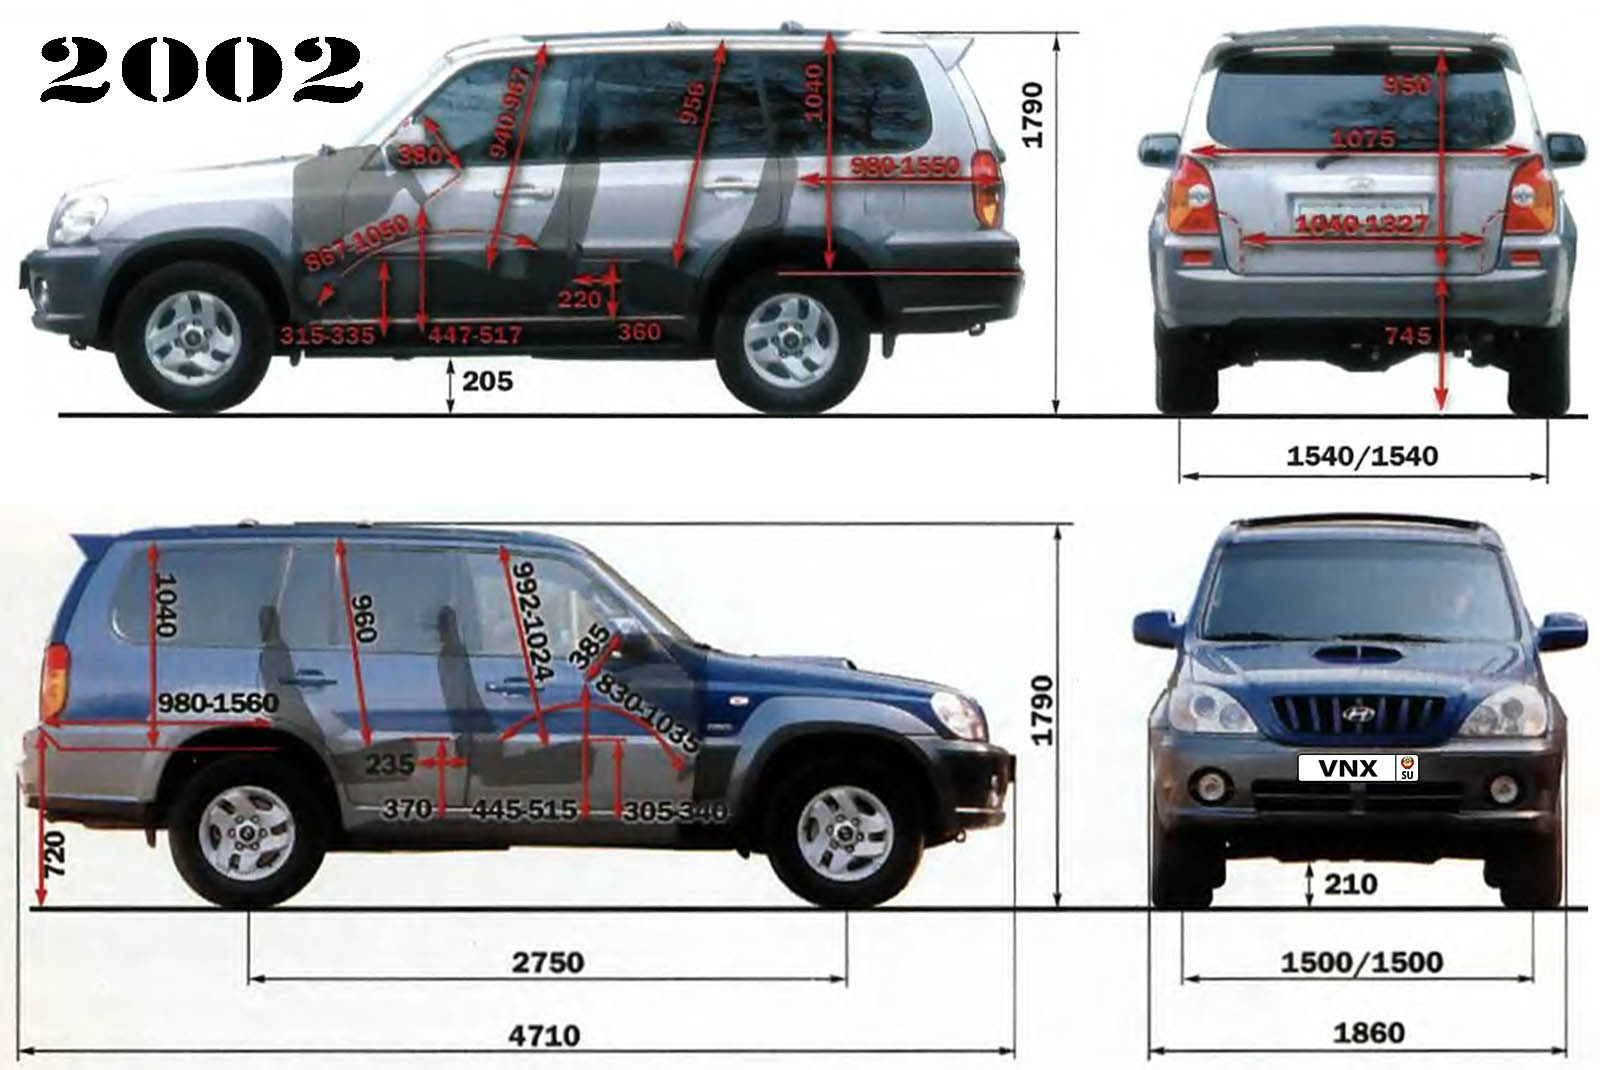
ГАБАРИТНЫЕ РАЗМЕРЫ АВТОМОБИЛЯ

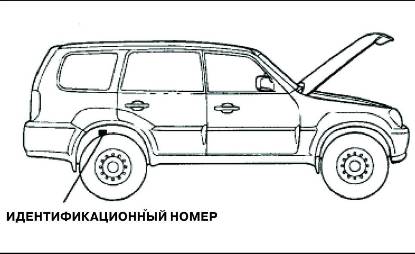
Рисунок 1.1 — Месторасположение идентификационного номера автомобиля
РАСШИФРОВКА ИДЕНТИФИКАЦИОННОГО НОМЕРА АВТОМОБИЛЯ
Идентификационный номер автомобиля состоит из семнадцати символов.
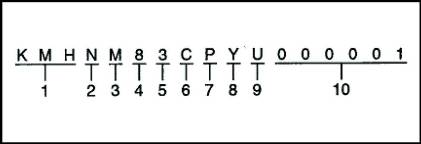
1. Географическая зона К: Корея
— Изготовитель
М: Hyundai motor company
— Тип автомобиля
Н: Легковой
2. Модель автомобиля N: Теrrасаn
3. Модификация и серия L: БАЗОВАЯ (L)
М: ЛЮКС(GL)
N: СУПЕР ЛЮКС (GLS)
4. Тип кузова
8: универсал
5. Системы пассивной безопасности
1: Ремни безопасности с преднатяжителем (водителя и пассажира)
2: Ремни безопасности без преднатяжителя (водителя и пассажира)
3: Ремень безопасности с преднатяжителем и подушка безопасности водителя 4: Ремень безопасности с преднатяжителем и подушка безопасности водителя и пассажира
6. Тип двигателя
С: Бензиновый 3.5 V6
(рабочий объем 3,5 л, 6-ти цилиндровый, V-образный) W: дизель 2.5 L4
(рабочий объем 2.5 л, 4-х цилиндровый, рядный)
X: дизель 2.9 L4
(рабочий объем 2.9 л, 4-х цилиндровый, рядный)
7. Рулевое управление Р: левостороннее,
R: правостороннее
8. Год выпуска У: 2000
1: 2001 2: 2002 3: 2003
9. Завод-производитель U: Улсан (Корея)
10. Серийный номер автомобиля 000001 -999999
РАСШИФРОВКА ИДЕНТИФИКАЦИОННОГО НОМЕРА ДВИГАТЕЛЯ

Рисунок 1.2- Идентификационный номер двигателя
Идентификационный номер двигателя штампуется справа спереди на верхней части блока цилиндров. Он состоит из одиннадцати символов.
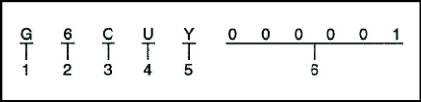
1. Используемое топливо G: Бензин
D: Дизель
2. Тип двигателя
4: Рядный, 4-тактный, 4-цилиндровый 6: V-образный, 4-тактный, 4-цилиндровый
3. Индекс двигателя
С: Двигатель V6 «Сигма»
В: Двигатель «4D56»
4. Рабочий объем V: 3496 см3
Н: 2467 см3
5. Год выпуска
У: 2000, 1: 2001, 2: 2002, 3: 2003
6. Серийный номер двигателя 000001 -999999
РАСШИФРОВКА ИДЕНТИФИКАЦИОННОГО НОМЕРА МЕХАНИЧЕСКОЙ КОРОБКИ ПЕРЕДАЧ
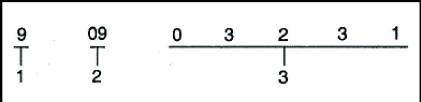
1. Год выпуска 9: 1999
0: 2000 1: 2001
2. Месяц выпуска 09: 9 (сентябрь)
12: 12 (декабрь)
3. Серийный номер коробки передач 00001 -9999
РАСШИФРОВКА ИДЕНТИФИКАЦИОННОГО НОМЕРА АВТОМАТИЧЕСКОЙ КОРОБКИ ПЕРЕДАЧ
1. Год выпуска 00: 2000 01: 2001
2. Месяц выпуска J: 9 (сентябрь)
3. Модель
Q: 03-7ILE
4. Серийный номер коробки передач 00001 -9999
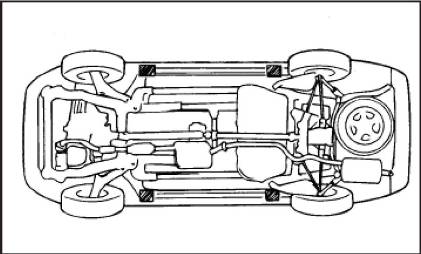
Рисунок 1.3 — Точки установки подпорок домкрата.
ВНИМАНИЕ
1. Не устанавливать домкрат под амортизаторной стойкой и в точках крепления подвески.
2. Чтобы предотвратить царапание кузова, под опору домкрата подложить ткань.
3. Не оставлять автомобиль только на домкрате, обязательно использовать специальные подпорки.
4. Домкрат устанавливать в строго указанных местах, чтобы исключить повреждение кузова.
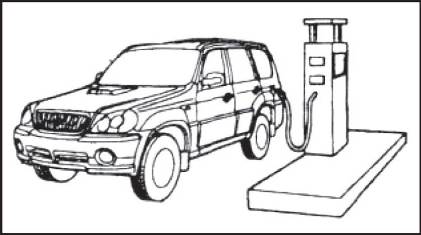
На автомобилях HYUNDAI необходимо использовать неэтилированный бензин с октановым числом 91 ROM (по исследовательскому методу, «Normal») или выше. Использование этилированного бензина приведет к выходу из строя каталитического нейтрализатора отработавших газов (ОГ) и к неисправности систем снижения токсичности. Это также может привести к увеличению затрат на техническое обслуживание Вашего автомобиля. В целях исключения возможности заправки автомобиля этилированным топливом, наливная горловина автомобиля сконструирована так, что в нее можно вставить только заправочный пистолет уменьшенного диаметра, используемый для подачи неэтилированного топлива.
ПРИМЕЧАНИЕ:
В некоторые страны поставляются автомобили HYUNDAI, имеющие возможность работать на этилированном топливе. Если Вы сбираетесь использовать этилированное топливо, проконсультируйтесь у своего официального дилера HYUNDAI о возможности применения этилированного топлива на Вашем автомобиле. Октановое число неэтилированного и этилированного бензина идентично.
Газоль (смесь 90% неэтилированного бензина и 10 % этанола или этилового спирта) может быть использован на Вашем автомобиле Hyundai. Однако если при этом наблюдается снижение технических характеристик двигателя, рекомендуется использование 100 % неэтилированного бензина. Не допускается использование топлива с несоответствующим количеством спирта или спиртов кроме этанола.
На автомобилях Hyundai с дизельным двигателем необходимо использовать дизельное топливо с цетановым числом 52-54. Из-за кристаллизации парафина вязкость дизельного топлива существенно повышается при снижении температуры. Поэтому применяется дизельное топливо двух типов: «летнее» и «зимнее».
1. При температуре выше -5°С используйте «летнее» дизельное топливо.
2. При температуре ниже -5°С используйте «зимнее» дизельное топливо. Следите за уровнем топлива в баке: если автомобиль заглох вследствие прекращения топливоподачи, то для возможности последующего запуска двигателя необходимо удалить воздух из системы топливоподачи.
ВНИМАНИЕ
1. Не допускайте попадания бензина или воды в топливный бак. Если это произошло, то необходимо слить из бака бензин или воду и прокачать систему топливоподачи, чтобы избежать засорения ТНВД и повреждения двигателя.
2. В зимний период, чтобы избежать неприятностей, связанных с кристаллизацией парафина, когда температура воздуха падает ниже -10°С, в дизельное топливо можно добавлять керосин. Максимальная концентрация керосина в дизельном топливе не должна превышать 20%.
МОМЕНТЫ ЗАТЯЖКИ НОРМАЛИЗОВАННЫХ КРЕПЕЖНЫХ ДЕТАЛЕЙ
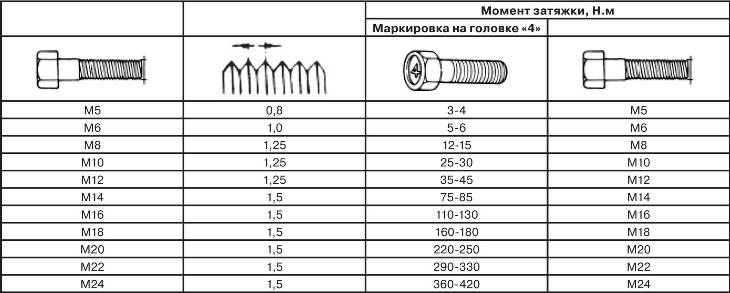
Примечание
1. Указанные в таблице моменты затяжки действительны при следующих условиях:
— Гайки и болты изготовлены из прутка оцинкованной стали.
— Установлены плоские шайбы из оцинкованной стали.
— Все гайки, болты и плоские шайбы сухие.
2. Указанные моменты затяжки не применимы:
— При установке пружинных, зубчатых и им подобных шайб.
— При соединении пластмассовых деталей.
— При затяжке самонарезных винтов и самоконтрящихся гаек.
— При нанесении масла на резьбы и сопрягающиеся поверхности.
3. Указанные в таблице величины моментов затяжки следует уменьшать:
— При установке пружинных шайб: до 85%.
— При нанесении масла на резьбы и сопрягающиеся поверхности: до 85,9%.
СМАЗОЧНЫЕ МАТЕРИАЛЫ И ЭКСПЛУАТАЦИОННЫЕ ЖИДКОСТИ
| Место заправки | Наименование |
| Моторное масло | Класс качества по API: не ниже SG (SAE 10W/30, 5W/30) Класс качества по API: не ниже SH (SAE 7.4W/30) |
| Картер механической коробки передач | Класс качества по API: GL-4 (SAE 75W/90) |
| Картер автоматической коробки передач | Оригинальное масло для коробок передач GENUINE HYUNDAI, GENUINE DIAMOND ATF SP-II M |
| Тормозная система | Тормозная жидкость DOT 3 или DOT 4 |
| Система охлаждения двигателя | Жидкость на основе этиленгликоля высокого качества: — в концентрации 40% (при эксплуатации в тропиках) — в концентрации 50% (вне эксплуатации в тропиках) |
| Система гидроусилителя рулевого управления | Жидкость PSF-3 |
| Привод управления коробкой передач, тросовый привод стояночного тормоза, замок и фиксатор капота, замки дверей, механизмы регулировки положения сидений, замок двери багажника, петли дверей, петли двери багажника | Универсальная смазка NLGI, сорт # 2 |
| Емкость, л | |||
| 2.5 | 3.5 V6 | ||
| Моторное масло | Масляный картер | 5.8 | 4.1 |
| Масляный фильтр | 0.7 | 0.3 | |
| Всего | 6.5 | 4.4 | |
| Система охлаждения | 8 | 11 | |
| Картер механической коробки передач | 2.5 | 2.5 | |
| Картер автоматической коробки передач | 8.2 | 10.46 | |
| Система гидроусилителя рулевого управления | 1.0 | 1.0 |
- Manuals
- Brands
- Hyundai Manuals
- Automobile
- Terracan 2004
- Owner’s manual
-
Contents
-
Table of Contents
-
Bookmarks
Quick Links
A000A01A-GAT
This Owner’s Manual should be considered a part of the car and remain with it when it is sold for
the use of the next owner.
ORIGINAL:
ADDRESS:
DATE OF SALE:
SUBSEQUENT:
ADDRESS:
TRANSFER DATE:
OWNER’S I.D.
NAME:
STREET:
TOWN:
COUNTRY:
P.CODE:
NAME:
STREET:
TOWN:
COUNTRY:
P.CODE:
Related Manuals for Hyundai Terracan 2004
Summary of Contents for Hyundai Terracan 2004
-
Page 1
A000A01A-GAT This Owner’s Manual should be considered a part of the car and remain with it when it is sold for the use of the next owner. OWNER’S I.D. ORIGINAL: NAME: ADDRESS: STREET: TOWN: COUNTRY: P.CODE: DATE OF SALE: SUBSEQUENT: NAME: ADDRESS: STREET:… -
Page 2
A020A01A-AAT RESPONSIBILITY FOR MAINTENANCE The maintenance requirements for your new Hyundai are found in Section 5. As the owner, it is your responsibility to see that all maintenance operations specified by the manufacturer are carried out at the appropriate intervals. When the vehicle is used in severe driving conditions, more frequent maintenance is required for some operations. -
Page 3: Specifications
A030A01HP Specifications All information in this Owner’s Manual is current at the time of publication. However, Hyundai reserves the right to make changes at any time so that our policy of continual product improvement may be carried out. This manual applies to all Hyundai models and includes descriptions and explanations of optional as well as standard equipment.
-
Page 4
Your Owner’s Manual will introduce you to the features and operation of your new Hyundai. It is suggested that you read it carefully because the information it contains can contribute greatly to the satisfaction you receive from your new car. -
Page 5: Table Of Contents
TABLE OF CONTENTS SECTION PAGE FEATURES OF YOUR HYUNDAI …………….1-1 DRIVING YOUR HYUNDAI ………………. 2-1 WHAT TO DO IN AN EMERGENCY …………..3-1 CORROSION PREVENTION & APPEARANCE CARE ……….4-1 VEHICLE MAINTENANCE REQUIREMENTS …………5-1 DO-IT-YOURSELF MAINTENANCE …………..6-1 EMISSION CONTROL SYSTEMS ……………
-
Page 6
CAUTION: MODIFICATIONS TO YOUR HYUNDAI Modification of components may void the manufacturer’s warranty Your Hyundai should not be modified in any way. Modifications may adversely affect the safety, durability and performance of your Hyundai. Components which are subjected to modification or are added to the vehicle resulting in consequential damage are not covered by the vehicle manufacturer’s warranty. -
Page 7
A090A01A-AAT SAFETY AND VEHICLE DAMAGE WARNING This manual includes information titled as WARNING, CAUTION and NOTE. These titles indicate the following: WARNING: This indicates that a condition may result in harm or injury to you or other persons if the warning is not heeded. -
Page 8
1. What are Hyundai Genuine Parts? an imitation, counterfeit or used sal- Hyundai Genuine Parts are the same vage part is not covered by Hyundai parts used by Hyundai Motor Company Motor Company. to manufacture vehicles. They are de- signed and tested for the optimum safe- 3. -
Page 9: Features Of Your Hyundai
Use Diesel Diesel fuel of 52 to 54 cetane is the correct rating B010D01S-AAT to use in your Hyundai. If two types of diesel fuel Do not Use Methanol are available, use summer or winter fuel properly Fuels containing methanol (wood alcohol) should according to the following temperature condi- not be used in your Hyundai.
-
Page 10
B030B01A-AAT Operation in Foreign Countries KEYS Record Your Key Number If you are going to drive your Hyundai in another country, be sure to: o Observe all regulations regarding registra- tion and insurance. o Determine that acceptable fuel is available. -
Page 11
(2) Master key This key is for general use. It will open all Type A Black locks on your vehicle. One side of the key has the Hyundai logo and Light the other side has the «M» symbol. B880C01HP Purple… -
Page 12
In addition, key numbers cannot 4. If all of four digits have been tried success- The immobilizer system is an anti-theft device, be provided by Hyundai for security reasons. fully, from this time, you have to start your designed to deter automobile theft. -
Page 13
In addition, key numbers can- not become locked inside the vehicle by mistake. not be provided by Hyundai for security reasons. If your vehicle is equipped with Theft-alarm sys- If you need additional keys or if you should lose… -
Page 14
After doing the limp home procedure, you have to B040A01A-AAT DOOR LOCKS You can get the limp home password when consult with your authorized Hyundai dealer as the vehicle is first delivered to you. If you do soon as possible. WARNING: not have the password, consult your autho- o Unlocked doors can be dangerous. -
Page 15
B040C02Y-DAT Locking from the Outside LOCK UNLOCK B040E01HP Your Hyundai is equipped with a «child-protec- tor» rear door lock assembly. When the lock mechanism is engaged, the rear door cannot be opened from the inside. Its use is recommended HSM362… -
Page 16
FEATURES OF YOUR HYUNDAI B040G01HP-AAT B070A01A-AAT Type B Central Door Locks THEFT-ALARM SYSTEM (If installed) This system is designed to provide protection from unauthorized entry into the car. This system LOCK is operated in three stages: the first is the «Armed»… -
Page 17
FEATURES OF YOUR HYUNDAI CAUTION: The siren will sound and the turn signal lights will B070F01A-GAT Keyless Entry System (If installed) Do not arm the system until all passengers blink continuouly for 27 seconds (Type B/ Type have left the car. If the system is armed while A : This happens 3 times). -
Page 18
FEATURES OF YOUR HYUNDAI Replacement instructions: Type B: B060A03L-DAT POWER WINDOWS Type A: Case Screwdriver Transmitter HMXOM033-2 B060A01HP MSO-0048-1 1. Carefully separate the case with a phillips The power windows operate when the ignition screwdriver. 1. Carefully separate the case with a blade key is in the «ON»… -
Page 19
FEATURES OF YOUR HYUNDAI WARNING: B080A01A-AAT ADJUSTABLE FRONT SEATS To ensure the seat is locked securely, at- WARNING: tempt to move the seat forward or rearward Never attempt to adjust the seat while the without using the lock release lever. -
Page 20
FEATURES OF YOUR HYUNDAI WARNING: belts and airbags in a frontal collision may be B080F01S-AAT Seat Cushion Height Adjustment reduced significantly when the seatbacks are o For maximum effectiveness in case of an reclined. There is greater risk that the driver… -
Page 21
FEATURES OF YOUR HYUNDAI B090A02Y-AAT B090B01L-AAT B090C01Y-AAT POWER DRIVER’S SEAT (If installed) Adjusting Seat Forward and Rearward Seat Cushion Height Adjustment The driver’s seat can be adjusted appropriately by using the control knob on the left side of the seat. Before driving, adjust the seat to the proper… -
Page 22
FEATURES OF YOUR HYUNDAI B090D01Y-AAT B080G01O-AAT B100A01HP-GAT Adjusting Seatback Angle UNDER TRAY SEAT WARMER (If Installed) B085D01HP B080G01HP B100A01HP-1 Rotate the upper portion of the control knob The seat warmer is provided to warm the front The tray is located under the front passenger forward or backward to recline the seatback to seats during cold weather. -
Page 23
FEATURES OF YOUR HYUNDAI B090A01HP-GAT B090C01HP-GAT B090B01HP-DAT SECOND SEAT Adjusting Seatback Angle Folding Rear Seatback and Seat Cush- Adjustable Headrests (If installed) For greater convenience, the entire seatback and seat cushion may be folded down and up. 1. Lower the headrest completely while press- ing the lock knob. -
Page 24
FEATURES OF YOUR HYUNDAI o When you return the seatback to its upright B095A02HP-GAT THIRD SEAT(For 7 Passengers) position, always be sure it is locked into position by pulling and pushing on the top of Adjusting Seatback Angle seatback. WARNING:… -
Page 25
FEATURES OF YOUR HYUNDAI B095B03HP-GAT 3. Pull the seat cushion release knob(2) beside 6. To return the seatback and seat cushion to its Folding Rear Seatback and Seat cush- the seat cushion, then fold the seat cushion normal position, reverse the above proce- sideways. -
Page 26
FEATURES OF YOUR HYUNDAI B095C01HP-GAT 3. To get in the third seat, pull the handle for B140A01B-GAT To get in and out of the third seat REAR SEAT WARNING folding the seat cushion (2) beside the seat The second seat should be folded up to get in and cushion, then fold up the seat cushion. -
Page 27
FEATURES OF YOUR HYUNDAI WARNING: B150B01Y-GAT B150D01A-AAT Infant or Small Child Pregnant Women Sitting in a reclined position or lying down Some countries require the use of child restraint The use of a seat belt is recommended for when your vehicle is in motion can be dan- systems for infants and small children. -
Page 28
Hyundai Dealer. To adjust the height of the seat belt anchor, lower or raise the height adjuster into an appropriate B180A01L position. -
Page 29
FEATURES OF YOUR HYUNDAI forward in a slow, easy motion, the belt will extend and let you move around. If there is a B210A01A-AAT To Release the Seat Belt extend and let you move around. If there is a sudden stop or impact, however, the belt will lock sudden stop or impact, however, the belt will lock into position. -
Page 30
FEATURES OF YOUR HYUNDAI B220A01A-AAT B220B01A-AAT B220C01A-AAT SEAT BELTS (2-Point Static Type) (Rear Adjusting Your Seat Belt To Release the Seat Belt Seat Center) To Fasten Your Seat Belt Too high Correct Shorten HTB226 HHP231-1 With a 2-point static type seat belt, the length… -
Page 31
FEATURES OF YOUR HYUNDAI o Lock the metal tab (a) and the buckle (b) B220D01HP-GAT SEAT BELTS — Center Rear Seat 3- immediately after folding rear seatbacks Point System With Emergency Lock- o To disconnect the metal tab (c) from the… -
Page 32
If the seat belt will not properly fit the B230A03P-GAT CHILD RESTRAINT SYSTEM o A child restraint system must be placed in child, Hyundai recommends the use of an the rear seat. Never install a child or infant approved booster seat in the rear seat in (If Installed) seat on the front passenger’s seat. -
Page 33
If the seat belt does not operate as de- scribed, have the system checked imme- diately by your authorized Hyundai dealer. WARNING: Do not install any child restraint system in the front passenger seat. Should an accident… -
Page 34
FEATURES OF YOUR HYUNDAI B230B02A-AAT B230C02HP-GAT Using a Child Restraint System With Securing a Child Restraint System with «Tether Anchorage» System «Tether Anchorage» System Three child restraint hook holders are located on the floor behind the second seat. Bolt, Holder (5/16″ — 30 mm) Install the child restraint seat according to the instructions provided as following. -
Page 35
«click» sound. the Hyundai ISOFIX GR1 / Hyundai Duo / Römer ing (check by pulling!) and has to be fixed with the 2. Connect the tether strap hook to the child ISOFIX GR1 and the Römer Duo ISOFIX / Britax… -
Page 36
0+ : Up to 13 kg B180B01S o Do not mount more than one child re- (0 ~ 2 years) Your Hyundai vehicle is equipped with driver’s straint to a child restraint lower anchor- I : 9kg to 18kg and front passenger’s pre-tensioner seat belts. -
Page 37
Do not attempt to inspect or replace the B180B02S CAUTION: pre-tensioner seat belts yourself. This o Because the sensor that activates the SRS must be done by an authorized Hyundai WARNING: airbag is connected with pre-tensioner dealer. To obtain maximum benefit from a pre-… -
Page 38
30° ble while still maintaining control of the from the forward longitudinal axis of the Your Hyundai is equipped with a Supplemental vehicle. If you are sitting too close to the vehicle and will not deploy in side, rear or Restraint (Airbag) System. -
Page 39
FEATURES OF YOUR HYUNDAI o Do not tamper with or disconnect SRS B240B02A-AAT SRS Components and Functions wiring, or other components of the SRS system. Doing so could result in injury, due to accidental firing of the airbags or by rendering the SRS inoperative. -
Page 40
The entire SRS system must be in- o When the SRS is activated, there may be a spected by an authorized Hyundai dealer in 10 loud noise and fine dust will be released years after the date that the vehicle was manu- through the vehicle. -
Page 41
Do not replace the bumper or the bumper vehicle is in a crash severe enough to guard with the one other than the Hyundai cause the airbags to inflate. genuine parts. Otherwise, it can adversely… -
Page 42
FEATURES OF YOUR HYUNDAI B250A02HP-GAT INSTRUMENTS AND CONTROLS CAUTION: When installing a container of liquid air fresh- ener inside the vehicle, do not place it near the instrument cluster nor on the instrument panel surface. If there is any leakage from the… -
Page 43
FEATURES OF YOUR HYUNDAI B260A02HP-GAT INSTRUMENT CLUSTER (GASOLINE ENGINE) B260A01HP-1 1. Tachometer 3. Fuel Gauge 5. Trip Odometer 2. Coolant Temperature Gauge 4. Speedometer 6. Odometer 7. Trip odometer Reset Knob 1- 35… -
Page 44
FEATURES OF YOUR HYUNDAI B261A02HP-GAT INDICATOR AND WARNING LIGHTS (GASOLINE ENGINE) Part-time 4WD : Full-time 4WD : B260A01HP-1 8 91011 1213 1819 1. Turn Signal Indicator Light 6. Charging System Warning Light 13. 4WD LOW Indicator Light 2. ABS Service Reminder Indicator Light 7. -
Page 45
FEATURES OF YOUR HYUNDAI B262A02HP-GAT INSTRUMENT CLUSTER (DIESEL ENGINE) B260A02HP-1 1. Tachometer 3. Fuel Gauge 5. Trip Odometer 2. Coolant Temperature Gauge 4. Speedometer 6. Odometer 7. Trip Odometer Reset Knob 1- 37… -
Page 46
FEATURES OF YOUR HYUNDAI B264A02HP-GAT INDICATOR AND WARNING LIGHTS (DIESEL ENGINE) Part-time 4WD : Full-time 4WD : B260A02HP-1 10 11 12 1314 2021 22 1. Turn Signal Indicator Light 7. Low Oil Pressure Warning Light 15. Automatic Transmission Position Indicator 2. -
Page 47
When the key is turned to the «ON» position, the checked by a Hyundai dealer as soon as damage may result. The oil pressure warning Anti-Lock Brake System SRI will come on and possible. -
Page 48
Hyundai dealer for inspection. If further trouble The indicator light does not illuminate when the is experienced, the vehicle should not be driven… -
Page 49
B260T01HP-GAT 6 seconds when you turned the ignition key to the rized Hyundai dealer as soon as possible. 4WD HIGH Indicator Light «ON» position or started the engine, or if it comes… -
Page 50
If the engine were not started within 2 sec- checked by a Hyundai dealer as soon as light goes off. The illuminating time varies with onds after the preheating is completed, turn possible. -
Page 51
It may also be heard when the brake pedal is pushed down firmly. Excessive rotor damage will result if the worn pads are not replaced. See your Hyundai dealer immediately. Reset Switch B300A01HP… -
Page 52
Gasoline Engine the tachometer face. This can cause severe engine damage and may void your warranty. HHP258-2 Reset switch Your Hyundai’s speedometer is calibrated in B330A01HP kilometers per hour or miles per hour. Diesel Engine B310A01HP-GAT ODOMETER… -
Page 53
FEATURES OF YOUR HYUNDAI B990A01HP-GAT B990B01HP-GAT HOW TO ADJUST MULTIMETER MULTIMETER(If installed) Switch function Switch Function Altimeter Relative Altimeter Mode Barometer Selecting of time adjustment mode (more than 2 sec) Altimeter correction (Up), Setting altitude to «0» (Down) Time adjustment… -
Page 54
FEATURES OF YOUR HYUNDAI Altitude Correction It displays 16 azimuths according to the vehicle 3. After the rotation is finished, the azimuth driving direction and the angle of one graduation compass indicator will stop blinking and now Displayed altitude could vary even at same place is 22.5°. -
Page 55
FEATURES OF YOUR HYUNDAI When you want to know the difference of altitude The current air pressure is displayed in hpa units B990H01HP-GAT ROAD DISPLAY RESPONSIVE TO VE- between the destination and the starting point. where the measurement range is from 720hpa to 1,045hpa.(The minimum is 1hpa) -
Page 56
Check for a burned- B360A01HP-GAT out fuse or bulb or see your Hyundai dealer. REAR FOG LIGHT SWITCH (If installed) B360A01HP 1- 48… -
Page 57
The headlights can be flashed even though the headlight switch is in (If Installed) the «OFF» position. Your Hyundai is equipped with daytime running lights. The daytime running lights are used to improve visibility for oncoming traffic. Your ve- B350A01A-AAT… -
Page 58
FEATURES OF YOUR HYUNDAI B350B01O-GAT To use the intermittent wiper feature, place the Mist Wiper Operation Windshield Washer Operation wiper switch in the «INT» position. With the switch in this position, the interval between wipes can be varied from approximately 1 to 18 seconds by turning the interval adjuster barrel. -
Page 59
FEATURES OF YOUR HYUNDAI NOTE: B370A01A-AAT B380A02HP-AAT HAZARD WARNING SYSTEM FRONT/REAR WINDOW DEFROSTER The ignition must be in the «ON» position for the front/rear window defroster to operate. SWITCH (If installed) Type A B400A01HP-GAT DIGITAL CLOCK (Without Multimeter) Type B… -
Page 60
12 volts. If it is necessary to replace the cigarette lighter, use only a genuine Hyundai replacement or its approved equivalent. CAUTION: B410A01HP Do not use electric accessories or equipment… -
Page 61
FEATURES OF YOUR HYUNDAI B430A01Y-AAT B440A01E-AAT The drink holder is located on the main console FRONT ASHTRAY REAR ASHTRAY for holding cups or cans. WARNING: o Use caution when using the drink holders. A spilled beverage that is very hot can injure you or your passengers. -
Page 62
FEATURES OF YOUR HYUNDAI WARNING: CAUTION: B460B01HP-GAT OPERATING THE SUNROOF SYSTEM Do not place objects other than cups or cans o Do not open the sunroof in severely cold in the drink holder. Such objects can be temperature or when it is covered with ice… -
Page 63
FEATURES OF YOUR HYUNDAI B460D01HP-GAT Push in the map light switch to turn the light on or Manual Operation of Sunroof off. This light produces a spot beam for conve- nient use as a map light at night or as a personal light for the driver and the passenger. -
Page 64
FEATURES OF YOUR HYUNDAI o OFF B500B01HP-DAT The outside rearview mirrors are equipped with MULTI BOX In the «OFF» position, the light stays off at all a remote control for your convenience. It is times even though a door is open. -
Page 65
FEATURES OF YOUR HYUNDAI B510B01Y-AAT B510D01HP-GAT OUTSIDE REARVIEW MIRROR HEAT- Electric Type (If installed) ER (If installed) Type A Type B B510D01E CAUTION: B510B01HP o Do not operate the switch continuously B380A02HP The outside rearview mirrors can be adjusted to for an unnecessary length of time. -
Page 66
B515A01HP To fold the outside rearview mirrors, push them Traffic and road conditions can be viewed on the Your Hyundai is equipped with a day/night inside towards the rear. lower right-hand side of the vehicle with the side rearview mirror. The «night» position is selected The outside rearview mirrors can be folded rear- under view mirror. -
Page 67
FEATURES OF YOUR HYUNDAI B520B01O-GAT B530A01A-AAT B540A01O-AAT DAY/NIGHT INSIDE REARVIEW MIR- PARKING BRAKE TAIL GATE ROR (Electric type) (If installed) B530A01HP B540A01HP B520B01HP Always engage the parking brake before leaving WARNING: The electric type day/night inside rearview mirror the car. This also turns on the parking brake… -
Page 68
FEATURES OF YOUR HYUNDAI B800A01HP-AAT B540C01HP-GAT B540D02HP-DAT CD Auto Changer (If Installed) Luggage compartment light Luggage Net B540C01HP B540B01HP B540D01HP Luggage compartment light has a 3-position Some objects can be kept in the net at the The CD Auto Changer is located in the right side switch. -
Page 69
B630A01HP the luggage carrier and cargo are still B640A01HP If your Hyundai has a roof rack, you can load securely fastened. things on top of your vehicle. The two cross bars o Always drive your vehicle at a moderate… -
Page 70
In addition to the lower-mounted rear stoplights to replace the filler cap, use a genuine Hyundai lever located below the right of the driver’s side on either side of the car, the high mounted rear replacement part. -
Page 71
Do not move the vehicle with the hood in 1. Pull the release knob to unlatch the hood. Your Hyundai is equipped with sun visors to give the raised position, as vision is obstructed the driver and front passenger either frontal or and the hood could fall or be damaged. -
Page 72
FEATURES OF YOUR HYUNDAI B620A01S-AAT B610A01L-GAT The rear seat arm rest is located in the center of FRONT DOOR EDGE WARNING HORN the rear seat back. A storage box and two drink LIGHT (If installed) holders are included for convenience. -
Page 73
FEATURES OF YOUR HYUNDAI B340G01HP-GAT B660B02L-AAT Switch HEADLIGHT LEVELING DEVICE SYS- To Set the Cruise Speed LOADING CONDITION position TEM (If installed) Driver only Driver + Front Passenger Full Passengers Full passengers + Maximum Permissible Loading Driver + Maximum Permissible… -
Page 74
FEATURES OF YOUR HYUNDAI NOTE: B660D01L-DAT B660F01L-GAT To Resume the Preset Speed To Reset at a Slower Speed If the vehicle speed decreases more than 15 km/h (9 mph) below the set speed or de- creases below 40 km/h (25 mph), the cruise control system will automatically cancel the set speed. -
Page 75
FEATURES OF YOUR HYUNDAI o Pay particular attention to the driving con- 1. Fan speed control. The blower fan speed, and therefore the volume ditions whenever using the cruise control This is used to turn the fan on and select the of air delivered from the system, may be con- system. -
Page 76
FEATURES OF YOUR HYUNDAI NOTE: B670D01L-AAT Air Flow Control o It should be noted that prolonged opera- tion of the heating system in » » mode will give rise to fogging of the windshield and side windows and the air within the passenger compartment will become stale. -
Page 77
FEATURES OF YOUR HYUNDAI If the «Floor-Defrost» mode is selected, the A/C B670E02A-AAT Temperature Control will turn on automatically and «Fresh» mode will be activated. HHP283-2 Cool Warm Floor-Level B670E01HP Air is discharged through the floor vents, wind- HHP283-4 This control is used to adjust the degree of shield defroster nozzle, side defroster nozzle heating or cooling desired. -
Page 78
B690A01HP B700A01HP B710A01HP For normal heating operation, set the air intake Your Hyundai is equipped with bi-level heating To operate the ventilation system: control to the fresh air ( ) position and the air controls. This makes it possible to have cooler air flow control to the floor ( ) position. -
Page 79
FEATURES OF YOUR HYUNDAI B710B01S-AAT B710C02HP-AAT B720A02FC-AAT CENTER VENTILATOR SIDE VENTILATOR DEFROSTING/DEFOGGING B720A01HP B710B01HP B710C01HP The side ventilators are located on each side of The center ventilators are located in the middle of Use the heating/ventilation system to defrost or dashboard. -
Page 80
FEATURES OF YOUR HYUNDAI B730A01L-AAT B740A01S-AAT Operation Tips AIR CONDITIONING SYSTEM o To keep dust or unpleasant fumes from (If installed) entering the car through the ventilation sys- Air Conditioning Switch tem, temporarily set the air intake control to position. Be sure to return the co-… -
Page 81
FEATURES OF YOUR HYUNDAI B740B01HP-GAT B740C01A-AAT Air Conditioning Operation De-Humidified Heating Cooling B740C01HP B740B01HP For dehumidified heating: To use the air conditioning to cool the interior: o Turn on the fan control switch. o Turn on the air conditioning switch. The air o Set the side vent control to «… -
Page 82
B970A01Y-AAT B970B01HP-GAT AUTOMATIC HEATING AND COOLING Heating and Cooling Controls CONTROL SYSTEM (If lnstalled) Your Hyundai is equipped with an automatic heating and cooling control system controlled by simply setting the desired temperature. B970B01HP 1. Blower Fan Control Switch 8. Air Flow Control Switch 2. -
Page 83
FEATURES OF YOUR HYUNDAI The display shows that the unit of tempera- B970C02L-AAT Automatic Operation ture is adjusted to Centigrade or Fahrenheit (°C → °F or °F → °C). Photo sensor B970C02HP 2. Push the «TEMP» button to set the desired B970C01HP temperature. -
Page 84
FEATURES OF YOUR HYUNDAI B995A01Y-AAT B980B01Y-AAT B670C02HP-GAT AMBIENT TEMPERATURE SWITCH Fan Speed Control Switch Air Intake Control Switch B980B01HP B980C01HP B995A01HP The fan speed can be set to the desired speed by Pressing the AMB button displays the ambient This is used to select fresh outside air or recircu- pressing the appropriate fan speed control but- temperature on the display. -
Page 85
FEATURES OF YOUR HYUNDAI NOTE: B980D01Y-AAT Heating and Cooling System Off o It should be noted that prolonged opera- tion of the heating system in «Recircula- Press the «OFF» button to stop the operation of tion» mode will give rise to fogging of the the heating and cooling system. -
Page 86
FEATURES OF YOUR HYUNDAI B980F01O-GAT Bi-Level Defrost Switch When selecting the «Bi-Level» mode, the indica- tor light will come on and the air will be discharged through the face vents and the floor vents. This makes it possible to have cooler air from the dashboard vents and warmer air from the floor outlets at the same time. -
Page 87
FEATURES OF YOUR HYUNDAI B760A05A-GAT B740D01Y-AAT AIR CONDITIONER FILTER Operation Tips o If the interior of the car is hot when you first get (FOR EVAPORATOR AND BLOWER in, open the windows for a few minutes to UNIT) (If installed) expel the hot air. -
Page 88
FEATURES OF YOUR HYUNDAI B750A02A-AAT AM reception FM radio station STEREO SOUND SYSTEM Ionosphere Unobstructed How Car Audio Works area FM reception Ionosphere Mountains Buildings Iron bridges SSAR011A SSAR012A Obstructed area AM broadcasts can be received at greater dis- FM broadcasts are transmitted at high frequen- tances than FM broadcasts. -
Page 89
FEATURES OF YOUR HYUNDAI B750B02Y-AAT Using a cellular phone or a two-way radio When a cellular phone is used inside the vehicle, noise may be produced from the audio equip- ment. This does not mean that something is wrong with the audio equipment. In such a case, use the cellular phone at a place as far as possible from the audio equipment. -
Page 90
FEATURES OF YOUR HYUNDAI H240A01O-GAT STEREO RADIO OPERATION (H240) (If Installed) 5. BAND Selector 3. TREBLE/FADER Control Knob (TREB/FAD) SEEK 2. BASS/BALANCE Control Knob (BASS/BAL) 6. PRESET Buttons 7. SCAN Button 4. TUNE/SEEK Select Button 1. POWER ON/OFF, VOLUME Control Knob… -
Page 91
FEATURES OF YOUR HYUNDAI H240B03O-AAT FAD (Fader Control) Knob 6. PRESET STATION SELECT Button 1. POWER ON-OFF Control Knob Pull the treble control knob further out. Six (6) stations for AM, FM1 and FM2 respective- The radio unit may be operated when the ignition… -
Page 92
FEATURES OF YOUR HYUNDAI 7. SCAN Button When the scan button is pressed, the frequency will increase and the receivable stations will be tuned in one after another, receiving each station for 5 seconds. To stop scanning, press the scan button again. -
Page 93
FEATURES OF YOUR HYUNDAI H240C01O-GAT CASSETTE TAPE PLAYER OPERATION (H240) (If Installed) 3. TAPE PROGRAM Button 6. TAPE SLOT 2. AUTO MUSIC SELECT Button 4. EJECT Button SEEK 1. FF/REW Button 5. DOLBY SELECT Button H240A01O 1- 85… -
Page 94
FEATURES OF YOUR HYUNDAI NOTE: H240A03O-AAT 1. FF/REW Button When tape operation is abnormal or ER8 fault o The FF (fast forward tape winding) starts when code is displayed, Press eject button more button is pressed during PLAY or REW. -
Page 95
FEATURES OF YOUR HYUNDAI H290A01E-GAT STEREO RADIO OPERATION (H280) (If Installed) 1. POWER ON/OFF VOLUME Control Knob 8. BEST STATION MEMORY or SCAN Button (If installed) 7. EQUALIZER Button 3. TREBLE/FAD Konb 2. BASS/BALANCE Control Knob 5. PRESET Buttons 4. TUNE/SEEK Select Button H290A01O 6. -
Page 96
FEATURES OF YOUR HYUNDAI H290B03E-AAT 3. TREBLE/FAD Knob 5. PRESET STATION Select Buttons 1. POWER ON-OFF Control Knob Six (6) stations for AM, FM1 and FM2 respec- TREBLE Control Knob The radio unit may be operated when the ignition tively can be preset in the electronic memory Press to pop the knob out and turn to the left or key is in the «ACC»… -
Page 97
FEATURES OF YOUR HYUNDAI CAUTION: 6. BAND Selector o Do not place beverages close to the audio Pressing the button changes the AM, FM1 FM/AM system. The audio system mechanism may and FM2 bands. The mode selected is shown on be damaged if you spill them. -
Page 98
FEATURES OF YOUR HYUNDAI H290C01E-GAT CASSETTE TAPE PLAYER OPERATION (H280) (If Installed) 5. EQUALIZER Button 4. TAPE EJECT Button 2. AUTO MUSIC Select Button 1. FF/REW Button 6. DOLBY Button 3. TAPE PROGRAM Button H290A01O 1- 90… -
Page 99
FEATURES OF YOUR HYUNDAI H290D02O-AAT 4. TAPE EJECT button 1. FF/REW Button o When the button is pressed with the o Fast forward tape winding starts when the FF cassette loaded, the cassette is ejected. ) button is pressed during the PLAY or… -
Page 100
FEATURES OF YOUR HYUNDAI H290E01E-GAT COMPACT DISC PLAYER OPERATION (H280) (If Installed) 6. CD EJECT Button 7. SCAN Button (If installed) 5. EQUALIZER Button 3. TRACK UP/DOWN 2. FF/REW Button 4. REPEAT 1. CD Select Button H290A01O 1- 92… -
Page 101
FEATURES OF YOUR HYUNDAI NOTE: H290F03O-GAT o If you do not release RPT operation when the 1. CD Select Button track ends, it will automatically be replayed. o To assure proper operation of the unit, o Insert the CD with the label facing upward. -
Page 102
FEATURES OF YOUR HYUNDAI CAUTION: o Do not insert warped or poor quality discs into the CD player as damage to the unit may occur. o Do not insert anything like coins into the player slot as damage to the unit may occur. -
Page 103
FEATURES OF YOUR HYUNDAI H290G01E-GAT CD AUTO CHANGER (H280) (If Installed) 6. SCAN Button (If installed) 7. EQ Button 3. TRACK UP/DOWN 4. FF/REW Button 5. REPEAT 2.DISC Select Button 1. CD CHANGER Select Button H290A01O 1- 95… -
Page 104
This unit is made of precision parts. Do the button again. is being used. The Hyundai CD changer can hold not attempt to disassemble or adjust any up to eight discs. The disc number will be lit, and parts. -
Page 105
FEATURES OF YOUR HYUNDAI CAUTION: o Do not insert warped or poor quality discs into the CD changer as damage to the unit may occur. o Do not insert anything like coins into the changer slot as damage to the unit may occur. -
Page 106
SOLUTION CD DECK MECHANICAL ERROR After resetting the audio, push the eject button. (EJECT ERROR, LOADING ERROR) If disc is not ejected, consult your Hyundai dealer. FOCUS ERROR Make sure the disc is not scratched or damaged. DATA READ ERROR Press the eject button and pull out the disc. -
Page 107
FEATURES OF YOUR HYUNDAI B850A02F-AAT Do not grip or pull out the disc with your hand B860A01A-AAT CARE OF DISC CARE OF CASSETTE TAPES while the disc is being pulled into the unit by the self loading mechanism. Proper Handling… -
Page 108
FEATURES OF YOUR HYUNDAI Head Cotton applicator SSAR053B B860A02L B860A01HP o Be sure that the cassette label is not loose or o The playback head, capstan and pinch rollers NOTE: peeling off or tape ejection may be difficult. will develop a coating of tape residue that can Look at a tape before you insert it. -
Page 109
FEATURES OF YOUR HYUNDAI B870A01A-GAT B880C02B-GAT ANTENNA Glass Antenna (If installed) Fixed Rod Antenna B870D01HP When the radio power switch is turned on while B870C01HP the ignition key is in either the «ON» or «ACC» Your car uses a fixed rod antenna to receive both position, your car will receive both AM and FM AM and FM broadcast signals. -
Page 110: Driving Your Hyundai
Hyundai dealer. o Do not run the engine in an enclosed area.
-
Page 111
To Start the Engine result in the need to apply greater pedal o «ON» o If your Hyundai is equipped with a manual pressure in order to effect the necessary transmission, place the shift lever in neutral When the key is in the «ON» position, the ignition braking effort. -
Page 112
3. The key can be removed in the «LOCK» 2. Apply the parking brake. o «LOCK» position. 3. If your Hyundai is equipped with a manual The key can be removed or inserted in this transmission, place the shift lever in neutral position. -
Page 113
SSA2090A (2) When the atmospheric temperature is Driving Condition Your Hyundai’s manual transmission has a con- Required Idle Time low and the engine is cold: ventional shift pattern. This shift pattern is im- Start the engine while depressing the… -
Page 114
DRIVING YOUR HYUNDAI shift lever in N(Neutral) position and re- o Always wear your seat belts. C070D02O-AAT Good Driving Practices lease the clutch. Press the clutch pedal In a collision crash, an unbelted person is o Never take the car out of gear and coast down… -
Page 115
(Park) position unless the vehicle is fully prevent the engine from over-running. The highly efficient Hyundai automatic transmis- stopped. Manually move the selector to «D» returning to sion has four forward speeds and one reverse Failure to observe this caution will cause normal driving condition. -
Page 116
DRIVING YOUR HYUNDAI o Always apply the footbrake when shifting C090H01HP-DAT For normal driving, the selector lever should be CAUTION: from «P» or «N» to «R», «D», «2» or «L» left in the «D» position and the overdrive switch o P (Park): position. -
Page 117
DRIVING YOUR HYUNDAI WARNING: o In the event your vehicle leaves the road- o Do not «ride» the brakes. This can cause them to overheat and malfunction. Instead, when way, do not steer sharply. Instead, slow ABS will not prevent accidents due to im-… -
Page 118
DRIVING YOUR HYUNDAI CAUTION: C350A01HP-GAT 4H → → → → → 4L Part-time 4WD operation Do not select 4WD (4H or 4L) mode on dry 1. Stop the vehicle. paved roads. Especially on dry highway, never 2. Depress the clutch pedal (Manual Transmis- select the 4WD mode. -
Page 119
DRIVING YOUR HYUNDAI conventional 2-wheel drive vehicles any more Driving on snowy or icy roads Select the 4L mode and drive through slowly. than low-slung sports cars are designed to The maximum advisable wading depth is ap- Select the 4H or 4L in accordance with the road perform satisfactorily under off-road condi- proximately 40cm (15.7 in.). -
Page 120
DRIVING YOUR HYUNDAI o When replacement of any of the tires or 1. Knob position LOW → → → → → AUTO disc wheels is necessary, replace all of This is used to set different positions. them. 1. Stop the vehicle. -
Page 121
DRIVING YOUR HYUNDAI WARNING: Climbing sharp grades Keep away from the front of the vehicle while Select the LOW to maximize use the engine inspecting. This is very dangerous as the torque. vehicle can jump forward and cause serious injury or death. -
Page 122
WARNING: traction. do so and call your Hyundai dealer for assis- o Avoid high cornering speeds. tance. o Do not make quick steering wheel move- o Don’t coast down hills with the car out of gear. -
Page 123
Avoid heavy traffic whenever possible. wheels into the curb to help keep the car from your Hyundai should be kept clean and free of Always maintain a safe distance from other rolling. If your car is facing uphill, turn the front corrosive materials. -
Page 124
To drive your vehicle in deep snow, it may be very cold weather, however, give your engine necessary to use snow tires or to install tire Your Hyundai is delivered with high quality ethyl- a slightly longer warm-up period. chains on your tires. If snow tires are needed, it ene glycol coolant in the cooling system. -
Page 125
Window washer anti-freeze is available or chains, flashlight, emergency flares, sand, a from Hyundai dealers and most auto parts out- shovel, jumper cables, a window scraper, gloves, lets. Do not use engine coolant or other types of ground cloth, coveralls, a blanket, etc. -
Page 126
Ask tween your car and the trailer or towed vehicle, require more frequent maintenance due to your Hyundai dealer for further details before are required in most provinces. the additional load. See «Maintenance Under towing. -
Page 127
DRIVING YOUR HYUNDAI NOTE: kg (Lbs.) 1. Never load the trailer with more weight in Maximum Towable Weight the back than in the front. About 60% of Engine Trailer Tongue the trailer load should be in the front half 1800(3,968) -
Page 128
DRIVING YOUR HYUNDAI 5. Always secure items in the trailer to prevent to overheat, resulting in reduced braking effi- load shift while driving. ciency. 6. Check the condition and air pressure of all 14.When going down a hill, shift into a lower gear tires on the trailer and your car. -
Page 129: What To Do In An Emergency
3. Check fuel line in the engine room. tance. Automobile batteries contain sulfuric 4. If engine still refuses to start, call a Hyundai acid. This is poisonous and highly corrosive. dealer or seek other qualified assistance.
-
Page 130
If there is no 3. Attach the clamps of the jumper cable in the Hyundai dealer. visible loss of coolant and no steam, leave the exact location shown in the illustration. First,… -
Page 131
30 seconds after shutting ther signs of overheating. If overheating hap- off engine. High pressure pump, rail, injec- pens again, call a Hyundai dealer for assis- tors and high pressure pipes are subject to tance. high pressure even after the engine stopped. -
Page 132
WHAT TO DO IN AN EMERGENCY 2. Insert the spare wheel rod into the hole in the D050A01HP-GAT D060A01HP-GAT IF YOU HAVE A FLAT TIRE CHANGING A FLAT TIRE upper pad of the rear bumper. 3. Connect the wheel nut wrench to the spare If a tire goes flat while you are driving: wheel rod. -
Page 133
WHAT TO DO IN AN EMERGENCY NOTE: D060B01HP-GAT D065C02HP-GAT 1. Obtain Spare Tire and Tool 3. Removing the Spare Wheel Cap The spare tire is located underneath the car. Pry off the wheel cap, using the bar as shown in The second seat the illustration. -
Page 134
WHAT TO DO IN AN EMERGENCY D060D01A-AAT D060E01A-AAT D060F02HP-GAT 4. Loosen Wheel Nuts 5. Put the Jack in Place 6. Raising the Car Front Release Hexagonal Bolt D060E01HP-1 valve D060D01HP D060F01HP o Open the lid at the left corner of the luggage Rear The wheel nuts should be loosened slightly be- compartment. -
Page 135
WHAT TO DO IN AN EMERGENCY Using the jack handle, turn the release valve Position the jack with the jack handle. Position it clockwise until it reaches a stop. only at the specified points indicated in the «Put the Jack in Place». Stop mark Use of the jack at other points could damage the car. -
Page 136
WHAT TO DO IN AN EMERGENCY D060G01A-AAT D060H01A-AAT 7. Changing Wheels 8. Reinstall Wheel Nuts D060G02HP WARNING: D060G01HP D060H01HP Wheel covers may have sharp edges. Handle To reinstall the wheel cover, hold it on the wheel Use the wrench to loosen the wheel nuts, then them carefully to avoid possible severe in- and put the wheel nuts on the studs and tighten remove them with your fingers. -
Page 137
Always reinstall the valve cap after checking or or use an extension pipe over the wrench handle. your Hyundai dealer or a commercial tow truck Go around the wheel tightening every other nut adjusting tire pressure. If the cap is not replaced, service. -
Page 138
WHAT TO DO IN AN EMERGENCY D080B01HP-GAT D080C01HP-GAT Towing a Car With Manual Transmis- Towing A Car With Automatic Trans- sion mission D080C02HP o OK for 4WD D080C01HP D080B01HP o Not OK for 4WD o OK for Automatic or Manual Transmission o Not OK for 4WD (OK for Part Time 4WD in 2H Position) Equipped Vehicle… -
Page 139
1.5 km (1 mile) at ANY TIME. D120A01A-GAT IF YOU LOSE YOUR KEYS If you lose your keys, many Hyundai dealers can make you a new key if you have your key number. If you lock the keys inside your car and… -
Page 140: Corrosion Prevention & Appearance Care
To achieve the long- slow to evaporate. least once a month and be sure to clean the term corrosion resistance your Hyundai can de- Mud is particularly corrosive because it is slow to underside thoroughly when winter is over.
-
Page 141: Corrosion Prevention And Appearance Care
Check under the If you find any nicks or scratches in the paint, use available at your Hyundai dealer or auto parts mats periodically to be sure the carpeting is dry. touch-up paint to cover them to prevent corro- outlet.
-
Page 142
In the normal course of use, leather upholstered Don’t use gasoline, strong solvents or corrosive Hyundai. They are: surfaces will, like any material, pick-up dust and cleaning agents. These can damage the finish of dirt. -
Page 143
Any Questions? ping circles. Do not add water. These cleaners If you have any questions about the care of your work best when the carpet is kept as dry as car, consult your Hyundai dealer. possible. E040D01A-AAT Cleaning the Seat Belts To clean the seat belts, use a cloth or sponge with mild soap or detergent and warm water. -
Page 144: Vehicle Maintenance Requirements
Hyundai or you fill the with conditions of the emissions system war- fuel tank. A list of these items will be found on o Specified scheduled procedures ranty.
-
Page 145
VEHICLE MAINTENANCE REQUIREMENTS F030A01A-GAT SCHEDULED MAINTENANCE The following maintenance services must be performed to assure good vehicle control and performance. Keep receipts for all vehicle services to protect your warranty. Where both mileage and time are shown, the frequency of service is determined by whichever occurs first. F030B01HP-GAT R :Replace I : Inspect and, after Inspection, clean, adjust, repair or replace if necessary. -
Page 146
VEHICLE MAINTENANCE REQUIREMENTS F030D03HP-GAT R :Replace I : Inspect and, after Inspection, clean, adjust, repair or replace if necessary. KILOMETERS X 1000 DESCRIPTION MONTHS ENGINE CONTROL SYSTEM MAINTENANCE (DIESEL (2.5 TCI)) ENGINE OIL AND FILTER European Community only See Note (1) (API CF-4 OR ABOVE, ACEA B2 OR B3) Except European Community See Note (2) -
Page 147
VEHICLE MAINTENANCE REQUIREMENTS F030E05HP-GAT R :Replace I : Inspect and, after Inspection, clean, adjust, repair or replace if necessary. KILOMETERS X 1000 DESCRIPTION MONTHS ENGINE CONTROL SYSTEM MAINTENANCE (DIESEL (2.9 CRDi)) ENGINE OIL AND FILTER Europe Countries Only (API CF-4 OR ABOVE, ACEA B4 OR ABOVE) Except Europe Countries See Note (1) AIR CLEANER FILTER… -
Page 148
VEHICLE MAINTENANCE REQUIREMENTS F030C05HP-GAT R : Replace I : Inspect and, after inspection, clean, adjust, repair or replace if necessary KILOMETERS X 1000 DESCRIPTION MONTHS GENERAL MAINTENANCE COOLING SYSTEM Gasoline Engine See Note (1) COOLANT Diesel Engine MANUAL TRANSMISSION OIL AUTOMATIC TRANSMISSION European Community Only FLUID AND FILTER… -
Page 149
VEHICLE MAINTENANCE REQUIREMENTS F040A05HP-GAT MAINTENANCE UNDER SEVERE USAGE CONDITIONS The following items must be serviced more frequently on cars normally used under severe driving conditions. Refer to the chart below for the appropriate maintenance intervals. R : Replace I : Inspect and, after inspection, clean, adjust, repair or replace if necessary MAINTENANCE MAINTENANCE DRIVING… -
Page 150
VEHICLE MAINTENANCE REQUIREMENTS F060A01A-AAT F060D01TB-GAT F060G01A-AAT o Fuel Lines, Fuel Hoses and Connec- EXPLANATION OF SCHEDULED MAIN- o Vapor Hose and Fuel Filler Cap tions The vapor hose and fuel filler cap should be TENANCE ITEMS Check the fuel lines, fuel hoses and connec- inspected at those intervals specified in the tions for leakage and damage. -
Page 151
Rear Brake Drums/ Linings/Pads, o Air Cleaner Filter o Automatic Transmission Fluid and Parking Brake A Genuine Hyundai air cleaner filter is recom- Filter Check the rear brake drums, linings and pads mended when the filter is replaced. The fluid level should be in the «HOT» range of… -
Page 152
VEHICLE MAINTENANCE REQUIREMENTS F070M01B-AAT o Steering Gear Box, Linkage & Boots/ Lower Arm Ball Joint, Upper Arm Ball Joint With the vehicle stopped and engine off, check for excessive free-play in the steering wheel. Check the linkage for bends or damage. Check the dust boots and ball joints for deterioration, cracks, or damage. -
Page 153
DO-IT-YOURSELF MAINTENANCE 6. DO-IT-YOURSELF MAINTENANCE G010A01HP-GAT GASOLINE ENGINE COMPARTMENT (3.5 V6) CAUTION: When inspecting or servicing the engine, you should handle tools and other heavy objects carefully so that the plastic cover of the engine is not damaged. G010A02HP 10 11 1. -
Page 154
DO-IT-YOURSELF MAINTENANCE G010B01HP-GAT DIESEL ENGINE COMPARTMENT (2.5 TCI) CAUTION: When inspecting or servicing the engine, you should handle tools and other heavy objects carefully so that the plastic cover of the engine is not damaged. G010B02HP 5. Engine oil level dipstick 10.Windshield washer fluid reservoir 1. -
Page 155
DO-IT-YOURSELF MAINTENANCE G010C01HP-GAT DIESEL ENGINE COMPARTMENT (2.9 CRDi) CAUTION: When inspecting or servicing the engine, you should handle tools and other heavy objects carefully so that the plastic cover of the engine is not damaged. G010C02HP 5. Engine oil filler cap 10. -
Page 156
Exhaust system condition ly, inspect it carefully and seek assistance from o Light condition and operation your Hyundai dealer if service is needed. o Windshield glass condition G030B01HP o Wiper blade condition… -
Page 157
DO-IT-YOURSELF MAINTENANCE (2) The engine oil quality should meet the fol- G030C01HP-AAT Diesel Engine (2.9 CRDi) To Check the Oil Level lowing API classification. Before checking the oil, warm up the engine to Europe : SG, SG/CD, SH OR SH/CD the normal operating temperature and be sure Except Europe : SE or ABOVE your car is parked on level ground. -
Page 158
DO-IT-YOURSELF MAINTENANCE G030D01HP-GAT 1. Remove the oil filler cap by turning it counter- Gasoline Adding Oil clockwise. 2. Add oil, then check the level again. Do not Gasoline overfill. 3. Replace the cap by turning it clockwise. The distance between the «F» and «L» marks is equal to about 1 liter (Gasoline Engine)/ Diesel Engine (2.5 TCI)/ 1.4 liters (Diesel Engine (2.9 CRDi)) of oil. -
Page 159
DO-IT-YOURSELF MAINTENANCE o The engine oil consumption is strongly ef- with a wrench of the proper size. Be sure Diesel (2.5 TCI) Diesel (2.9 CRDi) fected by the viscosity and quality of oil, that a drain pan is in position to catch the oil Oil filler cap Oil filler cap engine rpm and driving condition etc. -
Page 160
DO-IT-YOURSELF MAINTENANCE 8. Start the engine and check to be sure no oil G050B01A-DAT sion. Never allow the concentration of anti- Recommended Engine Coolant is leaking from the drain plug or oil filter. freeze to exceed the 60% level or go below the 9. -
Page 161
If the level drops again, visit your tities until the fluid level stays up in the Hyundai dealer for an inspection and diagnosis radiator neck. of the reason. G050D01HP-GAT… -
Page 162
SPARK PLUGS (Gasoline Engine Only) When spark plugs are replaced, always use spark plugs recommended by Hyundai. The use of other spark plugs can result in loss of Unleaded: 1.0 ~ 1.1mm (0.039 ~ 0.043 in.) performance, radio interference or engine dam- Leaded : 0.7 ~ 0.8mm (0.028 ~ 0.032 in.) -
Page 163
Use only HYUNDAI GENUINE PARTS MTF liters (4.75 U.S. quarts). If the wipers continue to streak or smear the 75W/90 (API GL-4) in the manual transmission. glass, replace them with genuine Hyundai re- CAUTION: placement parts or their equivalent. Manual Transmission Oil Capacity o Radiator antifreeze (engine coolant) The oil capacity of the manual transmission is ;… -
Page 164
Recommended Fluid 1. Using a wrench of the correct size, loosen the oil filler plug by turning it counterclock- Your Hyundai automatic transmission is spe- wise and remove it with your fingers. cially designed to operate with MOBIL 2. Use your finger to feel inside the hole. The DEXRON-II. -
Page 165
DO-IT-YOURSELF MAINTENANCE Park the car on level ground with the parking While the engine is idling, apply the brakes and brake engaged. When the transmission fluid move the gear selector lever from «P» to each level is checked, the transmission fluid should of its other positions —… -
Page 166
To Check the Clutch Fluid they be checked and inspected by your G120E02A-AAT Hyundai dealer. The brakes should be Adding Brake Fluid checked and inspected for wear at those intervals specified in the vehicle mainte- nance schedule in Section 5. -
Page 167
2. If the air coming out of the in-dash vents is not cold, have the air conditioning system NOTE: COMP. pulley inspected by your Hyundai dealer. Do not allow any other liquids to contami- nate the brake fluid. Seal damage will result. CAUTION:… -
Page 168
8.0 mm (0.315 inches). If the belt is too loose, have it adjusted by your Hyundai dealer. NOTE: The compressor drive belt tension for diesel engine (2.9 CRDi only) is adjusted automati- cally. -
Page 169
Use very light finger pressure and be sensitive the brake pedal until you feel a change in it is not, have it inspected by your Hyundai to changes in resistance that mark the limits of resistance. This is the brake pedal freeplay. -
Page 170
Auto Generator pulley A fusible link will melt if the electrical circuits it inspected by your Hyundai dealer and adjust- tensioner Tension pulley Crankshaft pulley Crankshaft from the battery are ever overloaded, thus pre- ed or repaired if necessary. -
Page 171
AXA6201B ous and should be referred to a Hyundai 3. Be sure to check all other fuses even if you dealer for diagnosis and repair. Never re- find one that appears to have burned out. -
Page 172
DO-IT-YOURSELF MAINTENANCE G210A01A-AAT o Charge batteries only in a well ventilated G220B01A-AAT CHECKING THE BATTERY Checking Engine Cooling Fan area. WARNING: o Do not permit flames, sparks or smoking in The engine cooling fan should come on auto- Batteries can be dangerous! When working the area. -
Page 173
If is due to a power steering If in doubt, consult your nearest authorized fluid characteristic in extremely cold condi- E090A01HP HYUNDAI dealer. tions. The fuel system should be bled to remove air as WARNING: described in the illustration if the fuel supply is… -
Page 174
E100A01HP If in doubt, consult your nearest authorized 2. Turn the ignition key to the «START» posi- HYUNDAI dealer. If the fuel filter warning lamp illuminates during tion and release it 2~3 times shortly until the driving, it indicates that water has accumulated engine starts. -
Page 175
If in doubt, consult your nearest authorized 7. Check for proper headlight aim. HYUNDAI dealer. CAUTION: Keep the lamps out of contact with petro- leum product, such as oil, gasoline, etc. 6-23… -
Page 176
DO-IT-YOURSELF MAINTENANCE G290A01HP-GAT 6. Draw the vertical line (through the center of HEADLIGHT AIMING ADJUSTMENT each headlight) and the horizontal line (through the center of each headlight) on the Horizontal aiming (Low Beam) aiming screen. Vertical aiming (Low Beam) (1) Horizontal line dimension from ground : Low Beam : 894 mm (35.1 in.) High Beam : 839 mm (33 in.) (2) Distance between each vertical line :… -
Page 177
DO-IT-YOURSELF MAINTENANCE G290B01HP-GAT If the vehicle has had front body repair and the Adjustment After Headlight Assembly headlight assembly has been replaced, the headlight aiming should be checked using an Replacement aiming screen as shown in the illustration. Turn <Low Beam> on the headlight switch. -
Page 178
DO-IT-YOURSELF MAINTENANCE G280A01HP-GAT G280A01HP Wattage Part Name Part Name Wattage 55/55 Head Light (Low/High) High Mounted Rear Stop Light (If installed) Turn Signal Light Luggage Compartment Light Front Position Light Rear Combination Light Room Light Stop/Tail Light 21/5 Map Light Turn Signal Light Front Fog Light Back-up Light… -
Page 179: Emission Control Systems
H020A01HP stored in the canister. When the engine is In order to assure the proper function of the All Hyundai vehicles are equipped with a mono- running, the fuel vapors absorbed in the canis- emission control systems, it is recommended…
-
Page 180
Remember that your Hyundai dealer is your best source of assistance. o Do not stop your Hyundai over any com- bustible material such as grass, paper, leaves or rags. These materials might contact the hot catalytic converter and a fire might result. -
Page 181: Consumer Information
Tire pressures should be checked monthly at least. Proper tire inflation pressures should be I020A01A-AAT maintained for these reasons: TIRE INFORMATION The tires supplied on your new Hyundai are chosen to provide the best performance for normal driving.
-
Page 182
TIRE CHAINS careful about overloading if you equip by a Hyundai dealer so the cause may be Tire chains should be installed on the rear your car with a luggage rack or car top corrected. -
Page 183
A tire that is out of balance may affect handling handling characteristics that may cause 1.6 mm (0.06 in.) and tire wear. The tires on your Hyundai were death, serious injury, or property dam- balanced before the car was delivered but may age. -
Page 184: Vehicle Specifications
VEHICLE SPECIFICATIONS J030A02HP-GAT 9. VEHICLE SPECIFICATIONS TIRE Standard 255/65 R16 J010A01HP-GAT MEASUREMENT Spare Full Size mm (in.) 4710 (185.4) Overall length Overall width 1860 (73.2) J040A02HP-GAT 1795 (70.6) Overall height ELECTRICAL Wheel base 2750 (108.2) DIESEL ITEM GASOLINE Wheel tread Front 1530 (60.2) 2.5 TCI…
-
Page 185
VEHICLE SPECIFICATIONS J070A02HP-GAT ENGINE GASOLINE DIESEL ITEMS 3.5 V6 2.5 TCI 2.9 CRDi Engine Type 6-Cyl., V-type DOHC 4-Cyl., In-line SOHC 4-Cyl., In-line DOHC Bore x Stroke 93.0 x 85.8 mm (3.67 x 3.38 in.) 91.1 x 95 mm (3.59 x 3.74 in.) 97.1 x 98 mm (3.82 x 3.86 in.) Displacement (cc) 3496… -
Page 186
VEHICLE SPECIFICATIONS J080A06HP-GAT LUBRICATION CHART Item Oil & Grease Standard Q’ty (liter) Engine oil (Gasoline) API SG, SAE 20W-40, 20W-50 [ABOVE -10°C (14°F)] Drain and refill (With oil filter):4.3 only SG/CD, SAE 15W-40, 15W-50 [ABOVE -15°C (5°F)] SH or SH/CD SAE 10W-30 [-25°C ~ 40°C(-13°F ~ 104°F)] SAE 10W-40, 10W-50 [ABOVE -25°C(-13°F)] Except… -
Page 187
Item Oil & Grease Standard Q’ty (liter) Transmission fluid Manual HYUNDAI GENUINE PARTS MTF 75W/90 (API GL-4) 2.5 (2.5 TCI), 3.2 (2.9 CRDi or 3.5 V6) Auto MOBIL DEXRON-II 8.2 (2.5 TCI), 11.8 (2.9 CRDi ), 10.5 (3.5 V6) Transfer case oil ATF DEXRON-III 1.42… -
Page 188: Index
Pedal clearance …………….6-18 Corrosion protection Pedal free-play …………….6-17 Cleaning the interior ……………. 4-3 Practices ………………2-13 Protecting your Hyundai from corrosion ……… 4-1 Breaking-In your New Hyundai …………1-2 Washing and waxing …………… 4-2 Cruise Control ……………. 1-65 ~ 1-67 10-1…
-
Page 189
INDEX Fog Light Defrosting/Defogging …………….. 1-71 Front ………………..1-48 Door Rear ………………..1-48 Locking, unlocking front door with a key ……..1-6 Front Seats Drink Holder ………………1-53 Adjustable front seats …………..1-11 Drive Belts …………….6-15, 6-18 Adjustable headrests …………..1-12 Driving Adjusting seat forward and rearward ………. -
Page 190
INDEX High-Mounted Rear Stoplight …………1-62 Luggage Compartment Hood Release ………………. 1-63 Cargo Security Screen …………..1-61 Horn ………………..1-64 Light ………………..1-60 Net ………………..1-60 Ignition Switch ………………2-2 Immobilizer System …………..1-3 ~ 1-6 Maintenance Intervals Limp Home Procedures ……..1-3 ~ 1-4, 1-5 ~ 1-6 Explanation of scheduled maintenance items …… -
Page 191
INDEX Power Outlet ………………1-51 Steering Wheel Tilt Lever …………..1-64 Power Steering Fluid Level …………… 6-20 Stereo Radio Operation (H240, H280) ….. 1-82 ~ 1-84, 1-87 ~ 1-89 Stereo Sound System …………1-80 ~ 1-81 Sun roof …………….. 1-54 ~ 1-55 Rear Seat Warning ……………. -
Page 192
INDEX Towing A trailer (or vehicle) …………2-17 ~ 2-19 Emergency ………………3-11 If your car must be towed …………… 3-9 Transmission Automatic …………….2-6 ~ 2-8 Automatic transmission fluid checking ………. 6-12 Manual ………………2-4 ~ 2-5 Manual transmission oil checking ……….6-11 Trip Odometer ………………. -
Page 193
A000A01A-EAT This Owner’s Manual should be considered as a part of the car and remain with it when it is sold for the use of the next owner. OWNER I.D. ORIGINAL: NAME: ADDRESS: STREET: TOWN: COUNTRY: P.CODE: DATE OF SALE: SUBSEQUENT: NAME: ADDRESS:… -
Page 194
This manual applies to all models and includes descriptions and explanations of optional as well as standard equipment. As a result, some of the equipment operating descriptions referred to may not apply to the particular vehicle with which this manual is supplied. Please refer to the nearest franchised Hyundai dealer for information regarding current standard and optional equipment levels. -
Page 195
It is recommended that all maintenance operations and repairs are entrusted to a franchised Hyundai dealer to ensure that the latest repair methods, specialized tooling and genuine Hyundai parts are used to ensure the continued reliability and safety of the vehicle. -
Page 196
Page 9-3 in the Vehicle Specifications section of the Owner’s Manual. Copyright 2003 Hyundai Motor Company. All rights reserved. No part of this publication may be reproduced, stored in any retrieval system or transmitted in any form or by any means without the prior written permission of Hyundai Motor Company. -
Page 197
TABLE OF CONTENTS SECTION PAGE 1. CONTROLS AND EQUIPMENT ………………. 1-1 2. DRIVING THE HYUNDAI ………………… 2-1 3. IN CASE OF EMERGENCY ………………3-1 4. APPEARANCE CARE ………………..4-1 5. VEHICLE MAINTENANCE REQUIREMENTS ………….. 5-1 6. OWNER MAINTENANCE ………………… 6-1 7. -
Page 198
It is possible for incorrectly installed two way radio equipment including mobile telephones to adversely affect these systems. Before radio equipment of this kind is installed, please contact your Hyundai dealer for recommendation regarding the suitability of the particular radio equipment con- cerned and the recommended method of installation and equipment location. -
Page 199
A090A01A-AAT SAFETY AND VEHICLE DAMAGE WARNING This manual includes information titled as WARNING, CAUTION and NOTE. These titles indicate the following: WARNING: This indicates that a condition may result in harm, serious injury or death to you or other persons if the warning is not heeded. Follow the advice provided with the warning. -
Page 200
New Vehicle Limited Warranty or any Hyundai Genuine Parts are only sold A100A01L-GAT GUIDE TO HYUNDAI GENUINE other Hyundai warranty. In addition, through authorized Hyundai Dealer- any damage to or failure of Genuine ship and Service Center. PARTS Hyundai Parts caused by the installa- 1. -
Page 201
Diesel fuel of 52 to 54 cetane is the correct respect to insurance, specifications etc.. rating to use in your Hyundai Terracan. If two o The correct types and grades of fuel are types of diesel fuel are available, use summer… -
Page 202
CONTROLS AND EQUIPMENT YB020A1-E B020A01FC-EAT B880A01HP-EAT BEFORE ENTERING THE VEHICLE RUNNING IN YOUR NEW HYUNDAI IMMOBILISER SYSTEM o Ensure that all windows, mirrors and lamps The longevity and performance of the vehicle — For Petrol Engine are clean. are greatly affected by the care exercised dur- The immobiliser system is an anti-theft device, o Check condition of all tyres. -
Page 203
This ID code will then have been recorded onto the master keys. your new vehicle. In addition, key numbers can- Both sides of the key have a Hyundai logo. not be provided by Hyundai for security reasons. 2) Master key If you need additional keys or if you should lose This key is for general use. -
Page 204
CAUTION: o The password should be recorded and kept in a safe place in case the need to order further keys arises. o If you forget the password, consult your authorized Hyundai dealer. Master keys B885B01HP Type B B885C02HP The vehicle key number is recorded upon a metal tag attached to the keys when the vehicle is first delivered to you. -
Page 205
UNLOCK LOCK receive your new vehicle. In addition, key num- recommended that the child-protector bers cannot be provided by Hyundai for secu- rear door locks are in the ‘lock’ position rity reasons. so that children cannot open the rear If you need additional keys or if you should lose… -
Page 206
CONTROLS AND EQUIPMENT B040C02Y-EAT B040D01S-AAT SB040F1-E Locking From the Outside Locking from the Inside CHILD-PROOF REAR DOOR LOCK LOCK UNLOCK B040C01HP.DAG HSM365-D B040E01HP.DAG The rear doors are fitted with child proof locks The doors can be locked without a key. To lock To lock the doors from the inside, simply close to prevent accidental opening of the doors us- the doors, first push the inside lock switch to the… -
Page 207
CONTROLS AND EQUIPMENT B040G01HP-AAT B070A01A-EAT 1) Remove the ignition key from the ignition Central Door Locks (Not all models) THEFT-ALARM SYSTEM switch. 2) Make sure that the bonnet and hatchback (Not all models) door are closed and latched. LOCK This system is designed to provide protection 3) Lock the doors using the transmitter of the UNLOCK from unauthorized entry into the car. -
Page 208
CONTROLS AND EQUIPMENT B070C01HP-EAT B070D01HP-EAT B070F01A-EAT Alarm Stage Disarmed Stage Keyless Entry System The system will be disarmed when the driver’s (Not all models) or passenger’s door is unlocked by depressing Locking doors the «UNLOCK» button on the transmitter. 1. Close all doors. 2. -
Page 209
CONTROLS AND EQUIPMENT B070E02HP-GAT B060A03L-DAT Replacing the battery POWER WINDOWS Hole When the transmitter’s battery begins to get weak, it may take several pushes on the button to lock or unlock the doors, and the LED will not light. Replace the battery as soon as possible. Battery type : CR1616 Replacement instructions: Battery… -
Page 210
CONTROLS AND EQUIPMENT (2) Never try to operate the main switch on revert to normal operation, press the window ZB060A8-E Front Seat Fore/Aft Adjustment lock switch a second time. the driver’s door and the individual door window switch in opposing directions NOTE: at the same time. -
Page 211
CONTROLS AND EQUIPMENT accident. Headrests may provide protec- ZB060C1-E B080D02L-EAT Adjustable Headrests Adjusting Seatback Angle tion against severe neck injuries when (Not all models) properly adjusted. B080E01A-EAT Driver’s Seat Lumbar Support Control (Not all models) Lock knob B080C01HP.DAG B080D01HP To recline the seatback, lean forward to take your weight off it, then pull up on the recliner Headrests are designed to help reduce the risk of neck injuries. -
Page 212
CONTROLS AND EQUIPMENT YB060F4-A B090A02Y-EAT B090B01L-AAT Seat Cushion Height Adjustment POWER DRIVER’S SEAT Adjusting Seat Forward and Rearward (Not all models) (Driver’s Seat Only) (Not all models) The driver’s seat can be adjusted appropriately by using the control knob on the right side of the seat. -
Page 213
CONTROLS AND EQUIPMENT B090C01Y-AAT B090D01Y-AAT B080G01O-EAT Seat Cushion Height Adjustment Adjusting Seatback Angle UNDER TRAY (Not all models) B085C01HP-D B085D01HP-D B080G01HP.DAG Rotate the upper portion of the control knob Move the front portion of the control knob up or The tray is located under the front passenger forward or backward to recline the seatback to down to raise or lower the front part of the seat seat. -
Page 214
CONTROLS AND EQUIPMENT B100A01HP-EAT B090A01HP-EAT B090C01HP-GAT SEAT WARMER (Not all models) REAR SEAT Adjusting Seatback Angle Adjustable Headrests Lock Knob Seatback folding lever HHP231-2 B100A01HP.EAG The seat warmer is provided to warm the front To recline the seatback, push the seatback B090A01HP-1 seats during cold weather. -
Page 215
CONTROLS AND EQUIPMENT B090B01HP-EAT o When you return the seatback to its upright Folding Rear Seatback and Seat Cush- position, always be sure it is locked into position by pulling and pushing on the top of seatback. For greater convenience, the entire seatback and seat cushion may be folded down and up. -
Page 216
CONTROLS AND EQUIPMENT B140A01B-GAT SB090B1-E SB090E1-E REAR SEAT WARNING Babies/Small Children Injured Persons Babies and small children must be restrained A seat belt should be used when an injured using a restraint system specifically designed person is being transported. For specific rec- for this purpose. -
Page 217
The length of the seat belt webbing will be evident. Additional questions concerning seat automatically adjusted by the seat belt mecha- belt operation should be directed to a Hyundai nism to allow the wearer maximum freedom of Dealer. 1- 17… -
Page 218
CONTROLS AND EQUIPMENT Both arms should not be under or over the movement whilst the belt is being worn. How- B220A01A-EAT SEAT BELTS (2-Point Static Type) ever, in the event of rapid deceleration or im- belt. Rather, one should be over and the pact, the belt mechanism will automatically lock. -
Page 219
CONTROLS AND EQUIPMENT B220B01A-AAT B220C01A-EAT B220D01HP-GAT Adjusting Your Seat Belt To Release the Seat Belt SEAT BELTS — Centre Rear Seat 3- Point System With Emergency Lock- ing Retractor (Not all models) Too high Correct Shorten HTB226 HHP231-1 When you want to release the seat belt, press With a 2-point static type seat belt, the length the button in the locking buckle. -
Page 220
CONTROLS AND EQUIPMENT they are inserted into the correct buckles to (2) If transporting an object on the rear seat may cause damage to the rear obtain maximum protection from the seat seat centre belt. belt system and assure proper operation. o Lock the metal tab (a) and the buckle (b) immediately after folding rear seatbacks o To disconnect the metal tab (c) from the… -
Page 221
CONTROLS AND EQUIPMENT WARNING: o If the seat belt will not properly fit the B230F01A-EAT Installation on Rear Seat Centre Posi- o A child restraint system must be placed child, we recommend the use of an ap- in the rear seat. Never install a child or proved booster seat in the rear seat in tion infant seat on the front passenger’s seat. -
Page 222
If the seat belt does not operate as de- Bolt, Holder scribed, have the system checked imme- (5/16″ — 30 mm) diately by your authorized Hyundai dealer. WARNING: Washer, Conical Spring Do not install any child restraint system in the front passenger seat. -
Page 223
ECE-R44. For your Hyundai, the tether strap under the headrest and restraint hook holder and tighten to secure the Hyundai ISOFIX GR1 / Hyundai Duo / between the headrest posts, otherwise route the seat. Römer ISOFIX GR1 and the Römer Duo ISOFIX the tether strap over the top of the seatback. -
Page 224
ISOFIX anchors by attempting to plies to the law. Please ask your Hyundai Hyundai. attach a child restraint seat in the middle dealer in this respect. -
Page 225
B180B01S.DAG I : 9kg to 18kg (9 months ~ U, L1 Your Hyundai vehicle is equipped with driver’s 4 years) and front passenger’s pre-tensioner seat belts. II & III : 15kg to The purpose of the pre-tensioner is to make… -
Page 226
Because the sensor that activates the pre-tensioner seat belts yourself. This SRS airbag is connected with pre- must be done by an authorized Hyundai Your Hyundai is equipped with a Supplemental tensioner seat belt, the SRS airbag warn- dealer. -
Page 227
CONTROLS AND EQUIPMENT front passenger with additional protection than B240B02A-EAT SRS Components and Functions that offered by the seat belt system alone, in case of a frontal impact of sufficient severity. NOTE: Be sure to read information about the SRS Rear impact on the labels provided on the reverse of the sun visor and in the glove box. -
Page 228
CONTROLS AND EQUIPMENT Passenger’s Airbag B240B03L-D B240B02L-D B240B01HP.DAG The SRS service reminder indicator (SRI) on Upon deployment, tear seams molded directly CAUTION: the instrument panel will blink for about 6 sec- into the pad covers will separate under pres- When installing a container of liquid air onds after the ignition key is turned to the «ON»… -
Page 229
The entire SRS system must be in- airbag in front of it! leased throughout the vehicle. These con- spected by an authorized Hyundai dealer 10 o Modification to SRS components or wir- ditions are normal and are not hazard-… -
Page 230
Hyundai dealer. o Do not replace the bumper or the bumper guard with the one other than the Hyundai genuine parts. Otherwise, it can adversely affect SRS performance and lead to un- expected injury. -
Page 231
CONTROLS AND EQUIPMENT B250A01HP-EAT INSTRUMENTS AND CONTROLS 9 10 CAUTION: When installing the container of liquid air freshener inside a vehicle, do not place it near the instrument cluster nor on the in- strument panel pad surface. If there is any leakage from the air freshener onto these areas (Instrument cluster, instrument panel pad or air ventilator), it may damage these… -
Page 232
CONTROLS AND EQUIPMENT B260A02HP-EAT INSTRUMENT CLUSTER (Not all models) (PETROL ENGINE TYPE A) B260A01HP-E 1. Tachometer 3. Fuel Gauge 5. Trip Odometer 2. Coolant Temperature Gauge 4. Speedometer 6. Odometer 7. Trip odometer Reset Knob 1- 32… -
Page 233
CONTROLS AND EQUIPMENT B261A02HP-EAT INDICATOR AND WARNING LIGHTS (Not all models) (PETROL ENGINE TYPE A) B260A01HP-E 8 91011 1213 1819 1. Turn Signal Indicator Light 6. Charging System Warning Light 12. Cruise Indicator Light (Not all models) 2. ABS Service Reminder Indicator Light 7. -
Page 234
CONTROLS AND EQUIPMENT B260A02HP-EAT INSTRUMENT CLUSTER (Not all models) (PETROL ENGINE TYPE B) B260A01HP-E-1 1. Tachometer 3. Fuel Gauge 5. Trip Odometer 2. Coolant Temperature Gauge 4. Speedometer 6. Odometer 7. Trip odometer Reset Knob 1- 34… -
Page 235
CONTROLS AND EQUIPMENT B261A02HP-EAT INDICATOR AND WARNING LIGHTS (Not all models) (PETROL ENGINE TYPE B) Part-time 4WD : Full-time 4WD : B260A01HP-E-1 8 91011 1213 1819 1. Turn Signal Indicator Light 6. Charging System Warning Light 12. Cruise Indicator Light (Not all models) 2. -
Page 236
CONTROLS AND EQUIPMENT B262A02HP-GAT INSTRUMENT CLUSTER (Not all models) (DIESEL ENGINE TYPE A) B260A03HP-E 1. Tachometer 3. Fuel Gauge 5. Trip Odometer 2. Coolant Temperature Gauge 4. Speedometer 6. Odometer 7. Trip Odometer Reset Knob 1- 36… -
Page 237
CONTROLS AND EQUIPMENT B264A02HP-EAT INDICATOR AND WARNING LIGHTS (Not all models) (DIESEL ENGINE TYPE A) B260A03HP-E 2 3 4 10 11 1213 1920 21 1. Turn Signal Indicator Light 8. Parking Brake/Low Brake Fluid Level 14. Automatic Transmission Position Indicator 2. -
Page 238
CONTROLS AND EQUIPMENT B262A02HP-GAT INSTRUMENT CLUSTER (Not all models) (DIESEL ENGINE TYPE B) B260A03HP-E-1 1. Tachometer 3. Fuel Gauge 5. Trip Odometer 2. Coolant Temperature Gauge 4. Speedometer 6. Odometer 7. Trip Odometer Reset Knob 1- 38… -
Page 239
CONTROLS AND EQUIPMENT B264A02HP-EAT INDICATOR AND WARNING LIGHTS (Not all models) (DIESEL ENGINE TYPE B) Part-time 4WD : Full-time 4WD : B260A03HP-E-1 2 3 4 9 10 11 12 1314 2021 22 1. Turn Signal Indicator Light 8. Brake Vacuum Warning Light 15.Automatic Transmission Position Indicator 2. -
Page 240
When the key is turned to the «ON» position, the checked by a Hyundai dealer as soon as damage may result. The oil pressure warning Anti-Lock Brake System SRI will come on and possible. -
Page 241
Hyundai dealer for inspection. the steering wheel. If further trouble is experienced, the vehicle… -
Page 242
If this occurs, have your vehicle turned to the «ON» position, take your car to your checked by an authorized Hyundai dealer as nearest authorized Hyundai dealer and have the soon as possible. -
Page 243
The engine can be started after the preheat time when the vehicle is moving. It may also be checked by a Hyundai dealer as soon as indication light goes off. The illuminating time heard when the brake pedal is pushed down possible. -
Page 244
If you suspect cooling system trouble, have your cool- Your Hyundai’s speedometer is calibrated in ing system checked by Hyundai dealer as soon miles per hour or kilometers per hour. as possible. 1- 44… -
Page 245
CONTROLS AND EQUIPMENT CAUTION: B310A01HP-EAT B330A01L-AAT ODOMETER TACHOMETER The engine should not be raced to such a The digital odometer records the total driving speed that the needle enters the red zone on Petrol Engine distance in miles, and is useful for keeping a the tachometer face. -
Page 246
CONTROLS AND EQUIPMENT B360A01HP-GAT ZB120A1-E HPB220B1-E REAR FOG LIGHT SWITCH MULTI FUNCTION SWITCH Lane Change Signal Turn Signal Operation To signal an intention to turn right, the switch lever should be pressed down. To signal an intention to turn left, the switch lever should be pushed upwards. -
Page 247
CONTROLS AND EQUIPMENT B340C03FC-EAT SB220E1-E Sidelight auto cut LIGHTING SWITCH HEADLIGHT FLASH If you do not turn the sidelight «OFF» after driving, the sidelight will automatically shut «OFF» when the driver’s door is opened. To turn them «ON» again, you must simply turn the ignition key to the «ON»… -
Page 248
CONTROLS AND EQUIPMENT NOTE: ZB130A2-E Type B WINDSCREEN WIPER AND To prevent damage to the wiper system, do WASHER SWITCH not attempt to wipe away heavy accumula- tions of snow or ice. Accumulated snow and Type A ice should be removed manually. If there is only a light layer of snow or ice, operate the heater in the defrost mode to melt the snow or ice before using the wiper. -
Page 249
CONTROLS AND EQUIPMENT OB140A1-E B390A01HP-EAT Mist Wiper Operation (Type A) REAR WINDOW WIPER AND WASHER VARIABLE INTERMITTENT WIPE (Type A)(Not all models) FACILITY Type A Type A HXG201J If a single wipe is desired in mist, push the B390A01HP.DAG HXG198J MIST operation switch at the end of the The rear window wiper and washer are turned on windscreen wiper and washer control lever. -
Page 250
CONTROLS AND EQUIPMENT NOTE: SB240A1-E SB250A1-E HAZARD WARNING SYSTEM HEATED REAR WINDOW o In icy or freezing weather, be sure the wiper blades are not frozen to the glass (Not all models) prior to operating the wipers. o In areas where water freezes in winter, Type A use windscreen washer antifreeze. -
Page 251
CONTROLS AND EQUIPMENT CAUTION: are not damaged by rings or jewellery whilst There are five control buttons for the digital the glass is being cleaned. The inside of the front/rear windscreen should clock. Their functions are: never be cleaned with a hard or sharp imple- NOTE: ment since damage to the heating element 1. -
Page 252
12 volts. If it is necessary to replace the cigar lighter, use only a genuine Hyundai replacement or its approved equivalent. CAUTION: Do not use electric accessories or equip- ment other than the Hyundai genuine parts in the socket. -
Page 253
CONTROLS AND EQUIPMENT B430A01Y-AAT B440A01E-AAT B450A01O-GAT FRONT ASHTRAY REAR ASHTRAY DRINK HOLDER B450A01HP.DAG B440A01HP B430A01HP.DAG The rear ashtray may be opened by pulling it The front ashtray may be opened by pushing The drink holder is located on the main console out by its top edge. -
Page 254
CONTROLS AND EQUIPMENT B450B01HP-GAT HPB330A1-E REAR DRINK HOLDER SUNROOF (Not all models) B460B01HP The sunroof can be electrically opened or closed. B450B01HP B470A01HP The sunroof is moved to its fully open position The rear drink holder is located in the rear seat The electrically operated sunroof may be used by pushing the «OPEN»… -
Page 255
CONTROLS AND EQUIPMENT panel and the vehicle body whilst the B460D01HP-EAT Manual Operation of Sunroof sunroof is being closed. o Do not stand up or extend any portion of your body out of the opening whilst the vehicle is moving. SB330C2-E Tilting the Sunroof System B460F01HP… -
Page 256
CONTROLS AND EQUIPMENT B480B01Y-AAT B490A02Y-AAT B500A01A-EAT MAP LIGHT INTERIOR LIGHT GLOVE BOX B490A01O B480B01HP B500A01HP.DAG Push in the map light switch to turn the light on The interior courtesy light has three buttons. WARNING: or off. This light produces a spot beam for The three buttons are: To avoid the possibility of injury in case of convenient use as a map light at night or as a… -
Page 257
CONTROLS AND EQUIPMENT B500B01HP-DAT B510A01A-AAT B510B01Y-EAT MULTI BOX (Not all models) OUTSIDE REARVIEW MIRROR Electric Type (Not all models) Manual Type B500B01HP.DAG B510B01HP.DAG B510A01HP.DAG The outside rearview mirrors can be adjusted to The multi box may be opened by pulling it out your preferred rear vision, both directly behind by its grip.It is used for storing small articles. -
Page 258
CONTROLS AND EQUIPMENT HPB270C1-E YB270D2-E OUTSIDE REARVIEW MIRROR FOLDING THE OUTSIDE REARVIEW HEATER (Not all models) MIRRORS Type A Type B B510D01E CAUTION: o Do not operate the switch continuously B510C01HP.DAG B380A02HP for an unnecessary length of time. To fold the outside rearview mirrors, push them o Scraping ice from the mirror face could The outside rearview mirror heater is actuated towards the rear. -
Page 259
CONTROLS AND EQUIPMENT SB370A1-E B520B01O-EAT SB380A1-E DAY/NIGHT INSIDE REARVIEW MIR- INTERIOR REARVIEW MIRROR PARKING BRAKE ROR (Electric type) (Not all models) B520A01HP B530A01HP.DAG B520B01HP The parking brake must always be set when the The interior mirror is of the day/night type to vehicle is to be left unattended. -
Page 260
CONTROLS AND EQUIPMENT B540A01O-EAT B540C01HP-EAT B540D02HP-DAT HATCHBACK DOOR Luggage compartment light Luggage Net B540C01HP B540A01HP B540D01HP WARNING: Luggage compartment light has a 3-position Some objects can be kept in the net at the switch. The three positions are: luggage compartment. The hatchback door should always be kept Use the luggage net on the floor or at the back completely closed whilst the vehicle is in… -
Page 261
EVENLY DISTRIBUTED o Loading cargo or luggage above 75 lb (34 B630A01HP kg) on the roof bars may damage your If your Hyundai has roof bars fitted, you can B640A01HP-E vehicle. load cargo / luggage on top of these. The two… -
Page 262
Hyundai replacement part. opener located below the left of the driver’s side stoplight in the centre of the rear window also If you open the fuel filler cap during high crash pad. -
Page 263
CONTROLS AND EQUIPMENT DB370A2-E B580A01E-EAT BONNET RELEASE SUN-VISOR B570A02HP Vanity mirror WARNING: B580A01HP.DAG B570A01HP.DAG o Always double check to be sure that the To open the bonnet, pull the release lever inside Sun visors are fitted to both the driver and bonnet is firmly latched before driving the vehicle to unlatch the bonnet. -
Page 264
CONTROLS AND EQUIPMENT B620A01S-EAT B610A01L-GAT HPB830A1-E FRONT DOOR EDGE WARNING HORN PACKAGE ARM REST LIGHT (Not all models) B610A01HP B620A01HP.DAG HHP232-1 Press the pad on the steering wheel to sound A red light comes on when the front door is the horn. -
Page 265
CONTROLS AND EQUIPMENT B600A01HP-EAT B340G01HP-EAT STEERING WHEEL TILT LEVER HEADLIGHT LEVELING DEVICE Switch LOADING CONDITION Position SYSTEM Driver only Driver + Front Passenger Full Passengers Full Passengers + Maximum Permissible Loading Driver + Maximum Permissible Loading B600A01HP To adjust the steering wheel: B340G01HP.DAG To adjust the headlight beam level according to 1. -
Page 266
CONTROLS AND EQUIPMENT NOTE: B660A01S-EAT B660B02L-EAT CRUISE CONTROL (Not all models) To Set the Cruise Speed If the vehicle speed decreases more than 9 mph (15 km/h) below the set speed or de- creases below 25 mph (40 km/h), the cruise control system will automatically cancel the set speed. -
Page 267
CONTROLS AND EQUIPMENT WARNING: o Decrease the vehicle speed lower than B660F01L-EAT To Reset at a Slower Speed memory speed by 9 mph (15 km/h). o Keep the main switch off when not using o Decrease the vehicle speed approximately the cruise control. -
Page 268
CONTROLS AND EQUIPMENT B670A01HP-EAT B670B01A-AAT B670C01Y-EAT Fan Speed Control (Blower Control) HEATING AND VENTILATION Air Intake Control B670C01HP B670A01HP B670B01HP This is used to select fresh outside air or recircu- This is used to turn the blower fan on and off There are four controls for the heating and lation inside air. -
Page 269
CONTROLS AND EQUIPMENT and side windows and the air within the passenger compartment will become stale. In addition prolonged use of the air conditioning with the » » mode se- lected may result in the air within the passenger compartment becoming ex- cessively dry. -
Page 270
CONTROLS AND EQUIPMENT If the «Floor-Defrost» mode is selected, the A/C B670E02A-AAT B690A01S-AAT Temperature Control HEATING CONTROLS will turn on automatically and «Fresh» mode will be activated. Cool Warm B690A01HP B670E01HP B670D06HP-D For normal heating operation, set the air intake This control is used to adjust the degree of control to the fresh air ( ) position and the air… -
Page 271
CENTRE VENTILATOR B700A01HP B710A01HP B710B01HP Your Hyundai is equipped with bi-level heating To operate the ventilation system: The centre ventilators are located in the middle controls. This makes it possible to have cooler of the dashboard. The direction of air flow from… -
Page 272
CONTROLS AND EQUIPMENT B710C02HP-AAT B720A02FC-EAT SIDE VENTILATOR DEFROSTING/DEFOGGING B720B01HP To remove frost or exterior fog on the wind- B720A01HP B710C01HP.DAG shield: The side ventilators are located on each side of o Set the air flow control to the defrost ( Use the heating/ventilation system to defrost or dashboard. -
Page 273
CONTROLS AND EQUIPMENT B730A01L-EAT B740A01S-AAT B740B01A-EAT AIR CONDITIONING SYSTEM Air Conditioning Operation Operation Tips Air Conditioning Switch Cooling o To keep dust or unpleasant fumes from entering the car through the ventilation sys- (Not all models) tem, temporarily set the air intake control to position. -
Page 274
CONTROLS AND EQUIPMENT o Adjust the fan control to the desired speed. For greater cooling, turn the fan control to one of the higher speeds or temporarily select the recirculate ( ) position on the air intake control. B740C01A-AAT De-Humidified Heating B740C01HP For dehumidified heating: o Turn on the fan control switch. -
Page 275
B970B01HP-GAT AUTOMATIC HEATING AND COOL- Heating and Cooling Controls ING CONTROL SYSTEM (Not aII models) Your Hyundai is equipped with an automatic heating and cooling control system controlled by simply setting the desired temperature. B970B01HP 1. Blower Fan Control Switch 7. -
Page 276
CONTROLS AND EQUIPMENT Press the TEMP down ( ) button 3 seconds B970C02L-EAT Automatic Operation or more with the AMB button held down. The display shows that the unit of tempera- ture is adjusted to Centigrade or Fahrenheit (°C → °F or °F → °C). photo sensor B970C02HP 2. -
Page 277
CONTROLS AND EQUIPMENT B995A01Y-AAT B980B01Y-AAT B670C02HP-EAT AMBIENT TEMPERATURE SWITCH Fan Speed Control Air Intake Control Switch B980B01HP B995A01HP B980C01HP This is used to select fresh outside air or The fan speed can be set to the desired speed Pressing the AMB button displays the ambient by pressing the appropriate fan speed control recirculation inside air. -
Page 278
CONTROLS AND EQUIPMENT With the «Recirculation» mode selected, air from B980E01L-EAT Air Flow Control within the passenger compartment will be drawn through the heating system heated or cooled according to the function selected. NOTE: o It should be noted that prolonged opera- tion of the heating in «recirculation»… -
Page 279
CONTROLS AND EQUIPMENT charged through the face vents and the floor B980C02L-EAT Defrost Switch vents. This makes it possible to have cooler air from the dashboard vents and warmer air from the floor outlets at the same time. B670D06HP-D Floor-Defrost Level B980F01HP When selecting the «Floor-Defrost»… -
Page 280
CONTROLS AND EQUIPMENT B740D01Y-AAT Operation Tips o If the interior of the car is hot when you first get in, open the windows for a few minutes to expel the hot air. o When you are using the air conditioning system, keep all windows closed to keep hot air out. -
Page 281
CONTROLS AND EQUIPMENT B750A02A-AAT AM reception FM radio station STEREO SOUND SYSTEM Ionosphere Unobstructed How Car Audio Works area FM reception Ionosphere Mountains Buildings Iron bridges SSAR011A SSAR012A Obstructed area AM broadcasts can be received at greater dis- FM broadcasts are transmitted at high frequency tances than FM broadcasts. -
Page 282
CONTROLS AND EQUIPMENT B750B02Y-AAT Using a cellular phone or a two-way radio When a cellular phone is used inside the ve- hicle, noise may be produced from the audio equipment. This does not mean that something is wrong with the audio equipment. In such a case, use the cellular phone at a place as far as possible from the audio equipment. -
Page 283
CONTROLS AND EQUIPMENT B870A01A-GAT B880C02B-EAT ANTENNA Glass Antenna (Not all models) Fixed Rod Antenna B870D01HP B870C01HP When the radio power switch is turned on whilst the ignition key is in either the «ON» or «ACC» Your car uses a fixed rod antenna to receive position, your car will receive both AM and FM both AM and FM broadcast signals. -
Page 284
DRIVING YOUR HYUNDAI YC010A1-A 2. DRIVING THE HYUNDAI C010A01O-EAT WARNING: ENGINE EXHAUST CAN BE DANGEROUS! Engine exhaust gases are potentially lethal. If at any time engine exhaust gas is detected within the passenger compartment, move the vehicle to an open area and open all windows. -
Page 285
If your Hyundai is equipped with a manual braking effort. indications of possible trouble. -
Page 286
DRIVING YOUR HYUNDAI YC030A1-E C070C01A-AAT «START» STEERING WHEEL LOCK To Remove the Ignition Key The engine is started in this position. It will When the ignition key is removed, the steering crank until you release the key. wheel lock will be activated. The lock only… -
Page 287
1. Ensure that the transmission is in neutral onds after the preheating is completed, turn 3. If your Hyundai is equipped with a manual and that the clutch pedal is held depressed the ignition key once more to the «LOCK»… -
Page 288
CAUTION: o Always ensure that the periodic maintenance Up to 62 mph About 1 minute services are performed by a Hyundai dealer o Do not attempt to engage reverse gear Steep mountain slopes or contin- About 2 minutes at the time and/or mileage intervals speci- when the car is in motion. -
Page 289
During cold weather, shifting may be dif- C070E03A-EAT ficult until the transmission lubricant has The highly efficient Hyundai automatic trans- RECOMMENDED SHIFT POINTS warmed up. This is normal and not harm- mission has four forward speeds and one re- ful to the transmission. -
Page 290
DRIVING YOUR HYUNDAI For optimum fuel economy, accelerate gradu- DC110D1-E DC110G2-E o N (Neutral): o L (Low Gear): ally. The transmission will automatically shift to the second, third and overdrive gears. With the selector in this position, no gear is… -
Page 291
DRIVING YOUR HYUNDAI C090I01E-EAT SC130A1-E HPC120D1-E CAUTION: OVERDRIVE SWITCH General Operating Instructions o Shift into «R» and «P» only when the o The button in the selector handle must be vehicle has completely stopped. depressed before the selector can be moved. -
Page 292
DRIVING YOUR HYUNDAI WARNING: o Ensure that the overdrive switch is at the C350A01HP-EAT Part-time 4WD operation «ON» position for maximum economy. ABS will not prevent accidents due to im- o If rapid acceleration is required, fully de- proper or dangerous driving manoeuvres. -
Page 293
DRIVING YOUR HYUNDAI Turn the transfer shift knob from the 4H mode D090E01HP-EAT The 4WD LOW indicator light ( ) will Driving Four-wheel drive safely to the 2H mode at speed below 50mph (80 km/ be turned on to remind you that you are in the 4L h). -
Page 294
DRIVING YOUR HYUNDAI o Check your brake condition once you are C355A02HP-EAT Driving in Water Full-time 4WD operation out of mud or water. Press the brake several Select the 4L mode and drive through slowly. times as you move slowly until your feel (Not all models) normal braking forces return. -
Page 295
DRIVING YOUR HYUNDAI o If the vehicle is towed with its only two LOW Mode Driving 4WD Safely wheels raised off the ground, the 4WD Full power to both axles, including a lower gear (1) Be sure to wear the seat belt. -
Page 296
DRIVING YOUR HYUNDAI (8) For speedometer test or inspection/mainte- Driving on dry paved road and high- Driving in Water nance (I/M) program of full-time 4WD ve- Select the LOW mode and drive through slowly. hicle, use a four-wheel chassis dynamom- Select the AUTO to drive on dry paved roads. -
Page 297
A limited-slip differential, if equipped, is for the cause the tyres to rotate. o Use only genuine Hyundai replacement rear wheel differential only. The features of this There is the danger that rotating tyres… -
Page 298
Keep your car clean. For maximum service, sary braking. This also reduces brake wear. C150A01A-EAT your Hyundai should be kept clean and free o Drive at a moderate speed. The faster you SMOOTH CORNERING of corrosive materials. It is especially impor- drive, the more fuel your car uses. -
Page 299
DRIVING YOUR HYUNDAI ZC170B1-E ZC170D1-E ZC170E1-E Electrical System Door Locks Windscreen Washers & Wipers Winter conditions impose severe demands upon Should the door lock mechanism become fro- The windscreen washer bottle should be filled vehicle electrical systems, particularly the charg- zen, a proprietary lock de-icer should be used. -
Page 300
Severe Usage Conditions» on page 5-5. types of vehicles or apparatus may differ. Ask C190E02HP-EAT your Hyundai dealer for further details before CAUTION: Trailer Weight Limit towing. o Never connect a trailer brake system di- rectly to the vehicle brake system. -
Page 301
Important Trailer Weight Information ceed the GVWR but exceeds the GAWR. The Maximum Towable Weight of your Hyundai Improper trailer loading and/or too much Terracan will be reduced if the vehicle is load. -
Page 302
DRIVING YOUR HYUNDAI CAUTION: HPC200E1-E 9. If the trailer has electric brakes, start your Trailer or Vehicle Towing Tips vehicle and trailer moving, and then apply If overheating should occur when towing, 1. Before towing, check towbar and safety cable… -
Page 303: In Case Of Emergency
3. Check fuel line in the engine compartment. system diagnosis. 4. If engine still refuses to start, call a Hyundai dealer or seek other qualified assistance. CAUTION: If the engine refuses to start, no attempt G210A01HP.DAG…
-
Page 304
IN CASE OF EMERGENCY CAUTION: amounts of water and medical assistance SD030A1-E JUMP STARTING sought. If the jump cable is incorrectly installed, damage to the vehicle electrical system may Negative to the engine 1. Ensure that the booster battery is 12 volt occur, in particular the electronic compo- Positive to positive not to the battery… -
Page 305
Com- be checked as soon as possible by a Hyundai seat . mon Rail system produce considerable mag- dealer. -
Page 306
IN CASE OF EMERGENCY 2. Insert the spare wheel rod into the hole in SD060A1-E HPD070A1-E IN THE EVENT OF A PUNCTURE CHANGING A FLAT TYRE the upper pad of the rear bumper. 3. Connect the wheel nut wrench to the spare If a puncture occurs whilst driving the vehicle: wheel rod. -
Page 307
IN CASE OF EMERGENCY NOTE: D060B01HP-GAT D065C01HP-GAT 1. Obtain Spare Tyre and Tool 3. Removing the Spare Wheel Cap The spare tyre is located underneath the car. Pry off the wheel cap, using the bar as shown Rear seat in the illustration. ZD070D1-E o Alloy Wheel Cap type 2. -
Page 308
IN CASE OF EMERGENCY ZD070F1-E D060E01A-AAT D060F02HP-EAT 4. Loosen Wheel Nuts 5. Put the Jack in Place 6. Raising the Car Front Release Hexagonal Bolt D060E01HP-1 valve D060D01HP D060F01HP The wheel nuts should be loosened slightly o Open the lid at the left corner of the luggage Rear before raising the car. -
Page 309
IN CASE OF EMERGENCY Using the jack handle, turn the release valve Position the jack with the jack handle. Position clockwise until it reaches a stop. it only at the specified points indicated in the «Put the Jack in Place». Stop mark Use of the jack at other points could damage the car. -
Page 310
IN CASE OF EMERGENCY SD070H1-E SD070I1-E 7. Changing Wheels 8. Re-install Wheel Nuts D060G02HP WARNING: D060G01HP D060H01HP It is important that the faces of the wheel Fit the wheel nuts onto the studs and tighten Using the wheel brace, remove the nuts and and hub are clean prior to installing the with the wheel brace. -
Page 311
If your car has to be towed, it should be done by correct. Always reinstall the valve cap after your Hyundai dealer or a commercial tow truck checking or adjusting tyre pressure. If the cap service. This will help assure that your car is not damaged in towing. -
Page 312
IN CASE OF EMERGENCY D080B01HP-EAT D080C01HP-EAT Towing a Car With Manual Transmis- Towing A Car With Automatic Trans- sion mission D080C02HP o OK for 4WD D080C01HP o Not OK for 4WD D080B01HP o OK for Automatic or Manual Transmission o Not OK for 4WD (OK for Part Time 4WD in 2H Position) Equipped Vehicle (OK for Part Time 4WD in 2H Position) -
Page 313
IN CASE OF EMERGENCY D080D01HP-EAT Nor should towing be attempted if the wheels, Emergency Towing drive train, axles, steering or brakes are dam- aged. Before towing, be sure the transmission Front is in neutral and the key is in «ACC» (with the engine off) or in the «ON»… -
Page 314: Appearance Care
Hyundai dealer regarding the use of a compatible repair material should be sought.
-
Page 315
It is recom- rubbed intensively to prevent breaking through using a light horizontal cleaning action. Care mended that repairs are entrusted to a Hyundai the colour coat and exposing the under coat. should be exercised to avoid the use of abra-… -
Page 316
APPEARANCE CARE YE010A1-E To Clean Leather Upholstery (Not all models) In the normal course of use, leather upholstered surfaces will, like any material, pick-up dust and dirt. This dust and dirt MUST be cleaned off or it may work into the surface of the leather, causing damage. -
Page 317
It is recommended that all maintenance op- a Hyundai dealer because of the need for erations with the exception of the daily oper- specialized knowledge and tooling and to en- ating checks are entrusted to a Hyundai dealer… -
Page 318
REGULAR SERVICING In order to ensure continued reliability, safety and longevity, regular Regular maintenance should be entrusted to a Hyundai dealer who is maintenance performed at the intervals specified is essential. The best able to provide the expertise required to ensure optimum opera- maintenance intervals specified are based both on time elapsed and tional performance. -
Page 319
VEHICLE MAINTENANCE REQUIREMENTS F030D04HP-EAT R :REPLACE I : INSPECT AND, AFTER INSPECTION, CLEAN, ADJUST, REPAIR OR REPLACE IF NECESSARY. MILES X 1000 DESCRIPTION MONTHS ENGINE CONTROL SYSTEM MAINTENANCE (DIESEL) ENGINE OIL & FILTER (API CF-4 OR ABOVE, ACEA B4 OR ABOVE) AIR CLEANER FILTER FUEL FILTER CARTRIDGE TIMING BELT… -
Page 320
VEHICLE MAINTENANCE REQUIREMENTS F030C02HP-EAT R : REPLACE I : INSPECT AND, AFTER INSPECTION, CLEAN, ADJUST, REPAIR OR REPLACE IF NECESSARY MILES X 1000 DESCRIPTION MONTHS GENERAL MAINTENANCE COOLING SYSTEM PETROL ENGINE COOLANT DIESEL ENGINE ENGINE COOLANT SPECIFIC GRAVITY MANUAL TRANSMISSION OIL AUTOMATIC TRANSMISSION FLUID AND FILTER BRAKE PIPES, HOSES, AND CONNECTIONS BRAKE FLUID… -
Page 321
VEHICLE MAINTENANCE REQUIREMENTS F040A05HP-EAT MAINTENANCE UNDER SEVERE USAGE CONDITIONS The following items must be serviced more frequently on cars normally used under severe driving conditions. Refer to the chart below for the appropriate maintenance intervals. R : REPLACE I : INSPECT AND, AFTER INSPECTION, CLEAN, ADJUST, REPAIR OR REPLACE IF NECESSARY MAINTENANCE DRIVING MAINTENANCE ITEM… -
Page 322
VEHICLE MAINTENANCE REQUIREMENTS F060A01A-AAT F060D01TB-AAT F060G01A-EAT o Fuel lines, fuel hoses and connec- EXPLANATION OF SCHEDULED o Vapour hose and fuel filler cap tions The vapour hose and fuel filler cap should be MAINTENANCE ITEMS Check the fuel lines, fuel hoses and connec- inspected at those intervals specified in the tions for leakage and damage. -
Page 323
Rear brake drums, linings and pads o Air cleaner filter o Automatic transmission fluid and parking brake A Genuine Hyundai air cleaner filter is recom- filter Check the rear brake drums, linings and pads mended when filter is replaced. -
Page 324
VEHICLE MAINTENANCE REQUIREMENTS F070M01B-AAT F070Q01A-AAT o Steering gear box, linkage & boots/ o Air conditioning refrigerant lower arm ball joint, upper arm ball Check the air conditioning lines and connec- joint tions for leakage and damage. Check air With the vehicle stopped and engine off, check conditioning performance according to the for excessive free-play in the steering wheel. -
Page 325
OWNER MAINTENANCE SG000A1-E 6. OWNER MAINTENANCE G010A01HP-EAT PETROL ENGINE COMPARTMENT (3.5 V6) CAUTION: When inspecting or servicing the en- gine, you should handle tools and other heavy objects carefully so that the plastic cover of the engine is not damaged. G010A02HP-E 10.Air cleaner 1. -
Page 326
OWNER MAINTENANCE G010C01HP-EAT DIESEL ENGINE COMPARTMENT (2.9 CRDi) CAUTION: When inspecting or servicing the en- gine, you should handle tools and other heavy objects carefully so that the plastic cover of the engine is not damaged. G010C01HP-D 9 10 1. Windscreen washer fluid reservoir 5. -
Page 327
OWNER MAINTENANCE SG020B1-E G030A01FC-EAT G030B01HP-EAT ENGINE OIL Recommended Oil DAILY OPERATING CHECKS The following items should be checked on a The correct engine oil level is of paramount 1. Petrol Engine daily basis or whenever the vehicle is refuelled, importance. An excessively high or low oil level whichever occurs sooner. -
Page 328
OWNER MAINTENANCE SG030C1-E Withdraw the dipstick and wipe it with a clean 2. Diesel Engine Engine Oil Level rag. Replace the dipstick fully and withdraw again when the oil level may be read from the Petrol Engine stick. Normal oil level is indicated when the oil is present between the two marks on the stick. -
Page 329
OWNER MAINTENANCE G350A01A-EAT G040A04A-EAT Diesel Engine ENGINE OIL CONSUMPTION ENGINE OIL AND FILTER Function of engine oil REPLACEMENT Engine oil has the primary function of lubricat- ing and cooling the inside of the engine. Petrol Engine Oil filler cap Engine oil consumption It is normal that an engine should consume some engine oil whilst normal driving. -
Page 330
OWNER MAINTENANCE Tightening torque: To replace the oil and filter, proceed as follows: SG050A1-E ENGINE COOLANT CHECKING AND Petrol Engine — 1.2 ~ 1.6 kgf.m 1. Ensure that the engine is at normal operat- Diesel Engine — 2.3 ~ 2.5 kgf.m REPLACING ing temperature and park the vehicle on WARNING:… -
Page 331
«LOW» mark, add coolant of the correct concentration until the level is be- tween the «LOW» and «FULL» marks. If the level falls below the «LOW» mark on a regular basis despite being topped up, consult a Hyundai dealer. -
Page 332
OWNER MAINTENANCE G060A02L-AAT Petrol Engine SPARK PLUGS (For Petrol Engine) 0.039 ~ 0.043 in. (1.0 ~ 1.1mm) G050D03HP G050D02HP-E 6. Start the engine with the radiator cap still SSA6060A Diesel Engine removed and continue to add coolant as the level decreases as air is expelled from the Your engine was originally equipped with plati- system. -
Page 333
When spark plugs are replaced, always use spark plugs recommended by Hyundai. The use of other spark plugs can result in loss of perfor- mance, radio interference or engine damage. -
Page 334
The windscreen washer Recommended Lubricant reservoir has a total capacity of 4.5 litres. Use only HYUNDAI GENUINE PARTS MTF 75W/90 (API GL-4). SSA6100B CAUTION: Park the car on level ground with the engine off. -
Page 335
OWNER MAINTENANCE CAUTION: up, add oil slowly until it reaches the proper Petrol Engine level. Do not overfill. The transmission fluid level should be 3. Replace the bolt and washer, screw it in with checked when the engine is at normal oper- your fingers and then tighten securely with ating temperature. -
Page 336
«MIN» mark, fluid should be added having ly switches on and off according to engine entrusted to a Hyundai dealer. carefully cleaned the area surrounding the res- temperature. Be careful to keep away from… -
Page 337
OWNER MAINTENANCE corrosion within the braking system. The SG130B2-E Diesel Engine Adding Fluid brake fluid must be changed at the specified time or mileage interval to ensure continued Recommended brake fluid conforming to DOT safe operation of the system. Brake fluid will 3 or DOT 4 should be used. -
Page 338
Adjustment of 2. If the air coming out of the in-dash vents is Tension pulley the belt should be entrusted to a Hyundai dealer. not cold, have the air conditioning system COMP. pulley inspected by your Hyundai dealer. -
Page 339
Hyundai dealer and adjusted The freeplay should be within the limits speci- or repaired if necessary. fied in the illustration. If it is not, have it inspect- ed by your Hyundai dealer and adjusted or repaired if necessary. 6-15… -
Page 340
Generator pulley If the brake pedal clearance is not within the Tension pulley limits specified in the illustration, have it in- G190D01HP Crankshaft pulley spected by your Hyundai dealer and adjusted or repaired if necessary. 6-16… -
Page 341
The circuit The fuse box containing the individual circuit should be checked by a Hyundai dealer at the harness in the event of an electrical system fuses is located on the lower portion of the first available opportunity. -
Page 342
OWNER MAINTENANCE DG210A1-E YG210A1-E WARNING: BATTERY MAINTENANCE CHECKING ELECTRIC COOLING FANS Motor vehicle batteries contain sulphuric CAUTION: acid which is corrosive and poisonous. Hy- Petrol Engine drogen gas is emitted from the battery which The cooling fan is controlled by engine cool- is explosive when combined with oxygen. -
Page 343
If the Diesel Engine power steering pump continues to be noisy after the engine has warmed up, have it inspected by your Authorized Hyundai Dealer. G230A02HP G350A01HP The power steering fluid level should be checked The fuel system should be bled to remove air as regularly. -
Page 344
If in doubt, consult your nearest authorized G300B01HP-GAT REMOVAL OF WATER FROM THE HYUNDAI dealer. FUEL FILTER (FOR DIESEL ENGINE) WARNING: Be sure to carefully wipe away any water drained out in this manner, because the fuel mixed in the water might be ignited and result in a fire. -
Page 345
OWNER MAINTENANCE G270A02Y-AAT G290A01HP-EAT HEADLIGHT BULB HEADLIGHT AIMING ADJUSTMENT Horizontal aiming (Low Beam) Vertical aiming (Low Beam) Vertical aiming (High Beam) Horizontal aiming (High Beam) G270A02HP WARNING: G270A01HP G290A01HP The halogen bulb contains gas under pres- Replacement instructions: Before performing aiming adjustment, make sure sure and if impacted could shatter, resulting in flying fragments. -
Page 346
OWNER MAINTENANCE 6. Draw the vertical line (through the centre of G290B01HP-EAT If the vehicle has had front body repair and the Adjustment After Headlight Assembly each headlight) and the horizontal line headlight assembly has been replaced, the (through the centre of each headlight) on the headlight aiming should be checked using an Replacement aiming screen. -
Page 347
OWNER MAINTENANCE G280A01HP-EAT G280A01HP Wattage Part Name Part Name Wattage Head Light (Low/High) 55/55 High Mounted Rear Stop Light (Not all models) Turn Signal Light Luggage Compartment Light Front Position Light Rear Combination Light Room Light Stop/Tail Light 21/5 Map Light Turn Signal Light Front Fog Light Back-up Light… -
Page 348
Set the fan at high speed and the running, the fuel vapors absorbed in the canis- tained by an authorized Hyundai dealer in ac- controls in any position desired. ter are drawn into the induction system through cordance with the schedule in this manual. -
Page 349
This can cause the After engine warm-up, during ordinary driving, it catalytic converter to overload. opens to introduce evaporated fuel to the surge o Take care not to stop your Hyundai over any tank. combustible material such as grass, paper, leaves or rags. -
Page 350
CONSUMER INFORMATION I010B01A-AAT ZI010C1-E YI000A1-E Engine Number TYRE INFORMATION 8. CONSUMER The tyres supplied on your new Hyundai are Petrol Engine chosen to provide the best performance for INFORMATION normal driving. YI010B2-E DI070A1-E TYRE PRESSURES VEHICLE IDENTIFICATION NUMBER (VIN) I010B01HP Diesel Engine I030A01HP.DAG… -
Page 351
CONSUMER INFORMATION NOTE: SI060A1-E PRESSURE, kPa (PSI) TYRE BALANCING Do not mix bias-ply and radial-ply under any TYRE NORMAL LOAD MAXIMUM LOAD Incorrect tyre balance will cause steering vibra- circumstances. This may cause dangerous SIZE SIZE FRONT REAR FRONT REAR tion and uneven tyre wear. -
Page 352
D060B02HP pattern should not be intermixed on the same axle. Radial and cross ply tyres should not be Your Hyundai is delivered with the following: used on the same vehicle. The use of tyres and wheels of non approved Spare tyre and wheel sizes can be dangerous. -
Page 353
VEHICLE SPECIFICATIONS J030A01HP-EAT 9. VEHICLE SPECIFICATIONS TYRE 235/75 R15 Option 225/65 R16 J010A01HP-EAT in. (mm) MEASUREMENT Spare Full Size 185.4 (4710) Overall length 73.2 (1860) Overall width J050A02HP-GAT BRAKE 70.6 (1795) Overall height Type Dual hydraulic with brake booster 108.2 (2750) Wheel base Front brake type Ventilated disc… -
Page 354
VEHICLE SPECIFICATIONS J070A02HP-EAT ENGINE Petrol Diesel ITEMS 3.5 V6 2.9 CRDi 6-Cyl., V-type DOHC Engine Type 4-Cyl., In-line SOHC 3.67 x 3.81 in. (93.0 x 85.8mm) Bore x Stroke 3.82 x 3.86 in. (97.1 x 98 mm) 3496 2902 Displacement (cc) 1 — 2 — 3 — 4 — 5 — 6 Firing Order 1 — 3 — 4 — 2… -
Page 355
VEHICLE SPECIFICATIONS J080A06HP-EAT LUBRICATION CHART Q’ty (lmp.qts)(litre) Item Oil & Coolant Engine Oil Petrol API SG, SAE 20W-40, 20W-50 [ABOVE -14°F (-10°C)] Dry fill (With oil filter) : 3.78 (4.3) SG/CD, SH SAE 15W-40, 15W-50 [ABOVE 5°F (-15°C)] or SH/CD SAE 10W-30 [-13°F ~ 104°F (-25°C ~ 40°C)] SAE 10W-40, 10W-50 [ABOVE -13°F (-25°C)] SAE 5W-20 [BELOW 14°F (-10°C)] *1, *2… -
Page 356
VEHICLE SPECIFICATIONS J080A06HP-EAT LUBRICATION CHART Item Oil & Coolant Q’ty (lmp.qts)(litre) Transmission Manual HYUNDAI GENUINE PARTS MTF 75W/90 (API GL-4) 2.82 (3.2) Fluid Auto MOBILE DEXRON-II Petrol : 9.24(10.5), Diesel : 10.38 (11.8) Transfer case oil ATF DEXRON-III 1.25(1.42) Front axle gear oil HYPOID GEAR OIL API GL-5 or HIGHER, Part-time 4WD : 1.58(1.8) -
Page 357
INDEX HPK000A1-E 10. INDEX Catalytic Converter …………….7-2 Child Restraint System …………1-20 ~ 1-25 Child-Proof Rear Door Lock …………… 1-6 Cigar Lighter ………………1-52 Air Cleaner Filter …………….. 6-9 Clock ………………..1-50 Air Conditioning Clutch Maintenance ……………… 6-14 Checking fluid …………….6-13 Operation ……………… -
Page 358
INDEX Fuel Emission Control System …………7-1 ~ 7-2 Capacity ………………9-1 Engine Diesel ………………..1-1 Before starting the engine …………… 2-2 Gauge ……………….. 1-44 Compartment (3.5 V6) …………..6-1 Unleaded petrol …………….1-1 Compartment (2.9 CRDi) …………..6-2 Fuel Filler Lid Coolant ……………….. -
Page 359
INDEX Ignition Switch ………………2-2 Maintenance Requirements Immobiliser System …………..1-2 ~ 1-4 Explanation of scheduled maintenance items ……5-6 ~ 5-8 Key ………………. 1-2, 1-4 Maintenance and servicing requirements ……..5-1 Indicator and Warning Lights ……….1-40 ~ 1-43 Maintenance under severe usage conditions ……… -
Page 360
Rear Seat Warning …………….1-16 Rheostat Switch …………….1-52 Tachometer ………………1-45 Roof Bars ………………1-61 Theft-Alarm system …………..1-7 ~ 1-8 Running in Your New Hyundai …………1-2 Tyres Balancing ………………8-2 Chains ………………… 8-2 Seat Belts Changing a flat tyre …………..3-4 ~ 3-9 2-Point Static Type …………… -
Page 361
INDEX Transmission Automatic …………….2-6 ~ 2-9 Automatic transmission lubricant ……….6-11 Manual ………………2-5 ~ 2-6 Manual transmission lubricant …………6-10 Trip Odometer ………………. 1-45 Under Tray ………………1-13 Vehicle Identification Number (VIN) ………… 8-1 Vehicle Specifications …………..9-1 ~ 9-4 Windows Power ………………..