Долго искал настройки на свой Аппарат NSZD-W60 очень редкая штука и вот делюсь со всеми данными по мануалу магнитол которые я нащел: toyota.jp/dop/navi/manual/ Очень большое спасибо хочу сказать igorvod45, у которого много информации я подчеркнул в его статях особенно : www.drive2.ru/l/9265423/
Комментарии
9
Войдите или зарегистрируйтесь, чтобы писать комментарии, задавать вопросы и участвовать в обсуждении.

Я езжу на Toyota Premio (T260)
Спасибо нашел свою NSZD-W60, хотел спросить вы себе usb активировали ?

Да, пришлось взять компьютерные пины и сделать самопал усб
Я езжу на Toyota Premio (T260)
по магнитоле можно с вами как не будь связаться,
Erik75rus
Спасибо нашел свою NSZD-W60, хотел спросить вы себе usb активировали ?
Да все активировано

Полезная ссылка! Нашёл свою магнитолу, на досуге почитаю

нашел свой мафон . Скачал . Спасибо Сань полезно.
Ок, посмотри что отображается у тебя по кану в конце мануала, мой поддерживает кан и отображает расход бензина и Economy
-
Contents
-
Table of Contents
-
Troubleshooting
-
Bookmarks
Quick Links
Audio system types
Entune Audio
Using the radio
Using the CD player
Playing back MP3 and WMA discs
Operating an iPod
Operating a USB memory
Using the AUX port
Title
Page
P. 272
P. 274
P. 274
P. 281
P. 287
P. 271
P. 293
249
3
Related Manuals for Toyota Navigation and Multimedia System
Summary of Contents for Toyota Navigation and Multimedia System
-
Page 1
3-2. Using the audio system Audio system types Entune Audio Title Page Using the radio P. 272 Using the CD player P. 274 Playing back MP3 and WMA discs P. 274 Operating an iPod P. 281 Operating a USB memory P. -
Page 2
3-2. Using the audio system Entune Audio Plus Owners of this system should refer to the “Navigation and Multime- dia System Owner’s Manual”. Entune Premium Audio with Navigation Owners of this system should refer to the “Navigation and Multime- dia System Owner’s Manual”. -
Page 3: Audio System Operation Buttons
3-2. Using the audio system Audio system Operations such as listening to audio, using the hands-free phone and changing audio settings are started by using the following but- tons. Audio system operation buttons “CAR” button Press this button to access the energy monitor/consumption screen.
-
Page 4: Operating The Touch Screen
3-2. Using the audio system Operating the touch screen By touching the screen with your finger, you can control the audio system, etc. ■ Drag Touch the screen with your finger, and move the screen to the desired position. ● Scrolling the lists ■…
-
Page 5
3-2. Using the audio system NOTICE ■ To avoid damaging the touch screen ● To prevent damaging the screen, lightly touch the screen buttons with your finger. ● Do not use objects other than your finger to touch the screen. ●… -
Page 6: Operating Audio Using Steering Wheel Switches
3-2. Using the audio system Steering wheel audio switches Some audio features can be controlled using the switches on the steering wheel. Operation may differ depending on the type of audio system or navi- gation system. For details, refer to the manual provided with the audio system or navigation system.
-
Page 7
3-2. Using the audio system “MODE/HOLD” switch • Changes audio source • Press and hold this switch to mute or pause the current operation To cancel the mute or pause, press and hold CAUTION ■ To reduce the risk of an accident Exercise care when operating the audio switches on the steering wheel. -
Page 8
3-2. Using the audio system USB/AUX port Connect an iPod, USB memory device or portable audio player to the USB/AUX port as indicated below. Select “iPod”, “USB” or “AUX” on the audio source selection screen and the device can be operated via audio system. -
Page 9
3-2. Using the audio system CAUTION ■ While driving Do not connect a device or operate the device controls. -
Page 10
3-2. Using the audio system Basic audio operations Basic audio operations and functions common to each mode are explained in this section. Operating the audio system Turn this knob to select radio Press this knob to turn the audio sys- station bands, tracks and files. -
Page 11
3-2. Using the audio system Random playback Select to change on/off. Repeat play Select to change on/off. ■ Using cellular phones Interference may be heard through the audio system’s speakers if a cellular phone is being used inside or close to the vehicle while the audio system is operating. -
Page 12
3-2. Using the audio system NOTICE ■ To prevent battery discharge Do not leave the audio system on longer than necessary when the engine is stopped. ■ To avoid damaging the audio system Take care not to spill drinks or other fluids over the audio system. -
Page 13
3-2. Using the audio system Setup menu You can adjust the audio system to your desired settings. Display “Setup” screen Press the “SETUP” button to display the “Setup” screen. Select to adjust the settings for operation sounds, screen animation, etc. (→P. 262) Select to set the voice set- tings. -
Page 14
Select to delete personal data (→P. 263) Select to update program ver- sions. For details, contact your Toyota dealer. Select to display the software information. Notices related to third party software used in this product are enlisted. (This… -
Page 15
3-2. Using the audio system ■ To return to the default volume settings Select “Default”, and then “Yes”. Delete personal data STEP Select “Delete Personal Data” on the “General Settings” screen. STEP Select “Delete”. Check carefully beforehand, as data cannot be retrieved once deleted. -
Page 16
3-2. Using the audio system Audio settings Settings are available for adjusting the radio operation, cover art, etc. Screen for audio settings STEP Press the “SETUP” button. Select “Audio” on the “Setup” STEP screen. Number of Radio Presets Select the number of radio preset stations. -
Page 17
3-2. Using the audio system Display settings Settings are available for adjusting the contrast and brightness of the screen. Screen for display settings STEP Press the “SETUP” button. STEP Select “Display” on the “Setup” screen. Adjust screen contrast/bright- ness Adjust screen contrast/bright- ness of the rear view monitor camera Changes to day mode. -
Page 18
3-2. Using the audio system Adjusting the screen contrast/brightness STEP Select “General” or “Camera” on the “Display Settings” screen. STEP Adjust the display as desired by selecting “+” or “-”. Day mode When the headlights are turned on, the screen dims. However, the screen can be switched to day mode by selecting “Day Mode”. -
Page 19
3-2. Using the audio system Voice settings This screen is used for guidance for voice command systems set- ting. Adjust the voice guidance vol- ume setting. voice recognition prompts “High”, “Low” or “Off”. Set the train voice recognition. Set the voice prompt interrupt on/off. -
Page 20
3-2. Using the audio system Selecting the audio source Switching between audio sources such as radio and CD are explained in this section. Changing audio source STEP Press the “AUDIO” button to display the audio source selec- tion screen. If the audio source selection screen is not displayed, press the “AUDIO”… -
Page 21
3-2. Using the audio system List screen operation When a list style screen is displayed, use the appropriate buttons to scroll through the list. How to scroll : Select to scroll to the next or previous page. : If appears to the right of titles, the complete titles are too long for the display. -
Page 22
3-2. Using the audio system Selecting, fast-forwarding and reversing tracks/files/songs ■ Selecting a track/file/song Press the “∧” or “∨” button on “SEEK/TRACK” or turn the “TUNE/ SCROLL” knob to select the desired track/file/song number. To fast-forward or reverse, press and hold the “∧” or “∨” button on “SEEK/TRACK”. -
Page 23
3-2. Using the audio system Optimal use of the audio system On the “Sound Settings” screen, sound quality (Treble/Mid/Bass), volume balance can be adjusted. How to adjust the sound settings and sound quality Select “-” or “+” to adjust the treble, mid or bass to a level between -5 and 5. -
Page 24
3-2. Using the audio system Radio operation Select “AM” or “FM” on the audio source selection screen to begin listening to the radio. Audio control screen Pressing the “AUDIO” button displays the audio control screen from any screens of the selected source. Audio source selection screen appears Preset stations… -
Page 25
3-2. Using the audio system Setting station presets STEP Search for desired stations by turning the “TUNE/SCROLL” knob or pressing the “∧” or “∨” button on “SEEK/TRACK”. STEP Select “(add new)” To change the preset station to a different one, select and hold the preset station. -
Page 26
3-2. Using the audio system CD player operation Insert disc or select “CD” on the audio source selection screen with a disc inserted to begin listening to a CD. Audio control screen Pressing the “AUDIO” button displays the audio control screen from any screens of the selected source. -
Page 27: Error Messages
■ Error messages If an error message is displayed, refer to the following table and take the appropriate measures. If the problem is not rectified, take the vehicle to your Toyota dealer. Message Cause Correction procedures • The disc is dirty or •…
-
Page 28
3-2. Using the audio system ■ Lens cleaners Do not use lens cleaners. Doing so may damage the CD player. ■ MP3, WMA and AAC files MP3 (MPEG Audio LAYER3) is a standard audio compression format. Files can be compressed to approximately 1/10 of their original size by using MP3 compression. -
Page 29
3-2. Using the audio system ● AAC file compatibility • Compatible standards MPEG4/AAC-LC • Compatible sampling frequencies 11.025/12/16/22.05/24/32/44.1/48 (kHz) • Compatible bit rates 16-320 (kbps) Compatible channel modes: 1ch and 2ch ● Compatible media Media that can be used for MP3, WMA and AAC playback are CD-Rs and CD-RWs. -
Page 30
3-2. Using the audio system ● ID3, WMA and AAC tags ID3 tags can be added to MP3 files, making it possible to record the track title, artist name, etc. The system is compatible with ID3 Ver. 1.0, 1.1, and Ver. 2.2, 2.3 ID3 tags. (The number of characters is based on ID3 Ver. -
Page 31
3-2. Using the audio system ● Playback • To play MP3 files with steady sound quality, we recommend a fixed bit rate of at least 128 kbps and a sampling frequency of 44.1 kHz. • CD-R or CD-RW playback may not be possible in some instances, depending on the characteristics of the disc. -
Page 32
3-2. Using the audio system NOTICE ■ Discs and adapters that cannot be used Do not use the following types of discs. Also, do not use 8 cm (3 in.) disc adapters, Dual Discs or printable discs. Doing so may damage the player and/or disc insert/eject function. ●… -
Page 33
3-2. Using the audio system Listening to an iPod Connecting an iPod enables you to enjoy music from the vehicle speakers. Select “iPod” on the audio source selection screen. When the iPod connected to the system includes iPod video, the system can only output the sound by selecting the browse screen. -
Page 34
3-2. Using the audio system Selecting a play mode STEP Select “Browse” on the screen. STEP Select the desired play mode. Then select a song to begin using the selected play mode. Shuffle play Select to change on/off. Repeat play Select to change on/off. -
Page 35
3-2. Using the audio system ■ About iPod ● “Made for iPod” and “Made for iPhone” mean that an electronic acces- sory has been designed to connect specifically to iPod or iPhone, respectively, and has been certified by the developer to meet Apple per- formance standards. -
Page 36
3-2. Using the audio system ● While connected to the system, the iPod cannot be operated with its own controls. It is necessary to use the controls of the vehicle’s audio system instead. ● When the battery level of an iPod is very low, the iPod may not operate. If so, charge the iPod before use. -
Page 37
3-2. Using the audio system ■ Compatible models ® ® ® ® ® The following iPod , iPod nano , iPod classic , iPod touch and iPhone devices can be used with this system. ● Made for • iPod touch (5th generation) •… -
Page 38
3-2. Using the audio system NOTICE ■ To prevent damage to the iPod or its terminals ● Do not leave the iPod in the vehicle. The temperature inside the vehicle may become high, resulting in damage to the iPod. ● Do not push down on or apply unnecessary pressure to the iPod while it is connected. -
Page 39
3-2. Using the audio system Listening to a USB memory device Connecting a USB memory device enables you to enjoy music from the vehicle speakers. Touch “USB” on the audio source selection screen. Connecting a USB memory device →P. 256 Audio control screen Pressing the “AUDIO”… -
Page 40
3-2. Using the audio system ■ USB memory functions ● Depending on the USB memory device that is connected to the system, the device itself may not be operable and certain functions may not be available. If the device is inoperable or a function is unavailable due to a malfunction (as opposed to a system specification), disconnecting the device and reconnecting it may resolve the problem. -
Page 41
3-2. Using the audio system ■ USB memory ● Compatible devices USB memory device that can be used for MP3, WMA and AAC playback. ● Compatible device formats The following device format can be used: • USB communication format: USB2.0 HS (480 Mbps) and FS (12 Mbps) •… -
Page 42
3-2. Using the audio system ● MP3 file compatibility • Compatible standards MP3 (MPEG1 AUDIO LAYERII, III, MPEG2 AUDIO LAYERII, III) • Compatible sampling frequencies MPEG1 AUDIO LAYERII, III: 32, 44.1, 48 (kHz) MPEG2 AUDIO LAYERII, III: 16, 22.05, 24 (kHz) •… -
Page 43
3-2. Using the audio system ● ID3, WMA and AAC tags ID3 tags can be added to MP3 files, making it possible to record the track title, artist name, etc. The system is compatible with ID3 Ver. 1.0, 1.1, and Ver. 2.2, 2.3 ID3 tags. (The number of characters is based on ID3 Ver. -
Page 44
3-2. Using the audio system CAUTION ■ While driving Do not connect a USB memory device or operate the device controls. NOTICE ■ To prevent damage to the USB memory device or its terminals ● Do not leave the USB memory device in the vehicle. The temperature inside the vehicle may become high, resulting in damage to the USB memory device. -
Page 45
3-2. Using the audio system Using the AUX port To use the AUX port, connect a portable player, press the “AUDIO” button, then select “AUX” to display the audio control screen. Connecting a portable audio player →P. 256 ■ Operating portable audio players connected to the audio system The volume can be adjusted using the vehicle’s audio controls. -
Page 46
3-2. Using the audio system Preparations to use wireless communication ® The following can be performed using Bluetooth wireless commu- nication: ■ A portable audio player can be operated and listened to via audio system ■ Hands-free phone calls can be made via a cellular phone In order to use wireless communication, register and connect a ®… -
Page 47
3-2. Using the audio system CAUTION ● CAUTION: Radio Frequency Radiation Exposure This equipment complies with FCC radiation exposure limits set forth for uncontrolled equipment and meets the FCC radio frequency (RF) Expo- sure Guidelines in Supplement C to OET65. This equipment has very low levels of RF energy that it deemed to comply without maximum permissive exposure evaluation (MPE). -
Page 48
3-2. Using the audio system Device registration/connection flow ® 1. Register the Bluetooth device to be used with audio sys- tem (→P. 298, 299, 300) ® 2. Connect the Bluetooth device to be used (→P. 303) To be used for audio To be used for hands-free phone ®… -
Page 49
3-2. Using the audio system Registering and connecting from the “Bluetooth* Setup” screen To display the screen shown below, press the “SETUP” button and select “Bluetooth*” on the “Setup” screen. Select to connect the device to be used with audio system. (→P. -
Page 50
3-2. Using the audio system ® Registering a Bluetooth audio player for the first time ® To use the Bluetooth Audio, it is necessary to register an audio player with the system. Once the player has been registered, it is possible to use the ®… -
Page 51
3-2. Using the audio system ® Registering a Bluetooth phone for the first time To use the hands-free system, it is necessary to register a ® Bluetooth phone with the system. Once the phone has been registered, it is possible to use the hands- free system. -
Page 52
3-2. Using the audio system ® Registering a Bluetooth device ® Bluetooth compatible phones (HFP) and portable audio players (AVP) can be registered simultaneously. You can register up to 5 ® Bluetooth devices. ® How to register a Bluetooth device STEP Display the “Bluetooth* Setup”… -
Page 53
3-2. Using the audio system Check that this screen is dis- STEP played when registration is com- plete. STEP STEP Select “OK” when the connection status changes from “Con- necting…” to “Connected”. If an error message is displayed, follow the guidance on the screen to try again. -
Page 54
3-2. Using the audio system ® Deleting a Bluetooth device STEP Display the “Bluetooth* Setup” screen. (→P. 297) *: Bluetooth is a registered trademark of Bluetooth SIG, Inc. STEP Select “Remove”. STEP Select the desired device. STEP A confirmation message will be displayed, select “Yes” to delete the device. -
Page 55
3-2. Using the audio system ® Connecting a Bluetooth device ® Up to 5 Bluetooth devices (Phones (HFP) and audio players (AVP)) can be registered. ® If more than 1 Bluetooth device has been registered, select which device to connect to. STEP Press the “SETUP”… -
Page 56
3-2. Using the audio system Auto connection To turn auto connection mode on, set “Bluetooth* Power” to on. (→P. 308) When you register a phone, auto connection will be activated. Always ® set it to this mode and leave the Bluetooth phone in a place where a connection can be established. -
Page 57
3-2. Using the audio system ® ■ Reconnecting a Bluetooth phone If the system cannot connect due to poor signal strength with the “POWER” switch in ACCESSORY or ON mode, the system will automatically attempt to reconnect. If the phone is turned off, the system will not attempt to reconnect. In this case, the connection must be made manually, or the phone must be rese- lected. -
Page 58
3-2. Using the audio system ® Displaying a Bluetooth device details You can confirm and change the registered device details. ® Bluetooth device registration status STEP Display the “Bluetooth* Setup” screen. (→P. 297) *: Bluetooth is a registered trademark of Bluetooth SIG, Inc. STEP Select the device. -
Page 59
3-2. Using the audio system Changing connection method STEP Select “Connect Audio Player from”. STEP Select “Vehicle” or “Device”. “Vehicle”: Connect the audio system to the portable audio player. “Device”: Connect the portable audio player to the audio system. -
Page 60
3-2. Using the audio system ® Detailed Bluetooth system settings ® You can confirm and change the detailed Bluetooth settings. ® How to check and change detailed Bluetooth settings STEP Display the “Bluetooth* Setup” screen. (→P. 297) STEP Select “System Settings”. STEP The following screen is displayed: ®… -
Page 61
3-2. Using the audio system Editing the Bluetooth* PIN ® You can change the PIN-code that is used to register your Bluetooth devices in the system. STEP Select “Bluetooth* PIN”. STEP Input a PIN-code, and select “OK”. *: Bluetooth is a registered trademark of Bluetooth SIG, Inc. -
Page 62
3-2. Using the audio system ® Listening to Bluetooth audio ® The Bluetooth audio system enables the user to enjoy music played on a portable player from the vehicle speakers via wireless communication. ® When a Bluetooth device cannot be connected, check the con- nection status on the “Bluetooth* Audio”… -
Page 63
3-2. Using the audio system Indicators Conditions Good Not connected Connection status Full Empty Battery charge ® Playing Bluetooth audio Select to Play/Pause. For details on “Bluetooth* Audio” screen operation methods, refer to Basic Audio Operations. (→P. 258) For details on how to select a track or album, refer to selecting, fast- forwarding and reversing tracks/files/songs. -
Page 64
3-2. Using the audio system ® Using a Bluetooth phone The hands-free system is a function that allows you to use your cel- lular phone without touching it. ® ® This system supports Bluetooth . Bluetooth is a wireless data sys- tem that allows the cellular phone to wirelessly connect to the hands-free system and make/receive calls. -
Page 65
3-2. Using the audio system ■ Telephone switch (→P. 328) ■ Microphone The vehicle’s built in microphone is used when talking on the phone. The person you are speaking to can be heard from the front speakers. ® To use the hands-free system, you must register your Bluetooth phone in the system. -
Page 66
3-2. Using the audio system Making a call ® Once a Bluetooth phone is registered, you can make a call using the following procedure: Dialing STEP Display the phone screen. (→P. 312) STEP Select the “Dial Pad” tab and enter a phone number. To delete the input phone number, select For the first digit, you can enter “+”… -
Page 67
3-2. Using the audio system When the contact is empty ® You can transfer the phone numbers in a Bluetooth phone to the system. Operation methods differ between PBAP (Phone Book Access Pro- ® file) compatible and PBAP incompatible Bluetooth phones. -
Page 68
3-2. Using the audio system ® For PBAP incompatible but OPP compatible Bluetooth phones STEP Select the desired item. Select to transfer the contacts from the connected cellular phone. Follow the steps in “Update con- tacts from phone” from “STEP2”. (→P. -
Page 69
3-2. Using the audio system Dialing from call history You can make a call using the call history, which has the 3 functions below. : calls which you missed : calls which you received : calls which you made STEP Display the phone screen. -
Page 70
3-2. Using the audio system Receiving a call When a call is received, the following screen is displayed together with a sound. To answer the phone Press the switch on the steering wheel or select To refuse a call Press the switch on the steering wheel or select To adjust the incoming call volume Turn the “PWR/VOL”… -
Page 71
3-2. Using the audio system Speaking on the phone The following screen is displayed when speaking on the phone. To adjust the call volume Select “-” or “+”. You can also adjust the volume using the steering switches or the volume knob. To prevent the other party from hearing your voice Select “Mute”. -
Page 72
3-2. Using the audio system ■ Release Tones “Release Tones” appear when a continuous tone signal(s) containing a (w) is registered in the contact list. Select “Release Tones”. ■ Release Tones ● A continuous tone signal is a character string that consists of numbers and the characters p or w. -
Page 73
3-2. Using the audio system To transfer a call Select “Handset Mode” to change from a hands-free call to a cellular phone call. Select “Handsfree Mode” to change from a cellular phone call to a hands-free call. Transmit volume setting STEP Select “Transmit Volume”. -
Page 74
3-2. Using the audio system ■ Transferring calls ● If you transfer from the cellular phone to hands-free, the hands-free screen will be displayed, and you can operate the system using the screen. ● Transfer method and operation may vary according to the cellular phone used. -
Page 75
3-2. Using the audio system ® Bluetooth phone message function Received messages can be forwarded from the connected ® Bluetooth phone, enabling checking and replying using the audio system. ® Depending on the type of Bluetooth phone connected, received messages may not be transferred to the message inbox. If the phone does not support the message function, this function cannot be used. -
Page 76
3-2. Using the audio system ■ Receiving a message ● Depending on the cellular phone used for receiving messages, or its reg- istration status with the audio system, some information may not be dis- played. ● The pop up screen is separately available for incoming e-mail and SMS/ MMS messages under the following conditions: E-mail: •… -
Page 77
3-2. Using the audio system Checking the messages STEP Display the message inbox screen. (→P. 323) STEP Select the desired message from the list. STEP Check that the message is displayed. E-mails: Select “Mark Unread” or “Mark Read” to mark mail unread or read on the mes- sage inbox screen. -
Page 78
3-2. Using the audio system ■ Check the messages ® ● Depending on the type of Bluetooth phone being connected, it may be necessary to perform additional steps on the phone. ● ® Messages are displayed in the appropriate connected Bluetooth phone’s registered mail address folder. -
Page 79
3-2. Using the audio system Calling the message sender Calls can be made to an e-mail/SMS/MMS message sender’s phone number. STEP Display the message inbox screen. (→P. 323) STEP Select the desired message. STEP Select STEP Check that the “Call” screen is displayed. ■… -
Page 80
3-2. Using the audio system Using the steering wheel switches The steering wheel switches can be used to operate a connected cel- lular phone. Operating a telephone using the steering wheel switches ■ Steering wheel switches on the right hand side Off hook switch •… -
Page 81
3-2. Using the audio system ® Bluetooth phone settings You can adjust the hands-free system to your desired settings. “Phone/Message Settings” screen To display the screen shown below, press the “SETUP” button, and select “Phone” on the “Setup” screen. Set the phone connection (→P. -
Page 82
3-2. Using the audio system Sound setting STEP Display the “Phone/Message Settings” screen. (→P. 329) STEP Select “Sound Settings” on the “Phone/Message Settings” screen. Set the desired ringtone. Adjust the ringtone volume. Adjust the message readout volume. desired incoming SMS/MMS tone. Adjust the incoming SMS/ MMS tone volume. -
Page 83
3-2. Using the audio system Contact/Call history settings ® The contact can be transferred from a Bluetooth phone to the sys- tem. The contact also can be added, edited and deleted. The call history can be deleted and contact and favorites can be changed. -
Page 84
3-2. Using the audio system Select to delete contacts from the contact list.* (→P. 336) Select reset setup items.* ® *: For PBAP compatible Bluetooth phones only, this function is avail- able when “Automatic Contact/ History Transfer” is set to off. (→P. -
Page 85
3-2. Using the audio system ■ ® For PBAP Incompatible but OPP compatible Bluetooth Phones STEP Select “Update Contacts from Phone”. ® STEP Transfer the contact data to the system using a Bluetooth phone. This operation may be unnecessary depending on the type of cellu- lar phone. -
Page 86
3-2. Using the audio system Registering a new contact to the contact list New contact data can be registered. Up to 4 numbers per person can ® be registered. For PBAP compatible Bluetooth phones, this function is available when “Automatic Contact/History Transfer” is set to off. (→P. -
Page 87
3-2. Using the audio system Editing the contact data ® For PBAP compatible Bluetooth phones, this function is available when “Automatic Contact/History Transfer” is set to off. (→P. 331) STEP Select “Edit Contact”. STEP Select the desired contact. STEP Select corresponding to the desired name or number. -
Page 88
3-2. Using the audio system Deleting the contact data ® For PBAP compatible Bluetooth phones, this function is available when “Automatic Contact/History Transfer” is set to off. (→P. 331) STEP Select “Delete Contacts”. STEP Select the desired contact and select “Delete”. STEP Select “Yes”… -
Page 89
3-2. Using the audio system When 15 contacts have already been registered to the favorites list STEP When 15 contacts have already been registered to the favor- ites list, a registered contact needs to be replaced. Select “Yes” when the confirmation screen appears to replace a contact. -
Page 90
3-2. Using the audio system ■ Deleting the contacts in the favorites list STEP Select “Remove Favorite”. STEP Select the desired contacts and select “Remove”. STEP Select “Yes” when the confirmation screen appears. STEP Check that a confirmation screen is displayed when the oper- ation is complete. -
Page 91
3-2. Using the audio system Message settings STEP Display the “Phone/Message Settings” screen. (→P. 329) STEP Select “Messaging Settings”. STEP Select the desired item to be set. Set automatic message trans- fer on/off. Set automatic message read- out on/off. Set the SMS/MMS notification popup on/off. -
Page 92
3-2. Using the audio system Change the incoming e-mail display. “Full Screen”: When an e-mail is received, the incoming e-mail dis- play screen is the displayed and can be operated on the screen. “Drop-Down”: When an e-mail is received, a message is displayed on the upper side of the screen. -
Page 93
3-2. Using the audio system Phone display settings STEP Display the “Phone/Message Settings” screen. (→P. 329) STEP Select “Phone Display Settings”. STEP Select the desired item to be set. Change the incoming call dis- play. “Full Screen”: When a call is received, the hands-free screen is displayed and can be operated on the screen. -
Page 94
→ For a list of specific devices which operation has been confirmed on this system, check with your Toyota dealer or the following website: http://www.toyota.com/entune.html The Bluetooth version of the connected cellular phone may be older than the specified version. -
Page 95
3-2. Using the audio system When registering/connecting a cellular phone A cellular phone cannot be registered. An incorrect passcode was entered on the cellular phone. → Enter the correct passcode on the cellular phone. The registration operation has not been completed on the cellular phone side. -
Page 96
→ For a list of specific devices which operation has been confirmed on this system, check with your Toyota dealer or the following website: http://www.toyota.com/entune.html Automatic phonebook transfer function on this system is set to off. -
Page 97
3-2. Using the audio system In other situations Even though all conceivable measures have been taken, the symptom status does not change. The cellular phone is not close enough to this system. → Bring the cellular phone closer to this system. The cellular phone is the most likely cause of the symptom. -
Page 98
3-2. Using the audio system ® Bluetooth ® ■ When using the Bluetooth audio system ● In the following conditions, the system may not function. • If the portable audio player is turned off • If the portable audio player is not connected •… -
Page 99
3-2. Using the audio system ® ■ Bluetooth antenna The antenna is built into the display. If the portable audio player is behind the seat or in the glove box or console box, or is touching or covered by metal objects, the connection status may deteriorate. -
Page 100
3-2. Using the audio system ■ Compatible models ® The Bluetooth audio system supports portable audio players with the fol- lowing specifications ● ® Bluetooth specifications: Ver. 2.0, or higher (Recommended: Ver. 3.0+EDR or higher) ● Profiles: • A2DP (Advanced Audio Distribution Profile) Ver. 1.0, or higher (Recommended: Ver. -
Page 101
3-2. Using the audio system ■ Reconnecting the portable audio player If the portable audio player is disconnected due to poor reception when the “POWER” switch is in ACCESSORY or ON mode, the system automatically reconnects the portable audio player. If you have switched off the portable audio player yourself, follow the instruc- tions below to reconnect: ●… -
Page 102
3-2. Using the audio system Voice command system The voice command system enables the hands-free system to be operated using voice commands. Operations of the voice command system can be performed by selecting the menu corresponding to each function on the screen. Even if any menu is selected, commands displayed on all menus can be operated. -
Page 103
3-2. Using the audio system ● Voice commands may not be recognized if: • Spoken too quickly. • Spoken at a low or high volume. • The roof or windows are open. • Passengers are talking while voice commands are spoken. •… -
Page 104
3-2. Using the audio system Command list Some recognizable voice commands and their actions are shown below as examples. Basic Command Action Prompts voice guidance to offer examples of com- “Help” mands or operation methods “Go Back” Returns to the previous screen Phone Command Action… -
Page 105
3-2. Using the audio system Rear view monitor system The rear view monitor system assists the driver by displaying guide lines and an image of the view behind the vehicle while backing up, for example while parking. The screen illustrations used in this text are intended as examples, and may differ from the image that is actually displayed on the screen. -
Page 106
3-2. Using the audio system Using the rear view monitor system ■ Screen description Vehicle width guide lines The line indicates a guide path when the vehicle is being backed straight The displayed width is wider than the actual vehicle width. Distance guide line The line shows distance behind the vehicle, a point approximately 3 ft. -
Page 107
3-2. Using the audio system Rear view monitor system precautions ■ Area displayed on screen The rear view monitor system displays an image of the view from the bumper of the rear area of the vehicle. To adjust the image on the rear view monitor… -
Page 108
3-2. Using the audio system ■ Rear view monitor system camera The camera for the rear view monitor system is located above the license plate. ● Using the camera If the camera lens becomes dirty, it cannot transmit a clear image. If water droplets, snow or mud adhere to the lens, rinse it with water and wipe with a soft cloth. -
Page 109
3-2. Using the audio system ● When the ground behind the vehicle slopes up sharply The distance guide lines will appear to be closer to the vehicle than actual distance. Because of this, objects will appear to be farther away than they actually are. -
Page 110
3-2. Using the audio system ● When any part of the vehicle sags When any part of the vehicle sags due to the number of pas- sengers or the distribution of the load, there is a margin of error between the fixed guide lines on the screen and the actual dis- tance/course on the road. -
Page 111
3-2. Using the audio system ■ Vehicle width guide lines Visually check the surroundings and the area behind the vehicle. In the case shown below, the truck appears to be outside of the vehi- cle width guide lines and the vehicle does not look as if it hits the truck. -
Page 112
If you notice any of the following symptoms, refer to the likely cause and the solution, and re-check. If the symptom is not resolved by the solution, have the vehicle inspected by your Toyota dealer. Likely cause Solution The image is difficult to see •… -
Page 113
Back up while visually ture, etc.) checking the vehicle’s surround- • The vehicle is used on an incline. ings. The camera position is out of align- Have the vehicle inspected by your ment. Toyota dealer. -
Page 114
3-2. Using the audio system CAUTION ■ When using the rear view monitor system The rear view monitor system is a supplemental device intended to assist the driver when backing up. When backing up, be sure to check visually behind and all around the vehicle before proceeding. Observe the following precautions to avoid an accident that could result in death or serious injuries. -
Page 115
● Do not expose the camera to strong impact as this could cause a malfunc- tion. If this happens, have the vehicle inspected by your Toyota dealer as soon as possible.
This manual is also suitable for:
Entune

18
Руководствошо эксплуатаций’
поверхности диска и оптических эле
ментов проигрывателя возможны сбои
при воспроизведении. После норма
лизации влажности работа системы
восстанавливается. При сильной виб
рации возможны искажения и переры
вы воспроизведения. Это не является
неисправностью. Не рекомендуется
оставлять диски на открытом солнце.
Оберегайте поверхность диска от ца
рапин.
Магнитола
Включение и выключение аудио~
системы
Аудиосистема включается нажатием
кнопки (2) «PWR» (включится система,
работавшая до последнего выключе
ния). Также кассетный проигрыватель
автоматически включается при встав
лении кассеты. При выталкивании
кассеты аудиосистема вернется в ис
ходное состояние — выключится или
перейдет в режим радио.
Регулировка громкости
Регулировка громкости производится
при выдвинутом положении регулято
ра (2) и его вращением.
Регулировка тембра и баланса
Регулировка осуществляется враще
нием кнопки (11). Переключение меж
ду параметрами регулировки осуще
ствляется нажатием кнопки (11)
«MODE». При этом на дисплее высве
чивается название параметра и уста
новленное значение:
BAL (баланс между правыми, и ле
выми динамиками) — от BALL7 до
BAL R7.
FAD (баланс между передними и
задними динамиками) — от FAD F7
A
o
FADR7.
BAS (тембр низких частот) — от
BAS -5 до BAS +5.
TRE (тембр высоких частот) — от
TRE-5 до TRE+5.
Радио
Радио включается нажатием на кнопку
(14) «AM FM». Повторным нажатием на
эту кнопку переключается диапазон
«AM» и «FM».
Настройка радиостанций
Нажимайте на кнопку (4) «AUTO-P» до
звукового сигнала (включится автома
тический поиск радиостанций). Поиск
остановится при нахождении устойчи
вого сигнала, При слабом сигнале, ес
ли автоматический поиск не фиксиру
ет настройку, нажмите на кнопку на
стройки еще раз (автоматический по
иск отключится) и настраивайте вруч
ную по одному шагу. При стереофони
ческом приеме на дисплее высвечи
вается индикатор «ST».
Программирование настроек
Настройки наиболее часто слушаемых
радиостанций можно занести в па
мять. Для этого настройтесь на нуж
ную радиостанцию, затем нажмите и
удерживайте одну из кнопок ( 5 — 1 0 ) до
появления звукового сигнала. Пере
ключение на настроенную радиостан
цию осуществляется кратким нажати
ем на нужную кнопку.
Примечание:
при
продолжительном
отсутствии
аккумуляторных
бата
рей память магнитолы стирается и
устанавливаются
заводские
на
стройки.
Быстрый просмотр записи
При нажатии на кнопку (3) «TUNE» про
игрывается выбранная запись по по
рядку. При повторном нажатии на кноп
ку проигрывается следующая запись.
«Любимая радиостанция»
Можно настроить наиболее часто
слушаемую радиостанцию на отдель
ную кнопку (13). При нажатии на дан
ную кнопку сразу включается выбран
ная станция, независимо от того, ка
кое устройство работало до этого.
Примечание:
на
новых
магнитолах
настроена волна 1620 кГц.
Настройка «любимой радиостанции»
Кнопками настройки настройтесь на
нужную радиостанцию, затем нажмите
и удерживайте кнопку (13) до появле
ния звукового сигнала.
Примечание: ео время приема радио
станции
с
дорожной
информацией
кнопки настройки и выбора радио
станций не действуют, Вначале не
обходимо выключить прием повтор
ным нажатием на кнопку (13),
Магнитофон
Переключение магнитолы в режим
магнитофона производится нажатием
кнопки (12) «ТАРЕ». При вставлении
кассеты магнитола автоматически
переходит в режим магнитофона.
Для извлечения кассеты нажмите
кнопку (16).
Перемотка
^
‘
Для перемотки каОс^тЫ^’нажмите кноп
ку (перемотка назад^,(0Д7,1Ш «вперед
(7)). Для остановка’ пфемо’гкй^нажми-
те кнопку перегЙЬтт^’^’иШрра^ на
кнопку (12) «ТАРЕ».
Система
При прослушивании кассет, записан
ных с использованием а^темы шумо
понижения DOLBY NR®, нажмите
кнопку (10).
Реверс
Изменение направления воспроизве
дения кассеты производится нажати
ем на кнопку (5).
Пропуск пустых мест
Эта функция предназначена для пе
ремотки пустых мест на кассете. Для
включения нажмите кнопку (9) «SKIP»,
Для отключения функции нажмите
кнопку еще раз.
Примечание:
работа
этой
функции
может быть неправильной, если:
— Пауза между записями составля
ет менее 15 секунд.
— Между записями есть посторон
ние звуки,
— Начало и конец записи не могут
быть четко определены.
Повтор записи
Для циклического воспроизведения
текущей записи нажмите кнопку (6)
«RPT». Для отключения повтора на
жмите кнопку еще раз.
Примечание: если между записями
пауза менее 3 секунд или сущест
вуют
посторонние
звуки,
работа
этой функции может быть непра
вильной.
Проигрыватель
компакт-дисков (CD — changer)
Переключение на режим проигрыва
теля компакт-дисков осуществляется
кнопкой (15) «CD».
Выбор диска
Выбор дисков осуществляется с по
мощью кнопок (9) (выбор диска С
большим номером) и (10) (выбор дис
ка с меньшим номером).
Выбор
записи и ускоренное
воспроизведение
Для ускоренного воспроизведения те
кущей дорожки нажмите И удерживай
те кнопку 4 i (назад) или > ►
(вперед). Перемотка остановится, ес
ли отпустить кнопку.
Распиновка автомагнитолы Тойота и индивидуальные схемы подключения

Распиновка автомагнитолы Тойота
Распиновка автомагнитолы Тойота практически ничем не отличается от схемы подключения остальных автомагнитол. На автомагнитолы Тойота распиновка представляет собой схему, состоящую из двух рядов разъемов.
В нашей статье будет рассказано, как подключать аппараты Тойота, что для этого нужно знать и как устанавливать автомагнитолы своими руками.
Несколько схем подключения

Распиновка разъемов toyota автомагнитол
Считается, что основной ошибкой при подключении автомагнитол Тойота является протягивание плюсового провода от прикуривателя. Это никоим образом не даст эффекта, так как упадет мощность головного аппарата в несколько раз (в этом несложно убедиться, если обратить внимание на мигающую подсветку во время работы аппарата на большой громкости).
Помимо этого, подключение автомагнитол Тойота через прикуриватель не устранит звуковые искажения, которые начнут появляться заметно раньше. С другой стороны, в некоторых случаях и такой вариант может рассматриваться, как пригодный для осуществления.
Идеальным вариантом подключения автомагнитол Тойота, впрочем как и всех остальных, является проведение основного питания от АКБ. Использовать желательно качественный провод (экономить на кабеле ни в коем случае не рекомендуется) и обязательно предохранитель, который надо поставить как можно ближе к аккумулятору.
Примечание. Отметим сразу, что у автомагнитол бывает не один, а два провода питания. Как правило, желтый отвечает за основное питание, красный – за управление (идет на замок).

Разъемы автомагнитол
Кроме этого, распиновка остальных проводов:
- Ч* – минусовой провод. Подключают, как правило, на кузов автомобиля, обеспечивая массу. Все же, рекомендуется специалистами соединить его с аккумулятором;
- С – провод, который отвечает за усилитель или активную антенну.
Помимо этого, автомагнитола еще наделена акустическими проводами (они идут на задние и передние динамики):
- Б, С-й – провода на фронтальную акустику;
- З, Ф – провода на тыловую акустику.
Ч – черный;
С – синий;
Б – белый;
С-й – серый;
З – зеленый;
Ф – фиолетовый.
Примечание. Надо еще знать, что каждая пара акустической проводки имеет в своем составе добавочные монотонный и минусовой провода. Последний часто маркируется черной полоской поверх основного цвета.
Подключение по схеме 1

Разъёмы для автомагнитол
Делаем так:
- Провода питания соединяем между собой;
- Подключаем их к АКБ.
Данная схема хороша тем, что осуществить ее просто. С другой стороны, она подходит только для автомагнитол с небольшим потреблением электроэнергии. Если по данной схеме подключить мощный аппарат, то всего за 2-3 дня в режиме сна автомагнитола полностью разрядит аккумулятор.
Схема подключения 2
Вот эта схема подойдет для любой мощной автомагнитолы:
- Провода питания соединяем между собой;
- Подключаем их к АКБ;
- Ставим дополнительно кнопку (она отвечает за включение и отключение аппарата).
Такая схема подразумевает ручное управление магнитолой, зато не собьются ни за что настройки и аккумулятор не сядет за пару дней.
Схема подключения 3

Разъем для автомагнитолы
Индивидуальная схема, подразумевающая следующее:
- Основной провод питания (желтый) подключаем к 12 В;
- Дополнительный (красный) подключаем к габаритным огням (через реле, обмотка которого связывается с лампочкой пепельницы).
Данная схема дает следующие преимущества:
- Аппарат включается одновременно с «габаритками» автоматически;
- Водитель никогда не забудет отключить габаритные огни и свет фар;
- Во время остановки можно будет без включения зажигания слушать музыку;
- Если поменять обычные лампочки «габариток» на светодиодные, потребление электроэнергии будет очень низким.
Существует еще множество схем подключения автомагнитол Тойота, таких как подключение через ACC или через сигнализацию. Как правило, они не так распространены и подойдут не для всех. В частности, подключение через ACC (замок) неудобен тем, что без ключа в замке аппарат функционировать не будет.
Подключение камеры согласно распиновке
Зная распиновку автомагнитолы, можно осуществить спокойно своими руками подключение камеры заднего вида. На примере популярного «тойотовского» аппарата Ca-Fi узнаем, как это сделать. Сам процесс делится на две части: собственно установка аппарата с подключением и соединение камеры заднего обзора.
Примечание. Установка и подключение монитора не отличается от инсталляции заводского головного устройства. Надо будет лишь поменять местами разъемы и все.
А вот подключение камеры может для некоторых вызвать затруднения.
Вот что нужно знать:
- Камера заднего вида на Тойота Прадо питается от 5В;
- Для ее подключения потребуется разъем от заводского монитора, который после установки новой магнитолы, остается свободным;
- Этот самый разъем 14-контактный. Но нам потребуется всего лишь два провода видео сигнала и сигнал задней передачи;
- Помимо этого, надо будет преобразовать напряжение с 12В на 5В.
Примечание. Преобразовать напряжение, значит, осуществить процесс посредством специального преобразователя, который продается в любом магазине.
Схема подключения камеры имеет свою распиновку. Вот как она выглядит.

Распиновка разъемов автомагнитол toyota
Схема расположена так, как будто на нее смотришь со стороны проводов. Фото в верхнем левом углу помещено для наглядности.
Итак, чтобы соединить камеру с автомагнитолой Тойота, надо в первую очередь связать вместе сигнал задней передачи и провод Reverse на Ca-Fi. Кроме того, надо будет поставить преобразователь и сделать тюльпан для передачи видеоданных.
Примечание. Это вовсе не означает, что придется в буквальном смысле делать все с нуля. Просто надо в том же магазине, где был приобретен преобразователь, купить скотчлоки (они помогут соединить провода между собой).
На фото ниже показано, как сращивать провода с помощью скотчлока.

Скотчлок и провода
Далее осуществляем следующее:
- Машину заводим;
- Включаем заднюю передачу;
- Поверяем, как все работает (на монитор установленной магнитолы должно идти изображение с камеры).
Таким образом, зная распиновку автомагнитол Тойота можно осуществлять подключение по любой из выбранных схем. В процессе работ крайне полезно посмотреть видео обзор.
Пошаговая инструкция из других источников также будет в помощь. Цена самостоятельной установки автомагнитолы заметно отличается от стоимости услуг специалистов, которая в несколько раз выше.
- Распечатать

Григорий с детства обожал машины, а в подростковом возрасте, когда самостоятельно подключил автомагнитолу в отцовской девятке, понял, что машины будут его работой, хобби, призванием.
Оцените статью:
- 5
- 4
- 3
- 2
- 1
(73 голоса, среднее: 4 из 5)
Поделитесь с друзьями!
Toyota Audio. Сервис мануалы штатных автомагнитол (pdf) — Руководства по уходу и эксплуатации штатных автомагнитол устанавливаемых на автомобилях Toyota. Техническая документация содержит описание характеристик, органов управления, разъемов, электрические схемы, включая печатные платы, список совместимого оборудования. Все руководства по штатным автомагнитолам Toyota представлены только на английском языке.
В архиве Toyota Audio. Сервис мануалы штатных автомагнитол (pdf) содержатся руководства для следующих моделей магнитол: CDS-1096, CDS-8017, CDS-9036, CN-TS0820, CN-TS0821, CN-TS0822, CN-TS0823, CN-TS0920, CN-TS09821, CN-TS0922, CN-TS0923, CN-TS6070, CN-TS6190, CN-TS6271, CR-LS7160, CR-LT1010, FH-M2017, KEH-8056, KEH-M1006, KEH-M1096, KEH-M2096, KEH-M2196, KEH-M8017, KEH-M8117, KEH-M8196, KEH-M8276, KEH-M8296.
Год выпуска: 2004
Формат: PDF
Качество: eBook (изначально компьютерное)

Ознакомьтесь с правилами эксплуатации вашего автомобиля Toyota, изучив электронную версию руководства.
На данной странице представлены следующие типы руководств:
- Общее руководство для владельца
- Руководство по мультимедиа и навигации
- Руководство по вождению в условиях бездорожья
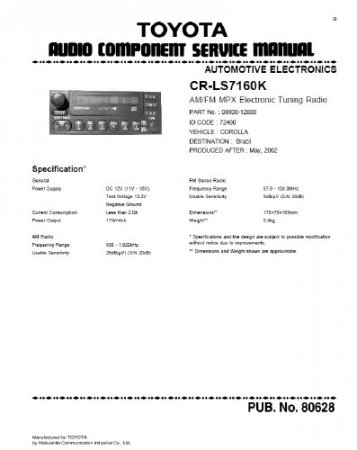
Сборник содержит оригинальные сервисные мануалы для штатных аудио систем автомобилей TOYOTA. Присутствуют электрические схемы, печатные платы, механические узлы и прочее.
Содержание сборника:
CDS-1096
CDS-8017
CDS-9036
CN-TS0820_CN-TS0821_CN-TS0822_CN-TS0823
CN-TS0920_CN-TS09821_CN-TS0922_CN-TS0923
CN-TS6070
CN-TS6190
CN-TS6271
CR-LS7160
CR-LT1010
FH-M2017
KEH-8056
KEH-M1006
KEH-M1096
KEH-M2096_KEH-M2196
KEH-M8017
KEH-M8117
KEH-M8196
KEH-M8276
KEH-M8296
размер: 50 мб
формат: pdf, программа для открытия PDF Скачать (Turbobit)
Внимание! У Вас нет прав для просмотра скрытого текста.
Сообщения без ответов | Активные темы
Руководства/сервис мануалы/инструкции по японским магнитолам
| Автор | Сообщение | ||
|---|---|---|---|
|
|||
Ваше имя: Михаил День рождения: 01.11.1982
|
За неимением мануалов на наши штатные магнитолы создаю универсальную тему, т.к. многие функции похожи, будем иметь хоть какую-то базу. Распиновка разъемов: Вложение: Распиновка NHZT.rar Распиновка Toyota voice navigation 16041 Вложение: Разъемы 16041.rar
У вас нет необходимых прав для просмотра вложений в этом сообщении. _________________ Хочешь поблагодарить, просто нажми кнопку «палец вверх» справа —> За это сообщение автора Grumbler поблагодарил: pashtat (08 авг 2018, 12:01)
Рейтинг: 1.2% |
||
| Вернуться к началу |
|
||


|
Yury |
Заголовок сообщения: Re: Руководства/сервис мануалы/инструкции по японским магнит
|
||
Ваше имя: Юрий День рождения: 01.11.1972
|
Мануал для навигации Toyota 56040
У вас нет необходимых прав для просмотра вложений в этом сообщении. _________________ |
||
| Вернуться к началу |
|
||


|
vaneks42 |
Заголовок сообщения: Re: Руководства/сервис мануалы/инструкции по японским магнит
|
||
Ваше имя: Иван День рождения: 27.12.1981
|
У меня от NHDT-W55 3 книжки новенькие, по моему их даже японец не открывал ). Что вот с ними делать… |
||
| Вернуться к началу |
|
||
|
Шнапс |
Заголовок сообщения: Re: Руководства/сервис мануалы/инструкции по японским магнит
|
||
Ваше имя: Сергей День рождения: 18.10.1958
|
Grumbler писал(а): будем иметь хоть какую-то базу. Хоть какая то уже есть…. viewtopic.php?p=30251#p30251 Содержание: _________________ |
||
| Вернуться к началу |
|
||


|
Grumbler |
Заголовок сообщения: Re: Руководства/сервис мануалы/инструкции по японским магнит
|
||
Ваше имя: Михаил День рождения: 01.11.1982
|
Шнапс, Ну извиняйте, не вылезло ничего по запросам _________________ Хочешь поблагодарить, просто нажми кнопку «палец вверх» справа —> |
||
| Вернуться к началу |
|
||

|
Grumbler |
Заголовок сообщения: Re: Руководства/сервис мануалы/инструкции по японским магнит
|
||
Ваше имя: Михаил День рождения: 01.11.1982
|
vaneks42, в идеале конечно отсканировать и в PDF выложить. Хотя бы веселые картинки будем разглядывать. _________________ Хочешь поблагодарить, просто нажми кнопку «палец вверх» справа —> |
||
| Вернуться к началу |
|
||
|
J-die |
Заголовок сообщения: Re: Руководства/сервис мануалы/инструкции по японским магнит
|
||
Ваше имя: Юрий День рождения: 05.10.1974
|
|||
| Вернуться к началу |
|
||
|
Шнапс |
Заголовок сообщения: Re: Руководства/сервис мануалы/инструкции по японским магнит
|
||
Ваше имя: Сергей День рождения: 18.10.1958
|
|||
| Вернуться к началу |
|
||
|
Шнапс |
|
||
Ваше имя: Сергей День рождения: 18.10.1958
|
|||
| Вернуться к началу |
|
||
|
Шнапс |
|
||
Ваше имя: Сергей День рождения: 18.10.1958
|
|||
| Вернуться к началу |
|
||
|
BudkoArt |
|
||
День рождения: 23.01.1987
|
Всем доброго дня. Кто нибудь менял штатную магнитолу NDKT-W52 на другую какую нибудь? Не могу найти «распиновку», чтобы понять какой провод и для чего, чтобы к новой магнитоле всё правильно подключить. |
||
| Вернуться к началу |
|
||

|
Шнапс |
|
||
Ваше имя: Сергей День рождения: 18.10.1958
|
|||
| Вернуться к началу |
|
||
|
Шнапс |
|
||
Ваше имя: Сергей День рождения: 18.10.1958
|
BudkoArt писал(а): к новой магнитоле всё правильно подключить. Покопайся в ссылках выше Тойотовская распиновка одинаковая Вложение: 34и6.jpg Если китайская потеха то лучше обратиться к медиасалону viewtopic.php?p=33069#p33069
У вас нет необходимых прав для просмотра вложений в этом сообщении. _________________ |
||
| Вернуться к началу |
|
||
|
BudkoArt |
|
||
День рождения: 23.01.1987
|
Спасибо большое |
||
| Вернуться к началу |
|
||
|
DVG |
|
||
Ваше имя: Владимир День рождения: 14.09.1974
|
Доброго времени суток! Помогите, пожалуйста. Взял на разборке магнитолу и не могу найти по ней информацию. |
||
| Вернуться к началу |
|
||
|
BudkoArt |
|
||
День рождения: 23.01.1987
|
Смотрите выше по картинке, разъемы по размеру и пинам почти все одинаковые, отличаются только их расположением на задней панели магнитолы. За это сообщение автора BudkoArt поблагодарил: DVG (13 апр 2019, 20:08) |
||
| Вернуться к началу |
|
||
|
Fox7735 |
|
||
Ваше имя: Леонид День рождения: 06.05.1986
|
А кто нибудь пытался русифицировать? |
||
| Вернуться к началу |
|
||
|
Бэликто |
|
||
Ваше имя: Бэликто День рождения: 29.07.1977
|
Fox7735, Пробовал, ну так, искал разные версии русификации, но там много заморочек, вопрос по поколению магнитолы, и фирме изготовителе оборудования навигации, насколько я понял. Если что https://navigps.org/ там выкладывается (за деньги разумеется) образы дисков руссификации и навигации по России. |
||
| Вернуться к началу |
|
||
| Похожие темы | Автор | Ответы | Просмотры | Последнее сообщение | ||
|---|---|---|---|---|---|---|
|
|
Инструкции на авто сигнализации и охранные системы
в форуме Автозвук и электроника |
Yury |
8 |
13833 |
09 янв 2015, 12:11 vaneks42 |
|
|
Инструкции, книги по Toyota Wish
в форуме Справочная информация |
Yury |
9 |
15002 |
28 окт 2015, 10:12 DEPESHE |
||
|
Доливка антифриза (смешивание с японским)
в форуме Вопросы текущей эксплуатации |
ЕВГЕНЬЕВИЧ |
11 |
4574 |
30 мар 2016, 22:32 voxeg |
Кто сейчас на конференции |
|
Сейчас этот форум просматривают: нет зарегистрированных пользователей и гости: 0 |
| Вы не можете начинать темы Вы не можете отвечать на сообщения Вы не можете редактировать свои сообщения Вы не можете удалять свои сообщения Вы не можете добавлять вложения |