Неофициальное руководство по эксплуатации скутеретты Супер Каб. Здесь собраны официальные инструкции, опыт сообщества и личные рекомендации. На странице есть самые ходовые артикулы запчастей из каталогов, к ним добавлены известные аналоги, и указаны ссылки на магазины, где можно купить запчасти. Если сомневаетесь в написанном, обращайтесь к выложенным здесь же первоисточникам на японском и английском: каталогам и инструкциям.
Этот материал про обслуживание и использование. Если вы хотите познакомиться с моделью, разобраться какие бывают и как улучшат вашу жизнь — посмотрите материал по существующим версиям Каба, как их выбрать и где купить.
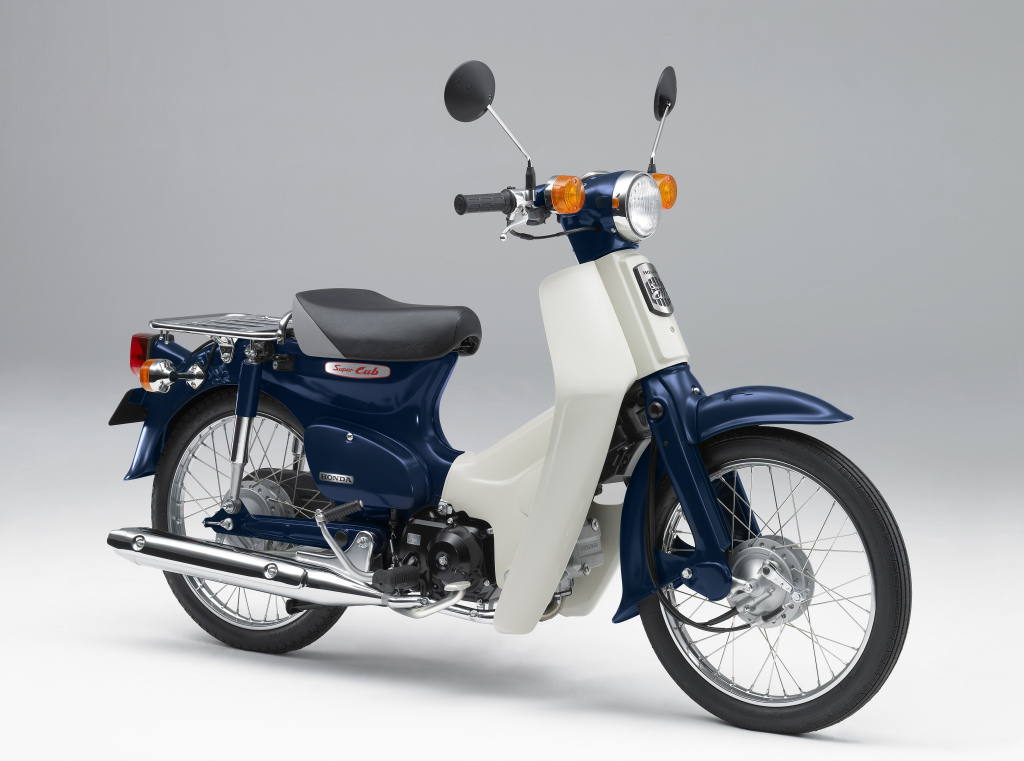
Самая многочисленная версия Каба 50сс, производилась в таком виде с 1982 по 2011 год
Эта база знаний охватывает Кабы, которые производились до 2011 года включительно и наиболее популярны в России. Номера рам: C50, C70, C90, AA01, HA02, инжекторные и карбюраторные. Отдельно есть база знаний AA04, JA10 с 2012 года.
Как узнать год выпуска
Для того, чтобы узнать год выпуска, нужно найти номер рамы или наклейку под сидушкой. Затем воспользуйтесь двумя основными материалами для определения года выпуска: по номеру рамы и по наклейке под сидушкой.
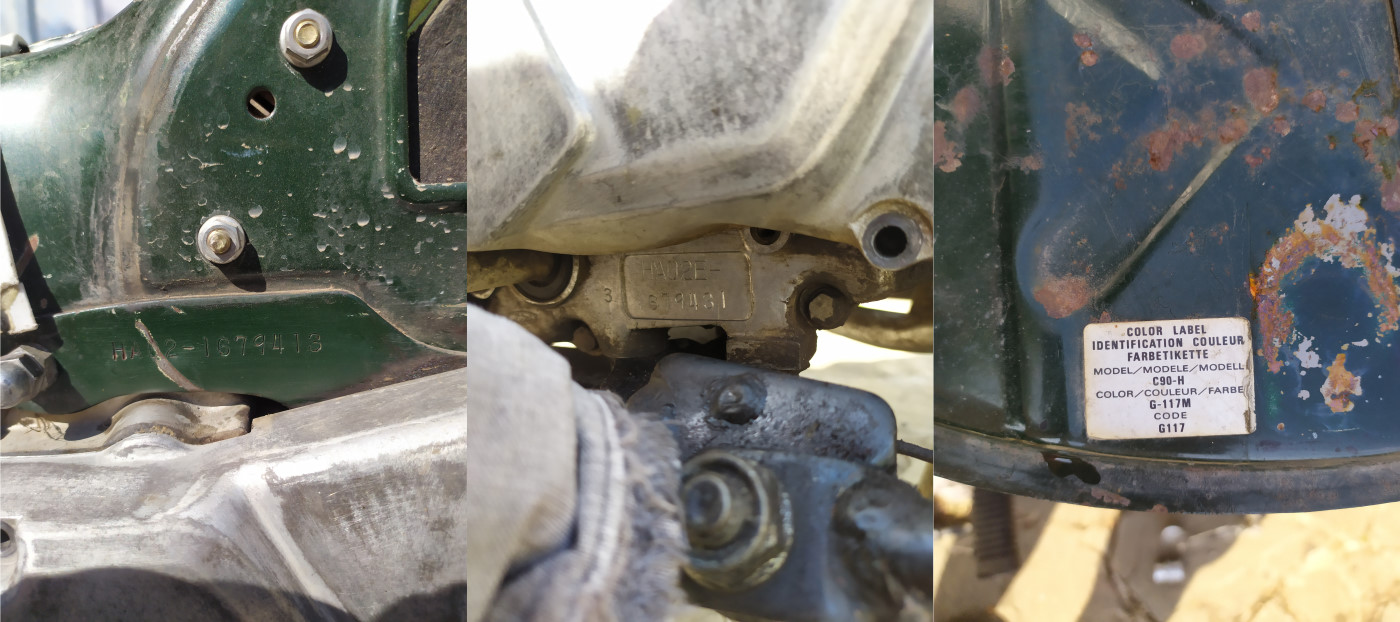
Слева направо: номер рамы под левой пластиковой крышкой, номер двигателя под левой крышкой двигателя, наклейка под сиденьем
На примере фотографии: возьмём номер рамы и откроем первый материал — номер рамы попадает в период между 1986 и 1991 годами. Воспользуемся наклейкой под сиденьем и вторым материалом и там будет понятно, что C90-H — 1987 года выпуска. Это самые достоверные данные о годе, после которых можно посмотреть на другие отметки разве из интереса: гравировка даты под пультом, на дисках и совсем редко на дату на резине.
Как пользоваться полуавтоматической коробкой
Не все сразу начинают пользоваться полуавтоматом так, как будто ездили на нём всю жизнь. Кажется, что передачи переключаются жестковато, с покачиванием мотоциклиста. Всё становится плавнее в процессе — накатанность влияет на ощущения от коробки. Для начала отрегулируйте сцепление, чтобы исключить плохие ощущения от неправильной настройки — видео-инструкция в конце раздела.
Переключать передачи: вниз давите четко, отпускаете плавно. Передачи можно переключить по кругу 1 → 2 → 3 → остановка → Нейтраль. Остановка нужна, потому что на коробке есть блокировка от случайного переключения передачи с третьей на нейтраль — работает в движении, позволяет переключиться только после полной остановки. На почтовике такой блокировки нет и остановка необязательна, там схема 1 → 2 → 3 → Нейтраль.
При переключении вверх 1 → 2 → 3 — газ нужно сбросить и переключить. При переключении вниз 3 → 2 → 1 — газ можно поддать или просто производить переключение на скорости 15—20 км/ч с третьей на вторую, до 10 км/ч со второй на первую. Сразу это может быть невпопад, со временем всё получится.
Чтобы удобнее переключать пяткой — можно поменять положение лапки КПП и поставить заднюю часть повыше, переднюю опустить. Можно поменять рычаг КПП на мотоциклетный и производить переключение носком. Довольно распространенный вариант: переставлять носок с передней на заднюю часть. Автор этой заметки ездит так постоянно и даже не пытается переключиться пяткой.
Отрегулируйте положение лапки, чтобы переключать пяткой или просто переставляйте носок
Если мопед набирает обороты, но не ускоряется — это проскальзывание сцепления. Начните с замены масла на подходящее — это я описал в следующем разделе. Если замена масла не помогла, то пора менять фрикционные диски сцепления.
Фрикционные диски сцепления комплект 3 шт, подходят для Кабов до 2011 года:
EBC CK1148
Ferodo FCD0107
Newfren F1639
TRW MCC101-3
Vesrah VC-148
Какое масло использовать
Параметры масла из официальной инструкции: SAE 10W-30, 10W-40, 15W-50, допуск JASO MA
Масло в Кабе работает одновременно в двигателе и в коробке передач — такая система называется «мокрое сцепление». В японских инструкциях для Кабов всех годов указано масло 10W-30 с допуском JASO MA для «мокрого сцепления». В американской инструкции есть привязка к температуре окружающей среды: до 35°C 10W-30, а при температуре до 45°C уже 10W-40.
Помимо температуры окружающей среды учитывайте ваши условия эксплуатации — вязкость в инструкции указана для случая, когда вы придерживаетесь разрешенных для Японии 35 км/ч и не насилуете его на бездорожье. Залить масло с другой вязкостью и раньше положенного интервала не страшно.
Вязкость в зависимости от условий эксплуатации
10W—30 — используйте масло с такой вязкостью, если вы ездите в спокойной режиме до 35 км/ч, без раскрутки ручки газа на полную.
10W—40 — стандартная вязкость для большинства ситуаций: город, в том числе с пробками, передвижение по грунту с редкими пробуксовками. Можно позволить периодические раскрутки в отсечку.
15W—50 — заливайте это масло в дальнее путешествие, когда ручка газа будет постоянно открыта на полную. Также, такая вязкость пригодится при внедорожных передвижениях с частыми пробуксовками и со слабым охлаждением двигателя.
Ничего страшного, если зальёте остатки автомобильного масла 5W-30, 5W-40, ещё ни один Каб не умер от свежего автомобильного масла. Правда, может проскальзывать сцепление и тогда лучше найти другой вариант. Если на полке есть выбор, посмотрите масло от дизельных грузовиков — в нём крепкие базовые масла, и рецептура часто выполняет стандарт JASO MA, но это никак не заявляется.
В подборке указаны масла, которые чем-то лучше, чем-то хуже, но двигатель будет работать нормально с любым.
Мотомасла 10W-40 допуск JASO MA
| Марка масла | Стоимость | Артикул |
| Eni i-Ride 10W-40, 1 л | ≈350 ₽ | ENIIRIDEMOTO10W401 |
| Zic M9 4Т 10W-40, 1 л | ≈400-450 ₽ | 137210 |
| Eurol Motorcycle 10W-40, 1 л | ≈450-500 ₽ | E1000971L |
| Castrol Power1 10W-40, 1 л | ≈600 ₽ | 15688B |
| Motul 5100 10W-40, 1 л | ≈600-750 ₽ | 104066 |
Как поменять масло, сколько, как часто
Интервал замены масла в официальной инструкции — 3000 км.
Масляного фильтра в Кабе этого поколения нет.
Официальная инструкция подразумевает, что и пользоваться вы будете «официально»: не ездить больше 35 км/ч, никакого бездорожья и пассажиров на 50 кубах. К цифре 3000 км стоит относиться как к ориентиру и по мере усложнения условий эксплуатации уменьшайте этот интервал.
Если меняете масло впервые после покупки, купите недорогое масло, прокатитесь на нём 100—200 км и слейте. Так вы промоете картер после неизвестного масла с неизвестными интервалами замены за лишних 200 ₽. В тяжелых случаях можно повторить. Если вы сливаете черное масло — оно необязательно плохое, наоборот, масло хорошо отмывало двигатель.
Обычно объём масла указан на этикетке на правой крышке двигателя. Меньшее значение — объём сливаемого масла, большее — общий объём картера. Если превысить максимальный объём, есть шанс продавить сальники.

На примере этой этикетки: объём сливаемого масла 600 мл, объём картера 800 мл
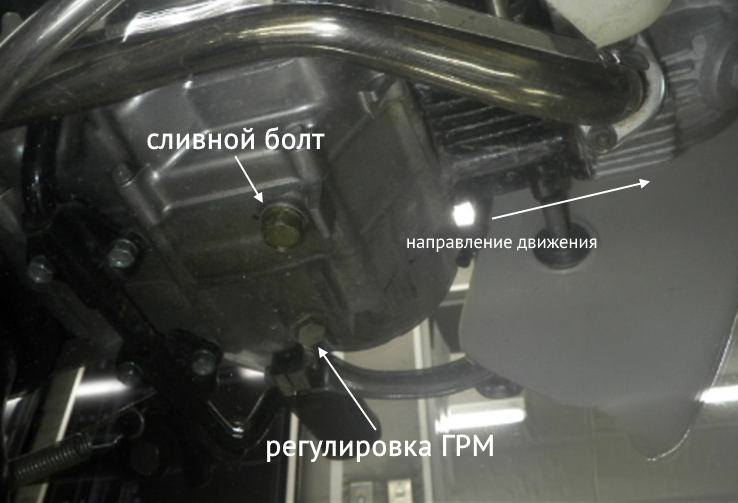
Внизу на картере есть два болта, похожих на сливную пробку. Для замены масла вам нужна правая по ходу движения.
Действия при замене масла
- Прогрейте картер небольшой поездкой
- Поставьте Каб на центральную подножку
- Открутите заливную пробку
- Подставьте емкость под картер, открутите сливную пробку — она справа по ходу движения, для неё подходит ключ 17 мм
- Понаклоняйте Каб в разные стороны, например за багажник
- Очистите тряпкой сливную дырку и закрутите болт с шайбой
- Залейте 600 мл, а затем смотрите уровень по щупу.
- Посмотрите уровень — вставьте пробку, не закручивая.
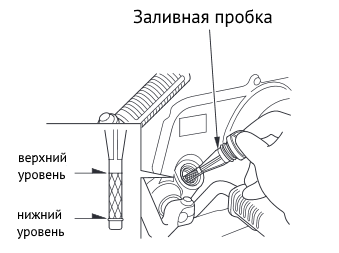
«Вафля» на щупе часто ломается — протирайте аккуратно
Как поменять масло в Кабе на видео
Воздушные фильтры
Интервал замены воздушного фильтра в официальной инструкции — 10 000 км.
Фильтр можно обслужить, это предусмотрено инструкцией — продуйте изнутри сжатым воздухом, снаружи пылесосом — это позволит выиграть время, пока придёт новый фильтр. Подразумевается, что такое обслуживание будет в рамках 10 000 км.
Артикулы воздушных фильтров
| Фильтр | Артикул | Где искать |
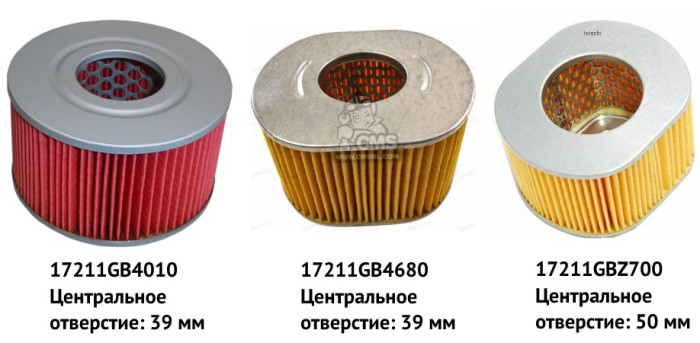
| Диаметр отверстия 39 мм, большой корпус | 17211GB4010, Hiflo HFA1002, NTB | Легко найти неоригинальный Hiflo HFA1002 поиском в Яндексе |
| Диаметр отверстия 39 мм, до 2000 года | 17211GB4680, NTB | Япония → Емекс, ZZap → Поиск в Яндексе |
| Диаметр отверстия 50 мм, 2000—2012 год, включая инжекторы | 17211GBZ700, NTB, размеры | Япония → Емекс, ZZap → Поиск в Яндексе |
Свечи
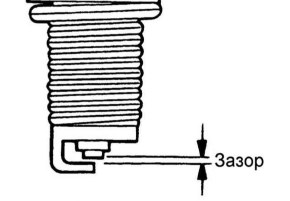
По свече нет указаний замены в километрах, ориентируйтесь на внешний вид и зазор. Оставляйте старую в запасе, на случай если с новой какие-то проблемы. Используйте C6HSA при прохладном межсезонье, C7HSA при полноценном теплом сезоне.

Заводские параметры свечей
| Год мопеда | Артикул свечи | Зазор, не больше |
| До 2007 | NGK C6HSA, C7HSA, Denso U22FS-U | 0,6—0,7 мм |
| Инжектор 2007—2011 | NGK CR6HSA, CR7HSA, Denso U22FSR-U | 0,6—0,7 мм |
Карбюратор
В карбюраторе большой простор для обслуживания. Чаще всего хватает простой разборки, чистки, настройки карбюратора, чтобы всё работало как надо. На случай, если всё плохо — ремкомплект можно купить на Webike или от Альфы, но оттуда не всё подходит.
С завода настроить можно не все карбюраторы, на некоторых Кабах нет засечки под отвёртку — тогда нужно сделать засечку под шлиц самостоятельно. Затем поиграться с винтами так, чтобы реакция на ручку газа была мгновенной в обе стороны — открытия и закрытия. Правильность настройки подскажет свеча после работы мотора — она не должна быть в чёрном налете, в таком случае карбюратор богатит, или в белом — значит, что смесь бедная.
Размеры карбюраторов
| Модель | Размер диффузора |
| C50 | 14 мм |
| С70 | — |
| С90 | 16—19 мм, зависит от года |
Видео как разобрать и почистить карбюратор
Какой бензин заливать? Какой расход?
И карбюратор, и инжектор с одинаковой степенью сжатия и им подходит бензин с октановым числом не ниже 90. Чем выше октановое число, тем выше температура горения, и отложений в двигателе остаётся меньше. Ещё от высокооктанового бензина можно ощутить увеличение мощности и снижение расхода, правда, на уровне погрешности. Можно постоянно ездить на любом одном, а можно чередовать заливку АИ92 и АИ95 — ориентируйтесь на местные заправки и своё чувство прекрасного.
Объем топливного бака
| карбюраторные | 4.3 литра |
| инжекторные 2007—2011 года | 3.4 литра |
Стандартный расход
| Модель | Расход |
| С50 карбюраторный | 1.8—1.9л/100 км |
| С50 инжекторный | 1.6 л/100 км |
| С90 карбюраторный | 2.2—2.6л/100 км |
Цепи и звезды
Стандартные параметры звезд
| Модель | Ведущая звезда | Ведомая звезда | Шаг и звенья цепи |
| AA01, C50 | 13 | 39 | 420, 98 звеньев |
| Почтовик, C50 | 13 | 42 | 420, 100 звеньев |
| Литл Каб, C50 | — | — | — |
| Кастом Каб, C50 | 13 | 42 | 420, 100 звеньев |
| HA02, C90 | 15 | 39 | 420, 98 звеньев |
Также продаётся и помещается комплект звезд и цепи с размером 428 — у него выше ресурс, но при этом увеличивается вес комплекта и нагрузка на двигатель возрастает. Менять звезды почаще или больше нагружать двигатель — выбор за вами. Чтобы поменять размер на 428 или на 420, нужно менять весь комплект звезд и цепи.
Ведущая звезда немного болтается на валу — это нормально.
Чтобы сделать максимальную скорость чуть больше, обороты меньше, передачи подлиннее — поставьте ведущую звездочку на зуб больше или ведомую на несколько зубов поменьше, например 14×39 на Супер Кабе; 14×42 на почтовике, 16×39 на С90. Большинство кабоводов говорят о положительных изменениях в движении при такой небольшой замене.
Соотношение передаточных чисел
| Зубья | 13 | 14 | 15 | 16 | 17 |
| 36 | 2.77 | 2.57 | 2.40 | 2.25 | 2.12 |
| 38 | 2.92 | 2.71 | 2.53 | 2.38 | 2.24 |
| 39 | 3.00 | 2.79 | 2.60 | 2.44 | 2.29 |
| 40 | 3.08 | 2.86 | 2.67 | 2.50 | 2.35 |
| 41 | 3.15 | 2.93 | 2.73 | 2.56 | 2.41 |
| 42 | 3.23 | 3.00 | 2.80 | 2.62 | 2.47 |
В России для Каба существует большой выбор цепей и звезд. Например, комплекты от китайской Альфы, которые можно купить в любой ближайшей мопедной лавочке. Если ездите немного и не быстро, то подойдёт и такой, будет служить несколько лет в режиме 500—1000 км в сезон. Нюанс: к китайским звёздам не подходит японский замок звезды — они не совпадают по посадочным размерам. Смотрите, чтобы в комплекте был китайский замок или купите отдельно.
Есть более качественные варианты: например звезды AFAM или JT, в сочетании с цепью D.I.D. или EK — такие комплекты стоят дороже, но и ресурс у них выше. Это ваш вариант, если ездите постоянно и хотите поменьше заниматься подтяжкой цепи.
В зависимости от качества комплекта, смазки и натяжки цепи, комплект будет служить 5000 км (самый ужасный китай) — 15000 км (JT + D.I.D.).
Артикулы цепей и звезд, ссылки на магазины
Цепь DID 420D, 100 звеньев — 420D100
Цепь DID 420D, 106 звеньев — 420D106
Цепь DID 420NZ3, 106 звеньев — 420NZ3106
Официальный дилер D.I.D
Ведущая звезда 13 зубьев — 23800GB4000, JT JTF253.13, AFAM 20101-13, NTB, тайваньская SFR
Ведущая звезда 14 зубьев — 23800040010, JT JTF253.14, AFAM 20101-14, NTB, тайваньская SFR
Ведущая звезда 15 зубьев — 23801179700, JT JTF253.15, AFAM 20101-15, NTB, тайваньская SFR
Ведущая звезда 16 зубьев — JT JTF253.16, AFAM 20101-16, тайваньская SFR
Ведомая звезда 36 зубьев — 41201GB5810, AFAM 10105-36, JTR257.36, размер
Ведомая звезда 39 зубьев — 41201GT0750, JTR211.39, Китако, размер
Ведомая звезда 40 зубьев — JTR257.40, размер
Особняком стоит задняя звезда для почтовика — у неё нестандартное центральное отверстие и звезды от Альфы не подойдут. Поиск аналогов от других мотоциклов пока не дал результатов, но в России в продаже есть звезда JT специально для почтовика.
Ведомая звезда почтовика 42 зуба — 41201GBJ740, JTR120342, Китако, размер
Как обслуживать цепь и звезды на Кабе
Интервал для смазки и натяжки цепи в официальной инструкции — 500 км.
На Кабе цепь без резиновых сальников — такую можно спокойно промыть в бензине или в любой другой химии, которая оказалась под рукой. Дайте цепи просушиться до того, как будете смазывать. После смазки тоже подождите 5—15 минут до того, как трогаться.
Чтобы звезды и сама цепь изнашивались меньше — следите за натяжкой. Проверяйте натяжку в окошке кожуха цепи — если упала ниже визуального центра отверстия, то пора доставать инструменты и натянуть.
Если преимущественно ездите по ровному асфальту, то натяните так, чтобы цепь отклонялась вверх в окне кожуха не больше чем на 1 сантиметр, а если по бездорожью то на 2 сантиметра. Добавляйте к этому полсантиметра, если весите 100+ килограмм.
Видео как натянуть цепь
Видео как заменить цепь
Какую резину ставить и какое давление
Заводские размеры покрышек
| Модель | Переднее колесо | Заднее колесо |
| C50 | 2.25-17 | 2.25-17 |
| С70 | 2.25-17 | 2.50-17 |
| С90 | 2.50-17 | 2.50-17 |
Заводские параметры давления покрышек
| Колесо | Обычный Каб | Почтовик |
| Переднее колесо | 1.75 атм | 2.0 атм |
| Заднее колесо | 2.0 атм | 2.25 атм |
При подборе нужно обращать внимание на размер в сочетании с шашками. Переднее крыло может вместить покрышку 2.50-17 или 70/100-17 с любыми шашками, а 2.75 подбирайте с шашками поскромнее или без них. Назад можно поставить 2.75 с любыми шашками, а 3.00 со скромными или без них.
Есть нюанс, что игра с размерами упирается в мощность Супер Каба С50 — крутить колёса больше 2.50 ему будет достаточно тяжело. Чтобы компенсировать тяжесть колёс 2.75 — поставьте ведущую звезду на один зуб меньше или ведомую на несколько зубов больше. С90 этому подвержен меньше, он спокойно переварит 2.75 на двух осях.
Модели шин, которые можно найти в России
R17
· Петрошина передняя Л358, задняя Л359, внедорожная Л263
· Kenda дорожная K422, смешанные покрытия K761
· Duro смешанные покрытия HF307, внедорожная HF333
· Mitas дорожная MC11, смешанные покрытия MC51, внедорожная C-19 Магазин Митас
· Metzeler дорожная ME22 Мосавтошина
· IRC дорожная NR6, смешанные покрытия TR1, внедорожная GP1
· Pirelli City Demon
· Michelin City Pro Мосавтошина
R14
· Wanda P2005 — адекватный размер и можно представить, что это резина для турэндуро, а не для пит-байка
Присылайте ссылки в комментарии.
Камеры
· Камера IRC — хорошая базовая камера
· Усиленная камера IRC — в ней есть смысл, только если постоянно ездите по бездорожью или с двойкой
· Ободные ленты
Отзывы о покрышках для Honda Super Cub
При замене покрышки — киньте её на солнце или нагрейте её борт феном и используйте шиномонтажную пасту, так меньше шансов погнуть обод. При использовании воды и мыла колпачки спиц начинают ржаветь.
Видео как снять заднее колесо
Видео как поменять покрышку
Лампочки
Обычно нет никаких проблем подобрать в живую. Но бывает, в наличии нет, а что это вообще за цоколь — неизвестно. По ссылкам поисковые запросы, в которых можно сравнить внешний вид ламп и по артикулу из примера заказать.
| Расположение | Маркировка | Пример |
| Ближний/дальний | 12V 30/30W P15D25-1 | Koito 0411, Osram 62377 |
| Поворотники | 12V 10W T13 или 12V R10W BA15s | Stanley WB001 или Osram 5008 |
| Стоп/габарит | 12V 18/5W T20 или 12V 18/5W BA15d | Stanley W7874 или ставьте 21/5W |
| Подсветка спидометра | 12V 2W BA7s | Bosch 1987302224 |
| Подсветка нейтрали и поворотников | 12V 1.7W T10 | Koito 1589 |
Опыт установки LED лампы в головной свет
Видео как заменить лампочку головного света
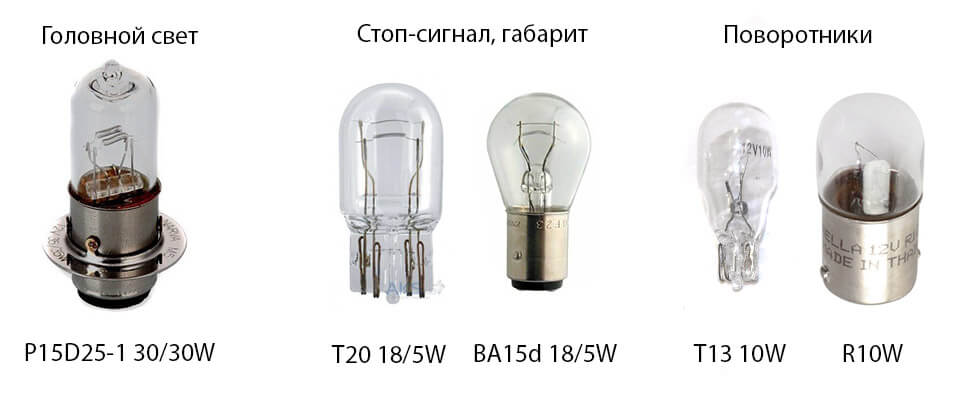
Внешний вид лампочек. Для стоп-сигнала, габарита и поворотников используются два типа, сравнивайте
Тормоза
Колодки и барабан ходят долго. Если у вас стертые накладки на тормозном барабане — это признак большого пробега у мопеда. Порой, вне зависимости от остатка фрикциона на колодке или барабане, их нужно заменить по старости/дубовости и наслаждаться новым качеством торможения.
Чтобы улучшить торможение без замены колодок — просто почистите тормозную пыль, которая скапливается внутри барабана, а также смажьте тормозной палец. Видео как снять колесо в разделе покрышек. Ещё не забудьте обслужить тросик тормоза — залейте в него универсальной не густой смазки, или замените.
Колодки для стандартного барабана
Honda 06450121730
DP Brakes 9126
EBC 303
Ferodo FSB704 ≈800 ₽
Galfer MF002 ≈950 ₽
Lucas/TRW MCS800
Newfren GF1043
Vesrah VB-101
Колодки для увеличенного барабана
Эти колодки на задний барабан почтовика и передний барабан С90 с 2001 года.
06430-GBJ-K10
Трос переднего тормоза — 45450GBJ830
Видео как заменить тормозные колодки
Аккумулятор
Аккумулятор во всех Кабах — YTX4L-BS, 3 а/ч.
Производитель заводского аккумулятора — Yuasa
От аккумулятора работают: стоп-сигнал, поворотники, лампа нейтрали и поворотников, гудок, а инжекторный мопед подаёт топливо для запуска.
В России легко найти аккумуляторы известных брендов, с ними всё стабильно: Exide, Bosch, Varta. Ещё ставили такие: Moratti (норм), Delta CT1204 (50/50), Red energy (не очень).
Видео как заменить аккумулятор
Передняя подвеска
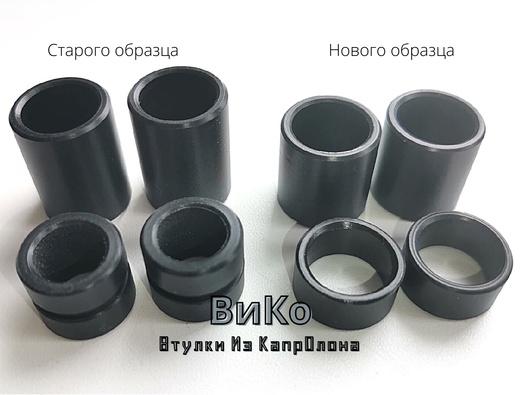
Больная тема рычажной подвески в Кабе — переднее колесо наклоняется в сторону при торможении. Так происходит, когда изношены втулки. После замены капролоновых втулок пропадает расхлябанность и колесо не подламывает в сторону.
Существует два вида втулок: для рычагов нового образца без тавотниц и пресс масленки, а также для редко встречающихся рычагов старого образца — с пресс масленками для заливки смазки. Почти у всех — рычаги нового образца, соответственно и нужно взять втулки для нового образца. Если у вас на рычагах есть пресс масленки — берите втулки для рычагов старого образца.
Заказать комплект втулок из капролона с доставкой по России
Изнашиваются не только капролоновые, но и металлические втулки — появляются люфты и скрипы. Совсем правильно будет заменить и все остальное. Полный комплект для замены передней подвески в обычном Кабе с осью 10 мм и с рычагами без пресс масленок:
Расходники для верхнего крепления амортизатора
51489086000 ×2 сайлентблоки
51486086000 ×2 втулки
Расходники для нижнего рычага
91311PH7003 ×8 о-ринги
51336001000 ×4 металлические колпачки
51333001000 ×4 металлические колпачки
51334GK4970 ×2 втулки
51331GK4970 ×2 втулки
51312GK4971 ×2 втулки
51311GK4971 ×2 втулки
Помимо втулок ещё можно обслужить передние амортизаторы и заменить в них пружины — со временем они проседают. Для этого потребуются новые пружины, немного инструментов, терпения и кропотливо подготовленная инструкция из сообщества.
Длина заводских передних амортизаторо — 210 мм.
Задняя подвеска
Длина заводских задних амортизаторов — 330 мм.
Чтобы немного повысить клиренс, можно поставить амортизаторы длиной 340 мм без переделок. При амортизаторах длиннее нужно будет проставлять глушитель.
Чтобы сделать амортизаторы пожестче, например для тяжелых грузов или для пассажира — поставить китайские амортизаторы. Обычно, они жестче.
Чтобы не менять сами амортизаторы, можно поменять изношенные составные части:
Пружины задних амортизаторов — 52401GB4681
Демпферы задних амортизаторов — 52410GK4971
Сальники
Размеры сальников
· сальник кикстартера 13.8×24×5 мм
· сальник лапки кпп 11.6×24×10 мм
· сальник вторичного вала 17×29×5 мм
· o-ring регулировки сцепления 8×1.7 мм
· o-ring левой крышки коленвала 107×2 мм
· o-ring винтов левой крышки коленвала 6×1.7 мм
· сальник коленвала 18.9×30×5 мм
· сальник задней ступицы 27×40×6 мм
· сальник задней ступицы 30×47×8 мм для почтовика
· сальник переднего барабана внутренний 47×60×7 мм
· сальник переднего барабана внешний 21×35×7 мм
· o-ring переднего рычага 13.8×2.4 мм
В каждой мопедной лавочке сальники продаются комплектами от 139FMB, но можно поискать покачественнее. Например, поиском в Яндексе или Гугле по размеру сальника.
Большой набор сальников для Каба
Набор из трёх сальников Takegawa
Набор китайских сальников
Подшипники
Переднего колеса, 2 штуки — 63002RS или 6300LLU
Заднего колеса, 2 штуки — 63012RS или 6301LLU
Задний ступичный, 1 штука — 6203Z
Заднего колеса почтовика — 6202Z
Задний ступичный почтовика — ???
Как расшифровать цифры и буквы на подшипнике
6300 — размер подшипника;
2RS и LLU — наличие резинового уплотнения
Крутые производители подшипников: NTN/SNR, Koyo, NSK, SKF.
Можно найти поиском по размеру в Яндексе или Гугле, а также по размеру подшипника в магазинах запчастей типа Emex. Китайские от альфы тоже есть, но не советую.
Другое
Демпферы колеса комплект — 06410-GBJ-J01, NTB
Демпферы колеса комплект почтовик — 06410-GBJ-J40, NTB
Трос газа (82 см)— 17910GB4771, NTB
Трос переднего тормоза (125 см) — 45450GBJ830; NTB; китайский, подходит на троечку с плюсом
Трос спидометра затягивающийся винтом (98 см) — 44830GBJ000; NTB
Трос спидометра накручивающийся по резьбе — 44830GB4680; ((https://www.webike.com.ru/products/20576843.html NTB)
Трос подсоса карбюратора (75 см) —
Стоп-сигнал Madmax за недорого https://japan.webike.net/products/20365912.html
Бензошланг Gates с тканевой оплеткой 5мм, 1 метр — 4324-10055
Паронитовый лист, 0.5мм 500х500мм — VSK00061735
Замок зажигания для карбюраторных Кабов подходит от Irbis TTR125. Для инжекторных Кабов нужна перепайка.
Ролик ГРМ KAYO большой 020012-004-8998
Ролик ГРМ KAYO зубчатый малый 020012-004-3572
Цепь ГРМ 82 звена (до 72 кубов) SFR 010136-909-5825
Цепь ГРМ 84 звена (от 90 до 110 кубов) SFR 010136-909-9539
Совместимость запчастей от Альфы, Дельты
Для таблиц использованы известные мне запчасти, которые можно повсеместно найти в интернет-магазинах. Используйте эти таблицы для сужения поиска, но не как истину. Вариантов китайских запчастей много, могу чего-то не учесть. Примерить вживую всегда надёжнее.
Двигатель
Индексы моторов Альфы, от которых подходят запчасти карбюраторному двигателю:
139FMB (50 сс),
147FMH (70—90 сс),
152FMH (110 cc).
Для инжекторных моторов от Альфы не подходит почти ничего.
| Деталь | Инжекторный Каб | Карбюраторный Каб | Нюансы |
| Коленвал | − | ?? | |
| Шатун | − | + | |
| Цилиндр | − | + | |
| Поршень | − | + | |
| Поршневые кольца | − | + | |
| Маслосъёмные колпачки | − | + | |
| Цепь ГРМ | + | + | 82 линка до 72 кубов, 84 линка для 90—110 кубов |
| Ролики натяжителя | + | + | |
| Звезда распредвала | + | + |
Ходовая часть
| Деталь | Обычный Каб | Почтовик | Нюансы |
| Ось передняя | + | + | Диаметр оси 10 мм |
| Ось маятника | − | − | Ось от Альфы толще и длиннее |
| Ось задняя | + | − | Длина совпадает, диаметр 12 мм. У почтовика толще |
| Колесо переднее | + | + | Диаметр оси 10 мм, диаметр барабана 111 мм |
| Колесо заднее | + | − | Почтовику не встанет на ось |
| Барабан передний | + | + | Может потребоваться доработка |
| Барабан задний | + | − | Может потребоваться доработка |
| Демпферы | + | − | У почтовика демпферы больше |
| Ступица | + | − | |
| Втулка ступицы | + | − | |
| Тормозные колодки | ± | ± | Есть обычные (105×25 мм) и большие для почтовика назад (110×25 мм) |
| Кожух цепи | + | − | Возможно придётся подгонять отверстия. У почтовика шире дырка под ступицу |
| Ушки натяжения цепи | + | − | Нужен комплект с разноширокими отверстиями |
| Ведущая звезда | + | + | |
| Ведомая звезда | + | − | У почтовика своя звезда |
Другое
| Деталь | Подходит | Нюансы |
| Пульт левый | + | Для управления поворотниками левой рукой |
| Пульт правый | + | Для управления светом правой рукой |
Тюнинг двигателя, увеличение кубатуры
Каб создан для уверенной неспешности — любите его какой есть. Но если вам не хватает стандартной мощности 50 кубов, то есть несколько вариантов, как можно исправить ситуацию. Будьте осторожны, даже после тюнинга есть вероятность не получить желаемого эффекта и тогда стоит уменьшить ожидания или сменить технику.
— Для карбюраторного: поставить ЦПГ 72сс без замены головы ≈2000—3000 ₽. На китайских запчастях такое получится только в одном случае — нужно взять цилиндр 147FMH, а к нему низкий поршень от 139QMB скутера. Про такой способ рассказывает знаменитая статья «Озверин для „Каба“».
Цилиндро-поршневая группа 72сс, 47 мм ≈1500 ₽
Низкий поршень от скутера ≈300 ₽
Набор прокладок 47 мм ≈200 ₽
— Для карбюраторного: поставить ЦПГ 72сс с заменой головы ≈7000 ₽ Для этого: поменять ГБЦ, а также поставить карбюратор 16 мм и шире выхлоп. Это даст заветные 70 км/ч в любых условиях: в горку, против ветра, груженым. Процесс установки описан в руководстве по увеличению кубатуры.
Цилиндро-поршневая группа 72сс, 47 мм ≈1500 ₽
Головка блока цилиндра ≈2200 ₽
Карбюратор PZ16 ≈1000 ₽
Выхлопная труба Альфа ≈2000 ₽
Набор прокладок 47 мм ≈200 ₽
— Для карбюраторного: поставить ЦПГ 75сс от Kitaco ≈8000 ₽. Встанет на стандартную ГБЦ, даст прирост по тяге, но на высоких почти ничего не будет. Один из самых простых и надежных способов прокачать старт со светофора.
Комплект Kitaco для тюнинга карбюраторного Каба ≈8000 ₽.
— Для инжекторного: поставить комплект SP Takegawa ≈28000 ₽. Инжекторный Каб без номеров начинает ездить почти как карбюраторный Super Cub C90, но всё таки будет ему уступать. Вместе со скоростью также повышается и расход топлива до 2,5—3 литров. А плюсы, что вы по-прежнему без номеров, техосмотра и страховки.
Комплект SP Takegawa для тюнинга инжекторного мотора AA01 ≈28000 ₽
— Получить права и купить Super Cub C90, C110 или другой мотоцикл ≈20—45 тысяч ₽. Это кажется шуткой, но зачастую тюнинг превращается в бесконечность, которая владельцу не нужна — ему бы ездить, а не ковыряться. В таком случае лучше взять модель, которая с завода выдаёт нужную скорость. Выучиться на права ≈20000 ₽, добавить денег к С50 и купить С110 ≈25000₽. Или сразу пойти и купить нормальный максискутер.
Что нужно для переделки инжекторного каба в карбюраторный, поколение С50, АА01
Полный комплект переделки системы, который нужно поставить, выглядит вот так:
— бак
— топливные шланги
— карбюратор
— двигатель в сборе
— фильтр бокс
— выхлопная труба
— проводка
— комплект замков
Каталоги запчастей
Все каталоги запчастей С50 до 2008 года
Каталоги на карбюраторные: С50 1995 года, C50 AA01 2000 года, C90 1992 года, C90 2007 года
Каталоги на инжекторные: АА01 Почтовик, C50 кастом и обычный
Магазины, где купить запчасти
Магазина «всё для Супер Каба» в России нет Есть моя Лавка Шмелтера, в которой я стараюсь привезти нужное и выкладываю запчасти от Супер Кабов, которые разбираю.
В остальном наша участь такая: нестабильно урвать запчасти с разборки, в сообществе, подобрать от авто или от Альфы вживую, бывают запчасти на Дроме. Оригинальные запчасти есть на Вибайке, Мегазипе и Импексе. Наличие меняется постоянно, и увы, даже ссылки ниже не гарантируют, что вы что-то найдёте.
По тексту статьи вы нередко найдёте номера, типа «17211GBZ700» или более простые «CK1148». Это уникальные артикулы запчастей по которым нужно будет заказать запчасти — всё как для машины. Этот артикул нужно вставить в строку поиска в магазинах типа Экзист и Емекс, а также Яндекса или Гугла. Некоторые магазины, в которых так можно сделать я указал ниже.
Запчасти из Японии
https://webike.com.ru/ — японский магазин, все оригинальные запчасти и тюнинг, запчасти по артикулу
https://www.megazip.ru/ — российский сервис, запчасти по артикулу
https://www.impex-jp.com — сервис для покупки запчастей с аукциона Яху, б/у узлы и новые
Запчасти в России
Лавка Шмелтера — запчасти для Кабов
http://avito.ru — попадаются Супер Кабы в разбор
http://emex.ru — запчасти по артикулу
http://zzap.ru — запчасти по артикулу
Мотомир.рф — китайские запчасти по вменяемым ценам
Карта магазинов с запчастями в Москве
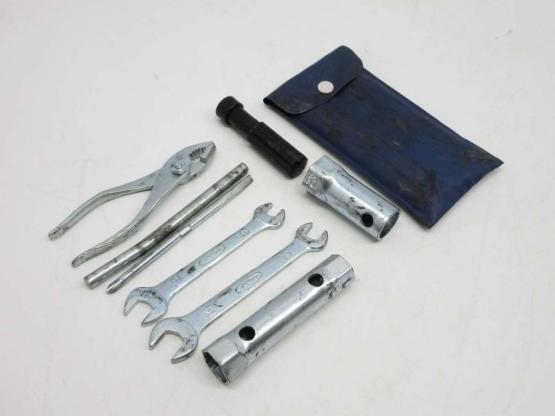
Набор необходимых инструментов
Ключи, головки: 8, 10, 12, 14, 17, 19, 23
Крестовая отвертка, ударная отвертка
Свечной 16 мм
Пассатижи
Монтировки, выкручиватель золотника
Размеры съёмников и ссылки для заказа
Известные проблемы
На спидометре моргает красная лампочка
Моргание красной лампочки означает, что вы превысили допустимые в Японии 35 км/ч для мопедов до 50 кубов. За вами уже выехала японская ДПС.
При торможении переднее колесо подламывается в сторону, до 2012 года
На передней рычажной подвеске изнашиваются втулки. Обратитесь в раздел подвески и закажите указанные там втулки.
Не заводится, карбюраторные Кабы
Проверить ключ зажигания → Проверить положение крана карбюратора → Добавить газа → Оттянуть подсос → Проверить свечу → Слить старый бензин
Мопед едет дёрганно, вяло реагирует на ручку газа, карбюраторные Кабы
Проверить свечу → Проверить воздушный фильтр → Настроить карбюратор → Замерить компрессию
Мопед дёргается на ходу, глохнет при откручивании ручки газа, инжекторные Кабы
У инжектора на бензонасосе есть топливный фильтр. Когда он забивается, то мопед начинает ехать рывками. Терминальная стадия — может завестись, потому что насосом подаётся много топлива при повороте ключа, но при открытии ручки газа глохнуть. Нужно отсоединить форсунку, снять бак, отсоединить фишку от него и снять топливный насос. Разобрать насос, удивиться количеству мусора, почистить топливный фильтр.
Моргает Check Engine, инжекторные Кабы
Моргания сигнализируют о неисправности. Например, может быть оборван датчик лямбда-зонда или вы налили слишком много масла в картер.
Посчитайте количество морганий, найдите это количество в списке:
1 — датчик давления на входе
7 — датчик температуры масла
8 — датчик дроссельной заслонки
9 — датчика температуры
12 — инжектор, неисправность цепи, неисправность датчика
21 — неисправность датчика о2
29 — клапан IAC
33 — неисправность блока управления двигателя
91 — катушка зажигания
105 — система подачи топлива, соотношения воздух/топливо
Что сделать после покупки
Поменять масло — Ютуб
Поменять свечку — Ютуб
Поменять воздушный фильтр — Ютуб
Поменять резину — Ютуб
Поменять тормозные колодки — Ютуб
Проверить люфт колесных подшипников — При смене резины
Поменять демпферы заднего колеса — Ютуб, как снять колесо
Заменить тросы тормоза и газа
Поменять цепь — Ютуб
Настроить сцепление — Ютуб
Поменять аккумулятор — Ютуб
Установка звукового повторителя поворотников
Японский ютуб-канал по обслуживанию Каба
Электрическая схема появилась благодаря Анатолию Резникову. У него на сайте можете найти доделки для Каба себе по душе.
.png)
Электрическая схема принципиальная Honda Super Cub, карбюратор.
Технические характеристики
| Модель | «Почтовик» C50, JBH-AA01 инжектор | C50, JBH-AA01 инжектор |
| Длина | 1.84 м | 1.8 м |
| Ширина | 0.675 м | 0.66 м |
| Высота | 1.02 м | 1.01 м |
| Колесная база | 1.18 м | 1.175 м |
| Клиренс | 13 см | 13 см |
| Вес | 87 кг | 79 кг |
| Количество мест | 1 | 1 |
| Радиус разворота | 1.8 м | 1.8 м |
| Объём двигателя | 49 см³ | 49 см³ |
| Мощность двигателя | 3.4 л.с./7000 RPM | 3.4 л.с./7000 RPM |
| Крутящий момент | 3.8 N·m (0.39 kg·m)/5.000 RPM | 3.8 N·m (0.39 kg·m)/5.000 RPM |
| Степень сжатия | 10.0 | 10.0 |
| Обороты холостого хода | 1700 RPM | 1700 RPM |
| Свечи | CR7HSA | CR7HSA |
| Допустимый зазор свечи | 0.6—0.7 мм | 0.6—0.7 мм |
| Объём бака | 3.4 л | 3.4 л |
| Аккумулятор | YTX4L-BS12 V-3 Ah (10HR) | |
| Покрышки спереди | 2.25-17 | 2.25-17 |
| Покрышки сзади | 2.5-17 | 2.25-17 |
| Масло | JASO MA, 10W-30, API: SL | |
| Объём замены масла | 0.6 л | 0.6 л |
| Объём картера масла | 0.8 л | 0.8 л |
| Замена масла | 3000 км | 3000 км |
| Замена воздушного фильтра | 10000 км | 10000 км |
Руководство пользователя
Эта база знаний и есть расширенное руководство пользователя, которое отвечает на вопросы что, как, где поменять. Но для ценителей выкладываю оригинальные японские руководства пользователя.
Руководство Honda Super Cub C50 6v, карбюраторный + электросхема
Руководство Honda Super Cub C50, инжекторный
Переведенные руководства на русский:
Частично переведенный Honda Super Cub C50, инжекторный
Что ещё про эти ваши Кабы
Ветка на форуме Беспечный ездок
Украинский Honda Super Cub клуб в Инстаграме
Австралийские постибайки
Британский форум C90Club.co.uk
Подборка рекламных роликов Хонды
Рекламные плакаты Супер Каба: раз, двас, трис, четырес
#ненормальный_мотоцикл, рубрика дальних путешествий
Истории о путешествиях «Плавленные штаны»
Эд Марч и проект «c90adventures»
Подпишитесь
Смотрите информацию по кабам у меня Вконтакте и на моём Ютуб-канале.
-
Contents
-
Table of Contents
-
Troubleshooting
-
Bookmarks
Quick Links
20180726215216_32K0GC000_eng_BOOK Page 1 Thursday, July 26 2018 21:57:26 JST
This manual should be considered a permanent part of the
motorcycle and should remain with the motorcycle when it is resold.
This publication includes the latest production information available
before printing. Honda Motor Co., Ltd. reserves the right to make
changes at any time without notice and without incurring any
obligation.
No part of this publication may be reproduced without written
permission.
The vehicle pictured in this owner’s manual may not match your
actual vehicle.
© 2018 Honda Motor Co., Ltd.
Chapters
Summary of Contents for Honda Super Cub 2019
-
Contents
-
Table of Contents
-
Troubleshooting
-
Bookmarks
Quick Links
Contents
31K0GA00
2019 Super Cub (CUB125A)
MOM 16858 (1809)
P. 2
P. 16
P. 54
P. 101
P. 121
P. 143
P. 147
Related Manuals for Honda Super Cub 2019
Summary of Contents for Honda Super Cub 2019
-
Page 1: Table Of Contents
Contents Motorcycle Safety P. 2 Operation Guide P. 16 Maintenance P. 54 Troubleshooting P. 101 Information P. 121 Specifications P. 143 Index P. 147 2019 Super Cub (CUB125A) MOM 16858 (1809) 31K0GA00…
-
Page 2
When service is required, remember that Honda motorcycle. Your selection of a your Honda dealer knows your motorcycle Honda makes you part of a worldwide family best. If you have the required mechanical of satisfied customers who appreciate “know-how” and tools, you can purchase an… -
Page 3
A Few Words About Safety DANGER Your safety, and the safety of others, is very important. Operating this motorcycle safely is You WILL be KILLED or SERIOUSLY an important responsibility. HURT if you don’t follow instructions. To help you make informed decisions about safety, we have provided operating WARNING procedures and other information on safety… -
Page 4: Motorcycle Safety
Motorcycle Safety This section contains important information for safe riding of your motorcycle. Please read this section carefully. Safety Guidelines ……….P. 3 Safety Labels…………P. 6 Safety Precautions……….P. 8 Riding Precautions ……….P. 9 Accessories & Modifications……P. 13 Loading …………..
-
Page 5: Safety Guidelines
Safety Guidelines Safety Guidelines Take Time to Learn & Practice Even if you have ridden other motorcycles, Follow these guidelines to enhance your safety: practice riding in a safe area to become familiar Perform all routine and regular inspections ● with how this motorcycle works and handles, specified in this manual.
-
Page 6
Be prepared to stop quickly or perform an evasive maneuver. Keep Your Honda in Safe Condition It’s important to keep your motorcycle properly Make Yourself Easy to See maintained and in safe riding condition. -
Page 7
Safety Guidelines If you decide to continue riding, first turn the Never run your motorcycle inside a garage or ignition switch to the OFF position, and evaluate other enclosure. the condition of your motorcycle. Inspect for WARNING fluid leaks, check the tightness of critical nuts Running the engine of your motorcycle and bolts, and check the handlebar, control levers, brakes, and wheels. -
Page 8: Safety Labels
Safety Labels Safety Labels If a label comes off or becomes hard to read, contact your dealer for a replacement. Safety and information labels on your motorcycle provide important safety information and may warn you of potential hazards that could cause serious injury. Read these labels carefully and don’t remove them.
-
Page 9
Safety Labels… -
Page 10: Safety Precautions
Safety Precautions Safety Precautions WARNING Not wearing a helmet increases the Ride cautiously and keep your hands on the ● chance of serious injury or death in a handlebar and feet on the footpegs. crash. Always consider the safety of other drivers ●…
-
Page 11: Riding Precautions
Riding Precautions Riding Precautions Exercise caution on low traction surfaces. ● The tires slip more easily on such surfaces and braking distances are Break-in Period longer. During the first 300 miles (500 km) of running, Avoid continuous braking. ● follow these guidelines to ensure your Repeated braking, such as when motorcycle’s future reliability and performance.
-
Page 12
Riding Precautions Anti-lock Brake System (ABS) on Front Engine Braking Wheel Engine braking helps slow your motorcycle This model equipped with an Anti-lock Brake down when you release the throttle. For further System (ABS) designed to help prevent the front slowing action, downshift to a lower gear. -
Page 13
To reduce the likelihood of theft, always lock ● the handlebar, lock the ignition switch P. 35) and leave your motorcycle while taking the Honda SMART Key with you. Center stand Deactivate the Honda SMART Key system if necessary. P. 30… -
Page 14
Riding Precautions Turn the ignition switch to the (Lock) Refueling and Fuel Guidelines position ( P. 28) and lock the ignition Follow these guidelines to protect the engine, switch ( P. 35). fuel system and catalytic converter: Set the anti-theft alarm system. P. -
Page 15: Accessories & Modifications
We strongly advise that you do not add any seriously hurt or killed. accessories that were not specifically designed or approved for your motorcycle by Honda or Follow all instructions in this owner’s make modifications to your motorcycle from its manual regarding accessories and original design.
-
Page 16: Loading
Loading Loading WARNING Overloading, improper loading or Carrying extra weight affects your ● carrying a passenger can cause a crash motorcycle’s handling, braking and stability. and you can be seriously hurt or killed. Always ride at a safe speed for the load you are carrying.
-
Page 18: Operation Guide
• Indicators (P.24) Starting the • Switches (P.26) Motorcycle • Steering Lock (P.28) Before pulling away, indicate • Honda SMART Key System your direction with the turn (P.29) signal switch, and check for • Anti-theft Alarm System oncoming traffic. (P.37) •…
-
Page 19
Parking (P.11) Braking Close the throttle and apply the front and rear brakes together. Park on a firm level surface. Use the stand, and lock the The brake light will indicate that steering. you have applied the brakes. Stopping If pulling off the road, signal early enough to show traffic that you are pulling over, and pull over smoothly. -
Page 20
Parts Location Right side cover opener switch (P.53) Document bag (P.53) Tool kit (P.53) Throttle grip (P.96) Front brake lever Helmet holder (P.52) Right side cover (P.53) Engine oil fill cap (P.81) Spark plug (P.79) Rear brake pedal (P.87) Engine oil drain bolt (P.82) Engine oil level inspection window (P.81) -
Page 21
Battery (P.76) Fuse box (P.119) Helmet holder (P.52) Fuel fill cap (P.50) Seat open button (P.52) Crankcase breather (P.97) Drive chain (P.91) Shift lever (P.49) Center stand (P.11) -
Page 22
Instruments Gear position indicator The gear position is shown in the gear position indicator. Speedometer «-» appears when the transmission was not shifted properly. Odometer [TOTAL]/Tripmeter [TRIP A/B] Mode button switches between the odometer and the tripmeter. • Odometer: Total distance ridden. •… -
Page 23
Display Setting The established setting can also be set by You can adjust the two settings. turning the ignition switch to the OFF position. • Clock setting • Changing of mileage unit The control is automatically switched from Ordinary display (Odometer) the setting mode to the ordinary display if the button is not pressed for about 30 seconds. -
Page 24
Instruments (Continued) 1 Clock setting: Press the mode button until the desired minute is displayed. Turn the ignition switch to the ON position. With odometer displayed, press and hold the mode button, the hour digits start flashing. Press the mode button until the desired Press and hold the mode button. -
Page 25
2 Changing of mileage unit: Press the mode button to select either “km” or “mile”. Press and hold the mode button. The mileage unit is set, and then the display returns to the ordinary display. -
Page 26
Anti-theft Alarm System: (P.37) Honda SMART Key indicator Comes on when vehicle and Honda SMART Key verification is complete, and the ignition switch can be operated. Goes off when the ignition switch is turned to the ON position. When the Honda SMART Key Indicator Flashes:… -
Page 27
ABS (Anti-lock Brake System) indicator Comes on when the ignition switch is turned to the ON position. Goes off when your speed reaches approximately 6 mph (10 km/h). If it comes on while riding: (P.104) Neutral indicator Comes on when the transmission is in Neutral. PGM-FI (Programmed Fuel Injection) malfunction indicator lamp (MIL) Comes on briefly when the ignition switch is turned to the ON position with the… -
Page 28
Switches Engine stop switch Should normally remain in the (Run) position. In an emergency, switch to the (Stop) position (the starter motor will not operate) to stop the engine. Start button Turn signal switch Pressing the switch turns the turn Horn button signal off. -
Page 29
Anti-theft Alarm System: Turns engine off. (P.37) ON/OFF button Turns electrical system This button is used to activate or on for starting/riding. deactivate the Honda SMART Key system, and also to confirm the activation status. (P.30) Continued… -
Page 30
Switches (Continued) Steering Lock Locking Turn the handlebar all the way to the left. Lock the steering when parking to help Push the ignition switch down, and turn it to prevent theft. (Lock) position. A U-shaped wheel lock or similar device is To unlock the ignition switch. -
Page 31
Honda SMART Key System The Honda SMART Key system allows you to operate the main switch without inserting a key into a keyhole. The system runs a two-way authentication between the motorcycle and the Honda SMART Key to verify if it is the registered Honda SMART Key. -
Page 32
(Continued) Switching the Honda SMART Key System To switch the Honda SMART Key system to activation or deactivation Press the ON/OFF button until the Honda SMART Key LED changes color. To check the Honda SMART Key system status ON/OFF button Lightly press the ON/OFF button. -
Page 33
Honda SMART Key system may not work properly in the following situations: • When the Honda SMART Key battery is depleted. • When there are facilities nearby that generate strong radio waves or noise, such as TV towers, power stations, radio stations, or airports. -
Page 34
(Continued) Anyone can unlock the ignition switch and When the ignition switch is locked: start the engine if your Honda SMART Key is The system can be operated within the within operating range of your motorcycle, shaded area shown in the illustration. -
Page 35
You should always keep the Honda SMART Key on your person after you get on and off the motorcycle or while riding. Do not place the Honda SMART Key in any compartment. Continued… -
Page 36
When the Honda SMART Key system does not work properly (P.107) To Unlock the Ignition Switch Make sure that the Honda SMART Key is If someone without the Honda SMART Key activated. (P.30) tries to turn the ignition switch, the ignition To authenticate the Honda SMART Key switch rotates freely. -
Page 37
• Wait for approximately 20 seconds after turning the ignition switch from ON to OFF or (Lock) position. • Switch the Honda SMART Key system to inactive. (P.30) Make sure that the Honda SMART Key indicator and ignition switch ring go off, the turn signals flash once, and the buzzer rings 1 time. -
Page 38
(Lock) position when you Ignition Switch is Locked/Unlocked leave your motorcycle. Enable Deactivate the Honda SMART Key system. When the ignition switch is locked in the OFF (P.30) position, the steering cannot be locked. To Lightly press the ON/OFF button. The red lock the steering, unlock the ignition switch. -
Page 39
Anti-theft Alarm System The anti-theft alarm system is a device to reduce the likelihood of theft. When the sensor detects vibration or movement with the ignition switch in the OFF or (Lock) position and the system is set, the alarm is activated. -
Page 40
Anti-theft Alarm System (Continued) If the ignition switch is left in the OFF or Setting the Anti-theft Alarm System (Lock) position for more than 10 days, the Turn the ignition switch to OFF or (Lock) anti-theft alarm system will no longer position. -
Page 41
To stop the anti-theft alarm activation, do To cancel the anti-theft alarm system, do one of the following: one of the following: • Press the alarm button on the Honda • Press the alarm button on the Honda SMART Key. SMART Key. -
Page 42
Push the ignition switch 1 time. Adjusting the Sensitivity of Anti-theft Repeat the following 3 times: Alarm System Press the alarm button on the Honda You can select from 3 sensitivity levels for the SMART Key 2 times and the ignition anti-theft alarm system. -
Page 43
P. 76) in the motorcycle may be 1 alarm ring: low sensitivity discharged or there is a system problem. The Honda SMART Key indicator and Remove the battery and see your dealer. ignition switch ring come on while setting. Wait for about 10 seconds until the ignition The alarm does not ring. -
Page 44
Answer immobilizer is active and you press the back button answer back button on the Honda SMART Key with the ignition switch in the OFF or (Lock) position, the turn signals light, the ignition switch ring lights, and the buzzer rings, informing you of your motorcycle’s location. -
Page 45
Operation Adjusting the Answer Back Buzzer Sound Volume Level Press the answer back button on the Honda SMART Key. You can select the buzzer sound volume from 3 levels. The answer back system will not function when the ignition switch is in the ON position. -
Page 46
3 levels for the sound volume. Press the answer back button on the The Honda SMART Key indicator and Honda SMART Key 2 times and the ignition switch ring come on while setting. ignition switch 1 time. Wait for about 10 seconds until the ignition switch ring starts blinking. -
Page 47
Honda SMART Key 3 times and the Remove the center cover. (P.78) ignition switch 1 time. Make sure that the Honda SMART Key is When the answer back button is pressed, active. (P.30) the Honda SMART Key LED comes on. -
Page 48
Press and hold the answer back button for Remove the EM mode coupler from the EM about 2 seconds. The Honda SMART Key LED mode connector to finish setting. changes to red. The sound pattern is also set if you… -
Page 49
OFF position and wait 10 seconds before trying to start This motorcycle is equipped with a Honda the engine again to recover battery voltage. SMART Key system. Always keep Honda •… -
Page 50
Starting the Engine (Continued) If you cannot start the engine: If the engine does not start: Open the throttle slightly (about 0.1 in (3 Open the throttle fully and press the start button for 5 seconds. mm), without freeplay). Repeat the normal starting procedure. About 0.1 in (3 mm), without freeplay If the engine starts, open the throttle slightly if idling is unstable. -
Page 51
Shifting Gears Your motorcycle transmission has 4 forward Recommended Shift Points gears, four-up shift pattern when you shift Shifting Up with your toe. From 1st to 2nd 12 mph (20 km/h) With a heel and toe shifter, you can also shift From 2nd to 3rd 19 mph (30 km/h) to a higher gear by pressing the shift lever… -
Page 52
Refueling Do not fill with fuel above the lower edge of Lower edge of Fuel fill cap the filler neck. filler neck Fuel type: Unleaded gasoline only Recommended fuel octane number: Pump Octane Number (PON) 86 or higher. Tank capacity: 0.98 US gal (3.7 L) Arrow marks Refueling and Fuel Guidelines (P.12) -
Page 53
Opening the Fuel Fill Cap WARNING Open the seat. (P.52) Gasoline is highly flammable and Turn the fuel fill cap counterclockwise until it explosive. You can be burned or stops and remove the cap. seriously injured when handling fuel. Closing the Fuel Fill Cap •… -
Page 54
Seat Open be seriously hurt or killed. The seat open button can be operated when the Honda SMART Key is in the operating Use the helmet holder only while range ( P. 31) and the ignition switch is in parked. -
Page 55
Right Side Cover Document Bag/Tool Kit The document bag and tool kit are held by Open the rubber band in the document Open the seat. (P.52) compartment behind the right side cover. Push the right side cover opener switch. Opening the seat. (P.52) Close Close the right side cover until it locks. -
Page 56: Maintenance
Adjusting the Headlight Aim ……P. 98 Maintenance Fundamentals ……P. 61 Other Replacement……….. P. 99 Tool …………… P. 75 Replacing the Honda SMART Key Battery..P. 99 Removing & Installing Body Components.. P. 76 Battery …………..P. 76 Center Cover …………P. 78 Spark Plug …………
-
Page 57: Importance Of Maintenance
Importance of Maintenance For information about the exhaust emission and Importance of Maintenance noise emission requirements of the U.S. Keeping your motorcycle well-maintained is Environmental Protection Agency (EPA), and the absolutely essential to your safety and to California Air Resources Board (CARB). P.
-
Page 58
Importance of Maintenance Maintenance Safety Always read the maintenance instructions before you begin each task, and make sure that you have the tools, parts, and skills required. We cannot warn you of every conceivable hazard that can arise in performing maintenance. -
Page 59: Maintenance Schedule
Maintenance work should be performed in accordance with Honda’s standards and specifications by properly trained and equipped technicians. Your dealer meets all of these requirements. All scheduled maintenance is considered a normal owner operating cost and will be charged to you by your dealer.
-
Page 60
: Intermediate. We recommend service by your dealer, unless Inspect (clean, adjust, lubricate, or replace, if necessary) you have the necessary tools and are mechanically skilled. Lubricate Procedures are provided in an official Honda Service Replace Manual (2 P. 138). Clean : Technical. -
Page 61
Maintenance Schedule Frequency Items × 1,000 mi Regular Refer to Replace page × 1,000 km 12.8 19.2 25.6 32.0 38.4 Drive Chain Every 300 mi (500 km): Brake Fluid 2 Years Brake Shoes/Pads Wear 86, 89 Brake System Brake Light Switch Headlight Aim Clutch System –… -
Page 62: Maintenance Record
Maintenance Record Distance Odometer Date Performed By: Notes 600 miles (1,000 km) 4,000 miles (6,400 km) 8,000 miles (12,800 km) 12,000 miles (19,200 km) 16,000 miles (25,600 km) 20,000 miles (32,000 km) 24,000 miles (38,400 km) 28,000 miles (44,800 km) 32,000 miles (51,200 km) 36,000 miles (57,600 km) 40,000 miles (64,000 km)
-
Page 63: Maintenance Fundamentals
Maintenance Fundamentals Check the following items after you get on your Pre-ride Inspection motorcycle: To ensure safety, it is your responsibility to Throttle action moves smoothly without ● perform a pre-ride inspection and make sure binding. P. 96 that any problem you find is corrected. A pre- Brake lever and pedal operate normally.
-
Page 64
Maintenance Fundamentals Periodic Checks You should also perform other periodic maintenance checks at least once a month regardless of how often you ride, or more often if you ride frequently. Also, check the odometer reading against the Maintenance Schedule and perform all maintenance that is due. -
Page 65
Maintenance Fundamentals Replacing Parts Always use Honda Genuine Parts or their equivalents to ensure reliability and safety. When ordering colored components, specify the model name, color, and code mentioned on the color label. The color label is attached to the frame near the brake light switch. -
Page 66
Maintenance Fundamentals Electrolyte splashes onto your skin: Battery ● Remove affected clothing and wash your Your motorcycle has a maintenance-free type skin thoroughly using water. battery. You do not have to check the battery Electrolyte splashes into your mouth: ● electrolyte level or add distilled water. -
Page 67
30 days using a charger designed specifically for If the terminals are heavily corroded, clean your Honda, which can be purchased from your and polish the terminals with a wire brush or dealer. Read the information that came with sandpaper. -
Page 68
Bump starting is also not recommended. ratings, see “Specifications.” P. 145 Blown fuse NOTICE Installing non-Honda electrical accessories can overload the electrical system, discharging the battery and possibly damaging the system. Fuses Fuses protect the electrical circuits on your NOTICE motorcycle. -
Page 69
P. 144 higher oils, excluding oils marked as “Energy Conserving” or “Resource Conserving” on the If you use non-Honda engine oil, check the circular API service symbol. label to make sure that the oil satisfies all of the following standards:… -
Page 70
Brake fluid can damage plastic and painted surfaces. Wipe up spills immediately and wash thoroughly. Recommended brake fluid: Normal Worn Damaged Honda DOT 3 or DOT 4 Brake Fluid or (GOOD) (REPLACE) (REPLACE) equivalent Drive Chain NOTICE Use of a new chain with worn sprockets will cause The drive chain must be inspected and rapid chain wear. -
Page 71
Service if the deposit level can be Recommended lubricant: seen in the transparent section of the drain Pro Honda HP Chain Lube or equivalent tube. If the drain tube overflows, the air filter may become contaminated with engine oil causing poor engine performance. -
Page 72
Maintenance Fundamentals Inspecting for Abnormal Wear Tires (Inspecting/Replacing) Checking the Air Pressure Inspect the tires for Visually inspect your tires and use an air signs of abnormal wear pressure gauge to measure the air pressure at on the contact surface. least once a month or any time you think the tires look low. -
Page 73
Maintenance Fundamentals WARNING Inspecting Tread Depth Inspect the tread wear indicators. If they Riding on tires that are excessively worn become visible, replace the tires immediately. or improperly inflated can cause a crash in which you can be seriously hurt or killed. -
Page 74
Maintenance Fundamentals Have your tires replaced by your dealer. WARNING For recommended tires and air pressure, see Installing improper tires on your “Specifications.” P. 144 motorcycle can adversely affect Follow these guidelines whenever you replace handling and stability, and can cause a tires. -
Page 75
Maintenance Fundamentals Tire Identification Number (TIN) Tire Service Life The tire identification number (TIN) is a group The service life of your tires is dependent on of numbers and letters located on the sidewall many factors, including, but not limited to, of the tire. -
Page 76
Maintenance Fundamentals Air Cleaner This motorcycle is equipped with a viscous type air cleaner element which cannot be cleaned with compressed air or otherwise without degrading its performance. If the filter becomes dirty, replace it with a new one. -
Page 77: Tool
Tool The tool kit is located behind the right side cover. P. 53 You can perform some roadside repairs, minor adjustments and parts replacement with the provided tools. Fuse puller ● Standard/Phillips screwdriver ● Screwdriver handle ● 5 mm Hex wrench ●…
-
Page 78: Removing & Installing Body Components
Removing & Installing Body Components Battery Removal Make sure the ignition switch is in the OFF Negative terminal position. Bolt Battery cover Remove the center cover. P. 78 Remove the couplers from the battery cover. Move the battery cover upward by removing the bolts.
-
Page 79
Removing & Installing Body Components Battery Installation Install the parts in the reverse order of removal. Always connect the positive + terminal first. Make sure that bolts and nuts are tight. Make sure the clock information is correct after the battery is reconnected. P. -
Page 80: Center Cover
Removing & Installing Body Components Center Cover Center Cover Removal Remove the center cover by removing the screw. Center cover Installation Screw Open the left and right body covers slightly, then install the center cover while aligning each tab and slit. Install and tighten the screw.
-
Page 81: Spark Plug
Spark Plug Checking Spark Plug Spark plug cap For the recommended spark plug, see “Specifications.” P. 144 Use only the recommended type of spark plug in the recommended heat range. NOTICE Using a spark plug with an improper heat range can cause engine damage.
-
Page 82
Spark Plug Checking Spark Plug Tighten the spark plug: Check the spark plug gap using a wire- If the old plug is good: type feeler gauge. ● 1/8 turn after it seats. If adjustment is necessary, bend the If installing a new plug, tighten it twice side electrode carefully. -
Page 83: Engine Oil
Engine Oil Checking the Engine Oil Oil fill cap Upper level If the engine is cold, idle the engine for 3 to 5 minutes. Turn the ignition switch to the OFF position and wait for 2 to 3 minutes. Place your motorcycle on its center stand Lower level on a firm, level surface.
-
Page 84
Engine Oil Adding Engine Oil Adding Engine Oil Securely reinstall the oil fill cap. NOTICE If the engine oil is below or near the lower Overfilling with oil or operating with insufficient level mark, add the recommended engine oil. oil can cause damage to your engine. Do not mix different brands and grades of oil. -
Page 85
Engine Oil Changing Engine Oil Place your motorcycle on its center stand Install a new sealing washer onto the on a firm, level surface. drain bolt. Tighten the drain bolt. Place a drain pan under the drain bolt. Torque: 18 lbf·ft (24 N·m, 2.4 kgf·m) Remove the oil fill cap, drain bolt and sealing washer to drain the oil. -
Page 86: Air Cleaner
Air Cleaner Changing Air Cleaner Element Rubber guard Use a new Honda Genuine air cleaner element or an equivalent specified for your motorcycle. NOTICE Using the wrong air cleaner element may cause premature engine wear or performance problems. Remove the rubber guard from the tab.
-
Page 87: Brakes
Brakes Checking the Front Brake Fluid Front brake fluid reservoir Place your motorcycle in an upright position on a firm, level surface. Check that the brake fluid reservoir is horizontal and that the fluid level is above the LWR mark. If the brake fluid level in the reservoir is below the LWR mark or the brake lever freeplay becomes excessive, inspect the…
-
Page 88
Brakes Inspecting the Front Brake Pads Inspecting the Front Brake Pads Brake pads Check the condition of the brake pad wear indicators. The pads need to be replaced if a brake pad is worn to the indicator. Inspect the brake pads from below the brake Wear caliper. -
Page 89
Brakes Inspecting the Rear Brake Pedal Freeplay Inspecting the Rear Brake Adjusting the Rear Brake Pedal Pedal Freeplay Freeplay Place your motorcycle on its center stand Make sure the cut-out on the adjusting nut is on a firm, level surface. seated on the brake arm pin when adjusting Measure the distance the rear brake the freeplay. -
Page 90
Brakes Adjusting the Rear Brake Pedal Freeplay Adjust by turning the rear brake adjusting Push the brake arm to confirm that there nut a half-turn at a time. is a gap between the rear brake adjusting nut and brake arm pin. Brake arm Push Brake arm… -
Page 91
The rear brake is equipped with a brake wear the brake, the brake shoes must be replaced. indicator. See your dealer for this service. Brake panel Arrow When the brake service is necessary, see your dealer. Use only Honda Genuine Parts or its equivalent. Reference mark Brake arm… -
Page 92
Brakes Adjusting the Brake Light Switch Adjusting the Brake Light Switch Check the operation of the brake light switch. Hold the brake light switch and turn the adjusting nut in the direction A if the switch operates too late, or turn the nut in the direction B if the switch operates too soon. -
Page 93: Drive Chain
Drive Chain Inspecting the Drive Chain Slack Check the drive chain slack at several points along the chain. If the slack is not constant at all points, some links may be kinked and binding. Have the chain inspected by your dealer. Inspection hole cap Shift the transmission to Neutral.
-
Page 94
Drive Chain Inspecting the Drive Chain Slack Move the drive chain up and down with Remove the chain covers by removing the your finger. bolts. Drive chain slack: 1.0 — 1.4 in (25 — 35 mm) Do not ride your motorcycle if the slack exceeds 1 15/16 in (50 mm). -
Page 95
Drive Chain Adjusting the Drive Chain Slack Adjusting the Drive Chain Slack Adjusting nut Rear axle nut Adjusting the chain requires special tools. Have the drive chain slack adjusted by your dealer. Lock nut Adjusting plate Shift the transmission to Neutral. Stop the Scale graduations engine. -
Page 96
Drive Chain Adjusting the Drive Chain Slack Turn both adjusting nuts an equal Check rear axle alignment by making sure number of turns until the correct drive the end of the chain adjusting plate aligns chain slack is obtained. Turn the adjusting with the scale graduations on both sides nuts clockwise to tighten the chain. -
Page 97
Drive Chain Adjusting the Drive Chain Slack Checking the Drive Chain Wear Rear brake pedal freeplay is affected when repositioning the rear wheel to If the drive chain slack is excessive when the adjust drive chain slack. Check rear brake rear axle is moved to the furthest limit of pedal freeplay and adjust as necessary. -
Page 98: Throttle
Throttle Checking the Throttle With the engine off, check that the throttle rotates smoothly from fully closed to fully open in all steering positions and throttle freeplay is correct. If the throttle does not move smoothly, close automatically, or if the cable is damaged, have the motorcycle inspected by your dealer.
-
Page 99: Crankcase Breather
Crankcase Breather Cleaning the Crankcase Breather Place a suitable container under the crankcase breather tube. Remove the crankcase breather tube and drain deposits. Reinstall the crankcase breather tube. Crankcase breather tube…
-
Page 100: Other Adjustments
Other Adjustments Adjusting the Headlight Aim You can adjust vertical aim of the headlight for proper alignment. Turn the pinion in or out as necessary. Obey local laws and regulations. Headlight Pinion Raise Lower…
-
Page 101: Other Replacement
Key Battery with a protective cloth into the slit. Wrap a coin or a screwdriver with a If the Honda SMART Key indicator flashes 5 protective cloth to prevent scratching times when the ignition switch is turned to the Honda SMART Key.
-
Page 102
Other Replacement Replacing the Honda SMART Key Battery WARNING Replace the old battery with a new battery with the negative — side facing Chemical Burn Hazard: do not swallow battery. Snap the two halves of the remote If swallowed, the battery can cause transmitter back together. -
Page 103: Troubleshooting
Honda SMART Key Indicator……P. 105 Other Warning Indications ……P. 106 Fuel Gauge Failure Indication……P. 106 When the Honda SMART Key System Does Not Operate Properly……….. P. 107 Unlock the Ignition Switch in an Emergency …………P. 109 Tire Puncture …………
-
Page 104: Engine Will Not Start
Engine Will Not Start Starter Motor Operates But Starter Motor Does Not Engine Does Not Start Operate Check the following items: Check the following items: Check the correct engine starting Check the correct engine starting ● ● sequence. P. 47 sequence.
-
Page 105: Warning Indicators On Or Flashing
Warning Indicators On or Flashing PGM-FI (Programmed Fuel Injection) Malfunction Indicator Lamp (MIL) If the indicator comes on while riding, you may have a serious problem with the PGM-FI system. Reduce speed and have your motorcycle inspected by your dealer as soon as possible.
-
Page 106: Abs (Anti-Lock Brake System) Indicator
Warning Indicators On or Flashing ABS (Anti-lock Brake System) Indicator ABS (Anti-lock Brake System) If the ABS indicator stays on, your brakes will continue to work as a conventional system, Indicator but without the anti-locking function. If the indicator operates in one of the The ABS indicator may flash if you turn the following ways, you may have a serious rear wheel while the rear wheel is lifted off…
-
Page 107: Honda Smart Key Indicator
Honda SMART Key stops switch is locked. after turning the ignition switch to the ON If you do not have the Honda SMART Key, position. the ignition switch can be unlocked in It is probably caused by the following: another way.
-
Page 108: Other Warning Indications
Other Warning Indications Fuel Gauge Failure Indication If the fuel system has an error, the fuel gauge indicators will be displayed as shown in the illustration. If this occurs, see your dealer as soon as possible.
-
Page 109: When The Honda Smart Key System Does Not Operate Properly
When the Honda SMART Key System Does Not Operate Properly When the Honda SMART Key system does Check that there is no communication ● not work properly, perform the following. failure in the Honda SMART Key system. Check that the Honda SMART Key system The Honda SMART Key system uses low- ●…
-
Page 110
When the Honda SMART Key System Does Not Operate Properly Check that a registered Honda SMART Check the battery condition and battery ● ● Key is used. lead in your motorcycle. Use a registered Honda SMART Key. Check the battery and battery terminals. If The Honda SMART Key system cannot be the battery is weak, contact your dealer. -
Page 111: Unlock The Ignition Switch In An Emergency
Unlock the Ignition Switch in an Emergency Set up to ID number input mode Hook Remove the center cover. P. 78 Pull out the EM mode connector. Remove the blue dummy coupler by releasing the tab of the EM mode connector while lifting the hook of the blue dummy coupler.
-
Page 112
Unlock the Ignition Switch in an Emergency ID number input Example: To input “0”, wait for 5 seconds without ● You can input your ID number by pressing pushing the ignition switch when the the ignition switch when the ignition switch is ignition switch ring comes on. -
Page 113
After the last ID number is inputted, the ignition switch After the last ID number is inputted, the ignition ring and Honda SMART Key Indicator will flash every 2 switch ring and Honda SMART Key Indicator will flash seconds until the EM mode coupler is removed. -
Page 114: Tire Puncture
Tire Puncture WARNING Repairing a puncture or removing a wheel requires special tools and technical expertise. Riding your motorcycle with a We recommend you have this type of service temporary tire repair can be risky. If the performed by your dealer. temporary repair fails, you can crash After an emergency repair, always have the and be seriously injured or killed.
-
Page 115
Tire Puncture Removing Wheels Front Wheel Remove the front axle shaft, front wheel and side collars. Removal Avoid getting grease, oil, or dirt on the Place your motorcycle on its center stand disc or pad surfaces. on a firm, level surface. Do not pull the brake lever while the Support your motorcycle securely and front wheel is removed. -
Page 116
Tire Puncture Removing Wheels Installation After installing the wheel, apply the brake Attach the side collars to the wheel. lever several times, then check if the Position the wheel between the fork legs wheel rotates freely. Recheck the wheel if and insert the front axle shaft from the the brake drags or if the wheel does not right side, through the wheel hub and… -
Page 117
Tire Puncture Removing Wheels Rear Wheel Drive chain Adjusting plate lock nut Removal Drive chain Rear axle nut/Washer Support your motorcycle securely and adjusting nut raise the rear wheel off the ground using the center stand or a hoist. Brake rod Remove the chain covers. -
Page 118
Tire Puncture Removing Wheels Tighten the brake stopper arm nut. Adjusting plate Torque: 16 lbf·ft (22 N·m, 2.2 kgf·m) Rear axle Adjust the rear brake pedal freeplay. P. 87 shaft Drive chain lock nut Adjust the drive chain slack. P. 93 After installing the wheel, apply the brake pedal several times, then check if the wheel rotates freely. -
Page 119: Electrical Trouble
Electrical Trouble Battery Goes Dead Burned-out Light Bulb Charge the battery using a motorcycle All light bulbs on the motorcycle are LEDs. If battery charger. there is an LED which is not turned on, see Remove the battery from the motorcycle your dealer for servicing.
-
Page 120
Electrical Trouble Burned-out Light Bulb Headlight/Front Turn Signal/ Brake light/Taillight/Rear Turn Position Light Signal/License Plate Light Rear turn signals Front turn signals Position Headlight Brake light/ light Taillight License plate The headlight, front turn signals and position light light use several LEDs. If there is an LED which is not turned on, see The brake light, taillight, rear turn signals and your dealer for servicing. -
Page 121: Blown Fuse
Electrical Trouble Blown Fuse Blown Fuse Fuse box cover Before handling fuses, see “Inspecting and Replacing Fuses.” P. 66 Fuse Box Fuses Remove the center cover. P. 78 Spare fuses Remove the battery cover. P. 76 Remove the fuse box cover. Pull the fuses out one by one with the fuse puller in the tool kit and check for a blown fuse.
-
Page 122: Unstable Engine Operation Occurs Intermittently
Unstable Engine Operation Occurs Intermittently If the fuel pump filter is clogged, unstable engine operation will occur intermittently while riding. Even if this symptom occurs, you can continue to ride your motorcycle. If unstable engine operation occurs even if sufficient fuel is available, have your motorcycle inspected by your dealer as soon as possible.
-
Page 123: Information
Vehicle Identification Number….. P. 131 Emission Control Systems ……P. 132 Catalytic Converter ……… P. 136 Oxygenated Fuels……….P. 137 Authorized Manuals ……..P. 138 Warranty Coverage and Service ….P. 139 Honda Contacts ……….P. 140 Reporting Safety Defects ……P. 142…
-
Page 124: Keys
● Do not store near any magnetized products ● The ID number of the Honda SMART Key is on such as a magnetized key chain. the ID tag. You can also unlock the ignition Always keep the Honda SMART Key away ●…
-
Page 125
● Do not wash in an ultrasonic cleaner. the Honda SMART Key system. ● If fuel, wax, or grease adhere to the Honda ● SMART Key, wipe it off immediately to avoid To get an additional Honda SMART Key, take cracking or warping. -
Page 126: Instruments, Controls, & Other Features
Instruments, Controls, & Other Features Instruments, Controls, & Tripmeter Other Features The tripmeters return to 0.0 when each read- out exceeds 9,999.9. Ignition Switch Document Bag Leaving the ignition switch in the ON position The owner’s manual, registration, and insurance with the engine stopped will drain the battery.
-
Page 127: Caring For Your Motorcycle
Frequent cleaning and polishing is important to Thoroughly rinse your motorcycle with ensure the life of your Honda. A clean plenty of clean water and dry with a soft, motorcycle makes it easier to spot potential clean cloth.
-
Page 128
Caring for Your Motorcycle Do not direct water at the air cleaner: Washing Precautions ● Water in the air cleaner can prevent the Follow these guidelines when washing: engine from starting. Do not use high-pressure washers: ● Do not direct water near the headlight: High-pressure water cleaners can ●… -
Page 129
Caring for Your Motorcycle Aluminum Components Exhaust Pipe and Muffler Aluminum will corrode from contact with dirt, The exhaust pipe and muffler are stainless steel mud, or road salt. Clean aluminum parts but may become stained by mud or dust. regularly and follow these guidelines to avoid To remove mud or dust, use a wet sponge and scratches:… -
Page 130: Storing Your Motorcycle
For more information about storage, refer to If you won’t be riding for an extended period, the Honda Winter Storage Guide, available from follow these guidelines: your dealer. Wash your motorcycle and wax all painted ●…
-
Page 131: Transporting Your Motorcycle
Transporting Your Motorcycle Transporting Your Motorcycle If your motorcycle needs to be transported, it should be carried on a motorcycle trailer or a flatbed truck or trailer that has a loading ramp or lifting platform, and motorcycle tie-down straps. Never try to tow your motorcycle with a wheel or wheels on the ground.
-
Page 132: You & The Environment
You & the Environment You & the Environment Recycle Wastes Put oil and other toxic wastes in approved Owning and riding a motorcycle can be containers and take them to a recycling center. enjoyable, but you must do your part to protect Call your local or state office of public works or the environment.
-
Page 133: Vehicle Identification Number
Vehicle Identification Number Vehicle Identification Number The VIN and engine serial number uniquely identify your motorcycle and are required in order to register your motorcycle. They may also be required when ordering replacement parts. You should record these numbers and keep them in a safe place.
-
Page 134: Emission Control Systems
Emission Control Systems Emission Control Systems Compliance with the terms of the Distributor’s Warranties for Honda Motorcycle Emission Your motorcycle engine emits combustion Control Systems is necessary in order to byproducts, including carbon monoxide (CO), maintain a valid emissions system warranty.
-
Page 135
Emission Control Systems Ignition Timing Control System Noise Emission Requirements The ignition timing control system adjusts the The EPA requires that motorcycles built after ignition timing to reduce the amount of HC, January 1, 1983 comply with applicable noise CO, and NOx produced. emission standards for one year or 3,730 miles (6,000 km) after the time of purchase when Catalytic Converters… -
Page 136
Emission Control Systems Crankcase Emissions Control System Noise Emission Control System The engine is equipped with a closed crankcase TAMPERING WITH THE NOISE CONTROL system to prevent discharging crankcase SYSTEM IS PROHIBITED: emissions into the atmosphere. U. S. federal law prohibits the following acts or Blow-by gas is returned to the combustion the causing thereof: (1) The removal or chamber through the air cleaner and the intake… -
Page 137
Emission Control Systems AMONG THOSE ACTS PRESUMED TO Problems Affecting Motorcycle Exhaust CONSTITUTE TAMPERING ARE THE Emissions FOLLOWING ACTS: Have your motorcycle inspected and repaired Removal of, or puncturing the muffler, ● by your dealer if you experience any of the baffles, header pipes or any other following symptoms: component which conducts exhaust gases. -
Page 138: Catalytic Converter
A defective catalytic converter contributes to air or otherwise not running properly, stop pollution and can impair your engine’s riding and turn off the engine. Have your performance. A replacement unit must be an motorcycle serviced as soon as possible. original Honda part or equivalent.
-
Page 139: Oxygenated Fuels
Oxygenated Fuels Oxygenated Fuels If you accidentally fill your fuel tank with an oxygenated fuel containing higher percentages, Some conventional fuels blended with alcohol you may experience performance problems. To or an ether compound are available in some resolve the problem, have your dealer drain the locales to help reduce emissions to meet clean fuel tank and replace with the correct fuel.
-
Page 140: Authorized Manuals
However, if you possess The Service Manual used by your authorized the proper tools, observe the safety standards, dealer is available from your Honda dealer or and are mechanically capable, you should find Helm, Inc. them easy to use.
-
Page 141: Warranty Coverage And Service
Service failures that occur due directly to improper maintenance are not covered by these Coverage warranties. Your new Honda is covered by the following warranties: You can extend almost all of your warranty Motorcycle Limited Warranty ● coverage through the Honda Protection Plan.
-
Page 142: Honda Contacts
Honda dealer. Make an appointment for an American Honda Motor Co., Inc. inspection and diagnosis. You will be asked to If you wish to contact Honda directly to authorize that inspection, and your dealer will comment on your experiences with your return the results of the inspection.
-
Page 143
Honda and Dealer name and address ● also handles warranty inspections and repairs. We will likely ask your Honda dealer to respond, The parts department offers Honda Genuine or possibly acknowledge your comments Parts, Pro Honda products and Honda Genuine directly. -
Page 144: Reporting Safety Defects
Highway Traffic Safety Administration Administrator, NHTSA, (NHTSA) in addition to notifying 1200 New Jersey Avenue, SE., American Honda Motor Co., Inc. Washington, DC 20590. You can also obtain other information If NHTSA receives similar complaints, it about motor vehicle safety from: may open an investigation, and if it finds http://www.safercar.gov.
-
Page 145: Specifications
Specifications Main Components ■ Displacement 7.6 cu-in (125 cm Overall length 75.4 in (1,915 mm) Bore x stroke 2.06 x 2.28 in (52.4 x 57.9 mm) Overall width 28.3 in (720 mm) Compression 9.3 : 1 ratio Overall height 39.4 in (1,000 mm) Unleaded gasoline Wheelbase 49.0 in (1,245 mm)
-
Page 146
MA, Pro Honda GN4 4-stroke oil Tire air pressure Rear 33 psi (225 kPa, 2.25 kgf/cm (USA & Canada) or Honda 4-stroke oil, or CPR6EA-9 (NGK) or U20EPR9 an equivalent motorcycle oil (standard) (DENSO) 0.8 US qt (0.8 L) -
Page 147
Specifications Bulbs Torque Specifications ■ ■ Headlight Engine oil drain bolt 18 lbf·ft (24 N·m, 2.4 kgf·m) Brake light/Taillight Air cleaner case cover screw 0.8 lbf·ft (1.1 N·m, 0.1 kgf·m) Front turn signal Chain cover bolt 5.2 lbf·ft (7 N·m, 0.7 kgf·m) Rear turn signal Front wheel axle nut 44 lbf·ft (59 N·m, 6.0 kgf·m) -
Page 148
Information Record Engine No. Color Label & Code Owner’s Name Address City/State Phone Dealer’s Name Address City/State Phone Service Manager… -
Page 149: Index
Index Headlight …………118 ABS (Anti-lock Brake System)……. 10 License Plate Light……….. 118 ABS (Anti-lock Brake System) Position Light ………… 118 Indicator ……….25, 104 Rear Turn Signal Light ……..118 Accessories …………13 Air Cleaner ……….74, 84 Alarm Button ………… 27 Caring for Your Motorcycle ……
-
Page 150
High Beam Indicator ……24, 124 Stop Switch………. 26, 47, 124 Honda Contacts ……….140 Stopping …………124 Honda SMART Key Indicator ……24 Will Not Start ………… 102 Horn Button …………26 Environment ……….. 130 Ignition Switch……..27, 47, 124 Flooded Engine ………. -
Page 151
PGM-FI (Programmed Fuel Injection) Maintenance Malfunction Indicator Lamp (MIL)..25, 103 Fundamentals …………. 61 Protective Apparel……….8 Importance …………55 Record …………..60 Safety …………..56 Recommended Schedule…………… 57 Engine Oil ……….. 67, 144 Maximum Weight Capacity ….14, 143 Fuel ……………. -
Page 152
Speedometer ………… 20 Start Button ……….26, 47 Vehicle Identification Number ….131 Starting the Engine ……… 47 Stopping Engine ……….124 Storage Warranty Coverage and Service ….139 Document Bag ………. 53, 124 Washing …………125 Equipment …………52 Weight Limit………. -
Page 153
California Proposition 65 Warning WARNING Operating, servicing and maintaining a passenger vehicle or off- highway motor vehicle can expose you to chemicals including engine exhaust, carbon monoxide, phthalates, and lead, which are known to the State of California to cause cancer and birth defects or other reproductive harm.
Honda Super Cub 2019: List of Available Documents
Note for Owners:
Guidesimo.com webproject is not a service center of Honda trademark and does not carries out works for diagnosis and repair of faulty Honda Super Cub 2019 equipment. For quality services, please contact an official service center of Honda company. On our website you can read and download documentation for your Honda Super Cub 2019 device for free and familiarize yourself with the technical specifications of device.
More Scooter Devices:
-
haibike SDURO HardFour RX 2016
ORIGINAL BETRIEBSANLEITUNG ORIGINAL INSTRUCTIONSDEUTSCHES ORIGINAL UND ENGLSICHE ÜBERSETZUNG German original instructions and English translation HAIBIKE SDURO HardFour RX HAIBIKE SDURO HardFour LifeMODELLJAHR // MODEL YEAR 2016 Deutsch English …
SDURO HardFour RX 2016 Scooter, 6
-
EBIKES4AFRICA FAT-E
— EBIKES4AFRICA — E-BIKE MANUAL 2020 EDITION Welcome to the future of mobility! Ebikes4Africa will change the way you move. E-Bikes reduce carbon emissions and are the perfect replacement for expensive, fuel consuming and polluting cars, making it the most eco-friendly mobility alternative out there. As a plus, E-Bikes provide health benefits and because of the electric support system, will mak …
FAT-E Scooter, 16
-
SEEMARK Y-22
1 Auto Balanced Scooter Model Y-22 Cross-country / 2 Batteries Instruction Please read these instructions carefully before using your Auto Balance Scooter. SEEMARK (AUSTRALIA) PTY LTD 2785 Remembrance Drive, Tahmoor NSW 2573 AUSTRALIA Ph: +61 (0)2 4683 1174 E: [email protected] W: www.seemark.com.au …
Y-22 Scooter, 12
-
Jeep Grand Cherokee
For more information, please visit jeep.com/grandcherokeeFor more information on Trail Rated, please visit jeep.com/trailratedJeep is a registered trademark of DaimlerChrysler Corporation©1995-2006 DaimlerChrysler. All Rights Reserved. For important information, go to jeep.com/privacyPage 1 of 82007 JEEP® GRAND CHEROKEEThe Next Revolution in On-Road Performance For more information, please visit …
Grand Cherokee Automobile, 8
Recommended Documentation:
Смотреть руководство для Honda Super Cub C50 (1983) ниже. Все руководства на ManualsCat.com могут просматриваться абсолютно бесплатно. Нажав кнопку «Выбор языка» вы можете изменить язык руководства, которое хотите просмотреть.

MANUALSCAT | RU
Вопросы и ответы
У вас есть вопрос о Honda Super Cub C50 (1983), но вы не можете найти ответ в пользовательском руководстве? Возможно, пользователи ManualsCat.com смогут помочь вам и ответят на ваш вопрос. Заполните форму ниже — и ваш вопрос будет отображаться под руководством для Honda Super Cub C50 (1983). Пожалуйста, убедитесь, что вы опишите свои трудности с Honda Super Cub C50 (1983) как можно более детально. Чем более детальным является ваш вопрос, тем более высоки шансы, что другой пользователь быстро ответит на него. Вам будет автоматически отправлено электронное письмо, чтобы проинформировать вас, когда кто-то из пользователей ответит на ваш вопрос.
Задать вопрос о Honda Super Cub C50 (1983)
- Бренд:
- Honda
- Продукт:
- мотоциклы
- Модель/название:
- Super Cub C50 (1983)
- Тип файла:
- Доступные языки: