Наслаждайтесь вашим автомобилем и «семейной» заботой от Kia!
Поздравляем вас с приобретением нового автомобиля Kia.
Являясь признанным в мире производителем автомобилей, известных
своим высоким качеством и справедливой ценой, компания Kia Motors
считает своим долгом предоставлять клиентам услуги на уровне выше их
ожиданий и полностью удовлетворяющем их потребности.
В дилерской сети Kia вас ожидает “семейное” отношение, которое создает
ощущение тепла, гостеприимства и доверия – ощущения, что за тобой
ухаживают заботливые люди.
Вся информация, содержащаяся в этом руководстве пользователя, является
точной на момент ее опубликования. Тем не менее, Kia оставляет за собой
право в любое время вносить изменения, потому что таким образом
реализуется наша политика непрерывного усовершенствования продукции.
Данное руководство относится ко всем моделям этого автомобиля и
включает в себя описания и пояснения дополнительного и стандартного
оборудования. В результате этого в руководстве могут встречаться
материалы, которые не соответствуют вашей конкретной модели
автомобиля Kia.
ООО «Киа Россия и СНГ» (115054, г. Москва, Валовая ул., д. 26) ведет деятельность на территории РФ в соответствии с законодательством РФ. Реализуемые товары доступны к получению на территории РФ. Мониторинг потребительского поведения субъектов, находящихся за пределами РФ, не ведется. Информация о соответствующих моделях и комплектациях и их наличии, ценах, возможных выгодах и условиях приобретения доступна у дилеров Kia. Товар сертифицирован. Не является публичной офертой.
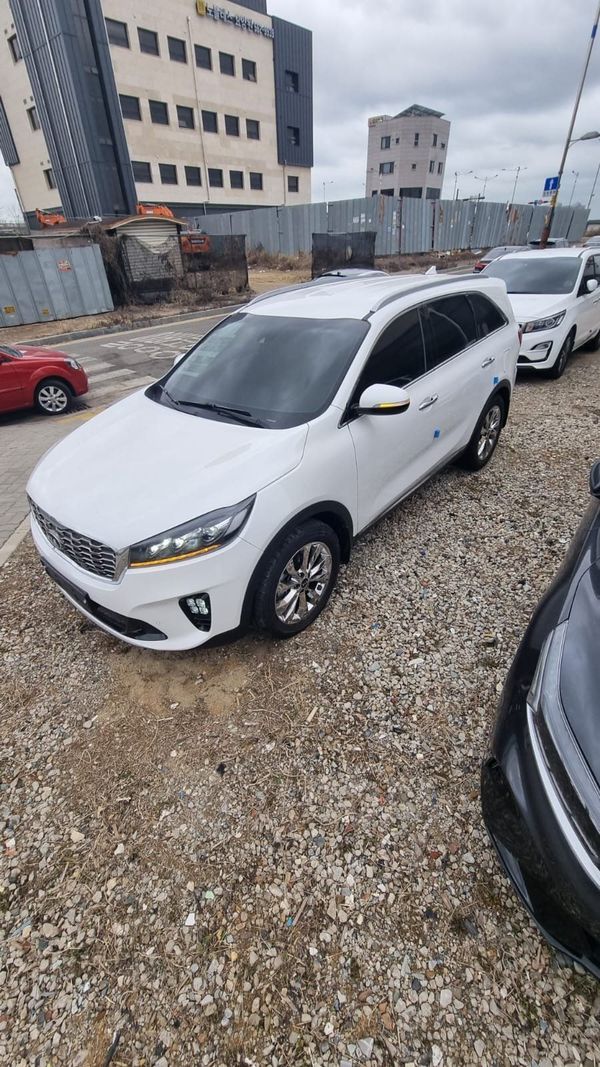
KIA Sorento GT Line
Шпаргалка. Руководства по эксплуатации и прочие документы

kindakaa
Был 4 дня назад
46 лет
Я езжу на KIA Sorento GT Line
Альметьевск, Россия
Список разных документов для эксплуатации автомобиля:
* Руководство по эксплуатации KIA Sorento Prime
* Руководство по эксплуатации мультимедиа KIA Sorento Prime
* Сервисная книжка KIA Sorento Prime
* Сетка технического обслуживания KIA Sorento Prime
* Руководство по эксплуатации KIA Sorento Prime (англ.)
Два варианта (не знаю чем отличаются):
* Руководство по ремонту KIA Sorento Prime (англ.) 1
* Руководство по ремонту KIA Sorento Prime (англ.) 2
Эту книга есть в продаже. Я ее купил — норм книга, хотя и не без косяков. Ссылка на издательство:
* KIA Sorento с 2015. Руководство по ремонту и эксплуатации автомобиля
* (демонстрационный отрывок книги)

31 декабря 2018
Метки: другое
5
Ранее Skoda Simply Clever в Kia Sorento Prime
Далее Шпаргалка. Плановое техническое обслуживание
Разместить рекламу
Реклама
Машины в продаже

Сальск
Kia Sorento, 2017
3 050 000 ₽
Волгодонск
Kia Sorento, 2020
2 770 000 ₽

Краснодар
Kia Sorento, 2020
3 045 500 ₽

Краснодар
Kia Sorento, 2018
2 830 000 ₽
Посмотреть больше машин на Дроме
Комментарии
5
Войдите или зарегистрируйтесь, чтобы писать комментарии, задавать вопросы и участвовать в обсуждении.
Войти
Зарегистрироваться

Sorento173
Я езжу на KIA Sorento (3G)
KIA SORENTO PRIME C 2019 Г. РУКОВОДСТВО ПО РЕМОНТУ И ЭКСПЛУАТАЦИИ
где можно скачать подскажите пожалуйста
3 месяца

S188
Я езжу на KIA Sorento (3G)
KIA SORENTO PRIME C 2015 Г. РУКОВОДСТВО ПО РЕМОНТУ И ЭКСПЛУАТАЦИИ
где можно скачать подскажите пожалуйста
9 месяцев

kindakaa
Автор
Я езжу на KIA Sorento (3G)
Ссылки же есть в сообщении
9 месяцев

level66
Без машины
Спасибо
9 месяцев

VivereBene
Я езжу на Toyota Camry (XV70)
Спасибо
4 года
Автосервис Москва, Авиамоторная
Автосервис ЮВАО, ВАО — метро Авиамоторная:
Автосервис Серп и Молот | Автосервис Красноказарменная | Автосервис Лефортово
Ближайшие станции метро — Авиамоторная, Площадь Ильича, Шоссе Энтузиастов, Чкаловская, Бауманская, Семеновская. Ближайшие для подъезда улицы — третье транспортное кольцо (ТТК), проезд завода Серп и Молот, Лефортовский вал, Красноказарменная улица.
Автосервис Москва, Октябрьское поле
Автосервис СЗАО, САО — метро Октябрьское поле, станция Зорге МЦК (район Щукино, Хорошёво—Мнёвники)
Ближайшие станции метро — Октябрьское поле, Полежаевская. Станция Московского Центрального Кольца — Зорге. Ближайшие для подъезда улицы — Маршала Бирюзова, Берзарина, Народного ополчения, Зорге, Куусинена, Расплетина.
Автосервис Москва, Измайлово
Автосервис ВАО — метро Соколиная гора (район Измайлово)
Ближайшие станции метро — Соколиная гора, Партизанская, Измайлово, Шоссе Энтузиастов, Черкизовская. Ближайшие для подъезда улицы — Вернисажная, Шоссе Энтузиастов, проспект Будённого, Северо-Восточная хорда, Щербаковская улица, Большая Черкизовская улица.
Автосервис Москва, Щелковская
Автосервис ВАО — метро Щелковская (район Гольяново)
Ближайшие станции метро — Щелковская, Черкизовская, Бульвар Рокоссовского, Первомайская, Партизанская, Измайловская. Ближайшие для подъезда улицы — Щелковское шоссе, Амурская, Сиреневый бульвар, Монтажная улица, Байкальская улица, Открытое шоссе.
AUTO-TEXCENTER.RU
Франшиза автосервиса, Вакансии автосервиса
Ремонт (сервис) корейских автомобилей. Специализированный техцентр (автосервис) в Москве. Copyright © 2000-2023. Все права сохранены. Обращаем Ваше внимание на то, что данный сайт носит исключительно информационный характер и ни при каких условиях не является публичной офертой, определяемой положениями Статьи 437 (2) Гражданского кодекса Российской Федерации.
Компания «АвтоМиг» является НЕОФИЦИАЛЬНЫМ техническим центром по обслуживанию и ремонту автомобилей марок KIA и HYUNDAI. Никакого отношения ни к официальным представителям (дилерам), ни к самим производителям транспортных средств автосервис не имеет! Все упоминания торговых знаков (марок автомобилей) на данном сайте носят исключительно ИДЕНТИФИЦИРУЮЩИЙ характер (используются не в качестве средства индивидуализации), указывают, какие именно автомобили обслуживает техцентр (в соответствии со ст. 1474, 1487 Гражданского Кодекса РФ).

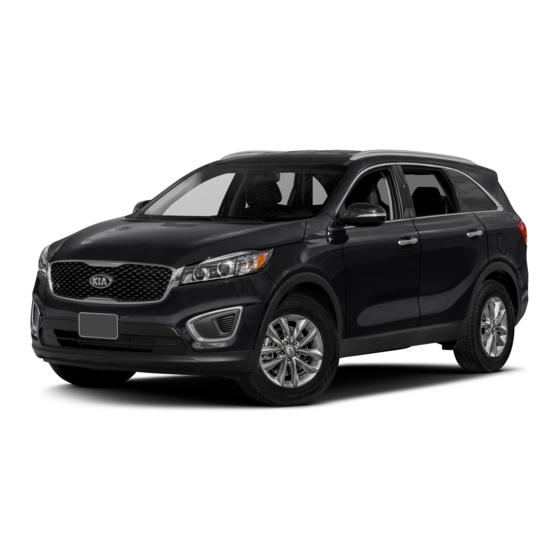
Данная инструкция на русском языке предназначена для автомобиля
Kia Sorento Prime UM (2014 — 2017), описывает принцип работы и основные моменты эксплуатации устройства.
Производитель настойчиво рекомендует перед включением автомобиля
внимательно изучить настоящую инструкцию.
Инструкция для автомобиля
представлена в формате PDF. Все современные браузеры уже поддерживают данный формат и сложностей с открытием файла возникнуть не должно.
Но если открыть инструкцию все же не удается, то необходимо установить на компьютер программу для чтения PDF файлов, например, Acrobat Reader. Если у вас возникли сложности с открытием инструкции на смартфоне под управлением Android, нужно установить, например, Adobe Acrobat Reader.
Комментарии (0)
Комментарии про другие Автомобили
Другие Автомобили Kia
- Manuals
- Brands
- Kia Manuals
- Automobile
- SORENTO 2016
- Owner’s manual
-
Contents
-
Table of Contents
-
Bookmarks
Quick Links
Chapters
-
Introduction 1
4 -
Your Vehicle at a Glance
11 -
Safety Features of Your Vehicle
19 -
Features Sunroof Your Vehicle
86 -
Advanced Smart Cruise Control System (Ascc). . 5-53
312 -
What to Do in an Emergency
425 -
Maintenance
453 -
Specifications, Consumer Information and Reporting Safety Defects
555
Related Manuals for Kia SORENTO 2016
Summary of Contents for Kia SORENTO 2016
-
Page 2
Kia, THE COMPANY Thank you for becoming the owner of a new Kia vehicle. As a global car manufacturer focused on building high-quality vehi- cles with exceptional value, Kia Motors is dedicated to providing you with a customer service experience that exceeds your expectations. -
Page 3
Thank you for choosing a Kia vehicle. The information and specifications provided in this manual were accurate at the time of printing. Kia reserves the right to When you require service, remember that your Kia dealer discontinue or change specifications or design at any time knows your vehicle best. -
Page 4: Table Of Contents
Introduction How to use this manual / Fuel requirements / Vehicle break-in process / Vehicle data collection and event data recorders Your vehicle at a glance Exterior overview / Interior overview / Instrument panel overview / Engine compartment Safety features of your vehicle Seats / Seat belts / Child restraint system / Air bag Features of your vehicle Keys / Door locks / Liftgate (Tailgate) / Windows / Hood / Fuel filler lid / Sunroof / Steering wheel / Mirrors /…
-
Page 5: Introduction
Introduction How to use this manual ….. . 1-2 Fuel requirements ……1-2 •…
-
Page 6: How To Use This Manual
(Consult an conditions. authorized Kia dealer for details.) The general layout of the manual is CAUTION • Tighten the cap until it clicks one provided in the Table of Contents.
-
Page 7: Gasoline Containing Alcohol And Methanol
Kia recom- your fuel efficiency and could lower • Always check that the fuel cap mends that customers do not use your MPG results.
-
Page 8: Do Not Use Methanol
Gasoline containing MMT Fuel Additives Using fuels such as Some gasoline contains harmful man- Kia recommends that you use good ganese-based fuel additives Such as quality gasolines treated with deter- — Silicone (Si) contained fuel, M M T ( M e t h y l c y c l o p e n t a d i e n y l…
-
Page 9: Operation In Foreign Countries
Introduction VEHICLE HANDLING VEHICLE BREAK-IN INSTRUCTIONS PROCESS Operation in foreign countries No special break-in period is need- If you are going to drive your vehicle As with other vehicles of this type, ed. By following a few simple precau- in another country, be sure to: failure to operate this vehicle correct- tions for the first 600 miles (1,000 ly may result in loss of control, an…
-
Page 10: Vehicle Data Collection And Event Data Recorders
Introduction VEHICLE DATA COLLECTION AND EVENT DATA RECORDERS This vehicle is equipped with an These data can help provide a bet- To read data recorded by an EDR, event data recorder (EDR). The ter understanding of the circum- special equipment is required, and stances in which crashes and access to the vehicle or the EDR is main purpose of an EDR is to…
-
Page 11: Your Vehicle At A Glance
Your vehicle at a glance Exterior overview ……2-2 Interior overview ……2-4 Instrument panel overview .
-
Page 12: Exterior Overview
Your vehicle at a glance EXTERIOR OVERVIEW ■ Front view 1. Hood…………4-43 2. Head lamp……..4-114, 7-82 3. Fog lamp ……..4-116, 7-85 4. Wheel and tire……..7-50, 8-4 5. Outside rearview mirror……4-67 6. Panoramic sunroof ……..4-49 7. Front windshield wiper blades..4-118, 7-45 8.
-
Page 13
Your vehicle at a glance ■ Rear view 9. Door locks ……….4-21 10. Fuel filler lid ………4-45 11. Rear combination lamp …….7-87 12. High mounted stop lamp …..7-89 13. Rear window wiper blade..4-118, 7-45 14. Liftgate(Tailgate)……..4-27 15. Rearview camera ……4-111 16. -
Page 14: Interior Overview
Your vehicle at a glance INTERIOR OVERVIEW 1. Inside door handle ……..4-22 2. Power window switch…….4-39 3. Central door lock switch ……4-23 4. Power window lock button …….4-41 5. Outside rearview mirror control ….4-68 6. Outside rearview mirror folding ….4-70 7.
-
Page 15: Instrument Panel Overview
Your vehicle at a glance INSTRUMENT PANEL OVERVIEW 1. Driver’s front air bag ……3-56 2. Horn………….4-56 3. Instrument cluster……..4-71 4. Wiper and washer control lever ..4-118 5. Ignition switch or Engine start/stop button ….5-6, 5-9 6. Cruise control / Advanced smart cruise control……5-49, 5-53 7.
-
Page 16: Engine Compartment
Your vehicle at a glance ENGINE COMPARTMENT ■ ■ Gasoline Engine (Theta II 2.4L) — GDI 1. Engine coolant reservoir ….7-35 2. Engine oil filler cap ……7-34 3. Brake fluid reservoir……7-38 4. Air cleaner………7-40 5. Fuse box ………..7-65 6. Negative battery terminal….7-47 7.
-
Page 17
Your vehicle at a glance ■ ■ Gasoline Engine (THETA 2.0L) T-GDI 1. Engine coolant reservoir ….7-35 2. Engine oil filler cap ……7-34 3. Brake fluid reservoir……7-38 4. Air cleaner………7-40 5. Fuse box ………..7-65 6. Negative battery terminal….7-47 7. Positive battery terminal ….7-47 8. -
Page 18
Your vehicle at a glance ■ ■ Gasoline Engine (Lambda 3.3L) — GDI 1. Engine coolant reservoir ….7-35 2. Engine oil filler cap ……7-34 3. Brake fluid reservoir……7-38 4. Air cleaner………7-40 5. Fuse box ………..7-65 6. Negative battery terminal….7-47 7. Positive battery terminal ….7-47 8. -
Page 19: Safety Features Of Your Vehicle
Safety features of your vehicle Seats ……..3-2 Air bag — advanced supplemental restraint system.
-
Page 20: Seats
Safety features of your vehicle SEATS Front seat (1) Forward and backward (2) Seatback angle (3) Seat cushion height (4) Lumbar support (Driver’s seat)* (5) Cushion extension (Driver’s seat)* (6) Driver position memory system ■ Manual seat (7) Headrest 2nd row seat (8) Forward and backward (9) Seatback angle and folding ■…
-
Page 21
Safety features of your vehicle WARNING WARNING WARNING — Loose — Driver respon- — Seat cushion objects sibility for passengers Occupants should never sit on Do not place anything in the dri- supplemental seat cushions. ver’s foot well or under the front The passenger’s hips may slide seats. -
Page 22
Safety features of your vehicle WARNING WARNING WARNING — Driver’s seat — Rear seatbacks — Cargo Area • Never attempt to adjust the Always lock the rear seatback Do not allow passengers to ride seat while the vehicle is mov- before driving. -
Page 23: Front Seat Adjustment — Manual
Safety features of your vehicle Seatback angle Front seat adjustment — manual WARNING — Seat adjust- Forward and backward ment • Do not adjust the seat while wearing seat belts. Moving the seat forward will cause strong pressure on the abdomen. •…
-
Page 24: Front Seat Adjustment — Power
Safety features of your vehicle Seat height (if equipped) Lumbar support (if equipped) Front seat adjustment — power (if equipped) The front seat can be adjusted by using the control switches located on the outside of the seat cushion. Before driving, adjust the seat to the proper position so you can easily con- trol the steering wheel, pedals and switches on the instrument panel.
-
Page 25
Safety features of your vehicle Forward and backward Cushion extension CAUTION — Power Seating (for driver’s seat, if equipped) Do not operate two or more power seat control switches at the same time. Doing so may damage the power seat motor or electrical components. -
Page 26
Safety features of your vehicle Seatback angle Seat height (if equipped) Lumbar support (for driver’s seat) ■ Type A OUM034007 OUM034008 OUM034068 Push the control switch forward or Pull the front portion of the control The lumbar support can be adjusted backward to move the seatback to switch up to raise or press down to by pressing the lumbar support… -
Page 27: Driver Position Memory System (For Power Seat)
Safety features of your vehicle ■ Type B Driver position memory system WARNING (if equipped, for power seat) Never attempt to operate the driver position memory system while the vehicle is moving. This could result in loss of con- trol, and an accident causing death, serious injury.
-
Page 28
Safety features of your vehicle Storing positions into memory When recalling an adjustment mem- Recalling positions from memory using the buttons on the door ory button while sitting in the vehicle, 1. Shift the shift lever into P while the you can be surprised by the setting engine start/stop button is ON or Storing driver’s seat positions… -
Page 29: Headrest (For Front Seat)
Safety features of your vehicle Easy access function Headrest (for front seat) Also, adjust the headrest as close to (if equipped) your head as possible. For this rea- son, the use of a cushion that holds The system will move the driver’s the body away from the seatback is seat automatically as follows: not recommended.
-
Page 30
Safety features of your vehicle Adjusting the height up and down Forward and backward adjustment Type A Pull it fully forward to the farthest ■ Type A ■ Type A position and release it. Type B Press and hold the release button (1), and adjust position of the head- rest. -
Page 31
Safety features of your vehicle Removal and reinstallation ■ Type C ■ Type A OYFH034205 OUM034012 OUM034013L CAUTION ■ Type B To remove the headrest: If you recline the seatback towards the front with the head 1. Recline the seatback (2) with the rest and seat cushion raised, recline lever or switch (1). -
Page 32
Safety features of your vehicle ■ Type C 3. Adjust the headrest to the appro- ■ Type A priate height. WARNING — Headrest Reinstallation To reduce the risk of injury to the head or neck, always make sure the headrest is locked into position and adjusted properly after reinstalling. -
Page 33: Seatback Pocket
Safety features of your vehicle Seatback angle (2nd row seat) Seatback pocket (if equipped) Rear seat adjustment Forward and backward (2nd row seat) OUM034083L OUM034077L To recline the seatback: The seatback pocket is provided on the back of the front passenger’s and 1.
-
Page 34
Safety features of your vehicle Walk-in seat (2nd row passenger Folding the rear seat side, if equipped) The rear seatbacks can be folded to facilitate carrying long items or to increase the luggage capacity of the vehicle. WARNING — Objects Objects carried on the folded down seatback should not extend higher than the top of… -
Page 35
Safety features of your vehicle ■ 2nd row seat ■ 3rd row seat (if equipped) To fold down the rear seatback 1. Insert the rear seat belt buckle in the pocket between the rear seat- back and cushion, and insert the rear seat belt webbing in the guide to prevent the seat belt from being damaged. -
Page 36
Safety features of your vehicle ■ 2nd row seat ■ 3rd row seat (if equipped) 4.Pull on the seatback folding lever or strap, then fold the seat toward the front of the vehicle. When you return the seatback to its upright position, always be sure it has locked into position by pushing on the top of the seatback. -
Page 37
Safety features of your vehicle 2nd row seat folding To fold down the rear center seat- WARNING — Rear seat (from outside, if equipped) back (for 2nd row seat) folding Do not fold the rear seats (2nd & 3rd row seats), if passengers, pets or luggage are in the rear seats. -
Page 38
Safety features of your vehicle Remember to return the rear shoulder CAUTION — Damaging belts to their proper position. Routing rear seat belt buckles the seat belt webbing through the rear seat belt guides will help keep the belts When you fold the rear (2nd from being trapped behind or under and/or 3rd row) seatback, insert the seats. -
Page 39: Headrest (For Rear Seat)
Safety features of your vehicle Armrest (2nd row seat) Headrest (for rear seat) For maximum effectiveness in case of an accident, the headrest should be adjusted so the middle of the head- rest is at the same height as the cen- ter of gravity of an occupant’s head.
-
Page 40
Safety features of your vehicle Adjusting the height up and down Removal and reinstallation To lower the headrest : (for 2nd row seats) 1. Push and hold the release button (for 2nd row seats) (2) on the headrest support ■ Outside ■… -
Page 41
Safety features of your vehicle 3rd row headrest (if equipped) To remove the headrest : To fold the headrest manually : Pull the strap. 1. Raise it as far as it can go then press the release button (1) while To unfold the headrest : pulling the headrest up (2). -
Page 42: Seat Belts
Safety features of your vehicle SEAT BELTS Seat belt restraint system Seat belts are designed to bear upon WARNING — Shoulder Belt the bony structure of the body, and • For maximum restraint system pro- should be worn low across the front •…
-
Page 43
Safety features of your vehicle Seat belt warning (for driver’s seat) • No modifications or additions WARNING — Seat belt should be made by the user which will either prevent the seat belt buckle adjusting devices from operating to Do not allow foreign material remove slack, or prevent the seat (gum, crumbs, coins, etc.) to belt assembly from being adjusted… -
Page 44
Safety features of your vehicle Seat belt — Driver’s 3-point system Conditions Warning Pattern with emergency locking retractor Vehicle Chime- Seat Belt Light-Blink Speed Sound Unbuckled 6 seconds Buckled 6 seconds None Below 3 mph 6 seconds None (5 km/h) Buckled →… -
Page 45
Safety features of your vehicle Seat belts — Front passenger and Release the button to lock the Front seat anchor into position. Try sliding the rear seat 3-point system with height adjuster to make sure that it combination locking retractor has locked into position. -
Page 46
Safety features of your vehicle It automatically adjusts to the proper CAUTION length only after the lap belt portion of the seat belt is adjusted manually Do NOT fold down the left por- so that it fits snugly around your hips. tion of the rear seat back when the rear center seat belt is buck- When the seat belt is fully extended… -
Page 47
Safety features of your vehicle Stowing the rear seat belt The rear seat belt buckles can be ■ ■ 2nd row seat 2nd row seat stowed in the pocket between the rear seatback and cushion when not in use. Routing the seat belt webbing through the rear seat belt guides will help keep the belts from being trapped behind or under the seats. -
Page 48: Pre-Tensioner Seat Belt
Safety features of your vehicle Pre-tensioner seat belt (1) Retractor Pretensioner If the system senses excessive ten- sion on the driver or passenger’s The purpose of the retractor pre- seat belt when the pre-tensioner sys- tensioner is to make sure that the tem activates, the load limiter inside shoulder belts fit in tightly against the retractor pre-tensioner will release…
-
Page 49
Safety features of your vehicle ✽ ✽ NOTICE WARNING — Skin Irritation • Both the driver’s and front pas- Wash all exposed skin areas senger’s seat belt pre-tensioner sys- thoroughly after an accident in tem may be activated not only in which the pre-tensioner seat certain frontal collision but also in belts were activated. -
Page 50: Seat Belt Precautions
“Child restraint system” in this driven, have an authorized Kia dealer burn you. section. inspect the pre-tensioner seat belt and SRS air bag system as soon as ✽…
-
Page 51
Safety features of your vehicle Larger children Restraint of pregnant women If the shoulder belt portion slightly touches the child’s neck or face, try Children who are too large for child Pregnant women should wear placing the child closer to the center of restraint systems should always lap/shoulder belt assemblies when- the vehicle. -
Page 52: Care Of Seat Belts
A seat belt cannot provide proper ation should be directed to an protection if the person is lying down authorized Kia dealer. in the rear seat or if the front and rear seats are in a reclined position.
-
Page 53: Child Restraint System
Safety features of your vehicle CHILD RESTRAINT SYSTEM Children riding in the vehicle should Children could be injured or killed in WARNING — Hot child sit in the rear seat and must always a crash if their restraints are not be properly restrained to minimize properly secured.
-
Page 54: Child Restraint System
Safety features of your vehicle Using a child restraint system WARNING WARNING — Holding chil- — Seat belt use Rearward-facing child restraint system dren Do not use one seat belt for two Never hold a child in your arms occupants at the same time. This will eliminate any safety or lap when riding in a vehicle.
-
Page 55
To secure a child authorized Kia dealer. manufacturer’s instructions. Be restraint system, use the following sure the seat belt webbing is not procedure. -
Page 56
Safety features of your vehicle If the vehicle headrest prevents prop- er installation of a child seat (as described in the child seat system manual), the headrest of the respec- tive seating position shall be read- justed or entirely removed. OEN036102 OEN036103 3. -
Page 57: Child Restraint System
Safety features of your vehicle The lap/shoulder belt automatically WARNING — Auto lock returns to the “emergency lock mode” whenever the belt is allowed mode to retract fully. Therefore, the preced- Set the retractor to Automatic ing seven steps must be followed Lock mode when installing any each time a child restraint is installed.
-
Page 58: Tether Anchor System
Safety features of your vehicle Securing a child restraint seat WARNING — Tether strap with tether anchor system Never mount more than one ■ 2nd row seat child restraint to a single tether or to a single lower anchorage point. increased load caused by multiple seats may…
-
Page 59: Lower Anchor System
Safety features of your vehicle Securing a child restraint seat with WARNING — Unused rear child seat lower anchor system seatbelts Always fasten the seatbelts behind the child restraint seat Lower Anchor Position Indicator when they are not used to secure the child seat.
-
Page 60
Safety features of your vehicle ✽ ✽ NOTICE LATCH anchors have been provided WARNING — LATCH lower in your vehicle. The LATCH anchors The recommended weight for the are located in the left and right out- anchors LATCH system is under 65 lb (30 board rear seating positions. -
Page 61
Safety features of your vehicle AIR BAG — ADVANCED SUPPLEMENTAL RESTRAINT SYSTEM (1) Driver’s front air bag (2) Passenger’s front air bag (3) Side air bag (4) Curtain air bag Even in vehicles with air bags, you and your passengers must always wear the safety belts provided in order to minimize the risk and sever- ity of injury in the event of a collision… -
Page 62: Air Bag
Safety features of your vehicle How does the air bag system • The front air bags will completely • In order to help provide protection, operate? the air bags must inflate rapidly. inflate and deflate in an instant. The speed of the air bag inflation is It is virtually impossible for you to •…
-
Page 63
Safety features of your vehicle Noise and smoke WARNING WARNING — Airbag infla- — Hot compo- When inflated, the air bags make a tion nents loud noise and leave smoke and Sit as far back as possible from powder in the air inside the vehicle. Do not touch the air bag storage the steering wheel while still This is normal and is a result of the… -
Page 64: Do Not Install A Child Restraint On The Front Passenger’s Seat
Safety features of your vehicle Do not install a child restraint on Air bag warning light WARNING — Air bag the front passenger’s seat. deployment When children are seated in the rear outboard seats of a vehicle equipped with side and/or cur- tain air bags, install the child restraint system as far away from the door side as possible.
-
Page 65: Srs Components And Functions
(2) Passenger’s front air bag module your vehicle checked by an author- (3) Side air bag modules ized Kia dealer. (4) Curtain air bag modules (5) Retractor pre-tensioner assemblies (6) Air bag warning light…
-
Page 66
Driver’s front air bag (2) occurs, this indicates a malfunction in the air bag system. Have an authorized Kia dealer inspect the air bag system as soon as possible. • The light does not turn on briefly when you turn the ignition ON. -
Page 67
Safety features of your vehicle Driver’s front air bag (3) Passenger’s front air bag WARNING — Flying objects Do not place any objects (an umbrella, bag, etc.) between the front door and the front seat. Such objects may become dan- gerous projectiles if the side airbag inflates. -
Page 68: Occupant Detection System (Ods)
SRS is not working properly. If this occurs, have your vehicle immediately inspected authorized Kia dealer. ✽ ✽ NOTICE OUMA034090 Your vehicle is equipped with an Before you replace a fuse or discon- occupant detection system in the nect a battery terminal, turn the front passenger’s seat.
-
Page 69
Safety features of your vehicle Main components of the occu- If the front passenger seat is occu- Always be sure that you and all vehicle pant detection system pied by a person that the system occupants are seated and restrained determines to be of appropriate size, properly (sitting upright with the seat in •… -
Page 70
Safety features of your vehicle ✽ ✽ NOTICE Condition and operation in the front passenger occupant detection system Do not modify or replace the front passenger seat. Don’t place anything Indicator/Warning light Devices on or attach anything such as a blan- Condition detected by the ket, front seat cover or after market «PASSENGER… -
Page 71
Safety features of your vehicle (Continued) OVQ036013N 1KMN3663 1KMN3665 — Never put a heavy load or an — Never sit with hips shifted — Never place feet on the dash- active electronic device on towards the front of the seat. board. -
Page 72
Safety features of your vehicle ✽ ✽ NOTICE If the PASSENGER AIR BAG “OFF” Proper position indicator is still on, ask the passen- The PASSENGER AIR BAG “OFF” ger to move to the rear seat. indicator illuminates for about 4 sec- onds after the ignition switch is turned to the ON position or after WARNING… -
Page 73
Kia dealer using original Kia parts • If the PASSENGER AIR BAG designed for this vehicle and “OFF” indicator is illuminated when model. Any other such replace-… -
Page 74: Driver’s And Passenger’s Front Air Bag
Safety features of your vehicle Driver’s and passenger’s front air Your vehicle is equipped with an These sensors provide the ability to Advanced Supplemental Restraint control the SRS deployment based on (Air Bag) System and lap/shoulder whether or not the seat belts are fas- ■…
-
Page 75
The occu- contact point concerning modifica- except by an authorized Kia dealer pant detection system detects the tions to the vehicle for persons with using original Kia parts designed for… -
Page 76: Side Air Bag
Safety features of your vehicle Front air bags are not intended to Side air bag • The side air bags are designed to deploy in side-impact, rear-impact or deploy during certain side-impact rollover crashes. However, when collisions, depending on the crash frontal deployment threshold is satis- severity, angle, speed and point of fied at side-impact, front air bags…
-
Page 77
Kia deal- with the seat belt properly fas- er. Inform the dealer that your vehi- tened. The driver’s hands should… -
Page 78: Curtain Air Bag
This should only be • The curtain air bags may deploy on done by an authorized Kia dealer. the side of the impact or on both sides. • Also, the curtain air bags on both sides of the vehicle will deploy in certain rollover situations.
-
Page 79
Safety features of your vehicle Air bag collision sensors Why didn’t my air bag go off in a collision? (Inflation and non-infla- tion conditions of the air bag) There are many types of accidents in which the air bag would not be expected to provide additional protection. -
Page 80
Therefore, do not try to per- impact of the front collision. form maintenance around the air bag sensors. Have the vehicle checked and repaired by an authorized Kia dealer. -
Page 81
Safety features of your vehicle Also, the side and curtain air bags are If the vehicle chassis is impacted by designed to inflate when a rollover is bumps or objects on unimproved detected by a rollover sensor. roads, the air bags may deploy. Drive carefully on unimproved roads or on Although the front air bags (driver’s surfaces not designed for vehicle… -
Page 82
Safety features of your vehicle Air bag non-inflation conditions OUM034056 OUM034057 • Air bags are not designed to inflate • Front air bags may not inflate in OUM034055 in rear collisions, because occu- side impact collisions, because • In certain low-speed collisions the pants are moved backward by the occupants move to the direction of air bags may not deploy. -
Page 83
Safety features of your vehicle 1VQA2089 OUM034058 OUM034059 • In an angled collision, the force of • Just before impact, drivers often • Front air bags may not inflate in all impact may direct the occupants in brake heavily. Such heavy braking rollover accidents where… -
Page 84: Srs Care
Kia dealer. must be scrapped, certain safety precautions must be observed. An Any work on the SRS system, such authorized Kia dealer knows these as removing, installing, repairing, or precautions and can give you the OUM034060 any work on the steering wheel, the necessary information.
-
Page 85: Air Bag Warning Label
Safety features of your vehicle Adding equipment to or modi- Air bag warning label WARNING — Tampering fying your air bag-equipped with SRS vehicle Do not tamper with or discon- If you modify your vehicle by chang- nect SRS wiring, or other com- ing your vehicle’s frame, bumper sys- ponents of the SRS system.
-
Page 86: Features Sunroof Your Vehicle
Features of your vehicle Folding key ……. . 4-5 • Opening the liftgate (tailgate) ….4-25 •…
-
Page 87
Steering wheel ……4-54 • Service mode ……. . 4-83 •… -
Page 88
• Front windshield washers….. 4-120 • Manual heating and air conditioning … 4-141 •… -
Page 89
• USB charger……. . 4-165 • Basic method of use……4-194 •… -
Page 90: Folding Key
Should lose your keys, this number will WARNING — Aftermarket enable an authorized Kia dealer to duplicate the keys easily. Remove the key code tag and store it in a safe Use only Kia original parts for place. Also, record the key code the ignition key in your vehicle.
-
Page 91
Features of your vehicle Door Lock (1) Door Unlock (2) WARNING — Ignition key 1. Press the unlock button(2). (smart key) 2. The driver’s door will unlock. The Never leave the keys in your hazard warning lights will blink two vehicle with unsupervised chil- times. -
Page 92: Transmitter Precautions
Features of your vehicle Liftgate (Tailgate) unlock (3) Panic (4) Transmitter precautions The liftgate (tailgate) is unlocked if The horn sounds and hazard warn- • The transmitter will not work if any the button is pressed for more than 1 ing lights flash for about 27 seconds of following occur: second.
-
Page 93: Battery Replacement
If you have a Keep the transmitter away from problem with the transmitter, con- water or any liquid as it can tact an authorized Kia dealer. become damaged and not func- tion properly. • If the transmitter is in close proxim-…
-
Page 94: Immobilizer System
Features of your vehicle To activate the immobilizer sys- For replacement transmitters, see an Immobilizer system authorized Kia dealer for transmitter (if equipped) tem: reprogramming. Turn the ignition key to the OFF posi- Your vehicle is equipped with an • The transmitter is designed to give tion.
-
Page 95
If you need additional keys or lose ference that may cause undesired your keys, contact an authorized CAUTION — Immobilizer operation. Kia dealer. alterations Do not change, alter or adjust WARNING the immobilizer system because it could cause the immobilizer Changes or modifications not system to malfunction. -
Page 96: Smart Key
WARNING — Ignition key this number will enable an author- (smart key) ized Kia dealer to duplicate the keys Never leave the keys in your easily. Remove the bar code tag and vehicle with unsupervised chil- store it in a safe place. Also, record dren.
-
Page 97
Features of your vehicle Door Lock Using the door handle button Using the button on the smart key 1. Carry the smart key. 1 Close all doors, engine hood and liftgate (tailgate). 2. Close all doors, engine hood and liftgate (tailgate). 2. -
Page 98
Features of your vehicle Unlocking Liftgate (Tailgate) unlocking Using the button on the smart key 1. Press the unlock button(2) of the Using the liftgate (tailgate) handle Using the door handle button button smart key. 1. Carry the smart key. 1. -
Page 99
Features of your vehicle Panic Start-up Using the button on the smart key 1. Press the liftgate (tailgate) unlock 1. Press the panic button (4) for more You can start the engine without button (3) for more than 1 second. than 1 second. -
Page 100: Loss Of The Smart Key
Kia dealer(tow the vehi- smart key. ing, and/or sending/receiving…
-
Page 101: Battery Replacement
Kia dealer. inside the vehicle. • Using the wrong battery can cause With the immobilizer system, when- the smart key to malfunction.
-
Page 102
Keep each key separate in ered by your manufacturer’s order to avoid a starting malfunction. vehicle warranty. ✽ ✽ NOTICE If you need additional keys or lose your keys, contact an authorized Kia dealer. 4 17… -
Page 103: Theft-Alarm System
The theft-alarm system can be deac- system is armed. «Armed» stage, the second is the tivated by an authorized Kia dealer. «Theft-alarm» stage, and the third is If you want this feature, consult an the «Disarmed» stage. If triggered, authorized Kia dealer.
-
Page 104: Theft-Alarm Stage
Features of your vehicle Do not arm the system until all Theft-alarm stage Disarmed stage passengers have left the vehicle. If The alarm will be activated if any of The system will be disarmed when the system is armed while a pas- the following occurs while the system •…
-
Page 105
Kia dealer. ignition switch to the ON position and wait for 30 seconds. Then the ✽ ✽ NOTICE system will be disarmed. -
Page 106: Door Locks
Features of your vehicle DOOR LOCKS Operating door locks from • Doors can also be locked and outside the vehicle unlocked with the transmitter. • Once the doors are unlocked, they ■ Type A ■ Type B may be opened by pulling the door handle.
-
Page 107
Features of your vehicle Operating door locks from • To open a door, pull the door handle If a power door lock ever fails to func- inside the vehicle (3) outward. tion while you are in the vehicle, try one or more of the following tech- •… -
Page 108: Central Door Lock Switch
Features of your vehicle With central door lock switch • When pressing the rear portion (2) Impact sensing door unlock of the switch, all vehicle doors will system Driver’s door unlock. In the event of air bag deployment • If the key is in the ignition switch resulting from a vehicle impact, all and any front door is opened, the doors will automatically unlock.
-
Page 109: Child-Protector Rear Door Lock
Features of your vehicle Child-protector rear door lock 3. Close the rear door. To open the rear door, pull the out- side door handle. Even though the doors may be unlocked, the rear door will not open by pulling the inner door handle until the rear door child safety lock is unlocked.
-
Page 110: Liftgate (Tailgate) (For Manual Liftgate (Tailgate))
Features of your vehicle LIFTGATE (TAILGATE) (for manual liftgate (tailgate)) Opening the liftgate (tailgate) The liftgate (tailgate) swings upward. Closing the liftgate (tailgate) Make sure no objects or people are near the rear of the vehicle when opening the liftgate (tailgate). ✽…
-
Page 111: Emergency Liftgate (Tailgate) Safety Release
Features of your vehicle Emergency liftgate (tailgate) WARNING WARNING — Exhaust safety release fumes • No one should be allowed to Driving with the liftgate (tail- occupy the cargo area of the vehicle at any time. The cargo gate) open is not advisable. area is a very dangerous loca- Dangerous exhaust fumes can tion in the event of a crash.
-
Page 112: Power Liftgate (Tailgate)
Features of your vehicle POWER LIFTGATE (TAILGATE) ✽ ✽ NOTICE (1) Power liftgate (tailgate) open / close button In cold and wet climates, power lift- (2) Power liftgate (tailgate) handle gate (tailgate) may not work proper- switch ly due to freezing conditions. (3) Power liftgate (tailgate) close but- ✽…
-
Page 113: Opening The Liftgate (Tailgate)
Features of your vehicle Opening the liftgate (tailgate) CAUTION WARNING Do not close or open the power liftgate (tailgate) manually during automatic operation. This may cause damage to the power lift- gate (tailgate) or to the vehicle. If it is necessary to close or open the power liftgate (tailgate) manually when the battery is discharged or disconnected,…
-
Page 114: Closing The Liftgate (Tailgate)
Features of your vehicle Closing the liftgate (tailgate) OUMA044011 OUMA044010 OUMA044010 • Press the power liftgate(tailgate) • Press the liftgate (tailgate) handle open/close button for approximate- switch carrying the smart key with ly one second. you. • For emergency stop while power liftgate(tailgate) operating, press the power liftgate (tailgate) open/close button shortly.
-
Page 115
(tailgate) by yourself. This must be done by an The chime will sound continuously if authorized Kia dealer. you drive over 2mph (3km/h) with the • When jacking up the vehicle to liftgate (tailgate) opened. Stop your… -
Page 116
Features of your vehicle Automatic reversal (Continued) However, if the resistance is weak • In cold and wet climates, the such as from an object that is thin or power liftgate (tailgate) may not soft, or the liftgate (tailgate) is near the latched position, the automatic work properly due to freezing con- stop and reversal may not detect the… -
Page 117
1. Position the liftgate (tailgate) man- by an authorized Kia dealer. ually to the height you prefer. 2. Press the liftgate (tailgate) close button for more than 3 seconds. -
Page 118: Smart Liftgate (Tailgate)
Features of your vehicle How to use the Smart Liftgate Smart Liftgate (Tailgate) 1. Setting (if equipped) (Tailgate) To activate the Smart Liftgate (Tailgate), go to User Settings Mode The liftgate (tailgate) can be opened and select Smart Liftgate (Tailgate) with no-touch activation satisfying all on the LCD display.
-
Page 119
Features of your vehicle ✽ ✽ NOTICE Do not approach the detecting area if you do not want the liftgate (tailgate) to open. If you have unintentionally entered the detecting area and the haz- ard warning lights and chime starts to operate, leave the detecting area with the smart key. -
Page 120
Features of your vehicle How to deactivate the Smart Make sure you close the liftgate (tail- CAUTION gate) before driving your vehicle. Liftgate (Tailgate) function using Liftgate (Tailgate) lift the smart key Make sure there are no people or Make certain that you close the objects around the liftgate (tailgate) liftgate (tailgate) before driving before opening or closing the liftgate… -
Page 121
Features of your vehicle ✽ ✽ NOTICE ✽ ✽ NOTICE Detecting area • If you press the door unlock but- • The Smart Liftgate (Tailgate) func- ton (2), the Smart Liftgate tion will not work if any of the fol- (Tailgate) function will be deacti- lowing occurs: vated temporarily. -
Page 122: Emergency Liftgate (Tailgate) Safety Release
Features of your vehicle Emergency liftgate (tailgate) WARNING safety release • No one should be allowed to occupy the cargo area of the vehicle at any time. The cargo area is a very dangerous loca- tion in the event of a crash. •…
-
Page 123: Windows
Features of your vehicle WINDOWS (1) Driver’s door power window switch (2) Front passenger’s door power window switch (3) Rear door (left) power window switch (4) Rear door (right) power window switch (5) Window opening and closing (6) Automatic power window up/down* (Driver’s and Passenger’s window) (7) Power window and rear sunroof*…
-
Page 124: Power Windows
Features of your vehicle ✽ ✽ NOTICE Window opening and closing Power windows While driving with the rear windows The ignition switch must be in the ON down or with the sunroof (if position for power windows to operate. equipped) in an open (or partially Each door has a power window open) position, your vehicle may switch that controls the door’s win-…
-
Page 125
Features of your vehicle Auto up/down window (if equipped) 1. Turn the ignition switch to the ON position. 2. Close the driver’s and passenger’s window and continue pulling up the driver’s power window switch for at least 1 second after the win- dow is completely closed. -
Page 126: Power Window Lock Button
Features of your vehicle Power window lock button And if the power window switch is • When the power window lock pulled up continuously again within 5 switch is pressed : seconds after the window is lowered — The driver’s master control can by the automatic window reversal operate all the power windows.
-
Page 127
Features of your vehicle Always double check to make sure all arms, hands, head and other obstructions are safely out of the way before closing a window. WARNING — Power win- dows Do not allow children to play with the power windows. Keep the power window lock switch (on the driver’s door) in the LOCK (pressed) position. -
Page 128: Hood
Features of your vehicle HOOD Opening the hood Open the hood after turning off the engine on a flat surface, shifting the shift lever to the P (Park) position and setting the parking brake. OUM044023 2. Go to the front of the vehicle, raise OUM044022 the hood slightly, pull the second- 1.
-
Page 129: Closing The Hood
Features of your vehicle Closing the hood WARNING WARNING — Hood — Unsecured 1. Before closing the hood, check the obstruction engine hood following: Before closing the hood, ensure Always double check to be sure • All filler caps in the engine com- that all obstructions are removed that the hood is firmly latched partment…
-
Page 130: Fuel Filler Lid
Features of your vehicle FUEL FILLER LID Opening the fuel filler lid Closing the fuel filler lid 1. To install the cap, turn it clockwise until it “clicks” once. This indicates that the cap is securely tightened. 2. Close the fuel filler lid and push it in lightly making sure that it is securely closed.
-
Page 131
Features of your vehicle WARNING WARNING WARNING — Fire/explo- — Static — Refueling sion risk electricity Always remove the fuel cap Read and follow all warnings • Before touching the fuel noz- carefully and slowly. If the cap is venting fuel or if you hear a posted at the gas station facili- zle, you should eliminate hissing sound, wait until the… -
Page 132
If the fuel filler cap requires replace- cigarette in your vehicle while at fuel container, be sure to place ment, use only a genuine Kia cap or a gas station especially during the container on the ground prior the equivalent specified for your vehi- refueling. -
Page 133: Emergency Fuel Filler Lid Release
Features of your vehicle Emergency fuel filler lid release OUM044026 If the fuel filler lid does not open using the remote fuel filler lid release, you can open it manually. Remove the panel in the cargo area. Pull the handle out slightly. CAUTION Do not pull the handle exces- sively, otherwise the luggage…
-
Page 134: Panoramic Sunroof
Features of your vehicle PANORAMIC SUNROOF (IF EQUIPPED) The sunroof cannot slide when it is in CAUTION — Sunroof motor the tilt position nor can it be tilted damage while in an open or slide position. To prevent damage to the sun- roof, periodically remove any WARNING — Roof cargo…
-
Page 135: Sunroof Open Warning
Features of your vehicle To close the sunshade when the Sunroof open warning Sunshade (if equipped) sunroof glass is closed Push the sunroof control lever for- ward or pull it down to the 1st detent position. To stop the sliding at any point, press the sunshade control switch momen- tarily.
-
Page 136: Sliding The Sunroof
Features of your vehicle When the sunshade is opened Automatic reversal Sliding the sunroof Pull the sunroof glass control lever backward to the 1st or 2nd detent position, the sunroof glass will be opened. To stop the sunroof glass movement at any point, pull or push the sunroof control lever momentarily.
-
Page 137: Tilting The Sunroof
Features of your vehicle When the sunshade is opened Do not extend the face, neck, arms Tilting the sunroof or body outside the sunroof while Push the sunroof control lever driving. upward, the sunroof glass will tilt. To stop the sunroof movement at any point, pull or push the sunroof control WARNING — Sunroof…
-
Page 138: Closing The Sunroof
Features of your vehicle The sunroof glass slide close → Closing the sunroof Resetting the sunroof The sunroof glass slide open → The To close the sunroof glass with Whenever the vehicle battery is dis- sunroof glass and sunshade close connected or discharged, you must the sunshade reset your sunroof system as follows:…
-
Page 139: Steering Wheel
Take your vehicle to vehicle may still be steered, but it will • The steering gets heavy immedi- an authorized Kia dealer and have require increased steering effort. ately after turning the ignition the vehicle checked as soon as switch on.
-
Page 140: Tilt And Telescopic Steering
Features of your vehicle (Continued) Tilt and telescopic steering • When you operate the steering Tilt and telescopic steering allows wheel in low temperature, abnor- you to adjust the steering wheel mal noise may occur. If tempera- before you drive. You can also raise it ture rises, the noise will likely dis- to give your legs more room when appear.
-
Page 141: Heated Steering Wheel
Features of your vehicle ✽ ✽ NOTICE Heated steering wheel Horn (if equipped) The heated steering wheel will turn off automatically approximately 30 minutes after the heated steering wheel is turned on. CAUTION • Do not install any grip to oper- ate the steering wheel.
-
Page 142: Mirrors
Features of your vehicle MIRRORS Day/night rearview mirror Inside rearview mirror WARNING — Mirror adjust- (if equipped) Adjust the rearview mirror so that the ment center view through the rear window Do not adjust the rearview mir- is seen. Make this adjustment before ror while the vehicle is moving.
-
Page 143
Features of your vehicle Electric chromatic mirror (ECM) CAUTION — Cleaning (if equipped) mirror The electric rearview mirror automat- When cleaning the mirror, use a ically controls the glare from the paper towel or similar material headlights of the vehicles behind you dampened with glass cleaner. -
Page 144
Features of your vehicle Electric chromatic mirror (ECM) Automatic-Dimming Night Vision Automatic-dimming function with compass (if equipped) Safety™ (NVS ® ) Mirror Your mirror will automatically dim The NVS ® Mirror in your vehicle is upon detecting glare from the vehi- the most advanced way to reduce cles traveling behind you. -
Page 145
Features of your vehicle Z-Nav™ Compass Display Compass function There is a difference between mag- netic north and true north. The com- The NVS™ Mirror in your vehicle is The Compass can be turned ON and pass in the mirror can compensate also equipped with a Z-Nav™… -
Page 146
Features of your vehicle To adjust the Zone setting: 1. Determine desired Zone Number based upon your current location on the Zone Map. 2. Press and hold the button for more than 3 but less than 6 seconds, the current Zone Number will appear on the display. -
Page 147
Features of your vehicle Electrochromic mirror with 1. Press and hold the button for more Glare detection sensor than 6 seconds. When the com- HomeLink system (if equipped) Indicator light pass memory is cleared a «C» will appear in the display. 2. -
Page 148
Features of your vehicle Retain the original transmitter for Programming Flashing future programming procedures (i.e., Your vehicle may require the ignition new vehicle purchase). It is also sug- switch to be turned to the ACC posi- gested that upon the sale of the vehi- tion for programming and/or opera- cle, the programmed HomeLink but- tion of HomeLink. -
Page 149
Features of your vehicle ✽ ✽ NOTICE ✽ ✽ NOTICE Flashing For non rolling code garage door Some gate and garage door openers openers, follow steps 2 — 3. may require you to replace step #3 For rolling code garage door open- with the “cycling”… -
Page 150
Features of your vehicle Rolling code programming 6. Return to the vehicle and firmly Operating HomeLink press release pro- To train a garage door opener (or operate, simply press grammed HomeLink button up to other rolling code equipped devices) programmed HomeLink button. -
Page 151
Features of your vehicle Erasing programmed HomeLink Reprogramming a single Canadian Programming Garage & gate openers buttons HomeLink button To program a device to HomeLink During programming, your hand-held Flashing using a HomeLink button previously transmitter may automatically stop trained, follow these steps: transmitting. -
Page 152
Features of your vehicle Accessories FCC ID: NZLZTVHL3 Outside rearview mirror If you would like additional informa- IC: 4112A-ZTVHL3 Be sure to adjust the mirror angles tion on the HomeLink Wireless before driving. Control System, HomeLink compati- Your vehicle is equipped with both This device complies with part 15 ble products, or to purchase other left-hand and right-hand outside… -
Page 153
Features of your vehicle Adjusting outside rearview mirror The right outside rearview mirror is If the mirror is jammed with ice, do convex. Objects seen in the mirror not adjust the mirror by force. Use an are closer than they appear. approved spray de-icer (not radiator antifreeze) to release the frozen Use your interior rearview mirror or… -
Page 154
Features of your vehicle Reverse parking aid function L/R : When the remote control outside CAUTION — Outside mirror (if equipped) rearview mirror switch is select- ed to the L (left) or R (right) posi- • The mirrors stop moving when tion, both outside rearview mir- they reach the maximum rors will move downward. -
Page 155: Outside Rearview Mirror
Features of your vehicle Folding the outside rearview mirror Center (AUTO, 3) : The mirror will fold or unfold auto- matically as follows: • The mirror will fold or unfold when the door is locked or unlocked by the folding key or smart key. •…
-
Page 156: Instrument Cluster
Features of your vehicle INSTRUMENT CLUSTER ■ ■ Type A 1. Tachometer 2. Speedometer 3. Engine coolant temperature gauge 4. Fuel gauge 5. LCD display 6. Warning and indicator lights ■ ■ Type B ❈ The actual cluster in the vehicle may differ from the illustration.
-
Page 157: Instrument Cluster Control
Features of your vehicle Instrument Cluster Control LCD Display Control Adjusting Instrument Cluster ■ Type A Illumination ■ Type B OUM044265L • If you hold the illumination control OUMA044209 button («+» or «-«), the brightness The LCD display modes can be will be changed continuously.
-
Page 158: Gauges
Features of your vehicle Tachometer Gauges CAUTION — Red zone Speedometer Do not operate the engine with- ■ Type A in the tachometer’s RED ZONE. This may cause severe engine damage. OUM044202L OYP044103N ■ Type B, C tachometer indicates approximate number of engine revo- lutions per minute (rpm).
-
Page 159
Features of your vehicle Engine Coolant Temperature Fuel Gauge If the gauge pointer moves beyond Gauge the normal range area toward the “H” ■ Type A ■ Type B position, it indicates overheating that ■ Type A ■ Type B may damage the engine. -
Page 160
Features of your vehicle Odometer Outside Temperature Gauge WARNING — Fuel gauge ■ Type A ■ Type A Stop and obtain additional fuel as soon as possible after the warning light comes on or when the gauge indicator comes close to the E level. Running out of fuel can expose vehicle occu- pants to danger. -
Page 161: Transaxle Shift Indicator
Features of your vehicle To change the temperature unit (from Transaxle Shift Indicator Icy Road Warning Indicator °C to °F or from °F to °C) Automatic Transaxle Shift Indicator ■ Type A ■ Type B temperature unit ■ Type A ■…
-
Page 162: Lcd Display
Features of your vehicle LCD DISPLAY LCD Modes Modes Symbol Explanation This mode displays driving information like the tripmeter, fuel economy, and so on. Trip Computer For more details, refer to “Trip Computer” in this chapter. Turn By Turn This mode displays the state of the navigation. (if equipped) This mode displays the state of the Smart Cruise Control system (SCC) and SCC/LDWS…
-
Page 163: Trip Modes (Trip Computer)
Features of your vehicle TRIP MODES (TRIP COMPUTER) The trip computer is a microcomput- Trip Modes Fuel Economy er-controlled driver information sys- FUEL ECONOMY tem that displays information related to driving. • Range • Average Fuel Economy ✽ ✽ NOTICE •…
-
Page 164
Features of your vehicle • The range may differ from the actu- Average Fuel Economy (2) Under “Auto Reset” mode, the aver- al driving distance as it is an esti- age fuel economy will be cleared to • The average fuel economy is calcu- zero (—) when the vehicle speed mate of the available driving dis- lated by the total driving distance… -
Page 165: Trip A/B
Features of your vehicle Trip A/B Average Vehicle Speed (2) Timer (3) • The average vehicle speed is cal- • The elapsed time is the total driv- culated by the total driving dis- ing time since the last elapsed time tance and driving time since the reset.
-
Page 166: Digital Speedometer
Features of your vehicle Digital speedometer One time driving information If the estimated distance is below mode 1mi. (1km), the range (3) will display as «—» and a refuel message will appear (4). OYP044192N OYP044193N This mode displays the current This display shows trip distance (1), speed of the vehicle.
-
Page 167: Turn By Turn Mode
Features of your vehicle Turn By Turn Mode (if equipped) SCC/LDWS Mode (if equipped) A/V Mode (if equipped) OYP044274N OUM054126L OYP044273N This mode displays the state of the This mode displays the state of the This mode displays the state of the navigation.
-
Page 168: Service Mode
Features of your vehicle Service Interval Service Mode Tire Pressure OYP044119N Service required OYP044314N If you do not have your vehicle serv- OUM044266L Service interval iced according to the already inputted This mode displays the pressure sta- It calculates and displays when you service interval.
-
Page 169
Features of your vehicle ✽ ✽ NOTICE Master Warning Mode If any of the following conditions occurs, the mileage and days may be incorrect. • This warning light informs the driv- — The battery cable is disconnected. er the following situations — The fuse switch is turned off. -
Page 170: User Settings Mode
Features of your vehicle Driving Assist Door / Liftgate (Tailgate) User Settings Mode Smart Cruise Control Response Automatically lock Description (if equipped) • Disable: Choose the sensitivity of the smart The auto door lock operation will cruise control. be deactivated. •…
-
Page 171
Features of your vehicle Automatically unlock Two Press Unlock Power liftgate (tailgate) (if equipped) • Disable: • Off: If this item is checked, the power lift- gate (tailgate) function will be activat- The auto door unlock operation will The two press unlock function will be canceled. -
Page 172
Features of your vehicle Lights Sound Seat / Steering One touch turn signal Park assist system vol. (if equipped) Seat easy access (if equipped) If this item is checked, the lane Adjust the Park Assist System vol- If this item is checked, the driver’s change signals will blink 3, 5 or 7 ume. -
Page 173
Features of your vehicle Service interval Other features Fuel Economy Unit On this mode, you can activate the Choose the fuel economy unit. (US Fuel economy auto reset service interval function with mileage gallon, UK gallon) • Off : (mi. or km) and period (months). The average fuel economy will not •… -
Page 174: Warning Messages
Features of your vehicle Low Key Battery Press start button while turn Warning Messages (for smart key system) steering (for smart key system) Shift to P position (for smart key system) OYP044125N OYP044271N OYP044131N • This warning message illuminates • This warning message illuminates •…
-
Page 175
Features of your vehicle Press brake pedal to start engine Key not in vehicle Key not detected (for smart key system) (for smart key system) (for smart key system) OYP044133N OYP044121N OYP044123N • This warning message illuminates • This warning message illuminates •… -
Page 176
Engine Start/ Stop Button once more. Start/Stop Button for 10 seconds in the ACC position. • If the warning illuminates each time press Engine Start/Stop Button, have your vehi- cle inspected by an authorized Kia dealer. 4 91… -
Page 177
Features of your vehicle Shift to P or N to start engine Door / Hood / liftgate (tailgate) Sunroof Open (if equipped) (for smart key system) Open OUM044134 OYP044145N OUM044133 • The warning message illuminates if you turn off the engine and then •… -
Page 178
Features of your vehicle Align steering wheel (if equipped) Low Washer Fluid (if equipped) Turn on FUSE SWITCH OYP044135N OYP044141N OYP044139N • This warning message illuminates • This warning message illuminates • This warning message illuminates if you start the engine when the on the service reminder mode if if the fuse switch on the fuse box is steering wheel is turned to more… -
Page 179
In this case, have your — When the trip computer displays an authorized Kia dealer. vehicle inspected by an authorized «— mile (or km)» as range. Kia dealer. Add fuel as soon as possible. -
Page 180: Warning And Indicator Lights
Belts” in chapter 3. situation that needs attention. — It illuminates for approximately 6 seconds and then goes off. • When there is a malfunction with the SRS. In this case, have your vehicle inspected by an authorized Kia dealer. 4 95…
-
Page 181
If the brakes fail while you are driv- reservoir is low. In this case, have your vehicle ing, shift to a lower gear for addition- towed to an authorized Kia dealer al engine braking and stop the vehi- — If the warning light illuminates and inspected. -
Page 182
Engine Start/Stop Button to the ON In this case, have your vehicle inspect- the same time while driving: position. ed by an authorized Kia dealer. • When the ABS and regular brake — It illuminates for approximately 3 system may not work normally. -
Page 183
EPS. driving and abrupt braking. In this case, have your vehicle inspect- ed by an authorized Kia dealer as In this case, have your vehicle Have your vehicle inspected by soon as possible. inspected by an authorized Kia an authorized Kia dealer as soon dealer. -
Page 184
Converter Damage In this case, have your vehicle If the Malfunction Indicator inspected by an authorized Kia If there is a malfunction with either Lamp (MIL) illuminates, poten- dealer. the alternator or electrical charging… -
Page 185
TPMS. able, have your vehicle inspected is started, turn the engine off by an authorized Kia dealer as In this case, have your vehicle immediately. In this case, have soon as possible. -
Page 186
• The TPMS cannot alert you to In this case, have your vehicle Driving with the Low Fuel Level severe and sudden tire damage inspected by an authorized Kia warning light on or with the fuel caused by external factors. dealer. -
Page 187
AWD system. (FCWS) malfunction (if equipped) In this case, have your vehicle In this case, have your vehicle — Smart cruise control system inspected by an authorized Kia inspected by an authorized Kia (SCC) malfunction (if equipped) dealer. dealer. -
Page 188: Indicator Lights
ESC OFF but- starting the engine. the ESC system. ton. In this case, have your vehicle inspected by an authorized Kia This indicator light blinks: For more details, refer to “Electronic dealer. • When there is a malfunction with Stability Control (ESC)”…
-
Page 189
30 seconds: • When you turn the turn signal light In this case, have your vehicle • When the vehicle detects the inspected by an authorized Kia smart key in the vehicle properly dealer. while the Engine Start/Stop Button If any of the following occurs, there is ACC or ON. -
Page 190
Features of your vehicle High Beam Indicator Light ON Indicator Light Washer Fluid Warning Light Light (if equipped) This warning light illuminates: This indicator light illuminates: This indicator light illuminates: • When the washer fluid level in the • When the tail lights or headlights •… -
Page 191
In this case, have your vehicle covered roads and/or off-road. inspected by an authorized Kia dealer. CAUTION — AWD Lock ❈ For more details, refer to “Auto Mode Hold”… -
Page 192: Rear Parking Assist System
Features of your vehicle REAR PARKING ASSIST SYSTEM (IF EQUIPPED) Operation of the rear parking WARNING — Rear parking assist system assist system Operating condition Never rely solely on the rear • This system will activate when the parking assist system. Always indicator on the rear parking assist perform a visual inspection to OFF button is not illuminated.
-
Page 193: Non-Operational Conditions Of Rear Parking Assist System
Features of your vehicle Types of warning sound • This system will activate when Non-operational conditions of backing up with the ignition switch rear parking assist system • When an object is 47 in. to 24 in. (120 cm to 61 cm) from the rear The rear parking assist system If the vehicle is moving at a speed bumper: Buzzer beeps intermit-…
-
Page 194: Rear Parking Assist System Precautions
Features of your vehicle ✽ ✽ NOTICE The detecting range may decrease Rear parking assist system when: precautions This system can only sense objects 1. The sensor is stained with foreign within the range and location of the • The rear parking assist system matter such as snow or water.
-
Page 195: Self-Diagnosis
If this occurs, have your vehicle checked by an author- ized Kia dealer as soon as possible. ✽ ✽ NOTICE Your new vehicle warranty does not cover any accidents or damage to…
-
Page 196: Rearview Camera
Features of your vehicle REARVIEW CAMERA (IF EQUIPPED) ❈ This system is a supplemental sys- If your vehicle is equipped with tem that shows behind the vehicle AVN(Audio, Video and Navigation) through the rearview display mirror system, rearview display will show while backing up unless equipped behind the vehicle through the with a navigation system, then will…
-
Page 197: Surround View Monitoring System (Svm)
• If the SVM system is not operating the vehicle. Push the button into the normally, the system should be [ON] position to operate the system. checked by an authorized Kia dealer. To cancel the system, push the but- • When the vehicle moves over ton again.
-
Page 198: Lighting
Features of your vehicle LIGHTING Battery saver function Lighting control Parking & Tail light ( • The purpose of this feature is to prevent the battery from being dis- charged if the lights are left in the ON position. The system automati- cally shuts off the parking lights 30 seconds after the ignition key is removed and the driver’s door is…
-
Page 199: High Beam Operation
Features of your vehicle Auto light position (if equipped) High beam operation Headlight position ( OUM044217L OUM044059L OUM044057L When the light switch is in the head- When the light switch is in the AUTO To turn on the high beam headlamp, light position, the head, tail, license light position, the taillights and head- push the lever away from you.
-
Page 200
Features of your vehicle Turn signals and lane change WARNING — High beams signals Do not use high beam when there are other vehicles. Using high beam could obstruct the other driver’s vision. OUM044058L To flash the headlights, pull the lever towards you. -
Page 201: Front Fog Light
(1) is turned to the on position case, have your vehicle inspected by after the headlight is turned on. an authorized Kia dealer. To turn off the fog lights, turn the fog light switch (1) to the OFF position.
-
Page 202
Features of your vehicle ✽ ✽ NOTICE • When replacing the bulb, use the same wattage bulb. For more information, refer to “BULB WATTAGE” in chapter 8. • If the different wattage bulb is equipped with the vehicle, this warning message is not displayed. 4 117… -
Page 203: Wipers And Washers
Features of your vehicle WIPERS AND WASHERS Windshield wipers Windshield wiper/washer Rear window wiper/washer Operates as follows when the igni- tion switch is turned ON. MIST : For a single wiping cycle, move the lever to this (MIST) position and release it. The wipers will operate continu- ously if the lever is held in this position.
-
Page 204
Features of your vehicle Auto control (if equipped) To vary the speed setting, turn the CAUTION speed control knob (1). • When washing the vehicle, set If the wiper switch is set in AUTO the wiper switch in the OFF mode when the ignition switch is ON, position to stop the auto wiper the wiper will operate once to per-… -
Page 205: Front Windshield Washers
Features of your vehicle Front windshield washers The reservoir filler neck is located in (Continued) the front of the engine compartment • When starting the vehicle in on the passenger side. winter, set the wiper switch in the OFF position. Otherwise, CAUTION — Washer pump wipers may operate and ice…
-
Page 206: Rear Window Wiper And Washer Switch
Features of your vehicle Rear window wiper and wash- CAUTION — Wipers & er switch windshields • To prevent possible damage to the wipers or windshield, do not operate the wipers when the windshield is dry. • To prevent damage to the wiper blades, do not use gasoline, kerosene, paint thinner, or other solvents on or near them.
-
Page 207: Interior Lights
Features of your vehicle INTERIOR LIGHTS Do not use the interior lights for Automatic turn off function Room lamp extended periods when the engine is (if equipped) ■ Type A not running. The interior lights automatically turn It may cause battery discharge. off approximately 20 minutes after the ignition switch is turned off, if the lights are in the ON position.
-
Page 208: Map Lamp
Features of your vehicle ✽ ✽ NOTICE Map lamp • (1) : The DOOR mode and ROOM mode — The map lamp and room lamp can not be selected at the same time. come on when a door is opened. The lamps go out after approxi- •…
-
Page 209: Luggage Lamp
Features of your vehicle Luggage lamp (if equipped) Vanity mirror lamp (if equipped) Glove box lamp OUM044074 OUMA044432 OUM044073 Opening the lid of the vanity mirror The glove box lamp comes on when • : The light comes on when the will automatically turn on the mirror the glove box is opened.
-
Page 210: Welcome System
Features of your vehicle WELCOME SYSTEM (IF EQUIPPED) Headlight (Headlamp) escort Interior light Pocket lamp (if equipped) function When the interior light switch is in the When all doors are locked and The headlights (and/or taillights) DOOR position and all doors (and lift- closed, the pocket lamp will come on remain on for approximately 5 min- gate (tailgate)) are locked and…
-
Page 211: Defroster
Features of your vehicle DEFROSTER Rear window defroster activate rear window CAUTION — Conductors defroster, press the rear window defroster button located in the center To prevent damage to the con- facia switch panel. The indicator on ductors bonded to the inside the rear window defroster button illu- surface of the rear window, minates when the defroster is ON.
-
Page 212: Manual Climate Control System
Features of your vehicle MANUAL CLIMATE CONTROL SYSTEM (IF EQUIPPED) ■ ■ Type A 1. Fan speed control knob 2. Front windshield defroster button 3. Rear window defroster button 4. Air conditioning button 5. MAX A/C (Max air conditioning) button 6.
-
Page 213: Heating And Air Conditioning
Features of your vehicle Heating and air conditioning 1. Start the engine. 2. Set the mode to the desired posi- tion. For improving the effectiveness of heating and cooling; — Heating: — Cooling: 3. Set the temperature control to the desired position.
-
Page 214
Features of your vehicle Mode selection Floor/Defrost-Level Face-Level (B, D) (A, C, D, E, F) Air flow is directed toward the upper Most of the air flow is directed to the body and face. Additionally, each floor and the windshield with a small outlet can be controlled to direct the amount directed to the side window air discharged from the outlet. -
Page 215
Features of your vehicle MAX A/C selection Temperature control OUM044151 Instrument panel vents OUM044233L OUM044152 The outlet vents can be opened or To select the MAX A/C, turn the fan The temperature control knob allows closed separately using the thumb- speed control knob to the right then you to control the temperature of the wheel (if equipped). -
Page 216
Features of your vehicle Air intake control Recirculated air position Prolonged operation of the heater in the recirculated air position (without air With the recirculated air ■ Type A conditioning selected) may cause fog- position selected, air ging of the windshield and side win- from passenger dows and the air within the passenger… -
Page 217
Features of your vehicle Fan speed control To turn off the blowers WARNING — Recirculated Continuous use of the climate control system in the recirculat- ed air position can cause drowsiness or sleepiness, and loss of vehicle control. Set the air intake control to the outside (fresh) air position as much as possible while driving. -
Page 218: 3Rd Row Air Conditioning
Features of your vehicle Air conditioning row air conditioning 2.The third row A/C system can be (if equipped) separately controlled by the control buttons in the third row. When the A/C is ON or OFF, the third row A/C control button in the front row will turn ON or OFF, informing the front passengers of the situation.
-
Page 219: System Operation
Features of your vehicle Air conditioning System operation Operation Tips • To keep dust or unpleasant fumes Kia Air Conditioning Systems are Ventilation from entering the vehicle through filled with refrigerant*. 1. Set the mode to the position. the ventilation system, temporarily 1.
-
Page 220
Features of your vehicle Air conditioning system operation tips • When using the air conditioning CAUTION — Excessive AC system, you may notice clear water • If the vehicle has been parked in dripping (or even puddling) on the When using the air conditioning direct sunlight during hot weather, ground under the passenger side system, monitor the tempera-… -
Page 221: Climate Control Air Filter
(fresh) air position is selected. If this hap- pens, we recommend that the cli- mate control air filter be replaced by an authorized Kia dealer.
-
Page 222: Checking The Amount Of Air Conditioner Refrigerant And Compressor Lubricant
You can find out which air condition- an authorized Kia dealer. serviced by trained and certi- ing refrigerant is applied to your vehi- fied technicians.
-
Page 223: Automatic Climate Control System
Features of your vehicle AUTOMATIC CLIMATE CONTROL SYSTEM (IF EQUIPPED) ■ ■ Front climate control (Type A) 1. Driver`s temperature control knob 2. Air conditioning button 3. Blower OFF button 4. Front windshield defroster button 5. Rear window defroster button 6.
-
Page 224
Features of your vehicle ■ ■ Front climate control (Type C) 1. Driver`s temperature control knob 2. Air conditioning button 3. Blower OFF button 4. Front windshield defroster button ■ ■ Front climate control (Type D) 5. Rear window defroster button 6. -
Page 225: Automatic Heating And Air Conditioning
Features of your vehicle ✽ ✽ NOTICE Automatic heating and air con- ■ ■ Driver’s side Passenger’s side ditioning • To turn the automatic operation off, select any button or switch of the following: — Mode selection button — Air conditioning button — Front windshield defroster button — Air intake control button — Fan speed control switch…
-
Page 226: Manual Heating And Air Conditioning
Features of your vehicle Mode selection Manual heating and air condi- tioning The heating and cooling system can be controlled manually by pressing buttons or turning knob(s) other than the AUTO button. In this case, the system works sequentially according to the order of buttons or knob(s) selected.
-
Page 227
Features of your vehicle Face-Level Floor-Level Air flow is directed toward the upper Most of the air flow is directed to the body and face. Additionally, each floor, with a small amount of the air outlet can be controlled to direct the being directed to the windshield and air discharged from the outlet. -
Page 228
Features of your vehicle Temperature control ■ ■ Driver’s side Passenger’s side OUM044151 OUMA044163 Instrument panel vents Adjusting the driver and passenger OUMA044162 side temperature equally The outlet vents can be opened or The temperature will increase to the closed separately using the thumb- •… -
Page 229
Features of your vehicle Air intake control Adjusting the driver and passenger Outside (fresh) air position side temperature individually Type B, D With the outside (fresh) ■ ■ Type A • Press the “SYNC” button again to air position selected, air adjust the driver and passenger enters the vehicle from side temperature individually. -
Page 230
Features of your vehicle ✽ ✽ NOTICE Fan speed control Air conditioning Prolonged operation of the heater in the recirculated air position (with- out air conditioning selected) may cause fogging of the windshield and side windows and the air within the passenger compartment become stale. -
Page 231
Features of your vehicle OFF mode Climate information screen row air conditioning selection (if equipped) (if equipped) OUMA044169 OUM044211L OUM044156 Press the front blower OFF button to turn off the front air climate control Press the climate information screen To turn on the third row air condition- system. -
Page 232: System Operation
Features of your vehicle 1.You can operate the third row air System operation Operation Tips conditioning system from the first • To keep dust or unpleasant fumes Ventilation row control panel. Changing the front from entering the vehicle through 1. Set the mode to the position.
-
Page 233
Air conditioning (if equipped) Air conditioning system operation tips CAUTION — Excessive A/C All Kia Air Conditioning Systems are • If the vehicle has been parked in When using the air conditioning filled with R-134a refrigerant. direct sunlight during hot weather,… -
Page 234: Climate Control Air Filter
• When the air flow rate suddenly ever, continual operation in this decreases, the system should be mode may cause the air inside the checked at an authorized Kia vehicle to become stale. dealer. Blower Heater core •…
-
Page 235: Checking The Amount Of Air Conditioner Refrigerant And Compressor Lubricant
Therefore, if abnormal operation is the air conditioning system in found, have the system inspected by your vehicle should only be an authorized Kia dealer. serviced by trained and certi- fied technicians. OXM063009 ❈ The actual Air Conditioning refrig-…
-
Page 236: Windshield Defrosting And Defogging
Features of your vehicle WINDSHIELD DEFROSTING AND DEFOGGING • For maximum defrosting, set the Manual climate control system WARNING — Windshield temperature control to the extreme To defog inside windshield heating right/hot position and the fan speed control to the highest speed. Do not use the posi- tion during cooling operation in…
-
Page 237: Automatic Climate Control System
Features of your vehicle To defrost outside windshield Automatic climate control If the air conditioning and outside system (fresh) air position are not selected automatically, adjust the correspon- To defog inside windshield ding button manually. If the posi- tion is selected, lower fan speed is adjusted to a higher fan speed.
-
Page 238: Defogging Logic
Features of your vehicle To defrost outside windshield Manual climate control system Defogging logic To reduce the possibility of fogging up the inside of the windshield, the air intake or air conditioning is con- trolled automatically according to certain conditions such as position.
-
Page 239
Features of your vehicle Automatic climate control system Auto defogging system If the battery has been discharged or disconnected, it resets to the defog (if equipped) logic status. OUMA044404 OUMA044405 1. Turn the ignition switch to the ON position. Auto defogging reduces the probabil- ity of fogging up the inside of the 2. -
Page 240: Clean Air
Features of your vehicle CLEAN AIR (IF EQUIPPED) ✽ ✽ NOTICE This indicator illuminates when the auto defogging If the A/C off or recirculated air system senses the mois- position is manually selected while ture on the inside of the the auto defogging system is on, the windshield and operates.
-
Page 241: Storage Compartments
Features of your vehicle STORAGE COMPARTMENTS These compartments can be used to Center console storage Glove box store small items required by the driver or passengers. • To avoid possible theft, do not leave valuables in the storage compartment. • Always keep the storage compart- ment covers closed while driving.
-
Page 242: Sunglass Holder
Features of your vehicle Sunglass holder WARNING WARNING — Sunglass holder To reduce the risk of injury in an accident or sudden stop, always Do not keep objects except sun- keep the glove box door closed glasses inside the sunglass while driving.
-
Page 243: Luggage Box
Features of your vehicle Luggage box ■ Type A OUM044079 ■ Type B (if equipped) OUM044181 You can place a first aid kit, a reflec- tor triangle, tools, etc. in the box for easy access. Grasp the handle on the edge of the cover and lift it.
-
Page 244: Interior Features
Features of your vehicle INTERIOR FEATURES Cup holder ■ Front ■ Center (if equipped) Type A WARNING Hot liquids Do not place uncovered cups with hot liquid in the cup holder while the vehicle is in motion. If the hot liquid spills, you may burn yourself.
-
Page 245: Bottle Holder
Features of your vehicle Bottle holder Seat warmer (if equipped) During mild weather or under condi- tions where the operation of the seat ■ Front seat warmer is not needed, keep the switches in the «OFF» position. • Each time you press the switch, the temperature setting of the seat will change as follows : OFF→HIGH(…
-
Page 246: Seat Cooler (Air Ventilation Seat)
Features of your vehicle Seat cooler (Air ventilation seat) • The seat warmer (with air ventila- WARNING — Seat heater (if equipped) tion) defaults to the OFF position burns whenever the ignition switch is turned on. The seat warmer may cause burns, even at low tempera- tures, if used over a long period CAUTION…
-
Page 247: Sunvisor
Features of your vehicle Sunvisor The ticket holder (5) is provided for Power outlet holding a tollgate ticket. (if equipped) ■ Front * The actual sunvisor lamp in the vehi- cle may differ from the illustration. CAUTION — Vanity mirror lamp If you use the vanity mirror lamp, turn off the lamp before return-…
-
Page 248: Ac Inverter
Features of your vehicle • Use the power outlet only when the • Plug in battery equipped electri- AC inverter (if equipped) engine is running and remove the cal/electronic devices with reverse current protection. The current accessory plug after use. Using the accessory plug for prolonged peri- from the battery may flow into the ods of time with the engine off could…
-
Page 249: Ac Inverter Button
Features of your vehicle If you wish to use the AC inverter, • To prevent the battery from being dis- press the AC inverter button while charged, do not use the AC inverter the engine is running. The light on while the engine is not running.
-
Page 250: Usb Charger
Features of your vehicle USB charger (if equipped) The battery charging state may be CAUTION — Electric acces- monitored on the electrical device. ■ sory devices Front Disconnect the USB cable from the • Do not use broken electric USB port after use. accessories which may dam- •…
-
Page 251: Clothes Hanger
To avoid any interference with pedal CAUTION — Hanging operation, Kia recommends that only clothing the Kia floor mat designed for use in your vehicle be installed. Do not hang heavy clothes, since those may damage the hook.
-
Page 252: Side Curtain
OUM044089 To keep items from shifting in the cargo area, you can use the holders located in the cargo area to attach the luggage net. If necessary, we recommend that you contact an authorized Kia dealer. 4 167…
-
Page 253
Features of your vehicle CAUTION To prevent damage to the vehi- cle, care should be taken when carrying fragile or bulky objects in the luggage compartment. WARNING — Luggage net To avoid eye injury, DO NOT overstretch the luggage net. ALWAYS keep your face and body out of the luggage net’s recoil path. -
Page 254: Exterior Features
Features of your vehicle EXTERIOR FEATURES Roof rack (if equipped) CAUTION — Loading Roof WARNING — Driving with Rack roof load • When carrying large objects Always drive slow and turn cor- on the roof rack, make sure ners carefully when carrying they do not exceed the overall items on the roof rack.
-
Page 255: Audio System
Features of your vehicle AUDIO SYSTEM If you install aftermarket HID head Antenna CAUTION — Antenna lamps, your vehicle’s audio and elec- ■ ■ Pole Type Shark fin type tronic devices may malfunction. Before entering a place with a low height clearance or a car wash, remove the antenna pole by rotating it counterclockwise.
-
Page 256: Steering Wheel Remote Controller
Features of your vehicle Steering wheel remote When pressed and held (over 0.8 (if equipped) controller seconds). When pressed shortly. — FM, AM mode : automatically — When pressed in the phone screen, searches broadcast frequencies displays call history screen. and channels.
-
Page 257
Bluetooth SIG, Inc. and devices, USB, or iPod ® tems which take the driver’s any use of such marks by Kia is eyes, attention and focus away under license. Other trademarks ✽ ✽ NOTICE from the safe operation of a… -
Page 258: How Vehicle Audio Works
Features of your vehicle How vehicle audio works This can be due to factors, such as AM reception the distance from the radio station, FM reception closeness of other strong radio sta- tions or the presence of buildings, bridges or other large obstructions in the area.
-
Page 259
Features of your vehicle FM radio station JBM003 JBM004 JBM005 • Station Swapping — As an FM sig- FM broadcasts are transmitted at • Fading — As your vehicle moves high frequencies and do not bend to away from the radio station, the nal weakens, another more power- follow the earth’s surface. -
Page 260
Features of your vehicle Using a cellular phone or a two- WARNING WARNING — Cell phone — Audio System way radio Do not disassemble, assemble, When a cellular phone is used inside Do not use a cellular phone or modify the audio system. the vehicle, noise may be produced while driving. -
Page 261
Features of your vehicle • Turn on the car ignition before CAUTION WARNING — Driver using the audio system. Do not distraction operate the audio system for long • Do not subject the device to periods of time with the ignition severe shock or impact. -
Page 262: Using The Usb Device
Features of your vehicle (Continued) USING THE USB DEVICE (Continued) • An encrypted MP3 PLAYER is not • You may hear a strange noise • To use an external USB device, recognizable. when connecting or disconnecting make sure the device is not con- a USB device.
-
Page 263: Using Ipod ® Device
Features of your vehicle ® (Continued) (Continued) USING iPod DEVICE • If you use devices such as a USB • Some USB flash memory readers iPhone is a registered trademark of ® hub purchased separately, the (such as CF, SD, micro SD, etc.) or Apple inc.
-
Page 264: Bluetooth ® Wireless Technology
Wireless Technology capability and audio may be interrupted. Bluetooth SIG, lnc. and any use of (such as for stereo headphone • When adjusting the sound effects such marks by Kia is under license. Bluetooth Wireless Technology ). ® of the iPod and the audio system, ®…
-
Page 265
Bluetooth mobile phones through periods of time. ® quality may differ depending on the the audio system. mobile phone. • Bluetooth Handsfree may not be ® supported in some mobile phones. To learn more about mobile device compatibility, visit www.kia.com. -
Page 266: Voice Recognition
Features of your vehicle • Park the vehicle when connecting Voice Recognition (Continued) the head unit with the mobile (if equipped) — When driving on rugged and phone. uneven roads • Bluetooth connection may become ® • When using the voice recognition — During severe rain (heavy rains, intermittently disconnected in some feature, only commands listed…
-
Page 267: Standard Audio System
Features of your vehicle Standard Audio System…
-
Page 268: System Controllers And Functions
Features of your vehicle SYSTEM CONTROLLERS RADIO PHONE AND FUNCTIONS Changes to FM/AM/SIRIUS mode. Operates Phone Screen ™ ❈ When a phone is not connected, Each time the key is pressed, the mode is changed in order of FM1 ➟ the connection screen is dis- Audio Head Unit ➟…
-
Page 269
Features of your vehicle — Press and hold the key (over 0.8 (11) TUNE knob seconds): Previews the broadcasts Radio mode : Changes frequency by saved in Preset for 5 turning the knob left/right. seconds each. CD, USB, iPod , My Music mode: ®… -
Page 270: Setup
Features of your vehicle SETUP Mode Pop up [Mode Pop up] Changes selection mode Display Settings • During On state, press the RADIO key to display the mode MEDIA SETUP Press key Select change pop up screen. CLOCK [Display] through TUNE knob or key Select menu through Media Display…
-
Page 271: Sound Settings
Features of your vehicle SOUND SETTINGS Sound Settings Speed Dependent Volume Control This feature is used to automatically This menu allows you to set the control the volume level according to ‘Bass, Middle, Treble’ and the Sound SETUP Press the key Select [Sound] the speed of the vehicle.
-
Page 272: Clock Settings
Features of your vehicle ❈ Adjust the number currently in CLOCK SETTINGS Clock Settings focus to make the settings and This menu is used to set the time. press the tune knob to move to Select [Clock Settings] Set through SETUP the next setting.
-
Page 273: System Settings
Features of your vehicle SYSTEM SETTINGS Memory Information • Off : This mode is for expert users and omits some information during Displays currently used memory and voice command operation. (When total system memory. SETUP using Expert mode, guidance Press key Select CLOCK Select [Memory Information] OK…
-
Page 274
Features of your vehicle RADIO : FM, AM OR SIRIUS Preset SEEK Selecting through manual ™ search Press the Turn the TUNE knob left/right to • Shortly pressing the key (under 0.8 adjust the frequency. seconds): Plays the frequency saved in the corresponding key. •… -
Page 275
Features of your vehicle MENU Within key are the A.Store MENU (Auto Store) and Info functions. A.Store Press the key Set [A.Store] MENU through TUNE knob or key. Saves broadcasts with superior reception to keys. If no frequencies are received, then the most recently received frequency will be broadcast. -
Page 276
Features of your vehicle SIRIUS Satellite Radio information ™ Satellite Radio channels: • Terrain: Hills, mountains, tall build- NOTE: ings, bridges, tunnels, freeway SIRIUS Satellite Radio has over SiriusXM service requires a sub- overpasses, parking garages, 130 channels, including 69 channels scription, sold separately, after 3- dense tree foliage and thunder- of 100% commercial-free music, plus… -
Page 277: Radio
Using SIRIUS Satellite Radio seconds): Previews each broad- activation signal. Your Kia vehicle is equipped with a 3 cast for 5 seconds each month complimentary period of SIR- ❈ Press the key again to SCAN ™…
-
Page 278
Displays the Artist/Song info of the ken or unplugged. Please consult current song. with your Kia dealership. 2. No Signal If this message is displayed, it means that the antenna is covered and that the SIRIUS™ Satellite Radio signal is not available. -
Page 279: Basic Method Of Use
Features of your vehicle BASIC METHOD OF USE : Repeat While song (file) is playing Audio CD / MP3 CD / USB / (RPT) key iPod ® / My Music Audio CD, MP3 CD, USB, iPod , My ® Music mode: RPT on screen Press the key to change the MEDIA…
-
Page 280
Features of your vehicle MP3 CD, USB mode: FLD.RDM on Folder Search : MP3 CD, USB While song (file) is playing SEEK screen Mode • Shortly pressing the key : Plays the • Folder Random (press the key) : next song. While file is playing (Folder Plays all files within the current fold-… -
Page 281
Features of your vehicle MENU : Audio CD Information MENU : MP3 CD / USB Press the CD MP3 mode Press the key Set [ Info] Press the CD MP3 mode MENU MENU MENU Repeat, Random, through the TUNE knob or to set the Repeat, Folder Random, Information features. -
Page 282
Features of your vehicle Folder Random Information Copy Press the key Set [ Info] MENU Press the key Set [ F.RDM] Press the key Set [ Copy] MENU MENU through the TUNE knob or through the TUNE knob or through the TUNE knob or key to display information of the cur- key to randomly play songs within the… -
Page 283
Features of your vehicle ® MENU : iPod Information In iPod mode, press the Press the key Set [ Info] ® MENU MENU to set the Repeat, Random, Information through the TUNE knob or and Search features. key. Displays information of the current song. -
Page 284
Features of your vehicle ➀ Select the file you wish to delete MENU : My Music Mode Information by using the TUNE knob. Press the key Set [ Info] MENU ➁ Press the key and select MENU In My Music mode, press the through the TUNE knob or MENU… -
Page 285
Features of your vehicle ➁ After selecting, press MENU and select the delete menu. AUX is used to play external MEDIA currently connected with the AUX terminal. AUX mode will automatically start when an external device is connect- ed with the AUX terminal. If an external device is connected, you can also press the key to… -
Page 286: Bluetooth Wireless Technology Audio
AUDIO logos are registered trademarks audio can be used only when the owned by Bluetooth SIG, Inc. and [Audio Streaming] of Phone is any use of such marks by Kia is turned What is Bluetooth Wireless under license. Other trademarks ®…
-
Page 287
Features of your vehicle Starting Bluetooth Using the Bluetooth ® Wireless ® Wireless Technology Audio Technology audio features • Press the key to change the • Play / Stop MEDIA mode in order of CD ➟ USB ➟ AUX Press the TUNE knob to play and ➟… -
Page 288: Phone
Features of your vehicle PHONE Making a call using the • Check call history and making calls Steering-wheel mount controls ➀ Shortly press (under 0.8 seconds) key on the steering Before using the Bluetooth Wireless ® remote controller. Technology phone features ➁…
-
Page 289
Bluetooth SIG, Inc. and any use of such marks by Kia is under license. Other trademarks and trade names are those of their respective owners. A Bluetooth ®… -
Page 290
Features of your vehicle 2. Select [OK] button to enter the [Non SSP supported device] Pairing Key / Key on PHONE Pair Phone screen. the Steering Remote Controller (SSP: Secure Simple Pairing) 4. After a few moments, a screen is displayed where the passkey is When No Devices have been Paired entered. -
Page 291
Blackberry phones) may offer an option to allow acceptance of all future Bluetooth connection requests default.» «Visit http://www.kia.com/#/bluetooth for additional information on pairing your Bluetooth-enabled mobile phone, and to view a phone compatibility list. ® • If Bluetooth Wireless Technology… -
Page 292
Features of your vehicle • Bluetooth ® • Only Bluetooth ® Pairing through [PHONE] Wireless Technology Wireless Technology Setup features supported within the vehi- Handsfree and Bluetooth audio related cle are as follows. Some features features are supported. may not be supported depending •… -
Page 293
Features of your vehicle • After pairing is complete, a con- Connecting a Device From the paired phone list, select the tacts download request is sent device you want to connect and once to the mobile phone. Some select [Connect]. SETUP Press key Select… -
Page 294
Features of your vehicle Changing Priority From the paired phone list, select • Priority icon will be displayed when the phone you want to switch to the the selected phone is set as a pri- highest priority, then select [Change ority phone. -
Page 295
Features of your vehicle Disconnecting a Device Deleting a Device • When deleting the currently con- nected device, the device will auto- matically be disconnected to pro- SETUP SETUP Press key Select Press key Select ceed with the deleting process. CLOCK CLOCK [Phone] Select [Phone List]… -
Page 296
Features of your vehicle • If you select the [Call History] but- Answering Calls ® USING Bluetooth Wireless ton but there is no call history data, Technology a prompt is displayed which asks to download call history data. Answering a Call Phone Menu Screen ®… -
Page 297
Features of your vehicle • When an incoming call pop-up is Favorites Call History displayed, most Audio and SETUP mode features are disabled. Only Press the Select Press the Select [Call the call volume will operate. PHONE PHONE [Favorites] History] •… -
Page 298
Features of your vehicle Contacts • Up to 1,000 contacts saved in your • It is not possible to begin down- Bluetooth ® Wireless Technology loading a contact list when the con- phone can be downloaded into the tact download feature has been Press key Select PHONE… -
Page 299
The Bluetooth ® word mark and logos are registered trademarks owned by Bluetooth SIG, Inc. and any use of such marks by Kia is under license. Other trademarks and trade names are those of their respective owners. ® A Bluetooth… -
Page 300
Features of your vehicle Downloading Contacts Outgoing Volume 1) Connect/Disconnect Phone SETUP SETUP Connect/ disconnects currently Press key Select Press key Select CLOCK CLOCK selected phone [Phone] Select [Contacts Download] [Phone] Select [Outgoing Volume] 2) Change Priority : Sets currently selected phone to highest connec- tion priority 3) Delete : Deletes the currently… -
Page 301
Features of your vehicle Turning Bluetooth System Off SETUP Press key Select CLOCK [Phone] Select [Bluetooth System Off] Once Bluetooth ® Wireless ® Technology is turned off, Bluetooth Wireless Technology related features will not be supported within the audio system. •… -
Page 302: Voice Recognition
Features of your vehicle VOICE RECOGNITION If prompt feedback is in [ON], then Contact List Best Practices the system will say “Please say a 1) Use full names vs. short or single command after the beep (BEEP)” syllable names (“John Smith” vs. •…
-
Page 303
RECOGNITION Contact Tips: While prompt message is being stat- ed Shortly press the key on the The Kia Voice Recognition System steering remote controller may have difficulty understanding While Voice Recognition is operating some accents or uncommon names. The prompt message is immediately… -
Page 304
Features of your vehicle Illustration on using voice commands More Help Here are some examples of mode commands. • Starting voice command. You can say a radio type like ‘FM’, ‘AM’, or ‘Satellite’. Shortly pressing the key (under 0.8 seconds): You can also say a media source like ‘USB’, ‘My Music’, or ‘iPod’. -
Page 305: Voice Command List
Features of your vehicle Voice Command List • Common Commands: These commands can be used in most operations. (However a few commands may not be available during certain operations) Command Function Command Function More Help Provides guidance on commands that can be Contacts Displays the Contacts screen.
-
Page 306
Features of your vehicle Command Function Command Function FM Preset 1~6 Plays the most recently played broadcast My Music Plays the music saved in My Music. saved in FM Preset 1~6. AUX (Auxiliary) Plays the connected external device. AM Preset 1~6 Plays the broadcast saved in AM Preset 1~6. -
Page 307
Features of your vehicle • FM/AM radio commands: Commands available during • Satellite radio commands: Commands that can be FM, AM radio operation. used while listening to Satellite Radio. Command Function Command Function Preset 1~6 Plays the broadcast station saved in Preset 1~6. Channel 0~223 Plays the selected Satellite Radio channel. -
Page 308
Features of your vehicle • Audio CD commands: Commands available during • MP3 CD / USB commands: Commands available dur- Audio CD operation. ing USB and MP3 CD operation. Command Function Command Function Random Randomly plays the tracks within the CD. Random Randomly plays the files within the current folder. -
Page 309
Features of your vehicle • iPod Commands: Commands available during iPod • My Music Commands: Commands available during ® ® operation. My Music operation. Command Function Command Function Random Randomly plays the songs within the current Random Randomly plays all saved files. category. -
Page 310
Bluetooth ® word mark and logos are registered ation Command Operation trademarks owned by Bluetooth SIG, Inc. and any use of such marks by Kia is under license. A Bluetooth ® enabled cell phone is required to use Command Function Bluetooth ®… -
Page 311
Features of your vehicle DECLARATION OF CONFORMITY <FCC Operation Guide> This device complies with part 15 of the FCC Rules. Operation is subject to the following two conditions: (1) This device may not cause harmful interference, and (2) This device must accept any interference received, including interference that may cause undesired operation. -
Page 312: Driving Your Vehicle
Driving your vehicle Before driving ……5-4 • Vehicle stability management (VSM) … . 5-45 •…
-
Page 313
Lane departure warning system (LDWS) ..5-80 • Use approved window washer anti-freeze in system ……..5-98 •… -
Page 314
State of California to cause can- the exhaust system checked as soon cer and birth defects and repro- 2. Open side vents. as possible by an authorized Kia ductive harm. In addition, cer- dealer. 3. Set the air intake control at tain fluids contained in vehicles «Fresh», the air flow control at… -
Page 315: Before Driving
Driving your vehicle BEFORE DRIVING Before entering vehicle Necessary inspections Before starting • Be sure that all windows, outside Fluid levels, such as engine oil, • Close and lock all doors. mirror(s), and outside lights are engine coolant, brake fluid, and •…
-
Page 316
Driving your vehicle WARNING WARNING WARNING — Fire risk — Loose — Driving while objects intoxicated When you intend to park or stop the vehicle with the engine on, Securely store items in your Do not drive while intoxicated. be careful not to depress the vehicle. -
Page 317: Illuminated Ignition Switch
Driving your vehicle KEY POSITIONS (IF EQUIPPED) ACC (Accessory) Illuminated ignition switch Ignition switch position The steering wheel is unlocked and LOCK electrical accessories are operative. If difficulty is experienced turning the ignition switch to the ACC position, turn the key while turning the steer- ing wheel right and left to release the tension.
-
Page 318: Starting The Engine
Driving your vehicle The anti-theft steering column lock (if Starting the engine equipped) is not a substitute for the The warning lights can be checked parking brake. Before leaving the dri- before the engine is started. This is WARNING — Proper ver’s seat, always make sure the shift the normal running position after the footwear…
-
Page 319
Driving your vehicle 3.Turn the ignition switch to START If the engine stalls while you are in and hold it there until the engine motion, do not attempt to move the starts (a maximum of 10 seconds), shift lever to the P (Park) position. If then release the key. -
Page 320: Engine Start/Stop Button
Driving your vehicle ENGINE START/STOP BUTTON (IF EQUIPPED) Illuminated ENGINE ENGINE START/STOP button In an emergency situation while the START/STOP button position vehicle is in motion, you are able to turn the engine off and to the ACC position by pressing the ENGINE START/STOP button for more than 2 seconds or 3 times successively within 3 seconds.
-
Page 321
Driving your vehicle ACC(Accessory) START/RUN Amber Redish orange Not illuminated Press the ENGINE START/STOP Press the ENGINE START/STOP To start the engine, depress the button while it is in the OFF position button while it is in the ACC position brake pedal and press the ENGINE without depressing the brake pedal. -
Page 322: Starting The Engine With A Smart Key
Driving your vehicle ✽ ✽ NOTICE Starting the engine with a • Even if the smart key is in the vehi- smart key cle, if it is far away from you, the If you leave the ENGINE START/ engine may not start. STOP button in the ACC or ON 1.Carry the smart key or leave it •…
-
Page 323
Driving your vehicle • When the stop lamp fuse is blown, WARNING — Unintended you can’t start the engine normally. vehicle movement Replace the fuse with a new one. If it is not possible, you can start the Never leave the smart key in the engine by pressing the ENGINE vehicle with children or vehicle START/STOP button for 10 sec-… -
Page 324: Automatic Transaxle
Driving your vehicle AUTOMATIC TRANSAXLE Automatic transaxle operation The automatic transaxle has 6 for- ward speeds and one reverse speed. The individual speeds are selected automatically, depending on the position of the shift lever. ✽ ✽ NOTICE The first few shifts on a new vehicle, if the battery has been disconnected, may be somewhat abrupt.
-
Page 325
Driving your vehicle For smooth operation, depress the Transaxle ranges CAUTION — Transaxle brake pedal and the lock release but- The indicator in the instrument clus- ton when shifting from N (Neutral) to avoid damage your ter displays the shift lever position a forward or reverse gear. -
Page 326
Driving your vehicle R (Reverse) N (Neutral) Use this position to drive the vehicle The wheels and transaxle are not backward. engaged. The vehicle will roll freely even on the slightest incline unless the parking brake or service brakes CAUTION — Shifting are applied. -
Page 327
Driving your vehicle In manual mode, moving the shift • In manual mode, the driver must • To maintain the required levels of lever backwards and forwards will execute upshifts in accordance vehicle performance and safety, the system may not execute cer- allow you to make gearshifts rapidly. -
Page 328
1.Carefully remove the cap covering the shift-lock access hole (1). 2.Insert a screwdriver into the access hole and press down on the screwdriver. 3.Move the shift lever. 4.Have your vehicle inspected by an authorized Kia dealer immediately. 5 17… -
Page 329: Good Driving Practices
Driving your vehicle Ignition key interlock system Moving up a steep grade from a Good driving practices standing start The ignition key cannot be removed • Never move the gear shift lever unless the shift lever is in the P To move up a steep grade from a from P (Park) to any other position (Park) position.
-
Page 330
Driving your vehicle ALL WHEEL DRIVE (AWD) (IF EQUIPPED) ■ These vehicles are not designed for These factors must be carefully con- Type A challenging off-road use. Occasional sidered when driving off-road. off-road use such as established Keeping the vehicle in contact with unpaved roads and trails are OK. -
Page 331: Tight Corner Brake Effect
If the AWD system warning light ) illuminates, this indicates that there is a malfunction in the AWD system. If this occurs, have your vehicle checked by an authorized Kia dealer as soon as possible.
-
Page 332: All Wheel Drive (Awd) Transfer Mode Selection
Driving your vehicle All Wheel Drive (AWD) transfer mode selection Transfer mode Selection button Indicator light Description • When driving in AWD AUTO mode, the vehicle operates sim- ilar to conventional FWD vehicles under normal operating conditions. However, if the system determines that there is a AWD AUTO need for the AWD mode, the engine’s driving power is dis- (AWD LOCK is…
-
Page 333: For Safe All Wheel Drive Operation
Driving your vehicle For safe all wheel drive opera- tion • Do not try to drive in deep standing water or mud since such conditions can stall your engine and clog your exhaust pipes. Do not drive down steep hills since it requires extreme skill to maintain control of the vehi- cle.
-
Page 334
Driving your vehicle • You must consciously take the • Always hold the steering wheel effort to learn how to corner in a firmly when you are driving off- AWD vehicle. Do not rely on your road. experience in conventional FWD •… -
Page 335
Driving your vehicle ✽ ✽ NOTICE WARNING WARNING — Driving — AWD driving • Shorten your scheduled mainte- through Do not attempt quick steering nance interval if you drive in off- water maneuvers or sharp turns in road conditions such as sand, mud AWD mode. -
Page 336
Driving your vehicle WARNING — Jacked vehicle While the full-time AWD vehicle is being raised on a jack, never start the engine or cause the tires to rotate. There is the danger that rotating tires touching the ground could cause the vehicle to go off the Temporary free roller jack and to jump forward. -
Page 337: Brake System
Driving your vehicle BRAKE SYSTEM Power brakes Wet brakes may impair the vehicle’s CAUTION — Brake Pedal ability to safely slow down; the vehi- Your vehicle has power-assisted cle may also pull to one side when Do not drive with your foot rest- brakes that adjust automatically the brakes are applied.
-
Page 338
Driving your vehicle In the event of brake failure Disc brakes wear indicator WARNING — Brake wear If service brakes fail to operate while When your brake pads are worn and the vehicle is in motion, you can new pads are required, you will hear Do not ignore high pitched wear make an emergency stop with the a high-pitched warning sound from… -
Page 339: Parking Brake — Foot Type
Driving your vehicle Releasing the parking brake Parking brake – Foot type WARNING — Parking brake Applying the parking brake All vehicles should always have the parking brake fully engaged when parking to avoid inadver- tent movement of the vehicle which can injure occupants or pedestrians.
-
Page 340: Electric Parking Brake (Epb)
Driving your vehicle If at all possible, cease driving the Electric parking brake (EPB) vehicle immediately. If that is not pos- (if equipped) sible, use extreme caution while Applying the parking brake operating the vehicle and only con- tinue to drive the vehicle until you can reach a safe location or repair shop.
-
Page 341
Driving your vehicle Releasing the parking brake Also, the EPB is applied automatical- Do not operate the parking brake/ ly if the Auto Hold button is on when EPB while the vehicle is moving the engine is turned off. However, if except in an emergency situation. -
Page 342
P have the system checked by cannot release it. (Park) to R (Reverse) or D (Drive). an authorized Kia dealer. • For your safety, depress the brake • Shift lever in N (Neutral) • Do not drive your vehicle with… -
Page 343: Auto Hold
Driving your vehicle System warning EPB (electric parking brake) may be If the above situation occurs, depress automatically applied when: the brake pedal and release EPB by pressing the EPB switch. • The EPB is overheated • Requested by other systems WARNING — Parking ✽…
-
Page 344
Driving your vehicle ✽ ✽ NOTICE System warning • A click or electric brake motor whine sound may be heard while Depress the brake pedal when the ■ Type A operating or releasing the EPB, but above message appears for the Auto these conditions are normal and Hold and EPB may not activate. -
Page 345
Driving your vehicle System warning EPB malfunction indicator If this occurs, have your vehicle (if equipped) checked by an authorized Kia dealer ■ Type A as soon as possible. ■ ■ Type A Type B The EPB malfunction indicator may… -
Page 346
• If the parking brake warning light Do not operate the electric park- Kia dealer by loading the vehicle on does not illuminate or blinks even ing brake while the vehicle is a flatbed tow truck and have the sys-… -
Page 347
Driving your vehicle AUTO HOLD (if equipped) The Auto Hold maintains the vehicle in a standstill even though the brake pedal is not depressed after the driv- er brings the vehicle to a complete stop by depressing the brake pedal. OUMA054016 OUM054017 1.Depress the brake pedal, start the… -
Page 348
Driving your vehicle ✽ ✽ NOTICE Cancel 4.If you press the accelerator pedal with the shift lever in R (Reverse), • The following are conditions when D (Drive) or sports mode, the Auto the Auto Hold will not engage Hold will be released automatically (Auto Hold light will not turn and the vehicle will start to move. -
Page 349
Auto Hold may manually with the EPB switch. not work properly. • If the AUTO HOLD indicator Take your vehicle to an authorized Kia lights up yellow, the Auto Hold is dealer and have the system checked. not working properly. Take your vehicle to an authorized Kia deal- er and have the system checked. -
Page 350: Anti-Lock Brake System (Abs)
Driving your vehicle ✽ ✽ NOTICE Anti-lock brake system (ABS) The ABS continuously senses the speed of the wheels. If the wheels A click sound may be heard in the ABS (or ESC) will not prevent acci- are going to lock, the ABS system engine compartment when the vehi- dents due to improper or dangerous repeatedly modulates the hydraulic…
-
Page 351
ABS. Contact an authorized Kia the ABS warning light may turn on dealer as soon as possible. at the same time. This happens because of low battery voltage. -
Page 352: Electronic Stability Control (Esc)
Driving your vehicle Electronic stability control Electronic stability control (ESC) will The Electronic Stability Control (ESC) (ESC) not prevent accidents. Excessive system is an electronic system speed in turns, abrupt maneuvers designed to help the driver maintain and hydroplaning on wet surfaces vehicle control under adverse condi- can still result in serious accidents.
-
Page 353: Esc Off Button
Driving your vehicle ESC operation ESC operation off When operating When the ESC is in opera- ESC ON condition ESC OFF state tion, the ESC indicator light • When the ignition is turned This car has 2 kinds of ESC blinks.
-
Page 354
Driving your vehicle ■ Type A ■ Type A Indicator light ■ ESC indicator light ■ ESC OFF indicator light OUM054165L OUM054162L ■ Type B ■ Type B When ignition switch is turned to ON, the indicator light illuminates, then goes off if the ESC system is operat- ing normally. -
Page 355
Driving your vehicle ✽ ✽ NOTICE ESC OFF usage WARNING — Electronic sta- When driving • When operating the vehicle on a bility control dynamometer, ensure that the • ESC should be turned on for daily Drive carefully even though ESC is turned off (ESC OFF light driving whenever possible. -
Page 356: Vehicle Stability Management (Vsm)
Driving your vehicle VSM operation VSM operation off Vehicle stability management (VSM) (if equipped) When the VSM is in operation, ESC If you press the ESC OFF button to indicator light ( ) blinks. turn off the ESC, the VSM will also This system provides…
-
Page 357: Hill-Start Assist Control (Hac)
2 seconds. authorized Kia dealer and have the even with installed VSM. Always The HAC is activated only for about 2 system checked.
-
Page 358: Good Braking Practices
Kia dealer for assis- tance. 5 47…
-
Page 359
Driving your vehicle • Under some conditions your park- ing brake can freeze in the engaged position. This is most like- ly to happen when there is an accumulation of snow or ice around or near the rear brakes or if the brakes are wet. -
Page 360: Cruise Control System
Driving your vehicle CRUISE CONTROL SYSTEM ✽ ✽ NOTICE Use the cruise control system only when traveling on open highways in • During normal cruise control good weather. operation, when the SET switch is Do not use the cruise control when activated or reactivated after driving in heavy or varying traffic, or applying the brakes, the cruise…
-
Page 361: To Set Cruise Control Speed
Driving your vehicle To set cruise control speed: To increase cruise control set speed: OUMA054023 3.Move the lever down (to SET-), and OUMA054022 release it at the desired speed. The OUMA054024 1.Press the CRUISE button on the SET indicator light in the instru- steering wheel to turn the system Follow either of these procedures: ment…
-
Page 362: To Decrease The Cruising Speed
Driving your vehicle To decrease the cruising To temporarily accelerate with To cancel cruise control, do speed: the cruise control on: one of the following: If you want to speed up temporarily when the cruise control is on, depress the accelerator pedal. Increased speed will not interfere with the cruise control operation or change the set speed.
-
Page 363: To Resume Cruising Speed
Driving your vehicle Each of these actions will cancel To resume cruising speed at To turn cruise control off, do cruise control operation (the SET more than approximately 20 one of the following: indicator light in the instrument clus- mph (30 km/h): ter will go off), but it will not turn the system off.
-
Page 364
Driving your vehicle ADVANCED SMART CRUISE CONTROL SYSTEM (ASCC) (IF EQUIPPED) (Continued) WARNING — Advanced • Do not use the advanced Smart Cruise Control smart cruise control when it Inadvertent Activation may not be safe to keep the If the advanced smart cruise car at a constant speed, for control is left on (CRUISE indi- instance, driving in heavy or… -
Page 365: Speed Setting (Ascc)
Driving your vehicle To increase cruise control set Speed setting (ASCC) speed: To set cruise control speed: OUMA054201 3. Move the lever down (to SET-), and release it at the desired OUMA054200 OUMA054202 speed. The set speed and vehicle to vehicle distance on the LDC Follow either of these procedures: 1.Press the CRUISE button, to turn screen will illuminate.
-
Page 366
Driving your vehicle To decrease the cruise control To temporarily accelerate with the ASCC will be temporarily can- set speed: cruise control on: celed when: If you want to speed up temporarily when the cruise control is on, depress the accelerator pedal. Increased speed will not interfere with cruise control operation or change the set speed. -
Page 367
(RES +) or down not mentioned, have the system ahead and driving condition. (SET -) or depressing the acceler- checked by an authorized Kia dealer. Always check the road conditions. ator pedal approximately 3 sec- Do not rely on the warning chime. -
Page 368
Driving your vehicle To resume cruise control set To turn cruise control off: WARNING — Cruise speed: control reactivation To reduce the risk of an acci- dent, always check the road conditions when reactivating the advanced smart cruise con- trol using the RES+ lever to ensure the road conditions per- mit safe use of the cruise con- trol. -
Page 369: Vehicle To Vehicle Distance Setting (Ascc)
Driving your vehicle Vehicle to vehicle distance The vehicle to vehicle distance will For example, if you drive at 56 mph setting (ASCC) automatically activate when the (90 km/h), the distance is maintained ASCC is on. as follows; To set vehicle to vehicle distance: Select the appropriate distance according to road conditions and Distance 4 — approximately 172 feet…
-
Page 370
Driving your vehicle • The vehicle will maintain the set speed, when the lane ahead is clear. • The vehicle will slow down or speed up within selected speed to maintain the selected distance, when there is a vehicle ahead of you in the lane. -
Page 371
Driving your vehicle In traffic situation • The warning chime sounds and LCD display blinks if it is hard to maintain the selected distance to the vehicle ahead. • If the warning chime sounds, actively adjust the vehicle speed by depressing brake pedal… -
Page 372
Take your vehicle to an authorized other foreign matter, the vehicle to cate a malfunction of the Advanced Kia dealer and have the system vehicle distance control may not Smart Cruise Control System. Clean checked. -
Page 373: To Adjust The Sensitivity Of Advanced Smart Cruise Control
• Normal: bumper clean. Advanced Smart Cruise Vehicle speed following the front Control • Use only a genuine Kia sensor vehicle to maintain the set distance cover for your vehicle. is normal • Do not install accessories around • Fast:…
-
Page 374: To Convert To Cruise Control Mode
Driving your vehicle To convert to cruise control 1.Turn the ASCC on (the cruise indi- Limitations of the system mode: cator light will be on but the system will not be activated). 2.Push the distance to distance switch for more than 2 seconds. 3.Choose between «Smart cruise control (SCC) mode»…
-
Page 375
Driving your vehicle On curves On inclines • On curves, the ASCC may not detect a moving vehicle in your lane, and then your vehicle could accelerate to the set speed. Also, the vehicle speed will rapidly slow down when the vehicle ahead is recognized suddenly. -
Page 376
Driving your vehicle Lane changing • If a vehicle which moves into your lane is faster than your vehicle, your vehicle will accelerate to the selected speed. OUM054044L • Your vehicle may accelerate when OUM054043L a vehicle ahead of you disappears. •… -
Page 377
Driving your vehicle Vehicle recognition A vehicle ahead cannot be recog- nized correctly by the sensor if any of following occurs: — When the vehicle is pointing upwards due to overloading in the trunk — While making turns by steering — When driving to one side of the lane — When driving on narrow lanes or on curves… -
Page 378
Driving your vehicle WARNING — Safe Use of ASCC The ASCC can provide you with an additional level of safety and fatigue reduction. However you must maintain careful observa- tion of the roadway in from of and around you and maintain control of your vehicle and spacing around other vehicles as you normally would. -
Page 379
Driving your vehicle This device complies with Part 15 Radio frequency radiation expo- WARNING — Inclines & of the FCC rules. sure information: Towing Operation is subject to the following This equipment complies with FCC Do not use ASCC on steep three conditions: radiation exposure limits set forth for inclines or when towing another… -
Page 380: Drive Mode Integrated Control System
Driving your vehicle DRIVE MODE INTEGRATED CONTROL SYSTEM (IF EQUIPPED) ECO mode (Active ECO) DRIVE mode The mode changes whenever the DRIVE MODE button is pressed. Active ECO helps improve ■ Type A fuel efficiency by control- NORMAL ling certain engine and transaxle system operat- ing parameters.
-
Page 381
Driving your vehicle SPORT mode When Active ECO is activated: Limitation of Active ECO opera- tion: • The acceleration may slightly be SPORT mode focuses on reduced even though you depress If the following conditions occur while dynamic driving by auto- SPORT the accelerator fully. -
Page 382
Driving your vehicle • If the system is activat- — While holding vehicle speed, it maintains the gear and RPM for some time even though the accelerator pedal is not depressed. — Up-shifting is delayed. ✽ ✽ NOTICE In Sport drive mode, the fuel effi- ciency may decrease. -
Page 383: Blind Spot Detection System (Bsd)
Driving your vehicle BLIND SPOT DETECTION SYSTEM (BSD) (IF EQUIPPED) (1) BSD (Blind Spot Detection) WARNING — BSD The warning range depends on Limitations your vehicle speed. However, if your vehicle is about 6 mph (10 • The Blind Spot Detection km/h) faster than the other vehi- System (BSD) is a supplemen- cle, the system will not warn you.
-
Page 384: Bsd (Blind Spot Detection) / Lca (Lane Change Assist)
Driving your vehicle Warning type BSD (Blind Spot Detection) / When the system is not used turn the LCA (Lane Change Assist) system off by turning off the switch. The system will activate when: When the system is turned on the Operating conditions 1.The system is on.
-
Page 385
Driving your vehicle — The second stage alarm may be 1st stage 2nd stage deactivated. • To activate the alarm: Go to the User Settings Mode → Sound and select «BSD» on the LCD display. • To deactivate the alarm: Go to the User Settings Mode →… -
Page 386
Detecting sensor Warning message If the system does not work normally even though the foreign substance is removed, take your vehicle to an authorized Kia dealer and have the system checked. OUM054030 OUM054177L The sensors are located inside of the The message will appear to notify rear bumper. -
Page 387: Rcta (Rear Cross Traffic Alert)
Have your vehicle inspected by an • Select RCTA again, to turn the sys- authorized Kia dealer. tem off. • If the vehicle is turned off and on again, the RCTA system will return to the state right before the vehicle was turned off.
-
Page 388
Driving your vehicle ❈ If your vehicle’s left or right side Warning type • The system operates when the vehicle speed is below 6.2 mph (10 bumper is blinded by barrier or km/h) with the shift lever in R vehicles, the system sensing abili- (Reverse). -
Page 389: Non-Operating Condition
Driving your vehicle ✽ ✽ NOTICE Non-operating condition — A fixed object is near such as a guardrail, etc. • The system may not work proper- Driver’s Attention — A substantial amount of metallic ly if the bumper has been replaced The driver must be cautious in the objects such as a construction or if a repair work has been done…
-
Page 390
Driving your vehicle Outside rearview mirror may not — When the temperature of rear This device complies with Part 15 bumper is high. alert the driver when: of the FCC rules. — When parking structure covers the Operation is subject to the following — The outside rearview mirror hous- sensor. -
Page 391: Lane Departure Warning System (Ldws)
Driving your vehicle LANE DEPARTURE WARNING SYSTEM (LDWS) (IF EQUIPPED) This system detects the lane with a • The LDWS does not make the sensor at the front windshield and vehicle change lanes. It is the dri- notifies you if it detects that your ver’s responsibility to always check vehicle leaves the lane.
-
Page 392
Driving your vehicle ■ When the sensor detects the lane line ■ Left lane departure warning OUM054126L OUM054128L ■ When the sensor doesn’t detect the lane line ■ Right lane departure warning OUM054133L To operate the LDWS, press the but- ton with the engine start/stop button in the ON position. -
Page 393: Warning Indicator
Driving your vehicle Warning indicator Take your vehicle to an authorized Kia dealer and have the system checked. The LDWS does not operate when: • The driver turns on the turn signal or the hazard warning flasher to change lane.
-
Page 394
Driving your vehicle • Driving in areas under construc- The LDWS may not warn you • The surrounding of the inside rear tion. even if the vehicle leaves the view mirror temperature is high due to a direct ray of light. lane, or may warn you even if •… -
Page 395: Forward Collision Warning System (Fcws)
Driving your vehicle FORWARD COLLISION WARNING SYSTEM (FCWS) (IF EQUIPPED) The Forward Collision Warning FCWS Operation The system will turn on and standby System helps avoid accidents by to activate. The system will activate To operate: identifying critical situations early when vehicle speed is above 25 mph and warning the driver.
-
Page 396
Driving your vehicle Warning message FCWS malfunction message WARNING — Forward ■ Warning message Collision Warning System Limitations • The Forward Collision Warning System is a supple- mental system to assist you and its effects may differ according to road and driving conditions. -
Page 397: Limitations Of The System
System may have limits to its ability era’s field of view is cleared, take to detect distance to the vehicle your vehicle to an authorized Kia ahead due to road and traffic condi- dealer have system tions.
-
Page 398
Driving your vehicle — The front vehicle has a separate This device complies with Part 15 of the FCC rules. lamp or LED lamp at the rear of the vehicle. Operation is subject to the following — Entering a tunnel where the differ- two conditions: ence of intensity of illumination is 1. -
Page 399: Economical Operation
Driving your vehicle ECONOMICAL OPERATION Your vehicle’s fuel economy depends • Don’t «ride» the brake pedal. This • Keep your vehicle in good condi- mainly on your style of driving, where can increase fuel consumption and tion. For better fuel economy and reduced maintenance costs, main- you drive and when you drive.
-
Page 400
Driving your vehicle • Remember, your vehicle does not • Use your air conditioning sparingly. WARNING — Engine off require extended warm-up. After The air conditioning system is the engine has started, allow the operated by engine power so your during motion engine to run for 10 to 20 seconds fuel economy is reduced when you… -
Page 401: Special Driving Conditions
Driving your vehicle SPECIAL DRIVING CONDITIONS Hazardous driving conditions • If stalled in snow, mud, or sand, Reducing the risk of a rollover use second gear. Accelerate slow- When hazardous driving conditions This multi-purpose passenger vehi- ly to avoid spinning the drive are encountered such as water, cle is defined as a Sports Utility wheels.
-
Page 402: Rocking The Vehicle
Driving your vehicle If at all possible, avoid sharp turns or Rocking the vehicle CAUTION — Vehicle rocking abrupt maneuvers, do not load your If it is necessary to rock the vehicle roof rack with heavy cargo, and Prolonged rocking may cause to free it from snow, sand, or mud, never modify your vehicle in any way.
-
Page 403: Smooth Cornering
Driving your vehicle Smooth cornering Driving at night • Adjust your mirrors to reduce the glare from other driver’s head- lights. • Keep your headlights clean and properly aimed. (On vehicles not equipped with the automatic head- light aiming feature.) Dirty or improperly aimed headlights will make it much more difficult to see at night.
-
Page 404: Driving In The Rain
Driving your vehicle Driving in the rain • A heavy rainfall will make it harder Driving in flooded areas to see and will increase the dis- Avoid driving through flooded areas tance needed to stop your vehicle, unless you are sure the water is no so slow down.
-
Page 405: Driving Off-Road
Driving your vehicle Fuel, engine coolant and engine Driving off-road WARNING — Under/over Drive carefully off-road because your inflated tires High speed travel consumes more vehicle may be damaged by rocks or Always check the tires for proper fuel than urban motoring. Do not for- roots of trees.
-
Page 406: Winter Driving
Driving your vehicle WINTER DRIVING Snow tires Severe weather conditions in the Snowy or icy conditions winter result in greater wear and If you mount snow tires on your vehi- To drive your vehicle in deep snow, it other problems. To minimize the cle, make sure they are radial tires of may be necessary to use snow tires problems of winter driving, you…
-
Page 407
Driving your vehicle Tire chains When using tire chains, attach them Chain installation to the drive wheels as follows. When installing chains, follow the FWD : Front wheels manufacturer’s instructions mount them as tightly as you can. AWD : All four wheels Drive slowly with chains installed. -
Page 408: Use High Quality Ethylene Glycol Coolant
• Stop driving and retighten the the battery and cables as described chains any time you hear them in section 7. The level of charge in hitting the vehicle. your battery can be checked by an authorized Kia dealer or a service station. 5 97…
-
Page 409: To Keep Locks From Freezing
Window wash- include tow straps or chains, flash- er anti-freeze is available from an light, emergency flares, sand, shov- authorized Kia dealer and most auto el, jumper cables, window scraper, parts outlets. Do not use engine gloves, ground cloth, coveralls, blan- coolant or other types of anti-freeze ket, etc.
-
Page 410: Trailer Towing
(gross vehicle weight), GAW vehicles or apparatus may differ. Ask (gross axle weight) and trailer an authorized Kia dealer for further tongue load are all within the This section contains many time- details before towing.
-
Page 411: Hitches
• Kia trailer hitch accessory is avail- ly set up the brake system. This able at an authorized Kia dealer. is not a task for amateurs. Use…
-
Page 412: Driving With A Trailer
Driving your vehicle Following distance Making turns Driving with a trailer Stay at least twice as far behind the When you’re turning with a trailer, Towing a trailer requires a certain vehicle ahead as you would when make wider turns than normal. Do amount of experience.
-
Page 413
Do not connect a trailer lighting sys- tem directly to your vehicle’s lighting system. Use only an approved trailer wiring harness. An authorized Kia dealer can assist you in installing the wiring harness. -
Page 414
Driving your vehicle Towing up hill Parking on hills 5.Start the vehicle, hold the brakes, shift to neutral, release the parking • When towing a trailer on steep Generally, if you have a trailer brake and slowly release the grades (in excess of 6%) pay close attached to your vehicle, you should brakes until the trailer chocks attention to the engine coolant… -
Page 415: Maintenance When Trailer Towing
Driving your vehicle When you are ready to leave after Maintenance when trailer tow- CAUTION — Air condition parking on a hill Do not use the A/C while using 1. With the automatic transaxle in P Your vehicle will need service more your vehicle to tow uphill.
-
Page 416: If You Do Decide To Pull A Trailer
“Weight of the Trailer” that appears later in this sec- age. tion. • When towing a trailer, be sure to consult an authorized Kia dealer for further information on additional requirements such as a towing kit, etc.
-
Page 417
Driving your vehicle Weight of the trailer Weight of the trailer tongue The trailer tongue should weigh a maximum of 10% of the total loaded trailer weight, within the limits of the maximum permissible trailer tongue load. After you’ve loaded your trailer, weigh the trailer and then the tongue, separately, to see if the weights are proper. -
Page 418: Vehicle Load Limit
Driving your vehicle VEHICLE LOAD LIMIT Tire and loading information label OUMA054204/OUMA054205/OUMA054206/OUMA054207/OUMA054208/OUMA054209 The label located on the driver’s door sill gives the original tire size, cold tire pressures recom- mended for your vehicle, the number of people that can be in your vehicle and vehicle capacity weight.
-
Page 419
Driving your vehicle Vehicle capacity weight: Seating capacity: Towing capacity: 5 persons : 930 lbs. (420kg) Total — 5 persons * 2.0L Engine (Front seat : 2 persons, 7 persons : 1,120 lbs. (506kg) Without trailer brakes Rear seat : 3 persons) Vehicle capacity weight is the maxi- : 1,650 lbs (750 kg) — 7 persons… -
Page 420
Driving your vehicle Steps for determining correct Towing capacity is the maximum 6.If your vehicle will be towing a trail- trailer weight including its cargo load limit er, load from your trailer will be transferred to your vehicle. Consult weight, your vehicle can tow. 1.Locate the statement «The com- this manual to determine how this bined weight of occupants and… -
Page 421
Driving your vehicle Example 1 Example 2 Example 3 C190F01JM C190F02JM C190F03JM Item Description Total Item Description Total Item Description Total Vehicle Capacity 1400 lbs Vehicle Capacity 1400 lbs Vehicle Capacity 1400 lbs Weight (635 kg) Weight (635 kg) Weight (635 kg) Subtract Occupant Subtract Occupant… -
Page 422: Certification Label
Driving your vehicle Certification label To find out the actual loads on your The label will help you decide how front and rear axles, you need to go much cargo and installed equipment to a weigh station and weigh your your vehicle can carry.
-
Page 423
Driving your vehicle WARNING WARNING — Over loading — Loose cargo Do not overload your vehicle. Do not travel with unsecured Overloading your vehicle can blunt objects in the passenger cause heat buildup in your vehi- compartment of your vehicle cle’s tires and possible tire fail- (e.g. -
Page 424: Vehicle Weight Glossary
Driving your vehicle VEHICLE WEIGHT GLOSSARY This section will guide you in the Cargo weight GVWR proper loading of your vehicle and/or (Gross vehicle weight rating) This figure includes all weight added trailer, to keep your loaded vehicle to the Base Curb Weight, including This is the maximum allowable weight within its design rating capa- cargo and optional equipment.
-
Page 425: What To Do In An Emergency
What to do in an emergency Road warning ……6-2 Towing ……..6-25 •…
-
Page 426: Road Warning
What to do in an emergency ROAD WARNING Hazard warning flasher It should be used whenever emer- gency repairs are being made or ■ Type A when the vehicle is stopped near the edge of a roadway. Depress the flasher switch with the ignition switch in any position.
-
Page 427: In Case Of An Emergency While Driving
If you have a flat tire while vehicle will not start, contact an from traffic. authorized Kia dealer or seek other driving 4.When changing a flat tire, follow qualified assistance. the instruction provided later in this If a tire goes flat while you are driv- section.
-
Page 428: If Engine Doesn’t Turn Over Or Turns Over Slowly
4.If the engine still does not start, call charged. an authorized Kia dealer or seek 4.Check the starter connections to other qualified assistance. be sure they are securely tight- ened.
-
Page 429: Emergency Starting
What to do in an emergency EMERGENCY STARTING Jump starting Jumper Cables WARNING — Frozen Jump starting can be dangerous if batteries done incorrectly. Therefore, to avoid Do not attempt to jump start the harm to yourself or damage to your vehicle if the discharged battery vehicle or battery, follow these jump is frozen or if the electrolyte…
-
Page 430: Push-Starting
If the cause of your battery discharg- from the battery (4). Do not con- ing is not apparent, you should have nect it to or near any part that your vehicle checked by an author- moves when the engine is cranked. ized Kia dealer.
-
Page 431: If The Engine Overheats
If overheating happens again, stopped. If there is no visible loss call an authorized Kia dealer for of engine coolant and no steam, 5.If the water pump drive belt is bro- assistance.
-
Page 432: Tire Pressure Monitoring System (Tpms)
What to do in an emergency TIRE PRESSURE MONITORING SYSTEM (TPMS) Check tire pressure • You can change the tire pressure unit in the user settings mode on the cluster. — psi, kpa, bar (Refer to “User set- tings mode” in chapter 3). CAUTION •…
-
Page 433
What to do in an emergency Each tire, including the spare (if pro- Please note that the TPMS is not a Always check the TPMS malfunction vided), should be checked monthly substitute for proper tire mainte- telltale after replacing one or more when cold and inflated to the inflation nance, and it is the driver’s responsi- tires or wheels on your vehicle to… -
Page 434: Low Tire Pressure Position Telltale
3 seconds, take your vehicle Then the TPMS malfunction indicator to your nearest authorized Kia deal- and the Low Tire Pressure telltale er and have the system checked. may turn on and illuminate after…
-
Page 435
Tire tire pressure position telltales may Pressure Monitoring System illuminate together with the TPMS (TPMS). malfunction indicator. Have the system checked by an authorized Kia dealer as soon as possible to determine the cause of the problem. 6 11… -
Page 436: Changing A Tire With Tpms
Kia dealer as soon as possible or be deactivated. If the TPMS sensor After you replace the low pressure replace the flat tire with the spare…
-
Page 437
What to do in an emergency ✽ ✽ NOTICE You may not be able to identify a low • The TPMS cannot alert you to — Protecting TPMS tire by simply looking at it. Always severe and sudden tire damage Tampering with, modifying, or dis- use a good quality tire pressure caused by external factors such as… -
Page 438
What to do in an emergency This device complies with Part 15 of the FCC rules. Operation is subject to the following two conditions: 1. This device may not cause harm- ful interference, and 2. This device must accept any inter- ference received, including inter- ference that may cause undesired operation. -
Page 439: If You Have A Flat Tire
What to do in an emergency IF YOU HAVE A FLAT TIRE Jacking instructions Jack and tools • Always move the vehicle complete- ly off the road and onto the shoul- The jack is provided for emergency der before trying to change a tire. tire changing only.
-
Page 440: Removing And Storing The Spare Tire
What to do in an emergency Removing and storing the WARNING spare tire — Running vehicle on jack Do not start or run the engine of the vehicle while the vehicle is on the jack as this may cause the vehicle to fall off the jack. OUM064005 3.
-
Page 441
What to do in an emergency WARNING Ensure the spare tire retainer is properly aligned with the center of the spare tire to prevent the spare tire from “rattling”. Otherwise, it may cause the spare tire to fall off the carrier and lead to an accident. -
Page 442: Changing Tires
What to do in an emergency Changing tires • To prevent vehicle movement while changing a tire, always set the parking brake fully, and always block the wheel diagonally oppo- site the wheel being changed. • We recommend that the wheels of the vehicle be blocked, and that no person remain in a vehicle that is being jacked.
-
Page 443
What to do in an emergency OUM064021 OUM064008 OUM064010 6. Loosen the wheel lug nuts coun- 8. Insert the wheel lug nut wrench terclockwise one turn each, but do into the jack and turn it clockwise, not remove any nut until the tire raising the vehicle until the tire just has been raised off the ground. -
Page 444
What to do in an emergency 9. Loosen the wheel nuts and Wheels may have sharp edges. 10. To install the wheel, hold it on the remove them with your fingers. Handle them carefully to avoid possi- studs, put the wheel nuts on the Slide the wheel off the studs and ble severe injury. -
Page 445
If in doubt, consult an each nut for tightness. After changing authorized Kia dealer. wheels, have an authorized Kia deal- er tighten the wheel nuts to their proper torque as soon as possible. Wheel nut tightening torque: 65~79 lb·ft (9~11 kg·m) -
Page 446
What to do in an emergency Important — use of compact spare WARNING WARNING — Wheel studs tire If the studs are damaged, they The compact spare tire is for Your vehicle is equipped with a com- may lose their ability to retain emergency use only. -
Page 447
What to do in an emergency When using a compact spare tire, • Do not take this vehicle through an • Do not use more than one compact spare tire at a time. observe the following precautions: automatic vehicle wash while the compact spare tire is installed. -
Page 448
What to do in an emergency Jack label 1. Model Name ■ Example • Type A 2. Maximum allowable load 3. When using the jack, set your parking brake. 4. When using the jack, stop the engine. 5. Do not get under a vehicle that is supported by a jack. -
Page 449: Towing
(without dollies) and authorized Kia dealer or a commer- the front wheels off the ground. cial tow-truck service. Proper lifting If any of the loaded wheels or sus-…
-
Page 450: Removable Towing Hook
What to do in an emergency When towing your vehicle in an Removable towing hook emergency without wheel dollies : (if equipped) 1. Set the ignition switch in the ACC position. 2. Place the transaxle shift lever in N (Neutral). 3.
-
Page 451: Emergency Towing
• Do not use the tow hooks to pull a • Do not jerk the hook. Apply it authorized Kia dealer or a com- vehicle out of mud, sand or other steadily and with even force.
-
Page 452
What to do in an emergency Emergency towing precautions CAUTION • Turn the ignition switch to ACC so • To avoid serious damage to the steering wheel isn’t locked. the automatic transaxle, limit • Place the transaxle shift lever in N the vehicle speed to 10 mph (Neutral). -
Page 453: Maintenance
Maintenance Engine compartment ……7-3 Wiper blades ……7-44 •…
-
Page 454: Rear Combination Lamp
Fuses ……..7-65 • Inner panel fuse replacement….7-66 •…
-
Page 455: Engine Compartment
Maintenance ENGINE COMPARTMENT ■ ■ Gasoline Engine (Theta II 2.4L) — GDI 1. Engine coolant reservoir 2. Engine oil filler cap 3. Brake fluid reservoir 4. Air cleaner 5. Fuse box 6. Positive battery terminal 7. Negative battery terminal 8. Radiator cap 9.
-
Page 456: Brake Fluid Reservoir
Maintenance ■ ■ Gasoline Engine (Theta II 2.0L) – T-GDI 1. Engine coolant reservoir 2. Engine oil filler cap 3. Brake fluid reservoir 4. Air cleaner 5. Fuse box 6. Positive battery terminal 7. Negative battery terminal 8. Engine oil dipstick 9.
-
Page 457: Air Cleaner
Maintenance ■ ■ Gasoline engine (Lambda II 3.3L) – GDI 1. Engine coolant reservoir 2. Engine oil filler cap 3. Brake fluid reservoir 4. Air cleaner 5. Fuse box 6. Positive battery terminal 7. Negative battery terminal 8. Engine oil dipstick 9.
-
Page 458: Maintenance Services
Kia dealer meets Kia’s high service tion procedures. quality standards and receives tech- Maintenance Service and Record nical support from Kia in order to pro- Retention are the owner’s responsi- Should you have any doubts con- vide you with a high level of service bility.
-
Page 459: Owner Maintenance Precautions
As explained earlier in this section, become entangled in moving several procedures can be done only parts, if you must run the engine by an authorized Kia dealer with spe- while working under the hood, cial tools. make certain that you remove all jewelry (especially rings, ✽…
-
Page 460: Owner Maintenance
• Check the engine oil level. ized Kia dealer at the frequencies exhaust fumes in the vehicle. indicated to help ensure safe, • Check the coolant level in the •…
-
Page 461
Maintenance At least monthly: At least once a year: • Check the coolant level in the • Clean the body and door drain engine coolant reservoir. holes. • Check the operation of all exterior • Lubricate the door hinges and lights, including the stoplights, turn checks, and hood hinges. -
Page 462: Scheduled Maintenance Service
Maintenance SCHEDULED MAINTENANCE SERVICE If your vehicle is operated under the Follow the Normal Maintenance above conditions, should Schedule if the vehicle is usually inspect, replace or refill more fre- operated where none of the following conditions apply. If any of the follow- quently than the following Normal ing conditions apply, follow the Maintenance Schedule.
-
Page 463
Additives are avail- anytime they have been submerged in water. able from your authorized Kia dealer along with infor- : Inspect for excessive tappet noise and/or engine mation on how to use them. Do not mix other addi- vibration and adjust if necessary. -
Page 464
Maintenance NORMAL MAINTENANCE SCHEDULE 3,000 miles (5,000 km) or 6 months 7,500 miles (12,000 km) or 6 months ❑ Rotate tire ❑ Replace engine oil and filter (2.0 T-GDI) ❑ Inspect battery condition (At first, replace at 3,000 miles (5,000 km) or 6 months, ❑… -
Page 465
Maintenance NORMAL MAINTENANCE SCHEDULE 15,000 miles (24,000 km) or 12 months 22,500 miles (36,000 km) or 18 months ❑ Rotate tire ❑ Rotate tire ❑ Inspect battery condition ❑ Inspect battery condition ❑ Inspect air cleaner filter ❑ Inspect air cleaner filter ❑… -
Page 466
Maintenance NORMAL MAINTENANCE SCHEDULE 30,000 miles (48,000 km) or 24 months (Continued) ❑ Rotate tire ❑ Replace air cleaner filter ❑ Inspect battery condition ❑ Replace engine oil and filter ❑ Inspect vacuum hose (Every 7,500 miles (12,000 km) or 12 months) ❑… -
Page 467
Maintenance NORMAL MAINTENANCE SCHEDULE 37,500 miles (60,000 km) or 30 months 45,000 miles (72,000 km) or 36 months ❑ Rotate tire ❑ Rotate tire ❑ Inspect battery condition ❑ Inspect battery condition ❑ Inspect air cleaner filter ❑ Inspect air cleaner filter ❑… -
Page 468
Maintenance NORMAL MAINTENANCE SCHEDULE 52,500 miles (84,000 km) or 42 months 60,000 miles (96,000 km) or 48 months ❑ Rotate tire ❑ Rotate tire ❑ Inspect battery condition ❑ Inspect battery condition ❑ Inspect vacuum hose ❑ Inspect air cleaner filter ❑… -
Page 469
Maintenance NORMAL MAINTENANCE SCHEDULE (Continued) 67,500 miles (108,000 km) or 54 months ❑ Inspect drive belts ❑ Rotate tire (First, 60,000 miles (96,000 km) or 72 months ❑ Inspect battery condition after every 15,000 miles (24,000 km) or 24 months) * ❑… -
Page 470
Maintenance NORMAL MAINTENANCE SCHEDULE 75,000 miles (120,000 km) or 60 months (Continued) ❑ Rotate tire ❑ Replace engine oil and filter ❑ Inspect battery condition (Every 7,500 miles (12,000 km) or 12 months) ❑ Inspect air cleaner filter ❑ Add fuel additive * ❑… -
Page 471
Maintenance NORMAL MAINTENANCE SCHEDULE 82,500 miles (132,000 km) or 66 months 90,000 miles (144,000 km) or 72 months ❑ Rotate tire ❑ Rotate tire ❑ Inspect battery condition ❑ Inspect battery condition ❑ Inspect air cleaner filter ❑ Inspect vacuum hose ❑… -
Page 472
Maintenance NORMAL MAINTENANCE SCHEDULE (Continued) 97,500 miles (156,000 km) or 78 months ❑ Replace climate control air filter ❑ Rotate tire ❑ Inspect battery condition (for evaporator and blower unit) ❑ Replace air cleaner filter ❑ Inspect air cleaner filter ❑… -
Page 473
Maintenance NORMAL MAINTENANCE SCHEDULE 105,000 miles (168,000 km) or 84 months (Continued) ❑ Add fuel additive * ❑ Rotate tire ❑ Inspect battery condition (Every 7,500 miles (12,000 km) or 12 months) ❑ Inspect air cleaner filter ❈ Inspect : Inspect and if necessary, adjust, correct, clean or ❑… -
Page 474
Maintenance NORMAL MAINTENANCE SCHEDULE 112,500 miles (180,000 km) or 90 months 120,000 miles (192,000 km) or 96 months ❑ Rotate tire ❑ Rotate tire ❑ Inspect battery condition ❑ Inspect battery condition ❑ Inspect vacuum hose ❑ Inspect air cleaner filter ❑… -
Page 475
Maintenance NORMAL MAINTENANCE SCHEDULE (Continued) 127,500 miles (204,000 km) or 102 months ❑ Rotate tire ❑ Replace climate control air filter ❑ Inspect battery condition (for evaporator and blower unit) ❑ Inspect air cleaner filter ❑ Replace air cleaner filter ❑… -
Page 476
Maintenance NORMAL MAINTENANCE SCHEDULE 135,000 miles (216,000 km) or 108 months (Continued) ❑ Add fuel additive * ❑ Rotate tire ❑ Inspect battery condition (Every 7,500 miles (12,000 km) or 12 months) ❑ Inspect air cleaner filter ❈ Inspect : Inspect and if necessary, adjust, correct, clean or ❑… -
Page 477
Maintenance NORMAL MAINTENANCE SCHEDULE 142,500 miles (228,000 km) or 114 months 150,000 miles (240,000 km) or 120 months ❑ Rotate tire ❑ Rotate tire ❑ Inspect battery condition ❑ Inspect battery condition ❑ Inspect air cleaner filter ❑ Inspect vacuum hose ❑… -
Page 478
Maintenance NORMAL MAINTENANCE SCHEDULE (Continued) No check, No service required ❑ Inspect drive belts ❑ Automatic transaxle fluid (First, 60,000 miles (96,000 km) or 72 months after every 15,000 miles (24,000 km) or 24 months) * ❑ Replace climate control air filter (for evaporator and blower unit) ❑… -
Page 479
Maintenance MAINTENANCE UNDER SEVERE USAGE CONDITIONS The following items must be serviced more frequently on cars normally used under severe driving conditions. Refer to the chart below for the appropriate maintenance intervals. R : Replace I : Inspect and, after inspection, clean, adjust, repair or replace if necessary MAINTENANCE DRIVING MAINTENANCE ITEM… -
Page 480
Maintenance MAINTENANCE DRIVING MAINTENANCE ITEM MAINTENANCE INTERVALS OPERATION CONDITION STEERING GEAR BOX, LINKAGE & BOOTS/LOWER ARM BALL JOINT, UPPER MORE FREQUENTLY C, D, E, F, G, H, I ARM BALL JOINT EVERY 7,500 MILES (12,000 KM) DRIVE SHAFTS AND BOOTS C, D, E, F, G, H, I, J OR 6 MONTHS TRANSFER CASE OIL (AWD) -
Page 481: Explanation Of Scheduled Maintenance Items
Have an authorized Kia dealer ditions, more frequent oil and filter starting. If an excessive amount of replace any damaged or leaking changes are required.
-
Page 482
Vacuum crankcase ventilation Air cleaner filter Cooling system hoses (if equipped) A Genuine Kia air cleaner filter is Check the cooling system compo- Inspect the surface of hoses for evi- recommended when the filter is nents, such as the radiator, coolant dence of heat and/or mechanical replaced. -
Page 483
But in severe conditions, the fluid transaxle malfunction and fail- should be changed at an authorized ure. (Refer to «Recommended Kia dealer in accordance to the Brake fluid lubricants and capacities» in scheduled maintenance at the begin- section 8.) Check the brake fluid level in the ning of this section. -
Page 484
Maintenance Parking brake Suspension mounting bolts Drive shafts and boots Inspect the parking brake system Check the suspension connections Check the drive shafts, boots and including the parking brake lever (or for looseness or damage. Retighten clamps for cracks, deterioration, or pedal) and cables. -
Page 485: Engine Oil
Maintenance ENGINE OIL Checking the engine oil level 3. Turn the engine off and wait for a 5. Pull the dipstick out again and few minutes (about 5 minutes) for check the level. The level should ■ Type A the oil to return to the oil pan. be between F and L.
-
Page 486: Changing The Engine Oil And Filter
Changing the engine oil and (Refer to “Recommended lubricants filter and capacities” in section 8.) Have engine oil and filter changed by an authorized Kia dealer according to the Maintenance Schedule at the beginning of this section. CALIFORNIA PROPO- SITION 65 WARNING…
-
Page 487: Engine Coolant
Maintenance ENGINE COOLANT The high-pressure cooling system Checking the coolant level • Turn the engine off and wait until it has a reservoir filled with year round cools down. Use extreme care antifreeze coolant. The reservoir is when removing the radiator cap. WARNING filled at the factory.
-
Page 488
If the coolant level is low, add enough specified coolant to provide protec- tion against freezing and corrosion. Bring the level to F, but do not over- fill. If frequent additions are required, see an authorized Kia dealer for a cooling system inspection. -
Page 489: Changing The Coolant
Maintenance For mixture percentage, refer to the Changing the coolant following table. Have the coolant changed by an authorized Kia dealer according to Mixture Percentage the Maintenance Schedule at the Ambient (volume) beginning of this chapter. Temperature Antifreeze Water Put a thick cloth around the radiator 5°F (-15°C)
-
Page 490: Brake Fluid
In the event the brake system CAUTION Proper fluid requires frequent additions of fluid, the vehicle should be inspected by Only use brake fluid in brake an authorized Kia dealer. system. Small amounts improper fluids (such as engine When changing and adding brake oil) can cause damage to the fluid, handle it carefully.
-
Page 491: Washer Fluid
If the stroke is more or less than specified, have the parking brake adjusted by an authorized Kia dealer. Stroke : 8~9 notch OYP074049K The reservoir is translucent so that you can check the level with a quick visual inspection.
-
Page 492: Air Cleaner
Maintenance AIR CLEANER Filter replacement OUM074008 OUMA074009 1. Pull out the air cleaner cover. 2. Unlock by turning the locking lever OUM074007 upward. It must be replaced when necessary, 3. Pull the air cleaner filter to replace. and should not be washed. 4.
-
Page 493
• Use a Kia genuine part. Use of non-genuine parts could dam- age the air flow sensor. 7 41… -
Page 494: Climate Control Air Filter
Maintenance CLIMATE CONTROL AIR FILTER (IF EQUIPPED) Filter inspection The climate control air filter should be replaced according to the mainte- nance schedule. If the vehicle is operated in severely air-polluted cities or on dusty rough roads for a long period, it should be inspected more frequently and replaced earlier.
-
Page 495
Maintenance OUM074013 OYP074008K 3. Remove the climate control air fil- 4. Replace the climate control air filter. ter case by pulling out right side of 5. Reassemble in the reverse order the cover. of disassembly. When replacing the climate control air filter install it properly. -
Page 496: Wiper Blades
Maintenance WIPER BLADES Blade inspection Contamination of either the wind- Blade replacement shield or the wiper blades with for- When the wipers no longer clean eign matter can reduce the effective- adequately, the blades may be worn ness of the windshield wipers. or cracked, and require replacement.
-
Page 497
Maintenance Front windshield wiper blade Rear window wiper blade 1JBA7037 1LDA5023 OHM078062 1. Raise the wiper arm and turn the 1. Raise the wiper arm and pull out wiper blade assembly to expose the wiper blade assembly. the plastic locking clip. CAUTION — Wiper arms Do not allow the wiper arm to… -
Page 498
3. Make sure the blade assembly is installed firmly by trying to pull it slightly. To prevent damage to the wiper arms or other components, have an authorized Kia dealer replace the wiper blade. -
Page 499: Battery
Maintenance BATTERY For best battery service Always read the following WARNING — Risk of instructions carefully when handling a battery. explosion Keep lit cigarettes and If any electrolyte gets into other flames your eyes, flush your eyes sparks away from the with clean water for at least battery.
-
Page 500: Battery Recharging
Maintenance Battery recharging WARNING CALIFORNIA PROPO- — Risk of elec- Your vehicle has a maintenance-free, SITION 65 WARNING trocution calcium-based battery. Never touch the electrical igni- Battery posts, terminals, and • If the battery becomes discharged tion system while the vehicle is related accessories contain in a short time (because, for exam- running.
-
Page 501: Recharging Battery
Maintenance Recharging battery • Before performing maintenance or Reset items recharging the battery, turn off all When recharging battery, Items should be reset after the bat- accessories and stop the engine. observe the following precautions: tery has been discharged or the bat- •…
-
Page 502: Tires And Wheels
Maintenance TIRES AND WHEELS Tire care WARNING — Tire under For proper maintenance, safety, and inflation maximum fuel economy, you must Inflate your tire consistent with always maintain recommended tire the instructions provided in this inflation pressures and stay within manual.
-
Page 503: Tire Pressure
(1.6 km) since startup.) authorized Kia dealer. • Check the pressure of your spare • Overinflation produces a harsh How to check tire each time you check the pres-…
-
Page 504: Tire Rotation
• Remember to check the pressure Replace the tire if you find either of the valve stems. They help prevent of your spare tire. Kia recommends these conditions. Replace the tire if leaks by keeping out dirt and mois- that you check the spare every fabric or cord is visible.
-
Page 505: Wheel Alignment And Tire Balance
Maintenance Disc brake pads should be inspected Wheel alignment and tire bal- Without a spare tire for wear whenever tires are rotated. ance Rotate radial tires that have an The wheels on your vehicle were asymmetric tread pattern only from aligned and balanced carefully at the front to rear and not from right to left.
-
Page 506: Tire Replacement
This shows there is CAUTION — Wheels less than 1/16 inch (1.6 mm) of tread Wheels that do not meet Kia left on the tire. Replace the tire when specifications may fit poorly this happens. and result in damage to the…
-
Page 507: Wheel Replacement
Maintenance Wheel replacement Tire traction Tire sidewall labeling When replacing the metal wheels for Tire traction can be reduced if you any reason, make sure the new drive on worn tires, tires that are wheels are equivalent to the original improperly inflated or on slippery factory units in diameter, rim width road surfaces.
-
Page 508
Maintenance 2. Tire size designation P — Applicable vehicle type (tires Wheel size designation marked with the prefix “P’’ are A tire’s sidewall is marked with a tire Wheels are also marked with impor- intended for use on passenger size designation. You will need this tant information that you need if you vehicles or light trucks;… -
Page 509
Maintenance 3. Checking tire life (TIN : Tire Tire speed ratings WARNING — Tire age Identification Number) The chart below lists many of the dif- ferent speed ratings currently being Replace tires within the recom- Any tires that are over 6 years old, used for passenger vehicle tires. -
Page 510
Maintenance 4. Tire ply composition and mate- 6. Maximum load rating Tread wear rial This number indicates the maximum The tread wear grade is a compara- load in kilograms and pounds that tive rating based on the wear rate of The number of layers or plies of rub- can be carried by the tire. -
Page 511
Maintenance Traction — AA, A, B & C Temperature -A, B & C Tire terminology and definitions Air Pressure: The amount of air The traction grades, from highest to The temperature grades are A (the inside the tire pressing outward on lowest, are AA, A, B and C. -
Page 512
Maintenance Cold Tire Pressure: The amount of Intended Outboard Sidewall: The Normal Occupant Weight: The number of occupants a vehicle is air pressure in a tire, measured in side of an asymmetrical tire, that must always face outward when designed to seat multiplied by 150 pounds per square inch (psi) or kilo- pascals (kPa) before a tire has built mounted on a vehicle. -
Page 513: All Season Tires
All season tires which the ply cords that extend to the Grading Standards, a tire information Kia specifies all season tires on system that provides consumers with beads are laid at 90 degrees to the some models to provide good per- centerline of the tread.
-
Page 514: Snow Tires
Maintenance Snow tires Tire chains • When driving on roads covered with snow or ice, drive at less than If you equip your vehicle with snow Tire chains, if necessary, should be 20 mph (30 km/h). tires, they should be the same size installed on the front wheels.
-
Page 515: Radial-Ply Tires
Maintenance Radial-ply tires Longer wearing tires can be more Low aspect ratio tire susceptible to irregular tread wear. It (if equipped) Radial-ply tires provide improved is very important to follow the tire Low aspect ratio tires, whose aspect tread life, road hazard resistance and rotation interval shown in this chap- ratio is lower than 50, are provided smoother high speed ride.
-
Page 516
— If the tire is impacted, we rec- ommend that you inspect the tire condition or contact an authorized Kia dealer. — To prevent damage to the tire, inspect the tire condition and pressure every 3,000km. -
Page 517: Fuses
Avoid Do not use a screwdriver or any using the system involved and imme- other metal object to remove diately consult an authorized Kia fuses because it may cause a dealer. short circuit and damage the system.
-
Page 518: Inner Panel Fuse Replacement
Spare fuses are provided in the displayed in the cluster. engine compartment fuse panel. 5. Push in a new fuse of the same rating, and make sure it fits tightly in the clips. If it fits loosely, consult an authorized Kia dealer.
-
Page 519
If you move the switch to the OFF lamps, have the vehicle checked by position, some items such as audio an authorized Kia dealer for assis- and digital clock must be reset and tance. transmitter (or smart key) may not work properly. -
Page 520: Engine Compartment Fuse Replacement
5. Reinstall in the reverse order of 4. Push in a new fuse of the same removal. rating, and make sure it fits tightly in the clips. If it fits loosely, consult an authorized Kia dealer.
-
Page 521: Fuse Box’
In Have the vehicle checked by an such case the cause of the problem authorized Kia dealer. may be disconnection of the main fuse (BFT type), which is located inside the positive battery terminal (+) cap.
-
Page 522: Fuse/Relay Panel Description
Maintenance Fuse/relay panel description OUMA074021 Inside the fuse/relay panel covers, you can find the fuse/relay label describing fuse/relay name and capacity. ✽ ✽ NOTICE OUMA074220 Not all fuse panel descriptions in this manual may be applicable to your vehicle. It is accurate at the time of printing.
-
Page 523
Maintenance Description Fuse rating Protected component AIR BAG IND. Cluster, A/C Control Module A/CON 3 Fuse — A/CON 2, Blower Motor A/CON 2 7.5A A/C Control Module (Auto) START 7.5A E/R Junction Block (Start Relay), Transaxle Range Switch AIR BAG SRS Control Module, Passenger Occupant Detection Sensor Crash Pad Switch, Tire Pressure Monitoring Module, 4WD ECM, Lane Departure Warning Module, Console MODULE 2… -
Page 524
Maintenance Description Fuse rating Protected component SMART KEY 1 Smart Key Control Module A/CON (RR) ICM Relay Box (Rear Blower Motor Relay) SUNROOF 2 Sunroof Control Module (Roller) SUNROOF 1 Sunroof Control Module (Glass) CLUSTER Instrument Cluster GATEWAY Gateway (MCU IG1) IMMO. -
Page 525
Maintenance Description Fuse rating Protected component MEMORY 1 HEATED STEERING WIPER (RR) Rear Wiper Relay, Rear Wiper Motor A/C Control Module, Cluster Ionizer, E/R Junction Block (Blower Relay), ICM Relay Box (Rear Blower Motor A/CON 1 7.5A Relay) HEATED MIRROR A/C Control Module, Driver/Passenger Power Outside Mirror MODULE 5 BCM, Smart Key Control Module… -
Page 526
Maintenance Description Fuse rating Protected component Glove Box Lamp, Ignition Key Ill. & Door Warning Switch, Driver Foot Lamp, Vanity Lamp LH/RH Switch, INTERIOR LAMP Cargo Lamp, Center Room Lamp, Overhead Console Lamp, Rear Personal Lamp LH/RH FUEL LID Fuel Filler & Tail Gate Switch P/SEAT (DRV) Driver IMS Control Module, Driver Seat Manual Switch P/SEAT (PASS) -
Page 527
Maintenance Engine compartment fuse panel OUM074023 OUMA074050 7 75… -
Page 528
Maintenance Description Fuse rating Protected component MDPS 1 100A MDPS Unit (Rack Type) MDPS 2 MDPS Unit (Column Type) COOLING Cooling Fan 1 Relay FAN 1 MULTI IGPM (Fuse — S/HEATER (RR), P/SEAT (DRV), P/SEAT (PASS), P/WINDOW (LH)) FUSE IGPM (Fuse — S/HEATER (FRT), P/WINDOW (RH), FULE LID, AMP 1, AMP 2) IGPM (IPS 1, Fuse — MODULE 7, Leak Current Autocut Device Fuse — MULTIMEDIA, MEMORY 2, MEMORY 1), INTERIOR LAMP IGPM (IPS 0/IPS 2/IPS 3/IPS 4/IPS 5/IPS 6/IPS 7/IPS 8, Fuse — S/ROOF 1) -
Page 529
Maintenance Description Fuse rating Protected component Battery Sensor VACUUM [G4KH] Vacuum Pump PUMP TCU 2 [G4KJ/G4KH] PCM EPB 1 Electric Parking Brake Module EPB 2 Electric Parking Brake Module FUSE 4WD ECM ECU 2 ECU 3 [G6DH] IDB (Injector Driver Box) MDPS 3 7.5A MDPS Unit (Rack Type) -
Page 530
Maintenance Description Fuse rating Protected component ABS 3 7.5A ESC Control Module, Multipurpose Check Connector ECU 1 PCM, [G6DH] IDB (Injector Driver Box) IG 2 RLY. 4 (Start Relay), PDM (IG2) Relay, Ignition Switch POWER Front Power Outlet & Cigarette Lighter OUTLET 1 SENSOR 6 7.5A… -
Page 531
Maintenance Description Fuse rating Protected component POWER Rear Power Outlet OUTLET 3 SENSOR 1 [G4KJ/G4KH] Ignition Coil #1/#2/#3/#4 [G6DF] Ignition Coil #1/#2/#3/#4/#5/#6, Condecser #1/#2 SENSOR 3 [G4KJ/G4KH] Fuel Pump Relay [G6DF] Fuel Pump Relay, PCM POWER Luggage Power Outlet OUTLET 4 REAR Rear Defogger Relay HEATED… -
Page 532
Maintenance Relay NO. Relay Name Type Blower Relay MICRO START #2 Relay MICRO Cooling Fan #1 Relay MINI… -
Page 533: Light Bulbs
So please have the vehicle checked by an authorized Kia dealer immediately. 7 81…
-
Page 534: Front Lamp Bulb Replacement
Front lamp bulb replacement (1) Headlamp(High) correct bulbs and the expertise, con- (2) Headlamp(Low) ■ Type A sult an authorized Kia dealer. In (3) Turn signal lamp many cases, it is difficult to replace (4) Side marker lamp vehicle light bulbs because other…
-
Page 535
If the light bulb does not headlamp. operate, have your vehicle • If a bulb becomes damaged or checked by an authorized Kia cracked, replace it immediately dealer. and carefully dispose of it. • Wear eye protection when chang- OXM079200N ing a bulb. -
Page 536
Maintenance Headlamp (bulb type) -high/low Turn signal lamp 7. Install the socket in the assembly by aligning the tabs on the socket with the slots in the assembly. Push the socket into the assembly and turn the socket clockwise. 8. Install the headlamp bulb cover by turning it clockwise. -
Page 537
Always have the headlamp aiming OUMA074109 adjusted after an accident or after the headlamp assembly is reinstalled at an authorized Kia dealer. 1. Remove the front bumper under cover. 2. Reach your hand into the back of the front bumper. -
Page 538
HID lamp needs to be replaced. HID an authorized Kia dealer. A skilled lamping components are more com- technician should check or repair the plex than conventional halogen… -
Page 539: Rear Combination Lamp Bulb Replacement
Maintenance Outside lamp Rear combination lamp bulb Type A replacement 1. Open the liftgate (tailgate). 2. Open the service cover. ■ Type A 3. Remove the nuts from the vehicle. Side marker Stop&tail Tail 4. Remove the rear combination lamp assembly from the body of the vehicle.
-
Page 540
OUMA074112 with LED assembled units. Please ■ Type B OUMA074111 contact an authorized Kia dealer. 5. Disconnect connector between lamp and the body. Type B (Stop and tail lamp) 6. Remove the socket from the… -
Page 541: High Mounted Stop Lamp Replacement
* If your vehicle is equipped with LED 2. Gently remove the center cover of type stop and tail lamps replace the rear tailgate trim. with LED assembled units. Please 3. Disconnect the electrical connec- contact an authorized Kia dealer. tor. 7 89…
-
Page 542
Maintenance License plate lamp bulb replacement OUMA074230 5. Remove the high mounted stop lamp assembly (A) after loosening OUMA074231 the nuts and washer nozzle (B). 1. Loosen the lens retaining screws 6. Reinstall a new lamp assembly in with a phillips head screwdriver. the reverse order of removal. -
Page 543
Maintenance ■ ■ Interior lamp bulb replacement Map lamp Luggage lamp 1. Using a flat-blade screwdriver, gently pry the lens from the interi- or light housing. 2. Remove the bulb by pulling it straight out. WARNING — Interior lamps ■ Room lamp Prior to working on the Interior ■… -
Page 544: Appearance Care
Maintenance APPEARANCE CARE Finish maintenance Exterior care After washing the vehicle, test the brakes while driving slowly to see if Washing Exterior general caution they have been affected by water. If To help protect your vehicle’s finish It is very important to follow the label braking performance is impaired, dry from rust and deterioration, wash it directions when using any chemical…
-
Page 545
Maintenance Waxing CAUTION — Drying vehicle Wax the vehicle when water will no • Wiping dust or dirt off the longer bead on the paint. body with a dry cloth will Always wash and dry the vehicle scratch the finish. before waxing. -
Page 546
Maintenance Finish damage repair Bright-metal maintenance Underbody maintenance Deep scratches or stone chips in the • To remove road tar and insects, Corrosive materials used for ice and painted surface must be repaired use a tar remover, not a scraper or snow removal and dust control may promptly. -
Page 547
Maintenance Aluminum wheel maintenance Corrosion protection High-corrosion areas The aluminum wheels are coated If you live in an area where your vehi- Protecting your vehicle from corro- with a clear protective finish. cle is regularly exposed to corrosive sion materials, corrosion protection is •… -
Page 548
Maintenance High temperatures can also acceler- Keep your vehicle clean • When cleaning lower door panels, ate corrosion of parts that are not rocker panels and frame members, The best way to prevent corrosion is properly ventilated so the moisture be sure that drain holes are kept to keep your vehicle clean and free can be dispersed. -
Page 549: Interior Care
Maintenance Keep paint and trim in good con- Interior care CAUTION — Leather dition Interior general precautions When cleaning leather products Scratches or chips in the finish Prevent chemicals such as perfume, (steering wheel, seats etc.), use should be covered with «touch-up» cosmetic oil, sun cream, hand clean- neutral detergents or low alco- paint as soon as possible to reduce…
-
Page 550
Maintenance Cleaning the upholstery and inte- Cleaning the lap/shoulder belt rior trim webbing Clean the belt webbing with any mild Vinyl soap solution recommended for Remove dust and loose dirt from cleaning upholstery or carpet. Follow vinyl with a whisk broom or vacuum the instructions provided with the cleaner. -
Page 551: Emission Control System
(The ORVR system is designed to an authorized Kia dealer in accor- allow the vapors from the fuel tank to dance with the maintenance sched- be loaded into a canister while refu- ule in this manual.
-
Page 552: Exhaust Emission Control System
Maintenance Canister Engine exhaust gas precautions 3. Exhaust emission control system (carbon monoxide) Fuel vapors generated inside the fuel tank are absorbed and stored in the • Carbon monoxide can be present Exhaust Emission Control onboard canister. When the engine is with other exhaust…
-
Page 553
Maintenance Operating precautions for catalyt- • Do not operate the engine in con- WARNING — Fire fined or closed areas (such as ic converters (if equipped) garages) any more than what is • Do not park, idle or drive the necessary to move the vehicle in or vehicle over or near flamma- WARNING… -
Page 554: California Perchlorate Notice
All inspections and adjustments must be made by an authorized Kia dealer. • Avoid driving with a extremely low fuel level. Running out of fuel could cause the engine to misfire, dam- aging the catalytic converter.
-
Page 555: Specifications, Consumer Information And Reporting Safety Defects
Specifications, Consumer information and Reporting safety defects Dimensions ……. . 8-2 Engine .
-
Page 556: Dimensions
Specifications, Consumer information, Reporting safety defects DIMENSIONS ITEM 5 Seats 7 Seats ← Overall length [mm (in.)] 4,760 (187.4) ← Overall width [mm (in.)] 1,890 (74.4) ← Without Roof rack 1,685 (66.3) Overall height [mm (in.)] ← With Roof rack 1,690 (66.5) ←…
-
Page 557: Bulb Wattage
Specifications, Consumer information, Reporting safety defects BULB WATTAGE Light Bulb Wattage (W) Bulb type Headlamps (Low) H7SPL Headlamps (Low) — HID type* Headlamps (High) Front turn signal lamps PY27/8W Bulb type Front position lamps LED type Front Daytime running light* Type A Front fog lamps Type B…
-
Page 558
Specifications, Consumer information, Reporting safety defects TIRES AND WHEELS Inflation pressure [bar(psi, kPa)] Wheel lug Load Speed Wheel nut torque Capacity capacity Item Tire size Supplier Normal load * Maximum load size [Kgf·m (lb·ft, N·m)] LI * SS * Km/h Front Rear Front… -
Page 559: Gross Vehicle Weight
FRONT A/CON 650 ± 25g Refrigerant R-134a FRONT + REAR A/CON 850 ± 25g FRONT A/CON 120 ± 10g Compressor lubricant PAG(FD46XG) FRONT + REAR A/CON 210 ± 10g We recommend that you contact an authorized Kia dealer for more details.
-
Page 560: Recommended Lubricants And Capacities
Specifications, Consumer information, Reporting safety defects RECOMMENDED LUBRICANTS AND CAPACITIES To help achieve proper engine and powertrain performance and durability, use only lubricants of the proper quality. The correct lubricants also help promote engine efficiency that results in improved fuel economy. These lubricants and fluids are recommended for use in your vehicle.
-
Page 561
Specifications, Consumer information, Reporting safety defects Lubricant Volume Classification Theta II 2.0 7.3 l (7.71 US qt.) T-GDI Mixture of antifreeze and distilled water Gasoline Coolant Theta II 2.4 GDI 7.9 l (8.35 US qt.) (Ethylene glycol base coolant for aluminum Engine radiator) Lambda II 3.3… -
Page 562: Recommended Sae Viscosity Number
Specifications, Consumer information, Reporting safety defects Recommended SAE viscosity Temperature Range for SAE Viscosity Numbers number °C Temperature Always be sure to clean the area (°F) around any filler plug, drain plug, or 20W-50 dipstick before checking or draining 15W-40 Gasoline Engine Oil any lubricant.
-
Page 563: Vehicle Identification Number (Vin)
Specifications, Consumer information, Reporting safety defects VEHICLE IDENTIFICATION NUMBER (VIN) VEHICLE CERTIFICATION LABEL ■ Frame number ■ VIN label OUM084001 OUM084005 The vehicle identification number The VIN is also on a plate attached OUM084004 (VIN) is the number used in register- to the top of the dashboard.
-
Page 564: Tire Specification And Pressure Label
Specifications, Consumer information, Reporting safety defects TIRE SPECIFICATION AND ENGINE NUMBER REFRIGERANT LABEL PRESSURE LABEL ■ Gasoline engine (THETA 2.0L T-GDI) OYF081013N ■ Gasoline engine (THETA 2.4L GDI) OUM084006 OUM084002 The refrigerant label is located on The tires supplied on your new vehi- the underside of the hood.
-
Page 565: Consumer Assistance (U.s. Only)
Roadside Assistance is provided on all new current Emergency roadside assistance model year Kia Vehicles from the date the vehicle is deliv- Kia’s toll free Roadside Assistance hot line is staffed 24 ered to the first retail buyer or otherwise put into use (in-…
-
Page 566
Roadside Assistance benefits are not available for any expenses. Trip interruption coverage is limited to $100 Kia vehicle that has ever been or should be issued a “sal- per day subject to a three day maximum limit per incident. vage” title or similar “branded” title under any state’s You must contact the Kia Roadside Assistance Center to law or has been declared a “total loss”… -
Page 567
Specifications, Consumer information, Reporting safety defects Registering your vehicle in a foreign country 3. There may not be an Authorized Kia Dealer in the area in which you plan to register your vehicle. You may If you plan to register your vehicle in a foreign country,… -
Page 568: Electrical Equipment (U.s. Only)
Authorized Kia electronic systems may be adversely affected. To avoid Dealer, in order to ensure that you do not void your war- damage to your vehicle, consult an Authorized Kia Dealer ranty. concerning the proper equipment and installation.
-
Page 569: Reporting Safety Defects (U.s. Only)
However, NHTSA cannot become involved in indi- vidual problems between you, your dealer, or Kia Motors America, Inc. Electrical troubleshooting manual: This manual complements the Service Manual by provid-…
-
Page 570
Index… -
Page 571: Air Cleaner
Index Manual climate control system ….4-127 Automatic climate control system … . . 4-138 A/V Mode ……..4-82 All wheel drive (AWD).
-
Page 572
Index SIRIUS XM™ Satellite Radio information ..4-191 RCTA (Rear cross traffic alert) ….5-76 SIRIUS™ radio ……4-192 Bluetooth ®… -
Page 573
Index Care of seat belts ……3-34 Center console storage ……4-156 Dashboard illumination, see instrument panel Central door lock switch. -
Page 574
Index Driver’s and passenger’s front air bag….3-56 Engine coolant ……. 7-35 Driving at night. -
Page 575
Index Floor mat anchor(s) ……4-166 Fluid Gauges ……..4-73 Brakes fluid . -
Page 576: Interior Overview
Index Warning lights ……4-95 Indicator Lights ……4-103 Icy road warning indicator .
-
Page 577
Index Emergency Liftgate (tailgate) safety release ..4-26 Light bulbs ……..7-81 Jack and tools . -
Page 578
Index Heating and air conditioning ….4-128 Outside Temperature Gauge ….. 4-75 Air conditioning . -
Page 579
Index Seat belt restraint system ….. . . 3-24 Seat belt warning ……3-25 Radio. -
Page 580
Index SIRIUS™ radio……4-222 Driving at night ……5-92 Sliding the sunroof . -
Page 581
Index Sunvisor ……..4-162 Tire sidewall labeling ……7-55 Surround view monitoring system . -
Page 582
Index Vehicle certification label ……8-9 Snow tires……. . . 5-95 Vehicle identification number (VIN) .
Скачать инструкцию Инструкция по эксплуатации
Our workshop manual is a fully updated document that will furnish you with the most detailed information about your 2016 KIA Sorento Prime] vehicle. Regardless of what you need information on — whether repair, maintenance or service, or even a step by step procedural guide on rebuilding your engine or simply changing your wiper, — we give you all of it. Feel free to read online or download.

О КОМПАНИИ Kia
Наслаждайтесь вашим автомобилем и «семейной» заботой от Kia!
Поздравляем вас с приобретением нового автомобиля Kia.
Являясь признанным в мире производителем автомобилей, известных
своим высоким качеством и справедливой ценой, компания Kia Motors
считает своим долгом предоставлять клиентам услуги на уровне выше их
ожиданий и полностью удовлетворяющем их потребности.
В дилерской сети Kia вас ожидает “семейное” отношение, которое создает
ощущение тепла, гостеприимства и доверия – ощущения, что за тобой
ухаживают заботливые люди.
Вся информация, содержащаяся в этом руководстве пользователя, является
точной на момент ее опубликования. Тем не менее, Kia оставляет за собой
право в любое время вносить изменения, потому что таким образом
реализуется наша политика непрерывного усовершенствования продукции.
Данное руководство относится ко всем моделям этого автомобиля и
включает в себя описания и пояснения дополнительного и стандартного
оборудования. В результате этого в руководстве могут встречаться
материалы, которые не соответствуют вашей конкретной модели
автомобиля Kia.

i
Спасибо за то, что вы выбрали автомобиль Kia.
В этом руководстве вы найдете сведения по эксплуатации, техническому обслуживанию и безопасности автомобиля. Оно
также дополнено буклетом “Гарантийные обязательства и техническое обслуживание”, который содержит важную
информацию по вопросам гарантийного обслуживания вашего автомобиля. Для обеспечения приятной и безопасной
эксплуатации вашего нового автомобиля Kia настоятельно просит внимательно ознакомиться с этими материалами и
выполнять приведенные рекомендации.
Kia предлагает Вам большое разнообразие вариантов исполнения, компонентов и комплектующих для различных моделей.
Следовательно, оборудование, описанное в данном руководстве, наряду с иллюстрациями, может отличаться от комплектации
Вашего автомобиля.
Информация и технические характеристики, приведенные в данном руководстве, были абсолютно точными на момент
издания. Kia оставляет за собой право вносить изменения в технические характеристики или конструкцию в любое время без
уведомления и каких-либо обязательств. Если у Вас возникают вопросы, всегда обращайтесь к авторизованному дилеру
компании Kia.
Компания Kia заявляет о своем постоянном стремлении к тому, чтобы вы получали удовольствие от использования
автомобиля Kia.
© 2014 Kia MOTORS Corp.
Все права защищены. Воспроизведение или перевод целого документа или какой-либо его части в любой форме, электронной
или печатной, включая фотокопирование, запись или внесение в информационно-поисковую систему, запрещено без
предварительного письменного разрешения компании Kia MOTORS.
Отпечатано в Корее.
Предисловие

ii
1
2
3
4
5
6
7
8
I
Введение
Знакомство с вашим автомобилем
Системы безопасности автомобиля
Характеристики автомобиля
Управление автомобилем
Действия в непредвиденных случаях
Техническое обслуживание
Технические характеристики & Информация для потребителя
9
Приложение I
10
Приложение II
Предметный указатель
СОДЕРЖАНИЕ

Введение
Как пользоваться настоящим руководством . . 1-2
Требования к топливу . . . . . . . . . . . . . . . . . . . . . . 1-3
• Автомобили с бензиновым двигателем. . . . . . . . . . 1-3
• Автомобили с дизельным двигателем. . . . . . . . . . . 1-6
Инструкции по вождению автомобиля . . . . . . . 1-8
Порядок обкатки автомобиля . . . . . . . . . . . . . . . 1-8
1
Введение
21
Мы хотим помочь Вам получить
максимально возможное
удовольствие от вождения данного
автомобиля. Настоящее Руководство
пользователя может оказать
содействие в этом различными
способами. Мы настойчиво
рекомендуем прочитать руководство
полностью. С целью уменьшения до
минимума вероятности гибели людей
и травматизма следует обязательно
прочитать разделы, отмеченные
заголовками ОСТОРОЖНО и
ВНИМАНИЕ, которые присутствуют во
всем руководстве.
Иллюстрации дополняют словесные
описания, приведенные в настоящем
руководстве, для того, чтобы
наилучшим образом показать, как
получить удовольствие от данного
автомобиля. Прочтя данное
руководство, владелец автомобиля
ознакомится с его характерными
особенностями, важной информацией
о безопасности и с советами по его
эксплуатации в различных дорожных
условиях.
Общая структура руководства
приведена в содержании. Неплохим
местом для начала знакомства
является предметный указатель; в нем
приведен в алфавитном порядке
перечень всей информации,
содержащейся в руководстве.
Разделы: Настоящий мануал имеет
восемь разделов и индекс. В начале
каждого раздела указано короткое
содержание, так что заглянут в него,
вы сразу можете узнать, находится ли
в нем информация, которая Вам
нужна.
В данном руководстве находятся
разнообразные сведения под
заголовками ОСТОРОЖНО,
ВНИМАНИЕ и К СВЕДЕНИЮ. Они
были подготовлены с целью
повышения уровня личной
безопасности владельца автомобиля.
Необходимо внимательно прочитать
ВСЕ процедуры и рекомендации,
приведенные под заголовками
ОСТОРОЖНО, ВНИМАНИЕ и К
СВЕДЕНИЮ, и соблюдать их.
✽✽
К СВЕДЕНИЮ
Информация, представленная под
заголовком К СВЕДЕНИЮ, может
представить интерес для владельца
автомобиля или оказаться ему
полезной.
КАК ПОЛЬЗОВАТЬСЯ НАСТОЯЩИМ РУКОВОДСТВОМ
ОСТОРОЖНО
Обозначенная под заголовком
ОСТОРОЖНО ситуация может
привести к нанесению вреда,
причинению тяжелых травм или
к гибели людей в случае
игнорирования данного
предупреждения.
ВНИМАНИЕ
Обозначенная под заголовком
ВНИМАНИЕ ситуация может
привести к нанесению вреда
автомобилю при игнорировании
данного предупреждения.
13
Введение
Автомобили с бензиновым
двигателем
Неэтилированный бензин
B Еврoпе
Для достижения оптимальных
рабочих характеристик автомобиля
мы рекомендуем вам применять
неэтилированный бензин с октановым
числом RON (по исследовательскому
методу) 95/антидетонационным
показателем AKI 91, или выше.
Вы можете использовать
неэтилированный бензин с октановым
числом RON от 91 до 94/показателем
AKI от 87 до 90, однако это может
привести к незначительному
снижению рабочих характеристик
автомобиля.
Bнe Еврoпы
Для достижения оптимальных
рабочих характеристик автомобиля
мы рекомендуем вам применять
неэтилированный бензин с октановым
числом RON (по исследовательскому
методу) 91/антидетонационным
показателем AKI 87, или выше.
Автомобиль разработан таким
образом, чтобы достигать
максимальных эксплуатационных
характеристик при использовании
НЕЭТИЛИРОВАННОГО БЕНЗИНА, что
также приводит к минимизации
выхлопа вредных веществ и
загрязнения свечей зажигания.
ТРЕБОВАНИЯ К ТОПЛИВУ
ВНИМАНИЕ
НИКОГДА НЕ ИСПОЛЬЗУЙТЕ
ЭТИЛИРОВАННОЕ ТОПЛИВО.
Использование этилированного
топлива наносит ущерб
каталитическому нейт
—
рализатору и приведет к
повреждению кислородного
датчика системы управления
двигателя, негативно
сказавшись на контроле
выброса вредных веществ.
Никогда не добавляйте какие
—
либо присадки для очистки
топливной системы в топливо
за исключением тех, которые
были рекомендованы
производителем автомобиля.
(Рекомендуем обратиться к
уполномоченному дилеру Kia.)
ОСТОРОЖНО
• Не доливайте топливо в бак по
верхнюю кромку заправочной
горловины после того, как
произойдет автоматическое
отключение заправочного
пистолета во время заправки.
• После завершения заправки
автомобиля топливом
обязательно убедитесь в том,
что крышка заправочной
горловины плотно закрыта,
для того, чтобы топливо не
выплеснулось наружу в случае
дорожнотранс-портного
происшествия.
Введение
41
Этилированный бензин
(при наличии)
В исполнении для некоторых стран
автомобили этой модели рассчитаны
на использование этилированного
бензина. Если планируется
использовать этилированное топливо,
рекомендуем обратиться к
уполномоченному дилеру Kia.
Октановые числа этилированного и
неэтилированного бензина
одинаковые.
Бензин, содержащий этиловый и
метиловый спирт
Бензоспирт, смесь, состоящая из
бензина и этилового спирта (также
известного под названием пищевой
спирт), и бензин или бензоспирт с
содержанием метилового спирта
(также известного под названием
древесный спирт) продаются на рынке
одновременно с этилированным или
неэтилированным бензином или
вместо них.
Не допускается использование
бензоспирта, содержащего более 10%
этилового спирта, и использование
бензина или бензоспирта,
содержащего какую-либо долю
метилового спирта. Все эти виды
топлива могут вызвать проблемы при
управлении автомобилем и привести к
повреждению топливной системы.
Прекратите использовать бензоспирт
любого типа при возникновении
проблем при управлении
автомобилем.
Повреждение автомобиля или
проблемы при управлении им могут не
покрываться гарантией производителя
в случае, если они вызваны
использованием следующих видов
топлива:
1. Бензоспирт, содержание этилового
спирта в котором превышает 10%.
2. Бензин или бензоспирт,
содержащие метиловый спирт.
3. Этилированное топливо или
этилированный бензин.
ВНИМАНИЕ
Никогда не используйте
бензоспирт, содержащий
метиловый спирт. Прекратите
использовать любой продукт
типа бензоспирта, который
негативно сказывается на
управлении автомобилем.
15
Введение
Прочие виды топлива
Использование таких видов топлива,
как
— топливо с содержанием кремния (Si),
— топливо с содержанием MMT
(марганца, Mn);
— топливо с содержанием ферроцена
(Fe);
— топливо с добавлением прочих
металлических присадок может
вызвать засорение фильтров, пропуски
зажигания, слабое ускорение,
остановку двигателя, расплавление
каталитического нейтрализатора,
повышенную коррозию, сокращение
срока службы и т.п.
Также может загореться индикатор
неисправности (MIL).
✽✽
К СВЕДЕНИЮ
Гарантия на новый автомобиль не
распространяется на повреждение
топливной системы или проблемы в
работе, вызванные использованием
данных видов топлива.
Использование
метилтербутилэфира (MTBE)
Не рекомендуется использовать в
данном автомобиле топлива,
объемная доля метилтербутилэфира
(MTBE) в которых превышает 15,0%
(весовая доля кислорода — 2,7%).
Использование топлив, объемная доля
метилтербутилэфира (MTBE) в которых
превышает 15,0% (весовая доля
кислорода — 2,7%), может привести к
снижению эксплуатационных
характеристик автомобиля и привести к
образованию паровых пробок или
проблем при запуске.
Не используйте метиловый
спирт
Для заправки данного автомобиля не
следует использовать виды топлива с
содержанием метанола (древесного
спирта). Такие виды топлива могут
снизить рабочие характеристики
автомобиля и стать причиной
повреждения компонентов топливной
системы, системы управления
двигателем и системы снижения
токсичности выбросов.
ВНИМАНИЕ
Предоставленная произво
—
дителем ограниченная
гарантия на новый автомобиль
может не распространяться на
повреждение топливной сис
—
темы и ухудшение
эксплуатационных характе
—
ристик, которые появились в
результате использования
видов топлива, объемная доля
метилтербутилэфира (MTBE) в
которых превышает 15,0%
(весовая доля кислорода — 2,7%).

Введение
61
Присадки к топливу
Kia рекомендует использовать
неэтилированный бензин с октановым
числом RON (октановое число по
исследовательскому методу) 95/AKI
(антидетонационный показатель) 91
или выше (для Европы) или октановым
числом RON (октановое число по
исследовательскому методу) 91/AKI
(антидетонационный показатель) 87
или выше (за исключением Европы).
Если у клиента, не использующего
высококачественный бензин с
присадками на регулярной основе,
возникают проблемы с пуском
двигателя или его перебоями, следует
вливать в топливный бак одну бутылку
присадки через каждые 15 000 км (для
Европы) / 5 000 км (кроме Европы, Для
РОССИИ). Присадки можно
приобрести у авторизованного дилера
Kia. Там же можно получить
рекомендации по их использованию.
Не смешивайте разные присадки.
Эксплуатация автомобиля за
рубежом
При поездке в другую страну на
данном автомобиле следует
обеспечить:
• соблюдение всех требований в
отношении регистрации и страховки;
• определение наличия в продаже
топлива необходимого качества.
Автомобили с дизельным
двигателем
Дизельный двигатель должен
работать только на имеющемся на
рынке дизельном топливе,
соответствующем стандарту EN 590
или аналогичному. (EN обозначает
“Европейский стандарт”) Не
используйте судовое дизельное
топливо, печное топливо или
неутвержденные топливные присадки,
т.к. это повысит износ и вызовет
повреждение двигателя и топливной
системы. Применение
неутвержденных марок топлива и/или
присадок приведет к ограничению
ваших гарантийных прав.
А автомобиле используется дизельное
топливо с цетановым числом более
51. При наличии двух видов
дизельного топлива используйте
летнее или зимнее топливо в
соответствии со следующими
рекомендациями применительно к
температуре окружающего воздуха.
• Выше -5°C (23°F) … Летнее
дизельное топливо
• Ниже -5°C (23°F) … Зимнее
дизельное топливо
17
Введение
Внимательно следите за уровнем
топлива в баке: Остановка двигателя
из-за отсутствия топлива в баке
обязательно потребует полной
прочистки магистралей для
последующего запуска.
Биодизель
В вашем транспортном средстве могут
использоваться поставляемые
коммерческим путем смеси
дизельного топлива с содержанием
биологического дизельного топлива,
обычно называемого «B7 Diesel», не
выше 7 %, если биологическое
дизельное топливо соответствует EN
14214 или аналогичным нормам. (EN
означает «Европейская норма»).
Использование биологического
топлива, в котором концентрация
добавок из рапсового метилового
эфира (RME), сложного метилового
эфира жирной кислоты (FAME),
метилового эфира растительного
масла (VME) и т. д. превышает 7 %,
или смеси дизельного топлива и
биологического дизельного топлива с
концентрацией больше 7 %, может
вызвать повышенный износ или
привести к повреждению двигателя и
топливной системы.
Ремонт или замена изношенных или
поврежденных деталей, если
использовалось несоответствующее
топливо, не будут производиться по
гарантии изготовителя.
ВНИМАНИЕ
Не допускайте попадания
бензина или воды в топливный
бак. В результате потребуется
слив топлива из бака и удаление
его из магистралей для
исключения засорения насоса
высокого давления и
повреждения двигателя.
ВНИМАНИЕ
—
Дизельное топливо
(При наличии c DPF)
Для автомобилей с дизельным
двигателем, оборудованным
системой DPF, рекомендуется
использовать
соответствующее стандартам
автомобильное дизельное
топливо. Если использовать
дизельное топливо с высоким
содержанием серы (серы более 50
промилле) и присадки, не
соответствующие техническим
условиям, возможно повреждение
системы DPF и выделение белого
дыма.

Введение
81
Как и для других автомобилей
подобного типа, неспособность
правильно управлять автомобилем
может привести к потере управления,
дорожно-транспортному происшест—
вию или переворачиванию авто—
мобиля.
Особые характеристики конструкции
(более высокий дорожный просвет,
колея и т.д.) делают центр тяжести
данного автомобиля более высоким,
чем у других типов автомобилей.
Другими словами, он не предназначен
для поворота с теми же скоростями,
как у обычных автомобилей с
приводом на 2 колеса. Избегайте
крутых поворотов или резкого
маневрирования. Следует повторить,
что неспособность правильно
управлять этим автомобилем может
привести к потере управления,
дорожно-транспортному происшест—
вию или переворачиванию авто—
мобиля. Обязательно прочитайте
указания по вождению “Снижение
риска переворачивания” в разделе
5 настоящего Руководства.
Не требуется специального периода
обкатки нового автомобиля.
Соблюдение нескольких простых мер
предосторожности в течение первых
1000 км (600 миль) пробега может
позитивно сказаться на
эксплуатационных характеристиках,
экономичности и сроке службы
автомобиля
• Не заставляйте двигатель работать
на очень высоких оборотах.
• Во время движения поддерживайте
обороты двигателя примерно 3000
об/мин.
• Не двигайтесь с одной скоростью
(как высокой, так и низкой) в течение
длительного времени. Изменение
частоты вращения двигателя
необходимо для его правильной
обкатки.
• Избегайте резких торможений, за
исключением экстренных случаев, с
целью обеспечения правильного
контакта тормозных колодок.
• Не следует буксировать прицеп в
течение первых 2000 км (1200 миль)
пробега автомобиля.
ИНСТРУКЦИИ ПО
ВОЖДЕНИЮ АВТОМОБИЛЯ
ПОРЯДОК ОБКАТКИ
АВТОМОБИЛЯ
ВНИМАНИЕ
• Никогда не используйте
топливо (дизельное топливо,
биологическое дизельное
топливо B7 или любое другое),
которое не соответствует
последним стандартам.
• Никогда не используйте
никакие топливные присадки
или присадки-очистители, не
рекомендуемые либо не
одобренные изготовителем
автомобиля.

Знакомство с вашим автомобилем
Внешний вид . . . . . . . . . . . . . . . . . . . . . . . . . . . . . . 2-2
Общий вид салона . . . . . . . . . . . . . . . . . . . . . . . . . 2-4
Общий вид приборной панели . . . . . . . . . . . . . . 2-5
Моторный отсек . . . . . . . . . . . . . . . . . . . . . . . . . . . 2-6
2
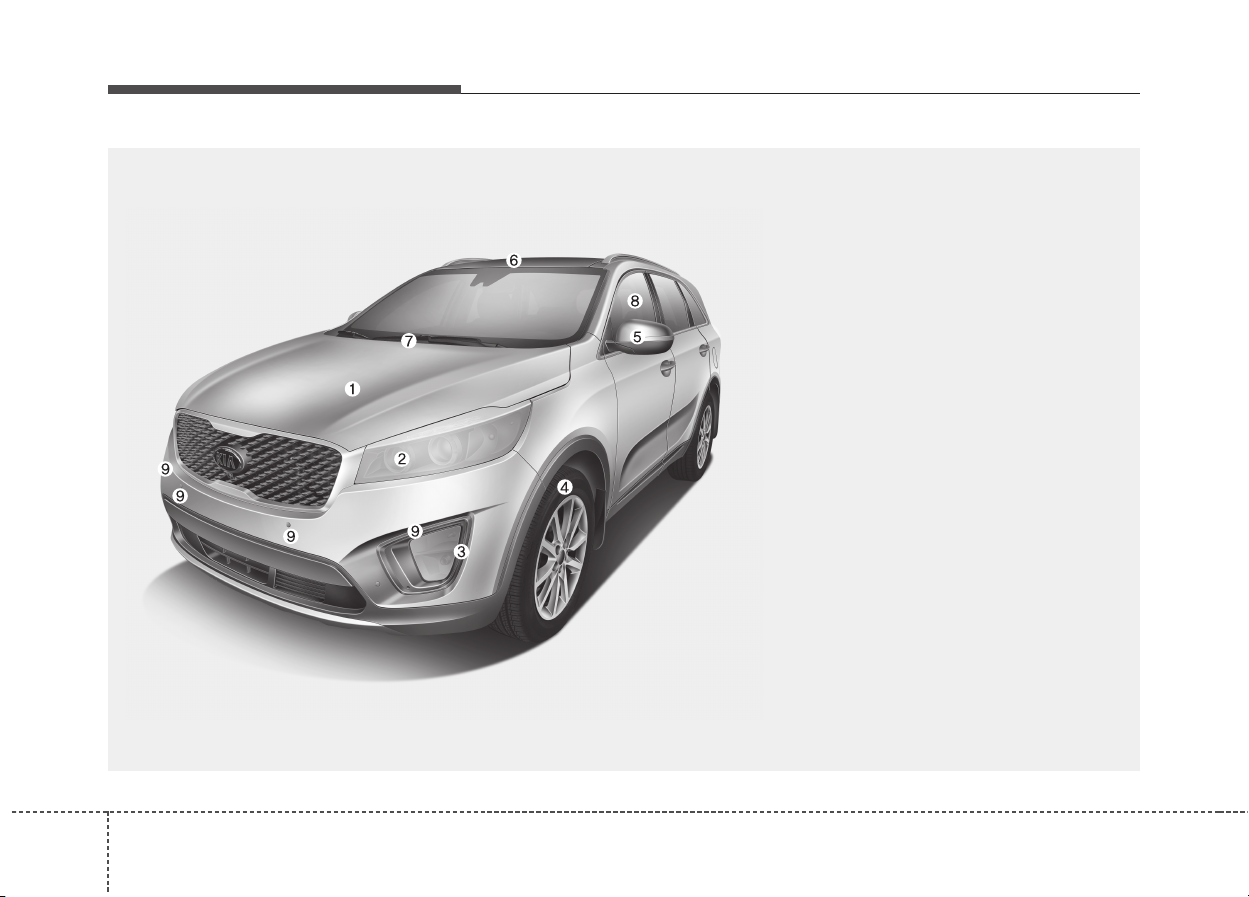
Знакомство с вашим автомобилем
22
ВНЕШНИЙ ВИД
1. Капот………………………………………………4-41
2. Фара ……………………………………..4-151,7-94
3. Противотуманная фара и указатель
поворота………………………………..4-154,7-94
4. Колеса и шины…………………………..7-57,8-9
5. Наружное зеркало заднего вида………4-60
6. Панорамный люк в крыше ……………….4-48
7. Щетки очистителя ветрового
стекла ……………………………………4-158,7-49
8. Стекла…………………………………………….4-35
9. Система помощи при парковке ………4-121
OUM014001K
■ Вид спереди
❈ Реальная форма может отличаться от показанной на рисунке.
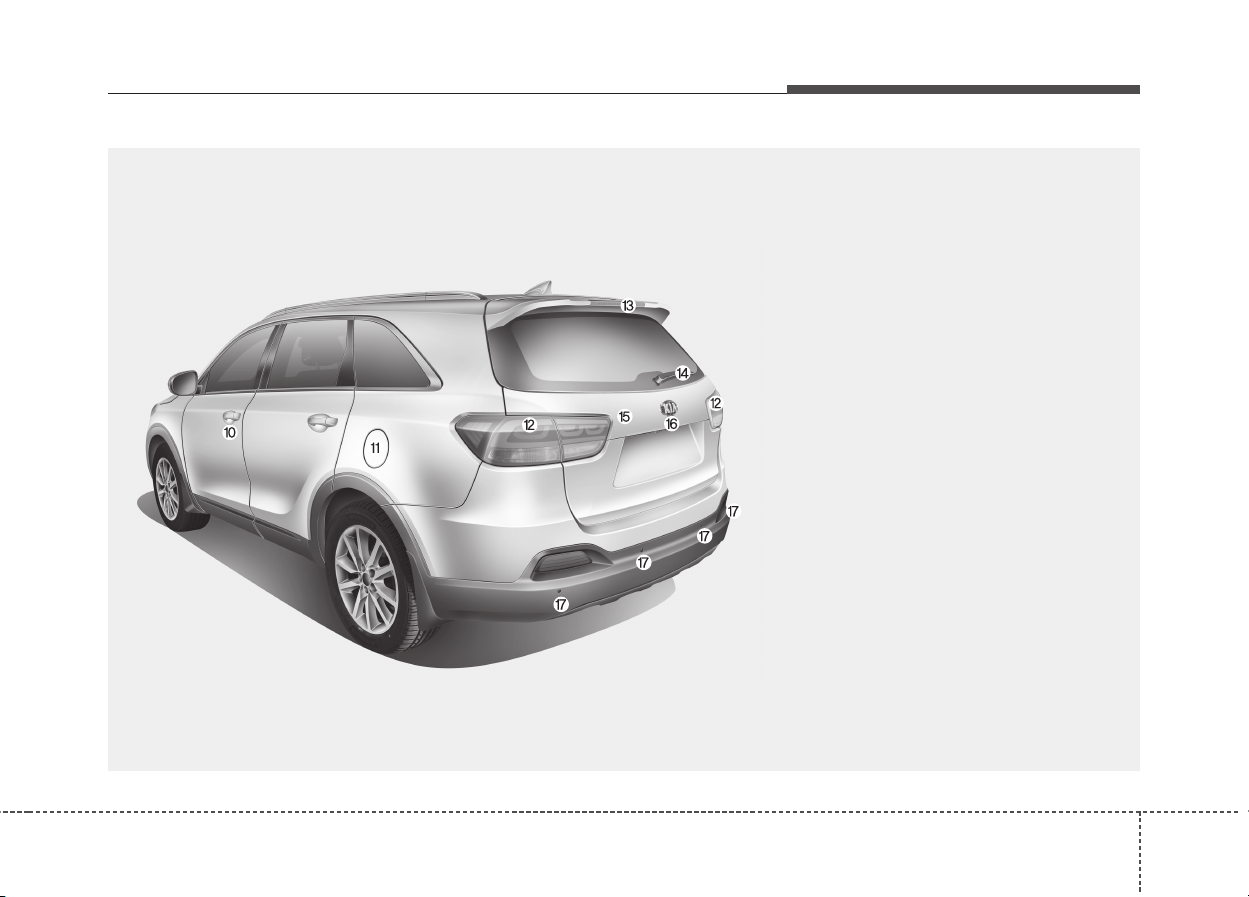
23
Знакомство с вашим автомобилем
10. Замки дверей ………………………………..4-17
11. Крышка горловины топливного бака..4-43
12. Задний комбинированный
фонарь………………………………………..7-107
13. Фонарь дополнительного сигнала
торможения…………………………………7-109
14. Щетка стеклоочистителя заднего
стекла ………………………………….4-162,7-51
15. Крышка багажника…………………………4-22
16. Камера заднего вида……………………4-147
17. Система помощи при
парковке …………………………….4-117,4-121
OUM014002K
■ Вид сзади
❈ Реальная форма может отличаться от показанной на рисунке.
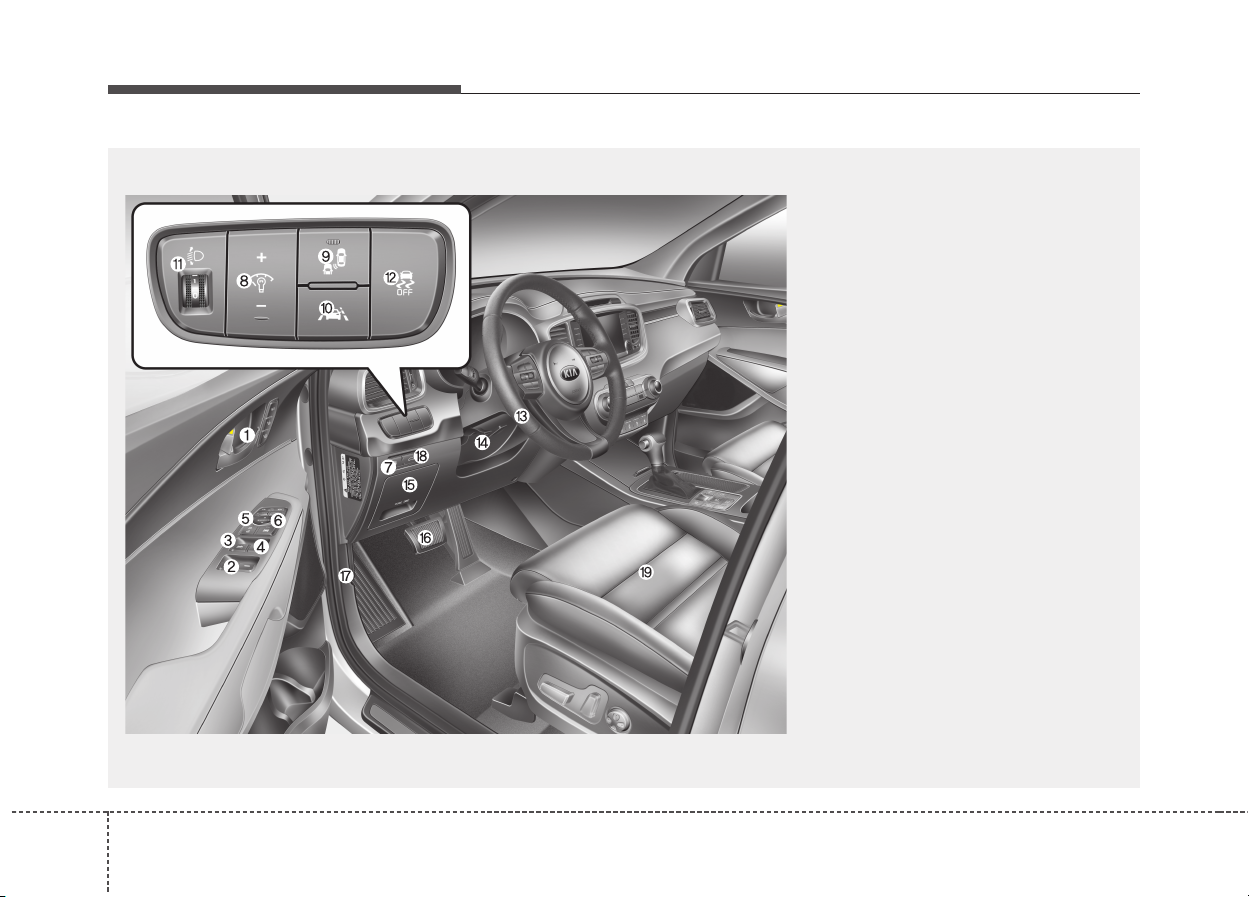
Знакомство с вашим автомобилем
42
ОБЩИЙ ВИД САЛОНА
1. Внутренняя ручка двери ……………………..4-17
2. Переключатель
электростеклоподъемников………………….4-35
3. Переключатель централизованного
управления замками дверей ………………..4-19
4. Кнопка блокировки
электростеклоподъемников………………….4-39
5. Складывание наружных зеркал
заднего вид …………………………………………4-62
6. Управление наружными зеркалами
заднего вида ……………………………………….4-62
7. Ручка открытия крышки заливной
горловины топливного бака ………………….4-43
8. Выключатель подсветки панели
приборов …………………………………………….4-65
9. Кнопка включения/выключения системы
обнаружения объектов вне зоны видимости
водителя (BSD). ………………………………..5-120
10. Кнопка LDWS ………………………………….5-114
11. Устройство регулировки угла
наклона фар ……………………………………4-156
12. Кнопка ESC OFF………………………………..5-60
13. Рулевое колесо………………………………….4-54
14. Наклон и высота рулевой колонки рычаг
управления ……………………………………….4-55
15. Внутренняя панель предохранителей ..7-75
16. Педаль тормоза ………………………………..5-43
17. Рычаг привода замка капота ………………4-41
18. Кнопка открытия/закрытия крышки
багажника с электроприводом …………4-24
19. Сиденье………………………………………………3-2
OUM014003L
❈ Реальная форма может отличаться от показанной на рисунке.
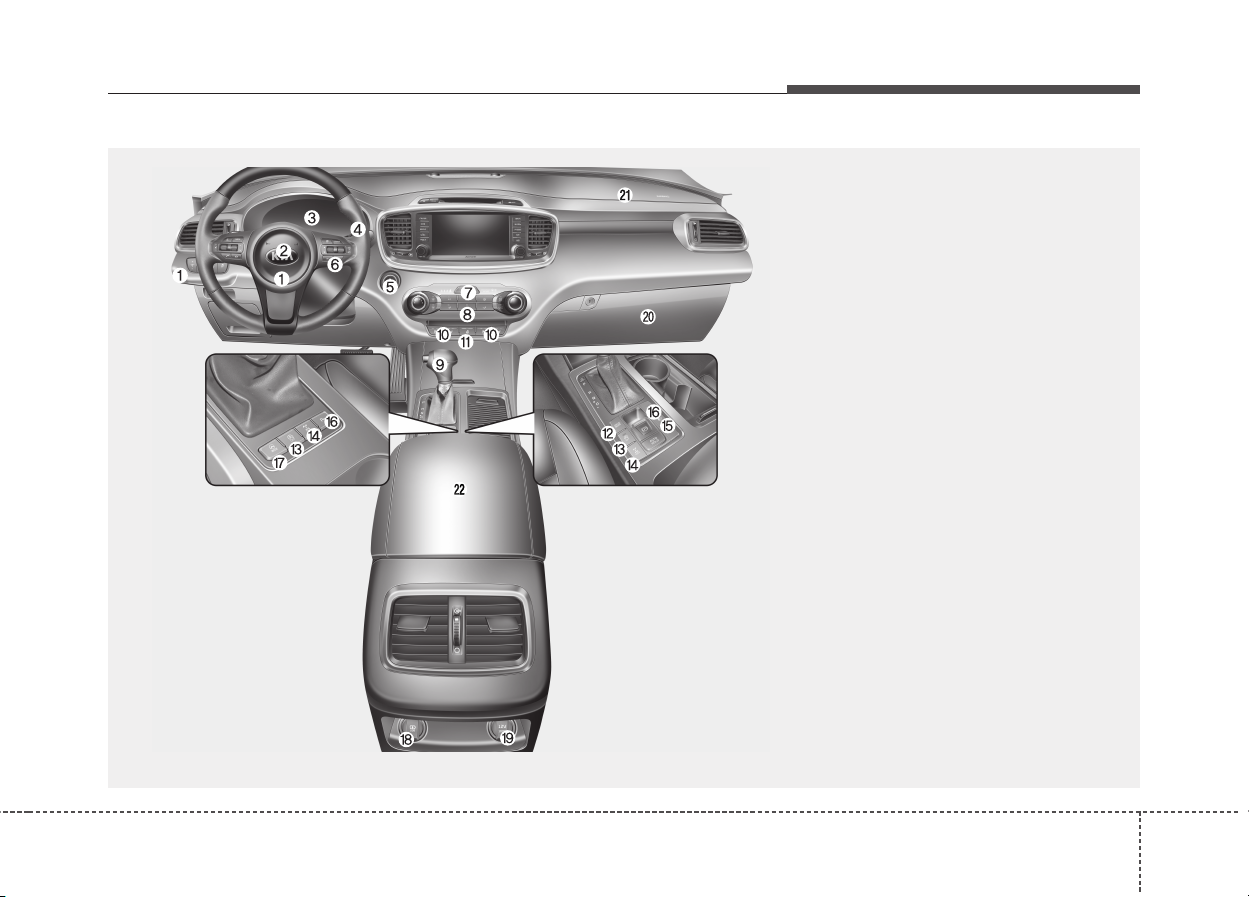
25
Знакомство с вашим автомобилем
ОБЩИЙ ВИД ПРИБОРНОЙ ПАНЕЛИ
1. Фронтальная подушка безопасности
водителя ……………………………………3-71
2. Сигнал звуковой …………………………4-56
3. Приборная панель ……………………..4-64
4. Рычаг управления стеклоочистителем и
стеклоомывателем ……………………4-158
5. Выключатель зажигания или кнопка
пуск/останов двигателя …………5-7,5-12
6. Круиз-контроль/контроль ограничения
скорости/усовершенствованная
система интеллектуального круиз-
контроля ……………………..5-70,5-80,5-86
7. Световая аварийная сигнализация……6-2
8. Система управления искусственным
климатом…………………………4-169,4-182
9. Рычаг переключения передач..5-19,5-24
10. Подогреватель переднего сиденья /
Охладитель сиденья ……..4-207,4-209
11. Кнопка обогрева рулевого колеса4-56
12. Кнопка режима движения…………5-111
13. Кнопка включения/выключения
ISG …………………………………………5-104
14. Кнопка блокировки AWD …………..5-32
15. Кнопка включения/выключения системы
мониторинга кругового обзора….4-148
16. Кнопка включения/выключения системы
помощи при парковке………………4-121
17. Кнопка адаптивного рулевого
управления ………………………………4-57
18. Зарядное USB-устройство ……….4-211
19. Розетка питания ……………………..4-210
20. Вещевой ящик…………………………4-202
21. Фронтальная подушка безопасности
пассажира ………………………………..3-71
22. Отделение в центральной
консоли ………………………………….4-201
OUM024017
❈ Реальная форма может отличаться от показанной на рисунке.
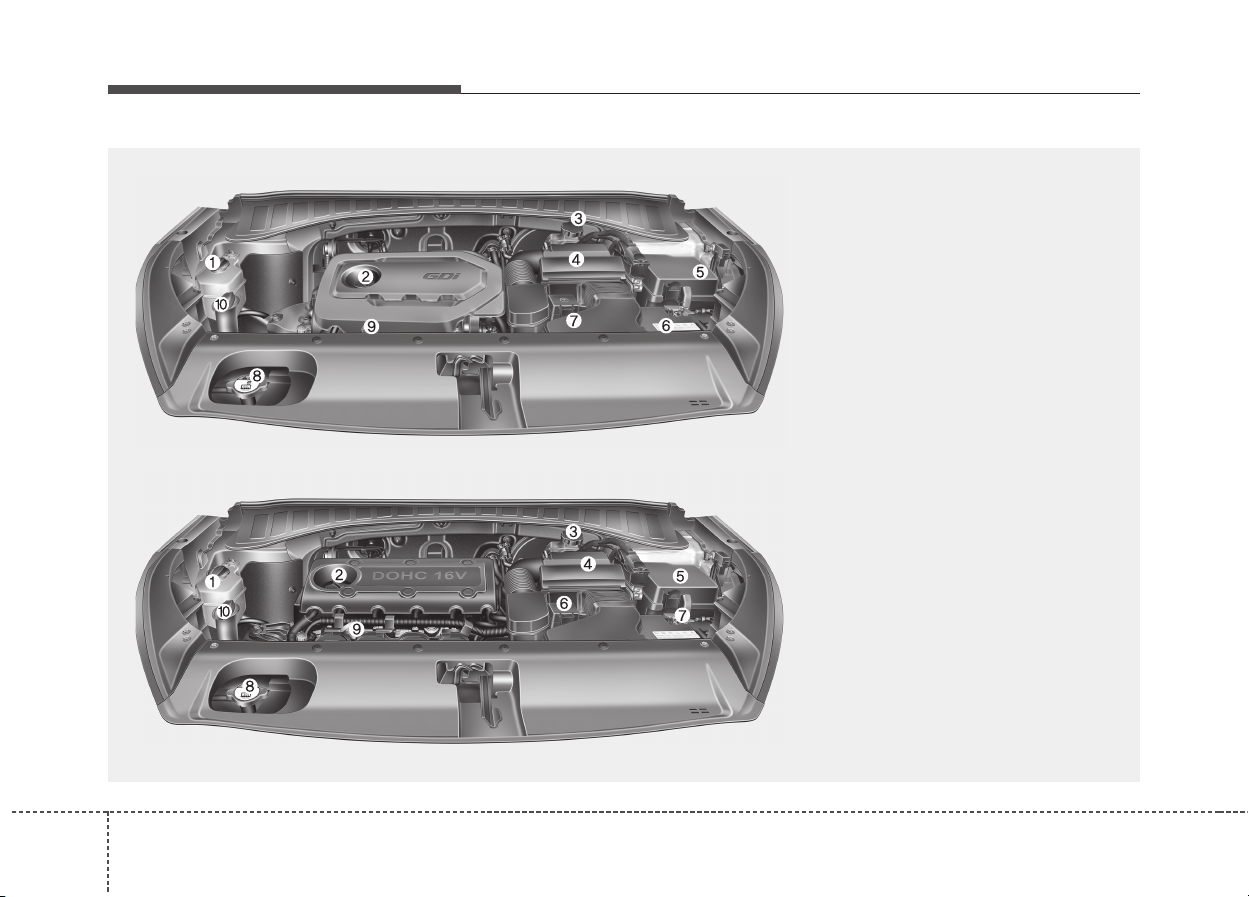
Знакомство с вашим автомобилем
62
МОТОРНЫЙ ОТСЕК
OUM074100L/OUM074101L
■■
Бензиновый двигатель (Theta II 2,4L) — GDI
❈ Реальная форма может отличаться от показанной на рисунке.
■■
Бензиновый двигатель (Theta II 2,4L) — MPI
1. Бачок для охлаждающей жидкости
двигателя …………………………………..7-34
2. Крышка маслозаливной горловины
двигателя …………………………………..7-35
3. Бачок для тормозной
жидкости/сцепления …………………..7-40
4. Воздушный фильтр …………………….7-45
5. Блок предохранителей……………….7-73
6. Отрицательная клемма
аккумуляторной батареи …………….7-53
7. Положительная клемма
аккумуляторной батареи …………….7-53
8. Крышка радиатора……………………..7-38
9. Масляный щуп …………………………..7-34
10. Бачок для жидкости омывателя
ветрового стекла ………………………7-42
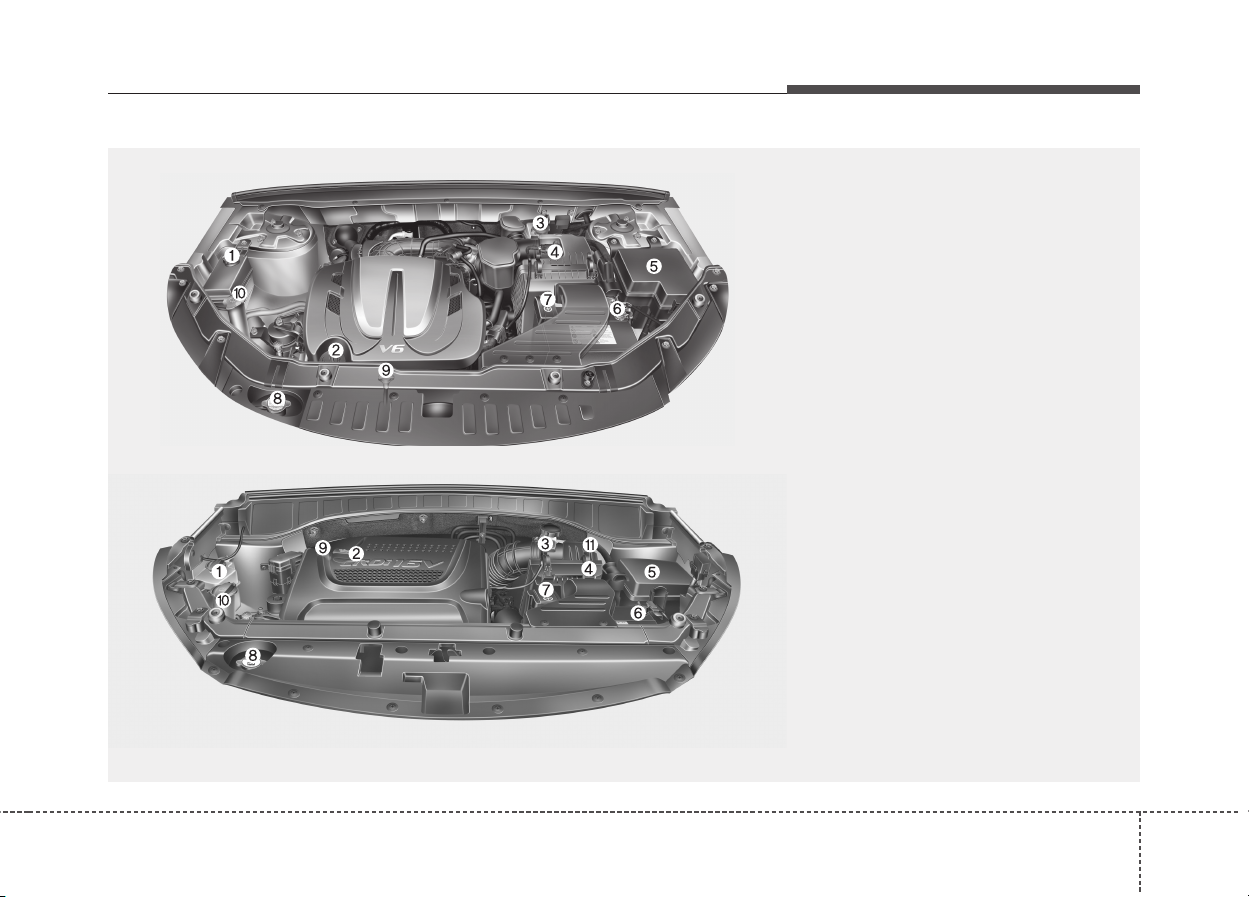
27
Знакомство с вашим автомобилем
1. Бачок для охлаждающей жидкости
двигателя …………………………………..7-34
2. Крышка маслозаливной горловины
двигателя …………………………………..7-35
3. Бачок для тормозной
жидкости/сцепления …………………..7-40
4. Воздушный фильтр …………………….7-45
5. Блок предохранителей……………….7-73
6. Отрицательная клемма
аккумуляторной батареи …………….7-53
7. Положительная клемма
аккумуляторной батареи …………….7-53
8. Крышка радиатора……………………..7-38
9. Масляный щуп …………………………..7-34
10. Бачок для жидкости омывателя
ветрового стекла ………………………7-42
11. Топливный фильтр
(при наличии)……………………………7-44
OUM074105L/ODM012005
■■
Дизельный двигатель (R2,0/R2,2)
❈ Реальная форма может отличаться от показанной на рисунке.
■■
Бензиновый двигатель (Lambda II 3,3L) — MPI (при наличии)

Знакомство с вашим автомобилем
82
OYF071200N
■■
Бензиновый двигатель (Theta II 2,0L) — T-GDI (при наличии)
❈ Реальная форма может отличаться от показанной на рисунке.
1. Бачок для охлаждающей жидкости
двигателя …………………………………..7-34
2. Крышка маслозаливной горловины
двигателя …………………………………..7-35
3. Бачок для тормозной
жидкости/сцепления …………………..7-40
4. Воздушный фильтр …………………….7-45
5. Блок предохранителей……………….7-73
6. Положительная клемма
аккумуляторной батареи …………….7-53
7. Отрицательная клемма
аккумуляторной батареи …………….7-53
8. Масляный щуп …………………………..7-34
9. Крышка радиатора……………………..7-38
10. Бачок для жидкости омывателя
ветрового стекла ………………………7-42

Системы безопасности автомобиля
Сиденье. . . . . . . . . . . . . . . . . . . . . . . . . . . . . . . . . . . 3-2
• Регулировка переднего сиденья — механическая. . 3-5
• Регулировка переднего сиденья
— электроприводом. . . . . . . . . . . . . . . . . . . . . . . . . . . 3-7
• Система памяти положений сиденья водителя
(для автоматического сиденья) . . . . . . . . . . . . . . 3-10
• Подголовник (переднее сиденье) . . . . . . . . . . . . . . 3-12
• Карман спинки сиденья . . . . . . . . . . . . . . . . . . . . . . 3-15
• Регулировка заднего сиденья . . . . . . . . . . . . . . . . . 3-16
• Подголовник (
для заднего сиденья). . . . . . . . . . . . 3-24
Ремни безопасности . . . . . . . . . . . . . . . . . . . . . . . 3-27
• Система ремней безопасности. . . . . . . . . . . . . . . . . 3-27
• Предупреждение о непристегнутых ремнях
безопасности. . . . . . . . . . . . . . . . . . . . . . . . . . . . . . . 3-29
• Поясной/плечевой ремень безопасности. . . . . . . . 3-31
• Ремни безопасности с преднатяжителем . . . . . . . 3-36
• Меры предосторожности при использовании
ремней безопасности. . . . . . . . . . . . . . . . . . . . . . . . 3-40
• Уход за ремнями безопасности . . . . . . . . . . . . . . . . 3-44
Детское сиденье . . . . . . . . . . . . . . . . . . . . . . . . . . 3-45
• Использование детского кресла . . . . . . . . . . . . . . . 3-48
• Фиксация детского кресла при помощи
привязного крепления . . . . . . . . . . . . . . . . . . . . . . 3-53
• Фиксация детского кресла системой ISOFIX и
системой привязного крепления . . . . . . . . . . . . . 3-55
Система подушек безопасности
(дополнительная система пассивной
безопасности). . . . . . . . . . . . . . . . . . . . . . . . . . . . 3-61
• Предупреждение о наличии подушек безопасности
на сиденье переднего пассажира для установки
детских кресел . . . . . . . . . . . . . . . . . . . . . . . . . . . . . 3-64
• Контрольная лампа неисправности подушек
безопасности . . . . . . . . . . . . . . . . . . . . . . . . . . . . . . . . 3-66
• Элементы системы подушек безопасности SRS
и их функции . . . . . . . . . . . . . . . . . . . . . . . . . . . . . . 3-67
• Передние подушки безопасности водителя и
пассажира . . . . . . . . . . . . . . . . . . . . . . . . . . . . . . . . . 3-71
• Боковая подушка безопасности . . . . . . . . . . . . . . . 3-78
• Надувная шторка . . . . . . . . . . . . . . . . . . . . . . . . . . . 3-80
• Уход за системой подушек безопасности SRS . . . 3-88
• Дополнительные меры безопасности . . . . . . . . . . 3-89
• Этикетка, предупреждающая о наличии подушек
безопасности. . . . . . . . . . . . . . . . . . . . . . . . . . . . . . . 3-91
Активная система капота. . . . . . . . . . . . . . . . . . 3-92
• Ситуации, в которых активируется активная
система капота. . . . . . . . . . . . . . . . . . . . . . . . . . . . . 3-92
• Ситуации, в которых не активируется активная
система капота . . . . . . . . . . . . . . . . . . . . . . . . . . . . 3-93
• Неисправность активной системы капота. . . . . . 3-94
3
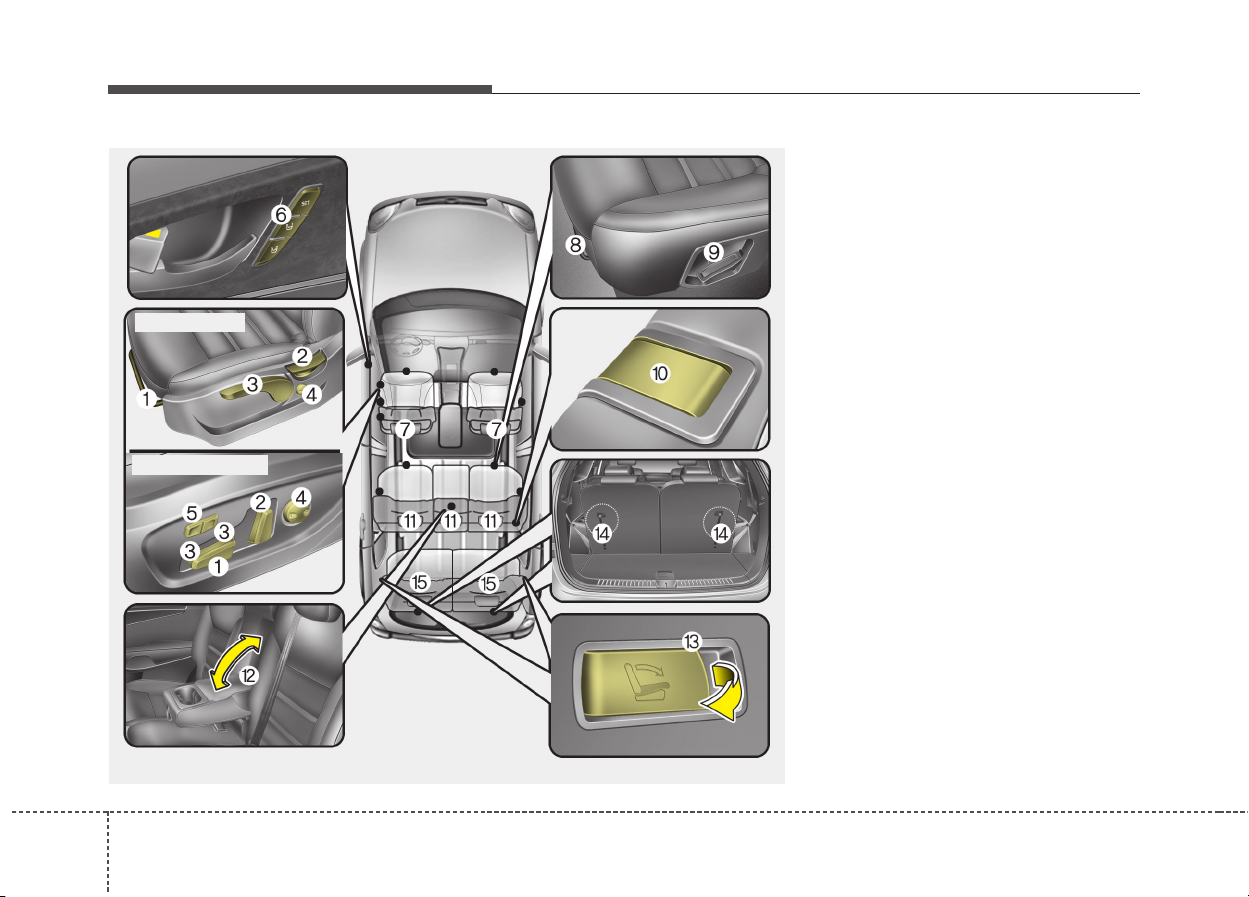
Системы безопасности автомобиля
23
Переднее сиденье
(1) Вперед и назад
(2) Наклон спинки сиденья
(3) Высота положения подушки
сиденья
(4) Поясничная опора
(сиденье водителя)*
(5) Удлинитель подушки
(сиденье водителя)*
(6) Система памяти настроек сиденья
водителя
(7) Подголовник
Второй ряд сидений
(8) Вперед и назад
(9) Угол спинки сиденья и
складывание
(10) Рычаг посадочного сиденья*
(11) Подголовник
(12) Подлокотник
(13) Дистанционное складывание*
Третий ряд сидений*
(14) Наклон спинки сиденья
(15) Подголовник
* при наличии
СИДЕНЬЕ
OUM034001L
■ Механическая
■ Электроприводом

33
Системы безопасности автомобиля
ОСТОРОЖНО
— Сиденье водителя
• Никогда не пытайтесь
отрегулировать положение
сиденья во время движения
автомобиля. Это может
привести к потере управления
и к дорожно-транспортному
происшествию, результатом
которого может быть гибель
людей, нанесение тяжелых
телесных повреждений или
причинение ущерба имуществу.
(Продолжение)
ОСТОРОЖНО
— Возвращение спинки
сиденья в вертикальное
положение
При возвращении спинки
сиденья в вертикальное
положение удерживайте ее и
перемещайте медленно.
Убедитесь в отсутствии других
людей рядом с сиденьем. Если
не удерживать спинку сиденья
при ее возврате в исходное
положение и не контролировать
этот процесс, она может резко
переместиться вперед и
причинить случайную травму
человеку, ударив его.
ОСТОРОЖНО
— Посторонние предметы
Посторонние предметы,
оказавшиеся в зоне ног
водителя, могут стать помехой
при нажатии педалей, что может
привести к дорожно
—
транспортному происшествию.
Не располагайте никаких вещей
под передними сиденьями.
ОСТОРОЖНО
— Водитель отвечает за
пассажира, находящегося
на переднем сиденье
Если во время движения
пассажир находится на переднем
сиденье, спинка которого
отклонена назад, это может
привести к получению
серьезных травм или к гибели
людей в случае дорожно
—
транспортного происшествия.
Если во время такого
происшествия спинка переднего
сиденья будет отклонена назад,
бедра находящегося на нем
пассажира могут проскользнуть
под поясной частью ремня
безопасности, и большая
нагрузка будет приложена к
незащищенной области живота.
Это может привести к получению
серьезных травм или к гибели
человека. Водитель должен
рекомендовать пассажиру,
находящемуся на переднем
сиденье, установить его спинку в
вертикальном положении во
время движения автомобиля.
ОСТОРОЖНО
Не используйте подушки
сидения, уменьшающие трение
между сидением и пассажиром.
Бедра пассажира могут
выскользнуть из-под ремня во
время аварии или внезапной
остановки. Ремень безопасности
может не сработать должным
образом и это может привести к
серьезным или фатальным
повреждениям внутренних
органов.
Системы безопасности автомобиля
43
ОСТОРОЖНО
— Спинка заднего сиденья
• Спинка заднего сиденья
должна быть надежно
зафиксирована замками. В
противном случае пассажиры
и предметы могут быть
выброшены вперед, что
приведет к получению
серьезных травм или к гибели
людей при неожиданной
остановке или столкновении.
• Багаж и другую полезную
нагрузку следует располагать в
горизонтальном положении на
полу багажного отделения. При
перевозке крупногабаритных,
тяжелых предметов, или при
необходимости перевозки их
уложенными друг на друга в
несколько рядов необходима
их надежная фиксация.
Ни при каких обстоятельствах
нельзя укладывать предметы
в багажнике друг на друга
выше спинки сидений.
(Продолжение)
(Продолжение)
• Не допускайте изменения кем—
либо нормального положения
спинки сиденья. Расположение
предметов с опорой на спинку
сиденья или создание иных
помех нормальной фиксации
спинки сиденья может привести
к серьезной травме или к
гибели человека при внезапной
остановке или столкновении.
• Во время движения спинки
сидений водителя и пассажиров
всегда должны стоять
вертикально, а поясная часть
ремня безопасности должна
находиться у них на бедрах как
можно ниже и удобнее. Это
наилучшее положение с точки
зрения обеспечения защиты
человека в случае дорожно-
транспортного происшествия.
• Для исключения получения
ненужных и, возможно,
серьезных травм от подушек
безопасности, всегда
располагайтесь на сиденье как
можно дальше от рулевого
колеса, сохраняя при этом
контроль над автомобилем.
Рекомендуется сидеть так, чтобы
грудь водителя находилась на
расстоянии не менее 25 cm от
рулевого колеса.
(Продолжение)
Несоблюдение этих мер
предосторожности может
привести к получению
серьезных травм или к гибели
людей в случае неожиданной
остановки, столкновения или
переворота автомобиля.
• Категорически не допускается
перевозка людей в багажном
отделении или сидящими
(лежащими) на сложенных
спинках сидений во время
движения автомобиля. Все
пассажиры должны находится
на сиденьях и быть пристегнуты
должным образом ремнями
безопасности во время поездки.
• При возврате спинки сиденья в
вертикальное положение
убедитесь в том, что она
надежно зафиксирована,
толкая ее вперед-назад.
• Для исключения возможности
получения ожогов не вынимайте
ковровое покрытие из багажного
отделения. Система контроля
выброса вредных веществ,
находящаяся под полом,
работает с высоким уровнем
температуры на выходе.
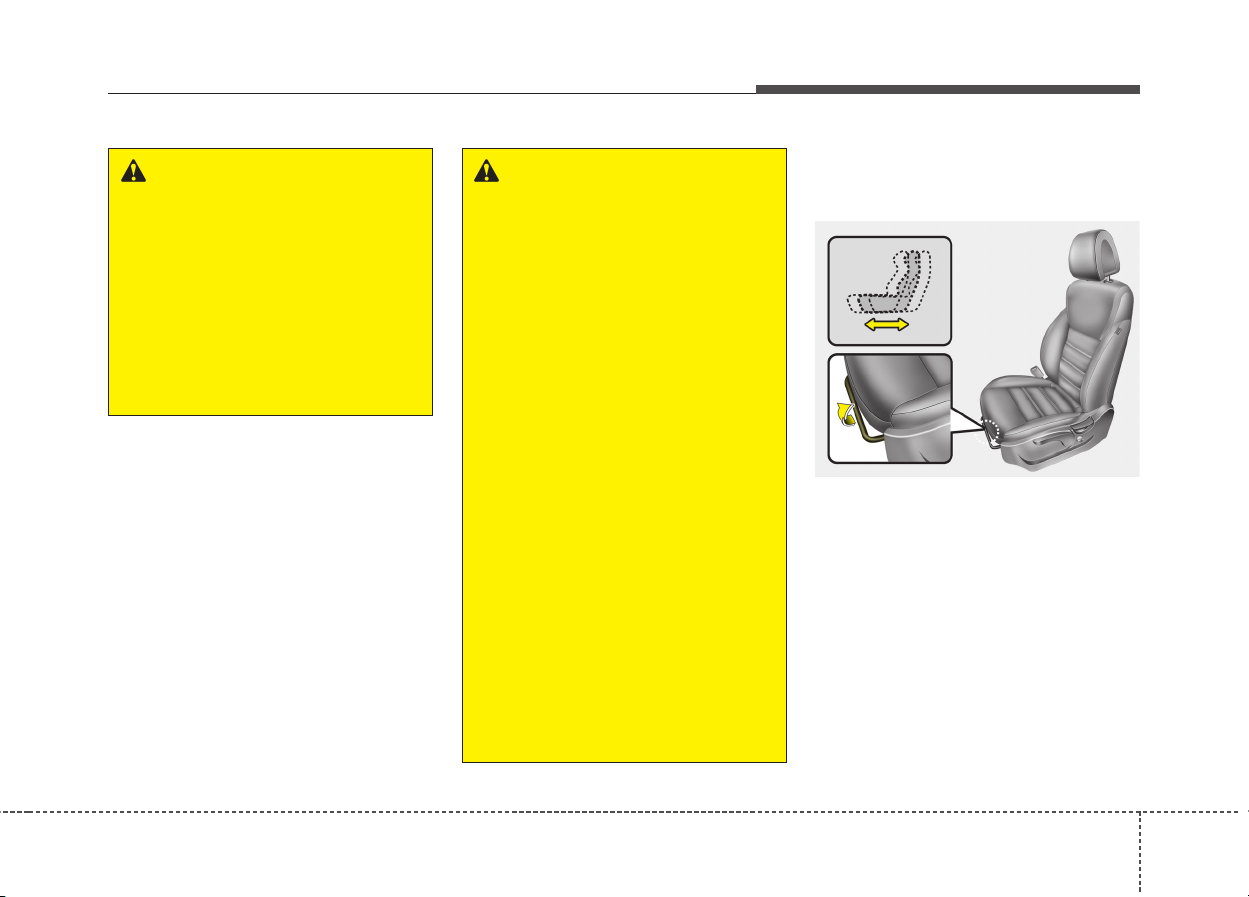
35
Системы безопасности автомобиля
Регулировка переднего сиденья
— механическая
В продольном направлении
Для перемещения сиденья в
продольном направлении:
1. Потянуть вверх за регулировочный
рычаг направляющей сиденья и
удерживать его.
2. Сдвиньте сиденье в продольном
направлении так, как это необходимо.
3. Отпустите рычаг и убедитесь в том,
что сиденье зафиксировано на
своем месте.
ОСТОРОЖНО
После выполнения регулировки
сидения следует убедиться, что
оно надежно закреплено. Для
этого необходимо попытаться
сдвинуть сидение вперед и назад,
не используя рычаг снятия
блокировки. Резкое или
неожиданное перемещение
сидения водителя может привести
к потере управления автомобилем
и стать причиной аварии.
ОСТОРОЖНО
• Не регулируйте сиденье, если
застегнут ремень безопасности.
Перемещение подушки сиденья
вперед может вызвать сильное
давление на живот.
• Будьте крайне внимательны,
следите за тем, чтобы ваши
руки или другие предметы не
попали в механизм сиденья во
время его перемещения.
• Не оставляйте зажигалку на полу
или на сиденье. При изменении
положения сиденья газ может
выйти из зажигалки и это может
привести к возгоранию.
• При регулировке положения
передних сидений следует
соблюдать осторожность, если
на задних сиденьях находятся
люди.
• Соблюдайте особую
осторожность, извлекая мелкие
предметы из пространства под
сиденьем или между сиденьем и
центральной консолью. Острые
края механизма сиденья могут
привести к порезам или
травмам рук.
OUM034002
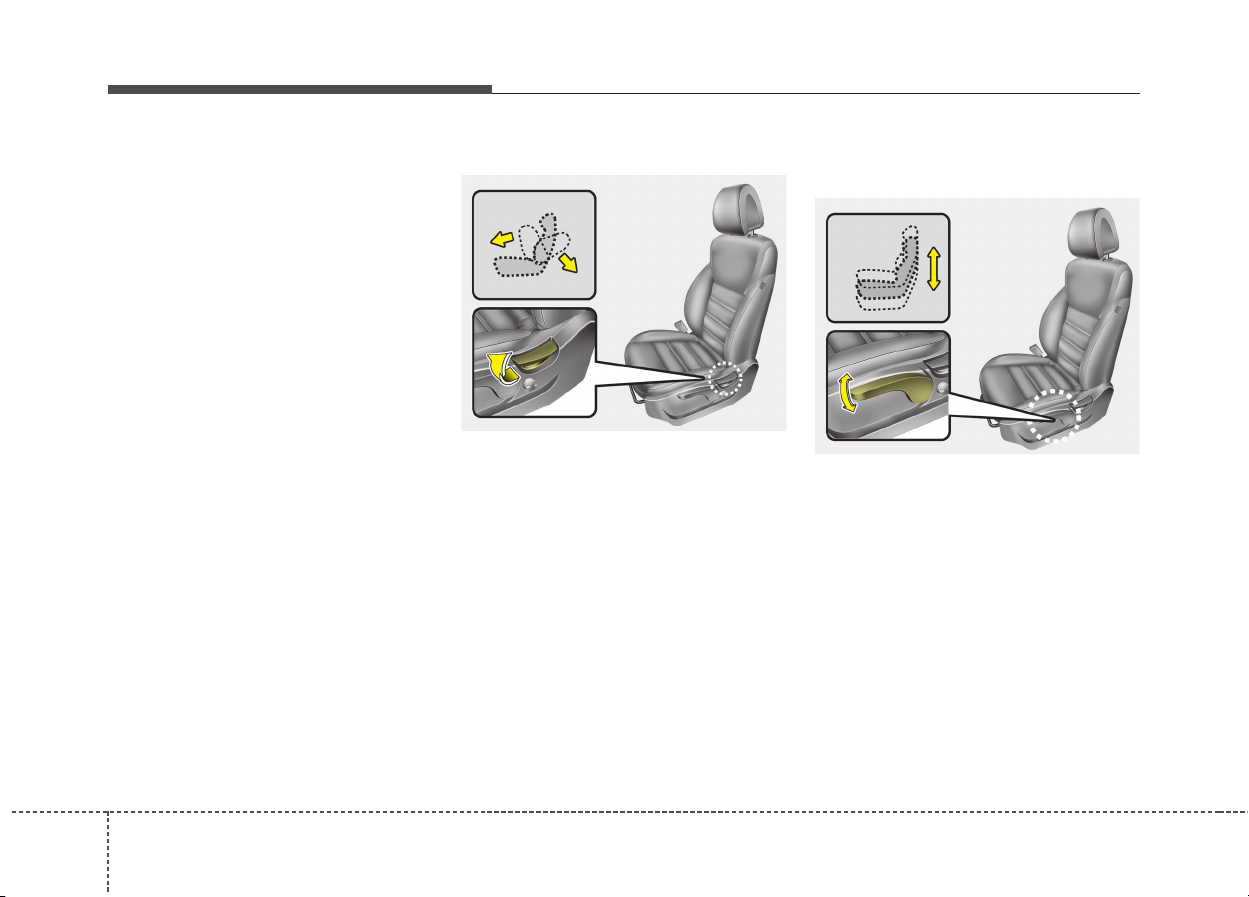
Системы безопасности автомобиля
63
Регулировку положения сиденья
производите до начала движения.
Убедитесь в том, что сиденье надежно
зафиксировано, попытавшись
переместить вперед-назад без
использования рычага. Если сиденье
движется, значит, оно не
зафиксировано должным образом.
Наклон спинки сиденья
Для отклонения назад спинки сиденья:
1. Слегка наклонить вперед и поднять
рычаг наклона сидения.
2. Осторожно наклонитесь назад и
установите спинку сиденья в
требуемое положение.
3. Отпустите рычаг и убедитесь в том,
что спинка сиденья зафиксирована
на своем месте. (Рычаг ДОЛЖЕН
вернуться в исходное положение
для того, чтобы зафиксировать
спинку сиденья.)
Высота положения подушки
сиденья (при наличии)
Слегка наклонить вперед и поднять
рычаг наклона сидения.
• Для того, чтобы опустить подушку
сиденья, толкните рычаг несколько
раз вниз.
• Для того, чтобы поднять подушку
сиденья, толкните рычаг несколько
раз вверх.
OUM034004
OUM034003
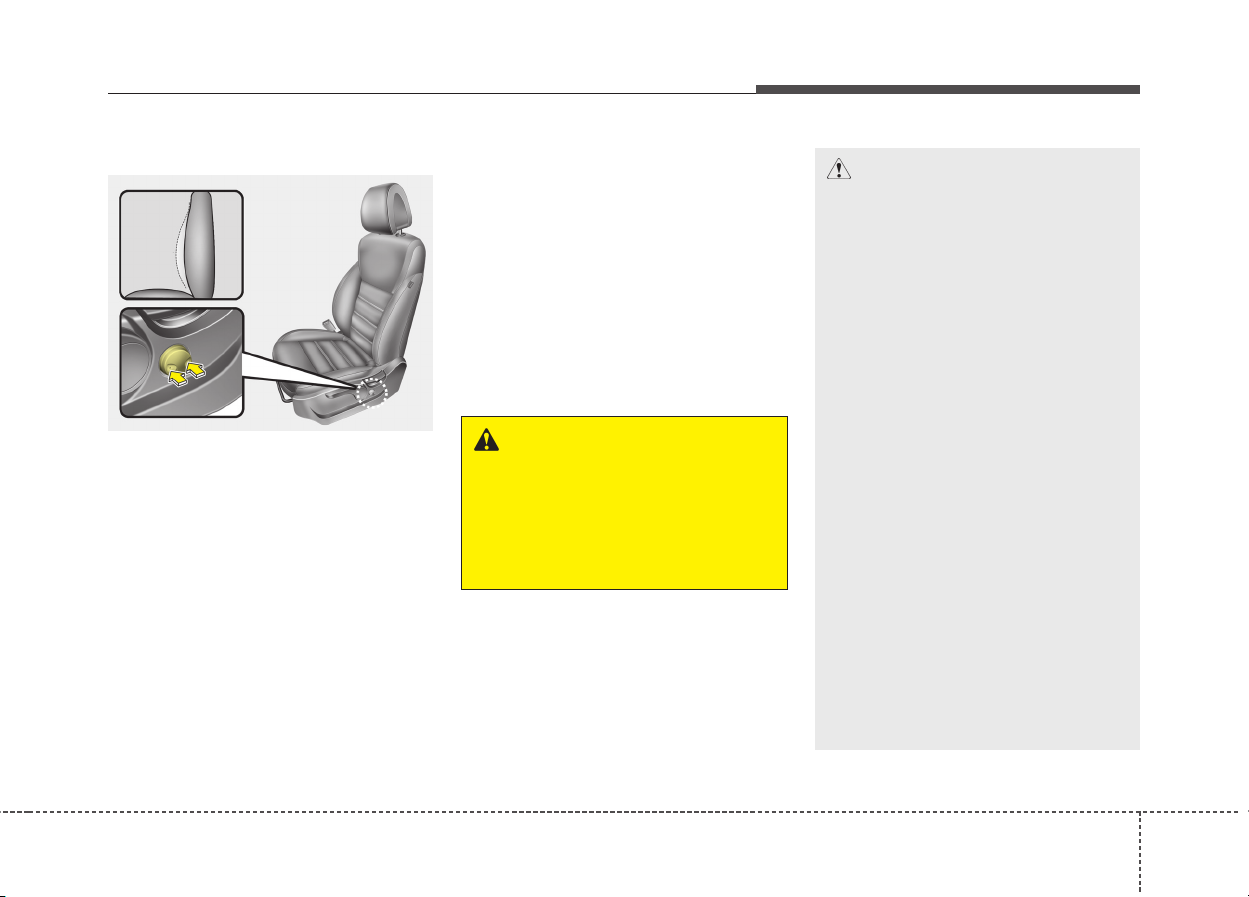
37
Системы безопасности автомобиля
Поясничная опора (при наличии)
Поясничную опору можно
отрегулировать, нажав на
соответствующий переключатель,
расположенный сбоку сиденья.
1. Нажмите на переднюю часть
переключателя, чтобы поднять
опору или на заднюю часть
переключателя, чтобы опустить.
2. После достижения требуемого
положения отпустите
переключатель.
Регулировка переднего сиденья
— электроприводом
(при наличии)
Регулировка переднего сиденья
производится при помощи ручки
управления, расположенной с
внешней стороны подушки сиденья.
Перед началом движения
отрегулируйте положение сиденья так,
чтобы можно было удобно управлять
рулем, педалями и переключателями
на передней панели.
ОСТОРОЖНО
Электропривод регулировки
сидений работает при
выключенном зажигании.
По этой причине никогда не
оставляйте детей без присмотра
в автомобиле.
ВНИМАНИЕ
• Привод сидений осущест—
вляется электродвигателем.
Прекратите работать
органами управления сразу
после завершения регулировки.
Излишние действия могут
привести к повреждению
электрооборудования.
• Во время работы
электропривод регулировки
сидений потребляет большое
количество электроэнергии.
Для исключения
неоправданного разряда
аккумуляторной батареи не
производите регулировку
сидений, оснащенных электро
—
приводом, дольше, чем это
необходимо, при
неработающем двигателе.
• Не допускается одновременное
использование двух ручек
управления электроприводом
регулировки сиденья. Это
может привести к отказу
электродвигателя привода
или другого электрообо
—
рудования.
OUM034068

Системы безопасности автомобиля
83
В продольном направлении
Переместите ручку управления
вперед или назад для перемещения
сиденья до необходимого места. Как
только это будет достигнуто, отпустите
ручку.
Удлинитель подушки (для сиденья
водителя, при наличии)
Нажмите на переднюю часть
переключателя, чтобы поднять
удлинитель подушки, или на заднюю
часть переключателя, чтобы опустить.
Отпустите переключатель, как только
удлинитель подушки займет нужное
положение.
Наклон спинки сиденья
Переместите ручку управления
вперед или назад для наклона спинки
сиденья на необходимый угол. Как
только это будет достигнуто, отпустите
ручку.
OUM034006
OUM034072L
OUM034007

39
Системы безопасности автомобиля
Высота положения подушки
сиденья (при наличии)
Переместите верхнюю часть ручки
управления вверх или вниз для того,
чтобы поднять или опустить
переднюю часть подушки сиденья.
Переместите заднюю часть ручки
управления вверх или вниз для того,
чтобы поднять или опустить заднюю
часть подушки сиденья. Как только это
будет достигнуто, отпустите ручку.
Поясничная опора
(для сиденья водителя)
Поясничную опору можно
отрегулировать, нажав на
соответствующий переключатель,
расположенный сбоку сиденья.
Tип A
1. Нажмите на переднюю часть
переключателя, чтобы поднять
опору или на заднюю часть
переключателя, чтобы опустить.
2. После достижения требуемого
положения отпустите переключатель.
Tип B
1. Нажмите на переднюю часть (1)
переключателя, чтобы поднять
опору, или на его заднюю часть (2),
чтобы опустить опору.
2. После достижения требуемого
положения отпустите переключатель.
3. Нажмите на верхнюю часть (3)
переключателя, чтобы поднять
положение опоры, или на его
заднюю часть (4), чтобы опустить
положение опоры.
4. После достижения требуемого
положения отпустите переключатель.
OUM034008 OUM034009
OUM034073L
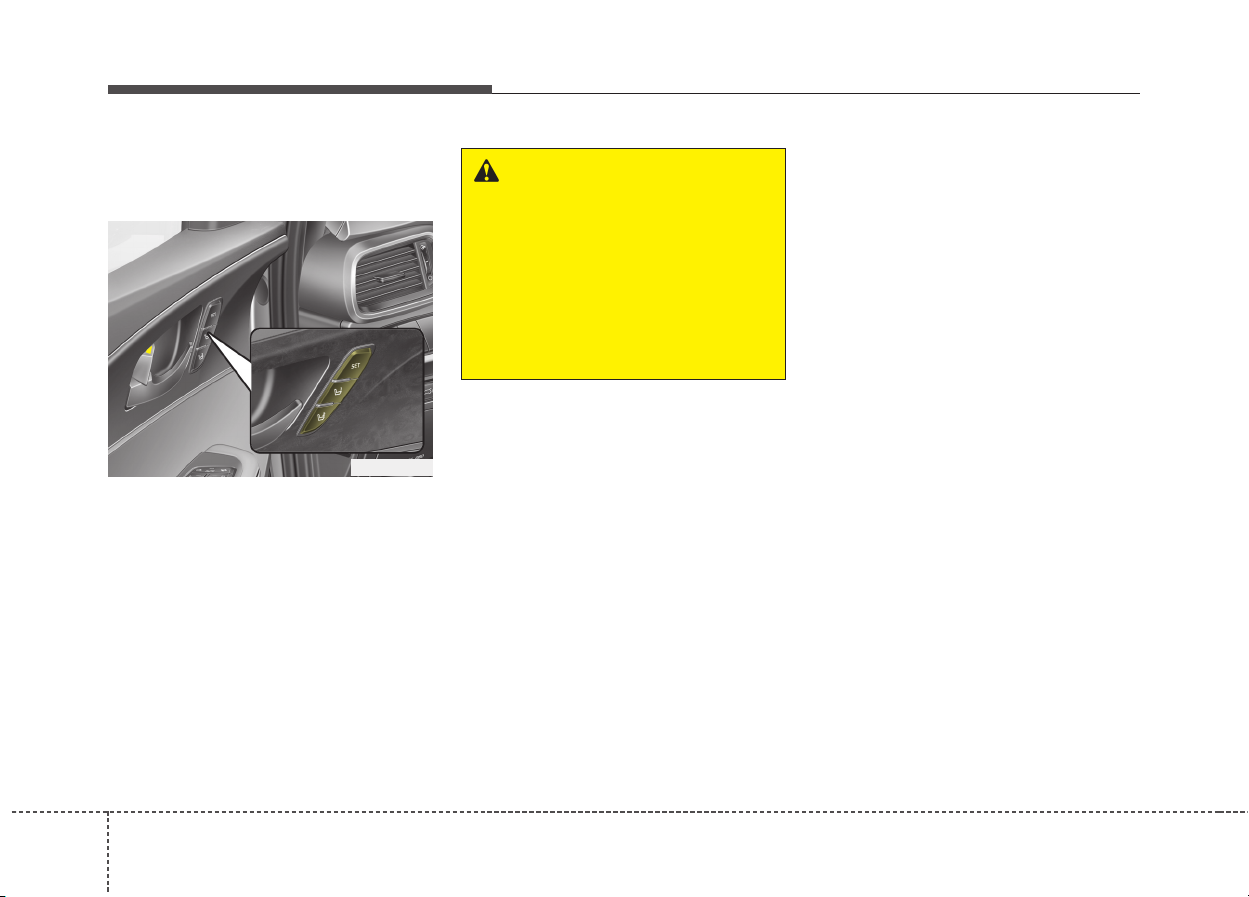
Системы безопасности автомобиля
103
Система памяти положений
сиденья водителя (при наличии,
для автоматического сиденья)
Система памяти положений водителя
позволяет сохранять и
восстанавливать положения сиденья
водителя и наружного зеркала заднего
вида одним нажатием кнопки.
Сохраняя выбранное положение в
памяти системы, разные водители
могут восстановить его в соответствии
со своими предпочтениями. При
отсоединении АКБ память положений
стирается, после чего требуется ее
восстановление.
Сохранение положений в памяти с
использованием кнопок на двери
Сохранение положений сиденья
водителя
1. Переведите рычаг переключения
передач в положение P (для
автоматической коробки передач)
или в нейтральное положение (для
механической коробки передач),
когда включено зажигание или
работает двигатель.
2. Откорректируйте положение
сиденья водителя и наружного
зеркала заднего вида в соответствии
со своими предпочтениями.
3. Нажмите кнопку SET (Установить)
на панели управления. Раздастся
один звуковой сигнал.
4. Не позднее чем через 5 с после
нажатия кнопки SET нажмите одну
из кнопок памяти (1 или 2).
Раздастся два звуковых сигнала,
подтверждая успешную запись в
память.
ОСТОРОЖНО
Запрещается использовать
систему памяти положений
сиденья водителя во время
движения.
Это может привести к потере
управления и созданию аварийной
ситуации со смертельным
исходом, серьезными травмами и
повреждением имущества.
OUM034032
311
Системы безопасности автомобиля
Восстановление положений из памяти
1. Переведите рычаг переключения
передач в положение P (для
автоматической коробки передач)
или в нейтральное положение (для
механической коробки передач),
когда включено зажигание или
работает двигатель.
2. Для восстановления записанного в
памяти положения нажмите
желаемую кнопку памяти (1 или 2).
Система подаст один звуковой
сигнал, затем сиденье водителя
будет автоматически установлено в
сохраненное положение.
Если нажать на управляющий
переключатель сиденья водителя,
когда системой производится
восстановление сохраненного
положения, то перемещение сиденья
будет остановлено, а затем начнется
перемещение в направлении,
выбранном управляющим
переключателем.
Функция простого доступа
(при наличии)
Система автоматически перемещает
сиденье водителя следующим образом:
• Без системы электронного ключа
— После извлечения ключа
зажигания и открытия двери
водителя сиденье водителя
переместится назад.
— После вставления ключа
зажигания сиденье водителя
переместится вперед.
• С системой электронного ключа
— После переключения кнопки пуска-
останова в положение OFF и
открытия двери водителя сиденье
водителя переместится назад.
— После перемещения кнопки пуска-
останова в положение ACC или
START сиденье водителя
переместится вперед.
Это подвинет сиденье водителя
вперед после закрытия двери со
стороны водителя при посадке в
автомобиль с электронным ключом.
Эту функцию можно активировать или
отключить. См. “Пользовательские
настройки” в разделе 4.
ОСТОРОЖНО
Если при восстановлении из
памяти положения сиденья
водителя вы сидите в нем,
следует быть осторожным.
Будьте готовы нажать
переключатель управления
сиденьем, если оно
переместится слишком далеко в
любом направлении.

Системы безопасности автомобиля
123
Подголовник (Переднее сиденье)
Водительское и переднее
пассажирское сидения оборудованы
подголовником для обеспечения
безопасности и комфорта водителя и
пассажира.
Подголовники не только служат для
удобства водителя или пассажиров, но
и помогают обеспечить защиту головы
и шеи в случае столкновения.
Регулировка в вертикальном
направлении
Для того, чтобы поднять подголовник,
потяните его вверх до требуемого
положения (1).
ОСТОРОЖНО
• Для максимальной
эффективности в случае аварии
подголовник должен быть
отрегулирован таким образом,
чтобы его середина
располагалась на той же высоте,
что и центр тяжести головы
пассажира. В общем случае,
центр тяжести головы
большинства людей
располагается на уровне верха
их глаз. Кроме того, необходимо
отрегулировать подголовник так,
чтобы он находился как можно
ближе к голове. По этой причине
использование подушки, которая
удерживает тело в отдалении от
спинки сидения, не
рекомендуется.
• Не следует пользоваться
автомобилем, если подголовник
снят. В этом случае пассажиры в
случае аварии могут получить
тяжелые травмы. Подголовник,
будучи правильно
отрегулирован, обеспечивает
защиту от травм шеи.
• Нельзя регулировать положение
подголовника водительского
сидения, когда машина движется.
OHM038048N
OUM034011
OUM034011L
■ Tип A
■ Tип B

313
Системы безопасности автомобиля
Для того, чтобы опустить подголовник,
нажмите кнопку фиксатора (2) на
опоре подголовника и удерживайте ее
в нажатом положении, опуская
подголовник в требуемое положение
(3).
Регулировка в вертикальном
направлении (при наличии)
Подголовник можно передвинуть
вперед в 4 различные положения
путем выдвижения подголовника
вперед в нужное фиксированное
положение.
Для установки подголовника в крайнее
заднее положение
Тип A
необходимо потянуть его в крайнее
заднее положение и отпустить.
Тип B
Потяните подголовник в нужное
фикисрованное положение, зажав при
этом кнопку фиксации.
Отрегулируйте подголовник, чтобы он
правильно поддерживал голову и
шею.
OUM034010
OUM034075L
■ Tип A
■ Tип B

Системы безопасности автомобиля
143
Снятие/установка
Снятие подголовника:
1. Наклоните спинку сиденья (2) с
помощью рычага или регулятора (1)
наклона спинки.
2. Поднимите подголовник, насколько
это возможно.
3. Нажмите на кнопку фиксации
подголовника (3) или нажмите на
кнопку фиксации тонким
инструментом (3) (для типа С), при
этом поднимая подголовник вверх (4).
OUM034012
OUM034013
■ Tип B
OUM034013L
■ Tип C
■ Tип A
ВНИМАНИЕ
При наклоне спинки сиденья
вперед, если подушка сиденья и
подголовник находятся в
поднятом состоянии, вероятно
соприкосновение подголовника с
солнцезащитным козырьком или
другими элементами интерьера
транспортного средства.
OYFH034205
ОСТОРОЖНО
Поездка на сиденье со снятым
подголовником НЕДОПУСТИМА.

315
Системы безопасности автомобиля
Установка подголовника:
1. Вставьте штыри подголовника (2) в
отверстия, зажав при этом кнопку
фиксации (1) или нажав на нее
тонким инструментом (1).
2. Наклоните спинку сиденья (4) с
помощью рычага или регулятора (3)
наклона спинки.
3. Отрегулируйте высоту подголовника.
Карман спинки сиденья
На задней стороне спинок сиденья
водителя и переднего пассажирского
сиденья предусмотрены карманы.
ОСТОРОЖНО
После установки и регулировки
убедитесь, что подголовник
зафиксирован в требуемом
положении.
OUM034014
OUM034015
■ Tип B
OUM034015L
■ Tип C
■ Tип A
ОСТОРОЖНО
— Карманы спинок сидений
Не размещайте тяжелые вещи
или предметы с острыми
кромками в карманах спинок
сидений. В случае дорожно-
транспортного происшествия
они могут вылететь из карманов
и нанести повреждение людям,
находящимся в автомобиле.
OUM034083L

Системы безопасности автомобиля
163
Регулировка заднего сиденья
Угол спинки сиденья
(сиденье 2-го ряда)
Для перемещения сиденья вперед или
назад:
1. Потяните вверх рычаг регулировки
продольного положения сиденья и
удерживайте его.
2. Переместите сиденье на салазках в
желаемое положение.
3. Отпустите рычаг и убедитесь, что
сиденье заблокировано на месте.
Перед началом движения
отрегулируйте положение сиденья и
убедитесь, что сиденье надежно
заблокировано на месте, для этого
попытайтесь переместить его вперед
и назад, не используя рычаг. Если
сиденье перемещается, это означает,
что оно неправильно заблокировано.
Угол наклона спинки сиденья
(сиденье 2-го ряда)
Для наклона спинки сиденья:
1. Слегка наклоните вперед и
поднимите вверх рычаг регулировки
наклона спинки сиденья.
2. Осторожно откиньтесь спиной на
сиденье и отрегулируйте спинку
сиденья до выбранного положения.
3. Отпустите рычаг и убедитесь, что
спинка сиденья заблокирована на
месте. (для блокировки спинки
сиденья рычаг ДОЛЖЕН быть
возвращен в исходное положение.)
OUM034017
OUM034018

317
Системы безопасности автомобиля
Посадочное сиденье
(2-й ряд сидений, при наличии)
Посадка на сиденье 3-го ряда и
высадка
1. Пропустите ремень безопасности
через направляющую скобу ремня
безопасности заднего сиденья.
Продев ремень, затяните его,
потянув вверх.
2. Потяните вверх рычаг (1) посадочного
сиденья, расположенный на спинке
сиденья 2-го ряда.
3. Спинка сиденья 2-го ряда сложится
и толкнет сиденье в крайнее
переднее положение.
После посадки или высадки задвиньте
сиденье 2-го ряда в крайнее заднее
положение и сильно потяните за его
спинку до щелчка. Проверьте
надежность фиксации сиденья.
OUM034022
OUM034023L
■ Tип A
■ Tип B
■ Tип A
■ Tип B
OUM034024L
OUM034024
OUM034023

Системы безопасности автомобиля
183
Складывание заднего сиденья
Спинки задних сидений могут быть
сложены для упрощения перевозки
длинномерных предметов или для
увеличения объема багажного
отделения автомобиля.
ОСТОРОЖНО
Запрещается регулировать
сиденье 2-го ряда во время
движения, а также когда на нем
находится пассажир, который
может получить травму
вследствие резкого смещения
сиденья.
ОСТОРОЖНО
Складывающиеся спинки задних
сидений предназначены для
того, чтобы в автомобиле можно
было перевозить более длинные
предметы, чем те, которые
помещаются в багажное
отделение. Во время движения
автомобиля никогда не
позволяйте пассажирам
садиться на верхнюю часть
спинки, когда она находится в
сложенном состоянии, поскольку
это неправильное положение для
сидения, и в таком случае нельзя
пристегнуться ремнями бе
—
зопасности.
(Продолжение)
(Продолжение)
Это может привести к получению
серьезных травм или к гибели
людей в случае дорожно-
транспортного происшествия
или внезапной остановки
автомобиля. Предметы, которые
перевозятся в автомобиле со
сложенной спинкой заднего
сиденья, не должны выступать
выше верхней кромки передних
сидений. В противном случае
груз может переместиться
вперед и привести в получению
травм или повреждений при
внезапной остановке ав
—
томобиля.

319
Системы безопасности автомобиля
Процедура складывания спинки
заднего сиденья:
1. Вставьте пряжку ремня
безопасности заднего сиденья в
карман между спинкой и подушкой
заднего сиденья, а сам ремень — в
направляющий кожух для
предотвращения его повреждения.
2. Установите спинку переднего
сиденья в вертикальное положение
и, при необходимости, сдвиньте
переднее сиденье вперед.
3. Опустите подголовники задних
сидений в крайнее нижнее
положение.
OUM034036/OUM034022/OUM034089L
■ Второй ряд сидений
■ Центральное сиденье 2-го ряда (при наличии)
OUM034037/OUM034035
■ Третий ряд сидений (при наличии)

Системы безопасности автомобиля
203
4. Потяните рычаг отклонения спинки
сидения (для 2-го ряда) или лямку
(для 3-го ряда) и наклоните спинку
сидения вперед. При возвращении
спинки заднего сиденья в
вертикальное положение всегда
убедитесь в его фиксации. Для
этого надо потянуть к себе верхнюю
часть спинки.
5. Для использования заднего сиденья
необходимо поднять и потянуть
спинку сиденья назад, потянув за
рычаг отклонения (для 2-го ряда)
или лямку (для 3-го ряда).
Необходимо сдвинуть спинку с
усилием (до щелчка). Убедитесь в
том, что положение спинки сиденья
зафиксировано.
6. Верните ремень безопасности
заднего сиденья в исходное
положение.
OUM034025/OUM034026
■ Второй ряд сидений
■ Третий ряд сидений (при наличии)
OUM034027/OUM034028

321
Системы безопасности автомобиля
Складывание сиденья 2-го ряда
(снаружи, при наличии)
Потяните наружу рычаг складывания
спинки сиденья 2-го ряда.
Спинка сиденья 2-го ряда сложится.
Если потянуть наружу рычаг (1) на
левой стороне, сложатся спинки
левого и центрального сидений.
Если потянуть наружу рычаг (2) на
правой стороне, сложится спинка
правого сиденья.
Порядок складывания спинки
заднего центрального сиденья
(2-го ряда)
1. Опустите подголовники задних
сидений в нижнее положение.
2. Потяните рычаг складывания
спинки центрального сидения вверх
и пригните спинку сидения вперед.
После каждого возвращения спинки
сиденья в вертикальное положение
надавливайте на ее верхнюю часть
для проверки фиксации.
ОСТОРОЖНО
— Складывание заднего
сиденья
Не складывайте задние сиденья
(сиденья 2-го и 3-го рядов), если
на них имеются пассажиры,
животные или багаж. Это может
травмировать пассажиров или
животных или повредить багаж.
OUM034030L/Q
OUM034031L

Системы безопасности автомобиля
223
ОСТОРОЖНО
— Складывание
центрального сиденья
2-го ряда
• Не складывайте центральное
сиденье 2-го ряда, если на 3-м
ряду имеются пассажиры,
поскольку имеется
вероятность их травмирования
механизмом сиденья. Если на
3-м ряду имеются пассажиры,
поддерживайте спинку
центрального сиденья 2-го
ряда в фиксированном
вертикальном положении.
• В сложенном состоянии спинка
центрального сиденья 2 ряда
не фиксируется.
Если для перевозки предметов
большой длины используется
функция складывания спинки
центрального сиденья 2 ряда,
нежно закрепить груз для
предотвращения его
перемещения в случае
столкновения, что может стать
причиной травмы водителя и
пассажиров транспортного
средства.
ОСТОРОЖНО
—
Возвращение спинки
сиденья в вертикальное
положение
При возвращении спинки сиденья
в вертикальное положение
удерживайте ее и перемещайте
медленно. Если не удерживать
спинку сиденья при ее возврате в
исходное положение, она может
резко переместиться вперед,
приведя к получению случайной
травмы человеком, которому она
нанесет удар.
ВНИМАНИЕ
— Ремни безопасности
заднего сиденья
При возврате спинок задних (2-
го и/или 3-го ряда) сидений в
вертикальное положение
необходимо вернуть плечевые
лямки ремня безопасности
заднего сиденья в надлежащее
положение. Направление ленты
через направляющие ремня
безопасности заднего сиденья
предотвратит защемление
ленты под или за сиденьями.
ВНИМАНИЕ
— Повреждение пряжек
ремней безопасности
задних сидений
При складывании спинки заднего
сиденья или размещения багажа
на его подушке вставьте
пряжку в карман между спинкой и
подушкой заднего сиденья. Это
может предотвратить
повреждение пряжки спинкой
заднего сиденья или багажом.

323
Системы безопасности автомобиля
Подлокотник
(Bтopoй pяд cидeний)
Для использования подлокотника
потяните его вперед в направлении от
спинки сиденья.
ОСТОРОЖНО
— Погрузка багажа
При погрузке или выгрузке
багажа всегда убедитесь в том,
что двигатель выключен,
селектор коробки передач
находится в положении Р
(Парковка), и автомобиль
зафиксирован стояночным
тормозом. Если этого не сделать
и случайно перевести селектор
коробки передач в любое другое
положение, можно привести
автомобиль в движение.
ОСТОРОЖНО — Багаж
Необходимо всегда фиксировать
положение багажа для
предотвращения его резкого
перемещения по автомобилю
при столкновении, что может
вызвать нанесение травм
людям, находящимся в
транспортном средстве. Особую
осторожность следует
соблюдать в отношении
предметов, расположенных на
задних сиденьях, поскольку они
могут ударить людей,
находящихся на передних
сиденьях, при лобовом
столкновении.
OUM034021L
OUM034021
■ Tип A
■ Tип B

(Продолжение)
• Запрещается пользоваться
автомобилем со снятыми
подголовниками. В случае
аварии возможно тяжелое
травмирование водителя или
пассажира. Подголовники
могут предотвратить
получение серьезной травмы
шеи при правильной их
установке.
ВНИМАНИЕ
Если на задних сиденьях нет
пассажиров, подголовники
следует опустить в самое
нижнее положение.
Подголовником заднего сиденья
может ограничиваться
видимость задней зоны.
Системы безопасности автомобиля
243
Подголовник
(Для заднего сиденья)
Задние сидения оборудованы
подголовниками на всех позициях
посадки пассажиров для их
безопасности и комфорта.
Подголовники не только служат для
удобства пассажиров, но и помогают
обеспечить защиту головы и шеи в
случае столкновения.
OHM038049N
*
*
* при наличии
ОСТОРОЖНО
• Для максимальной
эффективности в случае
аварии подголовник должен
быть отрегулирован таким
образом, чтобы его середина
располагалась на той же
высоте, что и центр тяжести
головы пассажира. В общем
случае, центр тяжести головы
большинства людей
располагается на уровне верха
их глаз. Кроме того,
необходимо отрегулировать
подголовник так, чтобы он
находился как можно ближе к
голове. По этой причине
использование подушки,
которая удерживает тело в
отдалении от спинки сидения,
не рекомендуется.
(Продолжение)

325
Системы безопасности автомобиля
Регулировка в вертикальном
направлении (сиденье 2-го и 3-го
ряда)
Для того, чтобы поднять подголовник,
потяните его вверх до требуемого
положения (1).
Для того, чтобы опустить подголовник,
нажмите кнопку фиксатора (2) на
опоре подголовника и удерживайте ее
в нажатом положении, опуская
подголовник в требуемое положение
(3).
Снятие (сиденье 2-го и 3-го ряда)
Для снятия подголовника, вытянуть
его на максимальную высоту, затем
нажать отпускающую кнопку (1),
одновременно вытягивая подголовник
(2).
OUM034019L
OUM034019
■ Tип A
■ Tип B
OUM034087L
OUM034020
■ Tип A
■ Tип B

Системы безопасности автомобиля
263
Для установки подголовника обратно,
вставьте штыри (3) в отверстия, нажав
отпускную кнопку (1). Затем настройте
его на нужную высоту.
Подголовник 3-го ряда
(при наличии)
Подголовник автоматически сложится
при складывании спинки сиденья.
Всегда проверяйте, встал ли
подголовник в нужное положение
после возвращения спинки сиденья на
место.
ОСТОРОЖНО
Убедитесь, что защелки в
правильном положении после
настройки для защиты водителя
и пассажира.
OXM039061N
OUN026140
ОСТОРОЖНО
При опускании двери багажного
отделения в случае, если голова
пассажира находится на
подголовнике, который не
отрегулирован по высоте
должным образом, она может
ударить пассажира по голове,
что может привести к нанесению
травмы.

327
Системы безопасности автомобиля
Система ремней безопасности
РЕМНИ БЕЗОПАСНОСТИ
(Продолжение)
• Никогда не размещайте
плечевой ремень безопасности
под рукой или за спиной.
Неправильное положение
плечевого ремня безопасности
может привести к получению
серьезных травм при
столкновении. Плечевой
ремень безопасности должен
лежать на плече так, чтобы
пересекать ключицу в ее
средней точке.
• Недопустимо накидывать
ремень безопасности поверх
хрупких предметов. В случае
резкого торможения или
столкновения они могут быть
повреждены ремнем.
• Избегайте перекручивания
ремней безопасности при их
застегивании. Эффективность
перекрученного ремня
безопасности невысока. При
столкновении он может даже
врезаться в тело человека.
Убедитесь в том, что ремень
безопасности не перекручен и
лежит прямо.
(Продолжение)
ОСТОРОЖНО
• Для обеспечения
максимального уровня защиты
ремни безопасности всегда
должны быть застегнуты во
время движения автомобиля.
• Наибольшая эффективность
ремней безопасности
достигается при нахождении
спинки сиденья в
вертикальном положении.
• Дети в возрасте 12 лет и
младше должны всегда
находится на заднем сиденье, а
положение их тела должно
быть надежно зафиксировано.
Никогда не разрешайте детям
ездить в автомобиле на
переднем пассажирском
сиденье. Если ребенок старше
13 лет должен располагаться
на переднем сиденье, он
должен быть надежно
пристегнут ремнями безопас-
ности, а сиденье должно быть
отодвинуто в крайнее заднее
положение.
(Продолжение)
(Продолжение)
• Проявляйте осторожность во
избежание повреждений ремня
безопасности или элементов
его замка. При повреждении
ремня безопасности или
элементов его замка замените
его.

Системы безопасности автомобиля
283
(Продолжение)
Безопасная очистка ремня может
выполняться при помощи
туалетного мыла и воды.
Необходимо заменить ремень
безопасности при наличии
потертостей, загрязнения или
повреждений его матерчатой
части. Очень важно произвести
замену всего ремня в сборе после
того, как он был использован при
серьезном столкновении, даже в
случае, если его видимые
повреждения отсутствуют. Не
допускается надевать ремни
перекрученными. Каждый ремень
должен использоваться только
одним человеком; опасным
является пристегивание ремнем
безопасности ребенка,
находящегося на коленях у
взрослого.
ОСТОРОЖНО
• Не допускается внесение
владельцем автомобиля таких
изменений или дополнений в
конструкцию, которые либо
будут препятствовать
нормальной работе устройств
натяжения ремней
безопасности по устранению
провисания ремня, или будут
препятствовать регулировке
натяжения ремня с этой же
целью.
• Пристегивая ремень
безопасности будьте
внимательны, закрепляйте его
в соответствующем замке, не
спутайте с замком соседнего
сидения. Это очень опасно и
ремень безопасности может не
защитить должным образом во
время аварии.
(Продолжение)
ОСТОРОЖНО
Ремни безопасности предназ-
начены для расположения на тех
частях тела, которые имеют
прочную костную структуру; их
надо располагать поперек таза в
нижней его части или поперек
таза, груди и плеч, в зависимости
от ситуации. Необходимо
избегать расположения поясной
части ремня безопасности
поперек живота.
Необходимо обеспечить по
возможности наиболее тугую
затяжку ремней безопасности
при сохранении комфорта для
того, чтобы обеспечить тот
уровень защиты, для которого
они предназначены.
Свободно висящий ремень
безопасности существенно
уменьшает уровень защиты
человека, находящегося в
автомобиле.
Необходимо проявлять
осторожность во избежание
загрязнения ремня полиролями,
маслами и химикатами, а в
особенности электролитом.
(Продолжение)

329
Системы безопасности автомобиля
Предупреждение о непристегнутых
ремнях безопасности
Контрольная лампа (1) ремня
безопасности водителя
В качестве напоминания для водителя
контрольная лампа ремня
безопасности будет гореть в течение
приблизительно 6 с при каждом
включении зажигания, независимо от
того, застегнут ремень или нет.
Если ремень безопасности водителя
остается непристегнутым после
включения зажигания, контрольная
лампа ремня безопасности будет
гореть до тех пор, пока ремень не
будет пристегнут.
Если при непристегнутом ремне
безопасности водителя скорость
превысит 9 км/ч, постоянный режим
включения контрольный лампы
сменится мигающим, который будет
сохраняться до тех пор, пока скорость
не опустится ниже 6 км/ч. (при наличии)
Если водитель с непристегнутым
ремнем безопасности превысит
скорость 20 км/ч, в течение 100 с
будет звучать предупредительный
звуковой сигнал и будет мигать
контрольная лампа. (при наличии)
(Продолжение)
• Не отстегивайте ремень
безопасности и не пытайтесь
застегнуть и расстегнуть
ремень безопасности по время
езды. Это может привести к
потере управления и созданию
аварийной ситуации со
смертельным исходом,
серьезными травмами и
повреждением имущества.
• Пристегивая ремень
безопасности убедитесь в том,
что он не попадает на твердые
предметы или те, что могут
легко разбиться.
• Убедитесь в том, что в замок
ремня безопасности не попали
никакие посторонние
предметы. В противном случае
ремень может не пристегнуться
должным образом.
OAM032161L

Системы безопасности автомобиля
303
Контрольная лампа (2) ремня
безопасности переднего пассажира
(при наличии)
Независимо от того, пристегнут ремень
безопасности пассажира на переднем
сиденье или нет, при каждом
включении зажигания в качестве
напоминания включаются контрольные
лампы ремня безопасности.
Если перед включением зажигания
пассажир на переднем сиденье не
пристегнулся ремнем безопасности, а
также в случае отстегивания ремня
после включения зажигания,
контрольная лампа загорается и
продолжает гореть до тех пор, пока
ремень не будет пристегнут.
Если при непристегнутом ремне
безопасности водителя скорость
превысит 9 км/ч, постоянный режим
включения контрольный лампы
сменится мигающим, который будет
сохраняться до тех пор, пока скорость
не опустится ниже 6 км/ч.
Если водитель с непристегнутым
ремнем безопасности превысит
скорость 20 км/ч, в течение 100 с
будет звучать предупредительный
звуковой сигнал и будет мигать
контрольная лампа.
✽✽
К СВЕДЕНИЮ
• Сигнальная лампа ремня
безопасности пассажира переднего
сиденья находится в центре
фронтальной панели.
• Несмотря на то, что сиденье
пассажира переднего ряда
свободно, сигнальная лампа ремня
безопасности будет мигать или
гореть в течение 6 секунд.
• Предупреждение о необходимости
пристегнуть ремень безопасности
для пассажирского сиденья
переднего ряда могут срабатывать
если на это место положен багаж.
ОСТОРОЖНО
Неправильная посадка во время
движения неблагоприятно
влияет на систему сигнализации
ремня безопасности переднего
пассажира. Важно, чтобы
водитель проинструктировал
пассажира о надлежащей
посадке в соответствии с
инструкциями, приведенным в
данном руководстве.
OUM034084L

331
Системы безопасности автомобиля
Контрольные лампы (3, 4, 5, 6, 7) ремней
безопасности заднего ряда (при наличии)
Если при включенном зажигании и
неработающем двигателе ремень
безопасности заднего ряда окажется
непристегнутым, загорится
соответствующая контрольная лампа
и будет гореть до тех пор, пока ремень
не будет пристегнут.
И затем, сигнальная лампа ремней
безопасности сидений заднего ряда
будет гореть в течение 35 с, если
случится что-то из перечисленного ниже:
— пуск двигателя при непристегнутом
ремне безопасности заднего ряда.
— превышение скорости 9 км/ч при
непристегнутом ремне безопасности
заднего ряда.
— отстегивание ремня безопасности
при скорости ниже 20 км/ч.
Если ремни безопасности заднего
ряда пристегиваются, сигнальная
лампа сразу же гаснет.
При отстегивании ремня безопасности
заднего ряда на скорости выше 20
км/ч загорится соответствующая
контрольная лампа и в течение 35 с
будет звучать предупредительный
колокольчик.
Но если поясной/плечевой ремень
безопасности заднего ряда сидений
будет пристегнут и расстегнут дважды
в течение 9 секунд после того, как
ремень пристегнут, соответствующая
сигнальная лампа ремня
безопасности не будет работать.
Поясной/плечевой ремень
безопасности
Регулировка высоты
Для максимального комфорта и
безопасности Вы можете
отрегулировать высоту точки
крепления плечевого ремня, установив
его в одном из 4 положений.
Высота отрегулированного ремня
безопасности должна быть такой,
чтобы он не находился слишком близко
к шее. В противном случае не будет
обеспечена наиболее эффективная
защита. Плечевая часть ремня должна
быть отрегулирована таким образом,
чтобы ремень пересекал грудную
клетку и плечо в его средней части
ближе к двери, а не к шее.
OLM039026
■ Передний пассажир
OUM034085L
OUM034086L
■ Автомобиль с вместимостью в 7 пассажиров
■ Автомобиль с вместимостью в 5 пассажиров
 Loading…