2014
Monarch™ XX/RL/RT
Service Manual
SRAM LLC WARRANTY
ExTENT of LiMiTEd WARRANTY
Except as otherwise set forth herein, SRAM warrants its products to be free from defects in materials or workmanship for a period of two years after original purchase.
This warranty only applies to the original owner and is not transferable. Claims under this warranty must be made through the retailer where the bicycle or the SRAM component was purchased. Original proof of purchase is required.
Except as described herein, SRAM makes no other warranties, guaranties, or representations of any type (express or implied), and all warranties (including any implied warranties of reasonable care, merchantibility, or fitness for a particular purpose) are hereby disclaimed.
LoCAL LAW
This warranty statement gives the customer specific legal rights. The customer may also have other rights which vary from state to state (USA), from province to province (Canada), and from country to country elsewhere in the world.
To the extent that this warranty statement is inconsistent with the local law, this warranty shall be deemed modified to be consistent with such law, under such local law, certain disclaimers and limitations of this warranty statement may apply to the customer. For example, some states in the United States of America, as well as some governments outside of the United States (including provinces in
Canada) may: a. Preclude the disclaimers and limitations of this warranty statement from limiting the statutory rights of the consumer
(e.g. United Kingdom).
b. Otherwise restrict the ability of a manufacturer to enforce such disclaimers or limitations.
For Australian customers:
This SRAM limited warranty is provided in Australia by SRAM LLC, 133 North Kingsbury, 4th floor, Chicago, Illinois, 60642, USA. To make a warranty claim please contact the retailer from whom you purchased this SRAM product. Alternatively, you may make a claim by contacting SRAM Australia, 6 Marco Court, Rowville 3178, Australia. For valid claims SRAM will, at its option, either repair or replace your SRAM product. Any expenses incurred in making the warranty claim are your responsibility. The benefits given by this warranty are additional to other rights and remedies that you may have under laws relating to our products. Our goods come with guarantees that cannot be excluded under the Australian Consumer Law. You are entitled to a replacement or refund for a major failure and for compensation for any other reasonably foreseeable loss or damage. You are also entitled to have the goods repaired or replaced if the goods fail to be of acceptable quality and the failure does not amount to a major failure.
LiMiTATioNS of LiAbiLiTY
To the extent allowed by local law, except for the obligations specifically set forth in this warranty statement, in no event shall SRAM or its third party suppliers be liable for direct, indirect, special, incidental, or consequential damages.
LiMiTATioNS of WARRANTY
This warranty does not apply to products that have been incorrectly installed and/or adjusted according to the respective SRAM user manual. The SRAM user manuals can be found online at sram.com, rockshox.com, avidbike.com, truvativ.com, or zipp.com.
This warranty does not apply to damage to the product caused by a crash, impact, abuse of the product, non-compliance with manufacturers specifications of usage or any other circumstances in which the product has been subjected to forces or loads beyond its design.
This warranty does not apply when the product has been modified, including, but not limited to any attempt to open or repair any electronic and electronic related components, including the motor, controller, battery packs, wiring harnesses, switches, and chargers.
This warranty does not apply when the serial number or production code has been deliberately altered, defaced or removed.
This warranty does not apply to normal wear and tear. Wear and tear parts are subject to damage as a result of normal use, failure to service according to SRAM recommendations and/or riding or installation in conditions or applications other than recommended.
Wear and tear parts are identified as:
• Dust seals
• Bushings
• Air sealing o-rings
• Glide rings
• Rubber moving parts
• Foam rings
• Rear shock mounting hardware and main seals
• Upper tubes (stanchions)
• Stripped threads/bolts (aluminium, titanium, magnesium or steel)
• Brake sleeves
• Brake pads
• Chains
• Sprockets
• Cassettes
• Shifter and brake cables (inner and outer)
• Handlebar grips
• Shifter grips
• Jockey wheels
• Disc brake rotors
• Wheel braking surfaces
• Bottom out pads
• Bearings
• Bearing races
• Pawls
• Transmission gears
• Spokes
• Free hubs
• Aero bar pads
• Corrosion
• Tools
• Motors
• Batteries
Notwithstanding anything else set forth herein
, this warranty is limited to one year for all electronic and electronic related components including motors, controllers, battery packs, wiring harnesses, switches, and chargers. The battery pack and charger warranty does not include damage from power surges, use of improper charger, improper maintenance, or such other misuse.
This warranty shall not cover damages caused by the use of parts of different manufacturers.
This warranty shall not cover damages caused by the use of parts that are not compatible, suitable and/or authorised by SRAM for use with SRAM components.
This warranty shall not cover damages resulting from commercial (rental) use.
Table of Contents
Exploded View — Monarch
™
XX/RL/RT Rear Shock ……………………………………………………………………………………………………..4
RockShox Suspension Service …………………………………………………………………………………………………………………………………….. 5
Mounting Hardware and Bushing Service ……………………………………………………………………………………………………………………. 5
Parts and Tools for Mounting and Bushing Service …………………………………………………………………………………………………………………………………………….5
Mounting Hardware Removal …………………………………………………………………………………………………………………………………………………………………………………..5
Eyelet Bushing Replacement ……………………………………………………………………………………………………………………………………………………………………………………7
Mounting Hardware Installation……………………………………………………………………………………………………………………………………………………………………………… 9
Monarch XX/RL/RT Service ………………………………………………………………………………………………………………………………………… 11
Parts and Tools Needed For Service ……………………………………………………………………………………………………………………………………………………………………..11
Air Can Removal …………………………………………………………………………………………………………………………………………………………………………………………………………11
Air Can Service ………………………………………………………………………………………………………………………………………………………………………………………………………….15
Damper Body Service ………………………………………………………………………………………………………………………………………………………………………………………………18
Piston Service ……………………………………………………………………………………………………………………………………………………………………………………………………………20
IFP and Damper Body Service ………………………………………………………………………………………………………………………………………………………………………………26
Shock Assembly and Bleed ……………………………………………………………………………………………………………………………………………………………………………………28
Air Can Installation ……………………………………………………………………………………………………………………………………………………………………………………………………31
XLoc Full Sprint
™
Remote Service………………………………………………………………………………………………………………………………34
Parts and Tools Needed For Service ……………………………………………………………………………………………………………………………………………………………………34
XLoc Full Sprint Anatomy …………………………………………………………………………………………………………………………………………..34
Hose Shortening ……………………………………………………………………………………………………………………………………………………………………………………………………….35
Hose Replacement ………………………………………………………………………………………………………………………………………………………………………………………………….. 37
XLoc Full Sprint Bleed Procedure …………………………………………………………………………………………………………………………….. 40
Bleed Preparation …………………………………………………………………………………………………………………………………………………………………………………………………… 40
Bleed the Rear Hose …………………………………………………………………………………………………………………………………………………………………………………………………41
Bleed the Remote …………………………………………………………………………………………………………………………………………………………………………………………………….43
SAfETY fiRST!
We care about YOU. Please, always wear your safety glasses and protective gloves when servicing RockShox products.
Protect yourself! Wear your safety gear!
4
E x p l o d e d V i e w — M o n a r c h
™
X X / R L / R T R e a r S h o c k
Shaft Eyelet
Rebound Adjuster
Compression Lever
Air Valve
Air Valve Cap
Shaft
Bottom Out Washer and O-ring
Bleed Screw
Seal Head/ Air Piston
XX™ Remote
High volume air can
Piston
Trek ®
IFP (Internal
Floating Piston)
Damper Body
Air Can
Compression Rod
Top Hat Washer
Top Hat Spring
Top Hat
Specialized ®
Damper Air/Nitrogen Fill Port Cap
Damper Body Eyelet
Exploded View — Monarch™ XX/RL/RT Rear Shock
R o c k S h o x S u s p e n s i o n S e r v i c e
We recommend that you have your RockShox suspension serviced by a qualified bicycle mechanic. Servicing RockShox suspension requires knowledge of suspension components as well as the special tools and fluids used for service.
For exploded diagram and part number information, please refer to the Spare Parts Catalog available on our web site at www.sram.com/service.
For order information, please contact your local SRAM distributor or dealer.
Information contained in this publication is subject to change at any time without prior notice. For the latest technical information, please visit our website at sram.com/service.
Your product‘s appearance may differ from the pictures/diagrams contained in this publication.
M o u n t i n g H a r d w a r e a n d B u s h i n g S e r v i c e
Prior to servicing the rear shock, remove it from the bicycle frame according to the bicycle manufacturer’s instructions. Once the shock is removed from the bicycle, remove the mounting hardware before performing any service.
N ot i c e
To prevent damage to the shock use aluminum soft jaws and position the eyelet in the vise so that the adjustment knobs are clear of the vise jaws.
P a r t s a n d T o o l s f o r M o u n t i n g a n d B u s h i n g S e r v i c e
• Safety glasses
• Nitrile gloves
• Apron
• Clean, lint-free rags
• Suspension specific grease
• Bench vise with aluminum soft jaws
• RockShox
1/2″ x 1/2″
rear shock bushing removal/installation tool
• 13 mm open end wrench
• Adjustable wrench
M o u n t i n g H a r d w a r e R e m o v a l
Some mounting hardware is easily removed using only your fingers. Try to remove the end spacers with your fingernail, then push the bushing pin out of the bushing. If this works, move on to the next section,
Eyelet
Bushing Replacement.
If you are unable to remove the mounting hardware using your fingers, use the RockShox rear shock bushing removal/installation tool.
Catcher
Push pin
Threaded rod
Rear shock bushing installation/removal tool
1
Thread the small end of the push pin onto the threaded rod until the rod is flush or slightly protrudes from the hex-shaped end of the push pin.
5
RockShox Suspension Service
2
Insert the threaded rod through the shaft eyelet until the push pin rests against the bushing pin.
Thread the large, open end of the catcher along the rod until it rests on the end spacer.
6
3
Clamp the catcher in a vise or hold it secure with a 13 mm open end or adjustable wrench.
Use a second 13 mm wrench to thread the push pin along the rod until it stops against the end spacer.
Unthread the push pin from the threaded rod and remove the end spacer from that side.
N ot i c e
Do not scratch the air can as you turn the wrench.
13 mm 13 mm
4
Reinsert the threaded rod and push pin through the shaft eyelet.
Thread the large, open end of the catcher along the rod until it rests against the shaft eyelet.
Use a 13 mm wrench to thread the push pin along the rod until it stops against the end spacer.
13 mm 13 mm
Mounting Hardware Removal
5
Unthread the catcher from the threaded rod.
Remove the end spacer and bushing pin from the tool.
Set the mounting hardware aside until you have finished servicing your shock.
Repeat for the body eyelet.
E y e l e t B u s h i n g R e p l a c e m e n t
To replace damaged or worn out bushings, use the RockShox rear shock bushing removal/installation tool.
1
Insert the threaded rod through the shaft eyelet until the base of the push pin rests against the bushing.
Thread the large, open end of the catcher onto the rod until it rests on the eyelet.
7
2
Clamp the catcher in a vise or hold it secure with a 13 mm wrench.
Use a second 13 mm wrench to thread the push pin along the rod until the push pin pushes the eyelet bushing out of the eyelet.
13 mm 13 mm
Eyelet Bushing Replacement
3
Unthread the catcher from the threaded rod. Remove the tool from the shaft eyelet and discard the old bushing.
Repeat steps 1-3 for the other eyelet.
4
Apply a small amount of grease to the outside of the new bushing.
8
5
Position the shaft eyelet and eyelet bushing between the soft jaws of a vise. Slowly turn the vise handle to begin pressing the eyelet bushing into the shaft eyelet.
Check the alignment of the bushing as it enters the eyelet. If the bushing starts to enter the eyelet at an angle, remove the bushing from the eyelet, regrease the bushing, and repeat this step until the bushing enters the eyelet straight.
6
Continue to press the eyelet bushing until it is seated in the shaft eyelet.
Remove the shock from the vise and repeat the installation process for the other bushing and eyelet.
Eyelet Bushing Replacement
M o u n t i n g H a r d w a r e I n s t a l l a t i o n
Some mounting hardware is easily installed using only your fingers. Press the bushing pin into the shock eyelet bushing until the pin protrudes from both sides of the eyelet an equal amount. Next, press an end spacer, large diameter side first, onto each end of the bushing pin. If this works, you have completed mounting hardware and bushing service.
If you are unable to install your mounting hardware using your fingers, use the RockShox rear shock bushing removal/installation tool.
1
Thread the small end of the push pin onto the threaded rod until the push pin is flush or slightly protrudes from the hex-shaped end of the push pin.
2
Insert the threaded rod through the bushing pin then through the shaft eyelet so that the bushing pin is positioned between the push pin and the eyelet.
9
3
Thread the large, open end of the catcher onto the rod until it rests on the eyelet.
Mounting Hardware Installation
10
4
Clamp the catcher in a vise or hold it secure with a 13 mm wrench.
Use a second 13 mm wrench to thread the push pin along the rod until it pushes the bushing pin into the shock eyelet bushing.
Continue to thread the push pin until the bushing pin protrudes from both sides of the eyelet an equal amount.
You may need to unthread the catcher slightly to check the bushing pin spacing.
13 mm
5
Unthread the catcher from the threaded rod and remove the tool from the shaft eyelet.
6
Press an end spacer, large diameter side first, onto each end of the bushing pin.
Mounting Hardware Installation
M o n a r c h
™
X X / R L / R T S e r v i c e
Prior to servicing your rear shock, remove it from the bicycle frame according to the bicycle manufacturer’s instructions. Once the shock is removed from the bicycle, remove the mounting hardware before performing any service (see the
Mounting Hardware And
Bushing Service
section).
P a r t s a n d T o o l s N e e d e d F o r S e r v i c e
• Safety glasses
• Nitrile gloves
• Apron
• Clean, lint-free rags
• Oil pan
• Isopropyl alcohol
• RockShox 3wt suspension fluid
• Suspension specific grease
• Parker® O-Lube
• Maxima® Maxum4 Extra 15w50 lube
• RockShox Rear Shock Vise Block
• RockShox Rear Shock Body Vise Block
• Bench vise with aluminum soft jaws
• Torque Wrench
• 13 and 17 mm (Trek®: 40 mm) open end wrenches
• 10 mm socket
• 13 and 17 mm (Trek: 40 mm) crowfoot sockets
• 1.5 and 2 mm hex wrenches
• Schrader valve core tool
• Strap wrench
• Pick
• Monarch air valve adapter
• Shock pump
• Metric caliper or small metric ruler
S A F E T y I N S T R u C T I o N S
Wear safety glasses and nitrile gloves when working with suspension fluid.
Place an oil pan on the floor underneath the area where you will be working on the shock.
N ot i c e
Do not scratch any sealing surfaces when servicing your suspension. Scratches can cause leaks. When replacing o-rings, use your fingers or a pick to remove the o-ring. Clean the o-ring groove and apply grease to the new o-ring.
To prevent damage to the shock use aluminum soft jaws and position the eyelet in the vise so that the adjustment knobs are clear of the vise jaws.
your product’s appearance may differ from the pictures/diagrams contained in this publication.
A i r C a n R e m o v a l
1
To record your adjustment settings, turn the rebound adjuster knob counter-clockwise (toward the rabbit) until it stops, while counting the number of detent clicks. This will assist you with post-service set up.
Turn the compression lever to the unlocked position.
11
Monarch™ XX/RL/RT Service
12
2
Record your air pressure setting to assist with post-service set up.
Remove the air valve cap by hand. Use a small hex wrench to depress the Schrader valve and release all air pressure from the air can. Use a Schrader valve tool to remove and replace the valve core from the valve body.
C Au T I o N — E y E H A z A R d
Do not disassemble a pressurized shock, this can cause suspension fluid or debris to forcefully eject from the shock. Wear safety glasses.
3
Use a Schrader valve tool to remove the damper air fill port cap.
Use a small hex wrench or pick to depress the Schrader valve and release all air pressure from the damper.
Once the pressure has been released, depress the Schrader valve a second time. If the Schrader valve is able to move, the shock has been completely depressurized.
If the Schrader valve does not move at all, the shock is still pressurized and will need to be sent to an authorized RockShox service center for further service.
C Au T I o N — E y E H A z A R d
Verify all pressure is removed from the shock before proceeding.
Failure to do so can cause the damper body to separate from the shaft eyelet at a high velocity. Wear safety glasses.
Air Can Removal
13
4
Use a Schrader valve tool to remove and replace the Schrader valve core from the damper air fill port.
5
Clamp the shaft eyelet into a vise, with the shock positioned horizontally.
6
If the shock is collapsed so that a minimal amount of damper body is visible, there is still air pressure in the air can.
Insert a rag through the damper body eyelet. This will prevent the air can from forcefully ejecting from the shock upon disassembly.
C Au T I o N — E y E H A z A R d
Do not disassemble a pressurized shock, this can cause suspension fluid or debris to forcefully eject from the shock. Wear safety glasses.
Air Can Removal
7
Use a strap wrench to remove the air can. Wrap the strap around the section of the air can furthest from the shaft eyelet. Turn the wrench counter-clockwise to unthread the air can.
Once it is completely unthreaded, slowly pull the air can along the damper body to remove it.
Vacuum pressure will increase as you pull the air can along the damper body, then suddenly release as the end of the can comes over the damper body eyelet.
do not place the strap wrench on the air can decal.
High Volume Air Cans:
Grip the lower portion of the can; otherwise, the high volume sleeve will rotate independent of the air can.
Autosag Air Cans:
Use a pick to remove the retention o-ring on the autosag sleeve. Pull the autosag sleeve off the air can.
Place a strap wrench on the air can where the autosag sleeve was located. Turn the strap wrench counter-clockwise to unthread the air can.
14
Air Can Removal
A i r C a n S e r v i c e
N ot i c e
Do not scratch any sealing surfaces when servicing your suspension. Scratches can cause leaks. When replacing seals and o-rings, use your fingers or a pick to remove the seal or o-ring. Clean the groove and apply grease to the new seal or o-ring.
1
Use a pick to pierce and remove the air can dust wiper seal located in the top groove.
Use a pick to pierce and remove the quad seal located between the two backup rings in the second deepest groove.
2
Use a pick to remove the two backup rings from the second deepest groove inside the air can.
15
3
Spray isopropyl alcohol inside the air can and clean it with a rag.
Remove a glove and use your finger to inspect the inside and outside of the air can for scratches, dents, or other surface deformations. Replace the air can if it is scratched or damaged.
All air cans have a small dimple, as seen from the exterior of the can, and high volume air cans have a small port inside the high volume sleeve that you should feel.
4
Install the first backup ring by inserting one end into the air can, then push the remainder of the ring into the can, so that it rests on the bottom of the second deepest groove.
Air Can Service
16
5
Apply a small amount of Parker® O-Lube to the new quad seal and install it above the backup ring in the second deepest groove.
6
Install the second backup ring by inserting one end into the air can, then push the remainder of the ring into the can, so that it rests on the quad seal at the top of the second deepest groove.
7
Orient the new dust wiper seal step side up. Install it into the dust wiper seal groove at the top of the air can.
8
Spray isopropyl alcohol on the air can threads and eyelet body threads and clean them with a rag.
Apply a small amount of Parker O-Lube to the quad seal, backup rings, and dust wiper seal. Set the air can aside.
Air Can Service
9
High Volume Air Cans:
Remove the retention o-ring from the high volume sleeve. Firmly grip the high volume sleeve and slide it off of the air can.
10
High Volume Air Cans:
Use your fingers to remove and replace the high volume sleeve o-rings.
Spray isopropyl alcohol inside the high volume sleeve and clean it with a rag.
11
High Volume Air Cans:
Apply a small amount of suspension specific grease to the inside of the sleeve. This stops the o-rings from rolling as the sleeve slides over them.
Slide the sleeve onto the air can.
Install the high volume sleeve retention o-ring into the groove outside of the air can.
17
Air Can Service
d a m p e r B o d y S e r v i c e
N ot i c e
Use aluminum soft jaws to protect the damper body eyelet when clamped.
1
Remove and replace the top out bumper on the damper body.
2
Remove the shock from the vise. Turn the shock over and clamp the damper eyelet into the vise.
3
Use a 2 mm hex wrench to remove the bleed screw, located in the seal head/air piston.
18
4
Use a 17 mm open end wrench to loosen the seal head/air piston assembly from the damper body. Use your hand to remove the assembly.
Fluid will spill from the assembly.
2 mm
17 mm
Damper Body Service
5
Remove the damper body from the vise and pour the fluid into an oil pan.
19
Damper Body Service
P i s t o n S e r v i c e
N ot i c e
Do not scratch any sealing surfaces when servicing your suspension. Scratches can cause leaks. When replacing seals and o-rings, use your fingers or a pick to remove the seal or o-ring. Clean the groove and apply grease to the new seal or o-ring.
1
Spray isopropyl alcohol on the shaft assembly and clean it with a rag.
2
Slide the seal head/air piston toward the shaft eyelet until it stops.
3
Use the RockShox Rear Shock Vise Block to clamp the shaft into a vise.
do not remove the shaft from the eyelet.
N ot i c e
To prevent damage to the seal head/air piston, position the shaft in the vise so that the piston is clear of the vise jaws.
4
Remove the compression rod and top hat assembly by hand.
Keep all the parts together and set them aside.
20
Piston Service
21
5
Use a 10 mm socket wrench to remove the piston nut.
6
Use a small wrench or pick to slide the main piston assembly off the shaft and onto the tool.
Keep all the parts together and set them aside.
N ot i c e
If the shims are not in the correct order, the shock will not perform properly.
10 mm
7
Remove the seal head/air piston from the damper shaft.
8
Use a pick to remove and replace the internal seal o-ring located in the internal seal gland.
Piston Service
9
Use a pick to remove and replace the inner o-ring, located at the base of the threads in the seal head/air piston.
10
Use a 1.5 mm hex wrench to push the compression ball out of the backside of the seal head through the bleed port.
Do not replace the compression ball at this time, you will replace it later.
do not reuse the compression ball.
11
Remove and replace the bottom out washer and o-ring from the shaft.
1.5 mm
12
Use your fingers to remove and replace the o-ring located inside the shaft eyelet threads.
22
Piston Service
13
Use your fingers to remove and replace the seal head/air piston seal and glide rings.
14
Install the seal head/air piston onto the damper shaft.
15
Use the RockShox Rear Shock Vise Block to clamp the shaft into a vise.
N ot i c e
To prevent damage to the seal head/air piston , position the shaft in the vise so that the piston is clear of the vise jaws.
23
Piston Service
16
Install the main piston assembly that was removed in step 6 onto the damper shaft.
Be sure to keep the piston assembly parts in the same order.
Thread the nut onto the damper shaft. Use a torque wrench with a
10 mm socket to tighten the nut to 4.5 N
m (40 in-lb).
N ot i c e
If the shims are not in the correct order, the shock will not perform properly.
Remove the assembly from the vise.
10 mm 4.5 N
·
m (40 in-lb)
17
Install the top hat spring and top hat washer onto the compression rod. Hold the compression rod vertically so the spring is seated in the groove inside the top hat.
N ot i c e
If the top hat spring is not seated in the groove inside the top hat, the shock will not perform properly.
Apply a small amount of grease to the tip of the compression rod. Install the compression rod and top hat into the main piston assembly.
24
Piston Service
18
Test the compression rod and top hat function by rotating the compression lever to the closed position and pushing on the top hat. The top hat should have a small amount of movement. If it does not move, adjust the top hat spring so it is seated inside the groove.
Return the compression lever to the open position.
25
Piston Service
I F P a n d d a m p e r B o d y S e r v i c e
1
Wrap a rag around the end of the damper body. Thread the
Monarch™ air valve adapter tool into a shock pump. Thread the pump and adapter into the air fill port.
Pump air into the damper body to force the IFP out of the damper body, into the rag.
2
Spray isopropyl alcohol on the inside and outside of the damper body and clean it with a rag.
Remove a glove and use your finger to inspect the inside and outside of the damper body for scratches, dents, or other surface deformations. If any deformations are found, the damper body will need to be replaced.
3
Remove and replace the IFP o-ring. Apply grease to the o-ring.
26
IFP and Damper Body Service
4
Install the IFP into the damper body with the stepped side visible.
Use a metric caliper or ruler to push the IFP to the depth specified in the tables below.
Measure the IFP depth from the lowest part of the IFP.
Shock dimensions
152 x 31
165 x 38
184 x 44
190 x 51
200 x 51
200 x 57
216 x 63
222 x 66
IFP insertion depth
(mm)
45.1
50.4
55.8
61.2
61.2
66.6
71.9
74.1
Trek®
Shock dimensions
171.5 x 44
184.2 x 48
184.2 x 51
190.5 x 48
196.9 x 51
196.9 x 54
196.9 x 57
209.6 x 60
IFP insertion depth
(mm)
55.8
58.6
61.2
58.6
61.2
63.9
66.6
69.31
Specialized®
Shock dimensions
193.7 x 48
196.9 x 48
193.7 x 51
IFP insertion depth
(mm)
58.6
61.2
27
IFP and Damper Body Service
S h o c k A s s e m b l y a n d B l e e d
1
Clamp the damper body into the RockShox Rear Shock Body Vise
Block.
Tighten the vise firmly enough so that the IFP cannot move in the damper body. Check this by using your finger to push on the IFP.
If the IFP does move, use a shock pump to reset the IFP to the depth specified in the table.
Wrap a clean rag around the damper body.
do not overtighten the vise so that the damper body gets crushed.
N ot i c e
The RockShox Rear Shock Body Vise Block holds the IFP in place.
Failure to use the vise block when clamping the damper body into the vise may result in improper IFP height. Improper IFP height can cause the damper to fail.
2
Pour new RockShox 3wt suspension fluid into the damper body until it is level with the top.
3
Check that the rebound adjuster is set to the minimum setting
(toward the rabbit).
Slide the seal head/air piston until it stops at the end of the damper shaft.
3 wt
28
Shock Assembly and Bleed
4
Use your hand to install the seal head/air piston onto the damper body.
do not hold on to the shaft eyelet or damper shaft while inserting the seal head. It will move the piston/shaft assembly, causing too much fluid to displace out of the damper body.
Check that the compression ball is removed from the seal head/air piston.
Fluid will be displaced out of the bleed port.
5
Use a torque wrench with 17 mm crowfoot to tighten the seal head/air piston to 28 N
·
m (248 in-lb).
Install the crowfoot onto the torque wrench at a 90° angle to the handle to ensure an accurate torque reading.
6
Allow air bubbles to escape from the bleed port in the seal head.
Insert the new compression ball into the bleed port.
17 mm 28 N
·
m (248 in-lb)
7
Use a 2 mm hex wrench to thread the bleed screw into the bleed port until you feel it touch the compression ball, then tighten the bleed screw an additional ½ turn.
N ot i c e
Overtightening the bleed screw can damage the compression ball.
29
Shock Assembly and Bleed
8
Use a shock pump with the Monarch™ air valve adapter tool to pressurize the damper body to the proper air pressure.
If you have the proper fill equipment, you may substitute air with nitrogen.
once you have pressurized the shock, remove the Monarch air valve adapter from the air fill port before removing it from the shock pump. Separating the pump from the adapter first will cause all of the air to escape from the shock.
Shock
Lock Tunes
RL
RT
XX 410
XX 380
XX 320
XX 219
Air Pressure
500 psi
34.4 bar
350 psi
24 bar
500 psi
34.4 bar
350 psi
24 bar
350 psi
24 bar
350 psi
24 bar
500 psi
9
Use a Schrader valve tool to install the damper air/nitrogen fill port cap.
350 psi
10
Remove the shock from the vise.
Spray the damper assembly with isopropyl alcohol and clean it with a rag.
30
Shock Assembly and Bleed
A i r C a n I n s t a l l a t i o n
N ot i c e
Use aluminum soft jaws to protect the shaft eyelet when clamped.
1
Clamp the shaft eyelet into a vise, so that the shock is horizontal.
Apply Parker® O-Lube to the seal head/air piston seals.
Ensure that the top out bumper is installed.
31
2
Apply a small amount of grease to the air can threads. Position the threaded side of the air can over the damper body eyelet.
Firmly press the air can onto the air piston and damper body until the air can is approximately 30 mm from the shaft eyelet threads.
Inject 0.3 mL of Maxima® Maxum4 Extra 15w 50 into the air can.
15w 0.3 mL
Air Can Installation
3
Continue to press the air can onto the damper body until the air can threads and shaft eyelet threads make contact. Turn the air can clockwise and hand-tighten it onto the shaft eyelet.
High volume air cans only:
Grip the lower portion of the can; otherwise, the high volume sleeve will rotate independent of the air can preventing tightening of the air can.
4
Remove the shock from the vise. Turn it over and clamp the damper eyelet into the vise, so the shock is vertical.
Spray isopropyl alcohol on the outside of the air can and clean it with a rag.
5
Stabilize the air can with a strap wrench to prevent it from rotating. Use a torque wrench with a 13 mm (Trek®: 40 mm) crowfoot socket to tighten the air can to 4.5 N
m (40 in-lb).
Autosag air cans only:
Reinstall the autosag sleeve and retaining o-ring. Turn the autosag sleeve so the knob is between
7 and 8 o’clock when the rebound knob is at 12 o’clock.
40 mm 4.5 N∙m (40 in-lb)
13 mm 4.5 N∙m (40 in-lb) space between frames space between steps
32
Air Can Installation
6
Use a shock pump to pressurize the shock to the desired air pressure, then install the valve cap.
7
Remove the shock from the vise. Spray isopropyl alcohol on the shock and clean it with a rag.
8
Install the sag indicator o-ring.
9
Reinstall the shock mounting hardware (see the Mounting
Hardware And Bushing Service section).
This concludes the service for the Monarch
™
XX/RL/RT rear shock. Reinstall the shock to the bicycle frame according to the bicycle manufacturer’s instructions.
33
Air Can Installation
X L o c F u l l S p r i n t
™
R e m o t e S e r v i c e
We recommend that you have your remote serviced by a qualified bicycle mechanic. Visit www.sram.com/service for XLoc Sprint™ and
XLoc Full Sprint remote service instructions.
N ot i c e
The XLoc Full Sprint remote lockout system uses a specific hydraulic hose that is compatible with the system’s suspension fluid. Use only RockShox® compatible hydraulic hose, Reverb ™ Hydraulic Fluid, and the RockShox Hydraulic Bleed Kit. Failure to do so will damage the system.
The Connectamajig can only be connected 3 times before you must bleed your remote.
P a r t s a n d T o o l s N e e d e d F o r S e r v i c e
• Safety glasses
• Nitrile gloves
• Apron
• Clean, lint-free rags
• Oil pan
• Isopropyl alcohol
• Replacement XLoc hydraulic hose
• T10 and T25 TORX® wrenches
• T10 and T25 TORX bit sockets
• 6 mm, 8 mm, and 9 mm open end wrenches
• 6 mm, 8 mm, and 9 mm crowfoot sockets
• Torque wrench
• Avid Hydraulic Hose Cutter Tool
• Avid Hydraulic Hose Barb Driver Tool
• RockShox Reverb Hydraulic Bleed kit
• RockShox Reverb Hydraulic Fluid
• Slick Honey® bike grease
C Au T I o N — E y E H A z A R d
Push the remote actuator to the extended (locked) position before disconnecting the Connectamajig; otherwise, fluid will spray from the hose. Wear safety glasses.
S A F E T y I N S T R u C T I o N S
Wear safety glasses and nitrile gloves when working with hydraulic fluid.
Place an oil pan on the floor underneath the area where you will be working on the shock.
your product’s appearance may differ from the pictures/diagrams contained in this publication.
X L o c F u l l S p r i n t A n a t o m y
Remote Bleed Screw
Floodgate
Knurled Collar
Fork Hose
Rear Shock
Bleed Screw
Rear Shock
Banjo Fitting
Hose Boot
Remote
Actuator
Compression
Fitting
Hose Barb
Compression Nut
Connectamajig
Boot
Connectamajig™
Rear Shock Hose
Fork Damper
34
XLoc Full Sprint™ Remote Service
H o s e S h o r t e n i n g
1
Press the remote actuator into the extended (locked) position.
C Au T I o N — E y E H A z A R d
Do
not
disassemble a remote hose in the unlocked position; this can cause hydraulic fluid to forcefully eject from the hose. Wear safety glasses.
2
Slide the hose boot off the rear shock banjo fitting.
Use an 8 mm open end wrench to remove the compression nut.
Pull the hose from the shock.
Hold the hose; fluid will drip from the end.
8 mm
3
Use an Avid Hydraulic Hose Cutter Tool to cut the hose to the desired length.
35
Hose Shortening space between frames space between steps
4
Apply Slick Honey® to the hose barb threads, the new compression fitting outer surfaces, and the compression nut threads.
Slide the hose boot onto the hose, small opening end first. Slide the compression nut onto the hose, non-threaded end first.
5
Use an Avid Hydraulic Hose Barb Driver Tool or a T10 TORX® wrench to thread the new hose barb into the end of the hose until it is flush.
Install the compression fitting onto the hose.
6
Push the hose into the rear shock banjo fitting until it stops.
Slide the compression fitting up to the rear shock banjo fitting, then thread the compression fitting clockwise into the banjo fitting until it stops.
T10
7
While continuing to push the hose into the rear shock banjo fitting, use a torque wrench with an 8 mm crowfoot socket to tighten the compression nut to 5 N·m (44 in-lb).
Install the crowfoot onto the torque wrench at a 90° angle to the handle to ensure an accurate torque reading.
Slide the hose boot onto the rear shock banjo fitting.
Shortening the hose introduces air into the system. It is necessary to
bleed the remote assembly for optimal performance. See XLoc Full
Sprint
™
Bleed Procedure
for instructions.
36
8 mm 5 N
·
m (44 in-lb)
Hose Shortening
H o s e R e p l a c e m e n t
1
Press the remote actuator into the extended (locked) position.
C Au T I o N — E y E H A z A R d
Do
not
disassemble a remote hose in the unlocked position; this can cause hydraulic fluid to forcefully eject from the hose. Wear safety glasses.
2
To replace the hydraulic hose:
Slide the hose boot off the rear shock banjo fitting.
Use an 8 mm open end wrench to remove the compression nut.
Pull the hose from the shock.
Hold the hose; fluid will drip from the end.
8 mm
3
Slide the Connectamajig ™ boot down the hose.
Use a 6 mm open end wrench to hold the Connectamajig in place while turning the knurled collar clockwise with a 9 mm open end wrench.
Pull the hose from the remote and the shock. Discard the hose.
Hold the hose; fluid will drip from the end.
N ot i c e
Do not push the remote actuator while the hose is removed.
6 mm 9 mm
37
Hose Replacement
4
Install a new hose. Inspect and clean the Connectamajig ™ hose fitting threads and ball check valve.
Push the Connectamajig into the knurled collar. Turn the collar counter-clockwise to thread the assembly together.
Continue to turn the knurled collar until it stops. Use a 6 mm open end wrench to hold the hose fitting, then use a torque wrench with a 9 mm crowfoot socket to tighten the assembly to
1.2-2.8 N·m (11-24 in-lb).
5
Slide the Connectamajig boot along the hose and onto the
Connectamajig.
6 mm 9 mm 1.2-2.8 N
·
m (11-24 in-lb)
6
Route the rear hose along or through the frame to the rear shock.
Leave a gentle bend from the frame to the handlebar and rear shock.
N ot i c e
TIght bends in the hose can cause excessive stress on the rear shock banjo. Leave 30 cm (12 in) of hose between the shock and the first hose mount.
Use an Avid Hydraulic Hose Cutter Tool to cut the hose to the desired length.
38
Hose Replacement
7
Apply Slick Honey® to the hose barb threads, the new compression fitting outer surfaces, and the compression nut threads.
Slide the hose boot onto the hose, small opening end first. Slide the compression nut onto the hose, non-threaded end first.
8
Use an Avid Hydraulic Hose Barb Driver Tool or a T10 TORX® wrench to thread the new hose barb into the end of the hose until it is flush.
Install the compression fitting onto the hose.
9
Push the hose into the rear shock banjo fitting until it stops.
Slide the compression fitting up to the rear shock banjo fitting, then thread the compression fitting clockwise into the banjo fitting until it stops.
T10
10
While continuing to push the hose into the rear shock banjo fitting, use a torque wrench with an 8 mm crowfoot socket to tighten the compression nut to 5 N·m (44 in-lb).
Install the crowfoot onto the torque wrench at a 90° angle to the handle to ensure an accurate torque reading.
Slide the hose boot onto the rear shock banjo fitting.
Cutting the hose introduces air into the system. It is necessary to
bleed the remote assembly for optimal performance. See XLoc Full
Sprint
™
Bleed Procedure
for instructions.
39
8 mm 5 N
·
m (44 in-lb)
Hose Replacement
X L o c F u l l S p r i n t
™
B l e e d P r o c e d u r e
B l e e d P r e p a r a t i o n
1
Check that the remote actuator is in the extended (locked) position.
Turn the floodgate adjuster in the direction of the arrow until it stops (maximum floodgate).
2
Use a T25 TORX® wrench to loosen the clamp bolt and rotate the remote on the handlebar until the bleed screw is at the highest point.
3
Fill one syringe from the RockShox Reverb™ Bleed Kit 3/4 full of
RockShox Reverb Hydraulic Fluid. Fill the other syringe 1/4 full.
T25
40
XLoc Full Sprint™ Bleed Procedure
B l e e d t h e R e a r H o s e
If the hose was not replaced or cut, go to the next section
Bleed the Remote
.
1
Use a T10 TORX® wrench to remove the bleed screw from the rebound adjuster on the rear shock. Thread the 3/4 full syringe into the bleed port on the rear shock.
Use a T10 TORX wrench to remove the bleed screw from the remote. Thread the 1/4 full syringe into the bleed port.
T10
2
While holding both syringes upright, push on the rear shock syringe plunger and pull up on the remote syringe plunger at the same time. This will force fluid and any air bubbles through the hose and into the remote syringe. Continue to push on the rear shock syringe plunger until the syringe is nearly empty.
Push on the remote syringe plunger until the syringe is nearly empty and pull up on the rear shock syringe at the same time. You should see air bubbles and hydraulic fluid moving into the rear shock syringe.
Cycle the hydraulic fluid between the remote syringe and the rear shock syringe, until no more air bubbles transfer into either syringe.
Press the remote actuator multiple times during the bleed process to dislodge bubbles that may be trapped in the remote.
Push on the rear shock syringe plunger a final time until the rear shock syringe is nearly empty
.
T10
41
Bleed the Rear Hose
3
Remove the syringe from the rear shock bleed port.
Fluid will drip from the syringe.
Use a T10 TORX® wrench to thread the rear shock bleed screw into the bleed port. Use a torque wrench with a T10 TORX bit socket to tighten the bleed screw to 1.7 N·m (15 in-lb).
T10 1.7 N
·
m (15 in-lb)
42
Bleed the Rear Hose
B l e e d t h e R e m o t e
1
Check that the remote actuator is in the extended (locked) position.
2
Gently pull up on the remote syringe plunger to remove any remaining air bubbles from inside the remote, then push on the plunger to force fluid into the remote. Repeat this process until no more air bubbles transfer into the syringe.
Turn the floodgate adjuster back and forth multiple times during the bleed process to dislodge bubbles that may be trapped in the remote.
Return the floodgate adjuster to maximum floodgate by rotating in the direction of the arrow until it stops.
Push on the remote syringe plunger a final time, then remove the syringe from the remote bleed port.
Fluid will drip from the syringe.
3
Use a T10 TORX® wrench to thread the remote bleed screw into the bleed port.
Use a torque wrench with a T10 TORX bit socket to tighten the bleed screw to 0.5 N·m (4.4 in-lb).
T10 0.5 N
·
m (4.4 in-lb)
43
Bleed the Remote
4
Spray isopropyl alcohol on the rear shock, rear hose, remote, front hose, and fork, and clean them with a rag.
Rotate the remote to the desired position. Use a torque wrench with a T25 TORX® bit socket to tighten the remote clamp bolt to
5-6 N·m (44-53 in-lb).
Turn the floodgate to the desired position.
Fasten the hose to the frame according to the frame manufacturer’s instructions.
T25 5-6 N
·
m (44-53 in-lb)
This concludes the service for XLoc Full Sprint™ remote.
44
Bleed the Remote
This publication includes trademarks and registered trademarks of the following companies:
Slick Honey® is a registered trademark of Quality Bicycle Products, Inc
Specialized® is a registered trademark of Specialized Bicycle Components, Inc
TORX® is a registered trademark of Acument Intellectual Properties, LLC
www.sram.com
GEN.0000000004412 Rev A © 2013 SRAM, LLC
| Year | Fork | Model | Damper | Spring |
|---|---|---|---|---|
| 2019 |
30 Gold |
R 26 |
Motion Control | Solo Air |
| 2019 |
30 Gold |
R 27.5 |
Motion Control | Solo Air |
| 2019 |
30 Gold |
R 29 |
Motion Control | Solo Air |
| 2019 |
30 Silver |
TK 26 |
Turnkey | Solo Air |
| 2019 |
30 Silver |
TK 26 |
Turnkey | Coil |
| 2019 |
30 Silver |
TK 27.5 |
Turnkey | Solo Air |
| 2019 |
30 Silver |
TK 27.5 |
Turnkey | Coil |
| 2019 |
30 Silver |
TK 29 |
Turnkey | Solo Air |
| 2019 |
30 Silver |
TK 29 |
Turnkey | Coil |
| 2019 |
Bluto |
RL | Motion Control | Solo Air |
| 2019 |
Bluto |
RL | Motion Control | Solo Air |
| 2019 |
Boxxer |
RC | Charger Damper RC | Debonair |
| 2019 |
Boxxer |
World Cup (RC2) | Charger 2 Damper | DebonAir |
| 2019 |
Judy Gold |
RL | Motion Control | Solo Air |
| 2019 |
Judy Silver |
TK | Turnkey | Solo Air |
| 2019 |
Lyrik |
RC | Charger 2 Damper | Debonair |
| 2019 |
Lyrik |
RC2 | Charger 2 Damper | Debonair |
| 2019 |
Lyrik |
RCT3 | Charger 2 Damper | Debonair |
| 2019 |
Paragon Gold |
RL | Motion Control | Solo Air |
| 2019 |
Paragon Silver |
TK | Turnkey | Coil |
| 2019 |
Pike |
DJ | Charger Damper RC | Solo Air |
| 2019 |
Pike |
RC | Charger 2 Damper | Debonair |
| 2019 |
Pike |
RCT3 | Charger 2 Damper | Debonair |
| 2019 |
Reba |
RL 100 |
Motion Control | Solo Air |
| 2019 |
Reba |
RL 120 |
Motion Control | Solo Air |
| 2019 |
Reba |
RL 130-150 |
Motion Control | Solo Air |
| 2019 |
Recon |
RL 27.5 80-120 |
Motion Control | Solo Air |
| 2019 |
Recon |
RL 27.5 130-140 |
Motion Control | Solo Air |
| 2019 |
Recon |
RL 29 80-120 |
Motion Control | Solo Air |
| 2019 |
Recon |
RL 29 130-140 |
Motion Control | Solo Air |
| 2019 |
Recon |
RL 27.5 Boost 80-150 |
Motion Control | Solo Air |
| 2019 |
Recon |
RL 29 Boost 80-140 |
Motion Control | Solo Air |
| 2019 |
Recon |
TK | Turnkey | Coil |
| 2019 |
Recon Gold |
RL 27.5 80-120 |
Motion Control | Solo Air |
| 2019 |
Recon Gold |
RL 27.5 130 |
Motion Control | Solo Air |
| 2019 |
Recon Gold |
RL 29 |
Motion Control | Solo Air |
| 2019 |
Revelation |
RC | Charger Damper RC | Debonair |
| 2019 |
Revelation |
RC | Motion Control | Debonair |
| 2019 |
RS-1 |
RLC | Charger 2 Damper | Solo Air |
| 2019 |
Sektor |
RL | Motion Control | Debonair |
| 2019 |
SID |
RL | Charger 2 Damper | Debonair |
| 2019 |
SID |
RLC | Charger 2 Damper | Debonair |
| 2019 |
SID |
World Cup | Charger 2 Damper | Debonair |
| 2019 |
XC 30 |
TK | Turnkey | Coil |
| 2019 |
Yari |
RC | Charger Damper RC | Debonair |
| 2019 |
Yari |
RC | Motion Control | Debonair |
| 2018 |
30 Gold |
RL 26 | Motion Control | Solo Air |
| 2018 |
30 Gold |
RL 27.5 | Motion Control | Solo Air |
| 2018 |
30 Gold |
RL 29 | Motion Control | Solo Air |
| 2018 |
30 Silver |
TK 26 | Turnkey | Solo Air |
| 2018 |
30 Silver |
TK 26 | Turnkey | Coil |
| 2018 |
30 Silver |
TK 27.5 | Turnkey | Solo Air |
| 2018 |
30 Silver |
TK 27.5 | TK | Coil |
| 2018 |
30 Silver |
TK 29 | TK | Solo Air |
| 2018 |
30 Silver |
TK 29 | TK | Coil |
| 2018 |
Bluto |
RCT3 | Motion Control | Solo Air |
| 2018 |
Bluto |
RL | Motion Control | Solo Air |
| 2018 |
Boxxer |
RC | Motion Control | Coil |
| 2018 |
Boxxer |
Team | Charger Damper | Coil |
| 2018 |
Boxxer |
World Cup | Charger Damper | Solo Air |
| 2018 |
Judy Gold |
RL | Motion Control | Solo Air |
| 2018 |
Judy Silver |
TK | Turnkey | Solo Air |
| 2018 |
Lyrik |
RC | Charger Damper / Charger 2 | Solo Air |
| 2018 |
Lyrik |
RC | Charger Damper / Charger 2 | Dual Position Air |
| 2018 |
Lyrik |
RC | Charger Damper / Charger 2 | DebonAir |
| 2018 |
Lyrik |
RCT3 | Charger Damper / Charger 2 | DebonAir |
| 2018 |
Lyrik |
RCT3 | Charger Damper / Charger 2 | Solo Air |
| 2018 |
Lyrik |
RCT3 | Charger Damper / Charger 2 | Dual Position Air |
| 2018 |
Paragon Gold |
RL | Motion Control | Solo Air |
| 2018 |
Paragon Silver |
TK | Turnkey | Coil |
| 2018 |
Pike |
DJ | Charger Damper | Solo Air |
| 2018 |
Pike |
RC | Charger Damper / Charger 2 | DebonAir |
| 2018 |
Pike |
RC | Charger Damper / Charger 2 | Solo Air |
| 2018 |
Pike |
RC | Charger Damper / Charger 2 | Dual Position Air |
| 2018 |
Pike |
RCT3 | Charger Damper / Charger 2 | Solo Air |
| 2018 |
Pike |
RCT3 | Charger Damper / Charger 2 | Dual Position Air |
| 2018 |
Pike |
RCT3 | Charger Damper / Charger 2 | DebonAir |
| 2018 |
Reba |
RL (110-120) | Motion Control | Solo Air |
| 2018 |
Reba |
RL (130-150) | Motion Control | Solo Air |
| 2018 |
Reba |
RL (80-100) | Motion Control | Solo Air |
| 2018 |
Recon |
RL 27.5 (130-140) | Motion Control | Solo Air |
| 2018 |
Recon |
RL 27.5 (80-120) | Motion Control | Solo Air |
| 2018 |
Recon |
RL 27.5B | Motion Control | Solo Air |
| 2018 |
Recon |
RL 29 (130-140) | Motion Control | Solo Air |
| 2018 |
Recon |
RL 29 (80-120) | Motion Control | Solo Air |
| 2018 |
Recon |
RL 29B | Motion Control | Solo Air |
| 2018 |
Recon |
TK | Turnkey | Coil |
| 2018 |
Recon Gold |
RL 27.5 (130) | Motion Control | Solo Air |
| 2018 |
Recon Gold |
RL 27.5 (80-120) | Motion Control | Solo Air |
| 2018 |
Recon Gold |
RL 27.5B | Motion Control | Solo Air |
| 2018 |
Recon Gold |
RL 29 | Motion Control | Solo Air |
| 2018 |
Recon Gold |
RL 29B | Motion Control | Solo Air |
| 2018 |
Revelation |
RL | Motion Control | DebonAir |
| 2018 |
RS-1 |
RL | Charger 2 | Solo Air |
| 2018 |
RS-1 |
RLC | Charger 2 | Solo Air |
| 2018 |
SID |
RL | Charger 2 | Solo Air |
| 2018 |
SID |
RLC | Charger 2 | Solo Air |
| 2018 |
SID |
World Cup | Charger 2 | Solo Air |
| 2018 |
XC 30 |
TK | Turnkey | Coil |
| 2018 |
Yari |
RC | Motion Control | Solo Air |
| 2018 |
Yari |
RC | Motion Control | DebonAir |
| 2018 |
Yari |
RC | Motion Control | Dual Position Air |
| 2017 |
30 Gold |
RL 26 | Motion Control | Solo Air |
| 2017 |
30 Gold |
RL 27.5 | Motion Control | Solo Air |
| 2017 |
30 Gold |
RL 29 | Motion Control | Solo Air |
| 2017 |
30 Silver |
TK 26 | Turnkey | Solo Air |
| 2017 |
30 Silver |
TK 26 | Turnkey | Coil |
| 2017 |
30 Silver |
TK 27.5 | Turnkey | Solo Air |
| 2017 |
30 Silver |
TK 27.5 | Turnkey | Coil |
| 2017 |
30 Silver |
TK 29 | Turnkey | Solo Air |
| 2017 |
30 Silver |
TK 29 | Turnkey | Coil |
| 2017 |
Bluto |
RCT3 | Motion Control | Solo Air |
| 2017 |
Bluto |
RL | Motion Control | Solo Air |
| 2017 |
Boxxer |
RC | Motion Control IS | Coil |
| 2017 |
Boxxer |
Team | Charger | Coil |
| 2017 |
Boxxer |
World Cup | Charger | Solo Air |
| 2017 |
Domain Dual Crown |
RC | Motion Control IS | Coil |
| 2017 |
Lyrik |
RC | Charger | Solo Air |
| 2017 |
Lyrik |
RC | Charger | Dual Position Air |
| 2017 |
Lyrik |
RCT3 | Charger | Solo Air |
| 2017 |
Lyrik |
RCT3 | Charger | Dual Position Air |
| 2017 |
Paragon Gold |
RL | Motion Control | Solo Air |
| 2017 |
Paragon Silver |
TK | Turnkey | Coil |
| 2017 |
Pike |
DJ | Charger | Solo Air |
| 2017 |
Pike |
RC | Charger | Solo Air |
| 2017 |
Pike |
RC | Charger | Dual Position Air |
| 2017 |
Pike |
RCT3 | Charger | Solo Air |
| 2017 |
Pike |
RCT3 | Charger | Dual Position Air |
| 2017 |
Reba |
RL | Motion Control | Solo Air |
| 2017 |
Recon Gold |
RL | Motion Control | Solo Air |
| 2017 |
Recon Silver |
RL | Motion Control | Solo Air |
| 2017 |
Recon Silver |
TK | Turnkey | Coil |
| 2017 |
Revelation |
RCT3 | Motion Control | Solo Air |
| 2017 |
Revelation |
RL | Motion Control | Solo Air |
| 2017 |
RS-1 |
— | Accelerator | Solo Air |
| 2017 |
Sektor Gold |
RL | Motion Control | Solo Air |
| 2017 |
Sektor Silver |
TK | Turnkey | Solo Air |
| 2017 |
SID |
RL | Motion Control | Solo Air |
| 2017 |
SID |
RLC | Charger | Solo Air |
| 2017 |
SID |
World Cup | Charger | Solo Air |
| 2017 |
SID |
XX | Motion Control | Solo Air |
| 2017 |
XC 30 |
TK | Turnkey | Coil |
| 2017 |
Yari |
RC | Motion Control | Solo Air |
| 2017 |
Yari |
RC | Motion Control | Dual Position Air |
| 2016 |
30 |
Gold 26 | Turnkey | Solo Air |
| 2016 |
30 |
Gold 27.5 | Turnkey | Solo Air |
| 2016 |
30 |
Gold 29 | Turnkey | Solo Air |
| 2016 |
30 |
Silver 26 | Turnkey | Solo Air |
| 2016 |
30 |
Silver 26 | Turnkey | Coil |
| 2016 |
30 |
Silver 27.5 | Turnkey | Solo Air |
| 2016 |
30 |
Silver 27.5 | Turnkey | Coil |
| 2016 |
30 |
Silver 29 | Turnkey | Solo Air |
| 2016 |
30 |
Silver 29 | Turnkey | Coil |
| 2016 |
Argyle |
R | Rebound | Coil |
| 2016 |
Argyle |
RC | Motion Control | Coil |
| 2016 |
Bluto |
RCT3 | Motion Control | Solo Air |
| 2016 |
Bluto |
RL | Motion Control | Solo Air |
| 2016 |
Boxxer |
RC | Motion Control IS | Coil |
| 2016 |
Boxxer |
Team | Charger | Coil |
| 2016 |
Boxxer |
World Cup | Charger | Solo Air |
| 2016 |
Domain |
Dual Crown RC | Motion Control IS | Coil |
| 2016 |
Domain |
RC | Motion Control IS | Coil |
| 2016 |
Lyrik |
RC | Charger | Solo Air |
| 2016 |
Lyrik |
RC | Charger | Dual Position Air |
| 2016 |
Lyrik |
RC | Charger | Coil |
| 2016 |
Lyrik |
RC2 DH | Motion Control / Motion Control DH | Solo Air |
| 2016 |
Lyrik |
RC2 DH | Motion Control / Motion Control DH | Dual Position Air |
| 2016 |
Lyrik |
RC2 DH | Motion Control / Motion Control DH | Coil |
| 2016 |
Lyrik |
RCT3 | Charger | Solo Air |
| 2016 |
Lyrik |
RCT3 | Charger | Dual Position Air |
| 2016 |
Lyrik |
RCT3 | Charger | Coil |
| 2016 |
Paragon |
Gold | Turnkey | Solo Air |
| 2016 |
Paragon |
Silver | Turnkey | Coil |
| 2016 |
Pike |
DJ | Charger | Solo Air |
| 2016 |
Pike |
RC | Charger | Solo Air |
| 2016 |
Pike |
RC | Charger | Dual Position Air |
| 2016 |
Pike |
RCT3 | Charger | Solo Air |
| 2016 |
Pike |
RCT3 | Charger | Dual Position Air |
| 2016 |
Reba |
RL | Motion Control | Solo Air |
| 2016 |
Reba |
RL3 | Motion Control | Solo Air |
| 2016 |
Reba |
RLT | Motion Control | Solo Air |
| 2016 |
Recon |
Gold RL | Motion Control | Solo Air |
| 2016 |
Recon |
Gold TK | Turnkey | Coil |
| 2016 |
Recon |
Gold TK | Turnkey | Solo Air |
| 2016 |
Recon |
Silver TK | Turnkey | Solo Air |
| 2016 |
Recon |
Silver TK | Turnkey | Coil |
| 2016 |
Revelation |
RCT3 | Motion Control | Solo Air / Dual Position Air |
| 2016 |
Revelation |
RL | Motion Control | Solo Air / Dual Position Air |
| 2016 |
Revelation |
RLT | Motion Control | Solo Air / Dual Position Air |
| 2016 |
Revelation |
WC | Motion Control | Solo Air / Dual Position Air |
| 2016 |
Revelation |
XX | Motion Control | Solo Air / Dual Position Air |
| 2016 |
Revelation |
XXWC | Motion Control | Solo Air / Dual Position Air |
| 2016 |
RS-1 |
— | Accelerator | Solo Air |
| 2016 |
Sektor |
Gold RL | Motion Control | Solo Air |
| 2016 |
Sektor |
Gold TK | Turnkey | Solo Air |
| 2016 |
Sektor |
Gold TK | Turnkey | Coil |
| 2016 |
Sektor |
Silver TK | Turnkey | Coil |
| 2016 |
Sektor |
Silver TK | Turnkey | Solo Air |
| 2016 |
SID |
RCT3 | Motion Control | Solo Air |
| 2016 |
SID |
RL | Motion Control | Solo Air |
| 2016 |
SID |
RL3 | Motion Control | Solo Air |
| 2016 |
SID |
RL3 | Motion Control | Solo Air |
| 2016 |
SID |
RLT3 | Motion Control | Solo Air |
| 2016 |
SID |
WC | Motion Control | Solo Air |
| 2016 |
SID |
WC 1 1/8″ | Motion Control | Solo Air |
| 2016 |
SID |
XX | Motion Control | Solo Air |
| 2016 |
SID |
XXWC | Motion Control | Solo Air |
| 2016 |
SID |
XXWC 1 1/8″ | Motion Control | Solo Air |
| 2016 |
XC 28 |
TK (120) | Turnkey | Coil |
| 2016 |
XC 28 |
TK (80/100) | Turnkey | Coil |
| 2016 |
XC 30 |
TK | Turnkey | Coil |
| 2016 |
Yari |
RC | Motion Control | Solo Air |
| 2016 |
Yari |
RC | Motion Control | Dual Position Air |
| 2015 |
30 Gold |
TK 26 | Turnkey | Solo Air |
| 2015 |
30 Gold |
TK 27.5 | Turnkey | Solo Air |
| 2015 |
30 Gold |
TK 29 | Turnkey | Solo Air |
| 2015 |
Argyle |
R | Rebound | Coil |
| 2015 |
Argyle |
RC | Motion Control | Coil |
| 2015 |
Argyle |
RCT | Motion Control | Solo Air |
| 2015 |
Bluto |
RL | Motion Control | Solo Air |
| 2015 |
Boxxer |
RC | Motion Control IS | Coil |
| 2015 |
Boxxer |
Team | Charger | Coil |
| 2015 |
Boxxer |
World Cup | Charger | Solo Air |
| 2015 |
Domain |
Dual Crown R | Rebound | Coil |
| 2015 |
Domain |
Dual Crown RC | Motion Control IS | Coil |
| 2015 |
Domain |
R | Rebound | Coil |
| 2015 |
Domain |
RC | Motion Control | Coil |
| 2015 |
Lyrik |
R | Rebound | Coil |
| 2015 |
Lyrik |
RC | Motion Control IS | Coil |
| 2015 |
Lyrik |
RC2L / RC2LDH | Mission Control / Mission Control DH | Solo Air |
| 2015 |
Paragon |
TK | Turnkey | Solo Air |
| 2015 |
Pike |
DJ | Charger | Solo Air |
| 2015 |
Pike |
RC | Charger | Solo Air |
| 2015 |
Pike |
RC | Charger | Dual Position Air |
| 2015 |
Pike |
RCT3 | Charger | Solo Air |
| 2015 |
Pike |
RCT3 | Charger | Dual Position Air |
| 2015 |
Reba |
RL | Motion Control | Solo Air |
| 2015 |
Reba |
RL3 | Motion Control | Solo Air |
| 2015 |
Reba |
RLT | Motion Control | Solo Air |
| 2015 |
Recon Gold |
RL | Motion Control | Coil |
| 2015 |
Recon Gold |
RL | Motion Control | Solo Air |
| 2015 |
Recon Gold |
TK | Turnkey | Coil |
| 2015 |
Recon Gold |
TK | Turnkey | Solo Air |
| 2015 |
Recon Silver |
TK | Turnkey | Coil |
| 2015 |
Recon Silver |
TK | Turnkey | Solo Air |
| 2015 |
Revelation |
RCT3, RLT, RL | Motion Control | Dual Position Air |
| 2015 |
Revelation |
RCT3, RLT, RL | Motion Control | Solo Air |
| 2015 |
Revelation |
XX, WC, XXWC | Motion Control | Dual Position Air |
| 2015 |
Revelation |
XX, WC, XXWC | Motion Control | Solo Air |
| 2015 |
RS-1 |
— | Accelerator | Solo Air |
| 2015 |
Sektor Gold |
RL | Motion Control | Solo Air |
| 2015 |
Sektor Gold |
RL | Motion Control | Coil |
| 2015 |
Sektor Gold |
TK | Turnkey | Solo Air |
| 2015 |
Sektor Gold |
TK | Turnkey | Coil |
| 2015 |
Sektor Silver |
TK | Turnkey | Solo Air |
| 2015 |
SID |
RCT3, RLT, RL | Motion Control | Solo Air |
| 2015 |
SID |
RLT3, RL3 | Motion Control | Solo Air |
| 2015 |
SID |
WC 1 1/8″ | Motion Control | Solo Air |
| 2015 |
SID |
XX, WC, XXWC | Motion Control | Solo Air |
| 2015 |
SID |
XXWC 1 1/8″ | Motion Control | Solo Air |
| 2015 |
XC 28 |
TK (120) | Turnkey | Coil |
| 2015 |
XC 28 |
TK (80-100) | Turnkey | Coil |
| 2015 |
XC 30 |
TK (26) | Turnkey | Coil |
| 2015 |
XC 30 |
TK (26) | Turnkey | Solo Air |
| 2015 |
XC 30 |
TK (27.5) | Turnkey | Coil |
| 2015 |
XC 30 |
TK (27.5) | Turnkey | Solo Air |
| 2015 |
XC 30 |
TK (29) | Turnkey | Solo Air |
| 2015 |
XC 30 |
TK (29) | Turnkey | Coil |
| 2015 |
XC 32 |
TK | Turnkey | Solo Air |
| 2015 |
XC 32 |
TK | Turnkey | Coil |
| 2014 |
30 Gold |
TK | Turnkey | Solo Air |
| 2014 |
30 Gold |
TK 27 | Turnkey | Solo Air |
| 2014 |
30 Gold |
TK 29 | Turnkey | Solo Air |
| 2014 |
Argyle |
R | Rebound | Coil |
| 2014 |
Argyle |
RC | Motion Control | Coil |
| 2014 |
Argyle |
RCT | Motion Control | Solo Air |
| 2014 |
Boxxer |
R2C2 | Motion Control DH | Coil with Drop Stop |
| 2014 |
Boxxer |
RC | Motion Control IS | Coil |
| 2014 |
Boxxer |
World Cup | Motion Control DH | Solo Air with Volume Adjust |
| 2014 |
Domain |
Dual Crown R | Rebound | Coil & Coil U-Turn |
| 2014 |
Domain |
Dual Crown RC | Motion Control IS | Coil |
| 2014 |
Domain |
R | Rebound | Coil & Coil U-Turn |
| 2014 |
Domain |
RC | Motion Control | Coil & Coil U-Turn |
| 2014 |
Lyrik |
R | Rebound | Solo Air & Coil |
| 2014 |
Lyrik |
RC | Motion Control IS | Solo Air & Dual Position Air |
| 2014 |
Lyrik |
RC2DH | Mission Control DH | Solo Air & Dual Position Air |
| 2014 |
Lyrik |
RC2L | Mission Control | Solo Air & Dual Position Air |
| 2014 |
Pike |
RC | Charger | Solo Air |
| 2014 |
Pike |
RCT3 | Charger | Solo Air |
| 2014 |
Reba |
RL | Motion Control | Solo Air |
| 2014 |
Reba |
RL3 | Motion Control | Solo Air |
| 2014 |
Reba |
RLT | Motion Control | Solo Air |
| 2014 |
Recon Gold |
R | Rebound | Solo Air |
| 2014 |
Recon Gold |
R | Rebound | Coil |
| 2014 |
Recon Gold |
RL | Motion Control | Solo Air |
| 2014 |
Recon Gold |
RL | Motion Control | Coil |
| 2014 |
Recon Gold |
TK | Turnkey | Solo Air |
| 2014 |
Recon Gold |
TK | Turnkey | Coil |
| 2014 |
Recon Gold |
TK 29 | Turnkey | Solo Air |
| 2014 |
Recon Gold |
TK 29 | Turnkey | Coil |
| 2014 |
Recon Silver |
TK | Turnkey | Solo Air |
| 2014 |
Recon Silver |
TK | Turnkey | Coil |
| 2014 |
Revelation |
RCT3 | Motion Control | Solo Air & Dual Position Air |
| 2014 |
Revelation |
RL | Motion Control | Solo Air & Dual Position Air |
| 2014 |
Revelation |
RLT | Motion Control | Solo Air & Dual Position Air |
| 2014 |
Revelation |
WC | Motion Control | Solo Air & Dual Position Air |
| 2014 |
Revelation |
XX | Motion Control | Solo Air & Dual Position Air |
| 2014 |
Revelation |
XXWC | Motion Control | Solo Air & Dual Position Air |
| 2014 |
Sektor Gold |
RL | Motion Control | Solo Air |
| 2014 |
Sektor Gold |
RL | Motion Control | U-Turn 130 |
| 2014 |
Sektor Gold |
RL | Motion Control | U-Turn 140 |
| 2014 |
Sektor Gold |
RL | Motion Control | U-Turn 150 |
| 2014 |
Sektor Gold |
TK | Turnkey | Solo Air |
| 2014 |
Sektor Gold |
TK | Turnkey | U-Turn 130 |
| 2014 |
Sektor Gold |
TK | Turnkey | U-Turn 140 |
| 2014 |
Sektor Gold |
TK | Turnkey | U-Turn 150 |
| 2014 |
Sektor Silver |
TK | Turnkey | Solo Air |
| 2014 |
SID |
RCT3 | Motion Control | Solo Air |
| 2014 |
SID |
RL | Motion Control | Solo Air |
| 2014 |
SID |
RL3 | Motion Control | Solo Air |
| 2014 |
SID |
RLT | Motion Control | Solo Air |
| 2014 |
SID |
RLT3 | Motion Control | Solo Air |
| 2014 |
SID |
WC | Motion Control | Solo Air |
| 2014 |
SID |
WC 1 1/8 | Motion Control | Solo Air |
| 2014 |
SID |
XX | Motion Control | Solo Air |
| 2014 |
SID |
XXWC | Motion Control | Solo Air |
| 2014 |
SID |
XXWC 1 1/8 | Motion Control | Solo Air |
| 2014 |
XC 28 |
120 | Turnkey | Coil |
| 2014 |
XC 28 |
80/100 | Turnkey | Coil |
| 2014 |
XC 30 |
TK | Turnkey | Solo Air & Coil |
| 2014 |
XC 30 |
TK 27 | Turnkey | Solo Air & Coil |
| 2014 |
XC 30 |
TK 29 | Turnkey | Solo Air & Coil |
| 2014 |
XC 32 |
TK | Turnkey | Solo Air |
| 2014 |
XC 32 |
TK | Turnkey | Coil |
| 2012 |
Argyle |
RC | Motion Control | Coil |
| 2012 |
Argyle |
RC | Rebound | Coil |
| 2012 |
Argyle |
RCT | Motion Control | Solo Air |
| 2012 |
Boxxer |
R2C2 | Motion Control DH | Coil with Drop Stop |
| 2012 |
Boxxer |
RC | Motion Control IS | Coil |
| 2012 |
Boxxer |
World Cup | Motion Control DH | Solo Air with Volume Adjust |
| 2012 |
Domain |
Dual Crown R | Rebound | Coil |
| 2012 |
Domain |
Dual Crown RC | Motion Control IS | Coil |
| 2012 |
Domain |
R | Motion Control | Coil & Coil U-Turn |
| 2012 |
Domain |
RC | Motion Control | Coil & Coil U-Turn |
| 2012 |
Lyrik |
R | Rebound | Solo Air & Coil |
| 2012 |
Lyrik |
RC | Mission Control IS | 2-Step, Solo Air & U-Turn |
| 2012 |
Lyrik |
RC2DH | Mission Control DH | 2-Step, Solo Air & U-Turn |
| 2012 |
Lyrik |
RC2L | Mission Control | 2-Step, Solo Air & U-Turn |
| 2012 |
Reba |
RL | Motion Control | Dual Air |
| 2012 |
Reba |
RL3 | Motion Control | Dual Air |
| 2012 |
Reba |
RLT | Motion Control | Dual Air |
| 2012 |
Recon Gold |
R | Rebound | Solo Air |
| 2012 |
Recon Gold |
R | Rebound | Coil |
| 2012 |
Recon Gold |
RL | Motion Control | Solo Air |
| 2012 |
Recon Gold |
RL | Motion Control | Coil |
| 2012 |
Recon Gold |
TK | Turnkey | Solo Air |
| 2012 |
Recon Gold |
TK | Turnkey | Coil |
| 2012 |
Recon Gold |
TK 29 | Turnkey | Solo Air |
| 2012 |
Recon Gold |
TK 29 | Turnkey | Coil |
| 2012 |
Recon Silver |
R | Rebound | Solo Air |
| 2012 |
Recon Silver |
R | Rebound | Coil |
| 2012 |
Recon Silver |
RL | Motion Control | Solo Air |
| 2012 |
Recon Silver |
RL | Motion Control | Coil |
| 2012 |
Recon Silver |
TK | Turnkey | Solo Air |
| 2012 |
Recon Silver |
TK | Turnkey | Coil |
| 2012 |
Recon Silver |
TK 29 | Turnkey | Solo Air |
| 2012 |
Recon Silver |
TK 29 | Turnkey | Coil |
| 2012 |
Revelation |
RCT3 | Motion Control | Dual Air & Dual Postion Air |
| 2012 |
Revelation |
RL | Motion Control | Dual Air & Dual Postion Air |
| 2012 |
Revelation |
RLT | Motion Control | Dual Air & Dual Postion Air |
| 2012 |
Revelation |
World Cup | Motion Control | Dual Air & Dual Postion Air |
| 2012 |
Revelation |
XX | Motion Control | Dual Air & Dual Postion Air |
| 2012 |
Revelation |
XX World Cup | Motion Control | Dual Air & Dual Postion Air |
| 2012 |
Sektor |
R | Rebound | Dual Postition Coil |
| 2012 |
Sektor |
RL | Motion Control | Solo Air |
| 2012 |
Sektor |
RL | Motion Control | U-Turn 130 |
| 2012 |
Sektor |
RL | Motion Control | U-Turn 140 |
| 2012 |
Sektor |
RL | Motion Control | U-Turn 150 |
| 2012 |
Sektor |
TK | Turnkey | Dual Postition Coil |
| 2012 |
SID |
RCT3 (120) | Motion Control | Dual Air |
| 2012 |
SID |
RL3 (120) | Motion Control | Dual Air |
| 2012 |
SID |
RLT (120) | Motion Control | Dual Air |
| 2012 |
SID |
RLT3 (120) | Motion Control | Dual Air |
| 2012 |
SID |
WC3 (120) | Motion Control | Dual Air |
| 2012 |
SID |
World Cup (100) | Motion Control | Dual Air |
| 2012 |
SID |
World Cup (120) | Motion Control | Dual Air |
| 2012 |
SID |
XX (100) | Motion Control | Dual Air |
| 2012 |
SID |
XX (120) | Motion Control | Dual Air |
| 2012 |
SID |
XX World Cup (120) | Motion Control | Dual Air |
| 2012 |
Tora |
289 | Rebound | Coil |
| 2012 |
Tora |
289 | Rebound | Coil U-Turn |
| 2012 |
Tora |
302 | Turnkey | Solo Air |
| 2012 |
Tora |
302 | Turnkey | Coil U-Turn |
| 2012 |
Tora |
302 | Turnkey | Coil |
| 2012 |
Tora |
TK | Turnkey | Solo Air |
| 2012 |
Totem |
RC | Motion Control IS | Coil |
| 2012 |
Totem |
RC2DH | Mission Control DH | Solo Air & Coil |
| 2012 |
Totem |
RC2DH | Mission Control DH | 2-Step |
| 2012 |
Totem |
RC2L | Mission Control | 2-Step |
| 2012 |
Totem |
RC2L | Mission Control | Solo Air & Coil |
| 2012 |
XC 28 |
R (80/100) | Rebound | Coil |
| 2012 |
XC 28 |
R (120) | Rebound | Coil |
| 2012 |
XC 28 |
TK (120) | Turnkey | Coil |
| 2012 |
XC 28 |
TK (29) | Turnkey | Coil |
| 2012 |
XC 28 |
TK (80/100) | Turnkey | Coil |
| 2012 |
XC 30 |
TK | Turnkey | Coil |
| 2012 |
XC 32 |
TK | Turnkey | Coil |
| 2011 |
Argyle |
R | Rebound | Coil |
| 2011 |
Argyle |
RC | Motion Control | Coil |
| 2011 |
Argyle |
RCT | Motion Control | Solo Air |
| 2011 |
Boxxer |
R2C2 | Motion Control DH | Coil w/ Drop Stop |
| 2011 |
Boxxer |
RC | Motion Control IS | Coil |
| 2011 |
Boxxer |
World Cup | Motion Control DH | Solo Air w/ Volume Adjust |
| 2011 |
Dart |
1 | None | Coil |
| 2011 |
Dart |
2 | Rebound | Coil |
| 2011 |
Dart |
2 (w/ Turnkey 120mm) | Turnkey | Coil |
| 2011 |
Dart |
2 (w/ Turnkey 80-100mm) | Turnkey | Coil |
| 2011 |
Dart |
3 (120mm) | Turnkey | Coil |
| 2011 |
Dart |
3 29er (80-100mm) | Turnkey | Coil |
| 2011 |
Domain |
Dual Crown R | Rebound | Coil |
| 2011 |
Domain |
Dual Crown RC | Motion Control IS | Coil |
| 2011 |
Domain |
R | Rebound | Coil & Coil U-turn |
| 2011 |
Domain |
RC | Motion Control | Coil & Coil U-turn |
| 2011 |
Lyrik |
R | Rebound | Coil |
| 2011 |
Lyrik |
R | Rebound | Solo Air |
| 2011 |
Lyrik |
RC | Motion Control IS | U-Turn |
| 2011 |
Lyrik |
RC | Motion Control IS | Solo Air |
| 2011 |
Lyrik |
RC | Motion Control IS | 2-Step |
| 2011 |
Lyrik |
RC2L / RC2LDH | Mission Control / Mission Control DH | U-Turn |
| 2011 |
Lyrik |
RC2L / RC2LDH | Mission Control / Mission Control DH | Solo Air |
| 2011 |
Lyrik |
RC2L / RC2LDH | Mission Control / Mission Control DH | 2-Step |
| 2011 |
Reba |
RLT Ti | Blackbox Motion Control | Air U-Turn |
| 2011 |
Reba |
RLT Ti | Blackbox Motion Control | Dual Air |
| 2011 |
Reba |
TK | Turnkey | Dual Air |
| 2011 |
Reba |
XX, RL, RLT | Motion Control | Air U-Turn |
| 2011 |
Reba |
XX, RL, RLT | Motion Control | Dual Air |
| 2011 |
Recon Gold |
R | Rebound | Coil |
| 2011 |
Recon Gold |
R | Rebound | Solo Air |
| 2011 |
Recon Gold |
RL | Motion Control | Coil |
| 2011 |
Recon Gold |
RL | Motion Control | Solo Air |
| 2011 |
Recon Gold |
TK | Turnkey | Solo Air |
| 2011 |
Recon Gold |
TK | Turnkey | Coil |
| 2011 |
Recon Silver |
R | Rebound | Coil |
| 2011 |
Recon Silver |
R | Rebound | Solo Air |
| 2011 |
Recon Silver |
TK | Turnkey | Coil |
| 2011 |
Recon Silver |
TK | Turnkey | Solo Air |
| 2011 |
Revelation |
RLT Ti, WC | Blackbox Motion Control | Dual Air |
| 2011 |
Revelation |
RLT Ti, WC | Blackbox Motion Control | Dual Position Air |
| 2011 |
Revelation |
XX, RL, RLT | Motion Control | Dual Air |
| 2011 |
Revelation |
XX, RL, RLT | Motion Control | Dual Position Air |
| 2011 |
Sektor |
R | Rebound | Coil |
| 2011 |
Sektor |
R | Rebound | U-Turn |
| 2011 |
Sektor |
R | Rebound | Solo Air |
| 2011 |
Sektor |
RL | Motion Control | Coil 130 |
| 2011 |
Sektor |
RL | Motion Control | Coil 140-150 |
| 2011 |
Sektor |
RL | Motion Control | U-Turn |
| 2011 |
Sektor |
RL | Motion Control | Solo Air |
| 2011 |
Sektor |
TK | Turnkey | Coil 130 |
| 2011 |
Sektor |
TK | Turnkey | Coil 140-150 |
| 2011 |
Sektor |
TK | Turnkey | U-Turn |
| 2011 |
Sektor |
TK | Turnkey | Solo Air |
| 2011 |
SID |
RLT Ti, WC (100) | Blackbox Motion Control | Dual Air |
| 2011 |
SID |
RLT Ti, WC (120) | Blackbox Motion Control | Dual Air |
| 2011 |
SID |
XX, RL, RLT (100) | Motion Control | Dual Air |
| 2011 |
SID |
XX, RLT (120) | Motion Control | Dual Air |
| 2011 |
Tora |
289 | Rebound | Coil |
| 2011 |
Tora |
289 | Rebound | Coil U-turn |
| 2011 |
Tora |
302 | Turnkey | Coil U-turn |
| 2011 |
Tora |
302 | Turnkey | Coil |
| 2011 |
Tora |
302 | Turnkey | Solo Air |
| 2011 |
Tora |
TK | Turnkey | Solo Air |
| 2011 |
Totem |
RC | Motion Control IS | Coil |
| 2011 |
Totem |
RC2L / RC2LDH | Mission Control / Mission Control DH | Coil |
| 2011 |
Totem |
RC2L / RC2LDH | Mission Control / Mission Control DH | Solo Air |
| 2011 |
Totem |
RC2L / RC2LDH | Mission Control / Mission Control DH | 2-Step |
| 2010 |
Argyle |
302 | Rebound | Coil |
| 2010 |
Argyle |
318 | Motion Control | Coil |
| 2010 |
Argyle |
409 | Motion Control | Solo Air |
| 2010 |
Boxxer |
Race | Motion Control IS | Coil |
| 2010 |
Boxxer |
Team | Mission Control DH | Coil w/ Drop Stop |
| 2010 |
Boxxer |
World Cup | Mission Control DH | Solo Air w/ Volume Adjust |
| 2010 |
Dart |
1 | None | Coil |
| 2010 |
Dart |
2 | Rebound | Coil |
| 2010 |
Dart |
2 (w/ Turnkey 120mm) | Turnkey | Coil |
| 2010 |
Dart |
2 (w/ Turnkey 80-100mm) | Turnkey | Coil |
| 2010 |
Dart |
3 (120mm) | Turnkey | Coil |
| 2010 |
Dart |
3, 29er (80-100mm) | Turnkey | Coil |
| 2010 |
Domain |
302 | Rebound | Coil & Coil U-turn |
| 2010 |
Domain |
318 | Motion Control | Coil & Coil U-turn |
| 2010 |
Lyrik |
2-Step | Motion Control IS | 2-Step |
| 2010 |
Lyrik |
2-Step | Mission Control | 2-Step |
| 2010 |
Lyrik |
Coil U-turn | Motion Control IS | U-Turn |
| 2010 |
Lyrik |
Coil U-turn | Mission Control | U-Turn |
| 2010 |
Lyrik |
R | Rebound | Coil |
| 2010 |
Lyrik |
R | Rebound | Solo Air |
| 2010 |
Lyrik |
Solo Air | Motion Control IS | Solo Air |
| 2010 |
Lyrik |
Solo Air | Mission Control | Solo Air |
| 2010 |
Pike |
327 | Rebound | Coil U-turn |
| 2010 |
Pike |
351 | Motion Control | Coil U-turn |
| 2010 |
Pike |
409 | Motion Control | Coil U-turn |
| 2010 |
Pike |
409 | Motion Control | Air U-turn |
| 2010 |
Pike |
409 | Motion Control | Dual Air |
| 2010 |
Pike |
426 | Motion Control | Dual Air |
| 2010 |
Pike |
426 | Motion Control | Air U-turn |
| 2010 |
Pike |
426 | Motion Control | Coil U-turn |
| 2010 |
Pike |
454 | Motion Control | Dual Air |
| 2010 |
Pike |
454 | Motion Control | Air U-turn |
| 2010 |
Pike |
454 | Motion Control | Coil U-turn |
| 2010 |
Reba |
Race | Motion Control | Air U-Turn |
| 2010 |
Reba |
Race | Motion Control | Dual Air |
| 2010 |
Reba |
SL | Motion Control | Air U-Turn |
| 2010 |
Reba |
SL | Motion Control | Dual Air |
| 2010 |
Reba |
Team | Blackbox Motion Control | Dual Air |
| 2010 |
Reba |
Team | Blackbox Motion Control | Air U-Turn |
| 2010 |
Recon |
327 (standard axle) | Rebound | Coil U-turn |
| 2010 |
Recon |
327 (standard axle) | Rebound | Solo Air |
| 2010 |
Recon |
327 (thru axle) | Rebound | Coil U-turn |
| 2010 |
Recon |
327 (thru axle) | Rebound | Solo Air |
| 2010 |
Recon |
335 (standard axle) | Turnkey | Coil U-turn |
| 2010 |
Recon |
335 (standard axle) | Turnkey | Solo Air |
| 2010 |
Recon |
335 (thru axle) | Turnkey | Coil U-turn |
| 2010 |
Recon |
335 (thru axle) | Turnkey | Solo Air |
| 2010 |
Recon |
351 (standard axle) | Motion Control | Coil U-turn |
| 2010 |
Recon |
351 (standard axle) | Motion Control | Solo Air |
| 2010 |
Recon |
351 (thru axle) | Motion Control | Coil U-turn |
| 2010 |
Recon |
351 (thru axle) | Motion Control | Solo Air |
| 2010 |
Recon |
Race | Motion Control | Coil |
| 2010 |
Recon |
Race | Motion Control | Solo Air |
| 2010 |
Recon |
SL | Turnkey | Coil |
| 2010 |
Recon |
SL | Turnkey | Solo Air |
| 2010 |
Recon |
XC | Rebound | Coil |
| 2010 |
Recon |
XC | Rebound | Solo Air |
| 2010 |
Revelation |
Race | Motion Control | Air U-Turn |
| 2010 |
Revelation |
Race | Motion Control | Dual Air |
| 2010 |
Revelation |
SL | Motion Control | Air U-Turn |
| 2010 |
Revelation |
SL | Motion Control | Dual Air |
| 2010 |
Revelation |
Team | Blackbox Motion Control | Air U-Turn |
| 2010 |
Revelation |
Team | Blackbox Motion Control | Dual Air |
| 2010 |
SID |
Race | Motion Control | Dual Air |
| 2010 |
SID |
Team | Blackbox Motion Control | Dual Air |
| 2010 |
SID |
World Cup | Blackbox Motion Control | Dual Air |
| 2010 |
Tora |
289 | Rebound | Coil |
| 2010 |
Tora |
289 | Rebound | Coil U-turn |
| 2010 |
Tora |
302 | Turnkey | Coil |
| 2010 |
Tora |
302 | Turnkey | Coil U-turn |
| 2010 |
Tora |
302 | Turnkey | Solo Air |
| 2010 |
Tora |
318 | Motion Control | Coil |
| 2010 |
Tora |
318 | Motion Control | Coil U-turn |
| 2010 |
Tora |
318 | Motion Control | Solo Air |
| 2010 |
Tora |
SL | Turnkey | Coil |
| 2010 |
Tora |
SL | Turnkey | Solo Air |
| 2010 |
Tora |
XC | Rebound | Coil |
| 2010 |
Tora |
XC | Rebound | Solo Air |
| 2010 |
Totem |
2-Step | Mission Control | 2-Step |
| 2010 |
Totem |
Coil | Mission Control | Coil |
| 2010 |
Totem |
IS Coil | Motion Control IS | Coil |
| 2010 |
Totem |
Solo Air | Mission Control | Solo Air |
| 2009 |
Argyle |
302 | Rebound | Coil |
| 2009 |
Argyle |
318 | Motion Control | Coil |
| 2009 |
Argyle |
409 | Motion Control | Solo Air |
| 2009 |
Boxxer |
Race | Motion Control | Coil |
| 2009 |
Boxxer |
Team | Motion Control | Coil |
| 2009 |
Boxxer |
World Cup (WC) | Motion Control | Coil |
| 2009 |
Dart |
1 | None | Coil |
| 2009 |
Dart |
2 | Rebound | Coil |
| 2009 |
Dart |
2 (w/Turnkey) | Turnkey | Coil |
| 2009 |
Dart |
3, 29er | Turnkey | Coil |
| 2009 |
Domain |
302 | Rebound | Coil |
| 2009 |
Domain |
302 | Rebound | Coil U-turn |
| 2009 |
Domain |
318 | Motion Control | Coil U-turn |
| 2009 |
Domain |
318 | Motion Control | Coil |
| 2009 |
Lyrik |
2-Step | Motion Control IS | 2-Step |
| 2009 |
Lyrik |
2-Step | Mission Control | 2-Step |
| 2009 |
Lyrik |
Coil U-turn | Motion Control IS | U-Turn |
| 2009 |
Lyrik |
Coil U-turn | Mission Control | U-Turn |
| 2009 |
Lyrik |
DFR | Rebound | Coil |
| 2009 |
Lyrik |
DFR | Rebound | Solo Air |
| 2009 |
Lyrik |
Solo Air | Motion Control IS | Solo Air |
| 2009 |
Lyrik |
Solo Air | Mission Control | Solo Air |
| 2009 |
Pike |
327 | Rebound | Coil U-turn |
| 2009 |
Pike |
351 | Motion Control | Coil U-turn |
| 2009 |
Pike |
409 | Motion Control | Coil U-turn |
| 2009 |
Pike |
409 | Motion Control | Air U-Turn |
| 2009 |
Pike |
409 | Motion Control | Dual Air |
| 2009 |
Pike |
426 | Motion Control | Coil U-turn |
| 2009 |
Pike |
426 | Motion Control | Dual Air |
| 2009 |
Pike |
426 | Motion Control | Air U-Turn |
| 2009 |
Pike |
454 | Motion Control | Coil U-turn |
| 2009 |
Pike |
454 | Motion Control | Dual Air |
| 2009 |
Pike |
454 | Motion Control | Air U-Turn |
| 2009 |
Reba |
Race | Motion Control | Air U-Turn |
| 2009 |
Reba |
Race | Motion Control | Dual Air |
| 2009 |
Reba |
SL | Motion Control | Air U-Turn |
| 2009 |
Reba |
SL | Motion Control | Dual Air |
| 2009 |
Reba |
Team | Blackbox Motion Control | Dual Air |
| 2009 |
Reba |
Team | Blackbox Motion Control | Air U-Turn |
| 2009 |
Recon |
327 | Rebound | Solo Air |
| 2009 |
Recon |
335 | Turnkey | Solo Air |
| 2009 |
Recon |
335 | Turnkey | Coil |
| 2009 |
Recon |
335 SL | Turnkey | Solo Air |
| 2009 |
Recon |
335 SL | Turnkey | Coil |
| 2009 |
Recon |
351 | Motion Control | Coil |
| 2009 |
Recon |
351 | Motion Control | Coil U-turn |
| 2009 |
Recon |
351 | Motion Control | Solo Air |
| 2009 |
Recon |
351 Race | Motion Control | Coil |
| 2009 |
Recon |
351 Race | Motion Control | Solo Air |
| 2009 |
Recon |
351 Race | Motion Control | Coil U-turn |
| 2009 |
Recon |
XC | Rebound | Solo Air |
| 2009 |
Revelation |
409 (20mm Thru-axle) | Motion Control | Air U-Turn |
| 2009 |
Revelation |
409 (20mm Thru-axle) | Motion Control | Dual Air |
| 2009 |
Revelation |
409 (QR) | Motion Control | Air U-Turn |
| 2009 |
Revelation |
409 (QR) | Motion Control | Dual Air |
| 2009 |
Revelation |
426 (20mm Thru-axle) | Motion Control | Air U-Turn |
| 2009 |
Revelation |
426 (20mm Thru-axle) | Motion Control | Dual Air |
| 2009 |
Revelation |
426 (QR) | Motion Control | Air U-Turn |
| 2009 |
Revelation |
426 (QR) | Motion Control | Dual Air |
| 2009 |
SID |
Race | Motion Control | Dual Air |
| 2009 |
SID |
Team | Blackbox Motion Control | Dual Air |
| 2009 |
SID |
World Cup (WC) | Blackbox Motion Control | Dual Air |
| 2009 |
Tora |
289 | Rebound | Coil |
| 2009 |
Tora |
289 | Rebound | Coil U-turn |
| 2009 |
Tora |
302 | Turnkey | Coil |
| 2009 |
Tora |
302 | Turnkey | Coil U-turn |
| 2009 |
Tora |
318 | Motion Control | Coil |
| 2009 |
Tora |
318 | Motion Control | Coil U-Turn |
| 2009 |
Tora |
318 | Motion Control | Solo Air |
| 2009 |
Totem |
2-Step | Mission Control | 2-Step |
| 2009 |
Totem |
Coil | Mission Control | Coil |
| 2009 |
Totem |
IS Coil | Motion Control IS | Coil |
| 2009 |
Totem |
Solo Air | Mission Control | Solo Air |
| 2008 |
Argyle |
302 | Rebound | Coil |
| 2008 |
Argyle |
318 | Motion Control | Coil |
| 2008 |
Argyle |
409 | Motion Control | Solo Air |
| 2008 |
Boxxer |
Race | Motion Control | Coil |
| 2008 |
Boxxer |
Team | Motion Control | Coil |
| 2008 |
Boxxer |
World Cup | Motion Control | Solo Air |
| 2008 |
Dart |
1 | None | Coil |
| 2008 |
Dart |
2 | Rebound | Coil |
| 2008 |
Dart |
2 (w/Turnkey) | Turnkey | Coil |
| 2008 |
Dart |
29er | Turnkey | Coil |
| 2008 |
Dart |
3 | Turnkey | Coil |
| 2008 |
Domain |
302 | Rebound | Coil |
| 2008 |
Domain |
302 | Rebound | Coil U-turn |
| 2008 |
Domain |
318 | Motion Control | Coil |
| 2008 |
Domain |
318 | Motion Control | Coil U-turn |
| 2008 |
Lyrik |
2-Step | Mission Control | 2-Step |
| 2008 |
Lyrik |
Coil U-turn | Mission Control | Coil U-turn |
| 2008 |
Lyrik |
IS 2-Step | Motion Control IS | 2-Step |
| 2008 |
Lyrik |
IS Coil U-turn | Motion Control IS | Coil U-turn |
| 2008 |
Lyrik |
IS Solo Air | Motion Control IS | Solo Air |
| 2008 |
Lyrik |
Solo Air | Mission Control | Solo Air |
| 2008 |
Pike |
327 | Rebound | Coil U-turn |
| 2008 |
Pike |
351 | Motion Control | Coil U-turn |
| 2008 |
Pike |
409 | Motion Control | Coil U-turn |
| 2008 |
Pike |
409 | Motion Control | Air U-Turn |
| 2008 |
Pike |
409 | Motion Control | Dual Air |
| 2008 |
Pike |
426 | Motion Control | Coil U-turn |
| 2008 |
Pike |
426 | Motion Control | Air U-Turn |
| 2008 |
Pike |
426 | Motion Control | Dual Air |
| 2008 |
Pike |
454 | Motion Control | Coil U-turn |
| 2008 |
Pike |
454 | Motion Control | Air U-Turn |
| 2008 |
Pike |
454 | Motion Control | Dual Air |
| 2008 |
Reba |
Race | Motion Control | Dual Air |
| 2008 |
Reba |
Race | Motion Control | Air U-Turn |
| 2008 |
Reba |
SL | Motion Control | Dual Air |
| 2008 |
Reba |
Team | Motion Control | Dual Air |
| 2008 |
Reba |
Team | Motion Control | Air U-Turn |
| 2008 |
Reba |
World Cup (WC) | Motion Control | Dual Air |
| 2008 |
Recon |
327 / XC | Rebound | Solo Air |
| 2008 |
Recon |
335 / SL | Turnkey | Solo Air |
| 2008 |
Recon |
335 / SL | Turnkey | Coil |
| 2008 |
Recon |
351 / Race | Motion Control | Coil |
| 2008 |
Recon |
351 / Race | Motion Control | Coil U-turn |
| 2008 |
Recon |
351 / Race | Motion Control | Solo Air |
| 2008 |
Revelation |
409 | Motion Control | Coil U-turn |
| 2008 |
Revelation |
409 | Motion Control | Air U-turn |
| 2008 |
Revelation |
409 | Motion Control | Dual Air |
| 2008 |
Revelation |
426 | Motion Control | Coil U-turn |
| 2008 |
Revelation |
426 | Motion Control | Air U-turn |
| 2008 |
Revelation |
426 | Motion Control | Dual Air |
| 2008 |
SID |
Race | Pure Delite | Dual Air |
| 2008 |
SID |
Team | Motion Control | Dual Air |
| 2008 |
SID |
World Cup (WC) | Motion Control | Dual Air |
| 2008 |
Tora |
289 | Rebound | Coil |
| 2008 |
Tora |
289 | Rebound | Coil U-turn |
| 2008 |
Tora |
302 | Turnkey | Coil |
| 2008 |
Tora |
302 | Turnkey | Coil U-turn |
| 2008 |
Tora |
318 | Motion Control | Coil |
| 2008 |
Tora |
318 | Motion Control | Coil U-turn |
| 2008 |
Tora |
318 | Motion Control | Solo Air |
| 2008 |
Totem |
2-Step | Mission Control | 2-Step |
| 2008 |
Totem |
Coil | Mission Control | Coil |
| 2008 |
Totem |
IS Coil | Motion Control IS | Coil |
| 2008 |
Totem |
Solo Air | Mission Control | Solo Air |
| 2007 |
Argyle |
302 | Rebound | Coil |
| 2007 |
Argyle |
318 | Motion Control | Coil |
| 2007 |
Argyle |
409 | Motion Control | Solo Air |
| 2007 |
Boxxer |
Race | Motion Control | Coil |
| 2007 |
Boxxer |
Team | Motion Control | Coil |
| 2007 |
Boxxer |
World Cup | Motion Control | Solo Air |
| 2007 |
Dart |
1 | None | Coil |
| 2007 |
Dart |
2 | Rebound | Coil |
| 2007 |
Dart |
2 (w/Turnkey) | Turnkey | Coil |
| 2007 |
Dart |
3 (w/Turnkey) | Turnkey | Coil |
| 2007 |
Domain |
302 | Rebound | Coil |
| 2007 |
Domain |
302 | Rebound | U-Turn |
| 2007 |
Domain |
318 | Motion Control IS | Coil |
| 2007 |
Domain |
318 | Motion Control IS | U-Turn |
| 2007 |
Lyrik |
2-Step | Mission Control | 2-Step |
| 2007 |
Lyrik |
Solo Air | Mission Control | Solo Air |
| 2007 |
Lyrik |
U-Turn | Mission Control | U-Turn |
| 2007 |
Pike |
Air U-Turn | Motion Control | Air U-Turn |
| 2007 |
Pike |
Dual Air | Motion Control | Dual Air |
| 2007 |
Pike |
U-Turn | Motion Control | Coil U-turn |
| 2007 |
Reba |
Air U-Turn | Motion Control | Air U-Turn |
| 2007 |
Reba |
Dual Air | Motion Control | Solo Air |
| 2007 |
Recon |
335 | Turnkey | Coil |
| 2007 |
Recon |
335 | Turnkey | Solo Air |
| 2007 |
Recon |
Solo Air | Motion Control | Solo Air |
| 2007 |
Recon |
U-Turn | Motion Control | U-Turn |
| 2007 |
Revelation |
Air U-Turn | Motion Control | Air U-Turn |
| 2007 |
Revelation |
Dual Air | Motion Control | Dual Air |
| 2007 |
Revelation |
U-Turn | Motion Control | U-Turn |
| 2007 |
SID |
Race | Pure Delite | Solo Air |
| 2007 |
SID |
Team | Motion Control | Solo Air |
| 2007 |
SID |
World Cup | Motion Control | Solo Air |
| 2007 |
Tora |
289 | Rebound | Coil |
| 2007 |
Tora |
289 | Rebound | U-Turn |
| 2007 |
Tora |
302 | Turnkey | Coil |
| 2007 |
Tora |
302 | Turnkey | U-Turn |
| 2007 |
Tora |
Coil | Motion Control | Coil |
| 2007 |
Tora |
Solo Air | Motion Control | Solo Air |
| 2007 |
Tora |
U-Turn | Motion Control | U-Turn |
| 2007 |
Totem |
2-Step | Motion Control IS | 2-Step |
| 2007 |
Totem |
2-Step | Mission Control | 2-Step |
| 2007 |
Totem |
Coil | Mission Control | Coil |
| 2007 |
Totem |
Solo Air | Mission Control | Solo Air |
| 2007 |
Totem |
Solo Air | Motion Control IS | Solo Air |
| 2006 |
Boxxer |
Race | Motion Control | Coil |
| 2006 |
Boxxer |
Ride | Motion Control | Coil |
| 2006 |
Boxxer |
Team | Motion Control | Coil |
| 2006 |
Boxxer |
World Cup | Motion Control | Solo Air |
| 2006 |
Judy |
J1 | None | |
| 2006 |
Judy |
J2 | Rebound | |
| 2006 |
Judy |
J2 Turnkey 125mm | Turnkey | |
| 2006 |
Judy |
J2 Turnkey 80/100mm | Turnkey | |
| 2006 |
Judy |
J3 125mm | Turnkey | |
| 2006 |
Judy |
J3 80/100mm | Turnkey | |
| 2006 |
Judy |
J4 | Turnkey | |
| 2006 |
Pike |
Air U-Turn | Motion Control | Air U-Turn |
| 2006 |
Pike |
Dual Air | Motion Control | Dual Air |
| 2006 |
Pike |
U-Turn | Motion Control | Coil U-turn |
| 2006 |
Reba |
Air U-Turn | Motion Control | Air U-Turn |
| 2006 |
Reba |
Dual Air | Motion Control | Solo Air |
| 2006 |
Recon |
Solo Air | Motion Control | Solo Air |
| 2006 |
Recon |
U-Turn | Motion Control | U-Turn |
| 2006 |
Revelation |
Air U-Turn | Motion Control | Air U-Turn |
| 2006 |
Revelation |
Dual Air | Motion Control | Dual Air |
| 2006 |
SID |
Race | Pure Delite | Solo Air |
| 2006 |
SID |
Team | Motion Control | Solo Air |
| 2006 |
SID |
World Cup | Motion Control | Solo Air |
| 2006 |
Tora |
Coil | Motion Control | Coil |
| 2006 |
Tora |
Solo Air | Motion Control | Solo Air |
| 2006 |
Tora |
U-Turn | Motion Control | U-Turn |
| 2005 |
Boxxer |
Race | HydraCoil2 | Coil |
| 2005 |
Boxxer |
Ride | HydraCoil2 | Coil |
| 2005 |
Boxxer |
Team | HydraCoil2 | Coil |
| 2005 |
Boxxer |
World Cup | HydraCoil2 | Coil |
| 2005 |
Duke |
C Air | Motion Control | Air |
| 2005 |
Duke |
Race | Motion Control | Air |
| 2005 |
Duke |
SL | Motion Control | Air |
| 2005 |
Duke |
XC Air | Motion Control | Air |
| 2005 |
Duke |
XC U-Turn | HydraCoil2 | U-Turn |
| 2005 |
Judy |
C | None | |
| 2005 |
Judy |
SL U-Turn | HydraCoil2 | Coil |
| 2005 |
Judy |
TT | None | |
| 2005 |
Judy |
XC 100mm | HydraCoil2 | Coil |
| 2005 |
Judy |
XC 80mm | HydraCoil2 | Coil |
| 2005 |
Pike |
Dual Air | Motion Control | Dual Air |
| 2005 |
Pike |
U-Turn | Motion Control | Coil U-turn |
| 2005 |
Pilot |
C 100mm | HydraCoil2 | Coil |
| 2005 |
Pilot |
C 80mm | HydraCoil2 | Coil |
| 2005 |
Pilot |
SL | Motion Control | Air |
| 2005 |
Pilot |
XC | Motion Control | Air |
| 2005 |
Psylo |
XC | HydraCoil2 | Coil |
| 2005 |
Reba |
Air U-Turn | Motion Control | Air U-Turn |
| 2005 |
Reba |
Dual Air | Motion Control | Solo Air |
| 2005 |
SID |
Race | Pure Delite | Air |
| 2005 |
SID |
Team | Pure | Air |
| 2005 |
SID |
World Cup | Pure | Air |
GEN.0000000004938 Rev B
© 2016 SRAM, LLC
Service Manual
Monarch Plus RC3/R

SRAM LLC WARRANTY
EXTENT OF LIMITED WARRANTY
Except as otherwise set forth herein, SRAM warrants its products to be free from defects in materials or workmanship for a period of two years after
original purchase. This warranty only applies to the original owner and is not transferable. Claims under this warranty must be made through the
retailer where the bicycle or the SRAM component was purchased. Original proof of purchase is required. Except as described herein, SRAM
makes no other warranties, guaranties, or representations of any type (express or implied), and all warranties (including any implied
warranties of reasonable care, merchantibility, or fitness for a particular purpose) are hereby disclaimed.
LOCAL LAW
This warranty statement gives the customer specic legal rights. The customer may also have other rights which vary from state to state (USA),
from province to province (Canada), and from country to country elsewhere in the world.
To the extent that this warranty statement is inconsistent with the local law, this warranty shall be deemed modied to be consistent with such law,
under such local law, certain disclaimers and limitations of this warranty statement may apply to the customer. For example, some states in the
United States of America, as well as some governments outside of the United States (including provinces in Canada) may:
a. Preclude the disclaimers and limitations of this warranty statement from limiting the statutory rights of the consumer
(e.g. United Kingdom).
b. Otherwise restrict the ability of a manufacturer to enforce such disclaimers or limitations.
For Australian customers:
This SRAM limited warranty is provided in Australia by SRAM LLC, 1333 North Kingsbury, 4th oor, Chicago, Illinois, 60642, USA. To make a
warranty claim please contact the retailer from whom you purchased this SRAM product. Alternatively, you may make a claim by contacting
SRAM Australia, 6 Marco Court, Rowville 3178, Australia. For valid claims SRAM will, at its option, either repair or replace your SRAM product.
Any expenses incurred in making the warranty claim are your responsibility. The benets given by this warranty are additional to other rights and
remedies that you may have under laws relating to our products. Our goods come with guarantees that cannot be excluded under the Australian
Consumer Law. You are entitled to a replacement or refund for a major failure and for compensation for any other reasonably foreseeable loss or
damage. You are also entitled to have the goods repaired or replaced if the goods fail to be of acceptable quality and the failure does not amount
to a major failure.
LIMITATIONS OF LIABILITY
To the extent allowed by local law, except for the obligations specically set forth in this warranty statement, in no event shall SRAM or its third party
suppliers be liable for direct, indirect, special, incidental, or consequential damages.
LIMITATIONS OF WARRANTY
This warranty does not apply to products that have been incorrectly installed and/or adjusted according to the respective SRAM user manual. The
SRAM user manuals can be found online at sram.com, rockshox.com, avidbike.com, truvativ.com, or zipp.com.
This warranty does not apply to damage to the product caused by a crash, impact, abuse of the product, non-compliance with manufacturers
specications of usage or any other circumstances in which the product has been subjected to forces or loads beyond its design.
This warranty does not apply when the product has been modied, including, but not limited to any attempt to open or repair any electronic and
electronic related components, including the motor, controller, battery packs, wiring harnesses, switches, and chargers.
This warranty does not apply when the serial number or production code has been deliberately altered, defaced or removed.
This warranty does not apply to normal wear and tear. Wear and tear parts are subject to damage as a result of normal use, failure to service
according to SRAM recommendations and/or riding or installation in conditions or applications other than recommended.
Wear and tear parts are identied as:
Notwithstanding anything else set forth herein, the battery pack and charger warranty does not include damage from power surges, use of
improper charger, improper maintenance, or such other misuse.
This warranty shall not cover damages caused by the use of parts of different manufacturers.
This warranty shall not cover damages caused by the use of parts that are not compatible, suitable and/or authorised by SRAM for use with SRAM
components.
This warranty shall not cover damages resulting from commercial (rental) use.
• Dust seals
• Bushings
• Air sealing o-rings
• Glide rings
• Rubber moving parts
• Foam rings
• Rear shock mounting hardware
and main seals
• Upper tubes (stanchions)
• Stripped threads/bolts (aluminium,
titanium, magnesium or steel)
• Brake sleeves
• Brake pads
• Chains
• Sprockets
• Cassettes
• Shifter and brake cables (inner
and outer)
• Handlebar grips
• Shifter grips
• Jockey wheels
• Disc brake rotors
• Wheel braking surfaces
• Bottomout pads
• Bearings
• Bearing races
• Pawls
• Transmission gears
• Spokes
• Free hubs
• Aero bar pads
• Corrosion
• Tools
• Motors
• Batteries
Table of Contents
Exploded View — Monarch Plus™ RC3/R Rear Shock ……………………………………………………………………………………………… 4
Maintenance…………………………………………………………………………………………………………………………………………………………… 5
RockShox Suspension Service ……………………………………………………………………………………………………………………………….6
Mounting Hardware and Bushing Service ……………………………………………………………………………………………………………… 6
Parts and Tools for Mounting and Bushing Service …………………………………………………………………………………………………………………………………… 6
Mounting Hardware Removal …………………………………………………………………………………………………………………………………………………………………………. 6
Eyelet Bushing Replacement ………………………………………………………………………………………………………………………………………………………………………….. 8
Mounting Hardware Installation……………………………………………………………………………………………………………………………………………………………………. 10
Monarch Plus™ RC3/R Service ……………………………………………………………………………………………………………………………….12
Parts and Tools Needed For Service ……………………………………………………………………………………………………………………………………………………………. 12
Air Can Removal ………………………………………………………………………………………………………………………………………………………………………………………………..12
Air Can Service ………………………………………………………………………………………………………………………………………………………………………………………………….15
Damper Body Service ………………………………………………………………………………………………………………………………………………………………………………………18
Piston Service …………………………………………………………………………………………………………………………………………………………………………………………………….19
IFP Reservoir Service ………………………………………………………………………………………………………………………………………………………………………………………24
Reassembly and Bleed ……………………………………………………………………………………………………………………………………………………………………………………28
Air Can Installation …………………………………………………………………………………………………………………………………………………………………………………………..35

SAFETY FIRST!
We care about YOU. Please, always wear your safety glasses and
protective gloves when servicing RockShox products.
Protect yourself! Wear your safety gear!
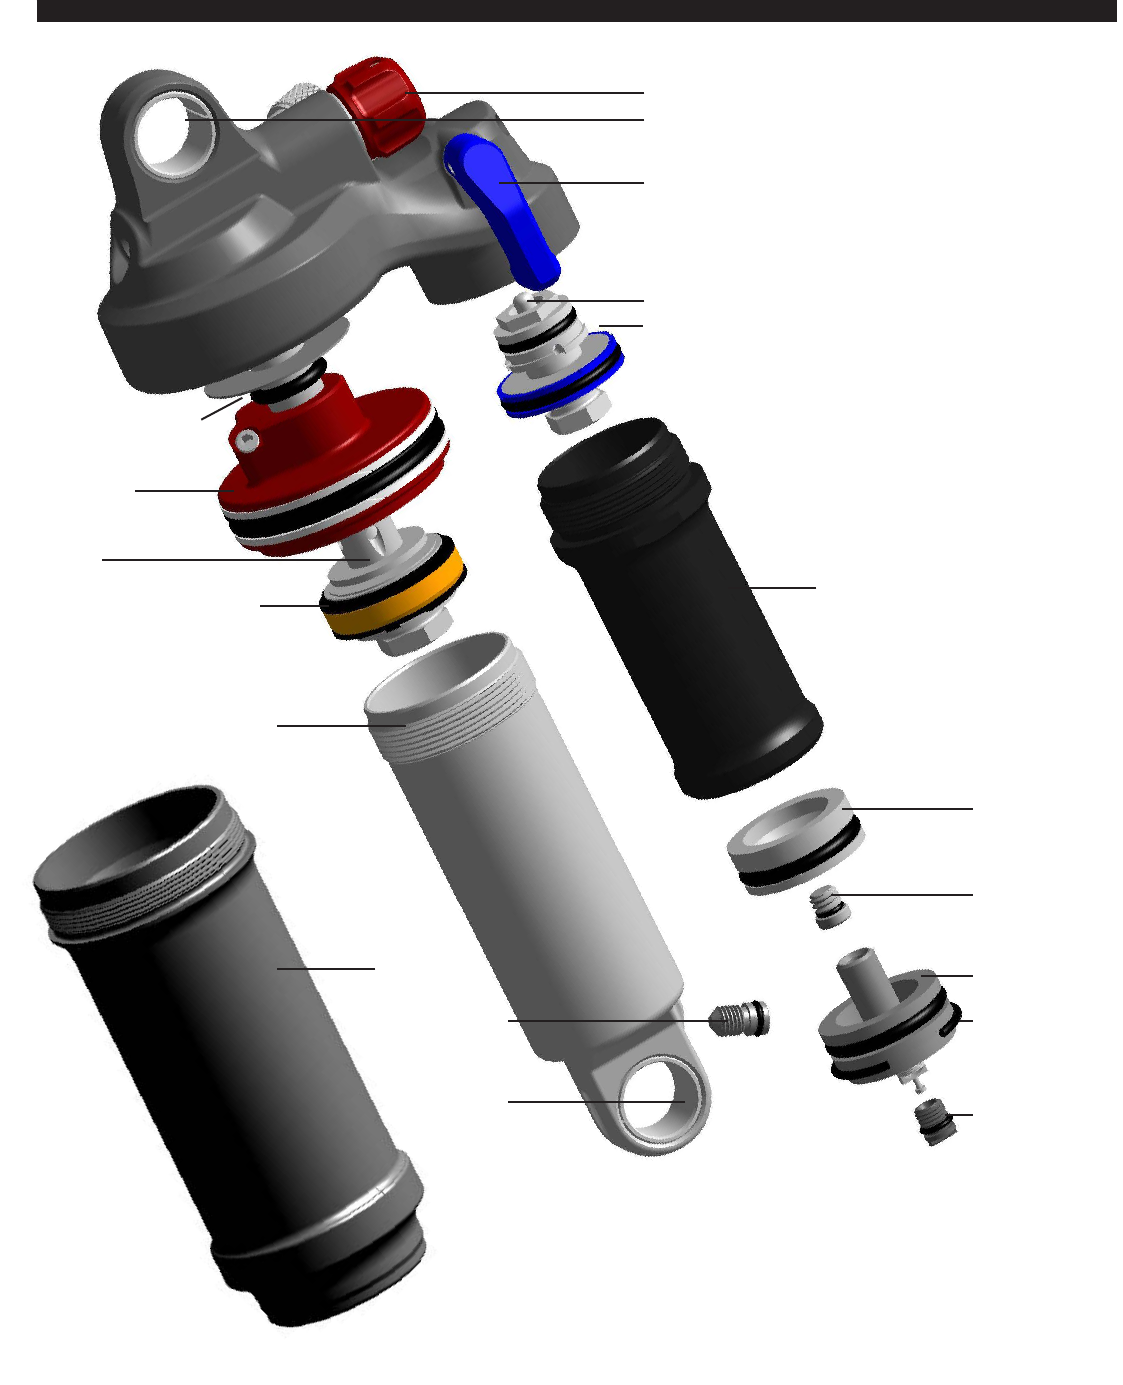
4Exploded View — Monarch Plus™ RC3/R Rear Shock
Exploded View — Monarch Plus™ RC3/R Rear Shock
Shaft Eyelet
Rebound Adjuster
Compression Lever
Compression Needle
Shaft
Bottom Out Washer
and O-ring
Seal Head/
Air Piston
Main Piston
Damper Body
Compression Assembly
IFP Reservoir
IFP Bleed Screw
IFP Reservoir Cap
IFP Retaining Ring
IFP Reservoir
Air/Nitrogen Fill
Cap
Damper Body
Eyelet
Air Can
Damper Body
Bleed Screw
IFP
(Internal Floating
Piston)

Maintenance
To maintain the high performance, safety, and long life of your rear suspension, it is required that you periodically check the fastener torque values for compliance as well as
perform routine maintenance on your shock. If you ride in extreme conditions, torque compliance checks and maintenance should be performed more frequently.
WARNING
Before disassembly or service of any air system remove the air pressure from all air chambers and remove the air valve cores. For complete service instructions, visit
www.sram.com or www.rockshox.com.
If your shock will not return to full extension, do not attempt to service or disassemble your shock. Attempting to service a shock that will not return to full extension can
cause severe and/or fatal injuries.
MAINTENANCE INTERVAL (hours)
Refer to bicycle’s owner’s manual for correct mounting
hardware torque values*
8
Clean your shock with mild soap and a toothbrush 8
Keep mounting hardware clean and lubricated 8
Remove, clean, and grease mounting hardware 20
Inspect eyelet bushings and mounting hardware for wear
and play. Replace if necessary
100 or annually
Inspect shaft, reservoir, damper body and air can
for scratches or damage (if applicable). Replace if
necessary
100 or annually
Replace all seals 100 or annually
Replace damping uid (if applicable) 100 or annually
5Maintenance
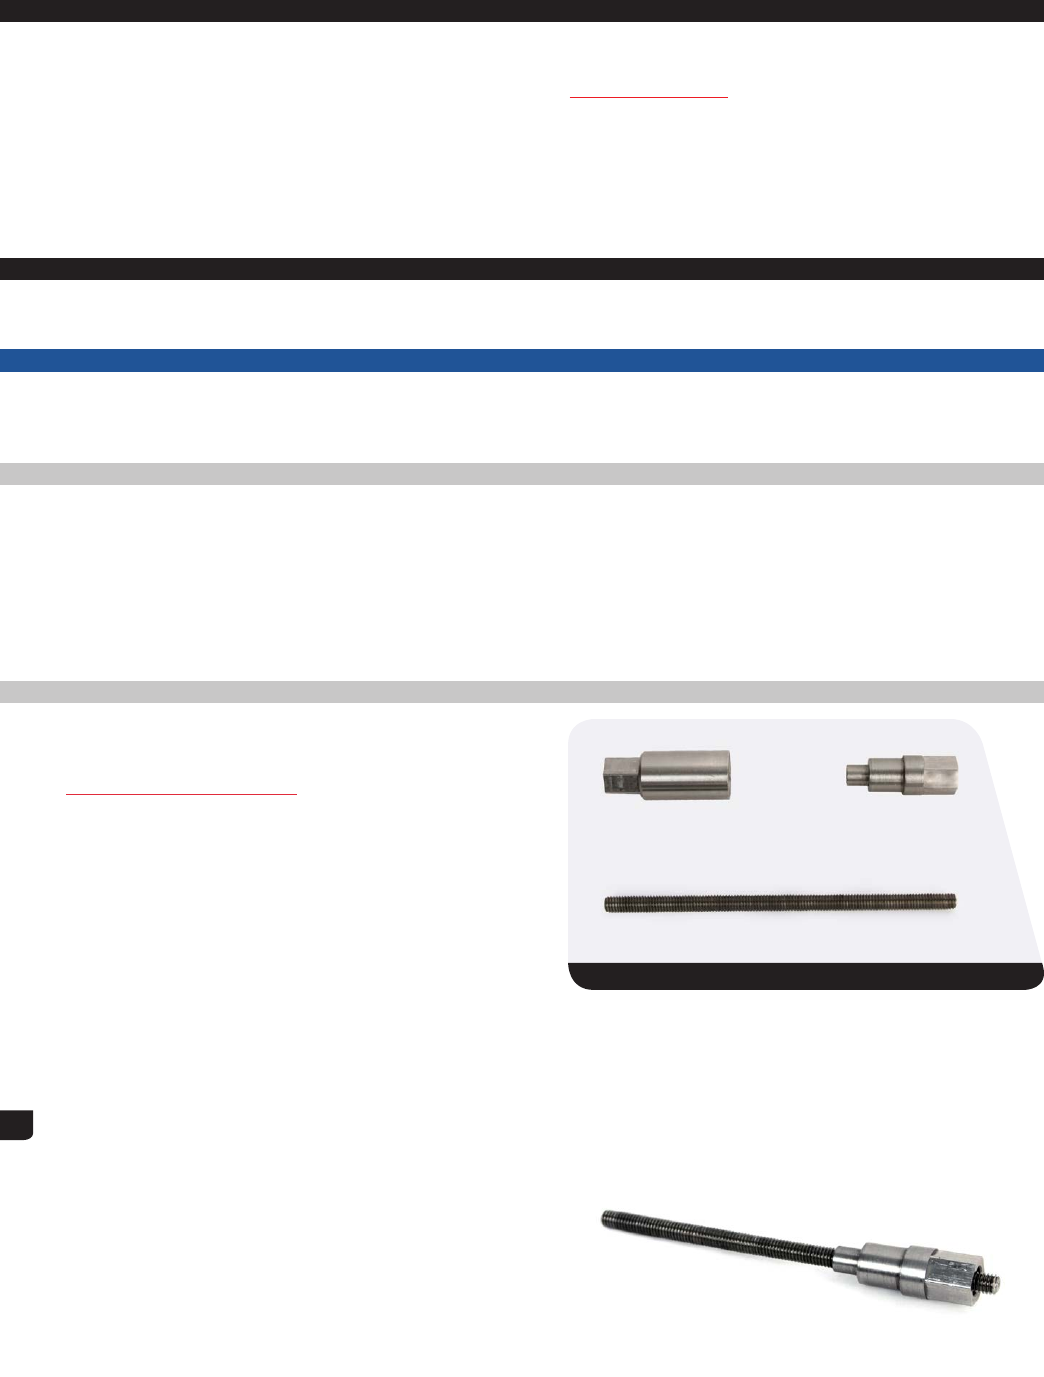
RockShox Suspension Service
We recommend that you have your RockShox suspension serviced by a qualified bicycle mechanic. Servicing RockShox suspension
requires knowledge of suspension components as well as the special tools and fluids used for service.
For exploded diagram and part number information, please refer to the Spare Parts Catalog available on our web site at
www.sram.com/service.
For order information, please contact your local SRAM distributor or dealer.
Information contained in this publication is subject to change at any time without prior notice. For the latest technical information,
please visit our website at sram.com/service.
Your product‘s appearance may dier from the pictures/diagrams contained in this publication.
Mounting Hardware and Bushing Service
Prior to servicing the rear shock, remove it from the bicycle frame according to the bicycle manufacturer’s instructions. Once the
shock is removed from the bicycle, remove the mounting hardware before performing any service.
NOTICE
To prevent damage to the shock use aluminum soft jaws and position the eyelet in the vise so that the adjustment knobs
are clear of the vise jaws.
To ensure proper performance, always grease all o-rings before installation with RockShox Dynamic Seal Grease
Parts and Tools for Mounting and Bushing Service
• Safety glasses
• Nitrile gloves
• Apron
• Clean, lint-free rags
• Suspension specific grease
• Bench vise with aluminum soft jaws
• RockShox 1/2″ x 1/2″ rear shock bushing removal/installation tool
• 13 mm open end wrench
• Adjustable wrench
Mounting Hardware Removal
Some mounting hardware is easily removed using only your fingers.
Try to remove the end spacers with your fingernail, then push the
bushing pin out of the bushing. If this works, move on to the next
section, Eyelet Bushing Replacement.
If you are unable to remove the mounting hardware using your
fingers, use the RockShox rear shock bushing removal/installation
tool.
1 Thread the small end of the push pin onto the threaded rod
until the rod is flush or slightly protrudes from the hex-shaped
end of the push pin.
Threaded rod
Push pin
Catcher
Rear shock bushing installation/removal tool
6RockShox Suspension Service
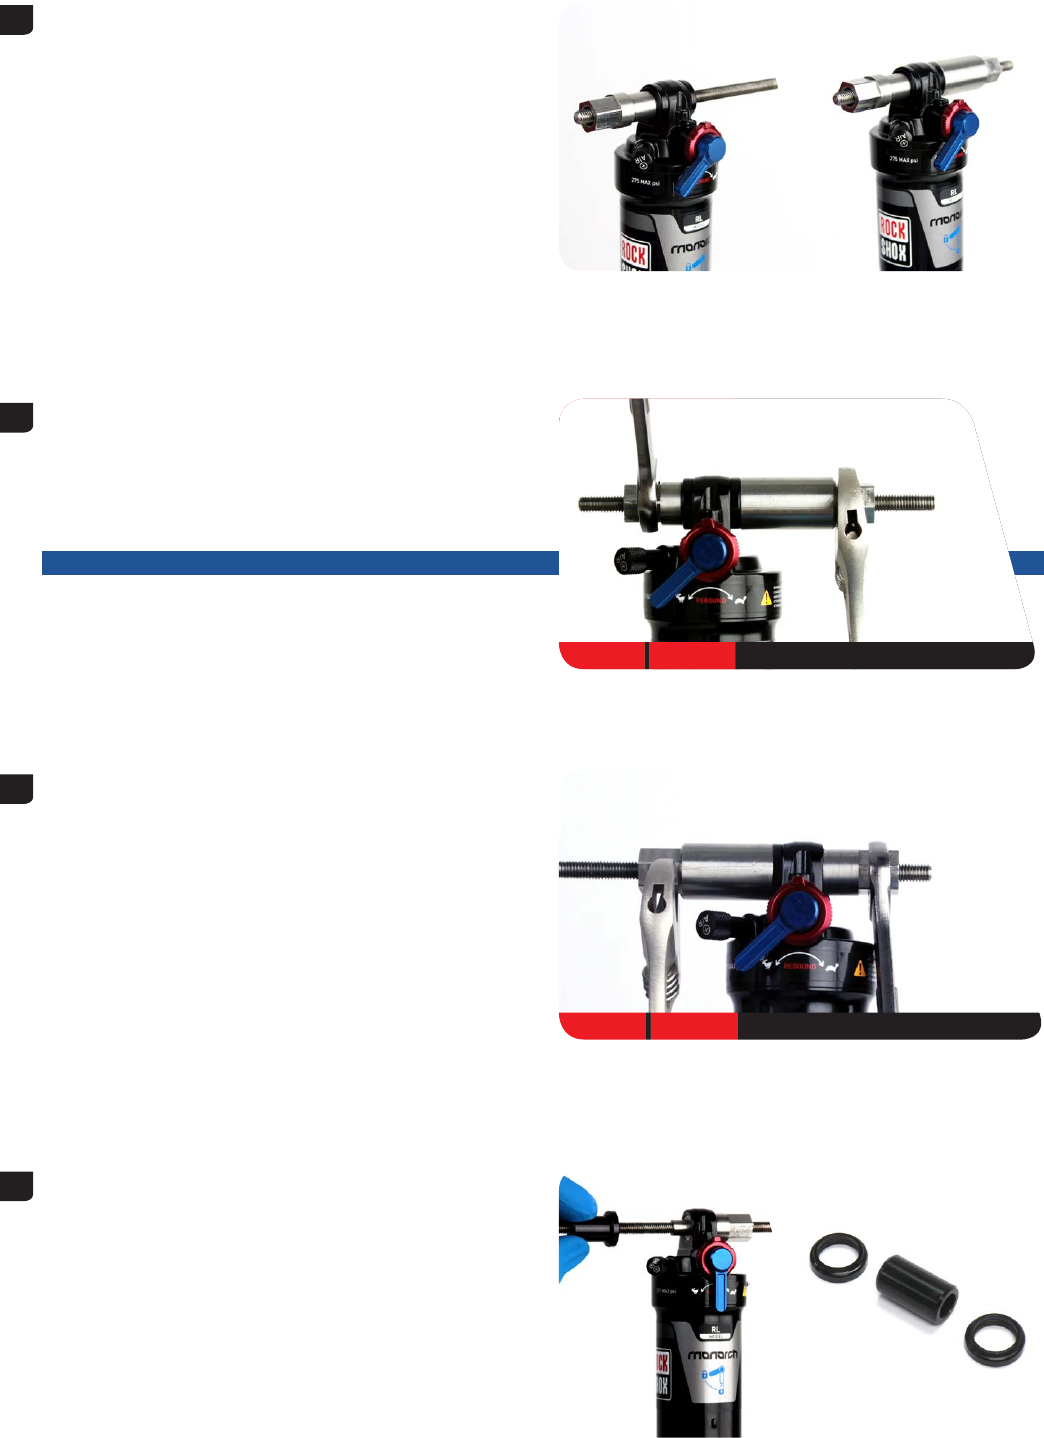
2 Insert the threaded rod through the shaft eyelet until the push
pin rests against the bushing pin.
Thread the large, open end of the catcher along the rod until it
rests on the end spacer.
3 Clamp the catcher in a vise or hold it secure with a 13 mm
open end or adjustable wrench.
Use a second 13 mm wrench to thread the push pin along the
rod until it stops against the end spacer.
Unthread the push pin from the threaded rod and remove the
end spacer from that side.
NOTICE
Do not scratch the air can as you turn the wrench.
4 Reinsert the threaded rod and push pin through the shaft
eyelet.
Thread the large, open end of the catcher along the rod until it
rests against the shaft eyelet.
Use a 13 mm wrench to thread the push pin along the rod until
it stops against the end spacer.
5 Unthread the catcher from the threaded rod.
Remove the end spacer and bushing pin from the tool.
Set the mounting hardware aside until you have finished
servicing your shock.
Repeat for the body eyelet.
13 mm 13 mm
13 mm 13 mm
7Mounting Hardware Removal
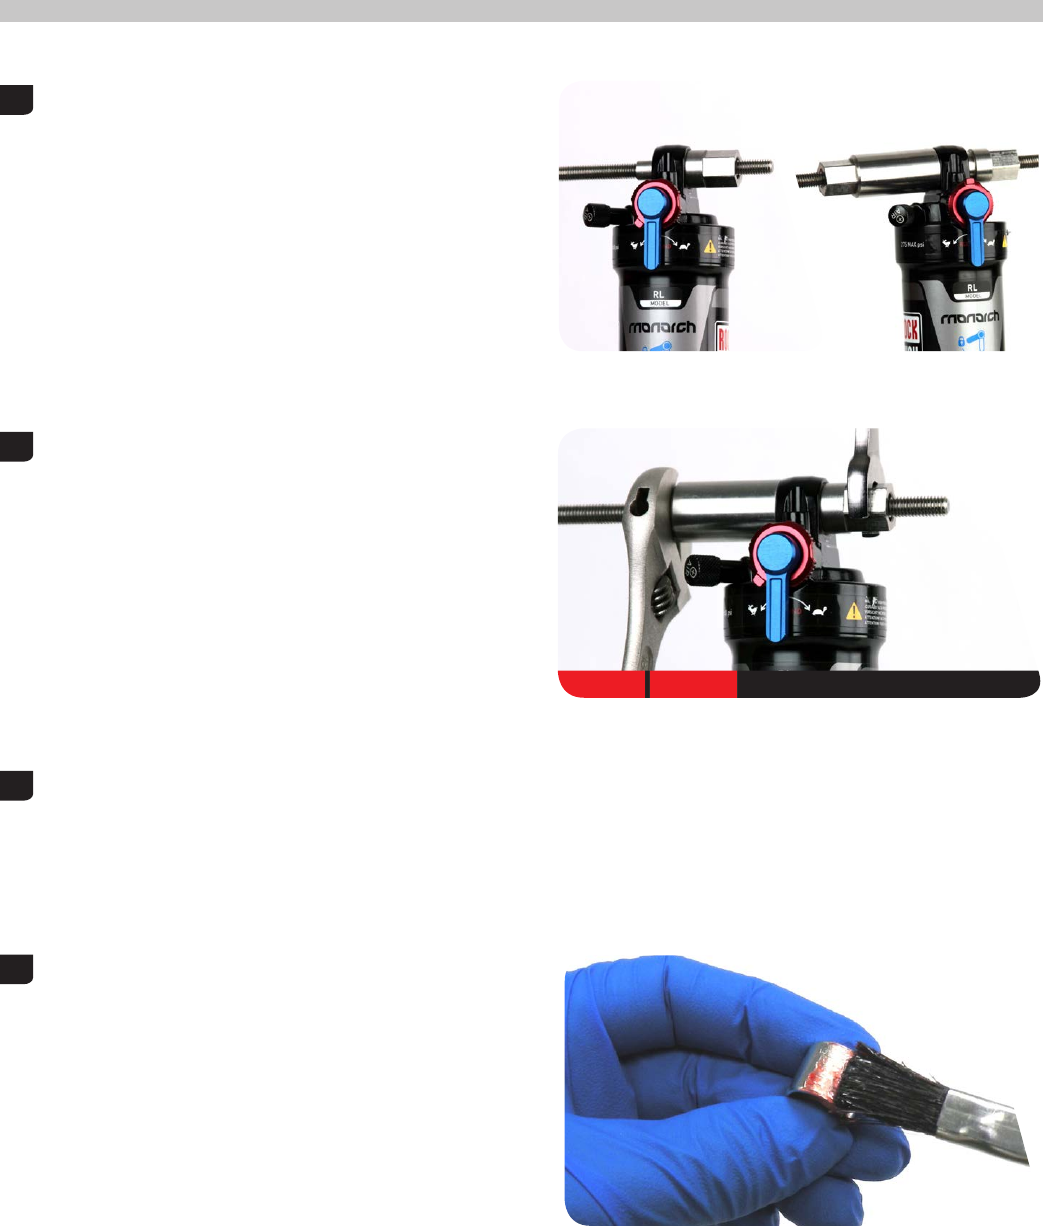
Eyelet Bushing Replacement
To replace damaged or worn out bushings, use the RockShox rear shock bushing removal/installation tool.
1 Insert the threaded rod through the shaft eyelet until the base
of the push pin rests against the bushing.
Thread the large, open end of the catcher onto the rod until it
rests on the eyelet.
2 Clamp the catcher in a vise or hold it secure with a 13 mm
wrench.
Use a second 13 mm wrench to thread the push pin along the
rod until the push pin pushes the eyelet bushing out of the
eyelet.
3 Unthread the catcher from the threaded rod. Remove the tool
from the shaft eyelet and discard the old bushing.
Repeat steps 1-3 for the other eyelet.
4 Apply a small amount of grease to the outside of the new
bushing.
13 mm 13 mm
8Eyelet Bushing Replacement
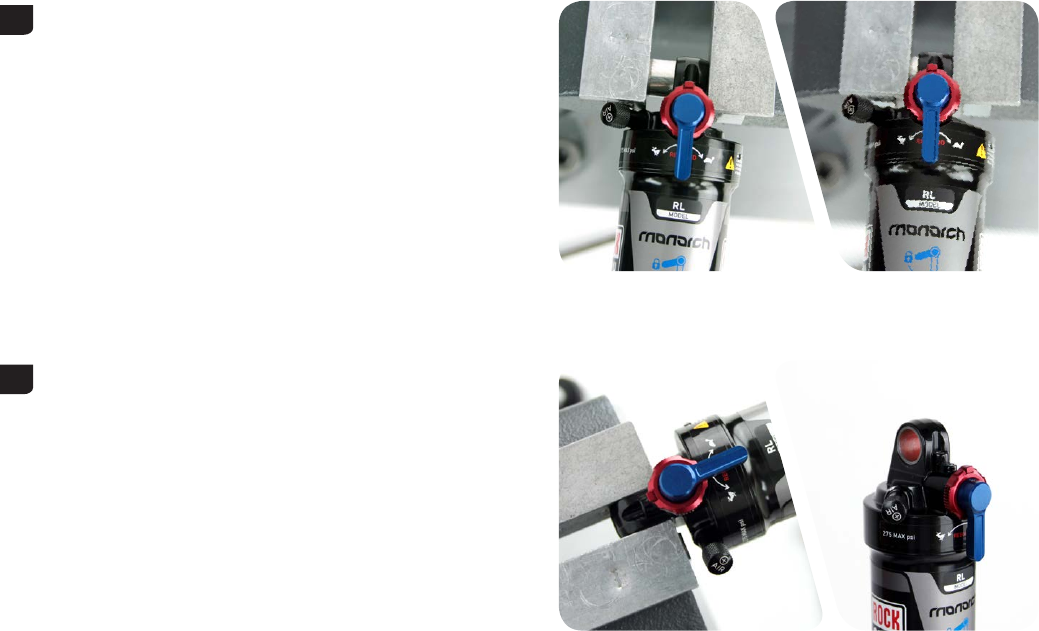
5 Position the shaft eyelet and eyelet bushing between the soft
jaws of a vise. Slowly turn the vise handle to begin pressing
the eyelet bushing into the shaft eyelet.
Check the alignment of the bushing as it enters the eyelet. If
the bushing starts to enter the eyelet at an angle, remove the
bushing from the eyelet, regrease the bushing, and repeat
this step until the bushing enters the eyelet straight.
6 Continue to press the eyelet bushing until it is seated in the
shaft eyelet.
Remove the shock from the vise and repeat the installation
process for the other bushing and eyelet.
9Eyelet Bushing Replacement
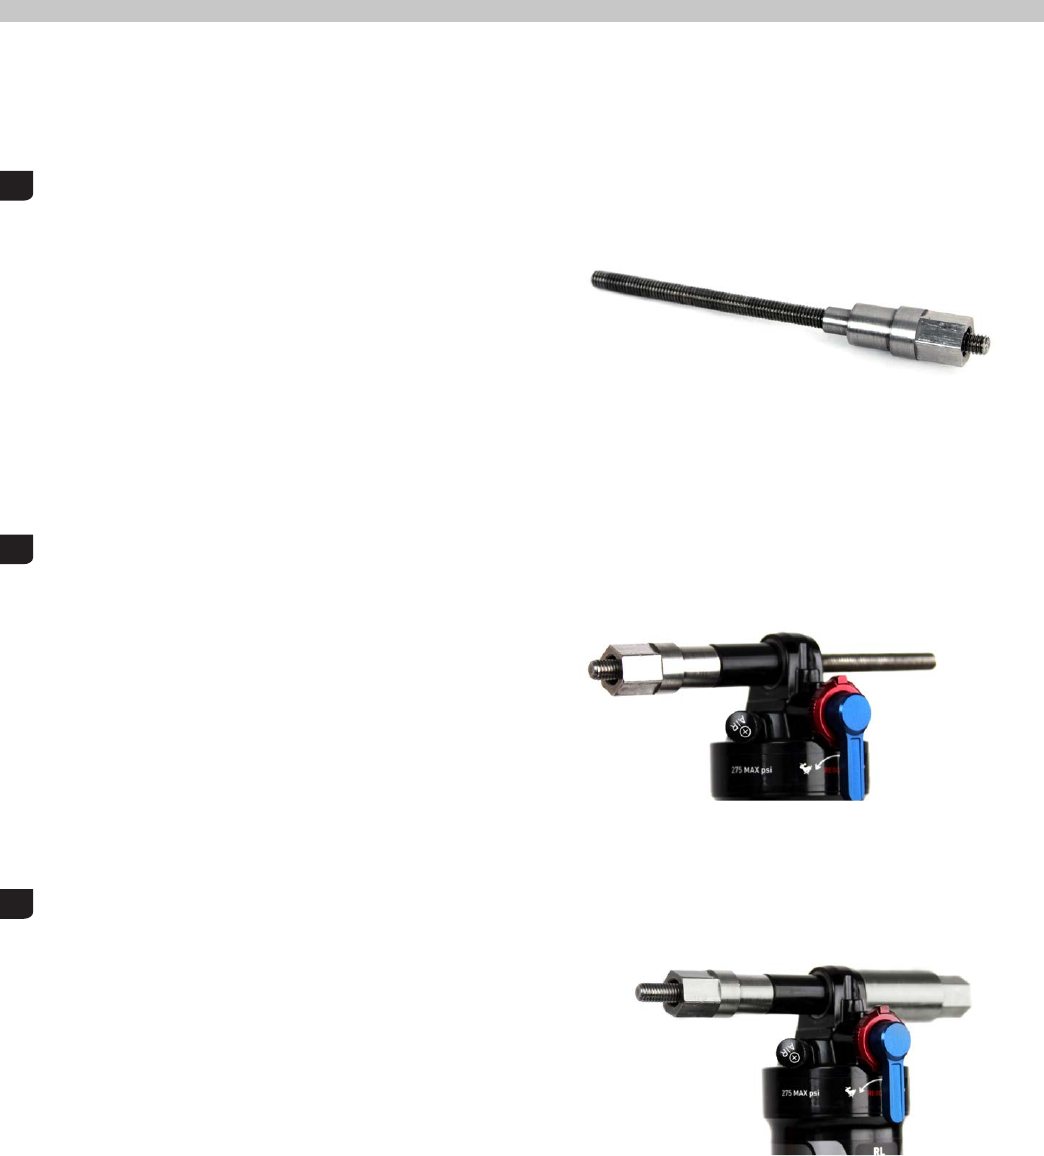
Mounting Hardware Installation
Some mounting hardware is easily installed using only your fingers. Press the bushing pin into the shock eyelet bushing until the pin
protrudes from both sides of the eyelet an equal amount. Next, press an end spacer, large diameter side first, onto each end of the
bushing pin. If this works, you have completed mounting hardware and bushing service.
If you are unable to install your mounting hardware using your fingers, use the RockShox rear shock bushing removal/installation
tool.
1 Thread the small end of the push pin onto the threaded rod
until the push pin is flush or slightly protrudes from the
hex-shaped end of the push pin.
2 Insert the threaded rod through the bushing pin then through
the shaft eyelet so that the bushing pin is positioned between
the push pin and the eyelet.
3 Thread the large, open end of the catcher onto the rod until it
rests on the eyelet.
10 Mounting Hardware Installation
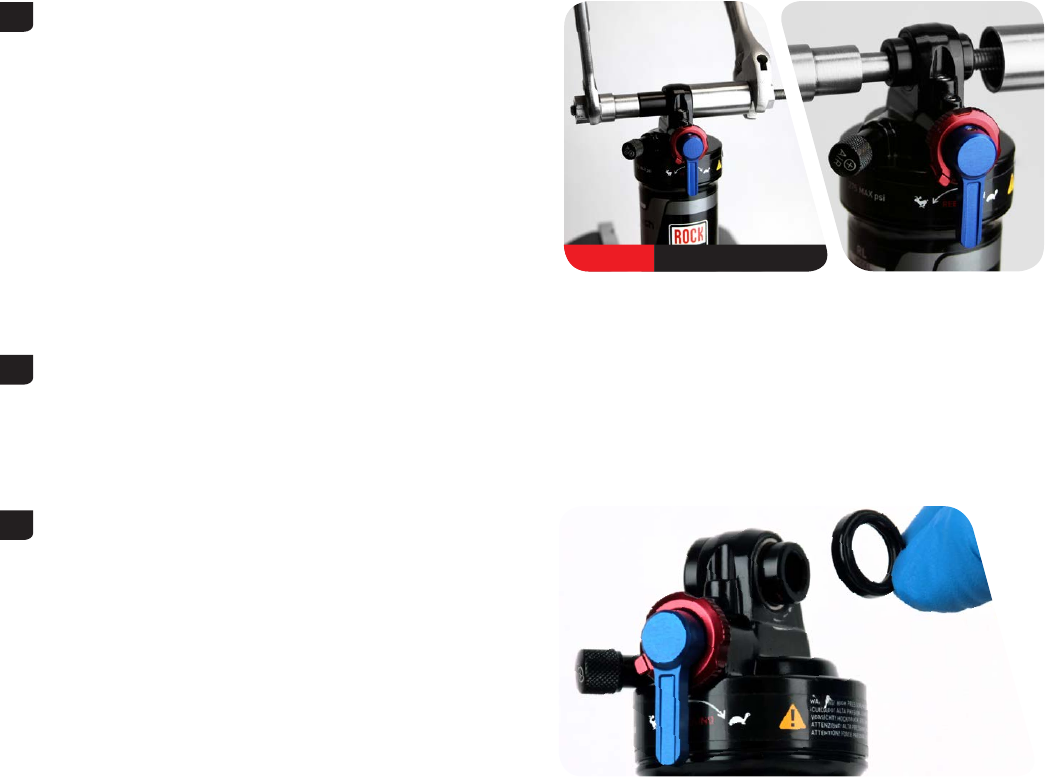
4 Clamp the catcher in a vise or hold it secure with a 13 mm
wrench.
Use a second 13 mm wrench to thread the push pin along
the rod until it pushes the bushing pin into the shock eyelet
bushing.
Continue to thread the push pin until the bushing pin
protrudes from both sides of the eyelet an equal amount.
You may need to unthread the catcher slightly to check the
bushing pin spacing.
5 Unthread the catcher from the threaded rod and remove the
tool from the shaft eyelet.
6 Press an end spacer, large diameter side first, onto each end of
the bushing pin.
13 mm
11 Mounting Hardware Installation
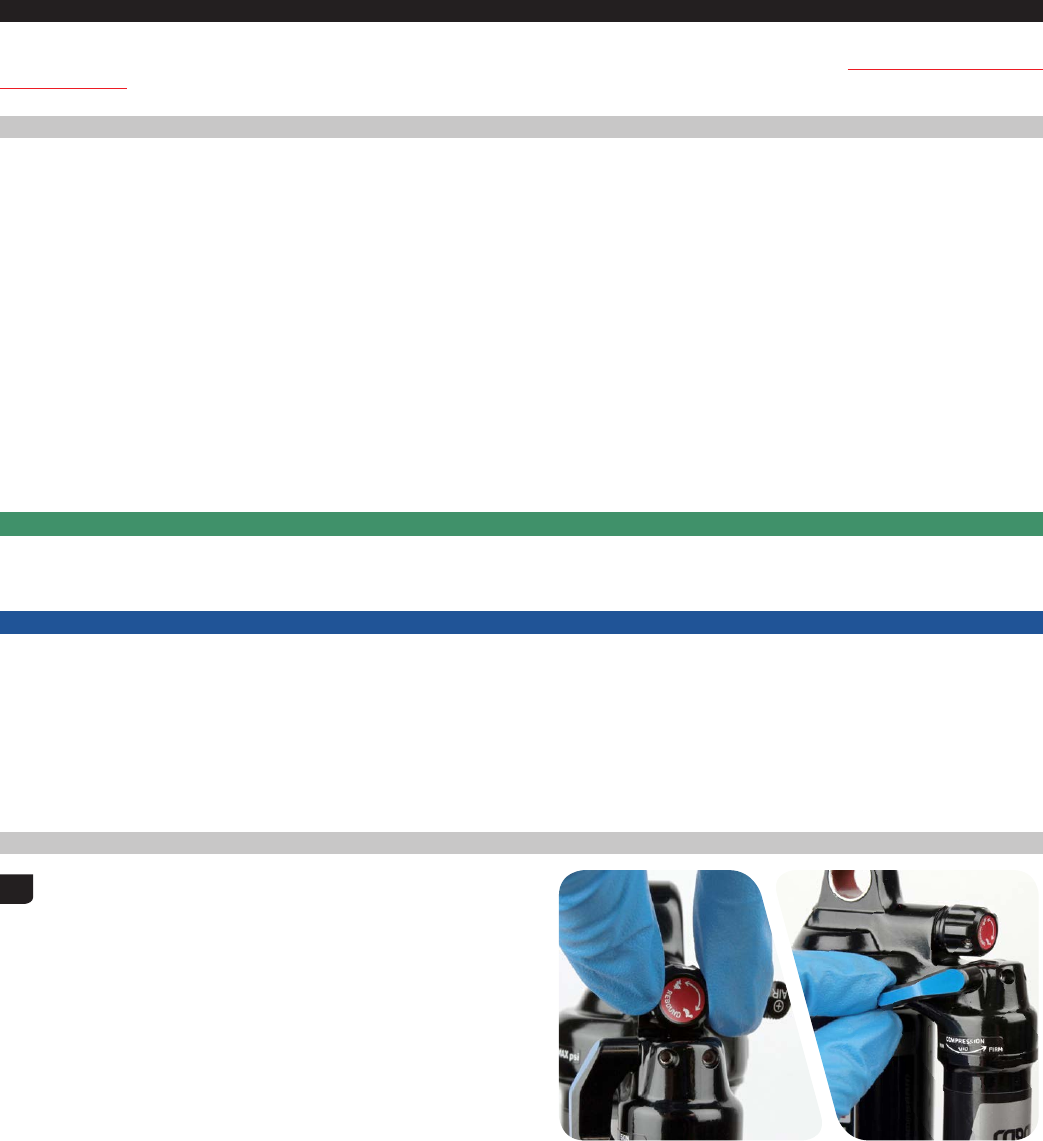
Monarch Plus™ RC3/R Service
Prior to servicing your rear shock, remove it from the bicycle frame according to the bicycle manufacturer’s instructions. Once the
shock is removed from the bicycle, remove the mounting hardware before performing any service (see the Mounting Hardware And
Bushing Service section).
Parts and Tools Needed For Service
• Safety glasses
• Nitrile gloves
• Apron
• Clean, lint-free rags
• Oil pan
• Isopropyl alcohol
• RockShox Dynamic Seal Grease
• Suspension specific grease
• Maxima® Maxum4 Extra 15w50 lube
• RockShox 3wt suspension fluid
• Bench vise with aluminum soft jaws
• RockShox Rear Shock Vise Block
• Monarch air fill adapter
• Torque wrench
• 12 mm socket wrench
• 13, 17, and 27 mm open end wrench
• 13, 17, and 27 mm crowfoot wrench
• 1.5 and 2 mm hex wrenches
• T10 TORX® wrench and bit socket
• 5 inch socket extension
• Schrader valve core tool
• Strap wrench
• Pick
• Shock pump
• Metric caliper or small metric ruler
SAFETY INSTRUCTIONS
Wear safety glasses and nitrile gloves when working with suspension fluid.
Place an oil pan on the floor underneath the area where you will be working on the shock.
NOTICE
Do not scratch any sealing surfaces when servicing your suspension. Scratches can cause leaks. When replacing o-rings, use your
fingers or a pick to remove the o-ring. Clean the o-ring groove and apply grease to the new o-ring.
To prevent damage to the shock use aluminum soft jaws and position the eyelet in the vise so that the adjustment knobs are clear
of the vise jaws.
Your product’s appearance may dier from the pictures/diagrams contained in this publication.
Air Can Removal
1 To record your adjustment settings, turn the rebound adjuster
knob counter-clockwise (toward the rabbit) until it stops, while
counting the number of detent clicks. This will assist you with
post-service set up.
Monarch Plus RC3 Only: Turn the compression lever to the
unlocked (min) position.
12 Monarch Plus™ RC3/R Service
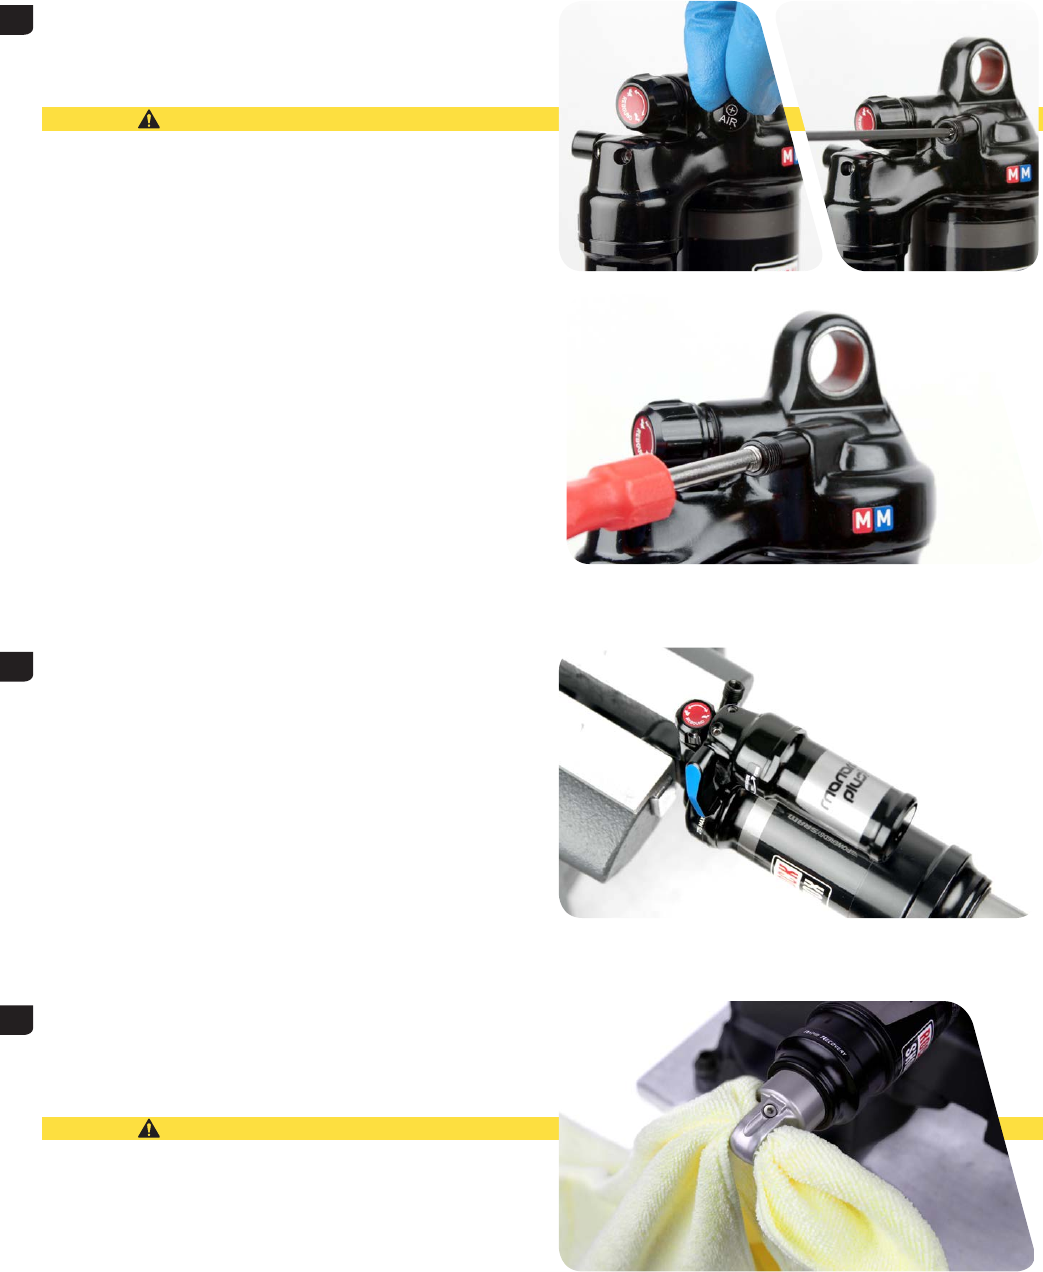
2 Record your air pressure setting to assist with post-service set
up. Remove the air valve cap by hand. Use a small hex wrench
to depress the Schrader valve and release all air pressure from
the air can. Use a Schrader valve tool to remove and replace
the valve core from the valve body.
CAUTION— EYE HAZARD
Do not disassemble a pressurized shock, this can cause
suspension fluid or debris to forcefully eject from the shock.
Wear
safety glasses.
3 Clamp the shaft eyelet into a vise, with the shock
positioned horizontally.
4 If the shock is collapsed so that a minimal amount of damper
body is visible, there is still air pressure in the air can.
Insert a rag through the damper body eyelet. This will prevent
the air can from forcefully ejecting from the shock upon
disassembly.
CAUTION— EYE HAZARD
Do not disassemble a pressurized shock, this can cause
suspension fluid or debris to forcefully eject from the shock.
Wear safety glasses.
13 Air Can Removal
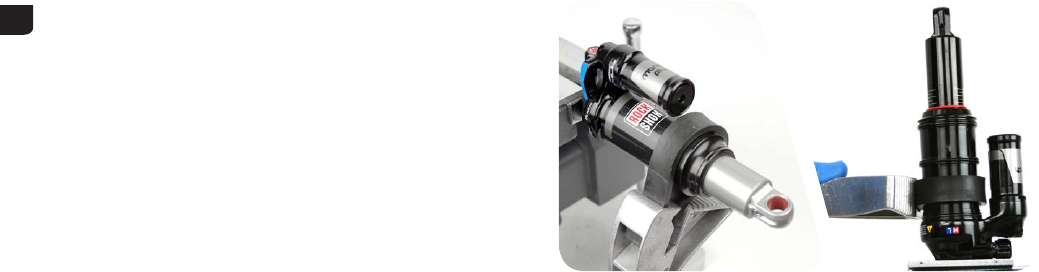
5 Use a strap wrench to remove the air can. Wrap the strap
around the section of the air can furthest from the shaft
eyelet. Turn the wrench counter-clockwise to unthread the air
can.
Once it is completely unthreaded, slowly pull the air can
along the damper body to remove it.
Do not place the strap wrench on the air can decal.
High Volume Air Cans: Grip the lower portion of the can;
otherwise, the high volume sleeve will rotate independent of
the air can.
DebonAirTM Air Cans: Remove the sleeve retaining o-ring
and the outer sleeve. Clean the air can sleeve. Place a strap
wrench on the air can. Turn the strap wrench counter-
clockwise to remove the
air can.
Be careful not to damage seal glands with the strap wrench.
Vacuum pressure will increase as you pull the air can along
the damper body, then suddenly release as the end of the can
comes over the damper body eyelet.
14 Air Can Removal
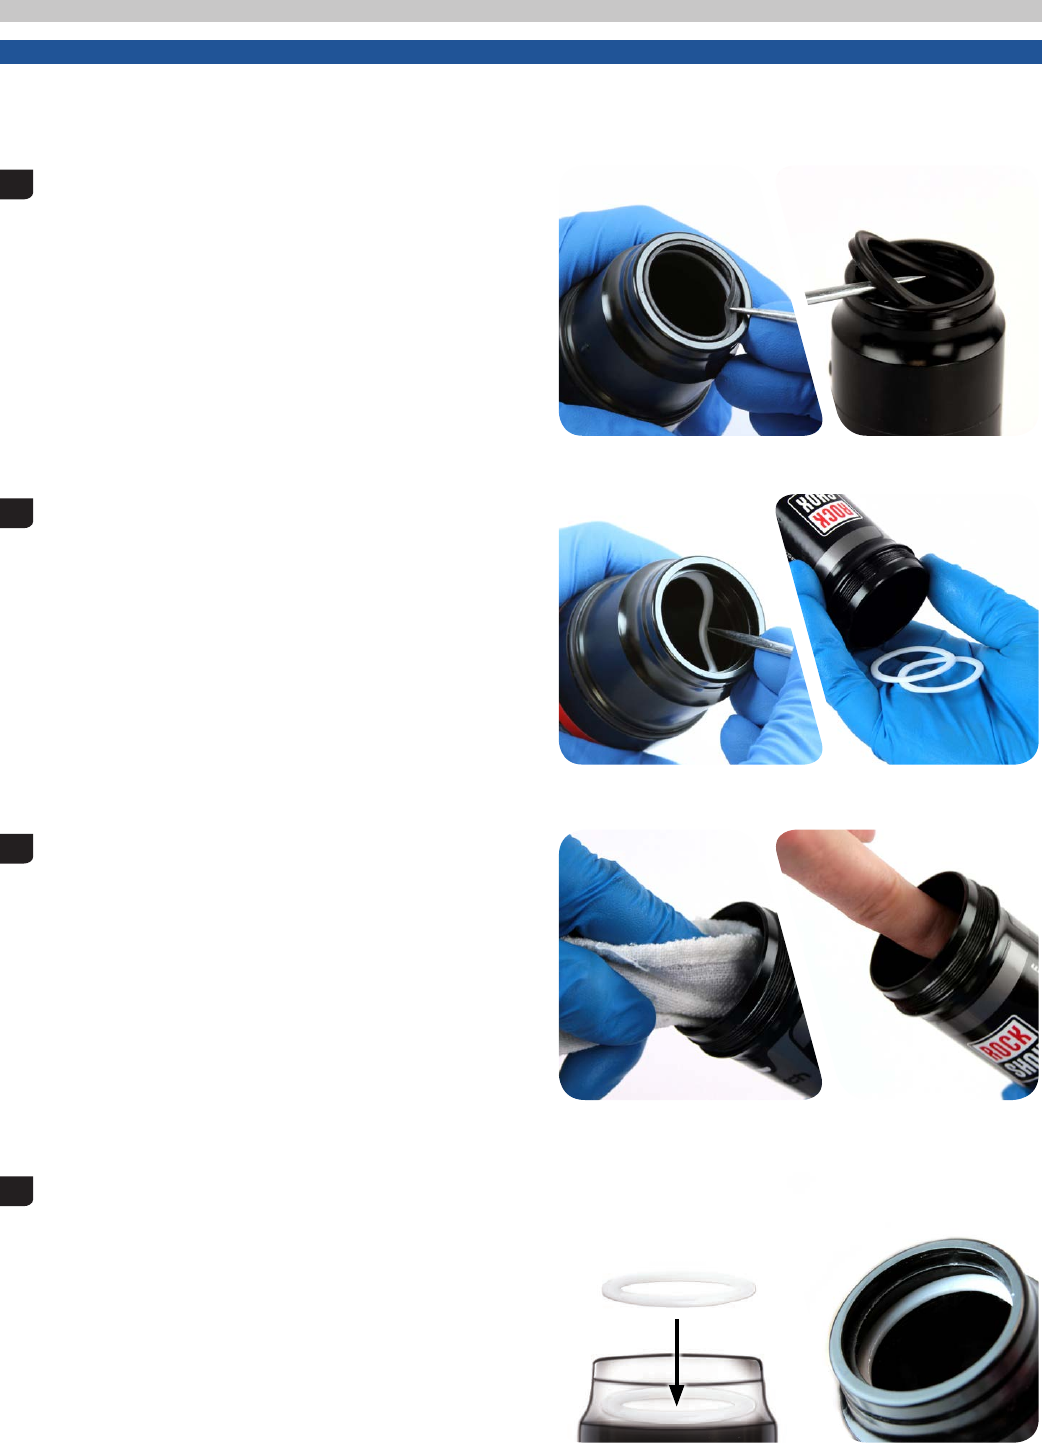
Air Can Service
NOTICE
Do not scratch any sealing surfaces when servicing your suspension. Scratches can cause leaks. When replacing seals and o-rings,
use your fingers or a pick to remove the seal or o-ring. Clean the groove and apply RockShox Dynamic Seal Grease to the new
seal or o-ring.
1 Use a pick to pierce and remove the air can dust wiper seal
located in the top groove.
Use a pick to pierce and remove the quad seal located
between the two backup rings in the second deepest groove.
2 Use a pick to remove the two backup rings from the second
deepest groove inside the air can.
3 Spray isopropyl alcohol inside the air can and clean it with a
rag. Remove a glove and use your finger to inspect the inside
and outside of the air can for scratches, dents, or other
surface deformations. Replace the air can if it is scratched or
damaged.
All air cans have a small dimple, as seen from the exterior of
the can, and high volume air cans have a small port inside the
high volume sleeve that you should feel.
4 Install the first backup ring by inserting one end into the air
can, then push the remainder of the ring into the can, so that
it rests on the bottom of the second deepest groove.
15 Air Can Service
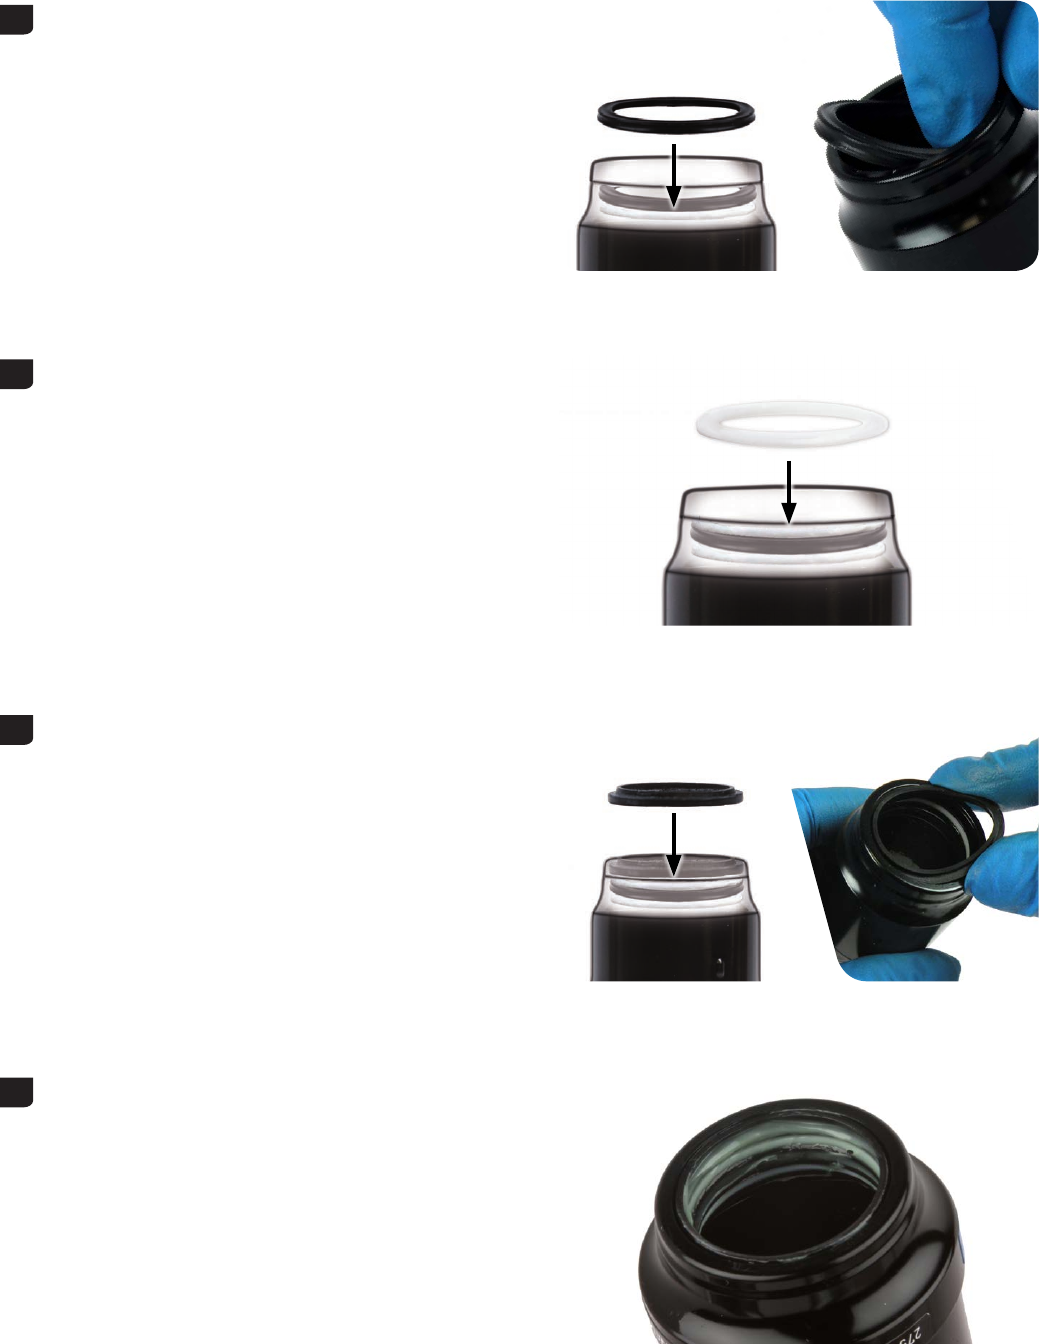
5 Apply a small amount of RockShox Dynamic Seal Grease to
the new quad seal and install it above the backup ring in the
second deepest groove.
6 Install the second backup ring by inserting one end into the air
can, then push the remainder of the ring into the can, so that
it rests on the quad seal at the top of the second deepest
groove.
7 Orient the new dust wiper seal step side up. Install it into the
dust wiper seal groove at the top of the air can.
8 Spray isopropyl alcohol on the air can threads and eyelet body
threads and clean them with a rag.
Apply a small amount of RockShox Dynamic Seal Grease to
the quad seal, backup rings, and dust wiper seal. Set the air
can aside.
16 Air Can Service
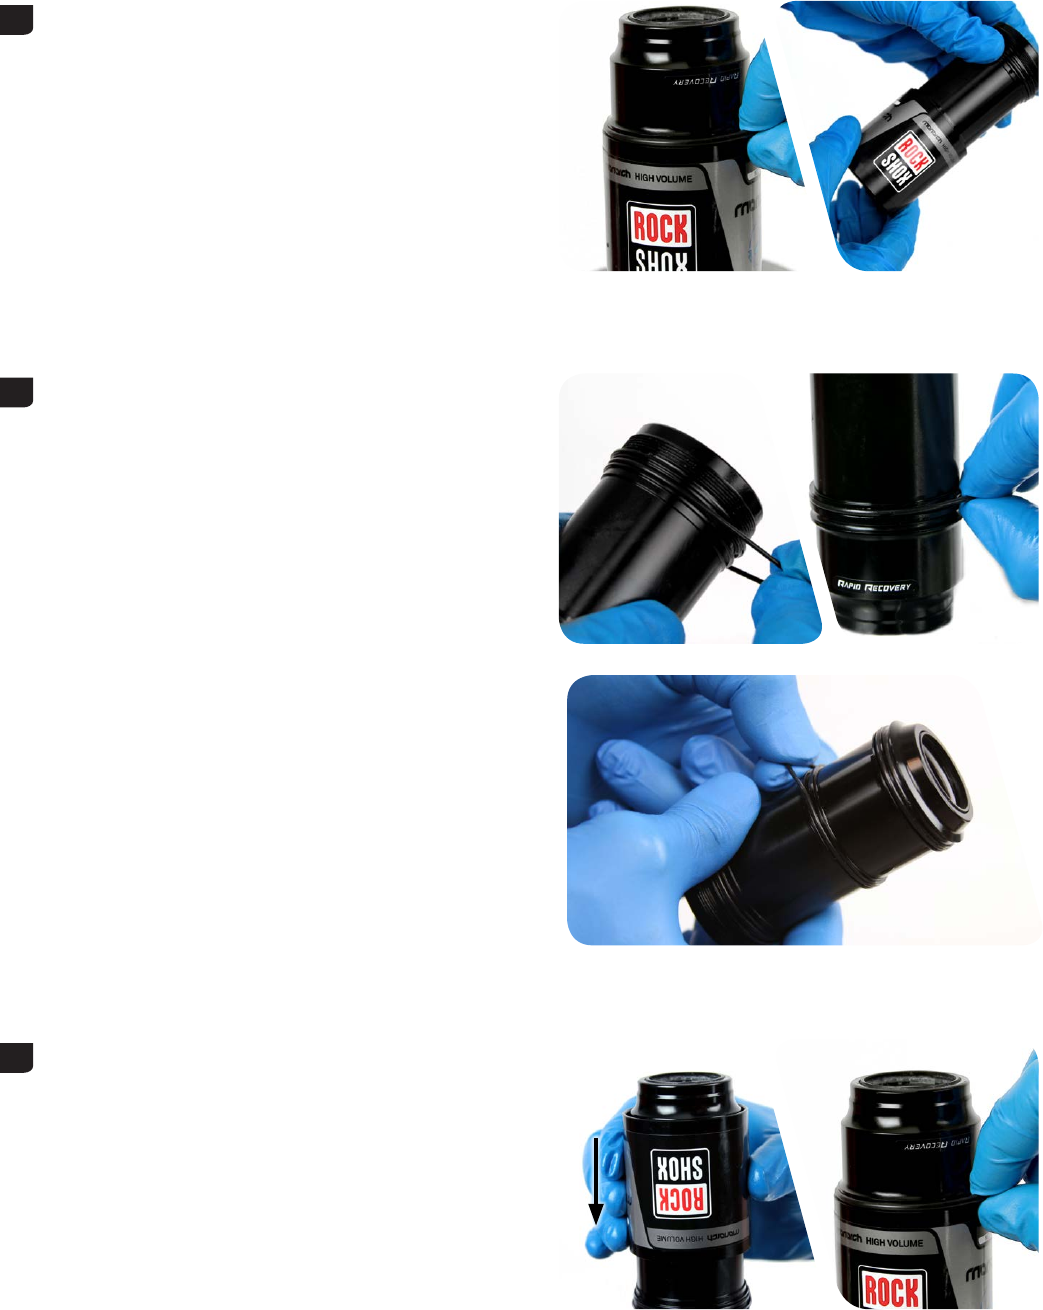
9 High Volume Air Cans: Remove the retention o-ring from the
high volume sleeve. Firmly grip the high volume sleeve and
slide it o of the air can.
10 High Volume Air Cans: Use your fingers to remove and
replace the high volume sleeve o-rings.
DebonAirTM Air Cans: Use your fingers to remove and replace
the three o-rings.
Spray isopropyl alcohol inside the high volume sleeve and
clean it with a rag.
11 High Volume Air Cans: Apply a small amount of suspension
specific grease to the inside of the sleeve. This stops the
o-rings from rolling as the sleeve slides over them.
Slide the sleeve onto the air can.
Install the high volume sleeve retention o-ring into the groove
outside of the air can.
DebonAirTM Air Cans: Leave the sleeve o until after the air
can has been installed and torqued.
DebonAir
17 Air Can Service
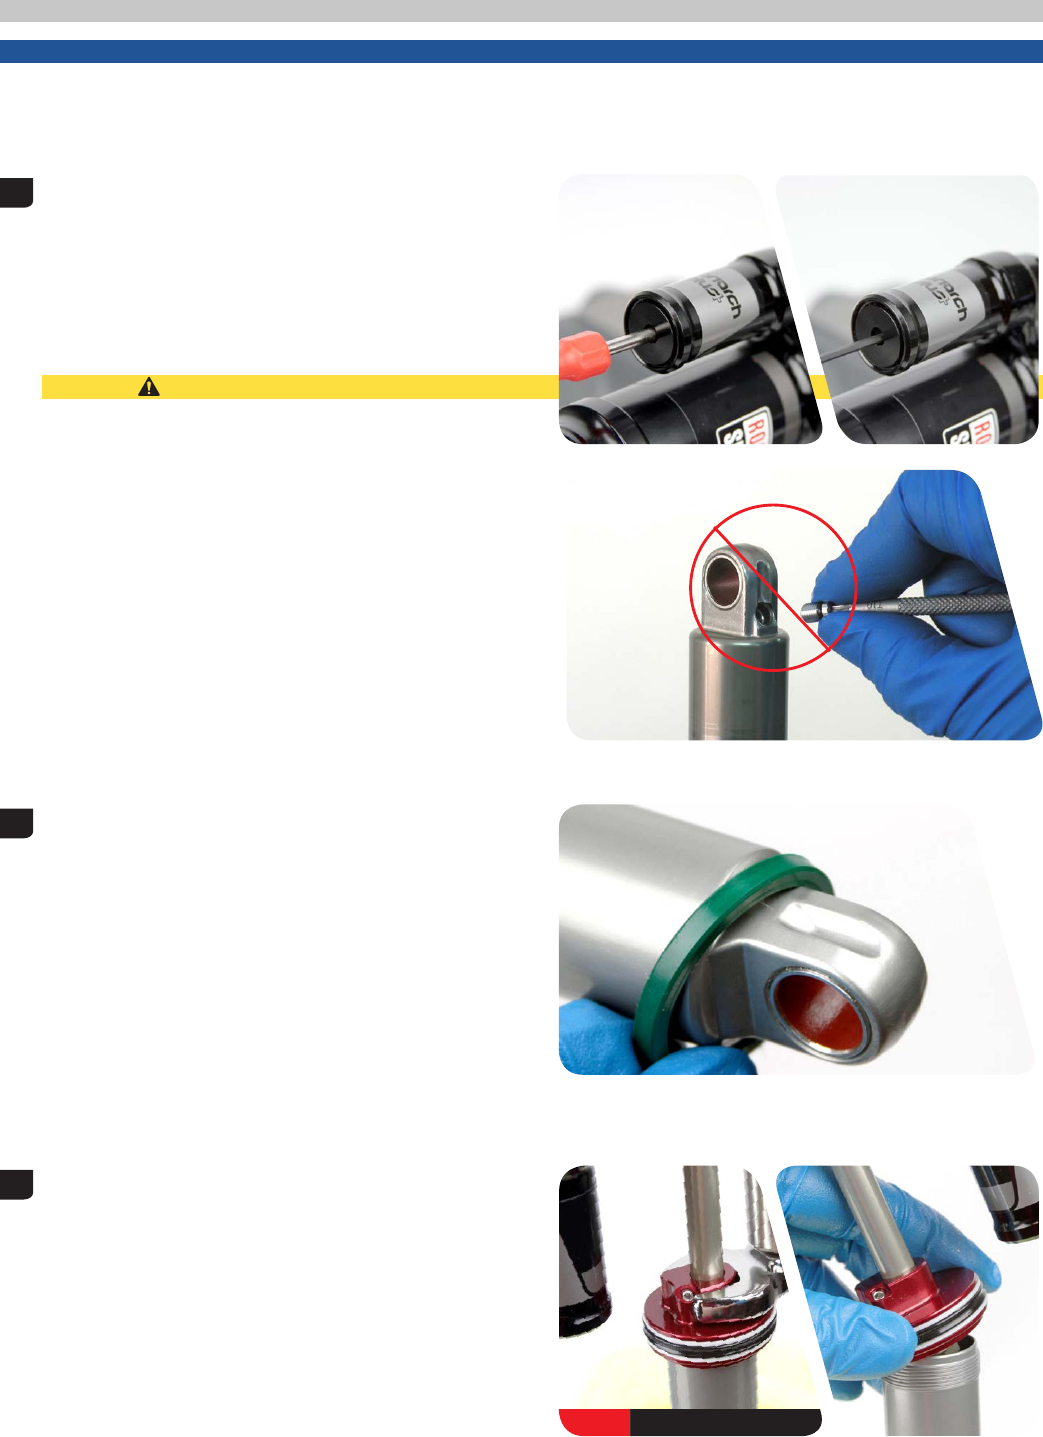
Damper Body Service
NOTICE
Use aluminum soft jaws to protect the damper body eyelet when clamped.
Do not scratch any sealing surfaces when servicing your suspension. Scratches can cause leaks. When replacing seals and o-rings,
use your fingers or a pick to remove the seal or o-ring. Clean the groove and apply grease to the new seal or o-ring.
1 Use a Schrader valve tool to remove the IFP reservoir valve
cap. Use a small hex wrench or pick to depress the Schrader
valve and release all air pressure from the IFP reservoir.
Once the pressure has been released, depress the Schrader
valve a second time. If the Schrader valve is able to move, the
shock has been completely depressurized.
If the Schrader valve does not move at all, the shock is still
pressurized and will need to be sent to an authorized Rock—
Shox service center for further service.
CAUTION — EYE HAZARD
Verify all pressure is removed from the shock before
proceeding. Failure to do so can cause the damper body to
separate from the shaft eyelet at a high velocity. Wear safety
glasses.
Do not remove the damper body bleed screw from the
damper body eyelet until instructed to do so. Removing the
damper body bleed screw while the shock is pressurized will
result in fluid being forcefully ejected from the bleed port.
Wear safety glasses.
2 Remove and replace the top out bumper on the damper body.
3 Use a 17 mm open end wrench to loosen the seal head/air
piston assembly from the damper body. Use your hand to
remove the assembly.
Fluid will spill from the assembly.
17 mm
18 Damper Body Service
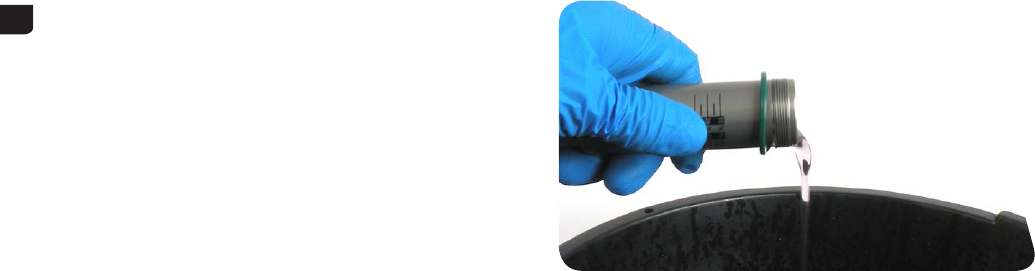
4 Remove the damper body from the vise and pour the fluid
into an oil pan.
19 Damper Body Service
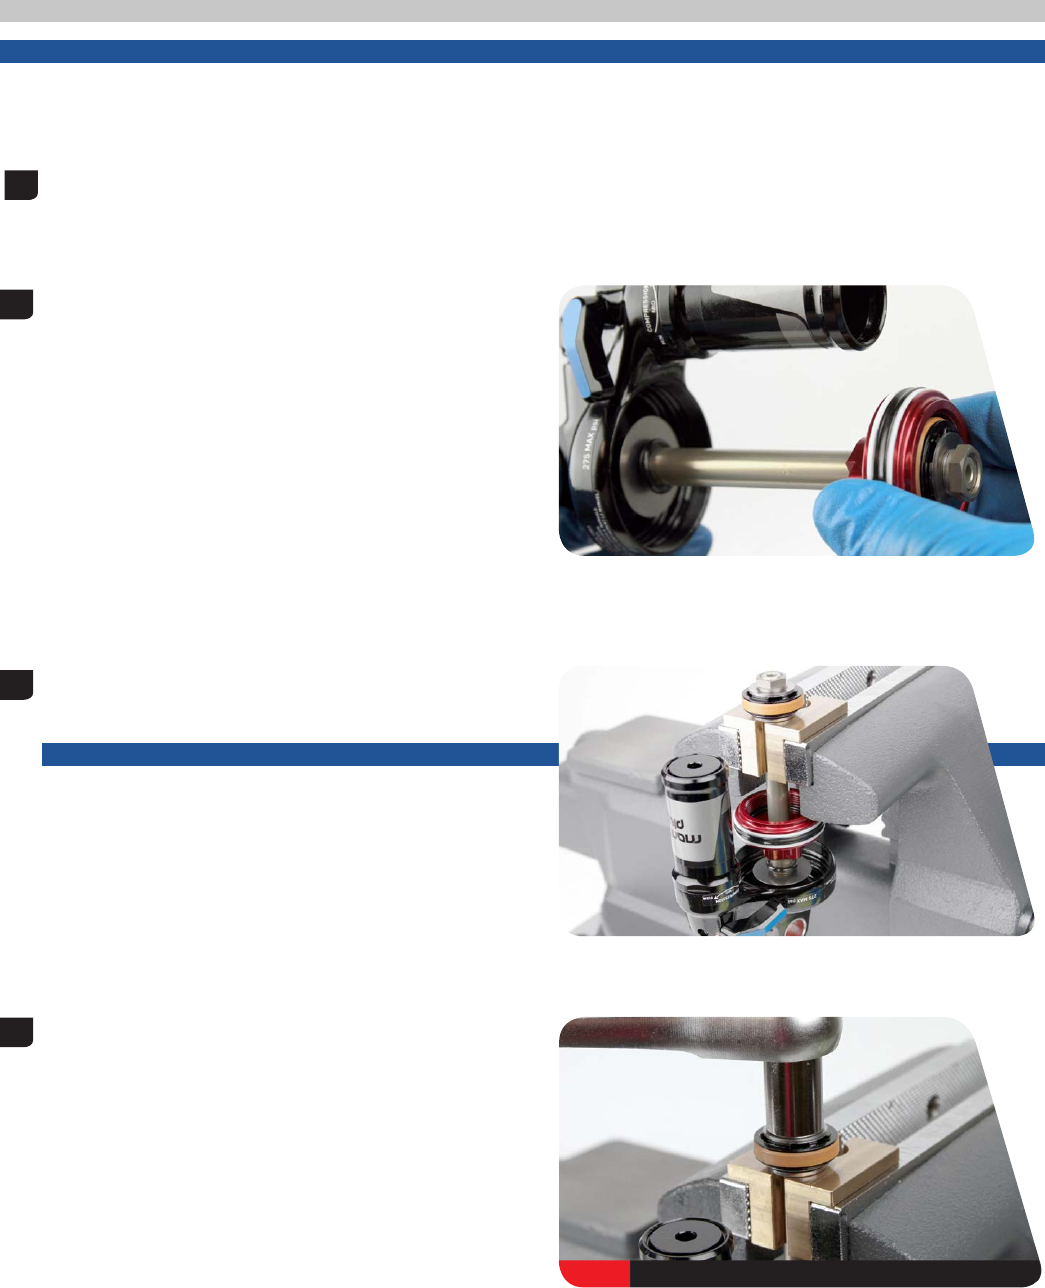
Piston Service
NOTICE
Do not scratch any sealing surfaces when servicing your suspension. Scratches can cause leaks. When replacing seals and o-rings,
use your fingers or a pick to remove the seal or o-ring. Clean the groove and apply RockShox Dynamic Seal Grease to the new
seal or o-ring.
1 Spray isopropyl alcohol on the shaft assembly and clean it
with a rag.
2 Slide the seal head/air piston toward the shaft eyelet until it
stops.
3 Use the RockShox Rear Shock Vise Block to clamp the
damper shaft into a vise.
Do not remove the damper shaft from the eyelet.
NOTICE
To prevent damage to the seal head/air piston, position the
damper shaft in the vise so that the piston and IFP reservoir
are clear of the vise jaws.
4 Use a 12 mm socket wrench to remove the main piston nut.
space between steps
space between frames
12 mm
20 Piston Service
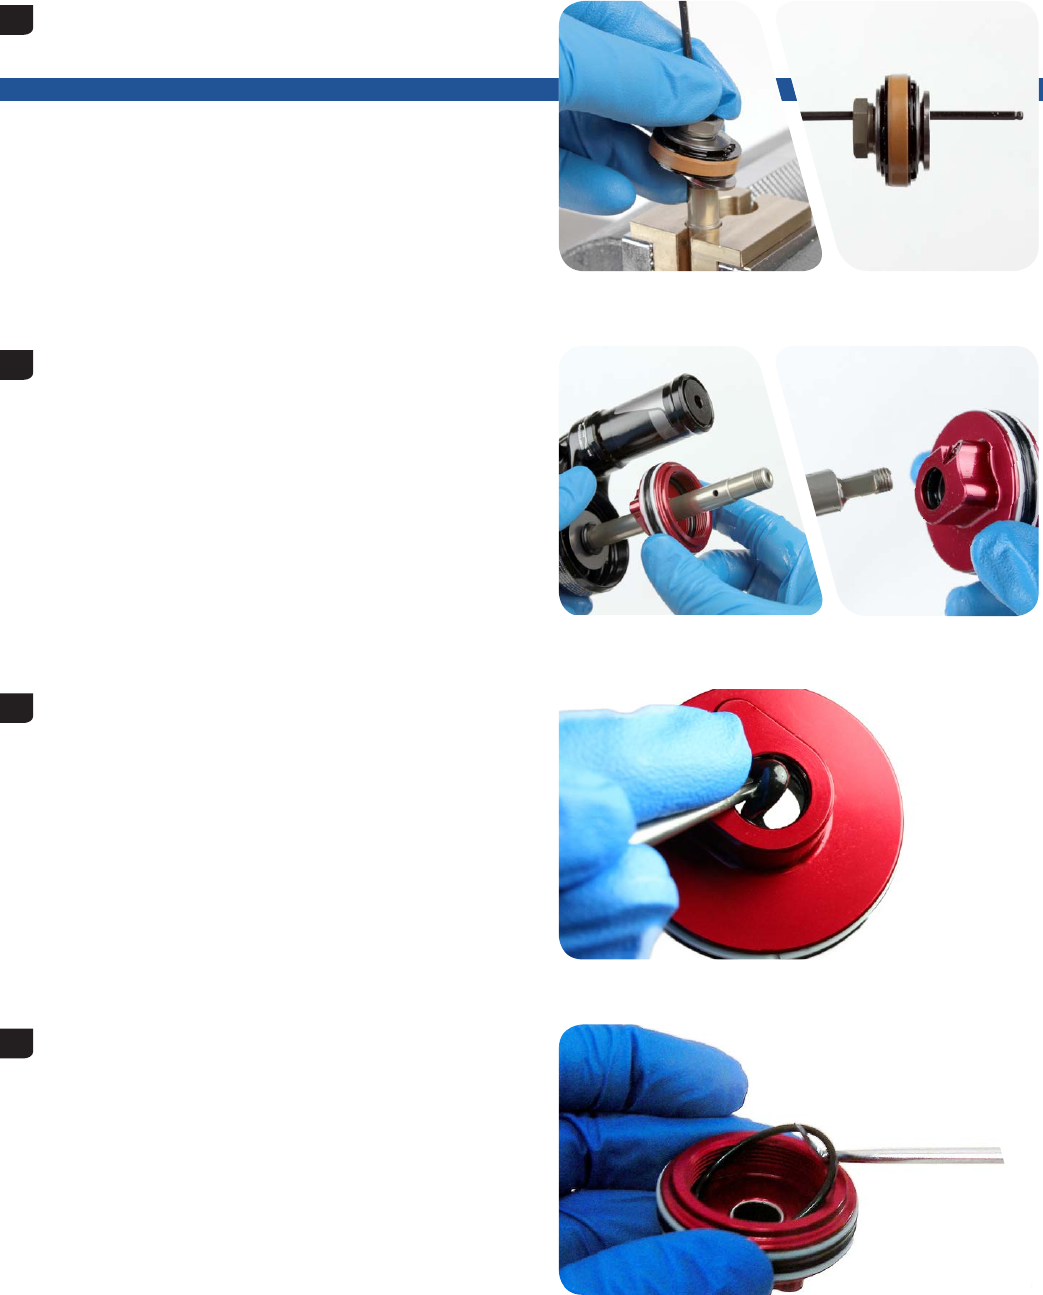
5 Use a small wrench or pick to slide the main piston assembly
o the damper shaft and onto the tool.
Keep all the parts together and set them aside.
NOTICE
If the shims are not in the correct order, the shock will not
perform properly.
6 Remove the seal head/air piston from the damper shaft.
7 Use a pick to remove and replace the internal seal o-ring
located in the internal seal gland.
8 Use a pick to remove and replace the inner o-ring, located at
the base of the threads in the seal head/air piston.
space between steps
space between frames
21 Piston Service

9 Remove and replace the bottom out washer and o-ring from
the damper shaft.
10 Use your fingers to remove and replace the o-ring located
inside the shaft eyelet threads.
11 Install the seal head/air piston onto the damper shaft.
22 Piston Service
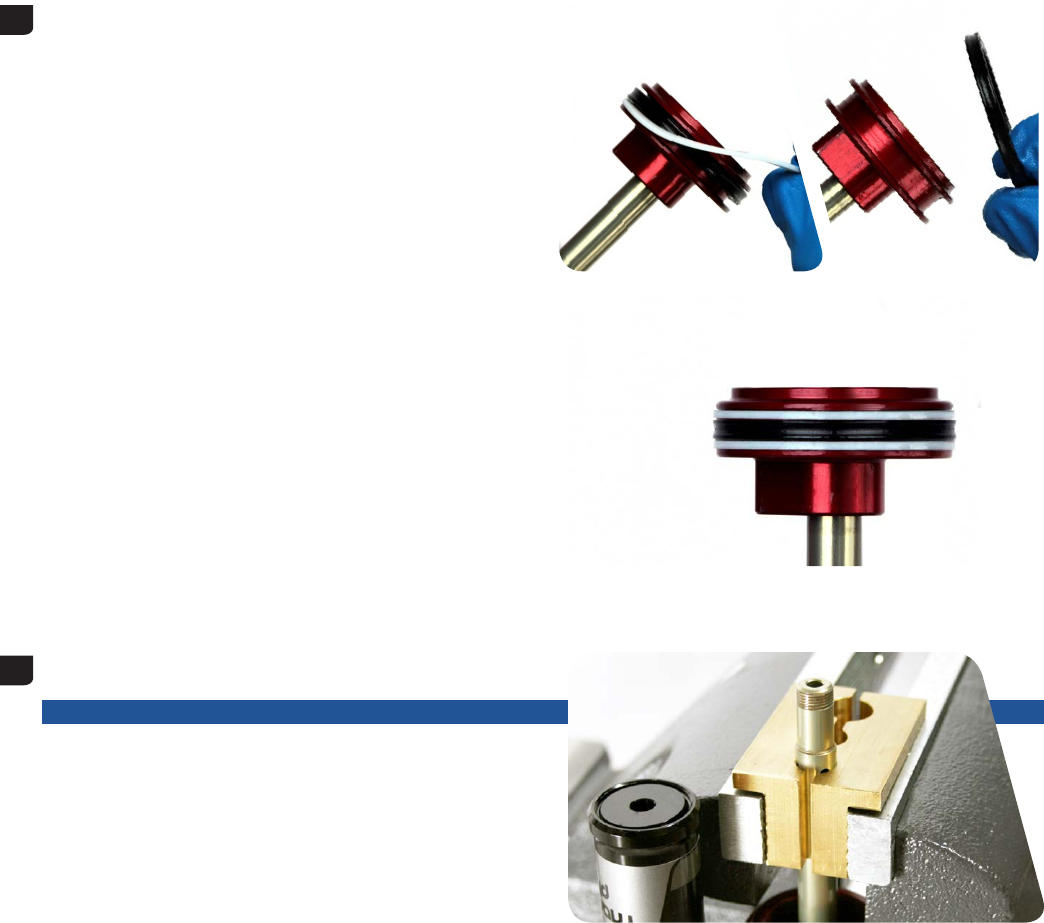
12 Use your fingers to remove and replace the seal head/air
piston seal and glide rings.
13 Use the RockShox Rear Shock Vise Block to clamp the damper
shaft into a vise.
NOTICE
To prevent damage to the seal head/air piston, position the
shaft in the vise so that the piston and IFP reservoir are clear
of the
vise jaws.
23 Piston Service
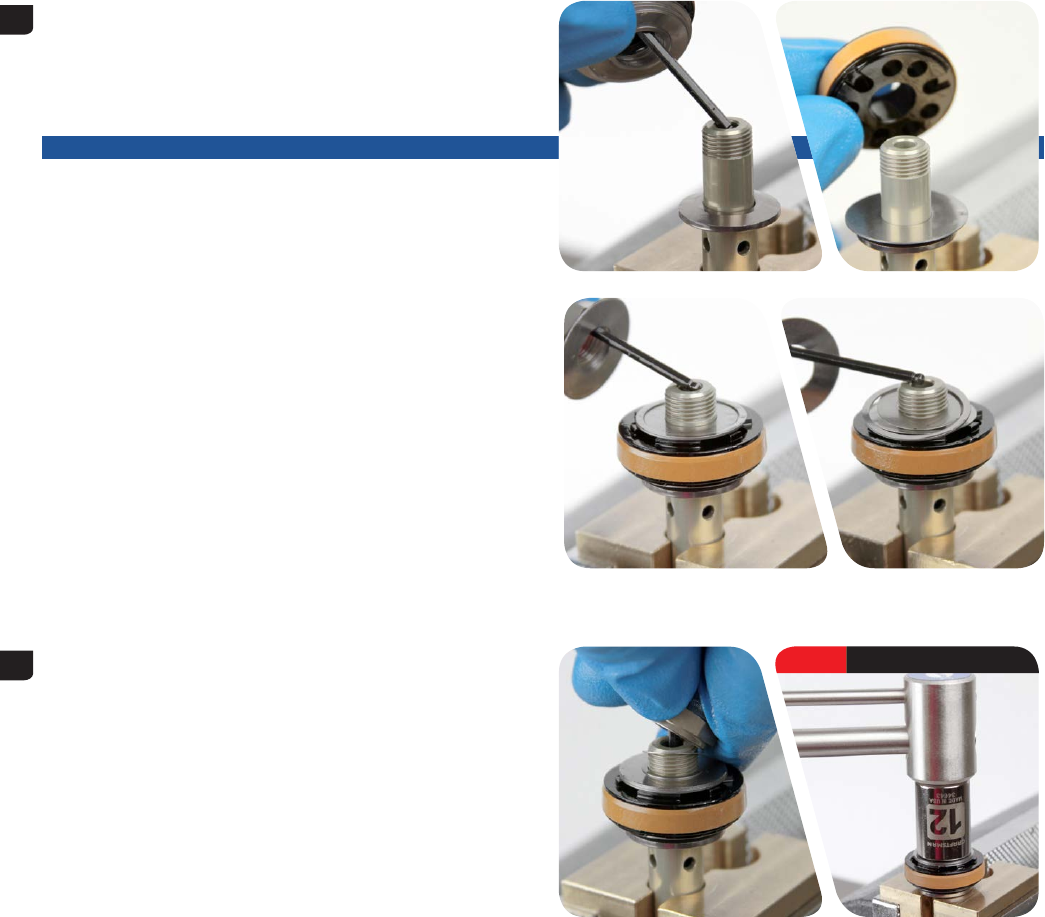
14 Install the main piston assembly that was removed in step 5
onto the damper shaft. To ensure the delta shim is centered,
use your fingers to squeeze the shims and center the shim
stack on top the main piston.
Be sure to keep the main piston assembly parts in the
same order.
NOTICE
If the shims are not centered and in the correct order, the
shock will not perform properly.
15 Apply 242® Blue Loctite® only on the threads of the nut, then
thread the nut onto the damper shaft. Use a torque wrench
with a 12 mm socket to tighten the main piston nut to
4.5 Nm (40 in-lb).
Remove the assembly from the vise.
12 mm 4.5 N·m (40 in-lb)
24 Piston Service
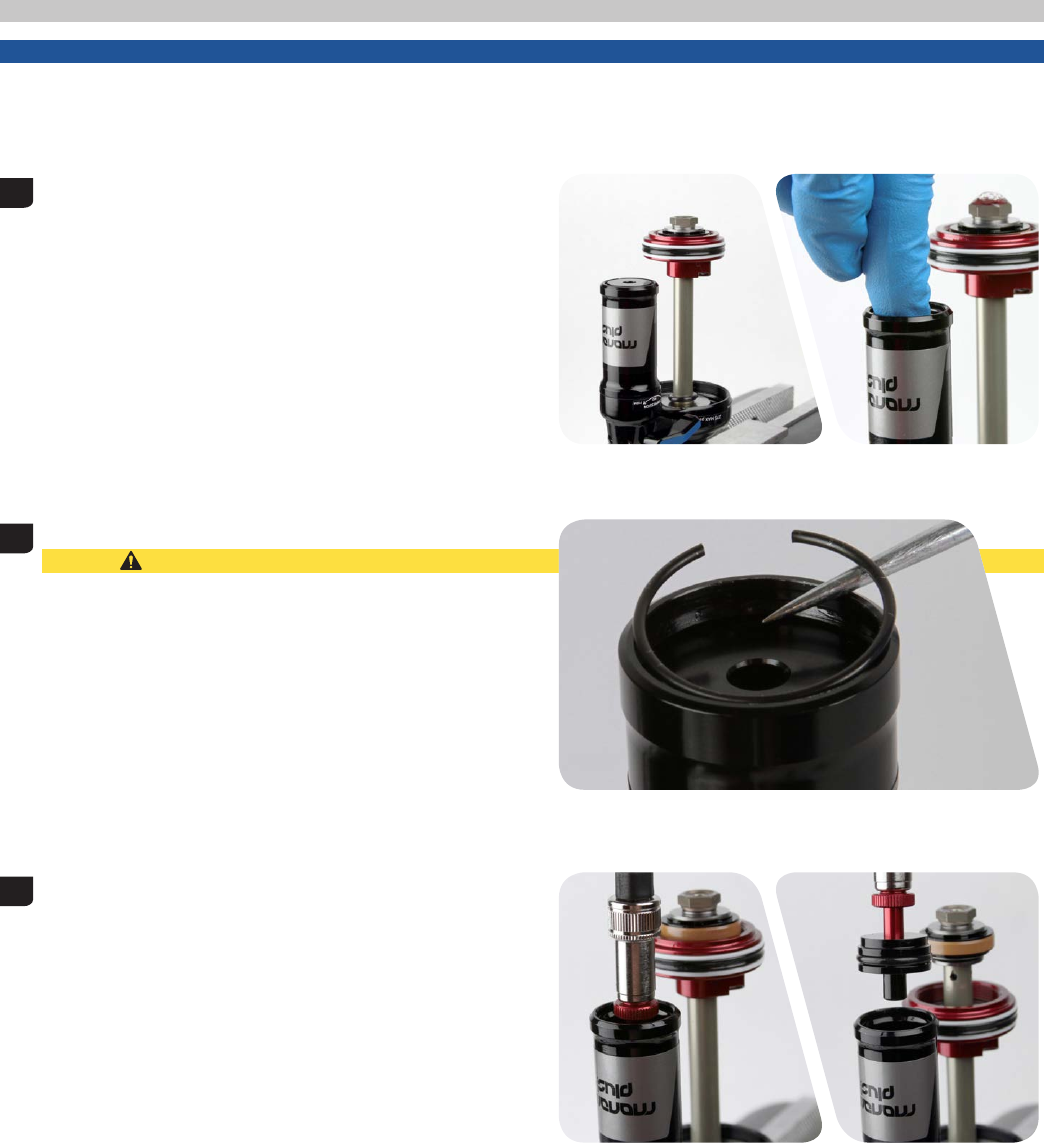
IFP Reservoir Service
NOTICE
Use aluminum soft jaws to protect the damper body eyelet when clamped.
Do not scratch any sealing surfaces when servicing your suspension. Scratches can cause leaks. When replacing seals and o-rings,
use your fingers or a pick to remove the seal or o-ring. Clean the groove and apply grease to the new seal or o-ring.
1 Clamp the shaft eyelet into the vise.
Use your thumb to push the IFP reservoir cap into the
reservoir until it stops.
2 Use a pick to remove the retention clip from the IFP reservoir.
CAUTION — EYE HAZARD
The retention clip can eject rapidly as it is removed.
Wear safety glasses.
Do not scratch the inside of the IFP reservoir with the pick.
3 Thread the Monarch™ air valve adapter tool into a shock
pump. Thread the pump and adapter into the IFP reservoir
cap. Pull up on the pump and rock it side to side to remove
the IFP reservoir cap from the IFP reservoir.
Remove the IFP reservoir cap assembly from the pump/
adapter.
Inspect the IFP reservoir cap for damage. If it is damaged, it
will need to be replaced.
space between steps
space between frames
25 IFP Reservoir Service
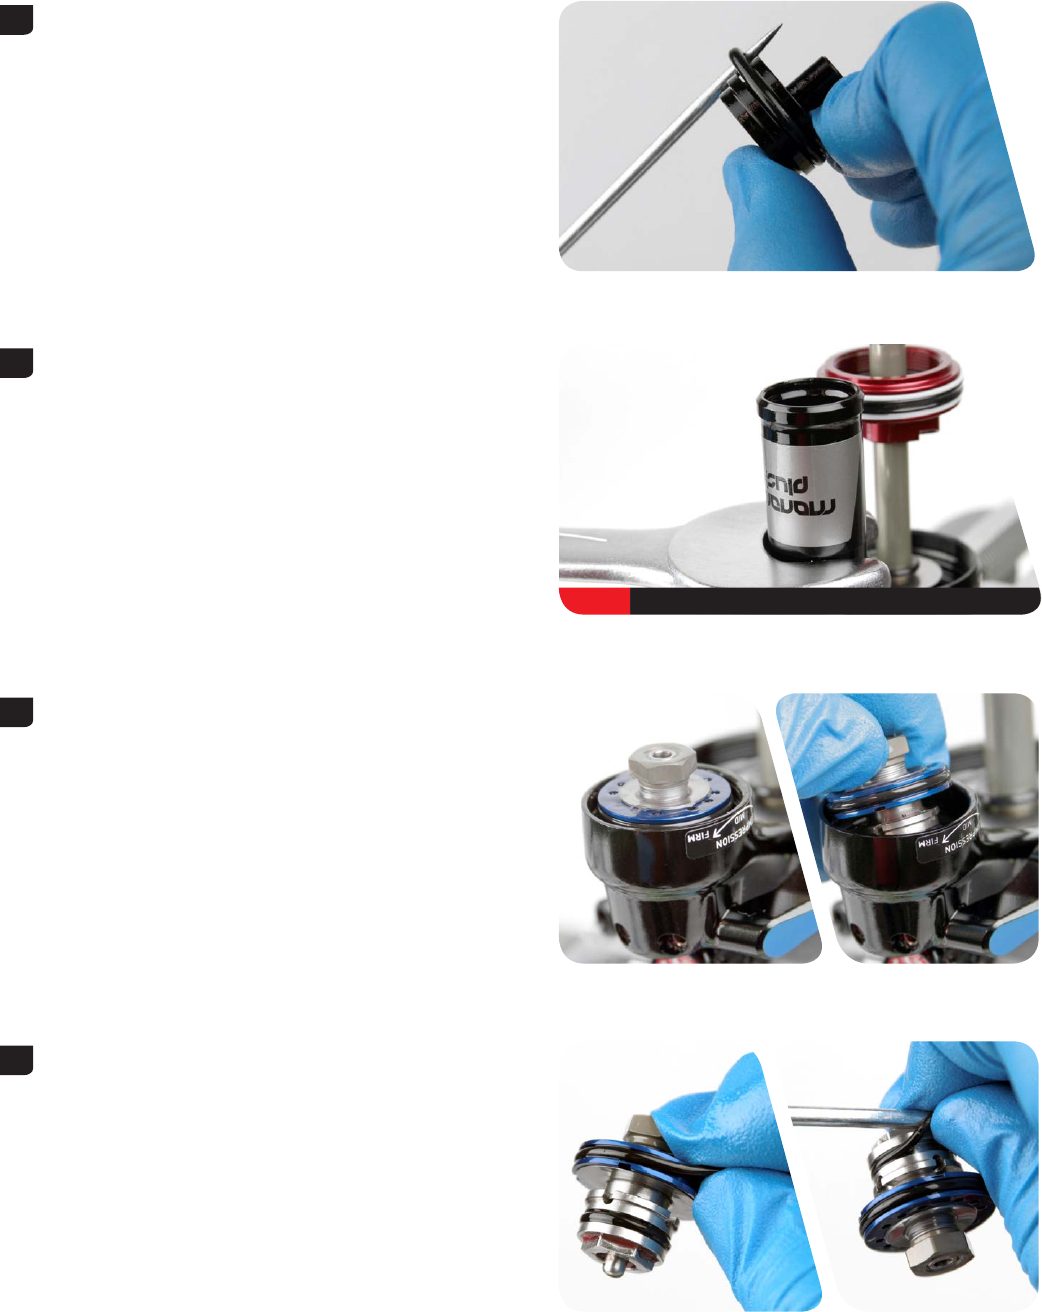
4 Remove and replace the IFP reservoir cap o-ring.
5 Use a 27 mm open end wrench at the base of the IFP reservoir
to loosen it from the eyelet.
Remove the shock from the vise, hold it over an oil pan, and
turn the shock over to remove the IFP reservoir by hand.
Fluid will spill from the IFP reservoir when it is removed. Pour
the fluid into an oil pan.
6 Monarch Plus™ RC3 Only: Use your fingers to remove the
compression assembly from the IFP reservoir or eyelet.
If the compression assembly is still installed in the eyelet, pull
on the piston nut while rocking it from side to side to remove
the compression assembly.
7 Monarch Plus RC3 Only: Remove and replace the compression
assembly o-rings.
27 mm
26 IFP Reservoir Service
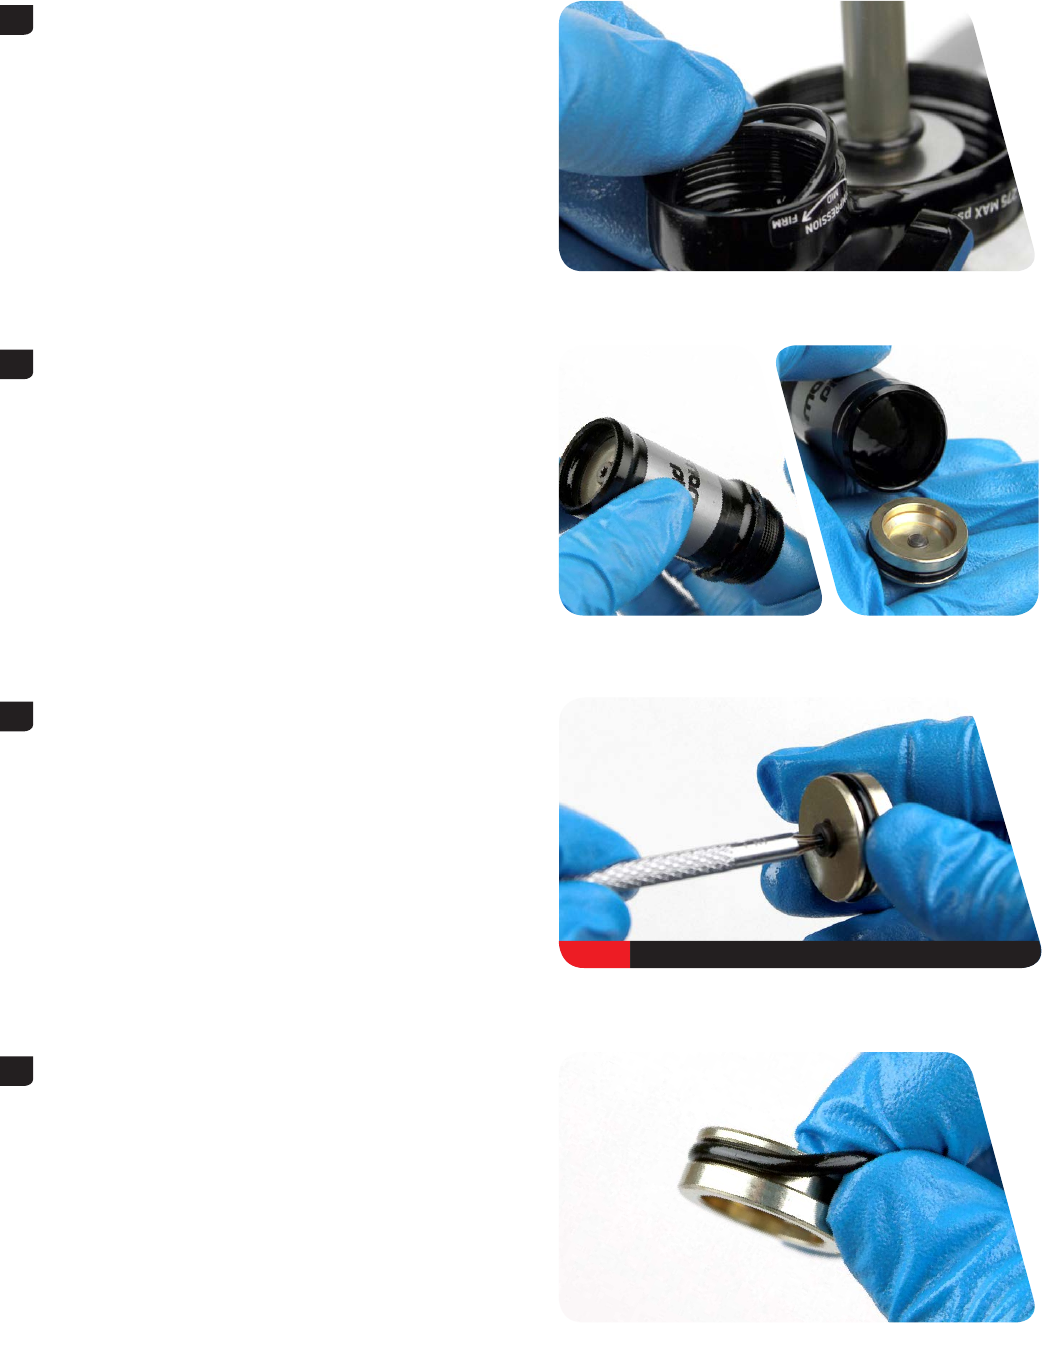
8 Use your fingers to remove and replace the o-ring located
inside the eyelet threads.
9 Use your finger to push the IFP out of the IFP reservoir.
10 Use a T10 TORX® wrench to remove the IFP bleed screw.
Replace the o-ring on the IFP bleed screw.
Set the bleed screw aside.
11 Remove and replace the IFP o-ring.
T10
27 IFP Reservoir Service
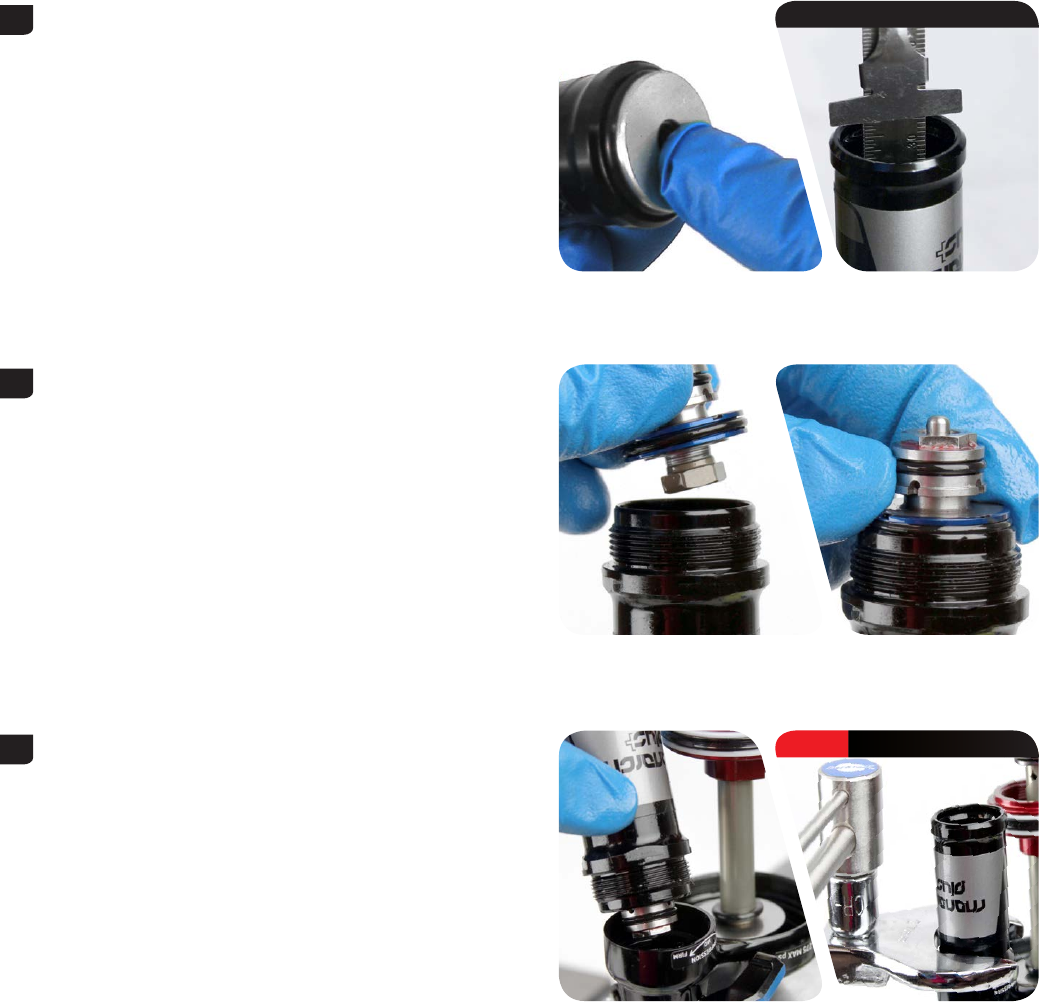
12 Install the IFP, flat side up, into the IFP reservoir. Use a metric
caliper or ruler to push the IFP into the reservoir to a depth
of 35 mm.
13 Monarch Plus™ RC3 Only: Install the compression assembly,
nut side first, into the threaded side of the IFP reservoir. Push
the compression assembly into the reservoir until it stops.
Check that the compression lever is still in the unlocked
(min) position and the compression needle is sticking up.
14 Thread the IFP reservoir onto the eyelet by hand. Use a torque
wrench with 27 mm crowfoot to tighten the IFP reservoir to
8.4 N·m (75 in-lb).
Install the crowfoot onto the torque wrench at a 90° angle to
the handle to ensure an accurate torque reading.
35 mm
27 mm 8.4 N·m (75 in-lb)
28 IFP Reservoir Service
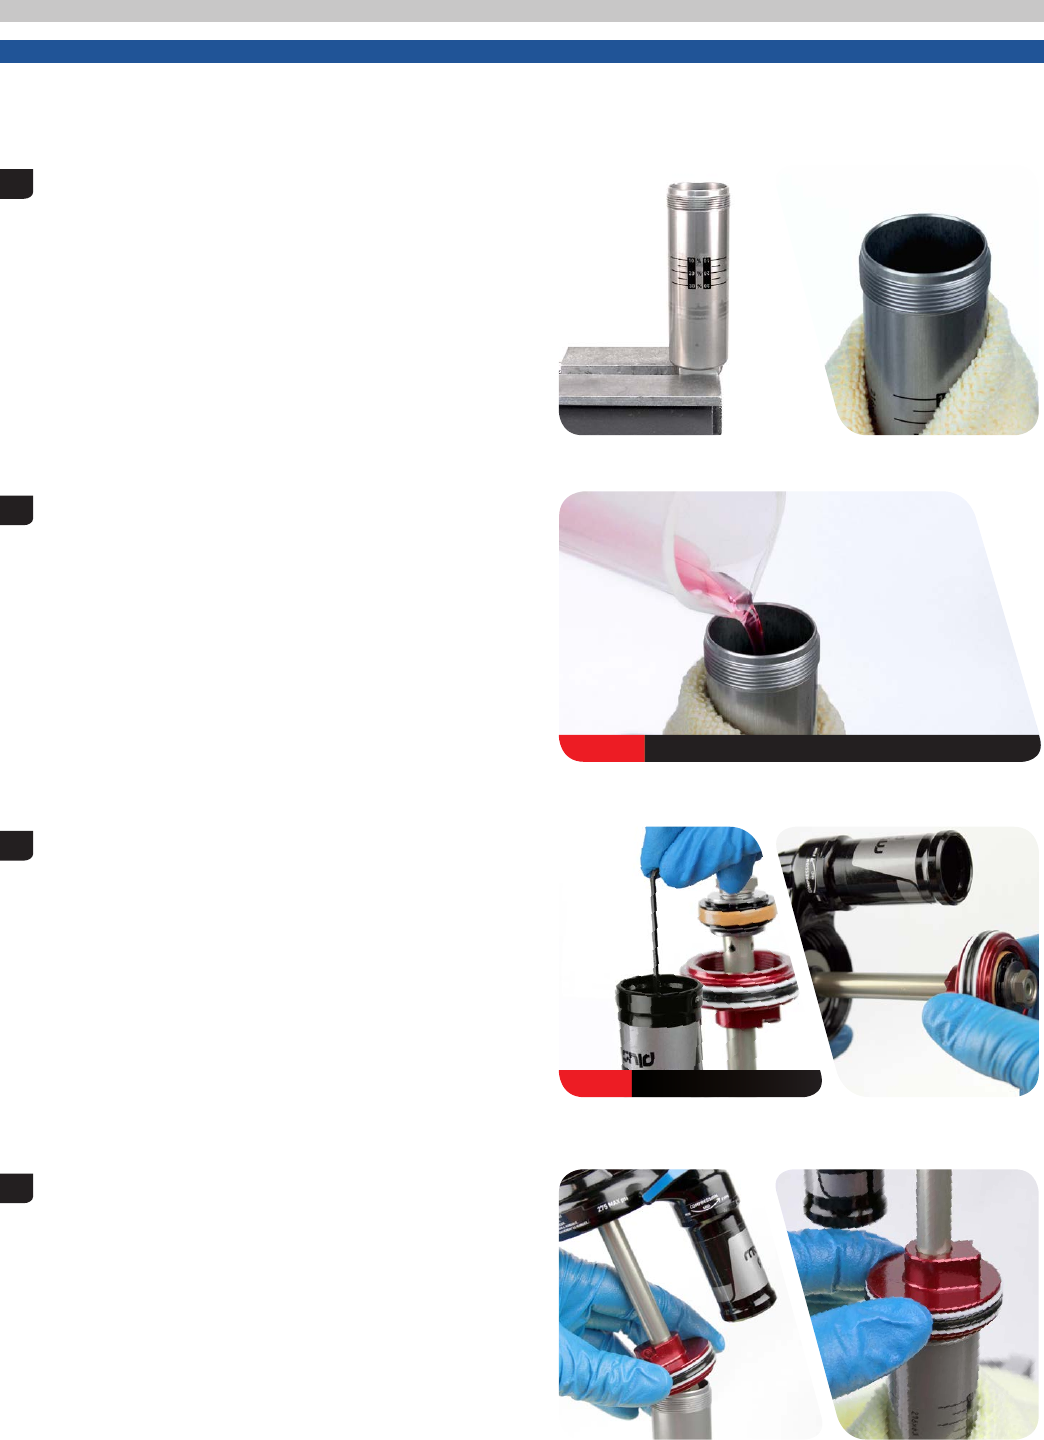
Reassembly and Bleed
NOTICE
Use aluminum soft jaws to protect the damper body eyelet when clamped.
Do not scratch any sealing surfaces when servicing your suspension. Scratches can cause leaks. When replacing seals and o-rings,
use your fingers or a pick to remove the seal or o-ring. Clean the groove and apply grease to the new seal or o-ring.
1 Clamp the damper body eyelet into the vise. Wrap a clean rag
around the damper body.
2 Pour new RockShox 3wt suspension fluid into the damper
body until it is level with the top.
3 Check that the rebound adjuster is set to the minimum setting
(toward the rabbit).
Monarch RC3 Only: Check that the compression lever is set to
the unlocked (min) position. Use a 1.5 mm hex wrench to push
the compression needle up. This will ensure that there is a
path for bleeding.
Slide the seal head/air piston until it stops at the end of the
damper shaft.
4 Use your hand to install the seal head/air piston onto the
damper body.
Do not hold on to the shaft eyelet or damper shaft while
inserting the seal head. It will move the piston/shaft
assembly, causing too much fluid to displace out of the
damper body.
space between steps
space between frames
3wt
1.5 mm RC3
29 Reassembly and Bleed
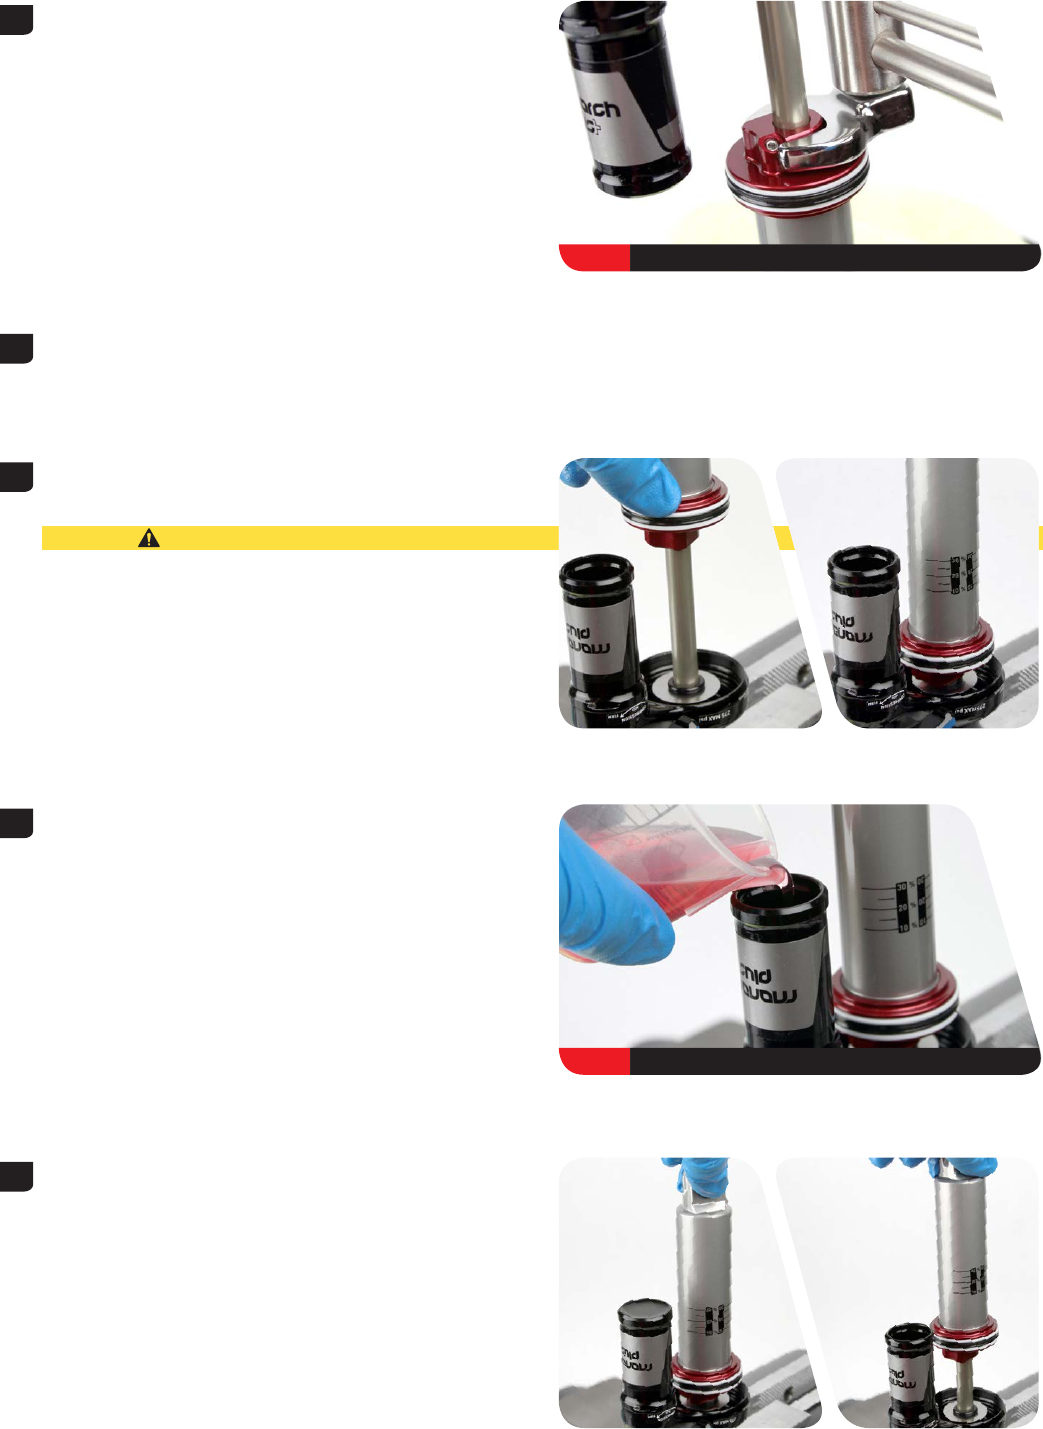
5 Use a torque wrench with a 17 mm crowfoot to tighten the
seal head/air piston to 28 N·m (248 in-lb).
Install the crowfoot onto the torque wrench at a 90° angle to
the handle to ensure an accurate torque reading.
6 Remove the shock from the vise. Turn the shock over and
clamp the shaft eyelet into the vise.
7 Slowly push the damper body downward. Fluid will begin to
fill the reservoir through the IFP bleed port. Continue to push
down until the damper body stops.
CAUTION— EYE HAZARD
Do not look directly into the reservoir as you push on the
damper body. Fluid may be ejected from the IFP reservoir if
you push the damper down to fast. Wear safety glasses.
8 Pour RockShox 3wt suspension fluid into the IFP reservoir
until it is level with the top of the reservoir.
9 Slowly pull up on the damper body until it stops. This will
cycle fluid from the reservoir back into the damper body and
purge air bubbles from the system.
Continue to pull up and push down on the damper body until
no more air bubbles emerge from the IFP bleed port.
17 mm 28 N·m (248 in-lb)
3wt
30 Reassembly and Bleed
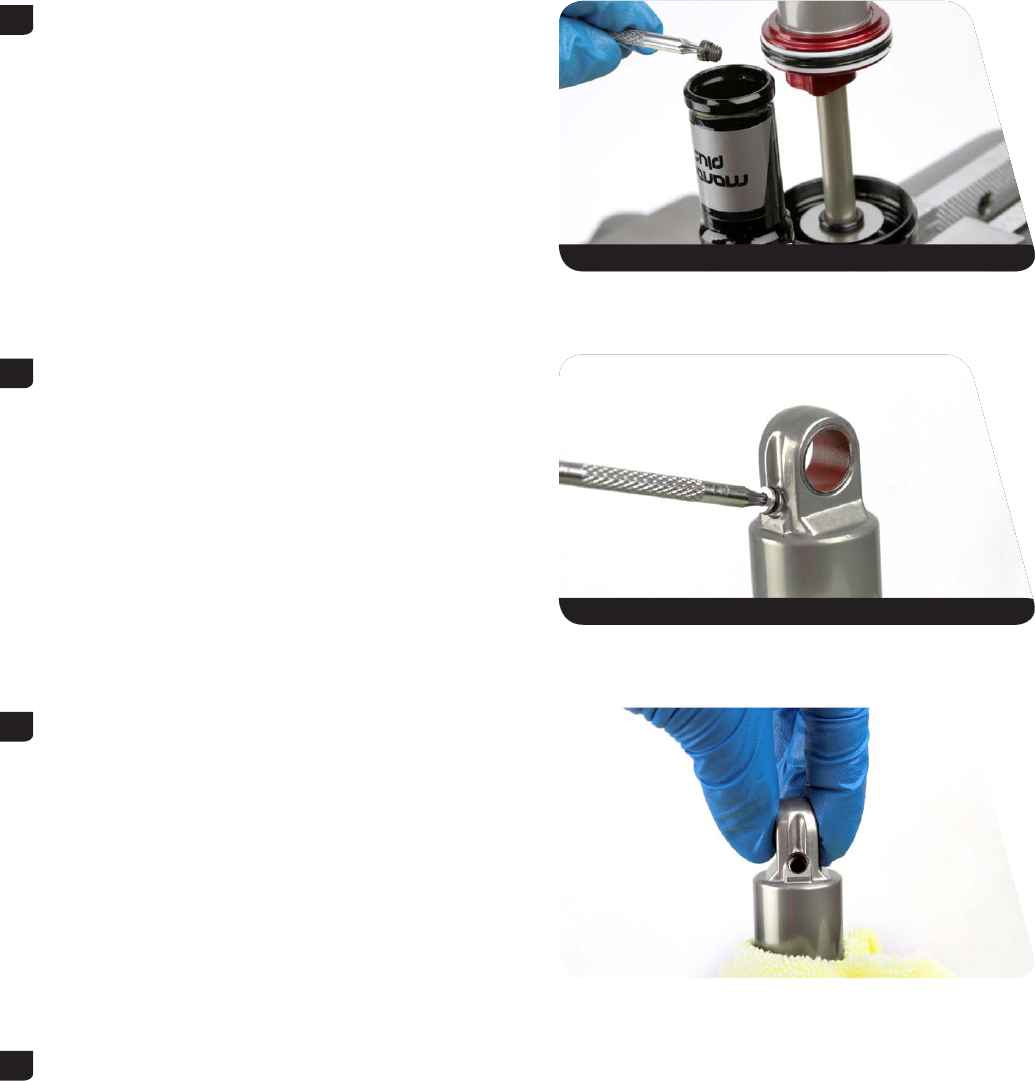
10 Use a T10 TORX® wrench to install the IFP bleed screw into the
IFP. The bleed screw should be submerged in fluid.
11 Use a T10 TORX wrench to remove the damper body bleed
screw from the damper body eyelet.
12 Wrap a clean rag around the damper body. Slowly push down
on the damper body to purge the air bubbles from the bleed
port in the damper body eyelet.
Stop pushing on the damper body when there are no
more air bubbles.
13 If the damper body is all the way down and air bubbles are still
present, then reinstall the damper bleed screw, remove the IFP
bleed screw, and repeat steps 9-12 until no more
air bubbles are present.
T10
T10
31 Reassembly and Bleed

14 Replace the o-ring on the damper body bleed screw.
Use a T10 TORX® wrench to install the damper body bleed
screw into the damper body eyelet. Use a torque wrench with
a
T10 TORX bit socket to tighten the bleed screw to 1.1 N·m (10
in-lb).
To ensure a good bleed, fluid should be displaced out of
the bleed port.
Spray isopropyl alcohol on the damper body and clean it
with a rag.
15 Use a T10 TORX wrench to remove the IFP bleed screw
from the IFP.
16 Pour additional RockShox 3wt suspension fluid into the IFP
reservoir until it is level with the top of the reservoir.
T10
T10 1.1 N·m (10 in-lb)
T10
3wt
32 Reassembly and Bleed

17 Slowly pull up on the damper body until it stops.
18 Use a T10 TORX® wrench to install the IFP bleed screw into the
IFP. The bleed screw should be submerged in fluid.
19 Remove the shock from the vise. Pour the fluid out of the IFP
reservoir. Spray isopropyl alcohol in the IFP reservoir and
clean it with a rag.
Clamp the shaft eyelet into the vise so the shock is vertical.
20 Use the Schrader valve tool to install a new Schrader valve
into
the IFP reservoir cap.
T10
33 Reassembly and Bleed
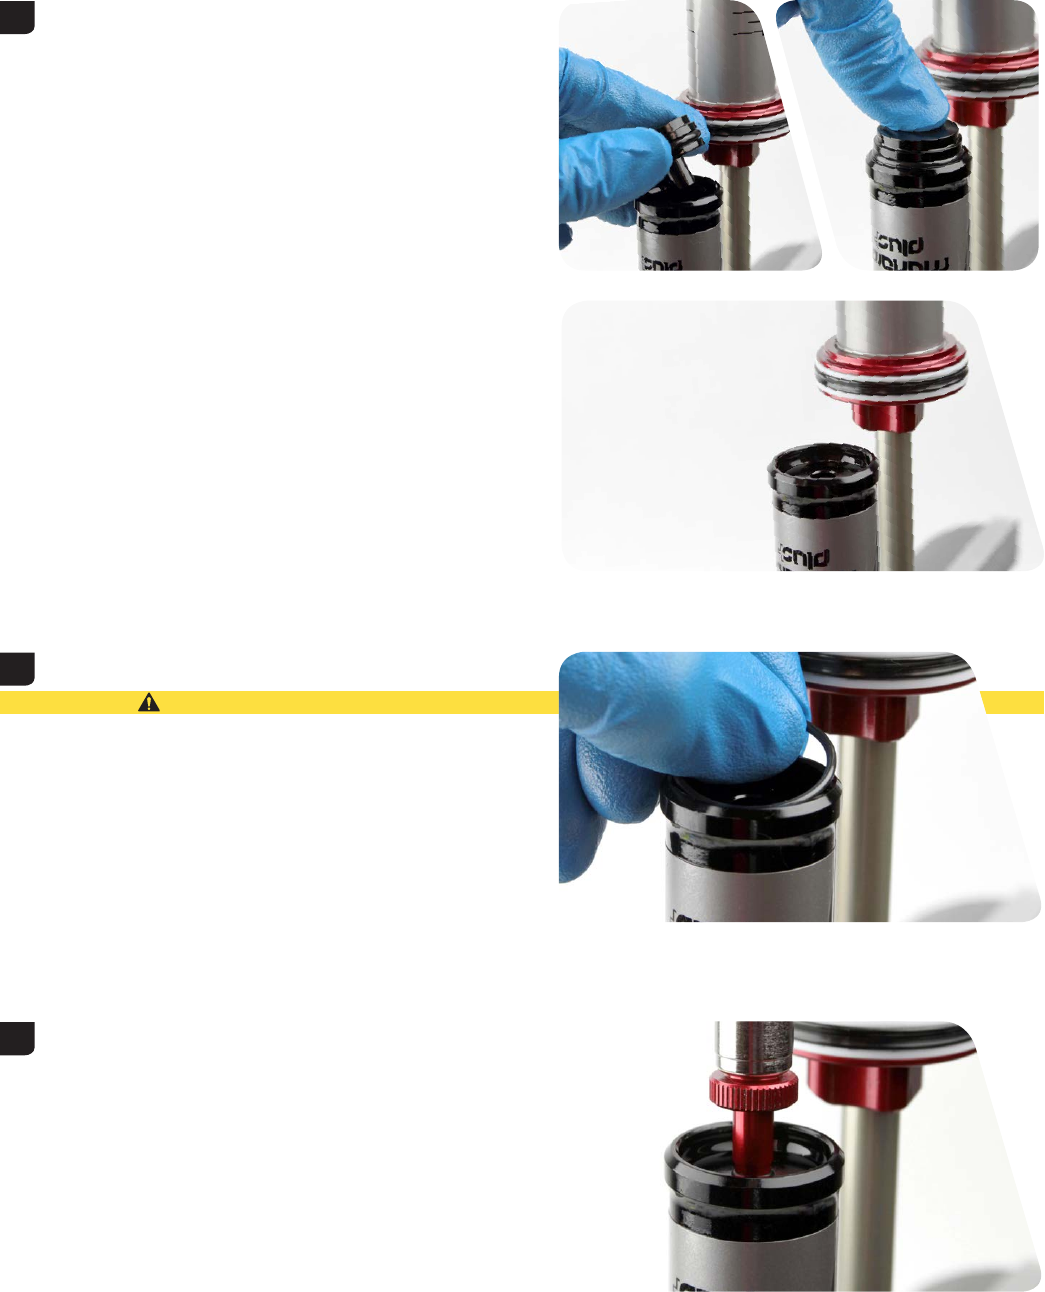
21 Apply a small amount of grease to the IFP reservoir cap
o-ring. Push the IFP reservoir cap into the IFP reservoir until
the retaining ring groove is visible.
22 Push the new retaining ring into the groove until it is seated.
CAUTION— EYE HAZARD
The retention clip can eject rapidly as it is removed.
Wear safety glasses.
23 Thread the pump and Monarch™ air valve adapter tool into the
IFP reservoir cap. Pull up on the pump to seat the reservoir
cap against the retaining ring.
34 Reassembly and Bleed
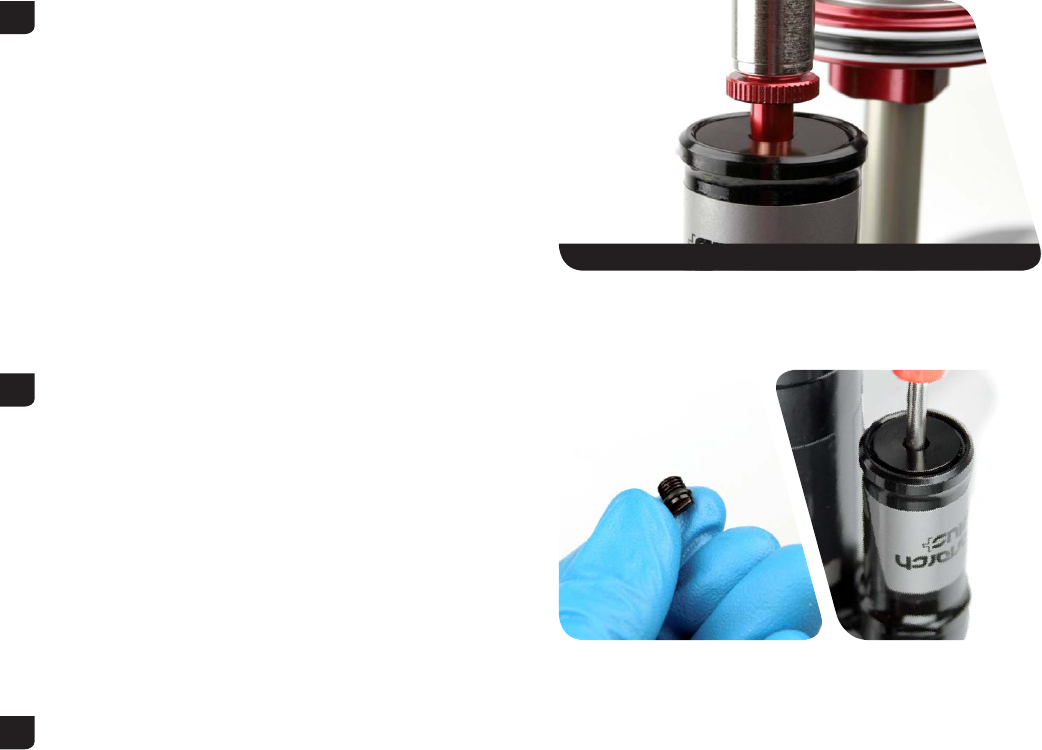
24 Use the pump to pressurize the IFP reservoir to 250 psi.
Once you have pressurized the reservoir, remove the Monarch
air valve adapter from the air fill port before removing it from
the shock pump.
Separating the pump from the adapter first will allow all of
the air to escape from the reservoir.
You may substitute nitrogen if you have the proper fill
equipment.
25 Remove and replace the IFP reservoir fill cap o-ring. Use a
Schrader valve tool to install the fill cap into the IFP reservoir
cap.
26 Spray the shock with isopropyl alcohol and clean it with a rag.
250 psi
35 Reassembly and Bleed
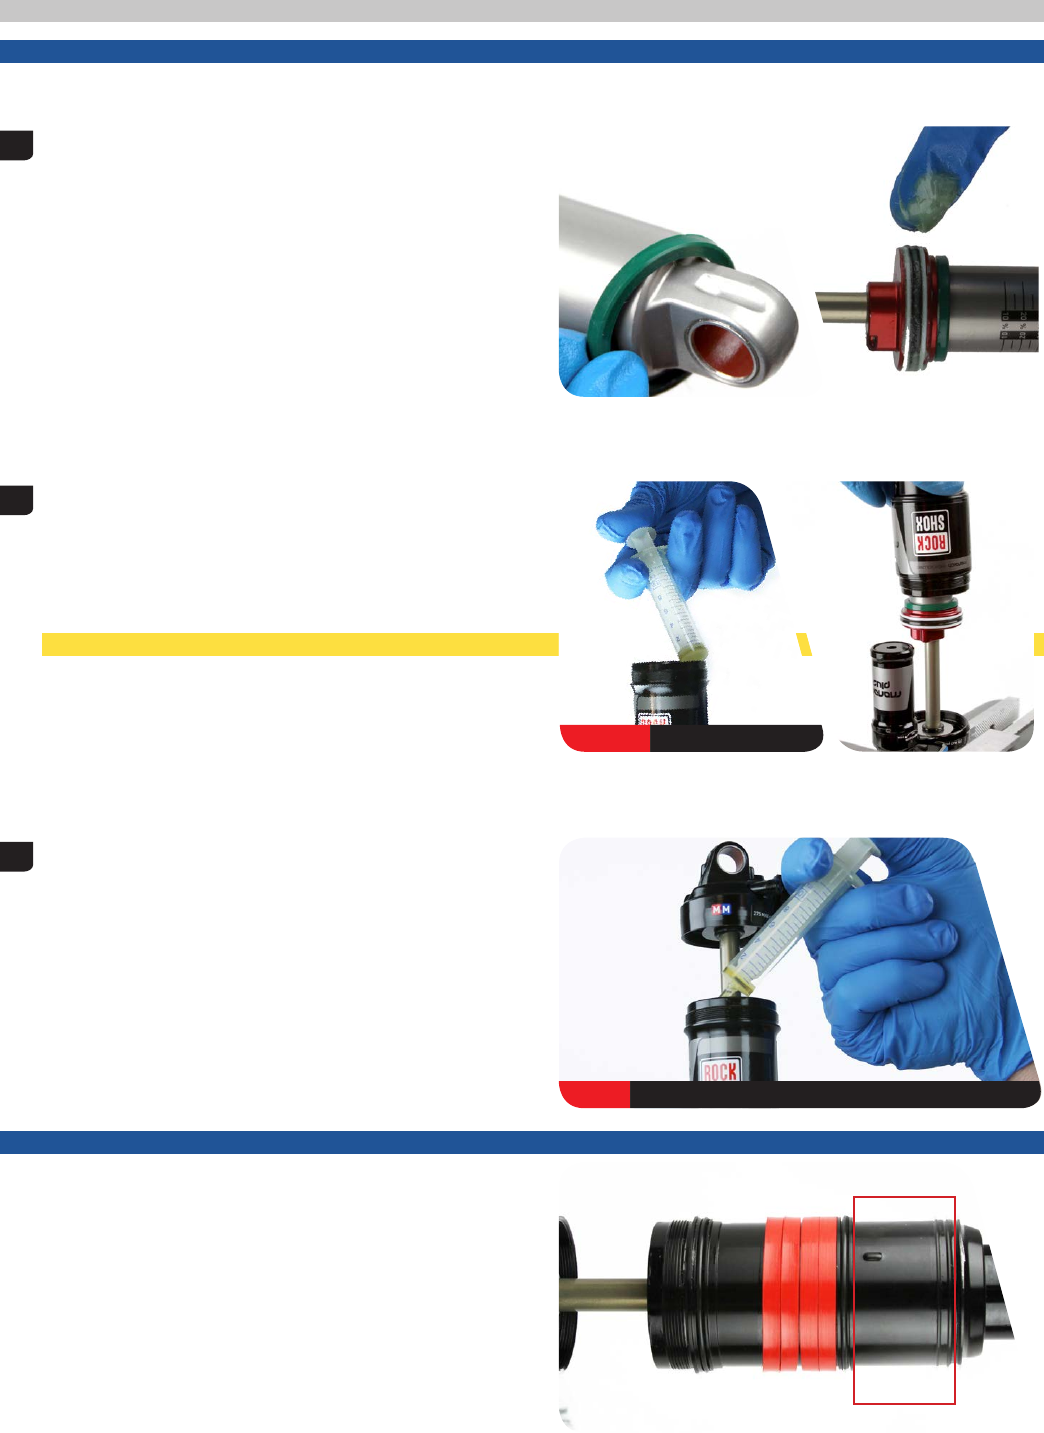
Air Can Installation
N O T I C E
Use aluminum soft jaws to protect the shaft eyelet when clamped.
1 Install the top out bumper onto the damper body. Apply
RockShox Dynamic Seal Grease to the seal head/air piston
seals.
Clamp the shaft eyelet in the vise with soft jaws.
2 Apply a small amount of grease to the air can threads. Inject
0.5 mL of Maxima® Maxum4 Extra 15w 50 into the air can
before installing the air can onto the damper. Firmly press the
air can down until the sealhead/air piston is inserted into the
air can.
DebonAirTM Air Cans: The high volume sleeve is not on the air
can at this time.
CAUTION— EYE HAZARD
Fluid will eject out of the holes as you install the air sleeve
onto the damper. Wear safety glasses.
3 Remove the shock from the vise, turn it over and clamp the
damper body eyelet in the soft jaws.
Inject another 0.5 mL of Maxima® Maxum4 Extra 15w 50
into the air can.
N O T I C E
Do not install bottomless rings within the boxed area as it will
reduce shock travel and performance.
15w 0.5 mL
15w 0.5 mL
36 Air Can Installation
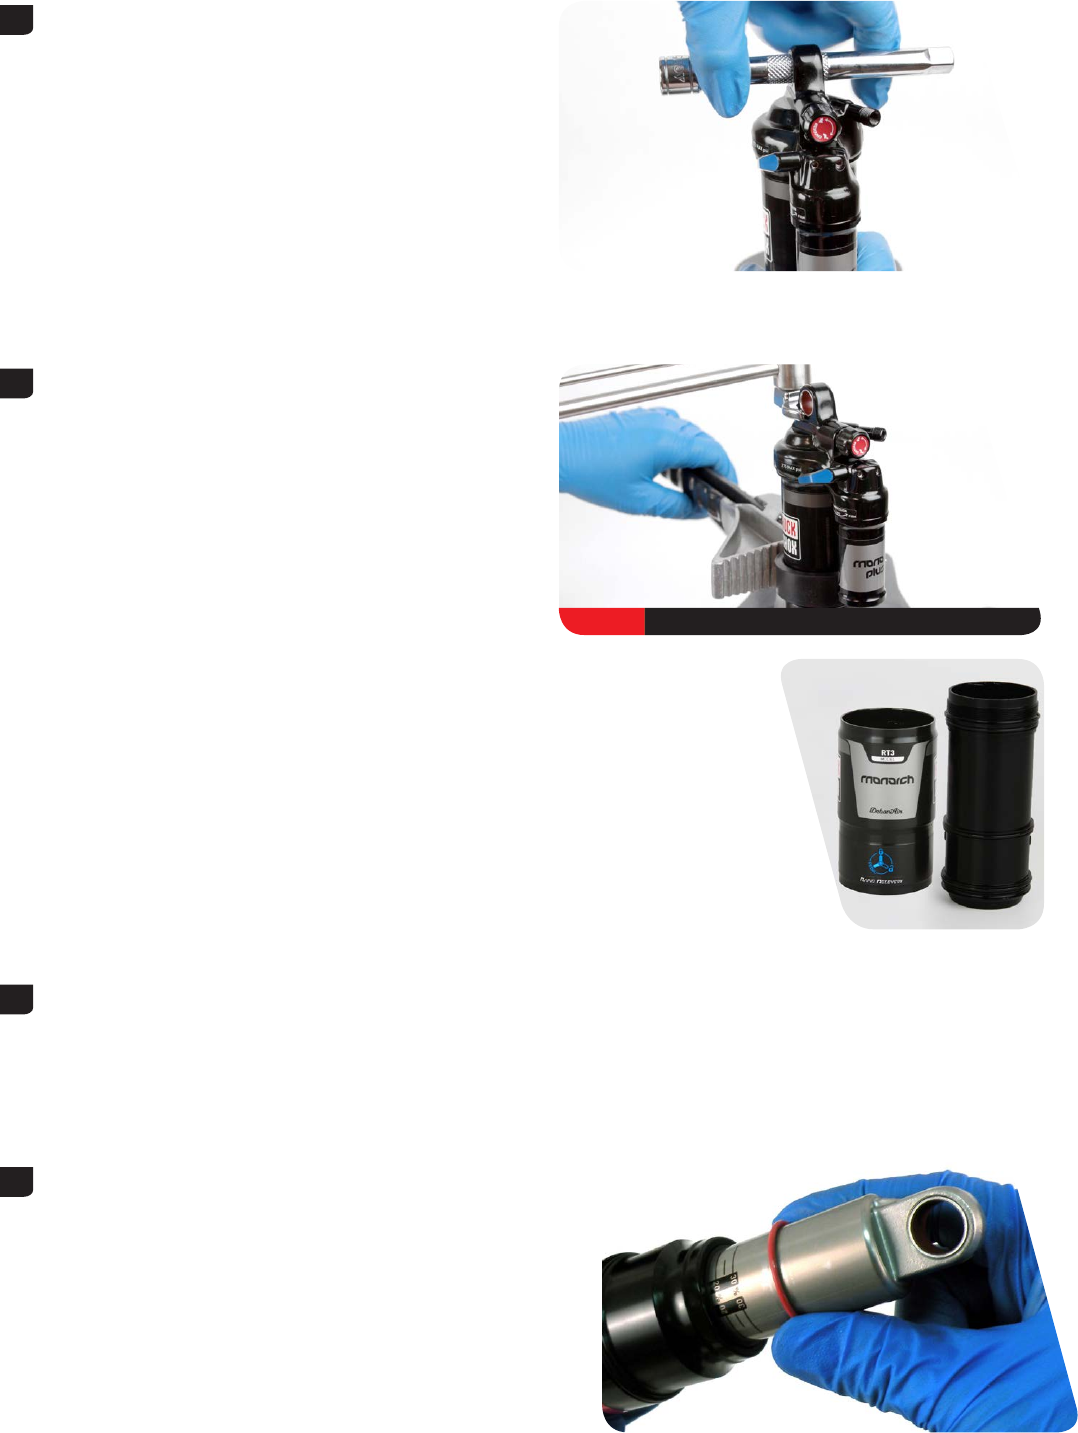
4 Insert a 5 inch socket extension through the shaft eyelet. Push
down on the shaft eyelet while pulling the air can up until the
air can threads engage with the eyelet threads.
Turn the socket extension clockwise until the shaft eyelet
threads and air can threads are tight.
High volume air cans only: Grip the lower portion of the can;
otherwise, the high volume sleeve will rotate independent of
the air can.
5 Stabilize the air can with a strap wrench to prevent it from
rotating. Use a torque wrench with a 13 mm crowfoot socket
to tighten the air can to 4.5 Nm (40 in-lb).
DebonAirTM Air Cans only: Reinstall the high volume sleeve
so that the indentation on the sleeve aligns with the middle
o-ring gland on the air can.
6 Remove the shock from the vise. Spray isopropyl alcohol on
the shock and clean it with a rag.
7 Install the sag indicator o-ring.
13 mm 4.5 N∙m (40 in-lb)
37 Air Can Installation
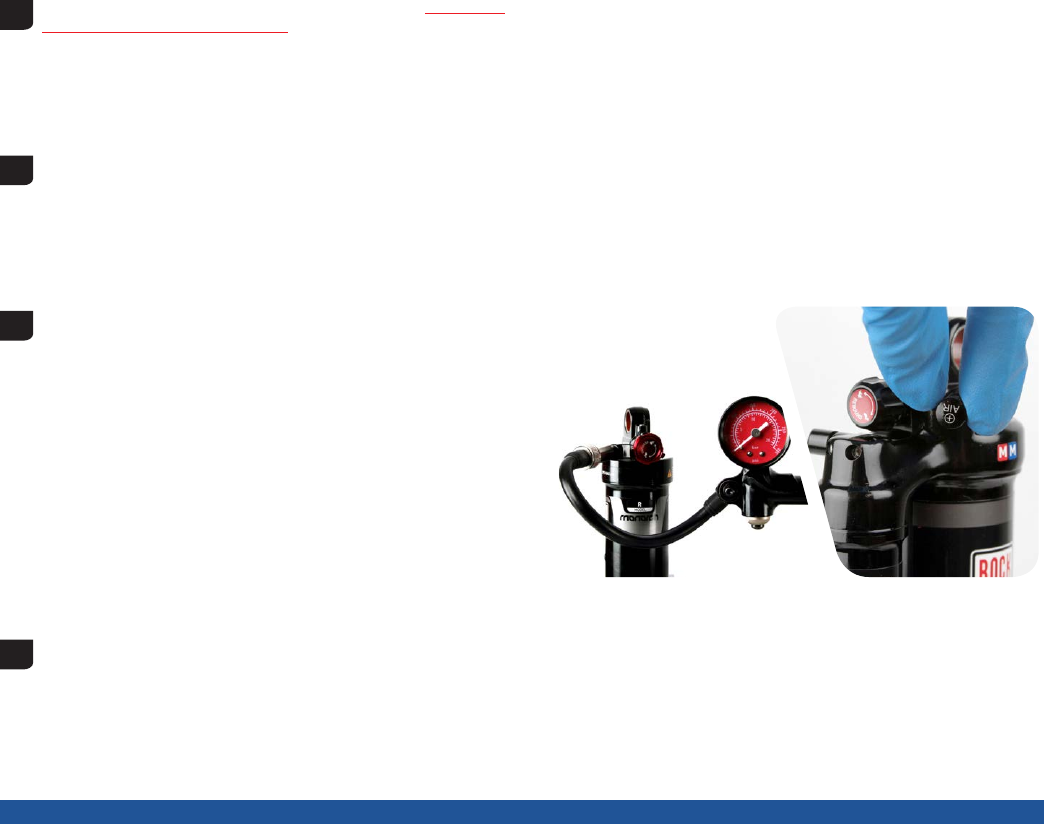
8 Reinstall the shock mounting hardware (see the Mounting
Hardware And Bushing Service section).
9 Reinstall the shock to your bicycle frame according to the
bicycle manufacturer’s instructions.
10 Use a shock pump to pressurize the shock to the desired air
pressure, then install the valve cap.
High Volume and DebonAirTM Air Cans: Align decal
orientation before pressurizing.
11 DebonAir TM Air Cans only: Use a shock pump to pressurize the shock to the desired air pressure. After adding air to the
shock, the pressure will need to be equalized between the shock chambers.
Record the air pressure value on the pump, then unthread it from the shock. Slowly but firmly press or sit on the saddle to
compress the shock until there is a hissing sound.
This sound indicates air transfer between chambers. Record the air pressure, then unthread it from the shock. Repeat this
process until you reach the desired amount of sag.
N O T I C E
When pressurizing the shock, do not exceed 275 psi.
The pump must be removed from the shock prior to checking sag to avoid damage to the pump.
This concludes the service for the Monarch Plus™ RC3/R rear shock.
38 Air Can Installation
This publication includes trademarks and registered trademarks of the following companies:
TORX® is a registered trademark of Acument Intellectual Properties, LLC
Loctite® and 242® are registered trademarks of Henkel Corporation
Maxima® Maxum4 Extra 15w 50 is a registered trademark of Maxima Racing Oils
“We will revolutionize the relationship that our users have with SRAM products,
cultivating a bond between the rider and bicycle. Our technical communication
will be delivered in innovative and exciting ways, with deliberation and accuracy
that inspires loyalty and trust across the globe.”
-SRAM TechCom Vision Statement
www.sram.com
tmplt 6.1.2016
ASIAN HEADQUARTERS
SRAM Taiwan
No. 1598-8 Chung Shan Road
Shen Kang Hsiang, Taichung City
Taiwan R.O.C.
WORLD HEADQUARTERS
SRAM LLC
1000 W. Fulton Market, 4th Floor
Chicago, Illinois 60607
USA
EUROPEAN HEADQUARTERS
SRAM Europe
Paasbosweg 14-16
3862ZS Nijkerk
The Netherlands
Содержание
- Сервис RockShox Monarch
- Тема: Настройка rock shox
- Настройка rock shox
- Ремонт и настройка — Настройка подвески #4: тонкости изменения объема воздушной пружины
Сервис RockShox Monarch

Хочу с вами поделиться шагами по быстрой переборке аммортизатора RockShox Monarch.
Снять аммортизатор с рамы, спустить воздух с основной камеры, выкрутить регулировки отскока и локаута в открытое положение.
Зажать в тисках за крепления со стороны бачка

Ленточным ключем (если есть) откручиваем бачек воздушной камеры. Если его нет, то пробуем руками. Если не получается руками, то намотать на бачек старую камеру чтоб увеличить диаметр хвата и не повредить бачек.
Аккуратно снимаем и видим вот такую картину
Снимаем отбойник, резиновое уплотнительное кольцо основной камеры, пластиковое разрезное кольцо.
В нижней части откручиваем колпачек ниппеля азотной камеры.
И видим обычный золотник. Спускаем оттуда давление.
Зажимаем аморт за нижнее крепление в тисках и ключем на 17 откручиваем крышку демпфера.
Выливаем масло из демпфера и видим «плавающий» клапан который нам надо достать

Чтобы его достать нам нужен специальный переходник.
Присоединяем вилочный насос, накачиваем давление и клапан выскочит
Пока клапан откладываем и возвращаемся к штоку.
шестигранником с верхней стороны крышки выкручиваем винтик
и выталкиваем компрессионный шарик который под ним зажат
Далее зажимаем это все за уши в тисках и ключем на 10 открычиваем клапан
Аккуратно расскладываем все на столе. Внимание. не рассыпьте шимстэк. Осматриваем/меняем если надо/смазываем все уплотнительные колечки на всех частях аммортизатора
Собираем клапан обратно, но шарик и прижимающий его винтик пока не вставляем
Вернемся к демпферу. Вставляем в него обратно плавающий клапан на глубину указанную в инструкции для данной длины аморта/хода штока
Заливаем в демпфер масло
До самого верха
Опустив крышку на клапан потихоньку начинаем надевать её
При этом мы видим как при закручивании крышки излишки масла и воздух выходят через верхний порт
Как закрутили — аккуратно вставляем компрессионный шарик и прижимаем его винтиком. Не раздавите при этом шарик, он полимерный
накачиваем через переходник азотную камеру до необходимого по инструкции давления

Вынимаем из банки сальник и уплотнения. Осматриваем/меняем/смазываем
Зажимаем горизонтально аммортизатор, насаживаем банку основной камеры
Капаем в позитивную и негативную части банки необходимое количество смазки.
И аккуратно, но с приличным усилием пытаемся насадить банку на резьбу.
Закручиваем до упора.
Накачиваем до рабочего давления и монтируем на велосипед.
Источник
Тема: Настройка rock shox
Опции темы
Поиск по теме
Отображение
Настройка rock shox
Всем привет
купил велик с чайника «sunn shaman s2». Как только поюзаю его, сразу расскажу что к чему
А сейчас у меня вопрос или даже просьба: помогите настроить вилку/задний аморт. (Вилка:Rock Shox Reba RL, задний аморт: Rock Shox Monarch RT3)
Купил специальный насос для этого дела. А вот инструкции как настрагивать нигде не могу найти. Если у вилки еще более менее понятно (там написано сколько качать), но при моем весе в 60 кг там диапазон 70-90psi что в камеру «*», что в камеру «-«. Куда же все таки больше накачать в «+» или «-» и зачем нужна резинка со шкалой? . За что отвечает регулятор с рисунком зайца и черепахи? Как я понимаю это отскок, но на что это влияет??
 купил велик с чайника «sunn shaman s2». Как только поюзаю его, сразу расскажу что к чему
 .
. А теперь для меня самое сложное: как настроить задний аморт? Там таблицы с весом и давлением нет. И работа самого аморта мне не понятно, как-то очень уж он медленно работает при слабой накачке, а при сильной я его вообще прожать не могу. И так же тут вопрос про резинку со шкалой, про регулятор «заяц-черепаха» и тут есть еще одно крутила от значения «min» до значения «Max» с надписью «GATE».
Кто поможет разобраться, огромное спасибо)
Пи$#%ц! Я в шоке. Хоть немного гуглить перед задаванием таких вопросов не пробовал?
Да ладно! А на сайте производителя не пробовал? А просто набрать в яндексе «Как настраивать вилку»? И в гугле и в яндексе забанили?
Есть такое понятие — сэг. Это то, насколько вилка и аморт проседают под твоим весом, когда ты сидишь на велосипеде. И вилку и аморт надо накачать таким образом, чтобы сэг составлял 30% от их хода (и там и там на ногах должна быть шкала). У вилки сначала подбираешь давление в позитивке, затем качаешь негативку на 10 ПСИ меньше. Пока этого достаточно. Потом, когда доберёшься до инструкции и профильных тем на форуме и сможешь их не только прочитать, но и понять, будешь настраивать более тонко. А пока просто запомни: 30% сэг и в негативку на 10 ПСИ меньше.
Инструкции находятся на www.sram.com/service. Это — толстый намёк.
Спасибо за совет, но инструкции которые я находил были только на английском.
Источник
Ремонт и настройка — Настройка подвески #4: тонкости изменения объема воздушной пружины
Текст — Tyler Benedict, по материалам www.bikerumor.com
В первой части серии статей о настройке подвески мы обсуждали настройку сэга, именно он задает правильную начальную точку для работы всей подвески. Во второй части мы говорили о низкоскоростной компрессии и различных настройках «платформы», закончив мысль настройкой отскока в третьей части. В конце концов, почти все производители велосипедов тесно сотрудничают с производителями подвески, чтобы разработать амортизатор, специально настроенный под конкретный велосипед. Однако, вилки и амортизаторы настраиваются на очень широкий круг райдеров, и зачастую ваш вес или стиль катания не вписываются в эти рамки, что не позволяет использовать весь диапазон внешних регулировок вилки или амортизатора.
Сегодня пришло время поговорить о настройке воздушных пружин вилок и амортизаторов.
Проставки Rockshox Bottomless Tokens, с помощью которых можно изменять объем воздуха в позитивной камере воздушной пружины всего за пару минут.
«Мы всегда используем сэг как отправную точку, но это не абсолютная истина для всех и каждого», — говорит Darren Murphy, владелец компании PUSH Industries, гуру настройки подвески из города Loveland, штат Колорадо. «Больший или меньший рекомендованного значения сэг не является чем-то неправильным. Не пытайтесь слепо следовать каким-то сферическим цифрам в вакууме. Вес и стиль катания каждого райдера уникален».
«Пройдя через настройки компрессии и отскока и хорошо настроив байк, у вас все равно не полностью используется ход подвески, или наоборот – вы все равно слишком часто пробиваетесь? Похоже, пришло время заняться объемом воздушной пружины».
К счастью, регулировать объем воздушной пружины проще пареной репы…
На Niner RIP9 устанавливается амортизатор с гораздо меньшей воздушной камерой (слева), чем на Niner JET9 (справа).
Перед тем, как приступить к делу, следует напомнить о рычажности подвески. Это касается только задних амортизаторов, и очень важно для понимания того, почему на ваш байк поставлен именно такой амортизатор, а не какой-то другой. Рычажность рамы – это отношение хода заднего колеса (подвески) к ходу штока амортизатора. Для наглядности мы будем рассматривать рычажность на примере Niner JET9 RDO (100 мм ход) и RIP9 RDO (125 мм ход).
Barrett James, продакт-менеджер компании Niner, объясняет: «Есть понятие рычажности в начале и в конце хода, значение рычажности вообще непостоянно по всей длине хода подвески, и изменение рычажности зависит от конфигурации шарниров в конкретной раме (т.е. от кинематики). Средние значения для наших рам из примера таковы: у JET9 рычажность примерно 2.1, а у RIP9 – 2.4. У рамы RIP9 значение рычажности не просто больше, она также обладает гораздо большей рычажностью в начале хода. Обе рамы имеют спадающую кривую рычажности (прогрессивная подвеска – прим. переводчика), это значит уменьшение значения рычажности с увеличением хода подвески, но у RIP9 более резкое изменение».
«Амортизатор с большей воздушной камерой легче страгивается, так что на раму JET9 с более низкой рычажностью устанавливается аморт с увеличенной банкой. На RIP устанавливается амортизатор с обычной банкой, поскольку у этой рамы рычажность выше. Если бы на RIP стоял амортизатор с увеличенной воздушной камерой, он бы прожимался на весь ход слишком легко».
Характеристики пружин амортизатора Monarch: Solo Air, Debonair и металлической пружины. Больший объем пружины Debonair сглаживает кривую жесткости пружины, делая ее более линейной по всему ходу.
Что делать: увеличивать или уменьшать?
При прочих равных, амортизаторы с большой воздушной камерой сжимаются легче, с менее резкой прогрессией в конце хода. Амортизаторы с малым объемом сжимаются жестче, с характерной резкой прогрессией в конце хода. Контролируя объем воздуха в пружине, вы можете изменять характеристику естественной прогрессивности сжатия воздушного амортизатора, особенно важна данная возможность для очень легких или очень тяжелых райдеров, вес которых лежит на границе диапазона, под который обычно проектируются и настраиваются амортизаторы и подвески.
«Традиционное заблуждение: тяжелым райдерам нужен аморт с большой воздушной камерой, легким – с маленькой. В действительно все с точностью до наоборот» — говорит Darren.
«Легкие райдеры особенно почувтсвуют профит более легкого сжатия в первой половине хода амортизаторов с большим объемом воздушной камеры» — дополняет Barrett. «У вас будет более мягкая прогрессия в конце хода, и это позволит использовать весь ход вашей подвески, при этом иметь мягкую упругую середину и ограничивающую от пробоя прогрессию в конце».
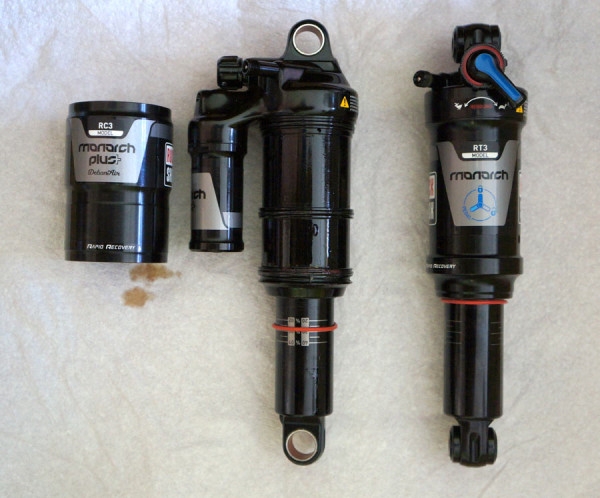
В амортизаторе Monarch Debonair вместо обычной банки используется внутренняя воздушная банка такого же диаметра, как и Solo Air, что позволяет использовать стандартные уплотнители. Внутренняя камера связана с внешней камерой, ограниченной специальным «стаканом», за счет которого и увеличивается общий объем пружины.
Итак, если вы правильно настроили сэг, но не можете заставить подвеску работать на весь ход, вы можете убрать проставки для уменьшения объема из камеры, или поменять банку на другую, большего объема, последнее позволяет сделать апгрейд-кит Debonair.
«Нам нужна как можно более мягкая и упругая характеристика подвески в начале хода, потому что это напрямую влияет на сцепление,» — добавляет Duncan Riffle, бывший чемпион США по ДХ, PR-менеджер отдела SRAM MTB. «Она должна отрабатывать каждую мелкую кочку на земле, и увеличенный объем пружины позволяет добиться такой работы подвески».
Большой объем воздушной пружины можно также использовать для изменения ощущений на короткоходных байках:
«Когда у вас больше объема воздуха в пружине, у вас есть гораздо больший диапазон настройки и более длинная и пологая кривая прогрессии в конце хода» — говорит Riffle. «Это может быть весьма полезным, чтобы сделать короткоходный 100/120 мм байк, амортизаторы на котором обычно имеют малый ход штока, более плюшевым и «длинноходным» по ощущениям».
«Обратная сторона увеличения объема камеры – вероятность пробоя подвески из-за менее резкой прогрессии в конце хода. Решить проблему можно проставками для уменьшения объема позитивной камеры (Bottomless Tokens). Небольшое уменьшение объема сохранит упругость и мягкость в начале хода, но даст более крутую характеристику пружины в конце хода, предотвращая пробой подвески. Я бы советовал пробовать качать немного меньшее давление, если вы ставите проставки в воздушную камеру, это позволит получить еще больше мягкости в начале хода, не пробивая подвеску».
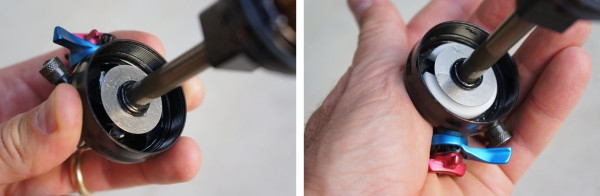
Fox предлагает широкий диапазон объемов проставок для изменения объема воздушной камеры, и они невероятно легко устанавливаются в амортизатор. Проставка – белая деталь-клипса на правой фотографии.
А если вы – тяжелый райдер, и вроде бы подвеска настроена правильно, но вы постоянно всаживаете аморт до пробоя? Или вы катаете по рельефу, который совсем немного жестче чем то, на что рассчитана ваша рама, и задняя часть байка ощущается слишком мягкой? Если просто подкачать давление в пружине, вы уменьшите сэг и получите подвеску, которую не сможете заставить работать на весь ход. Кривая подвески не изменит вид, она просто немного поднимется по абсолютному значению. И это не даст вам той работы подвески и того сцепления с поверхность, которое вам нужно.
Уменьшая объем воздушой камеры, вы оставляете практически нетронутой характеристику пружины в начала и в середине хода, но увеличиваете прогрессию в последней трети хода, уменьшая шансы жестко или часто пробивать подвеску.
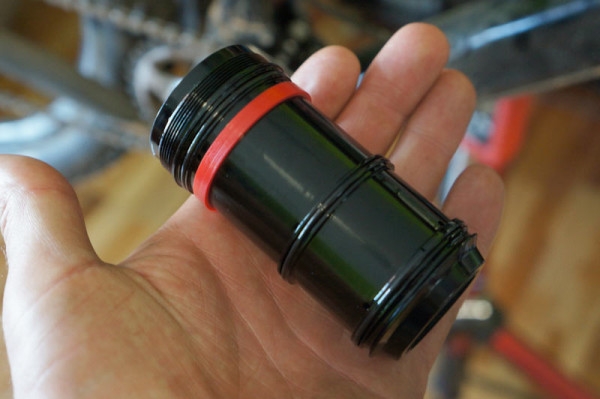
Спейсеры в виде красных колец позволяют очень тонко менять объем камеры Debonair.
Но проставки для изменения объема могут использовать не только легкие или тяжелые райдеры. Любой райдер может поиграться с объемом просто для того, чтобы добиться лучшего ощущения от работы подвески. Ветеран МТБ, райдер команды Manitou Eric Porter поясняет:
«Если вам кажется, что подвеска слишком линейна, вам пора уменьшить объем воздушной камеры. В конце концов, вам хочется использовать весь ход подвески, но при этом не ловить сильные пробои в конце хода. Здорово, когда после какого-нибудь огромного пролета и приземления чувствуешь, что подвеска отработала мягко, и, взглянув на шток амортизатора, понимаешь, что она отработала на весь ход, при этом не пробилась с треском. Уменьшение объема так же позволяет добиться большей упругости подвески, так что если вы любите выпрыгивать с корней или кочек – меньший объем камеры вам в помощь».
Добавлю, что тюн объема воздушной камеры также позволяет подстраивать амортизатор и работу задней подвески под работу более длинноходной вилки, что сейчас очень популярно в эндуро байках.
А что с вилками?
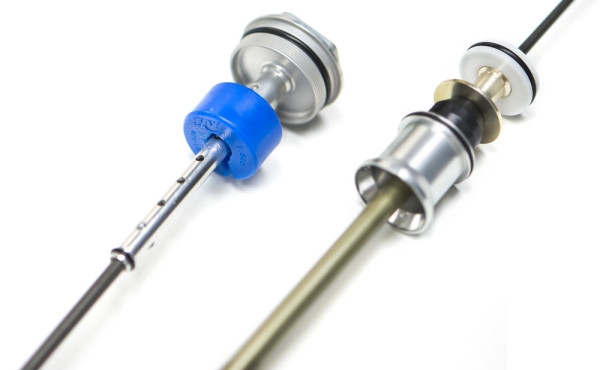
Fox предлагает проставки разного диаметра (синие детали на фото) для своих вилок серии FLOAT.
Поскольку на работу вилки не влияет ни конфигурация, ни рычажность подвески, а только вес вашего тела, легче понять и почувствовать, как изменение объема влияет на ее работу. К сожалению, в вилках объем камеры можно только уменьшать (эх, не были они в России…русские могут и увеличивать – прим. переводчика).
Современные вилки Magura, Rockshox и Fox (и остальные, наверное) используют проставки, которые очень легко установить. Иногда в вилках уже находятся предустановленные проставки «с завода». Велобренды теперь заказывают вилки не только с особыми настройками демпфера, но и с конкретным объемом проставок в воздушной пружине. Так что у вас есть возможность убрать уже установленные проставки и «увеличить» объем воздушной пружины. Если проставок в вилке нет, то вы можете лишь уменьшать объем камеры, что даст вот такой эффект:

На этом графике изображены зависимости усилия пружины от хода вилки Rockshox с 0/1/2/3 проставками Bottomless Tokens в воздушной пружине. В первой половине хода вилки изменения едва заметны, а во второй части хода мы видим значительное увеличение прогрессии пружины. Как и в случае с амортизаторами, если вам хочется сохранить мягкую работу вилки в начале хода, но при этом не пробиваться слишком часто – попробуйте уменьшить объем позитивной камеры.
Реальные примеры.
Chloe Woodruff и Evelyn Dong, гонщицы, спонсируемые компанией Niner, обе весят примерно 52 килограмма и катают на JET9 RDO в ростовке XS. На обоих байках стоят амортизаторы, прошедшие тюн в PUSH для того, чтобы лучше работать под миниатюрными райдершами. Darren говорит, что в стоке в амортизаторе Fox установлен средний спейсер объемом 0.6 кубических дюйма, так что девчонкам приходилось ездить на очень низком давлении в воздушной пружине, чтобы заставить подвеску работать на весь ход. И это отражалось на общей работе подвески не лучшим образом. Если они накачивали амортизаторы под «правильный» сэг, то получали всего 70-80% хода подвески. Решение проблемы – установка меньшего спейсера. Самый маленький из предлагаемых Fox проставок имеет объем 0.2 кубических дюйма, но в PUSH обточили его до 0.15 (они также полностью «перебрали» демпфер, но это совсем другая история).
Что касается меня, то в моем амортизаторе Fox на байке RIP9 RDO, который я тестирую, установлен белый спейсер (см. фото выше). На байке стоит «мощная» 150 мм вилка Fox 36, и передняя подвеска на 25 мм длинноходнее, чем задняя. На спусках в «больших горах» или на ДХ-трассах, задняя подвеска просто не справлялась с тем, что с радостью отрабатывала длинноходная вилка. Стоит напомнить, что во мне 190 см роста, и в полной «эндуро» экипировке я вешу около 95 кг. Добавление спейсера позволило получить чуть более жесткую прогрессию в конце хода, появилось ощущение, как будто задняя подвеска стала более длинноходной. Колечко на штоке амортизатора (или измеритель уровня фана) по-прежнему показывало, что амортизатор работает на весь ход, я просто чувствовал больше поддержки и упругости на больших дропах и приземлениях. Как раз то, что мне было нужно.
Наборы спейсеров достаточно недорогие и доступны практически во всех веломагазинах. Установка проставок и в вилки, и в амортизаторы достаточно простая, обычно хватает простого ключа с торцевыми головками и съемника воздушной банки амортизатора. На установку спейсера в мой Fox потребовалось 15 минут, учитывая время на снятие и установку амортизатора в раму. Многие производители предоставляют подробные мануалы для проведения данной процедуры. Вы также можете отправить ваш аморт или вилку профессионалам, например в PUSH или Suspension Experts. Если вы не боитесь экспериментов, большинство проставок можно просверлить или обточить для более точной подгонки объема, но не забывайте, что вы можете лишиться гарантии. Если вы решитесь на токарно-сверлильные работы, помните, что действуете на свой страх и риск.
После того, как вы поменяли объем воздушной камеры, самое время вернуться к тому, с чего мы начали – к настройке сэга и демпфирования. Затем, если вам все еще кажется, что подвеска не работает на 100%, пришло время сделать общий тюн амортизаторов. Именно этому будет посвящена пятая часть серии.
Добавлю реальный пример от себя.
Когда переводил статью — был удивлен, насколько точно в ней описан путь, который я эмпирически прошел в поисках подходящего мне амортизатора.
По средним меркам я довольно легкий «райдер», вес колеблется около отметки 63 кг. В прошлом сезоне приобрел подвесную раму Merida 1-20, в ней был установлен в стоке аморт Х-Fusion O2R с обычной банкой. Рама имеет прогрессивную кривую рычажности, это значит, что в начале хода она «мягче», чем в конце. И воздушный аморт также имеет прогрессию в конце хода. 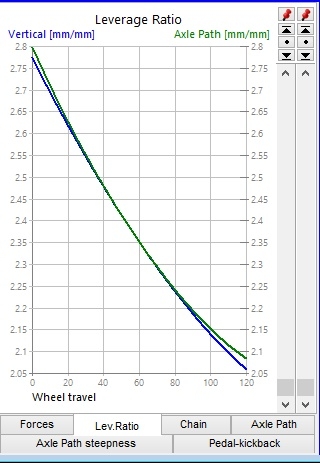
В итоге с моим дрыщавым весом я не мог нормально настроить подвеску: качаю по сэгу — за серединой хода подвеска дубовая, работает процентов на 60-70 от 120 мм, качаю по нормальному ощущению на кантрийной «мелочи» — подвеска слишком легко пробивается на прыжках и больших кочках. Дело усугублялось еще и тем, что тюн аморта был довольно жесткий — даже на открытой НСК я не мог быстро прожать подвеску. Этот вопрос решился перетюном шимстека на более мягкий, но проблема с пробоями осталась. При настройке подвески под нормальное подвседневное катание на небольших прыжках происходило следующее: 
Аморт жесточайше складывало.
Затем я приобрел Monarch RT3 за хорошую цену, с ним было как-то немного получше, но опять же — обычная мелкая банка не давала настроить аморт идеально.
И тут «нет худа без добра» — Монарх поломался. На срочную замену один мой хороший знакомый, у которого в шкафу лежит гора амортов , одолжил мне на время Monarch 3.3 c банкой High Volume… святой Грааль! Это было в точности то, что я хотел от подвески, все настроилось идеально, при сэге 25% подвеска кушала мелочь, сильно не качалась (с платформой), но при этом я мог пулять кантрийные пулялки и маленькие дропчики — аморт работал почти на весь ход, но не пробивался.
Я бы с радостью купил у владельца этот монарх, но меня останавливает один нюанс: в мою раму он становится только вот так 🙁 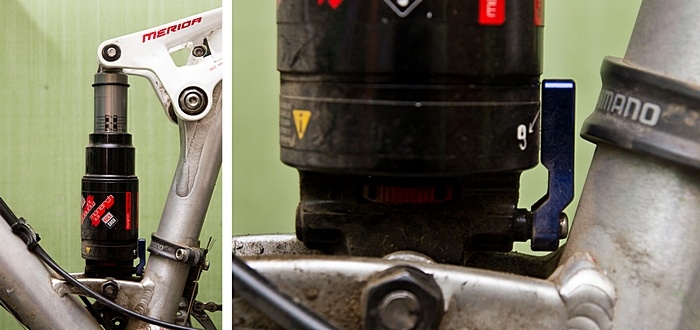
Так что коплю деньги на новый DebonAir, параллельно мониторя барахолки.
Получилось все именно так, как описано в статье для райдеров-легковесов.
Источник
Ремонт амортизатора Rock Shox Monarch 3.1
| Автор | Сообщение |
 Silvester Silvester |

У амортизатора Rock Shox Monarch 3.1.травит сосок в месте его присоединения к телу амортизатора (сам ниппель в порядке). Возьмеш сосок рукой пошевелиш он слегка люфтит и воздух из этого стыка выходит. Что делать не знаю. Новый что-ли амортизатор покупать? Можно ли както разобрать амортизатор чтоб посмотреть вчем там дело мож прокладки какие-нить стерлись или замялись за прошлый сезон? Такое впечатление на первый взгляд что он неразборный. Подскажите знающие люди буду Вам премного благодарен.


тему закрываем. проблема была в недокрученном соске через уплотнение которого при повышении давления в аморте и травил воздух (резиновое уплотнение между амортом и соском оказалось в порядке). на колене соска есть чтото вроде маленькой головки с двумя гранями. поначалу даже не обратил не нее внимание весь сосок закрашен черной краской. закрутил сосок покрепче пассатижами и все стало ок.
Собственно искал тему как решить проблему со своим монархом, ничерта нигде не нашел, а эта тема на иксах выскакивала первой в моих поисках, решил отписаться тут чтоб не плодить подобные темы. ( может кому поднимет моральных дух 🙂 и не позволит выкинуть аморт в мусорку преждевременно 🙂
Итак имеется аморт монарх 3,3

При езде аморт начал травить воздух с места соединения штуцера подкачки воздуха с банкой аморта(телом)
Пораскинув мозгами и послушав умных людей, принялся мотать фум-ленту, сразу оговорюсь если у кого-то есть желание повторить мой подвиг не мотайте фумку на резьбу — угробите её, мотайте как-то так:  (спасибо за фотку Fly_tmn 🙂
Короче говоря, как кто-то уже догадался угробил я резьбу штуцера под чистую, фоток не осталось, но слово «угробил» самое точное определение.
Попаниковав пару минут, собравшись с мыслями прокатившись по мастерским города, посоветовашись с ребятами (Саша, Паша, спасибо  )набросал план действий, первым пунктом в плане стал поиск толкового токаря, справедливости ради просто отпишусь что проискав оного пару дней, нашел его у в гостях у родителей. ихнего соседа 🙂 если кому нужны будут контакты обращайтесь, сведу.
Так вот, решение проблемы свелось к простому восстановлению резьбы штуцера, и выточки в болте с нужным шагом резьбы резьбы под сам штуцер.
Получилось вот такое дело:
тут уже нарезана резьба на банке аморта. (можно сравнить шаг резьбы на двух монархах, ну если не шаг, то диаметр отврстий точно видно отлично :))

Тут можно сравнить резьбу на штуцерах.

Это болт который послужил для подгонки всего этого добра в одно целое, перед установкой ему пришлось спилить голову, ибо линки не позволяли с такой высотой влезть в раму (штуцер упирался в линк)
ЗЫ: в самом болте выточена резьба под штуцер т.е. он полый.

В итоге посадив втулку на фиксатор резьбы и «полирнув» «немного» (Вася, спасибо :))) вышло такое добро:

Как итог, ничего неисправимого нет 🙂 если правая рука кривая и из жопы то спасает ровная левая. и наличие капли мозгов :))) всем бобра!
Источник
Сервис RockShox Monarch
Хочу с вами поделиться шагами по быстрой переборке аммортизатора RockShox Monarch.
Снять аммортизатор с рамы, спустить воздух с основной камеры, выкрутить регулировки отскока и локаута в открытое положение.
Зажать в тисках за крепления со стороны бачка
Ленточным ключем (если есть) откручиваем бачек воздушной камеры. Если его нет, то пробуем руками. Если не получается руками, то намотать на бачек старую камеру чтоб увеличить диаметр хвата и не повредить бачек.
Аккуратно снимаем и видим вот такую картину
Снимаем отбойник, резиновое уплотнительное кольцо основной камеры, пластиковое разрезное кольцо.
В нижней части откручиваем колпачек ниппеля азотной камеры.
И видим обычный золотник. Спускаем оттуда давление.
Зажимаем аморт за нижнее крепление в тисках и ключем на 17 откручиваем крышку демпфера.
Выливаем масло из демпфера и видим «плавающий» клапан который нам надо достать
Чтобы его достать нам нужен специальный переходник.
Присоединяем вилочный насос, накачиваем давление и клапан выскочит
Пока клапан откладываем и возвращаемся к штоку.
шестигранником с верхней стороны крышки выкручиваем винтик
и выталкиваем компрессионный шарик который под ним зажат
Далее зажимаем это все за уши в тисках и ключем на 10 открычиваем клапан
Аккуратно расскладываем все на столе. Внимание. не рассыпьте шимстэк. Осматриваем/меняем если надо/смазываем все уплотнительные колечки на всех частях аммортизатора
Собираем клапан обратно, но шарик и прижимающий его винтик пока не вставляем
Вернемся к демпферу. Вставляем в него обратно плавающий клапан на глубину указанную в инструкции для данной длины аморта/хода штока
Опустив крышку на клапан потихоньку начинаем надевать её
При этом мы видим как при закручивании крышки излишки масла и воздух выходят через верхний порт
Как закрутили — аккуратно вставляем компрессионный шарик и прижимаем его винтиком. Не раздавите при этом шарик, он полимерный
накачиваем через переходник азотную камеру до необходимого по инструкции давления
Вынимаем из банки сальник и уплотнения. Осматриваем/меняем/смазываем
Зажимаем горизонтально аммортизатор, насаживаем банку основной камеры
Капаем в позитивную и негативную части банки необходимое количество смазки.
И аккуратно, но с приличным усилием пытаемся насадить банку на резьбу.
Накачиваем до рабочего давления и монтируем на велосипед.
Источник
Разборка амортизатора rock shox monarch
У монарха оно не должно течь по определению В исправном аморте в камерах с воздухом масла нет.
Не хлюпает. За сутки простоя дома давление спустило на 10 psi
как померил?
если накачал, открутил насос, прикрутил насос померил — то так и должно быть.
>У монарха оно не должно течь по определению В исправном аморте в камерах с воздухом масла нет.
пеши ищщо !
Что-то я один пешу, а Вы толком ничего не напесали.
У меня на монархе 3.3 конструкция именно такая: две возд. камеры — основная и маленькая компенсационная, разделённые камерой с маслом. При замене масла оттуда специально выгоняется воздух и попадать он туда при работе не должен, как и выходить масло. У меня была указанная мной проблема, когда завоздушилось масло и сразу начало пениться, отсюда хлюпанье и изменение в работе.
Против заливания в камеру с воздухом какого-то количества масла, дабы насухо не работало я не имею ничего против, но это уже из другой области.
У Alewa43, вероятно, проблема другого плана. Предложите своё решение.
У меня на монархе 3.3 конструкция именно такая: две возд. камеры — основная и маленькая компенсационная, разделённые камерой с маслом.
всё свалено в одну кучу. :rolleyes::good: .Компенсационная никак не связана с воздушной. Как-то так.
И аморт , рабочий, должен сопливить. Иначе он тупо сдуется в неподходящий момент.
vadim-, Я не говорил, что они связаны.
И аморт , рабочий, должен сопливить. Иначе он тупо сдуется в неподходящий момент.
С чего это вдруг? Там давление 20 атмосфер, если оно начнёт сопливить, то пора менять резинки, ибо аморт просто спустит.
И опять же, «сопливить» он будет только если в основную воздушную камеру залить масло. И речь пойдёт не о «соплях», а о тончайшей масляной плёнке на скользящей поверхности. Если же уходит масло из демпфера и сопливит — это уже пора перебирать и устранять причину.
И вообще, наш спор не по теме.
если накачал, открутил насос, прикрутил насос померил — то так и должно быть.
Сначала накачал до 200 psi, открутил насос, потом сразу прикрутил. Давление было 190 psi. Значит, при проверке давления стравливается 10.
Накачал до 200 снова, и когда померил через сутки, оно было 180, зночит спустило на 10. Верно?!
———- Добавлено в 22:54 ———- Предыдущее сообщение было в 22:53 ———-
Например, вытащить аморт, накачать до предела и опустить в воду
В выходные надо попробовать.
Воздух ведь может еще выходить и из винтиков (настроечных)?
на табуретке катайтесь сами. Это кст, предельное давление (300пси). А если имеется ввиду компенсационная камера то там 25. 30 атм. Читайте мануал.
Источник
Тема: Настройка rock shox
Опции темы
Поиск по теме
Отображение
Настройка rock shox
Всем привет
А сейчас у меня вопрос или даже просьба: помогите настроить вилку/задний аморт. (Вилка:Rock Shox Reba RL, задний аморт: Rock Shox Monarch RT3)
Купил специальный насос для этого дела. А вот инструкции как настрагивать нигде не могу найти. Если у вилки еще более менее понятно (там написано сколько качать), но при моем весе в 60 кг там диапазон 70-90psi что в камеру «*», что в камеру «-«. Куда же все таки больше накачать в «+» или «-» и зачем нужна резинка со шкалой? . За что отвечает регулятор с рисунком зайца и черепахи? Как я понимаю это отскок, но на что это влияет??
А теперь для меня самое сложное: как настроить задний аморт? Там таблицы с весом и давлением нет. И работа самого аморта мне не понятно, как-то очень уж он медленно работает при слабой накачке, а при сильной я его вообще прожать не могу. И так же тут вопрос про резинку со шкалой, про регулятор «заяц-черепаха» и тут есть еще одно крутила от значения «min» до значения «Max» с надписью «GATE».
Кто поможет разобраться, огромное спасибо)
Пи$#%ц! Я в шоке. Хоть немного гуглить перед задаванием таких вопросов не пробовал?
Да ладно! А на сайте производителя не пробовал? А просто набрать в яндексе «Как настраивать вилку»? И в гугле и в яндексе забанили?
Есть такое понятие — сэг. Это то, насколько вилка и аморт проседают под твоим весом, когда ты сидишь на велосипеде. И вилку и аморт надо накачать таким образом, чтобы сэг составлял 30% от их хода (и там и там на ногах должна быть шкала). У вилки сначала подбираешь давление в позитивке, затем качаешь негативку на 10 ПСИ меньше. Пока этого достаточно. Потом, когда доберёшься до инструкции и профильных тем на форуме и сможешь их не только прочитать, но и понять, будешь настраивать более тонко. А пока просто запомни: 30% сэг и в негативку на 10 ПСИ меньше.
Инструкции находятся на www.sram.com/service. Это — толстый намёк.
Спасибо за совет, но инструкции которые я находил были только на английском.
Источник
Тема: Всё о RockShox
Опции темы
Поиск по теме
Отображение

Всё о RockShox
Итак, полезности про RockShox на веломании:
asdf[URL=»http://forum.velomania.ru/index.php?showtopic=24764&hl=RockShox»]Настройка вилок с Dual Air + крутим Floodgate и Rebound[/URL
[URL=»http://forum.velomania.ru/index.php?showtopic=27008&hl=RockShox»]Апгрейдим RockShox! — взаимозаменяемость среди вилок одной серии[/URL
[URL=»http://forum.velomania.ru/index.php?showtopic=28922&st=0″]Воздушная пружина от Ревелейшена в Торе-Реконе (ставим DualAir вместо SoloAir-пружины)[/URL
Что вы думаете про вилку RS Dart 3?! (обслуживание, ссылки на мануалы и проч.)
[URL=»http://forum.velomania.ru/index.php?showtopic=33158″]Встал вопрос о выборе вилки, Marzocchi 55 ATA2 или RS Lyrik Solo Air(Coil U-Turn)[/URL
[URL=»http://forum.velomania.ru/index.php?showtopic=35129″]Что вы знаете об истекающих маслом Tora’х 2008?[/URL
[URL=»http://forum.velomania.ru/index.php?showtopic=45783″]Монарх = гавно. Спускает на морозце.[/URL
[URL=»http://forum.velomania.ru/index.php?showtopic=28096&view=findpost&p=703141″]Buba2 элегантно добавляет регулировку компрессии на манетку Poplock[/URL
Первым разгрести кучу информации вызвался коллега eexo, вот ФАК его взглядом, рекомендую ознакомиться, прежде чем что-либо спрашивать. Дополнения я фигачил курсивом, читаем внимательно и потом не спрашиваем.
Q: Чмоки всем, не подскажите где сделать ТО вилке подешевле и чтоб качественно? Веломир?
A: Веломир — офф. дилер, конечно можно у них. Но ничего страшного в этих вилках нет, инструкции по переборке есть в свободном доступе — можно справиться самостоятельно — дешевле и быстрее.
Q: сервис-мануал на ребу
A: http://sram.com/_media/techdocs/95-4. ice Guide.pdf
Вообще все сервис-мануалы лежат здесь: http://sram.com/en/service/index.php
Q: подскажите, какой длины вилка ХХХ?
A: http://sram.com/en/service/rockshox/view.p. &subcatID=2 находим Front Suspension Crown To Axle, скачиваем — смотрим.
Q: в итоге какая то хрень с флудгейтом. между положениями откр/закр исчезла разница
A: Блокировки-флудгейты в РШ перестают работать если в демпфере упал уровень масла.
Соответственно или сам разбераешь демпфер и отмеряешь в него столько масла, сколько рекомендует производитель, или сдаешь вилку в мастерскую.
Замечание: если изначально всё работало, а потом начались проблемы — значит масло вытекло из полости ноги в штаны. Как пофиксить, см. далее.
Q: ПАНИКЕ. Вилка теряет ход (не прожимается до конца), не работает блокировка.
A: Масло вытекло из полости правой ноги в штаны. Чиним вот так: тыц
или вот так: бум!
новая подборка ссылок от InVader про колечки и прочее
Q: У меня нет съёмника стопорных колец и мне жалко 50 рублей на покупку инструмента, что делать?
A: Купить инструмент. Если вообще никак, то вот варианты:
Для внешних (над крутилкой блокировки): можно выйти из положения с помощью трёх саморезов и пассатижей — два из них вставляются в отверстия стопорного кольца, между ними, примерно по середине, зажимается третий (он выполняет функцию оси) и сверху вся эта конструкция сжимается пассатижами — кольцо расжимается, и вуаля! Подсказал способ мой родственник-мотокроссер =)
Для внутренних (заглушки в алюминиевых ногах): ножницы, мед. зажимы, гвозди, пассатижи и надёжный товарищ, фантазируем! Но лучше, конечно, купить инструмент.
Q:Выставлен ход 85мм. Хочу увеличить до 100. Насколько геморно это провернуть в домашних условиях?
А:Разбираешь воздушную камеру(в левой ноге) и вытаскиваешь проставку. Не надо опасаться. Воздушные пружины очень просты. Их следует потрошить и по необходимости менять резиновые колечки.
Фотки воздушной камеры на примере Recon Solo Air: Всё о RockShox
Q: А можно уменьшить ход у XXX со 100 мм до 80?
A: Конечно, но для этого нужны спец. проставки — резиновые кольца.
Q: Можно ли из ХХХ 100mm сделать 130mm?
А: читать мануал, там написано можно ли и на сколько для конкретной модели. Возможны варианты, но без доп. запчастей не обойтись.
Q: Вредно ли ездить на полностью «сдутой» воздушной вилке?
A: при атмосферном давлении(в вилке) на ребе можно ехать, если твой вес не больше 40 кг.
если весишь больше 50 кг — то очень вредно.
Q: После недельного простоя заметил, что масло по ноге стекает сверху, из-под короны и на сальнике его скопилось довольно много. Течь наблюдается и при езде и в состоянии покоя.
A: скорее всего при установки демпфера либо замяли уплотнитель, либо просто не до конца вкрутили его в ногу вилки. Для исправления потребуется разводной ключ =) и 5 минут работы — выкрути демпфер (не до конца, только чтобы полностью оголить резьбу), проверь состояние уплотнителя, смажь резинку маслицем и вкрути обратно. Всё. Если всё совсем грустно, обмотать уплотнение ФУМ-лентой.
Q: Из под синего диска на демфере, к которому подсоединяется трос блокировки, который заменяет крутилку локаута в случае поплока, сочится масло.
A: Мастер сказал, что это обычная болячка для вилок RS. Он эту проблему устраняет установкой доп резиночки.
Q: Течет масло из-под регулировки отбоя
А: Течь с низу вилки можно прекратить, обматав резьбу на болте (куда вставляется переключатель скорости отскока)фум-лентой. 4-5 витков, думаю, будет достаточно.
A2: уплотнительное колечко меняется на более толстое.
более толстое покупается в авто или хоз магазине.
требуется частичная разборка вилки, для многих это несложно smile.gif
понятное дело, что в магаз надо идти с уже снятым плохим и тонким колечком дабы не пролететь по основным размерам.
А3: если течёт сквозь шток отбоя, то помогает тока полная разборка этого узла с заменой уплотнения внутри штока. Разборка для вилок ДАРТ заключается в следующем — нужно выпрессовать металлический штырёк, ограничивающий поворот регулировки отскока, сделать можно плоской отвёрткой, чрезмерного усилия не требуется, после чего можно извлечь пластиковую «сердцевину». Внизу на ней будет уплотнение, кторое и пропускает масло. Под него нужно подмотать ФУМ-ленту — всё готово. При обратной сборке не забудьте вставить тот самый штырёк на место. Как вариант можно предложить выставить отскок один раз в удобное положение и вместо полого болта вкрутить обычный — течь прекратится без последствий для вилки. Вот только регулировать неудобно.
Q: покоцал ноги вилки
А: Пальцем ощущается покоц? Если да, то могу посоветовать полирнуть туалетной бумагой, слегка пропитанной маслом =) Серьёзно. Если на ощупь всё более-менее гладко, то и париться не стОит.
A2: Кста, даже если там и чуствуется ямочка, в теории никаких разрушительных последствий не предвидится — главное, чтобы края покоца были не острыми, да вилку после покатух протирать и ноги смазывать.
Q: Что такое Pushlock и чем отличается от Poplock?
A: Всё о RockShox
Q: Какое масло лить в вилку
А: Обычно в продукции РШ используется два сорта масла — более вязкое 15WT (идёт на смазку ног, заливается в штаны) и масло для демпфера и воздушных пружин 5WT.
Q: Как называется масло для вилки
A: «масло для вилок» «fork oil»
Q: Где купить масло для вилки
A: в авто/вело/мото магазинах, магазинах авто-масел, обычно в веломагазах — дороже всего.
Q: Обнаружил люфт между ногами и штанами, походу померли башинги? Где купить новые? где менять? АААААА.
A: Трясти Веломир как офф. дилера, смотреть чейн, менять придётся в спец. мастерской с нужным инструментом или изголяться самостоятельно с его изготовлением. А вот хороший совет от Lis Yalta для тех, кому не удалось найти новых башингов, а катать ну ооочень охота:
«Тут звучали мысли о замене башингов, или из чего их точить.
Во многих случаях помогает просто выпресовать а потом вставить их
но при етом чуть провернув. Будет работать другая часть поверхности.
Тот парень который и задался таким вопросом по профессии токарь,
он поймет о чем мои мысли.»
от себя добавлю, что поворачивать их нужно на 90 грудусов вокруг своей оси. Бюджетно и некоторое время протянут.
Q: Помогите выбрать! В чём разница между моделями вилок?
A: разница между моделями одной линейки указана на офф. сайте РШ (графа upgrade) : http://sram.com/en/rockshox/
Q: Помогите выбрать! В чём разница между Solo Air и Dual Air? Что плюшевее?
A: В пружине Solo Air вы накачиваете и позитивную и негативную камеры через один клапан, соотношение давлений между камерами задаётся подпружиненным поршнем автоматически. В Dual Air давление в позитивной и негативной камерах задаются отдельно, это позволяет настроить вилку более точно. Что плюшевее? В пределе Дуал Эир можно сделать сверхмягким, но для обычного использования нехрустальными людьми Solo Air также весьма и весьма хорош.
Q: Помогите выбрать! Чем отличаются системы Motion Control и TurnKey Lock-out? Или брать вилку вообще без них?
A: Перечисленные картриджи отвечают за регулировку компрессии. Motion Control (MC) — более продвинутая система, реализует т.н. платформенность вилки — препятствует раскачке. Существует две реализации МС — более навороченная (с регулируемым Floodgate) — на вилках от Reba и выше — и упрощённая (с фиксированным положением Floodgate) — на вилках Tora и Recon. TurnKey — это жёсткая блокировка вилки, открывающаяся только при сильных ударах. Прежде чем платить за более дорогой вариант с этими картриджами, задумайтесь над следующим: большинство людей никогда не блокирует вилку (зачем я её тогда покупал?), а настройки МС для любительского катания — избыточны.
Q: на короне отштампована цифра «7», значит год производства 2007?
A: большинство производителей велокомпонентов ставит на продукцию год, предшествующий модельному. Т.е. если у вас на короне цифра «7», значит вилка 2008-го модельного года.
Q: Я не знаю как работает Motion Control и не засну пока не объясните!
A: Пересказ от Котовского здесь, полный текст статьи здесь
Последний раз редактировалось Наливаич; 14.06.2021 в 04:36 .
Источник