Всех категорически приветствую!
Сижу, короче, на карантине. Делать нечего, решил перевести руководство по обслуживанию на Филдера бензин/гибрид. Так же приведу артикулы, как на оригинальные жидкости и заменители, так и неоригиналы, их выбор огромный на рынке, так что пусть он остаётся за покупателем на своё ощущение или по рекомендациям в коментах.
Далее перевод.
«На срок службы автомобиля в значительной степени влияет качество используемых жидкостей. Мы (прим. Toyota) рекомендуем использовать оригинальные масла и жидкости производителя Toyota (далее именуемые как рекомендуемые бренды) которые больше всего подходят для автомобиля Toyota. Пожалуйста, используйте то что соответствует качеству указанного бренда.»

Топливо
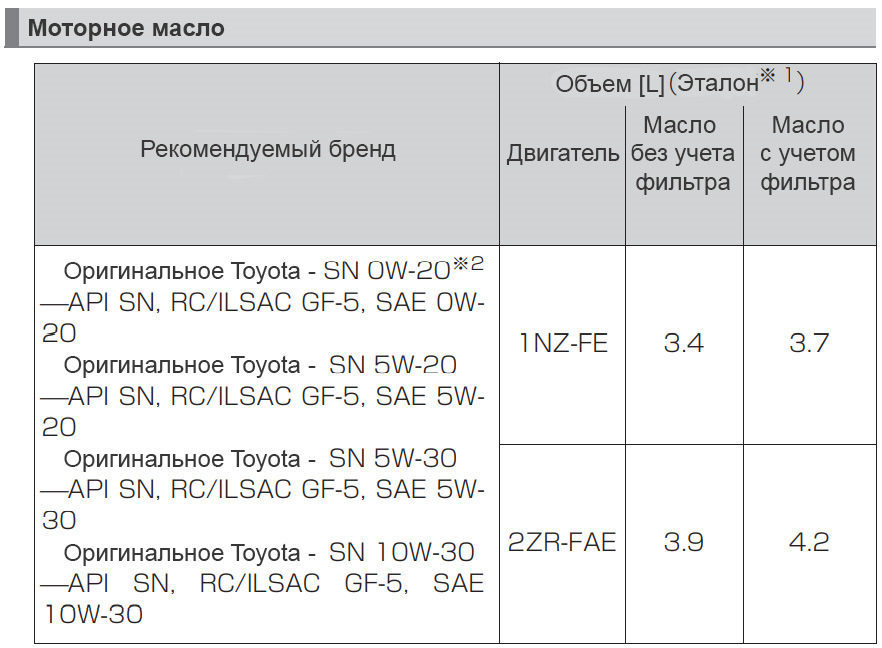
Моторное масло
Масло ДВС:
TOYOTA SN PLUS 0W-20 GF-5 SYNTHETIС — Артикул: 08880-12605;
TOYOTA GR Circuit 0W-20— Артикул: 08880-12405;
CASTLE Motor Oil 0W-20 SN/GF-5 — Артикул: V92103314;
TOYOTA Motor Oil 5W-20 SN/GF-5 — Артикул: 08880-10605;
CASTLE Motor Oil 5W-20 SN/GF-5 — Артикул: V92103306
TOYOTA Motor Oil 5W-30 SN/GF-5 — Артикул: 08880-10705;
CASTLE Motor Oil 5W-30 SN/GF-5 — Артикул: V92103334;
TOYOTA Motor Oil 10W-30 SN/GF-5 — Артикул: 08880-10805;
CASTLE Motor Oil 10W-30 SN/GF-5 — Артикул: V9210WA48
Фильтр масляный:
TOYOTA FILTER SUB-ASSY — Артикул: 90915-10003
Производитель: Завод EMG по заказу Toyota Mobility Parts Corporation, Япония
Новые масла и их спецификации Прайс-лист
____________________________________
Неоригинальные заменители:
Масло ДВС:
Idemitsu 0W-20 SN/GF-5 ZEPRO ECO MEDALIST — Артикул: 3583004;
TCL Zero Line 0W-20 SN, GF-5 — Артикул: Z0040020;
TCL Zero Line Fully Synth, GF-5, 5W-20 — Артикул: Z0040520;
ENEOS Premium Ultra SN 5W-20 — Артикул: 8809478941790;
ENEOS Premium TOURING SN 5W-30 — Артикул: 8809478942216;
Idemitsu 5W-30 ZEPRO TOURING — Артикул: 1845004;
Фильтр масляный:
VIC — Артикул: C110;
Sakura — Артикул: C1139;
NITTO — Артикул: 4TP121;
JS Asakashi — Артикул: C110J;
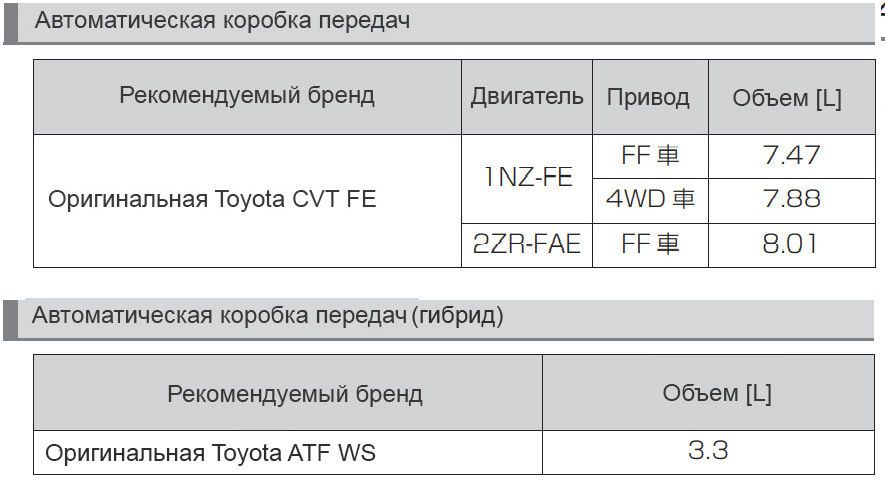
Масло АКПП
Масло вариаторное:
TOYOTA CVT FLUID FE — Артикул: 08886-02505;
TOYOTA CVT TC — Артикул: 08886-02105;
Масло для секвентальной АКПП (гибрид):
TOYOTA ATF WS — Артикул: 08886-02305;
____________________________________
Неоригинальные заменители:
Масло вариаторное:
TCL CVT FE — Артикул: A004TYFE;
MOBIL Multipurpose CVTF — Артикул: CVTF3320
AISIN CVT Fluid Excelllent — Артикул: CVTF7004;
TCL CVTF TC — Артикул: A004TYTC;
Масло для секвентальной АКПП (гибрид):
TOTACHI ATF WS — Артикул: 4562374691308;
TCL ATF WS — Артикул: A004TYWS
Фильтр масляный АКПП:
JS Asakashi — Артикул: JT494K
Double Force — Артикул: DFT1320
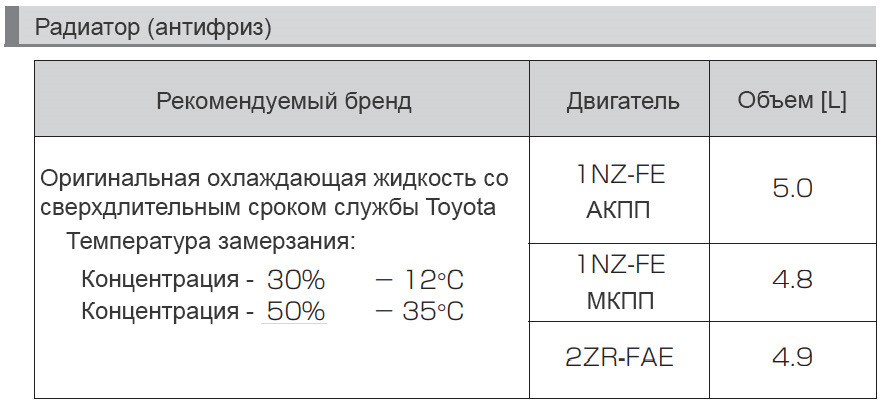
Антифриз
Антифриз розовый:
TOYOTA Super Long Life Coolant — Артикул: 08889-80072;
CASTLE E-Long Life Coolant — Артикул: V92301104;
____________________________________
Неоригинальные заменители:
Антифриз красный:
TLC POWER COOLANT -40C — Артикул: PC240R
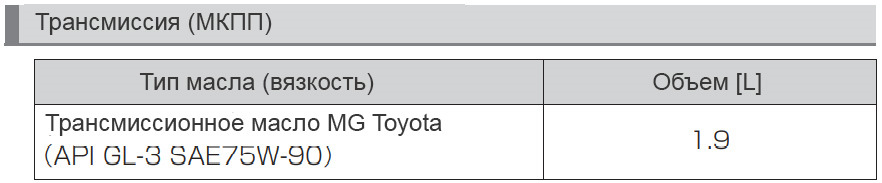
Трансмиссия МКПП
Масло трансмиссионное
TOYOTA MT GL-4 75W-90 — Артикул: 08885-80606;
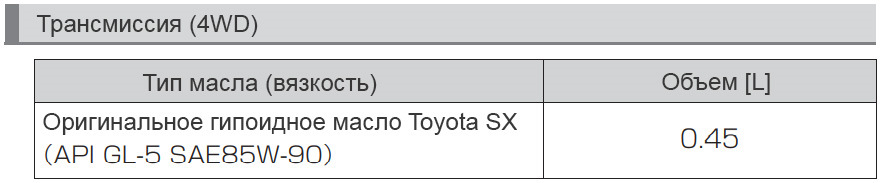
Трансмиссия 4WD
Масло трансмиссионное:
TOYOTA LSD GL-5 85W-90 — Артикул: 08885-00305;
TOYOTA LT 75W-85 GL-5 —Артикул: 08885-81060;
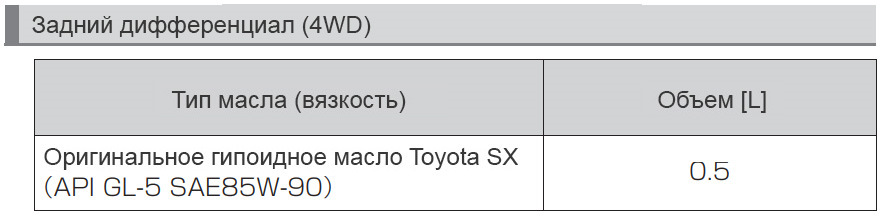
Дифференциал 4WD
Масло трансмиссионное:
TOYOTA LSD GL-5 85W-90 — Артикул: 08885-00305;
TOYOTA LT 75W-85 GL-5 —Артикул: 08885-81060;
____________________________________
Неоригинальные заменители:
Масло трансмиссионное:
TCL Gear 80W-90 LSD GL-5 —Артикул: G0018090
Mitasu Gear Oil GL-5 75w-90 LSD —Артикул: MJ-411-1
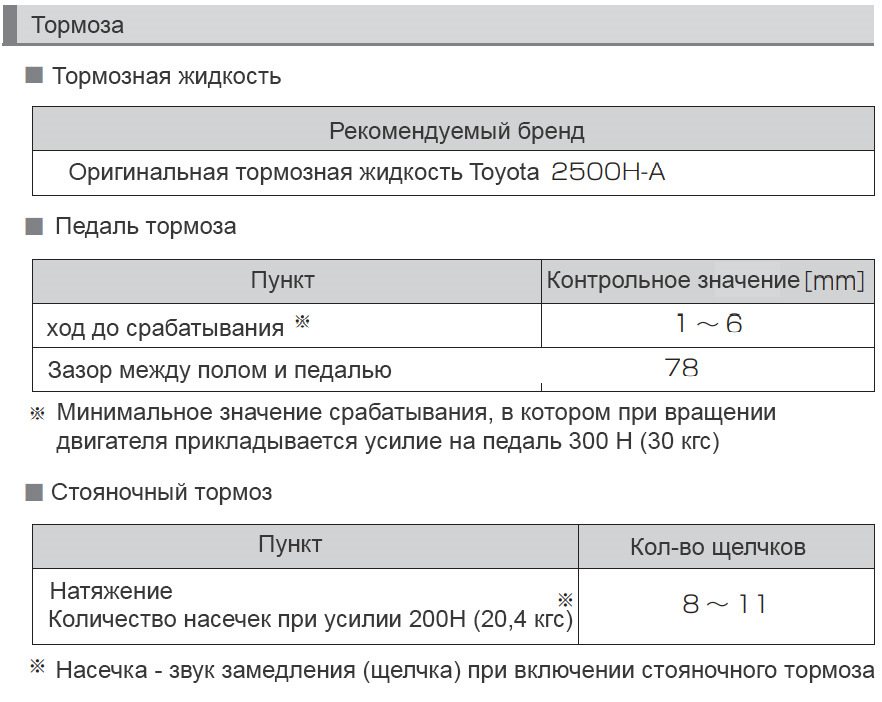
Тормоза
Тормозная жидкость:
TOYOTA BRAKE FLUID 2500 0,5 л — Артикул: 08823-00090;
CASTLE BRAKE FLUID J-4 — Артикул: V92201105;
Жидкость гидроусилителя руля:
TOYOTA PSF EH 1 л — Артикул: 08886-01206;
Дисковые тормозные колодки:
TOYOTA PAD KIT BRAKE — Артикул: 04465-52310;
Барабанные тормозные колодки:
TOYOTA SHOE KIT BRAKE — Артикул: 04495-52120;
____________________________________
Неоригинальные заменители:
Тормозная жидкость:
Совместимые DOT-34
TCL Brake & Clutch Fluid, DOT 4 — Артикул: 00833
Дисковые тормозные колодки:
ADVICS — Артикул: SN939;
AKEBONO — Артикул: AN-715K;
NISHHINBO — Артикул: NP1060;
Барабанные тормозные колодки:
G-brake — Артикул: GS02389
FBK — Артикул: FN2389
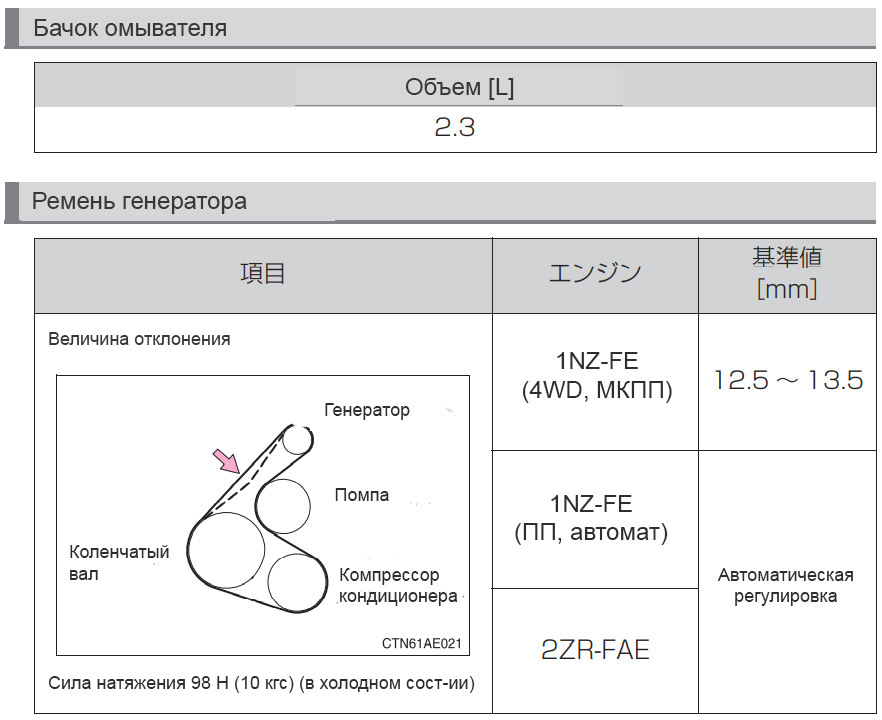
Омыватель и ремень генератора
Ремень приводной: 1NZ-FE (NZE161…164 5F) for Toyota — Артикул: 90916-02705;
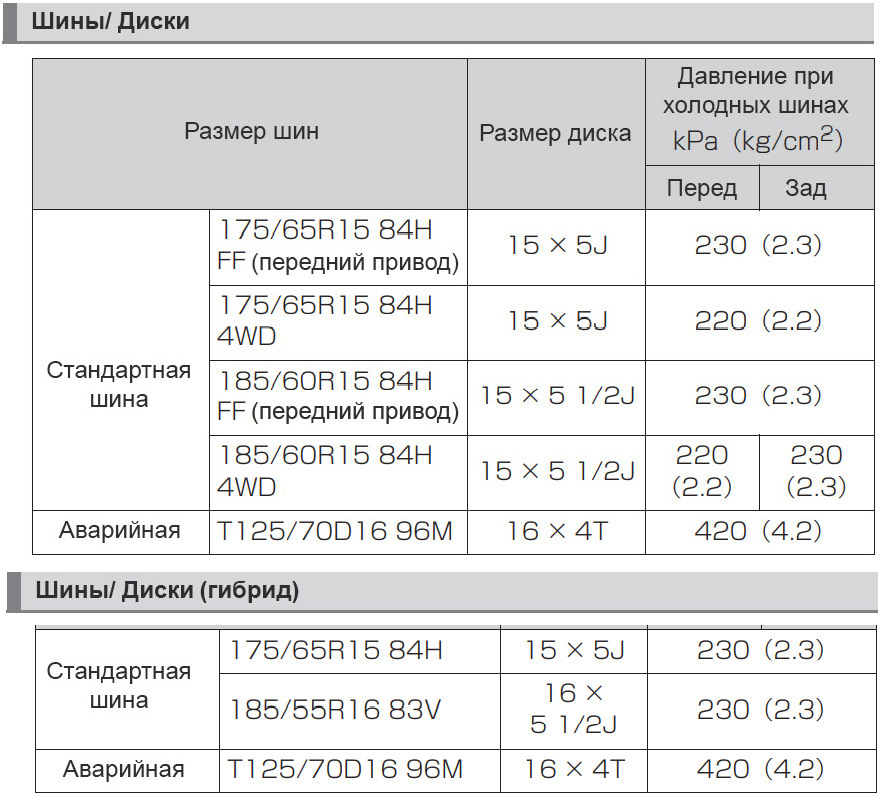
Шины и диски
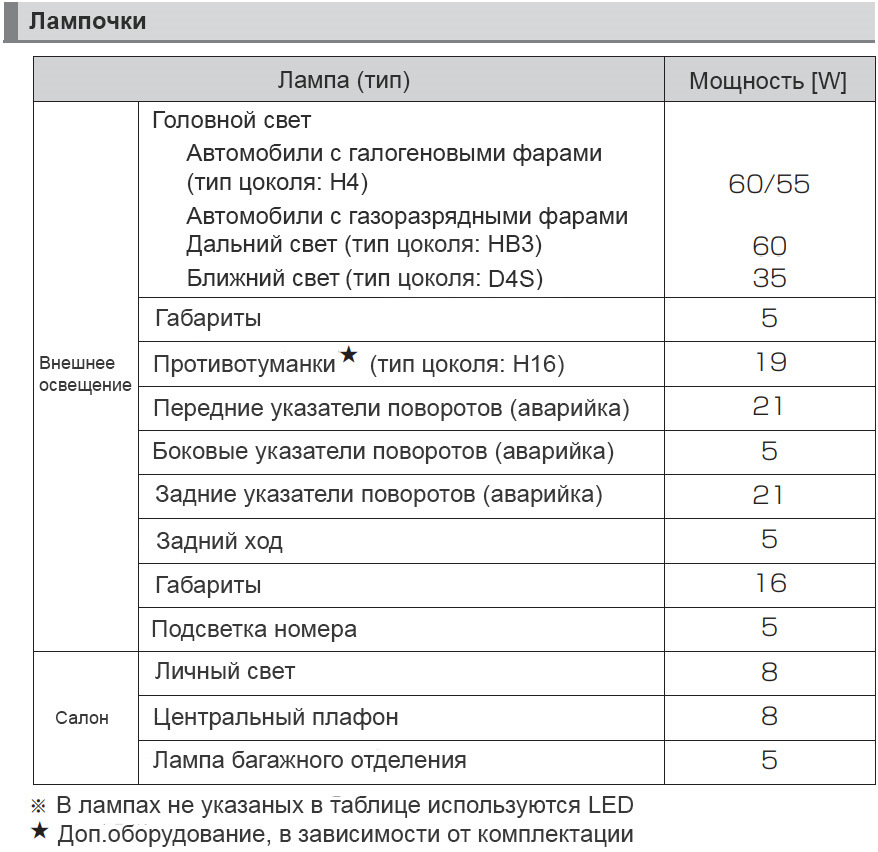
Свет
Лампа галогеновая — TOYOTA HB2/Н4 12V 60W/55W — Артикул: 90981-13058;
Лампа галогеновая — TOYOTA HB3 12V 60W — Артикул: 90981-13046;
Лампа газоразрядная — TOYOTA D4S 12V 35W — Артикул: 90981-20024;
Лампа противотуманок — TOYOTA Н16 12V 19W — Артикул: 90981-13090;
Лампа поворотников — TOYOTA 12V WY21W — Артикул: 90981-15021;
Лампа габаритов — TOYOTA 12V 5W — Артикул: 99132-12050;
Лампа стоп-сигналов — TOYOTA LEDx4 — Артикул: 81536-13730;
Лампа заднего хода — TOYOTA 12V 16W— Артикул: 90981-11059;
Лампа плафона личного освещения — TOYOTA 12V 8W— Артикул: 90981-11062;
Лампа центрального плафона — TOYOTA 12V 8W— Артикул: 90981-14011;
Лампа багажного отделения — TOYOTA 12V 5W— Артикул: 99132-13050;
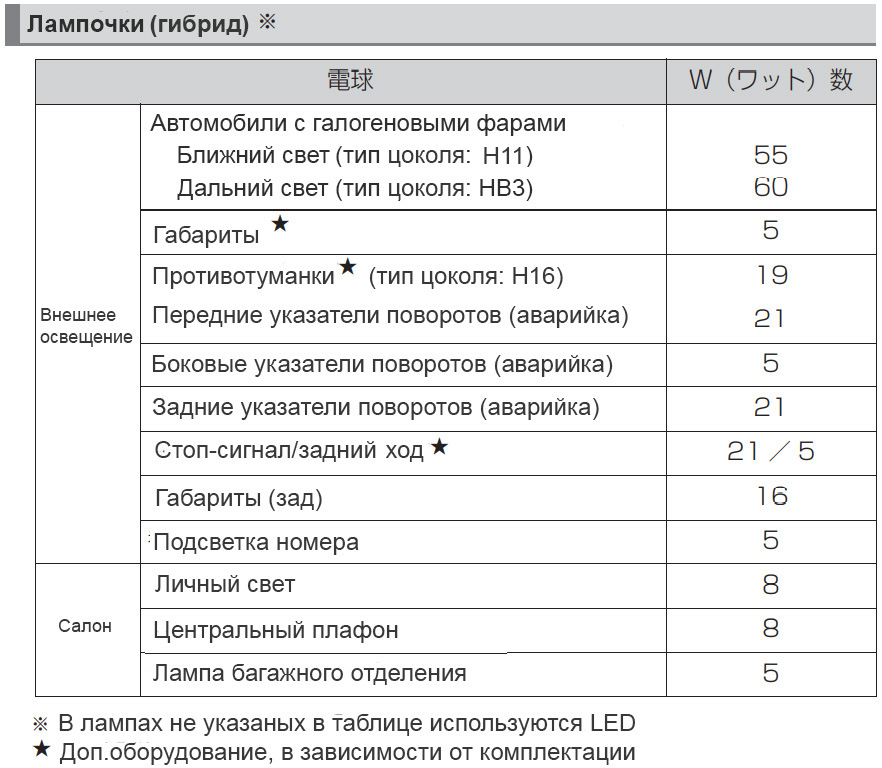
Свет гибрид
Лампа галогеновая — TOYOTA Н11 12V 55W — Артикул: 90981-13075;
ФИЛЬТРЫ
Воздушный фильтр
TOYOTA AIR CLEANER FILTER — Артикул: 17801-21050
____________________________________
Неоригинальные заменители:
Воздушный фильтр
AVANTECH — Артикул: AF0167;
JS Asakashi — Артикул: A1013;
VIC — Артикул: A1013;
NITTO — Артикул: 4TP1079;
Салонный фильтр (угольный)
TOYOTA CABIN FILTER — Артикул: 87139-50100;
____________________________________
Неоригинальные заменители:
Салонный фильтр (угольный)
JS Asakashi — Артикул: AC108C;
VIC — Артикул: AC108EX;
Sakura — Артикул: CAC1114;
RB-exide — Артикул: AC108;
Kitto — Артикул: AC108C;
Топливный фильтр
TOYOTA FUEL SUCTION — Артикул: 77024-52191
____________________________________
Неоригинальные заменители:
Топливный фильтр
MASUMA — Артикул: MFFT143A;
JS Asakashi — Артикул: FS2111;
SAT — Артикул: ST7702452191;
Оригинал Toyota
Спасибо lehacaldina и другим ребятам за номерочки.
Всем здоровья и ровных дорог.
- 21309
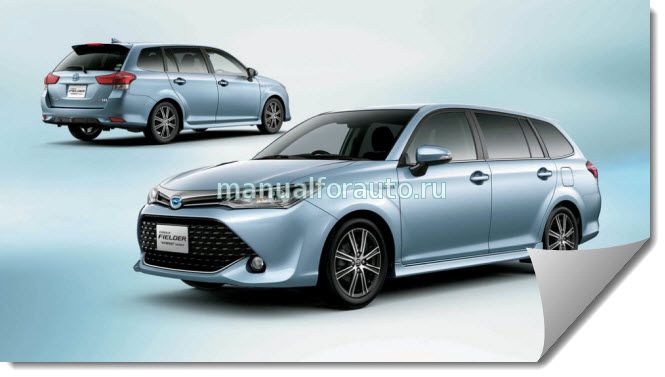
Инструкция на Тойота Королла Филдер с 2012 года в кузове Е160 с моторами 1NZ-FE, 2NR-FKE, 2ZR-FAE включая гибридную версию 1NZ-FXE — Третье поколение
Характеристики Королла Филдер 3
Тип привода Передний
Тип кузова Универсал
Тип трансмиссии Вариатор МКПП5
Объем двигателя, куб.см 1496
Клиренс (высота дорожного просвета), мм 155
Число дверей 5
Габариты кузова (Д x Ш x В), мм 4400 x 1695 x 1475
Габариты салона (Д x Ш x В), мм 1945 x 1430 x 1200
Колесная база, мм 2600
Минимальный радиус разворота, м 4.9
Ширина передней колеи, мм 1480
Ширина задней колеи, мм 1475
Масса, кг 1140
Общий вес автомобиля, кг 1415
Объем топливного бака, л 42
Передняя подвеска Независимая, амортизационная стойка типа МакФерсон
Задняя подвеска Полузависимая, торсионная балка
Формат PDF
автор Тойота
Королла Филдер руководство по эксплуатации
Добавлять комментарии могут только зарегистрированные пользователи.
[
Регистрация
|
Вход
]

- Manuals
- Brands
- Toyota Manuals
- Automobile
- Corolla Hybrid 2020
- Owner’s manual
-
Contents
-
Table of Contents
-
Troubleshooting
-
Bookmarks
Quick Links
Related Manuals for Toyota Corolla Hybrid 2020
Summary of Contents for Toyota Corolla Hybrid 2020
-
Page 3: Reading Driving-Related Information
Search by illustration Pictorial index Make sure to read through them For safety (Main topics: Child seat, theft deterrent system) and security Vehicle status Reading driving-related information information and (Main topics: Meters, multi-information display) indicators Opening and closing the doors and windows, adjustment before driving Before driving (Main topics: Keys, doors, seats, power windows)
-
Page 4: Table Of Contents
TABLE OF CONTENTS For your information ……Reading this manual…… Before driving How to search ……. Pictorial index …….. 3-1. Key information Keys……..120 For safety and security 3-2. Opening, closing and locking the doors 1-1. For safe use Doors ……..126 Before driving……
-
Page 5: Table Of Contents
……….239 switches……308 Cruise control……248 ® Register a Bluetooth device BSM (Blind Spot Monitor) …251 ……….308 Toyota parking assist-sensor 5-7. “SETUP” menu ……….256 Using the “SETUP” menu RCTA (Rear Cross Traffic Alert) (“Bluetooth” menu)….310 function ……262 Using the “SETUP” menu Driving mode select switch (“PHONE”…
-
Page 6: Table Of Contents
TABLE OF CONTENTS ® 7-3. Do-it-yourself maintenance 5-8. Bluetooth Audio Do-it-yourself service precau- ® Operating a Bluetooth enabled tions ……..361 portable player….316 Hood ……..363 ® 5-9. Bluetooth Phone Positioning a floor jack..364 Making a phone call….318 Engine compartment…365 When receiving a phone call Tires……..372 ……….319 Tire inflation pressure…
-
Page 7: Table Of Contents
TABLE OF CONTENTS If you have a flat tire (vehicles with a spare tire) ….430 If the hybrid system will not start ……….439 If you lose your keys …440 If the electronic key does not operate properly ….441 If the 12-volt battery is dis- charged……443 If your vehicle overheats..447…
-
Page 8: For Your Information
Using these Seat belt pretensioner system spare parts and accessories which are not genuine Toyota products Be sure to check with your Toyota may adversely affect the safety of dealer for precautionary measures your vehicle, even though these…
-
Page 9
• For use by Toyota in a lawsuit netic shielding. • For research purposes where the data is not tied to a specific vehicle or… -
Page 10
• For use by Toyota in a lawsuit • How fast the vehicle was However, if necessary, Toyota may: traveling. • Use the data for research on vehicle safety performance These data can help provide a bet- •… -
Page 11
WARNING ■ General precautions while driv- Driving under the influence: Never drive your vehicle when under the influence of alcohol or drugs that have impaired your ability to operate your vehicle. Alcohol and certain drugs delay reaction time, impair judgment and reduce coordination, which could lead to an accident that could result in death or serious injury. -
Page 12: Reading This Manual
Reading this manual Symbols Meanings Indicates the action (pushing, turning, etc.) Explains symbols used in this used to operate manual. switches and other devices. Symbols in this manual Indicates the outcome of an operation (e.g. a Symbols Meanings lid opens). WARNING: Explains something that, if not obeyed,…
-
Page 13: How To Search
■ How to search Searching by title Table of contents: P.2 ■ Searching by name Alphabetical index: P.477 ■ Searching by installation posi- tion Pictorial index: P.12 ■ Searching by symptom or sound What to do if… (Troubleshoot- ing): P.474 COROLLA HV_ 国瑞…
-
Page 14: Pictorial Index
Pictorial index Pictorial index ■Exterior Doors………………..P.126 Locking/unlocking …………….P.126 Opening/closing the side windows………..P.151 Locking/unlocking by using the mechanical key ……P.441 Warning messages …………….P.130 Trunk ………………..P.132 Opening from inside……………..P.133 Opening from outside……………P.133 Warning messages …………….P.130 Outside rear view mirrors ………….P.148 Adjusting the mirror angle …………..P.148 Folding the mirrors …………….P.149 Windshield wipers ……………..P.192 Precautions for winter season…………P.275…
-
Page 15
Pictorial index Refueling method…………….P.197 Fuel type/fuel tank capacity ………….P.453 Tires ………………..P.372 Tire size/inflation pressure ……………P.458 Winter tires/tire chains …………..P.275 Checking/rotation/tire pressure warning system ……P.372 Coping with flat tires…………..P.430, 419 Hood………………..P.363 Opening ……………….P.363 Engine oil ………………P.454 Coping with overheating …………..P.447 Light bulbs of the exterior lights for driving (Replacing method: P.393, Watts: P.459) Headlights/front position lights/daytime running lights turn signal lightsP.177, 184… -
Page 16
Pictorial index ■Instrument panel (left-hand drive vehicles) Power switch …………….P.166, 168 Starting the hybrid system/changing the positions ……P.166 Starting the hybrid system/changing the modes ……P.168 Emergency stop of the hybrid system……….P.400 When the hybrid system will not start ……….P.439 Warning messages …………….P.417 Shift lever………………P.174 Changing the shift position……………P.174 Precautions for towing …………..P.403… -
Page 17
Pictorial index Energy monitor…………….. P.113 When a warning message is displayed……….P.417 Parking brake …………….P.177 Applying/releasing…………….P.177 Precautions for winter season…………P.276 Warning light/message………….P.408, 177 Turn signal lever …………….P.177 Headlight switch …………….P.184 Headlights/front position lights/tail lights/license plate lights/daytime running lights ………………..P.184 Front fog lights /rear fog light …………P.190 Windshield wiper and washer switch ……….P.192… -
Page 18
Pictorial index ■Switches (left-hand drive vehicles) Headlight leveling dial …………..P.187 Automatic High Beam switch …………P.188 Tire pressure warning reset switch ……….P.377 Outside rear view mirror switches ……….P.148 Door lock switches …………….P.129 Power window switches…………..P.151 Window lock switch……………P.153 : If equipped Meter control switches …………..P.102 COROLLA HV_ 国瑞… -
Page 19
Pictorial index Vehicle-to-vehicle distance switch ……….P.244 Cruise control switches Dynamic radar cruise control with full-speed range ……P.229 Dynamic radar cruise control …………P.243 Cruise control …………….P.248 *1, 2 Audio remote control switches ……….P.281 LTA (Lane Tracing Assist) switch ……….P.212 LDA (Lane Departure Alert with steering control) switch ..P.221 *1, 2 Phone switch… -
Page 20
Pictorial index ■Interior (left-hand drive vehicles) SRS airbags………………P.37 Floor mats………………P.30 Front seats………………P.141 Head restraints…………….P.144 Seat belts ………………P.33 Console box ……………….P.336 Inside lock buttons …………….P.130 Cup holders ………………P.335 Rear seats………………P.142 COROLLA HV_ 国瑞 _GE COROLLA HYBRID_OM_General_OM12M44E… -
Page 21
Pictorial index ■Ceiling (left-hand drive vehicles) Inside rear view mirror …………..P.147 *1, 2 Sun visors ……………..P.343 Vanity mirrors …………….P.343 Vanity lights ……………..P.343 Front personal lights …………..P.332 Interior lights/personal lights …………P.331 Moon roof switches …………..P.153 Assist grips ………………P.344 : Except for Taiwan: NEVER use a rearward facing child restraint on a seat pro- tected by an ACTIVE AIRBAG in front of it, DEATH or SERIOUS INJURY to the CHILD can occur. -
Page 22
Pictorial index : If equipped COROLLA HV_ 国瑞 _GE COROLLA HYBRID_OM_General_OM12M44E… -
Page 23
Pictorial index ■Instrument panel (right-hand drive vehicles) Power switch …………….P.166, 168 Starting the hybrid system/changing the positions ……P.166 Starting the hybrid system/changing the modes ……P.168 Emergency stop of the hybrid system……….P.400 When the hybrid system will not start ……….P.439 Warning messages …………….P.417 Shift lever………………P.174 Changing the shift position……………P.174 Precautions for towing …………..P.403… -
Page 24
Pictorial index Energy monitor…………….. P.113 When a warning message is displayed……….P.417 Turn signal lever …………….P.177 Headlight switch …………….P.184 Headlights/front position lights/tail lights/license plate lights/daytime running lights………………..P.184 Front fog lights /rear fog light …………P.190 Windshield wiper and washer switch ……….P.192 Usage………………..P.192 Adding washer fluid…………….P.371 Emergency flasher switch………….P.400 Hood lock release lever…………..P.363… -
Page 25
Pictorial index ■Switches (right-hand drive vehicles) Tire pressure warning reset switch ……….P.377 Automatic High Beam switch …………P.188 Headlight leveling dial …………..P.187 Outside rear view mirror switches ……….P.148 Door lock switches …………….P.129 Power window switches…………..P.151 Window lock switch……………P.153 : If equipped Meter control switches …………..P.102 COROLLA HV_ 国瑞… -
Page 26
Pictorial index Vehicle-to-vehicle distance switch ……….P.244 Cruise control switches Dynamic radar cruise control with full-speed range ……P.229 Dynamic radar cruise control …………P.243 Cruise control …………….P.248 Audio remote control switches ……….P.281 LTA (Lane Tracing Assist) switch ……….P.212 LDA (Lane Departure Alert with steering control) switch ..P.221 Phone switch …………….P.308… -
Page 27
Pictorial index : If equipped COROLLA HV_ 国瑞 _GE COROLLA HYBRID_OM_General_OM12M44E… -
Page 28
Pictorial index ■Interior (right-hand drive vehicles) SRS airbags………………P.37 Floor mats………………P.30 Front seats………………P.141 Head restraints…………….P.144 Seat belts ………………P.33 Console box ……………….P.336 Inside lock buttons …………….P.130 Cup holders ………………P.335 Rear seats………………P.142 COROLLA HV_ 国瑞 _GE COROLLA HYBRID_OM_General_OM12M44E… -
Page 29
Pictorial index ■Ceiling (right-hand drive vehicles) Inside rear view mirror …………..P.147 Sun visors ………………P.343 Vanity mirrors……………..P.343 Vanity lights ……………..P.343 Front personal lights …………..P.332 Intrusion sensor cancel switch …………P.83 Assist grips ………………P.344 : NEVER use a rearward facing child restraint on a seat protected by an ACTIVE AIRBAG in front of it, DEATH or SERIOUS INJURY to the CHILD can occur. -
Page 30
Pictorial index COROLLA HV_ 国瑞 _GE COROLLA HYBRID_OM_General_OM12M44E… -
Page 31
For safety and security 1-1. For safe use Before driving ….. For safe driving ….Seat belts……SRS airbags ……. Exhaust gas precautions ..1-2. Child safety Airbag manual on-off system ……… Riding with children …. Child restraint systems ..1-3. -
Page 32: For Safe Use
Insert the retaining hooks (clips) year vehicles, even if they are into the floor mat eyelets. Toyota Genuine floor mats. Only use floor mats designed for ● the driver’s seat. Always install the floor mat securely ●…
-
Page 33
1-1. For safe use For safe driving WARNING With the hybrid system stopped and ● the shift lever in P, fully depress For safe driving, adjust the each pedal to the floor to make sure seat and mirror to an appropri- it does not interfere with the floor mat. -
Page 34
1-1. For safe use Use a child restraint system appro- WARNING priate for the child until the child Do not adjust the position of the ● becomes large enough to properly driver’s seat while driving. wear the vehicle’s seat belt. Doing so could cause the driver to lose control of the vehicle. -
Page 35: Seat Belts
Toyota recommends that children ● area. be seated in the rear seat and always use a seat belt and/or an If the seat belt is not worn properly, appropriate child restraint system.
-
Page 36
If seat belt regulations exist in the coun- modify, disassemble or dispose of try where you reside, please contact the seat belts. Have any necessary your Toyota dealer for seat belt replace- repairs carried out by your Toyota ment or installation. dealer. Inappropriate handling may lead to incorrect operation. -
Page 37
1-1. For safe use Push the seat belt shoulder lock if you lean forward too quickly. A slow, easy motion will allow the belt to anchor up. extend so that you can move around Move the height adjuster up and down fully. -
Page 38
■ Seat belt pretensioners If the pretensioner has activated, the SRS warning light will come on. In that case, the seat belt cannot be used again and must be replaced at your Toyota dealer. COROLLA HV_ 国瑞 _GE COROLLA HYBRID_OM_General_OM12M44E… -
Page 39: Srs Airbags
1-1. For safe use SRS airbags The SRS airbags inflate when the vehicle is subjected to certain types of severe impacts that may cause significant injury to the occupants. They work together with the seat belts to help reduce the risk of death or serious injury.
-
Page 40
1-1. For safe use For Taiwan SRS front airbags SRS driver airbag/front passenger airbag Can help protect the head and chest of the driver and front passenger from impact with interior components SRS knee airbag (if equipped) Can help provide driver protection SRS side and curtain shield airbags … -
Page 41
1-1. For safe use ■ SRS airbag system components Seat belt pretensioners and force limiters (if equipped) Side impact sensors (front) Airbag manual on-off switch (if equipped) Front passenger airbag Side airbags Curtain shield airbags (if equipped) Side impact sensors (rear) (if equipped) SRS warning light Side impact sensors (front door) (if equipped) Driver airbag… -
Page 42
1-1. For safe use ● A loud noise and white powder will be of a truck emitted. ● Depending on the type of collision, it is Vehicles without SRS curtain shield possible that only the seat belt ● airbags: Parts of the airbag module pretensioners will activate. -
Page 43
Collision from the side to the vehicle ● require inspection and/or repair. Contact body other than the passenger com- your Toyota dealer as soon as possible. partment Any of the SRS airbags have been ● Collision from the side at an angle ●… -
Page 44
1-1. For safe use side and curtain shield airbags to inflate. WARNING ■ Vehicles without an SRS driver’s knee ● SRS airbag precautions airbag: The pad section of the steer- Observe the following precautions ing wheel or dashboard near the front regarding the SRS airbags. -
Page 45
An infant or child who is too small to use a seat belt should be properly secured using a child restraint system. Toyota strongly recommends that all infants and children be placed in the rear seats of the vehicle and properly restrained. -
Page 46
1-1. For safe use Vehicles with SRS curtain shield ● WARNING airbags: Do not attach anything to Do not allow anyone to kneel on the ● areas such as a door, windshield, passenger seat toward the door or side windows, front or rear pillar, put their head or hands outside the roof side rail and assist grip. -
Page 47
SRS side form any of the following modifica- airbags inflate as they may interfere tions without consulting your Toyota with inflation of the SRS airbags. dealer. The SRS airbags may mal- Such accessories may prevent the… -
Page 48: Exhaust Gas Precautions
If you smell exhaust gases in the ● vehicle even when the trunk is closed, open the windows and have the vehicle inspected at your Toyota dealer as soon as possible. ■ When parking If the vehicle is in a poorly venti- ●…
-
Page 49: 1-2. Child Safety
If any of the following problems occur, it is possible that there is a malfunction in the system. Have the vehicle inspected by your Toyota dealer. ● The “OFF” indicator does not illumi- nate when the airbag manual on-off switch is set to “OFF”.
-
Page 50: Riding With Children
1-2. Child safety Riding with children WARNING ■ When children are in the vehicle Never leave children unattended in Observe the following precau- the vehicle, and never allow children tions when children are in the to have or use the key. vehicle.
-
Page 51: Child Restraint Systems
• Fixed with a seat belt: P.66 this manual. • Fixed with an ISOFIX lower ● Toyota strongly urges the use of a anchorage: P.68 proper child restraint system that • Using a top tether anchorage: conforms to the weight and size of P.70…
-
Page 52
1-2. Child safety When using a child restraint WARNING system Holding a child in your or someone ● else’s arms is not a substitute for a ■ child restraint system. In an acci- When installing a child dent, the child can be crushed restraint system to a front pas- against the windshield or between senger seat (except for Tai-… -
Page 53
1-2. Child safety There is a label(s) on the passen- ● ger side sun visor, indicating it is forbidden to attach a rear-facing child restraint system to the front passenger seat. Details of the label(s) are shown in the illustration below. WARNING ■… -
Page 54
1-2. Child safety WARNING ● Do not allow the child to lean WARNING his/her head or any part of his/her ● Only put a forward-facing child body against the door or the area of restraint system on the front seat the seat, front or rear pillars, or roof when unavoidable. -
Page 55
1-2. Child safety Never use a child restraint system ● WARNING on the front passenger seat. Use child restraint system suitable ● The force of the rapid inflation of to the age and size of the child and the front passenger airbag can install it to the rear seat. -
Page 56
1-2. Child safety WARNING ● Use child restraint system suitable WARNING to the age and size of the child and ● Do not allow the child to lean install it to the rear seat. his/her head or any part of his/her ●… -
Page 57
1-2. Child safety attached to the child restraint ■ Child restraint system compat- system. ibility for each seating posi- tion Compatibility of each seating posi- tion with child restraint systems (P.56) displays the type of child restraint systems that can be used and possible seating positions for installation using symbols. -
Page 58
1-2. Child safety • “universal” Right-hand drive vehicles • “semi-universal” • “restricted” • “vehicle specific” *1, 2, 3 : UN(ECE) R44 and UN(ECE) R129 are U.N. regulations for child restraint systems. : The child restraint systems men- tioned in the table may not be availa- ble outside of the EU area. -
Page 59
1-2. Child safety Includes a top tether anchorage point. Never use a rear-facing child restraint system on the front passenger seat. : Move the front seat fully rearward. If the passenger seat height can be adjusted, move it to the upper most position. -
Page 60
1-2. Child safety in the table above. For kind of “fixture” relation, confirm the following table. If your child restraint system has no kind of “fixture” (or if you cannot find information in the table below), please refer to the child restraint system “vehicle list”… -
Page 61
1-2. Child safety When installing a child restraint Child restraint system com- in the rear seats, adjust the front patibility for each seating seat so that it does not interfere position (for Taiwan) with the child or child restraint system. -
Page 62
1-2. Child safety attached to the child restraint • “universal” system. • “semi-universal” • “restricted” • “vehicle specific” : UN(ECE) R44 and UN(ECE) R129 are U.N. regulations for child restraint systems. Example of the displayed regulation number : The child restraint systems men- tioned in the table may not be availa- UN(ECE) R44 approval mark ble outside of the EU area. -
Page 63
1-2. Child safety Suitable for “universal” category child restraint system fixed with the seat belt. Suitable for child restraint sys- tems given on recommended child restraint systems and compatibility table. (P.62) Suitable for i-Size and ISOFIX child restraint system. *1, 2 Includes a top tether anchorage point. -
Page 64
1-2. Child safety ISOFIX child restraint systems are divided into different “fixture”. The child restraint system can be used in the seating positions for “fixture” mentioned in the table above. For kind of “fixture” relation, confirm the following table. If your child restraint system has no kind of “fixture” (or if you cannot find information in the table below), please refer to the child restraint system “vehicle list”… -
Page 65
1-2. Child safety to do so may result in death or seri- seat so that it does not interfere ous injury. with the child or child restraint system. When installing a child restraint in the rear seats, adjust the front Child restraint system installation method Confirm with the operation manual enclosed with the child restraint system about the installation of the child restraint system. -
Page 66
1-2. Child safety Installation method Page Seat belt attachment P.66 COROLLA HV_ 国瑞 _GE COROLLA HYBRID_OM_General_OM12M44E… -
Page 67
1-2. Child safety Installation method Page Except for GCC countries and Taiwan For GCC countries ISOFIX lower anchorage P.68 attachment For Taiwan: COROLLA HV_ 国瑞 _GE COROLLA HYBRID_OM_General_OM12M44E… -
Page 68
1-2. Child safety Installation method Page Seats with an adjustable type head restraint: Top tether anchorage P.70 attachment Seats with an integrated type head restraint: : Saudi Arabia, Sultanate of Oman, Bahrain, United Arab Emirates, Qatar and Kuwait “Vehicle List” provided by the child Child restraint system fixed restraint system maker for various with a seat belt… -
Page 69
If your child restraint system does not provide a locking clip, you can purchase the following item from your Toyota dealer: Locking clip for If your child restraint system is child restraint system (Part No. 73119-22010) -
Page 70
1-2. Child safety Except for GCC countries WARNING Taiwan Ensure that the belt and plate are ● securely locked and the seat belt is not twisted. ● Shake the child restraint system left and right, and forward and back- ward to ensure that it has been securely installed. -
Page 71
1-2. Child safety ual enclosed with the child restraint seatback. system. If the child restraint system on hand is not within the “universal” cate- gory (or the necessary information is not in the table), refer to the “Vehicle List” provided by the child restraint system maker for various possible installation positions, or check the compatibility after asking… -
Page 72
1-2. Child safety Use top tether anchorages when ■ When using an “i-Size MIDI” (for fixing the top strap. ASEAN countries Seats with an adjustable type Adjust the support leg and ISOFIX con- nectors as follows: head restraint Lock the ISOFIX connectors where number 3 can be seen. -
Page 73
1-2. Child safety child restraint system or top strap instal- WARNING lation and the head restraint can be removed, remove the head restraint. ■ When installing a child restraint (P.144) system Latch the hook onto the top Observe the following precautions. Failure to do so may result in death or tether anchorage and tighten serious injury. -
Page 74: Hybrid System
1-3. Hybrid system Hybrid system features 1-3.Hybrid system Your vehicle is a hybrid vehicle. It has characteristics different from conventional vehicles. Be sure you are closely familiar with the characteristics of your vehicle, and operate it with care. The hybrid system combines the use of a gasoline engine and an electric motor (traction motor) according to driving conditions, improving fuel efficiency and reducing exhaust emissions.
-
Page 75
The brake pedal is depressed while ● charged and you are unable to start the driving with the shift lever in D or B. hybrid system, contact your Toyota dealer. ■ EV indicator The EV indicator comes on when the ■… -
Page 76
■ Maintenance, repair, recycling, and disposal Contact your Toyota dealer regarding maintenance, repair, recycling and dis- posal. Do not dispose of the vehicle yourself. COROLLA HV_ 国瑞 _GE… -
Page 77
1-3. Hybrid system Hybrid system precautions Take care when handling the hybrid system, as it is a high voltage system (about 600 V at maximum) as well as contains parts that become extremely hot when the hybrid system is operating. Obey the warning labels attached to the vehicle. -
Page 78
1-3. Hybrid system extra fuel when the vehicle is inclined.) Never try to open the service plug ● access hole located under the right ■ Electromagnetic waves side of the rear seat. The service ● High voltage parts and cables on plug is used only when the vehicle hybrid vehicles incorporate electro- is serviced and is subject to high… -
Page 79
This may cause a fire. (P.403) by your Toyota dealer or a qualified service shop. If the hybrid battery is Carefully inspect the ground under ●… -
Page 80
1-3. Hybrid system the emergency shut off system acti- vates, your vehicle will not restart. To restart the hybrid system, con- tact your Toyota dealer. Hybrid warning message A message is automatically dis- played when a malfunction occurs in the hybrid system or an improper NOTICE operation is attempted. -
Page 81: Theft Deterrent System
1-4. Theft deterrent system indicate that the system has been Immobilizer system 1-4.Theft deterrent system canceled. Vehicles with a smart entry & The vehicle’s keys have start system built-in transponder chips that The indicator light flashes after the prevent the hybrid system power switch has been turned off to from starting if a key has not indicate that the system is operat-…
-
Page 82
1-4. Theft deterrent system ■ Certifications for the engine immobilizer system COROLLA HV_ 国瑞 _GE COROLLA HYBRID_OM_General_OM12M44E… -
Page 83
1-4. Theft deterrent system Alarm NOTICE ■ To ensure the system operates : If equipped correctly Do not modify or remove the system. The alarm uses light and If modified or removed, the proper sound to give an alert when an operation of the system cannot be guaranteed. -
Page 84
1-4. Theft deterrent system and lock all the doors. The system will set automatically after 30 sec- onds. The indicator light changes from being on to flashing when the system is set. ● The 12-volt battery is recharged or replaced when the vehicle is locked. (P.445) ■… -
Page 85
1-4. Theft deterrent system The intrusion sensor detec- ■ Canceling and automatic re-ena- tion (if equipped) bling of the intrusion sensor The alarm will still be set even when ● ■ the intrusion sensor is canceled. The intrusion sensor detection The intrusion sensor detects intrud- ●… -
Page 86
Ice or snow is removed from the vehi- cle, causing the vehicle to receive repeated impacts or vibrations. ● Installing accessories other than genuine Toyota parts or leaving objects between the driver’s seat and front passenger’s seat may reduce the detection performance. ●… -
Page 87: 2-1. Instrument Cluster
Vehicle status information and indicators 2-1. Instrument cluster Warning lights and indicators ……… Gauges and meters (4.2-inch display) ……Gauges and meters (7-inch display) ……Multi-information display …101 Head-up display….109 Energy monitor/consumption screen……113 COROLLA HV_ 国瑞 _GE COROLLA HYBRID_OM_General_OM12M44E…
-
Page 88
2-1. Instrument cluster Warning lights and indicators 2-1.Instrument cluster The warning lights and indicators on the instrument cluster, center panel and outside rear view mirrors inform the driver of the status of the vehicle’s various systems. Warning lights and indicators displayed on the instrument cluster For the purpose of explanation, the following illustrations display all warning lights and indicators illuminated. -
Page 89
Low engine oil pressure LTA indicator (if equipped) warning light (P.409) (P.412) Malfunction indicator lamp LDA indicator (if equipped) (P.409) (Orange) (P.412) Toyota parking assist-sensor SRS warning light (P.409) OFF indicator (if equipped) (P.413) (Flashes) ABS warning light (P.410) COROLLA HV_ 国瑞 _GE… -
Page 90
(P.252) tect you in an accident, which could BSM indicator (if equipped) result in death or serious injury. Have (P.252) the vehicle inspected by your Toyota dealer immediately if this occurs. Toyota parking assist-sensor *1, 2 OFF indicator equipped) (P.257) COROLLA HV_ 国瑞… -
Page 91
*1, 9 BAG” indicator system. equipped) (P.47) If this occurs, have the vehicle Eco drive mode indicator inspected by by your Toyota dealer. (P.267) : Vehicles with RCTA function: Power mode indicator These lights come on when the power (P.267) switch is turned to ON to indicate that a system check is being performed. -
Page 92
2-1. Instrument cluster dealer. : This light illuminates on the outside rear view mirrors. : This light illuminates on the multi-information display. : When the outside temperature is approximately 3°C (37°F) or lower, this indicator will flash for approxi- mately 10 seconds, then stay on. : This light illuminates on the center panel. -
Page 93: Gauges And Meters (4.2-Inch Display)
2-1. Instrument cluster Gauges and meters (4.2-inch display) Meter display ■ Locations of gauges and meters Hybrid System Indicator Displays hybrid system output or regeneration level (P.92) Speedometer Outside temperature Displays the outside temperature within the range of -40°C (-40°F) to 50°C (122°F) Clock (P.93) Multi-information display Presents the driver with a variety of vehicle data (P.101)
-
Page 94
● When “—” or “E” is displayed, the sys- The gasoline engine will automatically tem may be malfunctioning. Take your stop and restart under various condi- vehicle to your Toyota dealer. tions. ■ Liquid crystal display Eco area P.102 Shows that the vehicle is being driven in an Eco-friendly manner. -
Page 95
2-1. Instrument cluster Displays the total distance the vehicle WARNING has been driven. For example, there is a lag between Trip meter A/Trip meter B the driver’s shifting and the new gear number appearing on the display. Displays the distance the vehicle has This lag could cause the driver to been driven since the meter was last downshift again, causing rapid and… -
Page 96
2-1. Instrument cluster Select “Auto adjust by GPS” to ■ Changing the clock set to on. Press to select ■ the multi-information display. Adjusting the clock manually Press the “MENU” button. Press to select “Clock Select “Setup” on the “Menu” : 00”. -
Page 97
■ Clock settings screen (vehicles with navigation/multimedia system) If “Clock : 00” is displayed when selected on the multi-information dis- play, the system may be malfunctioning. Have the vehicle inspected by your Toyota dealer. COROLLA HV_ 国瑞 _GE COROLLA HYBRID_OM_General_OM12M44E… -
Page 98: Gauges And Meters (7-Inch Dis Play)
2-1. Instrument cluster Gauges and meters (7-inch display) Meter display ■ Locations of gauges and meters Analog speedometer Hybrid System Indicator Displays hybrid system output or regeneration level (P.92) Speedometer Clock (P.99) Fuel gauge Displays the quantity of fuel remaining in the tank Engine coolant temperature gauge Displays the engine coolant temperature Display change button (P.99)
-
Page 99
2-1. Instrument cluster Digital speedometer Hybrid System Indicator Displays hybrid system output or regeneration level (P.92) Speedometer Clock (P.100) Fuel gauge Displays the quantity of fuel remaining in the tank Engine coolant temperature gauge Displays the engine coolant temperature Display change button (P.99) Odometer and trip meter display (P.99) Multi-information display… -
Page 100
● When “—” or “E” is displayed, the sys- The gasoline engine will automatically tem may be malfunctioning. Take your stop and restart under various condi- vehicle to your Toyota dealer. tions. ■ Liquid crystal display Eco area P.102 Shows that the vehicle is being driven ■… -
Page 101
2-1. Instrument cluster WARNING ■ The information display at low temperatures Allow the interior of the vehicle to warm up before using the liquid crys- tal information display. At extremely low temperatures, the information dis- play monitor may respond slowly, and display changes may be delayed. -
Page 102
2-1. Instrument cluster ■ Setting the clock to be Press to select “Clock adjusted automatically by GPS : 00”. Press the “MENU” button. Press the to set the clock to Select “Setup” on the “Menu” the beginning of the nearest hour. screen. -
Page 103: Multi-Information Display
■ Clock settings screen (vehicles with navigation/multimedia system) If “Clock : 00” is displayed when selected on the multi-information dis- play, the system may be malfunctioning. Have the vehicle inspected by your Toyota dealer. COROLLA HV_ 国瑞 _GE COROLLA HYBRID_OM_General_OM12M44E…
-
Page 104
2-1. Instrument cluster 7-inch display Driving information display (P.103) Driving support system infor- mation display (P.105) Audio system-linked display (if equipped) (P.106) Vehicle information display (P.106) Settings display (P.106) Driving support system status Warning message display display area (P.417) Displays an image when the following ■… -
Page 105
2-1. Instrument cluster Driving range Displays driving range with remaining fuel. Use the displayed values as a ref- erence only. This distance is computed based on your average fuel consumption. As a result, the actual distance that can be driven may differ from that displayed. -
Page 106
2-1. Instrument cluster your average fuel consumption. As a result, the actual distance that can be driven may differ from that displayed. When only a small amount of fuel is added to the tank, the display may not be updated. When refueling, turn the power switch off. -
Page 107
2-1. Instrument cluster played. ■ The ECO Accelerator Guidance/Eco score will not operate when The ECO Accelerator Guidance/Eco score will not operate in the following sit- uations: The Hybrid System Indicator is not ● operating. The vehicle is being driven using the ●… -
Page 108
2-1. Instrument cluster selected in . (P.106) ■ Route guidance to destination dis- play After start When the route guidance to destination • Distance: Displays the distance display is enabled on the head-up dis- driven since hybrid system start play, it will not be displayed on the multi-information display. -
Page 109
2-1. Instrument cluster Multi-information display off ometer to analog/digital. EV indicator Select to turn the multi-information dis- play off. Select to enable/disable the EV indica- tor. To turn the multi-information display on again, press any of the following meter … -
Page 110
2-1. Instrument cluster NOTICE ■ During setting up the display To prevent 12-volt battery discharge, ensure that the hybrid system is oper- ating while setting up the display fea- tures. COROLLA HV_ 国瑞 _GE COROLLA HYBRID_OM_General_OM12M44E… -
Page 111: Head-Up Display
2-1. Instrument cluster Head-up display : If equipped The head-up display projects a variety of driving-related information and the operating state of the driving support systems on the wind- shield. System components Illustrations used in this text are intended as examples, and may differ from the image that is actually displayed by the head-up display.
-
Page 112
2-1. Instrument cluster Using the head-up display WARNING ■ When using the head-up display Select on the multi-information Check that the position and bright- ● display (P.106) and then “HUD ness of the head-up display image does not interfere with safe driving. Main”. -
Page 113
2-1. Instrument cluster Select to adjust the angle of the Driving support system sta- head-up display. tus/navigation sys- tem-linked display area (if ■ Enabling/disabling of the head-up display equipped) If the head-up display is disabled, it will remain disabled when the power switch ■… -
Page 114
2-1. Instrument cluster ■ Driving support systems ■ When a pop-up display is displayed Displays a warning/sugges- When a pop-up display is displayed, a tion/advice message or the operat- current display may no longer be dis- played. In this case, the display will ing state of a relevant system. -
Page 115: Energy Monitor/Consumption Screen
(at the entrance/exit of a garage, tunnel, etc.) When “—” or “E” is displayed, the sys- ● tem may be malfunctioning. Take your vehicle to your Toyota dealer. Audio system screen Multi-information display Meter control switches Energy monitor ■…
-
Page 116
2-1. Instrument cluster When the vehicle is powered by the electric motor (traction motor) Multi-information display (Example: Audio system screen 7-inch display) When the vehicle is powered by both the gasoline engine and the electric motor (traction motor) Multi-information display (Example: Audio system screen 7-inch display) COROLLA HV_ 国瑞… -
Page 117
2-1. Instrument cluster When the vehicle is powered by the gasoline engine Multi-information display (Example: Audio system screen 7-inch display) When the vehicle is charging the hybrid battery (traction battery) Multi-information display (Example: 7-inch display) Audio system screen COROLLA HV_ 国瑞 _GE COROLLA HYBRID_OM_General_OM12M44E… -
Page 118
2-1. Instrument cluster When there is no energy flow Multi-information display (Example: Audio system screen 7-inch display) These images are examples only, and may vary slightly from actual conditions. ■ Hybrid battery (traction bat- tery) status High Audio system screen … -
Page 119
2-1. Instrument cluster Fuel consumption in the past 15 Latest fuel consumption minutes Previous fuel consumption Current fuel consumption record Regenerated energy in the past Resetting the history data 15 minutes Updating the latest fuel con- One symbol indicates 30 Wh. Up to 5 sumption data symbols are shown. -
Page 120
2-1. Instrument cluster COROLLA HV_ 国瑞 _GE COROLLA HYBRID_OM_General_OM12M44E… -
Page 121
Before driving 3-1. Key information Keys……..120 3-2. Opening, closing and locking the doors Doors ……..126 Trunk………132 Smart entry & start system ……..134 3-3. Adjusting the seats Front seats……141 Rear seats ……142 Head restraints ….144 3-4. Adjusting the steering wheel and mirrors Steering wheel….146 Inside rear view mirror… -
Page 122: Keys
3-1. Key information Type C Keys 3-1.Key information The keys The following keys are provided with the vehicle. Type A Electronic keys • Operating the smart entry & start sys- P.134 tem ( • Operating the wireless remote control P.122 function (…
-
Page 123
Toyota dealer to check if key to the battery-saving mode. an unknown electronic key (other than (P.136) -
Page 124
Radio waves emitted from electric appli- : This setting must be customized at ances within 10 cm (3.9 in.) of the your Toyota dealer. electronic key may interfere with the key, causing the key to not function : If equipped properly. -
Page 125
3-1. Key information about one second, an alarm will sound ● When carrying a portable radio, cellu- intermittently and the vehicle lights will lar phone or other wireless communi- flash to deter any person from trying to cation devices break into or damage your vehicle. When the wireless key is in contact ●… -
Page 126
3-1. Key information inserted in one direction, as the key (P.441) only has grooves on one side. If the key cannot be inserted in a lock cyl- inder, turn it over and re-attempt to insert it. After using the mechanical key, store it in the electronic key. -
Page 127
3-1. Key information ■ Certification for the wireless remote control (vehicles with a smart entry & start system) P.139 COROLLA HV_ 国瑞 _GE COROLLA HYBRID_OM_General_OM12M44E… -
Page 128: The Doors Doors
3-2. Opening, closing and locking the doors ■ Doors Wireless remote control 3-2.Opening, closing and locking the doors Vehicles without a smart entry & start system Unlocking and locking the doors from the outside ■ Smart entry & start system (if equipped) Carry the electronic key to enable this function.
-
Page 129
3-2. Opening, closing and locking the doors your Toyota dealer. Cancel the intrusion sensor of the alarm system to prevent unintended : If equipped triggering of the alarm while chang- ing the settings. (if equipped) ■ (P.83) Turning the key operates the doors… -
Page 130
3-2. Opening, closing and locking the doors door once after the settings have been unlocked using the entry function or changed. (If a door is not opened within wireless remote control, the security fea- ture automatically locks the vehicle 30 seconds after is pressed, the again. -
Page 131
3-2. Opening, closing and locking the doors ■ If the smart entry & start system (if ■ When opening or closing a door equipped) or the wireless remote Check the surroundings of the vehicle control does not operate properly such as whether the vehicle is on an Vehicles without a smart entry &… -
Page 132
3-2. Opening, closing and locking the doors ■ Inside lock buttons Rear door child-protector lock The door cannot be opened from inside the vehicle when lock is set. Locks the door Unlocks the door The driver’s door can be opened by pulling the inside handle even if the lock button is in the lock position. -
Page 133
3-2. Opening, closing and locking the doors Function Operation Shift Door lock Function lever switch All doors are auto- position position matically locked Speed linked when vehicle speed Shift position door locking is approximately 20 linked door lock- function km/h (12 mph) or ing function higher. -
Page 134: Trunk
3-2. Opening, closing and locking the doors Trunk When opening or closing the trunk ● lid, thoroughly check to make sure the surrounding area is safe. The trunk can be opened using If anyone is in the vicinity, make ● the trunk opener, entry func- sure they are safe and let them know that the trunk is about to open…
-
Page 135
3-2. Opening, closing and locking the doors WARNING Do not attach any accessories ● other than genuine Toyota parts to the trunk lid. Such additional weight on the trunk lid may cause the lid to suddenly shut again after it is opened. -
Page 136
3-2. Opening, closing and locking the doors power switch is turned off, the light will Smart entry & start sys- go off automatically after 20 minutes. ■ Function to prevent the trunk being locked with the electronic key : If equipped inside (vehicles with a smart entry &… -
Page 137
3-2. Opening, closing and locking the doors Right-hand drive vehicles When opening the trunk The system can be operated when the electronic key is within about 0.7 m (2.3 ft.) of the trunk release button. Right-hand drive vehicles When locking or unlocking the doors Antennas outside the cabin… -
Page 138
3-2. Opening, closing and locking the doors any door except the driver’s door. In Correction Situation this case, hold the driver’s door han- procedure dle, or use the wireless remote control or mechanical key to unlock the Close all of An attempt was made doors. -
Page 139
3-2. Opening, closing and locking the doors metallic objects • The electronic key is too close to the • Cards to which aluminum foil is window or outside door handle, near attached the ground, or in a high place when •… -
Page 140
3-2. Opening, closing and locking the doors ● When the lock operation is performed ● The smart entry & start system can be using the lock sensor, recognition sig- deactivated in advance. (P.462) nals will be shown up to two consecu- Setting the electronic key to bat- ●… -
Page 141
3-2. Opening, closing and locking the doors ■ Certification for the smart entry & start system COROLLA HV_ 国瑞 _GE COROLLA HYBRID_OM_General_OM12M44E… -
Page 142
& start such medical devices. system antennas. (P.134) The radio waves may affect the Ask your Toyota dealer for details on operation of such devices. If neces- disabling the entry function. sary, the entry function can be disa- bled. -
Page 143
3-3. Adjusting the seats Seatback angle adjustment Front seats 3-3.Adjusting the seats switch Seat cushion (front) angle Adjustment procedure adjustment switch Manual seat Vertical height adjustment switch Lumbar support adjustment switch WARNING ■ When adjusting the seat position Take care when adjusting the seat ●… -
Page 144: Rear Seats
3-3. Adjusting the seats Rear seats (folding WARNING type) Manual seat only: After adjusting ● the seat, make sure that the seat is locked in position. : If equipped The seatbacks of the rear seats NOTICE can be folded down. ■…
-
Page 145
3-3. Adjusting the seats rately. ■ After returning the rear seatback to the upright position ● Make sure that the seatback is securely locked in position by lightly pushing it back and forth. If the seatback is not securely locked, the red marking will be visible on the seatback lock release button. -
Page 146: Head Restraints
3-3. Adjusting the seats ■ Head restraints Rear outside seats (adjustable type) Head restraints are provided for all seats. WARNING ■ Head restraint precautions Observe the following precautions regarding the head restraints. Failure to do so may result in death or serious injury.
-
Page 147
3-3. Adjusting the seats ■ Rear outside seats (adjustable type) Align the head restraint with the installation holes and push it down to the lock position. Press and hold the lock release button when lowering the head restraint. ■ Rear outside seats (adjustable type) Pull the head restraint up while pressing the lock release button… -
Page 148: And Mirrors Steering Wheel
3-4. Adjusting the steering wheel and mirrors Steering wheel 3-4.Adjusting the steering wheel and mirrors ■ After adjusting the steering wheel Make sure that the steering wheel is Adjustment procedure securely locked. Otherwise, the steering wheel may Hold the steering wheel and move suddenly, possibly causing an accident, and resulting in death or push the lever down.
-
Page 149: Inside Rear View Mirror
3-4. Adjusting the steering wheel and mirrors Inside rear view mirror The rear view mirror’s position can be adjusted to enable suf- ficient confirmation of the rear view. Adjusting the height of rear Normal position view mirror Anti-glare position The height of the rear view mirror Auto anti-glare inside rear view can be adjusted to suit your driving …
-
Page 150: Outside Rear View Mirrors
3-4. Adjusting the steering wheel and mirrors Outside rear view mir- ■ To prevent sensor error (vehicles rors with an auto anti-glare inside rear view mirror) To ensure that the sensors operate The rear view mirror’s position properly, do not touch or cover them. can be adjusted to enable suf- ficient confirmation of the rear view.
-
Page 151
3-4. Adjusting the steering wheel and mirrors To adjust the mirror, operate the readjust the angle in reversing. switch. Folding and extending the mirrors Manual type Push the mirror back in the direc- tion of the vehicle’s rear. Right Down Left Power type… -
Page 152
3-4. Adjusting the steering wheel and mirrors ■ Using automatic mode in cold weather (vehicles with automatic mode) When automatic mode is used in cold weather, the door mirror could freeze up and automatic stowing and return may not be possible. In this case, remove any ice and snow from the door mirror, then either operate the mirror using manual mode or move the mirror by… -
Page 153: Power Windows
3-5. Opening and closing the windows ■ Power windows Catch protection function 3-5.Opening and closing the windows If an object becomes caught between the door and window while the window is opening, window movement is Opening and closing the stopped. power windows ■…
-
Page 154
If the window reverses and cannot be fully closed or opened, have the vehicle inspected by your Toyota dealer. ■ Door lock linked window operation Vehicles without a smart entry & start ●… -
Page 155: Moon Roof
3-5. Opening and closing the windows Moon roof WARNING The catch protection function may ● : If equipped not work if something gets caught just before the window is fully Use the overhead switches to opened. Be careful not to get any open and close the moon roof part of your body or clothing caught in the window.
-
Page 156
: These settings must be customized at approximately 1 second. Then it will your Toyota dealer. tilt down, open and close. Check to make sure that the moon roof is com- ■… -
Page 157
Toyota dealer. caught when the moon roof is being operated. ■… -
Page 158
3-5. Opening and closing the windows WARNING The jam protection function may not ● work if something gets caught just before the moon roof is fully closed. Also, the jam protection function is not designed to operate while the moon roof switch is being pressed. Take care so that your fingers, etc. -
Page 159
Cruise control….248 Power (ignition) switch (vehi- BSM (Blind Spot Monitor) cles with a smart entry & start ……..251 system) ……168 Toyota parking assist-sensor EV drive mode ….172 ……..256 Hybrid transmission ..174 RCTA (Rear Cross Traffic Alert) Turn signal lever ….177 function ……262… -
Page 160: Before Driving Driving The Vehicle
4-1. Before driving Vehicles without a smart entry & Driving the vehicle 4-1.Before driving start system: Turn the power switch to OFF to stop the hybrid The following procedures system. should be observed to ensure Vehicles with a smart entry & safe driving: start system: Press the power switch to stop the hybrid system.
-
Page 161
■ ECO Accelerator Guidance ■ (P.104) Breaking in your new Toyota Eco-friendly driving may be achieved To extend the life of the vehicle, observ- more easily by staying within the zone of ing the following precautions is recom- Eco acceleration. -
Page 162
4-1. Before driving During normal driving, do not turn ● WARNING off the hybrid system. Turning the ■ hybrid system off while driving will When driving the vehicle not cause loss of steering or brak- Do not drive if you are unfamiliar ●… -
Page 163
Have the brake pads checked and make sure that the brakes are func- replaced by your Toyota dealer as tioning properly. Wet brake pads soon as possible. may prevent the brakes from func- tioning properly. -
Page 164
4-1. Before driving Always apply the parking brake, ● WARNING shift the shift lever to P, stop the ■ hybrid system and lock the vehicle. When the vehicle is parked Do not leave the vehicle unat- Do not leave glasses, cigarette ●… -
Page 165
Always set the parking brake and shift the shift lever to P. Failure to do so becomes flooded or stuck in mud or sand, be sure to have your Toyota may cause the vehicle to move or the vehicle may accelerate suddenly if… -
Page 166: Cargo And Luggage
4-1. Before driving Cargo and luggage Secure all items in the occupant ● compartment. Vehicles with folding type rear ● Take notice of the following seats: When you fold down the rear information about storage pre- seats, long items should not be placed directly behind the front cautions, cargo capacity and seats.
-
Page 167: Trailer Towing
4-1. Before driving Trailer towing Toyota does not recommend towing a trailer with your vehi- cle. Toyota also does not rec- ommend the installation of a tow hitch or the use of a tow hitch carrier for a wheelchair, scooter, bicycle, etc. Your vehi-…
-
Page 168
In the event that the “READY” indicator stops automatically in accordance with does not come on even after performing the state of the vehicle.) the proper procedures for starting the vehicle, contact your Toyota dealer immediately. ■ If the hybrid system is malfunction- P.78 COROLLA HV_ 国瑞… -
Page 169
If the hybrid system becomes difficult opened while the power switch is in OFF to start, have your vehicle checked by or ACC to remind you to remove the your Toyota dealer immediately. key. Changing the power switch WARNING positions ■… -
Page 170
● The immobilizer system may not have Firmly depress the brake pedal. been deactivated. (P.79) Contact your Toyota dealer. and a message will be displayed ● If a message related to start-up is on the multi-information display. If it is… -
Page 171
In the event that the “READY” indicator does not come on even after performing the proper procedures for starting the NOTICE vehicle, contact your Toyota dealer ■ immediately. When starting the hybrid system If the hybrid system becomes difficult ■… -
Page 172
Contact power switch for more than 2 sec- your Toyota dealer immediately. onds, or press it briefly 3 times or more in succession. (P.400) However, do not touch the power… -
Page 173
4-2. Driving procedures for long periods of time when the hybrid system is not operating. NOTICE ■ To prevent 12-volt battery dis- charge Do not leave the power switch in ● ACC or ON for long periods of time without the hybrid system on. If “ACCESSORY”… -
Page 174: Ev Drive Mode
4-2. Driving procedures EV drive mode NOTICE ■ To prevent 12-volt battery dis- charge In EV drive mode, electric Do not stop the hybrid system when power is supplied by the the shift lever is in a position other hybrid battery (traction bat- than P.
-
Page 175
4-2. Driving procedures ● The temperature of the hybrid system (P.116) is high. ● Vehicle speed is high. The vehicle has been left in the sun, ● The accelerator pedal is depressed driven on a hill, driven at high speeds, firmly or the vehicle is on a hill etc. -
Page 176: Hybrid Transmission
4-2. Driving procedures Hybrid transmission WARNING ■ Caution while driving Except for Taiwan: When driving in ● Select the shift position EV drive mode, pay special atten- depending on your purpose tion to the area around the vehicle. and situation. Because there is no engine noise, pedestrians, people riding bicycles or other people and vehicles in the…
-
Page 177
Have the vehicle inspected by your Toyota dealer immediately. The following steps may be used as an emergency measure to ensure that the shift lever can be shifted. -
Page 178
4-2. Driving procedures wrap the tip of the flathead screw- WARNING driver with a tape. ■ To prevent an accident when releasing the shift lock Before pressing the shift lock override button, make sure to set the parking brake and depress the brake pedal. If the accelerator pedal is accidentally depressed instead of the brake pedal when the shift lock override button is… -
Page 179: Turn Signal Lever
4-2. Driving procedures Turn signal lever Parking brake : If equipped Operating instructions Operating instructions To set the parking brake, fully pull the parking brake lever while depressing the brake Right turn pedal. Lane change to the right (move the lever partway and release it) To release the parking brake, The right hand signals will flash 3 times.
-
Page 180: Electric Parking Brake
4-2. Driving procedures Electric parking brake NOTICE ■ Before driving : If equipped Fully release the parking brake. Driv- ing the vehicle with the parking brake The parking brake can be set set will lead to brake components or released automatically or overheating, which may affect braking performance and increase brake manually.
-
Page 181
4-2. Driving procedures Push the switch to release the Operate the shift lever with the parking brake vehicle stopped and the brake • Operate the parking brake switch pedal depressed. while depressing the brake pedal. The parking brake may not operate •… -
Page 182
Have the may lead to an accident resulting in vehicle inspected by your Toyota dealer. death or serious injury. ■ Parking brake operation sound ■… -
Page 183: Brake Hold
D, B or N with brake wear. the system on and the brake Have the vehicle inspected by your pedal has been depressed to Toyota dealer immediately if this stop the vehicle. The system occurs. releases the brake when the accelerator pedal is depressed with the shift lever in D or B to allow smooth start off.
-
Page 184
Make sure that the parking brake indica- tor light goes off. (P.178) ■ When an inspection at your Toyota dealer is necessary When the brake hold standby indicator (green) does not illuminate even when COROLLA HV_ 国瑞 _GE… -
Page 185
4-2. Driving procedures NOTICE ■ When parking the vehicle The brake hold system is not designed for use when parking the vehicle for a long period of time. Turn- ing the power switch off while the sys- tem is holding the brake may release the brake, which would cause the vehicle to move. -
Page 186: Headlight Switch
4-3. Operating the lights and wipers Type B Headlight switch 4-3.Operating the lights and wipers The headlights can be oper- ated manually or automatically. Operating instructions Operating the switch turns on the lights as follows: Type A The headlights, daytime running lights (P.185) and all the lights listed below turn on and off automatically.
-
Page 187
4-3. Operating the lights and wipers tem to malfunction. The headlights, daytime ■ Automatic light off system (if running lights (P.185) and all equipped) the lights listed below turn on For GCC countries and Taiwan and off automatically. If you open the driver’s door with the power switch ACC or OFF, all lights are The front position, tail, turned off. -
Page 188
4-3. Operating the lights and wipers the power switch is turned off the 12-volt NOTICE battery saving function will operate and automatically turn off all the lights after ■ To prevent 12-volt battery dis- approximately 20 minutes. When the charge power switch is turned to ON, the 12-volt Do not leave the lights on longer than battery-saving function will be disabled. -
Page 189
4-3. Operating the lights and wipers ■ Guide to dial settings Occupancy and luggage load conditions Dial position Luggage Occupants load Driver None Driver and front pas- None The lights will turn off in the follow- senger ing situations. All seats None … -
Page 190: Automatic High Beam
4-3. Operating the lights and wipers Push the lever away from you Automatic High Beam with the headlight switch in the : If equipped position. The Automatic High Beam The Automatic High Beam indicator will uses a camera sensor located come on when the system is operating.
-
Page 191
4-3. Operating the lights and wipers • When the vehicle is cut in front of by etc.) another vehicle • When the windshield is obscured by • When vehicles ahead cannot be fog, mist, ice, dirt, etc. detected due to repeated curves, road •… -
Page 192: Fog Light Switch
4-3. Operating the lights and wipers Fog light switch Turning the high beams on/off manually : If equipped ■ Switching to the low beams The fog lights secure excellent Pull the lever to its original position. visibility in difficult driving The Automatic High Beam indicator will conditions, such as in rain and turn off.
-
Page 193
4-3. Operating the lights and wipers Rear fog light switch Turns the front and rear fog lights on Releasing the switch ring returns it Operating the switch ring again turns only the rear fog light off. ■ Fog lights can be used when Vehicles with a front fog light switch ●… -
Page 194: Windshield Wipers And Washer
4-3. Operating the lights and wipers Windshield wipers and Low speed windshield washer wiper operation High speed windshield Operating the lever can use the wiper operation windshield wipers or the Temporary operation washer. NOTICE ■ When the windshield is dry Do not use the wipers, as they may damage the windshield.
-
Page 195
4-3. Operating the lights and wipers Rain-sensing windshield wipers Intermittent windshield wiper operation Low speed windshield wiper operation High speed windshield wiper operation Temporary operation Wiper intervals can be adjusted when intermittent operation is selected. Rain-sensing windshield wiper operation Low speed windshield Increases the intermittent wind- wiper operation… -
Page 196
4-3. Operating the lights and wipers intermittently strikes the windshield, or if bugs etc. are present on the wind- shield. Increases the rain-sensing wind- ● If the wiper is turned to AUTO mode shield wiper sensitivity while the power switch is in ON, the Decreases the rain-sensing wipers will operate once to show that windshield wiper sensitivity… -
Page 197
■ When a nozzle becomes blocked In this case, contact your Toyota dealer. Do not try to clear it with a pin or other object. The nozzle will be damaged. -
Page 198
4-4. Refueling Opening the fuel tank 4-4.Refueling Always hold the grips on the fuel ● tank cap and turn it slowly to remove it. A whooshing sound may be heard when the fuel tank cap is loosened. Perform the following steps to Wait until the sound cannot be open the fuel tank cap: heard before fully removing the… -
Page 199
When replacing the fuel tank cap fuel filler door. Do not use anything but a genuine Toyota fuel tank cap designed for your vehicle. Doing so may cause a fire or other incident which may result in death or serious injury. -
Page 200: Toyota Safety Sense
4-5.Using the driving support systems WARNING ■ Toyota Safety Sense : If equipped The Toyota Safety Sense is designed to operate under the assumption that The Toyota Safety Sense con- the driver will drive safely, and is sists of the following drive…
-
Page 201
Toyota dealer. etc., clean it. Clean the radar sensor and grille cover with a soft cloth to avoid dam- aging them. -
Page 202
Contact your Toyota dealer for remove the fog, condensation, or details. ice. ( P.326) -
Page 203
4-5. Using the driving support systems ■ Certification COROLLA HV_ 国瑞 _GE COROLLA HYBRID_OM_General_OM12M44E… -
Page 204
In the following situations, perform the actions specified in the table. When the nor- ● mal operating conditions are detected, the message will disappear and the system will become operational. If the message does not disappear, contact your Toyota dealer. Situation Actions When the area around a sensor is cov-… -
Page 205
If the message does not disappear, contact your Toyota dealer. • When the temperature around the radar sensor is outside of the operational range, such as when the vehicle is in the sun or in an extremely cold environment •… -
Page 206
If the sys- region may be different. Contact tem determines that the possi- your Toyota dealer for details. bility of a frontal collision with an object is extremely high, the brakes are automatically… -
Page 207
4-5. Using the driving support systems ■ Pre-collision brake assist Although this system is designed to ● help avoid a collision or help reduce When the system determines that the impact of the collision, its effec- the possibility of a frontal collision is tiveness may change according to high, the system applies greater various conditions, therefore the… -
Page 208
4-5. Using the driving support systems When the tires are not properly ● WARNING inflated In some situations, while the ● When the tires are very worn ● pre-collision braking function is operating, operation of the function ● When tires of a size other than may be canceled if the accelerator specified are installed pedal is depressed strongly or the… -
Page 209
4-5. Using the driving support systems ■ Changing the pre-collision warning timing The pre-collision warning timing can be changed on (P.467) of the multi-information display. The warning timing setting is retained when the power switch is turned off. However, if the pre-collision system is disabled and re-enabled, the operation timing will return to the default setting (middle). -
Page 210
4-5. Using the driving support systems Relative speed between Detectable objects Vehicle speed your vehicle and object Approx. 10 to 180 km/h (7 Approx. 10 to 180 km/h (7 Vehicles to 110 mph) to 110 mph) Approx. 10 to 80 km/h (7 to Approx. -
Page 211
4-5. Using the driving support systems • When approaching a detectable object in an adjacent lane or on the roadside, such as when changing the course of travel or driving on a wind- ing road • When a detectable object approaches very close and then stops before entering the path of your vehicle •… -
Page 212
4-5. Using the driving support systems reflects radio waves, such as a large • If a detectable object cuts or suddenly truck or guardrail emerges in front of your vehicle • When driving near a TV tower, broad- • When the front of your vehicle is hit by casting station, electric power plant, or water, snow, dust, etc. -
Page 213
4-5. Using the driving support systems • If the radar sensor or front camera is approximately 2 m (6.5 ft.) misaligned • If a pedestrian/bicyclist is wearing oversized clothing (a rain coat, long In some situations such as the follow- ●… -
Page 214: Lta (Lane Tracing Assist)
4-5. Using the driving support systems LTA (Lane Tracing WARNING Assist) ■ Before using LTA system Do not rely solely upon the LTA sys- ● : If equipped tem. The LTA system does not automatically drive the vehicle or When driving on highways and reduce the amount of attention that must be paid to the area in front of freeways with white (yellow)
-
Page 215
Do not modify the suspension etc. If ● the suspension etc. needs to be When the follow-up cruising dis- ● replaced, contact your Toyota play is displayed ( P.217) and the preceding vehicle departs from its dealer. lane. (Your vehicle may follow the Do not install or place anything on ●… -
Page 216
4-5. Using the driving support systems The vehicle is driven on a road sur- ● WARNING face that is wet due to rain, pud- Vehicle is driven where the road ● dles, etc. diverges, merges, etc. The traffic lines are yellow (which ●… -
Page 217
4-5. Using the driving support systems : Boundary between asphalt and the WARNING side of the road, such as grass, soil, When driving in a tunnel or at night ● or a curb with the headlights off or when a headlight is dim due to its lens being dirty or it being misaligned. -
Page 218
4-5. Using the driving support systems steering assist function will operate even if the turn signals are operating. : Boundary between asphalt and the side of the road, such as grass, soil, or a curb ■ Lane centering function This function is linked with dynamic radar cruise control with full-speed range and provides the required assistance by operating the steer-… -
Page 219
4-5. Using the driving support systems canceled. Indications on multi-infor- mation display Turning LTA system on Press the LTA switch to turn the LTA indicator LTA system on. The illumination condition of the indica- The LTA indicator illuminates and a tor informs the driver of the system message is displayed on the multi-infor- operation status. -
Page 220
4-5. Using the driving support systems Inside of displayed lines is black lane centering function is operating. Both outer sides of the lane are dis- played: Indicates that steering wheel assist of the lane centering function is operating. One outer side of the lane is displayed: Indicates that steering wheel assist of the steering assist function is operating. -
Page 221
4-5. Using the driving support systems the multi-information display is set to km/h (32 mph) or more. “ON”. (P.101) • System recognizes white (yellow) lane • Vehicle speed is approximately 50 lines or a course . (When a white km/h (32 mph) or more. [yellow] line or course is recognized •… -
Page 222
4-5. Using the driving support systems cally restored. (P.218) ● If the operation conditions (P.218) are no longer met while the lane cen- tering function is operating, the buzzer may sound to indicate that the func- tion has been temporarily canceled. ■… -
Page 223: Lda (Lane Departure Alert With Steering Control)
The system may not be operating prop- erly. Have the vehicle inspected by your era. Additionally, it detects Toyota dealer. preceding vehicles using the ● “LTA Unavailable” front camera and radar. The system is temporarily canceled due…
-
Page 224
● Do not modify the suspension etc. If the suspension etc. needs to be driving for a long period of time. replaced, contact your Toyota Failure to perform appropriate driv- ● dealer. ing operations and pay careful… -
Page 225
4-5. Using the driving support systems The vehicle is driven in an area ● WARNING without white (yellow) lines, such as Objects or patterns that could be ● in front of a tollgate or checkpoint, mistaken for white (yellow) lines are or at an intersection, etc. -
Page 226
4-5. Using the driving support systems depart from its lane and that the possi- WARNING bility of a collision with an overtaking The vehicle is extremely tilted due ● vehicle in the adjacent lane is high, the to carrying heavy luggage or having lane departure alert will operate even if improper tire pressure. -
Page 227
4-5. Using the driving support systems Vehicle with BSM: When the system determines that the vehicle might depart from its lane and that the possi- bility of a collision with an overtaking vehicle in the adjacent lane is high, the steering assist function will operate even if the turn signals are operating. -
Page 228
4-5. Using the driving support systems Inside of displayed lines is white Indications on multi-infor- mation display Indicates that the system is recog- nizing white (yellow) lines or a LDA indicator course . When the vehicle departs The illumination condition of the indica- from its lane, the white line dis- tor informs the driver of the system played on the side the vehicle… -
Page 229
4-5. Using the driving support systems • LDA is turned on. • Width of traffic lane is approximately 3 • Vehicle speed is approximately 50 m (9.8 ft.) or more. km/h (32 mph) or more. • No system malfunctions are detected. •… -
Page 230
The system may not be operating prop- Depending on the vehicle condition and erly. Have the vehicle inspected by your road conditions, the warning may not Toyota dealer. operate. Also, if the system determines “Lane Departure Alert Unavailable” ● that the vehicle is driving around a… -
Page 231: Dynamic Radar Cruise Control With Full-Speed Range
4-5. Using the driving support systems ■ Customization Dynamic radar cruise Function settings can be changed. control with full-speed (P.462) range : If equipped In vehicle-to-vehicle distance control mode, the vehicle auto- matically accelerates, deceler- ates and stops to match the speed changes of the preced- ing vehicle even if the acceler- ator pedal is not depressed.
-
Page 232: Dynamic Radar Cruise Control
4-5. Using the driving support systems Indicators • Conditions under which the vehi- cle-to-vehicle distance control ■ Operation switches mode may not function correctly: P.238 Set the speed appropriately ● depending on the speed limit, traffic flow, road conditions, weather con- ditions, etc.
-
Page 233
4-5. Using the driving support systems ■ Situations unsuitable for WARNING dynamic radar cruise control Assisting the driver to measure fol- ● with full-speed range lowing distance Do not use dynamic radar cruise con- The dynamic radar cruise control with trol with full-speed range in any of the full-speed range is only intended to following situations. -
Page 234
4-5. Using the driving support systems Driving in vehicle-to-vehicle distance control mode This mode employs a radar to detect the presence of vehicles up to approx- imately 100 m (328 ft.) ahead, determines the current vehicle-to-vehicle fol- lowing distance, and operates to maintain a suitable following distance from the vehicle ahead. -
Page 235
4-5. Using the driving support systems driving at 80 km/h (50 mph) or more, the vehicle will quickly accelerate to help to overtake a passing vehicle. Example of acceleration When there are no longer any preceding vehicles driving slower than the set speed The system accelerates until the set speed is reached. -
Page 236
4-5. Using the driving support systems Fine adjustment: Press the switch. Large adjustment: Press and hold the switch to change the speed, and release when the desired speed is reached. In the vehicle-to-vehicle distance control mode, the set speed will be increased or decreased as follows: Fine adjustment: By 1 km/h (0.6 mph) Long… -
Page 237
4-5. Using the driving support systems Distance Vehicle-to-vehicle dis- Canceling and resuming the options tance speed control Approximately 50 m (160 Long ft.) Approximately 40 m (130 Medium ft.) Approximately 30 m (100 Short ft.) Resuming follow-up cruis- ing when the vehicle has Pressing the cancel switch can- been stopped by system cels the speed control. -
Page 238
4-5. Using the driving support systems Immediately after the switch is pressed, the dynamic radar cruise control indica- tor will come on. Afterwards, it switches to the cruise control indicator. Switching to constant speed control mode is only possible when operating the switch with the cruise control off. -
Page 239
■ tion in the system. Contact your Toyota Automatic cancelation of vehi- dealer. cle-to-vehicle distance control mode ■… -
Page 240
4-5. Using the driving support systems ing on the conditions, operate the brake pedal when deceleration of the system is insufficient or operate the accelerator pedal when acceleration is required. As the sensor may not be able to cor- rectly detect these types of vehicles, the approach warning (P.235) may not be activated. -
Page 241
4-5. Using the driving support systems erator pedal Dynamic radar cruise control : If equipped In vehicle-to-vehicle distance control mode, the vehicle auto- matically accelerates and decelerates to match the speed changes of the preceding vehi- cle even if the accelerator pedal is not depressed. -
Page 242
4-5. Using the driving support systems ■ Operation switches Set the speed appropriately ● depending on the speed limit, traffic flow, road conditions, weather con- ditions, etc. The driver is responsi- ble for checking the set speed. Even when the system is function- ●… -
Page 243
4-5. Using the driving support systems On steep downhills, or where there ● WARNING are sudden changes between sharp Assisting the driver to judge proper ● up and down gradients following distance Vehicle speed may exceed the set The dynamic radar cruise control speed when driving down a steep hill. -
Page 244
4-5. Using the driving support systems Driving in vehicle-to-vehicle distance control mode This mode employs a radar to detect the presence of vehicles up to approx- imately 100 m (328 ft.) ahead, determines the current vehicle-to-vehicle fol- lowing distance, and operates to maintain a suitable following distance from the vehicle ahead. -
Page 245
4-5. Using the driving support systems set speed The system accelerates until the set speed is reached. The system then returns to constant speed cruising. speed. Setting the vehicle speed (vehicle-to-vehicle distance control mode) Press the cruise control main switch to activate the cruise con- trol. -
Page 246
4-5. Using the driving support systems Short or 1 mph (1.6 km/h) each time the switch is pressed The vehicle-to-vehicle distance is set automatically to long mode when the Large adjustment: Increases or power switch is turned to ON. decreases in 5 km/h (3.1 mph) or 5 If a vehicle is running ahead of you, the mph (8 km/h) -
Page 247
4-5. Using the driving support systems Canceling and resuming the speed control ■ Warnings may not occur when In the following instances, warnings may not occur even when the vehi- Pressing the cancel switch can- cle-to-vehicle distance is small. cels the speed control. … -
Page 248
If vehicle-to-vehicle distance control mode is automatically canceled for any reasons other than the above, there may be a malfunction in the system. Contact your Toyota dealer. ■ Automatic cancelation of constant speed control mode Constant speed control mode is auto-… -
Page 249
● When water or snow thrown up by the than the above, there may be a malfunc- surrounding vehicles hinders the tion in the system. Contact your Toyota detecting of the sensor dealer. ● When your vehicle is pointing ■… -
Page 250: Cruise Control
4-5. Using the driving support systems Cruise control : If equipped Use the cruise control to main- tain a set speed without depressing the accelerator pedal. ● When steering wheel operation or your position in the lane is unstable System components ■…
-
Page 251
4-5. Using the driving support systems desired set speed is obtained. Setting the vehicle speed Press the cruise control main switch to activate the cruise con- trol. Cruise control indicator will come on. Press the switch again to deactivate the cruise control. -
Page 252
Have the vehicle inspected Resuming is available when the vehicle by your Toyota dealer. speed is more than approximately 30km/h (20 mph). WARNING ■… -
Page 253: Bsm (Blind Spot Monitor)
4-5. Using the driving support systems BSM (Blind Spot Moni- WARNING tor) On steep hills ● Vehicle speed may exceed the set : If equipped speed when driving down a steep hill. During emergency towing The Blind Spot Monitor is a ●…
-
Page 254
There may be a sensor malfunction of blind spot, the outside rear view mirror misaligned. Have the vehicle inspected indicator on the detected side will illumi- by your Toyota dealer. nate. If the turn signal lever is operated ■ Customization toward the detected side, the outside Some functions can be customized. -
Page 255
Toyota dealer. ● Do not paint the rear bumper any color other than an official Toyota color. Turning the Blind Spot Moni- tor on/off Use the meter control switches to COROLLA HV_ 国瑞 _GE… -
Page 256
4-5. Using the driving support systems turn on/off the function. Press to select Press to select and then press Blind Spot Monitor operation ■ Vehicles that can be detected by the Blind Spot Monitor The Blind Spot Monitor uses rear side radar sensors to detect the following vehicles traveling in adjacent lanes and advises the driver of the presence of such vehicles via the indicators on the outside rear view mirrors. -
Page 257
4-5. Using the driving support systems Approximately 3 m (9.8 ft.) from the rear bumper Approximately 3 m (9.8 ft.) to 60 m (197 ft.) from the rear bumper : The area between the side of the vehicle and 0.5 m (1.6 ft.) from the side of the vehicle cannot be detected. -
Page 258
4-5. Using the driving support systems • As your vehicle starts from a stop, a Toyota parking vehicle remains in the detection area assist-sensor • When driving up and down consecu- tive steep inclines, such as hills, dips in the road, etc. -
Page 259: Toyota Parking Assist-Sensor
ON. WARNING ■ When using the Toyota parking assist-sensor Observe the following precautions. Failing to do so may result in the vehi- cle being unable to be driven safely and possibly cause an accident.
-
Page 260
The vehicle speed is less than about ● sensor malfunction, etc. Have the 10 km/h (6 mph). vehicle checked by your Toyota ● A shift lever other than P is selected. dealer. ■… -
Page 261
4-5. Using the driving support systems ■ ● Wires, fences, ropes, etc. Conditions under which the func- tion may not function correctly ● Cotton, snow and other materials that Certain vehicle conditions and the sur- absorb sound waves rounding environment may affect the Sharply-angled objects ●… -
Page 262
4-5. Using the driving support systems object will be displayed on the multi-information display and head-up dis- play (if equipped). As the distance to the object becomes short, the dis- tance segments may blink. Approximate distance to object: 150 cm (4.9 ft.) to 60 cm (2.0 ft.) (Rear center sensor) Multi-information display (Example:… -
Page 263
The volume of buzzers for the When the vehicle comes within Toyota parking assist-sensor and approximately 30 cm (1.0 ft.) of RCTA function (if equipped) will be the object, the buzzer sounds adjusted simultaneously. -
Page 264: Function
4-5. Using the driving support systems RCTA (Rear Cross Traffic buzzer, press Alert) function The buzzers for the Toyota parking assist-sensor and RCTA function (if : If equipped equipped) will be muted simultane- ously. The RCTA function uses the BSM rear side radar sensors…
-
Page 265
4-5. Using the driving support systems or left at the rear of the vehicle is WARNING detected, the RCTA icon (P.264) for ■ the detected side will be displayed on Cautions regarding the use of the function the audio system display. This illustra- The driver is solely responsible for tion shows an example of a vehicle safe driving. -
Page 266
Toyota parking assist monitor: Vehicles are approaching from both sides of the vehicle ■ RCTA function detection areas The areas that vehicles can be detected in are outlined below. -
Page 267
● The buzzer volume can be adjusted on detect due to obstructions the multi-information display. The vol- ume of buzzers for the Toyota parking assist-sensor and RCTA function will be adjusted simultaneously. Use the meter control switches to change settings. (P.102) -
Page 268
4-5. Using the driving support systems ing spaces next to your vehicle : Depending on the conditions, detec- tion of a vehicle and/or object may occur. ■ Conditions under which the RCTA function may not function correctly The RCTA function may not detect ●… -
Page 269
4-5. Using the driving support systems When the Eco drive mode is selected, Driving mode select Eco drive mode indicator comes on. switch ■ Operation of the air conditioning The driving modes can be system in Eco drive mode Eco drive mode controls the heat- selected to suit driving condi- ing/cooling operations and fan speed of tion. -
Page 270
4-5. Using the driving support systems ity when swerving on slippery road Driving assist systems surfaces by controlling steering per- formance. To keep driving safety and per- ■ TRC (Traction Control) formance, the following sys- Helps to maintain drive power and tems operate automatically in prevent the drive wheels from spin- response to various driving sit-… -
Page 271
TRC is temporary deactivated. If the rock the vehicle in order to free it. information continues to show, contact your Toyota dealer. To turn the TRC system off, quickly ■ press and release… -
Page 272
4-5. Using the driving support systems ■ ■ Sounds and vibrations caused by Automatic reactivation of TRC and the ABS, brake assist, VSC, TRC VSC systems and hill-start assist control sys- After turning the TRC and VSC systems tems off, the systems will be automatically re-enabled in the following situations: A sound may be heard from the ●… -
Page 273
4-5. Using the driving support systems ■ Automatic system cancelation of ■ Stopping distance when the ABS emergency brake signal is operating may exceed that of The emergency brake signal will be normal conditions canceled in any of the following situa- The ABS is not designed to shorten tions: the vehicle’s stopping distance. -
Page 274
The ABS, TRC and VSC systems will not function correctly if different tires are installed on the vehicle. Contact your Toyota dealer for further information when replacing tires or wheels. ■ Handling of tires and the suspen-… -
Page 275
4-6. Driving tips (traction battery) power is con- Hybrid vehicle driving 4-6.Driving tips sumed. tips Accelerator pedal/brake For economical and ecological pedal operation driving, pay attention to the fol- lowing points: Drive your vehicle smoothly. Avoid abrupt acceleration and deceleration. -
Page 276
4-6. Driving tips a traffic jam, gently release the Checking tire inflation pres- brake pedal to allow the vehicle to sure move forward slightly while avoid- ing overuse of the accelerator Make sure to check the tire inflation pedal. Doing so can help control pressure frequently. -
Page 277
(vehicles with a tire pressure vehicle control and cause death or warning system) serious injury. Request repairs or replacement of snow tires from Toyota dealers or Use tires of the size specified. ● legitimate tire retailers. This is because the removal and Maintain the recommended level of ●… -
Page 278
P, there may be a prob- Check for and remove any lem with the shift lock system. Have excess ice or snow that may the vehicle inspected by your Toyota have accumulated on the exte- dealer immediately. rior lights, vehicle’s roof, chassis, around the tires or on the brakes. -
Page 279
4-6. Driving tips Side chain (30 mm [1.18 in.] in length) Cross chain (4 mm [0.16 in.] in diameter) Cross chain (14 mm [0.55 in.] in width) Cross chain (25 mm [0.98 in.] in length) Regulations on the use of tire chains Regulations regarding the use of tire chains vary depending on loca-… -
Page 280
4-6. Driving tips COROLLA HV_ 国瑞 _GE COROLLA HYBRID_OM_General_OM12M44E… -
Page 281: Audio System
Audio system ® 5-1. Basic Operations 5-9. Bluetooth Phone Audio system types ..280 Making a phone call..318 Using the steering wheel audio When receiving a phone call switches……281 ……..319 AUX port/USB port …282 Speaking on the phone..319 5-2. Using the audio system ®…
-
Page 282: Basic Operations Audio System Types
5-1. Basic Operations 5-1.Basic Operations Audio system types : If equipped Overview The illustration below is for left-hand drive vehicles. Some button positions are reversed for right-hand drive vehicles. Vehicles with navigation/multimedia system Refer to the “Navigation and Multimedia System Owner’s Manual”. Vehicles without navigation/multimedia system …
-
Page 283: Switches
5-1. Basic Operations To cancel the mute or pause, press and Using the steering wheel hold the switch again. audio switches Seek switch Radio mode: Some audio features can be • Press: Select a radio station saved in controlled using the switches preset channels.
-
Page 284: Aux Port/Usb Port
5-1. Basic Operations ■ USB memory AUX port /USB port Connect the USB memory device. : If equipped Turn on the power of the USB memory device if it is not turned on. Connect an iPod, USB memory ■ device or portable audio player Portable audio player to the AUX port/USB port as Connect the portable audio player.
-
Page 285: 5-2. Using The Audio System
5-2. Using the audio system P.312 Optimal use of the audio 5-2.Using the audio system Day mode switch system Day mode The sound quality, volume bal- ance and ASL settings can be When the headlights are turned on, adjusted and the day mode can the screen dims.
-
Page 286
5-2. Using the audio system Sound quality Mode displayed Level Turn to the left Turn to the right mode Front/rear vol- “FADER” R7 to F7 Shifts to rear Shifts to front ume balance Left/right vol- “BALANCE” L7 to R7 Shifts to left Shifts to right ume balance : The sound quality level is adjusted individually in each audio mode. -
Page 287
5-3. Using the radio Radio operation 5-3.Using the radio Press the “MODE” button until “AM” or “FM” is displayed. Control panel “POWER VOLUME” knob Press: Turning the audio system on or off Turn: Adjusting the volume Changing the audio source Station selectors “TUNE•SELECT”… -
Page 288
5-3. Using the radio rounding objects, such as trains, transmitters, etc. The radio antenna is mounted on the ● roof. COROLLA HV_ 国瑞 _GE COROLLA HYBRID_OM_General_OM12M44E… -
Page 289
5-4. Playing an audio CD and MP3/WMA discs CD player operation 5-4.Playing an audio CD and MP3/WMA discs Insert a disc, press the “MODE” button to begin listening to a CD. Control panel Disc eject “POWER VOLUME” knob Press: Turning the audio system on or off Turn: Adjusting the volume Displaying text message Changing the audio source/playback… -
Page 290
5-4. Playing an audio CD and MP3/WMA discs ■ Repeat play Loading a CD or Press (RPT). MP3/WMA/AAC disc Insert a disc. To cancel, press (RPT) again. ■ Switching the display Ejecting a CD or Press (TEXT) to display or hide MP3/WMA/AAC disc the CD title. -
Page 291
■ Error messages If an error message is displayed, refer to the following table and take the appro- priate measures. If the problem is not rectified, take the vehicle to your Toyota dealer. COROLLA HV_ 国瑞 _GE COROLLA HYBRID_OM_General_OM12M44E… -
Page 292
5-4. Playing an audio CD and MP3/WMA discs LAYER3) • Compatible sampling frequencies MPEG1 LAYER3: 32, 44.1, 48 (kHz) MPEG2 LSF LAYER3: 16, 22.05, 24 (kHz) • Compatible bit rates (compatible with VBR) MPEG1 LAYER3: 32-320 (kbps) MPEG2 LSF LAYER3: 8-160 (kbps) CDs with copy-protect features may not •… -
Page 293
5-4. Playing an audio CD and MP3/WMA discs The following disc formats can be used. making it possible to record the track • Disc formats: CD-ROM Mode 1 and title and artist name in the same way as Mode 2 CD-ROM XA Mode 2, Form 1 with ID3 tags. -
Page 294
5-4. Playing an audio CD and MP3/WMA discs Media are the registered trademarks Discs with a transparent or translu- ● of Microsoft Corporation in the U.S.A. cent recording area and other countries. WARNING ■ Certification for the CD player Discs that have tape, stickers or ●… -
Page 295
5-5. Using an external device Listening to an iPod 5-5.Using an external device Connecting an iPod enables you to enjoy music from the vehicle speakers. Press the “MODE” button until “iPod” is displayed. Connecting an iPod P.282 Control panel “POWER VOLUME” knob Press: Turning the audio system on or off Turn: Adjusting the volume Displaying text message… -
Page 296
5-5. Using an external device Pause/playback Selecting a song, fast-forwarding or rewinding “Playlists”“Art- Selecting a play mode ists”“Albums”“Songs”“Ge nres”“Compos- Press (BROWSE) to select ers”“Radio”“Audiobooks”“ iPod play mode. Podcasts”“iTunes U” Turning the “TUNE•SELECT” Press the knob to select the knob clockwise changes the desired play mode. -
Page 297
5-5. Using an external device If there are continuing texts, is dis- Selecting a song from the played. song list Press and hold (TEXT) until you Press (LIST). hear a beep to display the remaining The song list will be displayed. texts. -
Page 298
If the problem is not ■ Compatible models rectified, take the vehicle to your Toyota The following devices can be used with dealer. this system. Cause/Correction Made for ●… -
Page 299
5-5. Using an external device WARNING ■ While driving Do not connect iPod or operate the controls. Doing so may cause an acci- dent, resulting in death or serious injury. NOTICE ■ To prevent damage to iPod Do not leave iPod in the vehicle. ●… -
Page 300: Listening To Usb Memory Device
5-5. Using an external device Listening to USB memory device Connecting a USB memory enables you to enjoy music from the vehicle speakers. Press the “MODE” button until “USB” is dis- played. Connecting a USB memory P.282 Control panel “POWER VOLUME” knob Press: Turning the audio system on or off Turn: Adjusting the volume Displaying text message…
-
Page 301
Pressing (RDM) changes the following table and take the appro- priate measures. If the problem is not modes in the following order: rectified, take the vehicle to your Toyota Folder randomAll folder ran- dealer. domOff COROLLA HV_ 国瑞 _GE COROLLA HYBRID_OM_General_OM12M44E… -
Page 302
5-5. Using an external device may not play correctly, and their file Cause/Correction Message names and folder names may not be procedures displayed correctly. This indicates that Items related to standards and limita- the data in the “USB ERROR” tions are as follows: USB memory can- •… -
Page 303
5-5. Using an external device • Compatible channel modes: stereo, ● MP3, WMA and AAC playback joint stereo, dual channel and monau- • When a device containing MP3, WMA or AAC files is connected, all files in the USB memory device are checked. WMA file compatibility ●… -
Page 304: Using The Aux Port
5-5. Using an external device NOTICE Using the AUX port ■ To prevent damage to USB mem- : If equipped ● Do not leave USB memory in the This port can be used to con- vehicle. The temperature inside the nect a portable audio device vehicle may become high, resulting in damage to the USB memory.
-
Page 305
® 5-6. Using Bluetooth devices ® Select the Bluetooth device to ® 5-6.Using Bluetooth devices ® Bluetooth audio/phone be used (P.310, 312) Set automatic connection of the The following can be per- device (P.311) ® formed using Bluetooth wire- ® Check Bluetooth connection less communication:… -
Page 306
® 5-6. Using Bluetooth devices ® ■ Bluetooth connection condition Microphone ® If “BT” is not displayed, the Bluetooth audio/phone cannot be used. Display A message, name, number, etc. is dis- played. ® Menu list of the Bluetooth audio/phone To enter a menu, press the “TUNE•SELECT” knob and navigate menus by using the knob. -
Page 307
® 5-6. Using Bluetooth devices “Bluetooth” menu First menu Second menu Third menu Operation details Registering a ® “Pairing” Bluetooth device (P.308) Listing the regis- “List phone” tered cellular phones (P.310) Listing the regis- “List audio” tered portable play- ers (P.310) Changing the “Passkey”… -
Page 308
® 5-6. Using Bluetooth devices “PHONE” menu First menu Second menu Third menu Operation details Setting automatic “Auto transfer ON” contact/history transfer on or off “Auto transfer OFF” (P.312) Adding a new num- “Add contacts” ber (P.312) Deleting a contact stored in the “Delete contacts”… -
Page 309
® 5-6. Using Bluetooth devices ■ ® Bluetooth audio/phone system functions ® Depending on the Bluetooth device, certain functions may not be available. COROLLA HV_ 国瑞 _GE COROLLA HYBRID_OM_General_OM12M44E… -
Page 310
® 5-6. Using Bluetooth devices Using the steering wheel ® Register a Bluetooth switches device The steering wheel switches ® Before using the Bluetooth can be used to operate a con- audio/phone, it is necessary to nected cellular phone, or port- ®… -
Page 311
® 5-6. Using Bluetooth devices when no phones have been regis- tered, the registration screen will be automatically displayed. COROLLA HV_ 国瑞 _GE COROLLA HYBRID_OM_General_OM12M44E… -
Page 312
5-7. “SETUP” menu Deleting a registered cellular Using the “SETUP” menu 5-7.“SETUP” menu phone (“Bluetooth” menu) Select the name of the cellular phone to be deleted using the ® Registering a Bluetooth “TUNE•SELECT” knob. device in the system allows the Select “Delete”… -
Page 313
5-7. “SETUP” menu Select “Delete” using the knob. Setting automatic connec- Press (YES). tion of the device on or off Disconnecting the registered If “BT power OFF” is set to on, the portable player from the audio registered device will be connected system automatically when the power switch is turned to ACC or OFF. -
Page 314
5-7. “SETUP” menu “TUNE•SELECT” knob. Using the “SETUP” menu (“PHONE” menu) Initializing the “Sound setting” Select “Sound setting” using the “TUNE•SELECT” knob and press To enter the setup menu, press the “TUNE•SELECT” knob and (YES). select “PHONE” using the For details about “HF sound set- knob. -
Page 315
5-7. “SETUP” menu Transferring one contact from ® compatible Bluetooth phones only. the cellular phone Select “Phonebook” using the Select “Add one contact” using “TUNE•SELECT” knob. the “TUNE•SELECT” knob and Select “Transfer history” using press (YES). the knob and press (YES). -
Page 316
5-7. “SETUP” menu Select the desired phone num- ■ Registering the contacts from ber using the knob and press the “PHONE” mode Press the off-hook button. (YES). Select “Phonebook”, “All calls”, To delete all missed call history data, “Missed calls”, “Incoming calls” press (ALL) and then press or “Outgoing calls”… -
Page 317
5-7. “SETUP” menu Change the ring tone volume. Select (YES) when the con- To decrease the volume: Turn the knob firmation screen appears. counterclockwise. ■ Deleting the contacts from the To increase the volume: Turn the knob clockwise. “PHONE” mode Press the off-hook button. -
Page 318: Portable Player
® 5-8. Bluetooth Audio ® 5-8.Bluetooth Audio ® Operating a Bluetooth enabled portable player Control panel “POWER VOLUME” knob Press: Turning the audio system on or off Turn: Adjusting the volume Displaying text message Changing the audio source/playback Displaying play mode Selecting an album Repeat play Random play or back button…
-
Page 319
® 5-8. Bluetooth Audio Repeat the same procedure to Selecting a track select the desired file. Turn the “TUNE•SELECT” knob or To return to the previous display, press press the “SEEK >” or “< TRACK” (BACK). button to move up or down. Switching the display Fast-forwarding and rewind- Press… -
Page 320
® 5-9. Bluetooth Phone Select a desired number using Making a phone call ® 5-9.Bluetooth Phone the knob and press the off-hook button. To enter the “PHONE” mode, The following operations can be press the off-hook button. performed: Registering a number as a Dialing from the phonebook Favorite Select “Phonebook”… -
Page 321: Speaking On The Phone
® 5-9. Bluetooth Phone When receiving a phone Speaking on the phone call Transferring a call Answering the phone A call can be transferred between the cellular phone and system while Press the off-hook button. dialing, receiving a call, or during a call.
-
Page 322
® 5-9. Bluetooth Phone number and returns to the previous ■ screen. When talking on the phone ● Do not talk simultaneously with the Pressing (EXIT) deletes the number other party. and go to “Enter a number” screen. Keep the volume of the received voice ●… -
Page 323: Bluetooth Bluetooth
® 5-10. Bluetooth ® ® 5-10.Bluetooth ® ■ About Bluetooth Bluetooth Bluetooth is a registered trademark of Bluetooth SIG, Inc. Overview ® ■ When using the Bluetooth audio/phone In the following situations, the system may not function. • The portable player does not support ®…
-
Page 324
® 5-10. Bluetooth • HFP (Hands Free Profile) Ver. 1.0 or ® ● Before using Bluetooth devices, higher (Recommended: Ver. 1.7) users of any electrical medical This is a profile to allow hands-free device other than implantable car- diac pacemakers, cardiac phone calls using a cellular phone or resynchronization therapy-pace- head set. -
Page 325: 6-1. Using The Air Conditioning
Interior features 6-1. Using the air conditioning system and defogger Automatic air conditioning sys- ………324 6-2. Using the interior lights Interior lights list….331 6-3. Using the storage features List of storage features ..334 Trunk features….337 6-4. Other interior features Other interior features..338 COROLLA HV_ 国瑞…
-
Page 326: Automatic Air Conditioning Sys Tem
6-1. Using the air conditioning system and defogger Automatic air conditioning system 6-1.Using the air conditioning system and defogger Air outlets are automatically selected and fan speed is automatically adjusted according to the set temperature setting. Also, the display and button positions will differ depending on the type of the system.
-
Page 327
6-1. Using the air conditioning system and defogger Vehicles with DUAL mode air conditioning system Left-hand side temperature control switch Right-hand side temperature control switch Automatic mode switch Off switch Rear window defogger switch Windshield defogger switch Eco air conditioning mode switch Fan speed up switch Fan speed down switch Airflow mode control switch… -
Page 328
6-1. Using the air conditioning system and defogger Vehicles with DUAL mode air the indicator illuminates on the out- side/recirculated air mode switch. conditioning system ■ Operate the fan speed up switch to Set cooling and dehumidifica- increase the fan speed and the fan tion function speed down switch to decrease the Press the “A/C”… -
Page 329
6-1. Using the air conditioning system and defogger with low fuel consumption prior- ● Outside/recirculated air mode may automatically switch depending on the itized such as reducing fan speed, temperature setting or the inside tem- etc. perature. Press the eco air conditioning ■… -
Page 330
6-1. Using the air conditioning system and defogger To stop the operation, press the delayed for a short period of time immediately after the air conditioning off switch. system is started in automatic mode. If the fan speed setting or air flow Except for GCC countries : When ●… -
Page 331
6-1. Using the air conditioning system and defogger Front right-hand side Air outlet layout and opera- tions ■ Location of air outlets The air outlets and air volume changes according to the selected air flow mode. Direct air flow to the left or right, up or down Open the vent Close the vent… -
Page 332
6-1. Using the air conditioning system and defogger up or down Turn the knob to open or close the vents WARNING ■ To prevent the windshield defog- ger from operating improperly Do not place anything on the instru- ment panel which may cover the air outlets. -
Page 333
6-2. Using the interior lights Interior lights list 6-2.Using the interior lights Location of the interior lights Rear interior light Door trim lights (if equipped) Front personal lights / front interior lights (vehicles with a moon roof) Center tray light (if equipped) Cup holder lights (if equipped) Door courtesy lights (if equipped) Operating the interior lights… -
Page 334
6-2. Using the interior lights Vehicles without a moon roof When a door is opened while the door position is on, the lights turn on. Turns the lights on/off ■ Rear Turns the lights on/off ■ Illuminated entry system The lights automatically turn on/off Turns the light off according to the power switch mode, the… -
Page 335
6-2. Using the interior lights NOTICE ■ To prevent 12-volt battery dis- charge Do not leave the lights on longer than necessary when the hybrid system is off. COROLLA HV_ 国瑞 _GE COROLLA HYBRID_OM_General_OM12M44E… -
Page 336: Using The Storage Features List Of Storage Features
6-3. Using the storage features List of storage features 6-3.Using the storage features Location of the storage features Bottle holders/door pockets (P.335) Open tray (vehicles without a wireless charger) (P.336) Glove box (P.335) Cup holders (P.335) Console box (P.336) Lighters or spray cans may ●…
-
Page 337
6-3. Using the storage features Glove box WARNING ■ Items unsuitable for the cup Pull up the lever to open the glove holder box. Do not place anything other than cups or beverage cans in the cup holders. Other items may be thrown out of the ■… -
Page 338
6-3. Using the storage features Open tray (vehicles without ■ Bottle holders a wireless charger) ● When storing a bottle, close the cap. The bottle may not be stored depend- ● ing on its size or shape. WARNING ■ Items unsuitable for the bottle holders Do not place anything other than a bottle in the bottle holders. -
Page 339: Trunk Features
6-3. Using the storage features Trunk features Auxiliary box (if equipped) Lift the deck mat. Type A Type B COROLLA HV_ 国瑞 _GE COROLLA HYBRID_OM_General_OM12M44E…
-
Page 340: Other Interior Features Other Interior Features
6-4. Other interior features ● If the temperature inside the vehicle is Other interior features 6-4.Other interior features high, such as after the vehicle has been parked in the sun ■ USB charging port (if About connected external device Depending on the connected external equipped) device, charging may occasionally be suspended and then start again.
-
Page 341
6-4. Other interior features charging area, provided the device is compatible with the Qi wireless charging standard created by the Wireless Power Consortium. The wireless charger cannot be used with a portable device that is larger than the charging area. Addi- tionally, depending on the portable device, the wireless charger may ■… -
Page 342
6-4. Other interior features portable device as close to the center of ■ Using the wireless charger the charging area as possible. Press the power supply switch When charging is complete, the opera- of the wireless charger. tion indicator light (green) will illumi- nate. -
Page 343
6-4. Other interior features Operation indicator light Suspected cause Measure Blinks (orange) at a one Vehicle to charger commu- Contact your Toyota second interval continu- nication failure. dealer. ously A foreign object exists between the portable Remove the foreign object. -
Page 344
6-4. Other interior features NOTICE WARNING ■ ■ Caution while driving Conditions in which the wireless When charging a portable device charger may not operate cor- rectly while driving, for safety reasons, the driver should not operate the portable In the following situations, the wire- device. -
Page 345
Vanity mirrors (if equipped) light is blinking, the wireless charger Slide the cover to open. may be malfunctioning. Contact your Toyota dealer. The vanity light turns on. (if equipped) ■ To prevent failure or damage to data ●… -
Page 346
6-4. Other interior features Assist grips An assist grip installed on the ceil- ing can be used to support your body while sitting on the seat. NOTICE ■ To prevent damage to the arm- rest Do not apply too much load on the armrest. -
Page 347
6-4. Other interior features WARNING ■ Items that cannot be hung on the coat hook (vehicles with SRS curtain shield airbags) Do not hang coat hangers or other hard or sharp objects on the hook. If the SRS curtain shield airbags deploy, these items may become projectiles, causing death or serious injury. -
Page 348
6-4. Other interior features COROLLA HV_ 国瑞 _GE COROLLA HYBRID_OM_General_OM12M44E… -
Page 349: Cleaning And Protecting The Vehicle Exterior
Maintenance and care 7-1. Maintenance and care Cleaning and protecting the vehicle exterior ….348 Cleaning and protecting the vehicle interior ….351 7-2. Maintenance Maintenance requirements ……..354 Scheduled maintenance …356 7-3. Do-it-yourself maintenance Do-it-yourself service precau- tions ……..361 Hood ………363 Positioning a floor jack..364 Engine compartment ..365…
-
Page 350
7-1. Maintenance and care ously. Cleaning and protecting 7-1.Maintenance and care ■ the vehicle exterior When using a car wash (vehicles with a smart entry & start system) If the door handle becomes wet while the electronic key is within the effective Perform cleaning in a manner range, the door may lock and unlock appropriate to each compo-… -
Page 351
Set the wiper switch to off. If the wiper malfunction. If this occurs, consult switch is in “AUTO”, the wipers may your Toyota dealer. operate unexpectedly in the following situations, and may result in hands being caught or other serious injuries… -
Page 352
7-1. Maintenance and care • Suspension parts NOTICE • Brake parts ■ Cleaning the exterior lights Wash carefully. Do not use organic ● Keep the cleaning nozzle at least ● substances or scrub with a hard 30 cm (11.9 in.) away from the vehi- brush. -
Page 353: Cleaning And Protecting The Vehicle Interior
7-1. Maintenance and care Cleaning and protecting WARNING the vehicle interior ■ Water in the vehicle Do not splash or spill liquid in the ● vehicle, such as on the floor, in the Perform cleaning in a manner hybrid battery (traction battery) air appropriate to each compo- intake vent, and in the trunk.
-
Page 354
Wipe off any excess dirt and dust ■ When cleaning the inside of the with a soft cloth dampened with windshield (vehicles with Toyota Safety Sense) diluted detergent. Do not allow glass cleaner to contact Use a diluted water solution of approxi- the lens. -
Page 355
Allow the leather to dry in a shaded and ventilated area. ■ Caring for leather areas Toyota recommends cleaning the inte- rior of the vehicle at least twice a year to maintain the quality of the vehicle’s inte- rior. -
Page 356: 7-2. Maintenance
Doesn’t that seem like the best way? essential. Toyota recommends Your Toyota dealer has invested a lot of the maintenance below. money in special Toyota tools and ser- vice equipment. It helps them to do the WARNING job better and at less cost.
-
Page 357
● Engine coolant temperature continu- ally higher than normal (P.91, 96) If you notice any of these clues, take your vehicle to your Toyota dealer as soon as possible. Your vehicle may need adjustment or repair. COROLLA HV_ 国瑞 _GE… -
Page 358: Scheduled Maintenance
7-2. Maintenance Scheduled maintenance Perform maintenance by the schedule as follows: Maintenance schedule requirements Your vehicle needs to be serviced according to the normal maintenance schedule. (See “Maintenance schedule”.) If you mainly operate your vehicle under one or more of the special operat- ing conditions below, some of the maintenance schedule items need to be serviced more frequently in order to keep your vehicle in good condition.
-
Page 359
7-2. Maintenance SERVICE INTER- ODOMETER READING VAL: MONTHS (Odometer reading or x1000 km 10 20 30 40 50 60 70 80 months, whichever x1000 miles 6 12 18 24 30 36 42 48 comes first.) BASIC ENGINE COMPONENTS 1 Engine oil 2 Engine oil filter Cooling and heater system <<See note 1.>>… -
Page 360
7-2. Maintenance SERVICE INTER- ODOMETER READING VAL: MONTHS (Odometer reading or x1000 km 10 20 30 40 50 60 70 80 months, whichever x1000 miles 6 12 18 24 30 36 42 48 comes first.) Steering wheel, linkage and steering gear box 18 Drive shaft boots Suspension ball joints and dust covers… -
Page 361
7-2. Maintenance A-1: Operating on rough or muddy roads, or roads with melted snow. Every 5000 km (3000 miles) or 3 months Inspection of brake pads and discs Every 10000 km (6000 miles) or 6 Inspection of brake pipes and hoses months Every 10000 km (6000 miles) or 6 … -
Page 362
7-2. Maintenance B-1: Heavily loaded vehicle. (For example, using a car top carrier and so forth.) Every 10000 km (6000 miles) or 6 Inspection of front and rear suspen- months sion Tightening of bolts and nuts on chassis Every 10000 km (6000 miles) or 6 and body <<See note.>>… -
Page 363: Tions
(P.368) (for terminal clamp (P.368) bolts) Tire inflation • Tire pressure gauge • “Toyota Super Long pressure • Compressed air Life Coolant” or a simi- (P.379) source lar high quality ethyl- ene glycol-based • Water or washer fluid…
-
Page 364
7-3. Do-it-yourself maintenance NOTICE WARNING Keep hands, clothing and tools ● ■ If you remove the air cleaner fil- away from the moving fans. Driving with the air cleaner filter Be careful not to touch the engine, ● removed may cause excessive power control unit, radiator, exhaust engine wear due to dirt in the air. -
Page 365: Hood
7-3. Do-it-yourself maintenance Hold the hood open by inserting Hood the support rod into the slot. Opening the hood Pull the hood lock release lever. The hood will pop up slightly. Pull the auxiliary catch lever to WARNING the left and lift the hood. ■…
-
Page 366: Positioning A Floor Jack
7-3. Do-it-yourself maintenance ■ Positioning a floor jack Rear When using a floor jack, follow the instructions in the manual provided with the jack and per- form the operation safely. When raising your vehicle with a floor jack, position the jack correctly.
-
Page 367: Engine Compartment
7-3. Do-it-yourself maintenance Engine compartment Components Washer fluid tank (P.371) Engine coolant reservoir (P.367) Fuse boxes (P.391) Engine oil level dipstick (P.366) Engine oil filler cap (P.366) Air cleaner (P.371) Power control unit coolant reservoir (P.367) 12-volt battery (P.368) Radiator (P.368) Condenser (P.368) Electric cooling fans With the engine at operating tem-…
-
Page 368
7-3. Do-it-yourself maintenance Wipe the dipstick and reinsert it ■ Checking the engine oil fully. Park the vehicle on level ground. After warming up the ■ Checking the oil type and pre- engine and turning off the hybrid paring the item needed system, wait more than 5 min- Make sure to check the oil type and utes for the oil to drain back into… -
Page 369
Do not dispose of used oil and fil- ters in household trash, in sewers or onto the ground. Reservoir cap Call your Toyota dealer, service sta- tion or auto parts store for informa- “FULL” line tion concerning recycling or “LOW” line disposal. -
Page 370
Toyota dealer. voir caps, drain cock and water pump. If you cannot find a leak, have your WARNING Toyota dealer test the cap and check for leaks in the cooling system. ■ When the hybrid system is hot… -
Page 371
7-3. Do-it-yourself maintenance lows. ■ Caution symbols The meanings of each caution sym- bol on the top of the 12-volt battery are as follows: No smoking, no naked flames, no sparks Terminals Hold-down clamp 12-volt battery acid ■ Before recharging When recharging, the 12-volt battery produces hydrogen gas which is flam- mable and explosive. -
Page 372
● is unknown. 12-volt battery. If the system will not start even after ■ Where to safely charge the multiple attempts, contact your Toyota 12-volt battery dealer. Always charge the 12-volt battery in ■ When replacing the battery (vehicle an open area. Do not charge the… -
Page 373
7-3. Do-it-yourself maintenance ■ NOTICE Diluting washer fluid Dilute washer fluid with water as nec- ■ When recharging the 12-volt bat- essary. tery Refer to the freezing temperatures Never recharge the 12-volt battery listed on the label of the washer fluid while the hybrid system is operating. -
Page 374: Tires
7-3. Do-it-yourself maintenance secure the upper cover of the air Tires cleaner case using the clips. Replace or rotate tires in accordance with maintenance schedules and treadwear. Checking tires Check if the treadwear indicators are showing on the tires. Also check the tires for uneven wear, Inspect the outer surface of the fil- such as excessive wear on one…
-
Page 375
● Do not use tire sizes other than If you are not sure, consult with your those recommended by Toyota. Toyota dealer. Do not mix differently constructed ● ■… -
Page 376
NOTICE To equalize tire wear and help extend ■ If tire inflation pressure of each tire life, Toyota recommends that tire tire becomes low while driving rotation is carried out approximately Do not continue driving, or your tires and/or wheels may be ruined. -
Page 377
7-3. Do-it-yourself maintenance tire. play, airport or other facility that gen- • A tire has been replaced with a tire erates strong radio waves or electrical that is not of the specified size. noise. • Tire chains, etc. are equipped. •… -
Page 378
ID codes must be registered in the tire pressure warn- ing computer and the tire pressure warning system must be initialized. Have tire pressure warning valves and transmitter ID codes regis- tered by your Toyota dealer. COROLLA HV_ 国瑞 _GE COROLLA HYBRID_OM_General_OM12M44E… -
Page 379
■ How to initialize the tire pres- warning valves and transmitters, sure warning system contact your Toyota dealer as the Park the vehicle in a safe place tire pressure warning valves and transmitters may be damaged if not and turn the power switch off. -
Page 380
If repeated attempts to record tire inflation pressure settings are unsuccessful, have the vehicle inspected by your Toyota dealer. When operating the tire pressure ● warning reset switch, the tire pressure warning light does not blink 3 times. -
Page 381: Tire Inflation Pressure
For information about changing ID Make sure to maintain proper codes, ask your Toyota dealer. tire inflation pressure. Tire inflation pressure should be checked at least once per month. However, Toyota rec-…
-
Page 382
(due to road hazards, Damage to the drive train ● expansion joints, sharp edges in the road, etc.) If a tire needs frequent inflating, have it checked by your Toyota dealer. ■ Instructions for checking tire infla- NOTICE tion pressure ■… -
Page 383: Wheels
Replacement wheels are available ous injury. at your Toyota dealer. : Conventionally referred to as offset. Toyota does not recommend using the following: Wheels of different sizes or types Used wheels Bent wheels that have been…
-
Page 384
Aluminum wheel precau- tions (if equipped) Use only Toyota wheel nuts and wheel nut wrenches designed for use with your aluminum wheels. When rotating, repairing or changing your tires, check that the wheel nuts are still tight after driving 1600 km (1000 miles). -
Page 385: Air Conditioning Filter
7-3. Do-it-yourself maintenance ), and remove the filter Air conditioning filter cover. The air conditioning filter must be changed regularly to main- tain air conditioning efficiency. Removing the air condition- ing filter Turn the power switch off. Open the glove box. Slide off Remove the air conditioning fil- the damper.
-
Page 386: Filter
7-3. Do-it-yourself maintenance When an air conditioning odor comes Cleaning the hybrid bat- out continuously, replace the air condi- tery (traction battery) tioning filter. air intake vent and filter NOTICE ■ To prevent the fuel economy When using the air conditioning system from being affected, visually Make sure that a filter is always…
-
Page 387
7-3. Do-it-yourself maintenance Remove the air intake vent filter. If dust and clogs cannot be completely removed If dust and clogs cannot be com- pletely removed with the air intake vent cover installed, remove the cover and clean the filter. Turn the power switch off. -
Page 388
20 minutes before the warning message disappears. If the warning message does not disap- pear after driving for appropriately 20 minutes, have the vehicle inspected by your Toyota dealer. WARNING ■ ■ Scheduled maintenance of the air… -
Page 389
Carefully handle the removed filter so that it will not be damaged. If the filter is damaged, have it replaced with a new filter by your Toyota dealer. Make sure to reinstall the filter and ● cover to their original positions after cleaning. -
Page 390: Wireless Remote Control/Elec Tronic Key Battery
■ Use a CR2032 lithium battery Batteries can be purchased at your ● Remove the depleted battery Toyota dealer, local electrical appli- ance shops or camera stores. using a small flathead screw- Replace only with the same or equiva- ●…
-
Page 391
7-3. Do-it-yourself maintenance nal facing up. between it and the key. Operate the switch and check that the doors can be locked/unlocked. Vehicles with a smart entry & start system Release the lock and remove Install the battery cover with the the mechanical key. -
Page 392
7-3. Do-it-yourself maintenance Remove the depleted battery WARNING using a small flathead screw- ■ Removed battery and other parts driver. These parts are small and if swal- When removing the cover, the elec- lowed by a child, they can cause tronic key module may stick to the choking. -
Page 393: Checking And Replacing Fuses
7-3. Do-it-yourself maintenance Under the driver’s side instru- Checking and replacing ment panel (left-hand drive vehi- fuses cles) Remove the lid. If any of the electrical compo- Make sure to push the claw when nents do not operate, a fuse removing/installing the lid.
-
Page 394
(P.393) If the replaced fuse blows again, have ● the vehicle inspected by your Toyota dealer. ■ If there is an overload in a circuit The fuses are designed to blow, protect- ing the wiring harness from damage. -
Page 395: Light Bulbs
7-3. Do-it-yourself maintenance ■ When replacing light bulbs Light bulbs Toyota recommends that you use genu- ine Toyota products designed for this vehicle. You may replace the following Because certain bulbs are connected to bulbs by yourself. The diffi- circuits designed to prevent overload,…
-
Page 396
7-3. Do-it-yourself maintenance vehicle to your Toyota dealer to have the ■ Rear light replaced. ■ Condensation build-up on the inside of the lens Temporary condensation build-up on the inside of the headlight lens does not indicate a malfunction. Contact your… -
Page 397
7-3. Do-it-yourself maintenance Replace the light bulb, and Remove the light bulb. install the bulb base. Align the 3 tabs on the light bulb with the mounting and insert. When installing, reverse the steps listed. ■ Rear turn signal lights (bulb Turn and secure the bulb base. -
Page 398
7-3. Do-it-yourself maintenance Pull the cover toward the rear of Remove the light bulb. the vehicle and remove the cover. When installing the light bulb, install it by conducting steps Remove the 2 screws and then with the directions remove the light assembly by reversed. -
Page 399
7-3. Do-it-yourself maintenance ■ ■ Tail lights (bulb type) License plate lights Open the trunk lid, remove the Open the trunk lid, remove the clips, and pull back the cover. clips, and pull back the cover. Turn the bulb base Turn the bulb base counterclockwise and remove it. -
Page 400
7-3. Do-it-yourself maintenance WARNING ■ Replacing light bulbs Turn off the lights. Do not attempt to ● replace the bulb immediately after turning off the lights. The bulbs become very hot and may cause burns. ● Do not touch the glass portion of the light bulb with bare hands. -
Page 401: When Trouble Arises
When trouble arises 8-1. Essential information Emergency flashers..400 If your vehicle has to be stopped in an emergency ……..400 If the vehicle is trapped in rising water…….402 8-2. Steps to take in an emer- gency If your vehicle needs to be towed ……403 If you think something is wrong…
-
Page 402: Essential Information Emergency Flashers
8-1. Essential information Emergency flashers If your vehicle has to be 8-1.Essential information stopped in an emer- gency The emergency flashers are used to warn other drivers when the vehicle has to be Only in an emergency, such as stopped on the road due to a if it becomes impossible to breakdown, etc.
-
Page 403
8-1. Essential information system by turning the power Vehicles without a smart entry & ● switch to ACC. start system: Never attempt to remove the key, as doing so will lock the steering wheel. Vehicles with a smart entry & start system: To stop the hybrid system, press and hold the power switch for 2 consecutive… -
Page 404: Water
However, an emergency hammer can not shatter the wind- shield as it is laminated glass. : Contact your Toyota dealer or aftermarket accessory manufac- turer for further information about an emergency hammer. COROLLA HV_ 国瑞 _GE…
-
Page 405: 8-2. Steps To Take In An Emergency
If towing is necessary, we rec- The towing eyelets, cables or ommend having your vehicle chains may become damaged, bro- towed by your Toyota dealer or ken debris may hit people, and cause serious damage. commercial towing service, using a wheel-lift type truck or ●…
-
Page 406
From the front The following may indicate a prob- lem with your transmission. Contact your Toyota dealer or commercial towing service before towing. The hybrid system warning mes- sage is shown on the multi-infor- mation display and the vehicle does not move. -
Page 407
8-2. Steps to take in an emergency Emergency towing proce- dure Take out the towing eyelet. (P.421, 430) Remove the eyelet cover using a flathead screwdriver. To protect the bodywork, place a rag between the screwdriver and the vehi- If you use chains or cables to tie cle body as shown in the illustration. -
Page 408
If you notice any of the follow- ing symptoms, your vehicle probably needs adjustment or repair. Contact your Toyota dealer as soon as possible. Visible symptoms Fluid leaks under the vehicle. Securely attach cables or chains (Water dripping from the air con- to the towing eyelet. -
Page 409
8-2. Steps to take in an emergency Vehicle pulls heavily to one side when driving on a level road Loss of brake effectiveness, spongy feeling, pedal almost touches the floor COROLLA HV_ 国瑞 _GE COROLLA HYBRID_OM_General_OM12M44E… -
Page 410: If A Warning Light Turns On Or A Warning Buzzer Sounds
The brake fluid level is low; or The brake system is malfunctioning Immediately stop the vehicle in a safe place and contact (Red) your Toyota dealer. Continuing to drive the vehicle may be dangerous. ■ Brake system warning light…
-
Page 411
SRS warning light (warning buzzer) Warning light Details/Actions Indicates a malfunction in: The SRS airbag system; or The seat belt pretensioner system Have the vehicle inspected by your Toyota dealer immedi- ately. COROLLA HV_ 国瑞 _GE COROLLA HYBRID_OM_General_OM12M44E… -
Page 412
ABS warning light Warning light Details/Actions Indicates a malfunction in: The ABS; or The brake assist system Have the vehicle inspected by your Toyota dealer immedi- ately. ■ Brake Override System warning light/Drive-Start Control warning light (warning buzzer) -
Page 413
8-2. Steps to take in an emergency ■ Low fuel level warning light Warning light Details/Actions Indicates that remaining fuel is approximately 6.4 L (1.7 gal., 1.4 Imp. gal.) or less Refuel the vehicle. ■ Driver’s and front passenger’s seat belt reminder light (warning buzzer) Warning light Details/Actions… -
Page 414
Details/Actions When the light comes on after blinking for approximately 1 minute: Malfunction in the tire pressure warning system Have the system checked by your Toyota dealer. When the light comes on: Low tire inflation pressure such as (if equipped) … -
Page 415
Toyota parking assist-sensor OFF indicator (warning buzzer) Warning light Details/Actions Indicates a malfunction in the Toyota parking assist-sensor func- tion Have the vehicle inspected by your Toyota dealer immedi- ately. (Flashes) Indicates that the system is temporarily unavailable, possibly due (if equipped) to a sensor being dirty or covered with ice, etc. -
Page 416
Warning light Details/Actions Indicates a malfunction in: The VSC system; The TRC system; or The hill-start assist control system Have the vehicle inspected by your Toyota dealer immedi- ately. ■ Parking brake indicator Warning light Details/Actions… -
Page 417
There may be a malfunction in the tire adjust the tire inflation pressure. The tire pressure warning system. Have the pressure warning light will go off after a vehicle inspected by your Toyota dealer few minutes. immediately. ■ If the tire pressure warning light Conditions that the tire pressure … -
Page 418
Check the tires. If a tire is flat, change it with the spare tire and have the flat tire repaired by the nearest Toyota dealer. ● Vehicles with emergency tire punc-… -
Page 419: Played
■ performed, contact your If “Traction Battery Needs to be Protected Refrain from the Use of N Toyota dealer. Position” is displayed This message may be displayed when Additionally, if a warning light the shift lever is in N.
-
Page 420
Reduce your vehicle speed. equipped) ■ Automatic High Beam (if equipped) If a message that indicates the ● need for visiting your Toyota dealer ■ If “Front Camera Unavailable” or is displayed “Front Camera Temporarily Una- The system or part shown on the vailable See Owner’s Manual”… -
Page 421: If You Have A Flat Tire (Vehicles Without Spare Tire)
(vehicles without spare play, it may indicate a malfunction. Immediately stop the vehicle and con- tire) tact your Toyota dealer. • “Braking Power Low” • “Charging System Malfunction” Your vehicle is not equipped • “Oil Pressure Low”…
-
Page 422
In the following cases, the tire cannot be repaired with the emergency tire punc- ture repair kit. Contact your Toyota dealer. When the tire is damaged due to driv- ● ing without sufficient air pressure When there are any cracks or damage ●… -
Page 423
8-2. Steps to take in an emergency Location of the emergency tire puncture repair kit and tools Emergency tire puncture repair kit Towing eyelet Compressor Emergency tire puncture repair kit components Bottle Sticker Air pressure gauge Compressor switch Power plug COROLLA HV_ 国瑞… -
Page 424
The sealant should be replaced ones, or for any other purpose. If before the expiry date. Contact your the tires have not been completely Toyota dealer for replacement. repaired, it could lead to an acci- dent causing death or serious ●… -
Page 425
8-2. Steps to take in an emergency compressor and no longer visible. Taking out the emergency tire puncture repair kit Remove the deck mat. Take out the emergency tire puncture repair kit. (P.421) Emergency repair method Connect the hose to the bottle. Take out the repair kit from the plastic bag. -
Page 426
8-2. Steps to take in an emergency Remove the valve cap from the Make sure that the compressor valve of the punctured tire. switch is off. Extend the hose. Remove the Connect the power plug to the air release cap from the hose. power outlet socket. -
Page 427
8-2. Steps to take in an emergency 14Inflate the tire until the specified shown. (P.458) air pressure is reached. 12Start the hybrid system. (P.166, 168) 13To inject the sealant and inflate the tire, turn the compressor switch on. The sealant will be injected and the pressure will spike to between 300 kPa (3.0 kgf/cm or bar, 44 psi) and 400 kPa (4.0… -
Page 428
8-2. Steps to take in an emergency face and reconnect the repair pressor switch off and contact your Toyota dealer. kit. If the tire inflation pressure exceeds the Remove the air release cap from the specified air pressure, let out some air hose before reconnecting the hose. -
Page 429
(62 miles) away for tire repair or sure warning light may come on/flash. replacement. When having the tire repaired or WARNING replaced, make sure to tell the Toyota ■ dealer that the sealant is injected. Do not drive the vehicle with a flat tire Do not continue driving with a flat tire. -
Page 430
8-2. Steps to take in an emergency The repair kit may overheat if oper- ● WARNING ated for a long period of time. Do Driving with a flat tire may cause a cir- not operate the repair kit continu- cumferential groove on the side wall. ously for more than 40 minutes. -
Page 431
If a liquid sealant is used, sharp object such as nail or screw contact your Toyota dealer or other passing through the tire tread. qualified service shop as soon as Do not remove the sharp object possible. -
Page 432: If You Have A Flat Tire (Vehicles With A Spare Tire)
8-2. Steps to take in an emergency If you have a flat tire Before jacking up the vehi- (vehicles with a spare tire) Stop the vehicle in a safe place on a hard, flat surface. Your vehicle is equipped with a …
-
Page 433
8-2. Steps to take in an emergency Screw driver Pliers Wheel nut wrench Jack Spare tire Towing eyelet : If equipped Vehicles with a full-size spare tire Jack handle Spanners Screw driver Pliers Wheel nut wrench Jack Spare tire Towing eyelet : If equipped COROLLA HV_ 国瑞… -
Page 434
8-2. Steps to take in an emergency When lowering the vehicle, make ● WARNING sure that there is no-one near the ■ vehicle. If there are people nearby, Using the tire jack warn them vocally before lowering. Observe the following precautions. Improper use of the tire jack may cause the vehicle to suddenly fall off the jack, leading to death or serious… -
Page 435
8-2. Steps to take in an emergency Disengage the tightening strap. WARNING ■ When storing the spare tire Taking out the spare tire Be careful not to catch fingers or other body parts between the spare Remove the deck mat. (P.432) tire and the body of the vehicle. -
Page 436
8-2. Steps to take in an emergency Assemble the jack handle ornament. extension. Slightly loosen the wheel nuts (one turn). Raise the vehicle until the tire is slightly raised off the ground. Turn the tire jack portion hand until the center of the Remove all the wheel nuts and recessed portion of the jack is in the tire. -
Page 437
When replacing an aluminum wheel vehicle inspected by your Toyota with a steel wheel (including a compact dealer. spare tire), tighten the wheel nuts until •… -
Page 438
8-2. Steps to take in an emergency 103 N•m (10.5 kgf•m, 76 ft•lbf) Vehicles with a full-size spare When replacing an aluminum wheel with an aluminum wheel, turn the wheel tire and a steel wheel: Reinstall nuts until the washers come into the wheel ornament. -
Page 439
8-2. Steps to take in an emergency ■ When the compact spare tire is ■ When using the compact spare equipped tire The vehicle becomes lower when driv- ● Remember that the compact spare ing with the compact spare tire com- tire provided is specifically pared to when driving with standard designed for use with your vehicle. -
Page 440
• BSM (Blind Spot Monitor) (if valve and transmitter, contact your equipped) Toyota dealer as the tire pressure • Rear view monitor system (if warning valve and transmitter may be equipped) damaged if not handled correctly. -
Page 441: If The Hybrid System Will Not Start
There may be a malfunction in (P.368) the immobilizer system. (P.79) Contact your Toyota dealer if the prob- There may be a malfunction in lem cannot be repaired, or if repair pro- the steering lock system.
-
Page 442: If You Lose Your Keys
(vehicles with a smart entry & start system) If the electronic key remains lost, the risk of vehicle theft increases signifi- cantly. Visit your Toyota dealer imme- diately with all remaining electronic keys that were provided with your vehicle. COROLLA HV_ 国瑞 _GE…
-
Page 443: If The Electronic Key Does Not Operate Properly
In case of a smart entry & start system malfunction or other key-related problems Take your vehicle with all the elec- tronic keys provided with your vehicle to your Toyota dealer. Locking and unlocking the doors Use the mechanical key (P.123) COROLLA HV_ 国瑞 _GE…
-
Page 444
The hybrid system does not start and and depress the brake pedal. modes will be changed each time the switch is pressed. (P.170) Touch the Toyota emblem side of the electronic key to the power switch. When the electronic key is detected, a buzzer sounds and the power switch will turn to ON. -
Page 445: If The 12-Volt Battery Is Dis
12-volt battery, you can tem if the 12-volt battery is dis- jump start your vehicle by following charged. the steps below. You can also call your Toyota Vehicles with an alarm (P.81): dealer or a qualified repair Confirm that the electronic key shop.
-
Page 446
Once the hybrid system starts, any of the doors of your vehicle have the vehicle inspected at your with the power switch OFF. Toyota dealer as soon as possible. Maintain the engine speed of the second vehicle and start the ■… -
Page 447
The electricity stored in the 12-volt bat- start. tery will discharge gradually even when For details, consult your Toyota ● the vehicle is not in use, due to natural dealer. discharge and the draining effects of certain electrical appliances. -
Page 448
8-2. Steps to take in an emergency Do not allow children near the ● WARNING 12-volt battery. Make sure each jumper cable is ● connected to the correct terminal and that it is not unintentionally in NOTICE contact with any other than the intended terminal. -
Page 449
Cooling fans Power Reduced” is shown on If a large amount of coolant leaks, the multi-information display. immediately contact your Toyota dealer. Steam comes out from under The coolant level is satisfactory the hood. if it is between the “FULL” and “LOW”… -
Page 450
If a large amount of coolant leaks, The fans operate when the air condi- immediately contact your Toyota dealer. tioning system is turned on immediately after a cold start. Confirm that the fans The coolant level is satisfactory are operating by checking the fan if it is between the “FULL”… -
Page 451
If the message does not disap- pear: Stop the hybrid system NOTICE and contact your Toyota dealer. ■ When adding engine/power con- If the message is not displayed: trol unit coolant The hybrid system temperature Add coolant slowly after the hybrid system has cooled down sufficiently. -
Page 452
8-2. Steps to take in an emergency If the vehicle becomes WARNING stuck ■ When attempting to free a stuck vehicle If you choose to push the vehicle Carry out the following proce- back and forth to free it, make sure dures if the tires spin or the the surrounding area is clear to avoid striking other vehicles, objects or peo-… -
Page 453: Specifications
Vehicle specifications 9-1. Specifications Maintenance data (fuel, oil level, etc.) …….452 Fuel information ….461 9-2. Customization Customizable features..462 9-3. Initialization Items to initialize ….471 COROLLA HV_ 国瑞 _GE COROLLA HYBRID_OM_General_OM12M44E…
-
Page 454
Vehicle identification number The vehicle identification number (VIN) is the legal identifier for your vehicle. This is the primary identifi- cation number for your Toyota. It is used in registering the ownership of your vehicle. This number is stamped under the right-hand front seat. -
Page 455
9-1. Specifications : Saudi Arabia, Sultanate of Oman, Bahrain, United Arab Emirates, Qatar and Kuwait ■ Engine number The engine number is stamped on the engine block as shown. ■ Year of manufacture and coun- try of origin (for GCC coun- tries The year of the manufacture and country of origin are shown on the… -
Page 456
5 minutes, and check the oil level on the dipstick. Recommended viscosity (SAE): ■ Engine oil selection “Toyota Genuine Motor Oil” is used in your Toyota vehicle. Use Toyota approved “Toyota Genuine Motor Oil” or equivalent to satisfy the fol- COROLLA HV_ 国瑞 _GE… -
Page 457
9-1. Specifications Either or both API registered marks are added to some oil containers to help you select the oil you should use. Temperature range anticipated API Service Symbol before next oil change Top portion: “API SERVICE SN” means If you use SAE 10W-30 or a higher the oil quality designation by American viscosity engine oil in extremely low Petroleum Institute (API). -
Page 458
For GCC countries 1.5 L (1.6 qt., 1.3 Imp. qt.) Use either of the following: “Toyota Super Long Life Coolant” Similar high-quality ethylene glycol-based non-sili- Coolant type cate, non-amine, non-nitrite, and non-borate coolant with long-life hybrid organic acid technology Do not use plain water alone. -
Page 459
: The fluid capacity is a reference quantity. If replacement is necessary, contact your Toyota dealer. NOTICE ■ Hybrid transmission fluid type Using transmission fluid other than “Toyota Genuine ATF WS” may ultimately damage to the vehicle’s transmission. Brakes Except for GCC countries and Taiwan … -
Page 460
9-1. Specifications Steering Free play Less than 30 mm (1.2 in.) Tires and wheels 15-inch tires Tire size 195/65R15 91H Front wheel Rear wheel kPa (kgf/cm or bar, psi) kPa (kgf/cm or bar, psi) Tire inflation pressure Type A Type A (Recommended cold tire 250 (2.5, 36) -
Page 461
9-1. Specifications 17-inch tires Tire size 225/45R17 91W Front wheel Rear wheel Tire inflation pressure kPa (kgf/cm or bar, psi) kPa (kgf/cm or bar, psi) (Recommended cold tire inflation pressure) 230 (2.3, 33) 210 (2.1, 30) Wheel size 17 7 1/2J Wheel nut torque 103 N•m (10.5 kgf•m, 76 ft•lbf) Compact spare tire (if equipped) -
Page 462
9-1. Specifications A: HIR2 halogen bulbs (clear) B: Wedge base bulbs (amber) C: Wedge base bulbs (clear) D: Double end bulbs COROLLA HV_ 国瑞 _GE COROLLA HYBRID_OM_General_OM12M44E… -
Page 463
Use of ethanol blended gasoline in a gasoline engine Except for Thailand Toyota allows the use of ethanol blended gasoline where the ethanol content is up to 10%. Make sure that the ethanol blended gasoline to be used has a Research Octane Number that follows the above. -
Page 464
Customizable features Some function settings are changed simultaneously with other functions being customized. Contact your Toyota dealer for further details. Settings that can be changed using the navigation or multimedia system screen (vehicles with navigation/multimedia system) Settings that can be changed using the meter control switches COROLLA HV_ 国瑞… -
Page 465
9-2. Customization Settings that can be changed by your Toyota dealer Definition of symbols: O = Available, — = Not available ■ Gauges, meters and multi-information display (P.86, 91, 96, 101) Default setting Customized setting Function *3, 4 English —… -
Page 466
9-2. Customization : 7-inch display : If equipped ■ Head-up display (P.109) Function Default setting Customized setting Head-up display — — Tachometer Hybrid System Gauge information — — Indicator No content Route guidance to destina- — — tion/street name Driving support system dis- —… -
Page 467
9-2. Customization : If equipped ■ Smart entry & start system and wireless remote control (P.126, 134) Function Default setting Customized setting Operating signal (Buzz- — ers) 1 to 7 Operation signal (Emer- — gency flashers) Time elapsed before auto- 60 seconds matic door lock function is activated if door is not… -
Page 468
9-2. Customization ■ Wireless remote control (P.122, 126, 132) Function Default setting Customized setting Wireless remote control — — Driver’s door All doors unlocked in one step, Unlocking operation unlocked in one — all doors unlocked in step two step One short press Push twice Press and hold… -
Page 469
9-2. Customization ■ Moon roof (P.153) Function Default setting Customized setting Linked operation of compo- Slide only Tilt only — — nents when key is used Linked operation of compo- nents when wireless Slide only Tilt only — — remote control is used : If equipped ■… -
Page 470
Alert timing for presence of Late approaching vehicle (sensi- Intermediate — — Only when vehicle tivity) detected in blind spot : If equipped ■ Toyota parking assist-sensor (P.256) Function Default setting Customized setting Toyota parking assist-sen- — — Level1 Buzzer volume Level2 —… -
Page 471
9-2. Customization ■ RCTA (Rear cross traffic alert) function (P.262) Function Default setting Customized setting RCTA (Rear cross traffic — — alert) function Level1 Buzzer volume Level2 — — Level3 : If equipped ■ Automatic air conditioning system (P.324) Function Default setting Customized setting Switching between outside… -
Page 472
9-2. Customization ■ Vehicle customization ● When the smart entry & start system is off, Smart door unlocking cannot be customized. ● When the doors remain closed after unlocking the doors and the automatic door lock function is activated, the sig- nals will be generated in accordance with the operation signal (buzzer) and the operation signal (emergency… -
Page 473
9-3. Initialization Items to initialize 9-3.Initialization The following item must be initialized for normal system operation after such cases as the 12-volt battery being reconnected, or mainte- nance being performed on the vehicle: List of item to initialize Item When to initialize Reference •… -
Page 474
9-3. Initialization COROLLA HV_ 国瑞 _GE COROLLA HYBRID_OM_General_OM12M44E… -
Page 475
Index What to do if… (Troubleshoot- ing) ………474 Alphabetical Index ….477 COROLLA HV_ 国瑞 _GE COROLLA HYBRID_OM_General_OM12M44E… -
Page 476
The trunk lid is closed with by your Toyota dealer. (P.440) the electronic key left inside (vehicles with a smart entry If you lose your keys or elec- &… -
Page 477
What to do if… (Troubleshooting) start system: It is locked auto- The hybrid system does not matically to prevent theft of the start (vehicles with a smart vehicle. (P.169) entry & start system) Did you press the power switch The windows do not open or while firmly depressing the brake close by operating the… -
Page 478
What to do if… (Troubleshooting) An alarm is activated and the When a problem has horn sounds (vehicles with occurred an alarm) Did anyone inside the vehicle open a door during setting the If you have a flat tire alarm? … -
Page 479: Alphabetical Index
Alphabetical Index Alphabetical Index Assist grips ……..344 Audio input……..302 Audio system Air conditioning filter….383 Audio input ………302 Automatic air conditioning system AUX port/USB port …..282 ® ……….324 Bluetooth audio ……303 CD player ……..287 ABS (Anti-lock Brake System) ..268 Warning light ……
-
Page 480
…….226 cautions ……..390 LTA (Lane-Tracing Assist) ..217 Seat belt precautions ….48 Multi-information display ….101 Trunk precautions …… 132 RCTA……….262 Toyota parking assist-sensor..256 Child-protectors……130 Warning message ……417 Cleaning Aluminum wheels……. 348 Display change button …..93, 99 Exterior……..348 Do-it-yourself maintenance ..354… -
Page 481
Alphabetical Index Door glasses ……151 Emergency flashers Door lock……..126 Emergency brake signal…..268 Open door warning buzzer. 128, 130 Emergency tire puncture …..419 Outside rear view mirrors… 148 Emergency, in case of Rear door child-protectors ..130 If a warning buzzer sounds ..408 Side doors…….. -
Page 482
Alphabetical Index Turn signal lever……177 Engine coolant temperature gauge Wattage ……..459 ……….91, 96 Engine oil Fuel Capacity ……..454 Capacity ……..453 Checking ……..365 Fuel gauge ……91, 96 Preparing and checking before win- Information ………461 ter ……….275 Refueling ……..196 Warning light …… -
Page 483: Initialization Items To Initialize
Alphabetical Index Heaters Ignition switch (power switch) ..166, Automatic air conditioning system ……….324 Auto power off function ….171 Changing the power switch modes High mounted stoplight Replacing light bulbs….394 ……….170 If your vehicle has to be stopped in High-voltage components …..
-
Page 484
Alphabetical Index Replacing the battery ….388 Turn signal lever……177 Warning buzzer ……135 Vanity lights ……..343 Wireless remote control ….. 122 Wattage ……..459 Knee airbags……..37 Lock steering column…166, 169 LTA (Lane Tracing Assist) Operation ……..212 Warning messages…..221 Lane Departure Alert with steering LTA (Lane-Tracing Assist) switch 217 control (LDA) Operation …….. -
Page 485
Dynamic radar cruise control ..239 Dynamic radar cruise control with full-speed range ……. 229 ECO Accelerator Guidance..104 Panic mode……..122 Eco score ……..104 Parking assist sensors (Toyota park- Energy monitor……113 ing assist-sensor)…….256 Fuel economy ……103 Parking brake Operation ……177, 178… -
Page 486
Radar sensor……198, 253 Refueling Capacity ……..453 Rain-sensing windshield wipers .194 Fuel types ……..453 RCTA……….263 Opening the fuel tank cap ..196 Toyota parking assist-sensor..256 Regenerative braking ….. 73 Service plug ……..75 Replacing Shift lever Electronic key battery….388 Hybrid transmission….174 Fuses ……… -
Page 487
Talk switch……..308 Telephone switch……308 Steering wheel Adjustment ……… 146 Tire pressure warning reset switch Meter control switches ….102 ……….377 Toyota parking assist-sensor switch Stop lights Replacing light bulbs….394 ……….257 Vehicle-to-vehicle distance switch Storage features ……334 ………230, 240 Stuck If the vehicle becomes stuck.. -
Page 488
Towing Emergency towing ….. 403 USB charging port ……338 Towing eyelet ……405 USB port ……..282 Trailer towing ……165 Toyota parking assist-sensor Function ……..256 Warning message …… 258 Vanity lights……..343 Wattage ……..459 Toyota Safety Sense Automatic High Beam ….188 Vanity mirrors……..343… -
Page 489
Windshield wipers ……192 RCTA (Rear Cross Traffic Alert) . 413 Winter driving tips ……275 Seat belt……411, 412 Wireless charger……339 Toyota parking assist-sensor … 261, Wireless remote control Battery-Saving Function…..136 Locking/Unlocking ……122 Warning label ……..75 Replacing the battery ….388 Warning lights……. -
Page 490
43.0 L (11.4 gal., 9.5 Imp. gal.) (Reference) P.453 Fuel type P.461 Cold tire inflation pres- P.458 sure Engine oil capacity (Drain and refill ref- P.454 erence) Engine oil type “Toyota Genuine Motor Oil” or equivalent P.454 COROLLA HV_ 国瑞 _GE COROLLA HYBRID_OM_General_OM12M44E…
-
nekesha
- Администратор
- Сообщения: 1668
- Зарегистрирован: 17 дек 2014, 03:43
- Благодарил (а): 2 раза
- Поблагодарили: 6 раз
Toyota Corolla Fielder 2006-2012
Руководство по эксплуатации, техобслуживанию и ремонту Toyota Corolla Fielder
Operation, Maintenance and Repair Manual Toyota Corolla Fielder
 3827 просмотров")
- Года выпуска: с 2006-2012
Праворульные модели 2WD, 4WD
Бензиновые двигатели 1NZ-FE 1.5 l, 2ZR-FE 1.8 l, 2ZR-FaE 1.8 l
Year of manufacture: from 2006-2012
Right-hand drive models 2WD, 4WD
Gasoline engines 1NZ-FE 1.5 l, 2ZR-FE 1.8 l, 2ZR-FaE 1.8 l
- Язык: Русский
Формат: PDF
Размер: 445,2 Мб
Russian language
Format: PDF
Size: 445.2 MB
Скачать документацию Toyota Corolla Fielder
Download the documentation of Toyota Corolla Fielder
для распаковки используйте пароль — avtoproblem-net.ru
use the password to unpack — avtoproblem-net.ru
Copyright © 2023 DriverManuals.ru | Политика конфиденциальности | Правообладателям | Контакты
Все материалы представленные на сайте исключительно с целью ознакомления читателями и не преследуют коммерческих целей или нарушение авторских прав.