С чего бы мне начать цикл руководств по этой замечательной игре? Может, с описания интересных комбинаций заклинаний или советов по развитию государства? Нет, эти безусловно интересные темы я, пожалуй, оставлю на потом. А сейчас опишу один очень важный, хотя и не слишком очевидный аспект – героев. Тех, кто приходит к нам на службу зелёным новичком, но со временем матереет и вполне может достичь уровня, при котором от него с писком будут разбегаться драконы. Но сразу возникает множество вопросов: как заполучить героя себе на службу? Кто из них лучше выглядит во главе армии, а кто – армия сам по себе? Какая магия лучше всего подходит для поддержки героев? И так далее. Встречайте, перед вами – герои, как они есть.
Где же нам найти героя?
Герои в капусте не родятся. Получить их себе на службу можно аж тремя способами:
- 1) Герой может сам попроситься на службу к прославленному (имеющему много Fame) магу.
- 2) Героя можно призвать двумя заклинаниями школы Arcane – Summon Hero и Summon Champion. Призывают, соответственно, обычных героев – Hero и особо прославленных героев-чемпионов – Champion. Последние обычно гораздо полезнее, но далеко не всегда.
- 3) Героя можно освободить, зачистив подземелье.
|
Руководство по Master of Magic. Часть 1: Герои сказочных земель
|
|
Вот так и выглядит призыв героя |

Есть ещё один нюанс: некоторые герои идут к вам на службу с куда большей охотой, если у вас есть книги родственной им магии. Так, некромант или чёрный рыцарь с гораздо большей вероятностью предложат свои услуги счастливому обладателю книг Магии Смерти, а иллюзионистка – магу, владеющему Чудотворством (Sorcery magic). И небольшая хитрость: при вызове героя сохранитесь за ход до того, как заклинание будет завершено. Если вам не понравится призванный персонаж, то просто загрузите сохранённую игру – то, кто будет призван заклятием, решается случаем.
Герой в разрезе
Герои могут набирать уровни. За каждый уровень они получают стандартные бонусы к основным характеристикам и плюсы от имеющихся способностей.
Перечислю все уровни с необходимым для их достижения количеством опыта:
Myrmidon (20), Captain (60), Commander (120), Champion (200), Lord (300), Grand Lord (450), Super Hero (600) и Demi-God (1000).
Герои ценны в первую очередь не базовыми характеристиками, а набором способностей. На первом уровне все герои довольно слабы, но их дальнейшее развитие определяется именно имеющимися у них особенностями. Те, чьи способности слабы и немногочисленны, так и останутся слабаками даже на высших уровнях, а вот обладатели наиболее полезных особенностей смогут целые армии уничтожать в одиночку.
|
Руководство по Master of Magic. Часть 1: Герои сказочных земель
|
|
Уникальный набор редчайших навыков. Брать непременно! |

Способностей очень много, я опишу лишь самые важные из них, на которые надо ориентироваться при найме героя (некоторые из этих особенностей могут иметь усиленную версию, обозначаемую «звёздочкой» перед названием. Она имеет в 1,5 раза больший эффект):
Caster X – бонус, позволяющий герою использовать в бою заклинания. Число X – это количество маны, которую он может потратить на колдовство. Часто герои с этим бонусом имеют свои собственные заклинания, которые могут быть неизвестны игроку. Если герой с такой способностью находится в столице, то он помогает игроку создавать небоевые заклинания. Очень полезное умение, героев с высокими значениями Caster стоит брать хотя бы для помощи герою в вызове заклинаний.
Agility — за каждый уровень герой получает +1 к защите. Отличный бонус, особенно усиленная версия – герои с такой особенностью на высоких уровнях будут почти неуязвимы для обычных атак.
Blademaster – за каждые два уровня герой получает +1 к точности. Мощнейший бонус, особенно полезный для стрелков. К концу игры герои с такой особенностью почти не будут промахиваться.
Sage – герой помогает игроку исследовать заклинания. Если героя с таким умением получится нанять на ранних этапах, то он будет весьма полезен. К концу игры бонус даже от развитого навыка становится слишком незначителен на фоне того количества маны, которое игрок может сам вложить в исследование заклинаний.
Leadership – особенность, увеличивающая силу атак всех бойцов в армии героя на 1 за каждые два уровня. Эта и две следующие способности полезны для героя-полководца.
Prayermaster – герой повышает сопротивление к магическим атакам всех войск в своей армии на 1 за уровень.
Armsmaster – герой каждый ход повышает опыт всех войск в своей армии на 2 за уровень.
Missiles Immunity – персонаж с таким бонусом почти не получает урона от вражеских метательных снарядов типа стрел или камней. Очень полезно против армий, в которых много стрелков.
Magic Immunity – персонаж с этой способностью почти полностью иммунен к боевой магии, а также магическим атакам (всевозможным огненным дыханиям, молниям и окаменениям). Пользу бонуса сложно переоценить – такого героя можно убить лишь грубой силой, а грозные своими магическими способностями монстры ему совершенно не страшны.
Armor Piercing – если удар по врагу попал, то его броня действует лишь наполовину. Никакой защиты от этой способности нет. Очень мощный бонус, особенно в сочетании со следующим умением.
First Strike – позволяет в любом случае атаковать врага первым. Очень полезен, если герой сам по себе силён – тогда он сможет убить врага, не дав тому даже нанести удар. Важен он и в сражениях с тварями, которых герои не могут ударить сами – например, летающими.
Illusion – атаки этого героя игнорируют броню, если у врага нет иммунитета к иллюзиям. Чрезвычайно полезный и редкий бонус.
Invisibility – герой невидим врагу на карте, а также в бою, пока не подошёл вплотную к войскам врага. И даже вблизи в него попасть очень сложно. Крайне полезная и очень редкая способность, имеющая широкий спектр применения – от незаметной разведки чужих территорий без ухудшения отношений с их владельцами до изящного истребления вражеских магов и стрелков, неспособных атаковать невидимку издалека.
Wind Walking – великолепный бонус, позволяющий герою и всей его армии перемещаться по воздуху со скоростью героя. Для многих сильных, но медлительных отрядов это – настоящее спасение. Благодаря бонусу Wind Walking можно создать мобильный ударный отряд с героем во главе, не обращающий внимания на преграды ландшафта.
Pathfinding– тоже очень полезный бонус, благодаря которому герой и вся его армия по любому ландшафту, кроме воды, могут двигаться как по дороге. Опять же, мобильность и ещё раз мобильность.
Lifesteal – редчайшая и очень полезная способность, благодаря которой персонаж высасывает из противника жизнь, залечивая собственные раны.
Доска почёта
Кратко опишу наиболее выдающихся героев, за которых следует хвататься обеими руками.
Обычные герои
|
Портрет |
Имя |
Краткое описание |
|
Руководство по Master of Magic. Часть 1: Герои сказочных земель
|
Shin Bo the Ninja |
Герой, который полезнее многих чемпионов благодаря уникальному сочетанию бонусов Invisibility, Blademaster и Agility. Ниндзя полезен при любом стиле игры и при любой доступной магии. Разведка, истребление вражеских стрелков и магов – в этом его очень сложно превзойти. |
|
Руководство по Master of Magic. Часть 1: Герои сказочных земель
|
Serena the Healer |
Средненький маг, изначально владеющая заклинанием Heal. Для игроков, идущих путём Магии Жизни она почти бесполезна, зато для всех остальных целительница может оказаться очень ценным приобретением. |
|
Руководство по Master of Magic. Часть 1: Герои сказочных земель
|
Zaldron the Sage |
Довольно сильный маг, благодаря Sage способный помочь Вам в изучении магии, а в бою – помешать врагу творить заклинания с помощью полезных чар Counter magic (мешает накладывать новые заклинания) и Dispel magic true (развеивает уже наложенную магию). |
|
Руководство по Master of Magic. Часть 1: Герои сказочных земель
|
Malleus the Magician |
Могучий волшебник с мощной магической атакой и впечатляющим арсеналом атакующих заклинаний – Fire bolt, Fire ball, Fire elemental и Flame strike. Первыми двумя он убивает слабых противников, с помощью Fire elemental призывает довольно мощного союзника, а Flame strike очень больно бьёт сразу по всем вражеским отрядам в бою. |
|
Руководство по Master of Magic. Часть 1: Герои сказочных земель
|
Yramrag the Warlock |
Сильнейший маг среди всех героев, владеющий тремя очень мощными боевыми заклинаниями – Lightning bolt’ом, пробивающим броню, Warp lightning’ом и Doom bolt’ом, от которого и вовсе нет защиты. Если этот герой предложил Вам свои услуги – берите обязательно, не пожалеете. |
|
Руководство по Master of Magic. Часть 1: Герои сказочных земель
|
Jaer the Wind Mage |
Довольно сильный волшебник, но его ценность не в этом. Он – единственный счастливый обладатель способности Wind Walking, которую я уже описывал выше. Если Вы собирается создавать большие армии из мощных, но медлительных войск (наподобие хоббитских пращников или гномьих големов), то Jaer – ваш лучший друг. |
|
Руководство по Master of Magic. Часть 1: Герои сказочных земель
|
Shuri the Huntress |
Отличный стрелок. Обладает усиленной версией умения Blademaster, а также способностью Pathfinding. Благодаря этому и сама неплохо воюет, и может встать во главе мобильной армии. |
|
Руководство по Master of Magic. Часть 1: Герои сказочных земель
|
Fang the Draconian |
Это единственный герой, летающий сам по себе. Его не могут атаковать воины, не умеющие летать или стрелять, плюс он является отличным разведчиком. Да и огнём дышит, как все дракониды, что служит неплохим подспорьем в бою |


Чемпионы
|
Портрет |
Имя |
Краткое описание |
|
Руководство по Master of Magic. Часть 1: Герои сказочных земель
|
Aerie the Illusionist |
Посредственный маг, но обладает мощнейшим бонусом Illusion, благодаря чему очень полезна против тяжелобронированных противников. |
|
Руководство по Master of Magic. Часть 1: Герои сказочных земель
|
Torin the Chosen |
Его можно получить только заклинанием Магии Жизни Incarnation. Очень могущественный герой, сочетающий в себе черты великого воина, мага и полководца. Правильно экипированный и прокачанный Torin – смерть всему живому. |
|
Руководство по Master of Magic. Часть 1: Герои сказочных земель
Руководство по Master of Magic. Часть 1: Герои сказочных земель
|
Roland the Paladin и Mortu the Black Knight |
Служащие диаметрально противоположным силам, Паладин и Чёрный рыцарь схожи в одном – они обладают сочетанием навыков Magic Immunity, First strike и Armor piercing, что делает их в перспективе опаснейшими героями игры, превосходящими даже Торина, несмотря на всю его магию. |
|
Руководство по Master of Magic. Часть 1: Герои сказочных земель
|
Warrax the Chaos Warrior |
Мощный герой, обладающий очень сильной магической атакой, пробивающей броню благодаря Armor piercing. |
|
Руководство по Master of Magic. Часть 1: Герои сказочных земель
|
Ravashack the Necromancer |
Замечательный герой. Один из могущественнейших магов в игре, обладающий сильной магической атакой, мощнейшей способностью Lifesteal и очень полезным заклинанием Магии Смерти Animate dead, позволяющим в бою превращать павшие отряды врага в зомби под контролем игрока. |


Геройский инвентарь
Подробно о создании артефактов и их свойствах будет сказано в отдельной статье, а здесь я просто опишу, на что стоит ориентироваться при экипировке героев.
|
Руководство по Master of Magic. Часть 1: Герои сказочных земель
|
|
Пока что у героев почти нет экипировки, но такая команда её быстро себе найдёт. |

Предпочтение нужно отдавать артефактам, дающим принципиально новые свойства, а не просто усиливающим атаку, защиту и так далее. Особенно ценны предметы, наделяющие персонажа такими бонусами, как регенерация, полёт, невидимость, призрачная форма и почти полная неуязвимость. Самое ценное оружие — то, которое позволяет высасывать жизнь или игнорировать вражескую броню. Волшебникам можно вручить жезлы, усиливающие их магические способности и содержащие какие-либо боевые заклинания. Стрелкам жизненно необходимы луки с хоть какой-нибудь магической атакой — иначе их стрелы можно будет отклонить простейшим заклинанием Guardian Wind, да и многие твари попросту иммунны к обычному оружию.
Теперь Вы знаете, что делать, если в ворота вашей башни постучится герой. Но советы по этой великой игре не заканчиваются. Есть ещё много нюансов, которые стоит узнать претендентам на титул Владыки Магии. Удачи вам на этом нелёгком, но безумно интересном пути!
![]()
TECHNICAL SUPPLEMENT
 ™
™
Explore and Conquer Magical Worlds
HARDWARE & SYSTEM REQUIREMENTS
To play Master of Magic, your computer must have:
•an 80386sx processor or better (for best play, we recommend at least a 33MHz 80386 or faster)
•at least 575K of free conventional memory
•at least 2.7MB of free EMS (expanded) memory
•VGA graphics or better
•a mouse
Software Compatibility Issues
Please note that this list includes only the known conflicts and incompatibilities. Since no test procedure can ever be totally comprehensive, you may run into undiscovered problems. Please consult with Customer Service if you do.
We strongly recommend that you do not run Master of Magic under either Windows 3.1 or Windows 95. We recommend running the game in MS-DOS mode.
We strongly recommend that you not have any terminate-and-stay- resident programs (TSRs) loaded into memory when playing Master of Magic. Not only will they decrease the amount of free memory available, thus slowing the game, but there may be unpredictable interactions.
Configuration
As part of the installation process, you are prompted to select a few settings for your sound configuration. The installation program automatically detects the correct setup for the majority of sound cards, but you may need to change the defaults. If you do not know the correct numbers (DMA, IRQ, and such), please consult the documentation that came with your sound card.
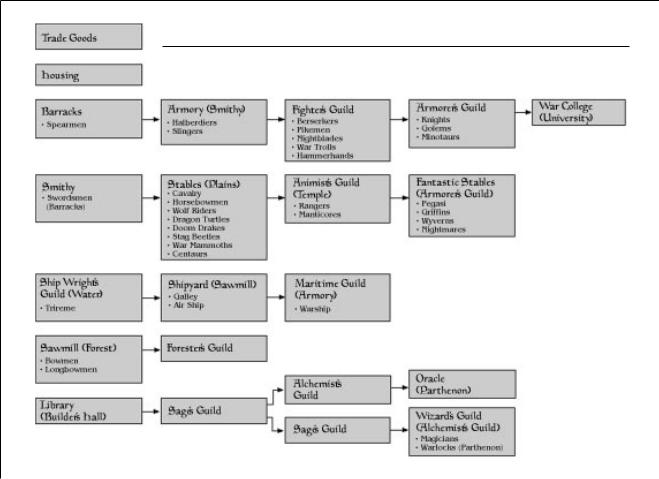
ADVANCES CHART

Master
of
™
Explore and Conquer Magical Worlds
MASTER OF MAGIC
Revised Edition
Game designed by SimTex Software
All Rights Reserved
Copyright ©1994 MicroProse
This book may not be reproduced in whole or in part, by mimeograph or photocopy or other means without permission, with the exception of quoting brief passages for the purpose of review.
Introduction to Master of Magic
Imagine falling through time and space. You land in a world called Arcanus, a world something like medieval earth, yet one where the practiced arts of alchemy and magic are true and powerful. The creatures of fantasy (elves, orcs, klackons and such) that in our world have so far been dismissed as the products of fertile imagination, are reality on Arcanus. Here, these creatures are intelligent beings who, along with species unknown to Earth even in fantasy, form the myriad races that populate Arcanus. Beyond Arcanus there lies a mysterious second world, Myrror. Accessible only through ancient towers of wizardry or through the careful practice of some obscure forms of magic, Myrror is in all senses an alien world full of powerful magic, danger and creatures of the most fantastic ilk. The saying among wizards is that no one can truly rule Arcanus until they’ve cracked the Myrror.
Into these worlds you emerge as a fledgling wizard. Sparsely equipped with but a spell or two, you begin as the ruler of a tiny hamlet and its people. With these raw materials, you must build a thriving city, explore the two worlds of Arcanus and Myrror, expand your empire and learn new spells. In time, you will meet other wizards, each rising from equally humble beginnings, each having the same goal as you, namely conquering the worlds. How well you allocate resources, make use of your races’ potentials, seize opportunities and negotiate with other wizards determines your eventual success. In the end, though, there can be only one Master of Magic!
1

Getting Started
2

Mouse Commands
e assume here that you understand basic mouse functionality, like clicking and dragging. Since your mouse has two buttons, the interface distinguishes between them. The following definitions refer to their usage in this manual.
•A “click” refers to placing the pointer over an area of the screen and clicking with the left mouse button.
•A “right-click” is a click with the right mouse button.
•“Opening a menu” requires a click on the name of the menu in the menu bar.
•“Selecting” means clicking on something.
•You “run” the mouse by moving it over an image or object without clicking.
•“Pressing a button” with the mouse means clicking on the screen button.
•“Toggling” means that you have only two options, and clicking the button flips back and forth between the two.
The Main Menu
fter installing Master of Magic and entering the game, you begin at the main menu. This menu allows you to continue playing the last game you were running (an option not present the first time you start Master of Magic), to load a previously saved game, and to start a new game.
If this is your first time playing Master of Magic or if you wish to start a new game, click on the new game button. Otherwise, click on the appropriate button.
CONTINUE
Clicking on this button takes you back to the game you were playing last. Note that any game in progress is automatically backed up every four turns and “autosaved” into a temporary saved game file. The autosave feature writes over the previous autosaved game in this file.
LOAD GAME
Clicking on this button takes you to thegame options screen. In that screen you can click on one of the saved game file names to reload that game.
NEW GAME
Clicking on this button takes you to the new game screen (described in the following section).
QUIT TO DOS
Clicking on this button exits Master of Magic and returns you to DOS.
3

The New Game Menu
f you choose to start a new game in the main menu, you are whisked to this screen. Here you can decide on several parameters (by clicking on the appropriate buttons to select or cycle through options) that will influence the nature of your new game of
Master of Magic.
DIFFICULTY
Choose a difficulty level by cycling through the options (clicking on the difficulty button) until you find a suitable level. Depending on the difficulty level you choose, your wizard is advantaged (Intro and Easy settings), equivalent (the Normal setting), or disadvantaged (Hard and Impossible settings) relative to the computer player wizards. The difficulty level modifies your starting treasury. At Intro level, you start with 125 gold pieces in the treasury, at Easy you have 100 gold pieces, at Normal you start with 75 gold pieces, at Hard you start with only 50 gold pieces, and at the Impossible setting your treasury has a meager 25 gold pieces at the start of the game. The difficulty level also affects your production and population growth rates, as well as the speed with which your wizard researches new spells. In addition, with higher difficulty levels, the skill with which enemy wizards set about conquering the worlds of Arcanus and Myrror increases (at Hard and Impossible levels, they also have more spell picks than you do), while their tolerance toward your diplomatic advances, faux pas and aggressive actions decreases. We warn you, the Impossible setting is aptly named!
4

The Universal Help Button
IMPORTANT NOTE: Regardless of the difficulty level that you choose, on-line help is always available! Right-clicking on almost any area of almost every screen in the game provides you with “HELP” information and definitions. Clicking then takes you back to where you were in the game.
OPPONENTS
Choose the number of enemy wizards (from one to four) playing against you by clicking on the opponents button. Beside determining how many wizards you are competing against, the number of opponents influences how rapidly you are likely to come in contact with another wizard. While contact with enemy wizards can have positive aspects (for example, being able to trade spells), it also has potential negative aspects, since tensions tend to escalate as you become more powerful. Thus, having time to research useful spells and to establish a few cities for a stronger power base before encountering another wizard definitely has its advantages.
LAND SIZE
The land size button controls the approximate size of continents (small, medium and large) and the proportion of the worlds’ surface areas that are land. Click on the land size button to cycle through the options.
In choosing a land size, consider the relative advantages of each option. Land size affects how quickly you establish contact with other wizards. Because small land sizes result in the creation of many islands separated by vast expanses of water, choosing this option generally results in delayed contact with opponents, while choosing large land sizes results in almost immediate contact.
While smaller land sizes delay contact with enemy wizards, they also hamper exploration and expansion efforts. Because new cities must be separated from pre-established cities by a minimum distance of three squares, founding new cities with adequate resources to support a reasonably sized community on small continents may be difficult.
MAGIC STRENGTH
There are a number of sources of magic power in the worlds of Master of Magic. These can be divided into two groups: nodes and citybased sources (such as shrines and temples). Clicking on the magic button (options are Weak, Normal and Powerful) allows you to choose how strong nodes are as a source of magic power (mana). Weak nodes produce half the magic power of Normal nodes, while Powerful nodes produce 50% more magic power than Normal nodes.
5
![]()
Because magic power is vital to the spell researching and spell casting efforts of the battling wizards on Arcanus and Myrror, when nodes are powerful sources of magic, enemy wizards aggressively attempt to gain control of them. When nodes are weak sources of magic, city-based sources of magic power become relatively more important, encouraging enemies to accelerate both expansion efforts and the development of their cities.
OK OR CANCEL
Once you are satisfied with the parameters of your new game, click on the OK button to move to the next screen (wizard creation). Alternatively, you can click on the cancel button to return to the main menu.
Choosing or Creating Wizards
f you are playing at the Intro (tutorial) or Easy setting, you have I to choose (by clicking with your mouse on one of the wizards’ names) one of the predesigned wizards described in Choosing a Wizard. At any other difficulty setting, you have the option of choosing a wizard or designing your own (by clicking on the
custom button when in the wizard creation screen). Important information on how to create your own wizard is described in Creating a Wizard.
|
Portrait |
|
Name |
|
Spell ranks |
|
and magic |
|
type |
|
Special |
|
abilities |
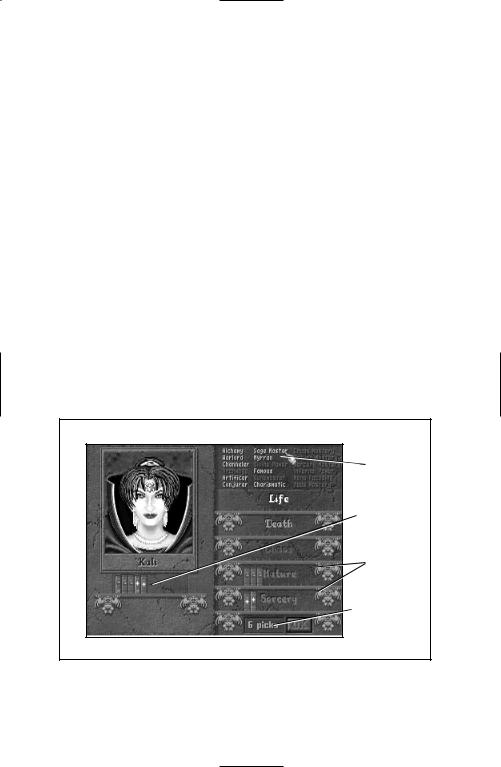
CHOOSING A WIZARD
When you run your mouse over the name of one of the fourteen predesigned wizards, you see a display of that wizard’s spell ranks and special abilities under his or her portrait. Spell ranks are the spell books that wizard has available for study. Each book has a mark on its binding
6

which indicates the kind of magic described in the tome. The more books that a wizard owns in a particular kind of magic, the more rare and powerful spells he or she can learn in that subject.
There are five types of magic in which wizards can specialize:
•Life magic (indicated by white ankhs on the spell book bindings) is focused on healing, protective and inspirational spells. This magic has healing spells so powerful that the dead can be resurrected. It is also the only type of magic to offer spells that allow creatures to travel between the worlds (planes) of Arcanus and Myrror. This form of magic has elements that strongly oppose death magic and some that mildly oppose chaos magic.
•Death magic (indicated by purple skulls on the spell book bindings) concentrates on controlling the forces of darkness. This magic provides spells for summoning dead creatures, corrupting enemy wizards’ power bases, instilling fear in the hearts of enemies, blighting land and causing misfortune of all types to befall foes. Because life and death magic are so strongly antithetical, no wizard can specialize in both of these magic types.
•Chaos magic (indicated by red fireballs on the spell book bindings) specializes in wreaking havoc on the surrounding world by twisting and warping creatures, weapons and nodes. When change alone is not enough, this magic can call forth the destructive elements of fire and lightning to do its bidding.
•Nature magic (indicated by green trees on the spell book bindings) claims as its domain spells that encourage fertility and growth. Rooted in the land, this magic can call upon the elements of stone and water to smite enemies with earthquakes and ice bolts. This magic may also call upon the earth’s wisdom to explore areas of the worlds and see things that are far beyond the normal range of sight.
•Sorcery magic (indicated by blue diamonds on the spell book bindings) focuses on creating illusions and controlling the elemental force of air (even to the extent that individual creatures can be endowed with the control of air through flight). When all else fails, however, sorcery magic has another area in which it reigns supreme: meta-magic, or the ability to control and resist other wizards’ spells!
In addition to the five magic types noted above, there is a sixth type, arcane magic, that requires no spell ranks to learn. Arcane magic is available to all spell casters.
•Arcane magic is the most basic of all magic on Arcanus and Myrror. Its spells allow wizards to summon heroes (see Heroes), to create amazing objects of great power (see Artifacts) and to cast basic magic spells, such as those that remove spells that have been cast on your wizard by enemies. All arcane magic spells are automatically placed into your spell library to learn when you are ready. These spells, therefore, require no spell books to learn (i.e., you do not choose arcane spell ranks).
7

Below the shelf containing the spell books, you see any special abilities the highlighted wizard possesses. These attributes are described in Special Abilities. Brief summaries of these special abilities are also included, when relevant, with the descriptions of the predesigned wizards.
What follows is a list of the fourteen predesigned wizards. If you wish to play as one of these wizards, click on his or her name. If you wish to design your own wizard, go to Creating a Wizard.
•Ariel is a high priestess who specializes in life magic. With ten spell books (ranks) in life magic, Ariel can learn all life magic spells. In addition to her extensive knowledge of this field, Ariel is a gifted diplomat. Her special ability (Charismatic) doubles the effectiveness of any positive diplomatic actions she takes and halves the negative impact—that is, how she is viewed by enemy wizards when she commits unfriendly acts. In addition, her charisma allows her to purchase magic items and to hire heroes and mercenaries at half price.
•Freya is an elven nymph who specializes in nature magic. With 10 spell ranks in nature magic, she can learn all the spells in this area. She also possesses the special ability of Nature Mastery, which increases the speed with which she can research nature spells. The ability of Nature Mastery makes Freya’s nature spells twice as difficult to dispel, while allowing her to draw double the normal amount of magic power from any nature nodes under her control.
•Horus is a sorcerer who specializes in both sorcery and life magic (having five spell ranks in each of these areas). Horus is also an Archmage, which makes him particularly effective at casting spells. This ability also makes his spells twice as difficult to dispel. Interestingly, Horus is the most erratic of the known wizards and is not always fully aware of his potential. Thus, when he is controlled by the computer (as an enemy wizard), he may have radically different areas of specialization than those noted here.
•Jafar is an Arabian illusionist who understands the mysteries of sorcery magic. With 10 spell ranks in sorcery magic there are few spells in this area missing from his spell library. Jafar is also an alchemist (his special ability is Alchemy), which allows him to interconvert gold and magic power at no cost.
•Kali is a witch who specializes in both death and sorcery magic (having five spell ranks in each of these areas). She also has the special ability of Artificer, which allows her to draw double the usual amount of magic power from nodes under her control.
•Lo Pan is an oriental mystic who specializes in both chaos and sorcery magic (having five spell ranks in each of these areas). Lo Pan has developed the ability to channel magic power directly from his location in the enchanted fortress to his troops on the battlefield (special ability of Channeler). This ability allows him to bypass paying higher mana rates for casting combat spells outside of his fortress.
8

•Merlin is a great wizard who specializes in both nature and life magic (having five spell ranks in each of these areas). Merlin is also a sage (special ability of Sage Master), which tremendously
increases the speed with which he researches (and learns) new spells.
•Oberic is an elementalist who specializes in both chaos and nature magic (having five spell ranks in each of these areas). He also possesses the special ability of Mana Focusing, which significantly increases the amount of magic power he can obtain for his mana reserves.
•Raven is an Indian shaman who specializes in both nature and sorcery magic (having five spell ranks in nature and six spell ranks in sorcery). In preference to developing some special skill, Raven has chosen to concentrate his efforts solely on the acquisition of spell knowledge.
•Rjak is a warlock who specializes in death magic. With nine spell ranks in this area, he has almost all death magic spells in his spell library. Further enhancing his fearsome powers, Rjak has developed the special ability of Infernal Power. This special ability increases the amount of magic power he draws from the shrines, temples and parthenons that have been bent to his worship.
•Sharee is a voodoo priestess who specializes in both chaos and death magic (having five spell ranks in each of these areas). Sharee is also a Conjurer (special ability), allowing her to summon creatures for far less mana than normally required.
•Sss’ra is a draconian warlock who specializes in both chaos and life magic (having four spell ranks in chaos magic and five in life magic). In addition, he is a Myrran (special ability) which places him on the world (or plane) of Myrror at the beginning of the game. He also starts with a special race (beastman, dark elf, draconian, dwarf or troll) to control. Not bad!
•Tauron is a demonic being who specializes in chaos magic. With ten spell books in this area, he can learn all chaos magic spells. Tauron also possesses the special ability of Chaos Mastery, which increases the speed with which he researches new chaos spells. Chaos Mastery makes it more difficult to dispel his chaos spells and doubles the magic power Tauron can draw from any chaos nodes under his control.
•Tlaloc is an Aztec priest who specializes in both nature and death magic (with five spell ranks in death magic and four in nature). Tlaloc is also a Warlord (special ability), which automatically adds an experience level to each of his units. His units can even surpass the normal highest level for troops (elite).
9
CREATING A WIZARD
To design your own wizard, click on the custom button when you are in the wizard creation screen. This option is not available if you are playing at the Intro level or Easy level of difficulty.
Select Picture
After you decide to custom design a wizard, you choose a picture for your wizard from one of the fourteen predesigned wizard portraits. Run the mouse cursor over the wizards’ names to bring up their portraits in the frame on the left side of the screen.
Wizard’s Name
A space appears next to the portrait you chose for your new wizard. The default name of that picture’s predesigned wizard appears in this space. You may choose to use this name or enter a name of your own choosing (it may have no more than ten letters). When you are satisfied with the name, hit the ekey to continue.
Spell Picks
After you have chosen a name for your new wizard, you zip to the spell picks screen. Here you must choose how many spell books (ranks) and which special abilities to give to your wizard. You have eleven “spell picks” to divide between spell ranks and special abilities. Each spell pick can be used to get another spell book (the only restriction here is that no wizard may be versed in both death and life magic) or another special ability (some special abilities cost two spell picks; see
Special Abilities).
|
Available |
|
special |
|
abilities are |
|
highlighted |
|
Current |
|
spell rank |
|
summary |
|
Spell ranks |
|
already |
|
chosen |
|
Remaining |
|
number of |
|
spell picks |
|
10 |

You can select (or if you change your mind, deselect) a special ability by clicking on its name in the spell picks screen. Special abilities that are available to your wizard (this depends on which spell ranks you have already selected) are highlighted in white. All special abilities you have chosen appear beneath the portrait of your wizard.
Spell ranks are selected or deselected by clicking on the “bookshelves” next to the name of the magic type (life, death, chaos, nature or sorcery). For example, to select two spell ranks in life magic, click on the second slot from the left on the bookshelf next to the word “Life.” If, later during the selection process, you decide that you do not want any ranks in life magic, click to the left of the bookshelf (i.e., on the left gargoyle). You can add or subtract ranks (as long as you have enough spell picks to do so) by clicking on different bookshelf slots until you are satisfied with your combined selection of spell ranks and special abilities. When you have used up all of your spell picks to your satisfaction, click on the OK button to get to the next screen (the select spell screen).
Relevant factors in choosing spell ranks and special abilities are described in Spell Ranks and Special Abilities.
Spell Ranks
Note that wizards may only cast spells they know. The most common way to learn a spell is to research it. Wizards may only research and cast spells from those magic types for which they have spell books. Arcane magic spells are the only exception; these can be learned by all wizards and, therefore, require no spell books. Listed below are the six types of magic practiced on Arcanus and Myrror.
•Life magic (white) focuses largely on healing and protective spells.
•Death magic (black) focuses on summoning and controlling the dead and calling into existence other manifestations of evil. Life and death magic are so strongly opposed in nature that no wizard can learn both types of magic spells.
•Chaos magic (red) can be used to control the element of fire and the forces of change primarily for destructive purposes.
•Nature magic (green) is used to control the forces of both water and the earth itself. While largely a constructive magic (focused on growth), nature magic can generate strongly destructive spells.
•Sorcery magic (blue) focuses on the control of the element of air and all apparently insubstantial things. Sorcery spells can generate and sustain illusions and control the spells of other wizards in addition to more concretely harnessing the force of air for other purposes.
•Arcane magic (gray) is accessible to all wizards. All arcane magic spells are automatically placed in new wizards’ spell libraries for future research.
11

In addition to belonging to one of the six magic types (colors), each spell has a certain degree of rarity (common, uncommon, rare and very rare) associated with it. Rare spells tend to be more powerful than common spells. To be able to learn the rarer spells of a particular magic type, a wizard must have a greater degree of knowledge (i.e., more spell ranks) in that area.
When creating a wizard, you have to choose which magic types (life, death, chaos, nature or sorcery) your wizard learns and how much understanding (in terms of the number of spell ranks) he or she has in each studied area. Wizards can concentrate on one magic type or dabble in several. The only limitations are that 1) a wizard cannot have more than eleven (minus the number of special abilities you select) spell ranks and 2) a wizard cannot learn both life and death magic spells. The number of spells a wizard can learn, based on the number of spell books chosen in a particular magic area, is discussed below.
Every wizard in Master of Magic has a spell library which represents those spells that the wizard can research and learn. This library is composed of spell books (called ranks). Each spell rank contains cryptic information on spells of a specific type of magic (life, death, chaos, nature or sorcery). The more spell ranks a wizard has in a particular area, the more spells he or she can research in that area. Also, a wizard can learn spells of greater rarity if he or she has more spell ranks in the relevant area.
For example, if your wizard has two spell ranks in death magic, he or she automatically gets five common spells, two uncommon spells and one rare death magic spell in his or her library. Although you cannot choose all of the death spells in that library (you can only choose one common death magic spell that is definitely there; the rest are randomly chosen by the program), you can be certain of having this many potential death magic spells to research and learn. The table entitled Spell Ranks shows how the number of spell ranks in a particular magic area affects how many spells (of a particular rarity) a wizard has in his or her spell library.
The number of spell ranks that a wizard has in a particular area of magic also dictates which spells the wizard can acquire through trade or when exploring dungeons, towers, ancient ruins and other places. For example, if a wizard cannot learn any very rare spells in a particular area (i.e., if the wizard has fewer than three spell ranks of that magic type), then he or she can never acquire very rare spells of that magic type through trade or exploration. Note that acquiring spells through trade and exploration is a quick and simple means both of learning new spells and of expanding a wizard’s spell library. Researching spells can take a considerable period of time.
Table A: Spell Ranks in the Appendix shows the total number of spells (of each rarity) you learn and the number of guaranteed choices you lock in, based on the number of ranks you choose in a color or magic type.
12

Special Abilities
Beside choosing spell ranks when you create a new wizard, you can use one or more of your eleven spell picks to endow your wizard with special abilities. Available choices are highlighted in white. Note that several of the special abilities have prerequisites. As an example, for the special ability Infernal Power to become available (become highlighted), you must have chosen at least four spell books in death magic.
To select or deselect a special ability, click on its name when you are in the spell picks screen. Selected special abilities are highlighted in yellow with a checkmark next to their names (on the right side of the screen); they also appear below your wizard’s portrait. The special abilities available are listed and described below:
•Alchemy allows a wizard to directly interconvert gold and magic power. The conversion process normally results in a loss of 50% of the starting material (you convert 100 gold into 50 mana). With Alchemy, you can convert on a straight one-for-one basis.
•Archmage increases a wizard’s spell casting skill by ten. It is also twice as difficult for an enemy wizard to dispel an Archmage’s spells. To become an Archmage, a wizard must have a minimum of four spell books in one of the magic types.
•Artificer allows a wizard to make powerful magic items at a
significantly reduced cost (33% less than normal). Artificers also start the game knowing the arcane spells of create magic item and create artifact, so that they can use their ability from the outset.
•Channeler allows a wizard to cast combat spells without paying any extra costs. Normally, a wizard must pay extra mana to cast a combat spell anywhere other than his or her “enchanted fortress” (e.g., starting city). This surcharge represents the mana that is dissipated over the distance between the wizard’s power base (at the enchanted fortress) and the battle site. Channelers are much more efficient at transferring the necessary magic power and, therefore, do not have to pay extra mana to cast spells during combat in locations outside their enchanted fortresses.
•Chaos Mastery enhances a wizard’s use of chaos magic in many different ways. This skill doubles the magic power that a wizard can draw from chaos nodes under his or her control and increases the speed with which the wizard researches new chaos spells. In addition, chaos spells cast by a wizard with this special ability are twice as difficult to dispel. A wizard must have a minimum of four spell ranks in chaos magic to choose Chaos Mastery.
•Charismatic gives a wizard a great advantage in all interactions with other wizards, mercenaries, merchants and heroes. This ability allows a wizard to purchase artifacts from merchants at half price and to hire mercenaries and heroes at half the usual cost. In addition, a Charismatic wizard obtains twice the normal effect from positive diplomatic actions he or she initiates and suffers only half the normal penalty for negative diplomatic actions.
13

•Conjurer allows a wizard to cast summoning spells at 25% less than the usual cost.
•Divine Power dramatically improves the effectiveness of shrines, temples, parthenons and cathedrals in cities owned by a wizard. The magic power obtained from these city-based sources is increased by 50%, and the pacifying effects (ability to reduce unrest in a city’s populace) of these institutions are enhanced. A wizard must have at least four spell ranks in life magic before you can choose Divine Power. This special ability costs two spell picks.
•Famous doubles the rate at which a wizard is approached by heroes and mercenaries looking for work and by merchants selling valuable artifacts. This effectively increases the options a wizard has in rounding out his or her armies and armory. Famous wizards also start the game with a significant amount of fame (see Fame), while wizards without this ability start with very little! This special ability costs two spell picks.
•Infernal Power is the death magic counterpart to Divine Power. All shrines, temples, parthenons and cathedrals in cities owned by the wizard yield 50% more than the usual amount of magic power. These institutions are also more effective than normal at reducing local unrest. A wizard must have a minimum of four spell ranks in death magic to choose Infernal Power. This special ability costs two spell picks.
•Mana Focusing increases the effectiveness of the mana drawn from a wizard’s magic power reserves by 25%. In other words, every four mana the wizard uses to cast spells counts as five. A wizard must have at least four spell ranks in one magic area to select this special ability.
•Myrran places a wizard on Myrror at the beginning of the game (otherwise, all wizards start on Arcanus). Myrran wizards may choose to begin the game with one of the special races (beastmen, dark elves, draconians, dwarves or trolls) that are otherwise not available to starting wizards. Because Myrror is a world richer in magic than Arcanus, the Myrran wizard’s enchanted fortress generates double the magic power of an equivalent fortress on Arcanus. This special ability costs two spell picks.
•Nature Mastery markedly enhances a wizard’s use of nature magic. This special ability increases the speed with which a wizard researches new nature spells. It also makes nature spells cast by a wizard with this special ability twice as difficult to dispel. Finally, Nature Mastery allows a wizard to draw double the amount of magic power from nature nodes he or she controls. A wizard must have a minimum of four spell books in nature magic to choose this ability.
•Node Mastery doubles the amount of magic power that a wizard draws from nodes of all types. A wizard must have at least one spell rank each in chaos, nature and sorcery magic before he or she can select Node Mastery.
•Runemaster improves the strength of all spells cast by a wizard (spells cast by a Runemaster are twice as difficult to dispel than normal). This ability increases the speed with which a wizard can learn arcane (i.e., gray-colored, “generic”) magic spells and also allows a wizard to cast arcane magic spells at a reduced cost. A wizard must have at least two spell ranks each in any three different magic types to select Runemaster.
14
•Sage Master greatly increases the speed at which a wizard researches all spells. A wizard must have a minimum of one spell book in at least two different magic areas to qualify for this special ability.
•Sorcery Mastery enhances a wizard’s use of sorcery magic in many different ways. This special ability increases the rate at which a wizard researches new sorcery spells and doubles the amount of magic power that the wizard can draw from sorcery nodes under his or her control. In addition, Sorcery Mastery makes sorcery spells cast by a wizard twice as difficult to dispel as normal. A wizard must have a minimum of four spell ranks in sorcery magic to select this ability.
•Warlord improves the quality of a wizard’s troops. All troops under the wizard’s control gain one extra level of experience over their actual training and experience. While troops cannot normally achieve a level higher than “elite,” equivalently experienced troops under a Warlord’s control fight at an “ultra-elite” level. This special ability costs two spell picks.
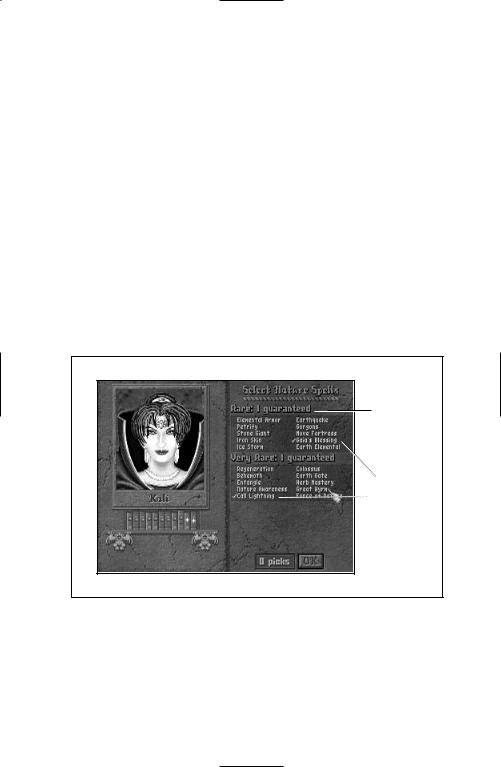
Select Spells
After you have allocated your eleven spell picks to spell ranks and special abilities, click on the OK button at the bottom of the spell pick screen to advance to the select spells screen.
|
Number of |
|
guaranteed |
|
spells per |
|
degree of |
|
rarity |
|
Names of |
|
guaranteed |
|
spells |
The select spells screen allows you to choose which spells are definitely in your spell library. Most of the spells in your spell library (the spells which you can eventually research) are randomly determined by the computer when it creates the game world. However, if you choose enough spell ranks in a particular magic area, you can guarantee the presence of a few specific, key spells in your spell library. Note, these are not spells that you know (i.e., can cast) at the beginning of the game; they are simply spells that you can eventually research.
15
![]()
When you enter the select spells screen, notice some spells are already highlighted in yellow with a check mark to their left. These are the default spell selections. If they are satisfactory, just click on the OK button at the bottom of the screen to continue. If you wish to make your own selections, click on the currently selected spells to deselect them, then select your own choices (a list and description of all available spells is given in the Spellbook supplement) by clicking on the spells you want. The number of spells you may select in each rarity category is indicated on the top line of that category’s section. Chosen spells are highlighted in yellow. When you are satisfied with your guaranteed spell selections, click on the OK button to go to the next screen.
Select Race
After you have chosen your guaranteed spells, you zip to the select race screen. The races available for your starting city depend on whether you chose the special ability Myrran (see Special Abilities). Myrrans start on the world of Myrror and have the choice of beginning the game with beastmen, dark elves, draconians, dwarves, or trolls—as well as any of the remaining nine “regular” races. All other wizards begin on Arcanus and may only choose from one of the other nine races: barbarians, gnolls, halflings, high elves, high men, klackons, lizardmen, nomads or orcs.
To select your villagers, click on one of the highlighted races; races that are not highlighted are not available.
Although choosing a race at the beginning of the game is an important decision, a “poor” selection for your specific situation should not be viewed as irreversible. You can always set out to conquer neutral cities which are populated by other races more useful to your needs. This allows you to ultimately make use of many races’ special advantages and abilities.
Basic information on the capabilities of most races (and those races that differ from the norm in these areas) is shown below (For specifics see Table B: Race Comparison in the Appendix). The values given for production of an item per person are on a per-game-turn basis. A “person” represents 1000 beings, symbolized by a single figure in the city screen (see City Population).
•Food: All races harvest two units of food per farmer except for halflings, which produce three.
•Production: All races are equally productive (one production unit per worker) except for klackons, which are 50% more productive than everyone else.
•Gold: You determine how much gold each town generates by setting the tax rate. By default, the tax rate starts at one gold per figure, but you can set it anywhere from one-half to three gold per figure, in half coin increments. Dwarf workers produce double the tax rate, and nomads produce 50% more.
•Magic Power: Only four races have an inherent ability to generate magic power! Beastmen, draconians and high elves can each produce half a unit of magic power per person. Dark elves are the most magical of all races and can produce one unit of magic power per person.
16

•Maximum City Population: Some races are less tolerant of crowding than others. Their cities have lower maximum population sizes as follows: trolls and dark elves have four fewer people per city; dwarves have three fewer people per city; draconians, gnolls, high elves and klackons each have two fewer people per city than “normal.”
•Population Growth Rates: Races have different population growth rates. Normal population growth rates depend mostly on the difference between the maximum size of a city and its current population. The larger this difference, the faster a city grows. The population growth rate can be found on the city screen in parenthesis after the actual population. Of the races, draconians, gnolls, klackons and nomads have slow growth rates; dark elves, dwarves, high elves and trolls have the slowest growth rates of all the races. Lizardmen have fast growth rates; barbarians have the fastest growth rates of all. Outpost growth rates reflect the abilities of races to establish new cities. While not identical to population growth rates, outpost growth rates roughly correspond to the races’ population growth rates.
•Natural Dispositions: Some races are inclined to get along with other races even after they capture one another’s cities or after one of their cities is captured. Others races tend to seethe with anger and rebellion when their cities are taken and have, in general, such an intense aversion to other races that even when they conquer other races’ cities, this hatred generates a large rebellious contingent in the populace. Generally, halflings are the most congenial race of all and very little unrest develops among their townsfolk when their cities are controlled by other races, or when they control other races’ cities. Barbarians, gnolls, high men, lizardmen, nomads and, surprisingly, orcs are also pretty easy going vis-à-vis occupation policies. Dark elves, dwarves, high elves, klackons and trolls, however, can create plenty of unrest when their cities are occupied or their race conquers another race’s city among this listing. Particular animosity exists between the high and dark elves, between the dwarves and elves, and among the trolls, dwarves and elves. Any combination of these is likely to require a conqueror to build several religious institutions just to keep the rebel populace in check. (See City Population, Building Types and Imperialism for more information.)
17

Select Banner
After you have chosen one of the predesigned wizards, or upon completing the creation of your own wizard, you enter the select banner screen. Click on one of the five banners (green, yellow, blue, purple or red) to select the color your troops will follow. After you choose, the program generates the worlds of Arcanus and Myrror according to the parameters you selected in the new game screen. During world generation, the program also determines which non-guaranteed spells are in each wizard’s spell library. When creation of the new worlds is complete, you are plunked onto the main movement screen of the game, in control of a city bearing a flag of your chosen color.
Select Home City Name
The last step before starting to play a game of Master of Magic is deciding whether or not to accept the default name for your wizard’s home city. After the worlds are created, you have the option to alter the name of your starting city or to accept the default selection. In addition, if you have chosen to play on the Easy setting, you are asked if you wish to use the grand vizier to manage the production of buildings in your cities (see Grand Vizier). With that decided, you are ready to start playing!
18
Beginning the Game —
The Main Screen
19
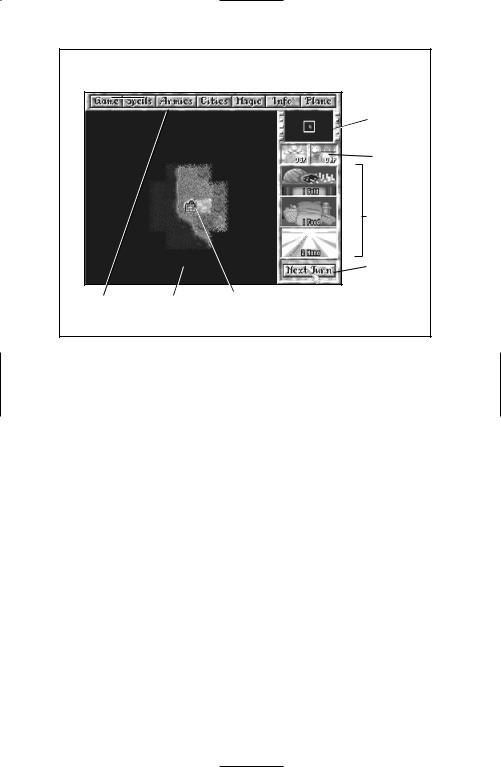
|
MAIN MOVEMENT SCREEN |
||
|
Reduced |
||
|
map (world |
||
|
window) |
||
|
Status |
||
|
window |
||
|
Upkeep |
||
|
summary |
||
|
window |
||
|
Next turn |
||
|
button |
||
|
Buttons |
Main |
Enchanted |
|
movement |
fortress |
|
|
view |
The main movement screen of Master of Magic is where most of the game play takes place. This introductory section contains a very brief description of each area of the main movement screen. The sections that follow describe each of these areas in detail.
There are seven buttons (game, spells, armies, cities, magic, info and plane) across the top of the screen. Clicking on these buttons takes you to new screens or menus.
•The game button takes you to the game options menu, from which you can load and save games.
•The spells button takes you to a list of spells that you can currently
cast. At the beginning of most games, the only spell in this spell book is magic spirit (an arcane magic spell described in the Spellbook supplement).
•The armies button takes you to a screen that shows all armies and heroes that you currently control. At the beginning of the game, you have no armies, so this screen is empty.
•The cities button takes you to a list of your current cities and outposts. At the beginning of the game, the only city on this list is your starting city (a.k.a. your “enchanted fortress”).
•The magic button takes you to a screen where you can examine and modify how your magic power is being distributed over the areas of spell research, spell casting skill and mana reserves. There are a series of empty “mirrors” or gems at the top of this screen that eventually display the faces of any opposing wizards in the current game; these mirrors are the means by which you communicate with all known wizards.
20

•The info button takes you to a long list of advisors. Clicking on the advisor buttons provides you with important information about the world, your spell library, other wizards, etc.
•The plane button switches you between the worlds of Arcanus and Myrror. At the beginning of the game you have no means to travel to a different plane. Eventually you will be able to use the plane button to move troops between these two worlds.
The reduced map (world window) is on the top-right side of the main movement screen. Clicking on a site on this map centers the main movement view on that site.
The status window below the reduced map shows the amount of gold and mana in your reserves.
The upkeep summary window shows how much net gold, food and mana you are producing every turn. If one of these numbers is colored red, then you are losing the displayed amount of that item each turn! When this happens, you probably want to take appropriate measures to correct this per turn deficit spending (you’re not the US Government, after all!). Note that surplus gold and mana are added to the amounts shown in the status window each turn, while surplus food is converted to gold at a rate of one gold piece per two surplus food units. The upkeep summary window is replaced by the unit window when it is time for an active unit to move.
In the bottom right corner of the main movement screen is the next turn button. Clicking on this button means you are done with this turn and takes you to the next turn in the game. This updates all of your economic, diplomatic and research data by one turn and allows your units to start a new turn of movement.
The largest section of the main movement screen is occupied by the main movement view. Here you can see a small town with a flag on top that represents your starting city (aka “enchanted fortress”). All exploration, troop movement and building of outposts and roads takes place in this viewing area.
21
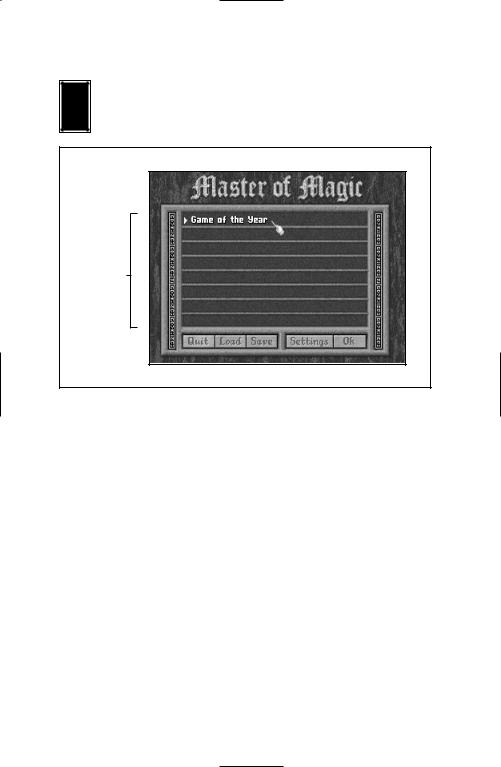
Game
licking on the game button takes you to the game options screen.
The game options screen can be used to save and load games, to quit to DOS and to adjust game settings.
Save slots
SAVING
To save a game, click on one of the eight slots in the middle of the screen. A cursor appears. Type in a name or short description for the game in progress and then click on the save button at the bottom of the screen. If there is already a name in the saved game slot you selected, you can either save the current game under that name (by clicking on the save button after selecting the game in that slot) or you can change the name in the slot by backspacing over the current name and typing in a new one. After hitting the ekey or clicking the save button, you immediately return to your game.
LOADING
To load a previously saved game, click on the slot in which that game was saved. The name or description of that saved game is highlighted. You can then click on the load button to resume playing the saved game.
SETTINGS
Clicking on the settings button takes you to the game settings screen. The following list of settings can be toggled on or off (by clicking on them), depending on your preference. A check mark appears in the small box to the left of each setting that is currently on.
22
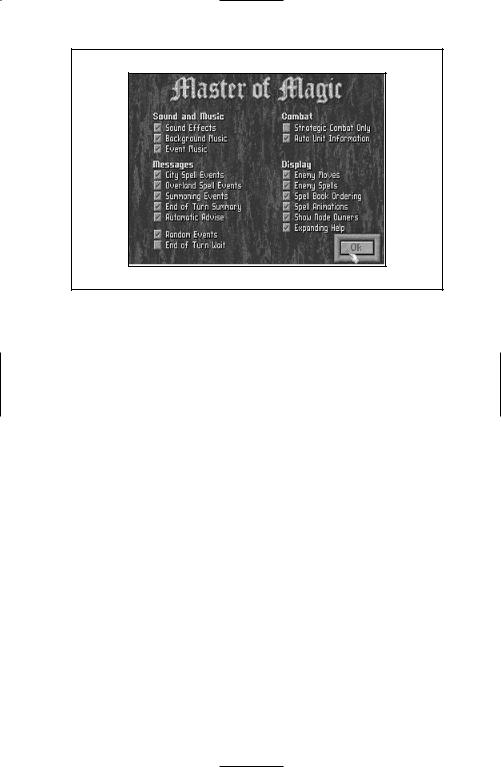
Sound Effects should be turned on if you wish to listen to the sound effects. This setting is ignored if your sound card does not support digitized speech.
Background Music should be turned off if you do not wish to have continuous music playing in the background during your game.
Event Music should be turned on if you wish to hear special music when various events occur.
City Spell Events should be on if you wish to be notified when city enchantment spells are cast on your cities or those of other players.
Overland Spell Events should be on if you wish to be notified when overland enchantment spells are cast on your cities or those of other players.
Summoning Events should be on if you wish to be notified when summoning spells are cast.
End of Turn Summary should be turned on if you wish to see a summary scroll at the end of each turn. The information contained in the summary is the same as that obtained by consulting with your Chancellor (see Chancellor).
Automatic Advice should be turned on if you wish the computer to supply you with suggestions on what you should be doing during your game. Experienced players can turn this option off.
Random Events should be turned on if you wish random events to be part of your game (see Events).
23

End of Turn Wait should be on if you wish to be prompted to press the next turn button once all your units have moved.
Strategic Combat Only should be on if you wish all battles to take place under the computer’s control. Turn this off if you wish to conduct your own tactical combat. Note: with this option on you need never witness combat at all; you are simply informed of the results.
Additional Unit Information should be on if you wish to keep an extra combat unit display window open during combat. This window provides information on remaining ammunition, mana and health of the active unit (see Combat).
Enemy Moves should be turned on if you wish to view the movements of enemy troops that are within your range of sight.
Enemy Spells should be turned on if you wish to be informed when other wizards cast spells.
Spell Book Ordering should be turned on if you wish to have the spells in your spell books arranged in sections by spell categories (i.e., city enchantments, creature summonings, etc.) rather than by color (life, death, chaos, nature or sorcery).
Spell Animations should be turned on if you wish to view the animations that apply to any spells that you have successfully cast.
Show Node Owners should be turned on if you wish to see the magic aura around controlled magic nodes. The magic aura is the same color as the banner of the controlling wizard.
Expanding Help should be turned on if you wish to view help information (obtained by right-clicking on areas) as a graphic that expands/emanates from the area in question.
Click on the OK button when you are finished adjusting the game settings to return to the game options screen.
QUIT
You can quit to DOS from the game options screen by clicking on the quit button at the bottom of the screen.
OK
If you simply wish to return to the game from the game options screen, click on the OK button.
24
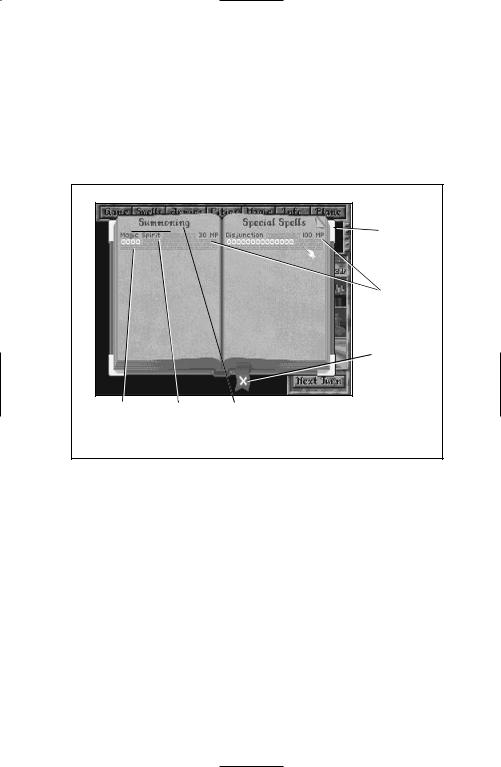
Spells |
||||
|
licking on the spells button takes you to your spellbook. Only those |
||||
|
C |
||||
|
spells that you know and that can be cast overland (i.e., noncombat |
||||
|
spells such as city enchantments, unit enchantments, summoning |
||||
|
spells, etc.) are visible. At the beginning of the game, the only spell |
||||
|
in your spellbook is likely to be magic spirit, a common arcane |
||||
|
summoning spell described in the Spellbook supplement. |
The casting cost of a spell is shown to the right of the spell’s name in your spellbook.
|
Dog ear: |
||
|
click here |
||
|
to turn |
||
|
page |
||
|
Casting |
||
|
cost |
||
|
Bookmark: |
||
|
click here to |
||
|
close book |
||
|
Length of |
Name of |
Type of |
|
time to |
spell |
spell effect |
|
cast spell |
The length of time (in turns) it takes to cast a spell is indicated underneath the spell’s name by the number of colored symbols (spells that can be instantaneously cast show “Instant” instead of symbols). For example, if you wish to cast a specific nature spell and there are four green tree symbols beneath the spell’s name, then it takes an estimated four turns to cast the spell (the actual time may vary if the amount of mana being spent per turn for spell casting is altered).
To turn to another page of your spell book, click on the dog-eared upper corners. To close the spell book without casting a spell, click on the red bookmark at the bottom of the book.
To cast a spell, click on the name of the spell. To change the spell you are casting, click on the new desired spell. Note that when you change spells, any magic power you have already invested into casting the original spell gets transferred to the new spell; any invested magic power that is “left over” after this transfer (i.e., the new spell has a lower casting cost than the original spell) is permanently lost.
25
![]()
You may simply stop casting the current spell (indicated in glowing letters) by clicking on that spell; you are then asked to confirm that you wish to cancel the spell.
For more information on different types of spells and spell casting, see the Spellbook supplement.
Armies
licking on the armies button takes you to the armies screen. C This screen provides a complete list of all your armies and heroes and gives you access to the items screen. You can move through the army list quickly by using the arrow buttons that are  located on either side of the list. Units that are stacked in the
same map square are grouped together on the armies screen.
|
Hero |
|
|
portrait |
|
|
Hero units |
|
|
Army units |
|
|
Upkeep |
|
|
summary for |
|
|
all units |
|
|
Reduced |
|
|
map |
|
|
window |
|
|
Name of |
Unit |
|
highlighted |
enchantment |
|
unit |
window |
Clicking on such a group of stacked units takes you directly to the map square which the group is occupying.
Placing your mouse cursor over a unit on the list highlights that unit and causes the following:
•All current enchantments on the highlighted unit are listed in the unit enchantment window underneath the army list.
•The location of the highlighted unit is shown as a blinking white dot in the reduced map window underneath the army list. Enemy troops and cities are shown in this reduced map window as dots in the color of the controlling wizard.
26
•Right-clicking on the highlighted unit presents a detailed description of the unit (see Basic Units Information). You can dismiss the unit from your army by clicking on the dismiss button. You can also remove any enchantments that were cast by your wizard from the unit by clicking on the enchantment icon.
•Clicking on the highlighted unit activates it and finds the unit for you by taking you to the map square it is occupying in the main movement screen.
In the bottom-left corner of the armies screen is the upkeep window. This displays how much total gold, mana and food is required each turn to maintain your armies. Most armies and enchantments require some sort of maintenance cost. The upkeep window is a way for your wizard to conveniently examine and readjust the numbers of armies (by dismissal) and enchantments (by removal) so that any upkeep costs can be adjusted to reasonable values.
Clicking on the OK button returns you to the main movement screen at the same position you were when you entered the armies screen.
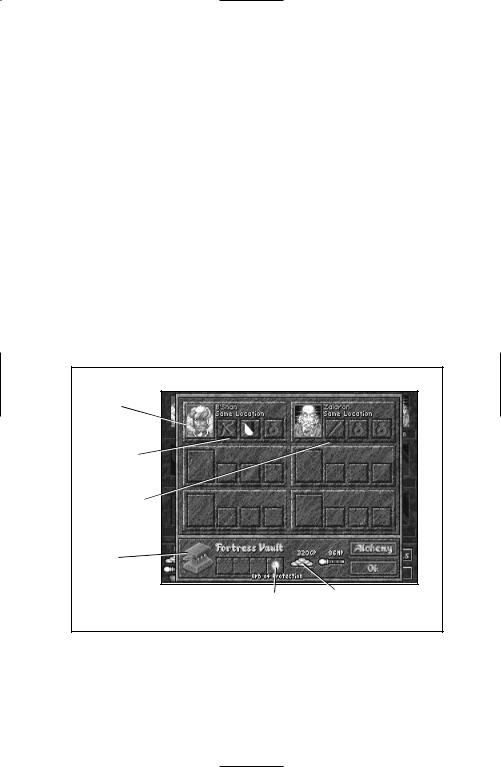
ITEMS
Clicking on the items button takes you to the items screen.
The items screen allows you to view, move and destroy artifacts that are currently being used by your heroes or in storage in your fortress vault (a holding area for unassigned items).
|
Hero |
|
|
Item |
|
|
carried by |
|
|
hero |
|
|
Item slots |
|
|
(staff and |
|
|
2 rings) |
|
|
Anvil |
|
|
Stored |
Treasury |
|
item |
summary |
The items screen displays the artifacts that each of your heroes is currently using in a series of slots next to the hero’s portrait. Each hero can carry up to three items: a weapon, a special item (such as a magic orb) and a piece of armor or a second special item. Up to four additional artifacts may be stored in the fortress vault (indicated by four slots in the lower left window of the items screen).
27

IMPORTANT: The three slots next to each hero’s portrait are limited to holding specific types of items. Some slots can only hold special items (such as rings and orbs), while others are suited to holding armor (mail and shields). Below is a chart of the slots and the sorts of items they can hold. Note that the weapons and armor a hero can be equipped with depend on the hero’s type; some heroes are mages, others are warriors, etc.
|
Slot For Artifact |
Artifacts Allowed |
|
Sword Icon |
Axe, Mace or Sword |
|
Bow Icon |
Axe, Bow, Mace or Sword |
|
Staff Icon |
Staff or Wand |
|
Staff crossed with Sword Icon |
All Weapons |
|
Armor Icon |
Any type of Mail/Armor, Shields |
|
Ring Icon |
All Miscellaneous Items |
Right-clicking on any item in the screen displays a list of attribute enhancements the equipped item provides.
Clicking on an item allows you to pick up an item (the mouse cursor now looks like the item). The item can then be moved to another hero (by clicking on the appropriate slot next to the recipient) or to the fortress vault.
If moving the artifact does not require moving it to a new map square (indicated by the phrase “Same Location” in light blue below the names of those heroes occupying the same map square as the current owner of the item), the move costs nothing.
If transferring the artifact requires moving it to a new map square (indicated by the phrase “Item Teleport” in red below the name of the planned recipient), attempting to do so calls up an item teleport window. You are asked if you wish to pay the required twenty mana to move the item (you must have enough mana to move the artifact).
Clicking on the yes button removes twenty mana from your mana reserves and moves the item to the requested location. If you click on the no button, you are returned to the items screen.
If you obtain too many artifacts to store or divide among your heroes, you may break extra artifacts by picking them up and clicking them on the anvil in the lower left corner of the items screen. Breaking an artifact over the anvil adds one half the base creation cost of the artifact in mana to your mana reserve (see Artifacts).
28

In addition to providing ways to view, move and break artifacts, the items screen allows you to examine heroes (by right-clicking on their portraits, see Basic Unit Information) and to move to the specific location of a hero (by clicking on his or her portrait) on the main movement screen.
If you are short of either mana or gold, you can use the alchemy button in the items screen to interconvert these two goods. Click on the alchemy button to get to the conversion screen. See Alchemy for more information.
Clicking on the OK button returns you to the armies screen.
Cities
licking on the cities button takes you to the cities screen. This C screen provides a list of all your cities, including specific information on each city’s production and current  enchantments. This screen also provides a way to alter the
structures or troops being built by a city.
|
City |
|
summaries |
|
Treasury |
|
summary |
|
City |
|
enchantment |
|
window (no |
|
enchantments) |
|
Reduced |
|
map window |
The listing of cities forms the largest part of the cities screen. You can scroll through the list by clicking on the arrow buttons on either side. The information provided on each city includes the city’s name, the race of the occupants, the population size, gold production per turn, production points per turn, the structure or troops currently being built and the length of time to complete the current project.
You can highlight a city by placing the mouse cursor over the city’s line on the list. Any enchantments on the highlighted city appear in the city enchantment window under the list. The location of the highlighted city appears as a blinking white dot in the reduced map window under the list. The locations of other cities appear as colored dots in the reduced map window, where the color of each dot is that of its controlling wizard.
29

Clicking on the highlighted city takes you to that city’s city screen (see The Hamlet and the City Screen). Right-clicking on the highlighted city calls up just that city’s production screen (see Production Screen) in which you can alter the city’s current project without leaving the city screen.
Click on the OK button to exit the cities screen.
Magic
licking on the magic button takes you to the magic summary C screen. This screen contains portraits of all known enemy wizards (there are no faces in the frames at the beginning of the game, but don’t worry, your opponents eventually introduce themselves), a list of overland enchantments, information on
your magic power base, current spells you are researching or casting and how your available magic power is divided between researching, reserves and spell casting skill. The magic summary screen also provides a means to communicate with other wizards, to obtain information about other wizards, to adjust how your magic power is being allocated and to use alchemy to interconvert gold and magic power.
ENEMY WIZARDS
Across the top of the magic summary screen are a series of mirrors (or gems). At the beginning of the game the mirrors are empty, but as you meet other wizards, their portraits occupy these mirrors. You can use these mirrors for a number of purposes:
•Quickly determine the banner color of an opposing wizard. The wizards’ faces are rimmed by the color of their banner type.
•Determine the status of your relationship with a wizard. Below the wizards’ faces, phrases like “neutral” or “hate” summarize the current status of your relationship with a particular wizard.
•Obtain information about an enemy wizard by right-clicking on his or her portrait. Doing this calls up a detailed character sheet for that wizard; see Enemy Wizard Statistics.
•Communicate with an enemy wizard by clicking on his or her portrait. This calls up the communication screen from which you can form or break treaties, exchange spells and take other diplomatic actions. For more information, see The Art of Diplomacy.
30

|
MAGIC SUMMARY SCREEN |
|
Enemy |
|
wizard |
|
portraits |
|
Status |
|
Overland |
|
enchantments |
|
window (no |
|
enchantments) |
|
“Locked” |
|
wand |
•Observe the status of wizards’ relationships with each other. To the right of each wizard’s portrait you may see a series of icons including scrolls, doves and crossed swords. These icons are colorcoded to match the banner colors of the other wizards, including yours. A scroll icon indicates that there is a wizard pact or alliance in effect between the wizard in the portrait and the wizard whose banner color matches the ribbon on the icon. Similarly, the crossed swords icon indicates a state of war exists, while a peace symbol icon indicates a peace treaty is currently in effect. If no icon appears, those rivals are in a neutral state (i.e., not at war, nor under the terms of a formal peace treaty, wizard pact or alliance). See The Art of Diplomacy for more details.
MAGIC SUMMARY
The left side of the magic summary screen contains important information on how your magic power is being used. Basic magic information for your wizard is listed:
•Spell casting skill is the amount of mana per turn that you can channel into casting overland spells. It is also the amount of mana you can cast during one battle. Fledgling wizards start with a spell casting skill of five unless they are also Archmages (see Special Abilities), in which case they start with a spell casting skill of fifteen. Note that if a wizard has a hero with spell casting skill residing in his or her enchanted fortress, half of that hero’s spell casting skill contributes to the wizard’s overland casting ability (see Casting Overland). Channeling heroes have no affect on a wizard’s combat casting. A hero’s contribution to this skill is
31

indicated by a second number in parentheses following the spell casting skill. This second number is the total current spell casting skill of the wizard, taking any heroes’ contributions into account.
•Magic reserves is the amount of total mana you have on hand for casting spells. You can make more efficient use of this mana if your wizard has the Mana Focusing ability (see Special Abilities).
•Power base is basically the amount of magic power or mana you are drawing in from all sources (magic nodes, religious institutions, special resources and wizard guilds) per turn.
•Casting shows the spell, if any, you are currently casting.
•Researching shows the spell you are currently researching.
•Summon to shows the city where your summoned magic creatures appear.
Above this basic magic information are three wands which can adjust how much of your total magic power you allocate to your mana reserves, researching efforts and spell casting skill. Each wand is appropriately labeled and the amount of magic power being devoted to each area (after adjustments for any special abilities, research points accumulated from institutions of higher learning, etc. have been made) is indicated underneath the wands. To adjust the ratio of magic power being allocated to an area, click and drag the “colored liquid” inside the wand to the desired level. The other wands simultaneously readjust their levels. To hold the percent (ratio) of magic power being devoted to a particular area constant, click on the head of that wand (the crystal glows bright to symbolize that its ratio bar is “locked”) before adjusting the levels in the remaining two wands. Click on the head a second time to unlock the wand’s ratio bar.
OVERLAND ENCHANTMENTS
This section of the magic summary screen shows any global enchantments currently in effect. The enchantments are shown in the banner-color of the casting wizard, except for enchantments cast by your wizard, which are listed in dark print.
To remove one of your wizard’s global enchantments (in dark letters), click on the spell in the overland enchantment window. This also ends any maintenance you were paying for that spell.
If you wish to dispel global enchantments that were cast by other wizards, you must cast (by clicking on the spells button in the main
movement screen and then clicking on the appropriate spell in your spell book; see Spell Casting) disjunction, disjunction true or spell binding. After
casting one of these spells, you can choose which global enchantment you wish to eliminate.
Right-clicking on a global enchantment calls up its description.
32

ALCHEMY
If you are short of mana or gold, you can interconvert these two resources through the use of alchemy. Click on the alchemy button to get to the conversion screen.
Do not, however, recklessly interconvert gold and mana. Unless your wizard has the special ability of Alchemy (see Special Abilities), all such conversions result in a loss of half the starting material! That is, if you convert 100 gold into magic power, you obtain only 50 mana points.
Click on the arrow button between OK and cancel until the direction of the conversion (gold to magic power or magic power to gold) suits your purposes. Then click and drag the black and gray arrow in the center of the window until the amount of mana or gold you are converting (called transmuting) is correct. Let go of the mouse button and click on the OK button to make the conversion. Click on the cancel button to return to the magic summary screen if you change your mind. Note that there is also an alchemy button in the items screen (see Armies). If you entered the conversion screen from the items screen, you return to the items screen upon exiting.
When you have finished with the magic summary screen, you may exit by clicking on the OK button.
33

Info
licking on the info button calls up a list of advisors (surveyor, cartographer, apprentice, historian, astrologer, chancellor, tax collector, grand vizier) who can provide valuable information to your wizard.
SURVEYOR
Clicking on the surveyor button replaces the status window of the main movement screen (see Status Window) with surveyor information (surveyor window). By running the mouse cursor over visible map squares on the main movement screen, you can see information about the map squares revealed in the surveyor window.
The surveyor’s information includes statistics for a potential city built on the selected map square: the potential maximum population of a city built at that site and any bonuses such a city would get to its production and gold revenue because of nearby terrain features.
The information displayed in the surveyor window also includes the terrain type and any special terrain features (minerals, crystals, wild game, etc.), including their bonus effects on food, gold, power and production. See Terrain Types and Terrain Specials for more information on specific terrain types and features.
Click on the cancel button at the bottom of the surveyor window to exit.
34

Surveyor summary of  effects for indicated square
CARTOGRAPHER
Clicking on the cartographer button brings up maps of Arcanus and Myrror (you can switch between the two maps by clicking on the dog ear in the lower right corner). These maps only show those areas of the worlds that you have already explored.
The information displayed on the maps includes known cities (the color of cities matches the banner-color of the controlling wizard), military units and other structures (towers, temples, ancient ruins, etc.). To the right of the map is a key which shows the banner-colors of all known wizards.
|
World |
|
|
Explored |
|
|
area |
|
|
City flags |
|
|
(colors |
|
|
indicate |
|
|
owners) |
|
|
List of known |
Dog ear |
|
wizards |
|
|
35 |
![]()
Clicking on a part of the map returns you to the main movement screen, with the main movement window centered on that location.
Clicking on the word “close” returns you to the main movement screen.
APPRENTICE
Clicking on the apprentice button takes you to your complete spell library. All the spells that you have already researched are legible in this book. All of the spells that you will eventually be able to research appear in a runic script.
|
Spell |
|
category |
|
Potential |
|
spells |
|
Known |
|
spells |
|
Bookmark: |
|
click to exit |
Spells in the apprentice’s spellbook are divided into categories: summoning spells, special spells, city spells, enchantments, unit spells, combat spells and research spells. The research spells are those that you can learn at this time. The spells that you are currently researching and casting appear in glowing letters.
To turn the pages of the apprentice’s spellbook, click on the dog ears in the upper corners of the pages. Click on the bookmark to exit.
HISTORIAN
Clicking on the historian button takes you to a graph called History of Wizards’ Power. This graph shows all known wizards’ power over time. The power of a wizard is the combined value of many things including army strength, total magic power drawn from all sources per turn, and spells that wizard has learned.
36

The History of Wizards’ Power graph also compares your wizard with all known enemy wizards. Each wizard’s power is represented by a colored line corresponding to the wizard’s banner-color. A key in the upper left corner shows each wizard’s name printed in the same color.
Click anywhere on the graph to exit this screen.
ASTROLOGER
Clicking on the astrologer button takes you to the current status screen. This screen shows a comparison of your wizard with all known enemy wizards.
37

The current status screen is divided into three sections: Army Strength, Magic Power and Spell Research. The sections each have a bar graph that compares all known wizards in terms of the relative strength of their armies, the total magic power drawn per turn, or the total research cost of all the spells learned by each wizard to date. The wizards are each represented by banner-colored bars next to their names, where the relative lengths of the bars reflects the relative “power” of each wizard.
Click anywhere on the screen to exit.
CHANCELLOR
Clicking on the chancellor button unrolls a scroll that lists the events that occurred during the previous game turn.
Click anywhere on the screen to exit.
TAX COLLECTOR
Clicking on the tax collector button takes you to the tax window in which you can set the taxes for the people in the cities you control.
Tax rates can be set in increments of one-half gold coin per townsperson. Tax rates at the beginning of the game are set at one gold piece per townsperson. Elevating taxes increases gold revenues, but decreases productivity by increasing the level of unrest in a city. Decreasing taxes has the opposite effect (see Gold).
If you wish to set a new tax rate, click on the desired rate. If you decide not to change the current tax rate, click anywhere else (outside of the tax window) on the screen. Both options takes you back to the main movement screen.
38

GRAND VIZIER
Clicking on the grand vizier button takes you to a window in which you can select or deselect computer-controlled production of buildings in your cities. This function is automatically on if you are playing at the Intro setting and off if you are playing at Average or harder settings. At the Easy setting, you receive a prompt at the beginning of the game asking if you wish to use the grand vizier to control what your cities are building.
If the grand vizier is on, you do not receive prompts when your cities complete projects. If you wish to examine what your cities are producing or if you wish to change what they are making, you can enter the cities screen (click on the cities button in the main movement screen) and right-click on any city whose production you wish to change. See Cities and Production Screen for more details.
39

MIRROR
Clicking on the mirror button takes you to your mirror screen. This screen contains all sorts of relevant information about yourself (and is almost identical in set up to the enemy wizard statistics screen that reveals information about your foes; see Enemy Wizard Statistics).
The mirror shows all of your spell ranks (as spell books), special abilities, total gold reserve, total mana reserve, your fame and a list of all your heroes (including their class and level).
Exit the mirror screen by clicking.
Fame
A wizard’s fame influences how readily mercenary troops (see Mercenaries and Heroes) approach a wizard. As your fame grows, you pay less gold per turn to maintain your total number of troops. In addition, your rising reputation tends to draw more experienced mercenaries than it did before. Mercenaries who approach you may ask for a lower initial payment to join your cause (though they always ask for something).
Wizards start with very little fame unless they have chosen to be Famous, in which case they start with 15 fame points (see Special Abilities).
Fame is slowly accumulated through conquest (of neutral or enemy cities), establishing new cities, and the recruitment of Legendary heroes (see Special Unit Abilities). For each new city that he builds, a wizard earns one fame point. For conquering hamlets, villages, towns, cities and capitals, a wizard earns 0, 0, 1, 2, and 3 fame points, respectively.
40

Plane
licking on the plane button shifts you between main movement views in Arcanus and Myrror. Currently-active units that can shift between planes (because of their location in a tower of wizardry or city with an astral gate, or because of a special ability) move between Arcanus and Myrror each time you click the plane button.
Status Window
he status window on the right side of the main movement screen displays your total gold reserve and total mana reserve.
Upkeep Summary Window
ppearing underneath the status window on the right side of the main movement screen is an area called the upkeep summary window. Most of the time this window contains information on the net gain or loss of gold, food and magic power per turn.
Because maintaining units and enchantments and casting spells requires gold, food and magic power, it is important to pay attention to what is happening in this window. If at any time, you are losing gold, food or mana every turn, the number in the upkeep summary window turns red. If there is not enough food to maintain troops, they start dying off! A running deficit of gold or mana, however, does not generally result in an immediate loss of units or enchantments. Instead, gold and mana are taken from your treasury (total gold reserve) and your total mana reserve, respectively. Once these reserves are depleted, units and enchantments can no longer be maintained. Then they start disappearing.
41

BASIC UPKEEP INFORMATION
|
Upkeep Type |
Notes |
|
Gold |
To pay normal troops and non-noble heroes |
|
(maintenance cost reduced by wizard’s fame); |
|
|
To maintain buildings |
|
|
Food |
To maintain normal troops (1 food per unit) |
|
Mana |
To maintain the presence of summoned creatures; |
|
To maintain enchantments and continuous spells |
If you are not generating a sufficient amount of food to maintain your troops, you may go to one of your city screens and adjust the number of farmers and workers so that you are producing enough food (see Food).
If you need more gold to maintain your troops and buildings, you have many options: you can increase your tax rate (see Tax Collector); construct buildings that increase city revenues (marketplace, bank or merchant’s guild); conquer neighboring cities or build new ones to increase your base productivity; convert mana into gold through alchemy, sell buildings, and dismiss extra troops or expensive heroes.
If you need more mana to maintain your enchantments and summoned creatures, you also have several options: you can alter how
much of your total magic power per turn gets funneled into your mana reserves (see Magic); summon magic spirits or guardian spirits to meld
with new magic nodes; construct buildings that produce magic power (shrine, temple, parthenon, cathedral or wizard’s guild); conquer nearby towns or build new cities to increase your potential magic power base; convert gold into mana through alchemy; destroy magic artifacts to release mana; dismiss summoned creatures, and remove expensive enchantments.
Main Movement Screen
he main movement screen is where you may move units for exploration and other purposes, view cities and surrounding terrain and keep an eye on previously discovered enemy cities and enemy troop movements.
The main movement view is the large map on the main movement screen and can be scrolled by right-clicking on map squares. The main movement view adjusts so that the map square you chose is centered in the window.
QUICK INTRODUCTION TO GETTING AROUND THE MAP
Right-clicking on cities on the map calls up their city screens (see
The Hamlet and City Screen). If the city is enemy owned or neutral, you cannot examine the city production screen. However, you can determine the race occupying the city, the city’s production, and the troops garrisoned there, as well as which buildings have been constructed.
42
 Loading…

Несколько советов для новичков в Master of Magic от тех, кто играет очень-очень давно.
Содержание
- Советы для начинающих
- Введение
- Начинать
- Юниты
- Стратегия мирового уровня
- Введение в продвинутые махинации
Советы для начинающих
Введение
Оригинальный&Мастер магии&вышла в мир 28 лет назад, на момент написания этой статьи, то есть через несколько дней после переиздания Master of Magic в декабре 2022 года. Это игра, в которую я много играл в время, и это игра, в которую я все еще счастлив играть 28 лет спустя. Почему? Из-за – и это то, что многие более поздние подражатели не смогли полностью охватить! – невероятная глубина игры; это было поразительно в свое время и все еще впечатляет сегодня. Вот почему Master of Magic так горячо любят и прославляют почти три десятилетия, за это время многие другие прекрасные игры той эпохи канули в безвестность. Более 200 заклинаний, 5 школ магии, 18 реторт, десятки существ, 14 различных рас, каждая из которых насчитывает около дюжины юнитов, более 50 способностей юнитов – все это в совокупности дает огромное количество способов приблизиться к цели стать Мастером Магии!
Одно прохождение может сильно зависеть от особых способностей данной расы и ее юнитов, а также от их синергии с одной или несколькими школами магии для создания «убийственных стеков». усиленных обычных юнитов. Другой мог бы считать выбор расы второстепенным делом и вместо этого стремиться доминировать с помощью призыва в выбранной школе(ах) магии – и баффы, которые дает школа или школы. Третьи могут добиваться превосходства на поле боя с помощью заклинаний, которые можно использовать в бою, а ваши отряды — это просто средство передвижения, которое доставит вас на поле битвы. Другое прохождение может быть сосредоточено на сборе команды самых могущественных героев и поддержке их мощными артефактами. И любое количество стратегий может быть основано на сочетании одного или нескольких вышеперечисленных подходов. Это действительно игра, в которой нет ни одного «оптимального билда». которому следует следовать; много путей к абсолютной силе!
И с этим введением покончено… вот 10 советов для новых игроков в Master of Magic!
Начинать
- Для нового новичка, который просто хочет сыграть в свою первую игру, не читая слишком много, выберите в качестве своей расы Высокие люди&или&Полурослики&. и выберите Божественная сила + 10 жизней&книги,&10 Природа + Мастерство природы&или&10 Хаос + Мастерство хаоса , а затем для двух последних — либо Фокусник, либо Архимаг.&в качестве вашего последнего выбора, в зависимости от того, хотите ли вы попробовать использовать много призывов или использовать больше заклинаний во время битвы.Почему эти выборы? Высшие люди имеют почти полностью законченное древо строений, с прекрасными паладинами, вполне возможно, лучшими нормальными юнитами, в конце его. Полурослики начинают с 3 едой на фермера с 1-го дня, и у них есть отличные пращники в конце их более короткого дерева сборки. Оба также не провоцируют слишком много беспорядков в побежденных расах – особенно халфлинги, которые вызывают меньше волнений, чем любая другая раса. В жизни много заклинаний, улучшающих юнитов, заклинаний, улучшающих города, и могущественный Герой в Торине Избранном; У природы также есть хорошие баффы, несколько полезных полезных заклинаний (привет, Знания Земли!) и несколько очень крепких призывов. Хаос, что неудивительно, является королем магии прямого урона, имеет несколько интересных баффов юнитов и несколько странных, но часто мощных призывов.
Юниты
-
- Способности юнитов важны.Нет, правда! Потратьте время, чтобы посмотреть на способности ваших юнитов и подумать о том, как вы можете их использовать – а затем посмотрите на своих врагов, их способности и слабости, которые вы могли бы использовать. Например, у упомянутых выше паладинов есть Первый удар, что делает их такими опасными – они могут убить фигуры вражеского отряда до того, как этот отряд нанесет ответный удар – обычно нападающий и защитник бьют друг друга одновременно. Особенность Первого удара в том, что он требует, чтобы Паладины были атакующим юнитом; он не вступает в игру, если что-то атакует их. Это означает, что вам нужно подумать о том, как вы управляете своими паладинами, чтобы они как можно чаще получали возможность атаковать.Точно так же Атаки дыханием и Метательное оружие разрешаются до Первого удара – это означает, что эти паладины теряют часть своей эффективности, если им приходится атаковать юниты драконианцев или варваров, обладающих такими способностями. (Хорошо, Paladins *по-прежнему*, вероятно, победят, потому что они сделаны из чистейшей воды, но они будут более избитыми, чем вы, возможно, привыкли видеть.)
< li>Количество цифр в единице имеет большое значение.&В большинстве игр юнит с полным здоровьем и юнит с 25% здоровья наносят удары с одинаковой силой. В Master of Magic, если у вас осталось 25% фигурок, это означает, что вы получаете только 25% атак, которые могли бы получить при полной силе! Обратите внимание, однако, что это правило применяется только к многозначным единицам – Небесный Дрейк с полным здоровьем и его приятель, у которого осталось 25% Небесного Дрейка, пострадали одинаково сильно. Это имеет несколько последствий: во-первых, поскольку фигурка, состоящая из нескольких юнитов, получает урон и теряет фигурки, она теряет боеспособность.
Я стараюсь, чтобы любой юнит, упавший наполовину, отступал, чтобы он мог жить, набираться опыта, лечиться и снова сражаться в другой день. Исключения могут быть, если мне нужно пожертвовать юнитом, чтобы выиграть время или связать вражеский юнит, или я нахожусь в ситуации «сделай или умри», например, защищая свою крепость, или если это юнит, который я мало о чем заботятся и могут легко заменить, как обычный фехтовальщик или копьеносец. Во-вторых, это означает, что вы должны пытаться использовать юниты с такими способностями, как «Первый удар», «Метательное оружие» или «Дыхательное оружие», как можно чаще в атаке, а не позволять их атаковать.
В качестве примера того, как все это происходит, рассмотрим следующий сценарий: вы сталкиваетесь с двумя вражескими юнитами, один в полной силе, а другой с 25% здоровья. У вас есть один юнит, который может поразить этих юнитов примерно на 75% их здоровья. Какой вражеский юнит вы атакуете первым? В большинстве игр вы сначала наносили удар по ослабленному юниту; в Master of Magic часто лучше сначала поразить отряд с полной силой! Вы получите больше урона, если вас ударит один враг с полной силой, чем два врага с 25% каждый.
- Прямой урон всегда забавен, но иногда не самый лучший использовать свои очки магии в бою.&Обычное заклинание природы «Паутина» может обездвижить чрезвычайно опасных вражеских юнитов за небольшую плату и сделать вражеские летуны уязвимыми для ваших ходячих юнитов ближнего боя. Замешательство, распространенное заклинание Волшебства, также может вывести опасный вражеский отряд из игры или, что еще лучше, заставить вражеские отряды драться между собой. Своевременное лечение может вернуть опасному отряду, потерявшему много фигур из-за истощения, его первоначальную опасность.
- Жертвенные отряды могут переломить ход битвы, а сделать раннее исследование намного более прибыльным.&У Природы есть Элементали Земли, у Хаоса есть Элементали Огня, у Волшебства есть Элементали Воздуха, Призрачные Звери и замечательные Призрачные Воины. В частности, Phantom Warriors — настоящая жемчужина. Они умирают от сильного ветра, но обычно наносят большой урон при попадании, так как их урон от иллюзий игнорирует вражескую броню. Объедините это с пунктом 3 выше, и вы увидите, насколько это полезно – представьте себе вражеского фехтовальщика против одного из ваших копейщиков. Обычно вы проигрываете, но если вы смягчите мечников атакой призрачных воинов, ваши копейщики с полным здоровьем, скорее всего, выиграют у мечника, которому не хватает нескольких фигур. Их также можно использовать в качестве приманки, чтобы заставить один или несколько вражеских юнитов преследовать их, чтобы отобрать тепло у других юнитов – хотя герои с артефактами, которые дают бонусы к движению, часто выполняют эту роль даже лучше!Это также позволяет вам проводить разведку на карте небольшими силами, имея возможность усилить свой разведывательный отряд во время битвы.
< /ul>
Стратегия мирового уровня
- От этого никуда не деться – игра начинается медленно, почти каждый раз. Используйте это время для разведки!&Вы знаете несколько простых заклинаний, у вас мало производственных мощностей и мизерный бюджет маны. Тем не менее, все еще стоит потратить время на разведку. Как указано в учебнике, Волшебные духи весьма полезны для этой задачи. Кавалерия находится не слишком далеко в дереве производства, обычно может побеждать в боях 1 на 1 против защитников нейтральных городов, не слишком дорога и является хорошим разведчиком второго уровня и атакующим для слабо защищенных целей. Помните, что вы можете исследовать узел, чтобы увидеть, что там находится, не вступая в бой, поэтому вы можете найти логова и узлы для атаки, города для завоевания, хорошие места для ваших собственных будущих городов и, конечно же, другие бредовые выскочки, изобретатели дешевых трюков, с которыми вы делите эти миры.Однако не пренебрегайте защитой своих городов – Я рекомендую как минимум две единицы на город, и я рекомендую поддерживать их в актуальном состоянии. Ничто так не обидно, как потеря города, который может производить юниты конечного уровня, потому что вы защищали его всего парой копейщиков!
- Подумайте, чем вы хотите обменять других волшебников.&Я бы порекомендовал никогда не обмениваться заклинаниями прямого урона, например, если нет абсолютно никакой вероятности, что они могут быть использованы против вас– например, Life’s Star Fires, который наносит вред только нежити. Повестка, вероятно, в порядке, если это повестка, которая не испортит полностью ваш день, если она будет направлена против вас. Свободно обменивайтесь любыми заклинаниями из школы Арканов, так как вы не даете своему противнику ничего, что он все равно не мог бы получить. ИИ, кажется, ЛЮБИТ призывать существ и чемпионов, и пока он это делает, он не тратит ману на более немедленные разрушительные действия.
- Не поддавайтесь желанию чрезмерно строить города.&Подумайте, какую роль играет каждый город, и учитывайте это. Например, если у вас есть два города полуросликов, один рядом с углем и мифрилом, а другой без этих ресурсов, имеет смысл сделать город с особыми ресурсами фабрикой солдат, а не строить многие из более поздних зданий, ориентированных на солдат в второй город – пусть они занимаются сельским хозяйством. Точно так же, если создание гильдии кораблестроителей не открывает для вас ничего полезного, нет необходимости строить ее для полноты картины. сакэ. Точно так же, если у вас нет проблем с беспорядками, подумайте о том, чтобы пропустить оракула. Если вы можете полагаться в основном на узлы как на источник энергии, соборы также можно пропустить.
Введение в продвинутые махинации
- Думайте нестандартно!&Иногда сочетание способностей неочевидными способами или на определенных юнитах может дать занимательные и полезные результаты. Например, рассмотрите следующие идеи о том, как обойти ограничения юнитов нежити. Нежить, оба призванных существа, которые по своей природе являются Нежитью или стали Нежитью, будучи убитыми Гулями или Похищением Жизни, или пораженными Черными Каналами, не лечат. Всегда. Это может резко ограничить их полезность, что обидно, так как они могут быть довольно мощными и иметь много природных иммунитетов. Однако *есть* способ обойти это!Регенерация может лечить даже нежить. Чтобы получить доступ к этому, либо базовый юнит должен быть троллем, либо вам нужно применить к юниту редкое природное заклинание Регенерация, либо, если юнит является героем, он должен быть экипирован предметом, обеспечивающим регенерацию. .
В спойлере ниже есть более экстремальный гамбит. Подумайте, хотите ли вы знать эту информацию или нет – это широко известно, и широко известно, что оно превосходит все остальные.
Летающие невидимые боевые корабли. Боевые корабли имеют мощную дальнобойную атаку и практически неограниченный боезапас. Будучи кораблями, они ограничены морем. если только вы не дадите им заклинание Полет из Волшебства! Теперь они могут бродить по земле и взрывать вещи! Добавляйте к этому невидимость, и большинство вражеских юнитов теперь не могут даже атаковать их дальнобойными атаками или заклинаниями. Некоторые из этих юнитов могут легко подчинить себе почти любое нейтральное логово или узел в игре, за исключением тех, в которых могут быть юниты, способные видеть сквозь вашу невидимость. Ваши соперничающие волшебники также могут иметь некоторое мнение об этой тактике, особенно если они знают Рассеивание магии.
В новой части руководства по этой великой игре вы не найдёте красочных скриншотов, зато получите представление о всех имеющихся в Master of Magic постройках и о тех расах, которые смогут стать нашими подданными — и врагами. Говорят, что врага надо знать в лицо, но хороший владыка должен и свой народ изучить досконально.
Местные расы различаются очень многим, но первое и самое кардинальное отличие между ними — список доступных построек. Для того, чтобы понять всю его важность, разберёмся — что же вообще можно построить.
Здания
|
Название |
Стоимость в продукции |
Содержание |
Открывает доступ к постройке |
Описание |
|
Alchemist’s Guild (Гильдия алхимиков) |
250 |
3 |
Wizard’s Guild |
Снабжает все войска, производимые в этом городе магическим оружием. Если рядом с городом есть месторождения мифрила или адамантия, то мифриловым или адамантиевым соответственно. Без постройки этого здания ваши войска будут иметь мало шансов в бою с тварями, неуязвимыми для обычного оружия. Ну и в качестве приятного бонуса Alchemist’s Guild даёт по 3 маны каждый ход |
|
Animist’s Guild (Гильдия зоологов) |
300 |
5 |
Fantastic Stables |
Это здание увеличивает производимое каждым фермером количество еды на 1, успокаивает одну тысячу бунтовщиков, а также вдвое ускоряет восстановление расквартированных в городе войск |
|
Armorer’s Guild (Гильдия бронников) |
350 |
4 |
War Coolege, Fantastic Stables |
Открывает доступ к некоторым продвинутым войскам и повышает опытность воинов, производимых в городе |
|
Armory (Оружейная) |
80 |
2 |
Fighter’s Guild. Maritime Guild |
Позволяет строить Halberdiers (алебардщиков), а также некоторые другие продвинутые войска |
|
Bank (Банк) |
250 |
3 |
Merchant’s Guild |
В полтора раза увеличивает сумму денег, выплачиваемую городом в казну |
|
Barracks (Казармы) |
30 |
0 |
Armory |
Открывает доступ к простейшим войскам типа Swordmans (мечников) |
|
Builder’s Hall (Строительный цех) |
60 |
1 |
Library, Shrine, Granary, Miners Guild, City Walls |
Базовое здание, необходимое для дальнейшей застройки города |
|
Cathedral (Собор) |
800 |
4 |
Крупнейшее из культовых сооружений в нашу честь. Даёт 4 единицы маны и успокаивает тысячу бунтовщиков |
|
|
City Walls (Городские стены) |
150 |
2 |
Высокие каменные стены вокруг города позволяют страже засекать вражеские отряды в радиусе трёх клеток от города и служат неплохой защитой. Во время штурма враги, которые не умеют стрелять, летать или проходить сквозь стены, вынуждены атаковать гарнизон только через городские ворота или через пролом в стене — если сумеют его сделать |
|
|
Fantastic Stables (Стойла для волшебных зверей) |
600 |
6 |
В этих «конюшнях» содержат отнюдь не безобидных лошадок — нет, места в них забронированы для боевых чудовищ. Обычно это здание открывает доступ к самым дорогим и могучим боевым единицам этой расы. Однако далеко не всегда местные обитатели оказываются наиболее эффективным боевым подразделением. |
|
|
Farmers Market (Фермерский рынок) |
100 |
2 |
Здесь местные фермеры торгуют тем, что вырастили у себя на грядках (при попытке представить престарелого клакона, с добродушным выражением жвал нахваливающего свежие огурцы, моё воображение дало сбой). А если без лирики, то это строение даёт 2 дополнительные единицы еды и ускоряет прирост населения на 30 существ в ход |
|
|
Fighter’s Guild (Гильдия бойцов) |
200 |
3 |
Armorer’s Guild |
Здесь войска тренируют бить морды более живописно и эффективно. Как следствие, все подразделения, производимые в городе, получают уровень опыта Regular |
|
Forester’s Guild (Гильдия лесников) |
200 |
2 |
Здесь тренируют охотников и следопытов. Здание даёт 2 еды в каждый ход и увеличивает производство продукции на четверть. Для постройки Forester’s Guild рядом с городом должен быть лес |
|
|
Granary (Амбар) |
40 |
1 |
Farmer’s Market |
Здесь хранятся избытки продовольствия. Прибавляет 2 единицы еды каждый ход и ускоряет прирост населения на 20 жителей |
|
Housing (Строительство домов) |
Особая программа «Каждой молодой семье по личной норе». Вся продукция города идёт на постройку новых домов, что неимоверно радует местных жителей и они начинают плодиться с бешеной скоростью |
|||
|
Library (Библиотека) |
60 |
1 |
Sage’s Guild |
Даёт 2 очка на магические исследования |
|
Maritime Guild (Гильдия мореплавателей) |
400 |
4 |
Это здание позволяет строить большие корабли типа Warship’ов |
|
|
Marketplace (Рынок) |
100 |
1 |
Bank, Farmer’s Market |
Приносит дополнительно 50% от суммы налога, установленной для города |
|
Mechanican’s Guild (Гильдия механиков) |
600 |
5 |
Специалисты-механики из этой гильдии обучают рабочих наиболее продвинутым строительным технологиям. Это увеличивает производство продукции в полтора раза. Также эта гильдия открывает доступ к постройке боевых машин |
|
|
Merchant’s Guild (Гильдия торговцев) |
600 |
5 |
Эта постройка увеличивает приток золота от города ровно в два раза. |
|
|
Miner’s Guild (Гильдия шахтёров) |
300 |
3 |
Mechanican’s Guild |
Этот профсоюз в полтора раза увеличивает объём производимой в городе продукции и выгоду от принадлежащих городу полезных ископаемых. Для постройки гильдии шахтёров рядом с городом должен быть хотя бы холм |
|
Oracle (Оракул) |
500 |
4 |
Местные оракулы по эффективности значительно превосходят своего дельфийского коллегу — они гарантированно засекают врага в радиусе четырёх клеток вокруг города и успокаивают аж 2 тысячи недовольных |
|
|
Parthenon (Парфенон) |
400 |
3 |
Oracle. Cathedral |
Здесь жителей обучают правильно молиться нам, великим. Даёт 3 маны и уменьшает количество бунтовщиков на тысячу |
|
Sage’s Guild (Гильдия мудрецов) |
120 |
2 |
Alchemist’s Guild, University |
Здесь смертные мудрецы вгрызаются в гранит магической науки, даруя нам 3 очка на разработку новых заклинаний |
|
Sawmill (Лесопилка) |
100 |
2 |
Ship Yard, Forester’s Guild |
В этом здании высококачественный лес перерабатывают в высококачественные брёвна и не менее высококачественные стрелы. Позволяет строить лучников, а также повышает производительность квадратов с лесом на 25% |
|
Ship Wrights Guild (Гильдия кораблестроителей) |
100 |
1 |
Здесь можно строить самые мелкие лодки |
|
|
Ship Yard (Верфь) |
200 |
2 |
Maritime Guild, Ship Wrights Guild |
После постройки этого здания в городе можно производить суда среднего размера |
|
Shrine (Часовня) |
100 |
1 |
Temple |
Простейшее культовое сооружение, дающее 1 единицу маны и успокаивающее тысячу бунтовщиков |
|
Smithy (Кузница) |
40 |
1 |
Armory, Stables, Marketplace |
Кузница открывает доступ к более качественному оружию (грубо говоря, от кулаков и палок к мечам и копьям) |
|
Stables (Конюшня) |
80 |
2 |
Animist’s Guild (Гильдия зоологов) |
Здесь тренируются отряды всадников — на чем бы они там ни скакали у этой расы |
|
Temple (Храм) |
200 |
2 |
Animist’s Guild, Parthenon |
В этом культовом сооружении прошедшие первичное обучение клирики постигают основы вознесения более сложных молитв нам. Даёт 2 маны и успокаивает одну тысячу недовольных |
|
Trade Goods (Торговля товарами) |
Программа, милая сердцу любого скряги — жители начинают клепать всякие там бусы и прочие сковородки на продажу, преобразуя 2 единицы продукции в один золотой. |
|||
|
University (Университет) |
300 |
2 |
War College, Wizard’s Guild, Oracle, Bank, Mechanican’s Guild |
Здесь смертные постигают глубины естественных наук, заодно помогая нам исследовать магию. Даёт 5 очков на разработку заклинаний |
|
War College (Военное училище) |
500 |
5 |
Заведение по обучению войск самым продвинутым военным доктринам, тактике и стратегии. Все новые отряды, произведённые в этом городе, сразу становятся ветеранами |
|
|
Wizard’s Guild (Гильдия волшебников) |
1000 |
5 |
Крупнейший центр изучения волшебства. Смертные упорно пытаются достичь хотя бы бледной тени нашего величия. Мы их за это почти уважаем. Почти. Однако их потуги не совсем бесполезны — гильдия волшебников даёт 8 очков на разработку новых заклинаний и генерирует 3 единицы маны. Плюс, после её постройки в городе становятся доступны самые могучие магические войска этой расы |
Расы
Расы Master of Magic можно разделить на те, что обитают на солнечном Аркане, и те, что живут в мрачном, пропитанном магией Мирране. Мирранские несколько интереснее арканских, но предпочтение кому-то отдать сложно — у всех есть свои отличительные черты, особые возможности и необычные бонусы. Для начала опишу стандартные войска, которые есть почти у всех рас.
Spearmen (копейщики) и Swordsmen (мечники) — начальные войска, не требующие для своей постройки ничего кроме Barracks и Smithy. Обычно ходят отрядами по 8 человек. Мечники посильнее копейщиков и благодаря большим щитам лучше защищены от стрел, зато копейщики не требуют для своего содержания ничего, кроме еды.
Shamans (шаманы) и Priests (cвященники), доступные после постройки или Shrine, или Parthenon соответственно, умеют слабенько стрелять магией, а также лечить войска вне боя и очищать территорию, поражённую магическим загрязнением — Corruption. Жрецы сильнее в бою и владеют заклинанием Heal, позволяющим раз за битву подлечить союзный отряд, зато шаманы дешевле и намного раньше доступны.
Halberdiers (алебардщики) — это тяжёлая пехота, неплохо защищённая и живучая. Заметно превосходит по своим боевым параметрам мечников, но стоит дороже и требует для своего производства построить Armory. Отлично подходит для защиты городов от случайных грабителей и слабых монстров.
Bowmen (лучники) — простейший стреляющий отряд, позволяющий уничтожать врага не вступая в ближний бой, но против сколько-нибудь сильных противников бесполезен. Доступен после постройки Sawmill.
Cavalry (кавалерия) — по совокупности параметров примерно равны алебардщикам, но перемещаются быстрее и обладают бонусом First Strike (всегда бьют первыми). Требуют постройки Stables.
Catapult (катапульта) — эти детища осадных инженеров из Mechanican’s Guild далеко и очень больно метают камни и могут рушить стены, но излишком меткости не страдают и совершенно беззащитны в ближнем бою.
Trireme (трирема), Galley (галлеон), Warship (боевой корабль) — корабли в основном используются для перевозки неспособных плавать войск через водные преграды. Однако Warship, который строить могут далеко не все расы, является очень мощной боевой единицей и прекрасно подходит для завоевания превосходства на море. А также он служит основой для одной очень хитрой тактики, которая будет описана в будущем.
Magician (волшебники) — эти результаты жалких попыток смертных достичь нашего могущества, тем не менее, весьма полезны благодаря довольно сильной магической атаке и умению раз за бой швырнуть во врага огненный шар.
А теперь перейду непосредственно к описанию рас. Надо отметить, что у большинства рас фермеры производят за ход 2 единицы еды 1/2 единицы продукции, а рабочие — 2 единицы продукции. Но так не у всех, поэтому в описании рас будут указаны отличия от стандарта.
Расы Аркана
Barbarians (Варвары)
Прирост населения ускорен на 20 человек за ход. Варвары не могут строить гильдию зоологов, собор и университет. Все войска этой расы умеют бросать во врага топоры в рукопашной, здорово прореживая его ряды перед собственно рубкой. Уникальный отряд варваров, берсерки, заменяет собой алебардщиков, намного превосходя их по боевым качествам. Благодаря умению бросать топоры и тому, что берсерков шестеров в отряде, они могут охотиться даже на летающих монстров — сами не достанут, так топориками сшибут.
Gnolls (Гнолли)
Плодятся несколько медленнее стандарта (на 10 человек… ээ, гноллей в ход). Не умеют строить парфеноны, библиотеки и гильдии зоологов. За счёт своей технологической отсталости не слишком удобны в поздней игре, однако для ранней военной экспансии великолепны — их бойцы намного сильнее аналогов у большинства остальных рас (для примера — копещики гноллей имеют силу 3, а копейщики людей — всего 1). Их особый отряд, Wolf Riders (волчьи всадники), производится в Stables и является великолепной ранней кавалерией, логично развивающим идею быстрой военной экспансии.
Halflings (Хоббиты или полурослики)
Они не могут строить конюшни, гильдии бронников и университеты. Фермеры хоббитов производят целых 3 еды и 1/2 продукции, благодаря чему с едой у этой расы проблем нет никогда. Все их войска на редкость удачливы, что выражается в повышенной защите от магии и точности ударов. Их уникальный боец, Slingers (пращники), являются одними из лучших стрелков в игре — их 8 в отряде и они очень больно кидаются камнями, которые в отличие от стрел пробивают защиту от выстрелов. Ну а удачливость позволяет им кидаться этими камешками ещё и весьма метко. Вообще, хоббиты на редкость мощная и развитая раса.
High Elfs (Высшие эльфы)
Высшие эльфы генерируют по 1/2 единицы маны с каждой тысячи жителей. Не могут строить парфеноны и гильдии моряков. Все войска эльфов ходят по лесу с той же скоростью, что и по равнине, а также эта раса имеет целых три уникальных отряда. Longbowen (лучники с длинным луком) заменяют обычных лучников — так же требуют постройки Sawmill, но при этом сильнее ровно втрое. Elven Lords (Эльфийские владыки) тренируются в Armorers Guild и представляют собой великолепную кавалерию, по всем параметрам превосходящую стандартную — быструю, сильную, живучую, бегающую по лесу аки по равнине, да ещё и впридачу к первому удару имеющую бонус Armor Piercing, позволяющий им игнорировать половину вражеской брони. Ну а Pegasai (Наездники на пегасах), выращиваемые в Fantastic Stables, служат прекрасными разведчиками за счёт летучести способности видеть всё вокруг на две клетки (обычные войска видят только на одну). Правда, бойцы они хилые.
High Men (Высшие люди)
Люди могут строить почти всё, кроме стойла для волшебных зверей. У них есть два уникальных отряда. Pikemen (Пикинёры) заменяют алебардщиков, но доступны позже — после постройки Fighter’s Guild, зато имеют два особых бонуса, Negate First Strike (парировать первый удар) и Armor Piercing (Пробой брони). И если первый не слишком-то полезен — первый удар не особо распространён в войсках, то пробой брони делает пикинёров весьма опасными противниками в ближнем бою. Но второй особый отряд людей, Paladins (паладины), представляют собой нечто совершенно особенное — не столько благодаря прекрасным параметрам, сколько из-за редчайшего бонуса Magic Immunity (иммунитет к магии), делающей их практически неуязвимыми к заклинаниям и магическим атакам типа огненного дыхания и молний. В результаты паладины становятся настоящими убийцами магов и монстров, сила которых заключается в их особых атаках. Ну и как приятный бонус — волшебники людей сильнее своих коллег из других народов за счёт того, что их больше в отрядах. Вообще, высшие люди — одна из сильнейших рас в игре, умеющая строить почти всё и имеющая великолепные войска.
Klackons (Клаконы)
Эти инсектоиды не слишком быстро размножаются (прирост на 10 меньше), зато, если они ваша основная раса, то бунтарей у них будет меньше на две тысячи. То ест в другом случае при прочих равных условиях в городах клаконов было бы уже по 2 тысячи восставших, а так — ни одного. Ну что тут скажешь — разум улья, как он есть. Плюс, их рабочие производят целых 3 единицы продукции. Но клаконы не могут строить гильдии мудрецов, верфи и храмы, что резко сужает возможности для развития. К счастью для инсектоидов, их войска намного лучше защищены, чем аналоги у других рас, а уникальный боец — Stag Beetle (огромный жук), доступный после постройки Armorer’s Guild — очень хорошо бронирован, отлично дерётся, да ещё и огнём очень неслабо дышит. Всё это ясно говорит о том, что наиболее логичный путь для клаконов — ранняя военная экспансия и завоевание более развитых рас.
Lizardmen (люди-ящеры)
Ещё одна раса, нацеленная на раннюю войну. Люди-ящеры не могут строить гильдии зоологов, парфеноны, гильдии мудрецов и гильдии корабелов , зато на 10 человек в ход быстрее растут и все поголовно умеют плавать. Благодаря этому они способны быстро захватить и заселить большие территории, пока противники будут развивать свои города, чтобы построить корабли. Плюс, у людей-ящеров есть два отличных уникальных отряда. Javelineers (метатели дротиков), доступные после постройки Fighter’s Guild, представляют собой прекрасных стрелков, как и все остальные войска умеющих плавать и к тому же неплохо дерущихся в ближнем бою. Ну а вершиной военной мощи lizardmen’ов является Dragon Turtle (драконья черепаха), тренируемая в Armorers Guild, прекрасно защищеная, очень сильная и выдыхающая огонь. В целом получилась мощная раса, ориентированная на мобильную войну и лучше всего чувствующая себя на картах с обилием водных поверхностей.
Nomads (кочевники)
Как ни странно, весьма цивилизованы — не могут строить только гильдии моряков и гильдии волшебников. Прирост уменьшен на 10 человек в ход. Их уникальные войска получились довольно странными. Horsebowmen (конные лучники), тренируемые в конюшнях, быстры, но малочисленны и слабовато стреляют. Rangers (следопыты), питомцы гильдии зоологов, хорошо стреляют и передвигаются что по горам, что по лесам как по равнине, но при этом опять же слишком малочисленны — всего четверо в отряде. Единственным по-настоящему мощным отрядом можно назвать Griffins (всадников на грифонах), поселившихся в Fantastic Stables — они быстро летают и очень больно бьют в рукопашной за счёт первого удара и пробоя брони, но слабовато защищены, что порой приводит к слишком тяжёлым потерям.
Orcs (орки)
Орки просто и со вкусом умеют строить всё. Других выдающихся качеств у них нет. Единственный уникальный отряд, Wyvern Riders (наездники на вивернах), доступный после постройки Fantastic Stables, быстро летает и травит врагов ядом, но сам по себе слабоват — и бьёт не слишком сильно, и защита подкачала.
Расы Миррана
Beastmen (зверолюди)
Зверолюди генерируют по 1/2 единицы маны с тысячи населения и не могут строить стойла для волшебных зверей, верфи и военные училища. Все их войска несколько сильнее стандарта и лучше защищены, а также гораздо живучее, но при этом дороже и в одном отряде меньше бойцов. Из трёх уникальных войск упоминания достойны только Minotaurs (минотавры) — они очень живучи, отлично дерутся в рукопашной и несут большие щиты, надёжно прикрывающие их от стрел, но слишком уж медлительны. Centaurs (кентавры) и Manticores (мантикоры) слишком слабы, особенно подкачала защита от магических атак.
Dark Elf (тёмные эльфы)
Самая странная раса — даже для Миррана. Они генерируют по 1 единице маны с каждой тысячи жителей, но рост населения сильно замедлен — на 20 эльфов в ход. Все обычные войска тёмных эльфов умеют стрелять магией в бою и имеют повышенную защиту от магии, но при этом дороже аналогов примерно вдвое. У них есть целых три особых отряда, каждый из которых в чём-то уникален. Nightblades (клинки ночи), тренируемые в Fighters Guild — единственный доступный для постройки невидимый отряд. Это даёт им множество преимуществ — враг не видит их на карте, в бою по ним нельзя стрелять и бить магией (кроме как действующей на всех врагов разом), и даже в рукопашной в них очень сложно попасть. А ведь клинки ночи ещё и травят своей атакой… Nightmares (ночные кошмары) — эти милые огненнокрылые лошадки, поселившиеся в Fantastic stables, очень быстро летают и умеют стрелять во врага магией, да ещё и видят на две клетки вокруг себя. Ну а выпускники Wizards Guild Warlocks (чернокнижники) заменяют тёмным эльфам волшебников, будучи намного могущественнее. И дело даже не в усиленной магической атаке. Вместо доступного волшебникам огненного шара чернокнижники раз за бой могут метнуть во врага мощнейшее заклятие Doom Bolt (стрела рока), от которого вообще нет защиты — оно пробивает даже иммунитет к магии! В общем, тёмные эльфы — одна из интереснейших рас в игре, но их ненавидят все остальные народы, и удержать захваченные города в повиновении может оказаться нелегко.
Draconian (дракониды)
Ещё одна очень интересная раса. Все войска драконидов летают и выдыхают огонь, что является огромным преимуществом перед остальными народами — ведь летающие воины могут атаковать пехоту, а та их — нет. За такие возможности приходится расплачиваться — войска дракоиндов вдвое дороже своих аналогов, их города растут медленнее на 20 драконят в ход, а также они не умеют строить стойла для волшебных зверей, гильдии моряков и гильдии механиков. У драконидов есть два весьма интересных особых отряда. Первый, Doom Drakes (драконы рока) , доступен после постройки Stables и представляет собой основную ударную силу армии драконидов за счёт высокой скорости, отличных показателей атаки и защиты, а также мощного огненного дыхания. А на Ship Yard можно ещё и Air Ship (воздушный корабль) построить, который летает с огромной скоростью и несёт на своём борту мощную катапульту.
Dwarven (гномы)
Растут на 20 гномиков за ход медленнее стандарта. Этот народец удваивает получаемую с полезных ископаемых продукцию и налоговые выплаты с городов, благодаря чему у гномьего владыки никогда не возникнет проблем с наличностью. К тому же их рабочие производят целых 3 единицы продукции. А вот набор доступных зданий подкачал — гномы не могут строить парфеноны, верфи, конюшни и университеты. Гномьи армии малочисленны, зато живучи. Но их главной ударной мощью являются прекрасные особые отряды. Hammerhands (молоторукие) тренируются в Fighter’s Guild и по характеристикам очень хороши. Их много в отряде, они сильны, живучи и отлично защищены. В качестве тяжёлого танка прорыва в гномьей армии выступает Golem (голем), защищённый от ядов и магии смерти, жутко сильный и великолепно бронированный. Ну а издалека этих рукопашников поддерживает огнём Steam Cannon (паровая пушка), метающая во врагов камни с силой и точностью, которая и не снилась примитивным катапультам других народов.
Trolls (тролли)
Эти монстры не только размножаются на 20 троллят в ход медленнее стандарта, так ещё и не могут строить кучу важных зданий — стойла для волшебных зверей, гильдии шахтёров, гильдии мудрецов и верфи. Однако вё это искупается тем, что их рабочие производят по 3 единицы продукции, а также великолепными армиями. Каждый солдат троллей очень силён и прекрасно защищён. И пусть их в отряде вдвое меньше, чем у большинства рас, зато каждый из бойцов вчетверо крепче. И, что самое главное, почти все войска троллей умеют регенерировать — это позволяет им прямо в бою залечивать свои раны и даже воскрешать убитых бойцов, если отряд не полностью уничтожен! Этот бонус невозможно переоценить. В боевом отношении с троллями мало кто может сравниться. А уж их уникальный отряд War Trolls (боевые тролли) является одним из претендентов на звание лучшего немагического рукопашника игры. Самое смешное, что самый дорогой отряд у троллей — War Mammonts (боевые мамонты) регенерировать не умеет и из-за этого не идёт ни в какое сравнение с боевыми троллями.
Теперь вы знаете всё о том, что из себя представляют ваши подданные и враги. Надеюсь, это знание поможет вам в нелёгком, но безумно интересном пути к званию истинного Владыки Магии и повелителя всего сущего на Мирране и Аркане.

Добро пожаловать в Master of Magic — Вики-руководство + информация о юнитах и руководство по стратегии.
Эти предложения исходят от опытного игрока в Master of Magic. Это руководство включает в себя базовый игровой процесс и пошаговое руководство.
Введение
Оригинальный Мастер Магии вышел 28 лет назад. Это произошло всего через несколько дней после переиздания Master of Magic в декабре 2022 года. Это была игра, которая мне очень нравилась в то время и до сих пор нравится играть 28 лет спустя. Почему? Из-за — и это то, чего не смогли понять многие более поздние подражатели! — Невероятная глубина игры. Это было удивительно в свое время и остается сегодня. Мастера магии любят и прославляют уже почти три десятилетия. Многие другие замечательные игры того времени потеряли репутацию. Более 200 заклинаний, 5 магических школ, 18 реторт и десятки существ. Также есть 14 рас, по дюжине юнитов в каждой. Есть 50+ способностей. Это дает вам много возможностей достичь Мастера Магии.
Одно прохождение может в значительной степени зависеть от особых способностей расы и ее юнитов и их комбинации с одной или несколькими школами магии для создания «убойных стеков», которые представляют собой усиленные обычные юниты. Другой может не считать расу серьезной проблемой и стремиться доминировать, используя призыв из выбранной школы (или) магии и баффы, которые предоставляет школа / школы. Другой может стремиться доминировать на поле боя с помощью доступных боевых заклинаний. Ваши юниты — не единственное, что приведет вас на передовую. Другой стратегией может быть создание команды могущественных героев и поддержка их мощными артефактами. Любая комбинация любой из вышеперечисленных стратегий может привести к различным стратегиям. Это игра, в которой нет «оптимального» билда. Есть много путей к абсолютной власти.
Не говоря уже об этом вступительном слове, вот 10 советов для новых игроков в Master of Magic.
(Совет 1: Начните с
- Если вы новичок и хотите сыграть в свою первую игру, не читая слишком много, выберите Высокие мужчины, Полурослики или Полурослики для вашей расы. Далее выберите Божественная сила + 10 жизней книги или 10 Природа + Мастерство Природы или 22, A27388525A. Тогда выбирай 10 Природа + Мастерство Природы, 10 Природа + Мастерство Природы или 10 Природа + Мастерство Природы для вашего последнего выбора. Это будет зависеть от того, хотите ли вы использовать больше заклинаний, разыграть больше заклинаний или использовать призыв для разыгрывания персонажа.
Вот причины такого выбора. Высшие люди имеют полное дерево сборки с паладинами в конце. Полурослики имеют по 3 еды на фермера в начале их более короткого дерева сборки, а отличные пращники ближе к концу. Они не вызывают особых волнений среди побежденных рас, особенно халфлинги, которые наименее склонны к беспокойству из всех рас. В жизни есть множество заклинаний, увеличивающих отряды, и заклинаний, улучшающих города. В Торине Избранном есть даже Герой. У природы есть хорошие баффы, несколько полезных полезных заклинаний (привет, Знания Земли!), и несколько очень сильных призывов. Хаос — король магии прямого урона. У него есть несколько интересных баффов юнитов и несколько странных, но мощных призывов.
Единицы (Советы 2, 3, 4 и 5 –
- Способности юнитов имеют значение. Вы должны потратить время, чтобы изучить возможности своих юнитов, подумать о том, как их можно использовать, а затем посмотреть на своих врагов, их способности и любые слабости, которые вы можете использовать. У упомянутых выше паладинов есть первый удар. Именно это делает их такими опасными. Они могут убивать юнитов до того, как нанесут ответный удар. Обычно нападающий и защитник наносят удар одновременно. Первый удар требует, чтобы Паладины были атакующим юнитом. Не применяется, если на них нападают. Было бы лучше, если бы вы подумали об управлении своими паладинами, чтобы они нападали как можно чаще и чаще.
Кроме того, метательное оружие и атаки дыханием разрешаются до первого удара. Это означает, что паладины, которые должны атаковать драконианцев или варваров с помощью этих способностей, теряют часть эффективности. Хотя Паладины все равно победят, они будут побиты сильнее, чем можно было ожидать.)
- Важнейшим фактором является количество цифр в блоке. Юниты с полным здоровьем и те, у которых осталось 25% здоровья, наносят удар с одинаковой силой. Мастер магии позволяет вам получить 25% атак только в том случае, если у вас осталось на 25% меньше фигурок. Это правило распространяется только на многозначные единицы. Небесный Дрейк с полным здоровьем и его друг Небесный Дрейк, у которого осталось 25% здоровья, бьют одинаково сильно. Это имеет два значения. Во-первых, если многоюнитовая фигурка повреждена или теряет фигурки, она теряет боеспособность.
Я стараюсь, чтобы любой юнит, численность которого падает ниже половины силы, отступал, чтобы он мог жить, набираться опыта и лечиться, а также снова сражаться с другим. Есть исключения из этого правила, например, когда я должен пожертвовать юнитом, чтобы выиграть время или связать вражеский юнит, или если я нахожусь в ситуации «сделай или умри», например, защищая свою крепость. Или если это юнит, который меня не волнует и может легко заменить, например, простой фехтовальщик/копейщик. Это также означает, что вы должны использовать юниты с такими способностями, как «Первый удар», «Метательное оружие» или «Дыхательное оружие», чаще, чем вы позволите их атаковать.
Рассмотрим следующий сценарий, чтобы проиллюстрировать, как все это работает: вы сталкиваетесь с двумя вражескими отрядами в полную силу, один с 25% и один с 25%. Один юнит может атаковать этих юнитов примерно на 75% от их здоровья. Какую вражескую единицу вы должны атаковать в первую очередь? В большинстве игр вы будете сначала поражать самого слабого юнита. Мастер магии с большей вероятностью поразит отряд в полную силу. Один враг в полную силу нанесет больше урона, чем два на 25%.
- Прямой урон может быть забавным, но это не всегда лучшее использование ваших очков магии в бою. Заклинание Common Nature Web может обездвижить чрезвычайно опасных вражеских юнитов с небольшими затратами и может сделать вражеских летунов неудержимыми вашими ходячими юнитами ближнего боя. Замешательство, обычное заклинание Колдовства, также может вывести из игры опасные вражеские отряды или даже заставить их драться друг с другом. Своевременное лечение может вернуть опасному отряду, пострадавшему от истощения и многим из его первоначальных опасностей, его первоначальную опасность.
- Жертвенные юниты — отличный способ переломить ход войны и сделать ранние исследования более прибыльными. Призрачные воины — особая жемчужина. Они могут погибнуть от сильного ветра, но при попадании наносят гораздо больший урон. Их урон от иллюзий игнорирует броню вражеских врагов. Это в сочетании с 3 — выше, и вы можете понять, почему это так полезно. Представьте себе вражеского фехтовальщика, стоящего лицом к лицу с одним из ваших копейщиков. Обычно вы проигрываете, но если вы смягчите мечников атакой фантомных бойцов, ваши мечники с полным здоровьем, скорее всего, выиграют у мечника, которому не хватает нескольких фигур. Они также могут заманивать юнитов в погоню, отбирая тепло у остальных юнитов. Герои с бонусами к движению часто лучше справляются с этой ролью.
Это позволяет вам наносить на карту разведчиков с небольшими силами и может использоваться для усиления вашей разведывательной группы в бою.
Стратегия мирового уровня (Советы 6, 7, 8 –
- Игра начинается медленно каждый раз. Это время для разведки. Вы знаете только несколько заклинаний и имеете небольшой запас маны. Это стоит вашего времени, чтобы осмотреться. Волшебные духи могут быть очень полезны в этой задаче, как показывает туториал. Кавалерия находится не слишком далеко в дереве производства и часто может побеждать в битвах 1 на 1 против обороны нейтральных городов. Он недорогой и является хорошим разведчиком второго уровня или атакующим для слабозащищенных целей. Вы можете осмотреть узел, не вступая в бой, чтобы узнать, что это такое. Это позволяет вам находить логова и узлы, которые вы можете атаковать, города для завоевания и хорошие места для будущих городов.
Однако не забывайте защищать свои города. Я рекомендую, по крайней мере, две единицы на город и поддерживать их в актуальном состоянии. Трудно потерять город, который может производить юниты высокого уровня, только потому, что у вас было всего два копейщика для его защиты.
- Подумайте о вещах, которыми вы хотели бы торговать с другими волшебниками. Например, Life’s Star Fires вредит только нежити. Вызов — это хорошо, если это не призыв, который полностью испортит вам день, если будет использован против вас. Вы можете торговать любыми заклинаниями из школы Арканов без ограничений, так как вы не даете своему противнику ничего, чего он не мог бы получить в противном случае. ИИ, кажется, ЛЮБИТ призывать существ и чемпионов, и пока он это делает, он не тратит ману на более разрушительные вещи.
- Не позволяйте вашему городу стать свалкой для большего. Учитывайте роль каждого города и соответствующим образом планируйте строительство. Предположим, у вас есть два города полуросликов, один рядом с углем, а другой без этих ресурсов. В этом случае более разумно сделать первый город заводом по производству солдат, а второй город оставить с большим количеством зданий, ориентированных на солдат. Пусть возвращаются к сельскому хозяйству. Если создание гильдии кораблестроителей не открывает для вас каких-либо полезных преимуществ, нет необходимости делать это для полноты картины. Если у вас нет проблем с беспорядками, пропустите оракула. Соборы также можно пропустить, если вы полагаетесь на узлы для своей силы.
Введение в продвинутые махинации (совет 9)
- Мыслите нестандартно! Сочетание способностей неожиданным образом или с определенными юнитами может привести к интересным и полезным результатам. Вот несколько идей, как обойти ограничения отряда нежити. Призванные нежити, которые либо являются нежитью, либо стали нежитью в результате удара Черными каналами, убиты гулями или выкачиванием жизни, не исцеляются. Всегда. Это может серьезно ограничить их полезность, и это позор, поскольку они могут быть довольно сильными и иметь много естественных иммунитетов. Есть способ обойти это!
Регенерация может лечить даже нежить. Доступ к этой способности может получить базовый юнит Тролля или Героя.
Спойлер ниже предлагает более экстремальный подход. Неважно, нужна ли вам эта информация, она широко доступна и широко известна как чрезвычайно мощная.
Летающие боевые корабли-невидимки Боевые корабли могут атаковать с большого расстояния и имеют неограниченный боезапас. Это корабли, и их можно использовать только для путешествий по морям, если они не получили заклинание Полет от Волшебства. Теперь они могут бродить по земле и взрывать вещи! Stack Invisibility — это дополнительная функция, которая делает невозможным для вражеских юнитов поражать их заклинаниями или атаками дальнего боя. Эти юниты могут захватить большинство нейтральных логов или узлов в игре. Некоторые юниты могут не видеть сквозь невидимку. Если они знакомы с Dispel Magic, ваши соперники-волшебники могут иметь мнение об этой тактике.
Ссылки и Outro
- Как я упоминал во введении, Master of Magic любят, с ним играют и обсуждают уже почти 30 лет. многие ресурсы могут быть использованы для получения идей, точек зрения или стратегий. Стоит отметить, что MuHa Games и Slitherine усердно работали над повторной реализацией Master of Magic. Вот вики, которая охватывает все.
https://masterofmagic.fandom.com/wiki/Master_of_Magic_Wiki – [fandom.com]
Я надеюсь, вам понравится руководство, которым мы поделились о Master of Magic — руководство Wiki + информация о юнитах и стратегия; если вы думаете, что мы забыли добавить или нам нужно добавить больше информации, сообщите нам об этом в комментариях ниже! До скорой встречи!
- Мастер Магии