-
Драйверы
33
-
Инструкции по эксплуатации
10
Языки:

ASUS MAXIMUS VIII RANGER инструкция по эксплуатации
(200 страниц)
- Языки:Английский
-
Тип:
PDF -
Размер:
23.58 MB -
Описание:
MAXIMUS VIII RANGER User’s manual (English)
Просмотр

ASUS MAXIMUS VIII RANGER инструкция по эксплуатации
(6 страниц)
- Языки:Английский
-
Тип:
PDF -
Размер:
1.26 MB -
Описание:
Win7 Installation guide(English)
Просмотр

ASUS MAXIMUS VIII RANGER инструкция по эксплуатации
(194 страницы)
- Языки:Японский
-
Тип:
PDF -
Размер:
12.84 MB -
Описание:
MAXIMUS VIII RANGER User’s manual (Japanese)
Просмотр

ASUS MAXIMUS VIII RANGER инструкция по эксплуатации
(202 страницы)
- Языки:Китайский
-
Тип:
PDF -
Размер:
15.52 MB -
Описание:
MAXIMUS VIII RANGER User’s manual (Simplified Chinese)
Просмотр

ASUS MAXIMUS VIII RANGER инструкция по эксплуатации
(200 страниц)
- Языки:Китайский
-
Тип:
PDF -
Размер:
15.81 MB -
Описание:
MAXIMUS VIII RANGER User’s manual (Traditional Chinese)
Просмотр

ASUS MAXIMUS VIII RANGER инструкция по эксплуатации
(200 страниц)
- Языки:Французский
-
Тип:
PDF -
Размер:
13.41 MB -
Описание:
MAXIMUS VIII RANGER user’s manual (French)
Просмотр

ASUS MAXIMUS VIII RANGER инструкция по эксплуатации
(200 страниц)
- Языки:Немецкий
-
Тип:
PDF -
Размер:
13.42 MB -
Описание:
MAXIMUS VIII RANGER User’s Manual(German)
Просмотр

ASUS MAXIMUS VIII RANGER инструкция по эксплуатации
(8 страниц)
- Языки:Японский
-
Тип:
PDF -
Размер:
1.67 MB -
Описание:
Win7 Installation guide(Japanese)
Просмотр

ASUS MAXIMUS VIII RANGER инструкция по эксплуатации
(6 страниц)
- Языки:Немецкий
-
Тип:
PDF -
Размер:
509.59 KB -
Описание:
Win7 Installation guide(German)
Просмотр

ASUS MAXIMUS VIII RANGER инструкция по эксплуатации
(6 страниц)
- Языки:Французский
-
Тип:
PDF -
Размер:
655.89 KB -
Описание:
Win7 Installation guide(French)
Просмотр
На NoDevice можно скачать инструкцию по эксплуатации для ASUS MAXIMUS VIII RANGER. Руководство пользователя необходимо для ознакомления с правилами установки и эксплуатации ASUS MAXIMUS VIII RANGER. Инструкции по использованию помогут правильно настроить ASUS MAXIMUS VIII RANGER, исправить ошибки и выявить неполадки.
- Manuals
- Brands
- Asus Manuals
- Motherboard
- Maximus VIII Ranger
- User manual
-
Contents
-
Table of Contents
-
Bookmarks
Quick Links
Related Manuals for Asus Maximus VIII Ranger
Summary of Contents for Asus Maximus VIII Ranger
-
Page 1
MAXIMUS VIII RANGER… -
Page 2
Product warranty or service will not be extended if: (1) the product is repaired, modified or altered, unless such repair, modification of alteration is authorized in writing by ASUS; or (2) the serial number of the product is defaced or missing. -
Page 3: Table Of Contents
Contents Safety information …………………. vi About this guide ………………….vii MAXIMUS VIII RANGER specifications summary ……….. ix Package contents ………………… xiv Installation tools and components …………….xv Chapter 1: Product Introduction Special features………………1-1 1.1.1 Product highlights……………. 1-1 1.1.2 ROG Gaming Features …………… 1-3 1.1.3…
-
Page 4
3.6.12 Intel(R) ThunderBolt …………..3-35 Monitor menu ………………. 3-36 Boot menu ………………..3-41 Tool menu ………………..3-46 3.9.1 ASUS EZ Flash 3 Utility …………3-46 3.9.2 Secure Erase …………….3-47 3.9.3 ASUS Overclocking Profile …………3-48 3.9.4 ROG OC Panel H-Key Configure ……….3-49 3.9.5… -
Page 5
Dual Intelligent Processors 5 …………..4-13 ROG Audio features …………….. 4-29 Sonic Radar II ………………. 4-36 GameFirst III ………………… 4-38 KeyBot II………………..4-41 4.10 ASUS Media Streamer …………….4-43 4.11 RAMDisk ………………..4-45 4.12 MemTweakIt ………………..4-48 4.13 ROG CPU-Z ………………..4-50 4.14… -
Page 6: Safety Information
Safety information Electrical safety • To prevent electrical shock hazard, disconnect the power cable from the electrical outlet before relocating the system. • When adding or removing devices to or from the system, ensure that the power cables for the devices are unplugged before the signal cables are connected. If possible, disconnect all power cables from the existing system before you add a device.
-
Page 7: About This Guide
Refer to the following sources for additional information and for product and software updates. ASUS website The ASUS website (www.asus.com) provides updated information on ASUS hardware and software products. Optional documentation Your product package may include optional documentation, such as warranty flyers, that may have been added by your dealer.
-
Page 8: Conventions Used In This Guide
Conventions used in this guide To ensure that you perform certain tasks properly, take note of the following symbols used throughout this manual. DANGER/WARNING: Information to prevent injury to yourself when trying to complete a task. CAUTION: Information to prevent damage to the components when trying to complete a task IMPORTANT: Instructions that you MUST follow to complete a task.
-
Page 9: Maximus Viii Ranger Specifications Summary
Turbo Boost Technology 2.0* ® * Intel Turbo Boost Technology 2.0 support depends on the CPU type ® * Refer to www.asus.com for Intel CPU support list Intel Z170 Express Chipset ® Chipset 4 x DIMM, max. 64GB DDR4 3400 (OC)* / 3333(OC)* / 3300(OC)*…
-
Page 10
— Sonic Studio II — Sonic Radar II — DTS Connect Intel Z170 Express Chipset — supports ASUS USB 3.1 Boost: ® — 6 x USB 3.0 ports (2 ports at back panel [blue], 4 ports at mid- board [grey]) — 8 x USB 2.0 ports (4 ports at back panel [black], 4 ports at mid-… -
Page 11
MAXIMUS VIII RANGER specifications summary Start button Reset button Clear CMOS button LN2 Mode ROG RAMDisk ROG RAMCache Overwolf KeyBot II — One-click overclocking — X.M.P. ROG Exclusive Features — DirectKey — Clr CMOS — Power On UEFI BIOS features : — Extreme Tweaker — Tweakers’… -
Page 12
1 x Start button 1 x Reset button 1 x LN2 mode jumper 1 x MemOK! button 1 x Thunderbolt header (5-pin) for ASUS ThunderboltEX II series support 1 x Front panel audio connector (AAFP) 1 x TPM connector 1 x System panel connector 1 x 128 Mb Flash ROM, UEFI AMI BIOS, PnP, DMI3.0, WfM3.0,… -
Page 13
MAXIMUS VIII RANGER specifications summary Drivers ROG GameFirst technology ROG RAMDisk ROG RAMCache ROG CPU-Z ROG Mem TweakIt Software Overwolf ROG Keybot II Kaspersky Anti-Virus ® DAEMON Tools Pro Standard ASUS WebStorage ASUS Utilities Windows ® Windows 8.1* ® Operating System… -
Page 14: Package Contents
Package contents Check your motherboard package for the following items. ROG MAXIMUS VIII RANGER Motherboard 2 x 2-in-1 SATA 6 Gb/s cables Cables 1 x SLI cable ™ 1 x I/O Shield 1 x 12-in-1 ROG cable label 1 x Q-Connector…
-
Page 15: Installation Tools And Components
Installation tools and components 1 Bag of screws Phillips (cross) screwdriver PC chassis Power supply unit Intel LGA 1151 CPU Intel LGA 1151 compatible CPU Fan DDR4 DIMM SATA hard disk drive SATA optical disc drive (optional) Graphics card (optional) The tools and components in the table above are not included in the motherboard package.
-
Page 17: Chapter 1: Product Introduction
This motherboard supports multi-GPU SLI /CrossFireX graphics cards for an unrivalled ® gaming performance. With the Intel Z97 platform to optimize the PCIe allocation of multiple ® ™ GPUs, it supports up to 2-WAY GPU SLI or CrossFireX configuration. ® ASUS MAXIMUS VIII RANGER…
-
Page 18
M.2 Support This motherboard features an M.2 slot, which supports both PCIE and SATA modes. The PCIE mode operates at full PCI Gen. 3.0 x4 speeds. The SATA mode shares bandwidth with SATA ports 1 and 2 and will automatically disable those ports when an M.2 card is inserted. Supports 2242 (22 mm x 42 mm), 2260 (22 mm x 60 mm), 2280 (22 mm x 80 mm), and 22110 (22 mm x 110 mm) SSD cards. -
Page 19: Rog Gaming Features
GameFirst technology ASUS GameFirst technology is a network management software that features four preset packet prioritized profiles facilitating user’s need. Users can also manually allocate bandwidth and adjust priority settings of each application to run faster and smoother.
-
Page 20: Rog Exclusive Features
USB 3.1 Boost ASUS USB 3.1 Boost, which supports USB 3.0 and USB 3.1 standard UASP (USB Attached SCSI Protocol), significantly increases a USB device’s transfer speed up to 170% faster than the already impressive USB 3.1 transfer speed.
-
Page 21: Rog Rich Bundled Software
Consumers can connect their PC to a home theatre system. DTS Interactive is capable of performing multichannel encoding of DTS bitstreams on personal computers, and sending encoded bitstreams out of a digital audio connection (such as S/PDIF or HDMI) designed to deliver audio to an external decoder. ASUS MAXIMUS VIII RANGER…
-
Page 22: Motherboard Overview
Motherboard overview 1.2.1 Before you proceed Take note of the following precautions before you install motherboard components or change any motherboard settings. • Unplug the power cord from the wall socket before touching any component. • Before handling components, use a grounded wrist strap or touch a safely grounded object or a metal object, such as the power supply case, to avoid damaging them due to static electricity.
-
Page 23: Motherboard Layout
1.2.2 Motherboard layout Refer to Internal connectors and Rear I/O connection for more information about rear panel connectors and internal connectors. ASUS MAXIMUS VIII RANGER…
-
Page 24: Layout Contents
Layout contents Connectors/Jumpers/Buttons and switches/Slots Page 1. ATX power connectors (24-pin EATXPWR; 8-pin EATX12V) 1-38 2. LGA1151 CPU Socket 3. CPU, water pump, CPU optional, extension, and chassis fan connectors (4-pin CPU_FAN; 4-pin W_PUMP; 4-pin CPU_OPT; 5-pin EXT_FAN; 1-37 4-pin CHA_FAN1-4) 4.
-
Page 25: Central Processing Unit (Cpu)
Contact your retailer immediately if the PnP cap is missing, or if you see any damage to the PnP cap/socket contacts/motherboard components. ASUS will shoulder the cost of repair only if the damage is shipment/ transit-related.
-
Page 26: System Memory
1.2.4 System memory The motherboard comes with four Double Data Rate 4 (DDR4) Dual Inline Memory Modules (DIMM) slots. A DDR4 module is notched differently from a DDR, DDR2, or DDR3 module. DO NOT install a DDR, DDR2, or DDR3 memory module to the DDR4 slot. Recommended memory configurations Chapter 1: Product Introduction 1-10…
-
Page 27: Memory Configurations
3.5 Ai Tweaker menu for manual memory frequency adjustment. • For system stability, use a more efficient memory cooling system to support a full memory load (4 DIMMs) or overclocking condition. ASUS MAXIMUS VIII RANGER 1-11…
-
Page 28
MAXIMUS VIII RANGER Motherboard Qualified Vendors Lists (QVL) DDR4 3400 MHz capability DIMM socket support Chip Vendors Part No. Size Chip NO. Timing Voltage (Optional) Brand CORSAIR CMD16GX4M4B3400C16 16GB(4GB*4) Samsung K4A4G085WD 16-18-18-38 1.35V • • ver. 4.23 DDR4 3333 MHz capability… -
Page 29
• CORSAIR CMD16GX4M4B3000C15 16GB(4GB*4) Samsung K4A4G085WD 15-17-17-35 1.35V • • CORSAIR CMK16GX4M4B3000C15 16GB(4GB*4) Samsung K4A4G085WD 15-17-17-35 1.35V • • Panram PUD43000C154G4NJW 16GB(4GB*4) 15-17-17-35 1.35V • • Asint SLB404G08-EWWHMX 16GB(8GB*2) SK hynix H5AN4G8NMFR 15-15-15-44 1.35V • ASUS MAXIMUS VIII RANGER 1-13… -
Page 30
DDR4 2800 MHz capability DIMM socket support Chip Vendors Part No. Size Chip NO. Timing Voltage (Optional) Brand Apacer 78.BAGM8.AF20B (XMP) 17-17-17-36 • • Apacer 78.CAGM8.AF30B (XMP) 17-17-17-36 • • CORSAIR CMD16GX4M4A2800C16 16GB ( 4x 16-18-18-36 • • (Ver4.23) (XMP) 4GB ) CORSAIR CMD16GX4M4A2800C16… -
Page 31
4GB ) ISDT IMA451U6MFR8N-CF0 ISDT I5AN4G8NMFR 15-15-15-35 • • (XMP) ISDT IMA41GU6MFR8N-CF0 ISDT I5AN4G8NMFR 15-15-15-35 • • (XMP) Team TCD44G2666C15ABK Samsung K4A4G085WD 15-15-15-35 • • (XMP) Team TCD48G2666C15ABK 32GB(4x Team TCD48G2666C15ABK 15-15-15-35 • • (XMP) 8GB) ASUS MAXIMUS VIII RANGER 1-15… -
Page 32
DDR4 2400 MHz capability DIMM socket support Chip Vendors Part No. Size Chip NO. Timing Voltage (Optional) Brand CORSAIR CMD16GX4M4A2400C14 16GB ( 4x 14-16-16-31 • • (Ver4.23) (XMP) 4GB ) CORSAIR CMK16GX4M4A2400C14 16GB ( 4x 14-16-16-31 • • (Ver4.23) (XMP) 4GB ) CORSAIR CMD32GX4M4A2400C14… -
Page 33
• AVEXIR AVD4U21331504G-4M AVEXIR 512X8DDR4 15-15-15-35 • • Century CD8G-D4U2133 SK Hynix H5AN4G8NMFRTFC 15-15-15-36 • • ISDT IMA451U6MFR8N-TF0 ISDT I5AN4G8NMFR 15-15-15-35 • • ISDT IMA41GU6MFR8N-TF0 ISDT I5AN4G8NMFR 15-15-15-35 • • (continued on the next page) ASUS MAXIMUS VIII RANGER 1-17… -
Page 34
ASUS exclusively provides hyper DIMM support function. • Hyper DIMM support is subject to the physical characteristics of individual CPUs. Load the X.M.P. settings in the BIOS for the hyper DIMM support. • Visit the ASUS website for the latest QVL. Chapter 1: Product Introduction 1-18… -
Page 35: Expansion Slots
Slot No. Slot Description PCIe 3.0 x1_1 slot PCIe 3.0 x16/x8_1 slot PCIe 3.0 x1_2 slot PCIe 3.0 x8_2 slot PCIe 3.0 x1_3 slot PCIe 3.0 x4_3 slot ASUS MAXIMUS VIII RANGER 1-19…
-
Page 36: Irq Assignments For This Motherboard
IRQ assignments for this motherboard PCIEX16/X8_1 shared PCIEX8_2 shared PCIEX4_3 shared PCIEX1_1 shared PCIEX1_2 shared PCIEX1_3 shared I.G.F.X . shared Intel LAN Controller shared SATA Controller shared High Definition Audio shared XHCI Controller shared ASM1142 shared PCIe operating mode VGA Configuration PCIe_x16/x8_1 PCIe_x8_2 Single VGA/PCIe card…
-
Page 37
PCIEX4_3 will run in X2 mode by default with PCIEX1_2 and PCIEX1_3 enabled. • When a PCIEx4 card is inserted into the PCIEX4_3 slot, PCIEX1_2 and PCIEX1_3 will be disabled and the PCIEX4 card will run in X4 mode. ASUS MAXIMUS VIII RANGER 1-21… -
Page 38: Onboard Buttons
1.2.6 Onboard buttons Onboard buttons allow you to fine-tune performance when working on a bare or open- case system. This is ideal for overclockers and gamers who continually change settings to enhance system performance. Power-on button (START) The motherboard comes with a power-on button that allows you to power up or wake up the system.
-
Page 39
BIOS default settings. A message will appear during POST reminding you that the BIOS has been restored to its default settings. • We recommend that you download and update to the latest BIOS version from www.asus.com after using the MemOK! function. ASUS MAXIMUS VIII RANGER 1-23… -
Page 40
Clear CMOS button (CLR_CMOS) Press this button to clear the BIOS setup information only when the systems hangs due to overclocking. Chapter 1: Product Introduction 1-24… -
Page 41: Onboard Leds
Q LEDs check key components (CPU, DRAM, VGA card, and booting devices) in sequence during motherboard booting process. If an error is found, the corresponding LED flashes until the problem is solved. This user-friendly design provides an intuitive way to locate the root problem within seconds. ASUS MAXIMUS VIII RANGER 1-25…
-
Page 42
Q-Code LED The Q-Code LED design provides you with a 2-digit error code that displays the system status. Refer to the Q-Code table on the following page for details. Chapter 1: Product Introduction 1-26… -
Page 43
Unspecified memory initialization error Memory not installed Invalid CPU type or Speed CPU mismatch CPU self test failed or possible CPU cache error CPU micro-code is not found or micro-code update is failed (continued on the next page) ASUS MAXIMUS VIII RANGER 1-27… -
Page 44
Q-Code table Code Description PEI Core is started Pre-memory CPU initialization is started 11 – 14 Pre-memory System Agent initialization is started 15 – 18 19 – 1C Pre-memory PCH initialization is started 2B – 2F Memory initialization Reserved for ASL (see ASL Status Codes section below) Memory Installed 32 –… -
Page 45
7A – 7F Boot Device Selection (BDS) phase is started Driver connecting is started PCI Bus initialization is started PCI Bus Hot Plug Controller Initialization PCI Bus Enumeration PCI Bus Request Resources (continued on the next page) ASUS MAXIMUS VIII RANGER 1-29… -
Page 46
Q-Code table Code Description PCI Bus Assign Resources Console Output devices connect Console input devices connect Super IO Initialization USB initialization is started USB Reset USB Detect USB Enable 9E – 9F Reserved for future AMI codes IDE initialization is started IDE Reset IDE Detect IDE Enable… -
Page 47
System is waking up from the S4 sleep state 0x40 System has transitioned into ACPI mode. Interrupt controller is in PIC mode. 0xAC System has transitioned into ACPI mode. Interrupt controller is in APIC mode. 0xAA ASUS MAXIMUS VIII RANGER 1-31… -
Page 48: Jumper
1.2.8 Jumper LN2 Mode jumper (3-pin LN2_MODE) With LN2 mode activated, the ROG motherboard is optimized to remedy the cold-boot bug during POST and help the system boot successfully. Chapter 1: Product Introduction 1-32…
-
Page 49: Internal Connectors
Before creating a RAID set, refer to section RAID configurations or the manual bundled in the motherboard support DVD. • When using NCQ, set the SATA Mode in the BIOS to [AHCI Mode]. Refer to section PCH Storage Configuration for details. ASUS MAXIMUS VIII RANGER 1-33…
-
Page 50
USB 3.0 connector (20-1 pin USB3_12; USB3_34) This connector allows you to connect a USB 3.0 module for additional USB 3.0 front or rear panel ports. With an installed USB 3.0 module, you can enjoy all the benefits of USB 3.0 including faster data transfer speeds of up to 5 Gbps, faster charging time for USB-chargeable devices, optimized power efficiency, and backward compatibility with USB 2.0. -
Page 51
Never connect a 1394 cable to the USB connectors. Doing so will damage the motherboard! You can connect the front panel USB cable to the ASUS Q-Connector (USB) first, and then install the Q-Connector (USB) to the USB connector onboard if your chassis supports front panel USB ports. -
Page 52
Front panel audio connector (10-1 pin AAFP) This connector is for a chassis-mounted front panel audio I/O module that supports HD Audio standard. Connect one end of the front panel audio I/O module cable to this connector. • We recommend that you connect a high-definition front panel audio module to this connector to avail of the motherboard’s high-definition audio capability. -
Page 53
Do not place jumper caps on the fan connectors! • Ensure to fully insert the 4-pin CPU fan cable to the CPU fan connector. The CPU_FAN connector supports the CPU fan of maximum 1A (12 W) fan power. ASUS MAXIMUS VIII RANGER 1-37… -
Page 54
• If you are uncertain about the minimum power supply requirement for your system, refer to the Recommended Power Supply Wattage Calculator at http://support.asus. com/PowerSupplyCalculator/PSCalculator.aspx?SLanguage=en-us for details. Chapter 1: Product Introduction 1-38… -
Page 55: System Panel Connector
Pressing the power button for more than four seconds while the system is ON turns the system OFF. • Reset button (3-pin RESET) This 3-pin connector is for the chassis-mounted reset button for system reboot without turning off the system power. ASUS MAXIMUS VIII RANGER 1-39…
-
Page 56
• The OC Panel and Front Base are purchased separately. • Visit www.asus.com for more information about the OC Panel and Front Base. TPM connector (14-1 pin TPM) This connector supports a Trusted Platform Module (TPM) system, which securely store keys, digital certificates, passwords and data. A TPM system also helps enhance the network security, protects digital identities, and ensures platform integrity. -
Page 57
The M.2 (Socket 3) with M Key supports type 2242 (22mm x 42mm), 2260 (22mm x 60mm), 2280 (22mm x 80mm), and 22110 (22mm x 110mm) PCIe/SATA interface storage devices. When the M.2 (Socket 3) is operating in SATA mode, SATA port 1 (SATA6G_12) will be disabled. ASUS MAXIMUS VIII RANGER 1-41… -
Page 58
Thunderbolt header (5-pin TB_HEADER) This connector is for the add-on Thunderbolt I/O card that supports Intel’s Thunderbolt Technology, allowing you to connect up to six Thunderbolt-enabled devices and a DisplayPort-enabled display in a daisy-chain configuration. The add-on Thunderbolt I/O card and Thunderbolt cables are purchased separately. Chapter 1: Product Introduction 1-42… -
Page 59: Chapter 2: Basic Installation
The diagrams in this section are for reference only. The motherboard layout may vary with models, but the installation steps are the same for all models. Install the ASUS Q-Shield to the chassis rear I/O panel. Place the motherboard into the chassis, ensuring that its rear I/O ports are aligned to the chassis’…
-
Page 60
Place nine screws into the holes indicated by circles to secure the motherboard to the chassis. DO NOT over tighten the screws! Doing so can damage the motherboard. Chapter 2: Basic Installation… -
Page 61: Cpu Installation
Ensure that you install the correct CPU designed for LGA1151 socket only. DO NOT install a CPU designed for LGA1155 and LGA1156 sockets on the LGA1151 socket. Top of CPU Bottom of CPU Bottom of CPU ASUS MAXIMUS VIII RANGER…
-
Page 62
Top of CPU • Ensure that the CPU is firmly clicked into place before installing it onto the CPU socket on the motherboard. • Use the CPU Installation Tool for installing the CPU only. DO NOT damage or bend the CPU Installation Tool. • Always firmly hold both sides of the CPU Installation Tool when installing, removing, or picking up the CPU Installation Tool. • ASUS will not cover damages resulting from incorrect CPU installation/removal, incorrect CPU orientation/placement, or other damages resulting from negligence by the user. Chapter 2: Basic Installation… -
Page 63: Cpu Heatsink And Fan Assembly Installation
2.1.3 CPU heatsink and fan assembly installation Apply the Thermal Interface Material to the CPU heatsink and CPU before you install the heatsink and fan, if necessary. To install the CPU heatsink and fan assembly ASUS MAXIMUS VIII RANGER…
-
Page 64
To uninstall the CPU heatsink and fan assembly Chapter 2: Basic Installation… -
Page 65: Dimm Installation
2.1.4 DIMM installation To remove a DIMM ASUS MAXIMUS VIII RANGER…
-
Page 66: Atx Power Connection
2.1.5 ATX Power connection Chapter 2: Basic Installation…
-
Page 67: Sata Device Connection
2.1.6 SATA device connection ASUS MAXIMUS VIII RANGER…
-
Page 68: Front I/O Connector
2.1.7 Front I/O Connector To install ASUS Q-Connector To install USB 2.0 connector To install front panel audio connector AAFP USB 2.0 To install USB 3.0 connector USB 3.0 Chapter 2: Basic Installation 2-10…
-
Page 69: Expansion Card Installation
2.1.8 Expansion Card installation To install PCIe x16 cards ASUS MAXIMUS VIII RANGER 2-11…
-
Page 70: Bios Update Utility
For more BIOS update utilities in BIOS setup, refer to the section Updating BIOS in Chapter 3. Updating BIOS may have risks. If the BIOS program is damaged during the process and results to the system’s failure to boot up, please contact your local ASUS Service Center. Chapter 2: Basic Installation 2-12…
-
Page 71: Motherboard Rear And Audio Connections
Intel USB 3.0 ports 5 and 6 ® Optical S/PDIF OUT port Audio I/O ports** * and ** : Refer to the tables on the next page for LAN port LEDs, and audio port definitions. ASUS MAXIMUS VIII RANGER 2-13…
-
Page 72: Audio I/O Connections
• Due to USB 3.0 controller limitation, USB 3.0 devices can only be used under Windows 7 and after the USB 3.0 driver installation. ® • USB 3.0 devices can only be used as data storage only. • We strongly recommend that you connect USB 3.0 devices to USB 3.0 ports for faster and better performance for your USB 3.0 devices. • Due to the design of the Intel chipset, all USB devices connected to the USB 2.0 and USB 3.0 ports are controlled by the xHCI controller. Some legacy USB devices must update their firmware for better compatibility.
-
Page 73
Connect to Headphone and Mic Connect to Stereo Speakers Connect to 2.1 channel Speakers ASUS MAXIMUS VIII RANGER 2-15… -
Page 74
Connect to 4.1 channel Speakers Connect to 5.1 channel Speakers Connect to 7.1 channel Speakers Chapter 2: Basic Installation 2-16… -
Page 75: Starting Up For The First Time
While the system is ON, press the power button for less than four seconds to put the system on sleep mode or soft-off mode, depending on the BIOS setting. Press the power button for more than four seconds to let the system enter the soft-off mode regardless of the BIOS setting. ASUS MAXIMUS VIII RANGER 2-17…
-
Page 76
Chapter 2: Basic Installation 2-18… -
Page 77: Chapter 3: Bios Setup
BIOS Setup Knowing BIOS The new ASUS UEFI BIOS is a Unified Extensible Interface that complies with UEFI architecture, offering a user-friendly interface that goes beyond the traditional keyboard- only BIOS controls to enable a more flexible and convenient mouse input. You can easily navigate the new UEFI BIOS with the same smoothness as your operating system.
-
Page 78: Bios Setup Program
BIOS setup program Use the BIOS Setup to update the BIOS or configure its parameters. The BIOS screen include navigation keys and brief onscreen help to guide you in using the BIOS Setup program. Entering BIOS at startup To enter BIOS Setup at startup, press <Delete> during the Power-On Self Test (POST). If you do not press <Delete>, POST continues with its routines.
-
Page 79: Ez Mode
Click to go to Advanced mode Search on the FAQ Loads optimized default settings Click to display boot devices Selects the boot device priority The boot device options vary depending on the devices you installed to the system. ASUS MAXIMUS VIII RANGER…
-
Page 80: Advanced Mode
3.2.2 Advanced Mode The Advanced Mode provides advanced options for experienced end-users to configure the BIOS settings. The figure below shows an example of the Advanced Mode. Refer to the following sections for the detailed configurations. To switch from EZ Mode to Advanced Mode, click Advanced Mode(F7) or press the <F7> hotkey.
-
Page 81: Menu Bar
EZ Tuning Wizard(F11) This button above the menu bar allows you to view and tweak the overclocking settings of your system. It also allows you to change the motherboard’s SATA mode from AHCI to RAID mode. ASUS MAXIMUS VIII RANGER…
-
Page 82: Hot Keys
Quick Note (F9) This button above the menu bar allows you to key in notes of the activities that you have done in BIOS. • The quick Note function does not support the following keyboard functions: delete, cut, copy and paste. •…
-
Page 83: My Favorites
You cannot add the following items to My Favorite items: • Items with sub-menu options. • User-managed items such as language and boot order. • Configuration items such as Memory SPD Information, system time and date. ASUS MAXIMUS VIII RANGER…
-
Page 84: Main Menu
Main menu The Main menu screen appears when you enter the Advanced Mode of the BIOS Setup program. The Main menu provides you an overview of the basic system information, and allows you to set the system date, time, language, and security settings. Chapter 3: BIOS Setup…
-
Page 85
RTC RAM via the Clear CMOS button. • The Administrator or User Password items on top of the screen show the default [Not Installed]. After you set a password, these items show [Installed]. ASUS MAXIMUS VIII RANGER… -
Page 86: Administrator Password
Administrator Password If you have set an administrator password, we recommend that you enter the administrator password for accessing the system. Otherwise, you might be able to see or change only selected fields in the BIOS setup program. To set an administrator password: Select the Administrator Password item and press <Enter>.
-
Page 87: Extreme Tweaker Menu
(X.M.P.) Technology, choose this item to set the profiles supported by your memory modules for optimizing the system performance. The [X.M.P.] configuration option appears only when you install memory modules supporting the eXtreme Memory Profile(X.M.P.) Technology. ASUS MAXIMUS VIII RANGER 3-11…
-
Page 88
ASUS MultiCore Enhancement [Auto] [Auto] This item allows you to maximize the oveclocking performance optimized by ASUS core ratio settings. [Disabled] This item allows you to set to default core ratio settings. CPU Core Ratio [Auto] This item allows you to set the CPU core ratio limit per core or synchronize automatically to all cores. -
Page 89
Ensure to use water cooling device before selecting [TPU II]. EPU Power Saving Mode [Disabled] The ASUS EPU (Energy Processing Unit) sets the CPU in its minimum power consumption settings. Enable this item to set lower CPU core/cache voltage and achieve the best energy saving condition. -
Page 90
Misc. MRC Fast Boot [Auto] Allows you to enable, disable or automatically set the MRC fast boot. Configuration options: [Auto] [Enabled] [Disabled] DRAM CLK Period [Auto] Configuration options: [Auto] [1] – [40] Memory Scrambler [Enabled] Set this item to enable or disable memory scrambler support. Configuration options: [Enabled] [Disabled] Channel A DIMM Control [Enable Both DIMMS] Allows you to enable or disable the Channel A DIMM slots. -
Page 91
[T. Probe] Select to set the VRM thermal balance mode. [Extreme] Select to set the VRM current balance mode. DO NOT remove the thermal module. The thermal conditions should be monitored. ASUS MAXIMUS VIII RANGER 3-15… -
Page 92
CPU Power Phase Control [Auto] This item allows you to set the power phase control of the CPU. Configuration options: [Auto] [Standard] [Optimized] [Extreme] [Power Phase Response] DO NOT remove the thermal module when setting this item to [Extreme] or [Power Phase Response]. -
Page 93
Configuration options: [Enabled] [Disabled] Turbo Mode [Enabled] Allows you to enable your processor cores to run faster than the base operating frequency when it is below power, current and specification limit. Configuration options: [Disabled] [Enabled] ASUS MAXIMUS VIII RANGER 3-17… -
Page 94
The following items appear only when you set the Turbo Mode to [Enabled]. Turbo Mode Parameters Long Duration Package Power Limit [Auto] Allows you to limit the Turbo Ratio’s time duration that exceeds the TDP (Thermal Design Power) for maximum performance. Use the <+> and <-> keys to adjust the value. -
Page 95
Configuration options: [Auto] [8] — [33] Max. CPU Graphics Ratio [Auto] This item allows you to set the CPU graphics ratio. Use the <+> and <-> keys to adjust the value. Configuration options: [Auto] [8] — [33] ASUS MAXIMUS VIII RANGER 3-19… -
Page 96
CPU Core/Cache Voltage [Auto] Configures the mode of Voltage fed to the cores of the processor. Configuration options: [Auto] [Manual Mode] [Offset Mode] [Adaptive Mode] The following items appear only when you set the CPU Core/Cache Voltage to [Manual Mode]. CPU Core Voltage Override [Auto] Allows you to configure the CPU Core voltage. -
Page 97
DRAM voltage times the configured value. Configuration options: [Auto] [0.39500] — [0.63000] DRAM DATA REF Voltage on CHA/CHB DIMM0/1 Rank0/1 BL0-7 [Auto] Configures the DRAM Data REF Voltage. Configuration options: [Auto] [0] — [63] ASUS MAXIMUS VIII RANGER 3-21… -
Page 98: Advanced Menu
Advanced menu The Advanced menu items allow you to change the settings for the CPU and other system devices. Be cautious when changing the settings of the Advanced menu items. Incorrect field values can cause the system to malfunction. Chapter 3: BIOS Setup 3-22…
-
Page 99: Cpu Configuration
This item allows you to enable or disable the MLC streamer prefetcher. Configuration options: [Disabled] [Enabled] Adjacent Cache Line Prefetcher [Enabled] This item allows you to enable or prefetching of adjacent cache lines. Configuration options: [Disabled] [Enabled] ASUS MAXIMUS VIII RANGER 3-23…
-
Page 100
Boot Performance Mode [Auto] This item allows you to select the CPU performance state during system boot before the operating system takes control. The CPU runs at a selected performance ratio based on CPU configuration. Configuration options: [Max Battery] [Max Non-Turbo Performance] [Turbo Performance] [Auto] CPU Power Management Configuration This item allows you to manage and configure the CPU’s power. -
Page 101: Platform Misc Configuration
BIOS controls the ASPM support for the device. PCH — PCI Express DMI Link ASPM Control [Disabled] This item is for the control of the Active State Power Management on SA side of the DMI link. Configuration options: [Enabled] [Disabled] ASUS MAXIMUS VIII RANGER 3-25…
-
Page 102: System Agent (Sa) Configuration
ASPM Support [Disabled] Select the ASPM level for energy saving conditions. Configuration options: [Disabled] [L0s] [L1s] [L0sL1] [Auto] SA — PCI Express DMI Link ASPM Control [Disabled] This item is for the control of the Active State Power Management on SA side of the DMI link. Configuration options: [Disabled] [L1] PEG ASPM [Disabled] This item is for the control of the Active State Power Management for the PEG 0.
-
Page 103: Graphics Configuration
The system will automatically select the PCIEX16/X8_1 slot speed. [Gen1] The PCIEX8_2 slot will run at PCI-E 1.0 speed. [Gen2] The PCIEX8_2 slot will run at PCI-E 2.0 speed. [Gen3] The PCIEX8_2 slot will run at PCI-E 3.0 speed. ASUS MAXIMUS VIII RANGER 3-27…
-
Page 104: Rog Effects
3.6.4 ROG Effects Onboard LED [Enabled] This item allows you to enable all the onboard LEDs. Configuration options: [Enabled] [Disabled] SupremeFX (ROG Audio) LED [Enabled] This item allows you to enable ROG Audio LED. Configuration options: [Enabled] [Disabled] 3.6.5 PCH Configuration PCI Express Configuration This item allows you to configure the PCI Express slots.
-
Page 105: Pch Storage Configuration
SATA Port items show Empty if no SATA device is installed to the corresponding SATA port. Scroll down to display the other BIOS items. Hyper kit Mode [Disabled] Disable this option for M.2 devices. Enable this option for “ASUS Hyper kit” card. Configuration options: [Disabled] [Enabled] SATA Controller(s) [Enabled] This item allows you to enable or disable the SATA Device.
-
Page 106
The following item appears only when you set the SATA Mode Selection to [RAID]. M.2 PCIE Storage RAID Support [Disabled] This item allows you to enable or disable PCIE port to SATA for RAID Remapping. Configuration options: [Disabled] [Enabled] SATA Express 1 PCIE Storage RAID Support [Disabled] This item allows you to enable or disable PCIE port to SATA for RAID Remapping. -
Page 107: Usb Configuration
Support XHCI by BIOS for operating systems without XHCI support. USB Single Port Control This item allows you to enable or disable the individual USB ports. Refer to section 1.2.2 Motherboard layout for the location of the USB ports. ASUS MAXIMUS VIII RANGER 3-31…
-
Page 108: Network Stack Configuration
3.6.8 Network Stack Configuration Network Stack [Disabled] This item allows you to disable or enable the UEFI network stack. Configuration options: [Disabled] [Enabled] The following items appear only when you set the Network Stack to [Enabled]. Ipv4/Ipv6 PXE Support [Enabled] This item allows you to enable or disable the Ipv4/Ipv6 PXE boot option.
-
Page 109
Intel LAN PXE Option ROM [Disabled] This item appears only when Intel LAN Controller is set to [Enabled].This item allows you to enable or disable the Intel LAN preboot execution environment (PXE) option ROM. Configuration options: [Enabled] [Disabled] ASUS MAXIMUS VIII RANGER 3-33… -
Page 110: Apm Configuration
3.6.10 APM Configuration ErP Ready [Disabled] Allows you to switch off some power at S4+S5 or S5 to get the system ready for ErP requirement. When set to [Enabled], all other PME options will be switched off. Configuration options: [Disabled] [Enabled(S4+S5] [Enabled(S5)] Restore AC Power Loss [Power Off] [Power Off] The system goes into OFF state after an AC power loss.
-
Page 111: Hdd/Ssd Smart Information
This item allows you to disable or enable the Intel Thunderbolt Technology. Configuration options: [Fully Disabled] [Disabled] [Enabled] ThunderBolt Boot Support [Disabled] This item allows you to disable or enable the ThunderBolt Boot Support. Configuration options: [Disabled] [Enabled] ASUS MAXIMUS VIII RANGER 3-35…
-
Page 112: Monitor Menu
Monitor menu The Monitor menu displays the system temperature/power status, and allows you to change the fan settings. Q-Fan Configuration Qfan Tuning Click this item to automatically detect the lowest speed and configure the minimum duty cycle for each fan. CPU Q-Fan Control [Auto] [Auto] Detect the type of CPU fan installed and automatically switches the…
-
Page 113
The assignment fan will be controlled according to the selected temperature source. Configuration options: [CPU] [MotherBoard] [VRM] [PCH] [T_SENSOR1] [EXT_ Sensor1] [EXT_Sensor2] [EXT_Sensor3] For EXT_Sensor1-3, connect a Thermistor cable to the EXT_TS1-3 header then place the other end to the component to get the temperature. ASUS MAXIMUS VIII RANGER 3-37… -
Page 114
Chassis Fan 1-4 Step Up [0 sec] This item allows you to set the value of the CPU fan step up. Configuration options: [0 sec] [12 sec] [25 sec] [51 sec] [76 sec] [102 sec] [127 sec] [153 sec] [178 sec] [204 sec] Chassis Fan 1-4 Step Down [0 sec] This item allows you to set the value of the CPU fan step down. -
Page 115
The values range from 0% to 100%. When the CPU temperature is under the limit, the Chassis Fan 1-4 fan will operate at the minimum duty cycle. ASUS FAN EXTENSION CARD is required to configure these items Extension Fan 1-4 Q-Fan Control [DC Mode] [Disabled] Disable the Extension Fan Q-Fan control feature. -
Page 116
Extension Fan 1-4 Middle. Duty Cycle (%) [60] Use the <+> or <-> keys to adjust the middle Extension Fan 1-4 duty cycle. The values range from 20% to 100%. When the CPU temperature reaches the middle limit, the Extension Fan 1-4 will operate at the middle duty cycle. Extension Fan 1-4 Lower Temperature [40] Use the <+>… -
Page 117: Boot Menu
Accelerates the boot speed on the next boot after an AC power loss. Boot Logo Display [Auto] [Auto] Auto adjustments for Windows requirements. [Full Screen] Maximize the boot logo size. [Disabled] Hid the logo during POST. ASUS MAXIMUS VIII RANGER 3-41…
-
Page 118
Configuration options: [Disabled] [Enabled] Option ROM Messages [Enabled] [Enabled] The Option ROM Messages will be shown during the POST. [Disabled] Only the ASUS logo will be shown during the POST. Interrupt 19 Capture [Disabled] [Enabled] Execute the trap right away. [Disabled] Execute the trap during legacy boot. -
Page 119: Secure Boot
UEFI mode or other ® Microsoft Secure Boot compliant OS. ® [Other OS] Get the optimized function when booting on Windows non- ® UEFI mode. Microsoft Secure Boot only supports Windows ® ® UEFI mode. ASUS MAXIMUS VIII RANGER 3-43…
-
Page 120
Key Management Install Default Secure Boot keys This item allows you to clear all default Secure Boot keys. Save Secure Boot Keys This item allows you to save the PK (Platform Keys) to a USB storage device. PK Management Set New Key This item allows you to load the downloaded PK from a USB storage device. -
Page 121: Boot Option Priorities
OS in Safe Mode, press <F8> after POST (Windows 8 not supported). • To select the boot device during system startup, press <F8> when the ASUS Logo appears. Boot Override These items displays the available devices. The number of device items that appears on the screen depends on the number of devices installed in the system.
-
Page 122: Tool Menu
3.9.1 ASUS EZ Flash 3 Utility Allows you to run ASUS EZ Flash 3. When you press <Enter>, a confirmation message appears. Use the Left/Right arrow key to select between [by USB] or [by Internet], then press <Enter> to confirm your choice.
-
Page 123: Secure Erase
To launch Secure Erase, click Tool > Secure Erase on the Advanced mode menu. Check the ASUS support site for a full list of SSDs tested with Secure Erase. The drive may become unstable if you run Secure Erase on an incompatible SSD.
-
Page 124: Asus Overclocking Profile
3.9.3 ASUS Overclocking Profile This item allows you to store or load multiple BIOS settings. Profile Name Key in the profile name to save current BIOS settings to profile 1 to 8. Save to Profile Saves the current BIOS settings to profile number 1 to 8.
-
Page 125: Rog Oc Panel H-Key Configure
This item allows you to save the new values of the CPU Core Voltage, VCCSA Voltage, BCLK Frequency, and CPU Ratio. Load from profile This item allows you to load the previous values of the CPU Core Voltage, VCCSA Voltage, BCLK Frequency, and CPU Ratio. ASUS MAXIMUS VIII RANGER 3-49…
-
Page 126: Asus Spd Information
3.9.5 ASUS SPD Information Allows you to view the DRAM SPD information. DIMM slot number Allows you to select the DIMM slot number to show the plugged DRAM Serial Presence Detect (SPD) information. Configuration options: [DIMM_A1] [DIMM_A2] [DIMM_B1] [DIMM_B2] Some DRAM manufacturers may not be recognized.
-
Page 127: Exit Menu
<Esc>, a confirmation window appears. Select Yes to discard changes and exit. Launch EFI Shell from USB devices This option allows you to attempt to launch the EFI Shell application (shellx64.efi) from one of the available filesystem devices. ASUS MAXIMUS VIII RANGER 3-51…
-
Page 128: Updating Bios
® ASUS EZ Flash 3: Updates the BIOS using a USB flash drive. ASUS CrashFree BIOS 3: Restores the BIOS using the motherboard support DVD or a USB flash drive when the BIOS file fails or gets corrupted. ASUS BIOS Updater: Updates the BIOS in DOS environment using the motherboard support DVD and a USB flash disk drive.
-
Page 129
3.11.2 ASUS EZ Flash 3 ASUS EZ Flash 3 allows you to update the BIOS without having to use a bootable floppy disk or an OS-based utility. Before you start using this utility, download the latest BIOS from the ASUS website at http://www.asus.com. -
Page 130: Asus Crashfree Bios
The BIOS file in the motherboard support DVD may be older than the BIOS file published on the ASUS official website. If you want to use the newer BIOS file, download the file at http://support.asus.com and save it to a USB flash drive.
-
Page 131: Asus Bios Updater
3.11.4 ASUS BIOS Updater ASUS BIOS Updater allows you to update the BIOS in DOS environment. The screen captures used in this section are for reference only and may not be exactly the same as actually shown on your computer screen.
-
Page 132
On the BIOS Updater screen, press <Tab> to switch from Files panel to Drives panel then select D:. ASUSTeK BIOS Updater for DOS V1.30 [2014/01/01] Current ROM Update ROM BOARD: MAXIMUS VIII RANGER BOARD: Unknown VER: 0201 (H :00 B :00) -
Page 133
DO NOT shut down or reset the system while updating the BIOS to prevent system boot failure. Ensure to load the BIOS default settings to ensure system compatibility and stability. Select the Load Optimized Defaults item under the Exit BIOS menu. See section 3.10 Exit menu for details. ASUS MAXIMUS VIII RANGER 3-57… -
Page 134
Chapter 3: BIOS Setup 3-58… -
Page 135: Chapter 4: Software Support
Connect the USB ODD or USB storage device to your 100 series platform. Insert the ASUS support DVD into a SATA ODD on your 100 series platform. Power on your system and press F8 during POST (Power-On Self Test) to enter the boot screen.
-
Page 136
Select the USB ODD or USB storage device as the boot device. The USB 3.0 driver will be loaded automatically during installation startup. The “Setup is starting…” screen will show up if the USB 3.0 driver is loaded correctly. Follow the onscreen instructions to complete the Windows 7 installation. -
Page 137
® source using a third-party ISO software. Copy both “Auto_Unattend.xml” and “Auto_Unattend” folder from the root directory of the ASUS supporting DVD to your system. Edit the ISO file and add both “Auto_Unattend.xml” and “Auto_Unattend” folder into the ISO file. -
Page 138
1 x USB storage device (8 GB or more) Insert the Windows 7 installation DVD. ® Launch the ASUS EZ Installer located on the ASUS support DVD. Select a method of creating a modified Windows 7 installation file: ® •… -
Page 139
— Click Yes to clear the contents on the USB storage device and create a bootable USB device. Make sure to backup contents on the USB storage device, as it will be formatted. — Once completed, click OK to finish. ASUS MAXIMUS VIII RANGER… -
Page 140
• Windows 7 OS disk to ISO file ® — Select Windows 7 OS disk to ISO file then click Next. — Check I agree and then click Next. — Select the source of the Windows 7 installation disk then click Next. ®… -
Page 141
The USB 3.0 driver will be loaded automatically during installation startup. The “Setup is starting…” screen will show up if the USB 3.0 driver is loaded correctly. Follow the onscreen instructions to complete the Windows 7 installation. ® ASUS MAXIMUS VIII RANGER… -
Page 142: Support Dvd Information
Support DVD information The contents of the support DVD are subject to change at any time without notice. Visit the ASUS website at www.asus.com for updates. 4.2.1 Running the support DVD Ensure that you have an Administrator account before running the support DVD in your operating system.
-
Page 143: Obtaining The Software Manuals
Click to select an item to install Contains ROG related videos Click to display the ASUS contact information Click to browse the file list of the suport CD Click to install the selected items 4.2.2 Obtaining the software manuals The software manuals are included in the support DVD.
-
Page 144: Software Information
View the online help or readme file that came with the software application for more information. AI Suite 3 AI Suite 3 is an all-in-one interface that integrates several ASUS utilities and allows you to launch and operate these utilities simultaneously. Installing AI Suite 3 Ensure that you have an Administrator account before installing AI Suite 3 in Windows ®…
-
Page 145
Launching AI Suite 3 Windows 7 OS ® From the Desktop, click Start > All Programs > ASUS > AI Suite 3 > AI Suite 3. You can also launch AI Suite 3 in Windows 7 by clicking on the Notification area. -
Page 146
Some functions in the AI Suite 3 main menu in this user guide may vary depending on the motherboard model. • Refer to the software manual in the support DVD or visit the ASUS website at www.asus.com for detailed software configuration. Chapter 4: Software Support… -
Page 147: Dual Intelligent Processors 5
Dual Intelligent Processors 5 ASUS Dual Intelligent Processors 5 combines TPU, EPU, DIGI+ Power Control, Fan Xpert 3, and Turbo App functions to push the system’s performance to its optimal potential. It automatically balances the system’s performance, power saving, levels, and fan settings via the user-friendly AI Suite 3 utility.
-
Page 148: Turbo Processing Unit (Tpu)
Turbo Processing Unit (TPU) TPU allows you to manually adjust the CPU frequency, CPU cache, core frequencies, DRAM frequency, and related voltages for an enhanced system stability and a performance boost. Refer to the CPU documentation before adjusting CPU voltage settings. Setting a high voltage may damage the CPU permanently, and setting a low voltage may lead to an unstable system.
-
Page 149: Gpu Boost
GPU Boost CPU Graphics Voltage Adjustments Click to apply the adjustments Click to undo the Click to enable the Click to load the Click to save the default settings adjustments saved profile adjustment into a profile ASUS MAXIMUS VIII RANGER 4-15…
-
Page 150: Energy Processing Unit (Epu)
Energy Processing Unit (EPU) EPU is a real-time system power-saving chip that automatically detects the current system load and intelligently moderates power usage. It offers a total system-wide energy optimization, reduces fan noise, and extends the lifespan of your hardware components. Using EPU Click to configure the settings in Max Power Saving mode…
-
Page 151: Digi+ Power Control
DIGI+ Power Control ASUS DIGI+ Power Control features the revolutionary and innovative digital VRM and DRAM Voltage controllers. These controllers offers ultra-precise memory and voltage tuning for optimal system efficiency, stability and performance. The following screens are for reference only. Configuration options varies depending on the motherboard model.
-
Page 152: Fan Xpert 3
Fan Xpert 3 ASUS Fan Xpert 3 provides customizable settings of your fans for a cooler and more quiet computing environment. With its fan Auto Tuning feature, ASUS Fan Xpert 3 automatically tweaks the settings of CPU and chassis fans to achieve their best cooling performance.
-
Page 153: Turbo App
Displays all the running applications on your system. Turbo App List pane Displays the applications added to the Turbo App List. Clieck the icon for more settings. * Only applications on the Turbo App List can be configured. ASUS MAXIMUS VIII RANGER 4-19…
-
Page 154
Ai Charger+ Ai Charger+ allows you to fast-charge your portable BC 1.1* mobile devices on your computer’s USB port three times faster than the standard USB devices**. Launching Ai Charger+ To launch Ai Charger+, click on the left of the AI Suite 3 main menu, then select Ai Charger+. -
Page 155
Boost. For more details, refer to section Rear I/O connection. • USB 3.1 Boost automatically detects the USB devices that support UASP. For a list of UASP-supported USB devices, visit the ASUS website at www.asus.com. • The data transfer speed varies with USB devices. For a higher data transfer performance, use a USB 3.1 device. -
Page 156
EZ Update EZ Update is a utility that allows you to automatically update your motherboard’s software, drivers, or BIOS. With this utility, you can also manually update the BIOS and select the boot logo that will display during POST. Launching EZ Update To launch EZ Update, click on the left of the AI Suite 3 main menu, then click EZ Update on the AI Suite 3 main menu bar. -
Page 157: System Information
AI Suite 3 main menu, then select System Information. Viewing the motherboard information Click the MB tab to view the motherboard’s information. Viewing the CPU information Click the CPU tab to view the processor’s information. ASUS MAXIMUS VIII RANGER 4-23…
-
Page 158
Viewing the SPD information Click the SPD tab to view the memory’s information. Chapter 4: Software Support 4-24… -
Page 159
AI Suite 3 main menu, then select Mobo Connect. Mobo Connect screen Set Hotkey for Keyboard/ Set Hotkey for Mouse sharing Audio Mode Select device for Select device for Click to apply the Keyboard/Mouse sharing audio Audio Mode settings ASUS MAXIMUS VIII RANGER 4-25… -
Page 160: Push Notice
Push Notice This utility allows you get the detailed status of your system to your smart device. You can also send messages to your smart device using this utility. Before using this utility, ensure that you pair your computer with your smart device. For pairing information, refer to section Pairing your computer and smart device.
-
Page 161
Tick to select the smart device Tick to select and send alerts to your smart device Tick to send alert when the selected items are back to its normal status ASUS MAXIMUS VIII RANGER 4-27… -
Page 162: Sending Messages To Your Smart Device
Sending messages to your smart device This feature allows you to send messages to your smart device. You can also send messages via the Push Notice messaging shortcut on the lower-right corner of your screen. To do this, click << then click then select Tick to select the smart device…
-
Page 163: Rog Audio Features
Sonic Studio II is an audio suite that offers six audio controls: Reverb, Bass Boost, Equalizer, Voice Clarity, Smart EQ (Smart Volume), and Surround. Surround is dedicated for 2-channel headset and offers one of the best virtual surround technology for gaming. ASUS MAXIMUS VIII RANGER 4-29…
-
Page 164
Equalizer Check this box to enable Equalizer. This item allows you to adjust the frequencies to suit your favorite type of music. Equalizer advanced settings This item available only when the Equalizer is enabled. This item allows you to configure the Equalizer settings. You can manually set or customized your setting or choose from any of the preset equalizer settings available. -
Page 165
Click the play button to start the test for the selected preset profile. Noise Gate mode Click to choose the Noise Gate mode from Auto or Manual. Manual mode allows you to use the slider to adjust the Noise Gate and Noise Reduction. ASUS MAXIMUS VIII RANGER 4-31… -
Page 166
Casting Enhancer Chapter 4: Software Support 4-32… -
Page 167: Sonic Senseamp
Amplify Level is automatically set at Performance 32 ohm Amplify Level is automatically set at Powerful 150 ohms Amplify Level is automatically set at Extreme > 150 ohms The device plugged in detected as other device Other device ASUS MAXIMUS VIII RANGER 4-33…
-
Page 168
After you close the pop-window, Sonic SenseAmp enters speaker configuration and displays the adjusted headphone impedance. Click to manually adjust the amplify level Displays the impedance of your headphone Chapter 4: Software Support 4-34… -
Page 169: Dts Connect
DTS Connect delivers excellent audio entertainment across all formats and works with 4, 5.1 and 7.1 channels of incredible surround sound . It also allows you to connect your PC to a home theatre system. Control settings panel ASUS MAXIMUS VIII RANGER 4-35…
-
Page 170: Sonic Radar Ii
Sonic Radar II Sonic Radar II is designed for First Person Shooting (FPS) games and shows the precise direction and intensity of where a sound is coming from. It features a simple and friendly user-interface and also features sound enhancers to amplify desired sound effects. Display Menu Customize the settings for each game including Transparency, Signal, Size, and Remanency.
-
Page 171
Allows you to configure the sound enhancers. Tick to choose the desired sound enhancer Audio Mode/Radar Selection are enabled with shortcut keys in the game. Refer to the Controls tab for more information about the shortcut key settings. ASUS MAXIMUS VIII RANGER 4-37… -
Page 172: Gamefirst Iii
GameFirst III GameFirst III is a network management software that features four preset packet prioritized profiles (Optimization, Game, Media Streaming and File Sharing) facilitating different user scenarios. Users can also manually allocate bandwidth and adjust priority settings of each application to run faster and smoother. To use GameFirst III, double-click on the desktop.
-
Page 173
Displays the top 5 bandwidth consuming applications currently used. Application usage Displays the individual downloading and uploading bandwidth of currently used applications. Total usage Displays the total downloading and uploading bandwidth of the currently used applications. ASUS MAXIMUS VIII RANGER 4-39… -
Page 174
Bandwidth Test You can use this feature to test the Internet Service Provider (ISP) speed or manually key in the desired uploading/downloading speed and apply the speed if needed. Key in the upload/ download speed Click to begin the speed test Click to apply the speed after manually keying in the desired speed or after you performing the speed test Using the Network Information… -
Page 175: Keybot Ii
Click to configure Macro Keys, Smart Input, Click to toggle the Function Keys, and Shortcut settings KeyBot II function on/off Click any of the items to perform a specific tasks, or click their corresponding keys on the keyboard Smart Input ASUS MAXIMUS VIII RANGER 4-41…
-
Page 176
Function Keys Shortcut Chapter 4: Software Support 4-42… -
Page 177: Asus Media Streamer
4.10 ASUS Media Streamer ASUS Media Streamer allows you to enjoy your PC’s multimedia content anywhere. You can pipe music from your PC or stream your favorite movie to a smart TV using your PC or smart device. • Ensure to enable the DLNA setting of your devices first.
-
Page 178
Adding and deleting media files Drag and drop or tick files to add or delete. Click to add or create a new folder Click to add the selected files Click to delete selected files Click to proceed with the deletion or Click to cancel changes addition of files The following media formats are supported: .3gp, .mp4, .m4a, .aac, .ts, .flac, .mp3, .mid,… -
Page 179: Ramdisk
Move the slider to the Click the drop-down right to set the size arrow to choose a drive allocation name for your RAMDisk Tick to enable Dynamic Click to finish creating Memory Allocation function the RAMDisk drive ASUS MAXIMUS VIII RANGER 4-45…
-
Page 180: Creating/Deleting A Junction Point
To delete or format an existing RAMDisk drive: Click to delete the existing RAMDisk drive Click to format the existing RAMDisk drive The format function is available only if you enable the Dynamic Memory Allocation function on your disk. Creating/Deleting a Junction Point A junction point creates a link that remaps the original contents into the RAMDisk, enabling access to the desired application or data to be done purely within the original file location.
-
Page 181
Synchronizing backup files After creating a junction point, RAMDisk automatically creates a backup folder in the file’s original location. Use RAMDisk to manually synchronize updates with these backup files. Click Synchronize to update your files ASUS MAXIMUS VIII RANGER 4-47… -
Page 182: Memtweakit
4.12 MemTweakIt MemTweakIt is a software that you can use to view all levels of memory timings. You can validate your MemTweakIt settings to generate a memory efficiency score that you can share and compare with other users on the ROG website. MemTweakIt functions depends on the chipset on the motherboard.
-
Page 183
To validate and save your configuration online: Launch MemTweakIt and click Validate. In Online Mode, key in your ASUS account ID and password, and click Submit. Your configuration will be displayed in MemTweakIt webpage. To validate and save your configuration manually: Launch MemTweakIt and click Validate. -
Page 184: Rog Cpu-Z
4.13 ROG CPU-Z This utility gathers information about the main devices installed in your system and displays it in an ROG custom layout. ROG CPU-Z provides you information and status of your CPU, motherboard, memory, graphics card, and other components installed in your system. You can generate a report about your system info and send or post it on the CPU-Z website.
-
Page 185: Ramcache
Launch RAMCache and select disk or partition to cache. Select cache size and then click Start. • You can only cache one partition at a time. • Min and Max amounts of RAM at disposal is automatically updated. ASUS MAXIMUS VIII RANGER 4-51…
-
Page 186
Chapter 4: Software Support 4-52… -
Page 187: Chapter 5: Raid Support
With the RAID 10 configuration you get all the benefits of both RAID 0 and RAID 1 configurations. Use four new hard disk drives or use an existing drive and three new drives for this setup. ASUS MAXIMUS VIII RANGER…
-
Page 188: Installing Serial Ata Hard Disks
5.1.2 Installing Serial ATA hard disks The motherboard supports Serial ATA hard disk drives. For optimal performance, install identical drives of the same model and capacity when creating a disk array. To install the SATA hard disks for a RAID configuration: Install the SATA hard disks into the drive bays.
-
Page 189: Intel ® Rapid Storage Technology Option Rom Utility
The RAID BIOS setup screens shown in this section are for reference only and may not exactly match the items on your screen. The utility supports maximum four hard disk drives for RAID configuration. ASUS MAXIMUS VIII RANGER…
-
Page 190
Creating a RAID set To create a RAID set: From the utility main menu, select 1. Create RAID Volume and press <Enter>. The following screen appears: Intel(R) Rapid Storage Technology — Option ROM — v10.5.1.1070 Copyright(C) 2003-10 Intel Corporation. All Rights Reserved. [ CREATE VOLUME MENU ] Name: Volume0… -
Page 191
WARNING: ALL DATA ON SELECTED DISKS WILL BE LOST. Are you sure you want to create this volume? (Y/N): Press <Y> to create the RAID volume and return to the main menu, or <N> to go back to the CREATE VOLUME menu. ASUS MAXIMUS VIII RANGER… -
Page 192
Deleting a RAID set Be cautious when deleting a RAID set. You will lose all data on the hard disk drives when you delete a RAID set. To delete a RAID set: From the utility main menu, select 2. Delete RAID Volume and press <Enter>. The following screen appears: [ DELETE VOLUME MENU ] Name… -
Page 193: Creating A Raid Driver Disk
When the Make Disk menu appears, press <1> to create a RAID driver disk. Insert a formatted floppy disk into the USB floppy disk drive, then press <Enter>. Follow the succeeding screen instructions to complete the process. ASUS MAXIMUS VIII RANGER…
-
Page 194: Creating A Raid Driver Disk In Windows
5.2.2 Creating a RAID driver disk in Windows ® To create a RAID driver disk in Windows ® Start Windows ® Plug the USB floppy disk drive and insert a floppy disk. Place the motherboard support DVD into the optical drive. Go to the Make Disk menu, and then click Intel AHCI/RAID Driver Disk to create a RAID driver disk.
-
Page 195: Appendix
Consult the dealer or an experienced radio/TV technician for help. The use of shielded cables for connection of the monitor to the graphics card is required to assure compliance with FCC regulations. Changes or modifications to this unit not expressly approved by the party responsible for compliance could void the user’s authority to operate this equipment. ASUS MAXIMUS VIII RANGER…
-
Page 196: Canadian Department Of Communications Statement
IC: Canadian Compliance Statement Complies with the Canadian ICES-003 Class B specifications. This device complies with RSS 210 of Industry Canada. This Class B device meets all the requirements of the Canadian interference-causing equipment regulations. This device complies with Industry Canada license exempt RSS standard(s). Operation is subject to the following two conditions: (1) this device may not cause interference, and (2) this device must accept any interference, including interference that may cause undesired operation of the device.
-
Page 197
ASUS Recycling/Takeback Services ASUS recycling and takeback programs come from our commitment to the highest standards for protecting our environment. We believe in providing solutions for you to be able to responsibly recycle our products, batteries, other components as well as the packaging materials. -
Page 198
Slovenščina AsusTek Inc. tukaj izjavlja, da je ta naprava skladna s di conformità CE. temeljnimi zahtevami in drugimi relevantnimi določili direktiv CE. Za več Компания ASUS заявляет, что это устройство соответствует основным informacij glejte Izjavo CE o skladnosti. требованиям и другим соответствующим условиям европейских… -
Page 199: Asus Contact Information
+1-510-739-3777 +1-510-608-4555 Web site http://www.asus.com/us/ Technical Support Support fax +1-812-284-0883 Telephone +1-812-282-2787 Online support http://www.service.asus.com/ ASUS COMPUTER GmbH (Germany and Austria) Address Harkort Str. 21-23, D-40880 Ratingen, Germany +49-2102-959911 Web site http://www.asus.com/de Online contact http://eu-rma.asus.com/sales Technical Support Telephone +49-1805-010923 Support Fax…
-
Page 200
Appendix…
Материнская плата ASUS MAXIMUS VIII RANGER

LGA 1151, Intel Z170, 4xDDR4-3400 МГц, 3xPCI-Ex16, аудио 7.1, Standard-ATX
подробнее

3 2
Код товара: 1028381
В представленном списке руководства для конкретной модели Материнской платы — ASUS MAXIMUS VIII RANGER. Вы можете скачать инструкции к себе на компьютер или просмотреть онлайн на страницах сайта бесплатно или распечатать.
- Инструкции и файлы
- Характеристики
- Основные поломки
- Сервисы по ремонту
В случае если инструкция на русском не полная или нужна дополнительная информация по этому устройству, если вам нужны
дополнительные файлы: драйвера, дополнительное руководство пользователя (производители зачастую для каждого
продукта делают несколько различных документов технической помощи и руководств), свежая версия прошивки, то
вы можете задать вопрос администраторам или всем пользователям сайта, все постараются оперативно отреагировать
на ваш запрос и как можно быстрее помочь. Ваше устройство имеет характеристики:Socket: LGA1151, Поддерживаемые процессоры: Intel Core i7/Core i5/Core i3/Pentium/Celeron, Поддержка многоядерных процессоров: есть, Чипсет: Intel Z170, BIOS: AMI, Поддержка EFI: есть, полные характеристики смотрите в следующей вкладке.
Для многих товаров, для работы с ASUS MAXIMUS VIII RANGER могут понадобиться различные дополнительные файлы: драйвера, патчи, обновления, программы установки. Вы можете скачать онлайн эти файлы для конкретнй модели ASUS MAXIMUS VIII RANGER или добавить свои для бесплатного скачивания другим посетителями.
Если вы не нашли файлов и документов для этой модели то можете посмотреть интсрукции для похожих товаров и моделей, так как они зачастую отличаются небольшим изменениями и взаимодополняемы.
Обязательно напишите несколько слов о преобретенном вами товаре, чтобы каждый мог ознакомиться с вашим отзывом или вопросом. Проявляйте активность что как можно бльше людей смогли узнать мнение настоящих людей которые уже пользовались ASUS MAXIMUS VIII RANGER.

Александр
2018-06-12 23:05:05
Горит белый светодиод и нет изображения
Denis
2019-04-07 09:34:20
Все Ok
Jklsow kikeje
2019-04-14 13:13:48
Jkifjfidjdo
не врубается, горит кнопка старт
Алекс
2019-10-15 22:55:20
не включается, часто моргает кнопка старт
шшщ
Основные и самые важные характеристики модели собраны из надежных источников и по характеристикам можно найти похожие модели.
| Процессор | |
| Socket | LGA1151 |
| Поддерживаемые процессоры | Intel Core i7/Core i5/Core i3/Pentium/Celeron |
| Поддержка многоядерных процессоров | есть |
| Чипсет | |
| Чипсет | Intel Z170 |
| BIOS | AMI |
| Поддержка EFI | есть |
| Поддержка SLI/CrossFire | SLI/CrossFireX |
| Память | |
| Память | DDR4 DIMM, 2133 — 3400 МГц |
| Количество слотов памяти | 4 |
| Поддержка двухканального режима | есть |
| Максимальный объем памяти | 64 Гб |
| Дисковые контроллеры | |
| IDE | нет |
| SATA | количество разъемов SATA 6Gb/s: 2, RAID: 0, 1, 5, 10 на основе Intel Z170 |
| Количество разъемов SATA Express | 2 |
| Количество слотов M.2 | 1 |
| Тип слотов M.2 | Socket 3, M Key, type 2242/2260/2280/22110 |
| Слоты расширения | |
| Слоты расширения | 3xPCI-E x16, 3xPCI-E x1 |
| Поддержка PCI Express 2.0 | есть |
| Поддержка PCI Express 3.0 | есть |
| Поддерживаемые режимы PCI-Express | dual: x8 |
| Аудио/видео | |
| Звук | 7.1CH, HDA, на основе SupremeFX 2015 |
| Сеть | |
| Ethernet | 1000 Мбит/с, на основе Intel I219V |
| Подключение | |
| Наличие интерфейсов | 16 USB, из них 6 USB 3.0 (2 на задней панели), 2 USB 3.1 (2 на задней панели), выход S/PDIF, HDMI, Ethernet, PS/2 (клавиатура), PS/2 (мышь) |
| Разъемы на задней панели | 8 USB, из них 2 USB 3.0, оптический выход, DisplayPort, HDMI, Ethernet, PS/2 (клавиатура), PS/2 (мышь) |
| Основной разъем питания | 24-pin |
| Разъем питания процессора | 8-pin |
| Тип системы охлаждения | водяное активное |
| Дополнительные параметры | |
| Форм-фактор | ATX |
| Комплектация | заглушка тыловых портов корпуса, 4 кабеля SATA, 1 винт для сокета M.2, инструмент для установки CPU, мостик SLI, Q-коннектор, метки ROG |
| Дополнительная информация | 2 порта SATA Express совместимы с 4 портами SATA 6.0 Gb/s |
Здесь представлен список самых частых и распространенных поломок и неисправностей у Материнских плат. Если у вас такая поломка то вам повезло, это типовая неисправность для ASUS MAXIMUS VIII RANGER и вы можете задать вопрос о том как ее устранить и вам быстро ответят или же прочитайте в вопросах и ответах ниже.
| Название поломки | Описание поломки | Действие |
|---|---|---|
| Разрыв Печатных Проводников | ||
| Обрыв Конденсаторов Или Резисторов | ||
| Короткое Замыкание В Электрических Цепях | ||
| Разрушение Разъемов И Слотов | ||
| Поломка Процессорного Разъема | ||
| Выгорание Портов | ||
| Микротрещины В Плате | ||
| Выход Из Строя Сетевого Адаптера | ||
| Перегрев Компонентов | ||
| Не Запускается При Включении | При Включении Не Загружается. В Биос Не Входит. Пост Код — А3 | |
| Какой Компонент | Подскажите Марку Траyзистора Q46? | |
| Не Работает Ps/2 | Сначала Отвалилась Клавиатура, А Через Некоторое Время 6 Коротких Гудков И Не Запускается | |
| Подключить Переднюю Панель | Не Могу Подключить Переднюю Панель | |
| Судя По Всему Отвал Биоса | Материнка Стартует Секунд На 5,Кулер Процессора Берет Обороты И Останавливается.и Так-Циклически,Без Остановок.запуск Невозможен.вечером Либо Завтра Буду Пытаться Его Восстановить,Потом Может Дополню | |
| Пропал Звук На Материнке | Пропал Звук На Материнке, Отображается Только Nvidia Hdmi. Переустановка Драйверов С Офсайта Не Помогла. | |
| Биос | При Старте Звук Через Промежетки Времени Примерно В 1-3 Мин Три Сигнала Потом Стартует Винда , Недавно Вообще Написал Cmos Setting Wrong И C7, Жму Del Меняется На B2 Чтоб Воити В Биос Три Сигнала По Одному Через Промеежутки Времени 1-3 Мин И Черный Экра | |
| Asus M2A-Vm Hdmi | Не Запускается Процессор Phenom Ii X4 945 Rev. C3, На Socket-Ам 3, Нет Даже Сигнала, Черный Экран | |
| Не Включается | После Замены Конденсаторов С34 И С35 Не Включается | |
| Черный Экран | Все Уже Перепробовал И Озу Менял И Переставлял И Ластиком Чистил, И Батарейку Вынимал И Измерял, И Видеокарту С Бп На Заведомо Годную Ставил Исход Один, Черный Экран И Speaker Издает 1 Длинный 2 Коротких, Если Я Не Путаю. | |
| Неправильно Отображается Память | При Установленной Памяти 4 Гигабайта В Биосе Отображается 8. Установил Одну Планку 2 Гига — Отображается 4 | |
В нашей базе сейчас зарегестрированно 18 353 сервиса в 513 города России, Беларусии, Казахстана и Украины.

КОМПЬЮТЕРНАЯ СЛУЖБА СПАСЕНИЯ 911
⭐
⭐
⭐
⭐
⭐
Адресс:
пр-т Будённого, д. 53, стр. 2
Телефон:
74957403924
Сайт:
n/a
Время работы
Ежедневно: с 1000 до 2000
РЕМОНТ НОУТБУКОВ
⭐
⭐
⭐
⭐
⭐
Адресс:
Варшавское шоссе 132А
Телефон:
74957259053
Сайт:
n/a
Время работы
Время работы не указано
АМПЕРВОЛЬТ
⭐
⭐
⭐
⭐
⭐
Адресс:
Сокольническая Слободка ул., д.10
Телефон:
74957965532
Сайт:
n/a
Время работы
Время работы не указано
СЕРВИС СЛАИР
⭐
⭐
⭐
⭐
⭐
Адресс:
маршала федоренко д.7
Телефон:
79778029960
Сайт:
n/a
Время работы
Будни: с 1000 до 1800
Суббота: с 1000 до 1500
Воскресенье: выходной
MOSPLAZMA
⭐
⭐
⭐
⭐
⭐
Адресс:
ул. Юных Ленинцев, д.57, корп.1
Телефон:
74952122359
Сайт:
n/a
Время работы
Будни: с 1000 до 1900
Суббота: с 1000 до 1800
Воскресенье: с 1100 до 1800
ASUS MAXIMUS VIII RANGER — обзор материнской платы
6:42
Очень доволен
хочу
авпваы
Хочу купить
ирлдоьвап ькеьпрлджыкеь дзьакерджь щзрбкежбрь апкыезрбкыеджрбеджр щзапбкерл
Только приобрела,а инструкции нет
Только приобрела,а инструкции нет
Отвалился распрыскиватель
Содержание
- Обзор и тест материнской платы ASUS MAXIMUS VIII RANGER
- Спецификация
- Упаковка и комплектация
- Внешний вид и особенности платы
- Настройки UEFI BIOS
- Фирменные утилиты
- Конфигурация тестового стенда
- Разгон и тестирование
- Заключение
Обзор и тест материнской платы ASUS MAXIMUS VIII RANGER

Материнские платы ASUS пользуются заслуженной популярностью во всем мире и на то есть веские причины. Данная компания обладает впечатляющим ассортиментом из самых разнообразных моделей, начиная от бюджетных и заканчивая самыми продвинутыми. Благородя этому, производитель успешно конкурирует на рынке в различных ценовых сегментах. Также, не мало внимания уделяется и игровой тематике, будь то расширенная функциональность или какая-то геймерская атрибутика. С появлением процессоров Intel Skylake, ASUS пополнила специализированную серию ROG несколькими моделями, одну из которых мы сегодня и рассмотрим.
Спецификация
- Производитель: ASUS;
- Модель: MAXIMUS VIII RANGER;
- Сокет: LGA1151;
- Поддерживаемые процессоры: Core i7/Core i5 (Skylake-S);
- Чипсет: Intel Z170;
- Память: 4 x DIMM, до 64GB, DDR3;
- Слоты расширения: 2 x PCIe 3.0/2.0 x16 (x8+x8), 1 x PCIe 3.0/2.0 x16 (x4), 3 x PCIe 3.0/2.0 x1;
- Поддержка SATA/RAID: чипсет 6 x SATA 6Gb/s портов с поддержкой Raid 0, 1, 5, 10; 2x SATA Express port, M.2 Socket 3 (тип 2242/2260/2280/22110);
- Сетевой контроллер: Intel I219V;
- Аудиокодек: ROG SupremeFX 2015;
- Порты USB: 1 × USB 3.1(Type-A), 1 × USB 3.1(Type-C), 6 × USB 3.0, 8 × USB 2.0;
- Питание материнской платы: 24 + 8 pin;
- Разъемы на задней панели: PS/2, 7 × USB, кнопка BIOS Flashback, HDMI, DisplayPort, USB 3.1(Type-C), Ethernet, оптический выход, 5 × аудио разъёмов;
- Форм-фактор: ATX;
- Цена: 14000 руб.
Упаковка и комплектация
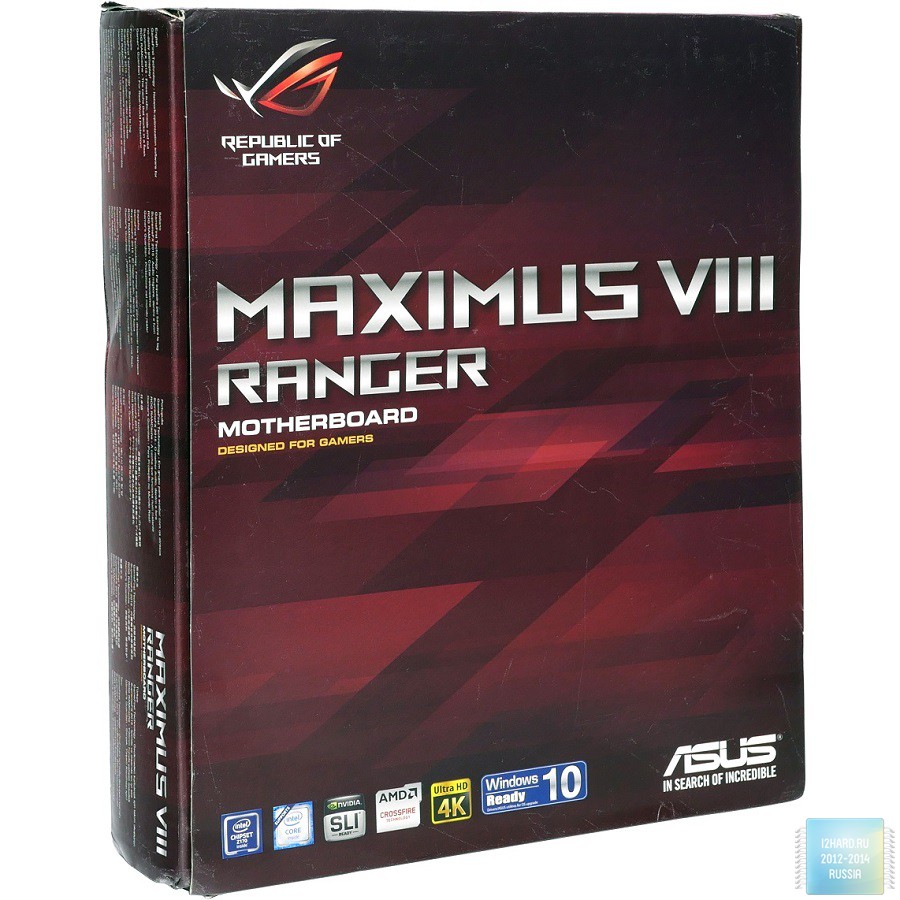
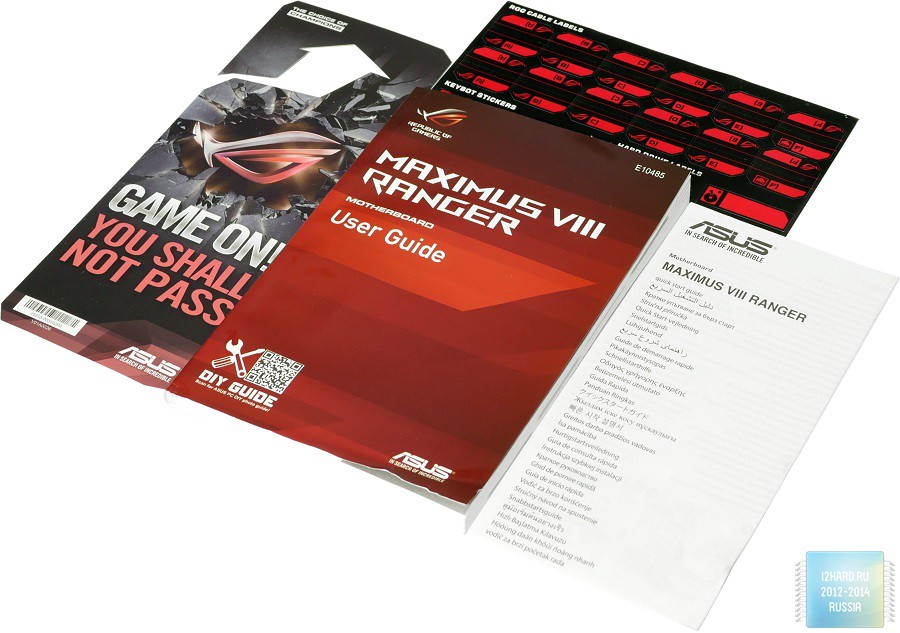
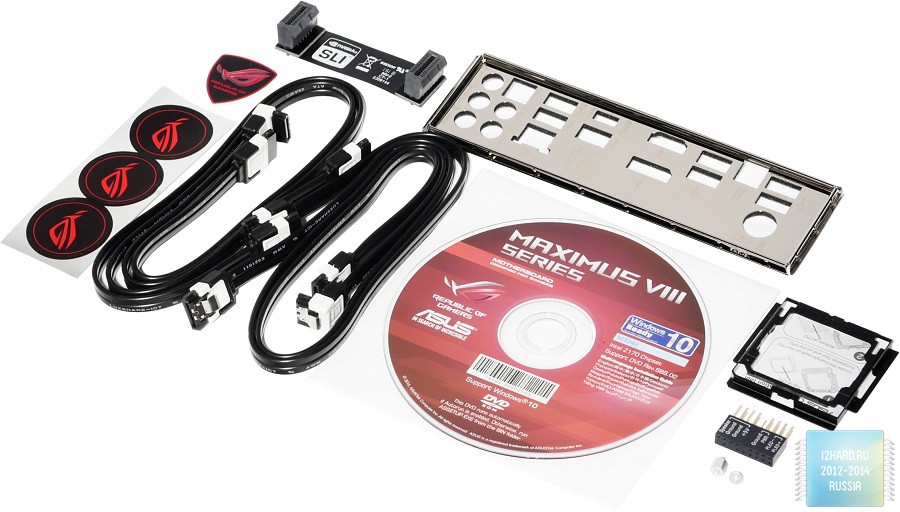
Все материнские платы относящиеся к премиум серии ROG обладают схожим оформлением упаковки. На темно-красном фоне красуется наименование модели, а на обратной части указан ряд ключевых особенностей: звуковая подсистема ROG SupremeFX 2015, наличие портов USB 3.1 (Type-A/ Type-C) и поддержка функции Keybot II. Здесь вы также найдете подробное описание функционала платы и всех портов задней панели, а для получения более полной сводки можно воспользоваться QR-кодом.
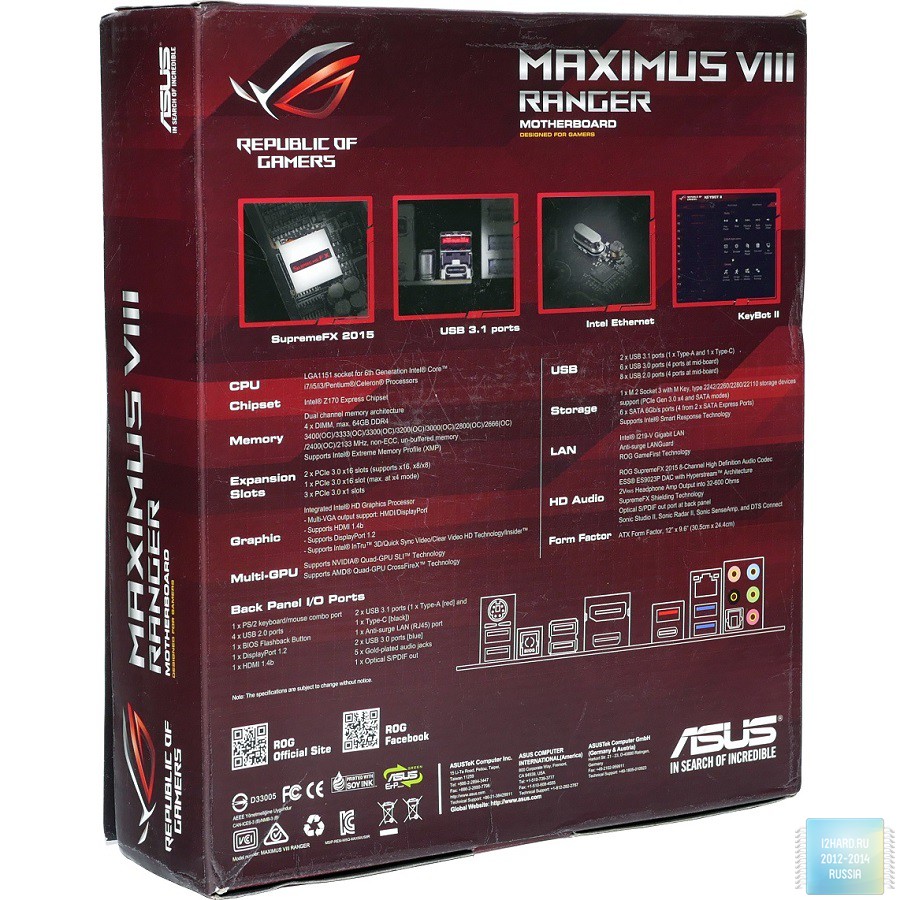
Но и на этом еще на все, ведь лицевая часть коробки открывается и позволяет получить еще больше информации по нашей плате. Основной упор сделан на указание составных частей аудио подсистемы, поддержку фирменных технологий на базе сетевого адаптера Intel и описании возможностей Keybot II. Не мало внимания уделено описанию надежности устройства, что достигается благодаря использованию высококачественных компонентов. Если вам и этого мало, то на изображении материнской платы можно ознакомиться с расположением разъемов, портов и всевозможных кнопок.
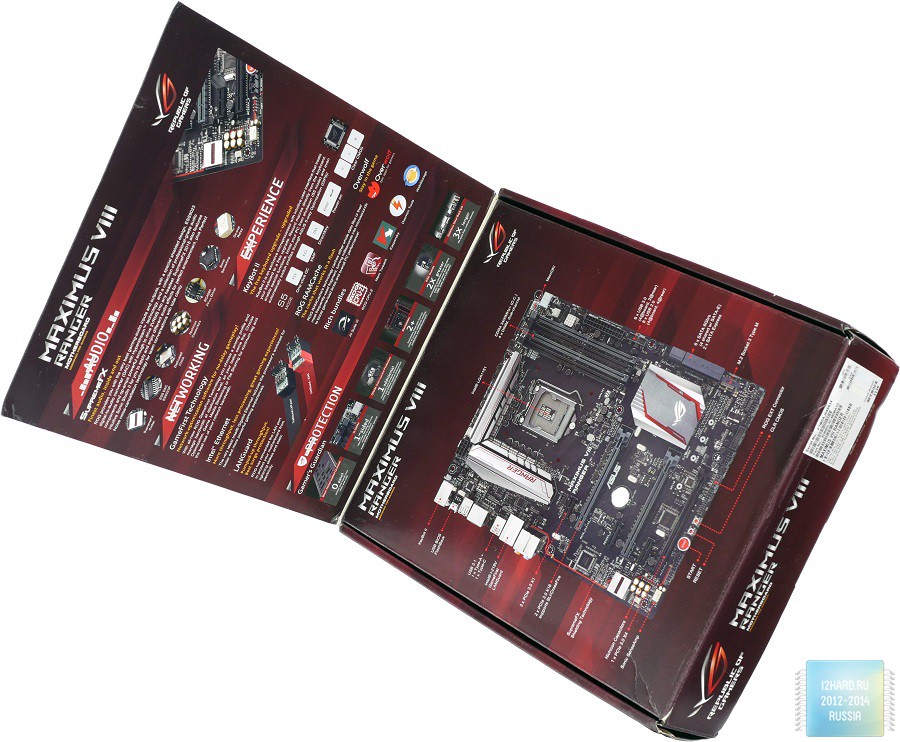
Перечислим типовой комплект ASUS MAXIMUS VIII RANGER:
- Подробное руководство пользователя и прочая документация;
- Набор стикеров для SATA кабелей и клавиатуры;
- Табличка на дверь «Game ON! You shall not pass»;
- Мостик SLI;
- Заглушка на заднюю панель корпуса;
- Фирменная эмблема и три наклейки тематики ROG;
- Четыре кабеля SATA 6 Гбит/с;
- Диск с драйверами и утилитами;
- Вспомогательная рамка для безопасной установки процессора;
- Q-коннектор для подключения кабелей с передней панели;
- Болтик для фиксации платы в разъеме M.2.
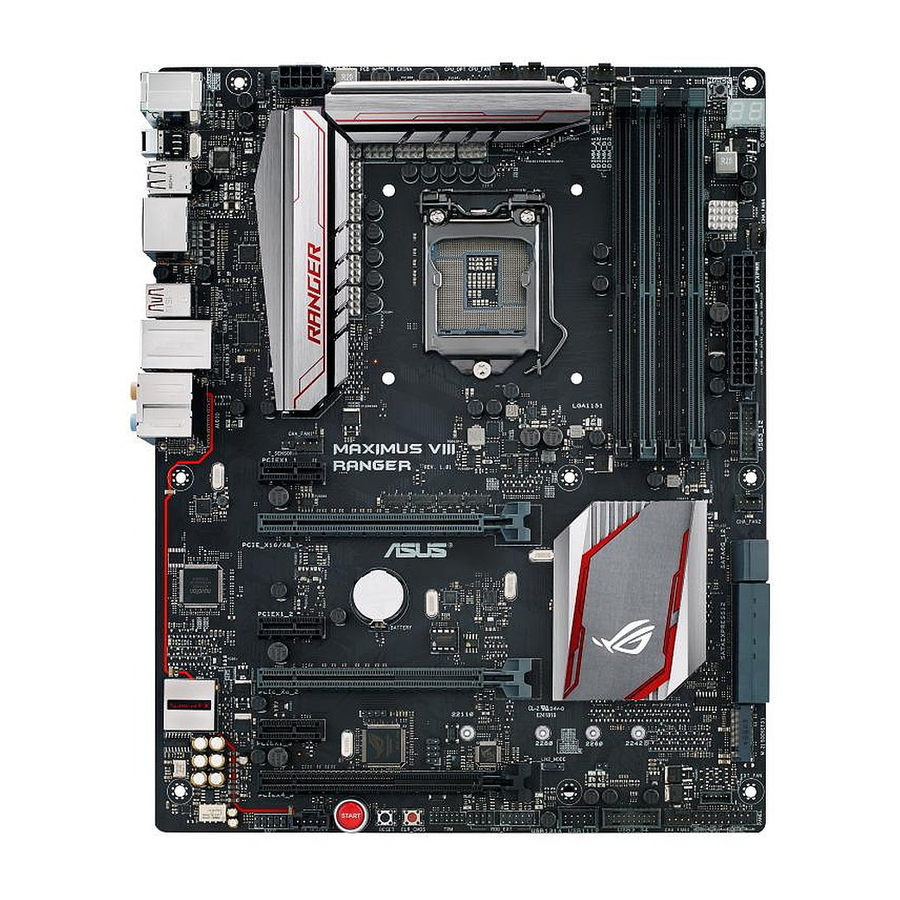
Внешний вид и особенности платы
Что же мы видим на примере ASUS MAXIMUS VIII RANGER? Отличный дизайн, который базируется на сочетании черного текстолита со стильными радиаторами. Несмотря на принадлежность к такой выдающейся серии, форм-фактор платы подчиняется классическим канонам ATX (305 х 244 мм). Все это способствует совместимости материнской платы с любой производительной конфигурацией.
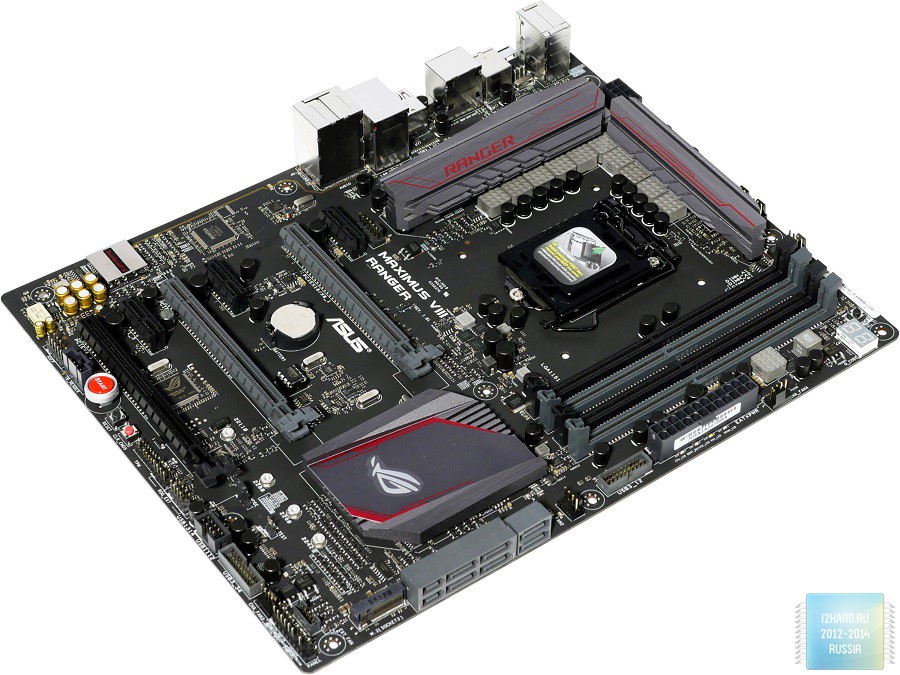
Производитель старается придерживаться концепции DIY (Do It Yourself). Поэтому, весь набор разъемов, всевозможных портов и кнопок расположен таким образом, чтобы максимально облегчить сборку ПК и сделать удобным процесс дальнейшей эксплуатации устройства.
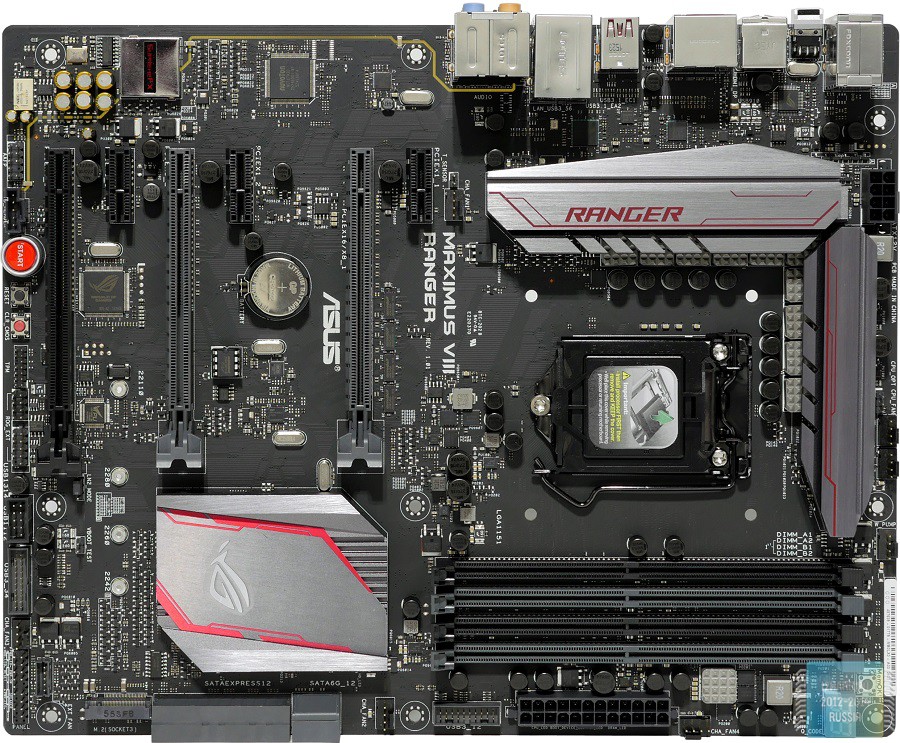
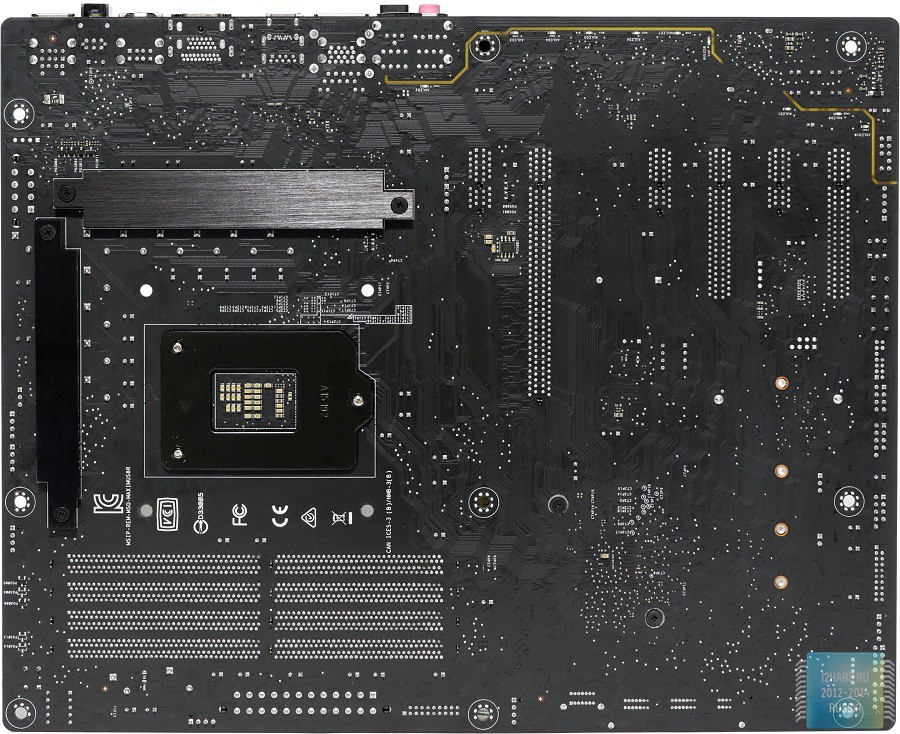
Перейдём к интерфейсной панели, которая включает в себя:
- 1 x PS/2 для подключения мыши/клавиатуры;
- 2 x USB 2.0;
- Кнопка BIOS Flashback (обновление БИОСа с USB-носителя через специальный порт);
- 2 x USB 2.0;
- 1 x DisplayPort;
- 1 x HDMI;
- 1 x USB 3.1 (Type-A);
- 1 x USB 3.1 (Type-C);
- 1 x LAN (RJ45);
- 2 x USB 3.0;
- 1 x оптический выход;
- 5 x аудио разъемов.
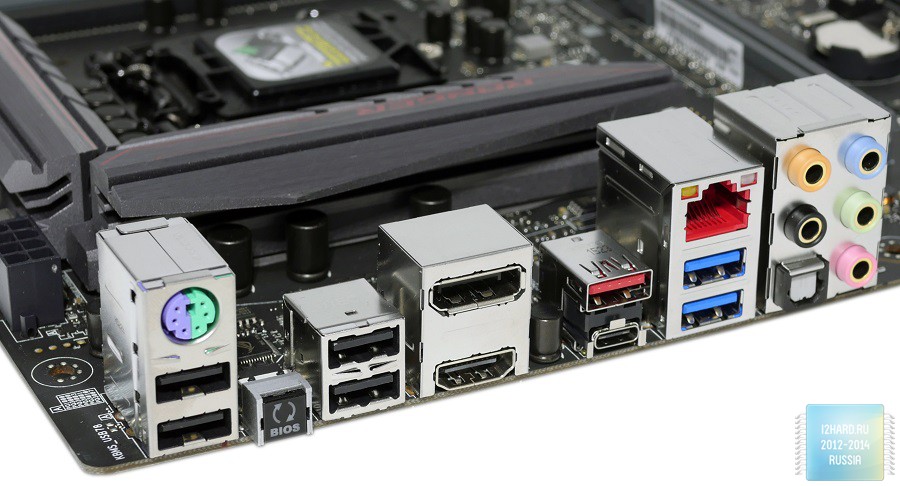
Для дополнительного питания предусмотрено наличие коннектора 8-пин.
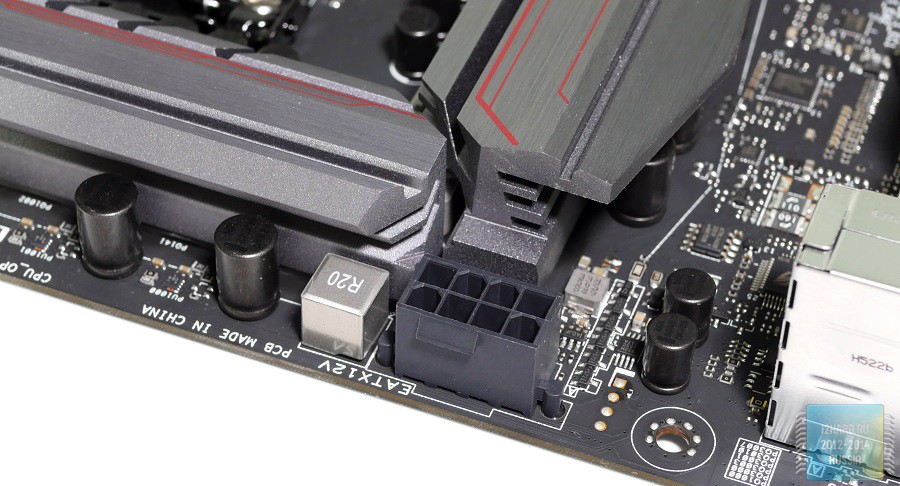
Далее видим 4-х штырьковые коннекторы CPU_OPT, CPU_FAN для подключения процессорного кулера и W_Pump для питания помпы СВО. Немного левее расположены элементы с обозначением PA102FDG — это P-канальные полевые транзисторы с управлением логическим уровнем, что позволяет напрямую управлять транзистором без дополнительных драйверов. Благодаря их наличию, через ASUS Fan Xpert 3 выполняется автоподстройка вентиляторов.
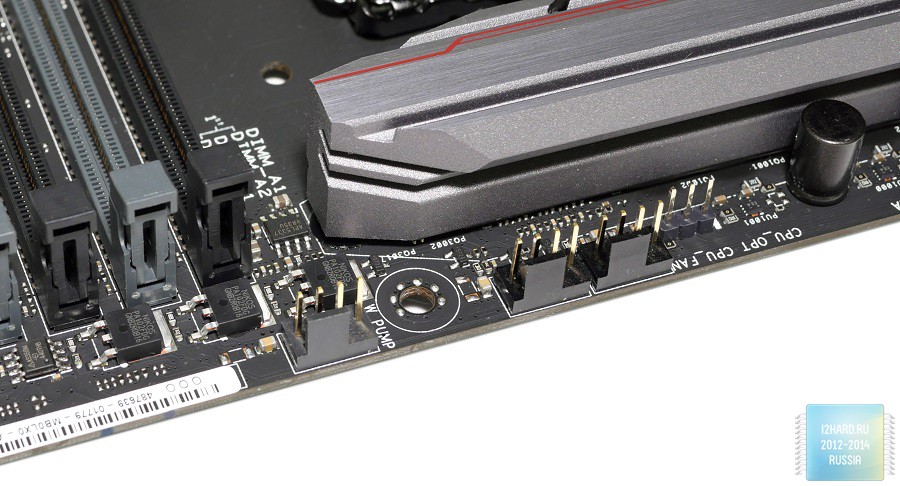
Для оперативной памяти доступно 4 слота с возможностью установки до 64 Гб. Заявлена поддержка широкого спектра частот от 2133 МГц до «заоблачных» 3400 МГц в режиме разгона. Защелка на каждом слоте только одна, с другой стороны предусмотрен фиксатор. Подобный подход существенно облегчает установку оперативной памяти, достаточно вспомнить ситуацию, когда установленная видеокарта блокировала нижние защелки.
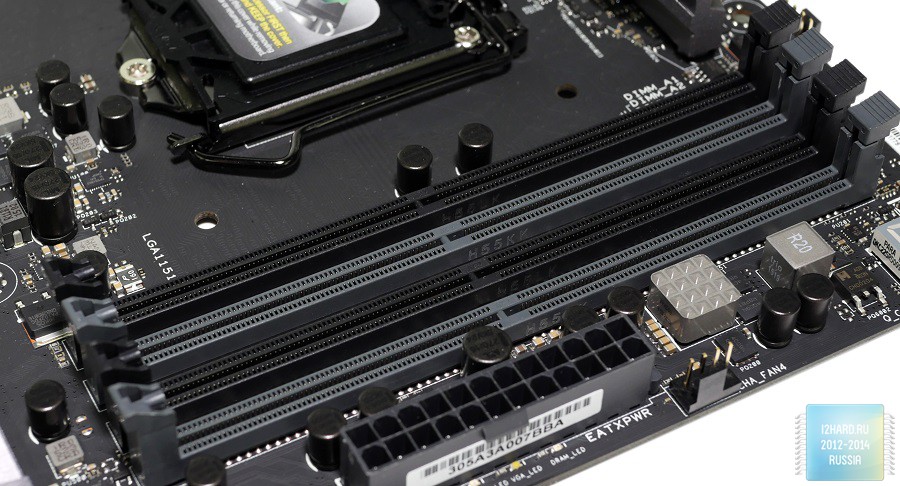
Рядом с кнопкой MemOK! расположен цифровой дисплей POST-кодов. Элементы с маркировкой NTMFS4C09N это силовые транзисторы компании On Semiconductor, а под маркировкой AS358M скрываются два маломощных операционных усилителя. Кроме того, рядом находится 4-х контактный разъем CHA_FAN4 для подключения корпусного вентилятора.
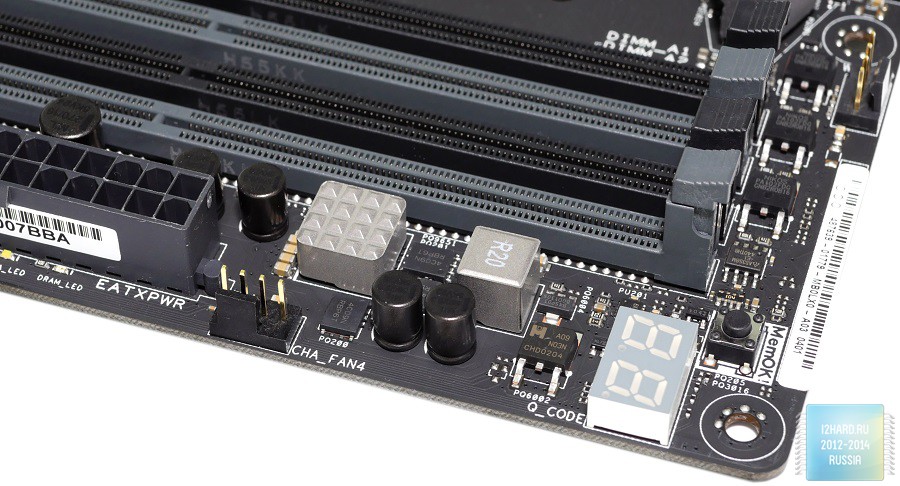
Около коннектора на 24-пин расположен разъем для вывода двух портов USB 3.0 на переднюю панель и 4-х контактный разъем CHA_FAN2 для подключения корпусного вентилятора. Также, отмечу наличие индикаторов CPU/DRAM/VGA/BOOT_DEVICE, которые пригодятся для выявления неисправности при начальной инициализации системы.
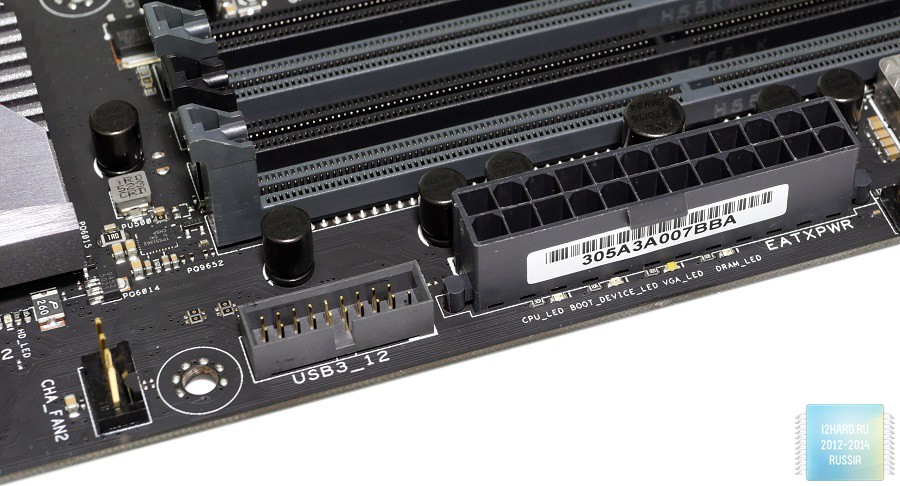
Все шесть портов SATA 6 Гбит/с базируются на интегрированном в родной чипсет контроллере. При этом, два из них отдельные, а четыре оставшихся входят в состав двух SATA Express. Заявлена поддержка Raid 0, 1, 5, 10.
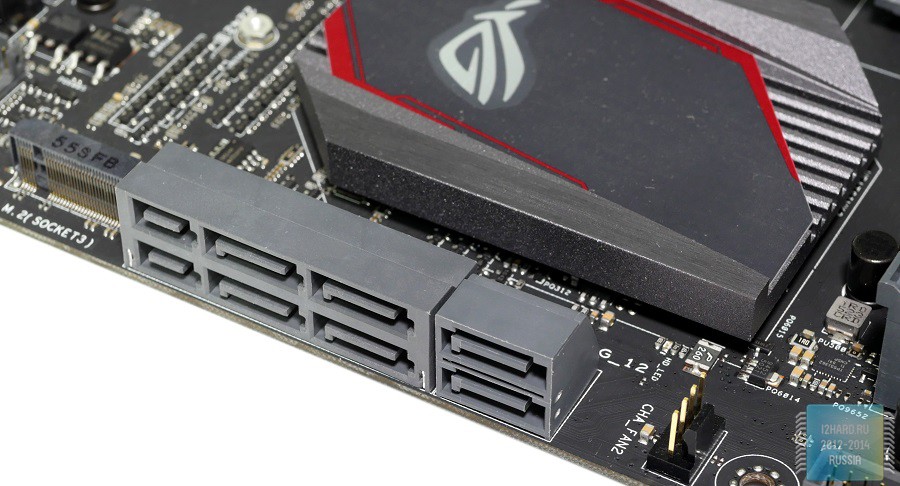
Чуть ниже радиатора находится разъем M.2, который позволяет подключать совместимые устройства различного типоразмера (2242/2260/2280/22110).
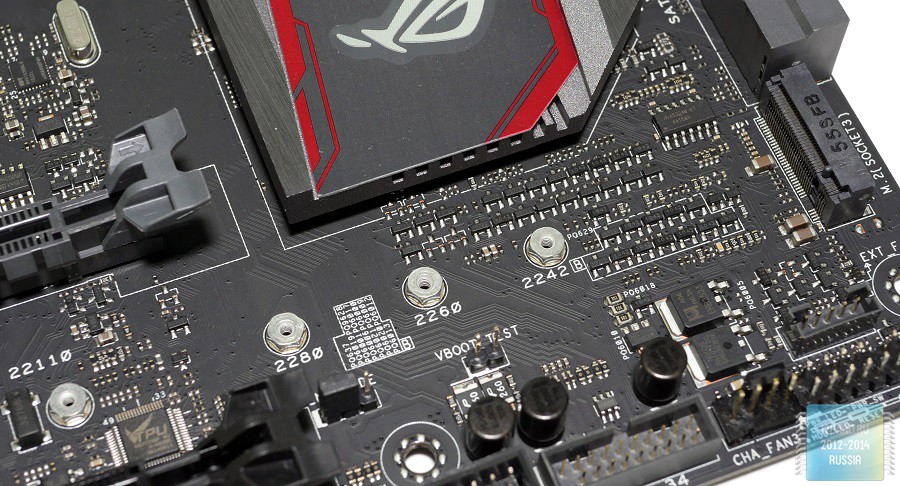
На нижней кромке справа расположено:
- Panel – подключение коннекторов корпусной панели;
- EXT_FAN – разъем для Fan Extension Card (плата с дополнительными портами под вентиляторы);
- CHA_FAN3 – разъем для вентилятора;
- USB3_34 – коннектор USB 3.0;
- USB1314/USB1112 – коннекторы USB 2.0;
- ROG_EXT – порт для подключения ASUS ROG панелей.
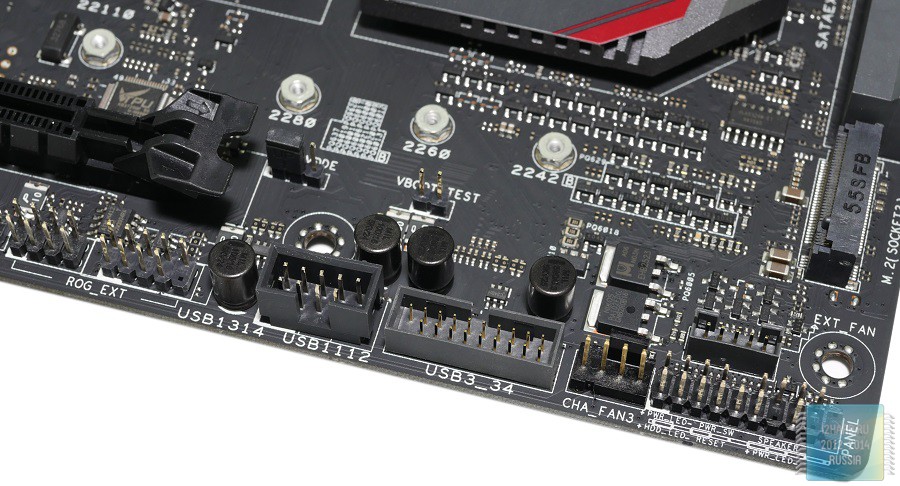
Здесь же находится VBOOT_TEST и LN2_Mode, который служит для устранения Cold Bug.
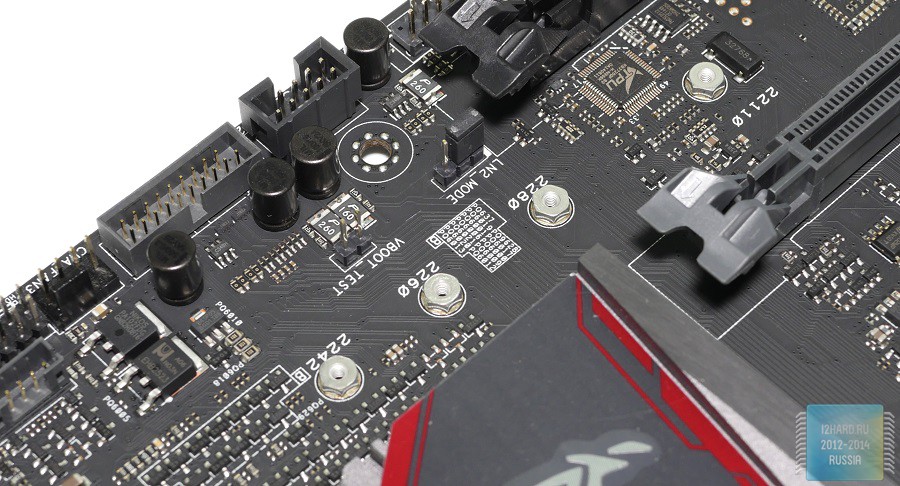
На нижней кромке слева можно обнаружить:
- TPM – разъем для TPM модуля (повышение безопасности системы);
- CLR_CMOS – полный сброс всех настроек БИОС;
- RESET – кнопка перезагрузки системы;
- START – кнопка включения системы;
- TB_Header – необходим для подключения фирменной платы расширения ThunderboltEX;
- AAFP – вывод звука не переднюю панель.
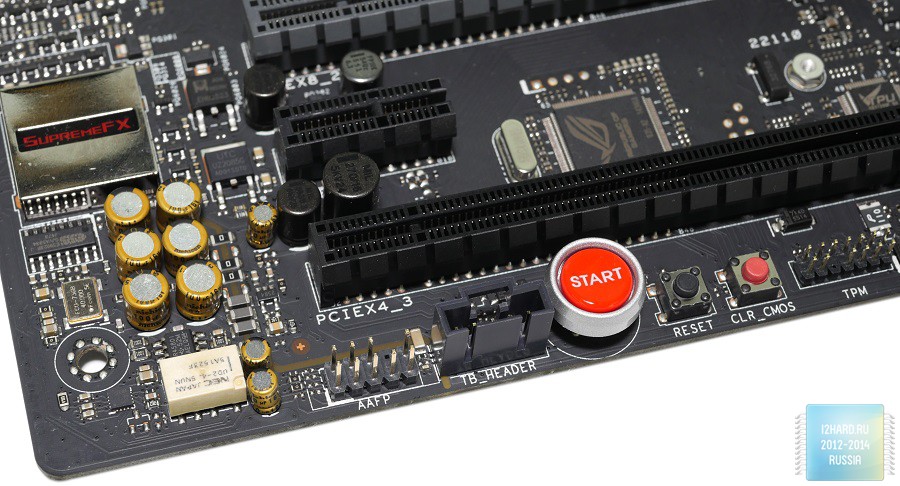
Под кожухом с надписью SupremeFX спрятан восьмиканальный звуковой аудиокодек Realtek ALC1150. Чуть ниже расположен элемент TI R4580I, который представляет собой сдвоенный операционный усилитель специально предназначенный для работы со звуковым диапазоном. Итоговую картину дополняют аудио-конденсаторы компании Nichicon и ЦАП ESS ES9023P.
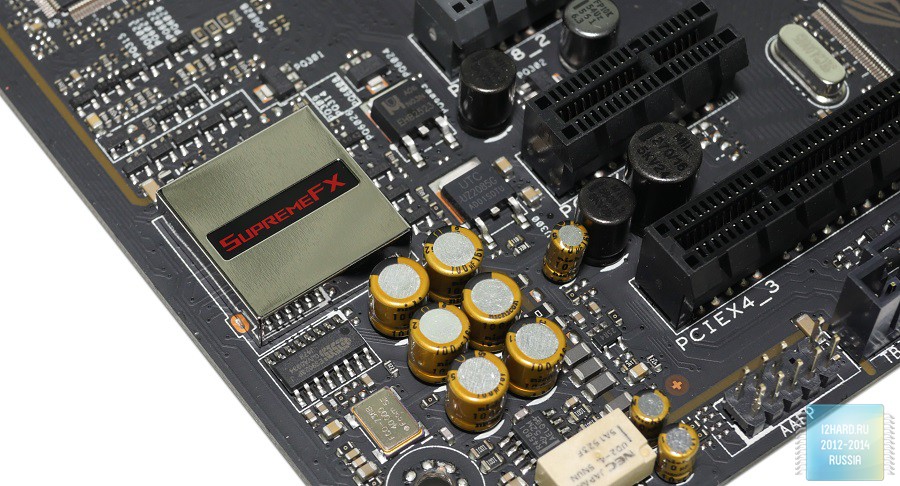
Контроллер с ROG 035-A2 необходим для использования специализированных функциональных панелей.
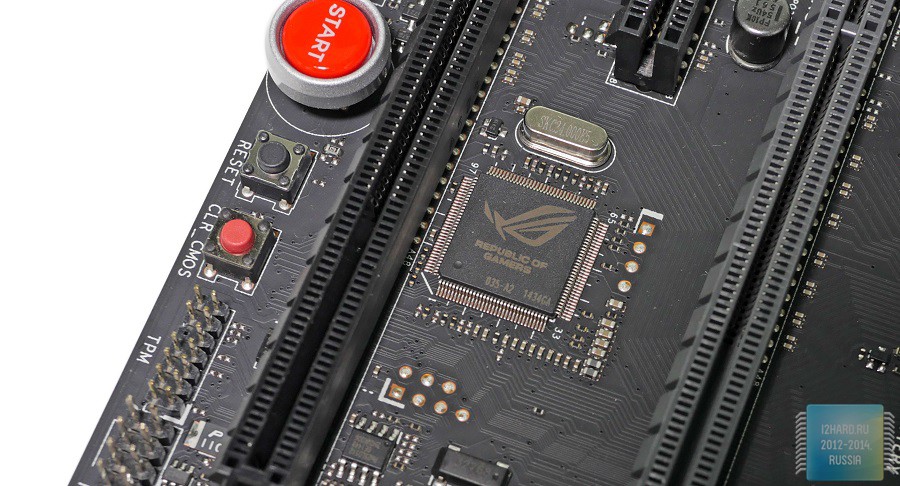
Микросхема TPU (TurboV Processing Unit) – отвечает за функцию автоматического разгона процессора. Левее расположена микросхема BIOS и флеш память с обозначением Winbound W25Q128FV. Чуть выше находится элемент с маркировкой IDT 6V41538NLG – представляет собой генератор тактовой частоты, на базе которого реализована технология ASUS PRO Clock. Благодаря этому появляется возможность разгонять процессор повышая значение шины BLCK.
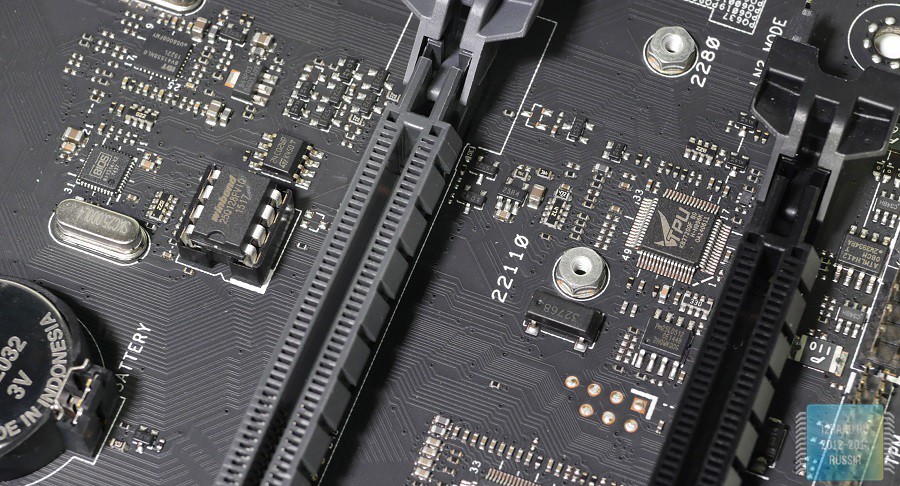
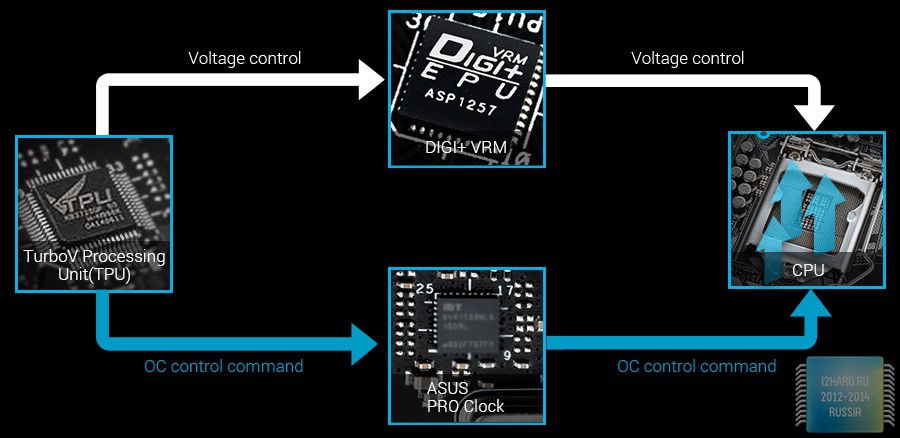
Для плат расширения предусмотрено 2 x PCIe 3.0/2.0 x16 (x8+x8), 1 x PCIe 3.0/2.0 x16 (x4), 3 x PCIe 3.0/2.0 x1. Поддержка NVIDIA SLI и AMD CrossFireX позволит создавать конфигурации с несколькими графическими ускорителями. Приятным моментом здесь является то, что можно использовать две трёхслотовые видеокарты и при этом останется еще один слот для установки звуковой карты или другой платы расширения.
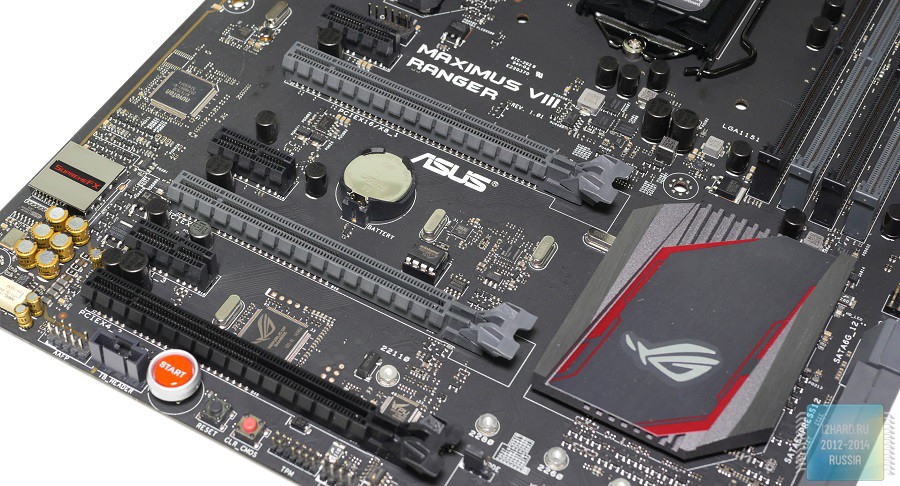
За распределение пропускной способности шин PCI-e ответственны специализированные мультиплексоры ASM1480 производства ASMedia.
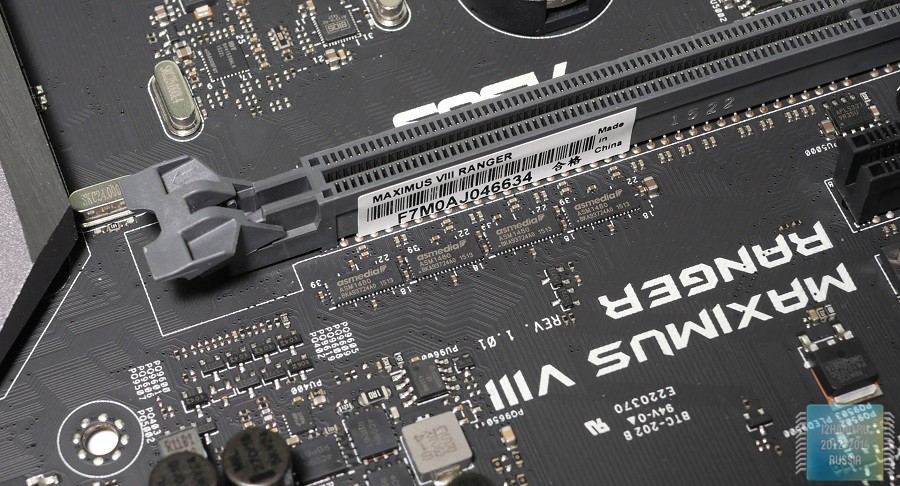
Неподалеку от интегрированного звукового кодека распаян контроллер Nuvoton NCT6793D, который отвечает за работу устройств ввода/вывода и системный мониторинг.
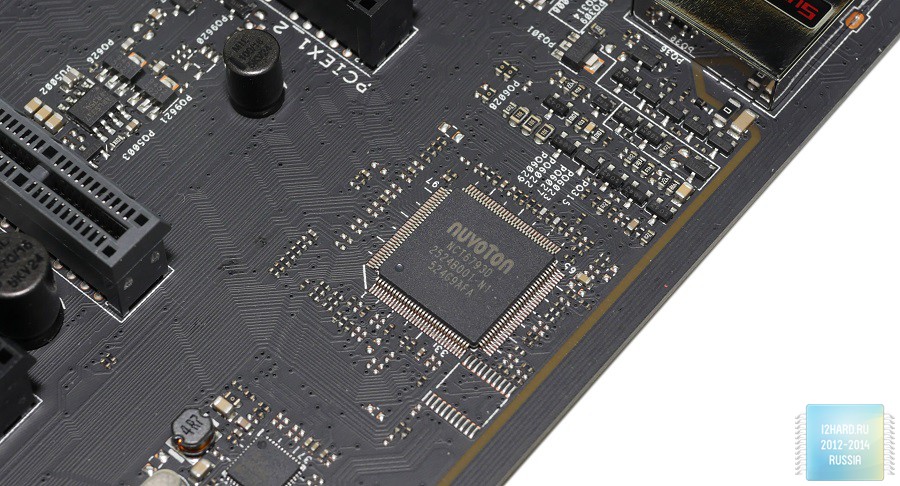
В качестве сетевого контроллера используется Intel I219V.
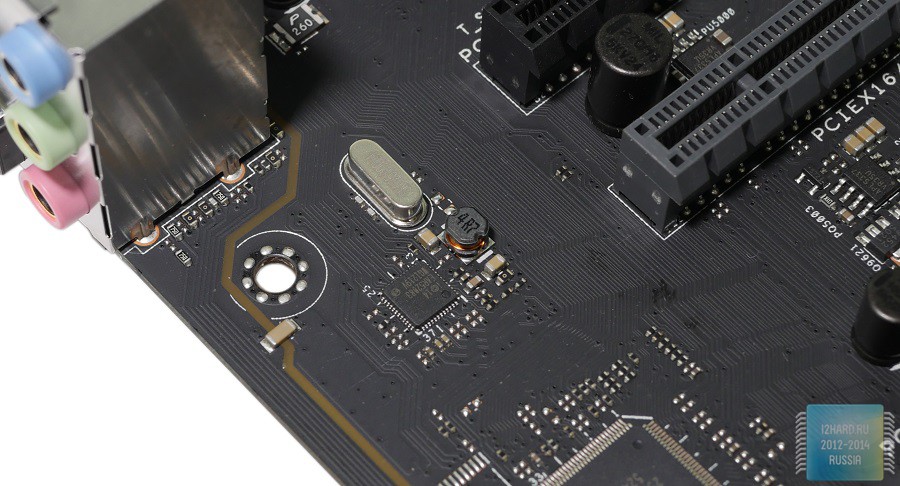
Вблизи слота PCIe x1 расположен 4-х контактный разъем для вентилятора CHA_FAN1 и 2-х контактный разъем T_Sensor для подключения кабеля с термистором.
За охлаждение чипсета и силовых транзисторов отвечают соответствующие радиаторы. Два радиатора расположенные в околосокетном пространстве и радиатор для системной логики Z170 посажены на шурупы. Для более эффективной теплопередачи используются специальные термопрокладки.
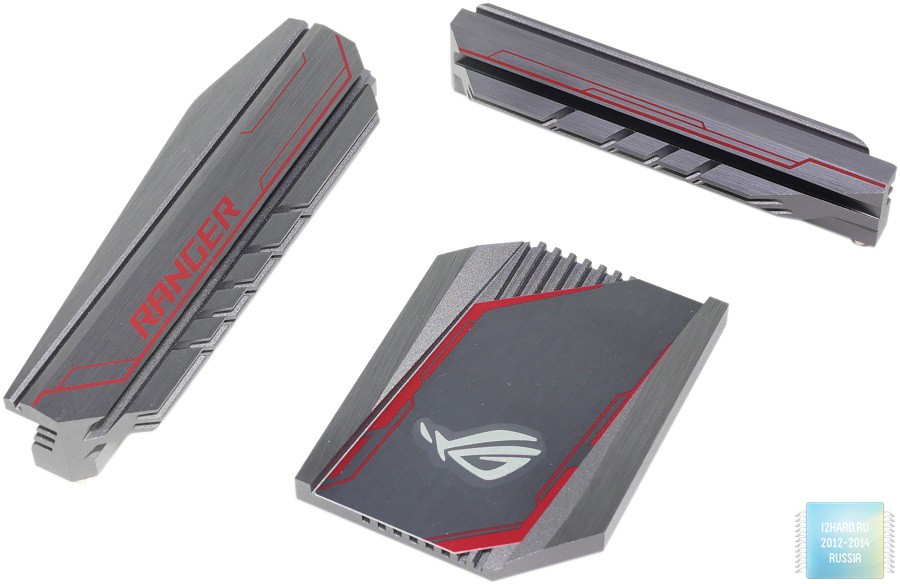
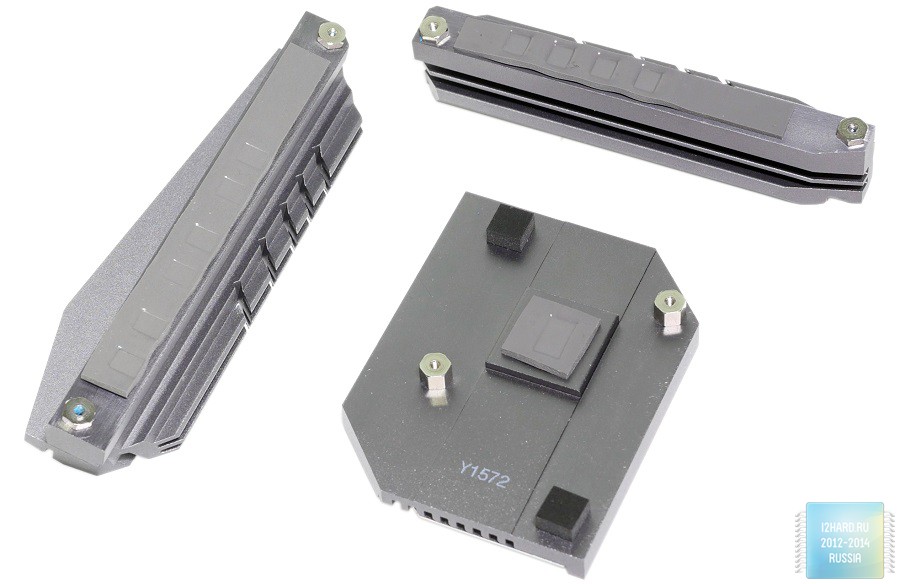
Новейший набор системной логики Intel Z170 визуально мало чем отличается от того же Intel Z97. Важной особенностью в данном случае является то, что контроллер напряжения питания для процессоров перенесён на материнскую плату, что безусловно оценят любители разгона.
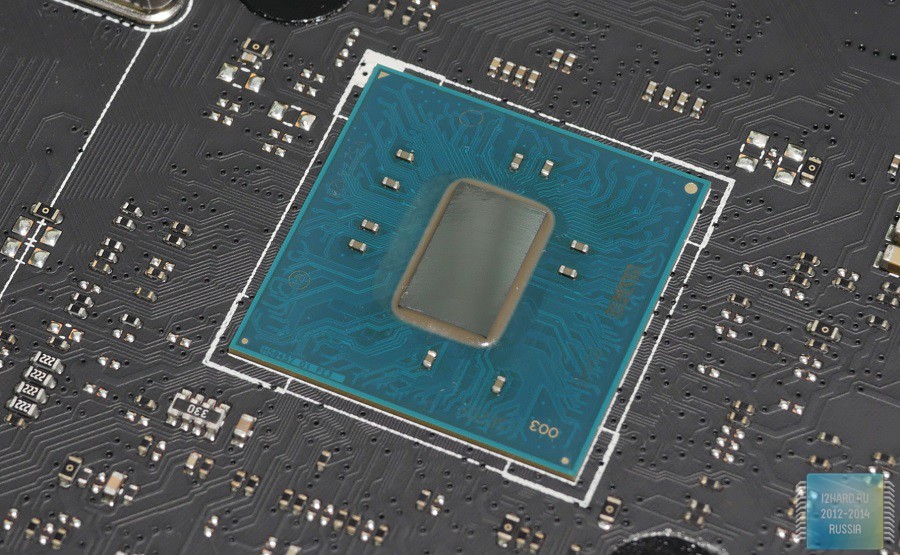
Наличие портов стандарта USB 3.1 обеспечено сторонним контроллером ASMedia с маркировкой ASM1142. Совсем рядом можно обнаружить микросхему Etron EJ179V, которая ответственна за реализацию коннектора USB 3.1 (Type-C). Правее распаян чип ASM1442K, который выполняет функцию преобразователя сигнала и ответственен за переключение между видеовыходами HDMI и DisplayPort.
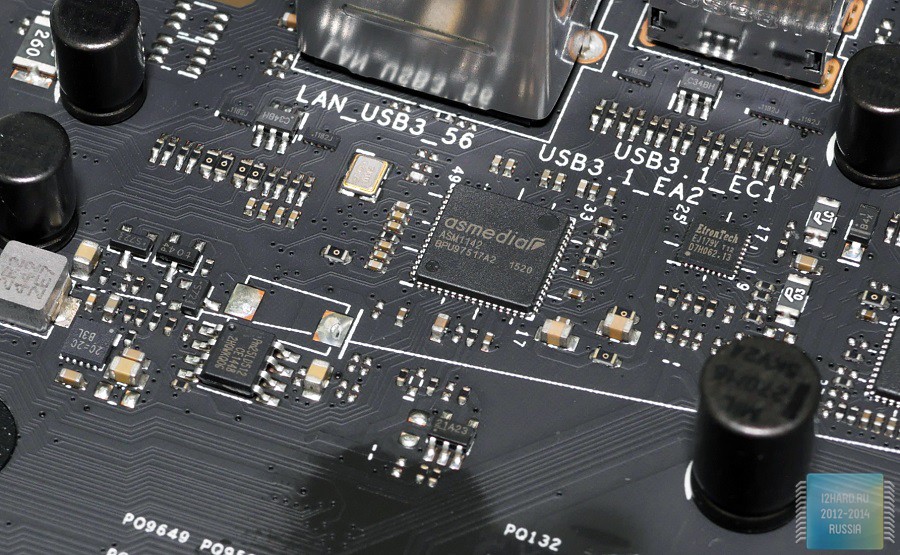
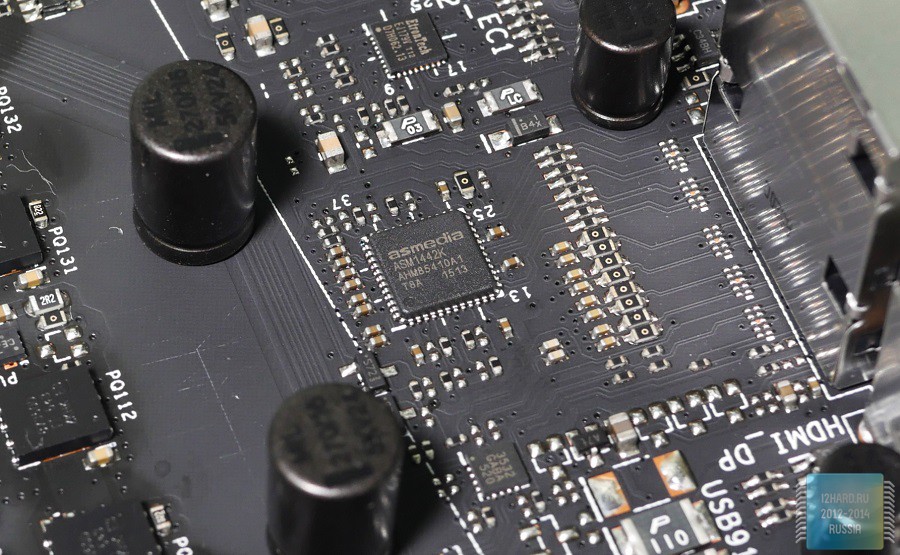
Подсистема питания под управлением контроллера DIGI+ ASP1400B выполнена по 10-ти фазной схеме. В качестве силовых ключей используются транзисторные сборки Texas Instruments 87350D.
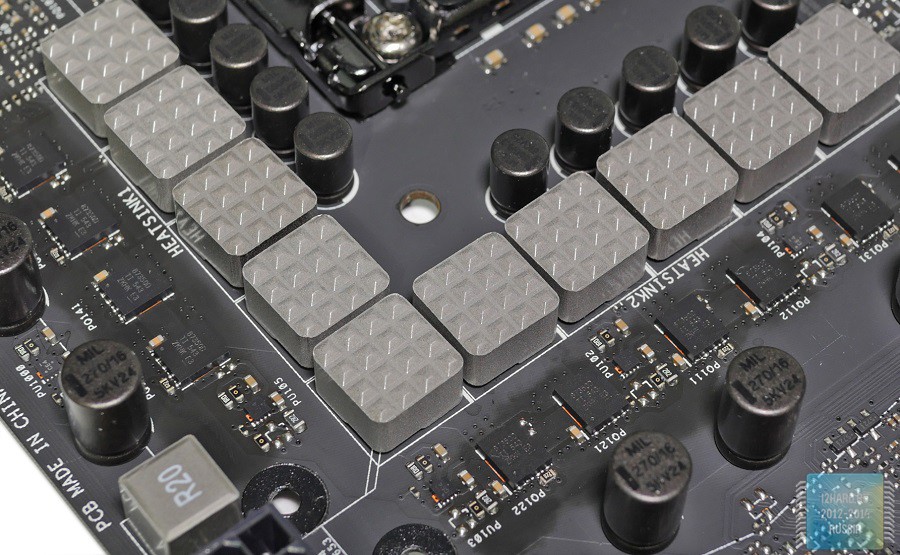

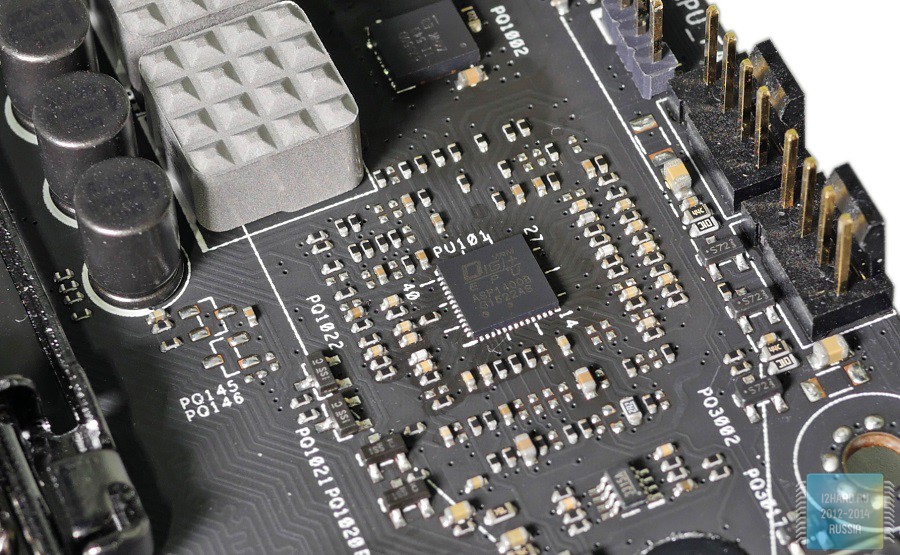
Звуковой тракт снабжен красной подсветкой, включена поддержка разнообразных эффектов. Реализация подсветки весомый плюс в сторону игровой направленности, так как часть корпусов снабжена прозрачным окном, с помощью которого можно любоваться на свою компьютерную сборку.
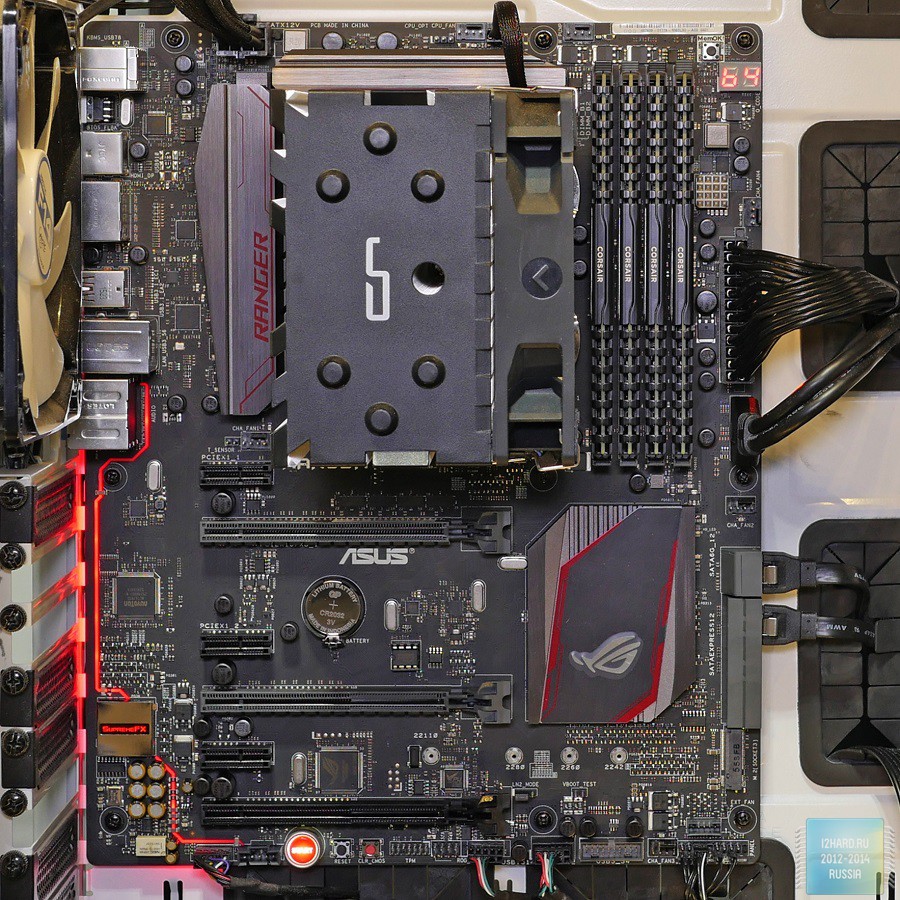
Настройки UEFI BIOS
Упрощенный режим BIOS озаглавлен EZ-Mode. Здесь доступна базовая информация о состоянии системы, есть возможность автоматического разгона с помощью EZ Tuning Wizard или настройка работы подключенных вентиляторов через Q-Fan Control. Также здесь доступен выбор загрузочного устройства, можно сменить язык или установить дату. Кстати о русификации меню, оно по-прежнему далеко от совершенства, поэтому рекомендую пользоваться английской версией.
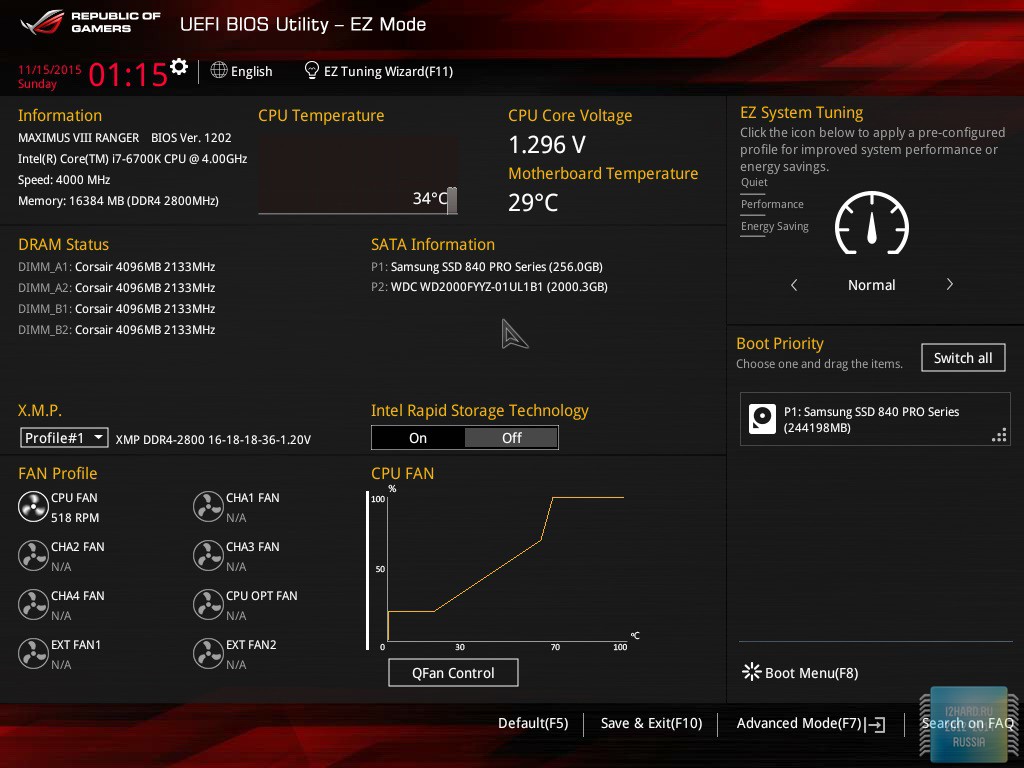
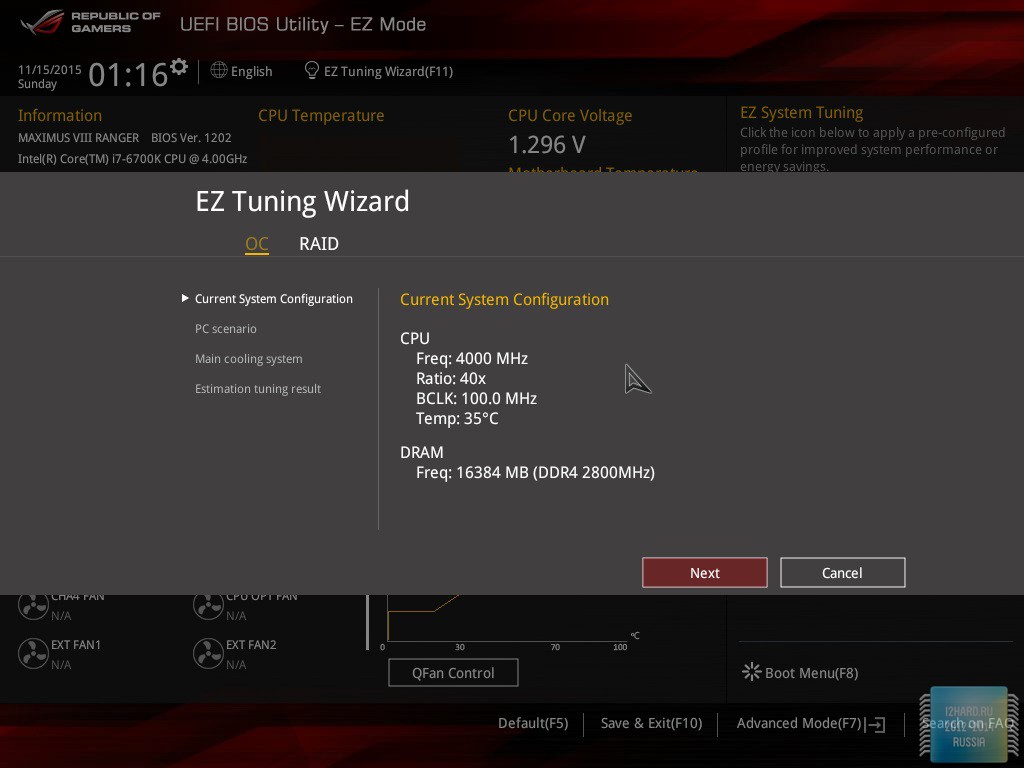
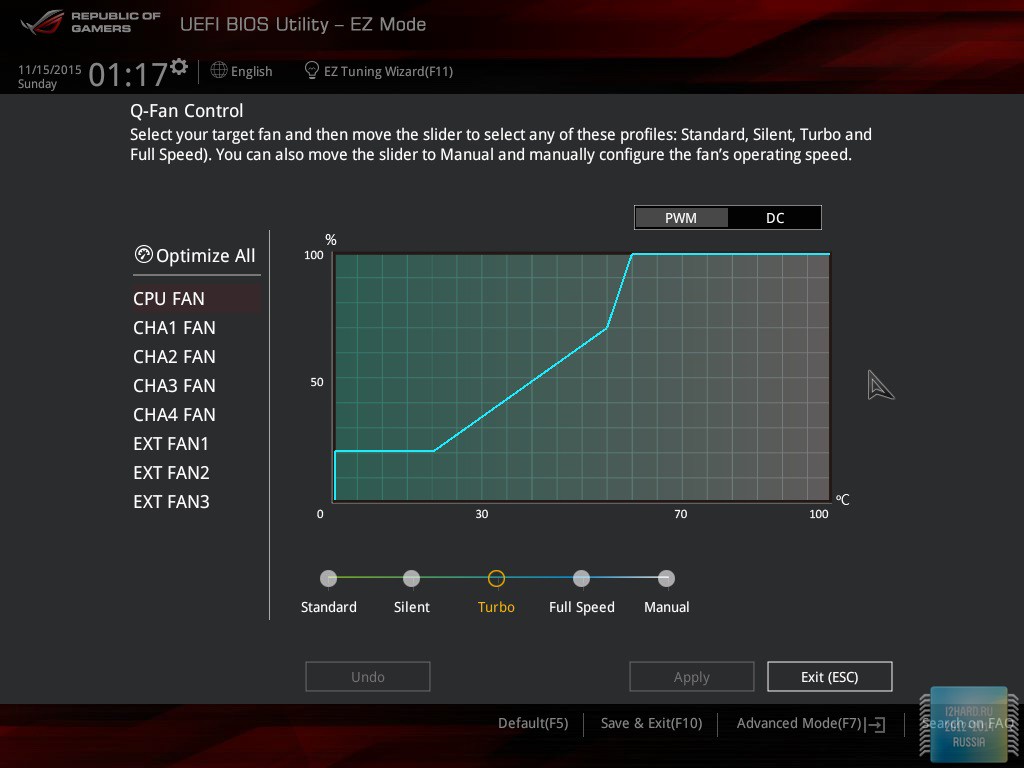
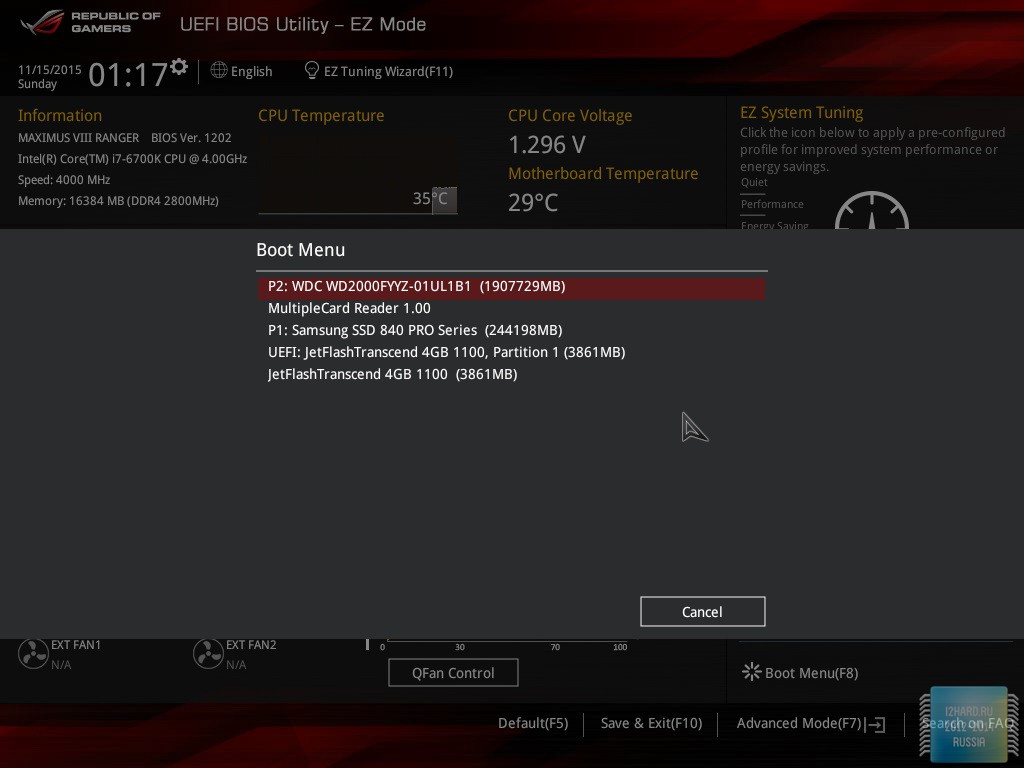
Самое интересное раскрывается при переходе в режим Advanced Mode. Первая вкладка «My Favorites» по умолчанию пуста, с ее помощью вы можете создать кастомизированное окошко с нужным набором параметров. Если раньше окно было пустым, то теперь производитель создал собственную заготовку и снабдил данную страничку типовым набором опций, которые могут пригодиться при разгоне. Вкладка «Main» – носит информативный характер и здесь можно настроить только дату/время или выбрать язык.
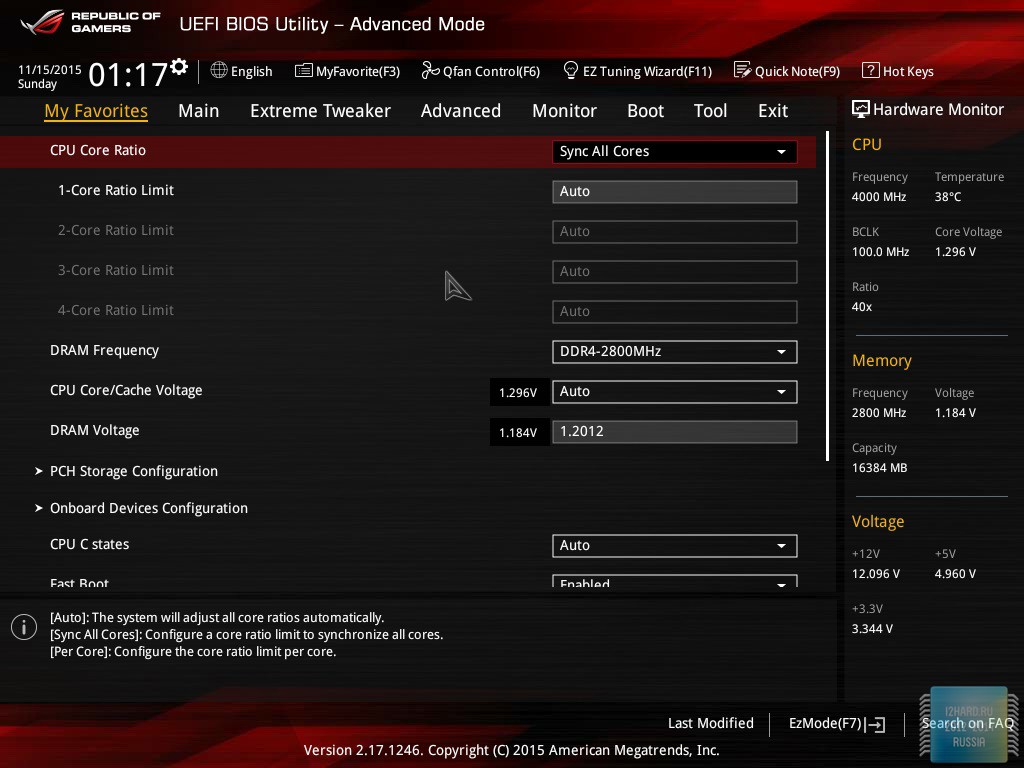
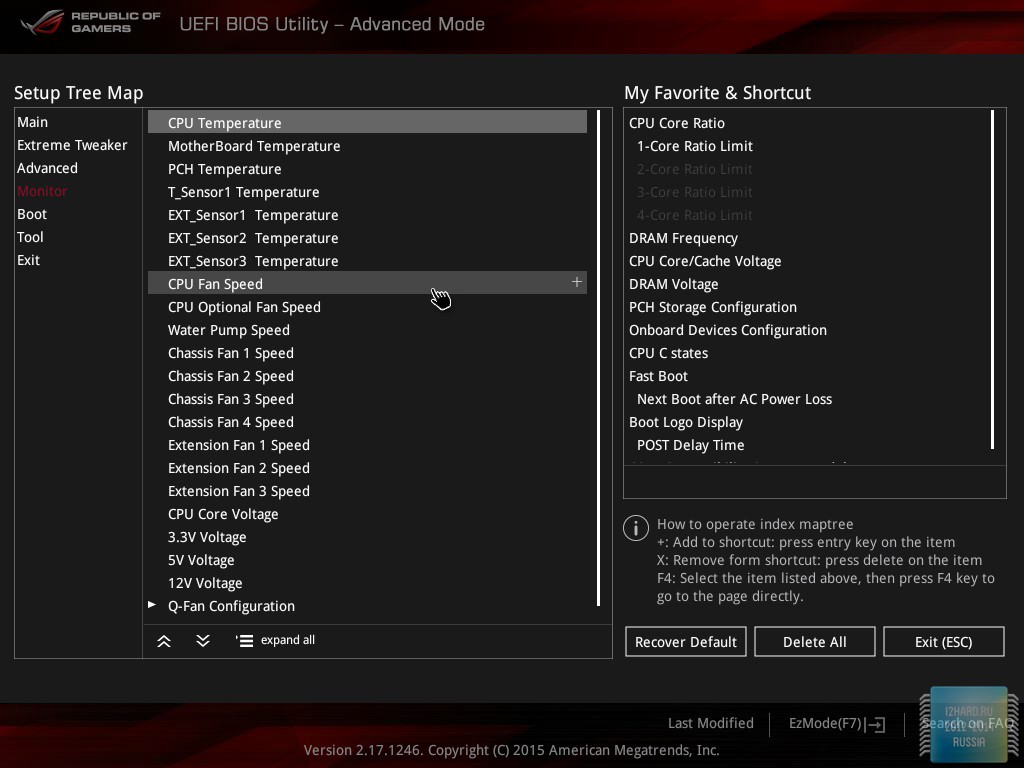
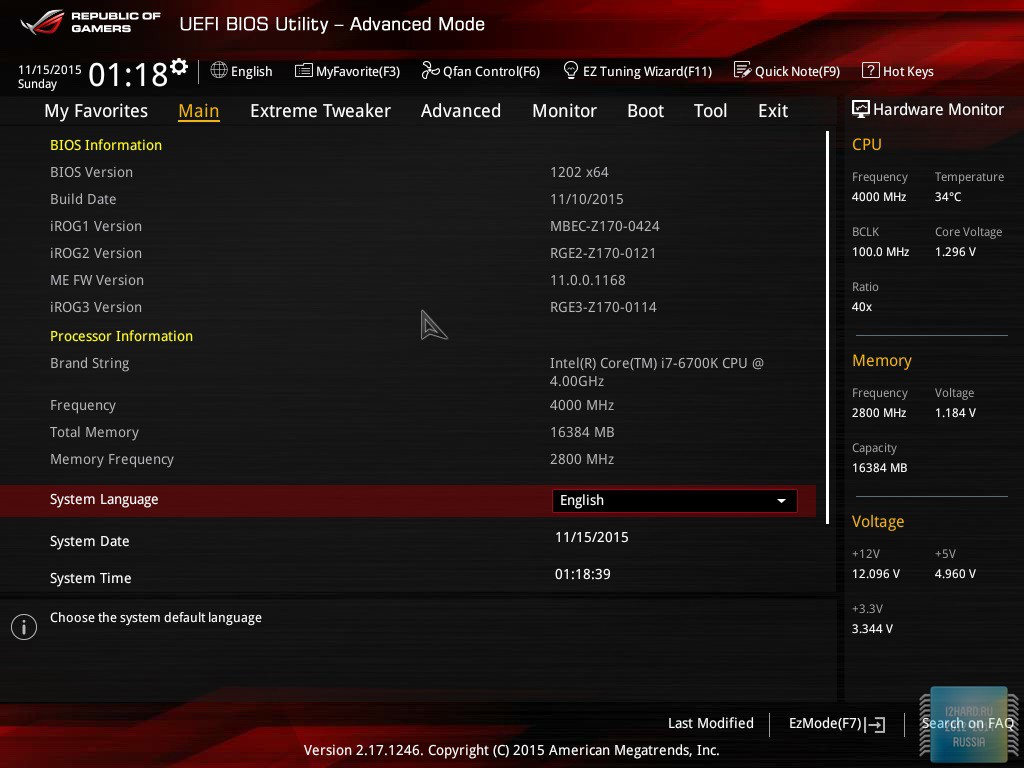
Вкладка «Extreme Tweaker» – включает в себя все настройки необходимые для разгона (изменение напряжения питания процессора и памяти, установка множителя процессора, таймингов и частоты памяти и т.д.). Кроме того, здесь присутствует мониторинг всевозможных значений питающего напряжения.
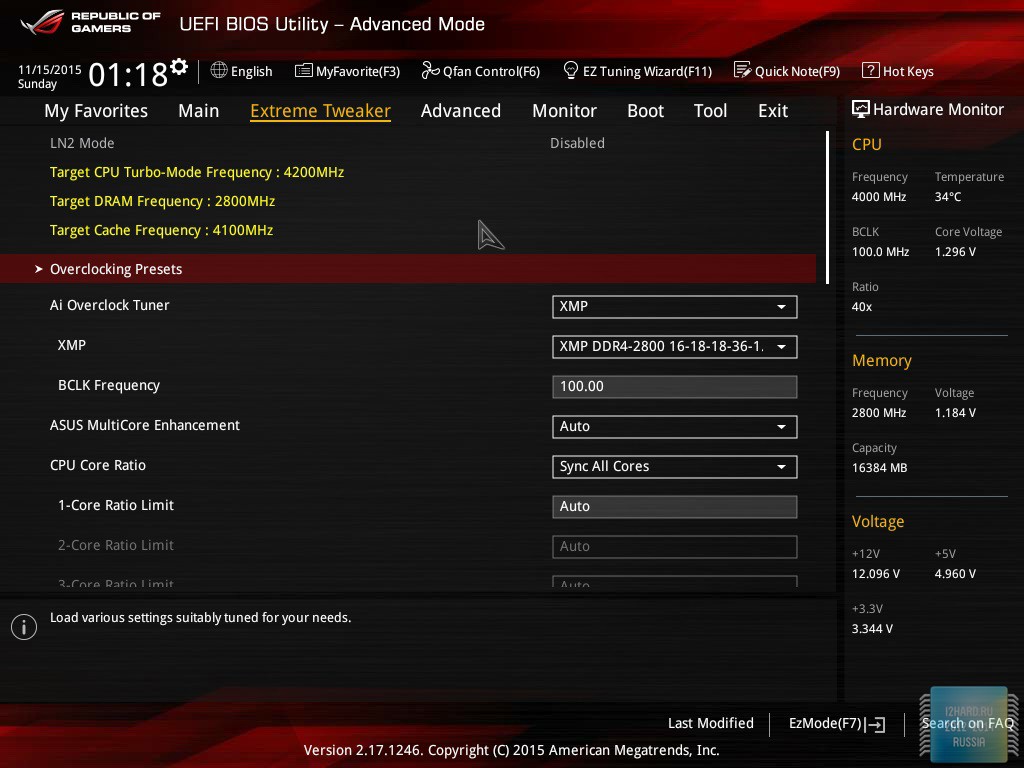
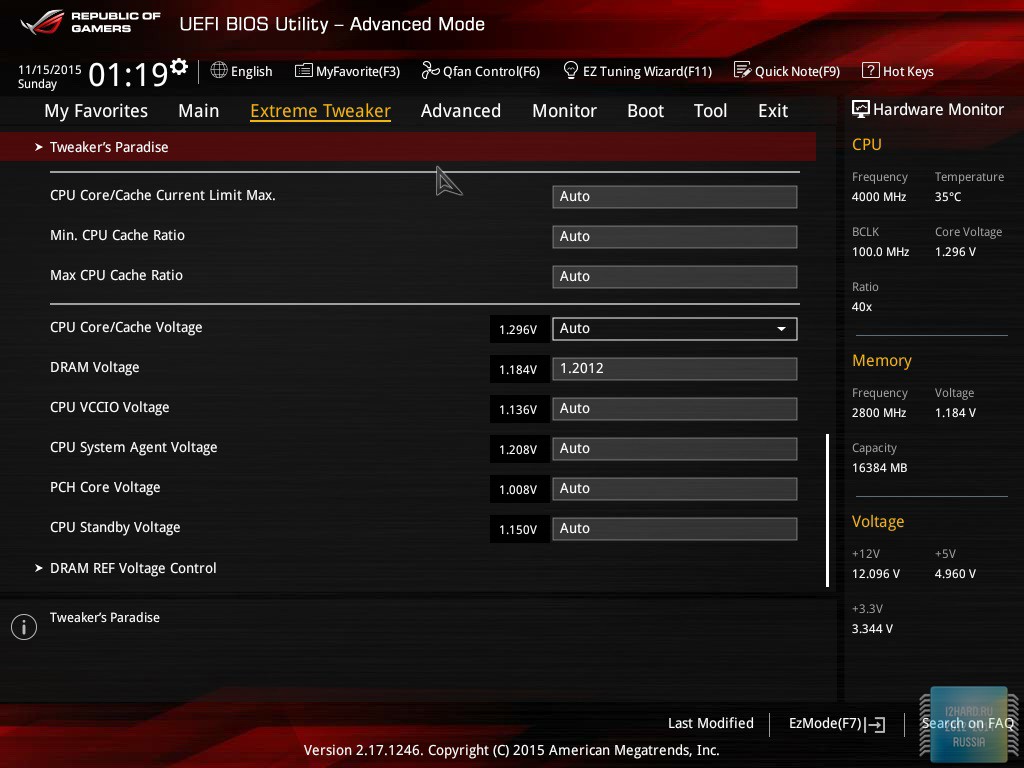
Вкладка «Advanced» содержит весь остальной перечень опций, не влияющих на разгон. Здесь можно изменить настройки энергосбережения процессора, отключить турбо режим или Hyper-threading, настроить работу SATA портов, сконфигурировать параметры встроенного графического контроллера, отключить подсветку и многое другое.
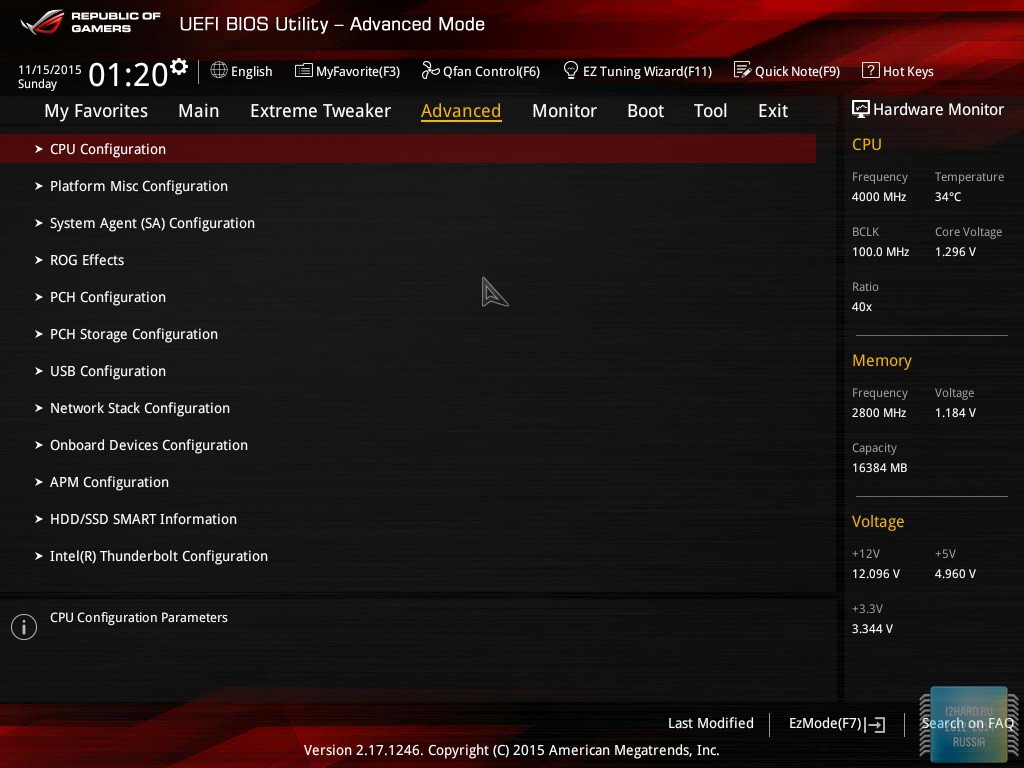
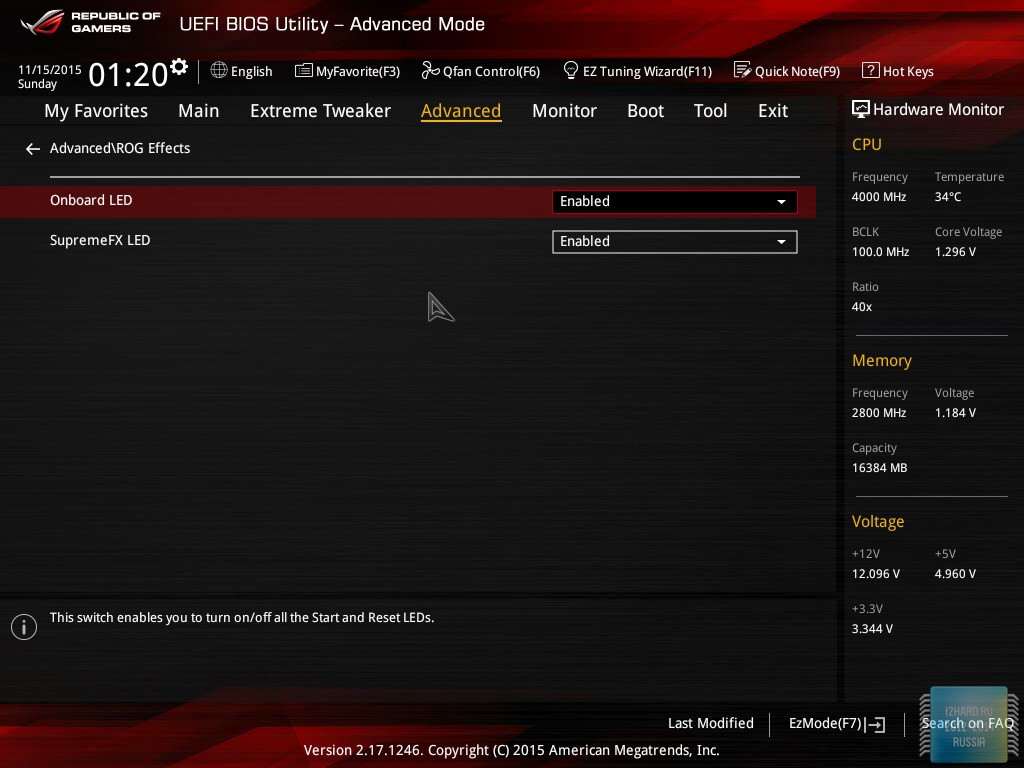
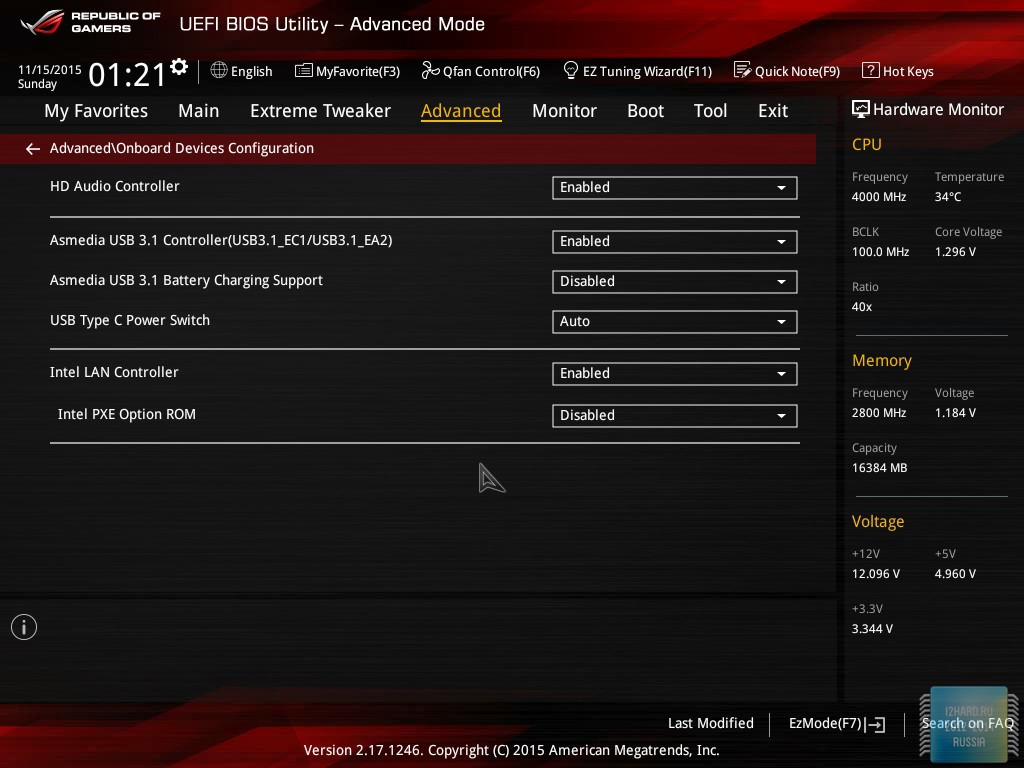
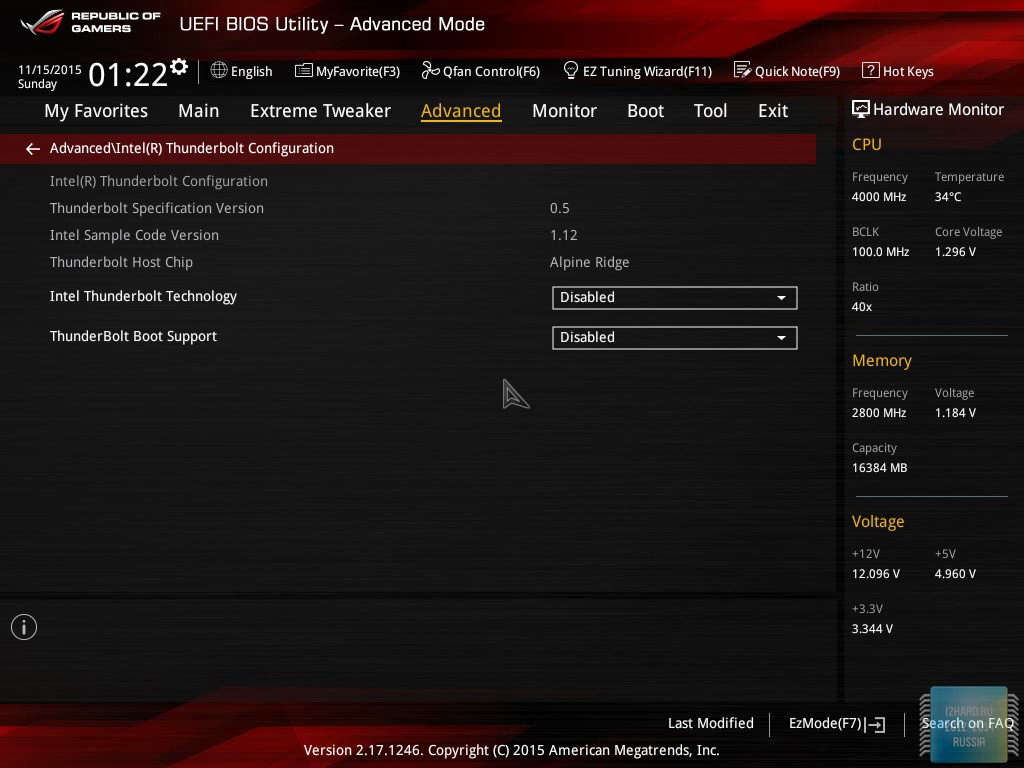
Вкладка «Monitor» – мониторинг показателей температуры и напряжения, а также контроль вращения скорости вентиляторов.
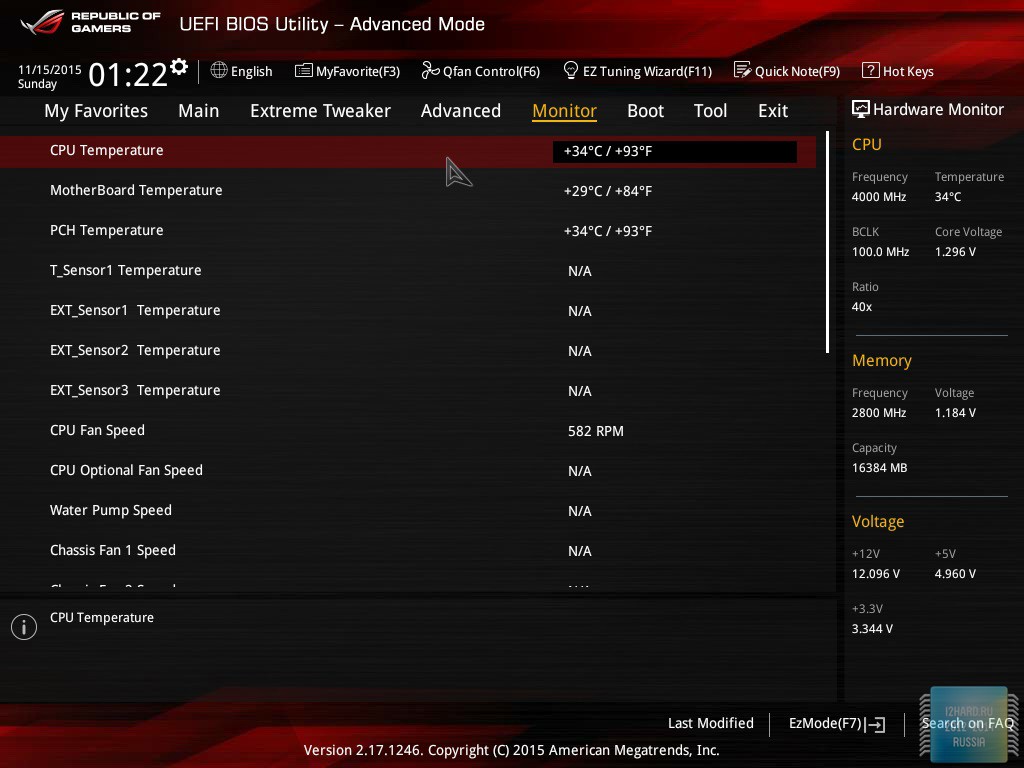
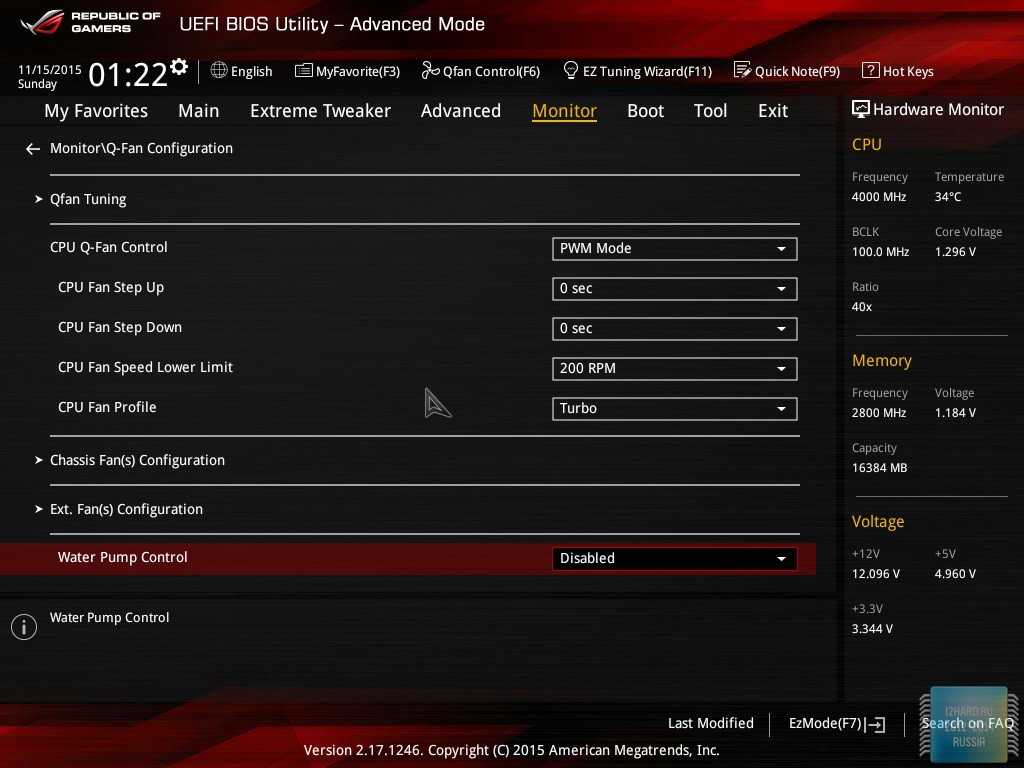
Вкладка «Boot» предоставляет ряд параметров по оптимизации загрузки и позволяет настроить приоритет между накопителями.
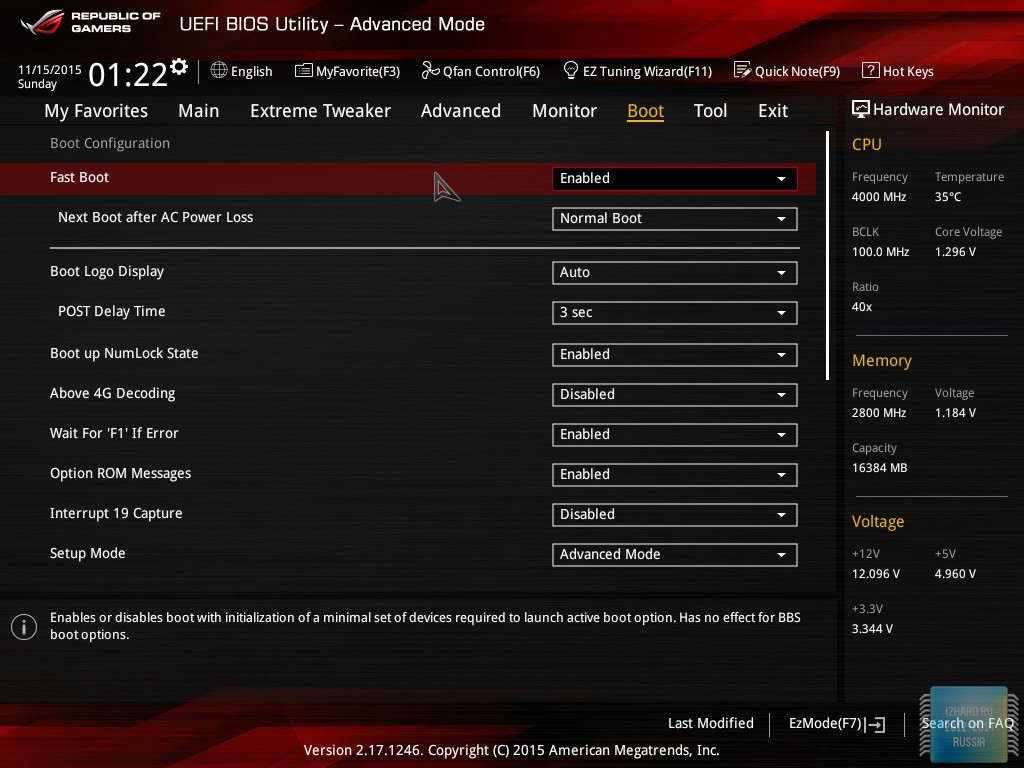
Вкладка «Tool» – в данной вкладке можно обновить БИОС, подгрузить предварительно сохраненный профиль с настройками системы или произвести полноценную очистку с твердотельного накопителя (Secure Erase).
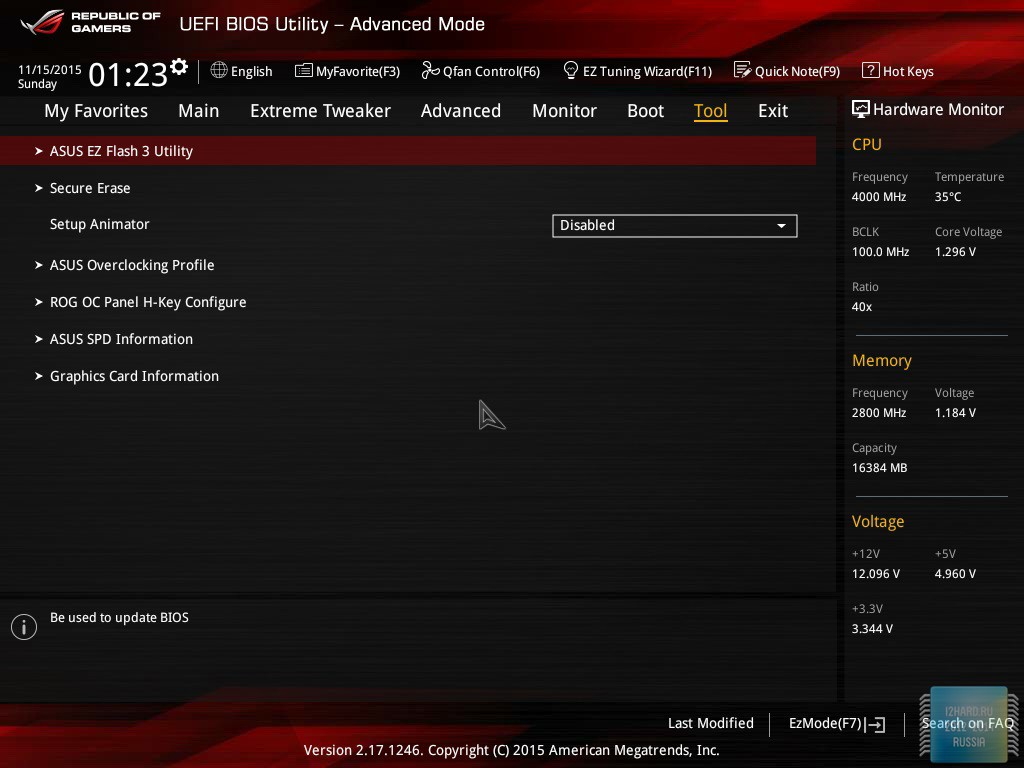

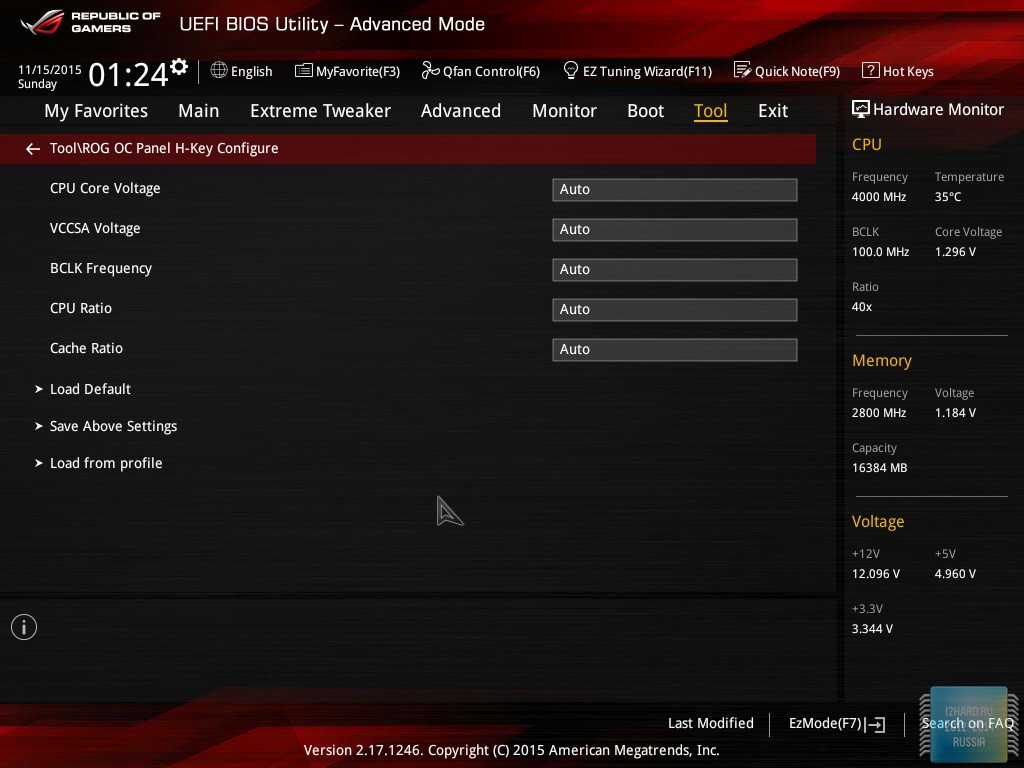
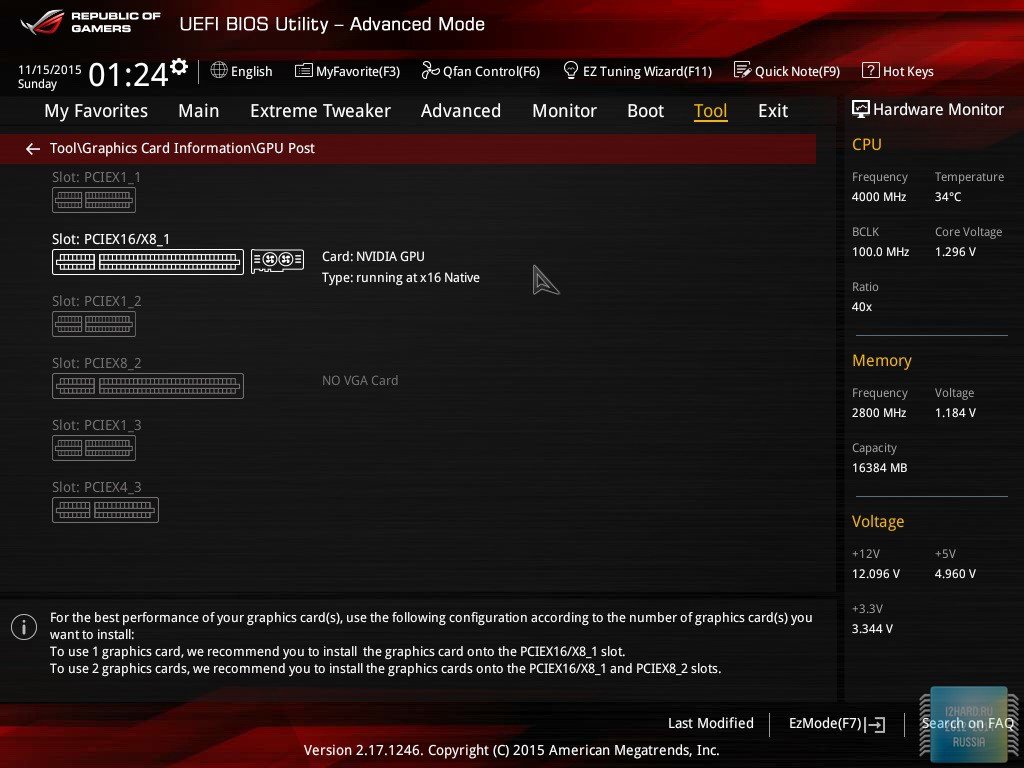
Вкладка «Exit» – выход с сохранением измененных параметров или откат на заводские настройки. Обращу ваше внимание также на Quick Note, который пригодится для кратких заметок.

Фирменные утилиты
Все необходимое и даже больше доступно для скачивания с официального сайта производителя. Основой является программный пакет Ai Suite3.
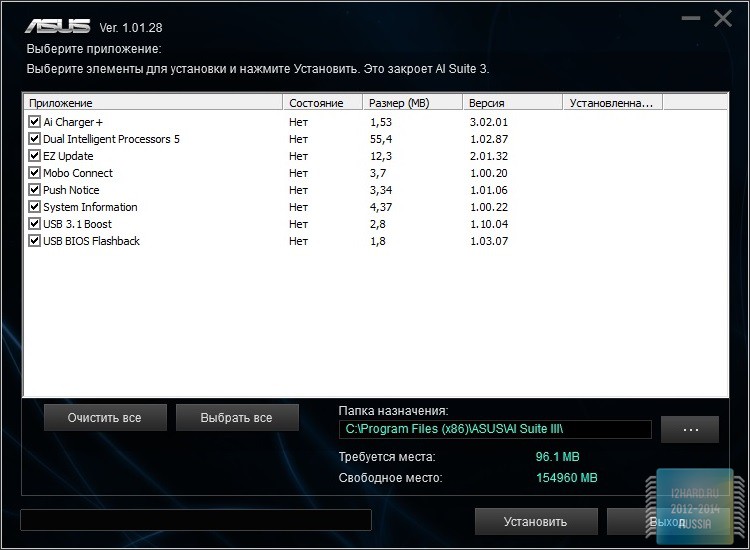
Для быстрого и удобного переключения между нужными опциями производитель ввел дополнительное меню, которое выходит по клику.
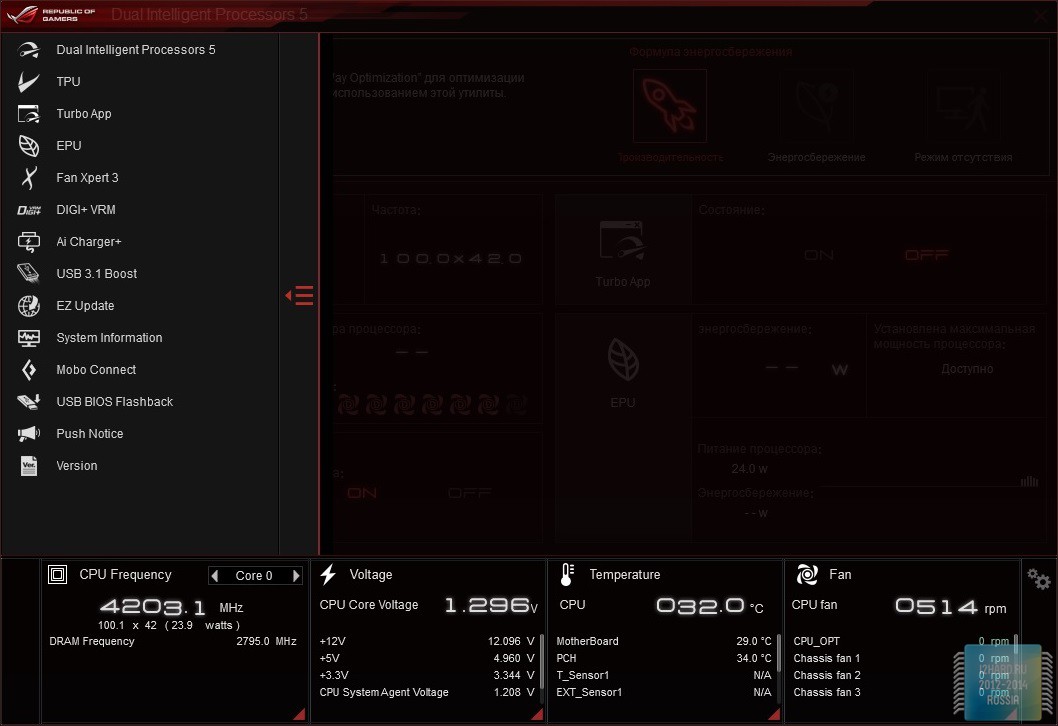
Dual Intelligent Processor 5 – обширный набор настроек по разгону процессора, регулировки вентилдяторов и прочего. Обратите ваше внимание на кнопку 5-Way Optimization, которая поможет настроить автоматическом режиме производительность вашей системы.
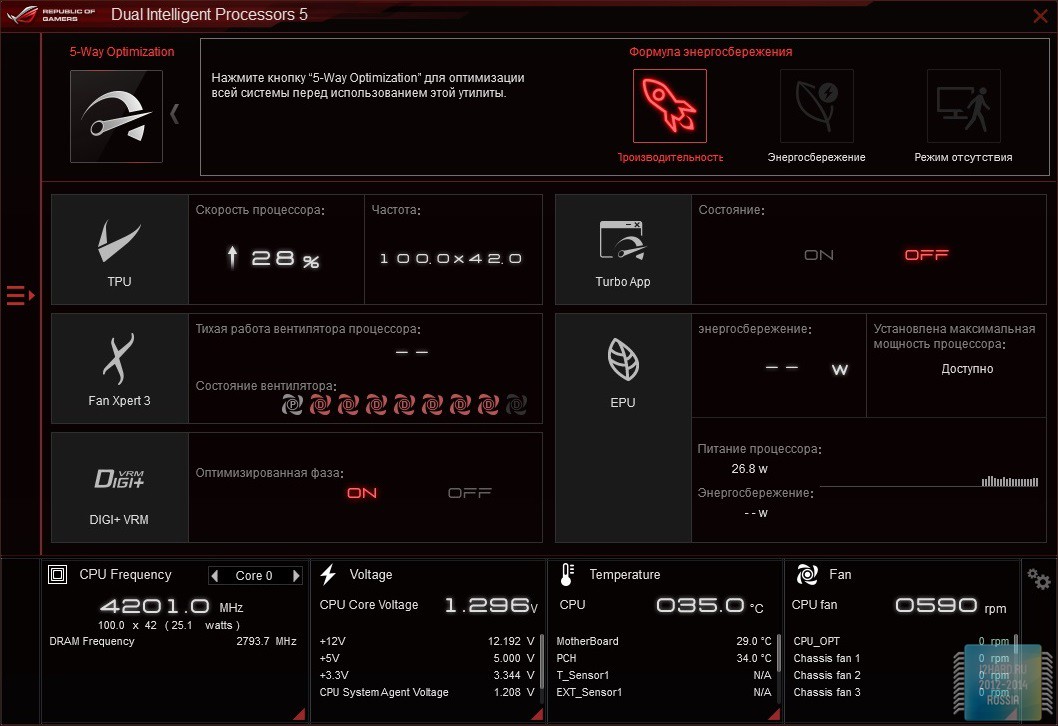
Раздел TPU – открывает доступ к изменению множителя и напряжения питания процессора, а также позволяет увеличить частоту и питающее напряжение встроенного графического контроллера.
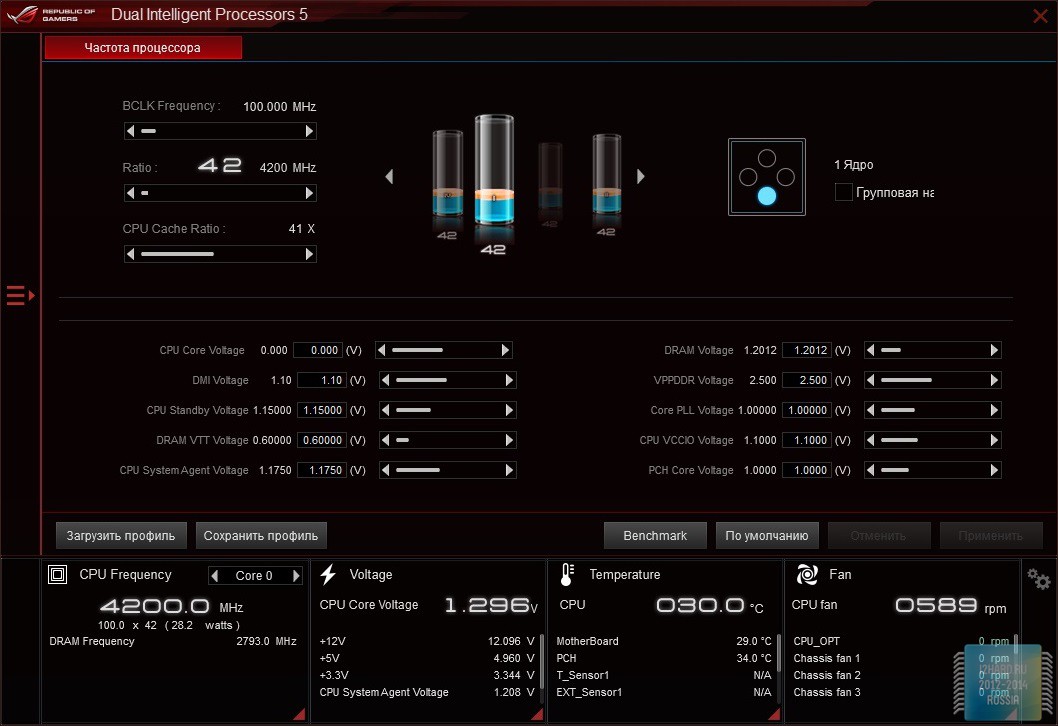
Turbo App – автоматическая настройка производительности системы (включая сетевой приоритет и конфигурацию аудионастроек) для выбранного приложения.
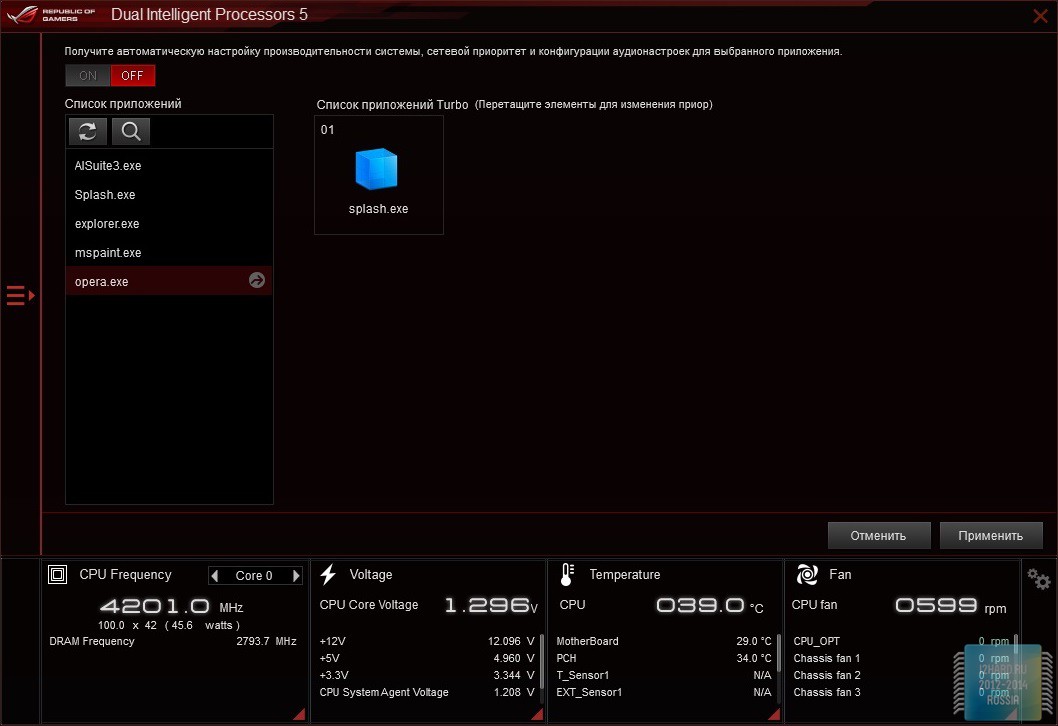
Раздел EPU – порадует любителей экономить на электроэнергии, так как позволяет изменять настройки способствующие повышению эффективности энергосбережения системы.
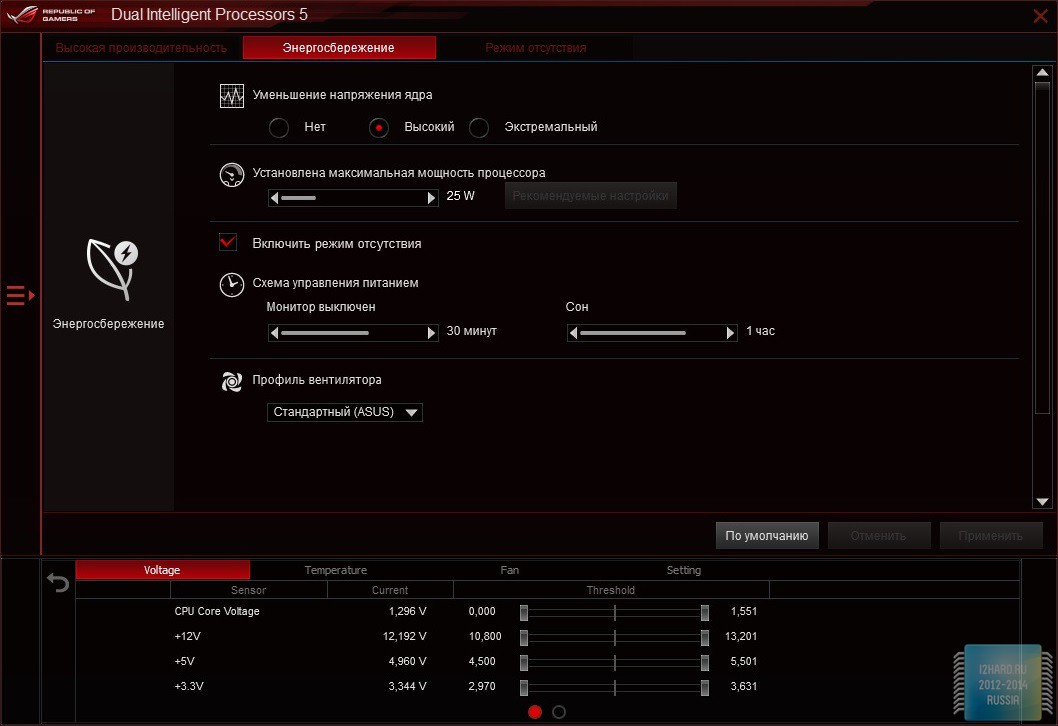
Fan Expert 3 – регулировка работы подключенных вентиляторов, можно настроить вручную или выбрать из готовых вариантов (тихий/стандартный/турбо/полная скорость).
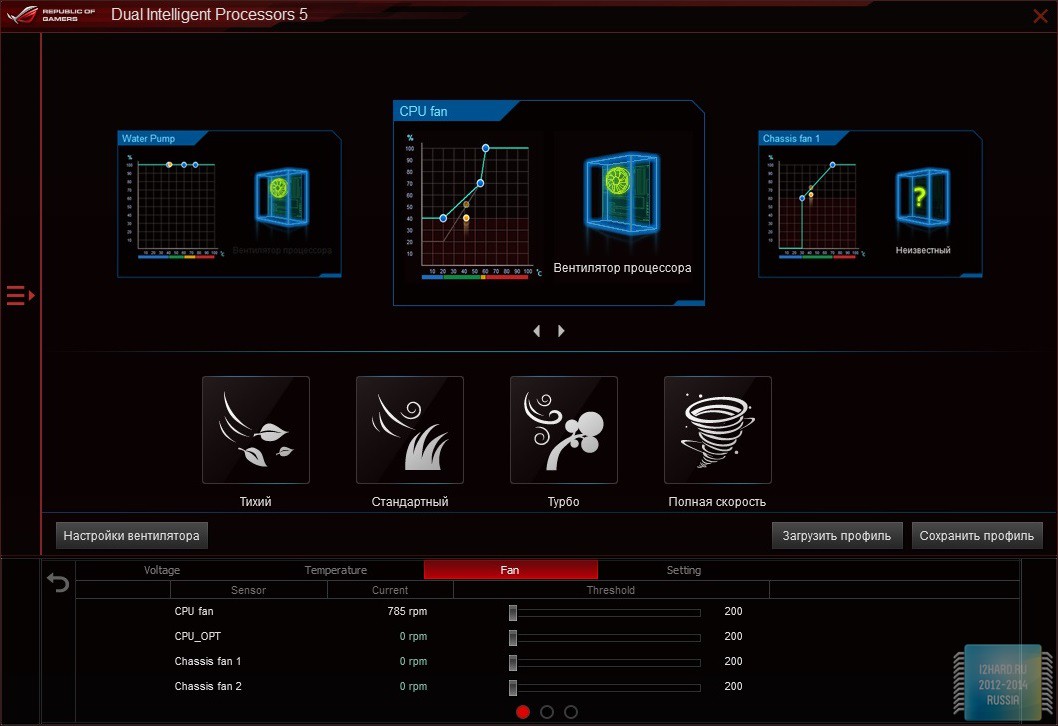
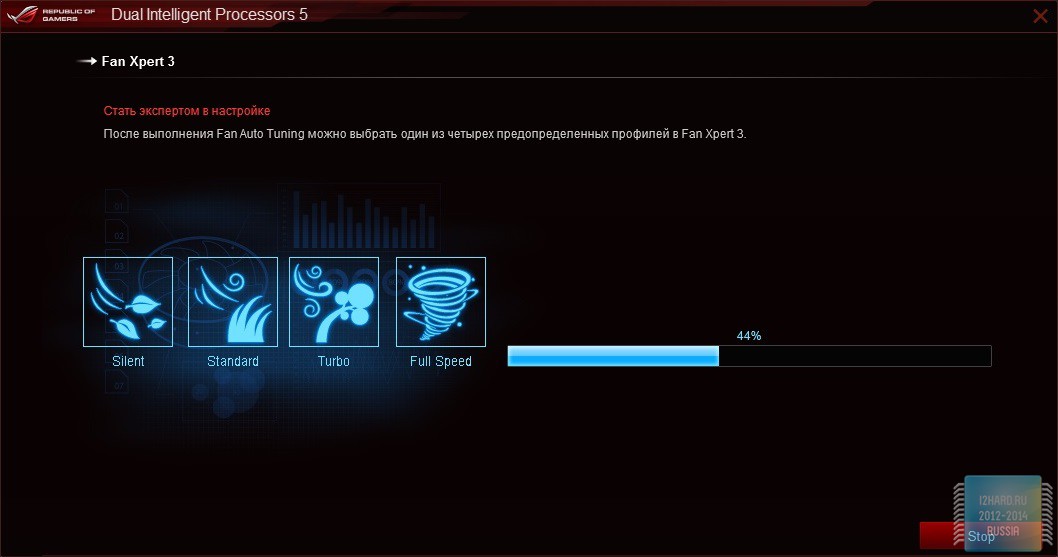
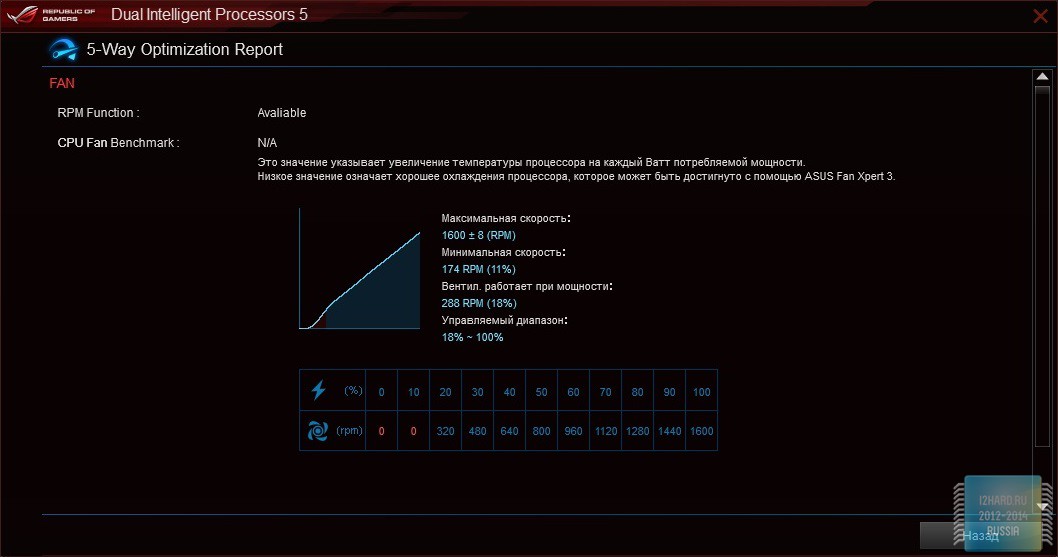
Digi+ VRM – настройки для повышения стабильности при разгоне процессора, а также предусмотрена отдельная вкладка для настройки встроенного в процессор графического чипа.
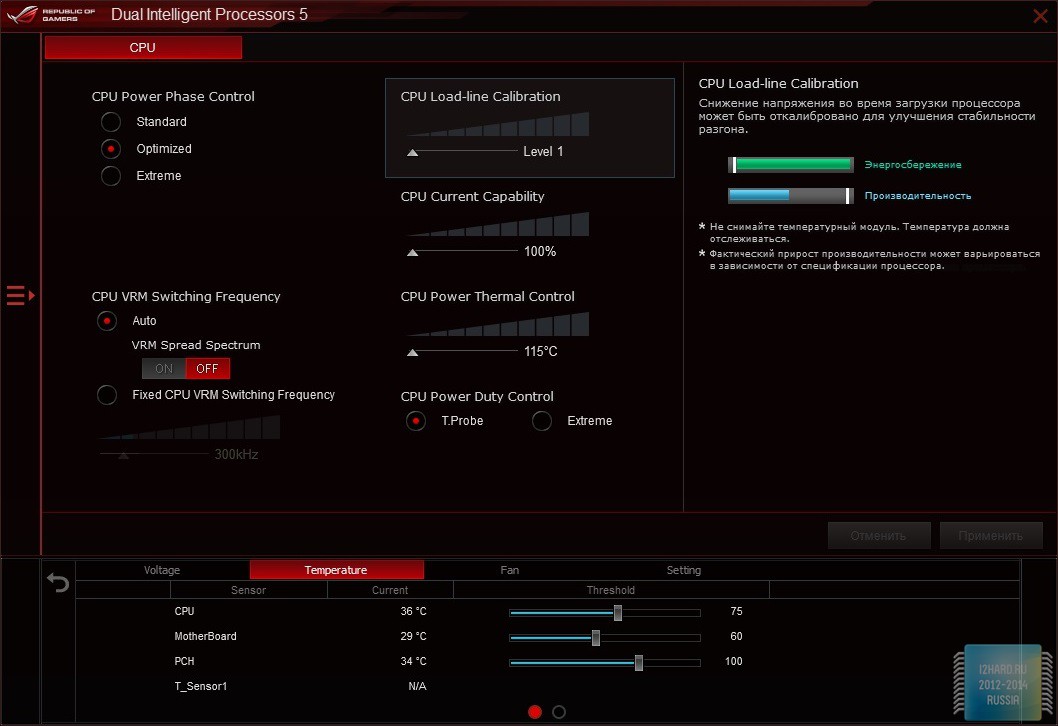
Ai Charger+ – быстрая подзарядка iPod, iPhone, iPad и других мобильных устройств с поддержкой функции BC 1.1.
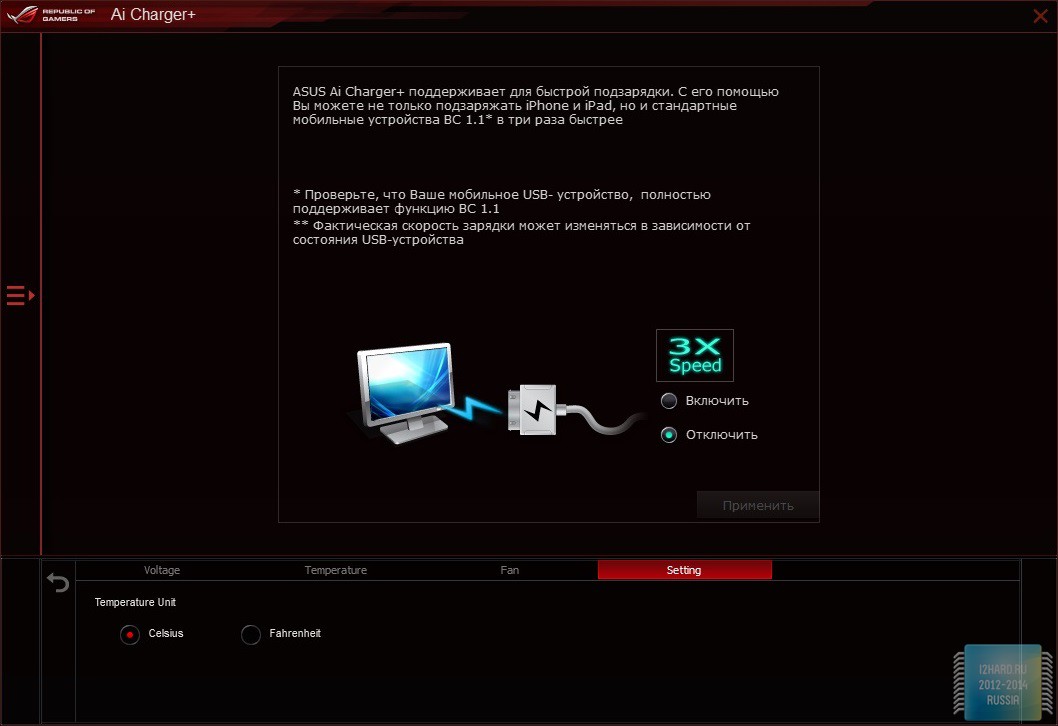
USB 3.1 Boost – ускорение передачи информации через порт USB 3.1.

EZ Update – обновление БИОС через интернет.
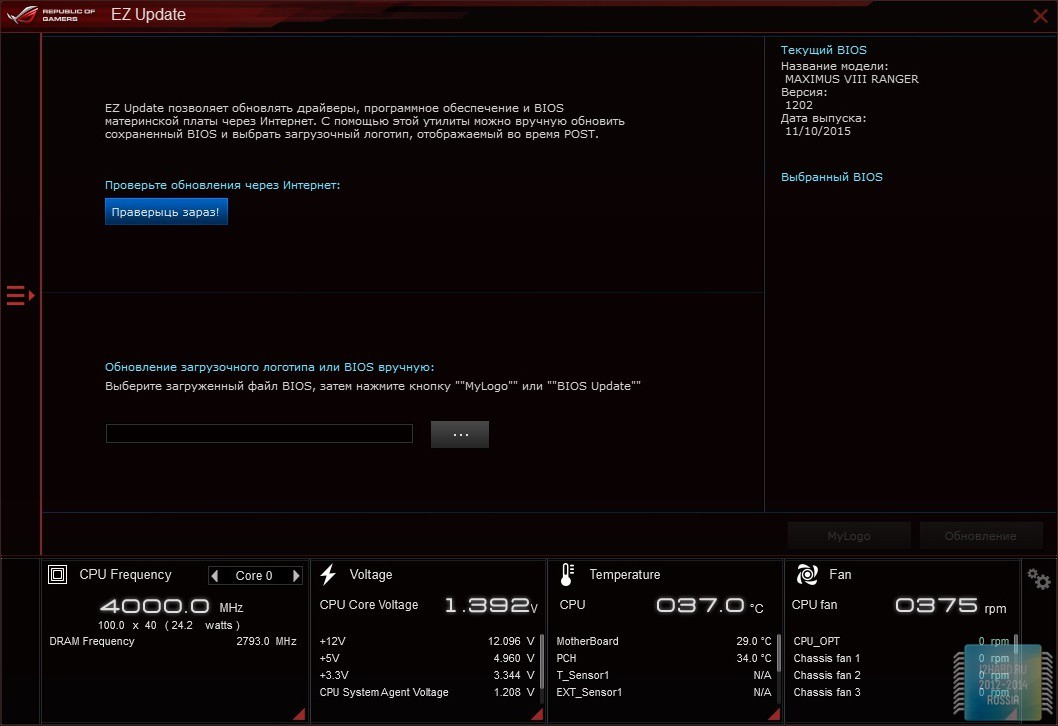
System Information – общая информация о состоянии системы.
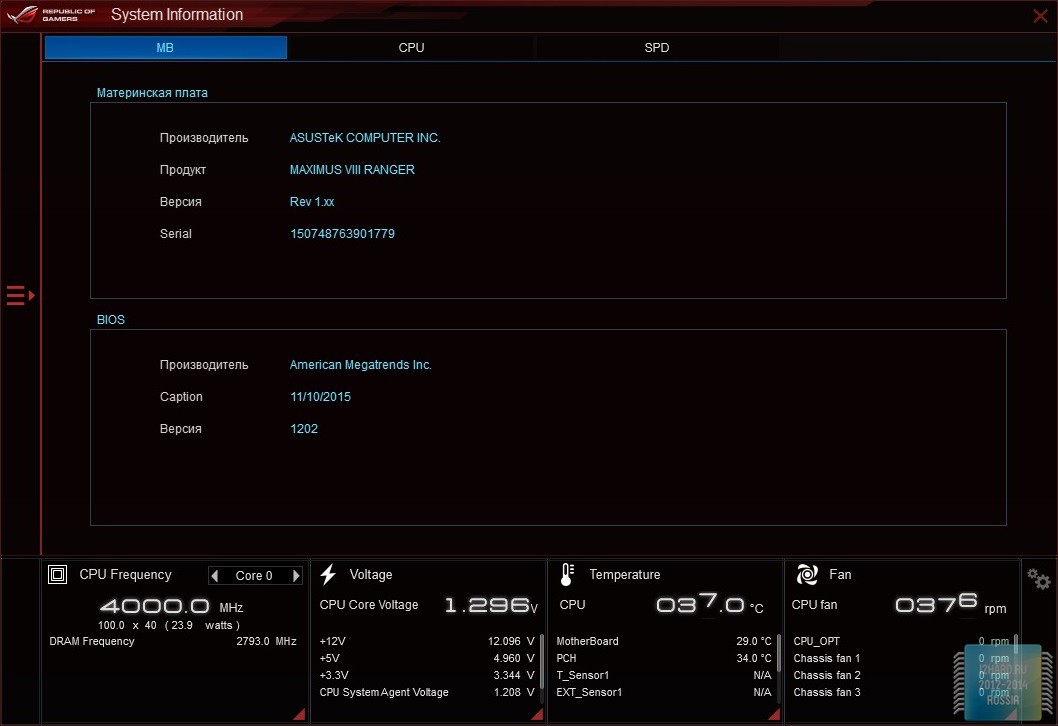
Mobo Connect – приложение, которое позволяет синхронизировать клавиатуру/мышь подключённые к компьютеру с другими мобильными устройствами.

USB BIOS Flashback – проверка и сохранение последней версии BIOS на флеш-накопитель для последующего обновления.
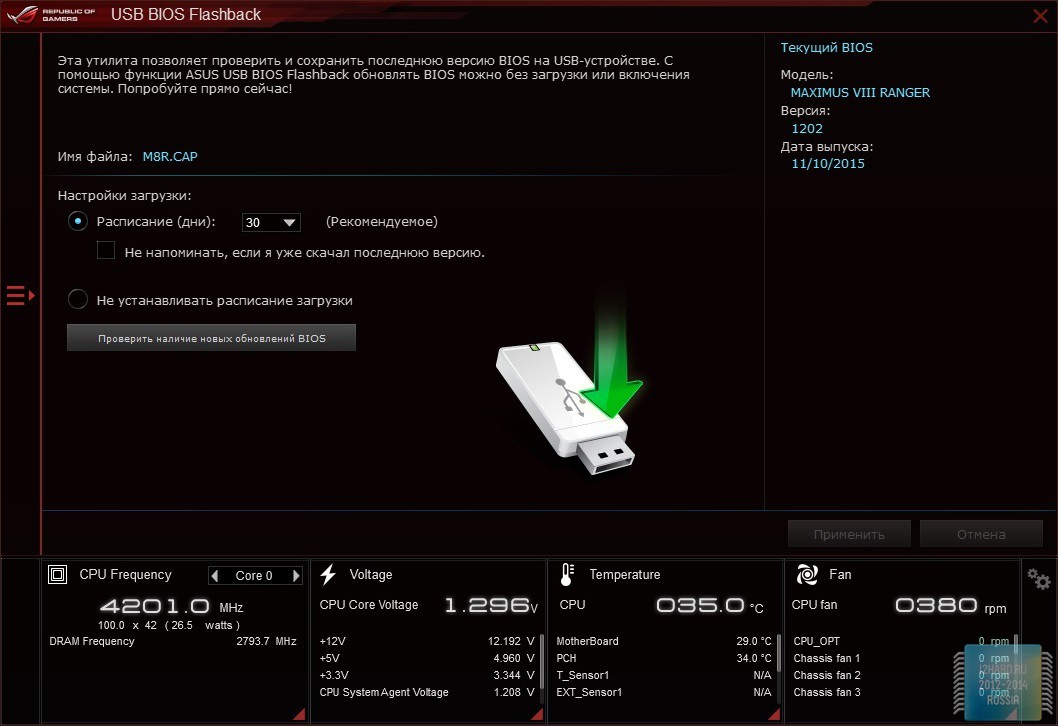
Push Notice – всплывающие или звуковые оповещения по определенному событию, например при превышении допустимой температуры или падении напряжения.
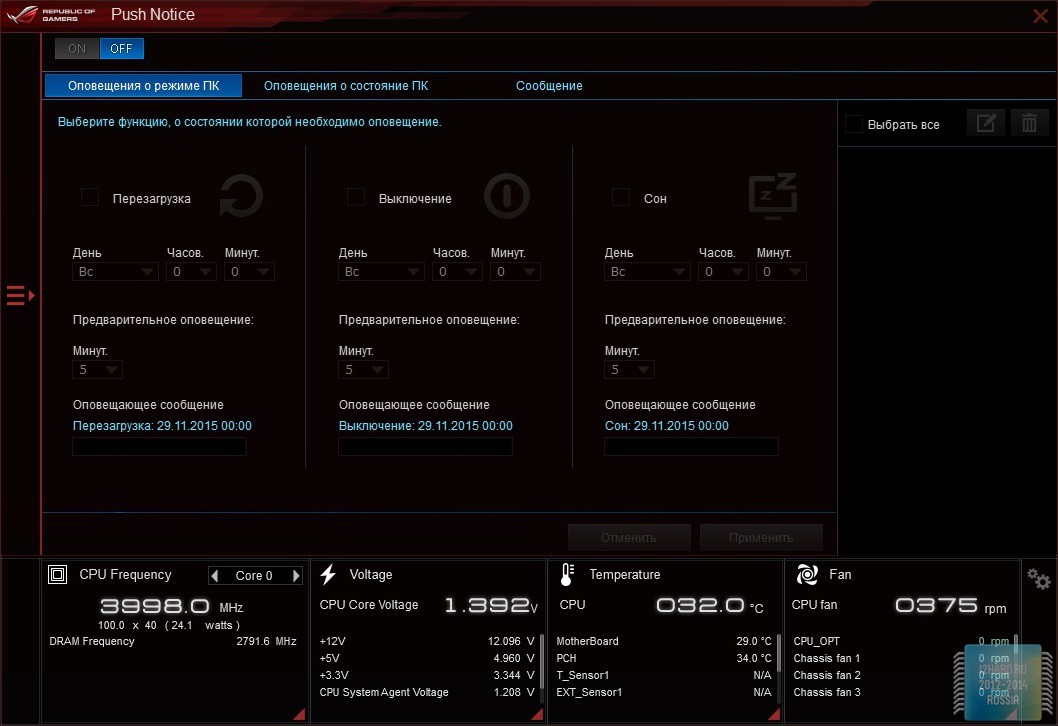
Version – информирует о версии каждой установленной утилиты.
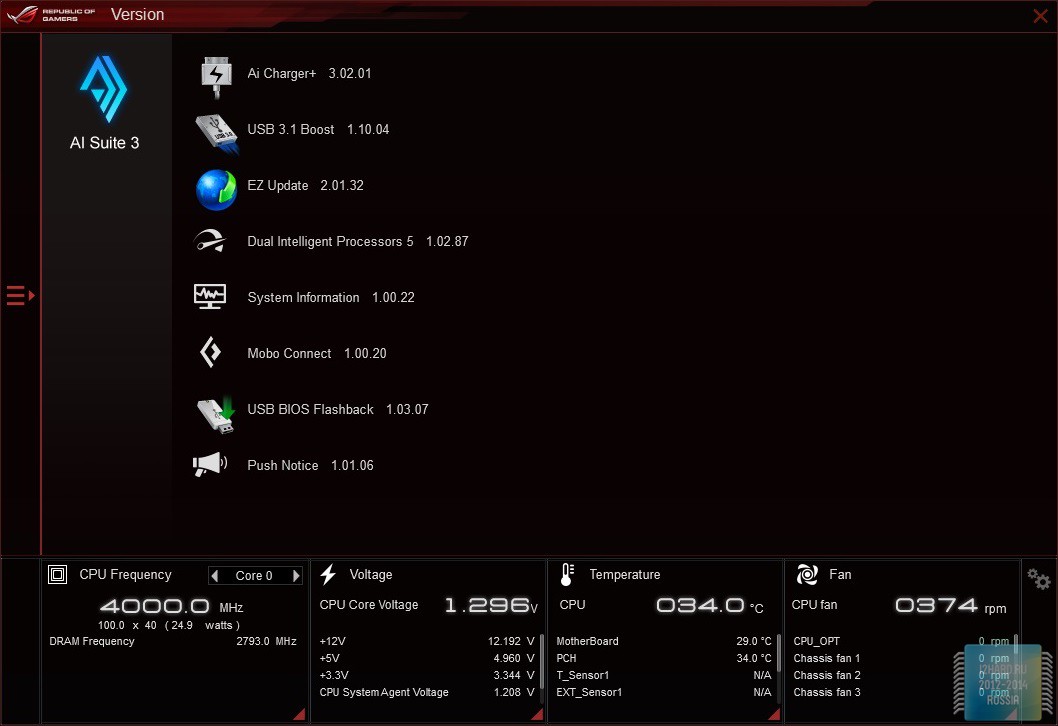
Далее рассмотрим остальной набор вспомогательных утилит.
Asus Boot Setting – содержит две функции, включение быстрой загрузки системы без повторного прохода инициализации и прямой вход в BIOS при перезагрузке без нажатия соответствующей клавиши.
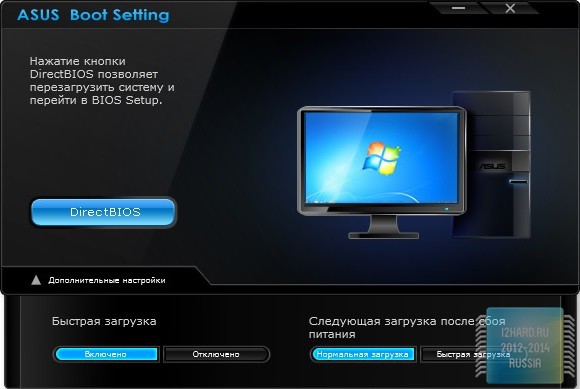
Asus Webstorage – открывает доступ к облачному сервису для хранения вашей информации.
Asus Media Streamer – позволит наслаждаться любым контентом не только на вашем компьютере но и на любом другом совместимом устройстве. Для исправной работы потребуется установка ASUS HomeCloud, при этом не забудьте активировать функцию DLNA на стороннем устройстве.

Если вы обладатель заурядной клавиатуры, то не стоит отчаиваться, приложение KeyBot позволит запрограммировать клавиши с F1 по F12. Тем самым вы расширите функциональные возможности клавиатуры и получите доступ к макро командам.
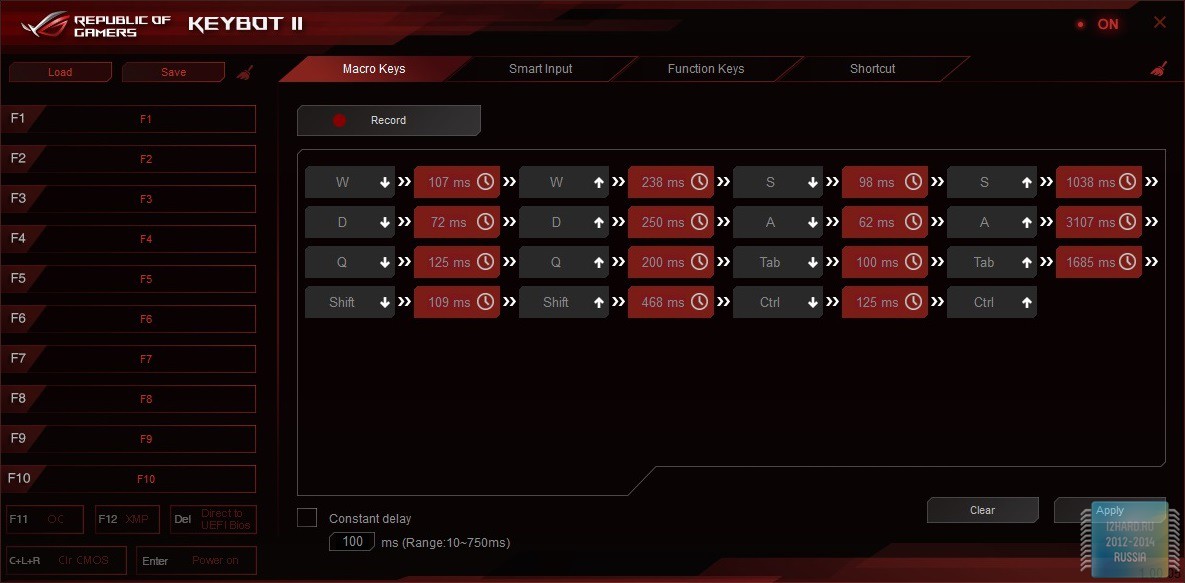
Mem TweakIt – утилита для тонкой подстройки таймингов оперативной памяти, что может благотворно сказаться на разгоне.
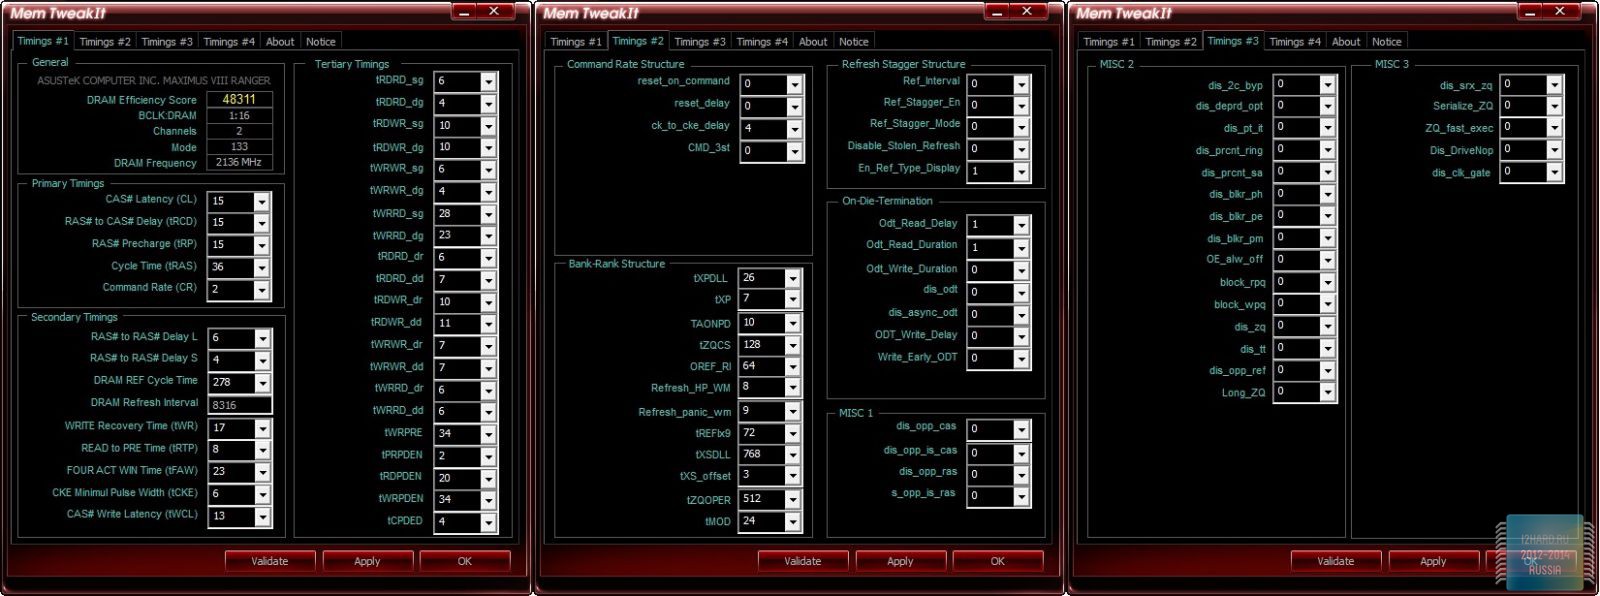
Asus PC Diagnostics – предоставляет основную информацию о компьютере и используемых компонентах, а также обладает встроенным стресс – тестом для проверки стабильности системы.
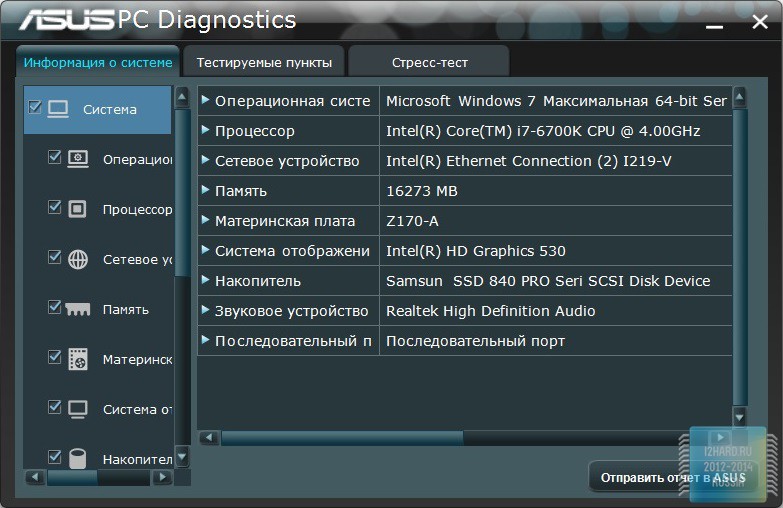
Asus RAMDisk – выделяет часть оперативной памяти для создания подобия HDD, что позволяет существенно снизить скорость загрузки файлов находящихся в выделенной области. Актуально при наличии большого объема оперативной памяти – 32-64 Гб.
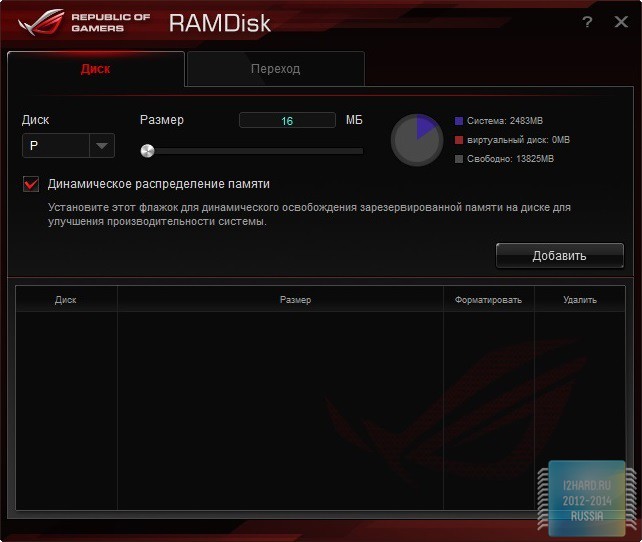
Asus RAMCache – выделяет часть оперативной памяти в качестве кэша для HDD, что положительным образом сказывается на скорости загрузки наиболее часто используемых приложений.
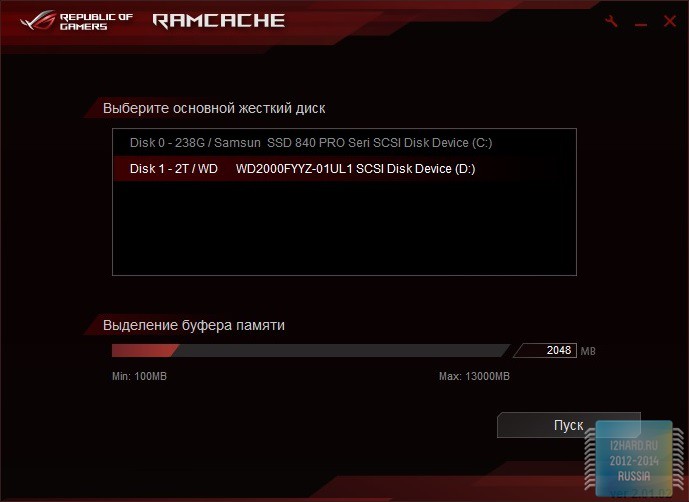
GameFirst III – сетевой монитор с готовыми сценариями по приоритету входящего/исходящего сетевого трафика.
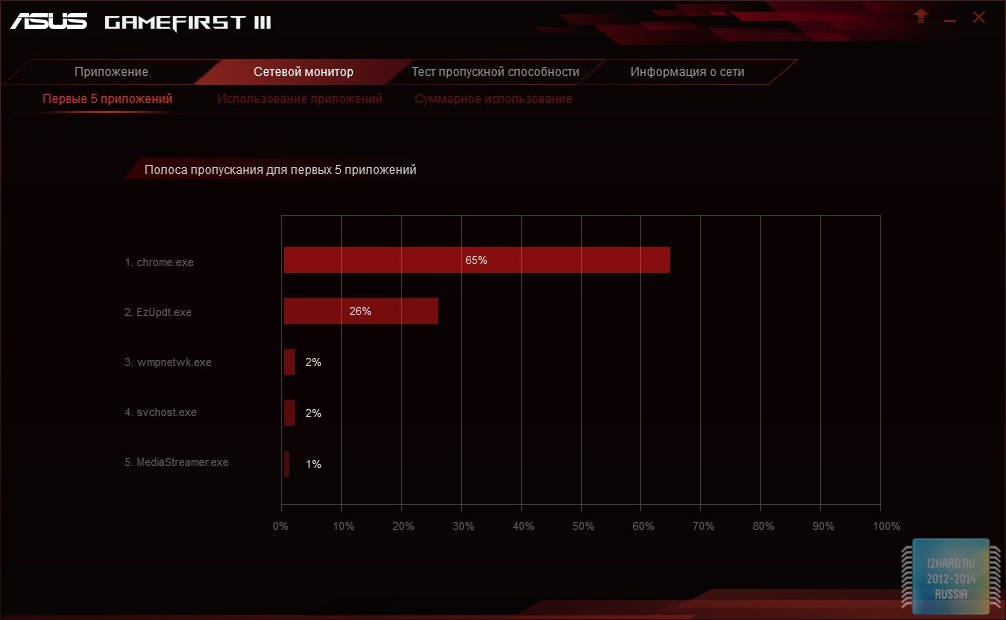
Sonic Radar II – вспомогательное приложение, позволяющее более тонко настроить эквалайзер для требуемого игрового сценария. Улучшение достигается за счет выделения определенного частотного диапазона. К примеру, из готовых профилей можно выбрать High Range, это позволит более отчетливо слышать стрельбу/шаги/бег.
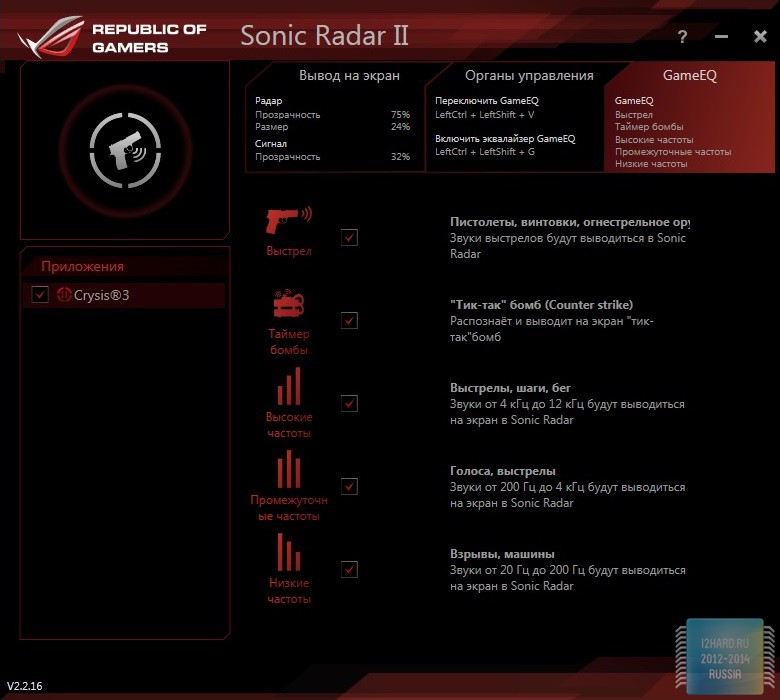
Asus Mini Bar – маленькая и удобная утилита, которая позволяет осуществить быстрый доступ к разделам Fan Expert 3/EPU/PC Cleaner, которые являются частью Ai Suite3.
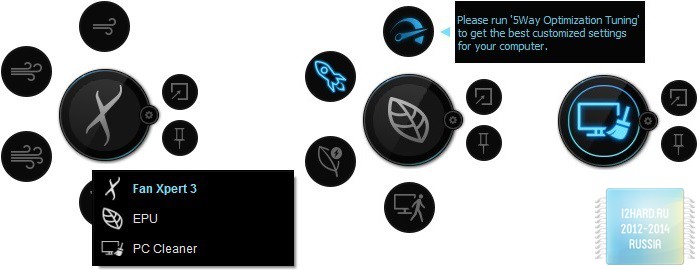
EZ Update – обновление БИОС через интернет.
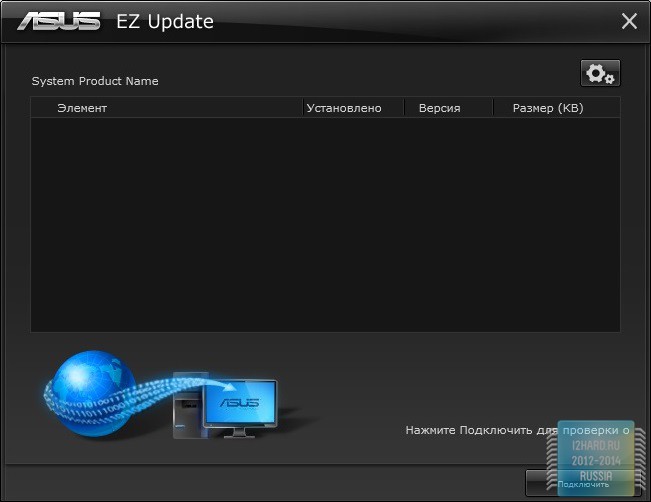
Конфигурация тестового стенда
- Процессор: Intel Core i7-6700K (4000 МГц);
- Материнская плата: ASUS MAXIMUS VIII RANGER;
- Кулер: CRYORIG H7;
- Термоинтерфейс: Arctic Cooling MX-2;
- Память: 4 x 4 Гбайт DDR4 2800, CORSAIR Vengeance LPX CMK16GX4M4A2800C16;
- Видеокарта: Palit GeForce GTX 980 Ti Super JetStream;
- Накопитель SSD: Samsung 840 Pro 240 Гбайт;
- Регулятор вращения вентиляторов: Schyte Kaze Q-12;
- Блок питания: Thermaltake Toughpower Grand 1200W Platinum;
- Корпус: NZXT Switch 810;
- Монитор: VIEWSONIC VP2770-LED;
- Операционная система: Windows 7 64-bit Service Pack 1;
- Драйвера: GeForce 355.82.
В качестве центрального процессора использовался Intel Core i7-6700K. Роль термоинтерфейса была возложена наArctic Cooling MX-2.
Разгон и тестирование
Было решено сравнить производительность процессора в двух случаях, при работе на частоте 4000 МГц и в режиме разгона. С помощью материнской платы ASUS MAXIMUS VIII RANGER удалось повысить частоту процессора на 17%, она составила 4700 МГц. Такой результат был достигнут при выставлении настроек напряжения питания процессора вручную до значения 1.45В. Другой способ разгона доступен при повышении частоты шины BCLK, но следует делать это аккуратно, так как она связана с другими шинами. Разогнать процессоры без литеры K в названии посредством BCLK у вас не получится, так как данная возможность по сути заблокирована.
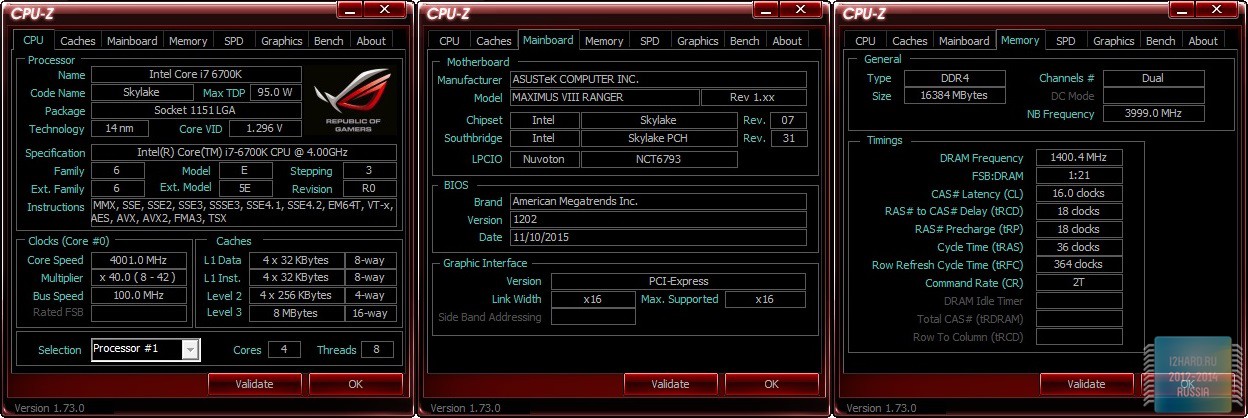


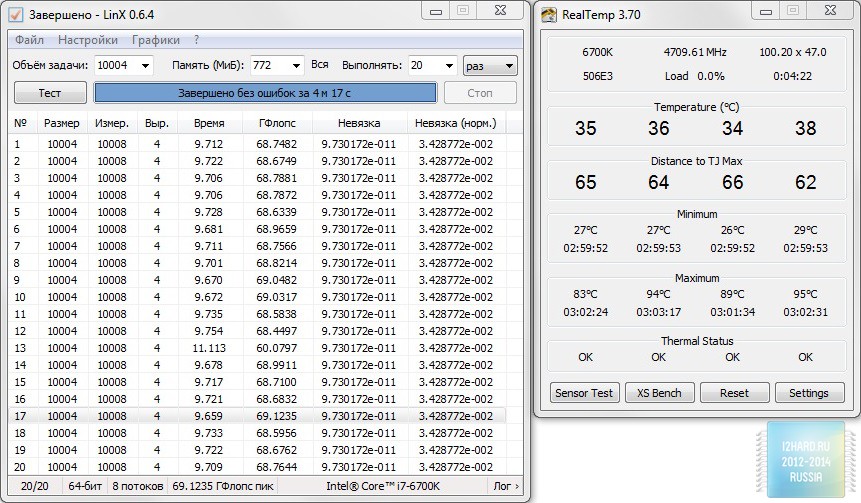
Предлагаю ознакомиться с результатами различных тестовых приложений.
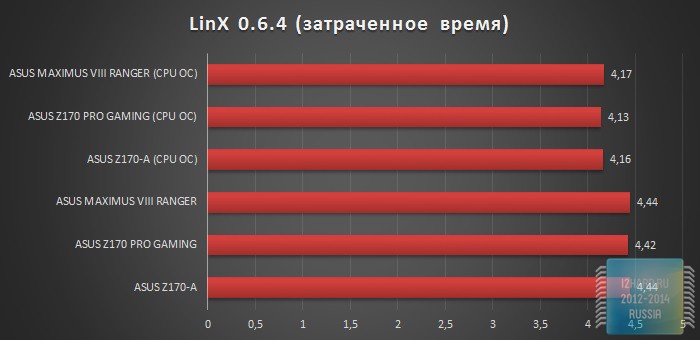
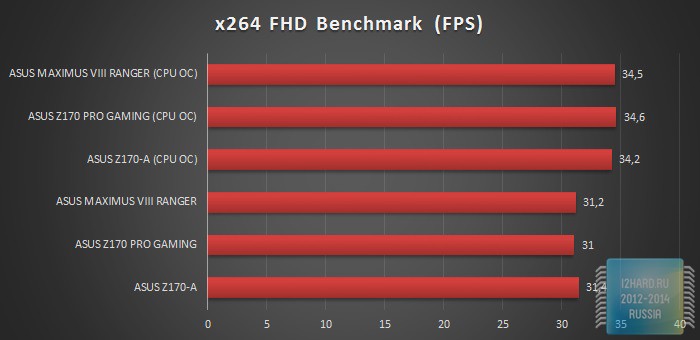
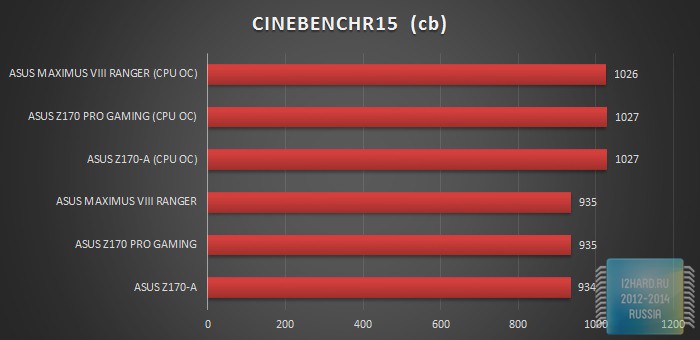

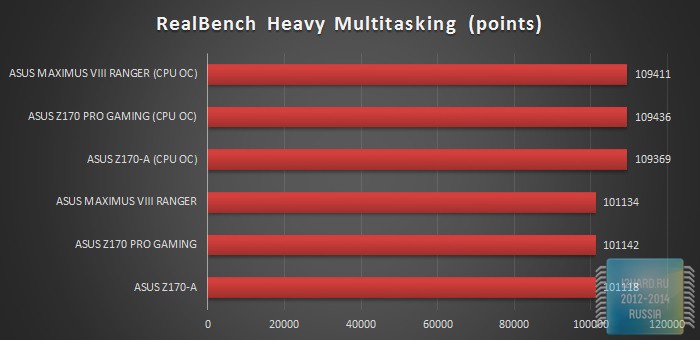
Благодаря возможности разгона мы получаем заметную прибавку к производительности во всех тестовых приложениях. Но не следует забывать о безопасности разгона, поэтому старайтесь не превышать допустимые значения по тому или иному параметру. Помимо этого, какого-то существенного разброса в полученных значениях между разными материнскими платами не будет, так как скорость работы в данном случае зависит только от процессора. С другой стороны, материнская плата напрямую влияет на разгон, а значит, в какой-то мере и на производительность.
Заключение
Добавив в ассортимент MAXIMUS VIII RANGER компания ASUS пошла на встречу продвинутым геймерам и энтузиастам. Дело в том, что цена на данную модель находится на вполне доступном уровне, если учесть принадлежность рассматриваемой материнской платы к премиум серии Republic of Gamers. При этом, функционал платы настолько обширен, что её можно смело порекомендовать к покупке. Также, стоит отметить удачный дизайн устройства, благодаря чему оно станет достойным украшением любой игровой сборки или моддинг проекта.
- Отличная функциональность;
- Удачный дизайн;
- Достаточный набор опций для разгона;
- Высокая надежность в следствии использования качественных компонентов;
- Приятный звук от встроенного аудиокодека;
- Наличие разъема M.2 (Socket 3);
- Наличие разъема SATA Express;
- Наличие портов USB 3.1 (Type-A/Type-C);
- Поддержка CrossFire и SLI в режиме x8+x8;
- Возможность гибкой регулировки подключенных вентиляторов;
- Подсветка звукового тракта с поддержкой разнообразных эффектов;
- Цена.
- Отсутствие возможности одновременного использования M.2 (Socket 3) и SATA port 1 (SATA6G_12);
- Третий слот PCIe x16 (PCIEX4_3) работает в режиме 2х в случае использовании слотов PCIe x1 (PCIEX1_2 и PCIEX1_3).

По мнению редакции, учитывая все плюсы и минусы, материнская плата ASUS MAXIMUS VIII RANGER получает награду «Золото».
источник