
22
УСТАНОВКА ЧАСОВ
Установка часов 1:
1. Для входа в режим установки часов
нажмите и удерживайте 3 секунды
кнопку MODE (РЕЖИМ) (появится
символ CLOCK 1 (ЧАСЫ 1), индикатор
времени начн¸т мигать)
2. Для ввода часа нажмите HOUR (ЧАС),
для ввода минут нажмите MINUTE
(МИНУТЫ);
3. Для смены режима отображения
времени 12 или 24 час нажмите
ALARM/(C/F) (БУДИЛЬНИК/ЦЕЛЬСИЙ/ФАРЕНГЕЙТ) во время
установки часов.
4. Для окончания установки нажмите кнопку MODE (РЕЖИМ) или не
нажимайте никаких кнопок минуту.
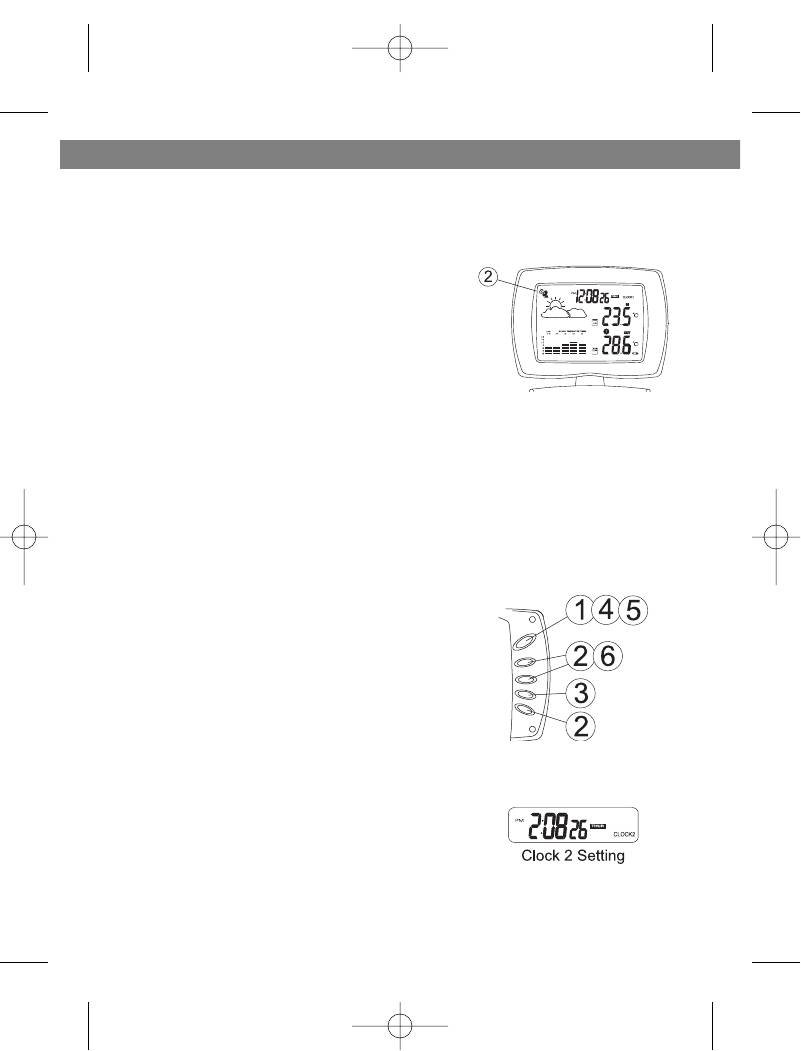
Установка часов 2:
5. Используя кнопку MODE (РЕЖИМ)
переключитесь в режим Clock 2 (ЧАСЫ 2)
6. Для изменения часовых параметров
нажмите кнопки + или — (на час больше
или меньше относительно Часов 1)
РУССКИЙ
3536.qxd 30.08.2004 14:48 Page 22
Инструкция и руководство для
Vitek VT-3536  на русском на английском


32 страницы подробных инструкций и пользовательских руководств по эксплуатации
 05:23
05:23
Обзор мультиварки Vitek VT-4209
 10:32
10:32
Кофеварка эспрессо Vitek 1511
 10:08
10:08
█ Разборка Фена СКРЫТЫЕ ЗАЩЁЛКИ / КОНТАКТНАЯ ГРУППА / Hairdryer repair
 05:50
05:50
Ремонт фена для волос своими руками
 15:15
15:15
РЕМОНТ ФЕНА. БЫСТРЫЙ и ПРОСТОЙ. УМЕЛЫЕ РУКИ. НЕ КОНТАЧАТ ПРОВОДА. ТЕРМО — УСАДКА. ИЗЛОМ ПРОВОДА.
 10:10
10:10
Ремонт фена для волос
 03:21
03:21
Как снять крыльчатку с фена
 05:59
05:59
ПОЛНЫЙ ОБЗОР БЛЕНДЕРА, VITEK VT-1477 PR ОТ МАРИНЫ, РЕЦЕПТЫ ДЛЯ МУЛЬТИВАРКИ # ОБЗОР БЛЕНДЕРА
3536.qxd 30.08.2004 14:48 Page 2

ИНСТРУКЦИЯ ПО ЭКСПЛУАТАЦИИ
MANUAL INSTRUCTION
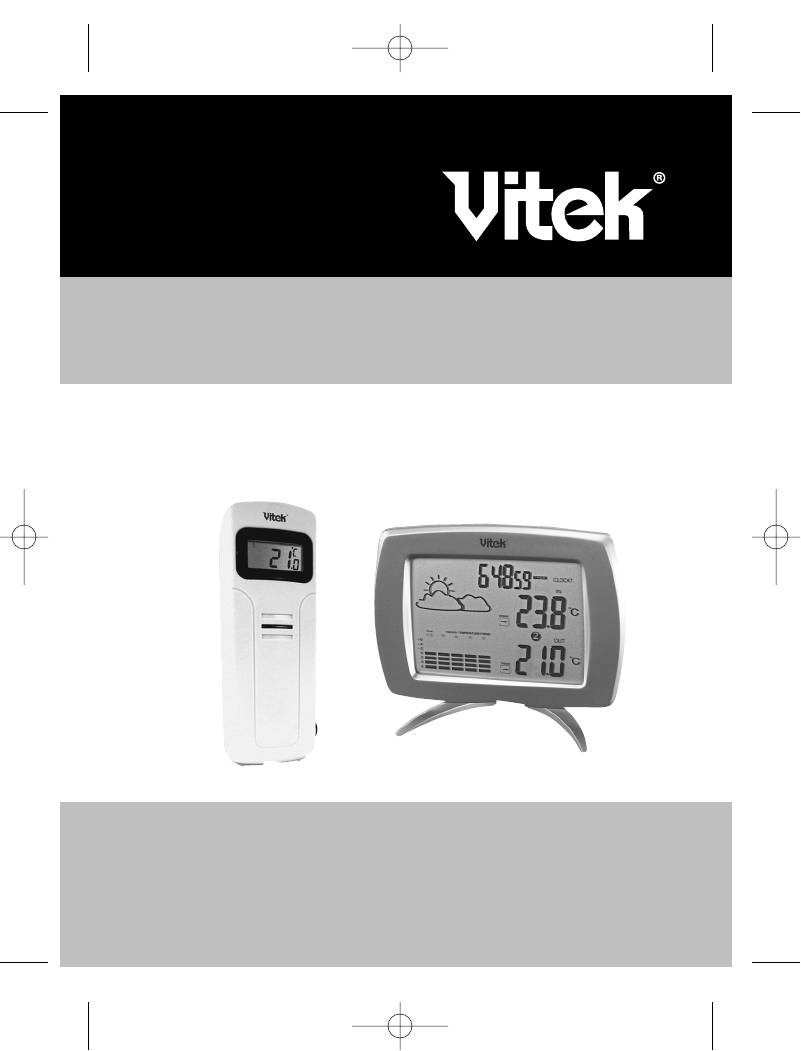
МОДЕЛЬ VT-3536
ALARM CLOCK / WIRELESS WEATHER STATION
ЧАСЫ — БУДИЛЬНИК / БЕСПРОВОДНАЯ МЕТЕОСТАНЦИЯ С
ОТОБРАЖЕНИЕМ ДАННЫХ О ПОГОДЕ
3536.qxd 30.08.2004 14:48 Page 3

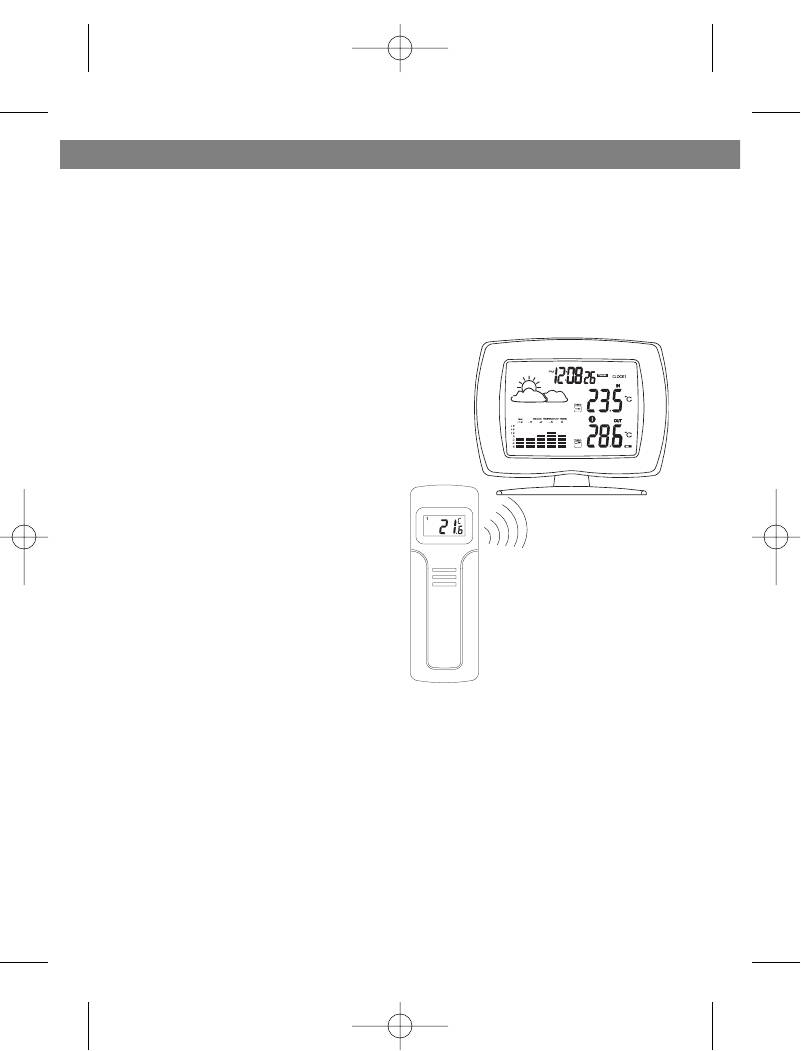
Wireless Weather Station with weather report
Congratulations on your purchase of this weather station. Please take the
time to read and understand this manual so you can begin to enjoy the con-
venience and features this product has to offer.
The unit is a weather station device that has several weather related func-
tions. The main features are:
Remote Transmitter
•
drip-proof design with LCD
• socket of external sensor probe
• temperature display in user-selectable °C or °F
• humidity display
• transmission range: up to 40 meters in open area
• battery type: 2 x AA size
ENGLISH
2
FEATURES
Main Display Unit:
•
dual clock and dual alarm
• calendar (month/day/date)
• local temperature display
• receives and displays tempera-
ture and humidity readings from
up to 3 remote transmitters via
RF technology of 433MHz
• minimum and maximum temper-
ature and humidity memory
• temperature and humidity trend
indicator
• temperature history (bar graph
for past 12 hours)
• weather icons
• user-selectable C or F
• table stand or wall mountable
• battery type: 2 x AA
VT-3536
receiver
VT-3536
transmitter
3536.qxd 30.08.2004 14:48 Page 2

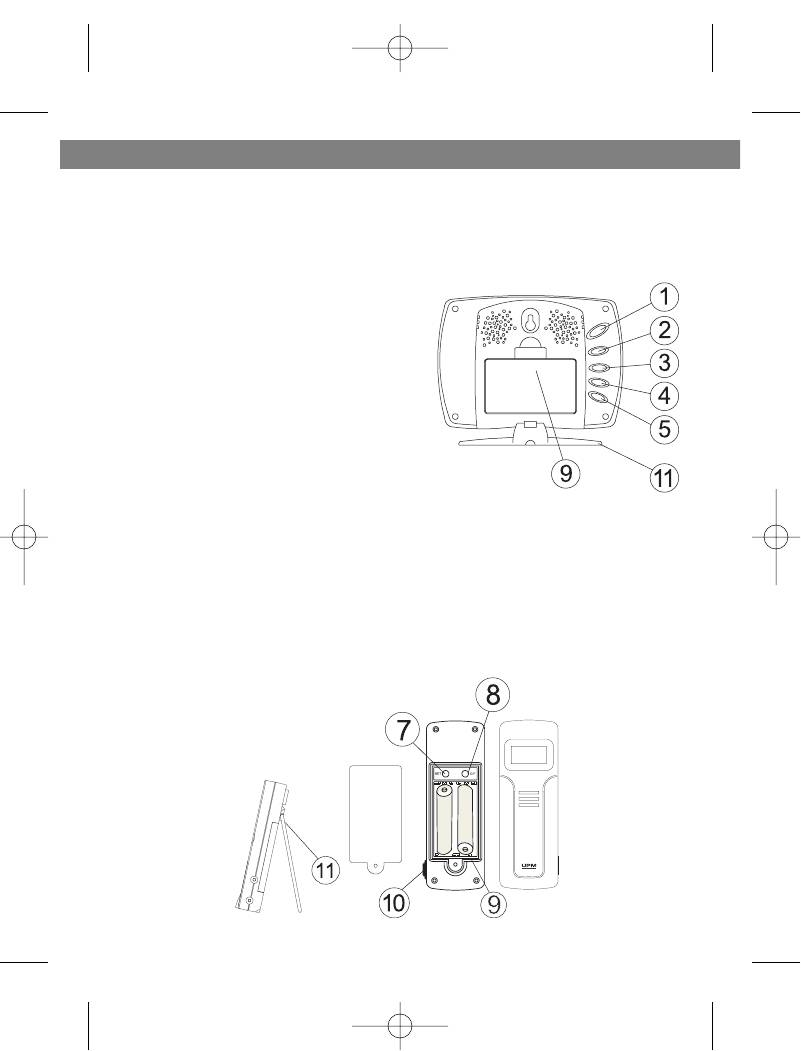
GETTING STARTED
1. MIN/-/MIN: shows minimum temper-
ature & humidity; adjusts clock,
alarm, date and temperature alarm
values
2. ON/OFF: toggles between °C and °F,
12 and 24 hour format, Alarm 1 & 2
on and off, and bar graph indoor and
outdoor selection; scrolls through
temperature alarm settings
(off/high/low)
3. CHN: scrolls through remote chan-
nels (1 to 3); adjusts time and date
values
4. HOUR/+/MAX: shows maximum tem-
perature & humidity; adjusts clock,
alarm, date and temperature alarm
values
5. SNOOZE/MODE: scrolls through Clock 1 & 2, Alarm 1 & 2, Date and
Temperature Alarm mode; snooze for alarm
6. LCD display
7. SET: enter to House code and Channel setting mode
8. C/F: change between °C or °F, change channel and house code
9. Battery compartment
10. Socket for external sensor probe.
11. Wall Mount Holder & Table Stand
ENGLISH
3
Button placement
3536.qxd 30.08.2004 14:48 Page 3

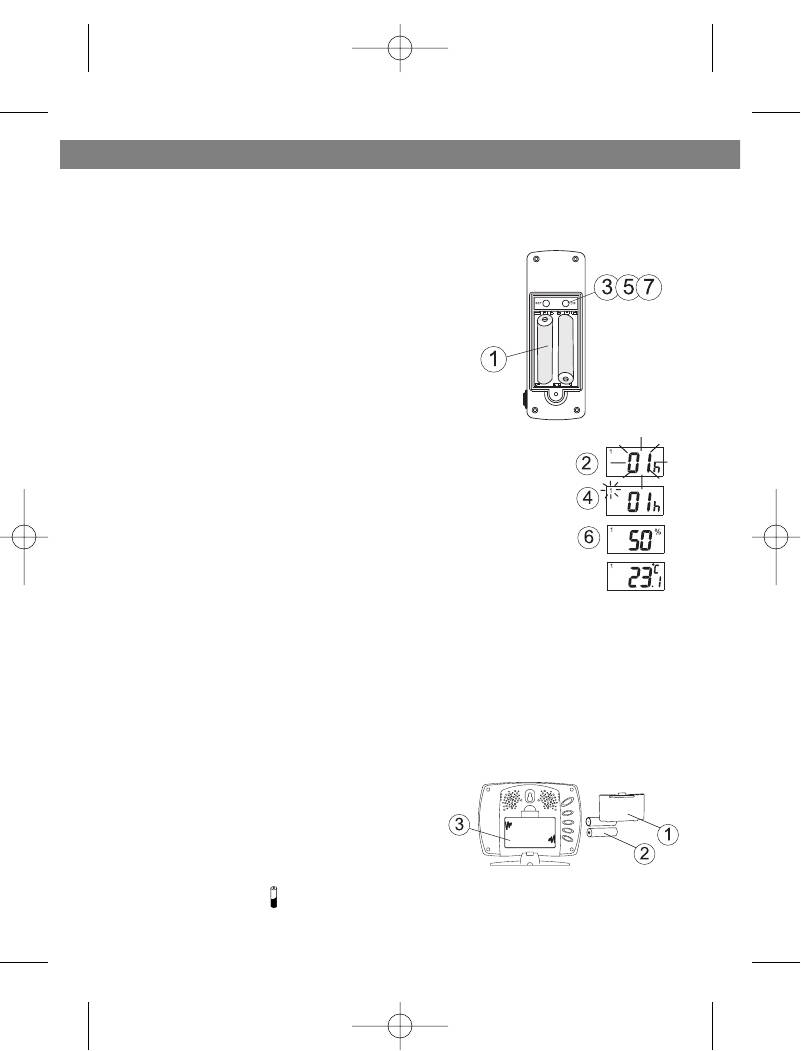
SETTING UP
Set up the transmitter(s) before setting up the
receiver
1. Remove battery cover and insert batteries
to start setup
AA size batteries (included) Insert batteries
into compartment observing proper polarity
2. HOUSE CODE will flash for 8 seconds
3. Select HOUSE CODE (1-15) by pressing
C/F and pressing SET to CHANNEL setting
If you have multiple transmitters for a single
receiver, set each transmitter to the same House code
4. CHANNEL will flash for 8 seconds
5. Select CHANNEL(1-3) by pressing C/F
If you have multiple transmitters for a single receiver, set
each transmitter to a different Channel code
6. Humidity & Temperature will alternatively display on LCD
screen
7. Select °C or °F of Temperature by pressing C/F
• Use a different house code if your weather station detects other signals
from neighboring sources
• Factory default: house code = 01 and channel = 01
1. Remove battery cover
2. 2 AA size batteries (included)
3. Insert batteries into compartment,
observing proper polarity; replace cover
LOW BATTERY INDICATION:
Receiver: Low battery indicator will display
continuously when batteries need replac-
ing. On transmitter,
will be displayed
ENGLISH
4
Setting up transmitter(s)
Setting up receiver
3536.qxd 30.08.2004 14:48 Page 4

WIRELESS TRANSMISSION
Automatic Learn Function:
The learn function starts automatically and runs for approximately 3 minutes
when batteries are first installed in the receiver.
Within these 3 minutes, the receiver will pick up the temperature and humidity
signals from the remote transmitter and display the reading.
Manual Learn Function (Remote Signal Search):
If a new remote transmitter is added or if signal is lost (outdoor read out on
the receiver is blinking), the learn function must be executed again.
1. Press and hold CHN for 3 seconds to start.
2. Unit will beep to indicate that learn function has started.
3. Channel symbol will blink and unit will continue to beep as each remote
transmitter is detected.
4. Within 3 minutes, the temperature and humidity reading of the remote
transmitter will display on the receiver.
ENGLISH
5
3536.qxd 30.08.2004 14:48 Page 5

WIRELESS TRANSMISSION
Environmental factors and signals from other household devices, such as
remote entry controls, security systems, and computers, may interfere with
the wireless transmission of this product and cause temporary reception
loss. This is normal and does not affect the general performance of this
product. Stable reception will resume once the interference ends.
For optimal performance:
• Place the receiver and remote transmitter side by side about 1 metre
apart, and allow the receiver and remote transmitter to synchronize for 10
minutes before you place the remote transmitter outdoors.
• The remote transmitter should be placed in a dry shaded area.
NOTE: Fog andmist will not harm the remote transmitter but direct rain
must be avoided.
• Mount the remote transmitter upright avoiding metallic objects and
frames, such as window sills. Verify that there are no obstacles like a
transmission tower or steep hill that can cause interference and blockage
between the remote transmitter and receiver.
• Place the receiver unit at least 2 metres away from any electrical devices,
such as your television set, computer, cordless phone, or any radio con-
trolled equipment.
• 1Replace unit(s) with fresh batteries when the Low Battery Indicator lights
up.
• Refer to the SETTING UP section.
• You may need to reposition the remote transmitter to a different location
and/or closer to the receiver for the best transmission.
ENGLISH
6
3536.qxd 30.08.2004 14:48 Page 6

CLOCK SETTING
Manual clock setting
Clock 1 Setting:
1. Press and hold MODE for 3 seconds to
enter the clock setting mode (the CLOCK 1
symbol appears and the time will flash)
2. Press HOUR to set the hour and MINUTE to
set the minute;
3. Press ALARM/(C/F) during clock setting, to
change between 12 and 24 hour display.
This also will end clock setting.
4. Press MODE or do not press any key for 1
minute to finish clock setting.
Clock 2 Setting:
5. Scroll to Clock 2 mode using MODE
6. Press + or — key to change the hour (in one
hour increments/decrements relative to
Clock 1)
ENGLISH
7
3536.qxd 30.08.2004 14:48 Page 7

ALARM SETTING
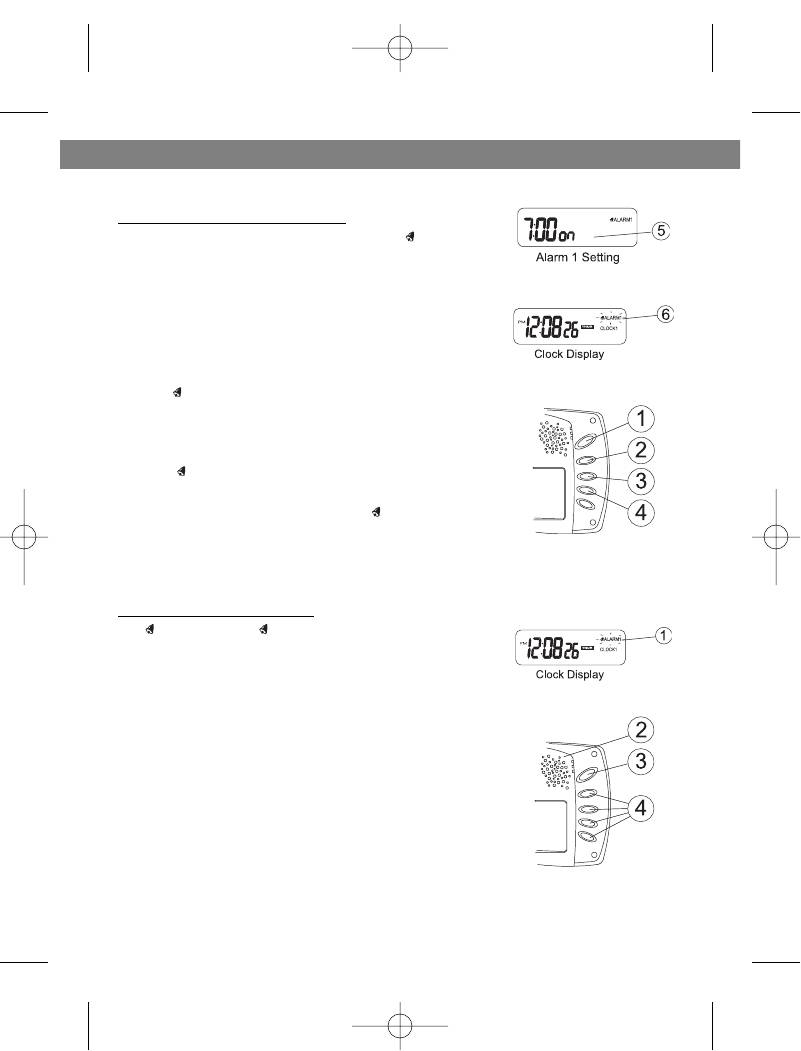
Alarm 1 and Alarm 2 Setting:
1. Scroll to Alarm 1 using MODE. The
ALARM 1
symbol will appear.
2. Press HOUR to set hour.
3. Press MIN to set minute.
4. Press ON/OFF to toggle alarm on and off.
5. When the alarm is set ON, the ‘on’ symbol will
appear.
6. In the normal clock display, if the alarm is set ON,
the
ALARM 1 symbol will also appear on the
display.
• To set Alarm 2, scroll to Alarm 2 using MODE.
• The
ALARM 2 symbol will appear. Follow the
same steps as above to set. In normal clock dis-
play, if the alarm is set ON, the
ALARM 2 sym-
bol will also appear on the display.
NOTE: Both Alarm 1 and Alarm 2 are based on the time set on Clock 1.
When the Alarm Sounds:
•
ALARM 1 or
ALARM 2 symbol will blink.
• The crescendo alarm will gradually increase in
loudness.
• Press SNOOZE to snooze the alarm for 5 min-
utes.
• After that the alarm will sound again.
• Press ANY other key to stop the alarm. Or without
interruption, the alarm will automatically stop
after one minute.
ENGLISH
8
3536.qxd 30.08.2004 14:48 Page 8

CALENDAR SETTING
1. Scroll to Date mode using MODE
2. Press HOUR/+/MAX to set month
3. Press MIN/-/MIN to set date
4. Press CHN to set day
TEMPERATURE & HUMIDITY
DISPLAY
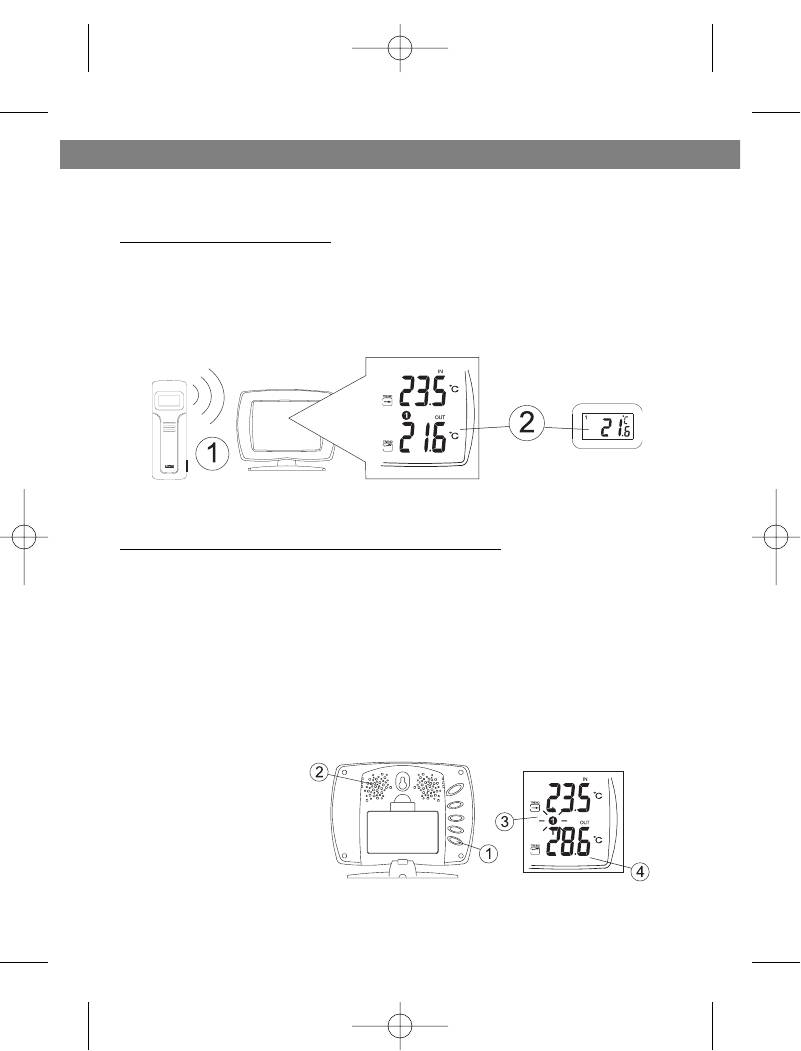
Local (Indoor) Temperature
The local (indoor) temperature will dis-
play instantly after batteries are inserted
into the receiver.
Remote (Outdoor) Temperature and Humidity
If the Learn Function is performed suc-
cessfully (refer to the WIRELESS TRANS-
MISSION section), the remote (outdoor)
temperature and humidity will display in
the bottom-right corner of the LCD
screen.
Press CHN to toggle between Channels
1, 2 and 3.
NOTE: The temperature and humidity
data will alternate on the LCD screen.
Selecting °C or °F Temperature Display
Toggle between °C and °F by pressing
ON/OFF in either Clock 1 or Clock 2 mode.
ENGLISH
9
3536.qxd 30.08.2004 14:48 Page 9

Комментарии
Вы здесь
Каталог инструкций » V » Vitek » Часы Vitek » Vitek VT-3536 » Страница инструкции 2
-
1
-
2
-
3
-
4
-
5
-
6
-
7
-
8
-
9
-
10
-
11
-
12
-
13
-
14
-
15
-
16
-
17
-
18
-
19
-
20
-
21
-
22
-
23
-
24
-
25
-
26
-
27
-
28
-
29
-
30
-
31
-
32


Распечатать
Страница 2 из 32
- << Предыдущая
- Следующая >>

Страница 2 в инструкции по эксплуатации Vitek VT-3536
ИНСТРУКЦИЯ ПО ЭКСПЛУАТАЦИИ
MANUAL INSTRUCTION
МОДЕЛЬ VT-3536
ALARM CLOCK WIRELESS WEATHER STATION
ЧАСЫ БУДИЛЬНИК БЕСПРОВОДНАЯ МЕТЕОСТАНЦИЯ С
ОТОБРАЖЕНИЕМ ДАННЫХ О ПОГОДЕ
3536.qxd 30.08.2004 14:48 Page 3
- << Предыдущая
- Следующая >>
Настольные часы VITEK VT-3536 — инструкция пользователя по применению, эксплуатации и установке на русском языке. Мы надеемся, она поможет вам решить возникшие у вас вопросы при эксплуатации техники.
Вы можете скачать инструкцию к VITEK VT-3536 по ссылке ниже, если не хотите ждать загрузки. Если остались вопросы, задайте их в комментариях после инструкции.
«Загружаем инструкцию», означает, что нужно подождать пока файл загрузится и можно будет его читать онлайн. Некоторые инструкции очень большие и время их появления зависит от вашей скорости интернета.
Полезные видео
Остались вопросы?
Не нашли свой ответ в руководстве или возникли другие проблемы? Задайте свой вопрос в форме ниже с подробным описанием вашей ситуации, чтобы другие люди и специалисты смогли дать на него ответ. Если вы знаете как решить проблему другого человека, пожалуйста, подскажите ему

Часто задаваемые вопросы

Как посмотреть инструкцию к VITEK VT-3536?
Необходимо подождать полной загрузки инструкции в сером окне на данной странице или скачать кликнув по специальной кнопке.
Руководство на русском языке?
Все наши руководства представлены на русском языке или схематично, поэтому вы без труда сможете разобраться с вашей моделью
Как можно распечатать инструкцию?
Скачайте ее по специальной кнопке над формой чтения на ваше устройства и отправьте на печать.
Страницы и текст этой инструкции
 Инструкция — VT-3536
 Информация отображена на картинке
 Информация отображена на картинке
 Информация отображена на картинке
 Информация отображена на картинке
Как использовать наш сайт инструкций OnlineManuals.ru
Наша цель состоит в том, чтобы предоставить вам быстрый доступ к содержанию инструкции для — VT-3536.
С помощью онлайн просмотра, Вы можете быстро просмотреть содержимое инструкции и найти решение проблемы с — VT-3536.
Для Вашего удобства
Если листать руководство пользователя — VT-3536 прямо на сайте, не очень удобно для Вас, есть два возможных решения:
• Просмотр в полноэкранном режиме — легко просмотреть руководство пользователя (без загрузки его на свой компьютер), Вы можете использовать режим полноэкранного просмотра.
Для просмотра инструкции пользователя — VT-3536 на полном экране, используйте кнопку «Открыть в Pdf-viewer».
• Загрузка на компьютер — Вы можете также скачать Инструкция — VT-3536 на свой компьютер и сохранить его в файлах.
Многие люди предпочитают читать документы не на экране, а в печатной версии.
Возможность печати руководства пользователя также была предусмотрена на нашем сайте,
и вы можете использовать ее, нажав на иконку «печать» в Pdf-viewer.
Нет необходимости печатать все руководство — VT-3536, можно выбрать только нужные страницы инструкции.

3536.qxd 30.08.2004 14:48 Page 2
ÈÍÑÒÐÓÊÖÈß ÏÎ ÝÊÑÏËÓÀÒÀÖÈÈ
MANUAL INSTRUCTION
ALARM CLOCK / WIRELESS WEATHER STATION
×ÀÑÛ — ÁÓÄÈËÜÍÈÊ / ÁÅÑÏÐÎÂÎÄÍÀß ÌÅÒÅÎÑÒÀÍÖÈß Ñ
ÎÒÎÁÐÀÆÅÍÈÅÌ ÄÀÍÍÛÕ Î ÏÎÃÎÄÅ
ÌÎÄÅËÜ VT-3536
3536.qxd 30.08.2004 14:48 Page 3
ENGLISH
Wireless Weather Station with weather report
Congratulations on your purchase of this weather station. Please take the
time to read and understand this manual so you can begin to enjoy the con-
venience and features this product has to offer.
The unit is a weather station device that has several weather related func-
tions. The main features are:
FEATURES
Main Display Unit:
• dual clock and dual alarm
• calendar (month/day/date)
• local temperature display
• receives and displays tempera-
ture and humidity readings from
up to 3 remote transmitters via
RF technology of 433MHz
• minimum and maximum temper-
VT-3536
ature and humidity memory
receiver
• temperature and humidity trend
indicator
• temperature history (bar graph
for past 12 hours)
• weather icons
• user-selectable C or F
VT-3536
• table stand or wall mountable
transmitter
• battery type: 2 x AA
Remote Transmitter
• drip-proof design with LCD
• socket of external sensor probe
• temperature display in user-selectable °C or °F
• humidity display
• transmission range: up to 40 meters in open area
• battery type: 2 x AA size
2
3536.qxd 30.08.2004 14:48 Page 2
ENGLISH
GETTING STARTED
1. MIN/-/MIN: shows minimum temper-
Button placement
ature & humidity; adjusts clock,
alarm, date and temperature alarm
values
2. ON/OFF: toggles between °C and °F,
12 and 24 hour format, Alarm 1 & 2
on and off, and bar graph indoor and
outdoor selection; scrolls through
temperature alarm settings
(off/high/low)
3. CHN: scrolls through remote chan-
nels (1 to 3); adjusts time and date
values
4. HOUR/+/MAX: shows maximum tem-
perature & humidity; adjusts clock,
alarm, date and temperature alarm
values
5. SNOOZE/MODE: scrolls through Clock 1 & 2, Alarm 1 & 2, Date and
Temperature Alarm mode; snooze for alarm
6. LCD display
7. SET: enter to House code and Channel setting mode
8. C/F: change between °C or °F, change channel and house code
9. Battery compartment
10.Socket for external sensor probe.
11.Wall Mount Holder & Table Stand
3
3536.qxd 30.08.2004 14:48 Page 3
ENGLISH
SETTING UP
Set up the transmitter(s) before setting up the
Setting up transmitter(s)
receiver
1. Remove battery cover and insert batteries
to start setup
AA size batteries (included) Insert batteries
into compartment observing proper polarity
2. HOUSE CODE will flash for 8 seconds
3. Select HOUSE CODE (1-15) by pressing
C/F and pressing SET to CHANNEL setting
If you have multiple transmitters for a single
receiver, set each transmitter to the same House code
4. CHANNEL will flash for 8 seconds
5. Select CHANNEL(1-3) by pressing C/F
If you have multiple transmitters for a single receiver, set
each transmitter to a different Channel code
6. Humidity & Temperature will alternatively display on LCD
screen
7. Select °C or °F of Temperature by pressing C/F
• Use a different house code if your weather station detects other signals
from neighboring sources
• Factory default: house code = 01 and channel = 01
1. Remove battery cover
Setting up receiver
2. 2 AA size batteries (included)
3. Insert batteries into compartment,
observing proper polarity; replace cover
LOW BATTERY INDICATION:
Receiver: Low battery indicator will display
continuously when batteries need replac-
ing. On transmitter, will be displayed
4
3536.qxd 30.08.2004 14:48 Page 4
ENGLISH
WIRELESS TRANSMISSION
Automatic Learn Function:
The learn function starts automatically and runs for approximately 3 minutes
when batteries are first installed in the receiver.
Within these 3 minutes, the receiver will pick up the temperature and humidity
signals from the remote transmitter and display the reading.
Manual Learn Function (Remote Signal Search):
If a new remote transmitter is added or if signal is lost (outdoor read out on
the receiver is blinking), the learn function must be executed again.
1. Press and hold CHN for 3 seconds to start.
2. Unit will beep to indicate that learn function has started.
3. Channel symbol will blink and unit will continue to beep as each remote
transmitter is detected.
4. Within 3 minutes, the temperature and humidity reading of the remote
transmitter will display on the receiver.
5
3536.qxd 30.08.2004 14:48 Page 5

ENGLISH
WIRELESS TRANSMISSION
Environmental factors and signals from other household devices, such as
remote entry controls, security systems, and computers, may interfere with
the wireless transmission of this product and cause temporary reception
loss. This is normal and does not affect the general performance of this
product. Stable reception will resume once the interference ends.
For optimal performance:
• Place the receiver and remote transmitter side by side about 1 metre
apart, and allow the receiver and remote transmitter to synchronize for 10
minutes before you place the remote transmitter outdoors.
• The remote transmitter should be placed in a dry shaded area.
NOTE: Fog andmist will not harm the remote transmitter but direct rain
must be avoided.
• Mount the remote transmitter upright avoiding metallic objects and
frames, such as window sills. Verify that there are no obstacles like a
transmission tower or steep hill that can cause interference and blockage
between the remote transmitter and receiver.
• Place the receiver unit at least 2 metres away from any electrical devices,
such as your television set, computer, cordless phone, or any radio con-
trolled equipment.
• 1Replace unit(s) with fresh batteries when the Low Battery Indicator lights
up.
• Refer to the SETTING UP section.
• You may need to reposition the remote transmitter to a different location
and/or closer to the receiver for the best transmission.
6
3536.qxd 30.08.2004 14:48 Page 6
ENGLISH
CLOCK SETTING
Manual clock setting
Clock 1 Setting:
1. Press and hold MODE for 3 seconds to
enter the clock setting mode (the CLOCK 1
symbol appears and the time will flash)
2. Press HOUR to set the hour and MINUTE to
set the minute;
3. Press ALARM/(C/F) during clock setting, to
change between 12 and 24 hour display.
This also will end clock setting.
4. Press MODE or do not press any key for 1
minute to finish clock setting.
Clock 2 Setting:
5. Scroll to Clock 2 mode using MODE
6. Press + or — key to change the hour (in one
hour increments/decrements relative to
Clock 1)
7
3536.qxd 30.08.2004 14:48 Page 7
ENGLISH
ALARM SETTING
Alarm 1 and Alarm 2 Setting:
1. Scroll to Alarm 1 using MODE. The ALARM 1
symbol will appear.
2. Press HOUR to set hour.
3. Press MIN to set minute.
4. Press ON/OFF to toggle alarm on and off.
5. When the alarm is set ON, the ‘on’ symbol will
appear.
6. In the normal clock display, if the alarm is set ON,
the ALARM 1 symbol will also appear on the
display.
• To set Alarm 2, scroll to Alarm 2 using MODE.
• The ALARM 2 symbol will appear. Follow the
same steps as above to set. In normal clock dis-
play, if the alarm is set ON, the ALARM 2 sym-
bol will also appear on the display.
NOTE: Both Alarm 1 and Alarm 2 are based on the time set on Clock 1.
When the Alarm Sounds:
• ALARM 1 or ALARM 2 symbol will blink.
• The crescendo alarm will gradually increase in
loudness.
• Press SNOOZE to snooze the alarm for 5 min-
utes.
• After that the alarm will sound again.
• Press ANY other key to stop the alarm. Or without
interruption, the alarm will automatically stop
after one minute.
8
3536.qxd 30.08.2004 14:48 Page 8

ENGLISH
CALENDAR SETTING
1. Scroll to Date mode using MODE
2. Press HOUR/+/MAX to set month
3. Press MIN/-/MIN to set date
4. Press CHN to set day
TEMPERATURE & HUMIDITY
DISPLAY
Local (Indoor) Temperature
The local (indoor) temperature will dis-
play instantly after batteries are inserted
into the receiver.
Remote (Outdoor) Temperature and Humidity
If the Learn Function is performed suc-
cessfully (refer to the WIRELESS TRANS-
MISSION section), the remote (outdoor)
temperature and humidity will display in
the bottom-right corner of the LCD
screen.
Press CHN to toggle between Channels
1, 2 and 3.
NOTE: The temperature and humidity
data will alternate on the LCD screen.
Selecting °C or °F Temperature Display
Toggle between °C and °F by pressing
ON/OFF in either Clock 1 or Clock 2 mode.
9
3536.qxd 30.08.2004 14:48 Page 9
ENGLISH
TEMPERATURE & HUMIDITY DISPLAY
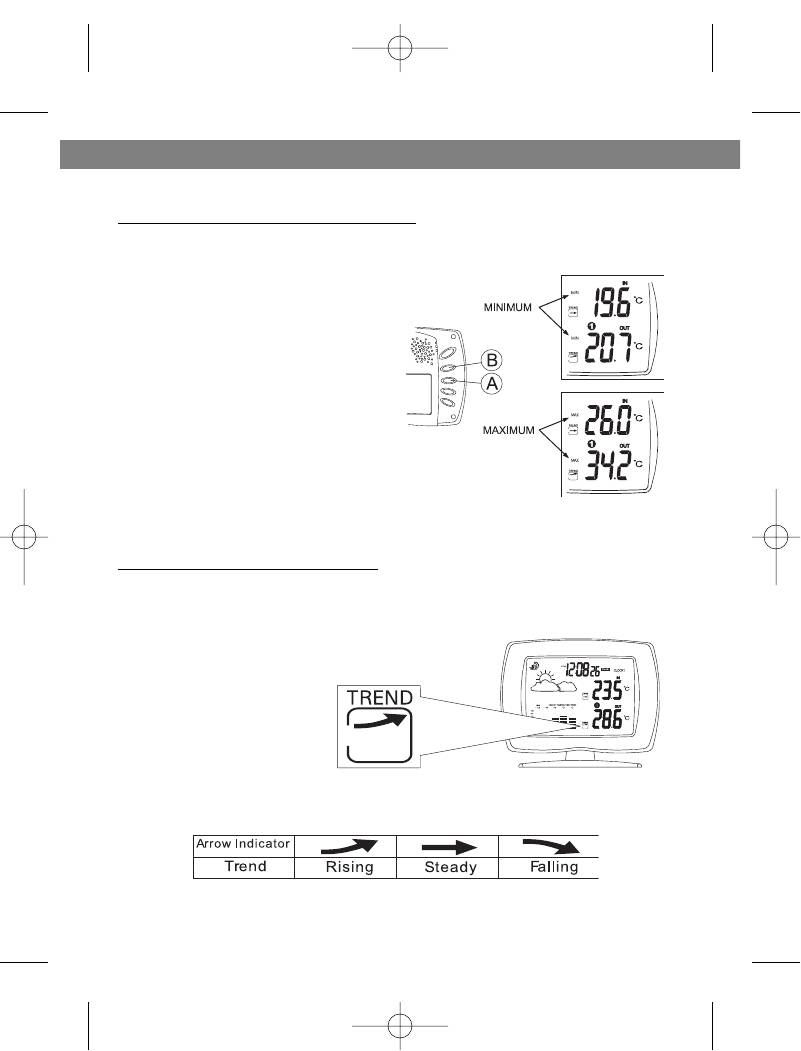
Min and Max Temperature & Humidity
A Press MIN in Clock 1 mode to
display minimum temperature
and humidity.
The MIN symbol will appear.
To return to normal temperature and
humidity display, press MIN again.
B Press MAX in Clock 1 mode to
display maximum temperature
and humidity.
The MAX symbol will appear.
To return to normal temperature and
humidity display,press MAX again.
NOTE: Min/Max readings are auto-
matically cleared daily at 00:00
Temperature and Humidity Trend
The trend indicator shows the trend of the temperature and humidity in the
past half-hour interval.
Example: The following indicates that the temperature is rising.
10
3536.qxd 30.08.2004 14:48 Page 10

ENGLISH
HISTORICAL TEMPERATURE BAR GRAPH
The bar graph lets you see the temperature
trend over a period of 12 hours in 3-hour
intervals. The left axis denotes the change in
temperature in ±2 degrees. The top axis
denotes the time period broken into 3-hour
intervals. The reference point is at (0,0);
where the current period is time zero and the
change in temperature is zero.
How to read the bar graph?
About 12 hours ago
The temperature was approximately 4 degrees
cooler than the current temperature
About 9 hours ago
The temperature was approximately 2 degrees
cooler than the current temperature
About 6 hours ago
The temperature was approximately the same
as the current temperature
Within the last 3 hours
The temperature was approximately 2 degrees
warmer than the current temperature
Selecting Indoor or Outdoor Bar Graph:
You can select to view the indoor or outdoor bar graph. The indoor bar graph
is based on the local temperature and the outdoor bar graph is based on the
remote (outdoor) temperature of Channel 1.
1. Scroll to Date mode using MODE.
2. Toggle between the indoor and outdoor bar graph by pressing ON/OFF in
date mode.
3. If you have selected the indoor bar graph, the INDOOR symbol will appear
on the display. Otherwise, you have selected the outdoor bar graph.
11
3536.qxd 30.08.2004 14:48 Page 11
ENGLISH
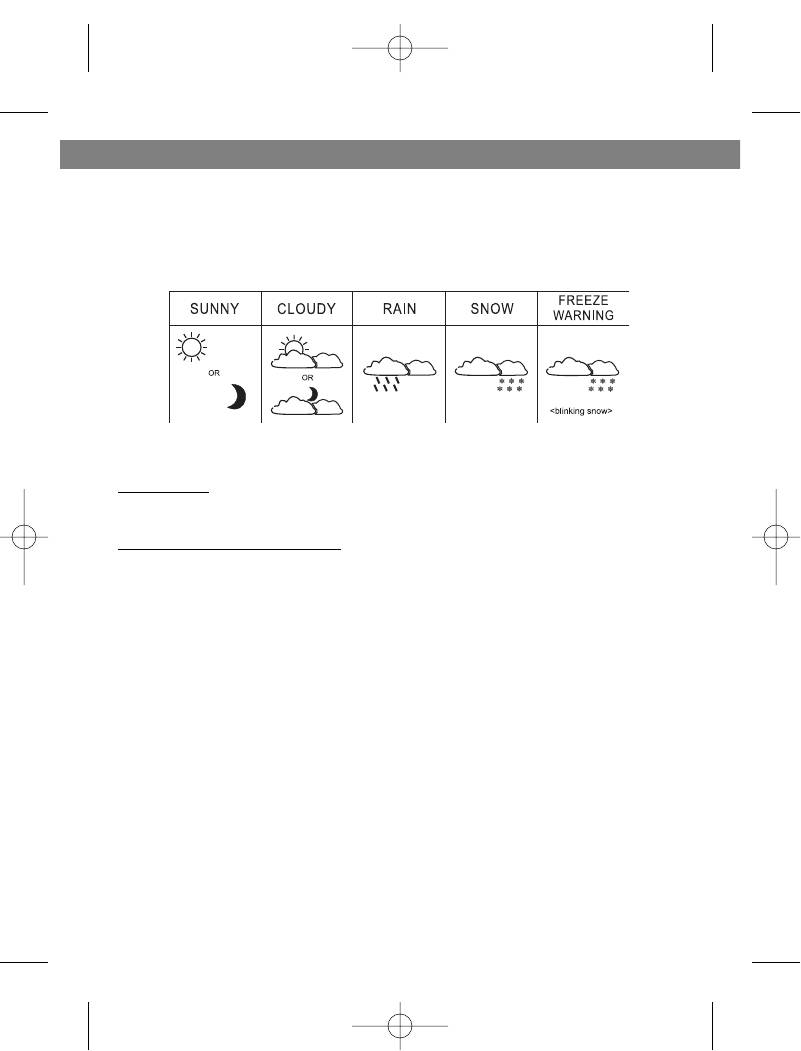
WEATHER ICONS
Based on the temperature and humidity data collected from the remote
transmitter (Channel 1), the receiver will display the following weather icons
on the LCD screen.
Storm Alert
• Storm symbol will flash to warn of thunderstorm.
About Snow Freeze Warning
• Snow symbol will flash to warn of ‘snowing’.
• Activated when Channel 1’s temperature is between -1.9 °C and +2.9 °C
• Snow will appear solid if and when Channel 1’s temperature falls below —
1.9 °C: it is freezing.
Note:
• Remote sensor Channel 1 will be used for weather symbols indication.
12
3536.qxd 30.08.2004 14:48 Page 12
ENGLISH
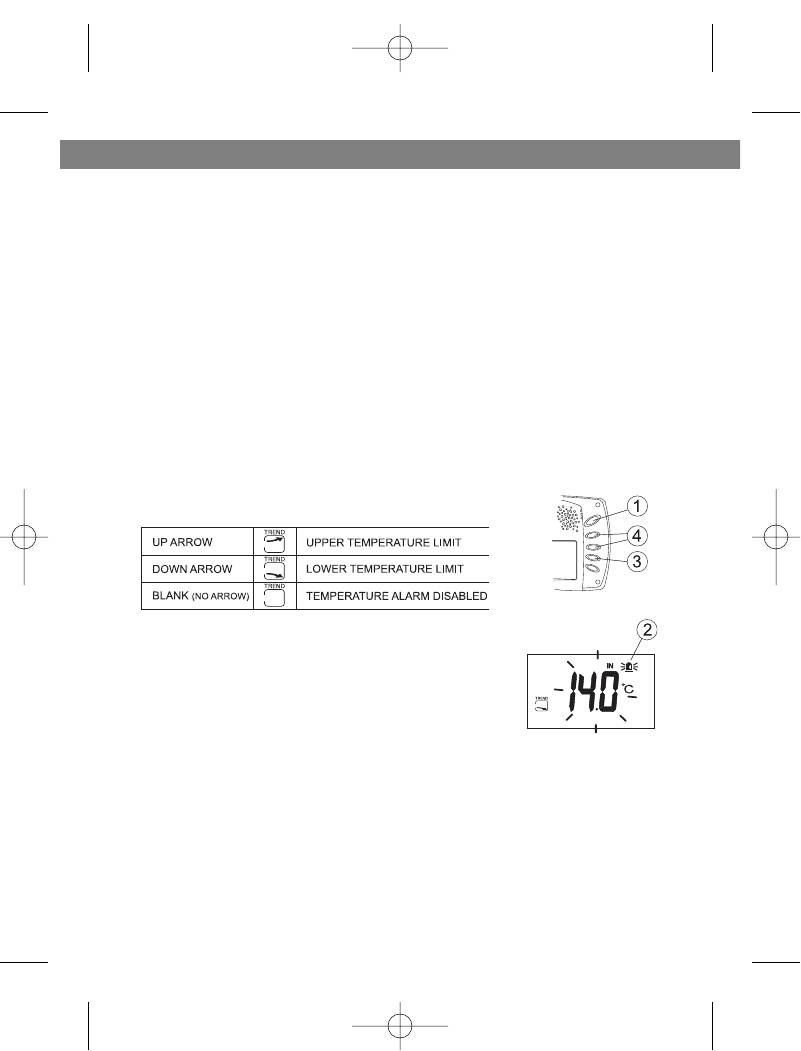
TEMPERATURE ALARM
• The temperature alarm is an ideal feature to be used for greenhouses and
wine cellars, or any place that you require controlled temperature. Once
activated, the temperature alarm would sound when the room gets too
warm or too cold depending on your settings.
• You can set the temperature alarm for the local temperature (main receiv-
er unit) and/or for one of the remote (outdoor) channels separately.
• UPPER TEMPERATURE LIMIT: If the temperature gets too warm and
reaches the upper temperature limit, the alarm would sound.
• LOWER TEMPERATURE LIMIT: If the temperature gets too cold and
reaches the lower temperature limit, the alarm would sound.
Setting the Temperature Alarm for the Local Temperature
1. Scroll to the local temperature alarm setting mode by pressing MODE.
2. The Temperature Alarm symbol will appear and the indoor temperature
will be blinking.
3. Press ON/OFF to select the following settings:
4. Press + or — key to set the desired value for the
temperature limit.
13
3536.qxd 30.08.2004 14:48 Page 13
ENGLISH
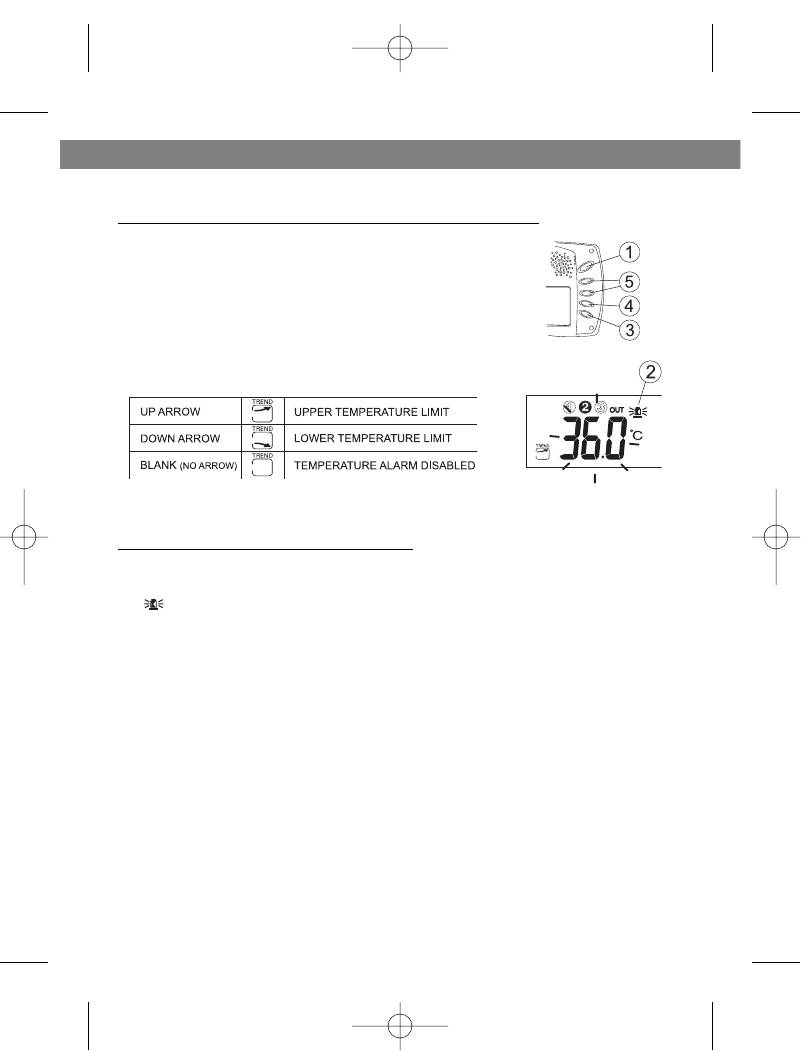
TEMPERATURE ALARM
Setting the Temperature Alarm for a Remote Channel
1. Scroll to the remote temperature alarm setting
mode by pressing MODE.
2. The Temperature Alarm symbol will appear and
the remote temperature will be blinking.
3. Press ON/OFF to select the following settings:
4. Press CHN to select the desired remote channel
(1, 2 or 3) that you wish the temperature alarm to
be set on. Only one channel can be selected.
5. Press + or — key to set the desired value for the temperature limit.
When the Temperature Alarm Sounds
• The temperature alarm will sound when the actual temperature has
reached (or exceeded) the upper or lower temperature limit.
• symbol will blink
• The temperature alarm has a distinctive tone different to that of Alarm 1 or
Alarm 2.
• Press ANY key to stop the temperature alarm. Or without interruption, the
temperature alarm will automatically stop after one minute.
14
3536.qxd 30.08.2004 14:48 Page 14

ENGLISH
TROUBLESHOOTING
PROBLEM
SOLUTION
The temperature and
This may occur when you move the remote transmitter
humidity data on the
from one environment to another. For example, when you
remote transmitter does
bring the transmitter from inside the warm house out to
not match the data dis-
the cold exterior. In such a case, there will be a big
played on the receiver.
change in temperature. The transmitter will record this
change in temperature much quicker than it is able to
transmit the data to the receiver (which is done once
every minute). Therefore, you will temporarily get a differ-
ence in reading between the remote transmitter and
receiver.
The temperature and
The solution is to allow the remote transmitter some time
humidity data on the
to sit in its new location to reach equilibrium. This may
remote transmitter does
take several minutes. Once the data is stable, the data
not match the data dis-
displayed on the remote transmitter should match that
played on the receiver.
displayed on the receiver.
This may also be the result of a temporary loss of recep-
tion due to interfering sources. Normal reception should
resume once the interference ends. Refer to the WIRE-
LESS TRANSMISSION section.
The remote (outdoor)
Re-synchronize the remote transmitter and receiver by
readout on the receiver is
pressing and holding CHN on the receiver for 3 seconds
blinking.
until a beep is heard. The temperature and humidity data
from the remote transmitter will display on the receiver
within 3 minutes. Refer to the WIRELESS TRANSMISSION
(Manual Learn Function) section.
The remote (outdoor)
Ensure the remote transmitter is away from any possible
readout on the receiver is
source of interference and electrical disturbances. You
blinking. The receiver will
may try to reposition the remote transmitter in a different
not detect or receive the
location and/or closer to the receiver. The remote trans-
temperature and humidity
mitter does have a maximum range of 40 metres, but any
data from the remote
walls or windows the signal has to pass through will
transmitter, even after the
reduce the distance. Due to the nature of the batteries,
Manual Learn Function has
extreme cold temperatures may also affect the transmis-
been executed.
sion range.
Refer to the WIRELESS TRANSMISSION section and
repeat the Manual Learn Function with the remote
transmitter in a new location.
15
3536.qxd 30.08.2004 14:48 Page 15

ENGLISH
SPECIFICATIONS
Weather Station Receiver
Battery Type: 2 x 1.5V AA batteries
Temp. Range: -9.9°C to +55°C
Weather Station Transmitter
Battery Type: 2 x 1.5V AA batteries
Temp. Range: -30°C to +70°C
Humidity Range: 15 to 95%
Transmission Frequency: 433.92 MHz
Transmission Range: up to 40 meters in open area
The manufacturer reserves the right to change the characteristics of
the device without prior warning
SERVICE LIFE OF THE UNIT NOT LESS 3 YEARS
16
3536.qxd 30.08.2004 14:48 Page 16
В представленном списке руководства для конкретной модели Цифровой метеостанции — VITEK VT-3536. Вы можете скачать инструкции к себе на компьютер или просмотреть онлайн на страницах сайта бесплатно или распечатать.
В случае если инструкция на русском не полная или нужна дополнительная информация по этому устройству, если вам нужны
дополнительные файлы: драйвера, дополнительное руководство пользователя (производители зачастую для каждого
продукта делают несколько различных документов технической помощи и руководств), свежая версия прошивки, то
вы можете задать вопрос администраторам или всем пользователям сайта, все постараются оперативно отреагировать
на ваш запрос и как можно быстрее помочь. Ваше устройство имеет характеристики:Тип: метеостанция, Измерение температуры (OUT): есть, Диапазон показателей температуры: -30 — 70? C, Измерение влажности: на улице, в диапазоне 15 — 95%, Дополнительные функции: прогноз погоды, сохранение температурных значений, часы, будильник, обычный календарь, Выносной датчик: беспроводной (радиус приема 40 м), макс. число датчиков — 3, в комплекте — 1, полные характеристики смотрите в следующей вкладке.
Для многих товаров, для работы с VITEK VT-3536 могут понадобиться различные дополнительные файлы: драйвера, патчи, обновления, программы установки. Вы можете скачать онлайн эти файлы для конкретнй модели VITEK VT-3536 или добавить свои для бесплатного скачивания другим посетителями.
Если вы не нашли файлов и документов для этой модели то можете посмотреть интсрукции для похожих товаров и моделей, так как они зачастую отличаются небольшим изменениями и взаимодополняемы.
Обязательно напишите несколько слов о преобретенном вами товаре, чтобы каждый мог ознакомиться с вашим отзывом или вопросом. Проявляйте активность что как можно бльше людей смогли узнать мнение настоящих людей которые уже пользовались VITEK VT-3536.
Геннадий
2017-08-15 14:06:35
Выносной датчик не правильно измеряет температуру. После замены элементов питания в выносном блоке не правильно измеряет температуру. Показания всегда в пределах 30 градусов + — 3 градуса
герман
2017-11-19 21:32:12
не работает
герман
2017-11-19 21:33:57
настройка
Elena
2019-10-12 13:51:28
Технику выпускаете, а инструкции нормальной нет
ЛЮБОВЬ
2020-10-15 20:43:13
работает более 10-ти лет. удобно, не жалуюсь. сейчас при замене батареек сбились настройки дисплея. необходимо руководство на русском языке.
Основные и самые важные характеристики модели собраны из надежных источников и по характеристикам можно найти похожие модели.
| Функциональность | |
| Тип | метеостанция |
| Измерение температуры (OUT) | есть |
| Диапазон показателей температуры | -30 — 70? C |
| Измерение влажности | на улице, в диапазоне 15 — 95% |
| Дополнительные функции | прогноз погоды, сохранение температурных значений, часы, будильник, обычный календарь |
| Особенности | |
| Выносной датчик | беспроводной (радиус приема 40 м), макс. число датчиков — 3, в комплекте — 1 |
| Передача данных | частота передачи 433,92 МГц |
| Питание | автономное, батареи типа АА (в комплекте), индикация уровня заряда |
| Отображение информации | цифры и символы, выбор единиц измерения |
| Дисплей | с подсветкой |
| Настенное крепление | есть |
| Звуковая индикация | есть |
| Размеры (ВхШхТ) | 81х114х21 мм |
| Дополнительная информация | предупреждение о снеге, обледенении и шторме |
Здесь представлен список самых частых и распространенных поломок и неисправностей у Цифровых метеостанций. Если у вас такая поломка то вам повезло, это типовая неисправность для VITEK VT-3536 и вы можете задать вопрос о том как ее устранить и вам быстро ответят или же прочитайте в вопросах и ответах ниже.
| Название поломки | Описание поломки | Действие |
|---|---|---|
| Сломался Датчик Измерения Температуры | ||
| Исчезновение Подсветки Дисплея | ||
| Не Измеряется Давление Или Скорость Ветра | ||
| Перестали Работать Электронные Часы | ||
| Не Срабатывает Будильник | ||
| При Кз В Сети Дисплей Светится, Но Никакой Информации Не Отображается. | ||
| Не Работает От Сети | От Батареек Работает, Шнур Рабочий, Вместе Не Работают. Метеостанции 6 Лет | |
| Не Показывает Внешнюю Температуру | На Дисплее Высвечивается Ll.l | |
| Звуковая Индикация | Как Отключить | |
| Vantage Pro 2 6163 | Отработала 5Лет И Померла. Нет Связи С Консолью. Внутренние Датчики Работают. Можно Как-То Подключить Через Коннектор Com Порта? | |
| Как Заменить Батарейки | ||
| Не Показывает Внешнюю Температуру | На Дисплее Показывает ——— | |
| Периодическое Мигание И Писк | Непрерывно Мигают Все Индикаторы Дисплея И Писк 1 Раз В Секунду. При Вынутых Батареях На Дисплее Есть Индикатор Связи И Дом |
В нашей базе сейчас зарегестрированно 18 353 сервиса в 513 города России, Беларусии, Казахстана и Украины.