This manual is for wAP kit series models:
wAP LTE kit
wAP LTE kit US
This device needs to be upgraded to RouterOS v6.44.6 or the latest version to ensure compliance with local authority regulations.
It is the customer’s responsibility to follow local country regulations, including operation within legal frequency channels, output power, cabling requirements, and Dynamic Frequency Selection (DFS) requirements. All Mikrotik radio devices must be professionally installed.

Note. The information contained here is subject to change. Please visit the product page on www.mikrotik.com for the most up to date version of this document.
Safety Warnings
Before you work on any equipment, be aware of the hazards involved with electrical circuitry, and be familiar with standard practices for preventing accidents.
Ultimate disposal of this product should be handled according to all national laws and regulations.
All installation methods for mounting an access point on any wall surface is subject to the acceptance of local jurisdiction.
The Installation of the equipment must comply with local and national electrical codes.
This product is intended to be mounted outdoors on a pole but can also be installed indoors. Please read the mounting instructions carefully before beginning installation. Failure to use the correct hardware and configuration or to follow the correct procedures could result in a hazardous situation to people and damage to the system.
Use only the power supply and accessories approved by the manufacturer, and which can be found in the original packaging of this product.
Read the installation instructions before connecting the system to the power source.
We cannot guarantee that no accidents or damage will occur due to the improper use of the device. Please use this product with care and operate at your own risk!
In the case of device failure, please disconnect it from power. The fastest way to do so is by unplugging the power plug from the power outlet.
It is the customer’s responsibility to follow local country regulations, including operation within legal frequency channels, output power, cabling requirements, and Dynamic Frequency Selection (DFS) requirements. All Mikrotik radio devices must be professionally installed.
This is a class A device. In a domestic environment, this product might cause radio interference in which case the user might be required to take adequate measures.
Exposure to Radio Frequency Radiation: This MikroTik equipment complies with the FCC, IC, and European Union radiation exposure limits set forth for an uncontrolled environment. This MikroTik device should be installed and operated no closer than 38 centimeters from your body, occupational user, or the general public.
Quickstart
- Use a Phillips head screwdriver to loosen the screw, which secures the bottom lid (see Bottom Lid).
- Insert the SIM card.
- Choose your powering solution, please see the Powering section for possibilities.
- Connect the Ethernet cable to the PoE and connect the other end of the Ethernet cable to this MikroTik router. Plug the provided power supply into the PoE injector.
- Wireless AP mode is enabled by default, you can connect from your computer to the SSID that begins with «MikroTik». The configuration interface is available via a web browser. The address is https://192.168.88.1
 .
. - Connect to the wireless network, open https://192.168.88.1 in your web browser to start the configuration.
- User name: admin and there is no password by default you will be logged in automatically to the Quick Set screen (or, for some models, check user and wireless passwords on the sticker).
- Click the «Check for updates» button on the right side and updating your RouterOS software to the latest version to ensure the best performance and stability. Must have a valid SIM card inserted.
- To personalize your wireless network, SSID can be changed in the fields «Network Name»;
- Choose your country on the left side of the screen in the field «Country», to apply country regulation settings.
- Set up your wireless network password in the field «WiFi Password» the password must be at least eight symbols.
- Set up your router password in the bottom field «Password» to the right and repeat it in the field «Confirm Password», it will be used to login next time.
- Click on the «Apply Configuration» to save changes.
- To manually update the device if no Internet connection is available.
- Download the latest RouterOS software from https://mikrotik.com/download.
- Choose MIPSBE packages, and save them to your PC.
- Connect again and in Files menu upload downloaded packages.
- Restart the device.
MikroTik mobile app
Use the MikroTik smartphone app to configure your router in the field, or to apply the most basic initial settings for your MikroTik home access point.

- Scan QR code and choose your preferred OS.
- Install and open application.
- By default, the IP address and user name will be already entered.
- Click Connect to establish a connection to your device through a wireless network.
- Choose Quick setup and application will guide you through all basic configuration settings in a couple of easy steps.
- An advanced menu is available to fully configure all necessary settings.
Powering
PoE Input
The ethernet port accepts 9-30 V passive PoE power. The box contains a 24 V adapter and a PoE injector. Plug the
included PoE injector into the first or internet port of the router that you will use in your LAN (or directly into your
laptop) and attach an ethernet cable to the PoE injector. Connect the other end of this ethernet cable to the wAP
LTE device. Plug the power supply into the PoE injector
Power jack
The DC jack (5.5 mm outside and 2 mm inside diameter, female, pin positive plug) supports 9-30 V power, the
the device comes with a 24 V 1.2 A power adapter
Automotive connector
The automotive connector can be used to power the device from regular 12/24 V connections in automobiles and
buses. The plug has four pins: bottom left (black) is the ground, bottom right is power in (red). The upper two are
reserved for future use.
Maximum power consumption at 24 V is 6 W without miniPCIe, and 8 W with a full load on the miniPCIe card.
Mounting
The device can be mounted in several ways: pole, wall, ceiling or it can be placed in specially designed Mikrotik holder which comes with the package. The package also includes a drill hole template with detailed mounting instructions, to help you with the Ethernet cable installation and attachment to a ceiling or a wall. Steel bracket to put on the other side of a dropdown ceiling tile and two screws and wall anchors. Zip ties or steel clamps for mounting on the pole.
The IP rating scale for this device is IP54. When mounting outdoors, please ensure that any cable openings are directed downwards. We recommend using the POE injector and proper grounding with Cat6 shielded cable. When using and installing this device please pay attention to Maximum Permissible Exposure (MPE) safety distance with a minimum of 35 cm between the radiator and your body.
Mounting on the mast or pole: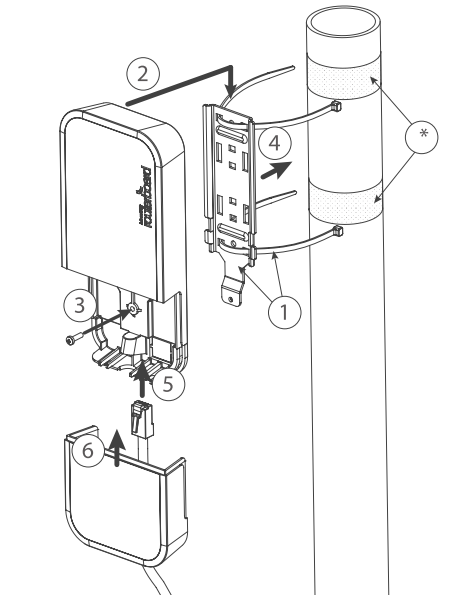
* It’s recommended to use electrical tape to increase friction between materials.
- Mount plastic tie straps to steel brackets guiding them through holes.
- Mount bracket to the device.
- Secure them with a screw.
- Mount and align the device on the pole or mast.
- Guide Ethernet cable through the opening and connect to the Ethernet port.
- Close bottom latch and secure with a screw.
It’s recommended to secure Ethernet cable to the pole using zip ties. With the distance from the device approximately 38 cm.
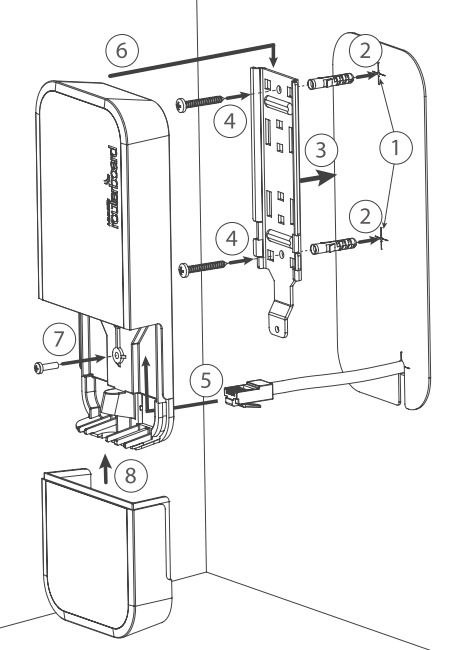
Mounting unit on the wall:
- Use included a template to mark spots for drilling holes. And if needed for Ethernet cable. Align accordingly, it will depend on how the device will be mounted finally.
- Insert dowels if needed, depends on wall structure and material.
- Place included a steel bracket on the wall.
- Use screws to secure it in the place.
- Extend your Ethernet cable through the opening and connect to the Ethernet port.
- Mount the device on the steel bracket
- Secure it in place with the screw.
- Close bottom latch.
Avoid mounting the device on the low ground spot, as you won’t be able to attach and close the bottom latch.
Mounting on the ceiling: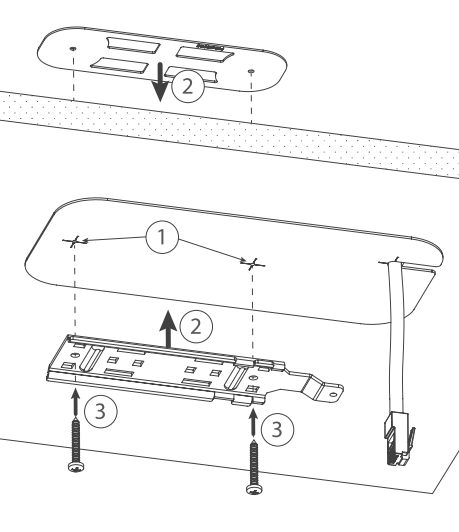
A Special bracket is included in the package to mount on the drop ceiling. As it consists of two parts, to be attached on both sides of the ceiling tile.
- Use the template to mark spots for holes.
- Place both mounting brackets on the spot.
- Secure them together using screws.
Continue assembling in the same manner if mounting on the wall.
- Extend your Ethernet cable through the opening and connect to the Ethernet port.
- Mount the device on the steel bracket.
- Secure it in place with the screw.
- Close bottom latch.

Bottom Lid
- The bottom lid is secured in place with the captive screw.
- Use the Philips PH2 screwdriver to unscrew it, but do not remove the screw completely.
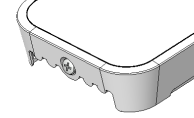
- Pull the cover in the opposite direction from the device to remove it.
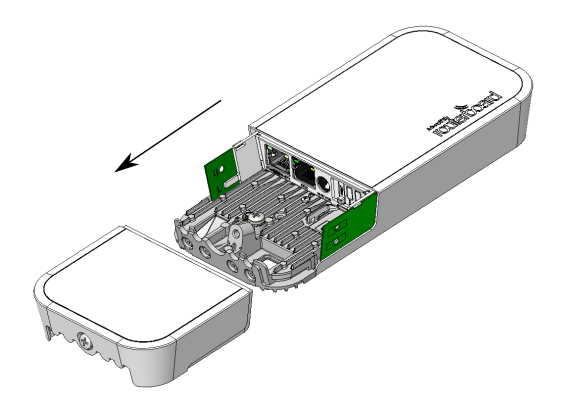
- Reassemble.
Expansion slots and ports
- Built-in 2 GHz wireless access point module, AP/station/bridge/p2p modes are supported.
- One 10/100 Ethernet port, supporting automatic cross/straight cable correction (Auto MDI/X). Either straight
or crossover cable can be used for connecting to other network devices. The ethernet port accepts 9-30 V
DC powering from a passive PoE injector. - miniPCIe slot and SIM slot (can’t be used separately) to be used with a 3G/4G/LTE modem (some kits
include it).
MiniPCIe slot usage
The device is equipped with a miniPCIe slot (a kit with preinstalled modem also available) to be used with a
3G/4G/LTE modem. A SIM slot is provided for use together with a miniPCIe modem. SIM slot is not used
separately.
To install the miniPCIe module, remove both screws below the power jack and slide out the wAP PCB board. Insert
the miniPCIe modem, and secure it with two Philips screws which are already in place.
Attach the grey uFL connector to the MAIN antenna connector of the modem, attach the black cable to the other (or
AUX) connector. It is possible to use external antennas for the modem, two SMA mounting holes are provided next
to the reset button, or if you prefer to attach antennas to the case directly, SMA antennas can be mounted on the
bottom of the case if you remove the two plastic hole covers first.
After you have reinserted the wAP board into the case and secured it with the screws that were removed earlier,
slide in the SIM card from your mobile operator into the SIM slot, with the chip facing up. The slot accepts miniSIM
(2FF). The SIM slot protects the SIM card from falling out with a plastic latch. You can press the latch and then pull
the SIM out using tweezers or a similar tool.
Buttons and jumpers
The reset button has three functions:
- Hold this button during boot time until LED light starts flashing, release the button to reset RouterOS configuration (total 5 seconds).
- Keep holding for 5 more seconds, LED turns solid, release now to turn on CAP mode. The device will now look for a CAPsMAN server (total 10 seconds).
- Or Keep holding the button for 5 more seconds until LED turns off, then release it to make the RouterBOARD look for Netinstall servers (total 15 seconds).
Regardless of the above option used, the system will load the backup RouterBOOT loader if the button is pressed before power is applied to the device. Useful for RouterBOOT debugging and recovery.
Configuration
We recommend clicking the «Check for updates» button and updating your RouterOS software to the latest version to ensure the best performance and stability. RouterOS includes many configuration options in addition to what is described in this document. We suggest visiting the RouterOS documentation page to get yourself accustomed to the possibilities: https://mt.lv/help![]() .
.
In case IP connection is not available, the Winbox tool (https://mt.lv/winbox![]() ) can be used to connect to the MAC address of the device from the LAN side (all access is blocked from the internet port by default).
) can be used to connect to the MAC address of the device from the LAN side (all access is blocked from the internet port by default).
It is possible to boot the device from a network, for reinstalling RouterOS for recovery purposes. This can be done from the first Ethernet port. See above how to do this.
Operating system support
The device supports RouterOS software version 6.46. The specific factory-installed version number is indicated in the RouterOS menu /system resource. Other operating systems have not been tested.
Notice
- The Frequency band 5.470-5.725 GHz isn’t allowed for commercial use.
- In case WLAN devices work with different ranges than the above regulations, then a customized firmware version from the manufacturer/supplier is required to be applied to the end-user equipment and also prevent the end-user from reconfiguration.
- For Outdoor Usage: End-user requires approval/license from the NTRA.
- Datasheet for any device is available on the official manufacturer website.
- Products with the letters “EG” at the end of their serial number have their wireless frequency range limited to 2.400 – 2.4835 GHz, the TX power is limited to 20dBm (EIRP).
- Products with the letters “EG” at the end of their serial number have their wireless frequency range limited to 5.150 – 5.250 GHz, the TX power is limited to 23dBm (EIRP).
- Products with the letters “EG” at the end of their serial number have their wireless frequency range limited to 5.250 – 5.350 GHz, the TX power is limited to 20dBm (EIRP).
Please make sure the device has a lock package (firmware version from the manufacturer) which is required to be applied to the end-user equipment to prevent the end-user from reconfiguration. The product will be marked with country code “-EG”. This device needs to be upgraded to the latest version to ensure compliance with local authority regulations! It is the end users responsibility to follow local country regulations, including operation within legal frequency channels, output power, cabling requirements, and Dynamic Frequency Selection (DFS) requirements. All MikroTik radio devices must be professionally installed.
To avoid pollution of the environment, please separate the device from household waste and dispose of it in a safe manner, such as in designated waste disposal sites. Familiarize yourself with the procedures for the proper transportation of the equipment to the designated disposal sites in your area.
Federal Communication Commission Interference Statement
This equipment has been tested and found to comply with the limits for a Class A digital device, pursuant to Part 15 of the FCC Rules. These limits are designed to provide reasonable protection against harmful interference in a commercial installation. ![]()
This equipment generates, uses, and can radiate radio frequency energy and, if not installed and used in accordance with the instruction manual, may cause harmful interference to radio communications. Operation of this equipment in a residential area is likely to cause harmful interference in which case the user will be required to correct the interference at his own expense
FCC Caution: Any changes or modifications not expressly approved by the party responsible for compliance could void the user’s authority to operate this equipment.
This device complies with Part 15 of the FCC Rules. Operation is subject to the following two conditions: (1) This device may not cause harmful interference, and (2) this device must accept any interference received, including interference that may cause undesired operation. This device and its antenna must not be co-located or operation in conjunction with any other antenna or transmitter.
IMPORTANT: Exposure to Radio Frequency Radiation.
This equipment complies with the FCC RF radiation exposure limits set forth for an uncontrolled environment. This equipment should be installed and operated with a minimum distance of 38 cm between the radiator and any part of your body.
|
Model |
FCC ID |
Contains FCC ID |
|---|---|---|
|
wAP LTE kit |
TV7WAPR2ND |
TV7R11ELTE |
|
wAP 4G kit |
TV7WAPR2ND |
TV7R11E4G |
For use of CBRS bands, the CBSD Category of the final Host equipment will be dependent on the power settings and antenna gain used.
Innovation, Science and Economic Development Canada
This device contains license-exempt transmitter(s)/receiver(s) that comply with Innovation, Science, and Economic Development Canada’s license-exempt RSS(s). Operation is subject to the following two conditions:
- This device may not cause interference;
- This device must accept any interference, including interference that may cause undesired operation of the device.
L’émetteur/récepteur exempt de licence contenu dans le présent appareil est conforme aux CNR d’Innovation, Sciences et Développement économique Canada applicables aux appareils radio exempts de licence. L’exploitation est autorisée aux deux conditions suivantes:
- L’appareil ne doit pas produire de brouillage;
- L’appareil doit accepter tout brouillage radioélectrique subi, mźme si le brouillage est.
This Class A digital apparatus complies with Canadian ICES-003.
Cet appareil numérique de la classe [A] est conforme à la norme NMB-003 du Canada.
CAN ICES-003 (A) / NMB-003 (A)
IMPORTANT: Exposure to Radio Frequency Radiation.
This equipment complies with the IC radiation exposure limits set forth for an uncontrolled environment. This equipment should be installed and operated with a minimum distance of 38 cm between the radiator and any part of your body.
Cet equipement est conforme aux limites d’exposition au rayonnement IC definies pour un environnement non controle. Cet equipement doit etre installe et utilise a une distance minimale de 38 cm entre le radiateur et toute partie de votre corps.
|
Model |
IC |
Contains IC |
|---|---|---|
|
wAP LTE kit |
7442A-WAPR2ND |
TV7R11ELTE |
|
wAP 4G kit |
7442A-WAPR2ND |
7442A-R11E4G |
UKCA marking

Eurasian Conformity Mark
|
Частотный каналы |
Мощность передатчика |
|---|---|
| 2400-2483.5 МГц | ≤10 Вт |
*Доступные частотные каналы могут различаться в зависимости от модели продукта и сертификации.
Информация о дате изготовления устройства указана в конце серийного номера на его наклейке через дробь. Первая цифра означает номер года (последняя цифра года), две последующие означают номер недели.
Изготовитель: Mikrotikls SIA, Aizkraukles iela 23, Riga, LV-1006, Латвия, support@mikrotik.com. Сделано в Китае, Латвии или Литве. Cм. на упаковке.
Для получения подробных сведений о гарантийном обслуживании обратитесь к продавцу. Информация об импортерах продукции MikroTik в Российскую Федерацию: https://mikrotik.com/buy/europe/russia
Продукты MikroTik, которые поставляются в Евразийский таможенный союз, оцениваются с учетом соответствующих требований и помечены знаком EAC, как показано ниже:

Norma Oficial Mexicana
Rango de frecuencia (potencia de salida máxima): 2400-2483.5 MHz (30 dBm). Los canales de frecuencia disponibles pueden variar según el modelo y la certificación del producto.
EFICIENCIA ENERGETICA CUMPLE CON LA NOM-029-ENER-2017.
La operacion de este equipo esta sujeta a las siguientes dos condiciones:
- Es posible que este equipo o dispositivo no cause interferencia perjudicial y.
- Este equipo debe aceptar cualquier interferencia, incluyendo la que pueda causar su operacion no deseada.
Fabricante: Mikrotikls SIA, Brivibas gatve 214i, Riga, LV-1039, Latvia.
País De Origen: Letonia; Lituania; China (Republica Popular); Estados Unidos De America; Mexico.
Por favor contacte a su distribuidor local para preguntas regionales específicas. La lista de importadores se puede encontrar en nuestra página de inicio – https://mikrotik.com/buy/latinamerica/mexico.
The National Commission for the State Regulation of Communications and Informatization by Ukraine
Виробник: Mikrotikls SIA, Brivibas gatve 214i Рига, Латвія, LV1039.
Робоча частота (Максимальна вихідна потужність): 2400-2483.5 МГц (20 дБм).
Справжнім Mikrotikls SIA заявляє, що маршрутизатор відповідає основним вимогам та іншим відповідним положенням директиви 2014/53/EC, а також суттєвим вимогам Технічного регламенту радіообладнання, затвердженого постановою Кабінету Міністрів України від 24 травня 2017 року № 355.
Для експлуатації в Україні необхідно отримати дозвіл на експлуатацію у порядку, затвердженому рішенням НКРЗІ від 01.11.2012 № 559, зареєстрованому в Міністерстві юстиції України 03.01.2013 за № 57/22589.
CE Declaration of Conformity
Manufacturer: Mikrotikls SIA, Brivibas gatve 214i Riga, Latvia, LV1039.
Hereby, Mikrotīkls SIA declares that the radio equipment type RouterBOARD is in compliance with Directive 2014/53/EU. The full text of the EU declaration of conformity is available at the following internet address: https://mikrotik.com/products![]()
WLAN/ GSM / WCDMA / LTE /
|
Operating Frequency / Maximum output power Betriebsfrequenz / maximale Ausgangsleistung Fréquence de fonctionnement / puissance de sortie maximale Frequenza operativa / massima potenza di uscita Frecuencia de funcionamiento / potencia de salida máxima Рабочая частота / максимальная выходная мощность |
WLAN |
2400-2483.5 MHz / / 20 dBm |
|
E-GSM-900 |
900 MHz / 33 dBm |
|
|
DCS-1800 |
1800 MHz / 30 dBm |
|
|
WCDMA Band I |
1922.4 MHz / 24 dBm ± 2.7 dB |
|
|
WCDMA Band VIII |
882.4 MHz / 24 dBm ± 2.7 dB |
|
|
LTE Band 1 (except 4G kit) |
2100 MHz / 23dBm ± 2.7 dB |
|
| LTE Band 3 | 1800 MHz / 23dBm ± 2.7 dB | |
| LTE Band 7 | 2600 MHz / 23dBm ± 2.7 dB | |
| LTE Band 8 (except 4G kit) | 900 MHz / 23dBm ± 2.7 dB | |
| LTE Band 20 | 800 MHz / 23dBm ± 2.7 dB | |
| LTE Band 31 (only 4G kit) | 450 MHz / 23 dBm ± 2.7 dB | |
| LTE Band 38 | 2600 MHz / 23dBm ± 2.7 dB | |
| LTE Band 40 | 2300 MHz / 23dBm ± 2.7 dB | |
| LTE Band 42 (only 4G kit) | 3500 MHz / 23dBm ± 2.7 dB | |
| LTE Band 43 (only 4G kit) | 3700 MHz / 23dBm ± 2.7 dB |
This MikroTik device meets Maximum WLAN and LTE transmit power limits per ETSI regulations. For more detailed information see Declaration of Conformity above / Dieses MikroTik-Gerät erfüllt die maximalen WLAN- und LTE-Sendeleistung Grenzwerte gemäß ETSI-Bestimmungen. Weitere Informationen finden Sie oben unter Konformitätserklärung / Cet appareil MikroTik respecte les limites maximales de puissance de transmission WLAN et LTE conformément aux réglementations ETSI. Pour plus d’informations, voir la déclaration de conformité ci-dessus / Questo dispositivo MikroTik è conforme ai limiti massimi di potenza di trasmissione WLAN e LTE in conformità con le normative ETSI. Per ulteriori informazioni, consultare la dichiarazione di conformità sopra / Este dispositivo MikroTik cumple con los límites máximos de potencia de transmisión WLAN y LTE de acuerdo con las regulaciones ETSI. Para obtener más información, consulte la declaración de conformidad anterior / Это устройство MikroTik соответствует максимальным пределам мощности передачи WLAN и LTE в соответствии с правилами ETSI. Для получения дополнительной информации см. Декларацию соответствия выше.
Note. The information contained here is subject to change. Please visit the product page on www.mikrotik.com for the most up to date version of this document.
В данной статье мы расскажем Вам как настроить роутер Mikrotik WAP LTE Kit. Также мы подготовили для Вас видео об особенностях и комплектации данного роутера.
1. Скачайте программу winbox на сайте mikrotik.com, выберите последнюю прошивку для архитектуры MIPSBE.
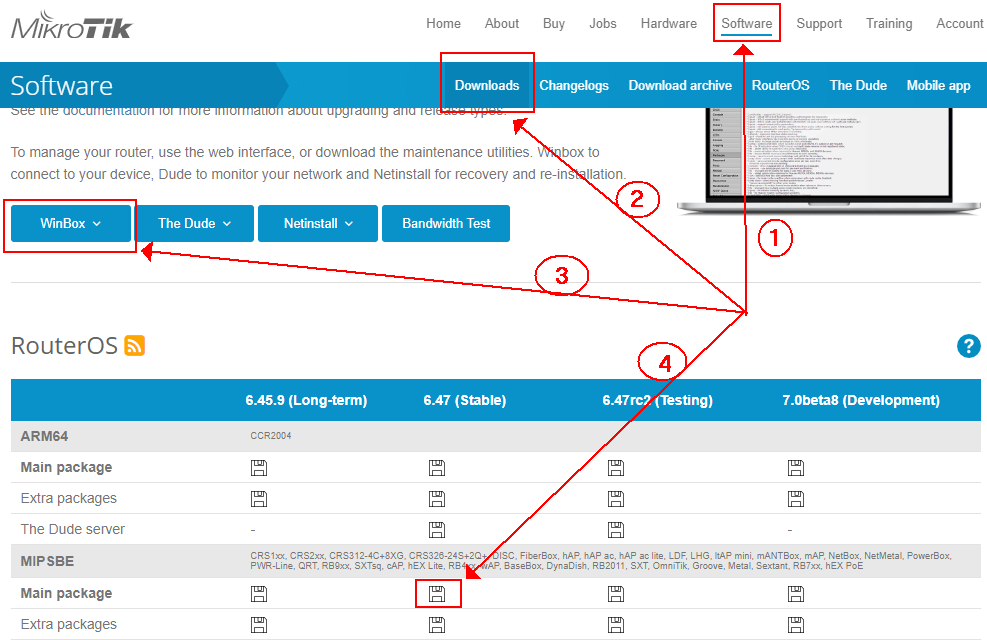
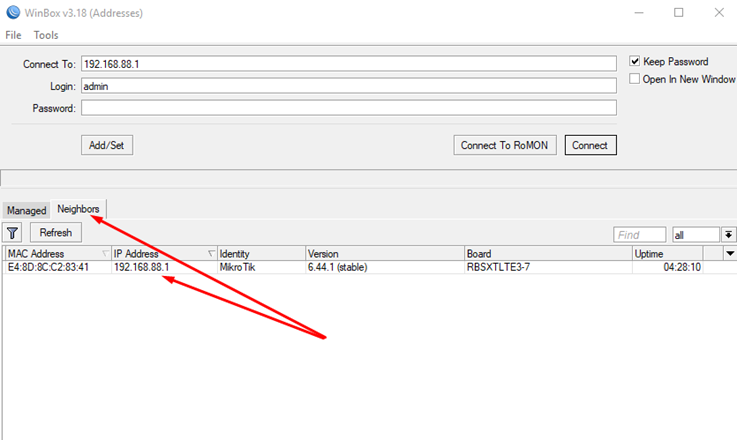
2. Подключите роутер сетевым кабелем и запустите «winbox», во вкладке «Neighbors» видим автоматически обнаруженный роутер, введите логин «admin», нажмите на «mac адрес или ip адрес» и далее «Connect». В открывшемся окне нажмите OK.

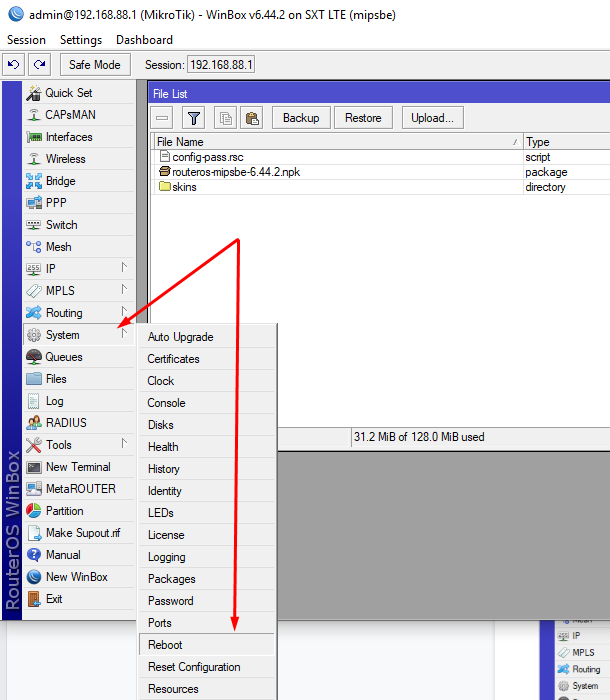
3. Далее нажмите «Files» и в открывшееся окно перетяните файл с прошивкой, подождите пока она загрузится.
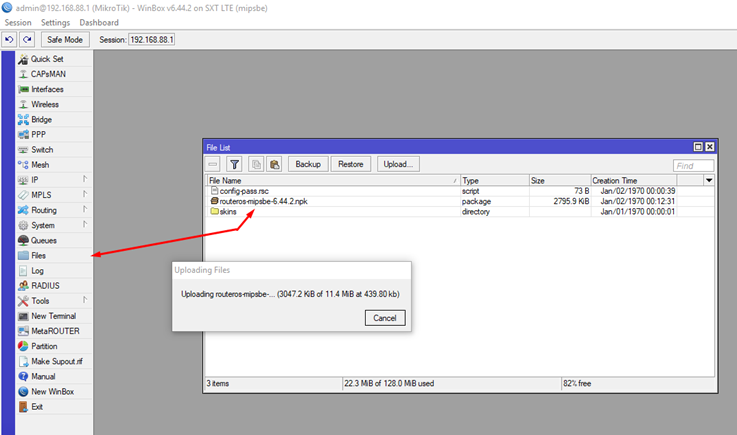
4. Нажмите «System — Reboot», дождитесь завершения перепрошивки и подключитесь снова.
5. Далее настраиваем LTE, после настройки интернет станет доступен.
6. Состояние подключения можно увидеть нажав тут:

7. Тут можно выбрать к каким диапазонам подключаться:
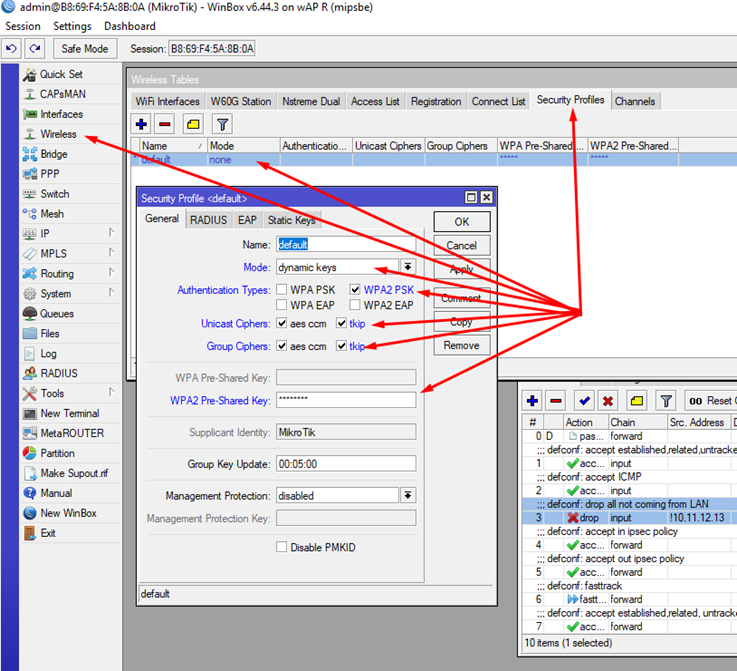
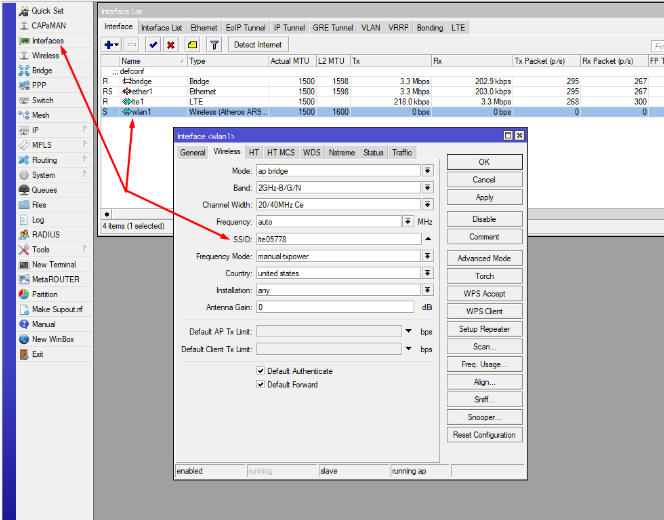
8. Теперь настроим Wi-Fi. В поле «Wpa2-pre-shared-key» пишем пароль от личного кабинета:
9. В поле SSID пишем логин от личного кабинета:
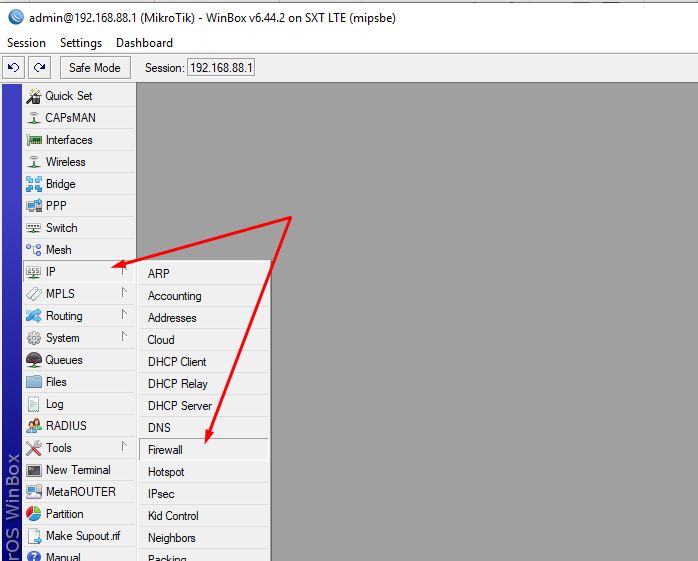
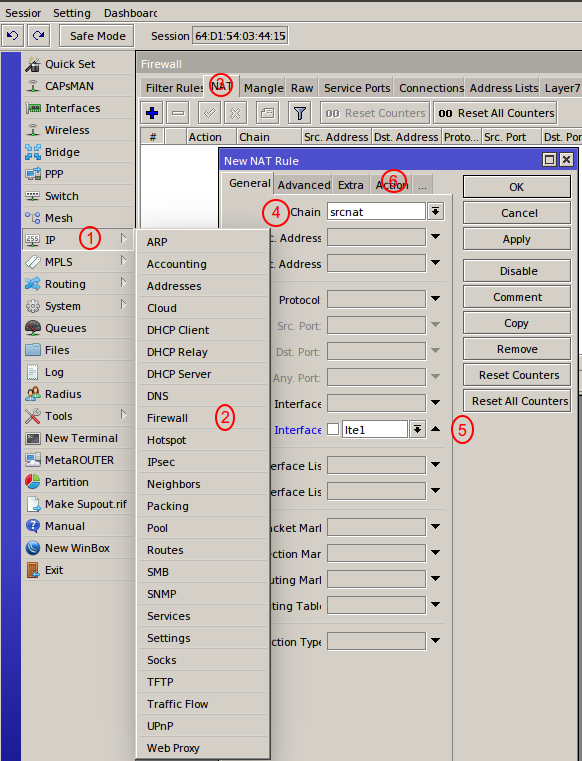
10. Далее настроим удаленный доступ, заходим в «Firewall»:
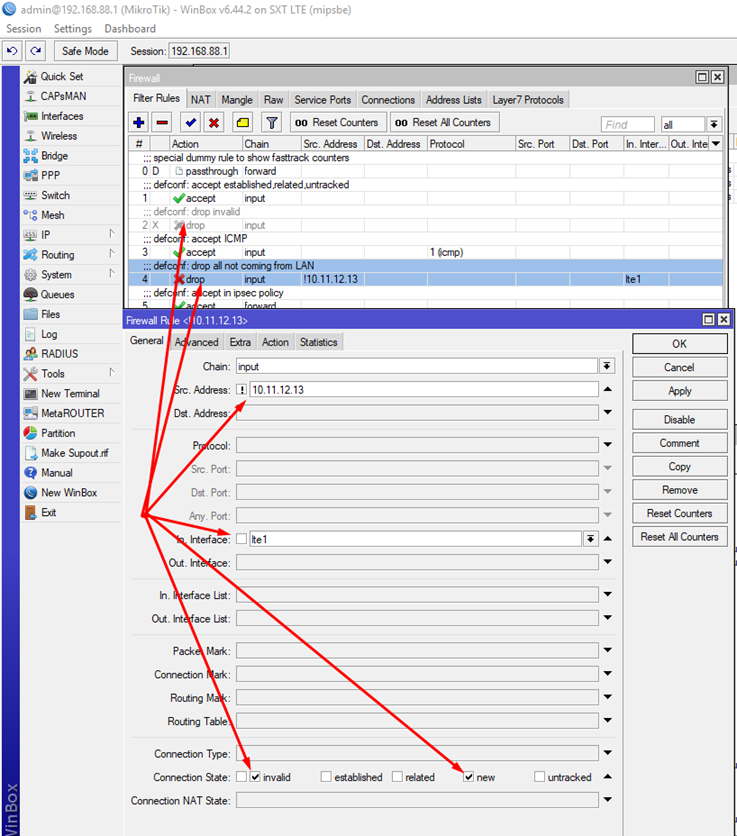
11. В Firewall меняем правила — 2-ое отключаем, а в 4-ом устанавливаем настройки, как показано на скриншоте:
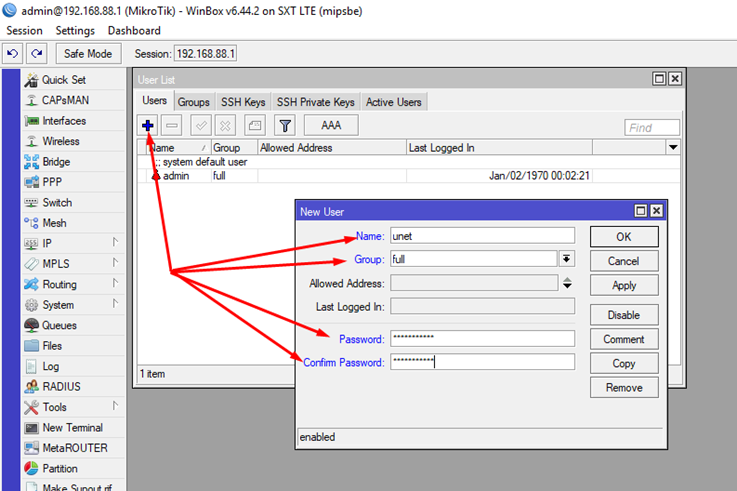
12. И создаем пользователя под которым мы будем ходить на этот роутер:
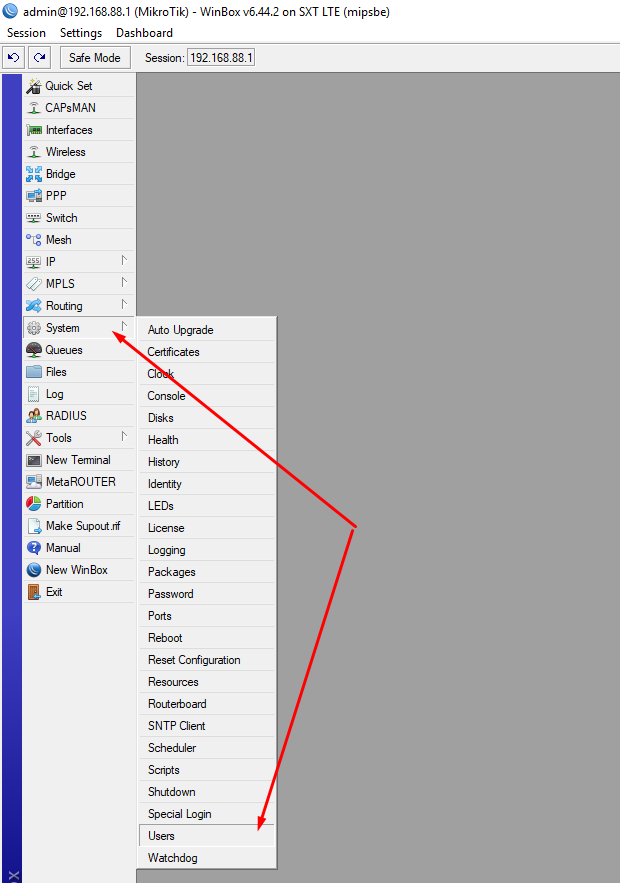
13. В поле Password напишите Ваш пароль от личного кабинета.
Настройка завершена!
Пример настройки с помощью Terminal.
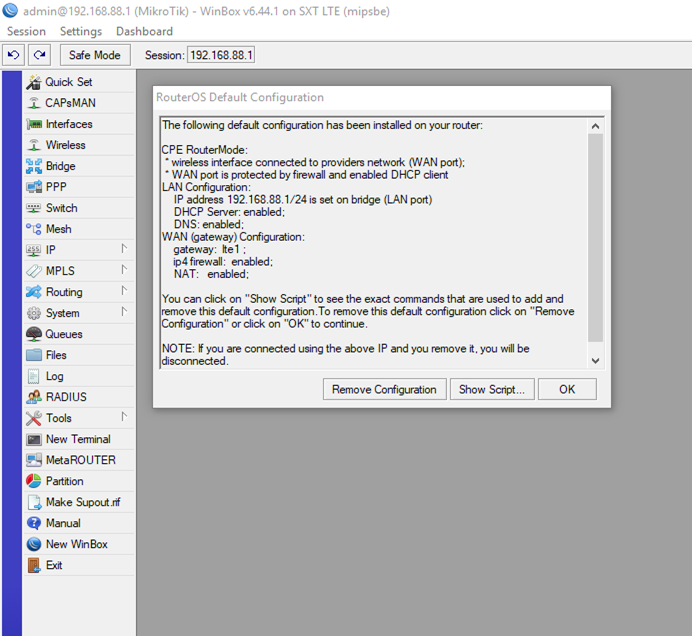
1. Необходимо после первого включения нажать кнопку «Remove configuration».
2. Роутер перезагрузится с IP адресом 0.0.0.0, можно зайти на него нажав на mac адрес, предварительно прописать на сетевой карте ip адрес 192.168.88.0/24, если не прописать, то через какое-то время соединение прервется.
3. Далее в левой колонке нажимаем «New Terminal» и в открывшееся окно вставляем скрипт, предварительно вставив Ваш пароль от личного кабинета в том месте, где написано «Пароль из ЛК» (см.ниже, текст обозначен красным цветом).
Скрипт:
/interface bridge
add name=bridge
/interface wireless
set [ find default-name=wlan1 ] band=2ghz-b/g/n channel-width=20/40mhz-Ce disabled=no distance=indoors frequency=auto mode=ap-bridge ssid=MikroTik wireless-protocol=802.11
/interface list
add comment=defconf name=WAN
add comment=defconf name=LAN
/interface lte apn
set [ find default=yes ] apn=unet authentication=chap
/interface wireless security-profiles
set [ find default=yes ] authentication-types=wpa2-psk eap-methods=»» group-ciphers=tkip,aes-ccm mode=dynamic-keys supplicant-identity=MikroTik unicast-ciphers=tkip,aes-ccm wpa2-pre-shared-key=Пароль из ЛК
/ip pool
add name=default-dhcp ranges=192.168.88.10-192.168.88.254
/ip dhcp-server
add address-pool=default-dhcp disabled=no interface=bridge
/interface bridge port
add bridge=bridge interface=ether1
4. После этого роутер отключится, нужно переподключиться и продолжить.
/interface bridge port
add bridge=bridge interface=wlan1
/ip neighbor discovery-settings
set discover-interface-list=LAN
/interface list member
add interface=bridge list=LAN
add interface=lte1 list=WAN
/ip address
add address=192.168.88.1/24 interface=bridge network=192.168.88.0
/ip dhcp-server network
add address=192.168.88.0/24 gateway=192.168.88.1
/ip dns
set allow-remote-requests=yes
/ip dns static
add address=192.168.88.1 name=router.lan
/ip firewall filter
add action=accept chain=input comment=»defconf: accept established,related,untracked» connection-state=established,related,untracked
add action=accept chain=input comment=»defconf: accept ICMP» protocol=icmp
add action=drop chain=input comment=»defconf: drop all not coming from LAN» connection-state=invalid,new in-interface-list=WAN src-address=!10.11.12.13
add action=accept chain=forward comment=»defconf: accept in ipsec policy» ipsec-policy=in,ipsec
add action=accept chain=forward comment=»defconf: accept out ipsec policy» ipsec-policy=out,ipsec
add action=fasttrack-connection chain=forward comment=»defconf: fasttrack» connection-state=established,related
add action=accept chain=forward comment=»defconf: accept established,related, untracked» connection-state=established,related,untracked
add action=drop chain=forward comment=»defconf: drop invalid» connection-state=invalid
add action=drop chain=forward comment=»defconf: drop all from WAN not DSTNATed» connection-nat-state=!dstnat connection-state=new in-interface-list=WAN
/ip firewall nat
add action=masquerade chain=srcnat comment=»defconf: masquerade» ipsec-policy=out,none out-interface-list=WAN
/system clock
set time-zone-name=Europe/Minsk
/tool mac-server
set allowed-interface-list=LAN
/tool mac-server mac-winbox
set allowed-interface-list=LAN
/use add name=unet password=Пароль из ЛК group=full
/use set admin password=Пароль из ЛК
Подпишитесь на мобильное приложение: Viber, Telegram.
А также следите за актуальными новостями в нашем Telegram-канале.
Если у Вас возникли вопросы — напишите нам или позвоните 7778282 (любой мобильный оператор).

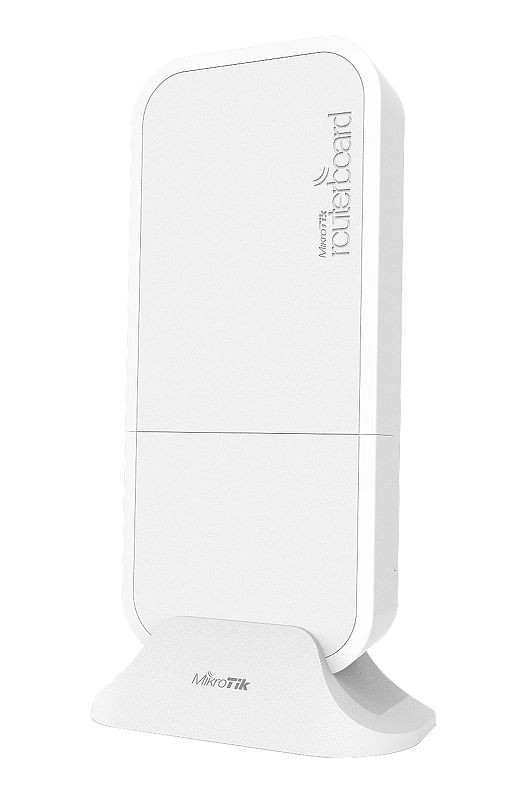
wAP LTE kit
wAP LTE kit
The wAP LTE is a small weatherproof wireless access point with a built in cellular modem that supports 2G, 3G and 4G (LTE) connectivity. Connect to the wAP’s built-in 802.11b/g/n wireless and access the LTE network from your phone or any other wireless device. The wAP LTE also has one 10/100 Ethernet LAN port for your wired devices.
The weatherproof device can be mounted outside your house, in the vehicle, on your porch or anywhere else where you need wireless access from your phone or computer. It also includes a desktop stand so you can put it inside the building near a window.
LTE cards are connected to two internal antennas with u.FL connectors, so if you want, you can unplug the connectors and add your own external LTE antenna for larger coverage. Unit has the several powering options — 9-30 V PoE-in by Ethernet port, DC jack and Automotive connector, very handy in mobile devices like car, bus or train.
Three versions are available:
RBwAPR-2nD&R11e-LTE includes LTE modem that supports International LTE bands 1,2,3,7,8,20,38 and 40.
RBwAPR-2nD&R11e-LTE-US includes LTE modem that supports LTE bands 2,4,5 and 12, mostly used by mobile operators in United States, Canada and Latin America.
RBwAPr-2nD is shipped with without LTE card installed (empty miniPCI-e slot), so you can use your own LTE card.
Included
|
24V 0.8 A |
Screw kit |
PoE injector |
|
power adapter |
|
0.35 m 4pin |
Desktop 2x plastic straps |
Mount base |
|
Automotive |
stand |
|
|
adapter cable |

|
wAP LTE kit |
||||
|
Specifications |
||||
|
Product code |
RBwAPR-2nD&R11e-LTE |
RBwAPR-2nD&R11e-LTE-US |
RBwAPR-2nD |
|
|
CPU |
QCA9531 |
|||
|
CPU nominal frequency |
650 MHz |
|||
|
CPU core count |
1 |
|||
|
Size of RAM |
64 MB |
|||
|
10/100 Ethernet ports |
1 |
|||
|
Wireless |
Built-in 2.4 GHz 802.11b/g/n, dual-chain |
|||
|
Wireless regulations |
Specific frequency range will be limited by country regulations |
|||
|
Wireless antenna gain |
2 dBi |
|||
|
LTE antenna gain |
2 — 4.5 dBi (with uFL connector) |
|||
|
Antenna beam width |
360° |
|||
|
Wireless chip model |
QCA9531 |
|||
|
LTE modem |
Included |
Included |
None (slot for miniPCI-e LTE card |
|
|
available) |
||||
|
LTE category |
4 (150Mbps Downlink, 50Mbps Uplink) |
— |
||
|
3G category |
R7 (21Mbps Downlinks, 5.76Mbps |
R8 (Cat24 — 42.2Mbps Downlink) |
— |
|
|
Uplink) |
R7 (Cat14 — 21.1Mbps Downlink) |
|||
|
2G category |
Class12 |
— |
— |
|
|
SIM slot |
1 |
|||
|
PoE in |
Yes |
|||
|
Supported input voltage |
9 V — 30 V (Passive PoE) |
|||
|
Dimensions |
185 x 85 x 30 mm |
|||
|
Operating temperature |
-40°C .. +60°C tested |
|||
|
License level |
4 |
|||
|
Operating System |
RouterOS |
|||
|
Max Power consumption |
8 W |
|||
Wireless specifications
|
RATE |
Tx (dBm) |
Rx (dBm) |
|
1MBit/s |
22 |
-96 |
|
11MBit/s |
22 |
-89 |
|
6MBit/s |
20 |
-93 |
|
54MBit/s |
18 |
-74 |
|
MCS0 |
20 |
-93 |
|
MCS7 |
16 |
-71 |
Supported bands
RBwAPR-2nD&R11e-LTE
|
LTE (FDD) bands |
1(2100)/2(1900)/3(1800)/7(2600)/8(900)/20(800) |
|
LTE (TDD) bands |
38(2600)/40(2300) |
|
3G bands |
1(2100)/2(1900)/5(850)/8(900) |
|
2G bands |
2(1900)/3(1800)/5(850)/8(900) |
RBwAPR-2nD&R11e-LTE-US
|
LTE (FDD) bands |
2(1900)/4(1700)/5(850)/12(700) |
|
3G bands |
2(1900)/5(850) |
- Manuals
- Brands
- MikroTik Manuals
- Wireless Access Point
- RBwAPR-2nD&R11 e-LTE
Manuals and User Guides for MikroTik RBwAPR-2nD&R11 e-LTE. We have 1 MikroTik RBwAPR-2nD&R11 e-LTE manual available for free PDF download: Quick Manual
03.11.2017
wAP LTE kit и wAP R. Обзор, тестирование, настройка.
1. Введение.
Часто, необходимо произвести подключение к сети Интернет в достаточно отдалённых районах нашей страны, где возможность организовать проводное или даже беспроводное соединение попросту отсутствует. В виду чего приходится использовать сети LTE или 3G.
Выпущенный ранее MikroTik SXT LTE
осуществлял работу исключительно в сетях LTE. Следовательно, в местах, где отсутствует LTE- покрытие, он помочь никак бы не смог. Учитывая данные трудности, MikroTik представили новые устройства, которые способны работать как в LTE, так и в 3G и 2G — wAP LTE kit и wAP R.
wAP LTE kit или wAP R будут полезны тем, кто планирует обеспечить себя интернетом на даче или в иных районах, где можно использовать Интернет только через сотовую связь!
2. Обзор устройств.
wAP LTE kit и wAP R одинаково выглядят и представляют собой компактные беспроводные точки доступа. Устройства работают в частотных диапазонах LTE FDD, LTE TDD, 3G, 2G и Wi-Fi 2400—2483,5 МГц, имеют Wi-Fi модуль, слот для SIM-карты, LAN-порт 10/100 Мбит (Fast Ethernet), а также 2 встроенные LTE-антенны с усилением 2-4.5 dBi.
wAP LTE kit имеет предустановленный в miniPCIe-слот LTE/3G/2G-модем MikroTik R11e-LTE. wAP R отличается от него лишь тем, что не имеет в комплекте LTE/3G/2G-модема (очевидно, чтобы пользователь смог использовать модем стороннего производителя; для этого в комплектации wAP R присутствует самоклеящаяся термо-пластина, предназначенная для более стабильной и безопасной работы)!
Список поддерживаемых модемов
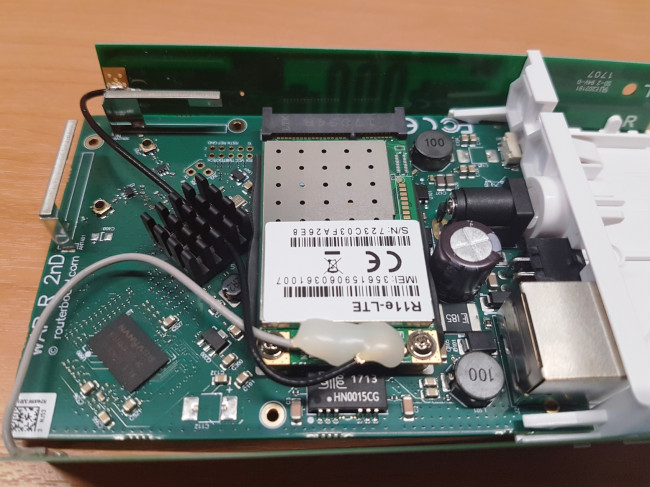
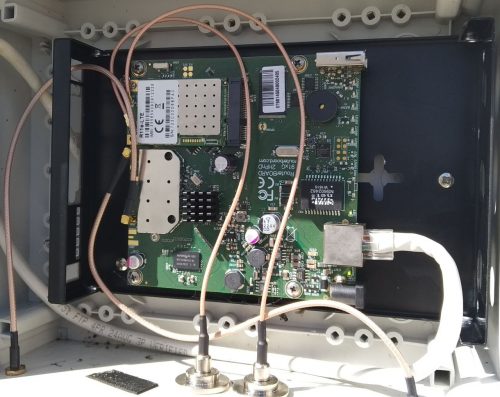
MikroTik R11e-LTE внутри корпуса wAP LTE kit.
3. Настройка и тестирование.
В нашем тестировании будут участвовать wAP R и простой 3G-модем Huawei MU709s-2.
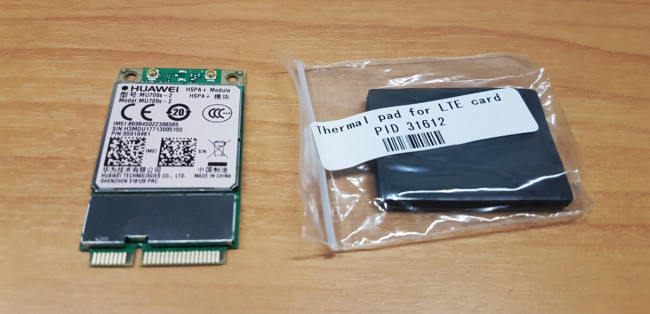
Huawei MU709s-2 и термо-пластина.
Выкрутив два фиксирующих болта предназначенных для закрепления модема, мы устанавливаем саму карту, затем, с помощью UFL-разъемов подключаем встроенные антенны и устанавливаем термо-пластину.
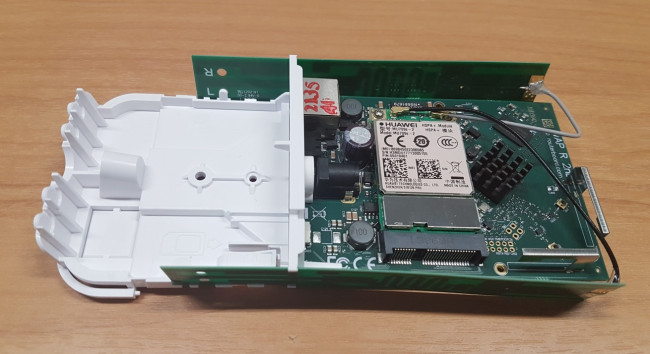
Установка модема.
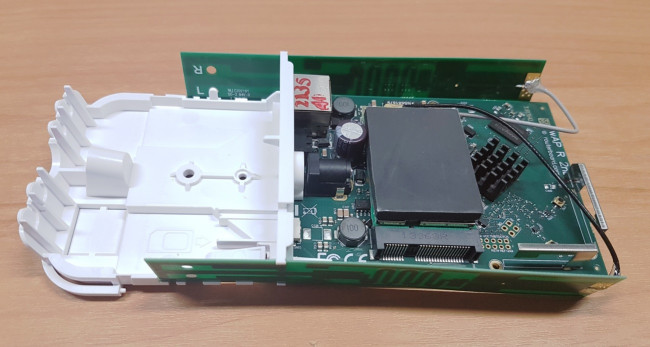
Установка термо-пластины.
Далее, устанавливаем SIM-карту. После этого подключаемся к устройству с помощью программы winbox. Обращаем ваше внимание, что настройки могут отличаться в зависимости от множества факторов (например, сотовый оператор).
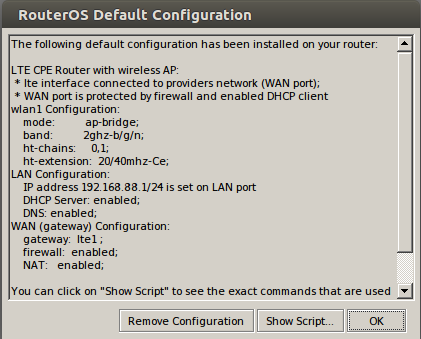
Для настройки устройства можно использовать ‘quickset’, но мы рекомендуем настроить устройство «с нуля». Для этого подключаемся к устройству и выбираем ‘Remove Configuration’.
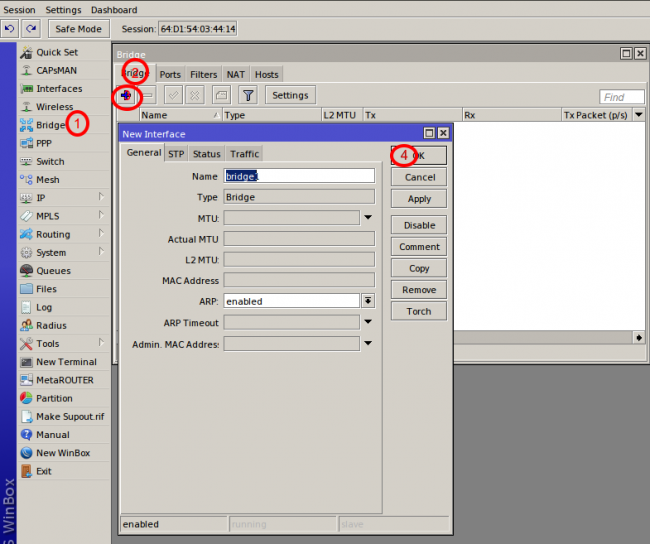
Далее, создадим логический интерфейс ‘Bridge’ для локальных подключений.
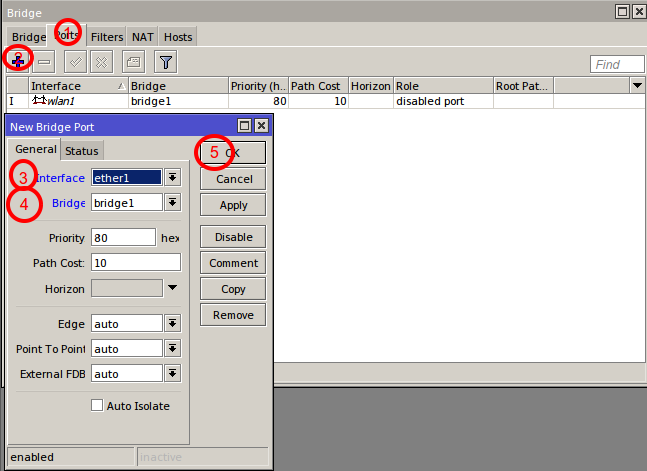
После этого, необходимо добавить интерфейсы ether1
и wlan1 в указанной на рисунке последовательности.
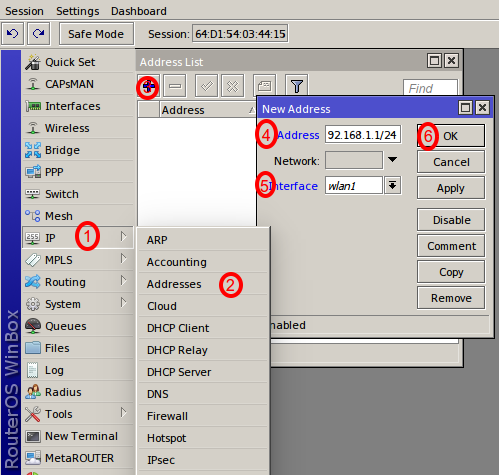
Как только интерфейс создан и настроен, присваиваем адрес на этот интерфейс. Обратите внимание, что в пункте 4 мы сразу же указали адрес с маской подсети 192.168.1.1/24, и RouterOS автоматически подставил поле Network. В поле 5 необходимо указать название Bridge-интерфейса, который мы создали на предыдущем шаге настройки.
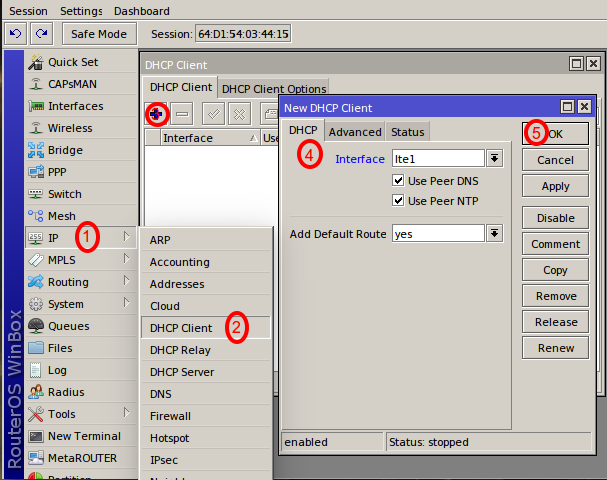
Далее, необходимо «повесить» на LTE-интерфейс DHCP-client. Данная настройка индивидуальна и может Вам не понадобится — все зависит от сотового оператора.
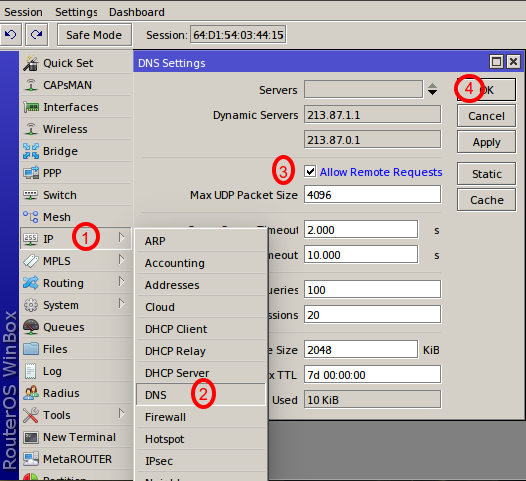
Теперь нам необходимо настроить, чтобы RouterOS обрабатывала наши DNS-запросы. Для этого в разделе DNS ставим галку ‘Allow Remote Requests’.
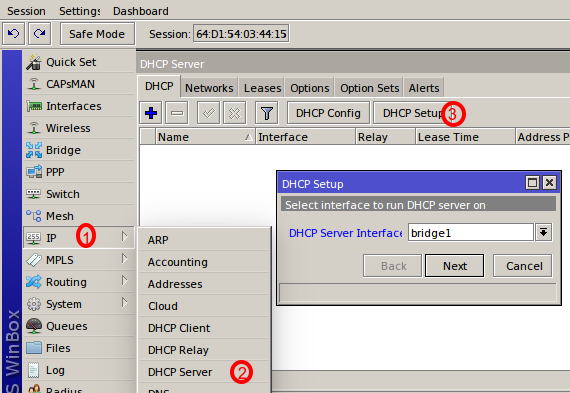
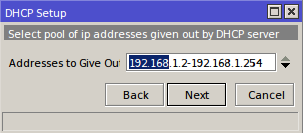
Следующим этапом будет настройка DHCP-сервера на интерфейсе ‘bridge’. Но чтобы не углубляться в подробности, мы используем для этих целей автоматический конфигуратор или ‘wizard’.
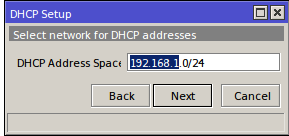
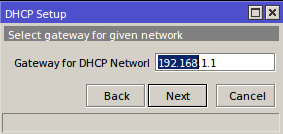
В каждом последующем поле, указываем запрошенную информацию. В нашем случае, разница от предложенной системой конфигурации в настройке адреса DNS-сервера. Там в качестве сервера мы указываем адрес самого устройства, в данном примере это — 192.168.1.1.

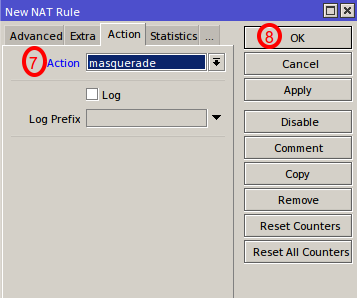
И последний, не менее важный этап: для дальнейшего пользования устройством необходимо настроить NAT на LTE-интерфейс, затем переключившись на вкладку‘Action’, выбираем ’masquerade’.
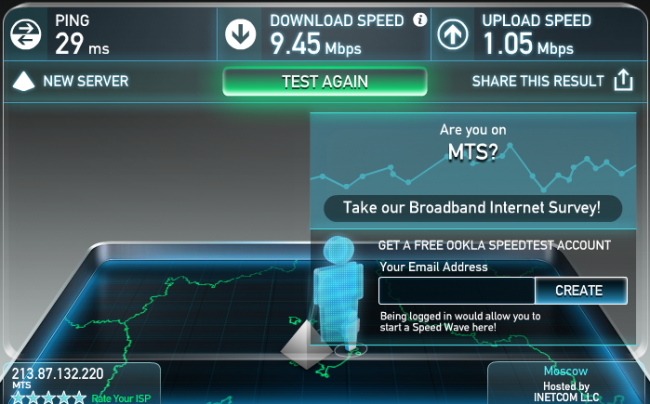
Когда все настройки закончены, нам остается только проверить наше Интернет-соединение!
Обновление от:
- 05/03/2020 — Добавил документацию по AT-командам для R11e-LTE
- 18/08/2019 — Внимание! Модуль R11e-LTE может быть несовместим с RB912UAG
- 23/07/2019 — в версии модема MikroTik_CP_2.160.000_v012 починили LTE Scanner
Mikrotik RB912UAG-2HPnD с R11e-LTE
3G / 4G модем Mikrotik R11e-LTE. Обзор, настройка и сравнение с USB модемами со Stick и Hilink прошивками.
Всё, что описано в данной статье, относится и к LHG LTE и SXT LTE, wAP LTE и LtAP mini, т.к. в данный маршрутизаторах используется такой же модем.
Характеристики
У Mikrotik есть два miniPCI-e модема:
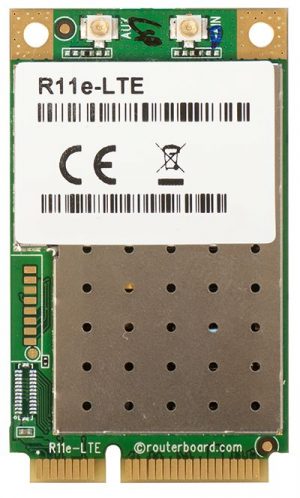
- R11e-LTE
- R11e-4G
R11e-LTE поддерживает 2G, 3G и 4G, а R11e-4G поддерживает только 4G и другие LTE диапазоны (частоты).
| Mikrotik R11e-LTE |
|---|
|
Mikrotik R11e-LTE |
| 2G Category: Class 12 |
| 3G Category: R7 (21Mbps Downlinks, 5.76Mbps Uplink) (DC-HSPA+ не поддерживает!) |
| LTE Category: 4 (150Mbps Downlink, 50Mbps Uplink) |
| LTE FDD bands: 1 (2100MHz) / 2 (1900MHz) / 3 (1800MHz) / 7 (2600MHz) / 8 (900 MHz) / 20 (800MHz) |
| LTE TDD bands: 38 (2600MHz) / 40 (2300MHz) |
| LTE Channel Bandwidth: 1.4/3/5/10/15/20 MHz |
| Connectors: 2x uFL |
| Рабочая температура: -30°C .. +70°C |
| Описание: R11e-LTE.pdf.
Документация по AT-командам: Luat LTE Module AT Command User Manual V1.0.pdf |
Модуль R11e-LTE может быть несовместим с RB912UAG
Модуль R11e-LTE может быть несовместим с RB912UAG. Об этом почти ни где не упоминается, кроме документации «Quick Guide» по RB912UAG. А в описании к модему R11e-LTE напрямую сказано, что совместим со всеми продуктами кроме RB800 — «Can be used with any of our products with RouterOS and miniPCIe slot (except RB800).»
Цитата из документации Quick Guide к RB912UAG:
«Extension slots and ports
One miniPCIe slot. This device might be incompatible with R11e-LTE international modem.»
Ссылка: https://i.mt.lv/cdn/rb_files/1557838523RB912UAG-qg.pdf
В моём случае, R11e-LTE и RB912UAG оказались совместимы (повезло), но как видно из обсуждения ниже, встречаются и несовместимые партии устройств.
Обсуждение: https://2keep.net/mikrotik-r11e-lte/#comment-568
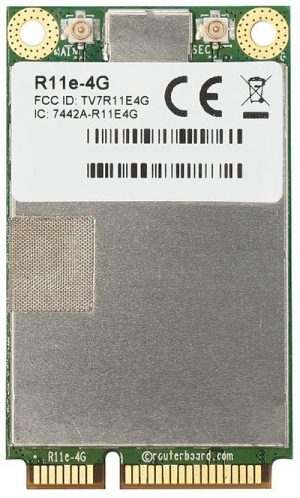
| Mikrotik R11e-4G |
|---|
|
Mikrotik R11e-4G |
| 2G Category: не поддерживает |
| 3G Category: не поддерживает |
| LTE Category: 4 (150Mbps Downlink, 50Mbps Uplink) |
| LTE FDD bands: 3 (1800MHz) / 7 (2600MHz) / 20 (800MHz) / 31 (450MHz) |
| LTE TDD bands: 41n (2500MHz) / 42 (3500MHz) / 43 (3700MHz) |
| LTE Channel Bandwidth: 5/10/15/20 MHz |
| Connectors: 2x uFL |
| Рабочая температура: -30°C .. +70°C |
| Описание: R11e-4G.pdf |
Рассматривать будем R11e-LTE, но многое будет относиться и к R11e-4G.
Модем видится в Mikrotik следующим образом
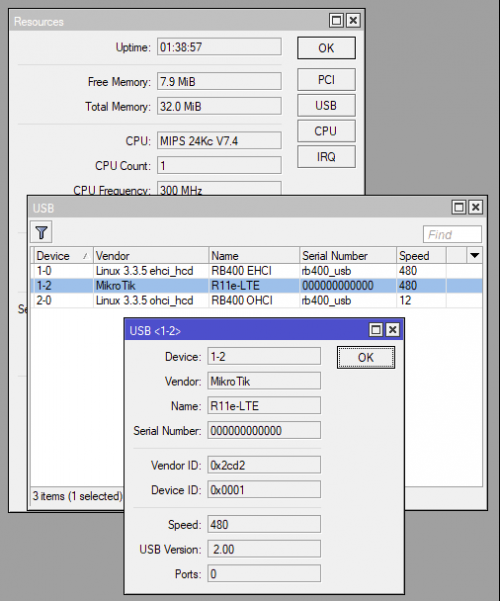
Модем R11e-LTE в Mikrotik
Пример команд в консоли
/system resource usb print detail
...
 2 device="1-2" vendor="MikroTik" name="R11e-LTE" serial-number="000000000000" vendor-id="0x2cd2" device-id="0x0001" speed="480" usb-version=" 2.00"
Обновление прошивки модема
Первое, что нужно сделать после покупки модема, это обновить прошивку. Делается это только из консоли.
Прошивка обновляется через мобильную связь и соответственно в модем должна быть установлена SIM карта и модем должен иметь доступ в мобильный Интернет.
Текущая версия прошивки.
/interface lte firmware-upgrade lte1
  installed: MikroTik_CP_2.160.000_v008
     latest: MikroTik_CP_2.160.000_v011
Видим, что есть новая прошивка, запускаем обновление.
/interface lte firmware-upgrade lte1 upgrade=yes
  status: downloading via LTE connection (>1min)
-- [Q quit|D dump|C-z pause]
Ждём минуты две, пока скачивается прошивка.
В другом терминальном окне можно посмотреть процент скачивания.
/interface lte at-chat lte1 input="AT+CHECKATUPGRADE"
  output: +CHECKATUPGRADE:0x1,99
OK

/interface lte at-chat lte1 input="AT+CHECKATUPGRADE"
  output: +CHECKATUPGRADE:0x0,100
99 и 100 это проценты скаченного.
После того, как скачается прошивка, начнётся процесс установки прошивки.
status: installing (wait for additional ~2min to complete)
Ждём примерно 5 минут и перезагружаем модем по питанию или даём AT команду на перезагрузку.
/interface lte at-chat lte1 input="AT+reset"
  output: OK
Ждём секунд 40 и проверяем версию ПО.
/interface lte firmware-upgrade lte1
  installed: MikroTik_CP_2.160.000_v011
     latest: MikroTik_CP_2.160.000_v011
У нас актуальная версия прошивки.
Настройка подачи питания на модем
Указываем что у нас используется mini-PCIe модем.
System > Routerboard: USB
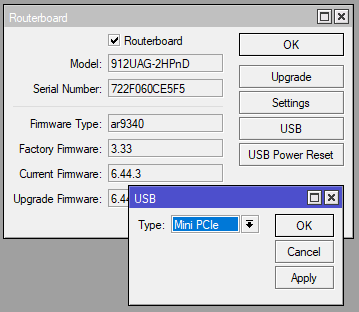
Модем Mikrotik R11e-LTE. Питание
Пример команд в консоли
/system routerboard usb set type=mini-PCIe
Может возникнуть ситуация, когда после перезагрузки Mikrotik модем R11e-LTE не распознается. Проблема в том, что модем не всегда успевает загрузится вместе с Mikrotik. Нужно поставить задержку подачи питания на модем.
System > Routerboard: Settings
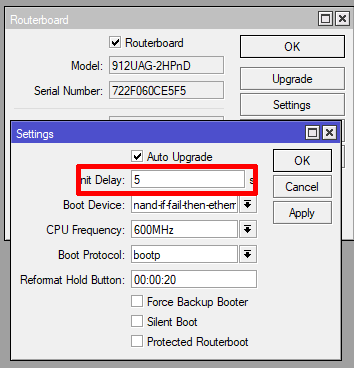
Модем Mikrotik R11e-LTE. Задержка подачи питания
Пример команд в консоли
/system routerboard settings set init-delay=5s
Настройка интерфейса модема
В Mikrotik модем виден как LTE интерфейс.
Заходим в настройки LTE интерфейса.
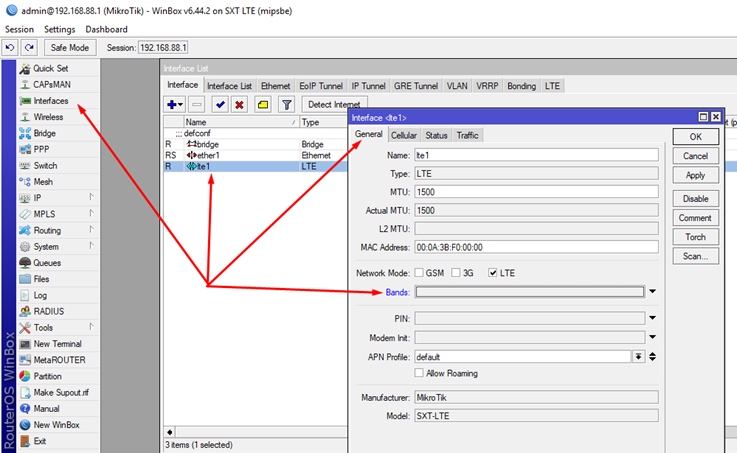
Закладка General
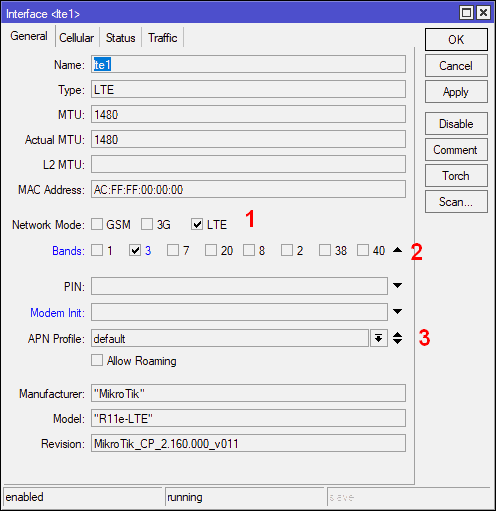
Модем Mikrotik R11e-LTE. Настройки General
На этой закладки мы можем жёстко настроить тип сети (1), диапазоны сети (2) и выбрать настройки APN (3).
Пример команд в консоли
/interface lte set lte1 band=3 network-mode=lte

/interface lte print
Flags: X - disabled, R - running
 0    ;;; resetting
      name="lte1" mtu=1480 mac-address=AC:FF:FF:00:00:00 apn-profiles=default network-mode=lte band=3
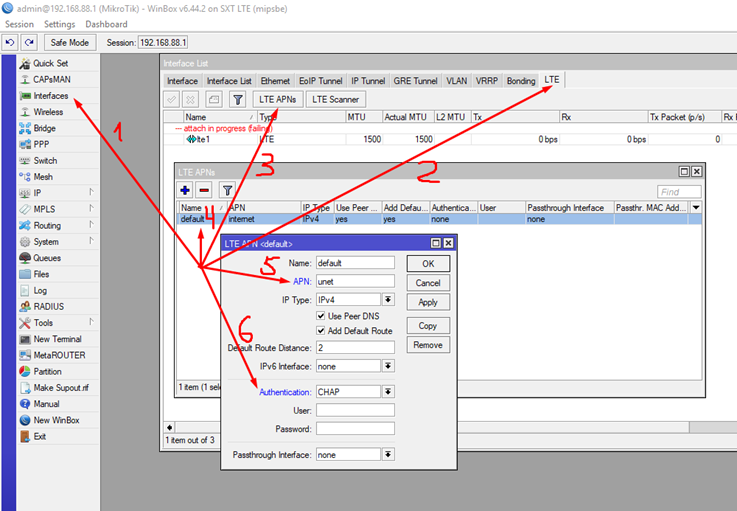
Настройка APN (получение IP по DHCP)
Модем получает IP от мобильного оператора по DHCP, но настраивается это не в DHCP клиенте Mikrotik’а, а в настройках APN (данное решение не самое очевидное).
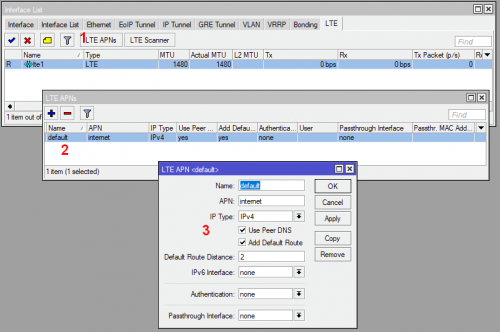
Модем Mikrotik R11e-LTE. Настройки APN
В меню интерфейсов заходим на закладку LTE, нажимаем кнопку LTE APNs (1), выбираем нужный APN (2) и открывается окно с настройками (3).
Именно тут настраивается и получение шлюза по умолчанию и DNS и другое.
Пример команд в консоли
/interface lte apn print
Flags: * - default
 0 * name="default" apn="internet" use-peer-dns=yes add-default-route=yes default-route-distance=2

/interface lte apn set default-route-distance=3 numbers=0

/interface lte apn print
Flags: * - default
 0 * name="default" apn="internet" use-peer-dns=yes add-default-route=yes default-route-distance=3

/interface lte apn export
/interface lte apn
set [ find default=yes ] default-route-distance=3
Отображение состояния сотовой сети
Модем предоставляет подробную диагностическую информацию о состоянии сети сотового оператора. Это очень помогает в настройке антенны на базовую станцию, анализа радиообстановки, шумов, уровня сигнала и т.д.
Эти данные можно использовать в скриптах и например в случае изменения уровня сигнала, отправлять на модем какую либо AT команду с помощью команды at-chat.
Состояние 2G сети
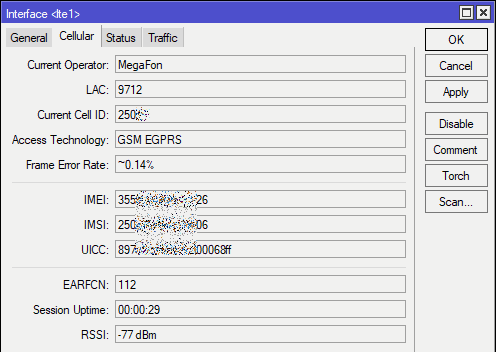
Модем Mikrotik R11e-LTE. Состояние 2G сети
Пример команд в консоли
[admin@2keep.net] > /interface lte info lte1 once
           pin-status: no password required
        functionality: full
  registration-status: registered
         manufacturer: "MikroTik"
                model: "R11e-LTE"
             revision: MikroTik_CP_2.160.000_v011
     current-operator: MegaFon
                  lac: 9712
       current-cellid: 250xx
    access-technology: GSM EGPRS
       session-uptime: 47s
                 imei: 355xxxxxxxxxx26
                 imsi: 250xxxxxxxxxx06
                 uicc: 897xxxxxxxxxx068xf
    subscriber-number: +CME ERROR: 100
               earfcn: 112
     frame-error-rate: ~0.14%
                 rssi: -77dBm
Состояние 3G сети
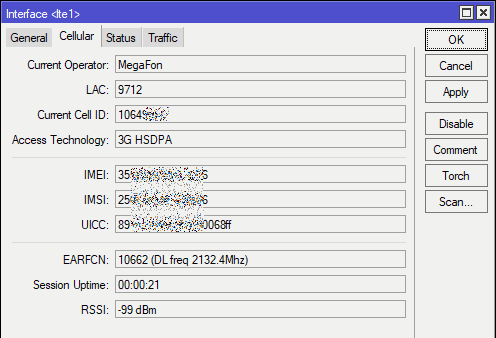
Модем Mikrotik R11e-LTE. Состояние 3G сети
Пример команд в консоли
/interface lte info lte1 once

           pin-status: no password required
        functionality: full
  registration-status: registered
         manufacturer: "MikroTik"
                model: "R11e-LTE"
             revision: MikroTik_CP_2.160.000_v011
     current-operator: MegaFon
                  lac: 9712
       current-cellid: 10649xxx
    access-technology: 3G HSDPA
       session-uptime: 37s
                 imei: 35565xxxxxxxxx6
                 imsi: 2500xxxxxxxxxx6
                 uicc: 897010xxxxxxxxx0xxxf
    subscriber-number: +CME ERROR: 100
               earfcn: 10662 (DL freq 2132.4Mhz)
                 rssi: -99dBm
Состояние 4G/LTE сети
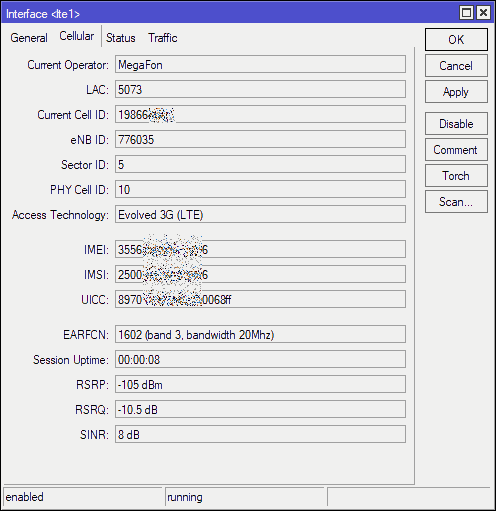
Модем Mikrotik R11e-LTE. Состояние 4G/LTE сети
Пример команд в консоли
/interface lte info lte1 once

           pin-status: no password required
        functionality: full
  registration-status: registered
         manufacturer: "MikroTik"
                model: "R11e-LTE"
             revision: MikroTik_CP_2.160.000_v011
     current-operator: MegaFon
                  lac: 5073
       current-cellid: 198664xxx
               enb-id: 776035
            sector-id: 5
           phy-cellid: 10
    access-technology: Evolved 3G (LTE)
       session-uptime: 18s
                 imei: 35565xxxxxxxxx6
                 imsi: 25002xxxxxxxxx6
                 uicc: 89701xxxxxxxxxxxxxx
    subscriber-number: +CME ERROR: 100
               earfcn: 1602 (band 3, bandwidth 20Mhz)
                 rsrp: -103dBm
                 rsrq: -10dB
                 sinr: 8dB
Как видим, информация очень подробная. Тут есть и диапазоны и частоты и качество сигнала и т.д.
Данную информацию можно анализировать в скриптах и отправлять СМС или email в случае если например сигнал изменился.
Радиоразведка
С помощью модема можно проводить радиоразведку. Смотреть какие есть в эфире операторы, какие уровни сигнала, какие базовые станции.
Для этого в модеме есть две функции — LTE Scanner и Cell Monitor.
Cell Monitor
Пока работает только в консоли (ROS 6.44.3).
Данная функция позволяет определить в эфире, какие есть ещё базовые станции/секторы (БС) оператора, SIM карта которого стоит в модеме.
Если БС к которой вы сейчас подключились, очень загружена и низакая скорость Интернет’а, можно настроится на соседнюю, возможно она менее нагружена.
/interface lte cell-monitor lte1

PHY-CELLID BAND       EARFCN            RSRP          RSRQ          RSSI
        10 B7         2850           -114dBm          -8dB
        10 B7         3048           -119dBm       -10.5dB
        13 B7         2850           -128dBm       -19.5dB
        13 B7         3048           -125dBm         -18dB
       247 B3         1602           -117dBm       -18.5dB
       254 B20        6350           -118dBm         -15dB
       433 B3         1602           -115dBm       -15.5dB
Мы видим и частоты и уровни сигнала БС.
LTE Scanner
Данная функция позволяет просканировать эфир, и посмотреть, каких операторов и с какими уровнями сигнала видит модем.
В версии ROS 6.44.3 и прошивки модема MikroTik_CP_2.160.000_v011 эта функция не работает, обновитесь.
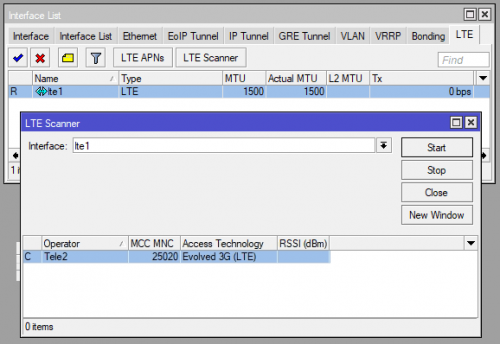
Модем Mikrotik R11e-LTE. LTE сканер
Расширенные логи
В случае проблем, можно включить расширенные логи взаимодействия модем с сетью сотового оператора и Mikrotik’ом.
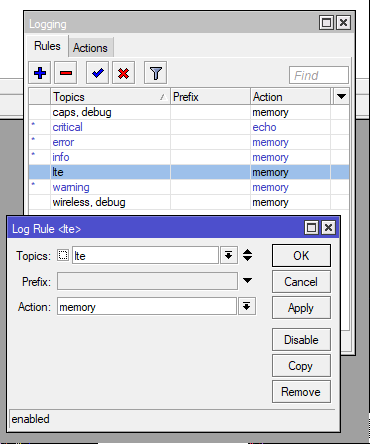
Модем Mikrotik R11e-LTE. Настройка логов
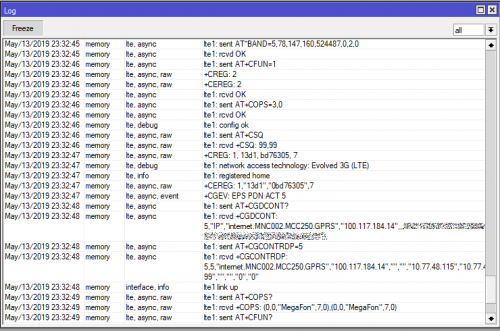
Модем Mikrotik R11e-LTE. Логи
Пример команд в консоли
/system logging add add topics=lte

/log print

23:32:33 lte,async lte1: rcvd OK
23:32:33 lte,async lte1: sent AT+CFUN?
23:32:33 lte,async lte1: rcvd +CFUN: 0
23:32:33 lte,async lte1: sent AT+CFUN=4
23:32:38 lte,async,event ^SIMST: 0
23:32:38 lte,async lte1: rcvd OK
23:32:38 lte,async lte1: sent AT+CMEE=2
23:32:38 lte,async lte1: rcvd OK
23:32:38 lte,async lte1: sent AT+CREG=2
23:32:38 lte,async lte1: rcvd OK
23:32:38 lte,async lte1: sent AT+CGREG=2
23:32:38 lte,async lte1: rcvd OK
23:32:38 lte,async lte1: sent AT+CEREG=2
23:32:38 lte,async lte1: rcvd OK
23:32:38 lte,async lte1: sent AT+CGEREP=2,0
23:32:38 lte,async lte1: rcvd OK
23:32:38 lte,async lte1: sent AT+CMGF=0
23:32:38 lte,async lte1: rcvd OK
23:32:38 lte,async lte1: sent AT+CNMI=1,1,0,1,0
23:32:38 lte,async lte1: rcvd OK
23:32:38 lte,async lte1: sent AT+EEMOPT=1
23:32:38 lte,async lte1: rcvd OK
23:32:38 lte,async lte1: sent AT*MRD_SN?
23:32:39 lte,async lte1: rcvd *MRD_SN:72344D346BFA0
23:32:39 lte,debug lte serial: *MRD_SN:72553D6BFA0
23:32:39 lte,async lte1: sent AT+CFUN=4
23:32:39 lte,async,event +MSTK: 11, D081970103052346456457560043004370432043B043504470435043D0438044F0F0C84800421043F043E044004420F10858008568204380F10868004240438043D0430043D0441044B0F1087800
23:32:39 lte,async,event 421043F044004300432034645645104490435043D04380435
23:32:39 lte,async lte1: rcvd OK
23:32:39 lte,async lte1: sent AT*CGDFLT=0,"IP","internet",,,,,,,,,,1,0,,,,,,,1
23:32:39 lte,async lte1: rcvd OK
23:32:39 lte,async lte1: sent AT*CGDFAUTH=0,0
23:32:39 lte,async lte1: rcvd OK
23:32:39 lte,async lte1: sent AT+CPIN?
23:32:39 lte,async lte1: rcvd +CME ERROR: SIM busy
23:32:39 lte,async,event +CPIN: READY
23:32:39 lte,async,event ^SIMST: 1
23:32:39 lte,async,event +MSTK: 14
23:32:39 lte,async,event +CPIN: READY
23:32:39 lte,async,event ^SIMST: 1
23:32:41 lte,async lte1: sent AT+CPIN?
23:32:41 lte,async lte1: rcvd +CPIN: READY
23:32:41 lte,async,event +MMSG: 2, 0
23:32:41 lte,async,event +MMSG: 3, 0
23:32:41 lte,async,event +MPBK: 1
23:32:41 lte,async,event +MMSG: 0, 0
23:32:45 lte,async lte1: sent AT+CPMS="SM","SM","SM"
23:32:45 lte,async lte1: rcvd +CPMS: 5,15,5,15,0,0
23:32:45 lte,async lte1: sent AT+CFUN?
23:32:45 lte,async lte1: rcvd +CFUN: 4
23:32:45 lte,async lte1: sent AT+CNUM
23:32:45 lte,async lte1: rcvd +CME ERROR: 100
23:32:45 lte,async lte1: sent AT+CIMI
23:32:45 lte,async lte1: rcvd 25056758906
23:32:45 lte,async lte1: sent AT+ICCID?
23:32:45 lte,async lte1: rcvd +ICCID: 897010242353647068ff
23:32:45 lte,async lte1: sent AT+CPIN?
23:32:45 lte,async lte1: rcvd +CPIN: READY
23:32:45 lte,async lte1: sent AT*BAND=5,78,147,160,524487,0,2,0
23:32:45 lte,async lte1: rcvd OK
23:32:46 lte,async lte1: sent AT+CFUN=1
23:32:46 lte,async,raw +CREG: 2
23:32:46 lte,async,raw +CEREG: 2
23:32:46 lte,async lte1: rcvd OK
23:32:46 lte,async lte1: sent AT+COPS=3,0
23:32:46 lte,async lte1: rcvd OK
23:32:46 lte,debug lte1: config ok
23:32:46 lte,async,raw lte1: sent AT+CSQ
23:32:46 lte,async,raw lte1: rcvd +CSQ: 99,99
23:32:47 lte,async,raw +CREG: 1, 13d1, bd76305, 7
23:32:47 lte,debug lte1: network access technology: Evolved 3G (LTE)
23:32:47 lte,info lte1: registered home
23:32:47 lte,async,raw +CEREG: 1,"13d1","0bd76305",7
23:32:47 lte,async,event +CGEV: EPS PDN ACT 5
23:32:48 lte,async lte1: sent AT+CGDCONT?
23:32:48 lte,async lte1: rcvd +CGDCONT: 5,"IP","internet.MNC002.MCC250.GPRS","100.117.184.14",,,802110030100108174736282949073,
23:32:48 lte,async lte1: sent AT+CGCONTRDP=5
23:32:48 lte,async lte1: rcvd +CGCONTRDP: 5,5,"internet.MNC002.MCC250.GPRS","100.117.184.14","","","10.77.48.115","10.77.48.99","","","0","0"
23:32:48 interface,info lte1 link up
23:32:49 lte,async,raw lte1: sent AT+COPS?
23:32:49 lte,async,raw lte1: rcvd +COPS: (0,0,"MegaFon",7,0),(0,0,"MegaFon",7,0)
23:32:49 lte,async,raw lte1: sent AT+CFUN?
23:32:49 lte,async,raw lte1: rcvd +CFUN: 1
23:32:49 lte,async,raw lte1: sent AT+CESQ
23:32:49 lte,async,raw lte1: rcvd +CESQ: 99,99,255,255,20,36
Работа с SMS
Модем может работать с SMS. Получать и отправлять. Русский язык (UTF8) в сообщениях не поддерживается.
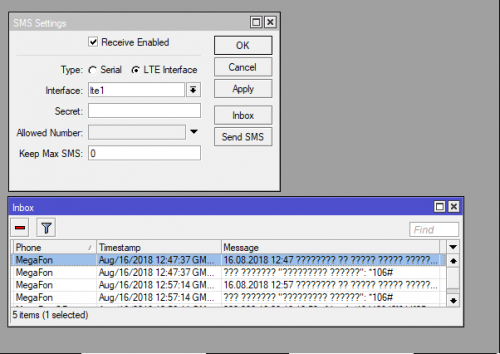
Модем Mikrotik R11e-LTE. SMS
Пример команд в консоли
/tool sms print

           status: running
  receive-enabled: yes
             port: lte1
          channel: 0
           secret:
   allowed-number:
       auto-erase: no
          sim-pin:

/tool sms set port=lte1 receive-enabled=yes

/tool sms inbox print

 # PHONE           TIMESTAMP                      MESSAGE
 0 MegaFon         Aug/16/2018 12:47:37 GMT +3    16.08.2018 12:47 ???????? ?? ????? ????? ?????????????. ???????????
 1 MegaFon         Aug/16/2018 12:47:37 GMT +3    ??? ??????? "????????? ??????": *106#
 2 MegaFon OF      Aug/16/2018 12:56:11 GMT +3    ??? 200 16.08.18 12:53 ofd.ru
 3 MegaFon         Aug/16/2018 12:57:14 GMT +3    16.08.2018 12:57 ???????? ?? ????? ????? ?????????????. ???????????
 4 MegaFon         Aug/16/2018 12:57:14 GMT +3    ??? ??????? "????????? ??????": *106#
Сравнение Mikrotik R11e-LTE/4G и USB модемов со Stick или HiLink прошивкой
Mikrotik поддерживает USB модем и других производителей, например Huawei.
На примере модема Huawei E3372, посмотрим какие есть преимущества модема R11e-LTE.
У Huawei E3372 есть две версии прошивки:
- Stick — в Mikrotik работает через эмуляцию PPP. Модем виден в Mikrotik как ppp-out1.
- HiLink — сам модем выступает в роли маршрутизатора. В нём есть NAT, Firewall, DHCP сервер. Модем виден в Mikrotik как lte1.
Mikrotik R11e-LTE и DC-HSPA+
У модема Mikrotik R11e-LTE есть один очень большой недостаток перед Huawei — он не поддерживает в 3G режим DC-HSPA+ (агрегация каналов). Если у вас 3G сеть, стоит очень сильно подумать, нужен ли вам R11e-LTE. Отсутствие этого режима, может сильно сказаться на скорости Интернет’а (а может и не сказаться, т.к. не все базовые станции оператора поддерживают DC-HSPA+ и даже, если поддерживают, то не факт, что они обеспечат скорость выше HSPA+, нужно тестировать).
Недостаток сообщил, теперь о преимуществах…
Преимущества по сравнению с Stick прошивкой
С модемами со Stick прошивкой, Mikrotik работает в режиме эмуляции PPP.
Она сильно нагружает Mikrotik и ограничивает скорость до примерно ~20 мбит/с. Т.е. если вы подключились к LTE сети, где реально скорость >50 мбит/с, то вы будете ограничены примерно 20 мбит/с.
Для 3G сетей это не критично, т.к. там редко бывает > 20-25 мбит/с.
Преимущества по сравнению с Hilink прошивкой
Когда в модеме используется HiLink прошивка, то сам модем выступает в роли маршрутизатора. В нём начинает работать NAT, Firewall, DHCP сервер и т.д.
В Mikrotik модем виден как LTE интерфейс с минимальным функционалом.
Недостатки:
- В Mikrotik не отображается состояние модема и состояние сети сотового оператора (уровень сигнала, качество сигнала и т.д.).
- Будет двойной NAT (NAT на Mikrotik и NAT на модеме, можно настроить Mikrotik в режиме бриджа, но тут будут свои недостатки).
- Невозможно получить публичный IP адрес на интерфейса LTE в Mikrotik.
- Нельзя отправлять/получать SMS с Mikrotik.
- Нельзя управлять модемом с Mikrotik (например, из скриптов).
У Mikrotik R11e-LTE удобней и надёжней коннекторы для антенны, он рассчитан на эксплуатацию в жёстких условиях (не все USB модемы переживают перепады температуры и влажности). Нет проблем с питанием от USB.
Ссылки
- https://wiki.mikrotik.com/wiki/Manual:Interface/LTE
- https://wiki.mikrotik.com/wiki/Manual:Tools/Sms
The following two tabs change content below.
- Bio
- Latest Posts
В профессиональной сфере занимаюсь всем, что связанно с IT. Основная специализация — VoIP и сети передачи данных. Стараюсь не заниматься Windows серверами (но иногда приходится) и 1С.
Артикул:RBwAPR-2nD&R11e-LTE
Код товара: 25651

Точка доступа 2.4 ГГц, LTE, 802.11b/g/n, MIMO2x2, 1×10/100 Ethernet
* Ваша цена: 20 701 ₽ / шт
Параметры заказа:
Заказать упаковкуВ Упаковке 20 шт
Склад: 0/9 шт (Транзит: 100+ шт)
Наличие (Количество отображается в виде Свободно / Общее количество)
| Свободно | Общее кол-во | |
|---|---|---|
| Транзит | 100+ | 100+ |
| Щёлково | 0 | 9 |
Товар новый гарантия 12 месяцев
- Manuals
- Brands
- MikroTik Manuals
- Wireless Access Point
- RBwAPR-2nD&R11e-LTE-US