- Manuals
- Brands
- Milestone Manuals
- Network Hardware
- Husky M50 Advanced
- Administrator’s manual
-
Contents
-
Table of Contents
-
Bookmarks
Quick Links
Milestone Systems
Milestone Husky M50 Advanced
Administrator’s Manual
Related Manuals for Milestone Husky M50 Advanced
Summary of Contents for Milestone Husky M50 Advanced
-
Page 1
Milestone Systems Milestone Husky M50 Advanced Administrator’s Manual… -
Page 2: Table Of Contents
Milestone Husky M50 Advanced Administrator’s Manual Contents COPYRIGHT, TRADEMARKS AND DISCLAIMER ……10 BEFORE YOU START …………..11 …………….11 NTRODUCTION TO THE HELP …………..11 AVIGATE THE BUILT IN HELP SYSTEM ………………. 12 BOUT VIRUS SCANNING …………….13 BOUT…
-
Page 3
ANAGEMENT LIENT Change Software License Code ………………28 ………………..28 NSTALL CLIENTS Install XProtect Smart Client silently …………….28 Install Milestone Mobile server ………………29 ………… 29 OWNLOAD ANAGER DOWNLOAD WEB PAGE Download Manager’s default configuration …………..31 Download Manager’s standard installers (user) …………. 32 Add/publish Download Manager installer components ………. -
Page 4
Milestone Husky M50 Advanced Administrator’s Manual ………………….43 ASICS License information ………………….43 Site information ……………………47 …………….. 48 ERVERS AND HARDWARE Recording servers ………………….48 Hardware and remote servers ………………. 66 Remove a recording server ………………..75 Delete all hardware on a recording server …………..75 …………………. -
Page 5
Milestone Husky M50 Advanced Administrator’s Manual Basic users ……………………210 ………………210 YSTEM DASHBOARD About system dashboard ………………..210 About system monitor ………………… 211 About evidence lock ………………….212 About current tasks ………………….213 About configuration reports ………………. 213 ………………..214 ERVER LOGS About logs ……………………. -
Page 6
Milestone Husky M50 Advanced Administrator’s Manual User Settings tab (options) ………………… 232 Access Control Settings tab (options) …………….232 Analytics Events tab (options) ………………233 Event Server tab (options) ………………..234 Generic Events tab (options) ………………234 FEATURE CONFIGURATION …………237 ) …… -
Page 7
About possible Milestone Interconnect setups …………260 Milestone Interconnect and licensing …………….261 Add a remote site to your central Milestone Interconnect site_not updated yet ..261 Update remote site hardware ………………262 Establish remote desktop connection to remote system ……….262 Enable playback directly from remote site camera ………… -
Page 8
Milestone Husky M50 Advanced Administrator’s Manual About access control integration ………………. 270 Configure an integrated access control system …………271 Wizard for access control system integration ………….. 271 Access control properties ………………..273 LPR ………………… 277 ROTECT LPR system overview …………………. 277 About preparing cameras for LPR ……………… -
Page 9
Milestone Husky M50 Advanced Administrator’s Manual …………..328 OVING THE MANAGEMENT SERVER About moving the management server…………….328 About unavailable management servers …………… 329 Move the system configuration ………………329 …………….329 ANAGING THE SERVER About updating the SQL server address …………… 329 Update the log server’s SQL address ……………. -
Page 10: Copyright, Trademarks And Disclaimer
Any risk arising from the use of this information rests with the recipient, and nothing herein should be construed as constituting any kind of warranty. Milestone Systems A/S reserve the right to make adjustments without prior notification. All names of people and organizations used in the examples in this text are fictitious. Any resemblance to any actual organization or person, living or dead, is purely coincidental and unintended.
-
Page 11: Before You Start
Milestone Husky M50 Advanced Administrator’s Manual Before you start Introduction to the help The help is divided into sections that each serves a targeted purpose. The sections are structured in a logical flow: System overview (on page 16) Provides an introduction to your video surveillance system, system components, and concepts. This is useful if you are new to the system.
-
Page 12: About Virus Scanning
Create the following additional exclusions: File types: .blk, .idx, .pic C:Program FilesMilestone or C:Program Files (x86)Milestone and all subdirectories. Exclude network scanning on the following TCP ports: Product TCP ports…
-
Page 13: About Active Directory
The Milestone Husky Assistant runs when you log in to your Milestone Husky M50 Advanced machine for the first time. Milestone Husky Assistant helps you set up your Milestone Husky M50 Advanced as a standalone system or if it should operate as a recording server or failover recording server.
-
Page 14: Milestone Husky Assistant
The Recording server or Failover recording server option allows you to set up your Milestone Husky M50 Advanced as a recording server or a failover recording server and to connect this to an existing Management server running on a different machine.
-
Page 15
Click Next when you have made your selection. 5. The Summary page appears. On this page, click either Setup to confirm your choices or Previous to go back to previous pages of the Milestone Husky Assistant and go through the corresponding steps again to make your choices. -
Page 16: System Overview
One or more XProtect® Smart Clients. One or more XProtect Web Clients and/or Milestone Mobile clients if needed. Your system also includes fully integrated Matrix functionality for distributed viewing of video from any camera on your surveillance system to any computer with XProtect Smart Client installed.
-
Page 17: Adistributed System Setup
Milestone Husky M50 Advanced Administrator’s Manual A distributed system setup Example of a system setup. The number of cameras, recording servers, and connected clients, can be as high as you require. Legend: One or more installations of the Management Client…
-
Page 18: Failover Management Server
The recording server is responsible for communicating with the network cameras and video encoders, recording the retrieved audio and video as well as providing client access to both live and recorded audio and video. The recording server is also responsible for communicating with other Milestone products connected via the Milestone Interconnect technology.
-
Page 19: Event Server
Milestone Husky M50 Advanced Administrator’s Manual Event server The event server handles various tasks related to events, alarms, maps and 3rd party integrations via the MIP Software Development Kit (SDK). Events: All system events are consolidated in the event server so there are one place and interface for partners to make integrations that utilize system events.
-
Page 20: Virtual Servers
Milestone Husky M50 Advanced Administrator’s Manual With the Active Directory installed, you can add Windows users from Active Directory, but you also have the option of adding basic users without Active Directory. Note that there are certain system limitations related to basic users.
-
Page 21
XProtect Download Manager. About Milestone Mobile client Milestone Mobile client is a mobile surveillance solution closely integrated with the rest of your XProtect system. It runs on your Android tablet or smartphone, your Apple tablet, smartphone or ®… -
Page 22
XProtect system. If you want to use Milestone Mobile client with your system, you must add a Mobile server to establish the connection between the Milestone Mobile client and your system. Once the Mobile server is set up, download the Milestone Mobile client for free from Google Play, App Store or Windows Phone Store to start using Milestone Mobile. -
Page 23: About Licenses
It also enables you to run the hardware device multiple times on one site or multiple times on multiple sites. You need a camera license for each enabled interconnected camera in a Milestone Interconnect setup.
-
Page 24: About Local Ip Address Ranges
Milestone Husky M50 Advanced Administrator’s Manual About local IP address ranges When a client, such as XProtect Smart Client, connects to a surveillance system, an amount of initial data communication, including the exchange of contact addresses goes on in the background. This happens automatically, and is transparent to users.
-
Page 25: About Writing Ipv6 Addresses
Milestone Husky M50 Advanced Administrator’s Manual Devices You can use devices (cameras, inputs, outputs, microphones, speakers) with a different IP version than that being used for server communication provided your network equipment and the recording servers also support the devices’ IP version. See also the illustration below.
-
Page 26: Configure The System In The Management Client
Even if information is presented as a checklist, a completed checklist does not in itself guarantee that the system matches the exact requirements of your organization. To make the system match the needs of your organization, Milestone recommends that you monitor and adjust the system continuously.
-
Page 27
Milestone Husky M50 Advanced Administrator’s Manual You have finished the initial installation of your system. See Install the system. Change the trial SLC to a permanent SLC (if required). See Change Software License Code (on page 28). Log in to the Management Client. -
Page 28: Change Software License Code
MilestoneXProtectSmartClient_x64.exe for 32-bit and 64-bit versions respectively. You find the file in a subfolder under the folder httpdocs. The httpdocs folder is located under the folder in which your Milestone surveillance software is installed. The path is typically: C:Program FilesMilestoneXProtect Management ServerIIShttpdocsXProtect Smart…
-
Page 29: Install Milestone Mobile Server
3. Follow the instructions on the screen to install. Once you have installed the Milestone Mobile server, you can use Milestone Mobile client and XProtect Web Client with your system. To reduce the overall use of system resources on the computer running the management server, install the Milestone Mobile server on a separate computer.
-
Page 30
On the management server, you can access the web page from Windows’ Start menu, select Programs > Milestone > Administrative Installation Page. Otherwise you can enter the URL: http://[management server address]:[port]/installation/admin/ [management server address] is the IP address or host name of the management server, and [port] is the port number which you have configured IIS to use on the management server. -
Page 31: Download Manager’s Default Configuration
Milestone Husky M50 Advanced Administrator’s Manual Windows’ Start menu, select Programs > Milestone > Public Installation Page. Otherwise you can enter the URL: http://[management server address]:[port]/installation/ [management server address] is the IP address or host name of the management server, and [port] is the port number which you have configured IIS to use on the management server.
-
Page 32: Download Manager’s Standard Installers (User)
Axis One-click Connection Component — only available here Milestone Mobile server — only available here More options may be available in your organization. For installation of device packs, see Device pack installer — must be downloaded (on page 34).
-
Page 33: Hide/Remove Download Manager Installer Components
Remove the installation of components on the management server. The components disappear from the Download Manager, but installation files for the components are kept at C:Program Files (x86)MilestoneXProtect Download Manager, so you can re-install them later if required. In the Download Manager, click Remove features.
-
Page 34: Device Pack Installer — Must Be Downloaded
So, if you need to reinstall the device pack or make the device pack installer available, you must first add or publish the latest device pack installer to the Download Manager: 1. Get the newest device pack from the download page on the Milestone website http://www.milestonesys.com/downloads.
-
Page 35: First Time Use
You can select which action to take if a camera database becomes corrupted. The actions include several database repair options. While it is good to have such options, Milestone recommends that you take steps to ensure that your camera databases do not become corrupted.
-
Page 36: About Daylight Saving Time
This may occasionally lead to confusion. If your cameras support timestamps, Milestone recommends that you auto-synchronize camera and system time through a time server for consistent synchronization.
-
Page 37: Management Client Overview
Milestone Husky M50 Advanced Administrator’s Manual Management Client overview About login authorization If you encounter a second dialog during login, you need additional login authorization to get access to the Management Client. When you log into the Management Client, you may be asked to for additional authorization of your login.
-
Page 38
Milestone Husky M50 Advanced Administrator’s Manual When you work with rules, time and notification profiles, users, roles: When you view logs: www.milestonesys.com First time use… -
Page 39: Panes Overview
The site name is visible at the top of the pane. The features are grouped into categories that reflect the functionality of the software. Federated Site Hierarchy pane: This is your navigation element that displays Milestone Federated Architecture sites and their parent/child links.
-
Page 40: Menu Overview
Milestone Husky M50 Advanced Administrator’s Manual Preview pane: The Preview pane appears when you work with recording servers and devices. It shows preview images from the selected cameras or displays information about the state of the device. The example shows a camera preview image with information about the resolution and data rate of the camera’s live stream: By default, the information shown with the camera preview images concerns live streams.
-
Page 41: View Menu
Milestone Husky M50 Advanced Administrator’s Manual View menu Name Description Reset the layout of the different panes in the Management Client to Reset Application Layout their default settings. Toggle the Preview pane on and off when working with recording Preview Window servers and devices.
-
Page 42: Tools Menu
Milestone Husky M50 Advanced Administrator’s Manual Name Description Is always available and reloads the requested information from the Refresh management server. Tools menu Name Description Manage registered services. Registered Services See About the service channel (on page 339). Add XProtect Enterprise servers to your system and manage the integration of the added servers.
-
Page 43: Management Client Elements
Milestone Husky M50 Advanced Administrator’s Manual Management Client elements Basics License information You can keep track of the licenses on this site and on all other sites licensed on the same software license code (SLC). Installed Products Lists all installed products on this site: …
-
Page 44
License type — hardware device: The total number of obtained and activated hardware device licenses on all sites using this SLC. If you run Milestone Interconnect, the total number of obtained and activated Milestone Interconnect camera licenses on all sites using this SLC. … -
Page 45
It also enables you to run the hardware device multiple times on one site or multiple times on multiple sites. You need a camera license for each enabled interconnected camera in a Milestone Interconnect setup. -
Page 46
If the computer that runs the Management Client does not have Internet access, you can activate licenses offline. First you export the license request and provide it to Milestone, who then actives the licenses. When you receive the activated licenses, you import them into your system: 1. -
Page 47: Site Information
Administrator’s Manual Get additional licenses If you want to add or if you have already added more hardware devices, Milestone Interconnect systems, or doors than you currently have licenses for, you must buy additional licenses to enable the devices to send data to your system.
-
Page 48: Servers And Hardware
You can still access recordings on such older recording servers, but if you want to change their configuration, make sure they match the current version. Milestone recommends that you upgrade all recording servers in your system to the same version as your management server.
-
Page 49
Milestone Husky M50 Advanced Administrator’s Manual 3. After a moment, the recording server is authorized and ready for further configuration via the tabs. Change/verify the basic configuration of a recording server If your Management Client does not list all the recording servers you have installed, the most likely reason is that you have configured the setup parameters (for example, the IP address or host name of the management server) incorrectly during installation. -
Page 50
Milestone Husky M50 Advanced Administrator’s Manual Icon Description Recording server is running Recording server is communicating Recording server requires attention: This icon typically appears because the Recording Server service is stopped. 1) Right-click the recording server icon in the notification area. -
Page 51
Milestone Husky M50 Advanced Administrator’s Manual Info tab properties Name Description Used when the recording server is listed in the system and clients. The name does not have to be unique. Name When you rename a recording server, the name is changed globally in the Management Client. -
Page 52
The following mostly mentions cameras and video, but speakers, microphones, audio and sound also apply. Important: Milestone recommends that you use a dedicated hard disk drive for the recording server database to prevent low disk performance. When you format the hard disk, it is important to change its Allocation unit size setting from 4 to 64 kilobytes. -
Page 53
Milestone Husky M50 Advanced Administrator’s Manual Encryption Frames Per Second (FPS). The size fields define the size of the camera’s database, exemplified by the cylinder, and its archive(s) respectively: Recordings’ way from recording database to archive to deletion By means of retention time and size setting for the recording database, exemplified by the white area in the cylinder, you define how old recordings must be before they are archived. -
Page 54
Milestone Husky M50 Advanced Administrator’s Manual Add a new recording storage You always create one storage with a predefined recording database named Recording. You cannot rename it. Apart from a recording database, a storage can contain a number of archives. -
Page 55
Milestone Husky M50 Advanced Administrator’s Manual 1. To edit a storage, select its recording database in the Recording and archiving configuration list. To edit an archive, select the archive database. 2. Click the Edit Recording Storage button located below the Recording and archiving configuration list. -
Page 56
Milestone Husky M50 Advanced Administrator’s Manual The sub-directories are named after the device, followed by an indication of where the recordings came from (edge camera or via SMTP), plus the date and time of the most recent database record contained in the sub-directory. -
Page 57
Milestone Husky M50 Advanced Administrator’s Manual To back up the recordings from a particular camera from a particular period of time, back up the contents of the relevant sub-directories only. For example everything under: …F:OurArchiveArchive1Camera 1 on Axis Q7404 Video Server(10.100.50.137) — 2011-10-05T11:23:47+02:00… -
Page 58
Milestone Husky M50 Advanced Administrator’s Manual Storage and Recording Settings properties Available functionality depends on the system you are using. See Product comparison chart for more information. In the Storage and Recording Settings dialog box, specify the following: www.milestonesys.com Management Client elements… -
Page 59
Milestone Husky M50 Advanced Administrator’s Manual Name Description Name Rename the storage if needed. Names must be unique. Specify the path to the directory to which you save recordings in this storage. The storage does not necessarily have to be located on the recording server computer. -
Page 60
Milestone Husky M50 Advanced Administrator’s Manual Archive Settings properties In the Archive Settings dialog box, specify the following: Name Description Name Rename the storage if needed. Names must be unique. Specify the path to the directory to which you save recordings in this storage. -
Page 61
Milestone Husky M50 Advanced Administrator’s Manual Failover tab (recording server) Available functionality depends on the system you are using. See Product comparison chart for more information. If your organization uses failover recording servers, use the Failover tab to assign failover servers to recording servers, see Failover tab properties (on page 61). -
Page 62
Milestone Husky M50 Advanced Administrator’s Manual Name Description None Select a setup without failover. Primary failover server group / Select a regular failover setup with one primary and possibly one Secondary failover sever secondary failover server group. group Select a hot standby setup with one dedicated recording server as Hot standby server hot standby server. -
Page 63
Milestone Husky M50 Advanced Administrator’s Manual With multicasting, you work with a defined group of recipients, based on options such as IP address ranges, the ability to enable/disable multicast for individual cameras, the ability to define largest acceptable data packet size (MTU), the maximum number of routers a data packet must be forwarded between (TTL), and so on. -
Page 64
Milestone Husky M50 Advanced Administrator’s Manual Name Description In the Start field, specify the first IP address in the required range. IP address Then specify the last IP address in the range in the End field. In the Start field, specify the first port number in the required range. -
Page 65
Milestone Husky M50 Advanced Administrator’s Manual Network tab (recording server) You define a recording server’s public IP address on the Network tab. Why use a public address? When an access client, such as XProtect Smart Client, connects to a surveillance system, an amount of initial data communication, including the exchange of contact addresses, is shared in the background. -
Page 66: Hardware And Remote Servers
The Add Hardware wizard helps you detect hardware like cameras and video encoders on your network and add them to the recording servers on your system. The wizard also helps you add remote recording servers for Milestone Interconnect setups. Only add hardware to one recording server at a time.
-
Page 67
You can select this option every time you add new hardware to your network and want to use it in your system. You cannot use this option to add remote systems in Milestone Interconnect setups. The system scans your network for relevant hardware and… -
Page 68
Milestone Husky M50 Advanced Administrator’s Manual 1. Expand the recording server, right-click the hardware you want to disable. 2. Select Enabled to clear or select it. Edit hardware You can edit basic settings, such as IP address/host name, for added hardware: 1. -
Page 69
Milestone Husky M50 Advanced Administrator’s Manual Consult your camera vendor to get a certificate for your hardware and upload it to the hardware, before you continue with the steps below: 1. In the Overview pane, right-click the recording server and select the hardware. -
Page 70
Milestone Husky M50 Advanced Administrator’s Manual Manage hardware Info tab (hardware) For information about the Info tab for remote servers, see Info tab (remote server) (on page 73). Info tab (hardware) Name Description Enter a name. The system uses the name whenever the hardware is listed in the system and in the clients. -
Page 71
Milestone Husky M50 Advanced Administrator’s Manual The content of the Settings tab is determined by the selected hardware, and varies depending on the type of hardware. For some types of hardware, the Settings tab displays no content at all or read-only content. -
Page 72
Milestone Husky M50 Advanced Administrator’s Manual 4. In the PTZ Protocol column, select which positioning scheme you want to use: Absolute: When operators use PTZ controls for the camera, the camera is adjusted relative to a fixed position, often referred to as the camera’s home position… -
Page 73
Address The host name or IP address of the remote system. (Applies only to Milestone Arcus™-enabled hardware) Opens the default home page of the hardware vendor. You can use this page for administration of the hardware or system. The unique system ID of the remote site used by XProtect to, for Remote system ID example, manage licenses. -
Page 74
1. Right-click the relevant remote server in the Overview pane and select Update Hardware. 2. The dialog box lists all changes (devices removed, updated and added) in the remote system since you established or last refreshed the Milestone Interconnect setup. Click Confirm to update your central site with these changes. -
Page 75: Remove A Recording Server
Milestone Husky M50 Advanced Administrator’s Manual Remove a recording server Important: If you remove a recording server, all configuration specified in the Management Client is removed for the recording server, including all of the recording server’s associated hardware (cameras, input devices, and so on).
-
Page 76: Working With Device Groups
Milestone Husky M50 Advanced Administrator’s Manual Working with device groups About device groups Grouping of devices into device groups is part of the Add Hardware wizard, but you can always modify the groups and add more groups if needed. You can benefit from grouping different types of devices (cameras, microphones, speakers, metadata, inputs, and outputs) on your system: …
-
Page 77
Milestone Husky M50 Advanced Administrator’s Manual Add a device group 1. In the Overview pane, right-click the device type under which you want to create a device group. 2. Select Add Device Group. 3. In the Add Device Group dialog box, specify a name and description of the new device group: The description appears when you pause the mouse pointer over the device group in the device group list. -
Page 78: Working With Devices
A dedicated audio module has devices that represent microphones and speaker inputs and outputs. In a Milestone Interconnect setup, the remote system appears as hardware with all devices from the remote system listed in one list. The system automatically adds the hardware’s devices when you add hardware.
-
Page 79
Milestone Husky M50 Advanced Administrator’s Manual For information about supported hardware, see the supported hardware page on the Milestone website http://www.milestonesys.com/Support/Technical- Support/supportedhardware/xprotectcorporate/. The following sections describe each of the device types with links to the tabs you can use to manage them. -
Page 80
Milestone Husky M50 Advanced Administrator’s Manual For information about supported hardware, see the supported hardware page on the Milestone website http://www.milestonesys.com/Support/Technical- Support/supportedhardware/xprotectcorporate/. Roles determine the users’ right to listen to microphones. You cannot listen to microphones from the Management Client. -
Page 81
A third party system or integration via a generic metadata driver. The device-generated metadata is automatically linked to one or more devices on the same hardware. For information about supported hardware, see the supported hardware page on the Milestone website http://www.milestonesys.com/Support/Technical- Support/supportedhardware/xprotectcorporate/. -
Page 82
Add Hardware wizard or afterwards. Input devices do not require separate licenses. You can use as many input devices as required on your system. For information about supported hardware, see the supported hardware page on the Milestone website http://www.milestonesys.com/Support/Technical- Support/supportedhardware/xprotectcorporate/. -
Page 83
Add Hardware wizard or afterwards. Output devices do not require separate licenses. You can use as many output devices as required on your system. For information about supported hardware, see the supported hardware page on the Milestone website http://www.milestonesys.com/Support/Technical- Support/supportedhardware/xprotectcorporate/. -
Page 84
Milestone Husky M50 Advanced Administrator’s Manual 3. Select/clear the check box to activate/deactivate the selected output. When an output is activated, the indicator lights up green: 4. Alternatively, click the rectangular button to activate the output for the duration defined in the Output Trigger Time setting on the Settings tab (this feature/setting may not be available for all outputs). -
Page 85
Milestone Husky M50 Advanced Administrator’s Manual Cam- Micro- Spea- Meta- Out- Description phone data Device enabled and retrieving data: The device is enabled and you retrieve a live stream. Device recording: The device is recording data on the system. Device temporarily stopped or has no feed: When stopped, no information is transferred to the system. -
Page 86
Milestone Husky M50 Advanced Administrator’s Manual Info tab (devices) About the Info tab On the Info tab, you can view and edit basic information about a device in a number of fields. All devices have an Info tab. Example of Info tab from a camera. -
Page 87
Milestone Husky M50 Advanced Administrator’s Manual Name Description The name is used whenever the device is listed in the system and clients. Name When you rename a device, the name is changed globally in the Management Client. Enter a description of the device (optional). -
Page 88
Milestone Husky M50 Advanced Administrator’s Manual Settings tab (devices) About the Settings tab On the Settings tab, you can view and edit settings for a device in a number of fields. All devices have a Settings tab. The values appear in a table as changeable or read-only. When you change a setting to a non-default value, the value appears in bold. -
Page 89
Milestone Husky M50 Advanced Administrator’s Manual About camera settings You can view or edit settings, such as: default frame rate resolution compression the maximum number of frames between keyframes on-screen date/time/text display for a selected camera, or for all cameras within a device group. -
Page 90
Milestone Husky M50 Advanced Administrator’s Manual Streams tab (devices) About the Streams tab The following devices have a Streams tab: Cameras The Streams tab lists by default a single stream. It is the selected camera’s default stream, used for live and recorded video. -
Page 91
See the camera’s documentation for more information. To see if a camera offers different types of streams, see the Settings tab. The number of available streams in a Milestone Interconnect setup depends on the capabilities of the interconnected system. Add a stream 1. -
Page 92
Milestone Husky M50 Advanced Administrator’s Manual Important: If you set a stream to Default or Record, the stream is always running independent of the Live Mode setting. Selecting When needed and Always have the same effect in the system and if you select Never, the stream is running, but cannot be viewed live. -
Page 93
Milestone Husky M50 Advanced Administrator’s Manual Record tab (devices) About the Record tab The following devices have a Record tab: Cameras Microphones Speakers Metadata Recordings from a device are only saved in the database when you have enabled recording and the recording-related rule criteria are met. -
Page 94
Milestone Husky M50 Advanced Administrator’s Manual Parameters that cannot be configured for a device are grayed out. Record tab, example from camera www.milestonesys.com Management Client elements… -
Page 95
Milestone Husky M50 Advanced Administrator’s Manual Enable/disable recording Recording is by default enabled. To enable/disable recording: 1. In the Site Navigation pane, select Recording Servers. 2. Select the relevant device in the Overview pane. 3. On the Record tab, select or clear the Recording check box. -
Page 96
Milestone Husky M50 Advanced Administrator’s Manual Devices that support pre-buffering Cameras, microphones and speakers support pre-buffering. For speakers, the streams are only sent when the XProtect Smart Client user uses the Talk to speaker function. This means that depending on how your speaker streams are triggered to be recorded there is little or no pre-buffering available. -
Page 97
Milestone Husky M50 Advanced Administrator’s Manual Add to roles: You must grant the right to start and stop manual recording to the client users on each camera in Roles on the Device tab. Use in rules: The events you can use when you create rules related to manual recording are: … -
Page 98
About remote recording The remote recording option is only available if the selected camera supports edge storage or is a camera in a Milestone Interconnect setup. To ensure that all recordings are saved in case of network issues, select Automatically retrieve remote recordings when connections are restored. -
Page 99
Milestone Husky M50 Advanced Administrator’s Manual For a Milestone Interconnect remote system, recordings are retrieved from the remote systems’ recording servers. You can use the following functionality independently of the automatic retrieval: Manual recording. The Retrieve and store remote recordings from <devices> rule. -
Page 100
Milestone Husky M50 Advanced Administrator’s Manual Presets tab (devices) About the Presets tab The following devices have a Presets tab: PTZ cameras that support preset positions On the Presets tab, you can create or import preset positions, for example: … -
Page 101
Milestone Husky M50 Advanced Administrator’s Manual For manual activation by the XProtect Smart Client users. Presets tab, with eight preset positions defined Add a preset position (type 1) To add a preset position for the camera: 1. Click Add New. The Add Preset window appears: www.milestonesys.com… -
Page 102
Milestone Husky M50 Advanced Administrator’s Manual 2. The Add Preset window displays a live preview image from the camera. Use the navigation buttons and/or sliders to move the camera to the required position. 3. Specify a name for the preset position in the Name field. -
Page 103
Milestone Husky M50 Advanced Administrator’s Manual 1. Import the presets into the system by selecting Use presets from device. 2. Any presets you have previously defined for the camera are deleted and affect any defined rules and patrolling schedules as well as remove the presets available for the XProtect Smart Client users. -
Page 104
Milestone Husky M50 Advanced Administrator’s Manual 2. Click Edit. This opens the Edit Preset window: Example only. Features are camera-dependent 3. The Edit Preset window displays a live preview image from the preset position. Use the navigation buttons and/or sliders to change the preset position as required. -
Page 105
Milestone Husky M50 Advanced Administrator’s Manual Patrolling tab (devices) About the Patrolling tab The following devices have a Patrolling tab: Cameras On the Patrolling tab, you can create patrolling profiles — the automatic movement of a PTZ (pan-tilt- zoom) camera between a number of preset positions. -
Page 106
Milestone Husky M50 Advanced Administrator’s Manual Patrolling profiles are the definitions of how patrolling should take place. This includes the order in which the camera should move between preset positions and how long it should remain at each position. You can create an unlimited number of patrolling profiles and use them in your rules. For example, you may create a rule specifying that one patrolling profile should be used during daytime opening hours and another during nights. -
Page 107
Milestone Husky M50 Advanced Administrator’s Manual 3. Click OK. The button is disabled if the name is not unique. The new patrolling profile is added to the Profile list. You can now specify the preset positions and other settings for the patrolling profile. -
Page 108
Milestone Husky M50 Advanced Administrator’s Manual 2. Select the preset position for which you want to change the time: 3. Specify the time in the Wait time (sec.) field: 4. If required, repeat for other preset positions. Customize transitions By default, the time required for moving the camera from one preset position to another, known as transition, is estimated to be three seconds. -
Page 109
Milestone Husky M50 Advanced Administrator’s Manual 3. In the list, select the transition: 4. Specify the estimated transition time (in number of seconds) in the Expected time (sec.) field: 5. Use the Speed slider to specify the transition speed. When the slider is in its rightmost position, the camera moves with its default speed. -
Page 110
Milestone Husky M50 Advanced Administrator’s Manual You can specify how much time should pass before regular patrolling is resumed after a manual interruption: 1. Select Tools > Options. 2. On the Options window’s General tab, select the amount of time in the Timeout for manual PTZ sessions list (default is 15 seconds). -
Page 111
Milestone Husky M50 Advanced Administrator’s Manual 360° Lens tab (devices) About the 360° Lens tab The following devices have a 360° Lens tab: Fixed cameras with a dedicated ImmerVision 360° lens On the 360° Lens tab, you can enable and configure panomorph support for the selected camera. -
Page 112
Milestone Husky M50 Advanced Administrator’s Manual Events tab (devices) About the Events tab The following devices have an Events tab: Cameras Microphones Inputs In addition to the system’s event, some devices can be configured to trigger events. You can use these events when creating event-based rules in the system. -
Page 113
Milestone Husky M50 Advanced Administrator’s Manual 5. In the toolbar, click Save. Specify event properties You can specify properties for each event you have added. The number of properties depends on the device and the event. In order for the event to work as intended, you must specify some or all of the properties identically on the device as well as on this tab. -
Page 114
Milestone Husky M50 Advanced Administrator’s Manual Client tab (devices) About the Client tab The following devices have a Client tab: Cameras On the Client tab you can specify which other devices are viewed and heard when you use the camera in XProtect Smart Client. -
Page 115
Milestone Husky M50 Advanced Administrator’s Manual Name Description The system supports multicast of live streams from the recording server to XProtect Smart Client. To enable multicast of live streams from the selected camera, select the check box. Live multicast You must also configure multicasting for the recording server. See About multicasting (on page 62). -
Page 116
As an alternative, some PTZ cameras support enabling of a position based privacy mask in the camera itself. In a Milestone Interconnect setup, the central system disregards privacy masking defined in a remote system. Enable/disable privacy masking The privacy masking feature is disabled by default. -
Page 117
Milestone Husky M50 Advanced Administrator’s Manual To enable/disable the privacy masking feature for a camera: Select/clear the Privacy Mask tab’s Privacy masking check box. Specify privacy mask settings When you enable privacy masking, the preview image is divided into selectable sections by a grid. -
Page 118
Hiding regions may provide a less obscured view of the preview Show Privacy Mask image. Milestone recommends that you keep the Show privacy mask box selected to avoid that regions exist without you or your colleagues being aware of it. -
Page 119
Before you configure motion detection for a camera, Milestone recommends that you have configured the camera’s image quality settings, for example resolution, video codec and stream settings on the Settings tab. -
Page 120
Motion detection is per default set up for dynamic sensitivity. To adjust the sensitivity level manually, see Enable manual sensitivity (on page 120). Milestone recommends that you do not enable manual sensitivity because: With dynamic sensitivity, the system calculates and optimizes the sensitivity level automatically and suppresses the motion detections that come from noise in the images. -
Page 121
Milestone Husky M50 Advanced Administrator’s Manual 3. Select a slider position in which only detections you consider motion are highlighted. Highlighted motion in the preview image You can compare and set the exact sensitivity setting between cameras by the number in the right side of the slider. -
Page 122
Milestone Husky M50 Advanced Administrator’s Manual Lets you optimize motion detection performance by analyzing only a selected percentage of the image, for example 25%. By analyzing 25%, only every fourth pixel in the image is analyzed instead of all pixels. -
Page 123: Client
Milestone Husky M50 Advanced Administrator’s Manual Client About clients Available functionality depends on the system you are using. See Product comparison chart for more information. The Client section of the Management Client consists of: Name Description XProtect Smart Wall is an add-on that allows you to send view content from XProtect Smart Client to dedicated video wall.
-
Page 124: Smart Client Profiles
Milestone Husky M50 Advanced Administrator’s Manual About view groups and roles By default, each role you define in the Management Client is also created as a view group. When you add a role in the Management Client, the role by default appears as a view group for use in clients.
-
Page 125
Milestone Husky M50 Advanced Administrator’s Manual Add and configure a Smart Client profile You must create a Smart Client profile before you can configure it. 1. Right-click Smart Client Profiles. 2. Select Add Smart Client Profile. 3. In the Add Smart Client Profile dialog box, type a name and description of the new profile and click OK. -
Page 126
Milestone Husky M50 Advanced Administrator’s Manual 6. Specify which cameras Guard (Selected cameras) can use. 7. Assign the Live only Smart Client profile and the Daytime only time profile to the Guard (Selected cameras) role to connect the three elements. -
Page 127
Milestone Husky M50 Advanced Administrator’s Manual Description Name and description, priority of existing profiles and an overview of which roles use the profile. Info If a user is a member of more than one role, each with their individual Smart Client profile, the user gets the Smart Client profile with the highest priority. -
Page 128: Management Client Profiles
Milestone Husky M50 Advanced Administrator’s Manual Management Client profiles About Management Client profiles Available functionality depends on the system you are using. See Product comparison chart for more information. Management Client profiles allow system administrators to modify the Management Client user interface for other users.
-
Page 129
Milestone Husky M50 Advanced Administrator’s Manual 3. In the Overview pane, click the profile and go to the Info tab or Profile tab to configure the profile. Management Client profile properties Info tab (Management Client Profiles) On the Info tab, you can set the following for Management Client profiles:… -
Page 130
Milestone Husky M50 Advanced Administrator’s Manual Navigation element Description Allows the administrator user associated with the Management Basics Client profile to see License Information and Site Information. Allows the administrator user associated with the Management Remote Connect Services Client profile to see Axis One-click Camera Connection. -
Page 131: Matrix
Milestone Husky M50 Advanced Administrator’s Manual Device channel Description Allows the administrator user associated with the Management Cameras Client profile to see some or all camera-related settings and tabs. Allows the administrator user associated with the Management Microphones Client profile to see some or all microphone-related settings and tabs.
-
Page 132
Milestone Husky M50 Advanced Administrator’s Manual computers running a dedicated Matrix application and computers running XProtect Smart Client. To see a list of Matrix recipients configured in the Management Client, expand Client in the Site Navigation pane, then select Matrix. A list of Matrix configurations is displayed in the Properties pane. -
Page 133: Rules And Events
Milestone Husky M50 Advanced Administrator’s Manual 6. Click Finish if the rule is complete or define if required additional actions and/or a stop action. If you delete a Matrix-recipient, any rule that includes the Matrix-recipient stops working. Send the same video to several XProtect Smart Client views If the Matrix-recipient is XProtect Smart Client, you can send the same video to Matrix positions in several of XProtect Smart Client’s views, provided the views’ Matrix positions share the same port…
-
Page 134: About Actions And Stop Actions
Milestone Husky M50 Advanced Administrator’s Manual Rules: Rules are a central element in the system. The behavior of your surveillance system is to a very large extent determined by rules. When creating a rule, you can work with all types of events.
-
Page 135
Milestone Husky M50 Advanced Administrator’s Manual Action Description Start recording on Start recording and saving data in the database from the selected devices. <devices> When your select this type of action, the Manage Rule wizard prompts you to specify: When recording should start. This happens either immediately or a number of seconds before the triggering event/beginning of the triggering time interval and on which devices the action should take place. -
Page 136
Sets a specific XProtect Smart Wall monitor to display live video from the <monitor> to show selected cameras on this site or any child site configured in Milestone Federated Architecture. No mandatory stop action: This type of action does not require a stop action. -
Page 137
Milestone Husky M50 Advanced Administrator’s Manual Action Description the stop action: Restore default recording frame rate of keyframes for H.264/MPEG4 Without this stop action, the default setting would potentially never be restored. You also have the option of specifying further stop actions. -
Page 138
Milestone Husky M50 Advanced Administrator’s Manual Action Description Start patrolling on Begins PTZ patrolling according to a particular patrolling profile for a <device> using particular PTZ camera with a particular priority. This is an exact definition of <profile> with PTZ how patrolling should be carried out, including the sequence of preset priority <priority>… -
Page 139
Milestone Husky M50 Advanced Administrator’s Manual Action Description <priority> one camera can be selected. It is not possible to select several preset positions. This type of action requires that the devices to which the action is linked are PTZ devices. -
Page 140
Milestone Husky M50 Advanced Administrator’s Manual Action Description Send notification to Sends a notification, using a particular notification profile. When you select <profile> this type of action, the Manage Rule wizard prompts you to select a notification profile, and which devices to include pre-alarm images from. You can only select one notification profile and you cannot select several notification profiles. -
Page 141
Milestone Husky M50 Advanced Administrator’s Manual Action Description Apply new settings Changes device settings on one or more devices. When you select this type on <devices> of action, the Manage Rule wizard prompts you to select relevant devices, and you can define the relevant settings on the devices you have specified. -
Page 142: Events Overview
Show <access Lets access request notifications pop up on the XProtect Smart Client screen request when the criteria for the triggering events are met. Milestone recommends notification> that you use access control events as triggering events for this action, because access request notifications typically are configured for operating on related access control commands and cameras.
-
Page 143
Milestone Husky M50 Advanced Administrator’s Manual Hardware: Some hardware is capable of creating events themselves, for example to detect motion. You can use these as events but you must configure them on the hardware before you can use them in the system. -
Page 144
Milestone Husky M50 Advanced Administrator’s Manual Devices — Predefined events: Event Description Occurs when a bookmark is made in live or playback mode in the Bookmark Reference clients. Also, a requirement for using the Default record on Requested bookmark rule. -
Page 145
Milestone Husky M50 Advanced Administrator’s Manual Event Description Occurs when a client user stops a recording session for a camera. Manual Recording Stopped If the rule system also have started a recording session it continues recording even after the manual recording is stopped. -
Page 146
Milestone Husky M50 Advanced Administrator’s Manual Event Description Occurs when a manually operated PTZ session (as opposed to a PTZ session based on scheduled patrolling or automatically triggered by an event) is stopped on a camera. PTZ Manual Session Stopped This type of event requires that the cameras to which the event is linked are PTZ cameras. -
Page 147
Milestone Husky M50 Advanced Administrator’s Manual Countless other purposes. For example, you may create user-defined events which occur if a particular type of data is received from a device. See About user-defined events (on page 165) for more information. -
Page 148
Milestone Husky M50 Advanced Administrator’s Manual Recording servers: Event Description Occurs when an archive for a recording server becomes available Archive Available after having been unavailable (see Archive Unavailable). Occurs when an archive for a recording server becomes unavailable, for example if the connection to an archive located on a network drive is lost. -
Page 149: Rules
Milestone Husky M50 Advanced Administrator’s Manual Event Description Occurs when a recording server becomes available again, and can Failover Stopped take over from a failover recording server. Events from add-on products and integrations: Events from add-on products and integrations can be used in the rule system, for example: …
-
Page 150
For example, a rule specifying that a camera should record does not work as intended if recording is not enabled for the relevant camera. Before creating a rule, Milestone recommends that you verify that the devices involved can perform as intended. -
Page 151
Milestone Husky M50 Advanced Administrator’s Manual Default rule Description Ensures that PTZ cameras go to their respective default preset positions after you have operated them manually. This rule is not enabled by default. Goto Preset when PTZ is done Even when you have enabled the rule, you must have defined default preset positions for the relevant PTZ cameras in order for the rule to work. -
Page 152
Milestone Husky M50 Advanced Administrator’s Manual Default rule Description Ensures that data feeds from all connected cameras are automatically fed to the system. While the default rule enables access to connected cameras’ data Start Metadata Feed feeds immediately upon installing the system, it does not guarantee that data is recorded, as cameras’ recording settings must be specified separately. -
Page 153
Milestone Husky M50 Advanced Administrator’s Manual Default rule Text to type Perform an action on PTZ Manual Session Stopped from All Cameras Goto preset when PTZ is done Move immediately to default preset on the device on which event occurred… -
Page 154
Milestone Husky M50 Advanced Administrator’s Manual for example in order to see whether one rule conflicts with another rule, not even if you use the Validate All Rules feature. Note that you cannot validate whether configuration of prerequisites outside the rule itself may prevent the rule from working. -
Page 155
Milestone Husky M50 Advanced Administrator’s Manual Example Explanation On Mondays between 08.30 and 11.30 (time condition), Camera 1 Very Simple Time-Based Rule and Camera 2 should start recording (action) when the time period begins and stop recording (stop action) when the time period ends. -
Page 156
Milestone Husky M50 Advanced Administrator’s Manual 5. Select one or more conditions, for example Day of week is <day>: Example only. Your selections may be different Depending on your selections, edit the rule description in the lower part of the wizard window: Example only. -
Page 157: Time Profiles
Milestone Husky M50 Advanced Administrator’s Manual Deactivating a rule 1. In the Overview pane, select the rule. 2. Clear the Active check box in the Properties pane. 3. Click Save in the toolbar. 4. An icon with a red x indicates that the rule is deactivated in the Rules list:…
-
Page 158
Milestone Husky M50 Advanced Administrator’s Manual You create and manage time profiles by expanding Rules and Events > Time Profiles. A Time Profiles list opens: Example only For an alternative to time profiles, see Day length time profiles (see «About day length time profiles» on page 160). -
Page 159
Milestone Husky M50 Advanced Administrator’s Manual Specify a recurring time When you select Add Recurring Time, the Select Recurring Time window appears: Time and date format may be different on your system 1. In the Select Time window, specify time range, recurrence pattern and range of recurrence. -
Page 160
Milestone Husky M50 Advanced Administrator’s Manual About day length time profiles When you place cameras outside, you must often lower the camera resolution, enable black/white or change other settings when it gets dark or when it gets light. The further north or south from the equator the cameras are placed, the more the sunrise and sunset time varies during the year. -
Page 161: Notification Profiles
Milestone Husky M50 Advanced Administrator’s Manual Notification profiles About notification profiles Notification profiles allow you to set up ready-made email notifications, which can automatically be triggered by a rule, for example when a particular event occurs. You can include still images and AVI video clips in the email notifications.
-
Page 162
Milestone Husky M50 Advanced Administrator’s Manual 4. Specify recipient, subject, message text and time between emails: 5. To send a test email notification to the specified recipients, click Test E-mail. 6. To include pre-alarm still images, select Include images, and specify number of images, time between images and whether to embed images in emails or not. -
Page 163
Milestone Husky M50 Advanced Administrator’s Manual Remember that you cannot include recordings in the notification profile’s email notifications unless something is actually being recorded. If you want still images or AVI video clips in the email notifications, verify that the rule specifies that recording should take place. The following example is… -
Page 164
Milestone Husky M50 Advanced Administrator’s Manual Component Requirement Type a descriptive name for the notification profile. The name Name appears later whenever you select the notification profile during the process of creating a rule. Type a description of the notification profile. The description… -
Page 165: User-Defined Events
Milestone Husky M50 Advanced Administrator’s Manual Component Requirement This setting is used to specify the start of the AVI file. By default, the AVI file contains recordings from 2 seconds before the Time before event (sec.) notification profile is triggered. You can change this to the number of seconds you require.
-
Page 166
Milestone Husky M50 Advanced Administrator’s Manual Events Description In this case, user-defined events make it possible for end users to For providing the ability to manually trigger events while viewing live video in XProtect Smart manually trigger events in Client. When a user-defined event occurs because a user of… -
Page 167: Analytics Events
VCA tool to use is entirely up to you, as long as the data supplied by the tool adheres to the format. This format is set out in the Milestone Analytics Events: Developer’s Manual. Contact your system provider for more details. Third-party VCA tools are developed by independent partners delivering solutions based on a Milestone open platform.
-
Page 168
Milestone Husky M50 Advanced Administrator’s Manual 4. In the toolbar, click Save. You can test the validity of the event by clicking Test Event. You can continually correct errors indicated in the test and run the test as many times as you want and from anywhere in the process. -
Page 169
Milestone Husky M50 Advanced Administrator’s Manual If the event is new, is it saved? Or if there are changes to the event Changes saved (step 1) name, are these changes saved? Analytics Events enabled Is the analytics event feature enabled? -
Page 170: Generic Events
Milestone Husky M50 Advanced Administrator’s Manual Event server not found Unable to find event server on the list of registered services. Unable to connect to event server on the stated port, most likely Error connecting to event due to network problems, event server being stopped or similar server incident.
-
Page 171
Milestone Husky M50 Advanced Administrator’s Manual You can use any hard- or software, which can send strings via TCP or UDP, to trigger generic events. Your system can analyze received TCP or UDP data packages, and automatically trigger generic events when specific criteria are met. This way, you may integrate your system with external sources, for example access control systems and alarm systems. -
Page 172
Milestone Husky M50 Advanced Administrator’s Manual Example: Create and test a basic generic event To trigger recording on Camera1, send the string RecordCamera1 to a TCP port on the event server and teach the event server to understand what RecordCamera1 means. -
Page 173
Milestone Husky M50 Advanced Administrator’s Manual Generic event (properties) Component Requirement Unique name for the generic event. Name must be unique among Name all types of events. such as user defined events, analytics events, and so on. Generic events are by default enabled. Clear the check box to Enabled disable the event. -
Page 174
Milestone Husky M50 Advanced Administrator’s Manual Indicates how particular the system should be when analyzing received data packages. The options are the following: Search: In order for the event to occur, the received data package must contain the text specified in the Expression: field, but may also have more content. -
Page 175
Milestone Husky M50 Advanced Administrator’s Manual Generic event test (properties) Component Requirement String to send as generic An event string to be tested from within the system by the event event server as a generic event. Data source to send event See Generic event data source properties (see «Generic event data… -
Page 176
Milestone Husky M50 Advanced Administrator’s Manual Generic event data source (properties) Component Requirement You can choose between two default data sources and define a custom data source. What to choose depends on your third party program and/or the hard- or software you want to interface from:… -
Page 177: Security
Milestone Husky M50 Advanced Administrator’s Manual Component Requirement Available echo return formats: Echo statistics: Echoes the following format: [X],[Y],[Z],[Name of generic event] [X] = request number. [Y] = number of characters. Echo type selector [Z] = number of matches with a generic event.
-
Page 178
You may, for example, want to create roles that only have rights to functionality in XProtect Smart Client or other Milestone viewing clients, with the rights to view only certain cameras. If you create such roles, these roles should not have rights to access and use the Management Client, but only have access to some or all functionality found in XProtect Smart Client or other clients. -
Page 179: About Users
Milestone Husky M50 Advanced Administrator’s Manual The rights you can set for a role are different between your products. You can only give all available rights to a role in XProtect Corporate. About users The term users primarily refers to users who connect to the surveillance system through the clients.
-
Page 180
Milestone Husky M50 Advanced Administrator’s Manual Before you can add users and groups through the Active Directory service, you must have a server with Active Directory installed on your network. Basic users If your system does not have access to Active Directory, create a basic user (see «About basic users»… -
Page 181
Milestone Husky M50 Advanced Administrator’s Manual 4. Click OK. Delete a role 1. Expand Security, and click Roles. 2. Right-click the unwanted role and select Delete Role. 3. Click Yes. Important: If you delete a role, this does not delete the view group based upon the role. -
Page 182
Milestone Husky M50 Advanced Administrator’s Manual Remove users and groups from a role 1. On the Users and Groups tab, select the user or group you want to remove and click Remove in the lower part of the tab. You can select more than one user or group, or a combination of groups and individual users, if you need to. -
Page 183
Milestone Husky M50 Advanced Administrator’s Manual Name Description Name Type a name for the role. Description Type a description for the role. Select a Management Client profile to associate with the role. You cannot apply this to the default Administrators role. -
Page 184
Milestone Husky M50 Advanced Administrator’s Manual Overall Security tab (roles) On the Overall Security tab, you set up overall rights for roles. For every component available in your system, decide whether to Allow or Deny users with the role the rights to access and use different areas on the relevant component. -
Page 185
Milestone Husky M50 Advanced Administrator’s Manual Management Server Security right Description Full control Enables the right to manage all security entries on this part of the system. Enables read access to general data on the Management Server which the individual object security does not handle: … -
Page 186
Milestone Husky M50 Advanced Administrator’s Manual Security right Description Enables the right to perform queries on the Status API located on the Status API recording server. This means that the role with this right enabled, has access to read the status of the items located on the recording server. -
Page 187
Milestone Husky M50 Advanced Administrator’s Manual Recording Servers Security right Description Enables the right to manage all security entries on this part of the Full control system. Enables the right to edit properties on the recording servers, except Edit for network configuration settings that require Edit right on the management server. -
Page 188
Milestone Husky M50 Advanced Administrator’s Manual Mobile Servers Security right Description Enables the right to manage all security entries on this part of the Full control system. Enables the right to see and access mobile servers in the Read Management Client. -
Page 189
Milestone Husky M50 Advanced Administrator’s Manual Cameras Security right Description Full control Enables the right to manage all security entries on this part of the system. Read Enables the right to view camera devices in the clients. Enables the right to edit properties for cameras in the Management Client. -
Page 190
Milestone Husky M50 Advanced Administrator’s Manual Microphones Security right Description Full control Enables the right to manage all security entries on this part of the system. Read Enables the right to view microphone devices in the clients. Enables the right to edit microphone properties in the Management Client. -
Page 191
Milestone Husky M50 Advanced Administrator’s Manual Speakers Security right Description Full control Enables the right to manage all security entries on this part of the system. Read Enables the right to view speaker devices in the clients. Enables the right to edit properties for speakers in the Management Client. -
Page 192
Milestone Husky M50 Advanced Administrator’s Manual Metadata Security right Description Full control Enables the right to manage all security entries on this part of the system. Read Enables the right to receive metadata in the clients. Enables the right to edit metadata properties in the Management Client. It Edit also allows users to enable or disable metadata devices. -
Page 193
Milestone Husky M50 Advanced Administrator’s Manual Output Security right Description Full control Enables the right to manage all security entries on this part of the system. Read Enables the right to view output devices in the clients. Enables the right to edit properties for output devices in the Management Edit Client. -
Page 194
Milestone Husky M50 Advanced Administrator’s Manual View Groups Security right Description Full control Enables the right to manage all security entries on this part of the system. Enables the right to view the View Groups created in the Management Read Client in the clients. -
Page 195
Milestone Husky M50 Advanced Administrator’s Manual Analytics Events Security right Description Enables the right to manage all security entries on this part of the Full control system. Enables the right to view analytics events in the Management Client. Read Only when you set this to allowed, the Analytics Events tab in the Options dialog appears. -
Page 196
Milestone Husky M50 Advanced Administrator’s Manual Matrix Security right Description Full control Enables the right to manage all security entries on this part of the system. Enables the right to select and send video to the Matrix recipient from the Read clients. -
Page 197
Connected sites are connected via Milestone Federated Architecture. Enables the right to edit properties on other sites in the Edit Management Client. Connected sites are connected via Milestone Federated Architecture. Manage security Enables the right to manage security permissions all sites. -
Page 198
Milestone Husky M50 Advanced Administrator’s Manual Alarms Security right Description Enables the right to manage all security entries on this part of the Full control system. Enables the right to view alarm definitions, alarm sounds, and alarm data settings in the Management Client. -
Page 199
Milestone Husky M50 Advanced Administrator’s Manual You can still select or clear such square-filled check boxes, but note that your choice in that case applies for all devices within the device group. Alternatively, select the individual devices in the device group to verify exactly which devices the relevant right applies for. -
Page 200
Milestone Husky M50 Advanced Administrator’s Manual Name Description Read The selected camera(s) will be visible in the clients. Allows live viewing of video from the selected camera(s) in the clients. For XProtect Smart Client, it requires that the role has been View live granted the right to view the clients’ Live tab. -
Page 201
Milestone Husky M50 Advanced Administrator’s Manual Name Description Allows the client user to: Remove the camera from existing evidence locks. Delete existing evidence locks. Delete evidence lock Shorten the expiry time for existing evidence locks. Shorten the protected interval for existing evidence locks. -
Page 202
Milestone Husky M50 Advanced Administrator’s Manual Name Description Read The selected microphone(s) will be visible in the clients. Allows listening to live audio from the selected microphones(s) in the clients. For XProtect Smart Client, it requires that the role has been granted Live >… -
Page 203
Milestone Husky M50 Advanced Administrator’s Manual Speaker-related rights Specify the following rights for speaker devices: www.milestonesys.com Management Client elements… -
Page 204
Milestone Husky M50 Advanced Administrator’s Manual Name Description Read The selected speaker(s) is visible in the clients. Allows listening to live audio from the selected speaker(s) in the clients. For XProtect Smart Client, it requires that the role has been granted Live >… -
Page 205
Milestone Husky M50 Advanced Administrator’s Manual Metadata-related rights Specify the following rights for metadata devices: Name Description Enables the right to see metadata devices and retrieve data from Read them in the clients. Enables the right to edit metadate properties. It also allows users to… -
Page 206
Milestone Husky M50 Advanced Administrator’s Manual Name Description The selected input(s) will be visible in the clients as well as in Read XProtect Central, an add-on product for providing complete overview of surveillance system status and alarms. Output-related rights Specify the following rights for output devices:… -
Page 207
Milestone Husky M50 Advanced Administrator’s Manual Name Description Determine if users should be allowed to talk through the selected Speak speaker(s). Specify the time profile or leave the default value. When several client users want to talk through the same speaker at the same time, conflicts may occur. -
Page 208
Specifying role rights on the Servers tab is only relevant if you have integrated XProtect Enterprise servers into your system or your system works in a Milestone Federated Architecture setup. See About XProtect Enterprise servers (on page 318) or About Milestone Federated Architecture (on page 251) for more information. -
Page 209
Milestone Husky M50 Advanced Administrator’s Manual Name Description Determine if users and groups with the selected role can select and Read send video to the Matrix recipient from the clients. Alarms tab (roles) If you use alarms in your system setup to provide central overview and control of your federated… -
Page 210: Basic Users
Milestone Husky M50 Advanced Administrator’s Manual Basic users About basic users When you add a basic user to your system, you create a dedicated surveillance system user account with basic user name and password authentication for the individual user. This is in contrast to the Windows user, added through Active Directory.
-
Page 211: About System Monitor
Milestone Husky M50 Advanced Administrator’s Manual Name Description View and print detailed system reports on servers, devices and System Monitor cameras. Evidence Lock Get an overview of all protected data in the system. Current Task Get an overview of tasks under a selected recording server.
-
Page 212: About Evidence Lock
Milestone Husky M50 Advanced Administrator’s Manual About evidence lock Available functionality depends on the system you are using. See Product comparison chart for more information. With the evidence lock functionality, client operators can protect video sequences, including audio and other data, from deletion if required, for example, while an investigation or trial is ongoing. For information about how to lock evidence, see the XProtect Smart Client documentation.
-
Page 213: About Current Tasks
Milestone Husky M50 Advanced Administrator’s Manual When a disk runs out of disk space, it does not impact the protected data. Instead the oldest non- protected data will be deleted. If there are no more non-protected data to delete, the system stops recording.
-
Page 214: S Erver Logs
Milestone Husky M50 Advanced Administrator’s Manual Add a configuration report 1. Expand System Dashboard and click Configuration Reports. This brings up the report configuration page. 2. Select the elements that you want to include in your report. 3. Optional: Click Front Page to customize your front page. In the window that appears, fill in the needed info.
-
Page 215: Search Logs
Milestone Husky M50 Advanced Administrator’s Manual Name Description System log Logs system-related information. Audit log Logs user activity. Logs rules in which users have specified the Make new log entry Rule log action. Your system has a number of default settings related to the different logs. To change the settings, see Server Logs tab (see «Server Logs tab (options)»…
-
Page 216: Change Log Language
Milestone Husky M50 Advanced Administrator’s Manual By default, exported log files are saved in your My Documents folder. However, you can specify a different location by clicking the browse button next to the field. 2. Any criteria you have selected to target the content of the exported log is listed in the Filters field.
-
Page 217: Audit Log (Properties)
Milestone Husky M50 Advanced Administrator’s Manual Name Description Displays an icon that indicates the level of the log entry: — indicates info Level — indicates warning — indicates error ‘blank’ — indicates an undefined entry. UTC Time Timestamped in coordinated universal time (UTC).
-
Page 218: Rule Log (Properties)
Milestone Husky M50 Advanced Administrator’s Manual Name Description Displays an icon that indicates the level of the log entry: — indicates info Level — indicates warning — indicates error ‘blank’ — indicates an undefined entry. UTC Time Timestamped in coordinated universal time (UTC).
-
Page 219: Alarm
Milestone Husky M50 Advanced Administrator’s Manual Name Description Displays an icon that indicates the level of the log entry: — indicates info Level — indicates warning — indicates error ‘blank’ — indicates an undefined entry. UTC Time Timestamped in coordinated universal time (UTC).
-
Page 220: About Alarms
Milestone Husky M50 Advanced Administrator’s Manual Name Description If the device causing the alarm is not set to be visible to the user’s Source/device visibility role, the user cannot see the alarm in the alarm list in XProtect Smart Client.
-
Page 221: Alarm Definitions
You can also use user-defined events for triggering alarms and use the same event to trigger several different alarms. Alarms can also register and handle events from federated sites in a Milestone Federated Architecture system.
-
Page 222
Milestone Husky M50 Advanced Administrator’s Manual Alarm definition settings: By default, the alarm definition is enabled. To disable it, clear the Enable check box. Alarm names do not have to be unique, but using unique and Name descriptive alarm names are advantageous in many situations. -
Page 223: Alarm Data Settings
Milestone Husky M50 Advanced Administrator’s Manual Select up to 15 cameras to include in the alarm definition, even if these cameras themselves do not trigger the alarm. This can be relevant, for example, if you have selected an external event…
-
Page 224: Sound Settings
Milestone Husky M50 Advanced Administrator’s Manual Add new categories with level numbers of your choosing. These Level category levels are used to configure the Initial alarm category setting. Name Type a name for the entity. You can create as many as you like.
-
Page 225: O Ptions Dialog Box
Milestone Husky M50 Advanced Administrator’s Manual User name and password If your surveillance setup includes one or more XProtect Enterprise slaves and you want to include one or more of these in your alarms, setup, you must specify the same login name and password when adding the slave as the one you use in the XProtect Central add-on in the XProtect Enterprise server.
-
Page 226: General Tab (Options)
Milestone Husky M50 Advanced Administrator’s Manual AVI Generation tab (see «AVI Generation tab (options)» on page 230) Network tab (see «Network tab (options)» on page 231) Evidence Lock tab (see «Evidence Lock tab (options)» on page 232) …
-
Page 227
Milestone Husky M50 Advanced Administrator’s Manual Management Client Name Description Select how many rows a single log page can contain. The default Number of log rows per page value is 50 rows. If a log contains more rows, it displays the next rows on the following pages. -
Page 228: Server Logs Tab (Options)
Milestone Husky M50 Advanced Administrator’s Manual Name Description Select the language of the Management Client. Language Restart the Management Client to use the new language. Recording server Name Description Client users with the necessary user rights can manually interrupt the patrolling of PTZ cameras. Select how much time should pass Timeout for PTZ sessions before regular patrolling is resumed after a manual interruption.
-
Page 229: Mail Server Tab (Options)
Milestone Husky M50 Advanced Administrator’s Manual Name Description Select the log that you want to configure: System Log Logs Audit Log Rule Log Disable/enable the logs and specify the retention period and the maximum number of rows for each log.
-
Page 230: Avi Generation Tab (Options)
Milestone Husky M50 Advanced Administrator’s Manual Name Description Type the e-mail address you want to appear as the sender of e-mail Sender e-mail address notifications for all notification profiles. Example: sender@organization.org. Outgoing mail (SMTP) server Type the name of the SMTP mail server that sends e-mail name notifications.
-
Page 231: Network Tab (Options)
Milestone Husky M50 Advanced Administrator’s Manual Name Description Select the codec (compression/decompression technology) that you want to apply. To have more codecs available in the list, install Compressor them on the management server. Not all cameras support all codecs. (Not available for all codecs). Use the slider to select the degree of compression (0-100) to be performed by the codec.
-
Page 232: Evidence Lock Tab (Options)
Milestone Husky M50 Advanced Administrator’s Manual Name Description Specify a prefix for all the bookmarks that is made by the users of Bookmark ID prefix XProtect Smart Client. Specify the default start and end time of a bookmark is set in XProtect Smart Client.
-
Page 233: Analytics Events Tab (Options)
Milestone Husky M50 Advanced Administrator’s Manual Name Description If selected, additional developer information appears for Access Control > General Settings. Show development property panel This setting is only meant to be used by developers of access control system integrations. Specify the number of days that you want the system to keep access control events visible in XProtect Smart Client.
-
Page 234: Event Server Tab (Options)
Milestone Husky M50 Advanced Administrator’s Manual Event Server tab (options) On the Event Server tab, you can specify settings for alarms, events and logs. Name Description Select the number of days to keep closed alarms. Closed alarms Keep closed alarms for are in the states Closed, Ignore, and Reject.
-
Page 235
Milestone Husky M50 Advanced Administrator’s Manual Name Description You can choose between two default data sources and define a custom data source. What to choose depends on your third party program and/or the hard- or software you want to interface from:… -
Page 236
Milestone Husky M50 Advanced Administrator’s Manual Name Description Available echo return formats: Echo statistics: Echoes the following format: [X],[Y],[Z],[Name of generic event] [X] = request number. [Y] = number of characters. Echo type selector [Z] = number of matches with a generic event. -
Page 237: Feature Configuration
Milestone Husky M50 Advanced Administrator’s Manual Feature configuration Failover recording servers (regular and hot standby) About failover recording servers Available functionality depends on the system you are using. See Product comparison chart for more information. A failover recording server is an extra recording server which takes over from a normal recording server if this becomes unavailable.
-
Page 238: About Failover Steps
Milestone Husky M50 Advanced Administrator’s Manual Hot standby failover recording servers In a hot standby recording server setup, you can dedicate a failover recording server to take over from one recording server only. Because of this, the system can keep this failover recording server in a «standby»…
-
Page 239: About Failover Recording Server Functionality
Milestone Husky M50 Advanced Administrator’s Manual Involved servers (numbers in red): Recording server Failover recording server Management server. Failover steps for Regular failover setups: To check whether it is running or not, a failover recording server has a non-stop TCP connection to a recording server.
-
Page 240: Install A Failover Recording Server
Milestone Husky M50 Advanced Administrator’s Manual If a failover recording server must take over from another recording server during the merging process in a regular failover recording server setup, it postpones the merging process with recording server A, and takes over from recording server B. When recording server B becomes available again, the regular failover recording server takes up the merging process with recording server A, after which it begins merging with recording server B.
-
Page 241: Set Up And Enable Failover Recording Servers
Milestone Husky M50 Advanced Administrator’s Manual 2. Select the Language you want to use during the installation. Click Continue. 3. From the selection list, select Failover to install a recording server as a failover recording server. 4. Specify failover recording server properties. Click Continue.
-
Page 242: Group Failover Recording Servers
Milestone Husky M50 Advanced Administrator’s Manual A primary/secondary failover setup A hot standby setup. If you select b and c, you must select the specific server/groups. With b, you can also select a secondary failover group. If the recording server becomes unavailable, a failover recording server from the primary failover group takes over.
-
Page 243: Failover Recording Server Properties
Milestone Husky M50 Advanced Administrator’s Manual Icon Description The failover recording server is either waiting or «watching». When waiting, the failover recording server is not configured to take over from any recording server yet. When «watching», the failover recording server is configured to watch one or more recording servers.
-
Page 244: About Failover Recording Server Services
View status messages 1. On the failover recording server, right-click the Milestone Failover Server service icon. 2. Select Show Status Messages. The Failover Server Status Messages window appears, listing time-stamped status messages.
-
Page 245: F Ailover Management Servers
Milestone Husky M50 Advanced Administrator’s Manual 1. On the failover recording server, right-click the Milestone Failover Recording Server service icon. 2. Select About. 3. A small dialog box opens that shows the exact version of your Failover Recording Server service.
-
Page 246
Milestone Husky M50 Advanced Administrator’s Manual The management server must be installed with a specific user and not as a network service. This requires that you use the Custom install option. Also, the specific user must have access to the shared network drive and preferably a non-expiry password. -
Page 247: Upgrade In A Cluster
6. To add the Milestone XProtect Event Server service as a resource to the Milestone XProtect Management Server Cluster service, right-click the cluster service and click Add a resource >…
-
Page 248: R Emote Connect Services
Milestone Husky M50 Advanced Administrator’s Manual Remote connect services About remote connect services Available functionality depends on the system you are using. See Product comparison chart for more information. The remote connect services feature contains the Axis One-click Camera Connection technology developed by Axis Communications.
-
Page 249: Add/Edit Stss
Milestone Husky M50 Advanced Administrator’s Manual Add/edit STSs 1. Do one of the following: a) To add an ST servers, right-click the Axis Secure Tunnel Servers top node, select Add Axis Secure Tunnel Server. b) To edit an ST server, right-click it, select Edit Axis Secure Tunnel Server.
-
Page 250: Axis One-Click Camera Connection Properties
About selecting Milestone Interconnect or Milestone Federated Architecture In a physically distributed system where users on the central site need to access the video on the remote site, you can choose between Milestone Interconnect™ or Milestone Federated Architecture™. Milestone recommends Milestone Federated Architecture when: www.milestonesys.com…
-
Page 251: About Milestone Federated Architecture
Milestone Federated Architecture does not require additional licenses. Important: You can only centrally manage one Milestone Federated Architecture hierarchy if all sites use the same version of your XProtect product. You install and configure each site in a federated hierarchy as a normal standalone system with standard system components, settings, rules, schedules, administrators, users, and user rights.
-
Page 252
Similarly, a child site only knows about and answers to its parent site one level up. Your home site is the parent site you are logged in to. The contents of a Milestone Federated Architecture setup: SQL server… -
Page 253
XProtect Smart Client. For more information about use cases and benefits, see the white paper about Milestone Federated Architecture technology on the Milestone website http://www.milestonesys.com. -
Page 254: Set Up Your System To Run Federated Sites
To connect to sites across domains, make sure that these domains are trusted by each other. Setting up domains to trust each other has nothing to do with Milestone Federated Architecture, but has to do with Microsoft Windows Domain configuration. When you have established trust between the domains on which the sites you want to connect to each other in a hierachy, follow the same description as seen in Alternative 1.
-
Page 255: Add Site To Hierarchy
Administrator’s Manual Alternative 3: Connect sites in workgroup(s) When you connect sites inside workgroups, Milestone Federated Architecture must have the same administrator account present on all computers you want connected in the hierarchy to work properly. You must have this in place before installing the system.
-
Page 256: Accept Inclusion In The Hierarchy
Milestone Husky M50 Advanced Administrator’s Manual Accept inclusion in the hierarchy When a child site has received a link request from a potential parent site where the administrator did not have administrator rights to the child site, it has the awaiting acceptance icon.
-
Page 257: Detach A Site From The Hierarchy
Milestone Husky M50 Advanced Administrator’s Manual Detach a site from the hierarchy When you detach a site, the link between the sites are broken. The process of detaching a site from its hierarchy depends on the site you want to detach.
-
Page 258: M Ilestone I Nterconnect
About selecting Milestone Interconnect or Milestone Federated Architecture In a physically distributed system where users on the central site need to access the video on the remote site, you can choose between Milestone Interconnect™ or Milestone Federated Architecture™. Milestone recommends Milestone Federated Architecture when: …
-
Page 259: About Milestone Interconnect
Add Hardware wizard) Milestone Interconnect connection Milestone Interconnect remote site (the complete remote site with system installation, users, cameras and so on) Milestone Interconnect remote system (the actual technical installation at the remote site) www.milestonesys.com…
-
Page 260: About Possible Milestone Interconnect Setups
It differs from setup to setup which versions, how many cameras, and how devices and events originating from the remote site are handled — if at all — by the central site. For further details on how specific XProtect products interact in a Milestone Interconnect setup, go to the Milestone Interconnect website http://www.milestonesys.com/our-products/milestone-interconnect/.
-
Page 261: Milestone Interconnect And Licensing
You can mix any of the above solutions to fit your organizations special needs. Milestone Interconnect and licensing Cameras under remote sites in a Milestone Interconnect setup are listed on the License Information page of the central site. They are listed according to the same rules as other cameras, but with Milestone Interconnect in front: …
-
Page 262: Update Remote Site Hardware
9. Select a default group. Click Finish. 10. The dialog box lists all changes (devices removed, updated and added) in the remote system since your Milestone Interconnect setup was established or refreshed last. Click Confirm to update your central site with these changes.
-
Page 263: Enable Playback Directly From Remote Site Camera
3. In the Properties pane, select the Record tab, and select the Play back recordings from remote system option. 4. In the toolbar, click Save. In a Milestone Interconnect setup, the central system disregards privacy masking defined in a remote system. Retrieve remote recordings from remote site camera 1.
-
Page 264: Configure Smart Walls
Milestone Husky M50 Advanced Administrator’s Manual XProtect Smart Wall is an advanced video wall product that provides supreme situation awareness in larger surveillance centers and helps the surveillance operators to focus on what is important ensuring higher efficiency and shorter response times.
-
Page 265
Milestone Husky M50 Advanced Administrator’s Manual 3. Specify the settings for the Smart Wall. 4. In the General View Item Properties settings, define if you want system status information and title bars to appear above the cameras’ layout items. 5. Click OK. -
Page 266: Manage Roles With Smart Walls
The cameras on the Federated Site Hierarchy tab are accessible in a Milestone Federated Architecture setup. You can leave layout items blank, so they are available for other content not controlled by the Smart Wall preset.
-
Page 267
Milestone Husky M50 Advanced Administrator’s Manual Name Description The name of the Smart Wall. Displayed in the XProtect Smart Client Name as the Smart Wall view group name. A description of the Smart Wall. The description is only used Description internally in the Management Client. -
Page 268: Monitor Properties
Milestone Husky M50 Advanced Administrator’s Manual Name Description Edit Click to adjust the positioning of the monitors. To move a monitor to a new position, select the relevant monitor Movement and drag it to the desired position, or click one of the arrow buttons to move the monitor in the selected direction.
-
Page 269
Milestone Husky M50 Advanced Administrator’s Manual Name Description The name of the monitor. The name is displayed in the XProtect Name Smart Client. A description of the monitor. The description is only used internally Description in the Management Client. Size The size of the physical monitor on the video wall. -
Page 270: Xp Rotect A Ccess C Ontrol M Odule
Milestone Husky M50 Advanced Administrator’s Manual Name Description Preset A list of Smart Wall presets for the select Smart Wall. Click Edit to edit the layout and the content of the selected monitor. Double-click a camera to remove a single camera.
-
Page 271: Configure An Integrated Access Control System
Milestone Husky M50 Advanced Administrator’s Manual Investigation of events at access points. Centralized overview and control of door states. Cardholder information. The Audit log always logs all the actions that users perform in the access control system from XProtect Smart Client.
-
Page 272
Milestone Husky M50 Advanced Administrator’s Manual The Access control system integration wizard is for step-by-step configuration of the initial integration with an access control system. Use the wizard to get through the most basic configuration tasks. You can do more detailed configuration afterwards. -
Page 273: Access Control Properties
Milestone Husky M50 Advanced Administrator’s Manual Your access control system integration has been successfully created in XProtect with default settings inherited from the integration plug-in. Client users must log into XProtect Smart Client to see and use the new access control system.
-
Page 274
Milestone Husky M50 Advanced Administrator’s Manual Name Description Type the address of the server that hosts the integrated access Address control system. Specify the port number on the server to which the access control Port system is connected. Type the name of the user, as defined in the access control system, User name who should be administrator of the integrated system in XProtect. -
Page 275
Milestone Husky M50 Advanced Administrator’s Manual Name Description Lists the access control events imported from the access control system. The integration plug-in controls default enabling and disabling of events. You can disable or enable events any time after the integration. -
Page 276
Add Access Request If a user of XProtect Smart Client logs into a parent site in a Notification Milestone Federated Architecture hierarchy, access request notifications from the child sites also appear in XProtect Smart Client. Specify which cameras, microphones or speakers that appear in the Access request notification access request notifications when a given event occurs. -
Page 277: Xp Rotect Lpr
Select picture Allowed file-formats are .bmp, .png, and .jpg. Pictures are resized to maximize the view. Milestone recommends that you use a quadratic picture. Click to delete the picture. If the access control system had a Delete picture picture, then this picture is shown after deletion.
-
Page 278
Milestone Husky M50 Advanced Administrator’s Manual Trigger surveillance system recordings in a particular quality. Activate alarms. Match against positive/negative license plate match lists. Open gates. Switch on lights. Push video of incidents to computer screens of particular security staff members. -
Page 279: Minimum System Requirements
Milestone Husky M50 Advanced Administrator’s Manual alarms. Milestone recommends that you install the LPR server on a computer especially allocated for this purpose. LPR camera: The LPR camera captures video as any other camera, but some cameras are dedicated for LPR use. The better suited camera you use, the more successful recognitions you will get.
-
Page 280: About Preparing Cameras For Lpr
To find information about the current status of your licenses, see View LPR server information (on page 294). To buy additional LPR licenses or country modules, contact your vendor, or go to the Milestone website http://www.milestonesys.com/SystemRequirements. About preparing cameras for LPR LPR differs from other kinds of video surveillance.
-
Page 281
Milestone Husky M50 Advanced Administrator’s Manual 1. Vehicle 2. Physical surroundings 3. Camera Speed Lightning conditions Exposure Plate size and Weather Field of view position Shutter speed Resolution Positioning It is important to take these factors into consideration as they have a critical influence on successful license plate recognition. -
Page 282
Milestone Husky M50 Advanced Administrator’s Manual Left image shows a correct mounting without interference in the field of view. Right image shows an incorrect mounting. The camera is mounted too low and with too much background ‘noise’ in the view. -
Page 283
Milestone Husky M50 Advanced Administrator’s Manual Vertical angle: The recommended vertical view angle of a camera used for LPR is between 15°-30°. Horizontal angle: The recommended maximum horizontal view angle of a camera used for LPR is between 15°-25°. -
Page 284
Milestone Husky M50 Advanced Administrator’s Manual Plate width recommendations Mount the camera so that the ideal snapshot of the license plate is captured when the license plate is in the center or lower half of the image: Take a snapshot and make sure that the requirements to stroke width and plate width as described below are fulfilled. -
Page 285
Milestone Husky M50 Advanced Administrator’s Manual Minimum plate Plate type Plate width Setup width (pixels) Single line vehicles stopped; no plate width 52 cm European interlacing plates stroke width around 1 cm vehicles are moving; interlaced 280 If vehicles are moving when recorded, and an interlaced camera is used, only a half of the image can be used (only the even lines) for recognition compared with a camera configured for stopped vehicles and no interlacing. -
Page 286
Milestone Husky M50 Advanced Administrator’s Manual Calculation for US plates in inches: 78 × 2.7 ÷ 0.27 = 780 pixels Recommended resolution = SVGA (800×600) Because US plates use a font with a narrow stroke, a higher resolution is needed than for European plates. -
Page 287
Milestone Husky M50 Advanced Administrator’s Manual Understanding camera exposure Camera exposure determines how light/dark and sharp/blurry an image appears when it has been captured. This is determined by three camera settings: aperture, shutter speed, and ISO speed. Understanding their use and interdependency can help you to set up the camera correctly for LPR. -
Page 288
Milestone Husky M50 Advanced Administrator’s Manual High f-stop value/narrow aperture = large depth of field The example illustrates how the depth of field is affected by the f-stop value. The blue line indicates the focus point. A high f-stop value makes it possible to have a longer distance where the license plate is in focus. -
Page 289
Overexposure is when images are exposed to too much light, resulting in a burnt-out and overly white appearance. To avoid overexposure, Milestone recommends that you use a camera with a high dynamic range and/or use an auto-iris lens. Iris is the adjustable aperture. -
Page 290
Milestone Husky M50 Advanced Administrator’s Manual Smear is an effect that leads to unwanted light vertical lines in images. It is often caused by slight imperfections in the cameras’ charge-coupled device (CCD) imagers. The CCS imagers are the sensors used to digitally create the images. -
Page 291
Milestone Husky M50 Advanced Administrator’s Manual Auto-iris: If using an auto-iris lens, always set the focus with the aperture as open as possible. In order to make the aperture open, you can use neutral density (ND) filters or—if the camera supports manual configuration of the shutter time—the shutter time can be set to a… -
Page 292
Automatic enhancement: Some cameras use contour, edge or contrast enhancement algorithms to make images look better to the human eye. Such algorithms can interfere with the algorithms used in the LPR process. Milestone recommends that you disable the cameras’ contour, edge and contrast enhancement algorithms whenever possible. -
Page 293: Lpr Installation
The LPR plug-in on all computers that run the Management Client and the event server. In distributed systems, Milestone recommends that you do not install the LPR server on the same computer as your management server or recording servers.
-
Page 294: Lpr Configuration
You cannot add LPR servers from the Management Client. If you need to install more LPR servers after the initial installation, run the Milestone XProtect LPR Server installer on these servers.
-
Page 295
Milestone Husky M50 Advanced Administrator’s Manual LPR server information properties Field Description Name Here you can change the name of the LPR server. Shows the LPR server host name. The first part of the name of the LPR server consists of the name of Host name the host computer for your LPR server installation. -
Page 296
The list below illustrates examples of the situations that you should consider when you capture and select snapshots. Not all may be applicable for your surroundings. Milestone recommends that you select minimum 5-10 snapshots that represent typical conditions of: www.milestonesys.com… -
Page 297
Milestone Husky M50 Advanced Administrator’s Manual The weather; for example sunlight and rain The light; for example daylight and nighttime Vehicle types; to define the top and bottom of the recognition area www.milestonesys.com Feature configuration… -
Page 298
Milestone Husky M50 Advanced Administrator’s Manual Position in the lane; to define the left and right of the recognition area Distance to the car; to define the area where LPR analyzes license plates Add LPR camera To configure cameras for LPR, you initially run the Add LPR camera wizard. The wizard takes you through the main configuration steps and automatically optimizes the configuration. -
Page 299
Changing the LPR server can be a good idea if you need to load Change Server balance. For example, if the CPU load is too high on an LPR server, Milestone recommends that you move one or more LPR cameras to another LPR server. Recognition settings tab www.milestonesys.com… -
Page 300
The system optimizes the recognition area during auto-configuration, but you can change it manually. To ensure the best possible performance and low risk of false detection, Milestone recommends that you always select a clearly defined and «well-trimmed» recognition area. The area should cover only the part of the image where the license plate is visible as the vehicle moves in and out of the image. -
Page 301
Milestone Husky M50 Advanced Administrator’s Manual Character height The system optimizes the character height during auto-configuration, but you can change it manually. You define the minimum and maximum height of the license plate characters (in percent). Select character heights as close as possible to the height of the characters in the real license plate. -
Page 302
Milestone Husky M50 Advanced Administrator’s Manual The recognition process can be divided into two steps: finding the plate(s) and recognizing the characters on the plates. The advanced settings allow you to define a trade-off between processing speed and recognition quality. -
Page 303
Milestone Husky M50 Advanced Administrator’s Manual Name Description In case your LPR camera sends interlaced video and you observe combing effects in the de-interlaced image in LPR, you can enable Compensate for interlacing this function. This may improve the quality of the image and thereby your recognition results. -
Page 304
Milestone Husky M50 Advanced Administrator’s Manual On this tab you select which license plate match list(s) you want a specific LPR camera to match license plates against. You can create as many lists as you need (see «Add new license plate match lists»… -
Page 305
Milestone Husky M50 Advanced Administrator’s Manual Already licensed modules appear with a check mark in the Licensed column. If the country module you are looking for is not on your list, contact your vendor. Name Description Click to select or deselect a country module. The list of selected Select country modules on the right side updates automatically. -
Page 306
Milestone Husky M50 Advanced Administrator’s Manual When you configured the LPR initially with the Add LPR camera wizard, you also added snapshots (see «About snapshots» on page 296). You can always add additional representative snapshots to improve the optimization of the configuration. -
Page 307
Milestone Husky M50 Advanced Administrator’s Manual You can validate the configuration as many times as you like and on any LPR camera and with different settings. Auto-configure Auto-configuration of the LPR camera overwrites any manual changes you have made to the settings. -
Page 308
Milestone Husky M50 Advanced Administrator’s Manual Triggered events can also be used for making cameras record in high quality or similar. You can even use an event to trigger combinations of such actions. About Unlisted license plates list Often you would trigger an event when a license plate that is included in a list is recognized, but you can also trigger an event with a license plate, which is not included in a list. -
Page 309
Milestone Husky M50 Advanced Administrator’s Manual Examples: ?????A, A?????, ???1??, 22??33, A?B?C? or similar. 5. If prompted, confirm to save changes. Import/export license plate match lists You can import a file with a list of license plates that you want to use in a license plate match list. You have the following import options: … -
Page 310
Milestone Husky M50 Advanced Administrator’s Manual Name Description Name Shows the name of the list. If needed, you can change the name. Click to specify which license plate entry columns that you or the Custom fields client user can add additional information to. See Custom fields (properties) (see «Edit custom fields properties»… -
Page 311
Milestone Husky M50 Advanced Administrator’s Manual You can add columns to your license plate match lists for additional information. You define the name and number of columns as well as the field content. The XProtect Smart Client users can update the information in the columns but not the columns themselves. -
Page 312
Milestone Husky M50 Advanced Administrator’s Manual 2. Add and configure your LPR camera(s) (see «Add LPR camera» on page 298). 3. In the Site Navigation pane, expand Alarms, right-click Alarm Definitions and select to create a new alarm. 4. The Alarm Definition Information window appears. Select the relevant properties (see «Alarm Definitions for LPR»… -
Page 313: Lpr Maintenance
Milestone Husky M50 Advanced Administrator’s Manual 2. On the Alarm List Configuration tab, select Object, Tag, and Type and click >. 3. If prompted, confirm to save changes. LPR maintenance About LPR Server Manager When you have installed an LPR server, you can check the state of its services with the XProtect LPR Server Manager.
-
Page 314
Milestone Husky M50 Advanced Administrator’s Manual Show LPR server status 1. On your LPR server, right-click the LPR Server Manager icon in the notification area. 2. From the menu that appears, select Show LPR server status. If the system is running without problems, the status will is: All LPR cameras running. -
Page 315
Milestone Husky M50 Advanced Administrator’s Manual On the computers where the LPR plug-in is installed, uninstall Milestone XProtect LPR Plug-in. On the computers where the LPR server is installed, uninstall Milestone XProtect LPR Server. www.milestonesys.com Feature configuration… -
Page 316: M Ulti — Domain With One — Way Trust
Milestone Husky M50 Advanced Administrator’s Manual Multi-domain with one-way trust Setup with one-way trust If you run your system in a multi-domain environment, you can configure this setup with one-way trust. The system is installed on the trusting domain and users log in from trusting and trusted domains.
-
Page 317: Snmp
Milestone Husky M50 Advanced Administrator’s Manual SNMP About SNMP support Your system supports Simple Network Management Protocol (SNMP), a standard protocol for monitoring and controlling network devices, for managing their configuration, collecting statistics and more. The system acts as an SNMP agent, which can generate an SNMP trap as a result of a triggered rule.
-
Page 318: Xp Rotect E Nterprise Servers
you have installations with XProtect Enterprise version 7 or later. In all other cases, use Milestone Federated Architecture or Milestone Interconnect. You can add XProtect Enterprise servers to your XProtect Corporate system. When added, the servers act as recording servers and their video can be viewed by the clients.
-
Page 319: Define Roles With Access To Xprotect Enterprise Servers
Milestone Husky M50 Advanced Administrator’s Manual Next step is to give your users access to devices from the XProtect Enterprise server. Define roles with access to XProtect Enterprise servers To give the users access to devices from the added XProtect Enterprise servers: 1.
-
Page 320: System Maintenance
Milestone Husky M50 Advanced Administrator’s Manual System maintenance Ports used by the system If nothing else is mentioned, the ports are both inbound and outbound. The port numbers are the default numbers. You can change the port numbers if needed.
-
Page 321
Milestone Husky M50 Advanced Administrator’s Manual Port number Protocol Used by Purpose 20 and 21 Recording servers Listening for event messages from devices. Listening for event messages from devices and SMTP Recording servers for sending images to the surveillance system server via e-mail. -
Page 322
Milestone Husky M50 Advanced Administrator’s Manual Port number Protocol Used by Purpose Communication between the two. Report server and 7609 HTTP Data Collector Server The port must always be kept open on the server service running the Data Collector Server service. -
Page 323: B Acking Up And Restoring System Configuration
Management Client. Note that the log server database and the log files, including audit log files, are not included in this backup. If your system is large, Milestone recommends that you define scheduled backups. This is done with the third-party tool: Microsoft® SQL Server Management Studio. This backup includes the same data as a manual backup.
-
Page 324
Milestone Husky M50 Advanced Administrator’s Manual Logs, including audit logs, are not part of the configuration backup. About backing up and restoring the event server configuration The content of your event server configuration is included when you back up and restore system configuration. -
Page 325: Scheduled Backup And Restore
Scheduled backup and restore About scheduled backup and restore of system configuration Milestone recommends that you make regular backups of your system configuration as a disaster recovery measure. While it is rare to lose your configuration, it can happen under unfortunate circumstances.
-
Page 326
Milestone Husky M50 Advanced Administrator’s Manual If you have a smaller setup and do not need scheduled backups, you can back up your system configuration manually. For instructions, see Manual backup and restore of system configuration (on page 323). The management server stores your system’s configuration in a database. When you back up/restore management server(s), make sure that this database is included in the backup/restore. -
Page 327
Server service» on page 335) Event Server Service (can be done from Windows Services (search for services.msc on your machine. Within Services, locate Milestone XProtect Event Server)) World Wide Web Publishing Service, also known as the Internet Information Service (IIS). -
Page 328: M Oving The Management Server
Milestone Husky M50 Advanced Administrator’s Manual Moving the management server About moving the management server You may sometimes need to move the management server installation from one physical server to another. The management server stores your system configuration in a database. If you are moving the management server from one physical server to another, it is vital that you make sure that your new management server also gets access to this database.
-
Page 329: About Unavailable Management Servers
No ability to configure the system: Without the management server, you cannot change the system configuration. Milestone recommends that you inform your users about the risk of losing contact with the surveillance system while the management server is down. Move the system configuration Moving your system configuration is a three step process: 1.
-
Page 330: Update The Log Server’s Sql Address
Milestone Husky M50 Advanced Administrator’s Manual You must do SQL updates locally on the computer where you have installed the management server/event server or log server. You cannot do it from the Management Client. If your management server and event server are not located on the same computer, you can still use the tool, but you must run it on both the computer on which the management server is installed and on the computer on which the event server is installed.
-
Page 331: R Eplace Hardware
Milestone Husky M50 Advanced Administrator’s Manual on different computers and you wish to update the event server SQL address only (or you have already updated it on the management server), go to the computer where your management server is installed and copy the directory %ProgramFiles%MilestoneXProtect Management ServerToolsChangeSqlAddress (with content) to temporary directory on the event server.
-
Page 332
Milestone Husky M50 Advanced Administrator’s Manual The wizard is prefilled with data from the existing hardware. If you replace it with a similar hardware device, you can reuse some of this data — for example, port and driver information. 5. Do one of the following: If you selected the required hardware device driver directly from the list, click Next. -
Page 333
Milestone Husky M50 Advanced Administrator’s Manual Important: Make sure to map all cameras, microphones, inputs, outputs, etc. Contents mapped to None, are lost. Example of the old hardware device having more individual devices than the new one. Click Next. 6. You are presented with a list of hardware to be added, replaced or removed. Click Confirm. -
Page 334: R Eplace A Recording Server
It is very important that you do not start two recording servers with identical IDs at the same time. b) On the new recording server, open an explorer and go to C:ProgramDataMilestoneXProtect Recording Server or the path where your recording server is located. Open the file RecorderConfig.xml.
-
Page 335: V Ideo Device Drivers
You must install video device drivers on each recording server on your system. When you install your system, video device drivers are part of the initial installation process. Milestone releases new versions of video device drivers regularly and makes them available on the download page http://www.milestonesys.com/downloads on our website.
-
Page 336: Restart Data Collector Server Service
Tools. If using Small icons or Large icons, click Administrative Tools. 2. Double-click Services. 3. Locate the Milestone XProtect Data Collector Server. Right-click it and select Start to restart the service. View status messages 1. Right-click the notification area’s server service icon.
-
Page 337: Read Server Service Icons — Management, Recording And Failover
Milestone Husky M50 Advanced Administrator’s Manual Read server service icons — management, recording and failover The following notification area icons represent the possible states of the Management Server service, Recording Server and Failover Recording Server services. They are all visible on the computers…
-
Page 338: Change Recording Server Settings
Milestone Husky M50 Advanced Administrator’s Manual Change recording server settings To change basic settings for the Recording Server service, such as which port numbers to use: You must stop the Recording Server service to change settings. While the Recording Server service is stopped, the system cannot interact with devices connected to the recording server.
-
Page 339: R Egistered Services
Milestone Husky M50 Advanced Administrator’s Manual Registered services Occasionally, you have servers and/or services which should be able to communicate with the system even if they are not directly part of the system. Some services, but not all, can register themselves automatically in the system.
-
Page 340: Manage Network Configuration
Milestone Husky M50 Advanced Administrator’s Manual Manage network configuration With the network configuration settings, you can specify the management server’s server LAN and WAN addresses so the management server and the trusted servers can communicate. 1. In the Add/Remove Registered Services window, click Network.
-
Page 341
Milestone Husky M50 Advanced Administrator’s Manual Component Requirement Type Prefilled field. Name of the registered service. The name is only used for display Name purposes in the Management Client. Click Add to add the IP address or hostname of the registered service. -
Page 342: Index
Milestone Husky M50 Advanced Administrator’s Manual About device groups • 72, 73 Index About devices • 72, 75 About dynamic sensitivity • 117 360° Lens tab (devices) • 108 About evidence lock • 196 About failover recording server functionality •…
-
Page 343
Milestone Husky M50 Advanced Administrator’s Manual About Milestone Federated Architecture • 194, About selecting Milestone Interconnect or Milestone Federated Architecture • 232, 239 About Milestone Interconnect • 240 About setting up alarms using Enterprise slaves • 208 About Milestone Mobile client • 20 About Smart Client profiles •… -
Page 344
About view groups and roles • 121 Add a preset position (type 1) • 69, 98 About virus scanning • 12 Add a remote site to your central Milestone About writing IPv6 addresses • 24 Interconnect site_not updated yet • 243 About XProtect Enterprise servers •… -
Page 345
Milestone Husky M50 Advanced Administrator’s Manual Add and edit registered services • 319 Assign IP address range • 61 Add and manage a role • 168, 170 Assign local IP ranges • 63 Add hardware • 26, 64 Assign/remove users and groups to/from roles •… -
Page 346
Milestone Husky M50 Advanced Administrator’s Manual Bookmark tab (options) • 209, 214 Copy a Smart Client profile • 122 Copy, rename or delete a role • 170 Camera angles • 262, 263 Copyright, trademarks and disclaimer • 10 Cardholders tab (Access Control) • 257 Country modules tab •… -
Page 347
Milestone Husky M50 Advanced Administrator’s Manual Disable/enable hardware • 65 Enable/disable devices via device groups • 76, 77, 78, 79, 80, 81 Download Manager/download web page • 28 Enable/disable individual devices • 65 Download Manager’s default configuration • 30 Enable/disable privacy masking • 113 Download Manager’s standard installers (user) •… -
Page 348
Install clients • 27 Generic event data source (properties) • 165, Install in a cluster • 227, 229 Install Milestone Mobile server • 28 Generic event test (properties) • 162, 165 Install SNMP service • 298 Generic events • 161 Install STS environment for One-click camera Generic Events tab (options) •… -
Page 349
Milestone Federated Architecture • 232 LPR licenses • 260, 275, 285 Milestone Interconnect • 239 LPR maintenance • 294 Milestone Interconnect and licensing • 243 LPR server information properties • 275, 276 Minimum system requirements • 260 LPR system architecture • 259 MIP tab (roles) •… -
Page 350
Milestone Husky M50 Advanced Administrator’s Manual Ports used by the system • 301 Recording servers • 46 Positioning the camera • 262, 281 Refresh site hierarchy • 237 Register new Axis One-click camera • 230 Power outages use a UPS • 34 Registered services •… -
Page 351
Set up and enable failover recording servers • Specify Panomorph settings • 108 Specify preset positions in a patrolling profile • Set up your system through the Milestone Husky Assistant • 13 Specify privacy mask settings • 114 Set up your system to run federated sites • 235 Specify recording frame rate •… -
Page 352
Milestone Husky M50 Advanced Administrator’s Manual Storage tab (recording server) • 49 Use several instances of an event • 109, 110 Streams tab (devices) • 76, 87 User and Groups tab (roles) • 173 System components • 16 User Settings tab (options) • 209, 214 System dashboard •… -
Page 353
Milestone Husky M50 Advanced Administrator’s Manual XProtect LPR • 258 XProtect Smart Wall • 245 www.milestonesys.com Index… -
Page 354
About Milestone Systems Milestone Systems is a global industry leader in open platform IP video management software, founded in 1998 and now operating as a stand-alone company in the Canon Group. Milestone technology is easy to manage, reliable and proven in thousands of…

XProtect
®
Advanced VMS 2014

Milestone XProtect
®
Advanced
VMS 2014
Contents
BEFORE YOU START ………………………………………………………….. 12
INTRODUCTION TO THE HELP …………………………………………………………………… 12
NAVIGATE THE BUILT—IN HELP SYSTEM ………………………………………………………. 12
SYSTEM OVERVIEW ……………………………………………………………. 14
PRODUCT OVERVIEW …………………………………………………………………………….. 14
A DISTRIBUTED SYSTEM SETUP ……………………………………………………………….. 15
SYSTEM COMPONENTS ………………………………………………………………………….. 15
Management server……………………………………………………………………………………………… 15
Failover management server ……………………………………………………………………………….. 16
Recording server …………………………………………………………………………………………………. 16
Failover recording server …………………………………………………………………………………….. 16
Event server ………………………………………………………………………………………………………… 17
Log server …………………………………………………………………………………………………………… 17
SQL server ………………………………………………………………………………………………………….. 17
Active Directory …………………………………………………………………………………………………… 18
Virtual servers …………………………………………………………………………………………………….. 18
Clients ………………………………………………………………………………………………………………... 18
ABOUT LICENSES …………………………………………………………………………………. 21
PRODUCT COMPARISON CHART ……………………………………………………………….. 21
ABOUT LOCAL IP ADDRESS RANGES ………………………………………………………… 22
ABOUT IPV6 AND IPV4 ………………………………………………………………………….. 23
About using the system with IPv6 ………………………………………………………………………… 23
About writing IPv6 addresses ………………………………………………………………………………. 24
SYSTEM REQUIREMENTS………………………………………………………………………… 25

Milestone XProtect
®
Advanced
VMS 2014
INSTALLATION ………………………………………………………. …………… 26
INSTALLATION PRECONDITIONS ……………………………………………………………….. 26
Determine installation method ……………………………………………………………………………… 26
Determine SQL server type ………………………………………………………………………………….. 26
Select service account ………………………………………………………………………………………… 27
Active Directory …………………………………………………………………………………………………… 27
Customize IIS ………………………………………………………………………………………………………. 28
About virus scanning…………………………………………………………………………………………… 28
Register Software License Code ………………………………………………………………………….. 29
INSTALL THE SYSTEM ……………………………………………………………………………. 30
Install your system — Single Server option ……………………………………………………………. 30
Install your system — Distributed option ……………………………………………………………….. 31
Install your system — Custom option …………………………………………………………………….. 31
Install the recording server ………………………………………………………………………………….. 33
Installation for workgroups …………………………..……………………………………………………… 34
Installation troubleshooting …………………………..…………………………………………………….. 34
CONFIGURE THE SYSTEM IN MANAGEMENT CLIENT ………………………………………. 37
Change Software License Code …………………………………………………………………………… 38
INSTALL CLIENTS …………………………………………………………………………………. 38
Install XProtect Smart Client silently ……………………………………………………………………. 38
Install Milestone Mobile server …………………………………………………………………………….. 39
DOWNLOAD MANAGER/DOWNLOAD WEB PAGE ……………………………………………. 40
Download Manager’s default configuration ………………………………………………………….. 41
Download Manager’s standard installers (user) ……………………………………………………. 42
Add/publish Download Manager installer components …………………………………………. 43
Hide/remove Download Manager installer components ………………………………………… 44
Device pack installer — must be downloaded ………………………………………………………… 45
UPGRADE…………………………………………………………………………………………… 45
About upgrade …………………………………………………………………………………………………….. 45

Milestone XProtect
®
Advanced
VMS 2014
Upgrade prerequisites …………………………………………………………………………………………. 46
Alternative upgrade for workgroup ………………………………………………………………………. 46
FIRST TIME USE ………………………………………………………………….. 47
BEST PRACTICES …………………………………………………………………………………. 47
Protect recording databases from corruption ………………………………………………………. 47
About daylight saving time ………………………………………………………………………………….. 48
About time servers ………………………………………………………………………………………………. 48
MANAGEMENT CLIENT OVERVIEW ……………………………………………………………. 49
About login authorization …………………………………………………………………………………….. 49
Management Client window …………………………………………………………………………………. 49
Panes overview …………………………………………………………………………………………………… 51
Menu overview …………………………………………………………………………………………………….. 52
MANAGEMENT CLIENT ELEMENTS ……………………………………… 54
BASICS ……………………………………………………………………………………………… 54
License information …………………………………………………………………………………………….. 54
Site information …………………………………………………………………………………………………… 58
SERVERS AND HARDWARE ……………………………………………………………………… 60
Recording servers ……………………………………………………………………………………………….. 60
Hardware and remote servers ………………………………………………………………………………. 74
Remove a recording server ………………………………………………………………………………….. 83
Delete all hardware on a recording server ……………………………………………………………. 84
DEVICES ……………………………………………………………………………………………. 84
Working with device groups ………………………………………………………………………………… 84
Working with devices…………………………………………………………………………………………… 87
CLIENT ……………………………………………………………………………………………. 124
About clients ……………………………………………………………………………………………………… 124
View groups ………………………………………………………………………………………………………. 125
Smart Client profiles ………………………………………………………………………………………….. 126

Milestone XProtect
®
Advanced
VMS 2014
Management Client profiles ……………………………………………………………………………….. 128
Matrix ………………………………………………………………………………………………………………... 132
RULES AND EVENTS ……………………………………………………………………………. 134
About rules and events ……………………………………………………………………………………… 134
About actions and stop actions ………………………………………………………………………….. 135
Events overview ………………………………………………………………………………………………… 142
Rules ……………………………………………………….………………………………………………………… 148
Time profiles ……………………………………………………………………………………………………… 155
Notification profiles……………………………………………………………………………………………. 159
User-defined events …………………………………………………………………………………………… 162
Analytics events ………………………………………………………………………………………………… 164
Generic events …………………………………………………………………………………………………… 167
SECURITY ………………………………………………………………………………………… 173
Roles ……………………………………………………….………………………………………………………… 173
Basic users ……………………………………………………………………………………………………….. 201
SYSTEM DASHBOARD ………………………………………………………………………….. 202
About system dashboard …………………………………………………………………………………… 202
About system monitor ……………………………………………………………………………………….. 202
About evidence lock ………………………………………………………………………………………….. 203
About current tasks …………………………………………………………………………………………… 204
About configuration reports ………………………………………………………………………………. 204
SERVER LOGS …………………………………………………………………………………… 205
About logs …………………………………………………………………………………………………………. 205
Search logs ……………………………………………………………………………………………………….. 205
Export logs ………………………………………………………………………………………………………… 206
Change log language …………………………………………………………………………………………. 206
System log properties………………………………………………………………………………………… 206
Audit log properties …………………………………………………………………………………………… 207
Rule log properties …………………………………………………………………………………………….. 208

Milestone XProtect
®
Advanced
VMS 2014
ALARMS …………………………………………………………………………………………… 208
About alarms …………………………………………………………………………………………………….. 208
About alarm configuration …………………………………………………………………………………. 210
Alarm Definitions ……………………………………………………………………………………………….. 210
Alarm Data Settings …………………………………………………………………………………………… 212
Sound Settings ………………………………………………………………………………………………….. 213
About setting up alarms using Enterprise slaves ……………………………………………….. 213
OPTIONS DIALOG BOX …………………………………………………………………………. 214
General tab (options) …………………………………………………………………………………………. 215
Server Logs tab (options) …………………………………………………………………………………… 216
Mail Server tab (options) ……………………………………………………………………………………. 217
AVI Generation tab (options) ……………………………………………………………………………… 218
Network tab (options) ………………………………………………………………………………………… 218
Bookmark tab (options) ……………………………………………………………………………………… 219
Evidence Lock tab (options) ………………………………………………………………………………. 219
User Settings tab (options) ………………………………………………………………………………… 219
Access Control Settings tab (options) …………………………..……………………………………. 219
Analytics Events tab (options) ……………………………………………………………………………. 220
Event Server tab (options) …………………………………………………………………………………. 221
Generic Events tab (options) ……………………………………………………………………………… 221
FEATURE CONFIGURATION ………………………….. ………………….. 224
FAILOVER RECORDING SERVERS (REGULAR AND HOT STANDBY) ……………………. 224
About failover recording servers ………………………………………………………………………… 224
About failover steps …………………………………………………………………………………………… 225
About failover recording server functionality ……………………………………………………… 226
Install a failover recording server ……………………………………………………………………….. 227
Setup and enable failover recording servers ………………………………………………………. 227
Assign failover recording servers ………………………………………………………………………. 228
Group failover recording servers ……………………………………………………………………….. 229
Read failover recording server status icons ……………………………………………………….. 229

Milestone XProtect
®
Advanced
VMS 2014
Failover recording server properties ………………………………………………………………….. 229
Failover group properties …………………………………………………………………………………… 230
About failover recording server services ……………………………………………………………. 230
View status messages ……………………………………………………………………………………….. 231
Change the management server address ……………………………………………………………. 231
View version information …………………………………………………………………………………… 231
FAILOVER MANAGEMENT SERVERS …………………………………………………………. 231
About multiple management servers (clustering) ……………………………………………….. 231
Prerequisites for clustering ……………………………………………………………………………….. 232
Install in a cluster ………………………………………………………………………………………………. 232
Upgrade in a cluster …………………………………………………………………………………………… 234
REMOTE CONNECT SERVICES ………………………………………………………………… 234
About remote connect services ………………………………………………………………………….. 234
Install STS environment for One-click camera connection ………………………………….. 235
Add/edit STSs ……………………………………………………………………………………………………. 235
Register new Axis One-click camera ………………………………………………………………….. 235
Axis One-Click Camera connection properties ……………………………………………………. 236
MILESTONE FEDERATED ARCHITECTURE …………………………………………………. 237
About selecting Milestone Interconnect or Milestone Federated Architecture ……… 237
About Milestone Federated Architecture ……………………………………………………….……. 237
Set up your system to run federated sites ………………………………………………………….. 240
Add site to hierarchy………………………………………………………………………………………….. 241
Accept inclusion in hierarchy …………………………………………………………………………….. 241
Refresh site hierarchy………………………………………………………………………………………… 242
Connect to another site in hierarchy …………………………………………………………………… 242
Detach a site from the hierarchy ………………………………………………………………………… 242
Federated site properties …………………………………………………………………………………… 243
MILESTONE INTERCONNECT ………………………………………………………………….. 244
About selecting Milestone Interconnect or Milestone Federated Architecture ……… 244
About Milestone Interconnect …………………………………………………………………………….. 245

Milestone XProtect
®
Advanced
VMS 2014
About possible Milestone Interconnect setups …………………………………………………… 246
Milestone Interconnect and licensing …………………………………………………………………. 247
Update remote site hardware ……………………………………………………………………………… 247
Establish remote desktop connection to remote system …………………………………….. 247
Enable playback directly from remote site camera ……………………………………………… 248
Retrieve remote recordings from remote site camera …………………………………………. 248
XPROTECT SMART WALL ………………………………………………………. ……………. 248
About XProtect Smart Wall ………………………………………………………………………………… 248
Configure Smart Walls ……………………………………………………………………………………….. 249
Manage roles with Smart Walls ………………………………………………………………………….. 251
About using rules with Smart Wall presets …………………………………………………………. 251
Smart Wall properties ………………………………………………………………………………………… 251
Monitor properties ……………………………………………………………………………………………… 252
ACCESS CONTROL ……………………………………………………………………………… 254
About access control integration ……………………………………………………………………….. 254
Configure an integrated access control system ………………………………………………….. 255
Wizard for access control system integration …………………………………………………….. 255
Access control properties …………………………..……………………………………………………… 257
MULTI—DOMAIN WITH ONE—WAY TRUST …………………………………………………….. 262
Setup with one-way trust ……………………………………………………………………………………. 262
SNMP …………………………………………………………………………………………….. 263
About SNMP support …………………………………………………………………………………………. 263
Install SNMP service ………………………………………………………………………………………….. 263
Configure SNMP service ……………………………………………………………………………………. 263
XPROTECT ENTERPRISE SERVERS …………………………………………………………. 264
About XProtect Enterprise servers …………………………………………………………………….. 264
Add XProtect Enterprise servers ………………………………………………………………………… 264
Define roles with access to XProtect Enterprise servers …………………………………….. 265
Edit XProtect Enterprise servers ………………………………………………………………………… 265

Milestone XProtect
®
Advanced
VMS 2014
SYSTEM MAINTENANCE ……………………………………………………. 266
PORTS USED BY THE SYSTEM ………………………………………………………………… 266
BACKING UP AND RESTORING CONFIGURATION ………………………………………….. 267
About backing up and restoring your system configuration ……………………………….. 267
Back up log server database ……………………………………………………………………………… 268
Manual backup and restore ………………………………………………………………………………… 268
Scheduled backup and restore …………………………………………………………………………… 270
MOVING THE MANAGEMENT SERVER ……………………………………………………….. 272
About moving the management server……………………………………………………………….. 272
About unavailable management servers …………………………………………………………….. 273
Move the system configuration ………………………………………………………………………….. 274
MANAGING THE SQL SERVER ……………………………………………………………….. 274
About updating the SQL server address …………………………………………………………….. 274
Update the log server’s SQL address …………………………………………………………………. 275
Update the management server or event server SQL server address ………………….. 275
REPLACE HARDWARE ………………………………………………………………………….. 276
REPLACE A RECORDING SERVER ……………………………………………………………. 279
VIDEO DEVICE DRIVERS ……………………………………………………………………….. 280
About video device drivers ………………………………………………………………………………… 280
About removing video device drivers …………………………………………………………………. 280
SERVICES ………………………………………………………………………………………… 280
About the Management Server service and Recording Server service …………………. 280
View status messages ……………………………………………………………………………………….. 281
Read server service icons — management, recording and failover ……………………….. 281
Change recording server settings ………………………………………………………………………. 282
Recording server properties ………………………………………………………………………………. 283
REGISTERED SERVICES ……………………………………………………………………….. 283
About the service channel …………………………………………………………………………………. 284

Milestone XProtect
®
Advanced
VMS 2014
Add and edit registered services ………………………………………………………………………… 284
Manage network configuration …………………………………………………………………………… 284
Registered services properties …………………………………………………………………………… 285
INDEX ……………………………………………………………………………….. 286

Milestone XProtect
®
Advanced
VMS 2014
Copyright, trademarks and disclaimer
Copyright, trademarks and disclaimer
Copyright
2014 Milestone Systems A/S.
Trademarks
XProtect is a registered trademark of Milestone Systems A/S.
Microsoft and Windows are registered trademarks of Microsoft Corporation. App Store is a service
mark of Apple Inc. Android is a trademark of Google Inc.
All other trademarks mentioned in this document are trademarks of their respective owners.
Disclaimer
This text is intended for general information purposes only, and due care has been taken in its
preparation.
Any risk arising from the use of this information rests with the recipient, and nothing herein should be
construed as constituting any kind of warranty.
Milestone Systems A/S reserve the right to make adjustments without prior notification.
All names of people and organizations used in the examples in this text are fictitious. Any resemblance
to any actual organization or person, living or dead, is purely coincidental and unintended.
This product may make use of third party software for which specific terms and conditions may apply.
When that is the case, you can find more information in the file
3rd_party_software_terms_and_conditions.txt located in your Milestone surveillance system
installation folder.

Milestone XProtect
®
Advanced
VMS 2014
Before you start
Before you start
Introduction to the help
The help is divided into sections that each serves a targeted purpose. The sections are structured in a
logical flow:
System overview (on page 14)
Provides an introduction to your video surveillance system, system components, and concepts. This is
useful if you are new to the system. The system overview also provides a comparison chart that lists
the most significant differences between Corporate and Expert.
Installation (on page 26)
Provides installation preconditions and step by step procedures that help you install and upgrade your
system.
First time use (on page 47)
Provides an overview of the Management Client and information about best practices to follow to have
your system running smoothly. This overview is useful if you are new to the system.
Management Client elements (on page 54)
Provides a thorough walk through of each of the nodes in the Site Navigation pane of the Management
Client. This section contains conceptual and procedural information about the basic elements of your
system.
Feature configuration (on page 224)
Provides self-contained, detailed information about the additional features and add-on products that
your system supports.
System maintenance (on page 266)
Provides an overview of the ports used in the system and step-by-step procedures for, for example,
backing up your system and monitoring system performance. This section is useful after installation
and configuration in order to maintain, expand and optimize your system.
Navigate the built-in help system
Press F1 to access a related help topic or select Help > Contents from the Management Client
toolbar to launch the complete help.
You can navigate between the help window’s three tabs: Contents, Index, and Search or use the
links inside the help topics.
Navigate the help system based on a tree structure.
Select the first letter of the term you are interested in and scroll until
you find it. Click a help topic title in the search results list to open
the required topic.

Milestone XProtect
®
Advanced
VMS 2014
Search for help topics that contain particular terms of interest. For
example, search for the term zoom and receive a list in the search
result of all help topics that contains the term zoom. Click a help
topic title in the search results list to open the required topic.
To print a help topic, navigate to the required topic and click the browser’s Print button.

Milestone XProtect
®
Advanced
VMS 2014
System overview
System overview
Product overview
This XProtect system is a fully distributed solution, designed for large multi-site and multiple server
installations requiring 24/7 surveillance, with support for devices from different vendors. The solution
offers centralized management of all devices, servers, and users, and empowers an extremely flexible
rule system driven by schedules and events.
Your system consists of the following main elements:
The management server — the center of your installation, consists of multiple servers
One or more recording servers
One or more Management Clients
The Download Manager
One or more XProtect
®
Smart Clients.
One or more XProtect Web Clients and/or Milestone Mobile clients if needed
Your system also includes fully integrated Matrix functionality for distributed viewing of video from any
camera on your surveillance system to any computer with XProtect Smart Client installed.
Your XProtect system installation can take place on virtualized servers or on multiple physical servers
in a distributed setup.
The system also offers the possibility of including the standalone XProtect
®
Smart Client – Player
when you export video evidence from the XProtect Smart Client. XProtect Smart Client – Player allows
recipients of video evidence (such as police officers, internal or external investigators, etc.) to browse
and play back the exported recordings without having to install any software on their computers.
Your system can handle an unlimited number of cameras, servers, and users and across multiple sites
if required. Your system can handle IPv4 as well as IPv6.
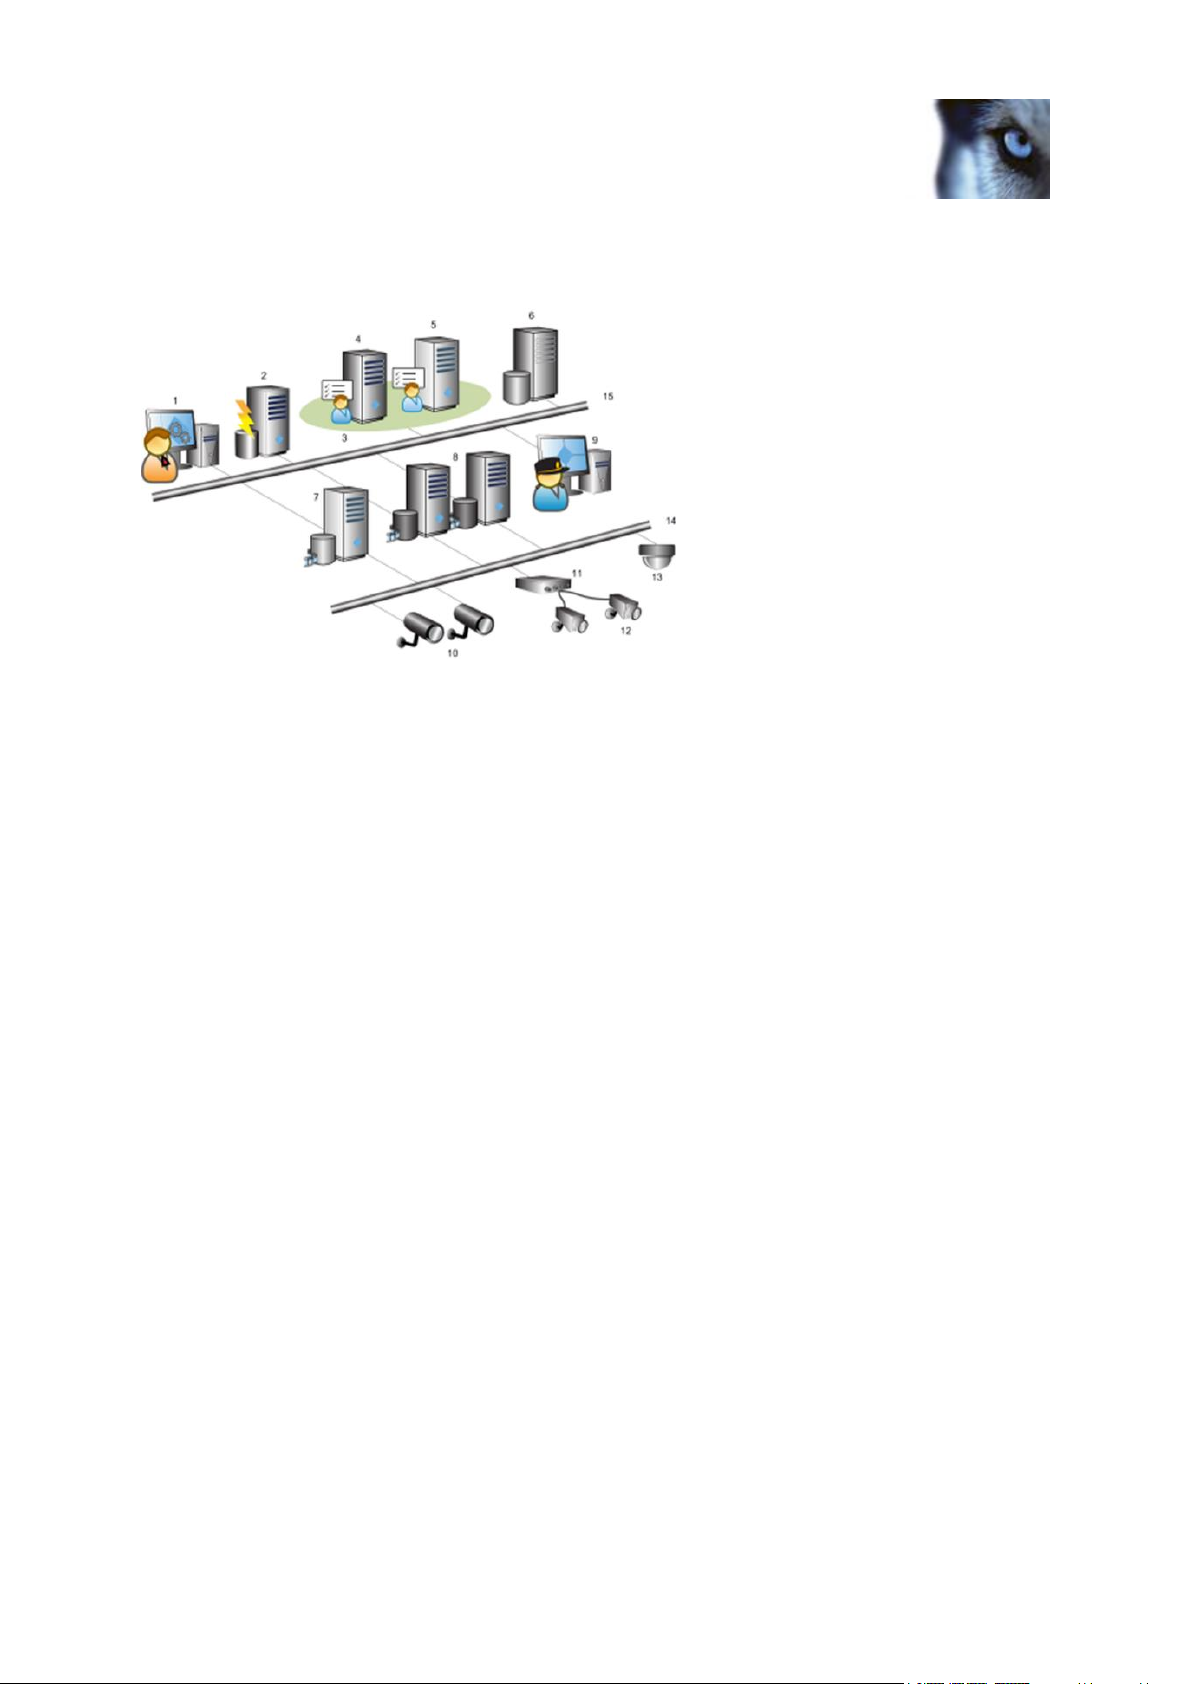
Milestone XProtect
®
Advanced
VMS 2014
A distributed system setup
Example of a system setup. The number of cameras, recording servers, and connected clients, can be as high as you require.
Legend:
1. Management Client(s)
2. Event server
3. Microsoft cluster
4. Management server
5. Failover management server
6. SQL server
7. Failover recording server
8. Recording server(s)
9. XProtect Smart Client(s)
10. IP video cameras
11. Video server
12. Analog cameras
13. PTZ IP camera
14. Camera network
15. Server network
System components
Management server
The management server stores the configuration of the surveillance system in a relational database,
either on the management server computer itself or on a separate SQL Server on the network. It also
handles user authentication, user rights, the rule system and more. To improve system performance,

Milestone XProtect
®
Advanced
VMS 2014
you can run several management servers as a Milestone Federated Architecture™. The management
server runs as a service, and is typically installed on a dedicated server.
Users connect to the management server for initial authentication, then transparently to the recording
servers for access to for video recordings, etc.
Failover management server
Failover support on the management server is achieved by installing the management server in a
Microsoft Windows Cluster. The cluster will then ensure that another server take over the
management server function should the first server fail.
Recording server
The recording server is responsible for communicating with the network cameras and video encoders,
recording the retrieved audio and video as well as providing client access to both live and recorded
audio and video.
Furthermore, the recording server is responsible for communicating with other Milestone products
connected via the Milestone Interconnect technology.
Device Drivers
Communication with the network cameras and video encoders are done through a device
driver developed specifically for individual devices or a series of similar devices from the same
manufacture.
The device drivers are by default installed when the recording server is installed, but can later
be updated by downloading and installing a newer version of the device pack.
Media Database
The retrieved audio and video data is stored in the tailor-made high performance Milestone
media database optimized for recording and storing audio and video data.
The media database supports various unique features like; multistage archiving, video
grooming, encryption and adding a digital signature to the recordings.
Failover recording server
The failover recording server is responsible for taking over the recording task should a recording
server fail.
The failover recording server can operator in two modes:
Standard failover – for monitoring multiple recording servers
Hot-standby – for monitoring a single recording server
The difference between the standard and hot-standby failover modes is that in the standard failover
mode the failover recording server does not know which server to take over from, so it cannot start
until a recording server fails. In the hot-standby mode the failover time is significantly shorter, as the
failover recording server already knows which recording server it should take over from and thus can

Milestone XProtect
®
Advanced
VMS 2014
pre-load the configuration and start up completely — except for the last step of connecting to the
cameras.
Event server
The event server handles various tasks related to events, alarms, maps and 3rd party integrations via
the MIP SDK.
Events:
All system events are consolidated in the event server so there are one place and interface for
partners to make integrations that utilize system events.
Furthermore, the event server offers 3rd party access to sending events to the system via the
Generic events or Analytics events interface.
Alarms:
The event server hosts the alarm feature, alarm logic, alarm state as well as handling the
alarm database. The alarm database is stored in the same SQL server the management
server uses.
Maps:
The event server also hosts the maps that are configured and used in the Smart Client.
MIP SDK:
Finally 3rd party developed plug-ins can be installed on the event server and utilize access to
system events.
Log server
The log server is responsible for storing all log messages for the entire system. The log server uses
the same SQL server as the management server and is typically installed on the same server as the
management server, but can be installed on a separate server if needed to increase performance of
the management and log servers.
SQL server
The management server, event server and log server uses an SQL server to store, for example, the
configuration, alarms, events and log messaged.
The system installer includes Microsoft SQL Server 2008 R2 Express that can be used freely for
systems up to 300 cameras.
For larger systems over 300 cameras it is recommended to use the SQL Server 2008 R2 Standard or
Enterprise edition on a dedicated server as these editions can handle larger databases and offer
backup functionality.

Milestone XProtect
®
Advanced
VMS 2014
Active Directory
You normally add users from Active Directory, but you can also add users without Active Directory.
Active Directory is a distributed directory service included with several Windows Server operating
systems. It identifies resources on a network in order for users or applications to access them.
Virtual servers
You can run all system components on virtualized Windows
®
servers, such as VMware
®
and Microsoft
®
Hyper-V
®
.
Virtualization is often preferred to better utilize hardware resources. Normally, virtual servers running
on the hardware host server do not load the virtual server to a great extent, and often not at the same
time. However, recording servers record all cameras and video streams. This puts high load on CPU,
memory, network, and storage system. So, when run on a virtual server, the normal gain of
virtualization disappears to a large extent, since — in many cases — it uses all available resources.
If run in a virtual environment, it is important that the hardware host has the same amount of physical
memory as allocated for the virtual servers and that the virtual server running the recording server is
allocated enough CPU and memory — which it is not by default. Typically, the recording server needs
2-4 GB depending on configuration. Another bottleneck is network adapter allocation and hard disk
performance. Consider allocating a physical network adapter on the host server of the virtual server
running the recording server. This makes it easier to ensure that the network adapter is not overloaded
with traffic to other virtual servers. If the network adapter is used for several virtual servers, the
network traffic might result in the recording server not retrieving and recording the configured amount
of images.
Clients
About the Management Client
Feature-rich administration client for configuration and day-to-day management of the system.
Available in several languages.
Typically installed on the surveillance system administrator’s workstation or similar.
For a detailed overview of the Management Client, see Management Client overview (on page 49).
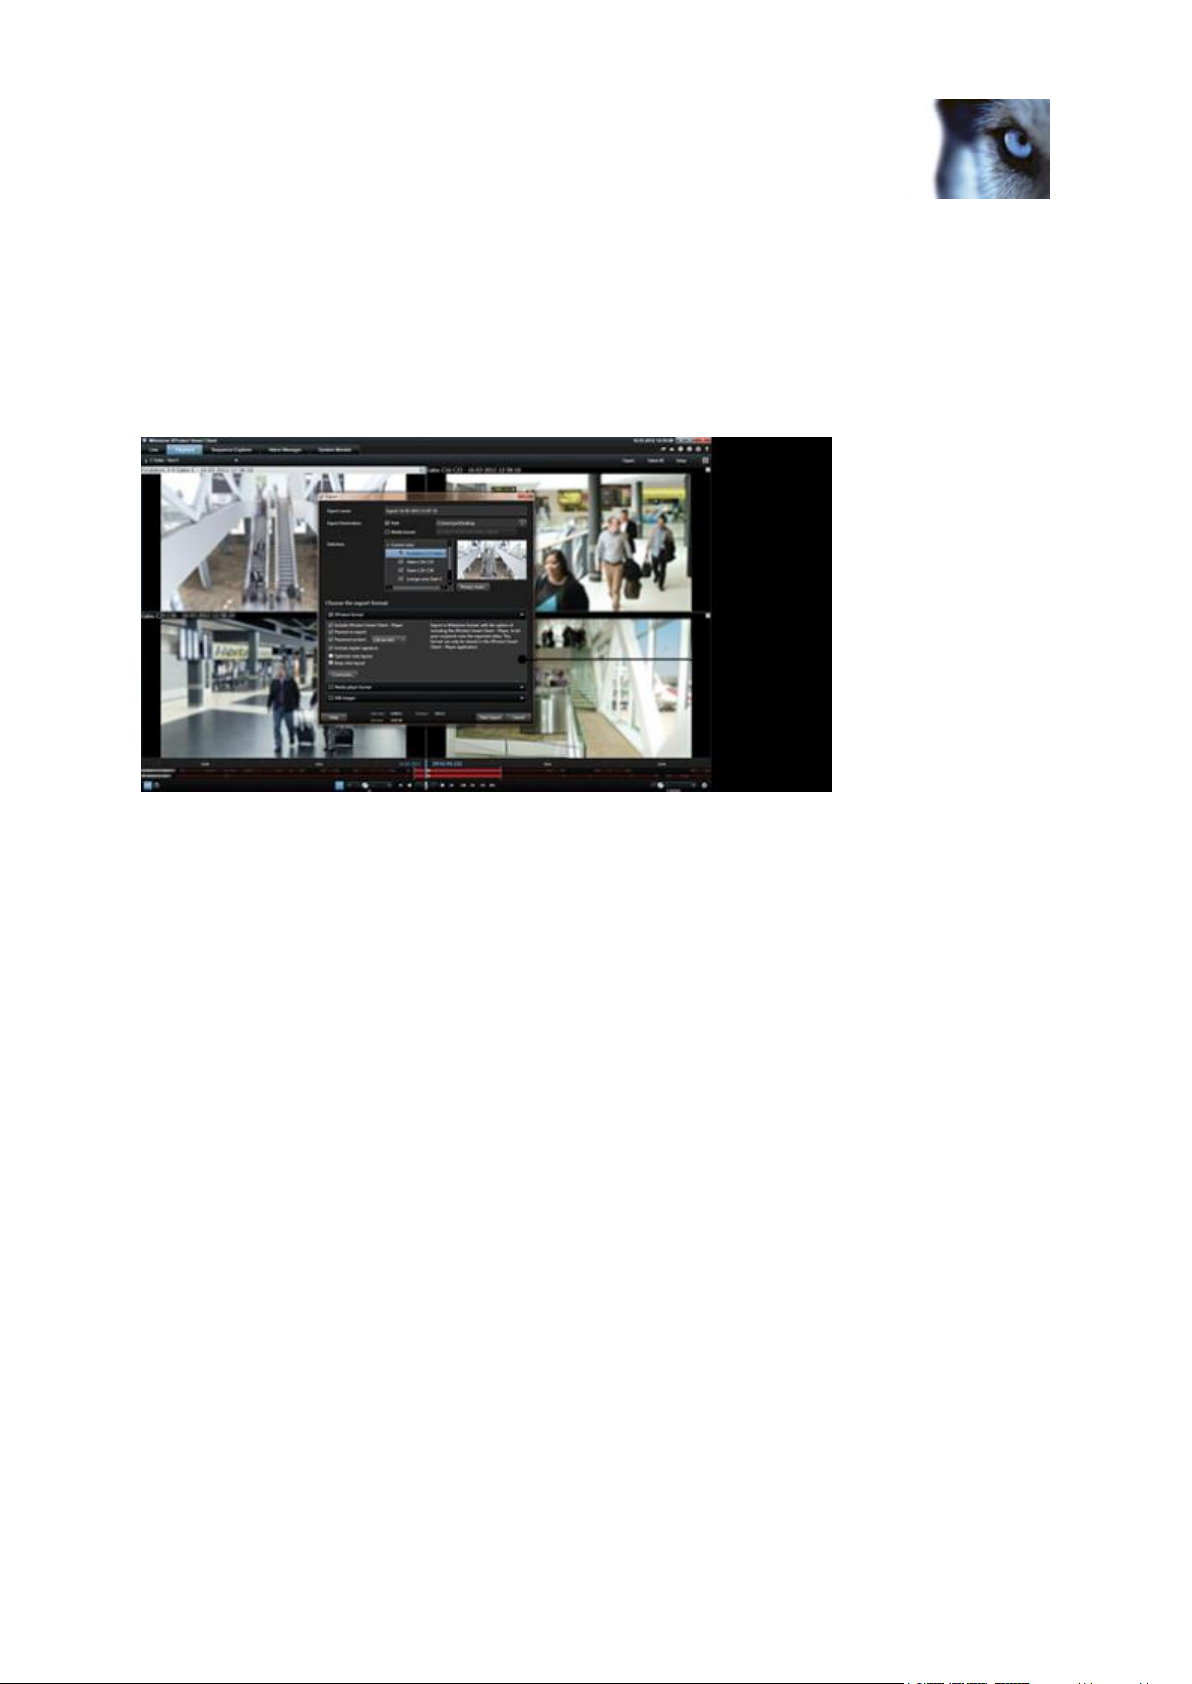
Milestone XProtect
®
Advanced
VMS 2014
About XProtect Smart Client
Designed for Milestone XProtect
®
IP video management software, the XProtect Smart Client is an
easy-to-use client application that provides intuitive control over security installations. Manage security
installations with XProtect Smart Client which gives users access to live and recorded video, instant
control of cameras and connected security devices, and an overview of recordings. Available in
multiple local languages, XProtect Smart Client has an adaptable user interface that can be optimized
for individual operators’ tasks and adjusted according to specific skills and authority levels.
The interface allows you to tailor your viewing experience to specific working environments by
selecting a light or dark theme, depending on room lighting or brightness of the video. It also features
work-optimized tabs and an integrated video timeline for easy surveillance operation. Using the
Milestone Integration Platform, users can integrate various types of security and business systems
and video analytics applications, which you manage through XProtect Smart Client.
XProtect Smart Client must be installed on users‘ computers. Surveillance system administrators
manage clients’ access to the surveillance system through the Management Application. Recordings
viewed by clients are provided by your XProtect system’s Image Server service. The service runs in
the background on the surveillance system server. Separate hardware is not required.
To download XProtect Smart Client, you must connect to the surveillance system server which
presents you with a welcome page that lists available clients and language versions. System
administrators can use XProtect Download Manager to control what clients and language versions
should be available to users on the welcome page of the XProtect Download Manager.
About Milestone Mobile client
Milestone
®
Mobile client is a mobile surveillance solution closely integrated with the rest of your
XProtect system. It runs on your Android tablet or smartphone or your Apple® tablet, smartphone or
portable music player and gives you access to cameras, views and other functionality set up in the
Management Application. Use the Milestone Mobile client to view and play back live and recorded
video from one or multiple cameras, control pan-tilt-zoom (PTZ) cameras, trigger output and events
and use the Video push functionality to send video from your device to your XProtect system.
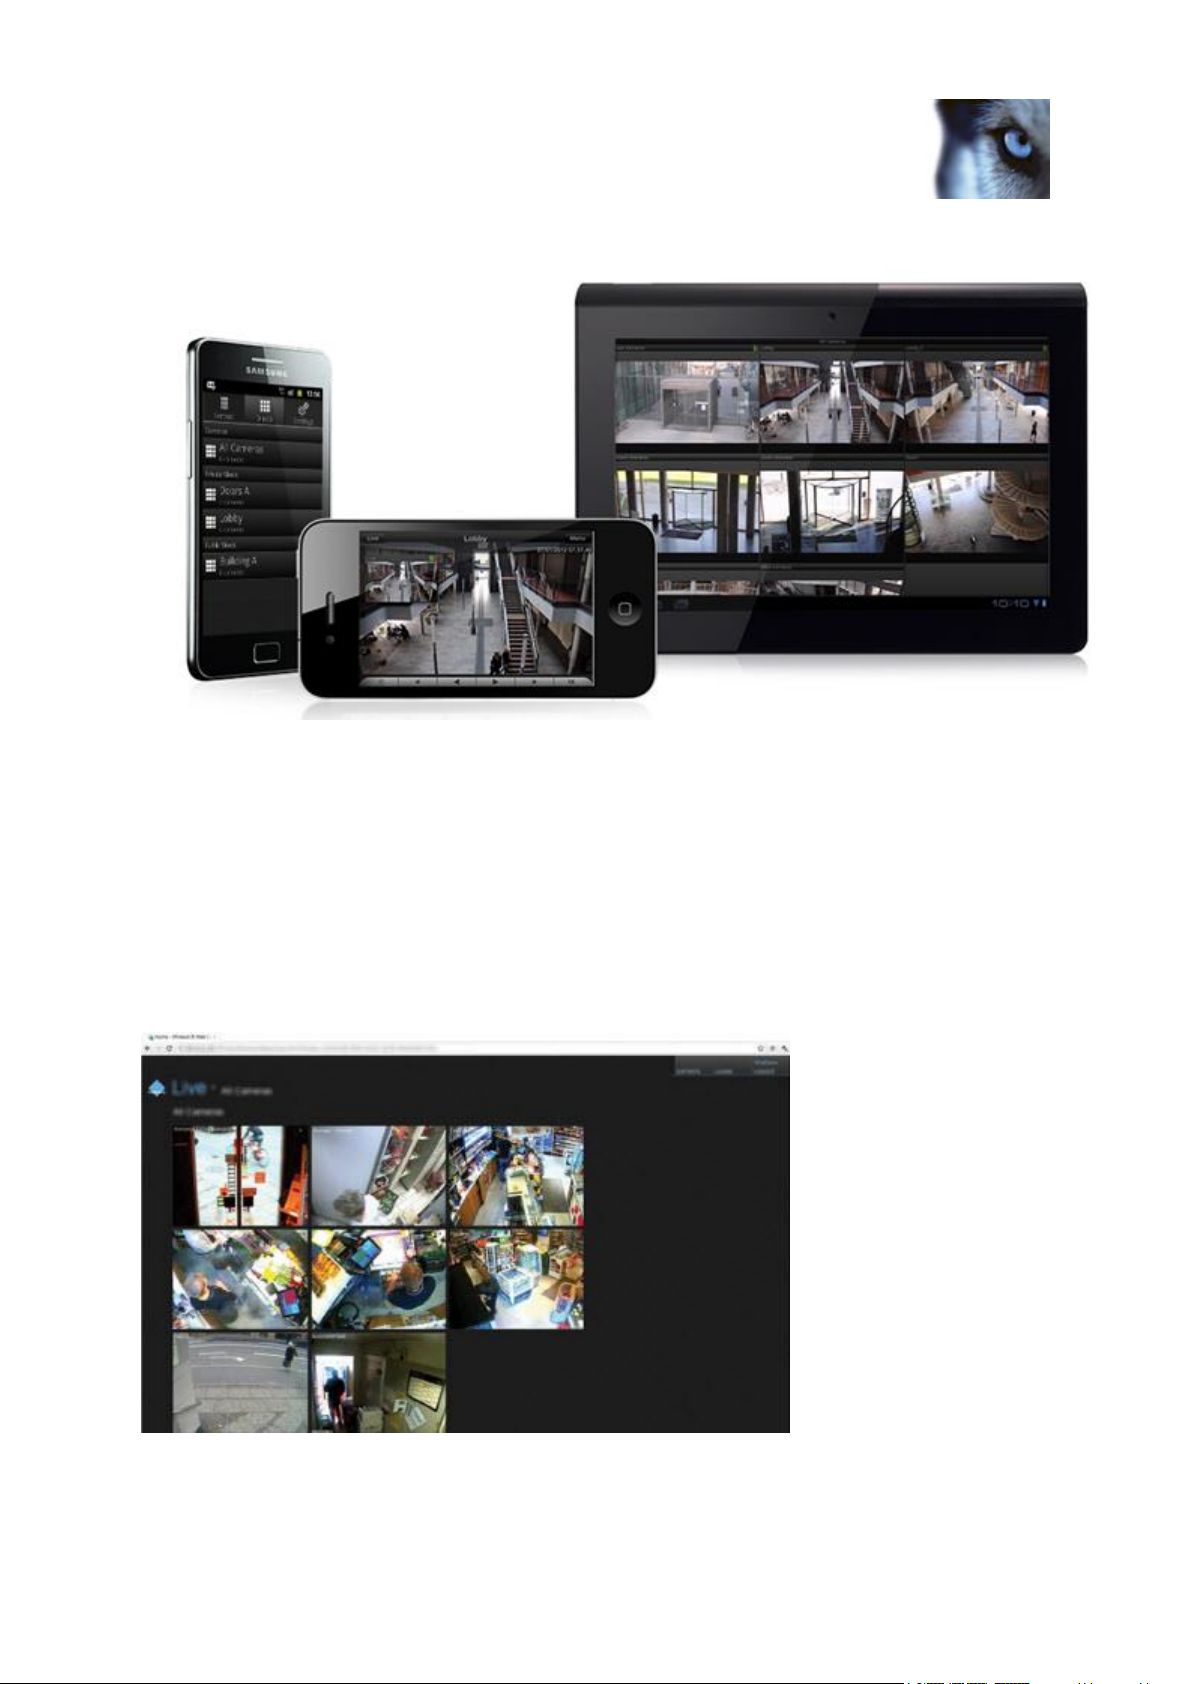
Milestone XProtect
®
Advanced
VMS 2014
If you want to use Milestone Mobile client with your system, you must add a Mobile server to establish
the connection between the Milestone Mobile client and your system. Once the Mobile server is set
up, download the Milestone Mobile client for free from Google Play or App Store to start using
Milestone Mobile.
About XProtect Web Client
XProtect Web Client is a web-based client application for viewing, playing back and sharing video. It
provides instant access to the most commonly used surveillance functions, such as viewing live video,
play back recorded video, print and export evidence. Access to features depends on individual user
rights which are set up in the Management Application.
To enable access to the XProtect Web Client, you must install a Mobile server to establish the
connection between the XProtect Web Client and your system. The XProtect Web Client itself does

Milestone XProtect
®
Advanced
VMS 2014
not require any installation itself and works with most Internet browsers. Once you have set up the
Mobile server, you can monitor your XProtect system anywhere from any computer or tablet with
Internet access (provided you know the right external/Internet address, user name and password).
About licenses
When you purchase the system, you also purchase a certain number of licenses for the number of
hardware devices, for example video encoders or cameras, that you want to run on the system. One
hardware device license enables you to run as many camera, speaker, microphone, input, output and
metadata devices that the hardware device consists of. It also enables you to run the hardware device
multiple times on one site or multiple times on multiple sites.
You need a camera license for each enabled interconnected camera in a Milestone Interconnect
setup.
If you purchase XProtect Access Control Module, you need a license for each door you want to
configure for access control.
At first, when you have installed the various system components, configured the system, and added
recording servers and cameras through the Management Client, the surveillance system runs on
temporary licenses which need to be activated before a certain period ends. This is known as the
grace period. You also need to activate licenses if you later add more cameras to the system.
When the new surveillance system is working, Milestone recommends that you activate your licenses
before you make the final adjustments. If you do not activate your licenses before the grace period
expires, all recording servers and cameras without activated licenses stop sending data to the
surveillance system.
Product comparison chart
XProtect Advanced VMS comes in two versions:
XProtect Expert
XProtect Corporate
The complete feature list of the XProtect Advanced VMS products is available on the product overview
page on the Milestone website.
Below is a list of the differences between the two products:
Milestone Federated Architecture

Milestone XProtect
®
Advanced
VMS 2014
Recording server failover and
hot stand-by recording server
Multi-stage video storage
XProtect Corporate
database
Live databases + 1 archive
XProtect Corporate database
Live databases + unlimited
archives
Reduce frame rate (grooming)
Video data encryption (recording
server)
Database signing (recording server)
Time controlled user access rights
administrator user rights
XProtect Management Client profiles
XProtect Smart Client profiles
About local IP address ranges
When a client, such as XProtect Smart Client, connects to a surveillance system, an amount of initial
data communication, including the exchange of contact addresses goes on in the background. This
happens automatically, and is transparent to users.
Clients may connect from the local network as well as from the Internet, and in each case the
surveillance system should be able to provide suitable addresses so the clients can get access to live
and recorded video from the recording servers:
When clients connect locally, the surveillance system should reply with local addresses and
port numbers.
When clients connect from the Internet, the surveillance system should reply with the recording
servers’ public addresses, that is the address of the firewall or NAT (Network Address
Translation) router, and often also a different port number (which is then forwarded to
recording servers).

Milestone XProtect
®
Advanced
VMS 2014
The surveillance system must therefore be able to determine whether a client belongs on a local IP
range or on the Internet. For this purpose, you can define a list of IP ranges which the surveillance
system should recognize as coming from a local network.
About IPv6 and IPv4
Your system supports IPv6 as well as IPv4. So does XProtect Smart Client.
IPv6 is the latest version of the Internet Protocol (IP). The Internet protocol determines the format and
use of IP addresses. IPv6 coexists with the still much more widely used IP version IPv4. IPv6 was
developed in order to solve the address exhaustion of IPv4. IPv6 addresses are 128 bit long, whereas
IPv4 addresses are only 32 bit long. IPv6 offers more than ten billion billion billion times as many
addresses as IPv4.
More and more organizations are implementing IPv6 on their networks. For example, all US federal
agency infrastructures are required to be IPv6 compliant. Examples and illustrations in this manual
reflect use of IPv4 because this is still the most widely used IP version. IPv6 works equally well with
the system.
About using the system with IPv6
The following conditions apply when using the system with IPv6:
Servers
Servers can often use IPv4 as well as IPv6. However, if just one server in your system (for example, a
management server, recording server or failover recording server) requires a particular IP version, all
other servers in your system must communicate using the same IP version.
Example: All of the servers in your system except one can use IPv4 as well as IPv6. The
exception is a server which is only capable of using IPv6. This means that all servers must
communicate with each other using IPv6.
Devices
You can use devices (cameras, inputs, outputs, microphones, speakers) with a different IP version
than that being used for server communication provided your network equipment and the recording
servers also support the devices’ IP version. See also the illustration below.
Clients
If your system uses IPv6, users should connect with the XProtect Smart Client. The XProtect Smart
Client supports IPv6 as well as IPv4.
If one or more servers in your system can only use IPv6, XProtect Smart Client users must use IPv6
for their communication with those servers. In this context, it is important to remember that XProtect
Smart Clients technically connect to a management server for initial authentication, and then to the
required recording servers for access to recordings.
However, the XProtect Smart Client users do not have to be on an IPv6 network themselves, provided
your network equipment supports communication between different IP versions, and they have
installed the IPv6 protocol on their computers. See also illustration. To install IPv6 on a client
computer, open a command prompt, type Ipv6 install, and press ENTER.

Milestone XProtect
®
Advanced
VMS 2014
Example illustration
Example: Since one server in the system can only use IPv6, all communication with
that server must use IPv6. However, that server also determines the IP version for
communication between all other servers in the system.
No XProtect Enterprise integration
If you use IPv6, you cannot integrate XProtect Enterprise servers into your system.
No Matrix Monitor compatibility
If using IPv6, you cannot use the Matrix Monitor application with your system. Matrix functionality in
XProtect Smart Client is not affected.
About writing IPv6 addresses
An IPv6 address is usually written as eight blocks of four hexadecimal digits, with each block
separated by a colon.
Example: 2001:0B80:0000:0000:0000:0F80:3FA8:18AB
You may shorten addresses by eliminating leading zeros in a block. Also note that some of the four-
digit blocks may consist of zeros only. If any number of such 0000 blocks are consecutive, you may
shorten addresses by replacing the 0000 blocks with two colons as long as there is only one such
double colon in the address.
Example:
2001:0B80:0000:0000:0000:0F80:3FA8:18AB can be shortened to
2001:B80:0000:0000:0000:F80:3FA8:18AB if removing the leading zeros, or to
2001:0B80::0F80:3FA8:18AB if removing the 0000 blocks, or even to
2001:B80::F80:3FA8:18AB if removing the leading zeros as well as the 0000 blocks.
Using IPv6 Addresses in URLs
IPv6 addresses contain colons. Colons, however, are also used in other types of network addressing
syntax. For example, IPv4 uses a colon to separate IP address and port number when both are used
in a URL. IPv6 has inherited this principle. Therefore, to avoid confusion, square brackets are put
around IPv6 addresses when they are used in URLs.
Example of a URL with an IPv6 address:
http://[2001:0B80:0000:0000:0000:0F80:3FA8:18AB], which may of course be shortened to,
for example, http://[2001:B80::F80:3FA8:18AB]

Milestone XProtect
®
Advanced
VMS 2014
Example of a URL with an IPv6 address and a port number:
http://[2001:0B80:0000:0000:0000:0F80:3FA8:18AB]:1234, which may of course be shortened
to, for example, http://[2001:B80::F80:3FA8:18AB]:1234
For more information about IPv6, see, for example, www.iana.org. IANA, the Internet Assigned
Numbers Authority, is the organization responsible for the global coordination of IP addressing.
System requirements
Important: Your system no longer supports Microsoft
®
Windows
®
2003 (however, you can still
run/access clients from computers with Windows 2003).
Important: Your system no longer supports Microsoft
®
Windows
®
32-bit OS (however, you can still
run/access XProtect Web Client and XProtect Smart Client from computers with Windows 32-bit OS).
For information about the minimum system requirements to the various components of your system,
go to www.milestonesys.com/systemrequirements.

Milestone XProtect
®
Advanced
VMS 2014
Installation
Installation
If you upgrade from a previous XProtect version, see About upgrade (on page 45 ).
Installation preconditions
Read the installation preconditions before you start the actual installation.
Determine installation method
As part of the installation wizard, you must decide which installation method to use. Your selection
depends on the organization needs, but has typically been determined when purchasing the system.
The options are:
Single Server: installs all management server components, recording server, and XProtect
Smart Client on the current computer. You only need to make a minimum of selections and all
components are preselected in the un-editable component list. The SQL server is not in the
list, but is also installed on the current computer.
Distributed: installs only the management server components on the current computer. This
means that the recording server and XProtect Smart Client are not visible in the un-editable
component list. You must install the recording server, XProtect Smart Client, and SQL server
on other computers.
Custom: allows you to select freely among all management server components, recording
server, and XProtect Smart Client to install on the current computer. By default, recording
server is unselected in the component list, but you can edit this. Depending on your selections
you must install the unselected component afterwards on other computers including the SQL
server.
For easy user and group management, Milestone recommends that you have Microsoft Active
Directory
®
in place before you install your system. If you add the management server to the Active
Directory after installing, you must re-install the management server, and replace users with new users
defined in the Active Directory.
Determine SQL server type
Read the following information to determine which SQL server type is right for your organization:
The Microsoft SQL Server Express Edition is a «lightweight» version of a full SQL server. It is easy to
install and prepare for use, and is often sufficient for systems with less than 300 cameras.
If you plan to perform frequent/regular backups of your database, Milestone recommends using an
existing SQL server on the network (you must have administrator rights on the SQL server).
For large installations (300 cameras or more), Milestone recommends using a full-scale existing SQL
server on a dedicated computer on the network.

Milestone XProtect
®
Advanced
VMS 2014
Milestone recommends that you install the database on a dedicated hard disk drive that is not used for
anything else but the database. Installing the database on its own drive prevents low disk
performance.
If you select Distributed or Custom as part of the installation wizard, you must decide what to do
regarding the SQL server.
If you do not have an SQL server installed, the options are:
Install SQL Server 2008 Express on this computer.
Use an existing SQL Server on the network: When you use a dedicated computer for the
SQL database on the network, the list of SQL servers that your account can access appears.
If you have an SQL server installed, the options are:
Use the installed Microsoft SQL Server Express database on this computer.
Use an existing SQL Server on the network: When you use a dedicated computer for the
SQL database on the network, the list of SQL servers that your account can access appears.
You are also asked whether you want to create a new database, use an existing database, or
overwrite an existing database.
o Create new database: For a new installation.
o Use existing database: If you are installing the database as part of upgrading to a newer
version of the system, and you want to use your existing database.
Select service account
As part of the installation wizard, you are asked to specify the service account that will access the
management server and the recording server to manage the services:
With a predefined network service account (This predefined user account), the service
always runs when the server (computer) are running — no matter which account is used. The
account matters for access to various resources.
With a particular user account (This account), the service uses the specified user account to
run the service under the same account as the management server. If the server acting as
management server is a member of a domain, you should either select the suggested
Network Service or specify a user account for the domain.
If you use network drives, always specify a particular user account (with access to the network drives).
Otherwise, the relevant service cannot access the required network drives.
Active Directory
If you want to add users through the Active Directory service, a server with Active Directory installed,
and acting as domain controller, must be available on your network.
If you do not install Active Directory, follow Installation for workgroups (on page 34) when you start the
installation.

Milestone XProtect
®
Advanced
VMS 2014
Customize IIS
If you install on Windows Server 2008, Milestone recommends that you customize the standard IIS
installation:
1. In Windows Start menu, select Control Panel, then select Programs and Features.
2. In the Programs and Features window, click Turn Windows features on or off. This
opens the Windows Features window (window name may be different depending on
which operating system you are installing the service channel on).
3. In the Windows Features window, expand Internet Information Services.
4. Expand and select Web Management Tools, then expand and select IIS 6 Management
Compatibility, then select IIS Metabase and IIS 6 configuration compatibility.
5. Expand and select World Wide Web Services, then expand and select Application
Development Features, then select the following:
.NET Extensibility
ASP
ASP.NET
ISAPI Extensions
ISAPI Filters.
6. Expand and select Security, then select Windows Authentication.
7. Click OK.
About virus scanning
As is the case with any other database software, if an antivirus program is installed on a computer
running XProtect
®
software, it is important that you exclude specific file types and locations, as well as
certain network traffic. Without implementing these exceptions, virus scanning uses a considerable
amount of system resources. On top of that, the scanning process can temporarily lock files which
likely results in a disruption in the recording process or even database corruption.
When you need to perform virus scanning, do not scan Recording Server directories containing
recording databases (by default c:mediadatabase, as well as all folders under that location). Avoid
also to perform virus scanning on archive storage directories. In older versions of the software, the
databases are by default located in the installation folder, each being a subfolder with the MAC
address of the device recorded.
Create the following additional exclusions:
File types: .blk, .idx, .pic, .pqz, .sts, .ts
C:Program FilesMilestone or C:Program Files (x86)Milestone and all subdirectories.
Exclude network scanning on TCP ports:
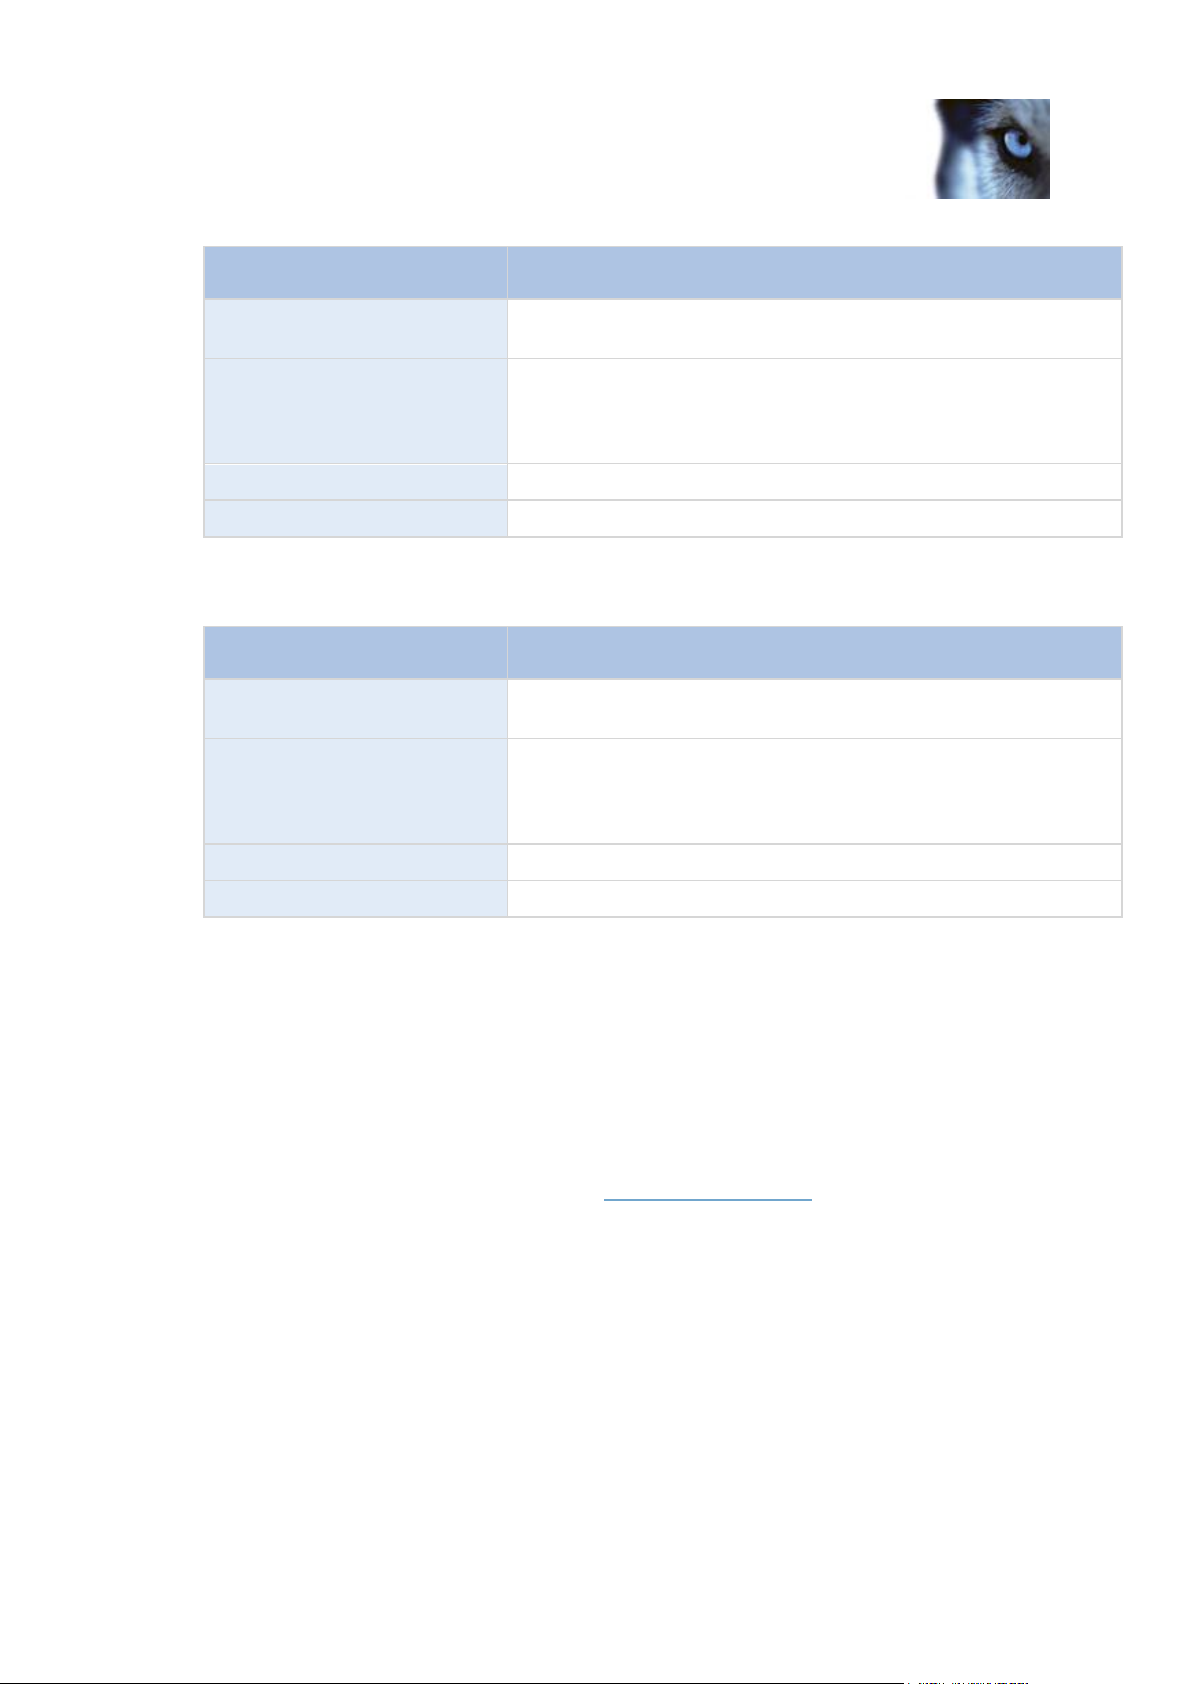
Milestone XProtect
®
Advanced
VMS 2014
XProtect
®
Corporate,
XProtect
®
Expert
80, 8080, 7563, 25, 21, 9993
XProtect
®
Enterprise,
XProtect
®
Professional,
XProtect
®
Express, XProtect
®
Essential, XProtect
®
Basis+
80, 25, 21, 1234, 1237, 22331
or
Exclude network scanning of the following processes:
XProtect Corporate, XProtect
Expert
VideoOS.Recording.Service.exe, VideoOS.Server.Service.exe, VideoOS.Administration.exe
XProtect Enterprise, XProtect
Professional, XProtect
Express, XProtect Essential,
XProtect Basis+
RecordingServer.exe, ImageServer.exe, ManagementApplication.exe, ImageImportService.exe,
RecordingServerManager.exe, VideoOS.ServiceControl.Service.exe, VideoOS.Event.Server.exe
VideoOS.MobileServer.Service.exe
VideoOS.Transact.TransactService.exe
Organizations may have strict guidelines regarding virus scanning, however it is important that the
above locations and files are excluded from virus scanning.
Register Software License Code
Before installing, you must have the name and location of the license file, that you received from
Milestone.
The Software License Code (SLC) is printed on your order confirmation. Milestone recommends that
you register your SLC before installation.
1. Go to the Milestone Systems A/S website at www.milestonesys.com.
2. In the top-menus, locate Register your software.
3. Log in to the software registration system with your user name and password.
If you have not used the software registration system before, click the New to the system?
link for registering yourself as a user and then log in.
4. In the software registration system, click the Add SLC link.
5. Type your SLC. When asked whether you want to add the SLC to your account, click OK.
6. Once you have added your SLC, log out.

Milestone XProtect
®
Advanced
VMS 2014
Install the system
Select one of the installation options:
Install your system — Single Server option (on page 30)
Install your system — Distributed option (on page 31)
Install your system — Custom option (on page 31)
Install your system — Single Server option
1. If you are installing a version downloaded from the Internet, run the
MilestoneAdvancedXProtectVMSSystemInstaller.exe file from the location where
you saved it.
Alternatively, insert the software DVD. If the dialog box does not open automatically, run the
MilestoneAdvancedXProtectVMSSystemInstaller.exe file from the DVD.
2. The installation files unpack. Depending on your security settings, one or more Windows
security warnings appear. Accept these and the unpacking continues.
3. When done, the Milestone Advanced XProtect VMS dialog box appears,
a) Select the Language to use during the installation (this is not the language your system
uses once installed, this is selected later). Click Continue.
b) In Type the location of the license file, enter your license file from your XProtect
provider. Alternatively, use the browse function to locate it. The system verifies your
license file before you can continue. Click Continue.
c) Read the Milestone End-user License Agreement. Select the I accept the terms in the
license agreement check box. Optionally, select the Sign me up for the Customer
Experience Improvement Program check box. Follow the on-screen Read more link for
further information on this.
4. Select Single Server. A list of components to install appears (you cannot edit this list). Click
Continue.
5. Select Files location for the program file. In Product language, select the language in which
your XProtect product should be installed. Click Install.
6. The software now installs. When done, you see a list of successfully installed components.
Click Close.
Microsoft
®
IIS is automatically installed during the process. Afterwards, you may be prompted
to restart your computer. Do so and after restart, depending on your security settings, one or
more Windows security warnings may appear. Accept these and the installation completes.
7. When done, your installation completes and you can continue with configuration, see
Configuration process (see «Configure the system in Management Client» on page 37).

Milestone XProtect
®
Advanced
VMS 2014
Install your system — Distributed option
1. If you are installing a version downloaded from the Internet, run the
MilestoneAdvancedXProtectVMSSystemInstaller.exe file from the location where
you saved it.
Alternatively, insert the software DVD. If the dialog box does not open automatically, run the
MilestoneAdvancedXProtectVMSSystemInstaller.exe file from the DVD.
2. The installation files unpack. Depending on your security settings, one or more Windows
security warnings appear. Accept these and the unpacking continues.
3. When done, the Milestone Advanced XProtect VMS dialog box appears,
a) Select the Language to use during the installation (this is not the language your system uses
once installed, this is selected later). Click Continue.
b) In Type the location of the license file, enter your license file from your XProtect
provider. Alternatively, use the browse function to locate it. The system verifies your
license file before you can continue. Click Continue.
c) Read the Milestone End-user License Agreement. Select the I accept the terms in the
license agreement check box. Optionally, select the Sign me up for the Customer
Experience Improvement Program check box. Follow the on-screen Read more link for
further information on this.
4. Select Distributed. A non-editable list of components to be installed appears. Click Continue.
5. Select the type of SQL server database you want. Also specify the name of the SQL server.
Click Continue.
6. Select either Create new database or Use existing database and name the database. If you
choose the latter, select to Keep or Overwrite existing data. Click Continue.
7. Select Files location for the program file. In Product language, select the language in which
your XProtect product should be installed. Click Install.
8. The software now installs. When done, you see a list of successfully installed components.
Click Close.
Microsoft
®
IIS is automatically installed during the process. Afterwards, you may be prompted
to restart your computer. Do so and after restart, depending on your security settings, one or
more Windows security warnings may appear. Accept these and the installation completes.
9. Install the recording server on a separate computer, see Install the recording server (on page
33).
Install your system — Custom option
Note that with this option you can select or clear all of the components to install, except the
management server. The management server is by default selected in the component list and is
always installed. If one is already installed, it is updated.

Milestone XProtect
®
Advanced
VMS 2014
1. If you are installing a version downloaded from the Internet, run the
MilestoneAdvancedXProtectVMSSystemInstaller.exe file from the location where
you saved it.
Alternatively, insert the software DVD. If the dialog box does not open automatically, run the
MilestoneAdvancedXProtectVMSSystemInstaller.exe file from the DVD.
2. The installation files unpack. Depending on your security settings, one or more Windows
security warnings appear. Accept these and the unpacking continues.
3. When done, the Milestone Advanced XProtect VMS dialog box appears,
a) Select the Language to use during the installation (this is not the language your system
uses once installed, this is selected later). Click Continue.
b) In Type the location of the license file, enter your license file from your XProtect
provider. Alternatively, use the browse function to locate it. The system verifies your
license file before you can continue. Click Continue.
c) Read the Milestone End-user License Agreement. Select the I accept the terms in the
license agreement check box. Optionally, select the Sign me up for the Customer
Experience Improvement Program check box. Follow the on-screen Read more link for
further information on this.
4. Select Custom. A list of components to be installed appears. Apart from the management
server, all elements in the list are optional. The recording server is by default deselected, but
you can change this if needed. Click Continue.
5. Select the type of SQL server database you want. If relevant, also specify the name of the
SQL server. Click Continue.
6. Select either Create new database or Use existing database and name the database. If you
choose the latter, select to Keep or Overwrite existing data. Click Continue.
7. Select either This predefined account or This account to select the service account. If
needed, enter a password and confirm this. Click Continue.
8. If you have more than one available IIS website, you can select any of these. However, if any
of your websites have HTTPS binding, select one of these. Click Continue.
9. Select Files location for the program file. In Product language, select the language in which
your XProtect product should be installed. Click Install.
10. The software now installs. When done, you see a list of successfully installed components.
Click Close.
Microsoft
®
IIS is automatically installed during the process. Afterwards, you may be prompted
to restart your computer. Do so and after restart, depending on your security settings, one or
more Windows security warnings may appear. Accept these and the installation completes.
11. Depending on your selections, install the remaining servers on other computers:
a) Go to the Management server’s download web page from Windows’ Start menu.
b) Select Programs, Milestone, Administrative Installation Page and copy the Internet
address.

Milestone XProtect
®
Advanced
VMS 2014
c) Log into each of the computers to install:.
Log server.
Event server.
Management Client.
d) Open an Internet browser, paste the address of the Management server’s download web
page into the address field and download the relevant installer.
e) Run the installer.
12. Install the recording server on a separate computer, see Install the recording server (on page
33).
Install the recording server
Once you have installed the management server, download the separate recording server installer
from the management server’s web page.
See Install a failover recording server (on page 227) if you want to install a failover server.
1. On the management server, go to the Management server’s download web page from
Windows’ Start menu.
2. Select Programs, Milestone, Administrative Installation Page and copy the Internet
address.
3. Log into the computer where you want to install the recording server.
4. Open an Internet browser, paste the address of the Management server’s download web page
into the address field and select the Recording Server installer. Save the installer somewhere
appropriate and run it from here or run it directly from the web page.
5. Select the Language you want to use during the installation. Click Continue.
6. Select:
Typical: to install a recording server with default values, or
Custom: to install a recording server with custom values.
7. Specify the recording server settings:
o Name.
o Management server address.
o Path to save recordings, and click Continue.
8. If you selected Custom:
a) Specify the number of recording servers you want to install on this computer. Click
Continue.

Milestone XProtect
®
Advanced
VMS 2014
b) Specify the service account. If needed, enter a password and confirm this. Click
Continue.
9. Select Files location for the program file. In Product language, select the language in which
to install your system. Click Install.
10. The software now installs. When done, you see a list of successfully installed components.
Click Close.
When you have installed the recording server, you can check its state from the Recording
Server service icon.
11. When done, your installation completes and you can continue with configuration, see
Configuration process (see «Configure the system in Management Client» on page 37).
Installation for workgroups
If you do not use a domain setup with an Active Directory server, but a workgroup setup, do the
following when you install:
1. Log in to Windows using a common administrator account.
2. Depending on your needs, start the management or recording server installation and click
Custom.
3. Depending on what you selected in step 2, select to install the Management or Recording
Server service using a common administrator account.
4. Finish the installation.
5. Repeat steps 1-4 to install any other systems you want to connect. They must all be installed
using a common administrator account.
This approach cannot be used when upgrading workgroup installations, see Alternative upgrade for
workgroup (on page 46).
Installation troubleshooting
The following issues may occur during or upon installation of the management server or recording
servers. For each issue, one or more solutions are available.
Issue: Recording server startup fails due to port conflict
This issue can only appear if the Simple Mail Transfer Protocol (SMTP) service is running as it uses
port 25. If port 25 is already in use for , it may not be possible to start the Recording Server service. It
is important that port number 25 is available for the recording server’s SMTP service.
SMTP Service: Verification and solutions
To verify whether SMTP Service is installed:
1. From Windows’ Start menu, select Control Panel.

Milestone XProtect
®
Advanced
VMS 2014
2. In the Control Panel, double-click Add or Remove Programs.
3. In the left side of the Add or Remove Programs window, click Add/Remove Windows
Components.
4. In the Windows Components wizard, select Internet Information Services (IIS), and click
Details.
5. In the Internet Information Services (IIS) window, verify whether the SMTP Service check
box is selected. If so, SMTP Service is installed.
If SMTP Service is installed, select one of the following solutions:
Solution 1: Disable SMTP Service, or set it to manual startup
This solution lets you start the recording server without having to stop the SMTP Service every time:
1. From Windows’ Start menu, select Control Panel.
2. In the Control Panel, double-click Administrative Tools.
3. In the Administrative Tools window, double-click Services.
4. In the Services window, double-click Simple Mail Transfer Protocol (SMTP).
5. In the SMTP Properties window, click Stop, then set Startup type to either Manual or
Disabled.
When set to Manual, the SMTP Service can be started manually from the Services
window, or from a command prompt using the command net start SMTPSVC.
6. Click OK.
Solution 2: Remove SMTP service
Removing the SMTP Service may affect other applications using the SMTP Service.
1. From Windows’ Start menu, select Control Panel.
2. In the Control Panel, double-click Add or Remove Programs.
3. In the left side of the Add or Remove Programs window, click Add/Remove Windows
Components.
4. In the Windows Components wizard, select the Internet Information Services (IIS)
item, and click Details.
5. In the Internet Information Services (IIS) window, clear the SMTP Service check box.
6. Click OK, Next, and Finish.
Issue: Automatic installation of IIS failed
The Internet Information Services (IIS) is normally installed automatically. If the automatic installation
fails, you must install the IIS manually:
1. If automatic IIS installation fails, you see an error message asking you to install the IIS
manually. In the error message box, click Install IIS Manually.
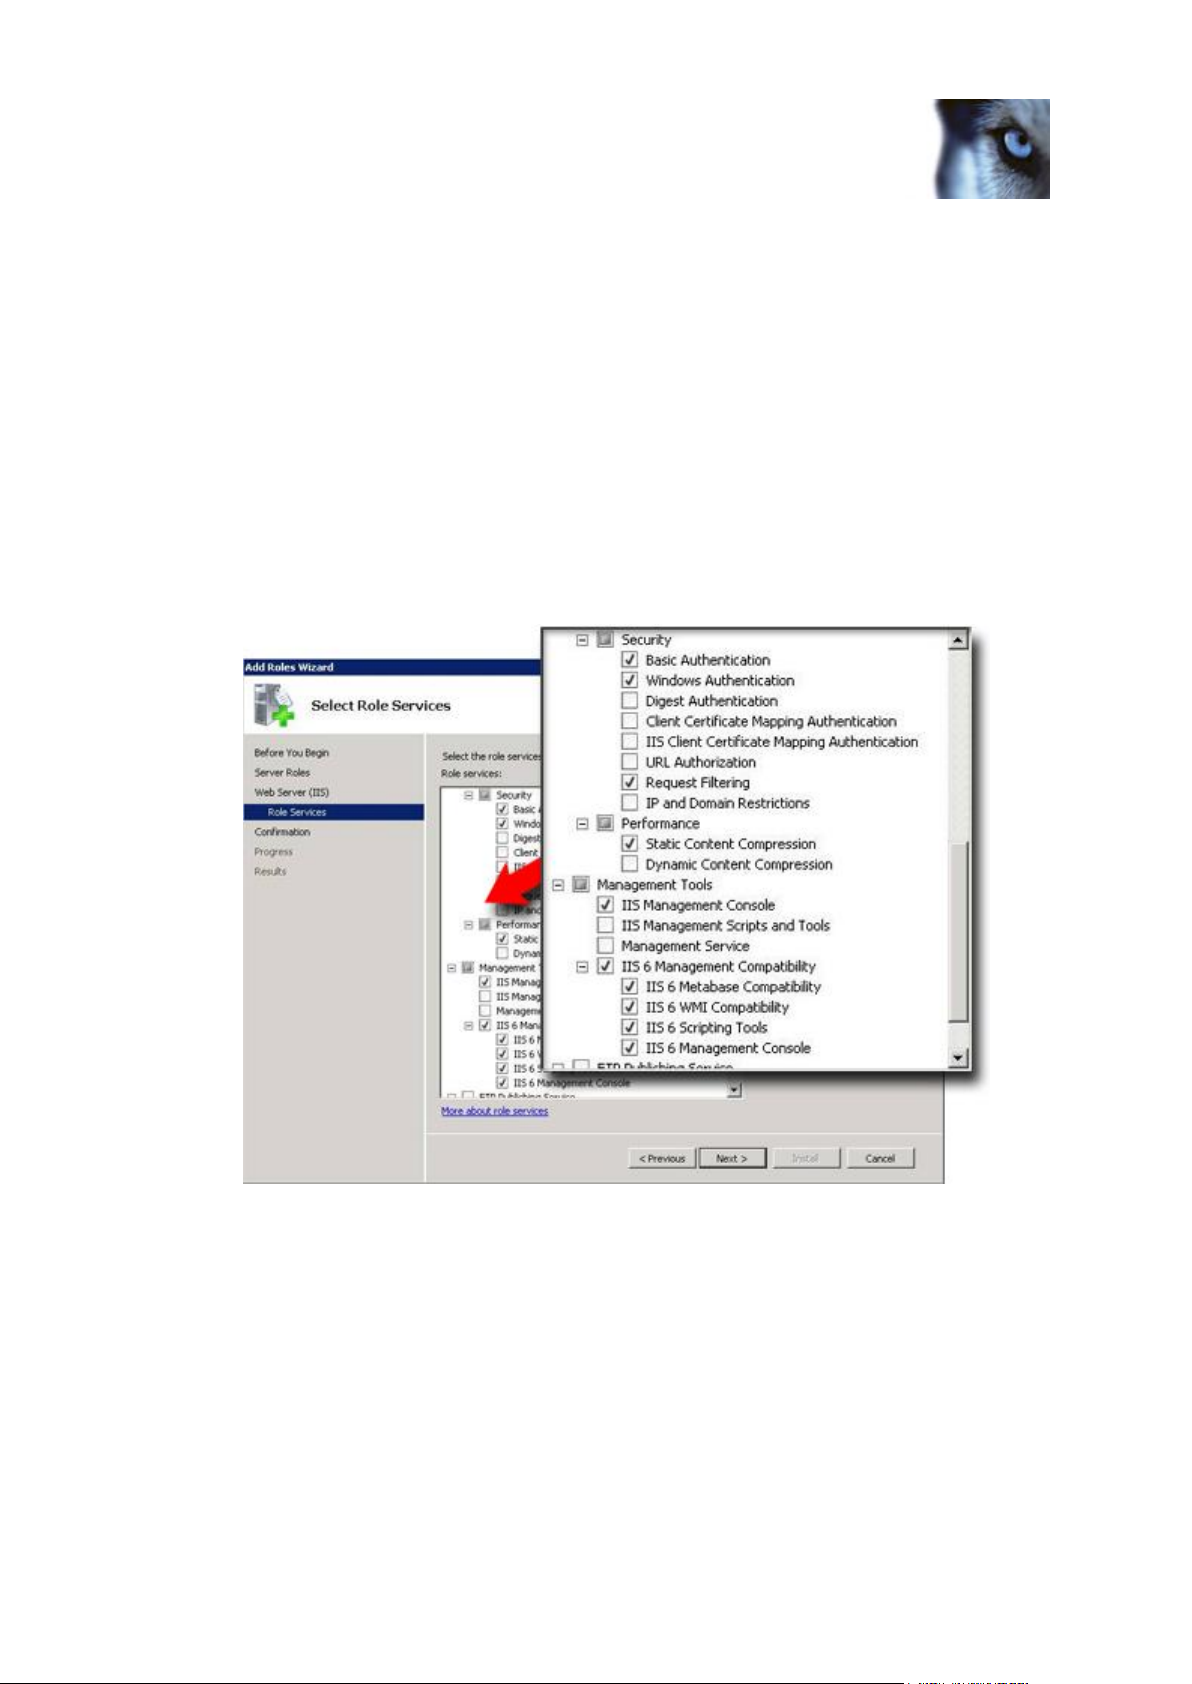
Milestone XProtect
®
Advanced
VMS 2014
2. Select Server Manager from Windows’ Start menu. In the left side of the Server Manager
window, select Roles, then the Roles Summary.
3. Now select Add Roles to start a wizard.
4. In the wizard, click Next, select Web Server (IIS), and follow the wizard’s steps.
5. When you reach the wizard’s Select Role Services step, you see that some role services are
selected by default. However you should select some additional role services:
o Under Security, select Basic Authentication and Windows authentication.
o Under Management Tools, select IIS Management Console, expand it, and select IIS 6
Metabase Compatibility, IIS 6 WMI Compatibility, IIS 6 Scripting Tools, and IIS 6
Management Console.
When ready, the relevant part of the Role services tree should look like this:
6. Complete the wizard by following the remaining steps.
Issue: Changes to SQL server location prevents database access
This is an issue if the location of the SQL Server is changed, for example by changing the host name
of the computer running the SQL Server. The result of this issue is that the access to the database is
lost.
Solution: Use the update SQL address tool found at the tray icon, aka Systray.
Milestone XProtect
®
Advanced
VMS 2014
Configure the system in Management Client
Here are the tasks typically involved in setting up the system.
Even if information is presented as a checklist, a completed checklist does not in itself guarantee that
the system matches the exact requirements of your organization. To make the system match the
needs of your organization, Milestone recommends that you monitor and adjust the system
continuously.
For example, it is a good idea to test and adjust the motion detection sensitivity settings of individual
cameras under different physical conditions (day/night, windy calm weather, and so on) once the
system is running. The setup of rules, which determines most of the actions performed by the system
(including when to record video), is another example of configuration which to a large extent depends
on your organization’s needs.
You have finished the initial installation of your system.
See Install the system (on page 30).
Change the trial SLC to a permanent SLC (if required).
See Change Software License Code (on page 38).
Log in to the Management Client.
Authorize use of your system’s recording servers.
See Authorize a recording server (on page 60).
Verify that each recording server’s storage areas meets your needs.
See About storage and archiving (on page 63).
Verify that each recording server’s archiving settings meets your needs.
See Archive settings properties (on page 66).
Detect the hardware (cameras or video encoders) to add to each recording server.
See Add hardware (on page 75).
Configure each recording server’s individual cameras.
See About camera devices (on page 88).
Enable storage and archiving for individual cameras or a group of cameras. This is done
from the individual cameras or from the device group.
See Attach a device or group of devices to a storage (on page 67).
Enable and configure devices.
See Working with devices (on page 87).
The behavior of the system is to a large extent determined by rules, such as when cameras
should record, when PTZ (pan-tilt-zoom) cameras should patrol, when notifications should
be sent.
Create rules.
See About rules and events (on page 134).
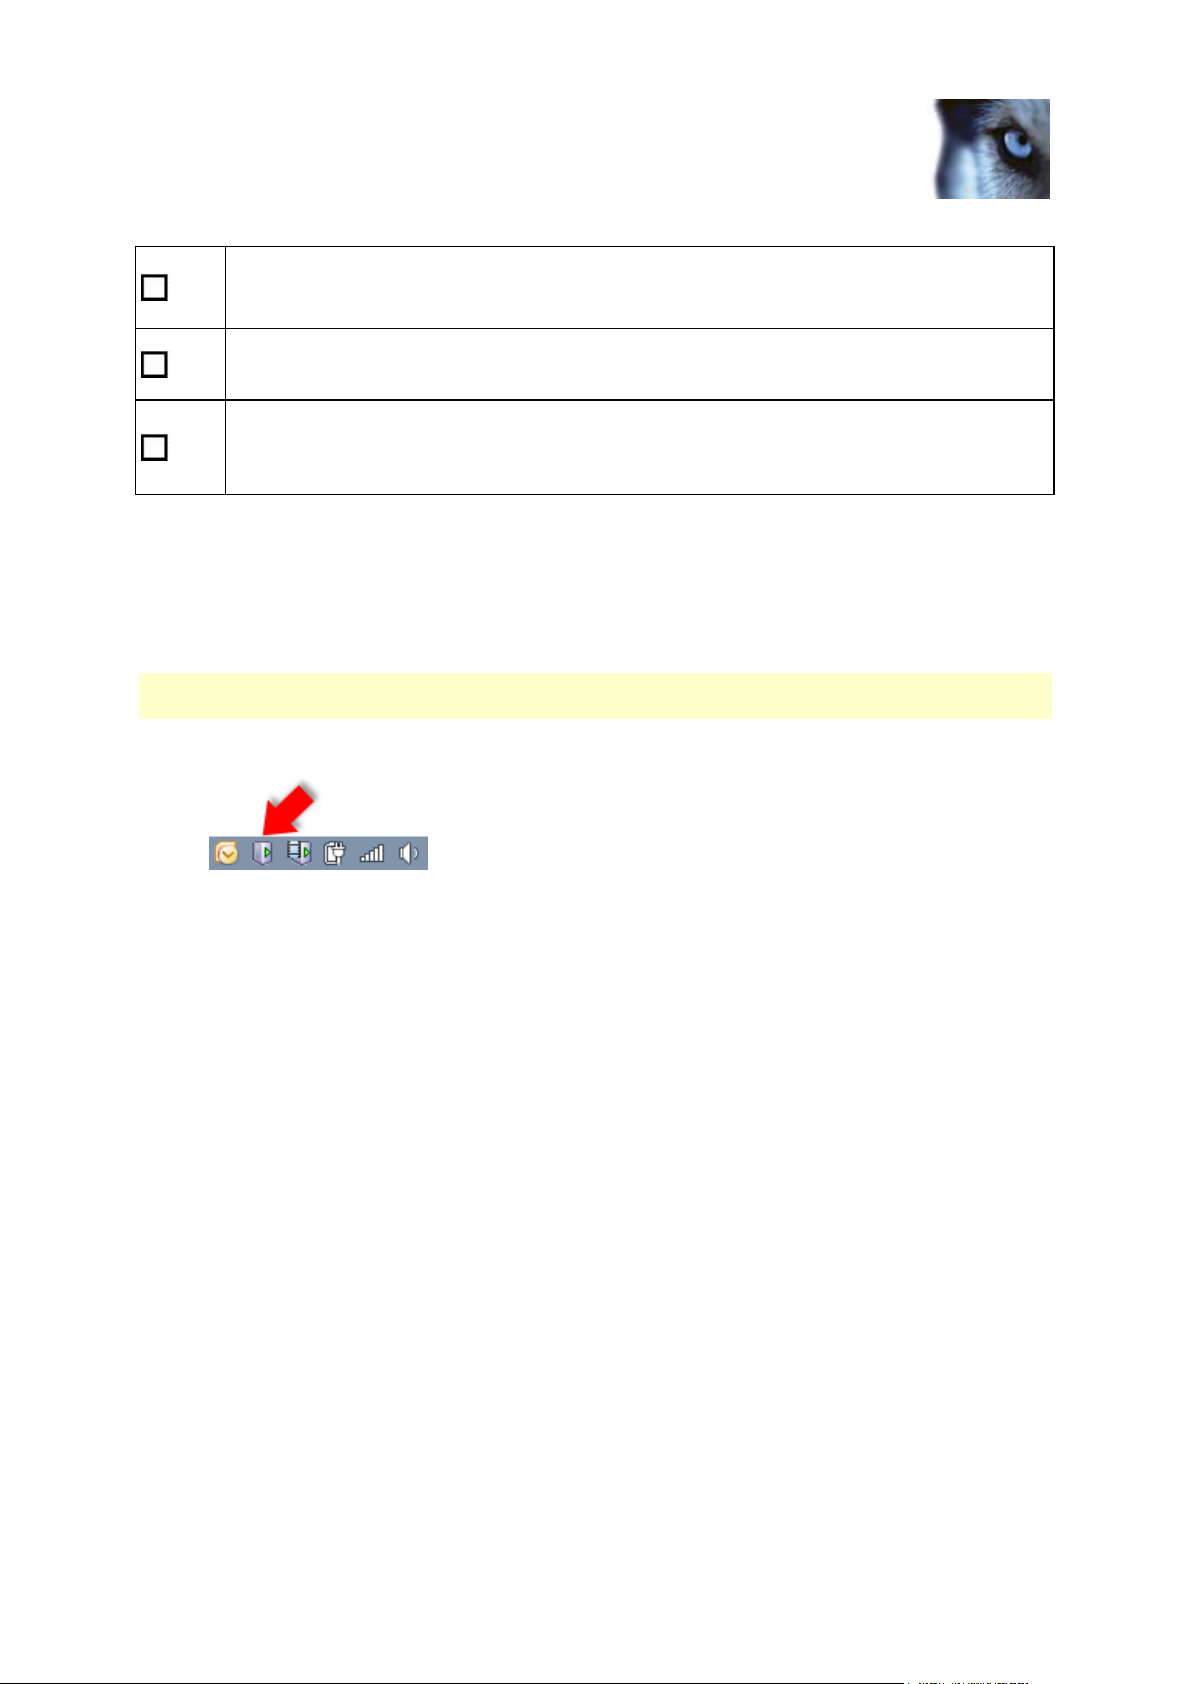
Milestone XProtect
®
Advanced
VMS 2014
See About roles (on page 173).
Add users and/or groups of users to each of the roles.
See Assign/remove users and groups to/from roles (on page 176).
See Activate licenses (online) (see «Activate licenses online» on page 56) or Activate
licenses (offline) (see «Activate licenses offline» on page 57).
Change Software License Code
If you run your installation on a trial Software License Code (SLC) during the first period, you can
change it into a permanent SLC without any un- or reinstallation actions.
Important: This must be done locally on the management server. You cannot do this from the
Management Client.
1. On the management server, go to the notification area of the taskbar.
2. Right-click the Management Server icon and select Change License.
3. Click Import License.
4. Next, select the SLC license file saved for this purpose. When done, the selected license file
location is added just below the Import License button.
5. Click OK and you are now ready to register SLC. See Register Software License Code (on
page 29).
Install clients
Install XProtect Smart Client silently
You can deploy XProtect Smart Client or your surveillance software to users’ computers using tools
such as Microsoft Systems Management Server (SMS). Such tools let you build up databases of
hardware and software on local networks. The databases can then, among other things, be used for
distributing and installing software applications, such as XProtect Smart Client, over local networks.
1. Locate the Smart Client installation program (.exe) file — MilestoneXProtectSmart Client.exe
or MilestoneXProtectSmart Client_x64.exe for 32-bit and 64-bit versions respectively. You
find the file in a subfolder under the folder httpdocs. The httpdocs folder is located under the
folder in which your Milestone surveillance software is installed.

Milestone XProtect
®
Advanced
VMS 2014
The path is typically:
C:Program FilesMilestoneXProtect Management ServerIIShttpdocsXProtect Smart
Client Installer[version number] [bit-version]All Languagesen—US
For example:
C:Program FilesMilestoneXProtect Management ServerIIShttpdocsXProtect Smart
Client Installer2014 (32-bit)All Languagesen—US
2. Run a silent installation using one of the following two options:
a Run with default parameter settings:
To run a silent installation using the default values for all parameters, start a command prompt
(cmd.exe) in the directory where the installation program is located and execute following
command:
>MilestoneXProtectSmart Client.exe —–quiet
This performs a quiet installation of the XProtect Smart Client using default values for
parameters such as target directory and so on. To change the default settings, see below.
b Customize default parameters using an xml argument file as input:
To customize the default installation settings, an xml file with modified values must be provided
as input. To generate the xml file with default values, open a command prompt in the directory
where the installation program is located and execute following command:
>MilestoneXProtectSmart Client.exe —generateargsfile=args.xml
Open the generated args.xml file, using for example Windows Notepad, and perform any
changes needed. Then, to run silent installation using these modified values, execute following
command in the same directory.
>MilestoneXProtectSmart Client.exe —arguments=args.xml —quiet
Install Milestone Mobile server
All XProtect system components, including the Milestone Mobile server, are available for separate
download and installation from the management server’s download web page (controlled by XProtect
Download Manager):
1. On the management server, go to the Management server’s download web page from
Windows’ Start menu, select Programs, Milestone, Administrative Installation Page.
2. Select the Milestone Mobile server installer. Save the installer somewhere appropriate and run
it from here or run it directly from the web page.
3. Follow the instructions on the screen to install.
Once you have installed the Milestone Mobile server, you can use Milestone Mobile client and
XProtect Web Client with your system. To reduce the overall use of system resources on the computer
running the management server, install the Milestone Mobile server on a separate computer. For more
information about how to do this, see the Milestone Mobile server manual, available on the Milestone
website.
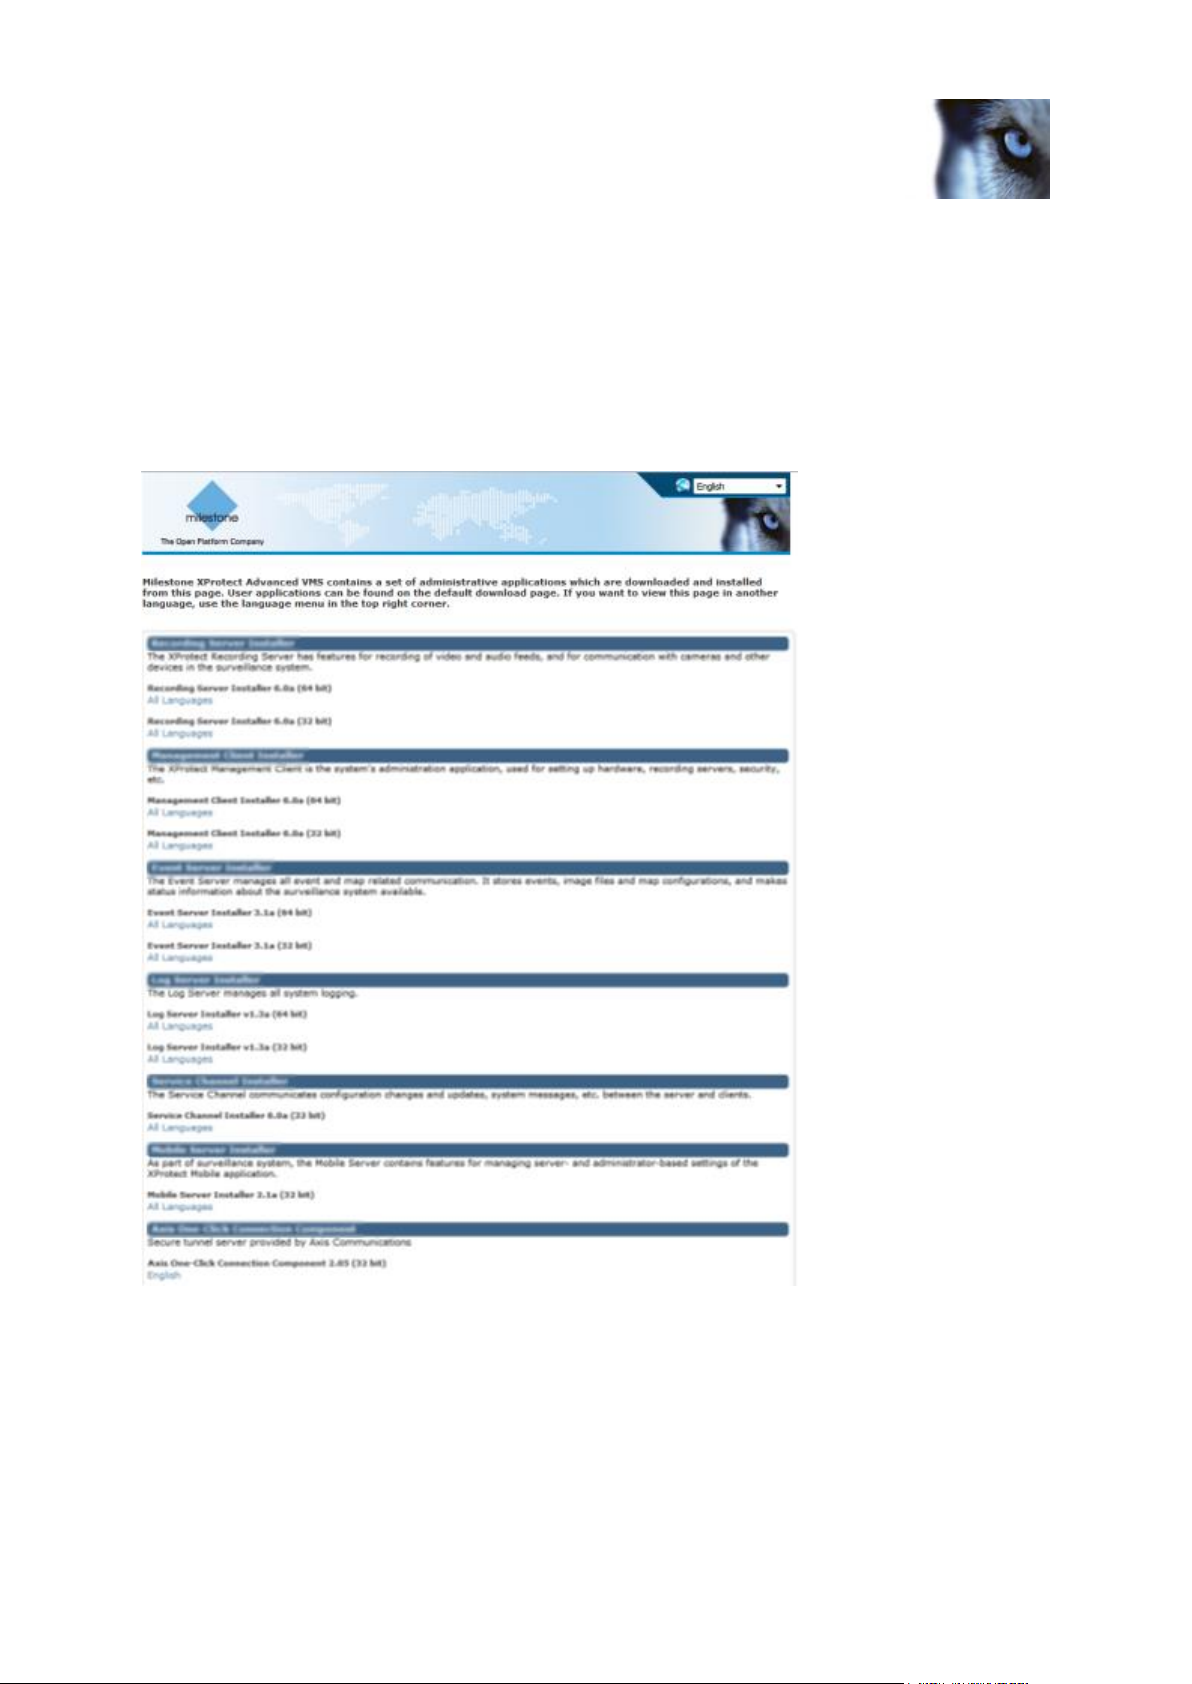
Milestone XProtect
®
Advanced
VMS 2014
For more information about XProtect Download Manager, see Download Manager/download web
page (on page 40).
Download Manager/download web page
The management server has a built-in web page. This web page enables administrators and end
users to download and install required XProtect system components from any location, locally or
remotely.
The web page is capable of displaying two sets of content, both by default in a language version
matching the language of the system installation:
One web page is targeted at administrators, enabling them to download and install key
system components. Most often the web page is automatically loaded at the end of the
management server installation and the default content is displayed. On the management
server, you can access the web page from Windows’ Start menu, select Programs,
Milestone, Administrative Installation Page. Otherwise you can enter the URL:

Milestone XProtect
®
Advanced
VMS 2014
http://[management server address]:[port]/installation/admin/
where [management server address] is the IP address or host name of the management
server, and [port] is the port number which you have configured IIS to use on the management
server. If not accessing the web page on the management server itself, log in with an account
which has administrator rights on the management server.
One web page is targeted at end users, providing them access to client applications with
default configuration. On the management server, you can access the web page from
Windows’ Start menu, select Programs, Milestone, Public Installation Page. Otherwise you
can enter the URL:
http://[management server address]:[port]/installation/
where [management server address] is the IP address or host name of the management
server, and [port] is the port number which Iyou have configured IIS to use on the
management server.
The two web pages automatically has some default content so you can use them straight away after
the installation process. As administrator however, by using the Download Manager, you can
customize what should be displayed on the web pages. You can also move components between the
two versions of the web page, that is between the one targeted at system administrators and the one
targeted at end users. To move a component, right-click it, and select the web page version you want
to move the component to.
Even if you in Download Manager can control which components users can download and install, you
cannot use it as a users’ rights management tool. Such rights are determined by roles defined in the
Management Client.
On the management server, you can access the XProtect Download Manager from Windows’ Start
menu, select Programs, Milestone, XProtect Download Manager.
Download Manager’s default configuration
The Download Manager has a default configuration. This ensures that your organization’s users can
access standard components from the start.
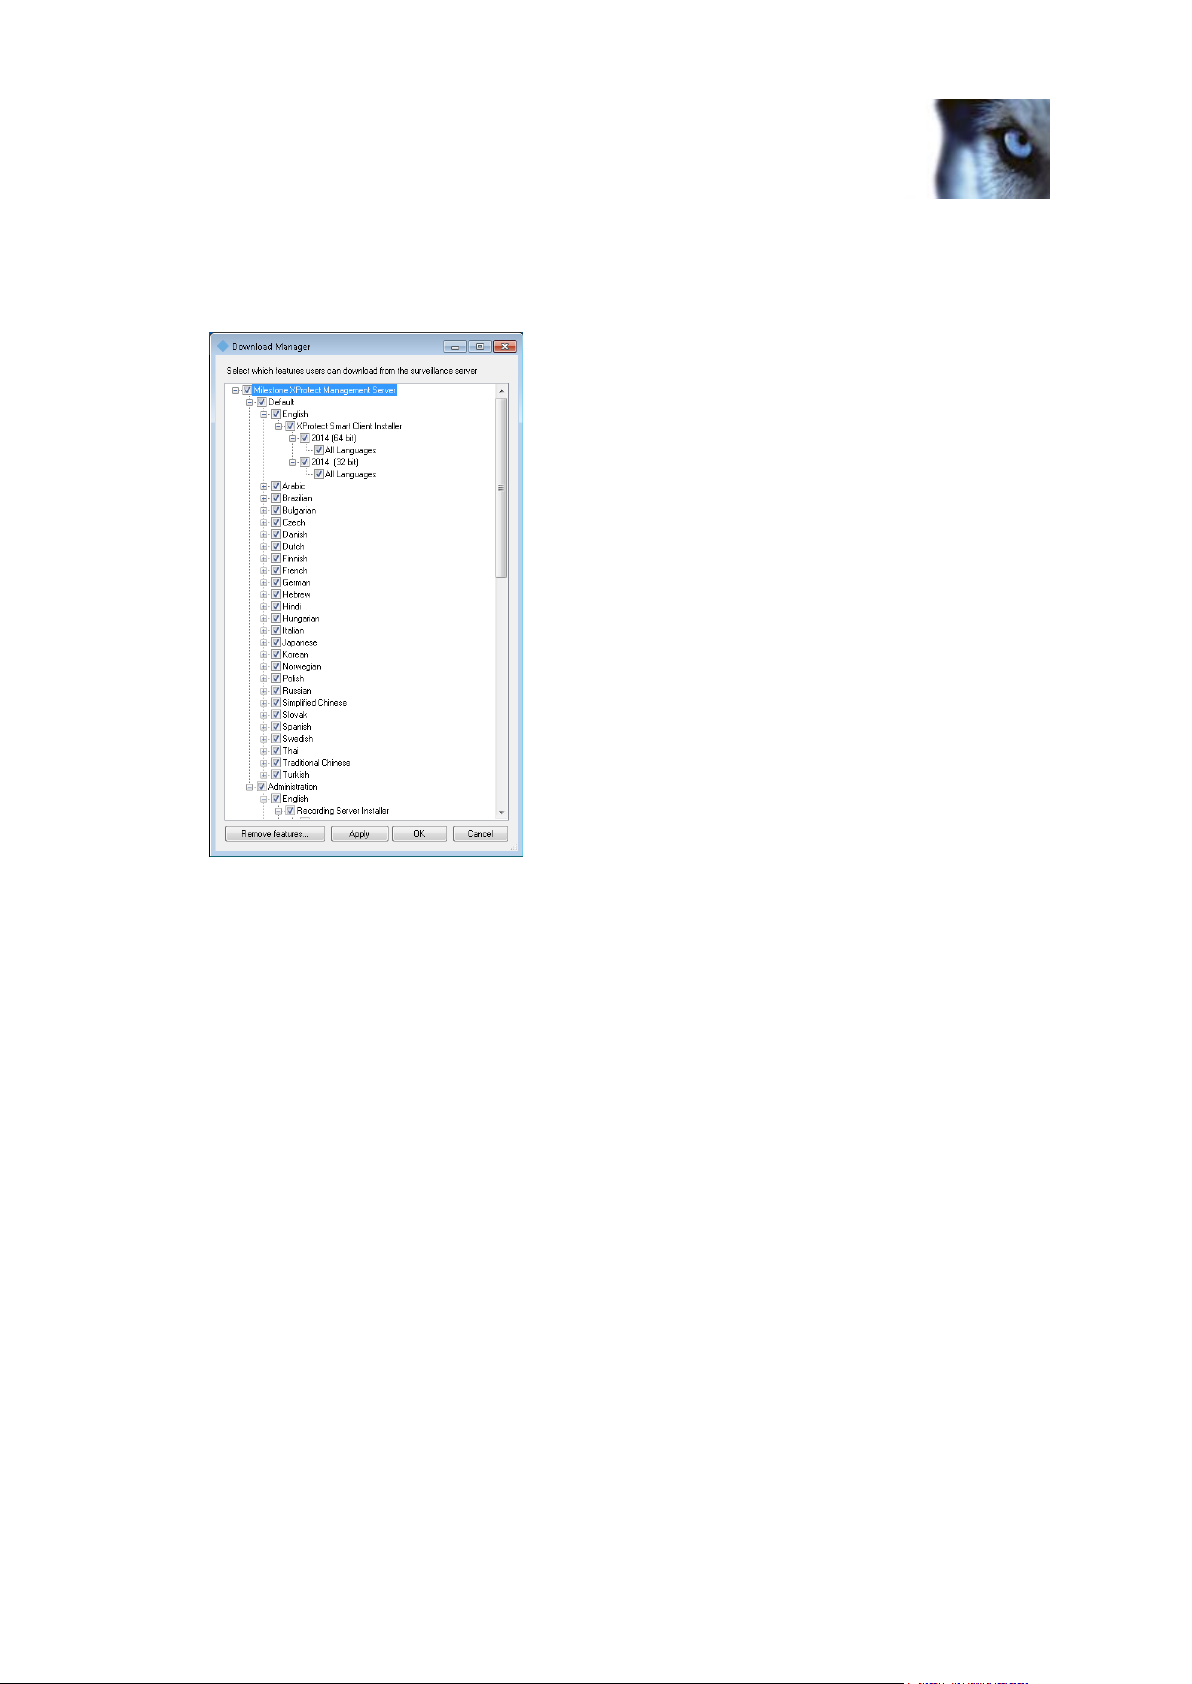
Milestone XProtect
®
Advanced
VMS 2014
The default configuration provides you a default setup with access to downloading extra or optional
components. Usually you access the web page from the management server computer, but you can
also access the web page from other computers.
The first level: Refers to your XProtect product.
The second level: Refers to the two targeted versions of the web page. Default refers to the
web page version viewed by end users. Administration refers to the web page version viewed
by system administrators.
The third level: Refers to the languages in which the web page is available.
The fourth level: Refers to the components which are — or can be made — available to users.
The fifth level: Refers to particular versions of each component, which are — or can be made —
available to users.
The sixth level: Refers to the language versions of the components which are — or can be
made — available to users.
The fact that only standard components are initially available — and only in the same language version
as the system itself — helps reduce installation time and save space on the server. There is no need to
have a component or language version available on the server if nobody uses it.
You can make more components or languages available as required and you can hide or remove
unwanted components or languages.
Download Manager’s standard installers (user)
By default, the following components are available for separate installation from the management
server’s download web page targeted at users (controlled by the Download Manager):

Milestone XProtect
®
Advanced
VMS 2014
Recording servers, including failover recording servers. Failover recording servers are initially
downloaded and installed as recording servers, during the installation process you specify that
you want a failover recording server.
Management Client
XProtect Smart Client
Event server, used in connection with map functionality
Log server, used for providing the necessary functionality for logging system information
Service channel, enables automatic and transparent configuration communication between
servers and clients
Axis One-click Connection Component — only available here
Milestone Mobile server — only available here
More options may be available in your organization.
For installation of device packs, see Device pack installer — must be downloaded (on page 45).
Add/publish Download Manager installer components
You must complete two procedures to make non-standard components and new versions available on
the management server’s download page.
First you add new and/or non-standard components to the Download Manager. Then you use it to
fine-tune which components should be available in the various language versions of the web page.
If the Download Manager is open, close it before installing new components.
Adding new/non-standard files to the Download Manager:
1. On the computer where you downloaded the component(s), go to Window’s Start, enter a
Command Promt
2. In the Command Promt, execute the name of the file (.exe) with:[space]—ss_registration
Example: RecordingServer_setup_x64.exe —ss_registration
The file is now added to the Download Manager, but not installed on the current computer.

Milestone XProtect
®
Advanced
VMS 2014
To get an overview of installer commands, in the Command Promt, type [space]—help and the
following window appears:
When you have installed new components they are by default selected in the Download Manager and
are immediately available to users via the web page. You can always show or hide features on the
web page by selecting or clearing check boxes in the Download Manager’s tree structure.
You can change the sequence in which components are displayed on the web page. In the Download
Manager’s tree structure, drag component items and drop them at the required position.
Hide/remove Download Manager installer components
You have three options:
Hide components from the web page by clearing check boxes in the Download Manager’s
tree structure. The components are still installed on the management server, and by selecting
check boxes in the Download Manager’s tree structure you can quickly make the components
available again.
Remove the installation of components on the management server. The components
disappear from the Download Manager, but installation files for the components are kept at
C:Program Files (x86)MilestoneXProtect Download Manager, so you can re-install them later
if required.
1. In the Download Manager, click Remove features.
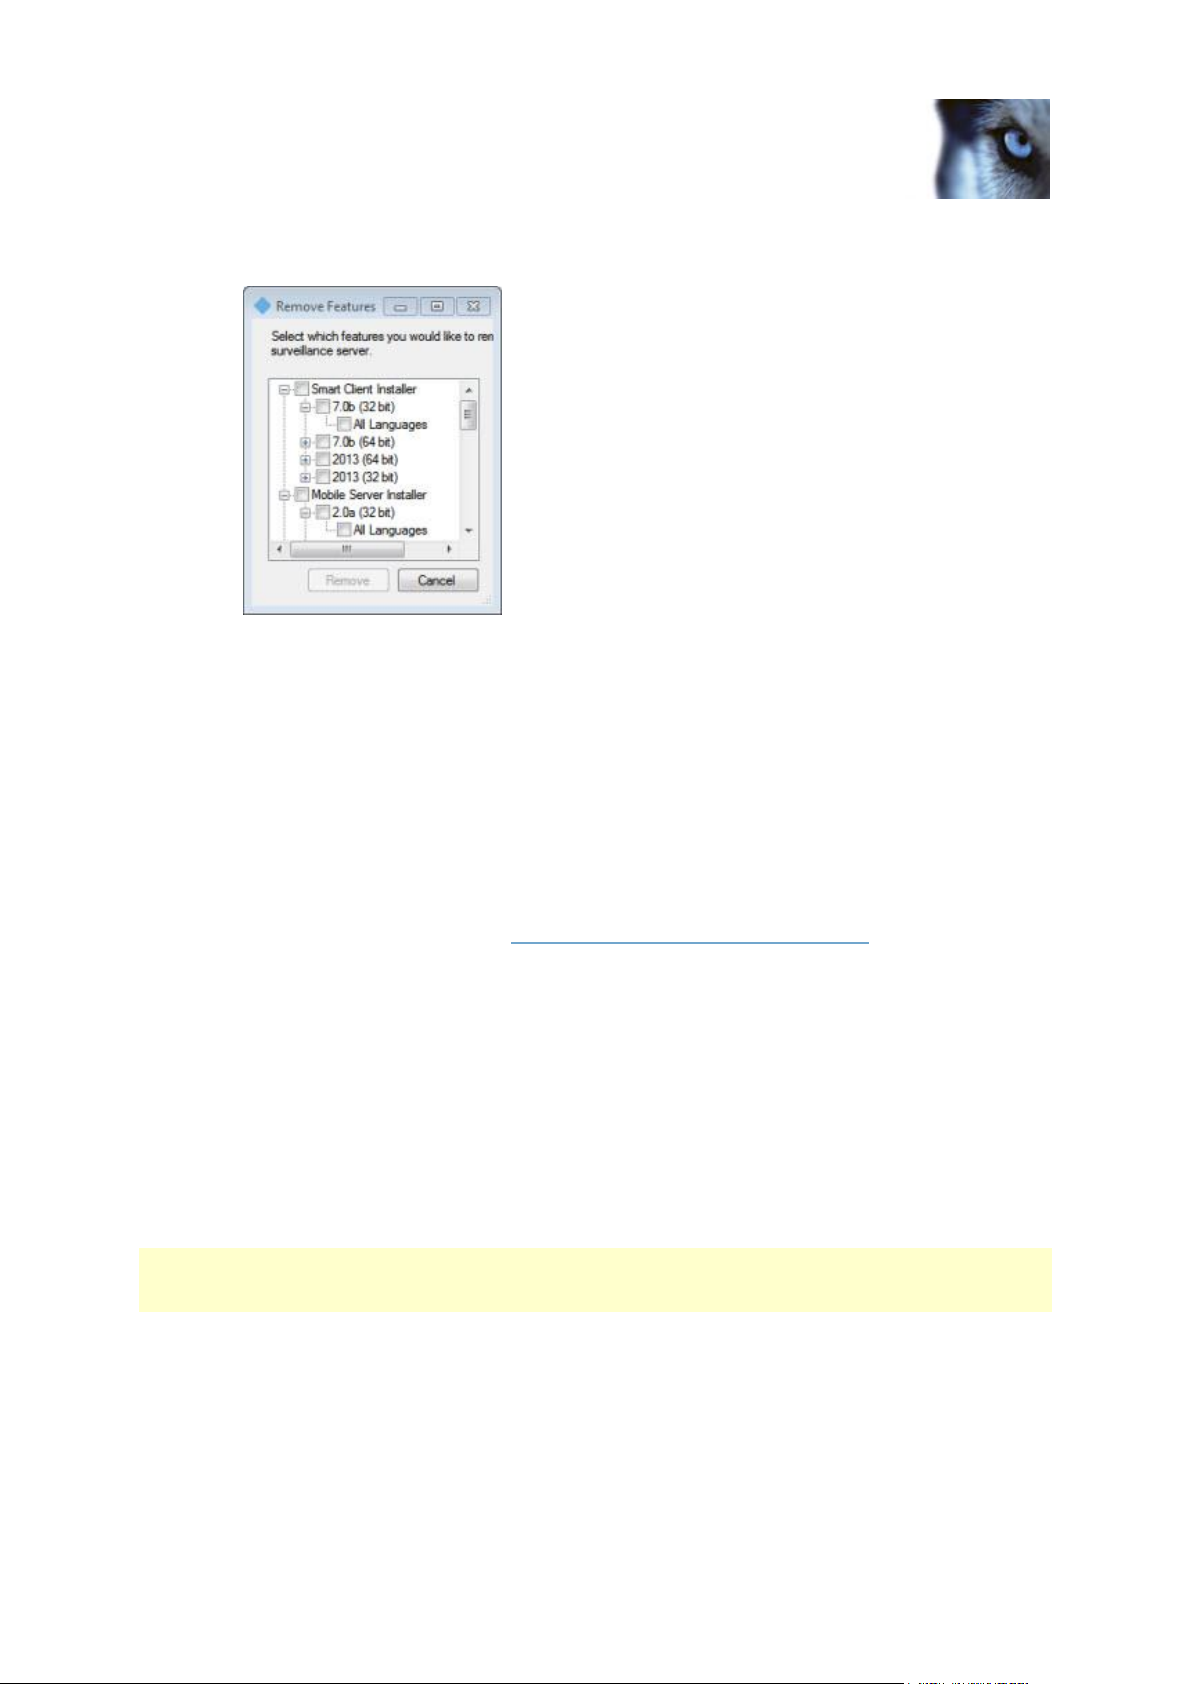
Milestone XProtect
®
Advanced
VMS 2014
2. In the Remove Features window, select the feature(s) you want to remove.
3. Click OK and Yes.
Remove installation files for non-required features from the management server. This can
help save disk space on the server if you know that your organization is not going to use
certain features.
Device pack installer — must be downloaded
The device pack (containing device drivers) included in your original installation is not included on the
download website. So, if you need to reinstall the device pack or make the device pack installer
available, you must first add or publish the latest device pack installer to the Download Manager:
1. Get the newest device pack from http://www.milestonesys.com/downloads.
2. Add/publish it to the Download Manager by calling it with the —ss_registration command.
If you do not have a network connection, you can reinstall the entire recording server from the
Download Manager. The installation files for the recording server is placed locally on your computer
and in this way you automatically get a reinstall of the device pack.
Upgrade
About upgrade
This information is only relevant if you are upgrading a previous XProtect installation.
Important: Your XProtect system no longer supports Microsoft Windows XP.
When you upgrade, all components, except the management server database, are automatically
removed and replaced. This includes the drivers of your device pack.
The management server database contains the entire system configuration (recording server
configurations, camera configurations, rules, and so on). As long as you do not remove the
management server database, no reconfiguration of your system configuration is needed, even if you
may want to configure some of the new features in the new version.

Milestone XProtect
®
Advanced
VMS 2014
Backward compatibility with recording servers from versions older than this current version is limited.
You can still access recordings on such older recording servers, but to be able to change their
configuration, they must be of the same version as this current one. Therefore, it is highly
recommended to upgrade all recording servers in your system.
When you do an upgrade including your recording servers, you are asked whether you want to update
or keep your video device drivers. If you choose to update, it might take a few minutes for your
hardware devices to make contact with the new video device drivers after restarting your system. This
is due to several internal checks being performed on the newly installed drivers.
Upgrade prerequisites
Have your temporary license (.lic) file ready. The license file changes when your SLC
changes, so you may have received a new license file when you purchased the new version.
When you install the management server, the wizard asks you to specify the location of your
license (.lic) file, which the system verifies before you can continue.
If you do not have your license file, contact your XProtect product vendor.
Have your new product version ready. If you have not purchased the software on a DVD,
you can download it from http://www.milestonesys.com/downloads.
The management server stores your system’s configuration in a database. The system
configuration database can be stored in two different ways:
o In a SQL Server Express Edition database on the management server itself
o In a database on an existing SQL Server on your network.
If using 2), you must have Administrator rights on the SQL Server whenever you want to
create, move or upgrade the management server’s system configuration database on the SQL
Server. Once you are done creating, moving or updating, being the database owner of the
management server’s system configuration database on the SQL Server is sufficient.
When you are ready to start the upgrade, follow the procedures in Install the system (on page 30).
Alternative upgrade for workgroup
If you do not use a domain setup, but a workgroup setup, you must do the following when you
upgrade:
1. On the recording server, create a local Windows user.
2. From the Windows Control Panel, find the Milestone XProtect Data Collector service.
Right-click it, select Properties, and select the Log on tab. Set the Data Collector service to
run as the local windows user you just created on the recording server.
3. On the management server, create the same local Windows user (with the same user name
and password).
4. In the Management Client, add this local Windows user to the Administrator‘s group.
For installing with workgroups, see Installation for workgroups (on page 34).

Milestone XProtect
®
Advanced
VMS 2014
First time use
Best practices
Protect recording databases from corruption
You can select which action to take if a camera database becomes corrupted. The actions include
several database repair options. While it is good to have such options, Milestone recommends that
you take steps to ensure that your camera databases do not become corrupted.
Hard disk failure: protect your drives
Hard disk drives are mechanical devices and are vulnerable to external factors. The following are
examples of external factors which may damage hard disk drives and lead to corrupt camera
databases:
Vibration (make sure the surveillance system server and its surroundings are stable)
Strong heat (make sure the server has adequate ventilation)
Strong magnetic fields (avoid)
Power outages (make sure you use an Uninterruptible Power Supply (UPS))
Static electricity (make sure you ground yourself if you are going to handle a hard disk drive).
Fire, water, etc. (avoid)
Windows Task Manager: be careful when you end processes
When you work in Windows Task Manager, be careful not to end any processes which affect the
surveillance system. If you end an application or system service by clicking End Process in the
Windows Task Manager, the process is not be given the chance to save its state or data before it is
terminated. This may lead to corrupt camera databases.
Windows Task Manager typically displays a warning if you attempt to end a process. Unless you are
absolutely sure that ending the process is not going to affect the surveillance system, click No when
the warning message asks you if you really want to terminate the process.
Power outages: use a UPS
The single-most common reason for corrupt databases is the recording server being shut down
abruptly, without files being saved and without the operating system being closed down properly. This
may happen due to power outages, due to somebody accidentally pulling out the server’s power cable,
or similar.
The best way of protecting your recording servers from being shut down abruptly is to equip each of
your recording servers with a UPS (Uninterruptible Power Supply).

Milestone XProtect
®
Advanced
VMS 2014
The UPS works as a battery-driven secondary power source, providing the necessary power for
saving open files and safely powering down your system in the event of power irregularities. UPSs
vary in sophistication, but many UPSs include software for automatically saving open files, for alerting
system administrators, etc.
Selecting the right type of UPS for your organization’s environment is an individual process. When you
assess your needs, however, bear in mind the amount of runtime you require the UPS to be able to
provide if the power fails. Saving open files and shutting down an operating system properly may take
several minutes.
About daylight saving time
Daylight saving time (DST) is the practice of advancing clocks in order for evenings to have more
daylight and mornings to have less. The use of DST varies between countries/regions.
When you work with a surveillance system, which is inherently time-sensitive, it is important that you
know how the system handles DST.
Spring: Switch from Standard Time to DST
The change from standard time to DST is not much of an issue since you jump one hour forward.
Typically, the clock jumps forward from 02:00 standard time to 03:00 DST, and the day has 23 hours.
In that case, there is no data between 02:00 and 03:00 in the morning since that hour, for that day, did
not exist.
Fall: Switch from DST to Standard Time
When you switch from DST to standard time in the fall, you jump one hour back. Typically, the clock
jumps backward from 02:00 DST to 01:00 standard time, repeating that hour, and the day has 25
hours. In that case, you reach 01:59:59, then immediately revert back to 01:00:00. If the system did
not react, it would essentially re-record that hour, so the first instance of, for example, 01:30 would be
overwritten by the second instance of 01:30.
Because of this, your system forcefully archives the current video in the event that the system time
changes by more than five minutes. The first instance of the 01:00 hour is not viewable directly from
clients. However, the data is recorded and safe, and it can be browsed using the XProtect Smart
Client by opening the archived database directly.
About time servers
Once your system receives images, they are instantly time-stamped. Since cameras are separate
units which may have separate timing devices, camera time and your system time may not correspond
fully. This may occasionally lead to confusion. If your cameras support timestamps, Milestone
recommends that you auto-synchronize camera and system time through a time server for consistent
synchronization.
For information about how to configure a time server, search www.microsoft.com for time server, time
service, or similar.
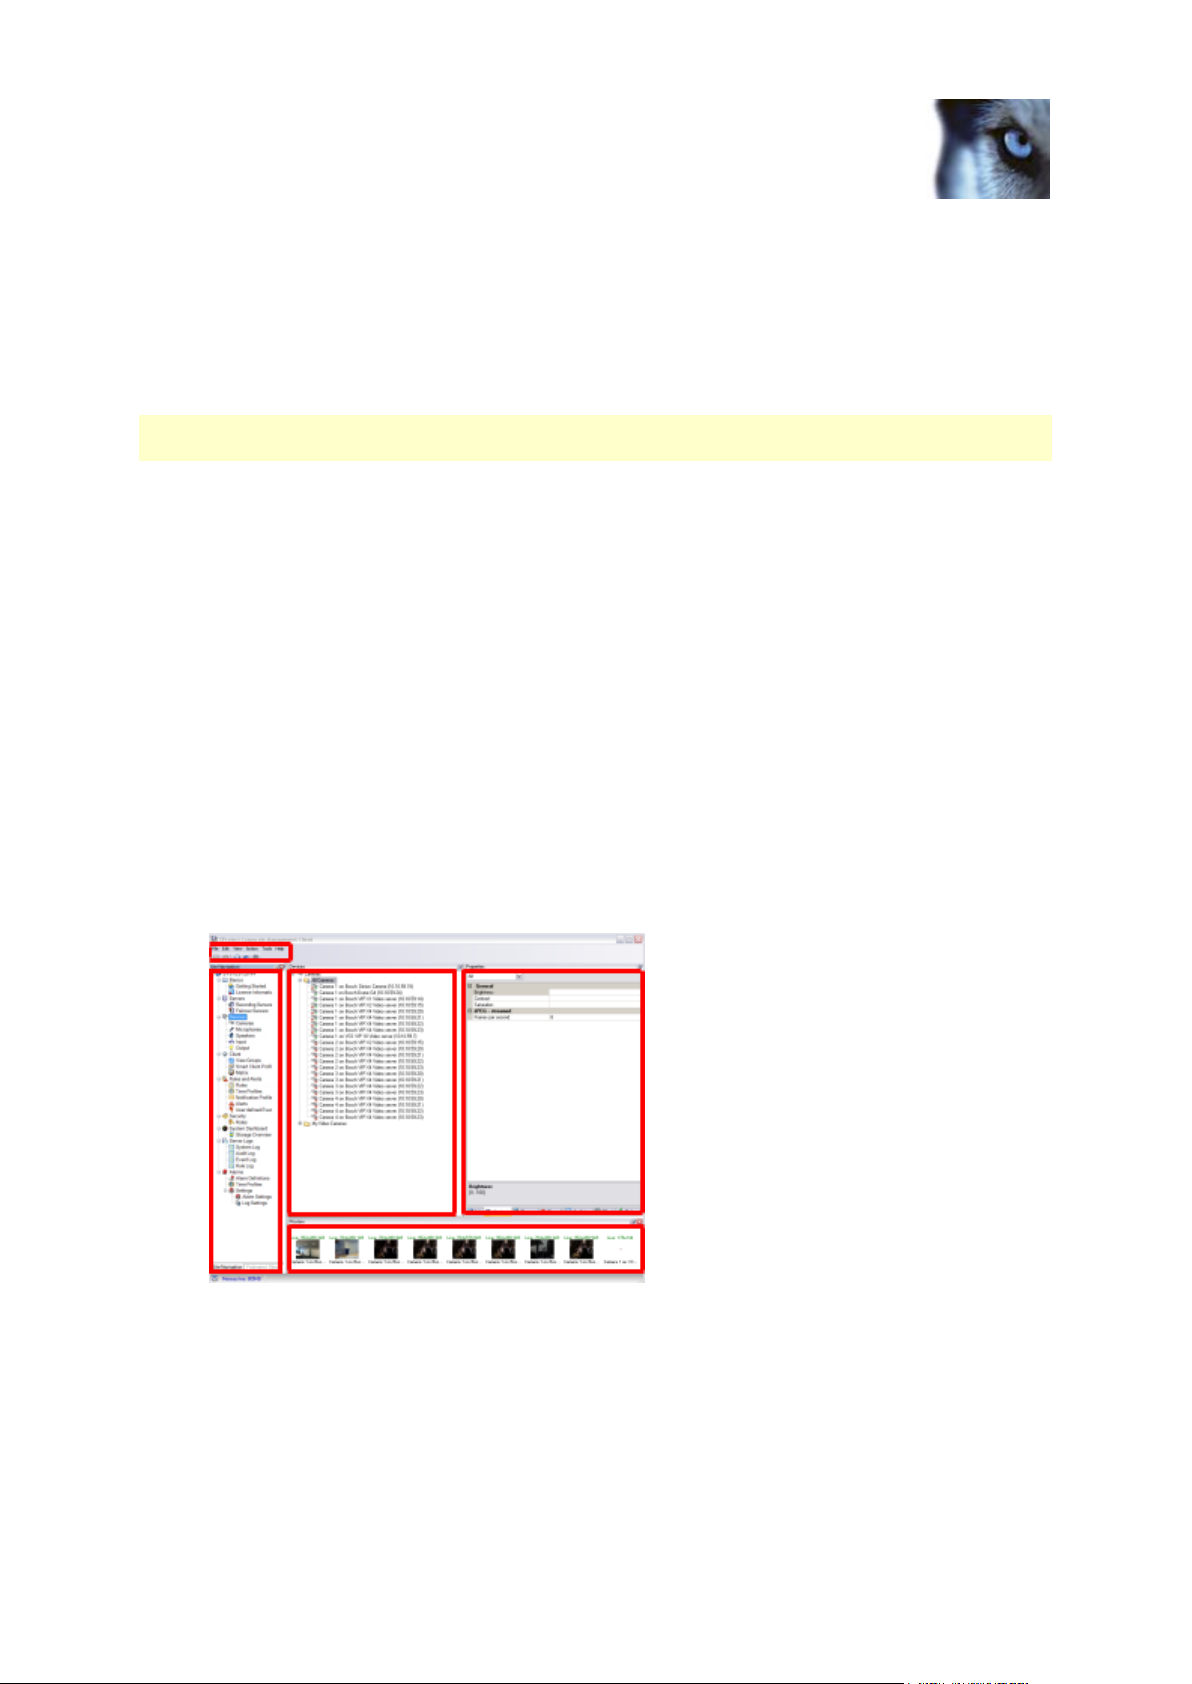
Milestone XProtect
®
Advanced
VMS 2014
Management Client overview
About login authorization
If you encounter a second dialog during login, you need additional login authorization to get access to
the Management Client.
When you log into the Management Client, you may be asked to for additional authorization of your
login. You need a person who has the rights to authorize you to enter their credentials in the
authorization login window.
If you do not know who can authorize you, ask your system administrator.
Management Client window
The Management Client window is divided into panes. The number of panes and layout depend on
your:
system configuration
task
available functions.
Below are some examples of typical layouts:
When you work with recording servers and devices:
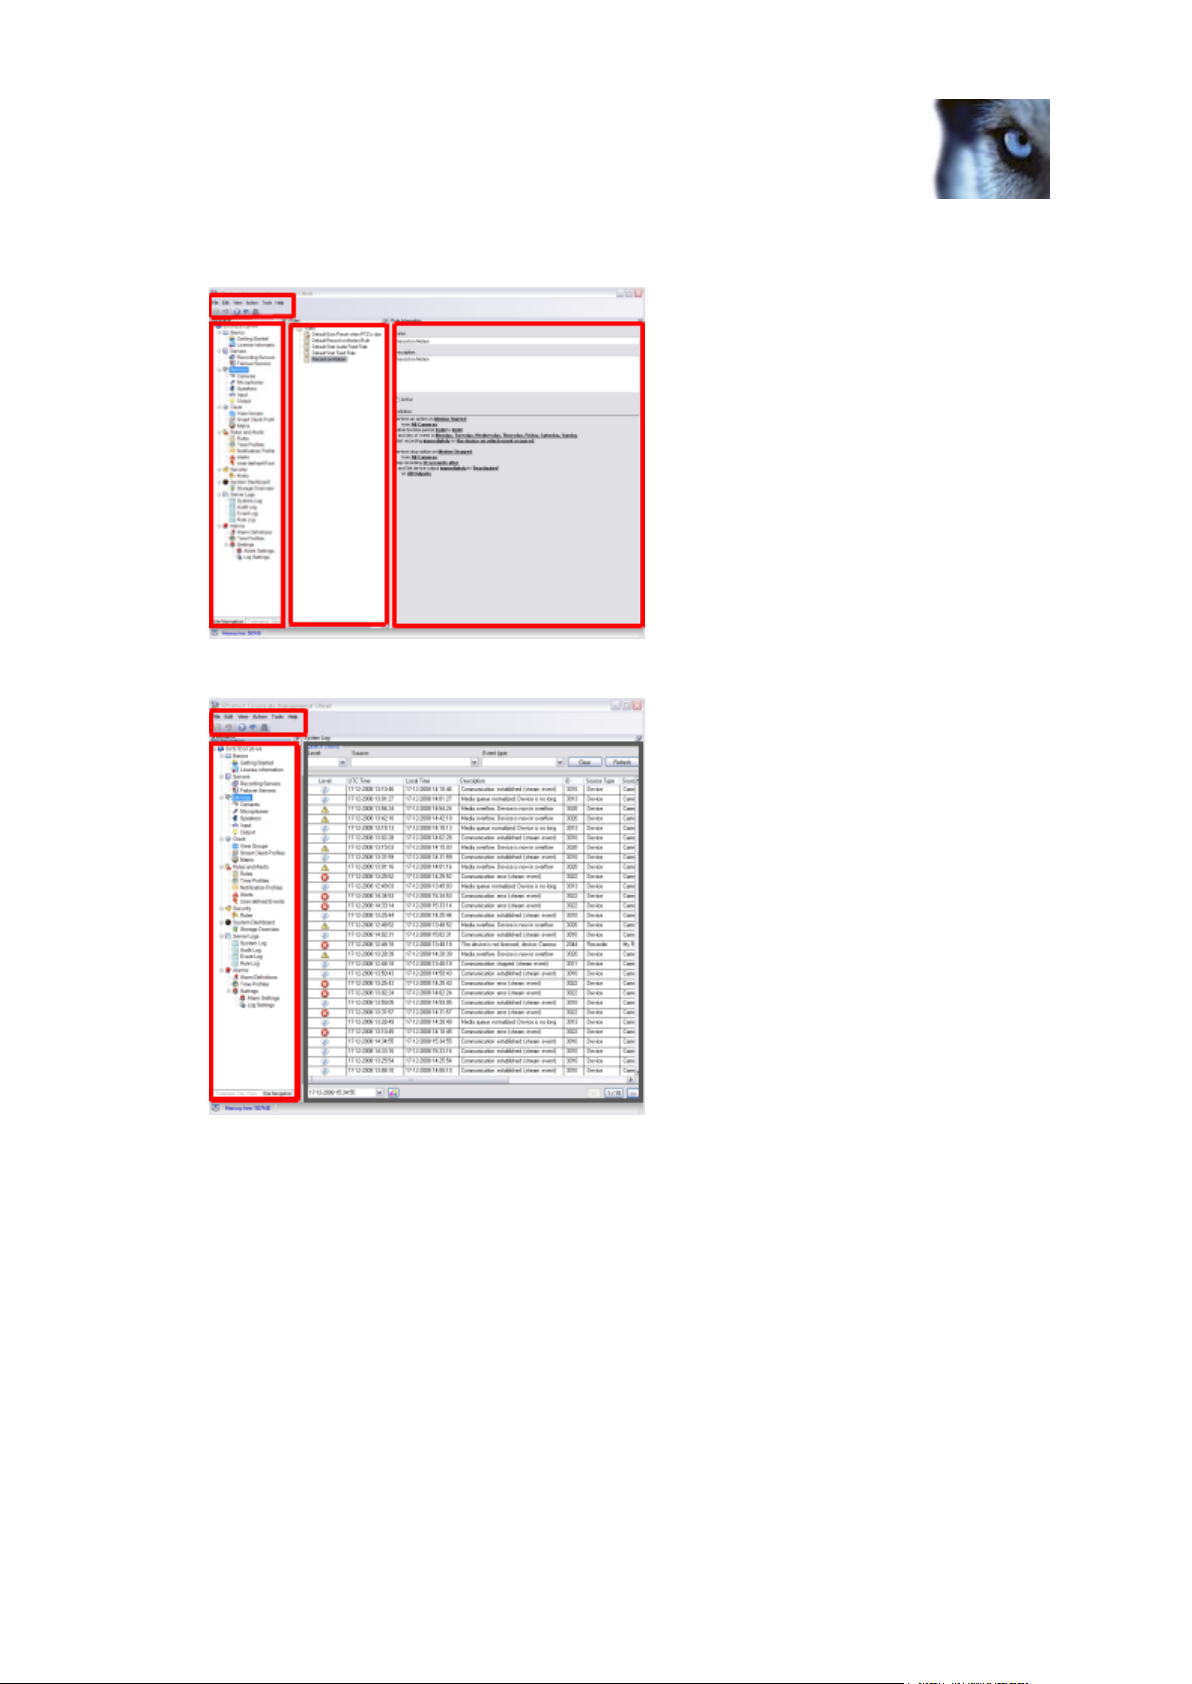
Milestone XProtect
®
Advanced
VMS 2014
When you work with rules, time and notification profiles, users, roles:
When you view logs:
 Loading…
Руководство пользователя подключаемого модуля Allied Telesis Milestone Integration системы управления видео
Введение
Подключаемый модуль Allied Telesis Milestone Integration Plug-In — это дополнение к системе управления видео Milestone (VMS), обеспечивающее удобный доступ к общим функциям управления портами и коммутаторами для коммутаторов AlliedWare Plus с поддержкой Power over Ethernet (PoE).
Milestone VMS — это широко используемая система для управления камерами видеонаблюдения и записями. Камеры наблюдения часто подключаются к коммутаторам PoE для упрощения прокладки кабелей и обслуживания. Благодаря интеграции функций управления коммутаторами AlliedWare Plus в саму систему VMS Milestone пользователи могут выполнять такие задачи, как перезагрузка камер и управление распределением мощности портов, без необходимости подключения к отдельному пользовательскому интерфейсу.
Системные требования
Требования к оборудованию
Подключаемый модуль Allied Telesis Milestone Integration Plug-In совместим со следующими коммутаторами AlliedWare Plus с поддержкой PoE:
- AT-x230-10GP
- AT-x230-18GP
- AT-x230-28GP
- AT-x530-28GPXm
- AT-x530-52GPXm
- AT-x530DP-28GHXm
- AT-x530DP-52GHXm
- AT-x530L-28GPX
- AT-x530L-52GPX
- AT-x930-28GPX
- AT-x930-52GPX
- AT-FS980M/9PS
- AT-FS980M/18PS
- AT-FS980M/28PS
- AT-FS980M/52PS
- AT-GS970M/10PS
- AT-GS970M/18PS
- AT-GS970M/28PS
- AT-IE300-12GP
- AT-IE340-12GP
Требования к ПО
Коммутаторы AlliedWare Plus должны работать под управлением AlliedWare Plus 5.5.0-1.4 или более поздней версии.
Подключаемый модуль Allied Telesis Milestone Integration Plug-In был протестирован с программным пакетом Milestone XProtect 2020, работающим в Microsoft Windows. Совместимость с более ранними версиями программного обеспечения Milestone XProtect не гарантируется.
Рекомендуется установить браузер Google Chrome или Mozilla Firefox в качестве браузера по умолчанию, чтобы использовать AlliedWare Plus. webна основе графического пользовательского интерфейса.
Ограничения и ограничения
Подключаемый модуль Allied Telesis Milestone Integration Plug-In в настоящее время не предназначен для использования с коммутаторами, сконфигурированными в режимах стекирования виртуальных шасси (VCStack).
Подключаемый модуль Allied Telesis Milestone Integration Plug-In в настоящее время не управляет настройками питания на «запасных» линиях Ethernet. Эти линии (контакты 4, 5, 7 и  используются в конфигурациях PoE «Mode-B» и «High-Power» (60 Вт) на некоторых коммутаторах AlliedWare Plus, таких как AT IE300. Плагин следует использовать для настройки портов коммутатора в конфигурациях «Mode-A».
Конфигурация сети
Рекомендуемая конфигурация сети Milestone VMS включает отдельные сети для камер и клиентских машин. Это помогает обеспечить безопасность (путем отделения портов коммутатора в сети камер, которые могут быть физически открыты для потенциальных злоумышленников, от внутренних сетей управления) и помогает предотвратить использование пропускной способности клиентской сети видеотрафиком с камер.
Однако при использовании подключаемого модуля Allied Telesis для управления коммутаторами PoE Allied Telesis, подключенными к сети камер, требуется прямое сетевое подключение между коммутатором и компьютерами, на которых установлено программное обеспечение XProtect Client. Для обеспечения безопасности и производительности сети рекомендуется использовать на коммутаторе отдельные VLAN для интерфейса управления и портов камеры.
В бывшемampВ приведенном выше примере брандмауэр UTM AR4050S используется в клиентской сети, а PoE-коммутатор IE300-12GP используется в сети камеры. Если предположить, что порт 1.0.1 на IE300 подключен напрямую к AR4050S, а клиентская сеть настроена на диапазон адресов 192.168.15.0/24, конфигурация для IE300-12GP будет примерно такой:
Благодаря наличию портов камеры PoE в другой VLAN, отличной от интерфейса управления восходящим каналом, клиентская сеть остается логически отделенной от сети камер. Следует позаботиться о том, чтобы восходящие порты коммутатора PoE были физически защищены от вторжения.
Доступ к TCP-порту
Если между клиентской сетью и сетью камер настроен брандмауэр, подключаемому модулю интеграции Allied Telesis Milestone требуется доступ к следующим портам протокола TCP:
- TCP-порт 443 (протокол HTTPS)
- TCP-порт 22 (протокол SSH) и/или TCP-порт 23 (протокол Telnet)
Установка программного обеспечения
Запуск установщика
Перед установкой подключаемого модуля Allied Telesis Milestone Integration Plug-In закройте Milestone XProtect Smart Client и Milestone XProtect Management Client, если они запущены.
Откройте исполняемый файл установщика приложения. (Номер версии может отличаться отampле ниже).
Разрешите приложению продолжить работу, нажав «Да» в диалоговом окне контроля учетных записей:
Нажмите кнопку «Установить», чтобы начать установку.
Установщик попытается остановить и перезапустить фоновые службы Milestone в процессе установки:
Нажмите «Готово», чтобы завершить установку.
Устранение неполадок в процессе установки
Если установка не удалась, убедитесь, что Milestone XProtect Smart Client и Milestone XProtect Management Client не запущены. Также убедитесь, что нет file окна проводника открываются в папке Milestone в папке Program Files вашего жесткого диска.
Вам также может потребоваться вручную остановить службу Milestone Event Server. Это можно сделать, щелкнув правой кнопкой мыши значок на панели инструментов и выбрав «Остановить службу сервера событий»:
Прекращение работы службы может занять некоторое время; значок будет показывать красный треугольник, когда служба полностью остановлена.
Кроме того, вы можете остановить службу с помощью утилиты Microsoft Windows Services:
Найдите службу Milestone XProtect Event Server и нажмите «Остановить службу».
Удаление
Чтобы удалить подключаемый модуль, перейдите в раздел «Программы и компоненты» панели управления Windows, выберите «Подключаемый модуль интеграции Allied Telesis Milestone» и нажмите «Удалить или изменить программу». Следуйте инструкциям для завершения удаления.
Обратите внимание, что любая конфигурация в приложении Milestone, связанная с подключаемым модулем, не будет удалена при удалении подключаемого модуля. Перед удалением подключаемого модуля рекомендуется удалить любую конфигурацию, связанную с коммутатором Allied Telesis, с помощью Milestone XProtect Management Client.
Применение
Предпосылки
Для использования подключаемого модуля Allied Telesis Milestone Integration Plug-In камеры и коммутационные устройства Allied Telesis должны быть подключены кабелями и включены. Используйте командную строку AlliedWare Plus или webпользовательский интерфейс для настройки основных параметров, таких как IP-интерфейс управления коммутатором и учетные данные пользователя-администратора. При необходимости обновите программное обеспечение AlliedWare Plus на коммутаторе.
Дополнительные сведения о настройке коммутатора AlliedWare Plus см. в следующих руководствах:
- Начало работы с интерфейсом командной строки AlliedWare Plus
- список всех функций AlliedWare Plus Overview и руководства по настройке
Настройка камер
Для установки камер используйте мастер установки оборудования в Milestone XProtect Management Client. Щелкните правой кнопкой мыши ранее настроенный сервер записи и выберите «Добавить оборудование». Система подскажет вам процесс обнаружения и настройки камер в системе.
Примечание: полную документацию по программному пакету Milestone XProtect можно найти по адресу https://www.milestonesys.com/support/self-service-and-support/manuals-and-guides/
Настройка коммутаторов ATI
Чтобы добавить коммутатор в конфигурацию, щелкните правой кнопкой мыши элемент «Коммутаторы ATI» в группе «Устройства» в левом дереве навигации Milestone XProtect Management Client и выберите «Добавить новый».
Введите имя переключателя и нажмите «ОК».
Отобразится страница конфигурации коммутатора.
Введите следующую обязательную информацию:
- IP-адрес: Введите IPv41-адрес управления коммутатора. Этот адрес должен быть доступен с машин, на которых установлены Milestone XProtect Smart Client и Milestone XProtect Management Client.
- Имя пользователя: Введите имя пользователя учетной записи, которая имеет доступ к коммутатору. Выбранный пользователь должен иметь привилегии конфигурирования (уровень привилегий 15) на коммутаторе для выполнения административных действий. Пользователи с уровнем привилегий 7 или выше могут view конфигурации коммутатора, но не может вносить изменения.
- Пароль: Введите пароль, связанный с указанной учетной записью пользователя. Пароль внутренне зашифрован в сохраненной конфигурации и не отображается на экране в целях безопасности.
- Умный клиентский доступ: Выберите, какие пользователи могут иметь доступ для записи к коммутатору через Milestone XProtect Smart Client. Доступ может быть ограничен ролями, которые назначаются с помощью инструмента «Роли» в разделе «Безопасность» в левом навигационном меню. Дополнительные сведения о ролях см. в документации Milestone.
- Подключить через: Выберите HTTPS/SSH или HTTPS/Telnet. Некоторые операции требуют, чтобы подключаемый модуль подключался к коммутатору с помощью внутреннего протокола SSH или Telnet. Доступ через Telnet используется по умолчанию. Чтобы использовать SSH для повышения безопасности, на коммутаторе должна быть включена служба SSH, а указанная учетная запись пользователя должна быть настроена для доступа по SSH. Если указанная служба (либо SSH, либо Telnet) не включена на коммутаторе, подключаемый модуль предоставит возможность автоматического включения службы.
Обратите внимание, что это приведет к записи текущей конфигурации коммутатора во флэш-память коммутатора. file system в качестве конфигурации загрузки по умолчанию.
После ввода этих параметров рекомендуется нажать кнопку «Проверить соединение», чтобы убедиться в правильности настроек. (Если был введен неправильный пароль, попытка использовать подключаемый модуль может привести к тому, что указанный пользователь будет временно заблокирован для доступа к коммутатору из-за слишком большого количества неправильных попыток ввода пароля.) Если возникает ошибка с «Test Connection», убедитесь, что сетевое подключение к коммутатору существует, и все параметры введены правильно.
Если «Проверка подключения» выполнена успешно, сохраните конфигурацию, используя значок сохранения в левом верхнем углу, или нажмите Ctrl-S.
Связывание камер с портами коммутатора ATI
Для более удобного управления портами коммутатора можно использовать Milestone XProtect Management Client для связывания камер с портами коммутатора. Если коммутаторы и камеры включены и подключены, эту ассоциацию можно легко выполнить с помощью подключаемого модуля интеграции Allied Telesis Milestone. Нажмите кнопку «Запросить порты».
Плагин запросит у коммутатора список его портов и определит, были ли обнаружены какие-либо камеры на этих портах. Когда появится список портов, нажмите «Автоматическое назначение камер», чтобы автоматически связать все обнаруженные камеры с соответствующими портами. В качестве альтернативы используйте меню выбора рядом с каждым портом, чтобы выбрать камеру для связи. После того, как нужные ассоциации камер будут выполнены, сохраните конфигурацию, используя значок сохранения в левом верхнем углу, или нажмите Ctrl-S.
Обратите внимание, что камеры, которые ранее были назначены портам на других коммутаторах, не могут быть связаны с портами с помощью этой формы. Камеры, которые не были обнаружены коммутатором, также недоступны для ассоциации. Если вы хотите обойти процесс автоматического обнаружения и назначения камер, существует альтернативный механизм. Выберите камеру, которую вы хотите связать, в разделе «Камеры» в группе «Устройства» в левом дереве навигации. Щелкните вкладку «ATI» в ряду вкладок в нижней части панели «Свойства». (Если вкладка «ATI» не отображается, используйте стрелку вправо в правом нижнем углу панели для прокрутки списка вкладок.)
На панели подключаемых модулей выберите переключатель для привязки к камере в раскрывающемся меню «Имя переключателя». (Вы также можете ввести имя коммутатора в поле, если нужный коммутатор еще не настроен.)
Вы можете ввести имя порта, к которому должна быть привязана камера, в поле «Switch Port».
Если коммутатор включен и подключен, вы можете нажать кнопку «Получить список портов», чтобы получить список портов с коммутатора. Это превращает поле в раскрывающееся меню, из которого вы можете выбрать из списка доступных портов. Кроме того, если камера была обнаружена на одном из портов в списке, можно использовать кнопку «Предложить» для автоматического выбора этого порта.
После создания нужной ассоциации камер сохраните конфигурацию с помощью значка сохранения в левом верхнем углу или нажмите Ctrl-S.
Управление данными коммутатора и настройками питания
После настройки коммутаторов и камер Milestone XProtect Smart Client можно использовать для простого и удобного управления настройками коммутаторов Allied Telesis и их портов. В Smart Client выберите вкладку «ATI» на панели вкладок в верхней части окна. Выберите переключатель для управления из списка в левой части окна.
Плагин отобразит информацию о коммутаторе, включая модель оборудования и текущую версию программного обеспечения. Он также покажет список портов в таблице в правом верхнем углу со сводной информацией о состоянии:
- Компания порт столбец показывает имя порта.
- Компания On Столбец указывает, включен ли порт административно для передачи данных.
- Компания PoE столбец показывает, подается ли питание через Ethernet на порт.
- Компания Питания Рисовать Столбец показывает, сколько энергии в настоящее время потребляет устройство, подключенное к порту.
- Компания Максимальное распределение В столбце указано максимальное количество энергии, которое коммутатор будет выделять порту. Это может быть основано на назначенном статическом максимуме или классе мощности устройства.
- В столбце Camera указано, какая камера связана с портом.
Чтобы изменить настройки порта, выберите порт из таблицы, щелкнув по нему. Информация о порте появится на панели справа внизу.
На этой панели можно изменить настройки порта, в том числе:
- Порт включен: административно включать или отключать порт для передачи данных.
- Питание через Ethernet: включить или отключить Power over Ethernet на порту.
- Безопасность порта: включить защиту порта, которая ограничивает доступ к порту для одного устройства.
- Максимальная мощность: определить максимальное количество энергии, которое могут потреблять устройства на порту.
Выберите «Авто», чтобы максимальная потребляемая мощность определялась классом мощности устройства. Обратите внимание, что значение «Авто» рекомендуется для коммутаторов Allied Telesis, поддерживающих динамическое распределение мощности.
Обратите внимание, что элементы управления будут отключены (выделены серым цветом), если текущий пользователь не имеет права записи на коммутатор, как это назначено в конфигурации в Milestone XProtect Management Client.
После изменения настроек порта выберите «Применить», чтобы применить изменения, или «Отмена», чтобы отменить их. Затем, чтобы записать изменения в загрузочную конфигурацию коммутатора (чтобы они сохранялись после перезагрузки коммутатора), нажмите кнопку «Write Boot Config» на панели внизу слева. Кнопка будет выделена после операции «Применить», чтобы напомнить вам, что эта опция доступна.
Другие операции переключения
Чтобы перезагрузить коммутатор, нажмите кнопку «Reboot Switch». Это может быть сделано для восстановления коммутатора, который работает неправильно, или для возврата конфигурации коммутатора к последней сохраненной загрузочной конфигурации.
Для выполнения других действий с коммутатором нажмите кнопку «Открыть в браузере». Это вызовет встроенный графический пользовательский интерфейс коммутатора по умолчанию. web браузер. Обратите внимание, что Internet Explorer не поддерживается webпользовательский интерфейс; рекомендуется выбрать Google Chrome или Mozilla Firefox в качестве браузера по умолчанию.
Обычное администрирование и восстановление камеры
Пользователи, отслеживающие видео с помощью вкладки «Прямой эфир» Milestone XProtect Smart Client, могут использовать удобный интерфейс для административного отключения порта, связанного с камерой, или отключения питания порта. Для бывшегоampнапример, сотрудник службы безопасности может захотеть временно отключить порт, чтобы остановить запись видео; или офицер может захотеть отключить, а затем снова подать питание на порт, чтобы восстановить камеру, которая не отвечает.
На вкладке «Живое» Smart Client, если боковая панель слева не видна, нажмите кнопку «Показать панель» в верхнем левом углу экрана, сразу под панелью вкладок.
Подключаемый модуль Allied Telesis Milestone Integration Plug-In будет доступен в разделе «Подключаемые модули MIP» на левой панели. Если окно камеры выбрано и камера связана с коммутатором и портом Allied Telesis, информация об этом коммутаторе и порте будет отображаться на панели подключаемых модулей.
Чтобы административно включить или отключить порт, установите или снимите флажок «Порт включен». Чтобы подать или отключить питание камеры от порта, установите или снимите флажок «Питание через Ethernet». Нажмите «Применить», чтобы применить любые изменения. Обратите внимание, что элементы управления будут отключены (выделены серым цветом), если текущий пользователь не имеет права записи на коммутатор, как это назначено в конфигурации в Клиент управления Milestone XProtect.
Любые сделанные здесь изменения не будут постоянными (т. е. они не будут записаны в загрузочную конфигурацию коммутатора). Чтобы сделать изменения постоянными, перейдите на вкладку «ATI» и используйте кнопку «Write Boot Config», как описано в разделе «Управление данными коммутатора и настройками питания» выше.
Регистрация доступа пользователей
Операции, выполняемые с помощью Milestone XProtect Smart Client и влияющие на конфигурацию коммутатора, записываются в систему регистрации событий Microsoft Windows на компьютере, на котором размещен сервер записи. (Обратите внимание, что для включения ведения журнала на этом компьютере должна быть запущена служба Milestone Event Server.) к view журналы, откройте событие Microsoft Windows Viewприложение:
В разделе «Журналы приложений и служб» выберите элементы «Операции коммутатора Allied Telesis». Для каждого изменения, внесенного в конфигурацию коммутатора, будет отображаться журнал с указанием пользователя, внесшего изменение, и выполненной операции.
Штаб-квартира в Северной Америке | 19800 Норт-Крик Паркуэй | Люкс 100 | Ботелл | ВА 98011 | США | Т: +1 800 424 4284 | Ф: +1 425 481 3895
Штаб-квартира в Азиатско-Тихоокеанском регионе | 11 Тай Сен Ссылка | Сингапур | 534182 | Т: +65 6383 3832 | Ф: +65 6383 3830
Операции в регионе EMEA и CSA | Инчхонвег 7 | 1437 ЕК Розенбург | Нидерланды | Т: +31 20 7950020 | Ф: +31 20 7950021
© 2022 Allied Telesis, Inc. Все права защищены. Информация в этом документе может быть изменена без предварительного уведомления. Все названия компаний, логотипы и дизайны продуктов, являющиеся товарными знаками или зарегистрированными товарными знаками, являются собственностью соответствующих владельцев.
![]()