Аудиооборудование: Руководства по эксплуатации
Материал из MMC Manuals
Перейти к навигации
Перейти к поиску
Руководства по эксплуатации аудиосистем Mitsubishi: Smartphone Link Display Audio (SDA, Mitsubishi Connect), MMCS SD/CD (NR-242), MMCS HDD/DVD (NR-261), MMES, Hands Free Link System, Mitsubishi Яндекс.Авто и прочих.
↑ Аудиооборудование
| Язык/Language: | Русский • English |
|---|
Smartphone Link Display Audio (SDA, Mitsubishi Connect)
- Руководство пользователя Smartphone Link Display Audio (Mitsubishi Connect) 2017, eng., pdf, 8,94 МБ
- Руководство пользователя Smartphone Link Display Audio (Mitsubishi Connect) 2017, рус., pdf, 60,3 МБ
- Руководство пользователя Smartphone Link Display Audio (Mitsubishi Connect) 2019, eng., pdf, 25,3 МБ
- Руководство пользователя Smartphone Link Display Audio (Mitsubishi Connect) 2019, рус., pdf, 17,9 МБ
- Руководство пользователя Smartphone Link Display Audio (Mitsubishi Connect) 2021, рус., pdf, 83,5 МБ
- Руководство пользователя Smartphone Link Display Audio для Eclipse Cross 2018-2019, eng., pdf, 25,9 МБ
- Руководство пользователя Smartphone Link Display Audio для Eclipse Cross 2018, рус., pdf, 3,20 МБ
- Руководство пользователя Smartphone Link Display Audio для Eclipse Cross 2021, рус., pdf, 10,5 МБ
- Краткое руководство Smartphone Link Display Audio для пользователей смартфонов на Android, 2018, eng., pdf, 646 кБ
- Краткое руководство Smartphone Link Display Audio для пользователей смартфонов Apple, 2018, eng., pdf, 861 кБ
Display Audio
- Руководство пользователя Display Audio, 2016, eng., pdf, 12,5 МБ
- Руководство пользователя Display Audio, 2017, рус., pdf, 44,9 МБ
- Руководство пользователя Display Audio, 2018, eng., pdf, 10,6 МБ
- Руководство пользователя Display Audio, 2019, eng., pdf, 10,6 МБ
- Руководство пользователя Display Audio, 2020, рус., pdf, 7,98 МБ
- Руководство пользователя Display Audio с Smartfone Link (DAS), 2018, eng., pdf, 31,0 МБ
- Краткое руководство Display Audio с Smartfone Link (DAS) для Eclipse Cross для пользователей смартфонов Apple, 2018, eng., pdf, 2,58 МБ
MMCS SD/CD (NR-242)
- Руководство по эксплуатации MMCS (NR-242) 2013, рус., pdf, 69,7 МБ
- Руководство по эксплуатации MMCS (NR-242) 2013, eng., pdf, 45,7 МБ
- Руководство по эксплуатации MMCS (NR-242) 2014, eng., pdf, 31,2 МБ
- Руководство по эксплуатации MMCS (NR-242) 2015, eng., pdf, 58,3 МБ
- Руководство по эксплуатации MMCS (NR-242) 2016, eng., pdf, 59,0 МБ
MMCS HDD/DVD (NR-261)
- Руководство по эксплуатации MMCS (частично), рус., pdf, 52,7 МБ
- Руководство по эксплуатации MMCS (NR-261) 2007, eng., pdf, 16,0 МБ
- Руководство по эксплуатации MMCS (NR-261) 2008, eng., pdf, 14,2 МБ
- Руководство по эксплуатации MMCS (NR-261) 2010, eng., pdf, 14,9 МБ
- Руководство по эксплуатации MMCS (NR-261) 2012, eng., pdf, 15,8 МБ
MMES
- Руководство по эксплуатации MMES 2014, eng., pdf, 26,9 МБ
- Руководство по эксплуатации MMCS для Galant / Endeavor 2008, eng., pdf, 8,77 МБ
Mitsubishi Яндекс.Авто
- Руководство пользователя Яндекс.Авто 2020, рус., pdf, 121 кБ
Прочие штатные головные устройства
- Руководство по эксплуатации аудио-системы (2013), рус., pdf, 1,31 МБ
- Руководство по эксплуатации аудио-системы с сенсорным экраном (2013), рус., pdf, 4,70 МБ
- Руководство по эксплуатации аудио-системы с сенсорным экраном (2014), eng., pdf, 11,6 МБ
Потолочный монитор
- Руководство по эксплуатации потолочного монитора 2011, eng., pdf, 8,52 МБ
- Руководство по эксплуатации потолочного монитора 2013, eng., pdf, 9,68 МБ
Hands Free Link System
- Дерево голосовых подсказок для Hands Free версии 17.0.0 и ниже, eng., pdf, 251 кБ
- Дерево голосовых подсказок для Hands Free версии 18.0.0 и выше, eng., pdf, 254 кБ
Решил запилить навигатор или ФАКу по 7’’ SDA или в простонародье — Мицубиси Коннект😜
Развёрнутая версия навигатора ТУТ.
Информацию пополняю. Критика, предложения и замечания принимаются. Поехали …
Навигатор темы
Smartphone Link Display Audio SDA Mitsubishi Outlander III
Мультимедийная система Mitsubishi Connect.
Мультимедийная система Smartphone Link Display Audio Mitsubishi Outlander.
Mitsubishi Connect Smartphone Link Display Audio (MCSDA, MC SDA)
SDA Mitsubishi Outlander
На автомобилях Mitsubishi Outlander III рестайлинг Dynamic Shield (Mitsubishi Outlander 2015-2016-2017-2018-2019-2020MY) с 2016 года в комплектациях Ultimate и выше ставятся магнитолы (мультимедийное устройство) нового поколения — Smartphone Link Display Audio с поддержкой системы Mitsubishi Connect.
На автомобилях Mitsubishi Pajero и Mitsubishi Pajero Sport с 2016 года так же ставиться данное мультимедийное устройство.
По умолчанию в ГУ русского языка нет! Русский интерфейс включается через сервисное меню или кодингом >>>
Данное ГУ поддерживает такие системы как:
— Apple Car Play. Если подключен совместимый iPhone, значок приложения на многопользовательском дисплее изменится на значок CarPlay >>>>>
— Android Auto™. Если подключено совместимое устройство Android, значок приложения на многоуровневом дисплее изменится на значок Android Auto >>>>>
— Система кругового обзора Multi-View Camera System. Система MULTI AROUND MONITOR (Rear view + Bird’s-eye view) >>>>>
и др.
Технические характеристики Smartphone Link Display Audio:
— 6,95″ широкоэкранный дисплей
— Удаленная работа от встроенного дисплея большого размера.
— Поддержка Android устройств и iPod®, iPhone®. Опираясь на приложения для смартфонов для функций и сервисов, возможность предоставления услуг с смартфонов без больших инвестиций.
— Элементы управления на экране — Touch Screen
— AM/FM radio
— DAB /Digital Audio Broadcast (Digital radio)
— поддержка USB (2 выхода)
— поддержка Bluetooth
— HDMI вход для просмотра видео (с 2020MY разъем убрали, его больше нет)
— камера заднего вида
— Система кругового обзора Multi-View Camera System. Система MULTI AROUND MONITOR (Rear view + Bird’s-eye view)*
— управление системами автомобиля
— 6 динамиков
— 9 динамиков (Rockford Fosgate® premium sound system)*
— нет CD/DVD
* — опционально, в зависимости от комплектации
Подробные технические характеристики SDA ==>
Код магнитолы:
8740A022 — устанавливается на Mitsubishi Outlander III (MY2016, MY2017)
8740A056— устанавливается на Mitsubishi Outlander III (MY2018, MY2019)
Mitsubishi Connect Smartphone Link Display Audio Mitsubishi Outlander это ГУ производства JVC/Kenwood. Модель Kenwood MXLQ16ELG4
8740A001 — устанавливается на Mitsubishi Pajero Sport от 2016MY
8740A003 — устанавливается на Mitsubishi Pajero IV от 2016MY
Mitsubishi Connect Smartphone Link Display Audio Mitsubishi Pajero это ГУ производства JVC/Kenwood. Модель Kenwood MXLP15ELG4
8740А005 — L200 Европа
8741A001 — Outlander III Америка
8741A005 — Outlander Sport Америка (ASX)
8740A025 — ASX Европа
8740A038 — ASX Австралия
8742A002 — Eclipse Cross Европа
Инструкции SDA. Owner’s manual Smartphone Link Display Audio
— Инструкция Smartphone Link Display Audio (приложение для iOS-устройств) ==> iTunes/AppStore
Owner’s manual Smartphone Link Display Audio for iOS. Приложение с инструкциями Mitsubishi Connect Smartphone Link Display Audio на Apple-устройствах. Обзор в картинках
В приложении инструкция в картинках на русском языке!
— Инструкция Smartphone Link Display Audio (приложение для Android-устройств) ==> GooglePlay
Owner’s manual Smartphone Link Display Audio for Android.
— Инструкция Smartphone Link Display Audio Mitsubishi Outlander (на английском языке) ==> PDF, English
— Инструкция Smartphone Link Display Audio Mitsubishi Outlander (на русском языке) ==> Скачать, 60 Mb, PDF, Russian
— Часто задеваемые вопросы на русском языке на сайте ММС
— Официальный сайт mitsubishi-connect.com/en/ (на английском языке, много полезной информации)
Вопросы по настройке Mitsubishi Connect Smartphone Link Display Audio (SDA)
— Какие форматы аудиофайлов может проигрывать SDA? ==>
— Меню настроек магнитолы ==>
— Настройки радио ==>
— Настройки Блютус Bluetooth® hands on ==>
— Инструкции по сопряжению телефона (смартфона) с магнитолой. Инструкции по удалению телефона (смартфона) из списка Bluetooth магнитолы ==>
— Экран «Принять» (Agree) при запуске магнитолы. Как отключить? ==>
— Как сменить язык в Mitsubishi Connect Smartphone Link Display Audio ==>
— Разблокировка Mitsubishi Connect при движении. Просмотр видео на Mitsubishi Connect в движении #post360285, #post389490
— Улучшаем качество звука Mitsubishi Connect Smartphone Link Display Audio ==>
— Как вернуться к исходным настройкам Mitsubishi Connect Smartphone Link Display Audio. Возврат к заводским настройкам. Сброс системы ==> , из Workshop Manual
— Как войти в сервисное меню (DIAGNOSIS MODE). Инструкция. ==> Видео
— Сервисное меню Mitsubishi Connect. Настройка задней камеры ==>
Через настройки «Тип автомобиля» можно управлять линиями разметки камеры заднего вида. Зайти в настройки магнитолы, далее System settings >> Vehicle Setting >> Car Type Setting
! Расшифровка значений Car Type Setting /Vehicle Line. Сводная информация по всем видам ГУ
Настройки Apple CarPlay ==>
— Доступные приложения для Apple CarPlay ==>
— WhatsApp в Apple Carplay Mitsubishi Connect Smartphone Link Display Audio Mitsubishi ==>
— Сторонние навигаторы в Apple Car Play в Mitsubishi Connect ==>
— Mitsubishi Connect с Яндекс навигатором. Hавигатор и не только на Mitsubihi Connect (танцы с бубнами через iPhone 5 с Джаилбрейк) ==> #post403941, ==>#post404035
Настройки Android Auto™ ==>
— Доступные приложения для Android Auto ==>
— Waze для Mitubishi Connect на Android устройствах ==>
— Неточное позиционирование при использовании навигатора Waze в Mitsubishi Connect и решение проблемы ==>
— Через некоторое время при подключении WAZE и Android Auto отключается GPS ==> Решение проблемы
— Просмотр YouTube в Android Auto Mitsubishi Connect ==>
— MirrorLink на SDA ==>#post390878, ==>#post394175
— Mirror link на Android — поиск решений ==>
— Android Auto. Интеграция Android-устройств в информационно-развлекательную систему автомобиля
— Реализуем AA Mirror на Android устройствах в Mitsubishi Conect SDA ==>
SMARTPHONE LINK DISPLAY AUDIO Mitsubishi Outlander. Описание, диагностика, ремонт ==> полная информация из Workshop Manual
— Как снять магнитолу Mitsubishi Connect в Mitsubishi Outlander. Как снять Smartphone Link Display Audio Mitsubishi Outlander. Как снять Mitsubishi Connect Outlander ==>
— Распиновка магнитолы Mitsubishi Connect Outlander. Распиновка Smartphone Link Display Audio Mitsubishi Outlander ==>
Прошивка Mitsubishi Connect Smartphone Link Display Audio (SDA) для Mitsubishi Outlander. Firmware for SDA Mitsubishi Outlander
— Штатно с завода на SDA Mitsubishi Outlander 2016MY, 2017MY (8740A022) стоит прошивка версии A (1.0.х)
Штатно с завода на SDA Mitsubishi Outlander 2018MY, 2019MY (8740A056) стоит прошивка версии 1E (1.0.х)
В марте 2018 года вышла прошивка версии Q (2.6.x)
В августе 2018 года вышла прошивка версии 1G (4.2.x)
Прошивка версии 1G подходит на обе модели SDA (и на 8740A022 и на 8740A056)
— Прошивка версия 1G — 4.2.0206.0500 (1G) и Инструкция по прошивке ==> скачать
Установка Mitsubishi Connect Smartphone Link Display Audio в Mitsubishi Outlander III 2013-2015MY, Mitsubishi Outlander PHEV
Установочные размеры (W × H × D) 209.5 mm × 108.0 mm × 158.2 mm
Коды необходимых аксессуаров и запчастей для установки MC-SLDA #post362393
— 8751A098 или 8751A046 Антенна GPS
— 8755A210 или 8755A098 или 8755A209 или 8755A214 Проводка USB
— 8718A044 или 8718A045 Разъемы USB
— Провод HDMI (можно универсальный, длина зависит от того, гуда будете выводить выход)
— Потребуется перепиновка разъема для работы микрофона: поскольку провод раньше проходил до блока Bluetooth/USB, сейчас идет до магнитолы самой (все системы встроены в магнитоле). Достаточно перепиновать провода и провести один дополнительный.
— Установка Mitsubishi Connect в Mitsubishi Outlander PHEV
— Установка Mitsubishi Connect в Mitsubishi Outlander III (2013-2015MY)
— Установка Mitsubishi Connect в Mitsubishi ASX (2013-2015MY)
— Установка Mitsubishi Connect в Mitsubishi Outlander XL возможна, но будет усеченный функционал.
Согласование работы Mitsubishi Connect с CAN Mitsubishi Lancer, Mitsubishi ASX и Mitsubishi Outlander XL ==>
Полезные ссылки
Т.к. похожие устройства стоят в Mitsubishi Eclipse Cross и Mitsubishi ASX, общую информацию по устройству и работе можете так же изучить часть вопросов в FAQ:
— Mitsubishi Connect Eclipse Cross. Smartphone Link Display Audio Mitsubishi Eclipse Cross
— Mitsubishi Connect SDA Mitsubishi ASX. Smartphone Link Display Audio Mitsubishi Mitsubishi ASX
- Manuals
- Brands
- Mitsubishi MOTORS Manuals
- Car Navigation system
- Multi-Communication System
- User manual
-
Contents
-
Table of Contents
-
Troubleshooting
-
Bookmarks
Quick Links
Mitsubishi
Multi-Communication
System
Summary of Contents for Mitsubishi MOTORS Multi-Communication System
-
Page 1
Mitsubishi Multi-Communication System… -
Page 2
Introduction Thank you for buying a Mitsubishi Motors product. In order to fully utilize the functionality of this product and ensure safe and correct operation, please read the “User Manual” carefully before operation. After reading the “User Manual”, ensure this is kept readily available, and refer to it again if you… -
Page 3: Table Of Contents
Table of contents Operations from the Scroll Menu ..42 Set as the Destination ……… 42 Set as the Waypoint……..42 Set in the Address Book ……43 Search for Nearby Establishments ….43 Introduction NAVI Check the Location of Your Car….44 Freeway Information …….
-
Page 4
Change the Route ……61 DISC Change Search Conditions ……61 Listen to CDs ……… 107 Set and Change a Waypoint ……61 Audio Functions Display a List ……….107 Select from Four Routes ……64 Display Contents ……..108 Basic Operation …… -
Page 5
INFO/SETTINGS HD Radio Data Information … 159 SETTINGS Displaying ……….159 Navi Settings ……… 196 Fuel price Information Screen ….160 INFO Guidance ……….. 197 Check the Location of Gas Stations ..160 Screen …………199 Calendar ……..131 Weather Information Screen …… 162 RTT Options ………. -
Page 6: Before Use
The map data may contain wrong or this product over to anyone else or disposing missing characters, incorrect locations etc. of it. Mitsubishi Motors will in no way be held responsible.
-
Page 7: Important Points On Usage
Important Points on Usage FCC NOTE • The following phenomena are characteristic of LCD screens. They do not indicate a This device complies with part 15 of the FCC Common malfunction. Rules. — Small black dots or bright dots (red, blue, Operation is subject to the following two •…
-
Page 8: Restrictions On Operations While The Vehicle Is Driving
Restrictions on Operations Trademarks ©1987-2013 HERE. All rights reserved. while the Vehicle Is Driving • Product names and other proper names are the trademarks or registered trademarks of their respective owners. Some operations are restricted while the • Furthermore, even if there is no specifi c denotation of vehicle is driving.
-
Page 9
iPod iPod classic “Made for iPod,” “Made for iPhone” mean that an electronic accessory has been designed to connect specifi cally to iPod or iPhone, respectively, and has been certifi ed by the developer to meet Apple performance standards. iPhone, iPod, iPod classic, iPod nano, and iPod touch are trademarks of Apple Inc., registered in the U.S. -
Page 10: Important Points On Safety For The Customer
Important Points WARNING WARNING • The driver should not pay close • Do not insert foreign objects into on Safety for the attention to the images on the the disc slot or card slot. Customer screen while driving. This may lead to fi re, electric shock, or This may prevent the driver looking where malfunction.
-
Page 11
CAUTION • Do not block ventilation holes or heat sinks on the product. Blocking ventilation holes or heat sinks may prevent heat from escaping from within the product, leading to fi re or malfunction. • Do not turn the volume up to the extent that you cannot hear sounds from outside the vehicle while driving. -
Page 12: How To Read This Manual
How to Read This Manual or [○○○] ○○○ Shows a touch switch displayed on the The notation used in this manual and what it means are as follows. screen. 10) (P000) Shows the page to refer to. It contains relevant explanations etc. 11) Continued on the next page Used when the explanation of operations is continued.
-
Page 13: Basic Operation
Basic Operation key/ Allows you to seek a radio station, or select a CD track. Also, holding down This Product either of these keys allows you to fast- forward/fast-rewind a CD. Main Unit Panel key (P24) MODE This gives the names of each section of the main unit panel and explains their functions. Used to select an audio source.
-
Page 14
When the panel is open key/ — ZOOM ZOOM + Zooms in or zooms out the map. →“Switch the Scale”(P40) key (P47) DEST Used to set a navigation destination. Allows you to switch the map screen color Auto, Daytime, and Nighttime according to the car lighting state. -
Page 15: Start
Start SD Cards ADVICE Start the system. • Immediately after the ignition key This product supports two types of SD cards: is switched to “ACC” or “ON”, if the map cards used with the navigation function CAUTION navigation functions are used, some and audio SD cards used with audio functions.
-
Page 16: Insert An Sd Card
Important Points on Handling Insert an SD Card NOTE • Mitsubishi Motors will in no way be held • Fingerprints or other marks on the terminals responsible for any losses resulting from of an SD card may result in its content being Map Card SD card data loss.
-
Page 17
Audio SD Card Insert the map card into Insert the audio SD card into Insert the audio SD card used for the audio the map slot. the user slot. functions. Insert until you hear the “click”. Insert until you hear the “click”. Press the key. -
Page 18: Remove The Sd Card
Remove the SD Card Push the audio SD card in the user slot Map Card until you hear a “click”. The map card that contains the map data for the navigation functions is inserted. This device cannot be used if the map card is Audio SD Card Audio SD Card Audio SD Card…
-
Page 19: How To Perform Touch Operations
How to Perform Searching Items from a List Touch Operations By touching , you can select one item at a time from the list. This system uses a touch panel that is By touching , you can move the operated by touching the display directly. display one page.
-
Page 20: How To Input Characters
How to Input Characters ADVICE • For some functions and character types, This section explains the menu items for the character input keyboard. some touch switches may either not be displayed or changed into some other touch switch. For details, refer to the Keyboard for Character Input explanations of individual functions.
-
Page 21: Keyboard For Number Input
Types of Characters That Can Keyboard for Number Input Input assist for searches Be Input The input keyboard makes it possible to input house numbers and latitude/longitude. The input keyboard is capable of inputting various characters. Character input is displayed when it becomes necessary during the operation of functions.
-
Page 22: Top Menu
Top Menu Touch Display contents switch By pressing the corresponding key, you can use various functions from the top menus. Display Types The top menus have a number of display methods. You can use the one you like best. You can switch by touching the display switch menu at the top of each top menu.
-
Page 23: Destination Menu
Destination Menu (P49) Address Book Allows you to select a location from the This section explains the destination menu displayed when you press the key. DEST address book. This may be the key depending on the model. (P53) Advanced Search Allows you to search for an establishment around the current location or destination, along the route, etc.
-
Page 24: Navi Menu
Navi Menu This section explains the navigation menu displayed when you press the key. NAVI MENU (P58) (P204) Route Menu Navi Voice/Others Allows you to check and edit the set route. Allows you to set up the navigation audio guidance. Also allows you to check vehicle (P197) Guidance signals.
-
Page 25: Mode
Mode *1, *2 (P130) When an external input device is This section explains the Mode displayed when you press the key. MODE connected to this product, the audio from the external input device is played. (P125) Bluetooth Audio When a Bluetooth-capable audio device is connected to this product, the Bluetooth audio function can be used.
-
Page 26: Info Menu
INFO Menu (P154) Maintenance Allows you to make settings for This section explains the info menu displayed when you press the key. INFO notifi cations when engine oil, oil fi lter, and The order of display items may differ depending on the model. In that case, 9) changes to Fuel/Weather…
-
Page 27: Settings Menu
SETTINGS Menu This section explains the settings menu displayed when you press the key. SETTINGS may not be displayed depending on the model. Sound Quality Control (P216) Display Off System Allows you to switch OFF the screen Allows you to make settings for the Time (P211) , Language (P211) , Opening display.
-
Page 28: Basic Operation
NAVI GPS Antenna This chapter explains navigation function operations. Basic Operation GPS antenna Navigation • The GPS satellites are managed by the Department of Defense of the United States Functions of America, which sometimes deliberately The location of your car is measured by reduces the location precision.
-
Page 29: Map Data
Reasons Why the Location of Your 3D Position Measurement Map Data Car Is Not Displayed Correctly When effective radio signals for which The map data may contain wrong or missing • When a freeway and general road are near positional precision can be expected can be characters, incorrect locations etc.
-
Page 30: Route Search Methods
Precautions for operating the Route Search Methods Route Guidance navigation • The route displayed in the route guidance • When your car is driving on the searched is a reference route to the destination. It route, this displays the distance until the •…
-
Page 31: Navigation Screen
Navigation Screen
 Direction icon Touching this displays the map switching This section explains the navigation map screen and the display contents for the menu screen. screens. →“Select the Map Screen”(P34) Map Display Contents 9) Scale icon The map screens include the current location screen and scroll screens (P31) . Shows the scale of the displayed map.
 -
Page 32
Scroll Screens ADVICE This section explains the contents displayed on the scroll screens displayed when the map is • The display of 7) POI icons can be scrolled or after a search is performed (P40) . removed from the map screen by setting [Hide All] for [Screen] “POI icons”. -
Page 33: Display The Destination Menu
Individual Icons Display the Destination Menu Display the Scroll Menu This section explains the icons displayed on You can set the destination and erase routes You can set the location scrolled (P40) to the current location screen (P30) . from this menu screen. as the destination or set it in the address book.
-
Page 34: Display The Sub-Menu
Display the Current Location Display the Sub-menu Set as Dest. location can be set as the Screen destination. This section explains how to display the sub- →“Set as the Destination”(P42) menu displayed from the current location You can display the current location screen Address Book The location can be screen (P30) .
-
Page 35: Select The Map Screen
Select the Map Types of Maps ADVICE Screen • You can select the map type and the This section explains the types of maps you reference orientation separately. can change to. You can change the map type and reference • To change the right screen for Two Maps One Map orientation.
-
Page 36
Freeway Info Turn List Arrow Guide This displays a list of freeway exit service The location for the next route guidance is This displays a list of the locations for route areas with the current location as the starting displayed with an arrow on the left screen. guidance on the left screen. -
Page 37: Map Reference Orientation
2D(N-up) Map Reference Orientation This displays a map with north as up. This displays a map as seen looking down This section explains the map reference from above. orientation, which you can change. 2D(H-up) This displays a map with the direction in which your car is moving as up.
-
Page 38: Change The P Side P Display Information
Change the P side P Display Touch the “item” to display. Information Change the information displayed on the P side P sub-screen. Touch the “Direction icon”. ▼ Direction icon Touch PsideP The screen for the selected item is displayed Touch on the left screen.
-
Page 39: Guidance Display
Guidance Display Toll Booth Guidance Map Lane Guidance Displayed when you approach a toll booth. Displayed when there is lane information for This product displays various guidance the junction ahead. according to the situation. Junction Guidance Map When you are traveling the route, as you approach a guidance point, this map is displayed together with the voice guidance.
-
Page 40: Junction View
Junction View Speed Indicator Guidance When you approach a junction on a freeway, Displayed if there is speed indicator the actual junction confi guration, which way to information while you are driving. go, the junction name, etc. are displayed. CAUTION CAUTION •…
-
Page 41: Operate The Map
Operate the Map Touch the location to view. ADVICE • By holding down , you can This section explains how to perform such use the free zoom function displaying operations as changing the scale and gradually in four steps to the next scale. scrolling the map.
-
Page 42
Scroll Fine Adjustment This fi nely adjusts the scroll position. [Adjust] may change to [Tuning] and [Adjust Off] may change to [Tuning Off] depending on the model. After scrolling, touch Adjust Touch the direction. Touch a few times to fi nely adjust. Touch Adjust Off ▼… -
Page 43: Operations From The Scroll Menu
Operations from the Set as the Waypoint Touch Start Scroll Menu Set the scroll screen (P31) location as a ▼ waypoint. When you display the scroll menu, you can ADVICE set the destination, waypoints, address book, etc. • It is necessary to set a destination. Display the scroll menu (P32) .
-
Page 44: Set In The Address Book
Search for Nearby Set in the Address Book Touch any “type”. Establishments Set the scroll screen (P31) location as an address in the address book. Search for establishments around (P31) location on the scroll screen. Display the scroll menu (P32) . Here, as an example, petrol stations are searched for around the location.
-
Page 45: Check The Location Of Your Car
Check the Location of Your Car. You can check the relationship between the scroll screen (P31) location and your current location. Display the scroll menu (P32) . Touch Location check ▼ You can check the relationship between your current location and the cursor location. ADVICE •…
-
Page 46: Freeway Information
Freeway Information Information on Establishments When you drive on a Freeway, “Freeway Info” (P35) is displayed. You can check service area and parking area establishment information and junction information. This displays information on the establishment. (Up to for 4 establishments can be displayed.) Display Contents Icon Explanation of marks…
-
Page 47: Displaying
Displaying Check Area Information ADVICE With the factory settings, when you drive on You can check information on SA, PA, IC, • Touching [Set] displays the scroll menu. a freeway, “freeway Info” (P35) is displayed and JCT and you can display maps of their You can set the destination, waypoints, automatically, so no operation is required.
-
Page 48: Destination Settings
Destination Settings Set Your Home as Touch Start the Destination ▼ You can set your pre-registered home (P68) as the destination. key may change to the DEST key depending on the model. Press the key. DEST This displays the destination menu. The search for the route with your home as Touch Go Home…
-
Page 49: Set The Searched For Location As The Destination
Set the Searched When the location you NOTE for Location as the searched for is displayed, • If a route using the HOV lane is in the search result with set conditions, a telop touch Start Destination that confi rms the use of the HOV lane is displayed.
-
Page 50: Search For A Location
Search for a Load a Frequently Used ADVICE Location from the Address Location • Touching [info] displays a map of the Book surroundings and related information. With this product, you can use various • While the guidance start screen is methods to search for locations.
-
Page 51: Use The Search History
Deleting from the Search Use the Search History Search from Address History You can use the search history of locations Searches for a location from an address. that were set as the destination and display You can delete a registered search history. Press the DEST key.
-
Page 52: Search By Inputting An Establishment Name
Search by Inputting an Touch , then Touch , then input the All Categories All POIs Establishment Name input the “category name”. “name of the establishment” The name of an establishment can be input to you are searching for. search for its location. Press the DEST key.
-
Page 53
Editing My Categories ADVICE Touch Back Registers a frequently used establishment • If the list has the “+” mark, touch [Sub Returns to the previous screen. category in “My Categories”. POI], select the detailed establishment ADVICE Up to 6 entries can be registered in “My name. -
Page 54: Search For Nearby Establishments
Search for Nearby Searching for Establishments Touch the “establishment” you Establishments near the Route are searching for. You can search for establishments near the Press the key. DEST current location and destination and along the route. This displays the destination menu. Touch Advanced Search Searching for Establishments…
-
Page 55
Searching for Establishments Searching for Establishments Input the “name of the near the Destination or a near a Street establishment” you are Waypoint This searches for establishments near any searching for. desired street. Press the DEST key. Press the key, then DEST This displays the destination menu. -
Page 56: Search From Telephone Number
Searching for Establishments Search from Telephone Search from Zip Code along a Freeway or near an Number Used when you know the zip code of the Exit location you are searching for. Used when you know the telephone number of the location you are searching for. This searches for establishments along a Press the DEST…
-
Page 57: Search By Latitude And Longitude
Search by Latitude and Set the Start Location as the Longitude Destination You can set the destination by specifying the You can set the start location set for the route latitude and longitude. as a new destination. Press the DEST key.
-
Page 58: Guidance Start Screen
Guidance Start Screen Show Route This section explains the screen displayed This is the screen displayed when the location to set as the destination is decided. when you touch [Show Route]. This section explains the operations you can do on this screen. Start Starts route guidance.
-
Page 59: Route Checking And Changing Route Checking
Route Checking and Changing Check the Route You can scroll along the route to check and check maps of the surroundings. Route Checking On the current location screen, ADVICE touch the “junction guidance If a route has been set, you can check it. •…
-
Page 60: Check The Entire Route
Types of Check Methods Remaining Check the Entire Route This displays the map at a scale that can This displays the map at a scale that allows Backward Scrolls from the destination display all of the route that has not been you to check the route from the start location toward the start location.
-
Page 61: View A Demo Trip
Route Outline Ending View a Demo Trip This displays a list of junctions at which turns You can travel the prepared route virtually to During the demo trip, press the must be made on the route to the destination. check. NAVI MENU key.
-
Page 62: Change The Route
Change the Route Change Search Conditions Set and Change a Waypoint You can change the route search conditions. A detour route or a different route can be ADVICE set for the route currently set. The route On the itinerary list screen, •…
-
Page 63
Search Method Selection Touch for the location to Phone Used when you know the Screen Number telephone number of the location add. you are searching for. The procedure is the same as from Step 2 onward in “Search from Telephone Number”(P55) . Map Point The location scrolled to on the map (P40) can be set. -
Page 64
Deleting a Waypoint Operating from a Sub-menu Re-ordering waypoints You can delete the next waypoint you are Delete a set waypoint. The order for reaching the destination and scheduled to pass through. waypoints is changed. ADVICE On the current location screen, ADVICE •… -
Page 65: Select From Four Routes
Selecting a detouring road Select from Four Routes Search for a Detour Route Select the street that will be the starting point You can simultaneously search for routes with You can search for a route that detours ahead and the street that will be the ending point, four different conditions, then select one of the distance you specify.
-
Page 66: Searching For A Different Route
Searching for a Different Pause Route Guidance Delete a Route Route This pauses route guidance. This deletes the input destination and waypoint and deletes the route. This repeats the searches for the route. On the current location screen, Press the NAVI MENU key.
-
Page 67: Select The Drg Route
Select the DRG route Register an Avoid Area Touch an item, then input the “location”. When the RTT message is detected, a route You can register and edit areas you want to based on the detected information is searched avoid passing through for route searches. and DRG (Dynamic Route Guidance) route NOTE can be selected.
-
Page 68
Editing an Avoid Area Deleting an Avoid Area Touch Set Area You can change and set avoid areas. This deletes a registered area. Touch again. Set Area Execute up to Step 2 in Execute up to Step 2 in “Register an Avoid Area”(P66) . “Register an Avoid Area”(P66) . -
Page 69: Set An Address In The Address Book
Set an Address in the Address Book ADVICE • You can change the address book information displayed here. Register a Home Execute the procedure for Steps 5 Touch any “search method” and beyond in “Change Address Book Location and search for the location. Information”(P74) .
-
Page 70: Change The Home Location
Change the Home Location Erase Your Home Registration You can edit your home information. This deletes your home registration. Execute up to Step 2 Press the NAVI MENU key. in “Change the Home This displays the navi menu. Location”(P69) . Touch Personal Touch…
-
Page 71: Set A Frequently Used Location In The Address Book
Set a Frequently Touch any “search method” ADVICE Used Location in and search for the location. • You can change the address book information displayed here. the Address Book Execute the procedure for Steps 5 and beyond in “Change Address Book You can register locations frequently used Information”(P74) .
-
Page 72: Change A Frequently Used Location
Change a Frequently Used Delete a Frequently Used Location Location You can edit frequently used locations. Execute up to Step 2 in Press the NAVI MENU key. “Change a Frequently Used This displays the navi menu. Location”(P71) . Touch Personal Touch in “Special Delete…
-
Page 73: Set An Address In The Address Book
Set an Address in Register a Searched for ADVICE Location the Address Book • Depending on the search method, the establishment name and telephone This section explains the series of operations Setting a location you have gone to, a number may not be displayed. for registering a location searched for from the location you want to go see, or the like destination menu (P22) in the address book.
-
Page 74: Change The List Order
Delete an Address from the Change the List Order Address Book You can change the order of items in the address book list. Delete an address registered in the address book. Press the DEST key. Press the NAVI MENU key. This displays the destination menu.
-
Page 75: Change Address Book Information
Change Address Address Book Information Touch the “information” to Screen Book Information change. This section explains the address book You can change and delete addresses from information you can change. the address book. key may change to the DEST Icon key depending on the model.
-
Page 76
Adjust Name Street or City You can change the location in the address You can change the name of the location mark You can change the street name or city name. book. for the location in the address book displayed On the address book on the map screen. -
Page 77
You can register the telephone number in the address book. On the address book information screen,touch “TEL”. Input telephone number by touching “numbers”, then touch ▼ The telephone number change is complete. NOTE • Telephone numbers up to 24 digits long can be input. -
Page 78: Rtt
ADVICE • If a broadcast station is not received, the below screen is displayed. RTT Switches You can receive or check traffi c messages. You can use the real-time traffi c message. On the current location screen, touch DRG (Dynamic Route Guidance) ▼…
-
Page 79: Display Contents
RTT Event Icons Display Contents Each traffi c message is displayed with the This section explains the RTT messages displayed on the map. following marks on the map. ADVICE • Whether or not to display “RTT Event Icons” can be selected with [RTT] → [RTT Icons on Map].
-
Page 80: Checking The Rtt Traffi C Messages
Checking the RTT ADVICE Traffi c Messages • When “RTT Event Icons” are displayed overlapped, a list is displayed to select You can check the traffi c messages using the icon. RTT. On the current location screen, touch Touch the “RTT Event Icons” to check.
-
Page 81: Registering The Rtt Surveillance Map
Registering the RTT Registering from Scroll Menu Surveillance Map Scroll the map (P40) and line up Areas can be registered to check traffi c mark with the “location” messages. to register. NOTE • Up to 3 areas can be registered. Registering from RTT Traffi…
-
Page 82: Audio Functions
Adjust Volume Adjust the audio function volume. During audio play, turn the The following explains audio function operations. key counter- PWR/VOL Audio Functions clockwise. Basic Operation Switch Audio ON/OFF You can switch the audio function ON/OFF. NOTE ADVICE • The album names, titles, etc. in the title •…
-
Page 83: Insert/Eject Discs
Inserting the Disc Ejecting the Disc Insert/Eject Discs The following explains how to insert a disc into Press the key. Press the key. OPEN OPEN this product. CAUTION Touch Touch Monitor OPEN DISC Eject • When replacing discs, fi rst ensure that the vehicle is stopped in an area in which stopping is permitted.
-
Page 84: Av Icons
Forcing Disc Ejection AV Icons NOTE Usually, when the disc loading ends normally, During audio playback, an icon is displayed • The audio screen currently being played the inserted disc can be ejected with the on the navigation screen as below in order to can be displayed by touching the AV icon method in the “Ejecting the Disc”…
-
Page 85: Steering Remote Control Switch Operation
Steering Remote Control Switch Operation MODE Hold down to turn the audio function ON/OFF. Additionally, each time this is A type B type C type D type pressed, this switches the audio source. The order of switching is as shown below. If devices are not connected, then these are to be skipped, and the next source selected.
-
Page 86: Handling Of Discs
Handling of Discs Important Points on Storage • When not using discs, ensure these are kept This explains care that should be taken in in cases, and stored out of direct sunlight. the handling of discs. • If discs are not going to be used for a long period of time, remove these from the Important Points on Handling product.
-
Page 87: Types Of Disc That Can Be Played Back
Nonstandard CDs Types of Disc That Can Be Played Back This product will play back audio CDs, The following marks are printed on the disc label, package, or jacket. however please be aware of the following points regarding CD standards. Type Size Maximum…
-
Page 88: Audio Files(Mp3/Wma/Aac/Wav)
Audio Files(MP3/ CAUTION ADVICE WMA/AAC/WAV) • Actions such as copying audio CDs or • Depending on the condition of the disc fi les and either distributing these to others recorder or recording software used, This product can play back MP3/WMA/ for free or for charge, or uploading fi…
-
Page 89: Folder Structure
Folder Structure Name Specifi cation Explanation Up to 8 folder levels can be recognized. Format ISO9660 Level 1 Maximum 8 character fi le name, and 3 character fi le specifi cations You can create a folder structure such as extension. (single-byte alphanumeric capital letters, numerals, “_”…
-
Page 90: What Is Mp3
Standards for MP3 Files That Can Be Played Back What Is MP3? Specifi cations for MP3 fi les that can be played are as below. MP3 is an abbreviation of “MPEG-1 Audio Layer 3”. MPEG is an abbreviation of “Motion ®…
-
Page 91: What Is Wma
Standards for WMA Files That Can Be Played Back What Is WMA? Specifi cations for WMA fi les that can be played are as below. WMA is an abbreviation of Windows Media Audio, and this is an audio compression ® ®…
-
Page 92: What Is Aac
Standards for AAC Files That Can Be Played Back What Is AAC? Specifi cations for AAC fi les that can be played are as below. AAC is an abbreviation of Advanced Audio ® ® * For vehicles with the Bluetooth 2.0 interface, refer to the vehicle’s user manual (Bluetooth 2.0 interface).
-
Page 93: What Is Wav
Standards for WAV Files That Can Be Played Back What Is WAV? Specifi cations for WAV fi les that can be played are as below. WAV is an abbreviation of “RIFF wave form Audio Format” and is mostly used ® ®…
-
Page 94: Radio
Radio Listen to Radio Turn the key to FOLDER/TUNE select a station. This explains how to listen to FM and AM radio broadcasts. HD Radio broadcast or analog broadcast can be received. Press the key. MODE This displays the mode. Digital, CD-quality sound.
-
Page 95: Display Contents
Display Contents FM Radio Broadcast Information Screen * ) 1) Source plate 12) PTY Station List Displays the name of the currently Displays a list of the stations that can Displays the PTY (Program Type) being be received. → “Search for Broadcast selected source, preset channel number, received.
-
Page 96
AM Radio Broadcast Information Screen * ) 1) Source plate 10) Artist Radio Setting Displays the name of the currently Allows you to set Reception Mode. Displays the acquired artist name. → “Set Reception Mode” (P98) selected source, preset channel number, SCAN reception frequency, and station name. -
Page 97: Register Your Favorite Broadcast Stations
Register Your Favorite Search for Broadcast Starting the Scan Broadcast Stations Stations with Strong Signals This searches for stations that can be received. You can register your favorite 6 stations for This is handy for searching for broadcast each band, FM1, FM2, and AM. stations you can receive when you drive to a On the radio broadcast different area, for example for vacation.
-
Page 98: Search For Broadcast Stations From The Station List
Search for Broadcast Updating the Station List Touch Preset Stations from the Station List You can manually update the station list. ▼ You can select a station from the list of On the station list, touch The display returns to the original radio receivable broadcast stations.
-
Page 99: Emergency Broadcasts
Emergency Broadcasts Set Reception Mode P side P Display Screen If an emergency broadcast starts, it will begin You can set Reception Mode to digital or This section explains the screens displayed to be received automatically. analog. when selecting the [AV] (radio) in the P side P If on the map screen, the FM radio source display information (P37) .
-
Page 100: Listen To Satellite Radio
Turn the key to FOLDER/TUNE Equipment by type Listen to Satellite select a station. Radio This section explains how to listen to SIRIUS radio. NOTE • A subscription is required to listen to SIRIUS radio. For details, please consult your Mitsubishi Motors Dealer.
-
Page 101: Display Contents
10) Composer name Display Contents Displays the acquired composer name. SIRIUS Broadcast Information Screen Lock Allows you to set Lock on a channel being received. → “Setting Listening Restrictions” (P102) Skip Allows you to set Skip on a channel being received.
-
Page 102: Search For Your Favorite Channel
Search for Your Favorite Selecting Channels Directly Begin Scanning Channels by Channel. Category On the SIRIUS broadcast Channels in the category are received in order information screen, touch and take 10 seconds each. Searching from a Channel List Direct On the SIRIUS broadcast On the SIRIUS broadcast information screen, touch Enter the “channel number”,…
-
Page 103: Register Your Favorite Channel
Canceling a Scan Register Your Favorite Setting Listening Restrictions Channel You can set listening restrictions on channels During the scan, touch Scan and categories. You can save up to 6 of your favorite channels again. Scan List If a channel that has listening restrictions is for each band (1, 2, 3, 4).
-
Page 104
Setting from Channel List Setting from Category List ADVICE Sets listening restrictions from the channel list. Sets listening restrictions on all channels in • “Channel locked” is displayed in the the category. channel name on the source plate. On the SIRIUS broadcast •… -
Page 105
Unlocking All Locked Changing the Lock Passcode ADVICE Channels Changes the listening restriction passcode. • “Channel locked” is displayed in the channel name on the source plate. Cancels the listening restrictions on all On the passcode entry screen, channels. • “CH Locked” is displayed in the preset touch Change Password switch and the channel list. -
Page 106: Set The Channel Skip
Setting from Channel List Setting from Category List Set the channel skip. Sets Skip from the channel list. Sets Skip on all channels in the category. You can set Skip on channels and categories. Channels in which Skip is set will be skipped On the SIRIUS broadcast On the SIRIUS broadcast and not received when cycling up and down…
-
Page 107: The Sirius Id Is Displayed
Canceling Skip on All The SIRIUS ID is displayed. P side P Display Screen Channels This section explains the screens displayed On the SIRIUS broadcast when selecting the [AV] (SIRIUS) in the P side Cancels the Skip setting on all channels. P display information (P37) .
-
Page 108: Listen To Cds
DISC Display a List You can display a track list. On the audio CD playback Listen to CDs ADVICE information screen, touch • You can fast forward or rewind the This explains how to listen to audio CDs List track being played by holding down the (CD-DA/CD-TEXT).
-
Page 109: Display Contents
Lists Display Contents Playback Information Screen 1) Source plate 1) Cursor switch ▲ Displays the name of the currently Displays a sub-menu to change the Allows you to select a track. selected source and the playback mode. playback mode. 2) Track number →“Switch Playback Mode”(P109) 2) Album name 3) Track name…
-
Page 110: Switch Playback Mode
Play Mode Switch Playback Mode P side P Display Screen Repeat playback, random playback, and scan This section explains the screens displayed Repeat Repeat playback of the track playback are possible. when selecting the [AV] (CD) in the P side P currently being played.
-
Page 111: Listen To Audio Files On A Disc
Listen to Audio Files Display a List ADVICE on a Disc • You can fast forward or rewind the When you display a list, you can check the track being played by holding down the folder levels while searching for tracks. This explains how to listen to audio fi…
-
Page 112: Display Contents
Display Contents Playback Information Screen 1) Source plate 6) Playback mode display Displays the name of the currently Displays the current playback mode. →“Switch Playback Mode”(P112) selected source and the playback mode. : Repeat play 2) Album name : Folder repeat play If there is an album name in the title : Scan play information, displays it.
-
Page 113: Switch Playback Mode
Lists Switch Playback Mode Repeat playback, random playback, and scan playback are possible. On the audio fi le playback information screen or on the list display, touch ▲ This displays the sub-menu. Touch the “mode” to change to. 1) ROOT Playback Shows the topmost level.
-
Page 114: P Side P Display Screen
Play Mode P side P Display Screen PsideP Change the information displayed on the This section explains the screens displayed Repeat Each time this is touched, the P side P sub-screen. when selecting the [AV] (DISC) in the P side P mode switches in the order display information (P37) .
-
Page 115: Play Ipod
iPod/USB/SD NOTE • When connecting an iPod/iPhone, use the connection cable included in the iPod/ iPhone. NOTE Equipment by type • Set up the device in order that no Play iPod • For information regarding details such unsafe actions, such as plugging in the as types of iPod/iPhone that can be connection cable are taken while driving.
-
Page 116: Switch Playback Mode
Play Mode Switch Playback Mode Press the key. MODE Repeat playback, random playback, etc. are This displays the mode. Repeat Each time this is touched, the possible. mode switches between “Repeat” Touch iPod and “Cancel”. On the iPod playback Repeat: Repeat playback of the The iPod playback information screen is information screen, track currently being played.
-
Page 117: Display Contents
Artist name Display Contents If there is an artist name in the title information, displays it. iPod Playback Information Screen 9) Playback time Menu Displays the iPod menu. →“iPod Menu”(P117) 1) Source plate 6) Playback mode display Displays the name of the currently Displays the current playback mode. -
Page 118: Search By List
iPod Menu Search by List Touch the “item” to play from Touching [Menu] on the iPod playback the list. Touching a category on the iPod menu (P117) information screen will display the iPod menu. displays a list of the categories. By touching Lists of various categories can be displayed the list, you can check album names and track from the iPod menu.
-
Page 119: P Side P Display Screen
Displaying the playback 4) Playback time P side P Display Screen information screen. 5) Status icon This section explains the screens displayed when selecting the [AV] (iPod) in the P side P When a list is displayed, the iPod playback : Play display information (P37) .
-
Page 120: Listen To Audio Files On A Usb Device/Sd Card
NOTE NOTE Equipment by type Listen to Audio Files • USB devices can be used in vehicles that • Set up the device in order that no have a USB port. unsafe actions, such as plugging in the on a USB Device/SD connection cable are taken while driving.
-
Page 121: Switch Playback Mode
Play Mode Switch Playback Mode Press the key. MODE Repeat playback, random playback, and scan This displays the mode. Repeat Each time this is touched, the playback are possible. mode switches in the order Touch “Repeat”, “Folder repeat”, and On the USB device or SD card The playback information screen is “Cancel”.
-
Page 122: Display Contents
9) Playback mode display Display Contents Displays the current playback mode. Playback Information Screen →“Switch Playback Mode”(P120) : Repeat play : Folder repeat play : Scan play : Folder scan play : Random play : All random play 10) Track number/name If there is a song name in the title information, displays it.
-
Page 123: Display A List
Folder List Display a List When you display a list, you can check the folder levels while searching for tracks. On the USB device or SD card playback information screen, touch List ▼ 1) ROOT 6) Folder name Shows the topmost level. Touching this expands the folder.
-
Page 124: Display The Music Menu
Music Menu Display the Music Menu Touch any “menu”. The following explains the menu displayed When the music menu is displayed, you can when [Playlist] is ON on the playback display a music list for each artist or album. information screen and you touch [Music On the USB device or SD card Menu].
-
Page 125: P Side P Display Screen
4) Playback time P side P Display Screen This section explains the screens displayed ▲ when selecting the [AV] (USB/SD) in the P Touching this displays the submenu. (P33) side P display information (P37) . 6) Playback mode display Displays the current playback mode. : Repeat play : Folder repeat play : Scan play…
-
Page 126: External Input Devices
External Input Devices Supported Profi les and Functions This section explains the functions supported for each profi le. NOTE Equipment by type ® (Vehicles with a Bluetooth 2.0 interface). • Confi rm together with the user manuals Function A2DP Use Bluetooth Audio for the commercially-available Bluetooth- Audio output during playback ○…
-
Page 127: Connect A Bluetooth-Capable Audio Device
Connect a Bluetooth-capable Listen to a Bluetooth-capable Audio Device Audio Device This product and the Bluetooth-capable audio Press the MODE key. device use the Bluetooth function to connect. For details on how to connect, refer to This displays the mode. “Bluetooth Setting”(P213) .
-
Page 128: Display Contents
7) Status icon Display Contents : Play Playback Information Screen : Pause : Stop : Fast forward : Rewind Allows you to stop, play, or pause. 9) Playback time This is used when selecting a song. 1) Source plate 4) Playback mode display *1, *2 Continue touching for fast forward or Displays the name of the currently…
-
Page 129: Switch Playback Mode
Play Mode Switch Playback Mode P side P Display Screen * Depending on the type of Bluetooth-capable Repeat playback, random playback, and scan This section explains the screens displayed audio devices, the details of playback modes playback are possible. when selecting the [AV] (Bluetooth Audio) in may differ.
-
Page 130
4) Playback time 5) Status icon : Play : Pause : Stop : Fast forward : Rewind ▲ Touching this displays the submenu. (P33) PsideP Change the information displayed on the P side P sub-screen. *1 Not displayed when AVRCP is v1.0. *2 Not displayed when information cannot be obtained. -
Page 131: Use Aux
Outputting Audio Equipment by type Use AUX Press the MODE key. By connecting AUX devices to this product, This displays the mode. you can input audio from these devices to the product and play it back. Touch ▼ CAUTION • Video from AUX devices cannot be viewed.
-
Page 132: Info
INFO/SETTINGS INFO Calendar NOTE • Icons are displayed for days set as This displays the calendar. You can check special days or anniversaries. and set special days and anniversaries. • If one day is set as both a special day and an anniversary, the special day icon has priority.
-
Page 133: Setting Special Days
Display Contents Setting Special Days This sets a new special day. Up to 200 special days can be set. Touch the day on the calendar that you want to set as a special day. ▼ 1) Year and month of the calendar (P134) Anniversary displayed…
-
Page 134
Editing Special Days Deleting Special Days Touch Memo This edits a special day that has already been This deletes a special day that has already Input a name for the special set. been set. day, then touch While the calendar is displayed, While the calendar is displayed, →“How to Input Characters”(P19) touch… -
Page 135: Setting Anniversaries
Setting Anniversaries Touch any “icon”. Touch This sets a new anniversary. Up to 20 ▼ anniversaries can be set. The anniversary setting is complete. While the calendar is displayed, touch Anniversary This displays the anniversary list. Touch New Event Touch Date ▼…
-
Page 136
Editing Anniversaries Deleting Anniversaries This edits an anniversary that has already While the calendar is displayed, been set. touch Anniversary While the calendar is displayed, This displays the list of set anniversaries. touch Anniversary Touch the anniversary to This displays the list of set anniversaries. delete. -
Page 137: User Sd
User SD If the audio SD card is inserted in this device, you can check the SD card capacity and space available. You can also perform various information updates. Displaying Press the key. INFO This displays the info menu. Touch User SD ▼…
-
Page 138: Update The Map Database
Update the Map Database You can perform an update of the map database with an SD card. NOTE • For details, please consult your Mitsubishi Motors Dealer. Update the Map Database…
-
Page 139: Trip
Display Contents Equipment by type Trip You can check and set trip information. Displaying Press the INFO key. This displays the info menu. Touch Trip 1) Fuel consumption graph 6) Distance to Empty ▼ Allows you to check the average fuel Measures and displays the possible consumption and the instantaneous fuel cruising distance based on the remaining…
-
Page 140: Changing The Reset Mode
Fuel Consumption Graph Reset Trip Information Changing the Reset Mode On the trip screen, Standard vehicle Average Fuel Economy Average Speed touch Manual 2) 3) 4) ▼ 1) Average fuel consumption 2) Average fuel consumption graph Displays the fuel consumption with 16 levels.
-
Page 141: Check The History
Change the Fuel Consumption Check the History Lap Time History Display You can check the fuel consumption and Eco You can measure the time, distance, vehicle score history. speed, and fuel consumption. There is a long-term fuel consumption history and a short-term fuel consumption history. On the trip screen, On the trip screen, touch On the fuel consumption…
-
Page 142
Delete Lap Times Touch ADVICE This deletes the recorded measurement • In Step 3, if you touch [Lap] again, the ▼ results. measurement results in “A” are recorded in “B”, and the previous measurement On the lap time screen, touch results are recorded in “A”. -
Page 143: Air Conditioner
Air Conditioner Display Contents You can check the air conditioner status. Dual-zone automatic climate control Other than dual-zone automatic (Only on vehicles that support this function) air conditioner climate control air conditioner Displaying Press the key. INFO This displays the info menu. Touch Air Conditioner ▼…
-
Page 144: Gps Information
GPS Information Display Contents You can check the name of the current location, its latitude/longitude, the number of GPS satellites being received, and a map of satellite locations. Displaying Press the key. INFO This displays the info menu. 1) Current location name North Up Touch GPS Information.
-
Page 145: P Side P Display Screen
P side P Display Screen Heading Up Touching this allows you to change the This section explains the screens displayed map of satellite locations to the heading when selecting the [GPSInfo] in the P side P display information (P37) . reference so that up is the direction your car is traveling.
-
Page 146: Mobile Phone
Display the Phonebook Register in Phonebook Equipment by type ® (Vehicles with a Bluetooth 2.0 interface). There is the vehicle phonebook registered in Telephone numbers can be registered. Mobile Phone this product and the mobile phonebook that can draw on the data in your mobile phone. Input and Register the Connecting your mobile phone to this product with Bluetooth lets you use the…
-
Page 147
Registering from Mobile NOTE Touch Back Phone • For details on how to operate your mobile ▼ phone, please refer to the user manual You can register each entry in the phonebook Registration in the vehicle phonebook is for your mobile phone. in your mobile phone into the vehicle complete. -
Page 148: Edit A Phonebook
Reading in one Entry Reading in All Entries Edit a Phonebook Display the vehicle phonebook Display the mobile phonebook You can edit a phonebook that has been registered. screen. screen. Display the vehicle phonebook →“Display the Phonebook”(P145) →“Display the Phonebook”(P145) screen.
-
Page 149: Dial A Telephone
Deleting a Phonebook Calling the Person You Were Dial a Telephone Just Talking with You can delete a phonebook that has been There are a number of ways to make a call. registered. CAUTION On the mobile phone screen, Display the vehicle phonebook •…
-
Page 150
Making a Call from a Call a Telephone Number Touch the “telephone number Phonebook Registered on the Map to call”. If there is a telephone number in the Display the vehicle phonebook information for an establishment registered screen or the mobile in the navigation function, you can call that telephone number. -
Page 151: Incoming Calls
Answering an Incoming Call Ending a Telephone Call Incoming Calls The incoming call ring is sounded and the Press the “OFF HOOK” key on Press the “ON HOOK” key on incoming call screen is displayed. the steering wheel. the steering wheel. →“Steering Remote Control Switch →“Steering Remote Control Switch Operation”(P84)
-
Page 152: Setting Passcode
• If you have set a passcode, after turning the ignition switch ON, check that the passcode is set correctly. • If you forget your passcode, consult your Mitsubishi Motors Dealer. ▼ The passcode setting is complete. Touch , and then ▲…
-
Page 153: Camera
Displaying Equipment by type Camera When a rear view camera, available Display Pictures from the separately, is connected, the picture from Rear View Camera this rear view camera can be displayed on the display. Move the gear shift position to For details, refer to the user manual for the “R”.
-
Page 154: Environment
Display Contents Equipment by type Environment You can check the altitude, air pressure, and outside temperature. Displaying Press the key. INFO This displays the info menu. Touch Environment 1) Altimeter 5) Outside temperature graph ▼ 2) Barometer 6) Altitude graph 3) Outside Back Touching this returns the display to the…
-
Page 155: Maintenance
ADVICE Equipment by type Maintenance • When the date approaches on which a part is scheduled to be replaced or the You can manage parts replacement timing travel distance since the last replacement for your car. approaches the distance for part replacement, this is displayed in yellow.
-
Page 156: Set Maintenance Information
Display Contents Set Maintenance Information You can set the maintenance fi xed date and maintenance distances. Press the INFO key. This displays the info menu. Touch Maintenance Touch the “part” to set. 1) Guidance 5) Date of Change This sets whether or not to display Displays the dates on which maintenance guidance when the parts replacement date was carried out.
-
Page 157
Add Maintenance Information Delete Maintenance Touch in Distance. Setup Information You can add maintenance items that you want to add. This deletes the “Date”, “Changed at Odometer” and “Remaining Distance” for the Press the key. INFO set part. This displays the info menu. Press the key. -
Page 158: Update Maintenance Information
Update Maintenance Batch Updating Set Maintenance Information Information Guidance This updates all the “Engine Oil”, “Oil Filter”, “Rotate Tires”, “Air Purifi er” and “Brake When parts are replaced, the maintenance If maintenance information guidance is set, System” replacement dates, odometer information is updated.
-
Page 159
When Setting “Give Guidance” When a parts replacement date approaches or passes, after this product is started, a message like the following is displayed. Touching a touch switch puts out the message. The operations after the next time this product is started are as follows. Do not show From the next start-up, messages again… -
Page 160: Info/Settings Hd Radio Data Information
HD Radio Data Fuel price Information Screen Information You can check Fuel price and weather information. NOTE • Depending on the region, it may not be possible to acquire information. You can check Fuel prices. → “Fuel price Information Screen” (P160) Displaying Weather Information Screen Press the…
-
Page 161: Fuel Price Information Screen
Check the Location of Gas Fuel price Information Screen Stations You can check the location of gas stations. In the HD Radio Data Information screen, touch Fuel Price This displayed a list of gas stations. Touch the “gas station” to check.
-
Page 162
Switching between Gas Station Information In the gas station list screen, touch Update ▼ Updates the gas station list. NOTE • 3) [Update] may change to [Near] depending on the model. HD Radio Data Information… -
Page 163: Weather Information Screen
Weather Information Screen 1) City name 4) Date Today Displays today’s weather information. 2) Weather information 5) Future weather
Weekly weather information Displays today’s weather information. Displays weather 3 — 6 hours ahead, 6 — Displays the weather (icon), the current 12 hours ahead, and 12 — 24 hours ahead. -
Page 164: Check The Weather Information
Check the Weather Switching between Weather Information Information You can switch between today’s weather You can check weather information by region. information and weekly weather information. In the HD Radio Data In the Weather Today screen, Information screen, touch touch Weekly Weather This displays the region list.
-
Page 165: P Side P Display Screen
Displaying Fuel price P side P Display Screen Information This section explains the screens displayed when [Fuel Price] or [Weather] is selected in display information (P37) of P side P. Displaying Weather Information Update Touching this updates the gas station list. 1) Weather information 3) City list Displays today’s weather information.
-
Page 166: Version Info
Version Info Checking the map request Version Updating Method code A map database or system can be updated You can check the map database, to a newer version by replacing the main unit navigation program version, and map Press the key.
-
Page 167
Push in the map card until you NOTE hear a “click”. • When reading map data, “Map cannot be displayed.” is displayed. • When it is necessary to update the system to a newer version, the system MAP Card MAP Card MAP Card update screen is displayed. -
Page 168: Voice Operation Voice Control
Voice Operation ADVICE NOTE • You can check the usage for voice The voice control function may have control, a list of voice commands, etc. diffi culty in some environments and with Voice Control → “Check the Voice Control Help” (P195) the way some people speak.
-
Page 169: About The Learning Function
About the Learning Function Audio operable screens The voice control system has a learning Operable commands differ according to the display screen. The screen shows an example. Even function. (This function cannot be used by corresponding screens may not operate. Also, non-corresponding screens may be operated. ®…
-
Page 170: Navigation Function Operation
Navigation Function Creating a Waypoint Creating a Route to Your Home Operation Select a Point on the Map. Press the “SPEECH” key on Can be operated in the navigation screen. This can be done by map scrolling or When a nearby establishment or destination selecting a destination.
-
Page 171: Search For A Location
Registering a Location Search for a Location ADVICE Location search is done through voice control. • The displayed numbers have the Select a Point on the Map. following meanings: ADVICE This can be done by map scrolling or Distance: The distance from the location selecting a destination.
-
Page 172
Searching by Telephone Searching by Postal Code After you hear the beep, say Number “212XXXX1XX”. Press the “SPEECH” key on ▼ Press the “SPEECH” key on the steering wheel. the steering wheel. After you hear the “beep”, say “Voice commands”. After you hear the “beep”, say “Voice commands”. -
Page 173: Operating The Map
Changing the Map Scale Operating the Map After you hear the beep, say “Search”. Basic map operations are done through voice Press the “SPEECH” key on control. ▼ the steering wheel. Scrolling the Map After you hear the “beep”, say “Voice commands”.
-
Page 174
Change the Two-screen Map Changing the Map Orientation Changing the Map Type Scale Press the “SPEECH” key on Press the “SPEECH” key on Press the “SPEECH” key on the steering wheel. the steering wheel. the steering wheel. After you hear the “beep”, say “Voice After you hear the “beep”, say “Voice commands”. -
Page 175: Checking And Changing The Route
Checking and Changing the Displaying All Routes Deleting a Route Route Press the “SPEECH” key on Press the “SPEECH” key on Confi rmation and editing of created routes the steering wheel. the steering wheel. and basic operations are done through voice control.
-
Page 176: Audio Function Operation
Audio Function Repeating Playback Selecting and Playing Tracks Operation You can do this operation if you know the Press the “SPEECH” key on track number of the media you want to play. the steering wheel while audio Press the “SPEECH” key on Selecting and Playing Media is playing.
-
Page 177: Switch To Other Functions
Switch to Other Equipment by type ® (Vehicles with a Bluetooth 2.0 interface). Functions Telephone (Hands-free) Press the “SPEECH” key on Displaying Information the steering wheel. After you hear the “beep”, say “Voice Press the “SPEECH” key on commands”. the steering wheel. Say“Telephone”…
-
Page 178: List Of Accepted Commands
List of Accepted Searching Setting Destination, Address Book, etc. Commands Search nearby Search nearby Destination Destination Setting Search area Setting Go here Search vicinity Navigation Function Search by Set as destination Search by Telephone Operation Telephone Number Set destination Number Describes the words that can operate Telephone number Go there…
-
Page 179
Confi rming Go to Special Current Time Go to Special Location X Current Time Location X Special location Time Guidance Guidance Special location X What time? Next junction Go to special location Confi rm time Estimated Time Estimated Time of Arrival at of Arrival at Address Book Destination… -
Page 180
Editing Route/Changing Detour Route 6 Alternative Route Alternative Route Detour Route 6 mile Search Conditions mile Length of detour 6 mile Search alternative route 6 mile detour route Search detour Erase Route Erase Route Search detour within 6 miles Search for detour Delete the route Detour Route 20 km Detour Route 20 km Search other route… -
Page 181
Character Size Mobile Phone Character Size Mobile Phone Icon Icon Font size Telephone Icon RTT Traffi c RTT Traffi c Messages Messages Letter size Phone image RTT message Motorway Motorway Simplifi ed Map Phone picture Display RTT message Simplifi ed Map Automatic Display Speed Indicator Speed Indicator… -
Page 182
Route Guidance RTT Icons on Map RTT Icons on Map Sound Route Guidance Frequency Sound Frequency Set Route Guidance RTT icons display setting Navi Voice Frequency Current Station Current Station Volume setting Route guidance frequency Set Time Display Search for RTT stations Set Time Display settings Display Progress… -
Page 183
Charging Timer User SD Maintenance Charging Timer User SD Maintenance Timer Charge Setting SD Information Maintenance Information Timer Charge SD Card Information Maintenance screen Remote Climate Remote Climate Control SD card info Maintenance Information Control screen Pre-Air Conditioning Settings SD card display Air Conditioner Air Conditioner Pre-Air Conditioning… -
Page 184
Scroll Down-Left Zoom In XX km/m Scroll Down-Left Zoom In DetailsXX km/m Scroll Left Scroll Left Enlarge XX (k)m scale Scroll Up-Left Scroll Up-Left Zoom In Right Screen XX (k)m Right Screen Details Scale Right Screen XX (k)m Changing Scale Enlarge Right Screen Right: XX (k)m Right Screen Zoom In… -
Page 185
Switching Maps Changing Map Orientation Changing Left Screen Scale One Map North Up Zoom Out left One Map North Up Zoom Out left screen screen 1 screen Right screen North up Left screen Reduce 1-screen Map Right North up Zoom out left screen Single Map North up mode Left Wide view… -
Page 186: Audio Function Operation
Changing Left Screen Map Audio Function Operation * If the display is in km/m, the XX will be replaced by 1000 (km), 500 (km), 250 (km), 100 (km), 50 (km), Orientation Describes the words that can operate audio 20 (km), 10 (k m), 5 (km), 2 (km), 1 (km), 100 (m), 50 (m), 25 (m), or 10 (m).
-
Page 187
AV Operations Previous Preset Previous Preset Station Station Listen to SD Previous Preset Audio Off Audio Off SD Playback Last Preset Turn audio off Set to SD Last Preset station Turn off music Play Play SD Play Stop music Pause SD Card Pause Stop audio… -
Page 188
All Repeat Random Album Shuffl e All Repeat Random Album Shuffl e Start Repeat All Start Random Start Album Shuffl e Repeat All ON Random ON Album Shuffl e ON Playlist Random Stop Shuffl e Repeat all Playlist Random Stop Shuffl e Repeat all songs Start Playlist Random Play Stop album shuffl… -
Page 189: Searchable Genre Names In The Surroundings
Searchable genre names in the FINA PEMEX FINA PEMEX surroundings below FLYING J PETRO-CANADA FLYING J PETRO-CANADA FOOD MART PETROLEUM FOOD MART PETROLEUM MITSUBISHI MOTORS GATE PHILLIPS 66 GATE PHILLIPS 66 DEALER GETGO MITSUBISHI MOTORS PILOT GETGO PILOT GETTY DEALER PIONEER…
-
Page 190
RACEWAY EV STATION 240V BANCO POPULAR BANCO POPULAR RACEWAY EV STATION 240V (PUBLIC) SHEETZ BANCORPSOUTH SHEETZ EV STATION 240V PUBLIC BANCORPSOUTH SHELL BANK OF SHELL PUBLIC EV STATION 240V BANK OF AMERICA AMERICA SINCLAIR SINCLAIR EV STATION BANK OF BANK OF MONTREAL SPEEDWAY EV STATION 240V SPEEDWAY… -
Page 191
FIRST NATIONAL WELLS FARGO ROAD FIRST NATIONAL BANK WELLS FARGO ROAD ASSISTANCE BANK ASSISTANCE WOODFOREST WOODFOREST NATIONAL FIRST NIAGARA NATIONAL BANK PHYSICIAN FIRST NIAGARA BANK PHYSICIAN FIRSTBANK POLICE SERVICE FIRSTBANK POLICE SERVICE HARRIS BANK MEDICAL COMMUNITY HARRIS BANK MEDICAL SERVICE SERVICE HSBC HSBC… -
Page 192
HISTORICAL FONDUE CAJUN/ HISTORICAL MONUMENT FONDUE CAJUN MONUMENT CARIBBEAN FRENCH FRENCH CARIBBEAN MARINA MARINA GERMAN CANADIAN GERMAN CANADIAN MUSEUM MUSEUM GREEK CREPERIE GREEK CREPERIE NIGHT LIFE/ NIGHT LIFE GRILL/ DUTCH GRILL DUTCH MUSIC CLUB BARBECUE MUSIC CLUB FUSION BARBECUE FUSION RECREATION RECREATION AREA INDIAN… -
Page 193
COFFEE SHOP FAST FOOD MRS FIELDS MRS FIELDS ORANGE JULIUS ORANGE JULIUS COFFEE SHOP FAST FOOD COFFEE SHOP FAST FOOD POPEYES POPEYES CARIBOU AUNTIE ANNE’S CARIBOU COFFEE AUNTIE ANNE’S COFFEE RALLY’S RALLY’S BACK YARD BACK YARD BURGERS COFFEE TIME BURGERS SMOOTHIE KING COFFEE TIME SMOOTHIE KING… -
Page 194
DISCOUNT WINE & LIQUOR BAYMONT INN & DISCOUNT STORE WINE and LIQUOR BAYMONT INN and SUITES STORE SUITES WINE ELECTRONICS BEST WESTERN ELECTRONICS BEST WESTERN LIQUOR / OFFICE BUDGET HOST INN BUDGET HOST INN OFFICE SUPPLIES SUPPLIES CANDLEWOOD CANDLEWOOD SUITES FLOWERS/ FLOWERS TRAVEL… -
Page 195
HOLIDAY INN SHERATON OTHER GENERAL HOLIDAY INN SHERATON OTHER GENERAL MERCHANDISE MERCHANDISE HOLIDAY INN SHONEY’S INN HOLIDAY INN EXPRESS SHONEY’S INN EXPRESS GENERAL MERCHANDISE SLEEP INN SLEEP INN HOMESTEAD HAIR & BEAUTY HOMESTEAD VILLAGE HAIR and BEAUTY SOFITEL SOFITEL VILLAGE HEALTH CLUB HEALTH CLUB STAYBRIDGE… -
Page 196: Check The Voice Control Help
Check the Voice Verifi able Information Control Help How to use This explains the operations voice control common to all voice control You can check the usage for voice control operations. (P167) , a list of voice commands, etc. voice control This explains the voice control help operations for individual functions.
-
Page 197: Navi Settings
SETTINGS Navi Settings Types That Can Be Set This changes the settings concerning Guidance Allows you to set up the guidance navigation. display. →“Guidance”(P197) Press the key. NAVI MENU Screen Allows you to set up the navigation display. This displays the navi menu. →“Screen”(P199) Touch the “type”…
-
Page 198: Guidance
Guidance You can change the settings for the guidance display. Settings name Settings value Settings content Travel Time Arrival Time Sets the arrival time as the display method for the time of arrival at the destination. Local Time Sets the local time as the display method for the time of arrival at the destination.
-
Page 199
Settings name Settings value Settings content Default Returns the guidance to their factory default settings. NOTE • “Intersection Guidance Map” may not be displayed. Navi Settings… -
Page 200: Screen
Screen You can change the settings for the display. Settings name Settings value Settings content 3D Bldg. Enables/disables display of buildings in 3D (P36) display. Show Hide 3D Polygon Show Enables/disables display of 3D polygon landmark when Landmark displaying a map screen in 3D. Hide 3D Landmark Show…
-
Page 201
NOTE Settings name Settings value Settings content • “3D Landmark” is may not be Freeway Display Allows you to set whether or not to automatically display Simplifi ed Map displayed. Freeway Info (P35) when traveling on a freeway. Not Display Automatic Display Current Street Enables/disables display of the name of the current location. -
Page 202
POI Icons on Map Map Color Change 3D point of view You can enable/disable display of each POI You can set the display colors for the map You can change the 3D (P36) point of view. icon type. screen. Press the key. -
Page 203: Rtt Options
RTT Surveillance Map Selecting the Current Station RTT Options Displays the registered area using “Registering Select a station to receive RTT messages. You can make the settings concerning RTT. the RTT Surveillance Map” (P80) . Press the key. NAVI MENU RTT Icons on Map Press the key.
-
Page 204: Route Options
Route Options You can change the settings concerning route searches. Settings name Settings value Settings content Route Priority Fast Searches for the route with the shortest driving time (earliest arrival at the destination) by using freeways and major roads. Short Searches for the route with the shortest distance on the map.
-
Page 205: Navi Voice/Others
Navi Voice/Others You can set the settings for the volume and other settings. Settings name Settings value Settings content Beep Sound Allows you to set the operation volume. Volume The larger the number, the higher the volume. [Off] mutes the operation sound.
-
Page 206
Sensor Calibration The levels for the speed sensor and gyro sensor are raises through automatic learning. When a tire is replaced, it is necessary to erase the speed learning data and relearn it. Precision of Your Car’s Location and Press the key. -
Page 207: Personal
Personal You can register, edit, and delete locates in the address book, your home, frequently used locations, etc. Settings name Settings value Settings content Address Book Allows you to register a new location. After you touch [New], the procedure is the same as in Step 2 in “Register a Searched for Location”…
-
Page 208: Adjust Audio Sound Quality
Adjust Audio Sound Touch to adjust ▲ ▼ vehicles with and without premium amp Quality the fader. Balance/Fader You can set F11 to F1, 0, or R1 to R11. The level of the sound output from each Change audio quality settings. speaker can be adjusted with the cursor ▼…
-
Page 209: Equalizer Settings
Tone Settings NOTE vehicles with and without premium amp Equalizer Settings Allows you to set the level of each sound • If your car is equipped with premium quality. audio, you can set the “Punch” level. You Allows you to set the sound type. can set one of 7 levels from 0 to 6.
-
Page 210: Surround Settings
Setting Contents Other Settings vehicles equipped with premium amp Surround Settings The settings are different for vehicles with and BASS Allows you to set the bass to one without premium audio. of 11 levels, from -5 to +5. You can set the surround and sound fi eld Allows you to set the medium vehicles equipped with premium amp center.
-
Page 211
Setting Contents vehicles not equipped with premium amp Speed Press the SETTINGS key. Sets the levels for when the Compensated volume is adjusted automatically This displays the settings menu. Volume according to the vehicle speed. PremiDIA Allows you to adjust the amount Touch Sound Quality Control *1,*2,*3… -
Page 212: System Settings
System Settings Language Touch the “date and time display format” to set. This changes the language used. You can make system related settings, such as the time, language, units, and Bluetooth Press the SETTINGS key. device. This displays the settings menu. Touch , and then System…
-
Page 213: Opening Setting
Opening Setting A/C Cut-in Units Enables/disables the opening animation. This sets whether or not to display an interrupt This changes the unit. Disabling the opening animation makes for air conditioner operations.(Only on vehicles Press the SETTINGS key. startup faster. that support this function) This function may not be available depending This displays the settings menu.
-
Page 214: Bluetooth Setting
Registering a Bluetooth NOTE Equipment by type ® (Vehicles with a Bluetooth 2.0 interface). Device • This function can be used on vehicles Bluetooth Setting ® equipped with a Bluetooth 2.0 interface. Register a Bluetooth device with this product. • Cancel functions such as the mobile You can use the Bluetooth function to connect Press the key.
-
Page 215
Selecting a Bluetooth Device Setting a Passkey Touch Connect If you have registered multiple Bluetooth This sets whether to keep the same passkey ▼ devices, you must select the one to connect. (factory setting “1212”) or to set a different This completes selection of the Bluetooth (From then on, the Bluetooth device you set passkey each time is registered. -
Page 216: Keyboard Layout
Set Passcode Keyboard Layout Voice control settings You can lock the telephone functions with a This changes the keyboard layout. Allows you to enable or disable the voice passcode. control guide and reset training data. Press the SETTINGS key. Press the key.
-
Page 217: Other Settings
Other Settings Picture Control Vehicle Settings This adjusts the brightness, contrast, etc., for You can make settings for the vehicle You can make the settings concerning the the menu screen, navigation screen, etc. equipment.(Only on vehicles that support this screen and sound volume. function) Press the SETTINGS…
-
Page 218
Items That Can Be Set NOTE • * are items that may not be displayed, depending on the supporting vehicle specifi cations. • Either “Keyless Entry System” or “Keyless Operation System” is displayed, depending on the vehicle equipment. Keyless Entry System Item Settings content Turn Signal Lights Answerback… -
Page 219
Wipers Item Settings content Windshield Wipers Intermittent Sets the operation interval for the windshield wipers. Operation * Some setting items are disabled for certain grades and vehicle models. Wipers Linked to Washer Sets automatic operation of the windshield wipers when the washer fl… -
Page 220
Theft Alarm Item Settings content Panic Alarm Enables/disables the panic alarm. Turn Signal Item Settings content Operation in Key Position Sets the turn signal operation conditions. Lane-change Signals (Flash 3 Times Enables/disables the function that fl ashes three times if you with 1 Touch) gently operate the direction indicator lever when changing lanes. -
Page 221
Others Reset the Vehicle Settings Item Settings content Execute up to Step 2 in “Vehicle Horn Answerback with Remote Enables/disables the function that sounds the horn when the Settings”(P216) . Engine Start engine is started with the remote controller. ▼ Accessory Power Timeout Sets the duration ACC stays ON when the ignition switch is ACC. -
Page 222: Clock Screen
Clock Screen Displays the clock over the entire screen. Press the SETTINGS key. This displays the settings menu. Touch Clock Screen ▼ The clock is displayed. ADVICE • Touching the screen returns the display to the original screen. • With [System Setting], [Time], and [Format Change], you can change the format for time display.
-
Page 223: Other
Other Troubleshooting Please check these items if a message appears on the screen, or if you think something is not working properly. If This Message Appears… A message is displayed on the screen of this product according to the situation. Navigation Functions Message Cause…
-
Page 224
Audio Functions Message Cause Response Play is impossible due to a mechanism error. The drive has malfunctioned for some reason. Check that there is no problem with the disc, and insert the disc again. If the problem persists, consult with your dealer. -
Page 225: If You Think Something Is Not Working Properly
If You Think Something Is Not Working Properly… Here is a list of symptoms, causes and responses if you think something is not working properly. Common Symptoms Cause Response The operation sound is not made. The operation sound is set to [OFF]. Set the [Navi Voice/Others] “Beep Sound Volume”…
-
Page 226
Navigation Functions Symptoms Cause Response The navigation function does not start. No map card is inserted. Insert the map card. →“Insert an SD Card”(P15) The wrong SD card is inserted. Insert the special map card. There is a problem with the radio signals from the Please go on for a little while in the GPS receiving GPS satellite. -
Page 227
Audio Functions Symptoms Cause Response There is no sound or quiet sound. The volume is turned to its minimum. Adjust the volume. →“Adjust Volume”(P81) The balance or fader is turned to one side. Adjust the balance or fader. →“Balance/Fader”(P207) “Audio OFF”. Switch to “Audio ON”. -
Page 228: After The Car Battery Has Been Replaced
After the Car Battery Has Been Replaced When the car battery is replaced, some of the memory contents are deleted. Example: the set route (The set destination and any waypoints are retained.) Troubleshooting…
-
Page 229: End User License Agreement Of The Here Database
END USER LICENSE AGREEMENT OF THE HERE DATABASE END-USER TERMS Additional License Limitations: Except where you have been specifi cally The content provided (“Data”) is licensed, not sold. By opening this package, or licensed to do so by HERE in a separate written agreement, and without installing, copying, or otherwise using the Data, you agree to be bound by the limiting the preceding paragraph, your license is conditioned on use of the Data terms of this agreement.
-
Page 230
Disclaimer of Liability: HERE AND ITS LICENSORS (INCLUDING THEIR Governing Law: The above terms and conditions shall be governed by the laws LICENSORS AND SUPPLIERS) SHALL NOT BE LIABLE TO YOU IN RESPECT of the State of Illinois (for Data for the Americas and/or the Asia Pacifi c region) or OF ANY CLAIM, DEMAND OR ACTION, IRRESPECTIVE OF THE NATURE OF The Netherlands (for Data for Europe, the Middle East and Africa), without giving THE CAUSE OF THE CLAIM, DEMAND OR ACTION ALLEGING ANY LOSS,…
 Direction icon Touching this displays the map switching This section explains the navigation map screen and the display contents for the menu screen. screens. →“Select the Map Screen”(P34) Map Display Contents 9) Scale icon The map screens include the current location screen and scroll screens (P31) . Shows the scale of the displayed map.
 Настройка AUX
Кнопка «AUX» может отображаться на экране «Главная».
1. Нажмите кнопку «Настройка AUX» на экране «Сервисное меню».
2. Выберите «FIXED» или «AUTO». Затем выберите «Назад».
3. В следующий раз, когда переключатель зажигания повернут в положение «ACC» или «ON», система будет активна.
Touch CheckПроверьте, нормально ли сенсорная панель.
1. Выберите «Touch Check» на экране «Service Menu».
2. Измените цвета кнопок, коснувшись каждой из пяти кнопок.
3. Когда все кнопки будут нажаты, кнопка «ОК» появится вместе с сообщением. После того, как кнопка «ОК» выбрана, она будет переключена на экран «Сервисное меню».
Информация о версииОтображает информацию о версии оборудования, программного обеспечения и базы данных.
1. Выберите «Информация о версии» на экране «Сервисное меню».
2. Отобразится информация о версии. Вы должны проверить информацию о версии, нажав кнопки «Предыдущая» и «Далее».
Проверка связиПроверьте состояние соединения каждого устройства.
1. Выберите «Проверка связи» на экране «Сервисное меню».
2. «Теперь проверьте подключение внешнего устройства». , а затем он переключится на экран «Результат подключения к внешнему устройству».
Когда устройство USB обнаружено, оно будет отображаться в поле USB1 и USB2 в указанном порядке. Устройство USB не исчезнет, пока его разъем не отсоединится. Устройство показано следующим образом:
CP: соединение CarPlay (когда подключено устройство, установленное CarPlay, система сначала распознает его как «iPod», затем он будет изменен на «NC», а затем «CP»)
APP: подключение APP
iPod: подключение iPod
USB: USB-соединение
Если система не обнаружила связи с оборудованием или пытается ее обнаружить, на дисплее отобразится «-».
В случае, кроме выше, отображается «NC».
Информация о сигнале транспортного средстваОтображает состояния сигнала освещения, сигнала скорости автомобиля и обратного сигнала.
1. Выберите «Информация о сигнале автомобиля» на экране «Сервисное меню».
2. Отобразится текущее состояние сигнала транспортного средства.
«ВКЛ» отображается в пункте «ILL +» при включении выключателя освещения (загорается фара или задняя подсветка). При выключении отображается «ВЫКЛ». (Если система не может получить какой-либо сигнал, отображается «-».)
«ILL-» отображает яркость освещения в процентах (от 0 до 100%). (Если система не может получить какой-либо сигнал, отображается «-».)
«Скорость» отображает скорость автомобиля.
«Реверс»: «ВКЛ», когда рычаг селектора находится в положении «R», и «ВЫКЛ», когда он находится в другом положении. (Если система не может получить какой-либо сигнал, отображается «-».)
Проверка цветовой полосыПроверяет цветной дисплей.
1. Выберите «Color Bar Check» на экране «Service Menu».
2. Отображаются шесть цветовых полос.
3. Когда вы касаетесь одной из шести цветовых полос, весь экран будет отображаться в соответствующем цвете.
4. Когда вы касаетесь любого места на этом экране, монитор вернется к предыдущему экрану.
Проверка колонокПроверяет громкоговорители.
1. Выберите «Speaker Check» на экране «Service Menu».
2. Когда вы нажимаете кнопку «Пуск», каждый громкоговоритель будет звучать каждую секунду в соответствии с порядком, указанным в таблице ниже. Когда будет звучать последний громкоговоритель, тест завершится.
заметка
Во время теста кнопка «Старт» будет переключаться на «Стоп». Когда вы нажимаете кнопку «Стоп», вы можете прервать тест.
Во время теста «*» будет добавляться до и после имени динамика, который звучит.<Автомобиль без аудиоусилителя>
Последовательность
тон
Оратор
1
Низкий
Передний динамик (LH), передний твитер (LH)
2
Высокая
Передний динамик (LH), передний твитер (LH)
3
Низкий
Передний динамик (RH), передний твитер (RH)
4
Высокая
Передний динамик (RH), передний твитер (RH)
5
Низкий
Динамик задней двери (LH)
6
Низкий
Динамик задней двери (RH)<Автомобиль с аудиоусилителем>
Последовательность
тон
Оратор
1
Высокая
Передний твитер (LH)
2
Низкий
Динамик передних дверей (LH)
3
Высокая
Передний твитер (RH)
4
Низкий
Передний динамик (RH)
5
Низкий
Динамик задней двери (LH)
6
Низкий
Динамик задней двери (RH)
7
Низкий
Сабвуфер
заметка Громкость можно изменить, нажав кнопку регулировки громкости.
Информация о GPSОтображает информацию, связанную с GPS
1. Выберите «GPS Info» на экране «Service Menu».
2. Отобразится информация, связанная с GPS.
Список CAN-блоковОтображает, какой CAN-совместимый модуль подключен к многовидовому дисплею.
1. Выберите «Список CAN Unit» на экране «Service Menu».
2. Система определит, какое оборудование установлено в соответствии с таблицей привязки оборудования.
Индикация экрана
Оборудование
WCM
KOS-ECU
OSS / KOS_OSS
ОСС-ECU
СЧЕТЧИК
Комбинированный счетчик
ETACS
ETACS-ECU
переменный ток
A / C-ECU
ETG
Блок управления электрической задней дверью
КАМЕРЫ
Камера-ECU
Кодирование данныхОтображает информацию, указанную на экране «Настройка автомобиля».
1. Выберите «Данные кодирования» на экране «Сервисное меню».
2. Отобразится информация, которую вы установили на экране «Настройка автомобиля».
Учу поиску. Дорого. С гарантией! ==>>> Подробнее тут
Навигатор по автомобилю и FAQ по системам для новичков и гостей форума:
- Путеводитель Mitsubishi Eclipse Cross ==>>>
- Путеводитель Mitsubishi ASX, Peugeot 4008, Citroen C4 Aircross ==>>>
- Путеводитель Mitsubishi Outlander XL, Peugeot 4007, Citroen C-Crosser ==>>>
- Путеводитель Mitsubishi Outlander III (2013-2015MY) ==>>>
- Путеводитель Mitsubishi Outlander IV (2015-2019MY) ==>>>
Citroen C-Crosser 3.0 V6 (240 hp, 330 Nm) AT, tuning by Musketier — черный — *787*190
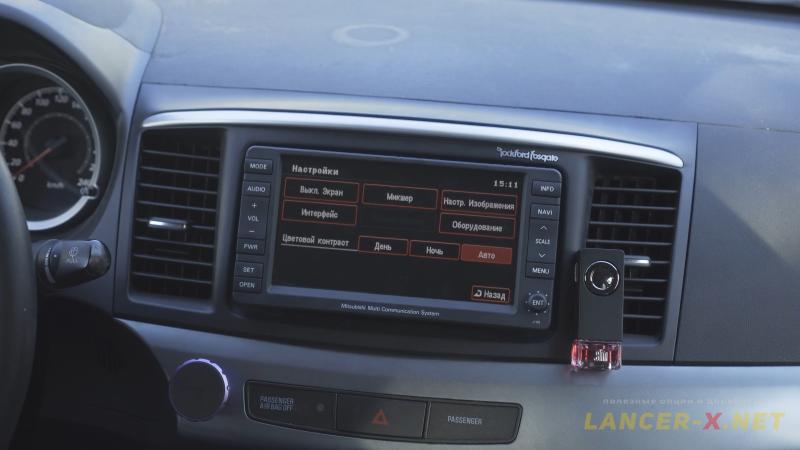 Данный комплект меня по-прежнему полностью устраивает и радует свой бесперебойной работой.
А с этим CAN адаптером, можно установить не только новой блок климата от Outlander 3, а еще более новую магнитолу Mitsubishi Connect, которую я решил установить вместо магнитолы MMCS J-05.
Для вашего удобства, данная статья будет в двух версиях: текстовая и видео в конце.
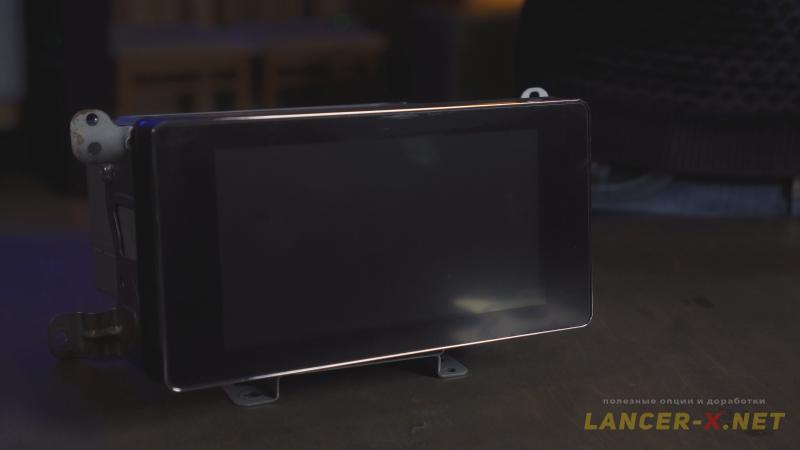 Магнитол Mitsubishi Connect достаточно много версий, кому интересно, подробнее можете почитать в данной статье.
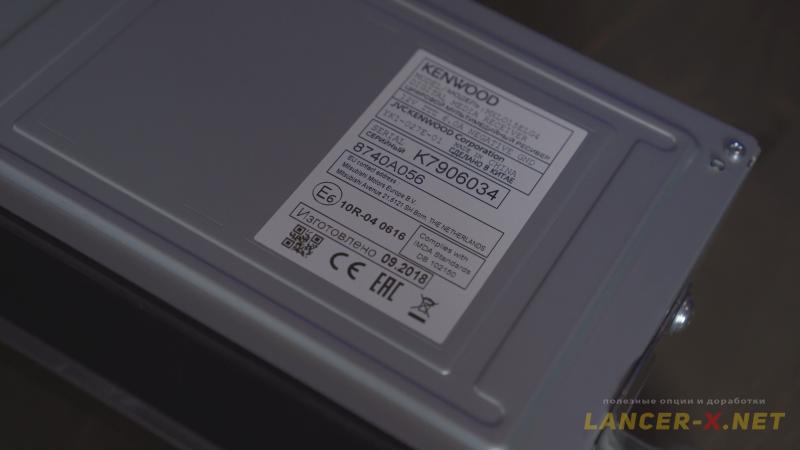 Но нас интересуют версии магнитол 8740A022 или 8740A056 с Outlander 3 с поддержкой CAN, чтобы это были не просто магнитолы, а магнитолы которые поддерживают связь с автомобилем через CAN шину автомобиля с помощью CAN адаптера от Николая.
Я приобрел себе магнитолу 8740A056. И мне повезло, так как в данной магнитоле присутствовал HDMI разъем.
В более поздних версиях 8740A056 HDMI разъем отсутствует, но при желании, данный разъем можно восстановить.
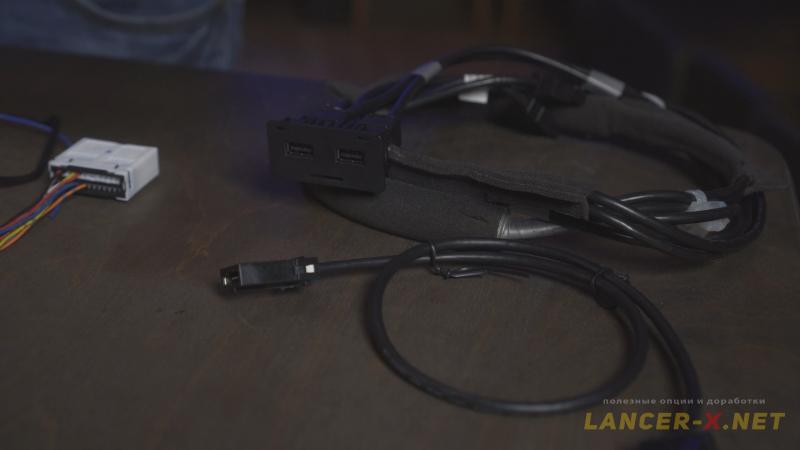 После получения магнитолы, я отправил ее на перепрошивку к Алексею Зайгарду, попутно докупив у него оригинальный USB и HDMI кабели для данной магнитолы. О том, что исправляет модифицированная прошивка можете подробно посмотреть в видео ниже, либо почитать у Алексея на сайте.
Кронштейны для установки Mitsubishi Connect на Лансер 10
Так как Mitsubishi Connect снят с Outlander 3, то кронштейны установленные на магнитоле не подойдут для установки на Лансер 10, из-за разного угла.
Кронштейны с магнитолы ММСС J-05 в теории могут подойти, но угол у них тоже немного отличается, магнитолу вы установите, но она будет утоплена в глубь рамки, что на мой взгляд будет смотреть не очень красиво.
 Для установки Mitsubishi Connect в Lаncer X необходимы штатные кронштейны с рестайлинговой магнитолы, их я нашел на авито, купив отдельно у владельца рестайлинговой магнитолы на Лансер 10 в моем городе.
CAN адаптер для подключения Mitsubishi Connect к Лансер 10
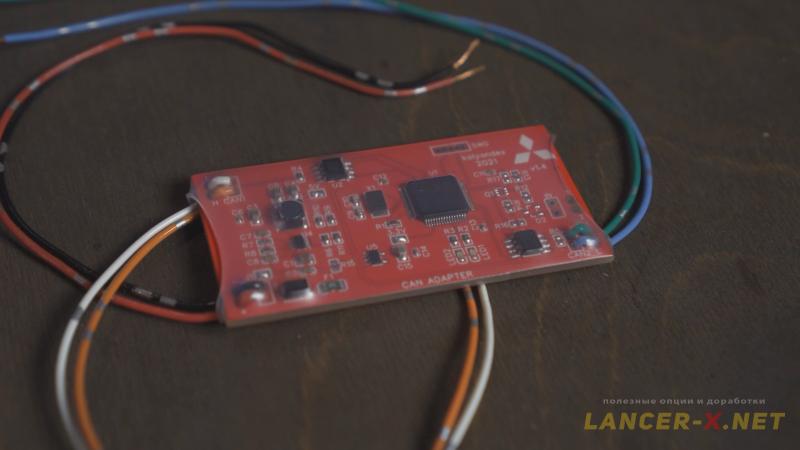 Чтобы была связь по CAN шине между автомобилем и Mitsubishi Connect необходимо все подключить через CAN Адаптер. Подробней почитать о CAN адаптере и, соответственно, приобрести его можно на официальном форуме.
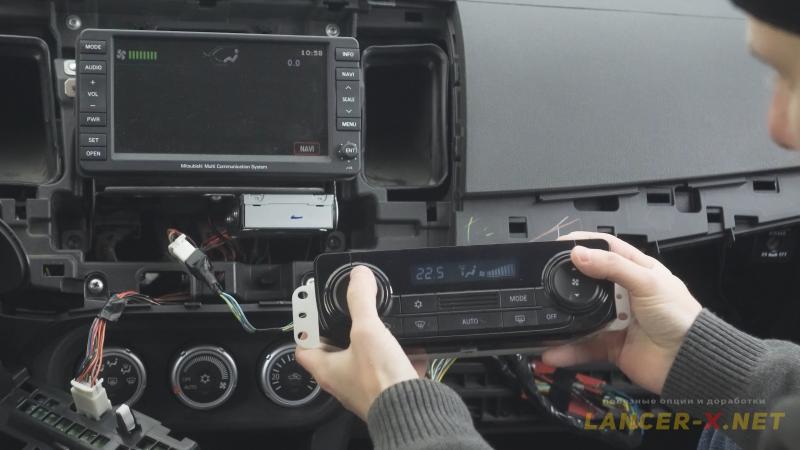 CAN адаптер вы покупайте отдельно, либо если у вас уже установлен CAN адаптер, например для блока климата от Outlander 3, то можете сэкономить. Доплачивайте Николаю за новую прошивку и ваш CAN адаптер будет поддерживать одновременную работу с несколькими устройствами: с блоком климата, Mitsubishi Connect и даже с приборной панелью от Outlander 3.
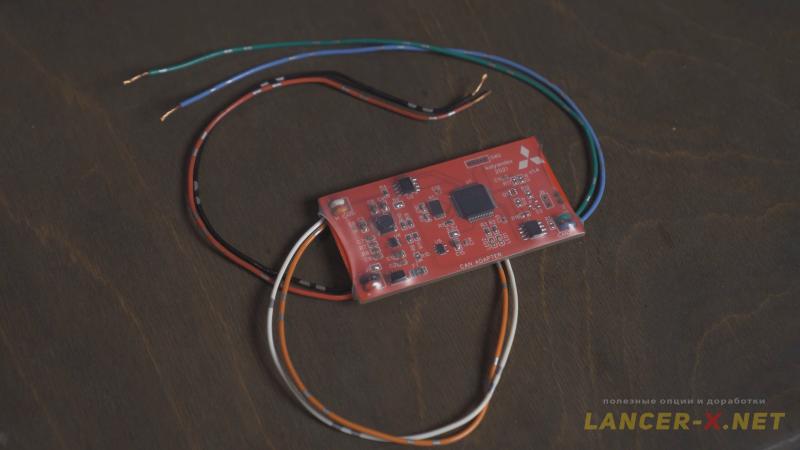 Я же купил второй CAN адаптер, так как буду изготавливать отдельную переходную проводку специально для Mitsubishi Connect.
Подключение Mitsubishi Connect к Лансер 10
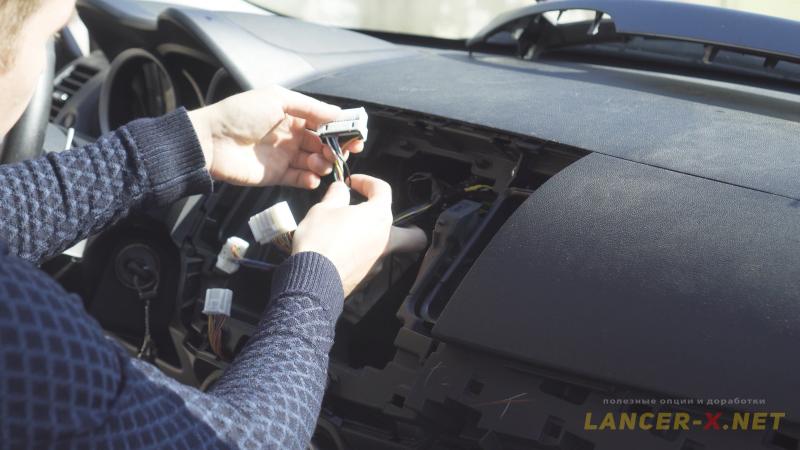 В статье про установку штатной магнитолы MMCS J-05 я нарастил недостающие провода и добавил недостающий разъем для подключения камеры к магнитоле, так как у меня рестайлинговый автомобиль.
На дорестайлинговом автомобиле до 2011 года выпуска вся проводка и разъемы присутствуют.
Для подключения Mitsubishi Connect потребуется перепиновка или переходная проводка, чтобы подключить камеру заднего вида и микрофон.
 Я решил все подключать через переходную проводку, чтобы была возможность оперативно откатиться на предыдущий вариант проводки.
Для изготовления переходной проводки я заказал на Aliexspress разъемы:
2. Ответная часть для подключения к разъему камеры С-133, брал с донорской проводки.
Но поскольку мои заказанные разъемы задерживались, я заказал переходную проводку для Mitsubishi Connect у Алексея Зайгарда, который выслал мне все вместе с перепрошитой магнитолой.
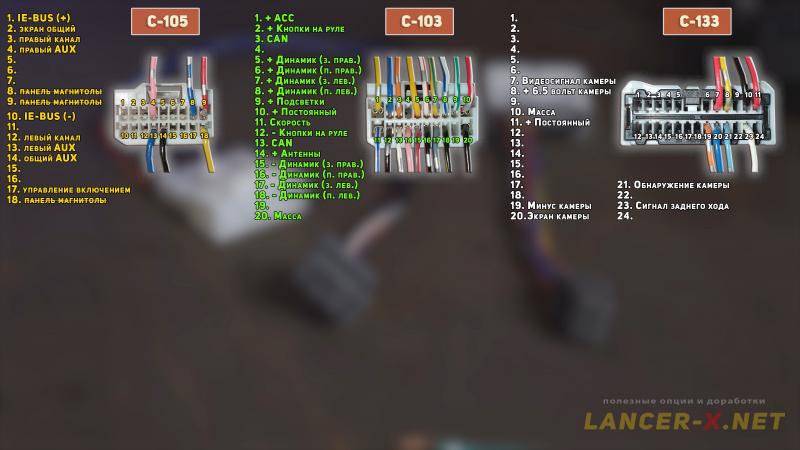 Вот так сейчас выглядит моя проводка, которая подключена к магнитоле ММСS.
Разъемы С-105 и С-103 одинаковые для подключения и на Mitsubishi Connect и на магнитоле MMCS.
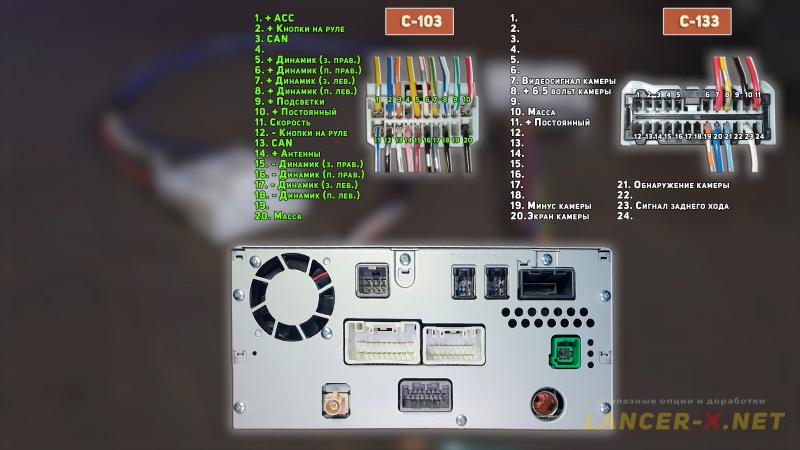 Разъем С-105 не нужен, его я не буду подключать к Mitsubishi Connect.
Разъем С-103 подключается штатно.
 С разъема С-103 дополнительно возьмём все необходимые провода для подключения CAN адаптера.
— Постоянный плюс с пин 10 разъема С-103.
— Массу с пин 20 разъема С-103 или кузова.
— CAN шина: пин 3 разъема С-103 это CAN H и пин 13 разъема С-103 это CAN L.
CAN шину с автомобиля подключаем к CAN адаптеру, а с адаптера уже к магнитоле.
И остается подключить штатную камеру и микрофон. Тут я напоминаю требуется перепиновка или переходная проводка, так как разъемы разные.
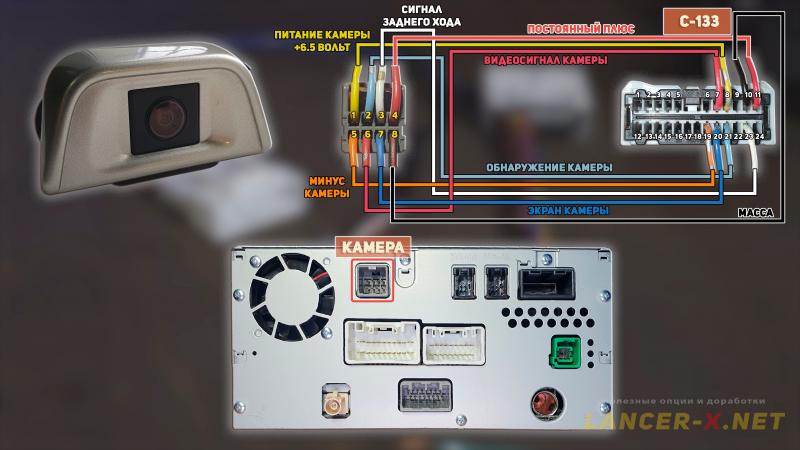 Камера к Mitsubishi Connect подключается так:
— питание камеры в пин 1.
— обнаружение камеры в пин 2.
— сигнал заднего хода в пин 3.
— постоянный плюс в пин 4.
— минус камеры в пин 5.
— видеосигнал камеры в пин 6.
— экран камеры в пин 7.
— масса в пин 8.
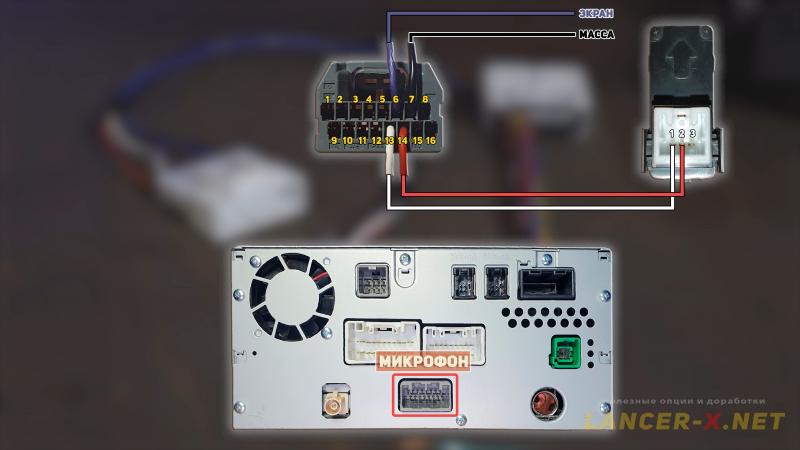 Поскольку в магнитоле Mitsubishi Connect уже встроена система Hands free Bluetooth, то блок Bluetooth от магнитоы MMCS нам больше не нужен. Необходимо подключить к Mitsubishi Connect только микрофон и массу, по следующей схеме:
— пин 1 разъема микрофона в пин 13.
— пин 2 разъема микрофона в пин 14.
— экран микрофона подключаем в пин 6.
— масса в пин 7.
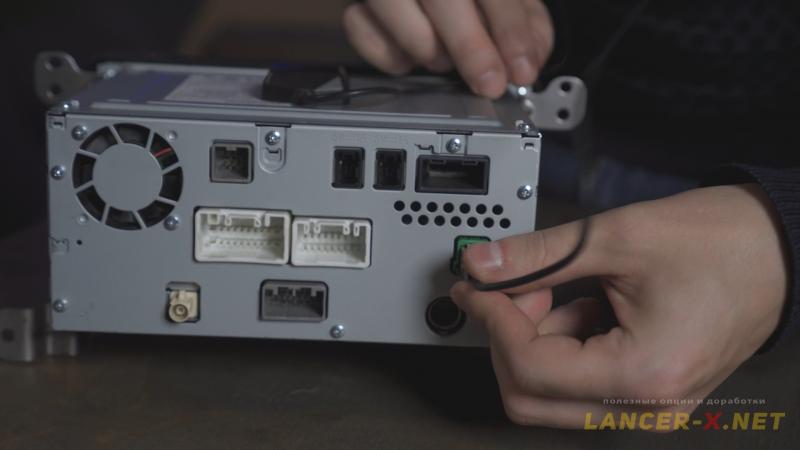 Также, еще дополнительно я подключу к Mitsubishi Connect gps антенну, которая шла в комплекте, антенна неоригинальная, но ее будет достаточно.
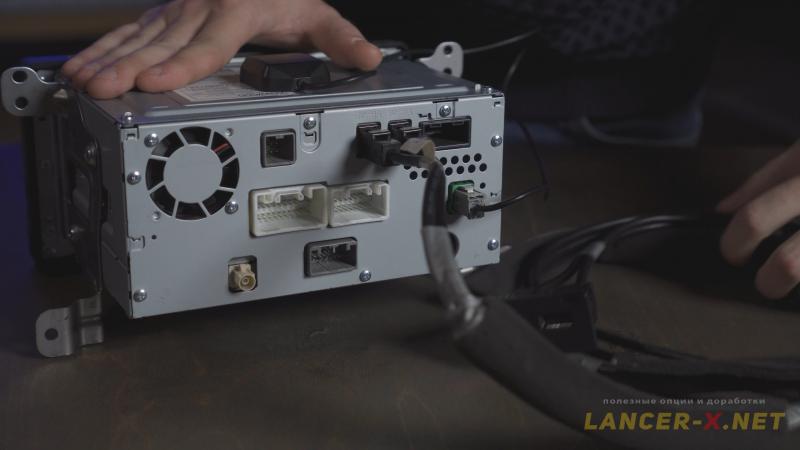 В эти разъемы подключается провод с usb портами, которые я выведу либо в районе прикуривателя, либо в бардачок.
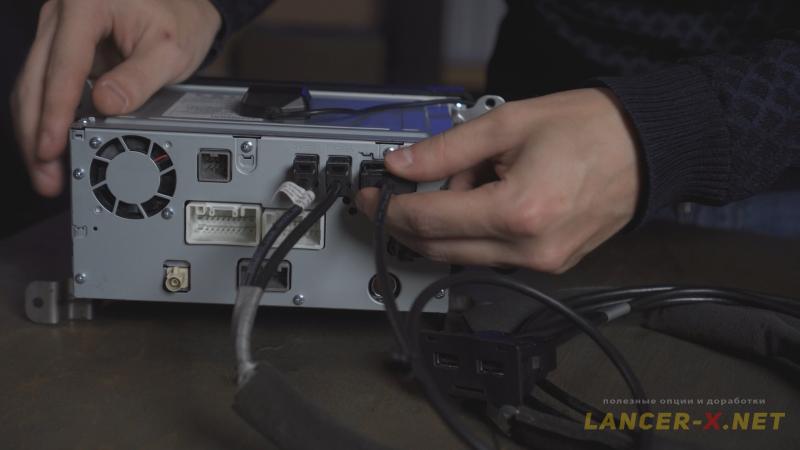 Сюда подключается провод HDMI разъема для подключения и воспроизведения видео с какого-либо источника, например с тв-тюнера или телефона.
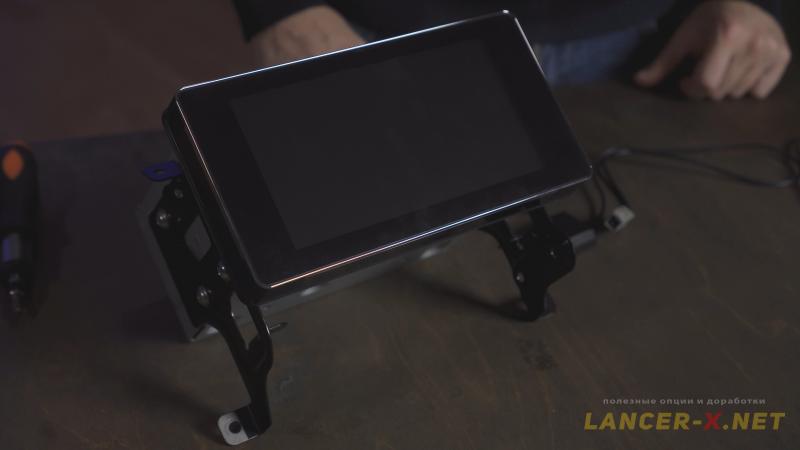 Прикручиваем кронштейны и можно идти устанавливать магнитолу в автомобиль!
Установка Mitsubishi Connect на Лансер 10
Прежде чем снять магнитолу MMCS J-05 и установить Mitsubishi Connect, для правильной работы необходимо внести изменения в вариант кодинг блока ETACS.
Для активации на Лансер 10 Mitsubishi Connect потребуется:
2. MMCodingWriter программа для скачивания и записи кодингов.
4. Ноутбук.
С 2021 года программа MUT Coding Mitsubishi стала платной, либо можете купить ее у разработчика, либо воспользоваться встроенным редактором в программе MMCoding Writer.
Обязательно делайте резервные копии оригинальных Variant и Custom кодингов!!!!!!!!!!!!!
В Variant кодинге находим пункты и активируем:
— AUDIO — — > Not Present
— AND [AVN] — — > Present
Если у вас установлена штатная камера заднего вида, чтобы включался экран камеры при включении задней передачи активируем вот этот пункт:
— Rear view camera — — > Present
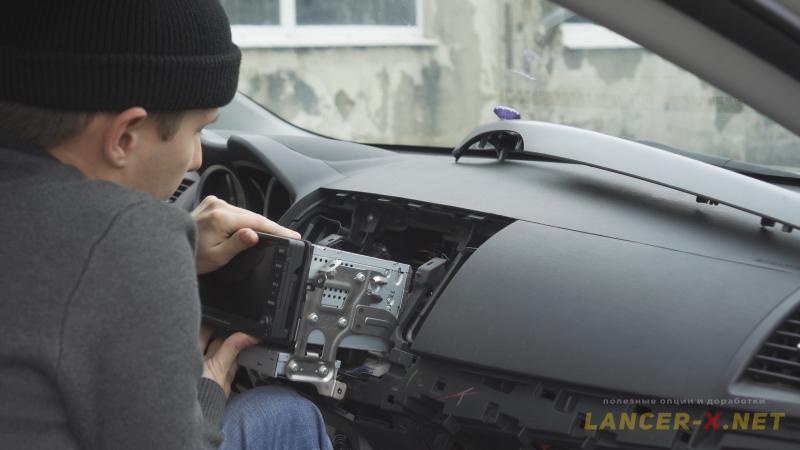 После чего магнитолу ММСS J-05 можно отключать от автомобиля и вынимать.
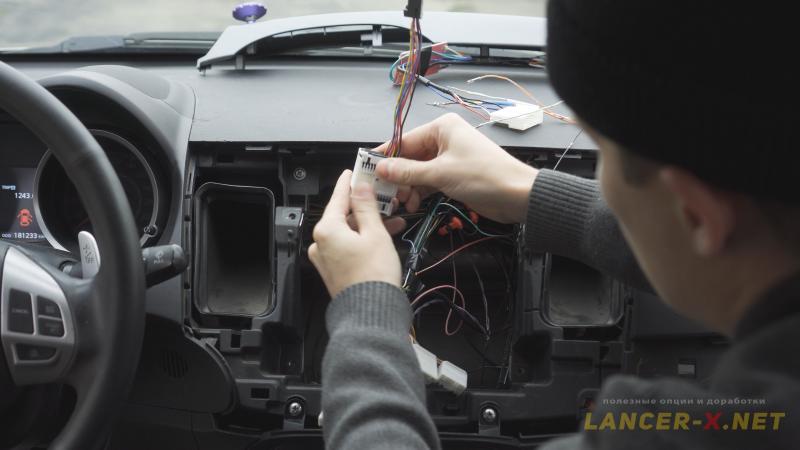 Подсоединяем переходную проводку для подключения камеры, микрофона и CAN адаптера к Mitsubishi Connect.
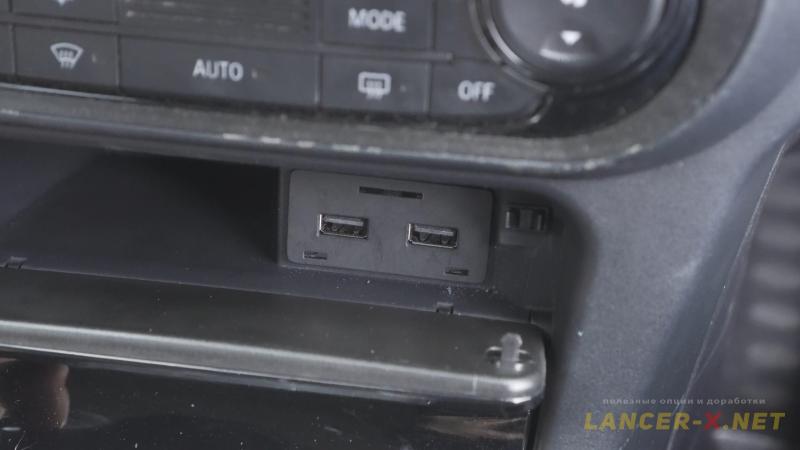 USB я решил вывести в центральную консоль, а не в подлокотник, но поскольку консоль у меня неоригинальная, пришлось немного подточить напильником посадочное место и порты юсб штатно защелкнулись.
 Провод hdmi я вывел в бардачок.
 Подключаем все разъемы и устанавливаем Mitsubishi Коннект на свое законное место.
 Мое первое впечатление, Mitsubishi Connect смотрится ничуть не хуже штатной магнитолы ММСS. Пробный запуск показал, что все установлено и подключено правильно.
Плюсы и минусы Mitsubishi Connect на Mitsubishi Лансер 10
Подробно весь функционал магнитолы описывать не буду, это все я очень детально рассмотрел в самом видео, а также показал преимущества модифицированной прошивки. Отмечу только основные плюсы и минусы.
Плюсы Mitsubishi Connect
— практически штатная установка и подключение.
— ёмкостный сенсорный дисплей с гораздо большим разрешением, чем в MMCS.
— идеальный прием FM радиостанций. FM конвертер не нужен.
— встроенный CAN box и Hands free Bluetooth.
— HDMI порт.
— Android Auto и Car Play (возможность подключать смартфоны).
Минусы Mitsubishi Connect
— цена магнитолы.
— для полного функционала необходим CAN адаптер.
— требуется модифицированная прошивка, чтобы исправить некоторые «раздражающие» функции.
— навигация работает только через подключенный телефон (Android Auto или Car Play).
Если подвести итог, то Mitsubishi Connect меня очень порадовал, однозначно оставляю эту магнитолу, а магнитолу MMCS буду продавать, так как Mitsubishi Connect во многом лучше MMCS.
Но сразу отмечу, если бы не было возможности установить Mitsubishi Connect на Лансер 10, то я остался бы на магнитоле MMCS и не на что бы ее не променял.