- Manuals
- Brands
- Motorola Manuals
- Cordless Telephone
- C1001LA
- User manual
-
Contents
-
Table of Contents
-
Bookmarks
Quick Links
Digital Cordless Telephone
Motorola C1LA
Model: C1001LA
Warning: Charge the handset for 24 hours before use.
Related Manuals for Motorola C1001LA
Summary of Contents for Motorola C1001LA
-
Page 1
Digital Cordless Telephone Motorola C1LA Model: C1001LA Warning: Charge the handset for 24 hours before use. -
Page 2: Need Help
Welcome… to your new Motorola C1LA Digital Cordless Telephone! • All handsets are fully cordless for locating anywhere within range. • Block nuisance calls by number or call type. • Do Not Disturb feature stops the phone from ringer when set to on.
-
Page 3
This user guide provides you with all the information you need to get the most from your phone. To set up your phone, follow the simple instructions in ‘Getting Started’, on the next few pages. IMPORTANT Only use the telephone line cord supplied. Got everything? •… -
Page 4: Table Of Contents
1. Getting started …………..6 2. Getting to know your phone ……….10 3. Using the phone …………..15 Switch the handset on / off …………….15 Calls …………………..15 3.2.1 Make a call ……………….15 3.2.2 Preparatory dialling …………….15 3.2.3 End a call …………………15 3.2.4 Receive a call ………………15 Adjust the earpiece volume…………….15 Mute …………………..15…
-
Page 5
6. Nuisance calls …………..24 Block calls by call type ……………….24 Block calls by number ………………24 7. Clock & alarm …………..25 Set the date and time………………25 Set the alarm ………………..25 Switch off alarm ring ………………25 8 Personal settings …………..26 Handset tones ………………..26 8.1.1 Handset ringer volume ……………26 8.1.2… -
Page 6: Getting Started
1. Getting started IMPORTANT Do not place your C1LA in the bathroom or other humid areas. Location You need to place your C1LA base within 1.5 metres of the mains power and telephone wall socket so that the cables will reach. The socket-outlet should be installed near the equipment and should be easily accessible.
-
Page 7: Connecting The Base
Connecting the base 1. Plug the telephone line cord into the socket marked on the underside of the base. 2. Plug the power adaptor into the socket marked on the underside of the base and plug the other end into the mains power wall socket. Switch on the mains power. Installing and charging the handset 1.
-
Page 8: Charging
Connecting the handset and charger (for multi-pack only) If you have purchased a multiple pack, you will need to carry out this process for all the handsets and chargers. 1. Plug the power adaptor into the socket marked on the underside of the charger and plug the other end into the mains power wall socket.
-
Page 9: Date And Time
possible. The charge capacity of rechargeable batteries will reduce with time as they wear out, giving the handset less talk / standby time. Eventually they will need to be replaced. After charging your handset for the first time, subsequent charging time is about 6–8 hours a day.
-
Page 10: Getting To Know Your Phone
2. Getting to know your phone Overview of your handset A Missed call LED B Earpiece C Display See page 12 for an overview of the display icons. D Up During a call, press to increase earpiece volume. When the phone is ringing, press to increase the handset ringer volume.
-
Page 11
F Talk / Hands-free Press to switch hands-free on or off during a call. Press to make and receive calls. G * / Keypad lock / Pulse to Tone dialling Press and hold to lock and unlock the keypad. During a call, press to switch from pulse dialling to tone dialling. H Recall Use with switchboard / PABX services and some network services. -
Page 12: Handset Lcd Display
Handset LCD Display Battery status Scrolls when charging Time or Handset name In standby mode, press and hold to switch handset idle screen between handset name or time. Signal icon ECO MODE is ON ECO PLUS is ON Handset ringer is off Indicates a missed call Steady when making an outgoing call Flashes to indicate an incoming or internal call…
-
Page 13: Navigating The Menus
Battery is partially charged Battery is running low Flashes when battery is almost fully discharged For this feature to work, you must subscribe to Caller ID Service from your network operator. A subscription fee may be payable. This feature is dependent on your Network Service provider supporting the service. A subscription fee may be payable.
-
Page 14: Menu Map
Menu map PHONEBOOK PERSONAL SET ADVANCED SET VIEW HANDSET TONE ECO MODE ADD NEW RING VOLUME ECO PLUS EDIT RING MELODY AUTO PREFIX DELETE KEY TONE RECALL TIME DELETE ALL BASE TONE DIAL MODE NUISANCECALL RING VOLUME CHANGE PIN BY CALLTYPE RING MELODY REGISTER BY NUM…
-
Page 15: Using The Phone
3. Using the phone NOTE Your handset will automatically time the duration of all external calls. The call timer will display after the first 15 seconds of your call. When the call ends, the total duration of your talk time is shown for 5 seconds. Switch the handset on / off Press and hold to switch the handset on or off.
-
Page 16: Receive An Internal Call
The icon flashes and the handset number that is calling is displayed. 1. If only 2 handsets are registered to the base, press and the other handset rings automatically. 2. If more than 2 handsets are registered to the base press and scroll to the handset that is to be called then press…
-
Page 17: Answer A Call Hands-Free
2. Press to switch the call between the earpiece and the loudspeaker. 3. Press to end the call. NOTE During a hands-free call, press to adjust the volume. 3.6.2 Answer a call hands-free 1. When the phone rings, press twice to answer the call. 3.6.3 Switch to hands-free during a call.
-
Page 18: Delete The Entire Redial List
3.7.4 Delete the entire Redial list 1. Press to open the Redial list. 2. Press and scroll DELETE ALL. 3. Press , the display shows CONFIRM?. 4. Press to confirm or to cancel. Lock / unlock the keypad You can lock the keypad so that it cannot be operated accidentally while carrying it around.
-
Page 19: Phonebook
4. Phonebook You can store up to 100 names and numbers in the phonebook. Names can be up to 12 characters long and numbers up to 24 digits. Store a name and number If the C1LA is connected to a switchboard, you may need to enter a pause in a stored number.
-
Page 20: View Or Dial An Entry
View or dial an entry 1. Press . The icon is displayed. 2. Scroll to the entry you want. Enter the first letter of the name to search alphabetically. The first name that starts with this letter or the nearest letter in the alphabet will be displayed.
-
Page 21: Store A Quickdial Number
Store a quickdial number Your C1LA can store 10 quickdial numbers the first 4 numbers are already set, these are 1_TM center, 2_UniFiCenter, 3_ Police and 4_FireRescue. The quickdial name can be upto 10 characters. 1. Press . The display shows PHONEBOOK. 2.
-
Page 22: Caller Id And The Calls List
5. Caller ID and the Calls list IMPORTANT To use Caller ID, you must first subscribe to the service from your network provider. A subscription fee may be payable. To ensure that the caller’s name is displayed, make sure you have stored the full telephone number, including the area code in the phonebook.
-
Page 23: Copy A Calls List Number To The Phonebook
3. Press to dial the displayed entry. 5.2.3 Copy a Calls list number to the phonebook 1. Press to open the Calls list. 2. Scroll to the entry you want. 3. Press and scroll SAVE NUMBER. 4. Press again. The display shows ENTER NAME.
-
Page 24: Nuisance Calls
6. Nuisance calls Block calls by call type You can set the C1LA so that when certain call types call you the phone does not ring. You can choose from international, private or payphone 1. Press , scroll NUISANCE CALL and press 2.
-
Page 25: Clock & Alarm
7. Clock & alarm Set the date and time 1. Press , scroll CLOCK/ALARM and press . The display shows DATE & TIME. 2. Press to select. 3. Enter the date (e.g. 12—08—2014 for 12th of August 2014) and press to confirm.
-
Page 26: Personal Settings
8 Personal settings Handset tones 8.1.1 Handset ringer volume The handset ring volume can be set to different volume levels. Choose from 5 volume levels or Off. 1. Press , scroll PERSONAL SET and press 2. The display shows HANDSET TONE, press 3.
-
Page 27: Base Ringer Melody
2. Scroll BASE TONE, press 3. The display shows RING VOLUME, press 4. Press to select the volume (1 -5 or OFF) . 5. Press to confirm or to return to the previous menu. 8.2.2 Base ringer melody You can set different ringer melodies for your calls. Choose from 5 different ringer melodies.
-
Page 28: Do Not Disturb
Do Not Disturb Your C1LA can be set to Do Not Disturb (DND) mode. Once activated when you receive an incoming call the phone will not ring. When DND is set to the display will show DONOTDISTURB. 1. Press , scroll PERSONAL SET and press 2.
-
Page 29: Base Settings
9. Base settings ECO mode Your C1LA offers ECO mode function which reduces the transmitted power and energy consumption when switched on. To switch Eco mode on: 1. Press , scroll ADVANCED SET and press 2. Scroll ECO MODE and press 3.
-
Page 30: Recall Mode
Recall mode Depending on your country and network operator, your C1LA has the recall time set as 600 ms (TIMED BR,4). It is unlikely that you will need to change this setting unless advised to do so. 1. Press , scroll ADVANCED SET and press 2.
-
Page 31: Registering An Additional Handset
Registering an additional handset NOTE Handset batteries must be fully charged before you start to register. Hold your handset close to the base during the registration process. Handsets that were supplied with your C1LA base are already pre-registered. On the base: 1.
-
Page 32: Default Settings
1. Press , scroll ADVANCED SET and press 2. Scroll RESET and press 3. The display shows RESET 4. Press to confirm or to return to the previous menu. Your C1LA will restart automatically. 9.10 Default settings Key tone Auto answer Ringer melody Ringer volume Ear volume…
-
Page 33: Help
10. Help No dial tone • Use only the telephone line cord supplied. • Check that the telephone line cord is connected properly. • Check that the mains power is connected properly and switched on. No display • Check that the batteries are inserted correctly and fully charged. Use only approved rechargeable batteries supplied.
-
Page 34: Handset Does Not Ring
Handset does not ring • The handset ringer volume may be set to Off. Base does not ring • The base ringer volume may be set to Off. Noise interference on my phone or on other electrical equipment nearby • Place your C1LA at least one metre away from electrical appliances or any metal obstructions to avoid any risk of interference.
-
Page 35: General Information
11. General information IMPORTANT This equipment is not designed to make emergency telephone calls when the power fails. Alternative arrangements should be made for access to emergency services. This product is intended for connection to analogue public switched telephone networks and private switchboards in Malaysia.
-
Page 36: Installation Guidelines
Installation Guidelines • Read and understand all instructions and save them for future reference. • Follow all warnings and instructions marked on the product. • Do not install this product near a bath tub, sink, or shower. • Operate this phone using only the power source that is indicated on the marking label.
-
Page 37: Product Disposal Instructions
(“SUNCORP”) What Does this Warranty Cover? Subject to the exclusions contained below, SUNCORP warrants that this Motorola branded product (“Product”) or certified accessory (“Accessory”) sold for use with this product that it manufactured to be free from defects in materials and workmanship under normal consumer usage for the period outlined below.
-
Page 38
WARRANTY IS THE EXCLUSIVE REMEDY OF THE CONSUMER, AND IS PROVIDED IN LIEU OF ALL OTHER WARRANTIES, EXPRESS OF IMPLIED. IN NO EVENT SHALL MOTOROLA OR SUNCORP BE LIABLE, WHETHER IN CONTRACT OR TORT (INCLUDING NEGLIGENCE) FOR DAMAGES IN EXCESS OF THE PURCHASE… -
Page 39: Technical Information
Motorola or SUNCORP are excluded from coverage. Use of Non-Motorola branded Products and Accessories. Defects or damage that result from the use of Non-Motorola branded or certified Products or Accessories or other peripheral equipment are excluded from coverage. Unauthorized Service or Modification. Defects or damages resulting from service,…
-
Page 40
<This page has been intentionally left blank>… -
Page 41
Suncorp declares that the following products: Brandname: Motorola Type: C1001LA, C1002LA, C1003LA, C1004LA Descriptions: DECT phone without telephone answering machine (C100xLA) and their multi-handset versions. to which this declaration related is in conformity with the essential requirements of the following directives of the Council of the European Communities: R&TTE Directive (1999/5/EC) -
Page 42
Manufactured, distributed or sold by Suncorp Technologies Ltd., official licensee for this product. MOTOROLA and the Stylized M Logo are trademarks or registered trademarks of Motorola Trademark Holdings, LLC. and are used under license. All other trademarks are the property of their respective owners.

Manufactured, distributed or sold by Suncorp Technologies Ltd., oicial licensee for this product. MOTOROLA and the Stylized M Logo are trademarks or registered trademarks of Motorola Trademark Holdings, LLC. and are used under license. All other trademarks are the property of their respective owners. © 2014 Motorola Mobility LLC. All rights reserved.Version 4 (SG)
Welcome…
to your new Motorola C1LB+ Digital Cordless Telephone!
• All handsets are fully cordless for locating anywhere within range.
• 50 Name and Number phonebook.
• Bright backlit display.
• Speakerphone for hands-free conversations.
• Caller ID shows you who’s calling and see details of the last 40 callers in a Calls list.
1
• Redial up to 10 of the last numbers called.
• Register up to 5 handsets to a single base and register each handset with up to 4 dierent
bases.
• Make internal calls and transfer external calls between handsets.
• Choose from 10 dierent ringtones for internal and external calls as well as numbers stored in
the phonebook.
Please note that this equipment is not designed for making emergency telephone calls when
the power fails. Alternative arrangements should be made for access to emergency services.
Need help?
If you have any problems setting up or using your C1LB+, please contact Customer Services
on (65) 68412668. Email: support@alcom.com.sg.
Alternatively, you may nd the answer in the ‘Help’ section at the back of this guide.
1
You must subscribe to your network provider’s Caller ID or Call Waiting service for these
features to work. A subscription fee may be payable.
This user guide provides you with all the information you need to get
the most from your phone.
To set up your phone, follow the simple instructions in ‘Getting
Started’, on the next few pages.
IMPORTANT
Only use the telephone line cord supplied.
Got everything?
• C1LB+ base & cordless handset
• 2 x rechargeable Ni-MH battery cells
• Power adaptor for the base
• Telephone line cord
If you have purchased a C1LB+ multiple pack you will also have the following additional
items:
• Cordless handset & charger
• 2 x rechargeable Ni-MH battery cells
• Power adaptor for the charger
ECOMOTO: a convergence of eorts by marketing, design, research, engineering and
supply chain management that leads to better products for everyone. A holistic view that
focuses on both social and environmental responsibility. A passion and a shared point of view.
The right thing to do.
• Meets and / or exceeds EMEA environmental regulatory requirements.
• Eco friendly packaging with a minimum 20% post consumer recycled content.
• Phone housing is built with a minimum of 25% post consumer recycled content plastic.
• Energy eicient charger that meets EU Code of Conduct requirements.
• ECO mode function which reduces the transmitted power and energy consumption.
2. Getting to know your phone
Overview of your handset
BATTERY PERFORMANCE
In ideal conditions, fully charged batteries should give up to 6.5 hours talk time or up to 135 hours
standby time on a single charge.
1
Note that new batteries do not reach their full capacity until they have been put to normal use for
several days.
To keep your batteries in the best condition, leave the handset o the base for a few hours at a
time.
Running the batteries right down at least once a week will help them last as long as possible.
The charge capacity of rechargeable batteries will reduce with time as they wear out, giving the
handset less talk / standby time. Eventually they will need to be replaced.
After charging your handset for the rst time, subsequent charging time is about 6–8 hours a day.
Batteries and handset may become warm during charging. This is normal.
1
All talk and standby times are approximate and depend on features selected and usage
pattern.
Date and time
If you have subscribed to a Caller ID Service, the date and time is set automatically for all handsets
when you receive your rst call.
If you do not have a Caller ID service, you can set the date and time manually, see section “7.
Clock & Alarm”.
Your C1LB+ is now ready for use.
Installing and charging the handset
1. Remove the battery cover from the back of the handset and insert the rechargeable Ni-MH
battery cells supplied. Please note the ’+’ and ’-’ markings inside the battery compartment
and insert in the correct direction.
2. Slide the battery cover back into place.
3. If you are charging the batteries for the rst time, place the handset on the base to charge for
at least 24 hours continuously.
4. When the handset is fully charged,
icon will appear steady on the display. Plug the other
end of the telephone line cord (make sure that one end is already plugged into the base) into
the telephone wall socket.
Connecting the handset and charger
(for multi-pack only)
If you have purchased a multiple pack, you will need to carry out this process for all the handsets
and chargers.
1. Plug the power adaptor into the socket marked
on the underside of the charger and plug
the other end into the mains power wall socket.
2. Remove the battery cover from the back of the handset and insert the 2 x AAA NiMH
rechargeable batteries supplied. Please note the ’+’ and ’-’ markings inside the battery
compartment and insert in the correct direction.
3. Slide the battery cover back into place.
If you are charging the batteries for the rst time, place the handset on the charger to charge for
at least 24 hours continuously.
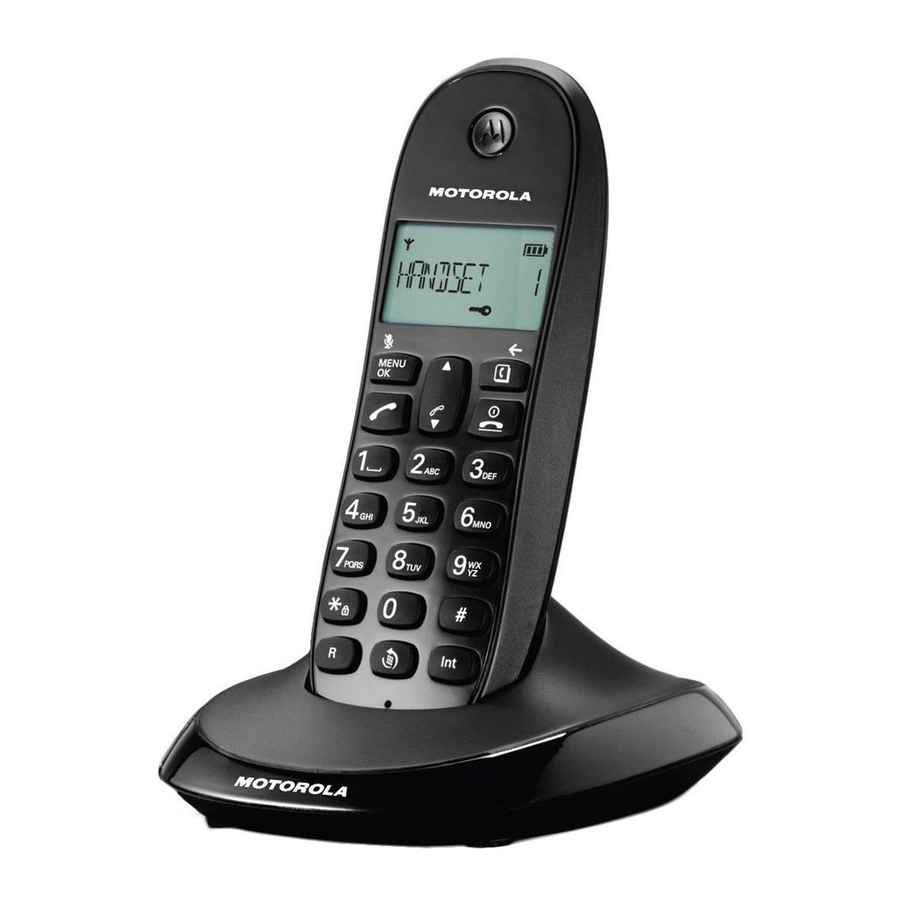
4. When the handset is fully charged,
icon will appear steady on the display. The display will
show
HANDSET
and handset number (e.g. 2) to indicate that it is registered to the base.
IMPORTANT
Warning! Use only the approved rechargeable Ni-MH battery cells (2 x AAA Ni-MH 300mA
rechargeable batteries) supplied with your C1LB+.
Please do not use alkaline or non rechargeable batteries. It may cause permanent damage to
the product and void the warranty.
BATTERY LOW WARNING
If
icon flashes on the display and you hear a warning beep every minute during a call, you
will need to recharge the handset before you can use it again.
When charging,
icon will scroll on the display. Once fully charged scrolling will stop.
1. Getting started
IMPORTANT
Do not place your C1LB+ in the bathroom or other humid areas.
Location
You need to place your C1LB+ base within 1.5 metres of the mains power and telephone wall
socket so that the cables will reach. The socket-outlet should be installed near the equipment and
should be easily accessible.
Make sure that it is at least 1 metre away from other electrical appliances to avoid interference.
Your C1LB+ works by sending radio signals between the handset and base. The strength of the
signal depends on where you place the base. Placing it as high as possible ensures the best
signal.
HANDSET RANGE
The unit has a range of up to 300 metres outdoors when there is a clear line of sight between
the base and handset. Any obstruction between the base and handset will reduce the range
signicantly. With the base indoors and the handset either indoors or outdoors, the range will
normally be up to 50 metres. Thick concrete and stone walls can severely aect the range.
SIGNAL STRENGTH
The
icon on your handset indicates that you are within range of the base. When out of range
of the base, the
icon flashes. If you are on a call, you will hear a warning beep.
The line will hang up if the handset moves out of range of the base. Move closer to the base. The
handset will automatically reconnect to the base.
Setting up
IMPORTANT
The base station must be plugged into the mains power at all times. Do not connect the
telephone line cord into the wall socket until the handset is fully charged. Use only the power
adaptor and telephone line cord supplied with the product.
Connecting the base
1. Plug the telephone line cord into the socket marked on the underside of the base.
2. Plug the power adaptor into the socket marked
on the underside of the base and plug the
other end into the mains power wall socket. Switch on the mains power.
Handset LCD Display
Flashes to indicate an incoming external call.
External call in progress.
Flashes to indicate an incoming internal call.
Internal call in progress.
3-way call in progress or transfer an external call to another C1LB+ handset registered to the
base.
Eco mode is ON.
Flashes to indicate new voicemail messages received. O when you have no voicemail
messages.
1
Indicates signal strength.
Flashes when handset is not registered to the base or if you go out of range.
Hands-free mode is ON.
Menu is opened.
Phonebook is opened.
Flashes to indicate new calls list entries received.
2
Answered call (when viewing the Calls list).
2
Unanswered call (when viewing the Calls list).
2
Keypad is locked.
Displayed number is longer than 12 digits.
The approximate power levels of your battery are indicated as follows:
Battery is fully charged.
Battery is partially charged.
Battery is running low.
Flashes when battery is almost fully discharged.
1
This feature is dependent on your Network Service provider supporting the service. A
subscription fee may be payable.
2
For this feature to work, you must subscribe to Caller ID Service from your network operator. A
subscription fee may be payable.
Underside of the base
A
A Page
In standby mode, press to ring the handset(s).
Press and hold to enter registration mode when registering handsets.
Navigating the menus
Your C1LB+ has an easy to use menu system.
Each menu has a list of options, which you can see on the menu map on the following page.
When the handset is switched on and in standby:
1. Press
m to open the main menu.
2. Then use
u or d buttons to scroll through the available options.
3. Press
m to select an option. To return to the previous menu level, press p . To exit the
menu and return to standby, press
n.
NOTE
If no buttons are pressed for 20 seconds, the handset returns to standby automatically.
Menu map
PHONEBOOK HANDSET DATE — TIME
ADD ENTRY BEEP DATE SET
MODIFY ENTRY INT RING VOL CLOCK SET
DELETE ENTRY EXT RING VOL ALARM SET
SETUP INT MELODY REGISTER
DEL HANDSET EXT MELODY SELECT BASE
PIN CODE AUTO ANSWER REG BASE
DIAL MODE NAME
RECALL LANGUAGE
DEFAULT KEYLOCK ?
ECO MODE
3. Using the phone
NOTE
Your handset will automatically time the duration of all external calls. The call timer will display
after the rst 15 seconds of your call. When the call ends, the total duration of your talk time is
shown for 5 seconds.
3.1 Switch the handset on / o
Press and hold n to switch the handset on or o.
3.2 Calls
3.2.1 Make a call
1. Press
t.
2. When you hear the dial tone, dial the number.
3.2.2 Preparatory dialling
1. Dial the number rst. If you make a mistake press
p to delete the last digit.
2. Press
t to dial.
3.2.3 End a call
Press
n, or place the handset back on the base or charger.
3.2.4 Receive a call
When you receive an external call, the phone rings and icon flashes on the display.
1. If the handset is o the base then press
t to answer the call, or if the handset is on the base
simply lift the handset to answer the call.
NOTE
If you prefer to press
t when you lift up the handset to answer a call, you will need to switch
Auto answer o.
3.3 Adjust the earpiece volume
During a call, press u or d to increase or decrease the volume. There are 5 levels to choose
from.
3.4 Mute
You can mute your handset so that you can talk to someone nearby without your caller hearing.
1. During a call, press
m. The display shows
MUTE
and your caller cannot hear you.
2. Press
m again to resume your call.
3.5 Intercom
3.5.1 Make an internal call
If you have more than one handset registered to the base, you can make internal calls between
two handsets.
icon is displayed to indicate an internal call.
1. Press
I followed by the number (1-5) of the handset you want to call.
3.5.2 Receive an internal call
When you receive an internal call, icon flashes and the handset number that is calling you is
displayed.
1. Press
t to answer the call.
3.5.3 Transfer a call
You can transfer an external call to another handset registered to the base.
During an external call:
1. Press
I followed by the handset number (1-5) that you want to transfer to.
2. When the other handset answers, press
n to complete the transfer.
NOTE
If there is no answer from the other handset and you wish to return to your external caller,
press
I.
Your external call resumes automatically after 30 seconds if there is no answer.
3.5.4 3-way conference call
You can hold a 3-way conference call between 2 internal callers and 1 external caller.
During a call with an external caller:
1. Press followed by the handset number (1-5) that you want to establish a conference call.
Enter the rst letter of the name to search alphabetically.
The rst name that starts with this letter or the nearest letter in the alphabet will be displayed.
Scroll
u or d to the entry you want.
3. Press
t to dial or n to return to standby.
NOTE
When the name is displayed, you can switch between the name and number by pressing
m.
4.3 Edit a name and number
1. Press m. The display shows
PHONEBOOK
.
2. Press
m. The display shows
ADD ENTRY
.
3. Scroll
d to
MODIFY ENTRY
and press m.
4. Scroll
u or d to the entry you want to edit, or search alphabetically and press m. The
existing name is displayed.
5. Press
p to delete the name if required, then enter the new name and press m. The
existing number is displayed.
6. Press
p to delete the number if required, then enter the new number and press m.
7. Scroll
u or d to select a new ringer melody and press m. The display shows
ADD ENTRY
.
8. Enter the next name and number entry you wish to store in your phonebook or press
p
twice to return to standby.
4.4 Delete an entry
1. Press m. The display shows
PHONEBOOK
.
2. Press
m. The display shows
ADD ENTRY
.
3. Scroll
d to
DELETE ENTRY
and press m.
4. Scroll
u or d to the entry you want to delete, or search alphabetically and press m. The
display shows
CONFIRM ?
.
5. Press
m to conrm or p to cancel.
5. Handset settings
5.1 Handset ringer volume
You can adjust the ringer volume and set dierent volume levels for your internal and external
calls. Choose from 5 volume levels or O.
1. Press
m, scroll d to
HANDSET
and press m.
2. Press
u or d to select
INT RING VOL
or
EXT RING VOL
and press m.
3. Press
u or d to select the volume (1 -5 or OFF) .
4.1 Store a name and number
If the C1LB+ is connected to a switchboard, you may need to enter a pause in a stored number.
This gives the switchboard time to nd an outside line.
A pause is normally stored after the switchboard access code (e.g. 9).
When storing a number, press and hold
#
until the display shows P. You can then continue
storing the phone number.
If you have subscribed to Caller ID Service and wish to display the name of your caller instead of
the number, save the full telephone number including the area code to your phonebook.
You can store multiple entries with the same number. However, to prevent unnecessary
duplicated entries, you can only store the same name once.
1. Press
m. The display shows
PHONEBOOK
.
2. Press
m. The display shows
ADD ENTRY
.
3. Press
m. The display shows
NAME ?
.
4. Enter the name and press
m. The display shows
NUMBER ?
.
5. Enter the number and press
m. The display shows
MELODY 1
.
6. Press
u or d to select the ringer melody you want and press m.
The display shows
ADD ENTRY
.
7. Enter the next name and number entry that you wish to store in your phonebook or press
p twice to return to standby.
ENTERING NAMES
Use the keypad letters to enter names, e.g. to store TOM:
Press
8 once to enter T.
Press
6 three times to enter O.
Press
6 once to enter M.
WRITING TIPS
Press
p to delete the last character or digit.
Press
u or d to move between characters.
Press
1 to insert a space.
Use
1 twice to insert a dash.
4.2 View or dial an entry
1. Press p.
icon is displayed.
2. Scroll
u or d to the entry you want.
OR
3. Press
m. The display shows
ADD ?
.
4. Press
m again. The display shows
NAME ?
.
5. Enter the name and press
m. The number is displayed.
6. Edit the number if necessary, then press
m.
7. Press
u or d to select the ringer melody you want and press m.
The number is stored.
3.7.3 Delete an entry
1. Press
r to open the Redial list.
2. Scroll
u or d to the entry you want and press p. The display shows
DELETE ?
.
3. Press
m to conrm or p to cancel.
3.74 Delete the entire Redial list
1. Press
r to open the Redial list.
2. Press and hold
p. The display shows
DELETE ALL ?
.
3. Press
m to conrm or to cancel.
3.8 Lock / unlock the keypad
You can lock the keypad so that it cannot be operated accidentally while carrying it around.
NOTE
When the keypad is locked, you can still answer incoming calls and operate the handset as
normal during the call. When the call ends, the keypad lock comes on again.
1. Press and hold
*.
icon is displayed.
2. To unlock the keypad, press any key on your handset. The display shows
PRESS *
.
3. Press
* within 5 seconds.
3.9 Paging / Find handset
You can alert a handset user that they are wanted or locate a missing handset.
Paging calls cannot be answered by a handset.
1. Press
on the base. All handsets registered to the base will ring.
2. To stop the ringing, press
on the base again or press any button on the handset.
4. Phonebook
You can store up to 50 names and numbers in the phonebook. Names can be up to 12 characters
long and numbers up to 24 digits. You can also select dierent ringer melodies for the phonebook
entries.
2. When the other handset answers, press
# to connect all three callers to begin the
conference call.
icon is displayed.
3. If there is no answer from the other handset, press
I to return to your external caller.
4. Press
n to end the call.
3.6 Hands-free speakerphone
Hands-free lets you talk to your caller without holding the handset. It also enables other people in
the room to listen to the conversation over the loudspeaker.
3.6.1 Make a hands-free call
1. Dial the number and then press
t twice.
icon is displayed and you will hear the call over the handset loudspeaker.
2. Press
t to switch the call between the earpiece and the loudspeaker.
3. Press
n to end the call.
NOTE
During a hands-free call, press
u or d to adjust the volume.
3.6.2 Answer a call hands-free
If the handset is on the base and auto answer is switched on, lift the handset and press
t.
If the handset is o the base or auto answer is switched o, press
t twice to answer the call.
3.6.3 Switch to hands-free during a call
During a call, press
t to put the call on the loudspeaker.
To switch hands-free o and return the call to the earpiece, press
t again.
3.7 Redial
The last 10 entries dialled are stored in the redial list.
3.7.1 View or dial an entry
1. Press
r to open the Redial list.
2. Scroll
u or d to the entry you want.
3. Press
t to dial the displayed entry or press n to return to standby.
NOTE
If the caller’s number exactly matches an entry stored in the phonebook, the name is displayed.
Press
m to see the caller’s number.
3.7.2 Copy a Redial list number to the phonebook
1. Press
r to open the Redial list.
2. Scroll
u or d to the entry you want.
Warning: Charge the handset for 24 hours before use.
Motorola C1LB+
For C1001LB+, C1002LB+, C1003LB+ and C1004LB+
Digital Cordless Telephone
Earpiece
Display
Up
During a call, press to increase
earpiece volume.
When the phone is ringing,
press to increase the handset
ringer volume.
Press to scroll through the
menu options, redial list, calls
list and phonebook entries.
Menu / OK / Mute
Press to open the Menu.
Press to select menu
options and to conrm a
displayed option.
During a call, press to turn
mute on / o.
Talk / Hands-free
Press to make and receive
calls.
Press to switch hands-free
on or o during a call.
Keypad lock / * / Switch
from Pulse to Tone
Press and hold to lock the
keypad.
To unlock, press any key
and follow the on screen
instructions.
Dial a *.
During a call, press and
hold to switch from pulse
dialling to
tone dialling.
Recall
Use with switchboard / PABX
services and some network services.
When on an external call, press
Recall to get a fresh dialling tone or
to access call waiting when you hear
the signal. Press the key again to
toggle between your two callers.
Redial
In standby mode,
press to open the
redial list.
Phonebook / Delete / Back
In standby mode, press to open
the phonebook menu.
In editing mode, press to delete
characters and digits.
Go back to the previous menu
level.
Calls list / Down
In standby mode, press to open
the calls list.
During a call, press to decrease
earpiece volume.
When the phone is ringing, press
to decrease the handset ringer
volume.
Press to scroll through the menu
options, redial list, calls list and
phonebook entries.
End Call / Exit / Switch Handset
on / o
Press to end a call.
When viewing the redial / calls
list / phonebook or when in the
menu, press to exit and return to
standby.
Press and hold for 3 seconds to
switch the handset on / o.
Pause / #
Press and hold to enter a
pause (P) when pre-dialling
or storing numbers.
Dial a #.
Intercom
Used to make internal calls
and transfer calls to other
C1LB+ handsets registered
to the base.
Microphone
Battery statusScrolls when chargingTime or Handset nameIn standby mode, press and hold to switch handset
0
idle screen between handset name or time.Eco modeCircle around appears when Eco mode is ON
Смотреть руководство для Motorola C1001LB Plus ниже. Все руководства на ManualsCat.com могут просматриваться абсолютно бесплатно. Нажав кнопку «Выбор языка» вы можете изменить язык руководства, которое хотите просмотреть.

MANUALSCAT | RU
Вопросы и ответы
У вас есть вопрос о Motorola C1001LB Plus, но вы не можете найти ответ в пользовательском руководстве? Возможно, пользователи ManualsCat.com смогут помочь вам и ответят на ваш вопрос. Заполните форму ниже — и ваш вопрос будет отображаться под руководством для Motorola C1001LB Plus. Пожалуйста, убедитесь, что вы опишите свои трудности с Motorola C1001LB Plus как можно более детально. Чем более детальным является ваш вопрос, тем более высоки шансы, что другой пользователь быстро ответит на него. Вам будет автоматически отправлено электронное письмо, чтобы проинформировать вас, когда кто-то из пользователей ответит на ваш вопрос.
Есть ли в телефоне фирмы Моторола С1001LB настройка трубки на русский язык?
свет2023-02-06
Руководство пользователя радиотелефона Motorola C1001LB+ на русском языке.
Игорь Абраменков2023-01-10
Руководство пользователя на русском языке
Игорь2023-01-10
Добрый день. Как подключить АОН?
Анна2023-05-03
Нет исходящего звонка
Владимир2023-01-16
Задать вопрос о Motorola C1001LB Plus
- Бренд:
- Motorola
- Продукт:
- телефоны
- Модель/название:
- C1001LB Plus
- Тип файла:
- Доступные языки:
- английский
Сопутствующие товары Motorola C1001LB Plus
 14:45
14:45
Motorola RAZR V3: тонкий намёк на превосходство (2004) – ретроспектива
 11:27
11:27
Обзор Motorola razr (2019)
 02:22
02:22
Motorola D1001 Cordless Phone UnBoxed
 24:42
24:42
Motorola Milestone. Milestone для Motorola
 03:28
03:28
Panasonic DECT регистрация трубки
 04:55
04:55
Радиотелефон DECT Panasonic KX-TG2511RUM
 10:43
10:43
Обзор гибкого Motorola RAZR / ЛЕГЕНДА ВЕРНУЛАСЬ
 13:47
13:47
Motorola AURA девять лет спустя (2008) – ретроспектива
Цифровой беспроводной телефон Предупреждение Используйте то…
Серия motorola d1000
- Изображение
- Текст
Серия Motorola
D1000
Цифровой беспроводной
телефон
Предупреждение
Используйте только аккумуляторные батареи.
Время зарядки трубки до начала использования — 24

• Все трубки беспроводные и могут находиться в любом месте зоны
покрытия.
• Телефонная книга с памятью на 100 записей.
• Возможность копирования записей телефонной книги на другие трубки.
• Услуга «Определитель номера» позволяет узнать, кто звонит; в списке
вызовов хранится информация о 50 последних разговорах.
1
• Привязка к одной базе до 5 трубок, одна трубка может быть привязана к 4
различным базам.
• Звонки внутри сети, перевод входящих вызовов, возможность разговора с
двумя внутренними и одним внешним абонентами одновременно.
1
Вам необходимо подключить услугу «Определитель номера» или «Ожидание вызова» у
вашего оператора для активации данных функций. Может взиматься ежеквартальная
плата.
Обратите внимание, что в данном устройстве не предусмотрена функция экстренных
вызовов при сбое питания. Для звонков в аварийные службы необходимо
предусмотреть альтернативные варианты.
Вас приветствует…
ваш новый цифровой беспроводной телефон Motorola D1001!

ВАЖНОИспользуйте только телефонный провод, входящий в компле…
Страница 3
- Изображение
- Текст
ВАЖНО
Используйте только телефонный провод, входящий в комплект.
В данном устройстве не предусмотрена функция экстренных вызовов при сбое
питания. Для звонков в аварийные службы необходимо предусмотреть
альтернативные варианты.
Перечень оборудования и документации
• Трубка D1001
• База D1001
• Краткое руководство пользователя
• 2
аккумуляторные батареи AAA NiMH
• Сетевой адаптер питания для базы
• Телефонный провод
Если вы приобрели комплект из нескольких трубок, то в комплект входят:
• Зарядное устройство и блок питания — для каждой трубки
• Комплект из 2-х никель-металлогидридных аккумуляторов для каждой
трубки
В данном «Руководстве пользователя» приводится вся информация,
которая понадобится вам для наиболее эффективного использования
телефона.
До начала эксплуатации телефона необходимо подготовить его к работе.
Следуйте простым инструкциям в разделе «Установка и подключение» на
следующих страницах.


Установка, Расположение, Подключение и подготовка к работе
Подключение большой базы, Только для мульти-комплектов)
- Изображение
- Текст
6
Установка
1. Установка
ПРЕДУПРЕЖДЕНИЕ
Не устанавливайте телефон в ванной комнате или других
помещениях с повышенной влажностью.
Расположение
Учитывая длину проводов, расстояние от базы D1001 до сетевой и
телефонной розеток не должно превышать 2 метров.
Убедитесь, что база располагается на расстоянии минимум 1 метра
от других электроприборов во избежание возникновения помех. Во
время работы телефона D1001 идет обмен радиосигналами между
трубкой и базой. Уровень сигнала зависит от местоположения базы.
Чем выше вы расположите станцию, тем лучше будет сигнал.
ЗОНА ДЕЙСТВИЯ ТРУБКИ
Дальность связи телефона D1001 вне помещения составляет
300 метров при условии, что трубка и база находятся в пределах
прямой видимости. Любое препятствие между трубкой и базой
значительно сократит дальность связи. Если база находится в
помещении, а трубка — либо вне помещения, либо также в
помещении, дальность связи обычно достигает 50 метров. На
дальность связи серьезно влияют толстые каменные стены.
УРОВЕНЬ СИГНАЛА
Когда трубка находится в зоне покрытия, на экране
отображается значок .
Когда трубка находится вне зоны
действия базы, на экране мигает
ПОИСК
.
Если вы разговариваете в это время по телефону, связь
оборвется, если трубка окажется вне зоны действия базовой
станции. Вернитесь в зону покрытия. Трубка автоматически
восстановит подключение к базе.
Подключение и подготовка к работе
ВАЖНО
Базовая станция должна быть постоянно подключена к
электропитанию от сети. Не подключайте телефонный провод к
гнезду, пока трубка полностью не зарядится. Используйте
только шнуры питания и телефонные провода, входящие в
комплект.
КАКОЙ СЕТЕВОЙ АДАПТЕР?
Адаптер питания с прозрачным разъемом — для базовой станции,
адаптер питания с красным разъемом — для зарядного устройства.
Подключение большой базы
(Только для мульти-комплектов)
Подключите главный кабель питания к гнезду, обозначенному ,
на нижней стороне базовой станции, воткните штепсель на другом
конце кабеля в настенную розетку и включите питание.

Подключение трубки и зарядного устройства, Настройка телефона d1001, Экран приветствия
Страница 7
- Изображение
- Текст
Установка
7
Подключение трубки и зарядного устройства
Если вы приобрели мультинабор, данную процедуру необходимо
повторить для всех трубок и зарядных устройств:
1. Подключите основной шнур питания с красным разъемом к
розетке с отметкой
внизу зарядного устройства.
2. Вставьте две батареи AAA NiMH, входящие в комплект поставки,
в трубку. Затем закройте крышку батарейного отсека.
3. Поместите трубку в зарядное устройство и заряжайте в течение
как минимум 24 часов. Когда трубка полностью зарядится, об
этом можно будет узнать по значку
.
4. После полной зарядки трубки в течение 24 часов подключите
телефонный провод большой базы к телефонной розетке.
ВАЖНО
Внимание! Используйте только аккумуляторы. При
использовании не перезаряжаемых батарей на экране появится
сообщение
ПРЕДУПРЕЖД.
, и зарядка остановится. Замените на
аккумуляторы.
ПРЕДУПРЕЖДЕНИЕ О НИЗКОМ УРОВНЕ ЗАРЯДА БАТАРЕИ
Если на дисплее мигает значок
необходимо подзарядить
трубку для ее дальнейшего использования.
Во время зарядки значок
будет отображать процесс зарядки.
АККУМУЛЯТОРНЫЕ БАТАРЕИ
В идеальных условиях заряда батарей должно хватать на 10
часов разговора или 100 часов в режиме ожидания.
Необходимо заметить, что новые батареи достигают своей
полной мощности только после нескольких дней эксплуатации в
обычном режиме.
Для поддержания батарей в наилучшем состоянии снимайте
трубку с базы на несколько часов.
Для продления срока службы батарей рекомендуется раз в неделю
полностью разряжать их.
Емкость аккумуляторных батарей со временем уменьшится в
связи с их износом, что сократит время разговора/ожидания. В
конечном итоге батареи необходимо будет заменить.
После первой зарядки трубки последующее время подзарядки
составит около 6-8 часов в день. Батареи и трубка могут
нагреваться во время подзарядки. Это обычное явление.
Настройка телефона D1001
Экран приветствия
1. На экране появляется и попеременно отображается на разных
языках надпись
ЗДРАВСТВУЙТЕ
. Нажмите
m
. На экране
отобразится название страны.
2. Прокрутите
u
или
d
до нужной страны и нажмите
m
. На
экране появится надпись
ПОДТВЕРДИТЬ?
.
3. Нажмите
OK
для подтверждения.
Настройки трубки и базы будут сброшены для загрузки
правильных настроек. Затем экран перейдет в режим ожидания;
телефон готов к работе.
Вы можете совершать и принимать звонки без предварительной
настройки страны и оператора, однако в этом случае экран
приветствия будет появляться до тех пор, пока не будут заданы
настройки страны.

Установка даты и времени вручную, Ознакомление с телефоном, Общий обзор трубки
Страница 8
- Изображение
- Текст
8
Ознакомление с телефоном
Дата и время
Если у вас подключена услуга определения номера, дата и время
устанавливаются на всех трубках автоматически при каждом
входящем вызове.
Если у вас не подключена услуга определения номера, вы можете
установить дату и время вручную.
Установка даты и времени вручную
1. Нажмите
m
и пролистайте
d
до пункта
ЧАСЫ/ БУДИЛ-К
. Нажмите
m
. На дисплее отобразится
ДАТА И ВРЕМЯ
, после этого нажмите
m
.
2. Введите дату в формате
ДД/ММ
, например,
04/ 08
для 4 августа.
3. Нажмите
m
и введите время в 24-часовом формате
ЧЧ:ММ
,
например, 14:45 для 2.45pm.
4. Нажмите
m
для подтверждения или
>
для возвращения в
режим ожидания.
Ваш телефон теперь готов к использованию.
2. Ознакомление с телефоном
Общий обзор трубки
A Динамик
B Дисплей
Обзор значков дисплея см. на страница 9

Ознакомление с телефоном
9
C Кнопка меню
Вход в основное меню. Выбор опции или пункта меню,
отображающегося на экране. Подтверждение выбора пункта меню
или опции — на экране отображено
ОК
.
D Список набранных номеров / Прокрутка вправо / Удалить /
Отключить звук
Доступ к списку набранных номеров. Прокрутка вправо
Удаление символов на экране при наборе имени или номера.
Отключение / включение звука микрофона во время разговора.
Возвращение в предыдущее меню — на экране отображено
BACK
(НАЗАД).
E Журнал звонков / Прокрутка вверх / Прибавить громкость
Вход в журнал звонков.
Прокрутка списков и настроек вверх.
Увеличение громкость звука в трубке во время разговора.
F Разговор / Автодозвон
Сделайте звонок или ответьте на вызов
Воспользуйтесь функциями автодозвона (R)
G Завершение разговора / Выход / Включение / Выключение
трубки
Завершение разговора.
Возвращение в режим ожидания из меню. Нажмите и удерживайте,
чтобы выключить трубку (в режиме ожидания) или включить ее.
H Телефонная книга / Прокрутка вниз / Убавить громкость
Доступ к телефонной книге.
Прокрутка списков и меню вниз.
Уменьшение громкости звука в телефонной трубке.
I
Затухающий звонок навигатор
Загорается, когда телефон используется. Мигает для указания на
новое событие, напр., пропущенный вызов.
J
* / Блокировка клавиатуры
Нажмите и удерживайте кнопку, чтобы заблокировать/
разблокировать клавиатуру.
Во время вызова нажмите и удерживайте кнопку, чтобы переключиться
с режима импульсного набора в режим тонального набора.
Вставить звездочку.
K #
/
Выключение звонка / Пауза
Нажмите и удерживайте, чтобы включить или выключить звонок
трубки.
При наборе или сохранении номера, нажмите и удерживайте, чтобы
ввести паузу (P).
Вставить #.
L
Громкоговоритель
Включение и выключение громкоговорителя во время разговора.
Предупреждение
Включение режима громкой связи может резко увеличить громкость
динамика трубки телефона до очень высокого уровня. Не держите
трубку слишком близко к уху.
M Внутренняя связь (требуется по крайней мере две трубки)
В режиме ожидания используется для внутренних вызовов.
Во время разговора используется для перевода входящего вызова
на другую трубку.
Дисплей трубки

10
Ознакомление с телефоном
A Значки дисплея
Загорается, когда линия используется.
Мигает при входящем вызове.
Мигает при наличии новых голосовых сообщений.
Не отображается, если нет новых голосовых сообщений.
Мигает при пропущенных вызовах и наличии нового(ых)
номера(ов) в списке вызовов.
Телефонная книга открыта.
Будильник установлен.
Режим громкой связи.
Звонок трубки отключен.
Остается неизменным, если трубка зарегистрирована и
находится в зоне покрытия базы. Мигает, когда трубка
находится вне зоны покрытия или ищет базу.
Приблизительные уровни заряда батареи указаны ниже:
Батарея полностью заряжена.
Батарея частично заряжена.
Батарея разряжается.
Аккумулятор почти разряжен. Во время разговора будет
мигать значок аккумулятора, и раздаваться
предупреждающий сигнал с интервалом в одну минуту.
B На экране отображается ОК
Нажмите кнопку
m
для выбора и подтверждения выбора
настройки
C На экране отображается ! «
Нажмите
u
или
d
, чтобы просмотреть список пунктов меню, открыть
телефонную книгу или список вызовов в режиме ожидания.
D На экране отображается BACK (Назад) !
Нажмите
e
для возвращения к предыдущему параметру меню,
для отмены действия или удаления символа.
Общий обзор базы
A Кнопка поиска
Вызов полезен, когда надо найти потерявшиеся трубки.
1. Нажмите кнопку
p
на базе.
— Все трубки зазвонят.
2. Нажмите
p
еще раз, чтобы отменить поисковый вызов, или
нажмите любую кнопку на трубке, чтобы прекратить поисковый
вызов.
Перемещение по меню
Основные этапы перемещения по меню и пунктам на экране.
1. Нажмите
m
, когда трубка находится в режиме ожидания.
Откроется основное меню.
