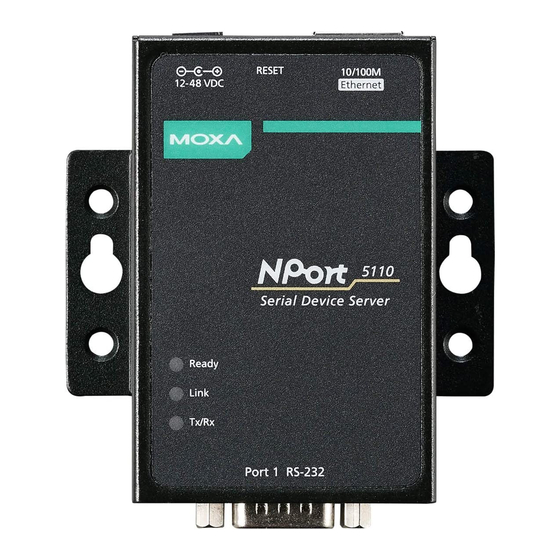
MOXA NPort 5150, 5130, 5110 преобразователи интерфейсов RS-232/422/485 в Ethernet отличаются интерфейсами как изображено на рисунке ниже:

Сброс настроек
Для сброса настроек преобразователя интерфейсов серии 5100 воспользуйтесь кнопкой перезагрузки reset расположенной на корпусе. Для установки настроек по умолчанию необходимо нажать и удерживать кнопку reset в течении пяти секунд, до тех пор, пока не перестанет мигать светодиодный индикатор ready.
- Купить преобразователь Nport 5150 по дилерским ценам со склада можно отправив запрос в свободном формате на почту или через карточку товара
Светодиодные индикаторы
На верхней̆ панели сервера NPort 5100 расположены три светодиодных индикатора.

Построечные резисторы Pull High/Pull Low сигналов RS-422/485 (150 КОм или 1 КОм)
Для установки значений pull high/low используйте построечные резисторы, расположенные с обратной стороны на корпусе. Значение по умолчанию – 150 КОм. Замкните джемперы для установки значения 1 КОм. Не рекомендуется использовать значение 1 кОм для режима передачи данных RS-232, Поскольку это приводит к ухудшению сигнала RS-232 и уменьшению дальности связи.

Распиновка
Выводы ethernet порта расположены как указано на рисунках ниже:
NPort 5110 – Расположение выводов разъема DB9 «папа» (RS-232)

NPort 5130 – Расположение выводов разъема DB9 «папа» (RS-422/485)

NPort 5150 – Расположение выводов разъема DB9 «папа» (RS-232/422/485)

Технические спецификации
В комплект поставки преобразователей интерфейсов 5150, 5130 и 5110 входят:
- — Сервер серии NPort 5100
- — Адаптер питания 100-240 В переменного тока, кроме моделей̆ работающих в расширенном диапазоне температур
- — 4 противоскользящие подушки
- — CD с документацией̆ и ПО
- — Руководство по аппаратной̆ установке
- — Гарантийный̆ талон
Крепеж для din-рейки 35мм DK-35A включается опционально.
Модели с литером —Т обозначают устройства, работающие в расширенном температурном диапазоне.


11.07.2019 г.
В статье рассматриваем настройку самых востребованных режимов работы: RealCOM — виртуальный СОМ порт на ПК, TCP Client, TCP Server.
Не путайте NPort со шлюзами MGate. NPort преобразует только интерфейсы СОМ в Ethernet и не изменяет данные, а MGate преобразует интерфейсы и протоколы, подробнее в статье об отличиях NPort и MGate.

Содержание:
- Видеообзор возможностей NPort
-
Настройка NPort
- Режим RealCOM или Виртуальный COM-порт
- Режим TCP Client
- Режим TCP Server
- Как проверить работает ли NPort?
- Подтягивающие и согласующие резисторы
Специалисты IPC2U сделали настолько подробный обзор конфигурации NPort, насколько это возможно. В видео показаны пошаговые действия по настройке NPort с помощью бесплатной утилиты и рассмотрены режимы работы (с подробным описанием и анимированным иллюстрациями). В ходе ролика мы подключим модуль M-7055D, который работает по протоколу Modbus RTU, и отправим на него команду для включения дискретных выходов. Также рассмотрим, как проверить правильность работы NPort без необходимости подключать дополнительные модули.
Дополнительно в третьей части видео показаны «секреты» NPort: расширенные функции, о которых мало кто знает, но именно они способны избавить вас от многих причин головной боли инженеров и проектировщиков.
Настройка NPort
Режим RealCOM
Для работы с NPort IA5150 в режиме RealCOM установите драйвер или NPort Administration Suite.
Сначала нужно настроить NPort, а затем добавить СОМ порт либо через драйвер, либо через NPort Administration Suite.
Если вы используете драйвер, то после настройки NPort вы увидите СОМ порт в диспетчере устройств. Если вы используете NPort Administration Suite для добавления СОМ порта, то СОМ порт в диспетчере устройств не отображается.

Настроим NPort в режим RealCOM и добавим виртуальный СОМ порт через NPort Administration Suite. Также можно использовать WEB-интерфейс для настройки.

Найдем NPort выделив поле Configuration и нажав кнопку Search.
После этого нужно разблокировать NPort: нажать правой кнопкой на нем, выбрать Unlock и ввести пароль из документации.

Далее выделяем наш NPort и нажимаем кнопку Configure.
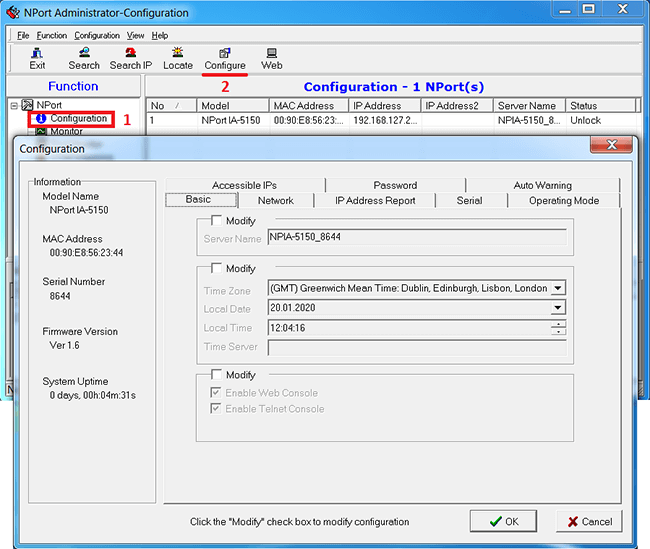
В этом окне можно изменить настройки NPort, достаточно поставить галочку возле поля Modify.
Во вкладке Network можно изменить IP адрес NPort.
Во вкладке Serial настраиваются параметры COM порта: его скорость, тип интерфейса и др.
Для режима RealCOM скорость COM порта будет автоматически изменяться при открытии СОМ порта, а в других режимах здесь нужно указать правильную скорость.

Перейдем во вкладку Operation Mode для настройки режима работы конкретного COM порта.

Выберем режим работы RealCOM, а другие параметры оставим по умолчанию.
После сохранения настроек, NPort перезагрузиться и издаст характерный звук.
Далее добавим виртуальный СОМ порт на ПК (также для этого можно использовать драйвер NPort).
Выделим поле COM Mapping и нажмем кнопку Add.

В программе появится NPort и он будет иметь синий цвет, что значит эта настройка еще не сохранена.

Вы можете изменить номер СОМ порта через кнопку Configure.

После установки всех настроек сохраним их, нажав на кнопку Apply.

Надпись стала черного цвета, что означает все изменения были сохранены.
Для работы с СОМ портом нужна программа, которая позволит открыть СОМ порт и отправить в него данные. MOXA предлагает воспользоваться бесплатной утилитой PComm Lite.
Для проверки работы NPort можно воспользоваться рекомендациями ниже.
Режим TCP Client
Для режима TCP Client во вкладке Serial нужно указать правильную скорость, т.к. она сама не перестраивается.
Во вкладке Operation Mode нужно выбрать режим TCP Client.
Для правильной работы нужно указать IP адрес TCP Server с которым будет установлено соединение и TCP порт. Остальные параметры можно оставить по умолчанию.

Режим TCP Server
Для режима TCP Server во вкладке Serial нужно указать правильную скорость, т.к. она сама не перестраивается.
Во вкладке Operation Mode нужно выбрать режим TCP Server.
Для правильной работы нужно указать TCP порт по которому будет подключаться TCP Client.
Остальные параметры можно оставить по умолчанию.

Как проверить работает ли NPort?
Для проверки RS-232 можно воспользоваться простым способом, достаточно замкнуть контакты RX и TX между собой, что позволяет сделать петлю. Тогда все переданные данные в NPort будут возвращены обратно.

Откройте программу PComm Terminal Emulator, во вкладке Port Manager откройте СОМ порт, соответствующий NPort(в режиме RealCOM). Скорость и другие параметры можно оставить по умолчанию, т.к. драйвер автоматически применяет такие же параметры на NPort.

Мы отправили несколько единиц в СОМ порт и получили их обратно, также видим одинаковые значения счетчиков TX и RX, что подтверждает получение всех отправленных данных.

Подтягивающие и согласующие резисторы
В некоторых моделях NPort есть встроенные резисторы, которые обеспечивают правильную работу линий RS-422/485.
Согласующий резистор или терминатор 120 Ом – ставится в начале и конце линии для предотвращения отражения сигнала от конца линии и искажении полезного сигнала в RS-422/485.
Подтягивающие резисторы (pull high/low resistors) – предназначены для ограничения тока, протекающего по сигнальным цепям, и чтобы сделать состояние цифрового входа по умолчанию высоким или низким.
NPort IA5150 не имеет встроенных резисторов, но у некоторых моделей они есть, пример для других моделей:

Распиновка разъема NPort IA5150


Если у Вас есть вопросы по продукции МОХА, обращайтесь по телефону: +7 (495) 419-1201 или по e-mail: russia@moxa.pro
-
Contents
-
Table of Contents
-
Bookmarks
Quick Links
NPort 5110 Series User’s Manual
First Edition, December 2004
www.moxa.com/product
Moxa Technologies Co., Ltd.
Tel:
+886-2-8919-1230
Fax:
+886-2-8919-1231
Web:
www.moxa.com
MOXA Technical Support
Worldwide:
The Americas
support@moxa.com.tw
support@moxa.com
Related Manuals for Moxa Technologies NPort 5110 Series
Summary of Contents for Moxa Technologies NPort 5110 Series
-
Page 1
NPort 5110 Series User’s Manual First Edition, December 2004 www.moxa.com/product Moxa Technologies Co., Ltd. Tel: +886-2-8919-1230 Fax: +886-2-8919-1231 Web: www.moxa.com MOXA Technical Support Worldwide: support@moxa.com.tw The Americas support@moxa.com… -
Page 2: Copyright Notice
Information provided in this manual is intended to be accurate and reliable. However, Moxa Technologies assumes no responsibility for its use, or for any infringements on the rights of third parties that may result from its use.
-
Page 3: Table Of Contents
Chapter 1 Introduction … 1-1 Overview… 1-2 Package Checklist … 1-2 Product Features … 1-2 Product Specifications … 1-3 Chapter 2 Getting Started … 2-1 Panel Layout… 2-2 Connecting the Hardware… 2-2 Connecting the Power … 2-2 Connecting to the Network… 2-3 Connecting to a Serial Device …
-
Page 4
Chapter 6 Configuring Windows Administrator… 6-1 Overview… 6-2 Installing Windows Administrator… 6-2 Configuration … 6-6 Broadcast Search … 6-7 Unlock Password Protection … 6-10 Configuring NPort 5110… 6-12 Upgrade Firmware… 6-14 Export/Import… 6-15 Monitor… 6-16 Port Monitor … 6-22 COM Mapping… 6-23 On-line COM Mapping … -
Page 5: Chapter 1 Introduction
Welcome to NPort 5110, an advanced, 1-port RS-232 serial device server that makes it easy to network-enable your devices. The following topics are covered in this chapter: Overview Package Checklist Product Features Product Specifications Introduction Chapter 1…
-
Page 6: Overview
NPort 5110 Series User’s Manual Overview NPort 5110 serial device server is designed to make your industrial serial devices Internet ready instantly, and is well-suited for POS security market applications. The compact size of NPort 5110 device server makes them the ideal choice for connecting your RS-232 serial devices, such as card reader, payment terminal, to an IP-based Ethernet LAN, making it possible for your software to access serial devices located anywhere on a local LAN, or the Internet.
-
Page 7: Product Specifications
NPort 5110 Series User’s Manual Product Specifications Ethernet Protection NPort 5110 Serial Interface Interface No. of Ports Port Type Signals Serial Line Protection Power Line Protection 4 KV Burst (EFT), EN61000-4-4 2 KV Surge, EN61000-4-5 Advanced Built-in Features Watch Dog Timer…
-
Page 8: Chapter 2 Getting Started
This chapter includes information about installing NPort 5110. The following topics are covered: Panel Layout Connecting the Hardware » Connecting the Power » Connecting to the Network » Connecting to a Serial Device » LED Indicators Getting Started Chapter 2…
-
Page 9: Panel Layout
NPort 5110 Series User’s Manual Panel Layout Rear Panel View Top Panel View 9-30VDC Ready Link Tx/Rx Front Panel View Connecting the Hardware This section describes how to connect NPort 5110 to serial devices for first time testing purposes. We cover Connecting to the Network, Connecting to a Serial Device, and LED Indicators.
-
Page 10: Connecting To The Network
NPort 5110 Series User’s Manual Connecting to the Network Connect one end of the Ethernet cable to NPort 5110’s 10/100M Ethernet port and the other end of the cable to the Ethernet network. NPort 5110 will indicate a valid connection to the Ethernet in…
-
Page 11: Initial Ip Address Configuration
Initial IP Address Configuration Chapter 3 When setting up your NPort 5110 for the first time, you should first configure the IP address. This chapter introduces the method to configure the device server’s IP address. For more details about network settings, see the Network Settings section from Chapter 5, Web Console Configuration. This chapter includes the following sections: Initializing NPort 5110’s IP Address Factory Default IP Address…
-
Page 12: Initializing Nport 5110’S Ip Address
NPort 5110 Series User’s Manual Initializing NPort 5110’s IP Address 1. Determine whether your NPort 5110 needs to use a Static IP or Dynamic IP (either DHCP or BOOTP application). 2. If NPort 5110 is used in a Static IP environment, you can use NPort 5110 Administration Suite, ARP, Web Console, Telnet Console, or Serial Console to configure the new IP address.
-
Page 13: Telnet Console
NPort 5110 Series User’s Manual Take the following steps to use ARP to configure the IP address: 1. Obtain a valid IP address for your NPort 5110 from your network administrator. 2. Obtain NPort 5110’s MAC address from the label on its bottom panel.
-
Page 14
NPort 5110 Series User’s Manual Initial IP Address Configuration 4. Type 2 to select Network settings, and then press Enter. 5. Type 1 to select IP address and then press Enter. -
Page 15
NPort 5110 Series User’s Manual Initial IP Address Configuration 6. Use the Backspace key to erase the current IP address, type in the new IP address, and then press Enter. 7. Press any key to continue. -
Page 16: Serial Console (19200, N, 8, 1)
NPort 5110 Series User’s Manual 8. Type m and then press Enter to return to the main menu. 9. Type s and then press Enter to Save/Restart the system. 10. Type y and then press Enter to save the new IP address and restart NPort 5110.
-
Page 17
NPort 5110 Series User’s Manual 1. Connect NPort 5110’s serial port 1 directly to your computer’s male RS-232 serial port. 2. From the Windows desktop click on Start $ Programs $ PComm Lite $ Terminal Emulator. 3. When the PComm Terminal Emulator window opens, first click on the Port Manager menu item and select Open, or simply click on the Open icon. -
Page 18
NPort 5110 Series User’s Manual 8. Input the password when prompted. Note that this page will only appear when the NPort 5110 has been set up for password protection. 9. Start configuring the IP address under Network Settings. Refer to step 4 in the Telnet Console section for instructions on how to configure the rest of the IP settings. -
Page 19: Choosing The Proper Operation Mode
Choosing the Proper Operation Mode Chapter 4 In this section, we describe the various NPort 5110 operation modes. The options include an operation mode that uses a driver installed on the host computer, and operation modes that rely on TCP/IP socket programming concepts. After choosing the proper operation mode in this chapter, refer to Chapter 5 for detailed configuration parameter definitions.
-
Page 20: Overview
NPort 5110 Series User’s Manual Overview NPort 5110 Serial Device Servers are used to network-enable traditional RS-232 devices. A Serial Device Server is a tiny computer equipped with a CPU, real-time OS, and TCP/IP protocols that can bi-directionally transfer data between the serial and Ethernet formats. Your computer can access, manage, and configure remote facilities and equipment over the Internet from anywhere in the world.
-
Page 21: Udp Mode
NPort 5110 Series User’s Manual UDP Mode Compared to TCP communication, UDP is faster and more efficient. In UDP mode, you can unicast or multicast data from the serial device to one or multiple host computers, and the serial device can also receive data from one or multiple host computers, making this mode ideal for message display applications.
-
Page 22: Ethernet Modem Mode
NPort 5110 Series User’s Manual Ethernet Modem Mode The Ethernet Modem operation mode is designed for use with legacy operating systems, such as MS-DOS, that do not support TCP/IP Ethernet. By connecting one NPort 5110’s serial port to the MS-DOS computer’s serial port, it is possible to use legacy software originally designed to transmit data via modem, but now transmit the data over the Ethernet.
-
Page 23: Web Console Configuration
Web Console Configuration Chapter 5 The Web Console is the most user-friendly method available to configure NPort 5110. This chapter introduces the Web Console function groups and function definitions. Opening Your Browser Basic Settings Network Settings Serial Settings Operating Settings «…
-
Page 24: Opening Your Browser
NPort 5110 Series User’s Manual Opening Your Browser 1. Open your browser with the cookie function enabled. (To enable your browser for cookies, right click on your desktop Internet Explorer icon, select Properties, click on the Security tab, and then select the three Enable options as shown in the figure below.) 2.
-
Page 25
NPort 5110 Series User’s Manual ATTENTION Refer to Chapter 3, “Initial IP Address Configuration,” to see how to configure the IP address. Examples shown in this chapter use the Factory Default IP address (192.168.127.254). 4. The NPort 5110 homepage will open. On this page, you can see a brief description of the Web Console’s nine function groups. -
Page 26: Basic Settings
NPort 5110 Series User’s Manual Basic Settings Server name Setting 1 to 39 characters This option is useful for specifying the location or application of different NPort 5110s. Web/Telnet Console The “Disable” option for “Web Console” and “Telnet Console” is included for security reasons. In some cases, you may want to Disable one or both of these console utilities as an extra precaution to prevent unauthorized users from accessing your NPort 5110.
-
Page 27: Network Settings
NPort 5110 Series User’s Manual Network Settings You must assign a valid IP address to NPort 5110 before it will work in your network environment. Your network system administrator should provide you with an IP address and related settings for your network.
-
Page 28
NPort 5110 Series User’s Manual IP address Setting E.g., 192.168.1.1 (IP addresses of the form x.x.x.0 and x.x.x.255 are invalid.) An IP address is a number assigned to a network device (such as a computer) as a permanent address on the network. Computers use the IP address to identify and talk to each other over the network. -
Page 29: Auto Ip Report Protocol
NPort 5110 Series User’s Manual connect to the web server. DNS is the way that Internet domain names are identified and translated into IP addresses. A domain name is an alphanumeric name, such as moxa.com, that it is usually easier to remember. A DNS server is a host that translates this kind of text-based domain name into the numeric IP address used to establish a TCP/IP connection.
-
Page 30: Serial Settings
NPort 5110 Series User’s Manual Auto report to IP Setting E.g., 192.168.1.1 or URL (IP addresses of the form x.x.x.0 and x.x.x.255 are invalid.) Reports generated by the Auto report function will be automatically sent to this IP address. Auto report to TCP port Setting E.g., 4001…
-
Page 31: Serial Parameters
NPort 5110 Series User’s Manual Port alias Setting 1 to 15 characters (E.g., PLC-No.1) “Port alias” is included to allow easy identification of the serial devices that are connected to NPort 5110’s serial port. Serial Parameters ATTENTION Check the serial communication parameters in your Serial Device’s user’s manual. You should set up NPort 5110’s serial parameters with the same communication parameters used by your…
-
Page 32: Operating Settings
NPort 5110 Series User’s Manual Operating Settings Click on Operating Settings, located under Main Menu, to display the operating settings for both of NPort 5110’s serial ports. Real COM Mode TCP alive check time Setting 0 to 99 min 0 min: TCP connection is not closed due to an idle TCP connection.
-
Page 33
NPort 5110 Series User’s Manual Max connection 2 to 4: Allows 2 to 4 host’s Real COM drivers to open the specific NPort 5110 serial port, at the same time. When multiple hosts’ Real COM drivers open the serial port at the same time, the COM driver only provides a pure data tunnel without control ability. -
Page 34: Tcp Server Mode
NPort 5110 Series User’s Manual buffer is full or if the Force transmit time interval reaches the time specified under Force transmit timeout. The optimal Force transmit timeout depends on your application, but it must be at least larger than one character interval within the specified baud rate.
-
Page 35
NPort 5110 Series User’s Manual for the given time. After the connection is closed, NPort 5110 starts listening for another host’s TCP connection. This parameter defines the maintenance status as Closed or Listen for the TCP connection. The connection is closed if there is no incoming or outgoing data through the serial port during the specific Inactivity time. -
Page 36
NPort 5110 Series User’s Manual Force transmit Setting 0 to 65535 ms 0: Disable the force transmit timeout. 1 to 65535: Forces the NPort 5110’s TCP/IP protocol software to try to pack serial data received during the specified time into the same data frame. -
Page 37: Tcp Client Mode
NPort 5110 Series User’s Manual TCP Client Mode TCP alive check time Setting 0 to 99 min 0 min: TCP connection is not closed due to an idle TCP connection. 1 to 99 min: NPort 5110 automatically closes the TCP connection if there is no TCP activity for the given time.
-
Page 38
NPort 5110 Series User’s Manual ATTENTION The Inactivity time should at least be set larger than that of Force transmit timeout. To prevent the unintended loss of data due to the session being disconnected, it is highly recommended that this value is set large enough so that the intended data transfer is completed. -
Page 39
NPort 5110 Series User’s Manual ( 10 (bits) / 1200 (bits/s) ) * 1000 (ms/s) = 8.3 ms. Therefore, you should set Force transmit timeout to be larger than 8.3 ms, so in this case, it must be greater than or equal to 10 ms. -
Page 40: Udp Mode
NPort 5110 Series User’s Manual UDP Mode Delimiter 1 Setting 00 to FF Delimiter 2 Setting 00 to FF Once the NPort 5110 receives both delimiters through its serial port, it immediately packs all data currently in its buffer and sends it out the NPort 5110’s Ethernet port.
-
Page 41
NPort 5110 Series User’s Manual internal buffer. NPort 5110 transmits data stored in the buffer via TCP/IP, but only if the internal buffer is full or if the Force transmit time interval reaches the time specified under Force transmit timeout. -
Page 42: Pair Connection Slave Mode
NPort 5110 Series User’s Manual Pair Connection Slave Mode TCP alive check time Setting 0 to 99 min 0 min: TCP connection is not closed due to an idle TCP connection. 1 to 99 min: NPort 5110 automatically closes the TCP connection if there is no TCP activity for the given time.
-
Page 43: Pair Connection Master Mode
NPort 5110 Series User’s Manual Pair Connection Master Mode TCP alive check time Setting 0 to 99 min 0 min: TCP connection is not closed due to an idle TCP connection. 1 to 99 min: NPort 5110 automatically closes the TCP connection if there is no TCP activity for the given time.
-
Page 44: Ethernet Modem
NPort 5110 Series User’s Manual Ethernet Modem Dial-in NPort 5110 listens for a TCP/IP connection request from the remote Ethernet modem or host. NPort 5110’s response depends on the ATS0 value, as outlined below. ATS0=0 (default): NPort 5110 will temporarily accept the TCP connection and then send the “RING” signal out through the serial port.
-
Page 45
NPort 5110 Series User’s Manual Disconnection request from remote site After the TCP connection has been shut down by the remote Ethernet modem or PC, NPort 5110 will send the “NO CARRIER” signal via the serial port and then return to command mode. -
Page 46
NPort 5110 Series User’s Manual 16 AT&D 17 AT&F 18 AT&G 19 AT&R 20 AT&S 21 AT&V 22 AT&W S Registers S Register 10 S9 11 S10 12 S11 13 S12 Serial port DTR control AT&D0=recognize DTE always ready AT&D1, AT&D2=reply DTE when DTR On (default) Restore manufacturer’s settings… -
Page 47: Accessible Ip Settings
NPort 5110 Series User’s Manual TCP port Setting 1 to 65535 The TCP port that other devices must use to contact this device. To avoid conflicts with standard TCP ports, the default is set to 4001. TCP alive check time…
-
Page 48: Auto Warning Settings
NPort 5110 Series User’s Manual ! Any host can access the NPort 5110 Disable this function by un-checking the “Enable the accessible IP list” checkbox. Refer to the following table for more configuration examples. Allowable Hosts Any host 192.168.1.120 192.168.1.1 to 192.168.1.254 192.168.0.1 to 192.168.255.254…
-
Page 49: Event Type
NPort 5110 Series User’s Manual From E-mail address Setting 1 to 63 characters E-mail address 1/2/3/4 Setting 1 to 63 characters ATTENTION Consult your Network Administrator or ISP for the proper mail server settings. The Auto warning function may not work properly if it is not configured correctly. NPort 5110 SMTP AUTH supports LOGIN, PLAIN, CRAM-MD5 (RFC 2554).
-
Page 50
NPort 5110 Series User’s Manual IP address changed The user has changed NPort 5110’s IP address. When the IP address changes, NPort 5110 will send an e-mail with the new IP address before NPort 5110 reboots. If the NPort 5110 is unable to send an e-mail message to the mail server within 15 seconds, NPort 5110 will reboot anyway, and abort the e-mail auto warning. -
Page 51: Change Password
NPort 5110 Series User’s Manual Change Password Input the “Old password” and “New password” to change the password. Leave the password boxes blank to erase the password. If the password is erased, then NPort 5110 will not have password protection.
-
Page 52: Configuring Windows Administrator
Configuring Windows Administrator Chapter 6 The following topics are covered in this chapter: Overview Installing Windows Administrator Configuration » Broadcast Search » Unlock Password Protection » Configuring NPort 5110 » Upgrade Firmware » Export/Import Monitor Port Monitor COM Mapping » On-line COM Mapping «…
-
Page 53: Overview
NPort 5110 Series User’s Manual Overview Windows Administrator is designed to let you install and configure your NPort 5110 products easily over the network. Windows Administrator provides five function groups that ease the installation process, allows off-line COM mapping, and provides monitoring and IP location server functions.
-
Page 54
NPort 5110 Series User’s Manual Configuring Windows Administrator 3. Click on Next to install program files in the default directory, or select an alternative location. 4. Click on Next to install the program using the default program name, or select a different… -
Page 55
NPort 5110 Series User’s Manual Configuring Windows Administrator 5. Click on Install to proceed with the installation. 6. The Installing window reports the progress of the installation. -
Page 56
NPort 5110 Series User’s Manual Configuring Windows Administrator 7. Click on Next to proceed with the installation. 8. Click on Finish to complete the installation of NPort 5110 Administration Suite. -
Page 57: Configuration
NPort 5110 Series User’s Manual Configuration The Administrator-Configuration window is divided into four parts. The top part is the function list and online help area. (Windows NT does not support this .chm file format.) The left part lists the five Administrator function groups.
-
Page 58: Broadcast Search
NPort 5110 Series User’s Manual Broadcast Search 1. The Broadcast Search function is used to locate all NPort 5110s that are connected to the same LAN as your computer. Since the Broadcast Search function searches by MAC address and not IP address, all NPort 5110s connected to the LAN will be located, regardless of whether or not they are part of the same subnet as the host.
-
Page 59
NPort 5110 Series User’s Manual Configuring Windows Administrator 2. The Broadcast Search window will open and display the Model, IP Address, MAC Address, and Progress (of the search for that particular device). -
Page 60
NPort 5110 Series User’s Manual 3. When the search is complete, the Broadcast Search window closes, and the NPort 5110s that were located are displayed in the right pane of the Administrator window. If you found more than one server connected to this network, refer to the MAC address sticker on your server(s) to determine which servers are the ones you wish to configure. -
Page 61: Unlock Password Protection
NPort 5110 Series User’s Manual Unlock Password Protection 1. If the NPort 5110 is password protected, then you will not be able to use the right click method to open the configuration page. 2. Instead, select an NPort 5110 with “Lock” status, right click the locked NPort 5110, and then select the unlock button.
-
Page 62
NPort 5110 Series User’s Manual 4. The previous “Lock” status will switch to “Unlock” status. Administrator will keep this NPort 5110 in the Unlock status throughout this Administrator session. The meanings of the six states are as follows (note that the term Fixed is borrowed from the… -
Page 63: Configuring Nport 5110
NPort 5110 Series User’s Manual Configuring NPort 5110 1. Input the password to Unlock the NPort 5110. Right click on a specific NPort 5110 and select configure to start the configuration. 2. The progress bar shows that Administrator is retrieving configuration information from the specific NPort 5110.
-
Page 64
NPort 5110 Series User’s Manual Configuring Windows Administrator 3. Refer to Chapter 5 for each parameter’s function definition. To modify the configuration, you must first click in the modify box to activate the parameter setting box. ATTENTION You can simultaneously modify the configurations of multiple NPort 5110s that are of the same model. -
Page 65: Upgrade Firmware
NPort 5110 Series User’s Manual Upgrade Firmware 1. Input the password to Unlock the NPort 5110, and then right click on a specific NPort 5110 and select the Upgrade Firmware function to start upgrading the firmware. 2. Select the correct ROM file to be downloaded to the NPort 5110.
-
Page 66: Export/Import
NPort 5110 Series User’s Manual Export/Import Right click on a specific NPort 5110 and select the Export function to start Exporting the configuration file. The Export Configuration function is a handy tool that can be used to produce a text file containing the current configuration of a particular NPort 5110.
-
Page 67: Monitor
NPort 5110 Series User’s Manual ATTENTION You can simultaneously import the same configuration file into multiple NPort 5110s that are of the same model. To select multiple NPort 5110s, hold down the Ctrl key when selecting an additional NPort 5110, or hold down the Shift key to select a block of NPort 5110s.
-
Page 68
NPort 5110 Series User’s Manual 4. Select Add Target. 5. When you select Add Target, you will see a NPort 5110 list that looks the same as when using Configuration $ Broadcast Search. Check the NPort 5110 you would like to Monitor, and then click OK. -
Page 69
NPort 5110 Series User’s Manual 8. Select or de-select Monitor Items. Use the single arrowhead buttons to move highlighted items from one box to the other. Use the double arrowhead buttons to move all items in one box to the other. -
Page 70
NPort 5110 Series User’s Manual 10. Select Display warning message for new event or Play warning music for new event. In the second case, you must enter the path to the WAV file that you want to be played. “New event”… -
Page 71
NPort 5110 Series User’s Manual Configuring Windows Administrator 12. For this example, the NPort 5110 shown in the list will be monitored. 13. When one of the NPort 5110s loses connection with the Monitor program, a warning alert will display automatically. The warning music will be played at the same time. -
Page 72
NPort 5110 Series User’s Manual Configuring Windows Administrator 15. If the NPort 5110 gets reconnected, a warning will be displayed to remind the user that the NPort 5110 is now “Alive.” 16. The NPort 5110 that was reconnected, and is now “Alive,” will be shown in black color. -
Page 73: Port Monitor
NPort 5110 Series User’s Manual Port Monitor The process described here is the same as in the previous “Monitor” section. The only difference is that you can select more items under Port Monitor than under Monitor. Select or de-select Monitor Items. Use the single arrowhead buttons to move highlighted items from one box to the other.
-
Page 74: Com Mapping
NPort 5110 Series User’s Manual COM Mapping Windows Administration Suite comes with Windows 95/98/ME/NT/2000/XP Real COM drivers. After you install NPort 5110 Administration Suite, there are two ways to set up the NPort 5110’s serial port as your host’s remote COM port.
-
Page 75
NPort 5110 Series User’s Manual Configuring Windows Administrator 3. Add the target to which you would like to map COM ports. 4. The NPort 5110 list that appears is the list generated by the previous Broadcast Search. Select the NPort 5110 that you would like to map COM ports to. -
Page 76
NPort 5110 Series User’s Manual 6. Select the COM No. COM ports that are “In use” or “Assigned” will also be indicated in this drop-down list. If you select multiple serial ports or multiple NPort 5110s, remember to check the “Auto Enumerating” function to use the COM No. you select as the first COM No. -
Page 77
NPort 5110 Series User’s Manual Enable/Disable Tx/Rx FIFO. If disabled, NPort 5110 will send one byte each time the Tx FIFO becomes empty; and an Rx interrupt will be generated for each incoming byte. This will result in a faster response and lower throughput. If you want to use XON/XOFF flow control, we recommend setting FIFO to Disable. -
Page 78
NPort 5110 Series User’s Manual 7. The Serial Parameter settings shown here are the default settings when the NPort 5110 is powered on. However, the program can redefine the serial parameters to different values after the program opens the port via Win 32 API. -
Page 79
NPort 5110 Series User’s Manual 9. Select Discard Change to tell Administrator NOT to save the COM Mapping information to the host. 10. To save the configuration to a text file, select Export COM Mapping. You will then be able to import this configuration file to another host and use the same COM Mapping settings in the other host. -
Page 80: Off-Line Com Mapping
NPort 5110 Series User’s Manual Off-line COM Mapping 1. Add a target by inputting the IP address and selecting the Model Name without physically connecting the NPort 5110 to the network. 2. Select Apply change. Configuring Windows Administrator 6-29…
-
Page 81: Ip Location
NPort 5110 Series User’s Manual IP Location When NPort 5110 is used in a dynamic IP environment, users must spend more time with IP management tasks. NPort 5110 products help out by periodically reporting their IP address to the IP location server, in case the dynamic IP has changed.
-
Page 82
NPort 5110 Series User’s Manual Configuring Windows Administrator 3. Next, configure the Local Listen Port to be the same as the NPort 5110’s “Auto report to UDP port” setting. 4. Click Go to start receiving the Auto IP address report from the NPort 5110. -
Page 83: Ip Serial Lib
The following topics are covered in this chapter: Overview IP Serial LIB Function Groups Example Program IP Serial LIB Chapter 7…
-
Page 84: Overview
NPort 5110 Series User’s Manual Overview What is IP Serial Library? IP Serial Library is a Windows library with frequently used serial command sets and subroutines. IP Serial Library is designed to reduce the complexity and poor efficiency of serial communication over TCP/IP.
-
Page 85: Ip Serial Lib Function Groups
NPort 5110 Series User’s Manual IP Serial LIB Function Groups Server Control nsio_init nsio_end nsio_resetserver nsio_checkalive Example Program char NPort 5110-Nip=”192.168.1.10”; char buffer[255]; int port = 1; int portid; nsio_init(); portid = nsio_open(NPort 5110ip, port); nsio_ioctl(portid, B9600, (BIT_8 | STOP_1 | P_NONE) );…
-
Page 86: Appendix A Pinouts And Cable Wiring
Pinouts and Cable Wiring Appendix A In this appendix, we cover the following topics. Port Pinout Diagrams » Ethernet Port Pinouts » Serial Port Pinouts Cable Wiring Diagrams » Ethernet Cables…
-
Page 87: Port Pinout Diagrams
NPort 5110 Series User’s Manual Port Pinout Diagrams Ethernet Port Pinouts Serial Port Pinouts DB9 Male RS-232 port pinouts for NPort 5110 SIGNAL Pinouts and Cable Wiring…
-
Page 88: Cable Wiring Diagrams
NPort 5110 Series User’s Manual Pinouts and Cable Wiring Cable Wiring Diagrams Ethernet Cables…
-
Page 89
Well Known Port Numbers Appendix B In this appendix, which is included for your reference, we provide a list of Well Known port numbers that may cause network problems if you set NPort 5110 to one of these ports. Refer to RFC 1700 for Well Known port numbers, or refer to the following introduction from the IANA. -
Page 90: Appendix B Well Known Port Numbers
NPort 5110 Series User’s Manual TCP Socket 160 – 223 UDP Socket Application Service Host name server (names server) Whois (nickname) (Login Host Protocol) (Login) Domain Name Server (domain) Finger protocol (Finger) World Wide Web HTTP Network news Transfer Protocol (NNTP)
-
Page 91
NPort 5110 Series User’s Manual UDP Socket Application Service SNMP (Simple Network Mail Protocol) SNMP Traps IPX (Used for IP Tunneling) Well Known Port Numbers… -
Page 92
SNMP Agents with MIB II & RS-232 Appendix C NPort 5110 has built-in SNMP (Simple Network Management Protocol) agent software that supports SNMP Trap, RFC1317 RS-232 like groups and RFC 1213 MIB-II. The following table lists the standard MIB-II groups, as well as the variable implementation for NPort 5110. RFC1213 MIB-II supported SNMP variables: System MIB Interfaces MIB… -
Page 93
NPort 5110 Series User’s Manual System MIB SysServices ifInUnknownProtos ipReasmFails ifOutOctets ifOutUcastPkts ifOutNUcastPkts ifOutDiscards ifOutErrors ifOutQLen ifSpecific UDP MIB UdpInDatagrams UdpNoPorts UdpInErrors UdpOutDatagrams UdpLocalAddress UdpLocalPort Address Translation MIB AtIfIndex AtPhysAddress AtNetAddress Interfaces MIB IP MIB ipFragOKs ipFragFails ipFragCreates ipAdEntAddr ipAdEntIfIndex… -
Page 94
NPort 5110 Series User’s Manual Address Translation MIB AtNetAddress RFC1317: RS-232 MIB objects Generic RS-232-like Group rs232Number TCP MIB tcpRetransSegs snmpInTotalSetVars tcpConnState snmpInGetRequests tcpConnLocalAddress snmpInGetNexts tcpConnLocalPort snmpInSetRequests tcpConnRemAddress snmpInGetResponses tcpConnRemPort snmpInTraps tcpInErrs snmpOutTooBigs tcpOutRsts snmpOutNoSuchNames snmpOutBadValues snmpOutGenErrs snmpOutGetRequests snmpOutGetNexts snmpOutSetRequests… -
Page 95
NPort 5110 Series User’s Manual The Input Signal Table rs232InSigTable rs232InSigEntry rs232InSigPortIndex rs232InSigName rs232InSigState The Output Signal Table rs232OutSigTable rs232OutSigEntry rs232OutSigPortIndex rs232OutSigName rs232OutSigState SNMP Agents… -
Page 96
Auto IP Report Protocol Appendix D NPort Series provides several ways to configure Ethernet IP addresses. One method is DHCP Client. When you set up the NPort to use DHCP Client to configure Ethernet IP addresses, a DHCP request is sent automatically over the Ethernet to find the DHCP Server. In response, the DHCP Server will send an available IP address to the NPort. -
Page 97: Appendix D Auto Ip Report Protocol
NPort 5110 Series User’s Manual You will then be able to develop your own programs to receive this information from the NPort. Here is NPort’s Auto IP Report Protocol. Click on the following link to link to a specific example.
-
Page 98: Appendix E Service Information
This appendix shows you how to contact Moxa for information about this and other products, and how to report problems. In this appendix, we cover the following topics. MOXA Internet Services Problem Report Form Product Return Procedure Service Information Appendix E…
-
Page 99: Moxa Internet Services
NPort 5110 Series User’s Manual MOXA Internet Services Customer satisfaction is our number one concern, and to ensure that customers receive the full benefit of our products, Moxa Internet Services has been set up to provide technical support, driver updates, product information, and user’s manual updates.
-
Page 100: Problem Report Form
NPort 5110 Series User’s Manual Problem Report Form Customer name: Company: Tel: Email: Moxa Product: NPort 5110 Serial Number: _________________ Problem Description: Please describe the symptoms of the problem as clearly as possible, including any error messages you see. A clearly written description of the problem will allow us to reproduce the symptoms, and expedite the repair of your product.
-
Page 101: Product Return Procedure
NPort 5110 Series User’s Manual Product Return Procedure For product repair, exchange, or refund, the customer must: % Provide evidence of original purchase. % Obtain a Product Return Agreement (PRA) from the sales representative or dealer. % Fill out the Problem Report Form (PRF). Include as much detail as possible for a shorter product repair time.
Необходимо подключить преобразователь к сети предприятия, а подключаемое оборудование непосредственно к преобразователю через указанные ниже коммутационные кабели.
Содержание
- 1 Требования к оборудованию
- 2 Настройка преобразователя MOXA NPort-5110 через WEB-интерфейс
- 2.1 Сетевые настройки
- 2.2 Настройки последовательного интерфейса
- 2.3 Настройка виртуального COM-порта
Требования к оборудованию
Настройка преобразователя MOXA NPort-5110 через WEB-интерфейс
Сетевые настройки
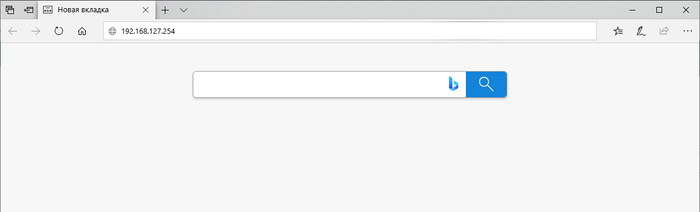
Настройки преобразователя производятся через web-интерфейс, по умолчанию устройство доступно по адресу: 192.168.127.254. Потребуется также ввести пароль, по умолчанию moxa.
В разделе Network Settings указываем ip-адрес, маску и шлюз в соответствии с параметрами локальной сети, параметры сети должны быть предоставлены администратором сети предприятия, после внесения настроек жмем кнопку Submit.
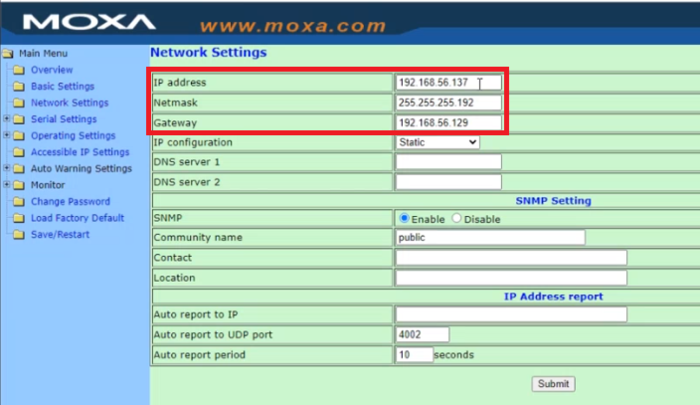
Для того, чтобы настройки вступили в силу требуется сохранить настройки и перезагрузить устройство в разделе Save/Restart.
После изменения сетевых настроек доступ к устройству будет осуществляться через новый ip-адрес, указанный в настройках.
Настройки последовательного интерфейса
В разделе Serial Sittings указываем параметры последовательного порта аналогичные с настройками на оборудовании, которое будет подключаться к NPort по интерфейсу RS-232/422/485.
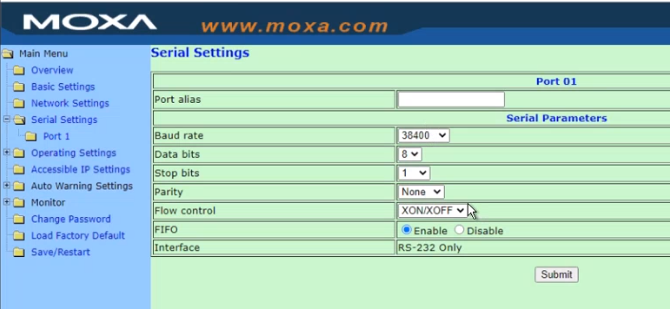
Мы рекомендуем использовать следующие настройки:
- Boud rate:38400
- Data bits: 8
- Stop bits: 1
- Parity: None
- Flow control: XON/XOFF
- FIFO: Enable
Настройка виртуального COM-порта
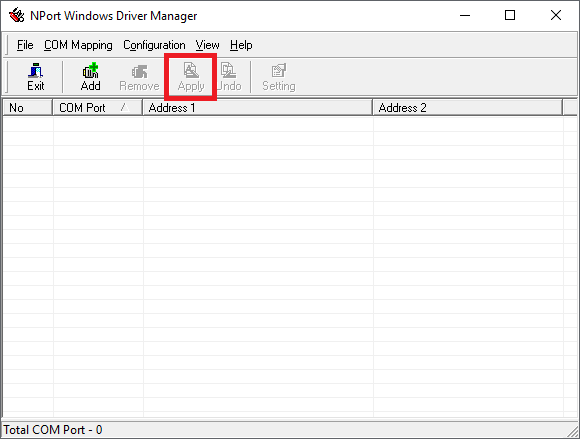
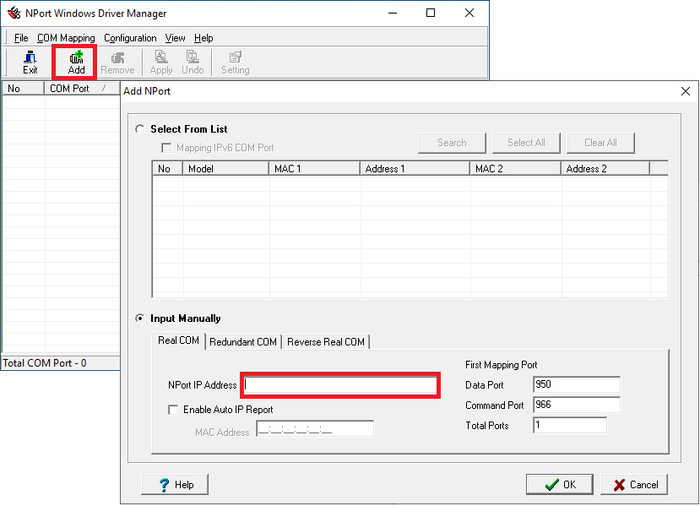
Для настройки нам потребуется утилита NPort Windows Driver Manager, скачать которую можно с официального сайта Moxa по ссылке
Установим и запустим утилиту. После запуска нажимаем кнопку «Add» и прописываем ip-адрес, присвоенных уже настроенному преобразователю MOXA.
Далее кликнув два раза по добавленному устройству необходимо прописать те же настройки, что мы указывали ранее в настройках последовательного интерфейса
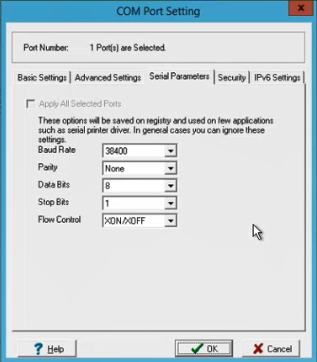
- Boud rate:38400
- Parity: None
- Data bits: 8
- Stop bits: 1
- Flow control: XON/XOFF
После настройки требуется нажать кнопку «Apply»: